

Page 1

Version 1.0
November 2011
701P32220
Xerox® 770 Digital Color Press
System Administration Guide
Page 2

© 2011 Xerox Corporation. All rights reserved.
Xerox®, Xerox and Design®, and SquareFold®, are trademarks of Xerox Corporation in
the US and/or other countries. Product status, build status, and/or specifications are
subject to change without notice.
GBC®, AdvancedPunch™, and are trademarks or registered trademarks of General Binding
Corporation.
Adobe, the Adobe logo, Acrobat, the Acrobat logo, Acrobat Reader, Distiller, Adobe PDF
logo, Adobe PDF JobReady, Illustrator, InDesign, and Photoshop are registered trademarks
of Adobe Systems, Inc. PostScript is an Adobe registered trademark used with the Adobe
PostScript Interpreter, the Adobe page description language, and other Adobe products.
This product is not endorsed or sponsored by Adobe Systems, publisher of Adobe
Photoshop.
BR638
Page 3

Table of Contents
1 Administrator overview...........................................................................1-1
Enter/exit administrator mode.......................................................................................1-1
Customizing the UI buttons/screens............................................................................1-2
Assigning a feature to the screens and buttons........................................1-2
Power Saver/Energy Saver mode...................................................................................1-2
Low Power mode.....................................................................................................1-3
Sleep mode...............................................................................................................1-3
Set/change the power saver mode time intervals.....................................1-3
Exiting power saver mode...................................................................................1-4
Tools tab overview (administrator mode)..................................................................1-4
Tools > System Settings.......................................................................................1-4
Tools > System Settings > Common Service Settings.....1-
4
Tools > System Settings > Copy Service Settings.......................1-6
Tools > System Settings > Scan Service Settings.........................1-8
Tools > System Settings > Network Controller
Settings...................................................................................................1-9
Tools > Setup and Calibration...........................................................................1-9
Tools > Accounting................................................................................................1-9
Tools > Authentication/Security Settings.....................................................1-9
2 System Settings > Common Service Settings...............................2-1
Machine Clock/Timers........................................................................................................2-2
Setting the Machine Clock/Timers..................................................................2-3
Audio Tones............................................................................................................................2-4
Setting Audio Tones...............................................................................................2-5
Screen/Button Settings......................................................................................................2-6
Assigning Screen/Button Settings....................................................................2-7
Paper Tray Settings.............................................................................................................2-8
Assigning Custom Paper Settings..................................................................2-10
Custom Paper Settings > Adjust Paper Curl.............................................2-11
Custom Paper Settings > Alignment Adjustment..................................2-12
Assigning Paper Tray Attributes.....................................................................2-15
Paper Tray Attributes > Adjust Paper Curl.................................................2-16
Paper Tray Attributes > Alignment Adjustment.....................................2-17
Assigning Custom Paper Color Settings......................................................2-19
Setting the option for Paper Tray Attributes on Setup Screen..........2-20
Setting the option for Paper Tray Attibutes During Loading.............2-20
Xerox® 770 Digital Color Press
System Administration Guide
i
Page 4

Table of Contents
Image Quality Adjustment...........................................................................................2-26
Reports...................................................................................................................................2-27
Maintenance.......................................................................................................................2-28
Watermark...........................................................................................................................2-32
Secure Watermark (optional).......................................................................................2-34
Other Settings.....................................................................................................................2-35
Adjust Paper Curl...............................................................................................................2-40
Alignment Adjustment....................................................................................................2-43
Adjust Fold Position (Finisher Adjustment).............................................................2-46
Setting the Paper Tray Priority........................................................................2-21
Setting the Tray 5 (Bypass) Paper Size Defaults......................................2-21
Setting Auto Tray Switching Control............................................................2-22
Adjust Air Assist Values......................................................................................2-23
Custom Paper Settings > Adjust Air Assist Values....................2-24
Paper Tray Attributes > Adjust Air Assist Values.......................2-25
Assigning Image Quality Adjustment options.........................................2-26
Calibrating for copy jobs...................................................................................2-27
Setting the Reports options.............................................................................2-28
Initializing the hard disk or deleting data..................................................2-29
Maintenance > Adjust Paper Curl.................................................................2-29
Maintenance > Alignment Adjustment.....................................................2-30
Selecting the Watermark options..................................................................2-34
Selecting the Secure Watermark options...................................................2-35
Selecting options for the Other Settings feature....................................2-38
Setting the Data Encryption options...........................................................2-39
Setting options for Encryption Key for Confidential Data...................2-39
Adjust Paper Curl options.................................................................................2-41
Adjust Paper Curl Types A, B, C.......................................................................2-42
Adjust Paper Curl Types 1-10..........................................................................2-42
Alignment Adjustment information.............................................................2-44
Things to consider when creating/using an alignment
procedures........................................................................................................2-44
Alignment Adjustment options......................................................................2-44
Adjusting the fold position...............................................................................2-47
Adjusting the Single Fold position................................................................2-48
Adjusting the Booklet Fold position.............................................................2-49
Adjusting the C Fold position..........................................................................2-50
Adjusting the Z Fold position..........................................................................2-51
Adjusting the Z Fold Half Sheet position....................................................2-52
ii
Xerox® 770 Digital Color Press
System Administration Guide
Page 5

Table of Contents
3 System Settings > Copy Service Settings........................................3-1
Preset Buttons.......................................................................................................................3-1
Selecting the Preset Buttons..............................................................................3-2
Copy Defaults........................................................................................................................3-2
Setting the Copy Defaults...................................................................................3-3
Copy Control..........................................................................................................................3-4
Selecting the Copy Control options.................................................................3-5
Original Size Defaults.........................................................................................................3-5
Selecting Original Size Defaults........................................................................3-6
Reduce/Enlarge Presets.....................................................................................................3-6
Selecting the Reduce/Enlarge Presets............................................................3-6
Custom Colors.......................................................................................................................3-7
Selecting the Custom Colors..............................................................................3-7
4 System Settings > Scan Service Settings........................................4-1
Original Size Defaults.........................................................................................................4-1
Selecting Original Size Defaults........................................................................4-2
Output Size Defaults...........................................................................................................4-2
Selecting Output Size Defaults..........................................................................4-2
Reduce/Enlarge Presets.....................................................................................................4-2
Selecting the Reduce/Enlarge Presets............................................................4-3
Other Settings.......................................................................................................................4-3
Selecting Other Settings......................................................................................4-4
5 Setup and Calibration..............................................................................5-1
Setup.........................................................................................................................................5-2
Stored Programming.............................................................................................5-2
Paper Tray Attributes............................................................................................5-3
Calibration..............................................................................................................................5-4
6 Overview of Accounting and Authentication/Security
Settings........................................................................................................6-1
Accounting overview...........................................................................................................6-1
Authentication/Security Settings overview...............................................................6-2
7 Accounting...................................................................................................7-1
Accounting > Create/View User Accounts................................................................7-1
Create/view/edit a user account.......................................................................7-2
Resetting an individual user account..............................................................7-3
Accounting > Reset User Accounts..............................................................................7-4
Resetting all user accounts (Accounting)......................................................7-4
System Administrator Meter (Copy Jobs)..................................................................7-5
Xerox® 770 Digital Color Press
System Administration Guide
iii
Page 6

Table of Contents
Accounting > Accounting Type......................................................................................7-5
Selecting an Accounting Type...........................................................................7-6
Accounting > Auto Reset of User Billing Information..........................................7-6
Copy Activity Report...........................................................................................................7-7
8 Authentication/Security Settings........................................................8-1
Types of users........................................................................................................................8-1
Types of authentication....................................................................................................8-2
System Administrator Settings.......................................................................................8-2
System Administrator Login ID.........................................................................8-2
System Administrator Passcode ......................................................................8-3
Authentication......................................................................................................................8-3
Login Type.................................................................................................................8-3
Selecting the Login Type........................................................................8-4
Access Control..........................................................................................................8-4
Selecting the Access Control options................................................8-4
Authentication > Create/View User Accounts...........................................8-5
Create/view/edit a user account.........................................................8-5
Resetting an individual user account................................................8-6
Authentication > Reset User Accounts..........................................................8-7
Resetting all user accounts (Authentication).................................8-7
Create Authorization Groups.............................................................................8-8
Creating/editing an authorization group........................................8-8
User Details Setup..................................................................................................8-9
Maximum Login Attempts...............................................................................8-10
Passcode Policy.....................................................................................................8-10
Allow User to Disable Active Settings.......................................................................8-11
Job Status Default.............................................................................................................8-11
Active Jobs View...................................................................................................8-12
Job Status Default...............................................................................................8-12
Overwrite Hard Disk (optional)....................................................................................8-12
Overwrite Hard Disk > Number of Overwrites...........................................8-13
Overwrite Hard Disk > Schedule Image Overwrite..................................8-13
iv
Xerox® 770 Digital Color Press
System Administration Guide
Page 7
Administrator overview
Enter/exit administrator mode
1. Press the Log In/Out button on the control panel.
The UI displays a numeric keypad.
2. Enter the system administrator ID.
The default ID is 11111.
3. Touch Enter.
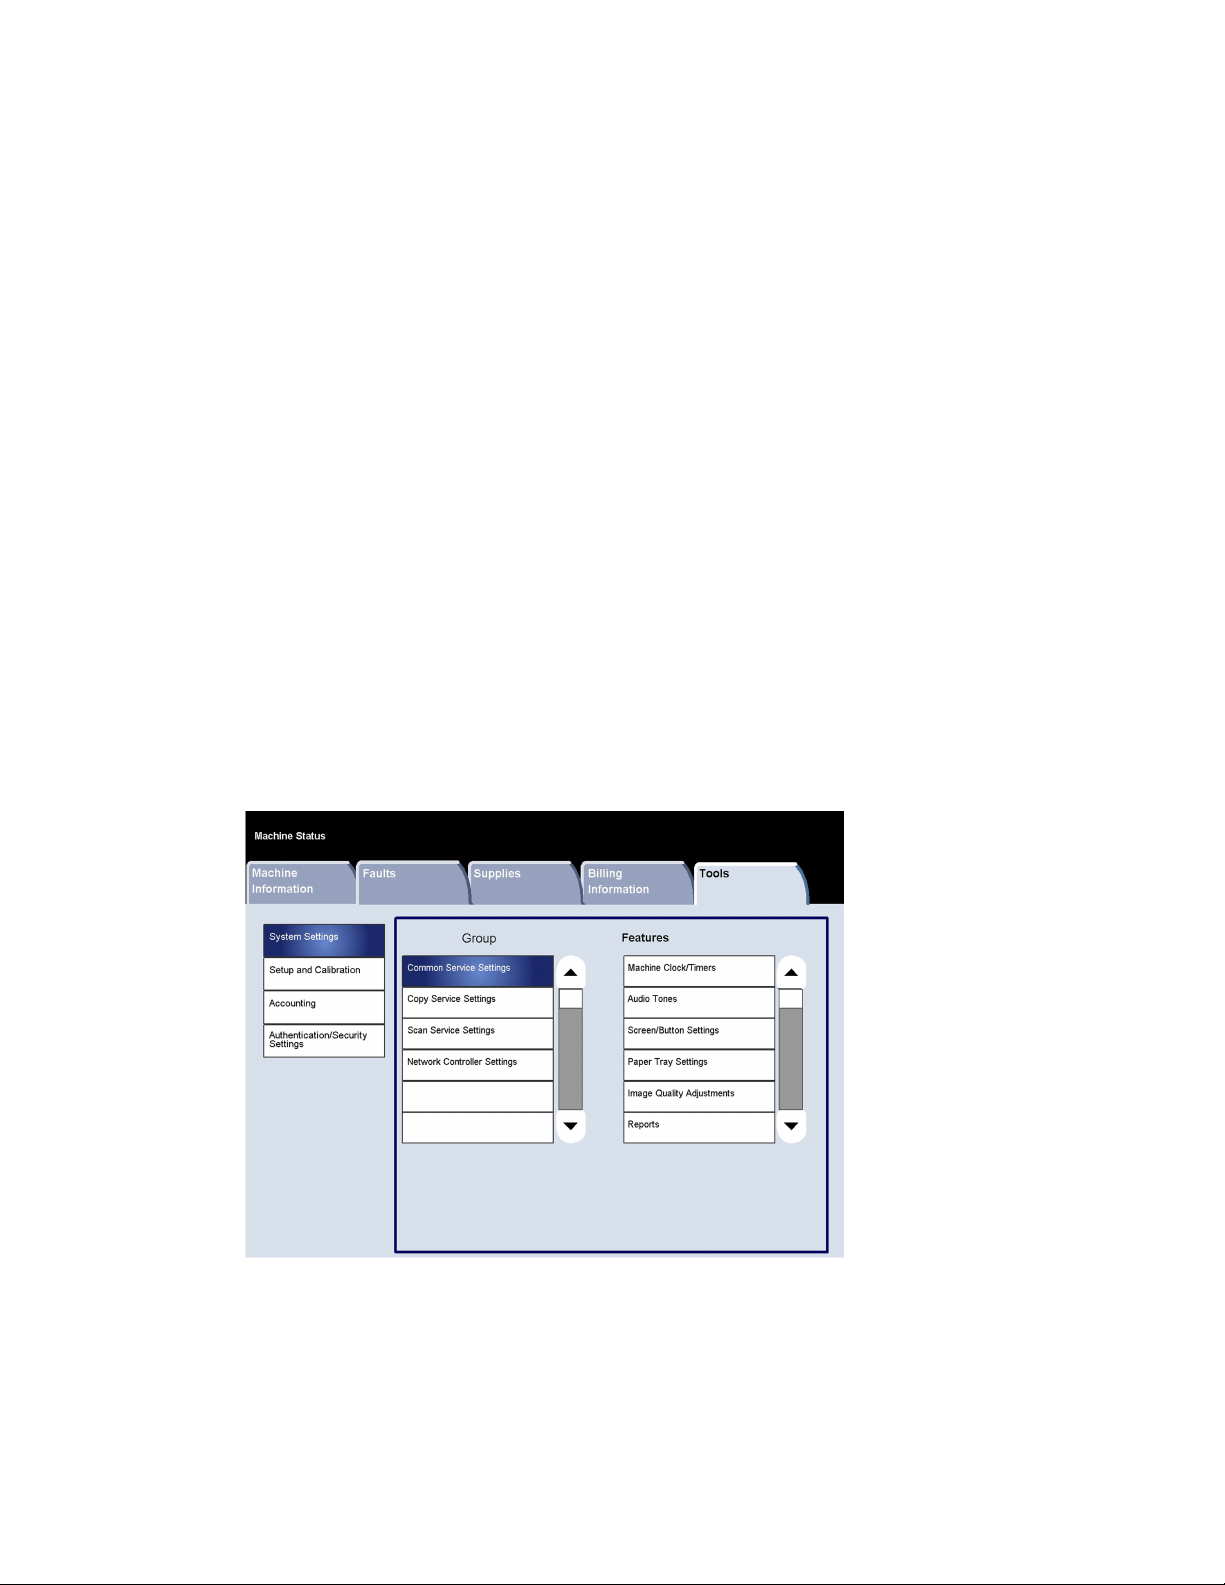
4. Press the Machine Status button on the control panel.
5. Touch the Tools tab on the UI.
The UI displays the System Settings screen.
1
6. Select the desired Mode, Group, and Feature (such as:
System Settings > Common Service Settings > Machine Clock/Timers).
7. To exit the administrator mode, press the Log In/Out button on the control panel.
The UI displays the Logout screen.
8. Touch Logout.
Xerox® 770 Digital Color Press
System Administration Guide
1-1
Page 8

Administrator overview
Customizing the UI buttons/screens
The administrator may customize specific buttons and screens:
• The user may switch to a specific feature without having to return to the All Services
screen. This is accomplished by assigning specific features to the three custom control
panel buttons. By default from manufacturing, the Copy feature is assigned to the
first custom button, Review is assigned to the third custom button, and the second
custom button is not assigned to anything (Not in Use).
• Specific screens may be displayed after the machine is switched on, when it exits the
Power Saver mode, and/or after Auto Clear is selected.
Assigning a feature to the screens and buttons
1. Login as administrator.
2. Access the Tools tab on the UI.
3. Select System Settings > Common Service Settings.
4. Select Screen/Button Settings.
• To set or change the default screen, select Screen Default.
• To set or change a button on the UI, select the desired custom button option
(Custom Button 1, Custom Button 2, Custom Button 3).
5. Select Change Settings.
6. Select the desired setting for the feature.
Choices are shown on the displayed list.
7. If desired, select another feature to set or change and repeat the previous steps.
8. Select Save.
The previous screen is displayed.
9. Select Close.
The main Tools tab screen is displayed.
10. Exit administrator mode.
Related Topics:
Screen/Button Settings
Assigning Screen/Button Settings
Power Saver/Energy Saver mode
The Power Saver/Energy Saver feature sets the time that lapses until the machine enters
a reduced power consumption mode. There are two power saver modes: Low Power and
Sleep.The modes are activated when all copy and/or print jobs have been completed
and there are no jobs currently processing.
1-2
Xerox® 770 Digital Color Press
System Administration Guide
Page 9

Administrator overview
The machine automatically enters the Low Power mode after 15 minutes of inactivity;
this is the manufacturing default time. After 60 minutes of inactivity, the machine then
enters Sleep mode; this is the manufacturing default time. The time intervals for both
the Low Power and Sleep modes may be changed to reflect a value of 1-240 minutes
for each mode.
Here are two examples:
• If Low Power Mode is set to 15 minutes and Sleep Mode is set to
60 minutes, Sleep Mode activates after 60 minutes of total
inactivity, not 60 minutes after Low Power Mode begins.
• If Low Power Mode is set to 15 minutes and Sleep mode is set to
20 minutes, Sleep Mode activates 5 minutes after Low Power Mode
begins.
Low Power mode
In this mode, the power to the UI and fuser unit is lowered to save power. The display
goes out, and the Power Saver button on the control panel lights. To use the machine,
press the Power Saver button. The Power Saver button goes out to indicate that the
Power Saver feature is canceled.
Sleep mode
In this mode, the power is lowered more than in the Low Power mode. The display goes
out, and the Power Saver button on the control panel lights. To use the machine, press
the Power Saver button. The Power Saver button goes out to indicate that the Power
Saver feature is canceled.
Set/change the power saver mode time intervals
NOTE
The time intervals for both the Low Power and Sleep modes may be changed to
reflect a value of 1-240 minutes for each mode.
1. Login as administrator.
2. Access the Tools tab on the UI.
3. Select System Settings > Common Service Settings.
4. Select Machine Clock/Timers.
5. Select Power Saver/Energy Saver.
6. Select Change Settings.
7. Select the desired time interval for both the Low Power and Sleep modes.
NOTE
The default time for Low Power mode is 15 minutes. The default time for Sleep
mode is 60 minutes. Ensure that the Sleep mode interval is configured with a
longer amount of time than the Low Power mode time interval.
8. Select Save.
The previous screen is displayed.
Xerox® 770 Digital Color Press
System Administration Guide
1-3
Page 10

Administrator overview
9. Select Close.
The main Tools tab screen is displayed.
10. Exit administrator mode.
Related Topics:
Machine Clock/Timers
Exiting power saver mode
The machine exits power saver mode either by pressing the Power Saver button on the
control panel or when it receives print data for an incoming print job.
Tools tab overview (administrator mode)
The following tables provide a listing of the various items that can be set or changed
while logged in as administrator. The items appearing in these tables depend on machine
configuration and the optional feeding and finishing devices connected to the machine.
Tools
System Settings
Setup and Calibration
Accounting
Authentication/Security Settings
Tools > System Settings
System Settings
Tools > System Settings > Common Service Settings
Machine Clock/Timers
Common Service Settings
Copy Service Settings
Scan Service Settings
Network Controller Settings
Date
Time
Auto Clear
Auto Job Release
Auto Print
Power Saver/Energy Saver Timers
Printer Lockout Duration
Time Zone
Daylight Savings
1-4
Xerox® 770 Digital Color Press
System Administration Guide
Page 11
(continued)
Audio Tones
Administrator overview
Control Panel Select Tone
Control Panel Alert Tone
Base Tone
Machine Ready Tone
Job Complete Tone 1
Job Complete Tone 2
Fault Tone
Auto Clear Alert Tone
Alert Tone
Out of Paper Warning Tone
Low Toner Alert Tone
Stored Programming Tone
Screen/Button Settings
Paper Tray Settings
Image Quality
Adjustment
Reports
Screen Default
Service Screen Default
Service Screen After Auto Clear
Auto Display of Login Screen
All Services
All Services Screen Default
Job Type on Job Status screen
Custom Buttons 1-3
Default Language
Customize Keyboard Button
Custom Paper Settings
Paper Tray Attributes
Custom Paper Color Settings
Paper Tray Attributes on Setup
Paper Tray Attributes During Loading
Paper Tray Priority
Tray 5 (Bypass) - Paper Size Defaults
Image Quality
Calibration
Print Reports Button
Job History Report
2 Sided Report
Maintenance
Watermark
Xerox® 770 Digital Color Press
System Administration Guide
Initialize Hard Disk
Delete All Data
Software Options
Alignment Adjustment
Adjust Paper Curl
NVM Read/Write
Finisher Adjustment (optional)
Date Format
Default Watermark Effect
Default Watermark
Font Size
Background Pattern
Font Color
Density
Watermark/Background Contrast
Force Watermark - Copy
Custom Watermark 1 to 3
1-5
Page 12
Administrator overview
(continued)
Secure/Hybrid Watermark
Secure Watermark Control
Digital Codes Settings
Force Secure Watermark
Secure Watermark Defaults
Secure Watermark Effect
Other Settings
Auto Job Promotion
Offset Stacking (Standard/Booklet Maker Middle Tray) - optional
Offset Stacking (High Capacity Stacker - Stacker Cart) - optional
Unload High Capacity Stacker - optional
Default Print Paper Size
Paper Size Settings
Millimeters/Inches
Keyboard Input Restriction
Operation of Up/Down Buttons
Data Encryption (optional)
Service Representative Restricted Operation
Software Download
Document Feeder Tray Elevation
Estimated Job Time
Tools > System Settings > Copy Service Settings
Preset Buttons
Paper Supply - Button 2
Paper Supply - Button 3
Paper Supply - Button 4
Paper Supply - Button 5
Reduce/Enlarge - Button 3
Reduce/Enlarge - Button 4
Reduce/Enlarge - Button 5
Stapling Buttons 4 and 5(optional)
Punching Buttons 4 and 5 (optional)
Front Cover Tray-Buttons 3 and 4
Back Cover Tray-Buttons 3 and 4
1-6
Xerox® 770 Digital Color Press
System Administration Guide
Page 13

(continued)
Copy Defaults
Administrator overview
Paper Supply
Reduce/Enlarge
Original Type
Lighten/Darken
Sharpness
Background Suppression
2 Sided
Mixed Size Originals
Edge Erase: Top Edge, Bottom Edge, Left Edge, Right Edge, 2
Sided Original - Side 2
Center Erase/Binding Edge Erase
Image Shift - Side 1 and 2
Image Rotation - Rotation Direction
Original Orientation
Pages per Side
Copy Output
Uncollated - Default Separators Tray (optional Standard/Booklet
Maker Finisher)
Output Destination
Face Up/Down Option
Sample Job
Annotations - Stored Comment, Comment on Side 1 and Side 2,
Comment - Font Size, Comment - Font Color
Date - Position on Side 1 and Side 2, Font Size
Page Numbers - Style, Position on Side 1 and Side 2, Font Size
Bates Stamp - Number of Digits, Position on Side 1 and Side 2,
Font Size
Tab Margin Shift - Shift Value
Booklet Creation - Default Cover Tray
Covers - Default Front Cover Tray
Default Back Cover Tray
Separators - Default Separator Tray
Xerox® 770 Digital Color Press
System Administration Guide
1-7
Page 14

Administrator overview
(continued)
Copy Control
Memory Full Procedure
Maximum Stored Pages
2 Sided Original Scan Options
Auto Paper Off
Mixed Size Originals - 2 Sided Copy
Fine-tune 100%
Pseudo-Photo Gradation Mode
Original Type - Lightweight (See-Through Paper)
Face Up/Down - Reverse Order, Auto (Single Sheet)
Default Trim Margin (optional SquareFold Trimmer Module)
Auto Image Positioning - Below 105 gsm, Above 106 gsm
Annotations - Comment Density
Comment Position - Top Left, - Top Center, - Top Right, - Left
Center, - Center, - Right Center, - Bottom Left, - Bottom Center,
and - Bottom Right
Date Position - Top Left, - Top Center, - Top Right, - Bottom Left,
- Bottom Center, and - Bottom Right
Page Number Position - Top Left, - Top Center, - Top Right, Bottom Left, - Bottom Center, and - Bottom Right
Bates Stamp - Top Left, - Top Center, - Top Right, - Bottom Left,
- Bottom Center, and - Bottom Right
Quantity Display
Maximum Number of Sets
Sample Output to Stacker - Top Tray (optional Standard/Booklet
Maker Finisher)
Original Size Defaults
A/B Series
Inch Series
Others
Custom Size
Not applicableReduce/Enlarge Presets
Tools > System Settings > Scan Service Settings
Not applicableOriginal Size Defaults
Not applicableOutput Size Defaults
Not applicableReduce/Enlarge Presets
Other Settings
Memory Full Procedure
Maximum Stored Pages
Saturation
Background Suppression Level
Normal
Color Space
TIFF Format
Image Transfer Screen
Print Login Name on PDF Files
1-8
Xerox® 770 Digital Color Press
System Administration Guide
Page 15
Tools > System Settings > Network Controller Settings
Administrator overview
Connectivity and Network
Setup
Ethernet Rated Speed
TCP/IP - IP Address Resolution
TCP/IP - IP Address
TCP/IP - Subnet Mask
TCP/IP - Gateway Address
Frame Type
Tools > Setup and Calibration
Setup
Stored Programming
Paper Tray Attributes
Not applicableCalibration
Tools > Accounting
Create/Check User
Accounts
Reset User Accounts
UserID
User Name
Account Limit
Reset User Account
All User Accounts
All Feature Access Settings
All Account Limits
Total Impressions
All Authorization Groups
Print Auditron Report
Not applicableSystem Administrator
Copy Meter
Accounting Type
Auto Reset of User
Billing Information
Accounting Disabled
Local Accounting
Off
Reset Every Year
Reset Every Quarter
Reset Every Month
Disabled/EnabledCopy Activity Report
Tools > Authentication/Security Settings
System Administrator
Settings
System Administrator Login ID
System Administrator Passcode
Xerox® 770 Digital Color Press
System Administration Guide
1-9
Page 16

Administrator overview
(continued)
Authentication
Active Settings
Login Type
Access Control
Create/View User Accounts
Reset User Accounts
Create Authentication Groups
User Details Setup
Maximum Login Attempts
Passcode Policy
Not applicableAllow Users to Disable
Job Status Default
Overwrite Hard Disk
Active Jobs View
Completed Jobs View
Number of Overwrites
Schedule Image Overwrite
1-10
Xerox® 770 Digital Color Press
System Administration Guide
Page 17

2
System Settings > Common Service Settings
Use the Common Service Settings to select the default settings that affect the machine
itself. Common Service Settings includes the following features:
Machine Clock/Timers
Use this feature to set the machine clock time and the time intervals for various timers,
including the power saver/energy saver timer.
Audio Tones
Use this feature to select whether or not to sound an alarm for various machine
functions; for example an alarm can be set to sound when a job ends or there is a fault.
Screen/Button Settings
Use this feature to set specific screens and buttons that are displayed when the power
is turned on, such as an alarm sound for when the machine exits Power Saver.
Paper Tray Settings
Use this feature to set items relating to the paper and trays.
Image Quality Adjustment
Use this feature to set the image quality processing method that is used when the
machine is scanning an original.
Reports
Use this feature to set the options which affect printable reports. For example, by
selecting a specific option, the machine will automatically print out a report after a
specified number of jobs has been processed.
Maintenance
Use this feature to further customize the machine settings (such as creating an
alignment adjustment for a specific stock), to initialize the machine hard disk, or to
delete data.
Watermark and optional Secure Watermark
Use this feature to configure default settings for commonly used watermarks.
Xerox® 770 Digital Color Press
System Administration Guide
2-1
Page 18

System Settings > Common Service Settings
Other Settings
Use this feature to assign a variety of settings for commonly used features (such as
default paper sizes).
Related Topics:
Tools > System Settings > Common Service Settings
Machine Clock/Timers
Use the Machine Clock/Timers feature to set the machine clock time and time intervals
for various options:
Date
Sets the date of the machine clock. The date set here prints on lists and reports. Select
from three different options when setting the date:
• Year/Month/Day
• Month/Day/Year
• Day/Month/Year
Time
Sets the time of the machine clock. The time set here prints on lists and reports. Select
either a 12-hour or 24-hour representation.
Auto Clear
Sets the time period which determines when the machine returns to its default screen;
in other words, if a given time period elapses with no operation, the machine
automatically returns to the initial (default) screen. When this option is set for On,
select a time period between 30-900 seconds, in one second intervals.
NOTE
Even if Off is selected, any currently scanned and pending jobs continue
processing after one minute of inactivity on the machine.
Auto Job Release
If an error occurs during a copy or scan job, this sets the time that elapses until the
current job is automatically cleared, and thereby enables the completion of the next
job. When set for On, select a time period between 4-99 minutes, in one minute
increments. Select Off if you do not want to use this feature.
Auto Print
Set the time from the end of print job until the execution of next print job. When set
for On, select a time period between 1-240 seconds, in one second intervals. If Off is
selected, printing can start immediately, once the machine is ready.
2-2
Xerox® 770 Digital Color Press
System Administration Guide
Page 19

System Settings > Common Service Settings
Power Saver/Energy Saver Timers
Allows the amount of time specified to elapse before the machine enters Low Power
Mode or Sleep Mode. Options include:
• From Last Operation to Low Power Mode: Specify a time period between the last
operation and entering into the Low Power mode in the range from 1-1240 minutes,
in one minute increments.
• From Last Operation to Sleep Mode: Specify a time period between the last operation
and entering into the Sleep mode from 1-240 minutes, in one minute increments.
NOTE
Set the Sleep Mode time for a longer time interval than the Low Power Mode
time.
Printer Lockout Duration
When set for On, select the time from the start to the end of printer lockout. Set the
values from 0-23 hours and to 59 minutes. If you select Off no printer lockout occurs.
Time Zone
Sets the time difference from Greenwich Mean Time (GMT).
Daylight Savings Time
With this feature enabled, the machine automatically adjusts the current time when
the summer time starts and ends. Options include:
• Adjust off: Select this feature if you do want to use the Daylight Savings feature.
• Adjust by Month, Day & Time: Select this feature to specify the start of the daylight
savings feature, by month, day and time.
• Adjust by Month, Week, Day of Week & Time: Select this feature to specify the
start of the daylight savings feature, by month, week, day of the week and time.
Related Topics:
Set/change the power saver mode time intervals
Setting the Machine Clock/Timers
1. Login as administrator.
2. Access the Tools tab on the UI.
3. Select System Settings > Common Service Settings.
4. Select Machine Clock/Timers.
5. Select the item to be set or changed. Options include:
• Date
• Time
• Auto Clear
• Auto Job Release
Xerox® 770 Digital Color Press
System Administration Guide
2-3
Page 20

System Settings > Common Service Settings
• Auto Print
• Power Saver/Energy Saver Timers
• Printer Lockout Duration
• Time Zone
• Daylight Savings Time
6. Select Change Settings.
7. Select the desired setting for the option.
8. Select Save.
The previous screen is displayed.
9. If desired, select another option to set or change and repeat the previous steps.
10. Select Close.
The main Tools tab screen is displayed.
11. Exit administrator mode.
Audio Tones
Use the Audio Tones feature to select whether or not to sound an alarm for various
machine functions; for example an alarm can be set to sound when a job ends or there
is a fault. Options include:
Control Panel Select Tone
Select the volume level that sounds when a button on the UI is correctly selected. Select
from Loud, Normal, and Soft. To disable the sound, select Off.
Control Panel Alert Tone
Select the volume level that sounds when a non-functioning (or grayed-out) button is
selected or when an error occurs. Select from Loud, Normal, and Soft. To disable the
sound, select Off.
Base Tone
For a button that toggles (the setting changes each time it is pressed), select the volume
level that sounds when the button is in its initial (first) position. This is the sound made
when the Interrupt button is released. Select from Loud, Normal, and Soft. To disable
the sound, select Off.
Machine Ready Tone
Set the volume level that sounds when the machine is ready to copy or print or after
the machine powers on. Select from Loud, Normal, and Soft. To disable the sound,
select Off.
Job Complete Tone 1
Select the volume level that sounds when the machine successfully completes the
specific cycle, such as a copy job. Select from Loud, Normal, and Soft. To disable the
sound, select Off. The default setting is Copy.
2-4
Xerox® 770 Digital Color Press
System Administration Guide
Page 21

System Settings > Common Service Settings
Job Complete Tone 2
Select the volume level that sounds when the machine successfully completes the
specific cycle, such as a copy job. Select from Loud, Normal, and Soft. To disable the
sound, select Off. The default setting is Print Report.
Fault Tone
Select the volume level that sounds when there is an error termination. Select from
Loud, Normal, and Soft. To disable the sound, select Off.
Auto Clear Alert Tone
Select the volume level that sounds when the automatic clear feature is enabled. Select
from Loud, Normal, and Soft. To disable the sound, select Off.
Alert Tone
Select the volume level that sounds when a fault, such as a paper jam occurs, and the
fault is left unattended. Select from Loud, Normal, and Soft. To disable the sound,
select Off.
Out of Paper Warning Tone
Select the volume level that sounds when there is no paper in the paper tray and the
job is left unattended. Select from Loud, Normal, and Soft. To disable the sound, select
Off.
Low Toner Alert Tone
Select the volume level that sounds when it is time to replace the drum toner cartridge.
Select from Loud, Normal, and Soft. To disable the sound, select Off.
Stored Programming
Select the volume level that sounds when the Stored Programming feature is enabled.
Select from Loud, Normal, and Soft. To disable the sound, select Off.
Setting Audio Tones
1. Login as administrator.
2. Access the Tools tab on the UI.
3. Select System Settings > Common Service Settings.
4. Select Audio Tones.
5. Select the item to be set or changed. Options include:
• Control Panel Select Tone
• Control Panel Alert Tone
• Base Tone
• Machine Ready Tone
• Job Complete Tone 1, 2
• Fault Tone
• Auto Clear Alert Tone
Xerox® 770 Digital Color Press
System Administration Guide
2-5
Page 22

System Settings > Common Service Settings
• Alert Tone
• Out of Paper Warning Tone
• Low Toner Alert Tone
• Stored Programming
6. Select Change Settings.
7. Select the desired setting for the option.
8. Select Save.
The previous screen is displayed.
9. If desired, select another option to set or change and repeat the previous steps.
10. Select Close.
The main Tools tab screen is displayed.
11. Exit administrator mode.
Screen/Button Settings
Use the Screen/Button Settings feature to set specific screens and buttons that are
displayed when the power is turned on, when exiting Power Saver, and more. Options
include:
Screen Default
Assign a default screen that displays when the machine powers on; selections include
Services, Copy, Job Status, or Machine Status.
Service Screen Default
Assign a default to the service screen; selections include All Services, Copy, or
Stored Programming.
Service Screen After Auto Clear
Assign a default service screen that displays after Auto Clear occurs; select either
All Services or Last Selection Screen.
Auto Display of Login Screen
When the Authentication feature is used, select whether or not to automatically display
the login screen after turning the machine on or after canceling the Power Saver/Energy
Saver mode.
All Services
Set the layout of service buttons that appear on the All Services screen when pressing
the All Services button on the control panel.
All Services Screen Default
Select whether or not the All Services screen displays a functional description of a
button when it is selected.
2-6
Xerox® 770 Digital Color Press
System Administration Guide
Page 23

System Settings > Common Service Settings
Job Type on Job Status screen
Select the job types that to display on the Completed Jobs tab of the Job Status screen
when the Job Status button on the control panel is pressed.
Custom Buttons 1-3
Assign features to the three custom buttons on the control panel. For example, one
button may be assigned to the Copy feature, and the other two buttons assigned to
Stored Programming and Language.
Default Language
Set the default language for the machine; this language appears on the UI.
Customize Keyboard Button
Use this option to enter and save frequently used information and to create a
customized button on the UI keyboard screen. Frequently used information may be a
domain name, an IP address, or other related data; for example: www.xerox.com. Only
one UI keyboard button may be customized.
Assigning Screen/Button Settings
1. Login as administrator.
2. Access the Tools tab on the UI.
3. Select System Settings > Common Service Settings.
4. Select Screen/Button Settings.
5. Select the item to be set or changed. Options include:
• Screen Default
• Service Screen Default
• Service Screen After Auto Clear
• Auto Display of Login Screen
• All Services
• All Services Screen Default
• Job Type on Job Status screen
• Custom Buttons 1-3
• Default Language
• Customize Keyboard Button
6. Select Change Settings.
7. Select the desired setting for the option.
8. Select Save.
The previous screen is displayed.
9. If desired, select another option to set or change and repeat the previous steps.
10. Select Close.
The main Tools tab screen is displayed.
Xerox® 770 Digital Color Press
System Administration Guide
2-7
Page 24

System Settings > Common Service Settings
11. Exit administrator mode.
Paper Tray Settings
Use the Paper Tray Settings feature to set items relating to the paper and trays, including
the following components:
Custom Paper Settings
Use this feature to assign and set specific paper attributes to a custom paper. Attributes
include:
• Name
• Paper Type (such as plain, uncoated, or uncoated stock)
• Paper Weight
• Alignment Adjustment: Use this feature to make adjustments to the image based
on the alignment output of a document. Adjustments can be modified such as:
registration, perpendicularity, skew, and magnification.
• Adjust Paper Curl: Use this feature when the output contains too much paper curl.
• Auto Air Assist Values: Use this feature to switch on/off fans in a paper tray in order
to eliminate misfeeds, multifeeds, paper jams, or other possible tray feeding
problems.
• Adjust Fold Position: Use this feature allows to adjust the fold position for various
paper types, as well as set adjustment values to various default types. This option
is available only if the machine is equipped with either the optional Standard Finisher
or Booklet Maker Finisher.
2-8
Xerox® 770 Digital Color Press
System Administration Guide
Page 25

System Settings > Common Service Settings
Paper Tray Attributes
Use this feature to configure settings for specific paper characteristics for the paper
that is loaded in each tray; options include:
• Paper Size
• Paper Type (such as plain, uncoated, or uncoated stock)
• Paper Weight
• Paper Color
• Alignment Adjustment: Use this feature to make adjustments to the image based
on the alignment output of a document. Adjustments can be modified such as:
registration, perpendicularity, skew, and magnification.
• Adjust Paper Curl: Use this feature when the output contains too much paper curl.
• Auto Air Assist Values: Use this feature to switch on/off fans in a paper tray in order
to eliminate misfeeds, multifeeds, paper jams, or other possible tray feeding
problems.
• Adjust Fold Position: Use this feature allows to adjust the fold position for various
paper types, as well as set adjustment values to various default types. This option
is available only if the machine is equipped with either the optional Standard Finisher
or Booklet Maker Finisher.
Custom Paper Color Settings
Use this feature to assign a custom name for the color paper loaded in the machine.
A maximum of twelve characters can be entered for each custom color paper name.
Paper Tray Attributes on Setup Screen
The selection made on this screen determines whether or not the Paper Tray Attributes
option is displayed on the Tools tab.
Paper Tray Attributes During Loading
This features determines whether or not the Paper Tray Attributes option is displayed
on the User Interface when a paper tray is opened and closed.
Paper Tray Priority
Use this feature to set the paper tray priority sequence for automatic tray selection.
Automatic tray selection occurs when a tray containing the appropriate paper is
automatically selected by the machine for copying or printing.
Tray 5 (Bypass) Paper Size
Use this feature to assign specific paper sizes to Tray 5 (Bypass). This will facilitate
easier copying when using Tray 5 (Bypass). A maximum of twenty paper sizes can be
assigned to the Tray 5 (Bypass) size selections.
Auto Tray Switching Control
Use this feature to choose the auto tray switching method and how to copy mixed size
documents.
Xerox® 770 Digital Color Press
System Administration Guide
2-9
Page 26

System Settings > Common Service Settings
Related Topics:
Adjust Fold Position (Finisher Adjustment)
Adjusting the fold position
Adjusting the Single Fold position
Adjusting the Booklet Fold position
Adjusting the C Fold position
Adjusting the Z Fold position
Adjusting the Z Fold Half Sheet position
Assigning Custom Paper Settings
1. Login as administrator.
2. Access the Tools tab on the UI.
3. Select System Settings > Common Service Settings.
4. Select Paper Tray Settings.
5. Select Custom Paper Settings.
The Custom Paper Settings screen displays.
6. Select the item to be set or changed.
7. Select Change Settings.
A secondary Custom Paper screen opens and displays a variety of options:
• Name
• Paper Type and Paper Weight
• Alignment Adjustment
• Adjust Paper Curl
• Auto Air Assist Values
• Adjust Fold Position
8. Select the desired option.
9. Select Change Settings.
10. Make the required changes to the option as instructed on the UI.
11. Select Save.
The Custom Paper Settings screen displays.
12. If desired, select another option to set or change and repeat the previous steps.
13. When finished, select Close.
The Paper Tray Settings screen displays.
14. Select Close.
The main Tools tab screen is displayed.
15. Exit administrator mode.
2-10
Xerox® 770 Digital Color Press
System Administration Guide
Page 27

System Settings > Common Service Settings
Custom Paper Settings > Adjust Paper Curl
1. Login as administrator.
2. Access the Tools tab on the UI.
3. Select System Settings > Common Service Settings.
4. Select Paper Tray Settings.
The Paper Tray Settings screen displays.
5. Select Custom Paper Settings.
The Custom Paper Settings screen displays.
6. Select a custom paper item.
7. Select Change Settings.
A secondary Custom Paper screen opens and displays a variety of options.
8. If required, select Name.
a) Select Change Settings.
b) Enter the desired name for the custom paper.
c) Select Save.
The previous screen is displayed. This screen reflects the custom paper name.
9. Select Adjust Paper Curl.
10. Select Change Settings.
11. Select Type A.
a) Select Close.
The previous screen is displayed.
b) Select Sample Printout.
Review the sample for paper curl. If paper curl is still present, select
Adjust Paper Curl and continue.
c) Select Adjust Paper Curl.
d) Select Change Settings.
12. Select Type B.
a) Select Close.
The previous screen is displayed.
b) Select Sample Printout.
Review the sample for paper curl. If paper curl is still present, select
Adjust Paper Curl and continue.
c) Select Adjust Paper Curl.
d) Select Change Settings.
13. Select Type C.
a) Select Close.
The previous screen is displayed.
b) Select Sample Printout.
Review the sample for paper curl. If paper curl is still present, select
Adjust Paper Curl and continue.
c) Select Adjust Paper Curl.
d) Select Change Settings.
14. Select one of the Type 1-10 items.
Xerox® 770 Digital Color Press
System Administration Guide
2-11
Page 28

System Settings > Common Service Settings
15. Select Change Settings.
16. Assign the desired parameters to the paper curl Type (1-10) option.
a) Select the Name field.
b) Use the keyboard to enter a name.
c) Select the appropriate settings for 1 Sided-Face Up, 1 Sided-Face Down, and 2
Sided output.
Use the arrow buttons to select the correct amount of curl.
NOTE
Selecting Auto lets the system automatically adjust the paper curl.
d) Select Sample Printout.
Review the sample for paper curl. If the sample printout still continues too much
curl, further adjust the paper curl parameters and print another sample printout.
17. Continue adjusting the paper curl parameters until satisfied with the printouts. Once
a satisfactory printout is achieved, select Save.
The Adjust Paper Curl screen is displayed.
18. Select Close.
The secondary custom paper screen is displayed.
19. Select Close.
The Custom Paper Settings screen displays.
20. Select Close.
The Paper Tray Settings screen displays.
21. Select Close.
The main Tools tab screen is displayed.
22. Exit administrator mode.
Custom Paper Settings > Alignment Adjustment
1. Load paper in the desired tray.
2. Login as administrator.
3. Access the Tools tab on the UI.
4. Select System Settings > Common Service Settings.
5. Select Paper Tray Settings.
The Paper Tray Settings screen displays.
6. Select Custom Paper Settings.
The Custom Paper Settings screen displays.
7. Select a custom paper item.
(For example, select Custom Paper 1.)
8. Select Change Settings.
A secondary Custom Paper screen opens and displays a variety of options. For example,
the screen displays Custom Paper 1 at the top of it.
9. If required, select Name.
a) Select Change Settings.
b) Enter the desired name for the custom paper.
c) Select Save.
2-12
Xerox® 770 Digital Color Press
System Administration Guide
Page 29

System Settings > Common Service Settings
The previous screen is displayed. This screen reflects the custom paper name.
10. Select Alignment Adjustment.
11. Select Change Settings.
The Alignment Adjustment Setup screen displays.
12. Select Alignment Adjustment Type Setup.
13. Select Change Settings.
The Alignment Adjustment Type Setup screen displays.
14. Select an alignment item (Type 1-20) to set (create) or adjust (revise).
For the purposes of this procedure Type X represents Type 1-20.
15. Select Change Settings.
The Type X screen displays (for example Type 1).
16. Make the following selections:
a) Select Name and then Change Settings.
b) Enter a recognizable name (such Letter Size or A4).
c) Select Save to return to the Type X screen.
17. Select Sample Printout.
The Type X - Sample Printout screen displays.
18. Select the tray in which you loaded paper, and then select either 2 Sided or 1 Sided,
and the number of sheets.
19. Press Start on the control panel.
20. Retrieve and review the sample printout.
Xerox® 770 Digital Color Press
System Administration Guide
2-13
Page 30
System Settings > Common Service Settings
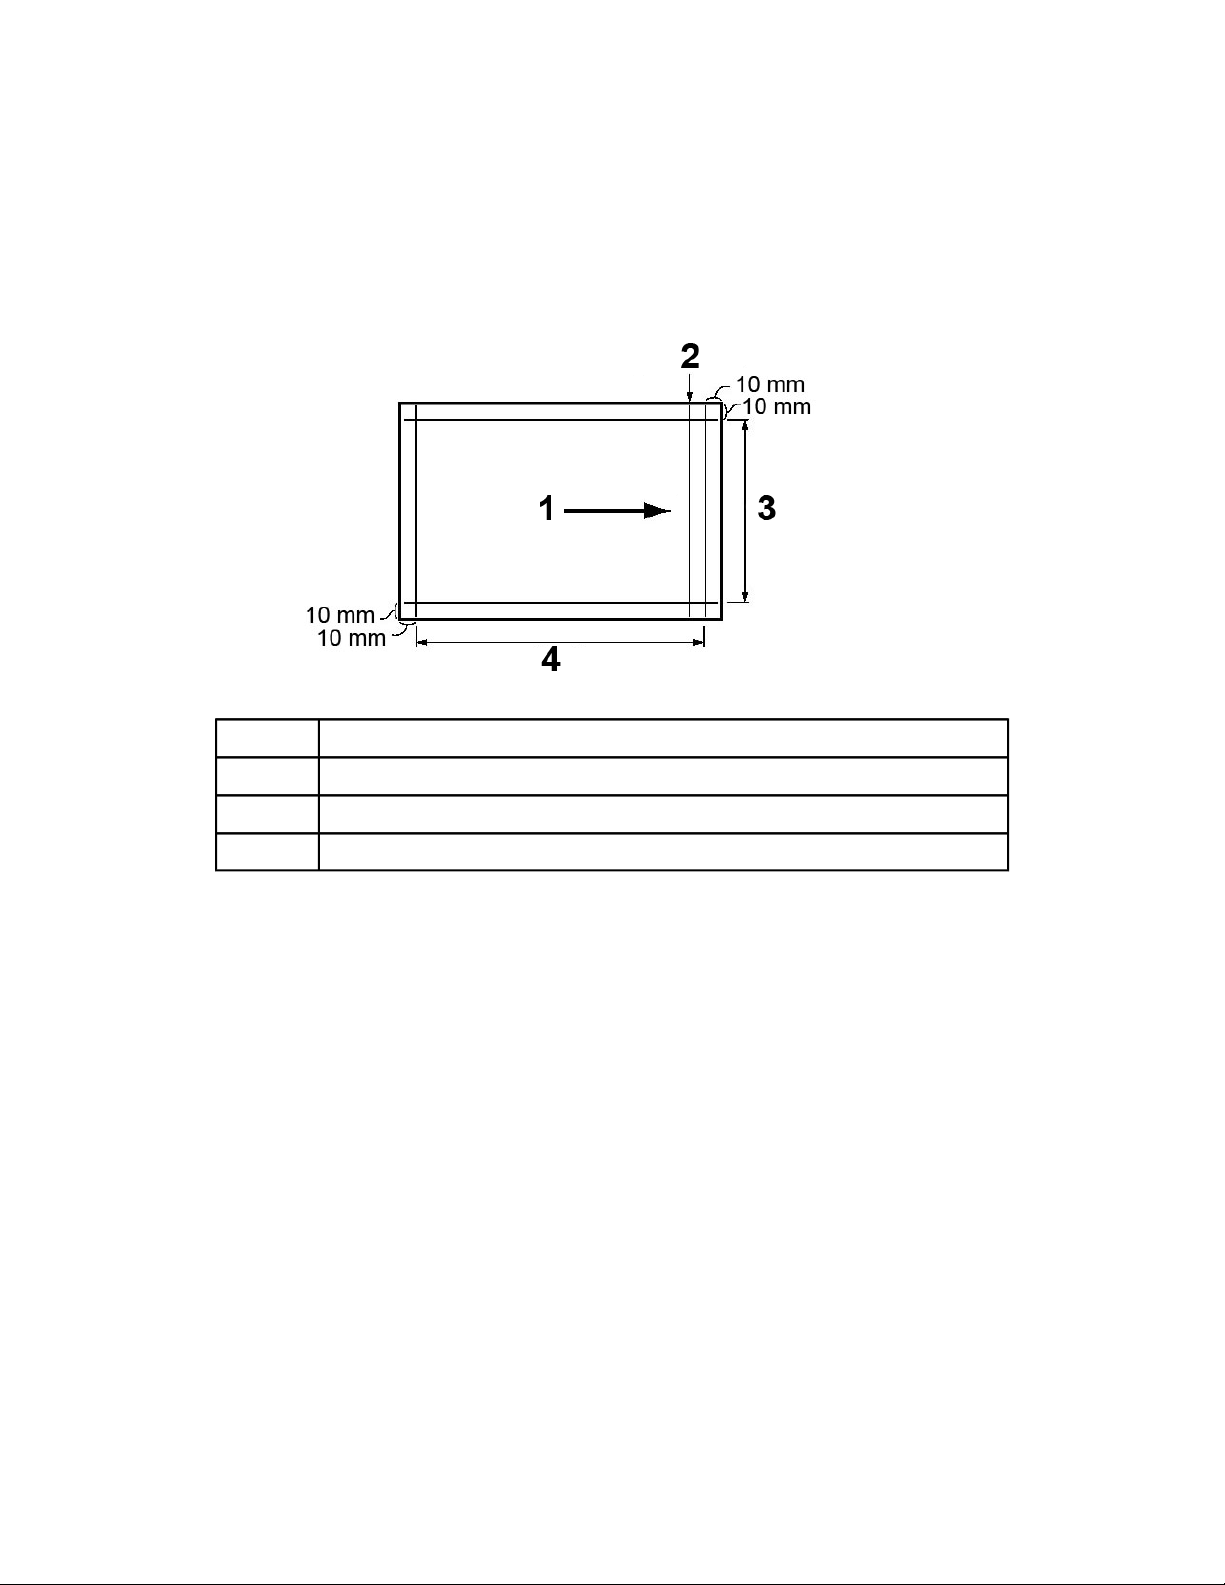
If the position of the sample output is correct, a line is printed at a position 10
a)
mm from the edge of the paper.
NOTE
Two lines are printed on the image of side 1 and one line is printed on the image
of side 2 of the sample that is printed with Sample Printout to indicate the paper
feed direction.
Paper feed direction1
Line that appears only on Side 12
Y direction3
X direction4
b) Select Save or Close to return to the Type X screen.
c) If the position of the line on the sample output is misaligned, make adjustments
accordingly; proceed to the next step.
21. If the image needs adjustment, select one of the alignment items.
• X Print Position
• Y Print Position
• X% - Magnification Width
• Y% - Magnification Length
• Perpendicularity
• Skew
22. Select Change Settings.
The selected alignment item screen displays.
23. Enter the desired changes and select Save.
The Type X screen displays (for example Type 1).
24. Print another sample printout, review the sample, and if necessary continue to make
adjustments as required.
2-14
Xerox® 770 Digital Color Press
System Administration Guide
Page 31

System Settings > Common Service Settings
25. After you complete adjustment, print a final sample printout with Sample Printout
and check the adjustment results.
26. Select Save.
The Alignment Adjustment Type Setup screen displays.
27. Select Close.
The Alignment Adjustment Setup screen displays.
28. Select the tray where the paper is loaded; this tray will be assigned to the current
Type X.
29. Select Change Settings.
The Alignment Adjustment Setup Tray window displays.
30. Select the type to which you made the adjustments (for example Type 1), and then
select Save.
The Alignment Adjustment Setup screen displays.
31. Select Close.
The secondary custom paper screen is displayed.
32. Select Close.
The Custom Paper Settings screen displays.
33. Select Close.
The Paper Tray Settings screen displays.
34. Select Close.
The main Tools tab screen is displayed.
35. Exit administrator mode.
Related Topics:
Alignment Adjustment
Assigning Paper Tray Attributes
1. Login as administrator.
2. Access the Tools tab on the UI.
3. Select System Settings > Common Service Settings.
4. Select Paper Tray Settings.
5. Select Paper Tray Attributes.
The Paper Tray Attributes screen is displayed.
6. Select the desired paper tray.
7. Select Change Settings.
The tray settings screen is displayed.
8. Select Change Settings.
9. Make the desired changes to the paper tray attributes:
• Paper Size
• Paper Type and Paper Weight
• Paper Color
• Alignment Adjustment
Xerox® 770 Digital Color Press
System Administration Guide
2-15
Page 32

System Settings > Common Service Settings
• Adjust Paper Curl
• Auto Air Assist Values
• Adjust Fold Position
10. Select Save.
The Paper Tray Attributes screen is displayed (showing a list of the paper trays).
11. If desired, select another paper tray and repeat the previous steps.
12. When finished, select Close.
The Paper Tray Settings screen displays.
13. Select Close.
The main Tools tab screen is displayed.
14. Exit administrator mode.
Paper Tray Attributes > Adjust Paper Curl
1. Login as administrator.
2. Access the Tools tab on the UI.
3. Select System Settings > Common Service Settings.
4. Select Paper Tray Settings.
The Paper Tray Settings screen displays.
5. Select Paper Tray Attributes.
The Paper Tray Attributes screen is displayed.
6. Select the desired paper tray.
7. Select Change Settings.
The paper tray setting confirmation screen displays.
8. Select Change Settings.
9. Select Adjust Paper Curl.
10. Select Type A.
11. Select Sample Printout.
Review the sample for paper curl. If paper curl is still present, continue to the next
step.
12. Select Type B.
13. Select Sample Printout.
Review the sample for paper curl. If paper curl is still present, continue to the next
step.
14. Select Type C.
15. Select Sample Printout.
Review the sample for paper curl. If paper curl is still present, continue to the next
step.
16. Select one of the Type 1-10 items.
17. Select Change Settings.
18. Assign the desired parameters to the paper curl Type (1-10) option.
a) Select the Name field.
b) Use the keyboard to enter a name.
2-16
Xerox® 770 Digital Color Press
System Administration Guide
Page 33

System Settings > Common Service Settings
c) Select the appropriate settings for 1 Sided-Face Up, 1 Sided-Face Down, and 2
Sided output.
Use the arrow buttons to select the correct amount of curl.
NOTE
Selecting Auto lets the system automatically adjust the paper curl.
d) Select Sample Printout.
Review the sample for paper curl. If the sample printout still continues too much
curl, further adjust the paper curl parameters and print another sample printout.
19. Continue adjusting the paper curl parameters until satisfied with the printouts. Once
a satisfactory printout is achieved, select Save.
The Adjust Paper Curl screen is displayed.
20. Select Close.
The Paper Tray Attributes screen is displayed.
21. Select Close.
The Paper Tray Settings screen displays.
22. Select Close.
The main Tools tab screen is displayed.
23. Exit administrator mode.
Paper Tray Attributes > Alignment Adjustment
1. Load paper in the desired tray.
2. Login as administrator.
3. Access the Tools tab on the UI.
4. Select System Settings > Common Service Settings.
5. Select Paper Tray Settings.
The Paper Tray Settings screen displays.
6. Select Paper Tray Attributes.
The Paper Tray Attributes screen is displayed.
7. Select the desired paper tray.
8. Select Change Settings.
The paper tray setting confirmation screen displays.
9. Select Change Settings.
10. Select Alignment Adjustment.
11. Select Change Settings.
The Alignment Adjustment Setup screen displays.
12. Select Alignment Adjustment Type Setup.
13. Select Change Settings.
The Alignment Adjustment Type Setup screen displays.
14. Select an alignment item (Type 1-20) to set (create) or adjust (revise).
For the purposes of this procedure Type X represents Type 1-20.
15. Select Change Settings.
The Type X screen displays (for example Type 1).
Xerox® 770 Digital Color Press
System Administration Guide
2-17
Page 34

System Settings > Common Service Settings
16. Make the following selections:
a) Select Name and then Change Settings.
b) Enter a recognizable name (such Letter Size or A4).
c) Select Save to return to the Type X screen.
17. Select Sample Printout.
The Type X - Sample Printout screen displays.
18. Select the tray in which you loaded paper, and then select either 2 Sided or 1 Sided,
and the number of sheets.
19. Press Start on the control panel.
20. Retrieve and review the sample printout.
a) If the position of the sample output is correct, a line is printed at a position 10
mm from the edge of the paper.
NOTE
Two lines are printed on the image of side 1 and one line is printed on the image
of side 2 of the sample that is printed with Sample Printout to indicate the paper
feed direction.
Paper feed direction1
Line that appears only on Side 12
Y direction3
X direction4
b) Select Save or Close to return to the Type X screen.
c) If the position of the line on the sample output is misaligned, make adjustments
accordingly; proceed to the next step.
21. If the image needs adjustment, select one of the alignment items.
• X Print Position
• Y Print Position
• X% - Magnification Width
2-18
Xerox® 770 Digital Color Press
System Administration Guide
Page 35

System Settings > Common Service Settings
• Y% - Magnification Length
• Perpendicularity
• Skew
22. Select Change Settings.
The selected alignment item screen displays.
23. Enter the desired changes and select Save.
The Type X screen displays (for example Type 1).
24. Print another sample printout, review the sample, and if necessary continue to make
adjustments as required.
25. After you complete adjustment, print a final sample printout with Sample Printout
and check the adjustment results.
26. Select Save.
The Alignment Adjustment Type Setup screen displays.
27. Select Close.
The Alignment Adjustment Setup screen displays.
28. Select the tray where the paper is loaded; this tray will be assigned to the current
Type X.
29. Select Change Settings.
The Alignment Adjustment Setup Tray window displays.
30. Select the type to which you made the adjustments (for example Type 1), and then
select Save.
The Alignment Adjustment Setup screen displays.
31. Select Close.
The paper tray setting confirmation screen displays.
32. Select Confirm.
The Paper Tray Attributes screen is displayed.
33. Select Close.
The Paper Tray Settings screen displays.
34. Select Close.
The main Tools tab screen is displayed.
35. Exit administrator mode.
Related Topics:
Alignment Adjustment
Assigning Custom Paper Color Settings
1. Login as administrator.
2. Access the Tools tab on the UI.
3. Select System Settings > Common Service Settings.
4. Select Paper Tray Settings.
5. Select Custom Paper Color Settings.
The Custom Paper Color Settings screen is displayed.
Xerox® 770 Digital Color Press
System Administration Guide
2-19
Page 36

System Settings > Common Service Settings
6. Select one of the custom color paper items.
7. Select Change Settings.
The keyboard screen opens.
8. Enter the desired name for the custom color paper.
9. Select Save.
The Custom Paper Color Settings screen is displayed.
10. If desired, select another custom color paper and repeat the previous steps.
11. When finished, select Close.
The Paper Tray Settings screen displays.
12. Select Close.
The main Tools tab screen is displayed.
13. Exit administrator mode.
Setting the option for Paper Tray Attributes on Setup Screen
1. Login as administrator.
2. Access the Tools tab on the UI.
3. Select System Settings > Common Service Settings.
4. Select Paper Tray Settings.
5. Select Paper Tray Attributes on Setup Screen.
6. Select one of two choices:
• Disabled: When selected, the paper tray attributes option does NOT display on
the Tools tab.
• Enabled: When selected, the paper tray attributes option DOES display on the
Tools tab.
7. Select Save.
The Paper Tray Settings screen displays.
8. Select Close.
The main Tools tab screen is displayed.
9. Exit administrator mode.
Setting the option for Paper Tray Attibutes During Loading
1. Login as administrator.
2. Access the Tools tab on the UI.
3. Select System Settings > Common Service Settings.
4. Select Paper Tray Settings.
5. Select Paper Tray Attributes During Loading.
6. Select one of two choices:
• Off: When selected, the UI does not display the paper tray attributes while loading
paper in a tray.
• On: When selected, the UI displays the paper tray attributes while loading paper
in a tray.
2-20
Xerox® 770 Digital Color Press
System Administration Guide
Page 37

System Settings > Common Service Settings
7. Select Save.
The Paper Tray Settings screen displays.
8. Select Close.
The main Tools tab screen is displayed.
9. Exit administrator mode.
Setting the Paper Tray Priority
1. Login as administrator.
2. Access the Tools tab on the UI.
3. Select System Settings > Common Service Settings.
4. Select Paper Tray Settings.
5. Select Paper Tray Priority.
6. Select a priority setting and assign a specific tray to that priority setting.
NOTE
Only one tray may be set to each priority.
7. Repeat the previous step until all available trays are assigned to priority settings.
8. Select Save.
The Paper Tray Settings screen displays.
9. Select Close.
The main Tools tab screen is displayed.
10. Exit administrator mode.
Setting the Tray 5 (Bypass) Paper Size Defaults
1. Login as administrator.
2. Access the Tools tab on the UI.
3. Select System Settings > Common Service Settings.
4. Select Paper Tray Settings.
5. Select Tray 5 Paper Size Defaults.
The Tray 5 Paper Size Defaults screen is displayed.
6. Select one of the paper size items.
7. Select Change Settings.
The paper size screen is displayed.
8. Select one of the paper series choices. If selecting Custom, set the numeric values
by using the arrow buttons.
9. Select Save.
The Tray 5 Paper Size Defaults screen is displayed.
10. If desired, select another paper size item and repeat the previous steps.
11. When finished, select Close.
The Paper Tray Settings screen displays.
12. Select Close.
The main Tools tab screen is displayed.
Xerox® 770 Digital Color Press
System Administration Guide
2-21
Page 38

System Settings > Common Service Settings
13. Exit administrator mode.
Setting Auto Tray Switching Control
1. Login as administrator.
2. Access the Tools tab on the UI.
3. Select System Settings > Common Service Settings.
4. Select Paper Tray Settings.
5. Select Auto Tray Switching Control.
The Auto Tray Switching Control screen is displayed.
6. Select Auto Tray Switching.
a) Select Change Settings.
b) Select either Enable during Auto Paper Select or
Enable for Same Paper Type, Weight and Color.
c) Select Save.
The Auto Tray Switching Control screen is displayed.
7. Select Targeted Type and Weight (Copy Jobs).
a) Select Change Settings.
b) Select the desired settings for the paper type (such as plain or coated) and for the
paper weight.
c) Select Save.
The Auto Tray Switching Control screen is displayed.
8. Select Targeted Paper Color (Copy Jobs).
a) Select Change Settings.
b) Select either All Colors or Selected Color Only.
c) If selecting Selected Color Only, select the desired color.
d) Select Save.
The Auto Tray Switching Control screen is displayed.
9. Select Targeted Type and Weight (Reports).
a) Select Change Settings.
b) Select the desired settings for the paper type (such as plain or coated) and for the
paper weight.
c) Select Save.
The Auto Tray Switching Control screen is displayed.
10. Select Targeted Paper Color (Reports).
a) Select Change Settings.
b) Select either All Colors or Selected Color Only.
c) If selecting Selected Color Only, select the desired color.
d) Select Save.
The Auto Tray Switching Control screen is displayed.
11. When finished, select Close.
The Paper Tray Settings screen displays.
2-22
Xerox® 770 Digital Color Press
System Administration Guide
Page 39

System Settings > Common Service Settings
12. Select Close.
The main Tools tab screen is displayed.
13. Exit administrator mode.
Adjust Air Assist Values
NOTE
This feature may or may not be available on your machine/configuration.
The Adjust Air Assist Values feature can be accessed from two different areas:
• Common Service Settings > Paper Tray Settings > Custom Paper Settings
• Common Service Settings > Paper Tray Settings > Paper Tray Attributes
Use the auto air assist feature to switch on/off fans in a paper tray in order to eliminate
misfeeds, multifeeds, paper jams, or other possible tray feeding problems. Air assist value
options include the following:
Auto
This is the default setting. With this option the paper tray blowers automatically adjust
using settings that are optimized for Xerox papers.
Standard Table
Select this setting when the Auto option does not provide the tray with optimum feed
capability. This setting uses a pre-programmed look-up table that uses the best-known
set of values for the paper that is programmed for the tray.
Multi-Feed Handling Table
Select this option to have the automatic settings incrementally adjust in order to reduce
multifeeds.
Misfeed Handling Table
Select this option to have the automatic settings incrementally adjust in order to reduce
misfeeds.
Custom Table 1, 2, 3, 4
With these four options, the paper tray blowers are controlled by parameters that are
set by your service representative.
Force OFF
Select this option to keep the paper tray blowers always switched off; in this mode, the
blowers are not automatically controlled. This mode is reserved for special media.
Related Topics:
Custom Paper Settings > Adjust Air Assist Values
Paper Tray Attributes > Adjust Air Assist Values
Xerox® 770 Digital Color Press
System Administration Guide
2-23
Page 40

System Settings > Common Service Settings
Custom Paper Settings > Adjust Air Assist Values
NOTE
This feature may or may not be available on your machine/configuration.
1. Login as administrator.
2. Access the Tools tab on the UI.
3. Select System Settings > Common Service Settings.
4. Select Paper Tray Settings.
The Paper Tray Settings screen displays.
5. Select Custom Paper Settings.
The Custom Paper Settings screen displays.
6. Select a custom paper item.
7. Select Change Settings.
A secondary Custom Paper screen opens and displays a variety of options.
8. If required, select Name.
a) Select Change Settings.
b) Enter the desired name for the custom paper.
c) Select Save.
The previous screen is displayed. This screen reflects the custom paper name.
9. Select Adjust Air Assist Values.
10. Select Change Settings.
11. From the Adjust Air Assist Values screen, select the desired option which that best
suits the environment and print/copy jobs:
• Auto
• Standard Table
• Multi-Feed Handling Table
• Misfeed Handling Table
• Custom Table 1, 2, 3, 4
• Force OFF
12. Select Save.
The previous screen is displayed.
13. If necessary select Close.
14. Select Save or Close to return to the Custom Paper Settings screen.
15. Select Close.
The Paper Tray Settings screen displays.
16. Select Close.
The main Tools tab screen is displayed.
17. Exit administrator mode.
2-24
Xerox® 770 Digital Color Press
System Administration Guide
Page 41

System Settings > Common Service Settings
Paper Tray Attributes > Adjust Air Assist Values
NOTE
This feature may or may not be available on your machine/configuration.
1. Login as administrator.
2. Access the Tools tab on the UI.
3. Select System Settings > Common Service Settings.
4. Select Paper Tray Settings.
The Paper Tray Settings screen displays.
5. Select Paper Tray Attributes.
The Paper Tray Attributes screen is displayed.
6. Select the item to be set or changed.
7. Select Change Settings.
A secondary screen opens and displays a variety of options.
8. If required, select Name.
a) Select Change Settings.
b) Enter the desired name.
c) Select Save.
The previous screen is displayed.
9. Select Adjust Air Assist Values.
10. Select Change Settings.
11. From the Adjust Air Assist Values screen, select the desired option which that best
suits the environment and print/copy jobs:
• Auto
• Standard Table
• Multi-Feed Handling Table
• Misfeed Handling Table
• Custom Table 1, 2, 3, 4
• Force OFF
12. Select Save.
The previous screen is displayed.
13. If necessary select Close.
14. Select Save or Close to return to the Paper Tray Attributes screen.
15. Select Close.
The Paper Tray Settings screen displays.
16. Select Close.
The main Tools tab screen is displayed.
17. Exit administrator mode.
Xerox® 770 Digital Color Press
System Administration Guide
2-25
Page 42

System Settings > Common Service Settings
Image Quality Adjustment
Use the Image Quality Adjustment feature to change settings for image quality and
calibration.
Image Quality
Select the image quality processing method that is used when the machine is scanning
an original. Image quality options include the following:
• Photo and Text Recognition: Use this option set the default level for all photo and
text copy jobs. Photo and text is used with Original Type when copying jobs.
• Output Color Recognition: Use this option to change the recognition settings used
when Auto Detect is selected on the Output Color area of the Copy tab. Choose
between More Black and White, Black and White, Normal, Color, and More Color.
• Photo Reproduction Level: Use this option to change the reproduction setting used
when Auto is selected on the Original Type screen. Choose between More Text,
Normal, and More Photo.
• Background Suppression (Color Copy): Use this option to change the background
suppression setting used when Auto Suppression is selected on the Image
Enhancement screen. Choose between High Quality and High Speed.
• Background Suppression (Black Copy): Use this option to change the background
suppression setting used when Auto Suppression is selected on the Image
Enhancement screen. Choose between High Quality and High Speed.
• Background Suppression (Scan Jobs): Use this option to change the background
suppression setting used when Auto Suppression is selected on the Image
Enhancement screen. Choose between High Quality and High Speed.
• Image Enhancement: Use this option to select whether or not to carry out image
enhancement. If On is selected, copy data is smoothed, to give a smoother
appearance. If Off is selected, the machine does not perform any image
enhancement.
Calibration
Use Calibration to optimize the quality of copied jobs. The machine prints a calibration
pattern, which then is placed on the document glass. The machine scans the calibration
pattern and automatically make adjustments as required.
Assigning Image Quality Adjustment options
1. Login as administrator.
2. Access the Tools tab on the UI.
3. Select System Settings > Common Service Settings.
4. Select Image Quality Adjustment.
The Image Quality Adjustment screen is displayed.
2-26
Xerox® 770 Digital Color Press
System Administration Guide
Page 43

System Settings > Common Service Settings
5. Select Image Quality.
6. Select the item to be set or changed.
Choices are shown on the displayed list.
7. Select Change Settings.
8. Select the desired setting for the option.
9. Select Save.
The Image Quality screen is displayed.
10. If desired, select another option to set or change and repeat the previous steps.
11. Select Close.
The Image Quality Adjustment screen is displayed.
12. Select Close.
The main Tools tab screen is displayed.
13. Exit administrator mode.
Calibrating for copy jobs
1. Login as administrator.
2. Access the Tools tab on the UI.
3. Select System Settings > Common Service Settings.
4. Select Image Quality Adjustment.
The Image Quality Adjustment screen is displayed.
5. Select Calibration.
6. Select Copy Jobs.
7. Select the appropriate Screen Type, Paper Supply, and Target.
8. Select Start.
9. Follow the instructions provided on the UI.
10. When finished, select Close.
The Image Quality Adjustment screen is displayed.
11. Select Close.
The main Tools tab screen is displayed.
12. Exit administrator mode.
Reports
Use this feature to set the options which affect printable reports; options include:
Print Reports Button
When enabled, the Print Reports button appears on the Machine Information tab. No
system administator login ID is required for printing the reports.
Job History Report
Select Print Report to automatically print a Job History Report after a total of fifty
jobs is processed.
Xerox® 770 Digital Color Press
System Administration Guide
2-27
Page 44

System Settings > Common Service Settings
2 Sided Report
When printing a report, select whether to print a 1-sided or 2-sided report.
Setting the Reports options
1. Login as administrator.
2. Access the Tools tab on the UI.
3. Select System Settings > Common Service Settings.
4. Select Reports.
5. Select the item to be set or changed.
6. Select Change Settings.
7. Select the desired setting for the option.
8. Select Save.
The Reports screen is displayed.
9. If desired, select another option to set or change and repeat the previous steps.
10. Select Close.
The main Tools tab screen is displayed.
11. Exit administrator mode.
Maintenance
Use this feature to further customize the machine settings for the following options:
Initialize Hard Disk
Use this option to initialize the machine hard disk. This erases any current data on the
hard disk.
Delete All Data
Use this option to select Delete Job or Run Job when the machine memory is full.
Software Options
This feature is for service representatives only. For more information, contact the Xerox
Customer Support Center.
NVM Read Write
The Xerox service representative uses this feature to change certain system settings.
It also may occasionally be used by system administrators.
Alignment Adjustment
Use this feature to configure the default settings for each of the Alignment Adjustment
options.
Adjust Paper Curl
Use this feature to change the paper curl settings either at point of need or to create
individual paper curl profiles for specific paper types, weights, and trays.
2-28
Xerox® 770 Digital Color Press
System Administration Guide
Page 45

System Settings > Common Service Settings
Adjust Fold Position (Finisher Adjustment) - optional
This feature is available only if the optional Standard/Booklet Maker Finisher is
connected to the machine. Use this feature to adjust the fold position on the printed
output. If the optional C/Z Folder is also connected, more folding options are available.
Related Topics:
Adjust Fold Position (Finisher Adjustment)
Adjusting the fold position
Adjusting the Single Fold position
Adjusting the Booklet Fold position
Adjusting the C Fold position
Adjusting the Z Fold position
Adjusting the Z Fold Half Sheet position
Initializing the hard disk or deleting data
1. Login as administrator.
2. Access the Tools tab on the UI.
3. Select System Settings > Common Service Settings.
4. Select Maintenance.
The Maintenance screen displays.
5. To initialize the machine hard disk, select Initialize Hard Disk.
a) From the Initialize Hard Disk screen, select the partition to be reformatted.
b) Select Start.
c) Select Yes.
When reformatting completes successfully, a message screen appears.
d) Select Confirm.
e) Select Close to return to the Maintenance screen.
6. To delete the machine data, select Delete All Data.
a) From the Delete All Data screen, select Start.
IMPORTANT
Do not use this function unless authorized and have checked with the Xerox
service representative. Selecting Start deletes all data recorded in the machine.
This includes all user settings, and data recorded automatically by the system.
b) Upon completion, select Close to return Maintenance screen.
7. Select Close.
The main Tools tab screen is displayed.
8. Exit administrator mode.
Maintenance > Adjust Paper Curl
1. Login as administrator.
Xerox® 770 Digital Color Press
System Administration Guide
2-29
Page 46

System Settings > Common Service Settings
2. Access the Tools tab on the UI.
3. Select System Settings > Common Service Settings.
4. Select Maintenance.
The Maintenance screen displays.
5. Select Adjust Paper Curl.
6. Select one of the Type 1-10 items.
7. Select Change Settings.
8. Assign the desired parameters to the paper curl Type (1-10) option.
a) Select the Name field.
b) Use the keyboard to enter a name.
c) Select the appropriate settings for 1 Sided-Face Up, 1 Sided-Face Down, and 2
Sided output.
Use the arrow buttons to select the correct amount of curl.
NOTE
Selecting Auto lets the system automatically adjust the paper curl.
d) Select Sample Printout.
Review the sample for paper curl. If the sample printout still continues too much
curl, further adjust the paper curl parameters and print another sample printout.
9. Continue adjusting the paper curl parameters until satisfied with the printouts. Once
a satisfactory printout is achieved, select Save.
The Adjust Paper Curl screen is displayed.
10. Select Close.
The Maintenance screen displays.
11. Select Close.
The main Tools tab screen is displayed.
12. Exit administrator mode.
Maintenance > Alignment Adjustment
1. Load paper in the desired tray.
2. Login as administrator.
3. Access the Tools tab on the UI.
4. Select System Settings > Common Service Settings.
5. Select Maintenance.
The Maintenance screen displays.
6. Select Alignment Adjustment.
7. Select Change Settings.
The Alignment Adjustment Setup screen displays.
8. Select Alignment Adjustment Type Setup.
9. Select Change Settings.
The Alignment Adjustment Type Setup screen displays.
10. Select an alignment item (Type 1-20) to set (create) or adjust (revise).
For the purposes of this procedure Type X represents Type 1-20.
2-30
Xerox® 770 Digital Color Press
System Administration Guide
Page 47

System Settings > Common Service Settings
11. Select Change Settings.
The Type X screen displays (for example Type 1).
12. Make the following selections:
a) Select Name and then Change Settings.
b) Enter a recognizable name (such Letter Size or A4).
c) Select Save to return to the Type X screen.
13. Select Sample Printout.
The Type X - Sample Printout screen displays.
14. Select the tray in which you loaded paper, and then select either 2 Sided or 1 Sided,
and the number of sheets.
15. Press Start on the control panel.
16. Retrieve and review the sample printout.
a) If the position of the sample output is correct, a line is printed at a position 10
mm from the edge of the paper.
NOTE
Two lines are printed on the image of side 1 and one line is printed on the image
of side 2 of the sample that is printed with Sample Printout to indicate the paper
feed direction.
Paper feed direction1
Line that appears only on Side 12
Y direction3
X direction4
b) Select Save or Close to return to the Type X screen.
c) If the position of the line on the sample output is misaligned, make adjustments
accordingly; proceed to the next step.
17. If the image needs adjustment, select one of the alignment items.
• X Print Position
Xerox® 770 Digital Color Press
System Administration Guide
2-31
Page 48

System Settings > Common Service Settings
• Y Print Position
• X% - Magnification Width
• Y% - Magnification Length
• Perpendicularity
• Skew
18. Select Change Settings.
The selected alignment item screen displays.
19. Enter the desired changes and select Save.
The Type X screen displays (for example Type 1).
20. Print another sample printout, review the sample, and if necessary continue to make
adjustments as required.
21. After you complete adjustment, print a final sample printout with Sample Printout
and check the adjustment results.
22. Select Save.
The Alignment Adjustment Type Setup screen displays.
23. Select Close.
The Alignment Adjustment Setup screen displays.
24. Select the tray where the paper is loaded; this tray will be assigned to the current
Type X.
25. Select Change Settings.
The Alignment Adjustment Setup Tray window displays.
26. Select the type to which you made the adjustments (for example Type 1), and then
select Save.
The Alignment Adjustment Setup screen displays.
27. Select Close.
The Maintenance screen displays.
28. Select Close.
The main Tools tab screen is displayed.
29. Exit administrator mode.
Related Topics:
Alignment Adjustment
Watermark
Use this feature to configure default settings for commonly used watermarks; options
include the following:
2-32
Xerox® 770 Digital Color Press
System Administration Guide
Page 49

System Settings > Common Service Settings
Date Format
Set the default date format as it appears on the Annotation and Watermark screens
in the Output Format tab (Copy feature). When selected, the default date format is
printed on the copy output when On is selected for the Annotation/Date feature or
when the Date option in the Watermark feature is selected.
• Choose from the following Date Format options: 20yy/mm/dd, mm/dd/20yy,
dd/mm/20yy, and 20yy-mm-dd.
• The option selected here becomes the default setting for both the Annotation and
Watermark features.
Default Watermark Effect
Select the default setting for Text Effect; this default value appears on the Watermark
screen in the Output Format tab (Copy feature). This setting determines how the
background text (watermark) appears on the printed output. Text Effect selections
include: Off, Embossed, and Outline.
Default Watermark
Select the default watermark from a displayed list.
Font Size
Select from four possibilities: 48 point, 64 point, 80 point or a custom size of 24 to 80
point.
Background Pattern
Select the background pattern to be used for the watermark option (on the Output
Format tab/Copy feature). Select from eight patterns: wave, circle, stripes, chain, beam,
rhombic, sunflower, and fan.
Font Color
Select the font color for printing the background watermark text. You can choose
between Black, Magenta, or Cyan.
Density
Select the density for printing the background watermark text. You can select from
three levels: Lighter, Normal, or Darker.
Watermark/Background Contrast
Select the text/background contrast for printing watermark information. You can select
from contrast levels 1 to 9.
Force Watermark Copy
Select On to force all copy jobs to print with a watermark. Select Off if you do not want
all copy jobs printed with a watermark.
Custom Watermark 1-3
Create your own watermark.
Xerox® 770 Digital Color Press
System Administration Guide
2-33
Page 50

System Settings > Common Service Settings
Selecting the Watermark options
1. Login as administrator.
2. Access the Tools tab on the UI.
3. Select System Settings > Common Service Settings.
4. Select Watermark.
The Watermark screen displays.
5. Select the item to be set or changed.
6. Select Change Settings.
7. Select the desired option for the Watermark feature.
8. Select Save.
The Watermark screen displays.
9. If desired, select another option to set or change and repeat the previous steps.
10. Select Close.
The main Tools tab screen is displayed.
11. Exit administrator mode.
Secure Watermark (optional)
The optional Secure Watermark feature is designed to provide security management
of paper documents by embedding job deterrence information into your paper document.
This information may include job type, date and time of job start, user information,
document name, and other such related information.
NOTE
It is assumed that you have purchased the security option that enables the Secure
Watermark feature. If you did not, contact your Xerox Representative to purchase
this option.
A digital code is put onto your copies in order to prevent unauthorized recopying/printing
of sensitive materials. Options selected here define what the default settings will be for
the Secure Watermark features on the Output Format tab of the Copy feature. The
following options are available for configuring the default settings for each of the Secure
Watermark options:
Secure Watermark Control
Select whether or not to set Secure Watermark Detection. Selections are Off or On.
Digital Codes Settings
Set a Decoding Passcode and a Custom Digital Watermark.
Force Secure Watermark
Select whether or not to force a secure watermark for Copy Job and Report. Selections
are Off or On.
Secure Watermark Defaults
Select the Protection Code setting. The selections are Off or Prevent Duplication.
2-34
Xerox® 770 Digital Color Press
System Administration Guide
Page 51

System Settings > Common Service Settings
Secure Watermark Effect
Set Default Secure Watermark, Background Pattern, Background Contrast, and
Custom Secure Watermarks 1,2, and 3.
Selecting the Secure Watermark options
1. Login as administrator.
2. Access the Tools tab on the UI.
3. Select System Settings > Common Service Settings.
4. Select Secure Watermark.
The Secure Watermark screen displays.
5. Select desired feature from the Secure Watermark screen.
6. Select the desired setting for the feature.
7. Select Save.
The Secure Watermark screen displays.
8. If desired, select another feature to set or change and repeat the previous steps.
9. Select Close.
The main Tools tab screen is displayed.
10. Exit administrator mode.
Other Settings
Use this feature to assign a variety of settings for commonly used features; options
include the following:
Offset Stacking (Right Middle Tray)
This feature is available only when the Standard/Booklet Maker Finisher is connected
to the machine. Select the default offset stacking option for the finisher tray:
• None: If this option is selected, the finishing tray will not offset any output.
• Offset per set: If this option is selected, the finishing tray will offset each set of a
copy/print job. This option also offsets each job.
• Offset per job: If this option is selected, all the sets of a job are delivered on one
stack to the output area. When the next job starts, that job is offset from the previous
job in the tray. This option does not offset each set of a job.
Xerox® 770 Digital Color Press
System Administration Guide
2-35
Page 52

System Settings > Common Service Settings
Offset Stacking (Stacker - Stacker Cart)
This feature is available only when the High Capacity Stacker (HCS) is connected to
the machine. Offsetting means that each copy set is delivered to the center tray and
shifted slightly to separate it from the previous job. When a copy set is delivered to the
front of the tray, the next set is delivered to the rear of the tray. Options for the offset
function for the High Capacity Stacker include the following:
• None: If this option is selected, the finishing tray will not offset any output.
• Offset per set: If this option is selected, the finishing tray will offset each set of a
copy/print job. This option also offsets each job.
• Offset per job: If this option is selected, all the sets of a job are delivered on one
stack to the output area. When the next job starts, that job is offset from the previous
job in the tray. This option does not offset each set of a job.
When Offset per Set or Offset per Job is selected, the machine slightly shifts the output
position per set or per job (print job) respectively.
Unload High Capacity Stacker
This feature is available only when the High Capacity Stacker (HCS) is connected to
the machine. Allows you to determine the timing to stop the machine when the
Unload Output button is pressed. Select either Stop When Current Set Completes
and Stop Immediately.
Default Print Paper Size
Set the default paper size, A4 or 8.5 × 11 in. on which to print reports and/or lists.
Paper Size Settings
Specify the size of paper to be automatically detected when you use standard sizes
for a document or the machine is set to detect sizes of a document. Select one of the
following options:
• A/B Series (8 × 13 in.)
• A/B Series
• A/B Series (8K/16K)
• A/B Series (8 × 13 in./8 × 14 in.)
• Inch Series
Millimeters/Inches
Select the unit of measurement that will be displayed on the screen; select either
Millimeters or Inches.
Keyboard Input Restriction
Select whether or not to restrict the display of the virtual keyboard on the machine UI.
To prevent characters from being garbled when switching character sets, you can limit
input to ASCII characters. If you select On (ASCII Only), the keyboard displayed shows
ASCII characters only.
2-36
Xerox® 770 Digital Color Press
System Administration Guide
Page 53

System Settings > Common Service Settings
Operation of Up/Down Buttons
Select whether or not to enable continuous scrolling when pressing the scroll buttons.
Display of Consumables Screen
Select whether or not to display the consumables status when a replacement is required;
options include:
• Off: Does not display the consumables status screen.
• When power is switched on: Displays the consumables status screen at startup.
• When Auto Clear is activated: Displays the consumables status screen when
Auto Clear is executed.
Data Encryption
If you want the recorded data on the hard disk encrypted, select On as the default
setting for this feature. By switching on the data encryption, all data written to the
hard disk is automatically encrypted. Encryption prevents unauthorized access to the
stored data.When encryption is on, an encryption key must be set.
NOTE
This is an optional feature that may not be available on your machine; it is part
of the optional Data Security Kit. For more information, contact the Customer
Support Center.
Encryption Key for Confidential Data
This optional feature sets an encryption key to encrypt confidential information such
as the passcode of the system administrator. Encrypting confidential information
prevents a network hacking and an unauthorized access to the information. Enter an
encryption key of 4 to 12 characters using alphanumeric characters.
IMPORTANT
If you change the existing encryption key, you may not restore confidential
information from a backup. The factory default encryption key is x-admin.
NOTE
This is an optional feature that may not be available on your machine; it is part
of the optional Data Security Kit. For more information, contact the Customer
Support Center. Furthermore, a service representative can block changes to the
settings of this feature.
Xerox® 770 Digital Color Press
System Administration Guide
2-37
Page 54

System Settings > Common Service Settings
Service Representative Restricted Operation
Select whether or not to restrict the operation by the service representative in order to
protect the security settings from being altered by someone impersonating the service
representative; options include the following:
• Off: The service representative is not restricted from any operations on the machine.
• On: The service representative cannot change the following settings: Delete All
Data, Secure Watermark, Data Encryption, Encryption Key for Confidential Data,
Service Representative Restricted Operation, System Administrator Settings,
Maximum Login Attempts by System Administrator, Overwrite Hard Disk, and
Creating/Changing Users with System Administrator Rights.
When On is set, set a maintenance passcode of 4 to 12 digits in the Maintenance
Passcode screen. Entering the passcode is required when the service representative
performs maintenance.
IMPORTANT
When On is set and if you lose the system administrator’s user ID and passcode,
the items restricted to the service representative cannot be changed or reset
to their default values.
Software Download
This feature is not supported; however, it may still be accessible. This feature is only
for service representative use. Contact the Customer Support Center.Select Disabled
as the default setting.
Document Feeder Tray Elevation
When a document is loaded in the document feeder, set the timing which tells the
document feeder tray when to raise. Select either When loading originals or
When pressing Start.
• When loading originals: Select this option if you want the elevator tray to raise
when you load documents in the document feeder.
• When pressing Start: Select this option if you want the document feeder elevator
tray to raise when you press the Start button on the control panel.
Estimated Job Time
Select the default setting that is displayed for the estimated job completion time.
Selecting options for the Other Settings feature
1. Login as administrator.
2. Access the Tools tab on the UI.
3. Select System Settings > Common Service Settings.
4. Select Other Settings.
The Other Settings screen displays.
5. Select the item to be set or changed.
6. Select Change Settings.
2-38
Xerox® 770 Digital Color Press
System Administration Guide
Page 55

System Settings > Common Service Settings
7. Select the desired setting for the option.
8. Select Save.
The Other Settings screen displays.
9. If desired, select another option to set or change and repeat the previous steps.
10. Select Close.
The main Tools tab screen is displayed.
11. Exit administrator mode.
Setting the Data Encryption options
1. Login as administrator.
2. Access the Tools tab on the UI.
3. Select System Settings > Common Service Settings.
4. Select Other Settings.
The Other Settings screen displays.
5. Select Data Encryption.
6. Select Change Settings.
7. Select On.
The Data Encryption screen displays.
8. Select Keyboard and from the Keyboard screen, enter the desired encryption key
password.
Enter a 12-character encryption key; the default encryption key is 12 ones
(111111111111).
9. Select Save.
The Data Encryption screen displays.
10. Select Keyboard again.
11. From the Keyboard screen reenter the same encryption key one more time.
12. Select Save.
The Data Encryption screen displays.
13. Select Save.
The Other Settings screen displays.
14. Select Close.
The main Tools tab screen is displayed.
15. Exit administrator mode.
Setting options for Encryption Key for Confidential Data
1. Login as administrator.
2. Access the Tools tab on the UI.
3. Select System Settings > Common Service Settings.
4. Select Other Settings.
The Other Settings screen displays.
5. Select Encryption Key for Confidential Data.
6. Select Change Settings.
The Encryption Key for Confidential Data screen displays.
Xerox® 770 Digital Color Press
System Administration Guide
2-39
Page 56

System Settings > Common Service Settings
7. Select Keyboard and from the Keyboard screen, enter the desired encryption key
password.
Enter a 12-character encryption key; the default encryption key is 12 ones
(111111111111).
8. Select Save.
The Encryption Key for Confidential Data screen displays.
9. Select Keyboard again.
10. From the Keyboard screen reenter the same encryption key one more time.
11. Select Save.
The Encryption Key for Confidential Data screen displays.
12. Select Save.
The Other Settings screen displays.
13. Select Close.
The main Tools tab screen is displayed.
14. Exit administrator mode.
Adjust Paper Curl
Use the Adjust Paper Curl feature when the printed output contains too much curl. This
feature allows the user to select the desired paper curl setting in order to prevent your
output from curling.
When paper is exposed to heat, the paper looses moisture and curls toward the heat
source. High dry ink/toner coverage jobs tend to curl more due to the dryink/toner
plastification effect on the paper surface. The system tries to reduce this by using
mechanical devices within the paper path called decurlers.
Paper curl is caused by many variables, including:
• The weight of the paper and whether it is coated or uncoated.
• The amount of dry ink/toner and the area being covered on a sheet; the heavier the
coverage, the greater the tendency to curl.
• How the paper is loaded in the tray. Make sure you load the paper as instructed on
the ream wrapper.
• The atmospheric conditions of the room where the paper is stored, especially those
related to humidity and temperature.
• The heat generated during the fusing processes.
Your system is designed with an automated setting to control curl. When using the
system Default, the machine automatically sends paper through the proper decurler.
The system Default automatically determines the amount of pressure needed at the
different decurlers in order to reduce the output curl of the paper.
2-40
Xerox® 770 Digital Color Press
System Administration Guide
Page 57

System Settings > Common Service Settings
With some print jobs, the output prints still may be curled more than you desire even
after using the system default. In those cases, use the Adjust Paper Curl feature to
compensate for paper curl in the prints. Adjust Paper Curl settings are based on the job
type and image density ratio. These settings are manually entered through one of three
ways, and must be logged in as the administrator. Adjust Paper Curl can be accessed
from the Tools tab on the UI by selecting:
• System Settings > Common Service Settings > Paper Tray Settings
> Custom Paper Settings
• System Settings > Common Service Settings > Paper Tray Settings
> Paper Tray Attributes
• System Settings > Common Service Settings > Maintenance
NOTE
It is important to remember that a successful paper curl correction setting used
today may not be the same setting that you would use on another day. This is
especially relevant if the room in which machine is located experiences changes in
temperature and humidity.
Related Topics:
Custom Paper Settings > Adjust Paper Curl
Paper Tray Attributes > Adjust Paper Curl
Maintenance > Adjust Paper Curl
Adjust Paper Curl options
While paper curl is caused by many variables, it is important to understand that the
Adjust Paper Curl options, both the preset and custom options, use lookup tables for curl
control that are based on the job’s percentage of toner area coverage and the humidity
values in the room where the machine sits. The Adjust Paper Curl feature includes the
following options:
Types A, B, and C
Types A, B, and C are system default settings. These preset options offer an alternative
to creating and using a customized setting. Always use these settings first before using
a customized setting. However, if the output is still curling more than desired, use one
of the customized Types 1-10 settings.
Types 1-10
Types 1-10 are customized by settings which are saved to the machine memory and
can be recalled and used at point of need.
Xerox® 770 Digital Color Press
System Administration Guide
2-41
Page 58

System Settings > Common Service Settings
Adjust Paper Curl Types A, B, C
If paper curl is a problem, using one of the preset Types A, B, or C settings usually
eliminates the problem. However, due to the broad range of paper variables, image
coverage, and environmental factors, these default settings may not result in satisfactory
performance. Always refer to the latest Recommended Materials List (RML) for your
machine for the recommended paper types and weights and the default paper curl
(decurler) settings to use with them. This RML can be downloaded from www.xerox.com.
NOTE
The settings recommended in the RML were developed from testing a wide range
of paper samples, percentage of toner area coverage, and environments. The
outcome of this testing is the preset parameters shown in the list, and these
parameters refer to how particular papers interact with the digital press decurling
system.
As previously stated, to correct paper curl, always uses Types A, B, and C before using a
customized paper curl setting. For example, if paper curl is a problem, do the following:
1. Select and use Type A; copy/print some samples and review the output.
2. If paper curl is still a problem, select and use Type B; copy/print some samples and
review the output.
3. If paper curl is still a problem, select and use Type C; copy/print some samples and
review the output.
4. If paper curl is still a problem, select and use one of the customized Types 1-10;
copy/print some samples and review the output.
Adjust Paper Curl Types 1-10
If the system default Types A, B, C did not successfully eliminate curl from the output,
use one of the customized Types 1-10. These customized types allow the user to create
and saved a paper curl profile based on paper type and weight, a specific paper tray,
and upward or downward curl adjustments to the output. This customized paper profile
is saved to the machine memory and can be recalled and used at point of need.
Paper Curl Types 1-10 include the following selections:
• Name: Enter a name specific so that later recall is not an issue.
• Paper type and weight: If accessing the Adjust Paper Curl feature from
Common Service Settings > Paper Tray Settings > Custom Paper Settings, selecting
a specific paper type and weight is available. This paper type and weight is assigned
to the selected paper curl type (for example Type 1) and associated with the name
entered and saved for that type.
• Paper tray: If accessing the Adjust Paper Curl feature from Common Service Settings
> Paper Tray Settings > Paper Tray Attributes, selecting a specific paper tray is
available. This paper tray is assigned to the selected paper curl type (for example
Type 1) and associated with the name entered and saved for that type.
2-42
Xerox® 770 Digital Color Press
System Administration Guide
Page 59

System Settings > Common Service Settings
Paper curl selections also include the following:
• 1 Sided-Face Up: This option allows you to set specific paper curl information for
one-sided only printed output which exits the machine in the face up position.
• 1 Sided-Face Down: This option allows you to set specific paper curl information for
one-sided only printed output which exits the machine in the face down position.
• 2 Sided: This option allows you to set specific paper curl information for two-sided
printed output.
These 1-sided/2-sided selections allow you to adjust upward or downward curl as required,
and based on these settings helps reduce or eliminate the curl in the printed output.
Auto may also be selected; this setting allows the machine system to automatically
adjust the upward or downward curl based on the 1-sided or 2-sided selection.
If accessing the Adjust Paper Curl feature from Common Service Settings
> Maintenance, the customized paper curl type becomes available for selection from
either Common Service Settings > Paper Tray Settings > Custom Paper Settings or
Common Service Settings > Paper Tray Settings > Paper Tray Attributes.
NOTE
Paper curl types created from Maintenance are NOT associated with a specific paper
type/weight nor with a specific paper tray.
Alignment Adjustment
The Alignment Adjustment feature allows you to create and store specific alignment
adjustment procedures. These procedures allow you to accommodate different media
types and how the image is registered, aligned, or magnified for side 1 and side 2 output.
These procedures may be used at point of need in order to ensure optimum output
quality of your prints.
Alignment adjustments can be made when the position of the output image is misaligned
or skewed. This may be a result of paper expansion or contraction, cutting inaccuracy,
or paper storage conditions.
You can create and save a maximum of 20 alignment procedures.
NOTE
It is recommended that you read through the entire Alignment Adjustment section
before creating/editing or performing any actual alignment adjustments.
Related Topics:
Custom Paper Settings > Alignment Adjustment
Paper Tray Attributes > Alignment Adjustment
Maintenance > Alignment Adjustment
Xerox® 770 Digital Color Press
System Administration Guide
2-43
Page 60

System Settings > Common Service Settings
Alignment Adjustment information
When printing duplex jobs and using different media types (including paper type, weight,
and coating/uncoating), the output may require specific handling by the machine as it
is moving through the paper path. With certain media types and duplex jobs, the images
on side 1 and/or side 2 may be misregistered, skewed, perpendicularly misaligned, or
stretched; this is where alignment procedures can be used to eliminate these type of
issues.
Alignment adjustment procedures allow you to:
• Make adjustments to the image based on the alignment output of a document.
Various adjustments can be modified such as: print position (registration),
perpendicularity, skew, and magnification.
• Make adjustments when the position of the output image is misaligned or skewed.
This may be a result of paper expansion or contraction, cutting inaccuracy, or paper
storage conditions. To compensate for this scenario, the alignment adjustment feature
can be used to adjust the image alignment.
Things to consider when creating/using an alignment procedures
When creating alignment procedures for side 1 and/or side 2 prints, be aware of the
following:
• Side 1/side 2 images may be misregistered because the paper is not the exact same
size. It may vary slightly, with differences of +/- 1 mm, causing the image to be
misregistered. To reduce the possibility of size differences, it is recommended that
you use paper from the same lot when running duplex jobs.
• During the fusing process, the heat and pressure applied to the paper causes the
paper to stretch. If the images on sides 1 and 2 are the same size, the stretching of
the paper may cause the image on side 1 to be slightly larger than the image on side
2.
Creating an alignment adjustment procedure for these types of jobs allows you to reduce
or eliminate the images being larger on side1 than on side 2 prints.
Alignment Adjustment options
Alignment Adjustment includes the following options:
• Name: Provide a name specific so that later recall is not an issue.
• X and Y Print Positions: Adjust the position of the image in lead edge/paper feed
direction (X position) or in the side edge/vertical direction (Y position). The X/Y Print
Position often is referred to as registration.
2-44
Xerox® 770 Digital Color Press
System Administration Guide
Page 61
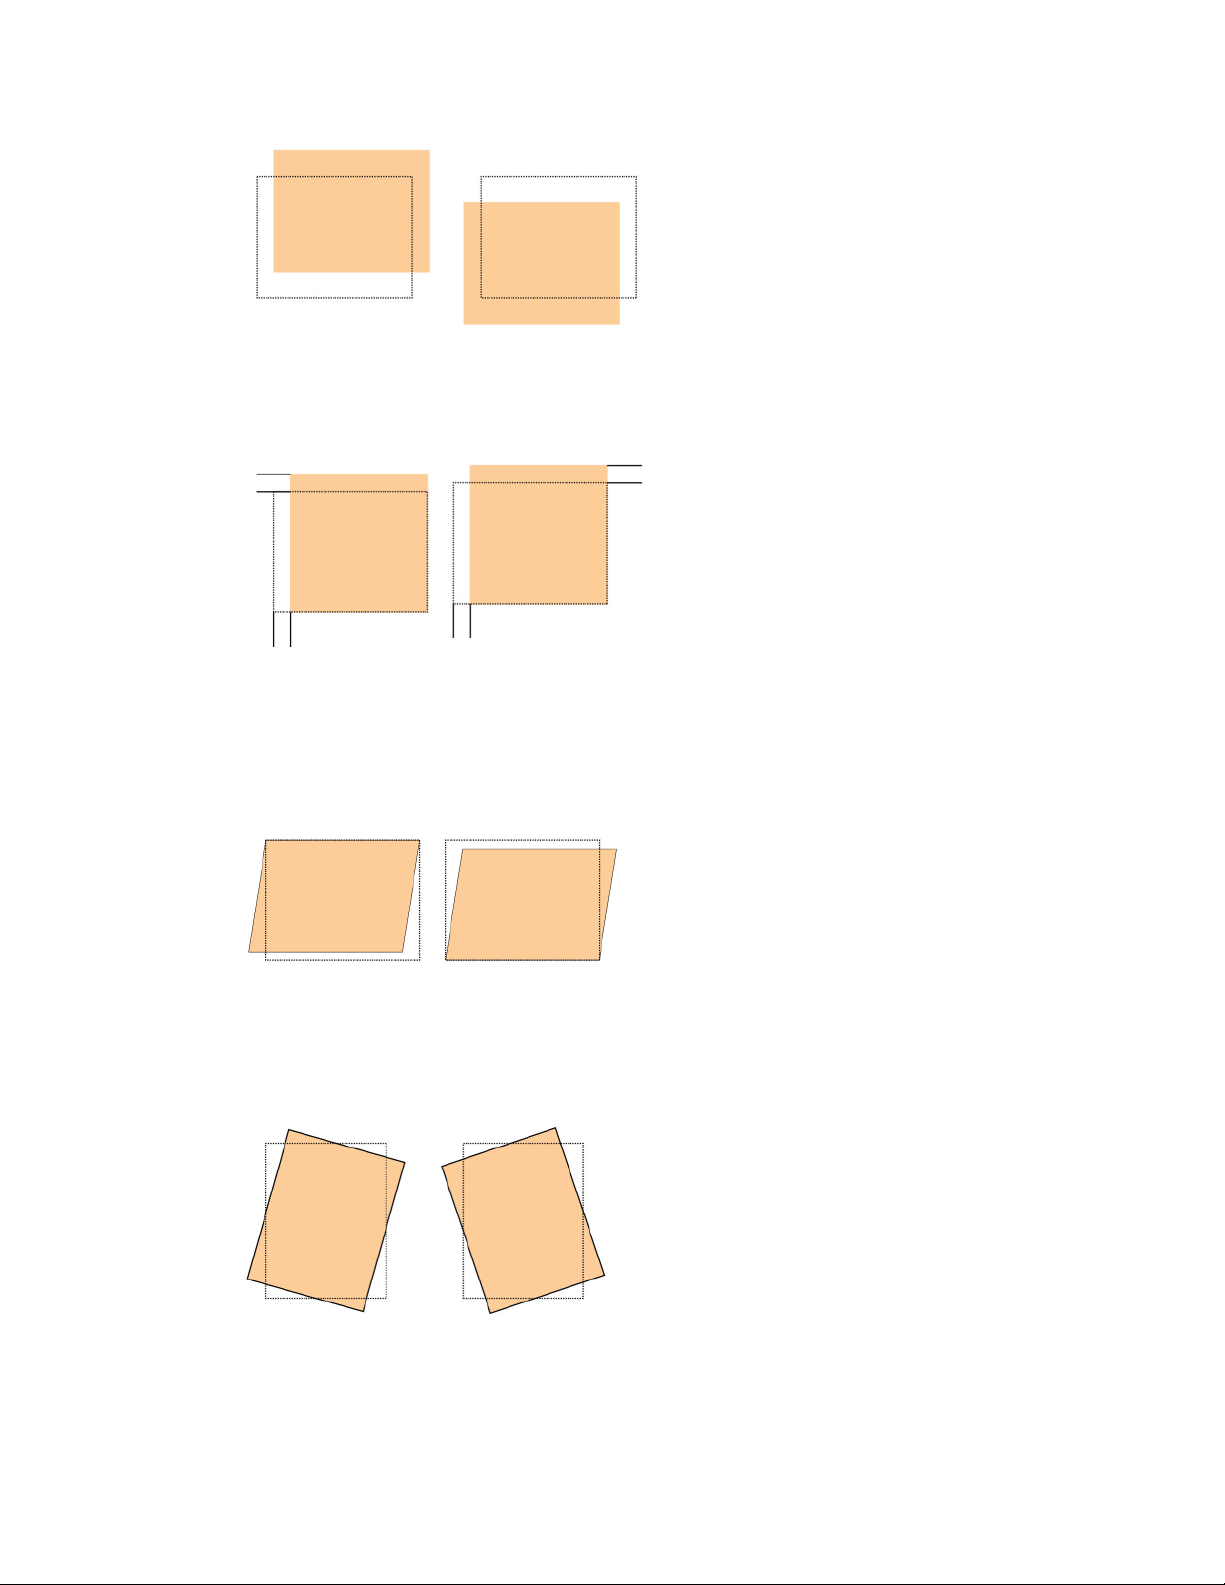
System Settings > Common Service Settings
• X/Y% Magnification (Width/Length): Use this feature to correct for image stretch
from side 1 to side 2. The image may be enlarged or reduced as necessary.
• Perpendicularity: Use this when the image is straight on the page, but the corners
are slanted, not at right (90 degree) angles to each other. This feature adjusts the
image digitally on the drum so that it will align with the paper for both side 1 and
side 2.
• Skew: Use this when the entire image on the page is slanted and not straight. This
feature adjusts the paper so that the image for side 1 and/or side 2 are not skewed
but aligned with each other.
When selecting/editing the various Alignment options, consider these tips:
• The arrows above the paper illustration as shown on the UI indicate the feed direction.
Xerox® 770 Digital Color Press
System Administration Guide
2-45
Page 62

System Settings > Common Service Settings
• Use the up/down arrow buttons to make the desired selections.
• As you click the up/down arrow buttons, the illustration moves indicating the direction
that the image will move or increase/decrease on the paper.
NOTE
The factory default setting for all the Alignment options is zero.
The following adjustments can be made to the position of the output image:
• Perpendicularity: Use this when the image is straight on the page, but the corners
are slanted, not at right (90 degree) angles to each other. This feature adjusts the
image digitally on the drum so that it will align with the paper for both side 1 and
side 2.
• Skew: Use this when the entire image on the page is slanted and not straight. This
feature adjusts the paper so that the image for side 1 and/or side 2 are not skewed
but aligned with each other.
• Magnification: Use this feature to correct for image stretch from side 1 to side 2. The
image may be enlarged or reduced as necessary.
NOTE
When making adjustments to multiple items, perform the adjustments in the
following order: Perpendicularity, Skew, X/Y% (width/length) Magnification, and
finally X/Y Print Positions.
Adjust Fold Position (Finisher Adjustment)
NOTE
The Adjust Fold Position (Finisher Adjustment) is available only when the
Standard/Booklet Maker Finisher is connected to the machine. If the finisher is
equipped with the optional C/Z Folder, additional fold position options become
available with the Adjust Fold Position feature.
2-46
Xerox® 770 Digital Color Press
System Administration Guide
Page 63

System Settings > Common Service Settings
Use the Adjust Fold Position (Finisher Adjustment) for adjusting the fold position of
the output. You can adjust the fold position for various paper types, as well as set
adjustment values for a maximum of 10 default types. Furthermore, a set type can be
assigned to each tray. Fold position adjustments can be set for single fold and booklet.
In addition, if the optional C/Z Folder is connect, fold positions can be set for C fold, Z
fold, and Z fold half sheet.
Adjusting the fold position
NOTE
Adjust Fold Position can be access from three separate areas in Common Service
Settings (Tools/administrator mode):
• Tools > System Settings > Common Service Settings
> Paper Tray Settings > Custom Paper Settings
• Tools > System Settings
> Common Service Settings > Paper Tray Settings > Paper Tray Attributes
• Tools > System Settings > Common Service Settings > Maintenance
1. Load paper in the desired tray.
2. Login as administrator.
3. Access the Tools tab on the UI.
4. Select System Settings > Common Service Settings.
5. Select one of the following:
• Paper Tray Settings > Custom Paper Settings
• Paper Tray Settings > Paper Tray Attributes
• Maintenance > Finisher Adjustment
6. Select Adjust Fold Position.
7. Select Fold Position Type Setup, and select Change Settings.
8. Select the paper fold position type you want to set or adjust, and select
Change Settings.
9. Select Name and select Change Settings.
10. Enter the desired type name, and select Save.
NOTE
The recommendation is to use a name such as Single Fold Plain that allows you
to recall what the content of that fold type is.
11. Select the fold type, and select Change Settings.
NOTE
For details on making each fold adjustment, refer to that specific fold procedure.
12. Select the desired settings, and select Sample Printout.
13. Select the tray in which you loaded paper in step 1, and then press the Start button.
14. Measure the fold position on the output sample, and adjust the fold position
accordingly.
15. Make adjustments to the items if necessary.
Xerox® 770 Digital Color Press
System Administration Guide
2-47
Page 64

System Settings > Common Service Settings
16. After you finish making adjustments, print another output sample with
Sample Printout and check the adjustment results.
17. Make adjustments accordingly by repeating the previous steps.
18. Select Save.
19. Select Close until the Adjust Fold Position screen appears.
20. Select the tray in which you loaded paper in step 1, and then press the Start button.
21. Select the adjusted fold position type, and select Save.
22. Continue to select Save or Close until you are returned to the main Tools tab display.
23. Exit administrator mode.
Adjusting the Single Fold position
NOTE
Adjust Fold Position can be access from three separate areas in Common Service
Settings (Tools/administrator mode):
• Tools > System Settings > Common Service Settings
> Paper Tray Settings > Custom Paper Settings
• Tools > System Settings
> Common Service Settings > Paper Tray Settings > Paper Tray Attributes
• Tools > System Settings > Common Service Settings > Maintenance
1. Load paper in the desired tray.
2. Login as administrator.
3. Access the Tools tab on the UI.
4. Select System Settings > Common Service Settings.
5. Select one of the following:
• Paper Tray Settings > Custom Paper Settings
• Paper Tray Settings > Paper Tray Attributes
• Maintenance > Finisher Adjustment
6. Select Adjust Fold Position.
7. Select Fold Position Type Setup, and select Change Settings.
8. Select Single Fold, and select Change Settings.
9. Specify Sheets to be folded, and select Sample Printout.
10. Select the tray in which you loaded paper, and press the Start button.
An output sample is printed.
11. Select Close.
12. Check the output sample printout, and measure the offset amount.
13. Select Long at Left or Long at Right.
14. Enter the measurement value you obtained previously in Values A Before Adjustment
field by touching the up/down arrow buttons.
15. Select Adjust.
16. Select Sample Printout again to print an output sample printout, and check the
adjustment results.
17. Make adjustments again if necessary.
2-48
Xerox® 770 Digital Color Press
System Administration Guide
Page 65

System Settings > Common Service Settings
18. Select Save.
19. Select Close until the Adjust Fold Position screen appears.
20. Select the tray in which you loaded paper in step 1, and then press the Start button.
21. Select the adjusted fold position type, and select Save.
22. Continue to select Save or Close until you are returned to the main Tools tab display.
23. Exit administrator mode.
Adjusting the Booklet Fold position
NOTE
Adjust Fold Position can be access from three separate areas in Common Service
Settings (Tools/administrator mode):
• Tools > System Settings > Common Service Settings
> Paper Tray Settings > Custom Paper Settings
• Tools > System Settings
> Common Service Settings > Paper Tray Settings > Paper Tray Attributes
• Tools > System Settings > Common Service Settings > Maintenance
1. Load paper in the desired tray.
2. Login as administrator.
3. Access the Tools tab on the UI.
4. Select System Settings > Common Service Settings.
5. Select one of the following:
• Paper Tray Settings > Custom Paper Settings
• Paper Tray Settings > Paper Tray Attributes
• Maintenance > Finisher Adjustment
6. Select Adjust Fold Position.
7. Select Fold Position Type Setup, and select Change Settings.
8. Select Booklet and select Change Settings.
9. Press Sample Printout.
10. Select the tray in which you loaded paper, select 2-Sheet Stack, and press the Start
button.
An output sample is printed.
11. Select the tray in which you loaded paper, select 15-Sheet Stack, and press the Start
button.
An output sample is printed.
12. Select Close.
13. Check the output sample, and measure the position offset amount for 2-sheet stack
and 15-sheet stack.
14. Press Booklet Fold State (2 Sheets).
15. Select the state of the fold and staple position of the output paper, and enter the
2-sheet stack offset amount you measured in previously in Values A & B Before
Adjustment field.
16. Select Save.
Xerox® 770 Digital Color Press
System Administration Guide
2-49
Page 66

System Settings > Common Service Settings
17. Set Booklet Fold State (15 Sheets) in the same way.
NOTE
The values between 2-sheet stack and 15-sheet stack are adjusted automatically.
NOTE
When you want to specify the number of sheets separately, use the set
Variable-Sheet Booklet option to make the proper selections.
18. Press Sample Printout again to print an output sample, and check the adjustment
results.
19. Make adjustments again if necessary.
20. Select Save.
21. Select Close until the Adjust Fold Position screen appears.
22. Select the tray in which you loaded paper in step 1, and then press the Start button.
23. Select the adjusted fold position type, and select Save.
24. Continue to select Save or Close until you are returned to the main Tools tab display.
25. Exit administrator mode.
Adjusting the C Fold position
TIP
The C Fold, Z Fold, and Z Fold Half Sheet Fold Positions are available only
when the Standard/Booklet Maker Finisher AND optional C/Z Folder is connected.
NOTE
Adjust Fold Position can be access from three separate areas in Common Service
Settings (Tools/administrator mode):
• Tools > System Settings > Common Service Settings
> Paper Tray Settings > Custom Paper Settings
• Tools > System Settings
> Common Service Settings > Paper Tray Settings > Paper Tray Attributes
• Tools > System Settings > Common Service Settings > Maintenance
1. Load paper in the desired tray.
2. Login as administrator.
3. Access the Tools tab on the UI.
4. Select System Settings > Common Service Settings.
5. Select one of the following:
• Paper Tray Settings > Custom Paper Settings
• Paper Tray Settings > Paper Tray Attributes
• Maintenance > Finisher Adjustment
6. Select Adjust Fold Position.
7. Select Fold Position Type Setup, and select Change Settings.
8. Select C Fold-A4 or C Fold-8.5x11”, and select Change Settings.
9. Press Sample Printout.
10. Select the tray in which you loaded paper, and press the Start button.
2-50
Xerox® 770 Digital Color Press
System Administration Guide
Page 67

System Settings > Common Service Settings
An output sample is printed.
11. Select Close.
12. Check the output sample, and measure the A and B fold position movement amounts.
13. Enter the measurement value you obtained previously in Values A & B Before
Adjustment, and the final value you want after adjustment in Desired Values A & B.
TIP
Set value A and value B so that an edge of the paper does not extend past a
fold position of the paper. An edge of paper extending past a fold position of
the paper may cause a paper jam.
14. Select Sample Printout again to print an output sample, and check the adjustment
results.
15. Make adjustments again if necessary.
16. Select Save.
17. Select Close until the Adjust Fold Position screen appears.
18. Select the tray in which you loaded paper in step 1, and then press the Start button.
19. Select the adjusted fold position type, and select Save.
20. Continue to select Save or Close until you are returned to the main Tools tab display.
21. Exit administrator mode.
Adjusting the Z Fold position
TIP
The C Fold, Z Fold, and Z Fold Half Sheet Fold Positions are available only
when the Standard/Booklet Maker Finisher AND optional C/Z Folder is connected.
NOTE
Adjust Fold Position can be access from three separate areas in Common Service
Settings (Tools/administrator mode):
• Tools > System Settings > Common Service Settings
> Paper Tray Settings > Custom Paper Settings
• Tools > System Settings
> Common Service Settings > Paper Tray Settings > Paper Tray Attributes
• Tools > System Settings > Common Service Settings > Maintenance
1. Load paper in the desired tray.
2. Login as administrator.
3. Access the Tools tab on the UI.
4. Select System Settings > Common Service Settings.
5. Select one of the following:
• Paper Tray Settings > Custom Paper Settings
• Paper Tray Settings > Paper Tray Attributes
• Maintenance > Finisher Adjustment
6. Select Adjust Fold Position.
7. Select Fold Position Type Setup, and select Change Settings.
Xerox® 770 Digital Color Press
System Administration Guide
2-51
Page 68

System Settings > Common Service Settings
8. Select Z Fold-A4 or Z Fold-8.5x11”, and select Change Settings.
9. Select Sample Printout.
10. Select the tray in which you loaded paper, and press the Start button.
An output sample is printed.
11. Select Save.
12. Check the output sample, and measure the A and B fold position movement amounts.
13. Enter the measurement value you obtained in the previous step in Values A & B Before
Adjustment, and the final value you want after adjustment in Desired Values A & B.
TIP
Set value A and value B so that an edge of the paper does not extend past a
fold position of the paper. An edge of paper extending past a fold position of
the paper may cause a paper jam.
14. Select Sample Printout again to print an output sample, and check the adjustment
results.
15. Make adjustments again if necessary.
16. Select Save.
17. Select Close until the Adjust Fold Position screen appears.
18. Select the tray in which you loaded paper in step 1, and then press the Start button.
19. Select the adjusted fold position type, and select Save.
20. Continue to select Save or Close until you are returned to the main Tools tab display.
21. Exit administrator mode.
Adjusting the Z Fold Half Sheet position
TIP
The C Fold, Z Fold, and Z Fold Half Sheet Fold Positions are available only
when the Standard/Booklet Maker Finisher AND optional C/Z Folder is connected.
NOTE
Adjust Fold Position can be access from three separate areas in Common Service
Settings (Tools/administrator mode):
• Tools > System Settings > Common Service Settings
> Paper Tray Settings > Custom Paper Settings
• Tools > System Settings
> Common Service Settings > Paper Tray Settings > Paper Tray Attributes
• Tools > System Settings > Common Service Settings > Maintenance
1. Load paper in the desired tray.
2. Login as administrator.
3. Access the Tools tab on the UI.
4. Select System Settings > Common Service Settings.
5. Select one of the following:
• Paper Tray Settings > Custom Paper Settings
• Paper Tray Settings > Paper Tray Attributes
2-52
Xerox® 770 Digital Color Press
System Administration Guide
Page 69

System Settings > Common Service Settings
• Maintenance > Finisher Adjustment
6. Select Adjust Fold Position.
7. Select Fold Position Type Setup, and select Change Settings.
8. Select Z Fold Half Sheet- A3, Z Fold Half Sheet- B4, Z Fold Half Sheet-11x17”, or
Z Fold Half Sheet - 8K, and select Change Settings.
9. Select Sample Printout.
10. Select the tray in which you loaded paper, and press the Start button.
An output sample is printed.
11. Select Save.
12. Check the output sample, and measure the A and B fold position movement amounts.
13. Enter the measurement value you obtained in the previous step in Values A & B Before
Adjustment, and the final value you want after adjustment in Desired Values A & B.
TIP
Set value B so that an edge of the paper does not extend past a fold position
of the paper. An edge of paper extending past a fold position of the paper may
cause a paper jam.
14. Select Sample Printout again to print an output sample, and check the adjustment
results.
15. Make adjustments again if necessary.
16. Select Save.
17. Select Close until the Adjust Fold Position screen appears.
18. Select the tray in which you loaded paper in step 1, and then press the Start button.
19. Select the adjusted fold position type, and select Save.
20. Continue to select Save or Close until you are returned to the main Tools tab display.
21. Exit administrator mode.
Xerox® 770 Digital Color Press
System Administration Guide
2-53
Page 70

System Settings > Common Service Settings
2-54
Xerox® 770 Digital Color Press
System Administration Guide
Page 71

3
System Settings > Copy Service Settings
Use Copy Service Settings to configure settings related to the Copy feature, including
the following features:
Preset Buttons
Use this feature to set the values for the Reduce/Enlarge, Image Shift, and Edge Erase
preset buttons on the User Interface.
Copy Defaults
Use this feature to view and change the settings for a variety of copying default values,
such as Paper Supply, Reduce/Enlarge, Output Color, and Original Type defaults.
Copy Control
Use this feature to view and change the settings for a variety of Copy options, such as
Mixed Size Originals, Background Suppression, and more.
Original Size Defaults
Use this feature to set defaults that are displayed on the Original Size screen within
the Layout Adjustment tab.
Reduce/Enlarge Presets
Use this feature to set up to 12 default reduction or enlargement ratios that are
displayed on the Copy tab of the User Interface.
Custom Colors
Use this feature to define up to six custom colors to be used on Output Color screen
of the User Interface.
Preset Buttons
Select the default settings for the Preset Buttons including the most commonly used
paper tray and magnification percentage. By assigning default values to these buttons,
you reduce the number of selections when choosing features for the copy process.
Options include the following:
Xerox® 770 Digital Color Press
System Administration Guide
3-1
Page 72

System Settings > Copy Service Settings
Paper Supply Buttons 2, 3, 4
Select the default tray setting for the Paper Supply Buttons 2, 3, and 4. These buttons
appear in the Paper Supply column on the basic Copy tab (Copy feature).
Reduce/Enlarge Buttons 3, 4, 5
Select the default magnification setting for the Reduce/Enlarge Buttons 3, 4, and 5.
These buttons appear in the Reduce/Enlarge column on the basic Copy tab (Copy
feature).
Image Shift Preset Buttons 1, 2, 3
Select the default setting for the Image Shift Preset Buttons 1, 2 and 3. These buttons
appear on the Image Shift screen, which can be found by accessing the Copy feature,
Layout Adjustment tab.
Selecting the Preset Buttons
1. Login as administrator.
2. Select System Settings > Copy Service Settings.
3. Select Preset Buttons.
The Preset Buttons screen displays.
4. Select the item to be set or changed.
5. Select Change Settings.
6. Follow the instructions on the UI to change the settings.
7. Select Save.
The previous screen is displayed.
8. If desired, select another feature to set or change and repeat the previous steps.
9. Select Close.
The main Tools tab screen is displayed.
10. Exit administrator mode.
Copy Defaults
Use this feature to select the default settings for the various copy features. Selections
made here are displayed on the Copy screen. When the power is switched on, when the
machine exits the power saving mode, or when the Clear All button is pressed, these
default settings are displayed. By assigning default values to commonly used features,
you reduce the number of selections when choosing features for the copy process. Copy
Defaults settings can be made for the following options:
• Paper Supply
• Reduce/Enlarge
• Output Color
• Single Color
• Dual Color
3-2
Xerox® 770 Digital Color Press
System Administration Guide
Page 73

• Original Type
• Lighten/Darken
• Contrast, Sharpness
• Saturation
• Background Suppression
• Color Balance
• Color Shift
• 2 Sided Copying
• Mixed Size Originals
• Edge Erase
• Image Shift
• Image Rotation
• Annotations
• Bates Stamp
System Settings > Copy Service Settings
• Tab Margin Shift
• Booklet Creation
• Covers
• Separators
Setting the Copy Defaults
1. Login as administrator.
2. Select System Settings > Copy Service Settings.
3. Select Copy Defaults.
The Copy Defaults screen displays.
4. Select the item to be set or changed.
5. Select Change Settings.
6. Follow the instructions on the UI to change the settings.
7. Select Save.
The previous screen is displayed.
8. If desired, select another feature to set or change and repeat the previous steps.
9. Select Close.
The main Tools tab screen is displayed.
10. Exit administrator mode.
Xerox® 770 Digital Color Press
System Administration Guide
3-3
Page 74

System Settings > Copy Service Settings
Copy Control
The options here allow you to select the default settings that relate to the copy operation,
including the following:
Memory Full Procedure
While scanning/copying an original, if there is insufficient space on the machine hard
disk, a screen appears. This screen asks the user how to handle the partially stored data.
If the user does not respond to this screen and a predetermined amount of time elapses,
then the machine will either cancel the job or run the partially scanned-in/copied job.
The setting selected here determines how the machine will handle that partially
scanned-in/copied job. Select one of two choices:
• Delete Job: The stored data is deleted from the machine’s hard disk.
• Run Job: The scanned-in/copied data is treated as valid and complete, and the job
printed as is.
The amount of time that elapses between an error occurring and the way the machine
handles the partially scanned-in/copied job can be set for a specific amount with
Auto Job Release option (Machine Clock/Timers).
Maximum Stored Pages
Set the maximum number of pages stored for a copy document. You can set from 1
to 2000 pages.
Auto Paper Off
Select the default tray that will be used when Auto ( Copy > Paper Supply) is canceled
because either Auto% or the Independent X-Y% ( Copy > Reduce/ Enlarge) is selected.
Mixed Size Originals
Select the default setting that affects the 2-sided originals. Select either
Copy to New Sheet or Copy to Side 2.
Fine-tune 100%
The fine-tune value is applied to documents that are placed on the document glass
for copying and either Copy > Reduce/Enlarge > 100% or Reduce/Enlarge > Preset%
is selected. Set the value in the X/Y direction within the range 98 to 102% in 0.1%
increments.
Background Suppression (Photo and Text)
Specify whether the Background Suppression level is Normal or Higher for the Photo
and Text feature.
Background Suppression Level (Text)
Specify whether the Background Suppression level is Normal or Higher for the Text
feature.
3-4
Xerox® 770 Digital Color Press
System Administration Guide
Page 75

System Settings > Copy Service Settings
Photo and Text/Printed Original
Specify whether the Printed Original option is for Normal, Inkjet, or Highlighted for
the Photo and Text feature.
Original Type - See Through Paper
Select the default setting for See - Through Paper.The selection made here is displayed
on Image Quality > Original Type.Select either Enabled or Disabled.
Face Up/Down Output
Specify whether the Face Up/Down feature should be set to Reverse Order.
Annotations - Edit Comment 1-8
Select Allow or Do Not Allow.
Bates Stamp - Edit Prefix 1-8
Select Allow or Do Not Allow.
Related Topics:
Machine Clock/Timers
Selecting the Copy Control options
1. Login as administrator.
2. Select System Settings > Copy Service Settings.
3. Select Copy Control.
The Copy Control screen displays.
4. Select the item to be set or changed.
5. Select Change Settings.
6. Follow the instructions on the UI to change the settings.
7. Select Save.
The previous screen is displayed.
8. If desired, select another feature to set or change and repeat the previous steps.
9. Select Close.
The main Tools tab screen is displayed.
10. Exit administrator mode.
Original Size Defaults
Set the original sizes displayed in Layout Adjustment > Original Size. You can assign
original sizes to the buttons (except the Auto Detect button).
If you frequently make non-standard size copies, setting default non-standard sizes can
avoid extra operations required during the use of the machine. Original Size Default
options include the following:
Xerox® 770 Digital Color Press
System Administration Guide
3-5
Page 76

System Settings > Copy Service Settings
A/B Series Size
Select a size from A and B series sizes.
Inch Size
Select a size from inch series sizes.
Others
Select a size from other sizes.
Custom Size
Enter any size. Set the width (X) from 15 to 432 mm, and the height (Y) from 15 to
297 mm in 1 mm increments.
Selecting Original Size Defaults
1. Login as administrator.
2. Select System Settings > Copy Service Settings.
3. Select Original Size Defaults.
The Original Size Defaults screen displays.
4. Select the item to be set or changed.
5. Select Change Settings.
6. Follow the instructions on the UI to change the settings.
7. Select Save.
The previous screen is displayed.
8. If desired, select another feature to set or change and repeat the previous steps.
9. Select Close.
The main Tools tab screen is displayed.
10. Exit administrator mode.
Reduce/Enlarge Presets
Select a maximum of 12 default magnification levels. The selections made here appear
on Copy > Reduce/Enlarge > More > Preset%.
Selecting the Reduce/Enlarge Presets
1. Login as administrator.
2. Select System Settings > Copy Service Settings.
3. Select Reduce/Enlarge Presets.
The Reduce/Enlarge Presets screen displays.
4. Select the item to be set or changed.
5. Select Change Settings.
6. Follow the instructions on the UI to change the settings.
7. Select Save.
3-6
Xerox® 770 Digital Color Press
System Administration Guide
Page 77

System Settings > Copy Service Settings
The previous screen is displayed.
8. If desired, select another feature to set or change and repeat the previous steps.
9. Select Close.
The main Tools tab screen is displayed.
10. Exit administrator mode.
Custom Colors
Select a maximum of six custom colors. The selections made here appear on Copy
> Output Color.
Selecting the Custom Colors
1. Login as administrator.
2. Select System Settings > Copy Service Settings.
3. Select Custom Colors.
The Custom Colors screen displays.
4. Select the item to be set or changed.
5. Select Change Settings.
6. Follow the instructions on the UI to change the settings.
7. Select Save.
The previous screen is displayed.
8. If desired, select another feature to set or change and repeat the previous steps.
9. Select Close.
The main Tools tab screen is displayed.
10. Exit administrator mode.
Xerox® 770 Digital Color Press
System Administration Guide
3-7
Page 78

System Settings > Copy Service Settings
3-8
Xerox® 770 Digital Color Press
System Administration Guide
Page 79

4
System Settings > Scan Service Settings
NOTE
Scan Service Settings is an optional feature and may not be available on your
machine. For more information, contact the Xerox Customer Support Center.
Use Scan Service Settings to configure settings related to the Scan feature, including
the following features:
Original Size Defaults
Use this feature to set defaults that are displayed on Layout Adjustment
> Original Size.
Output Size Defaults
Use this feature to set defaults that are displayed on the Layout Adjustment
> Reduce/Enlarge.
Preset Buttons
Use this feature to set the values for the Reduce/Enlarge, Image Shift, and Edge Erase
preset buttons on the User Interface.
Reduce/Enlarge Presets
Use this feature to set up to 12 default reduction or enlargement ratios that are
displayed on the Copy tab of the User Interface.
Other Settings
Use this feature to review and edit a variety of common settings for the machine, such
as maximum stored pages, background suppression, and more.
Original Size Defaults
Set the original sizes for users who scan non-standard size originals. Defaults set here
are displayed in Layout Adjustment > Original Size.
Xerox® 770 Digital Color Press
System Administration Guide
4-1
Page 80

System Settings > Scan Service Settings
Selecting Original Size Defaults
1. Login as administrator.
2. Select System Settings > Scan Service Settings.
3. Select Original Size Defaults.
The Original Size Defaults screen displays.
4. Select the item to be set or changed.
5. Select Change Settings.
6. Follow the instructions on the UI to change the settings.
7. Select Save.
The previous screen is displayed.
8. If desired, select another feature to set or change and repeat the previous steps.
9. Select Close.
The main Tools tab screen is displayed.
10. Exit administrator mode.
Output Size Defaults
Set the original sizes for users who scan non-standard size originals. Defaults set here
are displayed in Layout Adjustment > Reduce/Enlarge.
Selecting Output Size Defaults
1. Login as administrator.
2. Select System Settings > Scan Service Settings.
3. Select Output Size Defaults.
The Output Size Defaults screen displays.
4. Select the item to be set or changed.
5. Select Change Settings.
6. Follow the instructions on the UI to change the settings.
7. Select Save.
The previous screen is displayed.
8. If desired, select another feature to set or change and repeat the previous steps.
9. Select Close.
The main Tools tab screen is displayed.
10. Exit administrator mode.
Reduce/Enlarge Presets
Select a maximum of 12 default magnification levels. The selections made here appear
on the Copy tab.
4-2
Xerox® 770 Digital Color Press
System Administration Guide
Page 81

System Settings > Scan Service Settings
Selecting the Reduce/Enlarge Presets
1. Login as administrator.
2. Select System Settings > Scan Service Settings.
3. Select Reduce/Enlarge Presets.
The Reduce/Enlarge Presets screen displays.
4. Select the item to be set or changed.
5. Select Change Settings.
6. Follow the instructions on the UI to change the settings.
7. Select Save.
The previous screen is displayed.
8. If desired, select another feature to set or change and repeat the previous steps.
9. Select Close.
The main Tools tab screen is displayed.
10. Exit administrator mode.
Other Settings
The options here allow you to select the default settings including the following:
Memory Full Procedure
While scanning/copying an original, if there is insufficient space on the machine hard
disk, a screen appears. This screen asks the user how to handle the partially stored data.
If the user does not respond to this screen and a predetermined amount of time elapses,
then the machine will either cancel the job or run the partially scanned-in/copied job.
The setting selected here determines how the machine will handle that partially
scanned-in/copied job. Select one of two choices:
• Delete Job: The stored data is deleted from the machine’s hard disk.
• Run Job: The scanned-in/copied data is treated as valid and complete, and the job
printed as is.
The amount of time that elapses between an error occurring and the way the machine
handles the partially scanned-in/copied job can be set for a specific amount with
Auto Job Release option (Machine Clock/Timers).
Maximum Stored Pages
Set the maximum number of pages stored for a copy document. You can set from 1
to 2000 pages.
Saturation
Select the amount of color saturation for scanned data. Selections include Pastel +2,
Pastel +1, Normal, Vivid +1, and Vivid +2.
Xerox® 770 Digital Color Press
System Administration Guide
4-3
Page 82

System Settings > Scan Service Settings
Background Suppression Level
Select the amount of background suppression for scanned data. Selections include
Normal or Higher +1, Higher +2, and more.
Color Space
Select if color space is to be enabled for scanned data. Select Disabled or Enabled.
TIFF Format
Select the TIFF format for scanned data. Select either TIFF V6 or TTN2.
Image Transfer Screen
Select whether or not to display a message when the scan process is completed.
Print Login Name on PDF Files
Select either Yes or No. If yes, the name of the user will be printed on the PDF. This is
the user who is logged onto the system.
Selecting Other Settings
1. Login as administrator.
2. Select System Settings > Scan Service Settings.
3. Select Other Settings.
The Other Settings screen displays.
4. Select the item to be set or changed.
5. Select Change Settings.
6. Follow the instructions on the UI to change the settings.
7. Select Save.
The previous screen is displayed.
8. If desired, select another feature to set or change and repeat the previous steps.
9. Select Close.
The main Tools tab screen is displayed.
10. Exit administrator mode.
4-4
Xerox® 770 Digital Color Press
System Administration Guide
Page 83
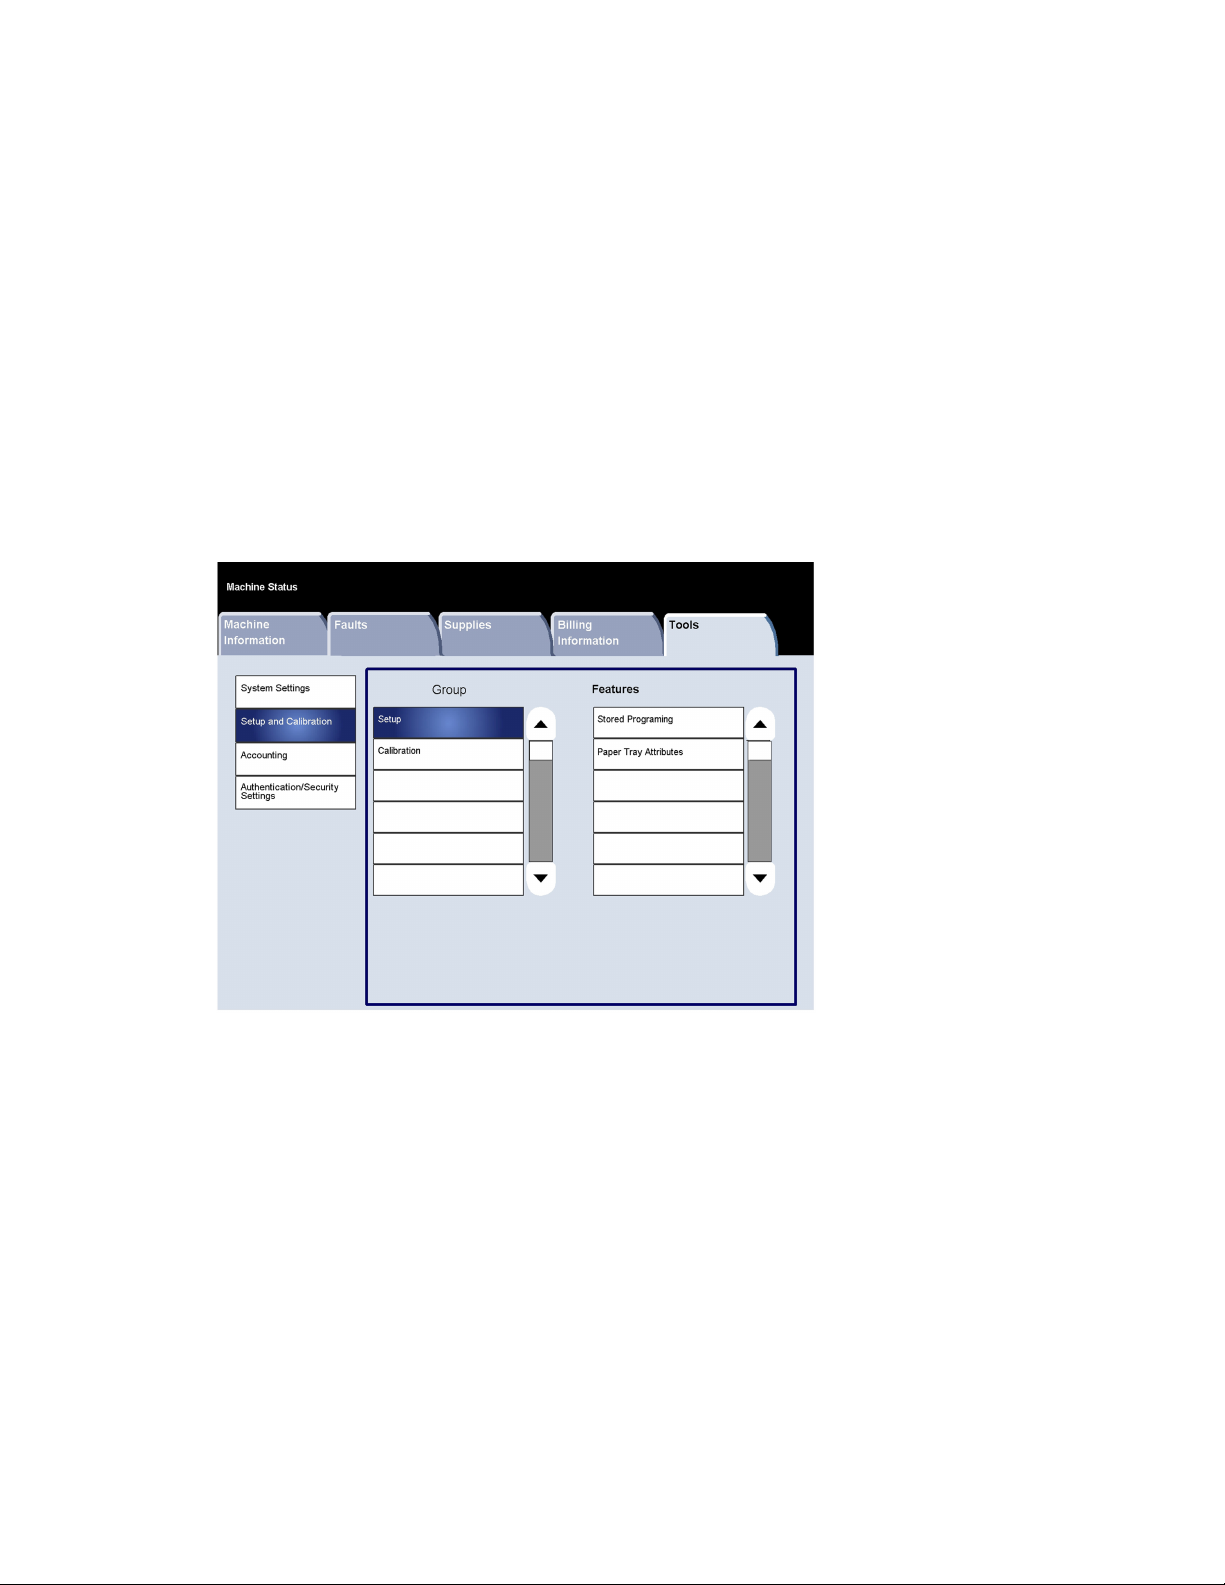
5
Setup and Calibration
From the Setup and Calibration menu, assign Stored Programming information and
paper tray attributes. This menu also allows the user to perform machine calibration for
the copy mode; full system calibration should also be performed from the print server
for optimal system performance.
Xerox® 770 Digital Color Press
System Administration Guide
5-1
Page 84

Setup and Calibration
Setup
Stored Programming
The Stored Programming screen allows administrators to store up to 40 jobs for future
use.
1. Login as administrator.
2. Access the Tools tab on the UI.
3. Select Setup and Calibration.
4. Select Setup.
5. Touch Stored Programming.
6. Touch Store.
7. Select the item to be set or changed.
8. Follow the screen instructions to change the settings.
• To add and assign a new stored job, program the job with the desired features
and options. This will be a stored job that users can access from the
Stored Programming feature on the Services window or from the Job Assembly
tab on the Copy window.
• To change (or delete?) and existing stored job, XXXXX.
9. Press Start to save the programming.
10. Touch Close.
The previous screen is displayed.
11. Exit administrator mode.
5-2
Xerox® 770 Digital Color Press
System Administration Guide
Page 85

Setup and Calibration
Paper Tray Attributes
Paper Tray Attributes allows administrators to assign a paper size, paper type, and paper
color for each paper tray on the machine.
1. Login as administrator.
2. Access the Tools tab on the UI.
3. Select Setup and Calibration.
4. Select Setup.
5. Touch Paper Tray Attributes.
6. Select the appropriate paper tray.
7. Select Change Settings.
8. Follow the screen instructions to change items such as the Paper Size or Paper Type
and Weight.
9. Select Save.
The previous screen is displayed.
10. Select Confirm.
The Paper Tray Attributes screen is displayed.
11. Select Close.
The main Tools tab screen is displayed.
12. Exit administrator mode.
Xerox® 770 Digital Color Press
System Administration Guide
5-3
Page 86

Setup and Calibration
Calibration
When you select Calibration, you will have the opportunity to move through a series of
steps to optimize the quality of copied jobs. The machine will print a calibration pattern
for you to place on the platen glass. The machine will scan the calibration pattern, and
automatically make adjustments as required.
1. Login as administrator.
2. Access the Tools tab on the UI.
3. Select Setup and Calibration.
4. Select Calibration.
5. Select the appropriate Screen Type, Paper Supply, and Target.
6. Select Start.
7. Follow the screen instructions.
8. Upon completion, select Close to return to Setup and Calibration.
9. Exit administrator mode.
5-4
Xerox® 770 Digital Color Press
System Administration Guide
Page 87

6
Overview of Accounting and Authentication/Security Settings
The machine has Accounting and Authentication/Security Settings features that are
used for numerous security measures.
While the Accounting feature restricts access to the copy, scan, and print features, the
Authentication/Security Settings restricts access to the Services area, which includes All
Services, Job Status, and/or Machine Status pathways.
The Accounting and Authentication/Security Settings features generally work
independently of each other, but there are instances when a change in one will affect
the other. As an example, if you set the Authentication feature to
Login to Local Accounts, Local Accounting is automatically set in the Accounting
menu.
Only the administrator can set and control Accounting and Authentication/Security
Settings.
Related Topics:
Accounting
Authentication/Security Settings
Accounting overview
The accounting feature allows you to:
• Restrict access to some or all of the print, copy and scan features. You may want
certain departments or individuals to have access only to certain machine features.
• Prevent unauthorized users from using the machine. Only users with a valid User ID
can access the machine. This allows you to determine which individuals are allowed
to access the machine.
Xerox® 770 Digital Color Press
System Administration Guide
6-1
Page 88

Overview of Accounting and Authentication/Security Settings
• Track the number of copies, scanned pages, and printed pages for any user account.
This can be useful when machine expenses are shared among various departments.
As an example, the human resources and maintenance departments can each be
invoiced separately for their machine usage.
• Impose restrictions on individual accounts, such as limiting the number of copy, scan,
and prints jobs that are allowed a user. As an example, you can allow the maintenance
department to have unlimited access the copy and print features, but limit scanning.
NOTE
When used with Accounting, the Authentication/Security Settings features provide
additional security options.
The type of information that users are prompted to enter when accessing machine
features depends on the selected options for both the Accounting and
Authentication/Security Settings features.
When the Authentication/Security Settings > Authentication > Login Type feature is
enabled, each user of the machine must enter a UserID and password, thus providing
administrative control and for the machine.
Authentication/Security Settings overview
While the Accounting feature restricts access to copy, scan and print features,
Authentication/Security Settings restricts access to the Services area, which includes All
Services, Job Status and/or Machine Status pathways.
• Authentication cannot be used unless Accounting is enabled in the Accounting Type
menu.
• The Accounting settings determine which features are available in
Authentication/Security Settings.
• Authentication/Security Settings are available only to System Administrator accounts.
6-2
Xerox® 770 Digital Color Press
System Administration Guide
Page 89

7
Accounting
Accounting is a security feature that is designed to prevent unauthorized use of the
machine.
Accounting > Create/View User Accounts
Creating user accounts allows you to register user account information, such as User
IDs, user names, and passcodes, and to impose restrictions:
• On the number of copy, scan and print pages allowed each user using the Accounting
menu.
• On the Services pathways allowed using the Authentication/Security Settings menu.
NOTE
A maximum of 1000 users can be registered.
TIP
User IDs, and user names must be registered in Accounting before you can register
users for Authentication
Each user account includes the following options:
User ID
Assign a user identification number to a specific account number. User IDs may have
a maximum of 32 characters.
User Name
Assign a user name to correspond with the user ID and its related account number.
User names may have a maximum of 32 characters.
Xerox® 770 Digital Color Press
System Administration Guide
7-1
Page 90

Accounting
User Role
Select a user role for the user.
• User: No special privileges are give to the user.
• System Administrator: This user has most system administrator privileges except
they cannot change the administrator passcode.
• Account Administrator: This user can view, register, delete, and change user account
information; however, they cannot change passcodes. This user may also print an
auditron report for each user.
Account Limit
For a specific account, assign a maximum number of pages that can be used for copying
and printing. Each account can be set for 1-9,999,999 pages in 1 sheet increments.
Feature Access
Set the type of access that the account user will be allowed to use. Selections include
copy, scan, and print.
Create/view/edit a user account
NOTE
The following procedure is presented using the Accounting menu screens, but
this same process is also performed using the Authentication/Security Settings
menu screens.
1. Login as administrator.
2. Access the Tools tab on the UI.
3. Select Accounting.
4. Select Create/View User Accounts.
5. From the Create/View User Accounts screen, perform one of the following to select
a user account:
• To create a new account, select a (Not in Use) account, or
• To edit a previously created account, select the desired one from the displayed
list.
6. Select the Create/Delete button.
• If creating a new account, use the numeric keypad, enter a four-digit number from
0001 to 1000, which corresponds to a (Not in Use) account. The entered number
displays in the Go To field. Select the Create/Delete button; the User ID screen is
displayed.
• If editing a previously created account, continue to the next step.
7. Select the UserID button.
The User ID screen appears.
8. Using the keypad, enter a User ID of up to 32 characters and select Save.
The Account Create/Delete screen is displayed.
7-2
Xerox® 770 Digital Color Press
System Administration Guide
Page 91

Accounting
9. Select the User Name button.
The User Name screen appears.
10. Using the keypad, enter a User Name of up to 32 characters and select Save.
The Account Create/Delete screen is displayed.
11. Select Account Limit.
The Account Limit screen is displayed.
12. Select the Copy, Scan or Print Service button to set account limits.
13. Select Change Account Limit.
14. Enter the maximum number of pages using numeric keypad and select Save.
The Account Limit screen is displayed.
15. Select Feature Access.
16. Select the type of feature access you want to allow the user.
17. Select Save.
The Account Limit screen is displayed.
18. Select Close.
The Account Create/Delete screen is displayed.
19. Review the user account information and modify if required.
20. Select Close.
The Create/View User Accounts screen is displayed.
21. Select Close.
The main Tools tab screen is displayed.
22. Exit administrator mode.
Resetting an individual user account
Use this procedure to delete an existing user account.
1. Login as administrator.
2. Access the Tools tab on the UI.
3. Select Accounting or Authentication/Security Settings.
4. Select Create/View User Accounts.
5. From the Create/View User Accounts screen, select the desired user account.
6. Select Reset Account.
A screen is displayed and prompts Accept Reset or Cancel the reset? Carefully review
the displayed information before performing a reset. It is important to remember
that once you accept a reset, that information cannot be restored.
7. Select Reset or Cancel.
Selecting Reset displays confirmation screen asking Are you sure? Select Yes to
delete/reset the user account. Once the account is deleted, the Create/View User
Accounts screen is displayed.
8. Select Close.
The main Tools tab screen is displayed.
9. Exit administrator mode.
Xerox® 770 Digital Color Press
System Administration Guide
7-3
Page 92

Accounting
Related Topics:
Resetting all user accounts (Accounting)
Resetting all user accounts (Authentication)
Accounting > Reset User Accounts
The Reset User Accounts feature allows administrators to reset all account data for all
user accounts or to reset specific options for all user accounts.
All User Accounts
This deletes all registered information for each user. It also deletes all data including
the maximum number of pages, cumulative number of pages, color mode restrictions,
printer statistics, and so forth.
All Feature Access Settings
This resets the feature access limit for all users.
All Account Limits
This resets the maximum number of pages for all users to the default value, 9999999.
Total Impressions
This resets all auditron administration data for all users including the system
administrator. The number of pages is also reset to 0.
All Authorization Groups
This resets or unlinks users from authorization groups, and links those users to the
default authorization group.
Print the Auditron Report button
This prints a report that about the account information that will be deleted/reset.
Depending on the option selected, the report contains either user account content
data or adminstration data. The report is available for confirmation before resetting.
Resetting all user accounts (Accounting)
1. Login as administrator.
2. Access the Tools tab on the UI.
3. Select Accounting > Reset User Accounts.
4. Select the desired option.
Choices are shown on the displayed list.
5. Select Reset.
A screen is displayed and prompts Accept Reset or Cancel the reset? Carefully review
the displayed information before performing a reset. It is important to remember
that once you accept a reset, that information cannot be restored.
6. Select Reset or Cancel.
7-4
Xerox® 770 Digital Color Press
System Administration Guide
Page 93

Accounting
Selecting Reset displays confirmation screen asking Are you sure? Select Yes to delete
or reset as applicable to the Reset User Accounts option selected.
7. Select Close.
The main Tools tab screen is displayed.
8. Exit administrator mode.
Related Topics:
Resetting an individual user account
System Administrator Meter (Copy Jobs)
You can check/reset the cumulative number of pages copied using the System
Administration mode on the screen. The cumulative number of page is counted up to
9,999,999 pages.
1. Login as administrator.
2. Access the Tools tab on the UI.
3. Select Accounting > System Administrator’s Meter (Copy Jobs).
The System Administrator’s Meter (Copy Jobs) screen is displayed and the meter
totals may be viewed and/or reset to zero.
4. To reset the meters, select Reset.
A second reset screen is not provided when resetting System Administrator’s Meter
(Copy Jobs). Once you select Reset, the Total Impressions meter is immediately reset
to 0 (zero).
5. Select Close.
The main Tools tab screen is displayed.
6. Exit administrator mode.
Accounting > Accounting Type
Accounting Type allows the administrator to enable or disable the Accounting feature
and specify the types of jobs that require account management.
TIP
The available Accounting Type selections depend on the Login Type setting used in
Authentication/Security Settings > Authentication. As an example, if you select
a Login Type of Login to Local Accounts in Authentication, then Local Accounting
will automatically be selected in Accounting > Accounting Type and
Accounting Disabled will be unavailable for selection.
Accounting Disabled
The machine does not require a user login ID and password in order to operate it.
Xerox® 770 Digital Color Press
System Administration Guide
7-5
Page 94

Accounting
Local Accounting
Enables the Accounting feature.
Once an Accounting Type is selected, additional choices are displayed:
Auditron Mode
Specify whether to perform account management for copy, print and scan services.
Verify User Details
Specifies whether to verify user details. Select No to allow access without verifying the
User ID and Account ID. The entered information is logged on the machine. Select Yes
to verify user information and then select a For Printer Jobs option.
Customize User Prompt
Specifies the type of user information used for the account administration feature.
Select from the following options: Display User ID and Account ID Prompts,
Display User ID Prompt Only, Display Account ID Prompt Only, or
Display No Prompts.
Selecting an Accounting Type
1. Login as administrator.
2. Access the Tools tab on the UI.
3. Select Accounting > Accounting Type.
4. Select an Accounting Type:
• Accounting Disabled
• Local Accounting
5. Select the desired Accounting Type options, if applicable.
• Auditron Mode
• Verify User Details
• Customize User Prompt
6. Select Save.
7. Select Close.
The main Tools tab screen is displayed.
8. Exit administrator mode.
Accounting > Auto Reset of User Billing Information
This feature allows you to reset Billing Information on particular dates.
1. Login as administrator.
2. Access the Tools tab on the UI.
7-6
Xerox® 770 Digital Color Press
System Administration Guide
Page 95

Accounting
3. Select Accounting > Auto Reset of User Billing Information.
4. Select the desired setting: Off, Reset Every Year, Reset Every Quarter or
Reset Every Month.
If you select Reset Every Year, Reset Every Quarter or Reset Every Month, you can
then select the date the reset will occur.
5. Select Save.
6. If required, select Close.
7. Exit administrator mode.
Copy Activity Report
Enabling this feature will automatically generate a printed usage report of an individual's
completed copy service session.
1. Login as administrator.
2. Access the Tools tab on the UI.
3. Select Accounting > Copy Activity Report.
4. Select Disabled or Enabled.
If you select Enabled, you have to option of adding the company name or other
designation to the printed report.
5. Touch the Company Name text bar to access the keyboard and type in the information
that you want to display.
6. Select Save.
7. Exit administrator mode.
Xerox® 770 Digital Color Press
System Administration Guide
7-7
Page 96

Accounting
7-8
Xerox® 770 Digital Color Press
System Administration Guide
Page 97

8
Authentication/Security Settings
Use the Authentication/Security Settings menu options to setup the login, access control
and user accounts.
Authentication/Security Settings works in conjunction with the Accounting feature to
provide additional security for your system.
Types of users
Authentication/Security Settings controls how users access features. User information
can be registered with the machine. The
Authentication/Security Settings > Authentication feature restricts operations
according to the user type. Users are classified into the following types:
• System administrators: These are users who can enter System Administrator mode
and change the machine settings. A system administrator uses a special user ID called
a System Administrator ID.
• Authenticated users: These are users who are registered on the machine. When using
a restricted service, an authenticated users is prompted to type the user ID and
passcode on the authentication screen. There are three types of authenticated users:
- Authenticated users (with system administrator privileges): These are users who
have System Administrator privileges.
- Authenticated users (with account administrator privileges): These are users who
are have Account Administrator privileges.
- Authenticated users: Users with no system administrator or account administrator
privileges.
• Unauthenticated users: Users who are not registered with the machine. An
unauthenticated user cannot use restricted services.
• General users: Users other than system administrators in non-authentication mode.
Xerox® 770 Digital Color Press
System Administration Guide
8-1
Page 98

Authentication/Security Settings
Types of authentication
Three types of authentication are used depending on where user information is stored:
• Local Machine Authentication: Uses the user information registered for the Account
Administration feature to manage authentication. You need, therefore, to enable
the Account Administration feature when you use Local Machine Authentication.
The print data sent directly from a computer can be received on the machine after
being authenticated by cross-checking the authentication information pre-configured
on a client’s print driver with the one registered on the machine.
• Remote Authentication: Uses a remote authentication server to manage
authentication. User information is not registered on the machine.
NOTE
A registered user ID on the remote authentication server can be a maximum of 32
characters, and the password a maximum of 128 characters. For SMB authentication,
however, the password can be a maximum of 32 characters.
• Xerox Secure Access: A system that uses a magnetic-card, IC-card, and biometrics
systems for authentication. If prompted, users must enter their user information on
the machine’s control panel.
System Administrator Settings
The System Administrator Settings menu is used to set the system administrator ID and
passcode. A new login ID and passcode is recommended to prevent users from making
unauthorized changes and to ensure system security.
System Administrator Login ID
The System Administrator’s Login ID can be from 1 to 32 characters.
NOTE
The default system administrator Login ID is 11111.
1. Login as administrator.
2. Access the Tools tab on the UI.
3. Select Authentication/Security Settings > System Administrator Settings
> System Administrator Login ID.
The System Administrator Login ID screen is displayed.
4. Select On.
5. Select Keyboard, then in the New System Administrator Login ID entry field, type a
system administrator ID.
6. Select Save.
You must reenter the login ID information a second time.
8-2
Xerox® 770 Digital Color Press
System Administration Guide
Page 99

Authentication/Security Settings
7. Select Keyboard once more, and in the Re-enter System Administrator Login ID field,
type the same system administrator ID.
8. Select Save.
9. Exit administrator mode.
System Administrator Passcode
Set the passcode for the system administration mode.The passcode is used to access
the control panel when Passcode Entry from Control Panel is set to On. A passcode must
be entered for local account login. However, a passcode must always be entered when
accessing either remotely or from the network.
TIP
This is recommended for stronger security.
NOTE
The default setting of the system administrator passcode is x-admin.
Set the password AFTER setting the system administrator UserID. The passcode must
be 4-12 characters.
1. Login as administrator.
2. Access the Tools tab on the UI.
3. Select Authentication/Security Settings > System Administrator Settings
> System Administrator Passcode.
4. Select Keyboard.
5. Type the new password from 4-12 numeric digits in the New Passcode field.
6. Select Save.
NOTE
To set no passcode, leave the passcode blank, and select Save.
7. In the Re-enter Passcode field, retype the same password.
8. Select Save.
9. Exit administrator mode.
Authentication
Use the Authentication menu options to setup the login, access control and user
accounts.
Login Type
When a Login Type is selected, users are required to login to their accounts before
accessing the copy, scan and/or print services. The availability of these services is
determined by machine configuration and system administrator settings. The Login Type
can be changed at any time to fit your needs.
The following options are available:
Xerox® 770 Digital Color Press
System Administration Guide
8-3
Page 100

Authentication/Security Settings
No Login Required
The user does not require a login to access services.
Login to Local Accounts
This is the direct operation of the machine from the UI. The system administrator sets
the Login Type, and the users are thereafter required to login to their accounts before
copy, scan, and/or print services can be accessed. Furthermore, the print data sent from
a computer is received on the machine after being authenticated by cross-checking
the authentication information that was pre-configured on a client’s print driver with
the one registered on the machine. The availability of the copy/scan/print services is
determined by the machine configuration and the system administrator settings.
Selecting the Login Type
1. Login as administrator.
2. Access the Tools tab on the UI.
3. Select Authentication/Security Settings > Authentication > Login Type.
The Login Type screen is displayed.
4. Select the desired Login Type option.
5. Select Save.
6. Exit administrator mode.
Access Control
The Access Control feature allows the system administrator to lock or unlock user access
to various machine features. The following options are available with Access Control:
Device Access
This option allows the administrator to lock or unlock user access to the All Services,
Job Status, and/or Machine Status pathways. These pathways are accessed from the
UI.
Service Access
This option allows the administrator to lock or unlock user access to the copy, network
scanning, and stored programming services.
Feature Access
This option allows the administrator to lock or unlock user access to color copying.
Selecting the Access Control options
1. Login as administrator.
2. Access the Tools tab on the UI.
3. Select Authentication/Security Settings > Authentication > Access Control.
4. Select Device Access.
a) Select Unlocked or Locked for each of the three pathway selections.
b) Select Save.
8-4
Xerox® 770 Digital Color Press
System Administration Guide
 Loading...