

Page 1
System Administrator’s Guide
WorkCentre
7655/7665/7675
Page 2

Copyrights and Trademarks
Microsoft® is a registered trademark of Microsoft Corporation.
Windows NT®, Windows® 95, Windows® 98, Windows® Me, Windows® 2000, and Windows® XP are
registered trademarks of Microsoft Corporation.
Windows Vista is either a registered trademark or trademark of Microsoft Corporation in the United States
and/or other countries.
Active Directory® is a registered trademark of Microsoft Corporation.
Internet Explorer is a copyright protected program of Microsoft Corporation.
Novell® and NetWare® are registered trademarks of Novell, Inc.
Netscape® is a registered trademark of Netscape Communications Corporation.
Adobe® and PostScript® are registered trademarks of Adobe Systems Incorporated.
TIFF is a copyright of Adobe Systems Incorporated.
AppleTalk, LaserWriter, and Macintosh are trademarks of Apple Computer , Inc.
PCL® and HP-GL® are registered trademarks of Hewlett-Packard Corporation.
WinZip® is a registered trademark of Nico Mak Computing, Incorporated.
Digi is a trademark of Digi International.
ACITS LPR Printing for Windows 95 is a copyright of the University of Texas at Austin.
VTAM® is a registered trademark of IBM Corporation.
IPDS is a trademark of IBM Corporation.
Solaris and Java are trademarks of Sun® Microsystems.
Linux® is a registered trademark of Linus Torvalds.
Red Hat® is a registered trademark of Redhat, Inc.
Mandrake and Linux-Mandrake are trademarks of MandrakeSoft.
CUPS is a trademark of Easy Software Products.
VIPP® (Variable-data Intelligent PostScript Printware) is a registered trademark of Xerox Corporation.
XEROX®, CentreWare® and WorkCentre® are registered trademarks of Xerox Corpor ation.
FreeFlow™ and SMARTsend™ are trademarks of Xerox Corporation.
Unicode™ is a trademark of the Unicode® Consortium.
Page 3

Table of Contents
Introduction: Read Me...............................................................................................................................7
Who Should Use This Guide.................................................................................................................7
Steps for installing this device on your network ....................................................................................7
Print a Configuration Report to verify current device settings ...............................................................7
Enable TCP/IP and HTTP at the device................................................................................................8
Configure protocols with Internet Services............................................................................................8
Configure additional purchased options................................................................................................9
Install Printer Drivers ............................................................................................................................9
Xerox Unicode 3.0 for SAP Font Kit......................................................................................................9
Physical Connection ...............................................................................................................................10
Power Cable........................................................................................................................................10
Power On the Machine . ... ... ... .... ............................................................................. ... .... ... ... ................10
The Welcome Page and Install Wizards .............................................................................................11
Network Connectivity...........................................................................................................................11
Ethernet Configuration ........................................................ ... ... .......................................... ................12
Ethernet Cable... ... .... ... ....................................... ... ... ... .... ... ... ... .... ... ... .............................................12
To Change the Ethernet Speed, if needed......................................................................................13
USB Printing . ... ....................................... ... ... ... ... .... ... ... ... .... ... ....................................... ......................14
Information Checklist.......................................................................................................................14
Enable the USB Port....................................... .... ... ... ... .... ... ... ... .... ... ................................................14
Parallel Port Printing............................... ... ... ... ... .... ... ... ... .... ... ... ..........................................................15
Information Checklist.......................................................................................................................15
Enable the Parallel Port...................................................................................................................15
General Setup............................... ... ....................................... ... ... ... .... ... ... .............................................16
Set a Description for the Machine.......................................................................................................16
Configuration Page.......................... ... .... ... ... ... ... .................................................................................17
Configuration Report.......... ... .... ... ... ... .............................................................................. ...................18
How to Print a Configuration Report................................................................................................18
How to Disable the Configuration Report from Printing at Power On..............................................18
Administrator Tools Password.............................................................................................................19
How to Change the Admin Password..............................................................................................19
Image Settings ....................................................................................................................................20
Accessing Image Settings (including Linearized PDF) and XPS........................................ ... .... ... ...20
TIFF Settings.................. ... .... ... ... ... ....................................... ... .... ... ... ... ... .... ... ... ... ..........................20
PDF & PDF/A Settings................................. ... .... ... ... ... .... ... ... ... .......................................... .............20
Flate Compression...........................................................................................................................21
JBIG2...............................................................................................................................................21
1
Page 4

XPS Settings....................................................................................................................................21
Scan to Searchable File Formats.................................... .... ... ... ... .... ...................................... ... ..........22
Accessing Image Settings ...............................................................................................................22
Accessing Network Scanning, E-mail, or Internet Fax Settings.......................................................23
Alert Notification.............. ... ... .... ... ... ... .... ... ... ... ... .... .......................................... ... ................................24
To Set up an Alert Notification Group..............................................................................................24
To Assign Notification Alerts to a Group..........................................................................................24
To Edit or Delete a Recipient Address.............................................................................................24
Billing Meter Read Alerts.....................................................................................................................25
To Set up a Billing Meter Read Alert ...............................................................................................25
Local UI Alerts.....................................................................................................................................26
To Set up the Local UI Alert.............................................................................................................26
Billing and Counters............................................................................................................................27
SMart eSolutions.................................................................................................................................28
Set Permissions for Job Management ................................................................................................29
Cloning................................................................................................................................................30
The Banner Sheet...............................................................................................................................31
Saving and Reprinting Jobs ................................................................................................................32
Enabling the feature at a TCP/IP Networked Workstation...............................................................32
Backup Saved Jobs.................................................. ... .......................................... .... ......................32
Restore Saved Jobs ........................................................................................................................33
Online / Offline.............................. ... ... .... ... ....................................... ... ... ... ... .... ... ................................34
Auditron...............................................................................................................................................35
Auxiliary (Foreign Device) Interface Kit...............................................................................................36
SNMP..................................................................................................................................................37
Software Upgrade via Network Connection ........................................................................................38
Prepare for the Upgrade..................................................................................................................38
Software Upgrade: Auto......................................................................................................................40
Set the Auto Upgrade Time.............................................................................................................41
Protocols.................................................................................................................................................42
NetWare..............................................................................................................................................42
Configure NetWare Settings............................................................................................................42
Service Advertising Protocol (SAP).................................................................................................42
Bindery Settings...............................................................................................................................42
NetWare Directory Services (NDS) .................................................................................................43
NDPS/NEPS....................................................................................................................................43
Windows 2000. ... ... ... ....................................... ... .... ... ... ... .... ... ... ... .... ...................................................44
Configure TCP/IP and SLP Settings................................................................................................44
Configure Raw TCP/IP Printing.......................................................................................................46
Create an IPP Printer (Internet Printing Protocol)............................................................................47
2
Page 5

Configure Microsoft Networking and WINS (Windows Internet Naming Service)............................50
Windows 2000 over AppleTalk.................... ... .... ... ... ... .... ... ... ... .... ... ... ... ... .......................................51
Windows XP.... ... ... ....................................... ... ... .... ... ... ... .... ... ... ... .......................................................54
Configure TCP/IP and SLP Settings................................................................................................54
Configure Raw TCP/IP Printing.......................................................................................................56
Create an IPP Printer (Internet Printing Protocol)............................................................................57
Configure Microsoft Networking and WINS (Windows Internet Naming Service)............................60
Windows XP over AppleTalk .............................................................. ... ... .... ... ... .............................61
Apple Macintosh 9.x/10.x (OS X) ........................................................................................................64
Apple Macintosh (AppleTalk)...........................................................................................................64
Apple Macintosh (TCP/IP)...............................................................................................................68
UNIX....................................................................................................................................................72
HP-UX Client (Version 10.x)............................................................................................................72
Solaris 2.x Environment...................................................................................................................74
SCO UNIX Environment..................................................................................................................76
CUPS...............................................................................................................................................78
AS400..................................................................................................................................................82
AS400 Raw TCP/IP Printing to Port 9100 (CRTDEVPRT)..............................................................82
AS400 Printing using LPR (CRTOUTQ)..........................................................................................85
Printer Drivers..................................... ... .... ... ....................................... ... ... ... ... .... ...................................87
Microsoft Windows 2000 Professional ......................................................... .... ... ... ... .... ... ... ... ... ..........90
Microsoft Windows XP ........................................................ ... ... ... .... ... ... ... ..........................................94
Apple Macintosh..................................................................................................................................98
Instructions for 9.x. ..........................................................................................................................99
Instructions for 10.x (OS X) ...................................................... .... ... ... ... ... .... ... ..............................100
Windows XP/2000 (USB Printing).....................................................................................................102
Authentication.......................................................................................................................................104
Overview ...........................................................................................................................................104
Network Authentication .....................................................................................................................105
Configure Authentication for Kerberos (Solaris)............................................................................106
Configure Authentication for Kerberos (Windows 2000/2003).......................................................108
Configure Authentication for NDS (Novell) ....................................................................................110
Configure Authentication for SMB (Windows 2000/2003) .............................................................112
Configure Authentication for LDAP/LDAPS...................................................................................114
Set Authentication to control access to individual services ...........................................................116
Configure Filters for LDAP (if desired)...........................................................................................117
Configure Contexts for LDAP (if desired) ......................................................................................118
Configure Authorization Access (by groups) for LDAP (if desired)............................ ... ... ... ... .... ... .119
Local Authentication..........................................................................................................................120
802.1X Authentication.......................................................................................................................122
3
Page 6

Information Checklist.....................................................................................................................122
Enable 802.1X................... ....................................... ... .... ... ... ... .... .................................................123
Configure 802.1X with Internet Services .......................................................................................124
Xerox Secure Access........................................................................................................................125
Secure Access and Accounting.....................................................................................................125
Information Checklist.....................................................................................................................125
Enable Secure Access.............................. ... ... .... ... ... ....................................... ... ... .... ... ... ... ...........126
Enable Web User Interface Authentication....................................................................................127
Configure your LDAP Server.........................................................................................................127
Set Authentication to control access to individual services ...........................................................128
Using Secure Access.....................................................................................................................129
Authentication Off (if available) .........................................................................................................130
Security.................................................................................................................................................131
IP Filtering.......... ... ... .... ... ... ... ....................................... ... .... ... ... ... .... .................................................131
Defining IP Filtering with the Define IP Filter Rule dialog ..............................................................131
Audit Log............... ... .... ... ... ... .... ...................................... .... ... ... ... .... ... ..............................................132
Digital Certificate Management.........................................................................................................133
Creating a Digital Certificate..... .......................................... ... .......................................... ... ...........133
IP Sec . ... ... .... ... ... ... ....................................... ... ... .... ... ....................................... ... ... ... ........................134
To enable IP Sec...................... ... ... .... ... ... ... ....................................... ... ... .... ... ... ... .... ... ... ..............134
Shared Secret Setup .....................................................................................................................134
Trusted Certificate Authorities...........................................................................................................135
Options..................................................................................................................................................136
Xerox Extensible Interface Program..................................................................................................136
Overview........................................................................................................................................136
Enable XEIP ................................................................................................. ... ... ... .... ... .................137
Network Scanning.............................................................................................................................138
Information Checklist.....................................................................................................................140
Enable Network Scanning ............................................................... ... ... ........................................141
Print a Configuration Report to verify that network scanning (Scan to File) is an Installed Option......
141
Configure a Scan Filing Location...................................................................................................142
Configure a Scan Filing Repository using FTP..............................................................................143
Configure a Scan Filing Repository using NetWare ......................................................................145
Configure a Scan Filing Repository using SMB.............................................................................148
Configure a Scan Filing Repository using HTTP/HTTPS ..............................................................150
Configuring the Default Template with Internet Services...............................................................152
Create a New Template (Optional)................................................................................................155
Set up Remote Template Pool Repository (optional) ....................................................................158
Scan to Home.................................. ... .... ... ... ... ... .... ...................................... .... ... ... ... .... ....................159
4
Page 7

Overview........................................................................................................................................159
Information Checklist.....................................................................................................................159
Configure Scan to Home ...............................................................................................................160
Scan to Mailbox..... .......................................... ... .......................................... .... .................................161
Overview........................................................................................................................................161
Information Checklist.....................................................................................................................161
Enable Scan to Mailbox............ ... ... .... ... ... ... ... .... ... .......................................... ... ...........................162
Configure Scan to Mailbox.............................................................................................................162
E-mail................................................................................................................................................163
Overview........................................................................................................................................163
Addressing - Internal Address Book (LDAP) .................................................................................169
Addressing - Public Address Book ................................................................................................172
Internet Fax.......................................................................................................................................174
Overview........................................................................................................................................174
Enable Internet Fax .......................................................................................................................176
Configure a Domain Name and SMTP Address............................................................................177
Configure General Internet Fax Settings.......................................................................................179
Addressing - Internal Address Book (LDAP) .................................................................................181
Addressing - Public Address Book ................................................................................................184
Server Fax.................................... ... ... .... ... ... ... ....................................... ... ... .... ... ... ... ........................186
Overview........................................................................................................................................186
Enable Server Fax.......... ... .... ... ... ... .... ...................................... .... ... ... ... ... .... ... ... ... ........................188
Configure a Server Fax Filing Location (Repository).....................................................................189
Configure a Fax Repository using FTP..........................................................................................190
Configure a Fax Repository using NetWare..................................................................................192
Configure a Fax Repository using SMB.........................................................................................194
Configure a Fax Repository using HTTP/HTTPS ..........................................................................196
Embedded Fax...... ... .... ... ... ... ....................................... ... .... ... ... ... .... ... ... ... ... .....................................198
Overview........................................................................................................................................198
Install the Fax Hardware Kit...........................................................................................................199
Complete the Fax Setup Screens..................................................................................................200
Configure Fax Settings..................................................................................................................201
Deferred Fax Setup .......................................................................................................................202
LAN Fax (PCL Drivers)......................................................................................................................204
Checklist........................................................................................................................................204
Initial Setup....................................................................................................................................205
Selecting a recipient and sending your fax....................................................................................206
LAN Fax (PostScript Drivers)............................................................................................................207
Checklist........................................................................................................................................207
Initial Setup....................................................................................................................................208
5
Page 8

Selecting a recipient and sending your fax....................................................................................209
Network Accounting ..........................................................................................................................210
Overview........................................................................................................................................210
Install the Network Accounting feature..........................................................................................212
Configure Network Accounting......................................................................................................213
Enable Network Accounting in your Windows Print Driver ............................................................214
Test Network Accounting...............................................................................................................215
Immediate Image Overwrite......... ... ... .... ... ... ... ... .... ... ... ... .... .......................................... ... .................216
Overview........................................................................................................................................216
On Demand Overwrite.......................................................................................................................218
Overview........................................................................................................................................218
Enable On Demand Overwrite.......................................................................................................219
Perform an Image Overwrite at the Machine.................................................................................220
Perform an Image Overwrite over the Network .............................................................................221
Schedule a Daily Overwrite ...................................................... .... ... ... ... ... .... ... ..............................222
USB Printing . ... ....................................... ... ... ... ... .... ... ... ... .... ... ....................................... ....................223
Overview........................................................................................................................................223
Enable the USB Port....................................... .... ... ... ... .... ... ... ... .... ... ..............................................224
Install and Configure Printer Drivers..............................................................................................225
Annotation (Bates Stamping) ............................................................................................................226
Overview........................................................................................................................................226
Configuring Bates Stamp Settings.................................................................................................226
Xerox Standard Accounting...............................................................................................................227
Overview........................................................................................................................................227
Enable Xerox Standard Accounting...............................................................................................228
Create a Group Account................................................................................................................229
Create a User Account and Set Usage Limits...............................................................................230
Next Steps – Using XSA at the machine.......................................................................................232
Disabling and Enabling Options............................................................................................................240
Disable an Optional Feature................................................................... ... ........................................240
Enable an Optional Feature ..............................................................................................................241
Troubleshooting....................................................................................................................................242
Troubleshooting: Network Scanning .................................................................................................242
Troubleshooting: E-mail ....................................................................................................................245
Troubleshooting: Internet Fax ...........................................................................................................248
Troubleshooting: Server Fax.............................................................................................................251
Troubleshooting: Embedded Fax......................................................................................................254
Troubleshooting: Network Accounting...............................................................................................255
Power On/Off Button.........................................................................................................................257
6
Page 9

Introduction: Read Me
Who Should Use This Guide
This WorkCentre 7655/7665/7675 System Administrator’s Guide has been created to assist Experienced
System Administrators in installing this device on a variety of networks. Print out this Read Me, then use
the steps below as your road map to navigate this guide and assure a successful installation.
Steps for installing this device on your network
Refer to the Physical Connection section and follow the steps provided for Power Cable and Ethernet
Cable installation.
Note the helpful information provided on The Welcome Page and Install Wizards in the Power Cable topic
of the Physical Connection section of this guide. This section also points to instructions for printer
connection directly to a workstation through optional USB or Parallel ports, if so desired.
Print a Configuration Report to verify current device settings
Note: A Configuration Report should have printed when the machine was powered off, then on, during
Power Cable and Ethernet Cable installation. If necessary, perform the following steps:
1. Press the [Machine Status] button (on the machine).
2. Touch [Print Reports]. Touch the [Machine Information tab], if Print Reports is not seen.
3. Touch [Configuration Report].
4. Touch [Print Selected Report].
5. Touch [Close].
7
Page 10

Enable TCP/IP and HTTP at the device
1. Looking at the Configuration Report, verify whether the addressing shown under TCP/IP Settings will
enable this device to communicate over your network. Also, verify that HTTP is enabled under HTTP
Settings, to enable use of the device's web User Interface for network and options configuration.
2. If necessary, reset TCP/IP addressing (including DHCP and DNS settings) and enable HTTP as
follows
a. Go to the machine and press the [Login / Out] button to enter the Tools pathway.
b. On the keypad, enter admin, then 1111 or the current administrator password. Tip: Thi s password
can be changed by following the steps provided in the Administrator Tools topic in th e General
Setup section of this guide.
c. Touch the [Enter] button, then touch [Machine Status], and the [Tools] tab (if necessary).
d. Wait for the screen to refresh and touch the [Connectivity and Network Settings] button.
e. Touch [HTTP Settings], touch Enable, then touch Save.
f. Touch [TCP/IP], then touch [TCP/IP Settings].
g. Configure TCP/IP settings, including DHCP (Dynamic Addressing) and DNS, touch Save, touch
Login /Out to log out of Tools. Note that this device supports IPv6 addressing, with an
automatically-built Link Local Address for broadcasting to routers that can supply the network-
layer configuration parameters. See Configure protocols with Internet Services below.
h. Power the system Off, and observe the network activity light on the Controller until it goes out (th e
Controller shuts Off).
i. Power the system On and verify the new settings for TCP/IP and HTTP on the Configuration
Report.
Configure protocols with Internet Services
Internet Services is a series of web pages, hosted on the embedded HTTP server of the machine, allowing
configuration of services and settings using a web browser.
Refer to the Protocols section of this guide and follow the instructions to configure protocols, for specific
network environments, with your web browser.
To configure individual protocols only, using your web browser, perform the following steps:
1. At a TCP/IP networked workstation, open your Web Browser and enter the TCP/IP address of the
machine in the Address or Location field and press [Enter]. Your Browser will display the machine
Home Page.
2. Click the [Properties] tab.
3. If prompted, enter the current system administrator name and password. The default is [admin] and
[1111].
4. Click on [Connectivity], then click on [Protocols]. Note: To see IPv6 addressing parameters, if
desired, click TCP/IP in the list of Protocols, then click on TCP/IP (v6).
5. Select your individual protocol of interest from the displayed list and modify settings to your
requirements. Make sure to click [Apply] when done.
8
Page 11

Configure additional purchased options
Refer to the Options section of this guide and follow the instructions provided
Note: If you are installing multiple machines on your network, you may find the Cloning feature useful.
This feature enables you to copy a number of configuration settings from one machine to another. For
more information, see the Cloning topic in this guide.
Security Note: This device offers enhanced security. For information, refer to the Security and
Authentication sections.
Install Printer Drivers
Refer to the Printer Drivers section of this guide and follow the instructions provided.
Xerox Unicode 3.0 for SAP Font Kit
A Unicode font kit is available for this multifunction device. Installation of the Unicode fonts, per the kit's
instructions, provides the required character sets to print documents in multiple languages, in an SAP
printing environment. To order the kit, contact your Xerox representative.
9
Page 12
Physical Connection
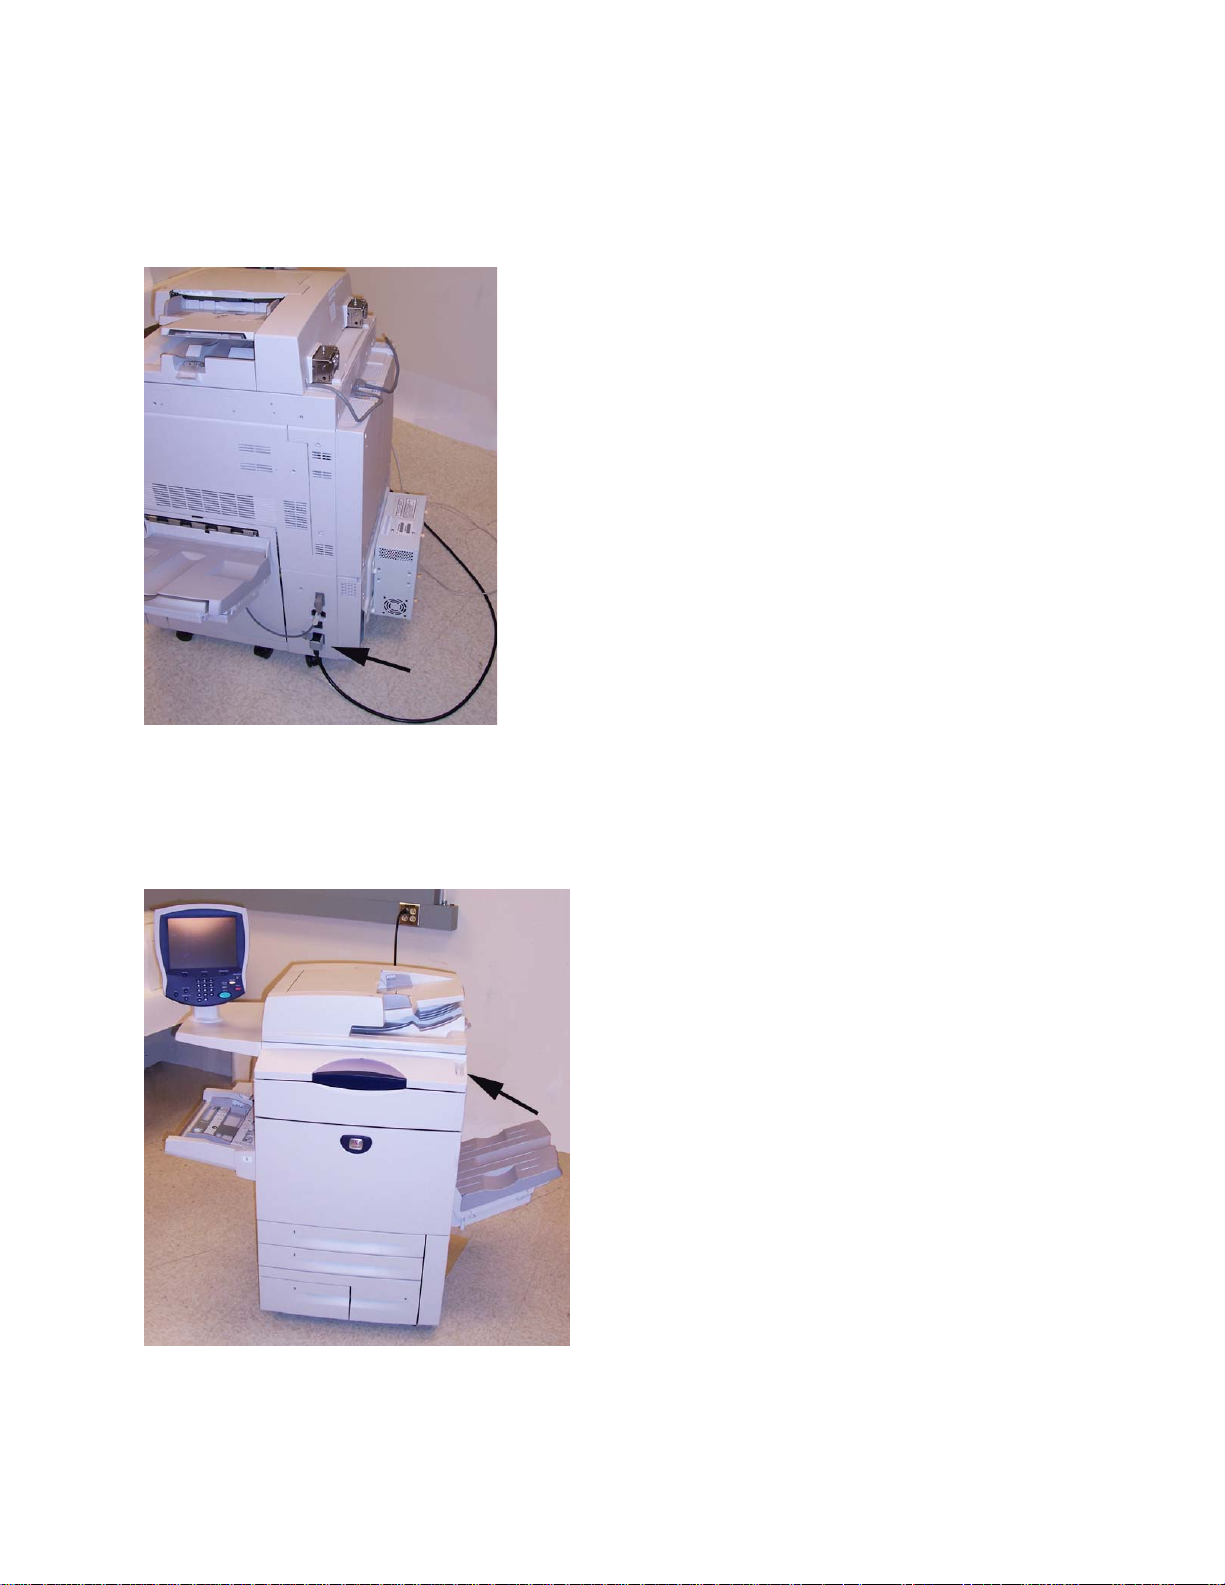
Power Cable
Ensure the machine is connected to a suitable power supply and that the power cord is fully plugged in to
the electrical outlet.
Power On the Machine
The Power On button is located on the front of the machine.
10
Page 13

The Welcome Page and Install Wizards
An Installation Wizard displays the first time the machine is powered on, providing the ability to set the date
and time.
Simultaneously, a Welcome Page is enabled as the opening page of the machine's Internet Services web
pages. You can click Configure Device on this Welcome Page, or click the Configuration Overview link on
the Properties tab, to go directly to the Install Wizards for configuring protocols and optional services.
A Cloning File... button on the Welcome Page lets you copy configuration setting s from a compatible Xerox
system and apply them to this system.
To stop showing the Internet Services Welcom e Page, check the Do n't Show... box on the Welcome Pag e.
Note: To access the Welcome Page or Properties tab of Internet Services, TCP/IP and HTTP must be
enabled on the device as described in the Read Me of this guide. To review the Read Me, click
Introduction, then Read Me, on the left hand side of this page.
Network Connectivity
The machine can be connected to the network via 10/100BaseT Ethernet cable.
11
Page 14
Ethernet Configuration
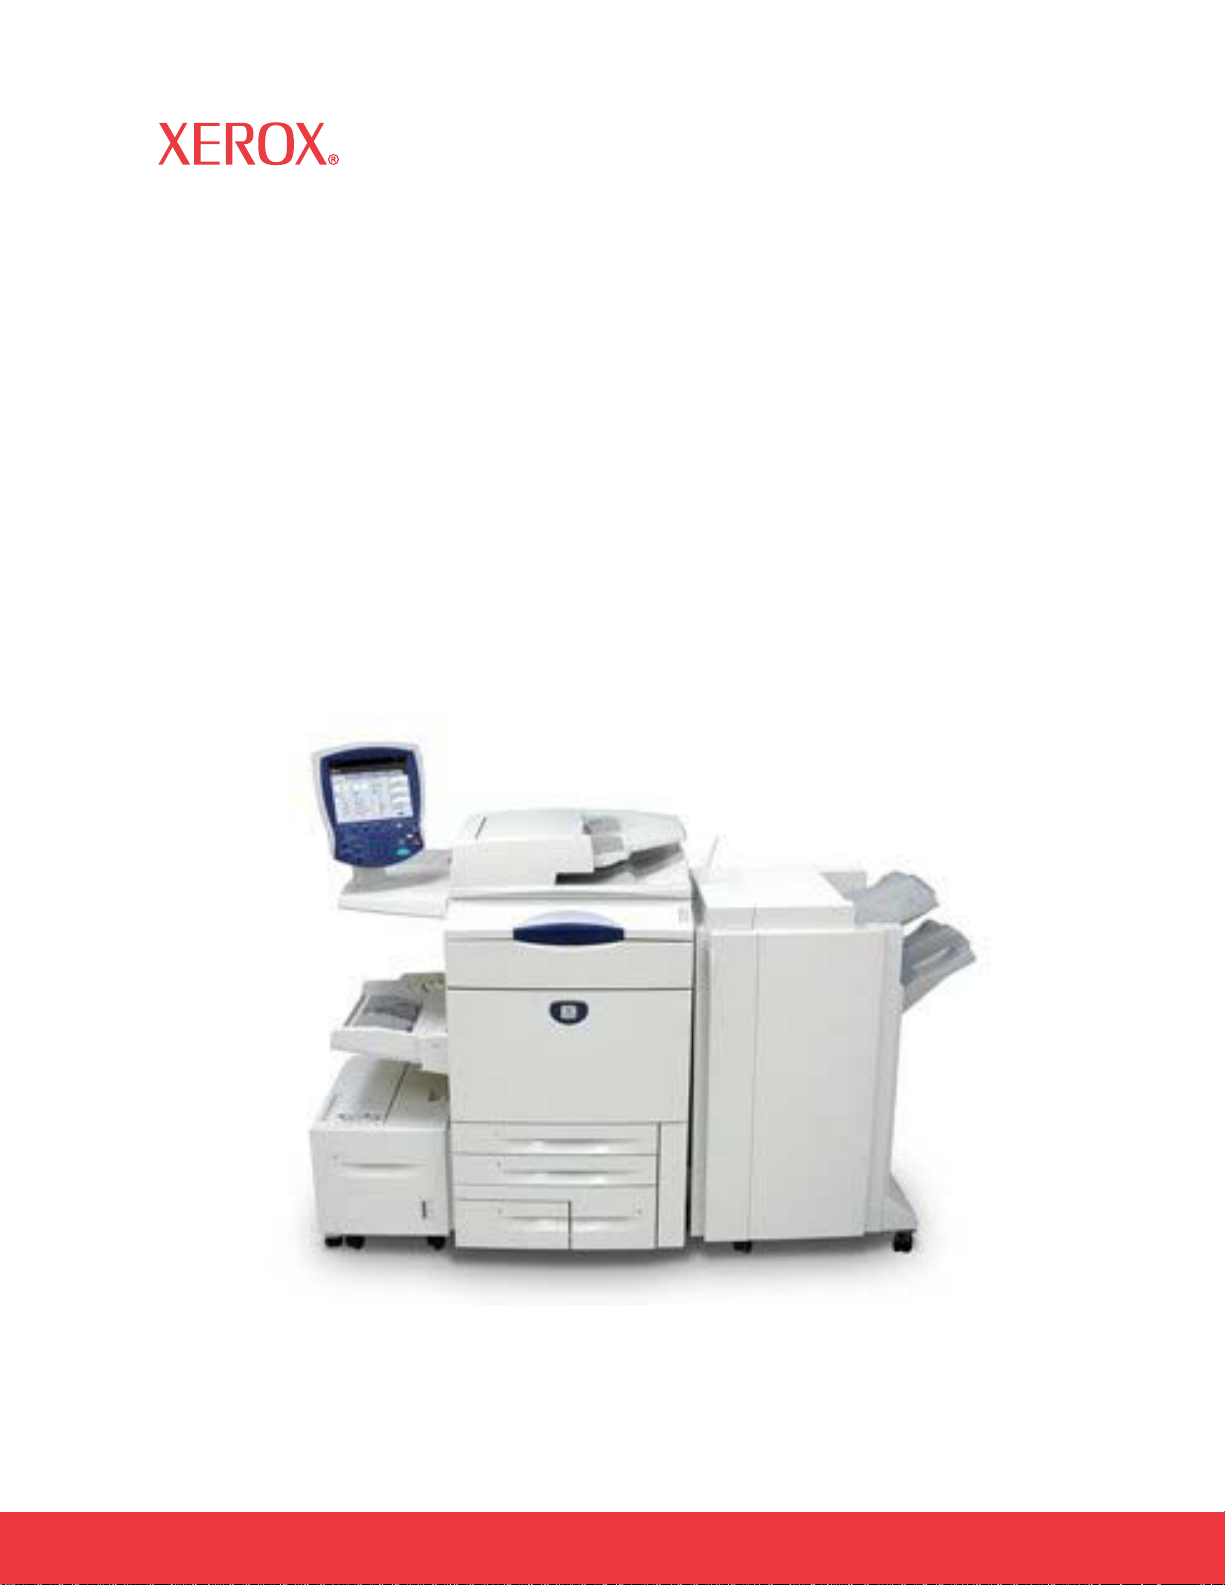
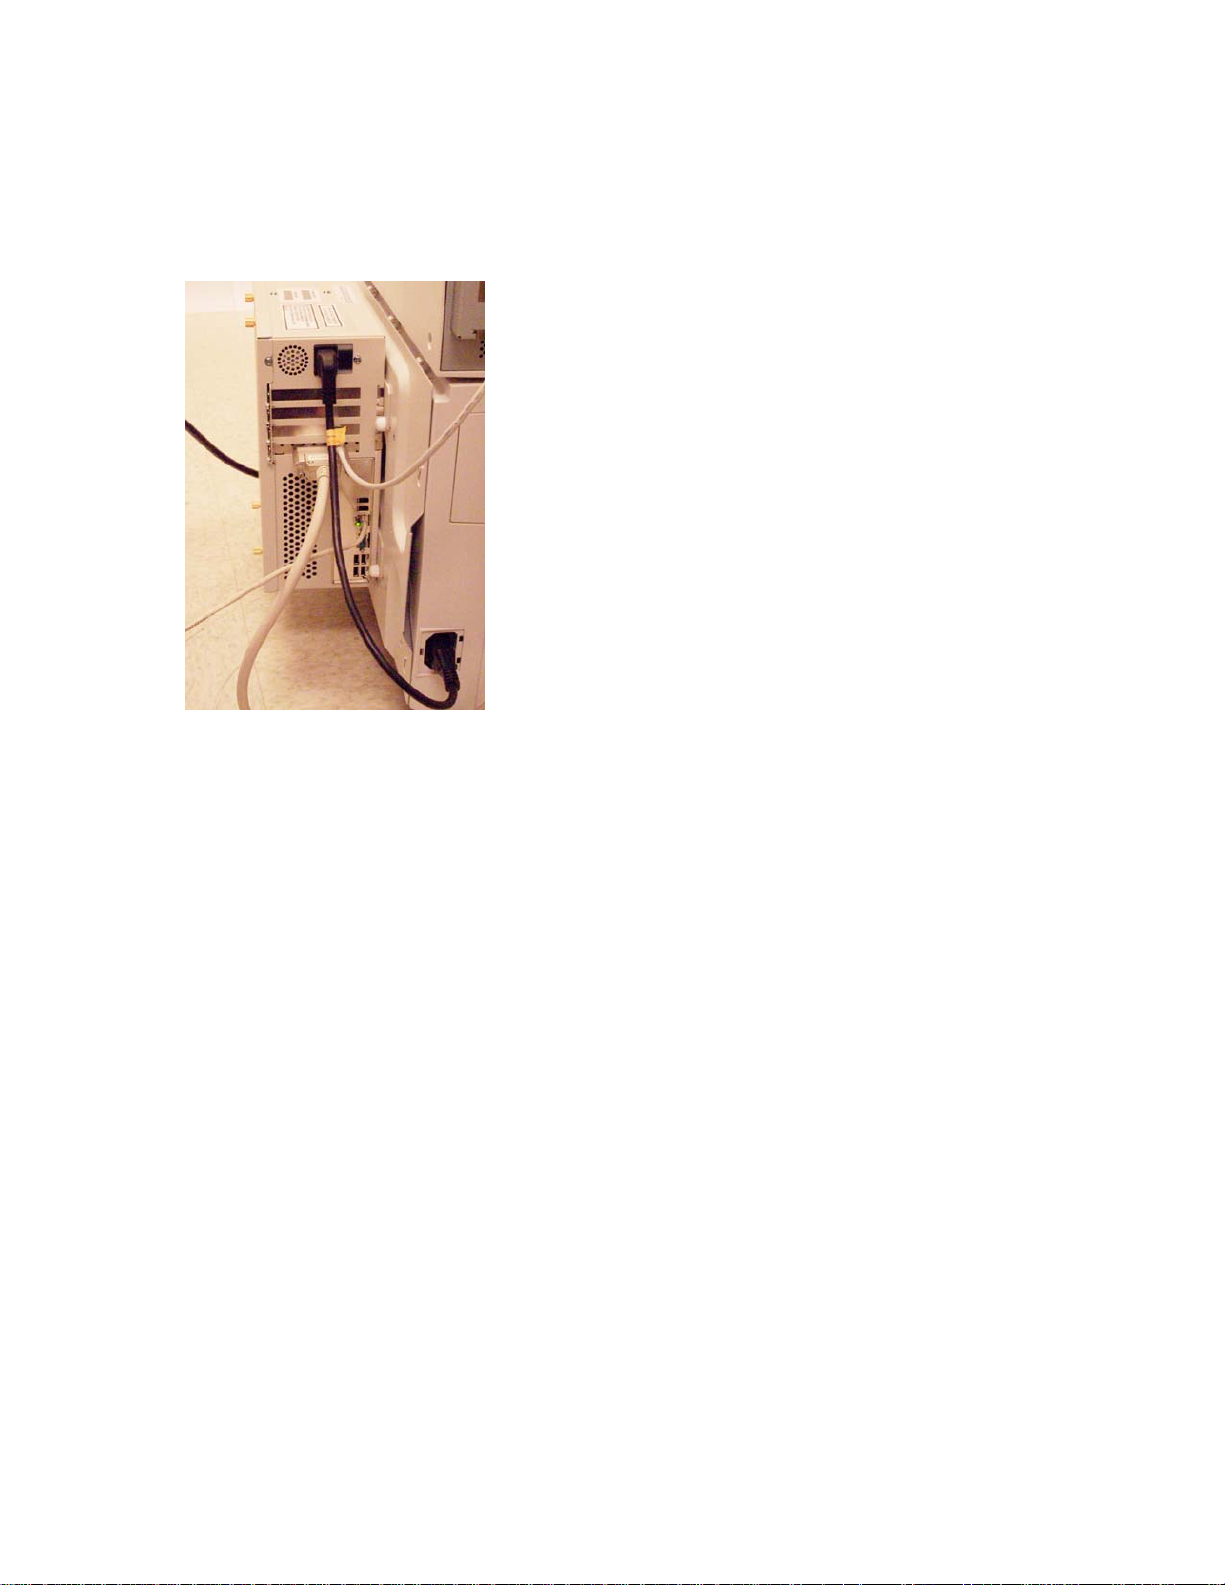
Ethernet Cable
1. Press the Power Off button to turn the machine off. Observe the network activity light on the
Controller until it goes out (the Controller shuts off).
2. Connect a category 5 Ethernet cable to the network interface port at the rear of the machine, and
connect the other end of the cable to a live network drop.
3. Turn on the machine by pressing the Power On button . The Ethernet Inter face is set to auto detect the
speed of your network. The device supports selectable speeds of Auto, 10Mbps Full-Duplex, 100
Mbps Full-Duplex, 10 Mbps Half-Duplex, and 100 Mbps Half-Duplex.
Note: If your network has hubs that have Auto-Sensing enabled and the machine Eth ernet speed is set
to Auto, it is possible that the hub will not arbitrate to the correct speed.
12
Page 15

To Change the Ethernet Speed, if needed
1. Go to a networked workstation, open a Web browser application, enter the TCP/IP address of the
machine in the Address bar, and press Enter.
2. Select the [Properties] tab.
3. Enter the Administrator User name and password if prompted. The default is [admin] and [1111]
4. Select [Connectivity].
5. Select [Physical Connections].
6. Select [Ethernet].
7. Select your [Rated Speed].
8. Click [Apply].
9. When you see the window that says that the properties have been successfully modified, select the
[Status] tab, and click [Reboot Machine].
10. When the machine has re-booted, verify the Ethernet speed setting displayed under Ethernet Profile
on the machine's Configuration Report, which is set to print, by default, whenever the device is
powered on.
11. To print a Configuration Report on demand, go to the machine a nd press the [M achine Status] butto n.
Next, touch [Print Reports], then touch [Configuration Report], then touch [Print Selected Report], and
finally touch [Close].
13
Page 16

USB Printing
USB printing is an optional feature available for the WorkCentre 7655/7665.
The USB Printer Port can be used for printing directly from a laptop or workstation connected via a USB
cable. USB printing from
Windows XP and 2000 are supported. The USB port is located o n a car d, that fits into o ne of the available
PCI slots on the Network Controller, at the back of the machine.
Information Checklist
1. Before starting the installation procedures, please ensure the following items are available:
2. The USB Print Kit available for purchase from your Xerox Sales Representative.
3. A standard USB peripheral cable.
4. CentreWare Print and Fax Drivers CD delivered with your machine. This contains the USB printer
drivers.
Enable the USB Port
1. Press the Power Off button to turn the machine off. Observe the network activity light on the
Controller until it goes out (the Controller shuts off). Install the PCI card contained in the USB
Print Kit, following the instructions enclosed with kit.
2. Turn on the machine by pressing the Power On button.
3. Go to a networked workstation, open a Web browser application, enter the TCP/IP address of the
machine in the Address bar, and press Enter.
4. Select the [Properties] tab.
5. Enter the Administrator User name and password if prompted. The default is [admin] and [1111]
6. Select [Connectivity].
7. Select [Physical Connections].
8. Select [USB Port].
9. Select [Enabled].
10. Input the Printer Port [Timeout] in seconds. (0-60 seconds).
NOTE: The default Timeout value is 5 seconds. If you are using an ol der PC and exper ien ce a ny prin t
problems, you may need to increase this value.
11. Click [Apply].
12. When you see the window that says that the properties have been successfully modified, select the
[Status] tab, and click [Reboot Machine].
13. When the machine has re-booted, verify that the USB Printer Port has been enabled by reviewing the
machine's Configuration Report, which is set to print, by default, whenever the device is powered on.
14. To print a Configuration Report on demand, go to the machine a nd press the [M achine Status] butto n.
Next, touch [Print Reports], then touch [Configuration Report], then touch [Print Selected Report], and
finally touch [Close].
15. After verifying that the USB Printer Port is enabled, connect your PC to the printer's USB port with a
Standard USB Peripheral cable. The PC will detect the device and ask to install USB printer drivers.
Locate the drivers that came with the printer and follow the standard windows driver installation
process.
14
Page 17

Parallel Port Printing
Parallel port printing is an optional feature available for the WorkCentre 7655/7665/7675. The Parall el port
is located on the optional USB card, that fits into one of the available PCI slots on the Network Controller,
at the back of the machine. The Parallel Port can be used for printing directly from a laptop or workstation
connected via a Parallel cable.
Information Checklist
Before starting the installation procedures, please ensure the following items are available:
1. The USB Print Kit, which includes the Parallel Port option, available for purchase from your Xerox
Sales Representative.
2. A standard Parallel Port printing cable.
3. CentreWare Print and Fax Drivers CD delivered with your machine. This contains the appropriate
printer drivers.
Enable the Parallel Port
1. Press the Power Off button to turn the machine off. Observe the network activity light on the
Controller until it goes out (the Controller shuts off). Install the PCI card contained in the USB
Print Kit, following the instructions enclosed with kit.
2. Turn on the machine by pressing the Power On button.
3. Go to a networked workstation, open a Web browser application, enter the TCP/IP address of the
machine in the Address bar, and press Enter.
4. Select the [Properties] tab.
5. Enter the Administrator User name and password if prompted. The default is [admin] and [1111]
6. Select [Connectivity].
7. Select [Physical Connections].
8. Select [Parallel].
9. Select [Enabled].
10. >Input the Printer Port [Timeout] in seconds. (1-60 seconds).
NOTE: The default Timeout value is 5 seconds. If you are using an ol der PC and exper ien ce a ny prin t
problems, you may need to increase this value.
11. Click [Apply].
12. When you see the window that says that the properties have been successfully modified, select the
[Status] tab, and click [Reboot Machine].
13. When the machine has re-booted, verify that the USB Parallel Card is shown as present on the
machine's Configuration Report, which is set to print, by default, whenever the device is powered on.
14. To print a Configuration Report on demand, go to the machine a nd press the [M achine Status] butto n.
Next, touch [Print Reports], then touch [Configuration Report], then touch [Print Selected Report], and
finally touch [Close].
15. After verifying that the USB Printer Port is shown as present, connect your PC to the printer's Parallel
port with a Standard Parallel Printing cable.
16. Locate the drivers that came with the printer and follow the standard windows driver installa tion
process, including the printing of a test print.
15
Page 18

General Setup
Set a Description for the Machine
The CentreWare Internet Services Properties Description page contains information that identifies a
specific machine model, name and physical location.
At your Workstation
1. Open your web browser and enter the TCP/IP address of the machine in the Addr ess or Locatio n field.
Press [Enter].
2. Click the [Properties] tab.
3. Enter the Administrator User name and password if prompted. The default is [admin] and [1111]
4. Select [Description] in the directory tree.
5. Type a name of your choice for the machine in [Machine Name].
6. Type the site location for the machine in [Location].
7. Click [Apply] to accept the changes or [Undo] to return the settings to their previous values.
16
Page 19

Configuration Page
The Configuration page allows you to view machine setup details, for example Network Setup and Network
Scanning Setup.
These details can also be printed by selecting the Print Configuration Page button.
At your Workstation
1. Open your web browser and enter the TCP/IP address of the machine in the Addr ess or Locatio n field.
Press [Enter].
2. Click the [Properties] tab.
3. Enter the Administrator User name and password if prompted. The default is [admin] and [1111]
4. Click the symbol to the left of [General Setup].
5. Select [Configuration] in the directory tree.
6. To view information about a setting select the required configuration setting from the list.
7. To print the Configuration details sele ct Print Configuration Page at the top of the screen.
17
Page 20

Configuration Report
The Configuration Report details the machine software versions and network settings configured for the
machine. The Configuration Report automatically prin ts when the machin e is rebooted or p owered on. The
report can be printed at any other time by following these instructions.
How to Print a Configuration Report
NOTE: If there is no Configuration Report button the machine does not have a network controller and
is unable to be connected to the network. Contact your Xerox Sales Representative to purchase a
network controller if you wish to connect your machin e ove r the ne tw or k.
At the Machine
1. Press the [Machine Status] button.
2. Touch the [Print Reports] button.
3. Touch the [Configuration Report] button.
4. Touch [Print Selected Report], then touch [Close].
How to Disable the Configuration Report from Printing at Power On
At the Machine
1. Press the [Log In / Out] button to enter the Tools pathway.
2. On the keypad enter [admin], then [1111] or the current password. Touch the [Enter] button when
finished.
3. Touch [Machine Status], then the [Tools] tab.
4. Touch [Connectivity and Network Setup].
5. Touch [General].
6. Select [Configuration Report].
7. Select [Do Not Print Report]
8. Touch the [Save] button.
9. Touch [Log In / Out] to exit the Tools pathway.
18
Page 21

Administrator Tools Password
The Administrator password is necessary to access the administrator tools function both from the machine
touch screen and CentreWare Internet Services. Access to the administrator tools is necessary to
configure the machine, network connectivity and optional settings.
Note that the Web User Interface (Internet Services) is now protected by the Administrator password, so
that you will need to log in with the User ID (default of admin) and the password (default of 1111) BEFORE
modifying any settings. After working with settings, make sure to log out by selecting admin-Logout in the
upper right corner of the Internet Services screen.
Xerox recommends that you change the Administrator password immediately after machine installation.
A password of at least 9 characters in length should be sufficient for a year. Once changed, ensure the
password is kept in a secure place for future use.
How to Change the Admin Password
At the Machine
1. Press the [Log In / Out] button to enter the Tools pathway.
2. On the keypad enter admin, then [1111] or the current password. Touch the [Enter] button when
finished.
3. Touch [Machine Status, then the [Tools] tab.
4. Touch [Security Settings].
5. Touch [Authentication].
6. Touch [User / Administrator Accounts].
7. Touch [Configure Account].
8. Touch [System Administrator (Admin)].
9. Enter a Passcode of 1 to 9 digits.
10. Touch [Save].
11. Touch [Log In / Out] to exit the Tools pathway.
19
Page 22

Image Settings
The Image Settings screen allows you to set preferences for the various file formats that the multifunction
device is capable of creating when features such as Network Scanni ng, E-m ail, and Inter net Fa x are used
at the device.
Accessing Image Settings (including Linearized PDF) and XPS
At your Workstation
1. Open your Web Browser and enter the TCP/IP address of the machine in the Address or Location field
and press [Enter]. Your Browser will display the machine Home Page.
2. Click the [Properties] tab.
3. Enter the Administrator User name and password if prompted. The default is [admin] and [1111]
4. Click [General Setup].
5. Click [Image Settings].
6. Select and configure the Image Settings for th e var io us file forma ts as desired.
7. When done, click [Apply] to save changes or [Undo] to remove changes and refresh the page.
TIFF Settings
Tagged Image File Format is a multi-platform format for raster (bitmapped) graphics. Nearly every
graphics application can read and write TIFF. Depending upon your nee ds, select which version of TIFF
Compression the Xerox system uses.
TIFF 6.0 (old JPEG)
TIFF Specification Supplement 2 (new JPEG).
LZW - One of the first lossless, data compression algorithms, LZW works best for files containing lots of
repetitive data, such as is the case with text and monochrome images. LZW has long been associated
with TIFF and GIF images. This compression algorithm was widely used in Adobe Photoshop, until
version 6, and Adobe Acrobat, until version 5.
PDF & PDF/A Settings
Select Optimized for Fast Web Viewing if you want to create linearized PDF files. Linearized PDF files
allow the first page of the PDF file to be displayed in a user's Web browser, before the entire file is
downloaded from the Web server. This fast first page display helps to alleviate Internet user frustration in
waiting for an entire file to download before displaying the file's contents.
Select MRC Compression if you want to use Mixed Raster Content (MRC) compression. MRC is used to
divide the scanned image based on content, and then compress each area in the optimal manner for that
image area. This option allows for smaller output files with better image quality.
Note regarding Searchable PDF and PDF/A: If this option is available, by enabling the selection you will
provide Network Scanning, E-mail, and Internet Fax users with the ability to choose [Searchable] as an
option for their PDF and PDF/A file formats. The Searchable Format provides a second layer of data with
the text of the scanned document. The second layer is converted to an optical character readable format,
enabling the text of the document to be searched on, copied, and pasted, as desired.
20
Page 23

Flate Compression
Select Enabled or Disabled. Flate is a lossless compression algorithm based on two other algorithms:
Huffman compression and LZ77 (the first LZW). Huffman compression is a lossless algorithm ideal for
compressing text. LZ77 works well with files containing lots of repetitive data, such as text and
monochrome image (TIFF and GIF) files. Flate compression is a standard feature of PDF files, that
Acrobat works well with.
JBIG2
JBIG is a standard algorithm for lossless compression of bi-level images (two color images), specializing in
the preservation of thin lines. JBIG2 compression is usually used for text and halftone documents, and is
claimed to be able to compress scanned documents up to 10 times smaller than with TIFF G4. A further
claim is that it allows scanned manuals, books, check images, and other docume nt types to be viewed and
manipulated efficiently over the Internet. This method yields a very small black and white file size with fast
viewing performance. This compression format requires Acrobat 5, with PDF version 1.4 or greater.
XPS Settings
XPS is Microsoft's new electronic paper format, an alternative to PDF. XPS is currently supported as a
saved file format in Microsoft Office 2007, with an XPS viewer built into Windows Vista. Microsoft states
that Windows vista uses the XPS format as a document format, a windows spool file format, and a page
description language for printers.
Select [Optimized for Fast Web Viewing] (also known as Interl eaved XPS), or [Ena ble MRC Comp ression]
for the same reasons stated above for PDF files.
Note regarding Searchable XPS: If this option is available, by enabling the selection you will provide
Network Scanning, E-mail, and Internet Fax users with the ability to choose [Searchable] as an option for
their XPS file format. The Searchable Format provides a second layer of data with the text of the scanned
document. The second layer is converted to an optical character readable format, enabling the text of the
document to be searched on, copied, and pasted, as desired.
21
Page 24

Scan to Searchable File Formats
The optional feature provides Network Scanning, E-mail, and Internet Fax users with the ability to choose
[Searchable] as an option for the their PDF, PDF/A, or XPS file formats. The Searchable Format provides
a second layer of data with the text of the scanned document. The second layer is converted to an optical
character readable format, enabling the text of the document to be searched on, copied, and pasted, as
desired.
Note: Before installing the Scan to Searchable File Formats feature, make sure that you have
installed the Network Scanning/E-mail option first. Network Scanning is an optional feature,
purchased from your Xerox Sales Representative, and installed using a Network Scanning/E-mail
Subscriber Installation Module (SIM). For more information, see the Network Scanning topic of the
Options section of this guide.
Once you have completed the Scan to Searchable File Formats setup below, you should see the option
displayed as an available setting for PDF, PDF/A and XPS. These settings should will be displayed under
the Default Template (Filing Options/Image Settings) for Network Scanning, under Defaults (Filing
Options/Image Settings) for E-mail, and under Defaults (Filing Options) for Internet Fax. Internet Services
is a series of web pages, hosted on the embedded HTTP server of the machine, allowing configuration of
services and settings using a web browser.
NOTE: XPS is not an available Document Format for Internet Fax.
Accessing Image Settings
At your Workstation
1. Open your Web Browser and enter the TCP/IP address of the machine in the Address or Location field
and press [Enter]. Your Browser will display the machine Home Page.
2. Click the [Properties] tab.
3. If prompted, enter the current system administrator name and password. The default is [admin] and
[1111].
4. Click [Services].
5. Click [Network Scanning].
6. Select [Default Template] or create a new template.
7. Under the Network Scanning option, click on the [Edit] button.
8. Within Scan Presets, Original Type - select [Photo & Text] or [Text].
9. Then select [for OCR].
10. Select [Apply].
11. Within Filing Options, select [Edit].
12. Within Document Format, select [PDF, PDF/A or XPS] format option.
13. Scroll down in Filing Options, Document Format to Searchable Options and select [Searchable].
14. Select [Apply].
15. Within [Network Scanning Image Settings], select [Edit].
16. Searchable XPS PDF and PDF/A Defaults, Searchable Options select [Searchable] and the correct
language for your device under Document Language.
17. Select [Apply].
At your Machine
1. Select [Services] button.
2. Select [Network Scanning], may have to select All Services.
3. Input documents to scan and touch [Start] button.
22
Page 25

Accessing Network Scanning, E-mail, or Internet Fax Settings
At your Workstation
1. Open your Web Browser and enter the TCP/IP address of the machine in the Address or Location field
and press [Enter]. Your Browser will display the machine Home Page.
2. Click the [Properties] tab.
3. If prompted, enter the current system administrator name and password. The default is [admin] and
[1111].
4. Click [Services].
5. Select [Network Scanning], [E-mail], or [Internet Fax].
6. For Network Scanning, select [Default Template], then the [Edit] button for Filing Options to set a
Searchable File Format as the user presented scanning default.
7. For E-mail or Internet Fax, select [Defaults], then the [Edit] button for Filing Options to set a
Searchable File Format as the user presented scanning default.
8. When done, click [Apply] to save changes or [Undo] to remove changes and refresh the page.
23
Page 26

Alert Notification
In the Alert Notification section you can set up groups to notify (by e-mail) when problems occur on the
machine.
To Set up an Alert Notification Group
At your Workstation
1. Open your Web Browser and enter the TCP/IP address of the machine in the Address or Location field
and press [Enter]. Your Browser will display the machine Home Page.
2. Click the [Properties] tab.
3. Enter the Administrator User name and password if prompted. The default is [admin] and [1111].
4. Click the symbol to the left of [General Setup].
5. Click [Alert Notification] in the directory tree.
6. Click [E-mail Alerts].
7. Check the [Enable Group 1] box.
8. Click [Add].
9. Enter an e-mail address and click [Add].
10. Enter an e-mail address in the [Reply To: E-mail Address] box.
11. Click [Apply] to accept the changes or [Undo] to return the settings to their previous values.
12. The Settings Confirmed. Send Test e-mail? window will appear. Click [OK] if you wish to send a test email to the Alert Notification recipient(s), or [Cancel] to return to the Alert Notification page.
To Assign Notification Alerts to a Group
1. Scroll down to the Recipient Group Preferences box. Select the Status Codes that you wish the
group(s) to be notified of by checking the appropriate boxes. Click the Glossary link next to Status
Codes in the Recipient Group Preferences box for further information about the Status Codes.
2. Enter the number of minutes for the [Set Jam Timer for release of status to selected groups] (0-60
minutes).
3. Select [Apply] to save your settings or [Undo] to cancel.
To Edit or Delete a Recipient Address
1. Select the address from the Group list and click [Edit].
2. To edit: make the required changes and click [Replace].
3. To delete an address from the Group list click [Delete]. The Are you sure you want to delete box
appears. Click [OK].
4. When you have finished making changes select [Apply] to save or [Undo ] to cancel.
5. If prompted, enter the valid tools administrator User Name and Password. The default is [admin] and
[1111].
24
Page 27

Billing Meter Read Alerts
Using this dialog, System Administrators can set up an e-mail notification to the designated Billing
Administrator whenever billing meters are automatically read by the Meter Assistant.
To Set up a Billing Meter Read Alert
At your Workstation
1. Open your Web Browser and enter the TCP/IP address of the machine in the Address or Location field
and press [Enter]. Your Browser will display the machine Home Page.
2. Click the [Properties] tab.
3. Enter the Administrator User name and password if prompted. The default is [admin] and [1111].
4. Click the symbol to the left of [General Setup].
5. Click the symbol to the left of [Alert Notification].
6. Select [E-mail Alerts] in the directory tree.
7. Check the box labeled [When Billing Meter Reads are reported] under Recipient Group Preferences.
8. Click [Add].
9. Enter an e-mail address and click [Add].
10. Enter an e-mail address in the [Reply To: E-mail Address] box.
11. Click [Apply] to accept the changes or [Undo] to return the settings to their previous values.
25
Page 28

Local UI Alerts
System Administrators can set up the local UI to warn users that the scan disk is running low on memory,
potentially impacting system performance and/or causing job loss.
To Set up the Local UI Alert
At your Workstation
1. Open your Web Browser and enter the TCP/IP address of the machine in the Address or Location field
and press [Enter]. Your Browser will display the machine Home Page.
2. Click the [Properties] tab.
3. Enter the Administrator User name and password if prompted. The default is [admin] and [1111].
4. Click the symbol to the left of [General Setup].
5. Click the symbol to the left of [Alert Notification].
6. Select [Local UI Alerts] in the directory tree.
7. Select the radio button corresponding to the warning that you wish to provide.
8. Click [Apply] to accept the changes or [Undo] to return the settings to their previous values.
26
Page 29

Billing and Counters
The Billing and Counters page provides the Billing information for the machine, including number of
impressions printed or copied.
At your Workstation
1. Open your Web Browser and enter the TCP/IP address of the machine in the Address or Location field
and press [Enter]. Your Browser will display the machine Home Page.
2. Click the [Status] tab.
3. Select [SMart eSolutions] in the directory tree
4. Select [Meter Assistant] to view Current Billing information.
5. Select [Usage Counters] to view the counts from the Usage Counters
27
Page 30

SMart eSolutions
SMart eSolutions provides Xerox customers with a setup page to guide you through the steps required to
configure the device for automatic meter readings. SMart eSolutions provides the ability of the device to
automatically send data to Xerox to be used for billing (MeterAssistant) and toner replenishment
(SuppliesAssistant).
There are three ways to register a device for SMart eSolutions:
Client Direct registration (Default)
SMart eSolutions Windows Client
CentreWare Web
For a full description of SMart eSolutions and to download the applications (SMart eSolutions Win dows
Client or CentreWare Web), refer to www.xerox.com/smartesolutions.
Information Checklist
Ensure the device is fully functioning on the network.
TCP/IP and HTTP protocols must be enabled on the device so that the device web browser can be
accessed. (Device Direct).
Enable SNMP (SMart eSolutions Client and CentreWare Web). If you want to use SMart eSolutions
Windows Client or CentreWare Web, visit www.xerox.com/smartesolutions.
SMart eSolutions Information
1. Open your Web Browser and enter the TCP/IP address of the machine in the Address or Location field
and press [Enter]. Your Browser will display the machine Home Page.
2. Click the [Status] tab.
3. Click [SMart eSolutions].
4. The device communication section indicates if your device is successf ully communicating to Xerox. If
there is an error in communication, select the [settings] button to update the internet proxy settings.
5. If you select settings, you will be prompted to enter the Administrator User name and password. the
default is [admin] and [1111].
6. In the Enrollment section, verify that the [Enrollment] radio button is selected.
7. In the Communications setup section, select the [setting] button if there is a communication error.
8. Enter the HTTP proxy settings and select [Apply].
Meter Assistant
Verify devices are enabled on Xerox.com
Go to www.xerox.com
Click on "Submit Meter Reads"
Login to Xerox.com, and ensure all devices are enabled for automation. If devices aren't enabled, submit
for enablement on Xerox.com. Check back on Xerox.com after 24 hours.
Supplies Assistant
Eligible devices will automatically be enabled for Supplies Assistant once the device is registered with
Xerox.
28
Page 31

Set Permissions for Job Management
The Job Management page allows you to set permissions that allow System Administrators or general
(non-administrator) users to delete jobs from the machine print queue.
NOTE: System Administrators can always delete any job, regardless of the setting selected on the Job
Management Page.
1. Open your web browser and enter the TCP/IP address of the machine in the Addr ess or Locatio n field.
Press [Enter].
2. Click the [Properties] tab.
3. Enter the Administrator User name and password if prompted. The default is [admin] and [1111].
4. Click the symbol to the left of [General Setup].
5. Select [Job Management] in the directory tree.
6. Select [All Users] to allow any user to delete their own or any other job OR select [Administrators Only]
to allow only users with administrative access (password) to delete jobs.
7. Click [Apply] to accept the changes or [Undo] to return the settings to their previous values.
29
Page 32

Cloning
Cloning is available with the WorkCentre 7655/7665/7675.
Configuration Cloning enables you to conveniently copy the settings and web-g enerated scan templates of
one machine and transfer them to other machines operating with the same version of system software.
Groups of settings can be cloned, depending on the optional features installed on the machine. For
example, scan settings will be available for cloning only if the Network Scanning optional feature is already
installed on the source device.
After selecting the settings to be cloned, a configuration cloning file is created and saved with the
extension .dlm (downloadable module).
The configuration cloning file can then be submitted to other machines using CentreWare Internet Services
(via a web browser). The settings are transferred and applied to the recipient device.
NOTE: Optional features must be installed on the recipient machine in order to accept cloned settings.
In other words, it is not possible to install an optional feature (eg: Network Scanning or E-mail) through
the process of cloning.
All machines involved in the cloning procedure must contain the same system software version.
To verify the software version
1. Open your web browser and enter the TCP/IP address of the machine in the Addr ess or Locatio n field.
Press [Enter].
2. Click the [Properties] tab.
3. Enter the Administrator User name and password if prompted. The default is [admin] and [1111].
4. Click the symbol to the left of [General Setup].
5. Click [Configuration].
6. Scroll down to the Printer Setup area and view the System Software Version.
To Clone a machine
1. Open your web browser and enter the TCP/IP address of the machine in the Addr ess or Locatio n field.
Press [Enter].
2. Click the [Properties] tab.
3. Enter the Administrator User name and password if prompted. The default is [admin] and [1111].
4. Click the symbol to the left of [General Setup].
5. Select [Cloning] in the directory tree.
6. From the display of available groups, select the settings that you wish to clone. To clone all features,
select [Clone], or to customize the configuration file disable any of the features by clicking the
checkboxes next to the feature(s) and then select Clone.
7. Right-click on the .dlm link that appears and select [Save Target As].
To Install the Clone File on another machine
1. On the Status tab, click [Welcome].
2. Click [I Have A Cloning File].
3. Enter the admin tools user name (default of admin) and password (default of 1111).
4. Click [Browse] to locate your file.
5. Click [Open], then click [Install].
30
Page 33

The Banner Sheet
When documents are sent to print at the machine, a ba nner sheet is printed identifying the PC that sent the
print job. It is possible to disable this setting both within the printer driver and from the machine
administrator tools. These instructions describe how to disable the banner sheet from the machine.
At the Machine
1. Press the [Log In / Out] button to enter the Tools pathway.
2. On the keypad enter [admin], then [1111] or the current password. Touch the [Enter] button when
finished.
3. Touch [Machine Status], then the [Tools] tab.
4. Touch [User Interface Settings].
5. Touch [Job Sheets].
6. Touch [Banner Sheets].
7. Touch the [Disabled] button.
8. Touch the [Save] button.
9. Touch [Log In / Out] to exit the Tools pathway.
31
Page 34

Saving and Reprinting Jobs
The Save Job for Reprint feature allows users to store print jobs on the device from their print driver, or the
Print page of Internet Services, then select the job from the device’s User Interface for reprinting.
This feature can be enabled and configured by the System Administrator from the Properties page of
Internet Services (the series of web pages, hosted on the embedded HTTP server of the machine).
Enabling the feature at a TCP/IP Networked Workstation
1. Open your web browser and enter the TCP/IP address of the machine in the Addr ess or Locatio n field.
Press [Enter].
2. Click the [Properties] tab.
3. Provide the current administrator tools user name and password, if prompted. The default is [admin]
and [1111].
4. Click the symbol to the left of [Services].
5. Click the symbol to the left of [Reprint Saved Jobs].
6. Click on [Enablement].
7. Select [Enabled] to enable the feature. Note that if you select [Disabled], two radio buttons will
become available. In this case, selecting [Retain All Jobs] will retain all saved jobs currently on the
system. Alternatively, [Delete All Jobs] will delete all saved jobs currently on the system.
Backup Saved Jobs
1. Select [Backup Jobs] to back up saved jobs stored on the system.
2. Under Settings, from the [Protocol] drop -down menu, note that only FTP is available.
3. Select either the [IP Address] or [Host Name] radio button for your FTP server.
4. Specify the IP address or host name of the repository.
5. For [Document Path], specify the path to the file repository.
6. For [File Name], type the file name for the backup. This name will be appended onto the end of the
document path.
7. For [Login Name], if you selected System for Login Credentials (referring to FTP repository in the
Network Scanning topic), then you must specify the system login name here.
8. For [Password] and [Retype Password], if you selected System for the login credentials, then you can
specify and confirm the system password here. The password may be blank.
9. Click [Select to Save New Password] for an existing Login Name. You must then click the Start button
at the bottom of the page to implement the password change.
10. Click [Start] to begin the backup process, or [Undo] to cancel any changes.
32
Page 35

Restore Saved Jobs
1. Select [Backup Jobs] to restore saved jobs stored on a repository.
Note that the following will happen when Saved Jobs are restored. All current Saved Jobs data
will be immediately deleted. The restore process may take considerable time to complete depending
on how many files were backed up. The restored Saved Jobs data is not appended to the existing
Saved Jobs If the restore is aborted, the Default Public Folder will be empty.
2. Under Settings, from the [Protocol] drop -down menu, note that only FTP is available.
3. Select either the [IP Address] or [Host Name] radio button for your FTP server.
4. Specify the IP address or host name of the repository.
5. For [Document Path], specify the path to the file repository.
6. For [File Name], type the file name for the backup to restore. This name will be appended onto the end
of the document path.
7. For [Login Name], if you selected System for Login Credentials (referring to FTP repository in the
Network Scanning topic), then you must specify the system login name here.
8. For [Password] and [Retype Password], if you selected System for the login credentials, then you can
specify and confirm the system password here. The password may be blank.
9. Click [Select to Save New Password] for an existing Login Name. You must then click the Start button
at the bottom of the page to implement the password change.
10. Click [Start] to begin the restore process, or [Undo] to cancel any changes.
33
Page 36

Online / Offline
The Online/Offline window allows the System Administrator to stop and resume the system from receiving
or sending jobs over the network.
At the Machine
1. Press the [Log In / Out] button to enter the Tools pathway.
2. On the keypad enter [admin], then [1111] or the current password. Touch the [Enter] button when
finished.
3. Touch [Machine Status], then the [Tools] tab.
4. Touch [Connectivity and Network Setup].
5. Touch [General], then touch [Online/Offline].
6. To stop the machine receiving or sending jobs over the network touch the [Offline] button. Any installed
optional features using the network (eg: Network Scanning) will not be available until the machine is
set to Online.
To enable the machine to receive or send jobs over the network touch the [Online] button.
7. Touch the [Close] button.
8. Touch [Log In / Out] to exit the Tools pathway.
34
Page 37

Auditron
The Auditron is a feature of the machine which automatically tracks copy usage for analysis and billing
purposes. There are two types of Auditron, an Internal Auditron and an External Auditron called Netwo rk
Accounting. Network Accounting is run over the network and the accounting functions are perfor me d
remotely via third party so ftware. Refe r to the Network Acco unting topic in the Options section of this guide
for further information.
For detailed instructions on how to set up the Internal Auditron refer to the Training and Information CD2
delivered with your machine.
For reference purposes, the path to Internal Auditron settings at the machine is: press the Log In / Out
button, supply the admin password to enter the Tools screen, select Accounting, select Accounting
Enablement, select Accounting Mode, select Auditron, select Configure User Accounts, and follow the onscreen instructions.
35
Page 38

Auxiliary (Foreign Device) Interface Kit
A third party access and accounting device such as a coin operated device or a card reader can be
attached to the machine. To enable this option the Foreign Device Interface Kit must be installed. After the
kit is installed the administrator must enable Auxiliary Access as the Accounting Mode from the Tools
menu of the machine.
The menu path to follow at the machine is:
1. Press the Log In / Out button.
2. Log into the machine as admin, with a default password of 1111.
3. From Tools, press the Accounting button.
4. Press Accounting Mode.
5. Press Auxiliary Access and select available buttons to configure your device.
For further instructions on Auxiliary (Foreign Device) Interface Setup options refer to the Training and
Information CD2 delivered with your machine.
36
Page 39

SNMP
It is possible to remotely define and modify GET, SET, and Trap SNMP (Simple Network Management
Protocol) community names for the machine. You can also configure SNMP trap destinat ions for TCP/IP
and NetWare (IPX) that will receive traps from any machine on the network.
SNMP Community Name properties that can be configured are:
GET Returns the password for SNMP GET requests to the machine. Applications obtaining
information from the device via SNMP, such as Xerox PrinterMap or CentreWare, use this password.
SET Returns the password for SNMP SET requests to the machine. Applications that set information
on the device via SNMP, such as Xerox PrinterMap or CentreWare, use this password.
TRAP Returns the password for SNMP TRAPS from the machine. This is the default password for
SNMP TRAPS sent from the device via SNMP.
SNMP Community Names
1. Open your Web browser and enter the TCP/IP addre ss of the machine in the Address or Location field.
Press [Enter].
2. Click the [Properties] tab.
3. Enter the Administrator User name and password if prompted. The default is [admin] and [1111].
4. Click the symbol to the left of [Connectivity].
5. Click the symbol to the left of [Protocols].
6. Select [SNMP] in the directory tree. You may be prompted for the current tools administrator user
name and password. The default is [admin] and [1111]. Click [OK].
7. Check the [Enable] box to enable the protocol.
8. To edit SNMP properties click [Edit].
9. Enter a name (up to 256 characters) for the [GET Community Name]. The default is public.
10. Enter a name (up to 256 characters) for the [SET Community Name]. The default is private.
CAUTION: If you change the GET and/or SET Community Names, you must change all network
applications that are communicating via SNMP with this machine to use the new GET/SET names.
11. Enter a name (up to 256 characters) for the default [TRAP Community Name]. The default is
SNMP_trap. The Default TRAP community name is used to specify the default community name for all
traps generated by this machine.
12. Check the box if you wish to enable [Authentication Failure Generic Traps]. When the Authentication
Failure Generic Trap is enabled, the machine will generate a trap for every SNMP request that is
received which contains an invalid community name.
Tray Destination Addresses
13. Click the [Advanced] button.
14. Click add [IP Address] or [IPX Address] in the Trap Destination addresses box.
15. Enter the required trap details.
16. Click [Apply] to accept the changes, [Cancel] to return the settings to their previous values and return
to the SNMP Properties screen, or [Undo] to return the settings to their default values but remain in the
Community Names screen.
17. When finished, click [Apply] to accept the changes or [Undo] to return the settings to their previous
values.
37
Page 40

Software Upgrade via Network Connection
WARNING: This procedure will delete any current jobs in the machine print queue and prevent
further jobs from printing until the upgrade has completed. If you wish to preserve these jobs,
allow them to complete before upgrading your software. All configured network settings and
installed options will be retained by the machine after the Software Upgrade process.
Prepare for the Upgrade
Obtain the new software upgrade file for your machine from the www.xerox.com web site or from your
Xerox Customer Support Representative. Download the upgrade file to a local or network drive. You will
be able to delete the file after the upgrade procedure.
It is important to obtain the correct upgrade file for your machine. Determine the software version you are
currently running, as follows.
1. Open your Web browser and enter http: // an d th e TC P/IP address of the machine in the Address or
Location field. Press [Enter].
2. Click the [Properties] tab.
3. Enter the Administrator User name and password if prompted. The default is [admin] and [1111].
4. Click the symbol to the left of [General Setup].
5. Click [Configuration] and scroll down to the Printer Setup section to see your System Software version.
At the Machine
1. Press the [Log In / Out] button to enter the Tools pathway.
2. On the keypad enter [admin], then [1111] or the current password. Touch the [Enter] button when
finished.
3. Touch [Machine Status], then the [Tools] tab.
4. Touch [Connectivity and Network Setup].
5. Touch [General].
6. Touch [Remote Software Upgrade].
7. Touch [Enable].
8. Touch [Save].
9. Touch [Log In / Out] to exit the Tools pathway.
At your Workstation
10. Open your Web browser and enter htt p: // an d th e TCP/IP address of the machine in the Address or
Location field. Press [Enter].
11. Click the [Properties] tab.
12. Enter the Administrator User name and password if prompted. The default is [admin] and [1111].
13. Click the symbol to the left of [General Setup].
14. Click the symbol to the left of [Machine Software].
15. Click [Manual Upgrade].
38
Page 41

16. Enter the current administrator tools User Name and Password. The default is admin and 1111.
17. Note the current software level in the Last Successful Upgrade box.
18. In the Manual Upgrade box select [Browse] to locate the software upgrade file obtained earlier.
19. Select the file and click [Open].
20. Click the [Install Software] button to proceed with the upgrade. The file will be sent to the printer and
will disable the printing functionality. The web browser will become inactive and you will not be able to
access the machine via this method until the upgrade has completed and the machine has rebooted.
The upgrade should take no longer than 15 minutes.
21. Once the machine has completed the upgrade it will reboot automatically. The configuration report will
print (if it was enabled in the Tools set up). When the machine is accessible from a web browser, view
the software version on the Internet Services Manual Upgrade pa ge, or ch eck th e configu ratio n repo rt
to verify that the software level has changed.
NOTE: Your device can be set to automatically schedule machine software upgrades from a central
server at a specific time on a regular basis. For instructions click the Software Upgrade link to the left
of the page and select Auto.
You have completed the steps to perform a manual software upgrade.
39
Page 42

Software Upgrade: Auto
Your device can be set to automatically schedule machine software upgrades from a central server.
WARNING: This procedure will delete any current jobs in the machine print queue and prevent
further jobs from printing until the upgrade has completed. If you wish to preserve these jobs,
allow them to complete before upgrading your software. All configured network settings and
installed options will be retained by the machine after the Software Upgrade process.
Before You Start
1. Determine your current System Software Version number.
a. Enter the IP address of the machine in your web browser and press [Enter].
b. Click the [Properties] tab.
c. Enter the Administrator User name and password if prompted. The default is [admin] and [1111].
d. Click the symbol to the left of [General Setup].
e. Click [Configuration].
f. Scroll down to Printer Setup to see your version number.
2. Contact your Xerox Customer Support Representative to make certain that Auto Upgrading is
appropriate for your machine. If it is not, refer to the Software Upgrade via Network Connection topic
for manual upgrade instructions.
Go to the Machine
3. Press the [Log In / Out] button to enter the Tools pathway.
4. On the keypad enter [admin], then [1111] or the current password. Touch the [Enter] button when
finished.
5. Touch [Machine Status], then the [Tools] tab.
6. Touch [Connectivity and Network Setup].
7. Touch [General].
8. Touch [Remote Software Upgrade].
9. Touch [Enable].
10. Touch [Save].
11. Touch [Log In / Out] to exit the Tools pathway.
40
Page 43

Set the Auto Upgrade Time
12. At your Workstation, open your Web browser and enter the TCP/IP address of the machine in the
Address or Location field. Press [Enter].
13. Click the [Properties] tab.
14. Enter the Administrator User name and password if prompted. The default is [admin] and [1111].
15. Click the symbol to the left of [General Setup].
16. Click the symbol to the left of [Machine Software].
17. Click [Auto Upgrade].
18. Check the [Enabled] box to enable the Auto Upgrade feature.
19. Select either [Hourly] or [Daily] to activate the feature accordingly, in the Refresh Start Time section.
20. If [Daily] has been selected, enter the required time for the upgrade to be performed.
21. Enter the IP address of the server where the software upgrade file (obtained earlier) is located, in the
[File Server IP Address] field.
22. Enter the path to the upgrade file on the server in the [Directory Path] field.
23. Enter the [Login Name] and [Password] for the server.
24. Click [Apply] to accept the changes.
The upgrade will now be performed automatically on the machine at the time specified. Once the upgrade
process starts network connectivity with the machine will be unavailable, including access from Internet
Services. The upgrade progress can be monitored from the machine screen interface.
You have completed the steps to automatically upgrade the machine software.
41
Page 44

Protocols
NetWare
Configure NetWare Settings
1. Open your Web browser and enter the TCP/IP addre ss of the machine in the Address or Location field.
Press [Enter].
2. Click the [Properties] tab.
3. Enter the Administrator User name and password if prompted. The default is [admin] and [1111].
4. Click the symbol to the left of [Connectivity].
5. Click the symbol to the left of [Protocols].
6. Select [NetWare] in the directory tree.
7. Select [Enabled] to enable NetWare.
8. Select Filing Transport (IP or IPX).
9. Select the required [Frame Type] from the pull down list.
10. Type a polling rate for the print server in [Queue Poll Interval] (1-240 seconds. The default is 5).
11. Enter the [Print Server Name] The default name is XRX_MAC address.
12. Enter the print server password in the [New Print Server Password] box, then re-enter it in the [Retype
New Print Server Password] box. Place a checkmark in the [Select to save new password] box.
Service Advertising Protocol (SAP)
13. Select [Enabled] if you wish to enable SAP.
14. Enter the [SAP Frequency] (from 15 -300 seconds or enter 0 for none. The default is 60).
Bindery Settings
15. If using NetWare in Bindery mode, enter the names of up to four primary [F ile Servers] for the machine
in the Bindery Settings box.
42
Page 45

NetWare Directory Services (NDS)
16. If using NetWare NDS (NetWare Directory Services), enter a directory tree and context for the
machine in [NDS Tree] and [NDS Context] in the Netware Directory Services (NDS) box. Note that you
can also select the IP Address or Host Name radio buttons to specify the server used in the IP
environment.
17. Click [Apply] to accept the changes or [Undo] to return the settings to their previous values.
NOTE: The settings are not applied until you reboot the machine.
18. Click the [Status Tab] link.
19. Click the [Reboot Machine] button and click [OK] to reboot the machine. The network controller takes
approximately 5 minutes to reboot and network connectivity will be unavailable during this time.
NDPS/NEPS
For The Xerox NDPS/NEPS Agent, documentation, and printer drivers visit the Xerox web site at
www.xerox.com.
Novell Distributed Print Services (NDPS) / Novell Enterprise Print Services (NEPS) are products built on
Novell's printing architecture that allow administrators to take advantage of built-in printer intelligence to
centrally manage network printing resources from anywhere on the network, improve network printing
performance, and reduce the hassles of network printing for end-users.
The Xerox NDPS/NEPS Solution allows you to use Novell NDPS/NEPS with many of the latest Xerox
printers. It includes administrative tools that snap-in to NWAdmin that enables users to easily configure
and manage their network print services. It also has a set of NetWare Loadable modules that run on the
NetWare server.
NetWare users will appreciate the ease of automatically creating a printer object in the NDS tree and
automatic driver download capability, eliminating individual driver installation by downloading the driver as
users connect to a printer. Network users can perform remote, up-to-the-minute status checks or define
meaningful notifications for their Xerox network printers.
43
Page 46

Windows 2000
Configure TCP/IP and SLP Settings
1. Open your Web browser and enter the TCP/IP addre ss of the machine in the Address or Location field.
Press [Enter].
NOTE: TCP/IP and HTTP should have been initially configured per the Introduction: Read Me of this
guide. If necessary, refer to the Read Me topic and follow the steps provided.
2. Click the [Properties] tab.
3. Enter the Administrator User name and password if prompted. The default is [admin] and [1111].
4. Click the symbol to the left of [Connectivity].
5. Click the symbol to the left of [Protocols].
6. Select [TCP/IP] in the directory tree.
7. Check [Enabled] to enable the TCP/IP protocol.
CAUTION: Disabling TCP/IP or changing the IP Address will affect NetBIOS/IP, LPR/LPD, FTP, SNMP,
and Raw TCP/IP printing. If TCP/IP is disabled, Internet Services will not be available until TCP/IP is
enabled from the control panel of the machine. If you change the IP address, you must reference the new
address within your web browser to locate the device.
8. Enter a unique [Host Name] for your machine.
9. Select the desired method for obtaining a Dynamic IP address from the [IP Address Resolution] dropdown list, or select Static to give the machine a static IP address.
10. If you select [Static], type the IP addresses that apply in [Machine IP Address, Subnet Mask], and
[Gateway Address].
NOTE: If BOOTP or DHCP address resolution mode is selected, you cannot change the IP address,
Subnet Mask, or default gateway. If RARP address resolution mode is selected, you cannot change
the IP address. Select Static if you wish to disable dynamic addressing.
Domain Name
11. Enter a valid [Domain Name].
44
Page 47

DNS Configuration
12. Enter an IP address for the [Preferred DNS Server]. Enter an IP address for [Alternate DNS Servers 1]
and [2].
13. Check the box to enable [Dynamic DNS Registration (DDNS)].
NOTE: If your DNS Server does not support dynamic updates there is no need to enable DDNS.
14. Check the [Enable] box under DHCP/DDNS Release Registration ONLY if you wish to release this
machine's IP address upon reboot. Default is unchecked.
15. Check the [Enabled] box for Self Assigned Address, under Zero-Configuratio n Networking, to support
communicating with other devices using 169.254/16 IPv4 addressing, over the same physical or
logical link (such as in ad hoc, or isolated (non-DHCP) networks). Refer to the IETF web site for
zeroconf details.
16. Check the [Enabled] box for Multicast DNS to resolve host names to IPv4 addresses without using a
conventional DNS server.
Supporting LPR Printing
1. Select LPR/LPD in the directory tree.
2. Check the Enabled box to enable LPR/LPD.
Configure SLP (if needed to support CUPS, Mac OS, and NetWare)
1. Select [SLP] in the directory tree.
2. Check the [Enabled] box to enable Service Location Protocol (SLP).
3. Enter an [IP address] for the Directory Agent, if required.
4. Enter the required name(s) for [Scope 1,2,3].
5. Select the Message type from the drop down list for [Multicast or Broadcast].
6. Enter a value for [Multicast Radius] (0-255).
7. Enter a value for MTU to set the Maximum Transmission Unit (484 - 32768), with 1400 as the default.
This allows you to set the maximum packet size for SLP.
8. Click [Apply] to accept the changes or [Undo] to return the settings to their previous values.
NOTE: The settings are not applied until you restart the machine.
9. Click the [Status] tab.
10. Click the [Reboot Machine] button and click [OK] to reboot the machine. The network controller takes
approximately 5 minutes to reboot and network connectivity will be unavailable during this time
45
Page 48

Configure Raw TCP/IP Printing
NOTE: TCP/IP must be enabled before Raw TCP/IP Printing is enabled.
Raw TCP/IP is a printing method used to open a TCP socket-level connection, over Port 9100, to stream a
print-ready file to the printer's input buffer, and then to close the connection after sensing an End Of Job
indicator in the Page Description Language, or after expiratio n of a preset timeout value. Port 9100 printing
does not require a Line Printer Request (LPR) from the workstation, or the use of a Line Printer Da emon
(LPD) running on the printer. Raw TCP/IP printing is selected in Windows 2000 as the Standard TCP/IP
port.
1. Open your Web browser and enter the TCP/IP addre ss of the machine in the Address or Location field.
Press [Enter].
2. Click the [Properties] tab.
3. Enter the Administrator User name and password if prompted. The default is [admin] and [1111].
4. Click the symbol to the left of [Connectivity].
5. Click the symbol to the left of [Protocols].
6. Select [Raw TCP/IP Printing] in the directory tree.
7. Ensure the [Enabled] box is checked to enable Raw TCP/IP Printing.
8. Leave the [TCP Port Number] set to 9100 for Port 1. If two additional ports are available, click [Default
All] to see if they set to 9101 and 9102 respectively (emulating HP JetDirect EX Plus 3).
9. Leave the [Bidirectional] and [Maximum Connections] settings at their default values.
10. Set the [End of Job Timeout] to the number of seconds to wait before processing a job without an End
Of Job indicator.
11. Leave the [PDL Switching] Enabled box at its default value.
12. Click [Apply] to accept the changes, [Undo] to return the settings to their previous values, or [Default
All] to enter printer defaults for all settings (recommended).
NOTE: The settings are not applied until you restart the machine.
13. Click the [Status Tab] link.
14. Click the [Reboot Machine] button and click [OK] to reboot the machine. The network controller takes
approximately 5 minutes to reboot and network connectivity will be unavailable during this time.
46
Page 49

Create an IPP Printer (Internet Printing Protocol)
Information Checklist
Before starting the installation procedure, please ensure that you have performed the following, critical
steps.
1. TCP/IP and HTTP (which supports IPP) should have been initially configured per the Introduction:
Read Me of this guide. If necessary, refer to the Read Me topic and follow the steps provided. This will
set up the device to communicate over the TCP/IP network and enable use of the Web User Interface
(CentreWare Internet Services).
2. In support of the use of domain names to communicate with the printer, make sure that DNS (domain
name service) is enabled on the printer and configured to use your DNS Server. For the path to these
settings, refer to the Read Me topic in this guide.
Enable Port 9100 as additional support for HTTP (IPP) printing
1. Open your Web browser and enter the TCP/IP addre ss of the machine in the Address or Location field.
Press [Enter].
2. Click the [Properties] tab.Enter the Administrator User name and password if prompted. The default is
[admin] and [1111].
3. Click the symbol to the left of [Connectivity].
4. Click the symbol to the left of [Protocols].
5. Select [Raw TCP/IP Printing] in the directory tree.
6. Ensure the [Enabled] box is checked to enable Raw TCP/IP Printing.
7. Leave the [TCP Port Number] set to 9100 for Port 1. If two additional ports are available, click [Default
All] to see if they set to 9101 and 9102 respectively (emulating HP JetDirect EX Plus 3).
8. Leave the [Bidirectional] and [Maximum Connections] settings at their default values.
9. Set the [End of Job Timeout] to the number of seconds to wait before processing a job without an End
Of Job indicator.
10. Leave the [PDL Switching] Enabled box at its default value.
47
Page 50

11. Click [Apply] to accept the changes.
NOTE: The settings are not applied until you restart the machine.
12. Click the [Status Tab] link.
13. Click the [Reboot Machine] button to reboot the machine. The network controller takes approximately 5
minutes to reboot and network connectivity will be unavailable during this time.
14. A Configuration Report should have printed (by default) when the device rebooted. If the report did not
print, refer to the Configuration Report topic in the General Setup section of this guide.
15. Review the settings for Raw TCP/IP Printing under the heading TCP/IP Settings. These settings
should read as follows:
a. Raw TCP/IP Printing Enabled: Enabled
b. Raw TCP/IP Port Number: 9100
Create an IPP Printer at your Workstation
Verify the correct software is loaded
16. At the Desktop, right mouse click the [My Network Places] icon.
17. Select [Properties].
18. Right mouse click on the [Local Area Connection] icon.
19. Click [Properties].
20. Verify that the [Internet Protocol (TCP/IP)] protocol has been loaded.
48
Page 51

Install the Printer Driver
21. From the [Start] menu, select [Settings] and then [Printers] (Windows 2000) or [Printers and Faxes]
(Windows XP). The Vista path is Start\Control Panel\Printer(s).
22. Double-click [Add Printer] and click [Next].
23. Verify that [Network Printer] is selected and click [Next].
24. The [Locate Your Printer] (Windows 2000) or [Specify a Printer] (Windows XP) screen will appear.
25. To create an IPP printer select [Connect to a printer on the Internet or on your intranet].
26. Type [HTTP:// followed by the printer's fully qualified Domain name or IP address] in the URL field. The
Printer Name can be either the Host Name or the SMB Host Name as shown on the machine
configuration report, depending on the name resolution used by your network (WINS or DNS).
27. Click [Next].
28. Select [Have Disk] and browse to the location of the printer driver (.INF).
29. Click [OK] to install the printer driver.
30. Select the Printer Model and Click [Next].
31. Select [Yes] if you wish to make this the default printer.
32. Select [Yes] to print a Test Page. Verify that it prints at the machine.
33. Click [Finish].
CentreWare Internet Services
Once installed an IPP printer should provide a link directly to the Internet Services web pages.
To Access CentreWare Internet Services
34. From the [Start] menu select [Settings] and then [Printers] .
35. Click on the machine printer icon and a Get More Info link will appear in the left hand pane of the
window.
36. Click the [Get More Info] link to go to straight to the machine home page.
For more information on how to use Internet Services refer to the Read Me topic of this guide.
You have completed the installation of an IPP port and printer drivers.
49
Page 52

Configure Microsoft Networking and WINS (Windows Internet Naming Service)
Configure Microsoft Networking
1. Open your Web browser and enter the TCP/IP addre ss of the machine in the Address or Location field.
Press [Enter].
2. Click the [Properties] tab.Enter the Administrator User name and password if prompted. The default is
[admin] and [1111].
3. Click the symbol to the left of [Connectivity].
4. Click the symbol to the left of [Protocols].
5. Select [Microsoft Networking] in the directory tree.
6. Check the [Enabled] box to enable Microsoft Networking.
7. Select TCP/IP or NetBIOS from the [Transport] drop-down list.
8. Enter the maximum number of connections allowed in [Maximum Connections]. The range is 10 - 30.
9. Enter the Connection Timeout in the available box. The range is 1 - 32767 seconds.
10. Enter the workgroup name in the [Workgroup] box.
11. Enter the [SMB Host Name] and type a descriptive comment in [SMB Host Name Comment] (optional).
12. Type the [Share Name] and type a descriptive comment in [Share Name Comment] (optional).
Configure WINS (if used)
13. Check the [Enabled] box to enable WINS.
14. Enter the IP Address of a Primary WINS server, and port.
15. Enter the IP Address of a Secondary WINS server and port.
NOTE: If DHCP is configured, WINS IP Address(es) will be overridden.
16. Click [Apply] to accept the changes or [Undo] to return the settings to their previous values.
NOTE: The settings are not applied until you reboot the machine.
17. Click the [Status Tab].
18. Click the [Reboot Machine] button and click [OK] to reboot the machine. The network controller takes
approximately 5 minutes to reboot and network connectivity will be unavailable during this time.
50
Page 53

Windows 2000 over AppleTalk
Information Checklist
Before starting the installation procedure, please ensure the following items are available:
1. An existing operational AppleTalk network with a Windows 2000 computer equipped with an Ethernet
network interface card.
2. The AppleTalk Name you wish to assign to your printer.
3. The AppleTalk Zone (if used) in which your printer will reside.
4. Ethernet Cable.
5. The CentreWare Print and Fax Drivers CD (delivered with your machine). Review any README file
contained with the printer drivers.
Enabling AppleTalk on the device
1. Open your Web browser and enter the TCP/IP addre ss of the machine in the Address or Location field.
Press [Enter].
2. Click the [Properties] tab.
3. Enter the Administrator User name and password if prompted. The default is [admin] and [1111].
4. Click the symbol to the left of [Connectivity].
5. Click the symbol to the left of [Protocols].
6. Select [AppleTalk] in the directory tree.
7. Check the [Enabled] box to enable the Protocol.
8. Type a name for the machine in [Printer Nam e]. The default name is XRX_MAC addr ess. Also note the
default star symbol for zone, which lets the closest ro uter assign the machine to a zone.
51
Page 54

9. Click [Apply] to accept the changes or [Undo] to return the settings to their previous values.
NOTE: The settings are not applied until you reboot the machine.
10. Click the [Status] tab.
11. Click the [Reboot Machine] button to reboot the machine. The network controller takes approximately 5
minutes to reboot and network connectivity will be unavailable during this time.
12. A Configuration Report should have printed by default when the machine rebooted . Loo k at the repor t
to verify AppleTalk settings.
13. If the Configuration Report did not print, press the [Machine Status] button.
14. Touch [Print Reports].
15. Touch [Configuration Report].
16. Touch [Print Selected Report].
17. Touch [Close].
At the Windows 2000 Desktop
18. Right mouse click [My Network Places].
19. Select [Properties].
20. Right mouse click on the network connection you want to configure AppleTalk on, and then click
[Properties]. The Connection Properties dialog box opens.
21. On the General tab, if the AppleTalk Protocol is in the list of installed protocols, make sure that it is
selected. If the AppleTalk protocol is not listed, install it using the documentation pr ovided by
Microsoft. Then return to the next step in this document.
22. Click [Start], [Settings], then [Printers].
23. Double-click the Add Printer icon to start the Add Printer Wizard.
24. Click [Next].
25. Click [Local Printer]. Deselect the Automatically detect and install my Plug and Play printer option.
26. Click [Next].
27. Click [Create a New Port].
28. Select [AppleTalk Printing Devices] and click [Next].
29. In the Available AppleTalk Printing Devices box, click the printer you want to connect to. It may be
necessary to double-click the required Zone to locate the printer. Click [OK].
52
Page 55

NOTE: You may be asked whether you want to capture the AppleTalk pr int device. If you are prompted
to do this and you are unsure how to respond, click the Help button and read the help file for an
explanation of capturing AppleTalk print devices.
IMPORTANT: Capturing the printer may prevent other computers from printing to this printer. For more
information refer to Microsoft.
30. Click [Have Disk]. Load the CentreWare Print and Fax Drivers CD into your CD drive.
31. Click [Browse] and locate the CD drive.
32. Locate the folder containing printer drivers on the CD and select the required Windows 2000 printer
driver.
33. Select [Open].
34. Select [Open] again, if necessary.
35. Select [OK].
36. Select your printer model from the list and click [Next].
37. Type a name for the printer (or accept the default name), and then click [Next].
38. If you want this to be your default printer click [Yes].
39. Click [Next].
40. If you want to share this printer from your computer, click [Share As:]. Enter a share name (or acc ep t
the default name), then click [Next].
41. If you want to print a test page, click [Yes], then click [Finish].
53
Page 56

Windows XP
Configure TCP/IP and SLP Settings
1. Open your Web browser and enter the TCP/IP addre ss of the machine in the Address or Location field.
Press [Enter].
NOTE: TCP/IP and HTTP should have been initially configured per the Introduction: Read Me of this
guide. If necessary, refer to the Read Me topic and follow the steps provided.
2. Click the [Properties] tab.
3. Enter the Administrator User name and password if prompted. The default is [admin] and [1111].
4. Click the symbol to the left of [Connectivity].
5. Click the symbol to the left of [Protocols].
6. Select [TCP/IP] in the directory tree.
7. Check [Enabled] to enable the TCP/IP protocol.
CAUTION: Disabling TCP/IP or changing the IP Address will affect NetBIOS/IP, LPR/LPD, FTP, SNMP,
and Raw TCP/IP printing. If TCP/IP is disabled, Internet Services will not be available until TCP/IP is
enabled from the control panel of the machine. If you change the IP address, you must reference the new
address within your web browser to locate the device.
8. Enter a unique [Host Name] for your machine.
9. Select the desired method for obtaining a Dynamic IP address from the [IP Address Resolution] dropdown list, or select Static to give the machine a static IP address.
10. If you select [Static], type the IP addresses that apply in [Machine IP Address, Subnet Mask], and
[Gateway Address].
NOTE: If BOOTP or DHCP address resolution mode is selected, you cannot change the IP address,
Subnet Mask, or default gateway. If RARP address resolution mode is selected, you cannot change
the IP address. Select Static if you wish to disable dynamic addressing.
Domain Name
11. Enter a valid [Domain Name].
54
Page 57

DNS Configuration
12. Enter an IP address for the [Preferred DNS Server]. Enter an IP address for [Alternate DNS Servers 1]
and [2].
13. Check the box to enable [Dynamic DNS Registration (DDNS)].
NOTE: If your DNS Server does not support dynamic updates there is no need to enable DDNS.
14. Check the [Enable] box under DHCP/DDNS Release Registration ONLY if you wish to release this
machine's IP address upon reboot. Default is unchecked.
15. Check the [Enabled] box for Self Assigned Address, under Zero-Configuratio n Networking, to support
communicating with other devices using 169.254/16 IPv4 addressing, over the same physical or
logical link (such as in ad hoc, or isolated (non-DHCP) networks). Refer to the IETF web site for
zeroconf details.
16. Check the [Enabled] box for Multicast DNS to resolve host names to IPv4 addresses without using a
conventional DNS server.
Supporting LPR Printing
1. Select LPR/LPD in the directory tree.
2. Check the Enabled box to enable LPR/LPD.
Configure SLP (if needed to support CUPS, Mac OS, and NetWare)
1. Select [SLP] in the directory tree.
2. Check the [Enabled] box to enable Service Location Protocol (SLP).
3. Enter an [IP address] for the Directory Agent, if required.
4. Enter the required name(s) for [Scope 1,2,3].
5. Select the Message type from the drop down list for [Multicast or Broadcast].
6. Enter a value for [Multicast Radius] (0-255).
7. Enter a value for MTU to set the Maximum Transmission Unit (484 - 32768), with 1400 as the default.
This allows you to set the maximum packet size for SLP.
8. Click [Apply] to accept the changes or [Undo] to return the settings to their previous values.
NOTE: The settings are not applied until you restart the machine.
9. Click the [Status] tab.
10. Click the [Reboot Machine] button and click [OK] to reboot the machine. The network controller takes
approximately 5 minutes to reboot and network connectivity will be unavailable during this time.
55
Page 58

Configure Raw TCP/IP Printing
NOTE: TCP/IP must be enabled before Raw TCP/IP Printing is enabled.
Raw TCP/IP is a printing method used to open a TCP socket-level connection, over Port 9100, to stream a
print-ready file to the printer's input buffer, and then to close the connection after sensing an End Of Job
indicator in the Page Description Language, or after expiratio n of a preset timeout value. Port 9100 printing
does not require a Line Printer Request (LPR) from the workstation, or the use of a Line Printer Da emon
(LPD) running on the printer. Raw TCP/IP printing is selected in Windows 2000 as the Standard TCP/IP
port.
1. Open your Web browser and enter the TCP/IP addre ss of the machine in the Address or Location field.
Press [Enter].
2. Click the [Properties] tab.
3. Enter the Administrator User name and password if prompted. The default is [admin] and [1111].
4. Click the symbol to the left of [Connectivity].
5. Click the symbol to the left of [Protocols].
6. Select [Raw TCP/IP Printing] in the directory tree.
7. Ensure the [Enabled] box is checked to enable Raw TCP/IP Printing.
8. Leave the [TCP Port Number] set to 9100 for Port 1. If two additional ports are available, click [Default
All] to see if they set to 9101 and 9102 respectively (emulating HP JetDirect EX Plus 3).
9. Leave the [Bidirectional] and [Maximum Connections] settings at their default values.
10. Set the [End of Job Timeout] to the number of seconds to wait before processing a job without an End
Of Job indicator.
11. Leave the [PDL Switching] Enabled box at its default value.
12. Click [Apply] to accept the changes, [Undo] to return the settings to their previous values, or [Default
All] to enter printer defaults for all settings (recommended).
NOTE: The settings are not applied until you restart the machine.
13. Click the [Status Tab] link.
14. Click the [Reboot Machine] button and click [OK] to reboot the machine. The network controller takes
approximately 5 minutes to reboot and network connectivity will be unavailable during this time.
56
Page 59

Create an IPP Printer (Internet Printing Protocol)
Information Checklist
Before starting the installation procedure, please ensure that you have performed the following, critical
steps.
1. TCP/IP and HTTP (which supports IPP) should have been initially configured per the Introduction:
Read Me of this guide. If necessary, refer to the Read Me topic and follow the steps provided. This will
set up the device to communicate over the TCP/IP network and enable use of the Web User Interface
(CentreWare Internet Services).
2. In support of the use of domain names to communicate with the printer, make sure that DNS (domain
name service) is enabled on the printer and configu red to use your DNS Server. Fo r instructions, refer
to the Read Me topic of this guide.
Enable Port 9100 as additional support for HTTP (IPP) printing
1. Open your Web browser and enter the TCP/IP addre ss of the machine in the Address or Location field.
Press [Enter].
2. Click the [Properties] tab.
3. Enter the Administrator User name and password if prompted. The default is [admin] and [1111]
4. Click the symbol to the left of [Connectivity].
5. Click the symbol to the left of [Protocols].
6. Select [Raw TCP/IP Printing] in the directory tree.
7. Ensure the [Enabled] box is checked to enable Raw TCP/IP Printing.
8. Leave the [TCP Port Number] set to 9100 for Port 1. If two additional ports are available, click [Default
All] to see if they set to 9101 and 9102 respectively (emulating HP JetDirect EX Plus 3).
9. Leave the [Bidirectional] and [Maximum Connections] settings at their default values.
10. Set the [End of Job Timeout] to the number of seconds to wait before processing a job without an End
Of Job indicator.
11. Leave the [PDL Switching] Enabled box at its default value.
57
Page 60

12. Click [Apply] to accept the changes.
NOTE: The settings are not applied until you restart the machine.
13. Click the [Status Tab] link.
14. Click the [Reboot Machine] button to reboot the machine. The network controller takes approximately 5
minutes to reboot and network connectivity will be unavailable during this time.
15. A Configuration Report should have printed (by default) when the device rebooted. If the report did not
print, refer to the Configuration Report topic in the General Setup section of this guide and follow the
steps provided.
16. Review the settings for Raw TCP/IP Printing under the heading TCP/IP Settings. These settings
should read as follows:
a. Raw TCP/IP Printing Enabled: Enabled
b. Raw TCP/IP Port Number: 9100
Create an IPP Printer at your Workstation
Verify the correct software is loaded
17. At the Desktop, right mouse click the [My Network Places] icon.
18. Select [Properties].
19. Right mouse click on the [Local Area Connection] icon.
20. Click [Properties].
21. Verify that the [Internet Protocol (TCP/IP)] protocol has been loaded.
58
Page 61

Install the Printer Driver
22. From the [Start] menu, select [Settings] and then [Printers] (Windows 2000) or [Printers and Faxes]
(Windows XP). The Vista path is Start\Control Panel\Printer(s).
23. Double-click [Add Printer] and click [Next].
24. Verify that [Network Printer] is selected and click [Next].
25. The [Locate Your Printer] (Windows 2000) or [Specify a Printer] (Windows XP) screen will appear.
26. To create an IPP printer select [Connect to a printer on the Internet or on your intranet].
27. Type [HTTP:// followed by the printer's fully qualified Domain name or IP address] in the URL field. The
Printer Name can be either the Host Name or the SMB Host Name as shown on the machine
configuration report, depending on the name resolution used by your network (WINS or DNS).
28. Click [Next].
29. Select [Have Disk] and browse to the location of the printer driver (.INF).
30. Click [OK] to install the printer driver.
31. Select the Printer Model and Click [Next].
32. Select [Yes] if you wish to make this the default printer.
33. Select [Yes] to print a Test Page. Verify that it prints at the machine.
34. Click [Finish].
CentreWare Internet Services
Once installed an IPP printer should provide a link directly to the Internet Services web pages.
To Access CentreWare Internet Services
35. From the [Start] menu select [Printers and Faxes].
36. Click on the machine printer icon and a Get More Info link will appear in the left hand pane of the
window.
37. Click the [Get More Info] link to go to straight to the machine home page.
For more information on how to use Internet Services refer to the Read Me topic in this guide.
You have completed the installation of an IPP port and printer drivers.
59
Page 62

Configure Microsoft Networking and WINS (Windows Internet Naming Service)
Configure Microsoft Networking
1. Open your Web browser and enter the TCP/IP addre ss of the machine in the Address or Location field.
Press [Enter].
2. Click the [Properties] tab.
3. Enter the Administrator User name and password if prompted. The default is [admin] and [1111]
4. Click the symbol to the left of [Connectivity].
5. Click the symbol to the left of [Protocols].
6. Select [Microsoft Networking] in the directory tree.
7. Check the [Enabled] box to enable Microsoft Networking.
8. Select TCP/IP or NetBIOS from the [Transport] drop-down list.
9. Enter the maximum number of connections allowed in [Maximum Connections]. The range is 10 - 30.
10. Enter the Connection Timeout in the available box. The range is 1 - 32767 seconds.
11. Enter the workgroup name in the [Workgroup] box.
12. Enter the [SMB Host Name] and type a descriptive comment in [SMB Host Name Comment] (optional).
13. Type the [Share Name] and type a descriptive comment in [Share Name Comment] (optional).
Configure WINS (if used)
14. Check the [Enabled] box to enable WINS.
15. Enter the IP Address of a Primary WINS server, and port.
16. Enter the IP Address of a Secondary WINS server and port.
NOTE: If DHCP is configured, WINS IP Address(es) will be overridden.
17. Click [Apply] to accept the changes or [Undo] to return the settings to their previous values.
NOTE: The settings are not applied until you reboot the machine.
18. Click the [Status Tab].
19. Click the [Reboot Machine] button and click [OK] to reboot the machine. The network controller takes
approximately 5 minutes to reboot and network connectivity will be unavailable during this time.
60
Page 63

Windows XP over AppleTalk
Information Checklist
Before starting the installation procedure, please ensure the following items are available:
1. An existing operational AppleTalk network with a Windows XP computer equipped with an Ethernet
network interface card.
2. The AppleTalk Name you wish to assign to your printer.
3. The AppleTalk Zone (if used) in which your printer will reside.
4. Ethernet Cable.
5. The CentreWare Print and Fax Drivers CD (delivered with your machine). Review any README file
contained with the printer drivers.
Enabling AppleTalk on the device
1. Open your Web browser and enter the TCP/IP addre ss of the machine in the Address or Location field.
Press [Enter].
2. Click the [Properties] tab.
3. Enter the Administrator User name and password if prompted. The default is [admin] and [1111].
4. Click the symbol to the left of [Connectivity].
5. Click the symbol to the left of [Protocols].
6. Select [AppleTalk] in the directory tree.
7. Check the [Enabled] box to enable the Protocol.
8. Type a name for the machine in [Printer Nam e]. The default name is XRX_MAC addr ess. Also note the
default star symbol for zone, which lets the closest ro uter assign the machine to a zone.
61
Page 64

9. Click [Apply] to accept the changes or [Undo] to return the settings to their previous values.
NOTE: The settings are not applied until you reboot the machine.
10. Click the [Status] tab.
11. Click the [Reboot Machine] button to reboot the machine. The network controller takes approximately 5
minutes to reboot and network connectivity will be unavailable during this time.
12. A Configuration Report should have printed by default when the machine rebooted . Loo k at the repor t
to verify AppleTalk settings.
13. If the Configuration Report did not print, press the [Machine Status] button.
14. Touch [Print Reports].
15. Touch [Configuration Report].
16. Touch [Print Selected Report].
17. Touch [Close].
At the Windows XP Desktop
18. Right mouse click [My Network Places].
19. Select [Properties].
20. Right mouse click on the network connection you want to configure AppleTalk on, and then click
[Properties]. The Connection Properties dialog box opens.
21. On the General tab, if the AppleTalk Protocol is in the list of installed protocols, make sure that it is
selected. If the AppleTalk protocol is not listed, install it using the documentation pr ovided by
Microsoft. Then return to the next step in this document.
22. Click [Start], [Settings] then [Printers and Faxes].
23. Click [Add a Printer] to start the Add Printer Wizard.
24. Click [Next].
25. Click [Local Printer]. Deselect the Automatically detect and install my Plug and Play printer option.
26. Click [Next].
27. Click [Create a New Port].
28. Select [AppleTalk Printing Devices] and click [Next].
29. In the Available AppleTalk Printing Devices box, click the printer you want to connect to. It may be
necessary to double-click the required Zone to locate the printer. Click [OK].
62
Page 65

NOTE: You may be asked whether you want to capture the AppleTalk pr int device. If you are prompted
to do this and you are unsure how to respond, click the Help button and read the help file for an
explanation of capturing AppleTalk print devices.
IMPORTANT: Capturing the printer may prevent other computers from printing to this printer. For more
information refer to Microsoft.
30. Click [Have Disk]. Load the CentreWare Print and Fax Drivers CD into your CD drive.
31. Click [Browse] and locate the CD drive.
32. Locate the folder containing printer drivers on the CD and select the required printer driver.
33. Select [Open].
34. Select [Open] again, if necessary.
35. Select [OK].
36. Select your printer model from the list and click [Next].
37. Type a name for the printer (or accept the default name), and then click [Next].
38. If you want this to be your default printer click [Yes].
39. Click [Next].
40. If you want to share this printer from your computer, click [Share As:]. Enter a share name (or acc ep t
the default name), then click [Next].
41. If you want to print a test page, click [Yes], then click [Finish].
63
Page 66

Apple Macintosh 9.x/10.x (OS X)
Apple Macintosh (AppleTalk)
AppleTalk printing is available with the WorkCentre 7655/7665/7675.
Information Checklist
Before starting the installation procedure, please ensure the following items are available:
1. An existing operational AppleTalk network with Macintosh workstation computers equipped with
Ethernet network interface cards.
2. The AppleTalk Name you wish to assign to your printer.
3. The AppleTalk Zone (if used) in which your printer will reside.
4. Ethernet Cable.
5. The CentreWare Print and Fax Drivers CD (delivered with your machine). Review any README file
contained with the printer drivers.
Enabling AppleTalk on the device
1. Open your Web browser and enter the TCP/IP addre ss of the machine in the Address or Location field.
Press [Enter].
2. Click the [Properties] tab.
3. Enter the Administrator User name and password if prompted. The default is [admin] and [1111].
4. Click the symbol to the left of [Connectivity].
5. Click the symbol to the left of [Protocols].
6. Select [AppleTalk] in the directory tree.
7. Check the [Enabled] box to enable the Protocol.
8. Type a name for the machine in [Printer Nam e]. The default name is XRX_MAC addr ess. Also note the
default star symbol for zone, which lets the closest ro uter assign the machine to a zone.
64
Page 67

9. Click [Apply] to accept the changes or [Undo] to return the settings to their previous values.
NOTE: The settings are not applied until you reboot the machine.
10. Click the [Status] tab.
11. Click the [Reboot Machine] button to reboot the machine. The network controller takes approximately 5
minutes to reboot and network connectivity will be unavailable during this time.
12. A Configuration Report should have printed by default when the machine rebooted . Loo k at the repor t
to verify AppleTalk settings.
13. If the Configuration Report did not print, press the [Machine Status] button.
14. Touch [Print Reports].
15. Touch [Configuration Report].
16. Touch [Print Selected Report].
17. Touch [Close].
Install the Print Driver
Refer to the Print and Fax Drivers Guide for Macintosh on the CentreWare Print and Fax Drive rs CD for
detailed instructions.
18. View the Configuration Report and note the Name given to the machine under AppleTalk Settings.
At the Macintosh Workstation
19. Load the CentreWare Print and Fax Drivers CD-ROM into your CD drive.
20. Open the CD and locate the [Drivers] folder.
21. Locate and open the [Mac] folder.
Instructions for 9.x
1. Double-click the installer file to install the printer driver on your Macintosh.
2. Click [Continue].
3. Click [Agree] to accept the License Agreement.
4. Click [Install].
5. Your Mac may need to be re-started. Click [Yes] to continue.
6. The driver will install. Select [Restart].
7. Once the Mac has restarted, select [Apple], then [Chooser].
65
Page 68

8. Select the printer icon, then select the Postscript Printer Name which corresponds to the name given
to the machine in AppleTalk Settings - 'Name'.
9. Select [Create].
10. Select the PostScript Printer Description (PPD) that matches your machine model.
11. Click [Select].
12. Click [Setup].
13. Click [Configure].
14. Select the installed options which correspond to your machine configuration.
15. Click OK.
16. Click OK and close the Chooser.
17. Print a document from an application to verify that the printer is installed correctly.
Instructions for 10.x (OS X)
1. Double-click to open the folder containing the drivers for version 10.x.
2. Double click to open the [machine model.dmg].
3. Double click to open the [machine model.pkg] file.
4. When the Welcome screen displays, click [Continue].
5. Click [Continue], then [Agree] to accept the License Agreement.
6. Select the required disk (if necessary) where you want to install the printer. Click [Continue].
7. Click [Install].
8. Click [Close], and restart the workstation.
66
Page 69

9. When the workstation has restarted, double click the hard drive icon.
10. Double click the Applications icon.
11. Double click the Utilities folder.
12. Double click Print Center icon.
13. Double click [Add] to add a new printer.
14. Select AppleTalk as your network protocol.
15. Select the required AppleTalk zone.
16. Select the printer that you wish to set up.
17. Select the Printer Model (that is, choose the PPD for your printer).
18. Click [Add].
19. Print a document from an application to verify that the printer is installed correctly.
View the Macintosh Printer Utility on the CentreWare Print and Fax Drivers CD.
CentreWare is a suite of applications used for installing, maintaining and using the Xerox machines.
CentreWare Macintosh Printer Utility is a CentreWare application that enables network administrators to
rename and rezone Xerox systems that are con figur ed for AppleTalk conne ctivity. Locate th e Ce ntre Wa re
Print and Fax Drivers CD-ROM delivered in the CentreWare Network Services Pack with your machine
follow the instructions contained in the CentreWare Print and Fax Drivers Guide for Macintosh.
67
Page 70

Apple Macintosh (TCP/IP)
TCP/IP printing is standard with the WorkCentre 7655/7665/7675.
Information Checklist
Before starting the installation procedure, please ensure the following items are available:
1. An existing operational TCP/IP network with Macintosh workstation computers equippe d with Ethernet
network interface cards.
2. Macintosh Operating System of 9.x or higher.
3. A live network drop and Ethernet Cable for the Macintosh workstation.
4. The printing device should already be configured with a static IP address (preferred), Sub net Mask,
and Gateway Address, as well as with a Host Name.
5. The CentreWare Print and Fax Drivers CD (delivered with your machine). Review any README file
contained with the printer drivers.
Enabling TCP/IP on the device
1. Open your Web browser and enter the TCP/IP addre ss of the machine in the Address or Location field.
Press [Enter].
2. Click the [Properties] tab.
3. Enter the Administrator User name and password if prompted. The default is [admin] and [1111].
4. Click the symbol to the left of [Connectivity].
5. Click the symbol to the left of [Protocols].
6. Select [TCP/IP] in the directory tree.
7. Verify that the printing device has been configured with a static IP address (preferred), Subnet Mask,
Gateway Address, and Host Name.
8. Verify that the Domain Name for your network has been supplied, and that DNS is enabled and
configured to resolve Host Names to IP Addresses.
9. Select LPR/LPD in the directory tree and verify that the Protocol is Enabled, and the Port Number is
set to 515.
10. If any of the above items are incorrectly set , res et them an d click App ly.
68
Page 71

11. Click the [Status] tab.
12. Click the [Reboot Machine] button to reboot the machine. The network controller takes approximately 5
minutes to reboot and network connectivity will be unavailable during this time.
13. A Configuration Report should have printed by default when the machine rebooted . Loo k at the repor t
to verify TCP/IP settings.
14. If the Configuration Report did not print, press the [Machine Status] button.
15. Touch [Print Reports].
16. Touch [Configuration Report].
17. Touch [Print Selected Report].
18. Touch [Close].
Setting up LPR Printing in Mac OS 9
1. On your Macintosh, locate and open the [Desktop Printer Utility].
2. The New Desktop Printer dialog appears. Select [Printer (LPR] from the options to create a desktop
printer using LPR printing.
3. Click [OK].
4. A dialog appears that allows you to confirm or change the LPR printer selection. Click [Change].
5. Enter the domain name or IP address of your printe r.
6. Click [Verify].
7. Click [OK].
8. Click [Create]. Enter a name with which to save your desktop printer.
9. Click [Save]. The desktop printer icon appears on your desktop.
10. Close all open dialog boxes.
Select the PPD - PostScript® Printer Definition
11. Insert the CentreWare Print and Fax Drivers CD into your CD drive.
12. Double-click the printer icon on your desktop.
13. Select [Printing].
14. Select [Change Setup].
15. Select [Change].
16. Locate the [Drivers] folder on the CD.
17. Select the appropriate PPD for OS9.x.
18. Select the options according to those installed on your machine.
19. Click [OK].
20. Print a document from an application to verify that the printer is installed correctly.
69
Page 72

Set up LPR (Line Printer Remote) Printing in Mac OSX
1. Load the CentreWare Print and Fax Drivers CD-ROM into your CD drive.
2. Open the CD and select the required language.
3. Double-click to open the [Drivers] folder.
4. Double-click to open the [Mac] folder.
NOTE: There may be more than one Print and Fax Drivers CD. If the Mac folder does not appear,
check for another Print and Fax Drivers CD.
5. Double-click to open the folder containing the drivers for version 10.x.
6. Double-click to open the [machine model.dmg] file.
7. Double click to open the [machine model.pkg] file.
8. The Welcome to the Installer dialog box appears. Click [Continue]
9. Click [Continue] and then [Agree] to accept the License Agreement.
10. Select the required disk (if necessary) where you want to install the printer. Click [Continue].
11. Click [Install].
12. Click [Close].
13. Restart your computer.
14. When your computer has restarted, open Print Centre. To do this:
15. Double-click the hard drive icon on the desktop.
70
Page 73

16. Double-click to open [Applications]
17. Double-click to open [Utilities].
18. Double-click to open [Print Center].
19. Double-click [Add] to add a new printer.
20. Select [IP Printing] from the menu.
21. Enter the IP address of the printer.
22. Select [Xerox] from the printer model list.
23. Select Xerox WCP xx/xx (according to your model) from the model name list.
24. Click [Add].
25. Print a document from an application to verify that the printer is installed correctly.
View the Macintosh Printer Utility on the CentreWare Print and Fax Drivers CD.
CentreWare is a suite of applications used for installing, maintaining and using the Xerox machines.
CentreWare Macintosh Printer Utility is a CentreWare application that enables network administrators to
rename and rezone Xerox systems that are con figur ed for AppleTalk conne ctivity. Locate th e Ce ntre Wa re
Print and Fax Drivers CD-ROM delivered in the CentreWare Network Services Pack with your machine
follow the instructions contained in the CentreWare Print and Fax Drivers Guide for Macintosh.
71
Page 74

UNIX
HP-UX Client (Version 10.x)
You can use CentreWare to configure in this environment. Click here for more information.
CentreWare for Unix
CentreWare for Unix supports a variety of Unix and Linux platforms and provides procedures which will
enable you to connect the machine in these environments. To use CentreWare for Unix to configure
printing locate the CentreWare Print and Fax Drivers CDROM delivered with your machine.
Information Checklist
Before starting the installation procedure, please ensure the following items are available or have been
performed:
1. Ensure that the correct IP Address is being used for the machine. To verify this, print a Configuration
Report from the machine.
At the Machine
2. Press the [Machine Status] button.
3. Touch the [Print Reports] button.
4. Touch [Configuration Report], touch [Print Selected Report], then touch [Close].
The configuration report will print. Verify the addresses detailed under TCP/IP Settings. If the TCP/IP
Settings are incorrectly configured, refer to the Read Me topic of this guide for the path to TCP/IP settings
at the machine.
5. Ensure the machine is connected to the network with Ethernet cabling.
6. Ensure you can PING the machine IP address from the Unix workstation
7. Locate the CentreWare Print and Fax Drivers CD (optional). The CD is contained in the CentreWare
Network Services Pack delivered with your machine.
To Configure your HP-UX Client (Version 10.x)
HP-UX workstations require specific installation steps to communicate with the machine. The machine is a
BSD style UNIX printer, whereas HP-UX is System V style UNIX. Use the correct case when entering
commands; UNIX commands are case sensitive.
1. Add the machine hostname to the etc/hosts file on the HP-UX workstation.
2. Ensure that you can ping the machine from the HP-UX workstation, using the hostname found in the /
etc/hosts file.
3. Use either the GUI method or the tty Method as follows:
72
Page 75

GUI Method
1. Open a command window from the desktop.
2. Type [su] to become super user.
3. Type [sam] to start the System Administrator Manager (SAM).
4. Select the [Printers and Plotters] icon.
5. Select [lp] spooler.
6. Select [Printers and Plotters].
7. Select [Actions: Add Remote Printer/Plotter...].
8. Enter the following information into the Add Remote Printer/Plotter form:
[Printer Name: printer name]. Where printer name is the name of the queue being created.
[Remote System Name: hostname]. Where hostname is the machine hostname from the /etc/hosts
file.
Select [Remote Printer is on a BSD System] and click [OK] to complete form.
9. Press [Yes] at the Configure HP UX Printers Subpanel screen. This screen may be obscured by Add
Remote Printer/Plotter form.
10. Select [File: Exit].
11. Select [File: Exit Sam].
12. Type [exit] to exit super user mode.
13. Test the queue created. Type the command [lp -d queuename /etc/ho sts].
tty Method
1. Type [su] to become super user
2. Type [sh] to run the Bourne shell.
3. Type [lpshut] to stop the print service.
4. Create the print queue by typing (on the same command line): [lpadmin -pqueuename -v/dev/null mrmodel -ocmrcmodel -osmrsmodel -ob3 -orc -ormhostname -orplp]
Where queuename is the name of the queue being created and hostname is the machine hostname
from the /etc/hosts file.
5. Type [lpsched] to start the print service.
6. Type [enable queuename] to enable the queue to print to the machine.
7. Type [accept queuename] to the queue accepting jobs from the HP-UX workstation.
8. Type [exit] to exit the Bourne shell and then [exit] to exit super user mode.
9. Test the queue created. Type the command [lp -d queu ename /etc/hosts]. Verify that th e job is printe d
at the machine.
73
Page 76

Solaris 2.x Environment
You can use CentreWare to configure in this environment. Click here for more information.
CentreWare for Unix
CentreWare for Unix supports a variety of Unix and Linux platforms and provides procedures which will
enable you to connect the machine in these environments. To use CentreWare for Unix to configure
printing locate the CentreWare Print and Fax Drivers CD-ROM delivered with your machine.
Information Checklist
Before starting the installation procedure, please ensure the following items are available or have been
performed:
1. Ensure that the correct IP Address is being used for the machine. To verify this, print a Configuration
Report from the machine.
At the Machine
2. Press the [Machine Status] button.
3. Touch the [Print Reports] button.
4. Touch [Configuration Report], touch [Print Selected Report], then touch [Close].
The configuration report will print. Verify the addresses detailed under TCP/IP Settings. If the TCP/IP
Settings are incorrectly configured, click the Protocols link to the left of this page and select Windows and
TCP/IP Port (LPR) options for further instructions.
5. Ensure the machine is connected to the network with Ethernet cabling.
6. Ensure you can PING the machine IP address from the Unix workstation
7. Locate the CentreWare Print and Fax Drivers CD (optional). The CD is contained in the CentreWare
Network Services Pack delivered with your machine.
To Configure your Solaris 2.x Client
1. Add the machine printer hostname to the etc/hosts file.
2. Ensure that you can Ping the machine, using the hostname found in the /etc/hosts file.
Perform the following steps to create a machine print queue on a Solaris 2.x workstation using either
the GUI or the TTY method.
74
Page 77

GUI Method
1. Open a command window from the desktop.
2. Type [su] to become super user.
3. Type [admintool] to run the System Administrator Tool.
4. Select [Browse:Printers].
5. Select [Edit:Add:Access to Printer...].
6. Enter the following information into the Access to Remote Printer form:
[Printer Name: queuename]. Where queuename is the name of the queue being created.
[Print Server : hostname]. Where hostname is the machine hostname from the /etc/hosts file. Click
[OK] to complete the form.
7. Type [sh] to run the Bourne shell.
8. Type [lpadmin -p queuename -s hostname!lp] to modify the remote queuename.
9. Type [exit] to exit the Bourne shell and [exit] to exit super user mode.
10. Test the queue created. Type the command [lp -d queuename /etc/ho sts].
tty Method
1. Type [su] to become super user.
2. Type [sh] to run the Bourne shell
3. Define the machine as a BSD style printer. Type [lpsystem -t bsd hostname]. Where hostname is the
machine hostname from the /etc/hosts file.
4. Create the queue. Type [lpadmin -p queuename -s hostname -T unknown -I any]. Where queuename
is the name of the queue being created.
5. Type [exit] to exit the Bourne shell and [exit] to exit super user mode.
6. Test the queue created. Type the command [lp -d queuename /etc/hosts]. Verify that the job prints at
the machine.
75
Page 78

SCO UNIX Environment
You can use CentreWare to configure in this environment.
Click here for more information.
CentreWare for Unix
CentreWare for Unix supports a variety of Unix and Linux platforms and provides procedures which will
enable you to connect the machine in these environments. To use CentreWare for Unix to configure
printing locate the CentreWare Print and Fax Drivers CD ROM delivered with your machine.
Information Checklist
Before starting the installation procedure, please ensure the following items are available or have been
performed:
1. Ensure that the correct IP Address is being used for the machine. To verify this, print a Configuration
Report from the machine.
At the Machine
2. Press the [Machine Status] button.
3. Touch the [Print Reports] button.
4. Touch [Configuration Report], touch [Print Selected Report], then touch [Close].
The configuration report will print. Verify the addresses detailed under TCP/IP Settings. If the TCP/IP
Settings are incorrectly configured, refer to the Read Me topic of this guide for the path to TCP/IP settings
at the machine.
5. Ensure the machine is connected to the network with Ethernet cabling.
6. Ensure you can PING the machine IP address from the Unix workstation
7. Locate the CentreWare Print and Fax Drivers CD (optional). The CD is contained in the CentreWare
Network Services Pack delivered with your machine.
Set up for a SCO Unix Client
SCO UNIX workstations require specific installation steps to communicate with the machine. The
machines are BSD style UNIX printers, whereas SCO is System V style UNIX.
1. Add the machine printer hostname to the /etc/hosts file on the SCO workstation.
2. Ensure that you can Ping the machine from the SCO workstation, using the hostname found in the /
etc/hosts file.
Perform the following steps to create a machine print queue on a SCO UNIX workstation using either
the GUI or the TTY method.
76
Page 79

GUI Method
1. Log in as root.
2. From the Main Desktop, select icons: [System Administration: Printers: Printer Manager].
3. Select [Printer: Add Remote: UNIX...].
4. Enter the following information into the Add Remote UNIX Printer form:
Host: hostname (Where hostname is the machine hostname from the /etc/hosts file.)
Printer: name of the queue being created, ie: dc xxxq. Select [OK] to complete the form.
5. Select [OK] at the Message window.
6. Select [Host:Exit].
7. Select [File: Close this directory].
8. Select [File: Close this directory].
9. Click [Save] at the warning confirmation window.
10. Type [exit] to log out of root account.
11. Open Unix Window.
tty Method
1. Type [su] to become super user.
2. Type [rlpconf] to create a printer. Enter the following information:
[Printer Name: queuename]
[Remote Printer: r]
[Hostname: hostname]
If the information has been entered properly, type [y].
3. Click [Enter] to accept default of a non-SCO remote printer.
4. Click [Enter] to accept default of non-default printer.
5. Click [Enter] to start process of adding queue.
6. Type [q] to quit the rlpconf program.
77
Page 80

CUPS
The Common Unix Printing System (CUPS) was created by Easy Software Pr od ucts in 199 8 as a modern
replacement for the Berkeley Line Printer Daemon (LPD) and A T and T Line Pr inter (LP) system design ed
in the 1970s for printing text to line printers.
Currently available for downloading from a number of sources on the Internet, such as www.cups.org,
CUPS is offered in both source code and binary distributions.
Information Checklist
Before starting the installation procedure, please ensure that you have performed the following, critical
steps.
1. TCP/IP and HTTP (which supports IPP) should have been initially configured per the Introduction:
Read Me of this guide. If necessary, refer to the Read Me topic and follow the steps provided. This will
set up the device to communicate over the TCP/IP network and enable use of the Web User Interface
(CentreWare Internet Services) for further configuration.
2. In support of the use of domain names to communicate with the printer, make sure that DNS (domain
name service) is enabled on the printer and configured to use your DNS server. If necessary, refer to
the Read Me topic of this guide and follow the steps provided.
78
Page 81

Enable Port 9100 as additional support for HTTP (IPP) printing
1. Open your Web browser and enter the TCP/IP addre ss of the machine in the Address or Location field.
Press [Enter].
2. Click the [Properties] tab.
3. Enter the Administrator User name and password if prompted. The default is [admin] and [1111].
4. Click the symbol to the left of [Connectivity].
5. Click the symbol to the left of [Protocols].
6. Select [Raw TCP/IP Printing] in the directory tree.
7. Ensure the [Enabled] box is checked to enable Raw TCP/IP Printing.
8. Leave the [TCP Port Number] set to 9100 for Port 1. If two additional ports are available, click [Default
All] to see if they set to 9101 and 9102 respectively (emulating HP JetDirect EX Plus 3).
9. Leave the [Bidirectional] and [Maximum Connections] settings at their default values.
10. Set the [End of Job Timeout] to the number of seconds to wait before processing a job without an End
Of Job indicator.
11. Leave the [PDL Switching] Enabled box at its default value.
12. Click [Apply] to accept the changes.
NOTE: The settings are not applied until you restart the machine.
13. Click the [Status Tab] link.
14. Click the [Reboot Machine] button to reboot the machine. The network controller takes approximately 5
minutes to reboot and network connectivity will be unavailable during this time.
79
Page 82

Installing CUPS on the UNIX workstation
The instructions for installing and building CUPS are contained in the CUPS Software Administrators
Manual, written and copyrighted by Easy Software Products and available for downloading at
www.cups.org/documentation.php. An Overview of the Common UNIX Printing System, Version 1.1, and
a large amount of other descriptive documentation, is also available at this site.
The binary distribution of CUPS is available in tar format with installa tion and r emoval scri pts, as well as in
rpm and dpkg formats for RedHat and Debian versions of Linux. After logging into the workstation as root
(su) and downloading the appropriate files to the root directory, the installation begins as follows:
Tar format:
After untarring the files, run the installation script with the ./cups.install (and press Enter).
RPM format:
rpm -e lpr
rpm -i cups-1.1-linux-M.m.n-intel.rpm (and press Enter).
Debian format:
dpkg -i cups-1.1-linux-M.m.n-intel.deb (and press Enter).
Note: RedHat Linux, versions 7.3 and newer, include CUPS support, so software downloading is
unnecessary. CUPS is also the default printing system for Mandrake Linux.
Installing the Xerox PPD on the workstation
The Xerox PPD for CUPS is available on one of the CD-ROMs that came with your printer. From the CDROM, with root privileges copy the PPD into your CUPS ppd folder on your workstation. If you are unsure
of the folder's location, use the Find command to locate the ppd's. An example of the location of the ppd.gz
files in RedHat 8.1 is /usr/share/cups/model.
80
Page 83

Adding the Xerox printer
1. Use the PS command to make sure that the CUPS daemon is running. The daemon can be restarted
from Linux using the init.d script that was created when the CUPS RPM was installed. The command
is > /etc/init.d/cups restart. A similar script or directory entry should have been created in System V
and BSD. For the example of CUPS built and installed on a FreeBSD 4.2 machine from the source
code, run cupsd from /usr/local/sbin. (cd /usr/local/sbin cupsd and press Enter).
2. Type http://localhost:631/admin into the address (URL) box of your web browser and press Enter.
3. For User ID, type root. For the requested password, type the root password.
4. Click Add Printer and follow the on screen prompts to add the printer to the CUPS printer list.
Printing with CUPS
CUPS supports the use of both the System V (lp) and Berkeley (lpr) printing commands.
Use the -d option with the lp command to print to a specific printer.
lp -dprinter filename (Enter)
Use the -P option with the lpr command to print to a specific printer.
lpr -Pprinter filename (Enter)
For complete information on CUPS printing capabilities, see the CUPS Software Users Manual available
from www.cups.org/documentation.php.
81
Page 84

AS400
AS400 Raw TCP/IP Printing to Port 9100 (CRTDEVPRT)
Purpose
This is the procedure to set up printing to a multifunction device from an AS/400 using the SNMP drivers.
Assumptions
This procedure is intended for users familiar with the AS/400 system, especially those experienced with
printing in an AS/400 environment.
The AS/400 must run V4R5 of OS/400 so that the SN MP drivers are present (or V4R3/V4R4 with the most
current PTFs installed).
The multifunction device must have port 9100 enabled.
Procedures
To enable port 9100
1. Open your Web browser and enter the TCP/IP addre ss of the machine in the Address or Location field.
Press [Enter].
2. Click the [Properties] tab.
3. Enter the Administrator User name and password if prompted. The default is [admin] and [1111].
4. Click the symbol to the left of [Connectivity].
5. Click the symbol to the left of [Protocols].
6. Select [Raw TCP/IP Printing] in the directory tree.
7. Ensure the [Enabled] box is checked to enable Raw TCP/IP Printing.
8. Leave the [TCP Port Number] set to 9100 for Port 1.
9. Leave the [Bidirectional] and [Maximum Connections] settings at their default values.
10. Set the [End of Job Timeout] to the number of seconds to wait before processing a job without an End
Of Job indicator.
11. Leave the [PDL Switching] Enabled box at its default value.
12. Click [Apply] to accept the changes, [Undo] to return the settings to their previous values, or [Default
All] to enter printer defaults for all settings (recommended). NOTE: The settings are not applied until
you restart the machine.
13. Click the [Status Tab] link.
14. Click the [Reboot Machine] button and click [OK] to reboot the machine. The network controller takes
approximately 5 minutes to reboot and network connectivity will be unavailable during this time.
82
Page 85

To create an SNMP trap
1. Open your Web browser and enter the TCP/IP addre ss of the machine in the Address or Location field.
Press [Enter].
2. Click the [Properties] tab.
3. Enter the Administrator User name and password if prompted. The default is [admin] and [1111].
4. Click the symbol to the left of [Connectivity].
5. Click the symbol to the left of [Protocols].
6. Select [SNMP] in the directory tree.
7. Check the [Enable] box to enable the protocol.
8. To edit SNMP properties click [Edit].
9. The default [TRAP Community Name] is SNMP_trap, which you can use without changing. The
Default TRAP community name is used to specify the default community name for all traps generated
by this machine.
10. Click your browser Back button to return to the SNMP Configuration page, then click the [Advanced]
button.
11. Click [Add IP Address] in the Trap Destination addresses box.
12. Enter the multifunction device's IP address and leave all other parameters at their default values.
13. Click [Apply] to accept the changes.
14. When finished, click [Apply] to accept the changes.
83
Page 86

To identify the trap
To identify the trap, create a device description from your terminal's command line.
1. Select the F-4 key to prompt the CRTDEVPRT command. Enter the following parameters: Device
Description: Xeroxprinter
Device Class: *lan
Device Type: 3812
Device Model: 1
2. Press Enter to continue, and enter the following parameters: Lan Attachment: *IP
Port Number: 9100
Online at IPL: *yes
Font Identifier: 11
Form Feed *autocut
Note: For some versions of AS400, the default may match some of these parameters.
3. Leave all other parameters at their defaults, press Enter, and enter the following parameters:
Activation Timer: 170
Inactivity Timer: *sec15
Host Print Transform: *yes
4. Press [Enter] to continue, and enter the following parameter: Manufacturer Type and Model: *hp5si
5. Leave the remaining parameters set to their default values and press Enter to continue. Enter the
following parameters: Remote Location: Enter the IP address of the printer.
User defined options: *IBMSHRCNN
System driver program: *IBMSNMPDRV
6. Leave all other options set to the default values and press Enter. A message indicates that you
created the device Xeroxprinter.
7. Set the device on and start a print writer. Then place a spool file in the appropriate queue to test the
printer.
84
Page 87

AS400 Printing using LPR (CRTOUTQ)
Creating a remote queue (LPR) on the AS400
At the command line, issue CRTOUTQ and press F4, then F9 for additional parameters. The setup is as
follows:
Output queue: queue name
Library: Library name
Maximum spooled file size
Number of pages: *NONE
Starting time: Time
Ending time: Time
Order of files on queue: *FIFO
Remote system: *INTNETADR
Remote printer queue: virtual printer name** (queue for WorkCent re should be lp (lower case L and
P)
Writers to autostart: 1
Queue for writer messages: QSYSOPR
Library: *LIBL
Connection type: *IP
Destination type: *OTHER
Transform SCS to ASCII: *YES
Manufacturer type and model: *IBM42011 ***SEE NOTE BELOW***
Workstation customizing object: xxxxxxxx (leave as default)
Library: xxxxxxxx (leave as default)
Internet address: xx.xxx.x.xx (IP address of printer)
VM/MVS class: *SAME
Forms control Buffer: *SAME
Destination options: XAIX
Text description:
Display any file: *NO
Job separators: 0
Operator controlled: *YES
Data Queue: *NONE
Library:
Authority to check: *DTAAUT
Press <enter> to create. Note that the Workstation Customizing Object is the file that was created in the
previous step (step 2).
85
Page 88

ONLY CHANGE THE PARAMETERS IN BOLD.
At this point, a spool file (document) should be able to be sent tot he WorkCentre.
NOTE**: If printing PCL, set this parameter to HPIIID, HP5Si (most of the HP drivers will work) and set
Workstation customizing object as *none.
If printing ASCII, set this parameter to *IBM42011 (which is the default).
86
Page 89

Printer Drivers
Windows 2000 Server
You can use CentreWare to configure in this environment. Click here for more information.
Xerox Printer Installer
By using the Xerox Printer Installer you can install multiple components at the same time, such as printer
drivers, PPDs, user documentation and the Xerox TCP/IP Port Monitor utility. To use the Xerox Printer
Installer locate the CentreWare Print and Fax Drivers CD-ROM delivered with your machine and follow the
instructions contained in the CentreWare Print and Fax Drivers Guide for Microsoft Windows chapter 1,
'Before Installing'.
Information Checklist
Before starting the installation procedure, please ensure the following items are available or have been
performed:
1. Verify the machine is configured with the correct IP Address, Subnet Mask, and Gateway Address
information by printing a Configuration Report.
Print a Configuration Report
At the Machine
i. Press the [Machine Status] button.
ii. Touch [Print Reports].
iii. Touch [Configuration Report], touch [Print Selected Report], then touch [Close].
2. Locate the CentreWare Print and Fax Drivers CD. (This was delivered in the CentreWare Network
Services Pack with your machine.) Review any README file contained with the printer drivers.
87
Page 90

Windows Add Printer Wizard
Go to the Windows 2000 Server
1. At the Desktop, right mouse click the [My Network Places] icon and select [Properties].
2. Right mouse click on the [Local Area Connection] icon and select [Properties].
3. Verify that the [Internet Protocol (TCP/IP)] protocol has been loaded. If this software is not present,
install it using the documentation provided by Microsoft. Then return to the next step in this document.
Verify that Print Services for Unix is loaded
4. From the [Start] menu, select [Settings].
5. Select [Control Panel].
6. Double-click [Add/Remove Programs].
7. Select [Add/Remove Windows Components].
8. Select [Other Network File and Print Services].
9. Click [Details].
10. Check the box to select [Print Services for Unix].
11. Click [OK].
12. Click [Next].
13. Close the [Add/Remove Programs] window.
Add the Printer
14. From the [Start] menu, select [Settings] then [Printers].
15. Double-click [Add Printer] and click [Next].
16. Select [Local Printer] and deselect [Automatically detect and install my Plug and Play printer].
17. Click [Next].
18. Select [Create a new port] and choose [LPR Port] from the Type pull-down menu.
19. Click [Next].
88
Page 91

20. Enter the IP address of the printer.
21. Enter a name for the print queue and click [OK].
22. You will be prompted for a printer driver. Select [Have Disk] and browse to the location of your printer
drivers.
23. Select the .INF file then click [Open].
24. The wizard will return you to the previous dialog. Verify the path and file name are correct and click
[OK].
25. Select the model that corresponds to your machine and click [Next].
26. The Name your Printer screen appears. Enter a pr inter name. Select [Yes] i f you wish to make this the
default printer, then click [Next].
27. The Printer Sharing Screen appears. If you will be sharing this printer with other clients select the
[Share As] button and enter a share name. Click [Next].
28. Enter a location and comment (optional).
29. Select [Yes] to print a test page and verify that it prints at the machine. Click [Next].
30. Click [Finish].
Configure the Print Driver
31. From the [Start] menu, select [Settings] and then [Printers].
32. Right click on the printer icon and select [Properties].
33. Use the available tabs to set the printer's default settings.
34. Additional settings may be accessed by clicking on the Printing Preferences button on the Gener al tab.
You have completed the installation of the printer driver on Windows 2000 Server.
89
Page 92

Microsoft Windows 2000 Professional
Note: You can use CentreWare to configure in this environment.
Xerox Printer Installer
By using the Xerox Printer Installer you can install multiple components at the same time, such as printer
drivers, PPDs, user documentation and the Xerox TCP/IP Port Monitor utility. To use the Xerox Printer
Installer locate the CentreWare Print and Fax Drivers CD-ROM delivered with your machine and follow the
instructions contained in the CentreWare Print and Fax Drivers Guide for Microsoft Windows.
Information Checklist
Before starting the installation procedure, please ensure the following items are available or have been
performed:
1. Verify the machine is configured with the correct IP Address, Subnet Mask, and Gateway Address
information by printing a Configuration Report.
Print a Configuration Report
At the Machine
i. Press the [Machine Status] button.
ii. Touch [Print Reports].
iii. Touch [Configuration Report], touch [Print Selected Report], then touch [Close].
2. Locate the CentreWare Print and Fax Drivers CD. (This was delivered in the CentreWare Network
Services Pack with your machine.) Review any README file contained with the printer drivers.
90
Page 93

To install printer drivers on Windows 2000 Professional choose one of the following options:
Connect to an existing print queue already created on a network server
Create a new print queue on the Windows 2000 Professional workstation
Connect to an Existing Print Queue
1. At the Windows 2000 Professional Desktop, right mouse click the [My Network Places] icon.
2. Select [Properties].
3. Right-click on the [Local Area Connection] icon.
4. Select [Properties].
5. Verify that the Internet Protocol (TCP/IP) protocol has been loaded. If this software is not present,
install it using the documentation provided by Microsoft. Then return to the next step in this document.
Add the Printer
6. From the [Start] menu, select [Settings].
7. Select [Printers].
8. Double-click [Add Printer] and click [Next].
9. Verify that [Network Printer] is selected and click [Next].
10. The Locate Your Printer screen will appear. Select the [Type the Printer Name] option or click [Next] to
browse for a printer.
11. Enter the path to the printer or click [Next] to browse for the print queue created on your server.
12. Select the printer and click [Next]. Select [Yes] if you wish to make it the default printer. Click [Next].
13. Click [Finish]. The printer driver will download to the Windows 2000 Professional workstation.
14. Once the printer driver has installed open an application on the workstation and print a test page to
verify operation.
You have completed the installation of the printer driver on Windows 2000 Professional.
91
Page 94

Create a New Print Queue
Go to the Windows 2000 Professional Workstation
1. At the Desktop, right mouse click the [My Network Places] icon.
2. Select [Properties].
3. Right mouse click on the [Local Area Connection] icon and select [Properties].
4. Verify that the [Internet Protocol (TCP/IP)] protocol has been loaded. If this software is not present,
install it using the documentation provided by Microsoft. Then return to the next step in this document.
Verify that Print Services for Unix is loaded
5. From the [Start] menu, select [Settings].
6. Select [Control Panel].
7. Double-click [Add/Remove Programs].
8. Select [Add/Remove Windows Components].
9. Select [Other Network File and Print Services].
10. Click [Details].
11. Check the box to select [Print Services for Unix].
12. Click [OK].
13. Click [Next].
14. Close the [Add/Remove Programs] window.
Add the Printer
15. From the [Start] menu, select [Settings] then [Printers].
16. Double-click [Add Printer] and click [Next].
17. Select [Local Printer] and deselect [Automatically detect and install my Plug and Play printer].
18. Click [Next].
19. Select [Create a new port] and choose [LPR Port] from the Type pull-down menu.
20. Click [Next].
21. Enter the IP address of the printer.
22. Enter a name for the print queue and click [OK].
23. You will be prompted for a printer driver. Select [Have Disk] and browse to the location of your printer
drivers.
92
Page 95

24. Select the [.INF] file then click [Open].
25. The wizard will return you to the previous dialog. Verify the path and file name are correct and click
[OK].
26. Select the model that corresponds to your machine and click [Next].
27. The Name your Printer screen appears. Enter a pr inter name. Select [Yes] i f you wish to make this the
default printer, then click [Next].
28. The Printer Sharing Screen appears. If you will be sharing this printer with other clients select the
[Share As] button and enter a share name. Click [Next].
29. Enter a location and comment (optional).
30. Select [Yes] to print a test page and verify that it prints at the machine. Click [Next].
31. Click [Finish].
You have completed the installation of the printer driver on Windows 2000 Professional.
93
Page 96

Microsoft Windows XP
Note: You can use CentreWare to configure in this environment.
Xerox Printer Installer
By using the Xerox Printer Installer you can install multiple components at the same time, such as printer
drivers, PPDs, user documentation and the Xerox TCP/IP Port Monitor utility. To use the Xerox Printer
Installer locate the CentreWare Print and Fax Drivers CD-ROM delivered with your machine and follow the
instructions contained in the CentreWare Print and Fax Drivers Guide for Microsoft Windows.
Information Checklist
Before starting the installation procedure, please ensure the following items are available or have been
performed:
1. Verify the machine is configured with the correct IP Address, Subnet Mask, and Gateway Address
information by printing a Configuration Report.
Print a Configuration Report
At the Machine
i. Press the [Machine Status] button.
ii. Touch [Print Reports].
iii. Touch [Configuration Report], touch [Print Selected Report], then touch [Close].
2. Locate the CentreWare Print and Fax Drivers CD. (This was delivered in the CentreWare Network
Services Pack with your machine.) Review any README file contained with the printer drivers.
94
Page 97

To install printer drivers on Windows XP choose one of the following options:
Connect to an existing print queue already created on a network server
Create a new print queue on the Windows XP workstation
Connect to an Existing Print Queue
1. At the Windows XP Workstation verify that the TCP/IP protocol stack is loaded: select [Start], rightclick the [My Network Places] icon, and select [Properties].
2. Right mouse click on the [Local Area Connection] icon. Select [Properties].
3. Verify that the Internet Protocol (TCP/IP) protocol has been loaded (i t may be necessa ry to scroll down
the list). If this software is not present, install it using the documentation provided by Microsoft. Then
return to the next step in this document.
4. From the [Start] menu select [Printers and Faxes]. The Vista path is Start\Control Panel\Printer(s).
5. Select [Add a Printer].
6. The Welcome Page appears. Click [Next].
7. Verify that [A network printer or a printer attached to another computer] is selected and click [Next].
8. The Specify a Printer screen will appear. Click [Next] to browse for the print queue created on your
server, or if you know the name of the server and printer click [Connect to this printer] and enter the
server and printer name details.
9. Select the printer and click [Next].
10. Decide whether or not you want to make this printer your default printer, then click [Next].
11. Click [Finish]. The printer will download to the Windows XP workstation.
12. Once the printer driver has installed, open an application on the workstation and print a test page to
verify operation.
Configure the Print Driver
13. From the [Start] menu select [Printers and Faxes]. The Vista path is Start\Control Panel\Printer(s).
14. Right click on the printer icon and select [Properties]. Use the available tabs to set the printing defaults.
Additional settings may be accessed by clicking the [Printing Preferences] button on the General tab.
You have completed the installation of the printer driver on Windows XP.
95
Page 98

Create a New Print Queue on Windows XP:
1. Obtain the Print Driver for your operating system.
2. Verify that Print Services for Unix is loaded: from the [Start] menu, select [Control Panel].
3. Double-click [Add/Remove Programs].
4. Select [Add/Remove Windows Components].
5. Scroll down until you see [Other File and Print Services].
6. Click the [Details] button.
7. Check the box to add [Print Services for Unix] if not already installed.
Add the Printer
8. From the [Start] menu select [Printers and Faxes]. The Vista path is Start\Control Panel\Printer(s).
9. Select [Add a Printer], then [Next].
10. Select [Local Printer attached to this computer].
11. If already selected, Deselect [Automatically detect and install my Plug and Play printer].
12. Click [Next].
13. Select [Create a new port].
14. Select [LPR] from the Type of Port pull down menu, then click [Next].
15. Enter the IP Address of the printer.
16. Enter a name for the print queue and click [OK].
96
Page 99

17. You will be prompted for a printer driver. Select [Have Disk] and browse to the location of your printer
drivers.
18. Select the [.INF] file then click [Open].
19. When the Install from Disk screen appears, verify that the path and file name are correct, then click
[OK].
20. Select the model of your machine from the list. Click [Next].
21. The Name your Printer screen appears. Enter a printer name.
22. Decide whether or not you want to make this printer your default printer, then click [Next].
23. The Printer Sharing Screen appears. If you will be sharing this printer with other clients select the
[Share Name] button and enter a share name. Click [Next].
24. Enter a location and comment in the [Location and Comment screen] (optional).
25. Select [Yes] to print a test page. Click [Next]
26. Click [Finish]. The printer driver will install. At the machine and verify that the test page printed.
Configure the Print Driver
27. From the [Start] menu select [Printers and Faxes]. The Vista path is Start\Control Panel\Printer(s).
28. Right-click on the printer icon and select [Properties].
29. Use the available tabs to set the printing defaults. Additional settings may be accessed by clicking the
[Printing Preferences] button on the Gene r al tab.
You have completed the installation of the printer driver on Windows XP.
97
Page 100

Apple Macintosh
Information Checklist
Before starting the installation procedure, please ensure the following items are available or have been
performed:
1. Verify the AppleTalk settings have been configured properly on the machine by printing a
Configuration Report.
Print a Configuration Report
At the Machine
i. Press the [Machine Status] button.
ii. Touch [Print Reports].
iii. Touch [Configuration Report], touch [Print Selected Report], then touch [Close].
2. Locate the CentreWare Print and Fax Drivers CD. Review any README file contained with the printer
drivers.
Install the Print Driver
1. View the Configuration Report and note the Name given to the machine under AppleTalk Settings.
At the Macintosh Workstation
2. Load the CentreWare Print and Fax Drivers CD-ROM into your CD drive.
3. Open the CD and locate the [Drivers] folder.
4. Locate and open the [Mac] folder.
98
 Loading...