

Page 1
Getting to Know Your Product
DocuColor 4 Copier/Printer
QuickStart Practice Guide
August 1999
701P31131
Page 2

Xerox Corporation
Xerox Customer Education Services
Xerox Square XRX2-18B
100 Clinton Ave. South
Rochester, New York 14644
© 1999 by Xerox Corporation. All rights reserved.
Copyright protection claimed includes all forms and matters of copyrightable material and information now allowed by statutory or judicial law or
hereinafter granted, including without limitations, material generated from
the software programs which are displayed on the screen, such as icons,
screen displays, looks, etc.
Printed in the United States of America.
Xerox®, The Document Company®, the digital X and all Xerox products
mentioned in this publication are trademarks of Xerox Corporation.
Changes are periodically made to this document. Changes, updates, and
typographic errors will be corrected in subsequent editions.
Page 3

Contents
Introduction 1
What to expect 1
Activity 1: Loading paper 2
Loading paper in the paper trays 2
Loading paper in the bypass tray 3
Activity 2: Clearing a jam 4
Clearing a jam in the Automatic Document Feeder (ADF) 4
Clearing a jam in a paper tray 4
Clearing a jam in the bypass tray 5
Clearing a jam in the right side 6
Clearing a jam in the fuser 7
Clearing a jam in the left side 8
Clearing a jam in the two tray module 8
Activity 3: Replacing consumables 9
Replacing the toner cartridges 9
Replacing the drum cartridge 11
Replacing the fuser oil roll cartridge 12
Activity 4: Making copies 15
Making colored copies from the document glass 15
Making black and white copies from the document glass 16
Copying multiple originals 17
Making reductions and enlargements 18
Troubleshooting: when something goes wrong 19
Getting to Know Your Product
QuickStart Practice Guide iii
Page 4

Caring for your DocuColor 4 Copier/Printer 19
Resources 20
Frequently asked questions 20
Getting to Know Your Product
iv QuickStart Practice Guide
Page 5

Introduction
Congratulations on the purchase of your new Xerox DocuColor 4
Copier/Printer. To help you become familiar with the DocuColor 4
Copier/Printer, this Quick Start guide has been prepared for your use.
The Carrier delivery agent conducts a Product Orientation session
when the product is delivered. The Product Orientation Guide is used
by the carrier to introduce you to the basic elements of the product.
You can use this guide to review the orientation information if you
wish.
What to expect
QuickStart Practice Guide This QuickStart Practice Guide section contains a series of self-guided
activities designed to increase your product knowledge. It can be
conducted at your own leisure and at your own pace.
This Guide is yours to keep so that you can review the information or
provide this same orientation to your colleagues, if you wish.
Additional training If after completing the Quick Start, you feel you need additional
training, please contact your sales agent, who will be happy to assist
you.
Evaluation After you have finished using this guide, please take a moment to fill
out the survey sheet.
Activity summary This document contains self-paced activities that will help you get
acquainted with your new DocuColor 4 Copier/Printer. It includes the
following tasks:
• Loading paper
• Clearing jams
• Replacing dry ink (toner)
• Replacing drum cartridge
• Making copies
• Caring for your copier/printer
When you complete these activities, you are encouraged to consult the
DocuColor 4 Copier/Printer User Guide for additional information.
Getting to Know Your Product
QuickStart Practice Guide 1
Page 6
Activity 1: Loading paper
You will need a ream of paper for this activity.
Loading paper in the paper trays
Demonstrate the steps as you describe them.
You may have three paper trays. To load paper in a
paper tray:
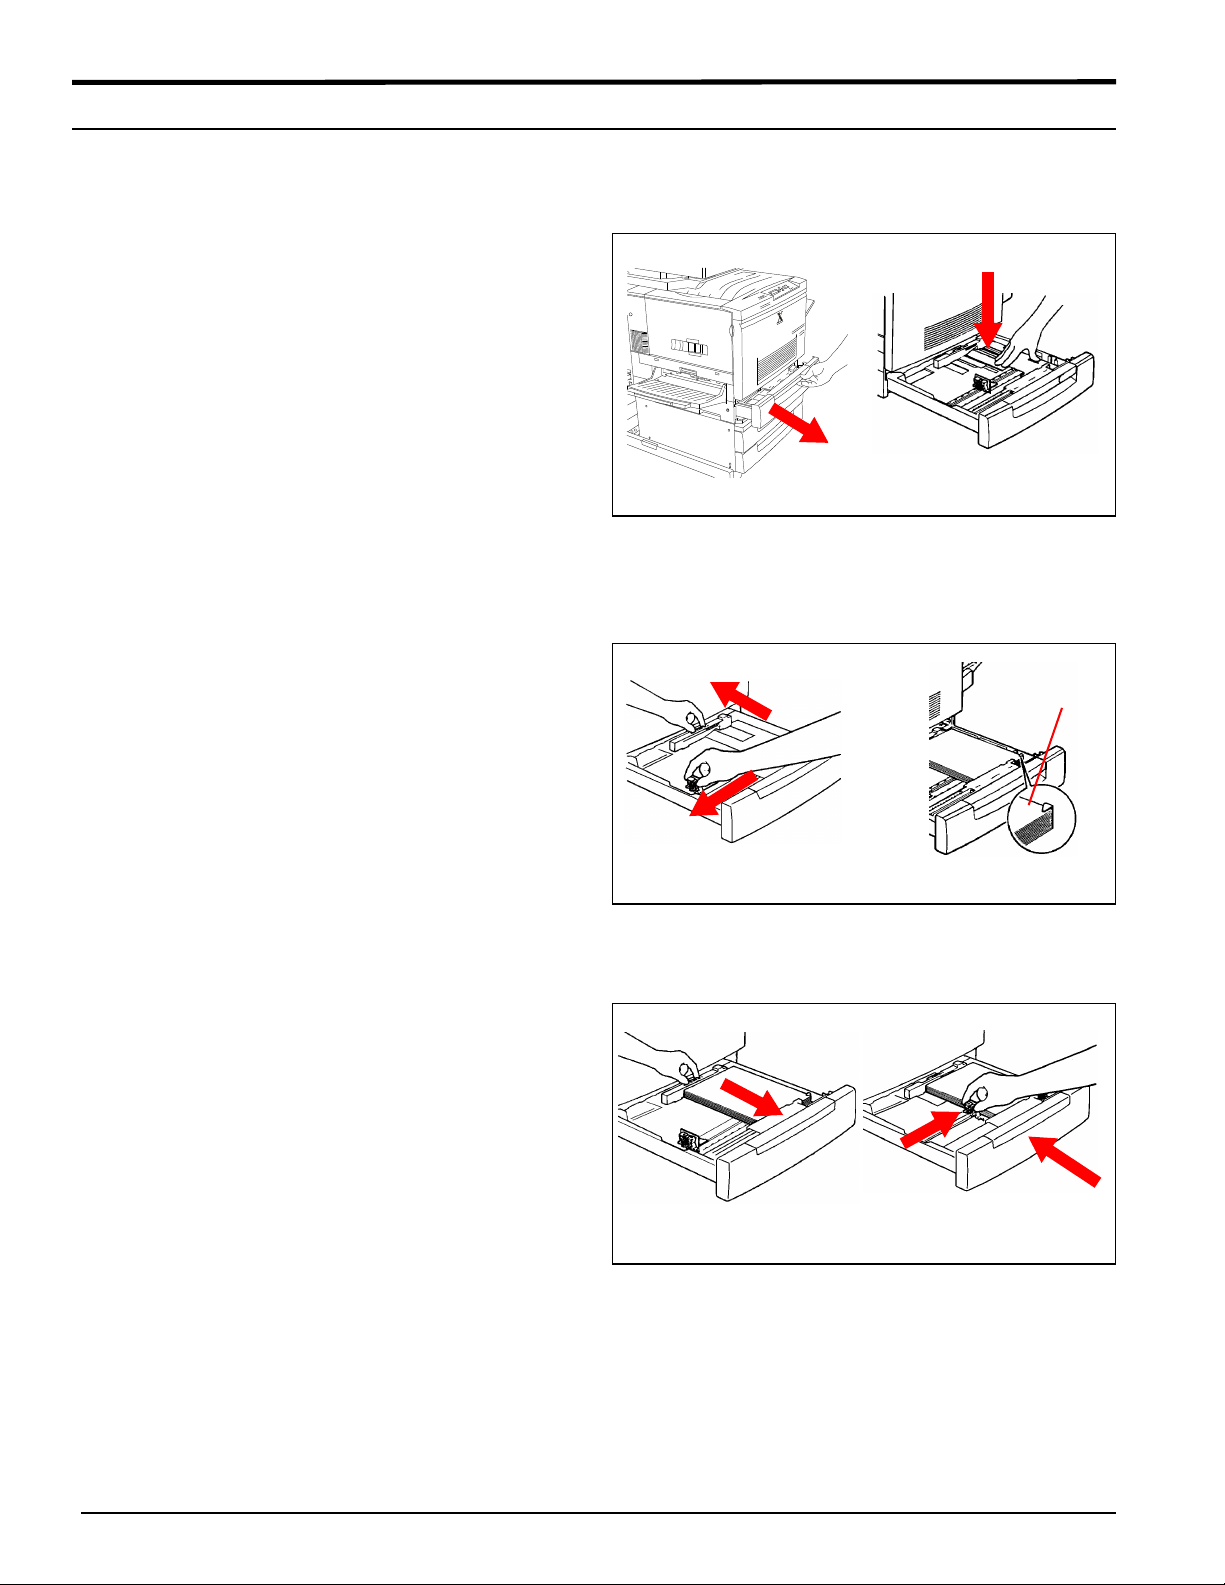
1. Face the DocuColor 4 Copier/Printer so that you
are directly in front of the paper tray.
2. See Figure 1. Open the tray by pulling it straight
out.
3. Press down on the metal plate until it latches.
4. Take the paper out of the wrapper.
5. See Figure 2. Move the paper guides toward the
outer edges of the paper drawer.
6. Place the stack of paper in the drawer with the corners under the fluke at the front right side. Add
paper up to the Max line. Straighten the paper
stack so the edges are even.
3
2
Figure 1
5
6
5
7. See Figure 3. Set the rear paper guide to the length
of the paper.
8. Set the side paper guide to the width of the paper.
Note: Align the “t” mark on the side paper guide
with the appropriate paper size mark on the tray. If
the side guide is out of position, automatic paper
size detection will not work.
9. Close the tray by pushing it completely into the
copier/printer.
Figure 2
7
8
9
Figure 3
Getting to Know Your Product
2 QuickStart Practice Guide
Page 7
Loading paper in the bypass tray
Demonstrate how to open the bypass tray and load
paper.
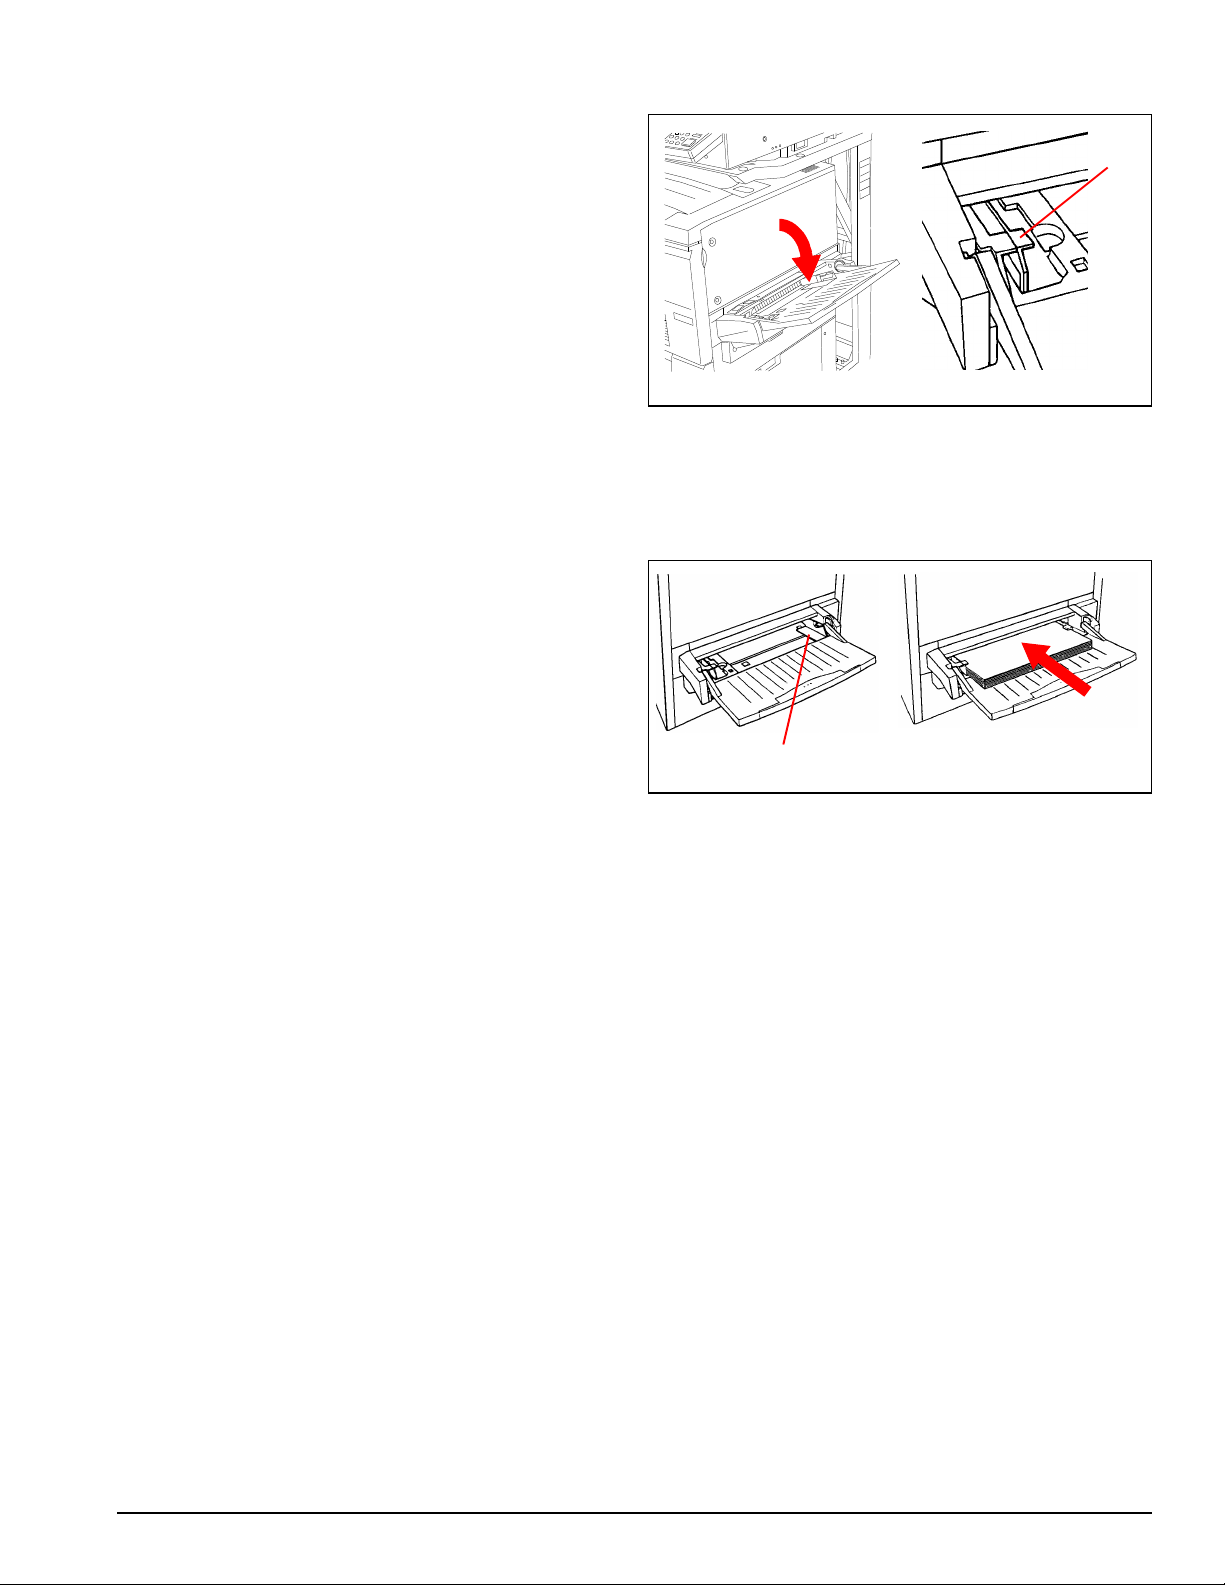
1. See Figure 4. Open the bypass tray by swinging
the door down.
2. Ensure the guide at the front of the tray is flipped
up unless 13 x 19 in. (330 x 483 mm) paper is
being used.
3. See Figure 5. Set the paper guide to the width of
the paper being loaded.
4. Load a stack of paper long edge feed and slide
the paper into the copier/printer until it stops.
2
1
Figure 4
4
3
Figure 5
Getting to Know Your Product
QuickStart Practice Guide 3
Page 8
Activity 2: Clearing a jam
Clearing a jam in the Automatic Document
Feeder (ADF)
Note: The ADF is optional and may not be present on
your DocuColor 4 Copier/Printer.
A jam in the ADF is indicated by a message on the
display.
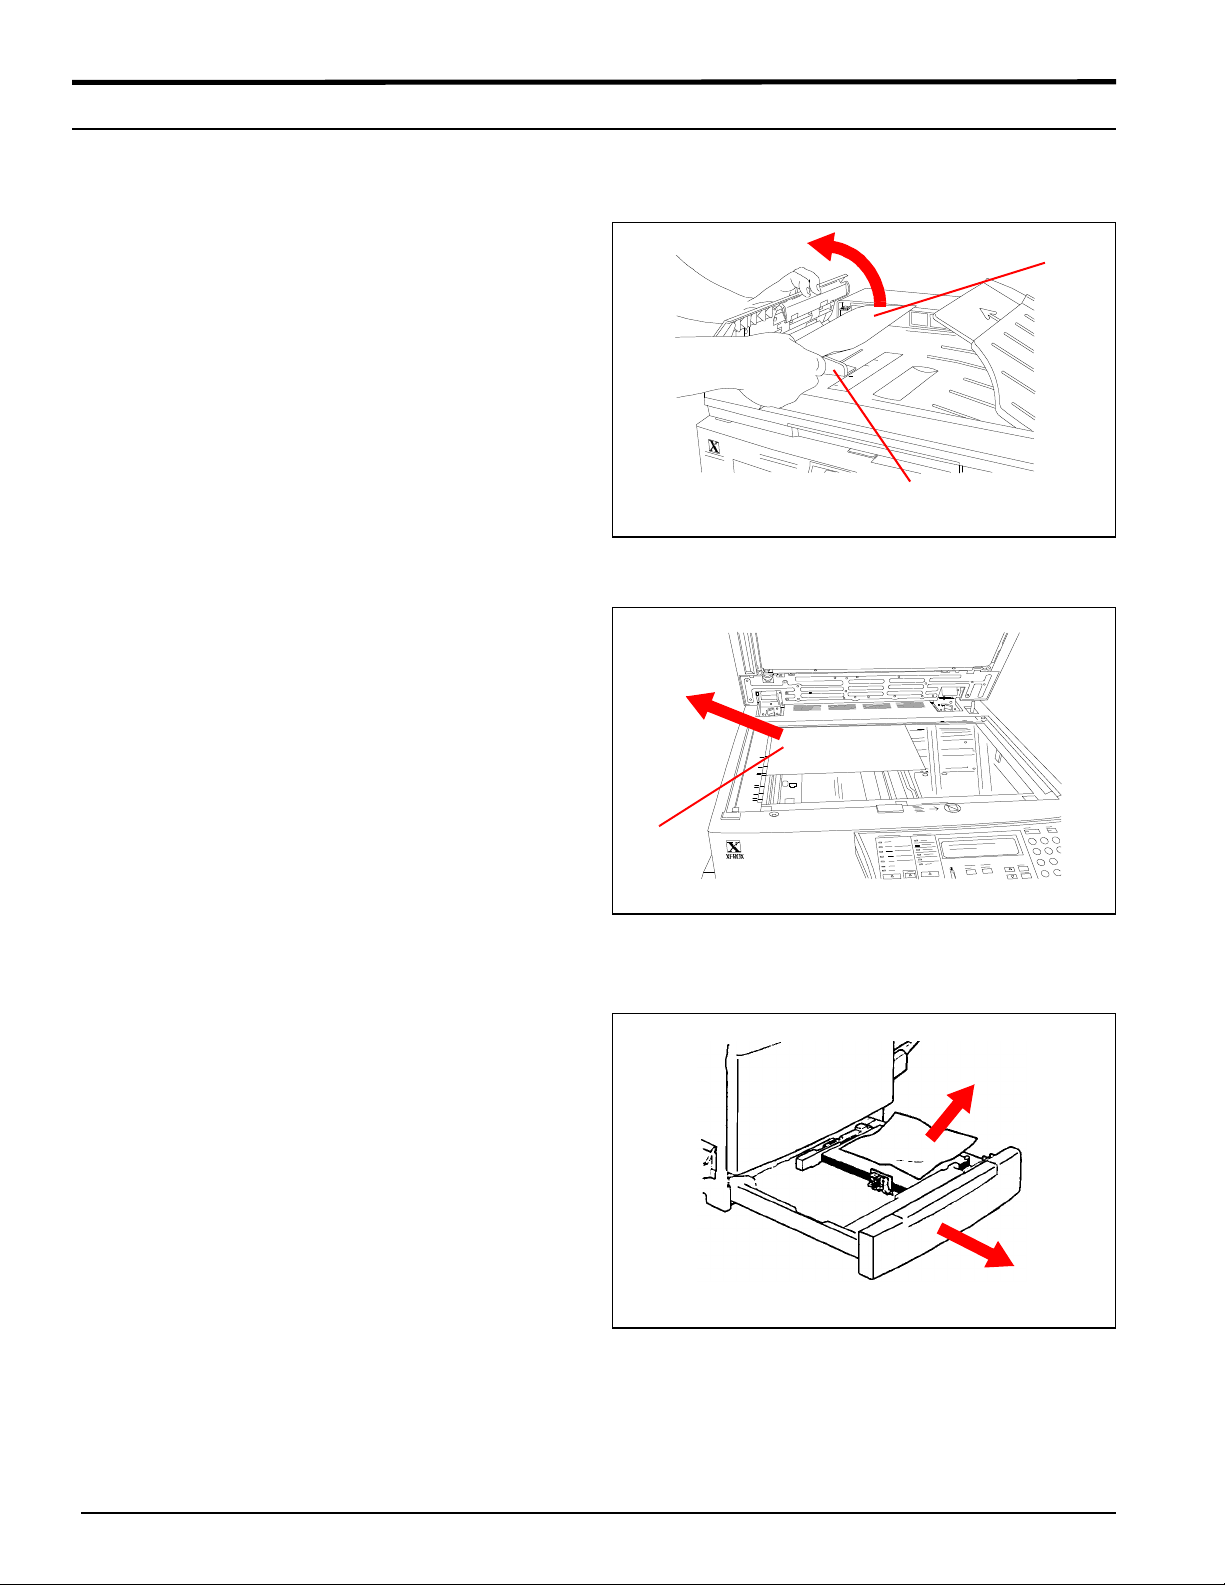
1. See Figure 6. Open the ADF left cover by lifting
it to the left.
2. Remove the jammed document and all torn
pieces of paper from the document feeder.
3. Slide the Document Guide away from the stack
of documents and remove the documents from
the document tray.
4. Raise the ADF and remove any paper from the
document glass. Close the ADF.
5. Check the originals for damage. (Any damaged
originals should be placed on the document glass
for copying.)
6. Rearrange the stack of originals and place them
in the document feeder input tray. Readjust the
Document Guide.
7. Press the Start button to continue making copies.
1
2
3
Figure 6
4
Clearing a jam in a paper tray
Clear a jam in a paper tray by:
1. See Figure 8. Slowly pull the paper tray out
until it stops.
2. Remove the jammed or creased paper. Be sure to
remove all pieces of torn paper.
3. Remove the remaining stack of paper from the
tray.
Figure 7
2
1
Figure 8
Getting to Know Your Product
4 QuickStart Practice Guide
Page 9

4. See Figure 9. Press down on the metal plate until it
latches.
5. See Figure 10. Reload the paper in the tray, being
sure the paper is under the fluke at the front right
side.
6. Slowly push the paper tray back into the copier/
printer as far as it will go.
4
Figure 9
5
6
Clearing a jam in the bypass tray
Show how to clear a jam in the bypass tray:
1. See Figure 11. Pull the jammed paper out of the
tray. Be sure no torn pieces of paper are left
inside.
Figure 10
Figure 11
Getting to Know Your Product
QuickStart Practice Guide 5
Page 10

Clearing a jam in the right side
Show how to open the lower right unit and remove the
jammed paper.
1. See Figure 12. Remove all paper from the
bypass tray.
2. Pull out the lower right unit as far as it will go.
1
1
2
Figure 12
3. See Figure 13. Lift up on the green handle to open
the cover.
4. Turn the green knob to move the jammed paper.
5. Pull the paper out. Be sure no pieces of torn
paper are left inside.
6. Lower the cover.
7. See Figure 14. Push the lower right unit back into
the copier/printer.
8. Reload paper into the bypass tray.
3
Figure 13
5
4
8
1
7
Figure 14
Getting to Know Your Product
6 QuickStart Practice Guide
Page 11

Clearing a jam in the fuser
WARNING: The fuser surface is very hot.
Do not touch the fuser or you may be
!
burned.
Show how to clear a paper jam in the fuser.
1. See Figure 15. Pull out the lower left side unit as
far as it will go.
2. Remove the jammed paper. Be sure no torn
pieces of paper are left inside.
Do not touch the white roller on the oil
roll cartridge. The oil will stick to your
!
skin.
3. Place two pieces of paper on a flat surface to set the
oil roll cartridge on when you remove it.
4. See Figure 16. Remove the oil roll cartridge and
set it aside.
5. Removed the jammed paper in the direction of
the arrow. Be sure no torn pieces of paper are
left inside the fuser area.
2
1
Figure 15
4
5
Figure 16
6. See Figure 17. Reinsert the oil roll cartridge.
7. Push the lower left unit firmly back into the copier/
printer.
6
7
Figure 17
Getting to Know Your Product
QuickStart Practice Guide 7
Page 12

Clearing a jam in the left side
Demonstrate how to open the top left cover and
remove a paper jam.
1. See Figure 18. Open the top left cover by pulling the top to the left.
2. Remove the jammed paper. Be sure no torn
pieces of paper remain inside the copier/printer.
3. See Figure 19. Close the top left cover.
1
2
Figure 18
3
Clearing a jam in the two tray module
Show how to clear a jam in the two tray module.
1. See Figure 20. Open the right cover of the two
tray module.
2. Remove the jammed paper. Be sure no pieces of
torn paper remain inside the copier/printer.
3. See Figure 21. Close the right cover of the 2-tray
module.
Figure 19
2
1
Figure 20
3
Figure 21
Getting to Know Your Product
8 QuickStart Practice Guide
Page 13

Activity 3: Replacing consumables
Replacing the toner cartridges
Note: During the demonstration, do not remove the
toner cartridge fully from the copier/printer. Toner
may spill if the cartridge if fully removed.
Demonstrate how to replace a toner cartridge.
1. See Figure 22. Open the front cover of the
copier/printer.
2. See Figure 23. If the cartridge to be replaced is not
at the cartridge window, push the anti-rotation
switch up to release the lock.
1
Figure 22
2
3. Turn the knob clockwise to rotate the toner car-
tridge turret until the desired color cartridge
appears in the cartridge window.
4. See Figure 24. Turn the cartridge handle counter-
clockwise to align the “l” mark on the cartridge
with the unlocked symbol () on the copier/
printer.
3
Figure 23
4
Figure 24
Getting to Know Your Product
QuickStart Practice Guide 9
Page 14

5. See Figure 25. Pull the toner cartridge out of the
copier/printer.
6. See Figure 26. Remove the new toner cartridge
from the package and shake several times.
7. With the arrow on the cartridge pointing up,
insert the cartridge into the copier/printer as far
as it will go.
5
Figure 25
6
7
8. See Figure 27. Turn the handle on the cartridge
clockwise until the “l” mark on the cartridge
aligns with the locked symbol () on the copier/
printer.
Figure 26
8
Figure 27
Getting to Know Your Product
10 QuickStart Practice Guide
Page 15

Replacing the drum cartridge
Show how to remove and replace the drum cartridge.
1. See Figure 28. Turn the peach colored cover
“A” counterclockwise until the “l” mark on the
cover aligns with the unlocked symbol () on
the copier/printer.
2. Turn the peach colored lever “B” counterclock-
wise until the lever aligns with the unlocked
symbol () on the copier/printer.
3. See Figure 29. Place a hand in the peach colored
hand hold and pull the drum cartridge partly out of
the copier/printer.
4. Grasp the top handle and pull the cartridge fully
out of the copier/printer.
5. Remove the new drum cartridge from the pack-
age and remove the protective paper cover.
Lever “B”
2
1
Cover “A”
Figure 28
4
3
Figure 29
6. See Figure 30. Align the arrows on top of the car-
tridge with the rails and push the cartridge fully
into the copier/printer.
Getting to Know Your Product
QuickStart Practice Guide 11
6
Figure 30
Page 16

7. See Figure 31. Turn the peach colored lever “B”
clockwise until the lever aligns with the locked
symbol () on the copier/printer.
8. Turn the peach colored cover “A” clockwise
until the “l” mark on the cover aligns with the
locked symbol () on the copier/printer.
9. See Figure 32. Close the front cover of the copier/
printer.
7
Lever “B”
8
Cover “A”
Figure 31
9
Replacing the fuser oil roll cartridge
Show how to remove and replace the fuser oil roll
cartridge.
1. See Figure 33. Pull out the lower left side unit as
far as it will go.
2. Place two pieces of paper on a flat surface to set
the oil roll cartridge on when you remove it.
3. Remove the used fuser oil roll cartridge and set
it aside.
Figure 32
3
1
Figure 33
Getting to Know Your Product
12 QuickStart Practice Guide
Page 17

4. See Figure 34. Remove the new fuser oil roll car-
tridge from the box.
5. Remove the cartridge from the clear plastic bag.
WARNING: Do not touch the white oil
roller. The oil will stick to your skin.
!
6. See Figure 35. Hold the fuser oil roll cartridge by
the handle and remove the tape.
7. Pull the tab back and remove the plastic cover
from the bottom of the cartridge.
4
5
Figure 34
6
8. See Figure 36. Remove the two retaining pins
from the ends of the cartridge.
7
Figure 35
8
Figure 36
Getting to Know Your Product
QuickStart Practice Guide 13
Page 18

9. See Figure 37. Tilt the cartridge in toward the
printer and aline the green label and arrow at the
left end of the fuser oil cartridge with the green
label on the housing.
10. Slide the cartridge straight down.
11. Rotate the cartridge down until it snaps into place.
12. See Figure 38. Close the lower left side unit.
9
10
11
Figure 37
12
Figure 38
Getting to Know Your Product
14 QuickStart Practice Guide
Page 19

Activity 4: Making copies
The DocuColor 4 Copier/Printer allows you to select
the color mode to produce copies that are the best
quality.
See Figure 39. When the Original Type button is
pressed, the color mode display appears.
1. Color - Text/Phto: This is the default setting and
should be used when the original contains both text
and photographs in color.
2. Color - PrintPhto:- Use this setting when you
are copying printed photographs (catalogs, magazines, etc.) in color.
3. Color - Phtograph: Use for copying developed
photographs or negative films (not printed photos) in color.
4. B/W - Text/Phto: This setting is for copying
black and white documents containing both text
and photographs.
5. B/W - Text: When the document being copied
only contains black and white text, this mode
should be used.
Choose, then press Select
Color - Text/Phto B/W - Text/Phto
Color - PrintPhto B/W - Text
Color - Phtograph
Figure 39
Making colored copies from the document glass
Note: Use the color test pattern supplied with the
DocuColor 4 Copier/Printer.
To make a single-sided copy from the document glass:
1. See Figure 40. Raise the document glass cover
or ADF.
2. Place the 8.5 x 11 in. colored original face down
and flush against the left rear corner of the document glass.
3. Lower the document glass cover or ADF.
1
3
2
Figure 40
Getting to Know Your Product
QuickStart Practice Guide 15
Page 20

4. See Figure 41. Press the Copy button.
5. Under Paper Supply, select Auto.
6. Under Reduce/Enlarge, select Auto.
7. Press the Original Type button.
8. Press the s or t buttons to highlight Color -
Text/Phto on the display.
9. Press the Select button.
10. Press the Start button.
11. Your full color copy will be delivered to the output tray.
Making black and white copies from the document glass
Note: Use the cover of the DocuColor 4 Product
Orientation Guide or other black and white original.
To make a black and white copy from the document
glass:
6
5
7
Figure 41
8
4
9
10
1. See Figure 42. Raise the document glass cover
or ADF.
2. Place the 8.5 x 11 in. original face down and
flush against the upper left corner of the document glass.
3. Lower the document glass cover or ADF.
4. See Figure 43. Press the Copy button.
5. Under Paper Supply, select Auto.
6. Under Reduce/Enlarge, select 100%.
7. Press the Original Type button.
8. Press the s or t buttons to select B/W - Text/
Phto in the display.
9. Press the Select button.
10. Press the 2 button.
11. Press the Start button.
1
3
2
Figure 42
6
4
10
12. Your black and white copies will be delivered to
the output tray.
16 QuickStart Practice Guide
5
7
Figure 43
8
Getting to Know Your Product
9
11
Page 21

Copying multiple originals
Note: The ADF is an option and may not be present on
your copier/printer.
To make copies from a stack of originals, use the ADF:
1. Raise the ADF and remove the original from the
document glass.
2. See Figure 44. Place the two copies from the
previous activity face-up in the document feeder.
Orient the originals for long edge feed.
3. Slide the copies forward until the green light on
the back cover of the ADF lights.
4. Adjust the edge guide to just touch the end of the
paper.
5. See Figure 45. Press the Copy button.
6. Under Paper Supply, select Auto.
7. Under Reduce/Enlarge, select Auto.
8. Press the Original Type button.
9. Press the s or t buttons to highlight B/W -
Text/Phto on the display.
10. Press the Select button.
11. Press the 2 button.
12. Press the Start button.
3
2
Figure 44
11
7
5
4
14
13. Two copies of the pages will be delivered to the
output tray.
14. Press the Clear All button to restore the original
settings.
6
8
Figure 45
9
10
12
Getting to Know Your Product
QuickStart Practice Guide 17
Page 22

Making reductions and enlargements
1. See Figure 46. Open the ADF or document cover.
2. Place an original face down on the document
glass. Orient the original for short edge feed.
3. Close the ADF or document cover.
1
3
2
Figure 46
4. See Figure 47. Press the Copy button.
5. Under Paper Supply, select Auto.
6. Under Reduce/Enlarge, press the s or t buttons to select one of the standard enlargement or
reduction ratios, between 64% and 200%.
7. Press the Original Type button.
8. Press the s or t buttons to highlight the desired
color mode on the display.
9. Press the Select button.
10. Press the Start button.
11. A copy will be produced that is reduced or
enlarged from the size of the original.
12. Press the Clear All button to restore the original
settings.
7
5
6 8
Figure 47
4
9
12
10
Getting to Know Your Product
18 QuickStart Practice Guide
Page 23

Troubleshooting: when something goes wrong
The DocuColor 4 Copier/Printer is designed to detect problems and
display the corrective action on the LCD screen. Follow the
instructions on the screen to solve the problem.
Refer to “Activity 2: Clearing a jam” on page4 for detailed information
on clearing paper jams.
If you need further instructions, refer to the Trouble Shooting section of
the DocuColor 4 Copier/Printer Set-Up Guide.
Caring for your DocuColor 4 Copier/Printer
To produce the highest quality copies, your DocuColor 4 Copier/Printer should be kept clean. Perform the
following simple steps at the start of each day.
1. See Figure 48. Clean the document glass with a
clean lint-free cloth dampened with a small amount
of Xerox Lens and Mirror Cleaner or a non-abrasive glass cleaner such as Windex or Glass Plus.
2. See Figure 49. Wipe the underside of the document
glass cover with a clean lint-free cloth dampened
with Xerox Film Remover.
Figure 48
Figure 49
Getting to Know Your Product
QuickStart Practice Guide 19
Page 24

Resources
Frequently asked questions
For more information, refer to the following publications:
DocuColor 4 LP/CP User Guide
DocuColor 4 LP/CP System Administration Guide
DocuColor 4 LP/CP Set-Up Guide
How long is the warm-up
period?
How fast is the copier in full
color mode?
How fast is the copier in black
and white mode?
How do I select color copying
mode?
What happens when I run out
of one color dry ink (toner)?
What happens if I accidentally
put the wrong color dry ink
cartridge into the copier/
printer?
The DocuColor 4 Copier/Printer takes about 8 minutes after the power
is switched on before it is ready to make copies.
About 4 full color copies per minute, depending on the paper size and
feeding orientation of the paper.
Approximately 16 copies per minute using 8-1/2 x 11 in. or A3 paper
being fed long edge first.
You don’t have to make any special selections for color copying. The
copier defaults to full color setting. This means it will copy all colors
present in the original, or automatically switch to black and white mode
if the original does not contain colors.
The copier/printer gives you a warning message on the LCD screen to
order more dry ink when a particular color dry ink is running low.
When the ink supply is exhausted, the copier/printer will not make
copies in that color until the dry ink cartridge is replaced.
You can’t. Each dry ink cartridge is keyed so it will only insert into the
proper color housing.
Getting to Know Your Product
20 QuickStart Practice Guide
Page 25

Customer Evaluation Questionnaire
Xerox Product:
Carrier Name: _____________________________________ Date: _________________
Company Name: ____________________________________ Participant Name: (optional): ________________________
To what extent do you agree with the following statements? (Check the appropriate box.) Make additional copies, as needed.
Please write in ink, if available. You may write comments on this evaluation if you wish. Please return at your earliest convenience.
SD = 1, Strongly disagree N = 3, Neither way A = 4, Agree
D = 2, Disagree SA = 5, Strongly agree
A. The Carrier
1. Was prepared for the product orientation and organized.
2. Displayed professional conduct.
3. Communicated the material in a
clear and concise way.
4. Addressed my expectations.
5. Conducted an orientation that was
easy to follow.
6. Overall, was effective.
Additional comments:
SD1D2N3A4SA
o o o o o
o o o o o
o o o o o
o o o o o
o o o o o
o o o o o
5
B. The Quick Start Guide
7. The practice exercises were well
organized in a meaningful
sequence.
8. Information was accurate.
9. The illustrations were clear and
understandable.
10. Overall, met my needs.
11. Amount of
information
12. Level of difficulty
SD1D2N3A4SA
5
o o o o o
o o o o o
o o o o o
o o o o o
o o o o o
o o o o o
o Check here if we may contact you to follow up on your comments. Please include your area code and telephone number.
Page 26

BUSINESS REPLY MAIL
First Class Mail Permit No. 229 El Segundo, CA
Postage will be paid by Addressee
Xerox Corporation
Customer Education Services
Attn: GTKYP CSMS
Suite 2000, ESL2-211
360 N. Sepulveda Boulevard
El Segundo, CA 90245-9935
No Postage Necessary
If Mailed
in the
United States
 Loading...