

Page 1

Xerox® WorkCentre® 5800/5800i Series
Multifunction Printer
2016 Xerox® ConnectKey® Technology
User Guide
Page 2

©2016 Xerox Corporation. All rights reserved. Xerox® and Xerox and Design® and WorkCentre®
are trademarks of Xerox Corporation in the United States and/or other countries. BR14363
Other company trademarks are also acknowledged.
Version 4.0: February 2016
Page 3

Xerox® WorkCentre® 5800/5800i Series
Contents
1 Safety and Regulations
Notices and Safety . . . . . . . . . . . . . . . . . . . . . . . . . . . . . . . . . . . . . . . . . . . . . . . . . . . . . . . . . . . . . . . . . 7
Safety Labels and Symbols . . . . . . . . . . . . . . . . . . . . . . . . . . . . . . . . . . . . . . . . . . . . . . . . . . . . . . . . . . 8
Operational Safety Information . . . . . . . . . . . . . . . . . . . . . . . . . . . . . . . . . . . . . . . . . . . . . . . . . . . . . 9
Electrical Supply. . . . . . . . . . . . . . . . . . . . . . . . . . . . . . . . . . . . . . . . . . . . . . . . . . . . . . . . . . . . . . . 9
Ozone Safety Information . . . . . . . . . . . . . . . . . . . . . . . . . . . . . . . . . . . . . . . . . . . . . . . . . . . . 11
Maintenance Information . . . . . . . . . . . . . . . . . . . . . . . . . . . . . . . . . . . . . . . . . . . . . . . . . . . . 11
Consumables Information . . . . . . . . . . . . . . . . . . . . . . . . . . . . . . . . . . . . . . . . . . . . . . . . . . . . 12
Product Safety Certification. . . . . . . . . . . . . . . . . . . . . . . . . . . . . . . . . . . . . . . . . . . . . . . . . . . 12
Basic Regulations. . . . . . . . . . . . . . . . . . . . . . . . . . . . . . . . . . . . . . . . . . . . . . . . . . . . . . . . . . . . . . . . . . 12
United States (FCC Regulations) . . . . . . . . . . . . . . . . . . . . . . . . . . . . . . . . . . . . . . . . . . . . . . 12
Canada (Regulations) . . . . . . . . . . . . . . . . . . . . . . . . . . . . . . . . . . . . . . . . . . . . . . . . . . . . . . . . 13
European Union. . . . . . . . . . . . . . . . . . . . . . . . . . . . . . . . . . . . . . . . . . . . . . . . . . . . . . . . . . . . . . 13
European Union Lot 4 Imaging Equipment Agreement Environmental
Information. . . . . . . . . . . . . . . . . . . . . . . . . . . . . . . . . . . . . . . . . . . . . . . . . . . . . . . . . . . . . . . . . . 14
Turkey RoHS Regulation . . . . . . . . . . . . . . . . . . . . . . . . . . . . . . . . . . . . . . . . . . . . . . . . . . . . . . 14
China RoHS . . . . . . . . . . . . . . . . . . . . . . . . . . . . . . . . . . . . . . . . . . . . . . . . . . . . . . . . . . . . . . . . . . 15
Copy Regulations. . . . . . . . . . . . . . . . . . . . . . . . . . . . . . . . . . . . . . . . . . . . . . . . . . . . . . . . . . . . . . . . . . 16
United States . . . . . . . . . . . . . . . . . . . . . . . . . . . . . . . . . . . . . . . . . . . . . . . . . . . . . . . . . . . . . . . . 16
Canada . . . . . . . . . . . . . . . . . . . . . . . . . . . . . . . . . . . . . . . . . . . . . . . . . . . . . . . . . . . . . . . . . . . . . . 17
Other Countries . . . . . . . . . . . . . . . . . . . . . . . . . . . . . . . . . . . . . . . . . . . . . . . . . . . . . . . . . . . . . . 18
Fax Regulations . . . . . . . . . . . . . . . . . . . . . . . . . . . . . . . . . . . . . . . . . . . . . . . . . . . . . . . . . . . . . . . . . . . 18
United States Fax Header Requirements . . . . . . . . . . . . . . . . . . . . . . . . . . . . . . . . . . . . . . . 18
Canada . . . . . . . . . . . . . . . . . . . . . . . . . . . . . . . . . . . . . . . . . . . . . . . . . . . . . . . . . . . . . . . . . . . . . . 20
Europe. . . . . . . . . . . . . . . . . . . . . . . . . . . . . . . . . . . . . . . . . . . . . . . . . . . . . . . . . . . . . . . . . . . . . . . 20
South Africa . . . . . . . . . . . . . . . . . . . . . . . . . . . . . . . . . . . . . . . . . . . . . . . . . . . . . . . . . . . . . . . . . 21
Material Safety Data . . . . . . . . . . . . . . . . . . . . . . . . . . . . . . . . . . . . . . . . . . . . . . . . . . . . . . . . . . . . . . 21
Product Recycling and Disposal. . . . . . . . . . . . . . . . . . . . . . . . . . . . . . . . . . . . . . . . . . . . . . . . . . . . . 21
USA and Canada . . . . . . . . . . . . . . . . . . . . . . . . . . . . . . . . . . . . . . . . . . . . . . . . . . . . . . . . . . . . . 21
European Union. . . . . . . . . . . . . . . . . . . . . . . . . . . . . . . . . . . . . . . . . . . . . . . . . . . . . . . . . . . . . . 21
Energy Program Compliance . . . . . . . . . . . . . . . . . . . . . . . . . . . . . . . . . . . . . . . . . . . . . . . . . . . . . . . 22
All Markets. . . . . . . . . . . . . . . . . . . . . . . . . . . . . . . . . . . . . . . . . . . . . . . . . . . . . . . . . . . . . . . . . . . 22
Canada . . . . . . . . . . . . . . . . . . . . . . . . . . . . . . . . . . . . . . . . . . . . . . . . . . . . . . . . . . . . . . . . . . . . . . 23
Environment, Health and Safety Contact Information . . . . . . . . . . . . . . . . . . . . . . . . . . . . . . . 23
2 Getting Started
Identifying the Parts of Your Device . . . . . . . . . . . . . . . . . . . . . . . . . . . . . . . . . . . . . . . . . . . . . . . . 25
Locating the Serial Number for Your Device . . . . . . . . . . . . . . . . . . . . . . . . . . . . . . . . . . . . . . . . . 26
Xerox ConnectKey Apps. . . . . . . . . . . . . . . . . . . . . . . . . . . . . . . . . . . . . . . . . . . . . . . . . . . . . . . . . . . . 27
Services and Options. . . . . . . . . . . . . . . . . . . . . . . . . . . . . . . . . . . . . . . . . . . . . . . . . . . . . . . . . . . . . . . 27
Identifying the WorkCentre 5845 Standard and Optional Services. . . . . . . . . . . . . . . 27
Identifying the WorkCentre 5855 Standard and Optional Services. . . . . . . . . . . . . . . 30
Identifying the WorkCentre 5865/5865i Standard and Optional Services . . . . . . . . 32
Identifying the WorkCentre 5875/5875i Standard and Optional Services . . . . . . . . 35
Identifying the WorkCentre 5890/5890i Standard and Optional Services . . . . . . . . 37
Describing the Finishing Devices. . . . . . . . . . . . . . . . . . . . . . . . . . . . . . . . . . . . . . . . . . . . . . . 40
Identifying the Control Panel Buttons. . . . . . . . . . . . . . . . . . . . . . . . . . . . . . . . . . . . . . . . . . . . . . . 41
User Guide 1
Page 4

Xerox® WorkCentre® 5800/5800i Series
Power On and Off . . . . . . . . . . . . . . . . . . . . . . . . . . . . . . . . . . . . . . . . . . . . . . . . . . . . . . . . . . . . . . . . . 42
Powering the Device On . . . . . . . . . . . . . . . . . . . . . . . . . . . . . . . . . . . . . . . . . . . . . . . . . . . . . . 42
Powering the Device Off . . . . . . . . . . . . . . . . . . . . . . . . . . . . . . . . . . . . . . . . . . . . . . . . . . . . . . 42
Using the Energy Saver Option . . . . . . . . . . . . . . . . . . . . . . . . . . . . . . . . . . . . . . . . . . . . . . . . 43
Loading Documents . . . . . . . . . . . . . . . . . . . . . . . . . . . . . . . . . . . . . . . . . . . . . . . . . . . . . . . . . . . . . . . 44
Making Copies . . . . . . . . . . . . . . . . . . . . . . . . . . . . . . . . . . . . . . . . . . . . . . . . . . . . . . . . . . . . . . . . . . . . 45
Print . . . . . . . . . . . . . . . . . . . . . . . . . . . . . . . . . . . . . . . . . . . . . . . . . . . . . . . . . . . . . . . . . . . . . . . . . . . . . . 46
Printing a Document using the PostScript Print Driver. . . . . . . . . . . . . . . . . . . . . . . . . . . 46
Printing a Document using the PCL Print Driver. . . . . . . . . . . . . . . . . . . . . . . . . . . . . . . . . 47
Printing a Document using the Mac Print Driver . . . . . . . . . . . . . . . . . . . . . . . . . . . . . . . . 49
Printing a Document using the XPS Print Driver. . . . . . . . . . . . . . . . . . . . . . . . . . . . . . . . . 51
Fax . . . . . . . . . . . . . . . . . . . . . . . . . . . . . . . . . . . . . . . . . . . . . . . . . . . . . . . . . . . . . . . . . . . . . . . . . . . . . . . 53
Explaining the Fax Options. . . . . . . . . . . . . . . . . . . . . . . . . . . . . . . . . . . . . . . . . . . . . . . . . . . . 53
Faxing from the Device . . . . . . . . . . . . . . . . . . . . . . . . . . . . . . . . . . . . . . . . . . . . . . . . . . . . . . . 53
Faxing from your Computer. . . . . . . . . . . . . . . . . . . . . . . . . . . . . . . . . . . . . . . . . . . . . . . . . . . 57
Using Workflow Scanning . . . . . . . . . . . . . . . . . . . . . . . . . . . . . . . . . . . . . . . . . . . . . . . . . . . . . . . . . . 69
Sending an E-mail . . . . . . . . . . . . . . . . . . . . . . . . . . . . . . . . . . . . . . . . . . . . . . . . . . . . . . . . . . . . . . . . . 70
Saved Jobs . . . . . . . . . . . . . . . . . . . . . . . . . . . . . . . . . . . . . . . . . . . . . . . . . . . . . . . . . . . . . . . . . . . . . . . . 71
Saving Jobs . . . . . . . . . . . . . . . . . . . . . . . . . . . . . . . . . . . . . . . . . . . . . . . . . . . . . . . . . . . . . . . . . . 71
Printing Saved Jobs. . . . . . . . . . . . . . . . . . . . . . . . . . . . . . . . . . . . . . . . . . . . . . . . . . . . . . . . . . . 76
Enhancing Productivity . . . . . . . . . . . . . . . . . . . . . . . . . . . . . . . . . . . . . . . . . . . . . . . . . . . . . . . . . . . . 79
Maintenance and Consumables . . . . . . . . . . . . . . . . . . . . . . . . . . . . . . . . . . . . . . . . . . . . . . . . . . . . 79
Identifying the Replaceable Units . . . . . . . . . . . . . . . . . . . . . . . . . . . . . . . . . . . . . . . . . . . . . 79
Cleaning the Document Glass and Constant Velocity Transport Glass. . . . . . . . . . . . 80
Cleaning the Control Panel, Touch Screen, Document Feeder and Output Trays . . 81
Clearing Paper Jams . . . . . . . . . . . . . . . . . . . . . . . . . . . . . . . . . . . . . . . . . . . . . . . . . . . . . . . . . . 81
Help . . . . . . . . . . . . . . . . . . . . . . . . . . . . . . . . . . . . . . . . . . . . . . . . . . . . . . . . . . . . . . . . . . . . . . . . . . . . . . 81
Accessing the Help Features On the Device. . . . . . . . . . . . . . . . . . . . . . . . . . . . . . . . . . . . . 81
Accessing the PostScript Print Driver Help Pages. . . . . . . . . . . . . . . . . . . . . . . . . . . . . . . . 82
Accessing the PCL Print Driver Help Pages. . . . . . . . . . . . . . . . . . . . . . . . . . . . . . . . . . . . . . 82
Accessing the Mac Print Driver Help Pages . . . . . . . . . . . . . . . . . . . . . . . . . . . . . . . . . . . . . 83
Accessing the XPS Print Driver Help Pages. . . . . . . . . . . . . . . . . . . . . . . . . . . . . . . . . . . . . . 83
Using the Internet Services Help Feature. . . . . . . . . . . . . . . . . . . . . . . . . . . . . . . . . . . . . . . 84
Getting Further Assistance . . . . . . . . . . . . . . . . . . . . . . . . . . . . . . . . . . . . . . . . . . . . . . . . . . . . 84
3Copy
Making Copies . . . . . . . . . . . . . . . . . . . . . . . . . . . . . . . . . . . . . . . . . . . . . . . . . . . . . . . . . . . . . . . . . . . . 85
Copy Options. . . . . . . . . . . . . . . . . . . . . . . . . . . . . . . . . . . . . . . . . . . . . . . . . . . . . . . . . . . . . . . . . . . . . . 86
Reduce or Enlarge . . . . . . . . . . . . . . . . . . . . . . . . . . . . . . . . . . . . . . . . . . . . . . . . . . . . . . . . . . . . 86
Setting the Paper Supply for Copies . . . . . . . . . . . . . . . . . . . . . . . . . . . . . . . . . . . . . . . . . . . 89
Making 2 Sided Copies or Copying 2 Sided Originals . . . . . . . . . . . . . . . . . . . . . . . . . . . . 91
Copy Output . . . . . . . . . . . . . . . . . . . . . . . . . . . . . . . . . . . . . . . . . . . . . . . . . . . . . . . . . . . . . . . . . 92
Image Quality. . . . . . . . . . . . . . . . . . . . . . . . . . . . . . . . . . . . . . . . . . . . . . . . . . . . . . . . . . . . . . . . . . . . 102
Setting the Original Type for Copies . . . . . . . . . . . . . . . . . . . . . . . . . . . . . . . . . . . . . . . . . . 102
Image Options . . . . . . . . . . . . . . . . . . . . . . . . . . . . . . . . . . . . . . . . . . . . . . . . . . . . . . . . . . . . . . 103
Image Enhancement . . . . . . . . . . . . . . . . . . . . . . . . . . . . . . . . . . . . . . . . . . . . . . . . . . . . . . . . 106
Layout Adjustment . . . . . . . . . . . . . . . . . . . . . . . . . . . . . . . . . . . . . . . . . . . . . . . . . . . . . . . . . . . . . . . 109
Setting the Original Orientation for Copies . . . . . . . . . . . . . . . . . . . . . . . . . . . . . . . . . . . . 109
Specifying the Size of the Original to be Copied . . . . . . . . . . . . . . . . . . . . . . . . . . . . . . . 110
Copying Book Pages . . . . . . . . . . . . . . . . . . . . . . . . . . . . . . . . . . . . . . . . . . . . . . . . . . . . . . . . . 111
Using the Image Shift Feature to Reposition the Copy Image . . . . . . . . . . . . . . . . . . 113
Erasing Edges from Copies . . . . . . . . . . . . . . . . . . . . . . . . . . . . . . . . . . . . . . . . . . . . . . . . . . . 114
Creating Copies with an Inverted Image . . . . . . . . . . . . . . . . . . . . . . . . . . . . . . . . . . . . . . 116
2 User Guide
Page 5

Xerox® WorkCentre® 5800/5800i Series
Output Format . . . . . . . . . . . . . . . . . . . . . . . . . . . . . . . . . . . . . . . . . . . . . . . . . . . . . . . . . . . . . . . . . . . 117
Making Copies into a Booklet . . . . . . . . . . . . . . . . . . . . . . . . . . . . . . . . . . . . . . . . . . . . . . . . 117
Special Pages . . . . . . . . . . . . . . . . . . . . . . . . . . . . . . . . . . . . . . . . . . . . . . . . . . . . . . . . . . . . . . . 118
Annotations. . . . . . . . . . . . . . . . . . . . . . . . . . . . . . . . . . . . . . . . . . . . . . . . . . . . . . . . . . . . . . . . . 126
Using Transparency Separators within Copy Sets . . . . . . . . . . . . . . . . . . . . . . . . . . . . . . 134
Copying Multiple Pages or Repeat Images onto a Page . . . . . . . . . . . . . . . . . . . . . . . . 135
Job Assembly. . . . . . . . . . . . . . . . . . . . . . . . . . . . . . . . . . . . . . . . . . . . . . . . . . . . . . . . . . . . . . . . . . . . . 136
Building a Copy Job with Multiple Page or Segment Settings . . . . . . . . . . . . . . . . . . . 136
Printing a Sample Set. . . . . . . . . . . . . . . . . . . . . . . . . . . . . . . . . . . . . . . . . . . . . . . . . . . . . . . . 138
Saving Current Settings for Copying . . . . . . . . . . . . . . . . . . . . . . . . . . . . . . . . . . . . . . . . . . 139
Retrieving Saved Settings for Copying . . . . . . . . . . . . . . . . . . . . . . . . . . . . . . . . . . . . . . . . 140
Deleting Saved Settings for Copying. . . . . . . . . . . . . . . . . . . . . . . . . . . . . . . . . . . . . . . . . . 141
Selecting the Number of Copies . . . . . . . . . . . . . . . . . . . . . . . . . . . . . . . . . . . . . . . . . . . . . . 142
4Fax
Fax (Embedded Fax). . . . . . . . . . . . . . . . . . . . . . . . . . . . . . . . . . . . . . . . . . . . . . . . . . . . . . . . . . . . . . 143
Sending a Fax (Embedded Fax) . . . . . . . . . . . . . . . . . . . . . . . . . . . . . . . . . . . . . . . . . . . . . . 143
Fax . . . . . . . . . . . . . . . . . . . . . . . . . . . . . . . . . . . . . . . . . . . . . . . . . . . . . . . . . . . . . . . . . . . . . . . . . 144
Image Quality . . . . . . . . . . . . . . . . . . . . . . . . . . . . . . . . . . . . . . . . . . . . . . . . . . . . . . . . . . . . . . 153
Layout Adjustment . . . . . . . . . . . . . . . . . . . . . . . . . . . . . . . . . . . . . . . . . . . . . . . . . . . . . . . . . . 159
Fax Options . . . . . . . . . . . . . . . . . . . . . . . . . . . . . . . . . . . . . . . . . . . . . . . . . . . . . . . . . . . . . . . . . 162
Building a Fax Job with Multiple Page or Segment Settings (Embedded Fax) . . . . 175
Server Fax. . . . . . . . . . . . . . . . . . . . . . . . . . . . . . . . . . . . . . . . . . . . . . . . . . . . . . . . . . . . . . . . . . . . . . . . 177
Sending a Server Fax . . . . . . . . . . . . . . . . . . . . . . . . . . . . . . . . . . . . . . . . . . . . . . . . . . . . . . . . 177
Sending a Server Fax using the Workflow Scanning Feature . . . . . . . . . . . . . . . . . . . . 178
Server Fax . . . . . . . . . . . . . . . . . . . . . . . . . . . . . . . . . . . . . . . . . . . . . . . . . . . . . . . . . . . . . . . . . . 179
Image Quality . . . . . . . . . . . . . . . . . . . . . . . . . . . . . . . . . . . . . . . . . . . . . . . . . . . . . . . . . . . . . . 185
Using a Timer to Send a Server Fax . . . . . . . . . . . . . . . . . . . . . . . . . . . . . . . . . . . . . . . . . . . 190
Building a Server Fax Job with Multiple Page or Segment Settings . . . . . . . . . . . . . . 191
Internet Fax. . . . . . . . . . . . . . . . . . . . . . . . . . . . . . . . . . . . . . . . . . . . . . . . . . . . . . . . . . . . . . . . . . . . . . 192
Sending an Internet Fax . . . . . . . . . . . . . . . . . . . . . . . . . . . . . . . . . . . . . . . . . . . . . . . . . . . . . 192
Internet Fax . . . . . . . . . . . . . . . . . . . . . . . . . . . . . . . . . . . . . . . . . . . . . . . . . . . . . . . . . . . . . . . . 194
Advanced Settings . . . . . . . . . . . . . . . . . . . . . . . . . . . . . . . . . . . . . . . . . . . . . . . . . . . . . . . . . . 201
Layout Adjustment . . . . . . . . . . . . . . . . . . . . . . . . . . . . . . . . . . . . . . . . . . . . . . . . . . . . . . . . . . 213
Internet Fax Options . . . . . . . . . . . . . . . . . . . . . . . . . . . . . . . . . . . . . . . . . . . . . . . . . . . . . . . . 214
Building an Internet Fax Job with Multiple Page or Segment Settings. . . . . . . . . . . 222
5Scan
Workflow Scanning . . . . . . . . . . . . . . . . . . . . . . . . . . . . . . . . . . . . . . . . . . . . . . . . . . . . . . . . . . . . . . . 225
Explaining What Workflow Scanning Does and How It Works . . . . . . . . . . . . . . . . . . 225
Using Workflow Scanning. . . . . . . . . . . . . . . . . . . . . . . . . . . . . . . . . . . . . . . . . . . . . . . . . . . . 226
Workflow Scanning. . . . . . . . . . . . . . . . . . . . . . . . . . . . . . . . . . . . . . . . . . . . . . . . . . . . . . . . . . 227
Advanced Settings . . . . . . . . . . . . . . . . . . . . . . . . . . . . . . . . . . . . . . . . . . . . . . . . . . . . . . . . . . 236
Layout Adjustment . . . . . . . . . . . . . . . . . . . . . . . . . . . . . . . . . . . . . . . . . . . . . . . . . . . . . . . . . . 245
Filing Options . . . . . . . . . . . . . . . . . . . . . . . . . . . . . . . . . . . . . . . . . . . . . . . . . . . . . . . . . . . . . . . 249
Building a Workflow Scanning Job with Multiple Page or Segment Settings . . . . . 254
Scan To . . . . . . . . . . . . . . . . . . . . . . . . . . . . . . . . . . . . . . . . . . . . . . . . . . . . . . . . . . . . . . . . . . . . . . . . . . 256
Using the Scan To Feature . . . . . . . . . . . . . . . . . . . . . . . . . . . . . . . . . . . . . . . . . . . . . . . . . . . 256
Scanning to a Favorite Address using the Scan To Feature . . . . . . . . . . . . . . . . . . . . . 257
Scan To. . . . . . . . . . . . . . . . . . . . . . . . . . . . . . . . . . . . . . . . . . . . . . . . . . . . . . . . . . . . . . . . . . . . . 258
Advanced Settings . . . . . . . . . . . . . . . . . . . . . . . . . . . . . . . . . . . . . . . . . . . . . . . . . . . . . . . . . . 264
Layout Adjustment . . . . . . . . . . . . . . . . . . . . . . . . . . . . . . . . . . . . . . . . . . . . . . . . . . . . . . . . . . 272
Filing Options . . . . . . . . . . . . . . . . . . . . . . . . . . . . . . . . . . . . . . . . . . . . . . . . . . . . . . . . . . . . . . . 276
User Guide 3
Page 6

Xerox® WorkCentre® 5800/5800i Series
Building a Job with Multiple Page or Segment Settings using the Scan To
Feature . . . . . . . . . . . . . . . . . . . . . . . . . . . . . . . . . . . . . . . . . . . . . . . . . . . . . . . . . . . . . . . . . . . . . 278
Single-Touch Scan . . . . . . . . . . . . . . . . . . . . . . . . . . . . . . . . . . . . . . . . . . . . . . . . . . . . . . . . . . . . . . . . 280
Scanning a Document to your Computer or Network using Single-Touch Scan. . . 280
Building a Single-Touch Scan Job with Multiple Settings . . . . . . . . . . . . . . . . . . . . . . . 281
Setting the Output Color for a Single-Touch Scan. . . . . . . . . . . . . . . . . . . . . . . . . . . . . . 282
Using Single-Touch Scan to Send 2-Sided Originals . . . . . . . . . . . . . . . . . . . . . . . . . . . . 283
Setting the Original Type for Single-Touch Scans . . . . . . . . . . . . . . . . . . . . . . . . . . . . . . 284
Specifying a File Name for Single-Touch Scans . . . . . . . . . . . . . . . . . . . . . . . . . . . . . . . . 286
Remote Scan . . . . . . . . . . . . . . . . . . . . . . . . . . . . . . . . . . . . . . . . . . . . . . . . . . . . . . . . . . . . . . . . . . . . . 287
Scanning an image using the Xerox TWAIN Scan Driver . . . . . . . . . . . . . . . . . . . . . . . 287
Accessing the TWAIN Scan Driver Help Pages . . . . . . . . . . . . . . . . . . . . . . . . . . . . . . . . . 289
6Print
PCL Driver. . . . . . . . . . . . . . . . . . . . . . . . . . . . . . . . . . . . . . . . . . . . . . . . . . . . . . . . . . . . . . . . . . . . . . . . 291
Printing a Document using the PCL Print Driver. . . . . . . . . . . . . . . . . . . . . . . . . . . . . . . . 291
Tab menu. . . . . . . . . . . . . . . . . . . . . . . . . . . . . . . . . . . . . . . . . . . . . . . . . . . . . . . . . . . . . . . . . . . 293
Menu at the bottom of the Tabs . . . . . . . . . . . . . . . . . . . . . . . . . . . . . . . . . . . . . . . . . . . . . 336
Viewing the Device Status using the PCL Print Driver. . . . . . . . . . . . . . . . . . . . . . . . . . . 344
PostScript Driver. . . . . . . . . . . . . . . . . . . . . . . . . . . . . . . . . . . . . . . . . . . . . . . . . . . . . . . . . . . . . . . . . . 345
Printing a Document using the PostScript Print Driver. . . . . . . . . . . . . . . . . . . . . . . . . . 345
Tab menu. . . . . . . . . . . . . . . . . . . . . . . . . . . . . . . . . . . . . . . . . . . . . . . . . . . . . . . . . . . . . . . . . . . 347
Menu at the bottom of the Tabs . . . . . . . . . . . . . . . . . . . . . . . . . . . . . . . . . . . . . . . . . . . . . 394
Viewing the Device Status using the PostScript Print Driver. . . . . . . . . . . . . . . . . . . . . 402
XPS Driver. . . . . . . . . . . . . . . . . . . . . . . . . . . . . . . . . . . . . . . . . . . . . . . . . . . . . . . . . . . . . . . . . . . . . . . . 403
Printing a Document using the XPS Print Driver. . . . . . . . . . . . . . . . . . . . . . . . . . . . . . . . 403
Tab menu. . . . . . . . . . . . . . . . . . . . . . . . . . . . . . . . . . . . . . . . . . . . . . . . . . . . . . . . . . . . . . . . . . . 405
Menu at the bottom of the Tabs . . . . . . . . . . . . . . . . . . . . . . . . . . . . . . . . . . . . . . . . . . . . . 452
Viewing the Device Status using the XPS Print Driver. . . . . . . . . . . . . . . . . . . . . . . . . . . 460
Mac Driver . . . . . . . . . . . . . . . . . . . . . . . . . . . . . . . . . . . . . . . . . . . . . . . . . . . . . . . . . . . . . . . . . . . . . . . 462
Printing a Document using the Mac Print Driver . . . . . . . . . . . . . . . . . . . . . . . . . . . . . . . 462
Xerox Features Menu . . . . . . . . . . . . . . . . . . . . . . . . . . . . . . . . . . . . . . . . . . . . . . . . . . . . . . . . 463
Other Options . . . . . . . . . . . . . . . . . . . . . . . . . . . . . . . . . . . . . . . . . . . . . . . . . . . . . . . . . . . . . . . 502
Print From. . . . . . . . . . . . . . . . . . . . . . . . . . . . . . . . . . . . . . . . . . . . . . . . . . . . . . . . . . . . . . . . . . . . . . . . 505
Printing a Saved Job using the Print From Feature . . . . . . . . . . . . . . . . . . . . . . . . . . . . . 505
Printing From a Mailbox using the Print From Feature . . . . . . . . . . . . . . . . . . . . . . . . . 506
Printing From USB using the Print From Feature . . . . . . . . . . . . . . . . . . . . . . . . . . . . . . . 507
7E-Mail
Sending an E-mail . . . . . . . . . . . . . . . . . . . . . . . . . . . . . . . . . . . . . . . . . . . . . . . . . . . . . . . . . . . . . . . . 509
E-Mail. . . . . . . . . . . . . . . . . . . . . . . . . . . . . . . . . . . . . . . . . . . . . . . . . . . . . . . . . . . . . . . . . . . . . . . . . . . . 510
Sending an E-mail to an Address Book Contact . . . . . . . . . . . . . . . . . . . . . . . . . . . . . . . . 510
Sending an E-mail to a Recipient Saved as a Favorite . . . . . . . . . . . . . . . . . . . . . . . . . . 511
Specifying a Subject for E-mail . . . . . . . . . . . . . . . . . . . . . . . . . . . . . . . . . . . . . . . . . . . . . . . 512
Using E-mail to send 2-Sided Originals . . . . . . . . . . . . . . . . . . . . . . . . . . . . . . . . . . . . . . . . 513
Specifying a File Name for E-mail Attachments . . . . . . . . . . . . . . . . . . . . . . . . . . . . . . . 514
Setting a File Format for E-mail Attachments . . . . . . . . . . . . . . . . . . . . . . . . . . . . . . . . . 516
Setting the Original Orientation for E-mails . . . . . . . . . . . . . . . . . . . . . . . . . . . . . . . . . . . 517
Advanced Settings. . . . . . . . . . . . . . . . . . . . . . . . . . . . . . . . . . . . . . . . . . . . . . . . . . . . . . . . . . . . . . . . 519
Setting the Output Color for an E-mail Attachment . . . . . . . . . . . . . . . . . . . . . . . . . . . . 519
Setting the Original Type for E-mails. . . . . . . . . . . . . . . . . . . . . . . . . . . . . . . . . . . . . . . . . . 520
Image Enhancement . . . . . . . . . . . . . . . . . . . . . . . . . . . . . . . . . . . . . . . . . . . . . . . . . . . . . . . . 522
Image Options . . . . . . . . . . . . . . . . . . . . . . . . . . . . . . . . . . . . . . . . . . . . . . . . . . . . . . . . . . . . . . 526
4 User Guide
Page 7

Xerox® WorkCentre® 5800/5800i Series
Changing the Saturation of E-mail Attachments. . . . . . . . . . . . . . . . . . . . . . . . . . . . . . . 530
Specifying the E-mail Scan Resolution . . . . . . . . . . . . . . . . . . . . . . . . . . . . . . . . . . . . . . . . 531
Layout Adjustment . . . . . . . . . . . . . . . . . . . . . . . . . . . . . . . . . . . . . . . . . . . . . . . . . . . . . . . . . . . . . . . 533
Specifying the Size of the Original to be E-mailed. . . . . . . . . . . . . . . . . . . . . . . . . . . . . . 533
Erasing Edges from E-mail Attachments . . . . . . . . . . . . . . . . . . . . . . . . . . . . . . . . . . . . . . 534
Removing Blank Pages from E-mail Originals During Scanning. . . . . . . . . . . . . . . . . . 536
E-mail Options. . . . . . . . . . . . . . . . . . . . . . . . . . . . . . . . . . . . . . . . . . . . . . . . . . . . . . . . . . . . . . . . . . . . 537
Adding a Message to an E-mail. . . . . . . . . . . . . . . . . . . . . . . . . . . . . . . . . . . . . . . . . . . . . . . 537
Adding a Reply To Address to an E-mail. . . . . . . . . . . . . . . . . . . . . . . . . . . . . . . . . . . . . . . 538
Setting the Quality or File Size for E-mail Attachments . . . . . . . . . . . . . . . . . . . . . . . . . 540
Adding a From Address to an E-mail . . . . . . . . . . . . . . . . . . . . . . . . . . . . . . . . . . . . . . . . . . 541
Activating Encryption for an E-mail . . . . . . . . . . . . . . . . . . . . . . . . . . . . . . . . . . . . . . . . . . . 542
Building an E-mail Job with Multiple Page or Segment Settings . . . . . . . . . . . . . . . . . . . . . . 544
8 ID Card Copy
Making Copies of ID Cards . . . . . . . . . . . . . . . . . . . . . . . . . . . . . . . . . . . . . . . . . . . . . . . . . . . . . . . . 547
Copy Options. . . . . . . . . . . . . . . . . . . . . . . . . . . . . . . . . . . . . . . . . . . . . . . . . . . . . . . . . . . . . . . . . . . . . 548
Reduce or Enlarge . . . . . . . . . . . . . . . . . . . . . . . . . . . . . . . . . . . . . . . . . . . . . . . . . . . . . . . . . . . 548
Setting the Paper Supply for ID Card Copying . . . . . . . . . . . . . . . . . . . . . . . . . . . . . . . . . 551
Image Quality. . . . . . . . . . . . . . . . . . . . . . . . . . . . . . . . . . . . . . . . . . . . . . . . . . . . . . . . . . . . . . . . . . . . 553
Setting the Original Type for ID Card Copying. . . . . . . . . . . . . . . . . . . . . . . . . . . . . . . . . 553
Lightening or Darkening Copies of ID Cards. . . . . . . . . . . . . . . . . . . . . . . . . . . . . . . . . . . 554
Setting the Background Suppression for ID Card Copying . . . . . . . . . . . . . . . . . . . . . . 555
9 Internet Services
Using Internet Services . . . . . . . . . . . . . . . . . . . . . . . . . . . . . . . . . . . . . . . . . . . . . . . . . . . . . . . . . . . 557
Tab menu. . . . . . . . . . . . . . . . . . . . . . . . . . . . . . . . . . . . . . . . . . . . . . . . . . . . . . . . . . . . . . . . . . . . . . . . 557
Status . . . . . . . . . . . . . . . . . . . . . . . . . . . . . . . . . . . . . . . . . . . . . . . . . . . . . . . . . . . . . . . . . . . . . . 557
Jobs . . . . . . . . . . . . . . . . . . . . . . . . . . . . . . . . . . . . . . . . . . . . . . . . . . . . . . . . . . . . . . . . . . . . . . . . 570
Print . . . . . . . . . . . . . . . . . . . . . . . . . . . . . . . . . . . . . . . . . . . . . . . . . . . . . . . . . . . . . . . . . . . . . . . . 580
Scan. . . . . . . . . . . . . . . . . . . . . . . . . . . . . . . . . . . . . . . . . . . . . . . . . . . . . . . . . . . . . . . . . . . . . . . . 600
Address Book . . . . . . . . . . . . . . . . . . . . . . . . . . . . . . . . . . . . . . . . . . . . . . . . . . . . . . . . . . . . . . . 623
Using the Properties page in Internet Services. . . . . . . . . . . . . . . . . . . . . . . . . . . . . . . . . 628
Support. . . . . . . . . . . . . . . . . . . . . . . . . . . . . . . . . . . . . . . . . . . . . . . . . . . . . . . . . . . . . . . . . . . . . 628
Top right menu. . . . . . . . . . . . . . . . . . . . . . . . . . . . . . . . . . . . . . . . . . . . . . . . . . . . . . . . . . . . . . . . . . . 635
Logging in to Internet Services . . . . . . . . . . . . . . . . . . . . . . . . . . . . . . . . . . . . . . . . . . . . . . . 635
Logging out of Internet Services. . . . . . . . . . . . . . . . . . . . . . . . . . . . . . . . . . . . . . . . . . . . . . 636
Using the Index in Internet Services . . . . . . . . . . . . . . . . . . . . . . . . . . . . . . . . . . . . . . . . . . 636
Using the Site Map in Internet Services . . . . . . . . . . . . . . . . . . . . . . . . . . . . . . . . . . . . . . . 637
Using the Home link in Internet Services . . . . . . . . . . . . . . . . . . . . . . . . . . . . . . . . . . . . . . 638
Using the Internet Services Help Feature. . . . . . . . . . . . . . . . . . . . . . . . . . . . . . . . . . . . . . 638
10 Paper and Media
Loading Tray 1 and Changing the Tray Settings . . . . . . . . . . . . . . . . . . . . . . . . . . . . . . . . . . . . 639
Changing the paper tray settings. . . . . . . . . . . . . . . . . . . . . . . . . . . . . . . . . . . . . . . . . . . . . 641
Loading Tray 2 and Changing the Tray Settings . . . . . . . . . . . . . . . . . . . . . . . . . . . . . . . . . . . . 641
Changing the paper tray settings. . . . . . . . . . . . . . . . . . . . . . . . . . . . . . . . . . . . . . . . . . . . . 643
Loading Tray 3 . . . . . . . . . . . . . . . . . . . . . . . . . . . . . . . . . . . . . . . . . . . . . . . . . . . . . . . . . . . . . . . . . . . 644
Loading Tray 4 . . . . . . . . . . . . . . . . . . . . . . . . . . . . . . . . . . . . . . . . . . . . . . . . . . . . . . . . . . . . . . . . . . . 645
Loading Tray 5 (Bypass Tray) and Changing the Tray Settings. . . . . . . . . . . . . . . . . . . . . . . 646
Changing the paper tray settings. . . . . . . . . . . . . . . . . . . . . . . . . . . . . . . . . . . . . . . . . . . . . 648
Loading Tray 6 . . . . . . . . . . . . . . . . . . . . . . . . . . . . . . . . . . . . . . . . . . . . . . . . . . . . . . . . . . . . . . . . . . . 648
User Guide 5
Page 8

Xerox® WorkCentre® 5800/5800i Series
Loading Tray 7 (Inserter Tray). . . . . . . . . . . . . . . . . . . . . . . . . . . . . . . . . . . . . . . . . . . . . . . . . . . . . 650
Loading Different Types of Media . . . . . . . . . . . . . . . . . . . . . . . . . . . . . . . . . . . . . . . . . . . . . . . . . 653
Punched . . . . . . . . . . . . . . . . . . . . . . . . . . . . . . . . . . . . . . . . . . . . . . . . . . . . . . . . . . . . . . . . . . . . 653
Transparencies . . . . . . . . . . . . . . . . . . . . . . . . . . . . . . . . . . . . . . . . . . . . . . . . . . . . . . . . . . . . . . 653
Labels . . . . . . . . . . . . . . . . . . . . . . . . . . . . . . . . . . . . . . . . . . . . . . . . . . . . . . . . . . . . . . . . . . . . . . 653
Tabs. . . . . . . . . . . . . . . . . . . . . . . . . . . . . . . . . . . . . . . . . . . . . . . . . . . . . . . . . . . . . . . . . . . . . . . . 653
Envelopes. . . . . . . . . . . . . . . . . . . . . . . . . . . . . . . . . . . . . . . . . . . . . . . . . . . . . . . . . . . . . . . . . . . 653
11 Machine and Job Status
Job Status. . . . . . . . . . . . . . . . . . . . . . . . . . . . . . . . . . . . . . . . . . . . . . . . . . . . . . . . . . . . . . . . . . . . . . . . 655
Active Jobs. . . . . . . . . . . . . . . . . . . . . . . . . . . . . . . . . . . . . . . . . . . . . . . . . . . . . . . . . . . . . . . . . . 655
Accessing Your Personal Secure Jobs List using the Job Status Menu . . . . . . . . . . . . 661
Viewing Completed Jobs using the Job Status Menu . . . . . . . . . . . . . . . . . . . . . . . . . . . 662
Machine Status. . . . . . . . . . . . . . . . . . . . . . . . . . . . . . . . . . . . . . . . . . . . . . . . . . . . . . . . . . . . . . . . . . . 663
Viewing Machine Information from the Machine Status Menu . . . . . . . . . . . . . . . . . 663
Viewing the Status of Paper Trays from the Machine Status Menu . . . . . . . . . . . . . 664
Printing the Information Pages from the Machine Status Menu . . . . . . . . . . . . . . . . 664
Using the Maintenance Assistant from the Machine Status Menu . . . . . . . . . . . . . . 665
Faults and Alerts . . . . . . . . . . . . . . . . . . . . . . . . . . . . . . . . . . . . . . . . . . . . . . . . . . . . . . . . . . . . 665
Checking the Status of Supplies using the Machine Status Menu . . . . . . . . . . . . . . . 666
Billing Information . . . . . . . . . . . . . . . . . . . . . . . . . . . . . . . . . . . . . . . . . . . . . . . . . . . . . . . . . . 667
12 Administration and Accounting
Using a User ID to Log In at the Device . . . . . . . . . . . . . . . . . . . . . . . . . . . . . . . . . . . . . . . . . . . . 669
Logging out at the Device . . . . . . . . . . . . . . . . . . . . . . . . . . . . . . . . . . . . . . . . . . . . . . . . . . . . . . . . . 670
Accessing the Tools Menu . . . . . . . . . . . . . . . . . . . . . . . . . . . . . . . . . . . . . . . . . . . . . . . . . . . . . . . . . 670
Device Settings . . . . . . . . . . . . . . . . . . . . . . . . . . . . . . . . . . . . . . . . . . . . . . . . . . . . . . . . . . . . . . . . . . . 671
General . . . . . . . . . . . . . . . . . . . . . . . . . . . . . . . . . . . . . . . . . . . . . . . . . . . . . . . . . . . . . . . . . . . . . 671
Adjusting the Display Brightness using the Tools Menu . . . . . . . . . . . . . . . . . . . . . . . . 672
Troubleshooting . . . . . . . . . . . . . . . . . . . . . . . . . . . . . . . . . . . . . . . . . . . . . . . . . . . . . . . . . . . . . . . . . . 673
Cleaning the Xerographic Module using the Tools Menu . . . . . . . . . . . . . . . . . . . . . . . 673
Checking the Device Network Connection using the Echo Test Option within
the Tools Menu . . . . . . . . . . . . . . . . . . . . . . . . . . . . . . . . . . . . . . . . . . . . . . . . . . . . . . . . . . . . . 673
Perform a Software Reset . . . . . . . . . . . . . . . . . . . . . . . . . . . . . . . . . . . . . . . . . . . . . . . . . . . . 674
13 Feature Installation
Using the Software Activation Portal (SWAP) to obtain a Feature Installation Key . . . . 675
14 General Care and Troubleshooting
General Care . . . . . . . . . . . . . . . . . . . . . . . . . . . . . . . . . . . . . . . . . . . . . . . . . . . . . . . . . . . . . . . . . . . . . 677
Customer Replaceable Units . . . . . . . . . . . . . . . . . . . . . . . . . . . . . . . . . . . . . . . . . . . . . . . . . 677
Staple Cartridges and Hole Punch Waste. . . . . . . . . . . . . . . . . . . . . . . . . . . . . . . . . . . . . . 680
Cleaning the Document Glass and Constant Velocity Transport Glass. . . . . . . . . . . 683
Cleaning the Control Panel, Touch Screen, Document Feeder and Output Trays . 684
Storing Paper and Other Media . . . . . . . . . . . . . . . . . . . . . . . . . . . . . . . . . . . . . . . . . . . . . . 684
Troubleshooting . . . . . . . . . . . . . . . . . . . . . . . . . . . . . . . . . . . . . . . . . . . . . . . . . . . . . . . . . . . . . . . . . . 685
Avoiding Poor Quality Output . . . . . . . . . . . . . . . . . . . . . . . . . . . . . . . . . . . . . . . . . . . . . . . . 685
Understanding Faults. . . . . . . . . . . . . . . . . . . . . . . . . . . . . . . . . . . . . . . . . . . . . . . . . . . . . . . . 685
Paper Jams . . . . . . . . . . . . . . . . . . . . . . . . . . . . . . . . . . . . . . . . . . . . . . . . . . . . . . . . . . . . . . . . . 688
Troubleshooting Tips . . . . . . . . . . . . . . . . . . . . . . . . . . . . . . . . . . . . . . . . . . . . . . . . . . . . . . . . 707
Getting Further Assistance . . . . . . . . . . . . . . . . . . . . . . . . . . . . . . . . . . . . . . . . . . . . . . . . . . . . . . . . 715
6 User Guide
Page 9

Safety and Regulations
1
Notices and Safety
Please read the following instructions carefully before operating the device. Refer to them as
needed to ensure the continued safe operation of your device.
Your Xerox device and supplies have been designed and tested to meet strict safety requirements.
These include safety agency evaluation and certification, and compliance with electromagnetic
regulations and established environmental standards.
The safety and environment testing and performance of this device have been verified using Xerox
materials only.
WARNING
!
Unauthorized alterations, which may include the addition of new functions or connection of external devices, may impact the device certification. Please contact your Xerox representative for more
information.
User Guide 7
Page 10
Safety and Regulations Xerox® WorkCentre® 5800/5800i Series
Safety Labels and Symbols
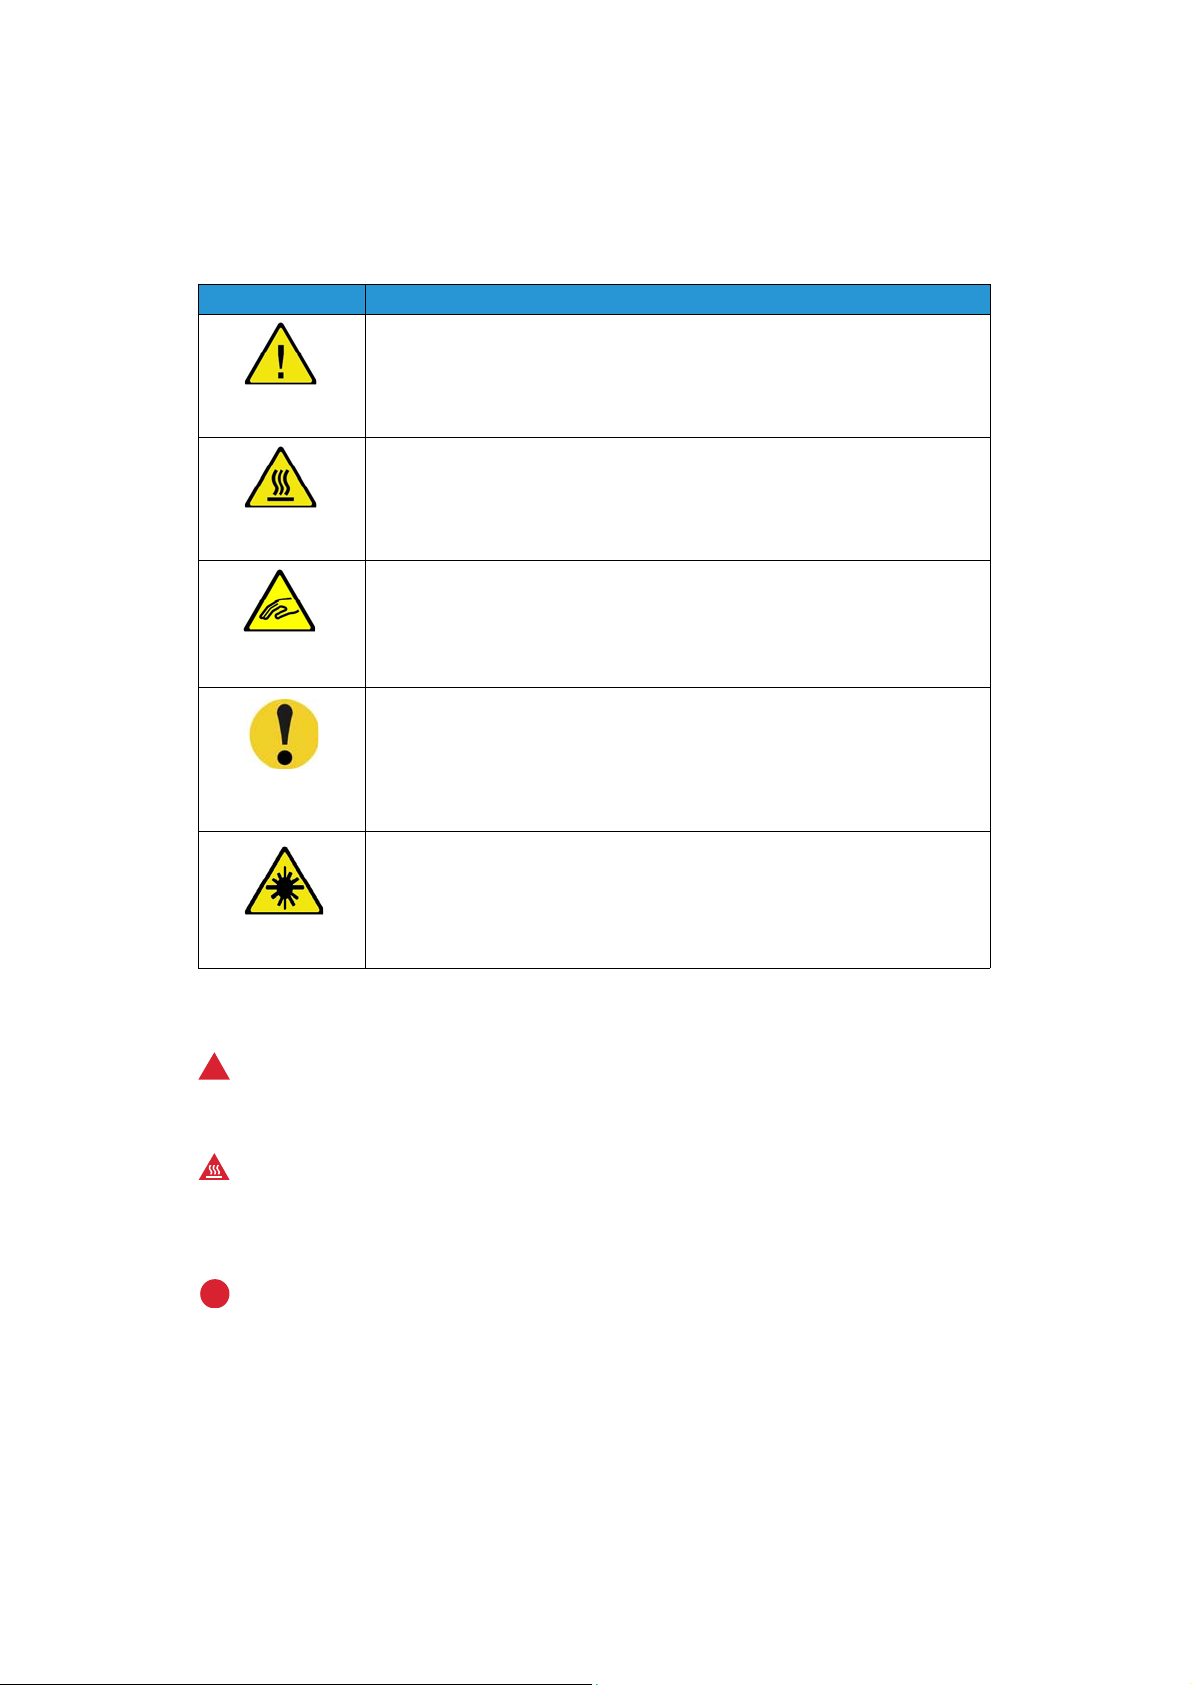
All warnings and instructions marked on or supplied for the device should be followed:
Symbol Description
WARNING:
This symbol alerts users to areas of the equipment where there is the possibility of
personal injury.
WARNING:
This symbol alerts users to areas of the equipment where there are heated or hot
surfaces, which should not be touched.
WARNING:
This symbol alerts users to the areas of the equipment with moving parts. To avoid
personal injury, use caution.
CAUTION:
This symbol alerts users to areas of the equipment which require special attention to
avoid the possibility of personal injury or damage to the equipment. A symbol for
items that must be performed. Follow instructions carefully to carry out these
essential tasks.
WARNING:
This symbol indicates a Laser is being used in the equipment and alerts the user to
refer to the appropriate safety information.
The following Warnings and Caution symbols are used in this documentation:
WARNING
!
This WARNING alerts users to areas of the device where there is the possibility of personal injury.
WARNING
This WARNING alerts users to areas of the device where there are heated surfaces, which should
not be touched.
!
Caution
This symbol alerts users to areas of the equipment which require special attention to avoid the possibility of personal injury or damage to the equipment. A symbol for items that must be performed.
Follow instructions carefully to carry out these essential tasks.
8 User Guide
Page 11

Safety and Regulations Xerox® WorkCentre® 5800/5800i Series
Operational Safety Information
Your Xerox device and supplies have been designed and tested to meet strict safety requirements.
These include safety agency examination, approval, and compliance with established
environmental standards. To ensure the continued safe operation of your Xerox device, follow the
safety guidelines on this website at all times.
Electrical Supply
This document provides important electrical supply safety information that you should read before
installing or using the device.
Read the information in the following sections:
• Power Outlet Electrical Safety
• Power Cord Electrical Safety
•Device Safety
•Emergency Power Off
• Disconnect Device
Power Outlet Electrical Safety
This device must be operated from the type of electrical supply indicated on the data plate label
located on the rear cover of the device. If you are not sure that your electrical supply meets the
requirements, please consult your local power company or a licensed electrician for advice.
The electrical supply outlet should be installed near the device and should be easily accessible.
WARNING
This device must be connected to a protective earth circuit. This device is supplied with a
plug that has a protective earth pin. This plug will only fit into an earthed electrical outlet. This is a
safety feature. If you are unable to insert the plug into the outlet, contact a licensed electrician to
replace the outlet. Always connect the device to a correctly grounded power outlet. If in doubt, have
the outlet checked by a qualified electrician. Improper connection of the device-grounding conductor can result in electrical shock.
Power Cord Electrical Safety
• Use only the power cord supplied with this device.
• Plug the power cord directly into a grounded electrical outlet. Do not use an extension cord. If
you do not know whether or not an outlet is grounded, consult a qualified electrician.
• Do not place this device where people might step on or trip on the power cord.
• Do not place objects on the power cord.
• To reduce the risk of fire, use only No. 26 American Wire Gauge (AWG) or larger
telecommunication line cord.
User Guide 9
Page 12

Safety and Regulations Xerox® WorkCentre® 5800/5800i Series
Laser Safety Information
!
Caution
Use of controls, adjustments, or performance of procedures other than those specified in this manual can result in hazardous radiation exposure.
With specific regard to laser safety, the device complies with performance standards for laser
products set by government, national and international agencies as a Class 1 laser product. It does
not emit hazardous light, as the beam is totally enclosed during all phases of customer operation
and maintenance.
Device Safety
This device has been designed to provide operator access to safe areas only. Operator access to
hazardous areas is restricted using covers or guards, which require a tool to enable removal. Never
remove the covers or guards that protect hazardous areas.
Device Safety - Do These
• Always follow all warnings and instructions that are marked on or supplied with the device.
• Before cleaning this device, switch off then unplug the device from the electrical outlet. Always
use materials specifically designated for this device, the use of other materials may result in
poor performance and create a hazardous situation.
• Always exercise care when moving or relocating the device. Please contact your local Xerox
dealer to arrange relocation of the device to a location outside of your building.
• Always locate the device on a solid support surface (not on plush carpet) that has adequate
strength to support the weight of the machine.
• Always locate the device in an area that has adequate ventilation and room for servicing.
Note: Your Xerox device is equipped with an energy saving function to conserve power when the
device is not in use. The device may be left on continuously.
Device Safety - Do Not Do These
WARNING
!
Do not use aerosol cleaners. Aerosol cleaners can be explosive or flammable when used on electromechanical equipment.
• Never use a ground adapter plug to connect the device to a power outlet that lacks a ground
connection terminal.
• Never attempt any maintenance function that is not specifically described in this
documentation.
• Never obstruct ventilation openings. They are provided to prevent overheating.
• Never remove covers or guards that are fastened with screws. There are no operator serviceable
areas within these covers.
• Never locate the machine near a radiator or any other heat source.
• Never push objects of any kind into the ventilation openings.
• Never override or “cheat” any of the electrical or mechanical interlock devices.
10 User Guide
Page 13

Safety and Regulations Xerox® WorkCentre® 5800/5800i Series
• Never place this device where people might step on or trip on the power cord.
• This device should not be placed in a room unless proper ventilation is provided.
Please contact your local Authorized dealer for further information.
Emergency Power Off
If any of the following conditions occur, turn off the device immediately switch off the device and
disconnect the power cable(s) from the electrical outlet(s). Contact an authorized Xerox Service
Representative to correct the problem:
• The device emits unusual odors or makes unusual noises.
• The power cable is damaged or frayed.
• A wall panel circuit breaker, fuse, or other safety device has been tripped.
• Liquid is spilled into the machine.
• The machine is exposed to water.
• Any part of the device is damaged.
Disconnect Device
The power cable is the disconnect device for this device. It is attached to the back of the machine
as a plug-in device. To remove all electrical power from the device, disconnect the power cable from
the electrical outlet.
Ozone Safety Information
This device will produce ozone during normal operation. The ozone produced is heavier than air and
is dependent on copy volume. Providing the correct environmental parameters as specified in the
Xerox installation procedure will ensure that the concentration levels meet safe limits.
If you need additional information about ozone, please request the Xerox publication Ozone by
calling 1-800-828-6571 in the United States and Canada. In other markets please contact your
authorized local dealer or Service Provider.
Maintenance Information
WARNING
!
Do not use aerosol cleaners. Aerosol cleaners can be explosive or flammable when used on electromechanical equipment.
• Any operator device maintenance procedures will be described in the user documentation
supplied with the device.
• Do not carry out any maintenance on this device which is not described in the customer
documentation.
• Use supplies and cleaning materials only as directed in the user documentation.
• Do not remove covers or guards that are fastened with screws. There are no parts behind these
covers that you can maintain or service.
User Guide 11
Page 14
Safety and Regulations Xerox® WorkCentre® 5800/5800i Series
Consumables Information
• Store all consumables in accordance with the instructions given on the package or container.
• Keep all consumables away from the reach of children.
• Never throw toner, toner cartridges or toner containers into an open flame.
• When handling cartridges, for example ink, fuser, etc. avoid skin or eye contact. Eye contact can
cause irritation and inflammation. Do not attempt to disassemble the cartridge. This can
increase the risk of skin or eye contact.
• Use a broom or a wet cloth to wipe off spilled toner. Sweep slowly to minimize generation of
dust during clean up. Avoid using a vacuum cleaner. If a vacuum cleaner must be used, the unit
should be designed for combustible dusts (e.g. explosion rated motor and conductive hose).
Product Safety Certification
This product is certified by the following Agency using the Safety standards listed below.
Agency Standard
UL60950-1 (2007) 2nd Edition
Underwriters Laboratories Inc. (US / Canada)
Underwriters Laboratories Inc. (Europe)
This device has been manufactured under a registered ISO9001 Quality system.
CSA 22.2 no. 60950-1-07 2nd Edition
IEC60950-1:2005, (2nd Edition) +A1:2009
EN60950-1:2006 (2nd Edition)
+A11:2009;+A1:2010;+A12:2011 (CB Scheme)
Basic Regulations
Xerox has tested this device to electromagnetic emission and immunity standards. These standards
are designed to mitigate interference caused or received by this device in a typical office
environment.
United States (FCC Regulations)
This device has been tested and found to comply with the limits for a Class A digital device,
pursuant to Part 15 of the FCC Rules. These limits are designed to provide reasonable protection
against harmful interference in a commercial environment. This device generates, uses, and can
radiate radio frequency energy. If it is not installed and used in accordance with these instructions,
it may cause harmful interference to radio communications. Operation of this device in a residential
area is likely to cause harmful interference in which case the user will be required to correct the
interference at his/her own expense.
12 User Guide
Page 15

Safety and Regulations Xerox® WorkCentre® 5800/5800i Series
If this device does cause harmful interference to radio or television reception, which can be
determined by turning the device off and on, the user is encouraged to try to correct the
interference by one or more of the following measures:
• Reorient or relocate the receiver.
• Increase the separation between the device and receiver.
• Connect the device into an outlet on a circuit different from that to which the receiver is
connected.
• Consult the dealer or an experienced radio/television technician for help.
Any changes or modifications not expressly approved by Xerox could void the user's authority to
operate the device. To ensure compliance with Part 15 of the FCC rules, use shielded interface
cables.
Canada (Regulations)
This Class A digital apparatus complies with Canadian ICES-003.
Cet appareil numérique de la classe A est conforme à la norme NMB-003 du Canada.
European Union
WARNING
!
This is a Class A product. In a domestic environment this device may cause radio interference in
which case the user may be required to take adequate measures.
The CE mark applied to this device symbolizes Xerox’s declaration of conformity with the
following applicable Directives of the European Union as of the dates indicated:
• Low Voltage Directive 2014/35/EU. Approximation of the laws of the member states related to
low voltage equipment.
• Electromagnetic Compatibility Directive 2014/30/EU. Approximation of the laws of the
member states related to electromagnetic compatibility.
• Radio Equipment Directive 2014/53/EU.
• Restriction of the use of certain hazardous substances in electrical and electronic equipment.
Directive 2011/65/EU.
This device, if used properly in accordance with the user's instructions, is neither dangerous for the
consumer nor for the environment.
To ensure compliance with European Union regulations, use shielded interface cables.
A signed copy of the Declaration of Conformity for this device can be obtained from Xerox.
User Guide 13
Page 16

Safety and Regulations Xerox® WorkCentre® 5800/5800i Series
European Union Lot 4 Imaging Equipment Agreement
Environmental Information
Environmental Information Providing Environmental Solutions and Reducing
Cost
Introduction
The following information has been developed to assist users and has been issued in relation to the
European Union (EU) Energy Related Products Directive, specifically the Lot 4 study on Imaging
Equipment. This requires manufacturers to improve environmental performance of in scope
products and supports the EU action plan on energy efficiency.
In scope products are Household and Office equipment that meet the following criteria.
• Standard monochrome format products with a maximum speed less than 64 A4 images per
minute.
• Standard color format products with a maximum speed less than 51 A4 images per minute.
Environmental Benefits of Duplex Printing
Most Xerox products have duplex printing, also known as 2-sided printing, capability. This enables
you to print on both sides of the paper automatically, and therefore helps to reduce the use of
valuable resources by reducing your paper consumption. The Lot 4 Imaging Equipment agreement
requires that on models greater than or equal to 40 ppm color or greater than or equal to 45 ppm
monochrome the duplex function has been auto enabled, during the setup and driver installation.
Some Xerox models below these speed bands may also be enabled with 2-sided printing settings
defaulted on at the time of install. Continuing to use the duplex function will reduce the
environmental impact of your work. However, should you require simplex / 1-sided printing, you
may change the print settings in the print driver.
Paper Types
This product can be used to print on both recycled and virgin paper, approved to an environmental
stewardship scheme, which complies with EN12281 or a similar quality standard. Lighter weight
paper (60 gsm), which contains less raw material and thus saves resources per print, may be used
in certain applications. We encourage you to check if this is suitable for your printing needs.
Turkey RoHS Regulation
In compliance with Article 7 (d). We hereby certify
"It is compliant with the EEE Regulation."
"EEE yönetmeliðine uygundur"
14 User Guide
Page 17

Safety and Regulations Xerox® WorkCentre® 5800/5800i Series
China RoHS
产品中有害物质的名称及含量
Name and Content of Harmful Substances in Products
部件名称
Name of the
Part
打印机模块
Printer
Module
本表格依据 SJ/T 11364 的规定编制 .
This form is prepared under the provisions of SJ/T 11364.
o:表示该有毒有害物质在该部件所有均质材料中的含量均在 GB/T 26572 标准规定的限量要求以下 .
Indicates that said hazardous substances contained in all of the homogeneous materials for this part is
below the limit requirement of GB/T 26572.
x:表示该有毒有害物质至少在该部件的某一均质材料中的含量超出 GB/T 26572 标准规定的限量要
求 . Indicates that said hazardous substance contained in at least one of the homogeneous materials used
for this is above the limit requirement of GB/T 26572.
铅
(Pb)
xooooo
有毒有害物质 Hazardous substances
汞
(Hg)
镉
(Cd)
六价铬
(Cr(VI))
多溴联苯
(PBB)
多溴二苯醚
(PBDE)
User Guide 15
Page 18

Safety and Regulations Xerox® WorkCentre® 5800/5800i Series
Copy Regulations
United States
Congress, by statute, has forbidden the reproduction of the following subjects under certain
circumstances. Penalties of fine or imprisonment may be imposed on those guilty of making such
reproductions.
1. Obligations or Securities of the United States Government, such as:
• Certificates of Indebtedness
• National Bank Currency
• Coupons from Bonds
• Federal Reserve Bank Notes
• Silver Certificates
• Gold Certificates
• United States Bonds
• Treasury Notes
• Federal Reserve Notes
•Fractional Notes
•Certificates of Deposit
•Paper Money
• Bonds and Obligations of certain agencies of the government, such as FHA, etc.
• Bonds (U.S. Savings Bonds may be photographed only for publicity purposes in connection
with the campaign for the sale of such bonds.)
• Internal Revenue Stamps. If it is necessary to reproduce a legal document on which there
is a canceled revenue stamp, this may be done provided the reproduction of the document
is performed for lawful purposes.
• Postage Stamps, canceled or uncanceled. For philatelic purposes, Postage Stamps may be
photographed, provided the reproduction is in black and white and is less than 75% or
more than 150% of the linear dimensions of the original.
•Postal Money Orders.
• Bills, Checks, or Draft of money drawn by or upon authorized officers of the United States.
• Stamps and other representatives of value, of whatever denomination, which have been or
may be issued under any Act of Congress.
2. Adjusted Compensation Certificates for Veterans of the World Wars.
3. Obligations or Securities of any Foreign Government, Bank, or Corporation.
4. Copyrighted materials, unless permission of the copyright owner has been obtained or the
reproduction falls within the “fair use” or library reproduction rights provisions of the copyright
law.
Further information of these provisions may be obtained from the Copyright Office, Library of
Congress, Washington, D.C. 20559. Ask for Circular R21.5.
5. Certificate of Citizenship or Naturalization. Foreign Naturalization Certificates may be
photographed.
6. Passports. Foreign Passports may be photographed.
7. Immigration papers.
8. Draft Registration Cards.
16 User Guide
Page 19

Safety and Regulations Xerox® WorkCentre® 5800/5800i Series
9. Selective Service Induction papers that bear any of the following Registrant’s information:
• Earnings or Income
•Court Record
• Physical or mental condition
• Dependency Status
• Previous military service
Exception: United States military discharge certificates may be photographed.
10. Badges, Identification Cards, Passes, or Insignia carried by military personnel, or by members
of the various Federal Departments, such as FBI, Treasure, etc. (Unless photograph is ordered
by the head of such department or bureau.)
Reproducing the following is also prohibited in certain states:
• Automobile Licenses
• Drivers’ Licenses
• Automobile Certificates of Title
The above list is not all inclusive, and no liability is assumed for its completeness or accuracy. In case
of doubt, consult your attorney.
Canada
Parliament, by stature, has forbidden the reproduction of the following subjects under certain
circumstances. Penalties of fine or imprisonment may be imposed on those guilty of making such
reproductions.
1. Current bank notes or current paper money.
2. Obligations or securities of a government or bank.
3. Exchequer bill paper or revenue paper.
4. The public seal of Canada or of a province, or the seal of a public body or authority in Canada,
or of a court of law.
5. Proclamations, orders, regulations or appointments, or notices thereof (with intent to falsely
cause same to purport to have been printed by the Queens Printer for Canada, or the equivalent
printer for a province).
6. Marks, brands, seals, wrappers or designs used by or on behalf of the Government of Canada
or of a province, the government of a state other than Canada or a department, board,
Commission or agency established by the Government of Canada or of a province or of a
government of a state other than Canada.
7. Impressed or adhesive stamps used for the purpose of revenue by the Government of Canada
or of a province or by the government of a state other than Canada.
8. Documents, registers or records kept by public officials charged with the duty of making or
issuing certified copies thereof, where the copy falsely purports to be a certified copy thereof.
9. Copyrighted material or trademarks of any manner or kind without the consent of the
copyright or trademark owner.
The above list is provided for your convenience and assistance, but it is not all-inclusive, and no
liability is assumed for its completeness or accuracy. In case of doubt, consult your solicitor.
User Guide 17
Page 20

Safety and Regulations Xerox® WorkCentre® 5800/5800i Series
Other Countries
Copying certain documents may be illegal in your country. Penalties of fine or imprisonment may
be imposed on those found guilty of making such reproductions:
• Currency notes
• Bank notes and cheques
• Bank and government bonds and securities
• Passports and identification cards
• Copyright material or trademarks without the consent of the owner
• Postage stamps and other negotiable instruments
This list is not inclusive and no liability is assumed for either its completeness or accuracy. In case
of doubt, contact your legal counsel.
Fax Regulations
United States Fax Header Requirements
Fax Send Header Requirements
The Telephone Consumer Protection Act of 1991 makes it unlawful for any person to use a
computer or other electronic device, including a fax machine, to send any message unless such
message clearly contains in a margin at the top or bottom of each transmitted page or on the first
page of the transmission, the date and time it is sent and an identification of the business or other
entity, or other individual sending the message and the telephone number of the sending machine
or such business, other entity or individual. The telephone number provided may not be a 900
number or any other number for which charges exceed local or long distance transmission charges.
In order to program this information into your machine, refer to the customer documentation and
follow the steps provided.
Data Coupler Information
This device complies with Part 68 of the FCC rules and the requirements adopted by the
Administrative Council for Terminal Attachments (ACTA). On the cover of this device is a label that
contains, among other information, a device identifier in the format US:AAAEQ##TXXXX. If
requested, this number must be provided to the Telephone Company. A plug and jack used to
connect this device to the premises wiring and telephone network must comply with the applicable
FCC Part 68 rules and requirements adopted by the ACTA. A compliant telephone cord and modular
plug is provided with this device. It is designed to be connected to a compatible modular jack that
is also compliant. See installation instructions for details.
You may safely connect the machine to the following standard modular jack: USOC RJ-11C using
the compliant telephone line cord (with modular plugs) provided with the installation kit. See
installation instructions for details.
18 User Guide
Page 21

Safety and Regulations Xerox® WorkCentre® 5800/5800i Series
The Ringer Equivalence Number (REN) is used to determine the number of devices that may be
connected to a telephone line. Excessive RENs on a telephone line may result in the devices not
ringing in response to an incoming call. In most but not all areas, the sum of RENs should not
exceed five (5.0). To be certain of the number of devices that may be connected to a line, as
determined by the total RENs, contact the local Telephone Company. For products approved after
July 23, 2001, the REN for this device is part of the device identifier that has the format
US:AAAEQ##TXXXX. The digits represented by ## are the REN without a decimal point (e.g., 03 is
a REN of 0.3). For earlier products, the REN is separately shown on the label.
To order the correct service from the local telephone company, you may also have to quote the
codes listed below:
• Facility Interface Code (FIC) = 02LS2
• Service Order Code (SOC) = 9.0Y
WARNING
!
Ask your local telephone company for the modular jack type installed on your line. Connecting this
machine to an unauthorized jack can damage telephone company equipment. You, not Xerox, assume all responsibility and/or liability for any damage caused by the connection of this machine to
an unauthorized jack.
If this Xerox device causes harm to the telephone network, the Telephone Company will notify you
in advance that temporary discontinuance of service may be required. But if advance notice is not
practical, the Telephone Company will notify the customer as soon as possible. Also, you will be
advised of your right to file a complaint with the FCC if you believe it is necessary.
The Telephone Company may make changes in its facilities, equipment, operations or procedures
that could affect the operation of the device. If this happens, the Telephone Company will provide
advance notice in order for you to make necessary modifications to maintain uninterrupted service.
If trouble is experienced with this Xerox device, for repair or warranty information, please contact
the appropriate service center; details of which are displayed either on the machine or contained
within the User Guide. If the device is causing harm to the telephone network, the Telephone
Company may request that you disconnect the device until the problem is resolved.
Repairs to the machine should be made only by a Xerox Service Representative or an authorized
Xerox Service provider. This applies at any time during or after the service warranty period. If
unauthorized repair is performed, the remainder of the warranty period is null and void.
This device must not be used on party lines. Connection to party line service is subject to state
tariffs. Contact the state public utility commission, public service commission or corporation
commission for information.
If your office has specially wired alarm equipment connected to the telephone line, make sure that
the installation of this Xerox device does not disable your alarm equipment.
If you have questions about what will disable alarm equipment, consult your Telephone Company
or a qualified installer.
User Guide 19
Page 22

Safety and Regulations Xerox® WorkCentre® 5800/5800i Series
Canada
Note: The Industry Canada label identifies certified equipment. This certification means that the
device meets certain telecommunications network protective, operational and safety requirements
as prescribed in the appropriate Terminal Equipment Technical Requirements document(s). The
Department does not guarantee the equipment will operate to the user’s satisfaction.
Before installing this device, users must make sure that it is permissible to be connected to the
facilities of the local telecommunications company. The device must also be installed using an
acceptable method of connection. The customer should be aware that compliance with the above
conditions may not prevent degradation of service in some situations.
Repairs to certified equipment should be coordinated by a representative designated by the
supplier. Any repairs or alterations made by the user to this device, or device malfunctions, may give
the telecommunications company cause to request the user to disconnect the device.
Users should make sure for their own protection that the electrical ground connections of the power
utility, telephone lines and internal metallic water pipe systems, if present, are connected together.
This precaution may be particularly important in rural areas.
!
Caution
Users should not attempt to make such connections themselves, but should contact the appropriate electric inspection authority, or electrician, as appropriate.
The Ringer Equivalence Number (REN) assigned to each terminal device provides an indication of
the maximum number of terminals allowed to be connected to a telephone interface. The
termination on an interface may consist of any combination of devices subject only to the
requirement that the sum of the Ringer Equivalent Numbers of all of the devices does not exceed
5. For the Canadian REN value, please see the label on the device.
Europe
Radio Equipment & Telecommunications Terminal Equipment Directive
The Facsimile has been approved in accordance with the Council Decision 1999/5/EC for panEuropean single terminal connection to the public switched telephone network (PSTN). However,
due to differences between the individual PSTNs provided in different countries, the approval does
not, of itself, give an unconditional assurance of successful operation on every PSTN network
terminal point.
In the event of a problem you should contact your authorized local dealer in the first instance.
This device has been tested to and is compliant with ES 203 021-1, -2, -3, a specification for terminal
equipment for use on analogue-switched telephone networks in the European Economic Area. This
device provides a user-adjustable setting of the country code. Refer to the customer documentation
for this procedure. Country codes should be set prior to connecting this device to the network.
Note: Although this device can use either loop disconnect (pulse) or DTMF (tone) signaling, it is
recommended that it is set to use DTMF signaling. DTMF signaling provides reliable and faster call
setup. Modification of this device, connection to external control software or to external control
apparatus not authorized by Xerox, will invalidate its certification.
20 User Guide
Page 23

Safety and Regulations Xerox® WorkCentre® 5800/5800i Series
South Africa
This modem must be used in conjunction with an approved surge protection device.
Material Safety Data
For Material Safety Data information regarding your machine see the support information for your
area.
North American material safety data can be found here: www.xerox.com/msds.
European Union material safety data can be found here: www.xerox.com/environment_europe.
For the Customer Support Center phone numbers, go to www.xerox.com/office/worldcontacts.
Product Recycling and Disposal
USA and Canada
Xerox operates a worldwide equipment take back and reuse/recycle program. Contact your Xerox
sales representative (1-800-ASK-XEROX) to determine whether this Xerox device is part of the
program. For more information about Xerox environmental programs, visit
www.xerox.com/environment.html.
If you are managing the disposal of your Xerox device, please note that the device may contain
lead, mercury, Perchlorate, and other materials whose disposal may be regulated due to
environmental considerations. The presence of these materials is fully consistent with global
regulations applicable at the time that the device was placed on the market. For recycling and
disposal information, contact your local authorities. In the United States, you may also refer to the
Electronic Industries Alliance web site: www.eiae.org/.
European Union
WEEE Directive 2012/19/EU
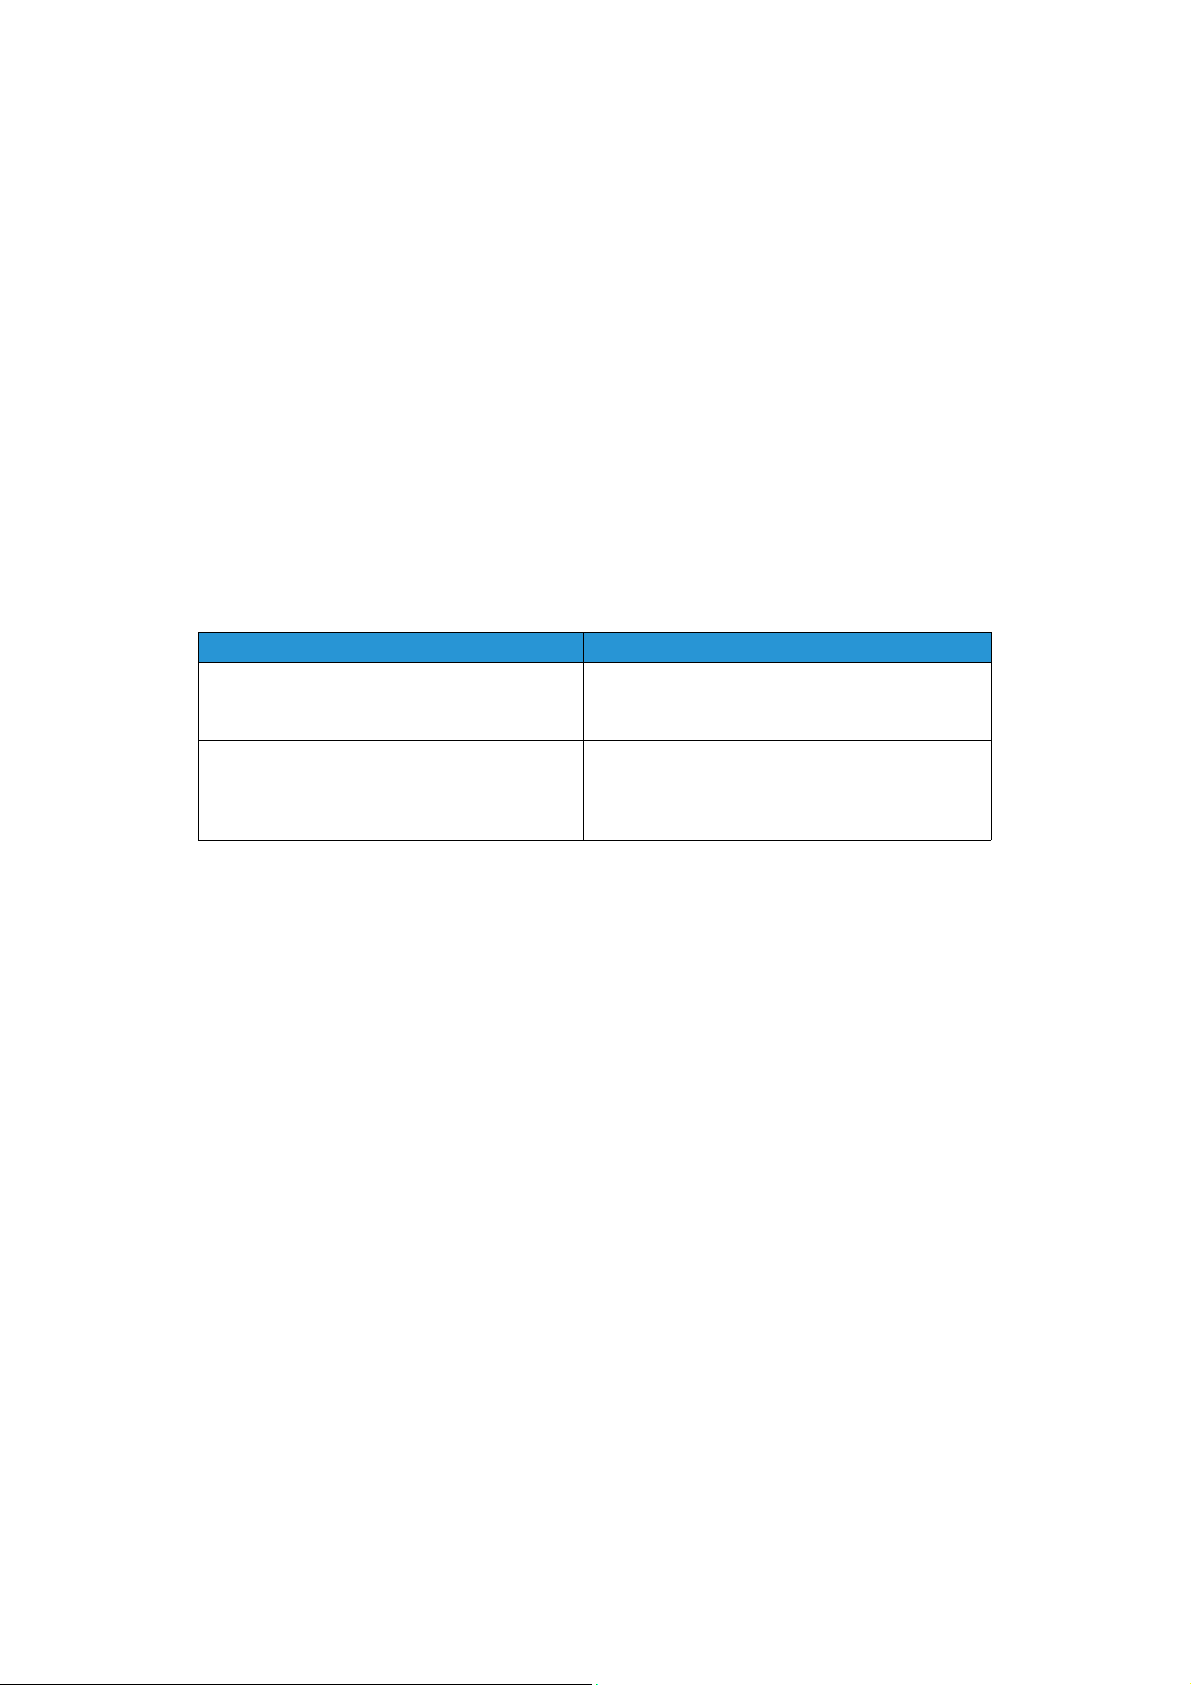
Some equipment may be used in both a domestic/household and a professional/business
application.
Professional/Business Environment
Application of this symbol on your device is confirmation that you must dispose of
this device in compliance with agreed national procedures. In accordance with
European legislation, end of life electrical and electronic equipment subject to
disposal must be managed within agreed procedures.
User Guide 21
Page 24

Safety and Regulations Xerox® WorkCentre® 5800/5800i Series
Domestic/Household Environment
Application of this symbol on your device is confirmation that you should not dispose
of the device in the normal household waste stream. In accordance with European
legislation, end of life electrical and electronic equipment subject to disposal must be
segregated from household waste. Private households within EU member states may
return used electrical and electronic equipment to designated collection facilities
free of charge. Please contact your local disposal authority for information. In some member states,
when you purchase new device, your local retailer may be required to take back your old device free
of charge. Please ask you retailer for information. Prior to disposal, please contact your local dealer
or Xerox representative for end of life takeback information.
Energy Program Compliance
All Markets
ENERGY STAR
The ENERGY STAR program is a voluntary scheme to promote the development
and purchase of energy efficient models, which help to reduce environmental
impact. Details on the ENERGY STAR program and models qualified to ENERGY
STAR can be found in the website below:
www.energystar.gov/products/certified-products/detail/imaging-equipment
Power Consumption and Activation Time
The amount of electricity a product consumes depends on the way the device is used. This product
is designed and configured to enable you to reduce your electricity costs. After the last print it
switches to Ready Mode. In this mode it can print again immediately if required. If the product is
not used for a period of time, the device switches to a Power Saver Mode. In these modes, only
essential functions remain active in order to enable reduced product power consumption. Upon
exiting from Power Saver Mode, the first print will take slightly longer than in Ready Mode. This
dela y is the r esult of the system “waking up” from Power Saver m ode and is typi cal of mo st imaging
products on the market. If you wish to set a longer Activation Time or would like to completely
deactivate the Power Save Mode, please consider that this device may then only switch to a lower
energy level after a longer period of time or not at all.
To learn more about Xerox’s participation in sustainability initiatives, please visit our site at:
www.xerox.com/about-xerox/environment/enus.html
22 User Guide
Page 25

Safety and Regulations Xerox® WorkCentre® 5800/5800i Series
The ENERGY STAR and ENERGY STAR MARK are registered United States
trademarks. The ENERGY STAR Imaging Equipment Program is a team effort
between U.S., European Union and Japanese governments and the office
equipment industry to promote energy-efficient copiers, printers, fax,
multifunction machine, personal computers, and monitors. Reducing product
energy consumption helps combat smog, acid rain and long-term changes to the
climate by decreasing the emissions that result from generating electricity.Xerox ENERGY STAR
equipment is preset at the factory. Your printer will be delivered with the timer for switching to
Power Save Mode from the last copy/print out, set at 1 minute. A more detailed description of this
feature can be found in the device setup instructions provided in the User Guide or System
Administration Guide. For additional information on energy or other related topics, please visit:
www.xerox.com/about-xerox/environment/enus.html or
www.xerox.co.uk/about-xerox/environment/engb.html
Blue Angel
"RAL, the German Institute for Quality Assurance and Labeling, has awarded this
product the Blue Angel Environmental Label, distinguishing it as a machine which
satisfies Blue Angel criteria for environmental acceptability in terms of machine
design, manufacture, and operation." The WorkCentre 5865/5865i, WorkCentre
5875/5875i and WorkCentre 5890/5890i are Blue Angel Certified to RAL-UZ-171.
Canada
Environmental Choice
Terra Choice of Canada has verified that this device conforms to all applicable
Environmental Choice EcoLogo requirements for minimized impact to the
environment. As a participant in the Environmental Choice program, Xerox
Corporation has determined that this device meets the Environmental Choice
guidelines for energy efficiency. Environment Canada established the
Environmental Choice program in 1988 to help consumers identify
environmentally responsible products and services. Copier, printer, digital press and fax products
must meet energy efficiency and emissions criteria, and exhibit compatibility with recycled
supplies.
Environment, Health and Safety Contact Information
For more information on Environment, Health, and Safety in relation to this Xerox device and
supplies, please contact the customer help line for your area.
Device safety information is also available on the Xerox website
www.xerox.com/about-xerox/environment.
USA: For Environment, Health, and Safety information call 1-800-ASK-XEROX (1-800-275-9376)
Canada: For Environment, Health, and Safety information call 1-800-ASK-XEROX (1-800-275-9376)
Europe: For Environment, Health, and Safety information call +44 1707 353 434
User Guide 23
Page 26

Safety and Regulations Xerox® WorkCentre® 5800/5800i Series
24 User Guide
Page 27
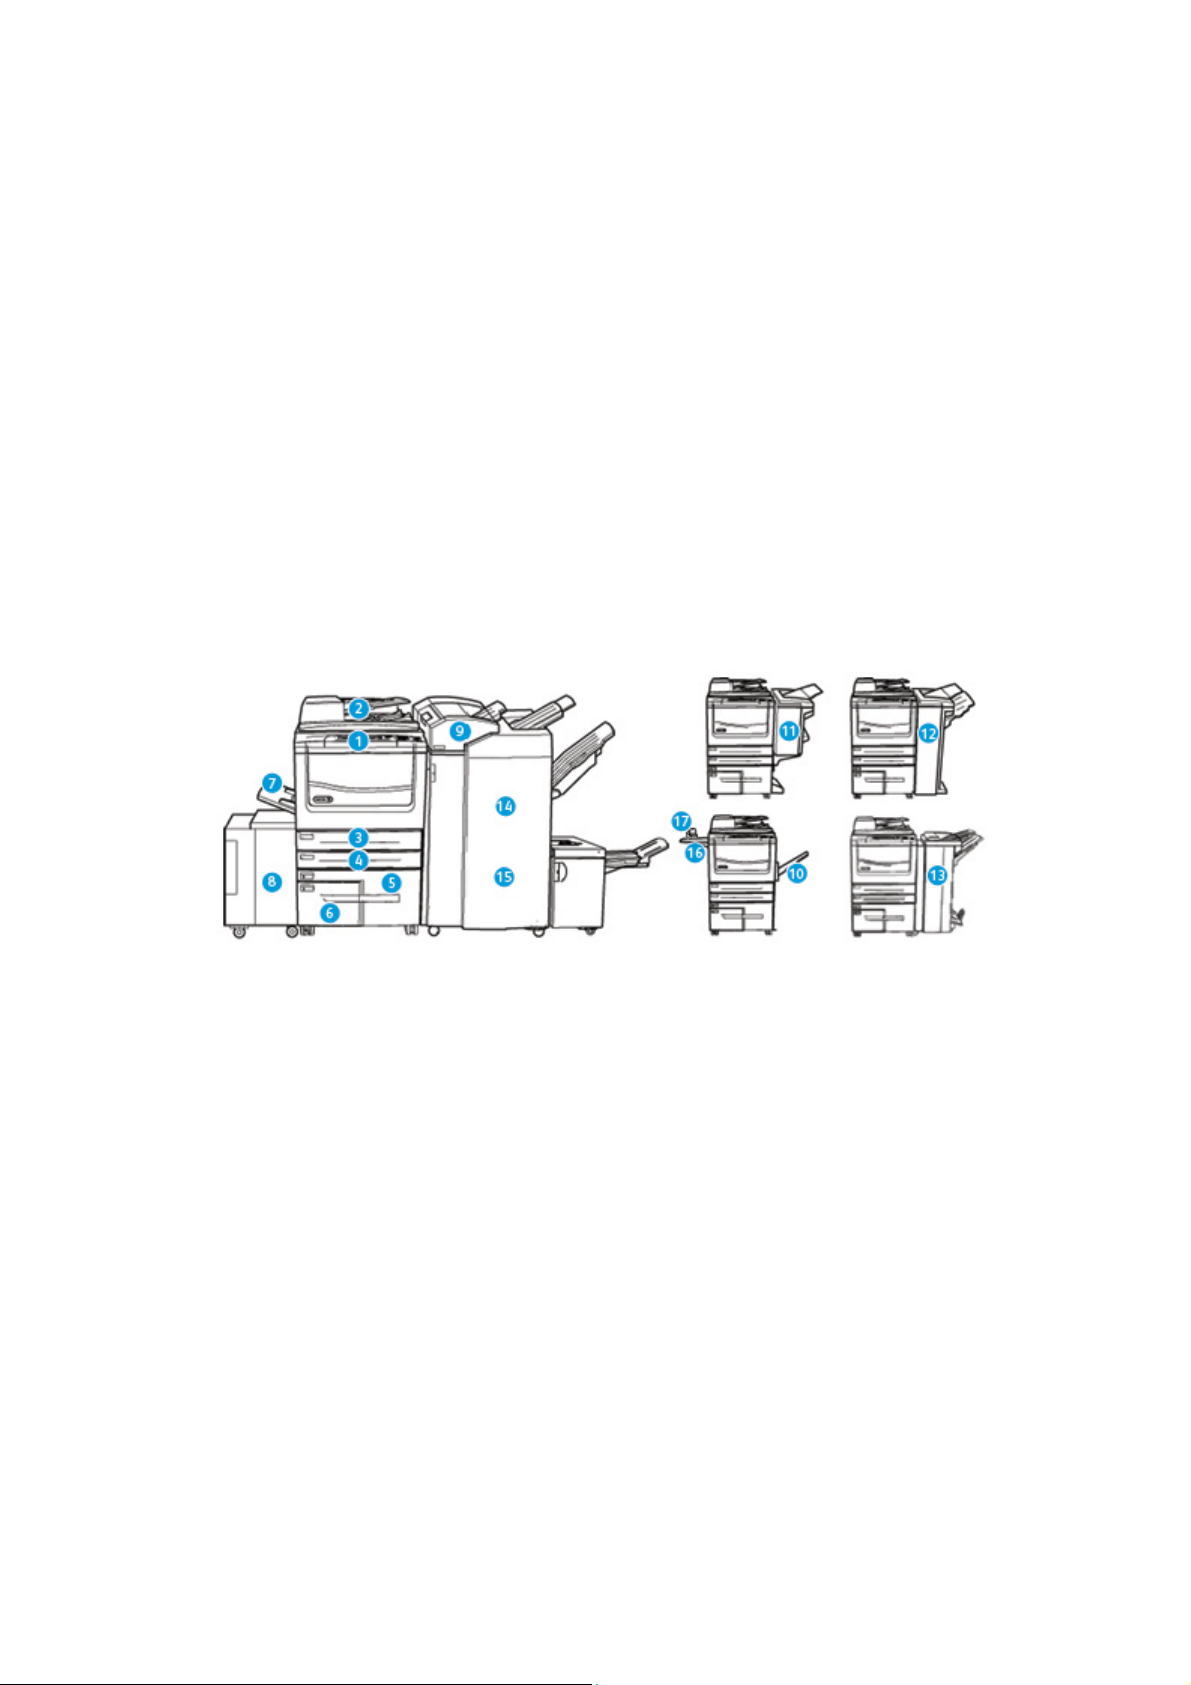
Getting Started
2
Identifying the Parts of Your Device
Your new device is not simply a conventional copier, it is a digital device capable of copying, faxing,
printing and scanning, dependent on your model and configuration.
All features and functions described within the User Guide relate to a fully configured WorkCentre
and may not be available on your device. If you require further information on any of the optional
components, or information on any of the other device configurations please contact your local
Xerox representative.
There are several configurations available which provide either 45, 55, 65, 75 or 90 copies or prints
a minute. All configurations are fully upgradable so as to meet any future requirements you may
have. Please contact your local Xerox representative for further information.
1. Control Panel: Touch Screen and Numeric Keypad.
2. Document Feeder and Document Glass: Used for scanning single or multiple documents.
The document glass can be used for scanning single, bound, custom size or damaged
documents.
3. Paper Tray 1: This tray is standard on all models. The tray is fully adjustable and can be used
for media sizes A5 LEF (5.5 x 8.5” LEF) to A3 (11 x 17”).
4. Paper Tray 2: This tray is standard on all models. The tray is fully adjustable and can be used
for media sizes A5 LEF (5.5 x 8.5” LEF) to A3 (11 x 17”).
5. Paper Tray 3: This tray is standard on all models. The tray can be used for media size A4 LEF
(8.5 x 11” LEF).
6. Paper Tray 4: This tray is standard on all models. The tray can be used for media size A4 LEF
(8.5 x 11” LEF).
7. Tray 5 (Bypa ss Tray) : Used for non-standard printing media from A6 SEF (2.8 x 4.3" SEF) to A3
(11 x 17").
8. Paper Tray 6: This is an optional high capacity paper tray. It is a dedicated tray used for A4 LEF
(8.5 x 11” LEF) size media. Optional kits are available to accommodate A3 (11 x 17”), 8.5 x 14”
SEF or A 4 SEF (8.5 x 11” SEF) media.
9. Tray 7 (Inserter): An optional paper tray. It is used to insert pre-printed sheets into copy sets.
It is not part of the printing process and cannot be used for imaging.
User Guide 25
Page 28
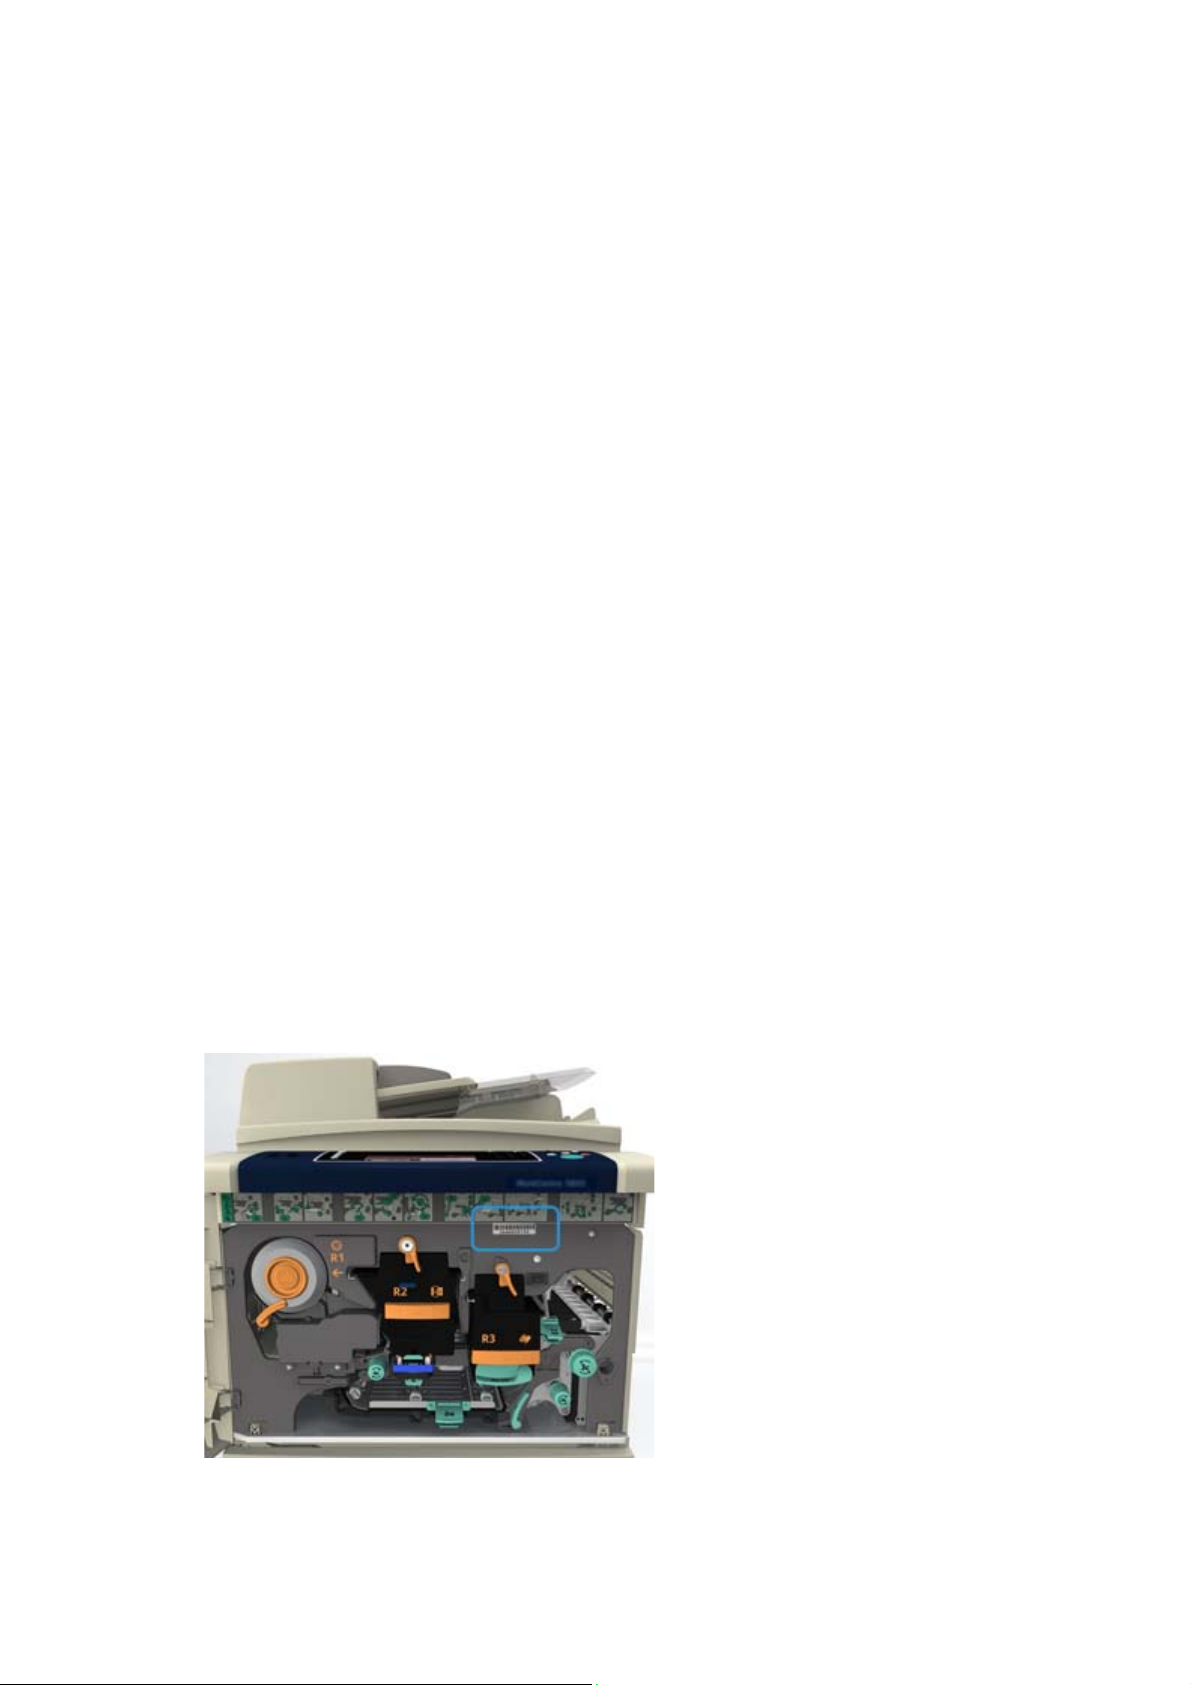
Getting Started Xerox® WorkCentre® 5800/5800i Series
10. Offset Catch Tray: The optional offset catch tray delivers output collated or uncollated. Each
set or stack will be offset from the previous to enable easy separation.
11. Basic Office Finisher: This optional device stacks, collates, staples and offsets your output.
12. Office Finisher: This optional device stacks, collates, staples and offsets your output. Hole
punch kits can be installed with this finisher.
13. Office Finisher with Booklet Maker: This optional finisher creates booklets, collates, offsets,
stacks and staples your output. Hole punch kits can be installed with this finisher.
14. High Volume Finisher: This optional finisher collates, offsets, stacks and staples your output.
Hole punch kits can be installed with this finisher.
15. High Volume Finisher with Booklet Maker: This optional finisher creates booklets, collates,
offsets, stacks and staples your output. Tri-fold and Hole Punch kits can be installed with this
finisher.
16. Convenience Shelf: An optional shelf used for holding documents and the Convenience
Stapler.
17. Convenience Stapler: Optional stapler used to staple sheets if there is no finisher, or to re-
staple originals after copying.
Note: SEF is Short Edge Feed (where the short edge of the paper is the leading edge when the
paper is fed into the device). LEF is Long Edge Feed (where the paper is oriented so that the long
edge is fed into the device first).
Locating the Serial Number for Your Device
If you need assistance during or after product installation, please visit www.xerox.com for online
solutions and support.
If you require further assistance, call our experts at the Xerox Support Center, or contact your local
representative. When telephoning please quote the machine serial number.
The Xerox Support Center or local representative telephone number is provided when the device is
installed.
1. To access the serial number open the front door. The serial number is located on a label above
the fuser module.
26 User Guide
Page 29

Getting Started Xerox® WorkCentre® 5800/5800i Series
Xerox ConnectKey Apps
There are a number of Xerox® ConnectKey® Apps available for use with your ConnectKey device.
ConnectKey
• Xerox QR Code - you can use this App to link your mobile applications with ConnectKey
devices. You can also use the QR Code App to access information about related Xerox
Apps.
• Xerox @PrintByXerox - you can use this App to print documents to ConnectKey-enabled
devices using email submission from any location.
• Xerox App Gallery 1.0 - you can use this App to access, login, browse, and download
ConnectKey Apps from the Xerox App Gallery.
For more information about Xerox
Note: The ConnectKey Apps available depend on your device model and software version.
To use ConnectKey Apps, ensure that your device is connected to the Internet.
®
Apps extend the capabilities of your ConnectKey devices.
®
ConnectKey Apps, go to www.xerox.com/XeroxAppGallery.
®
Mobile
Services and Options
Identifying the WorkCentre 5845 Standard and Optional Services
There are a number of services and options available for use with your device. Many services and
options are provided as standard and simply require enabling, or configuring with additional third
party hardware.
Additional optional functions and kits are also available and can be purchased and installed.
The options available depend on your device model and software version.
Standard
• Paper Tray 1 fully adjustable paper tray.
• Paper Tray 2 fully adjustable paper tray.
• Paper Tray 3 high capacity paper tray.
• Paper Tray 4 high capacity paper tray.
• Paper Tray 5 (Bypass Tray) used for non-standard printing media.
• Security kit provides additional security features, such as image overwrite options.
• Color Scanner used to scan in color.
• Server Fax enables users to send and receive hard copy faxes via a fax server.
Requires a Third Party Fax Server to be configured and installed.
• Internet Fax allows users to send or receive faxes over the internet or intranet.
• Scanning enables E-mail and Workflow Scanning services.
User Guide 27
Page 30

Getting Started Xerox® WorkCentre® 5800/5800i Series
Optional
• Paper Tray 6 high capacity paper tray.
• Tray 6 Large Paper Kit converts paper tray 6 to hold larger paper sizes.
• Tray 6 A4 Short Edge Feed Kit converts paper tray 6 into a short edge feed tray.
• Envelope Tray this tray is fitted instead of paper tray 2 to enable envelope printing. Up to 55
#10 Envelope s (4.1"x 9.5") can be loaded in the tray.
• Paper Tray 7 (Inserter) adds pre-printed sheets into copy sets. This is only available with the
high volume finisher or high volume finisher with booklet maker.
• Paper Tray Lock Kit locks the trays so that paper cannot be removed, this is a useful feature in
libraries.
• Offset Catch Tray delivers collated or uncollated output when a finisher is not installed.
• Basic Office Finisher stacks, collates, staples and offsets your output.
• Office Finisher stacks, collates, staples and offsets your output. A hole punch kit is also
available for this finisher.
• Office Finisher 2 Hole Punch Kit enables the Office Finisher to make 2 hole punches. Other
hole punch kits are available for this finisher. Only one hole punch kit can be fitted at one time.
• Office Finisher 3 Hole Punch Kit enables the Office Finisher to make 3 hole punches. Other
hole punch kits are available for this finisher. Only one hole punch kit can be fitted at one time.
• Office Finisher 4 Hole Punch Kit enables the Office Finisher to make 4 hole punches. Other
hole punch kits are available for this finisher. Only one hole punch kit can be fitted at one time.
• Office Finisher Swedish 4 Hole Punch Kit enables the Office Finisher to make 4 hole punches.
Other hole punch kits are available for this finisher. Only one hole punch kit can be fitted at one
time.
• Office Finisher with Booklet Maker creates booklets, collates, offsets, stacks and staples your
output. Hole punch kits can be installed with this finisher.
• High Volume Finisher collates, offsets, stacks and staples your output. Hole punch kits can be
installed with this finisher.
• High Volume Finisher 2 Hole Punch Kit enables the High Volume Finisher to make 2 hole
punches. Other hole punch kits are available for this finisher. Only one hole punch kit can be
fitted at one time.
• High Volume Finisher 3 Hole Punch Kit enables the High Volume Finisher to make 3 hole
punches. Other hole punch kits are available for this finisher. Only one hole punch kit can be
fitted at one time.
• High Volume Finisher 4 Hole Punch Kit enables the High Volume Finisher to make 4 hole
punches. Other hole punch kits are available for this finisher. Only one hole punch kit can be
fitted at one time.
• High Volume Finisher Swedish 4 Hole Punch Kit enables the High Volume Finisher to make
4 hole punches. Other hole punch kits are available for this finisher. Only one hole punch kit can
be fitted at one time.
• High Volume Finisher with Booklet Maker creates booklets, collates, offsets, stacks and
staples your output. Tri-fold and Hole Punch kits can be installed with this finisher.
• Trifo lder available with the High Volume Finisher with Booklet Maker. Enables the finisher to
produce tri-folded documents in a C fold or a Z fold.
• Convenience Stapler
for manual stapling. The Convenience Shelf must be installed.
• Convenience Shelf a shelf which can be installed on the left side of the device.
28 User Guide
Page 31

Getting Started Xerox® WorkCentre® 5800/5800i Series
• USB Keyboard support enables users to plug in an external keyboard. The keyboard can be
useful to enter logins with strong passwords, enter scan metadata, enter email addresses and
maintain the device address book.
• LAN Fax enables users to send faxes directly from their PC using the print and fax drivers.
Requires the Basic or Extended Fax Kit or a Third Party Fax Server to be configured and installed.
• Basic Fax Kit (Embedded) this kit enables a single fax line connection.
• Extended Fax Kit (Embedded) this kit enables two fax lines to be connected.
• Scan to PC Desktop Kit enables you to scan to your computer. Standard and Pro versions are
available.
• XPS Enablement Kit enables you to create documents in the XPS (XML Paper Specification)
for mat.
• McAfee Integrity Control Kit uses McAfee software to detect and prevent modification and
execution of files on the device.
• Unicode International Printing Kit enables unicode characters to be printed.
• Wireless Print Kit enables connection to a wireless network.
• Xerox App Gallery 1.0 use this App to access, login, browse, and download ConnectKey Apps
from the Xerox App Gallery.
• Xerox @PrintByXerox use this App to print documents to ConnectKey-enabled devices using
email submission from any location.
• Xerox QR Code use this App to link your mobile applications with ConnectKey devices. You can
also use the QR Code App to access information about related Xerox
®
Mobile Apps.
• Wi-Fi Direct allows you to connect directly to your printer using Wi-Fi enabled mobile devices.
• AirPrint 1.4 allows you to print from wired or wireless Apple iOS-based mobile devices and Mac
OS-based devices without the need to install a print driver.
• Xerox Secure Access provides a card reading device to restrict access to the device.
• Network Accounting enables the tracking of device usage for Print, Copy and Scan jobs from
multiple devices over the network. A third party server is needed.
• Xerox Standard Accounting is an accounting tool which tracks the number of Copy, Print,
Workflow Scanning, Server Fax and Fax jobs for each user.
• Xerox Copier Assistant Kit provides easier access to the copying capabilities. This assistive
technology is an alternative to the standard touchscreen and helps everyone, especially people
who are wheelchair users, blind or visually impaired, to easily program copy jobs and make
copies.
• Foreig n Interface Device enables the attachment of a third party access and accounting
device, such as a card swipe or coin operated unit.
Not Available
• All the potential options for this device are available on this model either as standard or
optional features.
User Guide 29
Page 32

Getting Started Xerox® WorkCentre® 5800/5800i Series
Identifying the WorkCentre 5855 Standard and Optional Services
There are a number of services and options available for use with your device. Many services and
options are provided as standard and simply require enabling, or configuring with additional third
party hardware.
Additional optional functions and kits are also available and can be purchased and installed.
The options available depend on your device model and software version.
Standard
• Paper Tray 1 fully adjustable paper tray.
• Paper Tray 2 fully adjustable paper tray.
• Paper Tray 3 high capacity paper tray.
• Paper Tray 4 high capacity paper tray.
• Paper Tray 5 (Bypass Tray) used for non-standard printing media.
• Security kit provides additional security features, such as image overwrite options.
• Color Scanner used to scan in color.
• Server Fax enables users to send and receive hard copy faxes via a fax server.
Requires a Third Party Fax Server to be configured and installed.
• Internet Fax allows users to send or receive faxes over the internet or intranet.
• Scanning enables E-mail and Workflow Scanning services.
Optional
• Paper Tray 6 high capacity paper tray.
• Tray 6 Large Paper Kit converts paper tray 6 to hold larger paper sizes.
• Tray 6 A4 Short Edge Feed Kit converts paper tray 6 into a short edge feed tray.
• Envelope Tray this tray is fitted instead of paper tray 2 to enable envelope printing. Up to 55
#10 Envelope s (4.1"x 9.5") can be loaded in the tray.
• Paper Tray 7 (Inserter) adds pre-printed sheets into copy sets. This is only available with the
high volume finisher or high volume finisher with booklet maker.
• Paper Tray Lock Kit locks the trays so that paper cannot be removed, this is a useful feature in
libraries.
• Offset Catch Tray delivers collated or uncollated output when a finisher is not installed.
• Office Finisher stacks, collates, staples and offsets your output. A hole punch kit is also
available for this finisher.
• Office Finisher 2 Hole Punch Kit enables the Office Finisher to make 2 hole punches. Other
hole punch kits are available for this finisher. Only one hole punch kit can be fitted at one time.
• Office Finisher 3 Hole Punch Kit enables the Office Finisher to make 3 hole punches. Other
hole punch kits are available for this finisher. Only one hole punch kit can be fitted at one time.
• Office Finisher 4 Hole Punch Kit enables the Office Finisher to make 4 hole punches. Other
hole punch kits are available for this finisher. Only one hole punch kit can be fitted at one time.
30 User Guide
Page 33

Getting Started Xerox® WorkCentre® 5800/5800i Series
• Office Finisher Swedish 4 Hole Punch Kit enables the Office Finisher to make 4 hole punches.
Other hole punch kits are available for this finisher. Only one hole punch kit can be fitted at one
time.
• Office Finisher with Booklet Maker creates booklets, collates, offsets, stacks and staples your
output. Hole punch kits can be installed with this finisher.
• High Volume Finisher collates, offsets, stacks and staples your output. Hole punch kits can be
installed with this finisher.
• High Volume Finisher 2 Hole Punch Kit enables the High Volume Finisher to make 2 hole
punches. Other hole punch kits are available for this finisher. Only one hole punch kit can be
fitted at one time.
• High Volume Finisher 3 Hole Punch Kit enables the High Volume Finisher to make 3 hole
punches. Other hole punch kits are available for this finisher. Only one hole punch kit can be
fitted at one time.
• High Volume Finisher 4 Hole Punch Kit enables the High Volume Finisher to make 4 hole
punches. Other hole punch kits are available for this finisher. Only one hole punch kit can be
fitted at one time.
• High Volume Finisher Swedish 4 Hole Punch Kit enables the High Volume Finisher to make
4 hole punches. Other hole punch kits are available for this finisher. Only one hole punch kit can
be fitted at one time.
• High Volume Finisher with Booklet Maker creates booklets, collates, offsets, stacks and
staples your output. Tri-fold and Hole Punch kits can be installed with this finisher.
• Trifo lder available with the High Volume Finisher with Booklet Maker. Enables the finisher to
produce tri-folded documents in a C fold or a Z fold.
• Convenience Stapler for manual stapling. The Convenience Shelf must be installed.
• Convenience Shelf a shelf which can be installed on the left side of the device.
• USB Keyboard support enables users to plug in an external keyboard. The keyboard can be
useful to enter logins with strong passwords, enter scan metadata, enter email addresses and
maintain the device address book.
• LAN Fax enables users to send faxes directly from their PC using the print and fax drivers.
Requires the Basic or Extended Fax Kit or a Third Party Fax Server to be configured and installed.
• Basic Fax Kit (Embedded) this kit enables a single fax line connection.
• Extended Fax Kit (Embedded) this kit enables two fax lines to be connected.
• Scan to PC Desktop Kit enables you to scan to your computer. Standard and Pro versions are
available.
• XPS Enablement Kit enables you to create documents in the XPS (XML Paper Specification)
for mat.
• McAfee Integrity Control Kit uses McAfee software to detect and prevent modification and
execution of files on the device.
• Unicode International Printing Kit enables unicode characters to be printed.
• Wireless Print Kit enables connection to a wireless network.
• Xerox App Gallery 1.0 use this App to access, login, browse, and download ConnectKey Apps
from the Xerox App Gallery.
• Xerox @PrintByXerox use this App to print documents to ConnectKey-enabled devices using
email submission from any location.
•
Xerox QR Code use this App to link your mobile applications with ConnectKey devices. You can
also use the QR Code App to access information about related Xerox
User Guide 31
®
Mobile Apps.
Page 34

Getting Started Xerox® WorkCentre® 5800/5800i Series
• Wi-Fi Direct allows you to connect directly to your printer using Wi-Fi enabled mobile devices.
• AirPrint 1.4 allows you to print from wired or wireless Apple iOS-based mobile devices and Mac
OS-based devices without the need to install a print driver.
• Xerox Secure Access provides a card reading device to restrict access to the device.
• Network Accounting enables the tracking of device usage for Print, Copy and Scan jobs from
multiple devices over the network. A third party server is needed.
• Xerox Standard Accounting is an accounting tool which tracks the number of Copy, Print,
Workflow Scanning, Server Fax and Fax jobs for each user.
• Xerox Copier Assistant Kit provides easier access to the copying capabilities. This assistive
technology is an alternative to the standard touchscreen and helps everyone, especially people
who are wheelchair users, blind or visually impaired, to easily program copy jobs and make
copies.
• Foreig n Interface Device enables the attachment of a third party access and accounting
device, such as a card swipe or coin operated unit.
Not Available
• Basic Office Finisher stacks, collates, staples and offsets your output.
Identifying the WorkCentre 5865/5865i Standard and Optional
Services
There are a number of services and options available for use with your device. Many services and
options are provided as standard and simply require enabling, or configuring with additional third
party hardware.
Additional optional functions and kits are also available and can be purchased and installed.
The options available depend on your device model and software version.
Standard
• Paper Tray 1 fully adjustable paper tray.
• Paper Tray 2 fully adjustable paper tray.
• Paper Tray 3 high capacity paper tray.
• Paper Tray 4 high capacity paper tray.
• Paper Tray 5 (Bypass Tray) used for non-standard printing media.
• Security kit provides additional security features, such as image overwrite options.
• Color Scanner used to scan in color.
• Server Fax enables users to send and receive hard copy faxes via a fax server.
Requires a Third Party Fax Server to be configured and installed.
• Internet Fax allows users to send or receive faxes over the internet or intranet.
• Scanning enables E-mail and Workflow Scanning services.
32 User Guide
Page 35

Getting Started Xerox® WorkCentre® 5800/5800i Series
Optional
• Paper Tray 6 high capacity paper tray.
• Tray 6 Large Paper Kit converts paper tray 6 to hold larger paper sizes.
• Tray 6 A4 Short Edge Feed Kit converts paper tray 6 into a short edge feed tray.
• Envelope Tray this tray is fitted instead of paper tray 2 to enable envelope printing. Up to 55
#10 Envelope s (4.1"x 9.5") can be loaded in the tray.
• Paper Tray 7 (Inserter) adds pre-printed sheets into copy sets. This is only available with the
high volume finisher or high volume finisher with booklet maker.
• Paper Tray Lock Kit locks the trays so that paper cannot be removed, this is a useful feature in
libraries.
• Offset Catch Tray delivers collated or uncollated output when a finisher is not installed.
• Office Finisher stacks, collates, staples and offsets your output. A hole punch kit is also
available for this finisher.
• Office Finisher 2 Hole Punch Kit enables the Office Finisher to make 2 hole punches. Other
hole punch kits are available for this finisher. Only one hole punch kit can be fitted at one time.
• Office Finisher 3 Hole Punch Kit enables the Office Finisher to make 3 hole punches. Other
hole punch kits are available for this finisher. Only one hole punch kit can be fitted at one time.
• Office Finisher 4 Hole Punch Kit enables the Office Finisher to make 4 hole punches. Other
hole punch kits are available for this finisher. Only one hole punch kit can be fitted at one time.
• Office Finisher Swedish 4 Hole Punch Kit enables the Office Finisher to make 4 hole punches.
Other hole punch kits are available for this finisher. Only one hole punch kit can be fitted at one
time.
• Office Finisher with Booklet Maker creates booklets, collates, offsets, stacks and staples your
output. Hole punch kits can be installed with this finisher.
• High Volume Finisher collates, offsets, stacks and staples your output. Hole punch kits can be
installed with this finisher.
• High Volume Finisher 2 Hole Punch Kit enables the High Volume Finisher to make 2 hole
punches. Other hole punch kits are available for this finisher. Only one hole punch kit can be
fitted at one time.
• High Volume Finisher 3 Hole Punch Kit enables the High Volume Finisher to make 3 hole
punches. Other hole punch kits are available for this finisher. Only one hole punch kit can be
fitted at one time.
• High Volume Finisher 4 Hole Punch Kit enables the High Volume Finisher to make 4 hole
punches. Other hole punch kits are available for this finisher. Only one hole punch kit can be
fitted at one time.
• High Volume Finisher Swedish 4 Hole Punch Kit enables the High Volume Finisher to make
4 hole punches. Other hole punch kits are available for this finisher. Only one hole punch kit can
be fitted at one time.
• High Volume Finisher with Booklet Maker creates booklets, collates, offsets, stacks and
staples your output. Tri-fold and Hole Punch kits can be installed with this finisher.
• Trifo lder available with the High Volume Finisher with Booklet Maker. Enables the finisher to
produce tri-folded documents in a C fold or a Z fold.
• Convenience Stapler for manual stapling. The Convenience Shelf must be installed.
• Convenience Shelf
User Guide 33
a shelf which can be installed on the left side of the device.
Page 36

Getting Started Xerox® WorkCentre® 5800/5800i Series
• USB Keyboard support enables users to plug in an external keyboard. The keyboard can be
useful to enter logins with strong passwords, enter scan metadata, enter email addresses and
maintain the device address book.
• LAN Fax enables users to send faxes directly from their PC using the print and fax drivers.
Requires the Basic or Extended Fax Kit or a Third Party Fax Server to be configured and installed.
• Basic Fax Kit (Embedded) this kit enables a single fax line connection.
• Extended Fax Kit (Embedded) this kit enables two fax lines to be connected.
• Scan to PC Desktop Kit enables you to scan to your computer. Standard and Pro versions are
available.
• XPS Enablement Kit enables you to create documents in the XPS (XML Paper Specification)
for mat.
• McAfee Integrity Control Kit uses McAfee software to detect and prevent modification and
execution of files on the device.
• Unicode International Printing Kit enables unicode characters to be printed.
• Wireless Print Kit enables connection to a wireless network.
• Xerox App Gallery 1.0 use this App to access, login, browse, and download ConnectKey Apps
from the Xerox App Gallery.
• Xerox @PrintByXerox use this App to print documents to ConnectKey-enabled devices using
email submission from any location.
• Xerox QR Code use this App to link your mobile applications with ConnectKey devices. You can
also use the QR Code App to access information about related Xerox
®
Mobile Apps.
• Wi-Fi Direct allows you to connect directly to your printer using Wi-Fi enabled mobile devices.
• AirPrint 1.4 allows you to print from wired or wireless Apple iOS-based mobile devices and Mac
OS-based devices without the need to install a print driver.
• Xerox Secure Access provides a card reading device to restrict access to the device.
• Network Accounting enables the tracking of device usage for Print, Copy and Scan jobs from
multiple devices over the network. A third party server is needed.
• Xerox Standard Accounting is an accounting tool which tracks the number of Copy, Print,
Workflow Scanning, Server Fax and Fax jobs for each user.
• Xerox Copier Assistant Kit provides easier access to the copying capabilities. This assistive
technology is an alternative to the standard touchscreen and helps everyone, especially people
who are wheelchair users, blind or visually impaired, to easily program copy jobs and make
copies.
• Foreig n Interface Device enables the attachment of a third party access and accounting
device, such as a card swipe or coin operated unit.
Not Available
• Basic Office Finisher stacks, collates, staples and offsets your output.
34 User Guide
Page 37

Getting Started Xerox® WorkCentre® 5800/5800i Series
Identifying the WorkCentre 5875/5875i Standard and Optional
Services
There are a number of services and options available for use with your device. Many services and
options are provided as standard and simply require enabling, or configuring with additional third
party hardware.
Additional optional functions and kits are also available and can be purchased and installed.
The options available depend on your device model and software version.
Standard
• Paper Tray 1 fully adjustable paper tray.
• Paper Tray 2 fully adjustable paper tray.
• Paper Tray 3 high capacity paper tray.
• Paper Tray 4 high capacity paper tray.
• Paper Tray 5 (Bypass Tray) used for non-standard printing media.
• Security kit provides additional security features, such as image overwrite options.
• Color Scanner used to scan in color.
• Server Fax enables users to send and receive hard copy faxes via a fax server.
Requires a Third Party Fax Server to be configured and installed.
• Internet Fax allows users to send or receive faxes over the internet or intranet.
• Scanning enables E-mail and Workflow Scanning services.
Optional
• Paper Tray 6 high capacity paper tray.
• Tray 6 Large Paper Kit converts paper tray 6 to hold larger paper sizes.
• Tray 6 A4 Short Edge Feed Kit converts paper tray 6 into a short edge feed tray.
• Envelope Tray this tray is fitted instead of paper tray 2 to enable envelope printing. Up to 55
#10 Envelope s (4.1"x 9.5") can be loaded in the tray.
• Paper Tray 7 (Inserter) adds pre-printed sheets into copy sets. This is only available with the
high volume finisher or high volume finisher with booklet maker.
• Paper Tray Lock Kit locks the trays so that paper cannot be removed, this is a useful feature in
libraries.
• Offset Catch Tray delivers collated or uncollated output when a finisher is not installed.
• Office Finisher stacks, collates, staples and offsets your output. A hole punch kit is also
available for this finisher.
• Office Finisher 2 Hole Punch Kit enables the Office Finisher to make 2 hole punches. Other
hole punch kits are available for this finisher. Only one hole punch kit can be fitted at one time.
• Office Finisher 3 Hole Punch Kit enables the Office Finisher to make 3 hole punches. Other
hole punch kits are available for this finisher. Only one hole punch kit can be fitted at one time.
• Office Finisher 4 Hole Punch Kit enables the Office Finisher to make 4 hole punches. Other
hole punch kits are available for this finisher. Only one hole punch kit can be fitted at one time.
User Guide 35
Page 38

Getting Started Xerox® WorkCentre® 5800/5800i Series
• Office Finisher Swedish 4 Hole Punch Kit enables the Office Finisher to make 4 hole punches.
Other hole punch kits are available for this finisher. Only one hole punch kit can be fitted at one
time.
• Office Finisher with Booklet Maker creates booklets, collates, offsets, stacks and staples your
output. Hole punch kits can be installed with this finisher.
• High Volume Finisher collates, offsets, stacks and staples your output. Hole punch kits can be
installed with this finisher.
• High Volume Finisher 2 Hole Punch Kit enables the High Volume Finisher to make 2 hole
punches. Other hole punch kits are available for this finisher. Only one hole punch kit can be
fitted at one time.
• High Volume Finisher 3 Hole Punch Kit enables the High Volume Finisher to make 3 hole
punches. Other hole punch kits are available for this finisher. Only one hole punch kit can be
fitted at one time.
• High Volume Finisher 4 Hole Punch Kit enables the High Volume Finisher to make 4 hole
punches. Other hole punch kits are available for this finisher. Only one hole punch kit can be
fitted at one time.
• High Volume Finisher Swedish 4 Hole Punch Kit enables the High Volume Finisher to make
4 hole punches. Other hole punch kits are available for this finisher. Only one hole punch kit can
be fitted at one time.
• High Volume Finisher with Booklet Maker creates booklets, collates, offsets, stacks and
staples your output. Tri-fold and Hole Punch kits can be installed with this finisher.
• Trifo lder available with the High Volume Finisher with Booklet Maker. Enables the finisher to
produce tri-folded documents in a C fold or a Z fold.
• Convenience Stapler for manual stapling. The Convenience Shelf must be installed.
• Convenience Shelf a shelf which can be installed on the left side of the device.
• USB Keyboard support enables users to plug in an external keyboard. The keyboard can be
useful to enter logins with strong passwords, enter scan metadata, enter email addresses and
maintain the device address book.
• LAN Fax enables users to send faxes directly from their PC using the print and fax drivers.
Requires the Basic or Extended Fax Kit or a Third Party Fax Server to be configured and installed.
• Basic Fax Kit (Embedded) this kit enables a single fax line connection.
• Extended Fax Kit (Embedded) this kit enables two fax lines to be connected.
• Scan to PC Desktop Kit enables you to scan to your computer. Standard and Pro versions are
available.
• XPS Enablement Kit enables you to create documents in the XPS (XML Paper Specification)
for mat.
• McAfee Integrity Control Kit uses McAfee software to detect and prevent modification and
execution of files on the device.
• Unicode International Printing Kit enables unicode characters to be printed.
• Wireless Print Kit enables connection to a wireless network.
• Xerox App Gallery 1.0 use this App to access, login, browse, and download ConnectKey Apps
from the Xerox App Gallery.
• Xerox @PrintByXerox use this App to print documents to ConnectKey-enabled devices using
email submission from any location.
•
Xerox QR Code use this App to link your mobile applications with ConnectKey devices. You can
also use the QR Code App to access information about related Xerox
36 User Guide
®
Mobile Apps.
Page 39

Getting Started Xerox® WorkCentre® 5800/5800i Series
• Wi-Fi Direct allows you to connect directly to your printer using Wi-Fi enabled mobile devices.
• AirPrint 1.4 allows you to print from wired or wireless Apple iOS-based mobile devices and Mac
OS-based devices without the need to install a print driver.
• Xerox Secure Access provides a card reading device to restrict access to the device.
• Network Accounting enables the tracking of device usage for Print, Copy and Scan jobs from
multiple devices over the network. A third party server is needed.
• Xerox Standard Accounting is an accounting tool which tracks the number of Copy, Print,
Workflow Scanning, Server Fax and Fax jobs for each user.
• Xerox Copier Assistant Kit provides easier access to the copying capabilities. This assistive
technology is an alternative to the standard touchscreen and helps everyone, especially people
who are wheelchair users, blind or visually impaired, to easily program copy jobs and make
copies.
• Foreig n Interface Device enables the attachment of a third party access and accounting
device, such as a card swipe or coin operated unit.
Not Available
• Basic Office Finisher stacks, collates, staples and offsets your output.
Identifying the WorkCentre 5890/5890i Standard and Optional
Services
There are a number of services and options available for use with your device. Many services and
options are provided as standard and simply require enabling, or configuring with additional third
party hardware.
Additional optional functions and kits are also available and can be purchased and installed.
The options available depend on your device model and software version.
Standard
• Paper Tray 1 fully adjustable paper tray.
• Paper Tray 2 fully adjustable paper tray.
• Paper Tray 3 high capacity paper tray.
• Paper Tray 4 high capacity paper tray.
• Paper Tray 5 (Bypass Tray) used for non-standard printing media.
• Security kit provides additional security features, such as image overwrite options.
• Color Scanner used to scan in color.
• Server Fax enables users to send and receive hard copy faxes via a fax server.
Requires a Third Party Fax Server to be configured and installed.
• Internet Fax allows users to send or receive faxes over the internet or intranet.
• Scanning enables E-mail and Workflow Scanning services.
User Guide 37
Page 40

Getting Started Xerox® WorkCentre® 5800/5800i Series
Optional
• Paper Tray 6 high capacity paper tray.
• Tray 6 Large Paper Kit converts paper tray 6 to hold larger paper sizes.
• Tray 6 A4 Short Edge Feed Kit converts paper tray 6 into a short edge feed tray.
• Envelope Tray this tray is fitted instead of paper tray 2 to enable envelope printing. Up to 55
#10 Envelope s (4.1"x 9.5") can be loaded in the tray.
• Paper Tray 7 (Inserter) adds pre-printed sheets into copy sets. This is only available with the
high volume finisher or high volume finisher with booklet maker.
• Paper Tray Lock Kit locks the trays so that paper cannot be removed, this is a useful feature in
libraries.
• High Volume Finisher collates, offsets, stacks and staples your output. Hole punch kits can be
installed with this finisher.
• High Volume Finisher 2 Hole Punch Kit enables the High Volume Finisher to make 2 hole
punches. Other hole punch kits are available for this finisher. Only one hole punch kit can be
fitted at one time.
• High Volume Finisher 3 Hole Punch Kit enables the High Volume Finisher to make 3 hole
punches. Other hole punch kits are available for this finisher. Only one hole punch kit can be
fitted at one time.
• High Volume Finisher 4 Hole Punch Kit enables the High Volume Finisher to make 4 hole
punches. Other hole punch kits are available for this finisher. Only one hole punch kit can be
fitted at one time.
• High Volume Finisher Swedish 4 Hole Punch Kit enables the High Volume Finisher to make
4 hole punches. Other hole punch kits are available for this finisher. Only one hole punch kit can
be fitted at one time.
• High Volume Finisher with Booklet Maker creates booklets, collates, offsets, stacks and
staples your output. Tri-fold and Hole Punch kits can be installed with this finisher.
• Trifo lder available with the High Volume Finisher with Booklet Maker. Enables the finisher to
produce tri-folded documents in a C fold or a Z fold.
• Convenience Stapler for manual stapling. The Convenience Shelf must be installed.
• Convenience Shelf a shelf which can be installed on the left side of the device.
• USB Keyboard support enables users to plug in an external keyboard. The keyboard can be
useful to enter logins with strong passwords, enter scan metadata, enter email addresses and
maintain the device address book.
• LAN Fax enables users to send faxes directly from their PC using the print and fax drivers.
Requires the Basic or Extended Fax Kit or a Third Party Fax Server to be configured and installed.
• Basic Fax Kit (Embedded) this kit enables a single fax line connection.
• Extended Fax Kit (Embedded) this kit enables two fax lines to be connected.
• Scan to PC Desktop Kit enables you to scan to your computer. Standard and Pro versions are
available.
• XPS Enablement Kit enables you to create documents in the XPS (XML Paper Specification)
for mat.
• McAfee Integrity Control Kit uses McAfee software to detect and prevent modification and
execution of files on the device.
• Unicode International Printing Kit enables unicode characters to be printed.
38 User Guide
Page 41

Getting Started Xerox® WorkCentre® 5800/5800i Series
• Wireless Print Kit enables connection to a wireless network.
• Xerox App Gallery 1.0 use this App to access, login, browse, and download ConnectKey Apps
from the Xerox App Gallery.
• Xerox @PrintByXerox use this App to print documents to ConnectKey-enabled devices using
email submission from any location.
• Xerox QR Code use this App to link your mobile applications with ConnectKey devices. You can
also use the QR Code App to access information about related Xerox
®
Mobile Apps.
• Wi-Fi Direct allows you to connect directly to your printer using Wi-Fi enabled mobile devices.
• AirPrint 1.4 allows you to print from wired or wireless Apple iOS-based mobile devices and Mac
OS-based devices without the need to install a print driver.
• Xerox Secure Access provides a card reading device to restrict access to the device.
• Network Accounting enables the tracking of device usage for Print, Copy and Scan jobs from
multiple devices over the network. A third party server is needed.
• Xerox Standard Accounting is an accounting tool which tracks the number of Copy, Print,
Workflow Scanning, Server Fax and Fax jobs for each user.
• Xerox Copier Assistant Kit provides easier access to the copying capabilities. This assistive
technology is an alternative to the standard touchscreen and helps everyone, especially people
who are wheelchair users, blind or visually impaired, to easily program copy jobs and make
copies.
• Foreig n Interface Device enables the attachment of a third party access and accounting
device, such as a card swipe or coin operated unit.
Not Available
• Offset Catch Tray delivers collated or uncollated output when a finisher is not installed.
• Basic Office Finisher stacks, collates, staples and offsets your output.
• Office Finisher stacks, collates, staples and offsets your output. A hole punch kit is also
available for this finisher.
• Office Finisher 2 Hole Punch Kit enables the Office Finisher to make 2 hole punches. Other
hole punch kits are available for this finisher. Only one hole punch kit can be fitted at one time.
• Office Finisher 3 Hole Punch Kit enables the Office Finisher to make 3 hole punches. Other
hole punch kits are available for this finisher. Only one hole punch kit can be fitted at one time.
• Office Finisher 4 Hole Punch Kit enables the Office Finisher to make 4 hole punches. Other
hole punch kits are available for this finisher. Only one hole punch kit can be fitted at one time.
• Office Finisher Swedish 4 Hole Punch Kit enables the Office Finisher to make 4 hole punches.
Other hole punch kits are available for this finisher. Only one hole punch kit can be fitted at one
time.
• Office Finisher with Booklet Maker creates booklets, collates, offsets, stacks and staples your
output. Hole punch kits can be installed with this finisher.
User Guide 39
Page 42

Getting Started Xerox® WorkCentre® 5800/5800i Series
Describing the Finishing Devices
Basic Office Finisher
• Holds up to 250 sheets of paper in the Top Tray, and up to 1000 sheets in the Stacker Tray.
• Paper weight 60 to 216 gsm (16 to 57 lb).
• The Stacker can collate, stack and staple your output, depending on the features selected. It
staples between 2 and 30 sheets of 80 gsm (20 lb) paper, less if using heavyweight paper or
tabs.
• The staple cartridge for the Basic Office Finisher contains 3000 staples.
Note: Double Staple is not available with the Basic Office Finisher.
Office Finisher
• Holds up to 250 sheets of paper in the Top Tray, and up to 2000 sheets in the Stacker Tray.
• Paper weight 60 to 216 gsm (16 to 57 lb).
• The Office Finisher can collate, stack, staple and hole punch (if available) your output
depending on the features selected. It staples between 2 and 50 sheets of 80 gsm (20 lb)
paper, less if using heavyweight paper or tabs.
• The finisher stapler has 1 staple cartridge containing 5000 staples.
• This finisher can be fitted with the optional 2, 3 or 4 Hole-Punch kit.
Office Finisher with Booklet Maker
• Holds up to 250 sheets of paper in the Top Tray, and up to 2000 sheets in the Stacker Tray.
• Paper weight 60 to 216 gsm (16 to 57 lb).
• The office finisher can collate, stack, staple and hole punch (if available) your output
depending on the features selected. It staples between 2 and 50 sheets of 80 gsm (20 lb)
paper, less if using heavyweight paper or tabs.
• The finisher stapler has 1 staple cartridge containing 5000 staples.
• The 2 booklet maker staplers each contain a cartridge of 2000 staples.
• This finisher can be fitted with the optional 2, 3 or 4 Hole-Punch kit.
• The booklet maker can staple and fold up to 15 sheets of 80 gsm (20 lb) paper.
High Volume Finisher
• Holds up to 250 sheets of paper in the Top Tray, and up to 3000 sheets in the Stacker Tray.
• Paper weight 60 to 216 gsm (16 to 57 lb).
• The High Volume Finisher can collate, stack, staple and hole punch (if available) your output
depending on the features selected. It staples between 2 and 100 sheets of 80 gsm (20 lb)
paper, less if using heavyweight paper or tabs.
• Use the Pause button on the top of the finisher to pause printing and unload the output tray.
Press the button again to resume.
• The finisher stapler has 1 staple cartridge containing 5000 staples.
• The booklet maker staplers each contain a cartridge of 2000 staples.
40 User Guide
Page 43

Getting Started Xerox® WorkCentre® 5800/5800i Series
• This finisher can be fitted with the optional 2, 3 or 4 Hole-Punch kit and the Tray 6 (Post Process
Inserter) kit.
• The High Volume Finisher is also available with a Booklet Maker which enables booklets to be
folded and stapled. Folded sheets and booklets are delivered to the booklet tray which can hold
between 10 and 30 booklets, depending upon the number of pages. If the flap on the right of
the tray is folded down, an unlimited number of booklets can be collected in a suitable
container.
• If you have a High Volume Finisher with Booklet Maker, a Tri-fold module can also be fitted. This
enables your device to produce tri-folded output. With the Tri-fold module fitted, the capacity
of the finisher stacker tray is reduced to 2000 sheets and a maximum paper weight of 120 gsm
(32lb).
Identifying the Control Panel Buttons
1. Services Home: Provides access to the services available on the device.
2. Services: Returns the display to the previous Copy, Fax, or Scan feature screen when the Job
Status screen or Machine Status screen is displayed.
3. Job Status: Use to check the progress of active jobs, or display detailed information about
completed jobs.
4. Machine Status: Use to check the device status, the billing meters, the status of consumables,
or print the user documentation and reports. Use this button also when accessing the Tools
mode.
5. Touch Screen: Use to select programing features and display fault clearance procedures and
general device information.
6. Log In/Out: Use to enter log in details, and to log out.
7. Help: Displays help messages for device features.
8. Numeric Keypad: Use to enter alphanumeric characters.
9. Dial Pause: Use to insert a pause when dialing a fax number.
10. ‘C’ Cancel Entry: Cancels the previous entry made on the Numeric Keypad.
11. Language: Use to select a different language for the touch screen options.
12. Power: Use to select Energy Saver mode, perform a quick restart or to power on or off the
device.
13. Clear All: Press once to clear a current entry. Press twice to return to default settings.
14. Interrupt Printing: Use to pause the job which is currently printing, to run a more urgent copy
job.
15. Stop: Stops the job in progress.
16. Start: Use to start a job.
User Guide 41
Page 44

Getting Started Xerox® WorkCentre® 5800/5800i Series
Power On and Off
Powering the Device On
1. Ensure that your device is connected to a suitable power supply and that the power cord is fully
plugged in to the electrical inlet of the device.
2. Press the Power button. The entire powering on process (to power on all installed options) takes
less than 3 minutes 50 seconds.
Powering the Device Off
Power Off ends the current session and turns off the device.
1. Press the Power button on the control panel.
2. Select the Power Off button on the touch screen.
3. Select the Power Down button to confirm that the device should power off.
Note: Confirming power off will result in the deletion of any jobs currently in the queue. If
Cancel is selected the power off option will be cancelled, the device will be available for use and
any jobs currently in the queue will be retained.
The device will begin a controlled power down sequence. It remains on for approximately 36
seconds before switching off.
More Information
Using the Energy Saver Option
42 User Guide
Page 45

Getting Started Xerox® WorkCentre® 5800/5800i Series
Using the Energy Saver Option
Energy Saver ends the current session and keeps the device running on low power. When in Energy
Saver Mode, press the Power button to wake up the device.
1. Press the Power button on the control panel.
2. Select the Energy Saver button on the touch screen.
3. The device enters Energy Saver mode when all active jobs are complete. If Sleep mode has
been configured, the device will then enter Sleep mode after a specified period of time.
Note: The Power button is illuminated when the device is in the Energy Saver state. A steady
light indicates the device is in Low Power mode. A flashing light indicates the device is in Sleep
mode.
4. To re-activate the device when in Low Power or Sleep mode, press the Power button. The device
takes longer to recover from Sleep mode.
More Information
Powering the Device Off
User Guide 43
Page 46

Getting Started Xerox® WorkCentre® 5800/5800i Series
Loading Documents
Original documents can be loaded either into the document feeder or onto the document glass.
1. Load your documents face up in the document feeder input tray. Adjust the guide to just touch
the documents.
Or
Lift up the document feeder. Place the document face down onto the document glass and
register it to the arrow at the top left corner. Close the document feeder.
!
Caution
Do not place objects or documents on the document feeder cover.
Note: Original documents are only scanned once even when several copies are selected or 2-sided
originals are inserted into the document feeder.
44 User Guide
Page 47

Getting Started Xerox® WorkCentre® 5800/5800i Series
Making Copies
When you press the Start button to make a copy, the device scans your originals and temporarily
stores the images. It then prints the images based on the selections made.
If Authentication or Accounting has been enabled on your device you may have to enter login
details to access the Copy features.
1. Load your documents face up in the document feeder input tray. Adjust the guide to just touch
the documents.
Or
Lift up the document feeder. Place the document face down onto the document glass and
register it to the arrow at the top left corner. Close the document feeder.
2. Press the Clear All button on the control panel twice, then select Confirm on the touch screen
to cancel any previous programming selections.
3. Press the Services Home button.
4. Select the Copy button on the touch screen.
5. If required, select the Copy tab. This is usually the active tab when the Copy service opens.
6. Select any options required.
7. Enter the number of prints required using the numeric keypad on the control panel.
8. Press the Start button on the control panel to scan the original.
9. Remove the original from the document feeder or document glass when scanning has
completed. The job enters the job list ready for processing.
10. The Job Progress screen displays the progress of the current job. After the Job Progress screen
closes, press the Job Status button on the device control panel to view the job list and check
the status of the job.
11. If your job remains held in the Active Jobs list, the device needs you to supply additional
resources, such as paper or staples before it can complete the job. To find out what resources
are needed, select the job and then select the Details button. Once the resources are available
the job will print.
More Information
Using a User ID to Log In at the Device
Viewing the Progress and Details of a Job using the Job Status Menu
User Guide 45
Page 48

Getting Started Xerox® WorkCentre® 5800/5800i Series
Printing a Document using the PostScript Print Driver
You can print to the device from your computer through a print driver. There are a variety of Xerox
print drivers available for the device to support all the popular operating systems. The Xerox print
drivers allow you to use the specific features available on your device.
Note: The device is enabled for AirPrint. AirPrint is Apple’s driverless printing technology that
enables Apple devices, including Macs, phones and tablets, to print to the device without installing
drivers or downloading software.
Your System Administrator may have loaded a specific print driver on your computer. However, if
the choice of driver is yours, the following information may help you decide which driver to install.
• PS (PostScript) gives you the most options to scale and manipulate images; it offers more
precision with high-end graphics. PostScript also provides you with different types of errorhandling and font substitution options.
• PCL (Printer Control Language) generally has fewer advanced features than PostScript. PCL
drivers process most jobs faster than other drivers. This driver is suitable for most every-day
printing tasks.
• XPS (XML Paper Specification) is an open specification for a page description language and
a fixed document format originally developed by Microsoft. Use this driver to improve the
speed and quality of XPS files that you print.
• Mac is a PostScript driver that has been specifically designed to work on Macs.
Note: To print an XPS document, your device needs to have the optional XPS feature installed.
In addition to the drivers designed specifically for your device, you can also use the Xerox Global
Print Driver or the Xerox Mobile Express Driver. These drivers will not give you access to all the
features available with the device specific drivers.
• Global Print Driver is available for PS or PCL printer description languages, the same as the
device-specific drivers mentioned above. This driver works with Xerox and non-Xerox printers.
Using this driver makes it easy to add and update printers as the print driver does not need to
be changed.
• Mobile Express Driver lets you find and print to any PostScript printer in any location without
driver downloads and installations.
Your System Administrator can configure permissions to control access to the print feature.
• Specifying the time and day of the week when you can print to the device.
• Blocking certain types of job such as secure print.
• Limiting access to specific paper trays.
• Preventing single sided printing.
• Setting specific print settings for applications, for example, setting all Microsoft Word
documents to print single sided.
• Limiting print jobs to secure print jobs.
Your System Administrator may also configure your print driver to prompt you to enter login details
when you print a document.
46 User Guide
Page 49

Getting Started Xerox® WorkCentre® 5800/5800i Series
Refer to the System Administrator Guide for further information.
1. Open the document to be printed. From most applications select the Office button or select
File, then select Print from the file menu.
2. Enter the number of copies you want to produce. Depending on the application you are using
you may also be able to select a page range and make other print selections.
3. Select the Xerox PS driver from the list of print drivers available.
4. Open the print driver Properties window - the method will vary depending on the application
you are printing from. From most Microsoft applications select the Properties or Preferences
button to open the window.
5. Select the option(s) required.
6. Click the OK button to save your settings.
7. Select the confirmation button, the name will vary depending on the application you are
printing from. From most applications select the OK or Print button.
8. Collect your job from the device.
9. Press the Job Status button on the device control panel to view the job list and check the status
of the job.
10. Print jobs are usually shown in the Active Jobs list, however if your System Administrator has
enabled the Hold All Jobs feature, your job will be listed in either the Held Print Jobs or the
Unidentified Print Jobs list. To release a held job select the job in the required list and then
select the Print button.
11. If your job remains held in the Active Jobs list, the device needs you to supply additional
resources, such as paper or staples before it can complete the job. To find out what resources
are needed, select the job and then select the Details button. Once the resources are available
the job will print.
More Information
Using the Job Type Feature with the PostScript Print Driver
Viewing Active Jobs using the Job Status Menu
Releasing a Held Job using the Job Status Menu
Releasing a Secure Print Job using the Job Status Menu
Accessing Your Personal Secure Jobs List using the Job Status Menu
Releasing Jobs Held in a Public Queue using the Job Status Menu
Releasing Jobs Held in a Private Queue using the Job Status Menu
Viewing the Unidentified Held Jobs Queue using the Job Status Menu
System Administrator Guide www.xerox.com/support.
Using Internet Services to find System Administrator Contact Details
Viewing the Progress and Details of a Job using the Job Status Menu
Printing a Document using the PCL Print Driver
You can print to the device from your computer through a print driver. There are a variety of Xerox
print drivers available for the device to support all the popular operating systems. The Xerox print
drivers allow you to use the specific features available on your device.
Note: The device is enabled for AirPrint. AirPrint is Apple’s driverless printing technology that
enables Apple devices, including Macs, phones and tablets, to print to the device without installing
drivers or downloading software.
User Guide 47
Page 50

Getting Started Xerox® WorkCentre® 5800/5800i Series
Your System Administrator may have loaded a specific print driver on your computer. However, if
the choice of driver is yours, the following information may help you decide which driver to install.
• PS (PostScript) gives you the most options to scale and manipulate images; it offers more
precision with high-end graphics. PostScript also provides you with different types of errorhandling and font substitution options.
• PCL (Printer Control Language) generally has fewer advanced features than PostScript. PCL
drivers process most jobs faster than other drivers. This driver is suitable for most every-day
printing tasks.
• XPS (XML Paper Specification) is an open specification for a page description language and
a fixed document format originally developed by Microsoft. Use this driver to improve the
speed and quality of XPS files that you print.
• Mac is a PostScript driver that has been specifically designed to work on Macs.
Note: To print an XPS document, your device needs to have the optional XPS feature installed.
In addition to the drivers designed specifically for your device, you can also use the Xerox Global
Print Driver or the Xerox Mobile Express Driver. These drivers will not give you access to all the
features available with the device specific drivers.
• Global Print Driver is available for PS or PCL printer description languages, the same as the
device-specific drivers mentioned above. This driver works with Xerox and non-Xerox printers.
Using this driver makes it easy to add and update printers as the print driver does not need to
be changed.
• Mobile Express Driver lets you find and print to any PostScript printer in any location without
driver downloads and installations.
Your System Administrator can configure permissions to control access to the print feature.
• Specifying the time and day of the week when you can print to the device.
• Blocking certain types of job such as secure print.
• Limiting access to specific paper trays.
• Preventing single sided printing.
• Setting specific print settings for applications, for example, setting all Microsoft Word
documents to print single sided.
• Limiting print jobs to secure print jobs.
Your System Administrator may also configure your print driver to prompt you to enter login details
when you print a document.
Refer to the System Administrator Guide for further information.
1. Open the document to be printed. From most applications select the Office button or select
File, then select Print from the file menu.
2. Enter the number of copies you want to produce. Depending on the application you are using
you may also be able to select a page range and make other print selections.
3. Select the Xerox PCL driver from the list of print drivers available.
4. Open the print driver Properties window - the method will vary depending on the application
you are printing from. From most Microsoft applications select the Properties or Preferences
button to open the window.
5. Select the option(s) required.
48 User Guide
Page 51

Getting Started Xerox® WorkCentre® 5800/5800i Series
6. Click the OK button to save your settings.
7. Select the confirmation button, the name will vary depending on the application you are
printing from. From most applications select the OK or Print button.
8. Print jobs are usually shown in the Active Jobs list, however if your System Administrator has
enabled the Hold All Jobs feature, your job will be listed in either the Held Print Jobs or the
Unidentified Print Jobs list. To release a held job select the job in the required list and then
select the Print button.
9. Press the Job Status button on the device control panel to view the job list and check the status
of the job.
10. Collect your job from the device.
11. If your job remains held in the Active Jobs list, the device needs you to supply additional
resources, such as paper or staples before it can complete the job. To find out what resources
are needed, select the job and then select the Details button. Once the resources are available
the job will print.
More Information
Using the Job Type Feature with the PCL Print Driver
Viewing Active Jobs using the Job Status Menu
Releasing a Held Job using the Job Status Menu
Releasing a Secure Print Job using the Job Status Menu
Accessing Your Personal Secure Jobs List using the Job Status Menu
Releasing Jobs Held in a Public Queue using the Job Status Menu
Releasing Jobs Held in a Private Queue using the Job Status Menu
Viewing the Unidentified Held Jobs Queue using the Job Status Menu
System Administrator Guide www.xerox.com/support.
Using Internet Services to find System Administrator Contact Details
Viewing the Progress and Details of a Job using the Job Status Menu
Printing a Document using the Mac Print Driver
You can print to the device from your computer through a print driver. There are a variety of Xerox
print drivers available for the device to support all the popular operating systems. The Xerox print
drivers allow you to use the specific features available on your device.
Note: The device is enabled for AirPrint. AirPrint is Apple’s driverless printing technology that
enables Apple devices, including Macs, phones and tablets, to print to the device without installing
drivers or downloading software.
Your System Administrator may have loaded a specific print driver on your computer. However, if
the choice of driver is yours, the following information may help you decide which driver to install.
• PS (PostScript) gives you the most options to scale and manipulate images; it offers more
precision with high-end graphics. PostScript also provides you with different types of errorhandling and font substitution options.
• PCL (Printer Control Language) generally has fewer advanced features than PostScript. PCL
drivers process most jobs faster than other drivers. This driver is suitable for most every-day
printing tasks.
• XPS (XML Paper Specification) is an open specification for a page description language and
a fixed document format originally developed by Microsoft. Use this driver to improve the
speed and quality of XPS files that you print.
• Mac is a PostScript driver that has been specifically designed to work on Macs.
Note: To print an XPS document, your device needs to have the optional XPS feature installed.
User Guide 49
Page 52

Getting Started Xerox® WorkCentre® 5800/5800i Series
In addition to the drivers designed specifically for your device, you can also use the Xerox Global
Print Driver or the Xerox Mobile Express Driver. These drivers will not give you access to all the
features available with the device specific drivers.
• Global Print Driver is available for PS or PCL printer description languages, the same as the
device-specific drivers mentioned above. This driver works with Xerox and non-Xerox printers.
Using this driver makes it easy to add and update printers as the print driver does not need to
be changed.
• Mobile Express Driver lets you find and print to any PostScript printer in any location without
driver downloads and installations.
Your System Administrator can configure permissions to control access to the print feature.
• Specifying the time and day of the week when you can print to the device.
• Blocking certain types of job such as secure print.
• Limiting access to specific paper trays.
• Preventing single sided printing.
• Setting specific print settings for applications, for example, setting all Microsoft Word
documents to print single sided.
• Limiting print jobs to secure print jobs.
Your System Administrator may also configure your print driver to prompt you to enter login details
when you print a document.
Refer to the System Administrator Guide for further information.
1. Open the document to be printed. From most applications select File, then select Print from
the file menu.
2. Enter the number of copies you want to produce. Depending on the application you are using
you may also be able to select a page range and make other print selections.
3. Select the Xerox driver from the list of print drivers available.
4. Select Xerox Features from the print driver properties menu - the name of the menu will vary
depending on the application you are printing from. From most applications select the
dropdown menu that states Copies and Pages, or that states the application name.
5. Select the option(s) required.
6. Select the confirmation button, the name will vary depending on the application you are
printing from. From most applications select the OK or Print button.
7. Collect your job from the device.
8. Press the Job Status button on the device control panel to view the job list and check the status
of the job.
9. Print jobs are usually shown in the Active Jobs list, however if your System Administrator has
enabled the Hold All Jobs feature, your job will be listed in either the Held Print Jobs or the
Unidentified Print Jobs list. To release a held job select the job in the required list and then
select the Print button.
10. If your job remains held in the Active Jobs list, the device needs you to supply additional
resources, such as paper or staples before it can complete the job. To find out what resources
are needed, select the job and then select the Details button. Once the resources are available
the job will print.
50 User Guide
Page 53

Getting Started Xerox® WorkCentre® 5800/5800i Series
More Information
Using the Job Type Feature with the Mac Print Driver
Viewing Active Jobs using the Job Status Menu
Releasing a Held Job using the Job Status Menu
Printing a Secure Print Job using the Mac Print Driver
Accessing Your Personal Secure Jobs List using the Job Status Menu
Releasing Jobs Held in a Public Queue using the Job Status Menu
Releasing Jobs Held in a Private Queue using the Job Status Menu
Viewing the Unidentified Held Jobs Queue using the Job Status Menu
System Administrator Guide www.xerox.com/support.
Using Internet Services to find System Administrator Contact Details
Viewing the Progress and Details of a Job using the Job Status Menu
Printing a Document using the XPS Print Driver
You can print to the device from your computer through a print driver. There are a variety of Xerox
print drivers available for the device to support all the popular operating systems. The Xerox print
drivers allow you to use the specific features available on your device.
Your System Administrator may have loaded a specific print driver on your computer. However, if
the choice of driver is yours, the following information may help you decide which driver to install.
• PS (PostScript) gives you the most options to scale and manipulate images; it offers more
precision with high-end graphics. PostScript also provides you with different types of errorhandling and font substitution options.
• PCL (Printer Control Language) generally has fewer advanced features than PostScript. PCL
drivers process most jobs faster than other drivers. This driver is suitable for most every-day
printing tasks.
• XPS (XML Paper Specification) is an open specification for a page description language and
a fixed document format originally developed by Microsoft. Use this driver to improve the
speed and quality of XPS files that you print.
• Mac is a PostScript driver that has been specifically designed to work on Macs.
Note: To print an XPS document, your device needs to have the optional XPS feature installed.
Refer to the System Administrator Guide for further information.
In addition to the drivers designed specifically for your device, you can also use the Xerox Global
Print Driver or the Xerox Mobile Express Driver. These drivers will not give you access to all the
features available with the device specific drivers.
• Global Print Driver is available for PS or PCL printer description languages, the same as the
device-specific drivers mentioned above. This driver works with Xerox and non-Xerox printers.
Using this driver makes it easy to add and update printers as the print driver does not need to
be changed.
• Mobile Express Driver lets you find and print to any PostScript printer in any location without
driver downloads and installations.
Your System Administrator can configure permissions to control access to the print feature.
• Specifying the time and day of the week when you can print to the device.
• Blocking certain types of job such as secure print.
• Limiting access to specific paper trays.
User Guide 51
Page 54

Getting Started Xerox® WorkCentre® 5800/5800i Series
• Preventing single sided printing.
• Setting specific print settings for applications, for example, setting all Microsoft Word
documents to print single sided.
• Limiting print jobs to secure print jobs.
Your System Administrator may also configure your print driver to prompt you to enter login details
when you print a document.
Refer to the System Administrator Guide for further information.
1. Open the document to be printed. From most applications select the Office button or select
File, then select Print from the file menu.
2. Enter the number of copies you want to produce. Depending on the application you are using
you may also be able to select a page range and make other print selections.
3. Select the Xerox XPS driver from the list of print drivers available.
4. Open the print driver Properties window - the method will vary depending on the application
you are printing from. From most Microsoft applications select the Properties or Preferences
button to open the window.
5. Select the option(s) required.
6. Click the OK button to save your settings.
7. Select the confirmation button, the name will vary depending on the application you are
printing from. From most applications select the OK or Print button.
8. Collect your job from the device.
9. Press the Job Status button on the device control panel to view the job list and check the status
of the job.
10. Print jobs are usually shown in the Active Jobs list, however if your System Administrator has
enabled the Hold All Jobs feature, your job will be listed in either the Held Print Jobs or the
Unidentified Print Jobs list. To release a held job select the job in the required list and then
select the Print button.
11. If your job remains held in the Active Jobs list, the device needs you to supply additional
resources, such as paper or staples before it can complete the job. To find out what resources
are needed, select the job and then select the Details button. Once the resources are available
the job will print.
More Information
Using the Job Type Feature with the XPS Print Driver
Viewing Active Jobs using the Job Status Menu
Releasing a Held Job using the Job Status Menu
Releasing a Secure Print Job using the Job Status Menu
Accessing Your Personal Secure Jobs List using the Job Status Menu
Releasing Jobs Held in a Public Queue using the Job Status Menu
Releasing Jobs Held in a Private Queue using the Job Status Menu
Viewing the Unidentified Held Jobs Queue using the Job Status Menu
System Administrator Guide www.xerox.com/support.
Using Internet Services to find System Administrator Contact Details
Installing Optional Services using the Tools Menu
Viewing the Progress and Details of a Job using the Job Status Menu
52 User Guide
Page 55

Getting Started Xerox® WorkCentre® 5800/5800i Series
Fax
Explaining the Fax Options
There are three Fax services which can be installed or enabled on your device, Fax (Embedded Fax),
Internet Fax and Server Fax.
If the Fax (Embedded Fax) service is installed, your device is connected directly to a telephone line
and therefore gives you direct control over your fax transmissions. This type of fax travels over
normal telephone lines and will therefore be charged at telephone rates.
Using Fax enables you to scan your documents and send them to most types of fax machines that
are connected to the telephone network.
Received faxes can be setup to print at the device automatically, held in the job list until a secure
passcode is entered or sent to an E-mail address using the Fax Forward feature.
The standard Fax option connects to one telephone line. An Extended Fax option is also available
which uses two telephone lines. Using two telephone lines allows you to simultaneously send to two
destinations, receive from two destinations, or send and receive.
Internet Fax enables the creation of an electronic image file by scanning an original hard copy
document. The scanned image is converted into Email format to transmit over the internet or
intranet.
Recipients are selected from an address book or entered manually using the keyboard. Received
Internet Faxes are automatically sent from the server to the device as print jobs.
Server Fax scans your documents and sends them to any type of fax machine that is connected to
a telephone network. Your images are sent from your device to a Third Party fax server, which relays
them over the telephone network to the fax number of your choice.
This means that your fax transmissions are controlled by the server, which may limit your faxing
options. For example, the server may be set-up to collect and send all faxes at off peak times.
The server control may also reduce your costs as the server can select the most appropriate time
and telephone network to use to transmit the fax.
Faxing from the Device
Sending a Fax (Embedded Fax)
There are three Fax services which can be installed or enabled on your device, Fax (Embedded Fax),
Internet Fax and Server Fax.
Use the Fax (Embedded Fax) service to scan your documents and send them to most types of fax
machines that are connected to the telephone network.
Note: This option must be made available by your System Administrator.
User Guide 53
Page 56

Getting Started Xerox® WorkCentre® 5800/5800i Series
If Authentication or Accounting has been enabled on your device you may have to enter login
details to access the Fax features.
1. Load your documents face up in the document feeder input tray. Adjust the guide to just touch
the documents.
Or
Lift up the document feeder. Place the document face down onto the document glass and
register it to the arrow at the top left corner. Close the document feeder.
2. Press the Clear All button on the control panel twice, then select Confirm on the touch screen
to cancel any previous programming selections.
3. Press the Services Home button.
4. Select the Fax button on the touch screen.
5. Enter the recipient details using one or more of the available options.
• Enter Recipient: This option allows you to enter a fax number manually. Use the
alphanumeric keypad to enter the number, then select Add. Use the special dialing
character options if required. Enter the numerals and characters in the appropriate place
during number entry.
Note: One or more dialing pauses can be required between the access number for an outside
line and the fax number. When inserted, the dial pauses appear as commas in the fax number.
- Use the touchscreen number pad to enter the recipient’s fax number plus the
additional dialing characters.
- Dial Pause [,] adds a delay between numbers. The pause allows time to switch from
an inside to an outside line during automatic dialing. For additional pause time, add
multiple pauses. If you are using charge code numbers, enter a pause after the fax
number but before the charge code number.
- Pulse to Tone [:] switches between pulse and tone dialing.
- Mask Data [/] protects confidential information by changing each character
displayed into a *. This is useful if a special charge code or credit card number is
required for a call. Select the Mask Data [/] button before entering confidential
numbers and again when you have finished to turn off the masking.
- Space ( ) - characters are used to make the numbers entered easier to read but they
are ignored by the device during dialling.
- Wait for Dial Tone [=] suspends dialing until an expected network tone is detected. It
can also be used to detect a specific tone when accessing an outside line or other
service.
• Favorit es: You can use this option to access and select the individual or group contacts that
are designated as favorites in your Device Address Book. Select one or more favorites and
select OK.
• Device Address Book: This option allows you to select fax numbers from your address
book. Select the Down arrow, then select Fax Contacts, Fax Groups, Fax Favorit es or All
Contacts from the drop-down menu. Select the desired contact then select Add to
Recipients from the menu. To remove a con tact from the Recipients list, select the contact,
then select Remove
. Select and add more contacts, or select OK.
• Mailboxes: This option allows you to store faxes locally in the device or on a remote fax
machine.
• Polling: This option is used to make fax documents stored on one fax device available for
remote polling by other fax devices. When Secure Storage is selected, you create a list of
fax numbers that are allowed to access the stored faxes on the device.
6. Select any options required.
7. Press the Start button on the control panel to scan the original.
54 User Guide
Page 57

Getting Started Xerox® WorkCentre® 5800/5800i Series
8. Remove the original from the document feeder or document glass when scanning has
completed.
9. The Job Progress screen displays the progress of the current job. After the Job Progress screen
closes, press the Job Status button on the device control panel to view the job list and check
the status of the job.
More Information
Using a User ID to Log In at the Device
Explaining the Fax Options
Using Internet Services to find System Administrator Contact Details
System Administrator Guide www.xerox.com/support.
Sending an Internet Fax
Internet Fax is similar to the E-mail feature in that it sends documents across the internet or intranet
using e-mail addresses. There are several key differences between Internet Fax and the E-mail
feature.
• Use Internet Fax if you need tracking evidence to confirm your document has been delivered,
this is useful for audit purposes.
• Use Internet Fax if you need to send to and receive from other Internet Fax enabled devices.
Note: This option must be made available by your System Administrator.
If Authentication or Accounting has been enabled on your device you may have to enter login
details to access the Internet Fax features.
1. Load your documents face up in the document feeder input tray. Adjust the guide to just touch
the documents.
Or
Lift up the document feeder. Place the document face down onto the document glass and
register it to the arrow at the top left corner. Close the document feeder.
2. Press the Clear All button on the control panel twice, then select Confirm on the touch screen
to cancel any previous programming selections.
3. Press the Services Home button.
4. Select the Internet Fax button.
5. Select the Enter Recipient button.
6. Use the touchscreen keyboard to enter the e-mail address of the recipient.
• The number of alphanumeric characters that can be entered depends on the size of the
characters chosen. Once the end of the entry box has been reached no more characters
can be added.
• To delete a character use the backspace X button.
• Use the special characters button to access special characters such as $ and %.
• Buttons with an icon in the lower right corner have accented or additional characters
available. Select and hold the button to view related characters in a pop-up menu. Select
the desired character from the pop-up menu.
•Use the ENG button to access additional language keyboards.
7. Select the Add button.
User Guide 55
Page 58

Getting Started Xerox® WorkCentre® 5800/5800i Series
• If you want to send the document to more than one recipient enter the additional details,
one recipient at a time, and select the Add button again until all the recipients have been
added.
8. If required, select Cc from the To: dropdown menu to copy a recipient on the e-mail. Use the
touch screen keyboard to enter the recipient details and then select the Add button.
Note: At least one To address must be selected, documents cannot be sent to a Cc address
alone.
9. Select the Add button.
• If you want to send the document to more than one recipient select the Add Recipient
button, enter the email address and select the Add button again. Repeat until all the
recipients have been added.
10. Select any options required.
11. Press the Start button on the control panel to scan the original.
12. Remove the original from the document feeder or document glass when scanning has
completed.
13. The Job Progress screen displays the progress of the current job. After the Job Progress screen
closes, press the Job Status button on the device control panel to view the job list and check
the status of the job.
More Information
Using the Internet Fax Address Book
Using a User ID to Log In at the Device
Sending an E-mail
Explaining the Fax Options
Using Internet Services to find System Administrator Contact Details
System Administrator Guide www.xerox.com/support.
Sending a Server Fax
There are three Fax services which can be installed or enabled on your device, Fax (Embedded Fax),
Internet Fax and Server Fax.
Server Fax scans your documents and sends them to any type of fax machine that is connected to
a telephone network. Your images are sent from your device to a third party fax server, which relays
them over the telephone network to the fax number of your choice.
Note: This option must be made available by your System Administrator.
If Authentication or Accounting has been enabled on your device you may have to enter login
details to access the Server Fax features.
1. Load your documents face up in the document feeder input tray. Adjust the guide to just touch
the documents.
Or
Lift up the document feeder. Place the document face down onto the document glass and
register it to the arrow at the top left corner. Close the document feeder.
2. Press the Clear All button on the control panel twice, then select Confirm on the touch screen
to cancel any previous programming selections.
3. Press the Services Home button.
4. Select the Server Fax button.
56 User Guide
Page 59

Getting Started Xerox® WorkCentre® 5800/5800i Series
5. Enter the recipient details using one or more of the available options.
• Enter Recipient: This option allows you to enter a fax number manually. Use the
alphanumeric keypad to enter the number, then select Add. Use the special dialing
character options if required. Enter the numerals and characters in the appropriate place
during number entry.
Note: One or more dialing pauses can be required between the access number for an outside
line and the fax number. When inserted, the dial pauses appear as commas in the fax number.
- Use the touchscreen number pad to enter the recipient’s fax number plus the
additional dialing characters.
- Dial Pause ( , ) adds a delay between numbers. The pause allows time to switch from
an inside to an outside line during automatic dialing. For additional pause time, add
multiple pauses. If you are using charge code numbers, enter a pause after the fax
number but before the charge code number.
- Pulse to Tone ( : ) switches between pulse and tone dialing.
- Mask Data ( / ) protects confidential information by changing each character
displayed into a *. This is useful if a special charge code or credit card number is
required for a call. Select the Mask Data ( / ) button before entering confidential
numbers and again when you have finished to turn off the masking.
- Space ( ) - characters are used to make the numbers entered easier to read but they
are ignored by the device during dialling.
- Wait for Dial Tone ( = ) suspends dialing until an expected network tone is detected.
It can also be used to detect a specific tone when accessing an outside line or other
service.
• Fax D irec tory: This option allows you to select fax numbers from your Fax Directory. Select
the Up or Down arrows to scroll through the list, select the desired contact, then select Add
to Recipients from the drop-down menu. To remove a contact from the Recipients list,
select the contact, then select Remove. Select and add more contacts, or select OK.
6. Select any options required.
7. Press the Start button on the control panel to scan the original.
8. Remove the original from the document feeder or document glass when scanning has
completed.
9. The Job Progress screen displays the progress of the current job. After the Job Progress screen
closes, press the Job Status button on the device control panel to view the job list and check
the status of the job.
More Information
Using a User ID to Log In at the Device
Explaining the Fax Options
Using Internet Services to find System Administrator Contact Details
System Administrator Guide www.xerox.com/support.
Faxing from your Computer
Sending a Fax using the PostScript Print Driver
You can print to the device from your computer through a print driver. There are a variety of Xerox
print drivers available for the device to support all the popular operating systems. The Xerox print
drivers allow you to use the specific features available on your device.
If Authentication has been enabled on your device you may have to login at the device to see or
release your jobs.
User Guide 57
Page 60

Getting Started Xerox® WorkCentre® 5800/5800i Series
If Accounting has been enabled you may have to enter login details at the print driver before you
can send your job.
Use the Fax option in your print driver to send a document to a fax address. The job is sent from
your computer to the device in the same way as a print job, but instead of being printed it is then
faxed over a telephone line to the specified fax destination.
Note: To use this feature, your System Administrator must install and enable the fax option on your
device.
1. Open the document to be printed. From most applications select the Office button or select
File, then select Print from the file menu.
2. Enter the number of copies you want to send.
Note: You only need to select 1 copy even if you are sending the fax to more than one address.
Selecting more than 1 copy will print your document more than once on the recipient’s device
but will only print the cover sheet once (if you include a cover sheet generated by the print
driver).
3. Select the Xerox PS driver from the list of print drivers available.
4. Open the print driver Properties window - the method will vary depending on the application
you are printing from. From most Microsoft applications select the Properties or Preferences
button to open the window.
5. If required, click the Printing Options tab. This is usually the active tab when the print driver
opens.
6. Select Fax from the Job Type dropdown menu.
Either
•Click the Add Recipient button to add a new recipient manually.
- Select the Name entry box and use your keyboard to enter the name of the recipient.
- Select the Fax Number entry box and use your keyboard to enter the recipient’s fax
number.
- If required, select the Organization entry box and use your keyboard to enter the
recipient’s company name.
-If required, select the Telephone Number entry box and use your keyboard to enter
the recipient’s telephone number.
- If required, select the E-mail Address entry box and use your keyboard to enter the
recipient’s e-mail address.
- If required, select the Mailbox entry box and use your keyboard to enter the
recipient’s mailbox number.
- If required, select the fax recipient in the list and then select the Save button.
Note: The recipient’s details are saved on your computer’s hard drive, in your personal address
book.
-Click the OK button.
Or
•Click the Add From Phonebook button to add a recipient stored in the address book.
- Select the option required.
- Personal Phonebook displays contacts you have added to the phonebook using
your print driver.
- Shared Phonebook lists contacts you have added, but also contacts added by
other people. This address book is usually saved on a network server and must be
made available by your System Administrator.
58 User Guide
Page 61

Getting Started Xerox® WorkCentre® 5800/5800i Series
- LDAP Phonebook contains contacts listed in your LDAP (Lightweight Directory
Access Protocol) address book. LDAP address books are usually maintained by IT
teams as they are often used as company address books and for network
authentication and authorization.
- Select the contact required from the list.
• If the contact list is long, click in the Search... entry box and use your keyboard to enter
the contact details.
•Click the OK button to see the search results.
- Select the Add button.
-Click the OK button.
7. If required, select more than one recipient from the Recipients list by clicking the first recipient,
pressing and holding the Ctrl button on a PC or the Command button on a Mac and then
clicking each additional recipient. Release the Ctrl or Command button once all recipients have
been selected.
8. If you want to add a cover sheet to your fax job, click the Cover Sheet tab.
9. Select Print a Cover Sheet from the Cover Sheet Options menu.
• Select the Information tab. This is usually the active tab when the Cover Sheet options box
opens.
- If required, select the Sender Name entry box and use your keyboard to enter your
name.
- If required, select the Sender Organization entry box and use your keyboard to enter
your company name.
- If required, select the Sender Telephone Number entry box and use your keyboard
to enter your telephone number.
- If required, select the Sender E-mail Address entry box and use your keyboard to
enter your e-mail address.
- If required, select the Sender Fax Number entry box and use your keyboard to enter
the fax number you would like any replies faxed to.
- If required, select a Recipients option.
- Show Recipient Names prints the names of all the recipients on the cover sheet.
The names used are the names you entered when adding each recipient’s details.
- Hide Recipient Names does not print any recipient name on the cover sheet.
- Show Custom Text adds specific text you enter as the recipient detail. This option
is useful if you are sending to more than one recipient at the same number, but
have saved the number under only one name.
• Select the entry box under the Recipients menu and use your keyboard to enter your
custom text.
• If you want to add a watermark to your cover sheet, click the Image tab.
- Select the Watermark option required.
- Select the option required.
- Te xt activates a text entry box where you can type in your text. There are options
to select a font, color, orientation and position for your text.
- Picture activates the graphic settings. Click the folder icon to browse to your
image. There are options to select a scale, the position and the lightness of your
graphic.
- If required, select a Layering option.
- Print in Background prints your cover sheet text over your watermark, so some of
the watermark may be covered.
- Blend gives equal prominence to your cover sheet text and your watermark.
- Print in Foreground prints your cover sheet text under your watermark, so some
of the cover sheet text may be covered.
•Click the OK button.
User Guide 59
Page 62

Getting Started Xerox® WorkCentre® 5800/5800i Series
10. If you want the device to print a confirmation sheet, use a specific send speed or resolution,
send at a specific time, use a dialing prefix or include credit card details, click the Options tab.
• If required, select Print a Confirmation Sheet from the Co nfirmation She et menu t o have
the device print a page stating that your job has successfully faxed. Depending on how
your System Administrator has configured the device an error sheet may print if the job
fai ls .
• If required, select the starting transmission speed you require from the Send Speed menu.
• If required, select the resolution you require from the Fax Resolution menu. Higher
resolutions take longer to transmit.
• If required, select the time the device should send your job using the Send Time options.
• If required, select the Dialing Prefix entry box and use your keyboard to enter a character
that should be dialled before the main fax number.
• If required, select the Credit Card entry box and use your keyboard to enter a credit card
number.
•Click the OK button.
11. Click the OK button to save your settings.
12. Select the confirmation button, the name will vary depending on the application you are
printing from. From most applications select the OK or Print button.
13. Depending on how your device has been set up, the Fax Confirmation screen may display with
the fax recipients for your job. If required, click the OK button to confirm.
More Information
Printing a Document using the PostScript Print Driver
Using the Job Type Feature with the PostScript Print Driver
System Administrator Guide www.xerox.com/support.
Using Internet Services to find System Administrator Contact Details
Sending a Fax using the PCL Print Driver
You can print to the device from your computer through a print driver. There are a variety of Xerox
print drivers available for the device to support all the popular operating systems. The Xerox print
drivers allow you to use the specific features available on your device.
If Authentication has been enabled on your device you may have to login at the device to see or
release your jobs.
If Accounting has been enabled you may have to enter login details at the print driver before you
can send your job.
Use the Fax option in your print driver to send a document to a fax address. The job is sent from
your computer to the device in the same way as a print job, but instead of being printed it is then
faxed over a telephone line to the specified fax destination.
Note: To use this feature, your System Administrator must install and enable the fax option on your
device.
1. Open the document to be printed. From most applications select the Office button or select
File, then select Print from the file menu.
2. Enter the number of copies you want to send.
Note: You only need to select 1 copy even if you are sending the fax to more than one address.
Selecting more than 1 copy will print your document more than once on the recipient’s device
but will only print the cover sheet once (if you include a cover sheet generated by the print
driver).
60 User Guide
Page 63

Getting Started Xerox® WorkCentre® 5800/5800i Series
3. Select the Xerox PCL driver from the list of print drivers available.
4. Open the print driver Properties window - the method will vary depending on the application
you are printing from. From most Microsoft applications select the Properties or Preferences
button to open the window.
5. If required, click the Printing Options tab. This is usually the active tab when the print driver
opens.
6. Select Fax from the Job Type dropdown menu.
Either
•Click the Add Recipient button to add a new recipient manually.
- Select the Name entry box and use your keyboard to enter the name of the recipient.
- Select the Fax Number entry box and use your keyboard to enter the recipient’s fax
number.
- If required, select the Organization entry box and use your keyboard to enter the
recipient’s company name.
-If required, select the Telephone Number entry box and use your keyboard to enter
the recipient’s telephone number.
- If required, select the E-mail Address entry box and use your keyboard to enter the
recipient’s e-mail address.
- If required, select the Mailbox entry box and use your keyboard to enter the
recipient’s mailbox number.
- If required, select the fax recipient in the list and then select the Save button.
Note: The recipient’s details are saved on your computer’s hard drive, in your personal address
book.
-Click the OK button.
Or
•Click the Add From Phonebook button to add a recipient stored in the address book.
- Select the option required.
- Personal Phonebook displays contacts you have added to the phonebook using
your print driver.
- Shared Phonebook lists contacts you have added, but also contacts added by
other people. This address book is usually saved on a network server and must be
made available by your System Administrator.
- LDAP Phonebook contains contacts listed in your LDAP (Lightweight Directory
Access Protocol) address book. LDAP address books are usually maintained by IT
teams as they are often used as company address books and for network
authentication and authorization.
- Select the contact required from the list.
• If the contact list is long, click in the Search... entry box and use your keyboard to enter
the contact details.
•Click the OK button to see the search results.
- Select the Add button.
-Click the OK button.
7. If required, select more than one recipient from the Recipients list by clicking the first recipient,
pressing and holding the Ctrl button on a PC or the Command button on a Mac and then
clicking each additional recipient. Release the Ctrl or Command button once all recipients have
been selected.
8. If you want to add a cover sheet to your fax job, click the Cover Sheet tab.
User Guide 61
Page 64

Getting Started Xerox® WorkCentre® 5800/5800i Series
9. Select Print a Cover Sheet from the Cover Sheet Options menu.
• Select the Information tab. This is usually the active tab when the Cover Sheet options box
opens.
- If required, select the Sender Name entry box and use your keyboard to enter your
name.
- If required, select the Sender Organization entry box and use your keyboard to enter
your company name.
- If required, select the Sender Telephone Number entry box and use your keyboard
to enter your telephone number.
- If required, select the Sender E-mail Address entry box and use your keyboard to
enter your e-mail address.
- If required, select the Sender Fax Number entry box and use your keyboard to enter
the fax number you would like any replies faxed to.
- If required, select a Recipients option.
- Show Recipient Names prints the names of all the recipients on the cover sheet.
The names used are the names you entered when adding each recipient’s details.
- Hide Recipient Names does not print any recipient name on the cover sheet.
- Show Custom Text adds specific text you enter as the recipient detail. This option
is useful if you are sending to more than one recipient at the same number, but
have saved the number under only one name.
• Select the entry box under the Recipients menu and use your keyboard to enter your
custom text.
• If you want to add a watermark to your cover sheet, click the Image tab.
- Select the Watermark option required.
- Select the option required.
- Te xt activates a text entry box where you can type in your text. There are options
to select a font, color, orientation and position for your text.
- Picture activates the graphic settings. Click the folder icon to browse to your
image. There are options to select a scale, the position and the lightness of your
graphic.
- If required, select a Layering option.
- Print in Background prints your cover sheet text over your watermark, so some of
the watermark may be covered.
- Blend gives equal prominence to your cover sheet text and your watermark.
- Print in Foreground prints your cover sheet text under your watermark, so some
of the cover sheet text may be covered.
•Click the OK button.
10. If you want the device to print a confirmation sheet, use a specific send speed or resolution,
send at a specific time, use a dialing prefix or include credit card details, click the Options tab.
• If required, select Print a Confirmation Sheet from the Co nfirmation She et menu t o have
the device print a page stating that your job has successfully faxed. Depending on how
your System Administrator has configured the device an error sheet may print if the job
fai ls .
• If required, select the starting transmission speed you require from the Send Speed menu.
• If required, select the resolution you require from the Fax Resolution menu. Higher
resolutions take longer to transmit.
• If required, select the time the device should send your job using the Send Time options.
• If required, select the
Dialing Prefix entry box and use your keyboard to enter a character
that should be dialled before the main fax number.
• If required, select the Credit Card entry box and use your keyboard to enter a credit card
number.
•Click the OK button.
62 User Guide
Page 65

Getting Started Xerox® WorkCentre® 5800/5800i Series
11. Click the OK button to save your settings.
12. Select the confirmation button, the name will vary depending on the application you are
printing from. From most applications select the OK or Print button.
13. Depending on how your device has been set up, the Fax Confirmation screen may display with
the fax recipients for your job. If required, click the OK button to confirm.
More Information
Printing a Document using the PCL Print Driver
Using the Job Type Feature with the PCL Print Driver
System Administrator Guide www.xerox.com/support.
Using Internet Services to find System Administrator Contact Details
Sending a Fax using the Mac Print Driver
You can print to the device from your computer through a print driver. There are a variety of Xerox
print drivers available for the device to support all the popular operating systems. The Xerox print
drivers allow you to use the specific features available on your device.
If Authentication has been enabled on your device you may have to login at the device to see or
release your jobs.
If Accounting has been enabled you may have to enter login details at the print driver before you
can send your job.
Use the Fax option in your print driver to send a document to a fax address. The job is sent from
your computer to the device in the same way as a print job, but instead of being printed it is then
faxed over a telephone line to the specified fax destination.
Note: To use this feature, your System Administrator must install and enable the fax option on your
device.
1. Open the document to be printed. From most applications select File, then select Print from
the file menu.
2. Enter the number of copies you want to send.
Note: You only need to select 1 copy even if you are sending the fax to more than one address.
Selecting more than 1 copy will print your document more than once on the recipient’s device
but will only print the cover sheet once (if you include a cover sheet generated by the print
driver).
3. Select the Xerox driver from the list of print drivers available.
4. Select Xerox Features from the print driver properties menu - the name of the menu will vary
depending on the application you are printing from. From most applications select the
dropdown menu that states Copies and Pages, or that states the application name.
5. Select Paper / Output from the Xerox Features group selection menu. This is usually the active
area when the print driver opens.
6. Select Fax from the Job Type dropdown menu.
Either
•Click the Add Recipient button to add a new recipient manually.
- Select the Name entry box and use your keyboard to enter the name of the recipient.
- Select the Fax Number entry box and use your keyboard to enter the recipient’s fax
number.
User Guide 63
Page 66

Getting Started Xerox® WorkCentre® 5800/5800i Series
- If required, select the Organization entry box and use your keyboard to enter the
recipient’s company name.
-If required, select the Telephone Number entry box and use your keyboard to enter
the recipient’s telephone number.
- If required, select the E-mail Address entry box and use your keyboard to enter the
recipient’s e-mail address.
- If required, select the Mailbox entry box and use your keyboard to enter the
recipient’s mailbox number.
- If required, click the Save to Address Book checkbox.
Note: The recipient’s details are saved on your computer’s hard drive, in your personal address
book.
-Click the OK button.
Or
•Click the Add From Address Book button to add a recipient stored in the address book.
- Select the contact required from the list.
• If the contact list is long, click in the Search... entry box and use your keyboard to enter
the contact details.
•Click the OK button to see the search results.
- Select the Add button.
- If required, select more than one recipient from the Recipients list by clicking the first
recipient, pressing and holding the Ctrl button on a PC or the Command button on a
Mac and then clicking each additional recipient. Release the Ctrl or Command button
once all recipients have been selected.
-Click the OK button.
7. If you want to add a cover sheet to your fax job, click the Cover Sheet tab.
8. Select Print a Cover Sheet from the Cover Sheet Options menu.
•Click the Cover Sheet Notes button.
-Click the Cover Sheet Notes entry box and use your keyboard to enter your note.
-Click the OK button.
•Click the Sender Information button.
- If required, select the Sender Name entry box and use your keyboard to enter your
name.
- If required, select the Sender Organization entry box and use your keyboard to enter
your company name.
- If required, select the Sender E-mail Address entry box and use your keyboard to
enter your e-mail address.
- If required, select the Sender Telephone Number entry box and use your keyboard
to enter your telephone number.
- If required, select the Sender Fax Number entry box and use your keyboard to enter
the fax number you would like any replies faxed to.
-Click the OK button.
•Click the Recipient Information button.
- If required, select a Recipients option.
-
Show Recipient Names prints the names of all the recipients on the cover sheet.
The names used are the names you entered when adding each recipient’s details.
- Show Custom Text adds specific text you enter as the recipient detail. This option
is useful if you are sending to more than one recipient at the same number, but
have saved the number under only one name.
• Select the entry box under the Recipients menu and use your keyboard to enter your
custom text.
64 User Guide
Page 67

Getting Started Xerox® WorkCentre® 5800/5800i Series
-Click the OK button.
-Click the OK button.
9. If required, select the Cover Sheet Image option required.
• New adds a new image.
• Te xt adds a text cover page.
• Picture adds an image to the cover page.
•Click the OK button.
10. Select the paper size required from the Cover Sheet Paper Size menu.
11. If you want the device to print a confirmation sheet, use a specific send speed or resolution,
send at a specific time, use a dialing prefix or include credit card details, click the Options tab.
• If required, select Print a Confirmation Sheet from the Co nfirmation She et menu t o have
the device print a page stating that your job has successfully faxed. Depending on how
your System Administrator has configured the device an error sheet may print if the job
fai ls .
• If required, select the starting transmission speed you require from the Send Speed menu.
• If required, select the resolution you require from the Fax Resolution menu. Higher
resolutions take longer to transmit.
• If required, select the time the device should send your job using the Send Time options.
• If required, select the Dialing Options entry box and use your keyboard to enter a
character that should be dialled before the main fax number.
• If required, select the Credit Card entry box and use your keyboard to enter a credit card
number.
•Click the OK button.
12. Select the confirmation button, the name will vary depending on the application you are
printing from. From most applications select the OK or Print button.
13. Depending on how your device has been set up, the Fax Confirmation screen may display with
the fax recipients for your job. If required, click the OK button to confirm.
More Information
Printing a Document using the Mac Print Driver
Using the Job Type Feature with the PostScript Print Driver
System Administrator Guide www.xerox.com/support.
Using Internet Services to find System Administrator Contact Details
Sending a Fax using the XPS Print Driver
You can print to the device from your computer through a print driver. There are a variety of Xerox
print drivers available for the device to support all the popular operating systems. The Xerox print
drivers allow you to use the specific features available on your device.
If Authentication has been enabled on your device you may have to login at the device to see or
release your jobs.
If Accounting has been enabled you may have to enter login details at the print driver before you
can send your job.
Note: To print an XPS document, your device needs to have the optional XPS feature installed.
Use the Fax option in your print driver to send a document to a fax address. The job is sent from
your computer to the device in the same way as a print job, but instead of being printed it is then
faxed over a telephone line to the specified fax destination.
User Guide 65
Page 68

Getting Started Xerox® WorkCentre® 5800/5800i Series
Note: To use this feature, your System Administrator must install and enable the fax option on your
device.
1. Open the document to be printed. From most applications select the Office button or select
File, then select Print from the file menu.
2. Enter the number of copies you want to send.
Note: You only need to select 1 copy even if you are sending the fax to more than one address.
Selecting more than 1 copy will print your document more than once on the recipient’s device
but will only print the cover sheet once (if you include a cover sheet generated by the print
driver).
3. Select the Xerox XPS driver from the list of print drivers available.
4. Open the print driver Properties window - the method will vary depending on the application
you are printing from. From most Microsoft applications select the Properties or Preferences
button to open the window.
5. If required, click the Printing Options tab. This is usually the active tab when the print driver
opens.
6. Select Fax from the Job Type dropdown menu.
Either
•Click the Add Recipient button to add a new recipient manually.
- Select the Name entry box and use your keyboard to enter the name of the recipient.
- Select the Fax Number entry box and use your keyboard to enter the recipient’s fax
number.
- If required, select the Organization entry box and use your keyboard to enter the
recipient’s company name.
-If required, select the Telephone Number entry box and use your keyboard to enter
the recipient’s telephone number.
- If required, select the E-mail Address entry box and use your keyboard to enter the
recipient’s e-mail address.
- If required, select the Mailbox entry box and use your keyboard to enter the
recipient’s mailbox number.
- If required, select the fax recipient in the list and then select the Save button.
Note: The recipient’s details are saved on your computer’s hard drive, in your personal address
book.
-Click the OK button.
Or
•Click the Add From Phonebook button to add a recipient stored in the address book.
- Select the option required.
- Personal Phonebook displays contacts you have added to the phonebook using
your print driver.
- Shared Phonebook lists contacts you have added, but also contacts added by
other people. This address book is usually saved on a network server and must be
made available by your System Administrator.
- LDAP Phonebook contains contacts listed in your LDAP (Lightweight Directory
Access Protocol) address book. LDAP address books are usually maintained by IT
teams as they are often used as company address books and for network
authentication and authorization.
- Select the contact required from the list.
66 User Guide
Page 69

Getting Started Xerox® WorkCentre® 5800/5800i Series
• If the contact list is long, click in the Search... entry box and use your keyboard to enter
the contact details.
•Click the OK button to see the search results.
- Select the Add button.
-Click the OK button.
7. If required, select more than one recipient from the Recipients list by clicking the first recipient,
pressing and holding the Ctrl button on a PC or the Command button on a Mac and then
clicking each additional recipient. Release the Ctrl or Command button once all recipients have
been selected.
8. If you want to add a cover sheet to your fax job, click the Cover Sheet tab.
9. Select Print a Cover Sheet from the Cover Sheet Options menu.
• Select the Information tab. This is usually the active tab when the Cover Sheet options box
opens.
- If required, select the Sender Name entry box and use your keyboard to enter your
name.
- If required, select the Sender Organization entry box and use your keyboard to enter
your company name.
- If required, select the Sender Telephone Number entry box and use your keyboard
to enter your telephone number.
- If required, select the Sender E-mail Address entry box and use your keyboard to
enter your e-mail address.
- If required, select the Sender Fax Number entry box and use your keyboard to enter
the fax number you would like any replies faxed to.
- If required, select a Recipients option.
- Show Recipient Names prints the names of all the recipients on the cover sheet.
The names used are the names you entered when adding each recipient’s details.
- Hide Recipient Names does not print any recipient name on the cover sheet.
- Show Custom Text adds specific text you enter as the recipient detail. This option
is useful if you are sending to more than one recipient at the same number, but
have saved the number under only one name.
• Select the entry box under the Recipients menu and use your keyboard to enter your
custom text.
• If you want to add a watermark to your cover sheet, click the Image tab.
- Select the Watermark option required.
- Select the option required.
- Te xt activates a text entry box where you can type in your text. There are options
to select a font, color, orientation and position for your text.
- Picture activates the graphic settings. Click the folder icon to browse to your
image. There are options to select a scale, the position and the lightness of your
graphic.
- If required, select a Layering option.
- Print in Background prints your cover sheet text over your watermark, so some of
the watermark may be covered.
-
Blend gives equal prominence to your cover sheet text and your watermark.
- Print in Foreground prints your cover sheet text under your watermark, so some
of the cover sheet text may be covered.
•Click the OK button.
User Guide 67
Page 70

Getting Started Xerox® WorkCentre® 5800/5800i Series
10. If you want the device to print a confirmation sheet, use a specific send speed or resolution,
send at a specific time, use a dialing prefix or include credit card details, click the Options tab.
• If required, select Print a Confirmation Sheet from the Co nfirmation She et menu t o have
the device print a page stating that your job has successfully faxed. Depending on how
your System Administrator has configured the device an error sheet may print if the job
fai ls .
• If required, select the starting transmission speed you require from the Send Speed menu.
• If required, select the resolution you require from the Fax Resolution menu. Higher
resolutions take longer to transmit.
• If required, select the time the device should send your job using the Send Time options.
• If required, select the Dialing Prefix entry box and use your keyboard to enter a character
that should be dialled before the main fax number.
• If required, select the Credit Card entry box and use your keyboard to enter a credit card
number.
•Click the OK button.
11. Click the OK button to save your settings.
12. Select the confirmation button, the name will vary depending on the application you are
printing from. From most applications select the OK or Print button.
13. Depending on how your device has been set up, the Fax Confirmation screen may display with
the fax recipients for your job. If required, click the OK button to confirm.
More Information
Printing a Document using the XPS Print Driver
Using the Job Type Feature with the XPS Print Driver
System Administrator Guide www.xerox.com/support.
Using Internet Services to find System Administrator Contact Details
68 User Guide
Page 71

Getting Started Xerox® WorkCentre® 5800/5800i Series
Using Workflow Scanning
Workflow Scanning converts hard copy documents into electronic images and saves them into
network filing destinations (repositories).
A Template must be used when a scan is made - the template contains the filing destination
address and other scan settings such as the image quality. When making a scan you can edit the
scan settings but not the filing destination.
Note: This option must be made available by your System Administrator.
If Authentication or Accounting has been enabled on your device you may have to enter login
details to access the Workflow Scanning features.
1. Load your documents face up in the document feeder input tray. Adjust the guide to just touch
the documents.
Or
Lift up the document feeder. Place the document face down onto the document glass and
register it to the arrow at the top left corner. Close the document feeder.
2. Press the Clear All button on the control panel twice, then select Confirm on the touch screen
to cancel any previous programming selections.
3. Press the Services Home button.
4. Select the Workflow Scanning button on the touch screen.
Note: If your System Administrator has added mandatory fields to the default template you
will be asked to complete the required document information as soon as you select the
Workflow Scanning button.
5. If required, select the Workflow Scanning tab. This is usually the active tab when the Workflow
Scanning service opens.
6. Select a workflow from the Pick a Workflow screen (if shown), or select Change to choose a
workflow.
7. If required, ensure the latest templates are available by selecting the Update button and
selecting Update Now from the Confirm Template Update window.
8. Select the template required.
9. Select any options required.
10. Press the Start button on the control panel to scan the original.
11. Remove the original from the document feeder or document glass when scanning has
completed.
12. The Job Progress screen displays the progress of the current job. After the Job Progress screen
closes, press the Job Status button on the device control panel to view the job list and check
the status of the job.
More Information
Explaining What Workflow Scanning Does and How It Works
Using a User ID to Log In at the Device
Scanning a Document to your Computer or Network using Single-Touch Scan
Creating a New Template in Internet Services
Using Internet Services to find System Administrator Contact Details
System Administrator Guide www.xerox.com/support.
User Guide 69
Page 72

Getting Started Xerox® WorkCentre® 5800/5800i Series
Sending an E-mail
Use the E-mail feature to scan images and send them to a recipient as an attachment to an e-mail.
Note: This option must be made available by your System Administrator.
If Authentication or Accounting has been enabled on your device you may have to enter login
details to access the E-mail features.
1. Load your documents face up in the document feeder input tray. Adjust the guide to just touch
the documents.
Or
Lift up the document feeder. Place the document face down onto the document glass and
register it to the arrow at the top left corner. Close the document feeder.
2. Press the Clear All button on the control panel twice, then select Confirm on the touch screen
to cancel any previous programming selections.
3. Press the Services Home button.
4. Select the E-mail button on the touch screen.
5. Select the Enter Recipient button.
6. Use the touch screen keyboard to enter the e-mail address of the recipient.
• The number of alphanumeric characters that can be entered depends on the size of the
characters chosen. Once the end of the entry box has been reached no more characters
can be added.
• To delete a character use the backspace X button.
• Use the special characters button to access special characters such as $ and %.
• Buttons with an icon in the lower right corner have accented or additional characters
available. Select and hold the button to view related characters in a pop-up menu. Select
the desired character from the pop-up menu.
• Select the Add to Address Book button to create a new address book contact or to add
the email address to an existing contact.
Note: If e-mail encryption is enabled, e-mails may only be sent to recipients with a valid
encryption certificate. Encryption ensures that the message cannot be read by anybody except
the intended recipient. In addition, with e-mail signing enabled, the recipient can be sure that
the message has actually come from the person marked as the sender.
7. Select the Add button.
• If you want to send the document to more than one recipient select the Add Recipient
button, enter the email address and select the Add button again. Repeat until all the
recipients have been added.
8. If required, select the Subject... button and use the touch screen keyboard to enter or edit the
subject title for the e-mail.
• Select the OK button.
9. Select any options required.
10. Press the Start button on the control panel to scan the original.
11. Remove the original from the document feeder or document glass when scanning has
completed. The job enters the job list ready for processing.
12. The Job Progress screen displays the progress of the current job. After the Job Progress screen
closes, press the Job Status button on the device control panel to view the job list and check
the status of the job.
70 User Guide
Page 73

Getting Started Xerox® WorkCentre® 5800/5800i Series
More Information
Using a User ID to Log In at the Device
Using Internet Services to find System Administrator Contact Details
System Administrator Guide www.xerox.com/support.
Saved Jobs
Saving Jobs
Saving Jobs using the PostScript Print Driver
You can print to the device from your computer through a print driver. There are a variety of Xerox
print drivers available for the device to support all the popular operating systems. The Xerox print
drivers allow you to use the specific features available on your device.
If Authentication has been enabled on your device you may have to login at the device to see or
release your jobs.
If Accounting has been enabled you may have to enter login details at the print driver before you
can send your job.
Use the Saved Job option to store your job on the device's hard drive so that it can then be printed
on demand when required or printed from Internet Services.
Note: Your System Administrator must enable the Job Storage feature on your print driver before
you can use the Saved Job option. If you are able to update your own driver settings, this feature
can be found by opening the drivers window, right clicking the driver, selecting Printer Properties
and then the Configuration tab. Use the dropdown menu to set the Job Storage Module status in
the Installable Options section to Installed.
Refer to the System Administrator Guide for further information.
1. Open the document to be printed. From most applications select the Office button or select
File, then select Print from the file menu.
2. Enter the number of copies you want to produce. Depending on the application you are using
you may also be able to select a page range and make other print selections.
3. Select the Xerox PS driver from the list of print drivers available.
4. Open the print driver Properties window - the method will vary depending on the application
you are printing from. From most Microsoft applications select the Properties or Preferences
button to open the window.
5. If required, click the Printing Options tab. This is usually the active tab when the print driver
opens.
6. Select Saved Job from the Job Type dropdown menu.
7. Select the Job Name entry box and use your keyboard to enter a name for your job.
• Select Use Document Name from the Job Name dropdown menu to save your job with
the same name as the original document.
8. Select the folder where your job should be saved from the Save To menu.
User Guide 71
Page 74

Getting Started Xerox® WorkCentre® 5800/5800i Series
• If your required folder does not display, you can use your keyboard to enter the name of
the folder where your job should be saved. The Default Public Folder is available for all users
to save their jobs to.
9. If required, select the Print and Save checkbox to print your document. If you do not check
this box your job will be saved, but not printed.
10. If required, select the Private radio button to passcode protect your document.
•Click in the Passcode entry box and use your keyboard to enter a 4 to 10 digit passcode.
Note: To release your job you will enter this passcode using the numeric keypad on the device
control panel. Only use numbers, and choose a passcode you will remember but that is not easy
for other people to guess.
•Click in the Confirm Passcode entry box and use your keyboard to re-enter your 4 to 10
digit passcode.
11. Click the OK button.
12. Select the option(s) required.
13. Click the OK button to save your settings.
14. Select the confirmation button, the name will vary depending on the application you are
printing from. From most applications select the OK or Print button.
More Information
Printing a Document using the PostScript Print Driver
Printing a Saved Job using the Print From Feature
Printing Saved Jobs from Internet Services
Creating a New Folder for Saved Jobs in Internet Services
System Administrator Guide www.xerox.com/support.
Using Internet Services to find System Administrator Contact Details
Saving Jobs using the PCL Print Driver
You can print to the device from your computer through a print driver. There are a variety of Xerox
print drivers available for the device to support all the popular operating systems. The Xerox print
drivers allow you to use the specific features available on your device.
If Authentication has been enabled on your device you may have to login at the device to see or
release your jobs.
If Accounting has been enabled you may have to enter login details at the print driver before you
can send your job.
Use the Saved Job option to store your job on the device's hard drive so that it can then be printed
on demand when required or printed from Internet Services.
Note: Your System Administrator must enable the Job Storage feature on your print driver before
you can use the Saved Job option. If you are able to update your own driver settings, this feature
can be found by opening the drivers window, right clicking the driver, selecting Printer Properties
and then the Configuration tab. Use the dropdown menu to set the Job Storage Module status in
the Installable Options section to Installed.
72 User Guide
Page 75

Getting Started Xerox® WorkCentre® 5800/5800i Series
Refer to the System Administrator Guide for further information.
1. Open the document to be printed. From most applications select the Office button or select
File, then select Print from the file menu.
2. Enter the number of copies you want to produce. Depending on the application you are using
you may also be able to select a page range and make other print selections.
3. Select the Xerox PCL driver from the list of print drivers available.
4. Open the print driver Properties window - the method will vary depending on the application
you are printing from. From most Microsoft applications select the Properties or Preferences
button to open the window.
5. If required, click the Printing Options tab. This is usually the active tab when the print driver
opens.
6. Select Saved Job from the Job Type dropdown menu.
7. Select the Job Name entry box and use your keyboard to enter a name for your job.
• Select Use Document Name from the Job Name dropdown menu to save your job with
the same name as the original document.
8. Select the folder where your job should be saved from the Save To menu.
• If your required folder does not display, you can use your keyboard to enter the name of
the folder where your job should be saved. The Default Public Folder is available for all users
to save their jobs to.
9. If required, select the Print and Save checkbox to print your document. If you do not check
this box your job will be saved, but not printed.
10. If required, select the Private radio button to passcode protect your document.
•Click in the Passcode entry box and use your keyboard to enter a 4 to 10 digit passcode.
Note: To release your job you will enter this passcode using the numeric keypad on the device
control panel. Only use numbers, and choose a passcode you will remember but that is not easy
for other people to guess.
•Click in the Confirm Passcode entry box and use your keyboard to re-enter your 4 to 10
digit passcode.
11. Click the OK button.
12. Select the option(s) required.
13. Click the OK button to save your settings.
14. Select the confirmation button, the name will vary depending on the application you are
printing from. From most applications select the OK or Print button.
More Information
Printing a Document using the PCL Print Driver
Printing a Saved Job using the Print From Feature
Printing Saved Jobs from Internet Services
Creating a New Folder for Saved Jobs in Internet Services
System Administrator Guide www.xerox.com/support.
Using Internet Services to find System Administrator Contact Details
Saving Jobs using the Mac Print Driver
You can print to the device from your computer through a print driver. There are a variety of Xerox
print drivers available for the device to support all the popular operating systems. The Xerox print
drivers allow you to use the specific features available on your device.
User Guide 73
Page 76

Getting Started Xerox® WorkCentre® 5800/5800i Series
If Authentication has been enabled on your device you may have to login at the device to see or
release your jobs.
If Accounting has been enabled you may have to enter login details at the print driver before you
can send your job.
Use the Saved Job option to store your job on the device's hard drive so that it can then be printed
on demand when required or printed from Internet Services.
Note: Your System Administrator must enable the Job Storage feature on your print driver before
you can use the Saved Job option. If you are able to update your own driver settings, this feature
can be found by opening the drivers window, right clicking the driver, selecting Printer Properties
and then the Configuration tab. Use the dropdown menu to set the Job Storage Module status in
the Installable Options section to Installed.
1. Open the document to be printed. From most applications select File, then select Print from
the file menu.
2. Enter the number of copies you want to produce. Depending on the application you are using
you may also be able to select a page range and make other print selections.
3. Select the Xerox driver from the list of print drivers available.
4. Select Xerox Features from the print driver properties menu - the name of the menu will vary
depending on the application you are printing from. From most applications select the
dropdown menu that states Copies and Pages, or that states the application name.
5. Select Paper / Output from the Xerox Features group selection menu. This is usually the active
area when the print driver opens.
6. Select Saved Job from the Job Type dropdown menu.
7. Select the Job Name entry box and use your keyboard to enter a name for your job.
• Select Use Document Name from the Job Name dropdown menu to save your job with
the same name as the original document.
8. Use the Folder dropdown menu to select the folder where your job should be saved.
• If your required folder does not display, you can use your keyboard to enter the name of
the folder where your job should be saved. The Default Public Folder is available for all users
to save their jobs to.
9. If required, select the Print and Save button. If the Save button is selected your job will be
saved, but not printed.
10. If required, select the Private button to passcode protect your document.
•Click in the Passcode entry box and use your keyboard to enter a 4 to 10 digit passcode.
Note: To release your job you will enter this passcode using the numeric keypad on the device
control panel. Only use numbers, and choose a passcode you will remember but that is not easy
for other people to guess.
•Click in the Confirm Passcode entry box and use your keyboard to re-enter your 4 to 10
digit passcode.
11. Click the OK button.
12. Select the option(s) required.
13. Select the confirmation button, the name will vary depending on the application you are
printing from. From most applications select the OK or Print button.
74 User Guide
Page 77

Getting Started Xerox® WorkCentre® 5800/5800i Series
More Information
Printing a Document using the Mac Print Driver
Printing a Saved Job using the Print From Feature
Printing Saved Jobs from Internet Services
Creating a New Folder for Saved Jobs in Internet Services
System Administrator Guide www.xerox.com/support.
Using Internet Services to find System Administrator Contact Details
Saving Jobs using the XPS Print Driver
You can print to the device from your computer through a print driver. There are a variety of Xerox
print drivers available for the device to support all the popular operating systems. The Xerox print
drivers allow you to use the specific features available on your device.
If Authentication has been enabled on your device you may have to login at the device to see or
release your jobs.
If Accounting has been enabled you may have to enter login details at the print driver before you
can send your job.
Note: To print an XPS document, your device needs to have the optional XPS feature installed.
Use the Saved Job option to store your job on the device's hard drive so that it can then be printed
on demand when required or printed from Internet Services.
Note: Your System Administrator must enable the Job Storage feature on your print driver before
you can use the Saved Job option. If you are able to update your own driver settings, this feature
can be found by opening the drivers window, right clicking the driver, selecting Printer Properties
and then the Configuration tab. Use the dropdown menu to set the Job Storage Module status in
the Installable Options section to Installed.
Refer to the System Administrator Guide for further information.
1. Open the document to be printed. From most applications select the Office button or select
File, then select Print from the file menu.
2. Enter the number of copies you want to produce. Depending on the application you are using
you may also be able to select a page range and make other print selections.
3. Select the Xerox XPS driver from the list of print drivers available.
4. Open the print driver Properties window - the method will vary depending on the application
you are printing from. From most Microsoft applications select the Properties or Preferences
button to open the window.
5. If required, click the Printing Options tab. This is usually the active tab when the print driver
opens.
6. Select Saved Job from the Job Type dropdown menu.
7. Select the Job Name entry box and use your keyboard to enter a name for your job.
• Select Use Document Name from the Job Name dropdown menu to save your job with
the same name as the original document.
8. Select the folder where your job should be saved from the Save To menu.
• If your required folder does not display, you can use your keyboard to enter the name of
the folder where your job should be saved. The Default Public Folder is available for all users
to save their jobs to.
9. If required, select the Print and Save checkbox to print your document. If you do not check
this box your job will be saved, but not printed.
User Guide 75
Page 78

Getting Started Xerox® WorkCentre® 5800/5800i Series
10. If required, select the Private radio button to passcode protect your document.
•Click in the Passcode entry box and use your keyboard to enter a 4 to 10 digit passcode.
Note: To release your job you will enter this passcode using the numeric keypad on the device
control panel. Only use numbers, and choose a passcode you will remember but that is not easy
for other people to guess.
•Click in the Confirm Passcode entry box and use your keyboard to re-enter your 4 to 10
digit passcode.
11. Click the OK button.
12. Select the option(s) required.
13. Click the OK button to save your settings.
14. Select the confirmation button, the name will vary depending on the application you are
printing from. From most applications select the OK or Print button.
More Information
Printing a Document using the XPS Print Driver
Printing a Saved Job using the Print From Feature
Printing Saved Jobs from Internet Services
Creating a New Folder for Saved Jobs in Internet Services
System Administrator Guide www.xerox.com/support.
Using Internet Services to find System Administrator Contact Details
Printing Saved Jobs
Printing a Saved Job using the Print From Feature
The Print From feature prints jobs which have been saved on the device or on a USB stick. This is a
useful feature if you have documents that you need to print regularly.
Note: This option must be made available by your System Administrator.
If Authentication or Accounting has been enabled on your device you may have to enter login
details to access the Print From feature.
Use Print From Saved Jobs to print jobs which have been saved in a folder on the device using the
Saved Jobs feature.
Saved Jobs are documents that are sent to the device and stored there for future use. Saved jobs
can be accessed and printed at the device and from Internet Services.
1. Press the Clear All button on the control panel twice, then select Confirm on the touch screen
to cancel any previous programming selections.
2. Press the Services Home button.
3. Select the Print From... button on the touch screen.
4. Select the Saved Jobs... button.
5. Select the folder required.
6. Select the saved job required.
7. Select any options required.
8. Select the Paper Supply button.
76 User Guide
Page 79

Getting Started Xerox® WorkCentre® 5800/5800i Series
9. Select the Paper Supply option required.
• Automatically Select lets the device select the appropriate paper size for each original
based on the size of the original and reduce or enlarge programming.
• Select a paper tray that contains the size and type of paper you require. The size and media
loaded in each tray is displayed.
10. Select the OK button.
11. Select the 2-Sided Printing button.
12. Select the 2-Sided Scanning option required.
• Auto use this option to allow the device to automatically detect if your originals are
printed on 1 or 2 sides.
• 1-Sided use this option if your originals are printed on 1 side.
• 2-Sided use this option if your originals are 2-sided. The document feeder must be used to
scan your originals with this option.
• 2-Sided, Rotate Side 2 use this option if your originals are 2-sided and open up like a
calendar. The document feeder must be used to scan your originals with this option.
13. Select the OK button.
14. Select the Finishing button to select a specific finishing option for the output, or select Auto
for the device to choose an appropriate option.
15. Select the OK button.
16. Press the Start button on the Control Panel to print the job.
17. If the job is a secure job, enter the passcode required and select OK.
18. Press the Job Status button on the device control panel to view the job list and check the status
of the job.
More Information
Printing Saved Jobs from Internet Services
Using the Job Type Feature with the PostScript Print Driver
Using a User ID to Log In at the Device
System Administrator Guide www.xerox.com/support.
Using Internet Services to find System Administrator Contact Details
Printing Saved Jobs from Internet Services
Internet Services uses the embedded web server on the device. This allows you to communicate
with the device over the internet or intranet through your web browser.
If Authentication or Accounting has been enabled on your device you may have to enter login
details to access this feature.
Saved Jobs are documents that are sent to the device and stored there for future use. Saved jobs
can be accessed and printed at the device and from Internet Services.
Note: This option must be made available by your System Administrator.
User Guide 77
Page 80

Getting Started Xerox® WorkCentre® 5800/5800i Series
Use the Saved Jobs option as a convenient way to store commonly used documents that you need
to print, such as forms. Saved jobs can be stored using your print driver and Internet Services. You
can print Saved Jobs from the device Control Panel and Internet Services.
1. At your computer, open your web browser.
2. In the URL field, use your keyboard to enter http:// followed by the IP Address of the device. For
example: If the IP Address is 192.168.100.100, enter http://192.168.100.100.
Note: To find out the IP Address of your device, press the Machine Status button and select
the Machine Information tab. You can also print a configuration report or ask your System
Administrator.
3. Press the Enter button on your keyboard to load the page.
4. Click the Jobs tab.
5. Click the Saved Jobs tab. The Reprint Saved Jobs page is displayed and any jobs saved in the
Default Public Folder are listed.
6. Check the checkbox to left of the job(s) required. To select all the jobs check the checkbox at
the top of the heading row.
7. Select the Print Job option from the Print Job dropdown menu.
8. If required, click the Copies entry box and use your keyboard to update the number of copies.
The default number is 1 even if multiple copies were requested when the job was originally
saved.
9. Click the Go button.
10. Collect your job from the device.
11. Press the Job Status button on the device control panel to view the job list and check the status
of the job.
12. Print jobs are usually shown in the Active Jobs list, however if your System Administrator has
enabled the Hold All Jobs feature, your job will be listed in either the Held Print Jobs or the
Unidentified Print Jobs list. To release a held job select the job in the required list and then
select the Print button.
13. If your job remains held in the Active Jobs list, the device needs you to supply additional
resources, such as paper or staples before it can complete the job. To find out what resources
are needed, select the job and then select the Details button. Once the resources are available
the job will print.
More Information
Saving Jobs using the PostScript Print Driver
Printing a Saved Job using the Print From Feature
Using Internet Services to find System Administrator Contact Details
System Administrator Guide www.xerox.com/support.
Viewing Active Jobs using the Job Status Menu
Logging in to Internet Services
Viewing the Progress and Details of a Job using the Job Status Menu
Printing the Information Pages from the Machine Status Menu
78 User Guide
Page 81

Getting Started Xerox® WorkCentre® 5800/5800i Series
Enhancing Productivity
Your device is a powerful multi-functional device with many digital functions integrated into one
sleek system. It is designed to support large workgroups in different office environments. You can
do more with less and streamline your workflow with these productivity enhancing features, for
example:
• Online address books
• Customization to meet your own work processes
• Powerful documentation features for example, Booklet Creation, Special Pages, Build Job and
Annotations
To maximize job productivity, use the Job Status button to access the Active Jobs list and manage
your jobs. If a job is urgent, use the Promote option to prioritize the job.
If a job is held in the list, it may require additional resources or a secure code to print. The reason
for the held status is displayed on the Job Progress screen. Once the requirement has been met or
the correct secure code entered, the job is released for printing.
More Information
Viewing the Progress and Details of a Job using the Job Status Menu
Maintenance and Consumables
Identifying the Replaceable Units
There are several consumables on the device that need replenishing or replacing, such as paper,
staples, and customer replaceable units.
1. Toner Cartridge
2. Xerographic Module
3. Fuser Module
4. Waste Toner Bottle
5. Ozone Filter
User Guide 79
Page 82

Getting Started Xerox® WorkCentre® 5800/5800i Series
The device will display a message on the touch screen when any of the units need to be re-ordered.
This message is a warning that the unit is nearing the end of its life. Only replace the unit when a
message actually instructs you to do so.
WARNING
!
When replacing consumables do NOT remove the covers or guards that are fastened with screws.
You cannot maintain or service any of the parts that are behind these covers and guards. Do NOT
attempt any maintenance procedure that is NOT specifically described in the documentation supplied with your device.
More Information
Replacing the Toner Cartridge
Replacing the Xerographic Module and Transfer Unit
Replacing the Fuser Module
Replacing the Waste Toner Bottle
Replacing the Ozone Filter
Cleaning the Document Glass and Constant Velocity Transport
Glass
To ensure optimum print quality at all times, regularly clean the glass areas of your device. This
helps avoid output with streaks, smears and other marks that may transfer from the glass area
when scanning documents.
When you use the document feeder, your documents will pass over the stationary scanners using
the Constant Velocity Transport glass and side 2 scanner window. Any dirt or marks on the glass will
cause lines or streaks on your copies, faxes or scanned images.
1. Use a lint-free cloth, lightly dampened with Xerox Anti-Static or general cleaning fluid (or
another suitable non-abrasive glass cleaner) to clean the document glass and the Constant
Velocity Transport glass (the narrow strip of glass to the left of the main document glass).
2. Wipe away any residue with a clean cloth or paper towel.
3. Use a lint-free cloth, lightly dampened with water, Xerox cleaning fluid or Xerox film remover to
clean the under side of the document cover or document feeder and the complete
circumference of the Constant Velocity Transport roll.
WARNING
!
When cleaning the device do NOT use organic or strong chemical solvents or aerosol cleaners. Do
NOT pour fluids directly onto any area. Use supplies and cleaning materials only as directed in this
documentation. Keep all cleaning materials out of the reach of children.
WARNING
!
Do not use pressurized air-spray cleaning aids on or in this equipment. Some pressurized air-spray
containers contain explosive mixtures and are not suitable for use in electrical applications. Use of
such cleaners can result in a risk of explosion and fire.
80 User Guide
Page 83

Getting Started Xerox® WorkCentre® 5800/5800i Series
Cleaning the Control Panel, Touch Screen, Document Feeder and
Output Trays
Regular cleaning keeps the touch screen, control panel and other device areas free from dust and
dirt.
1. Use a soft, lint-free cloth, lightly dampened with water.
2. Wipe clean the entire area of the control panel, including the touch screen.
3. Wipe clean the document feeder, output trays, paper trays and other outside areas of your
device.
4. Remove any residue with a clean cloth or paper towel.
Clearing Paper Jams
When a paper jam occurs, a fault screen is displayed which provides recovery instructions. Follow
these instructions to clear the fault.
Any printed sheets removed will automatically be reprinted once the paper jam is cleared.
1. The fault screen will indicate the location of the jam. Use the green handles and knobs
indicated in the instructions displayed on the touch screen to remove the jammed paper.
2. Ensure that all jam clearance handles and levers are returned to their correct positions. The red
flashes behind the jam clearance handles and levers should not be visible.
Help
Accessing the Help Features On the Device
When using your device, detailed and timely help is available at your fingertips. You can access Help
information and tips from a variety of sources.
1. Press the Help (?) button on the Control Panel at any time to access the Help screens.
2. Use the scroll bar to locate the item required, then select the item. Messages, screen
instructions and graphics provide additional information.
3. Press the Help (?) button again to close the Help screens.
User Guide 81
Page 84

Getting Started Xerox® WorkCentre® 5800/5800i Series
Accessing the PostScript Print Driver Help Pages
You can print to the device from your computer through a print driver. There are a variety of Xerox
print drivers available for the device to support all the popular operating systems. The Xerox print
drivers allow you to use the specific features available on your device.
If Authentication has been enabled on your device you may have to login at the device to see or
release your jobs.
If Accounting has been enabled you may have to enter login details at the print driver before you
can send your job.
Use the help button to open the Xerox online help. You will need to be connected to the internet to
use this help feature.
1. Open the document to be printed. From most applications select the Office button or select
File, then select Print from the file menu.
2. Select the Xerox PS driver from the list of print drivers available.
3. Open the print driver Properties window - the method will vary depending on the application
you are printing from. From most Microsoft applications select the Properties or Preferences
button to open the window.
4. Click the ? button. You will be directed to the Xerox online help in your default internet browser.
More Information
Printing a Document using the PostScript Print Driver
System Administrator Guide www.xerox.com/support.
Using Internet Services to find System Administrator Contact Details
Accessing the PCL Print Driver Help Pages
You can print to the device from your computer through a print driver. There are a variety of Xerox
print drivers available for the device to support all the popular operating systems. The Xerox print
drivers allow you to use the specific features available on your device.
If Authentication has been enabled on your device you may have to login at the device to see or
release your jobs.
If Accounting has been enabled you may have to enter login details at the print driver before you
can send your job.
Use the help button to open the Xerox online help. You will need to be connected to the internet to
use this help feature.
1. Open the document to be printed. From most applications select the Office button or select
File, then select Print from the file menu.
2. Select the Xerox PCL driver from the list of print drivers available.
3. Open the print driver Properties window - the method will vary depending on the application
you are printing from. From most Microsoft applications select the Properties or Preferences
button to open the window.
4. Click the ? button. You will be directed to the Xerox online help in your default internet browser.
82 User Guide
Page 85

Getting Started Xerox® WorkCentre® 5800/5800i Series
More Information
Printing a Document using the PCL Print Driver
System Administrator Guide www.xerox.com/support.
Using Internet Services to find System Administrator Contact Details
Accessing the Mac Print Driver Help Pages
You can print to the device from your computer through a print driver. There are a variety of Xerox
print drivers available for the device to support all the popular operating systems. The Xerox print
drivers allow you to use the specific features available on your device.
If Authentication has been enabled on your device you may have to login at the device to see or
release your jobs.
If Accounting has been enabled you may have to enter login details at the print driver before you
can send your job.
Use the help button to open the Xerox online help. You will need to be connected to the internet to
use this help feature.
1. Open the document to be printed. From most applications select File, then select Print from
the file menu.
2. Select the Xerox driver from the list of print drivers available.
3. Select Xerox Features from the print driver properties menu - the name of the menu will vary
depending on the application you are printing from. From most applications select the
dropdown menu that states Copies and Pages, or that states the application name.
4. Click the ? button. You will be directed to the Xerox online help in your default internet browser.
More Information
Printing a Document using the Mac Print Driver
System Administrator Guide www.xerox.com/support.
Using Internet Services to find System Administrator Contact Details
Accessing the XPS Print Driver Help Pages
You can print to the device from your computer through a print driver. There are a variety of Xerox
print drivers available for the device to support all the popular operating systems. The Xerox print
drivers allow you to use the specific features available on your device.
If Authentication has been enabled on your device you may have to login at the device to see or
release your jobs.
If Accounting has been enabled you may have to enter login details at the print driver before you
can send your job.
Note: To print an XPS document, your device needs to have the optional XPS feature installed.
Use the help button to open the Xerox online help. You will need to be connected to the internet to
use this help feature.
1. Open the document to be printed. From most applications select the Office button or select
File, then select Print from the file menu.
2. Select the Xerox XPS driver from the list of print drivers available.
User Guide 83
Page 86

Getting Started Xerox® WorkCentre® 5800/5800i Series
3. Open the print driver Properties window - the method will vary depending on the application
you are printing from. From most Microsoft applications select the Properties or Preferences
button to open the window.
4. Click the ? button. You will be directed to the Xerox online help in your default internet browser.
More Information
Printing a Document using the XPS Print Driver
System Administrator Guide www.xerox.com/support.
Using Internet Services to find System Administrator Contact Details
Using the Internet Services Help Feature
Internet Services uses the embedded web server on the device. This allows you to communicate
with the device over the internet or intranet through your web browser.
If Authentication or Accounting has been enabled on your device you may have to enter login
details to access this feature.
Use the Internet Services Help link to see instructions and information on how to use the features
in Internet Services. Internet Services Help opens in a new window.
Note: Internet Services is primarily a tool for System Administrators. The Help feature is written for
System Administrators rather than general users.
Refer to the System Administrator Guide for further information.
1. At your computer, open your web browser.
2. In the URL field, use your keyboard to enter http:// followed by the IP Address of the device. For
example: If the IP Address is 192.168.100.100, enter http://192.168.100.100.
Note: To find out the IP Address of your device, press the Machine Status button and select
the Machine Information tab. You can also print a configuration report or ask your System
Administrator.
3. Press the Enter button on your keyboard to load the page.
4. Select the Help link at the top right hand corner of the screen.
5. Select the option(s) required.
More Information
Using Internet Services to find System Administrator Contact Details
System Administrator Guide www.xerox.com/support.
Printing the Information Pages from the Machine Status Menu
Getting Further Assistance
For any additional help visit our customer web site at www.xerox.com or contact the Xerox Support
Center quoting the machine serial number.
The Xerox Support Center will want to know the nature of the problem, the machine serial number,
the fault code (if any) plus the name and location of your company.
More Information
Identifying the Parts of Your Device
84 User Guide
Page 87

Copy
3
Making Copies
When you press the Start button to make a copy, the device scans your originals and temporarily
stores the images. It then prints the images based on the selections made.
If Authentication or Accounting has been enabled on your device you may have to enter login
details to access the Copy features.
1. Load your documents face up in the document feeder input tray. Adjust the guide to just touch
the documents.
Or
Lift up the document feeder. Place the document face down onto the document glass and
register it to the arrow at the top left corner. Close the document feeder.
2. Press the Clear All button on the control panel twice, then select Confirm on the touch screen
to cancel any previous programming selections.
3. Press the Services Home button.
4. Select the Copy button on the touch screen. The copy features are displayed.
5. If required, select the Copy tab. This is usually the active tab when the Copy service opens.
6. Select any options required.
7. Enter the number of prints required using the numeric keypad on the control panel.
8. Press the Start button on the control panel to scan the original.
9. Remove the original from the document feeder or document glass when scanning has
completed. The job enters the job list ready for processing.
10. The Job Progress screen displays the progress of the current job. After the Job Progress screen
closes, press the Job Status button on the device control panel to view the job list and check
the status of the job.
11. If your job remains held in the Active Jobs list, the device needs you to supply additional
resources, such as paper or staples before it can complete the job. To find out what resources
are needed, select the job and then select the Details button. Once the resources are available
the job will print.
More Information
Using a User ID to Log In at the Device
Viewing the Progress and Details of a Job using the Job Status Menu
User Guide 85
Page 88

Copy Xerox® WorkCentre® 5800/5800i Series
Copy Options
Reduce or Enlarge
Reducing or Enlarging Copies
When you press the Start button to make a copy, the device scans your originals and temporarily
stores the images. It then prints the images based on the selections made.
If Authentication or Accounting has been enabled on your device you may have to enter login
details to access the Copy features.
A variety of options are available on your device to enable you to reduce or enlarge the output from
your original. You can input a specific reduction or enlargement ratio, or choose from a selection of
pre-defined options.
1. Load your documents face up in the document feeder input tray. Adjust the guide to just touch
the documents.
Or
Lift up the document feeder. Place the document face down onto the document glass and
register it to the arrow at the top left corner. Close the document feeder.
2. Press the Clear All button on the control panel twice, then select Confirm on the touch screen
to cancel any previous programming selections.
3. Press the Services Home button.
4. Select the Copy button on the touch screen. The copy features are displayed.
5. If required, select the Copy tab. This is usually the active tab when the Copy service opens.
6. Select the Reduce / Enlarge option required.
•Use the + and - buttons to set the exact reduce / enlarge % (or use the numeric keypad to
type in the ratio required).
• 100 % will keep your output image the same size as your original. This option is useful if
you are programming a complex job and want to cancel any reduce or enlarge settings
without cancelling other settings you have made.
• Auto % lets the device automatically select the best ratio to reduce or enlarge the original
by to fit onto the selected paper size.
• Preset is a commonly used pre-defined reduction or enlargement ratio. Your System
Administrator can alter the preset options.
Note: If Paper Supply is set to Auto Paper Select, the Paper Conflict screen appears. Select
the desired paper tray, then select OK.
• More... gives access to options not listed on the main page.
7. Select any options required.
8. Enter the number of prints required using the numeric keypad on the control panel.
9. Press the Start button on the control panel to scan the original.
10. Remove the original from the document feeder or document glass when scanning has
completed. The job enters the job list ready for processing.
11. The Job Progress screen displays the progress of the current job. After the Job Progress screen
closes, press the Job Status button on the device control panel to view the job list and check
the status of the job.
86 User Guide
Page 89

Copy Xerox® WorkCentre® 5800/5800i Series
12. If your job remains held in the Active Jobs list, the device needs you to supply additional
resources, such as paper or staples before it can complete the job. To find out what resources
are needed, select the job and then select the Details button. Once the resources are available
the job will print.
More Information
Reducing or Enlarging Copies by Proportional %
Reducing or Enlarging Copies by Independent X-Y %
Using a User ID to Log In at the Device
Viewing the Progress and Details of a Job using the Job Status Menu
Setting the Paper Supply for Copies
Reducing or Enlarging Copies by Proportional %
When you press the Start button to make a copy, the device scans your originals and temporarily
stores the images. It then prints the images based on the selections made.
If Authentication or Accounting has been enabled on your device you may have to enter login
details to access the Copy features.
A variety of options are available on your device to enable you to reduce or enlarge the output from
your original. You can input a specific reduction or enlargement ratio, or choose from a selection of
pre-defined options.
Use the Proportional % options to reduce or enlarge the image by the same ratio in both directions
so that the image gets bigger or smaller, but the proportions remain the same.
1. Load your documents face up in the document feeder input tray. Adjust the guide to just touch
the documents.
Or
Lift up the document feeder. Place the document face down onto the document glass and
register it to the arrow at the top left corner. Close the document feeder.
2. Press the Clear All button on the control panel twice, then select Confirm on the touch screen
to cancel any previous programming selections.
3. Press the Services Home button.
4. Select the Copy button on the touch screen. The copy features are displayed.
5. If required, select the Copy tab. This is usually the active tab when the Copy service opens.
6. Select the More... button at the bottom of the Reduce / Enlarge section to access the Reduce /
Enlarge options not listed on the main page.
7. Select the Proportional % button.
8. Select the option required. You can select more than one option.
• To set a specific ratio, select the 25-400 % entry box and use the numeric keypad or the +
or - buttons to enter the ratio required.
• To center the output on the page, check the Auto Center checkbox. To work effectively the
output should be smaller than the selected output media.
• To use a pre-defined reduction or enlargement ratio, use the Preset buttons to select
100%, Auto % or commonly used ratios. Your System Administrator can alter the preset
options. Select More... for additional Preset options.
Note: When Auto % is selected, the device chooses the best ratio to reduce or enlarge the
original onto the selected paper size.
User Guide 87
Page 90

Copy Xerox® WorkCentre® 5800/5800i Series
Note: If Paper Supply is set to Auto Paper Select, the Paper Conflict screen appears. Select
the desired paper tray, then select OK.
9. Select the OK button.
10. Select any options required.
11. Enter the number of prints required using the numeric keypad on the control panel.
12. Press the Start button on the control panel to scan the original.
13. Remove the original from the document feeder or document glass when scanning has
completed. The job enters the job list ready for processing.
14. The Job Progress screen displays the progress of the current job. After the Job Progress screen
closes, press the Job Status button on the device control panel to view the job list and check
the status of the job.
15. If your job remains held in the Active Jobs list, the device needs you to supply additional
resources, such as paper or staples before it can complete the job. To find out what resources
are needed, select the job and then select the Details button. Once the resources are available
the job will print.
More Information
Reducing or Enlarging Copies by Independent X-Y %
Using a User ID to Log In at the Device
Using Internet Services to find System Administrator Contact Details
Viewing the Progress and Details of a Job using the Job Status Menu
Setting the Paper Supply for Copies
Reducing or Enlarging Copies by Independent X-Y %
When you press the Start button to make a copy, the device scans your originals and temporarily
stores the images. It then prints the images based on the selections made.
If Authentication or Accounting has been enabled on your device you may have to enter login
details to access the Copy features.
A variety of options are available on your device to enable you to reduce or enlarge the output from
your original. You can input a specific reduction or enlargement ratio, or choose from a selection of
pre-defined options.
The Independent X-Y% selection enables you to set different reduction or enlargement ratios for
the X (width) and the Y (length) of the image. This will produce a distorted copy of your original.
1. Load your documents face up in the document feeder input tray. Adjust the guide to just touch
the documents.
Or
Lift up the document feeder. Place the document face down onto the document glass and
register it to the arrow at the top left corner. Close the document feeder.
2. Press the Clear All button on the control panel twice, then select Confirm on the touch screen
to cancel any previous programming selections.
3. Press the Services Home button.
4. Select the Copy button on the touch screen. The copy features are displayed.
5. If required, select the Copy tab. This is usually the active tab when the Copy service opens.
88 User Guide
Page 91

Copy Xerox® WorkCentre® 5800/5800i Series
6. Select the More... button at the bottom of the Reduce / Enlarge section to access the Reduce /
Enlarge options not listed on the main page.
7. Select the Independent % button.
8. Select the option required. You can select more than one option.
• To set a specific ratio, select the Width (X) entry box and the Length (Y) entry box and
use the numeric keypad or the + or - buttons to enter the width and length ratios required.
• To use a pre-defined reduction or enlargement ratio, use the Presets (X / Y) buttons to select
100 / 100%, Auto Independent % or commonly used ratios. The selected X and Y ratios in
percentages are shown next to the button. Your System Administrator can alter the preset
options. Select More... for additional Preset options.
• 100% / 100% will keep your output image the same size as your original. This option is
useful if you are programming a complex job and want to cancel any reduce or enlarge
settings without cancelling other settings you have made.
• Auto Independent % automatically fits the image of your original onto the paper you
have selected. The reduction or enlargement may not be proportional, the device will
distort the image so that it will fit onto the paper.
Note: If Paper Supply is set to Auto Paper Select, the Paper Conflict screen appears. Select
the desired paper tray, then select OK.
9. Select the OK button.
10. Select any options required.
11. Enter the number of prints required using the numeric keypad on the control panel.
12. Press the Start button on the control panel to scan the original.
13. Remove the original from the document feeder or document glass when scanning has
completed. The job enters the job list ready for processing.
14. The Job Progress screen displays the progress of the current job. After the Job Progress screen
closes, press the Job Status button on the device control panel to view the job list and check
the status of the job.
15. If your job remains held in the Active Jobs list, the device needs you to supply additional
resources, such as paper or staples before it can complete the job. To find out what resources
are needed, select the job and then select the Details button. Once the resources are available
the job will print.
More Information
Reducing or Enlarging Copies by Proportional %
Using a User ID to Log In at the Device
Using Internet Services to find System Administrator Contact Details
Viewing the Progress and Details of a Job using the Job Status Menu
Setting the Paper Supply for Copies
Setting the Paper Supply for Copies
When you press the Start button to make a copy, the device scans your originals and temporarily
stores the images. It then prints the images based on the selections made.
If Authentication or Accounting has been enabled on your device you may have to enter login
details to access the Copy features.
Use the Paper Supply options to select a specific paper tray for your job, or to allow the device to
automatically select a tray.
User Guide 89
Page 92

Copy Xerox® WorkCentre® 5800/5800i Series
The Auto Paper Select option automatically selects the appropriate paper size for each original
based on the size of the original and any reduce or enlarge programming you have chosen.
Alternatively, you can select a paper tray that contains the size and type of paper you require.
If the Auto Selection setting has been enabled by your System Administrator and the same size,
color and type of media is loaded in more than one tray, the device will automatically switch from
the active tray to another if the media in the active tray runs out. If you have an administrator login
you will be able to activate the Auto Selection setting.
1. Load your documents face up in the document feeder input tray. Adjust the guide to just touch
the documents.
Or
Lift up the document feeder. Place the document face down onto the document glass and
register it to the arrow at the top left corner. Close the document feeder.
2. Press the Clear All button on the control panel twice, then select Confirm on the touch screen
to cancel any previous programming selections.
3. Press the Services Home button.
4. Select the Copy button on the touch screen. The copy features are displayed.
5. If required, select the Copy tab. This is usually the active tab when the Copy service opens.
6. Select the Paper Supply option required.
• Auto Paper Select lets the device select the appropriate paper size for each original based
on the size of the original and reduce or enlarge programming.
• Select a paper tray that contains the size and type of paper you require. The size and media
loaded in each tray is displayed.
7. If the paper source you have chosen is not listed on the main screen, select More... to see the
additional options.
• Select the required tray from the list. The chosen tray is highlighted in blue.
• Select the OK button.
8. Select any options required.
9. Enter the number of prints required using the numeric keypad on the control panel.
10. Press the Start button on the control panel to scan the original.
11. Remove the original from the document feeder or document glass when scanning has
completed. The job enters the job list ready for processing.
12. The Job Progress screen displays the progress of the current job. After the Job Progress screen
closes, press the Job Status button on the device control panel to view the job list and check
the status of the job.
13. If your job remains held in the Active Jobs list, the device needs you to supply additional
resources, such as paper or staples before it can complete the job. To find out what resources
are needed, select the job and then select the Details button. Once the resources are available
the job will print.
More Information
Using a User ID to Log In at the Device
Viewing the Progress and Details of a Job using the Job Status Menu
90 User Guide
Page 93

Copy Xerox® WorkCentre® 5800/5800i Series
Making 2 Sided Copies or Copying 2 Sided Originals
When you press the Start button to make a copy, the device scans your originals and temporarily
stores the images. It then prints the images based on the selections made.
If Authentication or Accounting has been enabled on your device you may have to enter login
details to access the Copy features.
The device provides options to make one or two-sided copies from one or two-sided originals using
either the document feeder or the document glass.
Note: If using the document glass to scan two-sided originals, the device displays a message when
ready to scan side 2.
1. Load your documents face up in the document feeder input tray. Adjust the guide to just touch
the documents.
Or
Lift up the document feeder. Place the document face down onto the document glass and
register it to the arrow at the top left corner. Close the document feeder.
2. Press the Clear All button on the control panel twice, then select Confirm on the touch screen
to cancel any previous programming selections.
3. Press the Services Home button.
4. Select the Copy button on the touch screen. The copy features are displayed.
5. If required, select the Copy tab. This is usually the active tab when the Copy service opens.
6. Select the 2-Sided Copying option required.
• 1 > 1 Sided use this option if your originals are printed on 1 side and you want single-sided
copies.
• 1 > 2 Sided use this option if your originals are printed on 1 side and you want 2-sided
copies. You can also select the Rotate Side 2 button to have the second page rotated by
180°.
• 2 > 2 Sided use this option if you want to make 2-sided copies from 2-sided originals. You
can also select the Rotate Side 2 button to have the second side rotated by 180°.
• 2 > 1 Sided this option will make 1-sided copies from 2-sided originals.
7. Select any options required.
8. Enter the number of prints required using the numeric keypad on the control panel.
9. Press the Start button on the control panel to scan the original.
10. Remove the original from the document feeder or document glass when scanning has
completed. The job enters the job list ready for processing.
11. The Job Progress screen displays the progress of the current job. After the Job Progress screen
closes, press the Job Status button on the device control panel to view the job list and check
the status of the job.
12. If your job remains held in the Active Jobs list, the device needs you to supply additional
resources, such as paper or staples before it can complete the job. To find out what resources
are needed, select the job and then select the Details button. Once the resources are available
the job will print.
More Information
Using a User ID to Log In at the Device
Viewing the Progress and Details of a Job using the Job Status Menu
User Guide 91
Page 94

Copy Xerox® WorkCentre® 5800/5800i Series
Copy Output
Choosing an Output Option for Copies
When you press the Start button to make a copy, the device scans your originals and temporarily
stores the images. It then prints the images based on the selections made.
If Authentication or Accounting has been enabled on your device you may have to enter login
details to access the Copy features.
Depending on the optional finishing device and kits installed you will have the choice of different
output options such as stapling, folding and collating.
Use the collation options to sort your copies into sets (1,2,3 1,2,3 1,2,3) or stacks (1,1,1 2,2,2
3,3,3).
Use the stapling options to staple your document. The options available are dependent on the
finishing device installed. The basic stapling options are Off, 1 Staple, 2 Staples and Multi-Staple.
Use the None option if no finishing is required for the output.
Use the Hole Punched / Stapled option if you want your output to be hole punched or hole punched
and stapled. Each sheet will be punched individually so there is no limit to the number of pages you
can have in a set. Hole punching can only be selected for A4 LEF (8.5 x 11" LEF) and A3 (11 x 17”)
paper.
Note: The Collation options must be set before selecting the Hole Punched / Stapled options.
Note: SEF is Short Edge Feed (where the short edge of the paper is the leading edge when the paper
is fed into the device). LEF is Long Edge Feed (where the paper is oriented so that the long edge is
fed into the device first).
Use the Folding options to automatically produce folded and stapled booklets. Pages can be folded
individually or together as a set. Use the Advanced Settings to choose how to format the pages, the
imaging requirements and the paper supply to use for the booklets.
Use the Folding options to fold a single sheet of A4 (8.5 x 11”) media in a weight range of 60 to
120 gsm (16 to 32 lb). Pages can be bi-folded in half or tri-folded in a C fold or Z fold .
1. Load your documents face up in the document feeder input tray. Adjust the guide to just touch
the documents.
Or
Lift up the document feeder. Place the document face down onto the document glass and
register it to the arrow at the top left corner. Close the document feeder.
2. Press the Clear All button on the control panel twice, then select Confirm on the touch screen
to cancel any previous programming selections.
3. Press the Services Home button.
4. Select the Copy button on the touch screen. The copy features are displayed.
5. If required, select the Copy tab. This is usually the active tab when the Copy service opens.
6. If required, select the Advanced... button to access all the finishing options. The number of
options displayed will depend upon the finishing device and kits installed (there may not be
enough to require an Advanced... button).
92 User Guide
Page 95

Copy Xerox® WorkCentre® 5800/5800i Series
7. Select the Collation or Finishing option required.
8. Select the OK button.
9. Select any options required.
10. Enter the number of prints required using the numeric keypad on the control panel.
11. Press the Start button on the control panel to scan the original.
12. Remove the original from the document feeder or document glass when scanning has
completed. The job enters the job list ready for processing.
13. The Job Progress screen displays the progress of the current job. After the Job Progress screen
closes, press the Job Status button on the device control panel to view the job list and check
the status of the job.
14. If your job remains held in the Active Jobs list, the device needs you to supply additional
resources, such as paper or staples before it can complete the job. To find out what resources
are needed, select the job and then select the Details button. Once the resources are available
the job will print.
More Information
Using the None Output Option for Copies
Collating Copies
Stapling Copies
Hole Punching Copies
Preparing Copies to be made into a Booklet
Making Copies into Tri-Folded Pages
Using a User ID to Log In at the Device
Viewing the Progress and Details of a Job using the Job Status Menu
Describing the Finishing Devices
Identifying the WorkCentre 5845 Standard and Optional Services
Identifying the WorkCentre 5855 Standard and Optional Services
Identifying the WorkCentre 5865/5865i Standard and Optional Services
Identifying the WorkCentre 5875/5875i Standard and Optional Services
Identifying the WorkCentre 5890/5890i Standard and Optional Services
Using the None Output Option for Copies
When you press the Start button to make a copy, the device scans your originals and temporarily
stores the images. It then prints the images based on the selections made.
If Authentication or Accounting has been enabled on your device you may have to enter login
details to access the Copy features.
Depending on the optional finishing device and kits installed you will have the choice of different
output options such as stapling, folding and collating.
Use the No Finishing option if no finishing is required for the output.
1. Load your documents face up in the document feeder input tray. Adjust the guide to just touch
the documents.
Or
Lift up the document feeder. Place the document face down onto the document glass and
register it to the arrow at the top left corner. Close the document feeder.
2. Press the Clear All button on the control panel twice, then select Confirm on the touch screen
to cancel any previous programming selections.
User Guide 93
Page 96

Copy Xerox® WorkCentre® 5800/5800i Series
3. Press the Services Home button.
4. Select the Copy button on the touch screen. The copy features are displayed.
5. If required, select the Copy tab. This is usually the active tab when the Copy service opens.
6. If required, select the Advanced... button to access all the finishing options. The number of
options displayed will depend upon the finishing device and kits installed (there may not be
enough to require an Advanced... button).
Use the None option if no finishing is required for the output.
7. Select any options required.
8. Enter the number of prints required using the numeric keypad on the control panel.
9. Press the Start button on the control panel to scan the original.
10. Remove the original from the document feeder or document glass when scanning has
completed. The job enters the job list ready for processing.
11. The Job Progress screen displays the progress of the current job. After the Job Progress screen
closes, press the Job Status button on the device control panel to view the job list and check
the status of the job.
12. If your job remains held in the Active Jobs list, the device needs you to supply additional
resources, such as paper or staples before it can complete the job. To find out what resources
are needed, select the job and then select the Details button. Once the resources are available
the job will print.
More Information
Collating Copies
Stapling Copies
Hole Punching Copies
Preparing Copies to be made into a Booklet
Making Copies into Tri-Folded Pages
Using a User ID to Log In at the Device
Viewing the Progress and Details of a Job using the Job Status Menu
Collating Copies
When you press the Start button to make a copy, the device scans your originals and temporarily
stores the images. It then prints the images based on the selections made.
If Authentication or Accounting has been enabled on your device you may have to enter login
details to access the Copy features.
Depending on the optional finishing device and kits installed you will have the choice of different
output options such as stapling, folding and collating.
94 User Guide
Page 97

Copy Xerox® WorkCentre® 5800/5800i Series
Use the collation options to sort your copies into sets (1,2,3 1,2,3 1,2,3) or stacks (1,1,1 2,2,2
3,3,3).
1. Load your documents face up in the document feeder input tray. Adjust the guide to just touch
the documents.
Or
Lift up the document feeder. Place the document face down onto the document glass and
register it to the arrow at the top left corner. Close the document feeder.
2. Press the Clear All button on the control panel twice, then select Confirm on the touch screen
to cancel any previous programming selections.
3. Press the Services Home button.
4. Select the Copy button on the touch screen. The copy features are displayed.
5. If required, select the Copy tab. This is usually the active tab when the Copy service opens.
6. If required, select the Advanced... button to access all the finishing options. The number of
options displayed will depend upon the finishing device and kits installed (there may not be
enough to require an Advanced... button).
7. Select the Collation option required.
• Collated sorts your copies into sets 1,2,3 1,2,3 1,2,3.
• Uncollated sorts your copies into stacks 1,1,1 2,2,2 3,3,3.
8. Select the OK button.
9. Select any options required.
10. Enter the number of prints required using the numeric keypad on the control panel.
11. Press the Start button on the control panel to scan the original.
12. Remove the original from the document feeder or document glass when scanning has
completed. The job enters the job list ready for processing.
13. The Job Progress screen displays the progress of the current job. After the Job Progress screen
closes, press the Job Status button on the device control panel to view the job list and check
the status of the job.
14. If your job remains held in the Active Jobs list, the device needs you to supply additional
resources, such as paper or staples before it can complete the job. To find out what resources
are needed, select the job and then select the Details button. Once the resources are available
the job will print.
More Information
Using the None Output Option for Copies
Stapling Copies
Hole Punching Copies
Preparing Copies to be made into a Booklet
Making Copies into Tri-Folded Pages
Using a User ID to Log In at the Device
Viewing the Progress and Details of a Job using the Job Status Menu
Stapling Copies
When you press the Start button to make a copy, the device scans your originals and temporarily
stores the images. It then prints the images based on the selections made.
User Guide 95
Page 98

Copy Xerox® WorkCentre® 5800/5800i Series
If Authentication or Accounting has been enabled on your device you may have to enter login
details to access the Copy features.
Depending on the optional finishing device and kits installed you will have the choice of different
output options such as stapling, folding and collating.
Use the stapling options to staple your document. The options available are dependent on the
finishing device installed. The basic stapling options are Off, 1 Staple, 2 Staples and Multi-Staple.
1. Load your documents face up in the document feeder input tray. Adjust the guide to just touch
the documents.
Or
Lift up the document feeder. Place the document face down onto the document glass and
register it to the arrow at the top left corner. Close the document feeder.
2. Press the Clear All button on the control panel twice, then select Confirm on the touch screen
to cancel any previous programming selections.
3. Press the Services Home button.
4. Select the Copy button on the touch screen. The copy features are displayed.
5. If required, select the Copy tab. This is usually the active tab when the Copy service opens.
6. If required, select the Advanced... button to access all the finishing options. The number of
options displayed will depend upon the finishing device and kits installed (there may not be
enough to require an Advanced... button).
7. Select the Stapling option required.
Use the None option if no finishing is required for the output.
• 1 Staple positions a single staple the top left corner of your document.
• 2 Staples positions 2 staples along the trail edge of your document.
• Multiple Staples positions either three or four staples on the edge selected. The number
of staples depends on the size of the media chosen. For example: 4 Staples = A4 LEF (8.5 x
11” LEF), A3 (11 x 17”) and 8 x 10” LEF. 3 Staples = 8 x 10” SEF, A4 SEF (8.5 x 11” SEF), A5
LEF (8.5 x 5.5” LEF) and B5 SEF (8.5 x 14” SEF).
Note: For some staple selections the device will rotate the image. If you are unable to staple,
ensure that Image Rotation is set to Auto Rotate in Tools. Your System Administrator sets the
Image Rotation options when the device is installed.
Note: SEF is Short Edge Feed (where the short edge of the paper is the leading edge when the
paper is fed into the device). LEF is Long Edge Feed (where the paper is oriented so that the long
edge is fed into the device first).
8. Select the Collation, Original Orientation and Paper Supply options required.
9. Select the OK button.
10. Select any options required.
11. Enter the number of prints required using the numeric keypad on the control panel.
12. Press the Start button on the control panel to scan the original.
13. Remove the original from the document feeder or document glass when scanning has
completed. The job enters the job list ready for processing.
14. The Job Progress screen displays the progress of the current job. After the Job Progress screen
closes, press the Job Status button on the device control panel to view the job list and check
the status of the job.
96 User Guide
Page 99

Copy Xerox® WorkCentre® 5800/5800i Series
15. If your job remains held in the Active Jobs list, the device needs you to supply additional
resources, such as paper or staples before it can complete the job. To find out what resources
are needed, select the job and then select the Details button. Once the resources are available
the job will print.
More Information
Using the None Output Option for Copies
Collating Copies
Hole Punching Copies
Preparing Copies to be made into a Booklet
Making Copies into Tri-Folded Pages
Using a User ID to Log In at the Device
Using Internet Services to find System Administrator Contact Details
Viewing the Progress and Details of a Job using the Job Status Menu
Hole Punching Copies
When you press the Start button to make a copy, the device scans your originals and temporarily
stores the images. It then prints the images based on the selections made.
If Authentication or Accounting has been enabled on your device you may have to enter login
details to access the Copy features.
Depending on the optional finishing device and kits installed you will have the choice of different
output options such as stapling, folding and collating.
Use the Hole Punched / Stapled option if you want your output to be hole punched or hole punched
and stapled. Each sheet will be punched individually so there is no limit to the number of pages you
can have in a set. Hole punching can only be selected for A4 LEF (8.5 x 11" LEF) and A3 (11 x 17”)
paper.
Note: The Collation options must be set before selecting the Hole Punched / Stapled options.
Note: SEF is Short Edge Feed (where the short edge of the paper is the leading edge when the paper
is fed into the device). LEF is Long Edge Feed (where the paper is oriented so that the long edge is
fed into the device first).
1. Load your documents face up in the document feeder input tray. Adjust the guide to just touch
the documents.
Or
Lift up the document feeder. Place the document face down onto the document glass and
register it to the arrow at the top left corner. Close the document feeder.
2. Press the Clear All button on the control panel twice, then select Confirm on the touch screen
to cancel any previous programming selections.
3. Press the Services Home button.
4. Select the Copy button on the touch screen. The copy features are displayed.
5. If required, select the Copy tab. This is usually the active tab when the Copy service opens.
6. If required, select the Advanced... button to access all the finishing options. The number of
options displayed will depend upon the finishing device and kits installed (there may not be
enough to require an Advanced... button).
7. Select the Stapling option required.
Use the None option if no finishing is required for the output.
User Guide 97
Page 100

Copy Xerox® WorkCentre® 5800/5800i Series
• 1 Staple positions a single staple the top left corner of your document.
• 2 Staples positions 2 staples along the trail edge of your document.
• Multiple Staples positions either three or four staples on the edge selected. The number
of staples depends on the size of the media chosen. For example: 4 Staples = A4 LEF (8.5 x
11” LEF), A3 (11 x 17”) and 8 x 10” LEF. 3 Staples = 8 x 10” SEF, A4 SEF (8.5 x 11” SEF), A5
LEF (8.5 x 5.5” LEF) and B5 SEF (8.5 x 14” SEF).
Note: For some staple selections the device will rotate the image. If you are unable to staple,
ensure that Image Rotation is set to Auto Rotate in Tools. Your System Administrator sets the
Image Rotation options when the device is installed.
8. Select the Hole Punch option required.
• If required, select the Off button to cancel any programming you have entered.
• Select the On button to Hole Punch your sets and stacks on the left edge.
9. Select the Collation, Original Orientation and Paper Supply options required.
10. Select the OK button.
11. Select any options required.
12. Enter the number of prints required using the numeric keypad on the control panel.
13. Press the Start button on the control panel to scan the original.
14. Remove the original from the document feeder or document glass when scanning has
completed. The job enters the job list ready for processing.
15. The Job Progress screen displays the progress of the current job. After the Job Progress screen
closes, press the Job Status button on the device control panel to view the job list and check
the status of the job.
16. If your job remains held in the Active Jobs list, the device needs you to supply additional
resources, such as paper or staples before it can complete the job. To find out what resources
are needed, select the job and then select the Details button. Once the resources are available
the job will print.
More Information
Using the None Output Option for Copies
Collating Copies
Stapling Copies
Preparing Copies to be made into a Booklet
Making Copies into Tri-Folded Pages
Using a User ID to Log In at the Device
Viewing the Progress and Details of a Job using the Job Status Menu
Preparing Copies to be made into a Booklet
When you press the Start button to make a copy, the device scans your originals and temporarily
stores the images. It then prints the images based on the selections made.
If Authentication or Accounting has been enabled on your device you may have to enter login
details to access the Copy features.
Depending on the optional finishing device and kits installed you will have the choice of different
output options such as stapling, folding and collating.
98 User Guide
 Loading...