

Page 1
Paper Jams
0
This topic includes:
■ "Jam at A" on page 4-4
■ "Jam at B" on page 4-5
■ "Jam at B and C" on page 4-8
■ "Jam at C" on page 4-12
■ "Jam at D" on page 4-14
■ "Jam at D and A" on page 4-15
■ "Jam at E" on page 4-18
■ "Jam at F" on page 4-21
■ "Jam at G" on page 4-22
■ "Jam at H" on page 4-24
■ "Jam at the Stacker Upper Tray" on page 4-25
■ "Paper Size Jam in Tray 1 (MPT)" on page 4-26
■ "Paper Size Jam in Trays 2-5" on page 4-28
■ "Paper Size Jam in Tray 6" on page 4-30
■ "Jam at Tray 2, 3, 4, or 5" on page 4-33
■ "Jam at Tray 1 (MPT)" on page 4-35
■ "Jam at Tray 2 and Door A" on page 4-37
■ "Jam at Tray 3 and Door B" on page 4-41
■ "Jam at Tray 4 or 5 and Door C" on page 4-46
■ "Jam at Tray 6" on page 4-50
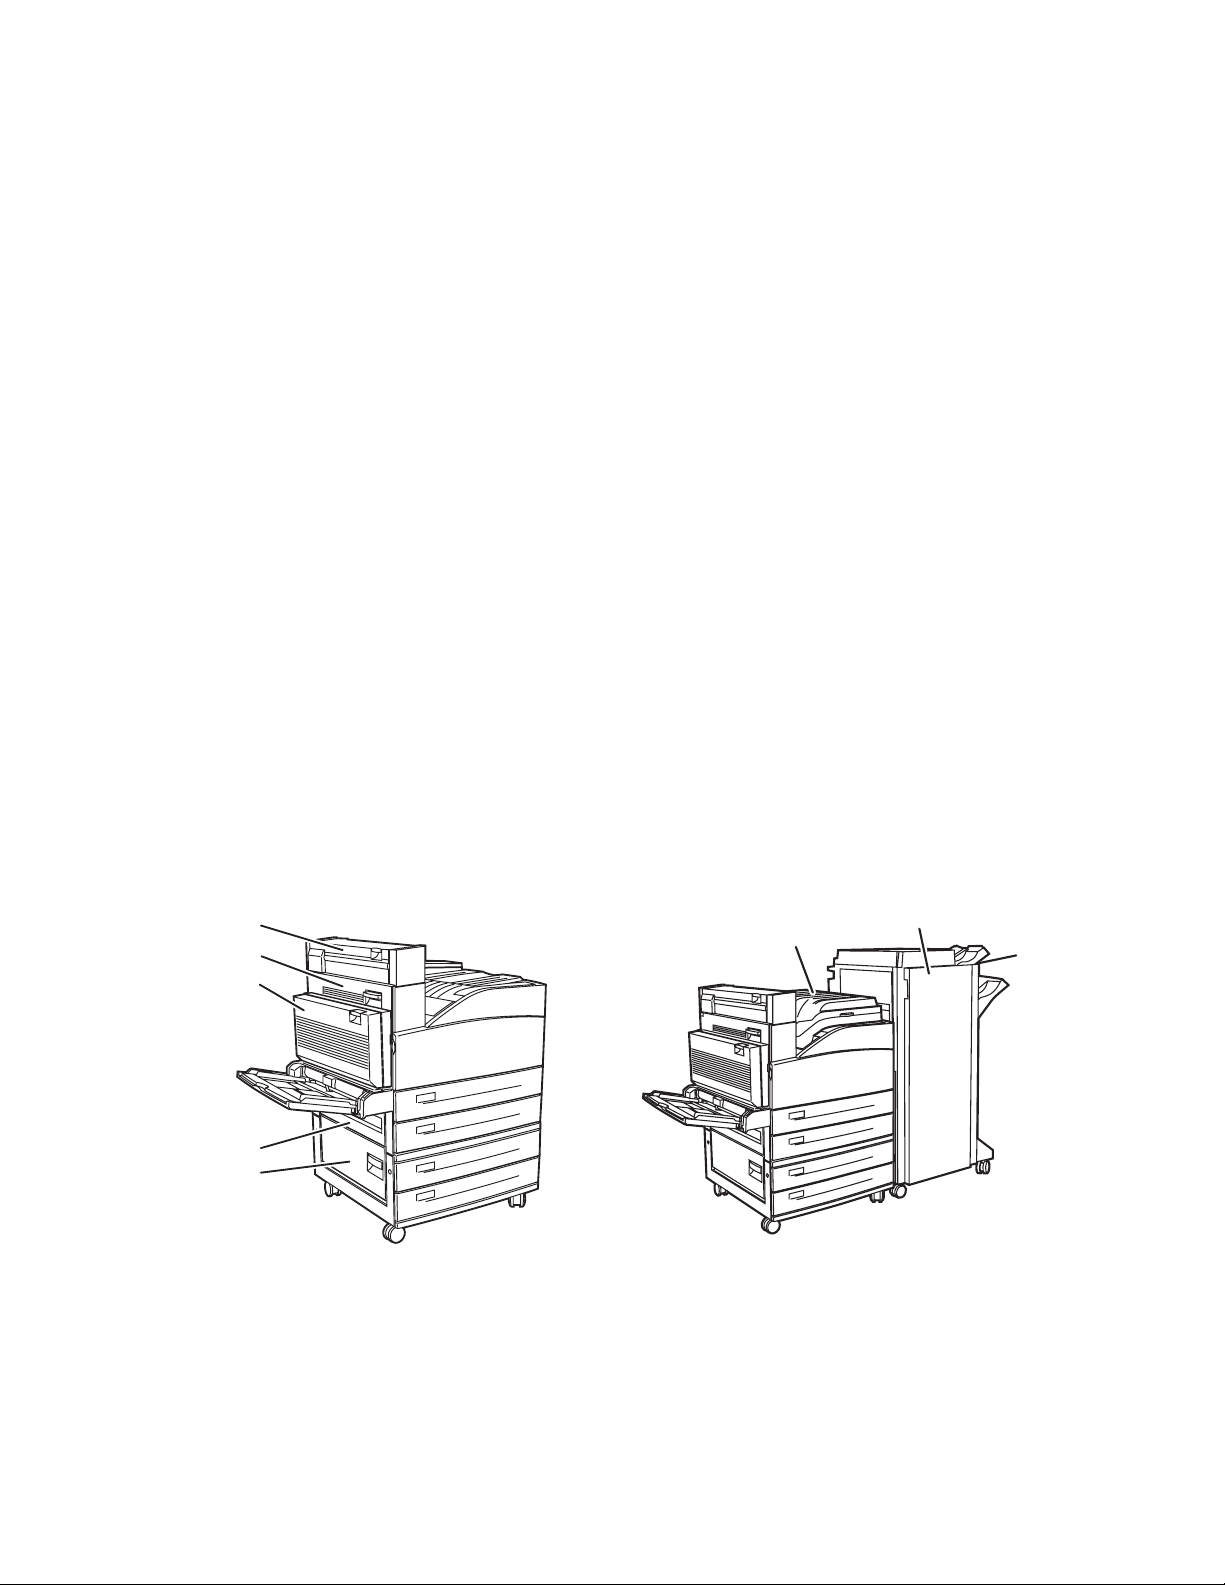
Phaser® 5500 Laser Printer
E
F
A
G
H
D
B
C
5500-07
5500-208
Copyright © 2004 Xerox Corporation. All Rights Reserved.
4-3
Page 2
Videos are available with instructions for clearing paper jams. Videos are located
A
on the User Documentation CD-ROM and at www.xerox.com/office/5500support.
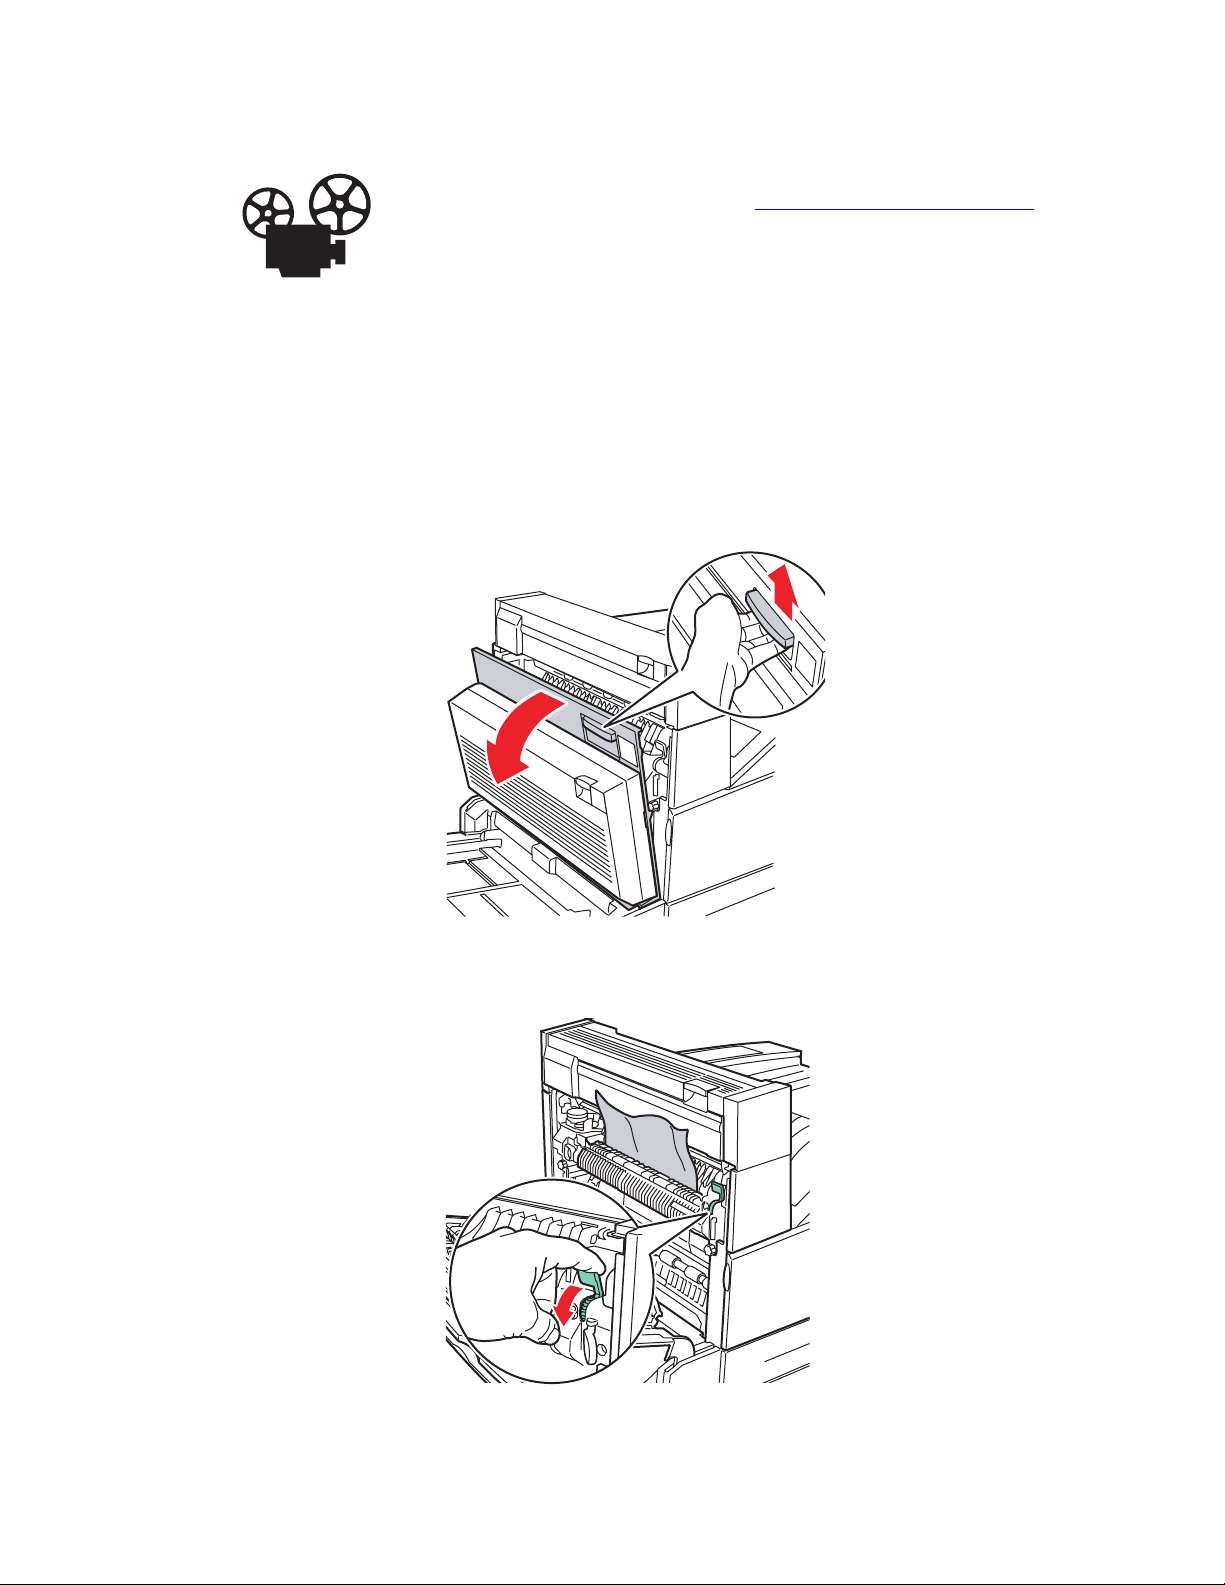
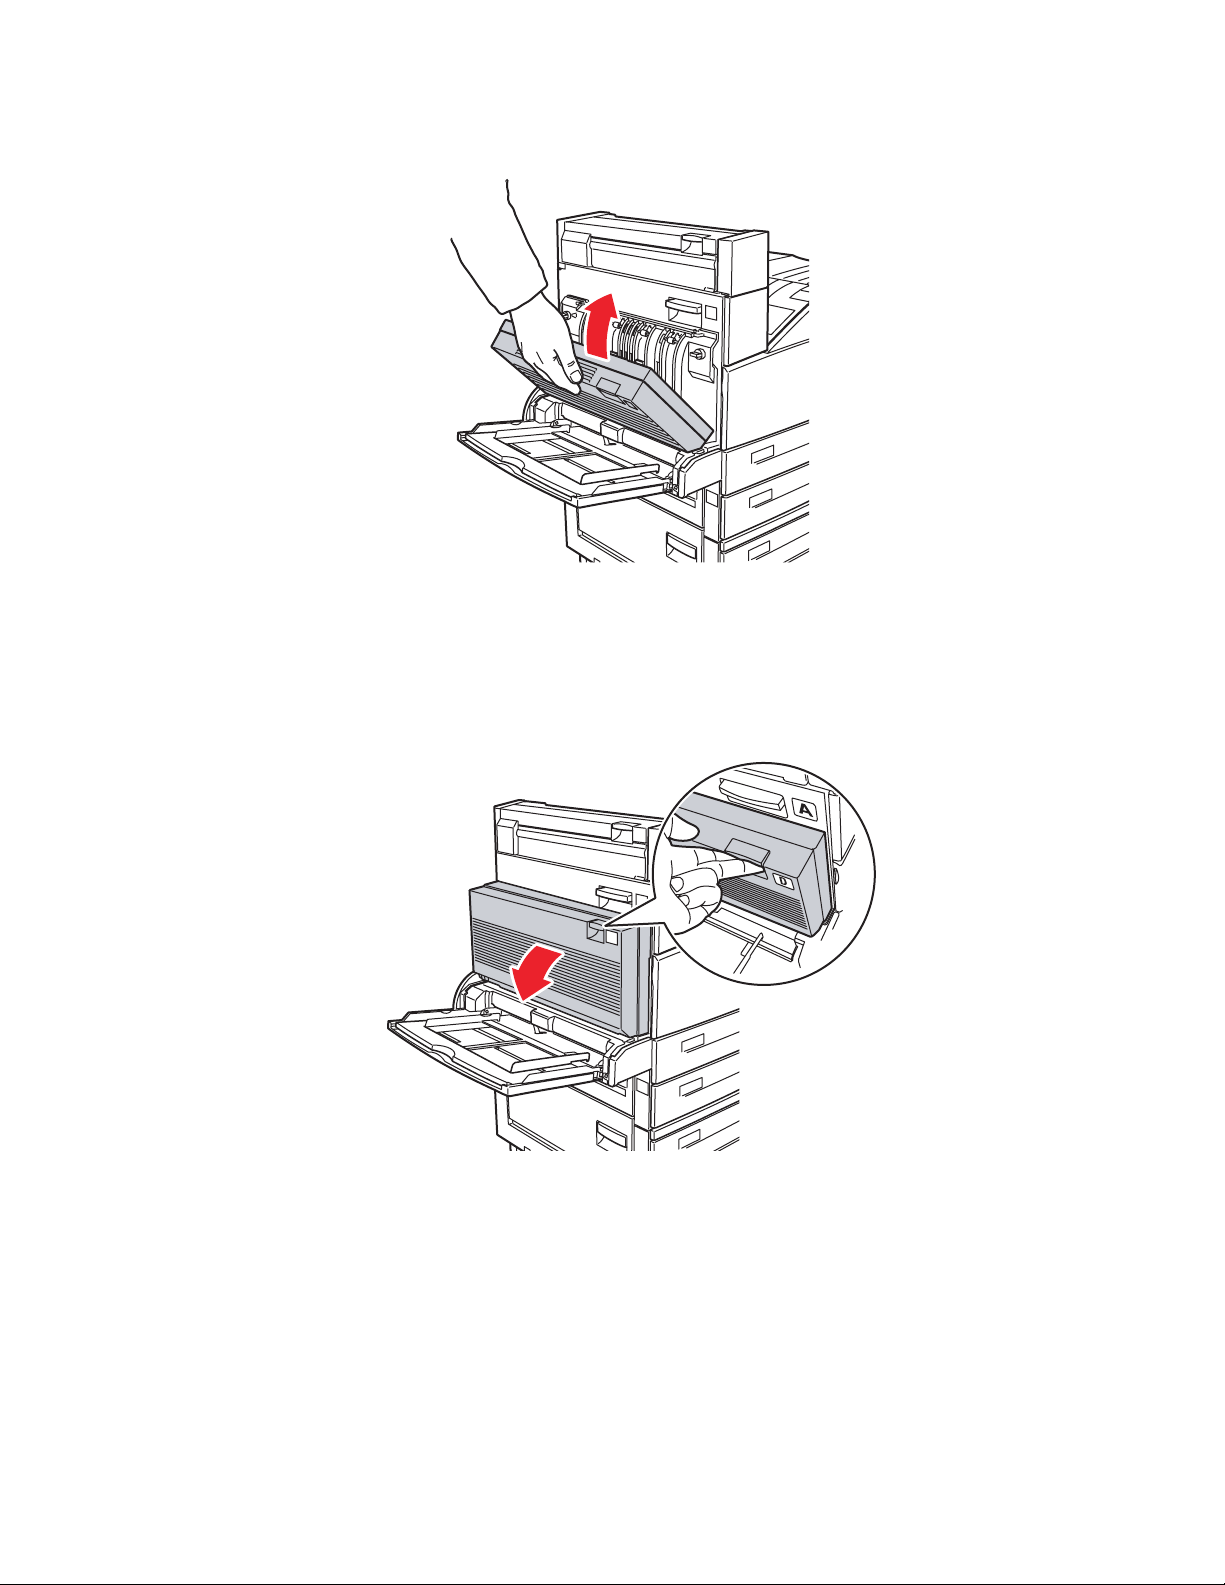
Jam at A
Follow these steps to clear the jam.
Warning
Use caution; some components inside Door A may be hot.
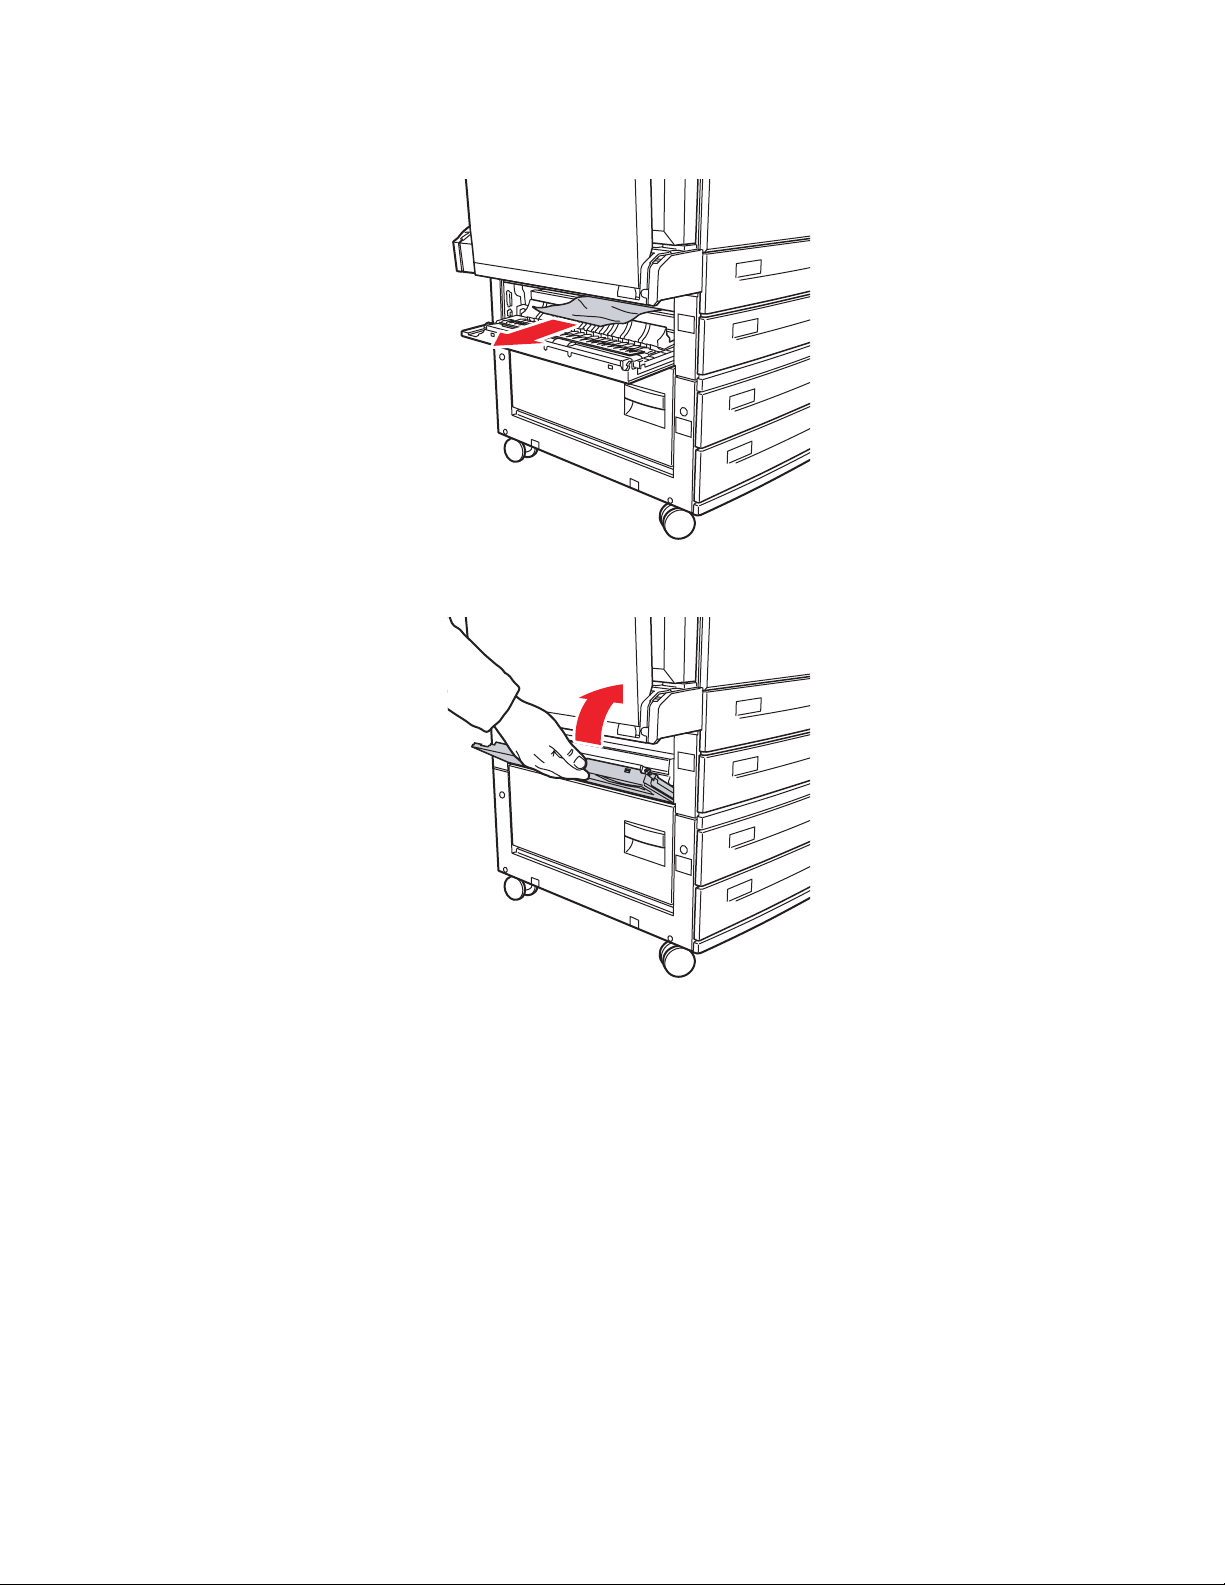
1. Open Door A.
Paper Jams
E
A
D
5500-001
2. Pull the jammed paper out of the printer. If necessary, press the green handle to move the
paper to make it easier to remove. Confirm that all paper fragments are removed.
E
5500-002
Phaser® 5500 Laser Printer
4-4
Page 3
3. Close Door A.
Jam at B
Follow these steps to clear the jam.
Paper Jams
E
A
D
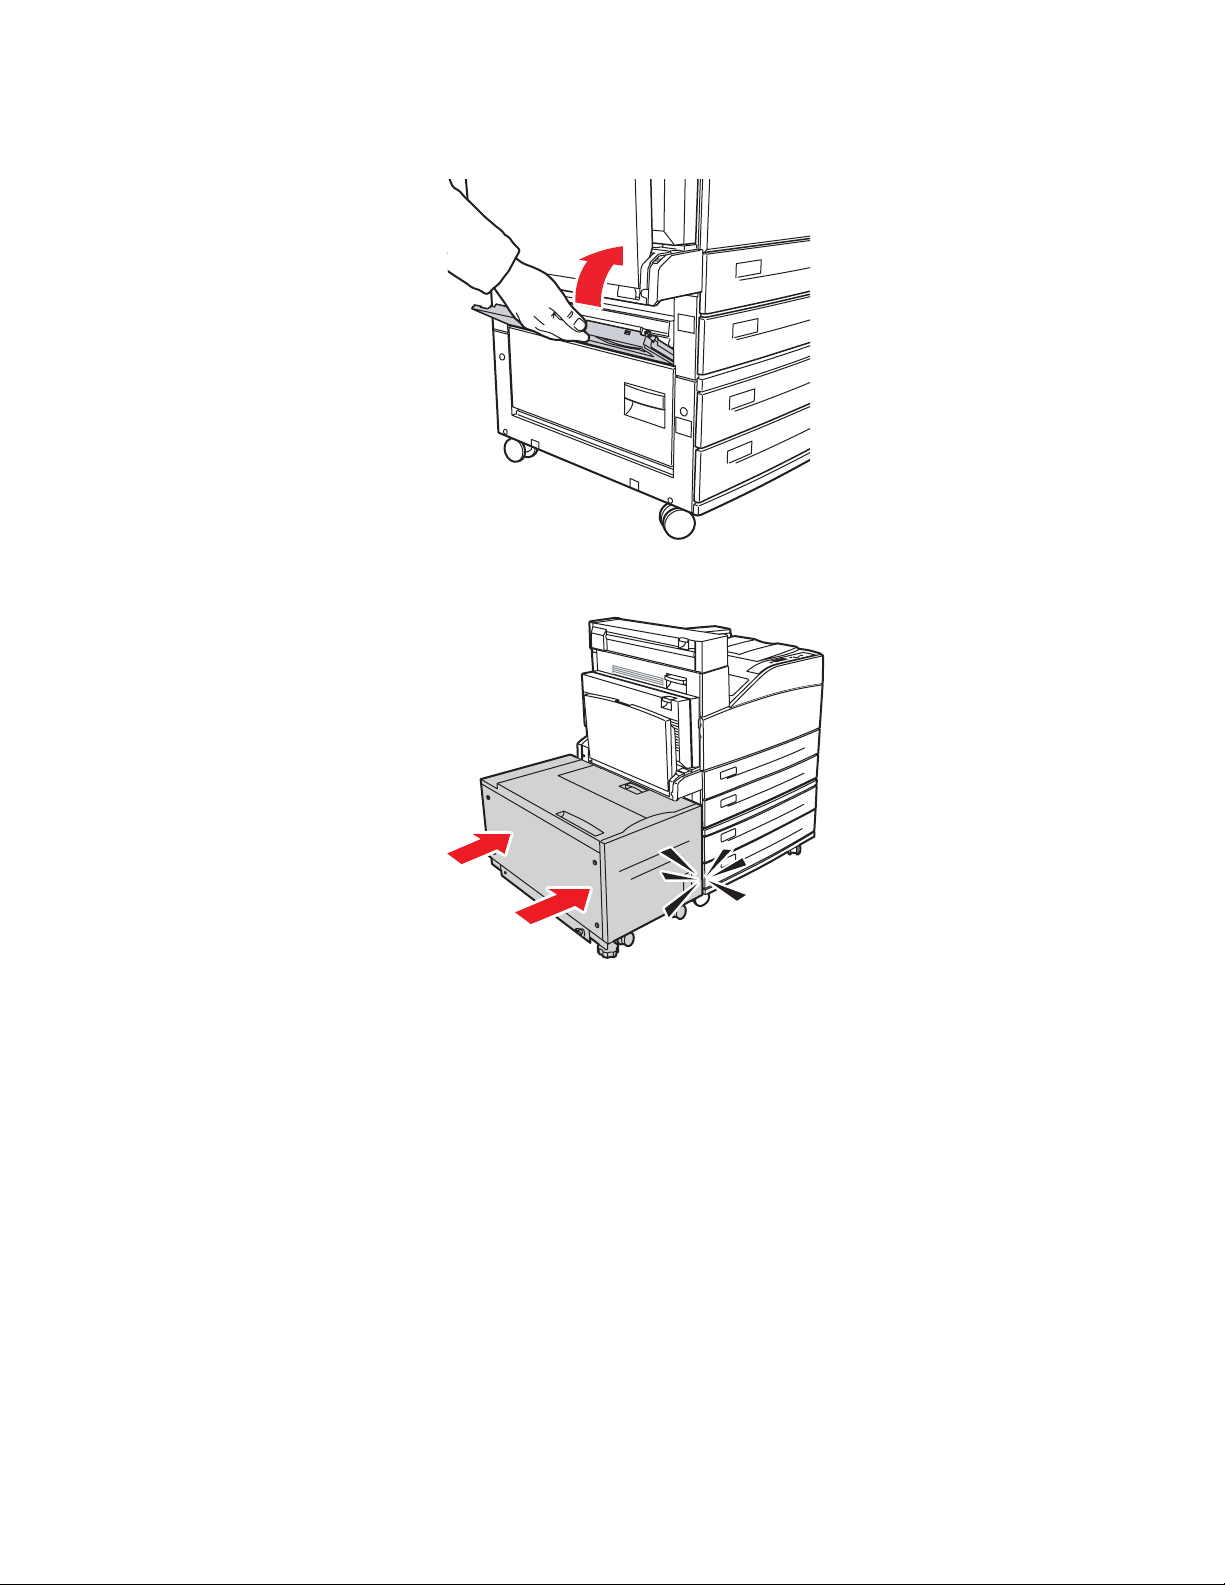
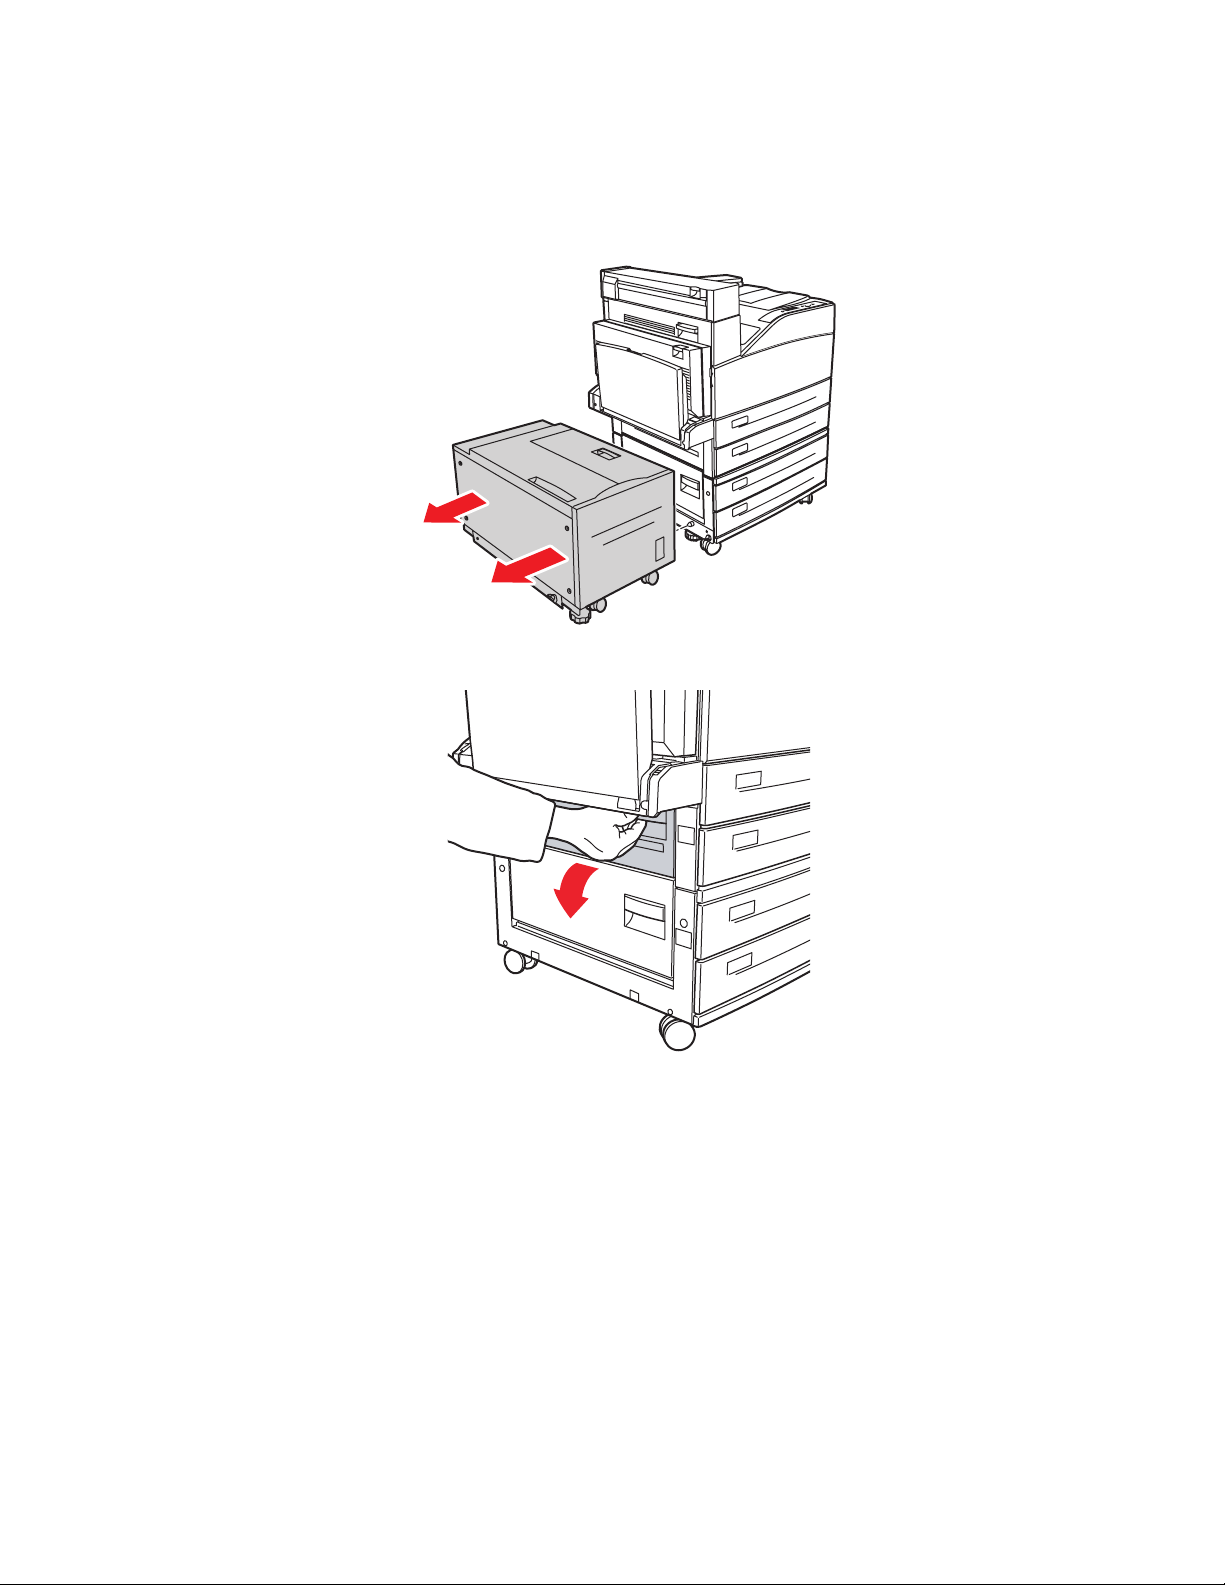
5500-003
1. If the printer has the 2000-Sheet Feeder (Tray 6), slide the feeder away from the printer.
5500-230
Phaser® 5500 Laser Printer
4-5
Page 4
Paper Jams
2. Open Door B.
B
C
5500-004
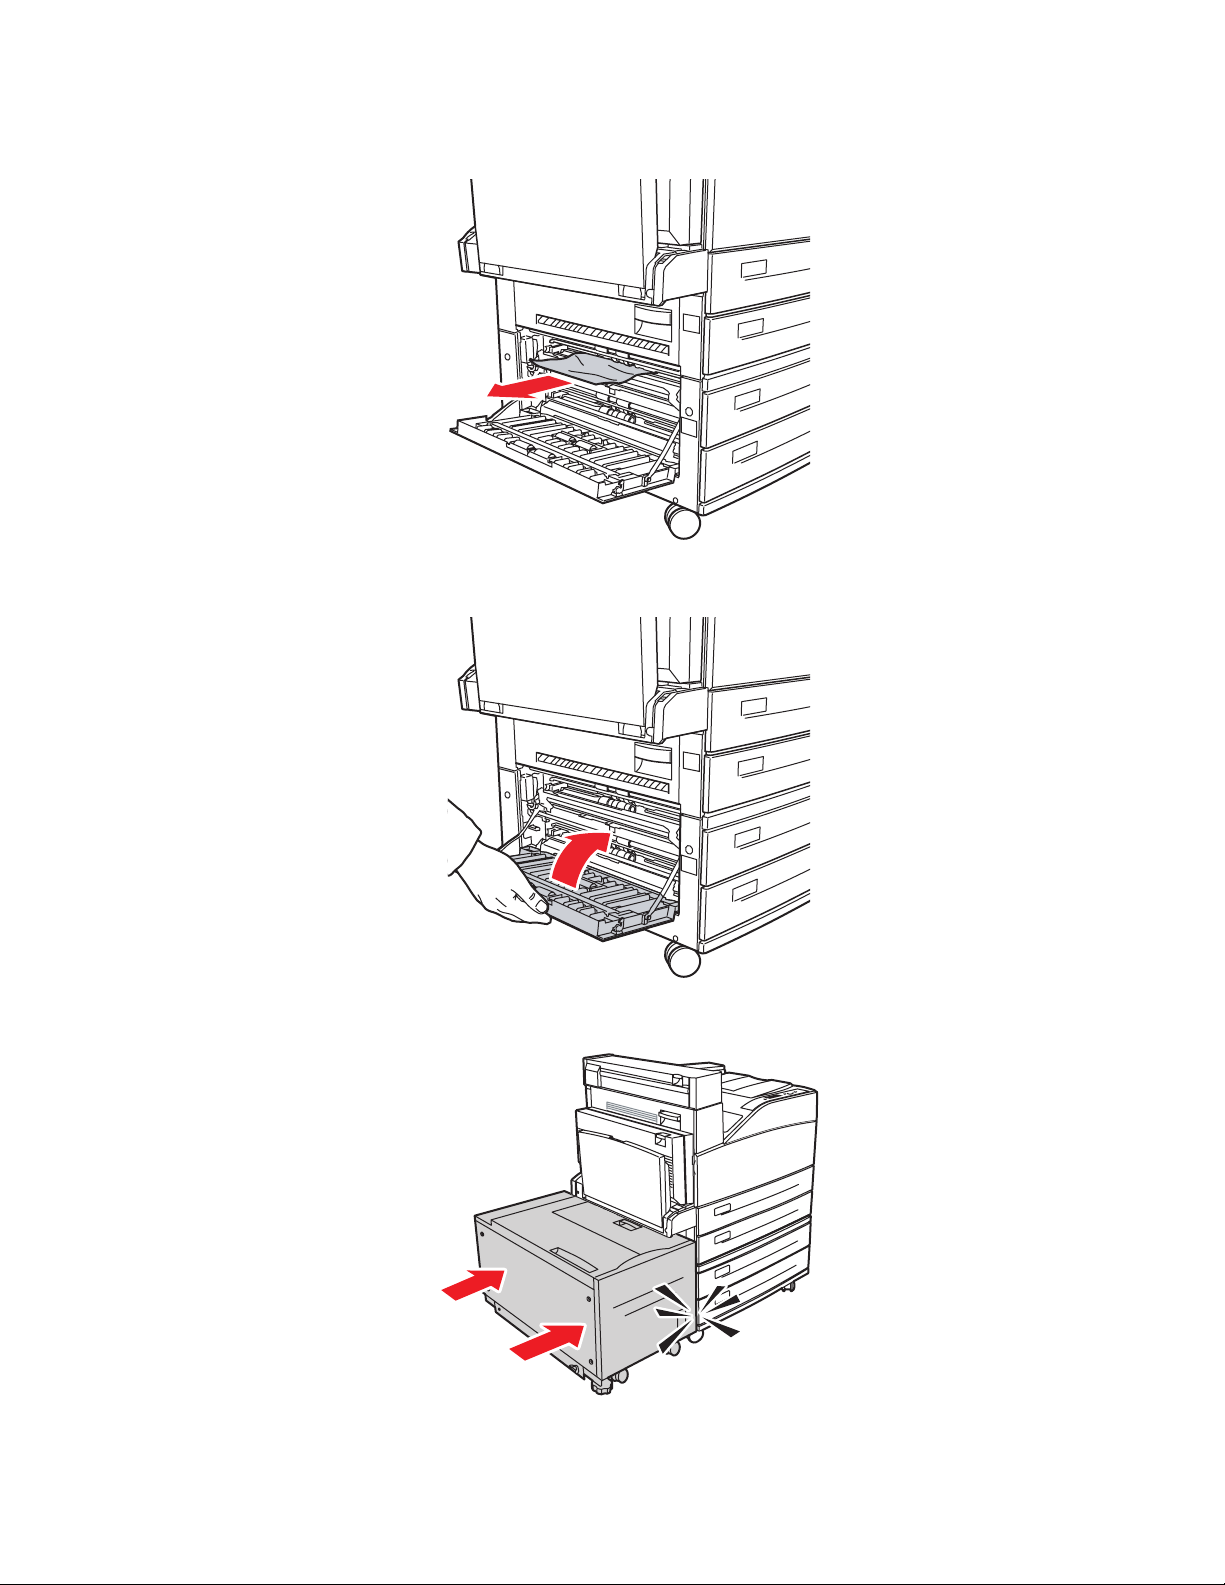
3. Pull the jammed paper out of the printer. Confirm that all paper fragments are removed.
B
C
5500-005
Phaser® 5500 Laser Printer
4-6
Page 5
Paper Jams
4. Close Door B.
B
C
5500-006
5. If the printer has the 2000-Sheet Feeder (Tray 6), slide the feeder firmly against the printer.
Phaser® 5500 Laser Printer
4-7
5500-231
Page 6
Paper Jams
Jam at B and C
Follow these steps to clear the jam.
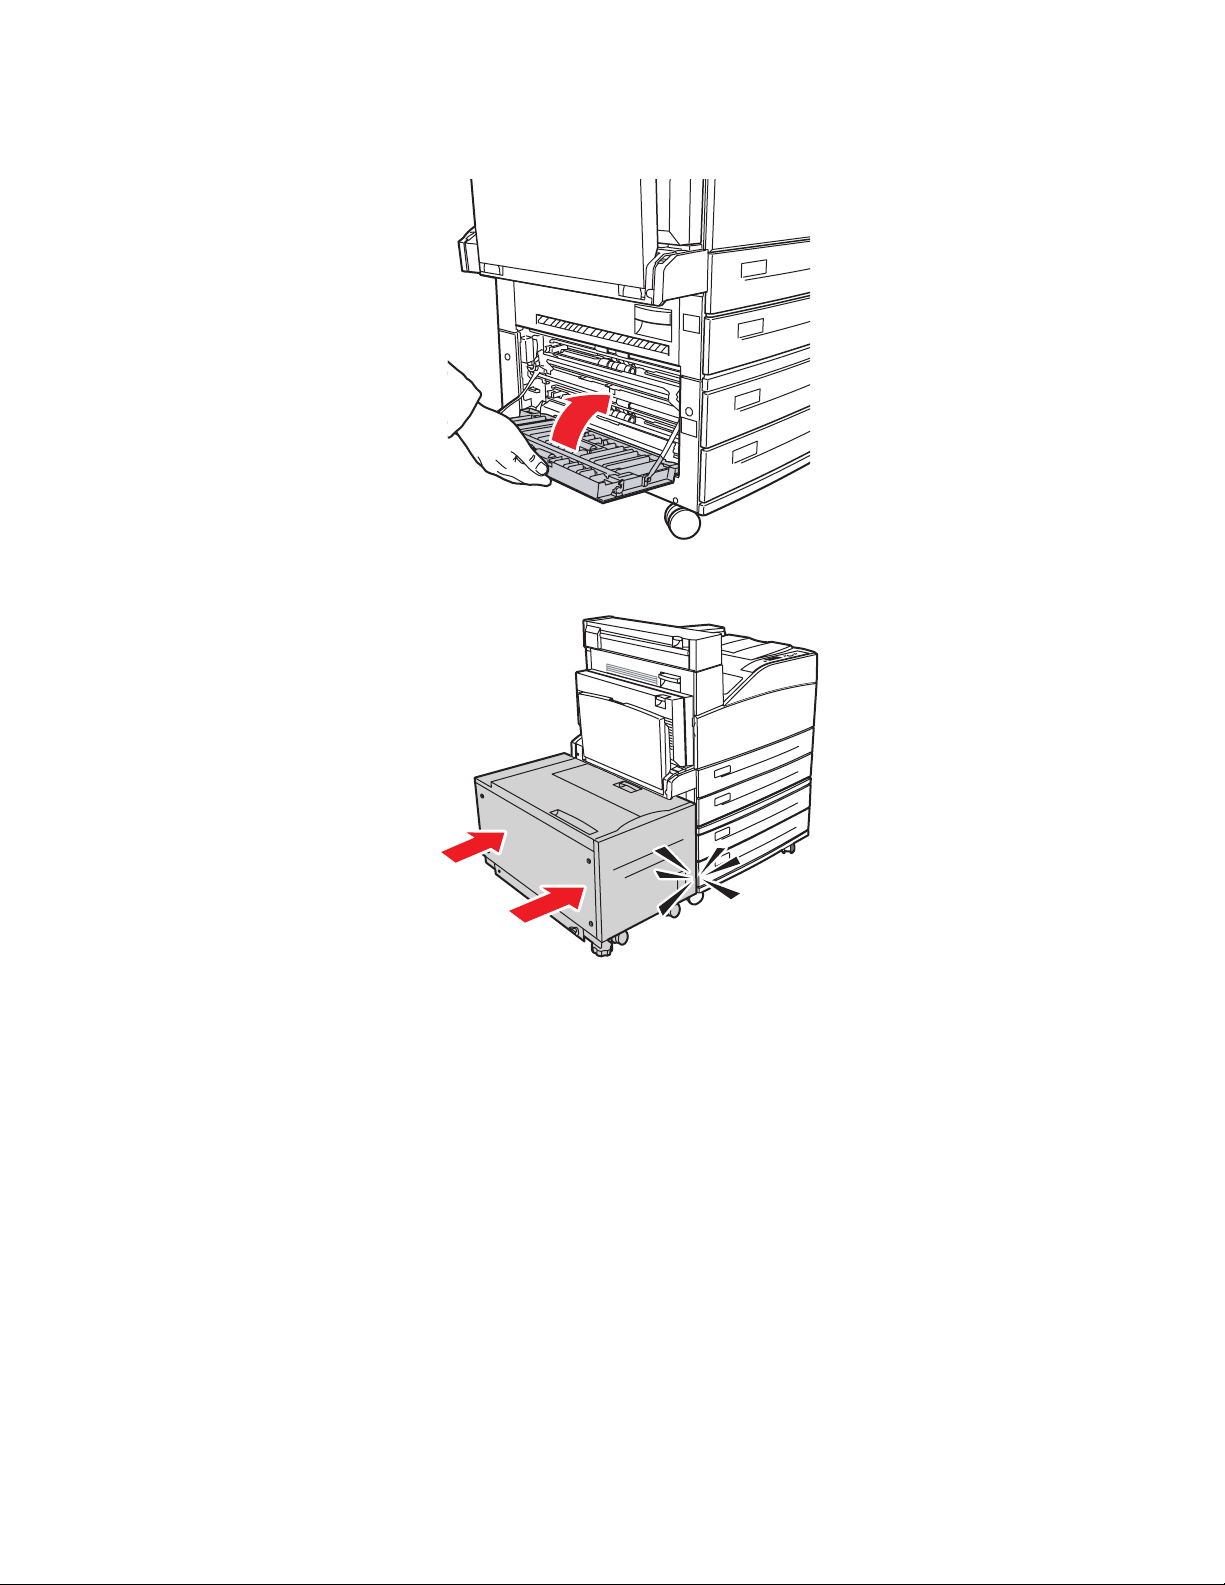
1. If the printer has the 2000-Sheet Feeder (Tray 6), slide the feeder away from the printer.
5500-230
2. Open Door B.
B
C
5500-004
Phaser® 5500 Laser Printer
4-8
Page 7
Paper Jams
3. Pull the jammed paper out of the printer. Confirm that all paper fragments are removed.
B
C
5500-005
4. Close Door B.
B
C
5500-006
Phaser® 5500 Laser Printer
4-9
Page 8
Paper Jams
5. Open Door C.
B
C
5500-007
6. Pull the jammed paper out of the printer. Confirm that all paper fragments are removed.
B
C
5500-008
Phaser® 5500 Laser Printer
4-10
Page 9
Paper Jams
7. Close Door C.
B
C
5500-009
8. If the printer has the 2000-Sheet Feeder (Tray 6), slide the feeder firmly against the printer.
Phaser® 5500 Laser Printer
4-11
5500-231
Page 10
Paper Jams
Jam at C
Follow these steps to clear the jam.
1. If the printer has the 2000-Sheet Feeder (Tray 6), slide the feeder away from the printer.
5500-230
2. Open Door C.
B
C
5500-007
Phaser® 5500 Laser Printer
4-12
Page 11
Paper Jams
3. Pull the jammed paper out of the printer. Confirm that all paper fragments are removed.
B
C
5500-008
4. Close Door C.
B
C
5500-009
5. If the printer has the 2000-Sheet Feeder (Tray 6), slide the feeder firmly against the printer.
Phaser® 5500 Laser Printer
4-13
5500-231
Page 12
Jam at D
Follow these steps to clear the jam.
1. Open Door D.
Paper Jams
E
A
D
B
5500-027
2. Pull the jammed paper out of the printer. Confirm that all paper fragments are removed.
E
A
D
B
5500-028
Phaser® 5500 Laser Printer
4-14
Page 13
3. Close Door D.
Jam at D and A
Paper Jams
E
A
D
B
5500-029
Follow these steps to clear the jam.
1. Open Door D.
E
A
D
B
5500-027
Phaser® 5500 Laser Printer
4-15
Page 14
Paper Jams
2. Pull the jammed paper out of the printer. Confirm that all paper fragments are removed.
E
A
D
B
5500-028
3. Close Door D.
E
A
D
B
5500-029
Phaser® 5500 Laser Printer
4-16
Page 15
4. Open Door A.
A
Warning
Use caution; some components inside Door A may be hot.
Paper Jams
E
A
D
5500-001
5. Pull the jammed paper out of the printer. If necessary, press the green handle to move the
paper to make it easier to remove. Confirm that all paper fragments are removed.
E
5500-002
Phaser® 5500 Laser Printer
4-17
Page 16

6. Close Door A.
A
Jam at E
Follow these steps to clear the jam.
Paper Jams
E
A
D
5500-003
Warning
Use caution; some components inside Door A may be hot.
1. Open Door A.
E
A
D
5500-001
Phaser® 5500 Laser Printer
4-18
Page 17

Paper Jams
2. Open Door E.
E
5500-010
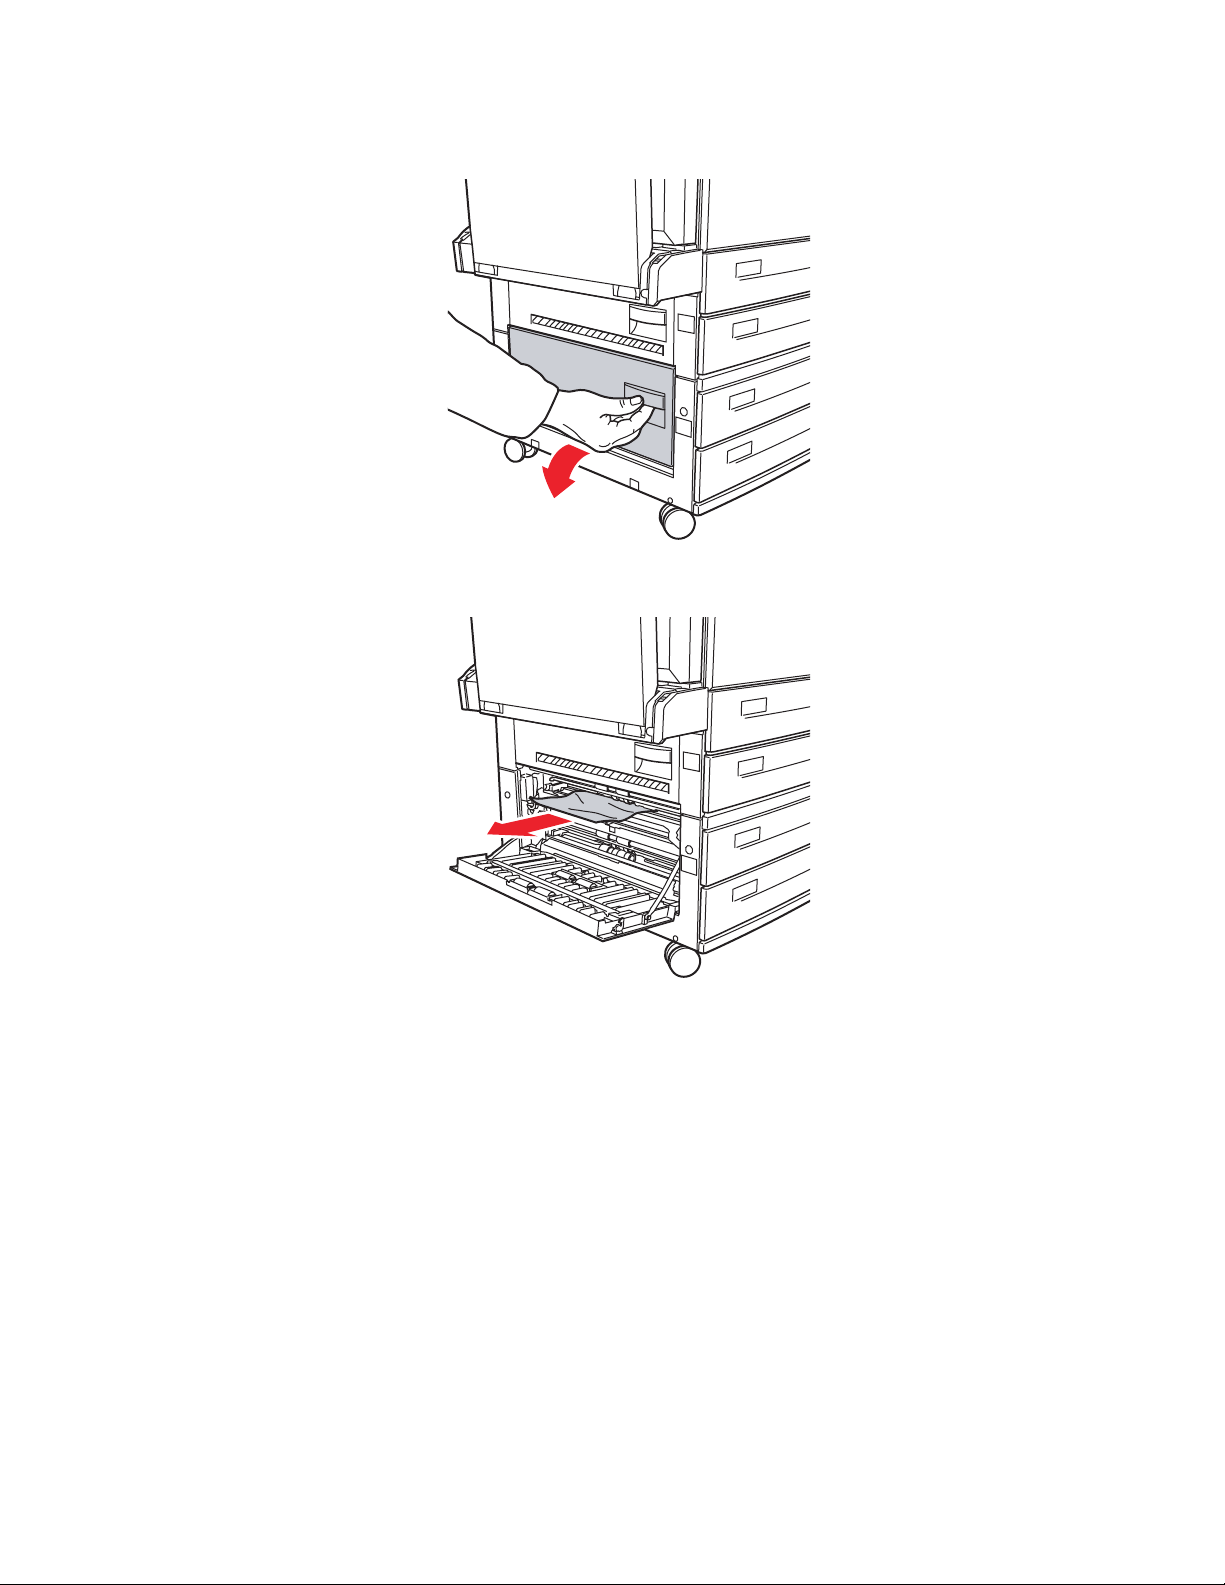
3. Pull the jammed paper out of the printer. Confirm that all paper fragments are removed.
Phaser® 5500 Laser Printer
4-19
5500-011
Page 18

4. Close Door E.
5. Close Door A.
Paper Jams
E
5500-012
E
A
D
5500-003
Phaser® 5500 Laser Printer
4-20
Page 19

Jam at F
Follow these steps to clear the jam.
1. Open Door F.
Paper Jams
E
E
A
A
D
D
B
B
5500-013
2. Pull the jammed paper out of the printer. Confirm that all paper fragments are removed.
E
A
D
B
5500-014
E
A
D
B
5500-273
Phaser® 5500 Laser Printer
4-21
Page 20

3. Close Door F.
Jam at G
Paper Jams
E
A
D
B
5500-015
Follow these steps to clear the jam. On the front panel of the printer, press the i button to view
information about the front panel message.
1. If visible, pull the jammed paper out of the stacker upper tray.
E
A
D
B
C
5500-205
Phaser® 5500 Laser Printer
4-22
Page 21

Paper Jams
2. Open Door G.
5500-186
3. Depending on the instructions shown on the front panel, open handle 2a, handle 2b, or
handle 3 as shown on the instruction labels.
Note
If the stapler is in the way, slide the stapler toward you then to the right.
4. If you opened handle 2a or handle 2b, rotate knob 2c counterclockwise as needed.
5. Pull the jammed paper out of the printer. Confirm that all paper fragments are removed.
6. Close the handles opened in Step 3.
7. Close Door G.
E
A
D
B
C
Phaser® 5500 Laser Printer
4-23
5500-018
Page 22

Paper Jams
Jam at H
Follow these steps to clear the jam.
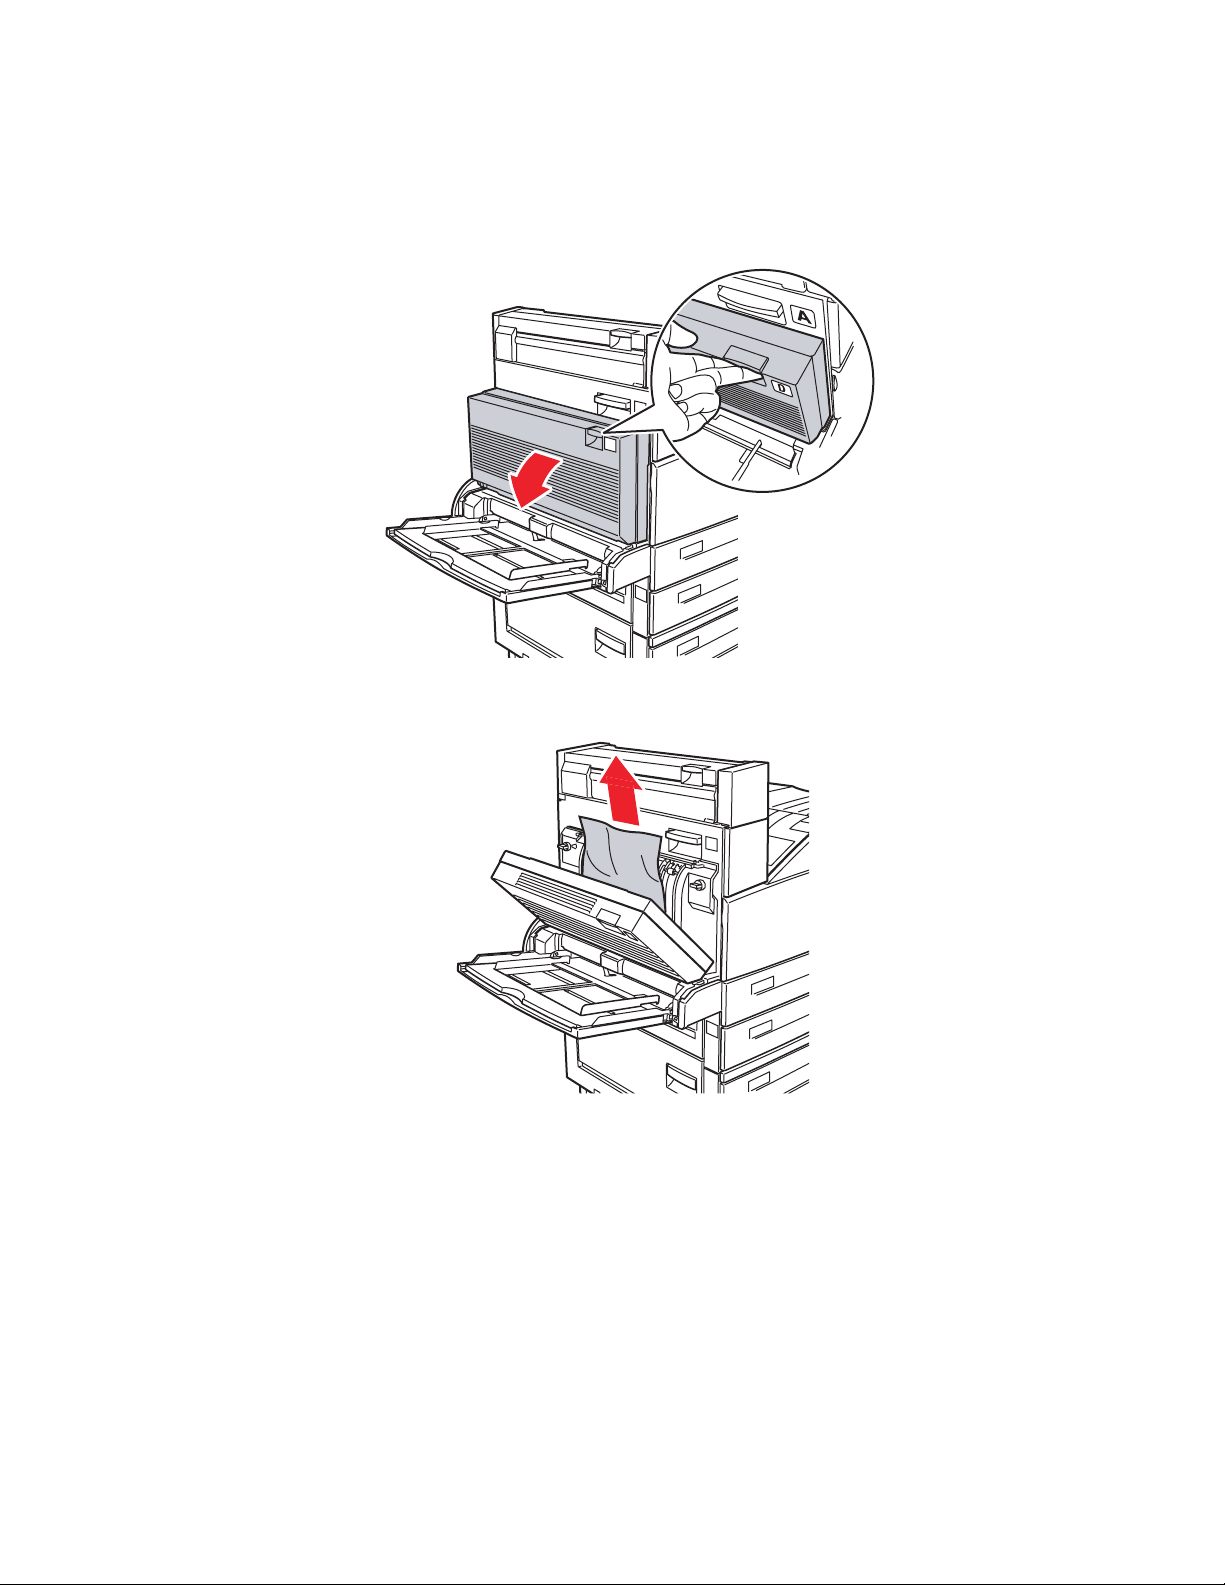
1. Lift Door H.
5500-270
2. Pull the jammed paper out of the printer. Confirm that all paper fragments are removed.
3. Close Door H.
5500-202
5500-271
Phaser® 5500 Laser Printer
4-24
Page 23

Jam at the Stacker Upper Tray
Follow these steps to clear the jam.
1. Pull the jammed paper out of the stacker upper tray.
2. Open Door G.
E
A
D
Paper Jams
3. Close Door G.
B
C
5500-025
E
A
D
B
C
5500-018
Phaser® 5500 Laser Printer
4-25
Page 24

Paper Jams
A
Paper Size Jam in Tray 1 (MPT)
Follow these steps to clear the paper size jam in Tray 1.
1. Verify that the width guides are pressed against the paper.
5500-220
2. If the paper size and type shown on the front panel match the size and type of the paper in
the tray, press the OK button.
3. If the paper size shown on the front panel does not match the size of the paper in the tray,
do the following:
a. Select Change Paper Size, then press the OK button.
b. Select Auto Sensed, Custom, or a listed paper size, then press the OK button.
c. If you selected Custom, specify the width and height of the paper. Select Custom
Width, press the OK button, scroll to the width of the paper, then press the OK
button. Select Custom Height, press the OK button, scroll to the height of the paper,
then press the OK button.
4. Open Door A.
Warning
Use caution; some components inside Door A may by hot.
E
A
D
5500-001
Phaser® 5500 Laser Printer
4-26
Page 25

Paper Jams
5. Pull the jammed paper out of the printer. If necessary, press the green handle to move the
paper to make it easier to remove. Confrim that all paper fragments are removed.
E
5500-002
6. Close Door A.
E
A
D
5500-003
Phaser® 5500 Laser Printer
4-27
Page 26

Paper Size Jam in Trays 2-5
0
Follow these steps to clear the paper size jam in Trays 2-5.
1. Pull out the tray specified on the front panel.
5500-03
2. Verify that the length and width guides are pressed against the paper.
Paper Jams
5500-064
3. Push the tray completely into the printer.
Phaser® 5500 Laser Printer
5500-063
5500-032
4-28
Page 27

4. Specify the size of the paper by doing the following:
A
a. In the front panel menus, select Printer Setup, then press the OK button.
b. Select Paper Handling Setup, then press the OK button.
c. Select Tray [2 - 5] Setup, then press the OK button.
d. Select Auto Sensed, Custom, or a listed paper size, then press the OK button.
e. If you selected Custom, specify the width and height of the paper. Select Custom
Width, press the OK button, scroll to the width of the paper, then press the OK
button. Select Custom Height, press the OK button, scroll to the height of the paper,
then press the OK button.
5. Open Door A.
Warning
Use caution; some components inside Door A may be hot.
E
Paper Jams
A
D
5500-001
6. Pull the jammed paper out of the printer. If necessary, press the green handle to move the
paper to make it easier to remove. Confirm that all paper fragments are removed.
E
5500-002
Phaser® 5500 Laser Printer
4-29
Page 28

7. Close Door A.
E
A
D
Paper Size Jam in Tray 6
Follow these steps to clear the paper size jam in Tray 6.
Paper Jams
5500-003
1. Pull out Tray 6.
5500-239
Phaser® 5500 Laser Printer
4-30
Page 29

2. Verify that the length and width guides are set correctly
A4
8.5"
A4
11"
A4
11"
A4
11"
A4
11"
Note
The default setting is for 8.5 x 11 in. paper. You must change the guides for A4 paper.
Paper Jams
5500-240
3. Push the tray completely into the printer.
5500-115
4. Specify the size of the paper by doing the following:
a. In the front panel menus, select Printer Setup, then press the OK button.
b. Select Paper Handling Setup, then press the OK button.
c. Select Tray 6 Setup, then press the OK button.
d. Select Auto Sensed or a listed paper size, then press the OK button.
Phaser® 5500 Laser Printer
4-31
Page 30

5. Open Door A.
A
Warning
Use caution; some components inside Door A may be hot.
Paper Jams
E
A
D
5500-001
6. Pull the jammed paper out of the printer. If necessary, press the green handle to move the
paper to make it easier to remove. Confirm that all paper fragments are removed.
E
5500-002
Phaser® 5500 Laser Printer
4-32
Page 31

7. Close Door A.
Jam at Tray 2, 3, 4, or 5
Follow these steps to clear the jam.
Paper Jams
E
A
D
5500-003
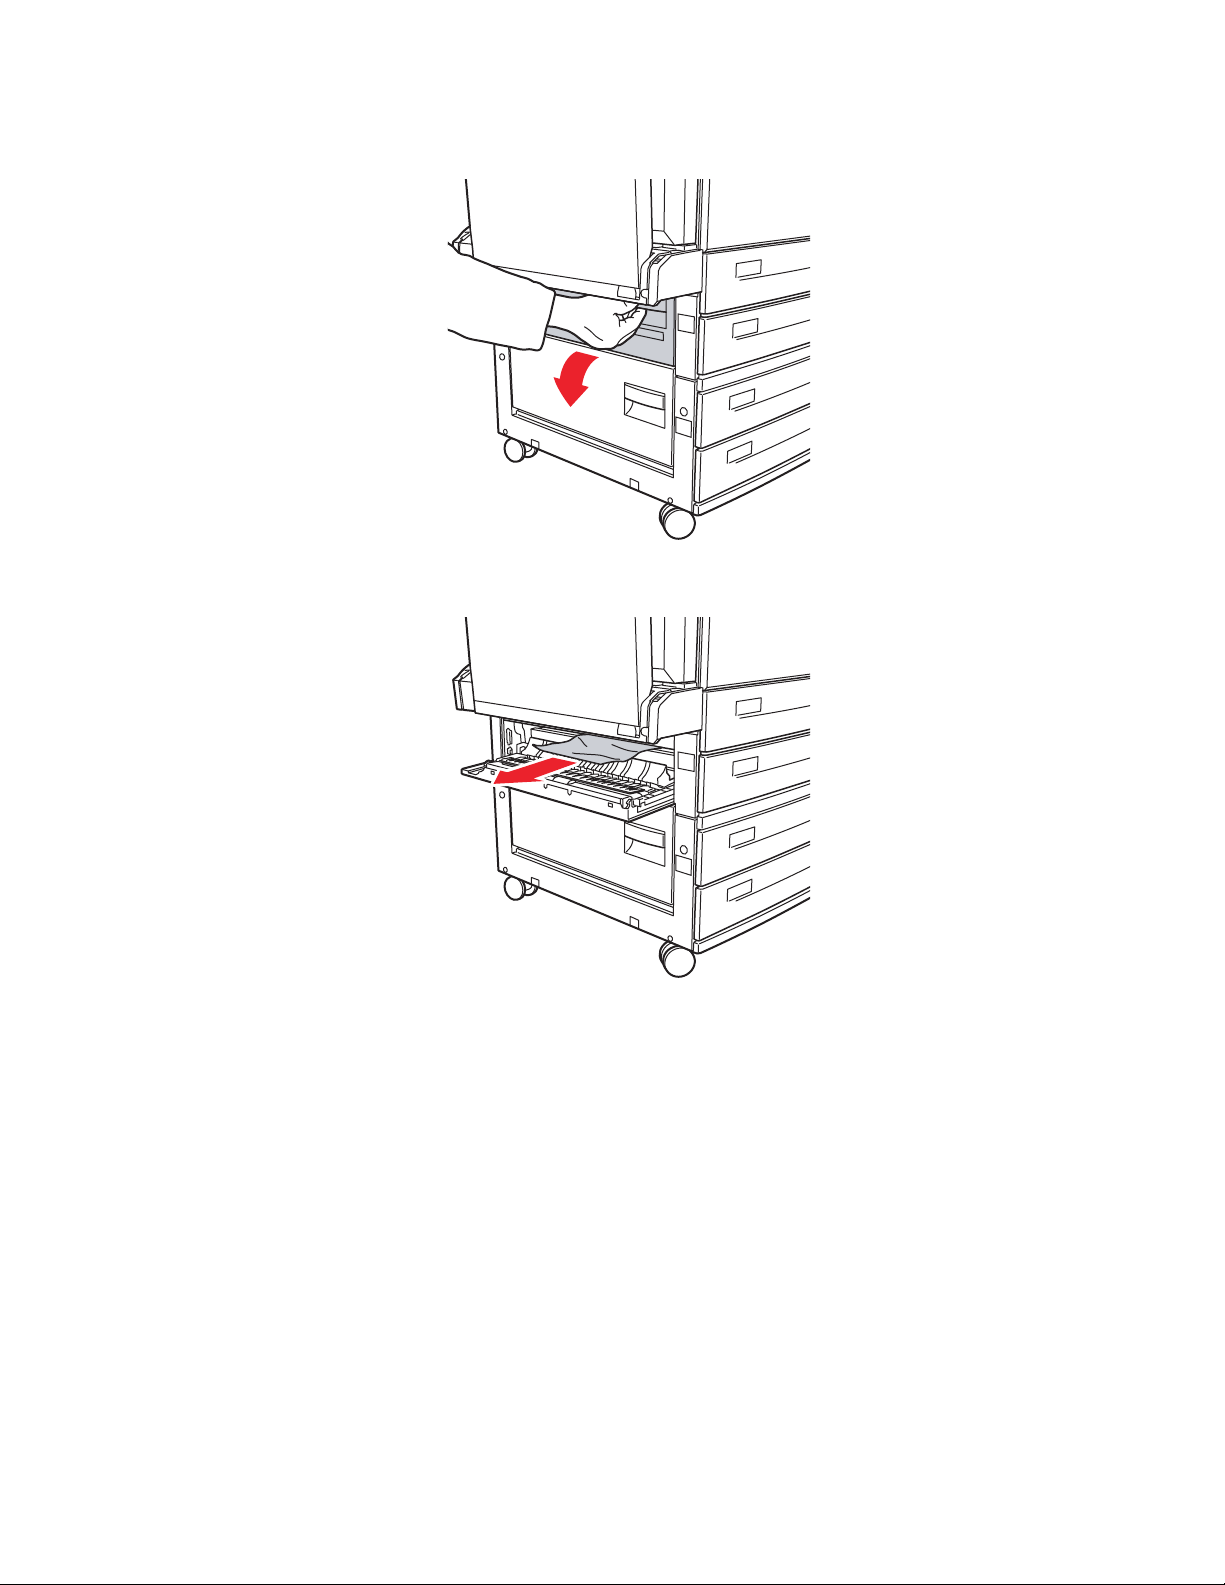
1. Pull the tray specified on the front panel completely out of the printer.
A
B
C
5500-210
Phaser® 5500 Laser Printer
4-33
Page 32

Paper Jams
2. Pull jammed paper from the printer tray slot. Confirm that all paper fragments are
removed.
5500-214
3. Remove crumpled paper from the tray.
5500-031
4. Verify that the paper is loaded correctly in the tray and that the guides are pressed against
the paper.
5500-063
5500-064
Phaser® 5500 Laser Printer
4-34
Page 33

5. Insert the tray and push it completely into the printer.
A
A
B
C
Paper Jams
5500-216
Jam at Tray 1 (MPT)
Follow these steps to clear the jam.
1. Open Door A.
E
A
D
5500-001
Phaser® 5500 Laser Printer
4-35
Page 34

Paper Jams
2. Pull the jammed paper out of the printer. If necessary, press the green handle to move the
paper to make it easier to remove. Confirm that all paper fragments are removed.
E
5500-002
3. Remove jammed or crumpled paper from Tray 1 (MPT), then close the tray.
D
5500-048
B
Phaser® 5500 Laser Printer
4-36
Page 35

Paper Jams
4. Close Door A.
E
A
D
5500-003
5. Verify that the paper is loaded correctly in the tray and that the guides are pressed against
the paper.
Jam at Tray 2 and Door A
Follow these steps to clear the jam.
Warning
Use caution; some components inside Door A may be hot.
5500-220
Phaser® 5500 Laser Printer
4-37
Page 36

Paper Jams
A
1. Open Door A.
E
A
D
5500-001
2. Pull the jammed paper out of the printer. If necessary, press the green handle to move the
paper to make it easier to remove. Confirm that all paper fragments are removed.
E
5500-002
Phaser® 5500 Laser Printer
4-38
Page 37

3. Close Door A.
D
4. Pull Tray 2 completely out of the printer.
A
Paper Jams
E
A
5500-003
B
C
5500-210
5. Pull jammed paper from the printer tray slot. Confirm that all paper fragments are
removed.
5500-214
Phaser® 5500 Laser Printer
4-39
Page 38

Paper Jams
6. Remove crumpled paper from the tray.
5500-031
7. Verify that the paper is loaded correctly in the tray and that the length and width guides are
pressed against the paper.
5500-063
5500-064
Phaser® 5500 Laser Printer
4-40
Page 39

8. Insert the tray and push it completely into the printer.
A
B
C
Paper Jams
5500-216
Jam at Tray 3 and Door B
Follow these steps to clear the jam.
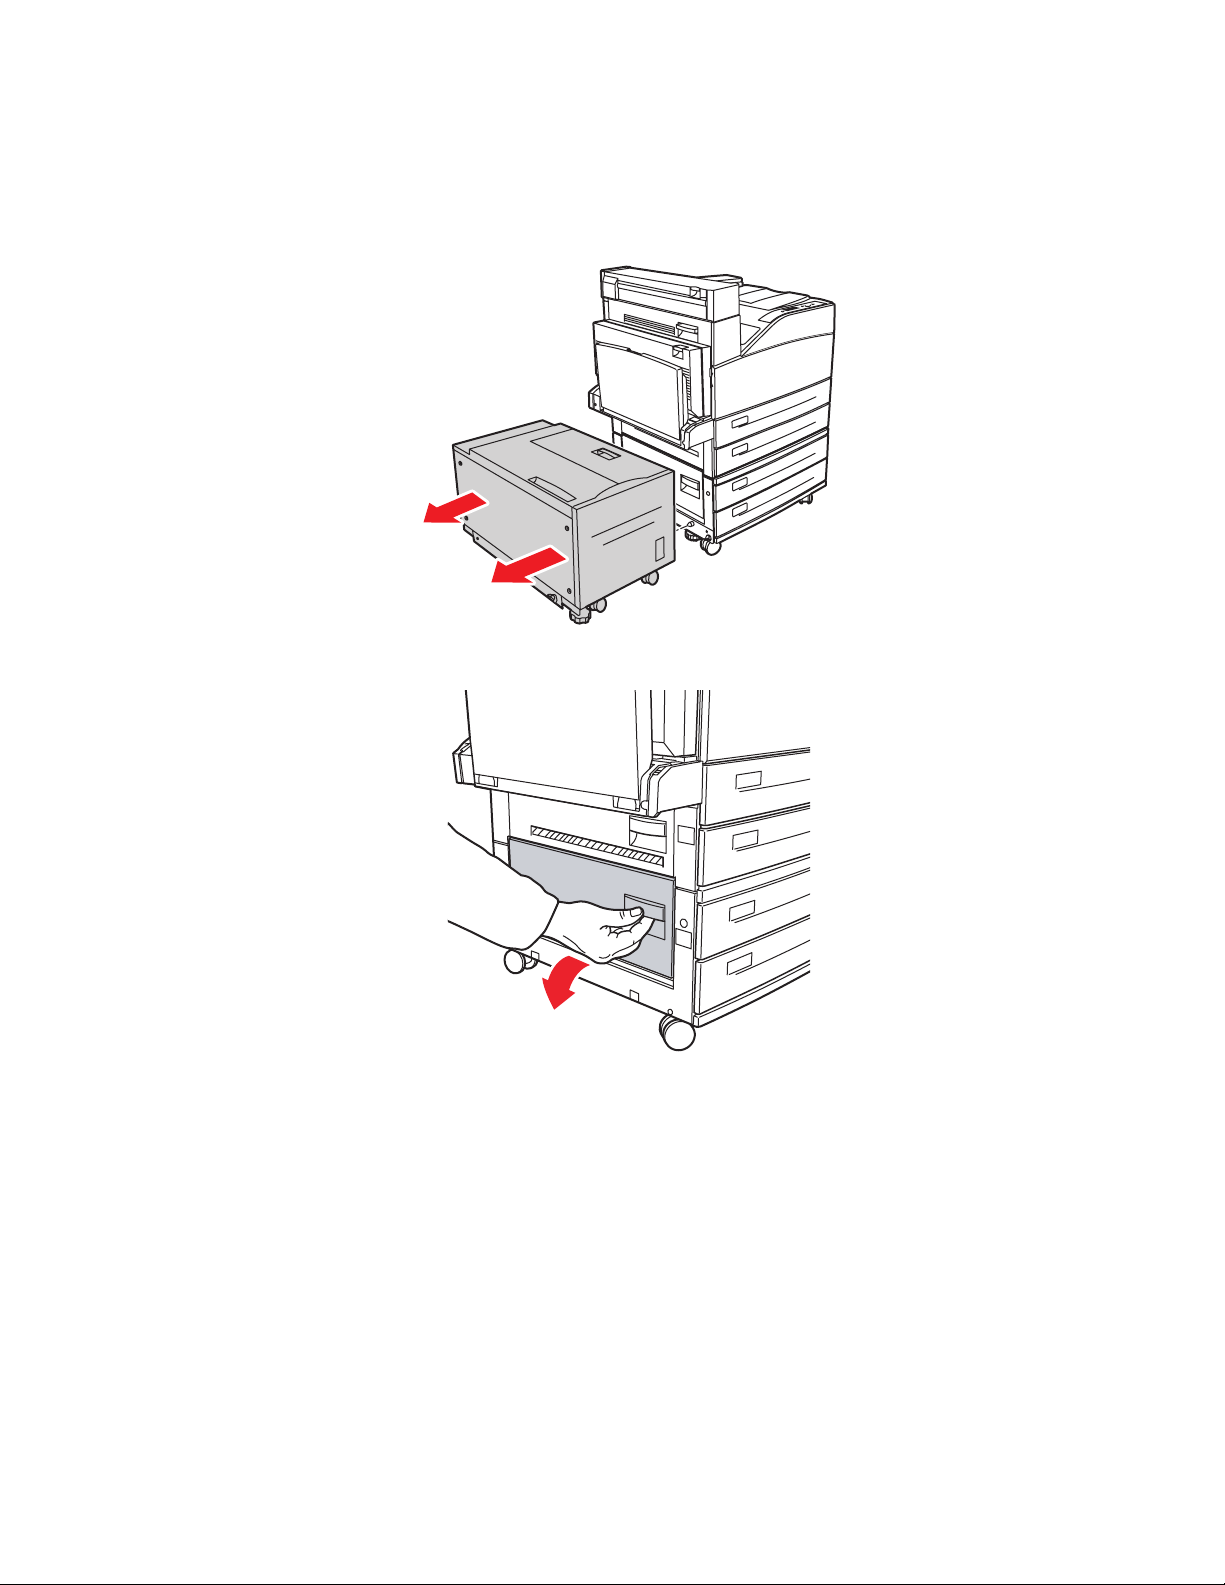
1. If the printer has the 2000-Sheet Feeder (Tray 6), slide the feeder away from the printer.
5500-230
Phaser® 5500 Laser Printer
4-41
Page 40

Paper Jams
2. Open Door B.
B
C
5500-004
3. Pull the jammed paper out of the printer. Confirm that all paper fragments are removed.
B
C
5500-005
Phaser® 5500 Laser Printer
4-42
Page 41

Paper Jams
4. Close Door B.
B
C
5500-006
5. If the printer has the 2000-Sheet Feeder (Tray 6), slide the feeder firmly against the printer.
Phaser® 5500 Laser Printer
4-43
5500-231
Page 42

Paper Jams
0
6. Pull Tray 3 completely out of the printer.
A
B
C
5500-211
7. Pull jammed paper from the printer tray slot. Confirm that all paper fragments are
removed.
8. Remove crumpled paper from the tray.
Phaser® 5500 Laser Printer
5500-215
5500-25
4-44
Page 43

Paper Jams
9. Verify that the paper is loaded correctly in the tray and that the length and width guides are
pressed against the paper.
5500-063
10. Insert the tray and push it completely into the printer.
A
B
C
5500-064
5500-217
Phaser® 5500 Laser Printer
4-45
Page 44

Paper Jams
Jam at Tray 4 or 5 and Door C
Follow these steps to clear the jam.
1. If the printer has the 2000-Sheet Feeder (Tray 6), slide the feeder away from the printer.
5500-230
2. Open Door C.
B
C
5500-007
Phaser® 5500 Laser Printer
4-46
Page 45

Paper Jams
3. Pull the jammed paper out of the printer. Confirm that all paper fragments are removed.
B
C
5500-008
4. Close Door C.
B
C
5500-009
5. If the printer has the 2000-Sheet Feeder (Tray 6), slide the feeder firmly against the printer.
Phaser® 5500 Laser Printer
4-47
5500-231
Page 46

Paper Jams
0
6. Pull the tray specified on the front panel completely out of the printer.
A
B
C
5500-212
7. Pull jammed paper from the printer tray slot. Confirm that all paper fragments are
removed.
D
B
C
8. Remove crumpled paper from the tray.
5500-051
5500-25
Phaser® 5500 Laser Printer
4-48
Page 47

Paper Jams
9. Verify that the paper is loaded correctly in the tray and that the length and width guides are
pressed against the paper.
5500-063
10. Insert the tray and push it completely into the printer.
A
B
C
5500-064
5500-216
Phaser® 5500 Laser Printer
4-49
Page 48

Jam at Tray 6
Follow these steps to clear the jam.
1. If Tray 1 is open, remove the paper from the tray and close it.
D
5500-221
Paper Jams
B
2. Slide the Tray 6 Feeder away from the printer.
5500-230
Phaser® 5500 Laser Printer
4-50
Page 49

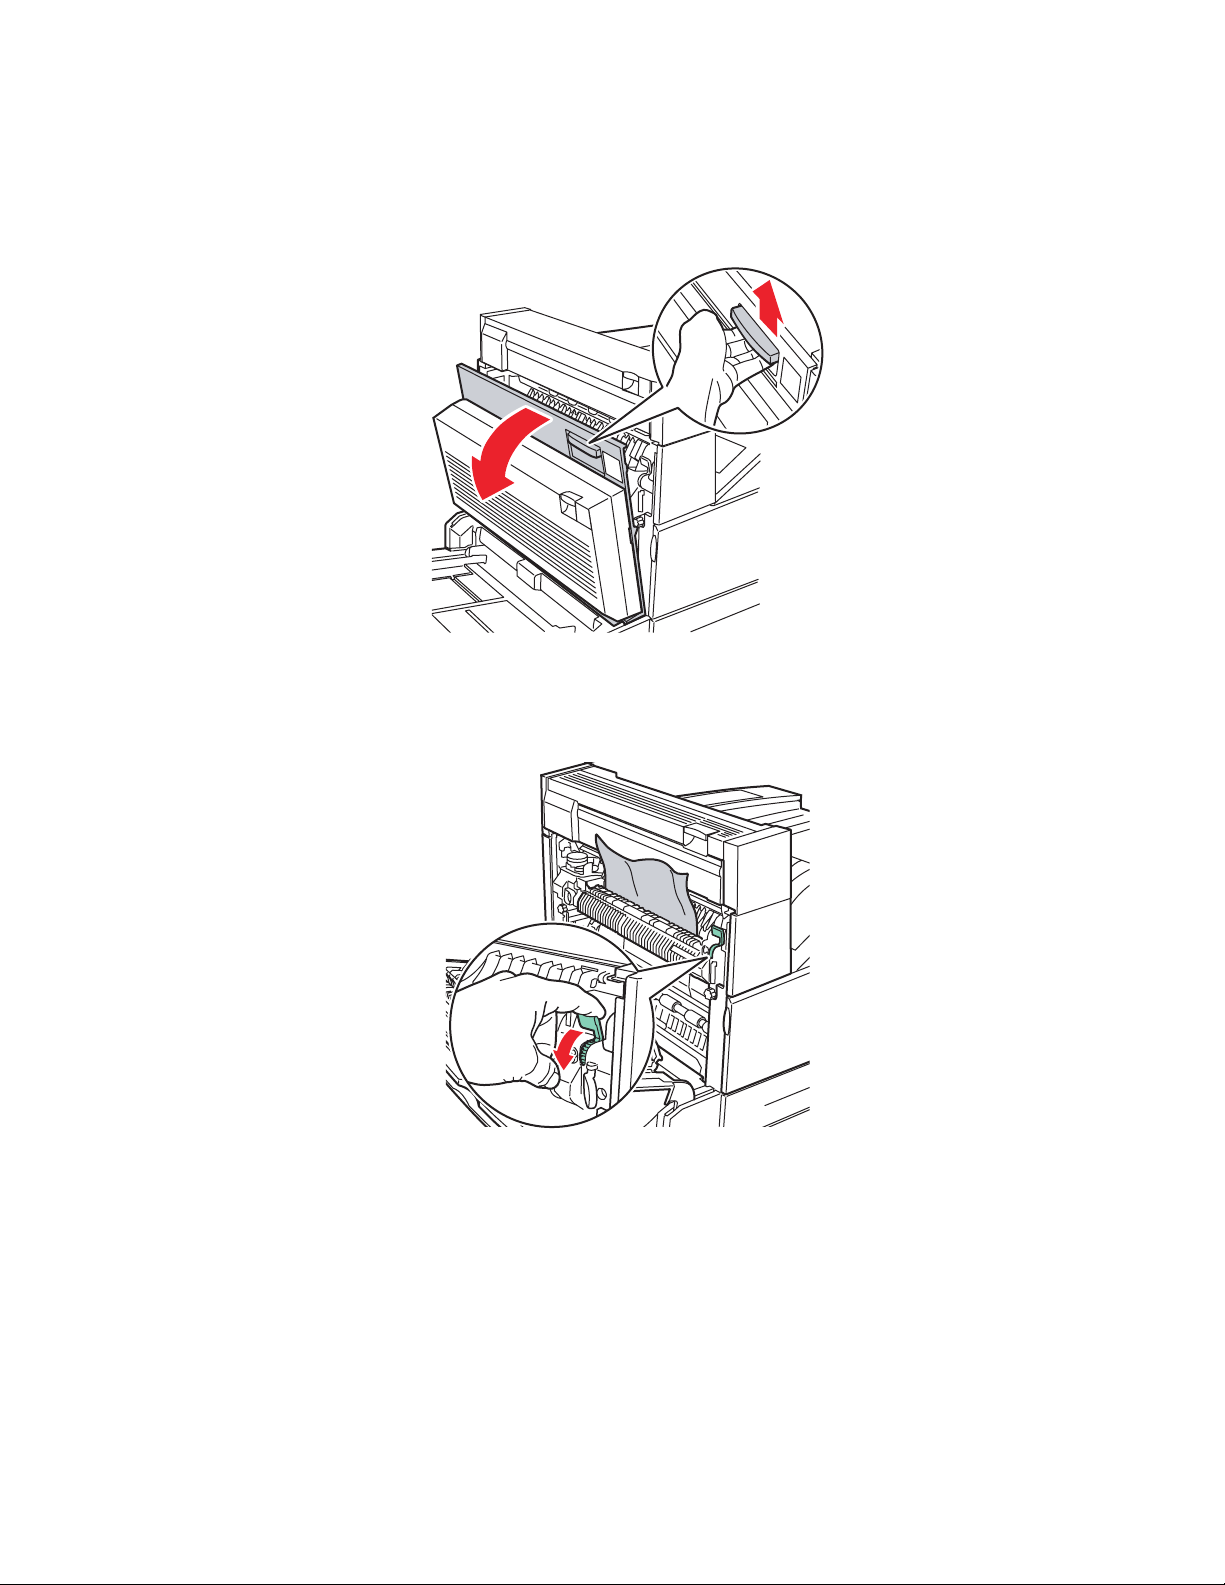
3. Open Door J and lift the access handle.
Paper Jams
5500-232
5500-234
4. Pull the jammed paper out of the printer. Confirm that all paper fragments are removed.
5500-235
Phaser® 5500 Laser Printer
4-51
Page 50

5. Close the jam access handle and close Door J.
Paper Jams
5500-236
6. Slide the Tray 6 Feeder firmly against the printer.
5500-237
5500-231
Phaser® 5500 Laser Printer
4-52
 Loading...