

Page 1

OneTouch 4.6
October 2012
05-0857-000
®
Xerox
DocuMate®
5445 / 5460
User Guide
Page 2

Design © 2012 Xerox Corporation. All rights reserved. Xerox®, Xerox and Design® and DocuMate® are registered
trademarks of Xerox Corporation in the United States and/or other countries. BR3847
Content © 2012 Visioneer, Inc. All rights reserved. The Visioneer brand name and OneTouch
®
logo are registered
trademarks of Visioneer, Inc.
Copyright protection claimed includes all forms of matters of copyrightable materials and information now allowed
by statutory or judicial law or hereinafter granted, including without limitation, material generated from the
software programs which are displayed on the screen such as styles, templates, icons, screen displays, looks, etc.
Reproduction, adaptation, or translation without prior written permission is prohibited, except as allowed under the
copyright laws.
The PaperPort
®
Adobe
®
and OmniPage® brand name and logo are registered trademarks of Nuance Communications, Inc.
, Adobe® Acrobat®, Adobe® Reader®, and the Adobe® PDF logo are registered trademarks of Adobe
Systems Incorporated in the United States and/or other countries. The Adobe PDF logo will appear in this product’s
software, and full access to Adobe software features is only available if an Adobe product is installed on your
computer.
®
Post-It
Microsoft is a U.S. registered trademark of Microsoft Corporation. Windows™ is a trademark and SharePoint
is a registered trademark of 3M in the United States and/or other countries.
®
is a
registered trademark of Microsoft Corporation.
ZyINDEX is a registered trademark of ZyLAB International, Inc. ZyINDEX toolkit portions, Copyright © 1990-1998,
ZyLAB International, Inc.
Document Version: 05-0857-000 (October 2012)
All Rights Reserved. All other products mentioned herein may be trademarks of their respective companies and are
hereby acknowledged.
Information is subject to change without notice and does not represent a commitment on the part of Visioneer. The
software described is furnished under a licensing agreement. The software may be used or copied only in
accordance with the terms of such an agreement. It is against the law to copy the software on any medium except
as specifically allowed in the licensing agreement. No part of this document may be reproduced or transmitted in
any form or by any means, electronic or mechanical, including photocopying, recording, or information storage and
retrieval systems, or translated to another language, for any purpose other than the licensee's personal use and as
specifically allowed in the licensing agreement, without the express written permission of Visioneer.
Restricted Rights Legend
Use, duplication, or disclosure is subject to restrictions as set forth in contract subdivision (c)(1)(ii) of the Rights in
Te c h n i c a l D a t a a n d C o m p u t e r S o f t w a r e Clause 52.227-FAR14. Material scanned by this product may be protected
by governmental laws and other regulations, such as copyright laws. The customer is solely responsible for
complying with all such laws and regulations.
Changes are periodically made to this document. Changes, technical inaccuracies, and typographic errors will be
corrected in subsequent editions.
Page 3

Ta b l e o f C o n t e n t s
1Safety
Safety Introduction . . . . . . . . . . . . . . . . . . . . . . . . . . . . . . . . . . . . . . . . . . . . . . . . . . . . . . . . . . . . . . . . . . . . . . . . . . . . . . . . . . . . 8
Operational Safety Information . . . . . . . . . . . . . . . . . . . . . . . . . . . . . . . . . . . . . . . . . . . . . . . . . . . . . . . . . . . . . . . . . . . . . . . . 9
Electrical Information . . . . . . . . . . . . . . . . . . . . . . . . . . . . . . . . . . . . . . . . . . . . . . . . . . . . . . . . . . . . . . . . . . . . . . . . . . . . . . . . .10
Warning - Electrical Safety Information . . . . . . . . . . . . . . . . . . . . . . . . . . . . . . . . . . . . . . . . . . . . . . . . . . . . . . . . . .10
Electrical Supply . . . . . . . . . . . . . . . . . . . . . . . . . . . . . . . . . . . . . . . . . . . . . . . . . . . . . . . . . . . . . . . . . . . . . . . . . . . . . . . . .10
Disconnect Device . . . . . . . . . . . . . . . . . . . . . . . . . . . . . . . . . . . . . . . . . . . . . . . . . . . . . . . . . . . . . . . . . . . . . . . . . . . . . . .10
Emergency Power Off . . . . . . . . . . . . . . . . . . . . . . . . . . . . . . . . . . . . . . . . . . . . . . . . . . . . . . . . . . . . . . . . . . . . . . . . . . . . . . . . .11
Maintenance Information . . . . . . . . . . . . . . . . . . . . . . . . . . . . . . . . . . . . . . . . . . . . . . . . . . . . . . . . . . . . . . . . . . . . . . . . . . . . .12
Product Safety Certification . . . . . . . . . . . . . . . . . . . . . . . . . . . . . . . . . . . . . . . . . . . . . . . . . . . . . . . . . . . . . . . . . . . . . . . . . . .13
Environmental Health and Safety Contacts . . . . . . . . . . . . . . . . . . . . . . . . . . . . . . . . . . . . . . . . . . . . . . . . . . . . . . . . . . . . .14
2 Welcome
What’s in the Box . . . . . . . . . . . . . . . . . . . . . . . . . . . . . . . . . . . . . . . . . . . . . . . . . . . . . . . . . . . . . . . . . . . . . . . . . . . . . . . . . . . . . .16
System Requirements . . . . . . . . . . . . . . . . . . . . . . . . . . . . . . . . . . . . . . . . . . . . . . . . . . . . . . . . . . . . . . . . . . . . . . . . . . . . . . . . .17
Documentation . . . . . . . . . . . . . . . . . . . . . . . . . . . . . . . . . . . . . . . . . . . . . . . . . . . . . . . . . . . . . . . . . . . . . . . . . . . . . . . . . . . . . . .18
The Xerox DocuMate 5445 / 5460 Scanner . . . . . . . . . . . . . . . . . . . . . . . . . . . . . . . . . . . . . . . . . . . . . . . . . . . . . . . . . . . . .19
Control Panel . . . . . . . . . . . . . . . . . . . . . . . . . . . . . . . . . . . . . . . . . . . . . . . . . . . . . . . . . . . . . . . . . . . . . . . . . . . . . . . . . . .20
3Scanner Setup
Unpack the Scanner . . . . . . . . . . . . . . . . . . . . . . . . . . . . . . . . . . . . . . . . . . . . . . . . . . . . . . . . . . . . . . . . . . . . . . . . . . . . . . . . . . .22
Attach the Input Tray . . . . . . . . . . . . . . . . . . . . . . . . . . . . . . . . . . . . . . . . . . . . . . . . . . . . . . . . . . . . . . . . . . . . . . . . . . . . . . . . .24
Connect the Scanner Power Cord . . . . . . . . . . . . . . . . . . . . . . . . . . . . . . . . . . . . . . . . . . . . . . . . . . . . . . . . . . . . . . . . . . . . . .25
4 Installation
Before You Begin . . . . . . . . . . . . . . . . . . . . . . . . . . . . . . . . . . . . . . . . . . . . . . . . . . . . . . . . . . . . . . . . . . . . . . . . . . . . . . . . . . . . . .28
Install the Software and Connect the Scanner . . . . . . . . . . . . . . . . . . . . . . . . . . . . . . . . . . . . . . . . . . . . . . . . . . . . . . . . . .29
Installing the Scanner Driver . . . . . . . . . . . . . . . . . . . . . . . . . . . . . . . . . . . . . . . . . . . . . . . . . . . . . . . . . . . . . . . . . . . . .31
Connect the USB Cable and Turn on the Power . . . . . . . . . . . . . . . . . . . . . . . . . . . . . . . . . . . . . . . . . . . . . . . . . . . 32
Installing the User Utility . . . . . . . . . . . . . . . . . . . . . . . . . . . . . . . . . . . . . . . . . . . . . . . . . . . . . . . . . . . . . . . . . . . . . . . .33
Installing Visioneer One Touch . . . . . . . . . . . . . . . . . . . . . . . . . . . . . . . . . . . . . . . . . . . . . . . . . . . . . . . . . . . . . . . . . . .34
Installing Additional Applications . . . . . . . . . . . . . . . . . . . . . . . . . . . . . . . . . . . . . . . . . . . . . . . . . . . . . . . . . . . . . . . . . . . . . . 36
View the User Guides . . . . . . . . . . . . . . . . . . . . . . . . . . . . . . . . . . . . . . . . . . . . . . . . . . . . . . . . . . . . . . . . . . . . . . . . . . . . . . . . . .38
Register Your Scanner . . . . . . . . . . . . . . . . . . . . . . . . . . . . . . . . . . . . . . . . . . . . . . . . . . . . . . . . . . . . . . . . . . . . . . . . . . . . . . . . .39
5Loading Documents to Scan
Using the Mixed Batch Card Guide . . . . . . . . . . . . . . . . . . . . . . . . . . . . . . . . . . . . . . . . . . . . . . . . . . . . . . . . . . . . . . . . . . . . .42
Detach or Attach the Mixed Batch Card Guide . . . . . . . . . . . . . . . . . . . . . . . . . . . . . . . . . . . . . . . . . . . . . . . . . . . .42
Preparing Documents for Scanning . . . . . . . . . . . . . . . . . . . . . . . . . . . . . . . . . . . . . . . . . . . . . . . . . . . . . . . . . . . . . . . . . . . .44
Scanning Thick Pages or Bound Documents . . . . . . . . . . . . . . . . . . . . . . . . . . . . . . . . . . . . . . . . . . . . . . . . . . . . . . . . . . . .46
Supported Document Types . . . . . . . . . . . . . . . . . . . . . . . . . . . . . . . . . . . . . . . . . . . . . . . . . . . . . . . . . . . . . . . . . . . . . . . . . . .47
Unacceptable Document Types . . . . . . . . . . . . . . . . . . . . . . . . . . . . . . . . . . . . . . . . . . . . . . . . . . . . . . . . . . . . . . . . . . . . . . . .48
Unsupported Document Types . . . . . . . . . . . . . . . . . . . . . . . . . . . . . . . . . . . . . . . . . . . . . . . . . . . . . . . . . . . . . . . . . . . . . . . .49
Scanning Interfaces . . . . . . . . . . . . . . . . . . . . . . . . . . . . . . . . . . . . . . . . . . . . . . . . . . . . . . . . . . . . . . . . . . . . . . . . . . . . . . . . . . .50
6Scanning and Configuring OneTouch
Xerox® DocuMate® 5445 / 5460
User’s Guide
3
Page 4

Default One Touch Settings . . . . . . . . . . . . . . . . . . . . . . . . . . . . . . . . . . . . . . . . . . . . . . . . . . . . . . . . . . . . . . . . . . . . . . . . . . .53
Scan from the One Touch Button Panel . . . . . . . . . . . . . . . . . . . . . . . . . . . . . . . . . . . . . . . . . . . . . . . . . . . . . . . . . . . . . . . .54
Features of the One Touch Button Panel . . . . . . . . . . . . . . . . . . . . . . . . . . . . . . . . . . . . . . . . . . . . . . . . . . . . . . . . .54
Changing the Button Settings . . . . . . . . . . . . . . . . . . . . . . . . . . . . . . . . . . . . . . . . . . . . . . . . . . . . . . . . . . . . . . . . . . . . . . . . .56
Selecting Options for One Touch . . . . . . . . . . . . . . . . . . . . . . . . . . . . . . . . . . . . . . . . . . . . . . . . . . . . . . . . . . . . . . . . . . . . . . .58
Scan Configurations . . . . . . . . . . . . . . . . . . . . . . . . . . . . . . . . . . . . . . . . . . . . . . . . . . . . . . . . . . . . . . . . . . . . . . . . . . . . . . . . . . .61
Scan Settings Tab . . . . . . . . . . . . . . . . . . . . . . . . . . . . . . . . . . . . . . . . . . . . . . . . . . . . . . . . . . . . . . . . . . . . . . . . . . . . . . .62
Page Settings Tab . . . . . . . . . . . . . . . . . . . . . . . . . . . . . . . . . . . . . . . . . . . . . . . . . . . . . . . . . . . . . . . . . . . . . . . . . . . . . . .63
Advanced Settings Tab . . . . . . . . . . . . . . . . . . . . . . . . . . . . . . . . . . . . . . . . . . . . . . . . . . . . . . . . . . . . . . . . . . . . . . . . . .65
Redaction Settings Tab . . . . . . . . . . . . . . . . . . . . . . . . . . . . . . . . . . . . . . . . . . . . . . . . . . . . . . . . . . . . . . . . . . . . . . . . . .66
File Formats . . . . . . . . . . . . . . . . . . . . . . . . . . . . . . . . . . . . . . . . . . . . . . . . . . . . . . . . . . . . . . . . . . . . . . . . . . . . . . . . . . . . . . . . . . .69
Create Single Image Files . . . . . . . . . . . . . . . . . . . . . . . . . . . . . . . . . . . . . . . . . . . . . . . . . . . . . . . . . . . . . . . . . . . . . . . .69
Image Formats . . . . . . . . . . . . . . . . . . . . . . . . . . . . . . . . . . . . . . . . . . . . . . . . . . . . . . . . . . . . . . . . . . . . . . . . . . . . . . . . .69
Text Formats . . . . . . . . . . . . . . . . . . . . . . . . . . . . . . . . . . . . . . . . . . . . . . . . . . . . . . . . . . . . . . . . . . . . . . . . . . . . . . . . . . . .72
Configure Before Scan . . . . . . . . . . . . . . . . . . . . . . . . . . . . . . . . . . . . . . . . . . . . . . . . . . . . . . . . . . . . . . . . . . . . . . . . . . . . . . . . .73
To Scan Using Configure Before Scan . . . . . . . . . . . . . . . . . . . . . . . . . . . . . . . . . . . . . . . . . . . . . . . . . . . . . . . . . . . .73
Open Scanned Document(s) . . . . . . . . . . . . . . . . . . . . . . . . . . . . . . . . . . . . . . . . . . . . . . . . . . . . . . . . . . . . . . . . . . . . . . . . . . .75
Transfer to Storage . . . . . . . . . . . . . . . . . . . . . . . . . . . . . . . . . . . . . . . . . . . . . . . . . . . . . . . . . . . . . . . . . . . . . . . . . . . . . . . . . . . .76
Setting the Folder and Options from One Touch . . . . . . . . . . . . . . . . . . . . . . . . . . . . . . . . . . . . . . . . . . . . . . . . . .76
Setting the Folder from Windows . . . . . . . . . . . . . . . . . . . . . . . . . . . . . . . . . . . . . . . . . . . . . . . . . . . . . . . . . . . . . . . .77
Scanning to Multiple Folders . . . . . . . . . . . . . . . . . . . . . . . . . . . . . . . . . . . . . . . . . . . . . . . . . . . . . . . . . . . . . . . . . . . . .78
Burn to CD-ROM . . . . . . . . . . . . . . . . . . . . . . . . . . . . . . . . . . . . . . . . . . . . . . . . . . . . . . . . . . . . . . . . . . . . . . . . . . . . . . . . . . . . . .82
Printer or Fax . . . . . . . . . . . . . . . . . . . . . . . . . . . . . . . . . . . . . . . . . . . . . . . . . . . . . . . . . . . . . . . . . . . . . . . . . . . . . . . . . . . . . . . . . .84
PaperPort . . . . . . . . . . . . . . . . . . . . . . . . . . . . . . . . . . . . . . . . . . . . . . . . . . . . . . . . . . . . . . . . . . . . . . . . . . . . . . . . . . . . . . . . . . . . .86
SharePoint . . . . . . . . . . . . . . . . . . . . . . . . . . . . . . . . . . . . . . . . . . . . . . . . . . . . . . . . . . . . . . . . . . . . . . . . . . . . . . . . . . . . . . . . . . . .88
SharePoint Link Log Viewer . . . . . . . . . . . . . . . . . . . . . . . . . . . . . . . . . . . . . . . . . . . . . . . . . . . . . . . . . . . . . . . . . . . . . .89
FTP Transfer . . . . . . . . . . . . . . . . . . . . . . . . . . . . . . . . . . . . . . . . . . . . . . . . . . . . . . . . . . . . . . . . . . . . . . . . . . . . . . . . . . . . . . . . . . 91
FTP Link Log Viewer . . . . . . . . . . . . . . . . . . . . . . . . . . . . . . . . . . . . . . . . . . . . . . . . . . . . . . . . . . . . . . . . . . . . . . . . . . . . .92
SMTP . . . . . . . . . . . . . . . . . . . . . . . . . . . . . . . . . . . . . . . . . . . . . . . . . . . . . . . . . . . . . . . . . . . . . . . . . . . . . . . . . . . . . . . . . . . . . . . . .93
SMTP Link Log Viewer . . . . . . . . . . . . . . . . . . . . . . . . . . . . . . . . . . . . . . . . . . . . . . . . . . . . . . . . . . . . . . . . . . . . . . . . . . .94
Email Applications . . . . . . . . . . . . . . . . . . . . . . . . . . . . . . . . . . . . . . . . . . . . . . . . . . . . . . . . . . . . . . . . . . . . . . . . . . . . . . . . . . . . .96
Email Properties . . . . . . . . . . . . . . . . . . . . . . . . . . . . . . . . . . . . . . . . . . . . . . . . . . . . . . . . . . . . . . . . . . . . . . . . . . . . . . . . .97
Text Editors . . . . . . . . . . . . . . . . . . . . . . . . . . . . . . . . . . . . . . . . . . . . . . . . . . . . . . . . . . . . . . . . . . . . . . . . . . . . . . . . . . . . . . . . . . .98
Text Documents Properties . . . . . . . . . . . . . . . . . . . . . . . . . . . . . . . . . . . . . . . . . . . . . . . . . . . . . . . . . . . . . . . . . . . . . .99
Adding Text Editor Applications to One Touch . . . . . . . . . . . . . . . . . . . . . . . . . . . . . . . . . . . . . . . . . . . . . . . . . . 100
Creating an HTML Web Page from Your Scanned Documents . . . . . . . . . . . . . . . . . . . . . . . . . . . . . . . . . . . 101
Still Image Client . . . . . . . . . . . . . . . . . . . . . . . . . . . . . . . . . . . . . . . . . . . . . . . . . . . . . . . . . . . . . . . . . . . . . . . . . . . . . . . . . . . . 102
Image Editors . . . . . . . . . . . . . . . . . . . . . . . . . . . . . . . . . . . . . . . . . . . . . . . . . . . . . . . . . . . . . . . . . . . . . . . . . . . . . . . . . . . . . . . 104
Image Documents Properties . . . . . . . . . . . . . . . . . . . . . . . . . . . . . . . . . . . . . . . . . . . . . . . . . . . . . . . . . . . . . . . . . . 105
Adding Image Editor Applications to One Touch . . . . . . . . . . . . . . . . . . . . . . . . . . . . . . . . . . . . . . . . . . . . . . . . 106
PDF Applications . . . . . . . . . . . . . . . . . . . . . . . . . . . . . . . . . . . . . . . . . . . . . . . . . . . . . . . . . . . . . . . . . . . . . . . . . . . . . . . . . . . . 107
Send to Application . . . . . . . . . . . . . . . . . . . . . . . . . . . . . . . . . . . . . . . . . . . . . . . . . . . . . . . . . . . . . . . . . . . . . . . . . . . . . . . . . 110
Scanning to Multiple Destinations . . . . . . . . . . . . . . . . . . . . . . . . . . . . . . . . . . . . . . . . . . . . . . . . . . . . . . . . . . . . . . . . . . . 113
Scanning with Job Separation . . . . . . . . . . . . . . . . . . . . . . . . . . . . . . . . . . . . . . . . . . . . . . . . . . . . . . . . . . . . . . . . . . . . . . . 116
Scanning with Optical Character Recognition (OCR) . . . . . . . . . . . . . . . . . . . . . . . . . . . . . . . . . . . . . . . . . . . . . . . . . . 119
Text Formats . . . . . . . . . . . . . . . . . . . . . . . . . . . . . . . . . . . . . . . . . . . . . . . . . . . . . . . . . . . . . . . . . . . . . . . . . . . . . . . . . . 120
Selecting One Touch OmniPage OCR Options . . . . . . . . . . . . . . . . . . . . . . . . . . . . . . . . . . . . . . . . . . . . . . . . . . . . . . . . . 123
The OCR Tab . . . . . . . . . . . . . . . . . . . . . . . . . . . . . . . . . . . . . . . . . . . . . . . . . . . . . . . . . . . . . . . . . . . . . . . . . . . . . . . . . . 124
Creating Your Own Dictionaries . . . . . . . . . . . . . . . . . . . . . . . . . . . . . . . . . . . . . . . . . . . . . . . . . . . . . . . . . . . . . . . . 125
Editing User Dictionaries . . . . . . . . . . . . . . . . . . . . . . . . . . . . . . . . . . . . . . . . . . . . . . . . . . . . . . . . . . . . . . . . . . . . . . 127
4
Xerox® DocuMate® 5445 / 5460
User’s Guide
Page 5

Table of Contents
The Format Tab . . . . . . . . . . . . . . . . . . . . . . . . . . . . . . . . . . . . . . . . . . . . . . . . . . . . . . . . . . . . . . . . . . . . . . . . . . . . . . . 128
One Touch with Visioneer Acuity Technology . . . . . . . . . . . . . . . . . . . . . . . . . . . . . . . . . . . . . . . . . . . . . . . . . . . . . . . . . 131
The Acuity Settings . . . . . . . . . . . . . . . . . . . . . . . . . . . . . . . . . . . . . . . . . . . . . . . . . . . . . . . . . . . . . . . . . . . . . . . . . . . . 132
Hardware Properties and Interface Behavior . . . . . . . . . . . . . . . . . . . . . . . . . . . . . . . . . . . . . . . . . . . . . . . . . . . . . . . . . 135
Device Settings . . . . . . . . . . . . . . . . . . . . . . . . . . . . . . . . . . . . . . . . . . . . . . . . . . . . . . . . . . . . . . . . . . . . . . . . . . . . . . . 136
Driver Settings . . . . . . . . . . . . . . . . . . . . . . . . . . . . . . . . . . . . . . . . . . . . . . . . . . . . . . . . . . . . . . . . . . . . . . . . . . . . . . . . 136
7 Scanning from TWAIN and WIA
Accessing the Scanner Interface . . . . . . . . . . . . . . . . . . . . . . . . . . . . . . . . . . . . . . . . . . . . . . . . . . . . . . . . . . . . . . . . . . . . . 138
Choosing TWAIN or WIA . . . . . . . . . . . . . . . . . . . . . . . . . . . . . . . . . . . . . . . . . . . . . . . . . . . . . . . . . . . . . . . . . . . . . . 138
Scanning . . . . . . . . . . . . . . . . . . . . . . . . . . . . . . . . . . . . . . . . . . . . . . . . . . . . . . . . . . . . . . . . . . . . . . . . . . . . . . . . . . . . . . . . . . . . 139
Using the Preview Window . . . . . . . . . . . . . . . . . . . . . . . . . . . . . . . . . . . . . . . . . . . . . . . . . . . . . . . . . . . . . . . . . . . . . . . . . . . 140
Scan Regions . . . . . . . . . . . . . . . . . . . . . . . . . . . . . . . . . . . . . . . . . . . . . . . . . . . . . . . . . . . . . . . . . . . . . . . . . . . . . . . . . . 141
Move, Resize, or Delete Regions . . . . . . . . . . . . . . . . . . . . . . . . . . . . . . . . . . . . . . . . . . . . . . . . . . . . . . . . . . . . . . . . 144
Reordering Regions . . . . . . . . . . . . . . . . . . . . . . . . . . . . . . . . . . . . . . . . . . . . . . . . . . . . . . . . . . . . . . . . . . . . . . . . . . . . 145
Clear All Regions . . . . . . . . . . . . . . . . . . . . . . . . . . . . . . . . . . . . . . . . . . . . . . . . . . . . . . . . . . . . . . . . . . . . . . . . . . . . . . 146
Document Source Configuration . . . . . . . . . . . . . . . . . . . . . . . . . . . . . . . . . . . . . . . . . . . . . . . . . . . . . . . . . . . . . . . . . . . . . 147
Basic Options . . . . . . . . . . . . . . . . . . . . . . . . . . . . . . . . . . . . . . . . . . . . . . . . . . . . . . . . . . . . . . . . . . . . . . . . . . . . . . . . . 147
Advanced Options . . . . . . . . . . . . . . . . . . . . . . . . . . . . . . . . . . . . . . . . . . . . . . . . . . . . . . . . . . . . . . . . . . . . . . . . . . . . . 147
Summary . . . . . . . . . . . . . . . . . . . . . . . . . . . . . . . . . . . . . . . . . . . . . . . . . . . . . . . . . . . . . . . . . . . . . . . . . . . . . . . . . . . . . . . . . . . 150
Presets . . . . . . . . . . . . . . . . . . . . . . . . . . . . . . . . . . . . . . . . . . . . . . . . . . . . . . . . . . . . . . . . . . . . . . . . . . . . . . . . . . . . . . . . . . . . . . 151
Save a Preset . . . . . . . . . . . . . . . . . . . . . . . . . . . . . . . . . . . . . . . . . . . . . . . . . . . . . . . . . . . . . . . . . . . . . . . . . . . . . . . . . . 151
Exporting Presets . . . . . . . . . . . . . . . . . . . . . . . . . . . . . . . . . . . . . . . . . . . . . . . . . . . . . . . . . . . . . . . . . . . . . . . . . . . . . . 152
Importing a Preset . . . . . . . . . . . . . . . . . . . . . . . . . . . . . . . . . . . . . . . . . . . . . . . . . . . . . . . . . . . . . . . . . . . . . . . . . . . . 154
Document Settings . . . . . . . . . . . . . . . . . . . . . . . . . . . . . . . . . . . . . . . . . . . . . . . . . . . . . . . . . . . . . . . . . . . . . . . . . . . . . . . . . . 156
Disabled Options in this Section . . . . . . . . . . . . . . . . . . . . . . . . . . . . . . . . . . . . . . . . . . . . . . . . . . . . . . . . . . . . . . . . 156
Main Panel Options . . . . . . . . . . . . . . . . . . . . . . . . . . . . . . . . . . . . . . . . . . . . . . . . . . . . . . . . . . . . . . . . . . . . . . . . . . . 157
Advanced Panel Options . . . . . . . . . . . . . . . . . . . . . . . . . . . . . . . . . . . . . . . . . . . . . . . . . . . . . . . . . . . . . . . . . . . . . . . 161
Scanner Model Panel Options . . . . . . . . . . . . . . . . . . . . . . . . . . . . . . . . . . . . . . . . . . . . . . . . . . . . . . . . . . . . . . . . . . 164
Image Enhancements . . . . . . . . . . . . . . . . . . . . . . . . . . . . . . . . . . . . . . . . . . . . . . . . . . . . . . . . . . . . . . . . . . . . . . . . . . . . . . . 167
Disabled Options in this Section . . . . . . . . . . . . . . . . . . . . . . . . . . . . . . . . . . . . . . . . . . . . . . . . . . . . . . . . . . . . . . . . 167
Main Panel Options . . . . . . . . . . . . . . . . . . . . . . . . . . . . . . . . . . . . . . . . . . . . . . . . . . . . . . . . . . . . . . . . . . . . . . . . . . . 168
Color Processing Panel Options . . . . . . . . . . . . . . . . . . . . . . . . . . . . . . . . . . . . . . . . . . . . . . . . . . . . . . . . . . . . . . . . 174
Advanced Panel Options . . . . . . . . . . . . . . . . . . . . . . . . . . . . . . . . . . . . . . . . . . . . . . . . . . . . . . . . . . . . . . . . . . . . . . . 176
Scanner Model Panel Options . . . . . . . . . . . . . . . . . . . . . . . . . . . . . . . . . . . . . . . . . . . . . . . . . . . . . . . . . . . . . . . . . . 179
Driver Configuration . . . . . . . . . . . . . . . . . . . . . . . . . . . . . . . . . . . . . . . . . . . . . . . . . . . . . . . . . . . . . . . . . . . . . . . . . . . . . . . . . 180
Disabled Options in this Section . . . . . . . . . . . . . . . . . . . . . . . . . . . . . . . . . . . . . . . . . . . . . . . . . . . . . . . . . . . . . . . . 180
Module Configuration . . . . . . . . . . . . . . . . . . . . . . . . . . . . . . . . . . . . . . . . . . . . . . . . . . . . . . . . . . . . . . . . . . . . . . . . . 180
Scanner Configuration . . . . . . . . . . . . . . . . . . . . . . . . . . . . . . . . . . . . . . . . . . . . . . . . . . . . . . . . . . . . . . . . . . . . . . . . 181
Hardware Properties and Interface Behavior . . . . . . . . . . . . . . . . . . . . . . . . . . . . . . . . . . . . . . . . . . . . . . . . . . . . . . . . . 182
Device Settings . . . . . . . . . . . . . . . . . . . . . . . . . . . . . . . . . . . . . . . . . . . . . . . . . . . . . . . . . . . . . . . . . . . . . . . . . . . . . . . 182
Driver Settings . . . . . . . . . . . . . . . . . . . . . . . . . . . . . . . . . . . . . . . . . . . . . . . . . . . . . . . . . . . . . . . . . . . . . . . . . . . . . . . . 184
8Scanning from ISIS
Accessing the ISIS Interface in QuickScan . . . . . . . . . . . . . . . . . . . . . . . . . . . . . . . . . . . . . . . . . . . . . . . . . . . . . . . . . . . . 188
9Scanner Options, Maintenance and Troubleshooting
Clearing Paper Jams . . . . . . . . . . . . . . . . . . . . . . . . . . . . . . . . . . . . . . . . . . . . . . . . . . . . . . . . . . . . . . . . . . . . . . . . . . . . . . . . . 190
Cleaning the Outside of the Scanner . . . . . . . . . . . . . . . . . . . . . . . . . . . . . . . . . . . . . . . . . . . . . . . . . . . . . . . . . . . . . . . . . 194
Cleaning the Inside of the Scanner . . . . . . . . . . . . . . . . . . . . . . . . . . . . . . . . . . . . . . . . . . . . . . . . . . . . . . . . . . . . . . . . . . . 195
Cleaning the Scanner Glass and Background Plates . . . . . . . . . . . . . . . . . . . . . . . . . . . . . . . . . . . . . . . . . . . . . 195
®
DocuMate® 5445 / 5460
Xerox
User’s Guide
5
Page 6

Cleaning the Double Feed Detection Sensors . . . . . . . . . . . . . . . . . . . . . . . . . . . . . . . . . . . . . . . . . . . . . . . . . . . 196
Cleaning the Rollers . . . . . . . . . . . . . . . . . . . . . . . . . . . . . . . . . . . . . . . . . . . . . . . . . . . . . . . . . . . . . . . . . . . . . . . . . . . 197
Replacing the Rollers . . . . . . . . . . . . . . . . . . . . . . . . . . . . . . . . . . . . . . . . . . . . . . . . . . . . . . . . . . . . . . . . . . . . . . . . . . . . . . . . 199
User Utility . . . . . . . . . . . . . . . . . . . . . . . . . . . . . . . . . . . . . . . . . . . . . . . . . . . . . . . . . . . . . . . . . . . . . . . . . . . . . . . . . . . . . . . . . . 203
Main Screen Options . . . . . . . . . . . . . . . . . . . . . . . . . . . . . . . . . . . . . . . . . . . . . . . . . . . . . . . . . . . . . . . . . . . . . . . . . . 204
Scanner Error Codes . . . . . . . . . . . . . . . . . . . . . . . . . . . . . . . . . . . . . . . . . . . . . . . . . . . . . . . . . . . . . . . . . . . . . . . . . . . 205
Setting Sleep Mode . . . . . . . . . . . . . . . . . . . . . . . . . . . . . . . . . . . . . . . . . . . . . . . . . . . . . . . . . . . . . . . . . . . . . . . . . . . 207
Vertical Line Reduction . . . . . . . . . . . . . . . . . . . . . . . . . . . . . . . . . . . . . . . . . . . . . . . . . . . . . . . . . . . . . . . . . . . . . . . . 208
Troubleshooting . . . . . . . . . . . . . . . . . . . . . . . . . . . . . . . . . . . . . . . . . . . . . . . . . . . . . . . . . . . . . . . . . . . . . . . . . . . . . . . . . . . . . 210
Uninstalling Your Scanner . . . . . . . . . . . . . . . . . . . . . . . . . . . . . . . . . . . . . . . . . . . . . . . . . . . . . . . . . . . . . . . . . . . . . . . . . . . 213
Xerox DocuMate 5445 / 5460 Specifications . . . . . . . . . . . . . . . . . . . . . . . . . . . . . . . . . . . . . . . . . . . . . . . . . . . . . . . . . 214
Xerox DocuMate 5445 / 5460 Scanner Parts List . . . . . . . . . . . . . . . . . . . . . . . . . . . . . . . . . . . . . . . . . . . . . . . . . . . . . . 216
ARegulatory Information
Basic Regulations . . . . . . . . . . . . . . . . . . . . . . . . . . . . . . . . . . . . . . . . . . . . . . . . . . . . . . . . . . . . . . . . . . . . . . . . . . . . . . . . . . . 218
United States (FCC Regulations) . . . . . . . . . . . . . . . . . . . . . . . . . . . . . . . . . . . . . . . . . . . . . . . . . . . . . . . . . . . . . . . 218
European Union . . . . . . . . . . . . . . . . . . . . . . . . . . . . . . . . . . . . . . . . . . . . . . . . . . . . . . . . . . . . . . . . . . . . . . . . . . . . . . . 218
Other Regulations . . . . . . . . . . . . . . . . . . . . . . . . . . . . . . . . . . . . . . . . . . . . . . . . . . . . . . . . . . . . . . . . . . . . . . . . . . . . . 219
Copy Regulations . . . . . . . . . . . . . . . . . . . . . . . . . . . . . . . . . . . . . . . . . . . . . . . . . . . . . . . . . . . . . . . . . . . . . . . . . . . . . . . . . . . 220
United States . . . . . . . . . . . . . . . . . . . . . . . . . . . . . . . . . . . . . . . . . . . . . . . . . . . . . . . . . . . . . . . . . . . . . . . . . . . . . . . . . 220
Canada . . . . . . . . . . . . . . . . . . . . . . . . . . . . . . . . . . . . . . . . . . . . . . . . . . . . . . . . . . . . . . . . . . . . . . . . . . . . . . . . . . . . . . . 221
Other Countries . . . . . . . . . . . . . . . . . . . . . . . . . . . . . . . . . . . . . . . . . . . . . . . . . . . . . . . . . . . . . . . . . . . . . . . . . . . . . . . 222
BCompliance Information
Product Recycling & Disposal . . . . . . . . . . . . . . . . . . . . . . . . . . . . . . . . . . . . . . . . . . . . . . . . . . . . . . . . . . . . . . . . . . . . . . . . 224
USA & Canada . . . . . . . . . . . . . . . . . . . . . . . . . . . . . . . . . . . . . . . . . . . . . . . . . . . . . . . . . . . . . . . . . . . . . . . . . . . . . . . . 224
European Union . . . . . . . . . . . . . . . . . . . . . . . . . . . . . . . . . . . . . . . . . . . . . . . . . . . . . . . . . . . . . . . . . . . . . . . . . . . . . . . 224
Energy Star for the USA . . . . . . . . . . . . . . . . . . . . . . . . . . . . . . . . . . . . . . . . . . . . . . . . . . . . . . . . . . . . . . . . . . . . . . . . . . . . . 225
Index
6
Xerox® DocuMate® 5445 / 5460
User’s Guide
Page 7

Safety
This chapter includes:
• Safety Introduction on page 8
• Operational Safety Information on page 9
• Electrical Information on page 10
• Emergency Power Off on page 11
• Maintenance Information on page 12
• Product Safety Certification on page 13
• Environmental Health and Safety Contacts on page 14
1
Xerox® DocuMate® 5445 / 5460
User’s Guide
7
Page 8

Safety Introduction
Notices and Safety
Please read the following instructions carefully before operating the machine and refer to them as needed to ensure
the continued safe operation of your machine.
Yo ur Xe r o x p r od u ct a nd s up p li e s h a ve be e n d e s ig n ed a nd t ested to meet strict safety requirements. These include
safety agency evaluation and certification, and compliance with electromagnetic regulations and established
environmental standards.
The safety and environment testing and performance of this product have been verified using Xerox materials only.
War ning : Un auth oriz ed alte rat ions , wh ich may incl ude the addition of new functions or connection of external
devices, may impact the product certification. Please contact your Xerox representative for more information.
8
Xerox® DocuMate® 5445 / 5460
User’s Guide
Page 9

Operational Safety Information
Yo ur Xe r o x e q ui p m en t an d s u p pl i es h av e been designed and tested to meet strict safety requirements. These
include safety agency examination, approval, and compliance with established environmental standards.
To e n s u r e t h e co n t i n u e d s a f e o p e r a t i o n o f y o u r Xe r o x e q uipment, follow these safety guidelines at all times:
Do These
•Always follow all warnings and instructions that are marked on or supplied with the equipment.
•Before cleaning this product, unplug the product from the USB port. Always use materials specifically
designated for this product, the use of other materials may result in poor performance and create a hazardous
situation. Do not use aerosol cleaners, they may be explosive and flammable under certain conditions.
•Always exercise care when moving or relocating equipment.
•Always locate the machine on a solid support surface that has adequate strength to support the weight of the
machine.
•Always locate the machine in an area that has adequate ventilation and room for servicing.
•Always unplug this equipment from the electrical outlet before cleaning.
Note: Yo ur Xe r ox m ac h i ne i s e q ui p pe d wi t h a n e n e rg y sa v in g device to conserve power when the machine is not in
use. The machine may be left on continuously.
Do Not Do These
•Never attempt any maintenance function that is not specifically described in this documentation.
•Never remove covers or guards that are fastened with screws. There are no operator serviceable areas within
these covers.
•Never locate the machine near a radiator or any other heat source.
•Never override or “cheat” any of the electrical or mechanical interlock devices.
•Never place this equipment where people might step on or trip on the power cord.
War ning : Th is d evic e i s no t in tend ed fo r us e in th e di rect field of view at visual display workplaces. To avoid
incommoding reflections at visual display workplaces this device must not be placed in the direct field of view.
Xerox® DocuMate® 5445 / 5460
User’s Guide
9
Page 10

Electrical Information
Warning - Electrical Safety Information
1. The power receptacle for the machine must meet the requirements stated on the data plate on the rear of the
machine. If you are not sure that your electrical supply meets the requirements, please consult your local
power company or an electrician for advice.
2. The socket outlet shall be installed near the equipment and shall be easily accessible.
3. Use the power cable that is supplied with your machine. Do not use an extension cord or remove or modify the
power cord plug.
4. Do not place this equipment where people might step or trip on the power cable.
5. Do not place objects on the power cable.
6. Do not override or disable electrical or mechanical interlock devices.
7. Do not push objects into slots or openings on the machine. Electrical shock or fire may result.
Electrical Supply
•This product shall be operated from the type of electrical supply indicted on the product’s data plate label. If
you are not sure that your electrical supply meets the requirements, please consult your local power company
for advi ce.
Disconnect Device
The power cable is the disconnect device for this e quipm ent . I t is attache d t o the back of the machine as a plug-in
device. To remove all electrical power from the equipment, disconnect the power cable from the electrical outlet.
10
Xerox® DocuMate® 5445 / 5460
User’s Guide
Page 11

Emergency Power Off
If any of the following conditions occur, turn off the machine immediately and disconnect the power cable(s) from
the electrical outlet(s).
Contact an authorized Xerox Service Representative to correct the problem:
•The equipment emits unusual odors or makes unusual noises.
•The power cable is damaged or frayed.
•A wall panel circuit breaker, fuse, or other safety device has been tripped.
•Liquid is spilled into the machine.
•The machine is exposed to water.
•Any part of the machine is damaged.
Xerox® DocuMate® 5445 / 5460
User’s Guide
11
Page 12

Maintenance Information
1. Any operator product maintenance procedures will be described in the user documentation supplied with the
product.
2. Do not carry out any maintenance on this product which is not described in the customer documentation.
3. Do not use aerosol cleaners. The use of cleaners that are not approved may cause poor performance of the
equipment, and could cause a dangerous condition.
4. Use supplies and cleaning materials only as directed in this manual.
5. Do not remove covers or guards that are fastened with screws. There are no parts behind these covers that you
can maintain or service.
6. Do not perform any maintenance procedures unless you have been trained to do them by an authorized local
dealer or unless a procedure is specifically described in the user manuals.
12
Xerox® DocuMate® 5445 / 5460
User’s Guide
Page 13

Product Safety Certification
This product is certified by the following Agency using the Safety standards listed:
Standard
UL60950-1 (USA)
CSA 22.2 No. 60950-1 (Canada)
IEC 60950-1
Xerox® DocuMate® 5445 / 5460
User’s Guide
13
Page 14

Environmental Health and Safety Contacts
Contact Information
For mo re infor ma ti on o n En vi ro nm en t, Health, and Safety in relation to this Xerox product and supplies, please
contact the following customer help lines:
USA & Canada: 1-800-828-6571
Europe: +44 1707 353 434
14
Xerox® DocuMate® 5445 / 5460
User’s Guide
Page 15

Welcome
This chapter includes:
• What’s in the Box on page 16
• System Requirements on page 17
• Documentation on page 18
• The Xerox DocuMate 5445 / 5460 Scanner on page 19
2
Xerox® DocuMate® 5445 / 5460
User’s Guide
15
Page 16
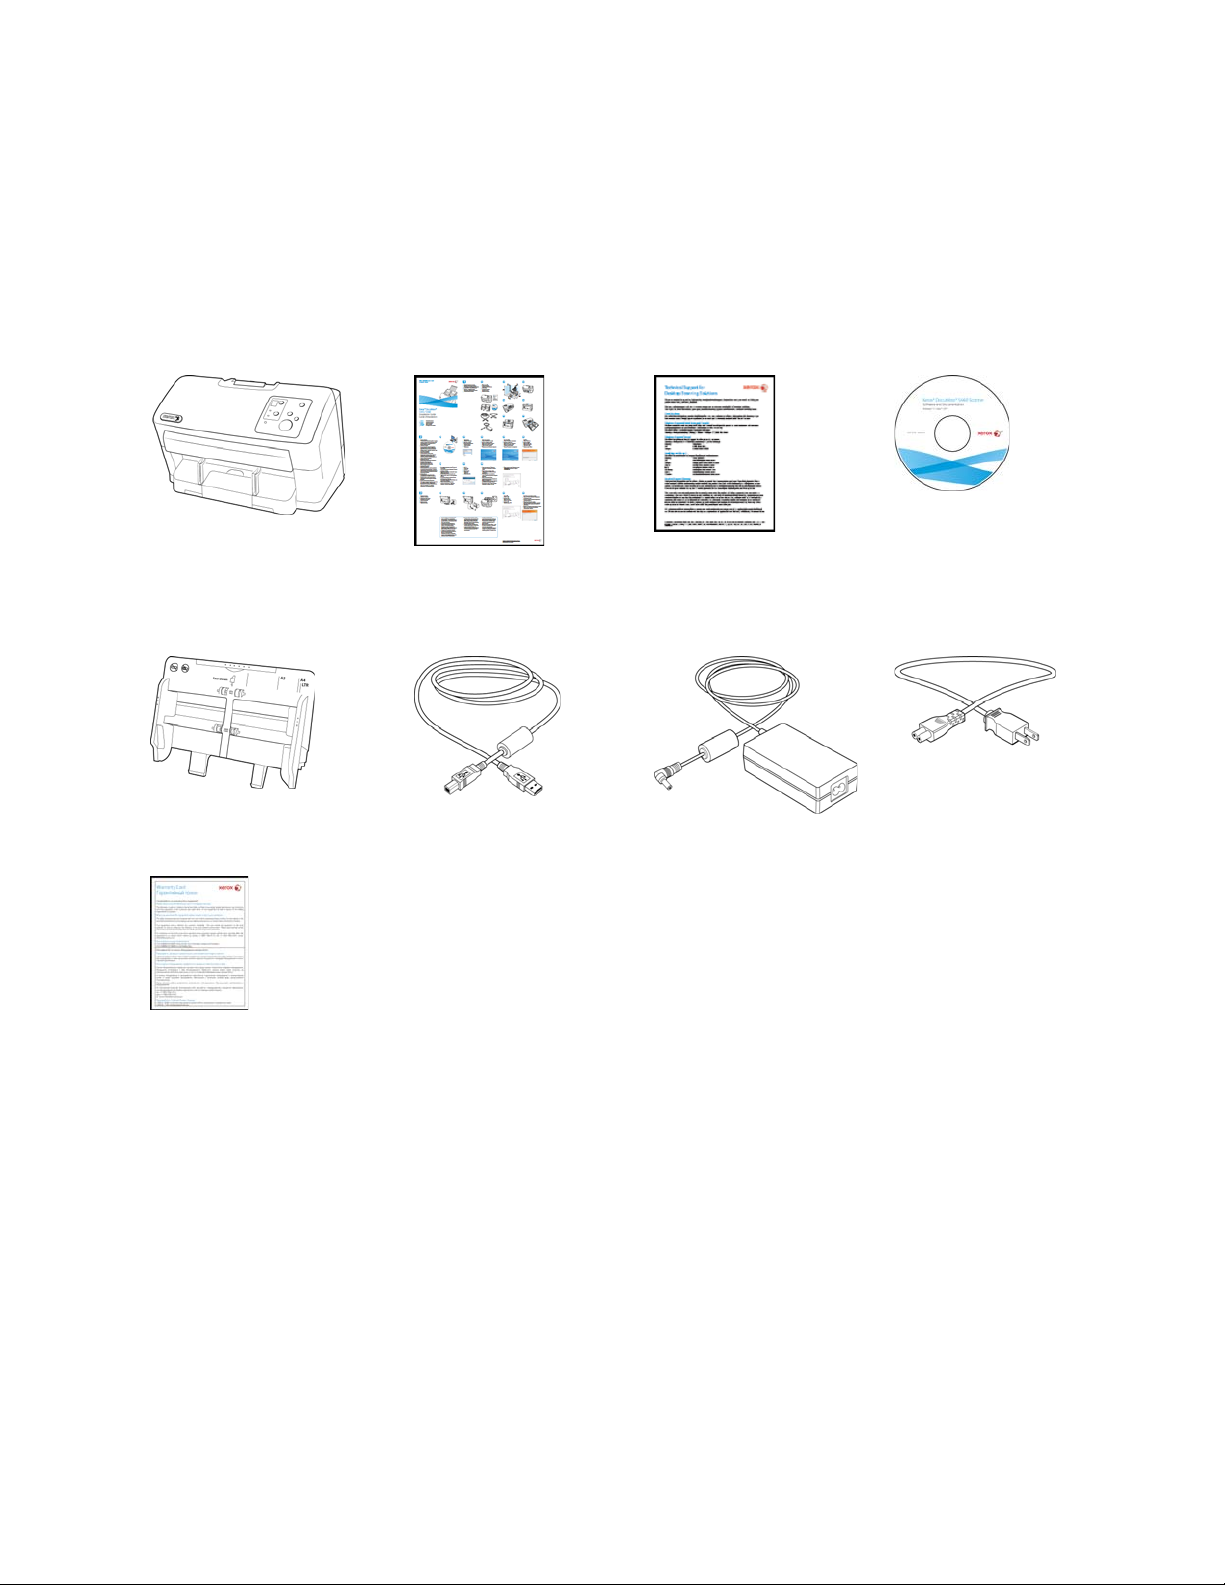
What’s in the Box
Before proceeding, check the contents of the box. If items are missing or damaged, contact the dealer where you
purchased the scanner.
Xerox DocuMate 5445
or
Xerox DocuMate 5460 Quick Install Guide Technical Support Card
Windows
Installation Disc
Input Tray USB Cable Power Supply Power Cord
War ran ty C ard
16
Xerox® DocuMate® 5445 / 5460
User’s Guide
Page 17

System Requirements
Pentium 4 PC or AMD equivalent with:
•A DVD-ROM drive
•An available Universal Serial Bus (USB) port
•Microsoft
–32-bit Windows XP (Service Pack 1 and 2)
–32-bit or 64-bit Windows Vista (Service Pack 1)
–32-bit or 64-bit Windows 7
–32-bit or 64-bit Windows 8
The scanner is compatible with Service Pack 3 for Windows XP, Service Pack 2 for Windows Vista, and Service
Pack 1 for Windows 7.
•Minimum of 2 gigabyte (GB) of internal memory (RAM)
•350 MB minimum of free hard disk space
A VGA or SVGA Monitor:
•The recommended settings for your monitor are:
–Color quality of 16-bit or 32-bit
–Resolution set to at least 800 x 600 pixels
®
Windows® operating system:
Refer to your Windows documentation for instructions on setting the color quality and resolution for the monitor.
Xerox® DocuMate® 5445 / 5460
User’s Guide
17
Page 18

Documentation
The following printed documentation is provided in the box:
• Installation guide—abbreviated scanner setup and installation instructions.
• Te ch n ica l su p po r t c a rd —contact information for technical support and customer service, and a brief overview
of our standard product warranty.
• Warranty card—the warranty card is provided for use rs in Ru ssi a and sh ould be fill ed in as de scrib ed on th e
card. For all other users, please dispose of this card in paper recycling.
The following soft-copy documentation is available on the installation disc:
• Scanner user’s guide—contains detailed installation, configuration, scanning, and maintenance instructions.
• Control sheets—automatically adjust the scan settings when scanning using the TWAIN interface. The file
contains layouts for various ISO and U.S. paper sizes. The TWAIN scanning chapter contains instructions on
using these sheets while scanning.
Make sure you print the page size that matches the size of the pages in your document stack. Also, make sure
the application you are using is not set to automatically scale the page to fit on the paper in your printer.
• File separation sheets—automatically separate a stack of paper into two or more separate files, when
scanning using the TWAIN interface.
Make sure you print the page size that matches the size of the pages in your document stack. Also, make sure
the application you are using is not set to automatically scale the page to fit on the paper in your printer.
• Patch code sheets—use with an application that supports detection of patch code data when using the
TWAIN interface. The patch code page layouts have been specifically designed for your scanner. The file
contains Patch 2, 3 and T layouts for A4 and U.S. Letter size pages.
Make sure you print the correct page size for the paper in your printer. Also, make sure the application you are
using is not set to automatically scale the page to fit on the paper in your printer.
• Nuance PaperPort user’s guide—contains detailed information using the application and managing your
scanned documents.
• Nuance OmniPage user’s guide—contains detailed instructions on using the software, including information
on using Optical Character Recognition to create editable text files from the scanned documents.
• Nuance PDF Converter user’s guide—contains detailed information on using the application to create and
modify PDF files.
18
Xerox® DocuMate® 5445 / 5460
User’s Guide
Page 19
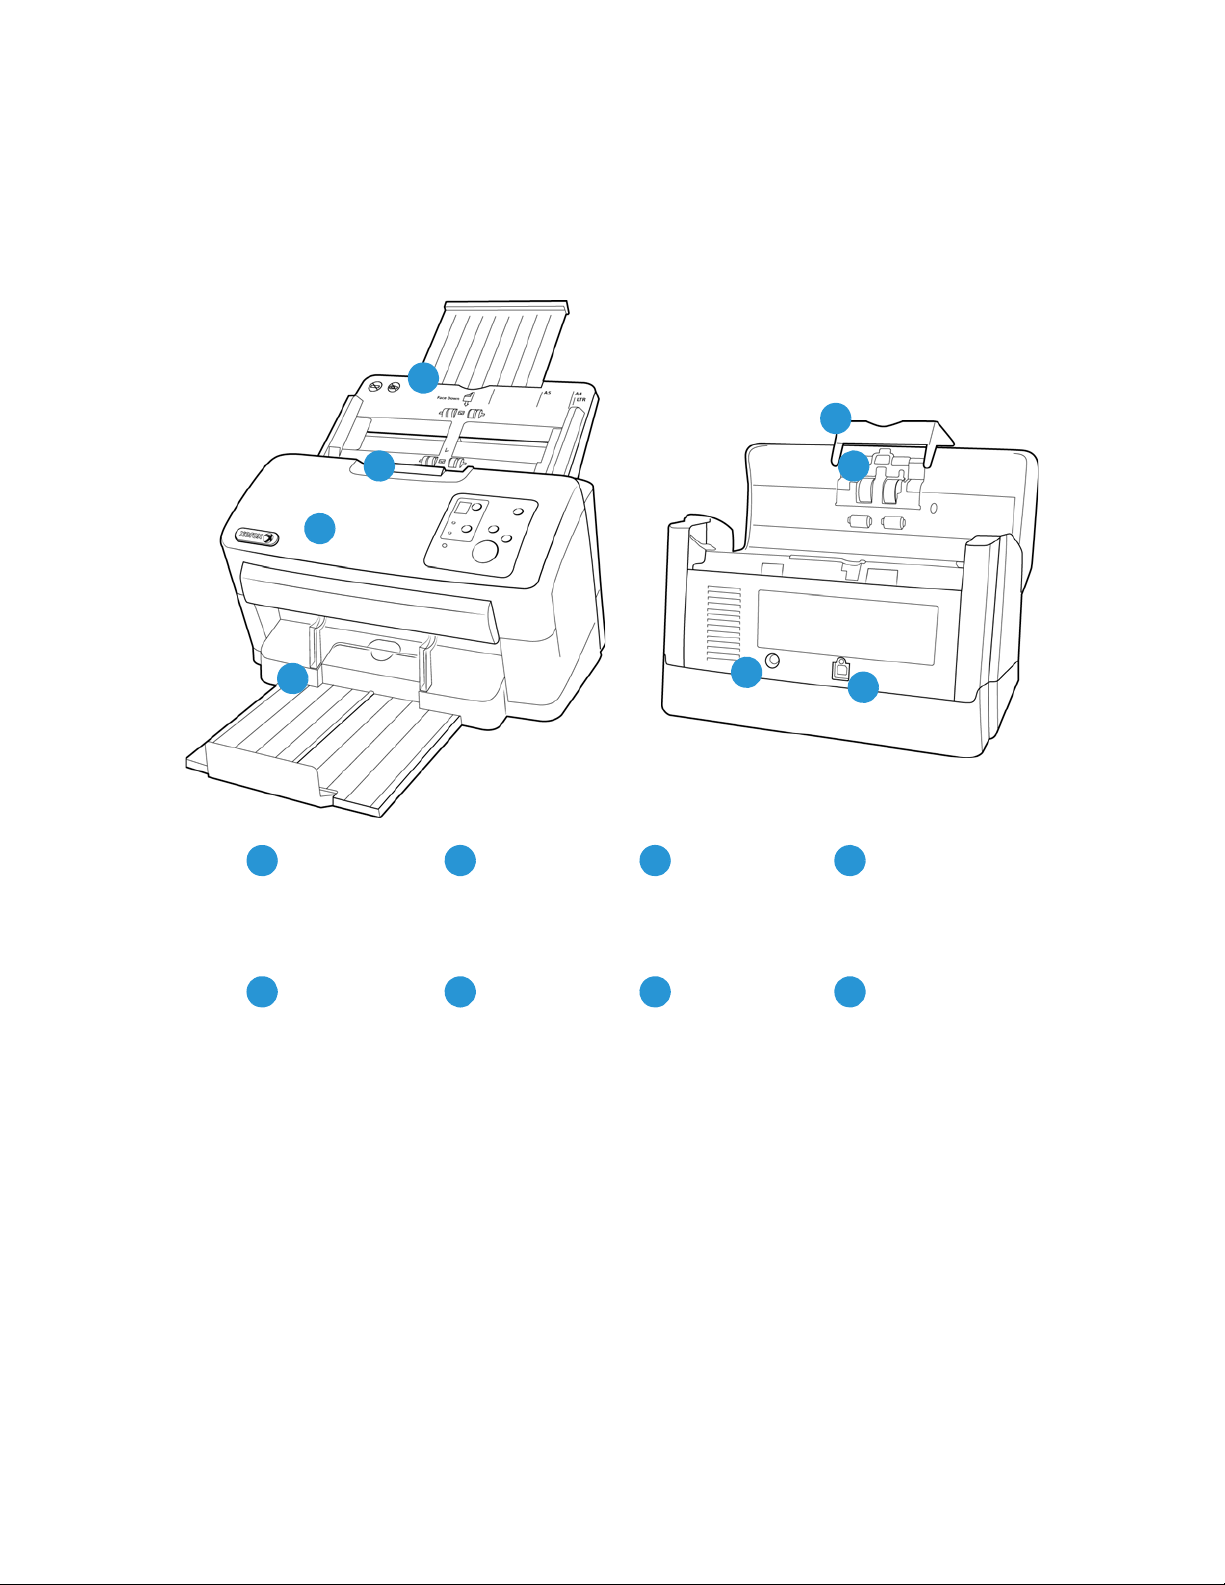
The Xerox DocuMate 5445 / 5460 Scanner
3
ADF Cover
Release
Paper Thickness
Switch
Input Tray
Mixed Batch Card
Guide
41
5
2
Automatic
Document Feeder
Output Tray
8
6 7
USB PortPower Jack
2
3
4
5
6
7
8
1
Input Tray—holds the documents in the Automatic Document Feeder for scanning.
• Paper Guides—adjust to support various document widths.
ADF Cover Release—pull to open the Automatic Document Feeder.
Automatic Document Feeder—feeds documents through the scanner during scanning.
Exit tray—where documents are exited out of the scanner.
• Exit tray extension—extends to support various document lengths.
• Exit stopper—holds documents in the exit tray.
• Exit guides—helps to keep paper stacked neatly in the exit tray.
Mixed batch card guide—allows for scanning a mixed batch of paper and cards.
Xerox® DocuMate® 5445 / 5460
User’s Guide
19
Page 20
Paper thickness switch—separates the rollers to allow for scanning thick items.
3
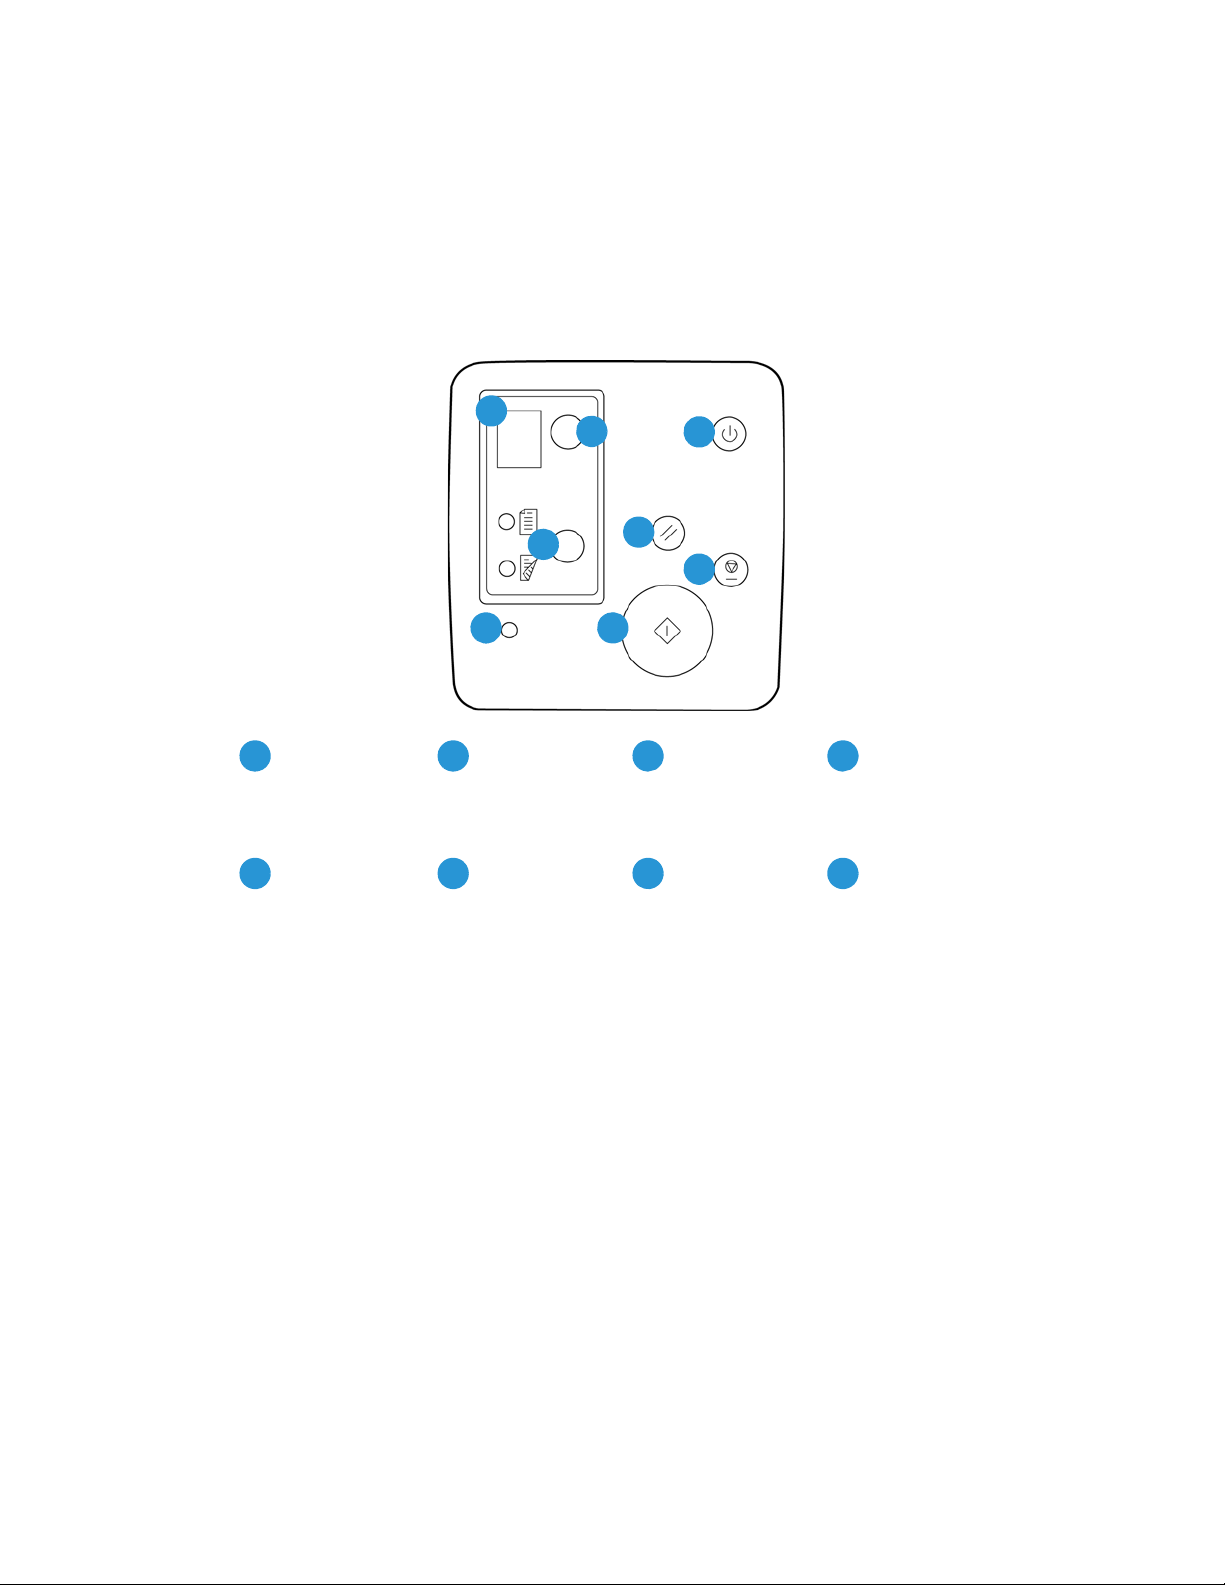
LED function button
Stop button
LED Number
Reset button
41
5
2
Scan type function
button
Power button
8
6 7
Error lightStart button
2
3
4
5
6
7
8
1
Power jack—Connects the power cord to the scanner.
Universal Serial Bus (USB) port—Connects the scanner to the computer.
Control Panel
LED number—shows the OneTouch function that will be used for scanning. You can view the scan settings for that
function in the OneTouch Properties window. When there is a hardware error, the LED number indicates what the
hardware error code is.
LED function button—tap the button to cycle through the 9 OneTouch scanning options.
Scan type function button—tap the button to change the scan type between Simplex (one-sided) and Duplex
(two-sided) scanning. The option you select here overrides the selected option in the OneTouch Properties window
when you scan by pressing the green start button.
Power button—turns the scanner power on or off. Press the button to turn the scanner on. Press and hold down
the button for a couple of seconds to turn the scanner off. This is the clear button on the control panel.
Reset button—returns the scan settings in TWAIN to the default settings. This is the yellow button on the control
panel.
Stop button—stops the scanner when scanning. This is the red button on the control panel.
Start button—starts scanning. This is the green button on the control panel.
Error light—this light will start flashing if the scanner experiences a hardware error.
20
Xerox® DocuMate® 5445 / 5460
User’s Guide
Page 21

Scanner Setup
This chapter includes:
• Unpack the Scanner on page 22
• Attach the Input Tray on page 24
• Connect the Scanner Power Cord on page 25
3
Xerox® DocuMate® 5445 / 5460
User’s Guide
21
Page 22
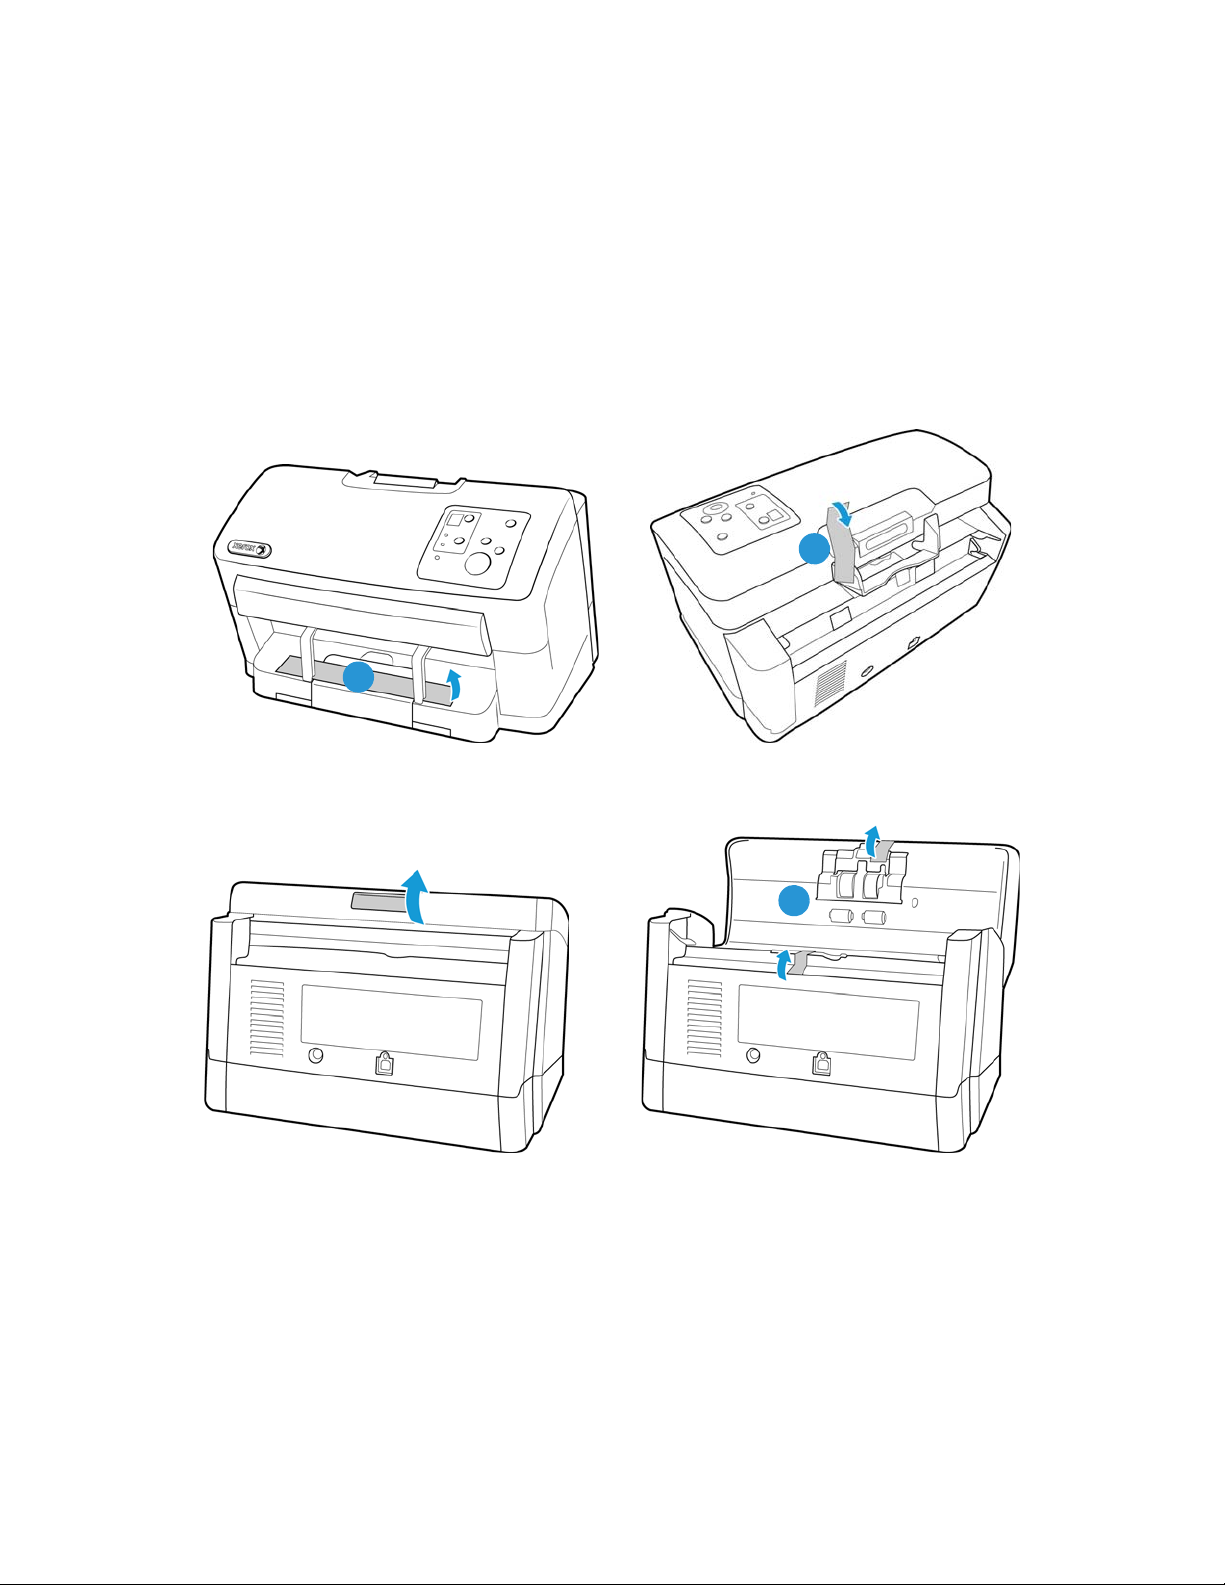
Unpack the Scanner
2
1
3
Remove any tape from the scanner body. Use care while removing the tape, the tape holds fragile parts in place for
shipping.
Note: we recommend you remove the tape from the scanner in the order indicated in the illustrations below. Also
remove any protective foam from the inside of the scanner while you are removing the packaging tape.
Press the ADF cover release button and open the scanner.
22
Xerox® DocuMate® 5445 / 5460
User’s Guide
Page 23
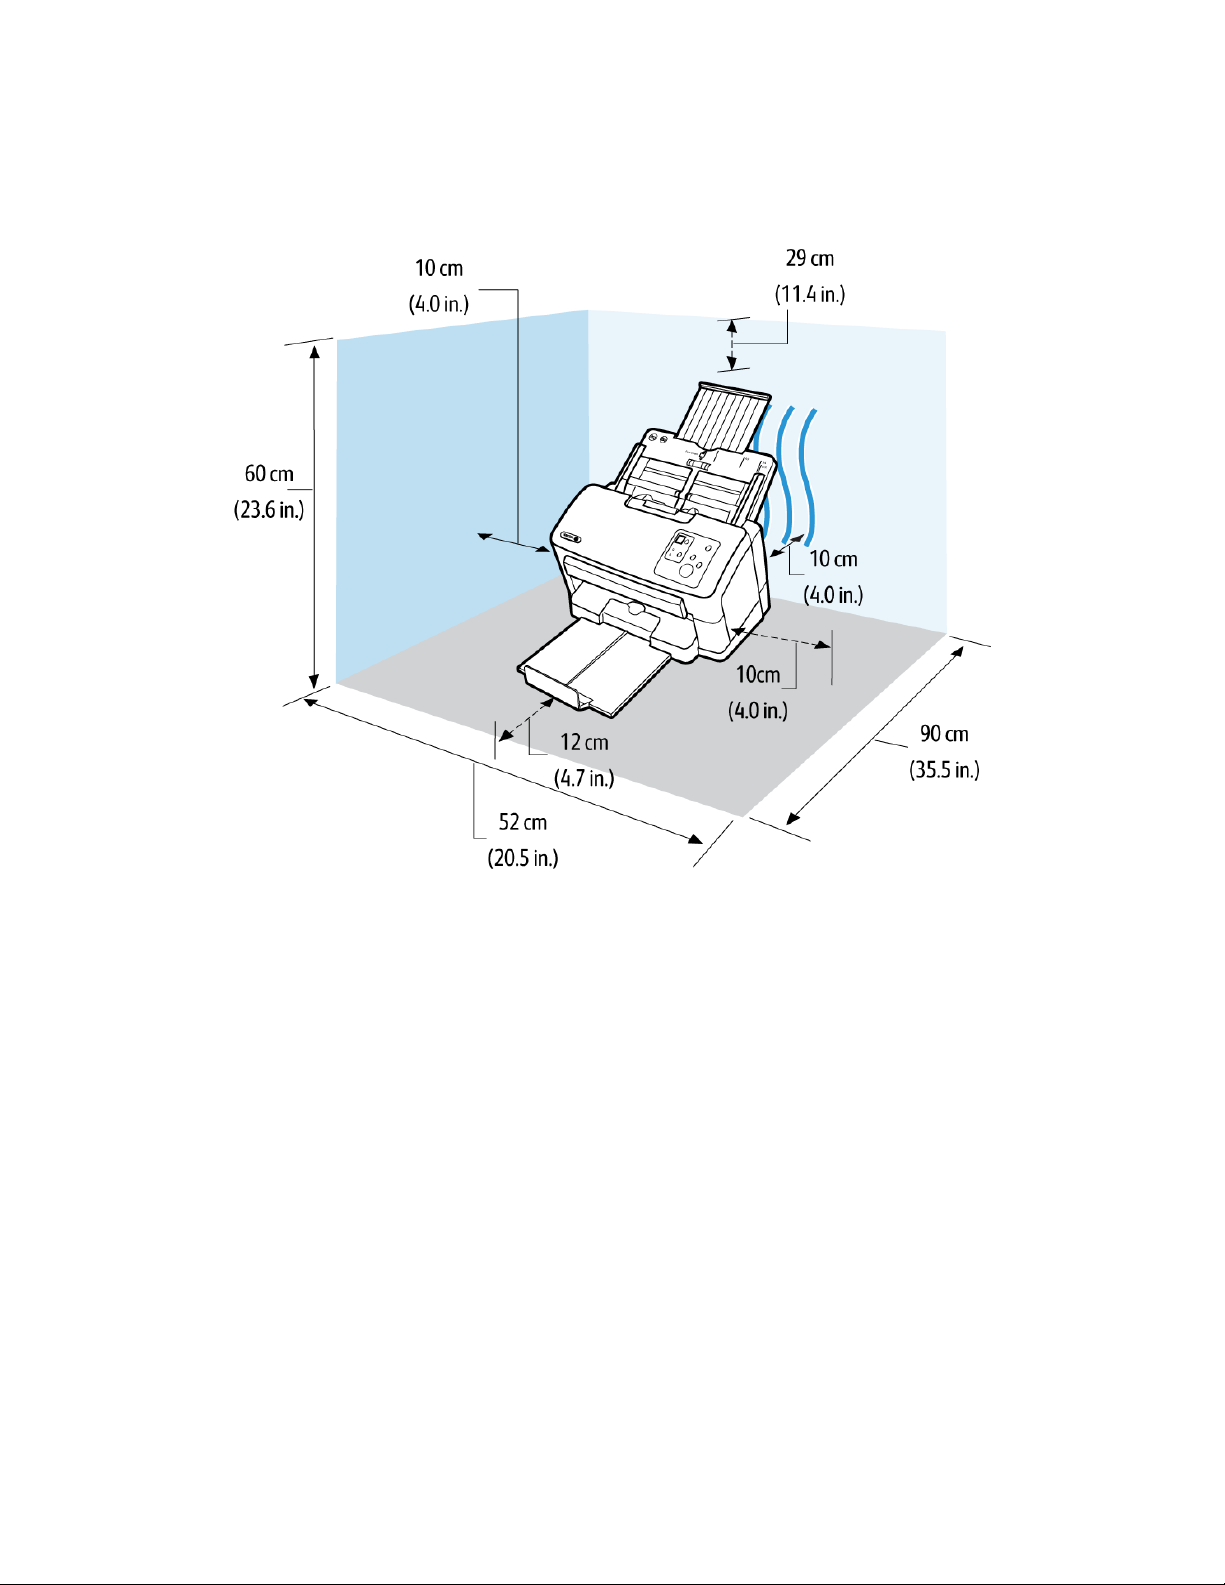
Place the scanner on a level surface near the computer.
•Keep clear space on every side of the scanner for the input and exit tray extensions, performing maintenance,
and to have sufficient air flow for ventilation.
Xerox® DocuMate® 5445 / 5460
User’s Guide
23
Page 24
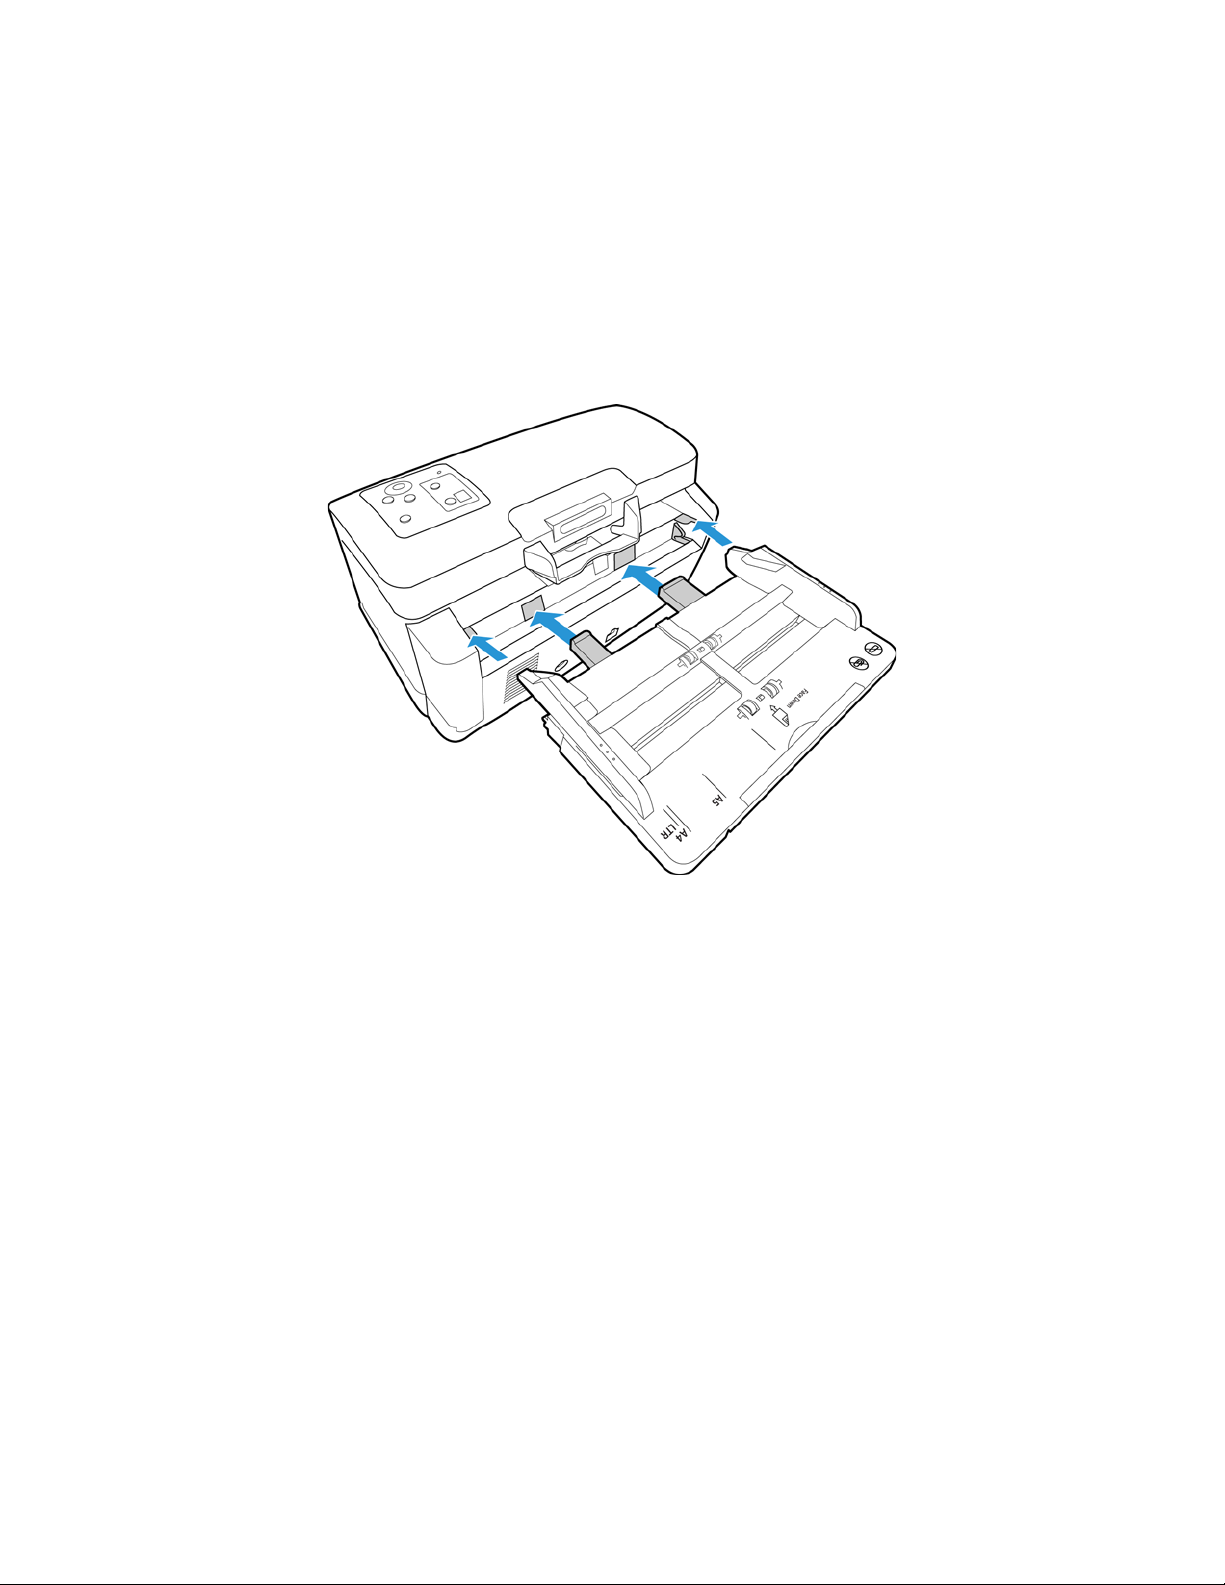
Attach the Input Tray
1. Align the tabs on the input tray with the holes in the scanner body.
2. Slide the input tray into position.
3. Push firmly on the input tray until you hear it lock in place.
24
Xerox® DocuMate® 5445 / 5460
User’s Guide
Page 25
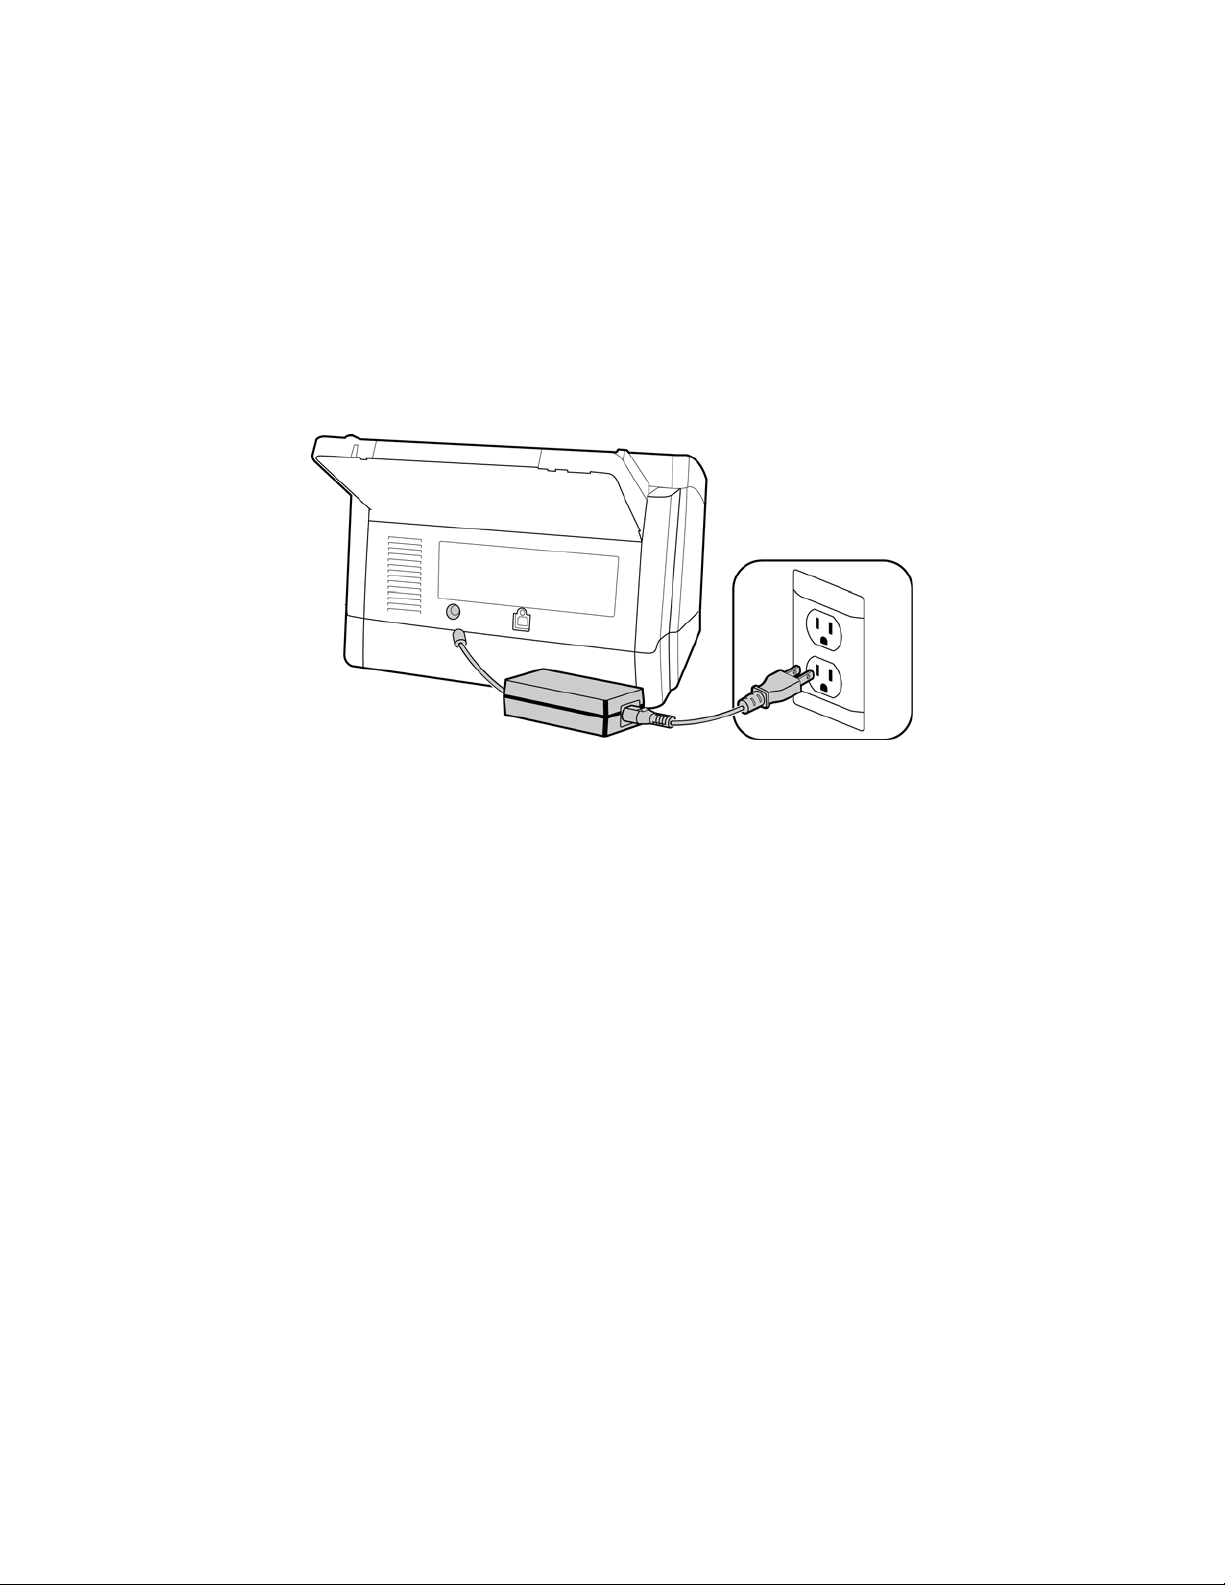
Connect the Scanner Power Cord
Note: Only use the power supply (PJSWC0004) included with your scanner. Connecting any other type of power
supply may damage your scanner, and will void its warranty.
1. Plug the power supply into the power port on the scanner.
2. Plug the power cord into the power supply and into a wall outlet.
Xerox® DocuMate® 5445 / 5460
User’s Guide
25
Page 26

26
Xerox® DocuMate® 5445 / 5460
User’s Guide
Page 27

Installation
This chapter includes:
• Before You Begin on page 28
• Install the Software and Connect the Scanner on page 29
• Installing Additional Applications on page 36
• View the User Guides on page 38
• Register Your Scanner on page 39
4
Xerox® DocuMate® 5445 / 5460
User’s Guide
27
Page 28
Before You Begin
Please make sure of the following before you begin installation:
•If you are prompted to reboot during installation, please select "No". Finish installing the rest of the software,
then close all open windows and reboot your computer.
•The information in this guide may cover software not provided with the scanner you purchased. Please
disregard any information about the software not applicable to your scanner. Visit our web site at
www.xeroxscanners.com for the latest software updates for your Xerox scanner.
•If your computer has AntiVirus or AntiSpyware software running, you may encounter alerts or messages
during installation asking you to allow the installation to proceed. Although the messages will differ based on
the software your computer is running, in each case you should allow the installation to proceed if that option
is available. Alternatively, you can turn off the AntiVirus or AntiSpyware software before installing your
scanner, but if you do, make sure to turn it back on again when installation is finished.
•If you already have a scanner connected to your computer, it is recommended that you remove that scanner’s
driver program prior to installing your Xerox scanner. You can remove these programs from the Windows
Control Panel. Please refer to the user manual provided with your other scanner hardware for instructions
about removing the driver and software for that unit.
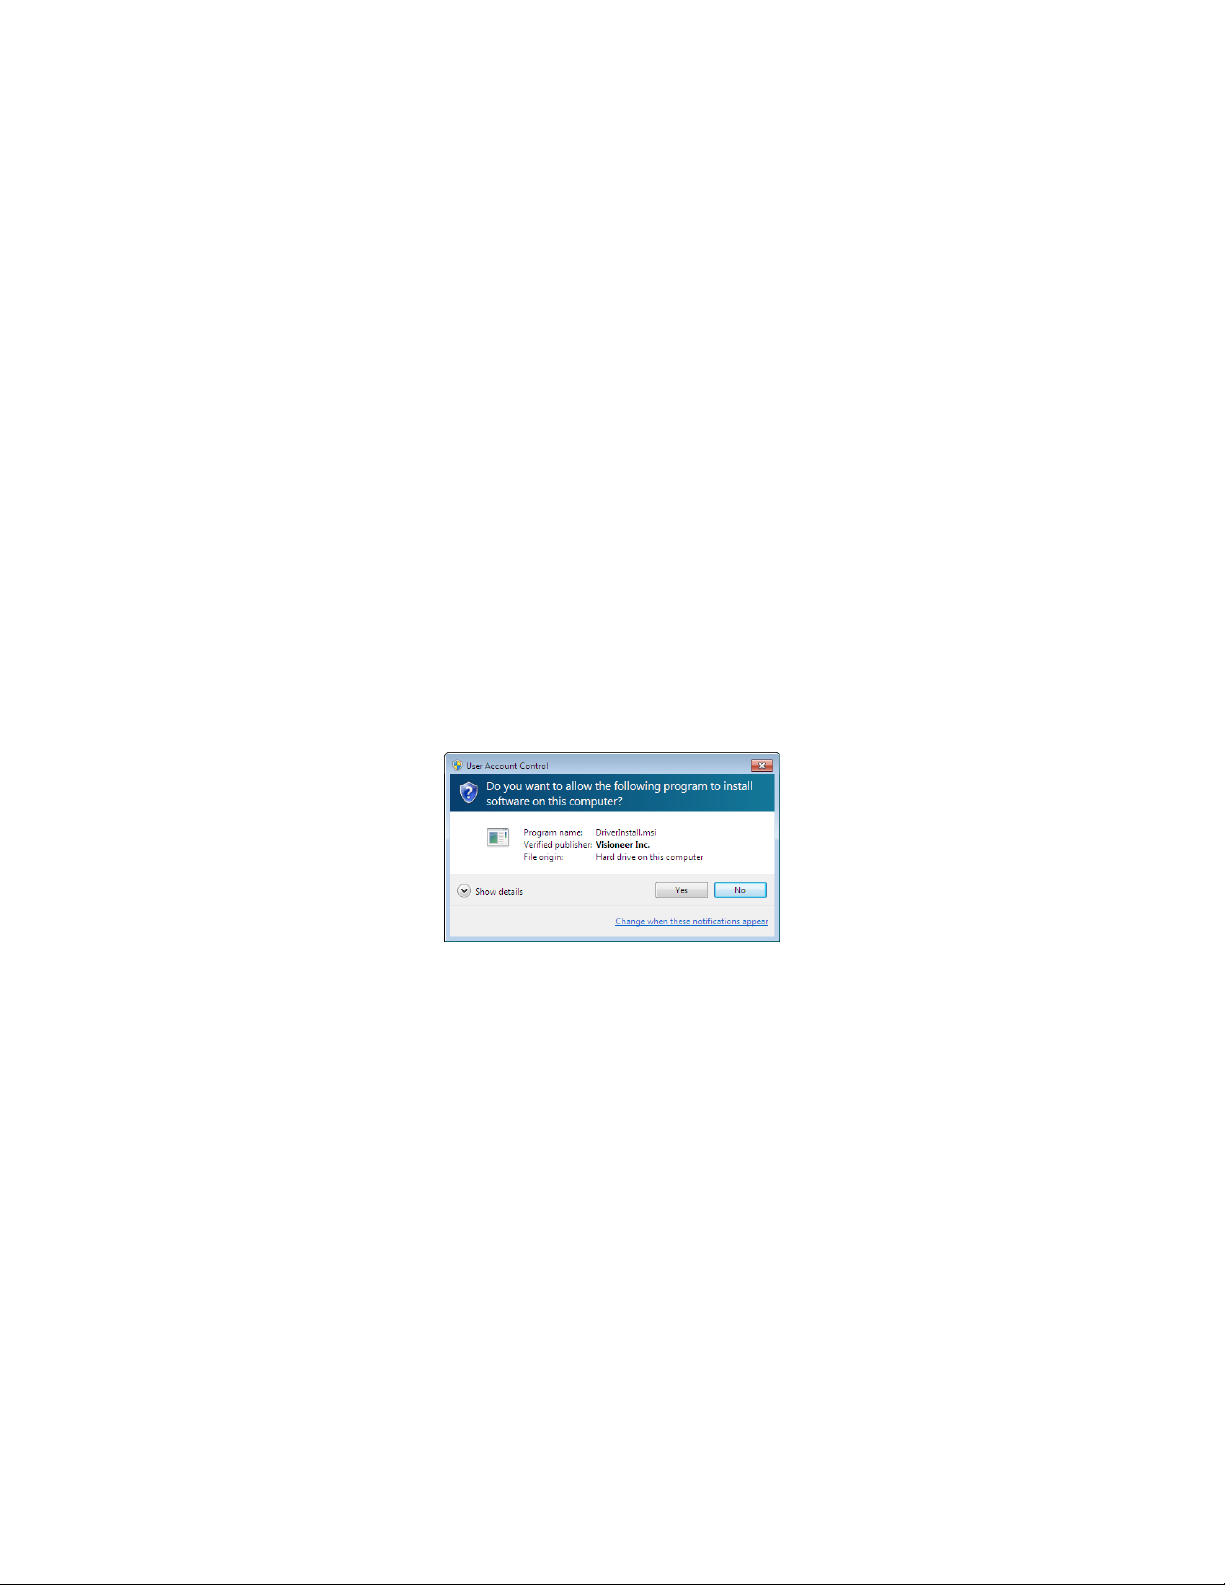
•If your computer is running Windows Vista, Windows 7 or Windows 8, you may see the Windows User Account
Control screen asking you to confirm system changes. Click the Yes button to allow the installation to proceed.
28
Xerox® DocuMate® 5445 / 5460
User’s Guide
Page 29

Install the Software and Connect the Scanner
The installation disc contains the necessary driver, and scanning software, to use your Xerox scanner.
To i n s ta l l t h e s o f t w a r e :
1. Start Microsoft Windows and make sure that no other applications are running.
2. Insert the installation disc into your computer’s DVD-ROM drive.
The disc automatically starts.
3. The Select Language window opens. Click the drop-down menu arrow and select the language to use. Click OK.
4. The disc’s Main menu window opens.
Note: If the disc does not start, check the following:
•Make sure the disc drive’s door is completely shut.
•Make sure the disc was inserted in the drive in the proper direction (label side up).
To l a u n c h t h e d i s c m a n u a l l y :
•Open the Windows options for your computer’s disc drives.
•Double-click the icon for your DVD-ROM drive.
•The Installation menu for the disc should now open.
If the menu does not open:
• From the list of files on the disc, double-click the file named setup.exe.
Xerox® DocuMate® 5445 / 5460
User’s Guide
29
Page 30
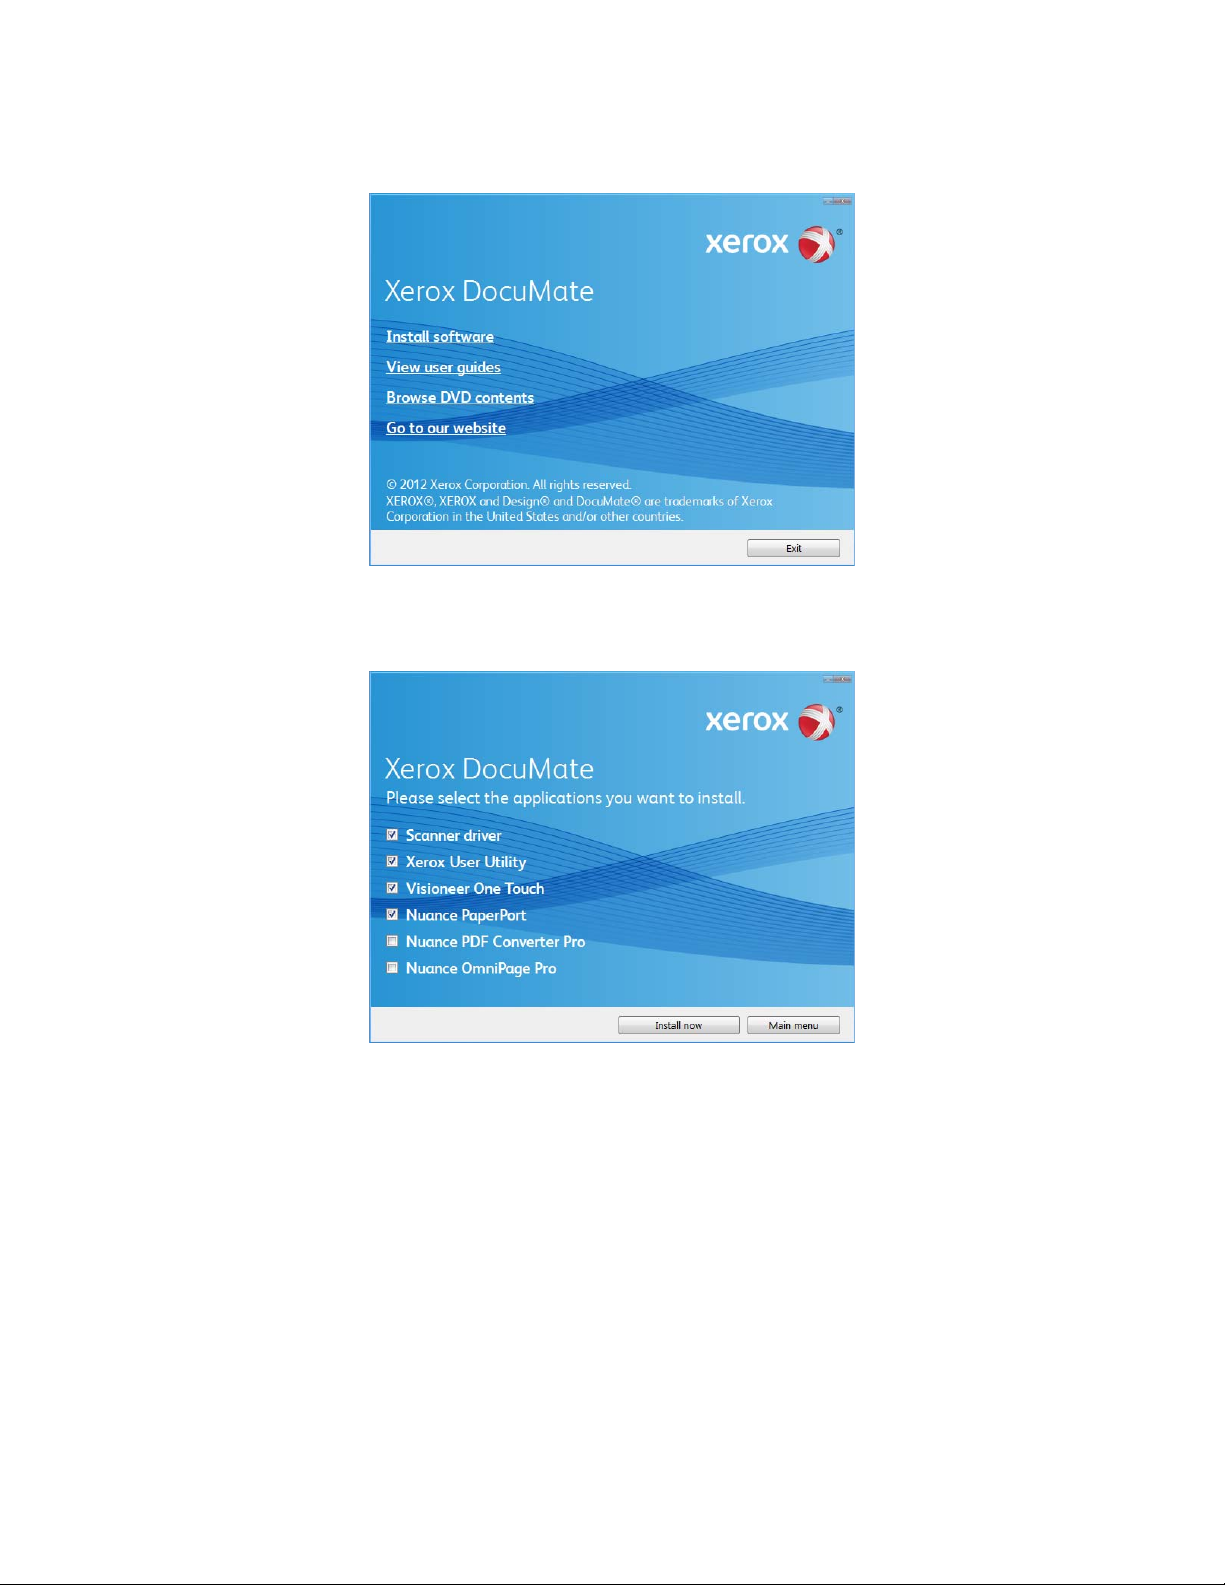
5. On the Main menu, select Install software.
6. Make sure the boxes for Scanner Driver and Visioneer One Touch are selected, as well as any other
applications you want to install.
Note: The software provided with your scanner may differ slightly from the list shown in the window.
7. Click Install now.
30
Xerox® DocuMate® 5445 / 5460
User’s Guide
Page 31

Installing the Scanner Driver
The scanner driver installation will start first.
1. The Welcome to the Xerox Setup Wizard opens.
2. Click Next.
3. On the Xerox License Agreement window, read the license agreement. If you accept the terms, select I Agree
then click Next.
If you choose not to accept the license agreement, click Cancel. Click Close on the Installation Interrupted
window.
4. The software will now be installed.
5. Stop when you see the “Complete the installation by connecting your hardware” window. Do not click OK yet.
Leave the window open and proceed to the next section.
Note: If you do not see this on-screen diagram for connecting the scanner, stop and follow the instructions below.
Xerox® DocuMate® 5445 / 5460
User’s Guide
31
Page 32

Connect the USB Cable and Turn on the Power
1. Remove any tape from the USB cable.
2. Plug the USB cable into the USB port on the scanner then into a USB port on the computer.
If the plug does not attach easily, make sure that you are plugging it in correctly. Do not force the plug into
either connection.
3. Turn on the scanner power. Press the power button on the control panel.
The status light comes on and flashes indicating that the scanner is receiving power.
Yo ur c om p u te r r e c og n i ze s th a t a sc a n ne r ha s b e e n p l ug g ed i nt o th e US B p o r t a n d a u to m at i c al l y l o ad s th e
appropriate software to run the scanner. If your computer is running Windows version XP or later, you will see a
message similar to the one below.
32
Xerox® DocuMate® 5445 / 5460
User’s Guide
Page 33

4. When you’re certain that the software has completely loaded, return to the “Complete the installation by
connecting your hardware” window.
5. Click OK to complete the installation process.
6. Click Close on the Installation Complete window to close and exit the driver installer.
Installing the User Utility
The User Utility is a software diagnostic and maintenance software that you can use for mo nit oring your scan ner
hardware.
Xerox® DocuMate® 5445 / 5460
User’s Guide
33
Page 34

1. On the Xerox User Utility License Agreement window, read the license agreement. If you accept the terms,
select Yes to accept the agreement and continue with the installation.
If you choose not to accept the license agreement, the installation will terminate and the User Utility will not
be installed.
2. The next screen lets you choose where the installation files are going to be on your computer. Click on Browse...
to change the location where the files are installed.
We recommend that you keep the default options on this window and just click on Next to proceed with the
installation.
3. The next screen lets you change the Program Files folder name and where the program appears in your
Windows Start Programs list.
The default options on this window will put the shortcut icon in your Windows All Programs list in the Xerox
fol der . We rec omm end tha t you keep th e defaul t optio ns on this window and just click on Next to proceed with
the installation.
4. Click on Finish on the Installation Complete window to close the installation window.
5. A shortcut icon for the User Utility will be on your Windows desktop and in the Windows Start All Programs
menu.
Installing Visioneer One Touch
The Visioneer One Touch software installation will start automatically after you click Close on the driver Installation
Complete window. One Touch is the software needed for the buttons on the scanner to work.
1. Click Next on the Welcome to the One Touch Setup Wizard.
2. On the Visioneer License Agreement window, read the license agreement. If you accept the terms, select I
Agree then click Next.
If you choose not to accept the license agreement, the installation will terminate and One Touch will not be
installed.
34
Xerox® DocuMate® 5445 / 5460
User’s Guide
Page 35

3. Click Close on the Installation Complete window to close and exit the software installer.
If you selected other software to install from the DVD the installation for that software will automatically start after
you click Close on the Installation Complete window. Follow the instructions on-screen to install each application
you selected.
Xerox® DocuMate® 5445 / 5460
User’s Guide
35
Page 36

Installing Additional Applications
Yo ur s ca n n er in c l ud e s f re e , a d d it i o na l a p p li c at i o ns a s d es c r ib e d i n th e ta b le be l o w.
1. Return to the disc’s Main menu and click Install software.
2. Select the additional applications you want to install, then click Install now.
3. Follow the instructions on the screen to install each of the additional applications.
Software About the Software
Nuance PaperPort
Nuance OmniPage®
®
PaperPort is a document management software application. The PaperPort scanning
fea ture s a llow yo u to in sert new pa ges in to a n ex ist ing file and nam e yo ur fil e
immediately after scanning. From within the PaperPort desktop you can sort your
documents and move them between folders as you would through the Windows My
Documents folder. You can reorder the pages in a PDF file, and unstack a document
so all the pages are resaved as individual files. PaperPort also has some basic image
editing options in the PaperPort PageView, such as; adding notes to image files,
modifying image colors, and touch up the image using the erase and/or auto-correct
options.
OmniPage Pro provides precision OCR analysis, advanced layout detection, and
Logical Form Recognition™ (LFR) technology. Advanced security features quickly turn
office documents and forms into over 30 different PC applications for editing,
searching and sharing. Custom workflows handle large volumes of documents, and
you can use its tools to print to PDF.
36
Xerox® DocuMate® 5445 / 5460
User’s Guide
Page 37

Software About the Software
Nuance PDF Converter PDF Converter Professional 7 features 100% industry-standard PDF creation and
editing plus the world’s most accurate PDF conversion to editable Microsoft® Office®
for mats avail able. It a lso of fer s o ne- click scanning to PDF, the most advanced PDF
search capabilities, excellent graphics management, document flattening and autoremoval of sensitive information. Combining unparalleled functionality, built-in
intelligence and ease of use, PDF Converter Professional 7 enables users to create,
convert, edit, assemble and securely share PDF files like never before for enhanced
professionalism, productivity and collaboration.
Xerox® DocuMate® 5445 / 5460
User’s Guide
37
Page 38

View the User Guides
Scanner documentation window Software documentation window
1. Return to the disc’s Main menu and click on View user guides.
2. Click on View scanner documentation to access the scanner user guide.
Click on View software documentation to access the user guides for the software applications provided with
the scanner.
From either of these user guide windows, click on the User guide menu button to return to the main user
guide window, then select the other documentation section to view the user guides.
3. When you’re finished, click Main menu to return to the Main menu window and click Exit.
4. Remove the installation disc and store it in a safe place.
That’s it! Installation is finished and your Xerox DocuMate scanner is ready to scan.
38
Xerox® DocuMate® 5445 / 5460
User’s Guide
Page 39

Register Your Scanner
Registering your scanner is important as it provides you with access to our free telephone support service.
Registration also gives you free access to software updates for your scanner.
To r e g i s t er y o u r s c a n n e r :
Yo u w i ll n ee d a n ac t i ve in t e rn e t c o nn e c ti o n t o r e g is t er your scanner. If you do not have internet access you can
contact our customer service department to register the scanner. Please refer to the Technical Support Card, that
you received with the scanner, for our customer service contact information.
1. Open an Internet Explorer window, or any other internet browser you have installed on your computer.
2. In the web address field type www.xeroxscanners.com.
3. Press Enter on your computer’s keyboard or click the option on screen to go to the web address.
4. When the Xerox scanners web page loads click on Register Your Product.
5. Fill in the registration form, all required fields have an asterisk (*).
Note: A valid email address is required for registration.
6. You will be asked to enter the serial number for the scanner, it is located on the back or underside of the
scanner.
7. After filling in the form, click on Submit Your Registration to complete the registration.
Xerox® DocuMate® 5445 / 5460
User’s Guide
39
Page 40

40
Xerox® DocuMate® 5445 / 5460
User’s Guide
Page 41

Loading Documents to
5
Scan
This chapter includes:
• Preparing Documents for Scanning on page 44
• Using the Mixed Batch Card Guide on page 42
• Scanning Thick Pages or Bound Documents on page 46
• Supported Document Types on page 47
• Unacceptable Document Types on page 48
• Unsupported Document Types on page 49
• Scanning Interfaces on page 50
This chapter illustrates scanning with the buttons on the scanner. After loading documents in the scanner, as
described below, you can also scan using the One Touch Button Panel on screen, or using a scanning application.
Note: Always remove any staples or paper clips from documents before inserting them into the scanner. Staples
and paper clips can jam the feed mechanism and scratch the internal components. Also remove any labels,
stickers, or Post-It
described here will void your scanner’s warranty.
®
notes that may come off during the scanning process and get stuck in the scanner. Misuse as
Xerox® DocuMate® 5445 / 5460
User’s Guide
41
Page 42

Using the Mixed Batch Card Guide
Yo u c a n u s e t he c ar d gu i de t o s c an mo s t I D an d c r e di t ca rds without having to adjust the paper guides to fit the
width of the card. The card guide helps to prevent the card from skewing while scanning a mixed batch containing
both regular paper and cards.
Please note and follow these guidelines when using the mixed batch card guide:
•The input tray paper guides cannot be adjusted to less than A5 size in width.
•The total thickness of the paper stack you place in the input tray should not exceed 0.08 inches (2 mm). This is
roughly equivalent to 20 pages of 20 lb (80 g/m
•Place only one card at a time in the card guide.
Detach or Attach the Mixed Batch Card Guide
The card guide is pre-installed in the scanner. After removing the shipping tape lift up on the card guide to remove
it from the scanner.
2
) printer paper.
After you remove the card guide from the scanner you can attach it to the back of the input tray. Slide the paper
guide into the tabs on the back of the input tray as indicated in the illustration below.
42
Xerox® DocuMate® 5445 / 5460
User’s Guide
Page 43

When you want to use the card guide you can attach it by sliding the tabs on the card guide into the niches on the
scanner.
Xerox® DocuMate® 5445 / 5460
User’s Guide
43
Page 44

Preparing Documents for Scanning
•Fan the documents to make sure all pages in the stack are separated.
•Bend and then flatten the document stack to make sure the horizontal edges are aligned to help prevent paper
from skewing while being pulled through the scanner.
•Pinch the ends to align the leading edges slantwise to help prevent multiple pages from being fed through at a
single time.
44
Xerox® DocuMate® 5445 / 5460
User’s Guide
Page 45

•Adjust the paper guide for the width of paper, and make sure the input and output trays are fully extended.
•Place the documents face down in the input tray. Set the leading edge of the documents as shown in the
illustration below.
Important: the paper capacity for the input tray is 75 pages of standard 20 lb printer paper. You cannot place
a full stack of pages in the scanner if the card guide is installed in the scanner. Please refer to page 42 for
instructions on removing and storing the card guide.
Xerox® DocuMate® 5445 / 5460
User’s Guide
45
Page 46

Scanning Thick Pages or Bound Documents
With this scanner you can scan thick paper and bound documents up to a maximum of 1 thick.
To s ca n t h ic k i te m s:
The double feed prevention roller has to be moved away from the feed roller before you can scan thick items. The
double feed prevention roller separates the pages as the fee d r olle r g rabs and fee ds the pa ges th roug h t he scan ner .
Because the double feed prevention roller has to be disengaged, you can scan only one page at a time.
1. Open the scanner.
2. Locate the paper thickness switch in the underside of the ADF door.
3. Pull the paper thickness switch up as indicated in the illustration below.
When you pull the paper thickness switch the double feed prevention roller disengages and sits back into the
scanner.
4. Close the ADF door.
When you close the ADF door the double feed prevention roller will no longer touch the feed roller.
5. Place a single item in the input tray and scan.
When you are scanning thick items you cannot use the Double Fee d De tect ion opti on in t he sc ann in g i nter face. If
you leave that option enabled the scanner will report a double feed error for each page you scan.
When you are done scanning, do not forget to move the paper thickness switch back into its original position so that
you can proceed with normal document scanning.
46
Xerox® DocuMate® 5445 / 5460
User’s Guide
Page 47

Supported Document Types
Yo u c a n s c an th e fo ll o w in g ty p e s o f d o cu m e nt s a n d c a r ds w it h t h i s s c an n er .
Acceptable Paper Documents
•The maximum amount of paper in the input tray should not exceed the maximum stack thickness indicated on
the paper guides.
This is approximately 75 sheets of 20 lb (75 gsm) new printer paper.
•Document size
–Minimum size (width x length) – 1.9 x 2.8 inches (48 x 71 mm)
The minimum supported paper length is 71 except when scanning the acceptable card size stated below.
–Maximum size (width x length) – 8.5 x 100 inches (216 x 2,540 mm)
We recommend scanning one page at a time when the documents you are scanning are longer than 14
inches (356 mm). Please refer to scanning with Manual feed mode in the TWAIN interface for
instructions on scanning one page at a time.
•Paper thickness between 5 lbs to 55 lbs (19-206 gsm)
–We recommend changing the Document handling speed to Delicate in the TWAIN interface when
scanning thin paper of approximately 11 lbs (40 gsm) or thinner. Additionally, we recommend using the
slow paper feeding speed if you are scanning fragile documents.
Important: the minimum custom item size is 1.9 x 2.13 inches (48 x 54 mm). This means that you cannot scan
business cards size 3.5 x 2 inches in the landscape orientation. You can place them with the short edge leading into
the scanner (portrait orientation) and scan from the TWAIN interface. Select one of the rotate image options in the
TWAIN interface to have the business cards rotated to the correct orientation in the final scan.
Note that if you attempt to scan business cards in the landscape orientation you will probably receive a paper jam
error.
Acceptable Card Type
Card size: 3.4 x 2.13 inches (86 x 54 mm)
•Standard ID cards
–Card size: 3.4 x 2.13 inches (86 x 54 mm)
–Card thickness: 0.03 inches (0.76 mm)
•Embossed cards
–A maximum of 3 cards can be loaded in the input tray.
–The maximum height of the 3 cards stacked in the input tray should not exceed 0.2 inches (5 mm).
–Scan the cards in the landscape (horizontal) orientation.
Use the mixed batch card guide when scanning mixed media (cards and paper) at the same time. Please refer to
Using the Mixed Batch Card Guide for instructions.
Xerox® DocuMate® 5445 / 5460
User’s Guide
47
Page 48

Unacceptable Document Types
The following types of documents may not scan properly or damage to the original document may occur during
scanning. We recommend you avoid scanning documents that are in this list.
•Curled, wrinkled or folded documents may cause paper jams or multiple pages being fed through the scanner
at one time.
•Perforated or punched paper that could tear when the separation roller engages.
•Coated paper or photographs where the coating can flake off during scanning and leave residue in the
scanner.
•Extremely smooth, shiny, or highly textured paper may cause the paper feed rollers to slip across the page and
cause the scanner to report a paper jam.
•Carbonless copy paper may tear while being fed through the scanner and the pressure of the rollers may leave
streaks on the page.
•Partially transparent paper such as tracing paper as any images from the opposite side of the page or black
background will appear in the scanned images.
48
Xerox® DocuMate® 5445 / 5460
User’s Guide
Page 49

Unsupported Document Types
Do not scan the following types of documents as they may cause damage to the scanner.
•Items outside of the specified supported sizes, thickness, and weight defined in this document.
•Non-rectangular or irregularly shaped paper will cause the scanner to detect and report document skew errors
or paper jams.
•Carbon paper that will leave residue in the scanner and on the rollers that will transfer to the next set of
documents scanned.
•Documents with hard items attached such as paper clips, binder clips, and staples.
•Documents with wet ink or white-out.
•Thermal or photosensitive paper.
•Overhead projector sheets, plastic film, camera film, and any other type of transparent or partially transparent
plastic item.
•Documents that have been glued together.
•Cloth or metallic sheets.
Xerox® DocuMate® 5445 / 5460
User’s Guide
49
Page 50

Scanning Interfaces
If you selected the recommended installation, then you have several different options to scan with your Xerox
DocuMate 5445 / 5460 scanner. Each method scans equally well, so use the one with appropriate options for the
item you are scanning.
• One Touch—When you press the Start button on the scanner, the scanner starts scanning using the settings
for the cur rent LED n umb er. T he scann ed ima ge is then sent to a destination on your computer or network
drive.
• One Touch Button Panel—Use this scan option when you want to scan from the computer screen. Scanning
from the on-screen One Touch Button Panel is the same as selecting a scanning option on the scanner, except
you click an icon that represents the function.
• TWAIN Interface—This option uses your scanner’s TWAIN interface to scan. Select scanning options before
scanning, put the document in the scanner, then click the Scan button in the TWAIN interface window.
• ISIS Interface—This option uses the ISIS interface for scanning. Select the ISIS scan settings, put the
document in the scanner, then click the Preview Scan button in the ISIS window.
50
Xerox® DocuMate® 5445 / 5460
User’s Guide
Page 51

Scanning and
Configuring One Touch
This chapter includes:
• Default One Touch Settings on page 53
• Scan from the One Touch Button Panel on page 54
• Changing the Button Settings on page 56
• Selecting Options for One Touch on page 58
• Scan Configurations on page 61
• File Formats on page 69
• Configure Before Scan on page 73
• Open Scanned Document(s) on page 75
• Trans fer to St orage on page 76
• Burn to CD-ROM on page 82
• Printer or Fax on page 84
• PaperPort on page 86
• SharePoint on page 88
• FTP Transfer on page 91
• SMTP on page 93
• Email Applications on page 96
• Te x t E d i t o r s on page 98
• Still Image Client on page 102
• Image Editors on page 104
• PDF Applications on page 107
• Send to Application on page 110
• Scanning to Multiple Destinations on page 113
• Scanning with Job Separation on page 116
• Scanning with Optical Character Recognition (OCR) on page 119
• Selecting One Touch OmniPage OCR Options on page 123
• One Touch with Visioneer Acuity Technology on page 131
• Hardware Properties and Interface Behavior on page 135
6
Based on the recommended full installation of the scanner driver and the Visioneer One Touch software, One Touch
is your main scanning interface for using the scanner.
The One Touch buttons, on the scanner, mirror the One Touch button panel on-screen.
Xerox® DocuMate® 5445 / 5460
User’s Guide
51
Page 52

The One Touch Button Panel, that you see on the computer screen, shows the pre-set function for each button (such
The One Touch button panel shows which
application the button is configured to send
images to.
as Email) and the icon of the destination (called the Destination Application) where the images will be sent when
scanning is finished.
52
Xerox® DocuMate® 5445 / 5460
User’s Guide
Page 53

Default One Touch Settings
When you installed the scanner, the software configured each One Touch button with appropriate settings
consisting of: a Destination Application, a Scan Configuration, and a File Format. The button names, such as Email
or Copy, indicate the original factory settings for a button. You can change any of these settings. Please see
Changing the Button Settings on page 56 for instructions.
For ex am ple, t he E ma il but to n is set u p to s ca n do cume nts then immediately attach them to a new email message
in your default email program. The email application will default to the email program specified in the internet
options of Internet Explorer.
A folder icon for a button means that the button is set up to archive the scanned item. The scanner sends the
scanned image directly to a folder without opening the image first in a software application.
A question mark for a button means your computer does not have the appropriate software or hardware for the
initial factory settings.
If OmniPage or the One Touch OmniPage Module is not installed, then the options for sending to word processing
applications such as Microsoft Word will not be available.
Note: The default page size in each configuration is based on your computer’s Windows Measurement system
selection of U.S. (United States) or Metric units.
•If U.S. is the selected measurement, the default page size in each profile will be based on the United States
standard paper sizes such as 8.5 x 11 inches.
•If Metric is the selected measurement, the default page size in each profile is based on the ISO 216 standard
and the majority of the profiles will default to A4.
Xerox® DocuMate® 5445 / 5460
User’s Guide
53
Page 54

Scan from the One Touch Button Panel
One Touch Icon
The Detail View The Hardware View
The Button View
Scanning from the button panel on your computer’s screen works like pressing a button on the scanner. The scanner
scans the item, then sends the image to the Destination Application indicated by the button’s icon.
To s c a n fr o m t h e O n e To u c h B u t t on p a n e l :
1. Load the documents into the scanner.
2. Click on the One Touch icon in the Windows notification area (at the lower right corner of the screen.)
3. The One Touch Button Panel opens.
4. Click the button you want to use to scan.
5. The scanner starts scanning and the image is sent to the selected destination for the One Touch button you
are using to scan.
Features of the One Touch Button Panel
The One Touch panel is your on-screen set of controls for the scanner. From the panel you can access the hardware
settings for your scanner and configure the Scan button.
Click on the One Touch icon to open the panel.
The Title Bar
•Green arrows—click to cycle through the panel’s 3 views.
54
Xerox® DocuMate® 5445 / 5460
User’s Guide
Page 55

•Scanner icon—click to open the scanner’s hardware properties.
•Red “X”—click to close the OneTouch panel.
The Button View
• Left-click on a Destination Application icon to start scanning.
• Right-click on a Destination Application icon to open the One Touch Properties.
• Left-click on the arrow buttons, on the right side of the panel, to view the rest of the One Touch buttons.
The Detail View
• Left-click on a Destination Application icon to start scanning.
• Right-click on a Destination Application icon to open the One Touch Properties.
• Single-click on the detailed information to open the One Touch Properties.
The Hardware View
• Left-click on the scanner icon to return to the Button view.
• Right-click on the scanner icon to open the scanner’s hardware properties.
Xerox® DocuMate® 5445 / 5460
User’s Guide
55
Page 56

Changing the Button Settings
Select the
Destination
Application that
will open when
you are finished
scanning. You use
the destination
application to
view and work
with your scanned
images.
Select a
configuration for
scanning the item.
Select a file format
for your scanned
images.
Scanner button
configuration tab
1. Click on the One Touch icon.
2. Right-click a button on the One Touch Button Panel.
3. The One Touch Properties window opens.
The One Touch Properties window will also open when you press, hold down for 3 seconds, and release a
scanner button.
Some of the options on the One Touch Properties Window are “grayed out” and are not available, these
options are not appropriate for your scanner model.
4. Select the destination you want One Touch to send the scanned image to in the Select destination list.
If you select a word processing program such as Microsoft WordPad or Microsoft Word that can be used for
OCR (such as TXT or RTF), the text in scanned images is automatically converted to word processing text.
5. Select a file format in the Select format panel.
The formats are based on the type of Destination Application you select. The icon names indicate their file
types. See File Formats on page 69 for more information about the available formats.
6. Select a scanning configuration in the Select configuration list.
The configuration’s basic settings include: scanning mode, resolution (dpi), page size, brightness (Br), and
contrast (Cr). To see a selected scan configuration’s settings, click its icon. Click the icon again to close the
detailed information. Refer to Scan Configurations on page 61 and Configure Before Scan on page 73 for
instructions on creating and modifying scan configurations.
7. Click on OK to save the changes.
8. Place an item in the scanner and click the One Touch button to start scanning.
56
Xerox® DocuMate® 5445 / 5460
User’s Guide
Page 57

The scanner scans and sends the image to the selected destination, with the file format and scan configuration you
specified.
Properties button—displays a window for selecting properties for a desti natio n. This but ton i s d isabled if th e
selected destination application does not have global configuration properties.
Refresh button—updates the links between all your computer’s Destination Applications and One Touch. If you
install new software that can be used as a Destination Application, click the Refresh button to link the new software
to One Touch.
New/Copy/Edit/Delete buttons—click New or Copy to add new scan configurations to the list. Click Edit or Delete
to change or remove them.
OK/Cancel/Apply buttons—OK accepts any changes and closes the window. Apply accepts any changes but leaves
the window open so you can continue making additional changes. Cancel closes the window without accepting any
changes.
Xerox® DocuMate® 5445 / 5460
User’s Guide
57
Page 58

Selecting Options for One Touch
Use the Options tab to configure how One Touch works with the selected button, such as which destinations are
available, or what the file name should be.
Select Button—click the down arrow and select the button for which you want to modify the settings from the list.
The options you choose in this window only apply to the button you select in this list.
Show all destinations—this option selects all of the Destination Application categories. The list of Destination
Applications available for the selected button will include all the applications on your computer that fall into these
categories.
Select destinations—select this option to individually choose the types of applications to include in the list of
Destination Applications. Check the boxes for the type of application to include.
Destination Categories:
• Document management includes Nuance PaperPort and other applications for processing and keeping track
of your scanned documents. This category includes the Send to Application and Open Scanned Document(s)
destinations.
• Image editors include Microsoft Paint and other drawing and graphics applications.
• Te xt ed it o rs include Microsoft Word and WordPad, Microsoft Excel, and other word processing and
spreadsheet applications. Select this option if you want OCR processing to convert your scanned documents to
text that you can edit.
• PDF applications are for viewing and/or editing Adobe PDF files.
• Email includes Microsoft Outlook and other email applications, as well as the SMTP destination which allows
you to scan directly to the SMTP server without opening an email client application.
• Storage and CD-R/W is for scanning directly to a folder on the computer, server, FTP server, SharePoint site, or
to the Windows CD temp directory for burning the files to a CD.
• Fax and Print is for sending your scanned documents directly to your printer or fax software.
• STI event forwarding is for using another application’s interface for scanning. The One Touch Event
Forw ar di ng dia lo g bo x open s so y ou c an s el ect wh ic h app li ca ti on t o us e to c on ti nu e sc an ni ng .
58
Xerox® DocuMate® 5445 / 5460
User’s Guide
Page 59

Enable scanning to multiple destinations—select this option to allow for multiple destinations to be selected, in
the destination list, on the One Touch configuration tab. This feature allows you to scan one time while distributing
the file to multiple destinations. Please refer to Scanning to Multiple Destinations on page 113.
Instant delivery—enables image transfer to the destination while scanning is in progress, provided that Create
Single Image Files is also selected. If Create single image files is not selected, image transfer occurs after all
pages have been scanned.
Show progress window—select this option to display the progress window of the document(s) during scanning.
Use job separator when scanning multiple pages—select this option to have the scanner separate multiple page
scan jobs into separate files when scanning is complete.
• When a blank page is detected—select this option to have a new file created each time a blank page is
detected in the stack of pages being scanned. Note that when scanning duplex, both sides of the page must
be blank.
• When the number of images reaches—select this option, and input a number in the box, to have a new file
created each time the number of images scanned reaches the number you input in this field. Note that when
scanning duplex, the number of images detected is twice the number of pages scanned. For example, if you
input “5” in the field, and scan 10 pages, 20 images are captured, and you will get 4 separate files with 5
images in each file.
Please refer to Scanning with Job Separation on page 116 for detailed information about scanning with job
separation, and how it works with other options in One Touch.
Use custom file naming—select this option to enable the input field so that you can specify the file name for your
scanned document(s). You can specify a different file name for each One Touch button. When this option is not
select, the file name is automatically generated by One Touch for all scans.
•The preview area, to the right of the Use custom file naming text, shows an example of the filename as you
type into the input field and/or select token options from the list.
•Type the file name you want into the input field. Note that you cannot input these characters in a file name: \ /
: * ? “ < > |
When inputting a file name, the file name must be unique, otherwise every scan created would overwrite the
previous scan. The menu to the right of the input field contains a list of tokens you can select to create unique
file names. These tokens include counting numbers, date and time values, number of pages scanned, and so
on. If the button name is not unique, you will see an on-screen notification that a {BatchID} and/or {#b} will be
inserted into the name.
Xerox® DocuMate® 5445 / 5460
User’s Guide
59
Page 60

•Click the down arrow and selected a token value from the list, then click the arrow button to add that value to
the file name field. The token values are:
{FN}—inserts the scanner name.
{#b}—inserts the image number without adding zero (1).
{#03b}—inserts a 3-digit image number in the scan batch (001).
{D}—inserts the numeric day of the month without a zero added to single-digit days (4).
{DD}—inserts the numeric day of the month with a zero added to single-digit days (04).
{DDD}—inserts the abbreviated 3-letter day (Mon).
{DDDD}—inserts the full name of the day (Monday).
{M}—inserts the numeric month without a zero added to single-digit months (8).
{MM}—inserts the numeric month with a zero added to single-digit months (08).
{MMM}—inserts the abbreviated 3-letter month (Aug).
{MMMM}—inserts the full name of the month (August).
{YY}—inserts the two-digit year (97).
{YYYY}—inserts the four-digit year (1997).
{h}—inserts the 12-hour clock hour without a zero added to single-digit time values (2).
{hh}—inserts the 12-hour clock hour with a zero added to single-digit time values (02).
{H}—inserts the 24-hour clock hour without a zero added to single-digit time values (2).
{HH}—inserts the 24-hour clock hour with a zero added to single-digit time values (02).
{m}—inserts the minute without a zero added to single-digit time values (7).
{mm}—inserts the minute with a zero added to single-digit time values (07).
{s}—inserts the second without zero added to single-digit time values (9).
{ss}—inserts the second with zero added to single-digit time values (09).
{User}—inserts the user name.
{Mach}—inserts the computer name.
{Dest}—inserts the destination application name.
{Bttn}—inserts the button name.
{Mode}—inserts the scan color mode.
{Size}—inserts the page size.
{BatchID}—inserts a unique batch identification number.
Te ch n ica l N ot e
Some destination application links, such as the NewSoft Presto! BizCard software, require a specific filename format
for the ima ges t hat have b een sent to the lin k to ope n correctly in the application. For example, when scanning
duplex, if the image token {#03b} is not included in the filename, then each image sent will be regarded as a
separate scan, and instead of one file with 2 pages you will have 2 files. As each destination application link is
different, there is no standard filename type you can create to use for all destinations. If you scan and the images
are not grouped in the file(s) as needed, try deselecting Use custom file naming and then scan again.
60
Xerox® DocuMate® 5445 / 5460
User’s Guide
Page 61

Scan Configurations
Click the icon of a
selected configuration to
view its settings.
Select the scan
configuration to edit or
delete. It must be
unlocked, as indicated by
not having a lock
displayed here.
The scan configurations are where you select the scanning resolution, brightness, mode (color, black & white, or
grayscale), and a number of other settings. To see a selected scan configuration’s settings, click its icon. Click the
icon again to close the detailed information.
Note: Use Configure Before Scan if you want to set the options manually before scanning. See Configure Before
Scan on page 73.
Create a new configuration:
•Click the New button to create a new configuration starting with the One Touch default configuration settings.
•Select a configuration in the list, then click on the Copy button to create a new configuration starting with the
settings of the currently selected configuration.
Edit or delete a configuration:
Select the scan configuration you want to edit or delete.
•To delete the configuration, click the Delete button.
•To edit the configuration, click the Edit button.
Edit the settings and click OK.
Note: Yo ur sc a n ne r co m es w it h a n u mb e r o f c o n fi g ur a ti o ns p re - set at the factory. To ensure that your scanner will
always have a set of correct scan configurations, do not delete the pre-set configurations. We also recommend that
you keep those configurations locked so they are not inadvertently deleted. That way, you will always have the
fact or y- se tt in gs a va il ab le . If y ou d o de le te o r ed it t he m, and want to get the factory pre-sets back again, you will
need to uninstall then re-install your scanner.
In the Scan Configuration Properties window, the Scan Settings, Page Settings, Advanced Settings, and
Redaction Settings tabs are always available. When the Visioneer Acuity module is installed, the Acuity Settings
tab will also be available for all destinations.
Xerox® DocuMate® 5445 / 5460
User’s Guide
61
Page 62

Based on the selected destination, additional settings tabs may also be available. If you see one of these additional
If the configuration
is locked, click the
lock to unlock it. The
icon becomes a key.
Type a new name for
the configuration.
Select the scan mode
and drag the slider to
set the resolution.
Drag the sliders to set
the Brightness and
Contrast.
settings tabs please refer to the appropriate section, as listed below, for instructions on configuring these
destination specific options.
•Use the Storage Options tab to choose the storage folder for scans sent to the Transfer to Storage
destination, as described on page 76.
•Use the Device Settings tab to configure Fax and Print destinations, as described on page 84.
•Use the PaperPort tab to choose the destination folder, in the Nuance PaperPort application, as described on
page 86.
•Use the SharePoint tab to specify a SharePoint site, user credentials, and destination folder, as described on
page 88.
•Use the FTP Transfer tab to specify an FTP site, user credentials, and destination folder, as described on page
91.
•Use the SMTP Configuration tab to specify an SMTP server, user credentials, and destination email address,
as described on page 93.
Scan Settings Tab
On the Scan Configuration Properties dialog box, type a name.
Mode—select a scanning mode:
• Black&White to scan in black and white. For example, letters and memos are usually scanned in black and
• Grayscale to scan items such as documents containing drawings or black and white photographs.
• Color to scan color photographs and other color items. Color scans have the largest file size.
Resolution—drag the slider to the right or left to adjust the dots per inch (dpi) of the resolution. The higher the dpi
setting, the sharper and clearer the scanned image. However, higher dpi settings take longer to scan and produce
larger files for the scanned images.
Brightness—sometimes an image is scanned with the brightness and contrast set too light or too dark. For
example, a note written with a light pencil may need to be scanned darker to improve legibility. Increasing or
decreasing the brightness makes the scanned image lighter or darker.
Contrast—the difference between the lighter and darker portions of the image. Increasing the contrast emphasizes
the difference between the lighter and darker portions, decreasing the contrast de-emphasizes that difference.
Key and Lock icon—if you want to lock the configuration, click the key icon to change it from a Key to a Lock.
62
white.
Xerox® DocuMate® 5445 / 5460
User’s Guide
Page 63

Page Settings Tab
Click the name to
toggle between inches
and millimeters.
The options on the Page Settings tab will be available based on either the selected color mode (Black & White,
Grayscale, or Color), or based on whether or not the scanner hardware supports the feature.
Standard—click the menu arrow and choose a page size from the list.
Custom—enter the horizontal and vertical page dimensions in the boxes. Click the name of the units, inches or
millimeters, to toggle between them.
Improvements and Settings—it is indicated in the feature description if there is a software or hardware
dependency for the option to be available.
• Duplex—scan both sides of the page. This option is only available if the scanner supports this feature.
The Simplex and Duplex buttons on the scanner take precedence over the One Touch settings. In other words,
if the LED number on the scanner is configured to scan as Duplex, but you press the Simplex button, the
scanner scans in Simplex, and vice versa.
• AutoCrop to original—select this option to let the scanner automatically determine the size of the item being
scanned. This option is only available if the scanner supports this feature.
Always use the paper guides on the scanner so the page is not skewed. Skewed pages may not crop properly.
• Reduce Moiré patterns—moiré patterns are wavy, rippled lines that sometimes appear on the scanned
images of photographs or illustrations, particularly newspaper and magazine illustrations. Selecting Reduce
moiré patterns will limit or eliminate moiré patterns in the scanned image. This option is only available when
scanning in Color or Grayscale at lower resolutions, and when the scanner supports this feature.
• Straighten image—select this option to let the scanner automatically determine if a page is skewed, then
straighten its image. This option is only available if the scanner supports this feature.
If you are scanning using an Automatic Document Feeder, and the page is fed through at too great of an
angle, the image may not straighten correctly. In that case, re-scan the page using the paper guides to feed
the paper in straight.
• Edge cleanup—select this option to have the software remove any thin lines that may be around the edges in
the scanned image. These lines may appear in the edges when the item being scanned is not the exact size of
the dimensions indicated in Size fields. This option is only available if the scanner supports this feature.
Xerox® DocuMate® 5445 / 5460
User’s Guide
63
Page 64

• Invert image—only available for Black&White Mode, this option reverses the black and whites of an image.
Original Image Inverted Image
The original with a red
watermark over black
text.
The scanned item with
the red filtered out.
• Skip blank originals—select this option to have the scanner detect if a blank page has been fed through the
scanner, and remove it from the final file. Typically you might use this option when scanning a stack of twosided pages which have a number of blank sides.
Sensitivity—you can adjust the sensitivity level of the blank image detection.
Note that when the Options tab feature Use job separator in multi-page batch is enabled, and the option
selected is When a blank page is detected, the sensitivity level for Skip Blank Originals is the sensitivity level
that will be used when both features are enabled.
Note that when the feature Use job separator in multi-page batch is enabled, and the option selected is
When the number of images reaches, the blank originals are discarded befor e the im ages are co unted . For
example, if you scan 3 pages in duplex mode, each side of the page is counted as an image and the total
number of images is 6. When Skip Blank Originals is enabled, and 2 of the 3 pages in the stack are blank on one
side, the total number of images counted is 4 not 6.
• Color dropout—color dropout is the ability of your scanner to automatically remove a color from a scanned
image. For example, if you are scanning a letter with a red watermark, you can choose to filter out the red so
the scanned letter just shows the text and not the red watermark. Color dropout applies to Black & White or
Grayscale scanning modes.
• Double Feed Detection—selecting this option turns on the scanner hardware feature that detects when
multiple pages feed through the scanner at one time. This option is only available if the scanner supports this
feat ure.
• Manual Feed Mode—select this option to enable a delay from when the last page is scanned and when the
scanner stops the scan job.
To s c a n w i t h ma n u a l f e e d m od e :
1. Select Manual feed mode.
2. In the Timeout field, input the amount of time you want the scanner to wait from when the last page is
scanned and when the scanner stops scanning.
3. Place a document in the scanner.
4. Click Scan.
64
Xerox® DocuMate® 5445 / 5460
User’s Guide
Page 65

5. The scanning progress dialogue on-screen will display a countdown indicating how much time you have
to place the next document in the scanner.
6. When you are done scanning all pages in your document, you can click on Abort to stop the timer or
simply let the timer run out.
Advanced Settings Tab
Use the Advanced Settings tab to set color correction options for Color or Grayscale scanning. Drag the sliders to the
left and right to change the color settings. As you do, the image changes to show the effects of the new settings.
• Color saturation—the strength or purity of a color. This option is only available when the selected scan mode
is Color.
• Color hue—the color your eyes see as reflected from the image. This option is only available when the
selected scan mode is Color.
• Gamma—is the tone curve and the starting point for image enhancement. As you raise or lower the Gamma
value, the values at which saturation, hue, brightness and contrast affec t th e i mage ar e ch ang ed. It is
recommended that you keep the default Gamma value or adjust this setting before adjusting the other
options. This option is available for both Color and Grayscale scanning.
Xerox® DocuMate® 5445 / 5460
User’s Guide
65
Page 66

Redaction Settings Tab
Use the options on the Redaction Settings tab to remove a specified area in the scanned image.
Please refer to the technical note, at the end of this section, for information about how this setting works with other
options in the One Touch Scan Configuration you are modifying.
Enable redaction—select this option to enable redaction when scanning. You might use this option if you want to
remove a logo or image that appears on each page that you are scanning. You can choose what color to fill in the
redacted area in the scanned image, and set multiple areas. If you are scanning in Duplex mode, you can specify
the area separately for the front and back side of the pages.
Click Add to add a line item to the area list in this window. You can redact multiple areas from the scanned image,
click the Add button again to continue adding line items to the list. Select an item in the list then click the Remove
button to remove the specified redaction area from the list.
Side—click once on the word Front to show the Side option list. If you are using a simplex (one-sided) scanner, only
the Front option will be available. If your scanner supports duplex (two-sided) scanning, the options Front , Back,
and Both will be available in the list.
• Front—this is the Simplex side of the page. The area(s) specified for the Front will only apply to the Simplex
side of the page when scanning in Duplex. Therefore, if you scan 4 double-sided pages, the resulting image
file(s) will have redacted areas on pages 1, 3, 5, and 7.
66
Xerox® DocuMate® 5445 / 5460
User’s Guide
Page 67

• Back—this is the Duplex side of the page. The area(s) specified for the Back will only apply to the Duplex side
of the page when scanning in Duplex. Therefore, if you scan 4 double-sided pages, the resulting image file(s)
will have redacted areas on pages 2, 4, 6, and 8.
• Both—select this option if you want to specify an area that appears in the same place on both sides of the
page, such as a company logo, so you don’t have to specify the same area separately for both the front and
back.
Click one time on the default value, 0.00 in each field, to enable the control box for you to input the start position
and redaction area size. The units of measurement is displayed on the lower-right corner next to the Paper size field.
• From left—input the upper-left corner start position measured from the left-side of the page.
• From top—input the upper-left corner start position measured from the top of the page.
• Width—input the width of the area to be removed.
• Height—input the height of the area to be removed.
Color—this color field shows the selected fill color for the redacted area(s). When the software removes the area
you specify, it fills the area with the color you have selected here. To change the color, click the artist palette button
to open the Windows color palette. Select the color you want then click on OK. The color you selected will now
display in the Color field on the Redaction Settings tab.
Xerox® DocuMate® 5445 / 5460
User’s Guide
67
Page 68
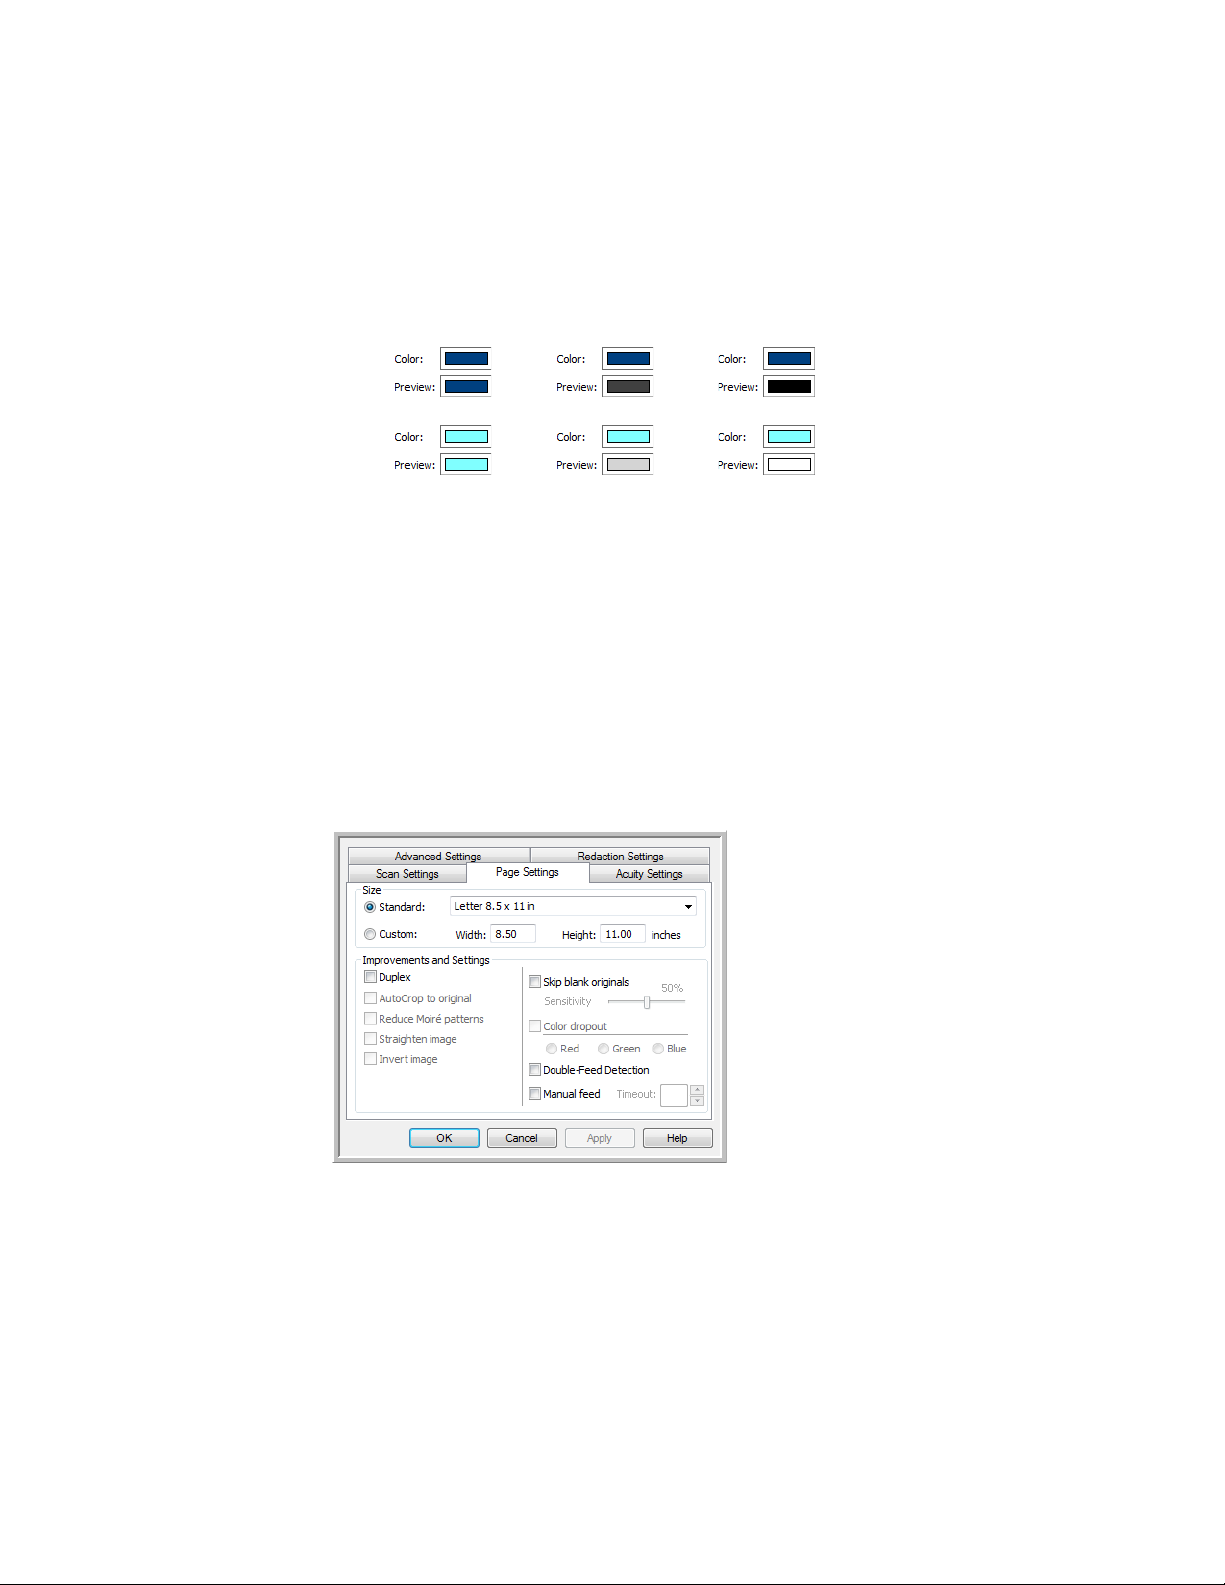
Preview—this color field shows the actual color that will fill the redaction area in the final scanned image. When
Color
scanning
Grayscale
scanning
Black&White
scanning
Click the name to
toggle between
inches and
millimeters.
scanning in color, the Preview field will match the Color field. When scanning in Grayscale, the preview field will show
the gray version of the color you selected, and that color will be in the final scanned image. When scanning in
Black&White, the preview field will display black or white depending on the darkness of the color you selected, and
the final image will have the redacted area(s) be black or white.
Te ch n ica l N ot e
The options on the Page Settings tab will affect th e re dact ion opt ion s as de scri bed bel ow:
•On the Page Settings tab, click the name inches or to toggle between the two units of measurement. When
you click back on the Redaction Settings tab, the lower-right corner displays the Paper size in the units of
measurement you selected.
•Make sure the page size selected on the Page Settings tab is correct for the documents you are scanning,
otherwise the redaction may not occur in the correct area.
•If Color dropout is selected, redaction occurs after the color specified is removed from the image.
For ex am ple, if y ou s el ec ted Red a s th e co lo r dr opou t, but then specify red for the redaction region, the final
image will have the redacted region filled with gray when scanning Grayscale, or black or white when scanning
in Black&White.
68
Xerox® DocuMate® 5445 / 5460
User’s Guide
Page 69

File Formats
Image Formats. The BMP,
JPG, and PDF image formats
Text Formats;
TEXT is only one
of several text
formats available.
The available file formats, in the Select format panel, are based on the selected destination for scanning. For
example, if scanning to the destination Trans fer to Storage, all file formats are available as the files are saved
directly to a folder without opening any application. If the destination is an application, such as Microsoft’s Paint,
only the file types the application supports will be available in the Select format panel.
Most of the format icons have a right-click menu to select file format specific options, or choose additional formats
that are not represented in the panel by default.
The format names in the Select format panel indicates the file type extension for the scanned file.
Create Single Image Files
The TIFF and PDF formats, as well as the text file formats, support multiple page documents in a single file. If you
are scanning as a TIFF or PDF format, or as one of the text formats, and want one file created for each image
scanned, select Create single image files. Note that this option is automatically selected and disabled if you have
selected a format that only supports single pages, such as BMP, PNG, GIF, JPG, or JP2.
Image Formats
Select an image file format for photos, artwork or other documents that you want to save as images. BMP and TIFF
are standard image file formats generally used if you want to do additional image processing, such as photo touchup or color correction.
Xerox® DocuMate® 5445 / 5460
User’s Guide
69
Page 70

Right-click on the BMP icon to access the GIF and PNG image formats. When you select either of these formats, the
for mat p ane l w ill c han ge the B MP ic on to the s ele cted ima ge for mat icon .
BMP—the *.bmp (bitmap) format is generally used when you want to do additional image processing, such
as photo touch-up or color correction, as very little image compression is used when creating the file. When
scanning in color or grayscale, BMP scans result in the largest file size of the image formats.
GIF—the *.gif (graphics interchange format) format is generally used when putting images on a website or
server, as image compression can reduce the file size by approximately 95% when compared to a BMP file
of the same image. Company logos and small pictures on a webpage are often GIF images. The GIF
compression, and limited color range, can result in the medium and large images looking grainy or pixilated.
PNG—the *.png (portable network graphics) format is another common image format for website graphics.
Like GIF, the PNG compression greatly reduces the file size when compared to a BMP file of the same
image. However, the PNG compression is different from GIF compression in that PNG images look better
when scaled. Therefore, PNG is often used in place of GIF for company logos with a lot of detail, clickable
buttons, medium sized pictures, and so on.
TIFF—the *.tif (tagged image file format) format is another image type that is often used for photo
editing. When scanning in color, it produces a file of similar quality and size to a BMP file. However, when
scanning in Black & White, the TIF compression produces the smallest file size of all the image types
without losing image quality. TIFF also supports multi-page image files.
Right-click on the JPG icon to access the JP2 image format. When you select JP2, the format panel will change the
JPG icon to the JP2 format icon.
JPG—the *.jpg (joint photographic experts group) format is a common image format for transferring
pictures electronically, such as posting to a website or sending via email, as JPG image files are smaller than
BMP and TIFF files. You can change the level of compression for the picture file to have better quality or a
smaller file size.
JP2—the *.jpg2 (joint photographic experts group 2000) format is the new JPEG standard. This new JPG file
type has improved compression for better image quality at smaller file sizes. Please refer to the official JPEG
website at www.jpeg.org for more information about this file format, and a list of applications that can view
and/or open this file type.
70
Xerox® DocuMate® 5445 / 5460
User’s Guide
Page 71

To s e l e c t a J P E G fi l e s i z e :
1. Select JPG as the page format.
2. Right-click on the JPG icon.
A menu opens.
3. Choose the file size/image quality option for your scanned images.
Minimize Size—smallest file size, lowest image quality.
Normal—medium file size, some loss of image quality.
Maximize Quality—largest file size, minimal loss of image quality.
Yo ur s el e c ti o n p e rt a i ns o nl y t o th e bu t t on cu r r en t l y selected on the One Touch Properties window. Other
buttons that have JPG selected as the file format are not affected, so you can set the JPG file size/image
quality independently for each button.
4. Click OK or Apply on the One Touch Properties window.
Right-click on the PDF format icon to change the image quality or select the option to make the scanned PDF file
PDF-A compliant.
PDF—the *.pdf (portable document format) image format is often used to create images of text pages.
The image compression of PDF files creates relatively small file sizes when scanning multiple page files in
color. While the TIFF image format also supports multiple page files, when scanning in color the TIFF files
are often too large to be transferred electronically. The PDF file format is often used for posting multiple
page files to websites, sending via email, and permanent storage. As with the JPG file format, you can
change the PDF quality to reduce the file size or improve the image quality.
®
Adobe
files.
Using PDF-A when scanning as PDF, means the files are compliant with the ISO-19005-1 standard for
permanent archival of electronic documents. More information about this standard can be found at
www.pdfa.org.
Reader®, or other PDF viewer software, must be installed on your computer for you to to view PDF
To s e l e c t a P D F fi l e s i z e :
1. Select PDF as the page format.
Xerox® DocuMate® 5445 / 5460
User’s Guide
71
Page 72

2. Right-click on the PDF icon.
A menu opens.
3. Choose the file size/image quality option for your scanned images.
Minimize Size—smallest file size, lowest image quality.
Normal—medium file size, some loss of image quality.
Maximize Quality—largest file size, minimal loss of image quality.
Yo ur s el e c ti o n p e rt a i ns o nl y t o th e bu t t on cu r r en t l y selected on the One Touch Properties window. Other
buttons that have PDF selected as the file format are not affected, so you can set the PDF file size/image
quality independently for each button.
4. Click OK or Apply on the One Touch Properties window.
Text Formats
Selecting the text format option also selects OCR processing as an automatic step for scanning. Therefore, when you
scan a document with the text format selected, the text portions of the document are automatically converted to
editable text.
Select a text format for documents with text or numbers, such as a business letter, report, or spreadsheet. The text
for mat i con ha s several file form ats a vaila ble, depending on the Destination Application you select.
Detailed information about these text file formats, and instructions for setting up the OCR options, are in the section
Scanning with Optical Character Recognition (OCR) on page 119.
To s el ec t a fi le ty pe fo r t he t ex t f or m at :
1. Select the Destination Application.
2. Right-click on the text format icon.
The menu options depend on the type of Destination Application you select.
3. Choose the file type that you want for the text format.
4. Click OK or Apply on the One Touch Properties window.
72
Xerox® DocuMate® 5445 / 5460
User’s Guide
Page 73

Configure Before Scan
Yo u c a n s e t u p t h e s c an n er s o t h at , wh e n y o u p r es s a b ut t o n or click it on the Button Panel, a different scanning
interface opens before the scanning starts. You can then use the interface to change the Resolution, Scan Mode, and
other settings. When you scan, the scanned image will still be sent as the file type and to the same Destination
Application already selected in the One Touch Properties window for that button.
1. Open the One Touch Properties window.
2. Select the scan configuration Configure Before Scan.
3. Click OK or Apply on the One Touch Properties window.
To Scan Using Configure Before Scan
1. Click the button you set up to use Configure Before Scan.
2. The TWAIN Interface opens.
3. Choose your scan settings, such as the Picture Type of Color, Grayscale or Black & White, Resolution in DPI, and
Page Size.
4. Click the Scan button on the TWAIN Interface.
5. The item is scanned. When finished, click the Done button and the image will be sent to the Destination
Application specified in the One Touch Properties window.
Xerox® DocuMate® 5445 / 5460
User’s Guide
73
Page 74

Canceling a Configure Before Scan
1. Click Cancel in the scanning progress window.
2. The following window will open asking if you want to cancel the entire job.
– Ye s—scanning stops and all pages scanned in this batch, up to this point, will be deleted. The TWAIN
interface will close and you can restart your scan from the beginning.
Choose Yes if the TWAIN scan settings are incorrect for your current scanning batch.
For in stan ce , the Pi ct ur e Ty pe i s Bl ac k & Whit e bu t yo u want to scan your documents in color. Choose Yes
to delete any scanned pages, then start over but select the correct picture type before scanning.
– No—scanning stops, but all pages scanned in this batch, up to this point, are not deleted and the TWAIN
interface remains open. You can place a new page in the scanner, adjust the TWAIN settings for it, then
click the Scan button in the TWAIN interface to continue scanning. At the end of the scanning batch, all
pages from the first portion of the scan and second will be sent to the Destination Application.
Choose this option if, for instance, you have been scanning a Black & White document but you want to
insert a color page into it. Instead of having to re-scan the entire batch, you can stop the current scan,
change the picture type from Black & White to Color, then restart the scanning without losing the pages
already scanned.
74
Xerox® DocuMate® 5445 / 5460
User’s Guide
Page 75

Open Scanned Document(s)
Select the destination Open Scanned Document(s) to have the scanned document open automatically when
scanning is complete.
Supported file types—all file formats are available when scanning to the Open Scanned Document(s) destination.
Note that text file formats are only available if an OCR module or application is installed. Please refer to Te x t
Form at s on page 72 to see a list of text file formats that are available when OCR is installed.
Destination type—the Open Scanned Document(s) destination is classified as a “Document Management Link”.
To m a k e i t a v a i l a b l e i n t h e de s t i n a t i o n l i s t , y o u m u s t se l e c t Document management on the Options tab in the
One Touch Properties window.
Te ch n ica l N ot e
•If there is no application installed for the file format you selected, the One Touch Link Log Viewer will open
when scanning is finished showing the fai lure . You ca n do ub le- cl ick on t he l og fa il ure t o o pe n t he de tail v iew o f
the failed transfer.
For ex am ple, if y ou s el ec t PDF as t he fi le typ e a PD F view er app li ca tion m us t be i ns tall ed t o op en t he fi le .
Either install an application for that file type, or associate an application in the Windows Explorer folders
option, please refer to your Windows documentation for instructions on associating file types.
•When scanning to multiple destinations, the scanned file is still sent to the other selected destination
application(s) in One Touch.
Xerox® DocuMate® 5445 / 5460
User’s Guide
75
Page 76
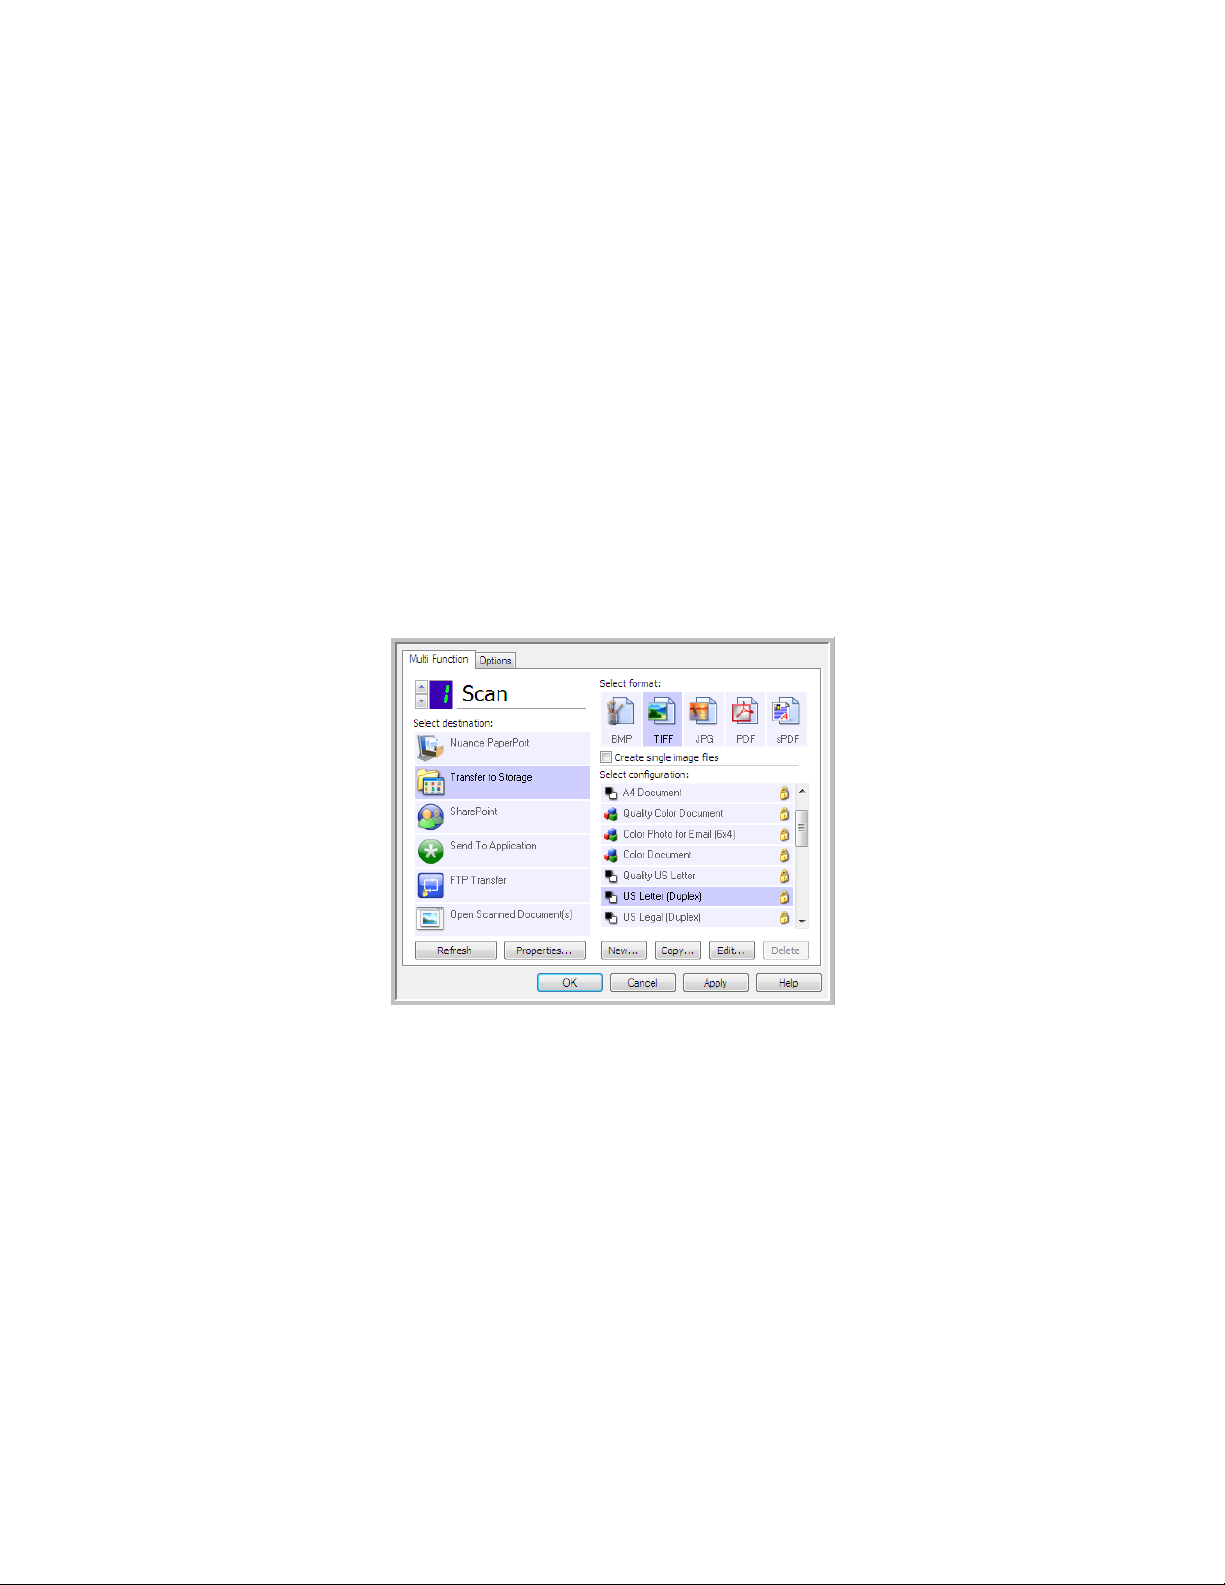
Transfer to Storage
With Trans fer to Storage, you can scan documents and save them in a folder in one step.
Supported file types—since the files are saved directly to a folder on the computer or server, all file formats in
One Touch are available. Note that text file formats are only available if an OCR module or application is installed.
Please refer to Te x t Fo r m a t s on page 72 to see a list of text file formats that are available when OCR is installed.
Destination type—the Transfer to Storage destination is classified as a “Storage Link”. To make it available in the
destination list, you must select Storage and CD-R/W on the Options tab in the One Touch Properties window.
Setting the Folder and Options from One Touch
In the One Touch Properties window, select Transfer to Storage as the Destination Application for scanning.
•Click the Properties button to open the One Touch Link Properties for Transfer to Storage. From this window,
you can change the global default storage location and options.
On initial installation of One Touch, all scan configurations use these settings. When you create new
configurations, the default settings will also match what you have selected here. If you modify the storage
options in an individual configuration, changing the options in this Link Properties window will no longer
update to the configurations you modified.
76
Xerox® DocuMate® 5445 / 5460
User’s Guide
Page 77

•Click the New, Copy, or Edit button to open the Scan Configuration Properties window. Click on the Storage
Transfer to Storage One Touch Link
Properties window
Scan Configuration Properties window - Storage
Options tab
Options tab and use this window to set a configuration to scan to a different folder than the one selected in
the Link Properties window.
Changing the options in this window only affects the configuration you are creating or modifying. All other
configurations will retain their settings for this destination.
Storage layout
• All documents are in the root—the scanned documents are saved in the root of the folder specified in the
Storage location.
• Documents are put into folders by month, week, or type—folders are created based on your selection
(month, week, or file type) and the scanned documents are saved in those folders. New folders are created for
each month and week so you can keep track of when you scanned the documents.
Storage location
•This is the location on the computer or network where the file will be saved. Click on the Browse button to
change the location by browsing through your Windows folder list, or type a location directly into the input
field. You can select a local folder, or a folder on a server or mapped drive.
Open storage folder when scan is complete
•Select this option to have the folder, specified in the Storage location, open when scanning is complete and
the image has been transferred to that location. If you have selected a month, week, or type grouping option,
the folder that opens will be the grouping option you selected.
Setting the Folder from Windows
When One Touch was installed, a storage option was added to the right-click menu of your Windows folders. This
menu option allows you to set the Transfer to Storage folder location without opening One Touch first.
1. Right-click on the folder you want set as the scan destination.
Xerox® DocuMate® 5445 / 5460
User’s Guide
77
Page 78

2. Hover the mouse cursor over the Set as scan destination option and the sub-menu will open to the right. Click
on the setting you want the Storage location to be updated with.
– For a ll configu rations—select this option to have the storage location, in all scan configurations Storage
Options tabs, updated to use this location. Note that the storage Link Properties location will also update
to use this location.
– For ne w and default configurations—select this option to have the One Touch Link Properties storage
location updated. Any scan configurations that you have not previously updated, with custom storage
locations, will also use this location.
– For co nfiguration used by a button—when you select this option, another sub-menu will open to the
right. The sub-menu will contain a list scanner buttons that are currently set to scan to the Transfer to
Storage destination. Select the button you want updated to use this location. This option modifies only
the scan configuration that is assigned to the button you select. If you have multiple One Touch 4.6
scanners installed, the first sub-menu will show a list of the currently connected scanners for you to select
which scanner to update.
Note that this option is disabled if there is no scanner plugged in and turned on.
Scanning to Multiple Folders
When archiving documents with Transfer to Storage option, you can scan the documents to different folders. For
example, one folder might be for “Business Receipts,” a second folder might be for “Personal Receipts,” and a third
fol der m igh t be for “An nual Rece ipt s.”
To scan to multiple folders, you create multiple configurations, each with a different storage location for the
scanned documents. Scan one set of documents using the scan configuration with the appropriate storage location
for that se t. Th en switc h to ano ther sca n c onfi guratio n a nd scan the next se t of doc ume nts t o s tore the m i n t heir
fol der.
Setting Up Multiple Folders for Transfer to Storage
1. Using Microsoft Windows, create the folders that you want to use for storing scanned items.
2. Open the One Touch Properties window.
3. Select Trans fer to Storage as the Destination Application.
78
Xerox® DocuMate® 5445 / 5460
User’s Guide
Page 79

4. Click the New button.
The Scan Configuration Properties dialog box opens.
5. To help you remember which folder it is, give the new configuration a name that indicates the folder name,
such as “Business Receipts.”
6. Click the Scan Settings, Page Settings, and Advanced Settings tabs, and select the settings you want.
7. Click the Storage Options tab.
8. Click the Browse button.
Xerox® DocuMate® 5445 / 5460
User’s Guide
79
Page 80

9. Select the folder you created for storing the scanned documents.
10. Click OK. The selected folder will now be set as the Storage location, such as “Business Receipts.”
11. Click OK. The new configuration is now listed as a Transfer to Storage configuration.
12. Repeat the process to create additional new configurations, such as one named “Personal Receipts.”
Note: Make sure to designate separate folders as the Storage Locations for each new configuration.
80
Xerox® DocuMate® 5445 / 5460
User’s Guide
Page 81
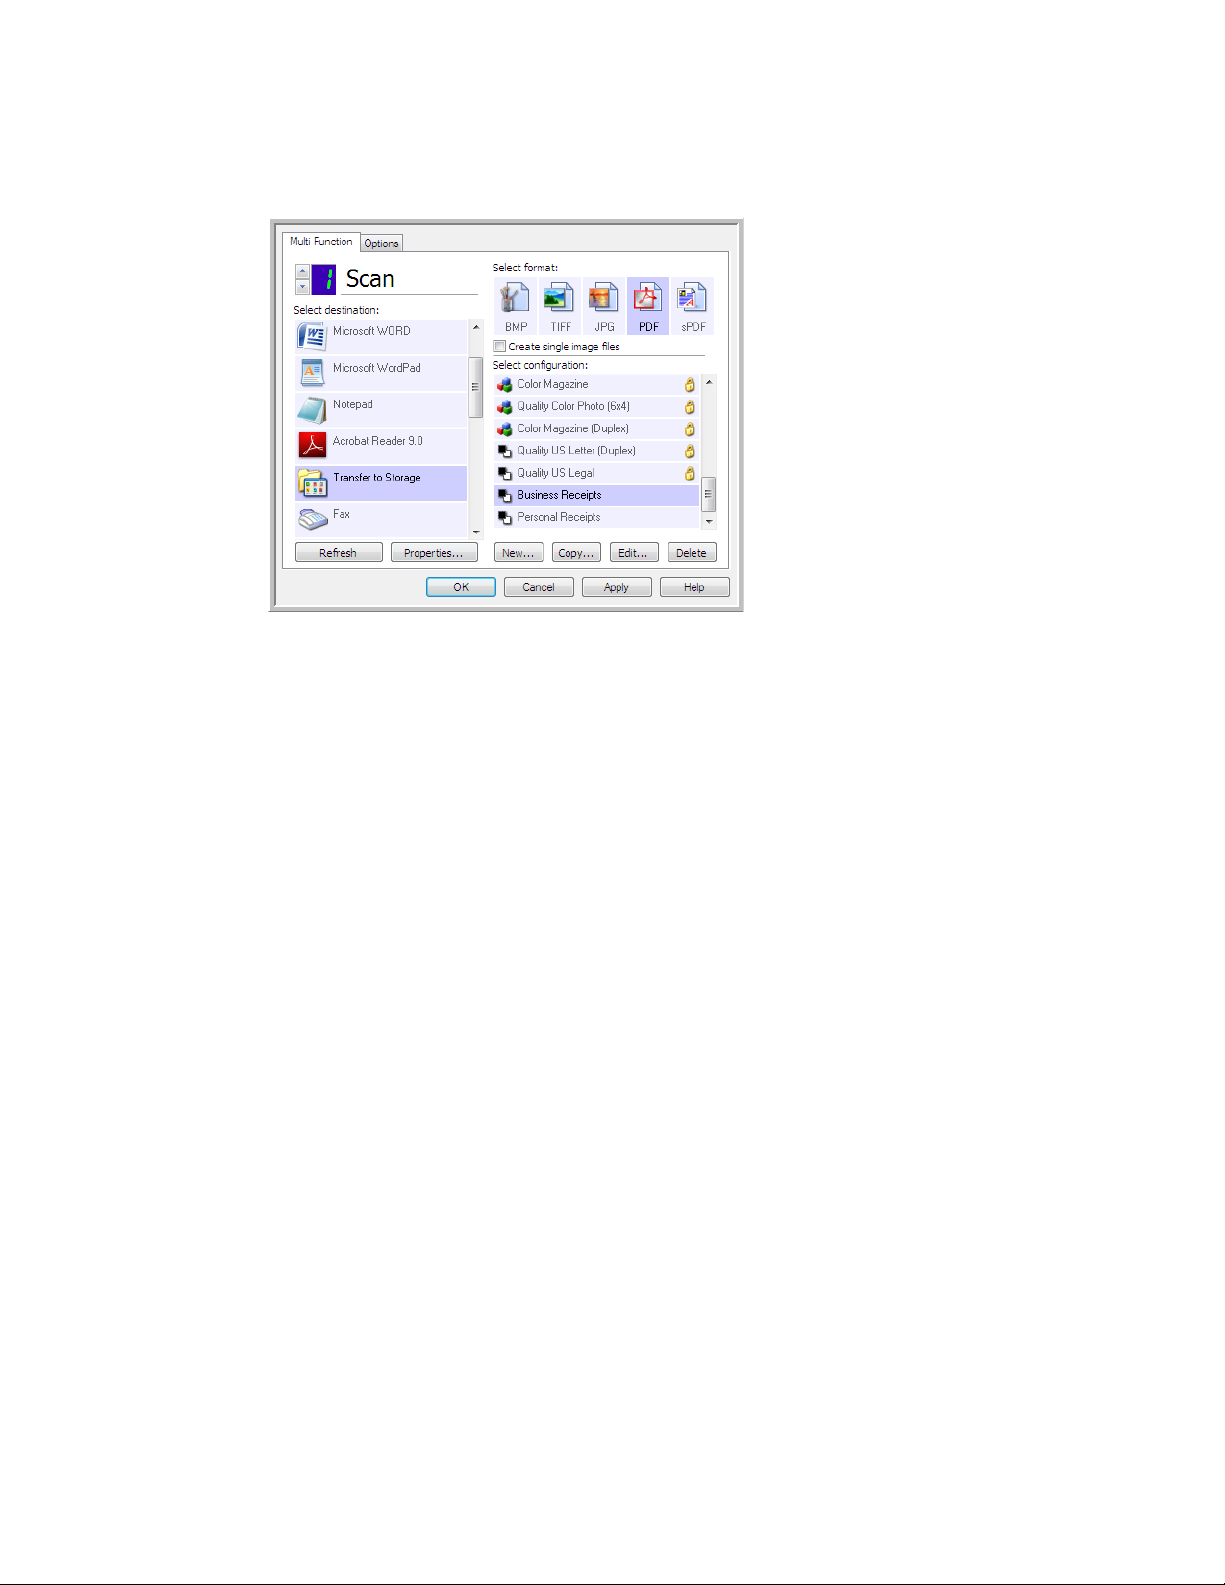
13. You will now have multiple configurations set up for the Transfer to Storage destination, and each
The new configurations
apply to the Transfer to
Storage Destination
Application.
configuration scans documents to separate folders.
14. Now select a scanner button for each new configuration. Click Apply to set that button for that configuration.
Scan to multiple storage folders:
1. Insert the document you want to scan to storage.
2. Start scanning with the first button that you set to scan documents and transfer to storage.
3. When scanning is complete, insert the next set of documents in the scanner, then press the second button you
set to scan documents and transfer them to storage.
4. When scanning is finished, the documents are stored in the two separate folders.
Xerox® DocuMate® 5445 / 5460
User’s Guide
81
Page 82

Burn to CD-ROM
If you have a CD burner attached to your computer, you can scan directly from your scanner onto a CD. This feature
is available only on computers running Windows version XP or later.
Supported file types—since the files are going to be burned to a CD, all file formats in One Touch are available.
Note that text file formats are only available if an OCR module or application is installed. Please refer to Te x t
Form at s on page 72 to see a list of text file formats that are available when OCR is installed.
Destination type—the Burn to CD-ROM destination is classified as a “Storage Link”. To make it available in the
destination list, you must select Storage and CD-R/W on the Options tab in the One Touch Properties window.
1. Open the One Touch Properties window.
2. Select Burn to CD as the Destination Application.
3. Choose a File Format and a Scan Configuration.
4. Click OK.
5. Now start scanning using the scanning button you set to scan and burn to a CD.
The scanner will start scanning. When finished the file will be saved to the Windows temporary location for CD
files. An information bubble will appear in the Windows notification area telling you that there are files waiting
to be burned to CD.
82
Xerox® DocuMate® 5445 / 5460
User’s Guide
Page 83

6. When you are ready to burn the files to a CD, open the One Touch Properties window, select Burn to CD and
then click the Properties button.
7. Make sure a blank CD is in the CD burner.
8. Click the Burn to CD button. The CD burner begins and your scanned documents are written to the CD.
If other files are also waiting in this location, they will get written with the One Touch files on the CD.
Xerox® DocuMate® 5445 / 5460
User’s Guide
83
Page 84

Printer or Fax
The availability of printers and/or faxes in the One Touch destination list depends on whether or not you have
printers or faxes configured in Windows. Please refer to the Windows documentation, or your printer or fax
documentation, for setting up printers and faxes.
Supported file types—only the BMP file format is available, when scanning to a printer or fax, as only
uncompressed data can be send to these devices.
Destination type—printers and Faxes are classified as “Device Links”. To make them available in the destination
list, you must select Fax and Print on the Options tab in the One Touch Properties window.
The Properties button will be disabled in One Touch as there are no global properties for this type of destination.
Select a printer or fax device, in the Select destination list, then open a Scan Configuration to modify the settings for
the device you selected.
Click on the Device Settings tab and use the options on this tab to select settings for the device.
84
Xerox® DocuMate® 5445 / 5460
User’s Guide
Page 85

• Fit to page, reduce image if necessary—if the scanned image is too big to be printed or faxed on a single
page, the image will automatically be reduced to fit the page.
• Actual size, crop image if necessary—if the scanned image is too big to be printed or faxed on a single page,
the image will automatically be cropped around its edges to fit on the page.
• Center image on page—the image will be printed in the center of the page instead of at the top left corner.
• Maintain aspect ratio—the aspect ratio is the length-to-width relationship of the image’s dimensions. Select
this option so the image’s relative proportions remain constant.
• AutoRotate image for best fit—if the image is a Landscape format and the device is printing in the Portrait
mode, or vice versa, rotate the image to fit on the page.
• Collate copies—if you are printing more than one page, collate the copies. Enter the number of copies in the
Copies box.
• Advanced—click to see additional settings for the device. The dialog box that opens is specific to the device.
For ex am ple, i f th e devi ce i s yo ur p ri nter , th e dialog box is your printer’s setup settings.
Note: When scanning to multiple printers and/or faxes, select the specific device, you want to configure the
Advanced features for, from the list before clicking on the Advanced... button.
Xerox® DocuMate® 5445 / 5460
User’s Guide
85
Page 86

PaperPort
In the One Touch Properties window, select PaperPort as the Destination Application for scanning.
Supported file types—all image file formats are available when scanning to PaperPort. The sPDF and nPDF text file
for mats ar e only avai lab le when the Om niPage software or One Touch OmniPage module is installed. Please refer to
Te x t F o r m a t s on page 72.
Destination type—the PaperPort destination is classified as a “Document Management Link”. To make it available
in the destination list, you must select Document management on the Options tab in the One Touch Properties
window.
•Click the Properties button to open the One Touch Link Properties for PaperPort. From this window, you can
change the default folder location and options.
On initial installation of One Touch, all scan configurations send the scanned document to the folder selected
in this window. When you create new configurations, the default settings will also match what you have
selected here. If you modify the options in an individual configuration, changing the options in this Link
Properties window will no longer update to the configurations you modified.
•Click the New, Copy, or Edit button to open the Scan Configuration Properties window. Click on the PaperPort
tab and use this window to set a configuration to scan to a different folder than the one selected in the Link
Properties window.
Changing the options in this window only affects the configuration you are creating or modifying. All other
configurations will retain their settings for this destination.
86
Xerox® DocuMate® 5445 / 5460
User’s Guide
Page 87

Select the destination folder for Scanned Documents
PaperPort One Touch Link Properties
window
Scan Configuration Properties window PaperPort tab
These are the folders that are available
in the One Touch PaperPort
configuration windows. Press F1 on
your keyboard to open the PaperPort
help file for instructions on managing
this folder list.
Click the folder icon to open or close
the folder list in PaperPort.
The selected folder in this list is where
the scanned file will be saved when
PaperPort is open and the One Touch
option Scan to the current PaperPort
folder is selected.
•Select a folder to send the scanned document(s) to when scanning to the PaperPort destination.
The list of folders in this window are from the PaperPort Folder Manager. Use the PaperPort Folder Manager to
add or delete folders, add other drives and network locations to this list. You cannot add new folders from the
One Touch PaperPort configuration windows.
Scan to the current PaperPort folder
•Select this option to have the scanned document(s) sent to the currently selected folder in the PaperPort
application.
The PaperPort software must be open, before scanning, for the scans to be sent to the selected folder in the
PaperPort folder pane. If PaperPort is not open, this option is ignored and the scanned file is sent to the folder
selected in either the One Touch Link Properties or Scan Configuration window for PaperPort.
Xerox® DocuMate® 5445 / 5460
User’s Guide
87
Page 88

SharePoint
The SharePoint destination link allows scans to be sent directly to a SharePoint site from One Touch. Please contact
your SharePoint site administrator for the server information you need to configure this link. Alternatively, have your
site administrator or IT professional configure this link for y ou. S etu p and co nfig uration of the Share Point s ites and
user accounts are outside the scope of this document.
Supported file types—all image and text file formats, except HTML, are available when scanning to the SharePoint
site. Note that text file formats are only available if an OCR module or application is installed. Please refer to Te x t
Form at s on page 72 to see a list of text file formats that are available when OCR is installed.
Destination type—the SharePoint destination is classified as a “Storage Link”. To make it available in the
destination list, you must select Storage and CD-R/W on the Options tab in the One Touch Properties window.
All configuration of the SharePoint server is done using the SharePoint settings tab in the Scan Configuration
Properties window.
1. Select SharePoint as the destination application.
2. Open the Scan Configuration you want to modify for scanning to a SharePoint site, or create a new Scan
Configuration.
Select an existing configuration in which you have already specified your SharePoint site information, and then
click on the Copy button to create a new configuration using the settings of the current configuration.
3. Click on the SharePoint tab and fill in the fields with the information for your SharePoint site.
• Protocol—select which protocol you want to use to transfer the scan to the server.
• SharePoint URL—input the full URL path of the SharePoint site without the http(s):// designation and actual
page. This path should include everything except the destination folder.
For ex am ple, i f th e we b brow se r UR L disp la ys h ttp://sharepoint.site.com/IT/common/shared documents/
default.aspx, then you would configure the SharePoint server path as follows:
–Select HTTP as the protocol
–The SharePoint URL would be sharepoint.site.com/IT/common
–The Destination folder would be shared documents
88
Xerox® DocuMate® 5445 / 5460
User’s Guide
Page 89

• User account—input the user account name that has privileges to save files to the specified SharePoint site
and Destination folder.
• Password—input the password for the user account name you specified.
• Use Windows Integrated Authentication—select this option to use the Windows current user’s login name
and password to access the SharePoint site.
• Destination folder—this is the folder where the final scanned document(s) are transferred to when scanning
is complete.
• Filename format—select a file naming format, for the scanned document, from the list. Select “Use custom
file naming” to use the file you set on the Options tab in the One Touch Properties window.
Count—this field will enable when the selected Filename format contain s { seq}. In put the number you want
the sequential count to start from.
Filename prefix—this field will enable when the selected Filename format contains {prefix}. Input the name
or value you want as the prefix in the final file name.
Because the destination configuration is done through the scan configuration, you can set each configuration to
scan to different SharePoint site, folder, filename format, using different user credentials, and so on. This is the same
process used as when scanning to different folders using the Transfer to Storage destination, as described in detail
starting on page 78.
Click on the Help button, in this configuration tab, to launch the SharePoint help file. The help file contains detailed
information about the settings in this window and technical implementation notes.
SharePoint Link Log Viewer
The One Touch Link Log Viewer opens automatically when scanning is complete. Click on the menu arrow next to
View logs for and select SharePoint Link from the list to display the transfer history for the SharePoint link only.
Double-click on any of the line items to open the selected log file in the Log File Detail View. If you open a failed
transfer, the log file may contain the information you need to determine why the transfer failed. After you address
the failure indicated in this log file, you can click the Retry button to resend the document to the server.
Xerox® DocuMate® 5445 / 5460
User’s Guide
89
Page 90

Click on the Properties button to open the Log Viewer from the SharePoint One Touch Link Properties window. There
are no global configuration properties for the Shar ePoint de stina tio n appli cat ion, all configuration is done using the
Scan Configuration Properties window as described in the previous section.
90
Xerox® DocuMate® 5445 / 5460
User’s Guide
Page 91

FTP Transfer
The FTP Transfer destination link allows scans to be sent directly to an FTP server from One Touch. Please contact
your server administrator for the server information you need to configure this link. Alternatively, have your site
administrator or IT professional configure this link for you. Setup and configuration of the FTP server and user
accounts are outside the scope of this document.
Supported file types—all image and text file formats, except HTML, are available when scanning to an FTP server.
Note that text file formats are only available if an OCR module or application is installed. Please refer to Te x t
Form at s on page 72 to see a list of text file formats that are available when OCR is installed.
Destination type—the FTP Transfer destination is classified as a “Storage Link”. To make it available in the
destination list, you must select Storage and CD-R/W on the Options tab in the One Touch Properties window.
All configuration of the FTP server is done using the FTP Transfer tab in the Scan Configuration Properties window.
1. Select FTP Transfer as the destination application.
2. Open the Scan Configuration you want to modify for scanning to an FTP server, or create a new Scan
Configuration.
Select an existing configuration in which you have already specified your FTP server information, and then click
on the Copy button to create a new configuration using the settings of the current configuration.
3. Click on the FTP Transfer tab and fill in the fields with the information for you FTP server.
• Protocol—select which protocol you want to use to transfer the scan to the server.
• Host—input the internet or intranet path of the server where you want to send the scanned documents. you
do not need ftp:// at the beginning. For example, ftp.company.com
• Port—input which port to use with the selected protocol. Changing the selected protocol will reset this value to
the appropriate default for the protocol.
• User account—input the user account name that has privileges to save files to the specified host destination
fol der.
• Password—input the password for the user account name you specified.
Xerox® DocuMate® 5445 / 5460
User’s Guide
91
Page 92

• Destination folder—input the folder path, on the remote FTP server, where you want the scanned documents
sent. This path would appear in your web browser after the host name. For example, marketing/shared
documents/data sheets.
Because the destination configuration is done through the scan configuration, you can set each configuration to
scan to a different FTP server, destination folder, and so on. This is the same process used as when scanning to
different folders using the Transfer to Storage destination, as described in detail starting on page 78.
FTP Link Log Viewer
The One Touch Link Log Viewer opens automatically when scanning is complete. Click on the menu arrow next to
View logs for and select FTP Link Agent from the list to display the transfer history for the FTP link only.
Double-click on any of the line items to open the selected log file in the Log File Detail View. If you open a failed
transfer, the log file may contain the information you need to determine why the transfer failed. After you address
the failure indicated in this log file, you can click the Retry button to resend the document to the server.
Click on the Properties button to open the Log Viewer from the FTP One Touch Link Properties window. There are no
global configuration properties for the FTP destination application, all configuration is done using the Scan
Configuration Properties window as described in the previous section.
92
Xerox® DocuMate® 5445 / 5460
User’s Guide
Page 93

SMTP
The SMTP destination link allows scans to be sent directly to an email address, through an SMTP server, from
One Touch. Please contact your server administrator for the server information you need to configure this link.
Alternatively, have your site administrator or IT professional configure this link for you. Configuration of the SMTP
server settings and user accounts is outside the scope of this document.
Supported file types—all image and text file formats, except HTML, are available when scanning to an SMTP
server. Note that text file formats are only available if an OCR module or application is installed. Please refer to Te x t
Form at s on page 72 to see a list of text file formats that are available when OCR is installed.
Destination type—the SMTP destination is classified as a “Email Link”. To make it available in the destination list,
you must select Email on the Options tab in the One Touch Properties window.
All configuration of the SMTP server is done using the SMTP Settings tab in the Scan Configuration Properties
window.
1. Open the Scan Configuration you want to modify for scanning to an SMTP server, or create a new Scan
Configuration.
Select an existing configuration in which you have already specified your SMTP server information, and then
click on the Copy button to create a new configuration using the settings of the current configuration.
2. Click on the SMTP Settings tab and fill in the fields with the information for you SMTP server.
• Protocol—select which protocol you want to use to transfer the scan to the server.
• Host—input the internet or intranet path of the server where you want to send the scanned documents. For
example, smtp.company.com
• Port—input which port to use with the selected protocol. Changing the selected protocol will reset this value to
the appropriate default for the protocol.
• User account—input the user account name that has privileges to send email messages through the SMTP
server.
• Password—input the password for the user account name you specified.
• Use Windows Integrated Authentication—Select this option to use the Windows current user’s login name
and password to send the message through the SMTP server.
Xerox® DocuMate® 5445 / 5460
User’s Guide
93
Page 94

• Email to—input a valid recipient email address to receive the scanned document. If it is not a valid address
the transfer will fail.
• Email from—input the email address you want to appear in the email message “from” field.
• Limit (MB)—input the maximum message size limit set on the SMTP server. This number should be lower than
or match the SMTP server maximum. Yo u c a n n ot s e nd m e s sa g e s th a t ex ceed the maximum message size of
the SMTP server.
Because the destination configuration is done through the scan configuration, you can set each configuration to
scan to a different SMTP server, send messages to different email addresses, using different user credentials, and so
on. This is the same process used as when scanning to different folders using the Transfer to Storage destination, as
described in detail starting on page 78.
Click on the Help button, in this configuration tab, to launch the SMTP help file. The help file contains detailed
information about the settings in this window and technical implementation notes.
SMTP Link Log Viewer
The One Touch Link Log Viewer opens automatically when scanning is complete. Click on the menu arrow next to
View logs for and select SMTP Link Agent from the list to display the transfer history for the SMTP link only.
Double-click on any of the line items to open the selected log file in the Log File Detail View. If you open a failed
transfer, the log file may contain the information you need to determine why the transfer failed. After you address
the failure indicated in this log file, you can click the Retry button to resend the document to the server.
94
Xerox® DocuMate® 5445 / 5460
User’s Guide
Page 95

Click on the Properties button to open the Log Viewer from the SMTP One Touch Link Properties window. There are
no global configuration properties for the SMTP destination application, all configuration is done using the Scan
Configuration Properties window as described in the previous section.
Xerox® DocuMate® 5445 / 5460
User’s Guide
95
Page 96

Email Applications
Scanning to an email application, such as Outlook or Windows Mail, attaches the scanned image to a blank email
message. You then fill in the recipient email address(es) and send the message. You need to have configured an
email application before you can scan to it using One Touch. If you do not have your email application set up prior
to scanning, the default Windows email application will open and ask you to configure your user information. Please
contact your IT department, server administrator, or other group that provided you the email information for setup
instructions. Configuring an email application and user account is outside the scope of this document.
Supported file types—all image and text file formats, except HTML, are available when scanning to an email
application. Note that text file formats are only available if an OCR module or application is installed. Please refer to
Te x t F o r m a t s on page 72 to see a list of text file formats that are available when OCR is installed.
Destination types—the email destination is classified as an “Email Link”. To make it available in the destination list,
you must select Email on the Options tab in the One Touch Properties window.
The email application in the One Touch destination list is the default email program selected in the Internet Options
of Internet Explorer. Click on the email application that is in the list, then click on the Properties button to launch the
Email One Touch Link Properties window to change the email application.
96
Xerox® DocuMate® 5445 / 5460
User’s Guide
Page 97

Email Properties
Use the Email Link Properties window to select a folder for stor ing a pe rma nen t cop y o f the sc anned im age, set ting
the color document options, and changing the email application that is in the One Touch destination list.
• Folder for storing attachments—click the Browse button to change the location using the Windows file
browser, or type a location directly in the field.
• Internet options—if you need to change your email client, or any other internet options, click the Internet
Options button.
The Windows Internet Options Control Panel opens. Click the Programs tab and choose a new email client from
the program list. These are the standard Windows Internet Explorer options. Please see your Windows
documentation for more information about the Internet Explorer options.
Color document handling—click in the Color document handling settings boxes for the options you want.
• Convert Bitmaps using Screen Resolution—use this option to ensure that an image will fit on the
computer’s screen.
• Convert Bitmaps to JPEG—JPEG files can be compressed to produce smaller files sizes and, therefore, shorter
transmission times when you email the file or upload it to the internet.
If you changed the email application Internet Explorer, and it does not immediately appear in the Select
destination list, click the Refresh button to update the destination list in One Touch.
Xerox® DocuMate® 5445 / 5460
User’s Guide
97
Page 98

Text Editors
Scanning to a text editing application, such as Microsoft’s Notepad or WordPad, automatically converts the text in
the scanned image into editable text using Optical Character Recognition (OCR).
Supported file types—the text file formats and destination applications are only available if an OCR module or
application is installed. Please refer to Te x t Fo r m a t s on page 72 to see a list of text file formats that are available
when OCR is installed. Additionally, the available file form ats a re applica tio n spe cifi c, for ex amp le Mi cro soft’ s
WordPad can open *.txt and *.rtf files, so only those two file types will be available when scanning to WordPad.
Note that when there is no OCR module or application installed, the format panel will not contain a text icon and
there will be no text editor applications in the Select destination list.
Destination type—this destination type is classified as a “Text Based Link”. To make it available in the destination
list, you must select Text editing applications on the Options tab in the One Touch Properties window. If the text
editing application you are using does not appear in the Select destination list, you can add the application using
the Text Documents One Touch Link Properties window.
1. In the One Touch Properties window select one of the default text editors such as WordPad.
2. Click on the Properties button to open the Text Document One Touch Link Properties window. From this
window you can select what One Touch should do when text is not detected or recognition fails, and add other
applications to One Touch.
Note that if you recently installed an application, click the Refresh button to see if One Touch will automatically
configure the link before you try adding it manually.
98
Xerox® DocuMate® 5445 / 5460
User’s Guide
Page 99

Text Documents Properties
These properties apply to Microsoft Word, Microsoft Excel®, and any other text editing applications indicated by
their icons in the list.
• Add application—click this button to open the Add Text Based Link dialogue so you can add other text editing
applications to One Touch.
• Delete application—select an application in the list then click this button to remove the application from the
One Touch destination list. You can only delete an application that you have added, the destinations that are
linked when One Touch is installed cannot be deleted.
General OCR settings—click in the OCR settings boxes for the options you want. The options will apply to all the
applications in the group.
• Always send a file, even when no text was found—the scanned file is sent to the application even if the
image does not appear to contain text. This could occur if you scanned a photograph with a scanner button
set for text applications.
• Show message if text recognition failed—a message will open on the screen if the OCR reader does not
detect text in the image.
Xerox® DocuMate® 5445 / 5460
User’s Guide
99
Page 100

Adding Text Editor Applications to One Touch
1. To add another application to the list, click the Add application button. The Add Text Based Link dialog box
opens.
2. Click Browse to find the application you want to add to the list.
When you select the application using the Browse button, Steps 1 and 2 on the dialog box are automatically
filled in, and the application icon appears in Step 3.
3. Select the icon in Step 3 of the dialog box. That is the icon that will appear in the One Touch Destination List.
4. In Step 4 of the dialog box, select the file formats that the application will accept.
HTML Formatted file—select this option when you want to scan to your web browser for posting HTML pages
to a website. Even though word processing applications, such as Notepad and Word can open *.htm files, you
cannot scan as *.htm to word processing text editors. Scanning as HTML creates a directory with the *.htm file
and linked images for website use. Word processing applications cannot accept a directory structure for image
and text transfer.
Rich Text Format—select this option if your application can open *.rtf files, which are plain text documents
that contain formatting. Microsoft’s WordPad application is a compatible application for the *.rtf file
for matio n.
Standard ASCII text file—select this option if you want to have plain text, without formatting, sent to your
text editing application. Most text editing applications will accept plain text (*.txt) files.
Adobe PDF format—select this option if you are adding a PDF viewing or editing application to the list. This
PDF format is an image format only, it will not recognize the document using OCR, and you will not be able to
search or edit the text in the final file. The application you are adding must be able to open *.pdf files.
Adobe searchable PDF—this is the PDF image format with a hidden searchable text layer. You will not be able
to edit the text the file. The application you are adding must be able to open *.pdf files.
The options you select at Step 4 determine the page format icons in the One Touch Properties window for that
group of applications. Refer to the documentation you received with the application to see which text formats
the application accepts.
5. When you are done making changes in this window, click the Add button to accept the changes and close the
window.
6. Click OK on the Link Properties window.
7. Click Refresh on the One Touch Properties window and the new application should now be available.
100
Xerox® DocuMate® 5445 / 5460
User’s Guide
 Loading...