

Page 1
PHASER™ 5400
LASER PRINTER
User Guide
Page 2

Page 3

Xerox Phaser™ 5400
Laser Printer
User Guide
721P57660
September 2001
Page 4

Copyright © 2001, Xerox Corporation. All Rights Reserved. Unpublished rights reserved
under the copyright laws of the United States. Contents of this publication may not be
reproduced in any form without permission of Xerox Corporation.
Copyright protection claimed includes all forms of matters of copyrightable materials
and information now allowed by statutory or judicial law or hereinafter granted,
including without limitation, material generated from the software programs which are
displayed on the screen such as styles, templates, icons, screen displays, looks, etc.
Printed in the United States of America.
Ethernet
Phaser
Adobe
PostScript
®,
the stylized X, and XEROX® are registered trademarks of Xerox Corporation.
™
and infoSMART™ are trademarks of Xerox Corporation.
®
, Acrobat®, Acrobat® Reader, Illustrator®, PageMaker®, Photoshop®, and
®
, ATM®, Adobe Garamond®, Birch®, Carta®, Mythos®, Quake®, and Tekton®
are registered trademarks and Adobe Jenson™, Adobe Brilliant Screens™ technology,
and IntelliSelect™ are trademarks of Adobe Systems Incorporated or its subsidiaries
which may be registered in certain jurisdictions.
®
Apple
, LaserWriter®, LocalTalk®, Macintosh®, Mac® OS, AppleTalk®, TrueType2®,
Apple Chancery
®
, Chicago®, Geneva®, Monaco®, and New York® are registered
trademarks, and QuickDraw™ is a trademark of Apple Computer Incorporated.
Marigold™ and Oxford™ are trademarks of AlphaOmega Typography.
Avery™ is a trademark of Avery Dennison Corporation.
®
PCL
and HP-GL® are registered trademarks of Hewlett-Packard Corporation.
Hoefler Text was designed by the Hoefler Type Foundry.
®
ITC Avant Guard Gothic
®
Symbol
, ITC Zapf Chancery®, and ITC Zapf Dingbats® are registered trademarks of
, ITC Bookman®, ITC Lubalin Graph®, ITC Mona Lisa®, ITC
International Typeface Corporation.
Bernhard Modern™, Clarendon™, Coronet™, Helvetica™, New Century Schoolbook™,
Optima™, Palatino™, Stempel Garamond™, Times™, and Univers™ are trademarks of
Linotype-Hell AG and/or its subsidiaries.
MS-DOS
Wingdings™ in TrueType
®
and Windows® are registered trademarks of Microsoft Corporation.
®
format is a product of Microsoft Corporation. WingDings is a
trademark of Microsoft Corporation and TrueType is a registered trademark of Apple
Computer, Inc.
Albertus™, Arial™, Gill Sans™, Joanna™, and Times New Roman™ are trademarks of
Monotype Corporation.
Antique Olive
®
is a registered trademark of M. Olive.
Eurostile™ is a trademark of Nebiolo.
®
Novell
and NetWare® are registered trademarks of Novell, Incorporated.
®
, Sun Microsystems®, and Sun Microsystems Computer Corporation® are registered
Sun
trademarks of Sun Microsystems, Incorporated.
®
SPARC
is a registered trademark of SPARC International, Incorporated.
SPARCstation™ is a trademark of SPARC International, Incorporated, licensed
exclusively to Sun Microsystems, Incorporated.
®
UNIX
is a registered trademark in the US and other countries, licensed exclusively
through X/Open Company Limited.
Page 5

As an ENERGY STAR® partner, Xerox Corporation has determined that this product
meets the ENERGY STAR guidelines for energy efficiency. The ENERGY STAR name
and logo are registered U.S. marks.
Other marks are trademarks or registered trademarks of the companies with which they
are associated.
Page 6

Page 7

Contents
Warranty . . . . . . . . . . . . . . . . . . . . . . . . . . . . . . . . . . . . . . . . . vii
User safety summary . . . . . . . . . . . . . . . . . . . . . . . . . . . . . . . . x
Overview . . . . . . . . . . . . . . . . . . . . . . . . . . . . . . . . . . . . . . . . . . 1
Printer components. . . . . . . . . . . . . . . . . . . . . . . . . . . . . . . . . . . . . . . . . . . 1
Printer options . . . . . . . . . . . . . . . . . . . . . . . . . . . . . . . . . . . . . . . . . . . . . . . 2
Control panel . . . . . . . . . . . . . . . . . . . . . . . . . . . . . . . . . . . . . . . . . . . . . . . . 3
Display screen . . . . . . . . . . . . . . . . . . . . . . . . . . . . . . . . . . . . . . . . . . . . . . . 4
Power saver feature. . . . . . . . . . . . . . . . . . . . . . . . . . . . . . . . . . . . . . . . . . . 5
Xerox supplies and accessories . . . . . . . . . . . . . . . . . . . . . . . . . . . . . . . . . 6
Print Media . . . . . . . . . . . . . . . . . . . . . . . . . . . . . . . . . . . . . . . 10
Storing paper . . . . . . . . . . . . . . . . . . . . . . . . . . . . . . . . . . . . . . . . . . . . . . . 10
Paper weights . . . . . . . . . . . . . . . . . . . . . . . . . . . . . . . . . . . . . . . . . . . . . . 10
Capacities of input sources. . . . . . . . . . . . . . . . . . . . . . . . . . . . . . . . . . . . 11
Supported media and media sizes . . . . . . . . . . . . . . . . . . . . . . . . . . . . . 12
Custom paper sizes . . . . . . . . . . . . . . . . . . . . . . . . . . . . . . . . . . . . . . . . . . 13
Unacceptable media . . . . . . . . . . . . . . . . . . . . . . . . . . . . . . . . . . . . . . . . . 14
Loading Media . . . . . . . . . . . . . . . . . . . . . . . . . . . . . . . . . . . . 15
Loading media in Tray 1, 2, or 3 . . . . . . . . . . . . . . . . . . . . . . . . . . . . . . . 15
Printing Jobs . . . . . . . . . . . . . . . . . . . . . . . . . . . . . . . . . . . . . . 36
Output. . . . . . . . . . . . . . . . . . . . . . . . . . . . . . . . . . . . . . . . . . . . . . . . . . . . . 38
Printing on special paper . . . . . . . . . . . . . . . . . . . . . . . . . . . . . . . . . . . . . 39
Printing envelopes. . . . . . . . . . . . . . . . . . . . . . . . . . . . . . . . . . . . . . . . . . . 41
Printing labels . . . . . . . . . . . . . . . . . . . . . . . . . . . . . . . . . . . . . . . . . . . . . . 43
Printing transparencies . . . . . . . . . . . . . . . . . . . . . . . . . . . . . . . . . . . . . . . 45
Printing two-sided (duplex) jobs . . . . . . . . . . . . . . . . . . . . . . . . . . . . . . . 47
Troubleshooting . . . . . . . . . . . . . . . . . . . . . . . . . . . . . . . . . . . 50
Replacing the Laser Print Cartridge . . . . . . . . . . . . . . . . . . . . . . . . . . . . . 50
Troubleshooting print quality . . . . . . . . . . . . . . . . . . . . . . . . . . . . . . . . . . 54
User Guide v
Page 8

Paper Jams . . . . . . . . . . . . . . . . . . . . . . . . . . . . . . . . . . . . . . 63
Preventing paper jams . . . . . . . . . . . . . . . . . . . . . . . . . . . . . . . . . . . . . . . . 63
Clearing a duplex jam . . . . . . . . . . . . . . . . . . . . . . . . . . . . . . . . . . . . . . . .64
Clearing an exit jam . . . . . . . . . . . . . . . . . . . . . . . . . . . . . . . . . . . . . . . . . .66
Clearing a stacker jam . . . . . . . . . . . . . . . . . . . . . . . . . . . . . . . . . . . . . . . . 70
Clearing a Tray 1 jam . . . . . . . . . . . . . . . . . . . . . . . . . . . . . . . . . . . . . . . . .72
Clearing a Tray 2 or Tray 3 jam . . . . . . . . . . . . . . . . . . . . . . . . . . . . . . . . .77
Clearing a jam at the Laser Print Cartridge. . . . . . . . . . . . . . . . . . . . . . . . 87
Paper size/type mismatch . . . . . . . . . . . . . . . . . . . . . . . . . . . . . . . . . . . . .92
Getting Help . . . . . . . . . . . . . . . . . . . . . . . . . . . . . . . . . . . . . 94
Xerox Phaser 5400 Laser Printer CD-ROM . . . . . . . . . . . . . . . . . . . . . . . . 94
Xerox web site . . . . . . . . . . . . . . . . . . . . . . . . . . . . . . . . . . . . . . . . . . . . . .95
Customer Support Centers . . . . . . . . . . . . . . . . . . . . . . . . . . . . . . . . . . . .96
Specifications. . . . . . . . . . . . . . . . . . . . . . . . . . . . . . . . . . . . . 97
Material Safety Data Sheet (MSDS) . . . . . . . . . . . . . . . . . . . . . . . . . . . . . 97
Index . . . . . . . . . . . . . . . . . . . . . . . . . . . . . . . . . . . . . . . . . . 101
vi Xerox Phaser 5400 Laser Printer
Page 9
Warranty
Printer Warranty
Xerox warrants that the Phaser 5400 Laser Printer will be free from defects in materials
and workmanship for a period of one (1) year from the date of shipment. If the product
proves defective during the warranty period, Xerox, at its option, will:
(1) repair the product by means of telephone support or on-site service at no charge for
parts or labor,
(2) replace the product with a comparable product, or
(3) refund the amount paid for the product, less a reasonable allowance for usage, upon
its return.
Under this product warranty, the Customer must notify Xerox or its authorized service
representative of the defect before the expiration of the warranty period. To obtain
service under this warranty, the Customer must first contact Xerox Telephone Support
personnel or that of its authorized service representative. Telephone Support personnel
will work to resolve issues professionally and quickly, however the Customer must
reasonably assist Xerox or its authorized representative.
If telephone support is unsuccessful, Xerox or its authorized service representative will
provide warranty repair at Customer's site without charge as provided below.
Service is available within the customary on-site service area in the United States
and Canada for products purchased in the United States and Canada.
Inside the European Economic Area, service is available within the customary
on-site service area for products purchased in the EEA.
Outside the US, Canada, & EEA, service is available within the customary on-site
service area in the country of purchase.
Xerox reserves the right to charge for on-site service in exceptional cases.
A description of the customary on-site service area may be obtained from the local Xerox
Customer Support Center or authorized Xerox distributor. On-site service is at Xerox or
its authorized service representative’s sole discretion and is considered an option of last
resort.
If the Customer’s product contains features that enable Xerox or its authorized service
representative to diagnose and repair problems with the product remotely, Xerox may
request that the Customer allow such remote access to the product.
In the maintenance of the product, Xerox may use new or equivalent to new parts or
assemblies for equal or improved quality. All defective parts and assemblies become the
property of Xerox. Xerox, at its option, may request the return of these parts.
Page 10

Consumables Warranty
Xerox warrants that laser print cartridges will be free from defects in materials and
workmanship for a period of one (1) year from date of installation. All other Customer
Replaceable Consumables (CRCs) will be covered for a period of ninety (90) days
(six (6) months where longer periods are required by law) from the date of installation,
but not more than one (1) year from date of shipment. Under this warranty, the Customer
must notify Xerox or its authorized service representative of the defect before the
expiration of the warranty period. XEROX MAY REQUIRE THAT THE DEFECTIVE CRC
BE RETURNED TO A DESIGNATED XEROX DEPOT OR THE XEROX
REPRESENTATIVE FROM WHICH THE CRC WAS ORIGINALLY PURCHASED. Claims
will be handled according to the current Xerox procedure.
These warranties shall not apply to any defect, failure or damage caused by improper
use or improper or inadequate maintenance and care. Xerox shall not be obligated under
these warranties:
a) to repair damage resulting from attempts by personnel other than Xerox
representatives to install, repair or service the product unless directed by a Xerox
representative;
b) to repair damage, malfunction, or degradation of performance resulting from improper
use or connection to incompatible equipment or memory;
c) to repair damage, malfunction, or degradation of performance caused by the use of
non-Tektronix/Xerox printer supplies or consumables or the use of Tektronix/Xerox
supplies not specified for use with this printer;
d) to repair a product or CRC that has been modified or integrated with other products
when the effect of such modification or integration increases the time or difficulty of
servicing the product or CRC;
e) to perform user maintenance or cleaning or to repair damage, malfunction, or
degradation of performance resulting from failure to perform user maintenance and
cleaning as prescribed in published product materials;
f) to repair damage, malfunction, or degradation of performance resulting from use of the
product in an environment not meeting the operating specifications set forth in the user
manual;
g) to repair this product after the limit of its duty cycle has been reached; all service
thereafter shall be billed on a time and material basis;
h) to replace CRCs that have been refilled, are used up, abused, misused, or tampered
with in any way.
THE ABOVE WARRANTIES ARE GIVEN BY XEROX WITH RESPECT TO THIS
PRODUCT AND ITS CUSTOMER REPLACEABLE CONSUMABLES IN LIEU OF ANY
OTHER WARRANTIES, EXPRESS OR IMPLIED. XEROX AND ITS VENDORS
DISCLAIM ANY IMPLIED WARRANTIES OF MERCHANTABILITY OR FITNESS FOR A
PARTICULAR PURPOSE OR ANY SIMILAR STANDARD IMPOSED BY APPLICABLE
LEGISLATION. XEROX' RESPONSIBILITY TO REPAIR, REPLACE, OR OFFER A
REFUND FOR DEFECTIVE PRODUCTS AND CUSTOMER REPLACEABLE
CONSUMABLES IS THE SOLE AND EXCLUSIVE REMEDY PROVIDED TO THE
CUSTOMER FOR BREACH OF THESE WARRANTIES. XEROX AND ITS VENDORS
WILL NOT BE LIABLE FOR ANY INDIRECT, SPECIAL, INCIDENTAL OR
CONSEQUENTIAL DAMAGES (INCLUDING LOSS OF PROFITS) IRRESPECTIVE OF
WHETHER XEROX OR THE VENDOR HAS ADVANCE NOTICE OF THE POSSIBILITY
OF SUCH DAMAGES.
Page 11

Some states, provinces, and countries do not allow the exclusion or limitation of
incidental or consequential damages or exclusions or limitations on the duration of
implied warranties or conditions, so the above limitations or exclusions may not apply
to you. This warranty gives you specific legal rights, and you may also have other rights
that vary by state, province, or country.
For the software warranty please see the end user license agreement included with the
software.
In certain geographies this product is warranted by Fuji Xerox. This statement of
warranty does not apply in Japan – please refer to the warranty statement provided in
the Japanese user manual for products purchased in Japan.
If you are an Australian consumer, you should be aware that the Trade Practices Act
1974 and equivalent State and Territory legislation (collectively “the Acts”) contain
special provisions designed to protect Australian consumers. Nothing in any Fuji Xerox
warranty material excludes or limits the application of any provision of any of the Acts,
where to do so would contravene the Acts or cause any part of this warranty to be void.
In this warranty material, an implied condition or warranty, the exclusion of which from
a contract with a “Consumer” (as defined in the Acts) would contravene any provision of
the Acts or cause any part or all of this warranty to be void, is called a “Non-excludable
Condition”. To the full extent permitted by law, Fuji Xerox’ sole and total liability to the
customer for a breach of any Non-excludable Condition (including for any consequential
loss suffered by the customer) is limited, except as otherwise stated herein, to (at Fuji
Xerox’ option) replacing or repairing the goods, or resupplying, or paying the cost of the
resupply of, the services, in respect of which the breach occurred. Subject to the above,
all conditions and warranties which would or might otherwise be implied in a
Consumer contract, whether by operation of statute, inference from circumstances,
industry practice or otherwise, are excluded.
Page 12
User safety summary
Your printer and the recommended consumable supplies have been designed and tested
to meet strict safety requirements. Attention to the following notes will ensure the
continued safe operation of your printer.
Electrical Safety
Use the power cord supplied with your printer.
Do not use a ground adapter plug to connect the printer to a power source
receptacle that lacks a ground connection terminal.
Plug the power cord directly into a properly grounded electrical outlet. Do not use
an extension cord. If you do not know whether an outlet is grounded, ask an
electrician to check the outlet.
Warning
Avoid the potential of severe electrical shock by ensuring the printer is
properly grounded.
Do not place the printer where people may step on the power cord.
Do not place objects on the power cord.
Do not obstruct the ventilation openings. These openings are provided to prevent
overheating of the printer.
Warning
Do not push objects into slots and openings on the printer. Making a contact
with a voltage point or shorting out a part could result in fire or electrical
shock.
If you notice unusual noises or odors, switch off the printer power immediately.
Disconnect the power cord from the electrical outlet. Call an authorized service
representative to correct the problem.
The power cord is attached to the printer as a plug-in device at the back of the
printer. In the event it is necessary to remove all electrical power from the printer,
disconnect the power cord from the power receptacle.
Page 13
If any of the following conditions occur, switch off the printer power immediately,
disconnect the power cord, and call an authorized service representative.
The power cord is damaged or frayed.
Liquid is spilled into the printer.
The printer is exposed to water.
Any part of the printer is damaged.
Maintenance Safety
Do not attempt any maintenance procedure that is not specifically described in the
documentation supplied with your printer.
Do not use aerosol cleaners. The use of supplies that are not approved may cause
poor performance and could create a dangerous condition.
Do not remove the covers or guards that are fastened with screws unless you are
installing optional equipment and are specifically instructed to do so. The power
cord should be removed when performing these installations. Except for user
installable options, there are no parts that you can maintain or service behind
these covers.
Operational Safety
Your printer and supplies were designed and tested to meet strict safety requirements.
These include safety agency examination, approval, and compliance with established
environmental standards.
Your attention to the following safety guidelines will help to ensure the continued safe
operation of your printer.
Use the material and supplies specifically designed for your printer. The use of
unsuitable materials may result in poor performance and possibly a hazardous
situation.
Follow all warnings and instructions marked on, or supplied with, the printer,
options and supplies.
Place the printer in a dust free, well ventilated area where the temperature range is
5 degrees C to 35 degrees C (41 degrees F to 95 degrees F) and the relative
humidity is 15 percent to 85 percent.
Place the printer in an area where there is adequate space for ventilation, operation
and servicing. The recommended minimal spacing is 76 cm (29.9 in.) in front of
the printer, 50 cm (19.7 in.) above the printer, 30 cm (11.8 in.) behind the printer,
20 cm (7.9 in.) on the side of the printer with the fan exhaust, and 10 cm (4.0 in.)
on the other side. Do not block or cover the slots and openings on the printer.
Without adequate ventilation, the printer may overheat.
For optimum performance, use the printer at elevations below 2,500 meters
(8,200 ft.). Use at elevations above 2,500 meters (8,200 ft.) exceeds operability
limits.
Do not place the printer near a heat source.
Do not place the printer in direct sunlight.
Do not place the printer in line with the cold air flow from an air conditioning
system.
Page 14
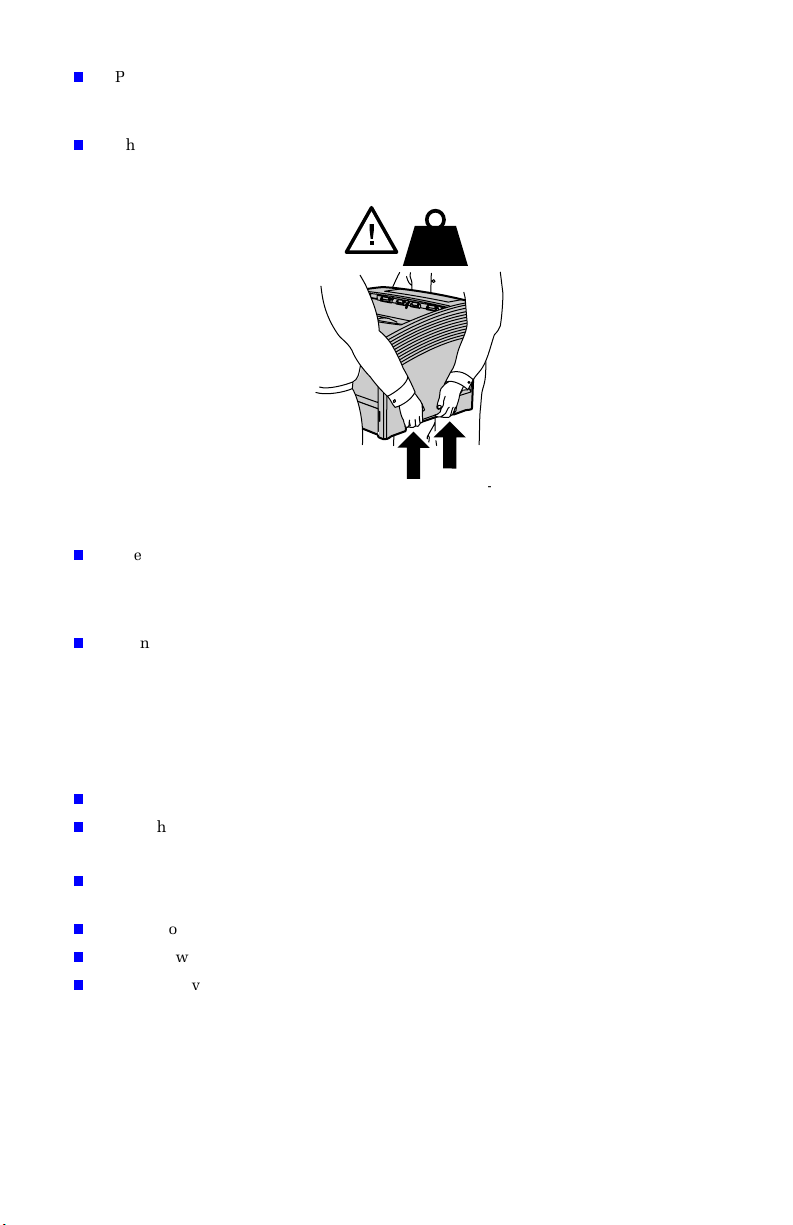
Place the printer on a level, solid surface with adequate strength for the weight of
the machine. The base printer weight without any packaging materials is 27 kg
(60 lbs.).
The printer is heavy, and must be lifted by two people. The illustration below
shows the proper technique for lifting the printer.
27 kg
60 lbs
3925-01
Exercise care in moving or relocating the printer, it is back-heavy and could tip
backward. Follow the recommended procedure when moving the printer from one
location to another. Refer to the Xerox Phaser 5400 Laser Printer Installation Setup
poster.
Do not place any liquids on the printer.
Warning
Be careful when working in areas inside the printer identified with a
warning symbol. These areas may be very hot and could cause personal
injury.
Wait 10-15 seconds between switching the printer off and on.
Keep hands, hair, neckties, etc., away from the exit and feed rollers.
While printing, follow these precautions:
Do not remove the media source tray that you have selected in the driver or front
panel.
Do not open the covers.
Do not switch off the printer power.
Do not move the printer.
Page 15
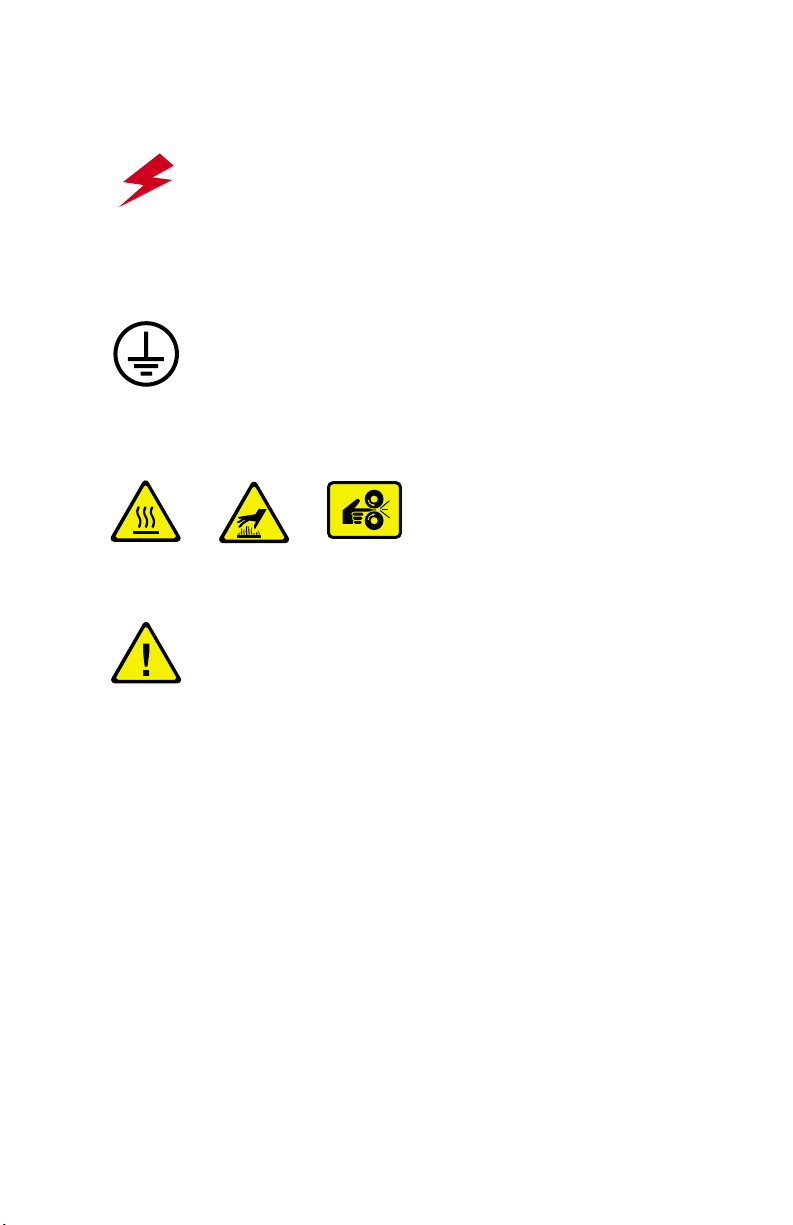
Symbols that may be marked on your product:
DANGER high voltage:
Protective ground (earth) terminal:
Hot surface on or in the printer. Use caution to avoid personal injury:
Use caution. Refer to the manual(s) for information:
Warning
Warning
If the product loses the ground connection, usage of knobs and controls (and
other conductive parts) can cause an electrical shock. Electrical product may
be hazardous if misused.
For your protection, do not defeat any interlocks.
Page 16

Page 17

Overview
Printer components
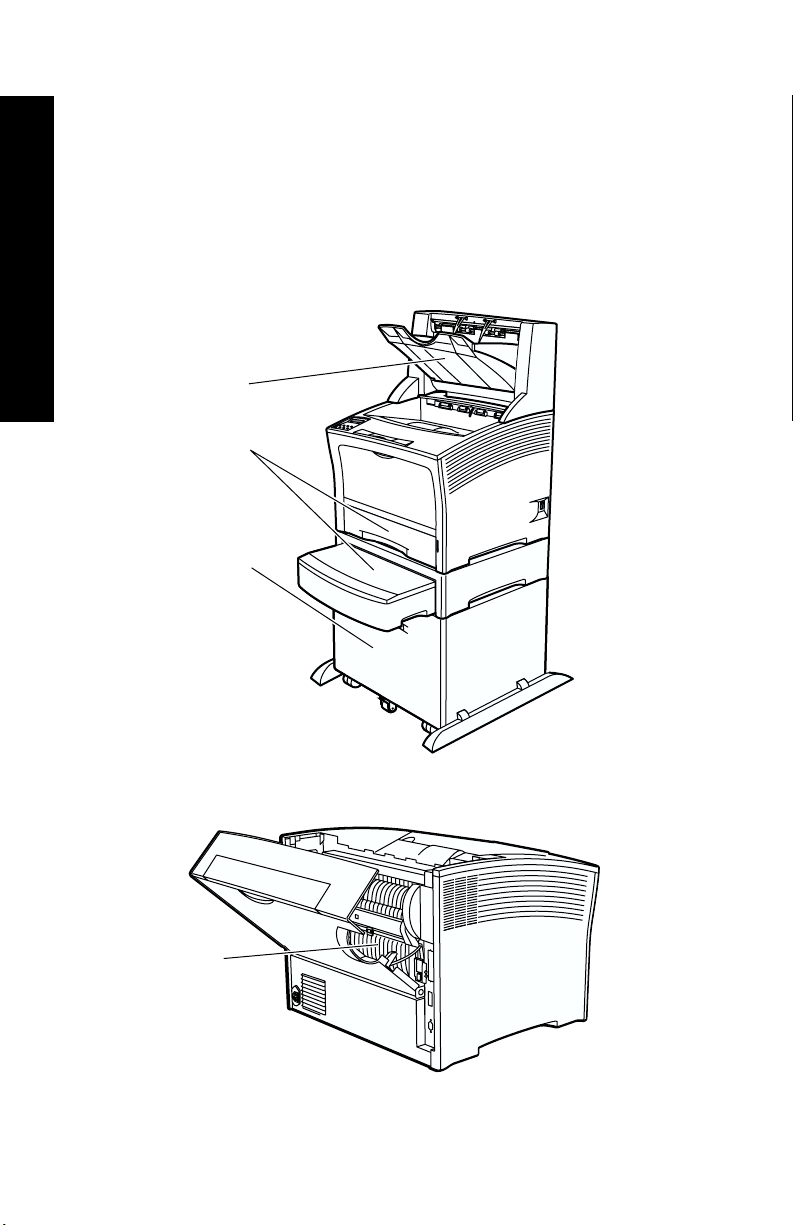
The base printer contains the following major components:
Front view
1 Standard output bin
2 Paper guide/curl extension
3 Control Panel
4 Paper support and stopper
5 Multi-sheet Bypass Feeder
(shown closed)
6 Tray 1
7 Paper amount indicator
8 Power switch
1
2
Rear view
9 Rear cover (shown closed)
10 Power cord receptacle
11 Ventilation slots
12 Interface connectors
(Parallel, USB, Ethernet)
13 Top cover (shown closed)
3
4
5
6
7
8
3925-03
Overview
13
9
10
11
12
3925-04
User Guide 1
Page 18
Printer options
Front view
1 1,000-Sheet Stacker Bin
2 500-Sheet Feeder
(A3/Ledger, shown as Tray 2 or
A4/Letter, shown as Tray 1)
3 2,000-Sheet Feeder
(shown as Tray 3)
Overview
Rear view
4 Duplex Module
(shown installed)
1
2
3
3925-05
4
3925-06
2 Xerox Phaser 5400 Laser Printer
Page 19
Control panel
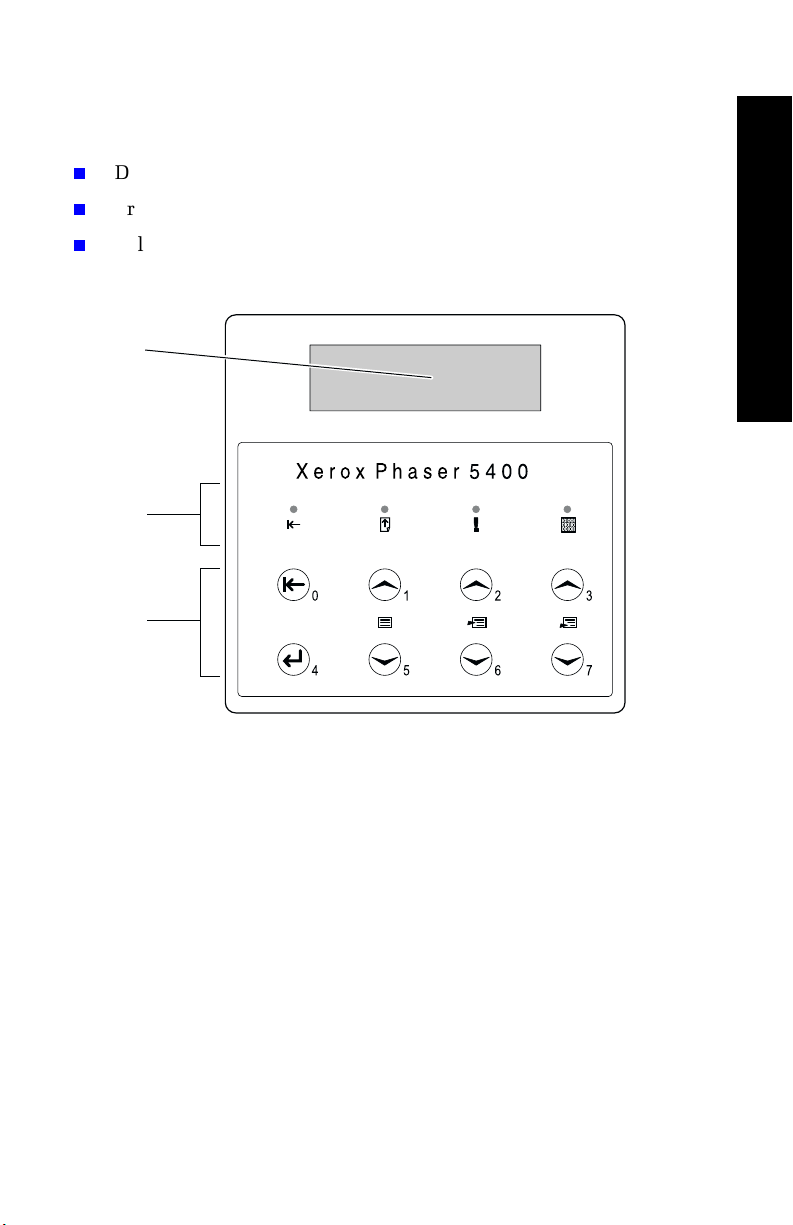
The Xerox Phaser 5400 control panel:
Displays printer status and jobs in process.
Provides the means to change printer settings.
Allows you to print reports (such as the configuration report,
which lists the printer’s current settings).
1
2
3
Overview
3925-07
1 Display screen
2 Four indicator lights:
- Online indicator light
- Form Feed indicator light
- Fault indicator light
- Data indicator light
3 Eight control panel keys:
- Online key (Password #0)
- Enter key (Password #4)
- Menu Up key (Password #1)
- Menu Down key (Password #5)
- Item Up key (Password #2)
- Item Down key (Password #6)
- Value Up key (Password #3)
- Value Down key (Password #7)
User Guide 3
Page 20
Display screen
The control panel’s display screen:
Provides access to a hierarchy of menus to configure and control
the printer. Access the menus by pressing the Menu keys (labeled
1 or 5). For more information on the menu structure, refer to the
Advanced Features and Troubleshooting Manual.
Overview
Displays information about the status of the printer (or the job in
process):
Examples:
The printer is online and ready to accept print jobs:
The printer is processing data:
The printer is waiting for more data:
Ready
Processing...
Waiting...
The printer is low on toner:
Toner Low
A tray is empty (in this case, Tray 2 is empty and no longer is
being used to print):
Tray 2 Empty
4 Xerox Phaser 5400 Laser Printer
Page 21

There is a problem (in this case, a paper jam has occurred
while feeding from Tray 3):
Tray 3 JamOpen Tray 3
For information on using the menus, refer to the Advanced
Features and Troubleshooting Manual on your printer’s CD-ROM.
Power saver feature
Products that carry the ENERGY STAR® label are designed to use less
energy, help you save money on Utility bills, and help protect the
environment.
Your Phaser 5400 laser printer is preset at the factory to enter a "low
power" state after a specified period of non-use. In this mode, the
printer systems are shut down. When a print job is initiated, it will
wake up the printer. The recovery time is approximately 30 seconds.
The default setting (*) for your printer to enter a power saver mode is
60 minutes. To change the default time setting, follow these steps on
the control panel:
1. Press the Menu keys (labeled 1 or 5) to scroll to the System Menu.
2. Press the Item keys (labeled 2 or 6) to scroll to Power Saver.
3. Press the Value keys (labeled 3 or 7) to scroll to the appropriate
selection: Off, 15, 30, 60*, 90, 120, or 180 minutes.
Overview
4. Press the Enter key (labeled 4).
5. Press the On Line key (labeled 0) to exit the menus.
For additional information on power consumption and settings, refer
to the Advanced Features and Troubleshooting Manual.
User Guide 5
Page 22

Xerox supplies and accessories
The following are the printer’s Customer-Replaceable Consumables
(CRCs)
1 Laser Print Cartridge (accessed through the top cover)
2 Maintenance Kit (Fuser and Bias Transfer Roll)
Overview
Your printer displays messages on the control panel when user
intervention is required. Attention messages do not result in printer
shutdown, but warn of an action that should be taken to avert a
shutdown.
:
2
1
3925-08
An empty Laser Print Cartridge or expended maintenance item may
reduce print quality and/or prevent printing.
Keep consumables and maintenance items in supply.
Add or replace when prompted by the printer.
To order supplies and accessories, contact your local dealer, or visit
the Xerox web site: www.xerox.com/officeprinting
6 Xerox Phaser 5400 Laser Printer
Page 23
Customer-Replaceable Consumables
Item Average Life Part Number
Laser Print Cartridge 20,000 prints* 113R00495
Maintenance Kit
Contains: a Fuser Cartridge,
Bias Transfer Roll, cleaning
cloth, and instructions.
* Average life of a Laser Print Cartridge is based on page coverage of 5 percent using Letter-
or A4-size paper. The printer displays a message on the control panel when the toner is
low and when you need to replace the Laser Print Cartridge.
200,000 prints 109R00521
for 110 V (60 Hz)
109R00522
for 220 V (50 Hz)
Xerox professional printing paper
Item Size Description Part Number
Standard Papers
Overview
Xerox 4024 DP Letter (U. S.)
8.5 x 11 in.
Xerox Business
Multi-purpose 4200
Xerox 4024 DP
3-hole punch
Letter (U. S.)
8.5 x 11 in.
Letter (U. S.)
8.5 x 11 in.
Xerox 4024 DP Legal
8.5 x 14 in.
Xerox 4024 DP Ledger
11x17in.
Xerox Premier Paper A4 (Metric Letter)
210x297mm
Xerox Business Paper A4 (Metric Letter)
210x297mm
Xerox Cover Stock Letter (U. S.)
8.5 x 11 in.
Alternative Paper
Xerox Image Series
Smooth
Letter (U. S.)
8.5 x 11 in.
Recycled Paper
Xerox Planet Plus A4 (Metric Letter)
210x297mm
20 lbs.
(75 g/m
20 lbs.
(75 g/m
20 lbs.
(75 g/m
20 lbs.
(75 g/m
20 lbs.
(75 g/m
2
80 g/m
2
80 g/m
65 lbs.
(243 g/m
20 lbs.
(75 g/m
2
80 g/m
2
)
2
)
2
)
2
)
2
)
3R721
3R2047
3R2193
3R727
3R729
3R91805
3R91820
2
)
2
)
3R3041
3R54
3R90652
User Guide 7
Page 24
Xerox transparency film
Item Size Part Number
Xerox Clear Letter (U. S.)
3R3117
8.5x11in.
Xerox Paperback,
Clear
Xerox Type C, Plain A4 (Metric Letter)
Overview
Letter (U. S.)
8.5x11in.
210x297mm
3R3028
3R96002
Xerox labels
Size Description Part Number
A4 (Metric Letter)
24 labels per sheet 3R96178
210 x 297 mm
Letter (U.S.)
30 labels per sheet 3R4469
8.5 x 11 in.
Options
Option and Features Part Number
Hard Disk Drive
2+ Gbyte hard drive
Store resources, fonts, forms, and macros; enables
uninterrupted large-job collation
097S02806
A3-/Ledger-/Legal-size Cassette
Additional/Replacement - Tray only
A4-/Letter-size Cassette
Additional/Replacement - Tray only
500-Sheet Feeder with A3-/Ledger-size tray
Additional media tray and feeder
A3-/Ledger-size tray is interchangeable with Tray 1
109R00523
109R00524
097S02711
or any 500-Sheet Feeder
500-Sheet Feeder with A4-/Letter-size tray
Additional media tray and feeder
A4-/Letter-size tray is interchangeable with Tray 1 or
097S02712
any 500-Sheet Feeder
8 Xerox Phaser 5400 Laser Printer
Page 25
Options (cont'd.)
Option and Features Part Number
2,000-Sheet Feeder
Enables loading of up to 2,000 sheets of paper of A4or Letter-size
Increased paper-printing capacity
Increased printing versatility and convenience
1,000-Sheet Stacker Bin
Enables stacking of up to 1,000 sheets of paper
Supplements the standard output bin
Duplex Module
Enables automatic duplex capability
Memory (DIMMs)
Increases the font capability and enhances the speed
of data transfer and complex page processing
Memory kits available in three configurations,
packaged in single units each:
16 Mbytes
32 Mbytes
64 Mbytes
Flash Memory (DIMMS)
Provides 8 Mbytes of memory for storage of
downloaded fonts and overlays
097S02714
Overview
097S02715
097S02713
097S02356
097S02357
097S02358
097S02360
User Guide 9
Page 26

Print Media
Storing paper
Store the paper on a flat surface, in a relatively low-humidity
environment.
Avoid storing paper in such a way as to cause wrinkling, bending,
curling, etc.
Do not unwrap paper until you are ready to use it, and rewrap any
paper you are not using.
Do not expose paper to direct sunlight or high humidity.
Paper weights
Acceptable Weight Input Source
2
(16 lb. bond to 110 lbs.
2
(16 lb. bond to 36 lbs.
2
(16 - 28 lbs. bond) Duplex Module
Main 500-Sheet Tray
Optional 500-Sheet Feeders
2,000-Sheet Feeder
Multi-sheet Bypass Feeder
Print Media
60-200 g/m
card stock)
60-135 g/m
bond)
60-105 g/m
10 Xerox Phaser 5400 Laser Printer
Page 27
Capacities of input sources
Input Source Capacity
Tray 1
Standard 500 sheet input source.
Tray 2
Optional input source installed immediately
500
500*
below Tray 1.
May be a 500-Sheet Feeder or the 2,000-Sheet
Feeder.
Tray 3
Optional input source installed immediately
500*
below Tray 2.
Only available if Tray 2 is not the 2,000-Sheet
Feeder.
May be another 500-Sheet Feeder or the
2,000-Sheet Feeder.
Multi-sheet Bypass Feeder
Functions as either a single sheet manual feed
150
tray or a tray for up to 150 sheets.
*
All capacities assume a typical paper weight of 80 g/m2 (20 lbs.).
Capacities will differ with other weights.
Note: Do not load paper above the indicated mark located on the back
or side of the tray.
Print Media
User Guide 11
Page 28
Supported media and media sizes
Media Media Size
A3
A4
A5
A6
B4-JIS
B5-JIS
Statement
Executive
Letter
Folio
Legal
Ledger
Print Media
Envelopes
COM-10
Monarch
DL
C5
Tray 1, Tray 2, Tray 3
Multi-sheet
A4/Letter A3/Ledger
2,000
sheet
Bypass
Feeder
feeder
LEF
LEF
LEF
LEF
(2)
(2)
(2)
(3)
(3)
(3)
-
-
-
-
-SEF
-LEF
-LEF
-LEF
-LEF
-SEF
-
-
-
-
LEF
LEF
LEF
LEF
297 x 420 mm - SEF
210 x 297 mm LEF LEF LEF LEF
LEF
LEF
LEF
LEF
(2)
(2)
(3)
(3)
(1)(3)
(1)(3)
(1)(2)
(1)
148 x 210 mm LEF
105 x 148 mm - - - LEF
257 x 364 mm - SEF - SEF
182 x 257 mm LEF
5.5 x 8.5 in. LEF
7.25 x 10.5 in. LEF
8.5 x 11 in. LEF LEF LEF LEF
8.5 x 13 in. - SEF - SEF
8.5 x 14 in. - SEF - SEF
11 x 17 in. - SEF
4.1 x 9.5 in.
3.8 x 7.5 in.
110 x 220 mm
162 x 229 mm
(1)
(1)
(1)
(1)
(1)
Transparencies
A4
Letter
Labels
A4
Letter
SEF = Short-Edge Feed, LEF = Long-Edge Feed
(1)
Simplex (one-sided) printing only.
(2)
Only when Defaults = Millimeters in the Control Panel System Menu.
(3)
Only when Defaults = Inches in the Control Panel System Menu.
210 x 297 mm
8.5 x 11 in.
210 x 297 mm
8.5 x 11 in.
LEF
LEF
LEF
LEF
(1)
(1)
(1)
(1)
LEF
LEF
LEF
LEF
(1)
(1)
(1)
(1)
-
-
-LEF
LEF
LEF
LEF
(1)
(1)
(1)
(1)
12 Xerox Phaser 5400 Laser Printer
Page 29

Custom paper sizes
Acceptable
Tray 1, Tray 2, Tray 3
sizes
A4/Letter A3/Ledger
Simplex
Width 148 - 297 mm
5.83 - 11.69 in.
Length 98.4 - 216 mm
3.875 - 8.5 in.
Duplex
Width 182 - 297 mm
7.16 - 11.69 in.
Length 139.7 - 216 mm
5.5 - 8.5 in.
210 - 297 mm
8.27 - 11.69 in.
139.7 - 431.8 mm
5.5 - 17 in.
210 - 297 mm
8.27 - 11.69 in.
139.7 - 431.8 mm
5.5 - 17 in.
2,000 sheet
Bypass Feeder
feeder
None 76.2 - 305 mm
3 - 12 in.
None 98.4 - 508 mm
3.875 - 20 in.
None 182 - 297 mm
7.16 - 11.69 in.
None 139.7 - 431.8 mm
5.5 - 17 in.
Multi-sheet
Print Media
User Guide 13
Page 30

Unacceptable media
The following media are unacceptable for use in the printer. Their use
may cause high rates of jamming and other paper-handling problems:
Excessively thick or thin paper
Heavily textured paper
Paper that has already been printed on (pre-printed letterhead is
allowed)
Wrinkled, torn, or bent paper
Moist or wet paper
Curled paper
Paper with an electrostatic charge
Glued paper
Paper with special coating
Paper unable to withstand a temperature of 150 degrees C
(302 degrees F)
Thermal paper
Print Media
Carbon paper
Paper with paper fasteners, ribbons, staples, tape, etc. attached
Label stock with exposed backing sheet
14 Xerox Phaser 5400 Laser Printer
Page 31

Loading Media
Loading media in Tray 1, 2, or 3
A4-/Letter-Size Tray
1. Remove the tray from the printer:
a. Pull out the tray until it stops.
b. Gently remove the tray from the printer while lifting up.
c. Place the tray on a flat surface.
3925-10
Supplies Loading Media
If you are loading paper of the same size, skip to Step 4.
2. Gently squeeze the length guide, lift it up, and slide it all the way
out of the tray.
3925-11
User Guide 15
Page 32

3. Gently squeeze the side guides and slide them all the way out of
the tray.
3925-12
4. If the tray’s metal base plate remains raised, press it down to
lock it.
3925-13
Loading Media
16 Xerox Phaser 5400 Laser Printer
Page 33

Note
To reduce the possibility of misfeeds and jams, fan the stack
of paper before inserting it into the tray.
5. Align the four corners of the paper stack and insert it into the tray
following the simplex and duplex instructions below. Make sure
that the paper is placed at the center of the tray, under the
retaining clips on both sides.
.
Top view of tray:
1. Simplex printing, 2. Duplex printing
1
2
3925-14
3925-15
Supplies Loading Media
User Guide 17
Page 34

6. While pressing the side guides, adjust them to the paper width.
Note
To avoid misfeeds and jams, make sure that the stack is
under the retaining clips on both sides and adjust the side
guides to the correct size.
3925-16
7. When the side guides are aligned, adjust the length guide to the
paper length.
3925-17
Loading Media
18 Xerox Phaser 5400 Laser Printer
Page 35

8. Insert the tray completely into the printer. Make sure that it is
properly seated.
3925-18
9. If you changed the type of paper in the tray, use the control panel
to specify the paper type:
a. Press the Menu keys (labeled 1 or 5) to scroll to the to
Tray Menu.
b. Press the Item keys (labeled 2 or 6) to scroll to
Tray 1 Type, Tray 2 Type, or Tray 3 Type.
c. Press the Value keys (labeled 3 or 7) to scroll to the correct
paper type (plain, preprinted, letterhead, etc.).
Supplies Loading Media
d. Press the Enter key (labeled 4).
e. Press the On Line key (labeled 0) to exit the menus.
User Guide 19
Page 36

A3-/Ledger-Size Tray
1. Remove the tray from the printer:
a. Pull out the tray until it stops.
b. Gently remove the tray from the printer while lifting up.
c. Place the tray on a flat surface.
2. Remove the tray cover.
If you are loading paper of the same size, skip to Step 5.
3925-19
3925-20
Loading Media
20 Xerox Phaser 5400 Laser Printer
Page 37

3. Gently squeeze the length guide, lift it up, and slide it all the way
out of the tray.
3925-21
4. Gently squeeze the side guides and slide them all the way out of
the tray.
Supplies Loading Media
3925-22
User Guide 21
Page 38

5. If the tray’s metal base plate remains raised, press it down to
lock it.
3925-23
Note
To reduce the possibility of misfeeds and jams, fan the stack
of paper before inserting it into the tray.
6. Align the four corners of the paper stack and insert it into the tray
with the side to be printed on facing up. Make sure that the paper
is placed at the center of the tray, under the retaining clips on
both sides.
.
3925-24
Loading Media
22 Xerox Phaser 5400 Laser Printer
Page 39

Top view of tray:
1. Simplex printing, 2. Duplex printing
1
2
Supplies Loading Media
3925-25
User Guide 23
Page 40

7. While pressing the side guides, adjust them to the paper width.
Note
To avoid misfeeds and jams, make sure that the stack is
under the retaining clips on both sides and adjust the side
guides to the correct size.
3925-26
8. When the side guides are aligned, adjust the length guide to the
paper length.
Loading Media
3925-27
24 Xerox Phaser 5400 Laser Printer
Page 41

9. Replace the tray cover.
3925-28
10. Hold the tray at the green labels (a) and insert it into the printer.
a
Supplies Loading Media
3925-29
11. Push the tray completely into the printer. Make sure that it is
properly seated.
3925-30
User Guide 25
Page 42
12. When using large-size media:
a. Pull out the paper support.
b. Lift up the stopper.
b
a
3925-31
13. If you changed the type of paper in the tray, use the control panel
to specify the paper type:
a. Press the Menu keys (labeled 1 or 5) to scroll to the to
Tray Menu.
b. Press the Item keys (labeled 2 or 6) to scroll to
Tray 1 Type, Tray 2 Type, or Tray 3 Type.
c. Press the Value keys (labeled 3 or 7) to scroll to the correct
paper type (plain, preprinted, letterhead, etc.).
d. Press the Enter key (labeled 4).
e. Press the On Line key (labeled 0) to exit the menus.
Loading Media
26 Xerox Phaser 5400 Laser Printer
Page 43

2,000-Sheet Feeder
1. Pull out the tray until it stops.
2. Push down the tray before loading paper.
If you are loading paper of the same size, skip to Step 4.
-
Supplies Loading Media
3925-33
User Guide 27
Page 44

3. Adjust the paper guides to the size of the paper by opening the
release tabs and inserting them into the desired guide holes.
4. Prepare a stack of paper for loading by fanning it and holding it
with both hands.
3925-34
3925-35
Loading Media
28 Xerox Phaser 5400 Laser Printer
Page 45

5. Gently load the stack of paper into the tray.
Note
Make sure that the stack does not exceed the maximum level
indicated on the tray; misfeeds may occur.
Top view of tray:
1. Simplex printing, 2. Duplex printing
1
2
3925-36
3925-37
Supplies Loading Media
User Guide 29
Page 46

6. Push the tray all the way back into the feeder.
-
7. If you changed the type of paper in the tray, use the control panel
to specify the paper type:
a. Press the Menu keys (labeled 1 or 5) to scroll to the to
Tray Menu.
b. Press the Item keys (labeled 2 or 6) to scroll to Tray 2 Type
or Tray 3 Type.
c. Press the Value keys (labeled 3 or 7) to scroll to the correct
paper type (plain, preprinted, letterhead, etc.).
d. Press the Enter key (labeled 4).
e. Press the On Line key (labeled 0) to exit the menus.
Loading Media
30 Xerox Phaser 5400 Laser Printer
Page 47

Multi-sheet Bypass Feeder
1. Open the Multi-sheet Bypass Feeder door by pulling the latch at
the top center.
Caution
To prevent possible damage to the Multi-sheet Bypass
Feeder, do not exert strong pressure on it or place any heavy
objects on it.
3925-39
2. If you intend to load envelopes, postcards or other small-size
paper, you need to extend the Multi-sheet Bypass Feeder.
Supplies Loading Media
a. Hold both sides of the feeder where indicated and tilt it up
slightly.
b. Gently lift up the feeder and pull out toward you until it
stops.
b
a
3925-40
User Guide 31
Page 48

3. Adjust the paper guide to fit the media you intend to use.
Note
To prevent possible jams, be sure to adjust the guides
correctly and do not overload the tray.
3925-41
4. Align the four corners of the paper and place it into the tray with
the side to be printed facing up.
Note
Be sure to insert the paper all the way in until it gently
touches the stopper inside the printer.
Loading Media
3925-42
32 Xerox Phaser 5400 Laser Printer
Page 49

Long-Edge Feed Orientation
1. Simplex orientations, 2. Duplex orientations,
3. Envelope orientation
3
1
2
Short-Edge Feed Orientation
1. Simplex orientation, 2. Duplex orientation
12
3925-44
3925-43
Supplies Loading Media
User Guide 33
Page 50
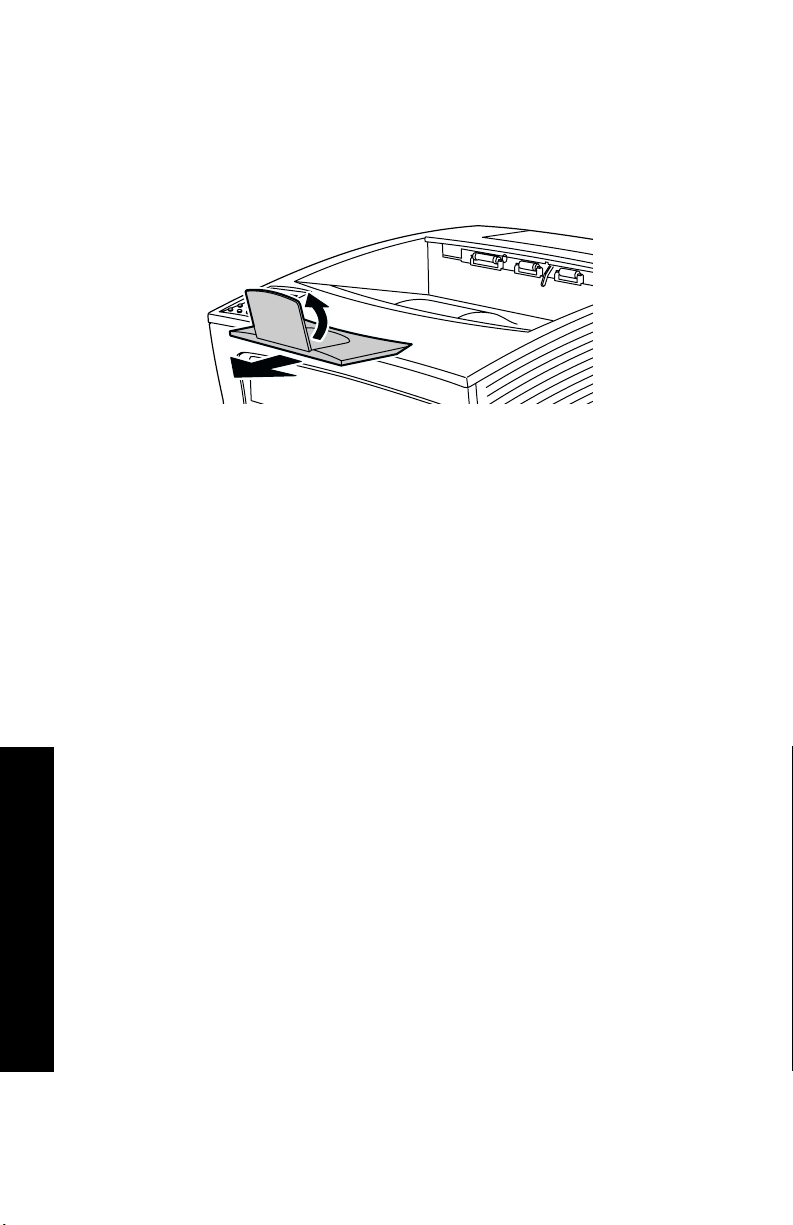
5. If you extended the Multi-sheet Bypass Feeder in Step 2, return it
to its normal position:
a. Hold both sides of the Multi-sheet Bypass Feeder where
indicated.
b. Push the feeder straight back into the printer until it stops.
3925-45
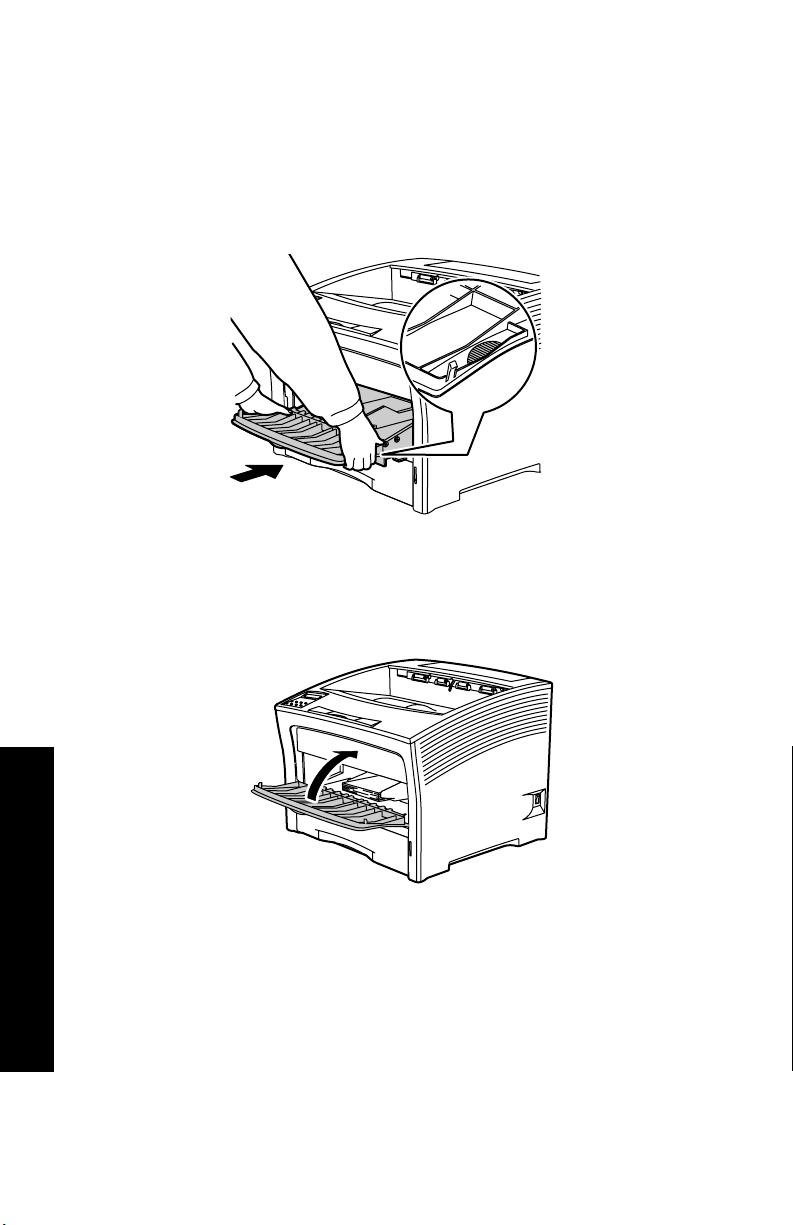
6. When the media fits within the Multi-sheet Bypass Feeder
enclosure, close the door.
3925-46
Loading Media
34 Xerox Phaser 5400 Laser Printer
Page 51

7. When using large-size media:
a. Pull out the paper support.
b. Lift up the stopper.
b
a
3925-31
8. If you changed the type or size of paper in the Multi-sheet Bypass
Feeder, use the control panel to specify the paper type and/or
size:
a. Press the Menu keys (labeled 1 or 5) to scroll to the
Tray Menu.
b. If you changed the type of media, press the Item keys (labeled
2 or 6) to scroll to MBF Type.
Supplies Loading Media
c. Press the Value keys (labeled 3 or 7) to scroll to the correct
paper type (plain, preprinted, letterhead, etc.).
d. Press the Enter key (labeled 4).
e. If you changed the size of the media, press the Item keys to
scroll to MBF Size.
f. Press the Value keys to scroll to the correct paper size (letter,
A4, etc.).
g. Press the Enter key.
h. Press the On Line key (labeled 0) to exit the menus.
User Guide 35
Page 52

Printing Jobs
When you print a job, you can use the print driver to select the
following features:
Paper source
Output bin — see page 38.
Paper size and media to use:
Printing Jobs
Special paper — see page 39.
First page different — see page 39.
Envelopes — see page 41.
Labels — see page 43.
Transparencies — see page 45.
Single- or double-sided printing (if the Duplex Module is
installed); see page 47.
Orientation — see page 49.
For information on the following features, refer to the printer driver
help or the Advanced Features and Troubleshooting Manual on your
printer’s CD-ROM:
Collating copies
Custom (nonstandard) paper sizes, suitable for the Multi-sheet
Bypass Feeder or any of the 500-sheet paper trays.
Draft mode, which reduces the amount of toner required per page
at the expense of lower print quality (intended for occasional
proof printing of high-density documents).
Booklet-style printing (if your printer has the optional Duplex
Module).
36 Xerox Phaser 5400 Laser Printer
Page 53

N-up, where N number of pages are printed on a single physical
sheet of paper (useful for previewing a document’s layout).
Secure printing and proof printing (if your printer has the
optional hard drive).
Edge-to-edge printing, where text and images are printed to the
physical edge of the page. (There may be some loss of data at the
edge due to mechanical and physical restraints.)
Watermark and overlay, which print background text across the
first page or every page of the document.
Printing Jobs
User Guide 37
Page 54

Output
Standard Bin
The Standard Output Bin holds approximately 500 sheets.
Direct your print job to the Standard Bin in one of two ways:
From the printer’s driver, select Standard Bin.
Printing Jobs
From the printer’s control panel, select Output Dest.
1,000-Sheet Stacker Bin
The 1,000-Sheet Stacker Bin is an optional output device for your
printer.
3925-48
It can be used as an additional 1,000-sheet capacity output bin to
supplement the 500-Sheet Standard Output Bin.
Direct your print job to the Stacker Bin in one of two ways:
From the printer’s driver, select Stacker Bin.
From the printer’s control panel, select Output Dest.
Refer to the Advanced Features and Troubleshooting Manual on the
printer’s CD-ROM for detailed instructions on configuring the
1,000-Sheet Stacker Bin for use.
38 Xerox Phaser 5400 Laser Printer
Page 55

Printing on special paper
You can print on letterhead, preprinted paper, prepunched paper,
color paper, and card stock. Check the allowable paper size on
page 12. Check the allowable paper weight on page 10.
At the printer:
1. Insert the special paper into either a tray or the Multi-sheet
Bypass Feeder. For letterhead, preprinted, and prepunched paper,
be sure that the special paper is oriented correctly, depending
upon whether you will be printing single-sided or double-sided.
For the A4/Letter tray, see page 17; for A3/Ledger tray, see
page 23; or for the 2,000-Sheet Feeder, see page 29.
For the Multi-sheet Bypass Feeder, see page 33.
2. If you changed the type of paper in a tray or the type or size of
paper in the Multi-sheet Bypass Feeder, use the control panel to
select the paper type and size.
For the A4/Letter tray, see page 19; for A3/Ledger tray, see
page 26; or for the 2,000-Sheet Feeder, see page 30.
For the Multi-sheet Bypass Feeder, see page 35.
(Trays 1, 2, and 3 have paper size sensors, so you don’t need to
specify the paper size.)
Printing Jobs
For the Windows 95/98/Me (PS/PCL5e) operating system:
1. In your application, select File and then Print.
2. Select the Xerox Phaser 5400 laser printer driver.
3. Open the Properties dialog box.
4. Select the Paper/Output tab.
5. Click the Select Paper button.
6. From the Select Paper dialog box, select the Document Body tab.
7. From the drop-down list under Media Type, select the type of
paper.
8. If you want another paper used for the cover:
a. From the Select Paper dialog box, select the First Page tab.
b. Check the First Page Different box.
User Guide 39
Page 56

c. From the drop-down list under Media Type, select the type
of paper.
9. Click the OK button to save the paper selections.
10. Click the OK button to save the properties.
11. Send the job to the printer.
For the Windows 2000 and Windows NT (PS/PCL5e) operating systems:
1. In your application, select File and then Print.
Printing Jobs
2. Select the Xerox Phaser 5400 laser printer driver.
3. Open the Properties dialog box.
4. Select your tab:
For Windows 2000, select the Paper/Quality tab.
For Windows NT, select the Advanced tab and
Paper/Output.
5. From the drop-down list under Media, select any special paper
type.
6. For Windows 2000, click the Advanced button if you want
another paper type for the cover. For Windows NT, skip to
Step #7.
7. Under Document Options, select Enabled from the drop-down list
for First Page Different.
8. Open the First Page Different option by clicking on the + sign.
9. From the First Page Media Type drop-down list, choose the type
you want to use.
10. For Windows 2000, click the OK button to save the Advanced
options, then click OK to save the properties. For Windows NT,
click the OK button to save the properties.
11. Send the job to the printer.
For the Windows NT (PCL6) operating system:
Note
PCL6 does not support Media Type.
40 Xerox Phaser 5400 Laser Printer
Page 57

Printing envelopes
At the printer:
1. Insert the envelopes:
A4/Letter tray — see page 17.
Multi-sheet Bypass Feeder — see page 33.
2. Be sure that the envelopes are oriented in the following manner:
Surface to be printed is face-up.
Top of the envelope enters the printer first.
3. If you changed the paper type in a tray or the type or size of the
envelopes in the Multi-sheet Bypass Feeder, use the control panel
to select the paper type and size. Ordinarily the type should be set
to Envelope. Refer to page 19 for the A4/Letter tray and page 35
for the Multi-sheet Bypass Feeder.
For the Windows 95/98/Me (PS/PCL5e) operating system:
1. Create an envelope document of the correct size.
Many applications include a tool for creating an envelope
document. For example, Microsoft Word includes an
Envelopes and Labels feature under the Tools menu.
Otherwise, create a document using the following selections:
Paper size: the size of the envelope
Orientation: Landscape
2. In your application, select File and then Print.
Printing Jobs
3. Select the Xerox Phaser 5400 laser printer driver.
4. Open the Properties dialog box.
5. Select the Paper/Output tab.
6. From the drop-down list under Orientation, select Landscape.
7. Click the Select Paper button.
8. From the Select Paper dialog box, select the Document Body tab.
9. From the drop-down list under Paper Size, select the size of
envelope.
User Guide 41
Page 58

10. If you want to use a particular source, such as the Multi-sheet
Bypass Feeder, select it from the drop-down list under Paper
Tray.
11. From the drop-down list under Media Type, select the media
type.
12. Click the OK button to save the paper selections.
13. Click the OK button to save the properties.
14. Send the job to the printer.
Printing Jobs
For the Windows 2000 and Windows NT (PS/PCL5e) operating systems:
1. In your application, select File and then Print.
2. Select the Xerox Phaser 5400 laser printer driver.
3. Open the Properties dialog box.
4. Select the Layout tab.
5. Under Orientation, select Landscape.
6. Click the Advanced button.
7. From the drop-down list under Paper Size, select the envelope
size.
8. Click the OK button to save the properties.
9. Send the job to the printer.
For the Windows NT (PCL6) operating system:
Note
PCL6 does not support Media Type.
Guidelines for envelope printing:
Use only the supported envelope sizes.
Never use envelopes with windows or metal clasps; they will
damage the printer.
Never have exposed gummed surfaces.
42 Xerox Phaser 5400 Laser Printer
Page 59

Keep unused envelopes in their packaging to avoid the effects of
moisture and dryness, which can affect print quality and cause
wrinkling.
Only print single-sided.
Don’t load envelopes above the indicated mark.
Envelopes cannot be sent to the 1,000-Sheet Stacker Bin.
Printing labels
You can print labels from the trays or the Multi-sheet Bypass Feeder.
At the printer:
1. Insert the label sheets into the trays or the Multi-sheet Bypass
Feeder in the following manner:
Side to be printed is face-up in trays.
The long edge of the sheet enters the printer first.
Don’t load labels above the indicated mark on the back of the
tray or side of the Multi-sheet Bypass Feeder.
2. If you changed the type of media in a tray or the type or size in the
Multi-sheet Bypass Feeder, use the control panel to select the
media type and size.
Printing Jobs
For the A4/Letter tray, see page 19; for A3/Ledger tray, see
page 26; or for the 2,000-Sheet Feeder, see page 30.
For the Multi-sheet Bypass Feeder, see page 35.
(Trays 1, 2, or 3 have paper-size sensors, so you don’t need to
specify the paper size.)
For the Windows 95/98/Me (PS/PCL5e) operating system:
1. Create a document with text located in the correct areas. Refer to
the instructions included with the labels for margin settings.
2. In your application, select File and then Print.
3. Select the Xerox Phaser 5400 laser printer driver.
4. Open the Properties dialog box.
5. Select the Paper/Output tab.
6. Click the Select Paper button.
User Guide 43
Page 60

7. From the Select Paper dialog box, select the Document Body tab.
8. From the drop-down list under Media Type, select Labels.
9. Click the OK button to save the media selections.
10. Click the OK button to save the properties.
11. Send the job to the printer.
For the Windows 2000 and Windows NT (PS/PCL5e) operating systems:
Printing Jobs
1. In your application, select File and then Print.
2. Select the Xerox Phaser 5400 laser printer driver.
3. Open the Properties dialog box.
4. Select the Paper/Quality tab.
5. From the Media drop-down list, select Labels.
6. Click the OK button to save the properties.
7. Send the job to the printer.
For the Windows NT (PCL6) operating system:
Note
PCL6 does not support Media Type.
Guidelines for printing on labels:
Use Xerox labels; refer to page 8 for information.
If any of the labels on a sheet are missing, do not use that sheet; it
may damage printer components.
Only print single-sided.
Labels cannot be sent to the 1,000-Sheet Stacker Bin.
44 Xerox Phaser 5400 Laser Printer
Page 61

Printing transparencies
You can print transparencies from the trays or the Multi-sheet Bypass
Feeder.
At the printer:
1. Insert the transparencies into a tray or the Multi-sheet Bypass
Feeder:
Rough side is up.
Smooth side is down.
The stripe enters the printer first.
Don’t load transparencies above the indicated mark on the
back of the tray or side of the Multi-sheet Bypass Feeder.
2. If you changed the type of media in a tray or the type or size in the
Multi-sheet Bypass Feeder, use the control panel to select the
media type and size:
For the A4/Letter tray, see page 19; for A3/Ledger tray, see
page 26; or for the 2,000-Sheet Feeder, see page 30.
For the Multi-sheet Bypass Feeder, see page 35.
(Trays 1, 2, and 3 have paper size sensors, so you don’t need to
specify the paper size.)
For the Windows 95/98/Me (PS/PCL5e) operating system:
1. In your application, select File and then Print.
Printing Jobs
2. Select the Xerox Phaser 5400 laser printer driver.
3. Open the Properties dialog box.
4. Select the Paper/Output tab.
5. Click the Select Paper button.
6. From the Select Paper dialog box, select the Document Body tab.
7. From the drop-down list under Media Type, select the
Transparency.
8. Click the OK button to save the media selections.
9. Click the OK button to save the properties.
10. Send the job to the printer.
User Guide 45
Page 62

For the Windows 2000 and Windows NT (PS/PCL5e) operating systems:
1. In your application, select File and then Print.
2. Select the Xerox Phaser 5400 laser printer driver.
3. Open the Properties dialog box.
4. Select the Paper/Quality tab.
5. From the Media drop-down list, select Transparencies.
6. Click the OK button to save the properties.
Printing Jobs
7. Send the job to the printer.
For the Windows NT (PCL6) operating system:
Note
PCL6 does not support Media Type.
Guidelines for printing on transparencies:
Use Xerox transparencies; refer to page 8 for information.
Only print single-sided.
Transparencies cannot be sent to the 1,000-Sheet Stacker Bin.
46 Xerox Phaser 5400 Laser Printer
Page 63

Printing two-sided (duplex) jobs
With the optional Duplex Module installed, you can print two-sided
(duplex) jobs.
Use only the paper sizes listed in the table on page 12. Do not use
envelopes, postcards, transparencies, or label paper for duplex jobs.
2
Use paper with a weight of 60-105 g/m
(16-28 lbs. bond).
Refer to pages 15 through 34 for the proper orientation of drilled paper
and letterhead when printing duplex.
For the Windows 95/98/Me (PS/PCL5e/PCL6), Windows NT (PCL6), and
Windows 2000 (PCL6) operating systems:
1. In your application, select File and then Print.
2. Select the Xerox Phaser 5400 laser printer driver.
3. Open the Properties dialog box.
4. Select the Paper/Output tab.
5. Select the type of Duplex from the pull-down menu:
Long edge binding
Short edge binding
You must have configured the printer (on the Printer
Configuration tab) to include the Duplex Module.
6. Click the OK button to save the properties.
7. Send the job to the printer.
Printing Jobs
For the Windows 2000 and Windows NT (PS/PCL5e) operating systems:
1. In your application, select File and then Print.
2. Select the Xerox Phaser 5400 laser printer driver.
3. Open the Properties dialog box.
4. Select the Layout tab.
5. Select either Flip on Long Edge or Flip on Short Edge.
6. Click the OK button to save the properties.
7. Send the job to the printer.
User Guide 47
Page 64

At the printer:
If your printer driver doesn’t include duplex mode, you can select it on
the printer’s control panel. However, all jobs sent to the printer are
then double-sided unless they are sent using a printer driver that
specifically says to print the job single-sided. (The driver setting
always overrides the control panel setting.)
8. On the Xerox Phaser 5400 control panel, select duplex printing:
Printing Jobs
a. Press the Menu keys (labeled 1 or 5) to scroll to the
System Menu.
b. Press the Item keys (labeled 2 or 6) to scroll to Duplex.
c. Press the Value keys (labeled 3 or 7) to scroll to either
Long Edge or Short Edge. Refer to the figures on page 49 to
determine this value.
d. Press the Enter key (labeled 4).
e. Press the On Line key (labeled 0) to exit the menus.
48 Xerox Phaser 5400 Laser Printer
Page 65

Available binding preferences (how the page turns) and duplex
settings (Long-Edge/Short-Edge):
Portrait Orientation
Long-Edge Binding Short-Edge Binding
Landscape Orientation
Printing Jobs
Long-Edge Binding Short-Edge Binding
User Guide 49
Page 66

Troubleshooting
If your printer is not operating properly, check the following:
The printer is plugged in and switched on.
The data cable is correctly connected to the printer.
The media trays are inserted correctly and the doors are securely
closed.
Is there a control panel error message displayed?
Your computer has the correct driver installed and properly
configured for your printer.
For detailed troubleshooting information, refer to the following:
Advanced Features and Troubleshooting Manual on the CD-ROM
that was shipped with your printer.
infoSMART™ Knowledge Base (troubleshooting knowledge
database) on the Xerox Printer web site:
www.xerox.com/officeprinting/infoSMART
Replacing the Laser Print Cartridge
Troubleshooting
Troubleshooting may require that you replace the Laser Print
Cartridge.
Warning
To avoid possible injury, never touch the Fuser area inside
the printer (where a label indicates high temperature).
Caution
Do not expose the Laser Print Cartridge to direct sunlight or
artificial light for more than 15 minutes. Overexposure will
permanently damage the photosensitive imaging drum.
Do not open the drum shutter or touch the blue imaging
drum surface.
50 Xerox Phaser 5400 Laser Printer
Page 67

1. Open the top cover.
2. Lift out the used cartridge.
3925-53
Troubleshooting
3925-54
Wrap the used Laser Print Cartridge by placing it in the packing
from your new cartridge and return it as directed.
User Guide 51
Page 68

3. After removing the new cartridge from its packing, shake it seven
to eight times to free the toner.
Note
Be sure to shake the Laser Print Cartridge as directed to
distribute the toner inside the cartridge. Print quality may be
degraded if the toner is not evenly distributed.
3925-55
4. Place the cartridge on a flat surface. With one hand, press down
the cartridge. With the other hand, grasp the end tab of the sealing
tape and pull the tape straight out horizontally.
Troubleshooting
3925-56
52 Xerox Phaser 5400 Laser Printer
Page 69

5. Holding the cartridge as shown, lower it into the printer, and then
insert the cartridge’s two projecting parts into the printer’s guide
channels. Be sure to push the cartridge all the way into the
printer.
3925-57
6. Close the top cover until it locks in place.
Troubleshooting
3925-58
User Guide 53
Page 70

Troubleshooting print quality
If you notice a problem with the quality of your prints, you may need
to replace one of the supplies, such as the laser print cartridge.
To diagnose the problem, check these items:
Check the control panel for messages on replacing supplies.
Print the Test Print pages from the printer’s control panel:
a. Press the Menu keys (labeled 1 or 5) to scroll to the
Print Menu.
b. Press the Item keys (labeled 2 or 6) to scroll to Test Print.
c. Press the Enter key (labeled 4).
The Test Print pages should print.
d. Examine the pages for the following symptoms.
Troubleshooting
54 Xerox Phaser 5400 Laser Printer
Page 71

Symptom: Light or faint prints
The overall image is lighter than normal.
Possible causes and solutions:
The paper stock may be damp. Replace the
paper stock.
If you are using Draft Mode, turn off Draft
Mode.
The toner level may be low. If the Laser Print
Cartridge is low on toner, replace it.
3925-59
Symptom: Blank prints
The entire printed page is blank with no visible print.
Possible causes and solutions:
If you just installed a new Laser Print Cartridge,
the yellow sealing tape may still be in place.
Remove the tape.
Multiple sheets may have been fed from the
paper tray at the same time. Remove the paper
from the paper tray and fan it. Also, ensure that
the paper is correctly loaded in the tray.
Printable data may not have been received from
the computer. To test this, print a Configuration
Sheet, as described on the previous page. If the
Configuration Sheet is normal, check the
3925-60
Interface cable between the computer and
printer, the printer set up, and application
software. If the configuration Sheet is blank,
contact your Customer Support Center.
The Laser Print Cartridge may be defective or
low on toner. Replace the Laser Print Cartridge.
Troubleshooting
User Guide 55
Page 72

Symptom: Black prints
The entire printed page is black.
Possible causes and solutions:
The Laser Print Cartridge may be defective.
Replace the Laser Print Cartridge.
The Printer’s power supply may have failed;
contact your Customer Support Center.
3925-61
Symptom: Spot deletions
Areas of the print are extremely light or missing.
Possible causes and solutions:
Troubleshooting
The paper stock may be damp. Replace the
paper stock.
The Laser Print Cartridge may be defective or at
the end of its life. Replace the Laser Print
Cartridge.
3925-62
56 Xerox Phaser 5400 Laser Printer
Page 73

Symptom: Vertical line deletions
There are localized print deletions forming narrow lines.
Possible causes and solutions:
The Laser Print Cartridge may not be installed
correctly. Remove then re-install the Laser Print
Cartridge.
The Laser Print Cartridge may be defective or at
the end of its life. Replace the Laser Print
Cartridge.
3925-63
Symptom: Horizontal line deletions
There are localized print deletions appearing as bands running across
the paper.
Troubleshooting
Possible causes and solutions:
The paper stock may be defective with creases,
folds, etc. Replace the paper stock.
The Laser Print Cartridge may be defective or at
the end of its life. Replace the Laser Print
Cartridge.
3925-64
User Guide 57
Page 74

Symptom: Vertical dark streaks
There are black lines running across the print.
Possible causes and solutions:
The Laser Print Cartridge may be defective or at
the end of its life. Replace the Laser Print
Cartridge.
The fuser may be defective. Replace the fuser
(in the Maintenance Kit).
3925-65
Symptom: Repetitive horizontal dark streaks
There are black lines running across the page.
Troubleshooting
Possible causes and solutions:
The paper path may be contaminated with
toner. Print several blank sheets of paper to
remove the toner accumulations.
The Laser Print Cartridge may be defective or at
the end of its life. Replace the Laser Print
Cartridge.
The fuser may be defective. Replace the fuser
(in the Maintenance Kit).
The Bias Transfer Roll may be defective.
Replace the Bias Transfer Roll (in the
3925-66
Maintenance Kit).
58 Xerox Phaser 5400 Laser Printer
Page 75

Symptom: Dark spots or marks
There are dark spots or marks on the page in a random pattern.
Possible causes and solutions:
The paper path may be contaminated with
toner. Print several blank sheets of paper to
remove the toner accumulations.
The Laser Print Cartridge may be defective.
Replace the Laser Print Cartridge.
The fuser may be defective. Replace the fuser
(in the Maintenance Kit).
The Bias Transfer Roll may be defective.
Replace the Bias Transfer Roll (in the
Maintenance Kit).
3925-67
Symptom: Unfused or partially fused image
The printed image is not fully fused to the paper and easily rubs off.
Possible causes and solutions:
The paper stock may be damp. Replace the
paper stock.
Heavy or unusual paper stock may be in the
tray. Replace that paper with approved media.
If you need to use heavy card stock, make sure
that the fuser temperature is set correctly for
that paper type; refer to the Advanced Features
and Troubleshooting Manual for more
information.
3925-68
The fuser may be defective. Replace the fuser
(in the Maintenance Kit).
Make sure that the printer is located in the
recommended environment for temperature
(between 10 to 32 degrees C) and relative
humidity (between 15 percent to 85 percent).
Move the printer to a suitable area, away from
air conditioning vents, open loading docks, etc.
Troubleshooting
User Guide 59
Page 76

Symptom: Wrinkled prints
The prints are wrinkled, creased, or torn.
Possible causes and solutions:
The paper stock may be in poor condition.
Replace the paper stock.
The paper stock may be damp. Replace the
paper stock.
The fuser may be at the end of its life. Replace
the fuser (contained in the Maintenance Kit).
3925-69
Symptom: Blurred prints
The image is blurred at the edges.
Possible causes and solutions:
Troubleshooting
The paper stock may be in poor condition.
Replace the paper stock.
The paper stock may be damp. Replace the
paper stock.
3925-70
60 Xerox Phaser 5400 Laser Printer
Page 77

Symptom: Random deletions
The page has random light areas and deletions.
Possible causes and solutions:
The paper stock may be in poor condition.
Replace the paper stock.
The paper stock may be damp. Replace the
paper stock.
3925-71
Symptom: Grainy graphics
A graphic image is coarse or grainy (like a brick or checkerboard
pattern) rather than a smooth halftone.
Troubleshooting
Possible causes and solutions:
The printer may have tried to print a complex
graphic image with inadequate memory.
Consider adding additional memory to the
printer.
Check that you are using the correct printer
driver.
3925-72
User Guide 61
Page 78

Symptom: Broken page image
The printed image is missing all of the image after a straight line.
Possible causes and solutions:
The printer may have tried to print a complex
graphic image with inadequate memory.
Consider adding additional memory to the
printer.
3925-73
Troubleshooting
62 Xerox Phaser 5400 Laser Printer
Page 79

Paper Jams
Warning
To avoid possible personal injury, avoid contact with the
printer’s fuser area, which may be very hot.
Caution
Do not use tools or sharp objects to clear paper jams since
this may damage the printer. Do not touch the surface of the
print drum; touching the drum may damage it.
Preventing paper jams
To reduce the frequency of paper and transparency jams, the
use of Xerox media is recommended; refer to page 7 for
information.
Use only the recommended sizes and weights of paper in the
trays; refer to page 10 for information on acceptable weights and
page 12 for acceptable sizes.
Supplies Paper Jams
After removing a paper jam, be sure to remove any paper scraps.
Avoid damp paper stock.
User Guide 63
Page 80

Clearing a duplex jam
1. Open the rear cover.
Warning
To avoid possible injury, never touch the Fuser area (where a
label indicating high temperature is located). The fuser may
be hot.
2. Check and carefully pull out any jammed paper.
3925-74
3925-75
Paper Jams
64 Xerox Phaser 5400 Laser Printer
Page 81

3. Close the rear cover.
3925-76
4. Check the control panel display. If the jam has been cleared and
all covers are closed, the control panel should display
Processing or Ready. If a paper jam message remains, there is
still paper jammed in the printer.
Supplies Paper Jams
User Guide 65
Page 82

Clearing an exit jam
1. Open the rear cover.
Warning
To avoid possible injury, never touch the Fuser area (where a
label indicating high temperature is located). The fuser may
be hot.
3925-77
2. Open the top cover all the way to the back until it stops. Remove
any paper that may be the output bin.
3925-78
Paper Jams
66 Xerox Phaser 5400 Laser Printer
Page 83

3. Pull out the Laser Print Cartridge and set it down on a flat surface.
3925-79
4. Check the area where the Laser Print Cartridge was located and
remove any jammed paper.
Warning
To avoid possible injury, be careful not to touch the rollers,
which may be hot.
Supplies Paper Jams
3925-80
User Guide 67
Page 84

5. Reinstall the cartridge, inserting the two projecting parts into the
printer’s guide channels.
Note
Be sure to push the cartridge all the way into the printer.
3925-57
6. Close the top cover.
3925-58
Paper Jams
68 Xerox Phaser 5400 Laser Printer
Page 85

7. Close the rear cover.
3925-76
8. Check the control panel display. If the jam has been cleared and
all covers are closed, the control panel should display
Processing or Ready. If a paper jam message remains, there is
still paper jammed in the printer.
Supplies Paper Jams
User Guide 69
Page 86

Clearing a stacker jam
1. Open the Stacker Bin’s rear cover.
2. Remove any jammed paper inside the open cover.
3925-81
3925-82
Paper Jams
70 Xerox Phaser 5400 Laser Printer
Page 87

3. Close the Stacker Bin’s rear cover.
3925-83
4. Check the control panel display. If the jam has been cleared and
all covers are closed, the control panel should display
Processing or Ready. If a paper jam message remains, there is
still paper jammed in the printer.
Supplies Paper Jams
User Guide 71
Page 88

Clearing a Tray 1 jam
1. Pull Tray 1 completely out of the printer.
Note
To remove the tray from the printer, pull it out, then gently
remove it from the printer while lifting up.
3925-10
2. Check for any jammed paper in the feeder. If there is wrinkled
paper in the tray, remove it.
3925-85
Paper Jams
72 Xerox Phaser 5400 Laser Printer
Page 89

3. Open the Multi-sheet Bypass Feeder by lifting and extending it.
a. Hold both sides where indicated and tilt up the feeder
slightly.
b. Gently lift up the feeder and pull it out toward you until it
stops.
Check for any jammed paper inside the Multi-sheet Bypass
Feeder.
b
a
3925-40
4. Remove any paper that may be in the output bin. Open the top
cover all the way until it stops.
3925-53
Supplies Paper Jams
User Guide 73
Page 90

5. Pull out the Laser Print Cartridge and set it down on a flat surface.
3925-54
6. Check the area where the Laser Print Cartridge was located and
remove any jammed paper.
3925-80
Paper Jams
74 Xerox Phaser 5400 Laser Printer
Page 91

7. Reinstall the cartridge, inserting the two projecting parts into the
printer’s guide channels. Be sure to push the cartridge all the way
into the printer.
3925-57
8. Close the top cover.
Supplies Paper Jams
3925-58
User Guide 75
Page 92

9. Reinsert the Multi-sheet Bypass Feeder. Hold both sides of the
feeder where indicated and push it straight back until it stops.
3925-45
10. Reinstall Tray 1.
3925-18
11. Check the control panel display. If the jam has been cleared and
all covers are closed, the control panel should display
Processing or Ready. If a paper jam message remains, there is
still paper jammed in the printer.
Paper Jams
76 Xerox Phaser 5400 Laser Printer
Page 93

Clearing a Tray 2 or Tray 3 jam
Feeding from the 2,000-sheet feeder
1. Open the feeder’s front door.
3925-32
2. Remove any jammed or wrinkled paper.
Supplies Paper Jams
3925-87
User Guide 77
Page 94

3. Push down the tray.
4. Push back the feeder’s front door.
3925-33
3925-38
Paper Jams
78 Xerox Phaser 5400 Laser Printer
Page 95
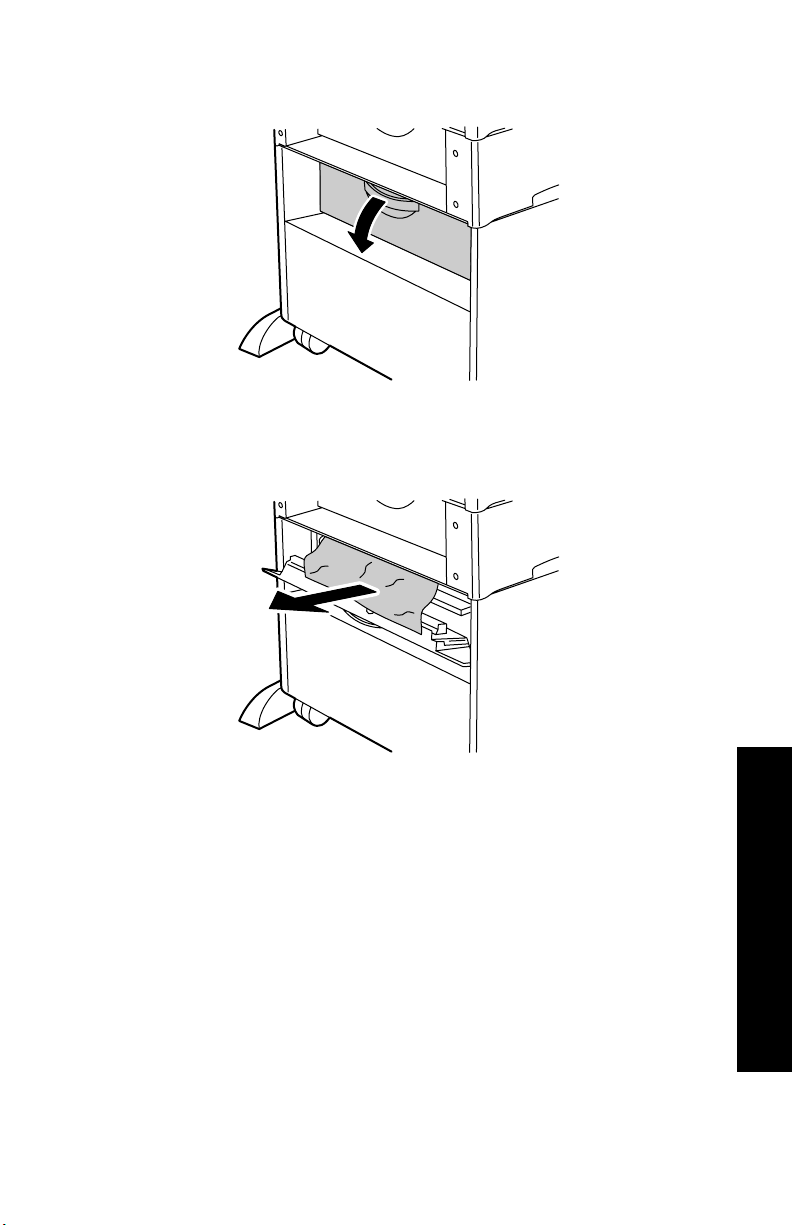
5. Open the feeder’s rear cover.
6. Remove any jammed or wrinkled paper.
3925-88
Supplies Paper Jams
3925-89
User Guide 79
Page 96

7. Close the feeder’s rear cover.
3925-90
8. Check the control panel display. If the jam has been cleared and
all covers are closed, the control panel should display
Processing or Ready. If a paper jam message remains, there is
still paper jammed in the printer.
Paper Jams
80 Xerox Phaser 5400 Laser Printer
Page 97

Feeding from the 500-sheet feeder
1. Pull all trays completely out of the printer.
Note
To remove a tray from the printer, pull out the tray until it
stops, then gently remove it from the printer while lifting up.
3925-91
2. If there is wrinkled paper in a tray, remove the paper.
3925-85
Supplies Paper Jams
User Guide 81
Page 98

3. Open the feeder’s rear cover.
4. Remove any jammed paper.
3925-92
3925-93
5. Check inside the printer and remove any jammed paper.
Paper Jams
3925-95
82 Xerox Phaser 5400 Laser Printer
Page 99

6. Open the Multi-sheet Bypass Feeder by lifting and extending it.
a. Hold both sides of the feeder where indicated and tilt it up
slightly.
b. Gently lift up the feeder and pull it out toward you until it
stops.
b
a
3925-40
7. Open the top cover all the way until it stops. Remove any paper
that may be in the output bin.
3925-53
Supplies Paper Jams
User Guide 83
Page 100

8. Pull out the Laser Print Cartridge and set it down on a flat surface.
3925-54
9. Check the area where the Laser Print Cartridge was located and
remove any jammed paper. Remove any paper remaining in the
Multi-sheet Bypass Feeder or in the Tray 1 opening.
3925-80
Paper Jams
84 Xerox Phaser 5400 Laser Printer
 Loading...