

Page 1
E310TECH
Technical Instructions Printers / OEM Info Tools 1
CORPORATE
LOS ANGELES, USA
U
S 1 800 394.9900
Int’l +1 818 837.8100
FAX 1 800 394.9910
Int’l +1 818 838.7047
ATLANTA, USA
US 1 877 676.4223
Int’l +1 770 516.9488
FAX 1 877 337.7976
Int’l +1 770 516.7794
DALLAS, USA
US 1 877 499.4989
Int’l +1 972 840.4989
FAX 1 877 774.1750
Int’l +1 972 840.1750
MIAMI, USA
US 1 800 595.429
Int’l +1 305 594.3396
FAX 1 800 522.8640
Int’l +1 305 594.3309
NEW YORK, USA
US 1 800 431.7884
Int’l +1 631 345.0121
FAX 1 800 431.8812
Int’l +1 631345.0690
SANFORD
US 1 800 786.9049
Int’l +1 919 775.4584
FAX 1 800 786.9049
Int’l +1 919 775.4584
,USA
TORONTO, CAN
AN 1 877 848.0818
C
Int’l +1 905 712.9501
FAX 1 877 772.6773
Int’l +1 905 712.9502
BUENOS AIRES, ARG
ARG 0810 444.2656
Int’l +011 4583.5900
FAX +011 4584.3100
US
A
MELBOURNE
US 1 800 003.
A
l +62 03 9561.8102
’
t
In
FAX 1 800 004.302
Int’l +62 03 9561-7751
,
100
SYDNEY, AUS
AUS 1 800 003.100
Int’l +62 02 9648.2630
FAX 1800 004.302
Int’l +62 02 9548.2635
MONTEVIDEO,URY
URY 02 902.7206
Int’l +5982 900.8358
FAX +5982 908.3816
JOHANNESBURG, S.A.
S.A. +27 11 974.6155
FAX +27 11 974.3593
Xerox Work Center 390
Toner Part Num.: 113R462
age Yield @ 5%: 3,000 pgs
P
Resolution: 6,000 dpi
Xerox Docuprint
P8E/P8EX/WC385
Toner Part Num.: 13R00296
Page Yield @ 5%: 5,000 pgs
Resolution: 1,200 dpi
Photo 1
Photo 2
Photo 3
Lexmark Optra
E310/E312/E312L
Toner Part Num: 13T0301
Page Yield @ 5%: 3,000 pgs
Resolution: 1,200 dpi
Toner Part Num: 13T10
Page Yield @ 5%: 6,000 pgs
Resolution: 1,200 dpi
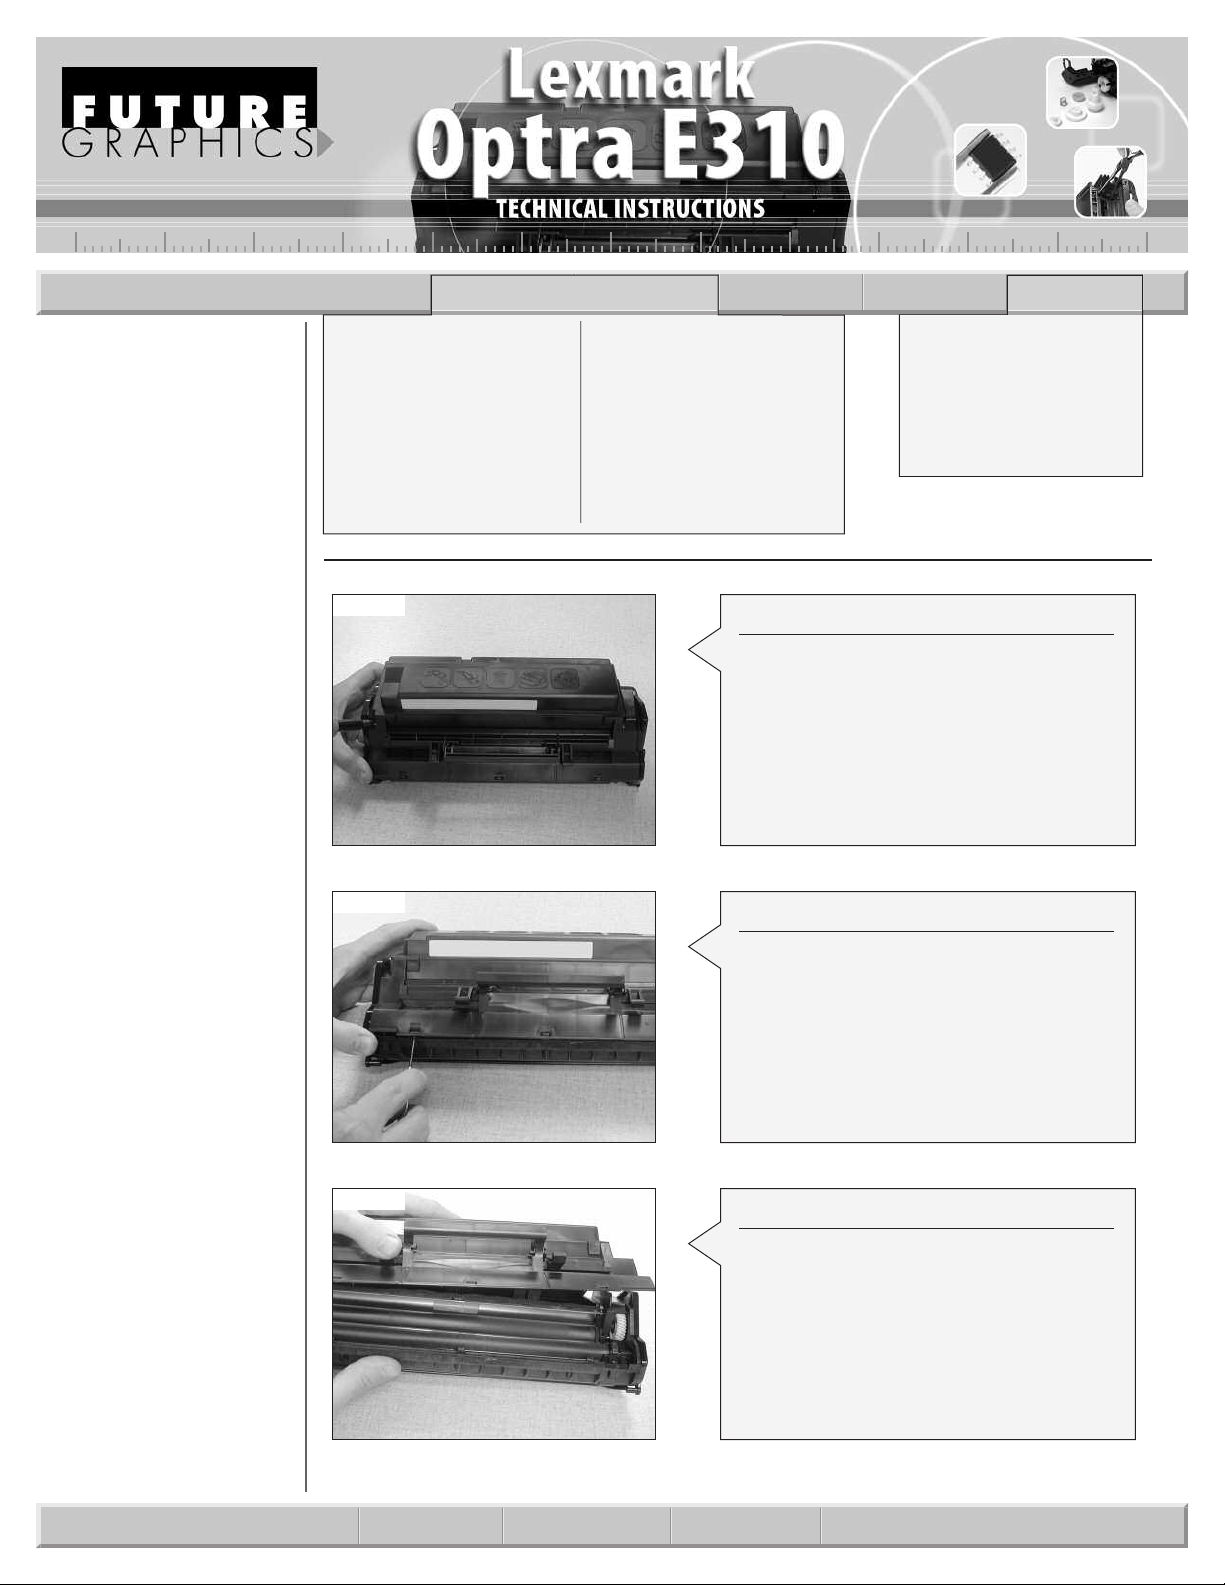
Step 1
Using a Phillips screwdriver remove the
two screws from the top of the cartridge.
(See Photo 1)
Step 2
With a small flat blade screwdriver release
the three clips located on the front of the
cartridge under the handle.
(See Photo 2)
Step 3
To separate the two sections, lift up on
the fr
when separating the two sections, toner
will spill out of the toner hopper.
ee P
(S
NOTE: Do not break off the clips on the
back of the hopp
#1 Phillips Screwdriver
Small Flat Blade Screwdriver
Needlenose Pliers
oft Lint-Free Cloth
S
Cotton Swabs
Anhydrous Isopropyl Alcohol
Vacuum or Compressed Air
ont of the toner hopper. Be careful
hoto 3)
.
er
E-mail: info@futuregraphicsllc.com Website: www.futuregraphicsllc.com
Page 2
2 Lexmark Optra E310 Technical Instructions
Notes
Photo 4
Photo 5
Photo 6
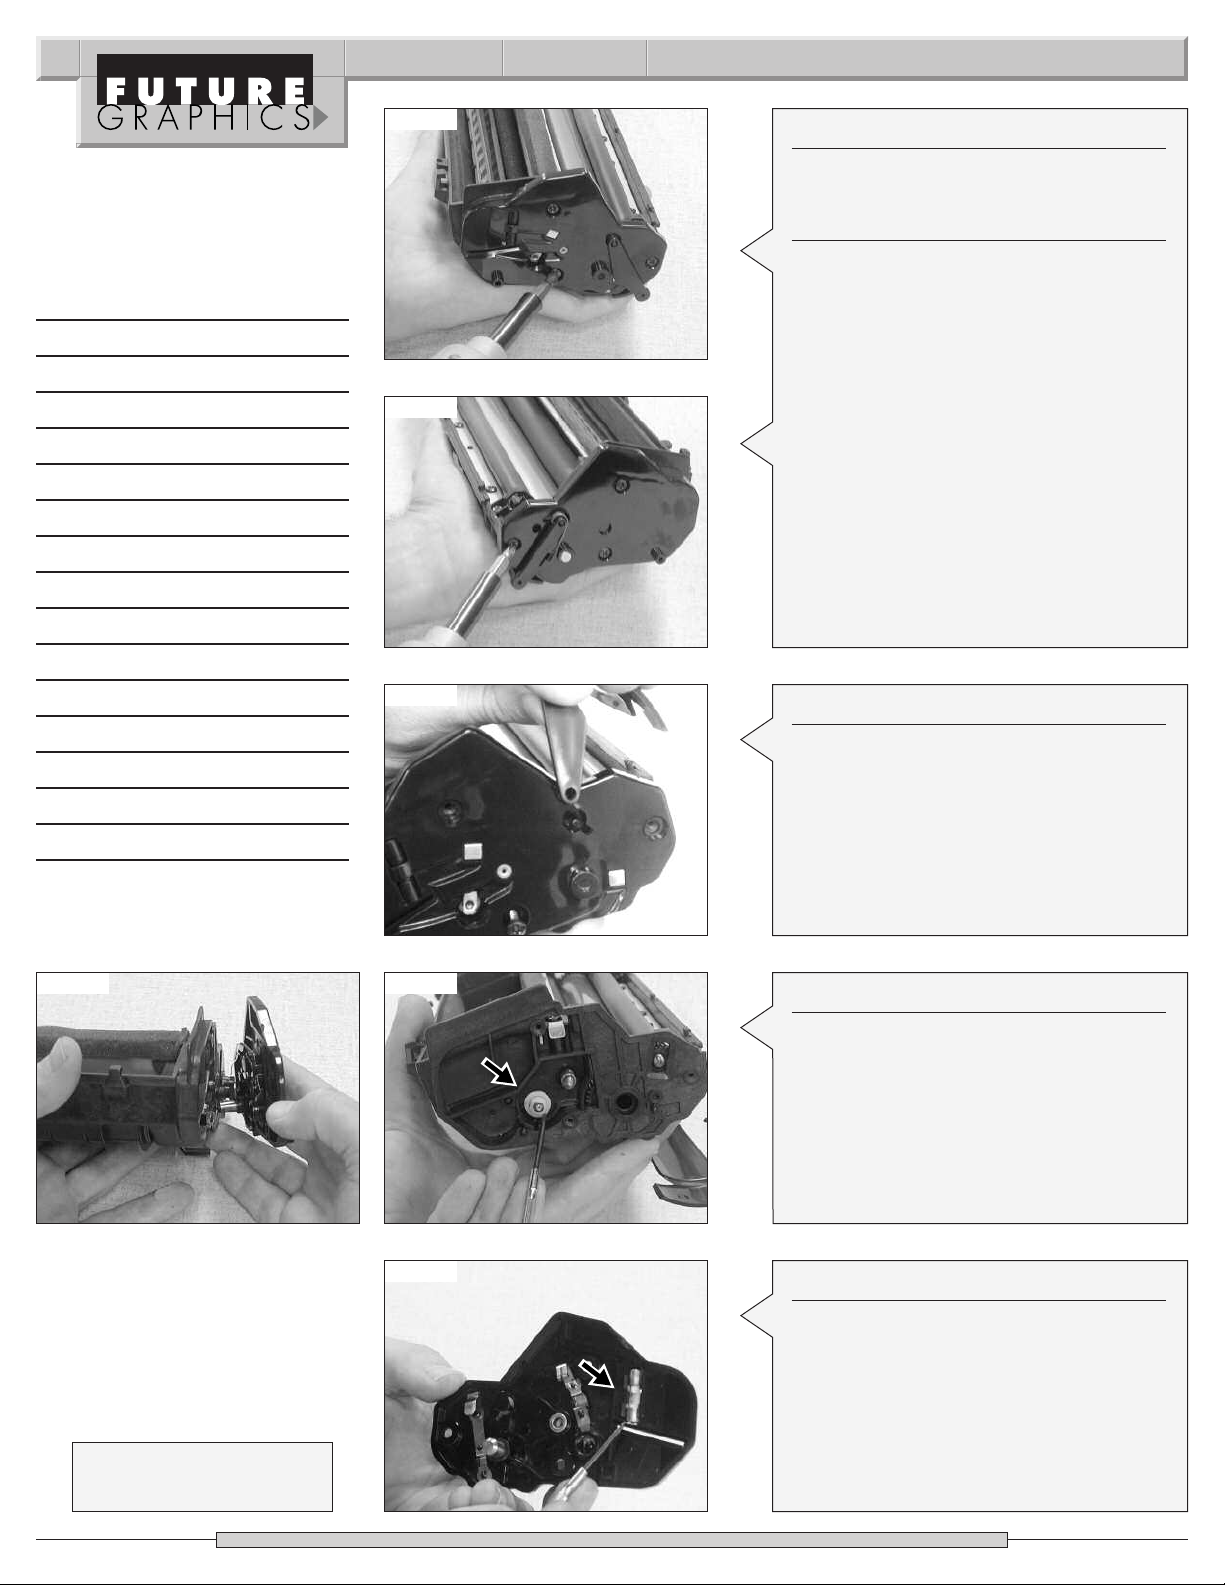
Step 4
Using dry compressed air or a vacuum,
clean out both sections of the cartridge.
Step 5
Remove the three screws holding the end
caps on each side of the cartridge.
(See Photos 4 and 5)
Step 6
Remove the drum shutter arm from the
contact end cap, rotate the drum shutter
up towards the handle on the cartridge
until the tab on the shutter fits through the
notch on the end cap.
NOTE: Let the shutter dangle; Do not
remove the shutter from the other end
cap.
(See Photo 6)
Photo 7 Photo 8
hoto 9
P
Need trust-worthy, detailed Technical
Instructions for another engine?
Visit: www.futuregraphicsllc.com
Step 7
Pull the contact end cap from the side of
tridge.
ar
the c
(See Photo 7)
NOTE: Do not lose the white bearing that
fits on the foam f
eed roller axle
(See Photo 8)
Step 8
Located ONLY on the contact end cap of
the fax cartridge is a blown 100m fuse. This
fuse must b
e r
ed each time this c
eplac
tridge is recycled. Replace the fuse.
hoto 9)
ee P
(S
ar-
Page 3

Lexmark Optra E310 Technical Instructions 3
Photo 10
Photo 11
Photo 12
Step 9
With the drum shutter still attached,
remove the end cap from the gear side of
the hopper.
(See Photo 10)
OTE:Once again there is a white bearing
N
on the foam feed roller axle. Do not lose
the bearing.
Step 10
Photo 11 shows the gear alignment of the
hopper. Remove the five white gears from
the hopper.
(See Photo 11)
Step 11
Remove the two metal gear axles from the
gear side of the hopper.
(See Photo 12)
Notes
Photo 13
hoto 14
P
ep 12
St
On each end of the PCR ther
e is a screw
that holds the PCR saddles in place
remove the two screws.
o 13)
hot
ee P
(S
Step 13
Lift out the PCR. NOTE: Do not lose the
gear tha
(See Photo 14)
Clean the PCR using a PCR cleaner.
t fits on the end of the PCR.
,
N
eed help with a particular remanu-
facturing problem?
Call the Technical Resource Center from
8am - 5pm PST: 800 394.9900
Page 4

4 Lexmark Optra E310 Technical Instructions
Step 14
Remove the three screws that
old the wiper blade.
h
(See Photo 15)
Photo 15
Step 15
Lift out the wiper blade straight
up to remove.
Step 16
Grab the drum by the gears and
lift the drum out of the hopper.
Clean the drum using a lint free
cloth. (See Photo 16)
Photo 18
Photo 19
Photo 20
S
tep 18
Release the two clips that hold the developer roller end cap.
(See Photo 18 and 19)
Remove the end cap.
Step 19
Slide the developer roller out through the
side of the hopper.
(See Photo 20)
Clean the developer roller using a dry lintfree cloth.
Photo 16
Step 17
emove the black gear from
R
oller axle.
er r
the dev
(See Photo 17)
E-mail: info@futuregraphicsllc.com Website: www.futuregraphicsllc.com
elop
Photo 21
Photo 17
ep 20
St
emove the two screws that hold the
R
doctor blade.
(See Photo 21)
ep 21
St
Lift the doctor blade up. It may be necessary to remove the small foam strips that
are connected to the back of the doctor
blade. Clean the doctor blade using
alcohol and a cotton swab.
Step 22
Apply a seal to the toner hopper.
Step 23
eassemble in reverse order.
R
Page 5

ENGINE FACT SHEET
PRINTER MODEL COMPATIBILITY
2
2
PPRRIINNTTEERR MMOODDEEL
Lexmark E210
Samsung ML-1010
Samsung ML-1020M
Samsung ML-1210
Samsung ML-1220M
Samsung ML-1250
Samsung ML-1430
Samsung ML-4500
Samsung ML-4600
L
OOEEMMNNUUMMBBEER
1OS0150
ML1210D3
ML1210D3
ML1210D3
ML1210D3
ML1210D3
ML1210D3
ML4500D3
ML4500D3
FUTURE GRAPHICS PRODUCT LISTING
PPrroodduucctt
Drum
Technical Guide
Toner
DDeessccrriippttiioon
Sinonar
idge R
Cartr
65gm Bottle
n
emanufacturing Instructions - Lexmark E210
R
IItteemm NNuummbbeer
E210SNR
E210TECH
E210TNR65
r
PPaacckk QQttyy.
5/100
1
10
.
Page 6

ENGINE FACT SHEET
PRINTER MODEL COMPATIBILITY
PPRRIINNTTEERR MMOODDEEL
Lexmark Optra E310
Lexmark Optra E312
Lexmark Optra E312L
Olivetti PGL 8L
Samsung ML-5000A
Samsung ML-5000G
Samsung ML-5050G
Samsung ML-5100A
Xerox Docuprint P8e
Xerox Docuprint P8ex
Xerox WorkCentre 385
Xerox WorkCentre 390
L
OOEEMMNNUUMMBBEER
1OS0150
ML1210D3
ML1210D3
ML1210D3
ML1210D3
ML1210D3
ML1210D3
ML4500D3
ML4500D3
113R296
113R296
113R462
FUTURE GRAPHICS PRODUCT LISTING
PPrroodduucctt
Cartridge Box
Cartridge Tech Guide
Developer Roller
Docotr Blade
Cartridge Tech Guide
Drum
Fuse
PCR
Seal
Seal
Toner
Toner
Wiper Blade
DDeessccrriippttiioon
Two-Color Self-Adhesive
Remanufacturing Intructions
Doctor Bar With Sponge
AEG
Drum Unit Reset Fuse,Fax
For Printer (Not for Fax) , New, Onyx
Adhesive Goldseal
Adhesive Onyx, Reinforced
Bulk Bag, 22 lb Per-Fil - Boxof 1,Sold per box
160gm B
n
ottle
R
IItteemm NNuummbbeer
ML5000LABEL
ML5000TECH
ML5000DVRROL
ML5000DRBLADEG
ML5000AEG
ML5000DRUMG
ML5000FUSED
ML5000PCR
ML5000GOLDSEAL
ML5000SEALONYXR
ML500010KG
ML5000TNR160
ML5000WBLADEG
r
PPaacckk QQttyy.
100
1
10
10
5/60
5/50
10
10
50
50
1
10
10/200
.
None of FG's pr
Future Graphics (FG) is a distributor of compatible replacement parts and products for imagining equipment.
o
duc
ts ar
e genuine OEM r
eplac
emen
ts and no affiliation or sponsorship is to be implied between FG and any OEM.
t par
 Loading...