

Page 1

Pro 385 User Manual
Table of Contents
Chapter 1 Getting Started
Chapter 2 Making a Copy
Chapter 3 Sending a Fax
Chapter 4 Receiving a Fax
Chapter 5 Printing
Chapter 6 Scanning
Chapter 7 Trouble Shooting
Chapter 8 Maintenance
Chapter 9 Appendix
Chapter 10 Glossary
Index
Pro 385 User Manual
http://xww.xedoc.world.xerox.com/data/XEDOC/Central/Multifunction/wc385/user/wc385toc.htm [07/09/1999 14:30:40]
Page 2

Chapter 1 Getting Started
Set Up Your Machine 1-1
Unpacking 1-1
Control Locations and Functions 1-2
Choosing a Location 1-4
Setting Up Your Machine 1-4
Document Inpute Tray 1-4
Printer Exit Tray 1-5
Document Exit Tray 1-5
Installing the Laser Printer Cartridge 1-6
Telephone Line 1-9
Extension Phone 1-9
PC Cable 1-10
AC Power Cord 1-12
Print Media Specifications 1-13
Core media List 1-14
Loading Paper 1-15
Using the Automatic Paper Feeder 1-15
Using the Manual Paper Feeder 1-20
Paper Guidelines 1-22
Installing Software 1-24
System Requirements 1-24
Overview of the WorkCentre 385 Drivers 1-24
Additional Software 1-25
Software Installation Procedure 1-26
Uninstalling Software 1-30
Using the Control Panel 1-32
System Setup 1-34
Ringer Volume 1-34
Home Resolution and Home Contrast 1-35
Sound Control 1-36
Remote Diagnosis Protection 1-37
Select Language 1-38
Econo Mode Setting 1-38
Last Fax Data Reprint 1-39
Adjusting Speaker Volume 1-40
Setting the Clock Mode 1-41
Setting the Date and Time 1-42
Setting the System ID(your Number and Name) 1-43
Print Priority 1-43
Dual 1-44
Installing the Machine
http://xww.xedoc.world.xerox.com/data/XEDOC/Central/Multifunction/wc385/user/chapter1/chpt1.htm (1 of 2) [07/09/1999 14:30:53]
Page 3

Reports 1-46
Printing Reports 1-46
User Options (System Data) 1-47
Setting an Option 1-47
Selectable Options 1-48
Installing the Machine
http://xww.xedoc.world.xerox.com/data/XEDOC/Central/Multifunction/wc385/user/chapter1/chpt1.htm (2 of 2) [07/09/1999 14:30:53]
Page 4

Getting Started
Set Up Your Machine
Unpacking
Chapter 1
1
Laser Printer
WorkCentre 385
Document Exit tray
Telephone line cord
*
cartridge
Document Input tray
Power cord
*
Parallel cable
* Appearance may vary according to country.
One-touch label
Printer exit tray
User Guide
CD-ROM
1-1
Page 5
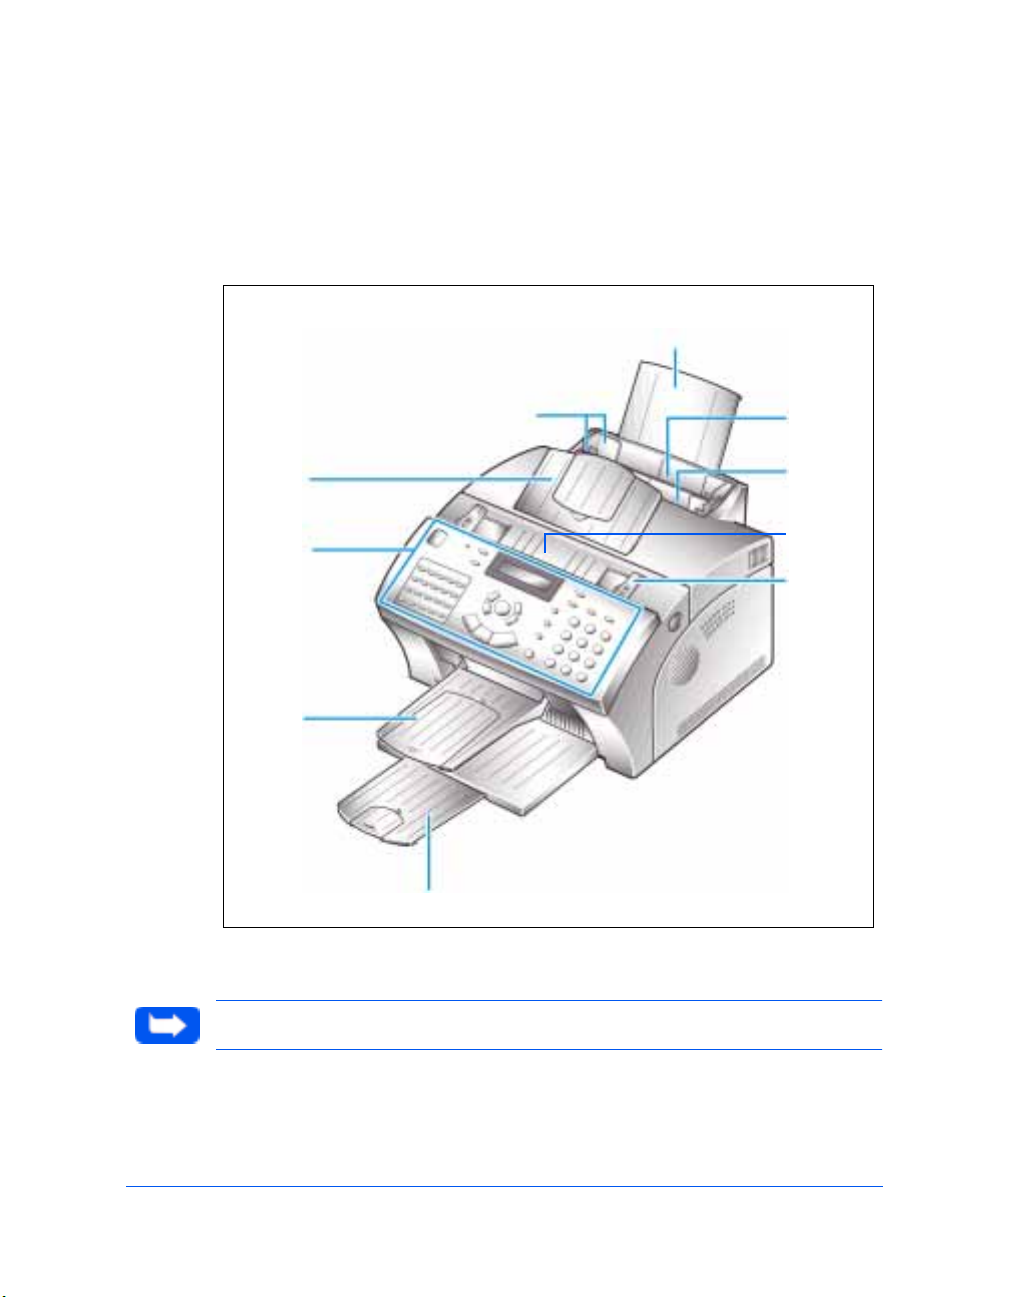
Control Locations and Functions
Take a moment to familiarize yourself with the main components and their
locations.
Automatic Paper Feeder
Front View
Document
Input
Tray
Control
Panel
Document
Exit Tray
Paper Guides
Extension Tray
Automatic
Paper
Feeder
Manual
Paper
Feeder
Automatic
Document
Feeder
Document
Guides
Note: Your machine may look slightly different than the illustration.
1-2 Getting Started
Paper Exit Tray
Page 6
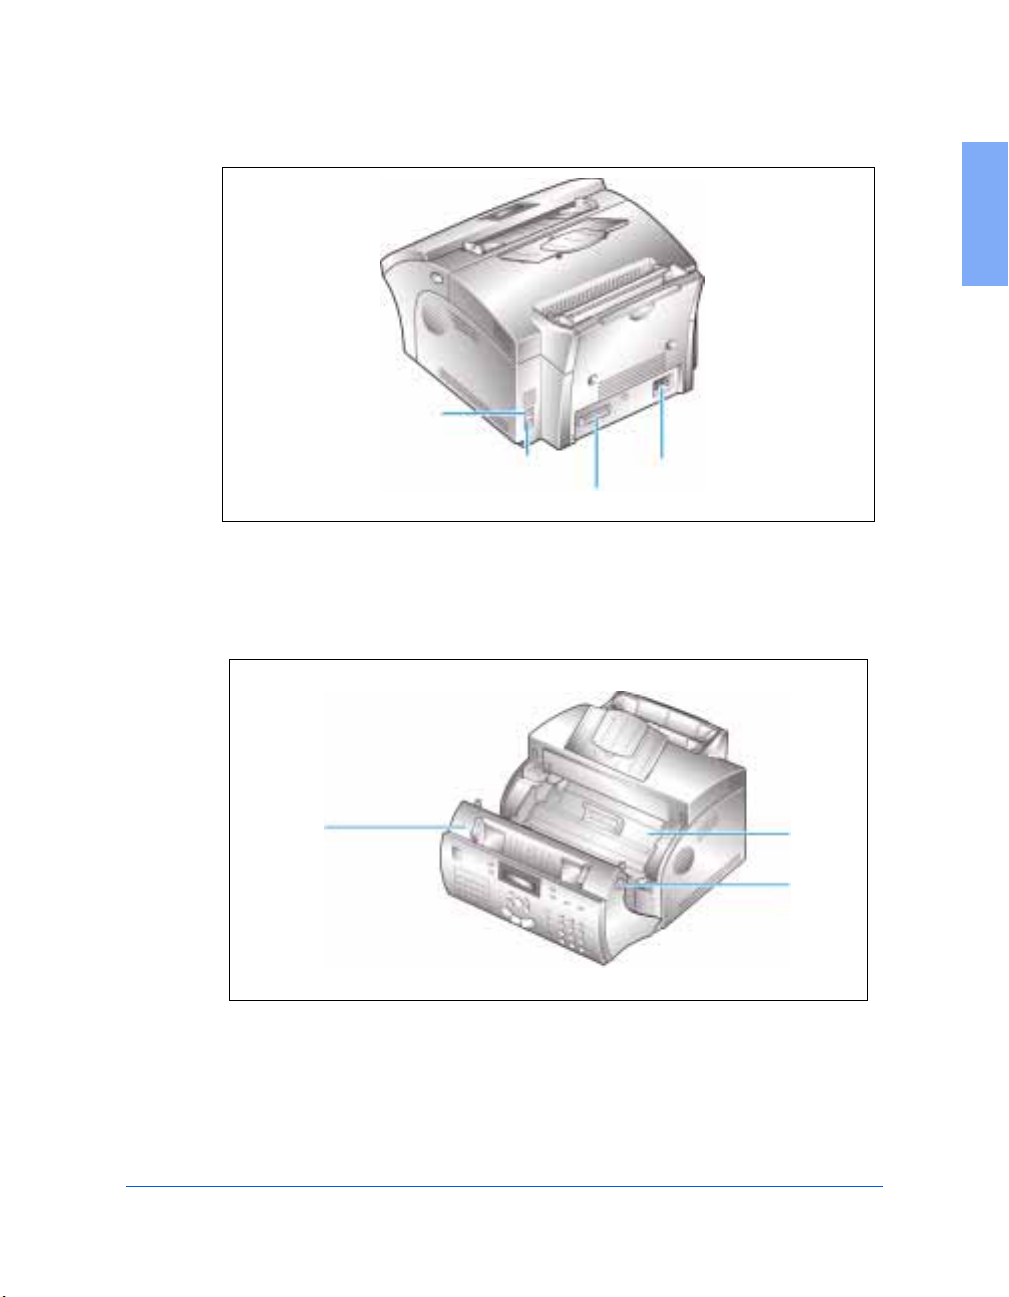
Rear View
1
TEL LINE
Jack
Inside
Cover
EXT. LINE Jack
PC Cable Connector
Power Cord Connector
Laser
Printer
Cartridge
Cover
Release
Buttons
(right and
left sides)
Set Up Your Machine 1-3
Page 7
Choosing a Location
To help guarantee trouble-free operation of your machine, place it on a flat,
stable surface near you r workst ation . Leave enoug h space t o allow f or easy
paper loading, paper unloading, and opening of the front cover.
Do not place your machine:
n
In direct sunlight.
n
Near heat sources or ai r conditioners.
n
In dusty or dirty environments.
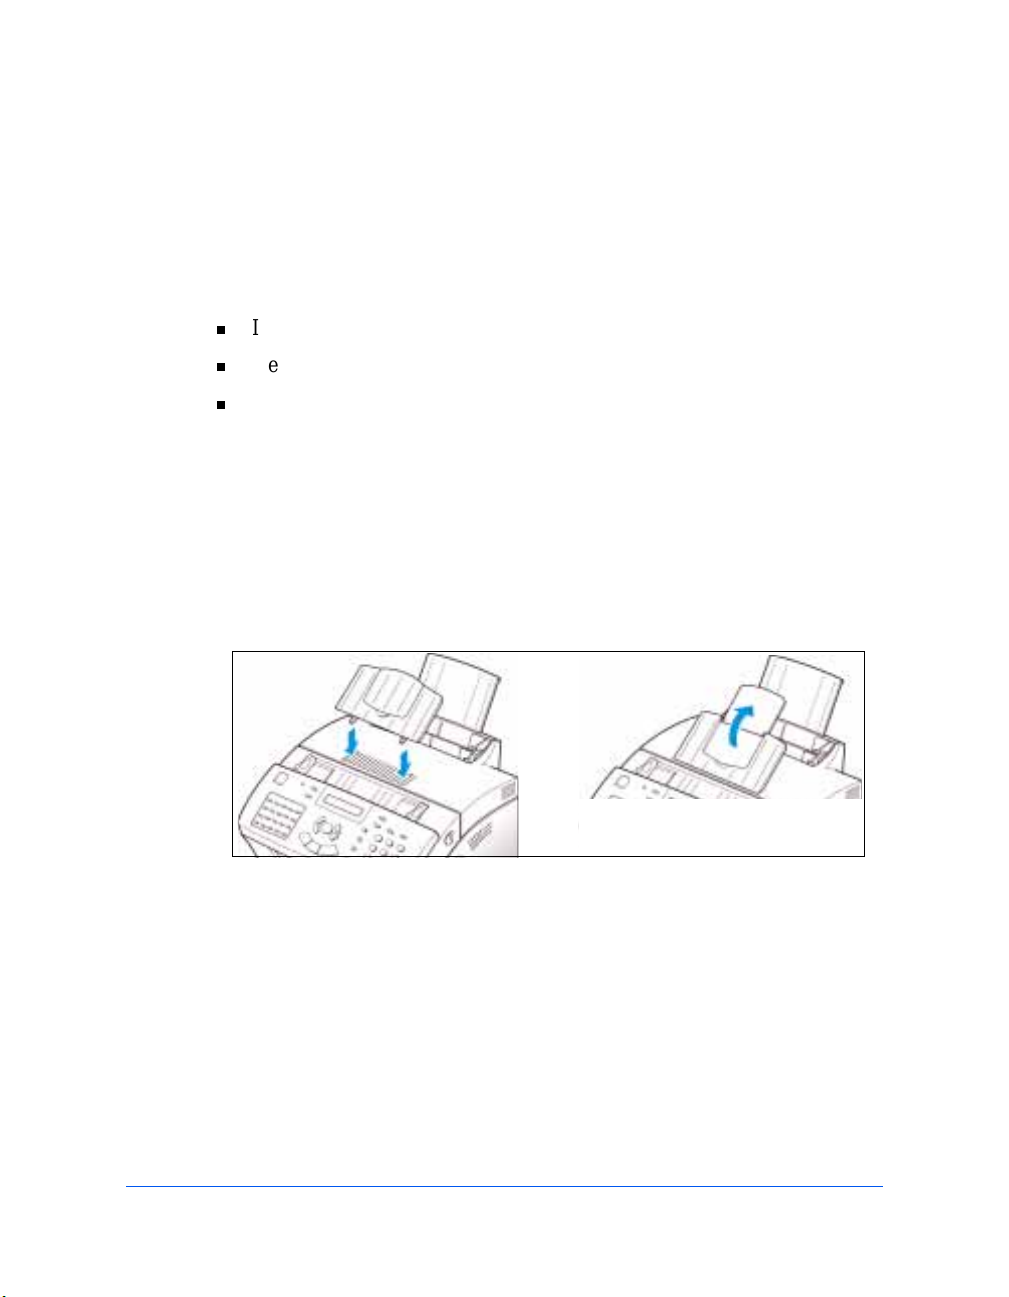
Setting Up Your Machine
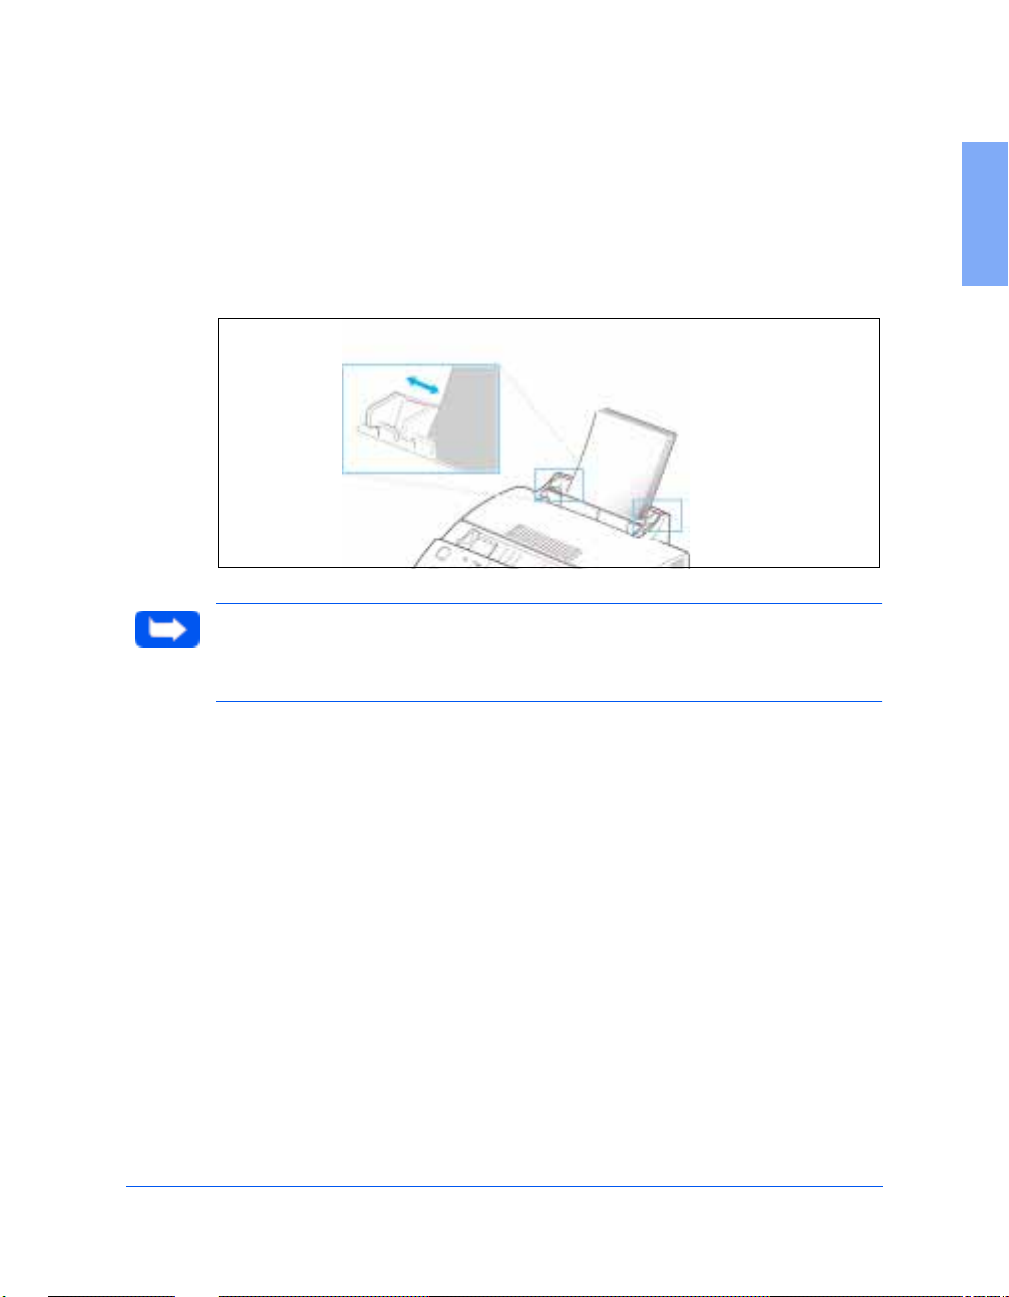
Document Input Tray
Insert the two tabs on the tray into the slots as shown. Fold out the extender
on the tray, if necessary.
1-4 Getting Started
Page 8
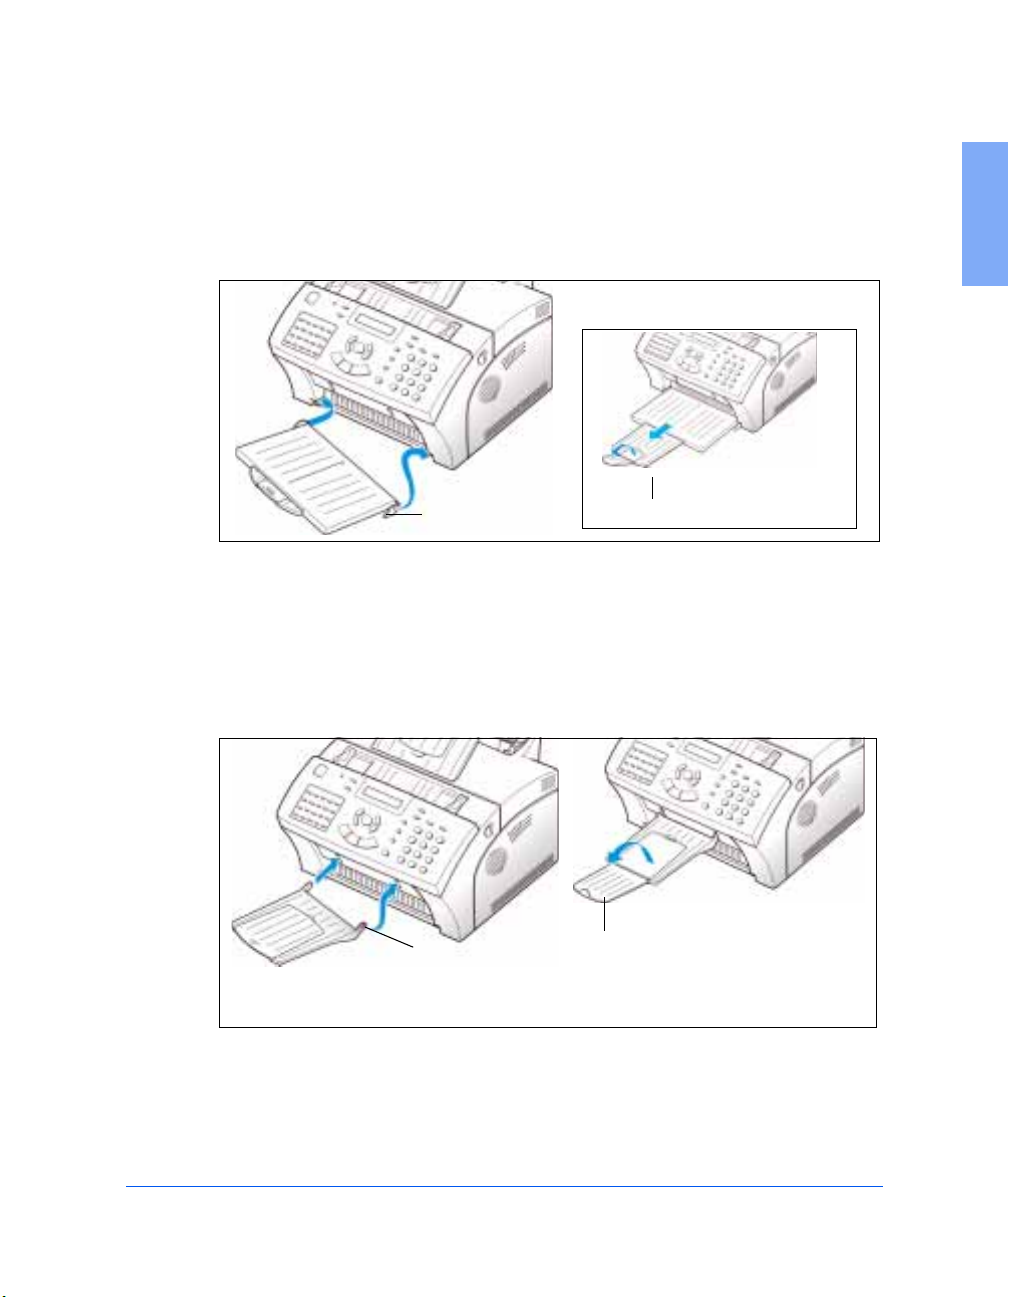
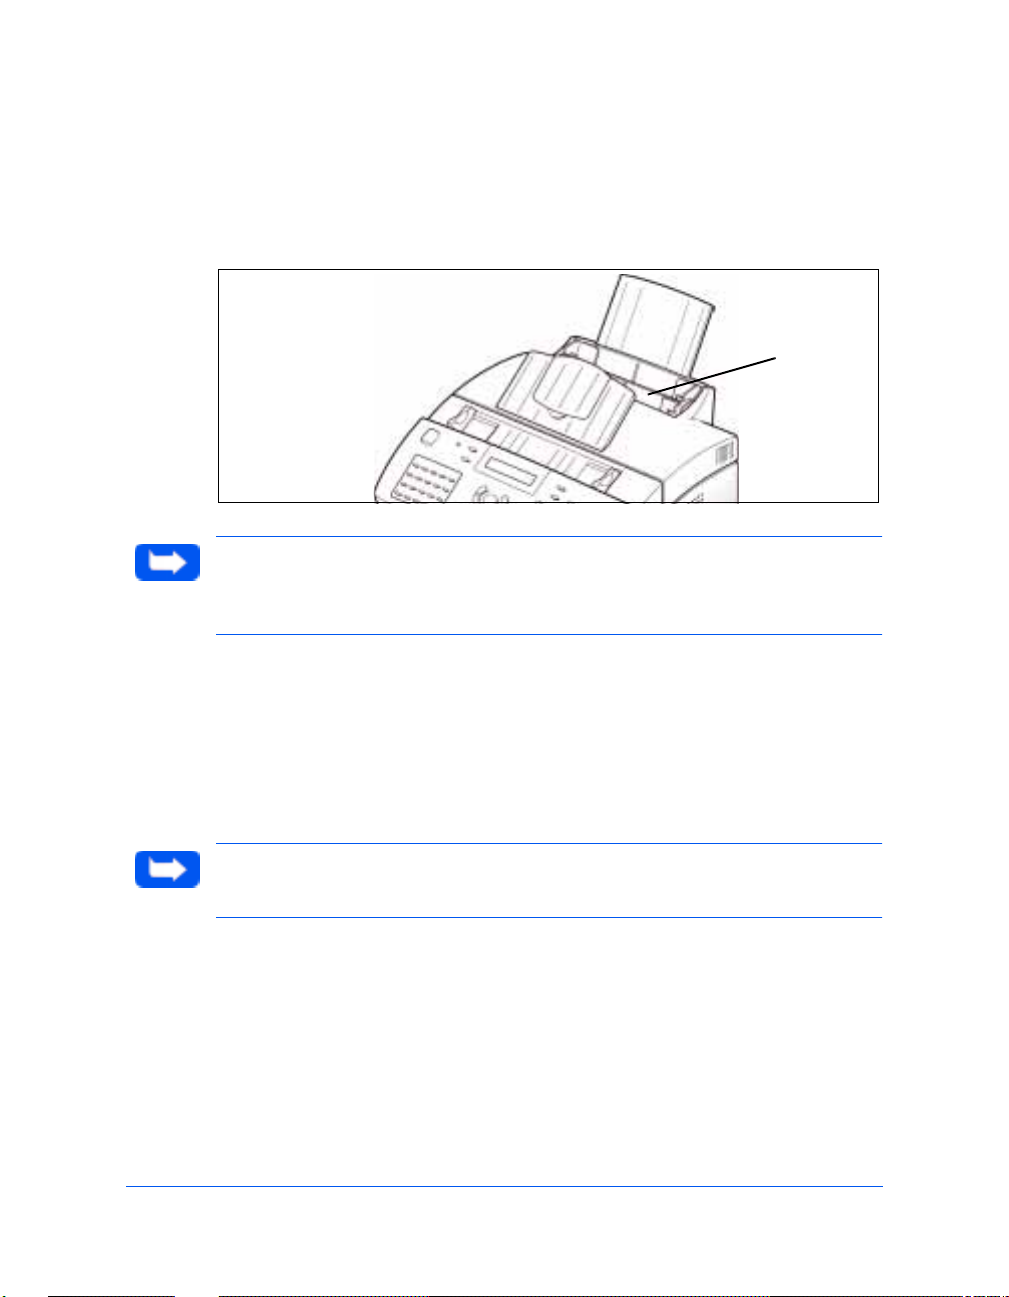
Printer Exit Tray
While pushing inward on the flexible side tabs of the printer exit tray, insert
them into the corresponding slots. If desired, fold out the extension tray.
Side tab
Extension tray
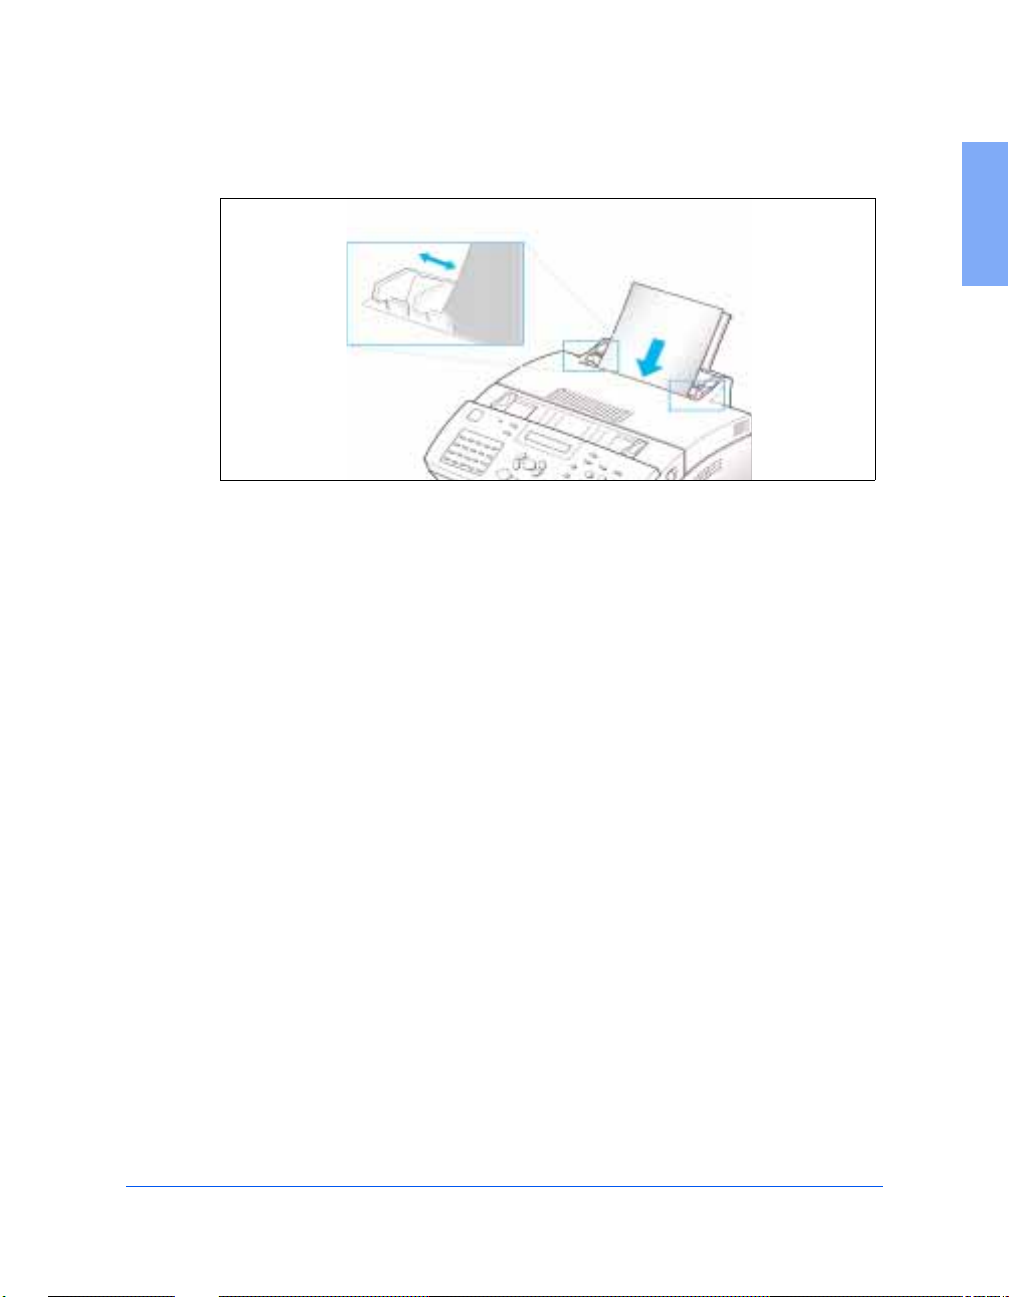
Document Exit Tray
Insert the two tabs on the document exit tr ay into the slots on the front of
your machine. Fold out the extension tray, if necessary.
1
Side tab
Insert one side tab. Then, while pushing inward on the remaining tab, slide it into place.
Extension tray
Set Up Your Machine 1-5
Page 9
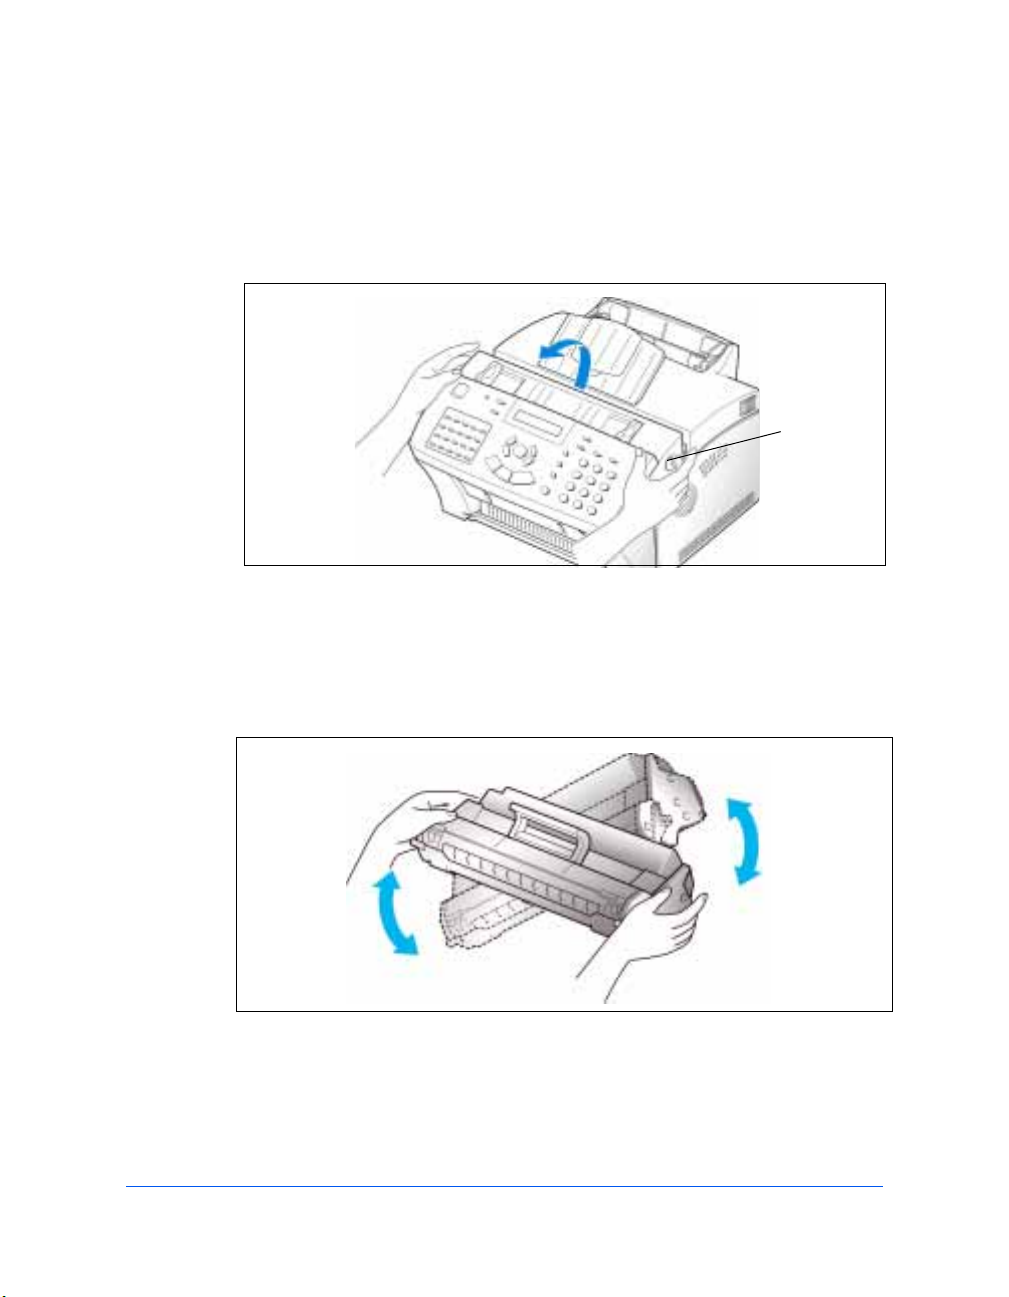
Installing the Laser Printer Cartridge
Open the cover by pulling t he cover relea se butt ons on bot h side s of the
1
machine toward you.
Cover Release
Button
2 Unwrap the Laser Printer Cartridge.
3 Shake the Laser Printer Cartridge from side to side five or six times t o
distribute the toner evenly.
1-6 Getting Started
Page 10
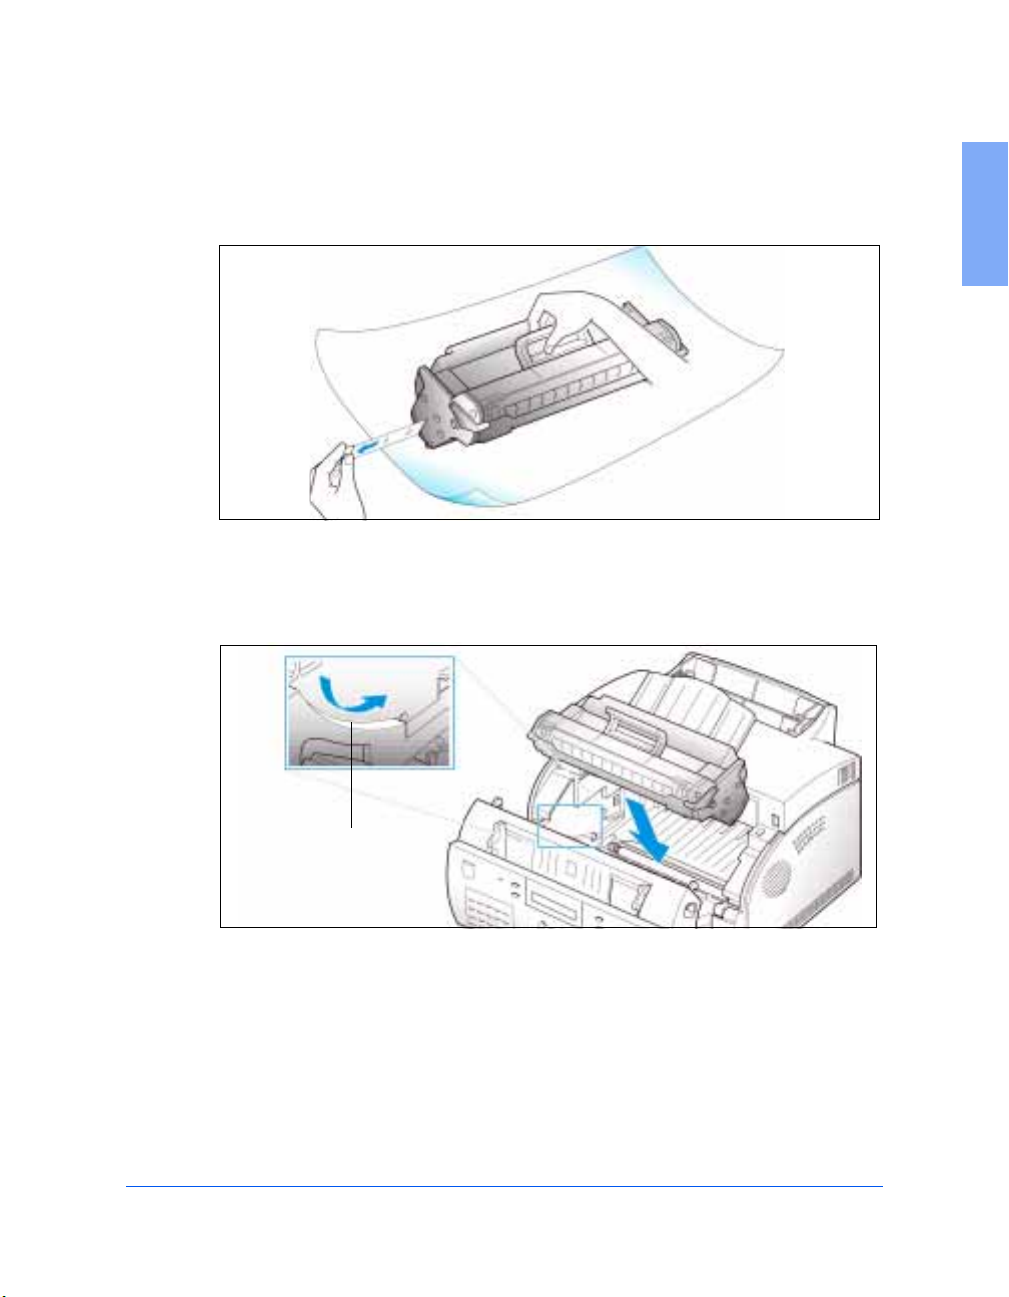
4 Carefully remove the sealing tape by pulling straight out on the tab
protruding from the end of the Laser Printer Cartridge.
5 Locate the two L aser Printer Cartridge slo ts inside the printer, one on
each side.
1
cartridge slot
Set Up Your Machine 1-7
Page 11
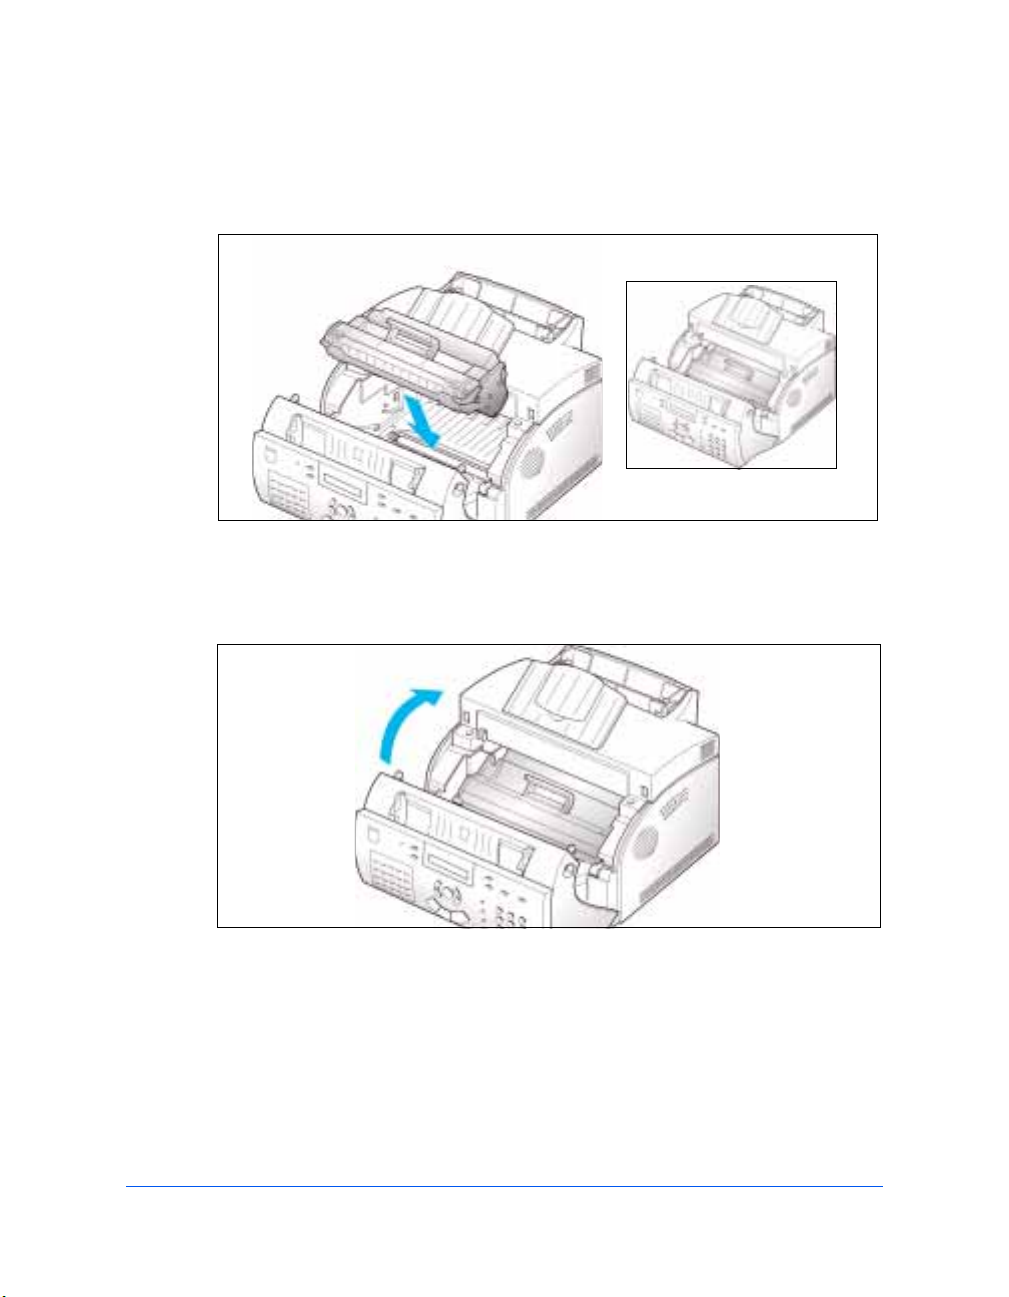
6 Grasp the handle and slide the Laser Printer Cartridge down along the
cartridge slots until it clicks into place.
7 Close the cover. Make sure that the cover is securely closed and both
cover release buttons have clicked into place.
1-8 Getting Started
Page 12
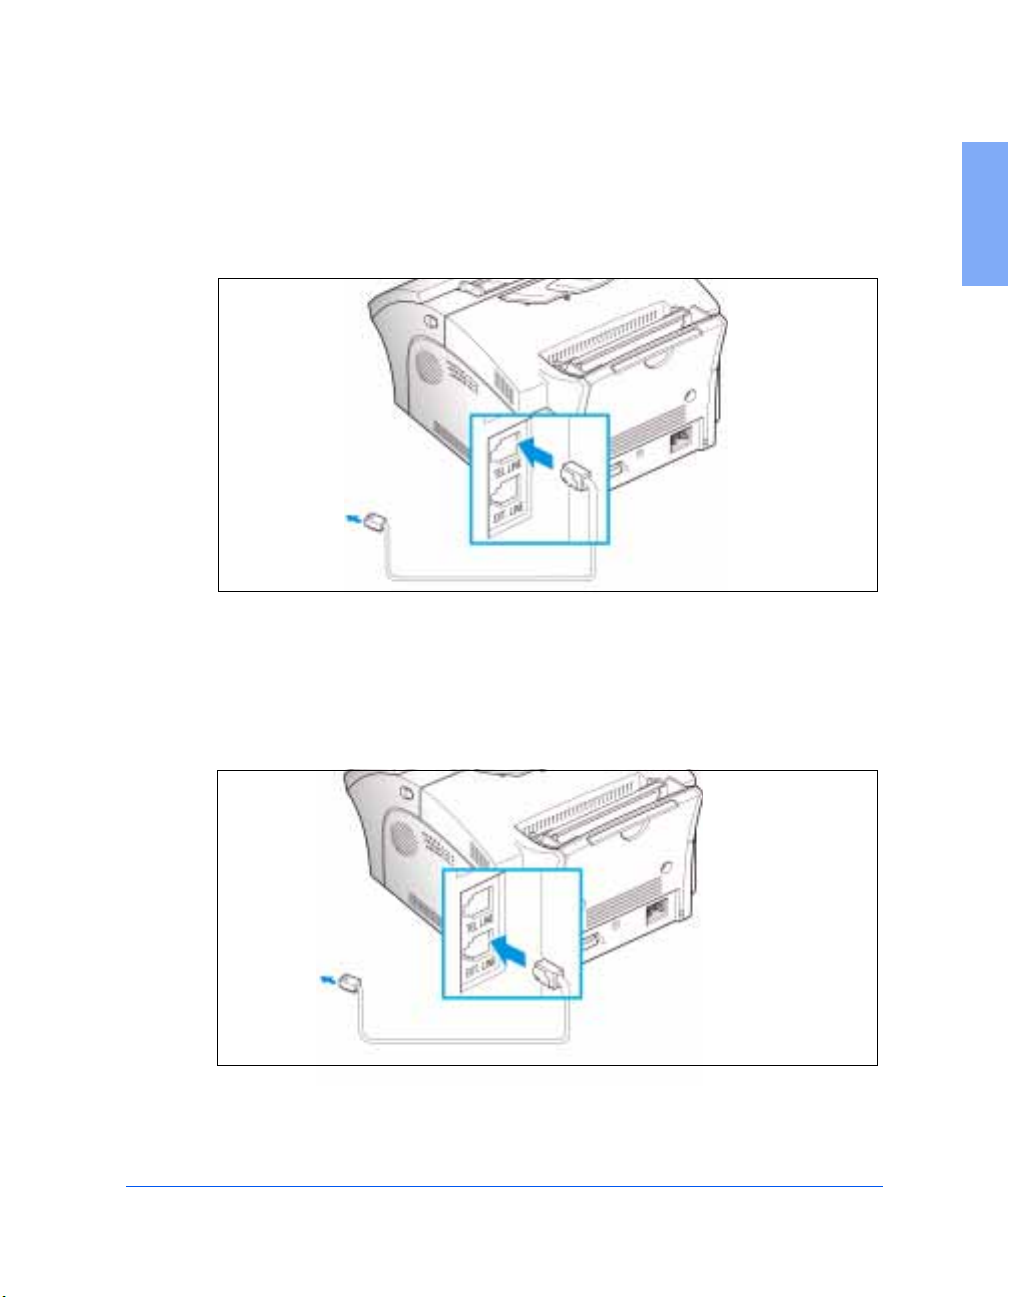
Telephone Line
Plug one end of the telep hone line cord into the TEL LINE jack and the
other end into a standard phone wall jack.
To a
standard
phone wall
jack
Extension Phone
If you want to use an ordinary phone or answering machine with your
WorkCentre 385, connect it to the jack labelled EXT. LINE on the back of
the machine.
1
To a
regular
phone or
answering
machine
Set Up Your Machine 1-9
Page 13

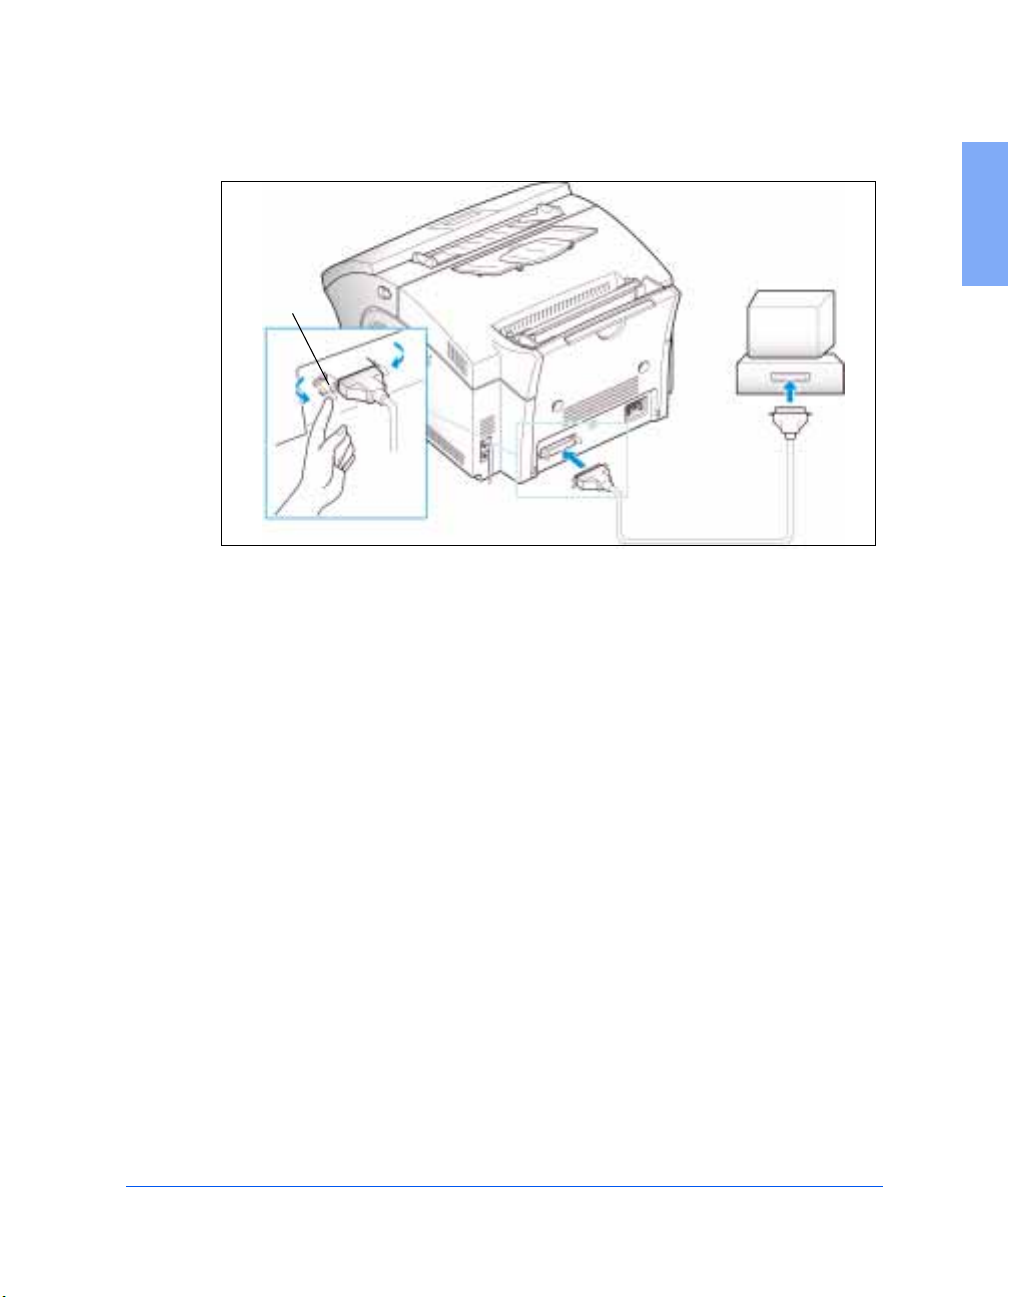
PC Cable
Your Xerox WorkCentre 385 is equipped with a parallel interface port for
use with IBM PCs and compatible computers. Using the supplied
Centronics parallel cable, connect your WorkCentre 385 to a computer that
supports bi-directional communications (IEEE standard 1284).
Note: If using another parallel cable, ensure that it meets IEEE standard
1284 specifications.
To connect the WorkCentre 385 to a computer, follow the steps
below:
CAUTION: Make sure the computer is tu rned of f , and the WorkCentre 385
is unplugged from the power outlet.
1 Plug the parallel cable into the connect or on the back of the
WorkCentre 385. Swing the metal clips of the connector inward until
they lock firmly inside the notches on the parallel cable connector.
1-10 Getting Started
Page 14
Connector
Clips
2 Connect the other e nd of the c able to t he paral lel port on y our computer.
If necessary, refer to your computer documentation for assistance with
this procedure.
1
Set Up Your Machine 1-11
Page 15

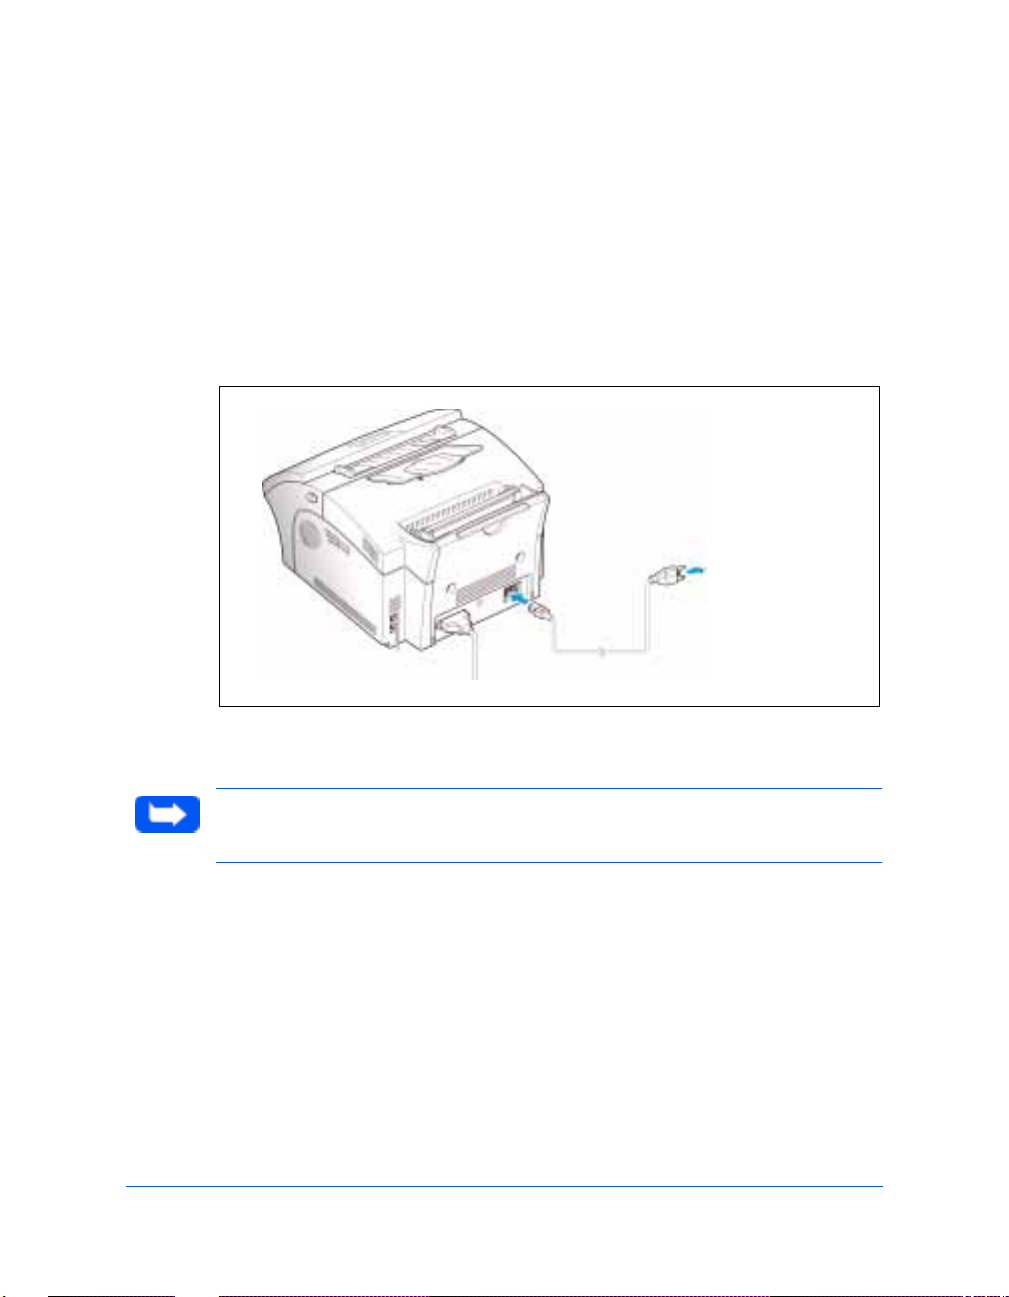
AC Power Cord
WARNING: There is NO On/Off switch for the WC 385. When the AC
power cord is plugged in, the machine is fully energized.
Note: To correctly install the WC 385, the AC power cord must remain
unplugged from the grounded wall outlet until software is to be loaded. In
the next step, one end of the power cord will be plugged into the back of the
WC 385. Leave the other end of the cord unplugged until directed to plug it
in during software installation.
1 Plug one end of the AC Power Cord in the back of the WC 385.
1-12 Getting Started
Page 16

Print Media Specifications
Refer to the Appendix for detailed print media specifi cations.
There are two locations to load paper, the Automatic Paper Feeder and the
Manual Paper Feeder. The table below illustrates the paper types that can
be loaded into each:
Automatic Paper Feeder Manual Paper Feeder
Standard Paper Non-Standard Paper
Transparency Film Transparency Film
Paper Label Paper Label
Envelopes
Card Stock
Odd Size (minimum 10.5 cm x 15 cm)
In the table below, the capacities fo r the various media in th e Automatic
Paper Feeder and the Manual Paper Feeder are shown:
1
Type
Paper
Transparency Film 1 1
Paper Label 1 1
Card Stock N/A 1
Envelope N/A 1
Automatic Paper
Feeder Capacity
150 (20# 80 gm
2
Stock)
Set Up Your Machine 1-13
Manual Paper
Feeder Capacity
1
Page 17

In the following table, the capacity of the Automatic Paper Feeder is shown:
Paper Type Capacity
Letter/A4
Legal
All Other Stock (Label Paper,
100 Sheets (20# 80 gm
50 Sheets (20# 80 gm
1
2
paper)
2
paper)
Transparency, Envelope)
Core Media List
The following list reflects the media that has been tested and is guaranteed
to successfu lly print.
Paper Size Weight
Xerox 4200 Letter (8 1/2 x11) 16#
Xerox 4024DP Bond Letter (8 1/2 x11)
Xerox 80 Premier 210 X 297 mm
Xerox Blue, Green and
Letter (8 1/2 x 11)
Red
Xerox 3R9023
Letter (8 1/2 x 11) N/A
Transparency Film
20# 80 gm
80 gm
20# 80 gm
2
2
2
1-14 Getting Started
Page 18

In the following table, the capacity of the Automatic Paper Feeder is shown:
Paper Type Capacity
Letter/A4
Legal
All Other Stock (Label Paper,
100 Sheets (20# 80 gm
50 Sheets (20# 80 gm
1
2
paper)
2
paper)
Transparency, Envelope)
Core Media List
The following list reflects the media that has been tested and is guaranteed
to successfu lly print.
Paper Size Weight
Xerox 4200 Letter (8 1/2 x11) 16#
Xerox 4024DP Bond Letter (8 1/2 x11)
Xerox 80 Premier 210 X 297 mm
Xerox Blue, Green and
Letter (8 1/2 x 11)
Red
Xerox 3R9023
Letter (8 1/2 x 11) N/A
Transparency Film
20# 80 gm
80 gm
20# 80 gm
2
2
2
1-14 Getting Started
Page 19

Loading Paper
For best results, use high quality xerographic copy paper as described in
Print Media Specifications on page 1-13.
Using the Automatic Paper Fe eder
You can stack paper, envelopes, card stocks, labels, or transparencies in the
Automatic Paper Feeder to feed automati cally. The Automatic Paper
2
Feeder can hold a maximum of 150 sheets of 80 gm
plain paper, or 10
envelopes, or other print media. Depending upon media thickness,
maximum capacity may be reduced.
Note: If you experience problems feeding paper, place the media into the
Manual Paper Feeder one sheet at a time.
1 Pull the Extension Tray on the Automatic Paper Feeder all the way up.
Automatic Paper
Extension
Tray
Feeder
Manual Paper
Feeder
1
2 Prepare the print material for loading.
For paper and envelopes, flex paper or fan envelopes back and forth.
Do not fold or crease the paper.
Set Up Your Machine 1-15
Page 20
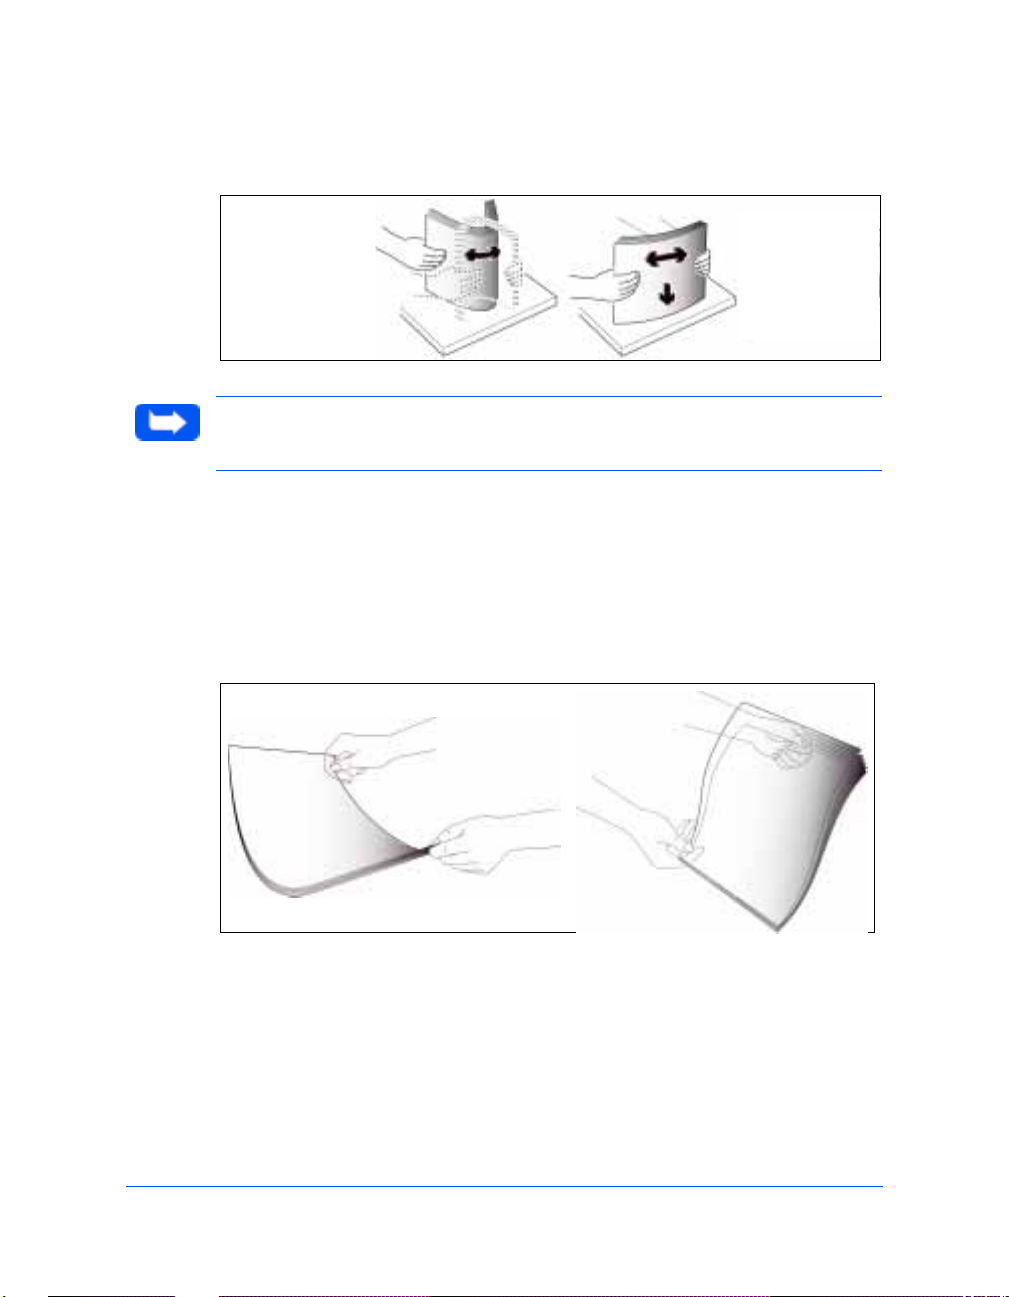
Straighten the edges on a level surface.
Note: If envelopes jam while printing, try reducing the number of
envelopes in the Automatic Paper Feeder.
For transparencies, refer to the packaging for the transparency stock to
determine the print side. Hold the transparencies by the edges and
avoid touching the print side. Be careful not to scratch or leave
fingerprints on the print side.
Fan the stack of transparencies to prevent feeding failures.
1-16 Getting Started
Page 21
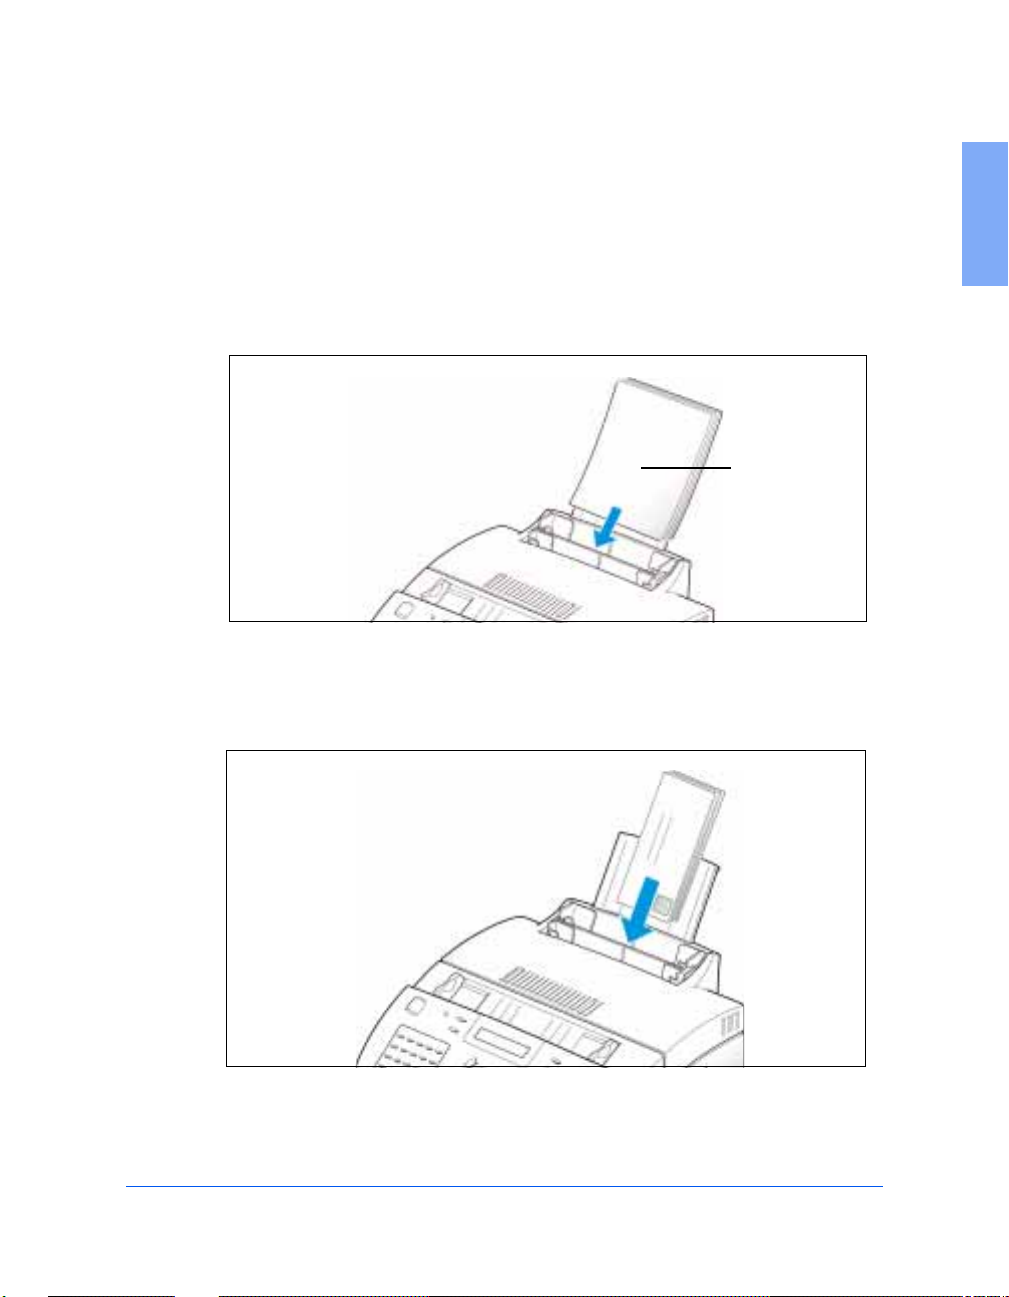
3 Load the print material in the Automatic Paper Feeder. Do not exceed
the rated cap acity for each type of print material. For med ia capacity
specifications, refer to Print Media Specifications on page 1-13 and
Specifications in the Appendix. Do not mix different types of print
media. Refer to the followin g ins tructio ns for loadin g each t ype of p rint
material.
a) Load paper or transparencies with the print side facing you.
The WorkCentre
385 will print on
the side facing
you.
b) Load envelopes with the flap side facing away from you. The end
of the envelope with the st amp area must ent er the Automa tic Paper
Feeder first.
1
Set Up Your Machine 1-17
Page 22
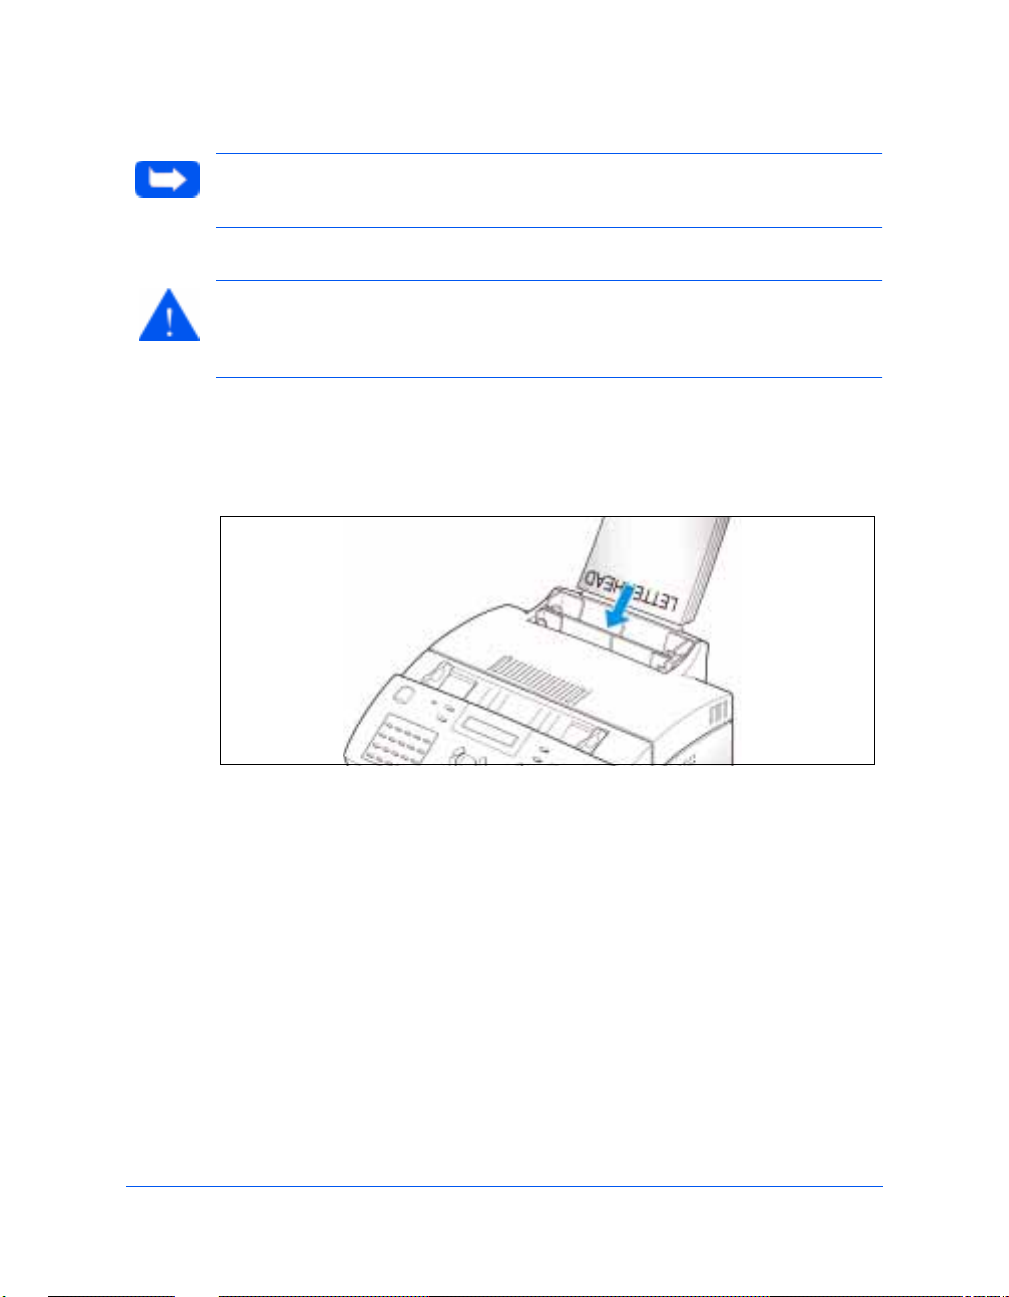
Note: Do not feed
illustration for reference only.
CAUTION: Never use envelopes with clasps, snaps, windows, coated
linings, or self-stick adhesives. These envelopes may severely damage the
printer.
stamped
envelopes. The stamp is shown in the previous
c) Load letterhead paper with the design facing you. The top edge of
the sheet with the logo should enter the printer first.
.
1-18 Getting Started
Page 23
4 Adjust the paper gui de s t o the wi dth of the print media. Slide the paper
guides until they lightly touch both sides of the stack of print media.
Do not tightly press the paper guides to the print media edges, the
guides may bend the media or provide too much resistance when
feeding.
Note: When you print a file from your PC using the Automatic Paper
Feeder, make sure that you select the correct paper source and paper size
from your software application before starting your print job.
1
Set Up Your Machine 1-19
Page 24
Using the Manual Paper Feed er
Use the Manual Paper Feeder to feed paper one sheet at a time into your
machine.
Manual
Paper
Feeder
Note: When you print a file from your PC using the Manual Paper Feeder,
make sure that you select the correct paper source and paper size from
your software application before starting your print job.
1 Place the paper in the Manual Paper Feeder and ad just the paper guides
to the width of the print material. Slide the paper guides until they
lightly touch the stack of print media. Do not tightly press the paper
guides to the print media edges, the guides may bend the media or
provide too much resistance when feeding.
Note: Refer to
loading various types of media.
1-20 Getting Started
Loading Paper
on page 1-15 for specific instructions on
Page 25
2 Ensure that the media is fed into the machine as far as it wi ll go.
3 Press the Start button to start manual feeding of the media . If you have
more than one page to print, press the Start button for each page.
1
Set Up Your Machine 1-21
Page 26

Paper Guidelines
When selecting or loading paper, envelopes, or other special media, keep
these guidelines in mind:
n
Always use paper and other med ia t hat conform with those listed under
Print Media Specifications on page 1-13 and Specifications in the
Appendix.
n
Attempting to print on damp, curled, wrinkled, or torn paper can cause
paper jams and poor print quality.
n
Use cut-sheet paper only. You cannot use continuous feed paper.
n
Use only high quality, copier grade paper. Avoid paper with embossed
lettering, perforations, or texture that is too smooth or too rough.
n
Colored paper should be of the same high quality as white paper. The
o
pigments must withstand the printer’s fusing temperature of 392
o
C) for 0.1 second without deterioration. Do not use paper with a
(200
colored co ating that was added after the paper w as produced.
n
Pre-printed forms must be printed with non-flammable, heat-resistant
inks that do not melt, vaporize, or release hazardous emissions when
o
subjected to the printer’s approximately 392
F (200o C) fusing
temperature for 0.1 second.
F
n
Store paper in it s ream wrapper until ready to use. Place cartons on
pallets or shelves , not on the floor. Do not place heavy obje cts on to p of
the paper, whether it is packaged or unpackaged. Keep it away from
moisture, or other conditions that can cause it to wrinkle or curl.
n
During storage, moisture -proof wrap (any plastic container or bag)
should be used to prevent dust and moisture from contaminating your
paper.
1-22 Getting Started
Page 27

n
Use only transparencies designed for use with xerographic printers.
n
Use only well-constructed envelopes with sharp, well creased folds.
l
DO NOT use envelopes with clasps and snaps.
l
DO NOT use envelopes with windows, coated linings, self-stick
adhesives, or other synthetic materials.
l
DO NOT use damaged or poorly made envelopes.
1
Paper Guidelines 1-23
Page 28

Installing Software
System Requirements
Proper operation of the WorkCentre 385 requires that your personal
computer meets or exceeds the following system requirements:
n
IBM compatible personal computer, with a 486SX 33MHz or fast er
processor
n
Windows operating environment (3.1x, Windows 95, Windows 98,
Windows NT 4.0)
n
At least 4MB of free hard disk space*
n
8MB or more RAM (Windows 3.1x), 16MB RAM (Windows 95, 98),
and 24MB RAM (NT 4.0)
* 4MB minimum hard disk spac e requir ed for dr iver inst allati on only. If
installing the additional software packages included on the CD ROM,
an additional 30MB f ree hard disk space is required (20MB TextBridge
Pro, 10MB LaserFax3.5 Lite).
Overview of the WorkCentre 385 Drivers
Before the WorkCentre 385 can interface with your computer, you must
install driver files. These drivers will enable your computer to properly
communicate with the WorkCentre 385 for printing, scanning and PC fax
operations. PC fax is the process of faxing a computer file, such as a word
processing document or image file, directly from your computer via the
built-in fax modem in the WorkCentre 385.
All of the necessary drivers are contained on the CD included with your
WorkCentre 3 85.
1-24 Getting Started
Page 29

Additional Software
Two software applications, LaserFAX 3.5 Lite and Textbridge Pro, are
included on the CD ROM supplied with the WorkCentre 385.
n
LaserFAX 3.5 Lite is a fax program which enables you to send faxes
from and receive faxes to your PC.
n
TextBridge Pro, a scanning program with optical character recognition
(OCR) capabilities, is also included for your convenience.
Proper operation of the WorkCentre 385 with either of the additional
software applications requires prior installation of the WorkCentre 385
drivers.
1
Installing Software 1-25
Page 30
Software Installation Procedure
In Windows 3.x, Windows 95/98, or Windows NT 4.0
1 Turn on your PC and start Windows.
2 Ensure the Xerox WorkCentre 385 is plugged into a standard grounded
AC power outlet and connected to your computer.
To AC outlet
3 The machine turns on.
Note: To power off the machine; unplug the power cord. Power must be
applied at all times if the machine is used as an unattended fax machine.
4 Insert the supplied CD into your computer’s CD ROM drive.
The Xerox WorkCentre 385 installation program will begin.
1-26 Getting Started
Page 31

Note: If you are using Windows 3.x, the Xerox WorkCentre 385 installation
program will not begin automatically. To start the program, Select
FILE>RUN from the Windows Program Manager then proceed to step
4b.
If the program does not start:
a) From the Start menu, select Run.
b) Type D:\autorun.exe (where "D" re presents the letter de signatio n of
the computer’s CD ROM drive), and click OK to start the
installation program.
The Xerox WorkCentre 385 installation program will begin.
1
Installing Software 1-27
Page 32

5 Select a language.
A window will appear showing the components to be installed.
1-28 Getting Started
Page 33

6 Follow the on-screen instructions and click Continue.
The selected components are installed one at a time in the order they are
presented on the screen.
1
Note: Although the installation program will prompt you to shut down your
machine after each component is installed, it is not necessary to shut down
your computer until all components are installed.
After the last component has been i nstal led, you mus t shut do wn and r estart
your computer to complete the installation process. If your computer does
not shut down and restart automatically, you must shut it down manually
and restart it before the changes you have made will be in effect.
Installing Software 1-29
Page 34

Note: After installing the printer driver, the WorkCentre 385 will be selected
as the default Windows printer.
Uninstalling Software
Uninstallation of software is required only if you are upgrading the
software, or if your installation fails.
In Windows 3.x
In Windo ws 3.x, al l WorkCentre 385 software c omponents ar e insta lled into
a single Program Group.
To uninstall components:
1 Start Windows.
2 In the Program Manager, double click the WorkCentre 385 Program
Group.
The WorkCentre 385 Program Group will open.
3 Double Click on the Program Group containing the component you
wish to uninstall.
The Program Group will open.
4 Double Click on the Uninstall icon.
The selected component is uninstalled.
Note: All software components must be uninstalled one at a time.
1-30 Getting Started
Page 35

In Windows 95/98, or Windows NT 4 .0
1 Start Windows.
2 From the Start menu, select Programs.
3 Select the Start Menu Program Item for component you wish to
uninstall.
4 Click on the Submenu uninstall icon for the component you wish to
remove.
A window will appear prompting you to confirm that you wish to
remove the selected application.
5 Click on Yes.
6 Uninstall Shield launches and the component is uninstalled.
Note: All software components must be uninstalled one at a time.
1
Uninstalling Software 1-31
Page 36

Using the Control Panel
On/Off Line
Button and
LED Indicator
Use to turn
your machine
On-line or Off-
line. The LED
lights while the
machine is on-
line, indicating
that the
machine is
ready to print a
PC file.
Print Priority
Use to assign
print priority to
PC file printing
over fax
printing.
One-touch Dial
Use to call most
frequently used
conjunction with
the Menu button
to set up special
functions or print
and
Special
Function
Buttons
numbers with
one button.
Also, use in
reports.
The display shows the current
status of your machine, and guides
you through various tasks using a
menu system for each operation.
Menu
Use to choose special functions.
Up and Down
Use to display the next or previous menu
item. Also use to adjust machine settings.
Right and Left
Use to move cursor left or right across the
display.
Stop
Use to stop an operation at any time.
Copy
Use to copy a document.
Start/Enter
Use to start a job. Also use to activate the
selection shown in the display.
LCD Display
1-32 Getting Started
Page 37

Search/Delete
Use to search for
numbers in
memory . Als o use
to delete digits in
the edit mode.
Receive
(
Receive Mode
Use to choose the
receive mode you
want to use. The
selected mode is
displayed.
Resolution
Use to choose the
resolution of
copied or
transmitted
documents.
Contrast
Use to choose the
contrast of copied
or transmitted
documents.
Number Keypad
Use to dial
numbers
manually or to
enter letters and
numbers for
various
programming
functions.
)
1
Speed/Dual
Use to dial calls and send fax documents by
entering a 2-digit number. Also use to switch
the LCD display between tasks while
performing dual jobs.
Redial/Pause
Use to redial the last phone number called.
You can also use it to add a pause when
storing a number in memory.
Flash
Use to perform a switch-hook operation such
as call waiting.
Speaker
Use to adjust the volume of the internal
speaker.
Using the Control Panel 1-33
Page 38

System Setup
Ringer Volume
You can adjust the volume of the ringer to the desired loudness.
1 Press the Menu butt on, then p ress t he Sy stem Setup but ton on t he One-
Touch keypad. The display indicates RINGER VOLUME ?.
2 Press Enter, then press the Up or Down button to choose the desired
loudness of the ringer.
The selected ringer sounds and the display indicates the loudness level
with the > symbol.
If adjusted such that no > symbo l is disp la yed, the ringer will be turned
off. The machine will work normally even if the ringer is set to off.
RINGER VOLUME
[>>>>>>>> ]
3 Press Enter when the desired volume level is selected. The display
indicates the next setup menu DEFAULT SETTINGS ?. For details on
the Default Settings menu, see Home Resolution and Home Contrast on
page 1-35.
4 To return to Standby mode, press the Stop button.
1-34 Getting Started
Page 39

Home Resolution and Home Contrast
The default p rint resoluti on and contra st can be set to their most freq uently
used modes. Whenever a documen t is sent or copied, t he home contr ast and
resolution mode will be activated unless otherwise changed by using the
Resolution or Contrast button on the control panel.
1 Press the Menu butt on, then p ress t he Syst em Setup but ton on t he One-
Touch keypad. The display indicates RINGER VOLUME ?.
2 Press the Up or Down button until DEFAULT SETTINGS ? appears.
3 Press Enter. The display prompts you to choose the Home Resolution
mode.
HOME RESOLUTION
[ STANDARD ]
4 Press the Left or Right button repeatedly until you locate the desired
mode:
l
STANDARD–use with most documents.
l
FINE–use fo r documents with fine detail, such as small prin t.
l
SUPER FINE–use for documents that have extremely fine detail.
5 Press Enter t o selec t the d esire d resol ution mo de. The di splay pr ompts
you to choose the Home Contrast mode
.
HOME CONTRAST
1
[ NORMAL ]
System Setup 1-35
Page 40

6 Press the Left or Right button repeatedly until you find the desired
mode:
l
NORMAL–use with documents of average or normal contrast.
l
DARKEN–use with documents with low cont rast or light images.
l
LIGHTEN–use with documents with high contrast or dark images.
l
PHOTO–for obtaining maximum image quality with documents
that contain pictures or photographs with shades of gray.
7 Press Enter to select the desired mode. The SOUND CONTROL ?
setup menu selection is displayed. Refer to the next section Sound
Control, for configuration details.
8 To return to Standby mode, press the Stop button.
Sound Control
Y o u can choose an alar m tone to sound when ab normal operati ng conditions
occur; for example, when out of paper, or if a cover is open. You can also
set the machine to beep when any key is pressed.
1 Press the Menu butt on, then p ress t he Sy stem Setup but ton on t he One-
Touch keypad. The display indicates RINGER VOLUME ?.
2 Press the Up or Down button until you find SOUND CONTROL ?.
3 Press Enter. The display prompts you to turn the alarm sound ON or
OFF.
4 Press 1 to turn the sound ON or 2 to turn it OFF. You can also press the
Right or Left button to choose ON or OFF, then press Enter to
confirm.
1-36 Getting Started
Page 41

6 Press the Left or Right button repeatedly until you find the desired
mode:
l
NORMAL–use with documents of average or normal contrast.
l
DARKEN–use with documents with low cont rast or light images.
l
LIGHTEN–use with documents with high contrast or dark images.
l
PHOTO–for obtaining maximum image quality with documents
that contain pictures or photographs with shades of gray.
7 Press Enter to select the desired mode. The SOUND CONTROL ?
setup menu selection is displayed. Refer to the next section Sound
Control, for configuration details.
8 To return to Standby mode, press the Stop button.
Sound Control
Y o u can choose an alar m tone to sound when ab normal operati ng conditions
occur; for example, when out of paper, or if a cover is open. You can also
set the machine to beep when any key is pressed.
1 Press the Menu butt on, then p ress t he Sy stem Setup but ton on t he One-
Touch keypad. The display indicates RINGER VOLUME ?.
2 Press the Up or Down button until you find SOUND CONTROL ?.
3 Press Enter. The display prompts you to turn the alarm sound ON or
OFF.
4 Press 1 to turn the sound ON or 2 to turn it OFF. You can also press the
Right or Left button to choose ON or OFF, then press Enter to
confirm.
1-36 Getting Started
Page 42

5 The display prompts you to turn the key sound ON or OFF.
Press 1 to turn the sound ON or 2 to turn it OFF. The REMOTE
DIAGNOSIS PROTECTION ? setup menu selection is displayed.
Refer to the next section, Remote Diagnosis Protection for
configuration details.
6 To return to Standby mode, press the Stop button.
Remote Diagnosis Protection
Remote diagnosis is a feature which allows Xerox or other authorized
personnel to perform diagnostics on your machine via telephone.
If you want to disable remote diagnos is (to protect your mach ine from being
serviced by an unauthorized person), you must activate the Remote
Diagnosis Protection feature.
1 Press Menu, then press System Setup on the One-Touch keypad. The
display indicates RINGER VOLUME ?.
2 Press the Up or Down button until you find REMOTE DIAGNOSIS
PROTECTION ?, then press Enter.
3 The display prompts you to turn the feature ON or OFF. Press 1 to turn
it ON or 2 to turn it OFF.
1
4 The SELECT LANGUAGE? setup menu selection is displayed. Refer
to the next section, Select Language for configuration details.
5 To return to Standby mode, press the Stop button.
System Setup 1-37
Page 43

5 The display prompts you to turn the key sound ON or OFF.
Press 1 to turn the sound ON or 2 to turn it OFF. The REMOTE
DIAGNOSIS PROTECTION ? setup menu selection is displayed.
Refer to the next section, Remote Diagnosis Protection for
configuration details.
6 To return to Standby mode, press the Stop button.
Remote Diagnosis Protection
Remote diagnosis is a feature which allows Xerox or other authorized
personnel to perform diagnostics on your machine via telephone.
If you want to disable remote diagnos is (to protect your mach ine from being
serviced by an unauthorized person), you must activate the Remote
Diagnosis Protection feature.
1 Press Menu, then press System Setup on the One-Touch keypad. The
display indicates RINGER VOLUME ?.
2 Press the Up or Down button until you find REMOTE DIAGNOSIS
PROTECTION ?, then press Enter.
3 The display prompts you to turn the feature ON or OFF. Press 1 to turn
it ON or 2 to turn it OFF.
1
4 The SELECT LANGUAGE? setup menu selection is displayed. Refer
to the next section, Select Language for configuration details.
5 To return to Standby mode, press the Stop button.
System Setup 1-37
Page 44

Select Language
You can select the LCD display language. The available choices are:
English, German, French, Italian, and Spanish.
1 Press the Menu butt on, then p ress t he Sy stem Setup but ton on t he One-
Touch keypad. The display indicates RINGER VOLUME ?.
2 Press the Up or Down button until you find SELECT LANGUAGE?,
then press Enter.
3 Press the Up or Down button to choose the desired display language,
then press Enter. You can also press the number of the language in the
display.
4 ECONO MODE SETTING ? setup menu selection is displayed. Refer
to the next section, Econo Mode for configuration details.
5 To return to Standby mode, press the Stop button.
Econo Mode Setting
Econo Mode can be set to on to conserve the supply of toner in your Laser
Printer Cart ridge.
1 Press the Menu button, then press the System Setup button on the
One-Touch keypad. The display indicates RINGER VOLUME ?.
2 Press the Up or Down button until ECONO MODE SETTING ? is
displayed. Then press Enter.
The display prompts you to set the mode to ON or OFF.
1-38 Getting Started
Page 45

3 Press 1 to turn Econo Mode ON or, 2 to turn Econo Mode OFF.
Note: Print quality may be reduced when using Econo Mode.
4 The LAST FAX DA TA REPRINT ? setup menu sel ec ti on i s dis pla yed .
Refer to the next section, Last Fax Data Reprint for configuration
details.
5 To return to Standby mode, press the Stop button.
Last Fax Data Reprint
If the toner is low or empty, the received fax page may be too light to read
the message. If the fax me ssage wa s lost be cause o f low or empt y toner, use
the Last Fax Data Reprint feature to print the last fax data. Your machine
continuously stores the last 10 pages of received fax data, and updates the
pages each time you receive a fax.
1 Press the Menu butt on, then p ress t he Sy stem Setu p but ton on t he One-
Touch keypad. The display indicates RINGER VOLUME ?.
2 Press the Up or Down button until LAST FAX DATA REPRINT ? is
displayed, then press Enter.
.
LAST FAX DATA
1
1:PRINT 2:CLEAR
3 Press 1 to print the last 10 pages of received fax. If you want to clear
the data to save memory, press 2. After clearing memory, full memory
is available until a new fax is recei ved.
4 The FLASH DOWNLOAD ? setup menu item is displayed. Press the
Stop button.
System Setup 1-39
Page 46

3 Press 1 to turn Econo Mode ON or, 2 to turn Econo Mode OFF.
Note: Print quality may be reduced when using Econo Mode.
4 The LAST FAX DA TA REPRINT ? setup menu sel ec ti on i s dis pla yed .
Refer to the next section, Last Fax Data Reprint for configuration
details.
5 To return to Standby mode, press the Stop button.
Last Fax Data Reprint
If the toner is low or empty, the received fax page may be too light to read
the message. If the fax me ssage wa s lost be cause o f low or empt y toner, use
the Last Fax Data Reprint feature to print the last fax data. Your machine
continuously stores the last 10 pages of received fax data, and updates the
pages each time you receive a fax.
1 Press the Menu butt on, then p ress t he Sy stem Setu p but ton on t he One-
Touch keypad. The display indicates RINGER VOLUME ?.
2 Press the Up or Down button until LAST FAX DATA REPRINT ? is
displayed, then press Enter.
.
LAST FAX DATA
1
1:PRINT 2:CLEAR
3 Press 1 to print the last 10 pages of received fax. If you want to clear
the data to save memory, press 2. After clearing memory, full memory
is available until a new fax is recei ved.
4 The FLASH DOWNLOAD ? setup menu item is displayed. Press the
Stop button.
System Setup 1-39
Page 47

Adjusting Speaker Volume
Press the Speaker button on the front panel to adjust the speaker
1
volume. If you cannot hear a dial tone, check the phone li ne connection.
2 The display indicates PHONE. Press the Up or Down button
repeatedly until the desired loudness setting is displayed. Loudness is
set in the range from 1 through 7, with 7 representing the loudest
setting.
3 After choosing the desired volume level, press the Speaker button to
return to the Standby mode.
Setting the Clock Mode
Y o u can configure your machin e to display time using either a 12 hour or 24
hour format.
1 Press the Menu button, then press the System Data (01) button on the
One-Touch keypad. PAPER SIZE appears on the display.
2 Press the Up button.
CLOCK MODE appears on the LCD display.
The display prompts you to select either a 12 hour or 24 hour Clock
Mode.
3 Press 1 to select a 12 hour Clock Mode or, Press 2 to select a 24 hour
Clock Mode .
1-40 Getting Started
Page 48

Setting the Date and Time
The current date and time are shown in the display when the machine is on
and ready for use (Standby mode). The date and time are printed on all
faxes you send.
1 Press the Menu button, then press the Date & Time button on the One-
Touch keypad. The current date and time are displayed. A flashing
cursor in the display prompts you to enter the date.
2 Using the Number keypad, enter the current date using a MMDDYY
date format. If you make a mistake, use the right and left buttons to
move the cursor to the digit you wish to change.
12-03-1998
04:06 (PM)
After entering the date the flashing cursor will move into the first digit
of the time.
3 Using the Number keypad, enter the current time. Remember to enter
the time according to the current Clock Mode setting (12 or 24 hour
format). Refer to the previous section, CLOCK MODE for details.
Note: AM or PM is selected by pressing the Up or Down arrow.
1
4 Press Enter when the date and time settings displayed are correct.
The display indicates the date and time you have set, then returns to
Standby mode.
Note: If an invalid number is entered, the machine beeps and does not
proceed to the next step. If this happens, enter the correct number.
System Setup 1-41
Page 49

Setting the System ID (Your Number and Name)
In some countries you are required by law to indicate your fax number on
any fax you send.
name, will be printed at the top of each page sent from your machine.
The System ID, including your telephone number and
1 Press the Menu button, then press the System ID button on the One-
T ouch keypa d. The di splay prompts you t o ent er the telep hone number.
If there is a number previously registered, the number appears.
2 Enter the telephone number (up to 20 digits) to which your machine is
connected. You can enter spaces with the Pause button or a dash with
the # button.
If an incorrect number is entered, press the Right or Left button to
move the cursor unde r the incorrect digit, then enter t he correct number
or press the Delete button to delete the number.
3 Press Enter when the correct number i s displaye d. The display prompts
you to enter your ID name.
4 Enter your ID name. This can be any name up to 20 characters in
length. You can enter alphanumeric characters using the Number
keypad. Special sy mbols su ch as + and - c an b e include d by press ing 0
repeatedly. If you want to enter the same letter or number in succession
(for example, SS, AA, 777), enter one digit, then move the cursor by
pressing the Right button, and enter the next digit.
Use the Right button to insert a space in the name, Pressing the Right
button two times moves the cursor two posi ti ons to the righ t, cr eat ing a
space.
For additional details on how to use the Number keypad to enter
alphanumeric characters, see Entering Alphanumeric Characters on
page 3-24.
1-42 Getting Started
Page 50

5 Press Enter when the name in the display is correct.
Note: If there is a number and name previously registered, the number
and name appear in the upper line and ED:1 DEL:2 NXT:3 in the bottom
line. Press 1 to edit the existing number. Press 2 to delete the number. The
machine deletes the number and continues to the next step. Press 3 to
keep the number and continue.
Print Priority
To print a PC document while the machine is printing a received fax, the
printing of the fax can be interrupted. Press the PRINT PRIORITY button
to enable this feature. The display indicates PP in the lower right corner.
The interrupted fax data will be stored in memory. To disable this feature,
press the PRINT PRIORITY button again. The display will no longer
indicate PP. The length of t ime Print Pr iority is in ef fect ca n be set us ing the
Print Priority feat ure. Refer to User Options (System Data) on page 1-47
for details.
Dual
The WorkCentre 385 can perform more than one function at the same time.
For example, it can simultaneously:
1
n
Print a PC document while sendi ng a fax.
n
Receive a fax into memory while making a copy.
n
Receive a fax into memory while printing a PC document.
n
Store a fax document for later transmission while printing an incoming
fax.
System Setup 1-43
Page 51

5 Press Enter when the name in the display is correct.
Note: If there is a number and name previously registered, the number
and name appear in the upper line and ED:1 DEL:2 NXT:3 in the bottom
line. Press 1 to edit the existing number. Press 2 to delete the number. The
machine deletes the number and continues to the next step. Press 3 to
keep the number and continue.
Print Priority
To print a PC document while the machine is printing a received fax, the
printing of the fax can be interrupted. Press the PRINT PRIORITY button
to enable this feature. The display indicates PP in the lower right corner.
The interrupted fax data will be stored in memory. To disable this feature,
press the PRINT PRIORITY button again. The display will no longer
indicate PP. The length of t ime Print Pr iority is in ef fect ca n be set us ing the
Print Priority feat ure. Refer to User Options (System Data) on page 1-47
for details.
Dual
The WorkCentre 385 can perform more than one function at the same time.
For example, it can simultaneously:
1
n
Print a PC document while sendi ng a fax.
n
Receive a fax into memory while making a copy.
n
Receive a fax into memory while printing a PC document.
n
Store a fax document for later transmission while printing an incoming
fax.
System Setup 1-43
Page 52

While the machine i s perf orming d ual t asks, pr ess t he Dual button to toggl e
the display between the current operation and the new operation.
Reports
Your fax machine can print reports containing useful information like
Scheduled Jobs and System Data. The following reports are available:
n
Journal (One-Touch button 14)
The journal consists of two reports, a Transmission Report and a
Reception Report. Each report contains information concerning
transmission or reception activities. They can be printed on command,
or automatically if cer tain conditions are met (see Selectab le Options on
page 1-48). These reports will be automatically printed after every 40
transmissions or receptions if auto is selected.
n
Help List (One-Touch button 15)
This quick reference guide consists of a list detailing the machine’s
basic functions and operating instructions.
n
TX Confirm (One-Touch button 16)
The Message Confirmation Report lists important information about
faxes sent from your machine including: the remote site fax number,
number of pages faxed, elapsed time of the operation, the
communication mode, and the communication results.
You can set up your machine to print a TX Confirm report:
l
Automaticall y after each transmission (ON).
l
Automaticall y only if an er ror occurs during transmission (ERR).
l
The machine can be set to print no report at all (OFF). You can
print this report manually at any time you want.
1-44 Getting Started
Page 53

While the machine i s perf orming d ual t asks, pr ess t he Dual button to toggl e
the display between the current operation and the new operation.
Reports
Your fax machine can print reports containing useful information like
Scheduled Jobs and System Data. The following reports are available:
n
Journal (One-Touch button 14)
The journal consists of two reports, a Transmission Report and a
Reception Report. Each report contains information concerning
transmission or reception activities. They can be printed on command,
or automatically if cer tain conditions are met (see Selectab le Options on
page 1-48). These reports will be automatically printed after every 40
transmissions or receptions if auto is selected.
n
Help List (One-Touch button 15)
This quick reference guide consists of a list detailing the machine’s
basic functions and operating instructions.
n
TX Confirm (One-Touch button 16)
The Message Confirmation Report lists important information about
faxes sent from your machine including: the remote site fax number,
number of pages faxed, elapsed time of the operation, the
communication mode, and the communication results.
You can set up your machine to print a TX Confirm report:
l
Automaticall y after each transmission (ON).
l
Automaticall y only if an er ror occurs during transmission (ERR).
l
The machine can be set to print no report at all (OFF). You can
print this report manually at any time you want.
1-44 Getting Started
Page 54

n
Schedule Job (One-Touch button 17)
The Schedule Information List provides information about documents
currently stored for D elayed Transmissi on, Priority Transmission,
Memory Transmission, Continuous Polling, and TX Polling. The list
shows the starting time, type of operation, etc.
n
Phone Book (One-Touch button 18)
This Telephone Numbers List indicates all of the numbers currently
stored in machine memory as One-Touch Dial numbers, Spee d Dial
numbers, and Group Dial numbers.
n
System List (One-Touch button 19)
This System Data List indicat es the status of the user -selectable options .
See User Options (System Data) on page 1-47. After changing any
setting, print this list to co nfirm your changes.
1
System Setup 1-45
Page 55

Printing Reports
To Print Reports:
1 Press the Menu button.
2 Press the One-Touch button corresponding to the desired report on the
One-Touch keypad. Refer to the table below:
One-Touch
Button #
14
15
16
17
18
19
Button Label Report/List Name
Journal Transmission or Reception Journal
Help List Help List
TX Confirm Message Confirmation Report
Schedule Job Schedule Information List
Phone Book Telephone Numbers List
System List Sy stem Data Li st
The select ed list will be printed out.
Other Reports
n
Multi-Communication Report
This report is printed auto matically after sending to o r receiving from
more than one location and provides detailed information about the
operation.
Note: Any report which is configured to print automatically will not print if
your machine runs out of paper, has a paper jam, or is printing a file sent
from a PC.
1-46 Getting Started
Page 56

User Options (System Data)
Your machine has various user -selecta ble feat ures. These o ptions ar e preset
at the factory, but you may need to change them. To find out how the
options are currently set, print the System List. For more information on
printing the list, see Printing Reports on page 1-46.
Setting an Option
1 Press the Menu button.
2 Press the System Data button on the One-Touch keypad.
The display shows the first option menu.
3 Scroll through the options by pres si ng the Down or Up buttons
repeatedly.
4 When the option you want appears in the display, enter the number for
the desired setting.
Or
You can use Right or Left buttons to select the desired setting.
5 Press the Enter button to store your choice in memory.
You can exit from setup mode at any time by pressing the Stop button.
When you press the Stop button, the machine stores the options you
changed and returns to the Standby mode.
1
System Setup 1-47
Page 57

Selectable Options
These instructions assume you’ve followed the steps listed in the previous
procedure, Setting an Option, and the machine is prompting you to change
one of the options listed below.
All of these options are menu settings accessed by the One-Touch button
01, System Data.
n
PAPER SIZE - Select the paper size you will be printing on.
Press 1 for letter (LTR), 2 for A4 size, or 3 to use legal (LGL) size
paper.
n
MESSAGE CONF. - A message confirmation report showing
transmission information; whether the transmission was successful,
how many pages were sent, etc.
Press 1 to print a confirma tion report au tomatically ea ch time you send
a fax (ON).
Press 2 to turn this feature off (OFF).
Press 3 to print only when an error occurs and the transmission was not
successful (E RR).
n
AUTO JOURNAL - The Journal is a report providing detailed
information about t he previous 40 communication operations inc lu d in g
times and dates.
Press 1 to print the Journal automatically after every 40 transmissions
or receptions (ON).
Press 2 to dis able automat ic printin g of the Jour nal (OFF). You can still
print Journal reports manually at any time. See Printing Reports on
page 1-46.
1-48 Getting Started
Page 58

n
REMOTE CODE - The remote receive start code allows you to initiate
fax reception from an extension phone plugged into the EXT. LINE
jack on the back of the machine. If you pick up the extension phone
and hear fax tones, enter the Remote Code and the machine will start
receiving. The Remote Code is preset to *9* at factory. You may
change the Remote Code by selecting any number from 0 to 9 on the
numeric keypad.
n
POWER SAVING - The power saving menu item lets you reduce
power usage when the printer is idle.
Press 1 to turn the feature ON. The display asks you to determine the
length of time the printer waits after printing a job before going to a
reduced power state. Press one of the following:
l
1 for 10 minutes
l
2 for 15 minutes
l
3 for 30 minutes
l
4 for 45 minutes
l
5 for 60 minutes
Or
If your printer is used constantly, press 2 to turn Power Saving OFF.
This keeps the printer read y to print with minimum war m-up time.
1
n
DIAL MODE - Select the type of dial system your fax machine is
connected to:
Press 1 if the fax machin e is connecte d to a to ne (Touch T one) dial li ne.
Press 2 if the fax machine is connected to a pulse (Rotary) dial line.
System Setup 1-49
Page 59

n
ECM MODE (Error Correction Mod e) - This mode compensates for
poor line quality and ensures accurate, error-free communication with
any other ECM-equipp ed fac si m il e ma chi ne. If the line quality is poor,
transmissio n time may be i ncreased when ECM is enabl ed.
Press 1 to turn the Error Corr ection mode on.
Press 2 to turn the Error Corr ection mode off.
n
RX REDUCTION - When receiving a document as long as or longer
than the paper installed in your machine, the machine can reduce the
data in the document to fit the paper size currently loaded in the
machine.
Use this feature if you want to automatically reduce an incoming page
(that would otherwise be divi ded int o two pa ges) t o fit on a sin gle pag e.
If the fax machine cannot reduce the data to fit into one p age with this
feature enabled, the data is divided and printed in actual size on two or
more sheets.
Press 1 to turn this feat ure on. Note that this feature does no t apply to
the copy mode.
Press 2 to turn this fe ature of f. The over flow d ata wi ll be prin ted out on
a second page.
1-50 Getting Started
Page 60

n
H. REDUCTION (Horizontal) - If you turn the RX reduction feature
on, you are allowed to set the Horizontal Reduction feature on or off.
With Horizontal Reduction enable d, the machine will reduce an
incoming page containing overflow data along the vertical axis only.
The net effect of Horiz ontal Reduc tion will b e a vert ical compr ession of
the image as shown below:
Received data
Original
If you want to reduce incoming pages equally along both axes in order
to maintain the pr oportion ality of t he orig inal image, t urn the horizonta l
reduction feature off. If you turn this feature off, the machine reduces
the data as shown below.
1
Original
Press 1 to turn this feat ure on.
Press 2 to turn this feature off.
Received data
System Setup 1-51
Page 61

n
DISCARD SIZE - When receiving or copying a doc ument as long as or
longer than the paper installed in your fax machine, you can set the fax
machine to discard any excess image at the bottom of the page, to fit
into the rec ording paper size.
If the received page is outside the margin you set, it will be printed on
two sheets of paper at the actual size.
If the data is w ithin the margin, and the Auto Reduction feature is
turned ON, it will be reduced to fit into the appropriate size paper
(Discard does not take place). If the Auto Reduction feature is turned
OFF or fails, the data within the margin will be discarded.
Using the Number keypad, enter the desired disc ard size, and press the
Enter button to store your selection.
n
REDIAL INTERVAL - Y our machine can automatically redial a remote
fax machine if it was busy or does not answer the first call attempt.
Enter the number of minutes (from 1 to 15) using the Number keypad.
n
REDIALS - Enter the number of redial at te mpts (from 0 to 9) you wish
your machine to make before giving up.
Note: If you enter 0, the machine will not redial.
n
ANSWER ON RING - You can select the number of times your
machine rings before answering a n incoming c all. If you are us ing your
machine as both a telep hone and a f ax mac hin e, it is rec ommende d tha t
you set the ring count to at least 4 to allow you time to answer a call.
Enter the ring count by selecting a number from 1 through 7 on the
Number keypad.
1-52 Getting Started
Page 62

n
DRPD (Distinctive Ring Pattern Detection) MODE - Distinctive Ring
is a telephone company service which enables a user to use a single
telephone line to answer several different telephone numbers. The
particular number someone uses to call you is identified by different
ringing patterns, which consist of various combinations of long and
short ringing sounds. This feature is often used by answering services
who answer telephones for many different clients. They need to know
which number someone is calling on to properly answer the phone.
Using the Distinctive Ring Pattern Detection feature, your fax machine
can "learn" the ring pattern you designate to be answered as a fax.
Unless you change it, t his rin ging patt ern will con tinue to be recogni zed
and answered as a fax cal l. All other r ingin g pa ttern s will be f orwa rded
to the extension te lephone or ans wer ing machi ne pl ugged i nto the EXT.
LINE jack.
Note: Before using the Distinctive Ring Pattern Detection option,
Distinctive Ring service must be installed on your telephone line by the
telephone company. To set up Distinctive Ring Pattern Detection, you will
need another telephone line at your location, or someone available to dial
your FAX number from outside.
1
System Setup 1-53
Page 63

You can suspend or change Distinctive Ring Pattern Detection at any
time:
Press 1 to turn this feat ure on.
Press 2 to turn this feature off.
Press 3 to setup the Distinctive Ring Pattern Detection. The LCD
displays WAITING RING. Call your fax number from another
telephone. It is not necessary to place the call from a fax machine.
When your machine begins to ring, do not answer the call. The
machine requires several rings to learn the pattern.
When the machine co mpletes "le arning," the LCD displays END DRPD
SETUP.
With the DRPD feature active, DRPD appears in the display and the
previously set reception mode is ignored. If you turn DRPD off, the
machine returns to any prev iously set rec eption mode.
Note: DRPD must be set up again if you re-assign your fax number, or
connect the machine to another telephone line.
After DRPD has been set up, call your fax number again to verify that the
machine answers with a fax tone, then have a call placed to a different
number assigned to that same line to be sure the call is forwarded to the
extension telephone or answering machine plugged into the EXT. LINE
jack.
1-54 Getting Started
Page 64

n
SEND FROM MEMORY - With this feature enabled , all transmission
documents are automatically scanned into memory, and it will not be
necessary to wait until documents in the Automatic Document Feeder
(ADF) are sent out before you can send or store other fax jobs.
Press 1 to turn this feat ure on.
Press 2 to turn this feature off.
n
LOCAL ID - Enabling this feature c aus es t he machi n e to aut omat ic al ly
print the page number, date, and time of the reception at the bottom of
each page of a received document.
Press 1 to turn this feat ure on.
Press 2 to turn this feature off.
n
PRIORITY TERM - You can set your machine to t urn Print Prio rity o ff
automatically if there is no further PC printing activity. There are two
user selectable interval options; 8 hours or 30 minutes.
Press 1 to select 8 hours. P rint Priority is turned off automa tically 8
hours after PC printing is completed.
Press 2 to select 30 minutes. Print Priority is turned off au tomatically
30 minutes after PC printing is completed.
1
Note: Refer to
feature.
n
REPRINT - This feature allows you to turn the Last Fax Data Reprint
Print Priority
on page 1-43 for details on the Print Priority
memory storage feature on or off.
Press 1 to turn this feat ure on.
Press 2 to turn this feature off.
System Setup 1-55
Page 65

n
CLOCK MODE - Use this feature to determine how time is displayed
on your machine.
Press 1 to select a 12 hour Clock Mode.
Press 2 to select a 24 hour Clock Mode.
1-56 Getting Started
Page 66

Chapter 2 Making a Copy
Set Up Your Machine 2-1
Making a Copy
http://xww.xedoc.world.xerox.com/data/XEDOC/Central/Multifunction/wc385/user/chapter2/chpt2.htm [07/09/1999 14:33:44]
Page 67

Chapter 2
Making a Copy
Making a Copy
Your machine is a high quality copier which offers the following features:
n
Adjustable Contrast - The contrast setting can be changed to obtain
the best copy quality for documents containing faint markings, dark
images, photographs or other halftone images.
2
n
Multiple copies - 1 to 99 copies of the document can be made.
n
Enlarge\Reduce - You can reduce or e nla r ge t he size of a co pied i mage
from 50% to 200% in increments of 1%.
n
Collation - When the Copy Collate menu option is set to On, the
machine sorts the print job. For example, if you print two copies of a
three-page document, the machine print s one comp lete do cument (pa ge
1, page 2, page 3) before printing a second copy (page 1, page 2, and
page 3).
2-1
Page 68

To make a quick copy:
1 Adjust the document gui des to match the width of the document.
2 Slide the document face down into the Automatic Document Feeder
until it is grasped and pulled into the machine.
3 If necessary, press the Contrast button.
You may choose NORMAL, DARKEN, LIGHTEN or PHOTO.
4 Press the Copy button.
5 Using the Number keypad, enter the number of copies you wish to
make. The default setting is 01 copy.
6 Press the Copy button.
Or
Press the Start button.
The machine copies the document.
Note: When making copies, resolution is automatically set to
Copy Collate
The
size. The
be collated.
2-2 Making a Copy
menu is not available if you reduce or enlarge the image
Enlarge\Reduce
Super Fine
menu is not available if you set the copy job to
.
Page 69

To make copies using the Copy menu features:
1 Adjust the document gui des to match the width of the document.
2 Slide the document face down into the Automatic Document Feeder
until it is grasped and pulled into the machine.
3 If necessary, press the Contrast button.
You may choose NORMAL, DARKEN, LIGHTEN or PHOTO.
4 Press the Copy button to display the COPY menu. For two or more
copies (2 to 99), enter the desired number using the Number keypad,
then press t he Down button.
COPY
[01-99] <01>
2
Making a Copy 2-3
Page 70

5 The display shows the next option: the REDUCE\ENLARGE menu.
REDUCE\ENLARGE
1.AUTO 2.MANUAL
a) Selecting 1. AUTO, will cause the WorkCentre 385 to
automatically reduce the copy size of each page to fit on a single
page.
b) Selecting 2. MANUAL, brings up the COPY RATE menu, where
you can manually adjust the copy image scale size settings.
The number in the right corner of the bottom line shows the current
image percentage. To reduce or enlarge the image size, enter the
percent value (50 to 200) using the Number keypad.
ENTER RATE
[50-200] <100>
Press the Down button to confirm your settings.
6 The display shows the next option: the COPY COLLATE menu.
2-4 Making a Copy
[COPY COLLATE]
1:ON 2:OFF
Page 71

When making multiple copies , there are two collate options: ON and
OFF.
l
Selecting 1:ON will make 1 copy of page 1, 2, and 3 in order, then
makes a second copy of 1, 2, a nd 3 until a tota l of n copies has bee n
made.
SORT
3
2
1
l
Selecting 2:OFF will make n copies of page one, n copies of page
3
2
1
two, and so on. These copy sets will all be stacked on top of each
other.
GROUP
1
1
1
2
2
2
Press 1 or 2 to choose the desired collation method. You can also press
the Down button to choose the default collation setting; 2.OFF. The
LCD display scrolls back and shows the first option: number of copies.
7 Press the Start button or the Copy button to begin the copy operation.
Note: When setting the copy options, pressing the Copy button will begin
the copy operation immediately without displaying any remaining options.
2
Making a Copy 2-5
Page 72

Chapter 3 Sending a Fax
Options for Sending a Fax Using the WorkCentre 385 3-1
Manual Faxing 3-2
Preparing Documents for Faxing 3-2
Sending a Fax Manually 3-3
Sending a Fax Using a One-Touch Number 3-4
Sending a Fax Using a Speed Dial Number 3-5
Sending a Fax Using Group Dialing (Multi-Address Transmission) 3-5
Sending a Fax After Talking 3-6
Canceling Transmission 3-7
Confirming Transmission 3-8
Memory Transmission (Broadcasting) 3-9
Delayed Transmission 3-11
Adding Documents to a Standby Operation 3-13
Canceling a Standby Operation 3-14
Configuring Automtic Dialing Features 3-15
One-Touch Dialing 3-15
Storing a Number for One-Touch Dialing 3-15
Speed Dialing 3-18
Storing a Number for Speed Dialing 3-18
Group Dialing (for Multi-Address Transmission) 3-19
Storing One-Touch or Speed Dial Numbersfor Group Dialing 3-19
Setting Document Resolution and Contrast 3-21
Resolution 3-21
Contrast 3-23
Using the Number Keypad 3-23
Entering Alphanumeric Characters 3-24
Keypad Character Assignments 3-26
Entering Numbers 3-26
Editing Numbers or Names 3-27
Inserting a Pause 3-27
Other Functions 3-28
Redial 3-28
Redial Memory 3-28
Searching for a Number in Memory 3-28
Searching Sequentially through Memory 3-29
Searching by the First Letter 3-29
Tone 3-30
Automatic Redial 3-31
Priority Transmission 3-32
Polling 3-34
Sending a Fax
http://xww.xedoc.world.xerox.com/data/XEDOC/Central/Multifunction/wc385/user/chapter3/chpt3.htm (1 of 2) [07/09/1999 14:33:51]
Page 73

What is Polling? 3-34
Being Polled By a Remote Machine (TX POLL) 3-34
Adding Documents To the Job to be Polled 3-36
Cancelling a Job Already in Memory Which is Waiting to be Polled 3-37
PC Faxing 3-38
What is LaserFax Lite? 3-38
LaserFAX Installation 3-38
Sending Faxes with LaserFAX Lite 3-39
Fax Conversion Dialog Advanced Features 3-43
Cover Sheet Options 3-44
The Send Options Button 3-45
The Attach Button 3-46
The Keep Button 3-48
LaserFAX Application Features 3-49
LaserFAX Application Toolbar Features 3-50
The LaserFAX Phonebook 3-53
Adding Entries to the Phonebook 3-53
Troubleshooting LaserFAX 3-53
Sending a Fax
http://xww.xedoc.world.xerox.com/data/XEDOC/Central/Multifunction/wc385/user/chapter3/chpt3.htm (2 of 2) [07/09/1999 14:33:51]
Page 74

Chapter 3
Sending a Fax
Options for Sending a Fax Using the WorkCentre 385
Using the WorkCentre 385, you can send a fax in one of two ways:
n
By placing the document in the Automatic Document Feeder and
entering the information required for faxing at the WorkCentre 385
Control Panel. This is called Manual Faxing.
3
For information and instructions for Manual Faxing, refer to Manual
Faxing on page 3-2.
n
By faxing the document direc tly from yo ur comput er work station u sing
LaserFAX software. This is called PC Faxing.
For information and instructions for PC Faxing, refer to PC Faxing on
page 3-38.
3-1
Page 75

Manual Faxing
This section provides information and instructions for faxing a document
from the WorkCentre 385 using the WorkCentre 385 Control Panel.
Preparing Documents for Faxing
You can fax documents that are printed on standard letter, legal or A4 size
paper. Follow these guidelines to prepare your documents.
n
Do not attempt to feed the following types of documents into the
machine:
l
carbon-paper or carbon-backed paper
l
coated paper
l
onion skin or thin paper
l
wrinkled or creased paper
l
curled or rolled paper
l
torn paper
Note: If your document falls into any of the above categories, make a copy
of the document first. Use the copy for insertion into the Automatic
Document Feeder.
n
Remove all staples and paper clips before feeding the document.
n
Make sure any glue, ink or correction fluid on the paper is completely
dry before loading the document.
n
Do not load documents containing different sizes or weights of paper.
3-2 Sending a Fax
Page 76

Sending a Fax Manually
Adjust the document gu ides to match the width of the document.
1
2 Slide the document face down into the Automatic Document Feede r
until it is grasped and pulled into the machine.
document guide
The display alternately reads DOCUMENT READY and shows the
remaining memory capacity. Up to 30 sheets may be inserted at a time .
To insert more than one sheet, ensure that the bottom sheet enters first.
Stagger the leading edge of th e sheets slightly a nd insert them with light
pressure to ensure smooth feeding.
3
To add pages while the fax is sending, insert them face down into the
Automatic Document Feeder on top of the already loaded sheets.
3 If necessary, adjust the document resolution and contrast. See
Resolution on page 3-21 and Contrast on page 3-23 .
Manual Faxing 3-3
Page 77

4 Using the Number keypad, enter the number of the fax machin e to
which you wish to send the document. If you make a mistake while
entering a number, move the cursor under the incorrect digit by using
the Right or Left buttons, and corr ect the number. You may also delete
incorrect numbers by pressing the Delete button.
5 Press the Start button when the number appears correc tly in the
display. The machine dials the number and begins to transmit the fax.
If you wish to cancel the fax, press the Stop button two times.
Sending a Fax Using a One-Touch Number
1
Adjust the document gu ides to match the width of the document.
2 Slide the document face down into the Automatic Document Feeder
until it is grasped and pulled into the machine.
3 Press the One-Touch button (01 through 2 0) t o whi ch y ou a ssi gned the
telephone number you wish to cal l. For information on storing numbers
in memory, see Configuring Automatic Dialing Features on page 3-15.
The machine will scan th e document and dial the number automatically .
When the remote fax machine ans wers the phone, the docu ment will be
transmitted automatically.
3-4 Sending a Fax
Page 78

4 Using the Number keypad, enter the number of the fax machin e to
which you wish to send the document. If you make a mistake while
entering a number, move the cursor under the incorrect digit by using
the Right or Left buttons, and corr ect the number. You may also delete
incorrect numbers by pressing the Delete button.
5 Press the Start button when the number appears correc tly in the
display. The machine dials the number and begins to transmit the fax.
If you wish to cancel the fax, press the Stop button two times.
Sending a Fax Using a One-Touch Number
1
Adjust the document gu ides to match the width of the document.
2 Slide the document face down into the Automatic Document Feeder
until it is grasped and pulled into the machine.
3 Press the One-Touch button (01 through 2 0) t o whi ch y ou a ssi gned the
telephone number you wish to cal l. For information on storing numbers
in memory, see Configuring Automatic Dialing Features on page 3-15.
The machine will scan th e document and dial the number automatically .
When the remote fax machine ans wers the phone, the docu ment will be
transmitted automatically.
3-4 Sending a Fax
Page 79

Sending a Fax Using a Speed Dial Number
Adjust the document gu ides to match the width of the document.
1
2 Slide the document face down into the Automatic Document Feeder
until it is grasped and pulled into the machine.
3 Press the Speed button, then enter a two digit speed dial location
number . For information on st oring numbers in memory, Speed Dialing
on page 3-18.
4 Press the Start button to dial the number.
The machine will scan th e document and dial the number automatically .
When the remote fax machine ans wers the phone, the docu ment wil l be
transmitted automatically.
Note: You can store One-Touch or Speed Dial numbers so you can dial
your most frequently used numbers with one touch of a button or a two digit
speed dial number. For information on storing numbers in memory, see
Configuring Automatic Dialing Features
on page 3-15.
3
Sending a Fax Using Group Dialing
(Multi-Address Transmission)
Group Dialing can be used in conjunction with Memory Transmission or
Delayed Transmission faxing operations. However, before you can access
the Group Dialing feature, Group Numbe rs must be con figured. See Group
Dialing (for Multi-Address Transmission) on page 3-19 for more
information.
Manual Faxing 3-5
Page 80

Sending a Fax Using a Speed Dial Number
Adjust the document gu ides to match the width of the document.
1
2 Slide the document face down into the Automatic Document Feeder
until it is grasped and pulled into the machine.
3 Press the Speed button, then enter a two digit speed dial location
number . For information on st oring numbers in memory, Speed Dialing
on page 3-18.
4 Press the Start button to dial the number.
The machine will scan th e document and dial the number automatically .
When the remote fax machine ans wers the phone, the docu ment wil l be
transmitted automatically.
Note: You can store One-Touch or Speed Dial numbers so you can dial
your most frequently used numbers with one touch of a button or a two digit
speed dial number. For information on storing numbers in memory, see
Configuring Automatic Dialing Features
on page 3-15.
3
Sending a Fax Using Group Dialing
(Multi-Address Transmission)
Group Dialing can be used in conjunction with Memory Transmission or
Delayed Transmission faxing operations. However, before you can access
the Group Dialing feature, Group Numbe rs must be con figured. See Group
Dialing (for Multi-Address Transmission) on page 3-19 for more
information.
Manual Faxing 3-5
Page 81

To send a fax using the Group Dialing feature:
1 Adjust the document gui des to match the width of the documen t.
2 Slide the document face down into the Automatic Document Feeder
until it is grasped and pulled into the machine.
3 Follow the procedure for the desired operation (see Memory
Transmission (Broadcasting) on page 3-9 or Delayed Transmission on
page 3-11).
4 When you come to the step where the display prompts you to enter the
remote fax number, enter the Group Number.
Note: A Group Number may be assigned to a One-Touch button or
designated as a two digit numerical keypad number. You can use only one
Group Number in a single operation.
5 Continue the procedure to complete the (Memory Transmission or
Delayed Transmission) operati on. Your machine will automatically
scan the document loaded in the Automatic Document Feeder into
memory and subsequently dial each of the numbers included in the
group.
Sending a Fax After Talking
If you have a regular phone co nnecte d to the EXT.LINE jack on the back of
the machine, you can send a fax after speaking with a person at the remote
site.
1 Adjust the document gu ides to match the width of the document.
3-6 Sending a Fax
Page 82

To send a fax using the Group Dialing feature:
1 Adjust the document gui des to match the width of the documen t.
2 Slide the document face down into the Automatic Document Feeder
until it is grasped and pulled into the machine.
3 Follow the procedure for the desired operation (see Memory
Transmission (Broadcasting) on page 3-9 or Delayed Transmission on
page 3-11).
4 When you come to the step where the display prompts you to enter the
remote fax number, enter the Group Number.
Note: A Group Number may be assigned to a One-Touch button or
designated as a two digit numerical keypad number. You can use only one
Group Number in a single operation.
5 Continue the procedure to complete the (Memory Transmission or
Delayed Transmission) operati on. Your machine will automatically
scan the document loaded in the Automatic Document Feeder into
memory and subsequently dial each of the numbers included in the
group.
Sending a Fax After Talking
If you have a regular phone co nnecte d to the EXT.LINE jack on the back of
the machine, you can send a fax after speaking with a person at the remote
site.
1 Adjust the document gu ides to match the width of the document.
3-6 Sending a Fax
Page 83

2 Slide the document face down into the Automatic D ocument Feeder
until it is grasped and pulled into the machine.
3 Pick up the handset of the telephone connect ed to the EXT. LINE jack;
call the remote location.
Note: For a successful fax transmission, it is imperative that steps 4 to 6
occur in the proper order.
4 When finished talking, instruct the person at the remote location to
press the start button on their fax machine. They can then hang up.
The remote fax machine will send the initial fax tones.
5 Wait until you hear the fax tone from the remote fax mach ine.
6 Press the Start button on the WorkCentre 385. The machine begins to
transmit.
7 Replace the handset.
Canceling Transmission
To cancel a fax:
1 Press the Stop button at any time during the transmission.
The machine continues to send the fax, and the display shows a
message warning you that the machine is in use.
2 Press the Stop button again to cancel the transmission.
3
Manual Faxing 3-7
Page 84

2 Slide the document face down into the Automatic D ocument Feeder
until it is grasped and pulled into the machine.
3 Pick up the handset of the telephone connect ed to the EXT. LINE jack;
call the remote location.
Note: For a successful fax transmission, it is imperative that steps 4 to 6
occur in the proper order.
4 When finished talking, instruct the person at the remote location to
press the start button on their fax machine. They can then hang up.
The remote fax machine will send the initial fax tones.
5 Wait until you hear the fax tone from the remote fax mach ine.
6 Press the Start button on the WorkCentre 385. The machine begins to
transmit.
7 Replace the handset.
Canceling Transmission
To cancel a fax:
1 Press the Stop button at any time during the transmission.
The machine continues to send the fax, and the display shows a
message warning you that the machine is in use.
2 Press the Stop button again to cancel the transmission.
3
Manual Faxing 3-7
Page 85

Confirming Transmission
A Message Confirmation report shows whether the transmission was
successful and how many pages were sent.
When the last page of your document has been sent successfully, the
machine beeps and returns to Standby mode.
To print a Message Confirmation report:
1 Press the Menu button.
2 Press the TX Confirm (16) button on the One-Touch keypad.
3 The machine prints out a Message Confirmation report.
You can also configure your machine to print out a confirmation report
automatica lly each time a fa x is sent.
To automatically print a confirmation report:
1 Press the Menu button.
2 Press the System Data button (01) on the One-Touch keypad.
3 Press the Down or Up buttons repeatedly until MESSAGE CONF.
appears in the display.
a) Press 1 to print a confirmation report automatic ally each time you
send a fax (ON).
Or
b) Press 2 to turn this f eature off (OFF).
Or
c) Press 3 to print only when an error occu rs an d the transmi ssion was
not successful (ERR).
3-8 Sending a Fax
Page 86

If an error occurred dur i ng your fax transmission, an error message appears
in the display. If you receive an error message, press Stop to clear the
message and try to send the document again.
For a listing of error messages and their meanings, see LCD Display Error
Messages on page 7-8.
Memory Transmission (Broadcasting)
With Memory Transmission, documents are stored in memory and
automatically sent to one or more remote stations. Use this feature to send
your documents to multiple locations.
You can store a maximum of ten fax numbers for a memory transmission.
If you need to send your fax to more than t en locati ons, you can i ncrease th e
number of fax locations dialed by including a Group Dial number as one of
the ten numb ers.
After sending, the documents are automatically erased from memory.
1 Adjust the document gui des to match the width of the documen t.
2 Slide the document face down into the Automatic Document Feeder
until it is grasped and pulled into the machine.
3
If necessary, adjust the resolution and contrast. For details, see
Resolution on page 3-21 and Contrast on page 3-23.
3 Press the Menu button, then press the Memory TX button on the One-
Touch keypad.
Manual Faxing 3-9
Page 87

If an error occurred dur i ng your fax transmission, an error message appears
in the display. If you receive an error message, press Stop to clear the
message and try to send the document again.
For a listing of error messages and their meanings, see LCD Display Error
Messages on page 7-8.
Memory Transmission (Broadcasting)
With Memory Transmission, documents are stored in memory and
automatically sent to one or more remote stations. Use this feature to send
your documents to multiple locations.
You can store a maximum of ten fax numbers for a memory transmission.
If you need to send your fax to more than t en locati ons, you can i ncrease th e
number of fax locations dialed by including a Group Dial number as one of
the ten numb ers.
After sending, the documents are automatically erased from memory.
1 Adjust the document gui des to match the width of the documen t.
2 Slide the document face down into the Automatic Document Feeder
until it is grasped and pulled into the machine.
3
If necessary, adjust the resolution and contrast. For details, see
Resolution on page 3-21 and Contrast on page 3-23.
3 Press the Menu button, then press the Memory TX button on the One-
Touch keypad.
Manual Faxing 3-9
Page 88

4 Enter the telephone number of the remote machine. There are several
methods available to do this:
l
Direct entry of the telephone number using the numeric keypad.
l
One-Touch keypad dialing of stored telephone numbers (see One-
Touch Dialing on page 3-15).
l
Speed Number dialing using the numeric keypad (see Speed
Dialing on page 3-18).
5 Press the START button.
The display prompts you to enter another fax number.
ANOTHER
FAX NUMBER?
6 If you have entered the last fax number setting, press the Stop button.
Or
If you want to send the document to more than one location, press the
Enter button and enter another fax number using the numeric keypad,
One-Touch keypad, or two digit Speed Dial number.
The number appears in the display.
Repeat Step 6 until you have entered the last fax number setting and
pressed the Stop button.
7 The document is scanned into memory. The display shows the
remaining memory capacity and the number of pages. The machine
dials the first telephone number and begins sending the document.
Note: Only a single Group Dial number may be used per Memory
Transmission operation.
3-10 Sending a Fax
Page 89

Delayed Transmission
You can configure your machine to send a fax at a specified time. Up to 30
delayed transmission operations can be reserved in your machine.
1 Place the document face down in the Automatic Document Feeder. If
desired, adjust the resolution and contrast . For detail s, see Reso lution on
page 3-21 and Contrast on page 3-23.
2 Press the Menu button, then press the Delay TX button on the One-
Touch keypad.
3 Enter the telephone number of the remote machine. There are several
methods available to do this:
l
Direct entry of the telephone number using the numeric keypad.
l
One-Touch keypad dialing of stored telephone numbers (see One-
Touch Dialing on page 3-15).
l
Group and Speed number dialing using the numeric keypad (see
Configuring Automatic Dialing Features on page 3-15).
4 Press the Enter button.
The display prompts you to enter another fax number.
3
ANOTHER
FAX NUMBER?
Manual Faxing 3-11
Page 90

5 If you have entered the last fax number setting, press the Stop button.
Or
If you want to send the document to more than one location, press the
Enter button and enter another fax number using the numeric keypad,
One-Touch keypad, or two digit Speed Dial number.
The number appears in the display.
Repeat Step 5 until you have entered the last fax number setting and
pressed the Stop button.
Note: Only a single Group dial number may be used in a Delayed
Tran smission Operation.
6 The display prompts you to enter an ID for the transmission. If you
want to assign a name to the transmission, enter it using the Number
keypad. If not, proceed to Step 7.
For details on how to enter letters using the Number keypad, see
Entering Alphanumeric Characters on page 3-24.
7 Press the Enter but ton. The di splay shows the curr ent time o n the upper
line and prompts you to ente r the time the fax will be sent.
3-12 Sending a Fax
CURRENT 12:30PM
START 12:30PM
Page 91

8 Using the Number keypad, enter the time the fax will be sent. Use the
Up or Down button to switch between AM and PM. If you set a time
earlier than the current ti me, the docum ent will be sent at that time on
the following day.
9 After entering the time, press the Enter button.
10 The machine scans the document into memory, returns to Standby
mode and displays a reminder that a Delayed Transmission is set.
Note: If you want to cancel the Delayed Transmission, see
Standby Operation
on page 3-14
.
Canceling a
Adding Documents To a Standby Operation
You can add documents to a Delayed Transmission previously entered into
memory .
1 Place the document face down in the Automatic Document Feeder. If
necessary, adjust the resolution and contras t. For detail s, see Resol ution
on page 3-21 and Contrast on page 3-23.
2 Press the Menu button.
3 Press the Add/Cancel button on the One-Touch keypad. The LCD
display prompts you to select ADD or CANCEL. Note that 1. Add is
already selected in the LCD display.
OPERATION
1.ADD 2.CANCEL
3
Manual Faxing 3-13
Page 92

8 Using the Number keypad, enter the time the fax will be sent. Use the
Up or Down button to switch between AM and PM. If you set a time
earlier than the current ti me, the docum ent will be sent at that time on
the following day.
9 After entering the time, press the Enter button.
10 The machine scans the document into memory, returns to Standby
mode and displays a reminder that a Delayed Transmission is set.
Note: If you want to cancel the Delayed Transmission, see
Standby Operation
on page 3-14
.
Canceling a
Adding Documents To a Standby Operation
You can add documents to a Delayed Transmission previously entered into
memory .
1 Place the document face down in the Automatic Document Feeder. If
necessary, adjust the resolution and contras t. For detail s, see Resol ution
on page 3-21 and Contrast on page 3-23.
2 Press the Menu button.
3 Press the Add/Cancel button on the One-Touch keypad. The LCD
display prompts you to select ADD or CANCEL. Note that 1. Add is
already selected in the LCD display.
OPERATION
1.ADD 2.CANCEL
3
Manual Faxing 3-13
Page 93

4 Press the Enter button to confirm. The display shows operations
currently reserved in memory.
09:00AM DELAY TX
FAX1
5 Press the Down or Up buttons repeatedly until you find the operation
you want to add documents to, then press the Enter button.
6 The machine automatically adds the new documents to the pages
already in memory, displays the number of total pa ges and added pages,
then returns to Standby mode.
Canceling a Standby Operation
1
Press Menu, then press the Add/Cancel button on the One-Touch
keypad. The display prompts you to select 1.ADD or 2.CANCEL.
2 Press 2. The display shows the operations currently reserved in
memory .
3 Press the Down or Up button repeatedly until you find the operation
you want to cancel.
4 Press the Enter button to cancel the job.
3-14 Sending a Fax
Page 94

4 Press the Enter button to confirm. The display shows operations
currently reserved in memory.
09:00AM DELAY TX
FAX1
5 Press the Down or Up buttons repeatedly until you find the operation
you want to add documents to, then press the Enter button.
6 The machine automatically adds the new documents to the pages
already in memory, displays the number of total pa ges and added pages,
then returns to Standby mode.
Canceling a Standby Operation
1
Press Menu, then press the Add/Cancel button on the One-Touch
keypad. The display prompts you to select 1.ADD or 2.CANCEL.
2 Press 2. The display shows the operations currently reserved in
memory .
3 Press the Down or Up button repeatedly until you find the operation
you want to cancel.
4 Press the Enter button to cancel the job.
3-14 Sending a Fax
Page 95

Configuring Automatic Dialing Features
One-Touch Dial ing
One-Touch dialing lets you use any one of the 20 One-Touch buttons
located on the left of the machine’s control panel to automatically dial a
number.
Storing a Number for One-Touch Dialing
1 When assigning a One-Touch number, press and hold the One-Touch
button (01 through 20) for 2 seconds. The display shows TXX:, where
"T" signifies you are assigning a One-Touch number and "XX"
designates the selected One-Touch button.
2 Enter the number you want to store by u sing the Number keyp ad, then
press Enter.
To insert a pause between numbers when dialing, press the Redial/
Pause button.
If you make a mistake while entering a number, use the Right or Left
buttons to move the cursor under the wrong digit, then enter the correct
digit, or press the Delete button.
3
3 The display asks you to en ter a name. Using the Number keypa d, enter
the desired name (up to 20 alphanumeric characters). For information
on how to enter names, see En terin g Alphanume ric Char acters on page
3-24.
Or
If you don’t want to assign a name, skip this step.
Configuring Automatic Dialing Features 3-15
Page 96

Note: If you assign a name to the number, the name will appear in the
display whenever you press the One-Touch button.
4 Press the Enter button when the name appears correctly or without
entering a name.
To set another One-Touch number, press the desired One-Touch button
and repeat steps 2 through this step.
Or
To return to Standby mode, press the Stop button.
Using the One-Touch Address Label Sheet
A One-Touch label sheet is included with your machine. As you store
numbers in One-Touch dial buttons, make a note of the numbers on the
label to remind you which number is stored in each position.
3-16 Sending a Fax
Page 97

1 Remove the clear cover and label using a pointed instrument, as shown
below.
Label
Note: You may want to use pencil in case you wish to change these
numbers later.
3
2 Write information on the label and replace the label and cover.
Configuring Automatic Dialing Features 3-17
Page 98

Speed Dialing
You can store up to 80 numbers in two digit Speed Dial locations (01-80).
Storing a Number for Speed Dialing
1 Press and hold the Speed button for 2 seconds.
2 Enter a two digit loc ation number (01 through 80) to whi ch you want to
store a number, then press the Enter button.
If a number is already stored in the location, the display shows the
number in the upper line and ED:1 DEL:2 NXT:3 in the bottom line.
Press 1 to edit that number, 2 to delete that number, or 3 to keep that
number and choose another location.
3 Enter the telephone number you want to store, then press the Enter
button.
4 To assign a name to the number, enter the desired name. For
information on how to enter names, see Entering Alphanumeric
Characters on page 3-24.
Or
If you don’t want to assign a name, skip this step.
5 Press the Enter button when the name appears correctly or without
entering a name.
6 To store more telephone numbers, repeat steps 2 through 5.
Or
To return to Standby mode, press the Stop button.
3-18 Sending a Fax
Page 99

Group Dialing (for Multi-Address Tr ansmission)
Multiple One-Touch and speed dial numbers can be registered as a Group.
By using the Group number, you can send a document to multiple parties in
a single operation. Up to ten numbers may be stored as a Group. Your
machine will dial th e remo te number s in a store d sequen ce. I f the nu mber i s
busy, your machine will dial the next stored number and after dialing all of
the stored numbers, will automatically redial any number previously busy.
Before you can use this feature, you must coordinate and store Group
numbers.
Storing One-Touch or Speed Dial Numbers for Group
Dialing
1 Press the Menu button, then press the Group Dial button on the One-
Touch keypad.
2 Enter a two digit location number (01 through 80) you want to use for
Group Dial, then press the Enter button.
The display prompts you to press a One-Touch button or enter a Speed
Dial number which you wish to include in the group.
3
ENTER ONE-TOUCH
/ SPEED DIAL> ##
3 Press the One-Touch button assigned to the fax number you wish to
include in the group.
Or
Enter the two digit Speed Dial location to which the fax number you
wish to include in the group is stored.
Configuring Automatic Dialing Features 3-19
Page 100

4 Press the Enter button. Repeat steps 3 and this step to include more
destination numbers in the group.
5 Press the Stop button when you have e nt ere d a ll t he telephone numbers
you want to include in the group. The display asks you to enter a name.
6 To assign a name to the Group, enter the desired name.
Or
If you don’t want to assign a name, skip this step.
7 Press the Enter button. If you want to store another group dial number,
repeat steps 2 through 7.
Or
To return to Standby mode, press the Stop button.
Assigning a Gr oup to a One-Touch Button
You can assign a Group number to a One-Touch button. The One-Touch
button can then be used to call all the telephone numbers stored in the
Group. Before you can use this feature, you must first register the Group
number and then assign the registered Group number to an empty OneT ouch butt on. Refer to Storing a Number for One-Touch Dialing on page 3-
15 or Storing a Number for Speed Dialing on page 3-18 for details.
1 Press and hold the One-Touch button that you want to assign (01
through 20) for 2 seconds.
2 Enter the two digit Group number.
3 Press the Enter button. The group number is assigned to the selected
One-Touch button, and the display asks you to enter One-Touch button
for another group dial if you wish.
3-20 Sending a Fax
 Loading...