

Page 1

V1.0
April 2010
Xerox® WorkCentre 3550
User Guide
Page 2

©2010 Xerox Corporation. All Rights Reserved. Unpublished rights reserved under the copyright laws of the United States. Contents
of this publication may not be reproduced in any form without permission of Xerox Corporation.
®
Xerox
and the sphere of connectivity design are trademarks of Xerox Corporation in the United States and/or other countries.
Document version 1.0: March 2010
Page 3

Table of Contents
1 Getting Started
Machine Overview. . . . . . . . . . . . . . . . . . . . . . . . . . . . . . . . . . . . . . . . . . . . . . . . . . . . . . . . . . . . . . . . . . . . . . . . .8
Powering on the Machine . . . . . . . . . . . . . . . . . . . . . . . . . . . . . . . . . . . . . . . . . . . . . . . . . . . . . . . . . . . . . . . . 11
Control Panel Overview . . . . . . . . . . . . . . . . . . . . . . . . . . . . . . . . . . . . . . . . . . . . . . . . . . . . . . . . . . . . . . . . . . 12
Supplied Software . . . . . . . . . . . . . . . . . . . . . . . . . . . . . . . . . . . . . . . . . . . . . . . . . . . . . . . . . . . . . . . . . . . . . . . 16
Loading Paper . . . . . . . . . . . . . . . . . . . . . . . . . . . . . . . . . . . . . . . . . . . . . . . . . . . . . . . . . . . . . . . . . . . . . . . . . . 17
Loading Documents . . . . . . . . . . . . . . . . . . . . . . . . . . . . . . . . . . . . . . . . . . . . . . . . . . . . . . . . . . . . . . . . . . . . . 18
Media Output Locations . . . . . . . . . . . . . . . . . . . . . . . . . . . . . . . . . . . . . . . . . . . . . . . . . . . . . . . . . . . . . . . . . 19
Machine Status . . . . . . . . . . . . . . . . . . . . . . . . . . . . . . . . . . . . . . . . . . . . . . . . . . . . . . . . . . . . . . . . . . . . . . . . . 20
General Care and Consumables . . . . . . . . . . . . . . . . . . . . . . . . . . . . . . . . . . . . . . . . . . . . . . . . . . . . . . . . . . 23
Further Assistance. . . . . . . . . . . . . . . . . . . . . . . . . . . . . . . . . . . . . . . . . . . . . . . . . . . . . . . . . . . . . . . . . . . . . . . 24
2Copy
Copy Procedure . . . . . . . . . . . . . . . . . . . . . . . . . . . . . . . . . . . . . . . . . . . . . . . . . . . . . . . . . . . . . . . . . . . . . . . . . 26
Copy Options . . . . . . . . . . . . . . . . . . . . . . . . . . . . . . . . . . . . . . . . . . . . . . . . . . . . . . . . . . . . . . . . . . . . . . . . . . . 29
Using the Layout Options . . . . . . . . . . . . . . . . . . . . . . . . . . . . . . . . . . . . . . . . . . . . . . . . . . . . . . . . . . . . . . . . 31
Media Output Locations . . . . . . . . . . . . . . . . . . . . . . . . . . . . . . . . . . . . . . . . . . . . . . . . . . . . . . . . . . . . . . . . . 35
3Fax
Fax Procedure. . . . . . . . . . . . . . . . . . . . . . . . . . . . . . . . . . . . . . . . . . . . . . . . . . . . . . . . . . . . . . . . . . . . . . . . . . . 38
Fax Options . . . . . . . . . . . . . . . . . . . . . . . . . . . . . . . . . . . . . . . . . . . . . . . . . . . . . . . . . . . . . . . . . . . . . . . . . . . . . 42
Using Fax Send Options . . . . . . . . . . . . . . . . . . . . . . . . . . . . . . . . . . . . . . . . . . . . . . . . . . . . . . . . . . . . . . . . . 45
Using Fax Forward . . . . . . . . . . . . . . . . . . . . . . . . . . . . . . . . . . . . . . . . . . . . . . . . . . . . . . . . . . . . . . . . . . . . . . 48
Using Secure Receive . . . . . . . . . . . . . . . . . . . . . . . . . . . . . . . . . . . . . . . . . . . . . . . . . . . . . . . . . . . . . . . . . . . . 50
Address Book . . . . . . . . . . . . . . . . . . . . . . . . . . . . . . . . . . . . . . . . . . . . . . . . . . . . . . . . . . . . . . . . . . . . . . . . . . . 51
Fax from PC. . . . . . . . . . . . . . . . . . . . . . . . . . . . . . . . . . . . . . . . . . . . . . . . . . . . . . . . . . . . . . . . . . . . . . . . . . . . . 55
Receiving Faxes . . . . . . . . . . . . . . . . . . . . . . . . . . . . . . . . . . . . . . . . . . . . . . . . . . . . . . . . . . . . . . . . . . . . . . . . . 56
4Scan
Introduction . . . . . . . . . . . . . . . . . . . . . . . . . . . . . . . . . . . . . . . . . . . . . . . . . . . . . . . . . . . . . . . . . . . . . . . . . . . . 60
Scan Procedure . . . . . . . . . . . . . . . . . . . . . . . . . . . . . . . . . . . . . . . . . . . . . . . . . . . . . . . . . . . . . . . . . . . . . . . . . 61
Scan Options. . . . . . . . . . . . . . . . . . . . . . . . . . . . . . . . . . . . . . . . . . . . . . . . . . . . . . . . . . . . . . . . . . . . . . . . . . . . 66
Scan Using TWAIN . . . . . . . . . . . . . . . . . . . . . . . . . . . . . . . . . . . . . . . . . . . . . . . . . . . . . . . . . . . . . . . . . . . . . . 68
Scan Using WIA Driver. . . . . . . . . . . . . . . . . . . . . . . . . . . . . . . . . . . . . . . . . . . . . . . . . . . . . . . . . . . . . . . . . . . 69
Network Scan Manager . . . . . . . . . . . . . . . . . . . . . . . . . . . . . . . . . . . . . . . . . . . . . . . . . . . . . . . . . . . . . . . . . . 70
Macintosh Scanning . . . . . . . . . . . . . . . . . . . . . . . . . . . . . . . . . . . . . . . . . . . . . . . . . . . . . . . . . . . . . . . . . . . . . 71
Linux Scanning. . . . . . . . . . . . . . . . . . . . . . . . . . . . . . . . . . . . . . . . . . . . . . . . . . . . . . . . . . . . . . . . . . . . . . . . . . 72
Xerox WorkCentre 3550
User Guide
3
Page 4

5E-mail
E-mail Procedure . . . . . . . . . . . . . . . . . . . . . . . . . . . . . . . . . . . . . . . . . . . . . . . . . . . . . . . . . . . . . . . . . . . . . . . . 76
E-mail Options . . . . . . . . . . . . . . . . . . . . . . . . . . . . . . . . . . . . . . . . . . . . . . . . . . . . . . . . . . . . . . . . . . . . . . . . . . 80
Address Book. . . . . . . . . . . . . . . . . . . . . . . . . . . . . . . . . . . . . . . . . . . . . . . . . . . . . . . . . . . . . . . . . . . . . . . . . . . . 82
Smart Key Addresses . . . . . . . . . . . . . . . . . . . . . . . . . . . . . . . . . . . . . . . . . . . . . . . . . . . . . . . . . . . . . . . . . . . . 84
6Print
Printing using Windows . . . . . . . . . . . . . . . . . . . . . . . . . . . . . . . . . . . . . . . . . . . . . . . . . . . . . . . . . . . . . . . . . . 86
Printing using Macintosh. . . . . . . . . . . . . . . . . . . . . . . . . . . . . . . . . . . . . . . . . . . . . . . . . . . . . . . . . . . . . . . . . 96
Printing using Linux. . . . . . . . . . . . . . . . . . . . . . . . . . . . . . . . . . . . . . . . . . . . . . . . . . . . . . . . . . . . . . . . . . . . . . 99
7USB Port
Inserting the USB Memory Device . . . . . . . . . . . . . . . . . . . . . . . . . . . . . . . . . . . . . . . . . . . . . . . . . . . . . . . 102
Scanning to USB Memory Device . . . . . . . . . . . . . . . . . . . . . . . . . . . . . . . . . . . . . . . . . . . . . . . . . . . . . . . . 103
Printing from USB Memory Device. . . . . . . . . . . . . . . . . . . . . . . . . . . . . . . . . . . . . . . . . . . . . . . . . . . . . . . 105
Managing USB Memory . . . . . . . . . . . . . . . . . . . . . . . . . . . . . . . . . . . . . . . . . . . . . . . . . . . . . . . . . . . . . . . . 106
8 CentreWare Internet Services
Using CentreWare Internet Services . . . . . . . . . . . . . . . . . . . . . . . . . . . . . . . . . . . . . . . . . . . . . . . . . . . . . 108
Welcome . . . . . . . . . . . . . . . . . . . . . . . . . . . . . . . . . . . . . . . . . . . . . . . . . . . . . . . . . . . . . . . . . . . . . . . . . . . . . . 109
Status . . . . . . . . . . . . . . . . . . . . . . . . . . . . . . . . . . . . . . . . . . . . . . . . . . . . . . . . . . . . . . . . . . . . . . . . . . . . . . . . . 110
Jobs . . . . . . . . . . . . . . . . . . . . . . . . . . . . . . . . . . . . . . . . . . . . . . . . . . . . . . . . . . . . . . . . . . . . . . . . . . . . . . . . . . . 112
Print . . . . . . . . . . . . . . . . . . . . . . . . . . . . . . . . . . . . . . . . . . . . . . . . . . . . . . . . . . . . . . . . . . . . . . . . . . . . . . . . . . . 113
Properties . . . . . . . . . . . . . . . . . . . . . . . . . . . . . . . . . . . . . . . . . . . . . . . . . . . . . . . . . . . . . . . . . . . . . . . . . . . . . . 114
Support . . . . . . . . . . . . . . . . . . . . . . . . . . . . . . . . . . . . . . . . . . . . . . . . . . . . . . . . . . . . . . . . . . . . . . . . . . . . . . . . 115
9 Paper and Media
Loading Paper. . . . . . . . . . . . . . . . . . . . . . . . . . . . . . . . . . . . . . . . . . . . . . . . . . . . . . . . . . . . . . . . . . . . . . . . . . 118
Setting Paper Size and Type. . . . . . . . . . . . . . . . . . . . . . . . . . . . . . . . . . . . . . . . . . . . . . . . . . . . . . . . . . . . . 122
Media Specifications . . . . . . . . . . . . . . . . . . . . . . . . . . . . . . . . . . . . . . . . . . . . . . . . . . . . . . . . . . . . . . . . . . . 124
10 Machine Status and Setups
Machine Status Menu . . . . . . . . . . . . . . . . . . . . . . . . . . . . . . . . . . . . . . . . . . . . . . . . . . . . . . . . . . . . . . . . . . 128
Information Pages . . . . . . . . . . . . . . . . . . . . . . . . . . . . . . . . . . . . . . . . . . . . . . . . . . . . . . . . . . . . . . . . . . . . . 134
Copy Defaults . . . . . . . . . . . . . . . . . . . . . . . . . . . . . . . . . . . . . . . . . . . . . . . . . . . . . . . . . . . . . . . . . . . . . . . . . . 136
E-mail Defaults. . . . . . . . . . . . . . . . . . . . . . . . . . . . . . . . . . . . . . . . . . . . . . . . . . . . . . . . . . . . . . . . . . . . . . . . . 138
Fax Setup . . . . . . . . . . . . . . . . . . . . . . . . . . . . . . . . . . . . . . . . . . . . . . . . . . . . . . . . . . . . . . . . . . . . . . . . . . . . . . 140
Scan Defaults . . . . . . . . . . . . . . . . . . . . . . . . . . . . . . . . . . . . . . . . . . . . . . . . . . . . . . . . . . . . . . . . . . . . . . . . . . 145
System Setup . . . . . . . . . . . . . . . . . . . . . . . . . . . . . . . . . . . . . . . . . . . . . . . . . . . . . . . . . . . . . . . . . . . . . . . . . . 147
Network Settings . . . . . . . . . . . . . . . . . . . . . . . . . . . . . . . . . . . . . . . . . . . . . . . . . . . . . . . . . . . . . . . . . . . . . . . 154
11 General Care and Troubleshooting
General Care . . . . . . . . . . . . . . . . . . . . . . . . . . . . . . . . . . . . . . . . . . . . . . . . . . . . . . . . . . . . . . . . . . . . . . . . . . . 156
4
Xerox WorkCentre 3550
User Guide
Page 5

Troubleshooting. . . . . . . . . . . . . . . . . . . . . . . . . . . . . . . . . . . . . . . . . . . . . . . . . . . . . . . . . . . . . . . . . . . . . . . . 161
Further Assistance. . . . . . . . . . . . . . . . . . . . . . . . . . . . . . . . . . . . . . . . . . . . . . . . . . . . . . . . . . . . . . . . . . . . . . 190
12 Specifications
Machine Specifications . . . . . . . . . . . . . . . . . . . . . . . . . . . . . . . . . . . . . . . . . . . . . . . . . . . . . . . . . . . . . . . . . 192
Electrical Specifications . . . . . . . . . . . . . . . . . . . . . . . . . . . . . . . . . . . . . . . . . . . . . . . . . . . . . . . . . . . . . . . . . 195
Feature Specifications . . . . . . . . . . . . . . . . . . . . . . . . . . . . . . . . . . . . . . . . . . . . . . . . . . . . . . . . . . . . . . . . . . 196
13 Safety
Notices and Safety . . . . . . . . . . . . . . . . . . . . . . . . . . . . . . . . . . . . . . . . . . . . . . . . . . . . . . . . . . . . . . . . . . . . . 200
Safety Labels and Symbols. . . . . . . . . . . . . . . . . . . . . . . . . . . . . . . . . . . . . . . . . . . . . . . . . . . . . . . . . . . . . . 201
Operational Safety Information. . . . . . . . . . . . . . . . . . . . . . . . . . . . . . . . . . . . . . . . . . . . . . . . . . . . . . . . . 202
Basic Regulations . . . . . . . . . . . . . . . . . . . . . . . . . . . . . . . . . . . . . . . . . . . . . . . . . . . . . . . . . . . . . . . . . . . . . . 206
Copy Regulations . . . . . . . . . . . . . . . . . . . . . . . . . . . . . . . . . . . . . . . . . . . . . . . . . . . . . . . . . . . . . . . . . . . . . . 208
Fax Regulations . . . . . . . . . . . . . . . . . . . . . . . . . . . . . . . . . . . . . . . . . . . . . . . . . . . . . . . . . . . . . . . . . . . . . . . . 211
Material Safety Data . . . . . . . . . . . . . . . . . . . . . . . . . . . . . . . . . . . . . . . . . . . . . . . . . . . . . . . . . . . . . . . . . . . 214
Product Recycling and Disposal . . . . . . . . . . . . . . . . . . . . . . . . . . . . . . . . . . . . . . . . . . . . . . . . . . . . . . . . . 215
Energy Program Compliance . . . . . . . . . . . . . . . . . . . . . . . . . . . . . . . . . . . . . . . . . . . . . . . . . . . . . . . . . . . . 217
EH&S Contact Information . . . . . . . . . . . . . . . . . . . . . . . . . . . . . . . . . . . . . . . . . . . . . . . . . . . . . . . . . . . . . 218
IndexIndex
Xerox WorkCentre 3550
User Guide
5
Page 6

6
Xerox WorkCentre 3550
User Guide
Page 7

Getting Started
This chapter includes:
• Machine Overview on page 8
• Powering on the Machine on page 11
• Control Panel Overview on page 12
• Supplied Software on page 16
• Loading Paper on page 17
• Loading Documents on page 18
• Media Output Locations on page 19
• Machine Status on page 20
• General Care and Consumables on page 23
• Further Assistance on page 24
1
Xerox WorkCentre 3550
User Guide
7
Page 8
Machine Overview
1
2
3
4
5
6
8
9
10
11
12
13
14
15
16
17
18
19
7
1112123
13
4145
15
6
16
7
17
8189
19
10
Machine Overview
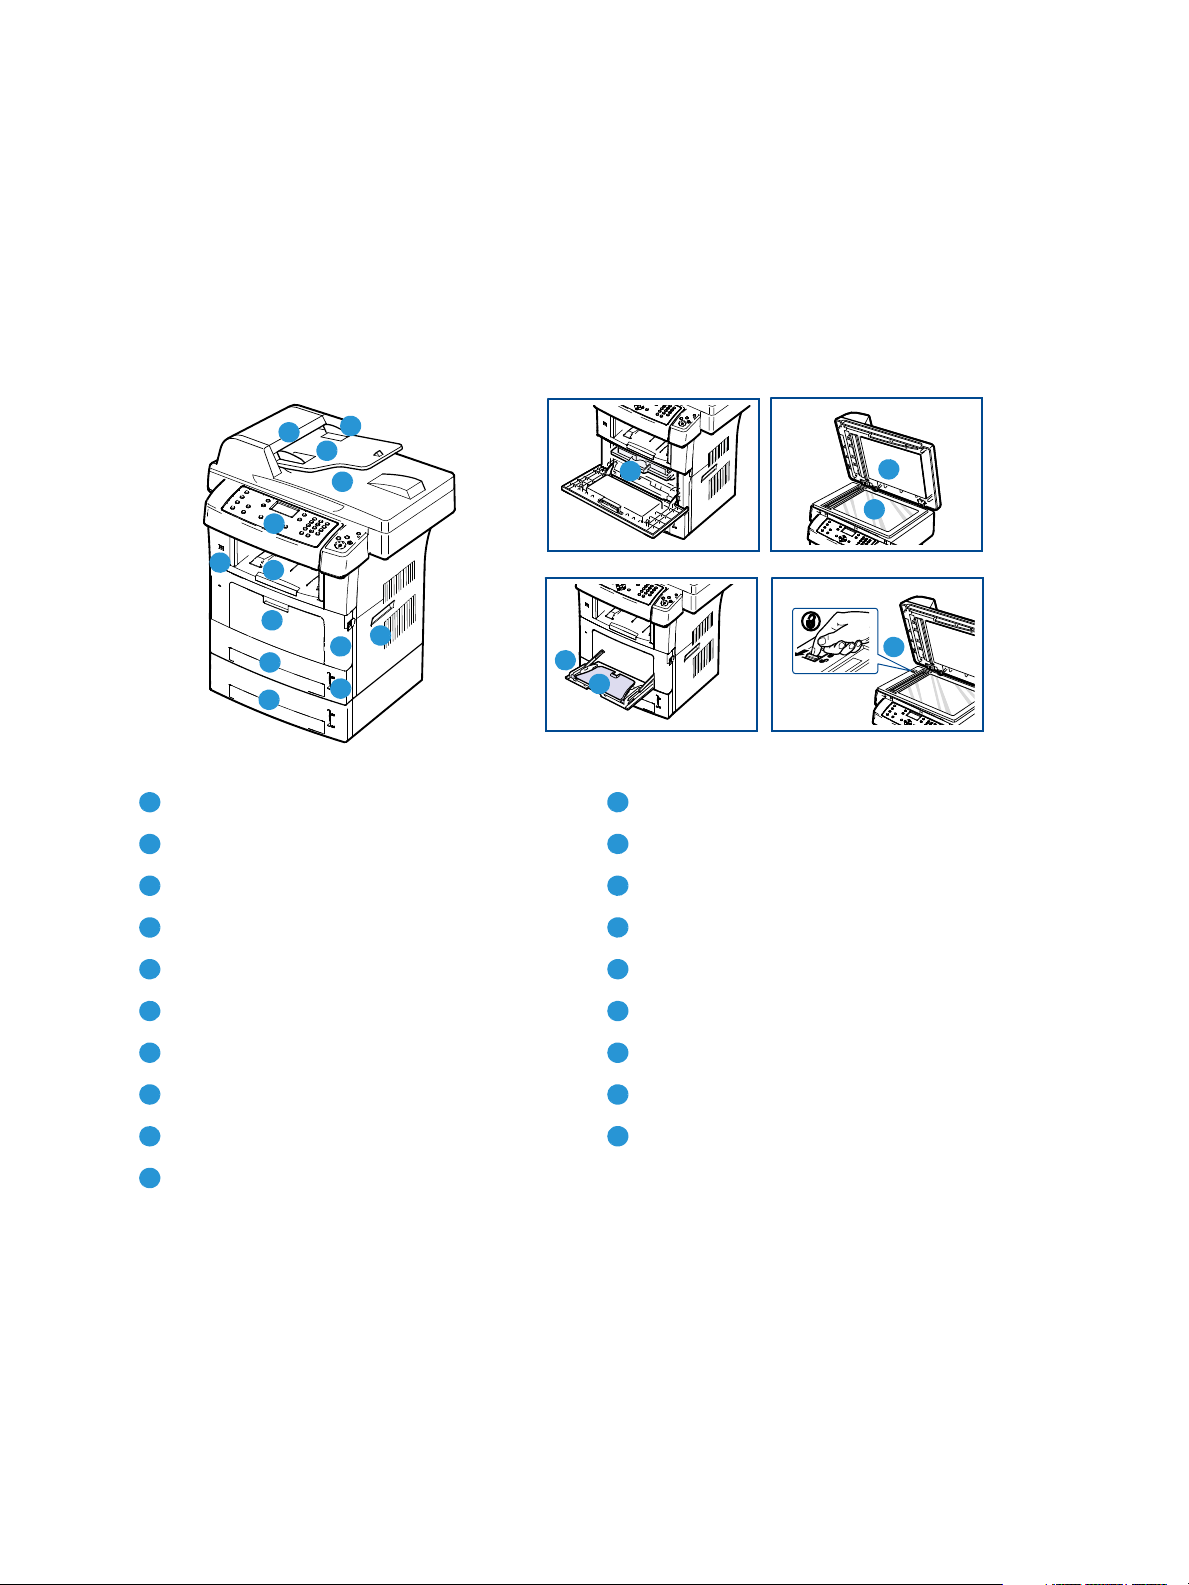
Before you use your machine, take some time to familiarize yourself with the various features and
options.
Front View
Document Feeder Cover Paper Level Indicator
Document Feeder Width Guides Front Door
Document Feeder Input Tray Handle
Document Feeder Output Tray Print Cartridge
Control Panel Bypass Tray Extension
Output Tray Bypass Tray Paper Width Guides
USB Memory Port Document Glass Cover
Bypass Tray Document Glass
Tray 1 Scanner Lock Switch
Tray 2 (Optional)
8
Xerox WorkCentre 3550
User Guide
Page 9
Rear View
2
6
1
3
4
5
7
8
9
162738495
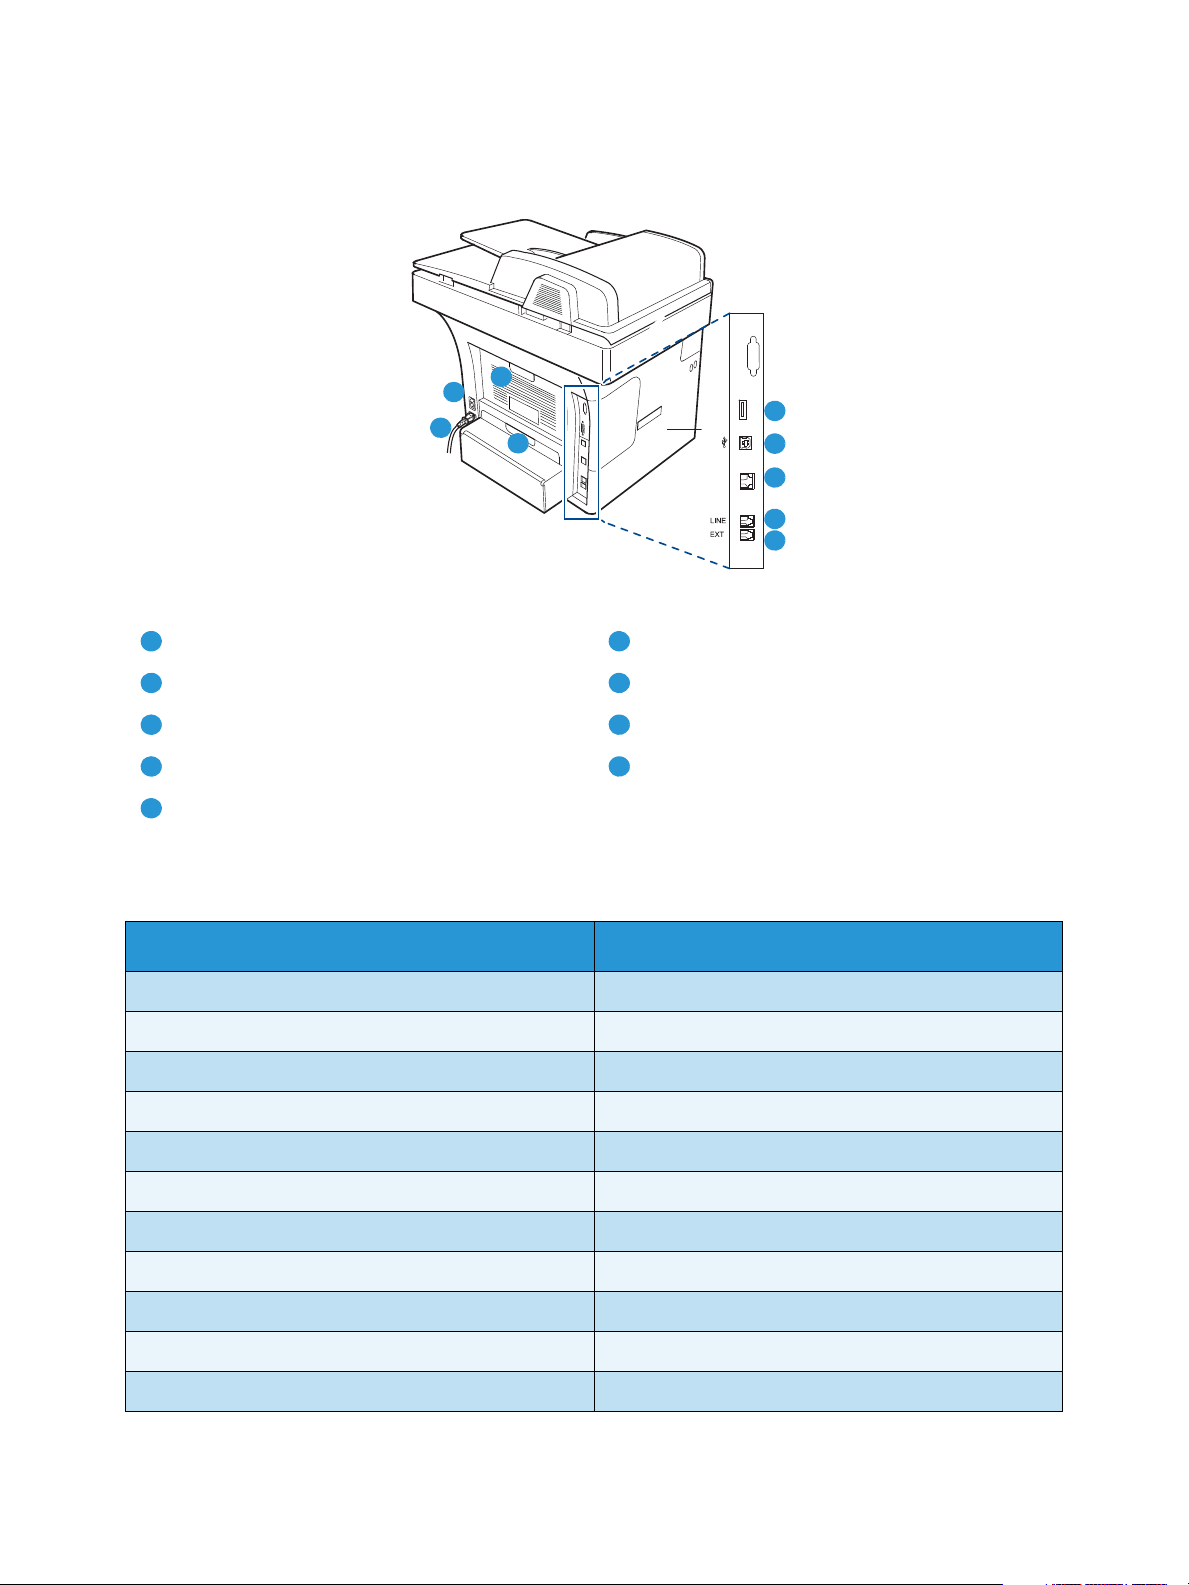
Card Reader Slot Power Switch
Machine Overview
USB Port Power Cord
Network Port Rear Door
Telephone Line Socket Duplex Unit
Extension Telephone Socket (Ext)
Machine Components
Component Xerox WorkCentre 3550
Document Feeder (60 sheets) Standard
Paper Tray 1 (500 sheets) Standard
Bypass Tray (50 sheets) Standard
Digital Copying Standard
Fax and Fax from PC Standard
Network Printing Standard
Scan and E-mail Standard
Embedded Fax Standard
USB Memory Device Drive Standard
256 MB Memory Configuration Option
Paper Tray 2 (500 sheets) Option
Xerox WorkCentre 3550
User Guide
9
Page 10

Machine Overview
Component Xerox WorkCentre 3550
Stand Option
For eign Int erface De vice Option
10
Xerox WorkCentre 3550
User Guide
Page 11
Powering on the Machine
1
2
1
2
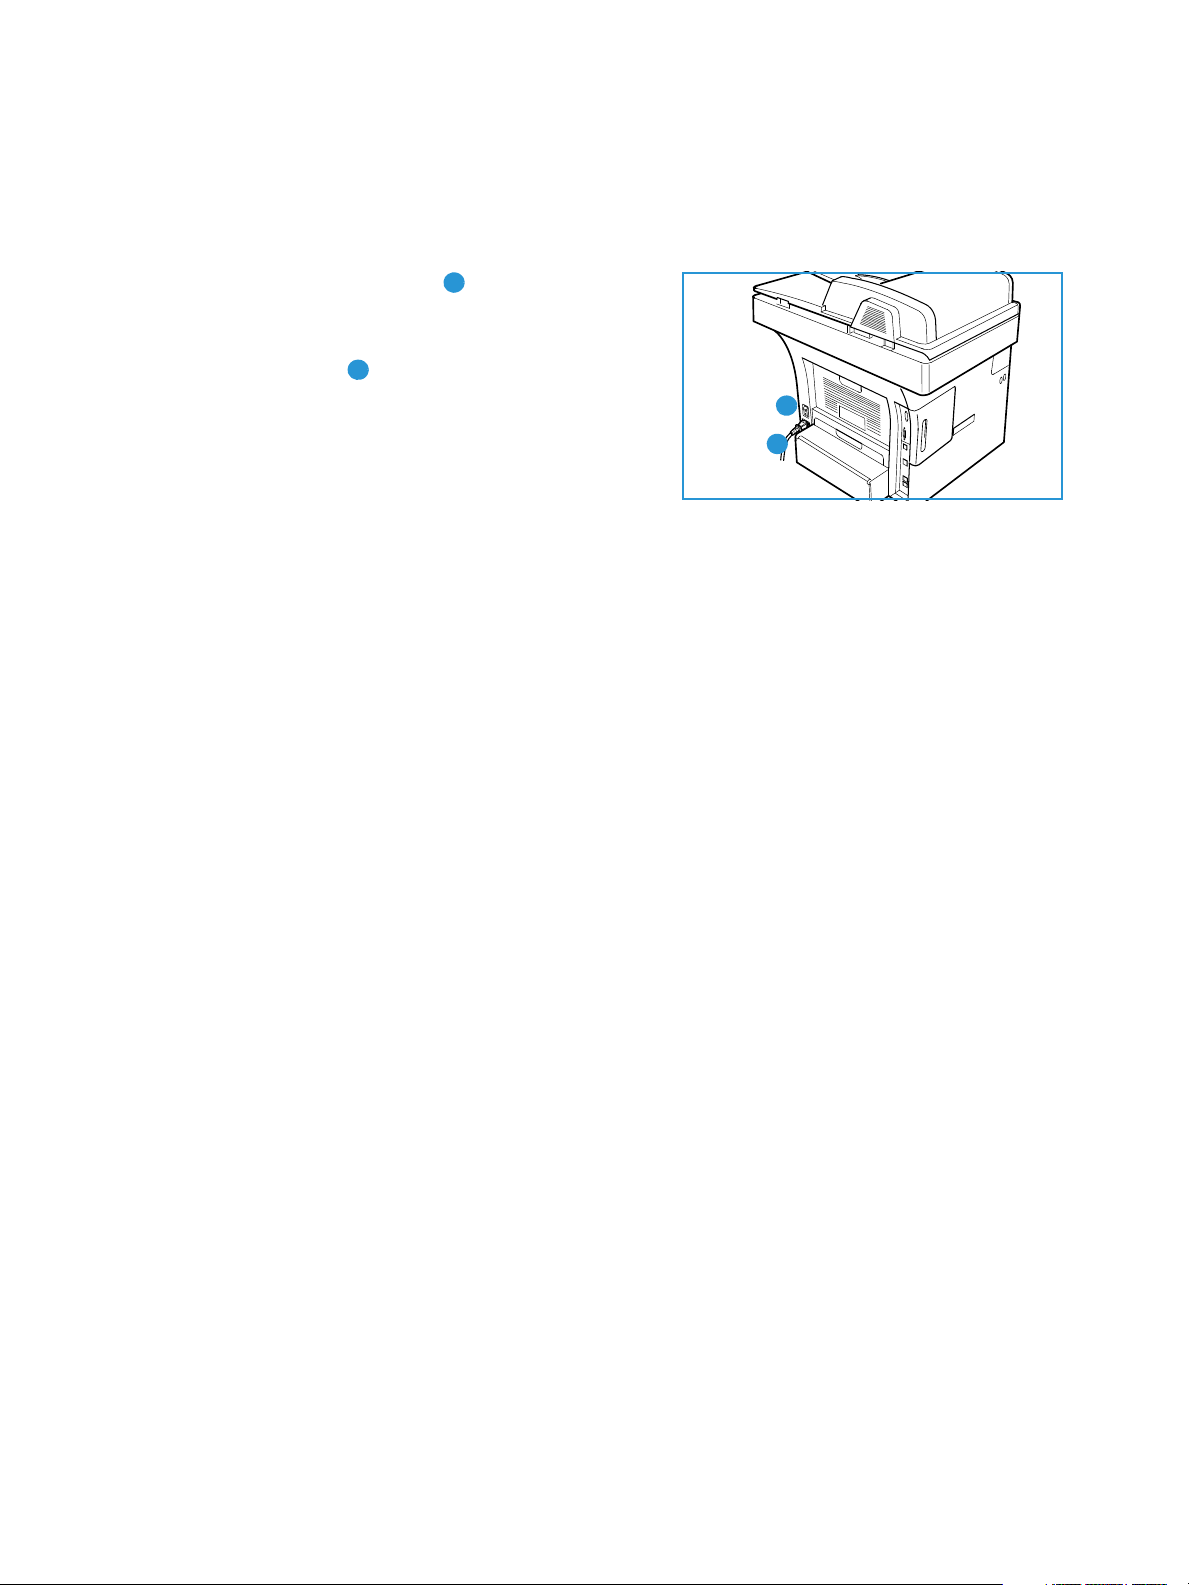
The On/Off switch and the power inlet are at the rear of the machine.
Powering on the Machine
1. Connect the
AC Power Cord to the machine and a
power outlet. The power cord must be plugged into a
grounded power socket.
2. Press the
ON/OFF switch to the ON (I) position.
3. To power OFF, press the ON/OFF switch to the (O)
position.
Xerox WorkCentre 3550
User Guide
11
Page 12
Control Panel Overview
1
2
3
4
5
6
8
9
10
7
14
15
11
17
18
16
20
19
21
22
23
12
13
1
234
5
678
9
10
11
12
13
14
15
16
17
18
Control Panel Overview
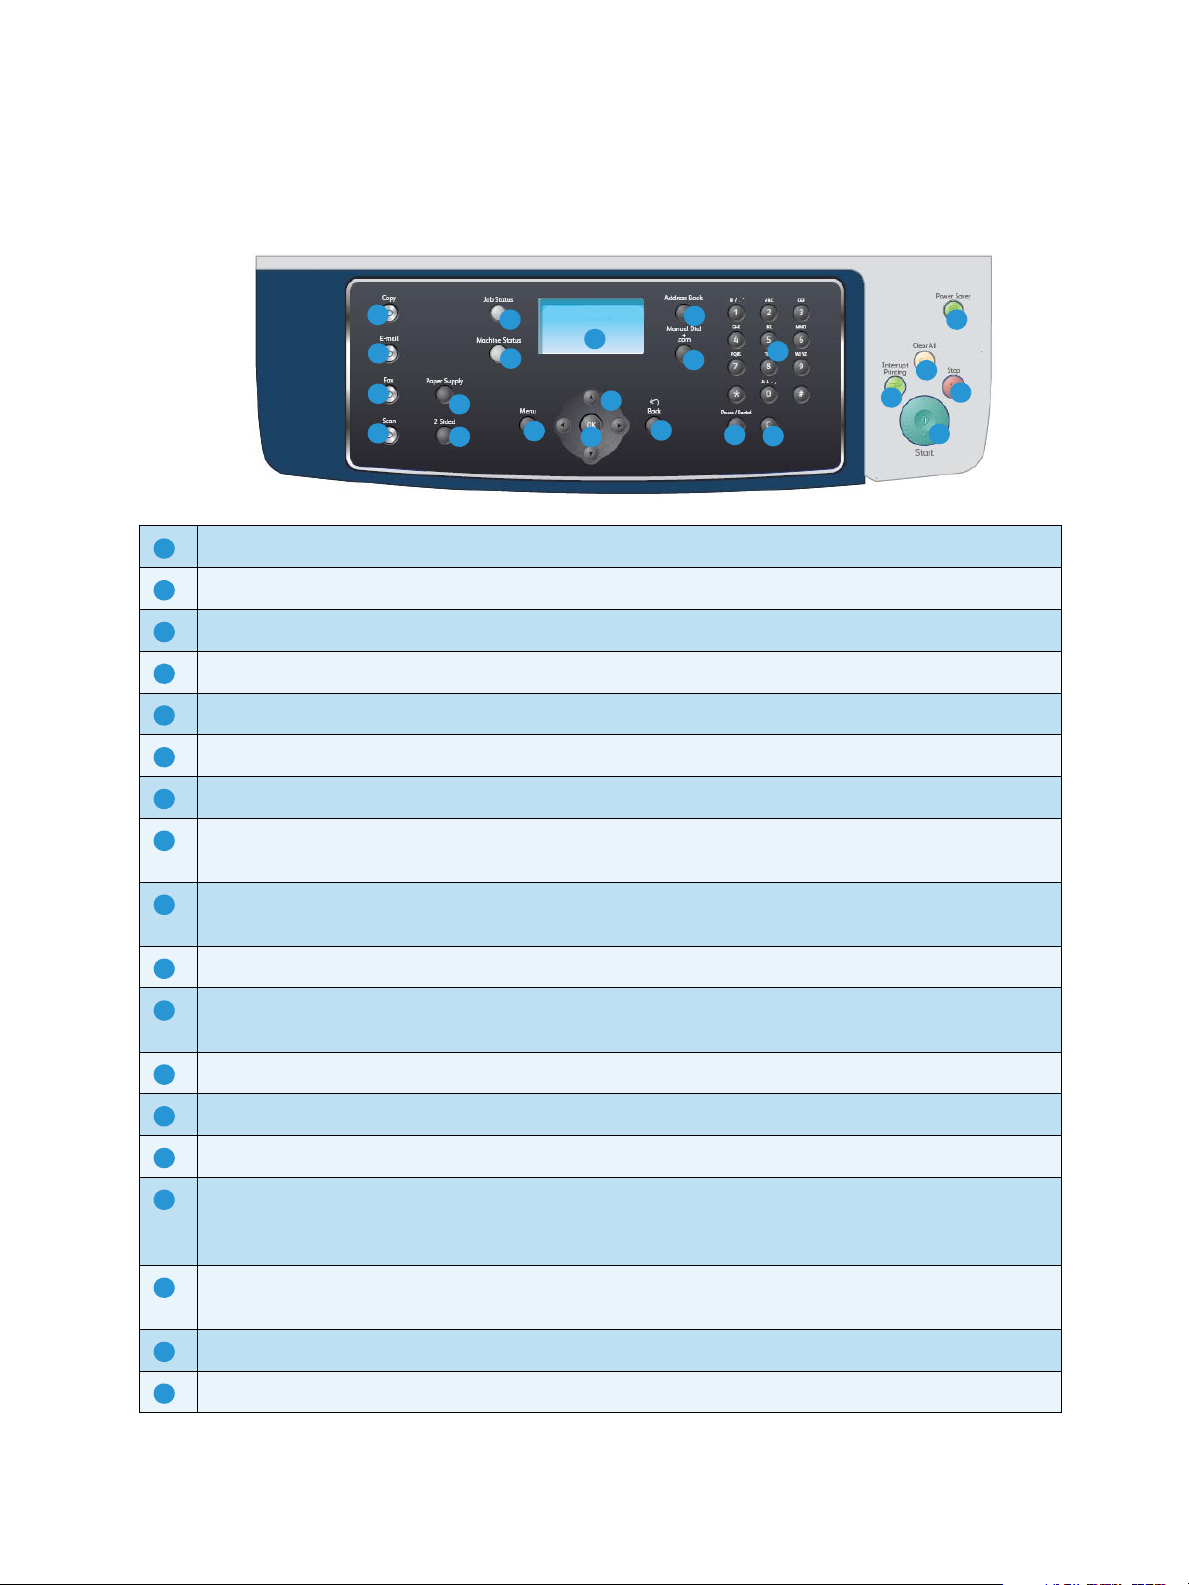
Copy: Activates Copy mode.
E-mail: Activates E-mail mode.
Fax : Activates Fax mode.
Scan: Activates Scan mode.
Paper Supply: Use to select a paper tray for the copy job.
2 Sided: Use to select whether your originals are 1 sided or 2 sided, or to produce 1 or 2 sided output.
Job Status: Displays job progress information.
Machine Status: Use to access machine information, status information, the machine serial number
and to print reports.
Display Screen: Displays and selects all the available programming features, plus general machine
information.
Menu: Enters Menu Mode and enables you to access options and settings.
Arrows: Use the up/down and left/right arrows to scroll through the options available in the selected
menu, and increase or decrease values.
OK: Confirms the selection on the screen.
Back: Sends you back one level in the menu.
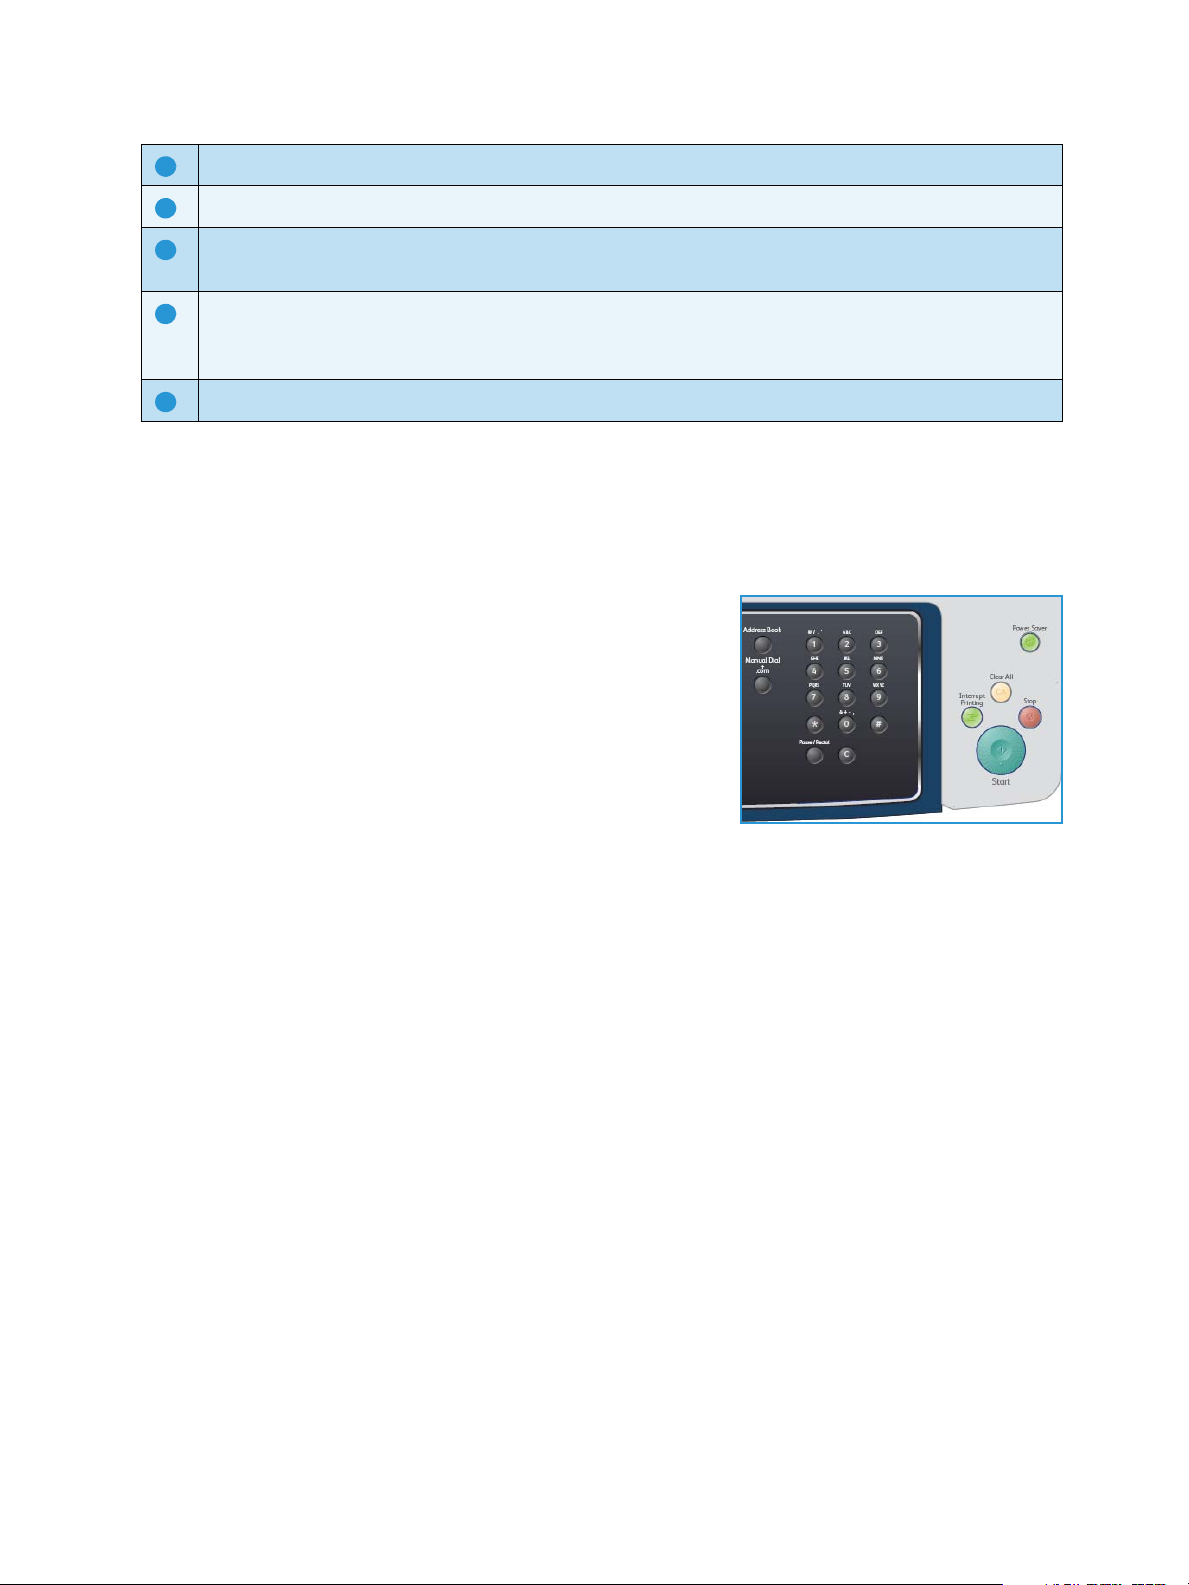
Address Book: Allows you to search for stored fax numbers or e-mail addresses.
Manual Dial + .com: In Fax mode this button opens the fax line. In E-mail mode this button provides
access to commonly used e-mail address text, for example .com or .org. The text available can be
customized using CentreWare Internet Services.
Pause / Redial: In standby mode it is used to redial the last number. In edit mode it is used to insert a
pause into a fax number.
‘C’ Cancel Entry: Cancels the previous entry made on the keypad.
Keypad: Use to enter alphanumeric characters.
12
Xerox WorkCentre 3550
User Guide
Page 13
Control Panel Overview
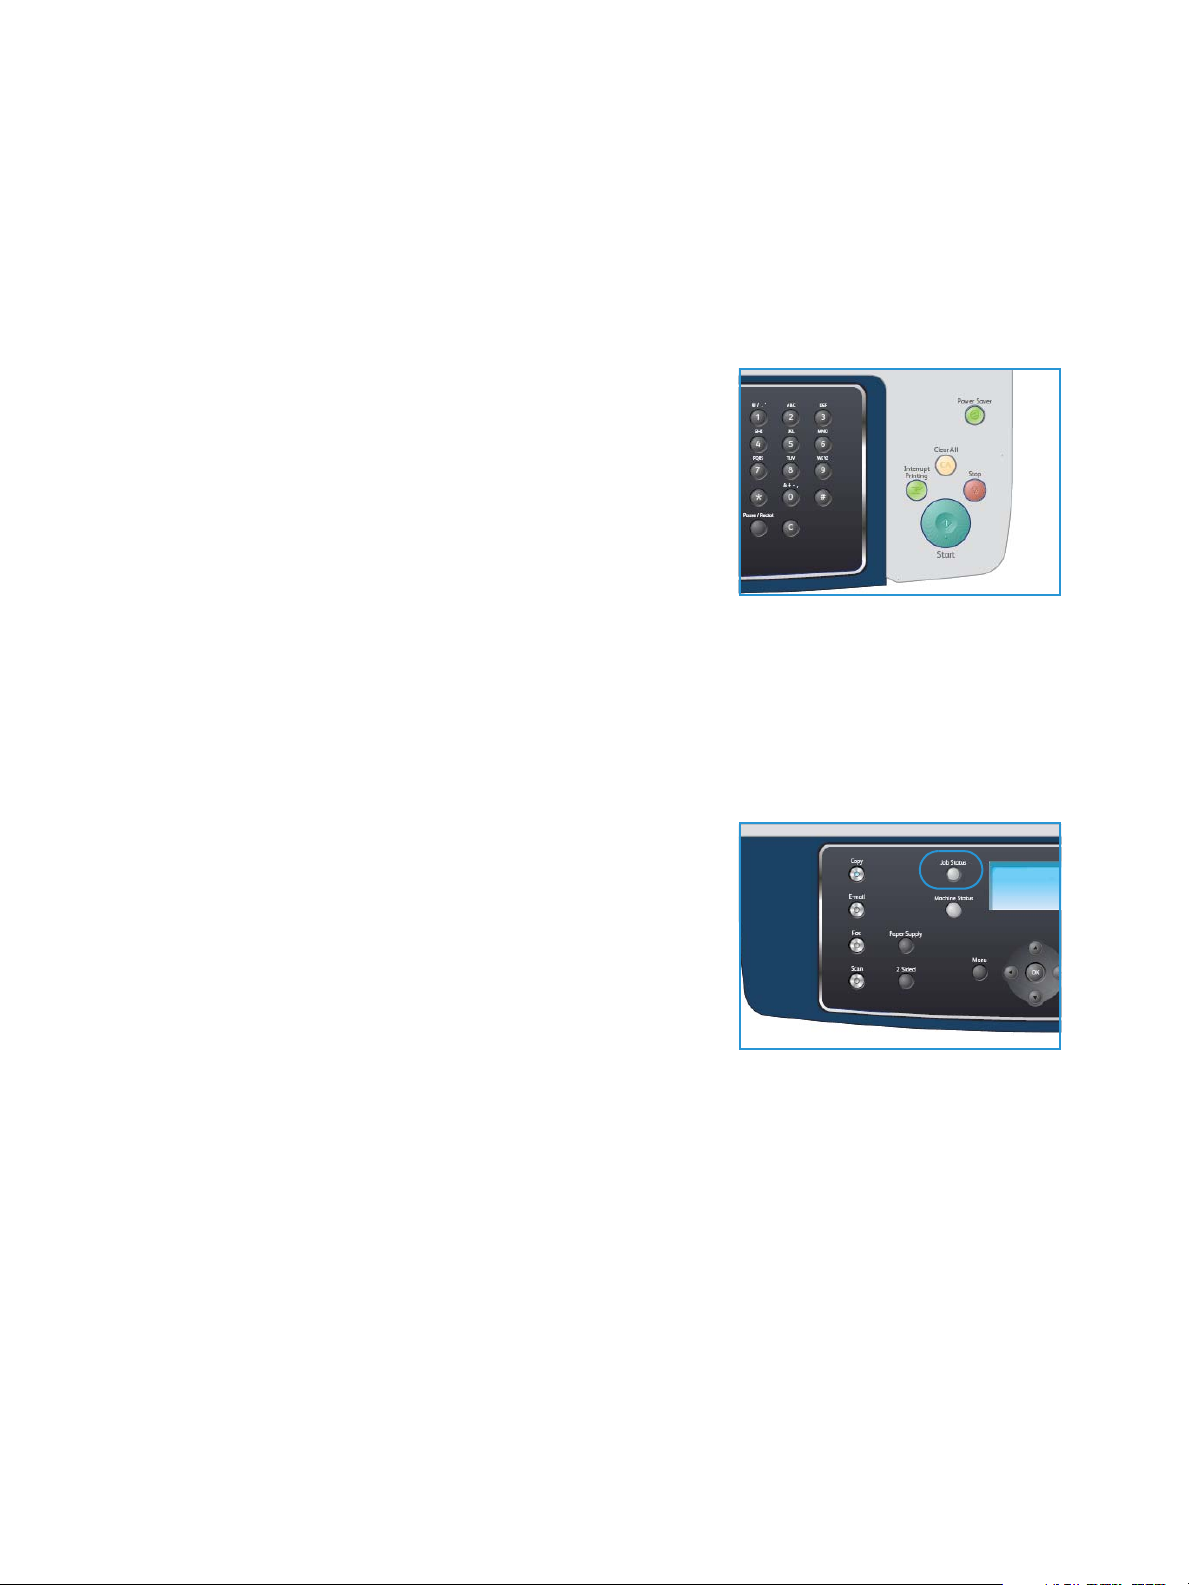
1920212223
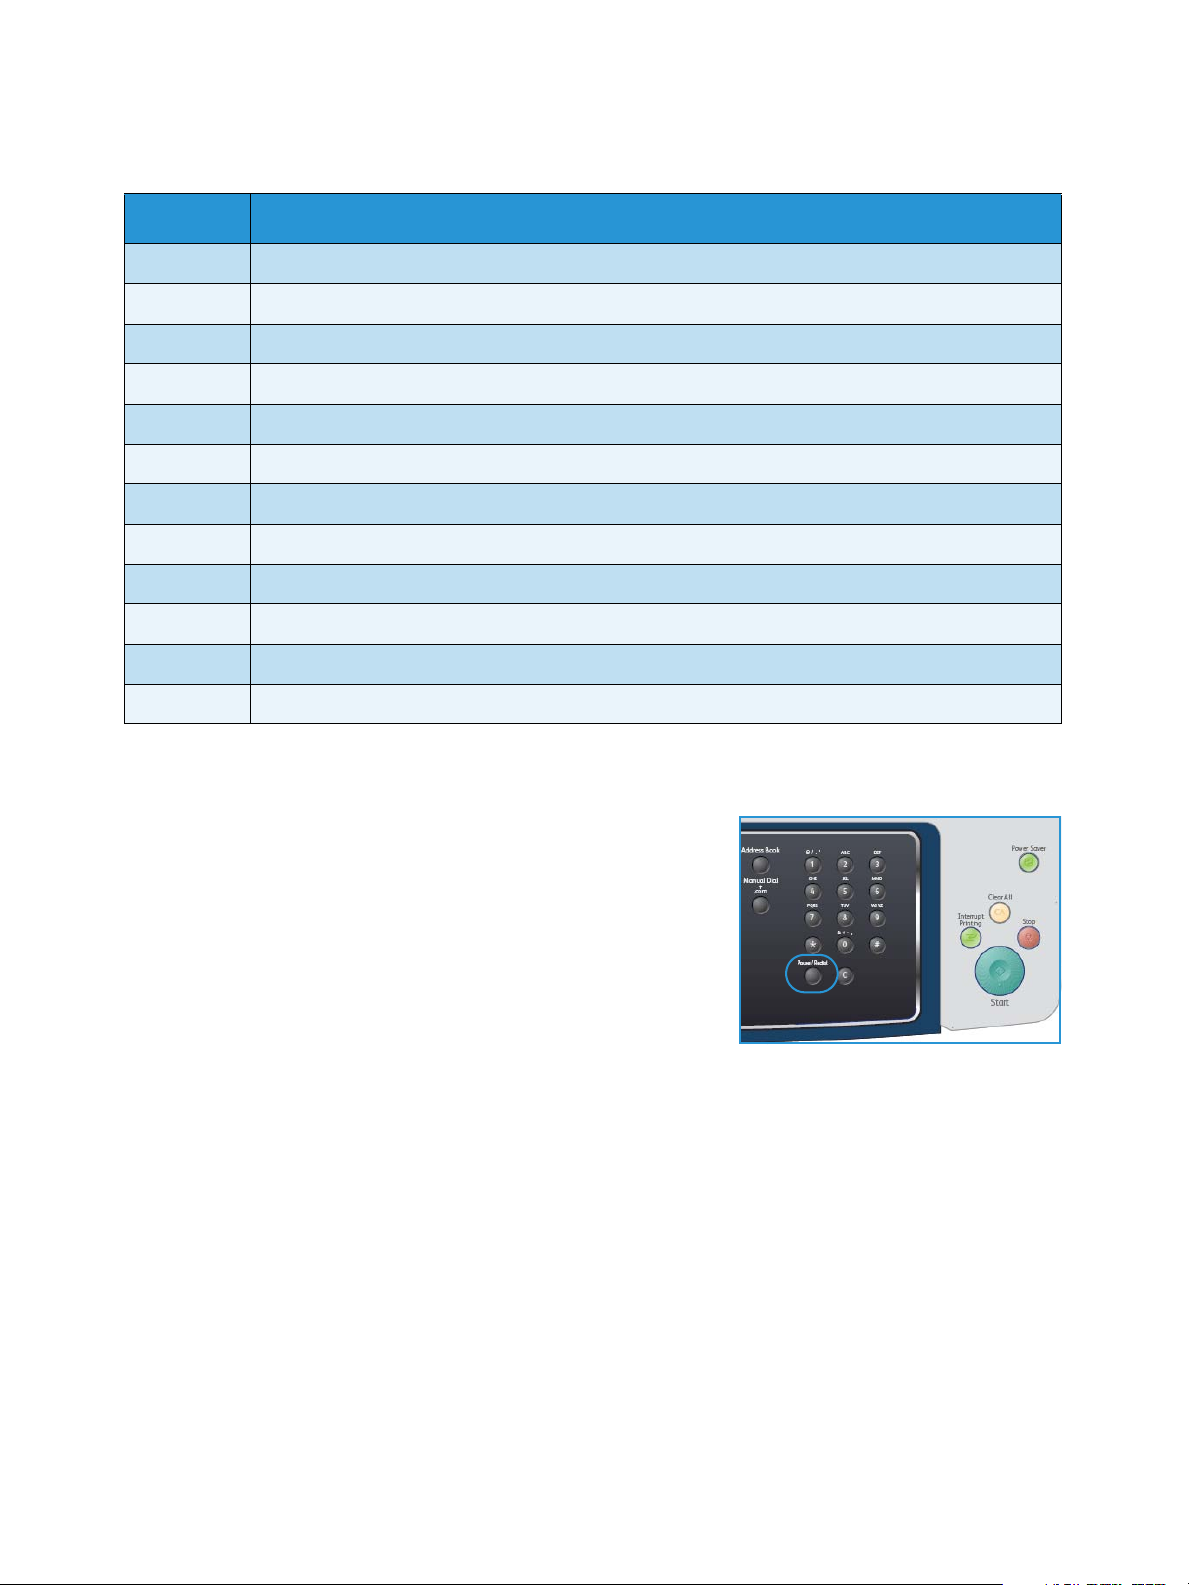
Interrupt Printing: Use to interrupt the current job to run a more urgent job.
Clear All: Press to clear the last selections made.
Power Saver: Sends the machine into power saver mode or power down. Press the button again to
restart a powered off machine.
Stop: Pressing the Stop button once displays a confirmation message but does not stop the machine.
Press Stop again to stop the job in progress. Pressing Stop also exits the Menu Mode. If you have
logged in to use the machine, pressing Stop will bring up the Log Out option.
Start: Use to activate a job.
Using the Keypad
As you perform various tasks, you may need to enter names and numbers. For example, when you set
up your machine, you enter your name or your company’s name, and the fax number. When you store
fax numbers or e-mail addresses in memory, you may also enter the corresponding names.
1. When you are prompted to enter a letter, locate the button
labeled with the character you want. Press the button until
the correct letter appears on the display.
• For example, to enter the letter O, press 6, labeled with
MNO.
• Each time you press 6, the display shows a different
letter, M, N, O, m, n, o and finally 6.
2. You can enter special characters, such as
Keypad Characters on page 14.
3. To enter additional letters, repeat step 1. If the next letter is printed on the same button wait 2
seconds between presses, or move the cursor by pressing the right arrow button and then press the
button again. The cursor will move to the right and the next letter will appear on the display.
If you make a mistake while entering a number or name, press the left arrow button to delete the
last digit or character. Then enter the correct number or character.
4. You can enter a space by pressing 1 twice.
5. When you have finished entering letters, press OK.
@ / . & + -. Refer to
Xerox WorkCentre 3550
User Guide
13
Page 14
Control Panel Overview
Keypad Characters
Key Assigned Numbers, Letters or Characters
1 space @ / . ‘ 1
2 A B C a b c 2
3 D E F d e f 3
4 G H I g h i 4
5 J K L j k l 5
6 M N O m n o 6
7 P Q R S p q r s 7
8 T U V t u v 8
9 W X Y Z w x y z 9
0 & + - , 0
* *
# #
Inserting a Pause
With some telephone systems, you must dial an access code (9,
for example) and listen for a second dial tone. In such cases, you
must insert a pause in the telephone number. You can insert a
pause while you are setting up speed dial numbers.
To insert a pause, press
while entering the telephone number.
A dash [ - ] appears on the display at the corresponding location.
Pause / Redial at the appropriate place
14
Xerox WorkCentre 3550
User Guide
Page 15
Control Panel Overview
Menu Overview
The control panel provides access to various menus to setup the machine or use the machine’s
functions. These menus can be accessed by pressing the appropriate service button e.g. Copy, Fax or Email and the Menu button. The menu options available are as follows:
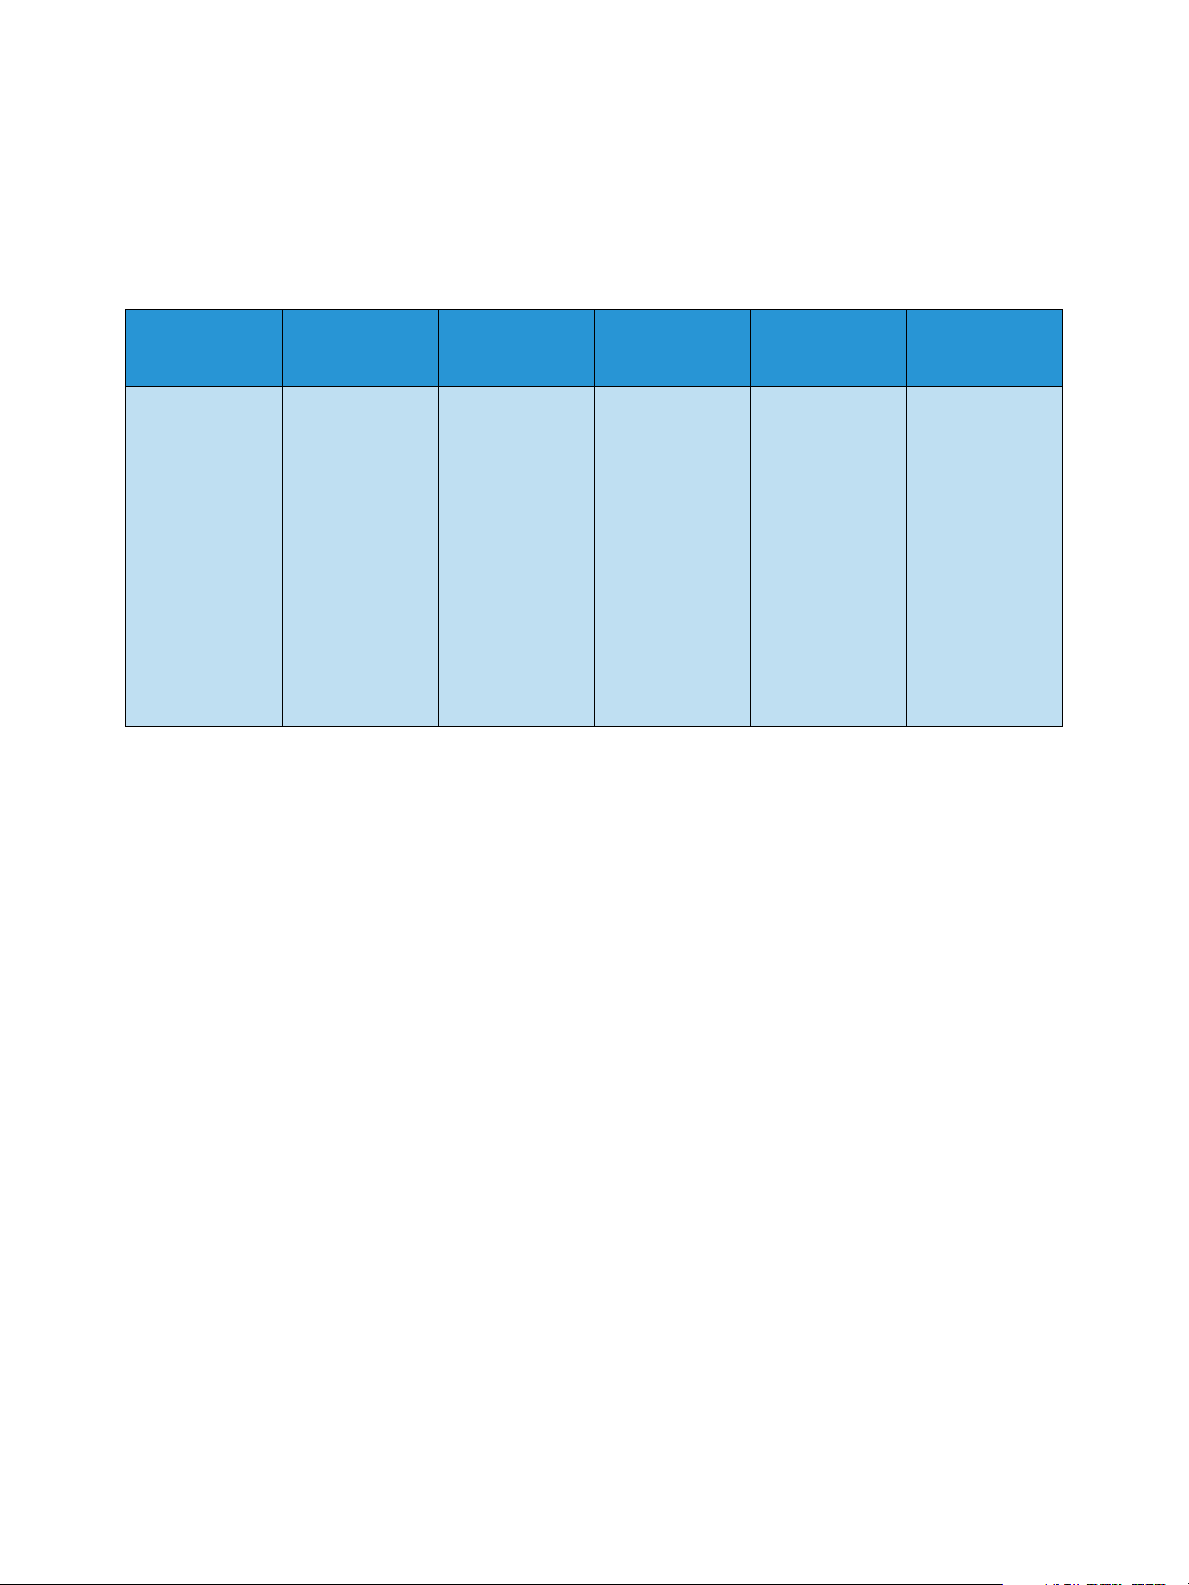
Copy Menu Fax Menu E-mail Menu Scan Menu
• Reduce/Enlarge
• Lighten/Darken
•Original Type
•Background
Suppression
•Layout
• Collation
•Original Size
• Lighten/Darken
•Background
Suppression
•Resolution
•Original Size
•Multi Send
•Delayed Start
• Priority Send
• Forward
•Secure
Receive
• Add Page
•Cancel Job
• File Format
• Lighten/Darken
•Output Color
• Original Type
•Background
Suppression
•Resolution
•Original Size
• File Format
•Lighten/Darken
•Output Color
• Original Type
•Background
Suppression
•Resolution
•Original Size
Machine
Status Menu
• Machine
Information
• Toner Level
• Information
Pages
•Copy
Defaults
•E-mail
Defaults
•Fax Setup
•Scan Defaults
• System Setup
• Network
Settings
Job Status
Menu
•Active Jobs
• Job Options
Note: For some services, the machine must be in the Ready state or additional selections may be
required before the Menu options can be accessed.
Xerox WorkCentre 3550
User Guide
15
Page 16
Supplied Software
Supplied Software
After you have setup your machine and connected it to your computer, you must install the printer and
scanner software. The software is supplied on the CD delivered with your machine, or can be
downloaded from www.xerox.com. The following software is provided:
CD Contents
Printer Software CD Windows • Printer Driver: Use the printer driver to
take full advantage of your printer’s
features.PCL6 and Postscript drivers are
provided.
• Postscript Printer Description (PPD) File:
Use the PostScript driver to print
documents with complex fonts and
graphics in the PS language.
• Printer Setting Utility (PSU): Use this
utility to configure and check print
settings.
• Scanner Driver: TWAIN and Windows
Image Acquisition (WIA) drivers are
available for scanning documents on your
machine.
• Status Monitor: This program allows you
to monitor the machine’s status and alerts
you when an error occurs during printing.
• Network Scan Manager: Use to change
scan settings and add or delete the folders
where scanned documents are saved on
your computer.
Printer Software CD Linux • Printer Driver: Use this driver to take full
advantage of your printer’s features.
• Postscript Printer Description (PPD) File:
Use this file to run your machine from a
Linux computer and print documents.
Printer Software CD Macintosh • Printer Driver: Use this driver to take full
advantage of your printer’s features.
• Postscript Printer Description (PPD) File:
Use this file to run your machine from a
Macintosh computer and print documents.
• Printer Setting Utility (PSU): Use this
utility to configure and check print
settings.
• Scanner Driver: A TWAIN driver is
available for scanning documents on your
machine.
16
Xerox WorkCentre 3550
User Guide
Page 17
Loading Paper
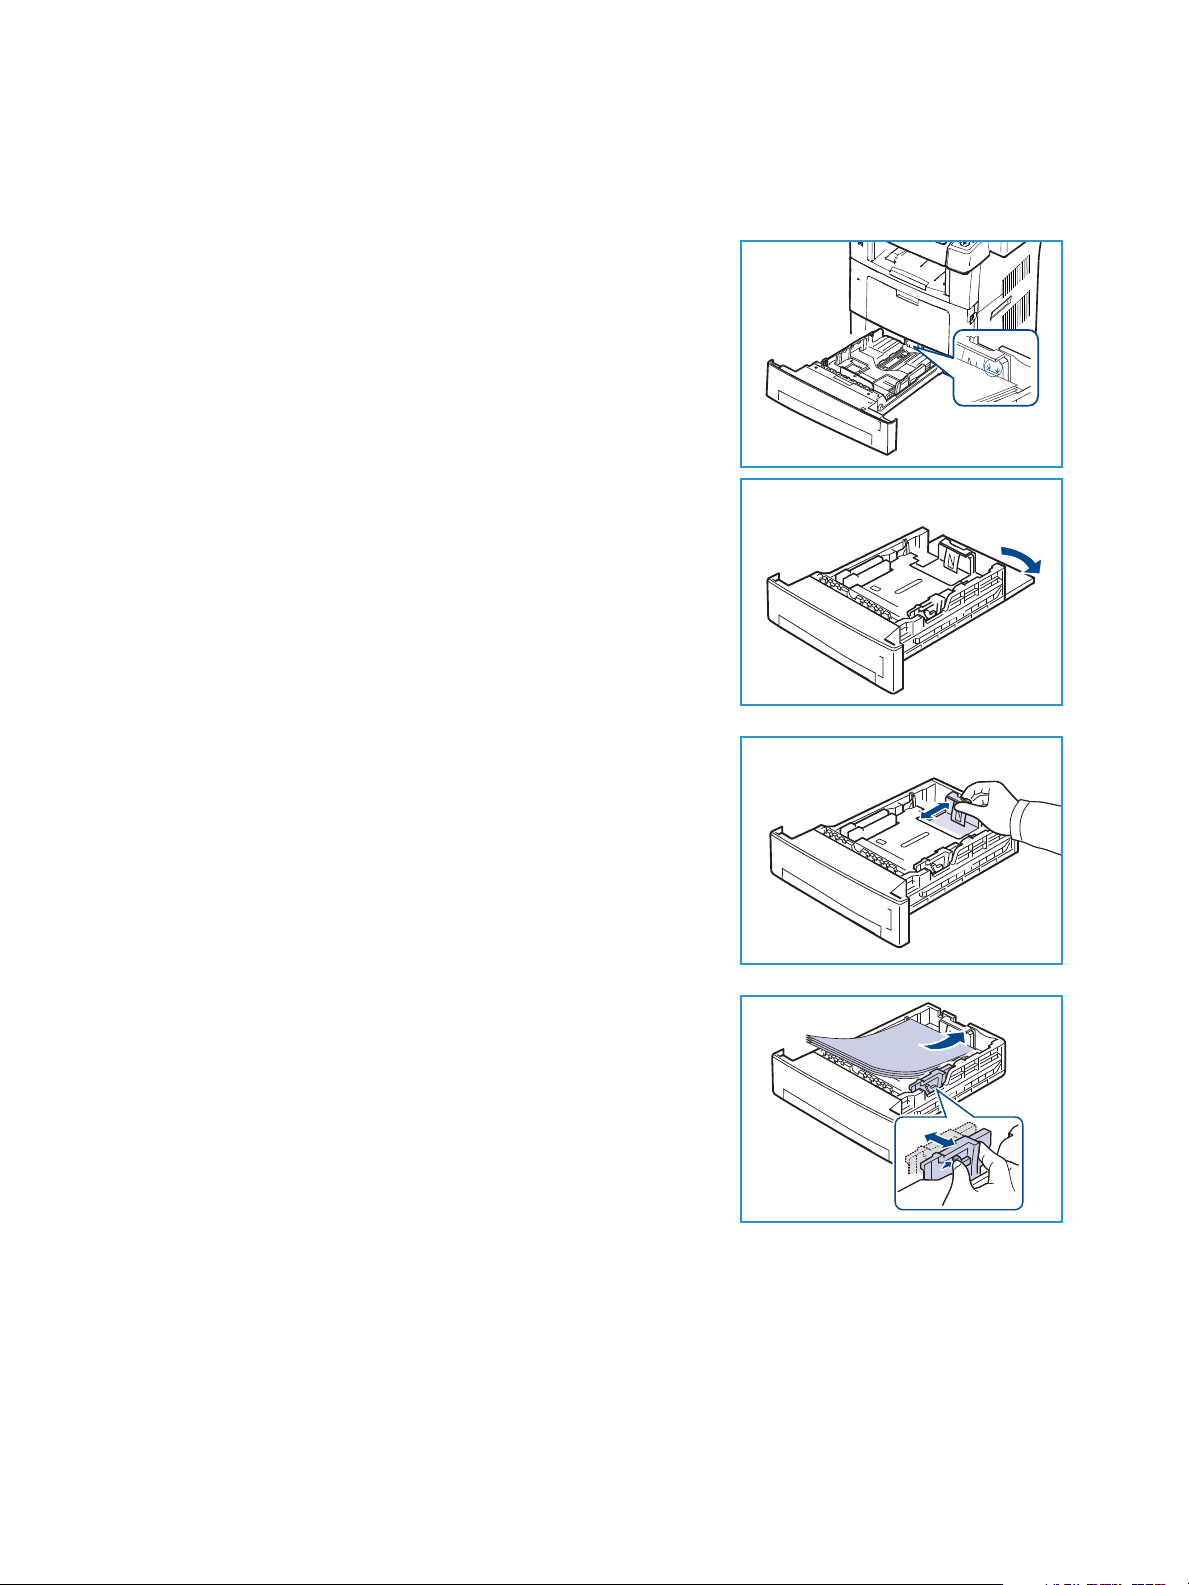
1. Open the paper tray.
The paper level indicator on the front of the tray 1 and the
optional tray 2 shows the amount of paper currently left in
the tray. When the tray is empty, the indicator of the bar is
completely lowered.
Note: The paper trays can each hold a maximum of 500
sheets of 20 lb (80 g/m²) bond paper. The bypass tray can
hold 50 sheets 20 lb (80 g/m²) bond paper.
2. If loading Legal, Oficio and Folio open the back of the paper
tray.
Loading Paper
3. Squeeze the rear guide and move from the current position
and into the correct position for the current paper size. Make
sure the guide clicks into place.
4. Load paper into the tray. Do not fill above the 28lb (105g)
line at the rear of the tray.
5. Position the side guide by squeezing the lever and sliding it
towards the stack of paper, until it gently touches the side of
the stack.
6. Insert the paper tray into the machine.
7. After loading paper in the paper tray, set the paper size and
type using the control panel. Press OK to confirm the settings
or Stop to change the settings. These settings will apply to
Copy and Fax modes.
For workstation printing, select the paper size and type in the application program you use on your
workstation.
Note: The settings made from the print driver override the settings on the control panel.
For more information on loading paper, refer to Paper and Media on page 117.
Xerox WorkCentre 3550
17
User Guide
Page 18
Loading Documents
Loading Documents
Documents can be loaded either into the document feeder or onto the document glass.
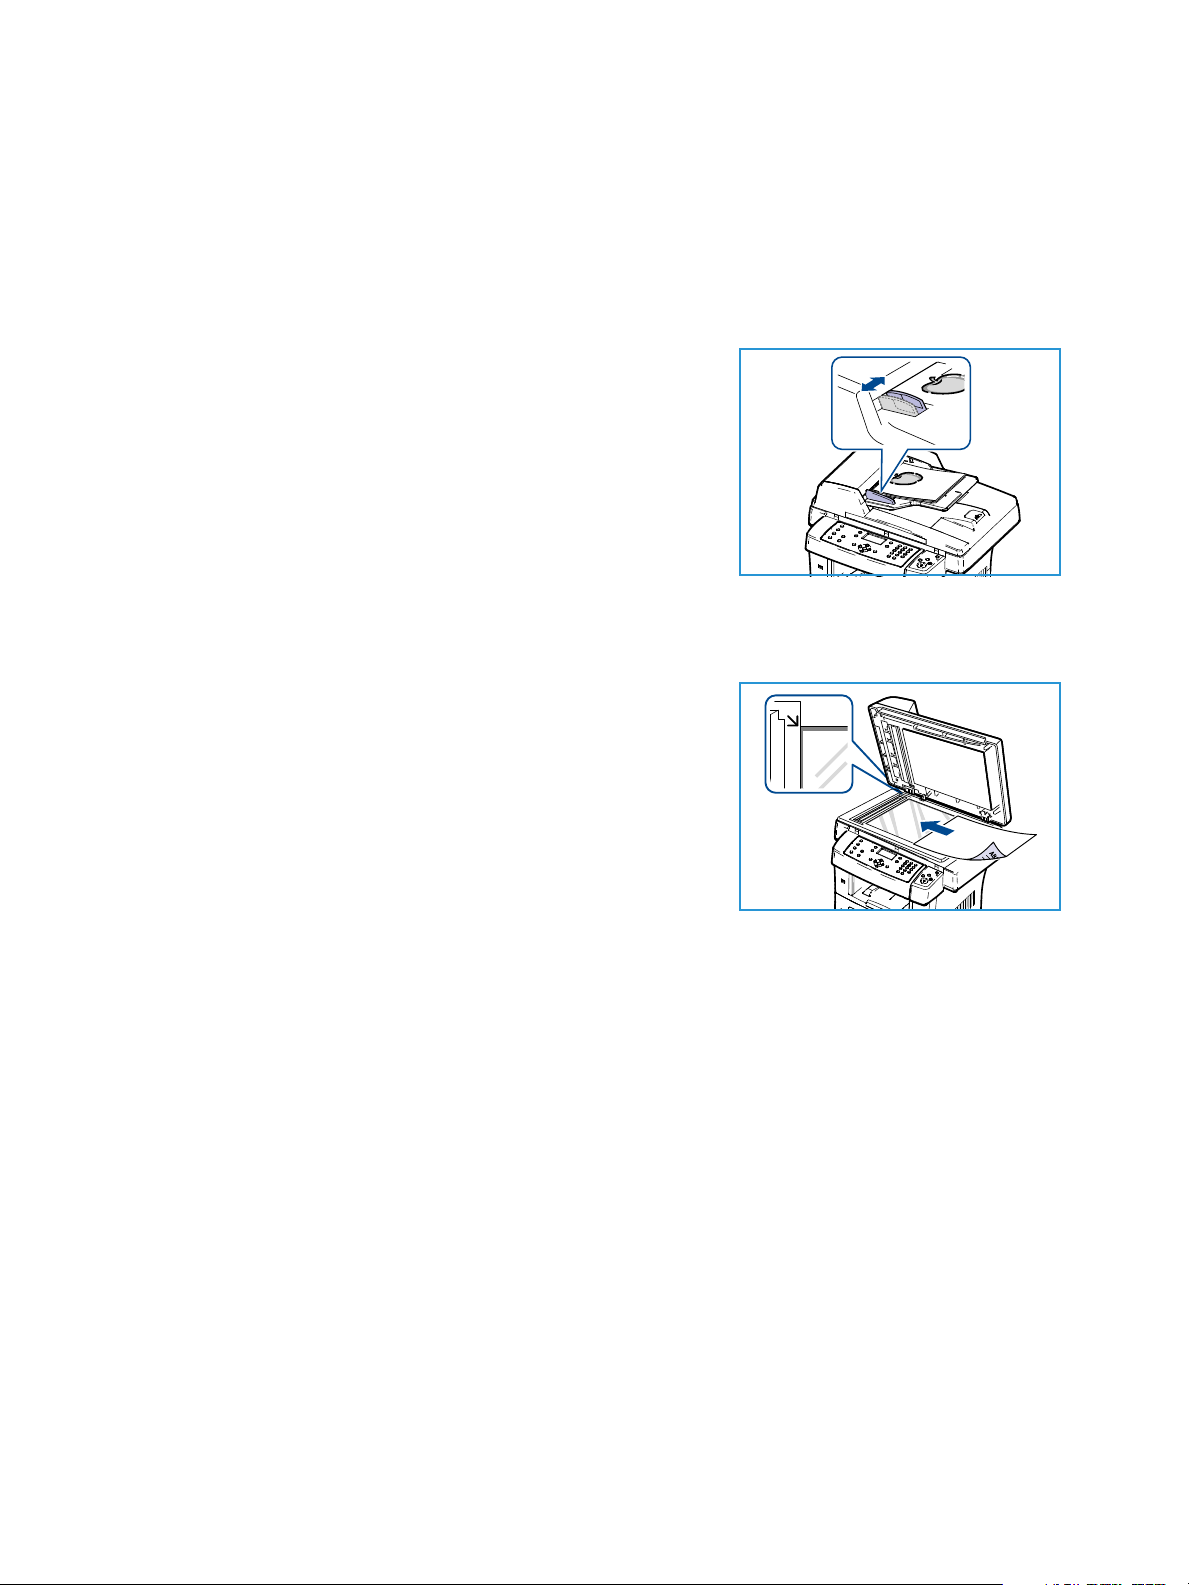
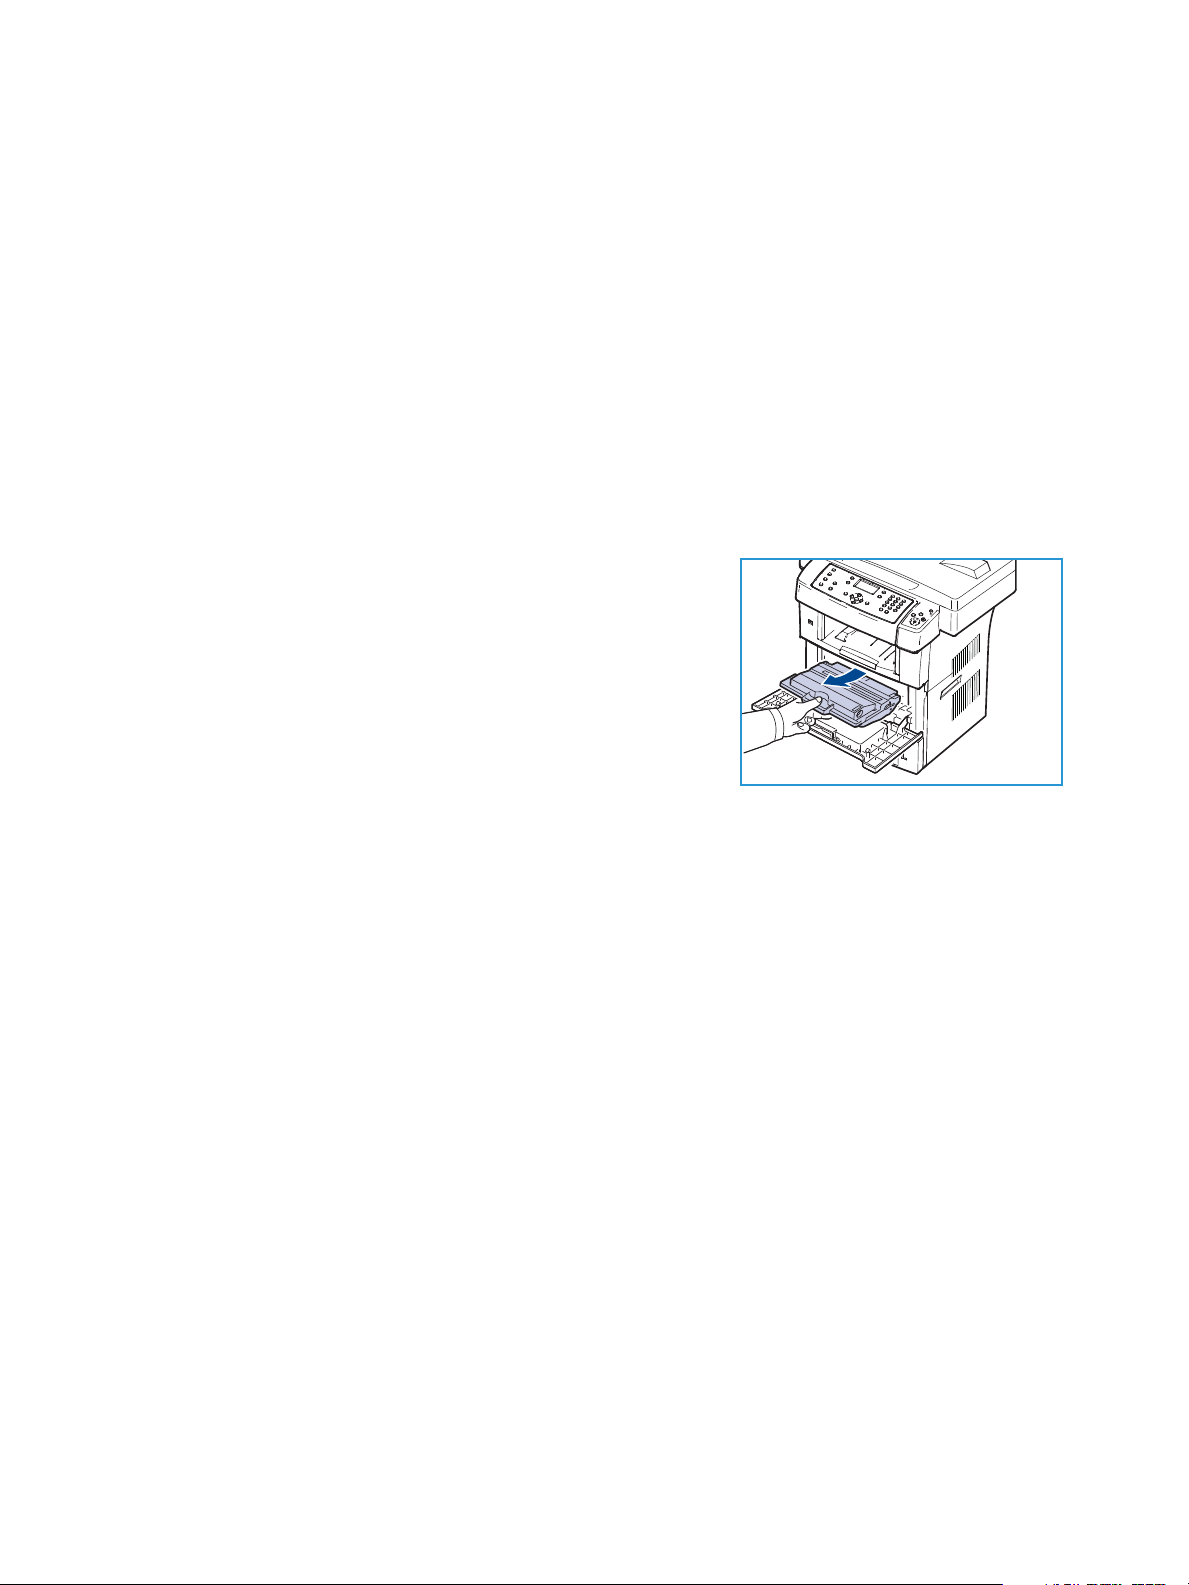
Document Feeder
1. Load documents to be scanned face up in the input tray of
the document feeder with the top of the document to the left
or rear of the tray.
2. Move the document guide to just touch both sides of the
document.
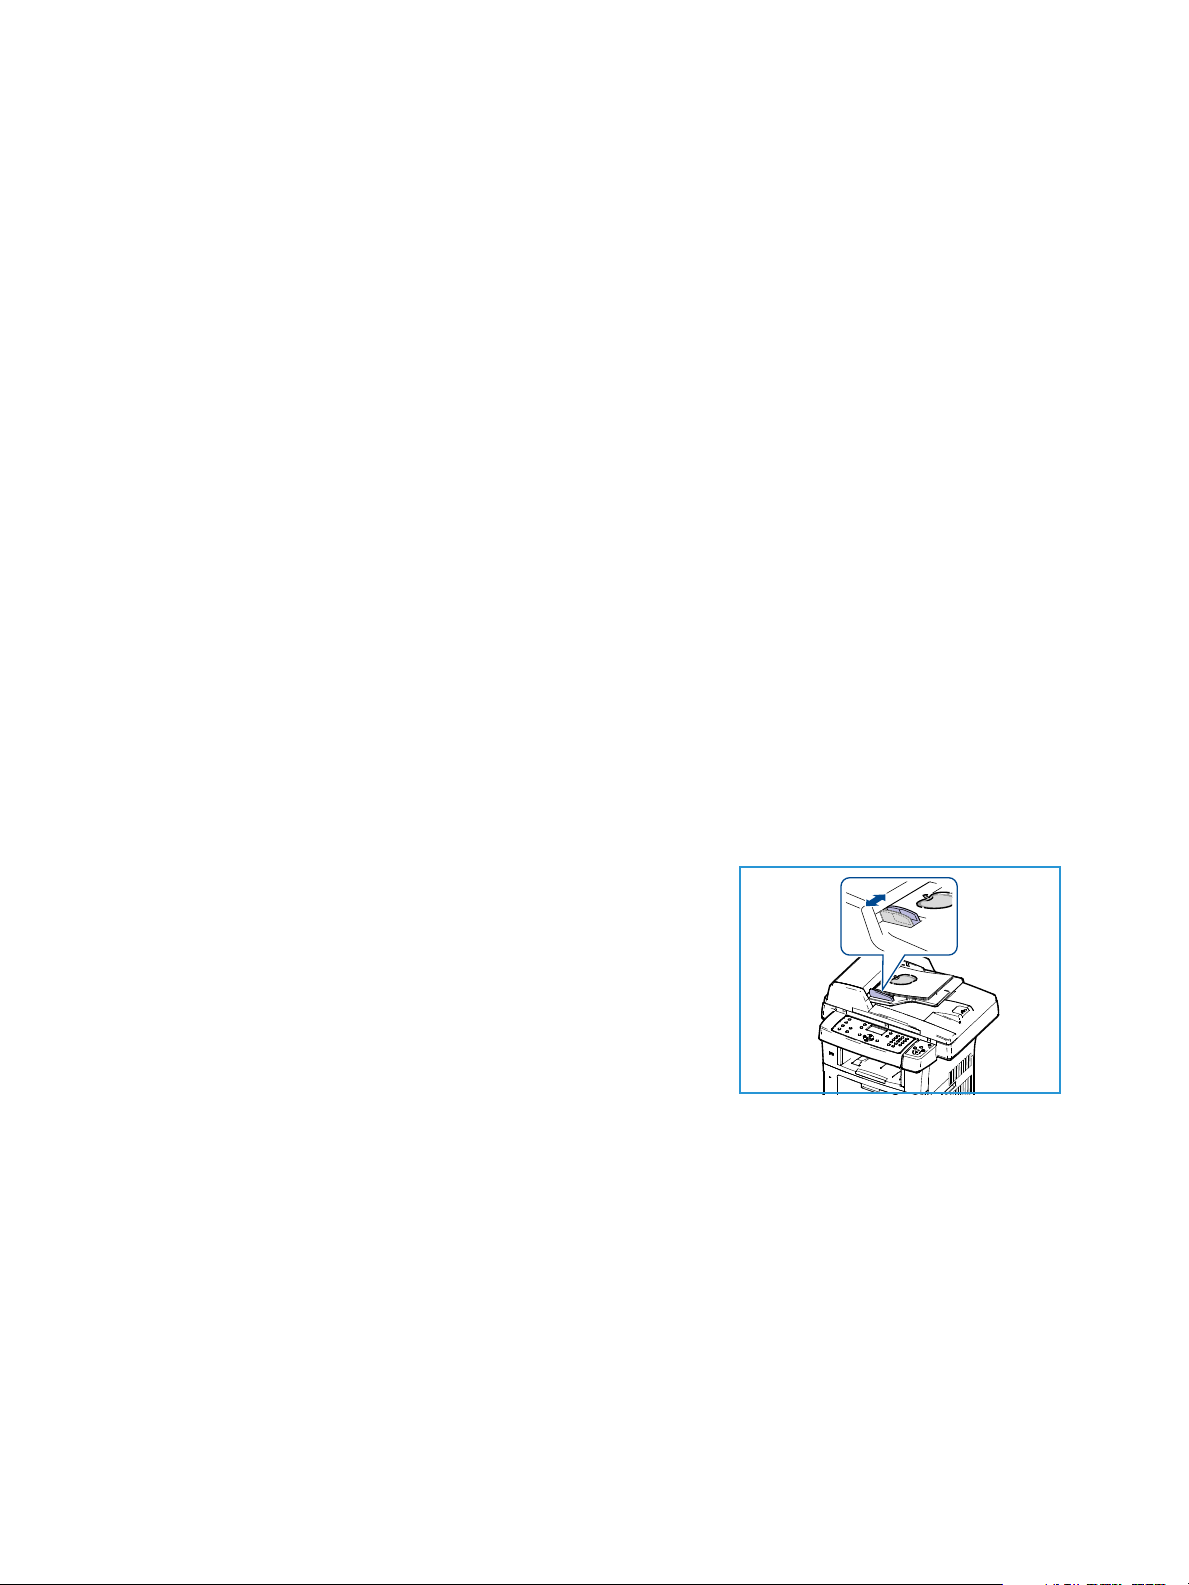
Document Glass
1. Open the document feeder and place single documents face
down on the document glass aligned with the rear left
corner.
2. The default document size is 8.5 x 11” or A4. For other sized
documents, change the Original Size option. Refer to Copy
Options on page 29 for further information.
Note: Documents are only scanned once even when several
copies are selected.
18
Xerox WorkCentre 3550
User Guide
Page 19
Media Output Locations
1
2
1
2
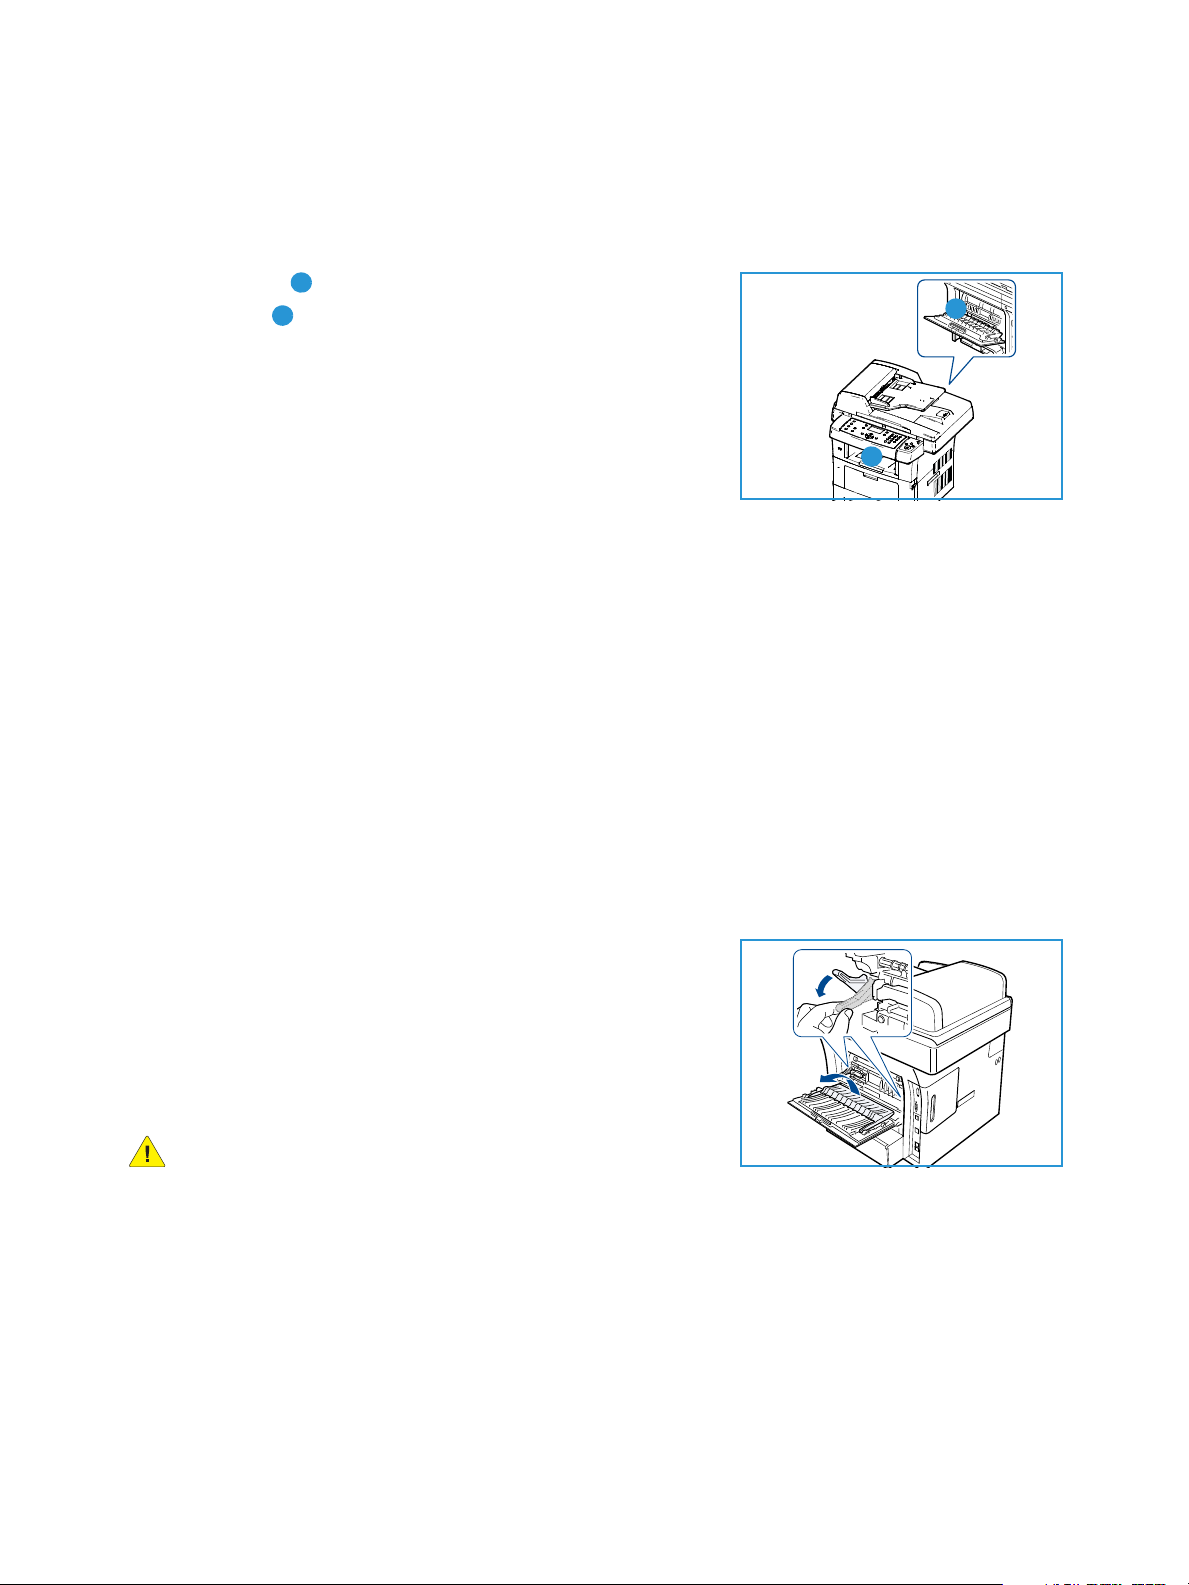
Media Output Locations
The machine has two output locations:
• Output Tray (face down)
• Rear Door (face up)
The machine sends output to the Output Tray by default. If
printing on envelopes and other special media, the Rear Door is
recommended.
Using the Output Tray
The Output Tray collects printed paper face down, in the order in which the sheets were printed. The
Output Tray should be used for most jobs.
To use the Output Tray, make sure that the Rear Door is closed.
Notes:
• If paper coming out of the Output Tray has problems, such as excessive curl, try printing
to the Rear Door.
• To reduce paper jams, do not open or close the Rear Door while the printer is printing.
Using the Rear Door
Using the Rear Door, paper comes out of the machine face up. Printing from the Bypass Tray to the
Rear Door provides a straight paper path. Using the Rear Door might improve the output quality when
printing on special media.
To use the Rear Door, pull on the handle to open the Rear Door
and flip open the inner flap. The output is delivered to the Rear
Door when the Rear Door is open.
If printing envelopes or other special media, open the rear cover
and pull down the fuser pressure levers about 90 degrees to
improve output quality.
CAUTION: The fuser area inside the Rear Door of your
machine becomes very hot when in use. Take care when you
access this area.
Xerox WorkCentre 3550
User Guide
19
Page 20
Machine Status
Machine Status
The Machine Status button provides information about the machine and access to the machine
setups. After your machine is installed, it is recommended that the settings and options are customized
to fully meet the requirements of the Users. Please discuss your requirements with your System or
Machine Administrator to ensure you get optimum performance from your machine. The Machine
Status options include:
Note: For full instructions on accessing and customizing the machine settings, refer to Machine
Status and Setups on page 127.
Machine Information
This option includes the following information:
•Model
• Printer Name
•DNS Name
•IP Address
• Serial Number
• Activation Date
•Billing Counters
Toner Level
Use this option to check the level of toner in the print cartridge. The toner level is indicated on the
status bar.
Information Pages
This option allows the user to print the following reports:
Report Description
All Pages This option enables you to print all the reports and information pages.
Configuration Report This provides information about your machine setup, including the serial
number, IP Address, installed options and the software version.
Address Book This list shows all of the Fax and E-mail addresses currently stored in the
machine’s memory.
Send Report This report shows the fax number, the number of pages, the elapsed
time of the job, the communication mode, and the communication
results for a particular Fax job.
Note: You can set up your machine to automatically print a Send Report
after each Fax job. (See Fax Setu p on page 140.)
20
Xerox WorkCentre 3550
User Guide
Page 21
Machine Status
Report Description
Sent Report This report shows information on the faxes and e-mails you have
recently sent.
Note: You can set the machine to automatically print this report every
50 communications. (See Fax Setup on page 140.)
Fax Recv Report This report shows information on the faxes you have recently received.
Schedule Job This list shows the documents currently stored for delayed faxes along
with the starting time and type of each operation.
Junk Fax Report This list shows the fax numbers specified as junk fax numbers. To add or
delete numbers to or from this list, access the Junk Fax Setup menu. (See
Fax Setu p on page 140.)
Network Information This list shows information about your machine’s network connection
and configuration.
User Auth List This list shows authorized users who are allowed to use the e-mail
function.
Billing Counters This list shows the total number of impressions, black Impressions and
maintenance impressions which have been made on the machine. It
also shows the total number of sheets and 2 sided sheets put through
the machine.
Copy Defaults
The Copy options, including Reduce/Enlarge, Lighten/Darken, Background Suppression, Original Type,
Layout, Collation and number of copies, can be set to those most frequently used. A passcode is
required to access and change the default settings. When you copy a document, the default settings
are used unless they have been changed for the current job. Once the current job is complete or after
20 seconds, the settings return to the default settings.
E-mail Defaults
The E-mail options, including File Format, Original Type, Output Color and Resolution, can be set to
those most frequently used. A passcode is required to access and change the default settings. When
you e-mail a document, the default settings are used unless they have been changed for the current
job. Once the current job is complete or after 20 seconds, the settings return to the default settings.
Xerox WorkCentre 3550
User Guide
21
Page 22

Machine Status
Fax Setup
Your machine provides you with various user-selectable options for setting up the fax system. You can
change the default settings for your preferences and needs. Receiving and Sending settings can be
customized. A passcode is required to access and change the default settings.
Scan Defaults
The scan options, including File Format, Output Color and Resolution, can be set to those most
frequently used for the Scan to USB, Scan to FTP and Scan to SMB options. A passcode is required to
access and change the default settings. When you scan a document, the default settings are used
unless they have been changed for the current job.
System Setup
System Setup options enable you to customize settings which are specific to the machine, such as Date
& Time and Power Save. A passcode is required to access and change the System Setup settings.
Network Settings
You may set up the network using the machine's display screen. Before doing that, you must have the
relevant information concerning the type of network protocols and computer system you use. If you
are not sure which setting to use, contact your System Administrator to configure this machine on the
network. A passcode is required to access and change the Network Settings.
22
Xerox WorkCentre 3550
User Guide
Page 23
General Care and Consumables
General Care and Consumables
There are several consumables on the machine that need replenishing or replacing, such as paper and
the Customer Replaceable Unit. To place an order for Xerox consumables, please contact your local
Xerox Representative giving your Company Name, product number and the machine serial number.
Supplies can also be ordered from www.xerox.com, refer to Supplies on page 111 for further
information.
The machine serial number can be displayed by pressing the Machine Status button, then highlighting
Machine Information and pressing OK. For further information about locating the serial number,
please refer to Locating the Serial Number on page 190.
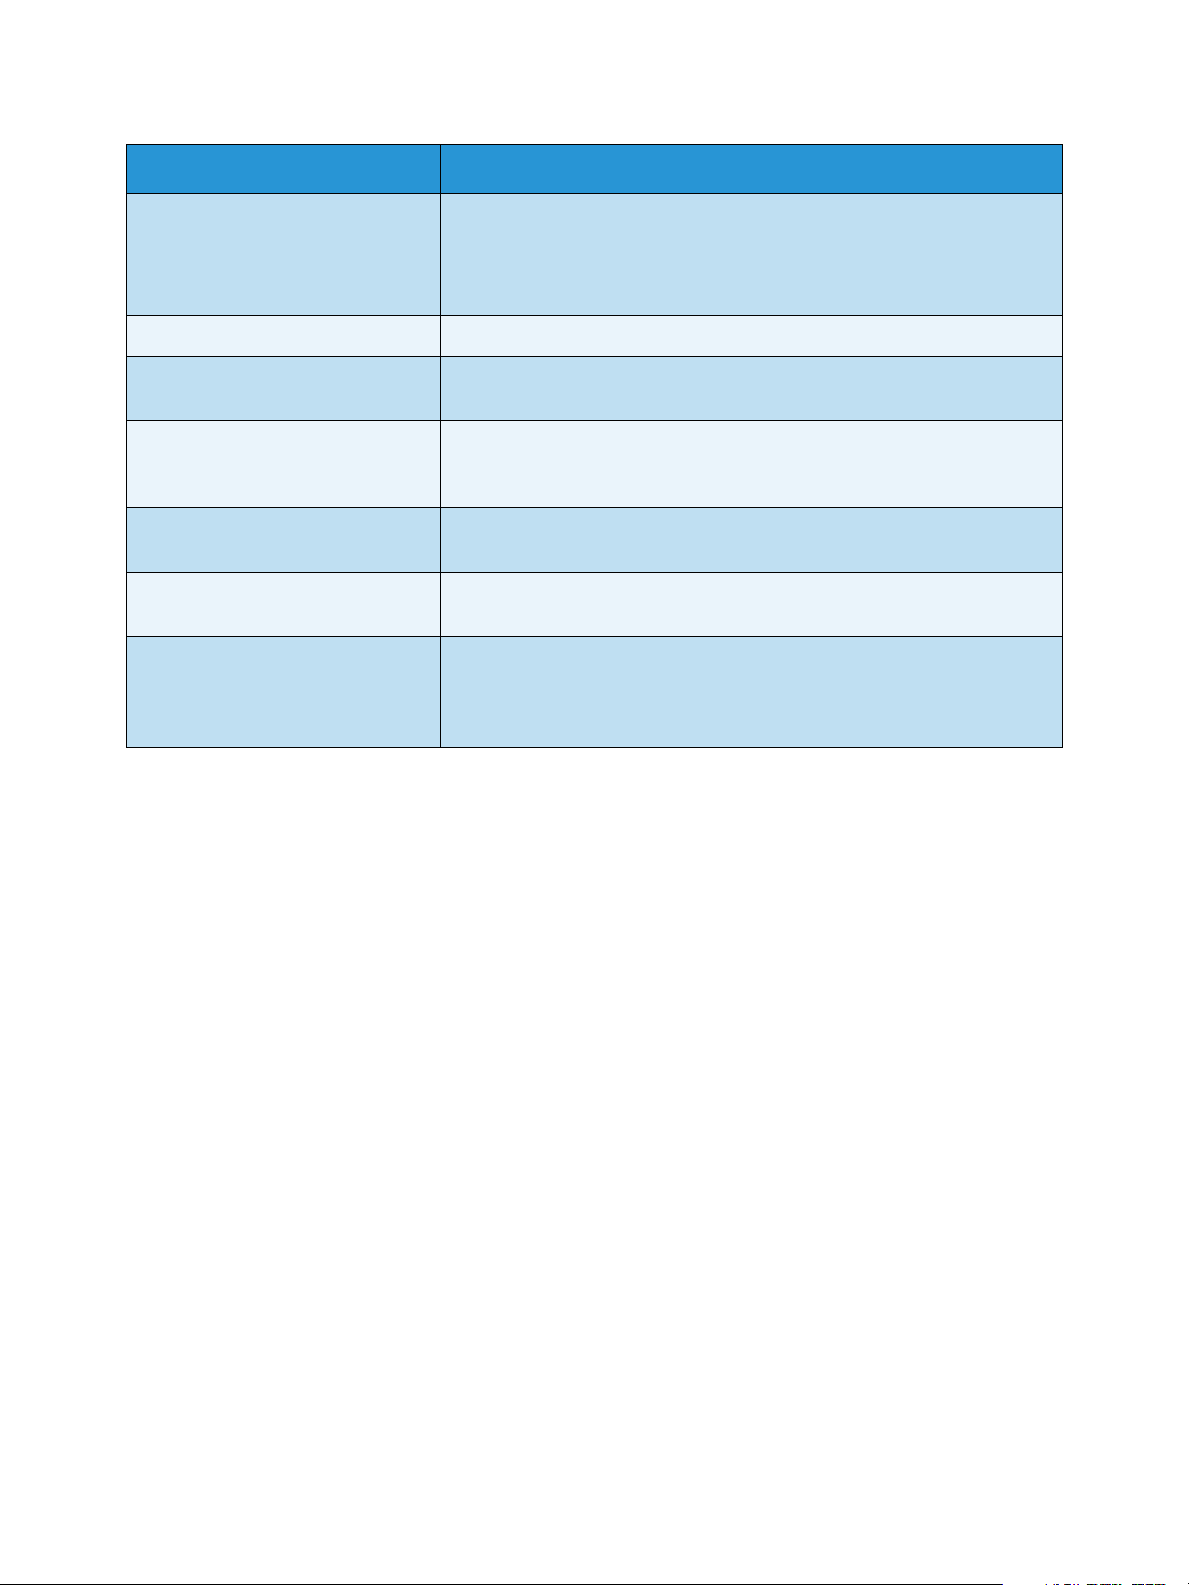
Customer Replaceable Unit
There is one Customer Replaceable Unit in the machine, the Print
Cartridge.
To avoid print quality problems resulting from worn parts and to
maintain your machine in top working condition, the Print
Cartridge will need to be replaced after printing the specified
number of pages or when the life span of the unit has expired.
The machine will display a message when the Print Cartridge
needs to be replaced. Only replace the unit when a message
instructs you to do so or when instructed by a Xerox representative. To replace a Customer Replaceable
Unit, follow the instructions provided within this guide or with the consumable.
To replace a Customer Replaceable Unit, refer to General Care and Troubleshooting on page 155. To
purchase a new Print Cartridge, contact your local Xerox representative or authorized dealer. Supplies
can also be ordered from www.xerox.com, refer to Supplies on page 111 for further information.
Cleaning Tasks
Performing regular cleaning activities ensures the machine is kept free of dust and debris. The machine
covers, control panel and document feeder should all be cleaned using a soft lint-free cloth, lightly
dampened with water. Xerox Cleaning Fluid or Anti-Static Cleaner can be used to clean the document
glass, but must be applied using a cloth and not poured directly on the document glass. Remove any
residue with a clean cloth or paper towel.
For further information on maintenance tasks, refer to General Care and Troubleshooting on page 155.
Xerox WorkCentre 3550
User Guide
23
Page 24

Further Assistance
Further Assistance
For any additional help visit our customer web site at www.xerox.com or contact the Xerox Support
Center quoting the machine serial number.
Xerox Support Center
If a fault cannot be resolved by following the display instructions, check Error Messages on page 169. If
the difficulty persists, contact the Xerox Support Center. The Xerox Support Center will want to know
the nature of the problem, the machine serial number, the fault code (if any) plus the name and
location of your company.
For information about locating the serial number, please refer to Locating the Serial Number on
page 190.
Documentation
Most answers to your questions will be provided by the documentation that is supplied on CD with the
WorkCentre 3550. Alternatively you can access the documents from www.xerox.com/support.
• Quick Use Guide - contains information about installing the machine and initial setups.
• User Guide (this document) - contains instructions and information about all the features on the
machine.
• System Administration Guide - provides detailed instructions and information about connecting
your machine to the network and installing optional features.
24
Xerox WorkCentre 3550
User Guide
Page 25

Copy
This chapter includes:
• Copy Procedure on page 26
• Copy Options on page 29
• Using the Layout Options on page 31
• Media Output Locations on page 35
2
Xerox WorkCentre 3550
User Guide
25
Page 26
Copy Procedure
Copy Procedure
This section describes the basic procedure for making copies. Follow the steps below.
• Load the Documents on page 26
• Select the Features on page 27
• Enter the Quantity on page 28
• Start the Job on page 28
• Check the Job Status on page 28
• Stop the Job on page 28
If an authentication feature is enabled, you may need an account before using the machine. To get an
account, or for more information, contact the System Administrator.
Load the Documents
You can load the documents to be copied either on the document glass or through the document
feeder.
Document Feeder
The following steps explain how to load documents using the document feeder:
1. Before loading the documents into the document feeder, ensure they are in good condition and
remove all staples and paper clips.
2. Insert the documents neatly into the document feeder, face
up. The first page should be on top with the headings
towards the left of the machine.
Note: Up to 60 sheets of 20 lb (75 g/m²) bond paper can be
loaded. Weight ranges from 12.5 lb to 28 lb (50 - 120 g/m²) refer to Specifications on page 191 for further information.
3. Place the documents in between the guides placing the left
edge in the document feeder, and position the guides to just
touch the edge of the documents.
26
Xerox WorkCentre 3550
User Guide
Page 27
Copy Procedure
Document Glass
The following steps explain how to load documents using the document glass:
1. Raise the document feeder.
2. Place the document face down on the document glass,
aligned with the tip of the registration arrow near the top left
of the document glass.
The default document size is 8.5 x 11” or A4. For other sized
documents change the Original Size option. Refer to Copy
Options on page 29 for further information.
3. Lower the document feeder.
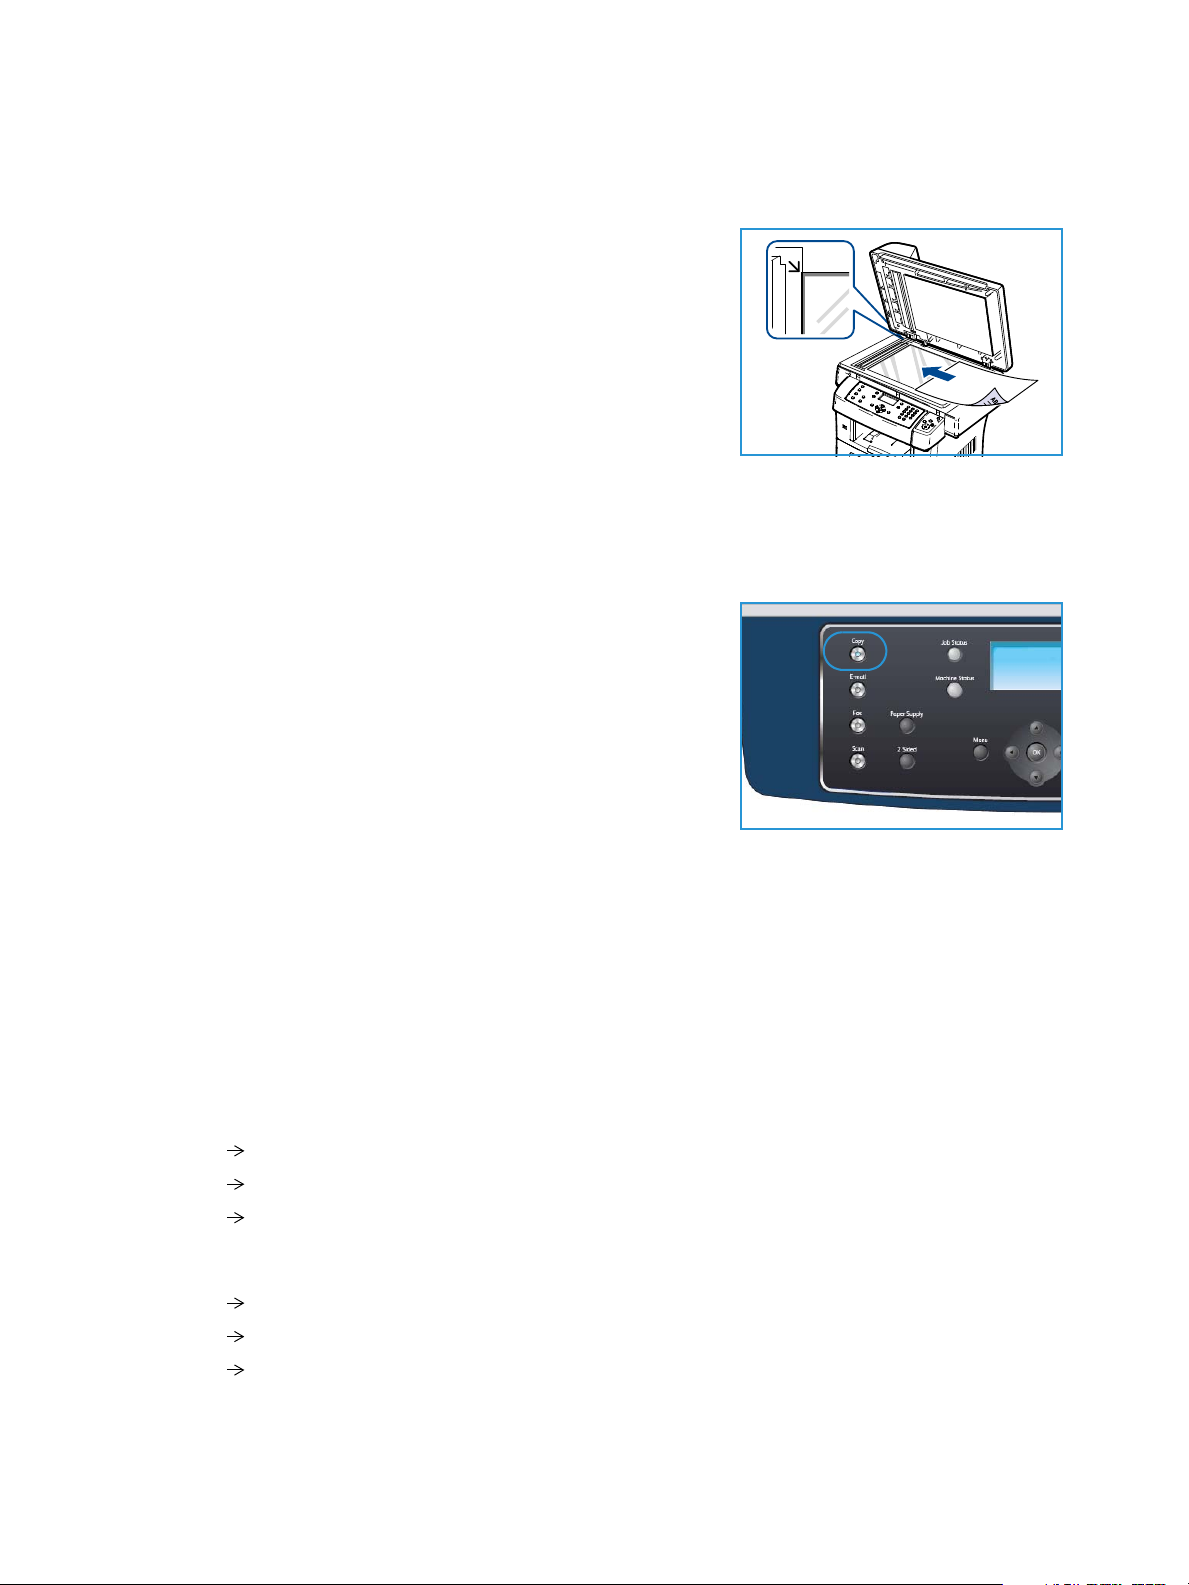
Select the Features
Various features can be selected for your copy job. The most common features are selected from the
control panel. Once you have made a selection, press Back to return to the Ready screen.
1. Press the Copy button on the control panel.
2. Press the Paper Supply button on the control panel:
• Auto Select: With this option selected, the machine
chooses the correct paper for the copy job based on the
size of the originals being scanned.
• Tray 1: Use this option to select the paper loaded in Tray
1.
• Tray 2 (Opti onal) : Use this option to select the paper
loaded in Tray 2.
Note: Trays 1 & 2 can each hold 500 sheets of 20lb paper. Weight ranges from 60-105 g/sm. Sizes
range from A4 (SEF) to Legal.
• Bypass Tray: Use this option when feeding individual types of stock, for example letterhead
or labels for one-off jobs. The Bypass Tray holds up to 50 sheets of 20lb paper or up to 5
transparency sheets or up to 5 envelopes.
Select the Paper Supply option required using the up/down arrows and press OK.
For more information, refer to Paper and Media on page 117.
3. Press the 2 Sided button on the control panel. Two-sided copies can be made automatically from
one or two-sided originals:
• 1 1 Sided: Use this option for 1 sided originals when 1 sided copies are required.
• 1 2 Sided: Use this option for 1 sided originals when 2 sided copies are required.
• 1 2 Sided, Rotate Side 2: This option produces 2 sided copies from 1 sided originals and
rotates 180 degrees every second side image. Use this option to create documents which can
be read in a “head to toe” manner, for example a calendar.
• 2 2 Sided: Use this option for 2 sided originals when 2 sided copies are required.
• 2 1 Sided: Use this option for 2 sided originals when 1 sided copies are required.
• 2 1 Sided, Rotate Side 2: This option produces 1 sided copies from 2 sided originals and
rotates 180 degrees every second side image. The “read” orientation for this option varies
depending on the input originals. For example, if “head to head” orientation originals are
Xerox WorkCentre 3550
User Guide
27
Page 28
Copy Procedure
scanned, the output will be “head to toe”. If “head to toe” orientation originals are scanned,
the output produced will be “head to head”.
Select the 2 Sided option required using the up/down arrows and press OK.
4. Additional Copy options are available through the Menu button. For information about
programming additional options, refer to Copy Options on page 29.
Enter the Quantity
• The maximum copy quantity is 999.
• Use the keypad on the control panel to enter the number of
copies required. The number entered is displayed in the
upper right-hand corner of the display.
Note: To cancel an incorrect entry, press the C button and
enter the correct quantity.
Start the Job
1. Press the Start button. Each document is scanned only once.
2. If using the document glass to scan 2 sided originals, the machine displays a message when ready
to scan side 2. Continue scanning until all sides have been scanned.
The images are scanned and the copy job is printed.
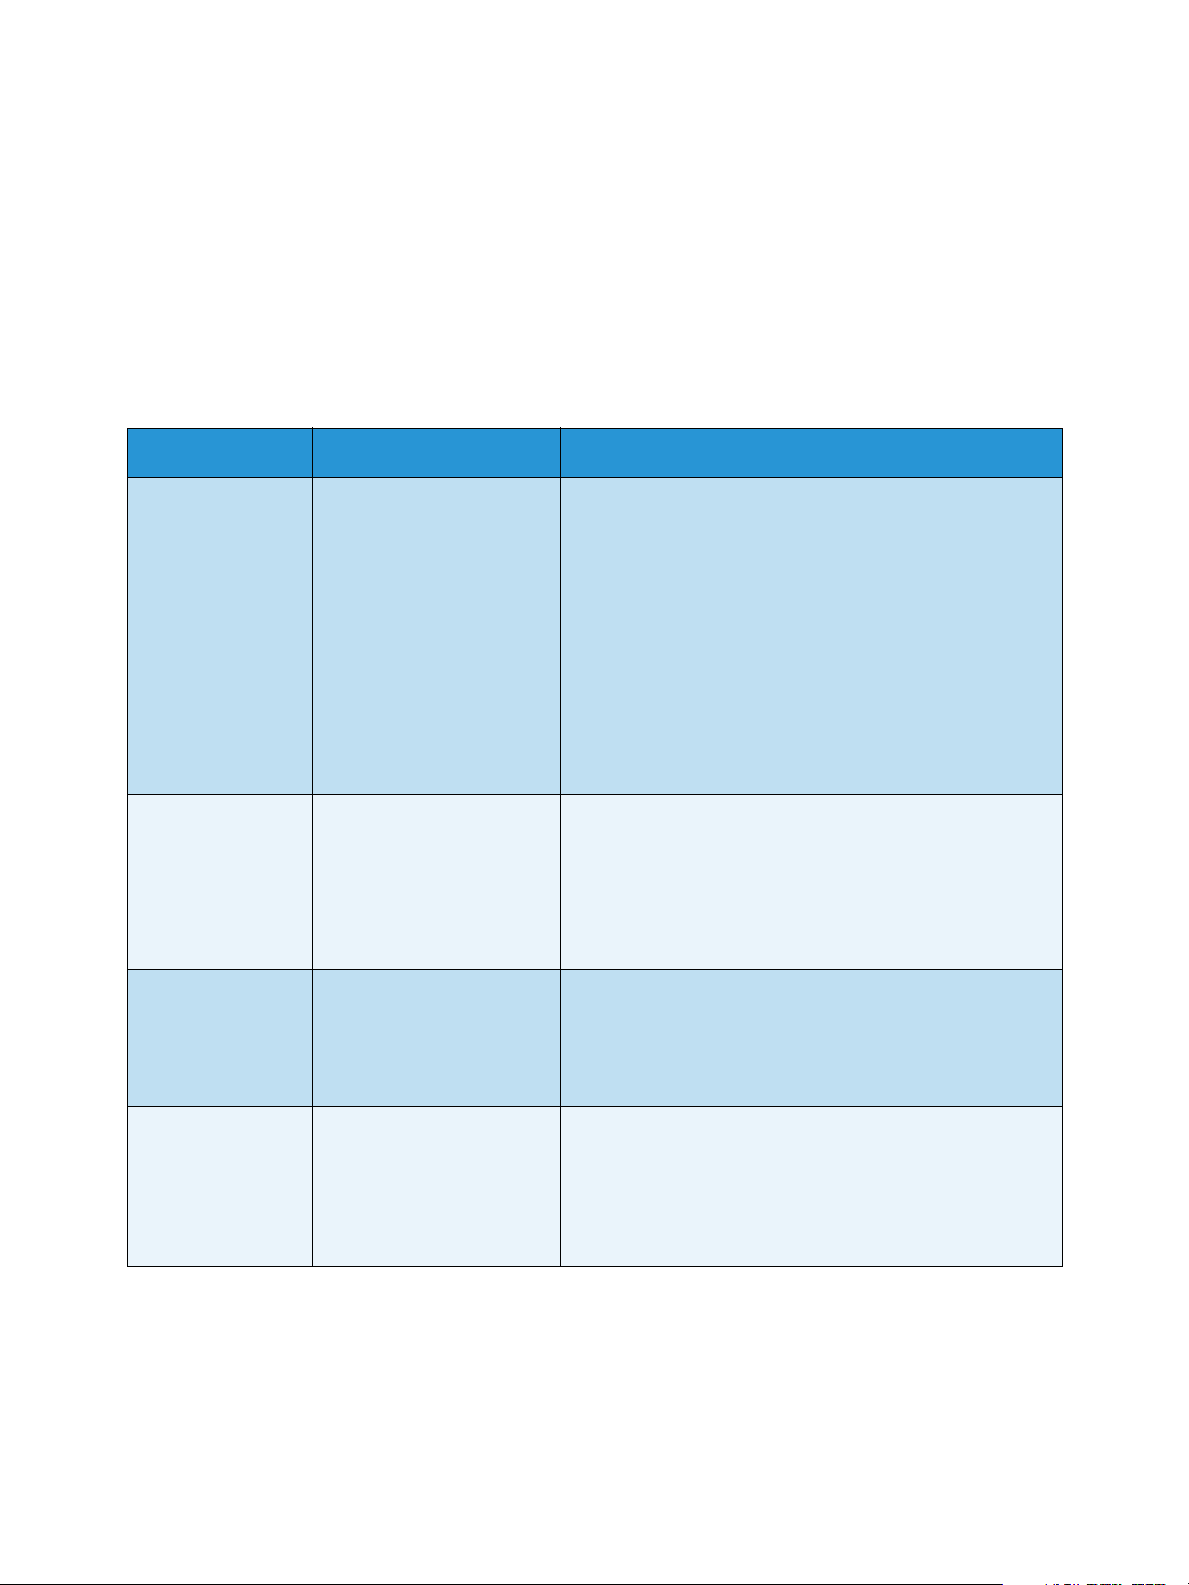
Check the Job Status
1. Press the Job Status button on the control panel to display
job status information.
2. A list of Active Jobs is displayed. Select your job using the
up/down arrows and press OK.
3. The following Job Options are available:
• Required Resources: Use this option to view the media
requirements for the job.
• Delete: Select this option to delete the job. Use the
left/right arrows to select Ye s or No.
• Details: Select this option to display details about the job. The job name, owner, type, status
and submission time is displayed.
Stop the Job
Follow the steps below to manually cancel an active copy job.
1. Press the Stop button on the control panel. A confirmation is displayed, press Stop again to cancel
the current copy job.
2. To cancel a queued job press the Job Status button on the control panel to display the active jobs.
3. Use the up/down arrows and select the job required, press OK.
4. Select Delete and OK.
5. Select Yes to delete the job or No to return to previous screen.
28
Xerox WorkCentre 3550
User Guide
Page 29
Copy Options
Copy Options
Your machine provides the following options to customize your Copy jobs. Use the Menu button to
access the options. For information about changing the default Copy settings, refer to Copy Defaults
on page 136.
Note: If you press Stop while setting the copy options, all of the options you have set for the
current copy job will be canceled and return to their default status after the machine completes
the copy job in progress.
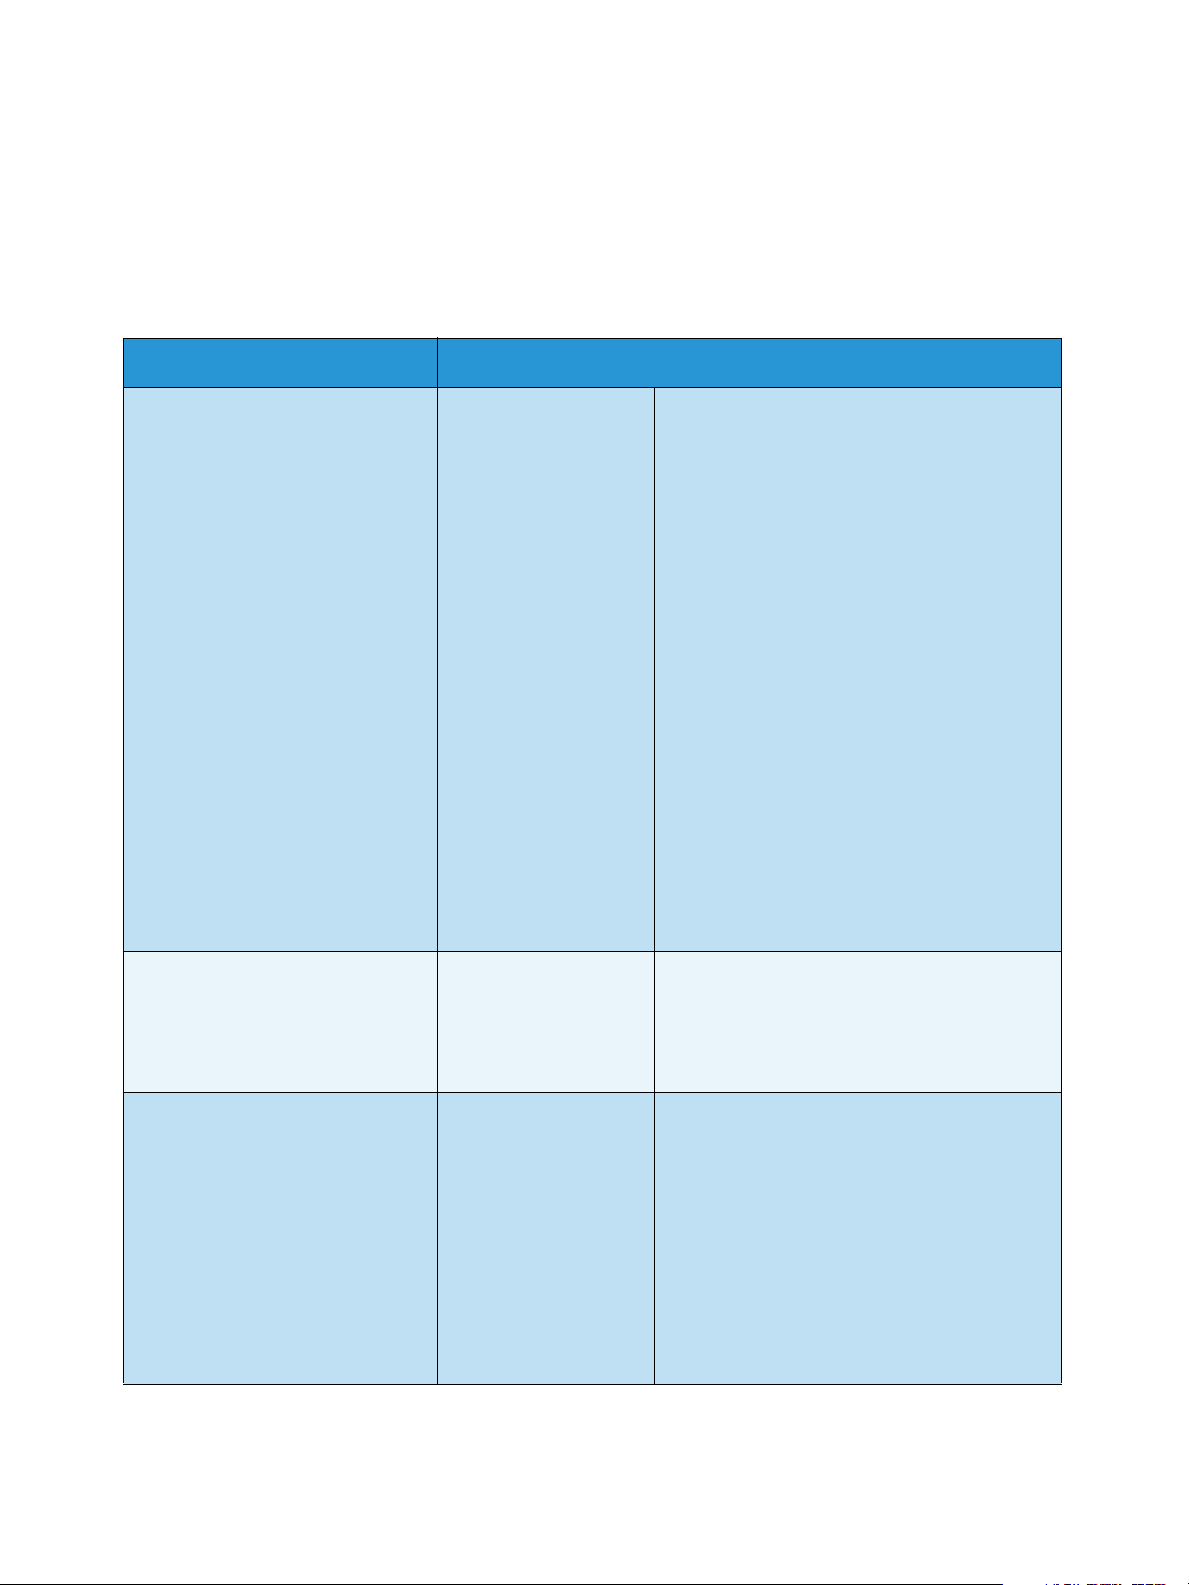
Feature Description Options
Reduce/Enlarge Originals can be reduced
or enlarged between 25%
and 400%. From 25% to
400% when using the
document glass, or from
25% to 100% using the
document feeder.
Lighten/Darken Adjusts the lightness or
darkness of the output.
Original Type The Original Type setting is
used to improve the image
quality by selecting the
document type for the
originals.
• 100%: Produces an image on the copies the same size
as the image on the original.
• Variable: Use the keypad or the up/down arrow
buttons to enter the percentage required.
• Auto Fit: Reduces or enlarges the image on the copies
based on the size of the original and the size of the
selected output paper.
• Presets: The most commonly used reduce/enlarge
percentages have been provided as preset options.
These preset options can be customized by your
System or Machine Administrator to meet individual
needs.
• Lightest: Lightens the image to the lightest setting.
• Light: Works well with dark print.
• Normal: Works well with standard typed or printed
originals.
• Dark: Works well with light print.
• Darkest: Darkens the original to the darkest setting.
• Te xt : Use for originals containing mostly text.
• Text and Photo: Use for originals with mixed text and
photographs.
• Photo: Use when the originals are photographs.
Background
Suppression
Use to automatically
reduce or eliminate the
dark background resulting
from scanning colored
paper or newspaper
originals.
• On: Select to eliminate background.
• Off: Select if Background Suppression is not required.
Xerox WorkCentre 3550
User Guide
29
Page 30
Copy Options
Feature Description Options
Layout This option is used to copy
multiple documents onto
one sheet of paper, copy
from book originals, create
booklet output and
produce documents which
can be pasted together to
make a poster.
• Normal: Select this option to match the layout of the
originals.
• 2 Up: This feature is used to copy two documents, in a
reduced size, onto one sheet of paper.
• 4 Up: This feature is used to copy four documents, in a
reduced size, onto one sheet of paper.
• ID Card Copy: The machine prints one side of the
original on the upper half of the paper and the other
side on the lower half without reducing the size of the
original.
• Book Copy: Use when copying bound documents and
books.
• Booklet Creation: This allows you to print your
document on both sides of the paper and arranges
the pages so that the paper can be folded in half after
printing to produce a booklet.
• Poster Copy: Your original will be divided into 9
portions. You can paste the printed pages together to
make one poster-sized document.
• Clone Copy: The machine prints multiple original
images onto a single page. The number of images is
automatically determined by the machine based on
the original size and the paper size.
Refer to Using the Layout Options on page 31 for
instructions.
Collation Collation is used to select
collated or uncollated
output.
Original Size Allows you to specify the
size of the image to be
scanned.
• Collated: Select Collated for output stacked in sets to
match the sequence of the originals, i.e. (1,2,3 / 1,2,3).
• Uncollated: Select Uncollated for output sorted into
stacks of individual pages, i.e. (1,1,1 / 2,2,2 / 3,3,3).
• A4
• A5
• B5
• Letter
• Legal
• Executive
• Folio
• Oficio
30
Xerox WorkCentre 3550
User Guide
Page 31

Using the Layout Options
Using the Layout Options
This option is used to copy multiple documents onto one sheet of paper, copy from book originals, create booklet
output and produce documents which can be pasted together to make a poster.
2 Up or 4 Up Copying
This feature is used to copy two or more documents, in a reduced
size, onto one sheet of paper. It is ideal for creating handouts,
storyboards or documents used for archival purposes.
1 2
Note: Originals must be loaded in the document feeder when
using this feature.
1. Press Copy on the control panel.
2. Press Menu on the control panel.
3. Press the up/down arrows to highlight Layout and press OK.
4. Select the option required:
• Normal: Copies an original onto one sheet of paper.
• 2 Up: Copies two separate originals onto one sheet of paper.
• 4 Up: Copies four separate originals onto one sheet of paper.
Note: For landscape originals, place the top of the document at the back of the feeder. For portrait
originals, place the top of the document to the left.
5. Select OK to save your selections and press Menu to return to the top level menu.
6. Load originals and press Start.
1 2
3 4
ID Card Copy
The machine prints one side of the original on the upper half of
the paper and the other side on the lower half without reducing
the size of the original. This feature is helpful for copying a smallsized item, such as a business card.
Note: This copy feature is available only when you place
originals on the document glass. If the original is larger than
the printable area, some portions may not be printed.
Your machine can print 2 sided originals on one sheet of A4,
Letter, Legal, Folio, Executive, B5, A5, or A6 paper.
1. Press Copy on the control panel.
2. Press Menu on the control panel.
3. Press the up/down arrows to highlight Layout and press OK.
4. Press the up/down arrows to highlight ID Card Copy and press OK.
5. Press Menu to return to the top level menu.
Xerox WorkCentre 3550
User Guide
31
Page 32

Using the Layout Options
B A
B A
6. Place the front side of the original face down on the
document glass, aligned with the tip of the registration arrow
and close the document feeder.
7. Press Start.
Place Front Side Press OK appears on the display. Press OK on
the control panel.
Your machine begins scanning the front side and shows Place
Rear Side Press Start.
8. Turn the original over and place the rear side of the original
face down on the document glass and close the document
feeder.
9. Press Start on the control panel to begin copying.
Book Copy
This feature enables you to specify which page or pages of a book
are to be scanned. The book original is placed face down on the
document glass with the spine of the book lined up with the book
marker.
1. Press Copy on the control panel.
2. Press Menu on the control panel.
3. Press the up/down arrows to highlight Layout and press OK.
4. Press the up/down arrows to highlight Book Copy and press
OK.
5. Press the up/down arrows to highlight the option required:
• Off: Use to deactivate the feature.
• Left Page Only: Use to scan and copy the left page of a bound document.
• Right Page Only: Use to scan and copy the right page of a bound document.
• Both Pages: Use to scan and copy both pages of a bound document. The left page of the
book first will be scanned first.
6. Select OK to save your selections and press Menu to return to the top level menu.
7. Place the book original face down on the document glass with the spine of the book lined up with
the book marker at the center of the rear edge of the document glass.
8. Press Start.
9. If another page requires scanning, select Ye s to add another page. Place the new page to be
scanned on the document glass and press OK.
When you have finished scanning all the pages required, select No at the Another Page? prompt.
32
Xerox WorkCentre 3550
User Guide
Page 33

Using the Layout Options
Booklet Creation
This allows you to print your document on both sides of the paper
and arranges the pages so that the paper can be folded in half
after printing to produce a booklet.
1. Insert the documents neatly into the document feeder, face
up. The first page should be on top with the headings
towards the left of the machine.
Note: The originals must be loaded in the document feeder
to enable the Booklet Creation feature to be selected.
2. Press Copy on the control panel.
3. Press Menu on the control panel.
4. Press the up/down arrows to highlight Layout and press OK.
5. Press the up/down arrows to highlight Booklet Creation and press OK.
6. Press the up/down arrows to highlight 1 Sided Originals or 2 Sided Originals and press OK.
7. Select OK to save your selections and press Menu to return to the top level menu.
8. Load originals and press Start.
Poster Copy
Your original will be divided into 9 portions. You can paste the
printed pages together to make one poster-sized document.
Note: This copy feature is available only when you place
originals on the document glass.
1. Press Copy on the control panel.
2. Press Menu on the control panel.
3. Press the up/down arrows to highlight Layout and press OK.
4. Press the up/down arrows to highlight Poster Copy and press
OK.
5. Select OK to save your selections and press Menu to return to the top level menu.
6. Load originals and press Start.
Each portion is scanned and printed one by one in the order shown.
Xerox WorkCentre 3550
User Guide
33
Page 34

Using the Layout Options
Clone Copy
The machine prints multiple original images on a single page. The
number of images is automatically determined by the original
image and the paper size.
Note: This copy feature is available only when you place
originals on the document glass.
1. Press Copy on the control panel.
2. Press Menu on the control panel.
3. Press the up/down arrows to highlight Layout and press OK.
4. Press the up/down arrows to highlight Clone Copy and press OK.
5. Select OK to save your selections and press Menu to return to the top level menu.
6. Load originals and press Start.
34
Xerox WorkCentre 3550
User Guide
Page 35

Media Output Locations
1
2
1
2
Media Output Locations
The machine has two output locations:
• Output Tray (face down)
• Rear Door (face up)
The machine sends output to the Output Tray by default. If
printing on envelopes and other special media, the Rear Door is
recommended.
Using the Output Tray
The Output Tray collects printed paper face down, in the order in which the sheets were printed. The
Output Tray should be used for most jobs.
To use the Output Tray, make sure that the Rear Door is closed.
Notes:
• If paper coming out of the Output Tray has problems, such as excessive curl, try printing
to the Rear Door.
• To avoid paper jams, do not open or close the Rear Door while the printer is printing.
Using the Rear Door
Using the Rear Door, paper comes out of the machine face up. Printing from the Bypass Tray to the
Rear Door provides a straight paper path. Using the Rear Door might improve the output quality when
printing on special media.
To use the Rear Door, pull on the handle to open the Rear Door
and flip open the inner flap. The output is delivered to the Rear
Door when the Rear Door is open.
If printing envelopes or other special media, open the rear cover
and pull down the fuser pressure levers about 90 degrees to
improve output quality.
CAUTION: The fuser area inside the Rear Door of your machine becomes very hot when in use.
Take care when you access this area.
Xerox WorkCentre 3550
User Guide
35
Page 36

Media Output Locations
36
Xerox WorkCentre 3550
User Guide
Page 37

Fax
This chapter includes:
• Fax Procedur e on page 38
• Fax Op tions on page 42
• Using Fax Send Options on page 45
• Using Fax Forward on page 48
• Using Secure Receive on page 50
• Address Book on page 51
• Fax from PC on page 55
• Receiving Faxes on page 56
3
Xerox WorkCentre 3550
User Guide
37
Page 38

Fax Proc edure
Fax Procedure
This section describes the basic procedure for sending faxes. Follow the steps below.
• Load the Documents on page 38
• Select the Features on page 39
• Enter the Fax Number on page 40
• Start the Job on page 40
• Check the Job Status on page 41
• Stop the Job on page 41
• Fax Confirmation on page 41
If an authentication feature is enabled, you may need an account before using the machine. To get an
account, or for more information, contact the System Administrator.
Load the Documents
You can load the documents to be faxed either on the document glass or through the document feeder.
Document Feeder
The following steps explain how to load documents using the document feeder:
1. Before loading the documents into the document feeder, ensure they are in good condition and
remove all staples and paper clips.
2. Insert the documents neatly into the document feeder, face
up. The first page should be on top with the headings
towards the left of the machine.
Note: Up to 60 sheets of 20 lb (75 g/m²) bond paper can be
loaded. Weight ranges from 12.5 lb to 28 lb (50 - 120 g/m²) refer to Specifications on page 191 for further information.
3. Place the documents in between the guides placing the left
edge in the document feeder, and position the guides to just
touch the edge of the documents.
38
Xerox WorkCentre 3550
User Guide
Page 39

Fax Proc edure
Document Glass
The following steps explain how to load documents using the document glass:
1. Raise the document feeder.
2. Place the document face down on the document glass,
aligned with the tip of the registration arrow near the top left
of the document glass.
The default document size is 8.5 x 11” or A4. For other sized
documents change the Original Size option. Refer to Fax
Options on page 42 for further information.
3. Lower the document feeder.
Select the Features
Various features can be selected for your Fax job. Once you have made a selection, press Back to return
to the Ready screen.
1. Press the 2 Sided button on the control panel. The following 2 Sided options are available:
• 1 1 Sided: Use this option for 1 sided originals.
• 2 1 Sided: Use this option for 2 sided originals.
• 2 1 Sided, Rotated: Use this option for 2 sided originals which have the second side
rotated. This option will rotate the second side image 180 degrees.
Select the 2 Sided option required using the up/down arrows and press OK.
2. The following features are available through the Menu button
Lighten/Darken This provides manual control to adjust the lightness or darkness of the
scanned images.
Background Suppression Use to automatically reduce or eliminate the dark background resulting
from scanning colored paper or newspaper originals.
Resolution A higher resolution produces better quality for photos. A lower resolution
reduces communication time.
Original Size This option allows you to specify the size of the image to be scanned.
Multi Send You can use this feature to send a fax to multiple locations.
Delayed Start Use to set your machine to send a fax at a later time.
Priority Send Use when a high priority fax need to be sent ahead of reserved
operations.
Forward You can set the machine to forward a received or sent fax to another fax,
e-mail or server destination.
Secure Receive Use to restrict printing of received faxes when the machine is
unattended.
Add Page Use to add additional documents to a delayed fax job which is saved in
memory.
Xerox WorkCentre 3550
User Guide
39
Page 40
Fax Proc edure
Press the up/down arrows until the feature you want highlights and press OK. Select the setting
required and press OK.
For more information about each of the options refer to Fax Options on page 42.
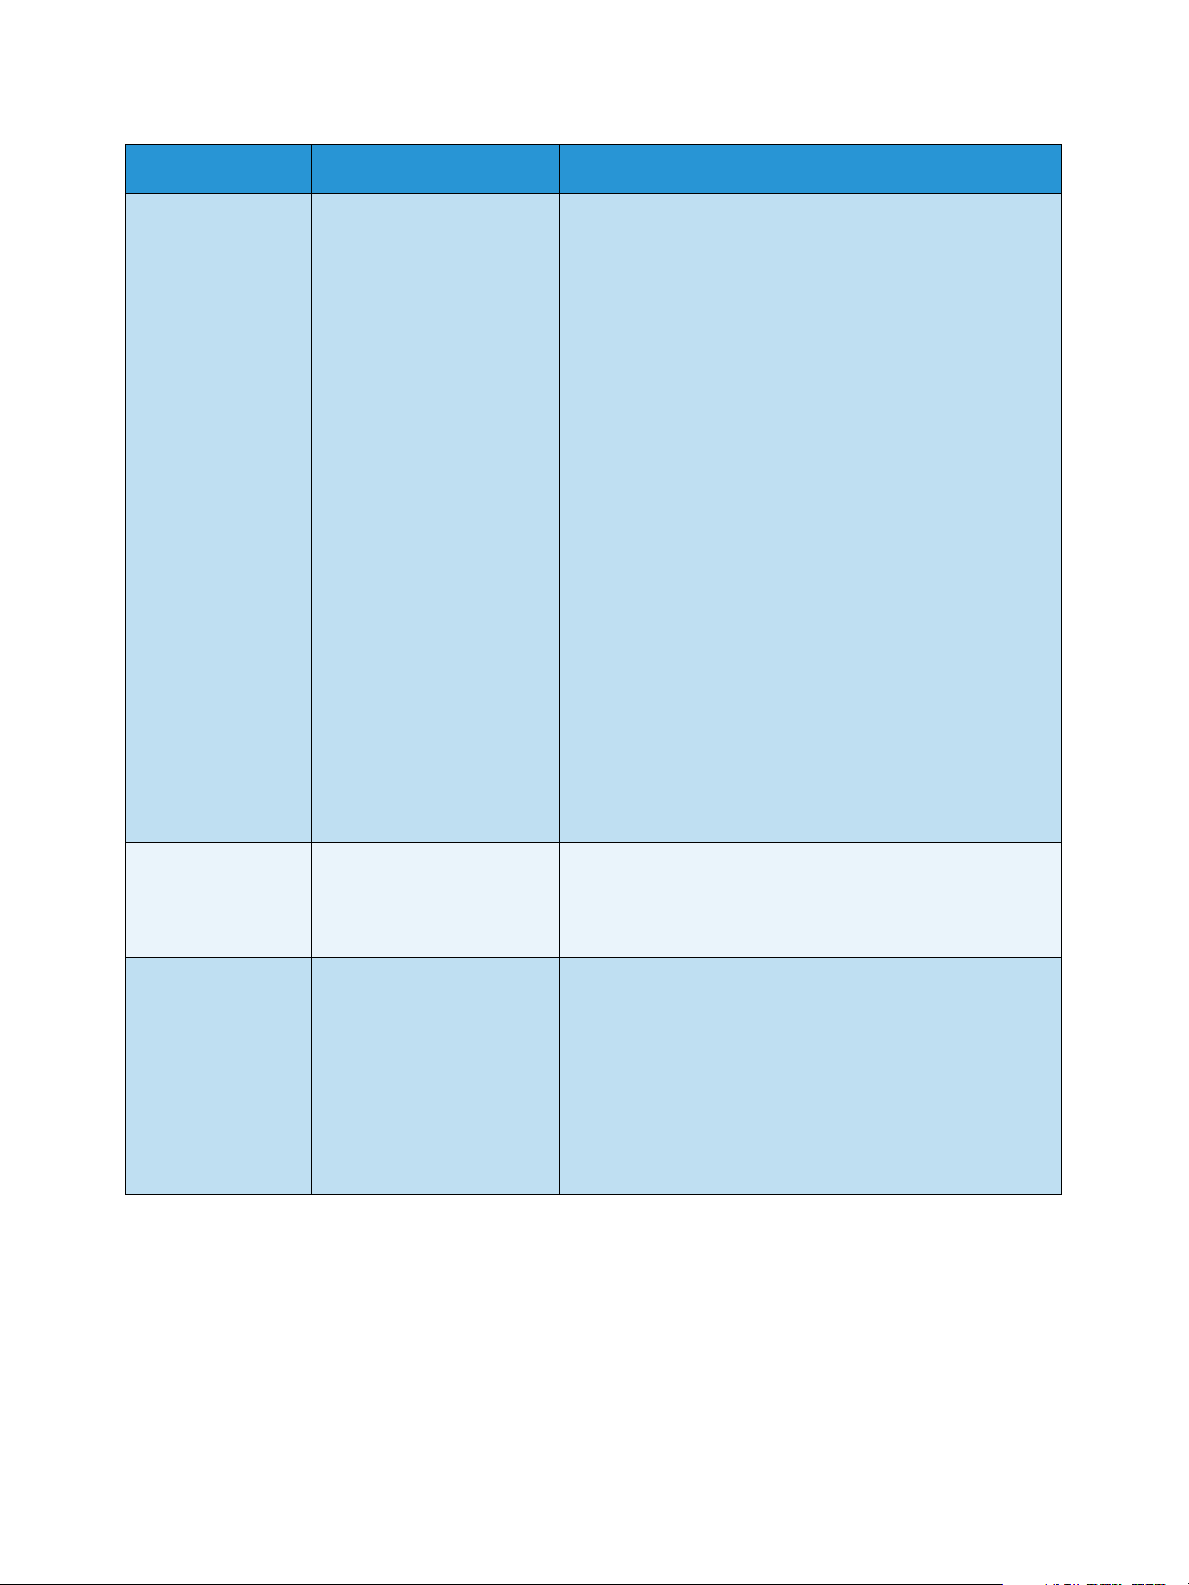
Enter the Fax Number
1. Press the Fax button on the control panel.
2. Enter the recipient’s fax number by:
• Keypad Dial: Use this option to enter the number using
the keypad. For instructions refer to Using the Keypad on
page 13.
• Manual Dial: Allows you to get the dial tone before
entering the fax number.
• Pause / Redial: Allows you to send to the last number or
list of numbers dialed. For information about entering a
Pause within the number, refer to Inserting a Pause on page 14.
• Speed Dial: For a one-digit (0-9) speed dial number, press and hold the corresponding digit
button on the keypad. For a two or three-digit speed dial number, press the first digit
button(s) and then hold down the last digit button.
• Address Book: Select the Address Book button to access the address book and select a
Speed Dial or Group Dial entry to add to the recipient list. Refer to Address Book on page 51
for instructions.
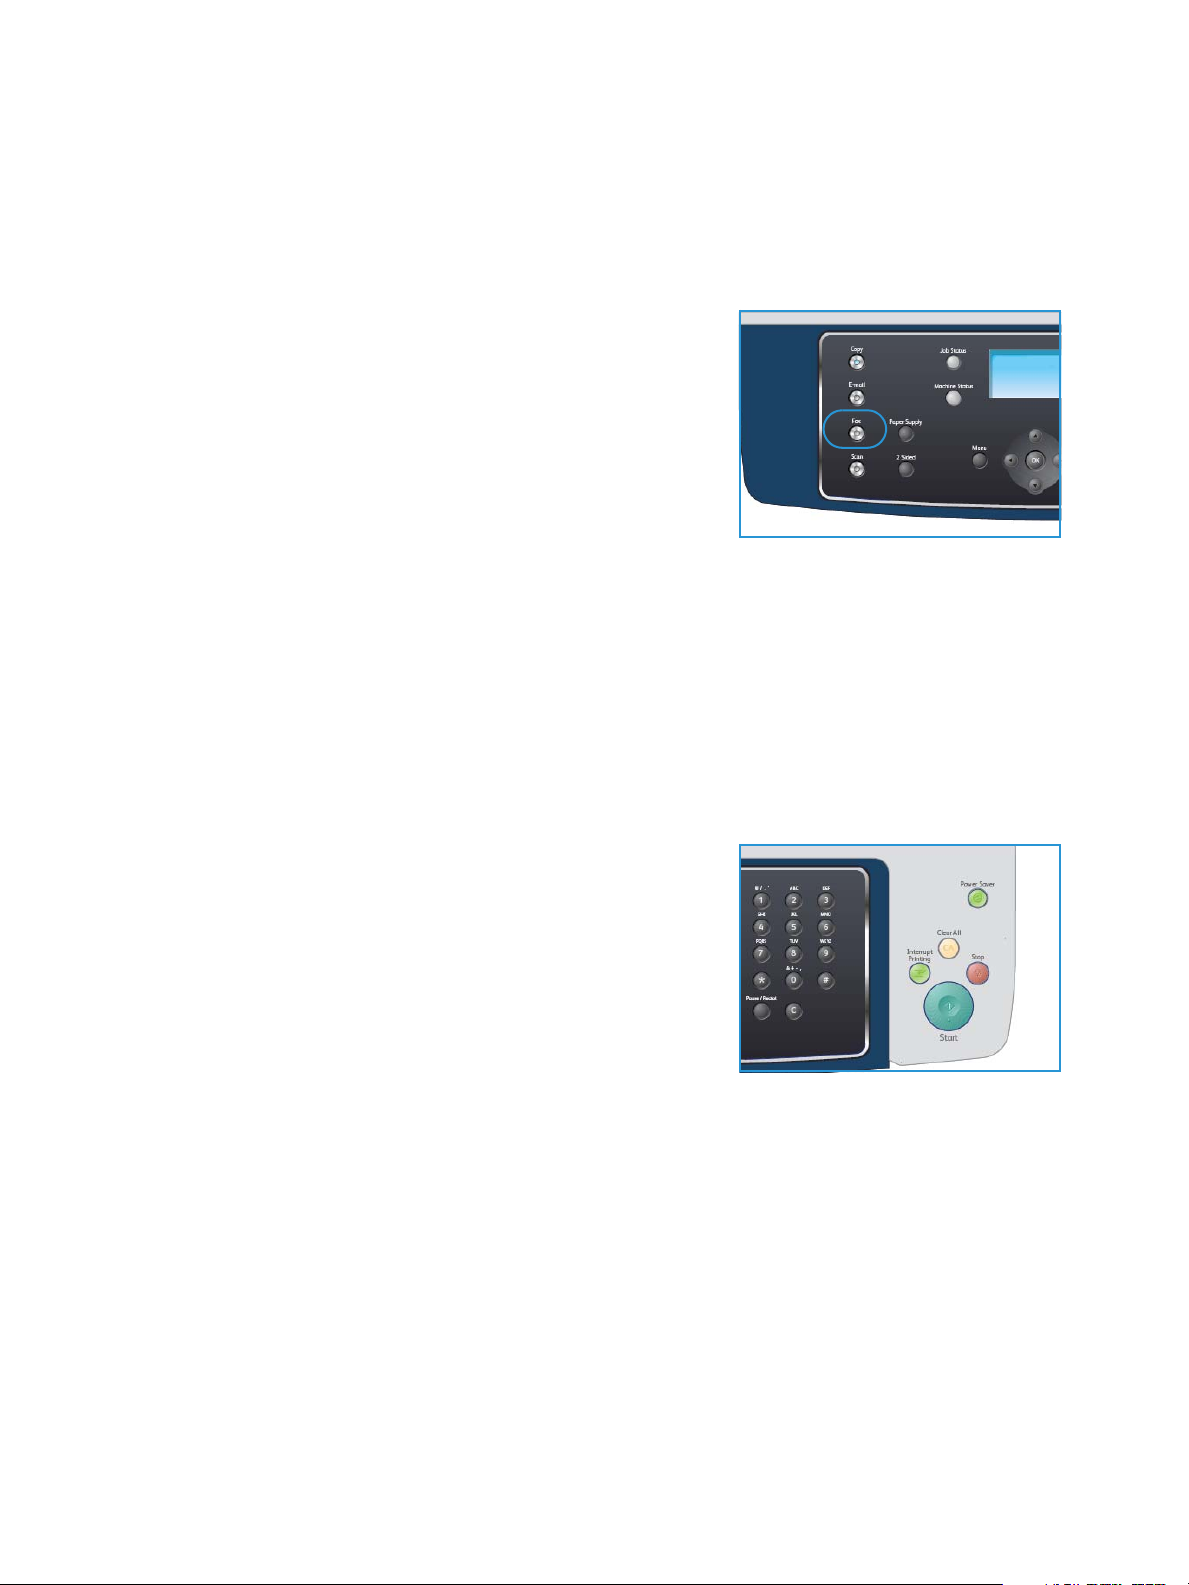
Start the Job
1. Press the Start button.
2. If using the document glass to scan 2 sided originals, the
machine displays a message when ready to scan side 2.
Continue scanning until all sides have been scanned.
The machine scans the originals, dials the entered number
and attempts to connect with the remote fax machine. Once
connected, the machine sends the Fax job.
If the number you have dialed is busy or there is no answer
when you send a fax, the machine automatically redials the
number every three minutes, up to seven times according to the factory default settings.
3. If the display shows Retry Redial? press OK to redial the number without waiting. To cancel the
automatic redialing, press Stop.
Note: To change the time interval between redials and the number of redial attempts, refer to Fax
Setup on page 140.
To print a confirmation or error report, refer to Information Pages on page 20.
40
Xerox WorkCentre 3550
User Guide
Page 41

Fax Proc edure
Check the Job Status
1. Press the Job Status button on the control panel to display
job status information.
2. A list of Active Jobs is displayed. Select your job using the
up/down arrows and press OK.
3. The following Job Options are available:
• Required Resources: Use this option to view the media
requirements for incoming Fax jobs.
• Delete: Select this option to delete the job. Use the
left/right arrows to select Ye s or No.
• Details: Select this option to display details about the job. The job name, owner, type, status
and submission time is displayed.
Stop the Job
Follow the steps below to manually cancel an active Fax job.
1. Press the Stop button on the control panel. A confirmation is displayed, press Stop again to cancel
the current Fax job.
2. To cancel a queued job press the Job Status button on the control panel to display the active jobs.
3. Use the up/down arrows and select the job required, press OK.
4. Select Delete and OK.
5. Select Yes to delete the job or No to return to previous screen.
Fax Confirmation
• When the last page of your original has been sent successfully, the machine beeps and returns to
ready mode.
• If something goes wrong while sending your fax, an error message appears on the display. For a
list of error messages and their meanings, refer to Fax Proble ms on page 188. If you receive an
error message, press Stop to clear the message and try to send the fax again.
• You can set your machine to print a confirmation report automatically each time sending a fax is
completed. For further details, refer to Fax Setup on page 140.
Xerox WorkCentre 3550
User Guide
41
Page 42

Fax O ption s
Fax Options
Your machine provides the following options to customize your Fax jobs. Use the Menu button to
access the options. For information about changing the default Fax settings, refer to Fax Setu p on
page 140.
Note: If you press Stop while setting the fax options, all of the options you have set for the current
Fax job will be canceled and return to their default status after the machine completes the job in
progress.
Feature Description Options
Lighten/Darken Adjusts the lightness or
darkness of the output.
Background
Suppression
Resolution Resolution affects the
Use to automatically
reduce or eliminate the
dark background resulting
from scanning colored
paper or newspaper
originals.
appearance of the fax at
the receiving fax terminal.
A higher resolution
produces a better quality
image. A lower resolution
reduces communication
time.
• Lightest: Lightens the image to the lightest setting.
• Light: Works well with dark print.
• Normal: Works well with standard typed or printed
originals.
• Dark: Works well with light print.
• Darkest: Darkens the original to the darkest setting.
• On: Select to eliminate background.
• Off: Select if Background Suppression is not required.
• Standard: Recommended for text documents. It
requires less communication time, but does not
produce the best image quality for graphics and
photos.
• Fine: Recommended for line art and photos. This is
the default resolution and the best choice in most
cases.
• SuperFine: Recommended for use with high quality
photos and graphics.
• Photo Fax: Recommended for originals containing
shades of gray or photographs.
• Color Fax: Recommended for originals with colors.
Sending a color fax is enabled only if the remote fax
machine supports color fax reception and you send
the fax manually. In this mode, memory transmission
is not available.
Note: When your machine is set to Super Fine resolution
and the remote fax machine does not support Super Fine
resolution, the machine transmits using the highest
resolution mode supported.
42
Xerox WorkCentre 3550
User Guide
Page 43

Feature Description Options
Fax Options
Original Size Allows you to specify the
size of the image to be
scanned.
Multi Send You can use the Multi Send
feature to send a fax to
multiple locations.
Delayed Start You can set your machine
to send a fax at a later
time when you will not be
present.
• A4
• A5
• B5
• Letter
• Legal
• Executive
• Folio
• Oficio
• Fax 1: Use this option to enter the first fax number.
• Fax 2: Use this option to enter the second fax number.
• Another Number?: Use this option to enter additional
fax numb ers.
Refer to Multi Send on page 45 for instructions.
• Fax 1: Use this option to enter the first fax number.
• Another Number?: Use this option to enter additional
fax numb ers.
• Job Name: Enter a name for the job using the keypad.
• Start Time: Enter a time for the fax to be transmitted
using the keypad.
Refer to Delayed Start on page 45 for instructions.
Priority Send This function is used when
a high priority fax need to
be sent ahead of reserved
operations.
Forward You can set the machine to
forward a received or sent
fax to an othe r fax, e-mail
or server destination.
Secure Receive You may need to prevent
your received faxes from
being accessed by
unauthorized people. In
Secure Receive mode, all
incoming faxes go into
memory and can be
printed by entering a 4digit password.
• Fax : Use this option to enter the fax number.
• Job Name: Enter a name for the job using the keypad.
Refer to Priority Send on page 46 for instructions.
• Fax : Use this option to forward a fax to another fax
number.
• E-mail: Use this option to forward faxes to an e-mail
address.
• Server: Use this option to forward faxes to a specified
server location.
Refer to Using Fax Forward on page 48 for instructions.
• On: Use this option to activate Secure Receive.
• Off: Use this option to deactivate Secure Receive.
• Print: Use this option to print the faxes received into
memory. If a 4-digit password was set when
activating Secure Receive, this password will be
required to print the faxes.
Refer to Using Secure Receive on page 50 for instructions.
Xerox WorkCentre 3550
User Guide
43
Page 44

Fax O ption s
Feature Description Options
Add Page Use to add additional
documents to a delayed
Fax job which is saved in
memory.
Cancel Job You can cancel a delayed
Fax job which is saved in
memory.
Refer to Adding Documents to a Delayed Fax on page 46
for instructions.
Refer to Canceling a Delayed Fax on page 46 for
instructions.
44
Xerox WorkCentre 3550
User Guide
Page 45

Using Fax Send Options
Using Fax Send Options
Multi Send
You can use the Multi Send feature to send a fax to multiple locations. The fax is automatically stored
in memory and then transmitted from memory to the fax destinations entered. After transmission, the
job is automatically erased from memory. You cannot send a color fax using this feature.
1. Press Fax on the control panel.
2. Press Menu on the control panel.
3. Press the up/down arrows to highlight Multi Send and press OK.
4. Enter the number of the first receiving fax machine and press OK.
You can select speed dial numbers or a group dial number using the Address book button. For
details, see Address Book on page 51.
Note: Once you have entered a group dial number, you cannot enter any more group dial
numbers.
5. Enter the second fax number and press OK.
The display asks you to enter another fax number. To enter more fax numbers, press OK when Yes
highlights and repeat the steps. You can add up to 10 destinations.
When you have finished entering fax numbers, press the left/right arrows to select No at the
Another No.? prompt and press OK.
6. Load originals and press Start to start storing the scanned original data into memory.
If using the document glass to scan more than one original, select Ye s to add another page. Load
another original and press OK.
When you have finished, select No at the Another Page? prompt.
The machine sends the fax to the numbers you entered in the order in which you entered them.
Delayed Start
You can set your machine to send a fax at a later time when you will not be present. Use this feature to
transmit faxes during off-peak hours or when sending to another country or time zone. You cannot
send a color fax using this feature.
1. Press Fax on the control panel.
2. Press Menu on the control panel.
3. Press the up/down arrows to highlight Delayed Start and press OK.
4. Enter the number of the receiving fax machine and press OK.
You can select speed dial numbers or a group dial number using the Address book button. For
details, see Address Book on page 51.
The display asks you to enter another fax number. To enter more fax numbers, press OK when Yes
highlights and repeat the steps. You can add up to 10 destinations.
Note: Once you entered a group dial number, you cannot enter another group dial numbers
anymore.
Xerox WorkCentre 3550
User Guide
45
Page 46

Using Fax Send Options
When you have finished entering fax numbers, press the left/right arrows to select No at the
Another No.? prompt and press OK.
5. Enter the Job Name you want and press OK. If you do not want to assign a name, skip this step.
For details on how to enter alphanumeric characters, refer to Using the Keypad on page 13.
6. Enter the time using the number keypad and press OK.
If you set a time earlier than the current time, the fax will be sent at that time on the following
day.
7. Load originals and press Start to start storing the scanned original data into memory.
If using the document glass to scan more than one original, select Ye s to add another page. Load
another original and press OK.
When you have finished, select No at the Another Page? prompt.
The machine returns to ready mode. The display reminds you that you are in ready mode and that a
delayed fax is set.
Adding Documents to a Delayed Fax
You can add additional documents to the delayed Fax job which is saved in memory.
1. Load the originals to be added and select the fax settings required.
2. Press Fax on the control panel.
3. Press Menu on the control panel.
4. Press the up/down arrows to highlight Add Page and press OK.
5. Press the up/down arrows until the Fax job you want appears and press OK.
6. Press Start.
If adding more than one original, select Yes to add another page. Load another original and press
OK.
When you have finished, select No at the Another Page? prompt.
Canceling a Delayed Fax
You can cancel a delayed Fax job which is saved in memory.
1. Press Fax on the control panel.
2. Press Menu on the control panel.
3. Press the up/down arrows to highlight Cancel Job and press OK.
4. Press the up/down arrows until the Fax job you want appears and press OK.
Press OK when Yes highlights to confirm and cancel the job.
The selected fax is deleted from memory.
Priority Send
This function is used when a high priority fax needs to be sent ahead of other Fax jobs in memory. The
original is scanned into memory and immediately transmitted when the current operation is finished.
In addition, a priority send fax will interrupt a Multi Send fax being sent. The fax is interrupted between
46
Xerox WorkCentre 3550
User Guide
Page 47

Using Fax Send Options
destinations, for example after the transmission to destination A ends and before the transmission to
destination B begins, or between redial attempts.
1. Press Fax on the control panel.
2. Press Menu on the control panel.
3. Press the up/down arrows to highlight Priority Send and press OK.
4. Enter the number of the receiving fax machine and press OK.
You can select speed dial numbers or a group dial number using the Address book button. For
details, see Address Book on page 51.
5. Enter the job name you want and press OK. If you do not want to assign a name, skip this step.
For details on how to enter alphanumeric characters, refer to Using the Keypad on page 13.
6. Load originals and press Start.
If an original is placed on the document glass, select Yes to add another page. Load another
original and press OK.
When you have finished, select No at the Another Page? prompt.
The machine scans and sends the fax to the destinations entered.
Xerox WorkCentre 3550
User Guide
47
Page 48

Usi ng Fax Fo rward
Using Fax Forward
You can set the machine to forward a received or sent fax to another fax, e-mail or server destination. If
you are out of office but have to receive the fax, this feature may be useful.
When you forward a fax to an e-mail address or an FTP or SMB server, you must use CentreWare
Internet Services to setup the destination details. You can forward a fax to a total of five destinations.
Refer to the System Administrator Guide for instructions.
Forwarding Sent Faxes
You can set the machine to forward a copy of every fax sent to another fax number, an e-mail address
or a server location. A copy of all sent faxes will continue to be forwarded to the destination set until
the option is deactivated. To deactivate Fax Forward, refer to Deactivating Fax Forward on page 49.
1. Press Fax on the control panel.
2. Press Menu on the control panel.
3. Press the up/down arrows to highlight Forward and press OK.
4. Select the option required:
Fax
a. Press the up/down arrows to highlight Fax and press OK.
b. Press the up/down arrows to highlight Send Forward and press OK.
c. Press the up/down arrows to highlight On and press OK.
d. Enter the fax number to which faxes are to be sent and press OK.
E-mail
a. Press the up/down arrows to highlight E-mail and press OK.
b. Press the up/down arrows to highlight Send Forward and press OK.
c. Press the up/down arrows to highlight On and press OK.
d. Enter your e-mail address and press OK.
e. Enter the e-mail address to which faxes are to be sent and press OK.
Server
a. Press the up/down arrows to highlight Server and press OK.
b. Press the up/down arrows to highlight Send Forward and press OK.
c. Press the up/down arrows to highlight On and press OK.
Forwarding Received Faxes
You can forward faxes received from remote fax machines to another fax number, an e-mail address or
a server location. When the machine receives a fax, it is stored in memory and then sent to the
destination you have set. All received faxes will continue to be forwarded to the destination set until
the option is deactivated. To deactivate Fax Forward, refer to Deactivating Fax Forward on page 49.
1. Press Fax on the control panel.
2. Press Menu on the control panel.
48
Xerox WorkCentre 3550
User Guide
Page 49

3. Press the up/down arrows to highlight Forward and press OK.
4. Select the option required:
Fax
a. Press the up/down arrows to highlight Fax and press OK.
b. Press the up/down arrows to highlight Receive Forward and press OK.
c. Press the up/down arrows to highlight On and press OK.
d. Enter the fax number to which faxes are to be sent and press OK.
E-mail
a. Press the up/down arrows to highlight E-mail and press OK.
b. Press the up/down arrows to highlight Receive Forward and press OK.
c. Press the up/down arrows to highlight On and press OK.
d. Enter your e-mail address and press OK.
e. Enter the e-mail address to which faxes are to be sent and press OK.
Server
a. Press the up/down arrows to highlight Server and press OK.
b. Press the up/down arrows to highlight Receive Forward and press OK.
c. Press the up/down arrows to highlight On and press OK.
Using Fax Forward
Deactivating Fax Forward
Follow the steps below to deactivate the Fax Forward option.
1. Press Fax on the control panel.
2. Press Menu on the control panel.
3. Press the up/down arrows to highlight Fax Fea ture and press OK.
4. Press the up/down arrows to highlight Forward and press OK.
5. Press the up/down arrows to highlight Fax, E-mail or Server and press OK.
6. Press the up/down arrows to highlight Send Forward or Receive Forward and press OK.
7. Press the up/down arrows to highlight Off and press OK.
Xerox WorkCentre 3550
User Guide
49
Page 50

Using Secure Receive
Using Secure Receive
You may need to prevent your received faxes from being accessed by unauthorized people. In Secure
Receive mode, all incoming faxes go into memory until they are accessed and released for printing. A 4-
digit passcode can be set to prevent faxes being printed by unauthorized users. If Secure Receive mode
is deactivated, any faxes stored in memory are automatically printed.
Activating Secure Receive
1. Press Fax on the control panel.
2. Press Menu on the control panel.
3. Press the up/down arrows to highlight Secure Receive and press OK.
4. Press the up/down arrows to highlight On and press OK.
5. Enter a four-digit password you want to use and press OK.
You can activate secure receiving mode without setting a password, but cannot protect your faxes.
Re-enter the password to confirm it and press OK.
When a fax is received in secure receiving mode, your machine stores it in memory and shows Secure
Receive to let you know that there is a fax received.
Deactivating Secure Receiving Mode
1. Press Fax on the control panel.
2. Press Menu on the control panel.
3. Press the up/down arrows to highlight Secure Receive and press OK.
4. Press the up/down arrows to highlight Off and press OK.
5. If required, enter the four-digit password and press OK.
The mode is deactivated and the machine prints all faxes stored in memory.
Printing Secure Faxes
1. Press Fax on the control panel.
2. Press Menu on the control panel.
3. Press the up/down arrows to highlight Secure Receive and press OK.
4. Press the up/down arrows to highlight Print and press OK.
5. If required, enter the four-digit password and press OK.
The machine prints all of the faxes stored in memory.
50
Xerox WorkCentre 3550
User Guide
Page 51

Address Book
Address Book
You can set up an Address Book with the fax numbers you use most frequently. Before beginning to
store fax numbers, make sure that your machine is in Fax mode. Your machine provides you with the
following features for setting up the Address Book.
Speed Dial Numbers
You can store up to 200 frequently-used fax numbers as speed dial numbers.
Registering a Speed Dial Number
1. Press Fax on the control panel.
2. Press Address Book on the control panel.
3. Press the up/down arrows to highlight New & Edit and press OK.
4. Press the up/down arrows to highlight Speed Dial and press OK.
5. Enter a speed dial number between 0 and 199 and press OK.
If an entry is already stored in the number you choose, a message is displayed. To start over with
another speed dial number, press Back.
6. Enter the name you want and press OK.
For details on how to enter alphanumeric characters, refer to Using the Keypad on page 13.
7. Enter the fax number you want and press OK.
8. Press Stop to return to ready mode.
Editing Speed Dial Numbers
1. Press Fax on the control panel.
2. Press Address Book on the control panel.
3. Press the up/down arrows to highlight New & Edit and press OK.
4. Press the up/down arrows to highlight Speed Dial and press OK.
5. Enter the speed dial number you want to edit and press OK.
6. Edit the details required:
• Change the name and press OK.
• Change the fax number and press OK.
7. Press Stop to return to ready mode.
Using Speed Dial Numbers
When you are prompted to enter a destination number while sending a fax, enter the speed dial
number at which you stored the number you want.
• For a one-digit (0-9) speed dial number, press and hold the corresponding digit button on the
number keypad.
Xerox WorkCentre 3550
User Guide
51
Page 52

Address Book
• For a two or three-digit speed dial number, press the first digit button(s) and then hold down the
last digit button.
You can also search through memory for an entry by pressing Address Book. (See Address Book on
page 51.)
Group Dial Numbers
If you frequently send the same document to several destinations, you can group these destinations
and set them under a group dial number. You can then use a group dial number to send a document to
all of the destinations within the group. You can set up to 100 (0 through 99) group dial numbers using
the destination’s existing speed dial numbers.
Registering a Group Dial Number
1. Press Fax on the control panel.
2. Press Address Book on the control panel.
3. Press the up/down arrows to highlight New & Edit and press OK.
4. Press the up/down arrows to highlight Group Dial and press OK.
5. Enter a group dial number between 0 and 99 and press OK.
If an entry is already stored in the number you choose, the display shows the message to allow
you to change it.
6. Enter the name you want and press OK.
For details on how to enter alphanumeric characters, refer to Using the Keypad on page 13.
7. Enter the first few letters of the speed dial’s name you want.
8. Press the up/down arrows until the name and number you want highlights and press OK.
9. Press OK when Yes highlights at the Add Another? prompt.
Repeat the steps to include other speed dial numbers into the group.
When you have finished, press the left/right arrows to select No at the Add Another? prompt and
press OK.
10. Press Stop to return to ready mode.
Editing a Group Dial Number
1. Press Fax on the control panel.
2. Press Address Book on the control panel.
3. Press the up/down arrows to highlight New & Edit and press OK.
4. Press the up/down arrows to highlight Group Dial and press OK.
5. Enter the group dial number you want to edit and press OK.
6. Enter the name you want to edit and press OK.
7. Enter the first few letters of the speed dial’s name you want to add or delete.
8. Press the up/down arrows until the name and number you want highlights and press OK.
If you entered a new speed dial number, Add? appears.
If you enter a speed dial number stored in the group, Delete? appears.
52
Xerox WorkCentre 3550
User Guide
Page 53

Address Book
Press OK to add or delete the number.
9. Press OK when Yes highlights to add or delete more numbers and repeat the steps.
When you have finished, press the left/right arrows to select No at the Another Number? and
press OK.
10. Press Stop to return to ready mode.
Using Group Dial Numbers
To use a group dial entry, you need to search for and select it from memory.
When you are prompted to enter a fax number while sending a fax, press Address Book. There are two
ways to search for a number in memory. You can either scan from A to Z sequentially, or you can search
by entering the first letters of the name associated with the number.
Searching Sequentially
1. Press Fax on the control panel.
2. Press Address Book on the control panel.
3. Press the up/down arrows to highlight Search & Dial and press OK.
4. Press the up/down arrows to highlight Group Dial and press OK.
5. Press the up/down arrows to highlight All and press OK.
6. Press the up/down arrows until the name and number you want highlights. You can search
upwards or downwards through the entire memory in alphabetical order.
Searching using the Name
1. Press Fax on the control panel.
2. Press Address Book on the control panel.
3. Press the up/down arrows to highlight Search & Dial and press OK.
4. Press the up/down arrows to highlight Group Dial and press OK.
5. Press the up/down arrows to highlight Search ID and press OK.
Enter the first few letters of the name you want.
6. Press the up/down arrows until the group dial’s name and number you want highlights.
Deleting an Address Book Entry
1. Press Fax on the control panel.
2. Press Address Book on the control panel.
3. Press the up/down arrows to highlight Delete and press OK.
4. Press the up/down arrows to highlight Speed Dial or Group Dial and press OK.
5. Press the up/down arrows until the searching method you want highlights and press OK.
• Select Search All to search for an entry by scanning through all entries in Address Book.
• Select Search ID to search for an entry by the first few letters of the name.
6. Press the up/down arrows until the name you want highlights and press OK.
Or, enter the first letters. Press the up/down arrows until the name you want highlights and press
OK.
Xerox WorkCentre 3550
User Guide
53
Page 54

Address Book
7. Press OK when Yes highlights to confirm the deletion.
8. Press Stop to return to ready mode.
Printing the Address Book
You can check your Address Book settings by printing a list.
1. Press Fax on the control panel.
2. Press Address Book on the control panel.
3. Press the up/down arrows to highlight Print and press OK.
54
Xerox WorkCentre 3550
User Guide
Page 55

Fax fro m PC
Fax from PC
You can send a fax from your PC without going to the machine. To a fax from your PC you will need to
install the PC-Fax software and customize the software settings. Refer to the System Administrator
Guide for setup instructions.
1. Open the document you want to send.
2. Select Print from the File menu.
The Print window is displayed. It may look slightly different
depending on your application.
3. Select Xerox MFP PC Fax from the Name drop-down list box.
4. Select OK.
5. Select the options required for the Fax job:
• Phonebook: If using the Windows Address Book, select a
recipient from the list or add a new recipient using the
Add button. Select the arrow button to add recipients to
the Recipient list. If using the Outlook Office Address
Book, select a recipient from the list and use the arrow
button to add recipients to the Recipient list. Use the
Add and Remove buttons to edit your Recipient list.
• Fax Quality: Select Standard or Fine fax quality.
• Cover Page: If a cover page is required, select the Cover
Page checkbox. Enter the cover page details required.
Use the Advanced button to import a cover page.
• Date: Select a date for the Fax job.
• Notify on Delivery: Select this checkbox to receive notification that your fax has been
delivered to the recipients.
• Preview: Use this option to view the cover page and fax document which will be sent.
6. Click Send to send the fax.
Your PC sends the fax data to the printer, then the printer sends the fax.
Xerox WorkCentre 3550
User Guide
55
Page 56

Receiving Faxes
Receiving Faxes
This part explains how to receive a fax, and the special receiving methods available.
Manual Receive
There are two methods for receiving a fax manually:
• On Hook Dial: You can receive a fax call by pressing On Hook Dial and then pressing Start when
you hear a fax tone from the remote machine. The machine begins receiving a fax. If a handset is
available you can answer calls using the handset.
To change the number of rings, see Fa x Setup on page 140.
• Using an Extension Telephone: This feature works best when you are using an extension
telephone connected to the EXT socket on the back of your machine. You can receive a fax from
someone you are talking to on the extension telephone, without going to the fax machine. When
you receive a call on the extension phone and hear fax tones, press the keys *9* on the extension
phone. The machine receives the fax.
*9* is the remote receive code preset at the factory. The first and the last asterisks are fixed, but
you can change the middle number to whatever you wish. For details about changing the
Start Code
, see Receiving on page 141.
RCV
Using an Answering Machine
To use this mode, you must attach an answering machine to the EXT socket on the back of your
machine. If the caller leaves a message, the answering machine stores the message as it would
normally. If your machine detects a fax tone on the line, it automatically starts to receive the fax.
Notes:
• If you have set your machine to this mode and your answering machine is switched off,
or no answering machine is connected to EXT socket, your machine automatically goes
into Fax mode after a predefined number of rings.
• If your answering machine has a user-selectable ring counter, set the machine to answer
incoming calls within 1 ring.
• If you are in Tel mode when the answering machine is connected to your machine, you
must switch off the answering machine. otherwise, the outgoing message from the
answering machine will interrupt your phone conversation.
Using DRPD Mode
Distinctive Ring is a telephone company service which enables a user to use a single telephone line to
answer several different telephone numbers. The particular number someone uses to call you is
identified by different ringing patterns, which consist of various combinations of long and short ringing
sounds. This feature is often used by answering services who answer telephones for many different
clients and need to know which number someone is calling in on to properly answer the phone.
Using the Distinctive Ring Pattern Detection (DRPD) feature, your fax machine can learn the ring
pattern you designate to be answered by the fax machine. Unless you change it, this ringing pattern
56
Xerox WorkCentre 3550
User Guide
Page 57

Receiving Faxes
will continue to be recognized and answered as a fax call, and all other ringing patterns will be
forwarded to the extension telephone or answering machine plugged into the EXT socket. You can
easily suspend or change DRPD at any time.
Before using the DRPD option, Distinctive Ring service must be installed on your telephone line by the
telephone company. To set up DRPD, you will need another telephone line at your location, or someone
available to dial your fax number from outside.
For information about setting up DRPD, refer to Setting up DRPD Mode on page 143.
Receiving Faxes in Memory
Since your machine is a multi-tasking device, it can receive faxes while you are making copies or
printing. If you receive a fax while you are copying or printing, your machine stores incoming faxes in
its memory. Then, as soon as you finish copying or printing, the machine automatically prints the fax.
Xerox WorkCentre 3550
User Guide
57
Page 58

Receiving Faxes
58
Xerox WorkCentre 3550
User Guide
Page 59

Scan
This chapter includes:
• Introduction on page 60
• Scan Procedure on page 61
• Scan Options on page 66
• Scan Using TWAIN on page 68
• Scan Using WIA Driver on page 69
• Network Scan Manager on page 70
• Macintosh Scanning on page 71
• Linux Scanning on page 72
4
Xerox WorkCentre 3550
User Guide
59
Page 60

Introduction
Introduction
Scanning with your machine lets you turn pictures and text into digital files that can be stored on your
computer or sent to a repository. Your machine can scan via USB or network to a PC or server, as well as
directly to a USB memory device. The following filing options are available for Scan:
• USB: Using this option, you can scan an image to a USB Memory Device inserted into the USB
Memory Device port.
• Local PC: This option is used if the machine is connected to a PC via USB cable. The scan driver
must be installed on your PC prior to use. The scanned data will be stored in the connected
computer’s My Documents folder.
• Network PC: Using this option the scanned data will be stored to a networked PC, in the My
Documents folder.
• SMB: Using this option, you can scan an image and upload it to a shared folder on an SMB server.
• FTP: Using this option, you can scan an image and upload it to an FTP server.
For instructions on setting up and configuring the Scan function, refer to the System Administrator
Guide.
Scanning Methods
Your machine offers the following ways to scan an image using a local connection:
• TWAIN: TWAIN drivers handle the communication between computer software and the scanning
device. Scanning an image launches the selected application, enabling you to control the
scanning process. This feature can be used via a local connection or a network connection.
Refer to Scan Using TWAIN on page 68.
• WIA: WIA stands for Windows Image Acquisition. To use this feature your computer must be
connected to the machine via a USB cable.
Refer to Scan Using WIA Driver on page 69.
60
Xerox WorkCentre 3550
User Guide
Page 61
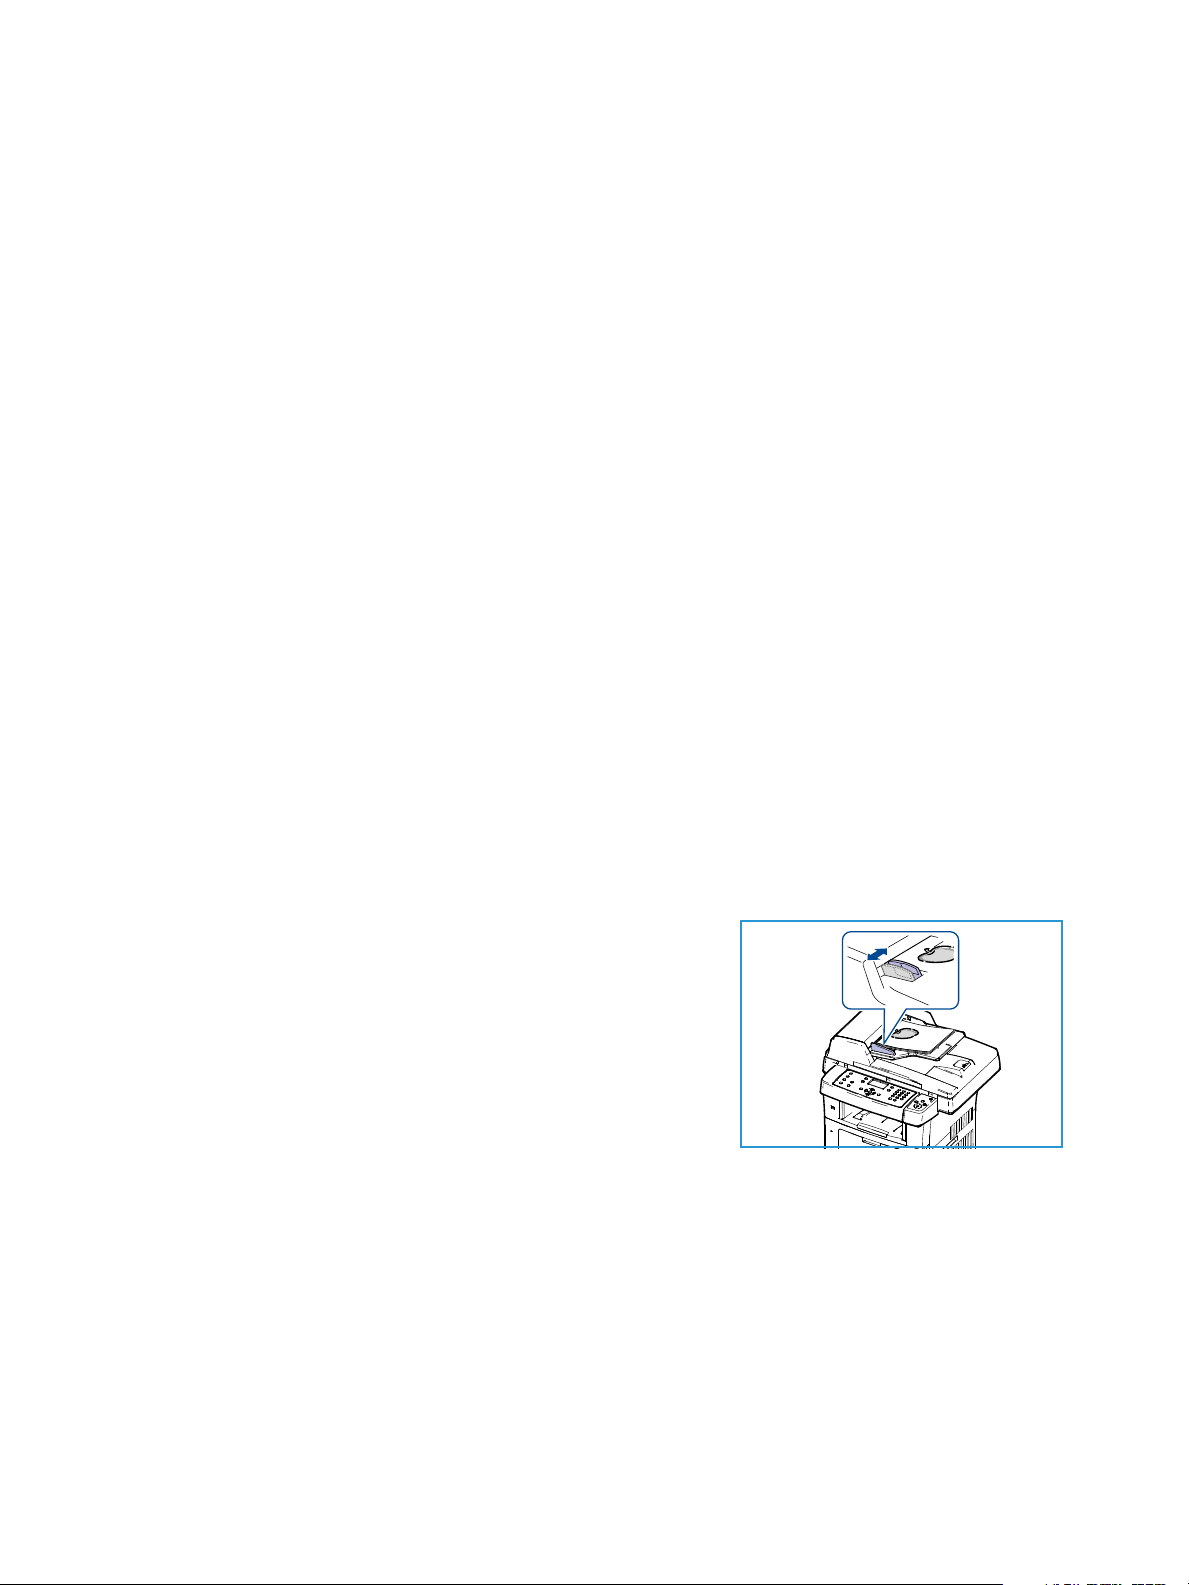
Scan Procedure
Scan Procedure
Using Scan, an electronic file can be created from a hard copy original. The electronic file can be filed
to a specified destination.
This section describes the basic procedure for scanning. Follow the steps below.
• Load the Documents on page 61
• Select the Scan Destination on page 62
• Select the Features on page 64
• Start the Job on page 65
• Check the Job Status on page 65
• Stop the Job on page 65
If an authentication feature is enabled, you may need an account before using the machine. To get an
account, or for more information, contact the System Administrator.
Load the Documents
You can load the documents to be scanned either on the document glass or through the document
feeder.
Document Feeder
The following steps explain how to load documents using the document feeder:
1. Before loading the documents into the document feeder, ensure they are in good condition and
remove all staples and paper clips.
2. Insert the documents neatly into the document feeder, face
up. The first page should be on top with the headings
towards the left of the machine.
Note: Up to 60 sheets of 20 lb (75 g/m²) bond paper can be
loaded. Weight ranges from 12.5 lb to 28 lb (50 - 120 g/m²) refer to Paper Supply on page 193 for further information.
3. Place the documents in between the guides placing the left
edge in the document feeder, and position the guides to just
touch the edge of the documents.
Xerox WorkCentre 3550
User Guide
61
Page 62

Scan Procedure
Document Glass
The following steps explain how to load documents using the document glass:
1. Raise the document feeder.
2. Place the document face down on the document glass,
aligned with the tip of the registration arrow near the top left
of the document glass.
The default document size is 8.5 x 11” or A4. For other sized
documents change the Original Size option. Refer to Scan
Options on page 66 for further information.
3. Lower the document feeder.
Select the Scan Destination
Scan to USB
1. Insert a USB Memory Device into the USB memory port on
your machine. Refer to Inserting the USB Memory Device on
page 102 for instructions.
2. Press the Scan button on the control panel.
3. Press the up/down arrows to highlight USB.
4. Press the 2 Sided button or Menu button to customize Scan
settings. Refer to Select the Features on page 64.
5. When the scan settings are selected, press OK to scan your
originals.
Scan to Local PC
To u s e Scan to Local PC, the machine must be connected to your PC or workstation via USB cable. The
scan driver must be installed on your PC prior to use. For instructions, refer to the System Administrator
Guide.
1. Press the Scan button on the control panel.
2. Press the up/down arrows to highlight Local PC.
3. Press the 2 Sided button to customize Scan settings.
4. Press OK. If you see the Not Available message, check the port connection.
5. Press the up/down arrows until the scan destination you want highlights and press OK. The default
setting is My Documents.
The images are scanned and filed to the destination selected.
62
Xerox WorkCentre 3550
User Guide
Page 63

Scan Procedure
Scan to Network PC
Make sure that your machine is connected to a network. Make sure the machine has been configured
using the Network Scan Manager utility and the scan driver has been installed. For instructions, refer to
the System Administrator guide.
Note: The Xerox Network Scan Manager program can only be used in the Windows system.
1. Press the Scan button on the control panel.
2. Press the up/down arrows to highlight Network PC.
3. Press the 2 Sided button to customize Scan settings.
4. Press OK. If you see the Not Available message, check the connection and/or setup.
5. Press the up/down arrows to highlight the Login ID you want and press OK.
6. Enter the Password using the keypad and press OK.
7. Press the up/down arrows to highlight the Scan Destination you want and press OK. The default
setting is My Documents.
8. Press the up/down arrows to highlight the Resolution you want and press OK.
9. Press the up/down arrows to highlight the Color you want and press OK.
10. Press the up/down arrows to highlight the File Format you want and press OK.
The images are scanned and filed to the destination selected.
Scan to FTP
Make sure that your machine is connected to a network. Make sure the machine has been configured
using CentreWare Internet Services. Refer to the System Administrator guide for instructions.
1. Press the Scan button on the control panel.
2. Press the up/down arrows to highlight FTP.
3. Press the 2 Sided button or Menu button to customize Scan settings. Refer to Select the Features
on page 64.
4. Press OK.
5. If Authentication is enabled, enter your Login ID and Password (if required).
6. Press the up/down arrows until the server you want highlights and press OK.
7. Press the up/down arrows to highlight the File Format you want and press OK.
The images are scanned and filed to the destination selected.
Scan to SMB
Make sure that your machine is connected to a network. Make sure the machine has been configured
using CentreWare Internet Services. Refer to the System Administrator guide for instructions.
1. Press the Scan button on the control panel.
2. Press the up/down arrows to highlight SMB.
3. Press the 2 Sided button or Menu button to customize Scan settings. Refer to Select the Features
on page 64.
4. Press OK.
Xerox WorkCentre 3550
User Guide
63
Page 64

Scan Procedure
5. If Authentication is enabled, enter your Login ID and Password (if required).
6. Press the up/down arrows until the server you want highlights and press OK.
7. Press the up/down arrows to highlight the File Format you want and press OK.
The images are scanned and filed to the destination selected.
Select the Features
Various features can be selected for your scan job when the machine is in the Ready mode. Once you
have made a selection, press Back to return to the Ready screen.
1. Press the 2 Sided button on the control panel. The following 2 Sided options are available:
• 1 1 Sided: Use this option for 1 sided originals.
• 2 1 Sided: Use this option for 2 sided originals.
• 2 1 Sided, Rotated: Use this option for 2 sided originals which have the second side
rotated. This option will rotate the second side image 180 degrees.
Select the 2 Sided option required using the up/down arrows and press OK.
2. The following features are available through the Menu button for Scan to USB, Scan to FTP and
Scan to SMB.
File Format Sets the file format of the saved image.
Output Color Sets the color mode of the scanned image.
Lighten/Darken Provides manual control to adjust the lightness or darkness of the
scanned images.
Background Suppression Use to automatically reduce or eliminate the dark background resulting
from scanning colored paper or newspaper originals.
Original Type Used to improve the image quality by selecting the document type for
the originals.
Resolution Sets the image resolution. A higher resolution increases the file size.
Original Size Use to set the size of the image being scanned.
Press the up/down arrows until the feature you want highlights and press OK. Select the setting
required and press OK.
For information about each of the options refer to Scan Options on page 66.
64
Xerox WorkCentre 3550
User Guide
Page 65

Start the Job
1. Press the Start button.
2. If using the document glass to scan 2 sided originals, the
machine displays a message when ready to scan side 2.
Continue scanning until all sides have been scanned.
The images are scanned and filed to the destination
selected.
Check the Job Status
1. Press the Job Status button on the control panel to display
job status information.
2. A list of Active Jobs is displayed. Select your job using the
up/down arrows and press OK.
3. The following Job Options are available:
• Delete: Select this option to delete the job. Use the
left/right arrows to select Ye s or No.
• Details: Select this option to display details about the
job. The job name, owner, type, status and submission
time is displayed.
Scan Procedure
Stop the Job
Follow the steps below to manually cancel an activate scan job.
1. Press the Stop button on the control panel. A confirmation is displayed, press Stop again to cancel
the current scan job.
2. To cancel a queued job press the Job Status button on the control panel to display the active jobs.
3. Use the up/down arrows and select the job required, press OK.
4. Select Delete and OK.
5. Select Yes to delete the job or No to return to previous screen.
Xerox WorkCentre 3550
User Guide
65
Page 66
Scan Options
Scan Options
Your machine provides the following options to customize your Scan jobs. Use the Menu button to
access the options. For information about changing the default Scan settings, refer to Scan Defaults on
page 145.
Feature Description Options
File Format File Format determines the
type of file created and
can be temporarily
changed for the current
job. Select the file format
you wish to use for your
scanned image.
Lighten/Darken This provides manual
control to adjust the
lightness or darkness of
the scanned images.
• PDF (Portable Document Format): Allows recipients
with the right software to view, print or edit the
electronic file, no matter what their computer
platform.
• TIFF (Tagged Image File Format): Produces a
graphic file that can be opened by a variety of graphic
software packages across a variety of computer
platforms. A separate file is produced for each image
scanned.
• Multi Page TIFF: Produces a single TIFF file
containing several pages of scanned images. A more
specialized software is required to open this type of
file format.
• JPEG (Joint Photographic Experts Group): Produces
a compressed graphic file that can be opened by a
variety of graphic software packages across a variety
of computer platforms. A separate file is produced for
each image scanned.
• Lightest: Lightens the image to the lightest setting.
• Light: Works well with dark print.
• Normal: Works well with standard typed or printed
originals.
• Dark: Works well with light print.
• Darkest: Darkens the original to the darkest setting.
Output Color
Select Output Color to
produce black and
white, grayscale or color
output.
Original Type The Original Type setting is
used to improve the image
quality by selecting the
document type for the
originals.
Background
Suppression
66
Xerox WorkCentre 3550
User Guide
Use to automatically
reduce or eliminate the
dark background resulting
from scanning colored
paper or newspaper
originals.
• Color: Use to select color output from your original.
• Grayscale: Use if gray scales are required.
• Black and White: Use to select black and white
output regardless of the color of your original.
• Te xt : Use for originals containing mostly text.
• Text and Photo: Use for originals with mixed text and
photographs.
• Photo: Use when the originals are photographs.
• On: Select to eliminate background.
• Off: Select if Background Suppression is not required.
Page 67

Feature Description Options
Scan Options
Resolution Resolution affects the
appearance of the
scanned image. A higher
resolution produces a
better quality image. A
lower resolution reduces
communication time when
sending the file over the
network.
Original Size Allows you to specify the
size of the image to be
scanned.
• 600 dpi: Recommended for high quality photos and
graphics. It produces the largest image file size, but
delivers the best image quality.
Note: 600 dpi is only supported for Scan to USB when the
maximum memory is installed.
• 300 dpi: Recommended for high quality text
documents that are to pass through OCR applications.
Also recommended for high quality line art or medium
quality photos and graphics. This is the default
resolution and the best choice in most cases.
• 200 dpi: Recommended for average quality text
documents and line art. Does not produce the best
image quality for photos and graphics.
• 100 dpi: Recommended for lower quality text
documents or if a smaller file size is required.
•A4
•A5
•B5
•Letter
•Legal
•Executive
•Folio
•Oficio
Xerox WorkCentre 3550
User Guide
67
Page 68

Scan Using TWAIN
Scan Using TWAIN
If you want to scan documents using other software, you will need to use TWAIN compliant software,
such as Adobe Photoshop. Follow the steps below to scan with TWAIN compliant software:
1. Make sure that the machine is connected to your computer and powered on.
2. Install the TWAIN driver. Follow the install instructions provided with your driver.
3. Load originals face up into the document feeder, or place a single original face down on the
document glass.
4. Open an application, such as Adobe Photoshop.
5. Open the TWAIN window and set the scan options.
6. Scan and save your scanned image.
68
Xerox WorkCentre 3550
User Guide
Page 69

Scan Using WIA Driver
Scan Using WIA Driver
Your machine also supports the Windows Image Acquisition (WIA) driver for scanning images. WIA is
one of the standard components provided by Microsoft Windows XP and works with digital cameras
and scanners.
Note: The WIA driver works only on Windows XP/Vista/7.0 with a USB port.
1. Make sure that the machine is connected to your computer and powered on.
2. Install the WIA driver. Follow the install instructions provided with your driver.
3. Load originals face up into the document feeder, or place a single original face down on the
document glass.
4. Scan the originals using the following instructions:
Windows XP
a. From the Start menu, select Control Panel, > Scanners and Cameras.
b. Double click your scanner driver icon. The Scanner and Camera Wizard appears. Then click
Next.
c. Set the option in Choose scanning preferences window. Then click Next.
d. Enter a picture name, and select a file format and destination to save the picture.
e. Click Next to scan your originals.
f. Click Next and Finish to view images.
Windows Vista
a. From the Start menu select Control Panel > Scanners and Cameras.
b. Double click Scan a document or picture. Windows Fax and Scan application appears. You
can click on View scanners and cameras to view scanners.
c. If there is no Scan a document or picture, open the MS paint program and from the File click
From Scanner or Camera... .
d. Click New Scan. Scan driver appears. Choose your scanning preferences.
e. Click Scan.
Windows 7
a. From the Start menu select Control Panel > Devices and Printers.
b. Click the right mouse button on the device driver icon in Printers and Faxes > Start Scan.
New Scan application appears.
c. Choose your scanning preferences.
d. Click Scan.
Xerox WorkCentre 3550
User Guide
69
Page 70

Network Scan Manager
Network Scan Manager
If you have installed the scan driver, the Network Scan Manager program has been automatically
installed too. Through this program, you can change scan settings and add or delete the folders where
scanned documents are saved on your computer.
Note: The Xerox Network Scan Manager program can only be used in the Windows system.
1. Select the Network Scan Manager:
• For Windows: From the Start menu, select All Programs > Xerox > Network Scan > Network
Scan.
2. Select the appropriate machine from the Xerox Network Scan Manager window.
3. Select Properties.
The Preferences tab allows you to change the saving destination and scan settings, add or delete
application program, and format files.
4. Click OK to confirm your settings.
Preferences Tab
Scan Destination
• Available Destination List: Shows the list of applications
currently linked to scanned images in the PC’s registry.
Select the program you want to use and click the right
arrow and add to Front Panel Destination List.
• Front Panel Destination List: Shows the list of applications
to open scanned image.
• Add Application: Allows you to add an application to the
Available Destination List.
• Remove Application: Allows you to remove an item added
by the user from the Available Destination List.
Scan Property
• Save Location: Allows you to choose the location of the default saving folder.
• Resolution: Allows you to choose the scan resolution.
• Output Color: Allows you to choose black and white, grayscale or color output.
• Original Size: Allows you to select the size of the original document.
• Default: Allows you to revert to default options.
• File Format: Determines the type of file created and can be temporarily changed for the current
job. You can select the file format you wish to use for your scanned image.
70
Xerox WorkCentre 3550
User Guide
Page 71

Macintosh Scanning
Macintosh Scanning
You can scan documents using Image Capture on Macintosh systems.
Scanning with USB Connection
Make sure that the machine is connected to your computer and powered on. Install the scan driver.
Follow the install instructions provided with your driver.
1. Make sure that the machine and your workstation are connected to the network.
2. Load originals face up into the document feeder, or place a single original face down on the
document glass.
3. Start Applications and click Image Capture.
If the No Image Capture device connected message appears, disconnect the USB cable and
reconnect it. If the problem continues, refer to the Image Capture help option to resolve the
problem.
4. Select the device required.
5. Set the scan options on this program.
6. Scan and save your scanned image.
For more information about using Image Capture, use the Image Capture help option.
Use TWAIN-compliant software to apply more scan options. You can also scan using TWAIN-compliant
software, such as Adobe Photoshop. Scan processes differ according to the TWAIN-compliant software
being used. Please refer to the User Guide supplied with the software for instructions.
If scanning does not operate in Image Capture, update Mac OS to the latest version. Image Capture
operates correctly in Mac OS X 10.3.9 or higher, and Mac OS X 10.4.7 or higher.
Xerox WorkCentre 3550
User Guide
71
Page 72

Linux Scanning
Linux Scanning
You can scan a document using the Unified Driver Configurator window. Make sure that the machine is
powered on and connected to your computer via USB cable, or connected to the network. Install the
scan driver. Follow the install instructions provided with your driver.
Scanning
1. Double-click the Unified Driver Configurator on your desktop.
2. Click the button to switch to Scanners Configuration.
3. Select the scanner on the list.
• If you use only one machine device and it is connected to the computer and turned on, your
scanner appears on the list and is automatically selected.
• If you have two or more scanners connected to your computer, you can select any scanner to
work at any time. For example, while acquisition is in progress on the first scanner, you may
select the second scanner, set the device options and start the image acquisition
simultaneously.
4. Click Properties.
5. Load originals face up into the document feeder, or place a single original face down on the
document glass.
6. From the Scanner Properties window, click Preview.
The document is scanned and the image preview appears in the Preview Pane.
7. Drag the pointer to set the image area to be scanned in the Preview Pane.
8. Change the scan options in the Image Quality and Scan Area sections.
• Image Quality: This option allows you to select the color composition and the scan
resolution for the image.
• Scan Area: This option allows you to select the page size. The Advanced button enables you
to set the page size manually.
If you want to use one of the preset scan option settings, select the option from the Job Type
drop-down list. (See Job Type Settings on page 72.)
9. Click Default to restore the default setting for the scan options.
10. When you have finished, click Scan to start scanning.
The status bar appears on the bottom left of the window to show you the progress of the scan. To
cancel scanning, click Cancel.
The scanned image appears.
11. When you are finished, click Save on the toolbar.
12. Select the file directory where you want to save the image and enter the file name.
13. Click Save.
Job Type Settings
You can save your scan option settings for later use.
72
Xerox WorkCentre 3550
User Guide
Page 73

Linux Scanning
Saving a New Job Type Setting
1. Change the options from the Scanner Properties window.
2. Click Save As.
3. Enter the name for your setting.
4. Click OK.
Your setting is added to the Job Type drop-down list.
Deleting a Job Type Setting
1. Select the setting you want to delete from the Job Type drop-down list.
2. Click Delete.
The setting is deleted from the list.
Using the Image Manager
The Image Manager application provides you with menu commands and tools to edit your scanned
image. Use the following tools to edit the image:
To ol s Name Function
Save Saves the image.
Undo Cancels your last action.
Redo Restores the action you canceled.
Scroll Allows you to scroll through the image.
Crop Crops the selected image area.
Zoom Out Zooms the image out.
Zoom In Zooms the image in.
Scale Allows you to scale the image size; you can enter the size manually, or
set the rate to scale proportionally, vertically, or horizontally.
Rotate Allows you to rotate the image; you can select the number of degrees
from the drop-down list.
Xerox WorkCentre 3550
User Guide
73
Page 74

Linux Scanning
To ol s Name Function
Flip Allows you to flip the image vertically or horizontally.
Effect Allows you to adjust the brightness or contrast of the image, or to invert
the image.
Properties Shows the properties of the image.
For further details about the Image Manager application, refer to the on screen help.
74
Xerox WorkCentre 3550
User Guide
Page 75

E-mailing with your machine lets you turn pictures and text into digital files that can be sent to an email address. You can scan the originals and e-mail the scanned image to several destinations from the
machine by e-mail.
This chapter includes:
• E-mail Procedure on page 76
• E-mail Options on page 80
• Address Book on page 82
• Smart Key Addresses on page 84
5
Xerox WorkCentre 3550
User Guide
75
Page 76

E-mail Procedure
E-mail Procedure
If E-mail has been enabled, an electronic file can be created from a hard copy original. The electronic
file can be e-mailed to a specified address.
This section describes the basic procedure for e-mailing. Follow the steps below.
• Load the Documents on page 76
• Enter the E-mail Address on page 77
• Select the Features on page 78
• Start the Job on page 78
• Check the Job Status on page 79
• Stop the E-mail Job on page 79
If an authentication feature is enabled, you may need an account before using the machine. To get an
account, or for more information, contact the System Administrator.
Load the Documents
You can load the documents to be scanned either on the document glass or through the document
feeder.
Document Feeder
The following steps explain how to load documents using the document feeder:
1. Before loading the documents into the document feeder,
ensure they are in good condition and remove all staples and
paper clips.
2. Insert the documents neatly into the document feeder, face
up. The first page should be on top with the headings
towards the left of the machine.
Note: Up to 60 sheets of 20 lb (75 g/m²) bond paper can be
loaded. Weight ranges from 12.5 lb to 28 lb (50 - 120 g/m²) refer to Specifications on page 191 for further information.
3. Place the documents in between the guides placing the left edge in the document feeder, and
position the guides to just touch the edge of the documents.
76
Xerox WorkCentre 3550
User Guide
Page 77

E-mail Procedure
Document Glass:
The following steps explain how to load documents using the document glass:
1. Raise the document feeder.
2. Place the document face down on the document glass,
aligned with the tip of the registration arrow near the top left
of the document glass.
The default document size is 8.5 x 11” or A4. For other sized
documents change the Original Size option. Refer to E-mail
Options on page 80 for further information.
3. Lower the document feeder.
Enter the E-mail Address
1. Press the E-mail button on the control panel.
If Authentication is enabled, enter your Login ID and
Password (if required).
2. When Enter From Address: appears, enter the sender’s e-
mail address and press OK.
If Send to Myself? appears, press the left/right arrows to
highlight Yes or No and press OK.
3. When Enter Destination Addresses: appears, enter the
recipient’s e-mail address and press OK.
•Use the .com button to add commonly used address
text to the e-mail address, for example .com or
@yourdomainname.com. Press the .com key repeatedly
until the text required is displayed and press OK. The
text is added to address. The Smart Key text can be
customized using CentreWare Internet Services, refer to
Smart Key Addresses on page 84 for instructions.
• E-mail addresses can also be added using the Address
Book, refer to Address Book on page 82 for instructions.
• Press the down arrow and enter additional e-mail addresses if required and press OK.
4. If File Format appears, highlight the file format required and press OK.
5. Enter an e-mail subject and press OK.
6. When Ready to E-mail appears you can add or edit the recipient list, press Menu to select
additional features or press Start to scan your originals.
• To add additional recipients, highlight Add Another Address and enter the address required.
• To edit or delete recipients, use the up/down arrows to highlight the address requiring editing
or deleting and press OK. Use the left arrow key to delete characters and then edit the
address. To delete the address, press the down arrow key to highlight Delete and select OK.
Xerox WorkCentre 3550
User Guide
77
Page 78

E-mail Procedure
Select the Features
Various features can be selected for your e-mail job. The most common features are selected from the
control panel. Once you have made a selection, press Back to return to the Ready screen.
1. Press the 2 Sided button on the control panel. The following 2 Sided options are available:
• 1 1 Sided: Use this option for 1 sided originals.
• 2 1 Sided: Use this option for 2 sided originals.
• 2 1 Sided, Rotated: Use this option for 2 sided originals which have the second side
rotated. This option will rotate the second side image 180 degrees.
Select the 2 Sided option required using the up/down arrows and press OK.
2. The following features are available through the Menu button:
File Format Sets the file format of the saved image.
Output Color Sets the color mode of the scanned image.
Lighten/Darken Provides manual control to adjust the lightness or darkness of the
scanned images.
Background Suppression Use to automatically reduce or eliminate the dark background resulting
from scanning colored paper or newspaper originals.
Original Type Used to improve the image quality by selecting the document type for
the originals.
Resolution Sets the image resolution. A higher resolution increases the file size.
Original Size Use to set the size of the image being scanned.
Press the up/down arrows until the feature you want highlights and press OK. Select the setting
required and press OK.
For information about each of the options refer to E-mail Options on page 80.
Start the Job
1. Press the Start button.
2. If using the document glass to scan 2 sided originals, the
machine displays a message when ready to scan side 2.
Continue scanning until all sides have been scanned.
The images are scanned and sent to the e-mail address or
addresses entered.
78
Xerox WorkCentre 3550
User Guide
Page 79

E-mail Procedure
Check the Job Status
1. Press the Job Status button on the control panel to display
job status information.
2. A list of Active Jobs is displayed. Select your job using the
up/down arrows and press OK.
3. The following Job Options are available:
• Delete: Select this option to delete the job. Use the
left/right arrows to select Ye s or No.
• Details: Select this option to display details about the
job. The job name, owner, type, status and submission
time is displayed.
Stop the E-mail Job
Follow the steps below to manually cancel an active e-mail job.
1. Press the Stop button on the control panel to cancel the current E-mail job.
2. To cancel a queued job press the Job Status button on the control panel to display the active jobs.
3. Use the up/down arrows and select the job required, press OK.
4. Select Delete and OK.
5. Select Yes to delete the job or No to return to previous screen.
Xerox WorkCentre 3550
User Guide
79
Page 80

E-mail Options
E-mail Options
Your machine provides the following options to customize your E-mail jobs. Use the Menu button to
access the options. For information about changing the default E-mail settings, refer to E-mail Defaults
on page 138.
Feature Description Options
File Format File Format determines the
type of file created and
can be temporarily
changed for the current
job. Select the file format
you wish to use for your
scanned image.
Lighten/Darken This provides manual
control to adjust the
lightness or darkness of
the scanned images.
• PDF (Portable Document Format): Allows recipients
with the right software to view, print or edit the
electronic file, no matter what their computer
platform.
• TIFF (Tagged Image File Format): Produces a
graphic file that can be opened by a variety of graphic
software packages across a variety of computer
platforms. A separate file is produced for each image
scanned.
• Multi Page TIFF: Produces a single TIFF file
containing several pages of scanned images. A more
specialized software is required to open this type of
file format.
• JPEG (Joint Photographic Experts Group): Produces
a compressed graphic file that can be opened by a
variety of graphic software packages across a variety
of computer platforms. A separate file is produced for
each image scanned.
• Lightest: Lightens the image to the lightest setting.
• Light: Works well with dark print.
• Normal: Works well with standard typed or printed
originals.
• Dark: Works well with light print.
• Darkest: Darkens the original to the darkest setting.
Output Color Select Output Color to
produce black and white,
grayscale or color output.
Original Type The Original Type setting is
used to improve the image
quality by selecting the
document type for the
originals.
Background
Suppression
80
Xerox WorkCentre 3550
User Guide
Use to automatically
reduce or eliminate the
dark background resulting
from scanning colored
paper or newspaper
originals.
• Color: Use to select color output from your original.
• Grayscale: Use if gray scales are required.
• Black and White: Use to select black and white
output regardless of the color of your original.
• Te xt : Use for originals containing mostly text.
• Text and Photo: Use for originals with mixed text and
photographs.
• Photo: Use when the originals are photographs.
• On: Select to eliminate background.
• Off: Select if Background Suppression is not required.
Page 81

Feature Description Options
E-mail Options
Resolution Resolution affects the
appearance of the
scanned image. A higher
resolution produces a
better quality image. A
lower resolution reduces
communication time when
sending the file over the
network.
Original Size Allows you to specify the
size of the image to be
scanned.
• 300 dpi: Recommended for high quality text
documents that are to pass through OCR applications.
Also recommended for high quality line art or medium
quality photos and graphics. This is the default
resolution and the best choice in most cases.
• 200 dpi: Recommended for average quality text
documents and line art. Does not produce the best
image quality for photos and graphics.
• 100 dpi: Recommended for lower quality text
documents or if a smaller file size is required.
• A4
• A5
• B5
• Letter
• Legal
• Executive
• Folio
• Oficio
Xerox WorkCentre 3550
User Guide
81
Page 82

Address Book
Address Book
You can set up an Address Book with the e-mail addresses you use frequently via CentreWare Internet
Services and then easily and quickly enter e-mail addresses by selecting them from the Address Book.
Store on Local Machine (Local Address Book)
This method means that you store e-mail addresses in your machine memory. You can add addresses,
as well as group them in particular categories.
Individual
1. Open the web browser from your workstation.
2. In the URL field, enter http:// followed
by the IP Address of the machine. For
example: if the IP Address is
192.168.100.100, enter the following
into the URL field:
http://192.168.100.100
3. Press Enter to view the Welcome
page. The CentreWare Internet Services options for your machine are displayed.
Note: To find the IP Address of your machine, print a configuration report. For instructions, refer to
Information Pages on page 134.
4. Select the Properties tab and enter the login details. The default User Name is admin and the
default password is 1111.
5. Select E-mail > E-mail Setup > Local Address Book. The screen shows Local Address Book on the
right side of the screen. Click Add.
6. When the Add E-Mail screen appears, select the Index number, enter User Name and E-mail
Address.
7. Click Apply.
Group
1. Open the web browser from your workstation.
2. In the URL field, enter http:// followed
by the IP Address of the machine. For
example: if the IP Address is
192.168.100.100, enter the following
into the URL field:
http://192.168.100.100
3. Press Enter to view the Welcome
page. The CentreWare Internet Services options for your machine are displayed.
Note: To find out the IP Address of your machine, print a configuration report. For instructions,
refer to Information Pages on page 134.
82
Xerox WorkCentre 3550
User Guide
Page 83

Address Book
4. Make sure you have configured Local Address Book.
5. Select the Properties tab and enter the login details. The default User Name is admin and the
default password is 1111.
6. Select E-mail > E-mail Setup > Group Address Book. The screen shows Group Address Book on
the right side of the screen. Click Add.
7. Select the Group number and enter Group Name.
8. Select e-mail addresses by clicking the check boxes.
Searching the Address Book
There are two ways to search for an address in memory. You can either preview the entries from 0 to
199 sequentially or search by entering the first letters of the name associated with the address.
1. Press E-mail on the control panel.
2. Enter the Sender Address (From Address) and press OK. The Enter To Addresses field appears.
3. Press the Address Book button on the control panel.
4. Press the up/down arrows to select the appropriate Address Book and press OK.
5. Enter a few letters of the name you are searching for. The machine will return matching names.
6. Press the up/down arrows until the name and address you want highlights and press OK.
Printing the Local Address Book
1. Press the Machine Status button on the control panel.
2. Press the up/down arrows to highlight Information Pages and press OK.
3. Press the up/down arrows to highlight Address Book and press OK.
4. Press the up/down arrows to highlight E-mail and press OK.
Yo ur Address Book information prints out.
Xerox WorkCentre 3550
User Guide
83
Page 84

Smart Key Addresses
Smart Key Addresses
Customizing the Smart Key addresses enables you to quickly access and select commonly used e-mail
address text, for example .com or @yourdomainname.com. Up to six Smart Key addresses can be
entered using the E-mail Setup options in CentreWare Internet Services.
To customize the E-mail Smart Key addresses:
1. Open the web browser from your workstation.
2. In the URL field, enter http:// followed
by the IP Address of the machine. For
example: if the IP Address is
192.168.100.100, enter the following
into the URL field:
http://192.168.100.100
3. Press Enter to view the Welcome
page. The CentreWare Internet Services options for your machine are displayed.
Note: To find the IP Address of your machine, print a configuration report. For instructions, refer to
Information Pages on page 134.
4. Select the Properties tab and enter the login details. The default User Name is admin and the
default password is 1111.
5. Select E-mail and then E-mail Setup.
6. Up to six Smart Key addresses can be
configured. Default text is provided
for each key.
Enter the text required for each key
and select Save Changes.
Each of the addresses configured will be
available through the .com key on the
machine.
Using Smart Key Addresses
The Smart Key addresses are selected by pressing the .com key on
the control panel.
When entering the e-mail address, press the .com key repeatedly
until the address text required is displayed and press OK.
84
Xerox WorkCentre 3550
User Guide
Page 85

The Xerox WorkCentre 3550 produces high quality prints from electronic documents. You can access
the printer from your PC by installing the appropriate printer driver. To access the many printer drivers
which can be used with your machine, refer to the Drivers CD or download the latest versions from the
Xerox website at www.xerox.com.
This chapter includes:
• Printing using Windows on page 86
• Printing using Macintosh on page 96
• Printing using Linux on page 99
6
Xerox WorkCentre 3550
User Guide
85
Page 86

Printing using Windows
Printing using Windows
The following provides an overview of the print procedure and features available when printing using
Windows.
Install Printer Software
You can install the printer software for local printing and network printing. To install the printer
software on the computer, perform the appropriate installation procedure depending on the printer in
use. The printer software also provides the Fax from PC function if selected during the installation
process.
A printer driver is software that lets your computer communicate with your printer. The procedure to
install drivers may differ depending on the operating system you are using. All applications should be
closed on your PC before beginning installation.
You can install the printer software using the typical or custom method. The instructions provided here
are for the typical method. For custom install instructions or further information about installing
software, refer to the System Administrator Guide.
Local Printer
A local printer is a printer directly attached to your computer using a printer cable, such as a USB cable.
If your printer is attached to a network, refer to Networked Printer on page 87.
Note: If the “New Hardware Wizard” window appears during the installation procedure, click Close
or Cancel.
1. Make sure that the printer is connected to your computer and powered on.
2. Insert the supplied CD-ROM into your CD-ROM drive.
The CD-ROM should automatically run, and an
installation window appears.
• If the installation window does not appear,
click Start and then Run. Type X:\Setup.exe,
replacing “X” with the letter which represents
your drive and click OK.
• If you use Windows Vista, click Start > All
programs > Accessories > Run, and type
X:\Setup.exe. If the AutoPlay window appears
in Windows Vista, click Run Setup.exe in Install
or run program field, and click Continue in the User Account Control window.
3. Click Install Software.
86
Xerox WorkCentre 3550
User Guide
Page 87

4. Click Typical installation for a local printer and
follow the wizard instructions to install the local
printer.
Note: For Custom install instructions, refer to the
System Administrator Guide.
If your printer is not already connected to the
computer, the Connect Device screen will appear.
After connecting the printer, click Next. If you don’t
want to connect the printer at this time, click Next,
and No on the following screen. Then the
installation will start and a test page will not be
printed at the end of the installation.
Printing using Windows
5. After the installation is finished, click Finish.
If the Test Print operation is successful, continue on to
the next setup procedure in this document. If the print
operation failed, refer to Troubleshooting on page 161.
Networked Printer
When you connect your printer to a network, you must first configure the TCP/IP settings for the
printer. After you have assigned and verified the TCP/IP settings, you are ready to install the software
on each computer on the network.
1. Make sure that the printer is connected to your network and powered on. For details about
connecting to the network, refer to the System Administrator Guide.
Xerox WorkCentre 3550
User Guide
87
Page 88

Printing using Windows
2. Insert the supplied CD-ROM into your CD-ROM drive.
The CD-ROM should automatically run, and an
installation window appears.
• If the installation window does not appear,
click Start and then Run. Type X:\Setup.exe,
replacing “X” with the letter which represents
your drive and click OK.
• If you use Windows Vista, click Start > All
programs > Accessories > Run, and type
X:\Setup.exe. If the AutoPlay window appears
in Windows Vista, click Run Setup.exe in Install
or run program field, and click Continue in the User Account Control window.
3. Click Install Software.
4. Click Typical installation for a network printer and
follow the wizard instruction to select and install the
printer.
Note: For Custom install instructions, refer to the
System Administrator Guide.
5. After the installation is finished, click Finish.
If the Test Print operation is successful, continue on to
the next setup procedure in this document. If the print
operation failed, refer to Troubleshooting on page 161.
88
Xerox WorkCentre 3550
User Guide
Page 89

Printing using Windows
Print Procedure
Documents can be printed from your PC using the print drivers supplied. The print driver must be
loaded on each PC which uses the machine for printing.
Note: If an authentication feature is enabled, you may need an account before using the
machine. To get an account, or for more information, contact the System Administrator.
1. Click Print in your application.
2. From the Printer: Name drop down menu, click on
your machine.
3. Click on Properties or Preferences to make your print selections. For information on the individual
tabs, refer to the following:
• Basic Tab on page 90
• Paper Tab on page 91
• Graphics Tab on page 92
• Advanced Tab on page 92
• Xerox Tab on page 95
4. Click OK to confirm your selections.
5. Click OK to print your document.
Xerox WorkCentre 3550
User Guide
89
Page 90

Printing using Windows
Basic Tab
The Basic Tab provides options to adjust how the
document appears on the printed page. The options
include orientation settings, quality settings, layout
options and double-sided printing settings.
Orientation
Orientation allows you to select the direction in which
information is printed on a page.
• Portrait: Prints across the width of the page, letter
style.
• Landscape: Prints across the length of the page,
spreadsheet style.
• Rotate 180 Degrees: This allows you to rotate the
page 180 degrees.
Quality
Use this option to select the image quality setting required.
• Best: Use this option if printing graphics or photographs.
• Normal: Use this option for text or line art.
Layout Options
Layout Options allow you to select a different layout for your output. You can select the number of
pages to print on a single sheet of paper. To print more than one page per sheet, the pages will be
reduced in size and arranged in the order you specify.
• Single Page Per Side: Use this option if the layout does not require changing.
• Multiple Pages Per Side: Use this option to print multiple pages on each page. You can print up to
16 pages on one sheet. Select the number of images required on each side, the page order and if
borders are required.
• Poster Printing: Use this option to print a single-page document onto 4, 9 or 16 sheets of paper,
for the purpose of pasting the sheets together to form one poster-size document. Select Poster
2x2 for 4 pages, Poster 3x3 for 9 pages or Poster 4x4 for 16. Then choose the overlap amount in
mm or inches.
• Booklet Printing: This allows you to print your document on both sides of the paper and arranges
the pages so that the paper can be folded in half after printing to produce a booklet.
Double-sided Printing
You can print on both sides of a sheet of paper. Before printing, decide how you want your document
oriented.
• Printer Default: If you select this option, this feature is determined by the setting made on the
control panel of the printer.
90
Xerox WorkCentre 3550
User Guide
Page 91

Printing using Windows
• None: The document is printed single-sided.
• Long Edge: This is the conventional layout used in book binding.
• Short Edge: This is the type often used with calendars.
• Reverse Double-Sided Printing: The document is printed 2 sided and the second side images are
rotated 180 degrees.
Paper Tab
Use the Paper Tab options to set the basic paper
handling specifications when you access the printer
properties.
Copies
This allows you to choose the number of copies to be
printed. You can select 1 to 999 copies.
Paper Options
• Size: This allows you to set the size of paper
required for printing. If the required size is not listed
in the Size box, click Edit. When the Custom Paper
Setting window appears, set the paper size and click
OK. The setting appears in the list so that you can
select it.
• Source: Use this option to select the paper tray required. Use the MP Tray (Bypass) when printing
on special materials like envelopes and transparencies. If the paper source is set to Auto Select,
the printer automatically selects the paper source based on the requested size.
• Type: Set Type to correspond to the paper loaded in the tray selected. This will provide the best
quality printout. If printing Envelopes, ensure the Envelope tab is selected.
• Advanced: This allows you to print the first page using a different paper type from the rest of the
document. You can select the paper source for the first page. This is useful if the first page is a
cover or transparency.
Scaling Options
This allows you to automatically or manually scale your print job on a page.
• Fit to Page: This allows you to scale your print job to any selected paper size, regardless of the
digital document size.
• Percentage: Use this option to change the contents of a page to appear larger or smaller on the
printed page. Enter the scaling rate in the Percentage input box.
Xerox WorkCentre 3550
User Guide
91
Page 92

Printing using Windows
Graphics Tab
Use the following options to adjust the print quality for
your specific printing needs.
Font/Text
• Darken Text: Use this option to increase the
darkness of the text in your document.
• All Text Black: All text in your document prints solid
black, regardless of the color it appears on the
screen.
• Advanced: Use this option to set font options. True
Type fonts can be downloaded as Outline or Bitmap
Images or printed as Graphics. Select the Use
Printer Fonts option if the fonts do not require
downloading and the printer fonts should be used.
Ton er S ave
Selecting this option extends the life of your print cartridge and reduces your cost per page without a
significant reduction in print quality.
Advanced Tab
You can select Advanced output options for your
document, such as watermarks or overlay text.
Watermark
This option allows you to print text over an existing
document. There are several predefined watermarks that
come with the printer which can be modified, or you can
add new ones to the list.
Using an Existing Watermark
Select the required watermark from the Watermark dropdown list. You will see the selected watermark in the
preview image.
Creating a Watermark
1. Select 0Edit from the Watermark drop-down list. The Edit Watermark window appears.
2. Enter a text message in the Watermark Message box. You can enter up to 40 characters. The
message displays in the preview window. When the First Page Only box is checked, the watermark
prints on the first page only.
92
Xerox WorkCentre 3550
User Guide
Page 93

Printing using Windows
3. Select the watermark options. You can select the font name, style, size or shade from the Font
Attributes section and set the angle of the watermark from the Message Angle section.
4. Click Add to add the new watermark to the list.
5. When you have finished editing, click OK.
Editing a Watermark
1. Select Edit from the Watermark drop-down list. The Edit Watermark window appears.
2. Select the watermark you want to edit from the Current Watermarks list and change the
watermark message options.
3. Click Update to save the changes.
4. When you have finished editing, click OK.
Deleting a Watermark
1. Select Edit from the Watermark drop-down list. The Edit Watermark window appears.
2. Select the watermark you want to delete from the Current Watermarks list and click Delete.
3. Click OK.
Overlay
An Overlay is text and/or images stored in the computer hard disk drive as a special file format that can
be printed on any document. Overlays are often used to take the place of preprinted forms and
letterhead paper.
Creating a New Page Overlay
To use a page overlay, you must create a new page overlay containing your logo or image.
1. Create or open a document containing text or an image for use in a new page overlay. Position the
items exactly as you want them to appear when printed as an overlay.
2. Select Edit from the Overlay drop-down list. The Edit Overlay window appears.
3. Click Create and type a name in the File name box. Select the destination path, if necessary.
4. Click Save. The name appears on the Overlay List box.
5. Click OK.
Note: The overlay document size must be the same as the documents you print with the overlay.
Do not create an overlay with a watermark.
6. Click OK on the Advanced tab page.
7. Click OK on the main Print window.
8. An Are you Sure? message displays. Select Yes to confirm.
Using a Page Overlay
1. Select the required overlay from the Overlay drop-down list box.
If the overlay file you want does not appear in the Overlay list, click the Edit button and Load
Overlay, and select the Overlay file.
If you have stored the overlay file you want to use in an external source, you can also load the file
when you access the Load Overlay window.
Xerox WorkCentre 3550
User Guide
93
Page 94

Printing using Windows
After you select the file, click Open. The file appears in the Overlay List box and is available for
printing. Select the overlay from the Overlay List box.
2. If necessary, click Confirm Page Overlay When Printing. If this box is checked, a message window
appears each time you submit a document for printing, asking you to confirm your wish to print
an overlay on your document.
If this box is not checked and an overlay has been selected, the overlay automatically prints with
your document.
3. Click OK.
Deleting a Page Overlay
1. Select Edit from the Overlay drop-down list. The Edit Overlay window appears.
2. Select the Overlay you want to delete from the Overlay List box
3. Click Delete Overlay. When a confirming message window appears, click Ye s.
4. Click OK.
Output Options
• Normal: All pages are printed.
• Reverse All Pages: Your printer prints all pages from the last page to the first page.
• Print Odd Pages: Your printer prints only the odd numbered pages of the document.
• Print Even Pages: Your printer prints only the even numbered pages of the document.
Advanced
Use this option if an Information Page requires printing with the job.
Job Settings
Choose from the following job types:
• Normal: Prints the job immediately without requiring a passcode.
• Proof: Prints one copy of the job as a sample and holds the remaining copies of the job at the
printer until you release them from the printer's control panel.
• Secure Print: Prints the job only after you enter your passcode on the printer's control panel.
When you choose this job type, the Secure Print dialog box appears so you can save your
passcode.
94
Xerox WorkCentre 3550
User Guide
Page 95

Xerox Tab
This tab provides version and copyright information and
a link to the Xerox website.
Printing using Windows
Xerox WorkCentre 3550
User Guide
95
Page 96

Printing using Macintosh
Printing using Macintosh
This section explains how to print using Macintosh. You need to set the print environment before
printing. Refer to the System Administrator Guide.
Printing a Document
When you print with a Macintosh, you need to check the printer driver setting in each application you
use. Follow the steps below to print from a Macintosh:
1. Open the document you want to print.
2. Open the File menu and click Page Setup (Document Setup in some applications).
3. Choose your paper size, orientation, scaling, other options, and make sure that your machine is
selected. Click OK.
4. Open the File menu and click Print.
5. Choose the number of copies you want and indicate which pages you want to print.
6. Click Print.
Changing Printer Settings
You can use advanced printing features provided by your machine.
Open an application and select Print from the File menu. The machine name, which appears in the
printer properties window may differ depending on the machine in use. Except for the name, the
composition of the printer properties window is similar to the following.
Note: The setting options may differ depending on printers and Macintosh OS version.
Layout
The Layout tab provides options to adjust how the document appears on the printed page. You can
print multiple pages on one sheet of paper.
Graphics
The Graphics tab provides options for selecting Resolution. Select Graphics from the drop-down list
under Orientation to access the graphic features.
Resolution
This option allows you to select the printing resolution. The higher the setting, the sharper the clarity of
printed characters and graphics. The higher setting also may increase the time it takes to print a
document.
96
Xerox WorkCentre 3550
User Guide
Page 97

Printing using Macintosh
Paper
Set Paper Type to correspond to the paper loaded in the tray from which you want to print. This will let
you get the best quality printout. If you load a different type of print material, select the corresponding
paper type.
Printer Features
Printer Features tab provides Reverse Duplex Printing and Fit to Page options. Select Printer
Features from the drop-down list under Orientation to access the following features.
• Reverse Duplex Printing: The document is printed 2 sided and the second side images are rotated
180 degrees.
• Fit to Page: This option allows you to scale your print job to any selected paper size regardless of
the document size. This can be useful when you want to check fine details on a small document.
Toner Save Mode
Selecting this option extends the life of your print cartridge and reduces your cost per page without a
significant reduction in print quality.
• Printer Setting: Select this option to use the settings made on the control panel of the printer.
• On: Select this option to allow the printer to use less toner on each page.
• Off: If you do not need to save toner when printing a document, select this option.
Printing Multiple Pages on one Sheet
You can print more than one page on a single sheet of paper. This feature provides a cost-effective way
to print draft pages.
1. Open an application, and select Print from the File menu.
2. Select Layout from the drop-down list under Orientation. In the Pages per Sheet drop-down list,
select the number of pages you want to print on one sheet of paper.
3. Select the other options you want to use.
4. Click Print, then the machine prints the selected number of pages you want to print on one sheet
of paper.
Two Sided Printing
You can print on both sides of the paper. Before printing in the duplex mode, decide on which edge you
will be binding your finished document. The binding options are, as follows:
• Long-Edge Binding This option is the conventional layout used in book binding.
• Short-Edge Binding This option is the type often used with calendars.
1. From your Macintosh application, select Print from the File menu.
2. Select Layout from the drop-down list under Orientation.
3. Select a binding orientation from the Two Sided Printing option.
4. Select the other options you want to use.
Xerox WorkCentre 3550
User Guide
97
Page 98

Printing using Macintosh
5. Click Print, then the machine prints on both sides of the paper.
Note: If you print more than 2 copies, the first copy and the second copy might print on the same
sheet of paper.
98
Xerox WorkCentre 3550
User Guide
Page 99

Printing using Linux
Printing using Linux
Printing from Applications
There are a lot of Linux applications that allow you to print using Common UNIX Printing System
(CUPS). You can print on your machine from any such application.
1. Open an application, and select Print from the File menu
2. Select Print directly using lpr.
3. In the LPR GUI window, select the machine from the printer list and click Properties.
4. Change the print job properties using the following four tabs displayed at the top of the window.
• General: This option allows you to change the paper size, the paper type, and the orientation
of the documents. It enables the duplex feature, adds start and end banners, and changes
the number of pages per sheet.
• Text: This option allows you to specify the page margins and set the text options, such as
spacing or columns.
• Graphics: This option allows you to set image options that are used when printing image
files, such as color options, image size, or image position.
• Device: This option allows you to set the print resolution, paper source, and destination.
5. Click Apply to apply the changes and close the Properties window.
6. Click OK in the LPR GUI window to start printing.
The Printing window appears, allowing you to monitor the status of your print job.
Printing Files
You can print many different types of files on your machine using the standard CUPS method, directly
from the command line interface. The drivers package replaces the standard lpr tool with a much more
user-friendly LPR GUI program.
To print any document file:
1. Type lpr <file_name> from the Linux shell command line and press Enter. The LPR GUI window
appears.
2. When you type only lpr and press Enter, the Select file(s) to print window appears first. Just select
any files you want to print and click Open.
3. In the LPR GUI window, select your machine from the list, and change the print job properties.
4. Click OK to start printing.
Configuring Printer Properties
Using the Printer Properties window provided by the Printers configuration, you can change the
various properties for your machine as a printer.
1. Open the Unified Driver Configurator.
If necessary, switch to Printers configuration.
2. Select your machine on the available printers list and click Properties.
Xerox WorkCentre 3550
User Guide
99
Page 100

Printing using Linux
3. The Printer Properties window opens.
The following five tabs display at the top of the window:
• General: This option allows you to change the printer location and name. The name entered
in this tab displays on the printer list in Printers configuration.
• Connection: This option allows you to view or select another port. If you change the machine
port from USB to parallel or vice versa while in use, you must re-configure the machine port in
this tab.
• Driver: This option allows you to view or select another machine driver. By clicking Options,
you can set the default device options.
• Jobs: This option shows the list of Print jobs. Click Cancel job to cancel the selected job and
select the Show completed jobs check box to see previous jobs on the job list.
• Classes: This option shows the class that your machine is in. Click Add to Class to add your
machine to a specific class or click Remove from Class to remove the machine from the
selected class.
4. Click OK to apply the changes and close the Printer Properties window.
100
Xerox WorkCentre 3550
User Guide
 Loading...