

Page 1

July 2014
Xerox® WorkCentre® 3215NI
Xerox
®
WorkCentre® 3225DN/
3225DNI
User Guide
Page 2

©2014 Xerox Corporation. All Rights Reserved. Xerox® and Xerox and Design® are registered trademarks of Xerox Corporation in the
United States and/or other countries.
Phaser®, CentreWare®, WorkCentre®, FreeFlow®, SMARTsend®, Scan to PC Desktop®, MeterAssistant®, SuppliesAssistant®,
Xerox Secure Access Unified ID System®, and Xerox Extensible Interface Platform® are trademarks of Xerox Corporation in the
United States and/or other countries.
Adobe® Reader® and PostScript® are trademarks of Adobe Systems Incorporated in the United States and/or other countries.
Macintosh and Mac OS are trademarks of Apple Inc., registered in the U.S. and other countries.
AirPrint and the AirPrint logo are trademarks of Apple Inc.
PCL® is a trademark of Hewlett-Packard Corporation in the United States and/or other countries.
IBM® and AIX® are trademarks of International Business Machines Corporation in the United States and/or other countries.
Microsoft®, Windows Vista®, Windows®, and Windows Server® are trademarks of Microsoft Corporation in the United States and
other countries.
Novell®, NetWare®, NDPS®, NDS®, IPX™, and Novell Distributed Print Services™ are trademarks of Novell, Inc. in the United States
and other countries.
Sun, Sun Microsystems, and Solaris are trademarks or registered trademarks of Oracle and/or its affiliates in the United States and
other countries.
UNIX® is a trademark in the United States and other countries, licensed exclusively through X/ Open Company Limited.
Linux is a registered trademark of Linus Torvalds.
Red Hat® is a registered trademark of Red Hat, Inc.
Fedora is a trademark of Red Hat, Inc.
Ubuntu is a registered trademark of Canonical Ltd.
Debian is a registered trademark of Software in the Public Interest, Inc.
Page 3

Contents
1 Getting Started
Machine Overview. . . . . . . . . . . . . . . . . . . . . . . . . . . . . . . . . . . . . . . . . . . . . . . . . . . . . . . . . . . . . . . . . . . . . . . . . 2
Front View . . . . . . . . . . . . . . . . . . . . . . . . . . . . . . . . . . . . . . . . . . . . . . . . . . . . . . . . . . . . . . . . . . . . . . . . . . . . 2
Rear View . . . . . . . . . . . . . . . . . . . . . . . . . . . . . . . . . . . . . . . . . . . . . . . . . . . . . . . . . . . . . . . . . . . . . . . . . . . . .3
Product Configurations . . . . . . . . . . . . . . . . . . . . . . . . . . . . . . . . . . . . . . . . . . . . . . . . . . . . . . . . . . . . . . . . . . . . 4
Control Panel Overview . . . . . . . . . . . . . . . . . . . . . . . . . . . . . . . . . . . . . . . . . . . . . . . . . . . . . . . . . . . . . . . . . . . . 5
Powering On the Machine. . . . . . . . . . . . . . . . . . . . . . . . . . . . . . . . . . . . . . . . . . . . . . . . . . . . . . . . . . . . . . . . . .8
Power Save. . . . . . . . . . . . . . . . . . . . . . . . . . . . . . . . . . . . . . . . . . . . . . . . . . . . . . . . . . . . . . . . . . . . . . . . . . . .8
Powering Off the Machine . . . . . . . . . . . . . . . . . . . . . . . . . . . . . . . . . . . . . . . . . . . . . . . . . . . . . . . . . . . . .9
Using the Keypad. . . . . . . . . . . . . . . . . . . . . . . . . . . . . . . . . . . . . . . . . . . . . . . . . . . . . . . . . . . . . . . . . . . . . . 9
Menu Overview. . . . . . . . . . . . . . . . . . . . . . . . . . . . . . . . . . . . . . . . . . . . . . . . . . . . . . . . . . . . . . . . . . . . . . 11
Machine Status Menu . . . . . . . . . . . . . . . . . . . . . . . . . . . . . . . . . . . . . . . . . . . . . . . . . . . . . . . . . . . . . . . 12
Network Menu . . . . . . . . . . . . . . . . . . . . . . . . . . . . . . . . . . . . . . . . . . . . . . . . . . . . . . . . . . . . . . . . . . . . . . 13
Software. . . . . . . . . . . . . . . . . . . . . . . . . . . . . . . . . . . . . . . . . . . . . . . . . . . . . . . . . . . . . . . . . . . . . . . . . . . . . . . . 14
Information Pages . . . . . . . . . . . . . . . . . . . . . . . . . . . . . . . . . . . . . . . . . . . . . . . . . . . . . . . . . . . . . . . . . . . . . . 16
Printing reports. . . . . . . . . . . . . . . . . . . . . . . . . . . . . . . . . . . . . . . . . . . . . . . . . . . . . . . . . . . . . . . . . . . . . . 17
Feature Defaults . . . . . . . . . . . . . . . . . . . . . . . . . . . . . . . . . . . . . . . . . . . . . . . . . . . . . . . . . . . . . . . . . . . . . . . . 18
Copy Defaults . . . . . . . . . . . . . . . . . . . . . . . . . . . . . . . . . . . . . . . . . . . . . . . . . . . . . . . . . . . . . . . . . . . . . . . 18
E-mail Defaults . . . . . . . . . . . . . . . . . . . . . . . . . . . . . . . . . . . . . . . . . . . . . . . . . . . . . . . . . . . . . . . . . . . . . . 18
Fax Defaults . . . . . . . . . . . . . . . . . . . . . . . . . . . . . . . . . . . . . . . . . . . . . . . . . . . . . . . . . . . . . . . . . . . . . . . . 19
Configuration Report . . . . . . . . . . . . . . . . . . . . . . . . . . . . . . . . . . . . . . . . . . . . . . . . . . . . . . . . . . . . . . . . 19
Xerox® CentreWare® Internet Services. . . . . . . . . . . . . . . . . . . . . . . . . . . . . . . . . . . . . . . . . . . . . . . 19
Accessing the Printer . . . . . . . . . . . . . . . . . . . . . . . . . . . . . . . . . . . . . . . . . . . . . . . . . . . . . . . . . . . . . . . . . . . . 21
More Information . . . . . . . . . . . . . . . . . . . . . . . . . . . . . . . . . . . . . . . . . . . . . . . . . . . . . . . . . . . . . . . . . . . . . . . 22
Further Assistance. . . . . . . . . . . . . . . . . . . . . . . . . . . . . . . . . . . . . . . . . . . . . . . . . . . . . . . . . . . . . . . . . . . . . . . 23
Xerox Support Center . . . . . . . . . . . . . . . . . . . . . . . . . . . . . . . . . . . . . . . . . . . . . . . . . . . . . . . . . . . . . . . . 23
Documentation . . . . . . . . . . . . . . . . . . . . . . . . . . . . . . . . . . . . . . . . . . . . . . . . . . . . . . . . . . . . . . . . . . . . . 23
2 Installation and Setup
Overview . . . . . . . . . . . . . . . . . . . . . . . . . . . . . . . . . . . . . . . . . . . . . . . . . . . . . . . . . . . . . . . . . . . . . . . . . . . . . . . 26
Installation Wizard . . . . . . . . . . . . . . . . . . . . . . . . . . . . . . . . . . . . . . . . . . . . . . . . . . . . . . . . . . . . . . . . . . . . . . 27
Administrator Access . . . . . . . . . . . . . . . . . . . . . . . . . . . . . . . . . . . . . . . . . . . . . . . . . . . . . . . . . . . . . . . . 28
Wireless Connectivity (WorkCentre 3215NI and 3225DNI) . . . . . . . . . . . . . . . . . . . . . . . . . . . . . 28
Configure Ethernet Settings . . . . . . . . . . . . . . . . . . . . . . . . . . . . . . . . . . . . . . . . . . . . . . . . . . . . . . . . . . 30
Configuration Report . . . . . . . . . . . . . . . . . . . . . . . . . . . . . . . . . . . . . . . . . . . . . . . . . . . . . . . . . . . . . . . . 30
CentreWare® Internet Services . . . . . . . . . . . . . . . . . . . . . . . . . . . . . . . . . . . . . . . . . . . . . . . . . . . . . . . . . . 31
System Configuration. . . . . . . . . . . . . . . . . . . . . . . . . . . . . . . . . . . . . . . . . . . . . . . . . . . . . . . . . . . . . . . . 31
Administrator User Name and Password . . . . . . . . . . . . . . . . . . . . . . . . . . . . . . . . . . . . . . . . . . . . . . 31
CentreWare Internet Services Administrator Access . . . . . . . . . . . . . . . . . . . . . . . . . . . . . . . . . . . . 31
Change the Administrator Password . . . . . . . . . . . . . . . . . . . . . . . . . . . . . . . . . . . . . . . . . . . . . . . . . . 32
Configuring Wireless Connectivity Using CentreWare Internet Services (WorkCentre 3215NI
Xerox® WorkCentre® 3215/3225
User Guide
iii
Page 4

Contents
and 3225DNI) . . . . . . . . . . . . . . . . . . . . . . . . . . . . . . . . . . . . . . . . . . . . . . . . . . . . . . . . . . . . . . . . . . . . . . 32
Configuring Wi-Fi DirectTM at the machine . . . . . . . . . . . . . . . . . . . . . . . . . . . . . . . . . . . . . . . . . . . 33
Configuring Wi-Fi DirectTM using CentreWare Internet Services . . . . . . . . . . . . . . . . . . . . . . . . 34
Setting the Ethernet Speed Using CentreWare Internet Services . . . . . . . . . . . . . . . . . . . . . . . . 34
Adjusting the Altitude . . . . . . . . . . . . . . . . . . . . . . . . . . . . . . . . . . . . . . . . . . . . . . . . . . . . . . . . . . . . . . . 35
Setting the Toner Low Alert . . . . . . . . . . . . . . . . . . . . . . . . . . . . . . . . . . . . . . . . . . . . . . . . . . . . . . . . . . 36
Network Installation: TCP/IP . . . . . . . . . . . . . . . . . . . . . . . . . . . . . . . . . . . . . . . . . . . . . . . . . . . . . . . . . . . . . 37
Configure Static IPv4 Addressing at the Machine . . . . . . . . . . . . . . . . . . . . . . . . . . . . . . . . . . . . . . 37
Configure Dynamic IPv4 Addressing at the Machine . . . . . . . . . . . . . . . . . . . . . . . . . . . . . . . . . . . 38
Configure TCP/IP Settings Using CentreWare Internet Services . . . . . . . . . . . . . . . . . . . . . . . . . 39
Network Installation: Unix . . . . . . . . . . . . . . . . . . . . . . . . . . . . . . . . . . . . . . . . . . . . . . . . . . . . . . . . . . . . . . . 42
HP-UX Client (Version 10.x). . . . . . . . . . . . . . . . . . . . . . . . . . . . . . . . . . . . . . . . . . . . . . . . . . . . . . . . . . . 42
Solaris 9 and later . . . . . . . . . . . . . . . . . . . . . . . . . . . . . . . . . . . . . . . . . . . . . . . . . . . . . . . . . . . . . . . . . . . 44
SCO . . . . . . . . . . . . . . . . . . . . . . . . . . . . . . . . . . . . . . . . . . . . . . . . . . . . . . . . . . . . . . . . . . . . . . . . . . . . . . . . 45
Network Installation: Linux CUPS. . . . . . . . . . . . . . . . . . . . . . . . . . . . . . . . . . . . . . . . . . . . . . . . . . . . . . . . . 47
Linux LPR via PrintTool . . . . . . . . . . . . . . . . . . . . . . . . . . . . . . . . . . . . . . . . . . . . . . . . . . . . . . . . . . . . . . . 48
Linux LPRng . . . . . . . . . . . . . . . . . . . . . . . . . . . . . . . . . . . . . . . . . . . . . . . . . . . . . . . . . . . . . . . . . . . . . . . . . 49
Printer Drivers . . . . . . . . . . . . . . . . . . . . . . . . . . . . . . . . . . . . . . . . . . . . . . . . . . . . . . . . . . . . . . . . . . . . . . . . . . . 51
Overview. . . . . . . . . . . . . . . . . . . . . . . . . . . . . . . . . . . . . . . . . . . . . . . . . . . . . . . . . . . . . . . . . . . . . . . . . . . . 51
Windows Drivers . . . . . . . . . . . . . . . . . . . . . . . . . . . . . . . . . . . . . . . . . . . . . . . . . . . . . . . . . . . . . . . . . . . . . . . . 52
Installing Windows Drivers . . . . . . . . . . . . . . . . . . . . . . . . . . . . . . . . . . . . . . . . . . . . . . . . . . . . . . . . . . . 52
Wireless Setting Program . . . . . . . . . . . . . . . . . . . . . . . . . . . . . . . . . . . . . . . . . . . . . . . . . . . . . . . . . . . . 55
Uninstalling a Windows driver . . . . . . . . . . . . . . . . . . . . . . . . . . . . . . . . . . . . . . . . . . . . . . . . . . . . . . . . 56
Macintosh Drivers . . . . . . . . . . . . . . . . . . . . . . . . . . . . . . . . . . . . . . . . . . . . . . . . . . . . . . . . . . . . . . . . . . . . . . . 57
Uninstalling a Macintosh Driver . . . . . . . . . . . . . . . . . . . . . . . . . . . . . . . . . . . . . . . . . . . . . . . . . . . . . . 58
Linux Drivers . . . . . . . . . . . . . . . . . . . . . . . . . . . . . . . . . . . . . . . . . . . . . . . . . . . . . . . . . . . . . . . . . . . . . . . . . . . . 59
Unix Drivers. . . . . . . . . . . . . . . . . . . . . . . . . . . . . . . . . . . . . . . . . . . . . . . . . . . . . . . . . . . . . . . . . . . . . . . . . . . . . 60
Setting Up the Printer. . . . . . . . . . . . . . . . . . . . . . . . . . . . . . . . . . . . . . . . . . . . . . . . . . . . . . . . . . . . . . . . 60
Uninstalling the Printer Driver Package. . . . . . . . . . . . . . . . . . . . . . . . . . . . . . . . . . . . . . . . . . . . . . . . 61
Sharing Your Machine Locally . . . . . . . . . . . . . . . . . . . . . . . . . . . . . . . . . . . . . . . . . . . . . . . . . . . . . . . . . . . . 62
Windows. . . . . . . . . . . . . . . . . . . . . . . . . . . . . . . . . . . . . . . . . . . . . . . . . . . . . . . . . . . . . . . . . . . . . . . . . . . . 62
Macintosh . . . . . . . . . . . . . . . . . . . . . . . . . . . . . . . . . . . . . . . . . . . . . . . . . . . . . . . . . . . . . . . . . . . . . . . . . . 63
Windows Printing . . . . . . . . . . . . . . . . . . . . . . . . . . . . . . . . . . . . . . . . . . . . . . . . . . . . . . . . . . . . . . . . . . . . . . . 64
LPR Printing . . . . . . . . . . . . . . . . . . . . . . . . . . . . . . . . . . . . . . . . . . . . . . . . . . . . . . . . . . . . . . . . . . . . . . . . . 64
Internet Printing Protocol (IPP) Port . . . . . . . . . . . . . . . . . . . . . . . . . . . . . . . . . . . . . . . . . . . . . . . . . . 66
Raw TCP/IP Printing (Port 9100). . . . . . . . . . . . . . . . . . . . . . . . . . . . . . . . . . . . . . . . . . . . . . . . . . . . . . 67
Configure the Windows Printer Driver . . . . . . . . . . . . . . . . . . . . . . . . . . . . . . . . . . . . . . . . . . . . . . . . . 68
AirPrint . . . . . . . . . . . . . . . . . . . . . . . . . . . . . . . . . . . . . . . . . . . . . . . . . . . . . . . . . . . . . . . . . . . . . . . . . . . . . . . . . 69
Google Cloud Print . . . . . . . . . . . . . . . . . . . . . . . . . . . . . . . . . . . . . . . . . . . . . . . . . . . . . . . . . . . . . . . . . . . . . . 70
Scan to PC Setup . . . . . . . . . . . . . . . . . . . . . . . . . . . . . . . . . . . . . . . . . . . . . . . . . . . . . . . . . . . . . . . . . . . . . . . . 71
Overview. . . . . . . . . . . . . . . . . . . . . . . . . . . . . . . . . . . . . . . . . . . . . . . . . . . . . . . . . . . . . . . . . . . . . . . . . . . . 71
Scan to Network PC. . . . . . . . . . . . . . . . . . . . . . . . . . . . . . . . . . . . . . . . . . . . . . . . . . . . . . . . . . . . . . . . . . 71
Scan to Local PC. . . . . . . . . . . . . . . . . . . . . . . . . . . . . . . . . . . . . . . . . . . . . . . . . . . . . . . . . . . . . . . . . . . . . 72
iv
® WorkCentre® 3215/3225
Xerox
User Guide
Page 5

Fax Setup. . . . . . . . . . . . . . . . . . . . . . . . . . . . . . . . . . . . . . . . . . . . . . . . . . . . . . . . . . . . . . . . . . . . . . . . . . . . . . . 73
Overview. . . . . . . . . . . . . . . . . . . . . . . . . . . . . . . . . . . . . . . . . . . . . . . . . . . . . . . . . . . . . . . . . . . . . . . . . . . . 73
Enable Fax from the Machine . . . . . . . . . . . . . . . . . . . . . . . . . . . . . . . . . . . . . . . . . . . . . . . . . . . . . . . . 73
Test the Fax. . . . . . . . . . . . . . . . . . . . . . . . . . . . . . . . . . . . . . . . . . . . . . . . . . . . . . . . . . . . . . . . . . . . . . . . . 73
Fax Defaults Using CentreWare Internet Services. . . . . . . . . . . . . . . . . . . . . . . . . . . . . . . . . . . . . . 73
Adjusting Fax Document Settings at the Machine . . . . . . . . . . . . . . . . . . . . . . . . . . . . . . . . . . . . . 75
Fax Address Book. . . . . . . . . . . . . . . . . . . . . . . . . . . . . . . . . . . . . . . . . . . . . . . . . . . . . . . . . . . . . . . . . . . . 75
E-mail Setup . . . . . . . . . . . . . . . . . . . . . . . . . . . . . . . . . . . . . . . . . . . . . . . . . . . . . . . . . . . . . . . . . . . . . . . . . . . . 76
Overview. . . . . . . . . . . . . . . . . . . . . . . . . . . . . . . . . . . . . . . . . . . . . . . . . . . . . . . . . . . . . . . . . . . . . . . . . . . . 76
E-mail Addressing . . . . . . . . . . . . . . . . . . . . . . . . . . . . . . . . . . . . . . . . . . . . . . . . . . . . . . . . . . . . . . . . . . . 76
Configure the Feature . . . . . . . . . . . . . . . . . . . . . . . . . . . . . . . . . . . . . . . . . . . . . . . . . . . . . . . . . . . . . . . 77
LDAP Configuration and Address Books . . . . . . . . . . . . . . . . . . . . . . . . . . . . . . . . . . . . . . . . . . . . . . . 79
LDAP Configuration . . . . . . . . . . . . . . . . . . . . . . . . . . . . . . . . . . . . . . . . . . . . . . . . . . . . . . . . . . . . . . . . . 79
Address Book. . . . . . . . . . . . . . . . . . . . . . . . . . . . . . . . . . . . . . . . . . . . . . . . . . . . . . . . . . . . . . . . . . . . . . . . 81
3 Paper and Media
Loading Paper . . . . . . . . . . . . . . . . . . . . . . . . . . . . . . . . . . . . . . . . . . . . . . . . . . . . . . . . . . . . . . . . . . . . . . . . . . 84
Preparing Paper for Loading. . . . . . . . . . . . . . . . . . . . . . . . . . . . . . . . . . . . . . . . . . . . . . . . . . . . . . . . . . 84
Loading Tray 1 . . . . . . . . . . . . . . . . . . . . . . . . . . . . . . . . . . . . . . . . . . . . . . . . . . . . . . . . . . . . . . . . . . . . . . 84
Using the Manual Feed Slot . . . . . . . . . . . . . . . . . . . . . . . . . . . . . . . . . . . . . . . . . . . . . . . . . . . . . . . . . . 85
Setting Paper Size and Type . . . . . . . . . . . . . . . . . . . . . . . . . . . . . . . . . . . . . . . . . . . . . . . . . . . . . . . . . . . . . 88
Setting the Paper Size. . . . . . . . . . . . . . . . . . . . . . . . . . . . . . . . . . . . . . . . . . . . . . . . . . . . . . . . . . . . . . . . 88
Setting the Paper Type. . . . . . . . . . . . . . . . . . . . . . . . . . . . . . . . . . . . . . . . . . . . . . . . . . . . . . . . . . . . . . . 88
Setting the Paper Source . . . . . . . . . . . . . . . . . . . . . . . . . . . . . . . . . . . . . . . . . . . . . . . . . . . . . . . . . . . . . 88
Media Specifications . . . . . . . . . . . . . . . . . . . . . . . . . . . . . . . . . . . . . . . . . . . . . . . . . . . . . . . . . . . . . . . . . . . . 90
Media Guidelines . . . . . . . . . . . . . . . . . . . . . . . . . . . . . . . . . . . . . . . . . . . . . . . . . . . . . . . . . . . . . . . . . . . . 90
Media Types . . . . . . . . . . . . . . . . . . . . . . . . . . . . . . . . . . . . . . . . . . . . . . . . . . . . . . . . . . . . . . . . . . . . . . . . 91
Loading Documents . . . . . . . . . . . . . . . . . . . . . . . . . . . . . . . . . . . . . . . . . . . . . . . . . . . . . . . . . . . . . . . . . . . . . 93
Automatic Document Feeder. . . . . . . . . . . . . . . . . . . . . . . . . . . . . . . . . . . . . . . . . . . . . . . . . . . . . . . . . 93
Platen Glass . . . . . . . . . . . . . . . . . . . . . . . . . . . . . . . . . . . . . . . . . . . . . . . . . . . . . . . . . . . . . . . . . . . . . . . . . 93
Media Output Locations . . . . . . . . . . . . . . . . . . . . . . . . . . . . . . . . . . . . . . . . . . . . . . . . . . . . . . . . . . . . . . . . . 94
Using the Output Tray . . . . . . . . . . . . . . . . . . . . . . . . . . . . . . . . . . . . . . . . . . . . . . . . . . . . . . . . . . . . . . . 94
Using the Rear Cover . . . . . . . . . . . . . . . . . . . . . . . . . . . . . . . . . . . . . . . . . . . . . . . . . . . . . . . . . . . . . . . . 95
Contents
4Print
Printing using Windows . . . . . . . . . . . . . . . . . . . . . . . . . . . . . . . . . . . . . . . . . . . . . . . . . . . . . . . . . . . . . . . . . . 98
Print Procedure . . . . . . . . . . . . . . . . . . . . . . . . . . . . . . . . . . . . . . . . . . . . . . . . . . . . . . . . . . . . . . . . . . . . . . 98
Favorites Tab . . . . . . . . . . . . . . . . . . . . . . . . . . . . . . . . . . . . . . . . . . . . . . . . . . . . . . . . . . . . . . . . . . . . . . . 98
Printer Status. . . . . . . . . . . . . . . . . . . . . . . . . . . . . . . . . . . . . . . . . . . . . . . . . . . . . . . . . . . . . . . . . . . . . . . . 99
Basic Tab . . . . . . . . . . . . . . . . . . . . . . . . . . . . . . . . . . . . . . . . . . . . . . . . . . . . . . . . . . . . . . . . . . . . . . . . . . 100
Paper Tab. . . . . . . . . . . . . . . . . . . . . . . . . . . . . . . . . . . . . . . . . . . . . . . . . . . . . . . . . . . . . . . . . . . . . . . . . . 101
Graphics Tab . . . . . . . . . . . . . . . . . . . . . . . . . . . . . . . . . . . . . . . . . . . . . . . . . . . . . . . . . . . . . . . . . . . . . . . 102
Advanced Tab. . . . . . . . . . . . . . . . . . . . . . . . . . . . . . . . . . . . . . . . . . . . . . . . . . . . . . . . . . . . . . . . . . . . . . 102
Earth Smart Tab. . . . . . . . . . . . . . . . . . . . . . . . . . . . . . . . . . . . . . . . . . . . . . . . . . . . . . . . . . . . . . . . . . . . 105
Xerox Tab . . . . . . . . . . . . . . . . . . . . . . . . . . . . . . . . . . . . . . . . . . . . . . . . . . . . . . . . . . . . . . . . . . . . . . . . . . 106
Xerox Easy Printer Manager (EPM) . . . . . . . . . . . . . . . . . . . . . . . . . . . . . . . . . . . . . . . . . . . . . . . . . . . . . . 107
® WorkCentre® 3215/3225
Xerox
User Guide
v
Page 6

Contents
Printing Using Macintosh . . . . . . . . . . . . . . . . . . . . . . . . . . . . . . . . . . . . . . . . . . . . . . . . . . . . . . . . . . . . . . . 108
Printing a Document. . . . . . . . . . . . . . . . . . . . . . . . . . . . . . . . . . . . . . . . . . . . . . . . . . . . . . . . . . . . . . . . 108
Changing Printer Settings . . . . . . . . . . . . . . . . . . . . . . . . . . . . . . . . . . . . . . . . . . . . . . . . . . . . . . . . . . . 108
Using AirPrint . . . . . . . . . . . . . . . . . . . . . . . . . . . . . . . . . . . . . . . . . . . . . . . . . . . . . . . . . . . . . . . . . . . . . . 110
Using Google Cloud Print. . . . . . . . . . . . . . . . . . . . . . . . . . . . . . . . . . . . . . . . . . . . . . . . . . . . . . . . . . . . 110
Printing Using Linux . . . . . . . . . . . . . . . . . . . . . . . . . . . . . . . . . . . . . . . . . . . . . . . . . . . . . . . . . . . . . . . . . . . . 111
Printing from Applications . . . . . . . . . . . . . . . . . . . . . . . . . . . . . . . . . . . . . . . . . . . . . . . . . . . . . . . . . . 111
Printing Files . . . . . . . . . . . . . . . . . . . . . . . . . . . . . . . . . . . . . . . . . . . . . . . . . . . . . . . . . . . . . . . . . . . . . . . 111
Configuring Printer Properties . . . . . . . . . . . . . . . . . . . . . . . . . . . . . . . . . . . . . . . . . . . . . . . . . . . . . . . 111
Printing Using Unix. . . . . . . . . . . . . . . . . . . . . . . . . . . . . . . . . . . . . . . . . . . . . . . . . . . . . . . . . . . . . . . . . . . . . 113
Printing Files . . . . . . . . . . . . . . . . . . . . . . . . . . . . . . . . . . . . . . . . . . . . . . . . . . . . . . . . . . . . . . . . . . . . . . . 113
Configuring Printer Properties . . . . . . . . . . . . . . . . . . . . . . . . . . . . . . . . . . . . . . . . . . . . . . . . . . . . . . . 113
5Copy
Copy Procedure . . . . . . . . . . . . . . . . . . . . . . . . . . . . . . . . . . . . . . . . . . . . . . . . . . . . . . . . . . . . . . . . . . . . . . . . 116
Load Documents . . . . . . . . . . . . . . . . . . . . . . . . . . . . . . . . . . . . . . . . . . . . . . . . . . . . . . . . . . . . . . . . . . . 116
Select the Features . . . . . . . . . . . . . . . . . . . . . . . . . . . . . . . . . . . . . . . . . . . . . . . . . . . . . . . . . . . . . . . . . 117
Enter the Quantity. . . . . . . . . . . . . . . . . . . . . . . . . . . . . . . . . . . . . . . . . . . . . . . . . . . . . . . . . . . . . . . . . . 117
Start the Job . . . . . . . . . . . . . . . . . . . . . . . . . . . . . . . . . . . . . . . . . . . . . . . . . . . . . . . . . . . . . . . . . . . . . . . 118
Stop the Copy Job . . . . . . . . . . . . . . . . . . . . . . . . . . . . . . . . . . . . . . . . . . . . . . . . . . . . . . . . . . . . . . . . . . 118
Copy Options . . . . . . . . . . . . . . . . . . . . . . . . . . . . . . . . . . . . . . . . . . . . . . . . . . . . . . . . . . . . . . . . . . . . . . . . . . 119
Using the Layout Options . . . . . . . . . . . . . . . . . . . . . . . . . . . . . . . . . . . . . . . . . . . . . . . . . . . . . . . . . . . . . . . 121
2 Up or 4 Up Copying . . . . . . . . . . . . . . . . . . . . . . . . . . . . . . . . . . . . . . . . . . . . . . . . . . . . . . . . . . . . . . . 121
ID Copy. . . . . . . . . . . . . . . . . . . . . . . . . . . . . . . . . . . . . . . . . . . . . . . . . . . . . . . . . . . . . . . . . . . . . . . . . . . . 121
Media Output Locations . . . . . . . . . . . . . . . . . . . . . . . . . . . . . . . . . . . . . . . . . . . . . . . . . . . . . . . . . . . . . . . . 123
Using the Output Tray . . . . . . . . . . . . . . . . . . . . . . . . . . . . . . . . . . . . . . . . . . . . . . . . . . . . . . . . . . . . . . 124
Using the Rear Cover . . . . . . . . . . . . . . . . . . . . . . . . . . . . . . . . . . . . . . . . . . . . . . . . . . . . . . . . . . . . . . . 124
6Scan
Scanning Overview . . . . . . . . . . . . . . . . . . . . . . . . . . . . . . . . . . . . . . . . . . . . . . . . . . . . . . . . . . . . . . . . . . . . . 126
Scan Process . . . . . . . . . . . . . . . . . . . . . . . . . . . . . . . . . . . . . . . . . . . . . . . . . . . . . . . . . . . . . . . . . . . . . . . 126
Scanning Methods. . . . . . . . . . . . . . . . . . . . . . . . . . . . . . . . . . . . . . . . . . . . . . . . . . . . . . . . . . . . . . . . . . 127
Windows Scanning . . . . . . . . . . . . . . . . . . . . . . . . . . . . . . . . . . . . . . . . . . . . . . . . . . . . . . . . . . . . . . . . . . . . . 128
Process Checklist . . . . . . . . . . . . . . . . . . . . . . . . . . . . . . . . . . . . . . . . . . . . . . . . . . . . . . . . . . . . . . . . . . . 128
Enable Scan to PC . . . . . . . . . . . . . . . . . . . . . . . . . . . . . . . . . . . . . . . . . . . . . . . . . . . . . . . . . . . . . . . . . . 128
Load Documents . . . . . . . . . . . . . . . . . . . . . . . . . . . . . . . . . . . . . . . . . . . . . . . . . . . . . . . . . . . . . . . . . . . 129
Select the Scan Destination . . . . . . . . . . . . . . . . . . . . . . . . . . . . . . . . . . . . . . . . . . . . . . . . . . . . . . . . . 129
Select the Features . . . . . . . . . . . . . . . . . . . . . . . . . . . . . . . . . . . . . . . . . . . . . . . . . . . . . . . . . . . . . . . . . 130
Start the Job . . . . . . . . . . . . . . . . . . . . . . . . . . . . . . . . . . . . . . . . . . . . . . . . . . . . . . . . . . . . . . . . . . . . . . . 131
Stop the Job . . . . . . . . . . . . . . . . . . . . . . . . . . . . . . . . . . . . . . . . . . . . . . . . . . . . . . . . . . . . . . . . . . . . . . . 131
vi
® WorkCentre® 3215/3225
Xerox
User Guide
Page 7

Macintosh Scanning . . . . . . . . . . . . . . . . . . . . . . . . . . . . . . . . . . . . . . . . . . . . . . . . . . . . . . . . . . . . . . . . . . . . 132
Process Checklist . . . . . . . . . . . . . . . . . . . . . . . . . . . . . . . . . . . . . . . . . . . . . . . . . . . . . . . . . . . . . . . . . . . 132
Load Documents . . . . . . . . . . . . . . . . . . . . . . . . . . . . . . . . . . . . . . . . . . . . . . . . . . . . . . . . . . . . . . . . . . . 132
Enable Scan to PC . . . . . . . . . . . . . . . . . . . . . . . . . . . . . . . . . . . . . . . . . . . . . . . . . . . . . . . . . . . . . . . . . . 133
Select the Scan Destination . . . . . . . . . . . . . . . . . . . . . . . . . . . . . . . . . . . . . . . . . . . . . . . . . . . . . . . . . 135
Start the Job . . . . . . . . . . . . . . . . . . . . . . . . . . . . . . . . . . . . . . . . . . . . . . . . . . . . . . . . . . . . . . . . . . . . . . . 135
Stop the Job . . . . . . . . . . . . . . . . . . . . . . . . . . . . . . . . . . . . . . . . . . . . . . . . . . . . . . . . . . . . . . . . . . . . . . . 136
Linux Scanning. . . . . . . . . . . . . . . . . . . . . . . . . . . . . . . . . . . . . . . . . . . . . . . . . . . . . . . . . . . . . . . . . . . . . . . . . 137
Scanning. . . . . . . . . . . . . . . . . . . . . . . . . . . . . . . . . . . . . . . . . . . . . . . . . . . . . . . . . . . . . . . . . . . . . . . . . . . 137
Job Type Settings. . . . . . . . . . . . . . . . . . . . . . . . . . . . . . . . . . . . . . . . . . . . . . . . . . . . . . . . . . . . . . . . . . . 138
Using the Image Manager . . . . . . . . . . . . . . . . . . . . . . . . . . . . . . . . . . . . . . . . . . . . . . . . . . . . . . . . . . 138
Scan Using TWAIN . . . . . . . . . . . . . . . . . . . . . . . . . . . . . . . . . . . . . . . . . . . . . . . . . . . . . . . . . . . . . . . . . . . . . 140
Scan Using WIA Driver. . . . . . . . . . . . . . . . . . . . . . . . . . . . . . . . . . . . . . . . . . . . . . . . . . . . . . . . . . . . . . . . . . 141
7Fax
Overview . . . . . . . . . . . . . . . . . . . . . . . . . . . . . . . . . . . . . . . . . . . . . . . . . . . . . . . . . . . . . . . . . . . . . . . . . . . . . . 144
Changing Fax Defaults Using CentreWare Internet Services. . . . . . . . . . . . . . . . . . . . . . . . . . . 144
Fax Procedure: Sending a Fax . . . . . . . . . . . . . . . . . . . . . . . . . . . . . . . . . . . . . . . . . . . . . . . . . . . . . . . . . . . 145
Load the Documents. . . . . . . . . . . . . . . . . . . . . . . . . . . . . . . . . . . . . . . . . . . . . . . . . . . . . . . . . . . . . . . . 145
Select the Features . . . . . . . . . . . . . . . . . . . . . . . . . . . . . . . . . . . . . . . . . . . . . . . . . . . . . . . . . . . . . . . . . 146
Enter the Fax Number . . . . . . . . . . . . . . . . . . . . . . . . . . . . . . . . . . . . . . . . . . . . . . . . . . . . . . . . . . . . . . 147
Start the Job . . . . . . . . . . . . . . . . . . . . . . . . . . . . . . . . . . . . . . . . . . . . . . . . . . . . . . . . . . . . . . . . . . . . . . . 147
Fax Confirmation. . . . . . . . . . . . . . . . . . . . . . . . . . . . . . . . . . . . . . . . . . . . . . . . . . . . . . . . . . . . . . . . . . . 148
To Stop a Fax Job . . . . . . . . . . . . . . . . . . . . . . . . . . . . . . . . . . . . . . . . . . . . . . . . . . . . . . . . . . . . . . . . . . 148
Fax Send Options . . . . . . . . . . . . . . . . . . . . . . . . . . . . . . . . . . . . . . . . . . . . . . . . . . . . . . . . . . . . . . . . . . . . . . 150
Multi Send . . . . . . . . . . . . . . . . . . . . . . . . . . . . . . . . . . . . . . . . . . . . . . . . . . . . . . . . . . . . . . . . . . . . . . . . . 152
Delay Send. . . . . . . . . . . . . . . . . . . . . . . . . . . . . . . . . . . . . . . . . . . . . . . . . . . . . . . . . . . . . . . . . . . . . . . . . 152
Priority Send . . . . . . . . . . . . . . . . . . . . . . . . . . . . . . . . . . . . . . . . . . . . . . . . . . . . . . . . . . . . . . . . . . . . . . . 154
Other Fax Send Options. . . . . . . . . . . . . . . . . . . . . . . . . . . . . . . . . . . . . . . . . . . . . . . . . . . . . . . . . . . . . 154
Fax Receive Options . . . . . . . . . . . . . . . . . . . . . . . . . . . . . . . . . . . . . . . . . . . . . . . . . . . . . . . . . . . . . . . . . . . . 156
Fax Receive Modes . . . . . . . . . . . . . . . . . . . . . . . . . . . . . . . . . . . . . . . . . . . . . . . . . . . . . . . . . . . . . . . . . 156
Fax Mode . . . . . . . . . . . . . . . . . . . . . . . . . . . . . . . . . . . . . . . . . . . . . . . . . . . . . . . . . . . . . . . . . . . . . . . . . . 156
Tel Mode. . . . . . . . . . . . . . . . . . . . . . . . . . . . . . . . . . . . . . . . . . . . . . . . . . . . . . . . . . . . . . . . . . . . . . . . . . . 157
Ans/Fax Mode. . . . . . . . . . . . . . . . . . . . . . . . . . . . . . . . . . . . . . . . . . . . . . . . . . . . . . . . . . . . . . . . . . . . . . 157
Distinctive Ring Mode. . . . . . . . . . . . . . . . . . . . . . . . . . . . . . . . . . . . . . . . . . . . . . . . . . . . . . . . . . . . . . . 157
Using Secure Receive . . . . . . . . . . . . . . . . . . . . . . . . . . . . . . . . . . . . . . . . . . . . . . . . . . . . . . . . . . . . . . . 158
Other Fax Receive Settings . . . . . . . . . . . . . . . . . . . . . . . . . . . . . . . . . . . . . . . . . . . . . . . . . . . . . . . . . . 159
Fax Forward Sent/Received . . . . . . . . . . . . . . . . . . . . . . . . . . . . . . . . . . . . . . . . . . . . . . . . . . . . . . . . . . . . . 160
Forwarding Sent Faxes. . . . . . . . . . . . . . . . . . . . . . . . . . . . . . . . . . . . . . . . . . . . . . . . . . . . . . . . . . . . . . 160
Forwarding Received Faxes. . . . . . . . . . . . . . . . . . . . . . . . . . . . . . . . . . . . . . . . . . . . . . . . . . . . . . . . . . 161
Deactivating Fax Forward . . . . . . . . . . . . . . . . . . . . . . . . . . . . . . . . . . . . . . . . . . . . . . . . . . . . . . . . . . . 162
Fax from PC. . . . . . . . . . . . . . . . . . . . . . . . . . . . . . . . . . . . . . . . . . . . . . . . . . . . . . . . . . . . . . . . . . . . . . . . . . . . 163
To send a fax from the PC: . . . . . . . . . . . . . . . . . . . . . . . . . . . . . . . . . . . . . . . . . . . . . . . . . . . . . . . . . . 163
Contents
® WorkCentre® 3215/3225
Xerox
vii
User Guide
Page 8

Contents
8E-mail
E-mail Procedure . . . . . . . . . . . . . . . . . . . . . . . . . . . . . . . . . . . . . . . . . . . . . . . . . . . . . . . . . . . . . . . . . . . . . . . 166
Loading Documents . . . . . . . . . . . . . . . . . . . . . . . . . . . . . . . . . . . . . . . . . . . . . . . . . . . . . . . . . . . . . . . . 166
Enter the E-mail Address . . . . . . . . . . . . . . . . . . . . . . . . . . . . . . . . . . . . . . . . . . . . . . . . . . . . . . . . . . . . 167
Select the Features . . . . . . . . . . . . . . . . . . . . . . . . . . . . . . . . . . . . . . . . . . . . . . . . . . . . . . . . . . . . . . . . . 167
Start the E-mail Job. . . . . . . . . . . . . . . . . . . . . . . . . . . . . . . . . . . . . . . . . . . . . . . . . . . . . . . . . . . . . . . . . 168
Stop the E-mail Job . . . . . . . . . . . . . . . . . . . . . . . . . . . . . . . . . . . . . . . . . . . . . . . . . . . . . . . . . . . . . . . . . 168
E-mail Options . . . . . . . . . . . . . . . . . . . . . . . . . . . . . . . . . . . . . . . . . . . . . . . . . . . . . . . . . . . . . . . . . . . . . . . . . 169
9 Address Book
Address Book Overview . . . . . . . . . . . . . . . . . . . . . . . . . . . . . . . . . . . . . . . . . . . . . . . . . . . . . . . . . . . . . . . . . 172
Using Address Book From the Control Panel. . . . . . . . . . . . . . . . . . . . . . . . . . . . . . . . . . . . . . . . . . . . . . 173
Searching the Address Book . . . . . . . . . . . . . . . . . . . . . . . . . . . . . . . . . . . . . . . . . . . . . . . . . . . . . . . . . 173
Speed Dial Numbers . . . . . . . . . . . . . . . . . . . . . . . . . . . . . . . . . . . . . . . . . . . . . . . . . . . . . . . . . . . . . . . . 173
Group Dial Numbers . . . . . . . . . . . . . . . . . . . . . . . . . . . . . . . . . . . . . . . . . . . . . . . . . . . . . . . . . . . . . . . . 174
Deleting an Address Book Entry . . . . . . . . . . . . . . . . . . . . . . . . . . . . . . . . . . . . . . . . . . . . . . . . . . . . . 176
Smart Key Addresses. . . . . . . . . . . . . . . . . . . . . . . . . . . . . . . . . . . . . . . . . . . . . . . . . . . . . . . . . . . . . . . . 176
Printing the Local Address Book . . . . . . . . . . . . . . . . . . . . . . . . . . . . . . . . . . . . . . . . . . . . . . . . . . . . . 176
Using Address Book in CWIS . . . . . . . . . . . . . . . . . . . . . . . . . . . . . . . . . . . . . . . . . . . . . . . . . . . . . . . . . . . . 177
Search for An Address . . . . . . . . . . . . . . . . . . . . . . . . . . . . . . . . . . . . . . . . . . . . . . . . . . . . . . . . . . . . . . 177
10 Security
Security at Xerox . . . . . . . . . . . . . . . . . . . . . . . . . . . . . . . . . . . . . . . . . . . . . . . . . . . . . . . . . . . . . . . . . . . . . . . 180
Security Settings . . . . . . . . . . . . . . . . . . . . . . . . . . . . . . . . . . . . . . . . . . . . . . . . . . . . . . . . . . . . . . . . . . . . . . . 180
Administrator Accounts . . . . . . . . . . . . . . . . . . . . . . . . . . . . . . . . . . . . . . . . . . . . . . . . . . . . . . . . . . . . . 180
Feature Management . . . . . . . . . . . . . . . . . . . . . . . . . . . . . . . . . . . . . . . . . . . . . . . . . . . . . . . . . . . . . . 181
Restart Device. . . . . . . . . . . . . . . . . . . . . . . . . . . . . . . . . . . . . . . . . . . . . . . . . . . . . . . . . . . . . . . . . . . . . . 181
Machine Digital Certificate Management . . . . . . . . . . . . . . . . . . . . . . . . . . . . . . . . . . . . . . . . . . . . . . . . 182
SNMP . . . . . . . . . . . . . . . . . . . . . . . . . . . . . . . . . . . . . . . . . . . . . . . . . . . . . . . . . . . . . . . . . . . . . . . . . . . . . . . . . 187
SNMPv3 . . . . . . . . . . . . . . . . . . . . . . . . . . . . . . . . . . . . . . . . . . . . . . . . . . . . . . . . . . . . . . . . . . . . . . . . . . . . . . . 189
IP Sec . . . . . . . . . . . . . . . . . . . . . . . . . . . . . . . . . . . . . . . . . . . . . . . . . . . . . . . . . . . . . . . . . . . . . . . . . . . . . . . . . 190
IP Filtering . . . . . . . . . . . . . . . . . . . . . . . . . . . . . . . . . . . . . . . . . . . . . . . . . . . . . . . . . . . . . . . . . . . . . . . . . . . . . 191
Overview. . . . . . . . . . . . . . . . . . . . . . . . . . . . . . . . . . . . . . . . . . . . . . . . . . . . . . . . . . . . . . . . . . . . . . . . . . . 191
Enable IP Filtering . . . . . . . . . . . . . . . . . . . . . . . . . . . . . . . . . . . . . . . . . . . . . . . . . . . . . . . . . . . . . . . . . . 191
802.1X Authentication. . . . . . . . . . . . . . . . . . . . . . . . . . . . . . . . . . . . . . . . . . . . . . . . . . . . . . . . . . . . . . . . . . 193
Overview. . . . . . . . . . . . . . . . . . . . . . . . . . . . . . . . . . . . . . . . . . . . . . . . . . . . . . . . . . . . . . . . . . . . . . . . . . . 193
Information Checklist. . . . . . . . . . . . . . . . . . . . . . . . . . . . . . . . . . . . . . . . . . . . . . . . . . . . . . . . . . . . . . . 193
Enable 802.1X at the Machine. . . . . . . . . . . . . . . . . . . . . . . . . . . . . . . . . . . . . . . . . . . . . . . . . . . . . . . 193
viii
® WorkCentre® 3215/3225
Xerox
User Guide
Page 9

Authentication . . . . . . . . . . . . . . . . . . . . . . . . . . . . . . . . . . . . . . . . . . . . . . . . . . . . . . . . . . . . . . . . . . . . . . . . . 195
Overview. . . . . . . . . . . . . . . . . . . . . . . . . . . . . . . . . . . . . . . . . . . . . . . . . . . . . . . . . . . . . . . . . . . . . . . . . . . 195
No Authentication . . . . . . . . . . . . . . . . . . . . . . . . . . . . . . . . . . . . . . . . . . . . . . . . . . . . . . . . . . . . . . . . . . 195
Authentication . . . . . . . . . . . . . . . . . . . . . . . . . . . . . . . . . . . . . . . . . . . . . . . . . . . . . . . . . . . . . . . . . . . . . 195
Configure Local Authentication. . . . . . . . . . . . . . . . . . . . . . . . . . . . . . . . . . . . . . . . . . . . . . . . . . . . . . 195
Configure External Authentication. . . . . . . . . . . . . . . . . . . . . . . . . . . . . . . . . . . . . . . . . . . . . . . . . . . 197
Configure Kerberos (Unix/Linux) . . . . . . . . . . . . . . . . . . . . . . . . . . . . . . . . . . . . . . . . . . . . . . . . . . . . . 197
Configure Kerberos (Windows ADS). . . . . . . . . . . . . . . . . . . . . . . . . . . . . . . . . . . . . . . . . . . . . . . . . . 198
Configure SMB (Windows ADS). . . . . . . . . . . . . . . . . . . . . . . . . . . . . . . . . . . . . . . . . . . . . . . . . . . . . . 198
Configure LDAP . . . . . . . . . . . . . . . . . . . . . . . . . . . . . . . . . . . . . . . . . . . . . . . . . . . . . . . . . . . . . . . . . . . . 199
11 Maintenance
Consumables . . . . . . . . . . . . . . . . . . . . . . . . . . . . . . . . . . . . . . . . . . . . . . . . . . . . . . . . . . . . . . . . . . . . . . . . . . 202
Placing an Order for Xerox Consumables . . . . . . . . . . . . . . . . . . . . . . . . . . . . . . . . . . . . . . . . . . . . . 202
Checking the Status of Consumables . . . . . . . . . . . . . . . . . . . . . . . . . . . . . . . . . . . . . . . . . . . . . . . . 203
Storage and Handling of Consumables. . . . . . . . . . . . . . . . . . . . . . . . . . . . . . . . . . . . . . . . . . . . . . . 204
When to Order Consumable Supplies . . . . . . . . . . . . . . . . . . . . . . . . . . . . . . . . . . . . . . . . . . . . . . . . 204
Maintenance Options . . . . . . . . . . . . . . . . . . . . . . . . . . . . . . . . . . . . . . . . . . . . . . . . . . . . . . . . . . . . . . . 205
General Care . . . . . . . . . . . . . . . . . . . . . . . . . . . . . . . . . . . . . . . . . . . . . . . . . . . . . . . . . . . . . . . . . . . . . . . . . . . 206
Redistributing Toner . . . . . . . . . . . . . . . . . . . . . . . . . . . . . . . . . . . . . . . . . . . . . . . . . . . . . . . . . . . . . . . . 206
Replacing the Toner Cartridge . . . . . . . . . . . . . . . . . . . . . . . . . . . . . . . . . . . . . . . . . . . . . . . . . . . . . . . 207
Replacing the Drum Cartridge . . . . . . . . . . . . . . . . . . . . . . . . . . . . . . . . . . . . . . . . . . . . . . . . . . . . . . . 208
Recycling Consumables . . . . . . . . . . . . . . . . . . . . . . . . . . . . . . . . . . . . . . . . . . . . . . . . . . . . . . . . . . . . . 210
Cleaning the Machine . . . . . . . . . . . . . . . . . . . . . . . . . . . . . . . . . . . . . . . . . . . . . . . . . . . . . . . . . . . . . . 210
Moving the Machine. . . . . . . . . . . . . . . . . . . . . . . . . . . . . . . . . . . . . . . . . . . . . . . . . . . . . . . . . . . . . . . . 212
Software Update . . . . . . . . . . . . . . . . . . . . . . . . . . . . . . . . . . . . . . . . . . . . . . . . . . . . . . . . . . . . . . . . . . . . . . . 213
The Software Upgrade Process . . . . . . . . . . . . . . . . . . . . . . . . . . . . . . . . . . . . . . . . . . . . . . . . . . . . . . 213
Procedure . . . . . . . . . . . . . . . . . . . . . . . . . . . . . . . . . . . . . . . . . . . . . . . . . . . . . . . . . . . . . . . . . . . . . . . . . . 213
Contents
12 Troubleshooting
Overview . . . . . . . . . . . . . . . . . . . . . . . . . . . . . . . . . . . . . . . . . . . . . . . . . . . . . . . . . . . . . . . . . . . . . . . . . . . . . . 216
Status / Wireless LED . . . . . . . . . . . . . . . . . . . . . . . . . . . . . . . . . . . . . . . . . . . . . . . . . . . . . . . . . . . . . . . 217
Clearing Paper Jams . . . . . . . . . . . . . . . . . . . . . . . . . . . . . . . . . . . . . . . . . . . . . . . . . . . . . . . . . . . . . . . . . . . . 218
Tips for Avoiding Paper Jams . . . . . . . . . . . . . . . . . . . . . . . . . . . . . . . . . . . . . . . . . . . . . . . . . . . . . . . . 218
Automatic Document Feeder Jams . . . . . . . . . . . . . . . . . . . . . . . . . . . . . . . . . . . . . . . . . . . . . . . . . . 218
Error Messages . . . . . . . . . . . . . . . . . . . . . . . . . . . . . . . . . . . . . . . . . . . . . . . . . . . . . . . . . . . . . . . . . . . . . . . . . 224
Common Problems . . . . . . . . . . . . . . . . . . . . . . . . . . . . . . . . . . . . . . . . . . . . . . . . . . . . . . . . . . . . . . . . . . . . . 225
Paper Feeding Problems . . . . . . . . . . . . . . . . . . . . . . . . . . . . . . . . . . . . . . . . . . . . . . . . . . . . . . . . . . . . 225
Printing Problems. . . . . . . . . . . . . . . . . . . . . . . . . . . . . . . . . . . . . . . . . . . . . . . . . . . . . . . . . . . . . . . . . . . 226
Common PostScript Problems . . . . . . . . . . . . . . . . . . . . . . . . . . . . . . . . . . . . . . . . . . . . . . . . . . . . . . . 228
Common Windows Problems . . . . . . . . . . . . . . . . . . . . . . . . . . . . . . . . . . . . . . . . . . . . . . . . . . . . . . . . 229
Common Linux Problems. . . . . . . . . . . . . . . . . . . . . . . . . . . . . . . . . . . . . . . . . . . . . . . . . . . . . . . . . . . . 230
Common Macintosh Problems. . . . . . . . . . . . . . . . . . . . . . . . . . . . . . . . . . . . . . . . . . . . . . . . . . . . . . . 232
Print Quality Problems . . . . . . . . . . . . . . . . . . . . . . . . . . . . . . . . . . . . . . . . . . . . . . . . . . . . . . . . . . . . . . 232
Copying Problems . . . . . . . . . . . . . . . . . . . . . . . . . . . . . . . . . . . . . . . . . . . . . . . . . . . . . . . . . . . . . . . . . . 236
Scanning Problems . . . . . . . . . . . . . . . . . . . . . . . . . . . . . . . . . . . . . . . . . . . . . . . . . . . . . . . . . . . . . . . . . 237
Fax Problems. . . . . . . . . . . . . . . . . . . . . . . . . . . . . . . . . . . . . . . . . . . . . . . . . . . . . . . . . . . . . . . . . . . . . . . 237
® WorkCentre® 3215/3225
Xerox
User Guide
ix
Page 10

Contents
Further Assistance. . . . . . . . . . . . . . . . . . . . . . . . . . . . . . . . . . . . . . . . . . . . . . . . . . . . . . . . . . . . . . . . . . . . . . 239
Xerox Support Center . . . . . . . . . . . . . . . . . . . . . . . . . . . . . . . . . . . . . . . . . . . . . . . . . . . . . . . . . . . . . . . 239
Locating the Serial Number . . . . . . . . . . . . . . . . . . . . . . . . . . . . . . . . . . . . . . . . . . . . . . . . . . . . . . . . . 239
Printing a Machine Report . . . . . . . . . . . . . . . . . . . . . . . . . . . . . . . . . . . . . . . . . . . . . . . . . . . . . . . . . . 239
13 Specifications
Machine Specifications . . . . . . . . . . . . . . . . . . . . . . . . . . . . . . . . . . . . . . . . . . . . . . . . . . . . . . . . . . . . . . . . . 242
Machine Configurations . . . . . . . . . . . . . . . . . . . . . . . . . . . . . . . . . . . . . . . . . . . . . . . . . . . . . . . . . . . . 242
Media Specifications. . . . . . . . . . . . . . . . . . . . . . . . . . . . . . . . . . . . . . . . . . . . . . . . . . . . . . . . . . . . . . . . 243
Feature Specifications . . . . . . . . . . . . . . . . . . . . . . . . . . . . . . . . . . . . . . . . . . . . . . . . . . . . . . . . . . . . . . . . . . 245
Print Features . . . . . . . . . . . . . . . . . . . . . . . . . . . . . . . . . . . . . . . . . . . . . . . . . . . . . . . . . . . . . . . . . . . . . . 245
Fax Features . . . . . . . . . . . . . . . . . . . . . . . . . . . . . . . . . . . . . . . . . . . . . . . . . . . . . . . . . . . . . . . . . . . . . . . 245
Scan Features . . . . . . . . . . . . . . . . . . . . . . . . . . . . . . . . . . . . . . . . . . . . . . . . . . . . . . . . . . . . . . . . . . . . . . 246
Network Environment . . . . . . . . . . . . . . . . . . . . . . . . . . . . . . . . . . . . . . . . . . . . . . . . . . . . . . . . . . . . . . . . . . 247
System Requirements . . . . . . . . . . . . . . . . . . . . . . . . . . . . . . . . . . . . . . . . . . . . . . . . . . . . . . . . . . . . . . . . . . 248
Microsoft® Windows® . . . . . . . . . . . . . . . . . . . . . . . . . . . . . . . . . . . . . . . . . . . . . . . . . . . . . . . . . . . . . 248
Macintosh . . . . . . . . . . . . . . . . . . . . . . . . . . . . . . . . . . . . . . . . . . . . . . . . . . . . . . . . . . . . . . . . . . . . . . . . . 248
Linux . . . . . . . . . . . . . . . . . . . . . . . . . . . . . . . . . . . . . . . . . . . . . . . . . . . . . . . . . . . . . . . . . . . . . . . . . . . . . . 249
Unix . . . . . . . . . . . . . . . . . . . . . . . . . . . . . . . . . . . . . . . . . . . . . . . . . . . . . . . . . . . . . . . . . . . . . . . . . . . . . . . 249
Electrical Specifications . . . . . . . . . . . . . . . . . . . . . . . . . . . . . . . . . . . . . . . . . . . . . . . . . . . . . . . . . . . . . . . . . 250
Environmental Specifications . . . . . . . . . . . . . . . . . . . . . . . . . . . . . . . . . . . . . . . . . . . . . . . . . . . . . . . . . . . 251
14 Safety
Electrical Safety . . . . . . . . . . . . . . . . . . . . . . . . . . . . . . . . . . . . . . . . . . . . . . . . . . . . . . . . . . . . . . . . . . . . . . . . 254
General Guidelines . . . . . . . . . . . . . . . . . . . . . . . . . . . . . . . . . . . . . . . . . . . . . . . . . . . . . . . . . . . . . . . . . 254
Power Cord. . . . . . . . . . . . . . . . . . . . . . . . . . . . . . . . . . . . . . . . . . . . . . . . . . . . . . . . . . . . . . . . . . . . . . . . . 254
Emergency Turn Off . . . . . . . . . . . . . . . . . . . . . . . . . . . . . . . . . . . . . . . . . . . . . . . . . . . . . . . . . . . . . . . . 255
Laser Safety. . . . . . . . . . . . . . . . . . . . . . . . . . . . . . . . . . . . . . . . . . . . . . . . . . . . . . . . . . . . . . . . . . . . . . . . 255
Operational Safety . . . . . . . . . . . . . . . . . . . . . . . . . . . . . . . . . . . . . . . . . . . . . . . . . . . . . . . . . . . . . . . . . . . . . 256
Operational Guidelines. . . . . . . . . . . . . . . . . . . . . . . . . . . . . . . . . . . . . . . . . . . . . . . . . . . . . . . . . . . . . . 256
Ozone Release. . . . . . . . . . . . . . . . . . . . . . . . . . . . . . . . . . . . . . . . . . . . . . . . . . . . . . . . . . . . . . . . . . . . . . 256
Printer Location . . . . . . . . . . . . . . . . . . . . . . . . . . . . . . . . . . . . . . . . . . . . . . . . . . . . . . . . . . . . . . . . . . . . 256
Printer Supplies. . . . . . . . . . . . . . . . . . . . . . . . . . . . . . . . . . . . . . . . . . . . . . . . . . . . . . . . . . . . . . . . . . . . . 257
Maintenance Safety . . . . . . . . . . . . . . . . . . . . . . . . . . . . . . . . . . . . . . . . . . . . . . . . . . . . . . . . . . . . . . . . . . . . 258
Printer Symbols. . . . . . . . . . . . . . . . . . . . . . . . . . . . . . . . . . . . . . . . . . . . . . . . . . . . . . . . . . . . . . . . . . . . . 258
Environmental, Health, and Safety Contact Information . . . . . . . . . . . . . . . . . . . . . . . . . . . . . . . . . . 260
x
® WorkCentre® 3215/3225
Xerox
User Guide
Page 11

15 Regulatory
Basic Regulations . . . . . . . . . . . . . . . . . . . . . . . . . . . . . . . . . . . . . . . . . . . . . . . . . . . . . . . . . . . . . . . . . . . . . . 262
United States (FCC Regulations). . . . . . . . . . . . . . . . . . . . . . . . . . . . . . . . . . . . . . . . . . . . . . . . . . . . . 262
Canada . . . . . . . . . . . . . . . . . . . . . . . . . . . . . . . . . . . . . . . . . . . . . . . . . . . . . . . . . . . . . . . . . . . . . . . . . . . . 262
European Union . . . . . . . . . . . . . . . . . . . . . . . . . . . . . . . . . . . . . . . . . . . . . . . . . . . . . . . . . . . . . . . . . . . . 262
European Union Lot 4 Imaging Equipment Agreement Environmental Information . . . . . 263
Power Consumption and Activation Time . . . . . . . . . . . . . . . . . . . . . . . . . . . . . . . . . . . . . . . . . . . . 264
Germany. . . . . . . . . . . . . . . . . . . . . . . . . . . . . . . . . . . . . . . . . . . . . . . . . . . . . . . . . . . . . . . . . . . . . . . . . . . 265
Turkey RoHS Regulation . . . . . . . . . . . . . . . . . . . . . . . . . . . . . . . . . . . . . . . . . . . . . . . . . . . . . . . . . . . . 265
Regulatory information for 2.4 Ghz Wireless LAN Module . . . . . . . . . . . . . . . . . . . . . . . . . . . . . 266
Copy Regulations . . . . . . . . . . . . . . . . . . . . . . . . . . . . . . . . . . . . . . . . . . . . . . . . . . . . . . . . . . . . . . . . . . . . . . 267
United States . . . . . . . . . . . . . . . . . . . . . . . . . . . . . . . . . . . . . . . . . . . . . . . . . . . . . . . . . . . . . . . . . . . . . . 267
Canada . . . . . . . . . . . . . . . . . . . . . . . . . . . . . . . . . . . . . . . . . . . . . . . . . . . . . . . . . . . . . . . . . . . . . . . . . . . . 268
Other Countries . . . . . . . . . . . . . . . . . . . . . . . . . . . . . . . . . . . . . . . . . . . . . . . . . . . . . . . . . . . . . . . . . . . . 269
Fax Regulations . . . . . . . . . . . . . . . . . . . . . . . . . . . . . . . . . . . . . . . . . . . . . . . . . . . . . . . . . . . . . . . . . . . . . . . . 270
United States . . . . . . . . . . . . . . . . . . . . . . . . . . . . . . . . . . . . . . . . . . . . . . . . . . . . . . . . . . . . . . . . . . . . . . 270
Canada . . . . . . . . . . . . . . . . . . . . . . . . . . . . . . . . . . . . . . . . . . . . . . . . . . . . . . . . . . . . . . . . . . . . . . . . . . . . 271
European Union . . . . . . . . . . . . . . . . . . . . . . . . . . . . . . . . . . . . . . . . . . . . . . . . . . . . . . . . . . . . . . . . . . . . 272
South Africa. . . . . . . . . . . . . . . . . . . . . . . . . . . . . . . . . . . . . . . . . . . . . . . . . . . . . . . . . . . . . . . . . . . . . . . . 272
New Zealand . . . . . . . . . . . . . . . . . . . . . . . . . . . . . . . . . . . . . . . . . . . . . . . . . . . . . . . . . . . . . . . . . . . . . . . 272
Material Safety Data . . . . . . . . . . . . . . . . . . . . . . . . . . . . . . . . . . . . . . . . . . . . . . . . . . . . . . . . . . . . . . . . . . . 274
Contents
16 Recycling and Disposal
All Countries . . . . . . . . . . . . . . . . . . . . . . . . . . . . . . . . . . . . . . . . . . . . . . . . . . . . . . . . . . . . . . . . . . . . . . . . . . . 276
Perchlorate Material . . . . . . . . . . . . . . . . . . . . . . . . . . . . . . . . . . . . . . . . . . . . . . . . . . . . . . . . . . . . . . . . 276
North America . . . . . . . . . . . . . . . . . . . . . . . . . . . . . . . . . . . . . . . . . . . . . . . . . . . . . . . . . . . . . . . . . . . . . . . . . 277
European Union. . . . . . . . . . . . . . . . . . . . . . . . . . . . . . . . . . . . . . . . . . . . . . . . . . . . . . . . . . . . . . . . . . . . . . . . 278
Domestic/Household Environment. . . . . . . . . . . . . . . . . . . . . . . . . . . . . . . . . . . . . . . . . . . . . . . . . . . 278
Professional/Business Environment . . . . . . . . . . . . . . . . . . . . . . . . . . . . . . . . . . . . . . . . . . . . . . . . . . 278
Collection and Disposal of Equipment and Batteries . . . . . . . . . . . . . . . . . . . . . . . . . . . . . . . . . . 278
Battery Symbol Note . . . . . . . . . . . . . . . . . . . . . . . . . . . . . . . . . . . . . . . . . . . . . . . . . . . . . . . . . . . . . . . 279
Battery Removal. . . . . . . . . . . . . . . . . . . . . . . . . . . . . . . . . . . . . . . . . . . . . . . . . . . . . . . . . . . . . . . . . . . . 279
Other Countries . . . . . . . . . . . . . . . . . . . . . . . . . . . . . . . . . . . . . . . . . . . . . . . . . . . . . . . . . . . . . . . . . . . . . . . . 280
® WorkCentre® 3215/3225
Xerox
xi
User Guide
Page 12

Contents
xii
® WorkCentre® 3215/3225
Xerox
User Guide
Page 13

Getting Started
This chapter includes:
• Machine Overview
• Product Configurations
• Control Panel Overview
• Powering On the Machine
•Software
• Information Pages
• Feature Defaults
• Accessing the Printer
• More Information
• Further Assistance
1
Xerox® WorkCentre® 3215/3225
User Guide
1
Page 14
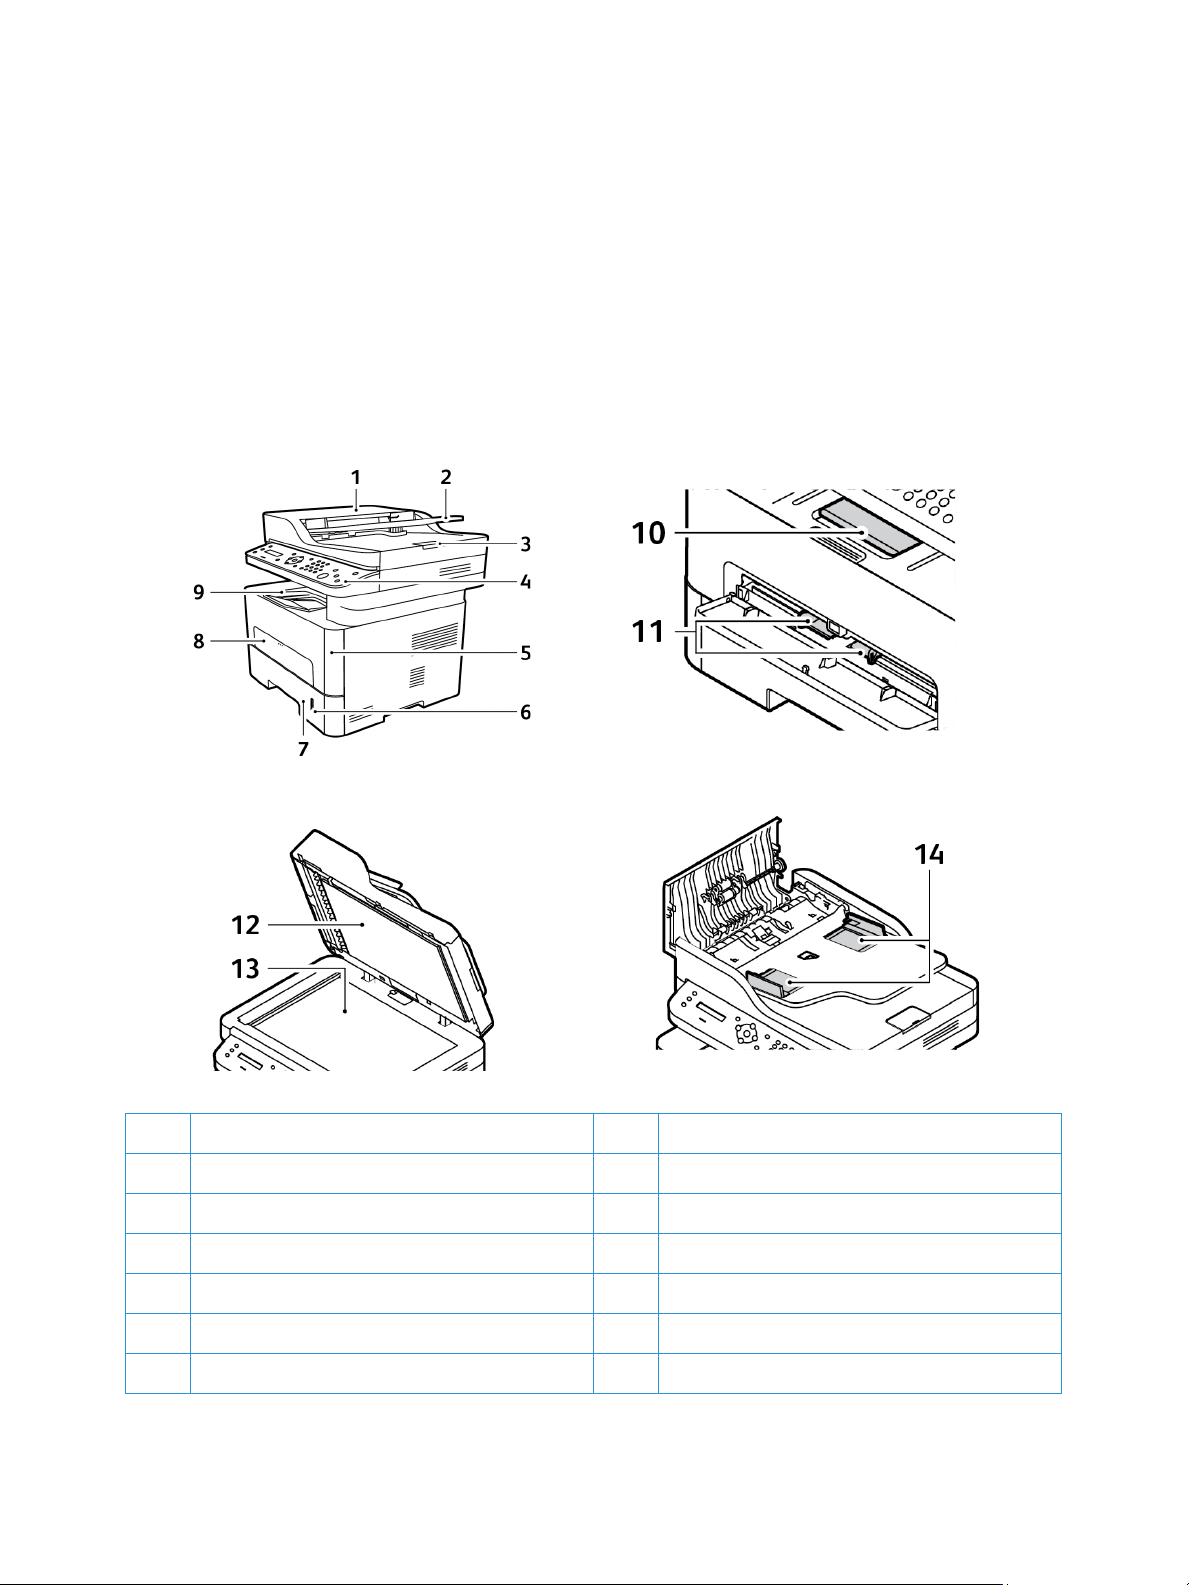
Machine Overview
Machine Overview
Before you use your machine, take some time to familiarize yourself with the various features and
options.
Front View
1 Document Feeder Cover 8 Manual Feeder Slot
2 Document Feeder Input Tray 9 Output Tray
3 Document Feeder Output Support 10 Output Support
4 Control Panel 11 Paper Width Guide on Manual Feeder
5 Front Cover 12 Document Cover
6 Paper Level Indicator 13 Platen Glass
7 Paper Tray 1 14 Paper Width Guide on Document Feeder
2
Xerox® WorkCentre® 3215/3225
User Guide
Page 15
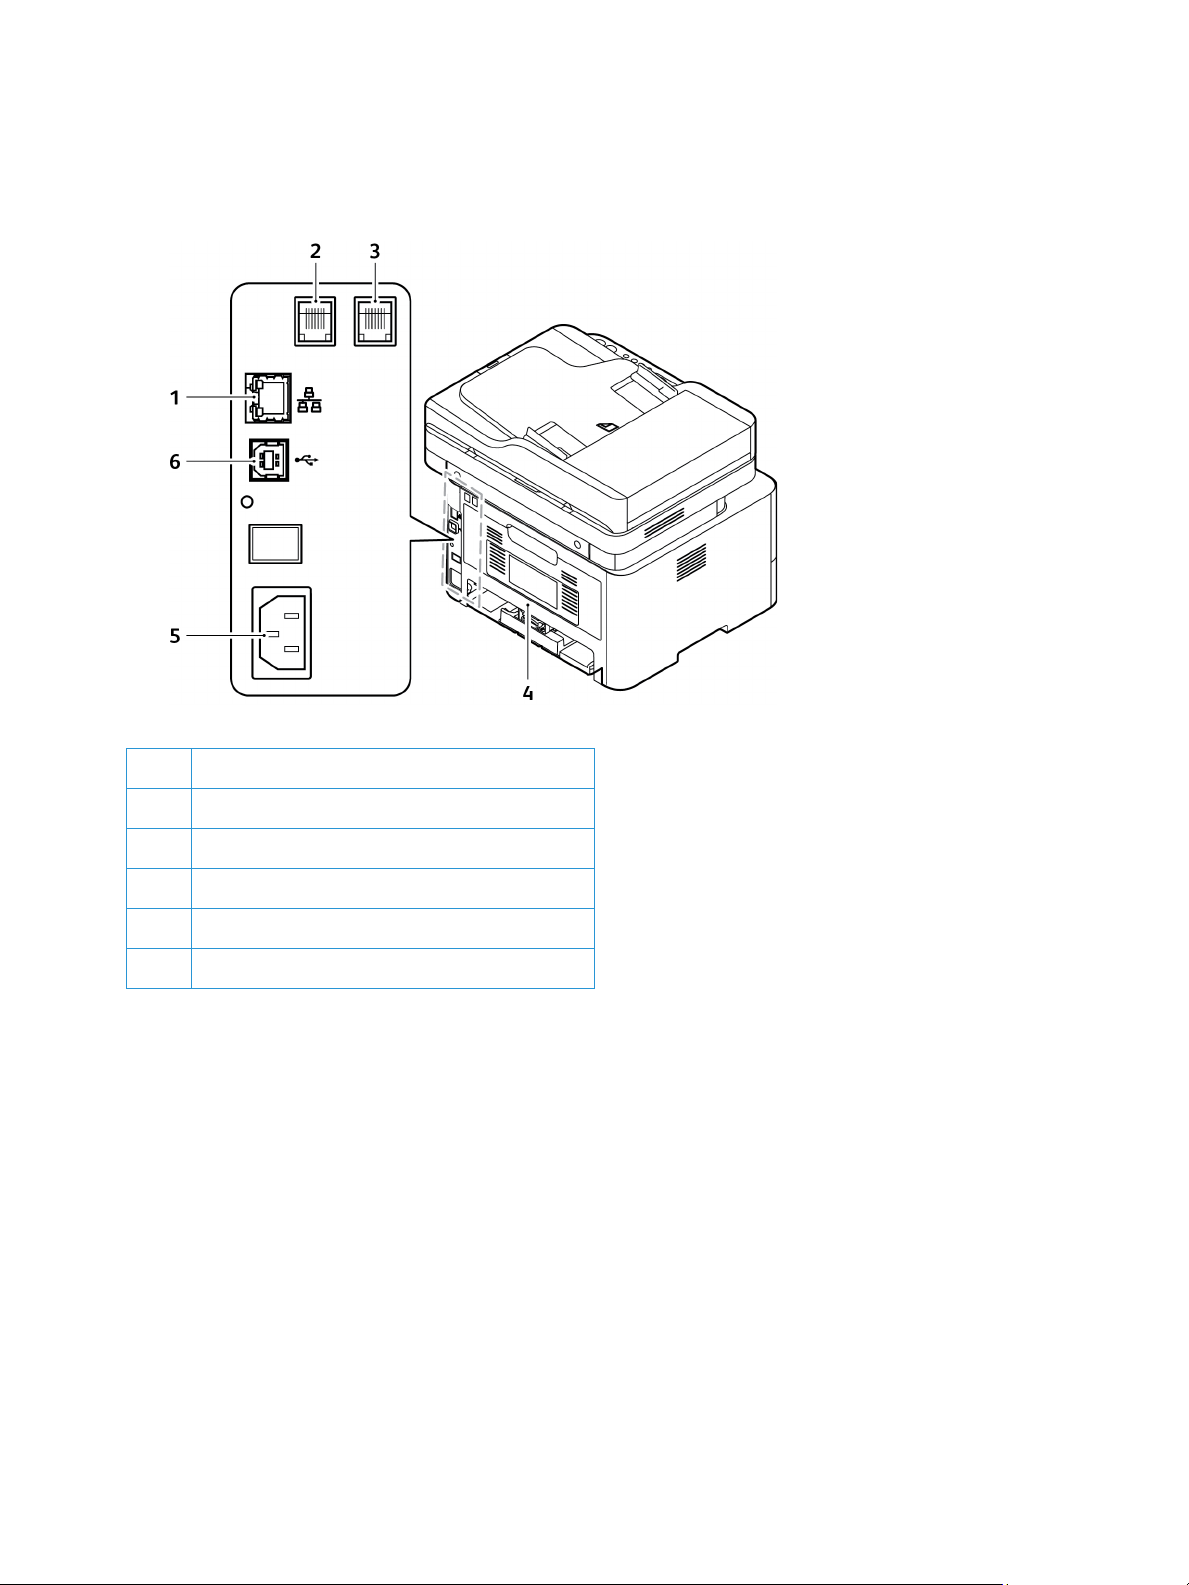
Rear View
Machine Overview
1Network Port
2 Telephone Line Socket (Line)
3 Extension Telephone Socket (EXT)
4Rear Cover
5Power Receptacle
6USB Port
Xerox® WorkCentre® 3215/3225
User Guide
3
Page 16

Product Configurations
Product Configurations
Component
Automatic Document Feeder Standard Standard Standard
Paper Tray (250 sheets) Standard Standard Standard
Manual Feeder Slot (1 sheet) Standard Standard Standard
Output Tray (120 sheets) Standard Standard Standard
AirPrint Standard Standard Not Applicable
Google Cloud Print Standard Standard Not Applicable
Network Printing Standard Standard Standard
Copy Standard Standard Standard
Scan Standard Standard Standard
Fax Standard Standard Standard
E-mail Standard Standard Standard
USB Device Standard Standard Standard
USB Host Not Applicable Not Applicable Not Applicable
WorkCentre
3215NI
WorkCentre
3225DNI
WorkCentre
3225DN
Wi-Fi Standard Standard Not Applicable
Wi-Fi Direct
TM
Standard Standard Not Applicable
4
Xerox® WorkCentre® 3215/3225
User Guide
Page 17
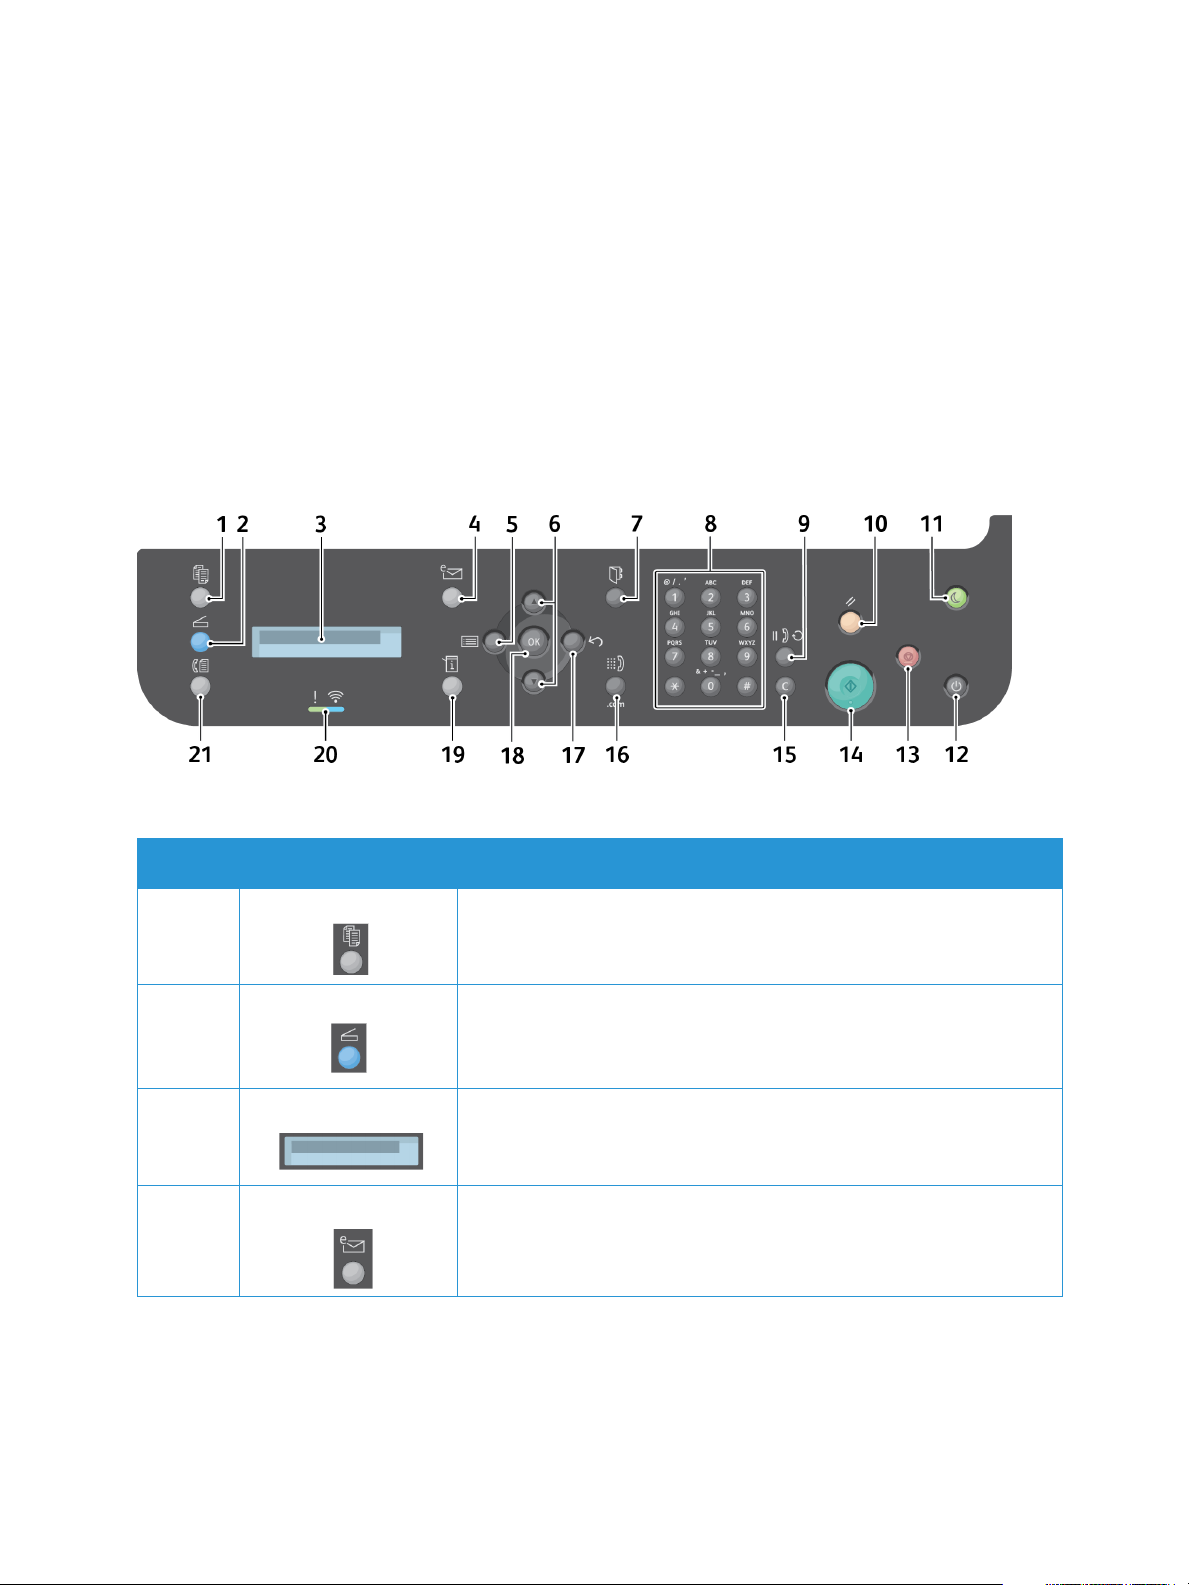
Control Panel Overview
Control Panel Overview
The control panel consists of a display, a keypad, and buttons you press to control the functions
available on the printer. The control panel:
• Displays the current operating status of the printer.
• Provides access to copy, print, scan, e-mail, and fax features.
• Provides access to information pages.
• Prompts you to load paper, replace supplies, and clear jams.
• Displays errors and warnings.
.
Number Button Description
1 Copy: Activates Copy mode.
2 Scan: Activates Scan mode.
3 Display Screen: Displays all the available programming features, plus
general machine information.
4 E-mail: Activates E-mail mode.
Xerox® WorkCentre® 3215/3225
User Guide
5
Page 18
Control Panel Overview
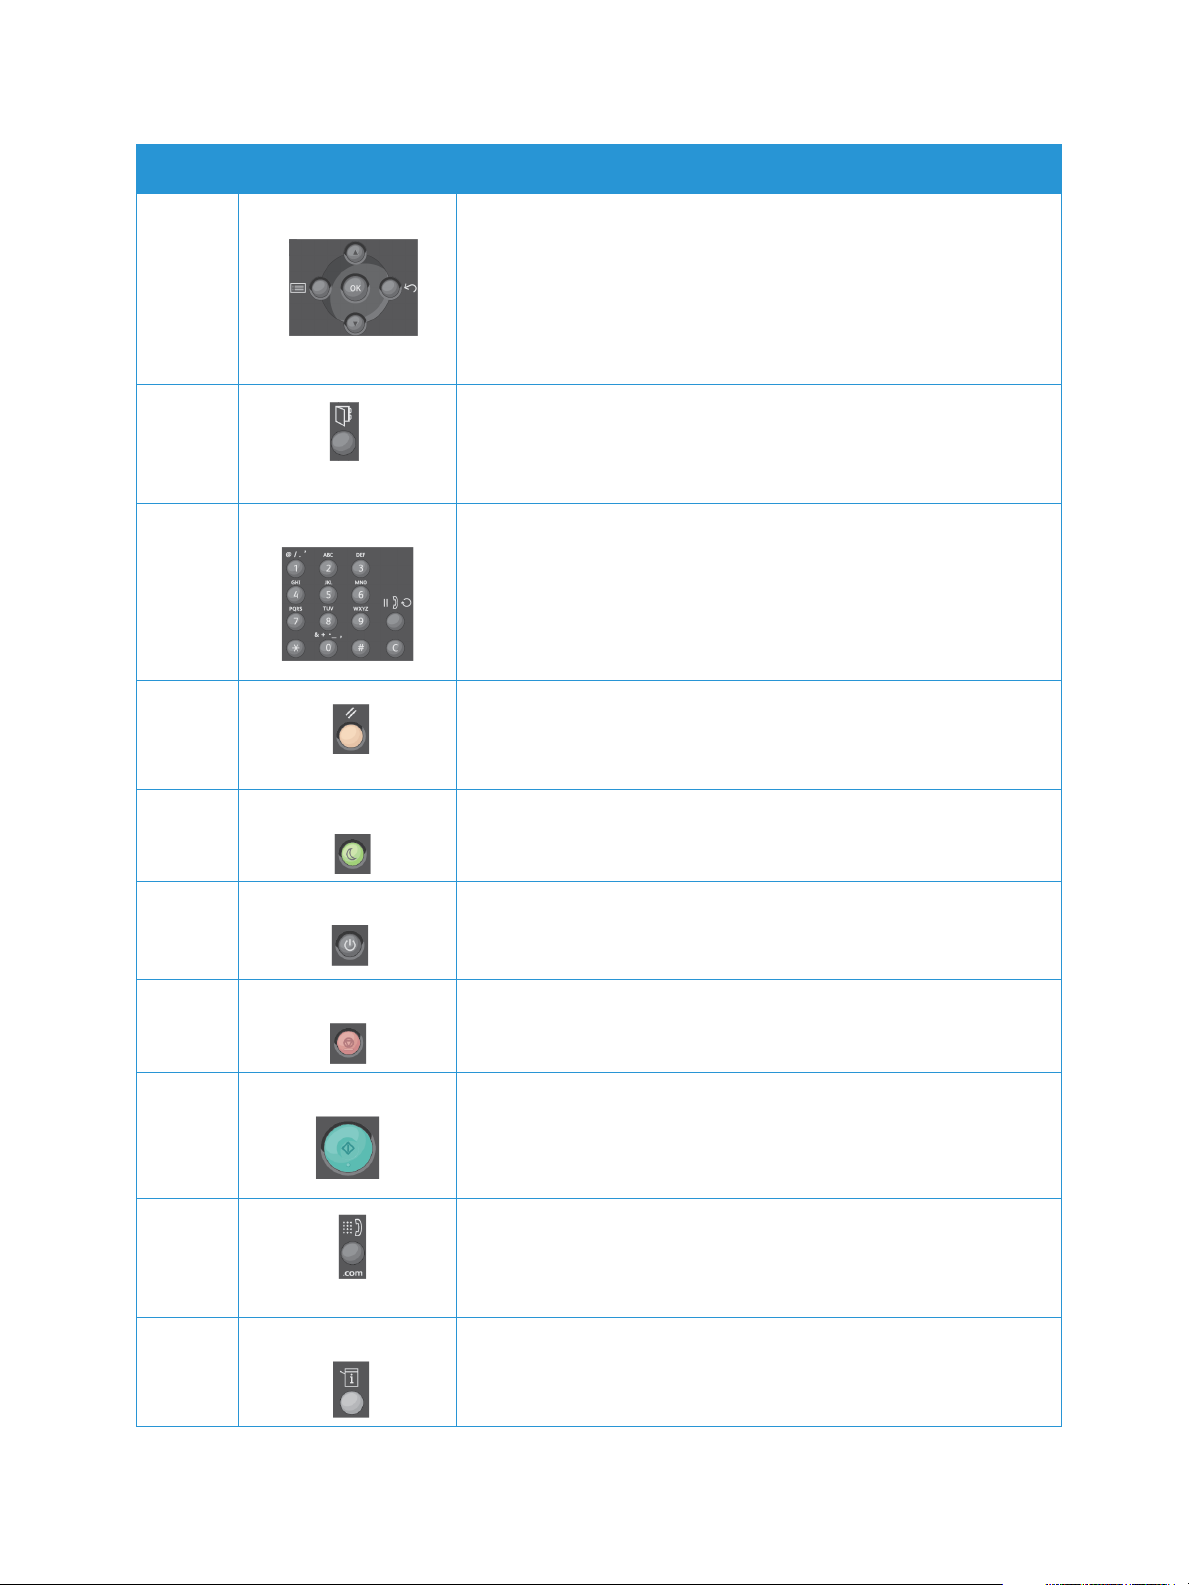
Number Button Description
5-6
17-18
7 Address Book: Used to search for stored fax numbers or e-mail
8
9
15
10 Clear All: Clears the last selections made.
Menu: Enters Menu mode and enables you to access options and
settings.
Arrows: The up and down arrows are used to scroll through the
options available in the selected menu, and to increase or decrease
values.
Back: Sends the user back to the higher menu level.
OK: Confirms the selection on the screen.
addresses.
Keypad: Used to enter alphanumeric characters.
Pause / Redial: In standby mode redials the last number. In edit mode
inserts a pause into a fax number.
Clear: Clears the last character entered.
11 Power Save: Sends the machine into Power Save mode or Power
Down. Press the button again to restart a powered off machine.
12 Power: Powers the machine on or off.
13 Stop: Pressing the Stop button stops the job in progress. Pressing Stop
also exits the Menu Mode. If you have logged in to use the machine,
pressing Stop displays the Log Out option.
14 Start: Activates a job.
16 Manual Dial: In Fax mode, opens the fax line. In E-mail mode
provides access to commonly used e-mail address text, for example,
.com or .org. The text available can be customized using CentreWare
Internet Services.
19 Machine Status: Accesses machine information, status information,
the machine serial number, and various reports to print.
6
Xerox® WorkCentre® 3215/3225
User Guide
Page 19

Control Panel Overview
Number Button Description
20 Status / Wireless LED: The color of the LEDs indicate the machine’s
current status.
21 Fax: Activates Fax mode.
Xerox® WorkCentre® 3215/3225
User Guide
7
Page 20
Powering On the Machine
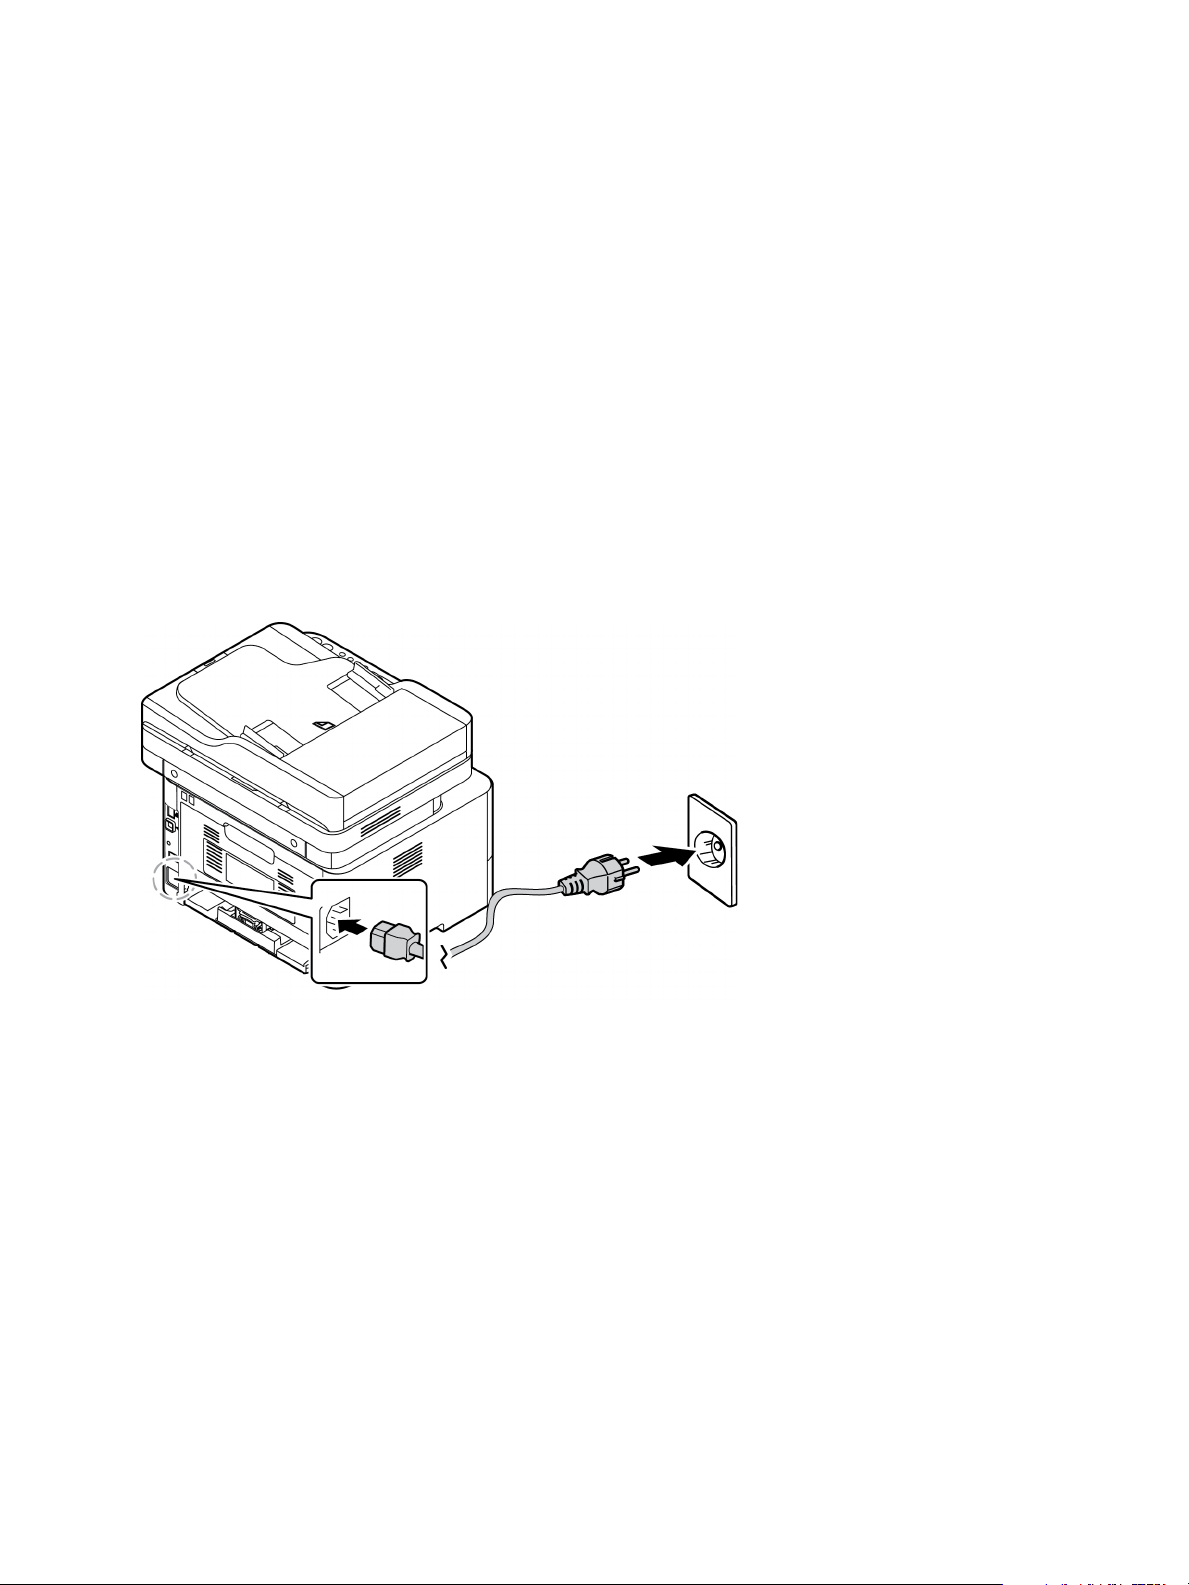
Powering On the Machine
The power button is located on the control panel. The power cable socket is located at the rear of the
printer.
1. Connect the AC Power Cord to the machine and a power outlet. The power cord must be plugged
into a grounded power socket.
2. The WorkCentre 3215NI and 3225DNI will connect to a wireless network, if available, when
powered on. Wi-Fi must be configured first. Refer to the Installation and Setup chapter for
instructions.
Note: The machine will not connect to the wireless network while the network cable is attached.
3. Connect the network cable, if required.
4. To allow faxing, connect the telephone line to the LINE Connector.
5. Press the Power button on the control panel.
Power Save
This machine contains advanced energy conservation technology that reduces power consumption
when it is not in active use. When the printer does not receive data for an extended period of time, the
Power Save mode becomes active and power consumption is automatically lowered.
To enter Power Save mode:
1. Press the Power Save button.
2. Use the Up/Down arrow buttons to select Power Save and then OK.
8
Xerox® WorkCentre® 3215/3225
User Guide
Page 21
Powering On the Machine
Powering Off the Machine
There are two ways to power the machine off:
•Press the Power button.
•Press the Power Save button, and use the Up/Down arrows to select Power Down and then OK.
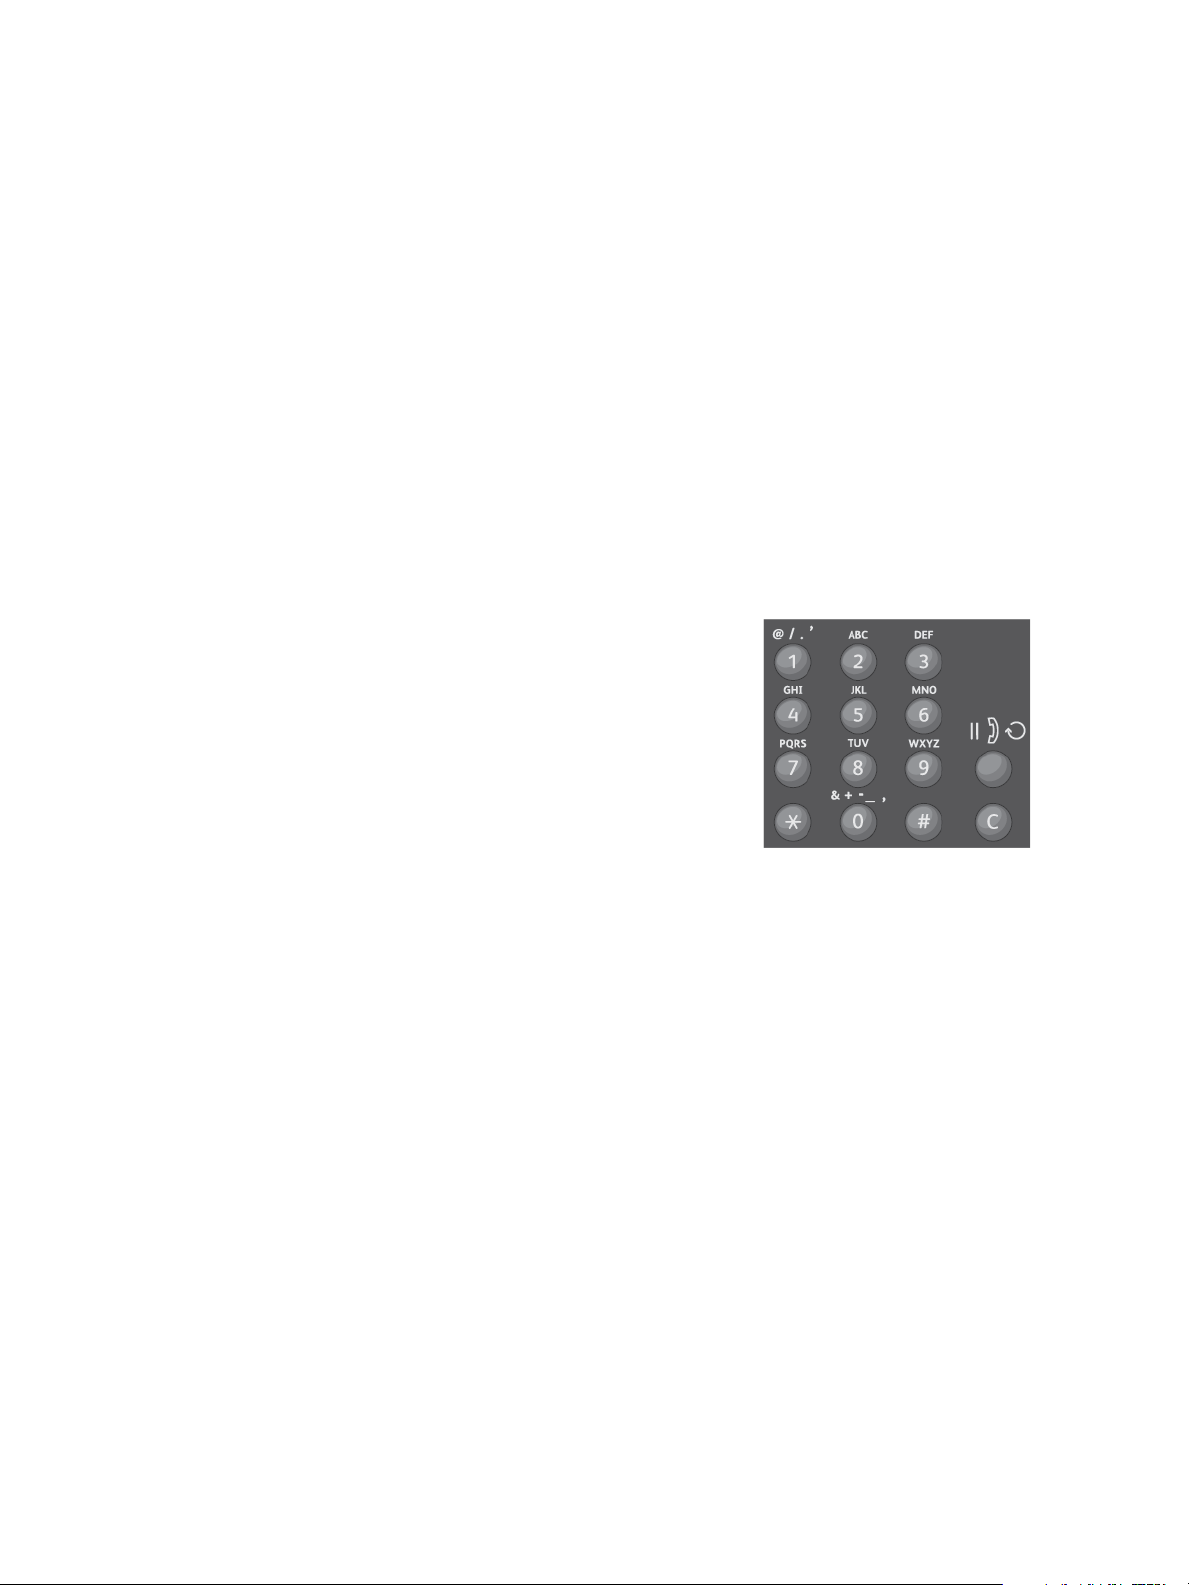
Using the Keypad
As you perform various tasks, you may need to enter names and numbers. For example, when you set
up your machine, you enter your name or your company’s name, and the fax number. When you store
fax numbers or e-mail addresses in memory, you may also enter the corresponding names.
1. When you are prompted to enter a letter, locate the button labeled with the character you want.
Press the button until the correct letter appears on the display.
• For example, to enter the letter O, press 6, labeled with MNO.
• Each time you press 6, the display shows a different letter, M, N, O, m, n, o and finally 6.
2. You can enter special characters, such as @ / . & + -
3. To enter additional letters, repeat step 1. If the next letter is
printed on the same button wait 2 seconds between presses, or
move the cursor by pressing the down arrow and then press the
button again. The cursor will move to the right and the next
letter will appear on the display.
If you make a mistake while entering a number or name, press
the up arrow to delete the last digit or character. Then enter
the correct number or character.
4. When you have finished entering all characters, press OK.
. Refer to Keypad Characters.
Xerox® WorkCentre® 3215/3225
User Guide
9
Page 22

Powering On the Machine
Keypad Characters
Key Assigned Numbers, Letters, or Characters
1@ / . ‘ 1
2A B C a b c 2
3D E F d e f 3
4 G H I g h i 4
5J K L j k l 5
6M N O m n o 6
7P Q R S p q r s 7
8T U V t u v 8
9W X Y Z w x y z 9
0& + - , 0 _
**
##
10
Xerox® WorkCentre® 3215/3225
User Guide
Page 23

Powering On the Machine
Menu Overview
The control panel provides access to various menus. These menus can be accessed by pressing the
appropriate service button, e.g. Copy, Scan, Fax, or E-mail, and the Menu button. The menu options
available are as follows:
Copy Menu Scan Menu Fax M enu E-mail Menu
•Original Size
• Reduce/Enlarge
•2 Sided
• Lighten/Darken
•Original Type
• Collation
•Layout
•Adjust
Background
Suppression
Scan To:
•PC
•WSD
• Lighten/Darken
•Resolution
•Original Size
•Multi Send
•Delay Send
•Priority Send
•Send Forward
• Receive
For ward
• Secure Receive
• Add Page
•Cancel Job
•Original Size
• Original Type
•Resolution
•Output Color
•File Format
•Lighten/Darken
•E-mail
Confirmation
Machine
Status Menu
• Information
Pages
•Feature
Default
•Print Setup
•Fax Setup
•System
Setup
•Network
Note: Some menu options may be unavailable depending on your machine configuration and
whether the machine is in the Ready state. Also, for some services such as fax, additional
selections or setups may be required before the Menu options can be accessed.
Xerox® WorkCentre® 3215/3225
User Guide
11
Page 24

Powering On the Machine
Machine Status Menu
The Machine Status button provides information about the machine and access to the machine
setups. After your machine is installed, it is recommended that you change the settings for various
feature options within the print environment to meet your preferences and needs. A password may be
required to access and change these settings.
The following table shows the available options for each menu item.
Information
Pages
• Configuration
•Demo Page
•Network
Configuration
•Supplies
Information
•Usage Counters
•Fax Received
•Fax Sent
• Scheduled Jobs
•Fax Confirmation
•Junk Fax
•PCL Font
•PS Font
•EPSON Font
Feature
Defaults
•Copy Defaults
•E-mail Defaults
•Fax Defaults
Print Setup Fax Setup System Setup
•Orientation
•2-Sided
•Copies
•Resolution
•Clear Text
•Line
Termination
•Skip Blank
Pages
•Emulation
•Enable/Disable
•Sending
• Receiving
•Manual TX/RX
•Machine Setup
•Paper Setup
• Sound/Volume
• Maintenance
Note: Some menu options may be unavailable depending on your machine configuration and
whether the machine is in the Ready state.
12
Xerox® WorkCentre® 3215/3225
User Guide
Page 25

Powering On the Machine
Network Menu
You may set up the network using the machine's display screen. Before doing that, you must have the
relevant information concerning the type of network protocols and computer system you use. A
password may be required to access and change the Network Setups. See the Installation and Setup
chapter of this guide for information on setting up the network.
Access the Network menu with the Machine Status button. The following options are available on the
Network menu:
• TCP/IP (IPv4)
• TCP/IP (IPv6)
•Ethernet
•802.1x
•Wi-Fi
•Protocol Manager
• Network Configuration
• Clear Settings
Alternatively, you may set up the network using CentreWare Internet Services at Properties > Network
Settings.
Xerox® WorkCentre® 3215/3225
User Guide
13
Page 26

Software
Software
After you have set up your machine and connected it to your computer, you must install the printer
and scanner software. The software required for Windows or Macintosh is supplied on the CD delivered
with your machine, additional software can be downloaded from www.xerox.com. The following
software is available:
CD
Printer
Software
Operating
System
Windows • Printer Driver: Use the printer driver to take full advantage of your
printer’s features. PCL6, Postscript and XPS drivers are provided.
• MFP PC Fax: Use to fax directly from your PC.
• Scanner Driver: TWAIN and Windows Image Acquisition (WIA) drivers
are available for scanning documents on your machine.
• Xerox Easy Document Creator: Used to adjust scan settings and start
the scanning process directly from your computer. The preview window
allows you to view the scan and make adjustments as necessary and
preferred settings can be preserved as favorites and added to a
pre-defined list.
• Xerox Easy Print Manager (EPM): Conveniently combines access to
device settings, printing/scanning environments, settings/actions, Scan
to PC, Fax to PC, and launching applications such as Xerox Scan
Assistant and CentreWare Internet Services in one location.
Note: Login is required to change Printer Settings.
• Wireless Setting Program: When installing the printer you can use the
Wireless Setting program that was automatically installed with the
printer driver to configure the wireless settings.
• SetIP program: A utility program allowing you to select a network
interface and manually configure the addresses for use with the TCP/IP
protocol.
Contents
Printer
Software
14
Linux • Printer Driver: Use this driver to take full advantage of your printer’s
features .
• Scanner Driver: A SANE driver is available for scanning documents on
your machine.
Note: Linux software is available on www.xerox.com only.
Xerox® WorkCentre® 3215/3225
User Guide
Page 27

Software
CD
Printer
Software
Printer
Software
Operating
System
Unix • Printer Driver: Use this driver to take full advantage of your printer’s
features .
Note: Unix software is available at www.xerox.com only.
Macintosh • Printer Driver: Use this driver to take full advantage of your printer’s
features .
• Scanner Driver: A TWAIN driver is available for scanning documents on
your machine.
• SetIP Program: A utility program allowing you to select a network
interface and manually configure the addresses for use with the TCP/IP
protocol.
• Scan and Fax Manager: This utility allows you to configure MFP PC Fax
and Scan settings.
Contents
Xerox® WorkCentre® 3215/3225
User Guide
15
Page 28

Information Pages
Information Pages
This option allows the user to print the following reports:
Report Description
Menu Map Prints the menu map, which shows the layout and current settings of the
machine.
Configuration This report provides information about your machine setup, including
the serial number, IP Address, installed options and the software
version.
Demo Page The demo page is printed to check the quality of the print.
Supplies Information Prints the supplies information page.
Fax Sent This report shows information on the faxes you have recently sent.
Note: The machine prints this report every 50 communications.
Fax Received This report shows information on the faxes you have recently received.
Fax Confirmation This is the report for an individual fax transmission.
Scheduled Jobs This list shows the documents currently stored for delayed faxing along
with the start time and type of each operation.
Junk Fax This list shows the fax numbers specified as junk fax numbers. To add or
delete numbers, access the Junk Fax Setup menu.
Network Configuration This list shows information about your machine’s network connection
and configuration.
PCL Font Prints the PCL font list.
PS Font Prints the PS font list.
EPSON Font Prints the EPSON font list.
Usage Counter This list shows the number of impressions made on the machine. The list
includes:
• Total Impressions
• Black Impressions
• Maintenance Impressions
• Sheets
• 2 Sided Sheets
16
Xerox® WorkCentre® 3215/3225
User Guide
Page 29

Information Pages
Printing reports
Various reports can be printed to provide information about your machine.
1. Select the Machine Status button on the control panel.
2. Press the Up/Down arrows to scroll to the Information Pages menu and select OK.
3. Press the Up/Down arrows until the report you require displays and select OK.
4. Select OK to print the report.
Xerox® WorkCentre® 3215/3225
User Guide
17
Page 30

Feature Defaults
Feature Defaults
Your machine provides default settings for Copy, E-mail, and Fax so that you can quickly and easily
make selections for your job. The default selections can be changed by selecting the Machine Status
button on the control panel and the down arrows to select Feature Defaults. A password may be
required to access and change the System Setup settings.
Note: Some options may be unavailable depending on your machine configuration.
Copy Defaults
The default selections for the Copy options can be set to those most frequently used. When you copy a
document, the default settings are used unless they have been changed for the current job. Once the
current job is complete the settings return to the default settings. A password may be required to
access and change the default settings.
Copy defaults you can set include:
•Original Size
• Reduce/Enlarge
•2 Sided
• Lighten/Darken
•Original Type
• Collation
•Layout
• Adjust Background Suppression
E-mail Defaults
The default selections for the e-mail options can be set to those most frequently used. When you
e-mail a document, the default settings are used unless they have been changed for the current job.
Once the current job is complete the settings return to the default settings. A password may be
required to access and change the default settings.
E-mail defaults you can set include:
•Original Size
•Original Type
• Resolution
•Output Color
•File Format
• Lighten/Darken
•E-mail Confirmation
18
Xerox® WorkCentre® 3215/3225
User Guide
Page 31

Feature Defaults
Fax Defaults
Your machine provides you with various user-selectable options for setting up the fax system. You can
change the default settings for your preferences and needs. Receiving and Sending settings can be
customized. A password may be required to access and change the Fax Setup settings.
Fax defaults you can set include:
• Lighten/Darken
• Resolution
•Original Size
•Multi Send
•Delay Send
•Priority Send
• Send Forward
• Receive Forward
• Secure Receive
• Add Page
•Cancel Job
Configuration Report
The Configuration Report lists printer information such as default settings, installed options, network
settings including IP address, and font settings. Use the information on the configuration page to help
you configure network settings for your printer, and to view page counts and system settings.
Printing a Configuration Report
1. At the printer control panel, press the Machine Status button.
2. Press the Up/Down arrows to display Information Pages, then press OK.
3. Press the Up/Down arrows to display Configuration Page, then press OK.
4. Press OK.
Note: IPv4 and IPv6 address information is located in the Network Setup section of the
Configuration Report under TCP/IP.
Xerox® CentreWare® Internet Services
Xerox® CentreWare® Internet Services is the administration and configuration software installed on the
embedded Web server in the printer. It allows you to configure and administer the printer from a Web
browser.
®
Xerox
• A TCP/IP connection between the printer and the network in Windows, Macintosh, Unix, or Linux
• TCP/IP and HTTP enabled in the printer.
• A network-connected computer with a Web browser that supports JavaScript.
CentreWare® Internet Services requires:
environments.
Xerox® WorkCentre® 3215/3225
User Guide
19
Page 32

Feature Defaults
Accessing Xerox® CentreWare® Internet Services
At your computer, open a Web browser, and in the address field, type the IP address of the printer, then
press Enter or Return.
20
Xerox® WorkCentre® 3215/3225
User Guide
Page 33

Accessing the Printer
Accessing the Printer
The system administrator can set access rights on the printer to ensure that unauthorized users cannot
access the printer. If the system administrator configures authentication and authorization, users
require a login and password to access some or all of the features of the printer. The administrator can
also configure accounting to require an accounting code to access tracked features.
Logging In
Logging in is the process by which you identify yourself to the printer for authentication. If
authentication is set, to access printer features, you log in with your user credentials.
®
Logging In to Xerox
When Administrator Mode is enabled, the Jobs, Address Book, Properties, and Support tabs are locked
until you enter the administrator user name and password.
To log in to Xerox
1. At your computer, open a Web browser, and in the address field, type the IP address of the printer,
then press Enter or Return.
2. Click Login at the top of the window.
3. Type the administrator user name.
4. Type the password, then type the password again to verify.
5. Click Status, Print, Address Book, Properties, or Support.
CentreWare® Internet Services
®
CentreWare® Internet Services as the administrator:
Logging In at the Control Panel
1. At the printer control panel, press the Machine Status button.
2. Use the Up/Down arrow buttons to navigate to the Machine Status option you want and press
OK.
3. Enter your administrator password using the keypad.
4. Press OK.
Xerox® WorkCentre® 3215/3225
User Guide
21
Page 34

More Information
More Information
You can obtain more information about your printer from these sources:
Resource Location
Other printer documentation www.xerox.com/office/WC3215docs
www.xerox.com/office/WC3225docs
Technical support information for
your printer, including online
technical support and driver
downloads
Demo page The demo page is printed to check the quality of the print.
Information pages
®
Xerox
CentreWare® Internet
Services documentation
Order supplies for your printer www.xerox.com/office/WC3215supplies
Tools and information, including
interactive tutorials, printing
templates, helpful tips, and
customized features to meet your
individual needs
Local sales and support center www.xerox.com/office/worldcontacts
Printer registration www.xerox.com/office/register
®
Xerox
Direct online store
www.xerox.com/office/WC3215support
www.xerox.com/office/WC3225support
Print from the control panel, or from Xerox
Services, select Status > Print Information.
In Xerox® CentreWare® Internet Services, click Help.
www.xerox.com/office/WC3225supplies
www.xerox.com/office/businessresourcecenter
www.direct.xerox.com/
®
CentreWare® Internet
Management Information Base
(MIB)
22
Xerox® WorkCentre® 3215/3225
User Guide
A MIB is a database of objects that can be accessed by a network
management system.
Xerox public MIBs are located at:
http://origin-download.support.xerox.com/pub/drivers/MIBs/
Customers can download the MIBs and use their SNMP tool to obtain
the required information.
Note: All information presented on the local UI display is also presented
in the MIB and CentreWare Internet Services. This includes e-mail
addresses, phone numbers, and passwords as they are being entered. If
this presents a security concern, Xerox recommends enabling the
SNMPv3 and the IP Filtering security feature in order to control remote
access to the device.
Page 35

Further Assistance
Further Assistance
For any additional help visit our customer Web site at www.xerox.com or contact the Xerox Support
Center quoting the machine serial number.
Xerox Support Center
If a fault cannot be resolved by following the display instructions, check the Troubleshooting chapter of
this guide for information. If the difficulty persists, contact the Xerox Support Center. The Xerox
Support Center will want to know the nature of the problem, the machine serial number, the fault code
(if any) plus the name and location of your company.
The Machine Serial Number can be found on the Configuration Report under ‘Device Profile’. The serial
number is also located on the data plate on the rear cover of the device.
Documentation
Most answers to your questions will be provided by this User Guide. Alternatively you can access
www.xerox.com/support for additional support and for the following documents:
• Install Guide - contains information about installing the machine.
• Quick Use Guide - provides basic information on how to use the machine.
Xerox® WorkCentre® 3215/3225
User Guide
23
Page 36

Further Assistance
24
Xerox® WorkCentre® 3215/3225
User Guide
Page 37

Installation and Setup
This chapter includes:
• Overview
• Installation Wizard
• CentreWare Internet Services
• Network Installation: TCP/IP
• Network Installation: Unix
• Printer Drivers
• Windows Drivers
• Macintosh Drivers
• Linux Drivers
• Unix Drivers
• Sharing Your Machine Locally
• Windows Printing
• Air Print
• Google Cloud Print
• Scan to PC Setup
• Fax Setup
•E-mail Setup
2
Xerox® WorkCentre® 3215/3225
User Guide
25
Page 38

Overview
Overview
This chapter identifies the key settings that you can customize to meet your requirements. Changing
these settings is easy and will save you time when using the machine.
Note: Some options may be unavailable depending on your machine configuration.
26
Xerox® WorkCentre® 3215/3225
User Guide
Page 39

Installation Wizard
Installation Wizard
1. On initial power on the Installation Wizard runs, the Language menu displays.
2. Press the up/down arrows to select the required language and press OK.
3. The Format Date menu displays. Press the up/down arrows to select one of the following and
press OK:
• MM/DD/YYYY
• DD/MM/YYYY
• YYYY/MM/DD
4. The Set Date menu displays.
a. Press the buttons on the keypad to enter the date or press the up/down arrows to increase or
decrease the value shown on the screen.
b. Press the up/down arrows to move from one section of the date to another.
c. When you have entered the date press OK.
5. The Format Time menu displays. Press the up/down arrows to select one of the following and
press OK:
• 12 Hour
• 24 Hour
6. The Set Time menu displays. Press the buttons on the control panel to enter the time and press
OK.
7. The Metric Defaults menu displays. Press the up/down arrows to select one of the following and
press OK:
• Inches
• mm
8. The Default Paper Size menu displays. Press the up/down arrows to select one of the following
and press OK:
• Letter
• A4
9. The Allow Upgrade menu displays. Select Yes or No and press OK.
10. The Admin Passcode menu displays. Select Yes or No and press OK. If you select Yes, enter a
value on the SetAdminPasscode menu and CfmAdminPasscode menu.
11. The Customer Support menu displays.
a. Press the up/down arrows to select Enter Cust. Support #.
b. The Enter Cust. Support # screen displays. Enter the telephone number of your customer
support center.
c. Press OK.
d. The
e. Enter the telephone number to order supplies.
f. Press OK. The Fax Setup menu displays.
g. Press the up/down arrows to select one of the following and press OK:
• Continue Setup
Enter Supplies Order # screen displays.
Xerox® WorkCentre® 3215/3225
User Guide
27
Page 40

Installation Wizard
• Skip Setup - go to step 15
12. The Fax Phone Num menu displays. Enter the fax number of the machine and press OK.
13. The Fax ID menu displays. Enter the fax id of the machine and press OK.
14. The Country menu displays. Press the up/down arrows to select the required country and press
OK.
15. The Complete Set Up menu displays. Press the up/down arrows to select Yes or No and press OK.
16. The machine reboots and the Initializing screen displays.
Administrator Access
Certain features accessed at the machine may require Administrator access to change the settings.
Access to the Feature Defaults, System Setup and Network Settings areas are usually password
protected.
1. Press the Machine Status button on the control panel.
2. Press the up/down arrows to select the required option.
3. Press OK.
4. If required, enter the Administrator Password using the alphanumerical keypad. The default is
1111.
5. Press OK. Once the password is verified, the selected option menu displays.
Wireless Connectivity (WorkCentre 3215NI and 3225DNI)
The WorkCentre 3215NI and WorkCentre 3225 DNI are compatible with 802.11 (Wi-Fi®) wireless
networks. The location where the machine is installed must be covered by an 802.11 wireless network.
This is typically provided by a nearby wireless access point or router, which is physically connected to
the wired Ethernet that serves the building.
The machine supports connectivity via a wireless only connection if required. The machine will
automatically configure wireless networking when powered on.
Note The machine will not connect to the wireless network while the network cable is attached.
There are several ways to configure Wireless Connectivity:
• At the machine. For instructions refer to Configure Wireless Connectivity at the Machine.
•Using CentreWare Internet Services. For instructions refer to Configure Wireless
Connectivity Using CentreWare Internet Services.
•With the Wireless Setting Program. For instructions refer to Wireless Setting Program.
Note: Performing the driver installation at this time may aid wireless setup. Refer to Printer Drivers.
Configure Wireless Connectivity at the Machine
1. Press the Machine Status button.
2. Press the up/down arrows to select Network and press OK.
3. Enter the Administrator Password using the alphanumerical keypad. The default is 1111.
28
Xerox® WorkCentre® 3215/3225
User Guide
Page 41

Installation Wizard
4. Press the up/down arrows to select Wi-Fi and press OK. This allows you to select the Wi-Fi setup.
The options are:
•Wi-Fi On/Off - allows you to turn Wi-Fi On or Off.
• Wi-Fi Settings - allows you to use a Wizard to find the wireless network name automatically,
or use the Custom feature to enter the SSID (Service Set Identifier) information manually.
• WPS - allows you to select the Wi-Fi Protected Setup - the options are PBC or PIN.
• Wi-Fi Direct - allows you to enable your wireless devices, such as notebooks, mobile phones
and PCs to establish wireless connectivity without the need for a wireless router, access point,
or Wi-Fi hot spots.
• Wi-Fi Signal - allows you view the strength of the wireless connection.
• Wi-Fi Default - allows you to restore the default wireless settings.
5. At the Wi-Fi On/Off menu, confirm that On is selected and press OK.
6. Press the up/down arrows to select Wi-Fi Settings and press OK. The options are Wizard and
Custom:
a. Select Wizard - to have the machine find the WPS Settings automatically. If you select this,
the Searching Wi-Fi Network screen displays and the machine searches the wireless network.
• Select your wireless network and select OK.
• Enter the wireless security information if requested and select OK.
• Select Yes to apply the changes.
b. Select Custom - to edit the SSID information manually. If you select this option, the SSID
screen displays.
• Enter the SSID using the keypad and select OK.
• Select the Operation Mode and select OK.
• Select the Encryption and select OK.
• Select the WPA Key and select OK.
• Select Yes to apply the changes.
7. At the WPS menu, select PBC or PIN.
8. At the Wi-Fi Direct menu, select On or Off, Device Name, IP Address, Group Owner, Network
Key, and Status.
9. At the Wi-Fi Signal menu, check to see if there is a Wi-Fi signal.
10. At the Wi-Fi Default menu, select Restore if you want to restore defaults.
Xerox® WorkCentre® 3215/3225
User Guide
29
Page 42

Installation Wizard
Configure Ethernet Settings
The Ethernet interface will automatically detect the speed of your network. The machine supports
hub/switch speeds of:
•Automatic
• 10 Mbps Full-Duplex
• 100 Mbps Full-Duplex
• 10 Mbps Half-Duplex
•100 Mbps Half-Duplex
Set the Ethernet speed on the machine to match the speed set on your hub or switch.
Setting the Ethernet Speed at the Machine
1. Press the Machine Status button.
2. Press the up/down arrows to select Network and press OK.
3. Enter the Administrator Password using the alphanumerical keypad. The default is 1111.
4. Press the up/down arrows to select Ethernet and press OK.
5. Press the up/down arrows to select Ethernet Speed and press OK.
6. Press the up/down arrows to select one of the following speeds:
•Automatic
•10 Mbps Half
•10 Mbps Full
•100 Mbps Half
•100 Mbps Full
7. Press OK. The Saved screen displays.
To set the Ethernet Speed using CentreWare Internet Services, refer to Setting the Ethernet Speed
Using CentreWare Internet Services.
Configuration Report
The Configuration Report details the machine software versions and network settings configured for
the machine.
Print a Configuration Report at the Machine
1. Press the Machine Status button.
2. Press the up/down arrows to select Information Pages and press OK.
3. Press the up/down arrows to select Configuration Page and press OK.
4. Press the up/down arrows to select Ye s and press OK. The Printing screen displays and the
configuration report prints.
30
Xerox® WorkCentre® 3215/3225
User Guide
Page 43

CentreWare® Internet Services
CentreWare® Internet Services
CentreWare Internet Services (Internet Services) is the embedded HTTP server application that resides
in the machine. CentreWare Internet Services allows an administrator to change network and system
settings on the machine from the convenience of their workstation.
Many features available on your machine will need to be set via the machine and CentreWare Internet
Services.
System Configuration
To use CentreWare Internet Services, you need to enable both TCP/IP and HTTP on the machine. See
Configure Static IPv4 Addressing using the Machine User Interface, or Configure Dynamic IPv4
Addressing using the Machine User Interface.
To enable HTTP at the machine:
Note HTTP is enabled by default.
1. Press the Machine Status button.
2. Use the up/down arrows to select Network.
3. Use the up/down arrows to select Protocol Mgr.
4. Use the up/down arrows to select HTTP.
5. Select On.
6. Press OK. The Saved screen will appear and then the Reboot Required screen will appear.
Administrator User Name and Password
Many of the features available within CentreWare Internet Services will require an Administrator user
name and password. The default user name is admin and the default password is 1111.
CentreWare Internet Services Administrator Access
To access CentreWare Internet Services Properties and change settings you will need to log in as
Administrator.
1. At your workstation, open the web browser and enter the IP Address of the machine in the
Address Bar.
2. Press Enter. The Home page appears.
There are two ways to access CentreWare Internet Services with the administrator login:
• Select Login at the top of the screen or
• Select the Properties icon. You are then prompted for the ID and Password.
3. Enter the admin for the ID and 1111 for the Password.
Xerox® WorkCentre® 3215/3225
User Guide
31
Page 44

CentreWare® Internet Services
Change the Administrator Password
It is recommended that you change the default administrator password to a more secure password, so
this Xerox machine is not compromised.
To change the Administrator password:
1. At your workstation, open the web browser and enter the IP Address of the machine in the
Address Bar.
2. Press Enter.
3. Select the Properties icon.
4. If prompted, enter the admin for the ID and 1111 for the Password, and select Login. Select
Properties.
5. In the Security link on the left hand side, select System Security.
6. Select the System Administrator link.
7. In the Access Control area:
a. Ensure Web UI Access Control Enable check box is selected.
b. In the Login ID field, enter a new login name.
c. Select the Change password box to change the password. In the Password field, enter a new
numeric password.
d. Enter the password again in the Confirm Password field.
CAUTION: Do not forget the password or you could be completely locked out of the system,
requiring a service call.
8. Select Apply to save the changes.
9. Select OK when the acknowledgement message displays.
10. Select the Advanced button. The Advanced Access Control screen appears.
11. Select Protect Login IPv4 Address to enable this feature if required, and enter an IPv4 Address in
the box.
12. Select the required option for the Login Failure Policy, for users who fail to login several times. The
options are: Off, 3 times or 5 times.
13. Select the required option for Auto Logout. The options are 5, 10, 15 or 30 minutes.
14. Select Security Settings Reset if required.
15. Select Save to save your changes.
Configuring Wireless Connectivity Using CentreWare Internet Services (WorkCentre 3215NI and 3225DNI)
Note The machine will not connect to the wireless network while the network cable is attached.
1. At your workstation, open the web browser and enter the IP Address of the machine in the
Address Bar.
2. Press Enter.
3. Select Properties.
32
Xerox® WorkCentre® 3215/3225
User Guide
Page 45

CentreWare® Internet Services
4. If prompted, enter the admin for the ID and 1111 for the Password, and select Login. Select
Properties.
5. In the Network Settings link, select the Wi-Fi link. Then select the Wi-Fi link below that.
6. The Connection Status shows the Link Status of the wireless connection.
7. The Wireless Settings area provides options to configure wireless connectivity. The options are
Easy Wireless Settings and Advanced Settings, and are explained below.
Use the Easy Wireless Settings Wizard
1. Select the Easy Wi-Fi Settings Wizard button to have the machine find the WPS Settings
automatically. The SSID screen appears with a list of available wireless networks.
2. Select the required Network Name SSID and select Next.
3. If encryption is required:
a. Enter the WPA Shared Key.
b. Enter the Confirm Network Key and select Next.
4. The Wireless Setup Confirmation screen displays. Select Apply.
Configure Advanced Wireless Settings
1. Select the Advanced Settings Custom button. The Advanced Wireless Setup screen appears.
2. To enable Wireless Radio, select On from the Wireless Radio menu.
3. Select the required option for SSID:
• Select Search List and select the required network from the drop-down menu. Select the
Refresh button to update the list of networks available.
• Select Insert New SSID to enter a new wireless network name.
4. In the Security Setup area:
a. Select the required method of Authentication.
b. Select the required method of Encryption.
5. Depending on your selections you may be required to enter some or all of the following
information for the Network Key Setup.
a. Select the required option for Using Key.
b. The Hexadecimal option may be enabled. Select the Hexadecimal check box to deselect if
required.
c. Enter the required Network Key and Confirm Network Key.
6. Depending on your selections you may be required to enter 802.1x Security Setup information.
7. Select Apply to save the changes.
Configuring Wi-Fi Direct
TM
at the machine
Refer to Configure Wireless Connectivity at the Machine.
Xerox® WorkCentre® 3215/3225
User Guide
33
Page 46

CentreWare® Internet Services
Configuring Wi-Fi Direct
Wi-Fi Direct
TM
allows you to enable your wireless devices, such as notebooks, mobile phones and PCs to
TM
using CentreWare Internet Services
establish wireless connectivity without the need for a wireless router, access point, or Wi-Fi hot spots.
1. At your workstation, open the web browser and enter the IP Address of the machine in the
Address Bar.
2. Press Enter.
3. Select Properties.
4. If prompted, enter the admin for the ID and 1111 for the Password, and select Login. Select
Properties.
5. In the Network Settings link, select the Wi-Fi link. Then select the Wi-Fi Direct
TM
6. Select On for Wi-Fi Direct
.
TM
link below that.
7. Enter the following:
•Device Name
• IP Address
• Activate or Deactivate the Group Owner
•Network Key
8. Select Apply and then OK.
Setting the Ethernet Speed Using CentreWare Internet Services
1. At your workstation, open the web browser and enter the IP Address of the machine in the
Address Bar.
2. Press Enter.
3. Select Properties.
4. If prompted, enter the Administrator User Name (admin) and Password (1111), and select Login.
Select Properties.
5. In the Network Settings link select the General link.
6. Select one of the following speeds from the Ethernet Speed drop-down menu:
• Automatic
• 10 Mbps (Half Duplex)
• 10 Mbps (Full Duplex)
• 100 Mbps (Half Duplex)
• 100 Mbps (Full Duplex)
7. Select on Apply to save the changes.
The change to Ethernet Speed rate will take effect after System Reboot screen appears.
8. Select OK.
9. When the Acknowledgement screen displays, select OK.
10. Reboot the machine.
34
Xerox® WorkCentre® 3215/3225
User Guide
Page 47

CentreWare® Internet Services
Adjusting the Altitude
Print quality is affected by atmospheric pressure, which is determined by the height of the machine
above sea level. The following information will guide you on how to set your machine for the best print
quality.
Before you set the altitude value, determine the altitude where you are.
Altitude Value
0 - 1000 M
0 - 3,280 ft.
1000 - 2000 M
3,280 - 6,561 ft.
2000 - 3000 M
6,561 - 9,842 ft.
3000 - 4000 M
9,842 - 13,123 ft.
4000 - 5000 M
13,123 - 16,404 ft.
Normal
High 1
High 2
High 3
High 4
1. Enter the IP Address of the printer in the browser.
2. Select Login and enter the ID (admin) and Password (1111).
3. Select Properties > System > Setup.
4. Select an Altitude Adjustment value, based on your altitude in the table above.
5. Select Apply.
Xerox® WorkCentre® 3215/3225
User Guide
35
Page 48

CentreWare® Internet Services
Setting the Toner Low Alert
If the amount of toner in the cartridge is low, a ‘Low toner warning’ message displays on the Display
Screen.
1. Enter the IP Address of the printer in the browser.
2. Select Login and enter the ID (admin) and Password (1111).
3. Select Properties > System > Setup.
4. Set the Ton er L ow A ler t to On.
5. Enter a percentage for the Toner Low Alert Level from 1 - 50%.
6. Select Apply.
Setting E-mail Notifications for Low Toner
1. Enter the IP Address of the printer in the browser.
2. Select Login and enter the ID (admin) and Password (1111).
3. Select Machine Settings > E-mail Notification.
4. Select Enable for E-mail Notification.
5. Select Add.
6. Enter a recipient Name and E-mail Address(es).
7. Select Setting for Consumables.
8. Under Consumable Shortage Warning, select a Tone r Lev e l percentage.
9. Select Enable for To ne r Em p ty, if required.
10. Select a Drum Level percentage for notifications.
11. Select Apply.
36
Xerox® WorkCentre® 3215/3225
User Guide
Page 49

Network Installation: TCP/IP
Network Installation: TCP/IP
This section covers the following topics:
•TCP/IP
These instructions show you how to configure the following via CentreWare Internet Services:
• TCP/IP v4 and v6
•Domain Name
•DNS
• Zero Configuration Networking
The machine supports TCP/IP versions 4 and 6. IPv6 can be used instead of or in addition to IPv4.
IPv4 and IPv6 settings can be configured directly at the machine user interface, or remotely, via a web
browser using CentreWare Internet Services. To configure TCP/IP settings using CentreWare Internet
Services, refer to Configure TCP/IP Settings using CentreWare Internet Services.
Configure Static IPv4 Addressing at the Machine
Information Checklist
Before starting ensure that the following items are available and/or the tasks have been performed:
• Existing operational network utilizing the TCP/IP protocol.
• Ensure that the machine is connected to the network.
• Static IP Address for the machine.
• Subnet Mask Address for the machine.
• Gateway Address for the machine.
• Host Name for the machine.
Procedure
Enter a Static IP Address:
1. Press the Machine Status button on the control panel.
2. Press the up/down arrows to select Network and press OK.
3. Enter the Administrator Password using the alphanumerical keypad. The default is 1111.
4. Press the OK button; the Network Settings menu displays.
5. Press the up/down arrows to select TCP/IP(IPv4); press OK.
6. Press the up/down arrows to select Static; press OK.
7. Press the up/down arrows to select IPv4 Address; press OK.
8. Enter the IP Address using the alphanumerical keypad; press OK.
9. Enter details for Subnet Mask using the alphanumerical keypad; press OK.
10. Enter details for Gateway using the alphanumerical keypad; press OK.
Xerox® WorkCentre® 3215/3225
User Guide
37
Page 50

Network Installation: TCP/IP
11. The Saved screen will display and return to the Network menu.
DNS Configuration:
12. From the Network menu, press the up/down arrows to select TCP/IP(IPv4); press OK.
13. Press the up/down arrows to select Static; press OK.
14. Press the up/down arrows to select Primary DNS; press OK.
15. Enter details for Primary DNS using the alphanumerical keypad; press OK. The Saved screen will
display and return to the Static menu.
16. Press the up/down arrows to select Secondary DNS; press OK.
17. Enter details for Secondary DNS using the alphanumerical keypad; press OK. The Saved screen
will display and return to the Network menu.
Configure Dynamic IPv4 Addressing at the Machine
Information Checklist
Before starting ensure that the following items are available and/or the tasks have been performed:
• Existing operational network utilizing the TCP/IP protocol.
• DHCP or BOOTP Server should be available on the network.
• Ensure that the machine is connected to the network.
Procedure
Installation via DHCP (Dynamic Host Configuration Protocol)
DHCP is enabled on the machine by default. If the machine is connected to the network, the TCP/IP
information will be configured when the machine is powered on and no further configuration is
required.
• Print a Configuration Report to verify that the information was assigned correctly.
Installation via BOOTP or DHCP
Ensure your machine is connected to the network with Ethernet cabling.
1. Press the Machine Status button on the control panel.
2. Press the up/down arrows to select Network Settings; press OK.
3. Enter the Administrator Password using the alphanumerical keypad. The default is 1111.
4. Press the OK button, the Network Settings menu displays.
5. Press the up/down arrows to select TCP/IP(IPv4); press OK.
6. Press the up/down arrows to select DHCP; press OK.
7. The Saved screen will display and return to the Network Settings menu.
38
Xerox® WorkCentre® 3215/3225
User Guide
Page 51

Network Installation: TCP/IP
Configure TCP/IP Settings Using CentreWare Internet Services
IPv4
1. At your workstation, open the web browser and enter the IP Address of the machine in the
Address Bar.
2. Press Enter.
3. Select Properties.
4. If prompted, enter the Administrator User Name (admin) and Password (1111), and select Login.
Select Properties.
5. In the Network Settings link select TCP/IPv4 from the directory tree. The TCP/IPv4 page displays.
6. In the Assign IPv4 Address menu, select Automatically or Manually.
7. If Manually is selected, in the TCP/IP Settings area enter details of the machine in the following
fields:
a. IPv4 Address
b. Subnet Mask
c. Gateway Address
If Automatically is selected, select BOOTP or DHCP.
Notes:
• If BOOTP or DHCP mode is selected, you cannot change the IP Address, Network Mask,
or Router/Gateway Address. Select Auto IP if required.
• New settings will not be applied until the machine is rebooted. Changing the machine’s
TCP/IP setting may cause you to lose your connection to the machine.
8. In the Domain Name area:
a. Enter a domain name in the Domain Name field.
b. Enter an IP address in the Primary DNS Server and Secondary DNS Server fields.
c. Select the
Note: If your DNS Server does not support dynamic updates there is no need to select Enabled.
9. In the WINS area select the box to enable WINS and enter details in the following fields:
a. Primary WINS Server
b. Secondary WINS Server
10. Select Apply to save the changes.
11. Select OK when the acknowledgement message displays.
Enable box to enable Dynamic DNS Registration if required.
IPv6
1. At your workstation, open the web browser and enter the IP Address of the machine in the
Address Bar.
2. Press Enter.
3. Select Properties.
4. If prompted, enter the Administrator User Name (admin) and Password (1111), and select Login.
Select Properties.
Xerox® WorkCentre® 3215/3225
User Guide
39
Page 52

Network Installation: TCP/IP
5. In the Network Settings link, select TCP/IPv6 from the directory tree.
6. Select the Enable check box to enable IPv6 protocol and select OK.
7. To set a manual address, select Enable Manual Address and enter the address and prefix in the
Address/Prefix area. Information in the Assigned IPv6 Addresses box is automatically
populated.
8. The machine performs auto-address DHCPv6 configuration every time it powers up. This is used
for neighbor discovery and address resolution on the local IPv6 subnet. However, you can choose
to use manual configuration, automatic configuration, or a combination of automatic and
manual configuration.
In the Dynamic Host Configuration Protocol Version 6 (DHCPv6) area, select one of the
following options:
• Use DHCP as directed by a router - this option is fully automatic. The DHCPv6 Address will
be obtained and displayed on the screen.
• Always Enable DHCP - this option is fully automatic. The DHCPv6 Address will be obtained
and displayed on the screen.
• Never use DHCP - when this option is selected, you must configure the Manual Address
Options and DNS separately.
9. In the Domain Name System Version 6 (DNSv6) area:
a. Enter valid details in the IPv6 Domain Name field.
b. Enter an IP addresses for the Primary DNSv6 Server Address and Secondary DNSv6 Server
Address.
c. Check the Dynamic DNSv6 Registration check box to enable this option.
Note: If your DNS Server does not support dynamic updates there is no need to enable DDNS.
10. Select Apply to save the changes.
11. Select OK when the acknowledgement message displays.
Note: Enabling or disabling the TCP/IPv6 protocol will take effect after the system is rebooted.
Enabling or disabling TCP/IPv6 will impact other protocols, for example, LPR/LPD, SNMP, Raw
TCP/ IP Printing, and DHCPv6 over TCP/IPv6.
Tes t Acc e ss
1. At your workstation, open the Web browser and enter the TCP/IP Address of the machine in the
Address bar. Press Enter.
If you use the domain name to specify the machine, use the following format.
http://myhost.example.com
If you use the IP address to specify the machine, use one of the following formats depending on
your machine configuration. An IPv6 address needs to be enclosed in square brackets.
IPv4: http://xxx.xxx.xxx.xxx
IPv6: http://[xxxx:xxxx:xxxx:xxxx:xxxx:xxxx:xxxx:xxxx]
Note: If you have changed the port number from the default port number 80, append the number
to the Internet address as follows. In the following examples, the port number is 8080.
Domain name: http://myhost.example.com:8080
IPv4: http://xxx.xxx.xxx.xxx:8080
40
Xerox® WorkCentre® 3215/3225
User Guide
Page 53

Network Installation: TCP/IP
IPv6: http://[xxxx:xxxx:xxxx:xxxx:xxxx:xxxx:xxxx:xxxx]:8080
2. Verify that the home page of CentreWare Internet Services is displayed.
The CentreWare Internet Services installation process is now completed.
Note: When your access to CentreWare Internet Services is encrypted, enter https:// followed by
the Internet address, instead of http://.
Xerox® WorkCentre® 3215/3225
User Guide
41
Page 54

Network Installation: Unix
Network Installation: Unix
HP-UX Client (Version 10.x)
HP-UX workstations require specific installation steps to communicate with the machine. The machine
is a BSD-style Unix printer, whereas HP-UX is a System V-style Unix.
IMPORTANT: All Unix commands are case sensitive, so enter the commands exactly as they are
written.
Information Checklist
Before starting ensure that the following items are available and/or the tasks have been performed:
• Existing operational network utilizing the TCP/IP protocol.
• Ensure that the machine is connected to the network.
• Static IP Address for the machine.
• Subnet Mask Address for the machine.
• Gateway Address for the machine.
• Host Name for the machine.
Procedure
1. Follow the steps in Configure Static IPv4 Addressing at the Machine, then return to this page.
Configure the Client
2. Add the machine Host Name to the etc/hosts file on the HP-UX workstation.
3. Ensure that you can ping the machine from the HP-UX workstation.
4. Use either the GUI method or the tty methods as detailed below.
GUI Method
1. Open a Command window from the desktop.
2. Enter su to access Super User mode.
3. Enter sam to start the System Administrator Manager (SAM).
4. Select the Printers and Plotters icon.
5. Select lp spooler.
6. Select Printers and Plotters.
7. Select Actions: Add Remote Printer/Plotter.
8. Enter the following information into the Add Remote Printer/Plotter form:
a. Printer Name: printer name.
Where printer name is the name of the queue being created.
b. Remote System Name: hostname.
Where hostname is the machine hostname from the /etc/hosts file.
c. Select Remote Printer is on a BSD System.
42
Xerox® WorkCentre® 3215/3225
User Guide
Page 55

Network Installation: Unix
d. Select OK to complete the form.
9. Select Yes at the Configure HP UX Printers Subpanel screen. This screen may be obscured by the
Add Remote Printer/Plotter form.
10. Select File: Exit.
11. Select File: Exit Sam.
12. Enter Exit to exit Super User mode.
13. Test the queue created, by entering the command:
lp -d queuename /etc/hosts
14. Verify that the job prints at the machine.
tty Method
1. Enter su to access Super User mode.
2. Enter sh to run the Bourne shell.
3. Enter lpshut to stop the print service.
4. Create the print queue by typing (on the same command line):
lpadmin -pqueuename> -v/dev/null -mrmodel -ocmrcmodel -osmrsmodel -ob3 -orc
-ormhostname -orplp
Where queuename is the name of the queue being created and hostname is the machine
hostname.
5. Enter lpsched to start the print service.
6. Enter enable queuename to enable the queue to print to the machine.
7. Enter accept queuename to the queue accepting jobs from the HP-UX workstation.
8. Enter Exit to exit the Bourne shell.
9. Enter Exit to exit Super User mode.
10. Test the queue created, by entering the command:
lp -d queuename /etc/hosts
11. Verify that the job prints at the machine.
Xerox® WorkCentre® 3215/3225
User Guide
43
Page 56

Network Installation: Unix
Solaris 9 and later
Information Checklist
Before starting ensure that the following items are available and/or the tasks have been performed:
• Existing operational network utilizing the TCP/IP protocol.
• Ensure that the machine is connected to the network.
• Static IP Address for the machine.
• Subnet Mask Address for the machine.
• Gateway Address for the machine.
• Host Name for the machine.
Procedure
Follow the steps in Configure Static IPv4 Addressing at the Machine, then return to this page.
Configure the Client
1. Add the machine printer Host Name to the etc/hosts file.
2. Ensure that you can ping the machine.
3. Use either the GUI method or the tty method as detailed below.
GUI Method
1. Open a Command window from the desktop.
2. Enter su to access Super User mode.
3. Enter admintool to run the System Administrator Tool.
4. Select Browse: Printers.
5. Select Edit: Add: Access to Printer.
6. Enter the following information into the Access to Remote Printer form:
a. Printer Name: queuename
Where queuename is the name of the queue being created.
b. Print Server: hostname
Where hostname is the machine hostname from the /etc/hosts file.
c. Select OK to complete the form.
7. Enter sh to run the Bourne shell.
8. Enter the command: lpadmin -p queuename -s hostname !lp to modify the remote queuename
9. Enter Exit to exit the Bourne shell.
10. Enter Exit to exit Super User mode.
11. Test the queue created, by entering the command:
lp -d queuename /etc/hosts
12. Verify that the job prints at the machine.
44
Xerox® WorkCentre® 3215/3225
User Guide
Page 57

tty Method
1. Enter su to access Super User mode.
2. Enter sh to run the Bourne shell.
3. Define the machine as a BSD style printer, by entering the command:
lpsystem -t bsd hostname
Where hostname is the machine hostname from the /etc/hosts file.
4. Create the queue, by entering the command:
lpadmin -p queuename -s hostname -T unknown -I any
where queuename is the name of the queue being created.
5. Enter Exit to exit the Bourne shell.
6. Enter Exit to exit Super User mode.
7. Test the queue created, by entering the command:
lp -d queuename /etc/hosts
8. Verify that the job prints at the machine.
SCO
Network Installation: Unix
SCO Unix workstations require specific installation steps to communicate with the machine. The
machines are BSD-style Unix printers, whereas SCO is a System V-style Unix.
Information Checklist
Before starting ensure that the following items are available and/or the tasks have been performed:
• Existing operational network utilizing the TCP/IP protocol.
• Ensure that the machine is connected to the network.
• Static IP Address for the machine.
• Subnet Mask Address for the machine.
• Gateway Address for the machine.
• Host Name for the machine.
Procedure
Follow the steps in Configure Static IPv4 Addressing at the Machine, then return to this page.
Configure the Client
1. Add the machine printer Host name to the etc/hosts file on the SCO workstation.
2. Ensure that you can ping the machine from the SCO workstation.
Perform the following steps to create a machine print queue on a SCO Unix workstation using
either the GUI or the TTY method.
GUI Method
1. Log in as root.
2. From the main desktop, select the icons System Administration: Printers: Printer Manager.
Xerox® WorkCentre® 3215/3225
User Guide
45
Page 58

Network Installation: Unix
3. Select Printer: Add Remote: Unix.
4. Enter the following information into the Add Remote Unix Printer form:
a. Host: hostname.
Where hostname is the machine Host Name from the /etc/hosts file.
b. Printer: name of the queue being created.
For example: dc xxxq.
c. Select OK to complete the form.
5. Select OK in the Message window.
6. Select Host:Exit.
7. Select File: Close this directory.
8. Select File: Close this directory.
9. Select Save in the Warning Confirmation window.
10. Enter Exit to log out of root account.
11. Open Unix Window.
tty Method
1. Enter su to access Super User mode.
2. Enter rlpconf to create a printer.
3. Enter the following information:
a. Printer Name: queuename
b. Remote Printer: r
c. Hostname: hostname
d. If the information has been entered correctly, enter y
4. Select Enter to accept the default for a non-SCO remote printer.
5. Select Enter to accept the default for non-default printer.
6. Select Enter to start the process for adding a queue.
7. Enter q to quit the rlconf program.
46
Xerox® WorkCentre® 3215/3225
User Guide
Page 59

Network Installation: Linux CUPS
Network Installation: Linux CUPS
Static Addressing
Information Checklist
Before starting ensure that the following item is available and/or the task has been performed:
• Linux operating system that supports printtool.
Procedure
Follow the steps in Configure Static IPv4 Addressing at the Machine, then return to this page.
Create the Print Queue
1. Ensure that the Common Unix Printing System (CUPS) is installed and started on your client.
The latest version of CUPS is available at cups.org.
2. Open the web browser from your workstation.
3. For example, enter http://127.0.0.1:631/printers in the Address Bar.
4. Press Enter.
5. Select Add Printer.
6. The Authorization dialog box displays.
7. Enter the root and the root password.
8. In the Add New Printer screen enter a name for the printer.
9. Enter a location and description for the printer (optional).
10. Select Continue.
11. In the Machine menu, select Internet Printing Protocol.
12. Select Continue.
13. Enter ipp://hostname/ipp/printername
Where hostname is the hostname of the Xerox machine and printername is the printer name of
the Xerox machine.
14. Select Continue.
15. Select Xerox in the Make menu.
16. Select Continue.
17. Select the correct driver in the Driver menu.
18. Select Continue.
19. The Printer Added Successfully message will appear.
Dynamic Addressing
Procedure
Follow the steps in Configure Dynamic IPv4 Addressing at the Machine, then return to this page.
Xerox® WorkCentre® 3215/3225
User Guide
47
Page 60

Network Installation: Linux CUPS
Important: Select BOOTP in step 6.
Create the Print Queue
Follow the steps to Create the Print Queue.
Linux LPR via PrintTool
Static Addressing
Information Checklist
Before starting please ensure that the following item is available and/or the task has been performed:
• Linux operating system that supports PrintTool.
Procedure
1. Follow the steps in Configure Static IPv4 Addressing using the Machine User Interface, then return
to this page.
Create the Print Queue
2. Log in, at the Linux Client, as root in a terminal.
3. Enter printtool.
4. The Red Hat Linux Print System Manager will launch.
5. Select Add.
6. The Add a Printer Entry window displays.
7. Select Remote Unix (lpd) Queue.
8. Select OK.
9. The Edit Remote Unix (lpd) Queue Entry window displays.
10. Enter the name of your Print Queue in the Names area.
11. The Spool directory is the directory where print jobs are stored and is a subdirectory of
/var/spool/lpd. Add the name of the print queue to the end of the subdirectory path.
12. Ensure that the File Limit reads 0.
13. In the Remote Host area, enter the IP Address of the Xerox machine.
14. In the Remote Queue area, enter the Print Queue Name from step 10.
15. Do not select the Input Filter option.
16. Leave the default Suppress Headers selected.
17. Select OK.
18. The printer should now be listed in the Red Hat Linux Print System Manager window. Select the
lpd menu.
19. Select Restart lpd.
20. Select the PrintTool menu.
21. Select Exit to close the program.
48
Xerox® WorkCentre® 3215/3225
User Guide
Page 61

Network Installation: Linux CUPS
22. To allow access to the printer, edit the /etc/hosts table to list the client system.
23. Edit and create the /etc/hosts.lpd file to list the client system.
Dynamic Addressing
Procedure
Follow the steps in Configure Dynamic IPv4 Addressing at the Machine, then return to this page.
Important: Highlight BOOTP in step 6.
Create the Print Queue
Follow the steps to Create the Print Queue.
Linux LPRng
Static Addressing
Information Checklist
Before starting ensure that the following item is available and/or the task has been performed:
• Linux operating system that supports PrintTool.
Procedure
Follow the steps in Configure Static IPv4 Addressing using the Machine User Interface, then return to
this page.
Create the Print Queue
1. Open the LPRngTool from the Linux Client.
2. Select Add.
3. In the Names area, enter a name for your print queue.
4. The spool directory is the directory where print jobs are stored and is a subdirectory of
/var/spool/lpd. Add the name of the print queue to the end of the subdirectory path.
5. In the Hostname/IP of Printer area, enter the hostname or IP Address of the Xerox machine.
6. Select OK.
7. Select Exit to close the program.
8. To allow access to the printer, edit the /etc/hosts table to list the client system.
9. Edit and create the /etc/hosts.lpd file to list the client system.
Xerox® WorkCentre® 3215/3225
User Guide
49
Page 62

Network Installation: Linux CUPS
Dynamic Addressing
Procedure
Follow the steps in Configure Dynamic IPv4 Addressing using the Machine User Interface on page 29,
then return to this page.
Important: Highlight BOOTP in step 6.
• Follow the steps to Create the Print Queue.
50
Xerox® WorkCentre® 3215/3225
User Guide
Page 63

Printer Drivers
Overview
The software and documentation CD is supplied with your machine.
The machine supports the following operating systems:
Platform Operating Systems
Printer Drivers
Windows
Macintosh
Linux Ubuntu 10.04, 10.10, 11.04, 11.10, 12.04, 12.10,
Unix
®
®
®
Windows 7 & 8 (32/64 bit)
Windows Vista (32/64 bit)
Windows XP (32/64 bit)
Windows 2003 Server (32/64 bit)
Windows 2008 Server (32/64 bit)
Windows 2008R2 (64 bit)
Macintosh OS X 10.5 - 10.9
13.04
Red Hat Enterprise Linux 5, 6
Fedora 11 -19
Debian 5.0, 6.0, 7.0, 7.1
Mint 13, 14, 15
SUSE Linux Enterprise Desktop 10, 11
openSUSE 11.0, 11.1, 11.2, 11.3, 11.4, 12.1, 12.2,
12.3
Oracle® Solaris 9, 10, 11 (x86, SPARC)
HP-UX® 11i v1, 11i v2, 11i v3 (PA-RISC, Itanium)
®
IBM
AIX 5.1, 5.2, 5.3, 5.4, 6.1, 7.1 (PowerPC)
Xerox® WorkCentre® 3215/3225
User Guide
51
Page 64

Windows Drivers
Windows Drivers
The Xerox® WorkCentre® 3215/3225 produces high quality prints from electronic documents. You can
access the printer from your computer by installing the appropriate printer driver. To access the many
printer drivers which can be used with your machine, refer to the Drivers CD or download the latest
versions from the Xerox web site at www.xerox.com
Installing Windows Drivers
The following provides an overview of the print procedure and features available when printing using
Windows.
Install Printer Software
You can install the printer software for local printing and network printing. To install the printer
software on the computer, perform the appropriate installation procedure depending on the printer in
use.
.
A printer driver is software that lets your computer communicate with your printer. The procedure to
install drivers may differ depending on the operating system you are using. All applications should be
closed on your PC before beginning installation.
You can install the printer software for a local, networked or wireless printer using the recommended or
custom method.
Local Printer
A local printer is a printer directly attached to your computer using a printer cable, such as a USB cable.
If your printer is attached to a network, refer to Networked Printer.
Note: If the New Hardware Wizard window appears during the installation procedure, select Close
or Cancel.
1. Make sure that the printer is connected to your computer and powered on.
2. Insert the supplied CD-ROM into your CD-ROM drive. The CD-ROM should automatically run, and
an installation window appears.
If the installation window does not appear, select the Start button and then Run. Type
X:\Setup.exe, replacing X with the letter which represents your drive and select OK.
If you use Windows Vista, select Start > All programs > Accessories > Run, and type X:\Setup.exe.
If the AutoPlay window appears in Windows Vista, select Run Setup.exe in the Install or run
program field, and select Continue in the User Account Control window.
3. Select Install Software. A Printer Connection Type window displays.
4. Select USB connection. The Select Software to Install window displays.
5. Leave the default selections and select Next. The Installing Software window displays.
6. After the installation is finished, the Setup Completed window displays.
7. Select Print a test page and select Finish.
52
Xerox® WorkCentre® 3215/3225
User Guide
Page 65

Windows Drivers
If your printer is connected to the computer, a Test Print page will be printed. If the Test Print operation
is successful, refer to the Print chapter of this guide. If the print operation failed, refer to the
Troubleshooting chapter of this guide.
Networked Printer
When you connect your printer to a network, you must first configure the TCP/IP settings for the
printer. After you have assigned and verified the TCP/IP settings, you are ready to install the software
on each computer on the network.
1. Make sure that the printer is connected to your network and powered on.
2. Insert the supplied CD-ROM into your CD-ROM drive.
The CD-ROM should automatically run, and an installation window appears.
If the installation window does not appear, select the Start button and then Run. Type
X:\Setup.exe, replacing X with the letter which represents your drive and select OK.
If you use Windows Vista, select Start > All programs > Accessories > Run, and type X:\Setup.exe.
If the AutoPlay window appears in Windows Vista, select Run Setup.exe in Install or run program
field, and select Continue in the User Account Control window.
3. Select Install Software.
4. Select Network connection and follow the wizard instruction to select and install the printer.
Note: For custom install instructions, refer to Custom Installation.
5. After the installation is finished, select Print a test page and select Finish.
If your printer is connected to the network, a Test Print page will be printed. If the Test Print operation
is successful, refer to the Print chapter of this guide. If the print operation failed, refer to the
Troubleshooting chapter of this guide.
Xerox® WorkCentre® 3215/3225
User Guide
53
Page 66

Windows Drivers
Custom Installation
With the custom installation, you can choose individual components to install.
1. Make sure that the printer is connected to your computer and powered on.
2. Insert the supplied CD-ROM into your CD-ROM drive.
The CD-ROM should automatically run, and an installation window appears. If the installation
window does not appear, select Start and then Run. Type X:\Setup.exe, replacing X with the letter
which represents your drive and select OK.
If you use Windows Vista, select Start > All Programs > Accessories > Run, and type X:\Setup.exe.
Note: If the AutoPlay window appears in Windows Vista, select Run Setup.exe in Install or run
program field, and select Continue in the User Account Control window.
3. Select Install Software.
4. Select your connection type and select Next. The Select Software to Install window displays.
5. Select Custom from the Setup type dropdown box.
6. Select the components to be installed and select Next.
Note: When you select an option, a description of that option displays at the bottom of the
screen.
7. Select Advanced Options if you would like to do any of the following:
• Change the printer name
• Change the default printer
• Share the printer with other users on the network
• Change the destination path where driver files and user guide files will be copied to. Select
Browse to change the path.
8. Select OK to continue, then select Next. The Copying Files window displays, and then the
Installing Software window.
9. After the installation is finished, the Setup Completed window displays.
10. Select Print a test page and select Finish.
If your printer is connected to the computer, a Test Print page will be printed. If the Test Print operation
is successful, refer to the Print chapter of this guide. If the print operation failed, refer to the
Troubleshooting chapter of this guide.
Wireless Printer (WorkCentre 3215NI and WorkCentre 3225DNI)
When you connect your printer to a network, you must first configure the TCP/IP settings for the
printer. After you have assigned and verified the TCP/IP settings, you are ready to install the software
on each computer on the network.
1. Make sure that the printer is connected to your computer with a USB cable and powered on.
2. Insert the supplied CD-ROM into your CD-ROM drive. The CD-ROM should automatically run, and
an installation window appears.
If the installation window does not appear, select the Start button and then Run. Type
X:\Setup.exe, replacing X with the letter which represents your drive and select OK.
54
Xerox® WorkCentre® 3215/3225
User Guide
Page 67

Windows Drivers
If you use Windows Vista, select Start > All programs > Accessories > Run, and type X:\Setup.exe.
If the AutoPlay window appears in Windows Vista, select Run Setup.exe in Install or run program
field, and select Continue in the User Account Control window.
3. Select Install Software. A Printer Connection Type window displays.
4. Select Wireless network connection.
5. When asked if you are setting up the printer for the first time, select Yes, I will set up my printer’s
wireless network and select Next.
6. Select your wireless network from the list and select Next.
7. Select Advanced Settings to set the following:
8. Select Next.
9. Follow the wizard instruction to select and install the printer. Select your connection type and
select Next. The Select Software to Install window displays.
10. After the installation is finished, the Setup Complete page will display. Select Print a test page
and select Finish.
If your printer is connected to the network, a Test Print page prints. If the Test Print operation is
successful, refer to the Print chapter of this guide. If the print operation failed, refer to the
Troubleshooting chapter of this guide.
Wireless Setting Program
When installing the WorkCentre 3215NI and WorkCentre 3225DNI, you can use the Xerox Easy
Wireless Setup program that was automatically installed with the printer driver to configure the
wireless settings.
To open the program:
1. Select Start > Programs or All Programs > Xerox Printers > [Xerox WorkCentre 3215 or 3225]>
Xerox Easy Wireless Setup.
2. Connect the machine to your computer using the USB cable.
Note: During installation, the printer needs to be temporarily connected using the USB cable.
Note: You cannot use your printer on a wired and wireless network at the same time. If your
printer is currently connected to the network with an Ethernet cable, unplug the cable.
3. Select Next.
4. Once the machine is connected to the computer with the USB cable, the program searches for
WLAN data.
5. When the search is complete, the Select Wireless Network window displays. Select your network
from the list.
6. Select Advanced Setting if you want to enter the following information:
7. Select Next. The Wireless Network Security screen displays.
8. Enter your Network Password and select Next.
9. When the Wireless Network Setup Complete page displays, select Finish.
Xerox® WorkCentre® 3215/3225
User Guide
55
Page 68

Windows Drivers
Uninstalling a Windows driver
For Windows follow the steps below to uninstall the driver:
1. Make sure that the machine is connected to your computer and powered on.
2. From the Start menu, select Programs or All Programs > Xerox Printers > Uninstall Xerox Printer
Software. The Uninstall Xerox Printer Software window displays.
3. Select Next. The Select Software window displays.
4. Select the components you want to remove and then select Next and then Ye s to confirm.
5. When your computer asks you to confirm your selection, select Yes. The Uninstallation window
displays.
6. After the software is removed, select Finish.
If you want to reinstall the driver over the currently installed driver via the provided software and
documentation CD, insert the CD; the window with an overwriting confirmation message appears.
Simply confirm it to proceed to the next step. Next steps are same as the first installation you
performed.
56
Xerox® WorkCentre® 3215/3225
User Guide
Page 69

Macintosh Drivers
Macintosh Drivers
The software and documentation CD that came with your machine provides you with the printer driver
files that allow you to use the CUPS driver or PostScript driver (only available when you use a machine
which supports the PostScript driver) for printing on a Macintosh computer.
A TWAIN driver is also provided for scanning on a Macintosh computer.
Information Checklist
Before starting please ensure that the following item is available and/or the task has been performed:
• Make sure that the machine is connected to your computer and powered on.
Procedure
These steps were performed using Macintosh version 10.8.5. Instructions may vary depending on your
operating system version.
1. Insert the supplied software and documentation CD into your CD-ROM drive.
2. Select the CD-ROM icon that appears on your Macintosh desktop.
3. Select the MAC_Installer folder.
4. Select the Installer icon.
5. The Install window opens. Select Continue.
6. Select Install.
Standard Install is the default and is recommended for most users. All components necessary for
machine operations are installed.
If you select Customize, you can choose individual components to install.
7. Enter your password and select Install Software.
8. Select how the printer will be connected to your computer. Choices are:
• USB Connected Printer
• Network Connected Printer
• Configuration of Wireless Network
9. Select Continue.
10. Select Add Printer and select Continue and follow the instructions on the installation wizard.
11. Select the options you want to add, such as Fax.
12. Select the Add Easy Printer Manager to Dock option if required.
13. After the installation is complete, select Close.
14. Select the Applications folder > System Preferences > Print & Scan.
15. Select the + sign on the Printer list and select the printer or enter the IP Address for the printer.
16. Select Add.
Xerox® WorkCentre® 3215/3225
User Guide
57
Page 70

Macintosh Drivers
Uninstalling a Macintosh Driver
If the printer driver does not work properly, uninstall the driver and reinstall it. Follow the steps below to
uninstall the driver for Macintosh.
1. Make sure that the machine is connected to your computer and powered on.
2. Select the Applications folder.
3. Select the Xerox folder.
4. Select Printer Software Uninstaller.
5. Select the programs you want to uninstall and select Uninstall.
6. Enter your password.
7. Select Close.
58
Xerox® WorkCentre® 3215/3225
User Guide
Page 71

Linux Drivers
Linux Drivers
You need to download the Linux software package from the Xerox website to install the printer
software.
Procedure for Installing the Linux Unified Driver
1. Make sure that the machine is connected to your computer and powered on.
You must log in as a super user (root) to install the machine software. If you are not a super user,
ask your system administrator.
2. When the Administrator Login window appears, type in root in the Login field and enter the
system password.
3. From the Xerox web site, download the Unified Linux Driver package to your computer.
4. Select the Unified Linux Driver package and extract the package.
5. Select cdroot > autorun.
6. When the Welcome screen appears, select Next.
7. When the installation is complete, select Finish.
The installation program has added the Unified Driver Configuration desktop icon and the Unified
Driver group to the system menu for your convenience. If you have any difficulties, consult the
on-screen help that is available through your system menu or called from the driver package Windows
applications, such as Unified Driver Configurator or Image Manager.
Xerox® WorkCentre® 3215/3225
User Guide
59
Page 72

Unix Drivers
Unix Drivers
Unix printer drivers are located on the software and documentation CD delivered with your machine.
To use the Unix printer driver, you need to install the Unix printer driver package first, then set up the
printer. The installation procedure is common for all variants of Unix OS mentioned.
Procedure for Installing the Unix Driver Package
1. Make sure that the machine is connected to your computer and powered on.
2. Acquire root privileges.
su -
3. Copy the appropriate driver archive to the target Unix computer.
4. Unpack the Unix printer driver package name.
For example, on IBM AIX, use the following command:
gzip -d < package archive name | tar xf -
The binaries folder consists of binz, install, share files and folders.
5. Change to the driver’s binaries directory.
For example, on IBM AIX,
cd aix_power/binaries
6. Run the install script.
./install
Install is the installer script file which is used to install or uninstall the Unix Printer Driver package.
Use chmod 755 install command to give the permission to the installer script.
7. Execute the ./install-c command to verify installation results.
8. Run installprinter from the command line. This will bring up the Add Printer Wizard window.
Follow the procedures in Setting up the printer.
Note On some Unix OS, for example on Solaris 10, printers recently installed may not be enabled
and/or may not accept jobs. In this case run the following two commands on the root terminal:
accept <printer_name>
enable <printer_name>
Setting Up the Printer
To add the printer to your Unix system, run installprinter from the command line. This will bring up the
Add Printer Wizard window. Setup the printer in this window according to the following steps.
1. Type the name of the printer.
2. Select the appropriate printer model from the model list.
3. Enter any description corresponding to the type of printer in the Type field. This is optional.
4. Specify any printer description in the Description field. This is optional.
5. Specify the printer location in the Location field.
60
Xerox® WorkCentre® 3215/3225
User Guide
Page 73

Unix Drivers
6. Type the IP address or DNS name of the printer in the Device text box for network connected
printers. On IBM AIX with jetdirect Queue type, only the DNS name is possible. It is not possible
to enter a numeric IP address.
7. Queue type shows the connection as lpd or jetdirect in the corresponding list box. Additionally
usb type is available on Sun Solaris OS.
8. Select Copies to set the number of copies.
9. Check the Collate option to receive copies already sorted.
10. Check the Reverse Order option to receive copies in the reverse order.
11. Check the Make Default option to set this printer as default.
12. Select OK to add the printer.
Uninstalling the Printer Driver Package
Note The utility should be used if you need to delete a printer installed on the system.
1. Run the uninstallprinter command from the terminal. The Uninstall Printer Wizard opens and the
installed printers are n the drop-down list.
2. Select the printer to be deleted.
3. Select Delete to delete the printer from the system.
4. Execute the ./install-d command to uninstall the whole package.
5. To verify removal results, execute the ./install-c command.
6. To re-install it, use the command ./install to reinstall the binaries.
Xerox® WorkCentre® 3215/3225
User Guide
61
Page 74

Sharing Your Machine Locally
Sharing Your Machine Locally
If a host computer is directly connected to the machine with a USB cable and is also connected to the
local network environment, the client computer connected to the local network can use the shared
machine through the host computer to print.
Follow the steps below to set up the computers to share your machine locally.
Windows
Host Computer Setup
1. Install your printer driver. Refer to Printer Drivers.
2. Depending on your operating system, navigate to the Printers, Printers and Faxes, or Devices
and Printers settings from the Windows Start menu or through the control panel.
3. Select your printer icon and select Printer Properties.
Note If the Printer properties item has a ?, you can select other printer drivers connected with the
selected printer.
4. Select the Sharing tab.
5. Check the Change Sharing Options check box.
6. Check the Share this printer check box.
7. Enter details in the Share Name field.
8. Select OK or Next.
Client Computer Setup
1. Install your printer driver. Refer to Printer Drivers.
2. From the Windows Start menu select All programs > Accessories > Windows Explorer.
3. Enter the IP address of the host computer and press Enter.
4. If the host computer requires a User name and Password, enter details in the User ID and
password field of the host computer account.
5. Select the printer you want to share and select Connect.
If a setup complete message appears, select OK.
6. Open the file you want to print and start printing.
62
Xerox® WorkCentre® 3215/3225
User Guide
Page 75

Sharing Your Machine Locally
Macintosh
The following steps are for Macintosh OS X 10.8.5. Refer to Macintosh Help for other OS versions.
Host Computer Setup
1. Install your printer driver. Refer to Installing Macintosh driver.
2. Open the Applications folder, select System Preferences.
3. Select Print & Fax or Print & Scan.
4. Select the printer to share in the Printers list.
5. Select Share this printer.
Client Computer Setup
1. Install your printer driver. Refer to Installing Macintosh driver.
2. Open the Applications folder, select System Preferences.
3. Select Print & Fax or Print & Scan.
4. Select Add or the + symbol.
A display window showing the name of your shared printer displays.
5. Select your machine and select Add.
Xerox® WorkCentre® 3215/3225
User Guide
63
Page 76

Windows Printing
Windows Printing
LPR Printing
Ensure Print Services for Unix is Enabled
Follow the relevant steps below that are specific to your operating system:
Windows 2003
1. From the desktop, select the My Network Places icon and select Properties.
2. Select the Local Area Connection icon and select Properties.
3. Verify that the Internet Protocol (TCP/IP) protocol has been loaded. If this software is not present,
install it using the documentation provided by Microsoft. When you are finished, return to this
page.
4. Verify that Print Services for Unix is loaded:
a. Select Start > Settings > Control Panel.
b. Select the Add/Remove Programs icon.
c. Select Add/Remove Win Components in the far left column.
d. Select Other Network File > Print Services.
e. Select Details.
f. Check the Print Services for Unix check box. If Print Services for Unix is not installed, refer to
instructions from Microsoft to install this service. When you are finished, return to this page.
5. Select the OK button.
6. Select the Next button.
7. Select the Finish button.
8. Close the Add/Remove Programs window.
Windows Vista
1. Select Start > Control Panel > Program and select Programs and Features.
2. Select Turn Windows Features on and off.
3. In the Windows Features window, expand the Print Services menu.
4. Check the LPR Port Monitor check box to enable the service.
5. Select the OK button. Your computer may need to restart.
Windows 7
1. Select Start, select Control Panel.
2. Select Hardware and Sound > Programs.
3. Select Programs and Features.
4. Select Turn Windows Features on and off from the menu on the left.
5. A Windows Features dialog displays. Select the + sign for Print and Document Services
64
Xerox® WorkCentre® 3215/3225
User Guide
.
Page 77

Windows Printing
6. Check the box for LPR Port Monitor to enable the service.
7. Select the OK button. Your computer may need to restart.
Windows 2008
1. Select Start > Administrative Tools.
2. Select Print Management.
3. Select the + sign for Print Servers. Select the print server to which you want to add the printer and
select Add Printer.
4. Select the check box for LPR Port Monitor to enable the service.
5. Select the OK button. Your computer may need to restart.
Install Printer Driver
1. From the Windows Start menu, navigate to your Devices and Printers or Printers settings.
2. Select Add a Printer.
3. Select the Local Printer option.
Depending on your operating system, if already selected, select Automatically detect and install
my Plug and Play printer to deselect it.
4. Select the local printer and select Next.
5. Select Create a new port.
6. Select the LPR option from the Type of Port pull-down menu:
7. Select the Next button.
8. Enter the IP Address of the printer.
9. Enter a name for the printer.
10. Select the OK button.
11. You will be prompted for a Printer Driver. Select Have Disk.
12. Select the Browse button.
13. Select the required Printer Driver file .inf.
14. Select the Open button.
15. Select the OK button.
16. Select the printer model from the list.
17. Select the Next button.
18. The Name your Printer screen appears.
19. Enter details in the Printer name field.
20. Select the Next button. The Printer Sharing screen appears.
21. Select the Do not share or Share option and enter the name, location, and comment, if required.
22. Select the Next button.
23. Select Set as the default printer if required.
24. Select Print Test Page to print a test page.
25. Select the Finish button. The printer driver will install.
26. Verify that the test page is printed at the machine.
Xerox® WorkCentre® 3215/3225
User Guide
65
Page 78

Windows Printing
Internet Printing Protocol (IPP) Port
The Internet Printing Protocol (IPP) defines a standard protocol for printing as well as managing print
jobs, media size, resolution, and so forth. IPP can be used locally or over the Internet, and also supports
access control, authentication, and encryption, making it a much more capable and secure printing
solution than older ones.
Note IPP Printing is enabled by default.
How to Enable the IPP Port
1. At your workstation, open the web browser and enter the IP Address of the machine in the
Address Bar.
2. Select Properties.
3. If prompted, enter the Administrator User Name (admin) and Password (1111), and select Login.
Select Properties.
4. In the Network Settings link select Raw TCP/IP, LPR, IPP in the directory tree.
5. In the Internet Printing Protocol (IPP) area:
a. For IPP Protocol, select Enable from the drop-down menu. The Printer URL displays the
http:// IP address of the machine and the ipp:// IP address of the machine. Enter the required
printer name in the Printer Name area.
b. Select the Advanced button. Enter the required information for IPP Attribute.
Install Printer Driver
1. Follow the steps below that are specific to your operating system:
Windows 2003
From your workstation:
a. Select the My Network Places icon.
b. Select Properties.
Windows 7
From your workstation:
a. Select Control Panel.
b. Select Network and Internet.
c. Select Network and Sharing Center.
d. Select Change adapter settings.
Windows 2008
From your workstation:
a. Select Start, select Control Panel.
b. Select Printers.
c. Select File, select Run as administrator. Go to step 6.
2. Select the Local Area Connection icon.
3. Select Properties.
4. Ensure that the Internet Protocol (TCP/IP) protocol has been loaded and ensure the check box is
checked. Select OK.
66
Xerox® WorkCentre® 3215/3225
User Guide
Page 79

Windows Printing
5. For:
• Windows 2003 - select Settings > Printers.
• Windows Vista - select Add a Local Printer.
• Windows 7 - select Start > Control Panel > Hardware and Sound > Devices and Printers.
6. Select Add a Printer in the far left column.
For Windows 7 select Add a network, wireless, or Bluetooth printer.
7. The Add Printer Wizard window will appear. Select the Next button.
8. Select The Printer that I want isn’t listed.
9. Select a shared printer by name.
10. Type HTTP:// followed by the printer's fully qualified Domain name or IP Address in the URL field.
The Printer Name can be either the Host Name or the SMB Host Name as shown on the machine
Configuration Report, depending on the name resolution used by your network (WINS or DNS).
11. Select the Next button.
12. Select the Have Disk button and browse to the location of the printer driver and select the OK
button.
13. Select the Printer Model and select the OK button.
14. Select Yes if you want to make this the default printer.
15. Select Next.
16. Select Finish.
Raw TCP/IP Printing (Port 9100)
Raw TCP/IP is a printing protocol that is similar to LPR printing. Also known as a direct TCP/IP
connection or sockets interface, it sends information directly to the machine and does not require a
Line Printer Daemon (LPD). The advantages are that connections stay open for multiple print files and
spooling is not needed, therefore, printing is faster and more reliable than LPD printing. Raw TCP/IP
printing is contained in Windows and other third-party applications and operating systems.
Note Raw TCP/IP Printing is enabled by default for port 9100.
Information Checklist
See Configure Static IPv4 Addressing at the Machine.
How to Configure Port 9100
1. At your workstation, open the web browser and enter the IP Address of the machine in the
Address Bar.
2. Select Properties.
3. If prompted, enter the Administrator User Name (admin) and Password (1111), and select Login.
Select Properties.
4. In the Network Settings link, select Raw TCP/IP, LPR, IPP in the directory tree.
5. In the Raw TCP/IP Printing area:
a. Select Enable.
b. For Port Number, enter the required port number (1 - 65535).
Xerox® WorkCentre® 3215/3225
User Guide
67
Page 80

Windows Printing
6. Select Apply to save the changes or Undo to return the settings to their previous values.
Note The settings are not applied until you restart the machine.
Install Printer Driver
Refer to Printer Drivers.
Configure the Windows Printer Driver
Manual Print Driver Configuration
To configure the printer driver without using Bi-directional communication:
Follow the steps below:
1. Select the Windows Start menu.
2. Depending on your operating system, navigate to the Printers or Devices and Printers setting.
3. Select the printer icon and then select Printing preferences.
4. Select each tab and change any default printer settings as required.
5. Select Apply.
6. Select OK.
Bi-Directional Support
Follow the steps below that are specific to your operating system:
1. Select the Windows Start menu.
2. Depending on your operating system, navigate to the Printers or Devices and Printers setting.
3. Select the printer icon and then select Printer properties.
4. Select the Ports tab.
5. Check the Enable bidirectional support check box.
Bi-directional communication automatically updates the printer driver with the printer's installed
options. The driver’s Printing Preferences will report information about the printer's operational
status, active jobs, completed jobs and paper status.
6. Select OK.
68
Xerox® WorkCentre® 3215/3225
User Guide
Page 81

AirPrint
AirPrint
AirPrint is a software feature that allows for driverless printing from Apple iOS-based mobile devices
and Macintosh OS-based devices. AirPrint-enabled printers let you print directly from a Macintosh or
from an iPhone, iPad, or iPod touch.
Notes:
• Not all applications support AirPrint.
• Wireless devices must join the same wireless network as the printer.
• For AirPrint to function, both IPP and Bonjour (mDNS) protocols must be enabled.
• The device that submits the AirPrint job must be on the same subnet as the printer. To allow
devices to print from different subnets, configure your network to pass multicast DNS traffic
across subnets.
• AirPrint-enabled printers work with iPad (all models), iPhone (3GS or later), and iPod touch
(3rd generation or later), running the latest version of iOS.
• The Macintosh OS device must be Macintosh OS 10.7 or later.
1. Open a Web browser, type the IP address of the printer, then press Enter or Return.
2. Select Login and enter the ID (admin) and Password (1111).
3. Select Properties > Network Settings > AirPrint.
4. To enable AirPrint, select Enable.
Note: AirPrint is enabled by default when IPP and Bonjour (mDNS) are both enabled. Enable these
settings by selecting Properties > Network Settings > Raw TCP/IP, LPR, IPP and Properties >
Network Settings > mDNS.
5. To change the printer name, in the Friendly Name field, enter a new name.
6. To enter a location for the printer, in the Location field, enter the location of the printer
7. To enter a physical location for the printer, in the Geographical Location field, enter the
geographic Latitude and Longitude coordinates in decimal form. For example, use coordinates
like +170.1234567 and +70.1234567 for a location.
8. Select Apply.
9. For the new settings to take effect, restart your printer.
Xerox® WorkCentre® 3215/3225
User Guide
69
Page 82

Google Cloud Print
Google Cloud Print
Google Cloud Print is a service that allows you to print to a printer using your smart phone, tablet, or
any other web-connected devices. Just register your Google account with the printer, and you are ready
to use the Google Cloud Print service. You can print your document or e-mail with Chrome OS, Chrome
browser, or a Gmail™/ Google Docs™ application on your mobile device, so you don’t need to install the
printer driver on the mobile device. Refer to the Google web site
http://www.google.com/cloudprint/learn/ or http://support.google.com/cloudprint) for more
information about Google Cloud Print.
Notes:
• Make sure the printer is turned on and connected to a wired or wireless network that has
access to the Internet.
• Depending on your security configuration, your firewall might not support Google Cloud Print.
• Set up a Google e-mail account.
• Configure the printer to use IPv4.
• Configure Proxy Server settings as needed.
1. Open a Web browser, type the IP address of the printer, then press Enter or Return.
2. Select Login and enter the ID (admin) and Password (1111).
3. Select Properties > Network Settings > Google Cloud Print.
4. To change the printer name, enter a new name in the Printer Name field.
5. If you need to enable a proxy server, select Proxy Setting and enter your proxy information.
6. Select Test Con ne ct i o n to ensure your connection with the printer is successful.
7. Select Register to register the device to Google Cloud Print.
Note: If the Claim Url link does not display when you select Register, refresh the CentreWare
Internet Services page and select Register.
8. Select the Claim Url that displays. This takes you to the Google Cloud Print web site to finish the
registration.
9. Select Finish printer registration.
10. Now your printer is registered with Google Cloud Print. Select Manage your printer. Google Cloud
Print - ready devices display in the list.
70
Xerox® WorkCentre® 3215/3225
User Guide
Page 83

Scan to PC Setup
Scan to PC Setup
This section explains how to configure the Scan to Network and Scan to Local PC features.
Overview
The Scan to Network PC feature allows you to scan from your machine to a computer over the network.
The Scan to Local PC feature allows you to scan from your machine to a computer connected with a
USB cable.
Information Checklist
Ensure the Xerox Easy Printer Manager application is installed.
Note The Xerox Easy Printer Manager program can only be used in the Windows system.
Through the Xerox Easy Printer Manager, you can change scan settings and add or delete the folders
where scanned documents are saved in your computer.
Note To use the Scan to Local PC feature it is important to select the Recommended installation
option when you install the Xerox Easy Printer Manager program.
Scan to Network PC
1. Open the Xerox Easy Printer Manager application. Select Start, Programs or All Programs, Xerox
Printers, Xerox Easy Printer Manager and select Easy Printer Manager.
2. Select the Switch to Advanced Mode button at the top of the window.
3. Select your machine in the Printer List and add it, if required.
4. Select the Scan to PC Settings button. The Scan to PC Settings screen appears.
5. Select Enable Scan from Device Panel.
6. Select your required settings for Scan Settings:
•Output Color
• Resolution
•Original Size
7. Select your required settings for File Settings:
•Save To
•File Format
•OCR Language
• Delete Original Image after OCR
8. Select the required option in the Actions after Saving area:
• Notify me when complete
• Open with Default Application
•E-mail
•None
Xerox® WorkCentre® 3215/3225
User Guide
71
Page 84

Scan to PC Setup
9. Select Save.
Scan to Local PC
This is a basic scanning method for USB-connected machines.
1. Make sure that the machine is connected to your computer with a USB cable, and powered on.
2. Install the Xerox Easy Printer Manager application.
Note To use the Scan to Local PC feature it is important to select the Recommended installation
when you install the Xerox Easy Printer Manager program.
3. Open the Xerox Easy Printer Manager application. Select Start > Programs or All Programs >
Xerox Printers > Xerox Easy Printer Manager and select Easy Printer Manager.
4. Select the Switch to Advanced Mode button at the top of the window.
5. Select your machine in the Printer List if required.
6. Select the Scan to PC Settings button. The Scan to PC Settings screen appears.
7. Select Enable Scan from Device Panel.
8. Select your required settings for Scan Settings:
•Output Color
• Resolution
•Original Size
9. Select your required settings for File Settings:
•Save To
•File Format
•OCR Language
• Delete Original Image after OCR
10. Select the required option in the Actions after Saving area:
• Notify me when complete
• Open with Default Application
•E-mail
•None
11. Select Save.
72
Xerox® WorkCentre® 3215/3225
User Guide
Page 85

Fax S e tup
Fax Setup
This section explains how to set up the Fax feature of the machine.
Overview
The Fax feature enables users to send hard copy documents to another fax machine (or multiple fax
machines) via a dedicated phone line connection.
Information Checklist
Before starting ensure that the following items are available and/or the tasks have been performed:
• Ensure that the machine is fully functioning in its existing configuration.
• Ensure that the machine has access to a telephone connection.
• Obtain the telephone number that you will configure as the machine's fax number.
• Connect your telephone cable(s) to the fax port(s) on the machine.
Enable Fax from the Machine
1. Press the Machine Status button.
2. Press the up/down arrows to select Fax Setup; press OK.
3. If prompted, enter the Administrator Password (1111).
4. Press the up/down arrows to select Enable/Disable.
5. Press the up/down arrows to select Enable.
6. Press OK.
Test the Fa x
1. At the machine, press the Fax button on the control panel.
2. Enter the number of a nearby fax machine using the alphanumerical keypad.
3. Place your documents in the document handler and press the Start button.
4. Verify that your documents are received at the other fax machine.
Fax Defaults Using CentreWare Internet Services
1. At your workstation, open the web browser and enter the IP Address of the machine in the
Address Bar.
2. Press Enter.
3. Select Properties.
4. If prompted, enter the Administrator User Name (admin) and Password (1111), and select Login.
Select Properties.
5. In the Machine Settings link, select the Fax link.
Xerox® WorkCentre® 3215/3225
User Guide
73
Page 86

Fax S e tup
6. Select the General link.
7. In the Machine ID & Fax Number area:
a. Enter an ID in the Machine ID field.
b. Enter the fax number in the Fax N umber field.
8. In the Change Default area:
a. From the Resolution drop-down menu select one of the available options:
b. From the Lighten/Darken drop-down menu select one of the available options
c. Select the required option for Original Size.
9. In the Sending area:
a. From the Redial Term drop-down menu select the minutes for the term of each redial.
b. From the Redial Times drop-down menu select the amount of times you want the machine
to re-dial.
c. If your telephone system requires you to enter a prefix in front of fax numbers, select Enable
and enter prefix dial details in the Prefix Dial field.
d. Select the ECM Mode check box to enable Error Correction Mode.
e. From the Fax Confirmation drop-down menu select one of the send report options.
•Off
• On - prints a report when a fax has been sent.
• On-Error - prints a report when an error occurs.
10. In the Receiving area:
a. From the Receive Mode drop-down menu select the required option for the line:
• Te l - receives a fax by picking up the handset.
• Fax - answers an incoming fax call and immediately goes into the fax reception mode.
• Ans/Fax - select when an answering machine is attached to the machine.
b. From the Ring to Answer drop-down menu select the number of times the machine should
ring before answering.
c. Select the Stamp Receive Name check box to enable the machine to print a page number
and the date and time of receipt on the bottom of each page of a received fax.
d. Select the Receive Start Code check box to initiate fax reception from an extension phone
plugged into the socket on the back of the machine. Select the required start code from the
menu (the default is 9).
e. From the Secure Receive drop-down menu, select one of the following options to allow the
machine to hold received faxes in the job queue as Secure Receive fax jobs. The held faxes will
remain in the queue and will only be released from the queue when the user enters the
release password.
•Off
• On - this option requires you to enter a Secure Receive passcode and select Apply.
• Print fax in secure receive mode - this option is only available when On is selected from
the Secure Receive menu. Select the Print button and enter the Secure Receive passcode.
Select Apply.
f. Select the Auto Reduction check box to automatically reduce large documents received to fit
on the fax paper size of your machine.
74
Xerox® WorkCentre® 3215/3225
User Guide
Page 87

Fax S e tup
g. In the Discard Size field, enter details of the fax size that can be discarded.
Note Discard Size is not available with Auto Reduction.
h. From the 2-Sided drop-down menu select one of the following options for printing on both
sides of the page:
•Off
• Long Edge - prints on both sides along the long edges of the page.
• Short Edge - prints on both sides along the short edges of the page
11. Select Apply to save the changes.
12. Select OK when the acknowledgement message displays.
Adjusting Fax Document Settings at the Machine
Before starting a fax, change the settings for the fax options according to your original document to
get the best quality. See the Fax chapter of the User Guide for detailed steps on faxing.
Fax Address Book
So set up an address book for fax, refer to the Address Book chapter of this User Guide.
Xerox® WorkCentre® 3215/3225
User Guide
75
Page 88

E-mail Setup
E-mail Setup
This section explains how to set up the E-mail feature of the machine.
Overview
The E-mail feature enables a user to scan paper documents into an electronic format and send those
documents to one or more e-mail recipients.
Authentication (Service Access Control) can be enabled on the machine to prevent unauthorized
access to the network options. If Authentication is enabled a user will be prompted to enter user
account details, before they can access the E-mail feature. Authentication prevents a user from sending
an anonymous e-mail from the machine.
E-mail Addressing
Recipient addresses can be added using any one of the three methods listed below:
• Enter a recipient address manually at the e-mail keyboard screen. e.g. name@company.com.
• Look up a recipient address using LDAP (Lightweight Directory Access Protocol), and/or perform a
look up using the Local Address book. LDAP provides access to the global, or corporate address
book. Refer to LDAP Configuration and Address Books.
• Enter a recipient using the .com key (Smart Key). The Smart Key can be programmed to enter full
e-mail address e.g. name@company.com, or the Smart Key can be programmed to append a
domain address, e.g. @company.com. The end user can then enter part of an e-mail address and
press the .com key to append the domain address to his entry.
Information Checklist
Before starting, ensure that the following items are available and/or the tasks have been performed:
• Ensure that the machine is fully functioning on the network.
• TCP/IP and HTTP protocols must be enabled on the machine so that the machine web browser
can be accessed. Ensure that the DNS settings are configured correctly.
• Obtain the address of a functional SMTP (Simple Mail Transfer Protocol) mail server that accepts
inbound mail traffic.
• Create an e-mail account which the machine will use as the default From address.
• Test the e-mail account by sending an e-mail to the machine’s account. This task should be
completed at a mail client on your network that supports SMTP and POP3 (Post Office Protocol 3).
Configure SMTP
1. At your workstation, open the web browser and enter the IP Address of the machine in the
Address Bar.
2. Press Enter.
3. Select Properties.
76
Xerox® WorkCentre® 3215/3225
User Guide
Page 89

E-mail Setup
4. If prompted, enter the Administrator User Name (admin) and Password (1111), and select Login.
Select Properties.
5. In the Network Settings link select the Outgoing Mail Server (SMTP) link.
6. In the Simple Mail Transfer Protocol (SMTP) area:
a. Enter the IP or host name of the SMTP Server.
b. Enter the Port Number. The Port field can have a value from 1 to 65535. The default Port
Number is 25.
c. Select the SMTP Requires Authentication check box if your mail server requires the machine
to log in.
d. Enter details in the Login ID and Password fields required for the machine to authenticate at
the mail server.
e. Enter a password in the Confirm Password field.
f. Select POP3 Authentication to enable this option and enter the required settings.
g. In the Advanced area, select Secure E-mail Connection with SSL/TLS if this option is
required.
h. Enter a value for server connection timeout in the SMTP Server Connection Timeout field.
The range is 30 - 120 seconds, and the default is 30 seconds.
i. Enter the required details for the Default From Address.
j. From the Maximum Message Size drop-down menu, select a value between 1MB - 10MB.
Larger scans will be sent as multiple e-mail messages, divided at page breaks.
k. Select the SMTP Configuration Te st button to test your settings.
7. Select Apply to save the changes.
8. Select OK when the acknowledgement message displays.
Configure the Feature
This feature allows you to configure the default settings for e-mail jobs.
1. At your workstation, open the web browser and enter the IP Address of the machine in the
Address Bar.
2. Press Enter.
3. Select Properties.
4. If prompted, enter the Administrator User Name (admin) and Password (1111), and select Login.
Select Properties.
5. In the Machine Settings link select the Scan link.
6. Select Change Default.
7. In the Scan to E-mail area:
a. Select one of the following e-mail types from the Original Type drop-down menu:
•Text
•Text / Photo
•Photo
b. Select one of the following e-mail types from the Original Size drop-down menu:
•Letter
Xerox® WorkCentre® 3215/3225
User Guide
77
Page 90

E-mail Setup
•Legal
•A4
•Folio
•A5
•B5(JIS)
•Executive
c. Select one of the following scanning resolutions from the Resolution drop-down menu:
•100 dpi
•200 dpi
•300 dpi
d. Select one of the following scan color types from the Output Color drop-down menu:
• Black and White
•Grayscale
•Color
e. Select one of the following e-mail attachment format types from the File Format drop-down
menu:
•Multi-PDF
•Multi-TIFF
•Single TIFF
•JPEG
• Single-PDF
f. Select the required option for Lighten/Darken.
8. Select Apply to save the changes.
9. Select OK when the acknowledgement message displays.
10. Select Scan to E-mail in the left hand menu.
a. Enter a valid e-mail address in the Default From: Address field.
b. Enter required information in the Default Subject field.
c. Deselect the Use default message on Scan To E-mail check box to change default mail text.
d. For the Smart Key Address #1 - Smart Key Address #6 fields enter details of default fixed
details for each numerical key. The default settings for commonly used addresses are already
configured for .com, .org, .net, .gov and .tv.
e. Select the check boxes to enable Edit From Address and Replace From Address if required.
f. Check the Auto Send To Self check box to automatically add the sender’s From: address to
the recipient list.
g. Select an option from the Print Confirmation Sheet drop-down menu:
• On Errors Only - This setting will produce a Confirmation Sheet only when error
information is indicated.
• Always - This setting will produce a Confirmation Sheet that will provide error
information and indication that the job has reached the recipient(s).
• Never - This setting will not produce a Confirmation Sheet.
11. Select Apply to save the changes.
78
Xerox® WorkCentre® 3215/3225
User Guide
Page 91

E-mail Setup
12. Select OK when the acknowledgement message displays.
LDAP Configuration and Address Books
This section explains how to install and set up Address Books.
Overview
The machine supports two types of address book:
•Global
A global address book provided by Lightweight Directory Access Protocol (LDAP) services stored on
a remote server.
•Local
An address book created from a list of addresses saved in a .csv file (Comma Separated by Values)
format stored locally on the machine.
Both address book types can be configured for use on the machine at the same time.
LDAP is used to access the Corporate Address Book to locate e-mail addresses and other information
for use with many of the services.
Information Checklist
Before starting ensure that the following items are available and/or the tasks have been performed:
• Ensure your network supports LDAP services.
• Obtain the IP Address or Host Name of your LDAP Server. The machine may also need a login
name and password if the LDAP server is not configured to allow Anonymous connection.
• Use an LDAP client to validate your settings before inputting them into the CentreWare Internet
Services menus. LDAP clients include Microsoft Outlook Express, Microsoft Outlook and Lotus
Notes and other e-mail clients.
• To use host names, DNS must be configured on the machine.
LDAP Configuration
General Settings
1. At your workstation, open the web browser and enter the IP Address of the machine in the
Address Bar.
2. Press Enter.
3. Select Properties.
4. If prompted, enter the Administrator User Name (admin) and Password (1111), and select Login.
Select Properties.
5. In the Security link on the left hand side select the Network Security link.
6. Select External Authentication.
7. Select LDAP Server.
Xerox® WorkCentre® 3215/3225
User Guide
79
Page 92

E-mail Setup
8. In the LDAP Server area enter the IP address or host name and Port Number of the LDAP server.
9. Select the required option for Match User’s Login ID to the following LDAP attribute.
10. In the Secure LDAP Connection area, select the Enable check box to enable Secure LDAP via
SSL.
11. Enter the required information in the LDAP User Search field:
• Search Root Directory - allows you to limit the LDAP search by entering the location on
the server where the user information is stored.
• Authentication Methods - select either Anonymous or Simple to access the LDAP
server.
If you selected Simple for Authentication Methods, enter the required Login ID and Password.
You can check the Enable check box for Append Root to Base DN.
When enabled the bind will append the Root to Append string to the authenticate user login IDs.
This should be enabled whenever the Windows Login attribute is UserPrincipalName. A typical
Root to Append may look like “@yourcompany.com.”
Note Many Unix/Linux LDAP servers require this attribute to be set and it is used frequently when
Authentication Methods is set to Simple.
12. Enter the required option for Maximum Number of Search Results. For Maximum Number of
Search Results, enter amount between 0, 5-300. This is the maximum number of addresses that
will appear which match the search criteria selected by the user. Set the search results to one less
than the server will allow. For example, if the LDAP server limit is 75, set the search results to 74 or
less. A zero value will attempt to return all searches.
13. For Search Timeout, enter the required setting for the search timeout (0, 5-100 seconds).
14. Select LDAP Referral if this option is required.
15. The Search By option offers 4 ways to search the address list depending on the name syntax used
in your environment. Select one of the following search types:
• Common Name - names are listed by the Common Name LDAP attribute. Common
Name is the default option.
• E-mail Address - names are listed by e-mail address.
• Surname/Given name - names are listed by Surname (Last Name) then Given Name
(First Name).
• Custom - Select Custom to enter the required search information in the
Custom Search
box.
The Search Name Order option will help control the returns by allowing the LDAP query to be on
Common Name or Surname.
16. Select the LDAP Configuration Test button to test your LDAP settings.
17. Select Apply to save the changes.
18. Select OK when the acknowledgement message displays.
Verify the LDAP Settings
1. At the machine, press the E-mail button on the control panel.
2. If Authentication is enabled, enter your Login ID and Password (if required).
3. The Enter From Address screen displays.
80
Xerox® WorkCentre® 3215/3225
User Guide
Page 93

E-mail Setup
4. Enter a few letters of a name in the LDAP Address Book. The machine will return matching names.
5. Press the up/down arrows until the name you want displays and press OK.
6. The Enter Destination Addresses screen displays.
7. Enter a destination e-mail address.
8. When Another Address? displays, press the up/down arrows to select Yes or No and press OK.
9. Highlight the required File Format and press OK.
10. Enter an e-mail subject and press OK.
11. Place a document in the document handler and press the Start button.
12. Verify that the recipient receives the scanned document in their e-mail inbox.
Address Book
To set up an address book for e-mail, refer to the Address Book chapter of this User Guide.
Xerox® WorkCentre® 3215/3225
User Guide
81
Page 94

E-mail Setup
82
Xerox® WorkCentre® 3215/3225
User Guide
Page 95

Paper and Media
This chapter contains information about the different types of stock and stock sizes that can be used
on your machine, available paper trays, and the types of stock and sizes supported by each tray.
This chapter includes:
• Loading Paper
• Setting Paper Size and Type
• Media Specifications
•Loading Documents
• Media Output Locations
3
Xerox® WorkCentre® 3215/3225
User Guide
83
Page 96

Loading Paper
Loading Paper
One paper tray and a manual feed slot are standard on your machine.
Various media sizes and types can be used in the trays. For more media specifications, refer to Media
Specifications.
Preparing Paper for Loading
Before loading paper into the paper trays, flex or fan the
edges of the paper stack. This procedure separates any sheets
of paper that are stuck together and reduces the possibility of
paper jams.
Note: To avoid unnecessary paper jams and misfeeds do
not remove paper from its packaging until required.
Loading Tray 1
The paper level indicator on the front of tray 1 shows the
amount of paper currently left in the tray. When the tray is
empty, the indicator is completely lowered as shown in the
illustration:
Using the instructions provided below, load paper into the
machine. Tray 1 holds up to 250 sheets of 20 lb (80 g/m²)
paper, A4 and letter only. It holds fewer sheets of other media
sizes. For more media specifications, refer to Media
Specifications.
1. Pull out tray 1 and load paper into the tray, print side
1 shows full, 2 shows empty.
down. Do not fill above the Maximum Fill line indicated
by the symbol .
84
Xerox® WorkCentre® 3215/3225
User Guide
Page 97

2. To accommodate longer paper, press the paper tray
extender lever (1) and slide the lever to the desired
position. Press and slide the paper length guide (2) until
it lightly touches the end of the paper stack.
3. Position the width guide by pressing the lever and sliding
it towards the stack of paper, until it gently touches the
side of the stack.
4. Insert the paper tray into the machine.
5. After loading paper in the paper tray, set the paper size
and type using the control panel. Press OK to confirm the
settings or Back to change the settings.
6. When printing from your computer, ensure you select the
Paper tab in the print driver to specify the correct paper
size and type. Not confirming the paper details may
result in printing delays. For information about setting
the paper type and size on the control panel, refer to Setting Paper Size and Type.
Loading Paper
Note: The settings made from the printer driver on your computer override the settings on the
control panel.
Using the Manual Feed Slot
The manual feed slot is located on the front of your machine. It can be closed when not in use, making
the product more compact. Use the manual feed slot to print transparencies, labels, envelopes, or
postcards in addition to making quick runs of paper types or sizes that are not currently loaded in the
paper tray.
When using the manual feed slot for special media it may be necessary to use the rear cover for the
output. For further information, refer to Media Output Locations.
Acceptable print media is plain paper from 3.0 x 5.0 inches to 8.5 x 14 inches Legal (76 mm x 127 mm
to 216 mm x 356 mm) and weighing between 16 lb and 58 lb (60 g/m²
specifications, refer to Media Specifications.
and 220 g/m²). For more media
Xerox® WorkCentre® 3215/3225
User Guide
85
Page 98

Loading Paper
Loading the Manual Feed Slot
1. Press to open the manual feed slot, located on the front
of the machine.
Note: The manual feed slot holds 1 sheet of the following
media: 20 lb (80 g/m²) plain paper, transparency, label,
envelope, or cardstock.
2. Load the print material between the width guides with
the print side facing up.
Note: Hold a transparency by the edge and avoid
touching the print side.
3. Adjust the paper guide to the width of the print material.
Note: If the media prints with curl, wrinkles, a crease, or
black bold lines, open the rear cover and print again.
4. When printing from your computer, ensure you select the
Paper tab button to specify the correct paper size and type. For the source, you must select
Manual Feeder. Not confirming the paper details may result in printing delays. For information
about setting the paper type and size on the control panel, refer to Setting Paper Size and Type.
Note: The settings made from the printer driver on your computer override the settings on the
control panel.
86
Xerox® WorkCentre® 3215/3225
User Guide
Page 99

Envelope Mode
1. Press to open the manual feed slot, located on the front
of the machine.
2. Remove any curl on the envelope before loading it into
the manual feed slot.
Note: For more information on media specifications,
refer to Media Specifications.
Loading Paper
3. Load the envelope short edge feed and with the flap
facing down as shown in the illustration.
4. Adjust the paper guide to the width of the print material.
Note: If the media prints with curl, wrinkles, a crease, or
black bold lines, open the rear cover and print again.
5. When printing from your computer, ensure you press the
Paper tab to specify the correct paper size and type. Fo r
the source, you must select Manual Feed Slot. Not
confirming the paper details may result in printing
delays.
Note: For information about setting the paper type and size on the control panel, refer to Setting
Paper Size and Type.
Note: The settings made from the printer driver on your computer override the settings on the
control panel.
Xerox® WorkCentre® 3215/3225
User Guide
87
Page 100

Setting Paper Size and Type
Setting Paper Size and Type
After loading paper in the paper tray, set the paper size and type using the control panel. These
settings will apply to Copy and Fax modes. For computer printing, select the paper size and type in the
application program you use on your computer.
Note: The settings made from the printer driver on your computer override the settings on the
control panel.
Alternatively, to change the paper size and type on your computer, select Xerox Easy Printer Manager
> (Switch to advanced mode) > Device Settings.
Setting the Paper Size
1. Press Machine Status on the control panel.
2. Press the up/down arrows to select System Setup and press OK.
3. Press the up/down arrows to select Paper Setup and press OK.
4. Press the up/down arrows to select Paper Size and press OK.
5. Press the up/down arrows to select the paper tray you want and press OK.
6. Press the up/down arrows to select the paper size you want.
7. Press OK to save the selection.
8. Press Back until you return to Ready mode.
If you want to use special sized paper, select a custom paper size in the printer driver.
Setting the Paper Type
1. Press Machine Status on the control panel.
2. Press the up/down arrows to select System Setup and press OK.
3. Press the up/down arrows to select Paper Setup and press OK.
4. Press the up/down arrows to select Paper Type and press OK.
5. Press the up/down arrows to select the paper tray you want and press OK.
6. Press the up/down arrows to select the paper type you want.
7. Press OK to save the selection.
8. Press Back until you return to Ready mode.
Setting the Paper Source
1. Press Machine Status on the control panel.
2. Press the up/down arrows to select System Setup and press OK.
3. Press the up/down arrows to select Paper Setup and press OK.
4. Press the up/down arrows to select Paper Source and press OK.
5. Press the up/down arrows to select Copy Tray or Print Tray and press OK.
6. Press the up/down arrows to select the paper tray you want.
88
Xerox® WorkCentre® 3215/3225
User Guide
 Loading...