

Page 1
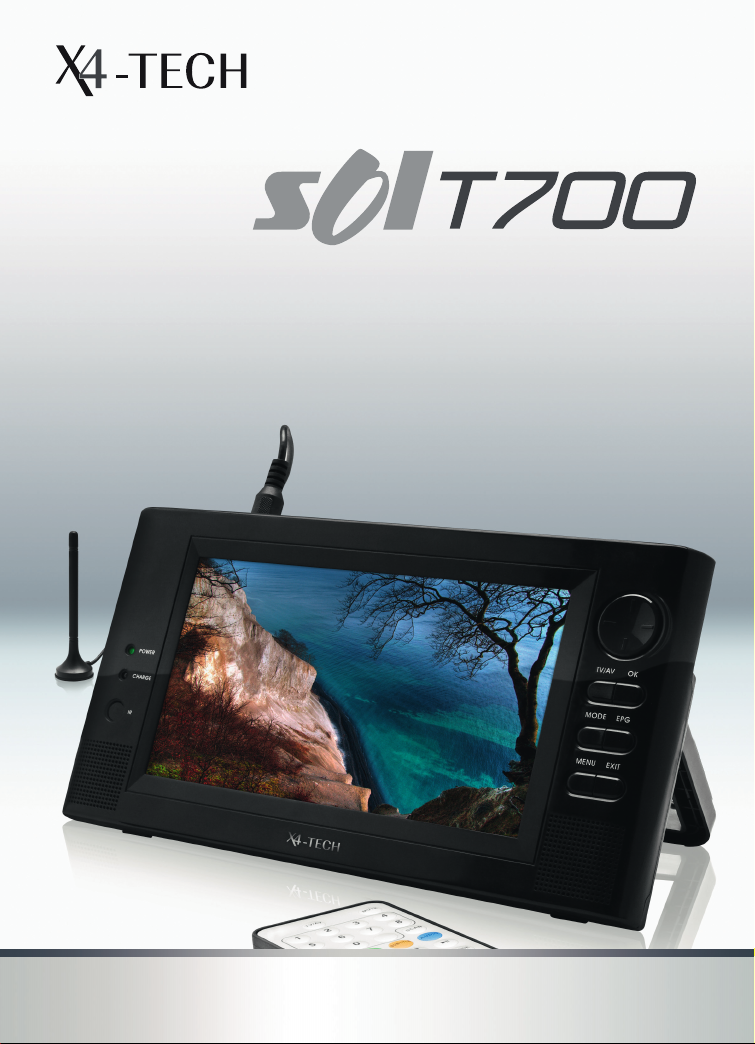
Mobile 7” widescreen
DVB-T television with
USB 2.0 port & 3-in-1 card slot
Instruction Manual
Page 2

Table of Contents
5 Chapter 1 Intended use
5 Explanation of symbols
6 Chapter 2 Safety information
10 Copyright information
10 Before use
12 Chapter 3 Features
13 Chapter 4 The device
15 Remote control
17 Changing batteries
18 Rechargeable battery
19 Information on handling batteries/rechargeable batteries
22 Chapter 5 Connections
22 Power supply
22 A/V IN
23 A/V OUT
23 Earphones
23 USB connection
24 Memory cards
24 Antenna
25 Chapter 6 General operation
25 Power ON/OFF
27 Chapter 7 DVB-T
27 Channel search
29 Channel selection
30 Zoom
30 Teletext (TTX)
31 Electronic program guide (EPG)
33 What is DVB-T?
34 Chapter 8 Main menu
36 Channel Manager
40 Installation
41 Conguration
44 Software Upgrade
44 Factory Default
45 Version
45 Movie
46 Music
47 Photo
49 Chapter 9 Selecting a signal source
50 Chapter 10 Audio settings
51 Chapter 11 Troubleshooting
53 Chapter 12 Maintenance, handling and cleaning
56 Chapter 13 Specications
56 Technical data
57 Battery parameters
57 Delivery contents
2
3
Page 3
Dear Customer:
Thank you for deciding on purchasing this quality product from X4-TECH.
This instruction manual will give you a general idea of how this device operates,
as well as provide you with information on cleaning and safety procedures. Please
take a few minutes to read and follow all safety and operating instructions found
in this manual carefully, in order to maintain this products condition and ensure
safe operation. Retain this instruction manual for future reference and where required pass it along with the device if handed over to a third party.
Should you have any additional questions regarding this device or should any
suggestions arise, please contract a specialized dealer or our service team for further information.
We look forward to you recommending us to others and hope you enjoy using
this device from X4-TECH.
Your X4-TECH Team
All company and product names mentioned in this document are registered
trademarks of their respective owners. All rights reserved.
We assume no liability for damage occurred as a result of improper use or damage
resulting from the failure to comply with the safety instructions found in this manual, improper operation or handling! Under such circumstances, all claims under
warranty will become void. We assume no liability for consequential damage!
The information contained in this instruction manual is subject to change without notice.
This product is EMV-certied and fullls all European and National guideline requirements. A declaration of CE conformity has been established for this product. Certication has been documented and entrusted to the manufacturer.
Intended use
The SOL T700 is a mobile device intended for DVB-T television reception and viewing. USB ash drives with a capacity of up to 32 GB and external hard disks formatted to FAT32 and with a capacity of up to 80 GB can be used via the USB port.
Hard disks require their own power supply and should only have one partition.
You will also be able to use SDHC, SD, MMC and MS memory cards with a capacity of up to 32 GB and formatted to FAT32 with the 3-in-1 card reader. This device
also supports JPEG image les, AVI video les and MP3 and WAV audio les.
Please adhere to all of the safety information/instructions found in this
instruction manual!
1
Explanation of symbols
An exclamation mark is intended to inform the user of important information, operation or maintenance instructions or that special attention
is required.
This symbol is intended to alert you to the presence of unprotected, live
parts or components found within the product’s enclosure or of dangerous connections that upon contact may be of sucient magnitude to
constitute a risk of electric shock. Cables intended for such connections
should only be connected by qualied personnel or you should only use
ready to connect cables. There are no user-serviceable parts found inside
the device, therefore the device is never to be opened.
4
Chapter 1 Intended use
5
Page 4
Safety information
2
Dear Customer:
The following safety and hazard warnings are not only for the protection of your
device, but also serve as a protection against potential health hazards. Please
take time to read the following instructions carefully.
› We assume no liability for personal or property damage resulting from
the failure to comply with the safety instructions, improper operation
and handling. Under such circumstances, all claims under warranty will
become void.
› For safety and licensing (CE) reasons any unauthorized modication
and/or change on the device is prohibited and will void the warranty
and all warranty claims.
› Any person operating, installing, setting up, or servicing this device
must be trained and qualied accordingly and must also observe these
operating instructions.
› Ensure that the device has been set up accordingly by following all
instructions found in the instruction manual.
› Power supply cords should be routed so that they are not likely to be
walked on or pinched by items placed upon or against them, paying
particular attention to cords at plugs, convenience receptacles, and
the point at which they exit from the device. Avoid exposing the cable
to extreme heat or cold. Never modify/change the cable. This could
otherwise damage the cable and result in the dangerous risk of electric
shock.
› Should any evident damage be seen on the device, power supply or
on the connection cables, do not come in contact with or touch these.
Switch o the corresponding circuit breaker in the power distribution
panel rst before carefully unplugging the power plug from the wall
outlet. Do not operate this device further! Please contact or take it to a
qualied service technician/specialty workshop.
› Unplug the power plug from the wall outlet in order to completely cut
o the power supply to the device. Merely turning the device o with
the ON/OFF button is not sucient enough. Make sure that receptacles
are easily accessible.
› Always pull on the plug’s grips and never on the cable to remove from
a power outlet.
› The device should be unplugged from the power outlet if it is not in
use for a longer period of time.
› For safety reasons always unplug the device from the power outlet
during thunderstorms.
› Eliminate potential tripping hazards by routing cables so that no one
can trip or stumble over them.
› Never use the device if the power cable or device is damaged.
This device is not suitable for children under 3 years of age.
Small children are unaware of the serious and immediate dangers involved when exposing themselves to or handling electronic devices.
6
Chapter 2 Safety information Chapter 2 Safety information
7
Page 5
› Furthermore, this product contains small parts that could be swallowed. Never leave packaging material lying around unsupervised. For
children it could become a hazardous toy and lead to serious injury.
Keep packaging and protective foil away from children at all times to a
void the danger of suocation.
› The device should never come in contact with water or moisture.
or shelf. Never block ventilation openings with magazines, tablecloths,
curtains or similar.
› Make sure the device is placed on a rm and stable surface.
› Never place any sources of re on top of or near the device and power
supply plug (e.g. lighted candle).
› To prevent the risk of re or electric shock make sure that liquids, such
as dripping or splashing water, rain or moisture, do not come in contact
› Your full concentration and attention is required while driving in
trac (as well as in many other surroundings).
with the device and power supply plug.
› Operating the device, listening to music with earphones/head› Operate this device in a moderate climate and never expose to extreme temperatures, such as high humidity.
phones or watching a movie can divert one’s attention and be just as
distracting, as using your cell phone while driving. In case of an acci-
dent, insurance coverage might be denied and you could be partially
› Condensation can build up suddenly when this device is brought
blamed for the accident respectively!
from a colder into a warmer area (e.g. when transporting). Should this
happen, allow the device to warm up to room temperature rst before
using.
› Please note that excessive sound pressure levels created when liste-
ning to loud volume levels, particularly with earphones or headphones,
can lead to permanent hearing damage or loss.
› Care should be taken that liquids do not come in contact with the interior; this is why containers containing liquids, e.g. bucket, vase or plants
should never be placed anywhere near or on this device. This can not
› Please adhere to the additional safety information found in the indivi-
dual chapters of this instruction manual.
only damage the device, but also become a re hazard.
› When connecting other devices, please refer to the safety and opera› It is imperative to avoid contact with moisture, e.g. in the bathroom.
ting instructions found in the literature accompanying these devices.
Never touch the power plug with damp or wet hands. There is the risk
of electric shock!
› Please contact our technical hotline or a service technician for further
information, should you be in doubt about device operation, safety
› Ensure that the device is properly ventilated during operation and never operate it in constricted areas, such as for example in a bookcase
8
Chapter 2 Safety information Chapter 2 Safety information
or when making connections or if any questions arise that are not ex-
plained within this manual.
9
Page 6

› Contribute to a better environment by using a designated disposal
system (e.g. Dual System in Germany) or recycling site for the disposal
of packaging material.
Copyright information
The reproduction, duplication and copying of copyright protected material, as
well as the distribution, circulation, public access to or even the rental of these,
without explicit authorization of the copyright holder, is strictly prohibited.
Before use
Please read this instruction manual thoroughly before operating this device
and retain it for further reference, questions and use. Following and heeding
all information found in this instruction manual shall maintain this products
condition and ensure safe operation. Pass on to third parties, where applicable.
This instruction manual contains information on how to operate and maintain
this device.
When connecting other devices, please refer to the safety and operating instructions found in the literature accompanying these devices.
Should a component require maintenance, servicing or repairs, then please
consult a qualied dealer or service technician.
10
Chapter 2 Safety information Chapter 2 Safety information
11
Page 7
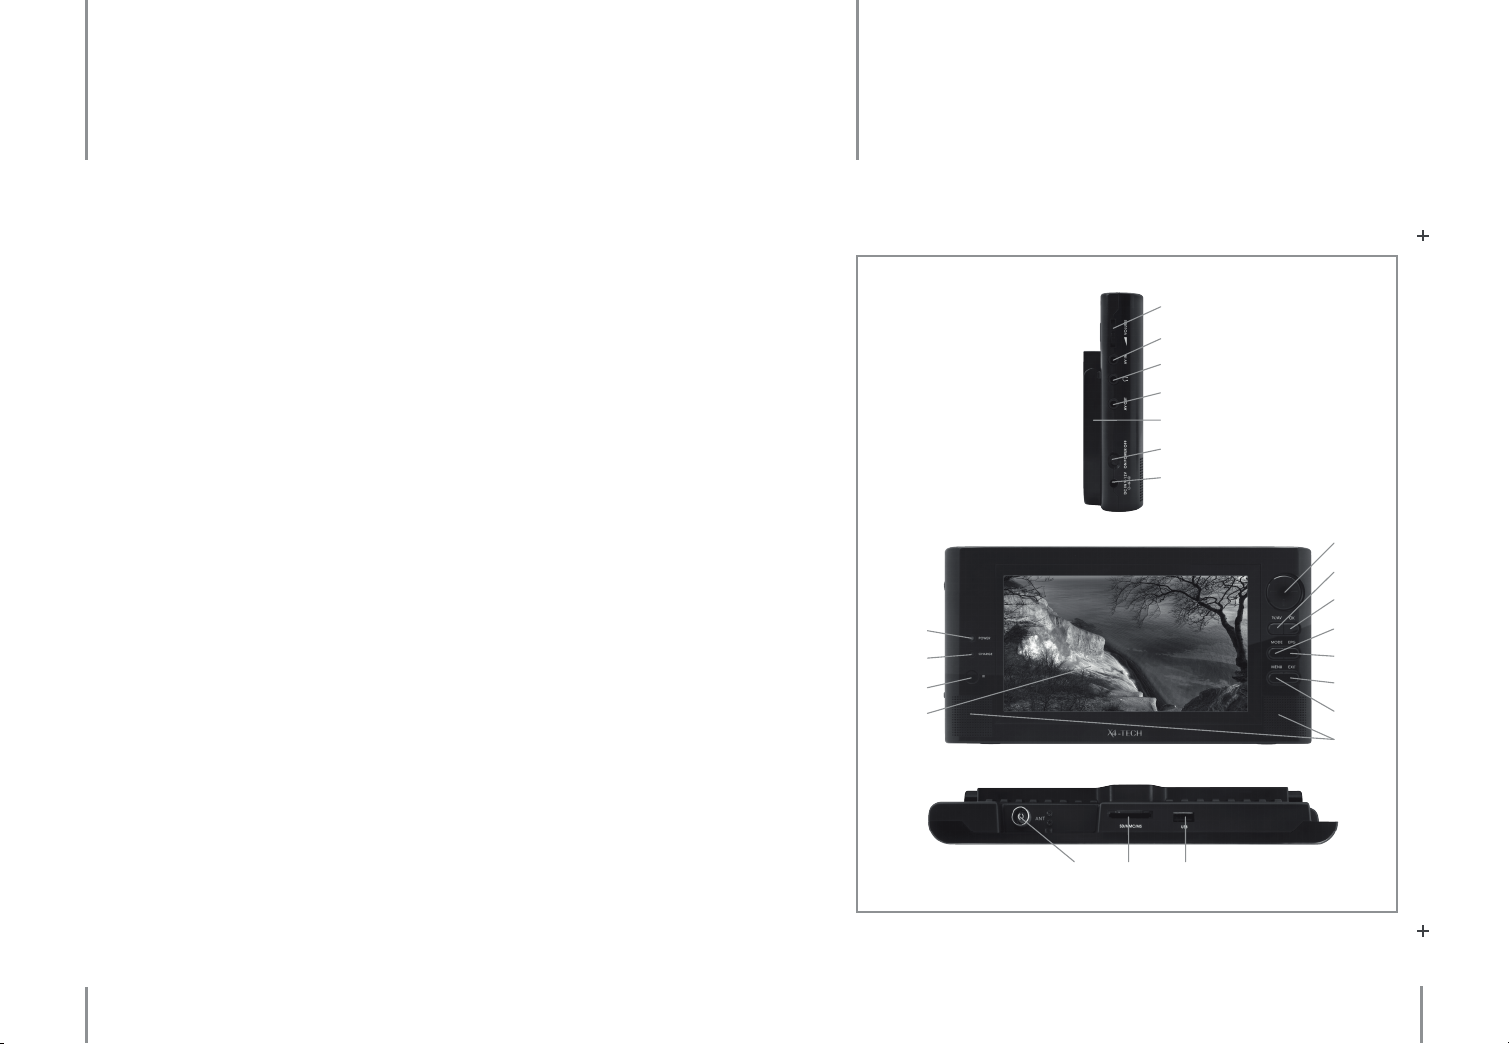
Features The device
› 17.78 cm (7“) widescreen LCD color display [480 RGB (H) x 234 (V)]
with LED backlight
› Mobile DVB-T reception and automatic channel search
› Integrated lithium rechargeable battery (7.4V / 1800mAh)
for up to 2.5 hours of use
› Compatible USB 2.0 port
› Electronic program guide (EPG)
› Teletext (TTX)
› Supports JPEG image les
› Supports MP3 and WAV audio les
› Supports AVI video les
› Reads USB ash drives with a capacity of up to 32 GB and external hard disks
with a capacity of up to 80 GB, all formatted to FAT32 (hard disks require their
own power supply)
› Reads SDHC, SD, MMC and MS memory cards with a capacity of up to 32 GB
and formatted to FAT 32
› Built-in stereo speakers
3 4
8
9
10
11
1
2
3
4
5
6
7
12
13
14
15
16
17
18
19
20 21 22
12
Chapter 3 Features Chapter 4 The device
13
Page 8
1. Volume control: increase/decrease the volume
2. A/V input: A/V IN (3.5 mm)
3. Earphone jack (3.5 mm)
4. A/V output: A/V OUT (3.5 mm)
5. Foldout stand
6. Power ON/OFF
7. Power supply jack (DC IN 9 – 12 V)
8. Power LED: lights up green when the device is turned on
9. Charge indicator: lights up red during charging, lights up green after
charging has been completed
10. Infrared sensor: infrared receiver for the remote control
11. Display: 17.78 cm (7“) display with a 480 RGB (H) x 234 (V) display resolution
12. Control eld: use to change channels, for navigation within menus,
for making settings
13. TV/AV: changes between DVB-T and AV input operation
14. OK: use to conrm or make a selection
15. MODE: opens a menu with various display setting options
16. EPG: opens the electronic program guide
17. EXIT: exits a menu item or menu
18. MENU: opens the main menu
19. Stereo speakers
20. Antenna connection (75 Ω)
21. 3-in-1 card slot: for SDHC, SD, MMC and MS memory cards
22. USB 2.0 port
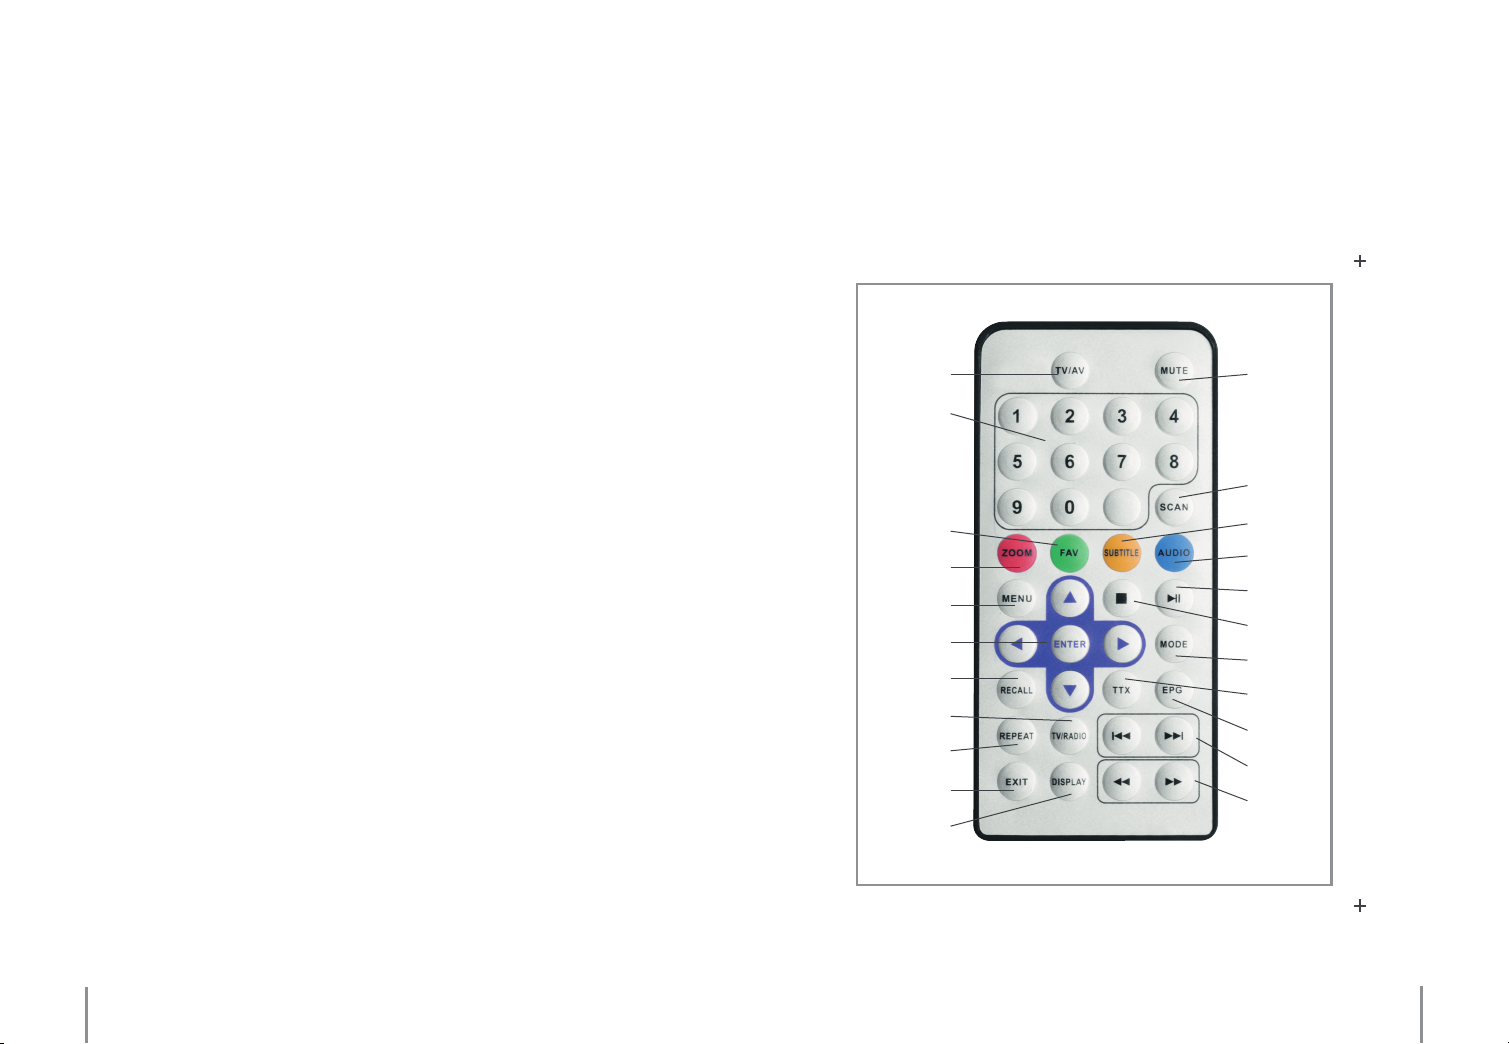
Remote control
1
2
3
4
5
6
7
8
9
10
11
12
13
14
15
16
17
18
19
20
21
22
14
Chapter 4 The device
Chapter 4 The device
15
Page 9
1. TV/AV: changes between the device and A/V input operation
2. Numeric buttons: enter a channel number directly
3. FAV: displays a list of favorites
4. ZOOM: zoom function
5. MENU: opens the main menu
6. Control eld: use to navigate or make a selection.
Use the navigation buttons o select a menu item, channel or for
changing/making settings.
Press „ENTER” for access to the selected menu item.
7. RECALL: changes back and forth between the current and previously
viewed channel
8. TV/RADIO: changes between TV and radio operation
9. REPEAT: switch through various repeat mode options
10. EXIT: exits a menu
11. DISPLAY: displays menu options (INFO: operation guide),
displays various channel/le information
12. MUTE: deactivates/activates the sound
13. SCAN: starts a channel search
14. SUBTITLE: press to search for available subtitles
15. AUDIO: displays available audio options
: pauses/resume playback
16.
17. : stops playback
18. MODE: opens a menu with various display setting options
19. TTX: displays available teletext pages
20. EPG: opens the electronic program guide
: skip/return to the next/previous movie, song or picture
21.
: browse, fast forward/reverse
22.
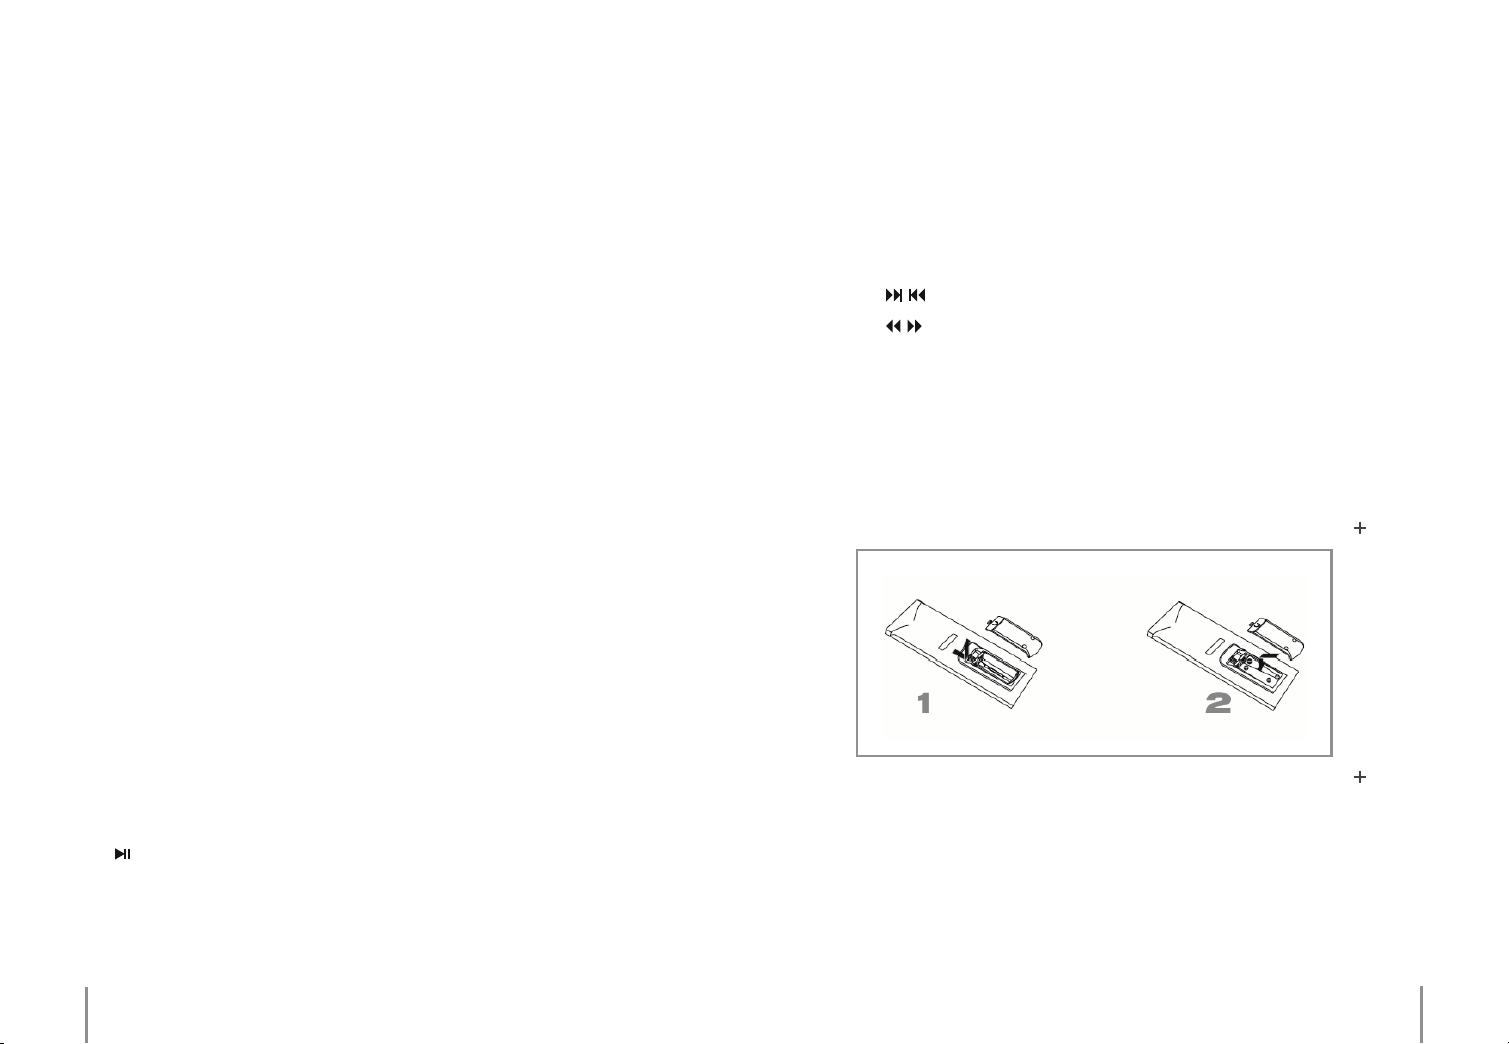
Changing batteries
› This remote control requires two AAA batteries for operation.
› To open the battery compartment, carefully remove the cover on the back of the
remote control by sliding it in the direction of the arrow. Remove used batteries
and dispose of these accordingly. Remove two new AAA batteries from their packaging and insert them into the battery compartment, ensuring correct polarity
(see battery silhouette as indicated in the compartment) beforehand.
16
Chapter 4 The deviceChapter 4 The device
17
Page 10

› For best possible results, point the remote control directly at the device. Ensure
that there is not more than a distance of 5 meters between the remote control
and device and that the remote control is not used at an angle of over 60 degrees.
› Always remove the batteries from the device when storing or if it is not is use for
longer periods of time.
Rechargeable battery
› This device utilizes a rechargeable lithium polymer battery with a capacity of
1800 mAh. A fully charged battery will give you the opportunity to watch television for up to approximately 2.5 hours, depending on the type of use.
Note
Please note that the battery charging process can take up to approximately 20
hours, if the device is turned on at the same time. However, charging the battery
with the device turned o will only take up to approximately 5 hours. It is therefore recommended to turn the device o during charging.
Please fully charge the battery in a turned o state completely rst, before using it for the rst time. This may otherwise impair capacity.
Try to avoid deeply discharging your rechargeable battery. This could impair capacity.
Information on handling batteries/rechargeable batteries
› The battery is charged directly via the device. The charge indicator lights up red
during charging and turns green once charging has been completed.
› Rechargeable batteries have a limited number of charge cycles. Each charging
cycle, even a short one, shortens the battery lifespan. To increase battery lifespan,
always recharge batteries completely and without disruption.
› This device has a permanent built-in lithium polymer rechargeable battery that
should be kept away from sources of warmth. Never try to remove the rechargeable battery. Please contract your local dealer if a malfunction occurs during
operation or battery replacement is required.
18
Please adhere to the following information when handling batteries/rechargeable batteries:
› Keep batteries out of children’s reach.
› Batteries are hazardous waste and do not belong in household waste.
› Ensure that batteries are always inserted according to the correct polarity.
› Always remove batteries when not in use for longer periods of time.
› Never leave batteries lying around unsupervised. These could pose a choking
hazard to children and pets if swallowed. Seek emergency medical care immediately, should this happen.
Chapter 4 The deviceChapter 4 The device
19
Page 11

› Please follow manufacturer instructions when charging rechargeable batteries.
› Never expose batteries to extreme temperatures, such as for example resulting
from sunlight, re or ovens. There is the risk of explosion!
› Make sure that batteries are not dismantled, short-circuited or are thrown into
re. Never recharge non-rechargeable batteries. There is a risk of explosion!
› Touching leaking or damaged batteries could cause skin burns. Use suitable protective gloves when handling such batteries.
› Always ensure that the device has been turned o after use.
› Always change/replace all batteries at the same time.
› Clean battery and device contacts before inserting, where required.
› Avoid totally discharging rechargeable batteries.
› Always use batteries from the same manufacturer and never mix batteries,
whether old with new, of dierent capacities or with rechargeable batteries.
› If the operating distance between remote control and device weakens or the
remote control is not functioning properly any more, change the batteries as explained above.
20
Chapter 4 The deviceChapter 4 The device
21
Page 12

Connections
5
Note
The device should always be turned o when making cable or electrical connections. (Switch should be positioned to „OFF”).
Cables should always be routed so that they can not be walked on or tripped over.
Power supply
› Turn the device o. Connect the power adapter’s connector to the DC IN 9 –12 V
power supply connection on the device. Now you can plug the power adapter’s
plug into a power outlet that has been correctly installed according to your public
power system. To operate via your car’s cigarette lighter, connect the car adapter’s
connector to the DC IN 9 –12 V power supply connection on the device. Now you
can plug the adapter into your car’s cigarette lighter.
Please bear in mind that the device consumes a minimal amount of
power, even when turned o. Please take this into consideration when
operating the device with your vehicle’s electrical system. Remove the
adapter from the power supply source in order to completely cut o the
power supply to the device.
A/V OUT
› This connection gives you the opportunity to use the SOL T700 as a signal source
for an external device (for example as a monitor). Please refer to the user manual
accompanying this device before connecting.
Earphones
› You can connect a set of earphones to this jack. Speakers are muted, once earphones are plugged into the device.
Please note that excessive sound pressure levels created when listening
to loud volume levels, particularly with earphones or headphones, can
lead to permanent hearing damage or loss.
USB connection
› Ensure that the device is turned o before connecting data media to the USB
port on the device. The following data media can be used with the USB 2.0 port:
A/V IN
› You can connect an external signal source to this connection (for example a
game console). Please refer to the user manual accompanying this device on how
to connect properly.
22
› USB ash drives formatted to FAT32 and with a capacity of up to 32 GB.
› USB hard disks formatted to FAT32 with a capacity of up to 80 GB (require their
own power supply) and only one partition.
Chapter 5 ConnectionsChapter 5 Connections
23
Page 13

General operation
6
The USB connection does not warrant a supply of power to the external
medium used, for example a hard disk. Please refer to the literature in the
user manual accompanying the connected device.
Please note that connected USB cables must be less than 3 m in length in
order to maintain EMC compliance. Using cables longer than 3 m could
inuence electromagnetic compatibility, which could lead to disturbance
or failure.
Memory cards
› Ensure that the device is turned o before inserting a memory card into the card
reader. You can use SDHC, SD, MMC and MS memory cards formatted to FAT32
with this 3-in-1 card slot. A maximum capacity of up to 32 GB can be used, depending on the type of memory card used.
Antenna
› Ensure that the device is turned o before connecting the antenna.
› Connect the antenna to the antenna connection found on the device.
› Select a location with good reception for top performance.
The following generally applies to operating functions within a menu.
› The ON/OFF switch on the side of the device turns the device on and o.
› Move a selection or change a setting with the control eld on the device or the
navigation buttons on the remote control.
› Conrm a selection with „ENTER“/“OK“.
› Press the „EXIT“ button to exit the current menu or to return to the main menu.
› If „INFO: Operation guide“ can been seen at the bottom of the screen, press the
“DISPLAY” button for a view/reminder of available operating functions.
Power ON/OFF
› Slide the ON/OFF switch to „ON“ to turn the device on.
› Turn the device o by sliding the ON/OFF switch to the position „OFF”.
› The device will automatically use the integrated rechargeable battery if it has
not been connected to an external power source.
Note
When turning the device on for the very rst time, it will try to carry out an automatic channel search.
24
Chapter 6 General operationChapter 5 Connections
25
Page 14

DVB-T
7
› First, you will be asked to select a menu language and country.
› After a selection has been made, conrm your choice with „ENTER”.
› Next, you will be required to conrm if you wish to install. Conrm with „YES” to
start a channel search.
› Change to a DVB-T mode by pressing the „TV/AV“ button.
› Press the „DISPLAY“ button repeatedly to display information about the current
selected channel (e.g. reception quality and strength).
› Press the „
closer look at a weather chart.
“ button while viewing a program to stop it and for example, take a
Channel search
› You can press the „SCAN“ button to start an automatic channel search. Conrm
with „YES” to delete existing channels and begin a channel search.
› As an alternative, you can also search through certain frequency ranges or channels in the main menu.
› Press the „MENU“ buttonto open the main menu and select „Digital TV” › „Installation”.
› Select „Area Search” to carry out a complete channel search. Existing channels
will be deleted. The whole frequency range will be scanned through. Channels
found will be stored in sequence. Conrm with „YES” to delete existing channels
and to begin a channel search.
› Select „Manual Search“ to search through a certain channel for stations. Stations of a channel already existing within a channel list, will be searched through
and deleted. Following this, the channel will be search through completely once
again. Stations found will be added to the end of the channel list.
26
Chapter 7 DVB-TChapter 6 General operation
27
Page 15

› Select „Auto Search” to search through a certain range for stations. Stations
within this frequency range, already existing within the channel list, will be searched through and deleted. Following this, the frequency range will be search
through completely once again. Stations found will be added to the bottom of
the channel list.
Channel selection
Choose one of the following options to select a channel:
› Use the „“ and „“ buttons to switch to the next/previous channel.
› Use the numerical buttons to enter a channel number directly.
First time installation
› The installation assistant will start if the device is being used for the rst time or
settings have been restored to factory default settings.
› Use the „,, and “ buttons to move to a selection and the „ENTER“ button
to conrm.
› Select a menu language (OSD Language).
› Select the area in which you are in (Area).
› Press „ENTER“.
› Conrm with „YES“ to carry out the installation.
› The scan progress will start automatically.
› The device will switch over to the rst channel found once the scan progress has
been completed.
› If you select „NO“, you will be able to carry out a channel search at a later point
in time.
› Press the „OK“ or „ENTER“ button to open the „Quick Select” guide to display listings.
› Use the „“ and „“ buttons to navigate to a channel.
› Use the „
“ and „ “ buttons to move faster through channel listings.
› Use the „ “ and „“ buttons to select a group (channels can be organized/dened ahead of time under „Main Menu“ › „Digital TV“ › „Channel Manager“ › „Channel Grouping“).
› Press the „OK“ and „ENTER“ buttons to switch to the selected menu item.
› Press „EXIT“ to exit a menu/return to the previous menu.
› Press the „FAV“ button to open a list of favorite channels.
Use the „ “ and „“ buttons to navigate to a channel (favorite channels can be
arranged or added to a list under „Main menu“ › „Digital TV“ › „Channel Manager“ ›
„Channel Organizer“).
› Use the „
“ and „ “ buttons to move faster through favorite listings.
› Press the „OK“ and „ENTER“ buttons to switch to the selected menu item.
› Press „EXIT“ to exit a menu/return to the previous menu.
› Press the „RECALL“ button to switch back and forth between the current and previously viewed channel.
28
Chapter 7 DVB-T
Chapter 7 DVB-T
29
Page 16

Zoom
› Press the „ZOOM“ button to activate the zoom function.
Now you can press the „
zoom levels (1/4, 1/3, 1/2, Normal, x 2, x 3, x 4).
› You can use the „,, and “ buttons to move an image during a zoom mode.
“ and „ “ buttons repeatedly to switch through dierent
Teletext (TTX)
› Press the „TTX“ button to open the teletext menu.
› Use the „“ and „“ buttons to navigate to an available TTxPid and press „ENTER“.
If the station you are watching supports this service, the teletext start page of this
station will then be displayed on screen. This service may vary according to the
station being watched.
› The „“ button can be used to move through teletext pages 100 at a time (e.g.
from 728 to 828). Once pressed, the device will try to proceed to this page. The
device may also return to the beginning (e.g. move from 828 back to 128).
› The „ “ button can be used to move from the current page back to page 100
(e.g. from 728 back to 100).
› The colored elds (red, green, yellow and blue) at the bottom of the teletext
page can be used to view the current and last three pages. Press the respective
colored button to switch to the respective page.
Note
Being able to nd a teletext page or use the teletext function all depends upon
the signal reception quality and whether the station selected supports this
service.
› You can switch through various teletext window transparencies by repeatedly
pressing the „ENTER” button. Press the „EXIT” or „TTX” button again to exit the teletext function.
› Use the numeric buttons to enter the page number you would like to view. After
a page number has been entered, the device will begin searching for the requested page. Once found, the display will switch over to this page.
› Use the „“ and „“ buttons to browse up/down through the teletext. The device will try to proceed in the selected direction to the next available page.
30
Chapter 7 DVB-T Chapter 7 DVB-T
Electronic program guide (EPG)
› The „EPG“ button opens the electronic program guide. Once selected, programs
will be search for within a seven-day period.
› The „“ and „“ buttons move a selection up/down.
Navigating with these buttons in the channel list will simultaneously change the
program in the background.
› Use the „ “ and „“ buttons to switch between the channel list and TV program
guide.
31
Page 17

› Use the „ “ and „ “ buttons to browse through the days of the week within
the program guide.
Daily Mode
› Press the red button to change from a weekly to a daily program mode and to
display detailed information about the current channel’s program.
Weekly Mode
› Press the green button to change from a daily to a weekly mode. In the program
guide you will be able to see a short version of programs found within a threehour period. You can use the „ “ and „“ buttons to move through the program
guide.
Extended Mode
Navigate within the program guide to a desired program and press the yellow
button. Any additional information (e.g. start and end time of a program or the
theme) will be displayed in this window. Use the „“ and „“ buttons to move
up/down through each line of the text and the „
“ and „ “ buttons to page up/
down through the whole text eld found in this window.
Note
Being able to access the electronic program guide all depends on the signal reception quality and whether this service is supported by the selected channel.
What is DVB-T?
DVB-T is the abbreviation for Digital Video Broadcasting – Terrestrial and refers to
the transmission of digital television signals into the atmosphere using terrestrial
methods.
DVB-T is a variation of DVB and is mainly used as a standard for transmitting
digital television and radio via an antenna in various European countries. The
transmission frequencies used to broadcast DVB-T already correspond with wellknown analog broadcasting UHF and VHF channels. These channels can be used
more eectively with digital broadcasting than with analog technology, as more
stations per channel can be transmitted.
32
Chapter 7 DVB-T Chapter 7 DVB-T
33
Page 18

Main menu
8
› Press the „MENU“ button to open the main menu.
› The following chart will give you a general idea about the main menu’s structure.
This outline makes it easier to understand the options and functions contained
within this menu.
Main Menu
Digital TV Channel
Manager
Installation Automatic Starts an automatic channel
Conguration OSD Select a menu and preferred
Channel Organizer
Channel Sorting
Channel Grouping
Edit Channels General view and setting
Delete All Deletes all stations
Manual Search Search manually for a cer-
Area Search Search through a certain
Add/Remove stations to/
from a favorites list, move,
lock, delete or rename
channels
Dene the sorting order
Assign channels to certain
groups
options of channel PIDs
search
tain channel
frequency range
audio language
TV Select diverse picture dis-
play options
System Setup Select dierent sound and
picture eect settings or
LCN and area settings
Time Set the time
Parental lock Change the password
Software
Upgrade
Factory Default
Version Displays diverse device
Movie Opens the browser for video
Music Opens the browser for
Photo Opens the browser for
Select dierent sound and
picture eect settings or
LCN and area settings
Restore settings to a factory
default setting
hardware and software
information
le display
music le display
displaying photos
34
Chapter 8 Main menuChapter 8 Main menu
35
Page 19

Channel Manager
Channel Organizer
› The „Channel Organizer” gives you the opportunity to create your favorites,
move channels, lock channels to prevent use and/or to delete channels.
› Use the „“ and „“ buttons to select a channel in the channel list.
› Use the „
Favo Press the red button to add/remove a channel to your favorites.
Del Press the green button to delete a highlighted channel or to
cancel the highlighted channel.
You will be required to enter a password once. Upon exiting the
„Channel Organizer” you will be asked to conrm if the
highlighted channel is to be deleted.
Mov Press the yellow button to move a channel to a dierent channel
location.
Use the „“ and „“ buttons to select a new channel location
and the „ENTER” button to conrm. The channel will then be
relocated to this channel location.
“ and „ “ buttons to move faster through the channel list.
Rename Press the „ “ or „“ button to open a window for renaming
channels.
› Press the numerical buttons repeatedly to move through and
select the required character. Available characters can be seen in
the dialogue box above the numerical pad. It will take
approximately 5 seconds before the cursor moves to the next
location and the previously entered character is accepted.
› Use the red button to change between characters (letters and/
or numbers).
› Use the green button to change between upper and lower case
letters.
› Use the blue button to insert an empty space between
characters.
› Use the green button to delete the position in which the cursor
is currently located.
› Use „ “ or „“ to move through entered positions.
› Select “EXIT” to exit the dialogue box without renaming a
channel.
› Select “ENTER” to exit the dialogue box and to save the
new name.
› Press „EXIT“ to exit the “Channel Organizer” menu again.
Lock Press the blue button to lock a channel or cancel a lock mode.
You will be required to enter a password once. In the future, you
will be required to enter this password in order to view the
locked channel.
36
Channel Sorting
Here you will be able to determine the order in which channels are to be sorted.
› Use the „“ and „“ buttons to select an option.
› Use the „ “ and „“ button to change between options and suboptions.
› Suboptions can be selected with the „“ and „“ buttons.
Chapter 8 Main menuChapter 8 Main menu
37
Page 20

› Press „ENTER“ to conrm a selection.
The „First Option” is for selecting a country.
The „Second Option” is for selecting an encoding option.
The „Third Option” is for selection according to names.
A combination of the above options is also possible.
› Press the „EXIT“ button to exit the channel grouping menu and to conrm settings that have been carried out.
Note
Favorites can be edited in the menu option „Channel Organizer”.
› Press the „EXIT“ button to discard selected options and to exit the „Channel Sorting” menu.
› Press the „ENTER” button after options have been selected and conrm with
„YES” to save selected options and carry out a sorting process.
› Use the „
“ and „ “ buttons to browse through channel listings faster and to
take a look at how channels are currently stored.
Channel Grouping
In this menu you will be able to assign channels to certain groups.
› Use the „“ and „“ buttons to select a channel to be assigned to the quick select guide. Use the „
“ and „ “ buttons to move through the channel list faster.
Use the numerical buttons to assign the highlighted channel to a certain group.
The following available groups include:
1 – None
2 – News
3 – Science
4 – Sport
5 – Movie
6 – Kids
7 – Music
8 – Fashion
Edit Channels
› This menu allows you to create stations according to information packs or to add
carriers to them.
› Press the red button to open a dialogue eld for adding a certain station.
› Press the yellow button to open a dialogue eld for editing existing stations.
Use the „“ and „“ buttons to select a channel in the list or use the „
“ buttons to move faster through channels.
„
“ and
Area name select a country; only available under the option „Add Channel“
Carrier available carrier signal; only available under the option „Add Channel“
Channel determines a new channel name
Audio PID Audio Packed Identication (audio signal ID of the desired station
within the selected carrier signal)
Video PID Video Packed Identication (video signal ID of the desired station
within the selected carrier signal)
PCR PID Program Clock Reference (contains information about the signal
synchronization of the decoder)
Delete All
› This option lets you delete all TV channels and/or radio stations.
38
Chapter 8 Main menuChapter 8 Main menu
39
Page 21

› Use the „“ and „“ buttons to make a selection.
› Press „ENTER” after selecting an option.
› Select „YES” within the dialogue window to conrm deletion.
Installation
› This menu option allows you to search for stations in several ways.
Area Search
› Select the option „Area Search“ to begin an automatic channel search. Existing
channels will be deleted. This scanning process will search through the whole
frequency range. Channels will be stored in the order that they are found. A dialogue window will appear on display requiring you to conrm a channel search.
Select „YES” to delete existing channels and to begin an automatic search.
Manual Search
Select „Manual Search“ to search through a certain channel for stations. Stations
of a channel already existing within a channel list will be searched through and
deleted. Following this, the channel will be search through completely once
again. Stations found will be added to the end of the channel list.
› Press „EXIT” to cancel a search process and to exit this menu option.
Auto Search
› Select „Auto Search” to search through a certain frequency range for stations.
Stations within this frequency range, which already exist in the channel list, will
be searched through and deleted. Following this, the frequency range will be
search through completely once again. Stations found will be added to the bottom of the channel list.
Start Freq (KHz) determine where a search is to begin
› Use the numerical buttons to enter the desired start frequency.
› Use the „ “ and „“ buttons to move through positions.
End Freq (KHz) determine where a search is to end
› Use the numerical buttons to enter the desired end frequency.
› Use the „ “ and „“ buttons to move through positions
Bandwidth choose the bandwidth for the selected channel
› Use the „ “ and „“ buttons to select a bandwidth
› Use the „“ and „“ button to change through options.
› Press „ENTER“ to begin searching.
› Press „EXIT” to cancel a search process and to exit this menu option.
› Use the „ “ and „“ button to select a channel that you’d like to search through
for stations.
› Press „ENTER” to begin searching.
40
Conguration
OSD
› Select this option for access to various display and language setting options.
Chapter 8 Main menuChapter 8 Main menu
41
Page 22

OSD › select a menu color scheme
Time on OSD › select on/o to display/not display the time on screen
OSD Timeout › determine the window fade out eect
(e.g. changing channels)
OSD Trans › select the menu window transparency
OSD Language › select a preferred menu language
MP4 Sub Language › select a preferred subtitle language*
1. Audio Language › select the preferred rst language*
2. Audio Language › select the preferred second language*
* These settings refer to, for example, DVDs or les found on removable storage
devices.
TV
Display Mode › determine if the color system is to be selected
automatically or if a PAL or NTSC setting is preferred.
Aspect Ratio › select a preferred aspect ratio (16:9, 4:3 LB or 4:3 PS)
Brightness › select to adjust the brightness
Contrast › select to adjust the contrast
Hue › select to adjust the shade of color
Saturation › select to adjust the color saturation
› In addition to the above options, you can also press the „MODE“ button to open
a further menu. Setting options that can be performed in this menu are independent and/or additional to those found within the menu „TV”.
› Press the „MODE” button.
Use the „“ and „“ buttons to select between the menu options „PICTURE“ and
„SYSTEM“.
Press „ENTER“ or „“ to access the selected menu.
Use the „“ and „“ buttons within this submenu to carry out setting adjustments.
Press the „MODE“ button once again to return to the menu selection option or to exit
the menu again.
MODE MENU
PICTURE BRIGHTNESS For brightness adjustments
CONTRAST For contrast adjustments
COLOR For color saturation adjustments
LANGUAGE For selecting the language of this menu
RESET Restore factory default settings
SYSTEME PICT. ASP. Switch between a 16:9 and 4:3 screen format
VERTICAL Flip an image vertically
System Setup
› Select this menu to carry out basic setting options
EQ Setup › select an equalizer setting
Surround › select a surround sound eect
JPEG Eect › select on/o to display/not display picture eects during viewing
LCN › turn the logical channel number on/o
Area › select an area
Time
› In this menu option you have the opportunity to set the time and date.
Timer Mode › select if the time is to be received automatically or manually set
Date › enter the date in the following order: mm/dd/yyyy
Time › enter the time hh:mm
42
Chapter 8 Main menu
Chapter 8 Main menu
43
Page 23

GMT Oset › select the current time zone oset (Germany is GMT +01:00)
Summer time › turn the Daylight Savings Time function on/o
Parental Lock
› This menu option gives you the opportunity to set a password. The preset pass-
word is “0000”.
Software Upgrade
Version
› This option opens a window that displays information on device hardware/software. Press „EXIT” to exits this menu window again.
Movie
› Select this option to open a le browser containing movie les stored on the
connected storage medium.
› This option allows you to search through a connected removable storage device
for a le that can be used to carry out a software upgrade.
Note
Please not that the user is solely responsible for any upgrades and all actions carried out.
Factory Default
› This option allows you to restore all device settings to a factory default setting.
Select „YES” within the dialogue window to carry out this action.
Note
Please note that the user is solely responsible for returning settings to a factory
default setting.
44
› Directories and playable les will be displayed. AVI video les are supported.
› Use the „“ and „“ buttons to select a le or directory in the list.
› Use the „
› Press „ENTER“ to start playback or to access a directory.
› Use the numerical buttons to enter a number directly. After approx. 3 seconds
the device will begin playback or change to the corresponding directory. Press
„ENTER” for immediate access to the lm / to switch to the directory.
› Press „
› Press „“ to stop playback.
› Use the „
› Press the „
20 and o). A fast forward/reverse process can be stopped by pressing the „
button.
“ and „ “ buttons to move faster through the le list.
“ to pause or resume playback.
“ and „ “ buttons to return/skip to the previous/next le.
“ and „ “ buttons repeatedly to fast forward/reverse (x 2, x 4, x 8, x
Chapter 8 Main menuChapter 8 Main menu
“
45
Page 24

› Press „REPEAT“ to switch through various repeat mode options:
Repeat One › repeats the current le
Repeat Dir › repeats the current directory
Repeat Shu. › repeats the current directory in a random order
Repeat OFF › turns the repeat mode function o
› Press „ZOOM“ to activate the zoom function.
Press the „
(1/4, 1/3, 1/2, Normal, x 2, x 3, x 4).
Use the „,, and “ buttons to move an image during a zoom mode.
› Press „DISPLAY“ to display names, playing time and total playing time.
› Press „EXIT” to stop playback or to switch to a higher directory level / return to
a menu mode.
“ and „ “ buttons repeatedly to switch through dierent zoom levels
› Press „ “ to pause or resume playback.
› Press „“ to stop playback.
› Use the „
› Press the „
8, x 20 and o ). A fast forward/reverse process can be stopped by pressing the
button.
› Press „REPEAT“ to switch through various repeat mode options:
Repeat One › repeats the current le
Repeat Dir › repeats the current directory
Repeat Shu. › repeats the current directory in a random order
Repeat OFF › turns the repeat mode function o
› Press „EXIT” to stop playback or to switch to a higher directory level / return to
a menu mode.
“ and „ “ buttons to return/skip to the previous/next le.
“ and „ “ buttons repeatedly to fast forward/reverse (x 2, x 4, x
Music
› Select this option to open a le browser containing music les stored on the
connected storage medium. Directories and playable les will be displayed. MP3
and WAV audio les are supported.
› Use the „“ and „“ buttons to select a le or directory in the list.
› Use the „
› Press „ENTER“ to start playback or to access a directory.
› Use the numerical buttons to enter a number directly. After approx. 3 seconds
the device will begin playback or change to the corresponding directory. Press
„ENTER” to play a song immediately / to switch to the directory.
46
“ and „ “ buttons to move faster through the le list.
Photo
› Select this option to open a le browser containing photo les stored on the
connected storage medium.
Directories and playable les will be displayed. JPEG les are supported.
› Use the „“ and „“ buttons to select a le or directory in the list.
› Use the „
› Press „ENTER“ to start playback or to access a directory.
› Use the numerical buttons to enter a number directly. After approx. 3 seconds
the device will display the picture or change to the corresponding directory. Press
„ENTER” to display the picture immediately / to switch to the directory.
“ and „ “ buttons to move faster through the le list.
Chapter 8 Main menuChapter 8 Main menu
47
Page 25

› Press „ENTER“ to start a slideshow or to skip to the next picture.
› Press „
› Press „“ to stop picture display.
› Use the „
› Use the „ “ and „“ buttons to rotate a picture to the left/right.
› Use the „“ button to ip a picture vertically from left to right around the central
axis.
› Use the „“ button to ip a picture horizontally from top to bottom around the
central axis.
› Press „ZOOM“ to activate the zoom function.
Press the „
(1/4, 1/3, 1/2, Normal, x 2, x 3, x 4). Use the „,, and “ buttons to move an
image during a zoom mode.
› Press „DISPLAY“ to display names, picture type and size.
› Press „EXIT” to stop playback or to switch to a higher directory level / return to
a menu mode.
“ to pause or resume a slideshow.
“ and „ “ buttons to return/skip to the previous/next le.
“ and „ “ button repeatedly to switch through dierent zoom levels
Selecting a signal source
› Press the TV/AV button on the remote control or on the device to change between DVB-T and A/V input operation.
› The TV/RADIO button lets you switch between DVB-T operation and available
radio stations.
› Browsers for removable storage devices can be selected in the main menu.
› Ensure that the medium selected for use has been properly connected to the
device.
› Open the main menu and select the „Movie”, „Music” or „Photo” browser.
› Now you can select between „USB” and „CARD” to open the selected medium’s
browser.
9
48
Chapter 9 Selecting a signal sourceChapter 8 Main menu
49
Page 26

Audio settings
› Press the „AUDIO” button during DVB-T operation to open a menu for dierent
audio track and balance setting options.
› Dierent equalizer and sound eect settings can be turned on and o in the
main menu under „Main Menu › Digital TV › Conguration › System Setup”.
› You can increase/decrease the volume with the volume control dial.
› Press the „MUTE" button to deactivate/activate the sound.
Try to maintain a safe volume level and avoid excessive noise. Over a certain amount of time your hearing will become accustomed to the adjusted volume level.
Please note that excessive sound pressure levels created when listening
to loud volume levels, particularly with earphones or headphones, can
lead to permanent hearing damage or loss.
Ensure that the volume control dial has been regulated to a minimum
sound level before turning the device on or before using on earphones/
headphones.
10
Troubleshooting
The device you have just purchased is equipped with state-of-the-art technology
and is safe to operate. Nevertheless, problems or malfunctions may occur.
Before contacting a service technician, refer to the following possible solutions:
Problems with le playback
› Check if everything has been connected properly.
› The audio codec is not supported.
› The video codec is not supported.
› You’ve been trying to open the wrong le type.
› You would like to open a le type intended for a dierent operating mode.
The remote control is not working
› Check if the batteries have been inserted correctly.
› If batteries are empty, replace them with new ones.
› Point the remote control to the remote sensor and press to operate.
› Remove any objects found between the remote control and the remote sensor.
› Make sure the distance between the remote control and the device does not
exceed 8 m.
Buttons do not function (on the device and/or remote control)
› Turn the device o and then on again. As an alternative, slide the power switch
on the device to OFF, unplug it from the power outlet and plug in again. (The
device may also not be functioning due to a stroke of lightning, static electricity
or other external factors.).
11
Distorted/Noisy reception or no picture
› The reception frequency is not optimal.
› The antenna is not adjusted properly.
› Start an automatic channel scan.
50
Chapter 11 TroubleshootingChapter 10 Audio settings
51
Page 27

Maintenance, handling
My removable storage device is not detected
› Ensure that the storage medium has been connected properly.
› The storage medium has not been formatted to the FAT32 le system.
Any repairs other than those mentioned above are to be carried out
solely by an authorized technician.
and cleaning
› Never operate the device in places with extreme high or low temperatures.
Permissible storage temperatures: – 25° C – 60° C
Permissible operating temperatures: 0° C – 40° C
› Should pixel errors (to light or to dark pixels) appear during operation, then this
does not necessarily mean that the device is defect. These errors are a common
TFT LCD technology problem. Up to ve pixel errors are acceptable.
Maintenance
› Carry out a technical safety inspection on a regular basis, e.g. check if the power
cable or housing may have become damaged.
› If there is reason to believe that the device can no longer be operated safely,
then disconnect it immediately from the power supply and secure it against any
unintentional operation. Carefully remove the power cable plug from the wall
outlet and where applicable switch o the corresponding circuit breaker rst.
It can be assumed that safe operation is no longer possible, if:
› there is visible damage to the device or power cable,
› the device no longer works,
› it has been stored for a longer period of time under unfavorable conditions
› or exposed to rigorous transport conditions.
12
› Always adhere to the following safety instructions before cleaning or servicing
the device:
› Live parts may be exposed, if the covering is opened or parts are removed.
› The device must be disconnected from the power supply source prior to service,
maintenance or repairs.
52
Chapter 12 Maintenance, handling and cleaningChapter 11 Troubleshooting
53
Page 28

› Capacitors within the device may still carry voltage even though they have been
disconnected from all power supply sources.
› Repairs are only to be carried out by qualied personnel, who are familiar with
the hazards involved and the relevant regulations.
Transporting or sending the device
Please retain the original box and the packaging material in case you need to
transport or send the device out for maintenance at a later date. Please note that
the device should be repacked in the original packaging. The box and packaging
have been especially developed for this device in order to protect it during transport and against damage. Retain this instruction manual for future reference and
where required pass it along with the device if handed over to a third party.
Keeping the external case clean
Never use volatile uids near the device, as for example insect spray. Avoid letting
the device come in contact with rubber or plastic products for longer periods of
time. These could otherwise leave marks behind.
Cleaning the device
Unplug the power cable before cleaning. Always use a soft and dry cloth to clean
the unit’s exterior. If the device is extremely dirty you can use a soft cloth, dampened with water or a mild cleaning solution to clean. Never use any abrasive or
harsh cleaning agents (e.g. alcohol, benzine or thinners) as these could damage
the controls, casing or any markings and labels found on the device.
Contribute to a better environment by using a designated disposal system (e.g.
Dual System in Germany) or recycling site for the disposal of packaging material.
54
Chapter 12 Maintenance, handling and cleaningChapter 12 Maintenance, handling and cleaning
55
Page 29

Specications
13
Technical data
› Operating voltage: Power supply: 100 – 240 V ~ 50/60 Hz
Car adapter: 10 –15 V DC
Device: 9 – 12 V DC
› Screen diagonal: 17.78 cm (7“)
› Picture format: 16:9, 4:3
› Pixels: 480 RGB (H) x 234 (V )
› Video color system: PAL and NTSC
› Dimensions (approx.): 236 (W) x 125 (H) x 36.5 (D) mm
› Weight (approx.): 550 g
› Connections: DC IN 9 –12 V
A/V OUT (3.5 mm)
A/V IN (3.5 mm)
Stereo earphones (3.5 mm)
Antenna (75 Ω)
3-in-1 card reader
USB 2.0
› Supports: Video: AVI
Audio: MP3 and WAV
Photos: JPEG
› USB 2.0 USB ash drives up to 32 GB and formatted to FAT32
External hard disks formatted to FAT32
(requires their own power supply; only one partition)
› Memory cards SDHC, SD, MMC and MS cards up to 32 GB
(depending on the type) and formatted to FAT32
Battery parameter
› Lithium polymer rechargeable battery (7,4 V/1800 mAh)
› Charge time: approx. 5 hours (turned o)
to 20 hours (turned on)
› Discharge time: up to 2.5 hours, depending on the type of active use
Permissible storage and operating temperatures
Storage conditions Temperatures Humidity
6 Months – 20 °C ~ + 45 °C 65 ± 20 %
1 Week – 20 °C ~ +65 °C 65 ± 20 %
Operating conditions Temperatures Humidity
Normal charging 0 °C ~ + 45 °C 65 ± 20 %
Normal discharging – 20 °C ~ + 65 °C 65 ± 20%
Delivery contents
› X4-TECH SOL T700 with built-in rechargeable battery
› Power supply 100 – 240 V
› 12 V car adapter
› DVB-T antenna with magnetic base
› Remote control with batteries
› Instruction manual
› Service data sheet
56
Chapter 13 SpecicationsChapter 13 Specications
57
Page 30

Version 1.0 – 3/2010
Service
Should questions arise then please contact a specialist or our service hotline:
Hotline: +49 (0) 53 02/8 06-450
Address: x-services.eu gmbh
Service department X4-TECH
Brackestraße 3 · 38159 Vechelde/Germany
› Information and updates: http://www.x4-tech.de
› We reserve the right to alter specications and information contained in this
manual without notice.
› All brands mentioned are property of X4-TECH or of their respective owners.
› X4-TECH assumes no responsibility or liability for any errors or inaccuracies that
may appear in this instruction manual.
© 2010 X4-TECH All Rights Reserved.
Manufacturer
x-peer.de GmbH · Brackestraße 3 · D-38159 Vechelde
Internet: www.x-peer.de · E-Mail: info@x-peer.de
www.x4-tech.de
 Loading...