

Page 1
SMARTdri
and SMARTdri
High-Efciency Intelligent Hand Dryer
Secamanos inteligente altamente eciente Sèche-mains intelligent à haute efcacité
Intelligenter Hochleistungs-Händetrockner Asciugamani elettrico ad alta efcienza
All K48 Series
Todos los modelos de la Serie K48
Ensemble de la série K48
Alle Geräte der Serie K48
Tutte le Serie K48
™
plus
Please read and save these instructions. Read carefully before attempting to assemble, install, operate or service the product described.
Protect yourself and others by observing all safety information. Failure to comply with instructions could result in personal injury and/or
property damage. Retain instructions for future reference.
Por favor lea y guarde estas instrucciones. Léalas cuidadosamente antes de tratar de montar, instalar, operar o dar mantenimiento al producto aquí descrito. Protéjase usted mismo y a los demás
observando toda la información de seguridad. No seguir las instrucciones puede ocasionar daños, tanto personales como materiales. Guarde estas instrucciones para referencia en el futuro.
Lire et conserver ces instructions. Les lire attentivement avant de commencer à assembler, installer, faire fonctionner, réparer ou entretenir l’appareil décrit. Pour se protéger et protéger autrui,
observer toutes les consignes de sécurité. Le fait de négliger d’appliquer ces instructions peut entraîner des blessures et/ou des dommages matériels. Conserver ces instructions pour consultation
ultérieure.
Bitte lesen Sie diese Anweisungen und bewahren Sie sie auf. Lesen Sie diese Anweisungen sorgfältig durch, bevor Sie das beschriebene Produkt zusammenbauen, montieren, betreiben bzw.
warten. Beachten Sie für Ihren persönlichen Schutz und zum Schutz anderer sämtliche Sicherheitsinformationen. Eine Nichtbeachtung dieser Anweisungen kann zu Verletzungen und/oder
Sachschäden führen. Bewahren Sie die Anweisungen für spätere Bezugnahme auf.
Si prega di leggere e conservare queste istruzioni. Leggere con attenzione prima di montare, installare, azionare o riparare il prodotto descritto. Proteggere se stessi e terzi attenendosi alle
istruzioni sulla sicurezza. La mancata conformità con le istruzioni potrebbe risultare in lesioni a persone e/o danni a cose. Conservare le istruzioni da leggere in futuro.
World Dryer Corporation
5700 McDermott Drive
Berkeley, IL 60163 U.S.A.
800-323-0701
www.worlddryer.com
1
Page 2

2
Page 3
Description
World warm air hand dryer, powered by a universal brush motor, delivers up to 800 watts of drying power and incorporates
an integrated element for heated air. The dryer controls provide for (3) distinct levels of motor operation (Hi, Med and
Low) and the option of operation with, or without, the heating element. An infrared sensor is used to automatically activate
the dryer. These models are intended for use in commercial, industrial, ofce and public facility environments.
Electrical Specications
Table 1
Models Type Electrical Input Rated Amperage Rated Watts Certications
K48-XXX Automatic 220 - 240VAC, 50/60Hz 5.0A 1200 CE, TUV-GS
General Safety Information
This appliance is not intended for use by young children or persons with physical, sensory or mental disabilities
unless adequately supervised by a responsible person to ensure they can use the appliance safely. Young children
should be supervised to ensure they do not play with the appliance.
DANGER Failure to disconnect the power source before installation or servicing can result in serious
injury or death from electric shock.
• Always disconnect the power source before servicing or installing the hand dryer.
DANGER Failure to properly ground this unit could result in severe electrical shock and/or death.
• This hand dryer must be properly grounded (Earthed) for safe operation. An identied ground connection point is
supplied on the hand dryer’s wall base.
• We recommend GFCI protection in wet or damp locations or as required by local code.
WARNING Risk of re, personal injury or property damage are possible if local codes, or safety
recommendations are not followed.
• Use only the electrical power (voltage and frequency) specied for the model hand dryer being installed. See
Table 1 – Electrical Specications.
• Connect the hand dryer to the nearest suitable distribution panel. The xed wiring must include a disconnection
means complying with local wiring codes.
• To limit a voltage drop, and insure efcient operation, use No. 12 AWG (4 mm2) wire or larger as required by
local electrical codes.
• Always connect to a branch circuit with circuit breaker or fuse protection with an electrical rating greater than the
model hand dryer’s rated amperage shown in Table 1 - Electrical Specications.
• To avoid a hazard due to inadvertent resetting of the thermal cutout, the hand dryer must not be supplied through
an external switching device, such as a timer, or connected to a circuit that is regularly switched on and off by the utility.
• Each automatic model hand dryer must have a dedicated circuit.
• Route all eld wiring away from moving parts within the hand dryer.
CAUTION Improper mounting could result in personal injury or property damage.
• Follow the mounting height recommendations in Table 2.
• On a stud wall, one side of the hand dryer should be mounted to an existing stud.
Unpacking
1. Remove all packing material. Recycling is recommended.
2. Carefully remove the hand dryer from the shipping carton, using care not to drop the appliance.
3. Inspect carefully for any damage that may have occurred during transit. Check for any loose, missing or damaged
parts. If the hand dryer is damaged, promptly inform the dealer where you purchased it.
3
Page 4

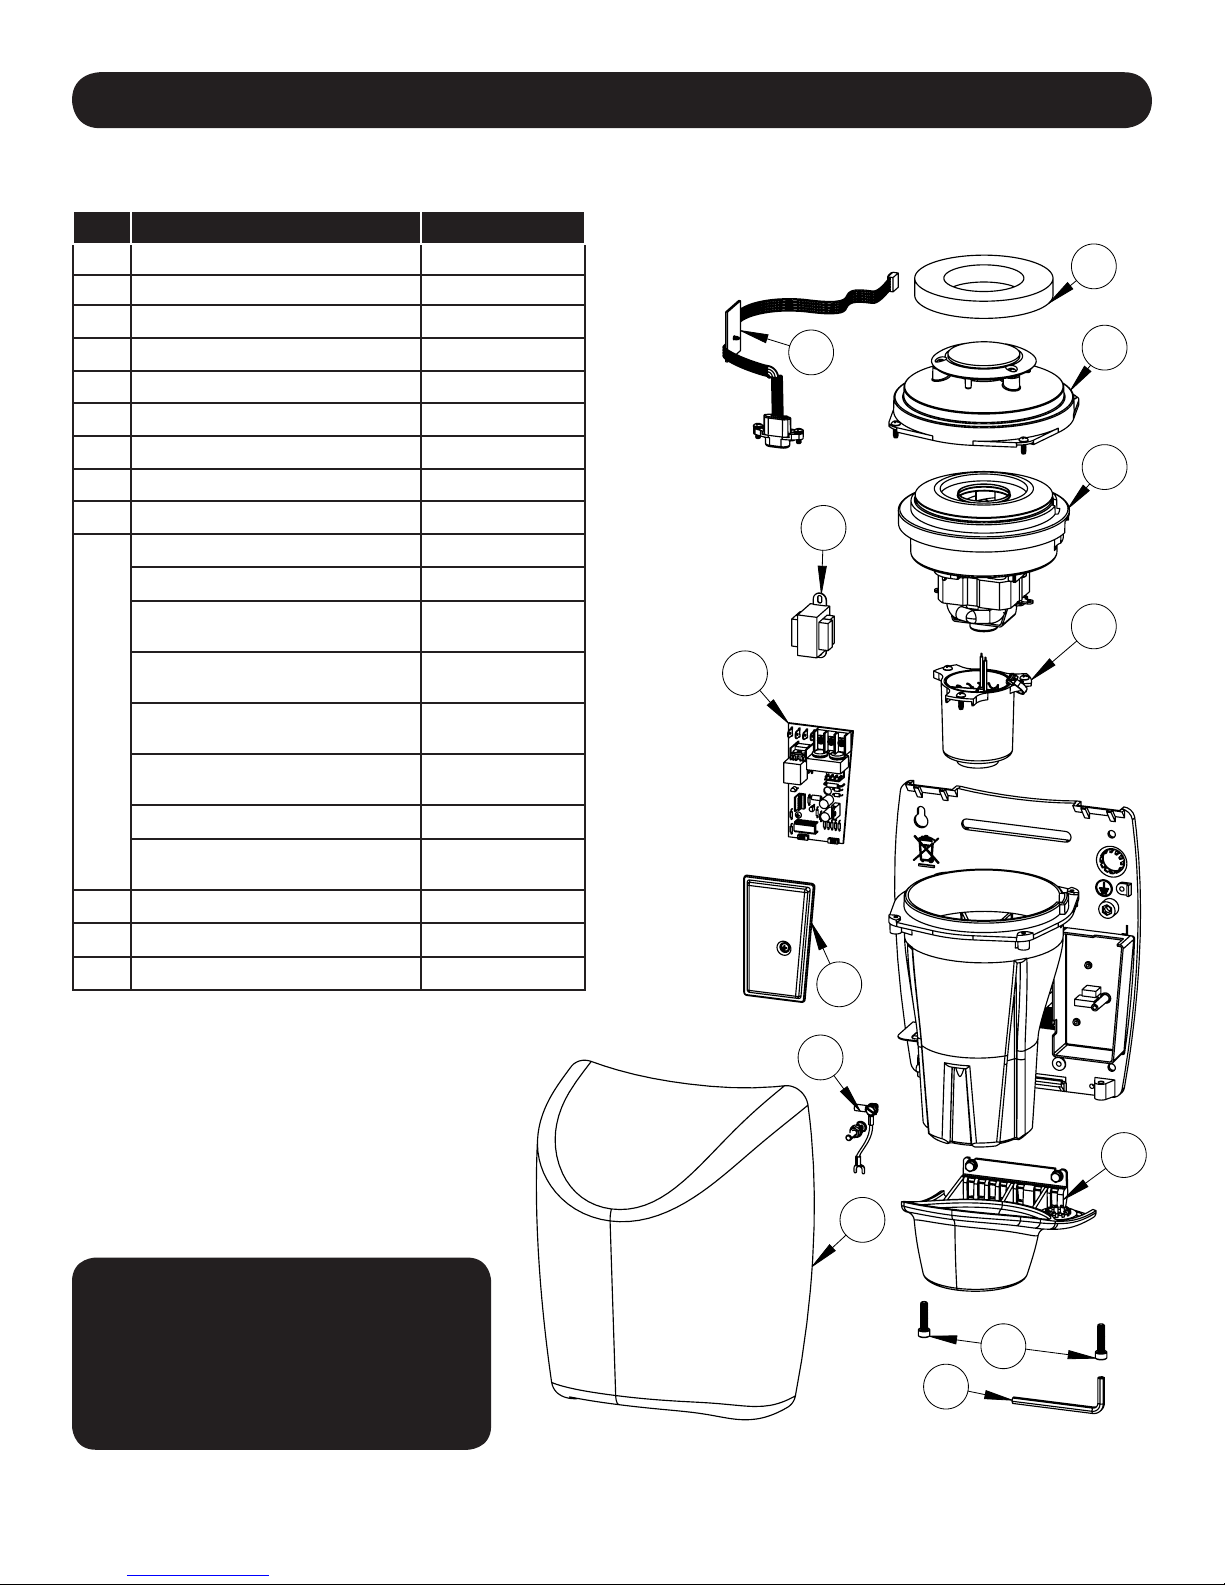
Parts List
Repair Parts List For SMARTdri™ and SMARTdri Plus Hand Dryers
Description Part Number
#
1 Kit, Sensor 49-10108K
2 Kit, Dryer Controls 16-KCEK
3 Kit, Motor - 240V 32-K240K
4 Kit, Heating Element - 240V 21-1240K
5 Kit, Plenum Cap Assy. 47-0818092AK
6 Air Filter 93-120309
7 Kit, Controls Cover 20-0815093K
8 Kit, Nozzle 30-K10109K
9 Kit, Grounding – Model K 23-120609
Cover Assy – Alum – White 20-K974
Cover Assy – Alum – Black 20-K162
Cover Assy – Alum – Polished/
Bright Chrome
Cover Assy – Alum – Brushed/
Satin Chrome
10
Cover Assy – Stainless Steel –
Polished/ Bright
Cover Assy – Stainless Steel –
Brushed/ Satin
Cover Assy – Steel – White 20-K975
Cover Assy – Cast Iron – Por-
celain Enamel
11 Kit, Security Screws 46-040222K
12 Wrench, Security 56-40189
13 Transformer - 240V 50-K240K
20-K970
20-K971
20-K972
20-K973
20-K976
2
1
13
7
6
5
3
4
All kits include fasteners needed for
installation. Part Number for Cover
Assy. (Reference Number 10) varies with
model number for hand dryer.
For Repair Parts, visit www.WorldDryer.com
Please provide following information:
- Model number
- Serial number
- Part description and number shown in
parts list
9
8
10
11
12
4
Page 5

Installation
1. Disconnect the power source.
2. Using Table 2 to determine the recommended mounting height, select a mounting location for the hand dryer where
no reective surfaces or objects (such as a hand basin) are directly under the infra-red sensor eye. The infra-red
sensor eye is visible from the bottom of the dryer and is located just inside the dryer’s nozzle area. The minimum
mounting distance from bottom of the dryer to a reective surface is 18 in (46 cm). When two or more dryers are
installed, they should be spaced apart 24 in (61 cm)
3. Use the security hex key supplied to turn the cover mounting screws clockwise to remove the cover from the dryer.
4. Place the hand dryer base on the wall at selected location and using the base as a template, mark locations for the 4
mounting bolt holes on the wall.
5. Fasten the base to the wall, using the type of bolts recommended in Table 3
6. Each dryer must have is own dedicated circuit.
7. Connect the dryer to the nearest suitable distribution panel.
8. Replace cover, turn screws counter-clockwise making certain not to over-tighten.
IMPORTANT: Consult local and general regulations before performing dryer installation. Ensure that the
electrical network is not overloaded. Do not connect to a branch circuit rated less than the model hand
dryer’s rated amperage shown in Table 1 – Electrical Specications.
Table 2
Recommended Mounting Heights from Floor to Dryer Bottom Edge in. (cm.)
Men’s washrooms 46 (117)
Women’s washrooms 44 (112)
Children’s washrooms, ages 4-7 32 (81)
Children’s washrooms, ages 7-10 36 (91)
Children’s washrooms, ages 10-13 40 (102)
Children’s washrooms, ages 13-17 44 (112)
Handicap Mounting Height 37 (94)
Table 3
Type of Wall Type of Bolt Minimum Bolt Length
Hollow Tile, Lath, Wall Board or Metal
Cement, Brick, or Tile Covered Cement or Brick 1/4” (M6) Stud Type Expansion Bolts 3” (76mm)
Stud Wall with wood Backing No 16 (M8) Wood Screws 23/4” (70mm)
1/4” (M6) screw Type or Wing Type
toggle Bolts
Dependent on wall
thickness
Adjusting Dryer Controls
Table 4
Motor Setting
Hi 800 1200
Med 575 975
Low 400 800
* Heating element wattage is 400W maximum.
Power Usage (Watts)
Heater "OFF" Heater “ON”*
The hand dryer has adjustable controls for (3) levels
of operation – Hi, Med and Low. The dryer can be
operated with the heating element “ON” or “OFF”.
The dryer’s power usage for the range of operation is
shown in Table 4.
Note: The factory setting for the dryer
controls is motor “Hi” and heater “ON”.
5
Page 6
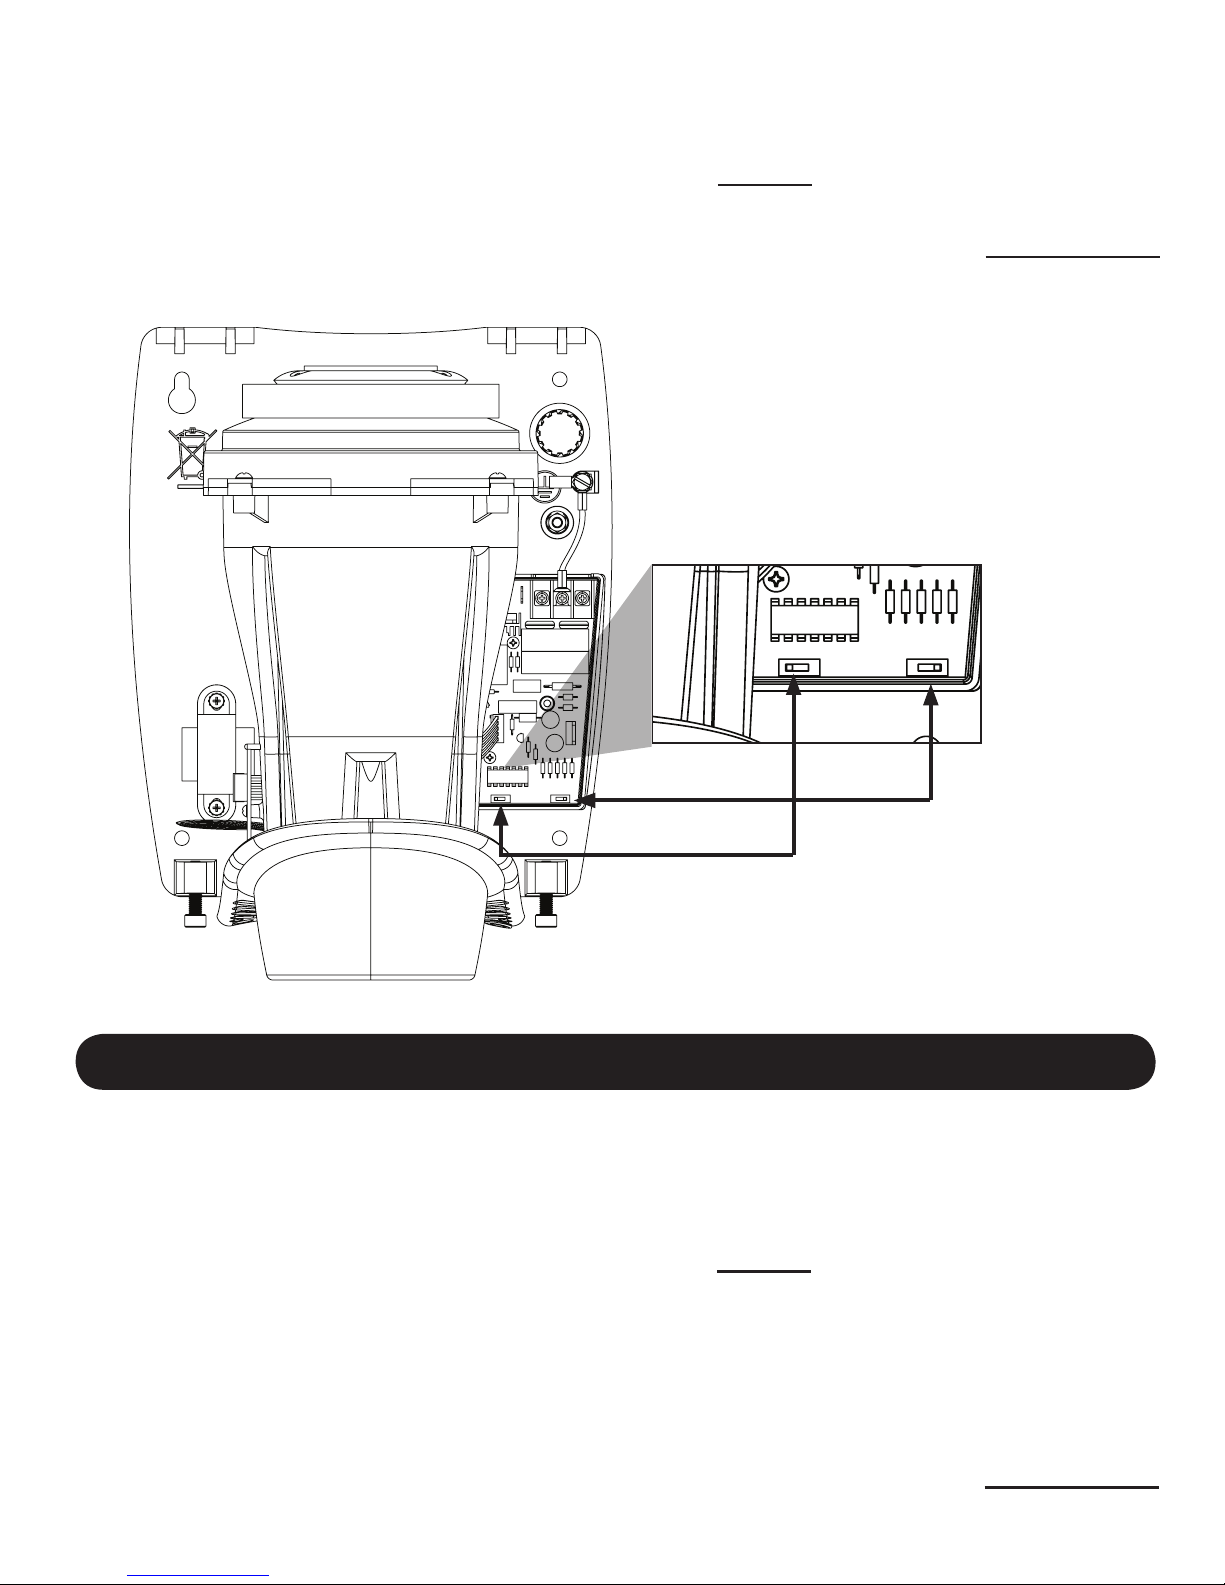
The adjustable dryer controls are located on the printed circuit board inside the dryer’s wiring compartment.
To adjust dryer controls:
1. Disconnect the power source.
2. Use the security hex key supplied to turn the cover mounting screws clockwise to remove the cover from the dryer.
3. Remove the wiring compartment cover to access the adjustable controls (see Fig. 1).
4. Adjust motor setting and heater as desired, and replace wiring compartment cover.
5. Reassemble the dryer cover using the security hex key supplied to turn the cover mounting screws counter-clockwise
and tighten until snug. Do not over tighten.
Fig. 1
Heater Options
On / Off
Motor Settings
Hi / Med / Low
Maintenance and Cleaning Instructions
IMPORTANT: Excessive lint and dust build up inside the dryer can damage the motor and heating element.
Excessive build up can also increase the dryer’s air temperature and risk injury to users. With light to moderate
wash room trafc, cleaning the hand dryer once a year will keep it in good operating condition. If the washroom
trafc is high, the dryer should be cleaned every 6 months. Read complete instruction before proceeding.
1. Disconnect the power source.
2. Use the security hex key supplied to turn the cover mounting screws clockwise to remove the cover from the dryer
3. Remove any lint or dust from the dryer base using a vacuum. Use caution to not damage wires or circuit boards.
4. For hand dryer models with an open cell lter covering the air intake, remove lter by gently lifting the lter up and
around the motor inlet cover. Clean the lter with a vacuum, and replace onto the motor inlet cover.
5. Loosen and remove (4) screws from motor inlet cover, and remove motor inlet cover to access the motor and the motor
housing for cleaning.
6. Use soft-medium bristle ½” paint brush to clean lint, dust and dirt from motor. Eliminate any build up of lint and dust
from the interior of the motor housing using a brush and/or vacuum.
7. After completing the cleaning process, completely reassemble the motor and motor inlet cover.
8. Reassemble the dryer cover using the security hex key supplied to turn the cover mounting screws counter-clockwise
and tighten until snug. Do not over tighten.
6
Page 7
Troubleshooting Chart
A) No power to unit. Check power to unit and connections.
Dryer fails to start.
Dryer will not shut off or
runs 30 seconds, then will
not re-start.
Dryer air output is slow.
Dryer air is not warm.
B) Defective motor. Replace motor.
C) Defective IR sensor. Replace IR sensor assembly.
D) Defective dryer controls. Replace dryer controls.
A) Sensor is dirty, defective or
there is a reection.
B) Defective dryer controls. Replace dryer controls.
A) Motor setting is incorrect. Adjust motor setting. See pg.3 of instructions.
A) Heater is in the "OFF" position. Adjust heater to "ON" position. See page 3 of
B) Defective heating element. Replace heating element assembly.
C) Defective dryer controls. Replace dryer controls.
1. Check infra-red eye for dirt or damage. Use
plastic lens cleaning solution and a soft cloth. Dry
lens with a soft cloth.
2. Make sure that sensor is not getting a reection
from another object.
3. After electricity has been applied to the dryer, it
should turn on within few seconds. Test by placing
hands 2 - 5 inches (51 - 127 mm) below the nozzle.
instructions.
Limited Warranty
World LIMITED FIVE – YEAR WARRANTY. World Warm Air Hair Dryer, Model covered in this manual, is warranted by World Dryer Corporation to the
original user against defects in workmanship or materials under normal use for 5 years after date of purchase. Any part which is determined to be defective in material
or workmanship and returned to an authorized service location, as World designates, shipping costs prepaid, will be, as the exclusive remedy, repaired or replaced at
World’s option. For limited warranty claim procedures, see PROMPT DISPOSITION below. This limited warranty gives purchasers specic rights from jurisdiction to
jurisdiction.
LIMITATION OF LIABILITY. To the extent allowable under applicable law, World’s liability for consequential and incidental damages is expressly disclaimed.
World’s liability in all events is limited to and shall not exceed the purchase price paid.
WARRANTY DISCLAIMER. World has made a diligent effort to provide product information and illustrate the products in this literature accurately; however,
such information and illustrations are for the sole purpose of identication, and do not express or imply a warranty that the products are MERCHANTABLE, or FIT FOR
A PARTICULAR PURPOSE, or that the products will necessary conform to the illustrations or descriptions. Except as provided below, no warranty or afrmation on
fact, expressed or implied, other than as stated in the “LIMITED WARRANTY” above is made or authorized by World.
PRODUCT SUITABILITY. Many jurisdictions have codes and regulations governing sales, construction, installation, and/or use of products for certain purposes,
which may vary from those in neighboring areas. While World attempts to assure that the products comply with such codes, it cannot guarantee compliance, and cannot be responsible for how the product is installed or used. Before purchase and use of a product, review the product application, and all applicable national and local
codes and regulations, and be sure that the product, installation, and use will comply with them.
Certain aspects of disclaimers are not applicable to consumer products; e.g., (a) some jurisdictions do not allow the exclusion or limitation of incidental or consequential damages, so the above limitation or exclusion may not apply to you; (b) also, some jurisdictions do not allow a limitation on how long an implied warranty lasts,
consequentially the above limitation may not apply to you; and (c) by law, during the period of this Limited Warranty, and implied warranties of implied merchantability
or tness for particular purpose applicable to consumer products purchased by consumers, may not be excluded or otherwise disclaimed.
Manufactured by World Dryer Corporation, Berkeley, Illinois 60163 U.S.A.
PROMPT DISPOSITION. World will make a good faith effort for prompt correction or other adjustment with respect to any product which proves to be defective
within limited warranty. For any product believed to be defective within limited warranty, rst write or call dealer from whom the product was purchased. Dealer will
give additional directions. If unable to resolve satisfactorily, write to World at address below, giving dealer’s name, address, date, and number of dealer’s invoice, and
describing the nature of defect. Title and risk of loss pass to buyer on delivery to common carrier. If product was damaged in transit to you, le claim with carrier.
5700 McDermott Drive
Berkeley, IL 60163 U.S.A.
800-323-0701
www.worlddryer.com
7
Page 8
Description
Le sèche-mains à air chaud à moteur universel avec balais de World Dryer offre une puissance de séchage de 800 watts et incorpore
un élément intégré pour l’air chaud. Les commandes du sèche-mains offrent trois niveaux distincts de fonctionnement du moteur
(« Hi », « Med » et « Low ») et l’option d’un fonctionnement avec ou sans l’élément chauffant. Un capteur infrarouge met en
marche automatiquement le sèche-mains. Ces modèles sont conçus pour être utilisés dans les magasins, usines, bureaux
et bâtiments publics.
Caractéristiques électriques
Tableau 1
Modèles Type Consommation électrique Intensité nominale Puissance nominale Certications
K48-XXX Automatique 220 - 240 Vc.a., 50/60 Hz 5,0 A 1200 CE, TUV-GS
Consignes générales de sécurité
Ce dispositif n’est pas destiné à être utilisé par de jeunes enfants ou des personnes ayant des handicaps physiques, sensoriels ou
mentaux moins correctement supervisés par une personne responsable an de s’assurer qu’ils peuvent utiliser l’appareil en toute
sécurité. Les jeunes enfants doivent être surveillés pour s’assurer qu’ils ne jouent pas avec l’appareil.
DANGER Le fait de ne pas débrancher la source d’alimentation avant de procéder à l’installation, à la réparation
ou à l’entretien peut entraîner des blessures graves ou mortelles résultant d’un choc électrique.
• Toujours débrancher la source d’alimentation avant de réparer, d’entretenir ou d’installer le sèche-mains.
DANGERVeiller à mettre cet appareil à la terre correctement an d’éviter un risque de choc électrique grave, voire mortel.
• Ce sèche-mains doit être mis à la terre correctement pour fonctionner en toute sécurité. Un point de raccordement à la terre
est identié sur le socle de xation murale du sèche-mains.
• Nous recommandons une protection par disjoncteur de fuite à la terre (DDFT) dans les endroits mouillés ou humides, ou si
les normes locales l’exigent.
AVERTISSEMENT Un risque d’incendie, de blessures ou de dommages matériels est possible
en cas de non-respect des normes locales en vigueur ou des recommandations de sécurité.
• N’utiliser que le type d’alimentation électrique (en termes de tension et de fréquence) spécié pour le modèle de sèche-mains
en cours d’installation. Se reporter au tableau 1 - Caractéristiques électriques.
• Raccorder le sèche-mains au tableau de distribution adapté le plus proche. Le câblage xe doit inclure un interrupteur de
déconnexion conforme aux codes de câblage locaux.
• Pour limiter les chutes de tension et garantir un fonctionnement efcace, utiliser du l de calibre 12 AWG (4,0 mm2) ou plus
gros suivant les normes électriques locales en vigueur.
• Toujours raccorder l’appareil à un circuit de dérivation protégé par un disjoncteur ou un fusible aux caractéristiques nominales
supérieures à l’intensité nominale du modèle de sèche-mains gurant sur le tableau 1, Caractéristiques électriques.
• An d’éviter les risques liés à une remise à zéro accidentelle de l’interrupteur à relais thermique, cet appareil ne doit pas être
alimenté par un dispositif de marche/arrêt externe (minuterie) ni branché sur un circuit régulièrement allumé et éteint par le
fournisseur d’énergie.
• Chaque modèle de sèche-mains doit avoir son propre circuit spécialisé.
• Faire passer l’ensemble du câblage sur site à l’écart des pièces mobiles qui sont à l’intérieur de l’appareil.
ATTENTION Un montage incorrect peut provoquer des accidents corporels et des dommages matériels.
• Suivre les recommandations concernant la hauteur de pose du tableau 2.
• Sur un colombage, monter un côté du sèche-mains sur un poteau existant.
Déballage
1. Enlever tous les produits d’emballage. Il est recommandé de les recycler.
2. Sortir le sèche-mains du carton avec précaution, en veillant à ne pas le faire tomber.
3. Vérier soigneusement qu’aucun dommage n’est survenu durant le transport. Examiner les pièces pour voir si certaines sont
desserrées, manquantes ou endommagées. Si le sèche-mains est endommagé, en informer immédiatement le concessionnaire
qui vous l’a vendu.
8
Page 9
Liste des pièces
Liste des pièces détachées pour les sèche-mains SMARTdri™ et SMARTdri Plus
Description Numéro de pièce
N°
1 Kit, capteur
2 Kit, commandes du sèche-mains
3 Kit, moteur - 240 V
4 Kit, élément chauffant - 240 V
5 Kit, caisson plénum
6 Filtre à air
7 Kit, couvercle commandes
8 Kit, buse de sortie d’air
9 Kit, mise à la terre – modèle K
Capot – alum. – blanc
Capot – alum. – noir
Capot – alum. – chrome
poli/brillant
Capot – alum. – chrome
brossé/satiné
10
Capot – acier inoxydable –
poli/brillant
Capot – acier inoxydable –
brossé/satiné
Capot – acier – blanc
Capot – fonte – porcelaine
émaillée
Kit, vis de sécurité
11
Clé six-pans, sécurité
12
Transformateur - 240 V
13
49-10108K
16-KCEK
32-K240K
21-1240K
47-0818092AK
93-120309
20-0815093K
30-K10109K
23-120609
20-K974
20-K162
20-K970
20-K971
20-K972
20-K973
20-K975
20-K976
46-040222K
56-40189
50-K240K
1
13
2
7
6
5
3
4
Tous les kits incluent les pièces de xation nécessaires
à l’installation. Le numéro de pièce pour le capot
(numéro de référence 10) varie en fonction du
numéro de modèle du sèche-mains.
Pour les pièces de rechange, consulter
www.WorldDryer.com
Fournir les renseignements suivants :
- Numéro de modèle
- Numéro de série
- Description et numéro de la pièce gurant
sur la liste des pièces
9
8
10
11
12
9
Page 10

Installation
1. Couper la source d’alimentation électrique.
2. En utilisant le tableau 2 pour déterminer la hauteur de pose recommandée, sélectionner un emplacement de pose du sèchemains en veillant à ce qu’aucune surface ni aucun objet rééchissant (comme un lavabo) ne se trouve directement sous la lentille
du capteur infrarouge. La lentille du capteur infrarouge est visible sous le sèche-mains et se trouve juste à l’intérieur de la zone
de la buse. La distance minimale de pose entre la surface inférieure du sèche-mains et toute surface rééchissante est de 46 cm.
En cas d’installation de plusieurs sèche-mains, les espacer d’au moins 61 cm.
3. Utiliser la clé six-pans de sécurité fournie pour faire tourner les vis de montage du capot dans le sens des aiguilles d’une
montre an de retirer le capot du sèche-mains.
4. Placer le socle de xation du sèche-mains sur le mur à l’emplacement souhaité et en utilisant le socle comme gabarit, marquer
sur le mur l’emplacement des trous des quatre boulons de xation.
5. Fixer le socle au mur au moyen de boulons du type recommandé sur le tableau 3.
6. Chaque sèche-mains doit avoir son propre circuit spécialisé.
7. Brancher le sèche-mains au tableau de distribution adapté le plus proche.
8. Remettre le capot en place, tourner les vis dans le sens contraire des aiguilles d’une montre en veillant à ne pas serrer
excessivement.
IMPORTANT : Consulter les réglementations locale et générale avant d’installer le sèche-mains. S’assurer que le
réseau électrique n’est pas surchargé. Ne pas raccorder l’appareil à un circuit de dérivation aux caractéristiques
inférieures à l’intensité nominale du modèle de sèche-mains gurant sur le tableau 1 - Caractéristiques électriques.
Tableau 2
Distances recommandées entre le sol et le bord inférieur du sèche-mains cm (po)
Toilettes pour hommes 117 (46)
Toilettes pour femmes 112 (44)
Toilettes pour enfants de 4 à 7 ans 81 (32)
Toilettes pour enfants de 7 à 10 ans 91 (36)
Toilettes pour enfants de 10 à 13 ans 102 (40)
Toilettes pour enfants de 13 à 17 ans 112 (44)
Hauteur de montage pour personnes handicapées 94 (37)
Tableau 3
Type de mur Type de boulon
Parpaings creux, lattes, panneaux de revêtement
ou métal
Ciment ou brique, carrelés ou non
Colombage avec support en bois Vis à bois (M8) n° 16 70 mm (2 3/4 po)
Boulons type vis (M6) ou à ailettes
6,35 mm (1/4 po)
Boulons à coquille d’expansion type
goujon (M6) 6,35 mm (1/4 po)
Longueur minimum
des boulons
Dépend de l’épaisseur du mur
76 mm (3 po)
Réglage des commandes du sèche-mains
Tableau 4
Réglage du
moteur
Hi 800 1200
Med 575 975
Low 400 800
* La puissance de l’élément chauffant est de 400 W maximum.
Chauffage « OFF »
Consommation (watts)
(Arrêt)
Chauffage « ON »
(Marche)*
Le sèche-mains est équipé de commandes réglables pour
trois niveaux de fonctionnement : « Hi » (Élevé), « Med »
(Moyen) et « Low » (Faible). Le sèche-mains peut fonctionner
avec l’élément chauffant sur « ON » (Marche) ou sur « OFF »
(Arrêt). La consommation du sèchemains pour la plage
de fonctionnement est indiquée sur le tableau 4.
Remarque : Le réglage en usine des commandes
du sèche-mains est : moteur « Hi » et élément
chauffant « ON ».
10
Page 11

Les commandes réglables du sèche-mains se trouvent sur la carte de circuits imprimés située à l’intérieur du compartiment de
câblage de l’appareil.
Pour régler les commandes de l’appareil :
1. Couper la source d’alimentation électrique.
2. Utiliser la clé six-pans de sécurité fournie pour faire tourner les vis de montage du capot dans le sens des aiguilles d’une montre
an de retirer le capot du sèche-mains.
3. Enlever le couvercle du compartiment de câblage pour accéder aux commandes réglables (voir la Fig. 1).
4. Effectuer le réglage voulu du moteur et de l’élément chauffant et remettre en place le couvercle du compartiment de câblage.
5. Remettre le capot de l’appareil en place en utilisant la clé six-pans de sécurité fournie pour faire tourner les vis de montage du capot
dans le sens contraire des aiguilles d’une montre et les serrer jusqu’à ce qu’elles soient bien ajustées. Ne pas serrer excessivement.
Fig. 1
Instructions d’entretien et de nettoyage
IMPORTANT : Une accumulation excessive de poussière ou de peluche à l’intérieur du sèche-mains peut endommager le
moteur et l’élément chauffant. Elle peut aussi augmenter la température de l’air sortant de l’appareil et risque de blesser les
utilisateurs. Si la fréquentation des toilettes est faible à moyenne, le sèche-mains doit être nettoyé une fois par an pour en
garantir le bon fonctionnement. Si la fréquentation des toilettes est supérieure à la normale, effectuer le nettoyage tous les
six mois. Lire toutes les instructions avant de procéder au nettoyage.
1. Couper la source d’alimentation électrique.
2. Utiliser la clé six-pans de sécurité fournie pour faire tourner les vis de montage du capot dans le sens des aiguilles d’une montre
an de retirer le capot du sèche-mains.
3. Nettoyer la peluche ou la poussière sur le support mural du sèche-mains en utilisant un aspirateur. Veiller à ne pas endommager
le câblage ou les cartes de circuits imprimés.
4. Pour les modèles de sèche-mains dont l’entrée d’air est recouverte d’un ltre en alvéoles ouvertes, retirer celui-ci en le soulevant
doucement et en le faisant passer autour de la grille d’aspiration du moteur. Nettoyer le ltre avec un aspirateur et le remettre en
place sur la grille d’aspiration du moteur.
5. Desserrer et retirer les quatre vis de la grille d’aspiration du moteur, puis enlever celle-ci pour accéder au moteur et au caisson et
effectuer le nettoyage.
6. Utiliser un pinceau à soies souples de 1,27 cm pour dépoussiérer et décrasser le moteur. Nettoyer toute accumulation de peluche
ou de poussière à l’intérieur du caisson moteur en utilisant une brosse et/ou un aspirateur.
7. Après le nettoyage, remettre en place la grille d’aspiration du moteur.
8. Remettre le capot de l’appareil en place en utilisant la clé six-pans de sécurité fournie pour faire tourner les vis de montage du capot
dans le sens contraire des aiguilles d’une montre et les serrer jusqu’à ce qu’elles soient bien ajustées. Ne pas serrer excessivement.
Options de l’élément
chauffant
On/Off (marche/arrêt)
Réglages du moteur
Hi/Med/Low (élevé/moyen/faible)
11
Page 12

Tableau de dépannage
Le sèche-mains ne
démarre pas.
Le sèche-mains fonctionne
sans s’arrêter ou marche
pendant trente secondes
et ne redémarre plus.
Le jet d’air sortant du sèchemains manque de puissance.
L’air qui sort du sèche-mains
n’est pas chaud.
A) Le sèche-mains n’est pas alimenté
Vérier l’alimentation et les connexions de l’appareil.
électriquement.
B) Le moteur est défectueux. Remplacer le moteur.
C) Le capteur infrarouge est défectueux. Remplacer le capteur infrarouge.
D) Les commandes du sèche-mains
Remplacer les commandes du sèche-mains.
sont défectueuses.
1. Vérier la lentille infrarouge pour voir si elle est
encrassée ou endommagée. Utiliser une solution de
nettoyage de lentille en plastique et un chiffon doux.
Sécher la lentille avec un chiffon doux.
A) Le capteur est sale ou défectueux,
ou il reçoit une réexion intempestive.
2. Vérier que le capteur ne reçoit pas de réexion
provenant d’un autre objet.
3. Lorsque le sèche-mains est mis sous tension, il devrait
se mettre en marche au bout de quelques secondes. Le
tester en plaçant les mains à une distance de 5 cm à
13 cm sous la buse.
B) Les commandes du sèche-mains
Remplacer les commandes du sèche-mains.
sont défectueuses.
A) Le moteur est mal réglé. Modier le réglage du moteur. Se reporter à la page 3
pour des instructions.
A) L’élément chauffant est sur la position
« OFF ».
Mettre l’élément chauffant sur la position « ON ». Se
reporter à la page 3 pour des instructions.
B) L’élément chauffant est défectueux. Remplacer l’élément chauffant.
C) Les commandes du sèche-mains
Remplacer les commandes du sèche-mains.
sont défectueuses.
Garantie limitée
GARANTIE LIMITÉE DE CINQ ANS de World Dryer. Le modèle de sèche-mains à air chaud World Dryer couvert dans ce manuel est garanti par World Dryer Corporation
au premier utilisateur contre tout défaut de fabrication ou de matériau dans des conditions d’utilisation normales durant 5 ans à compter de la date d’achat. Toute pièce présentant, selon
World Dryer, des défauts de fabrication ou de matériau et retournée, port payé, à un centre de service autorisé, sera réparée ou remplacée au choix de World Dryer, à titre de recours
exclusif. Voir les procédures de réclamations sous garantie sous la rubrique « PROMPT RÈGLEMENT », ci-après. La présente garantie donne aux acheteurs des droits spéciques
qui varient selon les juridictions.
LIMITES DE RESPONSABILITÉ. Dans la mesure permise au titre de la loi applicable, World Dryer décline expressément toute responsabilité pour tout dommage accessoire
et indirect. La responsabilité de World Dryer est dans tous les cas limitée et ne saurait dépasser le prix d’achat.
CLAUSE D’EXONÉRATION DE GARANTIE. World Dryer s’est diligemment efforcée d’illustrer et de décrire de manière exacte les produits de cette brochure. Cependant,
ces illustrations et ces descriptions ne sont données qu’à titre d’identication et ne garantissent pas expressément ou implicitement que les produits sont de QUALITÉ MARCHANDE
ou ADAPTÉS À UN USAGE PARTICULIER, ou qu’ils seront nécessairement conformes aux illustrations ou aux descriptions fournies. Sauf dispositions contraires ci-dessous, aucune
garantie ou afrmation de fait, expresse ou implicite, autre que celle énoncée à la rubrique « GARANTIE LIMITÉE » ci-dessus, n’est fournie ou autorisée par World Dryer.
ADÉQUATION DU PRODUIT. Dans de nombreuses juridictions, les normes et les réglementations qui régissent les ventes, la construction, l’installation et/ou l’utilisation de
produits pour certains usages peuvent être différentes de celles de régions avoisinantes. Bien que World Dryer se soit efforcée de rendre ses produits conformes à ces normes, la société
ne peut en garantir la conformité et ne saurait être responsable de la manière dont les produits sont installés ou utilisés. Avant d’acheter et d’utiliser un produit, il est conseillé d’étudier
son application ainsi que les normes et réglementations nationales et locales, et de s’assurer de la conformité à ces normes de ces produits, de leur installation et de leur utilisation.
Certains aspects des dénis de garantie ne sont pas applicables aux produits de consommation. Par exemple, (a) certaines juridictions n’autorisent pas l’exclusion ou la limitation des
dommages accessoires ou indirects, de sorte que la limitation ou l’exclusion susmentionnée peut ne pas s’appliquer à votre cas ; (b) en outre, certaines juridictions n’autorisent pas de limite
sur la durée d’une garantie implicite, par conséquent la limite susmentionnée peut ne pas s’appliquer à votre cas ; et (c) en vertu de la loi, durant la période de garantie limitée, toute
garantie implicite de qualité marchande ou d’adéquation à un usage particulier applicable aux produits de consommation achetés par des consommateurs, est susceptible de ne pas
pouvoir être exclue ou autrement déniée.
Fabriqué par World Dryer Corporation, Berkeley, Illinois 60163 États-Unis.
PROMPT RÈGLEMENT. World Dryer s’engage à effectuer de bonne foi les rectications ou autres ajustements prévus pour tout produit qui s’avère défectueux durant la période
de garantie limitée. Pour tout produit jugé défectueux durant la période de garantie limitée, contacter tout d’abord le concessionnaire où l’appareil a été acheté. Le concessionnaire
fournira des instructions supplémentaires. S’il est impossible de résoudre le problème de façon satisfaisante, écrire à World Dryer à l’adresse ci-dessous, en indiquant le nom et
l’adresse du concessionnaire, la date et le numéro de la facture du concessionnaire, ainsi que la nature du défaut constaté. Le titre et le risque de perte passent à l’acheteur au
moment de la livraison par le transporteur. Si le produit a été endommagé pendant le transport, une réclamation doit être adressée auprès du transporteur.
5700 McDermott Drive
Berkeley, IL 60163 États-Unis
800-323-0701
www.worlddryer.com
12
Page 13

Descripción
El secamanos por aire caliente World Dryer, impulsado por un motor universal con escobillas, suministra un máximo de 800 vatios
de potencia de secado e incorpora un elemento integrado de calefacción del aire. Los mandos del secador permiten tres (3) niveles
distintos de funcionamiento del motor [Hi (Alto), Med (Intermedio) y Low (Bajo)] así como la opción de utilizar la unidad con o sin el
elemento calefactor. El secador se activa automáticamente mediante un sensor de infrarrojos. Estos modelos están diseñados para
entornos comerciales, industriales, de ocinas e instalaciones públicas.
Especicaciones del sistema eléctrico
Tabla 1
Modelos Tipo Entrada eléctrica Intensidad nominal Potencia nominal Certicaciones
K48-XXX Automático 220-240 V CA, 50/60 Hz 5,0A 1200 CE, TUV-GS
Información de Seguridad General
Este aparato no está diseñado para ser utilizado por niños pequeños o personas con discapacidades físicas, sensoriales o
mentales estén convenientemente supervisada por una persona responsable para asegurar que puedan utilizar el aparato de
forma segura. Los niños pequeños deben ser supervisados para asegurarse de que no jueguen con el aparato.
PELIGRO No desconectar la fuente de alimentación eléctrica antes de realizar la instalación o el mantenimiento,
puede resultar en lesiones graves o la muerte debido a un choque eléctrico.
• Siempre desconecte la fuente de alimentación antes de instalar el secamanos o darle mantenimiento.
PELIGRONo conectar correctamente a tierra esta unidad puede resultar en un choque eléctrico grave y/o la muerte.
• Para utilizar este secamanos sin peligro, debe conectarse a tierra correctamente. En la base mural del secamanos se
identica un punto de conexión a tierra.
• Recomendamos utilizar un protector GFCI (interruptor de circuito de fallo a tierra) en emplazamientos mojados o húmedos,
o donde lo exija el código local.
ADVERTENCIA Se corren riesgos de incendio, lesiones personales o daños materiales si no se cumple
con los códigos locales o las recomendaciones de seguridad.
• Utilice únicamente la energía eléctrica (voltaje y frecuencia) especicada para el modelo de secamanos que se esté
instalando. Consulte la Tabla 1: Especicaciones del sistema eléctrico.
• Conecte el secamanos en el panel de distribución adecuado más cercano. El cableado jo debe incluir un interruptor de
desconexión que cumpla con los códigos de cableado locales.
• Para limitar las caídas de voltaje, y garantizar un funcionamiento eciente, utilice un conductor de número AWG 12 (4 mm2)
o mayor de acuerdo con los requisitos de los códigos eléctricos locales.
• Siempre conecte a un ramal que tenga instalado un cortacircuito o un fusible protector cuya capacidad eléctrica supere la
intensidad nominal del modelo del secamanos, como se indique en la Tabla 1: Especicaciones del sistema eléctrico.
• Para evitar el peligro de reconectar accidentalmente el interruptor térmico, el secamanos no debe alimentarse a través
de un dispositivo conmutador externo como, por ejemplo, un temporizador, ni conectarse a un circuito que la empresa de
servicio eléctrico cierre o abra regularmente.
• Todo secamanos de modelo automático debe tener un circuito dedicado.
• Separe todo el tendido de cables de las piezas móviles del interior del secamanos.
ATENCIÓN El montaje incorrecto puede ocasionar lesiones personales o daños materiales.
• Observe las alturas de montaje recomendadas en la Tabla 2.
• En paredes entramadas, se debe montar un lado del secamanos en uno de los montantes existentes.
Desembalaje
1. Retire todos los materiales de embalaje. Se recomienda reciclar los materiales.
2. Extraiga cuidadosamente el secamanos de la caja de envío, sin dejar caer el aparato.
3. Inspeccione el producto cuidadosamente para vericar si se han producido daños durante el transporte. Revise para vericar si
hay partes sueltas, que faltan o que están dañadas. Si el secamanos está averiado, informe prontamente al distribuidor que se
lo haya vendido.
13
Page 14

Lista de partes
Lista de repuestos del secamanos SMARTdri
Descripción Número de Parte
#
1 Juego, sensor 49-10108K
2 Juego, mandos del secador 16-KCEK
3 Juego, motor, 240 V 32-K240K
4 Juego, elemento calefactor, 240 V 21-1240K
5 Juego, conjunto de la cubierta
de la unidad impelente
6 Filtro de aire 93-120309
7 Juego, cubierta de los mandos 20-0815093K
8 Juego, boquilla 30-K10109K
9 Juego, conexión a tierra, modelo 23-120609
Conjunto de la cubierta, aluminio,
blanca
Conjunto de la cubierta, aluminio,
negra
Conjunto de la cubierta, aluminio,
cromada pulida/brillante
Conjunto de la cubierta, aluminio,
cromada cepillada/acabado satinado
10
Conjunto de la cubierta, acero
inoxidable, pulida/brillante
Conjunto de la cubierta, acero
inoxidable, cepillada/acabado
satinado
Conjunto de la cubierta, acero,
blanca
Conjunto de la cubierta, hierro
fundido, esmalte de porcelana
11 Juego, tornillos de seguridad 46-040222K
12 Llave inglesa, seguridad 56-40189
13 Transformador, 240 V 50-K240K
47-0818092AK
20-K974
20-K162
20-K970
2
20-K971
20-K972
20-K973
20-K975
20-K976
™
y SMARTdri Plus
1
13
7
9
6
5
3
4
Todos los juegos incluyen los aanzadores
necesarios para la instalación. El número de
pieza del conjunto de la cubierta (número de
referencia 10) varía con el número de modelo del
secamanos.
Para información sobre repuestos, visite
www.WorldDryer.com
Por favor proporcione la siguiente información:
- Número de modelo
- Número de serie
- Descripción de la pieza y número
indicado en la lista de partes
8
10
11
12
14
Page 15

Instalación
1. Desconecte la fuente de alimentación.
2. Basándose en las alturas de montaje recomendadas en la Tabla 2, seleccione un lugar donde montar el secamanos que no tenga
supercies ni objetos reectantes (p. ej., un lavamanos) directamente debajo del sensor de infrarrojos. El sensor de infrarrojos
puede verse por la parte inferior del secador, y está ubicado dentro del espacio de la boquilla del secador. La separación de
montaje mínima entre la parte inferior del secador y cualquier supercie reectante es 46 cm (18 pulg.). Cuando se instalan
dos o más secadores, deben separarse al menos 61 cm (24 pulg.).
3. Utilice la llave hexagonal de seguridad que se proporciona para girar a la derecha los tornillos de montaje de la cubierta, y
separarla del secador.
4. Coloque la base del secamanos en el lugar elegido de la pared y, utilizando la base de plantilla, marque en la pared la ubicación
de los agujeros para los 4 pernos de montaje.
5. Fije la base en la pared mediante el tipo de pernos recomendado en la Tabla 3.
6. Cada secamanos debe tener su propio circuito dedicado.
7. Conecte el secador en el panel de distribución adecuado más cercano.
8. Coloque nuevamente la cubierta, gire los tornillos a la izquierda y asegúrese de no apretarlos demasiado.
IMPORTANTE: Consulte los reglamentos locales y generales antes de realizar la instalación del secador. Asegúrese
que la red eléctrica no esté sobrecargada. No conecte a un ramal cuya capacidad nominal supere la intensidad nominal
del modelo del secamanos según se indica en la Tabla 1: Especicaciones del sistema eléctrico.
Tabla 2
Alturas de montaje recomendadas desde el suelo hasta la parte inferior del secamanos cm (pulg.)
Baños de hombres 117 (46)
Baños de mujeres 112 (44)
Baños de niños, 4 a 7 años de edad 81 (32)
Baños de niños, 7 a 10 años de edad 91 (36)
Baños de niños, 10 a 13 años de edad 102 (40)
Baños de niños, 13 a 17 años de edad 112 (44)
Altura de montaje para discapacitados 94 (37)
Tabla 3
Tipo de pared Tipo de perno Longitud mínima del perno
Baldosa hueca, malla, pared de yeso o metal
Cemento, ladrillo, o cemento o ladrillo recubierto
con baldosas
Pared de entramado con refuerzo de madera Tornillos para madera (M8) número 16 70 mm (2 3/4 pulg.)
Pernos acodillados roscados (M6) o de
palomilla de 1/4 pulg.
Pernos de expansión de tipo para postes
(M6) de 1/4 pulg.
Depende del grosor de la pared
76 mm (3 pulg.)
Ajuste de los mandos del secador
Tabla 4
Consumo de potencia (vatios)
Ajuste del motor
Hi (Alto) 800 1200
Med (Intermedio) 575 975
Low (Bajo) 400 800
* La potencia máxima del elemento calefactor es 400 W.
Calefactor
APAGADO
Calefactor
ENCENDIDO*
El secamanos cuenta con mandos ajustables para tres (3)
niveles de funcionamiento: Hi (Alto), Med (Intermedio) y
Low (Bajo). El secador puede utilizarse con el elemento
calefactor ENCENDIDO o APAGADO. En la Tabla 4 se
indica el consumo de potencia del secador correspondiente
a cada nivel de funcionamiento.
Aviso: En fábrica, los mandos del secador
se ajustan en Hi (Alto), para el motor, y ON
(Encendido), para el calefactor.
15
Page 16

Los mandos ajustables del secador están ubicados en la placa de circuito impreso, en el interior del compartimento de cableado
del secador.
Para ajustar los mandos del secador:
1. Desconecte la fuente de alimentación.
2. Utilice la llave hexagonal de seguridad que se proporciona para girar a la derecha los tornillos de montaje de la cubierta,
y separarla del secador.
3. Quite la tapa del compartimento de cableado para acceder a los mandos ajustables (ver Fig. 1).
4. Elija los ajustes del motor y del calefactor que interesen, y vuelva a tapar el compartimento de cableado.
5. Monte nuevamente la cubierta del secador valiéndose de la llave hexagonal de seguridad que se proporciona para girar
a la izquierda los tornillos de montaje de la cubierta, y apriete hasta jarla. No apriete demasiado.
Fig. 1
Instrucciones de mantenimiento y limpieza
IMPORTANTE: La acumulación excesiva de pelusa y polvo dentro del secador puede averiar el motor y el elemento calefactor.
Además, esta acumulación excesiva puede aumentar la temperatura del aire del secador y el riesgo de producir lesiones
al usuario. Si el uso del baño es leve o moderado, limpiar el secamanos una vez al año debe bastar para mantenerlo en
buenas condiciones de funcionamiento. Si el uso del baño es intenso, el secador debe limpiarse cada 6 meses. Lea todas
las instrucciones antes de proceder.
1. Desconecte la fuente de alimentación.
2. Utilice la llave hexagonal de seguridad que se proporciona para girar a la derecha los tornillos de montaje de la cubierta,
y separarla del secador.
3. Utilice una aspiradora para eliminar toda la pelusa y el polvo de la base del secador. Tenga cuidado de no dañar los cables ni
las placas de circuito.
4. Si se trata de un modelo de secamanos cuya toma de aire está cubierta por un ltro celular abierto, quite el ltro alzándolo
suavemente y separándolo de la cubierta del oricio de entrada del motor. Limpie el ltro con una aspiradora, y coloque
nuevamente en la cubierta del oricio de entrada del motor.
5. Aoje y quite los cuatro (4) tornillos que jan la cubierta del oricio de entrada del motor, y quítela para tener acceso al motor y
la carcasa del motor, y limpiarlos.
6. Elimine la pelusa, el polvo y la suciedad del motor con una brocha para pintar de cerdas suaves-intermedias de 1,27 cm. Utilice
un cepillo o una aspiradora para eliminar la pelusa y el polvo acumulados dentro de la carcasa del motor.
7. Una vez nalizado el procedimiento de limpieza, vuelva a montar completamente el motor y la cubierta del oricio de entrada
del motor.
8. Monte nuevamente la cubierta del secador valiéndose de la llave hexagonal de seguridad que se proporciona para girar
a la izquierda los tornillos de montaje de la cubierta, y apriete hasta jarla. No apriete demasiado.
Opciones del calefactor
On-Off (Encendido-Apagado)
Ajustes del motor
Hi-Med-Low (Alto-Intermedio-Bajo)
16
Page 17

Tabla de Identicación de Problemas
El secador no arranca.
El secador no puede
apagarse, o funciona
30 segundos y después
no puede encenderse
de nuevo.
El secador expulsa el
aire muy lentamente.
El aire del secador no
está caliente.
A) La unidad no recibe alimentación
eléctrica.
Verique el suministro eléctrico de la unidad y las
conexiones.
B) El motor está defectuoso. Reemplace el motor.
C) El sensor de IR está defectuoso. Reemplace el conjunto del sensor de IR.
D) Los mandos del secador están
Reemplace los mandos del secador.
defectuosos.
1. Revise el ojo infrarrojo para ver si está sucio o dañado.
Utilice una solución de limpieza para lentes de plástico y
un paño suave. Seque la lente con un paño suave.
A) El sensor está sucio o defectuoso,
o recibe el reejo de otro objeto.
2. Compruebe que el sensor no recibe el reejo de otro
objeto.
3. El secador debe encenderse pocos segundos después de
haberse conectado la alimentación eléctrica. Compruebe la
unidad colocando las manos entre 51 y 127 mm por debajo
de la boquilla.
B) Los mandos del secador están
Reemplace los mandos del secador.
defectuosos.
A) El ajuste del motor no es el adecuado. Cambie el ajuste del motor. Consulte las instrucciones en
la página 3.
A) El calefactor está apagado (posición
"OFF").
Encienda el calefactor (posición "ON"). Consulte las
instrucciones en la página 3.
B) El elemento calefactor está defectuoso. Reemplace el conjunto del elemento calefactor.
C) Los mandos del secador están
Reemplace los mandos del secador.
defectuosos.
Garantía Limitada
GARANTÍA LIMITADA DE CINCO AÑOS DE World Dryer. World Dryer Corporation le garantiza al usuario original que el modelo del secamanos de aire caliente World
Dryer tratado en este manual estará libre de defectos de construcción y materiales si se somete a un uso normal por cinco años a partir de la fecha de compra. Cualquier pieza que
se halle defectuosa, ya sea por materiales o construcción, y se devuelva a un centro de reparación autorizado, según lo indique World Dryer, con los costos de envío pagados por
adelantado, se reparará o reemplazará, como remedio exclusivo, a la discreción de World Dryer. Para información relacionada con los procedimientos de reclamación provistos por la
garantía limitada, consulte más adelante la sección ATENCIÓN OPORTUNA. Esta garantía limitada conere al comprador derechos especícos que varían de una jurisdicción a otra.
LÍMITES DE RESPONSABILIDAD. En la medida en que las leyes aplicables lo permitan, se excluye expresamente la responsabilidad de World Dryer por daños indirectos o
menores. La responsabilidad de World Dryer se limita al precio de compra pagado, al cual no sobrepasará.
EXCLUSIÓN DE RESPONSABILIDAD DE LA GARANTÍA. World Dryer se ha esforzado diligentemente en proporcionar a través de este manual información e
ilustraciones concernientes al producto; sin embargo, esta información y estas ilustraciones tienen como único n la identicación del producto, y no expresan ni implican garantía de
que los productos sean VENDIBLES o ADECUADOS A UN PROPÓSITO EN PARTICULAR, ni que se ajusten necesariamente a las ilustraciones o descripciones. Con excepción de lo
que se establece a continuación, World Dryer no hace ni autoriza ninguna garantía o armación de hecho, expresa o implícita, que no se estipule en la “GARANTÍA LIMITADA” anterior.
ADECUACIÓN DEL PRODUCTO. Muchas jurisdicciones tienen códigos o regulaciones sobre la venta, el diseño, la instalación y/o el uso de productos para ciertas aplicaciones;
dichas leyes pueden variar de un área a otra. Si bien World Dryer trata de que los productos cumplan con estos códigos, no puede garantizar su cumplimiento ni puede hacerse
responsable de la forma en que se instale o utilice el producto. Antes de comprar y utilizar el producto, revise su aplicación y todos los códigos y reglamentos nacionales y locales
aplicables, y asegúrese que el producto, la instalación y el uso los cumplan.
Ciertos aspectos de las limitaciones de responsabilidad no se aplican a los productos de consumo; es decir (a) algunas jurisdicciones no permiten la exclusión o limitación de daños
menores o indirectos, por lo cual la limitación o exclusión anterior quizás no se aplique en su caso; (b) asimismo, algunas jurisdicciones no permiten limitar el plazo de las garantías
implícitas, por lo cual la limitación anterior quizás no se aplique en su caso; y (c) por ley, mientras estén vigentes, no pueden excluirse ni de ninguna otra manera denegarse la
Garantía Limitada y las garantías implícitas de comerciabilidad o idoneidad para un propósito en particular implícitas que corresponden a los productos de consumo adquiridos
por los consumidores.
Fabricado por World Dryer Corporation, Berkeley, Illinois 60163 U.S.A.
ATENCIÓN OPORTUNA. World Dryer hará un esfuerzo de buena fe para corregir oportunamente o hacer otros ajustes relacionados con cualquier producto que resulte defectuoso
dentro de los términos de esta garantía limitada. En el caso de que encuentre un producto defectuoso y que esté cubierto dentro de los límites de esta garantía haga el favor de escribir
primero, o llame, al distribuidor a quien le compró el producto. El distribuidor le dará las instrucciones adicionales. Si no logra resolver el problema de forma satisfactoria, escriba a
World Dryer a la siguiente dirección, y proporcione el nombre y la dirección del distribuidor así como la fecha y el número de su factura, y describa la naturaleza del defecto. La
propiedad del artículo y el riesgo de pérdida pasan al comprador en el momento de la entrega del artículo a la compañía de transporte. Si el producto se daña durante el transporte,
debe presentar su reclamo a la compañía transportista.
5700 McDermott Drive
Berkeley, IL 60163 U.S.A.
800-323-0701
www.worlddryer.com
17
Page 18

Beschreibung
Der Warmluft-Händetrockner von World Dryer verfügt über einen Universal-Bürstenmotor und hat eine Trockenleistung von 800 Watt.
Er ist mit einem integrierten Heizelement zur Erhitzung der Luft ausgestattet. Der Motor des Händetrockners verfügt über drei (3)
verschiedene Leistungsstufen (Hoch, Mittel und Niedrig) und lässt sich wahlweise entweder mit oder ohne Heizelement betreiben.
Ein Infrarotsensor aktiviert den Trockner automatisch. Diese Modelle sind zur Benutzung in gewerblichen, industriellen und
Büroumgebungen sowie öffentlichen Einrichtungen vorgesehen.
Technische Daten – Elektrik
Tabelle 1
Modelle Typ Leistungseingangsdaten Nennstromstärke Nennleistung Zertikationen
K48-XXX Ein- und Ausschaltautomatik 220 - 240 V AC, 50/60 Hz 5,0 A 1200 CE, TUV-GS
Allgemeine Sicherheitsinformationen
Dieses Gerät ist nicht für die Verwendung von kleinen Kindern oder Personen mit eingeschränkten physischen, sensorischen oder
geistigen Fähigkeiten bestimmt, es sei denn adäquat beaufsichtigt durch eine verantwortliche Person zu gewährleisten, können sie
das Gerät sicher zu benutzen. Kleine Kinder sollten beaufsichtigt werden, um sicherzustellen, dass sie nicht mit dem Gerät spielen.
GEFAHR Wird das Gerät vor der Montage bzw. der Wartung nicht von der Stromquelle getrennt, kann dies
zu ernsten Verletzungen oder Tod durch elektrischen Schlag führen.
• Trennen Sie den Händetrockner vor Wartungsarbeiten oder Montage des Geräts stets von der Stromquelle.
GEFAHR Wird dieses Gerät nicht ordnungsgemäß geerdet, kann dies zu einem schweren elektrischen
Schlag und/oder zum Tode führen.
• Der Händetrockner muss ordnungsgemäß geerdet werden, damit ein sicherer Betrieb gewährleistet ist. An der Wandbasis des
Händetrockners ndet sich ein gekennzeichneter Erdungspunkt.
• In nassen bzw. feuchten Umgebungen empfehlen wir den Einbau eines Erdschlussunterbrechers bzw. ist dies gemäß örtlichen
Elektrovorschriften vorgeschrieben.
WARNHINWEIS Eine Nichtbeachtung örtlicher Elektrovorschriften bzw. Sicherheitsempfehlungen kann
zu Bränden, Verletzungen oder Sachschäden führen.
• Nur die für das zu montierende Händetrockner-Modell vorgeschriebene elektrische Leistung (Spannung und Frequenz)
verwenden. Siehe Tabelle 1 – Technische Daten – Elektrik
• Den Händetrockner an die am nächsten liegende Verteilertafel anschließen. Bei einem Festanschluss muss ein Trennschalter
vorhanden sein, der den jeweiligen örtlichen Elektroinstallationsvorschriften gerecht wird.
• Um Spannungsabfälle auf ein Minimum zu reduzieren und einen efzienteren Betrieb zu gewährleisten, sind Leiter mit der
Mindestgröße AWG Nr. 12 (4 mm2) gemäß örtlichen Elektrovorschriften zu verwenden.
• Das Gerät stets an einen Abzweigkreis mit einem Leistungsschalter bzw. einer Absicherung mit einer elektrischen
Belastbarkeit anschließen, die größer als die in Tabelle 1 – Technische Daten – Elektrik aufgeführte Nennstromstärke des
entsprechenden Händetrockner-Modells ist.
• Um ein gefährliches unbeabsichtigtes Rücksetzen des Temperaturbegrenzers zu vermeiden, darf der Händetrockner nicht
über ein externes Schaltgerät, wie z. B. einen Timer, gespeist bzw. an einen Stromkreis angeschlossen werden, der vom
Versorgungsunternehmen regelmäßig ein- und ausgeschaltet wird.
• Jeder Händetrockner mit Ein- und Ausschaltautomatik muss an eine festgeschaltete Leitung angeschlossen sein.
• Verlegen Sie sämtliche Feldverkabelungen in sicherer Entfernung von beweglichen Teilen im Händetrockner.
VORSICHT Eine unsachgemäße Montage kann zu Verletzungen oder Sachschäden führen.
• Beachten Sie die Empfehlungen zur Montagehöhe in Tabelle 2.
• Bei der Montage an eine Fachwerkwand muss eine Seite des Händetrockners an einem vorhandenen Ständer befestigt werden.
Auspacken
1. Entfernen Sie sämtliches Verpackungsmaterial. Wir empfehlen, das Verpackungsmaterial zu recyceln.
2. Nehmen Sie den Händetrockner vorsichtig aus dem Versandkarton. Achten Sie darauf, dass er nicht herunterfällt.
3. Überprüfen Sie das Gerät sorgfältig auf eventuell während des Transports entstandene Schäden. Prüfen Sie, ob Teile lose oder
beschädigt sind bzw. fehlen. Wenn der Händetrockner beschädigt ist, informieren Sie umgehend den Händler, bei dem Sie das
Gerät erworben haben.
18
Page 19

Teileliste
Liste der Reparaturteile für den SMARTdri™ und SMARTdri Plus Händetrockner
Beschreibung Teilenummer
#
1 Satz, Sensor 49-10108K
2 Satz, Trocknersteuerung 16-KCEK
3 Satz, Motor - 240 V 32-K240K
4 Satz, Heizelement - 240 V 21-1240K
5 Satz, Luftkammerdeckel-
Baugruppe
6 Luftlter 93-120309
7 Satz, Abdeckung für Steuerung 20-0815093K
8 Satz, Düse 30-K10109K
9 Satz, Erdung – Modell 23-120609
Abdeckung – Alum – Weiß 20-K974
Abdeckung – Alum – Schwarz 20-K162
Abdeckung – Alum –
Hochglanzchrom
Abdeckung – Alum – Mattchrom 20-K971
10
Abdeckung – Edelstahl –
Hochglanzpoliert
Abdeckung – Edelstahl –
Mattgebürstet
Abdeckung – Stahl – Weiß 20-K975
Abdeckung – Gusseisen – Emaille 20-K976
11 Satz, Sicherheitsschrauben 46-040222K
12 Schlüssel, Sicherheit 56-40189
13 Transformator - 240 V 50-K240K
47-0818092AK
20-K970
20-K972
20-K973
2
1
13
7
6
5
3
4
Alle Sätze enthalten die für die Installation notwendigen
Halter. Die Teilenummer für die Abdeckung
(Bezugsnummer 10) ist je nach Modellnummer
für den Händetrockner verschieden.
Reparaturteile nden Sie unter
www.WorldDryer.com
Geben Sie bitte die folgenden Informationen an:
- Modellnummer
- Seriennummer
- Teilebeschreibung und in der Teileliste
aufgeführte Nummer
9
8
10
11
12
19
Page 20

Montage
1. Trennen Sie das Gerät von der Stromquelle.
2. Die empfohlene Montagehöhe nden Sie in Tabelle 2. Wählen Sie einen Montageort für den Händetrockner, an dem sich
keine reektierenden Oberächen oder Gegenstände (wie z. B. ein Waschbecken) direkt unter dem Infrarotsender benden.
Der Infrarotsensor ist von der Unterseite des Trockners aus sichtbar und bendet sich direkt im Düsenbereich des Trockners.
Der Mindestmontageabstand von der Unterseite des Trockners zu einer reektierenden Oberäche beträgt 46 cm. Wenn zwei
oder mehr Trockner installiert werden, sollte der Abstand zwischen ihnen 61 cm betragen.
3. Drehen Sie mit dem im Lieferumfang enthaltenen Inbusschlüssel die Befestigungsschrauben der Abdeckung im Uhrzeigersinn,
um die Abdeckung vom Trockner abzunehmen.
4. Halten Sie die Basis des Händetrockners an der von Ihnen ausgewählten Stelle an die Wand. Verwenden Sie die Basis als
Schablone und markieren Sie an der Wand die 4 Bohrlöcher für die Befestigungsschrauben.
5. Befestigen Sie die Basis mithilfe des in Tabelle 3 empfohlenen Schraubentyps.
6. Jeder Trockner muss über eine eigene festgeschaltete Leitung verfügen.
7. Verbinden Sie den Händetrockner mit der am nächsten liegenden Verteilertafel.
8. Befestigen Sie die Abdeckung. Drehen Sie hierzu die Schrauben entgegen dem Uhrzeigersinn. Die Schrauben dürfen nicht
überdreht werden.
WICHTIG: Informieren Sie sich vor der Montage des Händetrockners über die örtlichen und allgemeinen
Elektrovorschriften. Stellen Sie sicher, dass das elektrische Netz nicht überlastet ist. Sie dürfen keinen
Abzweigstromkreis, bei dem die Nennstromstärke geringer als die des in Tabelle 1 – Technische Daten –
Elektrik aufgeführten Händetrocknermodells ist, anschließen.
Tabelle 2
Empfohlene Montagehöhen vom Boden bis zur Unterkante des Trockners cm (Zoll)
Waschraum für Männer 117 (46)
Waschraum für Frauen 112 (44)
Waschraum für Kinder zwischen 4 und 7 Jahre 81 (32)
Waschraum für Kinder zwischen 7 und 10 Jahre 91 (36)
Waschraum für Kinder zwischen 10 und 13 Jahre 102 (40)
Waschraum für Kinder zwischen 13 und 17 Jahre 112 (44)
Montagehöhe für Benutzung durch Behinderte 94 (37)
Tabelle 3
Art der Wand Art der Schraube Schraubenmindestlänge
Hohlziegel, Latte, Leichtbauplatte oder Metall
Zement, Ziegelstein oder Fliesen auf Zement oder
Ziegelstein
Fachwerkwand mit Holzhinterlegung Holzschrauben Nr. 16 (M8) 70 mm (2 3/4 Zoll)
1/4-Zoll-Schraube (M6) oder
Knebelschraube
1/4-Zoll-Spreizdübel für Ständer (M6) 76 mm (3 Zoll)
Abhängig von der
Dicke der Wand
Einstellen der Steuerung des Händetrockners
Tabelle 4
Motoreinstellung
Hoch 800 1200
Mittel 575 975
Niedrig 400 800
* Die maximale Wattleistung des Heizelements beträgt 400 W.
Heizelement „AUS“ Heizelement „EIN”*
Leistungsbedarf (Watt)
Der Händetrockner verfügt über drei (3) Leistungsstufen –
Hoch, Mittel und Niedrig. Der Händetrockner kann bei einund ausgeschaltetem Heizelement betrieben werden. Der
Leistungsbedarf für den entsprechenden Betriebsbereich
wird in Tabelle 4 angezeigt.
Hinweis: Die werkseitige Einstellung für die
Leistungsstufe des Motors beträgt „Hoch“ (Hi)
und das Heizelement ist eingeschaltet (ON).
20
Page 21

Die verstellbare Steuerung des Händetrockners bendet sich auf der Platine im Anschlussraum des Händetrockners.
Einstellen der Steuerung für den Händetrockner:
1. Trennen Sie das Gerät von der Stromquelle.
2. Drehen Sie mit dem im Lieferumfang enthaltenen Inbusschlüssel die Befestigungsschrauben der Abdeckung im Uhrzeigersinn,
um die Abdeckung vom Trockner abzunehmen.
3. Nehmen Sie die Abdeckung des Anschlussraumes ab, um auf die verstellbare Steuerung zugreifen zu können (siehe Abb. 1).
4. Nehmen Sie wie gewünscht die Einstellungen für Motor und Heizelement vor und bringen Sie die Abdeckung für den
Anschlussraum wieder an.
5. Bringen Sie die Abdeckung des Trockners mithilfe des im Lieferumfang bendlichen Inbusschlüssels wieder an. Drehen Sie die
Befestigungsschrauben der Abdeckung entgegen dem Uhrzeigersinn ein und ziehen Sie sie fest. Überdrehen Sie die Schrauben nicht.
Abb. 1
Wartungs- und Reinigungsanweisungen
WICHTIG: Übermäßige Ansammlung von Flusen und Staub im Händetrockner können zu Schäden am Motor und am
Heizelement führen sowie die Lufttemperatur im Händetrockner erhöhen, was zu einer möglichen Gefährdung von Benutzern
führen kann. Bei einem Waschraum mit leichtem bis mittelstarkem Verkehr empehlt es sich, den Händetrockner einmal im
Jahr zu reinigen, um einen guten Betriebszustand des Geräts zu gewährleisten. Wenn der Verkehr im Waschraum hoch ist,
sollte der Händetrockner alle 6 Monate gereinigt werden. Lesen Sie vor der Reinigung die komplette Anweisung durch.
1. Trennen Sie das Gerät von der Stromquelle.
2. Drehen Sie mit dem im Lieferumfang enthaltenen Inbusschlüssel die Befestigungsschrauben der Abdeckung im Uhrzeigersinn,
um die Abdeckung vom Trockner abzunehmen.
3. Saugen Sie mit einem Staubsauger alle Flusen und Staub von der Basis des Händetrockners. Gehen Sie sorgfältig vor. Leiter oder
Leiterplatten dürfen nicht beschädigt werden.
4. Entfernen Sie bei Händetrockner-Modellen, bei denen ein offener Zellenlter den Lufteinlass abdeckt, den Filter, indem Sie ihn
vorsichtig an- und um die Motoreinlassabdeckung herum abheben. Saugen Sie den Filter mit einem Staubsauger ab und setzen
Sie ihn wieder auf die Motoreinlassabdeckung auf.
5. Lockern und entfernen Sie die vier (4) Schrauben von der Motoreinlassabdeckung. Nehmen Sie die Motoreinlassabdeckung ab,
um zur Reinigung auf den Motor und das Motorgehäuse zugreifen zu können.
6. Wischen Sie mit einer 1,27 cm breiten Bürste mit weichen bis mittelharten Borsten Flusen, Staub und Schmutz vom Motor.
Entfernen Sie mit einer Bürste und/oder einem Staubsauger Ansammlungen von Flusen und Staub vom Innern des Motorgehäuses.
7. Bauen Sie den Motor und die Motoreinlassabdeckung nach der Reinigung wieder vollständig zusammen.
8. Bringen Sie die Abdeckung des Trockners mithilfe des im Lieferumfang bendlichen Inbusschlüssels wieder an. Drehen Sie
Befestigungsschrauben der Abdeckung entgegen dem Uhrzeigersinn ein und ziehen Sie sie fest. Überdrehen Sie die Schrauben nicht.
Optionen für das
Heizelement
Ein / Aus (On / Off)
Motoreinstellungen
Hoch / Mittel / Niedrig (Hi / Med / Low)
21
Page 22

Fehlersuche
Trockner startet nicht.
Händetrockner schaltet
sich nicht ab oder läuft
30 Sekunden und startet
dann nicht wieder.
Luftleistung des Händetrockners ist schwach.
Händetrocknerluft
ist nicht warm.
A) Gerät wird nicht mit Strom versorgt. Stromversorgung und Anschlüsse prüfen.
B) Motor ist defekt. Motor ersetzen.
C) Infrarotsensor ist defekt. Infrarotsender komplett austauschen.
D) Steuerung des Händetrockners ist defekt. Steuerung des Händetrockners austauschen.
1. Infrarotsensor auf Schmutz oder Schäden prüfen.
Eine Reinigungslösung für Kunststofinsen und ein weiches
Tuch verwenden. Linse mit einem weichen Tuch trocknen.
2. Darauf achten, dass der Sensor nicht durch eine
A) Sensor ist verschmutzt, defekt
oder er spiegelt wider.
Lichtspiegelung von einem anderen Gegenstand
beeinträchtigt wird.
3. Nachdem der Trockner wieder an die Stromversorgung
angeschlossen ist, sollte er sich innerhalb einiger Sekunden
wieder einschalten. Zur Überprüfung die Hände in einem
Abstand zwischen 51 und 127 mm unter die Düse halten.
B) Steuerung des Händetrockners ist defekt. Steuerung des Händetrockners austauschen.
A) Motoreinstellung ist inkorrekt. Motoreinstellung ändern. Anweisungen hierzu sind auf
S. 3 der Anleitung zu nden.
A) Heizelement ist ausgeschaltet (OFF). Heizelement einschalten (ON). Anweisungen hierzu
sind auf S. 3 der Anleitung zu nden.
B) Heizelement ist defekt. Heizelement-Baugruppe austauschen.
C) Steuerung des Händetrockners ist defekt. Steuerung des Händetrockners austauschen.
Eingeschränkte Garantie
EINGESCHRÄNKTE FÜNF-JAHRES-GARANTIE VON World Dryer. Die World Dryer Corporation gewährt dem Erstbenutzer des in diesem Handbuch beschriebenen
Modells des Warmluft-Händetrockners von World Dryer eine Garantie gegen Verarbeitungs- oder Materialmängel bei normaler Benutzung für einen Zeitraum von 5 Jahren ab Kaufdatum.
Teile, bei denen das Material bzw. die Verarbeitung als fehlerhaft befunden wird und die mit vorausbezahlten Versandkosten an eine befugte, von World Dryer bestimmte Kundendienststelle eingesandt werden, werden als zugesicherte Abhilfemaßnahme im Ermessen von World Dryer repariert bzw. ersetzt. Informationen zur Abwicklung von Ansprüchen unter der
eingeschränkten Garantie sind im nachstehenden Abschnitt UNVERZÜGLICHE MÄNGELBESEITIGUNG zu nden. Diese eingeschränkte Garantie verleiht dem Käufer bestimmte
Rechte, die in jeder Rechtsordnung verschieden sein können.
HAFTUNGSBESCHRÄNKUNG. World Dryer lehnt die Haftung für Folgeschäden und Nebenkosten ausdrücklich ab, soweit dies gesetzlich zulässig ist. Die Haftung von
World Dryer beschränkt sich in allen Fällen auf den gezahlten Kaufpreis und darf diesen nicht überschreiten.
HAFTUNGSAUSSCHLUSS. World Dryer ist immer bestrebt, gewissenhaft zusammengestellte Produktinformationen zur Verfügung zu stellen und das Produkt in diesem
Anweisungsblatt genau abzubilden. Solche Informationen und Abbildungen sind jedoch nur zur Identikation gedacht und stellen keine ausdrückliche oder stillschweigende Garantie
für die ALLGEMEINE GEBRAUCHSTAUGLICHKEIT der Produkte bzw. die GEEIGNETHEIT FÜR EINEN BESTIMMTEN ZWECK dar sowie auch keine Garantie dafür, dass die Produkte
notwendigerweise den Abbildungen oder Beschreibungen entsprechen. Vorbehaltlich unten stehender Bestimmungen übernimmt oder autorisiert World Dryer keine ausdrückliche oder
stillschweigende Garantie oder Zusicherung von Tatsachen neben den vorstehenden Bestimmungen in „HAFTUNGSBESCHRÄNKUNG“.
GEEIGNETHEIT UND ANGEMESSENHEIT DES PRODUKTS. In vielen Rechtsordnungen gibt es Gesetze und Regelungen zum Kaufrecht, zur Bauweise, Installation und/
oder zur Verwendung von Produkten für bestimmte Zwecke, welche sich von angrenzenden Gebieten unterscheiden können. Obwohl World Dryer bestrebt ist, sicherzustellen, dass die
Produkte diesen Gesetzen entsprechen, kann keine Garantie dafür übernommen werden und World Dryer ist nicht dafür verantwortlich, wie das Produkt installiert oder verwendet wird.
Vor dem Kauf und der Verwendung eines Produkts muss der Käufer sich mit den Anwendungsmöglichkeiten des Produkts sowie allen zutreffenden nationalen und örtlichen Gesetzen
und Regelungen vertraut machen und sicherstellen, dass das Produkt sowie dessen Installation und Verwendung mit diesen Vorschriften übereinstimmen wird.
Bestimmte Aspekte von Haftungsausschlüssen gelten nicht für Verbraucherprodukte, z. B. (a) in einigen Rechtsordnungen ist der Ausschluss oder die Beschränkung der Haftung für
Folgeschäden oder Nebenkosten ausgeschlossen und daher kann es sein, dass die vorstehenden Beschränkungen oder Ausschlüsse für Sie keine Anwendung nden, (b) in einigen
Rechtsordnungen ist auch die zeitliche Beschränkung einer stillschweigenden Garantie unzulässig und daher wäre die vorstehende Haftungsbeschränkung in einem solchen Fall für
Sie nicht anwendbar und (c) es ist gesetzlich vorgeschrieben, dass während der Laufzeit dieser Eingeschränkten Garantie stillschweigende Garantien für konkludente Zusicherung
der allgemeinen Gebrauchstauglichkeit oder Geeignetheit für einen bestimmten Zweck hinsichtlich von Verbrauchern erworbener Verbraucherprodukte nicht ausgeschlossen oder
anderweitig abgelehnt werden können.
Hergestellt von World Dryer Corporation, Berkeley, Illinois 60163 USA
UNVERZÜGLICHE MÄNGELBESEITIGUNG. World Dryer wird sich im Hinblick auf alle Produkte, die innerhalb der eingeschränkten Garantiezeit einen erwiesenen
Mangel aufweisen, gutgläubig um eine unverzügliche Mängelbeseitigung oder einen Ausgleich bemühen. Jede Kommunikation in Bezug auf ein mangelhaftes Produkt innerhalb der
eingeschränkten Garantiezeit ist zunächst schriftlich oder telefonisch an den Händler zu richten, von dem das Produkt erworben wurde. Der Händler wird dann zusätzliche Anweisungen
zur Verfügung stellen. Sollte das Problem nicht zufriedenstellend behoben werden können, wenden Sie sich schriftlich an World Dryer unter der untenstehenden Adresse. Geben Sie
dabei den Namen und die Adresse des Händlers sowie Rechnungsdatum und -nummer an und beschreiben Sie die Art des Mangels. Mit der Übergabe an ein Transportunternehmen
gehen Eigentum und Verlustrisiko auf den Käufer über. Wenn das Produkt beim Transport beschädigt wurde, sind Ansprüche an das Transportunternehmen zu richten.
5700 McDermott Drive
Berkeley, IL 60163 USA
800-323-0701
www.worlddryer.com
22
Page 23

Descrizione
Asciugamani elettrico ad aria calda per uso universale, alimentato da un motore a spazzole, che invia 800 watt per l’asciugatura ed
incorpora un elemento integrato per aria calda. I controlli dell’asciugamani prevedono (3) livelli di funzionamento motore (alto, medio
e basso) e l’opzione di funzionamento con o senza l’elemento riscaldante. Per attivare automaticamente l’asciugamani si fa uso di
un sensore a infrarossi. Questi modelli sono intesi per l’uso in ambienti commerciali, industriali, ufci e centri pubblici.
Speciche elettriche
Tabella 1
Modelli Tipo Ingresso elettrico Amperaggio nominale Watt nominali Certicazioni
K48-XXX Automatico 220 - 240 V c.a., 50/60Hz 5 A 1200 CE, TUV-GS
Informazioni generali sulla sicurezza
Questo apparecchio non è destinato all’uso da parte di bambini o persone con disabilità siche, sensoriali o mentali in modo
adeguato a meno che una persona responsabile di supervisione per assicurarsi di poter utilizzare l’apparecchio in modo sicuro. I
bambini piccoli devono essere sorvegliati per garantire che non giochino con l’apparecchio.
PERICOLO Il mancato scollegamento dalla fonte di alimentazione prima dell’installazione o della riparazione
potrebbe causare gravi lesioni o morte da folgorazione.
• Scollegare sempre la fonte di alimentazione prima di riparare o installare l’asciugamani.
PERICOLO La messa a terra non adeguata di questa unità potrebbe causare grave folgorazione e/o morte.
• Per garantirne un funzionamento sicuro, questo asciugamani deve avere un’adeguata messa a terra. Sulla base inferiore
dell’asciugamani è indicato un punto di collegamento per messa a terra.
• In applicazioni con ambiente bagnato o umido si consiglia una protezione GFCI o secondo i codici vigenti a livello locale.
AVVERTENZA Qualora non si rispettino i codici vigenti a livello locale o i consigli sulla sicurezza,
esiste il pericolo di incendio, lesioni a persone o danni alle cose.
• Utilizzare solo l’alimentazione elettrica (tensione e frequenza) specicata per il modello di asciugamani installato. Consultare
la Tabella 1 – Speciche elettriche.
• Collegare l’asciugamani al pannello di distribuzione adeguato più vicino. Il cablaggio permanente deve avere un dispositivo di
scollegamento compatibile con i codici di cablaggio locali.
• Al ne di limitare un’eventuale caduta di tensione e garantire un funzionamento efciente, usare un lo di misura 12 (4 mm2)
o superiore, come richiesto dai codici elettrici locali.
• Collegare sempre ad un circuito di diramazione con interruttore automatico o protezione con fusibile con una portata
nominale superiore all’amperaggio nominale del modello di asciugamani riportato nella Tabella 1 – Speciche elettriche.
• Onde evitare pericoli a seguito di un resettaggio inavvertito del limite termico, non alimentare l’asciugamani attraverso un
dispositivo a commutazione esterna, quale ad esempio un timer, oppure collegato ad un circuito commutato regolarmente
(on/off) dalla linea
di servizio.
• Tutti i modelli automatici di asciugamani devono disporre di un circuito dedicato.
• Instradare tutto il cablaggio lontano da parti mobili all’interno dell’asciugamani.
ATTENZIONE Un attacco inadeguato potrebbe causare lesioni a persone o danni a cose.
• Attenersi ai consigli per il montaggio contenuti nella Tabella 2.
• Su una parete con perno, un lato dell’asciugamani deve essere montato su un perno esistente.
Disimballaggio
1. Togliere tutto il materiale di imballaggio. Si consiglia di adottare un programma di riciclaggio.
2. Togliere con cura l’asciugamani dalla scatola di spedizione, facendo attenzione a non far cadere l’elettrodomestico.
3. Ispezionare con cura che durante il transito l’unità non abbia subito danni. Controllare che non vi siano parti allentate, mancanti
o danneggiate. Qualora l’asciugamani abbia subito danni, informare subito il punto di acquisto.
23
Page 24

Elenco parti
Elenco parti di riparazione per l’asciugamani SMARTdri™ e SMARTdri Plus
Descrizione N. di parte
#
1 Kit, sensore 49-10108K
2 Kit, controlli asciugamani 16-KCEK
3 Kit, motore - 240 V 32-K240K
4 Kit, elemento riscaldante - 240 V 21-1240K
5 Kit, gruppo cappuccio plenum 47-0818092AK
6 Filtro dell’aria 93-120309
7 Kit, copertura controlli 20-0815093K
8 Kit, ugello 30-K10109K
9 Kit, messa a terra – Modello 23-120609
Gruppo copertura – Alluminio –
Bianco
Gruppo copertura – Alluminio –
Nero
Gruppo copertura – Alluminio –
Cromo lucidato/lucido
Gruppo copertura – Alluminio –
Cromo spazzolato/satinato
10
Gruppo copertura – Acciaio
inossidabile – Lucidato/lucido
Gruppo copertura – Acciaio
inossidabile – Spazzolato/satinato
Gruppo copertura – Acciaio –
Bianco
Gruppo copertura – Fuso –
Smalto in porcellana
11 Kit, viti di tenuta 46-040222K
12 Chiave, di sicurezza 56-40189
13 Trasformatore - 240 V 50-K240K
20-K974
20-K162
20-K970
20-K971
20-K972
20-K973
20-K975
20-K976
1
13
2
7
6
4
5
3
Tutti i kit includono i ssaggi necessari per
l’installazione. Il numero di parte per il gruppo
copertura (numero di riferimento 10) varia con il
numero di modello per l’asciugamani.
Per le parti di riparazione, visitare il sito
www.WorldDryer.com
Indicare le seguenti informazioni:
- N. di modello
- N. di serie
- Descrizione della parte e numero riportato
nell’elenco parti
9
8
10
11
12
24
Page 25

Installazione
1. Scollegare la fonte di alimentazione.
2. Avvalendosi della Tabella 2 per determinare l’altezza di montaggio consigliata, selezionare un punto di montaggio per
l’asciugamani dove non vi siano superci o oggetti riettenti (quali un lavandino) direttamente sotto la cellula del sensore
a infrarossi. La cellula del sensore a infrarossi è visibile dal fondo dell’asciugamani e si trova appena all’interno dell’ugello
dell’asciugamani. La distanza minima di montaggio dal fondo dell’asciugamani rispetto ad una supercie riettente è di 46 cm
(18 pollici). Qualora si installino due o più asciugamani, calcolare una distanza di 61 cm (24 pollici) tra l’uno e l’altro.
3. Utilizzare la chiave esagonale di sicurezza in dotazione per girare la vite di montaggio in senso orario per rimuovere la copertura
dall’asciugamani.
4. Posizionare la base dell’asciugamani sulla parete in un punto selezionato e avvalendosi della base come mascherina, marcare
sulla parete i 4 fori per i bulloni di montaggio.
5. Fissare la base alla parete, utilizzando il tipo di bulloni suggeriti nella Tabella 3.
6. Ciascun asciugamani dispone del proprio circuito dedicato.
7. Collegare l’asciugamano al pannello di distribuzione adeguato più vicino.
8. Rimontare la copertura, girare le viti in senso antiorario, accertandosi di non serrarle in eccedenza.
IMPORTANTE: prima di eseguire l’installazione dell’asciugamani, consultare i regolamenti a livello locale e generale.
Accertarsi che la rete elettrica non sia sovraccarica. Non collegare ad un circuito di diramazione con portata nominale
inferiore all’amperaggio nominale del modello di asciugamani riportato nella Tabella 1 - Speciche elettriche.
Tabella 2
Altezze di montaggio consigliate, dal pavimento al fondo dell’asciugamani cm (pollici)
Bagno per uomini 117 (46)
Bagno per donne 112 (44)
Bagno per bambini (4-7 anni) 81 (32)
Bagno per bambini (7-10 anni) 91 (36)
Bagno per bambini (10-13 anni) 102 (40)
Bagno per bambini (13-17 anni) 112 (44)
Altezza di montaggio per persone affette da handicap 94 (37)
Tabella 3
Tipo di parete Tipo di bullone Lunghezza minima bulloni
Piastrella vuota, lamiera stirata, murata o metallo
Mattoni in cemento o piastrelle coperte, cemento
o mattoni
Parete con perno e rinforzo in legno Viti in legno n. 16 (M8) 70 mm (2 3/4 pollici)
Vite da 1/4 pollici (M6) o bulloni con dado ad
alette espansibili
Bulloni di espansione con perno da
1/4 pollici (M6)
Secondo lo spessore
della parete
76 mm (3 pollici)
Regolazione dei controlli dell’asciugamani
Tabella 4
Impostazione
motore
Alta 800 1200
Media 575 975
Bassa 400 800
* Il wattaggio massimo dell’elemento riscaldante è 400 W.
Riscaldatore spento
Assorbimento (watt)
(“OFF”)
Riscaldatore
acceso (“ON”*)
L’asciugamani dispone di controlli regolabili per (3) livelli
di funzionamento: alto, medio e basso. L’asciugamani
può essere azionato con l’elemento riscaldante acceso
(“ON”) o spento (“OFF”). La Tabella 4 riporta l’assorbimento
dell’asciugamani per la gamma operativa.
Nota: l’impostazione di fabbrica per i controlli
dell’asciugamani è motore alto (“Hi”) e
riscaldatore acceso (“ON”).
25
Page 26

I controlli regolabili dell’asciugamani sono situati sulla scheda a circuito stampato all’interno del vano cavi dell’asciugamani.
Per regolare i controlli dell’asciugamani:
1. Scollegare la fonte di alimentazione.
2. Utilizzare la chiave esagonale di sicurezza in dotazione per girare la vite di montaggio in senso orario per rimuovere la
copertura dall’asciugamani.
3. Togliere la copertura dal vano cavi per accedere ai controlli regolabili (vedere la Figura 1).
4. Regolare l’impostazione motore ed il riscaldatore a piacere e rimontare la copertura del vano cavi.
5. Rimontare la copertura dell’asciugamani avvalendosi della chiave esagonale di sicurezza in dotazione per ruotare le viti
di montaggio in senso antiorario e serrare n quando risultano sicure. Non serrare in eccedenza.
Fig. 1
Opzioni per il
riscaldatore
On / Off (Acceso / Spento)
Impostazioni motore
Hi / Med / Low (Alta / Media / Bassa)
Istruzioni per la manutenzione e la pulitura
IMPORTANTE: l’accumulo eccessivo di laccia e polvere all’interno dell’asciugamani può danneggiare il motore e l’elemento
riscaldante. La formazione eccessiva può inoltre aumentare la temperatura dell’aria dell’asciugamani e causare lesioni a
chi ne fa uso. In ambienti con utilizzo da leggero a moderato, per garantire il corretto funzionamento dell’asciugamani sarà
sufciente una pulitura annuale. In condizioni di forte utilizzo, l’asciugamani andrà pulito ogni sei mesi. Prima di procedere,
leggere le istruzioni nella loro interezza.
1. Scollegare la fonte di alimentazione.
2. Utilizzare la chiave esagonale in dotazione per girare la vite di montaggio in senso orario per rimuovere la copertura
dall’asciugamani.
3. Avvalendosi di un aspirapolvere, eliminare laccia o polvere dalla base dell’asciugamani. Prestare attenzione a non danneggiarne
i li o le schede a circuito stampato.
4. Per i modelli di asciugamani con un ltro a celle aperte che copre il punto di presa dell’aria, togliere il ltro sollevandolo
delicatamente intorno alla copertura di ingresso motore. Pulire il ltro con un aspirapolvere e rimontare quindi la copertura di
ingresso motore.
5. Allentare e togliere le (4) viti dalla copertura di ingresso motore e togliere la copertura stessa per accedere al motore ed alla
boccola motore per la pulitura.
6. Usare un pennello per vernici semi-morbido 1,27 cm per eliminare dal motore laccia, polvere e sporco. Con una spazzola e/o
aspirapolvere eliminare l’eventuale formazione di laccia e polvere dall’interno della boccola motore.
7. Dopo aver completato il processo di pulitura, rimontare completamente il motore e la copertura di ingresso motore.
8. Rimontare la copertura dell’asciugamani avvalendosi della chiave esagonale di sicurezza in dotazione per ruotare le viti
di montaggio in senso antiorario e serrare n quando risultano sicure. Non serrare in eccedenza.
26
Page 27

Tabella per l’individuazione e la soluzione dei problemi
A) Unità non alimentata. Controllare che l’unità sia alimentata e vericare le
connessioni.
L’asciugamani non si accende.
L’asciugamani non si spegne
o funziona per 30 secondi e
quindi non si riavvia.
L’uscita di aria
dall’asciugamani è bassa.
L’asciugamani non è caldo.
B) Motore difettoso. Sostituire il motore.
C) Sensore ad infrarossi difettoso. Sostituire il gruppo sensore ad infrarossi.
D) Controlli asciugamani difettosi. Sostituire i controlli dell’asciugamani.
1. Controllare che il sensore ad infrarossi non sia sporco
o danneggiato. Usare soluzioni detergenti per obiettivi in
plastica e un panno morbido. Asciugare l’obiettivo con un
panno morbido.
A) Sensore sporco, difettoso o senza
riessione.
2. Accertarsi che sul sensore non vi siano riessioni
provenienti da altri oggetti.
3. Dopo aver inviato elettricità all’asciugamani, questo
dovrebbe accendersi entro alcuni secondi. Testare
portando le mani 51 - 127 mm (2 - 5 pollici) sotto l’ugello.
B) Controlli asciugamani difettosi. Sostituire i controlli dell’asciugamani.
A) Impostazione motore incorretta. Regolare l’impostazione motore. Per istruzioni in merito
consultare pagina 3.
A) Riscaldatore nella posizione spenta
("OFF").
Regolare il riscaldatore sulla posizione accesa (“ON”).
Per istruzioni in merito consultare pagina 3.
B) Elemento riscaldante difettoso. Sostituire il gruppo elemento riscaldante.
C) Controlli asciugamani difettosi. Sostituire i controlli dell’asciugamani.
Garanzia limitata
GARANZIA World Dryer LIMITATA DI CINQUE ANNI. Il modello di asciugamani elettrico ad aria calda World Dryer coperto in questo manuale viene garantito dalla World
Dryer Corporation all’utente originale da difetti di manodopera o materiale in condizioni di utilizzo regolare, per cinque anni dalla data dell’acquisto. Qualsiasi parte considerata difettosa
per materiale o manodopera e restituita ad un centro per riparazioni autorizzato, designato da World Dryer, con costi di spedizione pre-pagati, verrà, a suo esclusivo rimedio, riparata o
sostituita a discrezione della World Dryer. Per le procedure di reclamo coperte dalla garanzia limitata, consultare la sezione DESTINAZIONE IMMEDIATA di cui sotto. Questa garanzia
limitata offre agli acquirenti diritti specici che variano da una giurisdizione all’altra.
LIMITAZIONE DI RESPONSABILITÀ. Nella misura in cui contemplato dalle leggi vigenti, la responsabilità World Dryer in caso di danni derivati o fortuiti viene espressamente
dichiarata. In tutti i casi la responsabilità della World Dryer è limitata a e non supererà il prezzo pagato per l’acquisto.
DICHIARAZIONE DI GARANZIA. World Dryer si è impegnata ad offrire informazioni sul prodotto e ad illustrare con cura i prodotti contenuti in questa documentazione; tuttavia,
tali informazioni e illustrazioni sono al solo scopo di identicazione e non indicano o implicano espressamente garanzia che i prodotti sono COMMERCIABILI O IDEONEI PER UNO
SCOPO PARTICOLARE, o che i prodotti saranno necessariamente conformi alle illustrazioni o descrizioni. Fatta eccezione per quanto descritto di seguito, nessuna garanzia o
affermazione, espressa o implicita, se non quella indicata nella “GARANZIA LIMITATA” di cui sopra, viene effettuata o autorizzata da World Dryer.
IDONEITÀ DEL PRODOTTO. Molte giurisdizioni prevedono codici e regolamenti che governano vendite, costruzione, installazione e/o utilizzo dei prodotti per scopi specici,
che possono variare da quelli in aree adiacenti. Sebbene World Dryer tenti di garantire che i prodotti siano conformi a tali codici, non potrà garantire conformità e non potrà essere
ritenuta responsabile dell’installazione o dell’utilizzo dei prodotti stessi. Prima di acquistare e utilizzare un prodotto, vericarne l’applicazione, unitamente a tutti i codici ed i regolamenti
di pertinenza e vigenti a livello nazionale e locale, accertandosi che il prodotto, l’installazione e l’utilizzo siano conformi a quanto previsto.
Taluni aspetti delle dichiarazioni non riguardano i prodotti per consumatori; ad esempio, (a) alcune giurisdizioni non consentono l’esclusione o la limitazione di danni fortuiti o derivati,
di conseguenza la limitazione o esclusione di cui sopra non avrà valore; (b) inoltre, alcune giurisdizioni non consentono o limitano la durata di una garanzia implicita e di conseguenza la
limitazione di cui sopra non riguarderà l’utente in questione; inne (c) secondo le leggi vigenti durante il periodo di questa Garanzia Limitata e delle garanzie implicite di commerciabilità
o idoneità implicita per uno scopo particolare riguardanti prodotti per consumatori acquistati da consumatori, potrebbero non essere escluse o altresì dichiarate.
Fabbricato da World Dryer Corporation, Berkeley, Illinois 60163 U.S.A.
DESTINAZIONE IMMEDIATA. World Dryer si impegna ad apportare correzioni immediate o altre modiche ritenute necessarie per qualsiasi prodotto ritenuto difettoso durante
il periodo della Garanzia Limitata. Per qualsiasi prodotto ritenuto difettoso durante il periodo della Garanzia Limitata, informare dapprima (per iscritto o per telefono) il concessionario
presso cui si è effettuato l’acquisto. Il concessionario fornirà istruzioni in merito. Qualora non si sia soddisfatti del rimedio proposto, rivolgersi per iscritto a World Dryer all’indirizzo di
cui sotto, indicando il nome del concessionario, l’indirizzo, la data ed il numero di fattura del concessionario, descrivendo inne la natura del difetto. Titolo e rischio di perdita passano
all’acquirente alla consegna al trasportatore comune. Qualora il prodotto riporti danni durante il transito all’acquirente, esporre reclamo al trasportatore.
27
5700 McDermott Drive
Berkeley, IL 60163 U.S.A.
800-323-0701
www.worlddryer.com
68-K48 Rev04
Page 28

28
 Loading...