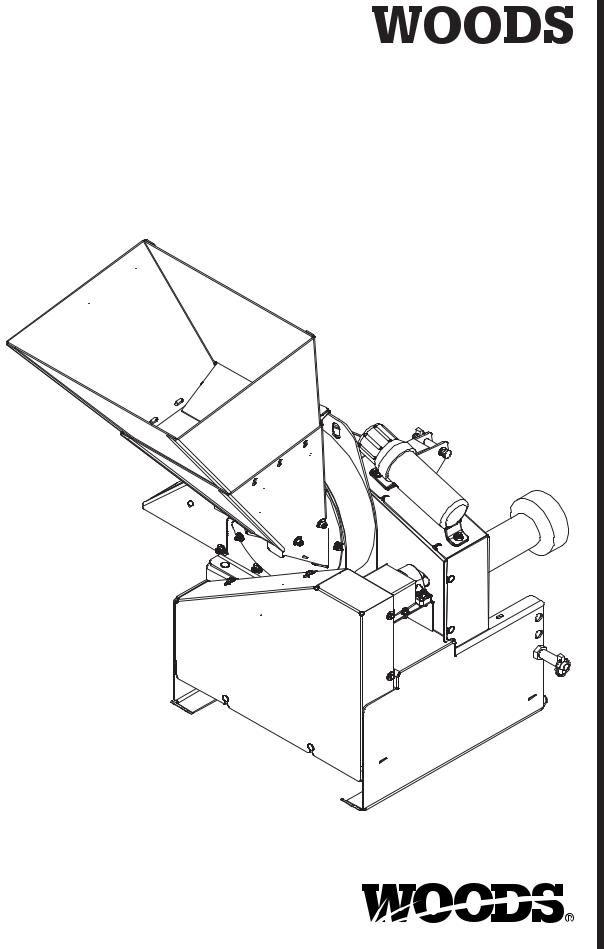
Woods Equipment TCH4500 User Manual

|
|
CHIPPER |
MANUAL |
|
|
|
|
|
|
TCH4500 |
|
MAN0458 |
(Rev. 2/13/2012) |
Tested. Proven. Unbeatable. |
OPERATOR'S |
|
|
|

TO THE DEALER:
Assembly and proper installation of this product is the responsibility of the Woods® dealer. Read manual instructions and safety rules. Make sure all items on the Dealer’s Pre-Delivery and Delivery Check Lists in the Operator’s Manual are completed before releasing equipment to the owner.
The dealer must complete the online Product Registration form at the Woods Dealer Website which certifies that all Dealer Check List items have been completed. Dealers can register all Woods product at dealer.WoodsEquipment.com under Product Registration.
Failure to register the product does not diminish customer’s warranty rights.
TO THE OWNER:
Read this manual before operating your Woods equipment. The information presented will prepare you to do a better and safer job. Keep this manual handy for ready reference. Require all operators to read this manual carefully and become acquainted with all adjustment and operating procedures before attempting to operate. Replacement manuals can be obtained from your dealer. To locate your nearest dealer, check the Dealer Locator at www.WoodsEquipment.com, or in the United States and Canada call 1-800-319-6637.
The equipment you have purchased has been carefully engineered and manufactured to provide dependable and satisfactory use. Like all mechanical products, it will require cleaning and upkeep. Lubricate the unit as specified. Observe all safety information in this manual and safety decals on the equipment.
For service, your authorized Woods dealer has trained mechanics, genuine Woods service parts, and the necessary tools and equipment to handle all your needs.
Use only genuine Woods service parts. Substitute parts will void the warranty and may not meet standards required for safe and satisfactory operation. Record the model number and serial number of your equipment in the spaces provided:
Model: _______________________________ |
Date of Purchase: _____________________ |
Serial Number: (see Safety Decal section for location) ____________________________________
Provide this information to your dealer to obtain correct repair parts.
Throughout this manual, the term NOTICE is used to indicate that failure to observe can cause damage to equipment. The terms CAUTION, WARNING, and DANGER are used in conjunction with the Safety-Alert Symbol (a triangle with an exclamation mark) to indicate the degree of hazard for items of personal safety.
|
|
|
|
|
|
|
|
|
|
|
|
|
|
|
|
|
|
|
2 Introduction |
Gen’l (Rev. 12/5/2011) |
|||
|
|
|
|
|
|

TABLE OF CONTENTS
INTRODUCTION . . . . . . . . . . . . . . . . . . . . . . . . . . . . . . . . . . . . . . . . . . . . . . 2 GENERAL INFORMATION . . . . . . . . . . . . . . . . . . . . . . . . . . . . . . . . . . . . . . 4 SPECIFICATIONS . . . . . . . . . . . . . . . . . . . . . . . . . . . . . . . . . . . . . . . . . . . . . 4 SAFETY RULES . . . . . . . . . . . . . . . . . . . . . . . . . . . . . . . . . . . . . . . . . . . . . . 5 SAFETY DECALS . . . . . . . . . . . . . . . . . . . . . . . . . . . . . . . . . . . . . . . . . . . . . 8 OPERATION . . . . . . . . . . . . . . . . . . . . . . . . . . . . . . . . . . . . . . . . . . . . . . . . 12 SERVICE . . . . . . . . . . . . . . . . . . . . . . . . . . . . . . . . . . . . . . . . . . . . . . . . . . . 16 TROUBLESHOOTING . . . . . . . . . . . . . . . . . . . . . . . . . . . . . . . . . . . . . . . . . 21 ASSEMBLY . . . . . . . . . . . . . . . . . . . . . . . . . . . . . . . . . . . . . . . . . . . . . . . . . 23 DEALER CHECK LIST. . . . . . . . . . . . . . . . . . . . . . . . . . . . . . . . . . . . . . . . . 27 PARTS LISTS . . . . . . . . . . . . . . . . . . . . . . . . . . . . . . . . . . . . . . . . . . . . . . . 28 BOLT TORQUE CHART . . . . . . . . . . . . . . . . . . . . . . . . . . . . . . . . . . . . . . . 35 BOLT SIZE CHART & ABBREVIATIONS. . . . . . . . . . . . . . . . . . . . . . . . . . . 36 REPLACEMENT PARTS WARRANTY . . . . . . . . . . . . INSIDE BACK COVER PRODUCT WARRANTY . . . . . . . . . . . . . . . . . . . . . . . . . . . . . BACK COVER
!LEA EL INSTRUCTIVO!
Si no lee Ingles, pida ayuda a alguien que si lo lea para que le traduzca las medidas de seguridad.
MAN0458 (9/23/2005) |
Introduction 3 |
|
|
GENERAL INFORMATION
The purpose of this manual is to assist you in operating and maintaining your chipper. Read it carefully. It furnishes information and instructions that will help you achieve years of dependable performance. These instructions have been compiled from extensive field experience and engineering data. Some information may be general in nature due to unknown and varying operating conditions. However, through experience and these instructions, you should be able to develop procedures suitable to your particular situation.
The illustrations and data used in this manual were current at the time of printing, but due to possible inline production changes, your chipper may vary slightly in detail. We reserve the right to redesign and change the chipper as may be necessary without notification.
Throughout this manual, references are made to right and left directions. These are determined by standing behind the equipment facing the direction of forward travel.
SPECIFICATIONS
|
TCH4500 |
Overall Size |
56-1/2" x 51-1/2" x 36-1/2" |
Maximum Chipper Capacity |
4-1/2 dia. |
Chipper Blade |
2 - Reversible |
|
3/8" x 5-3/32" x 4" |
Rotor Size |
14" dia. x 1 |
Rotor Weight (with blades) |
49 lbs |
Rotor Weight (without blades) |
45 lbs |
Discharge Size |
4.5" x 9" (Standard) |
|
4.5" x 4.5" (Optional) |
Drive Type |
Belt |
Belt Size |
2RB47 ARMID Construction |
Weight |
390 lbs |
4 Introduction |
MAN0458 (9/23/2005) |
|
|

SAFETY RULES
ATTENTION! BECOME ALERT! YOUR SAFETY IS INVOLVED!
Safety is a primary concern in the design and manufacture of our products. Unfortunately, our efforts to provide safe equipment can be wiped out by an operator’s single careless act.
In addition to the design and configuration of equipment, hazard control and accident prevention are dependent upon the awareness, concern, judgement, and proper training of personnel involved in the operation, transport, maintenance, and storage of equipment.
It has been said, “The best safety device is an informed, careful operator.” We ask you to be that kind of operator.
TRAINING
Safety instructions are important! Read all attachment and power unit manuals; follow all safety rules and safety decal information. (Replacement manuals and safety decals are available from your dealer. To locate your nearest dealer, check the Dealer Locator at www.WoodsEquipment.com, or in the United States and Canada call 1-800-319- 6637.) Failure to follow instructions or safety rules can result in serious injury or death.
If you do not understand any part of this manual and need assistance, see your dealer.
Know your controls and how to stop engine and attachment quickly in an emergency.
Operators must be instructed in and be capable of the safe operation of the equipment, its attachments, and all controls. Do not allow anyone to operate this equipment without proper instructions.
Never allow children or untrained persons to operate equipment.
PREPARATION
Check that all hardware is properly installed. Always tighten to torque chart specifications unless instructed otherwise in this manual.
Always wear relatively tight and belted clothing to avoid getting caught in moving parts. Wear sturdy, rough-soled work shoes and protective equipment for eyes, hair, hands, hearing, and head; and respirator or filter mask where appropriate.
Wear safety glasses and hearing protection at all times when operating this machine.
Make sure attachment is properly secured, adjusted, and in good operating condition.
Make sure spring-activated locking pin or collar slides freely and is seated firmly in tractor PTO spline groove.
Make sure all safety decals are installed. Replace if damaged. (See Safety Decals section for location.)
Make sure shields and guards are properly installed and in good condition. Replace if damaged.
OPERATION
Keep bystanders at least 50 feet away from area of operation.
Do not allow bystanders in the area when operating, attaching, removing, assembling, or servicing equipment.
Do not put chipper into service unless all shields and guards are in place and in good condition. Replace if damaged.
Do not operate or transport equipment while under the influence of alcohol or drugs.
Operate only in daylight or good artificial light.
Do not operate chipper on a paved, concrete, or hard gravel surface which can cause discharged material to rebound and kick back.
Make sure the cutting chamber is empty before starting the machine.
Keep hands, feet, hair, and clothing away from equipment while engine is running. Stay clear of all moving parts.
Never allow riders on power unit or attachment.
Always sit in power unit seat when operating controls or starting engine. Securely fasten seat belt, place transmission in neutral, engage brake, and ensure all other controls are disengaged before starting power unit engine.
Shift tractor transmission into park or neutral and set brakes before engaging PTO and chipper.
Operate tractor PTO at 540 RPM. Do not exceed.
Do not operate or transport on steep slopes.
Use extreme care and reduce ground speed on slopes and rough terrain.
(Safety Rules continued on next page)
TCH4500 Safety Rules (7/8//2005)
Safety 5

SAFETY RULES
ATTENTION! BECOME ALERT! YOUR SAFETY IS INVOLVED!
(Safety Rules continued from previous page)
Before performing any service or maintenance, lower equipment to ground or block securely, turn off engine, remove key, and disconnect driveline from tractor PTO.
NEVER GO UNDERNEATH EQUIPMENT. Never place any part of the body underneath equipment or between moveable parts even when the engine has been turned off. Hydraulic system leak-down, hydraulic system failures, mechanical failures, or movement of control levers can cause equipment to drop or rotate unexpectedly and cause severe injury or death.
•Service work does not require going underneath implement.
•Read Operator's Manual for service instructions or have service performed by a qualified dealer.
Always stand clear of discharge area when operating this machine. Keep face and body away from feed and discharge openings.
Keep hands and feet out of feed and discharge openings while machine is operating to avoid serious personal injury. Turn off power and allow machine to come to a complete stop before clearing obstructions.
Do not climb on machine when operating. Keep proper balance and footing at all times.
When feeding material into machine, do not allow metal, rocks, bottles, cans, or any other foreign material to be fed into the machine.
Make sure debris does not blow into traffic, parked cars, or pedestrians.
Do not allow processed material to build up in the discharge area. This may prevent proper discharge and can result in kickback of material through the feed opening.
Shut off machine immediately if it becomes clogged, the cutting mechanism strikes any foreign object, or the machine starts vibrating or making an unusual noise. Shut off power source and make sure all moving parts have come to a complete stop. After machine stops:
•Inspect for damage.
•Replace or repair any damaged parts.
•Check for and tighten any loose parts.
TRANSPORTATION
Reduce transport speed to avoid bouncing and brief loss of steering control.
Always comply with all state and local lighting and marking requirements.
Never allow riders on power unit or attachment.
Do not operate PTO during transport.
Do not operate or transport on steep slopes.
Do not operate or transport equipment while under the influence of alcohol or drugs.
MAINTENANCE
Service and maintenance work not covered in OWNER SERVICE must be done by a qualified dealership. Special skills, tools, and safety procedures may be required. Failure to follow these instructions can result in serious injury or death.
Before performing any service or maintenance, lower equipment to ground or block securely, turn off engine, remove key, and disconnect driveline from tractor PTO.
Do not modify or alter or permit anyone else to modify or alter the equipment or any of its components in any way.
Always wear relatively tight and belted clothing to avoid getting caught in moving parts. Wear sturdy, rough-soled work shoes and protective equipment for eyes, hair, hands, hearing, and head; and respirator or filter mask where appropriate.
Do not allow bystanders in the area when operating, attaching, removing, assembling, or servicing equipment.
Make sure attachment is properly secured, adjusted, and in good operating condition.
Never perform service or maintenance with engine running.
Keep all persons away from operator control area while performing adjustments, service, or maintenance.
Tighten all bolts, nuts, and screws to torque chart specifications. Check that all cotter pins are installed securely to ensure equipment is in a safe condition before putting unit into service.
Make sure shields and guards are properly installed and in good condition. Replace if damaged.
6 Safety
TCH4500 Safety Rules (7/8/2005)

SAFETY RULES
ATTENTION! BECOME ALERT! YOUR SAFETY IS INVOLVED!
Make sure all safety decals are installed. Replace if damaged. (See Safety Decals section for location.)
When lubricating telescoping PTO drives, keep fingers out of shield access slots to prevent injury.
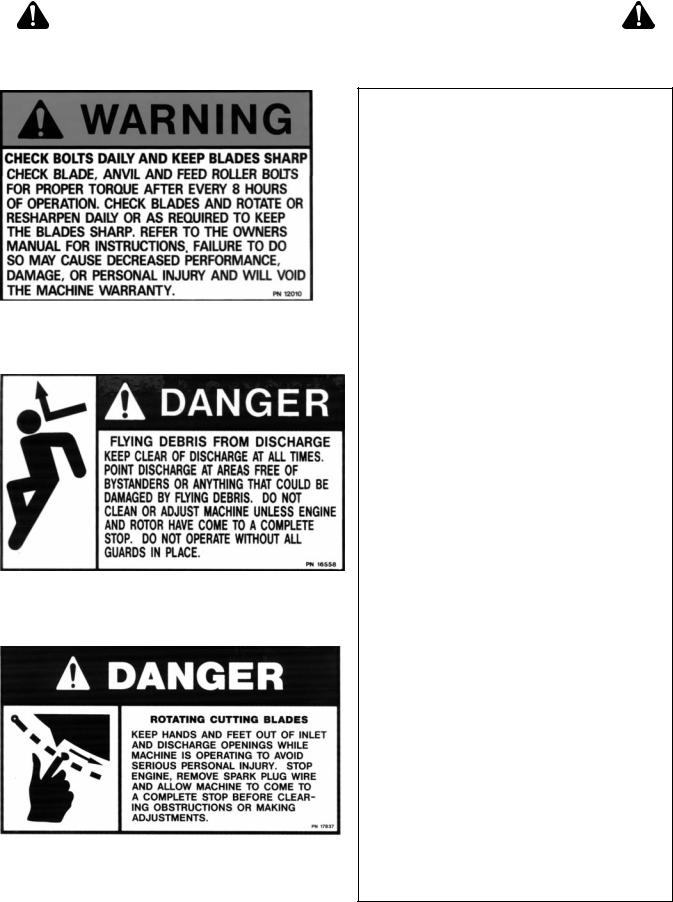
Check blade bolts for proper torque after every 8 hours of operation. Check blades and rotate or resharpen daily as required to keep blades sharp. Failure to do so may cause poor performance, damage, or personal injury and will void the machine warranty.
Before inspecting, servicing, storing, or changing an accessory, shut off power source, make sure all moving parts have come to a complete stop, and disconnect PTO driveline.
STORAGE
Block equipment securely for storage.
Keep children and bystanders away from storage area.
Follow manual instructions for storage.
TCH4500 Safety Rules (7/8//2005)
Safety 7

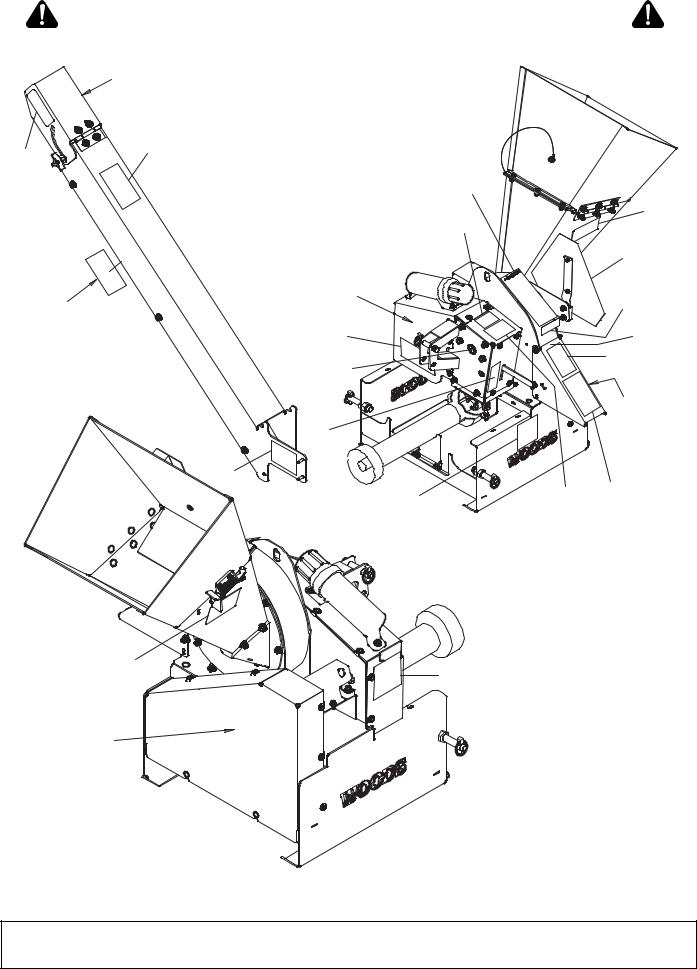
SAFETY & INSTRUCTIONAL DECALS
ATTENTION! BECOME ALERT! YOUR SAFETY IS INVOLVED!
Replace Immediately If Damaged!
15 - On Front |
|
|
|
|
|
of Chute |
|
|
|
|
|
10 |
|
|
|
|
|
14 |
|
|
|
|
|
|
|
|
9 |
|
|
|
|
|
3 |
|
17 |
|
|
|
|
|
|
|
|
|
|
|
13 |
|
6 - Under Shield |
|
|
|
|
11 - On Bottom |
Three Places |
|
|
18 |
|
|
|
|
|
|
|
Side Of Chute |
7 |
|
|
|
2 - Under |
|
|
|
|
||
|
|
|
|
Chute |
|
|
|
|
|
10 |
|
|
4 |
|
|
|
|
|
|
|
|
|
|
|
|
|
|
|
12 - On |
|
5 |
|
|
|
Back of |
|
|
|
|
Chute |
|
|
|
|
|
|
|
|
16 |
|
|
|
|
|
|
1 |
8 |
11 |
|
|
|
|
|
|
|
17 |
|
|
1 |
|
|
|
|
|
|
|
|
6 - Under |
|
|
|
|
|
Shield |
|
|
|
|
|
CD6782 |
|
|
|
|
|
8 Safety |
|
|
MAN0458 (9/23/2005) |
||

SAFETY & INSTRUCTIONAL DECALS
ATTENTION! BECOME ALERT! YOUR SAFETY IS INVOLVED!
Replace Immediately If Damaged!
1 - PN 1003751
5 - PN 1015933
WARNING
CRUSHING AND PINCHING HAZARD
Be extremely careful handling various parts of the machine. They are heavy and hands, fingers, feet, and other body parts could be crushed or pinched between tractor and implement.
Operate tractor controls from tractor seat only.
Do not stand between tractor and implement when tractor is in gear.
Make sure parking brake is engaged before going between tractor and implement.
Stand clear of machine while in operation or when it is being raised or lowered.
FAILURE TO FOLLOW THESE
INSTRUCTIONS COULD RESULT IN
SERIOUS INJURY OR DEATH. 1003751-A
2 - PN 18869
 DANGER
SHIELD MISSING |
18869-B |
|
DO NOT OPERATE - PUT SHIELD ON |
||
|
3 - PN 18866


 WARNING
540RPM
! " #$
18866-D
4 - PN 1015934
6 - PN 51361 |
7 - PN51281 |
|
MAN0458 (9/23/2005) |
Safety 9 |
|
|

SAFETY & INSTRUCTIONAL DECALS
ATTENTION! BECOME ALERT! YOUR SAFETY IS INVOLVED!
Replace Immediately If Damaged!
8 - PN 1015967 |
9 - PN 1017429 |
|
|
|
|
10 - PN 51312
11 - PN 51373
10 Safety |
MAN0458 (9/23/2005) |
|
|

SAFETY & INSTRUCTIONAL DECALS
ATTENTION! BECOME ALERT! YOUR SAFETY IS INVOLVED!
Replace Immediately If Damaged!
12 - PN 1015966 |
Body tag page 11 |
16 - PN 51284 |
17 - PN 1017433
13 - PN 24611
14 - PN 20106
Red Reflector - Rear
15 - PN 20105
Amber Reflector - Front
18 - SERIAL NUMBER PLATE
MODEL NO. |
SERIAL NO. |
|
Woods Equipment Company |
|
Oregon, Illinois, U.S.A. |
BE CAREFUL!
Use a clean, damp cloth to clean safety decals.
Avoid spraying too close to decals when using a pressure washer; high-pressure water can enter through very small scratches or under edges of decals causing them to peel or come off.
Replacement safety decals can be ordered free from your Woods dealer. To locate your nearest dealer, check the Dealer Locator at www.WoodsEquipment.com, or in the United States and Canada call 1-800-319-6637.
MAN0458 (9/23/2005) |
Safety 11 |
|
|

OPERATION
The operator is responsible for the safe operation of this chipper. The operator must be properly trained. Operators should be familiar with the tractor, chipper, and all safety practices before starting operation. Read the safety rules and safety decals on page 5 through page 11.

Safety instructions are important! Read all attachment and power unit manuals; follow all safety rules and safety decal information. (Replacement manuals and safety decals are available from your dealer. To locate your nearest dealer, check the Dealer Locator at www.WoodsEquipment.com, or in the United States and Canada call 1-800-319- 6637.) Failure to follow instructions or safety rules can result in serious injury or death.
Keep bystanders at least 50 feet away from area of operation.
 CAUTION
Know your controls and how to stop engine and attachment quickly in an emergency.
Operators must be instructed in and be capable of the safe operation of the equipment, its attachments, and all controls. Do not allow anyone to operate this equipment without proper instructions.
Never allow children or untrained persons to operate equipment.
Always wear relatively tight and belted clothing to avoid getting caught in moving parts. Wear sturdy, rough-soled work shoes and protective equipment for eyes, hair, hands, hearing, and head; and respirator or filter mask where appropriate.
Make sure attachment is properly secured, adjusted, and in good operating condition.
Do not put chipper into service unless all shields and guards are in place and in good condition. Replace if damaged.
CHIPPER PRE-OPERATION
The chipping operation takes place on the side of the machine, where hardened steel chipper blades are mounted on a rotating rotor assembly. Material fed into
the chipper hopper is sliced into small chips and propelled out though the discharge cap. The chips can be diverted into a container or onto the ground.
As with any other piece of power equipment, getting to know the feel for how your machine operates and getting to know the best techniques for particular jobs are important to overall good performance.
NOTE: For operation of this chipper, references to right, left, forward, and rearward directions are determined from the operator’s position in the tractor seat.
ATTACHING CHIPPER TO TRACTOR

Make sure spring-activated locking pin or collar slides freely and is seated firmly in tractor PTO spline groove.
IMPORTANT
■ Avoid driveline angle greater than 15-degrees up and down when the chipper is in use.
1.Attach chipper hitch pins to tractor 3-point lower lift arms and secure.
2.Attach tractor top link to chipper clevis and secure with tractor top link pin.
3.Connect driveline to tractor PTO shaft.
NOTE: The minimum and maximum telescoping on the PTO shaft is 18.11 inches to 24.49 inches. The PTO shaft may need to be shortened depending on the tractor the chipper is mounted on. To shorten the PTO shaft see Shorten Driveline, page 26.
4.Slide slip collar back or push slip pin in to make connection.
5.Make sure connection is secure. Slip collar or slip pin should snap back into original position.
6.Adjust the tractor 3-point arm anti-sway devices to prevent chipper from swaying side-to-side during transport. Adjust top link so chipper is level front to back.
7.Adjust or remove tractor drawbar so that it will not interfere with chipper or driveline.
12 Operation |
MAN0458 (9/23/2005) |
|
|
 Loading...