

Page 1

CONVECTION STEAM OVENS
USE & CARE GUIDE
GUÍA DE USO Y MANTENIMIENTO
GUIDE D'UTILISATION ET D'ENTRETIEN
GUIDA ALL’USO E ALLA MANUTENZIONE
BEDIENUNGS-UND PFLEGEANLEITUNG
Page 2

CONVECTION STEAM OVENS
Contents
3 Safety Precautions
5 Convection Steam Oven Features
5 Convection Steam Oven Operation
12 Care Recommendations
13 Troubleshooting
13 Wolf Warranty
Customer Care
The model and serial number are printed on the enclosed
product registration card. Both numbers are also listed on
the product rating plate. Refer to page 5 for rating plate
location. For warranty purposes, you will also need the date
of installation and name of your authorized Wolf dealer.
Record this information below for future reference.
SERVICE INFORMATION
Model Number
Serial Number
Date of Installation
Certied Service Name
Certied Service Number
Authorized Dealer
Dealer Number
Important Note
To ensure this product is installed and operated as safely
and efciently as possible, take note of the following types
of highlighted information throughout this guide:
IMPORTANT NOTE highlights information that is especially
important.
CAUTION indicates a situation where minor injury or product
damage may occur if instructions are not followed.
WARNING states a hazard that may cause serious injury or
death if precautions are not followed.
2 | English
Page 3

SAFETY PRECAUTIONS
SAFETY PRECAUTIONS
This oven was built to achieve recognized standards in technology and safety regulations and is designed for use in the
home for preparing food. It is not intended for use by persons
with reduced physical, sensory or mental capabilities, or lack
of experience and knowledge, unless supervised or unless they
have been given instruction concerning the use of the appliance by a person responsible for their safety. Proper use is
essential to avoid damage or accidents.
Installation and connection to power supply must be performed
by a qualied electrician in accordance with provided installation instructions.
Before rst use, please ll the water tank and perform related
duties as outlined in the ‘Prior To Use’ section.
Please retain this guide for future reference. If you sell the
appliance or pass it on to a third party, please ensure these
instructions accompany the appliance, together with the
instructions on installation.
IMPORTANT SAFEGUARDS
When using electrical appliances, basic safety precautions should
always be followed including the following:
• Read all instructions.
• Do not touch hot surfaces. Use handles or knobs.
• To protect against electrical shock, do not immerse cord or plug
in water or other liquid.
• Do not let cord hang over edge of table or counter, or touch hot
surfaces.
• Close supervision is necessary when any appliance is used by
or near children.
• Children should be supervised to ensure that they do not play
with the appliance.
WARNING
Accessible parts may become hot during use. Young children
should be kept away.
wolfappliance.com | 3
Page 4

SAFETY PRECAUTIONS
IMPORTANT SAFEGUARDS
• This appliance can be used by children aged from 8 years
and above and persons with reduced physical, sensory or
mental capabilities or lack of experience and knowledge if
they have been given supervision or instruction concerning
use of the appliance in a safe way and understand the hazards
involved. Children shall not play with the appliance. Cleaning
and user maintenance shall not be made by children without
supervision.
• Only use the temperature probe recommended for this oven.
• Unplug from outlet when not in use and before cleaning. Allow
to cool before putting on or taking off parts.
• Do not use harsh abrasive cleaners or sharp metal scrapers to
clean the oven door glass since they can scratch the surface,
which may result in shattering of the glass.
• Do not operate any appliance with a damaged cord or plug, or
after the appliance malfunctions or has been damaged in any
manner. Return appliance to the nearest authorized service
facility for examination, repair or adjustment.
• The use of accessory attachments not recommended by the
appliance manufacturer may cause injuries.
• Do not use outdoors.
• Do not place on or near a hot gas or electric burner, or in a
heated oven.
• Extreme caution must be used when moving an appliance con-
taining hot oil or other hot liquids.
• Always attach plug to appliance rst, then plug cord into
the wall outlet. To disconnect, turn any control to “off”, then
remove plug from wall outlet.
• Do not use appliance for other than intended use.
• Save these instructions.
4 | English
Page 5
CONVECTION STEAM OVEN FEATURES
OVEN OPERATION
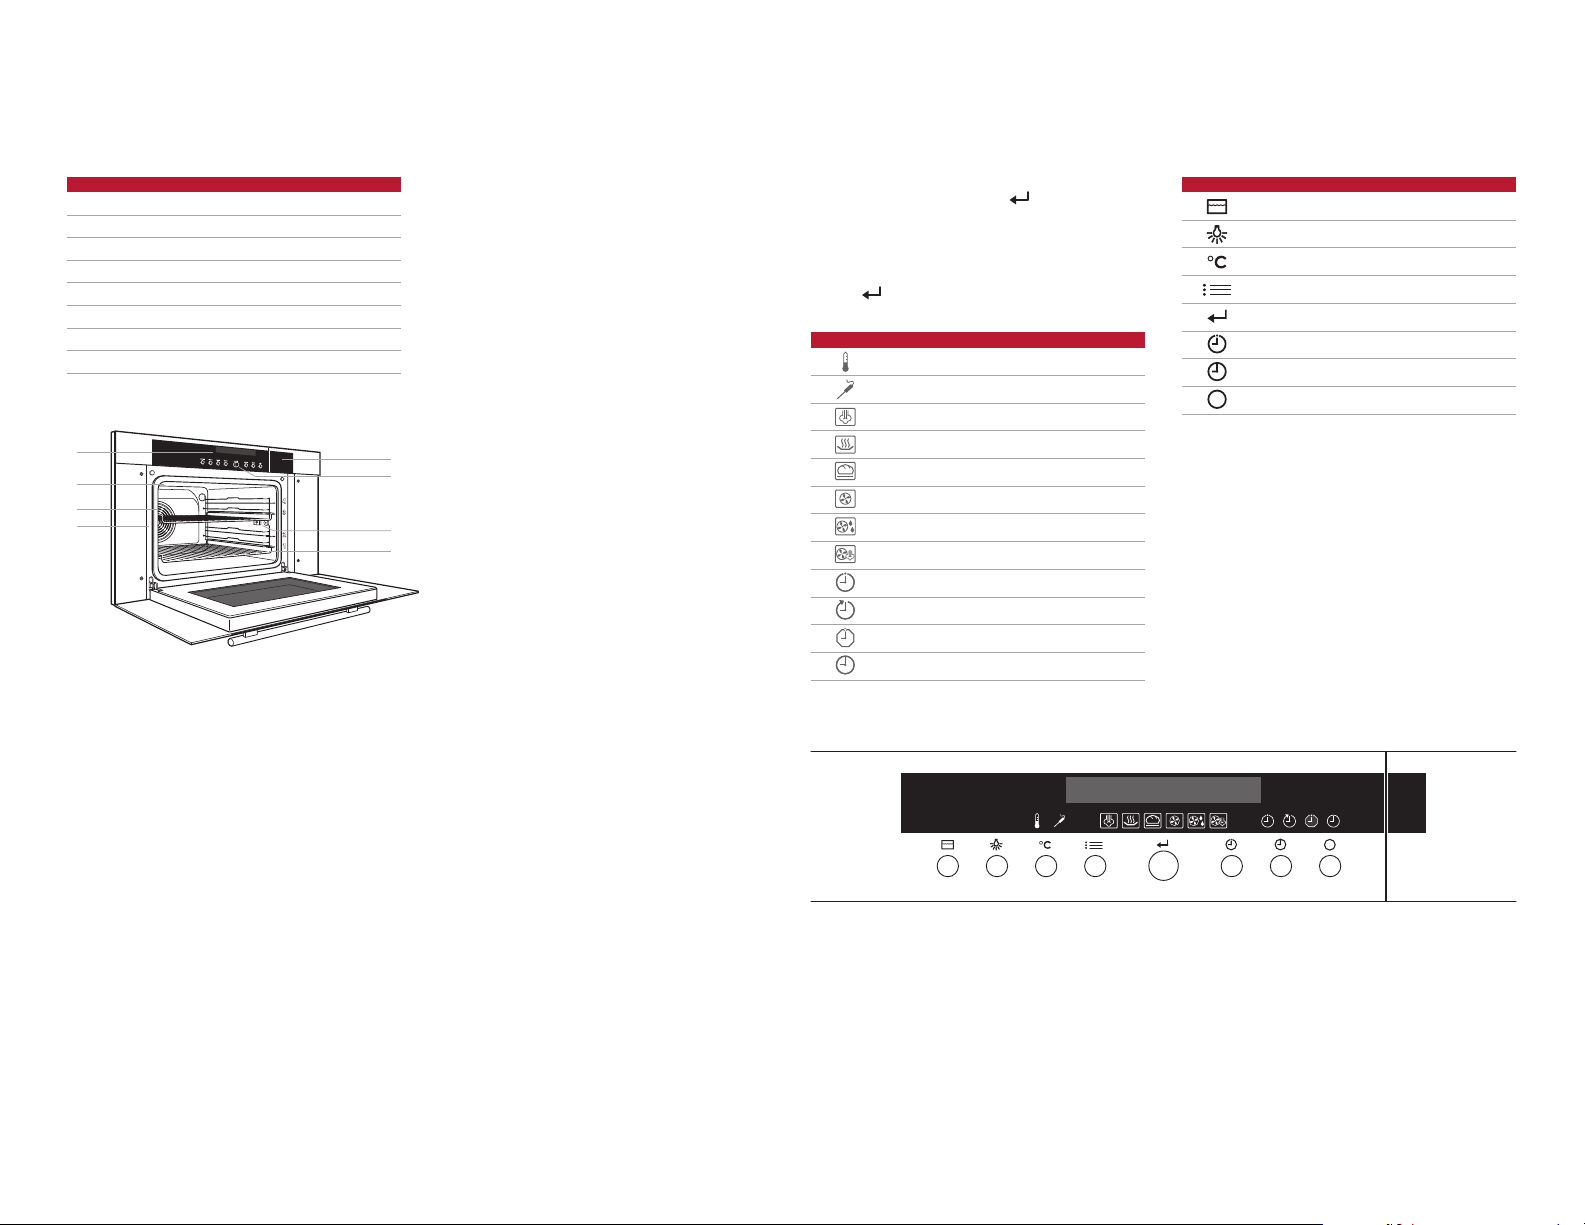
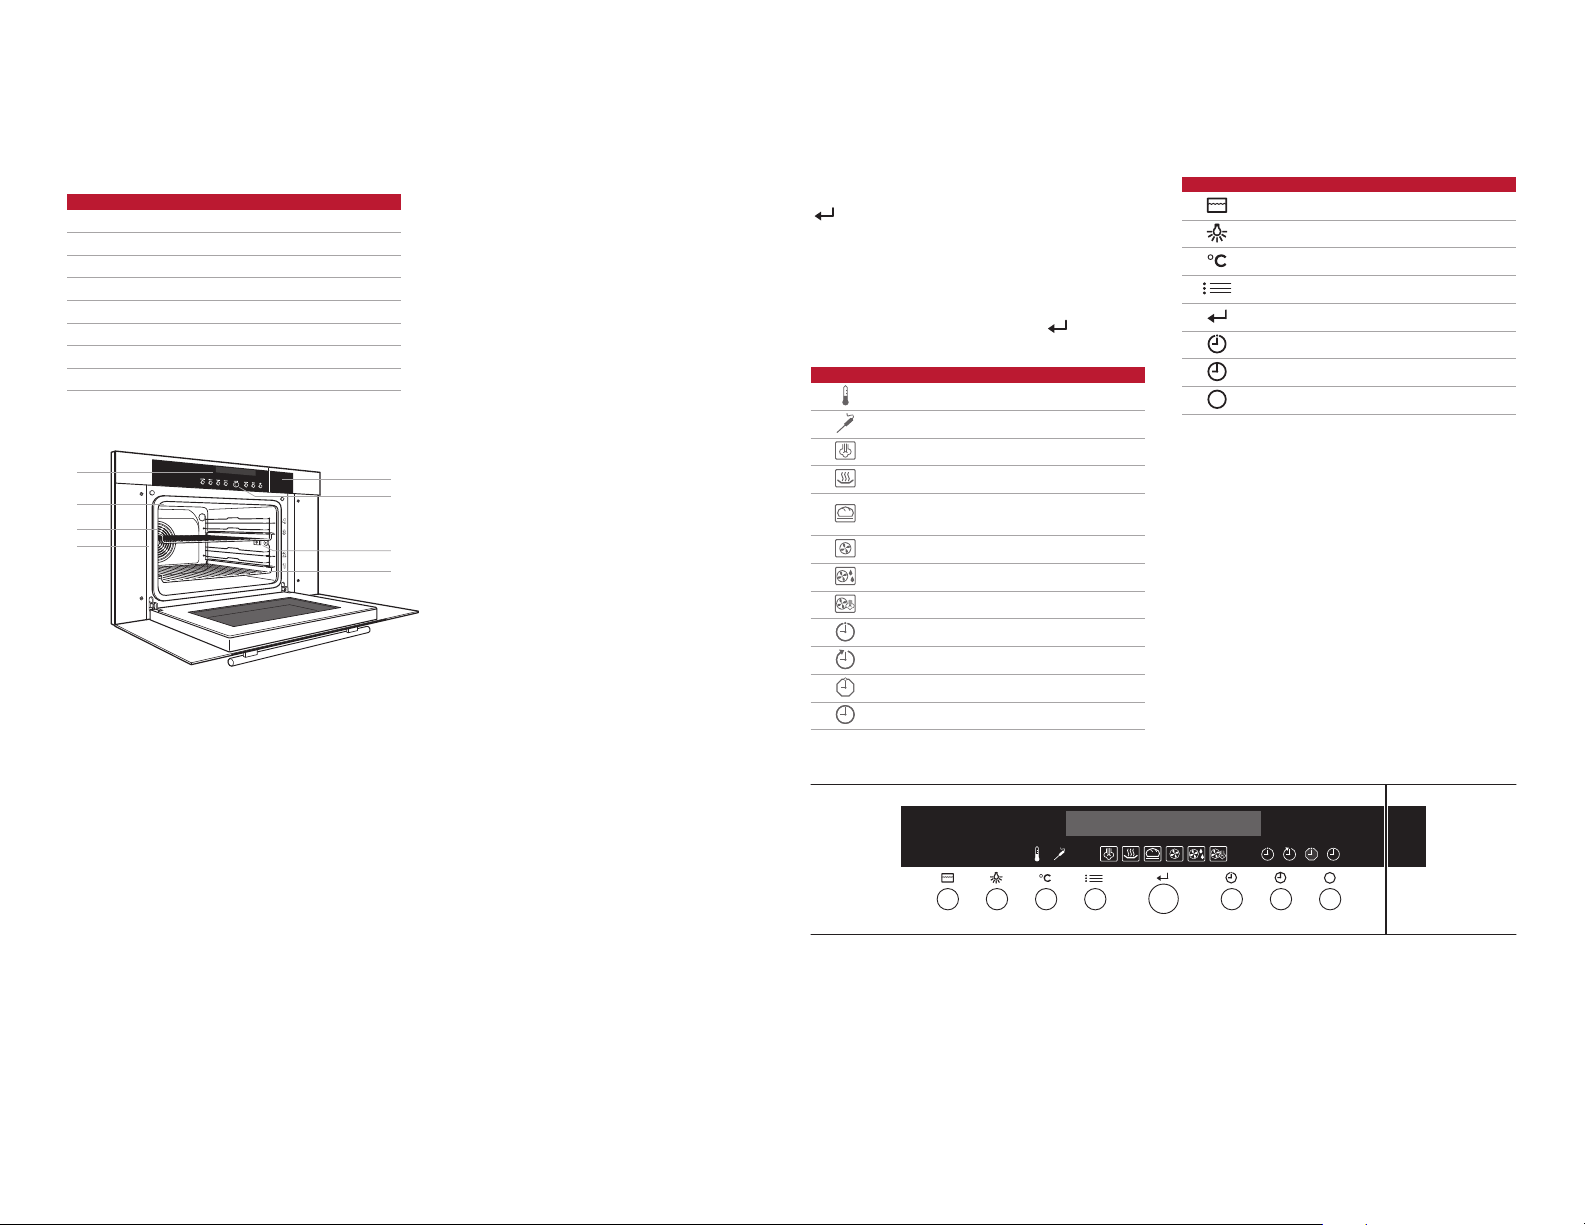
Convection Steam Oven Features
FEATURE
1
Product Rating Plate
2
Control Panel and Display
3
Control Knob
4
Adjustable Oven Racks
5
Convection Fan
6
Temperature Probe Receptacle
7
Halogen Lighting
8
Water Tank Access Door
2
7
5
1
Convection steam oven (ICBCSO30TM shown).
Getting Started
We know you are eager to start cooking, but before you
do, please take some time to read this use & care guide.
Whether you are an occasional cook or an expert chef, it
will be to your benet to familiarize yourself with the safety
practices, features, operation and care recommendations of
your convection steam oven.
To ensure the best results, review cooking modes and
special features on page 8.
8
3
6
4
Control Panel
The control panel and control panel display are streamlined
and easy to use. The control knob (
used to set cooking modes and access all the features of
your convection steam oven for exceptional results.
The knob is used on its own and in combination with the
buttons to make selections. All selections are conrmed by
pressing
CONTROL PANEL DISPLAY INDICATORS
.
Oven temperature is set.
Temperature probe is in use.
Steam mode is activated.
Reheat mode is activated.
Auto Steam Bake mode is activated.
Convection mode is activated.
Convection Humid mode is activated.
Convection Steam mode is activated.
Timer is set.
Operating time is activated.
Switch-off time is activated.
Clock is set.
) and buttons are
CONTROL PANEL KNOB AND BUTTONS
Water
Light
Temperature
Mode
OK
Timer
Time
Off
Control panel.
8:30190°C
wolfappliance.com | 5
Page 6
OVEN OPERATION
User Settings
The user settings allow the user to select preferences for
language, childproof lock, time display, acoustic signal, illumination, water hardness, temperature unit, contrast, time
format, factory settings and water door control.
The control panel can be locked through user settings. To
use the oven by temporarily disabling the lock, press and
continue to hold
cally reactivate 10 minutes after the oven has been turned
off.
Setting user settings:
1 With oven off, press and turn knob to USER SET-
TINGS, then press
2 Turn the knob to scroll through options, then press .
3 Follow instructions on the display, then press .
, then press . The lock will automati-
.
Oven Operation
SELECT COOKING MODE
1 Press multiple times until desired cooking mode is
displayed, then press
SELECT TEMPERATURE
1 Press .
2 Turn the knob to desired temperature, then press .
To adjust temperature during cooking, press and turn
the knob to desired temperature, then press
WATER TANK
The water tank holds enough water for 1.5 hours of continuous steam, typically enough for 4–5 cooking sessions.
Use fresh, cold tap water. Do not use demineralized, ltered
or distilled water.
Always press
to open the water door. Attempting to
access the water tank manually will cause damage.
When the oven is turned off, water is pumped back into
the tank once the water temperature is below 80°C. If the
tank needs to be relled during cooking, limit the amount of
water to less than two cups to prevent overow when water
is pumped back into the tank.
To fill water tank:
1 Press .
2 Remove and ll the water tank.
3 Reinstall the tank and close the water door manually.
.
.
PRIOR TO USE
Use the test strip provided to determine water hardness.
The oven defaults to hard water. Refer to User Settings on
page 6 to adjust hardness.
To ensure all residual oil from the manufacturing process
has been removed, the oven must go through the following
procedure.
1 Clean oven thoroughly with hot water and a mild deter-
gent. Rinse and dry with a soft cloth.
2 Turn on ventilation. Some smoke and odor is normal.
3 Fill and install the water tank.
4 Select Auto Steam Bake mode and 210°C. Heat oven
(empty) for 30 minutes.
AFTER EACH USE
1 Press . For modes utilizing steam, do not remove the
water tank until ‘WATER IS BEING PUMPED OFF’ no
longer appears on the display.
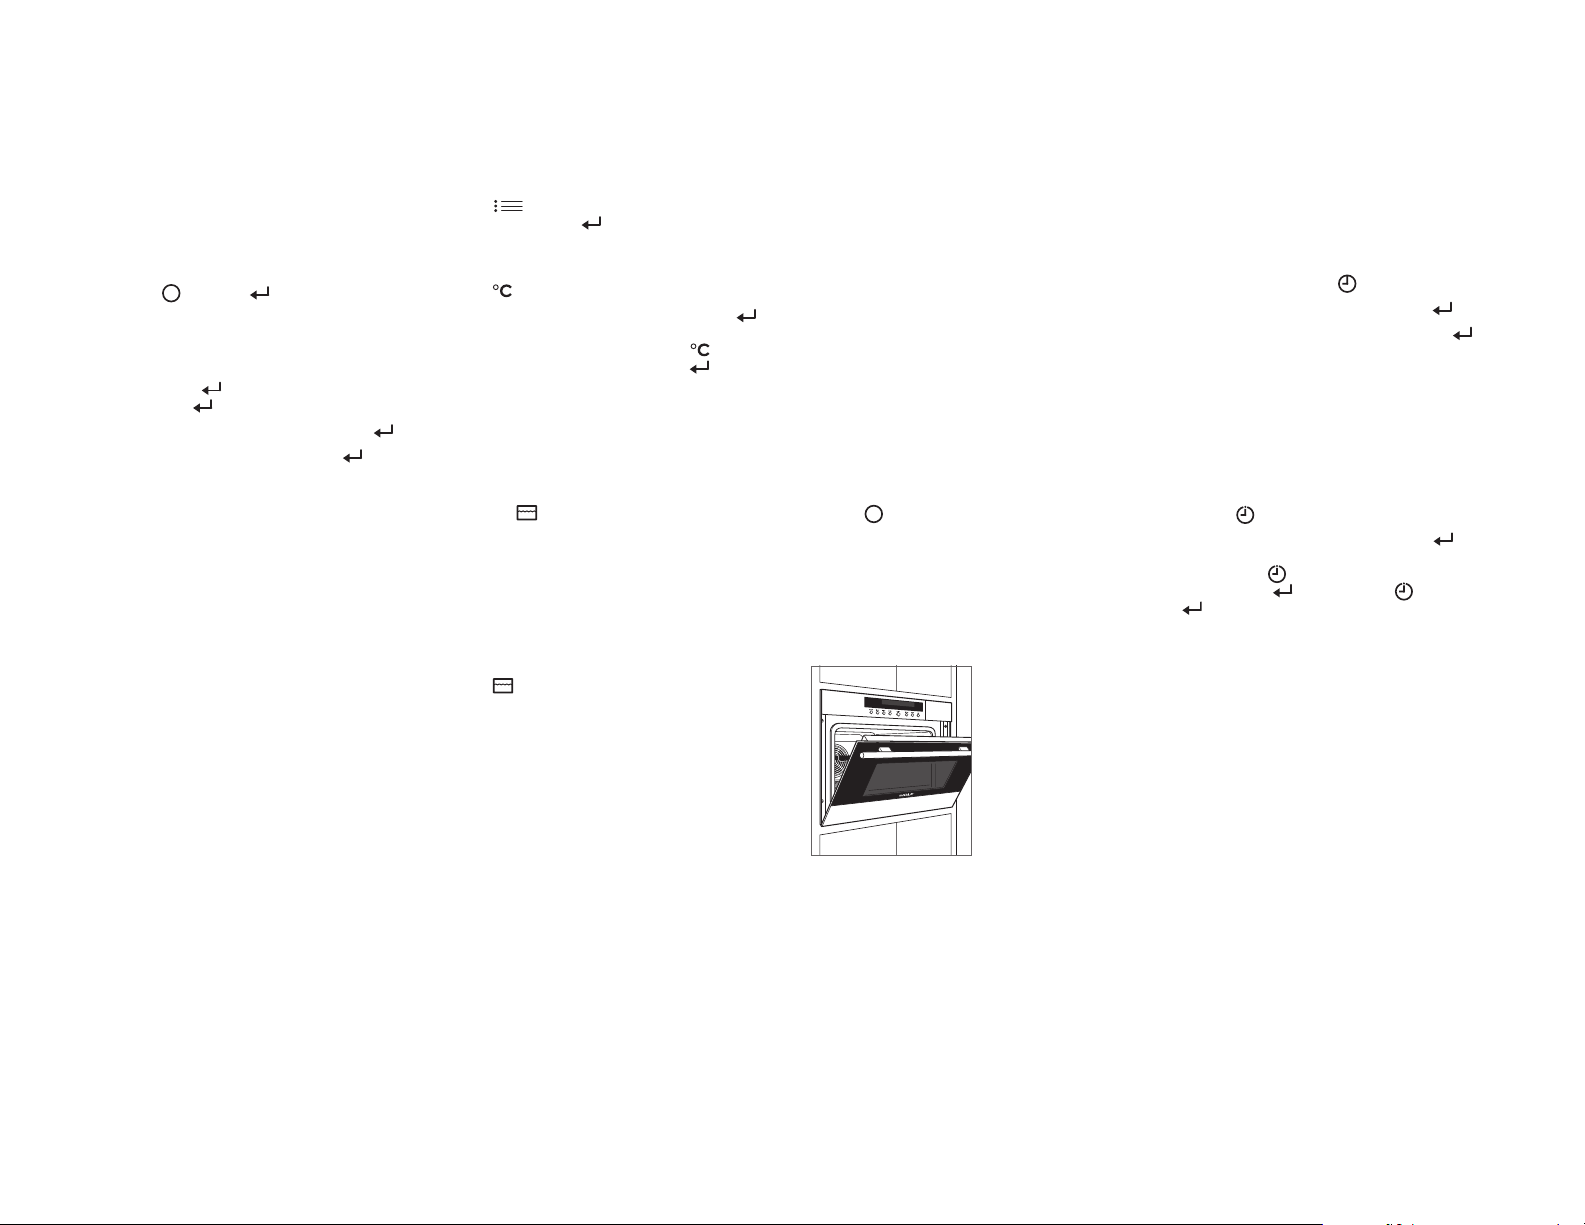
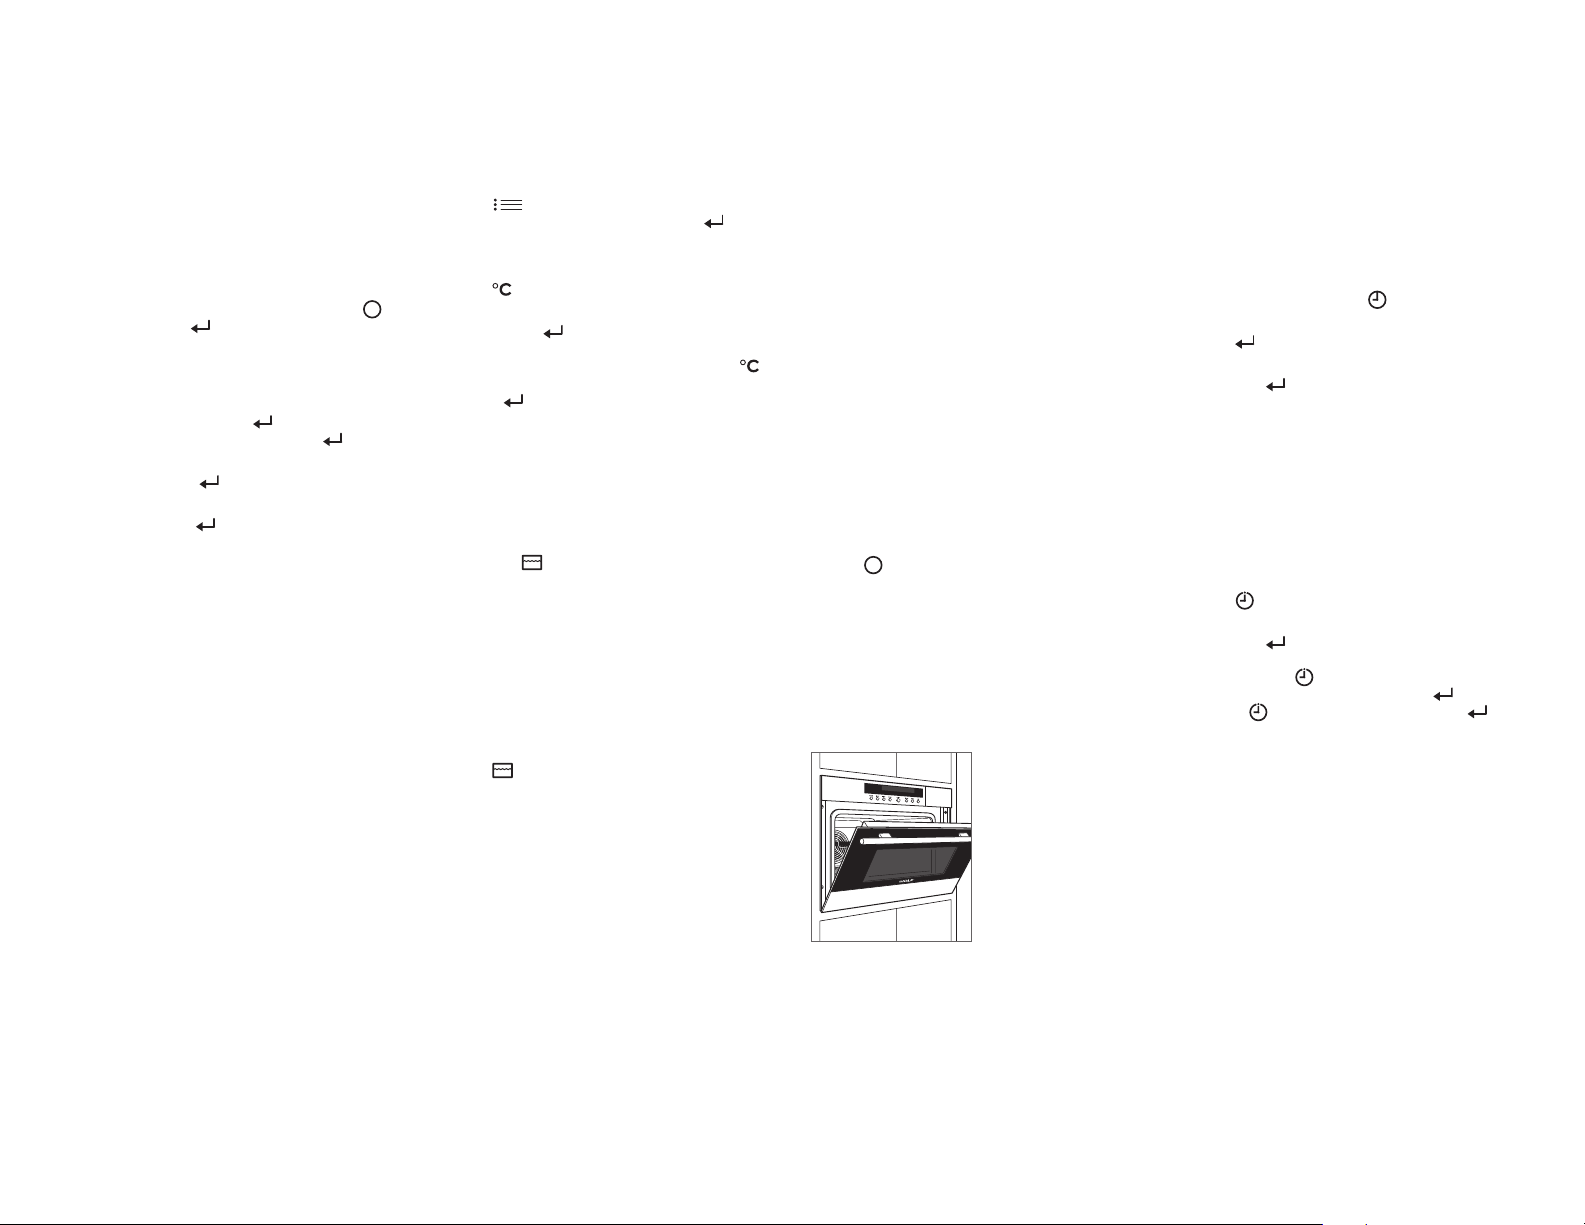
2 Open the door to the “at-rest” position and allow to cool.
Once cool, wipe the interior dry before closing the door.
Refer to the illustration below.
TIME
It is very important the correct time is set if a timed cook
feature is used. Time must be reset after a power failure.
Setting time:
1 With the oven off, press .
2 Turn the knob to set the hour, then press .
3 Turn the knob to set the minutes, then press .
TIMER
The timer can be set for a maximum of 9 hours and 59 minutes. Once the timer is set, the countdown is illuminated on
the display. The timer is independent from the oven. Setting
the timer does not affect operating time or switch-off time.
Setting timer:
1 Press .
2 Turn the knob to set duration, then press .
To reset, press and turn the knob to select desired duration, then press
. To cancel, press twice, then press
.
6 | English
Door “at-rest” position.
Page 7
OVEN OPERATION
Oven Operation
OPERATING TIME
The operating time feature automatically turns the oven off
at a specied time. Oven will begin to heat immediately and
will turn off at desired switch-off time.
If the temperature probe is used, the probe will override the
switch-off time and turn the oven off when the set temperature is reached. If the probe temperature is not reached
before the switch-off time, it will not extend operating time.
Setting controls:
1 Select desired cooking mode and temperature.
2 Press .
3 Turn the knob to select desired operating time, then
To adjust operating time, press and turn the knob to
select desired time, then press
press
.
.
DELAYED START
The delayed start feature automatically turns the oven on
and off at specied times. Oven will remain idle until desired
start time and will turn off at desired switch-off time. Clock
must be set to the correct time for delayed start to function
properly.
If the temperature probe is used, the probe will override the
switch-off time and turn the oven off when the set temperature is reached. If the probe temperature is not reached
before the switch-off time, it will not extend operating time.
Setting controls:
1 Select desired cooking mode and temperature.
2 Press and turn the knob to select desired operating
time (do not press
3 Press and turn the knob to select desired switch-off
time, then press
).
.
To adjust switch-off time, press twice and turn the knob
to select desired time, then press
.
TEMPERATURE PROBE
The temperature probe measures internal temperature
of food while cooking. It can be used with all cooking
modes except Gourmet. When the temperature probe is in
use, press
to alternate between the actual probe tem-
perature displayed and probe set temperature.
Setting controls:
1 Select desired cooking mode and temperature.
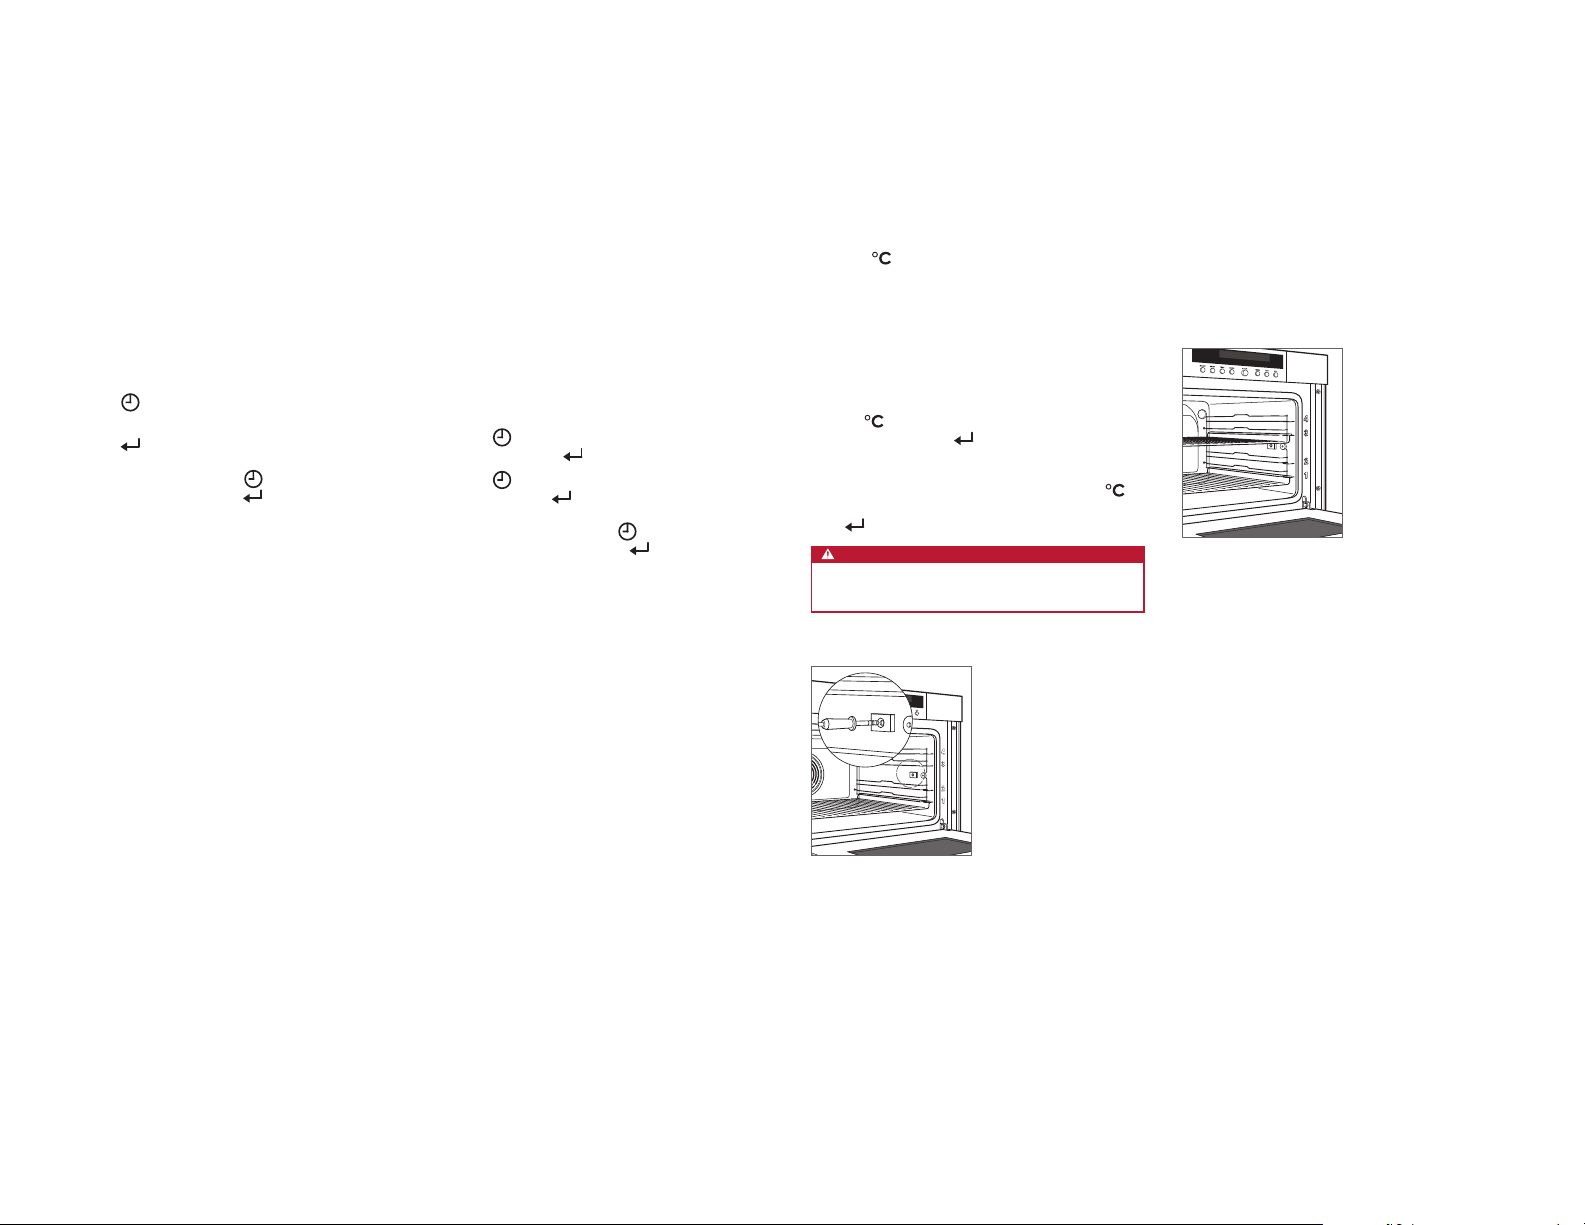
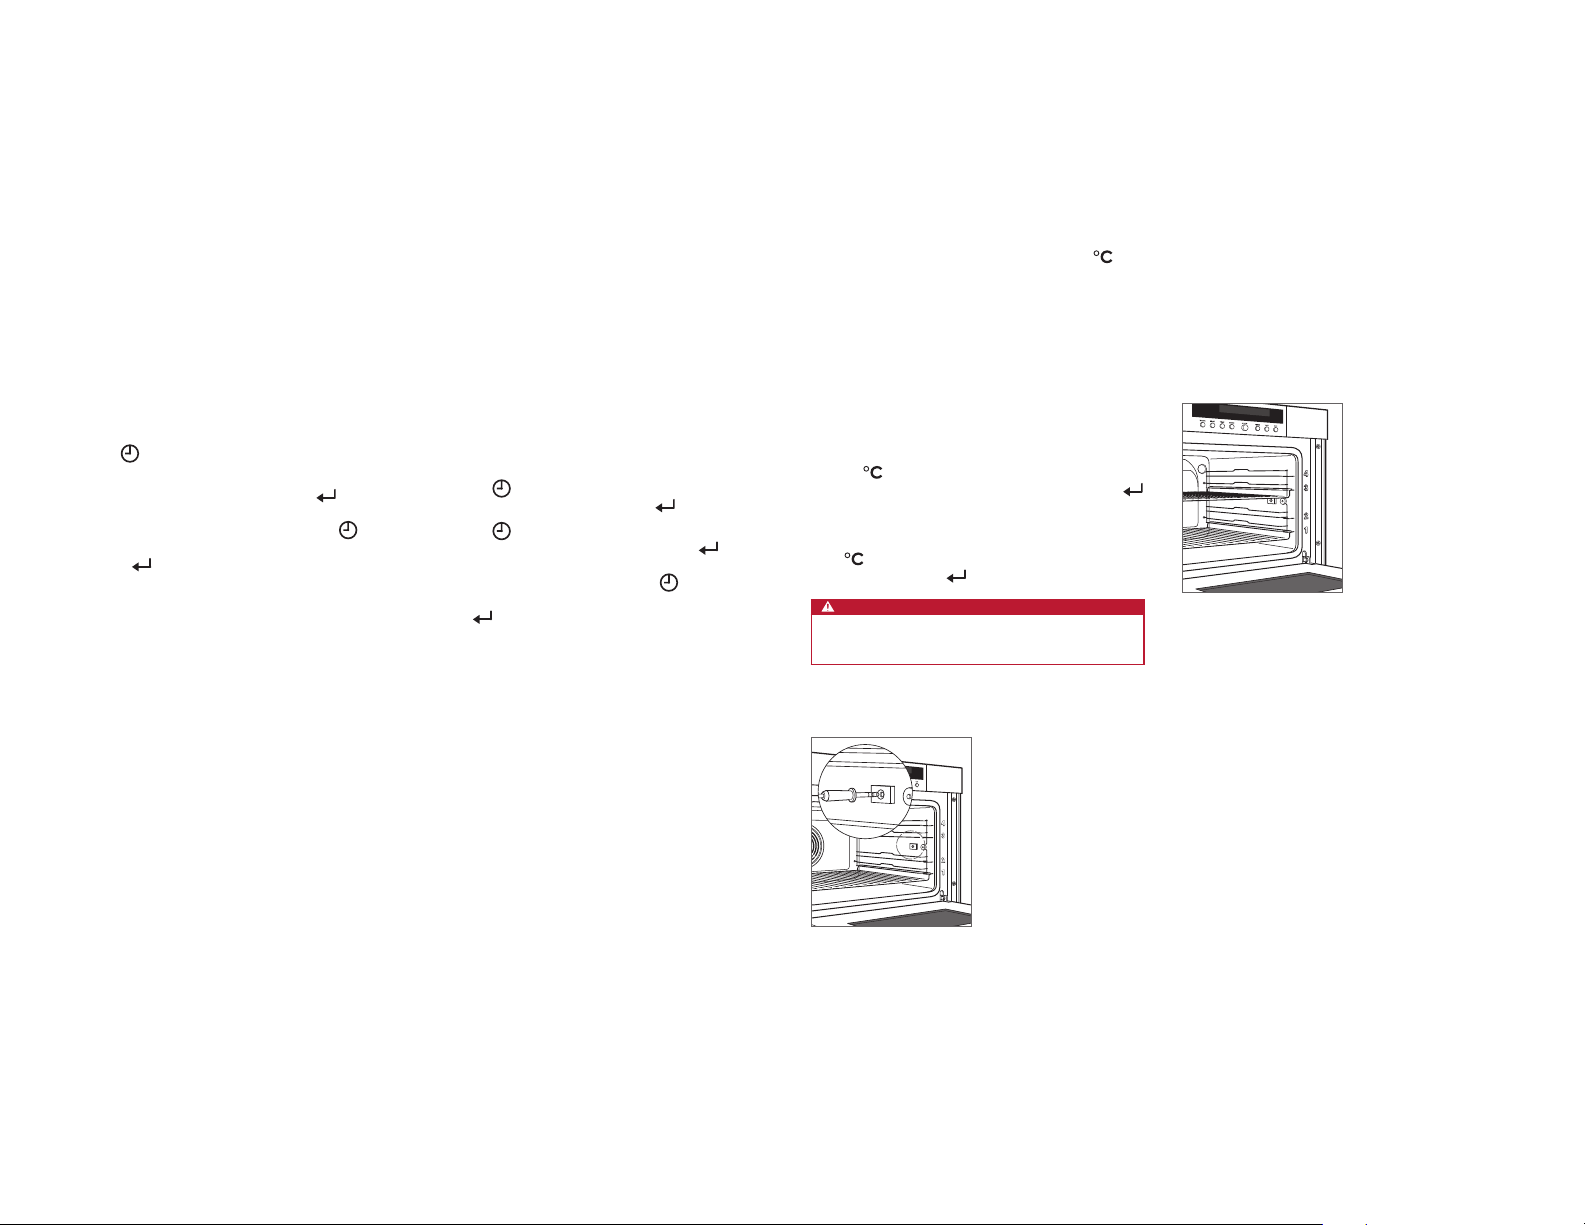
2 Place the probe in the thickest part of the food being
cooked, then insert the probe into the receptacle. Refer
to the illustration below.
3 Press twice and turn the knob to select desired
doneness, then press
.
The probe temperature will appear on the display once it is
above 30°C. To adjust the probe temperature, press
and
turn the knob to desired temperature, then
.
press
CAUTION
Probe and probe receptacle will be very hot. Handle
with care.
OVEN RACK POSITION
The oven racks can be placed in any of the four positions
labeled on the right front face of the convection steam oven.
Position the oven racks so the horizontal bar is at the back
of the oven. Do not use the stainless steal pan upside down.
Refer to the illustration below. The recipes in Recipes mode
reference rack position for best results.
Rack position.
Probe receptacle.
wolfappliance.com | 7
Page 8
OVEN OPERATION
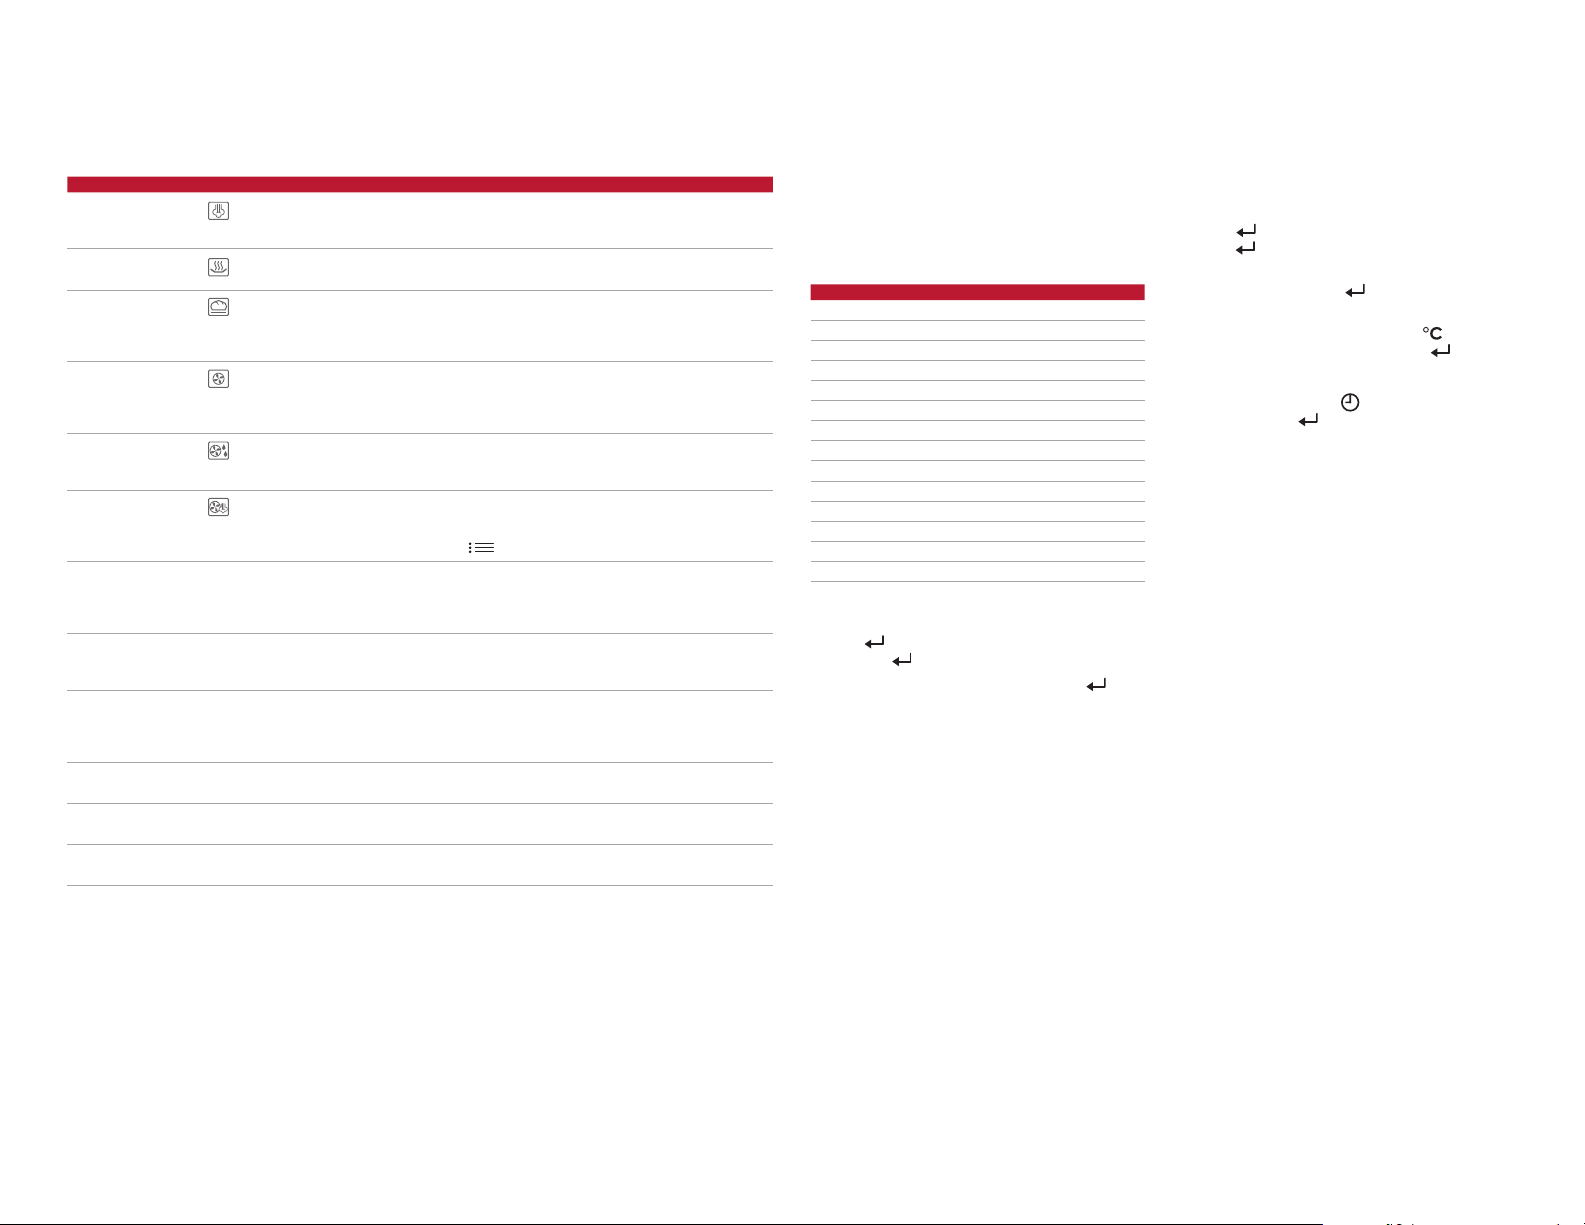
Cooking Modes
MODE
Steam 30 – 100°C
Reheat
Auto Steam Bake
Convection
Convection Humid
Convection Steam
Gourmet — — Use to prepare specied foods (refer to page 8); fresh, refrigerated or
Slow Roast 30 – 150°C
Recipes 30 – 230°C
My Recipes 30 – 230°C
Keep Warm 80°C
Cleanse 30 – 230°C Cleanse uses steam to clean baby bottles and canning jars, and is faster
INDICATOR RANGE PROBE USES
100 – 150°C
100 – 230°C
30 – 230°C
30 – 230°C
30 – 230°C
Use Steam mode for foods you would have heated in a saucepan and for
•
all foods that would benet from gentle handling such as sh and seafood,
vegetables and rice.
Reheat mode uses steam and hot air to rehydrate food gently. Use to
•
reheat any food you would have reheated in the oven, range or microwave.
By heating with steam rst, then using convection heat to nish baking,
•
baked goods acquire a tender interior and an exterior with natural shine,
without the need for an egg wash. Use for breads, buns, cakes and pastries whether fresh, par-baked or frozen. Do not preheat.
The convection fan distributes heat evenly for consistent results and
•
browning. Cooking temperatures may be 25° less, and times may be 25%
faster than traditional ovens, saving time and energy. Use Convection
mode for a variety of foods, including mufns, biscuits and roasts.
In Convection Humid mode, oven ventilation is sealed so the moisture
•
produced during cooking remains in the oven. Use for cakes, casseroles,
grain dishes, lasagna and meats.
Steam transfers energy to food more efciently than hot air alone, which
•
speeds up cooking time. Food retains its own moisture. Use Convection
Steam mode to cook foods that are tender inside and roasted or crisped
outside. Press to activate or deactivate steam.
frozen. Select the food and desired doneness and the sensor adjusts time,
temperature and humidity so no baking instructions are required. Preset
temperature and range are dependent on food and desired doneness.
Use to keep meats tender by slow roasting. Insert temperture probe into
•
the prepared meat, select a Slow Roast setting and completion time, and
come home to a perfectly cooked meal.
Use to prepare entire meals from appetizers and entrees to desserts (refer
•
to page 9). Select food, number of portions and level of browning. The
sensor adjusts the rest. Recipes mode is ideal for quick meals or to prepare a variety of foods for a party.
Use My Recipes to store cooking instructions for ten of your favorite
•
recipes, and replace or edit them at any time.
Keep Warm uses a combination of convection and steam heat to keep
•
foods warm until it’s time to serve.
and safer than conventional methods.
GOURMET
Use Gourmet to prepare any of the foods listed below; fresh,
refrigerated or frozen. Select the food and desired doneness
and the sensor adjusts time, temperature and humidity so
no baking instructions are required.
FOOD CODE
Fresh Appetizers A1
Frozen Appetizers A2
Baked Dish A3
Soufé A4
Baked Potatoes A5
Frozen Potato Products A6
Braising Meat A7
Fresh Pizza A8
Frozen Pizza A9
Custard A10
Bread A11
Yeast Pastry with Filling A12
Cake A13
Torte A14
Setting Gourmet:
1 Press twice and turn the knob to select desired food,
then press
2 Follow instructions on the display, then press .
.
SLOW ROAST
Setting Slow Roast:
1 Press and turn the knob to Slow Roast, then
2 Turn the knob to select desired food and doneness
3 The preset probe temperature will appear on the display.
.
press
(if applicable), then press
.
To adjust the probe temperature, press
knob to desired temperature, then press
and turn the
.
Slow Roast operating time can be adjusted from 2.5 to 4.5
hours. To adjust time, press
duration, then press
and turn the knob to desired
.
8 | English
Page 9

OVEN OPERATION
Cooking Modes
RECIPES MODE
Use Recipes mode to prepare entire meals from appetizers
and entrees to desserts. Refer to the chart below and
recipes on pages 9–11.
FOOD CODE
Appetizers R1
Fish in Puff Pastry R2
Fish Rolls R3
Beef Stroganoff R4
Beef Pot Roast R5
Pork Loin in Puff Pastry R6
Pasta Gratin R7
Eggplant Gratin R8
Flan R9
Pears in Red Wine R10
Rolls R11
Mufns R12
Cake R13
Focaccia R14
Setting Recipes:
1 Press and turn the knob to Recipes, then press .
2 Turn the knob to select desired recipe, then press .
3 Follow instructions on the display, then press .
MY RECIPES MODE
Use My Recipes to store cooking instructions for ten of your
favorite recipes. If the recipe utilizes the temperature probe,
insert the probe into the receptacle before entering settings.
Setting My Recipes:
1 Press and turn the knob to My Recipes, then
2 Turn the knob to select desired recipe number, then
3 Select desired mode, temperature, time and probe
4 Press to Save recipe.
.
press
.
press
temperature (if applicable), then press
.
To remove a saved recipe, press and turn the knob to
My Recipes, then press
recipe, then press
then press
.
. Turn the knob to select desired
. Turn knob until Clear is displayed,
KEEP WARM MODE
Setting Keep Warm:
1 Press and turn the knob to Keep Warm, then
press
.
CLEANSE MODE
Setting Cleanse:
1 Press and turn the knob to Cleanse, then press .
2 Turn the knob to select desired option, then press .
Recipes
R1 APPETIZERS
Cook time—20 minutes
1 – 500 g package puff pastry sheets
30 ml olive oil
60 g fresh oregano, chopped
45 g fresh thyme, chopped
115 g Parmesan cheese, shredded
Unfold one sheet puff pastry on cutting board. Brush with olive
oil. Sprinkle oregano, thyme and cheese over oil. Unfold the
second sheet and carefully lay on top of herbs.
Press down lightly. Using pastry or pizza cutter, cut pastry into
13 mm strips. Tightly twist strips, keeping lling inside. Line
solid pan with parchment paper and lay strips on paper, about
25 mm apart. Allow pastry to stand 15 minutes before placing
in the oven. Slide pan into oven on rack position 1. Close oven
door. Set oven to Recipes R1. Press
remove pan from oven. Cut each appetizer into thirds. Serve
immediately.
Makes 42 appetizers.
For more than one sheet of appetizers, use 2 racks at rack position 1 and 3. Timing is the same.
. When oven chimes,
R2 FISH IN PUFF PASTRY
Cook time—25 minutes
1 small zucchini
1 red pepper
1
/2 – 250 g package puff pastry sheets
60 g parsley, chopped
Kosher salt and freshly ground black pepper
4 – 60 g llets rm sh, cut into 76 x 51 mm portions
Cut red pepper into quarters. Remove seeds and cut each
quarter lengthwise into four 6 mm strips. Set aside. Cut ends off
zucchini and cut lengthwise into 6 mm slices. Set aside.
Line solid pan with parchment paper. Unfold and lay cool puff
pastry onto cutting board. Cut into four equal squares. Stack
one zucchini slice and four pepper strips on each square, laying
them across connecting opposite corners. Sprinkle each with
15 g parsley. Season with salt and pepper. Lay one llet on each
stack and season again with salt and pepper. Pull two free corners of pastry over the sh and press lightly. Carefully place puff
pastry bundles on parchment paper. Slide pan on rack position
1. Close oven door. Set oven to Recipes R2. Press
oven chimes, remove pan from oven. Serve immediately.
Makes 4 servings.
. When
R3 FISH ROLLS
Cook time—10 minutes
8 thin sh llets, such as sole, ounder or turbot
Kosher salt and freshly ground black pepper
30 g pine nuts, toasted
95 g arugula
Lay sh on cutting board. Season both sides with salt and
pepper. Spread approximately 7 g pine nuts and 9 g arugula
on each sh. Roll llets from pointed end. Secure with toothpicks. Grease perforated pan with nonstick spray and place sh
bundles on pan. Slide pan on rack position 2. Close oven door.
Set oven to Recipe R3. Press
sh from oven and serve immediately.
Makes 4 to 6 servings.
. When oven chimes, remove
wolfappliance.com | 9
Page 10

OVEN OPERATION
Recipes
R4 BEEF STROGANOFF
Cook time—47 minutes
800 g beef chuck roast, cut into 6 x 13 mm strips
10 g kosher salt
5 g freshly ground black pepper
15 g beef bouillon granules
1 yellow pepper, sliced into 6 mm strips
1 red pepper, sliced into 6 mm strips
225 g mushrooms, sliced 6 mm thick
2 small yellow onions, sliced thin
2 – 30 g packages dry gravy mix
15 g cornstarch
10 g paprika
350 ml heavy cream
60 ml tomato paste
Cooked egg noodles, optional
Season beef with salt and pepper. Place beef in 13 x 9-inch
baking dish. Mix in bouillon, peppers, mushrooms and onions.
Place oven rack in rack position 2. Place dish on rack. Close
oven door. Set oven to Recipe R4 with six people. Press
When oven chimes, remove dish from oven and carefully pour
liquid into 500 ml measuring cup and set aside. Return dish
back in oven and press to continue cooking.
To make sauce: In 2-quart saucepan whisk gravy mixes,
cornstarch and paprika. Mix in cream and tomato paste. Whisk
in reserved 410 ml juice, adding water if needed to equal 410
ml. Place on Wolf cooktop over medium heat. Bring to a boil to
thicken, stirring constantly.
When oven chimes, remove dish from oven and mix in sauce.
Serve alone or over egg noodles.
Makes 5 to 6 servings.
R5 BEEF POT ROAST
Cook time—2 hours
1.1 kg beef chuck roast, cut into 3 pieces
2 carrots, peeled and quartered
1
/2 small celery root or celeriac, peeled and quartered
2 small yellow onions, quartered
1 bay leaf
2 whole cloves
8 black peppercorns
940 ml vegetable stock
Place beef, vegetables and spices in 4-quart casserole dish.
Pour vegetable stock over all.
Place oven rack in rack position 2. Place dish on rack. Close
oven door. Set oven to Recipe R5. Press
chimes, remove dish from oven and serve warm.
. When oven
Makes 5 to 6 servings.
.
R6 PORK LOIN IN PUFF PASTRY
Cook time—30 minutes
1
/2 – 250 g package puff pastry sheets
30 ml stone ground mustard
460 g pork tenderloin
Kosher salt and freshly ground black pepper
Unfold pastry sheet on cutting board and cut in half. Spread 15
ml mustard evenly across each pastry sheet. Cut pork in half
lengthwise. Season with salt and pepper. Place one pork piece
in the middle of each sheet, leaving 25 mm on each long end.
Fold ends over the pork and tightly roll the sides around the
pork, placing seam on the bottom under the pork. Line solid pan
with parchment paper. Carefully place puff pastry bundles on
paper. Slide pan on rack position 2. Close oven door. Set oven
to Recipes R6. Press
oven. Remove bundles from paper using a metal spatula. Serve
immediately.
. When oven chimes, remove pan from
Makes 4 to 6 servings.
R7 PASTA GRATIN
Cook time—30 minutes
690 g uncooked pasta (shells or elbow macaroni)
2 small yellow onions, sliced 13 mm thick
230 g mushrooms, sliced
85 g sliced dried ham or prosciutto, sliced 13 mm thick
230 g at leaf parsley, coarsely chopped
140 g Italian or Parmesan cheese, shredded, divided
470 ml vegetable stock
235 ml heavy cream
Kosher salt and freshly ground black pepper
Dash nutmeg
Combine pasta, onions, mushrooms, ham, parsley and half
Italian cheese into a greased 4-quart casserole. Stir in stock,
cream, salt, pepper and nutmeg. Pour over pasta. Sprinkle
remaining cheese on top. Position oven rack to rack position 1.
Place uncovered casserole on rack. Close oven door. Set oven
to Recipes R7. Press
from oven. Cover. Allow casserole to stand for 15 minutes.
Serve warm.
1
/2-cup servings.
Makes 6 1
. When oven chimes, remove casserole
R8 EGGPLANT GRATIN
Cook time—approximately 30 minutes
1 – 395 g can tomatoes
1 clove garlic, minced
15 g fresh oregano, chopped (or 5 g dry)
15 g fresh thyme, chopped (or 5 g dry)
15 ml olive oil
Kosher salt and freshly ground black pepper
2 medium eggplants
230 g grated Italian cheese
Place tomatoes in 3-quart bowl. Crush with fork or potato
masher. Mix in garlic, herbs and olive oil. Season with salt and
pepper. Spread 115 ml tomato sauce in bottom of 2
greased casserole. Slice the top off each eggplant and cut into
13 mm slices. Place slices evenly over tomatoes in dish. Spread
remaining tomato mixture over eggplant slices. Sprinkle cheese
on top. Place oven rack on rack position 2. Place dish on rack.
Close oven door. Set oven to Recipe R8. Press . When oven
chimes, remove dish from oven and serve immediately.
1
/2-quart
R9 FLAN
Cook time—approximately 25 minutes
115 g sugar, divided
115 ml orange juice
500 ml heavy cream or half & half
1 vanilla bean, split lengthwise
3 eggs, beaten
To make sauce: In 1
medium heat, place 60 g sugar. Continue to heat three minutes
or until sugar turns light brown. Gradually pour orange juice into
pan and allow to reduce in half. Remove and pour evenly into
four 177 ml ramekin dishes. Set aside.
In 2-quart saucepan over medium heat, place cream, remaining
sugar and vanilla bean. Bring to a simmer, stirring constantly.
Whisk eggs in 2-quart bowl. Slowly pour cream into eggs, a
little at a time, beating after each addition. Pour mixture through
a ne strainer evenly into the dishes over the orange sauce.
Place dishes on perforated pan. Carefully slide on rack position
1. Close oven door. Set oven to Recipes R9. Press
oven chimes, remove from oven. Allow to cool completely. Chill
for at least two hours. To serve, run a knife around the edge
of each dish. Turn ans upside down onto plate and pour any
remaining sauce from dish over the top
1
/2-quart saucepan on Wolf cooktop over
. When
Makes 4 servings.
R10 PEARS IN RED WINE
Cook time—approximately 15 minutes
235 ml red wine
60 g sugar
Seeds from 1 vanilla bean
5 or 6 pears, cut in half, seeds removed
In 13 x 9-inch baking dish, combine red wine, sugar and seeds
from vanilla bean. Place pears, cut side down into wine mixture.
Place oven rack on rack position 2. Place dish in cold oven on
rack. Close oven door. Set oven to Recipes R10. Press
When oven chimes, remove pan from oven. Allow to cool slightly
before serving warm.
Makes 10 to 12 servings.
.
Makes 4 to 6 servings.
10 | English
Page 11

OVEN OPERATION
Recipes
R11 ROLLS
Cook time—approximately 33 minutes
740 g our
30 g sugar
1 – 7 g package active dry yeast
5 g salt
230 ml very warm milk, 50–55°C
60 g butter, melted
30 m milk
5 g sugar
15 g butter, melted
In mixer bowl with dough hook, place our, sugar, dry yeast and
salt. Mix ingredients together on low speed for two minutes.
Pour in warm milk and 60 g melted butter. Continue to mix for
ve minutes or until dough begins to form and pull away from
the bowl. Remove dough hook and cover with damp cloth.
Allow to rise at room temperature 1–1
in bulk.*
On lightly oured surface, divide dough into 12 equal portions.
Shape into balls and place in greased 12 x 8-inch glass dish.
Cover with damp cloth and allow to rise about one hour or until
doubled in bulk.
Place oven rack on rack position 2. Place dish on rack. Close
oven door. Set oven to Recipes R11. Press . Mix remaining
milk, sugar and butter. When oven chimes, brush rolls with
mixture. Press again. When oven chimes again, remove rolls
and cool slightly before serving. Serve warm.
Makes 12 rolls.
*Dough can be placed in a covered container in the refrigerator
overnight. When ready to use, allow dough to set at room temperature for about one hour to warm before forming into rolls.
To check if the dough has doubled in bulk, stick two fingers into
the dough about 25 mm down and quickly remove them. If the
finger indents remain, then the dough has doubled in bulk. If
the finger indents disappear, then the dough still needs to rise
longer.
1
/2 hours or until doubled
R12 MUFFINS
Cook time—approximately 35 minutes
For muffins:
460 g our
150 g sugar
10 g baking powder
2 g baking soda
2 g salt
1 g cinnamon
2 eggs
230 ml buttermilk
115 g butter, melted
15 g lemon zest
5 ml vanilla
60 ml plain yogurt
230 g blueberries
For streusel:
115 g our
60 g butter, softened
60 g sugar
60 g walnuts, chopped
15 g lemon zest
In large mixing bowl with at beater on low speed, combine
our, sugar, baking powder, baking soda, salt and cinnamon. In
separate bowl, whisk together eggs, buttermilk, cooled butter,
zest, vanilla and yogurt. Add egg mixture to mixing bowl and mix
for 20 seconds, or until just combined. Remove bowl from mixer
and hand mix blueberries into batter. Spray jumbo mufn pans
with nonstick spray or use jumbo mufn pan liners. Divide batter
evenly into 12 mufn cups.
To make streusel: Place our butter, sugar, walnuts and lemon
zest in small mixing bowl. Combine with hands or pastry blender
until crumbly. Spoon mixture evenly on tops of mufns.
Place pan or mufn liners on perforated pan. Slide into cold
oven on rack position 1. Close oven door. Set oven to Recipes
R12. Press
Allow to cool ve minutes before removing from pan. Serve
warm or cool and store in airtight container.
Makes 10 to 12 servings.
. When oven chimes, remove pan from oven.
R13 CAKE
Cook time—approximately 1 hour
6 eggs, separated
230 g sugar
60 ml water
5 ml lemon extract
5 g lemon zest
230 g cake our
2 g cream of tarter
2 g salt
Frosting or fresh fruit, optional
In large mixing bowl with at beater on low speed, place egg
yolks and sugar. Beat at medium speed for two minutes or until
thick. Add water, lemon extract and zest. Beat until combined
for one minute. Add our and beat on low speed until combined.
Set aside.
In another large clean mixing bowl with wire whisk, pour egg
whites. Whip at high speed for about 30 seconds until frothy, but
not stiff. Add cream of tartar and salt. Continue to whip whites to
stiff peaks, but not dry.
Gently fold egg whites into egg yolk batter. Pour into ungreased
9-inch tube pan.
Place oven rack on rack position 1. Close oven door. Set oven to
Recipes R13. Press
is complete, place pan in middle of rack. Press . When oven
chimes to indicate baking time is over, remove oven. Allow to
cool 10 minutes before removing from pan. With long metal
spatula loosen the cake from the sides and middle of cake. Push
cake out of removable bottom and carefully loosen the cake
from the bottom. Frost cake or serve with fresh fruit.
Makes 10 to 12 servings.
. When oven chimes to indicate preheat
R14 FOCACCIA
Cook time—approximately 40 minutes
970 g bread our
1 – 7 g package active dry yeast
10 g Italian seasoning
5 g sugar
5 g salt
310 ml warm water, 40–45°C
15 ml olive oil
Extra olive oil
Coarse sea salt
In mixer bowl with dough hook, place our, dry yeast, seasoning,
sugar and salt. Mix ingredients together on low speed for two
minutes. Pour in water and oil. Continue to mix for ve minutes
or until dough begins to form and pull away from the bowl.*
Increase speed to medium and knead the dough for 2–4 more
minutes to form dough. Remove dough hook and cover with
damp cloth. Allow to rise at room temperature two hours or until
doubled in bulk.**
On lightly oured surface, roll dough into a attened ball. Place
in greased 8-inch glass pie plate. Spread dough to ll the plate.
Coat top with olive oil. Using ngers, poke holes about 25 mm
into dough evenly across dough. Cover with dry cloth and allow
to rise one hour. Coat top with olive oil again and poke holes
evenly across dough. Sprinkle top with coarse sea salt.
Position oven rack to rack position 1. Place dish on rack. Close
oven door. Set oven to Recipes R14. Press
chimes, remove pan from oven. Remove from dish immediately.
Makes 1 loaf bread.
*If dough is too dry, add additional water, 15 ml at a time, until
dough becomes moist. If dough is too moist, add additional
flour, 8 g at a time, until dough becomes more dry.
**To check if the dough has doubled in bulk, stick two fingers
into the dough about 25 mm down and quickly remove them. If
the finger indents remain, then the dough has doubled in bulk.
If the finger indents disappear, then the dough still needs to rise
longer.
. When oven
wolfappliance.com | 11
Page 12
CARE RECOMMENDATIONS
Care Recommendations
DESCALE
Depending on water conditions, the oven may need to be
descaled every 6–18 months. When the oven needs to be
descaled, ‘Boiler scaled up—please descale’ will appear
on the display. The duration between notications is based
on the water hardness specied in user settings. To adjust
water hardness levels, refer to page 6.
®
Only use Durgol
follow the manufacturers instructions. Durgol
ordered online at subzerowolfstore.com.
Setting Descale:
1 With the oven off, press and turn the knob to
Descale, then press
and press
2 Remove water tank and pour entire Durgol
Steamer descaling solution contents into the tank, then
reinstall water tank and press
3 After approximately 30 minutes, ‘Pour away descaler—
Add 1 L water’ appears on the display. Remove tank,
turn on faucet, then pour descaler down the drain.
CAUTION
Failure to dilute descaling solution before discarding
may discolor sink and drain.
4 Fill the tank with warm tap water and reinstall. ‘Descale
appliance—1st rinsing cycle’ appears on the display.
After approximately 45 minutes, ‘Pour away water—
Descaling completed’ appears on the display.
5 Depending on the level of soil in the rinse water, the
oven will determine whether additional rinse cycles are
necessary. Follow instructions on the display.
6 Once the rinse cycles are complete, remove, empty and
dry the water tank then wipe all stainless steel surfaces.
Swiss Steamer descaling solution and
®
can be
. ‘Add 0.5 L descaler—
’ appears on the display.
®
Swiss
.
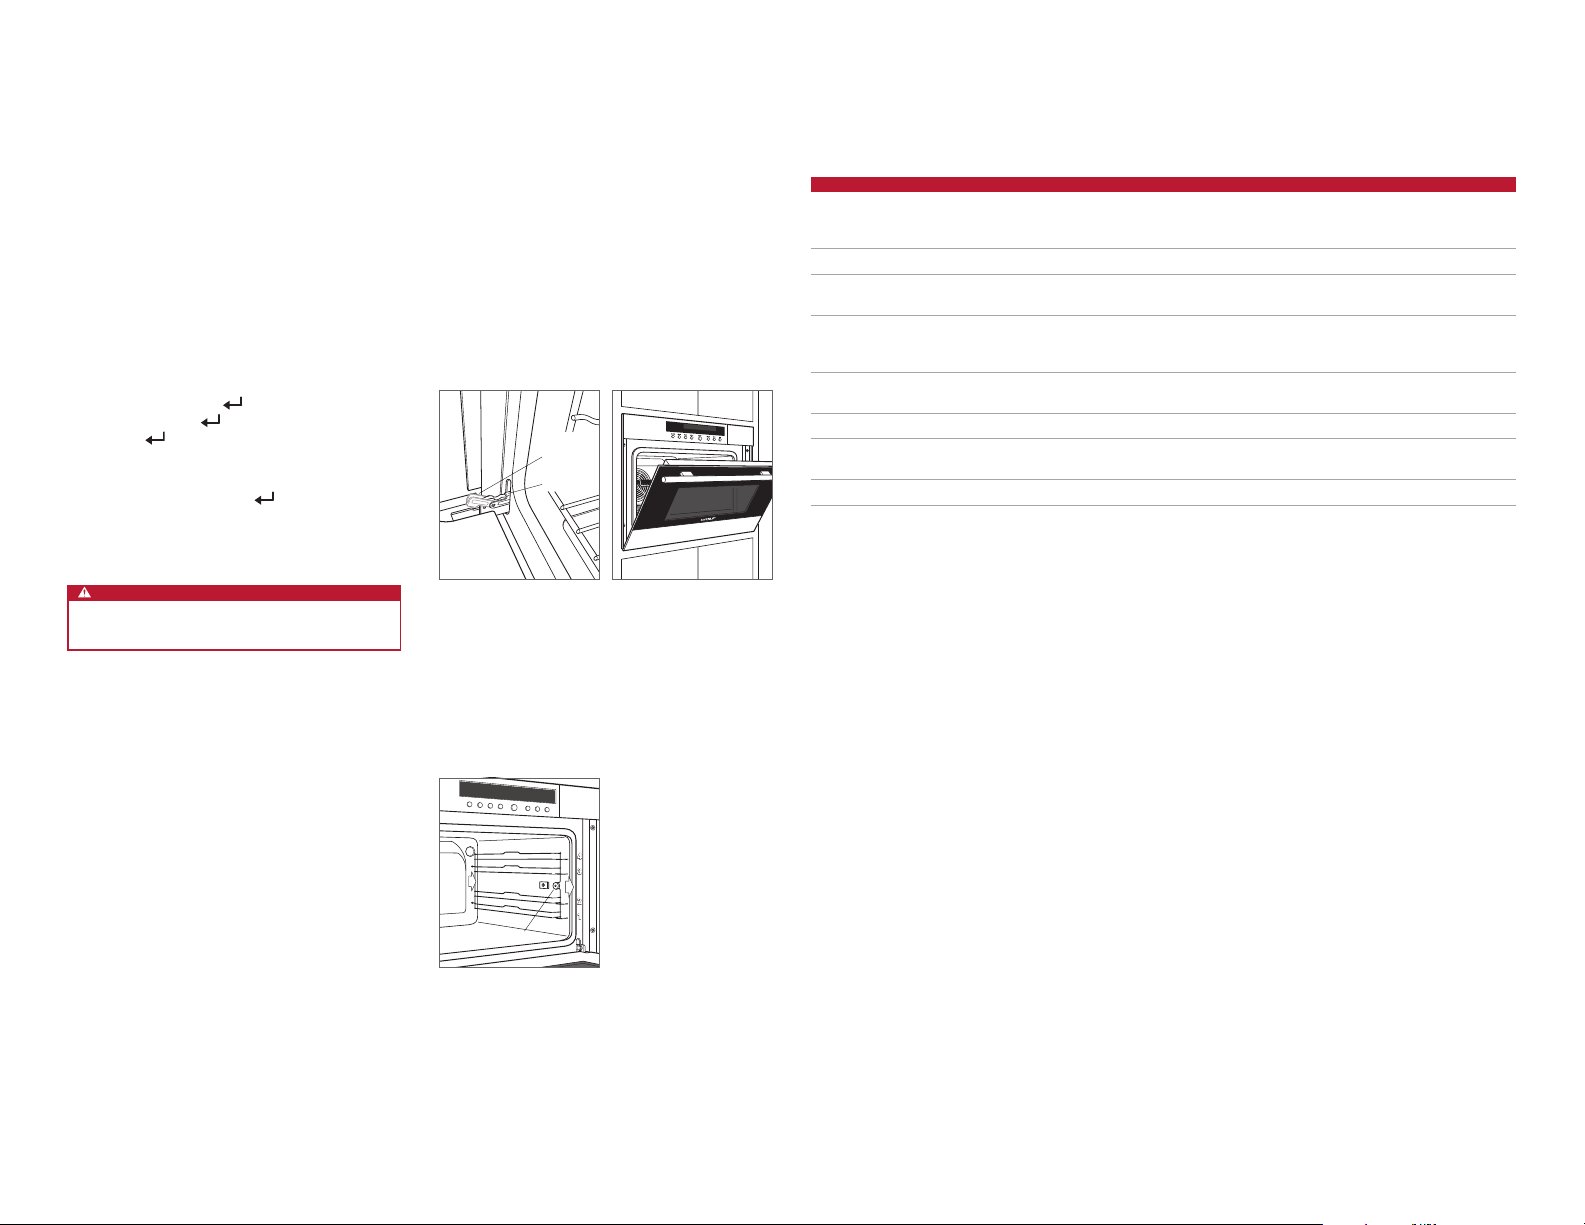
OVEN DOOR REMOVAL
The oven door can be removed for a thorough cleaning.
To remove, open oven door completely. Rotate both hinge
latches forward to the open position. Close door to the
“at-rest” position, then lift up and out. Refer to the illustrations below.
To reinstall, insert door hinges into frame openings. Open
oven door completely and rotate both hinge latches back to
the closed position.
OPEN
POSITION
CLOSED
POSITION
Oven door hinge latch.
Door “at-rest” position.
RACK GUIDE REMOVAL
To remove rack guides, unscrew the knurled nut on the front
of the rack guide. Pull rack guide to the side of the threaded
stud and remove from the front. Refer to the illustration
below.
WATER
LIGHT
TEMP
MODE
ON
POWER
TIME
OFF
CLEANING
Stainless steel Use a nonabrasive stainless steel cleaner and apply with a soft lint-free cloth. To bring out the natural
luster, lightly wipe surface with a water-dampened microber cloth followed by a dry polishing chamois.
Always follow the grain of stainless steel.
Door front Spray glass cleaner on a cloth to clean.
Control panel Use spray degreaser to remove ngerprints and food soil. Spray on a cloth before wiping panel. Do not
Interior For general cleaning, initiate the Steam mode at 80°C for 30 minutes. This will loosen fat and cooking
Oven racks and
rack guides
spray cleaners directly on the control panel.
debris from the oven. Turn the oven off and wipe the interior with a cloth. Use a damp cloth and lemon
juice to wipe away water and blue tarnish spots. Do not use a steam cleaner.
Oven racks and rack guides can be cleaned in the dishwasher.
Stainless steel pans The solid and perforated stainless steel pans can be cleaned in the dishwasher.
Water tank Watermarks and calcium build-up can be removed using a standard descaler. Do not clean the water
tank in the dishwasher.
Temperature probe Do not clean the temperature probe in the dishwasher.
12 | English
RACK GUIDE
KNURLED NUT
Rack guide removal.
Page 13

TROUBLESHOOTING
Troubleshooting
OPERATION
Oven does not operate.
• Verify power is on.
• Verify electrical power to unit and home circuit breaker
is on.
Oven temperature issue.
• Contact Wolf customer care at 800-222-7820 for
recommendations.
Illumination is not working.
• The light bulb is defective, call Wolf factory certied
service.
Oven starts making noise during operation.
• The oven may emit switching and pumping sounds
during operation. Such sounds are normal.
Oven pans are difficult to remove.
• Some combinations of heat, moisture and food place-
ment may cause the oven pans to warp, but will return
to their original shape when cool.
‘Do not remove water tank’ appears on the display.
• Water in the boiler is not pumped off until the water
temperature drops below 80°C.
‘Boiler scaled up, please descale!’ appears on the display.
• Descale oven, refer to page 12.
Service
• Maintain the quality built into your product by contacting
Wolf factory certied service.
• When contacting service, you will need the model and
serial number of your product. Both numbers are listed
on the product rating plate. Refer to page 5 for rating
plate location.
• For warranty purposes, you will also need the date of
installation and name of your authorized Wolf dealer. This
information should be recorded on page 2 of this guide.
Wolf Products Limited Warranty
INTERNATIONAL PRODUCTS
FOR RESIDENTIAL USE ONLY
FULL TWO YEAR WARRANTY
For two years from the date of original installation, your Wolf Appliance product warranty covers
all parts and labor to repair or replace, under normal residential use, any part of the product that
proves to be defective in materials or workmanship. All service provided by Wolf Appliance under
the above warranty must be performed by Wolf factory certied service, unless otherwise specied by Wolf Appliance, Inc. Service will be provided during normal business hours.
LIMITED THIRD THROUGH FIFTH YEAR WARRANTY
For ve years from the date of original installation, Wolf Appliance will repair or replace the following parts that prove to be defective in materials or workmanship: gas burners (excluding appearance), electric heating elements, blower motors (ventilation hoods), electronic control boards,
magnetron tubes and induction generators. The part(s) will be repaired or replaced, free of charge,
with the owner paying for all other costs including labor. All service provided by Wolf Appliance
under the above warranty must be performed by Wolf factory certied service, unless otherwise
specied by Wolf Appliance, Inc. Service will be provided during normal business hours.
‘Appliance blocked, descaling necessary’ appears on the
display.
• Descale oven, refer to page 12. If the message does not
disappear after descaling, contact Wolf factory certied
service.
Wolf, Wolf & Design, Wolf Gourmet, W & Design and the color red as applied to knobs are registered trademarks and service marks of Wolf Appliance, Inc. Sub-Zero, Sub-Zero &
Design, Dual Refrigeration, Constant Care, The Living Kitchen, Great American Kitchens The Fine Art of Kitchen Design, and Ingredients are registered trademarks and service marks
of Sub-Zero, Inc. (collectively, the “Company Marks.”) All other trademarks or registered trademarks are property of their respective owners in the United States and other countries.
wolfappliance.com | 13
Page 14

HORNOS DE CONVECCIÓN CON VAPOR
Índice
3 Precauciones de seguridad
5 Características de los hornos de convección con vapor
5 Funcionamiento de los hornos de convección con vapor
12 Recomendaciones de mantenimiento
13 Localización y solución de problemas
13 Garantía Wolf
Atención al cliente
El modelo y el número de serie están impresos en la tarjeta
de registro del producto que se adjunta. Esta información
también se muestra en la placa de datos del producto. Consulte la página 5 para observar la ubicación de la placa de
datos. Para cuestiones relacionadas con la garantía, también es necesario saber la fecha de instalación y el nombre
de su distribuidor autorizado de Wolf. Guarde la siguiente
información para tenerla como referencia en el futuro.
INFORMACIÓN SOBRE EL MANTENIMIENTO
Referencia del modelo
Número de serie
Fecha de instalación
Nombre del servicio certicado
Número del servicio certicado
Distribuidor autorizado
Número del distribuidor
Nota importante:
Para garantizar que este producto se instala y funciona de
la forma más ecaz y segura posible, tenga en cuenta la
información que se destaca en esta guía:
NOTA IMPORTANTE se utiliza para resaltar información que
resulta especialmente importante.
PRECAUCIÓN indica una situación en la que se pueden
sufrir heridas leves o provocar daños al producto si no se
siguen las instrucciones.
AVISO indica peligro de que se produzcan heridas graves o
incluso la muerte si no se respetan las precauciones.
2 | Español
Page 15

PRECAUCIONES DE SEGURIDAD
PRECAUCIONES DE SEGURIDAD
Este horno ha sido diseñado para cumplir con estándares
reconocidos en las regulaciones sobre tecnología y seguridad,
y ha sido creado para que se utilice en el hogar en la preparación de alimentos. No está diseñado para que sea utilizado por
personas con las capacidades físicas, sensoriales o mentales
reducidas, ni por personas con falta de experiencia y conocimientos, a menos que cuenten con la supervisión adecuada
o a menos que una persona responsable de su seguridad les
proporcione las instrucciones necesarias para utilizarlo. Es
imprescindible utilizarlo de la manera correcta para evitar que
se produzcan daños o accidentes.
La instalación y la conexión a un suministro eléctrico debe ser
realizada por un electricista cualicado siguiendo las instrucciones de instalación que se proporcionan.
Antes de utilizar el aparato por primera vez, llene el tanque de
agua y lleve a cabo las tareas relacionadas que se especican
en la sección "Antes de su utilización".
Guarde esta guía para utilizarla como referencia en el futuro.
Si vende el aparato o se lo da a otra persona, asegúrese de
que entrega estas instrucciones junto con el aparato y junto
con las instrucciones de instalación.
INSTRUCCIONES DE SEGURIDAD IMPORTANTES
Cuando utilice aparatos eléctricos, siempre debe seguir ciertas
precauciones de seguridad básicas, entre las que se incluyen las
siguientes:
• Lea todas las instrucciones.
• No toque las supercies calientes. Utilice manillares o pomos.
• Para evitar el riesgo de descargas eléctricas, no sumerja el
cable ni el enchufe en agua ni en cualquier otro líquido.
• No deje el cable colgando sobre el borde de la mesa o enci-
mera, ni deje que toque las supercies calientes.
• Es necesario realizar una estrecha supervisión cuando el apa-
rato sea utilizado por niños o cerca de ellos.
• Es preciso supervisar a los niños para asegurarse de que no
jueguen con el aparato.
AVISO
Las zonas accesibles pueden calentarse durante su uso.
Mantenga alejados a los niños pequeños.
wolfappliance.com | 3
Page 16

PRECAUCIONES DE SEGURIDAD
INSTRUCCIONES DE SEGURIDAD IMPORTANTES
• Este aparato puede ser utilizado por niños a partir de 8 años y
por personas con capacidades físicas, sensoriales o mentales
reducidas, o con falta de experiencia y conocimientos, siempre
que estén supervisados o se les haya enseñado cómo utilizar
el aparato de forma segura y hayan entendido los peligros que
supone el uso del mismo. Los niños no deben jugar con el
aparato. Los niños no pueden realizar las tareas de limpieza y
mantenimiento sin supervisión.
• Utilice solamente el sensor de temperatura que se recomienda
para este horno.
• Desenchufe el aparato de la toma de corriente cuando no lo
esté utilizando y antes de limpiarlo. Deje que el aparato se
enfríe antes de encenderlo o de extraer alguna pieza.
• No utilice limpiadores abrasivos ni espátulas metálicas aladas
para limpiar el cristal de la puerta del horno ya que pueden
rayar la supercie, lo que podría hacer que el cristal se rompa.
• No ponga en funcionamiento ningún horno que tenga dañado
el cable o el enchufe, ni lo ponga en funcionamiento después
de que se haya producido algún fallo de funcionamiento o
daño en el aparato. Lleve el aparato al centro de servicio autorizado más cercano para que lo examinen, reparen o realicen
los ajustes necesarios.
• El uso de accesorios no recomendados por el fabricante del
aparato puede provocar lesiones.
• No lo utilice en el exterior.
• No lo coloque en o cerca de un quemador eléctrico o que-
mador de gas caliente, ni en un horno caliente.
• Extreme las precauciones cuando mueva un aparato que con-
tenga aceite caliente u otro tipo de líquido caliente.
• Primero, conecte el enchufe al aparato y, a continuación,
enchufe el cable a la toma de corriente de la pared. Para desconectarlo, apague los controles y, a continuación, retire el
enchufe de la toma de pared.
• No utilice el aparato para un uso diferente de aquel para el que
ha sido diseñado.
• Guarde estas instrucciones.
4 | Español
Page 17
CARACTERÍSTICAS DE LOS HORNOS DE CONVECCIÓN CON VAPOR
FUNCIONAMIENTO DEL HORNO
Características de los hornos de convección
con vapor
ILUSTRACIÓN
1
Placa de datos del producto
2
Pantalla y panel de control
3
Mando de control
4
Bandejas de horno ajustables
5
Ventilador de convección
6
Receptáculo del sensor de temperatura
7
Luces halógenas
8
Puerta de acceso al tanque de agua
2
7
5
1
Horno de convección con vapor (se muestra el modelo
ICBCSO30TM).
Primeros pasos
Sabemos que está deseando empezar a cocinar, pero,
antes de hacerlo, debe leer esta guía de uso y mantenimiento. Tanto si es un cocinero novato como si es un chef
experto, le resultará útil familiarizarse con las prácticas de
seguridad, las características, el funcionamiento y las recomendaciones de mantenimiento del horno de convección
con vapor.
Para asegurarse de que logra los mejores resultados,
consulte la sección Características especiales y modos de
cocción de la página 8.
8
3
6
4
Panel de control
El panel de control y la pantalla del panel de control son de
última generación y fáciles de utilizar. El mando de control
) y los botones se utilizan para congurar los modos
(
de cocción y para acceder a todas las funciones del horno
de convección con vapor y lograr así unos resultados
excepcionales.
El mando se utiliza de manera individual o junto con los
botones para poder realizar las selecciones. Las selecciones que realice se conrman pulsando
INDICADORES DE LA PANTALLA DEL PANEL DE CONTROL
La temperatura del horno está congurada.
El sensor de temperatura se está utilizando.
El modo vapor está activado.
El modo recalentado está activado.
El modo horneado automático con vapor está
activado.
El modo convección está activado.
El modo convección con humedad está activado.
El modo convección con vapor está activado.
El temporizador está congurado.
El tiempo de funcionamiento está activado.
La hora de apagado está activada.
El reloj está congurado.
.
MANDOS Y BOTONES DEL PANEL DE CONTROL
Agua
Luz
Temperatura
Modo
OK
Temporizador
Hora
Apagado
Panel de control.
8:30190°C
wolfappliance.com | 5
Page 18
FUNCIONAMIENTO DEL HORNO
Conguración del usuario
La conguración del usuario le permite seleccionar sus
preferencias de idioma, bloqueo a prueba de niños, visualización de la hora, señal acústica, iluminación, dureza del
agua, unidad de temperatura, contraste, formato de hora,
conguración de fábrica y control de la puerta del agua.
El panel de control se puede bloquear utilizando la conguración del usuario. Para utilizar el horno con el bloqueo desactivado temporalmente, pulse y mantenga pulsado
a continuación, pulse
. El bloqueo se activará de nuevo
automáticamente 10 minutos después de que el horno se
haya apagado.
Ajustar las configuraciones del usuario:
1 Con el horno apagado, pulse y gire el mando hasta
USER SETTINGS y, a continuación, pulse
2 Gire el mando para desplazarse por las opciones y, a
continuación, pulse
3 Siga las instrucciones que aparecen en la pantalla y, a
continuación pulse
.
.
y,
.
Funcionamiento del horno
SELECCIONAR MODO DE COCCIÓN
1 Pulse varias veces hasta que aparezca el modo de
cocción que desee y, a continuación, pulse
SELECCIONAR TEMPERATURA
1 Pulse .
2 Gire el mando hasta la temperatura que desee y, a conti-
nuación, pulse
.
Para ajustar la temperatura durante la cocción, pulse y
gire el mando hasta la temperatura que desee y, a continuación, pulse
TANQUE DE AGUA
.
El tanque de agua contiene suciente agua para proporcionar 1 hora y media de vapor continuo, lo que normalmente es suciente para 4-5 sesiones de cocción. Utilice
agua del grifo fría y fresca. No utilice agua desmineralizada,
ltrada ni destilada.
Pulse siempre
para abrir la puerta del agua. Si intenta
acceder al tanque de agua de manera manual puede ocasionar daños en el aparato.
Cuando el horno está apagado, el agua se bombea de
nuevo al tanque una vez que la temperatura del agua está
por debajo de 80°C. Si es necesario llenar el tanque durante
el proceso de cocción, limite la cantidad de agua a menos
de dos tazas para evitar que se produzca un desbordamiento cuando el agua vuelva al tanque.
.
ANTES DE SU USO
Use la tira de prueba que se proporciona para determinar la
dureza del agua. El horno está predeterminado para agua
dura. Consulte la sección Conguración del usuario en la
página 6 para ajustar la dureza del agua.
Para asegurarse de que se ha eliminado todo los restos de
aceite del proceso de fabricación, el horno debe someterse
al siguiente procedimiento.
1 Limpie el horno con agua caliente y detergente suave.
Aclárelo y séquelo con un paño suave.
2 Encienda la ventilación. Es normal que aparezca un poco
de humo y olor.
3 Llene e instale el tanque de agua.
4 Seleccione el modo de horneado automático con vapor
Auto Steam Bake y 210°C. Caliente el horno (cuando
esté vacío) durante 30 minutos.
DESPUÉS DE CADA USO
1 Pulse . Para los modos que utilicen vapor, no extraiga
el tanque de agua hasta que el mensaje "WATER IS
BEING PUMPED OFF" (El agua se está bombeando)
desaparezca de la pantalla.
2 Abra la puerta hasta que se encuentre en la posición de
"descanso" y deje que el horno se enfríe. Cuando se
haya enfriado, seque el interior antes de cerrar la puerta.
Observe la siguiente ilustración.
HORA
Es muy importante que congure la hora correcta si se utiliza la función de cocción programada. La hora debe restablecerse en caso de corte en el suministro de alimentación.
Programar la hora:
1 Con el horno apagado, pulse .
2 Gire el mando para programar la hora y, a continuación,
3 Gire el mando para congurar los minutos y, a continua-
TEMPORIZADOR
pulse
ción, pulse
.
.
Puede programar el temporizador para un máximo de
9horas y 59 minutos. Cuando haya programado el temporizador, el cronómetro se iluminará en la pantalla. El
temporizador es independiente del horno. Programar el
temporizador no afecta a la hora de funcionamiento ni a
la de apagado.
Programar el temporizador:
1 Pulse
2 Gire el mando para congurar la duración y, a continua-
ción, pulse
.
.
Para reiniciar, pulse y gire el mando para seleccionar la
duración que desee y, a continuación, pulse
celar, pulse
dos veces y, a continuación, pulse .
. Para can-
6 | Español
Para llenar el tanque de agua:
1 Pulse .
2 Extraiga el tanque de agua y llénelo.
3 Instale de nuevo el tanque y cierre la puerta del agua de
manera manual.
Puerta en la posición de
"descanso".
Page 19
FUNCIONAMIENTO DEL HORNO
Funcionamiento del horno
TIEMPO DE FUNCIONAMIENTO
La opción de tiempo de funcionamiento apaga automáticamente el horno a una hora determinada. El horno empezará
a calentarse inmediatamente y se apagará a la hora de
apagado que desee.
Si se utiliza el sensor de temperatura, el sensor omitirá la
hora de apagado y apagará el horno cuando se alcance la
temperatura establecida. Si no se alcanza la temperatura
del sensor antes de la hora de apagado, no se ampliará el
tiempo de funcionamiento.
Configuración de los mandos:
1 Seleccione el modo de cocción y la temperatura que
desee.
2 Pulse
3 Gire el mando para seleccionar el tiempo de funciona-
Para ajustar el tiempo de funcionamiento, pulse y gire el
mando para seleccionar el tiempo que desee y, a continuación, pulse
.
miento deseado y, a continuación, pulse
.
.
INICIO PROGRAMABLE
La opción de inicio programable enciende y apaga el horno
automáticamente a las horas especicadas. El horno permanecerá en espera hasta la hora de inicio que desee y se
apagará a la hora de apagado deseada. El reloj debe congurarse a la hora correcta para que el inicio programable
funcione correctamente.
Si se utiliza el sensor de temperatura, el sensor omitirá la
hora de apagado y apagará el horno cuando se alcance
la temperatura jada. Si no se alcanza la temperatura del
sensor antes de la hora de apagado, no se ampliará el
tiempo de funcionamiento.
Configuración de los mandos:
1 Seleccione el modo de cocción y la temperatura que
desee.
2 Pulse y gire el mando para seleccionar el tiempo de
funcionamiento deseado (no pulse
3 Pulse y gire el mando para seleccionar la hora de
apagado deseada y, a continuación, pulse
).
.
Para ajustar la hora de apagado, pulse y gire el mando
para seleccionar la hora que desee y, a continuación,
.
pulse
SENSOR DE TEMPERATURA
El sensor de temperatura mide la temperatura interna de la
comida durante su cocción. Puede utilizarse con todos los
modos de cocción, excepto con el modo Gourmet. Cuando
se esté utilizando el sensor de temperatura, pulse
para
alternar entre la temperatura del sensor real que se muestra
y la temperatura programada del sensor.
Configuración de los mandos:
1 Seleccione el modo de cocción y la temperatura que
desee.
2 Coloque el sensor en la parte más gruesa de la comida
que se esté cocinando y, a continuación, inserte
el sensor en el receptáculo. Consulte la siguiente
ilustración.
3 Pulse dos veces y gire el mando para seleccionar el
punto de cocción que desee y, a continuación, pulse
La temperatura del sensor aparecerá en la pantalla cuando
supere los 30°C. Para ajustar la temperatura del sensor,
y gire el mando hasta la temperatura que desee,
pulse
y, a continuación, pulse
.
PRECAUCIÓN
El receptáculo y el sensor adquieren una temperatura
muy alta. Sujételos con cuidado.
POSICIÓN DE LAS REJILLAS DEL HORNO
Las rejillas del horno pueden colocarse en cualquiera de
las cuatro posiciones que aparecen en las etiquetas de la
parte frontal derecha del horno de convección con vapor.
Coloque las rejillas del horno de manera que la barra horizontal se encuentre en la parte trasera del horno. No utilice
la bandeja de acero inoxidable boca abajo. Consulte la
siguiente ilustración. Las recetas que aparecen en el modo
Recipes hacen referencia a la posición de las rejillas para
poder obtener los mejores resultados.
.
Posición de las rejillas.
Receptáculo del sensor.
wolfappliance.com | 7
Page 20

FUNCIONAMIENTO DEL HORNO
Modos de cocción
MODO
Vapor 30 – 100°C
Recalentar
Horneado automático con vapor
Convección
Convección con
humedad
Convección con
vapor
Gourmet — — Use este modo para preparar alimentos especícos (consulte la página 8);
Slow Roast 30 – 150°C
Recipes 30 – 230°C
My Recipes 30 – 230°C
Keep Warm 80°C
Cleanse 30 – 230°C El modo de limpieza utiliza el vapor para limpiar biberones y botes de con-
INDICADOR RANGO DE TEMP. SENSOR USOS
100 – 150°C
100 – 230°C
30 – 230°C
30 – 230°C
30 – 230°C
Utilice el modo de vapor para aquellos alimentos que cocinaría en una
•
cacerola y para todos los alimentos que es mejor manipular cuidadosamente como pescado, marisco, verduras y arroz.
El modo recalentar utiliza vapor y aire caliente para rehidratar los alimentos
•
ligeramente. Utilícelo para recalentar los alimentos que recalentaría en su
horno, cocina o microondas.
Calentar los alimentos con vapor primero, y usar a continuación calor por
•
convección para acabar el horneado, hace que los alimentos horneados
queden tiernos por dentro y adquieran un brillo natural por fuera, lo que
hace que no sea necesario barnizarlos con huevo. Utilice este modo para
hornear pan, bollos, tartas y pasteles tanto si son frescos como si son
precocidos o congelados. No precaliente el horno.
El ventilador de convección distribuye el calor de manera uniforme para
•
obtener unos resultados consistentes y un dorado óptimo. Además, las
temperaturas de cocción pueden ser de 25° menos y el tiempo de cocción
puede ser un 25% más rápido que en los hornos tradicionales, lo que
ahorra tiempo y energía. Use el modo de convección para hornear distintos
tipos de alimentos, incluyendo mufns, galletas y asados.
En el modo de convección con humedad, la ventilación del horno está
•
sellada, de manera que la humedad que se genera durante la cocción
permanece en el horno. Puede utilizarlo para hornear pasteles, guisados,
platos elaborados con granos, lasaña y carnes.
El vapor transere energía a los alimentos de manera más ecaz que usando
•
el aire caliente solamente, lo cual acelera el tiempo de cocción. Los alimentos
conservan su propia humedad. Utilice el modo de convección con vapor para
cocinar alimentos que desea que queden tiernos por dentro y tostados o
crujientes por fuera. Pulse para activar o desactivar el vapor.
frescos, refrigerados o congelados. Seleccione los alimentos y el punto
de cocción que desee y el sensor ajusta el tiempo, la temperatura y la
humedad necesarios por lo que no necesita consultar las instrucciones
de horneado. El rango y la temperatura predeterminados dependen de los
alimentos y del punto de cocción que desee.
Utilice el modo de asado lento para que las carnes se mantengan tiernas
•
asándolas lentamente. Introduzca el sensor de temperatura en la carne que
ha preparado, seleccione la conguración
zación, y cuando llegue a casa tendrá la comida cocinada a la perfección.
Utilice el modo de recetas para preparar toda la comida, desde aperitivos
•
y entrantes hasta postres (consulte la página 9). Seleccione el alimento, el
número de porciones y el nivel de dorado que desea. El sensor ajusta el
resto de opciones. El modo de recetas es ideal para hacer comidas rápidas
o para preparar una gran variedad de platos para una esta.
Utilice el modo Mis recetas para guardar las instrucciones para cocinar diez
•
de sus recetas favoritas, y puede cambiarlas o modicarlas en cualquier
momento.
El modo Mantener caliente utiliza una combinación de calor de convección
•
y vapor para mantener los alimentos calientes hasta que sea el momento
de servirlos.
serva, y es más rápido y seguro que los métodos convencionales.
asado lento y la hora de nali-
GOURMET
Utilice el modo Gourmet para preparar cualquiera de los alimentos que se especican más abajo; frescos, refrigerados
o congelados. Seleccione los alimentos y el punto de cocción que desee y el sensor ajusta el tiempo, la temperatura
y la humedad necesarios por lo que no necesita consultar
las instrucciones de horneado.
ALIMENTO CÓDIGO
Aperitivos frescos A1
Aperitivos congelados A2
Platos al horno A3
Soufé A4
Patatas asadas A5
Productos con patatas congeladas A6
Carne estofada A7
Pizza fresca A8
Pizza congelada A9
Flan A10
Pan A11
Masa de hojaldre rellena A12
Pastel A13
Tarta A14
Configurar el modo Gourmet:
1 Pulse dos veces y gire el mando para seleccionar el
alimento que desee y, a continuación, pulse
2 Siga las instrucciones que aparecen en la pantalla y, a
continuación pulse
.
.
ASADO LENTO
Configurar el modo Asado lento:
1 Pulse y gire el mando para seleccionar asado lento
y, a continuación, pulse
2 Gire el mando para seleccionar el alimento que desee y
).
el punto de cocción (si procede) y, a continuación,
.
pulse
3 La temperatura del sensor predeterminada aparecerá en
la pantalla. Para ajustar la temperatura del sensor, pulse
y gire el mando hasta la temperatura que desee y, a
continuación, pulse
.
El tiempo de funcionamiento del modo de asado lento se
puede ajustar de 2,5 a 4,5 horas. Para ajustar el tiempo,
y gire el mando para seleccionar la duración que
pulse
desee y, a continuación, pulse
.
8 | Español
Page 21

FUNCIONAMIENTO DEL HORNO
Modos de cocción
MODO RECETAS
Utilice el modo Recipes para preparar todos los platos de
una comida, desde aperitivos y entrantes hasta postres.
Puede consultar la siguiente tabla y las recetas en las
páginas 9-11.
ALIMENTO CÓDIGO
Aperitivos R1
Pescado en masa de hojaldre R2
Rollitos de pescado R3
Carne Stroganoff R4
Estofado de carne R5
Lomo de cerdo hojaldrado R6
Pasta gratinada R7
Berenjenas gratinadas R8
Flan R9
Peras al vino tinto R10
Panecillos R11
Mufns R12
Pastel R13
Focaccia R14
Configurar el modo Recetas:
1 Pulse y gire el mando para seleccionar Recipes y, a
continuación, pulse
2 Gire el mando para seleccionar la receta que desee y, a
continuación, pulse
3 Siga las instrucciones que aparecen en la pantalla y, a
continuación pulse
.
.
.
MODO MIS RECETAS
Use el modo Mis recetas para almacenar las instrucciones
para preparar diez de sus recetas favoritas. Si la receta
requiere usar el sensor de temperatura, inserte el sensor en
el receptáculo antes de introducir la conguración.
Configurar el modo Mis recetas:
1 Pulse y gire el mando para seleccionar Mis recetas
y, a continuación, pulse
2 Gire el mando para seleccionar el número de receta que
desee y, a continuación, pulse
3 Seleccione el modo, la temperatura, la hora y el sensor
.
.
de temperatura que desee (si es necesario) y, a continuación, pulse
4 Pulse para guardar la receta.
.
Para eliminar una receta guardada, pulse y gire el
mando hasta la opción My Recipes y, a continuación, pulse
. Gire el mando para seleccionar la receta que desee y, a
continuación, pulse
Clear y, a continuación, pulse
. Gire el mando hasta que aparezca
.
MODO MANTENER CALIENTE
Configurar el modo Mantener caliente:
1 Pulse y gire el mando para seleccionar Keep Warm
y, a continuación, pulse
.
MODO LIMPIEZA
Configurar el modo de limpieza:
1 Pulse y gire el mando para seleccionar Cleanse y, a
continuación, pulse
2 Gire el mando para seleccionar la opción que desee y, a
continuación, pulse
.
.
Recetas
R1 APERITIVOS
Tiempo de cocción: 20 minutos
1 paquete de 500 g de láminas de masa de hojaldre
30 ml de aceite de oliva
60 g de orégano fresco cortado
45 g de tomillo fresco cortado
115 g de queso parmesano rallado
Coloque una lámina de masa de hojaldre en una tabla para
cortar. Úntela con aceite de oliva. Sazone con orégano, tomillo y
queso. Desenrolle la segunda lámina de masa de hojaldre y, con
cuidado, colóquela sobre las hierbas aromáticas.
Presione ligeramente. Con la ayuda de un cortador de masa o
de pizza, corte la masa en tiras de 13 mm. Enrolle bien las tiras,
teniendo cuidado de que no se salga el relleno de dentro. Forre
el recipiente con papel para hornear y coloque las tiras sobre
el papel con una separación de unos 25 mm. Deje que la pasta
repose 15 minutos antes de meterla en el horno. Meta la bandeja en el horno en la posición de rejilla 1. Cierre la puerta del
horno. Programe el horno con Recipes R1. Pulse
el horno emita un pitido, saque la bandeja del horno. Corte cada
tira de masa en tres partes. Sirva inmediatamente.
Puede hacer 42 aperitivos.
Si desea hacer más de una lámina de aperitivo, utilice 2 rejillas
en la posición de rejilla 1 y 3. El tiempo de cocción es el mismo.
. Cuando
R2 Pescado hojaldrado
Tiempo de cocción: 25 minutos
1 calabacín pequeño
1 primiento rojo
1
/2 paquete de 250 g de láminas de masa de hojaldre
60 g de perejil cortado
Sal Kosher y pimienta negra recién molida
4 letes de pescado de carne rme de 60 g, cortado en porciones de 76 x 51 mm
Corte el pimiento rojo en cuartos. Quite las pepitas y corte
cada cuarto en cuatro tiras largas de 6 mm. Apártelos. Corte y
quite los extremos del calabacín y córtelo en rodajas de 6 mm.
Apártelo.
Cubra la bandeja con papel de cocción. Saque y coloque las
láminas de hojaldre frías en la tabla para cortar. Corte la lámina
en cuatro cuadrados iguales. Coloque una rodaja de calabacín
y cuatro tiras de pimiento en cada cuadrado; tome una esquina
y dóblela hasta unirla con su opuesta. Sazone cada uno de ellos
con 15 g de perejil. Sazone con sal y pimienta. Coloque un lete
en cada montón y sazone de nuevo con sal y pimienta. Tire y
coloque las dos esquinas libres del hojaldre sobre el pescado
y presione ligeramente. Coloque con cuidado los paquetes de
masa de hojaldre sobre el papel de cocción. Coloque la bandeja
en la posición de rejilla 1. Cierre la puerta del horno. Programe
el horno con Recipes R2. Pulse
pitido, saque la bandeja del horno. Sirva inmediatamente.
Para 4 raciones.
. Cuando el horno emita un
R3 ROLLITOS DE PESCADO
Tiempo de cocción: 10 minutos
8 letes de pescado nos, como lenguado o rodaballo
Sal Kosher y pimienta negra recién molida
30 g de piñones tostados
95 g de rúcula
Coloque el pescado sobre la tabla para cortar. Sazone ambos
lados con sal y pimienta. Esparza aproximadamente 7 g de
piñones y 9 g de rúcula sobre cada pescado. Enrolle los letes
empezando por la parte puntiaguda. Sujételos con palillos.
Rocíe una cacerola perforada con spray antiadherente y coloque
los rollitos de pescado atados en el recipiente. Coloque la
bandeja en la posición de rejilla 2. Cierre la puerta del horno.
Programe el horno con Recipes R3. Pulse
emita un pitido, saque el pescado y sírvalo inmediatamente.
Entre 4 y 6 raciones.
. Cuando el horno
wolfappliance.com | 9
Page 22

FUNCIONAMIENTO DEL HORNO
Recetas
R4 CARNE STROGONOFF
Tiempo de cocción: 47 minutos
800 g de carne de vacuno para guisar cortada en tiras de 6 x 13
mm
10 g de sal kosher
5 g de pimienta negra recién molida
Pastillas de caldo de carne de 15 g
1 pimiento amarillo cortado en tiras de 6 mm
1 pimiento rojo cortado en tiras de 6 mm
225 g de champiñones cortados con un grosor de 6 mm
2 cebollas amarillas pequeñas, cortadas en rodajas delgadas
2 paquetes de 30 g de mezcla de salsa Gravy seca
15 g de maicena
10 g de paprika
350 ml de crema de leche
60 ml de tomate frito
Fideos de huevo cocidos, opcional
Sazone la carne con sal y pimienta. Coloque la carne en un
recipiente para hornear de 13 x 9 pulgadas. Mezcle el caldo, los
pimientos, los champiñones y las cebollas.
Coloque la rejilla del horno en la posición de rejilla 2. Coloque
el recipiente en la rejilla. Cierre la puerta del horno. Programe el
horno con Recipe R4 para seis personas. Pulse
horno emita un pitido, saque el recipiente del horno y vierta con
cuidado el caldo en un tazón que tenga una capacidad de 500
ml y apártelo. Vuelva a meter el recipiente en el horno y pulse
para seguir con la cocción.
Para elaborar la salsa: En un cazo de medio litro, bata la mezcla
de salsa, la maicena y la paprika. Mezcle la crema y el tomate
frito. Bata poco a poco 410 ml de caldo añadiendo agua si es
necesario hasta tener los 410 ml necesarios. Coloque sobre una
placa Wolf a medio fuego. Deje que hierva hasta que se espese
sin dejar de remover.
Cuando el horno emita un pitido, saque el recipiente del horno
y mezcle la carne con la salsa. Sírvase sola o sobre deos de
huevo.
Entre 5 y 6 raciones.
. Cuando el
R5 ESTOFADO DE CARNE
Tiempo de cocción: 2 horas
1,100 kg de carne de vacuno para guisar, cortada en 3 partes
2 zanahorias, peladas y cuarteadas
1
/2 apio o apionabo pequeño pelado y cuarteado
2 cebollas amarillas pequeñas partidas en cuatro partes
1 hoja de laurel
2 clavos enteros
8 granos de pimienta negra
940 ml de caldo de verduras
Coloque la carne de vacuno, las verduras y las especias en una
cazuela de 1 litro. Vierta el caldo de verduras sobre la carne y
las verduras.
Coloque la rejilla del horno en la posición de rejilla 2. Coloque
el recipiente en la rejilla. Cierre la puerta del horno. Programe
el horno con Recipe R5. Pulse
pitido, saque la cazuela y sirva la carne inmediatamente.
. Cuando el horno emita un
Entre 5 y 6 raciones.
R6 LOMO DE CERDO HOJALDRADO
Tempo de cocción: 30 minutes
1
/2 paquete – 250 g de láminas de masa de hojaldre
30 ml de mostaza en grano molida
460 g de solomillo de cerdo
Sal Kosher y pimienta negra molida fresca
Desenrolle la lámina de masa de hojaldre sobre la tabla para
cortar, y córtela por la mitad. Esparza 15 ml de mostaza de
manera uniforme en cada hoja de hojaldre. Corte el solomillo por
la mitad. Sazone con sal y pimienta. Coloque un trozo de solomillo en la mitad de cada lámina de hojaldre, dejando 25 mm de
espacio en cada extremo. Doble los extremos sobre la carne y
enrolle rmemente los lados alrededor de la carne, colocando la
juntura en la parte inferior debajo de la carne. Cubra la bandeja
con papel de cocción. Coloque con cuidado los paquetes de
masa de hojaldre sobre el papel de cocción. Coloque la bandeja
en la posición de rejilla 2. Cierre la puerta del horno. Programe
el horno con Recipes R6. Pulse
pitido, saque el recipiente del horno. Retire los paquetes del
papel de cocinar con ayuda de una espátula metálica. Sirva
inmediatamente.
Entre 4 y 6 raciones.
. Cuando el horno emita un
R7 PASTA GRATINADA
Tiempo de cocción: 30 minutes
690 g pasta sin cocer (conchas o macarrones)
2 cebollas amarillas pequeñas, en rodajas de 13 mm de grosor
230 g de champiñones, laminados
85 g de jamón curado o prosciutto, en lonchas de 13 mm de
grosor
230 g de hojas de perejil, cortadas en trozos grandes
140 g de queso italiano o parmesano, rallado, dividido
470 ml de caldo de verduras
235 ml de nata espesa
Sal Kosher y pimienta negra molida fresca
Una pizca de nuez moscada
Mezcle la pasta, las cebollas, los champiñones, el jamón, el
perejil y la mitad de queso italiano en una cazuela de 1 litro
previamente engrasada. Añada el caldo, la nata, la sal, pimienta
y la nuez moscada. Vierta la mezcla sobre la pasta. Y espolvoree
con el resto del queso. Coloque la rejilla del horno en la posición
de rejilla 1. Coloque en la rejilla la cazuela sin tapar. Cierre la
puerta del horno. Programe el horno con Recipes R7. Pulse
Cuando el horno emita un pitido, saque la cazuela del horno.
Tápela. Deje que la pasta repose durante 15 minutos.
Sírvala templada.
Para 6 raciones y media.
R8 BERENJENAS GRATINADAS
Tiempo de cocción: aproximadamente 30 minutos
1 – 395 g de tomates enlatados
1 diente de ajo, picado
15 g de orégano fresco, cortado (o 5 g si es seco)
15 g de tomillo fresco, cortado (o 5 g si es seco)
15 ml de aceite de oliva
Sal Kosher y pimienta negra molida fresca
2 berenjenas medianas
230 g de queso italiano para gratinar
Ponga los tomates en un recipiente de 3 cuartos. Tritúrelos
con un tenedor o con un pasapuré. Mezcle el ajo, las hierbas
aromáticas y el aceite de oliva. Sazone con sal y pimienta. Eche
115ml de salsa de tomate en el fondo de una cazuela engra-
1
sada de
/2 litro aproximadamente. Quite la parte de arriba de
cada berenjena y córtelas en rodajas de 13 mm. Coloque las
rodajas con cuidado sobre los tomates en el recipiente. Eche
el resto de la salsa de tomate sobre las rodajas de berenjenas.
Y espolvoréelas con el queso. Coloque la rejilla del horno en la
posición de rejilla 2. Coloque el recipiente en la rejilla. Cierre la
puerta del horno. Programe el horno con Recipe R8. Pulse .
Cuando el horno emita un pitido, saque el recipiente y sirva el
plato inmediatamente.
Entre 4 y 6 raciones.
R9 FLAN
Tiempo de cocción: aproximadamente 25 minutos
115 g de azúcar, dividida
115 ml de zumo de naranja
500 ml de nata espesa, o semidescremada
1 rama de vainilla, partida longitudinalmente
3 huevos, batidos
Para elaborar la crema: En un cazo de
mente colocado sobre una placa Wolf a medio fuego, eche 60g
de azúcar. Continúe calentando durante tres minutos o hasta
que el azúcar se dore ligeramente. Vierta poco a poco el zumo
de naranja en el cazo y deje que se reduzca a la mitad. Remueva
y vierta la crema en cuatro moldes de 117 ml. Apártelos.
Coloque un cazo de medio litro en la placa de cocción a medio
fuego, y eche la crema que queda, el azúcar restante y la
vainilla. Deje que hierva a fuego lento sin dejar de remover. Bata
los huevos en un recipiente de 2 cuartos. Lentamente,mezcle la
nata con los huevos, poco a poco, batiéndolos bien cada vez
que añada uno. Vierta de manera uniforme la mezcla a través
.
de un colador de agujeros nos en los moldes sobre la crema
de zumo de naranja.
Coloque los moldes en una cazuela perforada. Coloque la
cazuela en la posición de rejilla 1. Cierre la puerta del horno.
Programe el horno con Recipes R9. Pulse
emita un pitido, saque el recipiente del horno. Deje que se enfríe
totalmente. Refrigere durante dos horas antes de servir. Para
servirlo, pase un cuchillo por los bordes de cada uno de los
moldes del an. Dé la vuelta a los moldes de an sobre un plato
y vierta la crema que queda en el recipiente sobre los anes.
1
/2 litro aproximada-
Para 4 raciones.
R10 PERAS AL VINO TINTO
Tiempo de cocción: aproximadamente 15 minutos
235 ml de vino tinto
60 g de azúcar
Semillas de 1 rama de vainilla
5 o 6 peras, cortadas por la mitad y sin pepitas
En un recipiente para hornear de 13 x 9 pulgadas, mezcle el
vino tinto, el azúcar y las semillas de la rama de vainilla. Coloque
las peras, con la parte del corte hacia abajo sobre la mezcla
del vino. Coloque la rejilla del horno en la posición de rejilla 2.
Coloque el recipiente sobre la rejilla en el horno frío. Cierre la
puerta del horno. Programe el horno con Recipes R10. Pulse
. Cuando el horno emita un pitido, saque el recipiente del
horno. Deje que se enfríen un poco y sírvalas templadas.
Entre 10 y 12 raciones.
. Cuando el horno
10 | Español
Page 23

FUNCIONAMIENTO DEL HORNO
Recetas
R11 PANECILLOS
Tiempo de cocción: aproximadamente 33 minutos
740 g de harina
30 g de azúcar
1 – 7 g de levadura seca activa
5 g de sal
230 ml de leche templada, 50–55°C
60 g mantequilla, derretida
30 ml de leche
5 g de azúcar
15 g mantequilla, derretida
En el bol de la batidora con brazo para amasar, eche la harina, el
azúcar, la levadura seca y la sal. Mezcle todos los ingredientes
a una velocidad baja durante cinco minutos. Vierta la leche
templada y 60 g de mantequilla derretida. Continúe mezclando
durante cinco minutos o hasta que la masa comience a tomar
forma y pueda sacarla del bol. Retire el brazo para amasar y
cubra la masa con un paño húmedo. Deje que fermente a temperatura ambiente durante 1–1
su volumen.
En una supercie ligeramente enharinada, divida la masa en 12
porciones iguales. Con cada porción, forme bolas y colóquelas
en un recipiente de cristal de 12 x 8 pulgadas. Tápelas con un
paño húmedo y deje que fermenten durante una hora aproximadamente o hasta que dupliquen su volumen.
Coloque la rejilla del horno en la posición de rejilla 2. Coloque
el recipiente en la rejilla. Cierre la puerta del horno. Programe el
horno con Recipes R11. Pulse . Mezcle la leche, el azúcar y
la mantequilla restantes. Cuando el horno emita un pitido, saque
los panecillos y deje que se enfríen un poco antes de servirlos.
Pulse de nuevo. Cuando el horno vuelva a emitir un pitido,
retire los panecillos y deje que se enfríen ligeramente antes de
servir. Sírvalos templados.
Receta para 12 panecillos.
*La masa puede colocarse en un recipiente cubierto en la nevera
durante toda la noche. Cuando esté listo para utilizarla, deje la
masa a temperatura ambiente durante una hora para que se
caliente antes de formar los panecillos.
Para comprobar si la masa ha duplicado su volumen, introduzca
dos dedos en el interior de la masa aproximadamente 25 mm y
sáquelos inmediatamente. Si la marca de los dedos permanece
en la masa, esto significa que habrá doblado el volumen. Si la
marca de los dedos desaparece, la masa tendrá que fermentar
todavía más.
1
/2 hora o hasta que se duplique
R12 MUFFINS
Tiempo de cocción: aproximadamente 35 minutos
Para las muffins:
460 g de harina
150 g de azúcar
10 g de levadura en polvo
2 g de bicarbonato sódico
2 g de sal
1 g de canela
2 huevos
230 ml de suero de leche
115 g de mantequilla, derretida
15 g de cáscara de limón
5 ml de vainilla
60 ml de yogur natural
230 g de arándanos
Para el streusel:
115 g de harina
60 g de mantequilla, blanda
60 g de azúcar
60 g de nueces, picadas
15 g de cáscara de limón
En un bol de la batidora con la aplicación de paleta a baja
velocidad, mezcle la harina, el azúcar, la levadura en polvo, el
bicarbonato sódico, la sal y la canela. En un bol distinto, bata
los huevos, el suero de leche, la mantequilla fría, la cáscara de
limón, la vainilla y el yogur. Añada la mezcla del huevo en un
recipiente de la batidora y mezcle durante 20 segundos, o hasta
que esté todo bien mezclado. Retire el recipiente de la batidora
y mezcle a mano los arándanos con la paleta. Rocíe los moldes
para mufns grandes con spray antiadherente o utilice moldes
de papel para mufns. Divida la mezcla entre los 12 moldes
preparados para mufns.
Para elaborar el streusel: Mezcle la harina, la mantequilla,
el azúcar, las nueces y la cáscara de limón en un recipiente
pequeño para mezclar. Mezcle los ingredientes con las manos
o con una batidora de repostería hasta que adquiera una consistencia harinosa. Reparta la mezcla en la parte superior de los
moldes a partes iguales.
Coloque el molde o los moldes de papel para mufns en un
recipiente perforado. Meta la bandeja en el horno en la posición
de rejilla 1. Cierre la puerta del horno. Programe el horno con
Recipes R12. Pulse
el recipiente del horno. Deje que se enfríe durante cinco minutos
antes de desmoldar las mufns. Sírvalas templadas o frías y
guárdelas en un recipiente hermético.
Entre 10 y 12 raciones.
. Cuando el horno emita un pitido, saque
R13 PASTEL
Tiempo de cocción: aproximadamente 1 hora
6 huevos por separado
230 g de azúcar
60 ml de agua
5 ml de extracto de limón
5 g de cáscara de limón
230 g de harina para repostería
2 g de cremor tártaro
2 g de sal
Fruta fresca o escarchada, opcional
Coloque las yemas de huevo y el azúcar en un recipiente
grande con la batidora de paleta a baja velocidad. Bata a media
velocidad durante dos minutos o hasta que se espesen estos
ingredientes. Añada agua, extracto y cáscara de limón. Bata
durante un minuto hasta que se combinen estos ingredientes.
Añada harina y bata a baja velocidad hasta que se combinen los
ingredientes. Aparte el recipiente.
En otro recipiente grande para mezclar, eche las claras de
huevo y utilice la batidora con el batidor de alambre. Bata a alta
velocidad durante unos 30 segundos hasta que la mezcla quede
espumosa pero no rígida. Añada el cremor tártaro y la sal. Continúe batiendo las claras hasta alcanzar el punto de nieve pero
sin que queden secas.
Incorpore gradualmente las claras en la mezcla de las yemas
de huevo. Viértala en un recipiente alargado de 9 pulgadas sin
engrasar.
Coloque la rejilla del horno en la posición de rejilla 1. Cierre la
puerta del horno. Programe el horno con Recipes R13. Pulse
. Cuando el horno emita un pitido que indique que ya se ha
precalentado, coloque el recipiente en la mitad de la rejilla. Pulse
. Cuando el horno emita un pitido que indique que el tiempo
de horneado ya ha nalizado, saque el molde del horno. Deje
que se enfríe durante 10 minutos antes de desmoldarla. Con
una espátula metálica larga, despegue el pastel por los lados y
por la mitad. Saque el pastel de la base extraíble y, con cuidado,
retire el pastel de la base. Meta el pastel en la nevera o sírvalo
con fruta fresca.
Entre 10 y 12 raciones.
R14 FOCACCIA
Tiempo de cocción: aproximadamente 40 minutos
970 g de harina de pan
1 – 7 g de levadura activa seca
10 g de sazonador italiano
5 g de azúcar
5 g de sal
310 ml de agua templada, 40–45°C
15 ml de aceite de oliva
Aceite de oliva extra
Sal gorda marina
En el bol de la batidora con brazo para amasar, eche la harina, la
levadura seca, el sazonador, el azúcar y la sal. Mezcle todos los
ingredientes a una velocidad baja durante cinco minutos. Vierta
el agua y el aceite. Continúe mezclando durante cinco minutos o
hasta que la masa comience a tomar forma y pueda sacarla del
bol.* Aumente la velocidad a media y amase la mezcla durante
2-4 minutos más para que la masa tome consistencia. Retire el
brazo para amasar y cubra la masa con un paño húmedo. Deje
que fermente a temperatura ambiente durante dos horas o hasta
que se duplique su volumen.**
En una supercie ligeramente enharinada, haga una bola con la
masa y aplástela. Colóquela en un molde de cristal para pasteles de 8 pulgadas previamente engrasado. Extienda la masa
uniformemente por el molde. Cubra la masa con aceite de oliva.
Con los dedos, haga agujeros de 25 mm en la masa de manera
uniforme. Cubra la masa con un paño seco y deje que fermente
durante una hora. Eche aceite de oliva sobre la parte superior y
agujeree la masa con los dedos de manera uniforme. Espolvoree
la masa con sal marina gorda.
Coloque la rejilla del horno en la posición de rejilla 1. Coloque
el recipiente en la rejilla. Cierre la puerta del horno. Programe
el horno con Recipes R14. Pulse
un pitido, saque el recipiente del horno. Retírelo de la bandeja
inmediatamente.
Receta para una hogaza de pan.
*Si la masa está demasiado seca, añada más agua, 15 ml cada
vez que la añada, hasta que la masa se humedezca. Si la masa
está demasiado húmeda, añada más harina, 8 g cada vez que la
añada, hasta que la masa se vaya secando.
**Para comprobar si la masa ha duplicado su volumen, introduzca dos dedos en el interior de la masa aproximadamente
25 mm y sáquelos inmediatamente. Si la marca de los dedos
permanece en la masa, esto significa que habrá doblado el
volumen. Si la marca de los dedos desaparece, la masa tendrá
que fermentar todavía más.
. Cuando el horno emita
wolfappliance.com | 11
Page 24

RECOMENDACIONES DE MANTENIMIENTO
Recomendaciones de mantenimiento
DESCALCIFICAR
Dependiendo de las condiciones del agua, es posible que
sea necesario descalcicar el horno cada 6-18 meses.
Cuando sea necesario descalcicar el horno, en la pantalla
aparecerá el mensaje ‘La caldera ha subido, descalcifíquela’. El tiempo que pase entre noticación y noticación
depende de la dureza del agua que se especique en la
conguración del usuario. Para ajustar los niveles de dureza
del agua, consulte la página 6.
®
Utilice solamente la solución descalcicante Durgol
Steamer, y siga las instrucciones del fabricante. Puede pedir
®
online a través de subzerowolfstore.com.
Durgol
Configurar el modo Descalcificar:
1 Con el horno apagado, pulse y gire el mando hasta
Descaler, a continuación, pulse
. A continuación aparecerá en la pantalla el mensaje ‘Add 0.5 L descaler—
and press (Añada 0,5 L de descalcicador y pulse)
2 Extraiga el tanque de agua y vierta todo el contenido de
la solución descalcicante Durgol
®
Swiss Steamer en el
tanque y, a continuación, coloque de nuevo el tanque de
agua y pulse
3 Cuando hayan transcurrido 30 minutos aproximada-
.
mente, aparecerá en la pantalla el mensaje ‘Pour away
descaler—Add 1 L water’ (Tire el descalcicador y añada
1 litro de agua). Extraiga el tanque, abra el grifo y tire el
descalcicador por el desagüe.
PRECAUCIÓN
Si no disuelve la solución descalcificante antes de
tirarla, es posible que decolore el fregadero y el tubo
del desagüe.
4 Llene el tanque con agua templada del grifo y colóquelo
de nuevo. A continuación aparecerá el mensaje ‘Descale
appliance—1st rinsing cycle’ (Descalcicar aparato,
primer ciclo de lavado). Cuando hayan transcurrido 45
minutos aproximadamente, aparecerá en la pantalla el
mensaje ‘Pour away water— Descaling completed’ (Tire
el agua. Descalcicación completada).
5 Dependiendo del nivel de arena que haya en el agua,
el horno determinará si es necesario realizar ciclos de
lavado adicionales. Siga las instrucciones que aparecen
en la pantalla.
6 Cuando los ciclos de lavado se hayan completado,
extraiga, vacíe y seque el tanque de agua y, a continuación, limpie todas las supercies de acero inoxidable.
Swiss
'.
EXTRACCIÓN DE LA PUERTA DEL HORNO
La puerta del horno se puede extraer si desea realizar una
limpieza a fondo.
Para extraerla, abra la puerta completamente. Gire los
pasadores de las bisagras hacia adelante hasta la posición
abierta. Cierre la puerta hasta la posición de "descanso" y,
a continuación, tire hacia arriba y hacia fuera. Observe las
siguientes ilustraciones.
Para instalarla de nuevo, inserte las bisagras de la puerta en
las aperturas del marco. Abra la puerta del horno completamente y gire los pasadores de las bisagras hacia adelante
hasta la posición cerrada.
POSICIÓN
ABIERTA
POSICIÓN
CERRADA
Pasador de la bisagra de la
puerta del horno.
Puerta en la posición de
"descanso".
EXTRACCIÓN DE LAS GUÍAS DE REJILLA
Para extraer las guía de la rejilla, desatornille la tuerca
estriada de la parte delantera de la guía de la rejilla. Tire de
la guía de la rejilla hacia el lado de los montantes roscados
y extráigala desde la parte delantera. Consulte la siguiente
ilustración.
WATER
LIGHT
TEMP
MODE
ON
POWER
TIME
OFF
GUÍA DE
REJILLA
TUERCA ESTRIADA
EXTRACCIÓN DE LAS GUÍAS
DE REJILLA.
LIMPIEZA
Acero inoxidable Utilice un limpiador de acero inoxidable no abrasivo y aplíquelo con un paño suave que no deje pelusas.
Para que el acero inoxidable adquiera un brillo natural, frote suavemente la supercie con un paño de
microbra empapado en agua y con una gamuza seca para pulir. Siga siempre la dirección del acero
inoxidable.
Puerta delantera Pulverice el limpiacristales en un paño para su limpieza.
Panel de control Utilice desengrasantes en spray para eliminar las huellas y las manchas de alimentos. Aplique el producto
Interior Para una limpieza general, ponga el modo vapor a 80°C durante 30 minutos. Esto permitirá limpiar la grasa
Rejillas del horno y
guías de la rejilla
Recipientes de acero
inoxidable
Tanque de agua Las marcas de agua y el calcio acumulado se pueden limpiar utilizando un descalcicador común.
de limpieza sobre un paño antes de limpiar el panel. No aplique los limpiadores directamente sobre el
panel de control.
y los restos de la cocción. Apague el horno y limpie el interior con un paño. Utilice un paño húmedo y
zumo de limón para limpiar el agua y los puntos azules empañados. No utilice un limpiador de vapor.
Las guías de las rejillas y las rejillas del horno pueden limpiarse en el lavaplatos.
Los recipientes perforados y sólidos de acero inoxidable pueden limpiarse en el lavavajillas.
No introduzca el tanque de agua en el lavavajillas.
Sensor de temperatura No introduzca el sensor de temperatura en el lavavajillas.
12 | Español
Page 25

LOCALIZACIÓN Y SOLUCIÓN DE PROBLEMAS
Localización y solución de problemas
FUNCIONAMIENTO
El horno no funciona.
• Compruebe si está encendido.
• Compruebe la red eléctrica de la unidad y asegúrese de
que los fusibles no están fundidos.
Problemas con la temperatura del horno.
• Póngase en contacto con el servicio de atención al
cliente de Wolf llamando al 800-222-7820 si desea
obtener recomendaciones especícas.
La iluminación no funciona.
• La bombilla está defectuosa, llame al servicio técnico de
Wolf autorizado.
El horno comienza a hacer ruido durante su
funcionamiento.
• El horno puede emitir sonidos provenientes de la bomba
y del conmutador durante su funcionamiento. Estos
sonidos son normales.
Es difícil extraer las bandejas del horno.
• Ciertas combinaciones de calor, humedad y colocación
de los alimentos pueden hacer que las bandejas del
horno se enrosquen, pero volverán a su posición original
cuando se enfríen.
En la pantalla aparece ‘Do not remove water tank’ (No
extraer el tanque de agua).
• El agua de la caldera no se vaciará hasta que la tempe-
ratura del agua esté por debajo de 80°C.
Servicio
• Mantenga la calidad de su producto poniéndose en
contacto con el servicio de asistencia técnica autorizado
de Wolf.
• Le recomendamos que anote la referencia del modelo
y el número de serie del producto cuando se ponga en
contacto con el servicio de asistencia técnica. Esta información se muestra en la placa de datos del producto.
Consulte la página 5 para observar la ubicación de la
placa de datos.
• Para cuestiones relacionadas con la garantía, también
necesita saber la fecha de instalación y el nombre de su
distribuidor autorizado de Wolf. Esta información está
incluida en la página 2 de esta guía.
Garantía limitada de los productos de Wolf
PRODUCTOS INTERNACIONALES
SOLO PARA USO DOMÉSTICO
GARANTÍA COMPLETA DE DOS AÑOS
Durante dos años después de la fecha de instalación original, la garantía de su producto de Wolf
Appliance cubre todas las piezas y la mano de obra necesarias para reparar o sustituir cualquier
parte del producto que se compruebe que tiene defectos de material o mano de obra, siempre y
cuando se haya realizado un uso doméstico del mismo. El servicio certicado de fábrica de Wolf
llevará a cabo todos los servicios proporcionados por Wolf Appliance en virtud de la garantía
anterior, a menos de que Wolf Appliance, Inc. especique lo contrario. El servicio se proporcionará durante el horario laboral normal.
GARANTÍA LIMITADA DEL TERCER AL QUINTO AÑO
Durante cinco años después de la fecha de instalación original, Wolf Appliance reparará o sustituirá las siguientes piezas que se compruebe que tengan defectos de material o mano de obra:
quemadores de gas (no incluye la apariencia), elementos calorícos, motores del ventilador
(campanas de extracción), tableros de mandos electrónicos, tubos de magnetrón y generadores
de inducción. Las piezas se repararán o sustituirán, sin cargo, y el propietario deberá pagar todos
los demás costes, incluyendo la mano de obra. El servicio certicado de fábrica de Wolf llevará
a cabo todos los servicios proporcionados por Wolf Appliance en virtud de la garantía anterior, a
menos de que Wolf Appliance, Inc. especique lo contrario. El servicio se proporcionará durante
el horario laboral normal.
Aparece en la pantalla el mensaje ‘Boiler scaled up,
please descale!’ (‘La caldera ha subido, descalcifíquela’).
• Para descalcicar el horno, consulte la página 12.
Aparece el mensaje ‘Appliance blocked, descaling
necessary’ (Aparato bloqueado, es necesario realizar la
descalcificación).
• Para descalcicar el horno, consulte la página 12. Si el
mensaje no desaparece después de haber realizado la
descalcicación, póngase en contacto con el servicio de
asistencia técnica de Wolf certicado.
Wolf, Wolf & Design, Wolf Gourmet, W & Design y los mandos distintivos de color rojo son marcas registradas y marcas de servicio de Wolf Appliance, Inc. Sub-Zero, Sub-Zero &
Design, Dual Refrigeration, Constant Care, The Living Kitchen, Great American Kitchens The Fine Art of Kitchen Design, and Ingredients son marcas registradas y marcas de servicio
de Sub-Zero, Inc., (en su conjunto, las «Marcas de la Empresa.») Todas las demás marcas o marcas registran son propiedad de sus respectivos propietarios en los Estados Unidos
y en otros países.
wolfappliance.com | 13
Page 26

FOURS CONVECTION VAPEUR
Table des matières
3 Mesures de sécurité
5 Caractéristiques des fours convection vapeur
5 Fonctionnement des fours convection vapeur
12 Consignes d'entretien
13 Dépistage des pannes
13 Garantie Wolf
Entretien par le client
Les référence et numéro de série sont imprimés sur la Carte
d'enregistrement du produit ci-jointe. Ces deux numéros
gurent sur la plaque des caractéristiques du produit. Pour
repérer l'emplacement de la plaque des caractéristiques,
reportez-vous à la page 5. Pour les besoins de la garantie,
vous devrez aussi fournir la date d'installation et le nom de
votre revendeur agréé Wolf. Consignez ces renseignements
pour pouvoir vous y reporter ultérieurement.
SERVICE APRÈS-VENTE
Référence de modèle
Numéro de série
Date d'installation
Nom du service certié
Numéro du service certié
Revendeur agréé
Numéro du revendeur
Remarque importante
Pour garantir une installation de ce produit aussi sûre et efcace que possible, veuillez faire particulièrement attention
aux mentions mises en évidence tout au long de ce guide,
notamment :
REMARQUE IMPORTANTE met l'accent sur un renseigne-
ment particulièrement important.
MISE EN GARDE signale un danger qui pourrait causer une
blessure mineure ou endommager le produit si vous ne
suivez pas les instructions.
AVERTISSEMENT signale un danger qui pourrait causer
des blessures graves voire fatales si vous ne prenez pas
certaines précautions.
2 | Français
Page 27

MESURES DE SÉCURITÉ
MESURES DE SÉCURITÉ
Ce four a été construit pour répondre à des normes technologiques et à des réglementations de sécurité reconnues et est
conçu pour une utilisation domestique à des ns de préparation d'aliments. Il n'est pas prévu pour être utilisé par des personnes dont les capacités physiques, sensorielles ou mentales
sont diminuées ou n'ayant ni l'expérience ni les connaissances
requises, sauf en cas de surveillance ou en cas d'instruction
concernant l'usage de l'appareil par une personne responsable
de leur sécurité. Une utilisation correcte est essentielle pour
éviter les dommages ou les accidents.
L'installation et la connexion à une alimentation électrique doit
être assurée par un électricien qualié conformément aux instructions d'installation fournies.
Avant sa première utilisation, veuillez remplir le réservoir d'eau
et effectuer les tâches en rapport telles qu'indiquées dans la
section 'Avant utilisation'.
PRÉCAUTIONS IMPORTANTES
Lorsque vous utilisez des appareils électriques, respectez toujours certaines précautions de sécurité de base, y compris les
consignes suivantes:
• Lisez toutes les consignes.
• Ne touchez pas les surfaces chaudes. Utilisez les poignées ou
les boutons.
• N'immergez pas le cordon électrique ou la prise dans l'eau ou
autre liquide an d'éviter les chocs électriques.
• Ne laissez pas pendre le cordon ni toucher des surfaces
chaudes.
• Assurez toujours la supervision des enfants lorsqu'ils utilisent
un appareil ménager ou s'ils sont à proximité de celui-ci.
• Les enfants en bas âge doivent être surveillés pour s'assurer
qu'ils ne jouent pas avec l'appareil ménager.
Veuillez conserver ce guide pour toute référence future. Si vous
vendez l'appareil ou si vous le transmettez à un tiers, assurezvous que ces instructions accompagnent l'appareil, de même
que les instructions pour son installation.
AVERTISSEMENT
Les pièces accessibles peuvent devenir très chaudes pendant l'utilisation. Gardez les jeunes enfants à l'écart de
l'appareil.
wolfappliance.com | 3
Page 28

MESURES DE SÉCURITÉ
PRÉCAUTIONS IMPORTANTES
• Cet appareil peut être utilisé par des enfants de 8 ans et plus et
par des personnes dont les capacités physiques, sensorielles
ou mentales sont diminuées ou n'ayant ni l'expérience ni les
connaissances requises, à condition qu'ils soient étroitement
surveillés et qu'ils aient reçu des consignes concernant l'usage
sécuritaire de l'appareil et qu'ils comprennent les risques.
Ne laissez pas jouer les enfants avec cet appareil. Le nettoyage
et l'entretien ne doivent pas être assurés par les enfants sans
surveillance étroite.
• N'utilisez que la sonde à cœur recommandée pour ce four.
• Débranchez le four lorsqu'il n'est pas utilisé et avant de le net-
toyer. Laissez refroidir avant de retirer ou d'ajouter des pièces.
• N'utilisez pas de détergents durs abrasifs ou de grattoirs en
métal acéré pour nettoyer la vitre de la porte du four car ils
pourraient rayer la surface et entraîner éventuellement l'éclatement du verre.
• Ne faites pas fonctionner un appareil ménager dont le cordon
électrique ou la prise est endommagé, ou après le mauvais
fonctionnement ou l'endommagement de l'appareil. Amenez
l'appareil au service d'entretien le plus proche pour qu'il puisse
y être examiné, réparé ou réglé.
• L'utilisation de pièces accessoires n'est pas recommandé par
le fabricant de l'appareil et peut entraîner des blessures.
• N'utilisez pas à l'extérieur.
• Ne placez pas sur ou à proximité d'un brûleur électrique ou à
gaz chaud ni dans un four chaud.
• Faites très attention en déplaçant un appareil ménager conte-
nant de l'huile chaude ou d'autre liquides chauds.
• Branchez toujours la prise sur l'appareil en premier avant de
brancher le cordon à une prise électrique. Pour déconnecter,
placez toutes les commandes sur «off» avant de débrancher
la prise électrique.
• N'utilisez pas l'appareil pour toute autre fonction que celle pour
laquelle il est prévu.
• Conservez ces consignes.
4 | Français
Page 29

CARACTÉRISTIQUES DU FOUR CONVECTION VAPEUR
FONCTIONNEMENT DU FOUR
Caractéristiques du four convection vapeur
CARACTÉRISTIQUE
1
Plaque des caractéristiques du produit
2
Afcheur et panneau de commande
3
Bouton de commande
4
Grilles du four réglables
5
Ventilateur de convection
6
Prise de la sonde à cœur
7
Éclairage halogène
8
Porte d'accès au réservoir d'eau
2
7
5
1
Four convection vapeur (modèle ICBCSO30TM figuré).
Pour vous lancer
Bien entendu, vous êtes impatient(e) de commencer à
cuisiner ; mais veuillez d'abord prendre le temps de lire le
présent Guide d'utilisation et d'entretien. Que vous soyez
un cuisinier débutant ou un chef chevronné, vous avez tout
intérêt à vous familiariser avec les mesures de sécurité, les
caractéristiques, le fonctionnement et les recommandations
d'entretien qui s'appliquent à votre four convection vapeur.
Pour obtenir les meilleurs résultats, examinez les différents
modes de cuisson et les caractéristiques spéciales décrits à
la page 8.
8
3
6
4
Panneau de commande
Le panneau de commande et son afchage sont simples
et faciles d'utilisation. Le bouton de commande (
boutons servent à régler les modes de cuisson et à accéder
à toutes les caractéristiques de votre four convection vapeur
pour obtenir des résultats exceptionnels.
Le bouton de commande seul et combiné aux autres boutons permet d'effectuer les sélections. Toutes les sélections
sont conrmées en appuyant sur
INDICATEURS D'AFFICHAGE DU PANNEAU DE COMMANDE
La température du four est réglée.
La sonde à cœur est en service.
Le mode vapeur est activé.
Le mode réchauffage est activé.
Le mode cuisson vapeur automatique est activé.
Le mode convection est activé.
Le mode convection humide est activé.
Le mode convection vapeur est activé.
La minuterie est en marche.
Le temps de cuisson est activé.
L'heure d'arrêt est activée.
L'horloge est réglée.
.
) et les
BOUTON DE COMMANDE ET BOUTONS
Eau
Éclairage
Température
Mode
OK
Minuterie
Horloge
Off (désactivé)
Panneau de commande.
8:30190°C
wolfappliance.com | 5
Page 30

FONCTIONNEMENT DU FOUR
Options utilisateur
Les options utilisateur permettent à l'utilisateur de choisir
ses préférences pour la langue, la sécurité enfant, l'afchage de l'horloge, le signal acoustique, l'éclairage, la
dureté de l'eau, l'unité de température, le contraste, le
format de l'horloge, les réglages en usine et le contrôle de
la porte d'accès à l'eau.
Le panneau de commandes peut être verrouillé par l'utilisateur. Pour utiliser le four en désactivant temporairement
le verrou, maintenez appuyé
verrou sera automatiquement réactivé 10 minutes après
que le four ait été éteint.
Réglage des options utilisateur:
1 Lorsque le four est éteint, appuyez sur puis tournez
le bouton sur USER SETTINGS (OPTIONS UTILISATEUR), puis appuyez sur
2 Tournez le bouton de commande pour faire déler les
options, puis appuyez sur
3 Suivez les consignes afchées puis appuyez sur .
, puis appuyer sur . Le
.
.
Fonctionnement du four
CHOIX DU MODE DE CUISSON
1 Appuyez sur à plusieurs reprises jusqu'à ce que
le mode de cuisson souhaité soit afché, puis appuyez
.
sur
CHOIX DE LA TEMPÉRATURE
1 Appuyez sur .
2 Tournez le bouton de commande pour obtenir la tempé-
rature souhaitée, puis appuyez sur
Pour régler la température pendant la cuisson, appuyez sur
et tournez le bouton à la température souhaitée, puis
appuyez sur
RÉSERVOIR D'EAU
.
Le réservoir d'eau contient sufsamment d'eau pour
assurer 1 heure et demi de vapeur en continu, ce qui suft
généralement pour 4 à 5 séances de cuisson. Utilisez de
l'eau fraiche du robinet. N'utilisez pas de l'eau déminéralisée, ltrée ou distillée.
Appuyez toujours sur
pour ouvrir la porte d'accès au
réservoir d'eau. Toute tentative manuelle d'accès au réservoir d'eau endommagera l'appareil.
Lorsque le four est éteint, l'eau est pompée dans le réservoir une fois la température de l'eau inférieure à 80°C. Si
le réservoir doit être rempli pendant la cuisson, limitez la
quantité d'eau à moins de deux tasses pour éviter tout
débordement lorsque l'eau est pompée dans le réservoir.
Pour remplir le réservoir d'eau:
1 Appuyez sur .
2 Retirez le réservoir et remplissez-le d'eau.
3 Réinstallez le réservoir et fermez la porte manuellement.
.
AVANT UTILISATION
Utilisez la bande de test pour établir la dureté de l'eau. Par
défaut le four est réglé pour une eau dure. Reportez-vous
aux options utilisateur en page 6 pour régler la dureté.
Nettoyez le four de la manière suivante pour que tous les
résidus d'huile provenant du processus de fabrication
soient éliminés.
1 Nettoyez minutieusement le four avec de l'eau chaude
et un détergent doux. Ensuite, rincez-le et séchez-le à
l'aide d'un torchon doux
2 Activez la ventilation. Il est possible que vous remar-
quiez de la fumée et une odeur. Ceci est tout à fait
normal.
3 Remplissez le réservoir et installez-le.
4 Choisissez le mode Cuisson vapeur automatique et une
température de 210°C. Chauffez le four (à vide) pendant
30 minutes.
APRÈS CHAQUE UTILISATION
1 Appuyez sur . Pour les modes qui utilisent la vapeur,
ne retirez pas le réservoir d'eau tant que le message
«WATER IS BEING PUMPED OFF» (EAU EN COURS
DE POMPAGE) est afché.
2 Ouvrez la porte en position «repos» et laissez refroidir.
Lorsque refroidi, séchez l'intérieur avant de fermer la
porte. Reportez-vous à l'illustration ci-après.
HORLOGE
Il est important que l'horloge soit réglée à l'heure correcte si
vous désirez utiliser la fonction Durée de cuisson. L'horloge
doit être réglée de nouveau après une coupure de courant.
Réglage de l'horloge:
1 À four éteint, appuyez sur .
2 Tournez le bouton de commande pour régler l'heure,
puis appuyez sur
3 Tournez le bouton de commande pour régler les minutes,
puis appuyez sur
MINUTERIE
.
.
La minuterie peut être programmée pour une durée maximale de 9 heures 59 minutes. Une fois que vous avez réglé
la minuterie, le compte à rebours est afché. La minuterie
est indépendante du four. Le réglage de la minuterie n'a
aucun effet sur la durée de cuisson et l'heure dénie pour
l'arrêt de la cuisson.
Réglage de la minuterie :
1 Appuyez sur .
2 Tournez le bouton de commande pour régler la durée,
puis appuyez sur
.
Pour réinitialiser la minuterie, appuyez sur et tournez
le bouton à la durée souhaitée puis appuyez sur
annuler, appuyez sur
.
sur
à deux reprises, puis appuyez
. Pour
6 | Français
Position «repos» de la porte
du four.
Page 31

FONCTIONNEMENT DU FOUR
Fonctionnement du four
TEMPS DE CUISSON
La fonction temps de cuisson éteint automatiquement le
four à l'heure programmée. Le four commence à chauffer
immédiatement puis s'éteint à l'heure d'arrêt souhaitée.
Si la sonde à cœur est utilisée, la sonde aura priorité sur
l'heure d'arrêt de cuisson et elle éteindra le four lorsque la
température réglée avec la sonde est atteinte. Si la température réglée avec la sonde à cœur n'est pas atteinte avant
l'heure d'arrêt, le temps de cuisson ne sera pas prolongé.
Réglage des commandes :
1 Sélectionnez le mode de cuisson et la température
souhaitée.
2 Appuyez sur
3 Tournez le bouton de commande pour sélectionner le
temps de cuisson souhaité, puis appuyez sur
Pour régler le temps de cuisson, appuyez sur et tournez
le bouton à la durée souhaitée puis appuyer sur
.
.
.
MISE EN MARCHE DIFFÉRÉE
La fonction de mise en marche différée allume et éteint
automatiquement le four aux heures programmées. Le four
reste en veille jusqu'à l'heure de lancement de la cuisson
voulue, puis s'éteint à l'heure d'arrêt voulue. L'horloge doit
être réglée à l'heure correcte pour que la mise en marche
différée fonctionne correctement.
Si la sonde à cœur est utilisée, la sonde aura priorité sur
l'heure d'arrêt de cuisson et elle éteindra le four lorsque la
température réglée avec la sonde est atteinte. Si la température réglée avec la sonde à cœur n'est pas atteinte avant
l'heure d'arrêt, le temps de cuisson ne sera pas prolongé.
Réglage des commandes :
1 Sélectionnez le mode de cuisson et la température
souhaitée.
2 Appuyez sur et tournez le bouton de commande
pour sélectionner le temps de cuisson souhaité (ne pas
appuyer sur
3 Appuyez sur et tournez le bouton de commande
).
pour sélectionner le l'heure d'arrêt souhaitée puis
appuyez sur
.
Pour régler l'heure d'arrêt, appuyez sur à deux reprises
et tournez le bouton à l'heure souhaitée puis appuyez
.
sur
SONDE À CŒUR
La sonde à cœur mesure la température interne des aliments pendant la cuisson. Elle peut être utilisée pour tous
les modes de cuisson, sauf Gourmet. Lorsque la sonde à
cœur est en service, appuyez sur
pour alterner entre
l'afchage de la température réelle de la sonde et la température réglée pour la sonde.
Réglage des commandes :
1 Sélectionnez le mode de cuisson et la température
souhaitée.
2 Placez la sonde dans la partie la plus épaisse de l'ali-
ment en cours de cuisson, puis insérez la sonde dans la
prise. Reportez-vous à l'illustration ci-après.
3 Appuyez sur à deux reprises et tournez le bouton de
commande pour sélectionner la cuisson souhaitée, puis
appuyez sur
.
La température de la sonde s'afchera lorsqu'elle est
supérieure à 30°C. Pour régler la température de la sonde,
appuyez sur
haitée, puis appuyez sur
et tournez le bouton à la température sou-
.
MISE EN GARDE
La sonde et la prise de la sonde seront très chaudes.
À manipuler avec précaution.
POSITIONS DES GRILLES DU FOUR
Les grilles du four peuvent être placées dans l'une des
quatre positions indiquées sur la face avant droite du four
convection vapeur. Positionnez les grilles du four de sorte
que la barre horizontale se trouve au fond du four. N'utilisez
pas le bac en acier inoxydable à l'envers. Reportez-vous à
l'illustration ci-après. Les recettes dans le mode Recettes
indiquent la position de la grille pour obtenir les meilleurs
résultats.
Position de la grille.
Prise de la sonde.
wolfappliance.com | 7
Page 32

FONCTIONNEMENT DU FOUR
Modes de cuisson
MODE
Vapeur 30 – 100°C
Réchauffage
Cuisson vapeur
automatique
Convection
Convection humide
Convection vapeur
Gourmet — — Utilisez ce mode pour préparer des aliments spéciques (voir en page 8);
Rôti à cuisson lente 30 – 150°C
Recettes 30 – 230°C
Mes recettes 30 – 230°C
Conserver au chaud 80°C
Purifier 30 – 230°C Le mode Purier utilise la vapeur pour nettoyer les biberons et les bocaux
VOYANT
PLAGE DE
TEMPÉRATURES
100 – 150°C
100 – 230°C
30 – 230°C
30 – 230°C
30 – 230°C
SONDE USAGES
Utilisez le mode Vapeur pour les aliments que vous réchaufferiez dans
•
une casserole et pour tous les aliments qui demandent une manipulation
délicate tels que poissons et fruits de mer, légumes et riz.
Le mode de réchauffage utilise la vapeur et l'air chaud pour réhydrater les
•
aliments en douceur. Utilisez ce mode pour réchauffer les aliments que
vous auriez réchauffé au four, sur la cuisinière ou au four à micro-ondes.
En chauffant d'abord à la vapeur puis en utilisant la chaleur de convection
•
pour terminer la cuisson, les produits de boulangerie et les pâtisseries
présentent un cœur tendre et un extérieur luisant, sans avoir besoin d'une
dorure à l'œuf. Utilisez ce mode pour les pains, brioches, gâteaux et pâtisseries, qu'ils soient frais, précuits ou surgelés. Ne pas préchauffer.
Le ventilateur de convection distribue la chaleur uniformément pour des
•
résultats et un doré homogènes. Les températures de cuisson peuvent
être inférieures de 25° et les temps de cuisson peuvent être 25% plus
rapides que les fours traditionnels, ce qui permet une économie de temps
et d'énergie. Utilisez le mode convection pour une variété d'aliments, y
compris les mufns, les biscuits et les rôtis.
En mode convection humide, la ventilation du four est hermétique de sorte
•
que l'humidité produite pendant la cuisson reste dans le four. Utilisez ce
mode pour les gâteaux, les plats cuisinés, les plats à base de céréales, les
lasagnes et les viandes.
La vapeur transfert l'énergie aux aliments plus efcacement que l'air
•
chaud, ce qui accélère le temps de cuisson. Les aliments retiennent leur
propre vapeur d'eau. Utilisez le mode convection vapeur pour cuire les
aliments qui sont tendres à l'intérieur et rôtis ou croustillants à l'extérieur.
Appuyez sur pour activer ou désactiver la vapeur.
frais, réfrigérés ou congelés. Sélectionnez l'aliment et la cuisson souhaités
et le capteur règle la durée, la température et l'humidité de sorte que les
consignes de cuisson ne sont pas nécessaires. Les températures et les
intervalles préréglés dépendent des aliments et de la cuisson souhaitée.
Utilisez ce mode pour que les viandes restent tendres grâce à une rôtis-
•
serie à cuisson lente. Insérez la sonde à cœur dans la viande préparée,
sélectionnez le mode Rôti à cuisson lente et la durée de la cuisson et
retrouvez un repas cuit à perfection.
Utilisez ce mode pour préparer des repas complets de l'entrée au plat
•
principal et au dessert (reportez-vous à la page 9). Sélectionnez les aliments, le nombre de portions et le degré de doré. Le capteur s'occupe du
reste. Le mode Recettes est idéal pour des repas rapides ou pour préparer
des aliments variés pour une soirée.
Utilisez le mode Mes recettes pour conserver les instructions pour dix de
•
vos recettes préférées et remplacez et modiez-les quand vous voulez.
Le mode Conserver au chaud combine la chaleur de convection et de
•
vapeur pour garder les aliments au chaud jusqu'à l'heure du repas.
de conserve. Il s'agit d'une méthode plus rapide et plus sûre que les
méthodes conventionnelles.
GOURMET
Utilisez le mode Gourmet pour préparer les aliments énumérés ci-dessous; qu'ils soient frais, réfrigérés ou congelés.
Sélectionnez l'aliment et la cuisson souhaités et le capteur
règle la durée, la température et l'humidité de sorte que les
consignes de cuisson ne sont pas nécessaires.
ALIMENT CODE
Entrées fraîches A1
Entrées surgelées A2
Plat cuisiné A3
Soufé A4
Pommes de terre en robe de chambre A5
Produits à base de pommes de terre surgelées A6
Viande à braiser A7
Pizza fraîche A8
Pizza surgelée A9
Flan A10
Pain A11
Pâtisseries à la levure avec garniture A12
Gâteau A13
Tourte A14
Option Gourmet:
1 Appuyez sur à deux reprises et tournez le bouton
de commande pour sélectionner l'aliment souhaité, puis
appuyez sur
2 Suivez les consignes afchées puis appuyez sur .
.
RÔTI CUISSON LENTE
Option Rôti cuisson lente :
1 Appuyez sur et tournez le bouton de commande
pour sélectionner rôti cuisson lente, puis appuyez sur
.
2 Tournez le bouton de commande pour sélectionner l'ali-
ment souhaité et la cuisson souhaitée, puis appuyez sur
.
3 La température prédéterminée de la sonde s'afchera.
Pour régler la température de la sonde, appuyez sur
et tournez le bouton à la température souhaitée, puis
appuyez sur
.
La durée de cuisson lente du rôti peut être réglée entre 2,5
et 4,5 heures. Pour régler le temps de cuisson, appuyez sur
et tournez le bouton à la durée souhaitée puis appuyez
.
sur
8 | Français
Page 33

FONCTIONNEMENT DU FOUR
Modes de cuisson
MODE RECETTES
Utilisez le mode Recettes pour préparer des repas complets
de l'entrée au plat principal et au dessert. Reportez-vous au
tableau ci-dessous et aux recettes aux pages 9 à 11.
ALIMENT CODE
Entrées R1
Poisson en croûte R2
Rouleaux de poisson R3
Bœuf Strogonoff R4
Bœuf braisé R5
Filet de porc en croûte R6
Gratin de pâtes R7
Gratin d'aubergine R8
Flan R9
Poires au vin rouge R10
Petits pains R11
Mufns R12
Gâteau R13
Focaccia R14
Option Recettes:
1 Appuyez sur et tournez le bouton de commande
pour sélectionner Recettes, puis appuyez sur
2 Tournez le bouton de commande pour sélectionner la
recette souhaitée, puis appuyez sur
3 Suivez les consignes afchées puis appuyez sur .
.
.
MODE MES RECETTES
Utilisez le mode Mes recettes pour conserver dix de vos
recettes préférées. Si la recette utilise la sonde à cœur,
insérez la sonde dans la prise de sonde avant de choisir les
options.
Option Mes recettes:
1 Appuyez sur et tournez le bouton de commande
pour sélectionner Mes recettes, puis appuyez sur
2 Tournez le bouton de commande pour sélectionner le
numéro de recette souhaité, puis appuyez sur
3 Sélectionnez le mode, la température, la durée et la tem-
.
.
pérature de la sonde (le cas échéant), puis appuyez sur
.
4 Appuyez sur pour enregistrer la recette.
Pour supprimer une recette enregistrée, appuyez sur
et tournez le bouton de commande à Mes recettes, puis
appuyez sur
sélectionner la recette souhaitée, puis appuyez sur
. Tournez le bouton de commande pour
.
Tournez le bouton de commande jusqu'à ce que Supprimer
soit afché, puis appuyez sur
.
MODE CONSERVER AU CHAUD
Option Conserver au chaud:
1 Appuyez sur et tournez le bouton de commande à
Conserver au chaud, puis appuyez sur
.
MODE PURIFIER
Option Purifier :
1 Appuyez sur et tournez le bouton de commande
pour sélectionner Purier, puis appuyez sur
2 Tournez le bouton de commande pour sélectionner
l'option souhaitée, puis appuyez sur
.
.
Recettes
R1 ENTRÉES
Temps de cuisson—20 minutes
500g de pâte feuilletée
30 ml d'huile d'olive
60 g d'origan frais, haché
45 g de thym frais, haché
115 g de Parmesan, râpé
Dépliez une feuille de pâte feuilletée sur la planche à découper.
Enduisez d'huile d'olive. Saupoudrez d'origan, de thym et de
fromage. Dépliez une seconde feuille de pâte feuilletée et posezla soigneusement sur la première.
Appuyez légèrement. À l'aide d'une roue à découper, coupez la
pâte en bandes de 13 mm de largeur. Faites de chaque bande
une torsade serrée en maintenant la garniture à l'intérieur.
Recouvrez un plat de papier parchemin et posez les bandes sur
celui-ci, à environ 25 mm les unes des autres. Laissez reposer
la pâte pendant 15 minutes avant de placer dans le four. Glissez
le plat sur la grille en position 1. Fermez la porte du four. Réglez
le four à recettes R1. Appuyez sur
retentit, retirez le plat du four. Découpez chaque bande en trois.
Servez immédiatement.
42 parts.
Si vous avez plus d'un plat, utilisez 2 grilles en position 1 et 3. Le
temps de cuisson reste identique.
. Lorsque la sonnette
R2 POISSON EN CROÛTE
Temps de cuisson—25 minutes
1 petite courgette
1 poivron rouge
1
/2 – 250 g de pâte feuilletée
60 g de persil, haché
Gros sel et poivre frais moulu
4 lets de 60 g de poisson coupés en portions de 76 x 51 mm
Découpez le poivron en quatre. Retirez les graines et découpez
chaque morceau en quatre lamelles de 6 mm. Mettez de côté.
Coupez les extrémités de la courgette et découpez en tranches
de 6 mm. Mettez de côté.
Recouvrez un plat de papier parchemin. Dépliez et posez la pâte
feuilletée sur la planche à découper. Coupez la pâte en quatre
carrés égaux. Placez une tranche de courgette et quatre lamelles
de poivron rouge sur chaque carré, en les plaçant en diagonale.
Saupoudrez de persil. Assaisonnez de sel et de poivre. Placez
un let sur chaque empilement de légumes et assaisonnez de
nouveau de sel et de poivre. Refermez la pâte sur le poisson
en appuyant légèrement. Placez soigneusement les paquets de
pâte feuilletée sur le papier parchemin. Glissez le plat sur la grille
en position 1. Fermez la porte du four. Réglez le four à recettes
R2. Appuyez sur
du four. Servez immédiatement.
4 parts.
. Lorsque la sonnette retentit, retirez le plat
ROULEAUX DE POISSON
Temps de cuisson—10 minutes
8 lets de poisson tel que sole, limande ou turbot
gros sel et poivre frais moulu
30 g de pignons, rôtis
95 g de roquette
Placez le poisson sur la planche à découper. Assaisonnez les
deux côtés de sel et de poivre. Parsemez environ 7 g de pignons
et 9 g de roquette sur chaque let. Roulez les lets en partant
de l'extrémité la plus ne. Maintenez le rouleau obtenu avec un
cure-dent. Huilez un récipient perforé et placez les paquets de
poisson sur celui-ci. Glissez le plat sur la grille en position 2.
Fermez la porte du four. Réglez le four à recettes R3. Appuyez
sur
. Lorsque la sonnette retentit, sortez le poisson du four et
servez immédiatement.
4 à 6 parts.
wolfappliance.com | 9
Page 34

FONCTIONNEMENT DU FOUR
Recettes
R4 BŒUF STROGONOFF
Temps de cuisson—47 minutes
800 g de palette de bœuf découpée en 6 lamelles de 13 mm
10 g de gros sel
5 g de poivre frais moulu
15 g de granules de bouillon de bœuf
1 poivron jaune découpé en lamelles de 6 mm
1 poivron rouge découpé en lamelles de 6 mm
225 g de champignons découpés en tranches de 6 mm
2 petits oignons jaunes, nement coupés
2 paquets de 30 g de préparation sèche pour sauce
15 g de fécule de maïs
10 g de paprika
350 ml de crème épaisse
60 ml de purée de tomate
Pâtes aux œufs cuites, en option
Assaisonnez la viande de sel et de poivre. Placez le bœuf dans
un plat de cuisson 23,5 x 33,5 cm. Incorporez-y le bouillon, les
poivrons, les champignons et les oignons.
Placez la grille en position 2. Placez le plat sur la grille. Fermez
la porte du four. Réglez le four à Recette R4 pour six personnes.
Appuyez sur
four et versez soigneusement le liquide dans un verre doseur de
500 ml et mettez de côté. Remettez le plat au four et appuyez
sur pour continuer la cuisson.
Pour la sauce: Dans une casserole, fouettez la préparation pour
sauce, la fécule de maïs et le paprika. Ajoutez la crème et la
purée de tomate. Ajoutez 410 ml du jus mis de côté au fouet, en
ajoutant de l'eau si nécessaire pour obtenir 410 ml. Placez sur la
cuisinière Wolf à feu moyen. Faites bouillir pour épaissir tout en
remuant constamment.
Lorsque la sonnette du four retentit, sortez le plat du four et
incorporez la sauce. Servez seul ou sur des pâtes aux œufs.
5 à 6 parts.
. Lorsque la sonnette retentit, sortez le plat du
R5 BŒUF BRAISÉ
temps de cuisson—2 heures
1,1 kg de palette de bœuf en 3 morceaux
2 carottes épluchées et coupées en quatre
1
/2 petit céleri rave épluché et coupé en quatre
2 petits oignons jaunes coupés en quatre
1 feuille de laurier
2 clous de giroe
8 grains de poivre
940 ml de bouillon de légumes
Placez le bœuf, les légumes et les épices dans un plat de
4litres. Versez le bouillon de légumes sur le tout.
Placez la grille en position 2. Placez le plat sur la grille. Fermez
la porte du four. Réglez le four à recettes R5. Appuyez sur
. Lorsque la sonnette retentit, sortez le plat du four et servez
chaud.
5 à 6 parts.
R6 FILET DE PORC EN CROÛTE
Temps de cuisson—30 minutes
250 g de pâte feuilletée
30 ml de moutarde
460 g de let de porc
Gros sel et poivre frais moulu
Dépliez la pâte feuilletée sur la planche à découper et coupez
en deux. Étalez 15 ml de moutarde sur chaque feuille de pâte
feuilletée. Coupez le porc en deux dans le sens de la longueur.
Assaisonnez de sel et de poivre. Placez un morceau de porc au
milieu de chaque feuille de pâte en laissant 25 mm à chaque
extrémité. Repliez les extrémités de la pâte sur le porc et
refermez les côtés autour de la viande en positionnant la ligne
de jonction de la pâte sous la viande. Recouvrez un plat de
papier parchemin. Placez soigneusement les paquets de pâte
feuilletée sur le papier parchemin. Glissez le plat sur la grille en
position 2. Fermez la porte du four. Réglez le four à recettes
R6. Appuyez sur
du four. Retirez les paquets du plat avec une spatule. Servez
immédiatement.
4 à 6 parts.
. Lorsque la sonnette retentit, retirez le plat
R7 GRATIN DE PÂTES
Temps de cuisson —30 minutes
690 g de pâtes crues (coquilles ou macaroni)
2 petits oignons jaune découpés en rondelles de 13 mm d'épaisseur
230 g de champignons, en tranches
85 g de tranches de jambon sec de 13 mm d'épaisseur
230 g de persil à feuilles plates
140 g de Parmesan râpé et partagé
470 ml de bouillon de légumes
235 ml de crème épaisse
Gros sel et poivre frais moulu
Pincée de noix de muscade
Combinez les pâtes, les oignons, les champignons, le jambon,
le persil et la moitié du fromage dans un plat de 4 litres huilé.
Mélangez le bouillon, la crème, le sel, le poivre et la noix de
muscade. Versez sur les pâtes. Saupoudrez le reste du fromage
sur le mélange. Placez la grille en position 1. Placez le plat de
cuisson non couvert sur la grille. Fermez la porte du four. Réglez
le four à recettes R7. Appuyez sur
retentit, retirez le plat du four. Couvrez. Laissez reposer le plat
pendant 15 minutes.
Servez chaud.
6 parts.
. Lorsque la sonnette
R8 GRATIN D'AUBERGINE
Temps de cuisson—environ 30 minutes
1 boîte de tomates de 395g
1 gousse d'ail
15 g origan frais, haché (ou 5 g sec)
15 g thym frais, haché (ou 5 g sec)
15 ml huile d'olive
Gros sel et poivre frais moulu
2 aubergines moyennes
230 g de fromage italien râpé
Placez les tomates dans un bol de 3 litres. Écrasez à la fourchette ou au pilon. Incorporez l'ail, les herbes et l'huile d'olive.
Assaisonnez de sel et de poivre. Étalez 115 ml de sauce tomate
dans le fond d'un plat huilé de 2,5 litres. Coupez le haut de
chaque aubergine et découpez en tranches de 13 mm. Répartissez les tranches sur les tomates dans le plat. Étalez le reste
du mélange de tomate sur les tranches d'aubergine. Saupoudrez de fromage. Placez la grille en position 2. Placez le plat sur
la grille. Fermez la porte du four. Réglez le four à recettes R8.
Appuyez sur
four et servez immédiatement.
4 à 6 parts.
. Lorsque la sonnette retentit, sortez le plat du
R9 FLAN
Temps de cuisson—environ 25 minutes
115 g de sucre, partagé
115 ml de jus d'orange
500 ml de crème épaisse ou de demi-crème
1 gousse de vanille, coupée en deux dans le sens de la longueur
3 œufs, battus
Pour la sauce: Placez 60 g de sucre dans une casserole de 1,5
litre sur la cuisinière Wolf à feu moyen. Faites chauffer pendant
3 minutes ou jusqu'à ce que le sucre devienne roux. Versez
progressivement le jus d'orange dans la casserole et laissez
réduire de moitié. Retirez et versez en parts égales dans quatre
ramequins de 177 ml. Mettez de côté.
Placez la crème, le reste du sucre et la gousse de vanille dans
une casserole de 2 litres à feu moyen. Faites frémir en remuant
constamment. Fouettez les œufs dans un bol de 2 litres. Versez
lentement la crème dans les œufs, un petit peu à la fois, en
fouettant après chaque ajout. Faites passer le mélange dans
une passoire ne et répartissez dans les ramequins sur la sauce
à l'orange. Placez les ramequins sur un plat perforé. Glissez
soigneusement sur la grille en position 1. Fermez la porte du
four. Réglez le four à recettes R9. Appuyez sur
sonnette retentit, retirez le plat du four. Laissez complètement
refroidir. Mettez au frais pendant au moins deux heures. Pour
servir, passez la lame d'un couteau le long des bords de chaque
ramequin. Retournez les ans sur une assiette et versez la sauce
qui reste dans le ramequin par-dessus.
4 parts.
. Lorsque la
R10 POIRES AU VIN ROUGE
Temps de cuisson—environ 15 minutes
235 ml de vin rouge
60 g de sucre
Graines d'une gousse de vanille
5 ou 6 poires, coupées en deux, épépinées
Dans un plat de cuisson de 23,5 x 33,5 cm, combinez le vin
rouge, le sucre et les graines de vanille. Placez les poires côté
coupé vers le bas dans le mélange de vin. Placez la grille en
position 2. Placez le plat dans le four froid sur la grille. Fermez
la porte du four. Réglez le four à recettes R10. Appuyez sur
. Lorsque la sonnette retentit, retirez le plat du four. Laissez
refroidir légèrement avant de servir chaud.
10 à 12 parts.
10 | Français
Page 35

FONCTIONNEMENT DU FOUR
Recettes
R11 PETITS PAINS
Temps de cuisson—environ 33 minutes
740 g de farine
30 g de sucre
1 sachet de 7 g de levure sèche
5 g de sel
230 ml de lait très chaud, 50–55°C
60 g de beurre fondu
30 m de lait
5 g de sucre
15 g de beurre fondu
Dans un bol de mixeur avec crochet pétrisseur placez la farine,
le sucre, la levure sèche et le sel. Mélangez les ingrédients à
faible vitesse pendant deux minutes. Versez le lait chaud et 60 g
de beurre fondu. Continuez de mélanger pendant cinq minutes
ou jusqu'à ce que la pâte commence à se former et à se séparer
des bords du bol. Retirez le crochet pétrisseur et recouvrez
d'un chiffon humide. Laissez lever à température ambiante
pendant 1heure et demie ou jusqu'à ce que la pâte ait doublé
de volume*.
Sur une surface légèrement farinée, divisez la pâte en 12 portions égales. Formez des boules et placez-les dans un plat en
verre de 30 x 12 cm. Recouvrez d'un chiffon humide et faites
lever pendant environ une heure ou jusqu'à ce le volume ait
doublé.
Placez la grille en position 2. Placez le plat sur la grille. Fermez la
porte du four. Réglez le four à recettes R11. Appuyez sur
Mélangez le reste du lait, sucre et beurre. Lorsque la sonnette
retentit, appliquez le mélange au pinceau sur les petits pains.
Appuyez de nouveau sur . Lorsque la sonnette du four
retentit de nouveau, retirez les petits pains et refroidissez légèrement avant de servir. Servez chaud.
12 petits pains.
*La pâte peut être placée dans un récipient couvert au réfrigérateur jusqu'au lendemain. Laissez la pâte se réchauffer à température ambiante avant de former en boules.
Pour vérifier si la pâte a doublé de volume, placez deux doigts
dans la pâte à environ 25 mm de profondeur et retirez-les
rapidement. Si les marques de doigt restent visibles, la pâte a
doublé de volume. Si les marques de doigt disparaissent, laissez
lever la pâte davantage.
R12 MUFFINS
Temps de cuisson—environ 35 minutes
Pour les muffins:
460 g de farine
150 g de sucre
10 g de levure chimique
2 g de bicarbonate de soude
2 g de sel
1 g de cannelle
2 œufs
230 ml de babeurre
115 g de beurre fondu
15 g zest de citron
5 ml de vanille
60 ml de yaourt nature
230 g de myrtilles
Pour le streusel:
115 g de farine
60 g de beurre ramolli
60 g de sucre
60 g de noix hachées
15 g de zeste de citron
Dans un grand bol de mixeur avec le batteur plat à faible vitesse,
mélangez la farine, le sucre, la levure chimique, le bicarbonate,
le sel et la cannelle. Dans un deuxième bol, fouettez les œufs, le
babeurre, le beurre refroidi, le zest, la vanille et le yaourt. Ajoutez
.
le mélange des œufs au bol du mixeur et mélangez pendant 20
secondes ou jusqu'à ce qu'incorporé. Retirez le bol du mixeur et
mélangez les myrtilles dans la pâte. Préparez un moule à mufns
Partagez la pâte en portions égales.
Pour faire le streusel: Placez la farine, le beurre, le sucre, les
noix et le zest de citron dans un petit bol de mixeur. Mélangez
avec les mains ou au mélangeur à pâtisserie jusqu'à obtenir des
miettes. Répartissez ce mélange à la cuillère sur les mufns.
Placez le moule à mufns sur un plat perforé. Glissez le plat sur
la grille en position 1 dans le four froid. Fermez la porte du four.
Réglez le four à recettes R12. Appuyez sur
nette retentit, retirez le plat du four. Laissez refroidir pendant 5
minutes avant de sortir les mufns de leur moule. Servez chaud
ou froid et conservez dans un récipient hermétique.
10 à 12 parts.
. Lorsque la son-
R13 GÂTEAU
Temps de cuisson—environ 1 heure
6 œufs, séparés
230 g de sucre
60 ml d'eau
5 ml d'extrait de citron
5 g de zest de citron
230 g de farine de gâteau
2 g de crème de tartre
2 g de sel
Glaçage ou fruits frais en option
Placez les jaunes d'œufs et le sucre dans un grand bol de
mixeur avec un batteur plat à faible vitesse. Battez à vitesse
moyenne pendant 2 minutes ou jusqu'à épaississement du
mélange. Ajouter l'eau, l'extrait de citron et le zest de citron.
Battez pour incorporer pendant une minute. Ajoutez la farine et
battez à faible vitesse pour incorporer. Mettez de côté.
Dans un deuxième bol de mixeur propre avec fouet, versez les
blancs d'œufs. Fouettez à grande vitesse pendant environ 30
secondes jusqu'à ce qu'ils soient mousseux mais pas fermes.
Ajoutez la crème de tartre et le sel. Continuez de fouetter les
blancs pour obtenir des blancs fermes mais pas secs.
Repliez doucement les blancs d'œufs dans le mélange de
jaunes d'œufs. Versez dans un moule à cheminée 24 cm.
Placez la grille en position 1. Fermez la porte du four. Réglez
le four à recettes R13. Appuyez sur
retentit pour indiquer que le préchauffage est terminé, placez le
moule au milieu de la grille. Appuyez sur . Lorsque la sonnette retentit pour indiquer la n de la cuisson, retirez du four.
Laissez refroidir pendant 10 minutes avant de retirer du moule.
Utilisez une spatule en métal pour décoller le gâteau des bords
du moule. Sortez le gâteau et décollez doucement du fond du
moule. Glacez ou servez avec des fruits frais.
10 à 12 parts.
. Lorsque la sonnette
R14 FOCACCIA
Temps de cuisson—environ 40 minutes
970 g farine à pain
1 sachet de 7 g de levure sèche
10 g d'assaisonnement à l'italienne
5 g de sucre
5 g de sel
310 ml d'eau chaude, 40–45°C
15 ml d'huile d'olive
Huile d'olive en plus
Gros sel de mer
Dans un bol de mixeur avec crochet pétrisseur, placez la farine,
l'assaisonnement, le sucre, la levure sèche et le sel. Mélangez
les ingrédients à faible vitesse pendant deux minutes. Versez
l'eau et l'huile. Continuez de mélanger pendant cinq minutes ou
jusqu'à ce que la pâte commence à se former et à se séparer
des bords du bol*. Augmentez la vitesse à vitesse moyenne et
pétrissez la pâte pendant 2 à 4 minutes de plus pour former
la pâte. Retirez le crochet pétrisseur et recouvrez d'un chiffon
humide. Laissez lever à température ambiante pendant deux
heures ou jusque ce que la pâte ait doublé de volume**.
Sur une surface légèrement farinée, roulez la pâte en boule
aplatie. Placez-la dans un moule à tarte de 20 cm huilé. Étalez
la pâte pour remplir le moule à tarte. Recouvrez la pâte d'huile
d'olive. Avec les doigts, faites des trous dans toute la pâte à
environ 25 mm de profondeur. Recouvrez d'un chiffon sec et
laissez lever pendant une heure. Recouvrez de nouveau d'huile
d'olive et faites des trous dans la pâte. Saupoudrez la pâte de
gros sel.
Placez la grille en position 1. Placez le plat sur la grille. Fermez
la porte du four. Réglez le four à recettes R14. Appuyez sur
Lorsque la sonnette retentit, retirez le plat du four. Retirez le pain
du moule immédiatement.
1 pain.
*Si la pâte est trop sèche, ajoutez de l'eau, 15 ml à la fois,
jusqu'à ce que la pâte soit humidifiée. Si la pâte est trop humide,
ajoutez de la farine, 8 g à la fois, jusqu'à ce que la pâte soit plus
sèche.
**Pour vérifier si la pâte a doublé de volume, placez deux doigts
dans la pâte à environ 25 mm de profondeur et retirez-les
rapidement. Si les marques de doigt restent visibles, la pâte a
doublé de volume. Si les marques de doigt disparaissent, laissez
lever la pâte davantage.
.
wolfappliance.com | 11
Page 36

CONSIGNES D’ENTRETIEN
Consignes d'entretien
DÉTARTRAGE
Selon la dureté de l'eau, le four peut devoir être détartré
tous les 6 à 18 mois. Lorsque le four doit être détartré, le
message «Boiler scaled up—please descale» (Chauffe-eau
entartré - veuillez détartrer) s'afchera. Les intervalles entre
ces messages sont fonction de la dureté de l'eau précisée
dans les options utilisateur. Pour régler la dureté de l'eau
reportez-vous à la page 6.
Utilisez uniquement la solution détartrante Durgol® Swiss
Steamer et respectez les consignes du fabricant. Durgol® peut
être commandé en ligne sur le site subzerowolfstore.com.
Option détartrage:
1 Lorsque le four est éteint, appuyez sur puis tournez
le bouton de commande à Détartrage, puis appuyez
. Le message ‘Ajouter 0.5 L de détartrant — et
sur
appuyer sur
2 Retirez le réservoir d'eau et versez l'ensemble de la
solution Durgol
remettez le réservoir en place et appuyez sur
3 Après environ 30 minutes, le message «Pour away des-
caler—Add 1 L water» (Retirez le détartrant —Ajoutez 1
L d'eau) s'afche. Retirez le réservoir, faites couler l'eau
du robinet et versez le détartrant dans l'évier.
MISE EN GARDE
Si vous manquez de diluer la solution de détartrage
avant de vous en débarrasser, vous risquez de ternir
l'évier.
4 Remplissez le réservoir d'eau tiède du robinet et remettez
en place. Le message «Pour away water—
Descaling completed» (Détartrage de l'appareil —1er
cycle de rinçage) s'afche. Après environ 45 minutes, le
message ‘Retirez l'eau—Détartrage terminé’ s'afche.
5 Selon le degré de saleté de l'eau de rinçage, le four
déterminera si des cycles de rinçage supplémentaires
sont nécessaires. Suivez les consignes afchées.
6 Après la n des cycles de rinçage, retirez, videz et séchez
le réservoir d'eau et essuyez toutes les surfaces en acier
inoxydable.
’ s'afche.
®
Swiss Steamer dans le réservoir, puis
.
RETRAIT DE LA PORTE DU FOUR
La porte du four peut être retirée pour un nettoyage
complet.
Pour la retirer, ouvrez complètement la porte du four. Faites
tourner les deux charnières vers l'avant en position ouverte.
Fermez la porte en position «repos» puis soulevez vers
le haut et vers l'extérieur. Reportez-vous aux illustrations
ci-après.
Pour la réinstallation, insérez les charnières de porte dans
les ouvertures du cadre. Ouvrez entièrement la porte du four
et faites tourner les deux loquets de charnière en position
fermée.
POSITION
OUVERTE
POSITION
FERMÉE
Loquet de charnière de la porte
du four.
Position «repos» de la porte
de four.
RETRAIT DU GUIDE DE GRILLE
Pour retirer les guides de grille, dévissez l'écrou moleté à
l'avant du guide de grille. Tirez sur le guide de grille vers le
côté du goujon leté et retirez par l'avant. Reportez-vous à
l'illustration ci-après.
WATER
LIGHT
TEMP
MODE
ON
POWER
TIME
OFF
GUIDE DE
GRILLE
NETTOYAGE
Acier inoxydable Utilisez un nettoyant non abrasif pour acier inoxydable que vous appliquerez à l'aide d'un chiffon doux
non pelucheux. An de faire ressortir le lustre naturel, essuyez légèrement la surface avec un chiffon en
microbre humide, puis avec une peau de chamois sèche. Déplacez toujours le chiffon dans le sens du
grain de l'acier inoxydable.
Face avant de la porte Pulvérisez le produit nettoyant pour vitres sur un chiffon pour nettoyer.
Panneau de commande Utilisez des produits dégraissants à pulvériser pour enlever les traces de doigts et les taches d'ingré-
Intérieur Pour un nettoyage généralisé, mettez le mode Vapeur à 80°C pendant 30 minutes. Cela aura pour effet
Grilles de four et
guides de grille
dients. Pulvérisez tout d'abord le produit sur un chiffon avant d'essuyer le panneau. Ne pulvérisez pas
directement les produits nettoyants sur le module de commande.
de décoller les graisses et les débris de cuisson des parois du four. Éteignez le four et essuyez avec un
chiffon. Utilisez un chiffon humide et du jus de citron pour essuyer l'eau et les taches. N'utilisez pas de
nettoyeur à la vapeur.
Les grilles et les guides de grille du four peuvent être nettoyés au lave-vaisselle.
Plats en acier inoxydable Les plats pleins et perforés en acier inoxydable peuvent être nettoyés au lave-vaisselle.
Réservoir d'eau Les marques de tartre peuvent être retirées avec un détartrant standard. Ne passez pas le réservoir
d'eau au lave-vaisselle.
Sonde à cœur Ne passez pas la sonde à cœur au lave-vaisselle.
12 | Français
ÉCROU MOLETÉ
Retrait du guide de grille.
Page 37

DÉPISTAGE DES PANNES
Dépistage des pannes
FONCTIONNEMENT
Le four ne fonctionne pas.
• Vériez que l'appareil est sous tension.
• Vériez si l'appareil est sous tension et si le disjoncteur
de la maison est activé.
Problème avec la température du four.
• Contactez le service à la clientèle Wolf au 800-222-7820
pour des recommandations.
L'éclairage ne fonctionne pas.
• L'ampoule est défectueuse, appelez le service à la clien-
tèle Wolf.
Le four fait du bruit pendant son fonctionnement.
• Le four peut faire des bruits de sifement et de pompage
pendant son fonctionnement. Il est normal d'entendre ce
type de bruit.
Les plats sont difficiles à retirer.
• Certaines combinaisons de chaleur, d'humidité et de
placement des aliments peuvent faire en sorte que les
plats se déforment, mais ils revienne à leur forme initiale
après refroidissement.
Le message «Do not remove water tank» (Ne pas retirer
le réservoir d'eau) s'affiche.
• L'eau dans le chauffe-eau n'est pas pompée tant que
la température de l'eau n'est pas tombée en dessous
de 80°C.
Service
• Maintenez la qualité qui fait partie intégrante de votre
appareil en contactant un prestataire agréé par l'usine
Wolf.
• Si vous nous contactez pour un service après-vente,
vous devrez fournir la référence modèle et le numéro
de série de votre appareil. Ces deux numéros gurent
sur la plaque des caractéristiques du produit. Pour
repérer l'emplacement de la plaque des caractéristiques,
reportez-vous à la page 5.
• Pour les besoins de la garantie, vous devrez aussi fournir
la date d'installation et le nom de votre revendeur agréé
Wolf. Ces renseignements doivent être consignés à la
page 2 de ce guide.
Garantie limitée des produits Wolf
PRODUITS INTERNATIONAUX
À USAGE MÉNAGER UNIQUEMENT
GARANTIE TOTALE DE DEUX ANS
La garantie des appareils Wolf Appliance couvre, pendant deux ans à compter de la date de l'installation initiale, tous les frais de pièces et de main d'œuvre pour réparer ou remplacer, dans des
conditions d'utilisation ménagère normales, toute pièce du produit qui présenterait des défauts
causés par des vices de matériau ou de fabrication. Tous les services offerts par Wolf Appliance
dans le cadre de la garantie dénie ci-dessus doivent être exécutés par un prestataire agréé par
l'usine Wolf, sauf en cas d'exception particulière spéciée par Wolf Appliance, Inc. Les services
seront exécutés pendant les heures normales ouvrées.
GARANTIE LIMITÉE DE LA TROISIÈME À LA CINQUIÈME ANNÉE
Wolf Appliance s'engage à réparer ou remplacer, pendant cinq ans à compter de la date de
l'installation initiale, les pièces suivantes qui présenteraient des défauts causés par des vices
de matériau ou de fabrication : brûleurs à gaz (à l'exception de l'aspect), les résistances chauffantes, les moteurs (hottes d'aspiration), les panneaux de commande électroniques, les tubes de
magnétron et les générateurs à induction Les pièces seront réparées ou remplacées gratuitement
; toutefois le propriétaire devra payer tous les autres frais connexes y compris la main d'œuvre.
Tous les services offerts par Wolf Appliance dans le cadre de la garantie dénie ci-dessus doivent
être exécutés par un prestataire agréé par l'usine Wolf, sauf en cas d'exception particulière spéciée par Wolf Appliance, Inc. Les services seront exécutés pendant les heures normales ouvrées.
Le message «Boiler scaled up, please descale!»
(Chauffe-eau entartré, veuillez détartrer) s'affiche.
• Détartrez le four, reportez-vous à la page 12.
Le message «Appliance blocked, descaling necessary»
(Appareil bloqué, détartrage requis) s'affiche.
• Détartrez le four, reportez-vous à la page 12. Si le mes-
sage ne disparaît pas après le détartrage, contactez un
prestataire agréé par l'usine Wolf.
Wolf, Wolf & Design, Wolf Gourmet, W & Design et la couleur rouge comme celle appliquée aux boutons sont des marques déposées et des marques de services de Wolf Appliance,
Inc. Sub-Zero, Sub-Zero & Design, Dual Refrigeration, Constant Care, The Living Kitchen, Great American Kitchens The Fine Art of Kitchen Design et Ingredients sont des marques
déposées et des marques de services de Sub-Zero, Inc. (collectivement, les « marques d'entreprise »...) Toutes les autres marques de commerce ou marques déposées ont été
brevetées par leurs propriétaires respectifs aux États-Unis ou dans d'autres pays.
wolfappliance.com | 13
Page 38

FORNI A CONVEZIONE/VAPORE
Indice
3 Precauzioni di sicurezza
5 Caratteristiche del forno a convezione/vapore
5 Funzionamento del forno a convezione/vapore
12 Consigli di manutenzione
13 Risoluzione problemi
13 Garanzia Wolf
Assistenza clienti
I numeri di serie e di modello sono stampati sulla cedola di
registrazione del prodotto. Entramabi i numeri sono riportati
anche sulla targhetta identicativa del prodotto. Consultare
pagina 5 per la posizione della targhetta identicativa. Ai ni
della garanzia sono inoltre necessari la data di installazione
e il nome del rivenditore Wolf autorizzato presso il quale è
stato effettuato l'acquisto. Conservare le seguenti informazioni a titolo di riferimento futuro.
INFORMAZIONI PER IL SERVIZIO DI ASSISTENZA
Numero del modello
Numero di serie
Data di installazione
Nome del centro di assistenza autorizzato
Numero del centro di assistenza autorizzato
Rivenditore autorizzato
Numero del rivenditore
Nota importante
Per garantire l'installazione e il funzionamento sicuri ed
efcaci di questo prodotto, prestare attenzione alle seguenti
informazioni evidenziate nella guida:
NOTA IMPORTANTE evidenzia informazioni di particolare
rilievo.
ATTENZIONE indica una situazione che potrebbe compor-
tare lievi lesioni alle persone o danni al prodotto in caso di
mancata osservanza delle istruzioni.
AVVERTENZA indica una situazione di pericolo che potrebbe
causare gravi lesioni o la morte in caso di mancata osservanza delle precauzioni.
2 | Italiano
Page 39

PRECAUZIONI DI SICUREZZA
PRECAUZIONI DI SICUREZZA
Questo forno è stato realizzato in conformità con gli standard
tecnologici e di sicurezza stabiliti dalla normativa in vigore ed è
destinato all'uso domestico per la preparazione degli alimenti.
Non è destinato all'uso da parte di persone con ridotte capacità siche, sensoriali o mentali oppure prive di esperienza e
competenza adeguata a meno che non siano supervisionati
o abbiano ricevuto istruzioni sull'uso dell'elettrodomestico da
parte di una persona responsabile della loro sicurezza. L'uso
corretto del forno è un requisito essenziale per la prevenzione
di danni e incidenti.
L'installazione e il collegamento a una fonte di alimentazione
devono essere effettuati da un elettricista qualicato in conformità con le istruzioni di installazione fornite.
Prima del primo uso, riempire la tanica dell'acqua ed eseguire
le operazioni descritte nella sezione "Prima dell'uso".
Conservare la presente guida a titolo di riferimento futuro. Se si
vende l'elettrodomestico o lo si cede a un'altra persona, accertarsi che sia accompagnato dalle presenti informazioni e dalle
istruzioni di installazione.
MISURE DI SICUREZZA IMPORTANTI
L'uso di apparecchi elettrici presuppone l'osservanza di precauzioni di sicurezza di base tra cui:
• Leggere tutte le istruzioni.
• Non toccare supercie calde. Usare le apposite maniglie e
manopole.
• Per la massima protezione contro scosse elettriche, non immer-
gere il cavo di alimentazione o la relativa spina nell'acqua o in
altri liquidi.
• Non lasciare che il cavo di alimentazione sporga dal bordo del
tavolo o del banco di cucina o che tocchi superci calde.
• È necessario sovrintendere all'uso dell'elettrodomestico da
parte o in prossimità di bambini.
• È necessario accertarsi che i bambini non giochino con
l'elettrodomestico.
AVVERTENZA
Le parti accessibili possono diventare bollenti durante l'utilizzo. Tenere lontano dalla portata dei bambini.
wolfappliance.com | 3
Page 40

PRECAUZIONI DI SICUREZZA
MISURE DI SICUREZZA IMPORTANTI
• Questo elettrodomestico può essere utilizzato da bambini
di età superiore a 8 anni e da persone con ridotte capacità
siche, sensoriali o mentali o prive dell'esperienza e competenza necessaria, a condizione che tali persone abbiano
ricevuto supervisione o istruzioni adeguate a un utilizzo sicuro
dell'apparecchio e che ne abbiano compreso i potenziali pericoli. Non lasciare che i bambini giochino con l'apparecchiatura.
Operazioni di pulizia e manutenzione non devono essere eseguite da bambini senza la necessaria supervisione.
• Usare esclusivamente la sonda della temperatura prevista per
questo forno.
• Scollegare dalla presa quando non in uso e prima di pulire.
Attendere che l'elettrodomestico si raffreddi prima di montare o
smontare uno o più dei suoi componenti.
• Non usare detergenti aggressivi e abrasivi o pagliette metal-
liche per pulire il vetro dello sportello in quanto la supercie
potrebbe grafarsi e il vetro infrangersi.
• Il collegamento di accessori non autorizzati dal produttore
dell'elettrodomestico potrebbe causare lesioni.
• Non utilizzare l'elettrodomestico all'aperto.
• Non collocare sopra o vicino a un fornello a gas o elettrico o in
un forno riscaldato.
• Osservare la massima cautela quando si sposta un elettrodo-
mestico che contiene olio o altri liquidi bollenti.
• Inserire sempre per prima la spina del cavo di alimentazione
nell'elettrodomestico e quindi nella presa elettrica a muro. Per
scollegare, portare tutti i pulsanti in posizione di “spento” e
quindi scollegare dalla presa a muro.
• Non utilizzare l'apparecchiatura per nalità diverse da quelle
indicate.
• Conservare le presenti istruzioni.
• Non utilizzare elettrodomestici con cavo o spinotto danneggiati
o dopo aver rilevato un malfunzionamento o un danno qualsiasi
dell'elettrodomestico. Portare l'elettrodomestico a un centro
di assistenza autorizzato per il controllo, la riparazione o una
regolazione.
4 | Italiano
Page 41

CARATTERISTICHE DEL FORNO A CONVEZIONE/VAPORE
FUNZIONAMENTO DEL FORNO
Caratteristiche del forno a convezione/vapore
CARATTERISTICHE
1
Targhetta identicativa del prodotto
2
Pannello di controllo e display
3
Manopola di conferma
4
Grate del forno regolabili
5
Ventola di convezione
6
Presa per la sonda della temperatura
7
Luci alogene
8
Sportello di accesso alla tanica dell'acqua
2
7
5
1
Forno a convezione/vapore (modello illustrato ICBCSO30TM).
Introduzione
Sarete sicuramente ansiosi di iniziare a cucinare, ma prima
di farlo è importante dedicare qualche minuto alla lettura
della presente guida all'uso e alla manutenzione. Sia nel
caso di un cuoco occasionale o di uno chef professionista,
è essenziale acquisire dimestichezza con le procedure di
sicurezza, le caratteristiche, il funzionamento e i consigli di
manutenzione del forno a convezione/vapore.
Per acquisire i migliori risultati, consultare le modalità di
cottura e le caratteristiche speciche del forno a pagina 8.
8
3
6
4
Pannello di controllo
Il pannello di controllo e il relativo display sono stati realizzati per la massima facilità d'uso. La manopola di conferma
) e i pulsanti vanno utilizzati per impostare la modalità
(
di cottura e accedere alle funzioni del forno a convezione/
vapore ottenendo risultati ottimali.
La manopola viene utilizzata da sola o insieme ai pulsanti
per eseguire le selezioni necessarie. Ogni selezione eseguita
va confermata premendo
INDICATORI DEL DISPLAY DEL PANNELLO DI CONTROLLO
La temperatura del forno è stata impostata.
La sonda della temperatura è in uso.
La modalità vapore è stata attivata.
La modalità riscaldamento è stata attivata.
La modalità di cottura automatica a vapore è stata
attivata.
La modalità convezione è stata attivata.
La modalità di cottura con calore umido per
convezione è stata attivata.
La modalità di cottura a vapore per convezione è
stata attivata.
Il timer è stato impostato.
Il tempo operativo è stato attivato.
Il tempo di spegnimento stato attivato.
L'orologio è stato impostato.
.
MANOPOLA E PULSANTI DEL PANNELLO DI CONTROLLO
Acqua
Luce
Temperatura
Modalità
OK
Timer
Ora
Off (spento)
Pannello di controllo.
8:30190°C
wolfappliance.com | 5
Page 42

FUNZIONAMENTO DEL FORNO
Impostazioni dell'utente
Le impostazioni dell'utente consentono all'utente di selezionate lingua, blocco protettivo per i bambini, visualizzazione dei tempi di cottura, segnale acustico, illuminazione,
durezza dell'acqua, unità di misura della temperatura, contrasto, formato dell'ora, impostazioni di fabbrica e controllo
dello sportello dell'acqua.
L'uso del pannello di controllo può essere bloccato dall'utente. Per utilizzare un forno che è stato provvisoriamente
disattivato, premere e tenere premuto
. Il pannello di controllo verrà automaticamente bloccato,
per impedirne l'uso, 10 minuti dopo aver spento il forno.
Per selezionare le impostazioni dell'utente:
1 Con il forno spento, premere e ruotare la mano-
pola portandola su USER SETTINGS (IMPOSTAZIONI
UTENTE), quindi premere
2 Ruotare la manopola per scorrere le opzioni disponibili,
quindi premere
3 Seguire le istruzioni visualizzate, quindi premere .
.
, quindi premere
.
Funzionamento del forno
SELEZIONE DELLA MODALITÀ DI COTTURA
1 Premere molteplici volte no a quando la moda-
lità di cottura desiderata non viene visualizzata, quindi
premere
SELEZIONE DELLA TEMPERATURA
1 Premere .
2 Ruotare la manopola portandola alla temperatura desi-
derata, quindi premere
Per regolare la temperatura durante la cottura, premere
e ruotare la manopola portandola alla temperatura desiderata, quindi premere
TANICA DELL'ACQUA
La tanica dell'acqua ha una capienza tale da consentire
un afusso continuo di vapore per 1 ora e mezza, tempo
normalmente sufciente per 4 o 5 sessioni di cottura. Usare
l'acqua del rubinetto. Non usare acqua demineralizzata,
ltrata o distillata.
Premere sempre
dell'acqua. Il tentativo di accedere manualmente alla tanica
dell'acqua potrebbe causare danni.
Dopo aver spento il forno e quando la temperatura
dell'acqua scende al di sotto di 80°C, l'acqua viene ripompata nella tanica. Se occorre riempire la tanica d'acqua
durante la cottura, limitare la quantità d'acqua immessa a
meno di mezzo litro per impedirne la fuoriuscita durante il
rimpompaggio d'acqua nella tanica.
.
.
.
per aprire lo sportello della tanica
PRIMA DELL'USO
Utilizzare la striscia di prova della durezza dell'acqua. Il
forno è impostato, per predenizione, sull'uso di acqua
dura. Consultare la sezione Impostazioni dell'utente a
pagina 6 per denire la durezza dell'acqua.
Per assicurarsi che eventuali oli residui del processo di
fabbricazione siano stati rimossi, il forno va sottoposto alla
seguente procedura.
1 Pulire accuratamente il forno con acqua calda e deter-
sivo delicato. Sciacquare e asciugare con un panno
morbido.
2 Accendere la ventilazione. Una piccola quantità di fumo
e odore è normale.
3 Riempire e reinserire la tanica dell'acqua nell'apposito
vano.
4 Selezionare la modalità di cottura automatica a vapore
su 210°C. Riscaldare il forno (vuoto) per 30 minuti.
DOPO OGNI USO
1 Premere . Per le modalità che utilizzano vapore,
non rimuovere la tanica dell'acqua no a quando il
messaggio “WATER IS BEING PUMPED OFF” (SVUOTAMENTO DELLA TANICA IN CORSO) non è più visualizzato nel display.
2 Aprire lo sportello in posizione di apertura intermedia e
lasciare che il forno si raffreddi. Una volta raffreddato,
asciugare le pareti interne prima di chiudere lo sportello.
Fare riferimento alla gura qui di seguito.
IMPOSTAZIONE DELL'ORA
È importante impostare correttamente l'ora se si utilizza la
funzione di cottura a tempo denito. Dopo un'interruzione
dell'alimentazione elettrica, è necessario reimpostare l'ora.
Impostazione dell'ora:
1 Con il forno spento, premere .
2 Ruotare la manopola per impostare l'ora quindi premere
.
3 Ruotare la manopola per impostare i minuti, quindi pre-
TIMER
mere
.
Il timer può essere impostato su un massimo di 9 ore e 59
minuti. Una volta impostato il timer, il display visualizza il
conto alla rovescia. Il timer è indipendente dal forno. L'impostazione del timer non agisce sui tempi di cottura o di
spegnimento.
Impostazione del timer:
1 Premere .
2 Ruotare la manopola per selezionare la durata di tempo
desiderata, quindi premere
.
Per reimpostare il timer, premere e ruotare la manopola
portandola alla durata di tempo desiderata, quindi premere
. Per cancellare, premere due volte, quindi premere
.
6 | Italiano
Per riempire la tanica dell'acqua:
1 Premere .
2 Rimuovere e riempire la tanica dell'acqua.
3 Reinserire la tanica dell'acqua nell'apposito vano e chiu-
dere manualmente lo sportello.
Sportello in posizione
intermedia.
Page 43

FUNZIONAMENTO DEL FORNO
Funzionamento del forno
TEMPO OPERATIVO
La funzione di impostazione del tempo operativo spegne
automaticamente il forno a una data ora. Il forno inizia a
scaldarsi subito e si spegne all'ora selezionata.
Se si utilizza la sonda della temperatura, questa assume
priorità sull'ora di spegnimento e spegne automaticamente il
forno al raggiungimento della temperatura selezionata. Se la
temperatura denita per la sonda non viene raggiunta prima
dell'ora stabilita per lo spegnimento del forno, il tempo operativo non viene esteso.
Impostazione dei controlli:
1 Selezionare la modalità di cottura e la temperatura
desiderate.
2 Premere
3 Ruotare la manopola per selezionare il tempo operativo,
quindi premere
Per cambiare il tempo operativo, premere e ruotare la
manopola portandola al tempo operativo desiderato, quindi
premere
.
.
.
AVVIO RITARDATO
La funzione di avvio ritardato accende e spegne automaticamente il forno alle ore impostate. Il forno resta in modalità
sospensione no all'ora di avvio impostata e si spegne
all'ora desiderata. Per il corretto funzionamento dell'avvio
ritardato, l'orologio deve essere impostato sull'ora corretta.
Se si utilizza la sonda della temperatura, questa assume
priorità sull'ora di spegnimento e spegne automaticamente il
forno al raggiungimento della temperatura selezionata. Se la
temperatura denita per la sonda non viene raggiunta prima
dell'ora stabilita per lo spegnimento del forno, il tempo operativo non viene esteso.
Impostazione dei controlli:
1 Selezionare la modalità di cottura e la temperatura
desiderate.
2 Premere e ruotare la manopola per selezionare il
tempo operativo desiderato (non premere
3 Premere e ruotare la manopola per selezionare l'ora
di spegnimento desiderata, quindi premere
).
.
Per cambiare l'ora di spegnimento, premere due volte e
ruotare la manopola portandola sul tempo operativo desiderato, quindi premere
.
SONDA DELLA TEMPERATURA
La sonda misura la temperatura interna del cibo durante la
cottura. La sonda può essere utilizzata per tutte le modalità
di cottura ad eccezione della modalità Gourmet. Quando la
sonda della temperatura è in uso, premere
per alternare
tra la temperatura effettiva della sonda, visualizzata nel
display, e la temperatura denita per la sonda.
Impostazione dei controlli:
1 Selezionare la modalità di cottura e la temperatura
desiderate.
2 Collocare la sonda nella parte più densa del cibo in
corso di cottura e collegare quindi la sonda all'apposita
presa. Fare riferimento alla gura qui di seguito.
3 Premere due volte e ruotare la manopola per selezio-
nare il grado di cottura desiderato, quindi premere
La temperatura della sonda viene visualizzata nel display
una volta che supera i 30°C. Per regolare la temperatura
della sonda, premere
ratura desiderata, quindi premere
e portare la manopola alla tempe-
.
ATTENZIONE
Sonda e relativa presa diventano molto calde. Maneggiare con cura.
POSIZIONE DELLE GRATE DEL FORNO
Le grate del forno possono essere collocate in una qualunque delle quattro posizioni etichettate sul fronte del forno
a convezione/vapore. Collocare le grate del forno in modo
che la barra orizzontale si trovi sul retro del forno. Non usare
la leccarda in acciaio inossidabile capovolta. Fare riferimento alla gura qui di seguito. Le ricette della modalità
“Recipes” (Ricette) indicano la posizione ideale della grata
per ottenere risultati ottimali.
.
Posizione della grata.
Presa della sonda.
wolfappliance.com | 7
Page 44

FUNZIONAMENTO DEL FORNO
Modalità di cottura
MODALITÀ
Vapore 30 – 100°C
Riscalda
Cottura automatica
al vapore
Convezione
Convezione con
umidità
Convezione con
vapore
Gourmet — — Utilizzare per la preparazione di piatti speciali (consultare la pagina 8) sia
Slow Roast (Arrostitura lenta)
Recipes (Ricette) 30 – 230°C
My Recipes (Le mie
ricette)
Keep warm (Mantenere caldo)
INDICATORE INTERVALLO SONDA UTILIZZI
100 – 150°C
100 – 230°C
30 – 230°C
30 – 230°C
30 – 230°C
30 – 150°C
30 – 230°C
80°C
Usare la modalità Vapore per gli alimenti che verrebbero altrimenti riscal-
•
dati in un tegame e per gli alimenti che vanno maneggiati con delicatezza,
quali pesce, crostacei, verdure e riso.
La modalità Riscalda utilizza vapore e aria calda per reidratare delica-
•
tamente gli alimenti. Utilizzare per riscaldare alimenti che si sarebbero
altrimenti riscaldati nel forno, su un piano di cottura o in un microwave.
Riscaldando prima con il vapore e riscaldando quindi a convezione per
•
terminare la cottura, gli alimenti vengono cotti delicatamente all'interno
mentre l'esterno acquisisce un aspetto di lucentezza naturale senza dover
usare la glassa d'uovo. Utilizzare per il pane, panini al latte, torte e paste
sia fresche, pre-cotte o surgelate. Non pre-riscaldare.
La ventola di convezione distribuisce il calore in modo uniforme ottenendo
•
risultati e rosolatura omogenei. La temperatura di cottura può essere inferiore a 25° e i tempi di cottura possono essere del 25% più rapidi rispetto
al forno tradizionale con un risparmio di tempo ed energia. Utilizzare la
modalità Convezione per una varietà di alimenti, compreso mufn, biscotti
e arrosti.
In modalità Convezione con umidità, la ventilazione del forno viene bloc-
•
cata in modo che l'umidità prodotta durante la cottura rimanga nel forno.
Utilizzare per torte, casseruole, alimenti a base di cereali, lasagne e carne.
Il vapore trasferisce più efcacemente energia termica agli alimenti rispetto
•
all'aria calda da sola, accorciando quindi i tempi di cottura. Gli alimenti
conservano la propria umidità. Utilizzare la modalità Convezione/vapore
per cucinare alimenti che devono restare morbidi all'interno e arrostiti o
croccanti all'esterno. Premere per attivare o disattivare il vapore.
freschi, conservati in frigorifero o surgelati. Selezionare l'alimento e il grado
di cottura desiderato e il sensore regolerà il tempo di cottura, la temperatura e il livello di umidità eliminando la necessità di seguire istruzioni
per la cottura nel forno. La temperatura e l'intervallo di temperatura da
selezionare dipendono dall'alimento da cucinare e dal livello di cottura
desiderato.
Utilizzare per mantenere la carne morbida arrostendola lentamente.
•
Inserire la sonda della temperatura nella carne da cuocere, selezionare
l'impostazione “Slow Roast” e l'ora di completamento e quando si ritorna
a casa, il pasto è pronto.
Utilizzare per preparare pasti completi da antipasto primo piatto al dolce
•
(consultare la pagina 9). Selezionare alimenti, numero di porzioni e livello di
rosolatura. Il sensore denisce il resto. La modalità “Recipes” è ideale per
la preparazione rapida di pasti o di una varietà di piatti per una festa.
Utilizzare la modalità “My recipes” per memorizzare istruzioni di cottura
•
no a dieci ricette tra quelle preferite e sostituirle o modicarle in qualsiasi
momento.
La modalità “Keep warm” utilizza una combinazione di convezione e
•
vapore per tenere gli alimenti caldi no a quando non si è pronti a servire.
GOURMET
Utilizzare la modalità Gourmet per preparare gli alimenti
elencati qui di seguito, sia freschi, conservati in frigorifero
o surgelati. Selezionare l'alimento e il grado di cottura desiderato e il sensore regolerà il tempo di cottura, la temperatura e il livello di umidità eliminando la necessità di seguire
istruzioni per la cottura nel forno.
ALIMENTO CODICE
Antipasti freschi A1
Antipasti surgelati A2
Piatto al forno A3
Soufé A4
Patate al cartoccio A5
Prodotti surgelati con patate A6
Carne brasata A7
Pizza fresca A8
Pizza surgelata A9
Crema pasticcera A10
Pane A11
Pasticceria con lievito e ripieno A12
Torta A13
Crostata A14
Impostazione della modalità Gourmet:
1 Premere due volte e ruotare la manopola per selezio-
nare il grado di cottura desiderato, quindi premere
2 Seguire le istruzioni visualizzate, quindi premere .
ARROSTITURA LENTA
Impostazione della modalità “Slow Roast” (Arrostitura
lenta):
1 Premere e ruotare la manopola per selezionare la
modalità “Slow Roast”, quindi premere
2 Ruotare la manopola per selezionare l'alimento e il grado
di cottura desiderati (se del caso) e premere quindi
3 La temperatura predenita della sonda viene visualizzata
nel display. Per regolare la temperatura della sonda, pre-
e ruotare la manopola portandola alla tempera-
mere
tura desiderata, quindi premere
.
Il tempo di cottura della modalità “Slow Roast” può essere
impostato tra 2 ore e mezzo e 4 ore e mezzo. Per cambiare
il tempo di cottura, premere
e ruotare la manopola portandola alla durata di cottura desiderata, quindi
premere
.
.
.
.
Cleanse (Pulizia) 30 – 230°C La modalità “Cleanse” utilizza il vapore per pulire biberon e vasetti di
confettura, un sistema più rapido e sicuro rispetto ai metodi di pulizia
tradizionali.
8 | Italiano
Page 45

FUNZIONAMENTO DEL FORNO
Modalità di cottura
MODALITÀ RICETTE
Utilizzare la modalità “Recipes” (Ricette) per preparare interi
pasti, dall'antipasto al secondo piatto e al dolce. Consultare
l'illustrazione e le ricette riportate alle pagine 9-11.
ALIMENTO CODICE
Antipasto R1
Pesce in pasta sfoglia R2
Rotoli di pesce R3
Manzo alla Strogonoff R4
Arrosto di manzo R5
Lombo di maiale in pasta sfoglia R6
Pasta al gratin R7
Melanzane al gratin R8
Flan R9
Pere al vino rosso R10
Panini al latte R11
Mufn R12
Torta R13
Focaccia R14
Impostazione della modalità “Recipes” (Ricette):
1 Premere e ruotare la manopola portandola alla
modalità “Recipes”, quindi premere
2 Ruotare la manopola per selezionare la ricetta deside-
rata, quindi premere
3 Seguire le istruzioni visualizzate, quindi premere .
.
.
MODALITÀ LE MIE RICETTE
Utilizzare la modalità “My Recipes” (Le mie ricette) per
memorizzare istruzioni di cottura no a 10 ricette tra le preferite. Se la ricetta utilizza la sonda della temperatura, inserire la sonda nella presa prima di immettere le impostazioni.
Impostazione della modalità “My Recipes” (Le mie ricette):
1 Premere e ruotare la manopola portandola alla
modalità “My Recipes”, quindi premere
2 Ruotare la manopola per selezionare il numero di ricetta
desiderato, quindi premere
3 Selezionare modalità, temperatura, tempo di cottura e
.
temperatura della sonda (se utilizzata) e premere
4 Premere per salvare (Save) la ricetta.
.
.
Per cancellare una ricetta salvata, premere e ruotare la
manopola portandola alla modalità “My Recipes”, quindi
premere
desiderata, quindi premere
visualizzare “Clear” (Cancella) e quindi premere
. Ruotare la manopola per selezionare la ricetta
. Ruotare la manopola no a
.
MODALITÁ MANTENERE CALDO
Impostazione della modalità “Keep Warm” (Mantenere
caldo):
1 Premere e ruotare la manopola portandola alla
modalità “Keep Warm”, quindi premere
.
MODALITÀ PULIZIA
Impostazione della modalità “Cleanse” (Pulizia)
1 Premere e ruotare la manopola portandola alla
modalità “Cleanse”, quindi premere
2 Ruotare la manopola per selezionare l'opzione deside-
rata, quindi premere
.
.
Recipes (Ricette)
R1 ANTIPASTO
Tempo di cottura — 20 minuti
Confezione da 500 g di fogli di pasta sfoglia
30 ml di olio d'oliva
60 g di origano fresco, nemente tritato
45 g di timo fresco, nemente tritato
115 g di parmigiano a striscioline
Stendere un foglio di pasta sfoglia sul tagliere. Spennellare con
olio d'oliva. Spargere origano, timo e formaggio sopra l'olio. Stendere il secondo foglio adagiandolo delicatamente sopra le erbe.
Premere leggermente. Con un coltello da pasticceria o pizza,
tagliare la pasta sfoglia in strisce di 13 mm. Attorcigliare le
strisce accertandosi di tenere il ripieno al loro interno. Stendere
un foglio di carta pergamena sul fondo di una teglia e disporre
le strisce sulla pergamena a una distanza di circa 25 mm una
dall'altra. Lasciar riposare la sfoglia per 15 minuti prima di
infornare. Mettere la teglia sulla grata del forno in posizione 1.
Chiudere lo sportello del forno. Impostare il forno su Recipes R1
(Ricetta R1). Premere
togliere la teglia dal forno. Tagliare ogni striscia dell'antipasto in
tre parti. Servire immediatamente.
Ricetta per 42 porzioni.
Se si usa più di una teglia con fogli di pasta sfoglia, utilizzare 2
grate in posizione 1 e 3. Il tempo di cottura è lo stesso.
. All'emissione del segnale acustico,
R2 PESCE IN PASTA SFOGLIA
Tempo di cottura — 25 minuti
1 zucchino piccolo
1 peperone rosso
1
/2 confezione da 250 g di fogli di pasta sfoglia
60 g di prezzemolo, nemente tritato
Sale kosher e pepe nero macinato fresco
4 – 60 g letti di pesce, tagliati in pezzi da 76 x 51 mm.
Tagliare il peperone rosso in quattro parti uguali. Eliminare i semi
e tagliare ognuna delle quattro parti nel senso della lunghezza
per ottenere strisce di 6 mm. Mettere da parte. Tagliare le estremità dello zucchino e quindi tagliare nel senso della lunghezza in
fette di 6 mm. Mettere da parte.
Stendere un foglio di carta pergamena in una teglia. Stendere
un foglio di pasta sfoglia fredda sul tagliere. Tagliare in quattro
parti uguali. Mettere una fetta di zucchino e quattro strisce di
peperone su ogni quadrato in posizione trasversale così da
connettere i due angoli opposti. Spargere su ciascun quadrato
15 g di prezzemolo. Insaporire con sale e pepe. Disporre un
letto su ogni quadrato e aggiustare di sale e pepe. Portare i due
angoli liberi di pasta sfoglia sopra il pesce e premere leggermente. Disporre delicatamente i rotoli di pasta sfoglia sulla carta
pergamena. Mettere la teglia nel forno sulla grata in posizione 1.
Chiudere lo sportello del forno. Impostare il forno su Recipes R2
(Ricetta R2). Premere
togliere la teglia dal forno. Servire immediatamente.
Ricetta per 4 persone.
. All'emissione del segnale acustico,
R3 ROTOLI DI PESCE
Tempo di cottura — 10 minuti
8 letti di pesce sottili, ad esempio letti di sogliola, platessa o
rombo
Sale kosher e pepe nero macinato fresco
30 g di pinoli tostati
95 g di rucola
Mettere i letti di pesce sul tagliere. Salare e pepare entrambi
i lati. Cospargere circa 7 g di pinoli e 9 g di rucola su ciascun
letto di pesce. Arrotolare i letti iniziando dal lato appuntito.
Fissare con uno stuzzicadenti. Ungere un vassoio forato usando
una bomboletta spray da cucina anti-aderente e collocare i rotoli
di pesce sul vassoio. Mettere il vassoio nel forno sulla grata in
posizione 2. Chiudere lo sportello del forno. Impostare il forno su
Recipe R3 (Ricetta R3). Premere
acustico, togliere il vassoio con il pesce dal forno e servire
immediatamente.
Ricetta per 4 - 6 persone.
. All'emissione del segnale
wolfappliance.com | 9
Page 46

FUNZIONAMENTO DEL FORNO
Recipes (Ricette)
R4 MANZO ALLA STROGANOFF
Tempo di cottura — 47 minuti
800 g spalla di manzo per arrosto, tagliato in strisce di 6 x 13mm
10 g di sale kosher
5 g di pepe nere macinato fresco
15 g di dadi per brodo di carne
1 peperone giallo, tagliato in strisce di 6 mm
1 peperone rosso, tagliato in strisce di 6 mm
225 g di funghi, tagliati a fette di 6 mm di spessore
2 piccole cipolle gialle, nemente affettate
2 - 30 g di “brown gravy mix” in busta
15 g di amido di mais
10 g paprica
350 ml di panna acida
60 ml di concentrato di pomodoro
Tagliatelle all'uovo, facoltative
Insaporire la carne con sale e pepe. Disporla in una teglia da
33 x 24 cm. Unire il dado, peperoni, funghi e cipolle.
Collocare la grata nel forno in posizione 2. Mettere la teglia nel
forno, sull'apposita grata. Chiudere lo sportello del forno. Impostare il forno su Recipe R4 (Ricetta R4), ricetta per 6 persone.
Premere
All'emissione del segnale acustico, togliere la teglia dal forno e
versare con cautela il liquido in un misuratore di volume da 500
ml e mettere da parte. Rimettere la teglia nel forno e premere
Per preparare la salsa: In un tegame da 1,8 litri, mischiare il
“brown gravy mix”, l'amido di mais e la paprica. Unire la panna
acida e il concentrato di pomodoro. Usando la frusta, aggiungere 410 ml di succo aggiungendo dell'acqua, se necessario,
per raggiungere 410 ml. Collocare sul piano di cottura Wolf a
fuoco moderato. Portare all'ebollizione per addensare, mescolando continuamente.
All'emissione del segnale acustico, togliere la teglia dal forno e
aggiungervi il sugo appena preparato. Servire da solo o sopra
tagliatelle all'uovo.
Ricetta per 5 - 6 persone.
.
per continuare la cottura.
R5 ARROSTO DI MANZO
Tempo di cottura — 2 ore
1,1 kg di spalla di manzo, tagliato in tre pezzi
2 carote, pelate e tagliate in 4 pezzi ciascuna
1
/2 radice di sedano, pelata e tagliata in 4 pezzi uguali
2 piccole cipolle gialle, tagliate in 4 pezzi uguali
1 foglia d'alloro
2 spicchi d'aglio
8 grani di pepe nero
940 ml di brodo vegetale
Disporre la carne, le verdure e gli aromi in una casseruola da 3,8
litri circa. Versare il brodo vegetale sulla carne.
Collocare la grata nel forno in posizione 2. Mettere la casseruola
nel forno, sull'apposita grata. Chiudere lo sportello del forno.
Impostare il forno su Recipe R5 (Ricetta R5). Premere
All'emissione del segnale acustico, togliere la teglia dal forno e
servire caldo.
Ricetta per 5 - 6 persone.
.
R6 LOMBO DI MAIALE IN PASTA SFOGLIA
Tempo di cottura — 30 minuti
1
/2 confezione da 250 g di fogli di pasta sfoglia
30 ml di senape macinata a pietra
460 g di letto di maiale
Sale kosher e pepe nero macinato fresco
Stendere ogni foglio di pasta sfoglia sul tagliere e tagliarli a
metà. Cospargere uniformemente ogni foglio di pasta sfoglia
con 15 ml di senape. Tagliare il letto di maiale a metà nel senso
della lunghezza. Insaporire con sale e pepe. Mettere un pezzo di
maiale nel mezzo di ciascun foglio di pasta sfoglia, lasciando 25
mm a ognuno dei due bordi nel senso della lunghezza. Ripiegare
le due estremità sul letto di maiale e arrotolare fermamente dai
lati lasciando la giuntura sul fondo. Stendere un foglio di carta
pergamena in una teglia. Disporre delicatamente i rotoli di maiale
con pasta sfoglia sulla carta pergamena. Mettere la teglia nel
forno sulla grata in posizione 2. Chiudere lo sportello del forno.
Impostare il forno su Recipes R6 (Ricetta R6). Premere
All'emissione del segnale acustico, togliere la teglia dal forno.
Rimuovere i rotoli di maiale con pasta sfoglia dalla pergamena
usando una spatola di metallo. Servire immediatamente.
Ricetta per 4 - 6 persone.
.
R7 PASTA AL GRATIN
Tempo di cottura — 30 minuti
690 g di pasta (conchiglie, treccine o gobbetti)
2 piccole cipolle gialle, tagliate a fette di 13 mm di spessore
230 g di funghi affettati
85 g di prosciutto crudo o cotto, a fette di 13 mm di spessore
230 g di prezzemolo a foglie piatte
140 g parmigiano, a striscioline, diviso in due
470 ml di brodo vegetale
235 ml di panna acida
Sale kosher e pepe nero macinato fresco
Un pizzico di noce moscata
Unire pasta, cipolle, funghi, prosciutto, prezzemolo e metà
del parmigiano in una casseruola di 3,8 litri circa. Mescolare il
brodo, la panna acida, sale, pepe e noce moscata. Versare il
composto sopra la pasta. Cospargere inne con l'altra metà di
formaggio grattugiato. Collocare la grata nel forno in posizione
1. Infornare la casseruola scoperta sulla grata. Chiudere lo
sportello del forno. Impostare il forno su Recipes R7 (Ricetta
R7). Premere
la casseruola dal forno. Coprire. Lasciare riposare la casseruola
per 15 minuti.
Servire caldo.
Ricetta per 6 persone.
. All'emissione del segnale acustico, togliere
R8 MELANZANE AL GRATIN
Tempo di cottura — circa 30 minuti
1 – 395 g di pomodori pelati
1 spicchio d'aglio, tritato
15 g di origano fresco, nemente tritato (o 5 g di originano
secco)
15 g di timo fresco, nemente tritato (o 5 g di timo secco)
15 ml di olio d'oliva
Sale kosher e pepe nero macinato fresco
2 melanzane di media grandezza
230 g di formaggio grattugiato
Mettere i pelati in una tegame da 2,8 litri circa. Schiacciare
con una forchetta. Aggiungere l'aglio, gli aromi e l'olio d'oliva.
Insaporire con sale e pepe. Stendere uno strato di sugo di
pomodoro (115 ml) sul fondo di una casseruola da 2,4 litri circa,
spennellata con un po' d'olio. Eliminare l'estremità di ciascuna
melanzana e tagliare a fette di circa 13 mm di spessore. Disporre
le fette in modo uniforme sopra i pelati nella casseruola. Mettere
il sugo di pomodoro sopra le fette di melanzane. Cospargere
inne di formaggio grattugiato. Collocare la grata nel forno in
posizione 2. Mettere la casseruola nel forno, sull'apposita grata.
Chiudere lo sportello del forno. Impostare il forno su Recipe R8
(Ricetta R8). Premere
togliere la casseruola dal forno e servire subito.
Ricetta per 4 - 6 persone.
. All'emissione del segnale acustico,
R9 FLAN
Tempo di cottura — circa 25 minuti
115 g di zucchero
115 ml di succo d'arancia
500 ml di panna acida
1 baccello di vaniglia, tagliata nel senso della lunghezza
3 uova sbattute
Per preparare la salsa: Mettere 60 g di zucchero in un tegame
da 1,42 litri e far sciogliere a fuoco moderato sul piano di cottura
Wolf. Continuare per tre minuti o no a quando lo zucchero non
si è sciolto e ha assunto un colore marrone chiaro. Versare lentamente il succo d'arancia nel tegame e lasciare che si raddensi
a metà. Togliere dal fornello e versare in modo uniforme in 4
pirottini in ceramica da 177 ml ciascuno. Mettere da parte.
In una casseruola di circa 1,9 litri, unire la panna acida allo zucchero rimasto e aggiungere il baccello di vaniglia. Portare all'ebollizione mescolando continuamente. Frustare le uova in una
ciotola da 1,9 litri circa. Amalgamare lentamente la panna alle
uova, poco per volta, sbattendo bene a ogni aggiunta. Filtrare
il composto versandolo quindi in modo uniforme nei pirottini,
sopra il succo d'arancia. Mettere i pirottini su un vassoio forato.
Mettere il vassoio nel forno, sulla grata in posizione 1. Chiudere
lo sportello del forno. Impostare il forno su Recipes R9 (Ricetta
R9). Premere
il vassoio forato dal forno. Lasciar raffreddare completamente.
Tenere in luogo fresco per almeno due ore. Prima di servire, passare la lama di un coltello intorno al bordo di ciascun pirottino.
Capovolgere i an nel piatto di portata e versarvi sopra il succo
rimasto nei pirottini
Ricetta per 4 persone.
. All'emissione del segnale acustico, togliere
R10 PERE AL VINO ROSSO
Tempo di cottura — circa 15 minuti
235 ml di vino rosso
60 g di zucchero
Semi da un baccello di vaniglia
5 o 6 pere, tagliate a metà, dopo aver tolto i semi
In una teglia da 33 x 22 cm, unire vino rosso, zucchero e semi
dal baccello di vaniglia. Disporre le pere con la parte tagliata
sul fondo della teglia, sopra la mistura di vino rosso. Collocare
la grata nel forno in posizione 2. Mettere la teglia sulla grata nel
forno freddo. Chiudere lo sportello del forno. Impostare il forno
su Recipes R10 (Ricetta R10). Premere
segnale acustico, togliere la teglia dal forno. Lasciar raffreddare
per breve tempo e servire caldo.
Ricetta per 10 -12 persone.
. All'emissione del
10 | Italiano
Page 47

FUNZIONAMENTO DEL FORNO
Recipes (Ricette)
R11 PANINI AL LATTE
Tempo di cottura — circa 33 minuti
740 g di farina
30 g di zucchero
7 g di lievito in bustina
5 g di sale
230 ml di latte molto caldo, 50–55°C
60 g di burro sciolto
30 ml di latte
5 g di zucchero
15 g di burro sciolto
Mettere nella ciotola dell'impastatrice, munita di gancio impastatore, la farina, lo zucchero, il lievito e il sale. Amalgamare gli
ingredienti a bassa velocità per due minuti. Versare il latte caldo
e 60 g di burro sciolto. Continuare ad amalgamare per 5 minuti
o no a quando l'impasto inizia a prendere forma e si stacca
dall'impastatrice. Togliere il gancio impastatore e coprire con
un panno inumidito. Lasciar lievitare l'impasto a temperatura
ambiente per 1 ora o 1 ora e
piato di volume.*
Su una supercie leggermente infarinata, dividere l'impasto in
12 parti uguali. Formare delle palle e collocarle in una teglia di
vetro, unta con olio, da 30 x 20 cm di dimensioni. Coprire con un
panno inumidito e lasciar lievitare per almeno un'ora o no
a quando la dimensione dei panini non è raddoppiata.
Collocare la grata nel forno in posizione 2. Mettere la teglia nel
forno, sull'apposita grata. Chiudere lo sportello del forno. Impostare il forno su Recipes R11 (Ricetta R11). Premere . Amalgamare il rimanente latte, zucchero e burro. All'emissione del
segnale acustico, spennellare i panini con il composto. Premere
ancora. All'emissione del segnale acustico, togliere i panini
dal forno e lasciarli raffreddare per breve tempo. Servire caldi.
Ricetta per 12 panini al latte.
*Si può lasciare l'impasto nel frigorifero, in un contenitore
coperto, durante la notte. Quando si è pronti a usarlo, portare
l'impasto a temperatura ambiente (occorre circa un'ora), in modo
che si riscaldi prima di dare forma ai panini.
Per controllare se l'impasto è raddoppiato di volume, affondare due dita nell'impasto per circa 25 mm circa e toglierle
subito Se il dito lascia un'indentazione vuol dire che l'impasto è
raddoppiato di volume. Se l'indentazione sparisce vuol dire che
l'impasto ha bisogno di lievitare più a lungo.
1
/2 no a quando non è raddop-
R12 MUFFIN
Tempo di cottura — circa 35 minuti
Per i muffin:
460 g di farina
150 g di zucchero
10 g di lievito in polvere
2 g bicarbonato di sodio
2 g di sale
1 g di cannella
2 uova
230 ml di latticello
115 g di burro sciolto
15 g di buccia di limone
5 ml di vaniglia
60 ml di yogurt
230 g di mirtilli
Per lo streusel:
115 g di farina
60 g di burro ammorbidito
60 g di zucchero
60 g di noci tritate
15 g di buccia di limone
Nella ciotola dell'impastatrice munita della frusta piatta, impastare a bassa velocità farina, zucchero, lievito in polvere, bicarbonato di sodio, sale e cannella. In una ciotola separata frustare
le uova, il latticello, il burro raffreddato, la buccia di limone, la
vaniglia e lo yogurt. Aggiungere la mistura di uova alla ciotola
dell'impastatrice e miscelare per 20 secondi o no a quando tutti
gli ingredienti non si sono mischiati. Togliere la ciotola dall'impastatrice e unire i mirtilli. Spruzzare con una bomboletta spray
anti-aderente uno stampo o dei pirottini per mufn. Suddividere
l'impasto nei 12 contenitori di mufn.
Per preparare lo streusel: Mettere in una piccola ciotola da
impasto burro, zucchero, noci e buccia di limone. Mischiare con
le mani o usare un frullatore da pasticceria no a ottenere un
composto sbriciolato. Cospargere la parte superiore dei mufn
con il composto.
Mettere lo stampo o i pirottini per mufn su un vassoio forato.
Mettere il vassoio nel forno freddo in posizione 1. Chiudere lo
sportello del forno. Impostare il forno su Recipes R12 (Ricetta
R12). Premere
il vassoio forato dal forno. Lasciar raffreddare per circa 5 minuti
prima di togliere i mufn dallo stampo o dai pirottini. Servire
caldi o freddi e conservare in un contenitore sigillato.
Ricetta per 10 - 12 persone.
. All'emissione del segnale acustico, togliere
R13 - TORTA
Tempo di cottura — circa 1 ora
6 uova, separate
230 g di zucchero
60 ml di acqua
5 ml di estratto di limone
5 g di buccia di limone
230 g di farina per torte
2 g di cremotartaro
2 g di sale
Glassatura o frutta fresca, facoltativi
Mettere nella ciotola grande di un'impastatrice munita di frusta
piatta, i tuorli d'uovo e lo zucchero. Amalgamare a media velocità per due minuti o no a quando il composto non si addensa.
Aggiungere acqua, estratto di limone e buccia di limone. Rimestare per un minuto no a quando gli ingredienti non si sono
completamente amalgamati. Aggiungere la farina e frustare a
bassa velocità. Mettere da parte.
In un'altra ciotola grande da impastatrice munita di frusta
ellittica, versare gli albumi della uova. Montare gli albumi ad alta
velocità per circa 30 secondi no a quando non sono schiumosi
ma non induriti. Aggiungere il cremotartaro e il sale. Continuare a
montare gli albumi a neve no a quando sollevando la frusta non
si forma una punta nel composto.
Incorporare lentamente gli albumi a neve nel composto con i
tuorli d'uova. Versare il composto in uno stampo per ciambelle
di 22 cm di diametro.
Collocare la grata nel forno in posizione 1. Chiudere lo sportello
del forno. Impostare il forno su Recipes R13 (Ricetta R13).
Premere
il pre-riscaldamento del forno è pronto, mettere lo stampo nel
mezzo della grata. Premere . Quando il segnale acustico del
forno indica che il tempo di cottura è scaduto, togliere lo stampo
dal forno. Lasciar raffreddare per circa 10 minuti prima di
rimuovere la torta dallo stampo. Far passare una lunga spatola
di metallo ai lati e nel centro dello stampo per separare la torta.
Spingere in fuori dal fondo rimovibile e separare delicatamente
la torta dal fondo. Spalmare la torta con la glassatura o servire
con frutta fresca.
Ricetta per 10 -12 persone.
. All'emissione del segnale acustico di conferma che
R14 FOCACCIA
Tempo di cottura — circa 40 minuti
970 g di farina per pane o pizza
1 bustina da 7 g di lievito
10 g di aromi vari
5 g di zucchero
5 g di sale
310 ml di acqua calda, a 40–45°C
15 ml di olio d'oliva
Olio d'oliva supplementare
Sale marino
Mettere nella ciotola dell'impastatrice, munita di gancio impastatore, la farina, il lievito, gli aromi, lo zucchero e il sale. Amalgamare gli ingredienti a bassa velocità per due minuti. Aggiungere
l'acqua e l'olio. Continuare a impastare per cinque minuti o
no a quando l'impasto non inizia ad assumere una forma e a
staccarsi dalla ciotola.* Aumentare la velocità portandola a un
livello medio e impastare per 2-4 minuti no a quando l'impasto
non prende forma. Togliere il gancio impastatore e coprire con
un panno inumidito. Lasciar lievitare a temperatura ambiente
per 2 ore o no a quando le dimensioni dell'impasto non sono
raddoppiate.**
Su una supercie leggermente infarinata, lavorare l'impasto
formando una palla piatta. Adagiarla in una teglia di vetro di 20
cm. Stenderla no ai bordi della teglia. Spargere tutto l'olio sulla
supercie. Praticare dei fori di 25 mm circa ciascuno, con le
dita, a distanza uniforme nell'impasto. Coprire con una panno
inumidito e lasciar lievitare per 1 ora. Cospargere la supercie
dell'impasto con olio e praticare altri fori a distanza uniforme.
Cospargere di sale marino.
Collocare la grata nel forno in posizione 1. Mettere la teglia nel
forno, sull'apposita grata. Chiudere lo sportello del forno. Impostare il forno su Recipes R14 (Ricetta R14). Premere
All'emissione del segnale acustico, togliere la teglia dal forno.
Rimuovere immediatamente la focaccia dalla teglia.
Porzione: un'intera focaccia.
*Se l'impasto è troppo asciutto, aggiungere dell'acqua, 15 ml per
volta, fino a quando l'impasto non diventa morbido. Se l'impasto
è troppo molle, aggiungere della farina, 8 g per volta, fino a
quando l'impasto non si asciuga.
**Per controllare se l'impasto è raddoppiato di volume affondare
due dita nell'impasto per circa 25 mm e toglierle subito. Se il
dito lascia un'indentazione vuol dire che l'impasto è raddoppiato
di volume. Se l'indentazione sparisce vuol dire che l'impasto ha
bisogno di lievitare più a lungo.
.
wolfappliance.com | 11
Page 48

CONSIGLI DI MANUTENZIONE
Consigli di manutenzione
DISINCROSTAZIONE
A seconda delle condizioni dell'acqua, il forno va pulito ogni
6 – 18 mesi. Quando il forno ha bisogno di essere disincrostato, viene visualizzato il messaggio ‘Boiler scaled up—
please descale’ (Boiler incrostato - disincrostare). Il tempo
che intercorre tra una notica e l'altra dipende dalla durezza
dell'acqua specicata nelle impostazioni utente. Per regolare il livello di durezza dell'acqua, consultare la pagina 6.
®
Utilizzare soltanto la soluzione disincrostante Durgol
Steamer e attenersi alle istruzioni fornite dal produttore.
®
può essere ordinato online al sito: subzerowolfstore.
Durgol
com.
Impostazione della disincrostazione:
1 Con il forno spento, premere e ruotare la manopola
portandola su Descale (Disincrostazione), quindi premere
. Nel display viene visualizzato il messaggio ‘Add 0.5
L descaler— and press’ (Aggiungere 0,5 litri di soluzione
disincrostante — e premere)
2 Rimuovere la tanica d'acqua e versare l'intera solu-
zione disincrostante Durgol
.
®
Swiss Steamer nella tanica
dell'acqua, quindi rimettere la tanica nell'apposito vano e
premere
3 Dopo circa 30 minuti, viene visualizzato il messaggio,
.
‘Pour away descaler—Add 1 L water’ (Eliminare la
soluzione disincrostante — Aggiungere 1 litro d'acqua).
Rimuovere la tanica, aprire il rubinetto e versare il disincrostante nello scarico del lavandino.
ATTENZIONE
La mancata diluizione della soluzione disincrostante
prima della sua eliminazione, potrebbe scolorire il
lavandino e lo scarico d'acqua.
Swiss
RIMOZIONE DELLO SPORTELLO DEL FORNO
Lo sportello del forno può essere rimosso e pulito.
Per rimuovere lo sportello del forno, aprirlo completamente.
Ruotare in avanti entrambe le alette della cerniera portandole in posizione aperta. Chiudere lo sportello portandolo in
posizione di chiusura intermedia, quindi sollevarlo in alto e
fuori dalla sua sede. Vedere le gure che seguono.
Per reinstallarlo, inserire le cerniere dello sportello negli
appositi slot della cornice. Aprire completamente lo sportello del forno e ruotare entrambe le alette della cerniera
riportandole in posizione chiusa.
POSIZIONE
APERTA
POSIZIONE
CHIUSA
Alette della cerniera dello sportello del forno.
Sportello in posizione di apertura intermedia.
RIMOZIONE DELLE GUIDE DELLA GRATA
Per rimuovere le guide della grata, svitare il dado zigrinato
situato sul fronte della guida. Tirare la guida della grata al
lato dei perni lettati e rimuovere dal lato frontale. Fare riferimento alla gura qui di seguito.
PULIZIA
Acciaio inossidabile Applicare un detergente per acciaio inox non abrasivo utilizzando un panno morbido privo di lanugine.
Per far risaltare la lucentezza naturale, pulire delicatamente la supercie con un panno in microbra inumidito e quindi con un panno di camoscio asciutto. Seguire sempre la trama dell'acciaio
inossidabile.
Fronte dello sportello Per la pulizia, spruzzare del detergente per vetri su un panno.
Pannello di controllo Usare uno sgrassatore spray per rimuovere impronte digitali e macchie di alimenti. Per pulire il pan-
Interno Per una pulizia generica, attivare la modalità Steam (Vapore) a 80°C per 30 minuti. Questo ammor-
nello, spruzzare dapprima il detergente su un panno. Non spruzzare detergenti spray direttamente sul
pannello di controllo.
bidirà i grassi e i detriti dal forno. Spegnere il forno e pulire l'interno con un panno. Usare un panno
inumidito e del succo di limone per eliminare l'acqua ed eventuali macchie blu. Non usare apparecchi
di pulizia a vapore.
Grate del forno e guide delle grate Le grate del forno e le rispettive guide possono essere rimosse e pulite.
Vassoi in acciaio inossidabile I vassoi sia forati sia non forati in acciaio inossidabile possono essere lavati nella lavapiatti.
Tanica dell'acqua Macchie d'acqua e depositi di calcio possono essere rimossi usando un disincrostante. Non lavare la
tanica dell'acqua nella lavapiatti.
Sonda di temperatura Non lavare la sonda della temperatura nella lavapiatti.
4 Riempire la tanica con l'acqua del rubinetto e rimet-
terla nell'apposito vano. Viene visualizzato il messaggio
‘Descale appliance—1st rinsing cycle’ (Disincrostare l'elettrodomestico — 1º ciclo di risciacquo). Dopo circa 45
minuti, viene visualizzato il messaggio, ‘Pour away water
— Descaling completed’ (Eliminare l'acqua — Disincrostazione completata).
5 Il livello di sporco presente nell'acqua di risciacquo
determinerà se è necessario eseguire altri cicli di
risciacquo. Attenersi alle istruzioni visualizzate.
6 Una volta completati i cicli di risciacquo, rimuovere,
svuotare e asciugare la tanica d'acqua, quindi ripulire
tutte le superci di acciaio inossidabile.
12 | Italiano
WATER
LIGHT
TEMP
MODE
ON
POWER
TIME
OFF
GUIDA DELLA
GRATA
DADO ZIGRINATO
Rimozione delle guide della
grata.
Page 49

RISOLUZIONE PROBLEMI
Risoluzione problemi
FUNZIONAMENTO
Il forno non funziona.
• Vericare che il forno sia alimentato.
• Vericare che l'interruttore dell'unità e l'interruttore
elettrico dell'abitazione siano accesi.
Problemi di temperatura del forno.
• Contattare Wolf customer care (Servizio di assistenza
Wolf) al numero 800-222-7820 per possibili suggerimenti.
L'illuminazione non funziona.
• La lampadina è difettosa, chiamare un centro di assi-
stenza autorizzato Wolfe.
Il forno fa strani rumori durante il funzionamento.
• Il forno potrebbe emettere suoni durante il passaggio
a una fase diversa o un suono di pompaggio durante
il funzionamento. Tali suoni sono normali.
I ripiani del forno sono difficili da rimuovere.
• Alcune combinazioni di calore, umidità e posizionamento
degli alimenti potrebbero causare temporanee deformazioni dei ripiani del forno ma questi dovrebbero ritornare
al loro stato originale al raffreddamento del forno.
È stato visualizzato il messaggio ‘Do not remove water
tank’ (Non rimuovere la tanica dell'acqua).
• L'acqua del boiler non viene eliminata no a quando la
temperatura dell'acqua non è scesa a 80°C.
Assistenza clienti
• Per preservare la qualità del prodotto, contattare un
centro autorizzato Wolf.
• Prima di contattare un centro di assistenza autoriz-
zato, accertarsi di avere a portata di mano il numero
di modello e di serie dell'unità. Entrambi i numeri sono
riportati nella targhetta identicativa del prodotto.
Consultare pagina 5 per la posizione della targhetta
identicativa.
• Ai ni della garanzia è inoltre necessario avere a portata
di mano la data di installazione e il nome del rivenditore
Wolf autorizzato presso cui è stato effettuato l'acquisto.
Tale informazione dovrebbe essere disponibile a pagina
2 della presente guida.
Garanzia limitata dei prodotti Wolf
PRODOTTI INTERNAZIONALI
SOLO PER USO DOMESTICO
GARANZIA COMPLETA DI DUE ANNI
La garanzia accordata ai prodotti Wolf copre, no a due anni dopo la data di installazione, tutte
le parti e tutti i lavori per la riparazione o sostituzione, in condizioni di normale uso domestico, di
ogni parte del prodotto che riveli difetti di materiale o mano d'opera. Tutti i servizi di riparazione/
manutenzione resi da Wolf, coperti dalla summenzionata garanzia, devono essere eseguiti da
centri autorizzati Wolf, a meno che diversamente specicato da Wolf Appliance, Inc. Il servizio di
riparazione/manutenzione verrà fornito durante i regolari orari di lavoro.
GARANZIA LIMITATA DA TRE A CINQUE ANNI
Per cinque anni dalla data di installazione originale, Wolf Appliance riparerà o sostituirà le seguenti
parti che rivelano difetti di materiale o manodopera: bruciatori a gas (esclusi difetti cosmetici),
elementi riscaldanti elettrici, motori di sofanti (cappe di ventilazione), schede elettroniche di
controllo, tubi magnetron e generatori a induzione. La parte o le parti difettose verranno riparate
o sostituite, senza costi aggiuntivi. Tutti gli altri costi, inclusa la manodopera, saranno a carico
del proprietario dell'apparecchio. Tutti i servizi di riparazione/manutenzione resi da Wolf, coperti
dalla summenzionata garanzia, devono essere eseguiti da centri autorizzati Wolf, a meno che
diversamente specicato da Wolf Appliance, Inc. Il servizio di riparazione/manutenzione verrà
fornito durante i regolari orari di lavoro.
È stato visualizzato il messaggio ‘Boiler scaled up, please
descale!’ (Boiler incrostato - Disincrostare).
• Disincrostare il forno, consultare la pagina 12.
È stato visualizzato il messaggio ‘Appliance blocked,
descaling necessary’ (Elettrodomestico bloccato, disincrostazione necessaria).
• Disincrostare il forno, consultare la pagina 12. Se il mes-
saggio non scompare dopo la disincrostazione, contattare un centro di assistenza autorizzato Wolf.
Wolf, Wolf & Design, Wolf Gourmet, W & Design e il colore rosso applicato alle manopole sono marchi registrati e marchi di assistenza di Wolf Appliance, Inc. Sub-Zero, Sub-Zero &
Design, Dual Refrigeration, Constant Care, The Living Kitchen, Great American Kitchens The Fine Art of Kitchen Design e Ingredients sono marchi registrati e marchi di assistenza di
Sub-Zero, Inc. (indicati collettivamente come "Marchi aziendali".) Tutti gli altri marchi o marchi registrati sono di proprietà dei rispettivi titolari negli Stati Uniti e in altri paesi.
wolfappliance.com | 13
Page 50

DAMPFBACKOFEN MIT HEISSLUFT-FUNKTION
Inhaltsverzeichnis
3 Sicherheitshinweise
5 Dampfbackofen mit Heißluft-Funktion
– Leistungsmerkmale
5 Dampfbackofen mit Heißluft-Funktion – Betrieb
12 Empfehlungen zur Pege
13 Fehlersuche
13 Wolf-Garantie
Kundendienst
Modell und Seriennummer nden Sie auf der beiliegenden
Produktregistrierungskarte. Beide Nummern sind auch auf
dem Produkttypenschild aufgeführt. Die Typenschildposition
ist auf Seite 5 angegeben. Für Garantiezwecke benötigen Sie
außerdem das Datum der Installation und den Namen Ihres
Wolf-Vertragshändlers. Zeichnen Sie die nachstehenden
Informationen für zukünftige Nachschlagezwecke auf.
SERVICEINFORMATIONEN
Modellnummer
Seriennummer
Datum der Installation
Name des zertizierten Service
Nummer des zertizierten Service
Vertragshändler
Händlernummer
Wichtiger Hinweis
Um eine möglichst sichere und efziente Installation dieses
Produkts zu gewährleisten, beachten Sie bitte die folgenden
Arten hervorgehobener Informationen in der gesamten
Anleitung:
WICHTIGER HINWEIS hebt Informationen hervor, die beson-
ders wichtig sind.
VORSICHT ist ein Hinweis auf eine Situation, die bei Nicht-
beachtung der Anweisungen zu geringfügigen Personenoder Sachschäden führen kann.
ACHTUNG weist auf eine Gefahr hin, die bei Nichtbeachtung
der Anweisungen zu schweren Verletzungen oder zum Tod
führen kann.
2 | Deutsch
Page 51

SICHERHEITSHINWEISE
SICHERHEITSHINWEISE
Dieser Ofen wurde gebaut, um den anerkannten Technologieund Sicherheitsnormen zu entsprechen und ist zur Verwendung
in nicht kommerziellen Küchen vorgesehen. Dieser Ofen wurde
nicht für Personen (einschl. Kindern) mit eingeschränkten
physischen, sensorischen oder mentalen Fähigkeiten oder
fehlenden Erfahrungen/Kenntnissen konzipiert, es sei denn,
sie stehen unter Aufsicht oder erhalten Anweisungen für die
Verwendung des Geräts von einer Person, die für ihre Sicherheit verantwortlich ist. Die richtige Verwendung ist wichtig, um
Schaden oder Unfälle zu vermeiden.
Die Installation und der Anschluss an die elektrische Versorgung müssen von einem qualizierten Elektriker gemäß der mitgelieferten Installationsanweisung vorgenommen werden.
Vor der Verwendung den Wassertank füllen und alle Vorbereitungen vornehmen, die im Abschnitt „Vor der Verwendung“
beschrieben werden.
Bitte bewahren Sie diese Anweisung an einem sicheren Ort auf.
Wenn Sie diesen Ofen verkaufen oder an Dritte weitergeben,
müssen Sie diese Anweisungen gemeinsam mit der Installationsanweisung an den Empfänger geben.
WICHTIGE SICHERHEITSVORKEHRUNGEN
Bei der Verwendung elektrischer Geräte müssen immer grundlegende Sicherheitsvorkehrungen beachtet werden, wie die
Folgenden:
• Lesen Sie alle Anweisungen.
• Berühren Sie keine heißen Oberächen. Verwenden Sie Griffe
oder Knebel.
• Um gegen elektrischen Schlag zu schützen, das Kabel oder den
Stecker nicht in Wasser oder andere Flüssigkeiten eintauchen.
• Das Kabel nicht über eine Tisch- oder Arbeitsplattenkante
hängen lassen oder mit heißen Oberächen in Kontakt kommen
lassen.
• Die Verwendung des Geräts von Kindern oder in der Nähe von
Kindern erfordert die Aufsicht eines Erwachsenen.
Kinder sollten beaufsichtigt werden, um sicherzustellen, dass sie
nicht mit dem Gerät spielen.
ACHTUNG
Zugängliche Teile können während der Verwendung heiß
werden. Kleinkinder sollten vom Gerät fern gehalten werden.
wolfappliance.com | 3
Page 52

SICHERHEITSHINWEISE
WICHTIGE SICHERHEITSVORKEHRUNGEN
• Dieses Gerät kann von Kindern ab 8 Jahren und von Personen
mit eingeschränkten physischen, sensorischen oder mentalen
Fähigkeiten oder fehlenden Erfahrungen/Kenntnissen benutzt
werden, wenn diese beaufsichtigt werden oder Anweisungen
für die sichere Verwendung des Geräts erhalten haben und
die damit zusammenhängenden Gefahren verstehen. Kinder
dürfen mit dem Gerät nicht spielen. Reinigungs- und Wartungsarbeiten dürfen von Kindern nicht ohne Aufsicht durchgeführt
werden.
• Nur die für diesen Backofen empfohlene Temperatursonde
verwenden.
• Bei Nichtverwendung und vor jeder Reinigung Stecker aus der
Steckdose ziehen. Vor dem Entfernen von Teilen Ofen abkühlen
lassen.
• Keine aggressiven scheuernden Reinigungsmittel oder scharfe
Metallkratzer verwenden, um die Glastür zu reinigen. Die Oberäche kann zerkratzt werden, was möglicherweise zum Zerschmettern des Glases führen kann.
• Bei der Verwendung von Zubehör, das nicht vom Geräteher-
steller empfohlen wird, können Verletzungen auftreten.
• Nicht im Freien verwenden.
• Nicht auf oder in die Nähe einer heißen Gas- oder Elektroherd-
platte oder in einen erhitzten Ofen stellen.
• Beim Tragen eines Geräts, das heißes Öl oder heiße Flüssig-
keiten enthält, extrem vorsichtig vorgehen.
• Kabel immer zuerst am Gerät anschließen und dann in die
Steckdose stecken. Zum Ausschalten Schaltknebel in die Position „Aus“ bringen und dann den Stecker aus der Steckdose
ziehen.
• Gerät nur zum dafür vorgesehenen Zweck verwenden.
• Diese Anleitung an einem sicheren Ort aufbewahren.
• Keine Gerät mit beschädigtem Kabel oder Stecker verwenden,
nachdem ein Problem aufgetreten ist oder das Gerät auf
irgendeine Weise beschädigt wurde. Gerät zum nächsten Vertragshändler zur Diagnose, Reparatur oder Einstellung bringen.
4 | Deutsch
Page 53

DAMPFBACKOFEN MIT HEISSLUFT-FUNKTION – LEISTUNGSMERKMALE
BENUTZUNG DES BACKOFENS
Dampfbackofen mit Heißluft-Funktion
– Leistungsmerkmale
LEISTUNGSMERKMAL
1
Produkttypenschild
2
Schaltblende und Display
3
Schaltknebel
4
Verstellbare Backofenroste
5
Umluftventilator
6
Temperatursondenaufnahme
7
Halogenbeleuchtung
8
Wassertank-Zugangsöffnung
2
7
5
1
Dampfbackofen mit Heißluft-Funktion (ICBCSO30TM
abgebildet).
Erste Schritte
Sie können es sicher kaum abwarten, mit dem Kochen zu
beginnen. Nehmen Sie sich aber dennoch die Zeit, um diese
Bedienungs- und Pegeanleitung zu lesen. Unabhängig
davon, ob Sie nur gelegentlich kochen oder ein erfahrener
Koch sind, sollten Sie sich mit sicheren Arbeitspraktiken,
den besonderen Merkmalen sowie unseren Empfehlungen
für die Bedienung und Pege Ihres Dambackofens mit
Heißluft-Funktion vertraut machen.
Um die besten Ergebnisse zu gewährleisten, sollten Sie sich
mit den Betriebsarten und Sondermerkmalen auf Seite 8
vertraut machen.
8
3
6
4
Schaltblende
Die Schaltblende und das Schaltblenden-Display sind
schnittig und bedienerfreundlich. Der Schaltknebel (
und die Tasten dienen der Einstellung der Betriebsarten und
Sie können damit auf alle Leistungsmerkmale des Dampfbackofens mit Heißluft-Funktion zugreifen, um herausragende Ergebnisse zu erzielen.
Der Knebel kann eigenständig und in Kombination mit den
Tasten verwendet werden, um eine Auswahl zu treffen. Sie
können Ihre Auswahl durch Drücken von
SCHALTBLENDEN-ANZEIGEN
Die Ofentemperatur wurde eingestellt.
Die Temperatursonde wird verwendet.
Der Dampfmodus ist aktiviert.
Der Aufwärmmodus ist aktiviert.
Der automatische Dampfbackmodus ist aktiviert.
Der Heißluft-Modus ist aktiviert.
Der Heißluft-Feucht-Modus ist aktiviert.
Der Heißluft-Dampf-Modus ist aktiviert.
Der Timer ist eingestellt.
Die Betriebszeit ist aktiviert.
Die Ausschaltzeit ist aktiviert.
Der Uhr ist eingestellt.
bestätigen.
)
KNEBEL UND TASTEN AUF DER SCHALTBLENDE
Wasser
Lampe
Temperatur
Modus
OK
Timer
Zeit
Aus
Schaltblende.
8:30190°C
wolfappliance.com | 5
Page 54

BENUTZUNG DES BACKOFENS
Benutzereinstellungen
Mithilfe der Benutzereinstellungen kann der Benutzer die
Sprache, die Kindersicherung, die Zeitanzeige, das akustische Signal, die Beleuchtung, die Wasserhärte, die Temperatureinheiten, das Zeitformat, die Werkseinstellungen und
die Wassertanköffnungskontrolle einstellen.
Die Schaltblende kann mithilfe der Benutzereinstellungen
gesperrt werden. Um den Ofen zu verwenden, indem die
Sperre kurzzeitig deaktiviert wird,
halten und dann auf
drücken. Die Sperre wird automatisch 10 Minuten nachdem der Ofen ausgeschaltet wurde
wieder aktiviert.
Einstellen der Benutzereinstellungen:
1 Drücken Sie bei ausgeschaltetem Ofen die Taste und
drehen Sie den Knebel auf „USER SETTINGS“ (BENUTZEREINSTELLUNGEN). Drücken Sie dann auf
2 Drehen Sie den Knebel für die verschiedenen Optionen
und drücken Sie dann auf
3 Folgen Sie den Anweisungen auf dem Display und
drücken Sie dann auf
drücken und gedrückt
.
.
.
Bedienung des Backofens
WÅHLEN SIE DEN KOCHMODUS
1 Drücken Sie mehrere Male auf , bis der gewünschte
Kochmodus angezeigt wird und drücken Sie dann auf
WÄHLEN SIE DIE TEMPERATUR
1 Drücken Sie auf .
2 Drehen Sie den Knebel zur gewünschten Temperatur und
drücken Sie dann auf
Um die Temperatur während des Kochens zu verändern,
drücken Sie auf
ratur ein und drücken dann auf
WASSERBEHÄLTER
Der Wassertank hat ein Fassungsvermögen, das für 1,5
Stunden Dampf ausreicht, normalerweise genug für 4–5
Kochrunden. Füllen Sie den Behälter mit frischem, kalten
Leitungswasser. Verwenden Sie kein entmineralisiertes,
geltertes oder destilliertes Wasser.
Drücken Sie zum Öffnen der Zugangsöffnung immer auf
Beim manuellen Zugriff auf den Wassertank kann Schaden
entstehen.
Wenn der Ofen ausgeschaltet ist, wird Wasser zurück in den
Behälter gepumpt, sobald die Wassertemperatur unter 80°C
liegt. Wenn der Behälter während des Kochens wieder aufgefüllt werden muss, nicht mehr als 2 Tassen voll einfüllen,
damit das Wasser nicht überläuft, wenn es wieder zurück in
den Behälter gepumpt wird.
.
, dann stellen Sie die gewünschte Tempe-
.
VOR DER VERWENDUNG
Testen Sie die Wasserhärte mit dem mitgelieferten Test-
.
streifen. Der Ofen ist standardmäßig für hartes Wasser
eingestellt. Lesen Sie unter den Benutzereinstellungen auf
Seite 6 nach, wie Sie die Härte einstellen können.
Um sicherzugehen, dass das gesamte Öl vom Herstellungsprozess aus em Ofen entfernt wurde, müssen Sie wie folgt
vorgehen.
1 Den Backofen gründlich mit heißem Wasser und einem
milden Spülmittel reinigen. Anschließend mit einem weichen Tuch abwischen und trocknen.
2 Die Abzugshaube einschalten. Etwas Rauch und
Geruchsbildung ist normal.
3 Füllen Sie den Wassertank und setzen Sie ihn ein.
4 Wählen Sie den Automatischen Dampfbackmodus und
210°C. Heizen Sie den (leeren) Ofen 30 Minuten lang auf.
NACH JEDER VERWENDUNG
.
1 Drücken Sie auf
Wassertank erst dann entfernen, wenn die Nachricht
. Wenn Sie mit Dampf kochen, den
„WATER IS BEING PUMPED OFF“ (WASSER WIRD
ABGEPUMPT) nicht mehr länger angezeigt wird.
2 Öffnen Sie die Zugangsöffnung in der Ruhe-Position und
lassen Sie den Behälter abkühlen. Nach dem Abkühlen
das Innere trocken wischen, bevor Sie die Zugangsöffnung schließen. Siehe Abbildung unten.
ZEIT
Es ist sehr wichtig, dass die richtige Zeit eingestellt wird,
wenn mit vorgegebenen Kochzeiten gekocht wird. Nach
einem Stromausfall muss die Zeit neu gestellt werden.
Zeit einstellen:
1 Drücken Sie bei ausgeschaltetem Ofen auf .
2 Drehen Sie den Knebel, um die Zeit einzustellen, und
drücken Sie dann auf
3 Drehen Sie den Knebel, um die Minuten einzustellen, und
drücken Sie dann auf
TIMER
.
.
Der Timer kann maximal auf 9 Stunden 59 Minuten eingestellt werden. Nach dem Einstellen des Timers wird der
Countdown auf dem Display beleuchtet. Der Timer ist unabhängig vom Backofen. Durch das Einstellen des Timers ist
die Kochzeit oder Ausschaltzeit nicht betroffen.
Timer einstellen:
1 Drücken Sie auf .
2 Drehen Sie den Knebel zur gewünschten Dauer und
drücken Sie dann auf
.
Zum Zurückstellen auf drücken, mit dem Knebel die
Dauer einstellen und dann auf
chen, zweimal auf
und dann auf drücken.
drücken. Zum Abbre-
6 | Deutsch
So füllen Sie den Wassertank:
1 Drücken Sie auf .
2 Nehmen Sie den Wassertank heraus und füllen Sie ihn.
3 Setzen Sie den Wassertank wieder ein und schließen Sie
die Zugangsöffnung manuell.
Tür in Ruhe-Position.
Page 55

BENUTZUNG DES BACKOFENS
Bedienung des Backofens
KOCHZEIT
Beim Kochen mit vorgegebenen Kochzeiten wird der Backofen zu einer festgelegten Zeit automatisch ausgeschaltet.
Der Backofen beginnt sofort sich aufzuheizen und schaltet
sich zur gewünschten Ausschaltzeit aus.
Wenn eine Temperatursonde verwendet wird, schaltet sich
der Ofen aus, wenn die eingestellte Temperatur erreicht
wird. Wenn die auf der Sonde eingestellte Temperatur nicht
vor der Ausschaltzeit erreicht wird, wird die Kochzeit nicht
verlängert.
Bedienelemente einstellen:
1 Wählen Sie den gewünschten Kochmodus und die
Temperatur.
2 Drücken Sie auf
3 Drehen Sie den Knebel, um die gewünschte Kochzeit
einzustellen, und drücken Sie dann auf
Zum Einstellen der Kochzeit auf drücken, mit dem
Knebel die Zeit einstellen und dann auf
.
.
drücken.
EINSCHALTVERZÖGERUNG
Mit der Einschaltverzögerung wird der Backofen zu festgelegten Zeiten automatisch ein- und ausgeschaltet. Der
Backofen bleibt bis zur gewünschten Startzeit inaktiv
und schaltet sich zur gewünschten Ausschaltzeit aus. Die
Uhr muss auf die korrekte Zeit eingestellt sein, damit das
Kochen mit der Einschaltverzögerung richtig funktioniert.
Wenn eine Temperatursonde verwendet wird, schaltet sich
der Ofen aus, wenn die eingestellte Temperatur erreicht
wird. Wenn die auf der Sonde eingestellte Temperatur nicht
vor der Ausschaltzeit erreicht wird, wird die Kochzeit nicht
verlängert.
Bedienelemente einstellen:
1 Wählen Sie den gewünschten Kochmodus und die
Temperatur.
2 Drücken Sie auf und drehen Sie den Knebel zur
gewünschten Kochzeit (nicht auf
3 Drücken Sie auf und drehen Sie dann den Knebel zur
gewünschten Ausschaltzeit. Drücken Sie dann auf
drücken).
.
Zum Einstellen der Ausschaltzeit auf drücken, mit dem
Knebel die Zeit einstellen und dann auf
drücken.
TEMPERATURSONDE
Die Temperatursonde misst die interne Temperatur
der Speisen während des Kochens. Sie kann in allen Kochmodi mit Ausnahme von Gourmet verwendet werden. Wenn
die Temperatursonde verwendet wird, auf
drücken, um
zwischen der tatsächlichen Sondentemperatur und der eingestellten Sondentemperatur hin- und herzuschalten.
Bedienelemente einstellen:
1 Wählen Sie den gewünschten Kochmodus und die
Temperatur.
2 Die Sonde in den dicksten Teil der Speise einstecken
und dann in die Steckdose. Siehe Abbildung unten.
3 Drücken Sie zweimal auf und drehen Sie dann den
Knebel zur gewünschten Garzeit. Drücken Sie dann auf
.
Die Sondentemperatur wird auf dem Display angezeigt,
sobald sie über 30°C liegt. Zum Einstellen der Sondentemperatur auf
Temperatur drehen. Dann auf
drücken und den Knebel auf die gewünschte
drücken.
VORSICHT
Sonde und Sondenaufnahme werden sehr heiß. Vorsichtig behandeln.
POSITIONEN DER BACKOFENROSTE
Die Backofenroste können in die vier Positionen gebracht
werden, die auf der Vorderklappe des Ofens abgebildet
sind. Die Roste so positionieren, dass die horizontale
Stange hinten im Ofen ist. Die Edelstahlwanne nicht umgekehrt verwenden. Siehe Abbildung unten. Im Rezeptbuch
werden die optimalen Rostpositionen für die jeweiligen
Rezepte angegeben.
Einschubhöhe.
Sondenaufnahme.
wolfappliance.com | 7
Page 56

BENUTZUNG DES BACKOFENS
Kochmodi
MODUS
Dampf 30 – 100°C
Aufwärmen
Automatisches
Dampfbacken
Heißluft
Heißluft-FeuchtModus
Heißluft-DampfModus
Gourmet — — Verwenden Sie diesen Modus für die auf Seite 8 beschriebenen Speisen,
Langsames Braten 30 – 150°C
Rezepte 30 – 230°C
Meine Rezepte 30 – 230°C
Warmhalten 80°C
Reinigen 30 – 230°C Im Reinigen-Modus wird Dampf verwendet, um Babyaschen und Ein-
ANZEIGE BEREICH SONDE VERWENDUNG
100 – 150°C
100 – 230°C
30 – 230°C
30 – 230°C
30 – 230°C
Verwenden Sie den Dampfmodus für Speisen, die Sie in einem Topf
•
erhitzen würden und alle Speisen, die eine sanfte Garmethode erfordern,
wie Fisch, Meeresfrüchte, Gemüse und Reis.
Im Aufwärm-Modus werden Dampf und Wasser verwendet, um Speisen
•
langsam wieder aufzuwärmen. Verwenden Sie diesen Modus für alle
Speisen, die Sie im Ofen, auf dem Herd oder in der Mikrowelle aufwärmen
würden.
Wenn Sie Backwaren zuerst im Dampf und dann mit Heißluft backen,
•
werden Sie innen weich und haben eine glänzendes Äußeres ohne dass
sie zuvor mit Eigelb bestrichen werden müssen. Verwenden Sie diese
Methode für frische, vorgebackene oder gefrorene Brote, Brötchen,
Kuchen und Plätzchen. Nicht aufwärmen.
Der Heißluftventilator verteilt die Luft gleichmäßig für konsistente Ergeb-
•
nisse und Bräunung. Sie können bis zu 25° und 25% Kochzeit im Vergleich
zu traditionellen Öfen einsparen und somit Zeit und Energie sparen. Verwenden Sie den Heißluftmodus für verschiedene Speisen, darunter auch
Mufns, Brötchen und Braten.
Im Heißluft-Feucht-Modus wird keine Luft abgeführt, damit die erzeugte
•
Feuchtigkeit im Ofen bleibt. Verwenden Sie diesen Modus für Kuchen,
Auäufe, Vollkorngerichte, Lasagne und Fleischgerichte.
Dampf überträgt Energie efzienter auf Speisen als nur Heißluft, was die
•
Kochzeit beschleunigt. Speisen behalten Ihre eigene Feuchtigkeit bei.
Verwenden Sie den Heißluft-Dampf-Modus, um Speisen zuzubereiten, die
im Inneren zart und saftig und außen knusprig sein sollen. Drücken Sie auf
, um den Dampf zu aktivieren.
die frisch, gekühlt oder gefroren sein können. Wählen Sie die Speise und
die gewünschte Garzeit, und der Sensor stellt die Zeit, die Temperatur und
die Feuchtigkeit ein, damit keine weiteren Anleitungen notwendig sind. Die
voreingestellte Temperatur und die Zeit hängen von der Speise und dem
gewünschten Garzustand ab.
Verwenden Sie diesen Modus für zarte Fleischspeisen. Stecken Sie die
•
Temperatursonde in das Fleisch, wählen Sie eine Brateinstellung und die
Garzeit und genießen Sie eine perfekt gekochte Fleischspeise, wenn Sie
nach Hause kommen.
Sie können ganze Mahlzeiten zubereiten - von der Vorspeise über die
•
Hauptspeise bis hin zum Dessert (siehe Seite 9). Wählen Sie die Speise,
die Anzahl der Portionen und den Garzustand. Der Sensor stellt den Rest
ein. Der Rezeptmodus ist ideal für schnelle Gerichte oder um verschiedene
Gericht für eine Party zuzubereiten.
Unter Meine Rezepte können Sie Kochanweisungen für zehn Ihrer Lieb-
•
lingsgerichte speichern und diese jederzeit ersetzen oder bearbeiten.
Beim Warmhalten wird eine Kombination aus Heißluft und Dampf ver-
•
wendet, um Speisen bis zum Verzehr warmzuhalten.
machgläser schneller und sicherer zu reinigen.
GOURMET
Im Gourmet-Modus werden die nachstehend aufgelisteten
frischen, gekühlten oder gefrorenen Speisen zubereitet.
Wählen Sie die Speise und die gewünschte Garzeit, und der
Sensor stellt die Zeit, die Temperatur und die Feuchtigkeit
ein, damit keine weiteren Anleitungen notwendig sind.
SPEISEN CODE
Frische Vorspeisen A1
Gefrorene Vorspeisen A2
Gebackene Speisen A3
Soufés A4
Ofenkartoffeln A5
Gefrorene Kartoffelspeisen A6
Schmorgerichte A7
Frische Pizza A8
Gefrorene Pizza A9
Pudding A10
Brot A11
Hefeteig mit Füllung A12
Kuchen A13
Torten A14
Gourmet einstellen:
1 Drücken Sie zweimal auf und drehen Sie den Knebel
zur gewünschten Speise. Drücken Sie dann auf
2 Folgen Sie den Anweisungen auf dem Display und
drücken Sie dann auf
.
.
LANGSAMES BRATEN
Einstellung für Langsames Braten:
1 Drücken Sie auf und drehen Sie den Knebel auf
Langsames Baten. Drücken Sie dann auf
2 Drehen Sie den Knebel, um die gewünschte Speise und
.
den gewünschten Garzustand (sofern zutreffend) einzustellen, und drücken Sie dann auf
3 Auf dem Display wird die voreingestellte Sondentempe-
.
ratur angezeigt. Um die Sondentemperatur während des
Kochens zu verändern, drücken Sie auf
, dann stellen
Sie die gewünschte Temperatur ein und drücken dann
.
auf
Die Garzeit für langsames Braten kann zwischen 2,5 bis
4,5 Stunden eingestellt werden. Um die Zeit einzustellen,
drücken Sie auf
Dauer. Dann drücken Sie auf
und drehen den Knebel zur gewünschten
.
8 | Deutsch
Page 57

BENUTZUNG DES BACKOFENS
Kochmodi
REZEPT-MODUS
Mit dem Rezept-Modus können Sie gesamte Mahlzeiten von der Vorspeise, bis zur Hauptspeise und dem Dessert
zubereiten. Siehe die nachstehende Tabelle und die Rezepte
auf den Seiten 9-11.
SPEISEN CODE
Vorspeisen R1
Fisch in Blätterteig R2
Fischröllchen R3
Rindeisch nach Art Stroganoff R4
Rinderbraten R5
Schweinelet in Blätterteig R6
Nudelauauf R7
Auberginenauauf R8
Flan R9
Birnen in Rotwein R10
Brötchen R11
Mufns R12
Kuchen R13
Focaccia R14
Rezepte einstellen:
1 Drücken Sie auf und drehen Sie den Knebel auf
Rezepte. Drücken Sie dann auf
2 Drehen Sie den Knebel, um das gewünschte Rezept zu
wählen, und drücken Sie dann auf
3 Folgen Sie den Anweisungen auf dem Display und drü-
cken Sie dann auf
.
.
.
MEINE REZEPTE-MODUS
Mit Meine Rezepte können Sie die Rezepte für bis zu zehn
Ihrer Lieblingsgerichte speichern. Wenn Sie für das Rezept
eine Temperatursonde benötigen, stecken Sie diese ein,
bevor Sie die Einstellungen vornehmen.
Meine Rezepte einstellen:
1 Drücken Sie auf und drehen Sie den Knebel auf
Meine Rezepte. Drücken Sie dann auf
2 Drehen Sie den Knebel, um das gewünschte Rezept zu
wählen, und drücken Sie dann auf
3 Wählen Sie den gewünschten Modus, die Temperatur,
.
.
die Zeit und Sondentemperatur (sofern zutreffend) und
drücken Sie dann auf
4 Drücken Sie auf , um das Rezept zu speichern.
.
Um ein gespeichertes Rezept zu löschen, drücken Sie auf
, dann stellen Sie den Knebel auf Meine Rezepte und
drücken dann auf
. Drehen Sie den Knebel, um das
gewünschte Rezept zu wählen, und drücken Sie dann auf
. Drehen Sie den Knebel, bis Löschen angezeigt wird,
und drücken Sie dann auf
.
WARMHALTE-MODUS
Warmhalte-Modus einstellen:
1 Drücken Sie auf und drehen Sie den Knebel auf
Warmhalten. Drücken Sie dann auf
.
REINIGEN-MODUS
Reinigen einstellen:
1 Drücken Sie auf und drehen Sie den Knebel auf
Reinigen. Drücken Sie dann auf
2 Drehen Sie den Knebel, um die gewünschte Option ein-
zustellen, und drücken Sie dann auf
.
.
Rezepte
R1 VORSPEISEN
Kochzeit—20 Minuten
1 – 500 g Blätterteigscheiben
30 ml Olivenöl
60 g frischer gehackter Oregano
45 g frischer gehackter Thymian
115 g geriebener Parmesan
Eine Scheibe Blätterteig auf ein Brett legen. Den Teig mit Öl
bepinseln. Den Oregano, den Thymian und den Parmesankäse
über das Öl streuen. Die zweite Teigscheibe ausrollen und diese
vorsichtig auf die Kräuter-Käse-Mischung legen.
Leicht auf die Mischung drücken. Den Blätterteig in 13 mm lange
Streifen schneiden. Die Streifen verdrehen und darauf achten,
dass die Mischung nicht austritt. Ein Backblech mit Backpapier
auslegen und die Streifen im Abstand von ca. 25 mm auf das
Backblech legen. Die Streifen ca. 15 Minuten ruhen lassen,
bevor Sie das Backblech in den Ofen schieben. Das Blech auf
Position 1 in den Ofen schieben. Die Backofentür schließen.
Den Ofen auf Rezept R1 einstellen. Auf
Klingelton zu hören ist, das Blech aus dem Ofen nehmen. Jede
Vorspeise in drei Teile schneiden. Sofort servieren.
42 Portionen.
Wenn Sie mehr als ein Backblech verwenden, schieben Sie die
Bleche auf die Positionen 1 und 3 im Ofen. Die Backzeit ändert
sich nicht.
drücken. Wenn der
R2 FISCH IN BLÄTTERTEIG
Kochzeit —25 Minuten
1 kleine Zucchini
1 rote Paprikaschote
1
/2 – 250 g Blätterteigscheiben
60 g gehackte Petersilie
Salz und frisch gemahlener Pfeffer
4 – 60 g feste Fischlets in 76 x 51 mm Stücke geschnitten
Schneiden Sie die rote Paprikaschote in Viertel. Samen entfernen und jedes Viertel in vier 9 mm dicke Streifen schneiden.
Beiseite stellen. Die Enden der Zucchini abschneiden und diese
in 6 mm dicke Scheiben schneiden. Beiseite stellen.
Ein Backblech mit Backpapier auslegen. Die kühle Blätterteigscheibe auf eine Schnittäche legen und öffnen. In vier gleich
große Quadrate schneiden. Eine Zucchinischeibe und vier Paprikastreifen auf jedes Quadrat legen und die Kanten frei lassen.
Jedes Quadrat mit ca. 15 g Petersilie bestreuen. Mit Salz und
Pfeffer würzen. Ein Fischlet auf jedes Quadrat legen und mit
Salz und Pfeffer würzen. Den Teig über den Fisch falten und die
Teigkanten zusammen drücken. Die Päckchen auf das Backpapier legen. Das Blech auf Position 1 in den Ofen schieben.
Backofentür schließen. Den Ofen auf Rezept R2 einstellen. Auf
drücken. Wenn der Klingelton zu hören ist, das Blech aus
dem Ofen nehmen. Sofort servieren.
4 Portionen.
R4 FISCHRÖLLCHEN
Kochzeit —10 Minuten
8 dünne Fischlets, wie Seezunge, Heilbutt oder Steinbutt
Salz und frisch gemahlener Pfeffer
30 g geröstete Pinienkerne
95 g Rucola
Den Fisch auf ein Schnittbrett legen. Beide Seiten mit Salz
und Pfeffer würzen. Ungefähr 7 g Pinienkerne und 9 g Rucola
auf jedes Filet legen. Filets von einem zum anderen Ende hin
aufrollen. Mit Zahnstocher schließen. Ein perforiertes Blech mit
Backspray besprühen und Fischröllchen darauf legen. Das Blech
auf Position 2 in den Ofen schieben. Backofentür schließen. Den
Ofen auf Rezept R3 einstellen. Auf
Klingelton hören, den Fisch herausnehmen und sofort servieren.
4 - 6 Portionen.
drücken. Wenn Sie den
wolfappliance.com | 9
Page 58

BENUTZUNG DES BACKOFENS
Rezepte
R4 Rindfleisch nach Art Stroganoff
Kochzeit—47 Minuten
800 g Rinderbraten in 6 x 13 mm große Streifen geschnitten
10 g Salz
5 g frisch gemahlener Pfeffer
15 g Rinderbrühenwürfel
1 gelbe Paprikaschote in 6 mm lange Streifen geschnitten
1 rote Paprikaschote in 6 mm lange Streifen geschnitten
225 g Champignons in 6 mm dicke Scheiben geschnitten
2 kleine, dünn geschnittene Zwiebeln
2 – 30 g Päkchen Soßenmischung
15 g Speisestärke
10 g Paprika
350 ml Sahne
60 ml Tomatenmark
Gekochte Breitbandnudeln, optional
Fleisch mit Salz und Pfeffer würzen. Rindeisch in eine ca.
22 x 33 cm großer Auaufform legen. Die Brühe mit den Paprikaschoten und den Zwiebeln mischen.
Den Rost in Position 2 bringen. Die Auaufform auf den Rost
stellen. Backofentür schließen. Ofen auf Rezept R4 für 6 Portionen einstellen. Auf
Wenn der Klingelton zu hören ist, Gericht aus dem Ofen nehmen
und die Flüssigkeit in ein Gefäß mit 500 ml Fassungsvermögen
schütten und beiseite stellen. Gericht wieder in den Ofen stellen
und auf drücken, um das Gericht fertig zu kochen.
Soßenzubereitung: Die Soßenmischung, die Speisestärke
und das Paprikapulver in einem Topf vermischen. Sahne und
Tomatenmark unterrühren. 410 ml Kochüssigkeit (ggf. mit
Wasser verdünnen) hinzufügen. Auf den Wolf-Herd stellen und
bei mittlerer Hitze zum Kochen bringen. Bei ständigem Rühren
aufkochen lassen.
Wenn Sie den Klingelton hören, das Gericht aus dem Ofen
nehmen und mit der Soße vermischen. Alleine oder mit den
Nudeln servieren.
5 - 6 Portionen.
drücken.
R5 RINDERBRATEN
Kochzeit—2 Stunden
1,1 kg Rinderbraten in drei Teile geschnitten
2 geschälte und geviertelte Karotten
1
/2 kleine Selleriewurzel, geschält und geviertelt
2 kleine geviertelte Zwiebeln
1 Lorbeerblatt
2 ganze Nelken
8 schwarze Pfefferkörner
940 ml Gemüsebrühe
Rindeisch, Gemüse und Gewürze in eine Auaufform mit 4 Liter
Fassungsvermögen legen. Gemüsebrühe darüber gießen.
Den Rost in Position 2 bringen. Die Auaufform auf den Rost
stellen. Backofentür schließen. Ofen auf Rezept R5 einstellen.
Auf
drücken. Wenn Sie den Klingelton hören, den Fisch
herausnehmen und sofort servieren.
5 - 6 Portionen.
R6 SCHWEINEFIELT IN BLÄTTERTEIG
Kochzeit —30 Minuten
1
/2 – 250 g Blätterteigscheiben
30 ml grober Senf
460 g Schweinelet
Salz und frisch gemahlener Pfeffer
Blätterteig auf einem Schnittbrett ausrollen und in die Hälfte
schneiden. 15 ml Senf auf jede Teigäche streichen. Schweinelet in die Hälfte schneiden. Mit Salz und Pfeffer würzen. Jeweils
ein Stück Schweineeisch auf den Teig legen und am langen
Ende 25 mm Kante frei lassen. Teig über das Fleisch legen
und die Kanten zusammendrücken. Kanten unter das Fleisch
falten. Ein Backblech mit Backpapier auslegen. Die Päckchen
auf das Backpapier legen. Das Blech auf Position 2 in den Ofen
schieben. Backofentür schließen. Den Ofen auf Rezept R6 einstellen. Auf
Blech aus dem Ofen nehmen. Päkchen aus dem Ofen nehmen
und vom Backpapier nehmen. Sofort servieren.
4 - 6 Portionen.
drücken. Wenn der Klingelton zu hören ist, das
R7 NUDELAUFLAUF
Kochzeit—30 Minuten
690 g ungekochte Nudeln (Muschel- oder Hörnlinudeln)
2 kleine gehackte Zwiebeln ( 13 mm)
230 g Champignon in Scheiben geschnitten
85 g Schicken-oder Prosciutto-Würfel (13 mm)
230 g glatte gehackte Petersilie
140 g geriebener Hart- oder Parmesankäse, aufgeteilt
470 ml Gemüsebrühe
235 ml Sahne
Salz und frisch gemahlener Pfeffer
Muskatnuss
Nudeln, Zwiebeln, Champignons, Schinken, Petersilie und die
Hälfte des geriebenen Käses in eine gefettete Auaufform (4
Liter Fassungsvermögen) geben. Gemüsebrühe, Sahne, Salz,
Pfeffer und Muskatnuss miteinander verrühren. Über die Nudeln
gießen. Den restlichen Käse darüber streuen. Den Rost in Position 1 bringen. Die unbedeckte Auaufform auf den Rost stellen.
Backofentür schließen. Den Ofen auf Rezept R7 einstellen. Auf
drücken. Wenn der Klingelton zu hören ist, die Auaufform
aus dem Ofen nehmen. Abdecken. Das Gericht abgedeckt 15
Minuten stehen lassen.
Warm servieren.
6 1/2 Portionen.
R8 AUBERGINENAUFLAUF
Kochzeit —ca. 30 Minuten
1 – 395 g Dose Geschälte Tomaten
1 gehackte Knoblauchzehe
15 g gehackter frischer Oregano (oder 5 g getrockneter)
15 g gehackter frischer Thymian (oder 5 g getrockneter)
15 ml Olivenöl
Salz und frisch gemahlener Pfeffer
2 mittelgroße Auberginen
230 g gemahlener italienischer Hartkäse
Tomaten in eine Schüssel (3 l Fassungsvermögen) schütten. Mit
einer Gabel zerstoßen. Knoblauch, Kräuter und Öl untermischen.
Mit Salz und Pfeffer würzen. 115 ml Tomatensoße in eine gefettete Auaufform mit 2
Die Enden der Auberginen abschneiden und diese in 13 mm
dicke Scheiben schneiden. Scheiben in die Auaufform legen.
Restliche Tomatenmischung darüber verteilen. Käse darüber
streuen. Den Rost in Position 2 bringen. Die Auaufform auf den
Rost stellen. Backofentür schließen. Den Ofen auf Rezept R8
einstellen. Auf drücken. Wenn Sie den Klingelton hören, die
Auaufform herausnehmen und sofort servieren.
4 - 6 Portionen.
1
/2-Liter Fassungsvermögen streichen.
R9 FLAN
Kochzeit —ca. 25 Minuten
115 g Zucker
115 ml Orangensaft
500 ml Sahne oder Kaffeesahne
1 Vanilleschote
3 verquirlte Eier
Soßenzubereitung: 60 g Zucker in einem Top auf einem WolfHerd bei mittlerer Hitze erwärmen. Drei Minuten lang erhitzen,
oder so lange, bis der Zucker sich leicht braun verfärbt. Orangensaft langsam zugießen und auf die Hälfte reduzieren. In vier
gleich große Auaufformen (117 ml) gießen. Beiseite stellen.
Sahne mit dem restlichen Zucker und der geöffneten Vanilleschote in einem Topf erhitzen. Bei ständigem Rühren zum
Kochen bringen. Eier in einer Schüssel verquirlen. Die Sahne
langsam zu den Eiern gießen und dabei regelmäßig rühren.
Mischung durch ein feines Sieb in die Auaufformen gießen.
Formen auf das perforierte Blech stellen. Das Blech auf Position
1 in den Ofen schieben. Backofentür schließen. Den Ofen auf
Rezept R9 einstellen. Auf
zu hören ist, die Formen aus dem Ofen nehmen. Vollständig
abkühlen lassen. Mindestens 2 Stunden lang kalt stellen. Zum
Servieren, den Flan mit der achen Seite eines Messers vom
Rand lösen. Die Formen auf einen Teller umstürzen und die Soße
darüber gießen.
4 Portionen.
drücken. Wenn der Klingelton
R10 BIRNEN IN ROTWEIN
Kochzeit —ca. 15 Minuten
235 ml Rotwein
60 g Zucker
Mark von 1 Vanilleschote
5 oder 6 Birnen, halbiert und entkernt
In einer 22 x 33 cm großen Auaufform den Rotwein, den Zucker
und das Vanillemark miteinander vermischen. Birnen mit der
Schnittseite nach unten in die Weinmischung legen. Den Rost in
Position 2 bringen. Form in den kalten Ofen auf den Rost stellen.
Backofentür schließen. Den Ofen auf Rezept R10 einstellen. Auf
drücken. Wenn der Klingelton zu hören ist, das Blech aus
dem Ofen nehmen. Vor dem Servieren abkühlen lassen.
10 - 12 Portionen.
10 | Deutsch
Page 59

BENUTZUNG DES BACKOFENS
Rezepte
R11 SÜSSE BRÖTCHEN
Kochzeit—ca. 33 Minuten
740 g Mehl
30 g Zucker
1 – 7 g aktive Trockenhefe
5 g Salz
230 ml sehr warme Milch, 50–55°C
60 g zerlaufene Butter
30 m Milch
5 g Zucker
15 g zerlaufene Butter
In einer Schüssel mit Knethaken, Mehl, Zucker, Trockenhefe
und Salz miteinander vermischen. Alle Zutaten zwei Minuten
lang miteinander vermischen. Warme Milch und 60 g zerlaufene Butter hinzufügen. Fünf Minuten lang miteinander verkneten oder bis sich der Teig vom Schüsselrand löst. Schüssel
abgedeckt an einen warmen Ort stellen. Bei Zimmertemperatur
1
1–1
/2 Stunden lang gehen lassen oder bis sich die Teigmenge
verdoppelt hat.*
Auf einer bemehlten Arbeitsäche den Teig in 12 gleich große
Portionen teilen. Kugeln formen und in eine gefettete Glasauflaufform legen. Mit einem feuchten Tuch abdecken und eine
Stunde lang gehen lassen, oder bis sich die Teigmenge verdoppelt hat.
Den Rost in Position 2 bringen. Die Auaufform auf den Rost
stellen. Backofentür schließen. Den Ofen auf Rezept R11
einstellen. Auf drücken. Restliche Milch, Zucker und Butter
miteinander vermischen. Wenn der Klingelton zu hören ist, die
Brötchen mit der Mischung bestreichen. Erneut auf drücken.
Wenn der Klingelton erneut zu hören ist, Brötchen herausnehmen und vor dem Servieren leicht abkühlen lassen. Warm
servieren.
12 Portionen.
*Teig kann in einem verschlossenen Behälter über Nacht im
Kühlschrank aufbewahrt werden. Vor der Verwendung ca. eine
Stunde lang auf Zimmertemperatur bringen und zu Kugeln
formen.
Um zu sehen, ob sich die Teigmenge verdoppelt hat, zwei Finger
ca. 25 mm tief in den Teig stecken und schnell herausziehen.
Wenn die Vertiefung zurück bleibt, hat sich die Teigmenge verdoppelt. Wenn die Vertiefung verschwindet, muss der Teig länger
gehen.
R12 MUFFINS
Kochzeit —ca. 35 Minuten
Für die Muffins:
460 g Mehl
150 g Zucker
10 g Backpulver
2 g Natron
2 g Salz
1 g Zimt
2 Eier
230 ml Buttermilch
115 g zerlaufene Butter
15 g Zitronenschale
5 ml Vanillearoma
60 ml Joghurt
230 g Blaubeeren
Für den Streusel:
115 g Mehl
60 g zerlaufene Butter
60 g Zucker
60 g gehackte Walnüsse
15 g Zitronenschale
Mehl, Zucker, Backpulver, Natron, Salz und Zimt in eine
Schüssel mit Rührhaken geben. In einer separaten Schüssel
Eier, Buttermilch, die abgekühlte Butter, die Zitronenschale, das
Vanillearoma und Joghurt miteinander vermischen. Eiermischung
zur Mehlmischung geben und 20 Sekunden lang vermischen.
Blaubeeren leicht unterheben. Mufn-Formen mit Backspray
besprühen oder mit Mufn-Backpapierformen auslegen. Teig auf
die 12 Formen verteilen.
Streuselzubereitung: Butter, Zucker, Walnüsse und Zitronenschale in eine Schüssel geben. Mit der Hand vermischen, bis
daraus ein grober Streusel wird. Mischung in gleichen Teilen
über die Mufns verteilen.
Mufn-Blech auf das perforierte Blech stellen. Das Blech auf
Position 1 in den kalten Ofen schieben. Backofentür schließen.
Den Ofen auf Rezept R12 einstellen. Auf
Klingelton zu hören ist, das Blech aus dem Ofen nehmen. Vor
dem Herausnehmen fünf Minuten abkühlen lassen. Warm oder
kalt servieren oder in einem luftdichten Behälter aufbewahren.
10 - 12 Portionen.
drücken. Wenn der
R13 KUCHEN
Kochzeit —ca. 1 Stunde
6 Eier, getrennt
230 g Zucker
60 ml Wasser
5 ml Zitronenaroma
5 g Zitronenschale
230 g Kuchenmehl
2 g Weinstein
2 g Salz
Zuckerguss oder frisches Obst, optional
Die Eigelbe und den Zucker schaumig rühren. Zwei Minuten lang
rühren, bis die Mischung dick wird. Wasser, Zitronenaroma und
Zitronenschale dazugeben. Eine Minute lang rühren. Mehl dazugeben und gut miteinander verrühren. Beiseite stellen.
Eiweiße in eine andere Schüssel geben. Ca. 30 Minuten lang
schaumig rühren, aber nicht steif werden lassen. Weinstein und
Salz dazugeben. Eiweiße zu einem steifen Schnee schlagen,
aber nicht austrocknen lassen.
Eischnee unter die Eigelbmasse heben. In eine ungefettete
Gugelhupfform füllen.
Den Rost in Position 1 bringen. Backofentür schließen. Den Ofen
auf Rezept R13 einstellen. Auf
vorgeheizt ist, die Form auf den Rost stellen. Auf drücken.
Wenn der Klingelton zu hören ist, die Form aus dem Ofen
nehmen. Vor dem Herausnehmen aus der Form fünf Minuten
abkühlen lassen. Den Kuchen mit einer Backspatel von den
Seiten der Gugelhupfform lösen. Kuchen aus der Form stürzen.
Kuchen mit Glasur überziehen oder mit frischem Obst verzieren.
10 - 12 Portionen.
drücken. Wenn der Ofen
R14 FOCACCIA
Kochzeit—ca. 40 Minuten
970 g Brotmehl
1 – 7 g aktive Trockenhefe
10 g Pizzagewürz
5 g Zucker
5 g Salz
310 ml warmes Wasser, 40–45°C
15 ml Olivenöl
Zusätzliches Olivenöl
Grobes Meersalz
In einer Schüssel mit Knethaken, Mehl, Zucker, Trockenhefe,
Gewürze und Salz miteinander vermischen. Alle Zutaten zwei
Minuten lang miteinander vermischen. Wasser und Öl dazu
gießen. Fünf Minuten lang miteinander verkneten oder bis sich
der Teig vom Schüsselrand löst.* Bei mittlerer Rührgeschwindigkeit den Teig weitere 2 - 4 Minuten lang kneten. Schüssel
abgedeckt an einen warmen Ort stellen. Bei Zimmertemperatur
zwei 2 Stunden lang gehen lassen oder bis sich die Teigmenge
verdoppelt hat.**
Auf einer leicht bemehlten Arbeitsäche den Teig zu einer achen Scheibe formen. In eine Form (20 cm Durchmesser) legen.
Teig in die Form pressen. Oberseite mit Öl bestreichen. Mit den
Fingern den Teig ca. 25 mm tief eindrücken. Mit einem Tuch
abdecken und an einem warmen Ort eine Stunde lang gehen
lassen. Oberäche erneut mit Öl bestreichen und erneut mit
den Fingern 25 mm tief eindrücken. Oberäche mit grobem Salz
bestreuen.
Den Rost in Position 1 bringen. Die Auaufform auf den Rost
stellen. Backofentür schließen. Den Ofen auf Rezept R14 einstellen. Auf
Blech aus dem Ofen nehmen. Sofort aus der Form stürzen.
Ergibt 1 Foccacia-Brot.
*Wenn der Teig zu trocken ist, jeweils 15 ml Wasser dazugeben,
bis er feuchter wird. *Wenn der Teig zu nass ist, jeweils 8 g Mehl
dazugeben, bis er trockener wird.
**Um zu sehen, ob sich die Teigmenge verdoppelt hat, zwei
Finger ca. 25 mm tief in den Teig stecken und schnell herausziehen. Wenn die Vertiefung zurück bleibt, hat sich die Teigmenge verdoppelt. Wenn die Vertiefung verschwindet, muss der
Teig länger gehen.
drücken. Wenn der Klingelton zu hören ist, das
wolfappliance.com | 11
Page 60

PFLEGEEMPFEHLUNGEN
Empfehlungen zur Pege
ENTKALKEN
Je nach Wasserhärte muss der Ofen alle 6 - 18 Monate
entkalkt werden. Wenn der Ofen entkalkt werden muss,
wird „Kocher muss entkalkt werden“ angezeigt. Die Dauer
zwischen den Entkalkungsverfahren hängt von der in den
Benutzereinstellungen angegebenen Wasserhärte ab. Siehe
Seite 6 zum Einstellen der Wasserhärte.
®
Verwenden Sie nur Durgol
gehen Sie wie auf der Packung beschrieben vor. Durgol
kann online von subzerowolfstore.com bestellt werden.
Entkalkung einstellen:
1 Drücken Sie bei ausgeschaltetem Ofen die Taste
und drehen Sie den Knebel auf Entkalken. Drücken Sie
dann auf
. Auf dem „Display erscheint Add 0.5 L
descaler— and press
und auf
2 Wassertank herausnehmen und den Durgol
drücken).
Steamer Entkalker in den Tank schütten. Tank wieder
einsetzen und auf
3 Nach ca. 30 Minuten wird die Nachricht „Pour away
descaler—Add 1 L water“ (Entkalker ausschütten—1 L
Wasser hinzufügen) angezeigt. Den Tank herausnehmen
und bei aufgedrehtem Wasserhahn den Entkalker aus
dem Tank schütten.
VORSICHT
Wenn die Entkalkungslösung vor dem Ausschütten
nicht verdünnt wird, kann das Spülbecken verfärbt
werden.
4 Den Tank mit warmem Leitungswasser füllen und wieder
einsetzen. „Descale appliance—1st rinsing cycle“ (Gerät
wird entkalkt—1. Spülzyklus) erscheint auf dem Display.
Nach ca. 45 Minuten wird die Nachricht „Pour away
water — Descaling completed“ (Wasser abgießen— Entkalkungsvorgang abgeschlossen)angezeigt.
5 Je nach Verschmutzung im Spülwasser können weitere
Spülzyklen notwendig sein. Gehen Sie wie auf dem Display beschrieben vor.
6 Sobald die Spülzyklen abgeschlossen sind, den Tank
herausnehmen, leeren und trocknen und dann alle Edelstahloberächen abwischen.
Swiss Steamer-Entkalker und
“ (0,5 L Entkalker hinzufügen —
®
Swiss
drücken.
®
AUSBAUEN DER BACKOFENTÜR
Die Ofentür kann für eine gründliche Reinigung entfernt
werden.
Zum Ausbauen die Ofentür vollständig öffnen. Beide Scharniere in die geöffnete Position bringen. Tür in die RuhePosition bringen, nach oben heben und abnehmen. Siehe
die Abbildungen weiter unten.
Zum Wiedereinbau die Scharniere in die Öffnungen einsetzen. Ofentür vollständig öffnen und beide Scharniere
zurück in die geschlossene Position drehen.
GEÖFFNETE
POSITION
GESCHLOSSENE
POSITION
Ofentür-Scharnier.
Tür in Ruhe-Position.
HERAUSNEHMEN DER ROSTSCHIENEN
Zum Herausnehmen der Rostschienen die Rändelmuttern
an der Vorderseite der Schiene abschreiben. Rostschiene
zur Seite des Gewindestifts ziehen und Vorderseite entfernen. Siehe Abbildung unten.
WATER
LIGHT
TEMP
MODE
ON
POWER
TIME
OFF
ROSTFÜHRUNG
RÄNDELMUTTER
REINIGUNG
Edelstahl Einen nicht scheuernden Edelstahlreiniger verwenden und mit einem weichen, usenreien Tuch auf-
tragen. Einen natürlichen Glanz erzielen Sie, indem Sie die Oberäche mit einem feuchten Mikrofasertuch, dann mit einem trockenen Polierleder leicht abwischen. Stets in Richtung der Maserung des
Edelstahls arbeiten.
Tür-Vorderseite Glasreiniger auf ein Tuch sprühen und Glas reinigen.
Schaltblende Fingerabdrücke und Verschmutzungen durch Essreste mit einem Entfettungsspray entfernen. Zuerst
Innenseite Für allgemeine Reinigungsarbeiten, den Dampfmodus bei 80°C 30 Minuten lang einschalten. Dabei lösen
Backofenroste und
Rostschienen
Edelstahlbleche Die Edelstahlbleche und die perforierten Edelstahlbleche können in einer Geschirrspülmaschine gereinigt
Wassertank Wasserecken und Kalkreste können mit einem Kalkentferner entfernt werden. Den Wassertank nicht in
auf ein Tuch sprühen, bevor Sie eine Platte abwischen. Reinigungsmittel nicht direkt auf Schaltblende
sprühen.
sich das Fett und die Kochreste im Ofen. Ofen ausschalten und die Innenseite mit einem Tuch abwischen. Mit einem feuchten Tuch und Zitronensaft das Wasser und die blauen Flecken abwischen. Keinen
Dampfreiniger verwenden.
Backofenroste und Rostschienen können in einer Geschirrspülmaschine gereinigt werden.
werden.
der Geschirrspülmaschine reinigen.
Temperatursonde Die Temperatursonde nicht in der Geschirrspülmaschine reinigen.
12 | Deutsch
Herausnehmen der Rostschiene.
Page 61

FEHLERSUCHE
Fehlersuche
BEDIENUNG
Der Backofen funktioniert nicht.
• Sicherstellen, dass der Strom eingeschaltet ist.
• Sicherstellen, dass die Stromzufuhr zum Gerät und der
Schutzschalter im Haus eingeschaltet sind.
Problem bei der Ofentemperatur.
• Kontaktieren Sie den Wolf-Kundendienst unter der Ruf-
nummer 800-222-7820 für Empfehlungen.
Beleuchtung funktioniert nicht.
• Die Glühbirne ist defekt. Rufen Sie den Wolf-Kunden-
dienst an.
Der Ofen macht beim Betrieb Geräusche.
• Der Ofen gibt beim Betrieb Schalt- und Pumpgeräusche
ab. Diese Geräusche sind normal.
Die Bleche sind schwer zu entfernen.
• Die Kombination aus Wärme, Feuchtigkeit und Platzie-
rung der Speisen kann dazu führen, dass sich die Bleche
verbiegen. Sie nehmen nach dem Abkühlen allerdings
wieder ihr ursprüngliche Form an.
Auf dem Display erscheint „Do not remove water tank“
(Wassertank nicht herausnehmen).
• Das Wasser im Kocher wird erst abgepumpt, wenn die
Wassertemperatur unter 80°C fällt.
Versorgung
• Halten Sie die in Ihr Produkt integrierte Qualität aufrecht,
indem Sie sich an ein zugelassenes Wolf-Kundendienstzentrum wenden.
• Wenn Sie sich mit dem Kundendienst in Verbindung
setzen, benötigen Sie die Modell- und Seriennummern
Ihres Produkts. Beide Nummern sind auf dem Produkttypenschild aufgeführt. Die Typenschildposition ist auf
Seite 5 angegeben.
• Für Garantiezwecke benötigen Sie außerdem das Datum
der Installation und den Namen Ihres Wolf-Vertragshändlers. Diese Informationen sollten auf Seite 2 dieser
Anleitung aufgezeichnet werden.
Eingeschränkte Garantie für Produkte von Wolf
INTERNATIONALE PRODUKTE
NICHT ZUR GEWERBLICHEN VERWENDUNG
VOLLSTÄNDIGE ZWEIJAHRESGARANTIE
Ab dem Datum der ersten Installation deckt Ihre Produktgarantie von Wolf Appliance für die
Dauer von zwei Jahren alle Teile und Lohnkosten für die Reparatur oder den Austausch von Teilen
des Produktes ab, an dem bei normalem, nicht-gewerblichem Gebrauch Material- oder Verarbeitungsmängel festgestellt wurden. Alle von Wolf Appliance im Rahmen der vorstehenden Garantie
erbrachten Leistungen müssen, wenn von Wolf Appliance, Inc. nicht anderweitig festgelegt, von
einem zugelassenen Wolf-Kundendienstzentrum erbracht werden. Die Leistungen werden zu den
normalen Geschäftszeiten erbracht.
EINGESCHRÄNKTE GARANTIE VOM DRITTEN BIS ZUM FÜNFTEN JAHR
Ab dem Datum der ersten Installation repariert oder ersetzt Wolf Appliance bis zum fünften
Jahr die folgenden Teile, bei welchen Material- oder Verarbeitungsmängel festgestellt wurden:
Gasbrenner (außer äußerlichen Fehlern), elektrische Heizelemente, Gebläsemotoren (Dunstabzugshauben), elektronische Bedienfelder, Mikrowellenröhren und Induktionsgeneratoren. Das Teil/
die Teile wird/werden kostenlos repariert oder ersetzt, wobei der Eigentümer alle anderen Kosten
einschließlich Lohnkosten trägt. Alle von Wolf Appliance im Rahmen der vorstehenden Garantie
erbrachten Leistungen müssen, wenn von Wolf Appliance, Inc. nicht anderweitig festgelegt, von
einem zugelassenen Wolf-Kundendienstzentrum erbracht werden. Die Leistungen werden zu den
normalen Geschäftszeiten erbracht.
„Boiler scaled up, please descale!“ (Kocher muss entkalkt
werden!) erscheint auf dem Display.
• Der Ofen muss entkalkt werden - siehe Seite 12.
„Appliance blocked, descaling necessary “ (Gerät blockiert - Entkalkung notwendig) erscheint auf dem Display.
• Der Ofen muss entkalkt werden - siehe Seite 12.
Wenn die Nachricht auch nach dem Entkalken noch
angezeigt wird, wenden Sie sich an ein zugelassenes
Wolf-Kundendienstzentrum.
Wolf, Wolf & Design, Wolf Gourmet, W & Design und die auf Schaltknebel aufgebrachte Farbe Rot sind eingetragene Marken und Servicemarken der Wolf Appliance, Inc. Sub-Zero,
Sub-Zero & Design, Dual Refrigeration, Constant Care, The Living Kitchen, Great American Kitchens, The Fine Art of Kitchen Design und Ingredients sind eingetragene Marken und
Servicemarken der Sub-Zero, Inc. (zusammen die „Firmenmarken“). Alle anderen Marken oder eingetragenen Marken sind das Eigentum ihrer jeweiligen Eigentümer in den Vereinigten
Staaten und anderen Ländern.
wolfappliance.com | 13
Page 62

WOLF APPLIANCE, INC.
PO BOX 44848
MADISON, WI 53744 USA
WWW.WOLFAPPLIANCE.COM
824653 REV-A 11/2013
 Loading...