Whirlpool AKP 309 IX, AKP 309/01 AL, AKP 309 AV, AKP 309 WH, AKP 309/01 IX INSTALLATION
...
AKP 309
DE |
BE |
NL |
PL |
CZ |
PRODUCT DESCRIPTION SHEET
SK |
HU |
RU |
BG |
RO |
GB |
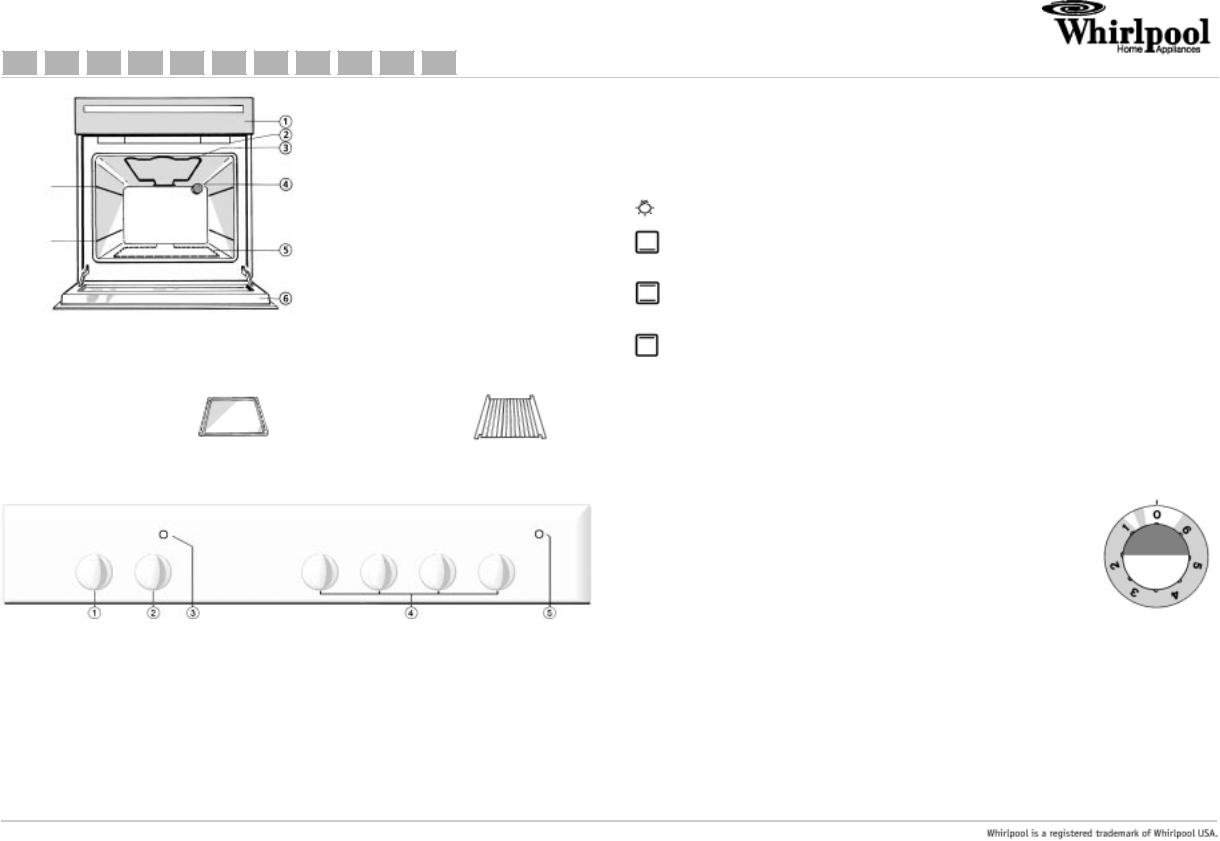
Highest level
First level
1.Control panel
2.Cooling fan (not visible)
3.Top heating element
4.Rear oven lamp
5.Bottom heating element (not visible)
6.Oven door*
*Important: An optional kit consisting of a glass panel for the oven door with related assembly components is available upon request from the AfterSales Service. Using this kit reduces the oven door external temperature; it is advisable for children's safety. Code no. 4819 310 39186.
ACCESSORIES
|
|
Oven functions table |
|
|
|
|
Function |
Description of function |
|
|
|
0 |
OVEN OFF |
- |
|
|
|
|
LAMP |
• To switch on the oven light. |
|
|
|
|
BOTTOM HEATING |
• To finish cooking fruit or cheese cakes or to thicken sauce. |
|
ELEMENT |
• Use this function for the last 10/15 minutes of cooking time. |
|
|
|
|
|
• To cook meat, fish and poultry in the oven. |
|
STATIC |
• Preheat the oven to the required cooking temperature and place the food inside |
|
as soon as the red thermostat light turns off. |
|
|
|
|
|
|
• It is advisable to use the second or third level. |
|
|
|
|
TOP HEATING |
• For browning food. |
|
ELEMENT |
• Use this function for the last 10/15 minutes of cooking time. |
|
|
|
SWITCHING ON THE OVEN
• Turn the selector knob to the required function.
Aluminium baking tray: Wire Shelf: The oven light switches on.
• Turn the thermostat knob clockwise to the required temperature. The red thermostat indicator light switches on; when the required cooking temperature is reached it will turn off.
At the end of cooking time:
• Turn the knob to “0”.
CONTROL PANEL
1.Function selector knob
2.Thermostat knob
3.Thermostat indicator light (red)
4.Cooktop knobs
5.Hob operation yellow LED.
HOW TO USE THE HOB
The oven control panel features 4 adjustable knobs (from 0 to 6) that control hob operation.
To turn on the electric hot plates:
•Turn the control knob of the required hot plate clockwise to the desired position (refer to the instructions supplied with the hob).
The yellow led lights up, indicating operation.
IMPORTANT:
•When using the hot plates for the first time, place a pot of suitable diameter and half full of water on each hotplate, set the knobs to position 6 and leave the hotplates on for approx. 3 to eliminate smells.
•Do not leave the hot plates turned on when they are empty.
•Use pots and pans specifically designed for electric hobs, particularly those with multiple layer flatbottoms.
•The diameter of the base of pots and pans must be the same or slightly greater than that of the hotplate.
5019 310 56256
 Loading...