

Page 1

N C
INTRODUCTION
BEFORE STARTING
1. Remove the cardboard and accessories from inside the oven.
2. Clean the hob.
3. The first time you use the oven heat it at the maximum setting for about two hours to eliminate
odours and fumes due to the protective grease.
ROUTINE USE
Hob
1. Turn the knob to the required setting.
2. To switch off, turn the knob to “0”.
Oven
1. Arrange the food in the oven
2. Select the required cooking function (see “Using the oven”).
3. Select the temperature.
To get the most out of your new appliance, be sure to read the instructions in this
booklet.
111
M Y
111
Page 2
N C
CONTENTSGB
THE APPLIANCE AND ITS COMPONENTS Pages 113-114
CONTROL PANEL Pages 113-114
GENERAL PRECAUTIONS AND RECOMMENDATIONS Page 115
USING THE NORMAL AND HIGH-SPEED HOTPLATE Page 116
USING THE GLASS-CERAMIC HOB Pages 117
USING THE OVEN Page 119
USING THE CONVENTIONAL OVEN – mod. ACM 342 Page 120
USING THE CONVENTIONAL OVEN –
mod. ACM 342 G – ACM 343 – ACM 346
Page 123
USING THE MULTIFUNCTION OVEN – mod. ACM 348 Page 127
CLEANING AND MAINTENANCE Page 130
TROUBLE-SHOOTING GUIDE Page 132
AFTER SALES SERVICE Page 132
INSTALLATION Page 133
TABLES Page 135
112
M Y
112
Page 3
N C
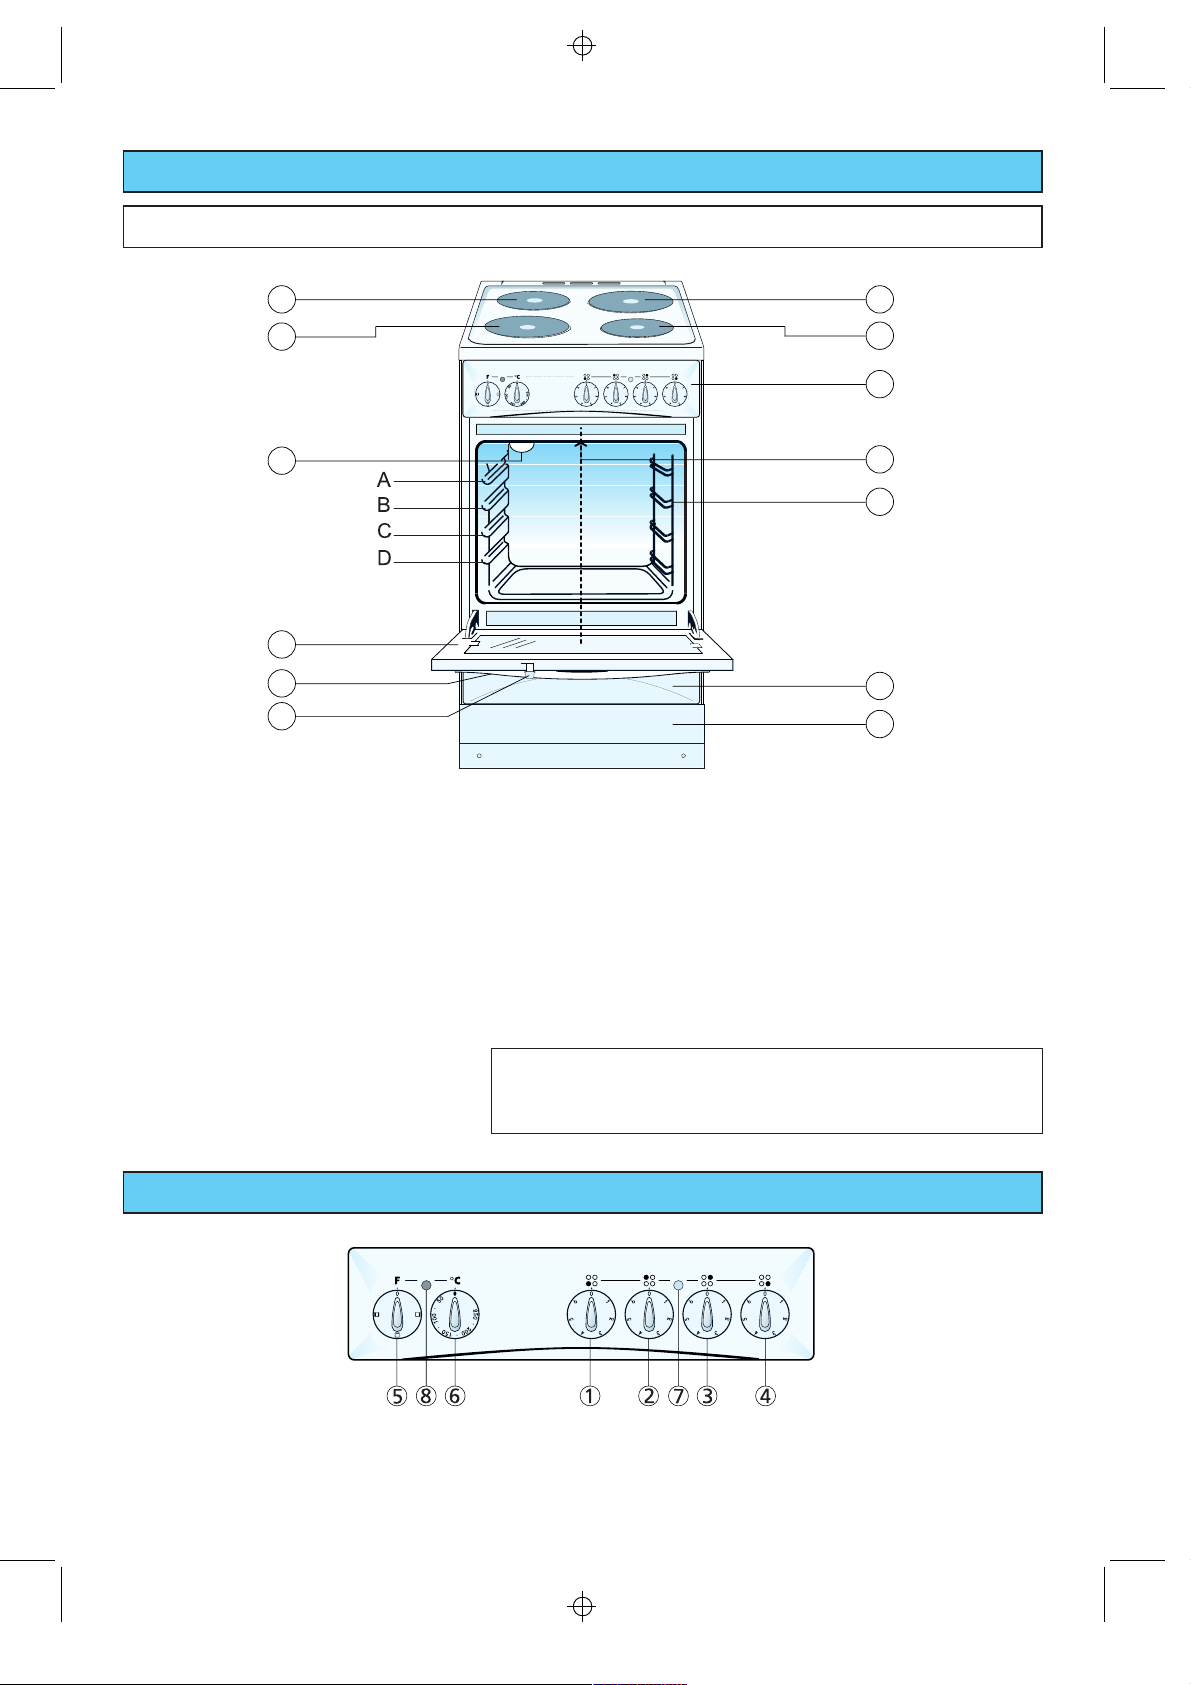
THE APPLIANCE AND ITS COMPONENTS
ACM 342 – ACM 342 G – ACM 343
4
5
6
9
10
11
1. Control panel
2. Normal hotplate – Ø 145 – 1000 W (ACM 342)
High-speed hotplate – Ø 145 – 1500 W
(mod. ACM 342 G, ACM 343)
3. Normal hotplate – Ø 180 – 1500 W
4. Normal hotplate – Ø 145 – 1000 W
5. High-speed hotplate – Ø 180 – 2000 W
6. Oven light
7. Grill elements (self-cleaning, mod. ACM 342 G –
ACM 343)
8. Side racks (mod. ACM 342 G – ACM 343)
9. Oven door
10. Door handle
11. Child lock
12. Warming drawer (with safety device)
13. Plinth
3
2
1
7
8
12
13
A, B, C, D:
Guides for baking trays, grids or drip tray (see cooking
time tables)
Accessories:
2 enamel baking trays
1 enamel drip tray
1 grid for grilling, roasting or baking
2 adjustable feet
This appliance has type “Y” overheating surrounding
surfaces protection and may be installed with a sidewall
which exceed the height of the cooktop.
CONTROL PANEL
1. Front lh plate (5) control knob
2. Rear lh plate (4) control knob
3. Rear rh plate (3) control knob
4. Front rh plate (2) control knob
M Y
5. Oven function selector knob
6. Oven thermostat knob
7. Plate on indicator light
8. Oven thermostat indicator light
113
113
Page 4
N C
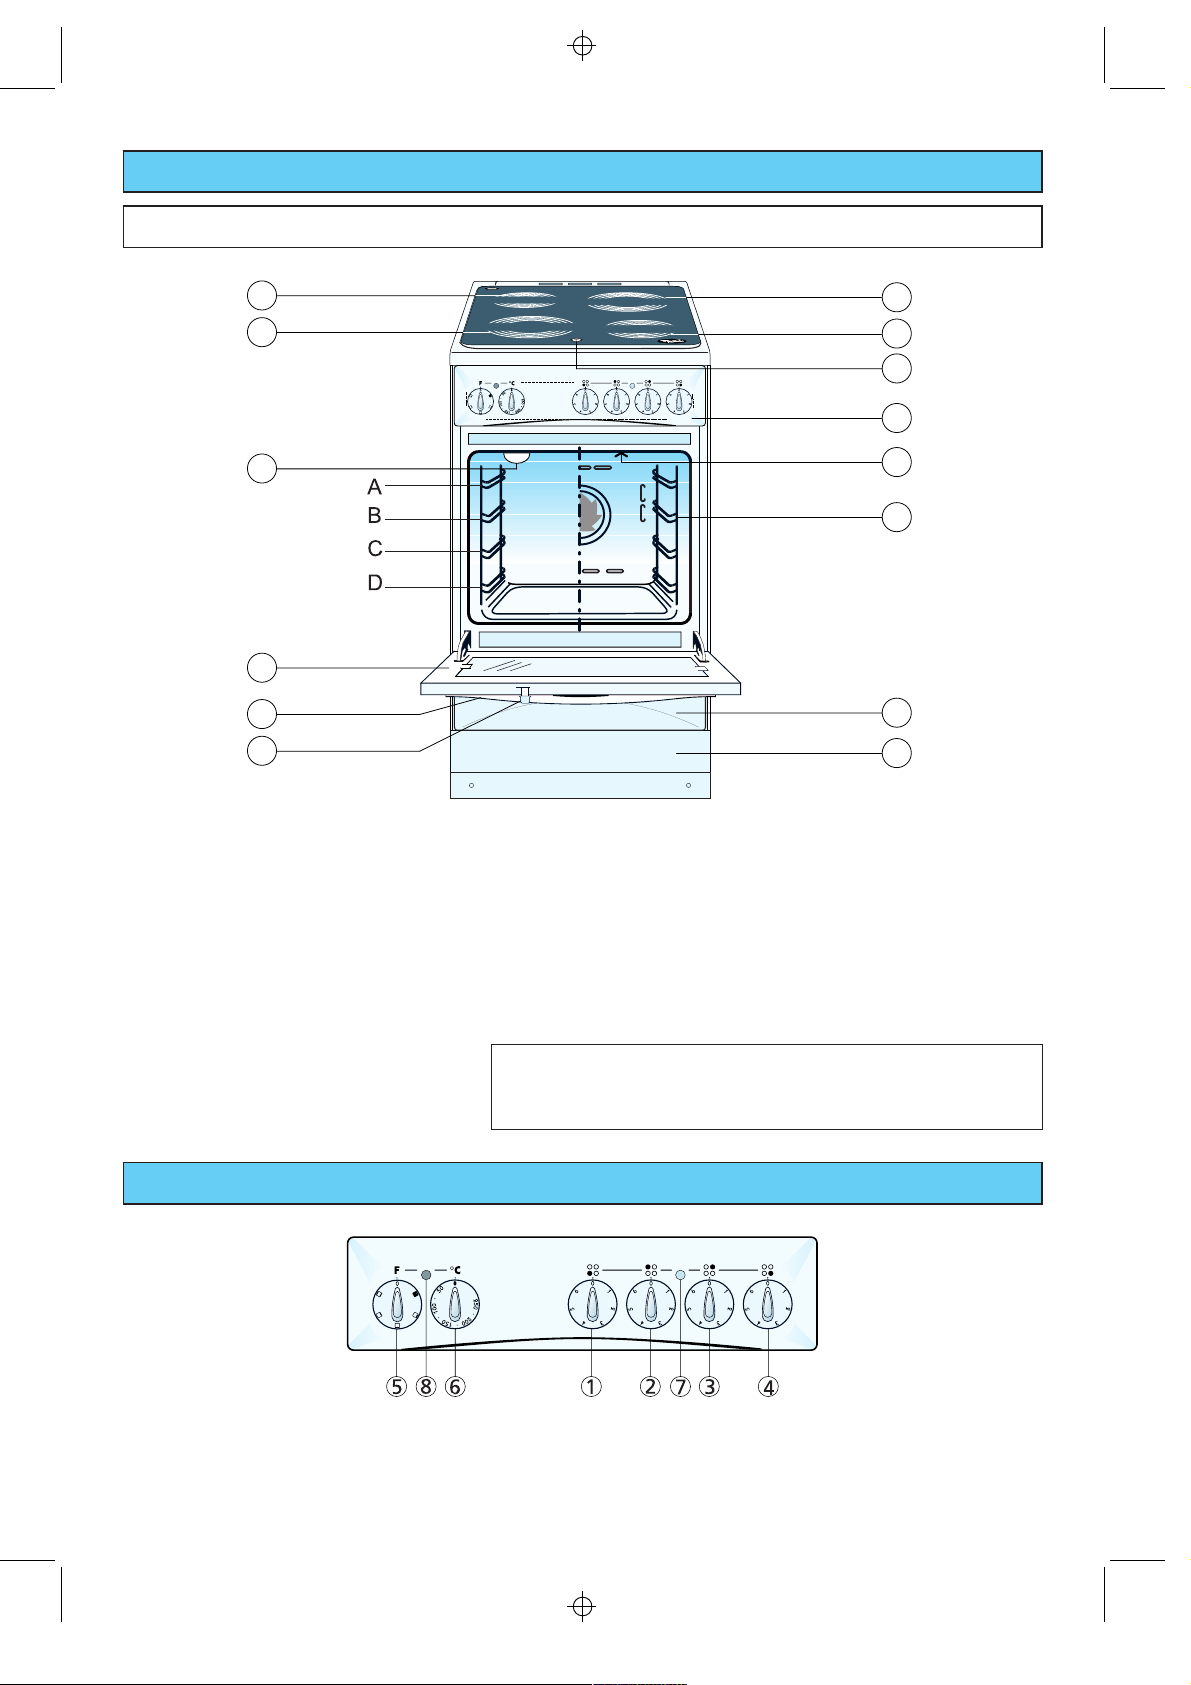
THE APPLIANCE AND ITS COMPONENTS
ACM 346 – ACM 348
5
6
7
10
11
12
1. Control panel
2. Residual heat indicator
3. Quick-light star hot plate – Ø 145 – 1200 W
4. Quick-light star hot plate – Ø 180 – 1700 W
5. Quick-light star hot plate – Ø 145 – 1200 W
6. Quick-light star hot plate – Ø 180 – 1700 W
7. Oven light
8. Grill elements (self-cleaning)
9. Side racks
10. Oven door
11. Door handle
12. Child lock
13. Warming drawer (with safety device)
14. Plinth
4
3
2
1
8
9
13
14
A, B, C, D:
Guides for baking trays, grids or drip tray (see cooking
time tables)
Accessories:
2 enamel baking trays
1 enamel drip tray
1 grid for grilling, roasting or baking
2 adjustable feet
This appliance has type “Y” overheating surrounding
surfaces protection and may be installed with a sidewall
which exceed the height of the cooktop.
CONTROL PANEL
1. Front lh plate (6) control knob
2. Rear lh plate (5) control knob
3. Rear rh plate (4) control knob
4. Front rh plate (3) control knob
114
M Y
114
5. Oven function selector knob
6. Oven thermostat knob
7. Plate on indicator light
8. Oven thermostat indicator light
Page 5

N C
GENERAL PRECAUTIONS AND RECOMMENDATIONS
x
Before starting
1. Packaging materials (plastic film, expanded
polystyrene, etc.) are potentially dangerous and
must be kept out of the reach of children.
2. The packaging materials can be recycled, as
confirmed by the symbol
Ù
.
3. Make sure the appliance has not been damaged
during transport and that the oven door closes
correctly.
4. Installation and electrical connection of the appliance
must be entrusted to skilled personnel in
accordance with the instructions supplied by the
manufacturer and in compliance with established
safety standards.
5. Remove packaging residues from inside and outside
the appliance. Remove the accessories. Keep
cardboard and plastic protective packages in a safe
place for future use, or dispose of them properly.
6. Hotplates
x
Heat up empty for about 3-5 minutes.
7. Glass-ceramic hob
x
Clean thoroughly with a clean damp cloth
and a drop of washing-up liquid. Rinse with
clean water and dry with a clean cloth.
8. Oven
x
Empty the oven and close the door. Heat
the oven at the maximum temperature
setting for around two hours to eliminate
the odour of grease and fumes from the
manufacturing process. Make sure that the
kitchen is well ventilated and do not remain
in the room during this process.
x
Clean the oven and accessories with warm
water and washing-up liquid.
During and after use of the oven, certain
parts will become very hot (e.g. the oven
door inspection window). Do not touch hot
parts.
x
Keep children well away from the
appliance while it is in use.
x
Fire risk! Do not store flammable material in
the oven, above the hob or in accessory
drawer.
x
Make sure that electrical cables connecting
other appliances near the cooker cannot
come into contact with the hob or be
trapped in the oven door.
x
Do not line the oven walls with aluminium
foil. Do not place baking trays or the drip
tray on the floor of the oven chamber.
x
Do not allow heavy or sharp objects to
drop on the glass ceramic hob. If the hob is
cracked or otherwise damaged by falling
objects etc., disconnect the electrical power
cord and call Customer Service (mod. ACM
346, ACM 348).
x
Do not lean aluminium sheets or plastic
containers above the hot hob.
x
Do not scratch the hob with sharp objects.
Do not use the hob as a work surface.
x
The manufacturer declines all liability for
injury to persons or damage to property
caused by incorrect or improper use of the
appliance.
x
The various components of the appliance
are recyclable. Dispose of them in
accordance with the regulations in force in
your country. If the appliance is to be
scrapped, cut off the power cord.
115
M Y
115
Page 6

N C
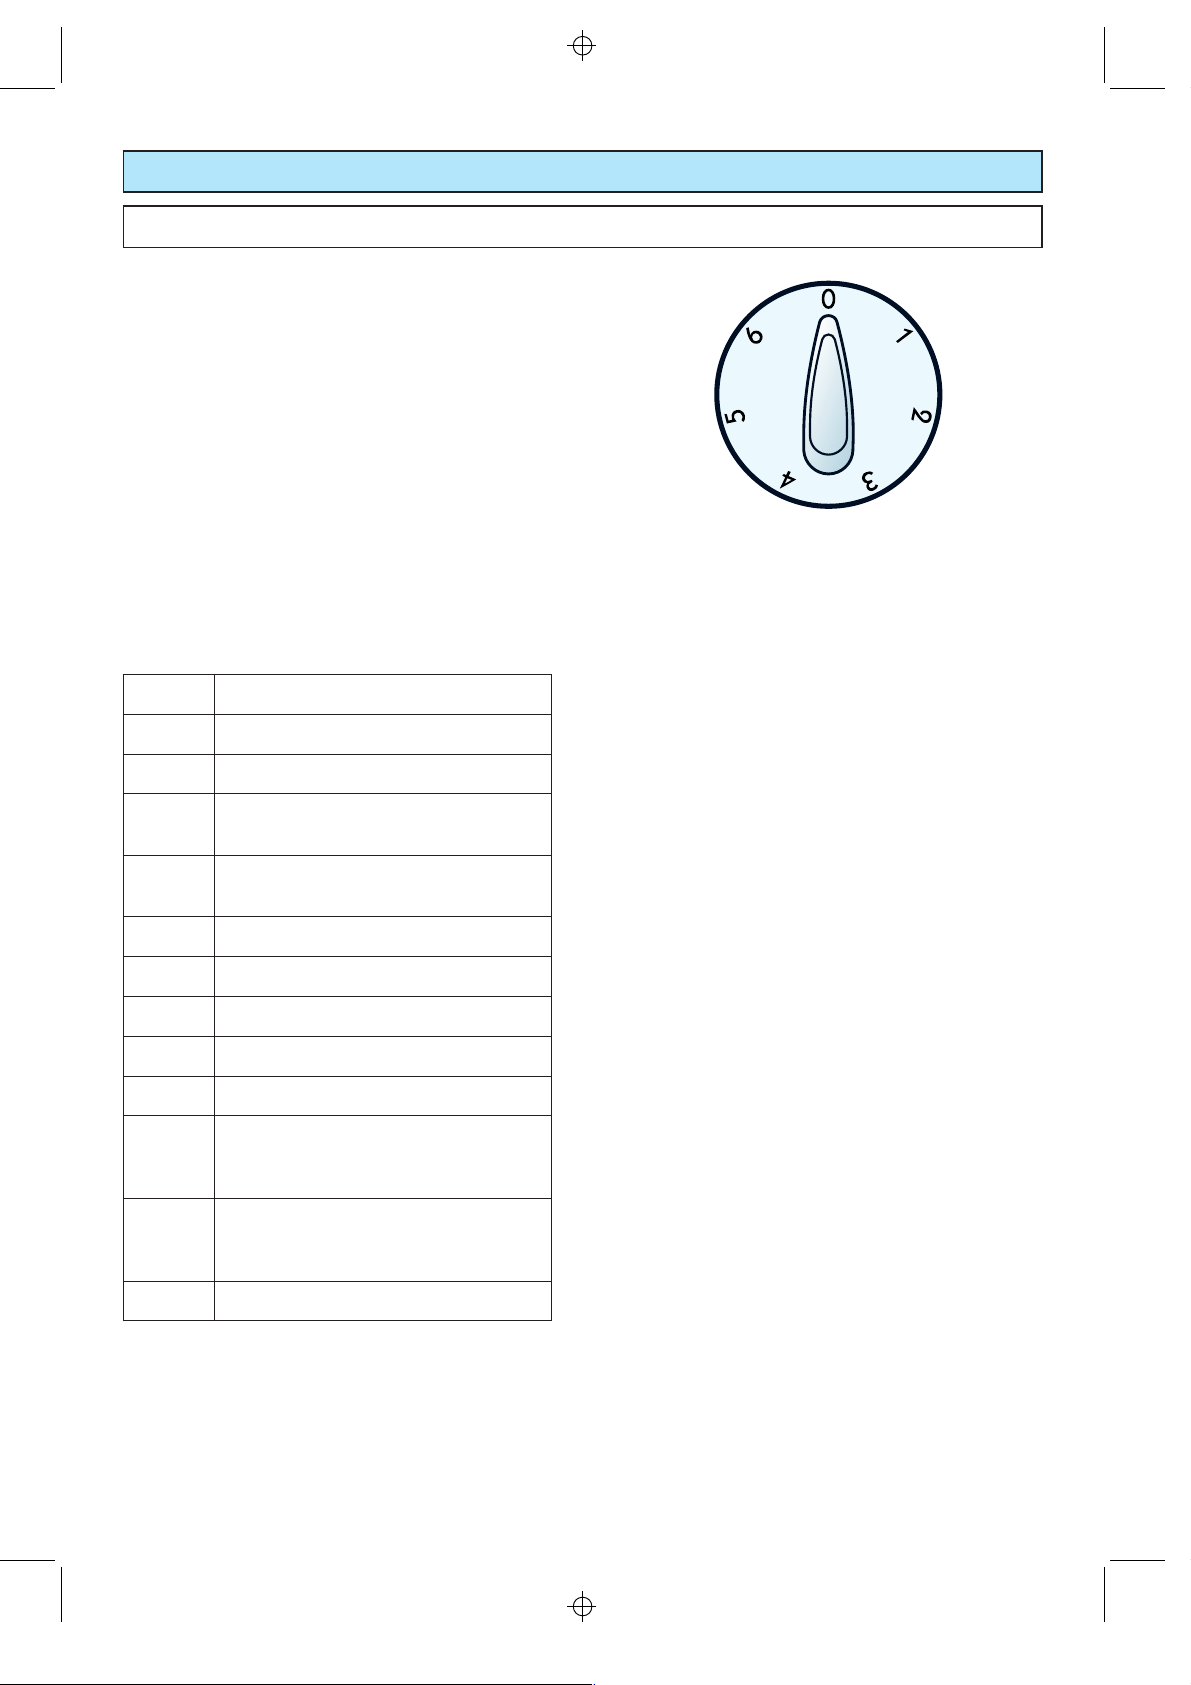
USING THE NORMAL AND HIGH-SPEED HOTPLATES
ACM 342 – ACM 342 G – ACM 343
Tip:
The yellow pilot light remains on as long as a hotplate is
switched on.
Turn the control knob to the performance level required:
1. Boiling and browning: setting “5” or “6”.
2. Frying: setting “4”.
3. Simmering: setting “2” or “3”.
4. Simmering and warming up: setting “1”.
5. To switch OFF: setting “0”.
x
When necessary select a higher or lower setting.
x
With sensitive foods turn down earlier.
HIGH-SPEED HOTPLATES (RED
DOT)
These are used for particularly quick boiling and
browning.
TIP FOR ENERGY SAVING
Use the residual heat. For nearly all boiling or frying the
hotplates can be switched to “0” 5 – 10 minutes before
finishing.
TIPS FOR PANS
x
Use special pans for electric cookers with flat and
solid bottoms. Pans with turned bottoms are
particularly suitable.
x
Uneven pans require longer cooking times and
consume more energy.
x
The pan diameter should be the same as that of the
hotplate or slightly larger.
x
To save energy, always use lids.
x
Do not leave any wet or damp lids on the hotplate.
x
Put the pan on the hotplate first, then switch on.
x
Never cook the food directly on the hotplates, but in
special pans or containers.
116
M Y
116
Page 7
N C
USING THE GLASS-CERAMIC HOB
ACM 346 – ACM 348
Quick-light star hotplates
x
The quick-light star hotplates incorporating 3
heating elements you can control and light up all
together or separately.
x
Reaches the working temperature in very short time.
x
The quick-light star hotplates is controlled by a 7position control switch.
x
To switch on the hotplates, turn the knob to
position 6.
x
Once the required temperature has been reached,
turn the knob to the required setting for cooking.
x
Observe the recommendations in the table.
Heat setting table
Setting Function
6 Boiling large quantities of water; pasta.
5-6 Chips; meat dishes such as stew.
5
4-5
Croquets; fillet of steak, steaks, breaded
meat.
Meat: scallops, cutlets etc., omelettes,
meatballs, roasts
4 Tender meat, sausages, liver, eggs, fritters
3-4 Large portions, single course meals, soups.
3 Boiled potatoes, minestrone.
2-3 Boiled vegetables, stew.
2 Rice pudding
Rice and milk based foods, small quantities
1-2
of potatoes and vegetables; warming precooked food.
Omelettes, scrambled egg, sauces,
1
hollandaise sauce; for warming, melting
butter, chocolate and gelatine.
0 Residual heat only, radiant plate is off.
117
M Y
117
Page 8

N C
USING THE GLASS-CERAMIC HOB
ACM 346 – ACM 348
RESIDUAL HEAT INDICATOR
The indicator remains active as long as glass-ceramic
surface temperature exceeds 60
ceramic cooktop has been switched off or after power
has been restored following a mains failure). Do not
touch the glass-ceramic surface when the residual heat
indicator is illuminated.
POWER SAVING TIPS
To save power, make use of the residual heat. 5 or 10
minutes before you finish cooking, set the control knob
to “0” .
USING THE IDEAL PANS
x
Use special pans for electric hobs with smooth, flat
and solid bottoms (pans with the test mark for
glass-ceramic hobs are available from specialist
shops).
x
The diameter of the pan should be the same as the
radiant plate or slightly larger.
x
Do not use pans with damaged or rough bottoms
(cast iron pans). The hob surface could be scratched
or the decoration may be damaged. Do not slide
pots across the hob.
x
To save electricity, use lids whenever possible.
x
Pots with aluminium bottoms may leave silver
streaks or spots on the hob.
x
Pots and pans should be dry. Place pans on the
cooking areas marked on the hob.
x
Do not leave wet or damp lids on the hob.
x
The glass-ceramic surface and pans must be clean.
Carefully eliminate any food remains (especially
containing sugar), dirt etc. with the aid of a
cleansing agent.
x
Never cook the food directly on the glass-ceramic
cooktop, but in special pans or containers.
o
C (also after the glass-
118
M Y
118
Page 9

N C
USING THE OVEN
CHILD LOCK
The cookers are equipped with a “Child lock” safety device.
2
B
R
1
C
L
USE OF THE SAFETY DEVICE
x
USE: The door closes normally and is blocked by
the safety device.
To open the door move lever C to the R.
x
DEACTIVATION: With the door open move
lever C to the R and block it in this position by
screwing screw B in position 2.
x
ACTIVATION: Open the oven door and with a
coin slacken screw B.
Lever C moves to the L after screw B is
tightened in position 1.
In order to open drawer please act as shown in
the picture.
119
M Y
119
Page 10

N C
USING THE CONVENTIONAL OVEN
ACM 342
SIDE GUIDES
The embossed oven side walls form 4 guides for the
insertion of the drip tray, baking trays and grids.
Recommended grid/baking tray levels are shown in the
tables at the end of this handbook.
FITTING THE OVEN SHELVES
Upper and lower heating elements
Inside the oven the heating elements are located on
the oven floor and ceiling. Heat is supplied by radiation.
The oven shelves are provided with a safety lock to
prevent accidental extraction. They must be put in as
showninthefigure.
To pull them out operate in reverse.
120
M Y
120
Page 11

N C
USING THE CONVENTIONAL OVEN
ACM 342
Switching on and off
To switch on the oven turn the cooking mode selector
and the temperature selectorPto the required
Q
positions.
The cooking mode selector
direction.
The temperature selector knob
the right to switch on the oven and to the left, position
N
, to switch it off.
Preheating
Preheating is unnecessary when preparing roasts,
casseroles, and slow-cooking dishes in general. Oven
preheating is recommended, however, for delicate
cooking and dishes that require shorter cooking times
(pastries, etc.). Consult the cooking time tables at the
back of the handbook.
can be turned in either
Q
must be turned to
P
Summary table
Cooking functions and temperatures
The following table shows cooking modes and
temperatures for oven and grill cooking.
Control knob
Temperature Cooking
o
C function
Off
Lower and upper
heating elements
Lower heating element
Upper heating element
Energy saving tips
You can utilise residual heat by setting the control knob
to “0” for approximately 5 or 10 minutes to finish
nearly all types of cooking.
You can also cook side dishes, such as potatoes, rice or
vegetables, together with the meat course.
Oven light
Turning the knob to any setting switches on the oven
light. The oven remains alight while any of the
functions is on.
N
-250
N
-150
N
-150
N
0
Þ
2
ñ
The outdoor parts of the oven become hot
during operation. Keep children well out of
reach.
121
M Y
121
Page 12

 Loading...