

Whirlpool 3LWGD4800YQ, 3LWED4800YQ Owner's Manual
ELECTRIC OR GAS DRYER
TM
USE AND CARE GUIDE
SECHE-LINGE ELECTRIQUE OU A GAZ
GUIDE D’UTILISATION ET D’ENTRETIEN
SECADORA A GAS O ELÉCTRICA
MANUAL DE USO Y CUIDADO
Table of Contents
DRYER SAFETY .................................................................2
SPECIFICATIONS ...............................................................2
DRYER DISPOSAL .............................................................4
CHECK YOUR VENT SYSTEM
FOR GOOD AIR FLOW ......................................................5
CONTROL PANEL & FEATURES .......................................6
CYCLE GUIDE ....................................................................7
USING YOUR DRYER ........................................................8
DRYER CARE ...................................................................10
TROUBLESHOOTING ......................................................12
Table des matières
SECURITE DU SECHE-LINGE ........................................14
CARACTERISTIQUES ......................................................14
ELIMINATION DU SECHE-LINGE ...................................16
VERIFICATION D’UNE CIRCULATION D’AIR
ADEQUATE POUR LE SYSTEME D’EVACUATION ........17
Índice
SEGURIDAD DE LA SECADORA ....................................27
ESPECIFICACIONES .......................................................27
ELIMINACIÓN DE LA SECADORA .................................29
REVISE QUE EL SISTEMA DE VENTILACIÓN
TENGA UN BUEN FLUJO DE AIRE ................................30
W10462986B
TABLEAU DE COMMANDE ET CARACTERISTIQUES ..18
GUIDE DE PROGRAMMES .............................................19
UTILISATION DU SECHE-LINGE ....................................21
ENTRETIEN DU SECHE-LINGE ......................................23
DEPANNAGE ....................................................................25
PANEL DE CONTROL Y CARACTERÍSTICAS ...............31
GUÍA DE CICLOS .............................................................32
USO DE SU SECADORA .................................................34
CUIDADO DE LA SECADORA .........................................36
SOLUCIÓN DE PROBLEMAS ..........................................38
3LWGD4800YQ
3LWED4800YQ
3LWED4900YW
DRYER SAFETY
SPECIFICATIONS
These units are sold in multiple regions with different
requirements for measuring capacity. Below are a few
of the valid forms of measure posted on this product:
Dry Linen Capacity: A weight measure that reects a maximum
load size that can be loaded into the dryer.
IEC Capacity: The capacity measure that represents the
maximum capacity of dry linens and textiles which the
manufacturer declares can be treated in a specic cycle.
2
Dry Linen Capacity
10,5 kg (23 lb)
IEC Capacity
9,0 kg (19,8 lb)

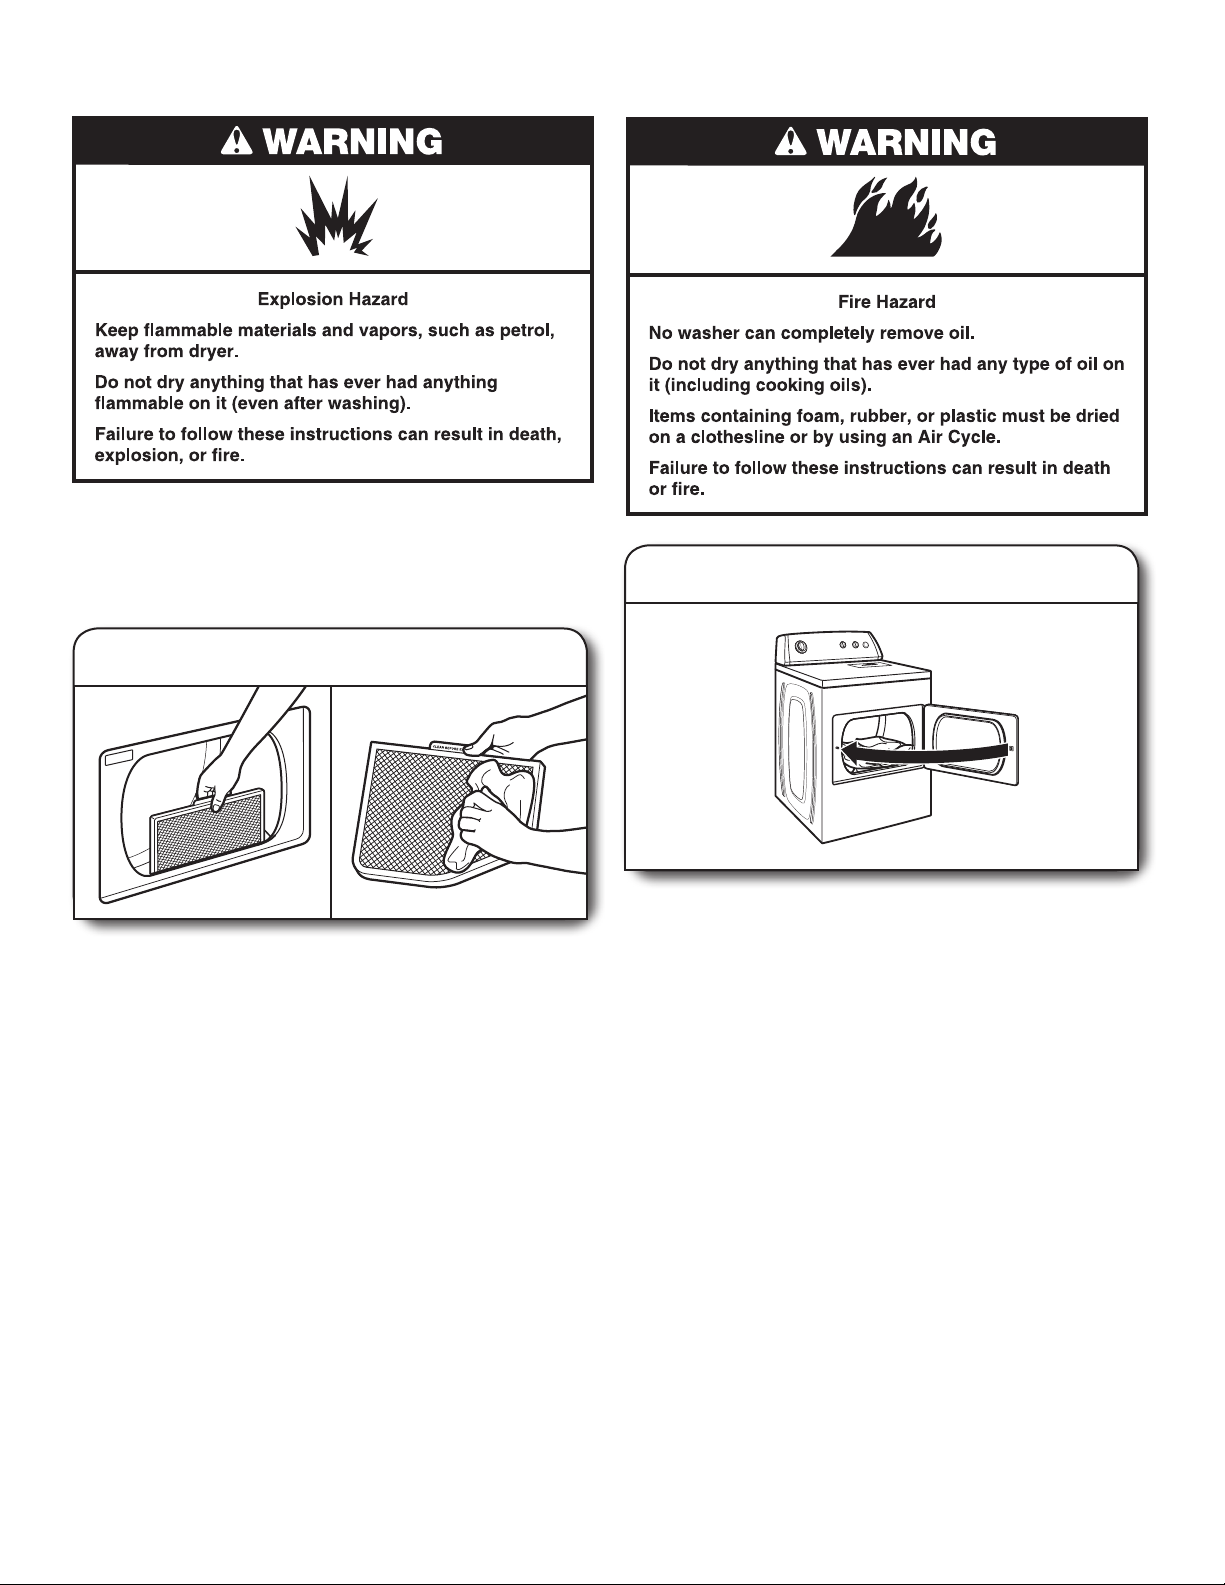
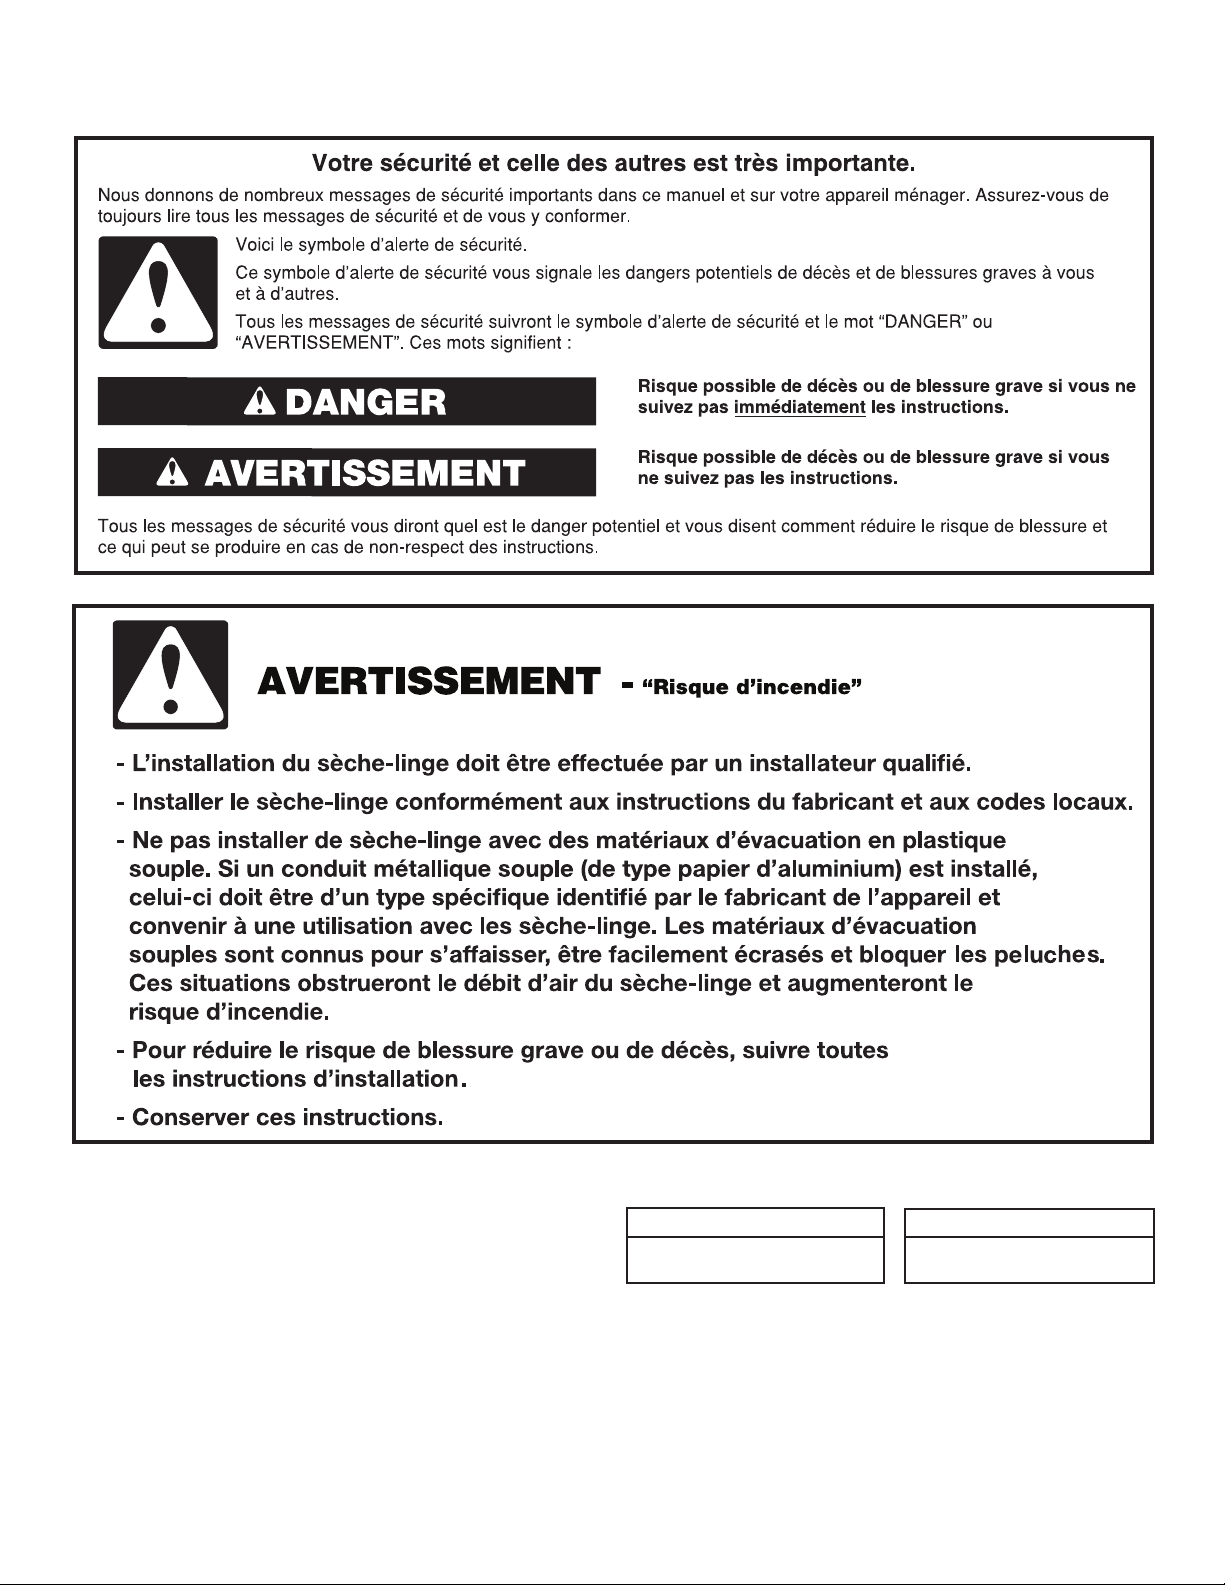
IMPORTANT SAFETY INSTRUCTIONS
WARNING:
precautions, including the following:
To reduce the risk of re, electric shock, or injury to persons when using the dryer, follow basic
Read all instructions before using the dryer.
Keep a minimum clearance of 100 mm (4 in.) between the
rear of the dryer and any wall.
The operation of this appliance may affect the operation of
other types of appliances which take their air supply for safe
combustion from the same room. There has to be adequate
ventilation to replace exhausted air and thus avoid the
back-ow of gases into the room from appliances burning
other fuels, including open res, when operating the tumble
dryer. If in doubt, consult the appliance manufacturers.
Do not obstruct the air supply to the dryer (see Installation
Instructions for minimum clearances).
Do not place items exposed to cooking oils in your dryer.
Oil-affected items can ignite spontaneously, especially when
exposed to heat sources such as in a tumble dryer. The
items become warm causing an oxidation reaction in the oil.
Oxidation creates heat. If the heat cannot escape, the items
can become hot enough to catch re. Piling, stacking or
storing oil-affected items can prevent heat from escaping
and so create a re hazard.
If it is unavoidable to dry in the dryer items that have been
soiled with substances such as cooking oil, acetone, alcohol,
petrol, kerosene, spot removers, turpentine, waxes and wax
removers, or that have been contaminated by hair care
products, should be washed in hot water with an extra
amount of detergent before being dried in the dryer. These
items may give off vapours that could ignite or explode. Such
washing will reduce, but not eliminate, the hazard.
This appliance is not intended for use by persons (including
children) with reduced physical, sensory or mental
capabilities, or lack of experience and knowledge, unless
they have been given supervision or instructions concerning
use of the appliance by persons responsible for their safety.
Children should be supervised to ensure that they do not
play with the appliance.
The dryer should not be used if industrial chemicals have
been used for cleaning.
Remove all objects from pockets, including, but not limited
to, lighters and matches.
Do not exceed the maximum mass of dry textile material
to be used in the appliance as listed under Specications.
Before the dryer is removed from service or discarded,
remove the doors to the drying compartment.
Do not reach into the dryer if the drum is moving. A door
switch is tted for your safety.
Do not install or store the dryer where it will be exposed
to the weather.
Do not tamper with controls.
Do not continue to use this appliance if it appears to be
faulty.
Do not repair or replace any part of the dryer or attempt
any maintenance unless specically recommended in this
Use and Care Guide. Repairs and servicing should only
be carried out by competent service personnel.
Do not use fabric softeners or products to eliminate static
unless recommended by the manufacturer of the fabric
softener or product. Follow their instructions.
Clean dryer lint screen before or after each load. Do not
operate dryer without lint screen in place.
Keep area around the exhaust and inlet openings and
adjacent surrounding areas free from the accumulation of
lint, dust, and dirt.
The interior of the dryer and exhaust vent should be
cleaned periodically by qualied service personnel.
See Installation Instructions for earthing instructions.
Do not dry unwashed items in this dryer.
The nal part of a tumble dryer cycle occurs without heat
(cool down cycle) to ensure that the items are left at a
temperature that ensures the items will not be damaged.
Items such as foam rubber (latex foam), shower caps,
waterproof textiles, rubber backed articles and clothes or
pillows tted with foam rubber pads must only be dried
on a clothesline.
If the supply cord is damaged, it must be replaced by the
manufacturer or its service agent or a similarly qualied
person in order to avoid a hazard.
WARNING: Never stop a tumble dryer cycle before the
end of the drying cycle unless all items are quickly removed
and spread out so that the heat is dissipated.
SAVE THESE INSTRUCTIONS
3
DRYER DISPOSAL
4
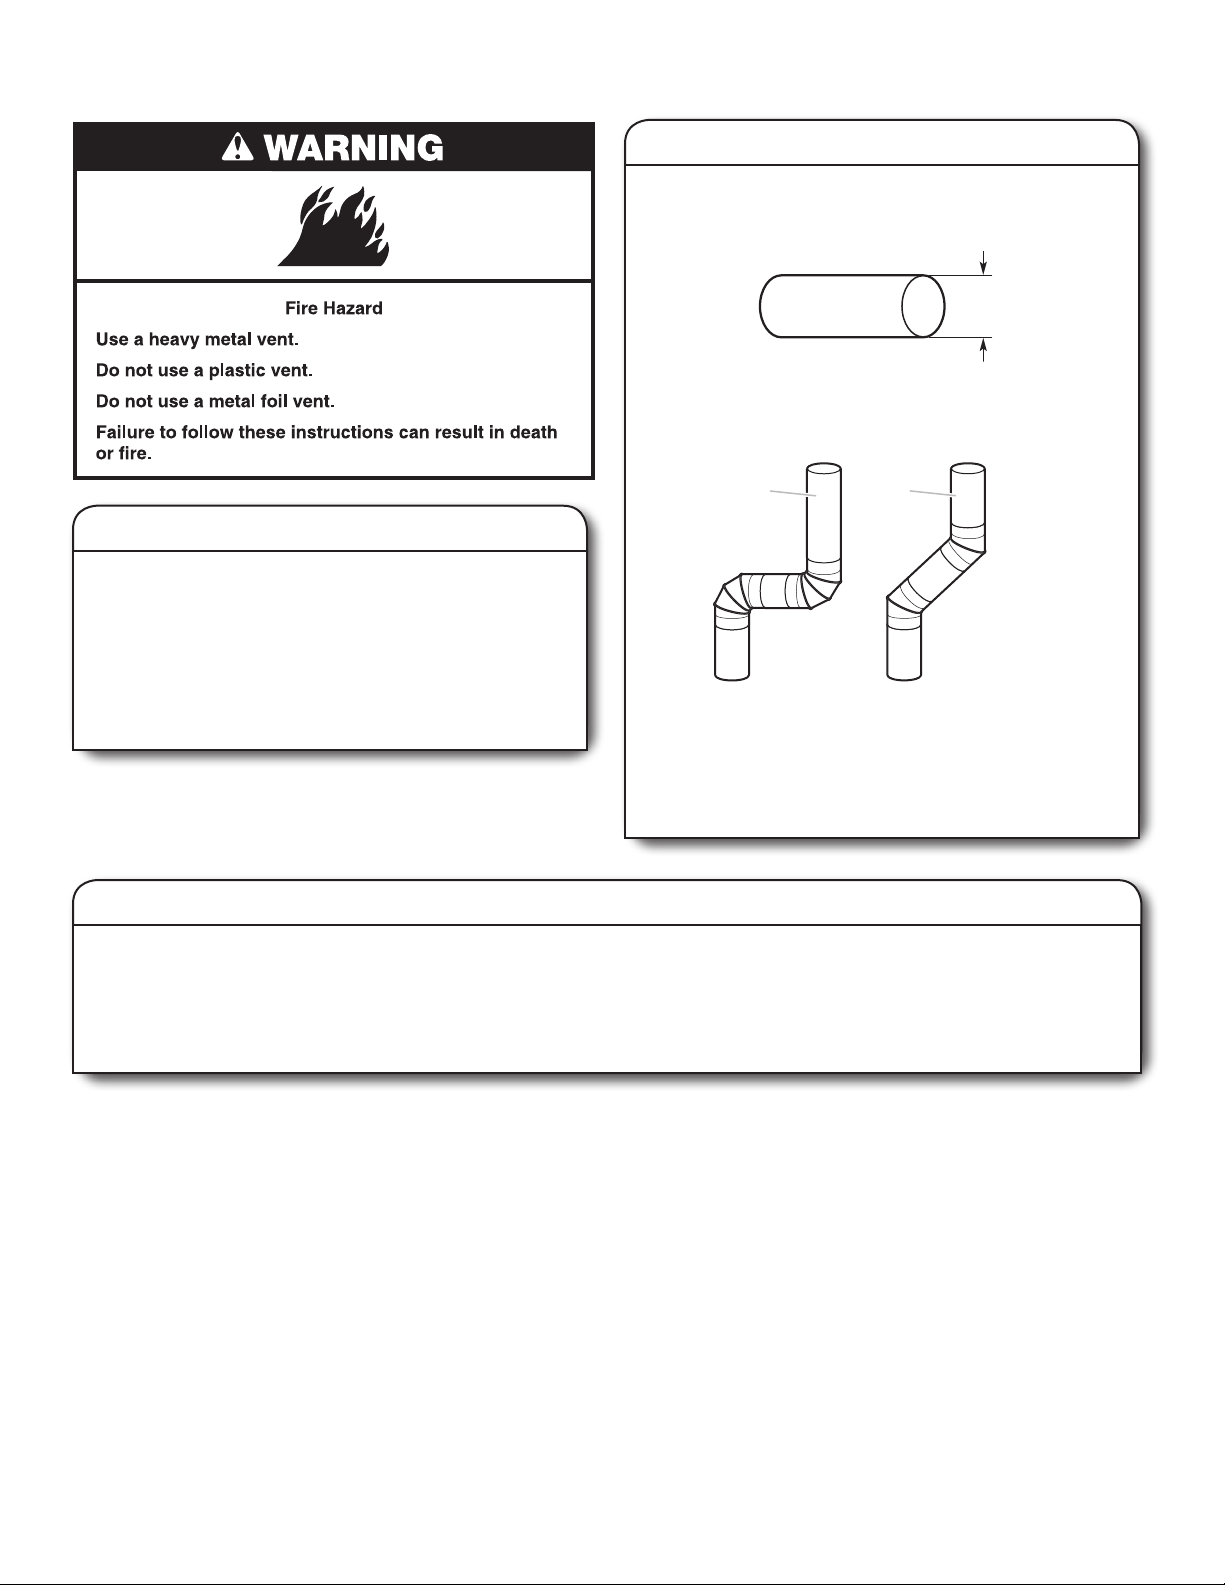
CHECK YOUR VENT SYSTEM FOR GOOD AIR FLOW
Maintain good air ow by:
n
Cleaning your lint screen before each load.
n
Replace plastic or foil vent material with 102 mm (4")
diameter heavy, rigid vent material.
n
Use the shortest length of vent possible.
n
Use no more than four 90° elbows in a vent system;
each bend and curve reduces air ow.
Good air ow
Along with heat, dryers require good air ow to efciently
dry laundry. Proper venting will reduce your drying times
and improve your energy savings. See “Installation
Instructions.”
The venting system attached to the dryer plays a big role in
good air ow.
Service calls caused by improper venting are not covered
by the warranty and will be paid by the customer, regardless
of who installed the dryer.
n
Remove lint and debris from the exhaust hood.
n
Remove lint from the entire length of the vent system at
least every 2 years. When cleaning is complete, be sure
to follow the “Installation Instructions” supplied with your
dryer for nal product check.
n
Clear away items from the front the dryer.
102 mm
(4")
Good Better
Use Automatic Dry Cycles for Better Fabric Care and Energy Savings
Use the Automatic Dry Cycles to provide the most energy savings and enhanced fabric care from the dryer. During Automatic Dry
Cycles, drying air temperature and moisture level are sensed in the load. This sensing occurs throughout the drying cycle and the
dryer shuts off when the load reaches the selected dryness. The dryer will default to Energy Preferred cycle to give you optimal
dryness for your load and save energy.
With Timed Dry, the dryer runs the amount of time set and sometimes results in shrinkage, wrinkling, and static due to over-drying.
Use Timed Dry for the occasional damp load that needs a little more drying time or when using the drying rack.
5
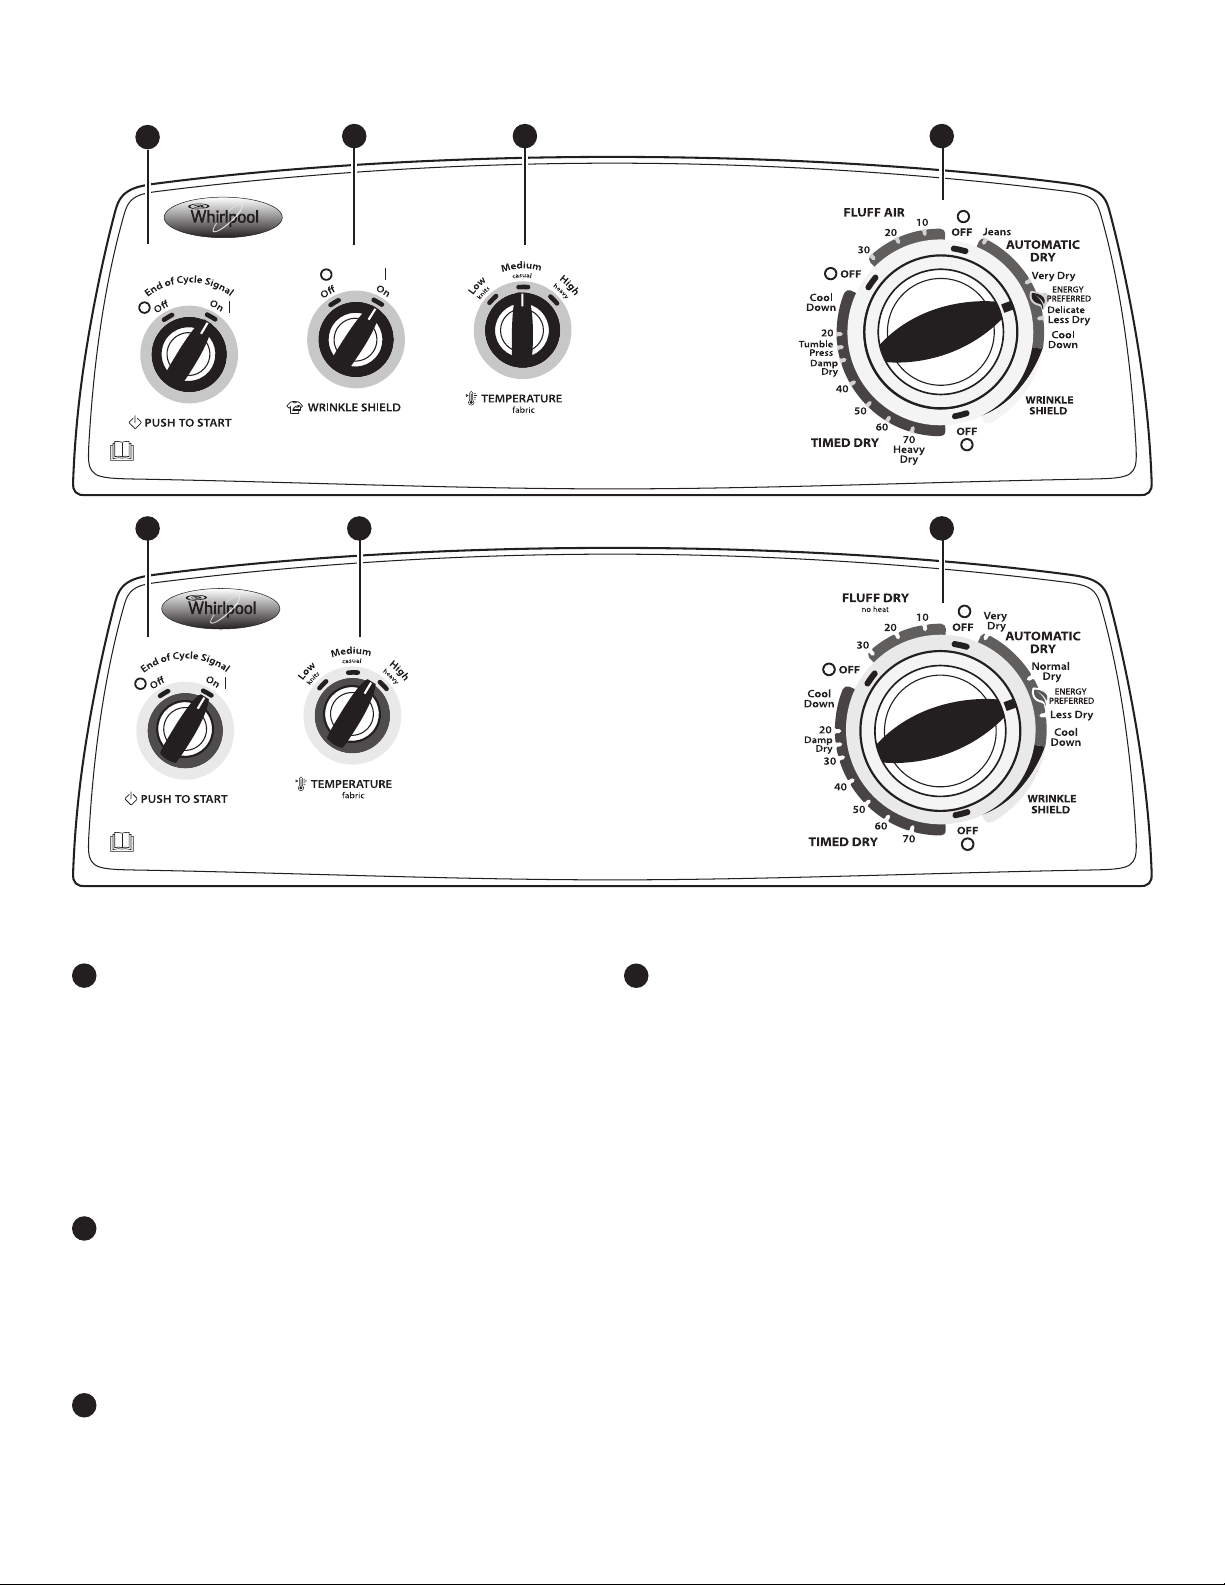
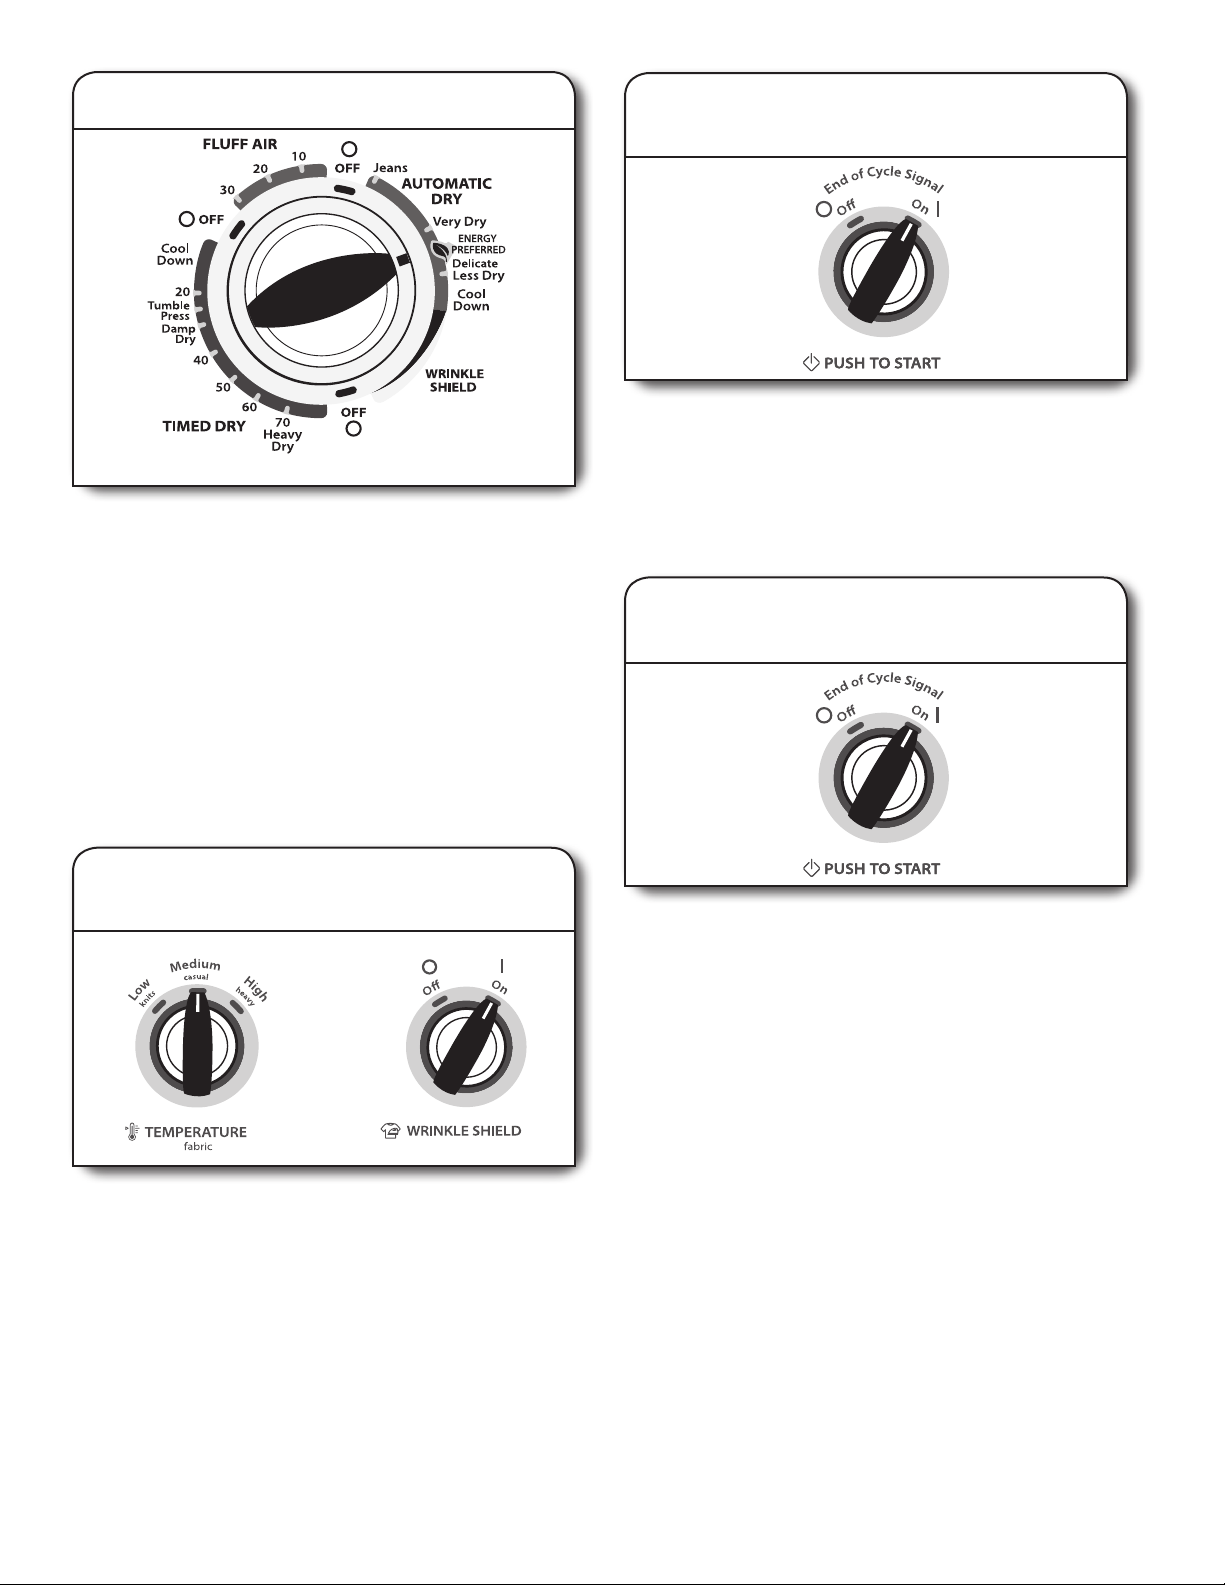
CONTROL PANEL & FEATURES
1
1 3
2 3
4
4
Not all features and options are available on all models.
1
END OF CYCLE SIGNAL/PUSH TO START
The End of Cycle Signal produces an audible sound when
the drying cycle is nished. Promptly removing clothes at
the end of the cycle reduces wrinkling.
Turn the END OF CYCLE SIGNAL knob to select the
desired setting (On or Off). Press the PUSH to START
knob to start the dryer.
NOTE: When the Wrinkle Shield setting is selected
and the End of Cycle Signal is on, the tone will sound
every 5minutes until the clothes are removed, or the
Wrinkle Shield setting ends.
WRINKLE SHIELD FEATURE (on some models)
2
When you are unable to remove a load of clothes from the
dryer as soon as it stops, wrinkles can form. The WRINKLE
SHIELD feature periodically tumbles, rearranges, and uffs
the load to help keep wrinkles from forming.
n
Get up to 40minutes of heat-free, periodic tumbling at
the end of a cycle. Turn the WRINKLE SHIELD knob to
ON or OFF at any time before the cycle has ended.
TEMPERATURE/FABRIC
3
Select a drying temperature based on the fabrics in your
load. If you are unsure of the temperature to select for a
load, select the lower setting rather than the higher setting.
Appearance may vary.
4
DRYER CYCLE KNOB
Use your Dryer Cycle knob to select available cycles on
your dryer. Turn the knob to select a cycle for your laundry
load. See “Cycle Guide” for detailed descriptions of cycles.
TIMED DRY
Will run the dryer for the specied time on the control.
On models with a selectable temperature knob, you
may choose a setting based on the fabrics in your load.
Drying time and temperature will depend on your dryer
model.
FLUFF AIR/FLUFF DRY
Will run the dryer in a no heat cycle for the specied time
on the control. On models with a selectable temperature
knob, you may choose a setting based on the fabrics in
your load. Drying time will depend on your dryer model.
AUTOMATIC DRY
Senses moisture in the load or air temperature and shuts
off when the load reaches the selected dryness level.
Gives the best drying in the shortest time. Drying time
will vary based on fabric type, load size, and dryness
setting.
6
CYCLE GUIDE — AUTOMATIC DRY CYCLES
Not all cycles and settings are available on all models.
AUTOMATIC DRY CYCLES - Senses moisture in the load or air temperature and shuts off when the load reaches the selected
dryness level. Choose ENERGY PREFERRED cycle for optimal energy savings.
Items to dry:
Temperature
Dryness Level:
Fabric:
Jeans, heavy work
clothes, towels
Work clothes, medium
weight fabrics, sheets
Casual, shirts, pants,
lightweight items,
synthetics, delicates,
athletic wear
* This option is only available on some models.
NOTE: If loads do not seem as dry as you would like, select Jeans* or Very Dry next time you dry a similar load. If loads seem drier
than you like, select Less Dry next time you dry a similar load.
High Heavy
Medium Casual
Low Knits
Jeans*
Very Dry
Normal Dry*
Energy Preferred
Less Dry
Available
Options:
Temperature/Fabric
Wrinkle Shield
End of Cycle Signal
Cycle Details:
Automatic Dry cycles give the best drying
in the shortest time. Drying time varies
based on fabric type, load size, and
dryness setting.
Select a drying temperature based on
the fabrics in your load. If you are unsure
of the temperature to select for a load,
select the lower setting rather than the
higher setting.
CYCLE GUIDE — TIMED DRY CYCLES
Not all cycles and settings are available on all models.
TIMED DRY - Will run the dryer for the specied time on the control.
Items to dry: Temperature:Cycle: Available
Options:
Large or heavy items
such as thick towels
or robes
Any load
Heavy Dry
Damp Dry Any
Any
Temperature/Fabric
End of Cycle Signal
Temperature/Fabric
End of Cycle Signal
Choose High Heavy to dry large
or heavy loads.
Dries items to a damp level or for items
that do not require an entire drying
cycle.
Cycle Details:
Any load Tumble Press Any Temperature/Fabric
End of Cycle Signal
Rubber, plastic, heat
sensitive fabrics
Fluff Air/Fluff Dry
No Heat
End of Cycle Signal
Setting the Drying Temperature
If your dryer has multiple heat settings:
A High Heavy temperature setting may be used for drying
heavyweight items such as towels and work clothes.
A Low Knits to Medium Casual temperature setting may
be used for drying medium-weight items such as sheets,
blouses, dresses, underwear, permanent press fabrics,
and some knits.
Use the Fluff Air/Fluff Dry (no heat) setting for foam, rubber,
plastic, or heat-sensitive fabrics.
Line dry bonded or laminated fabrics.
NOTE: If you have questions about drying temperatures for
various loads, refer to the care label directions.
Use low to medium temperature to
smooth out wrinkles, such as those
found in clothes packed in a suitcase or
in items wrinkled from being left in the
dryer too long.
No heat drying.
7
USING YOUR DRYER
WARNING: To reduce the risk of fire, electric shock, or injury to
persons, read the IMPORTANT SAFETY INSTRUCTIONS before
operating this dryer.
Before using your dryer, wipe the dryer drum with a damp cloth
to remove dust from storing and shipping.
1. Clean the lint screen
2. Load the dryer
Clean the lint screen before each load. Pull the lint screen out
of its holder. Roll lint off the screen with your ngers. Do not
rinse or wash screen to remove lint. Push the lint screen rmly
back into place.
For additional cleaning information, see “Dryer Care.”
Place laundry in the dryer. Close the door. Do not tightly pack
the dryer; clothes should be able to tumble freely.
NOTE: Your model may have a different door than the one
shown. Some models have drop down doors.
8
3. Select the desired cycle
Appearance may vary
Select the desired cycle for your load. See the Cycle Guide
for more information about each cycle.
AUTOMATIC DRY Cycles
You can select a different dryness level, depending on your
load, by turning the knob to the appropriate Automatic Dry
cycle.
Selecting an Automatic Dry cycle automatically adjusts the
dryness level at which the dryer will shut off. Once a dryness
level is set, it cannot be changed without stopping the cycle.
AUTOMATIC DRY cycles give the best drying in the shortest
time. Drying time varies based on fabric type, load size, and
dryness setting.
NOTE: ENERGY PREFERRED is used for a starting point for
AUTOMATIC DRY cycles. Choose ENERGY PREFERRED for
optimal energy savings.
5. Select End of Cycle Signal
(if desired)
Turn the END OF CYCLE SIGNAL knob to select the desired
setting (On or Off). The End of Cycle Signal produces an
audible sound when the drying cycle is nished. Promptly
removing clothes at the end of the cycle reduces wrinkling.
NOTE: When the Wrinkle Shield setting is selected and
the End of Cycle Signal is on, the tone will sound every
5minutes until the clothes are removed, or the Wrinkle
Shield setting ends.
6. Press PUSH to START to
begin cycle
4. Set cycle settings and options
(on some models)
Select cycle settings and options by turning the knob to the
desired position.
Push and hold the PUSH to START knob to begin the cycle.
Promptly remove garments after cycle has completed to
reduce wrinkling. Use the Wrinkle Shield feature to avoid
wrinkling when you are unable to remove a load from the
dryer as soon as it stops.
9
DRYER CARE
Cleaning the dryer location
Keep dryer area clear and free from items that would
block the air ow for proper dryer operation. This includes
clearing piles of laundry in front of the dryer.
Cleaning the dryer interior
To clean dryer drum
1. Apply a liquid, nonammable household cleaner to the
stained area of the drum and rub with a soft cloth until
stain is removed.
2. Wipe drum thoroughly with a damp cloth.
3. Tumble a load of clean cloths or towels to dry the drum.
NOTE: Garments that contain loose dyes, such as denim
blue jeans or brightly colored cotton items, may discolor the
dryer interior. These stains are not harmful to your dryer and
will not stain future loads of clothes. Dry these items inside
out to avoid drum staining.
Removing accumulated lint
From Inside the Dryer Cabinet
Lint should be removed every 2 years, or more often,
depending on dryer usage. Cleaning should be done
by a qualied servicer.
From the Exhaust Vent
Lint should be removed every 2 years, or more often,
depending on dryer usage.
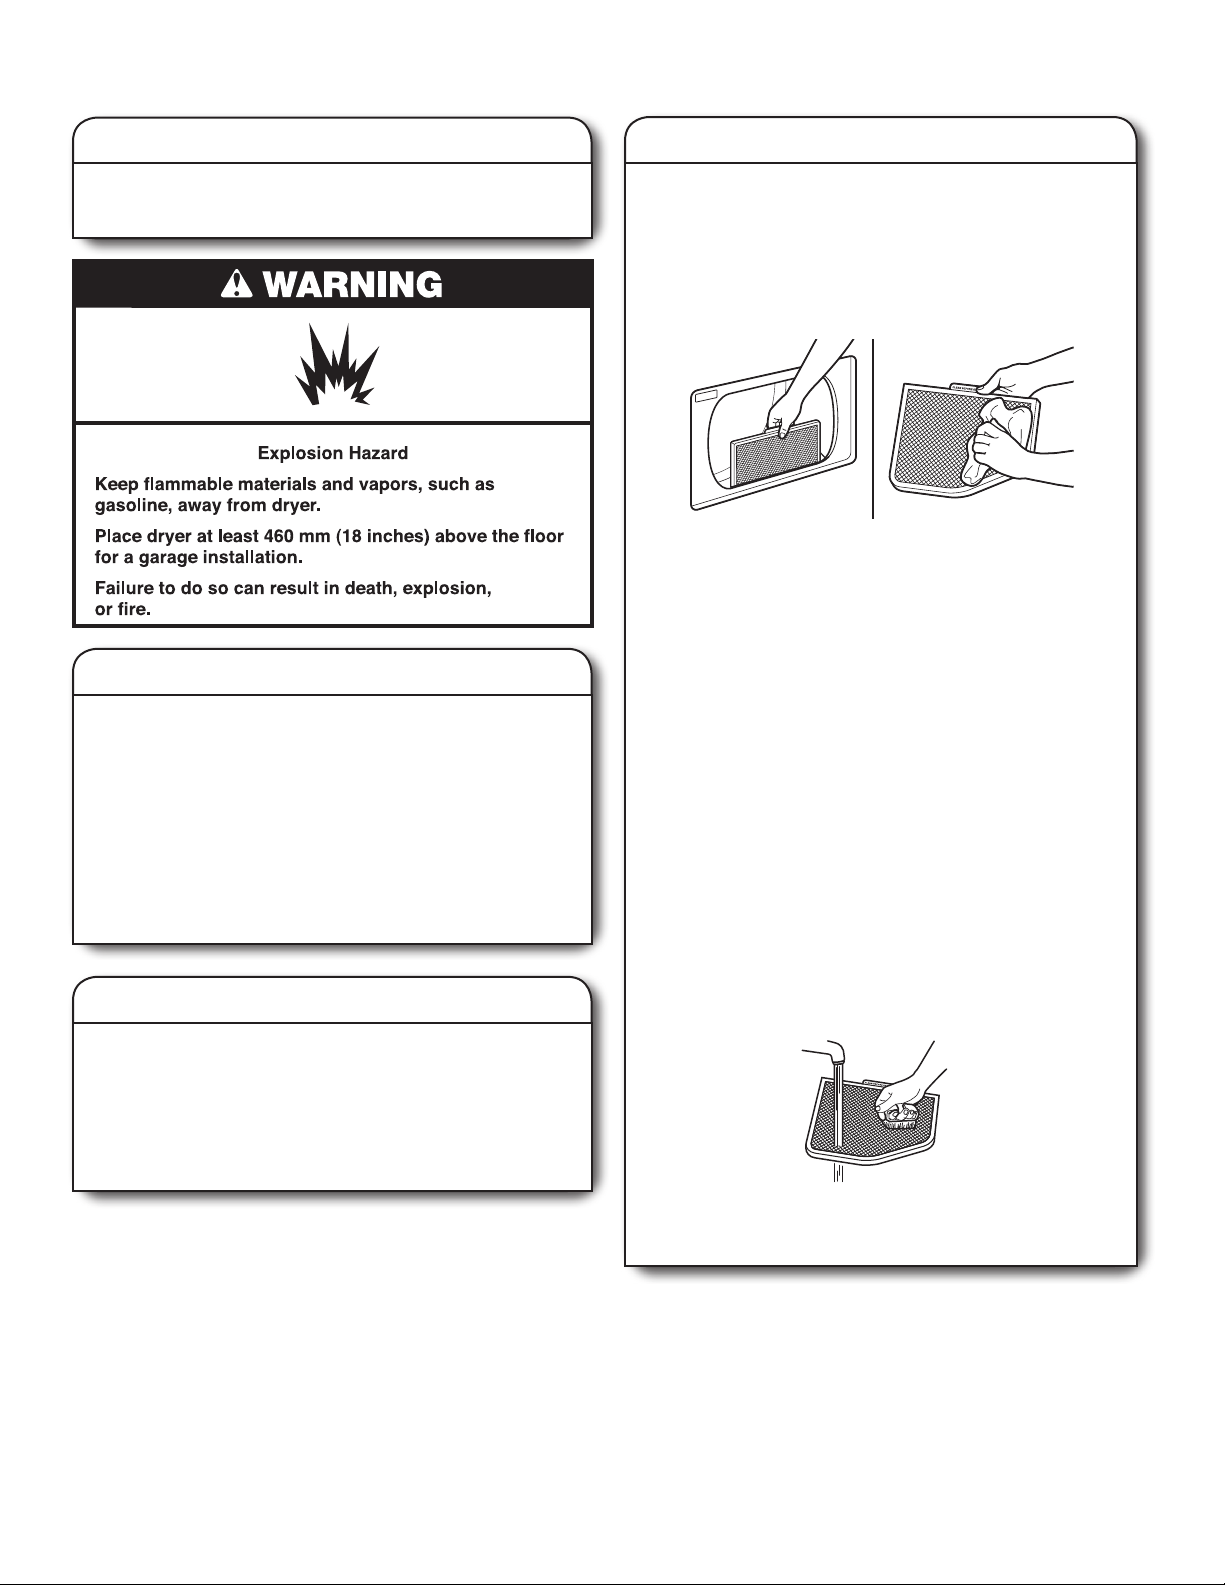
Cleaning the lint screen
Every load cleaning
The lint screen is located in the dryer. A screen blocked by
lint can increase drying time.
To clean:
1. Pull the lint screen out of its holder. Roll lint off the
screen with your ngers. Do not rinse or wash screen to
remove lint. Wet lint is hard to remove.
2. Push the lint screen rmly back into place.
IMPORTANT:
n
Do not run the dryer with the lint screen loose,
damaged, blocked, or missing. Doing so can cause
overheating and damage to both the dryer and fabrics.
n
If lint falls off the screen into the dryer during removal,
check the exhaust hood and remove the lint. See
“Venting Requirements.”
As needed cleaning
Laundry detergent and fabric softener residue can build
up on the lint screen. This buildup can cause longer drying
times for your clothes, or cause the dryer to stop before
your load is completely dry. The screen is probably clogged
if lint falls off while the screen is in the dryer.
Clean the lint screen with a nylon brush every 6 months,
or more frequently, if it becomes clogged due to a residue
buildup.
To wash:
1. Roll lint off the screen with your ngers.
2. Wet both sides of lint screen with hot water.
3. Wet a nylon brush with hot water and liquid detergent.
Scrub lint screen with the brush to remove residue
buildup.
4. Rinse screen with hot water.
5. Thoroughly dry lint screen with a clean towel.
Reinstall screen in dryer.
10
Vacation, storage, and moving care
Non-Use or Storage Care
Operate your dryer only when you are at home. If you will
be on vacation or not using your dryer for an extended
period of time, you should:
1. Unplug dryer or disconnect power.
2. (For gas dryers only): Close shut off valve to gas supply
line.
3. Clean lint screen. See “Cleaning the Lint Screen.”
Moving Care
For power supply cord-connected dryers:
1. Unplug the power supply cord.
2. Make sure leveling legs are secure in dryer base.
3. Use tape to secure dryer door.
For gas dryers:
1. Unplug or disconnect power to dryer.
2. Close shutoff valve in gas supply line.
3. Disconnect gas supply line pipe and remove ttings
attached to dryer pipe.
4. Cap the open fuel supply line.
5. Make sure leveling legs are secure in dryer base.
6. Use tape to secure dryer door.
Reinstalling the Dryer
Follow the “Installation Instructions” to locate, level,
and connect the dryer.
For direct-wired dryers:
1. Turn off power at fuse or breaker box.
2. Disconnect wiring.
3. Make sure leveling legs are secure in dryer base.
4. Use tape to secure dryer door.
11
TROUBLESHOOTING
First try the solutions suggested here to possibly avoid the cost of a service call.
If you experience
Clothes are not drying
satisfactorily, drying
times are too long
Possible Causes
Lint screen clogged with lint.
Has the Fluff Air cycle been
selected.
Load too large and heavy to dry
quickly.
Exhaust vent or outside exhaust
hood clogged with lint, restricting air
movement.
Fabric softener sheets blocking
the grill.
Exhaust vent not the correct length.
Exhaust vent diameter not the
correct size.
Dryer located in a room with
temperature below 7ºC (45ºF).
Dryer located in a closet without
adequate opening.
Solution
Lint screen should be cleaned before each load.
Select the right cycle for the types of garments being dried.
See “Cycle Guide.”
Separate the load to tumble freely.
Run the dryer for 5-10 minutes. Hold your hand under the
outside exhaust hood to check air movement. If you do not feel
air movement, clean exhaust system of lint or replace exhaust
vent with heavy metal or exible metal vent. Make sure vent is
not crushed or kinked. See “Installation Instructions”.
Use only one fabric softener sheet, and use it only once.
Check that the exhaust vent is not too long or has too many
turns. Long venting will increase drying times. Make sure vent
is not crushed or kinked. See “Installation Instructions”.
Use 102mm (4") diameter vent material.
Proper operation of dryer cycles requires temperatures above
7ºC (45ºF).
Closet doors must have ventilation openings at the top and
bottom of the door. The front of the dryer requires a minimum of
25mm (1") of airspace, and, for most installations, the rear of
the dryer requires 127mm (5"). See “Installation Instructions.”
Dryer will not run
Unusual sounds
No heat Household fuse is blown or circuit
Door not closed completely. Make sure the dryer door is closed completely.
PUSH to START knob not pressed
rmly or held long enough.
Household fuse is blown or circuit
breaker has tripped.
Incorrect power supply.
Wrong type of fuse.
Dryer had a period of non-use.
Coin, button, or paper clip caught
between the drum and front or rear
of the dryer.
It is a gas dryer.
Dryer is not level.
Clothing knotted or balled up.
breaker has tripped.
Supply line valve not open. For gas dryers, is the valve open on the supply line.
Press and hold the PUSH to START knob until you hear the dryer
drum moving.
Electric dryers use 2 household fuses or circuit breakers. The
drum may be turning, but you may not have heat. Replace both
fuses or reset the circuit breaker. If the problem continues, call
an electrician.
Electric dryers require 220-240 volt power supply.
Check with a qualied electrician.
Use a time-delay fuse.
If the dryer hasn’t been used for awhile, there may be a
thumping sound during the rst few minutes of operation.
Check the front and rear edges of the drum for small objects.
Clean out pockets before laundering.
The gas valve clicking is a normal operating sound.
The dryer may vibrate if not properly installed.
See “Installation Instructions”.
When balled up, the load will bounce, causing the dryer to
vibrate. Separate the load items and restart the dryer.
The drum may be turning, but you may not have heat. Electric
dryers use 2 household fuses or circuit breakers. Replace both
fuses or reset the circuit breaker. If the problem continues, call
an electrician.
12
Incorrect power supply.
Electric dryers require 220-240 volt power supply.
Check with a qualied electrician.
TROUBLESHOOTING cont.
First try the solutions suggested here to possibly avoid the cost of a service call.
If you experience
Cycle time too short
Lint on load
Stains on load or drum
Loads are wrinkled
Odors
Load is too hot
Possible Causes
Automatic cycle ending early. The load may not be contacting the sensor strips. Level the
dryer.
Use Timed Dry for very small loads. Change the dryness level
setting on Automatic Dry cycles.
Increasing or decreasing the Dry Level setting will change the
amount of drying time in a cycle.
Lint screen clogged.
Dryer fabric softener not properly
used.
Load not removed from dryer at the
end of the cycle.
Dryer tightly packed.
Recently been painting, staining, or
varnishing in the area where your
dryer is located.
Electric dryer being used for the rst
time.
Laundry items removed from the
dryer before the end of the cycle.
High temperature cycle used or was
Temperature/Fabric control set to
high.
Lint screen should be cleaned before each load.
Add dryer fabric softener sheets at the beginning of the cycle.
Fabric softener sheets added to a partially dried load can stain
your garments.
Drum stains are caused by dyes in clothing (usually blue jeans).
These will not transfer to other clothing.
Select Wrinkle Shield feature to tumble the load without heat to
avoid wrinkling.
Dry smaller loads that can tumble freely reduce wrinkles from
forming.
If so, ventilate the area. When the odors or fumes are gone
from the area, rewash and dry the clothing.
The new electric heating element may have an odor. The odor
will be gone after the rst cycle.
Allow Cool Down feature to nish before removing laundry from
dryer. All cycles are cooled slowly to reduced wrinkling and
make it easier to handle. Items removed before Cool Down may
feel very warm.
Select a lower temperature, and use an Automatic Dry cycle.
These cycles sense the temperature or the moisture level in the
load and shut off when the load reaches the selected dryness.
This reduces overdrying.
Solution
13
SECURITE DU SECHE-LINGE
CARACTERISTIQUES
Ces appareils sont vendus dans diverses régions aux
critères de capacité de mesure différents. Vous trouverez
ci-dessous quelques unes des formes de mesures valables
indiquées sur ce produit :
Capacité linge sec : Poids reétant la taille de charge
maximale pouvant être placée dans le lave-linge.
Capacité IEC : Mesure de capacité représentant la capacité
maximale de linge sec et de textiles pour lesquels le fabricant
conseille un programme spécique de traitement.
14
Capacité linge sec
10,5 kg (23 lb)
Capacité IEC
9,0 kg (19,8 lb)
IMPORTANTES INSTRUCTIONS DE SECURITE
AVERTISSEMENT :
l’utilisation du sèche-linge, il convient d’observer certaines précautions fondamentales, notamment :
An de réduire le risque d’incendie, de choc électrique ou de blessures corporelles lors de
Lire toutes les instructions avant d’utiliser le sèche-linge.
Laisser un dégagement minimal de 100 mm (4") entre l’arrière
du sèche-linge et les éventuelles parois environnantes.
Le fonctionnement de cet appareil peut affecter celui d’autres
appareils dont la source d’approvisionnement en air se fait
dans la même pièce pour une combustion sans danger.
Lorsqu’on utilise le sèche-linge, une aération adéquate est
nécessaire pour renouveler l’air rejeté et ainsi éviter le retour
dans la pièce de gaz en provenance d’appareils ménagers
utilisant d’autres carburants comme combustible, y compris
les feux ouverts. En cas de doute, consulter le fabricant de
l’appareil.
Ne pas obstruer l’alimentation en air du sèche-linge (voir les
instructions d’installation pour les dégagements minimaux).
Ne pas placer d’articles tâchés d’huile de cuisson dans le
sèche-linge. Des articles ayant été au contact d’huile peuvent
s’enammer spontanément, surtout s’ils sont exposés à des
sources de chaleur, telles un sèche-linge. Les articles
peuvent chauffer, entraînant une réaction d’oxydation de
l’huile. Le phénomène d’oxydation crée de la chaleur. Si la
chaleur ne peut pas s’échapper, les articles peuvent devenir
sufsamment chauds pour prendre feu. Le fait d’empiler,
d’entasser ou d’entreposer des articles ayant été au contact
d’huile peut empêcher la chaleur de s’échapper et créer un
risque d’incendie.
Si l’on doit faire sécher dans le sèche-linge des articles ayant
été souillés par des substances telles que de l’huile de
cuisson, acétone, alcool, pétrole, kérosène, produit
détachant, térébenthine, cire, décapant pour cire ou produits
de coiffure, ils doivent être lavés à l’eau chaude avec un
supplément de détergent avant d’être séchés dans le
sèche-linge. Ces articles sont susceptibles de dégager des
vapeurs qui pourraient s’enammer ou exploser. Les laver
ainsi au préalable permet de réduire mais non de supprimer
ce risque.
Cet appareil ne convient pas à une utilisation par des
personnes (y compris des enfants) à capacités physiques,
sensorielles ou mentales réduites, ou dépourvues
d’expérience et de connaissances, à moins qu’elles ne soient
placées sous supervision ou qu’elles aient reçu des
instructions concernant l’utilisation de l’appareil par une
personne responsable de leur sécurité.
Il convient de surveiller les enfants pour qu’ils ne jouent pas
avec l’appareil.
Ne pas utiliser le sèche-linge si l’on a utilisé des produits
chimiques industriels pour le nettoyage.
Vider les poches de tous objets – y compris briquets
ou allumettes.
Ne pas dépasser la masse maximale de tissu sec à
respecter avec cet appareil électroménager, tel qu’indiqué
sous la section Spécications.
Retirer les portes du compartiment de séchage avant de
retirer le sèche-linge pour un entretien ou de le mettre
au rebut.
Ne pas accéder à l’intérieur du sèche-linge pendant le
fonctionnement du tambour. Pour votre sécurité,
l’appareil est pourvu d’un contacteur de porte.
Ne pas installer ou entreposer le sèche-linge dans un
endroit où il serait exposé aux intempéries.
Ne pas effectuer d’intervention non autorisée sur les
commandes.
Ne pas utiliser ce sèche-linge s’il semble défectueux.
Ne pas procéder à l’entretien, à la réparation ou au
remplacement de n’importe quelle pièce du sèche-linge,
à moins que ceci ne soit spéciquement recommandé
dans le guide d’utilisation et d’entretien. Seul un
dépanneur compétent est habilité à effectuer une
intervention de réparation ou d’entretien sur cet appareil.
Ne pas utiliser d’assouplissants pour tissu ou de produits
pour éliminer l’électricité statique à moins que cela ne
soit recommandé par le fabricant d’assouplissants pour
tissu ou du produit. Suivre leurs instructions.
Nettoyer le ltre à peluches du sèche-linge avant ou
après chaque charge. Ne pas utiliser le sèche-linge si
le ltre à peluches n’est pas installé.
La zone située autour des ouvertures de prise ou
d’évacuation d’air et les zones adjacentes doivent être
exemptes de peluches et poussières.
L’intérieur du sèche-linge et le conduit d’évacuation
doivent être nettoyés régulièrement par un personnel
d’entretien qualié.
Voir les instructions d’installation pour les instructions
de mise à la terre.
Ne pas faire sécher d’articles non lavés dans ce
sèche-linge.
La partie nale du programme de séchage par culbutage
a lieu sans chaleur (programme de refroidissement) pour
que les articles soient laissés à une température qui ne
risque pas de les endommager.
Les articles tels que le caoutchouc mousse (mousse de
latex), les bonnets de douche, les textiles imperméabilisés,
les articles avec endos de caoutchouc et les vêtements
ou oreillers rembourrés avec matelassage en mousse
doivent être séchés uniquement sur une corde à linge.
Si le cordon d’alimentation est endommagé, il doit être
remplacé par le fabricant, son agent de service ou toute
autre personne qualiée an d’éviter tout danger.
AVERTISSEMENT : Ne jamais arrêter un sèche-linge
en phase de culbutage avant la n du programme de
séchage à moins de retirer les articles rapidement et de les
étendre an de dissiper la chaleur.
CONSERVER CES INSTRUCTIONS
15
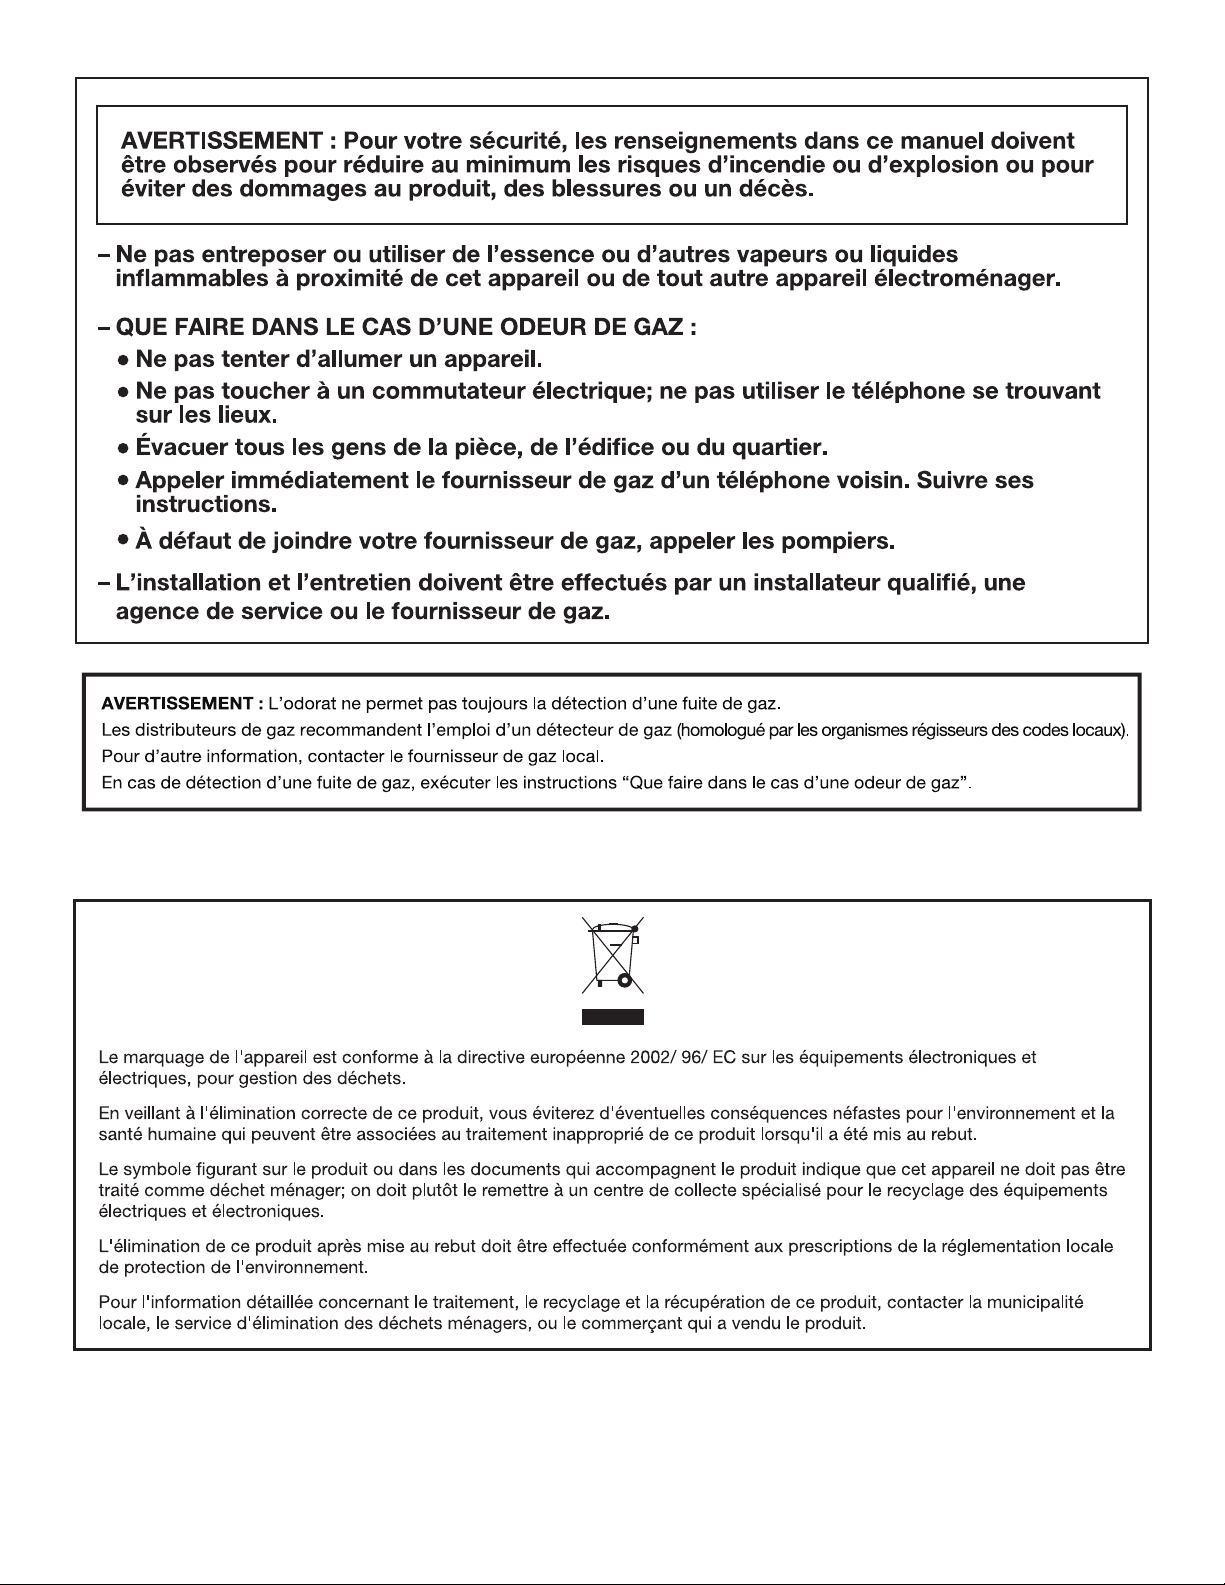
ELIMINATION DU SECHE-LINGE
16
 Loading...