

WESTINGHOUSE WSF6608 User manual
USER MANUAL
DISHWASHER
WSF6608
Applicable to WSF6608 dishwashers
with serial numbers greater than 82100000
ENVIRONMENTAL TIPS
ENVIRONMENTAL TIPS
CONTENTSCONGRATULATIONS IMPORTANT SAFETY INSTRUCTIONS
WARNING
TIPS & INFORMATION
ENVIRONMENTAL TIPS
WARNING
Congratulations and thank you for choosing our product.
We are sure you will find your new appliance a pleasure
to use and a great asset to your cooking. Before you use
the appliance, we recommend you
read through the whole user manual which provides
a description of the product and its functions.
To make the best use of your new appliance, it is
important that the appliance is installed correctly and
that you read the safety instructions carefully to avoid
misuse and hazards. We recommend that you keep this
instruction booklet for future reference and pass it on
to any future owners. This appliance complies with the
requirements of Australian Standard AS/NZ 60335.2.5.
Conditions of use
This appliance is intended to be used in household
and similar applications such as:
• Staff kitchen areas in shops, offices and other
working environments
• Farm houses
• By clients in hotels, motels and other residential type
environments
• Bed and breakfast type environments.
Record model and serial number here:
Model: ............................................................................
Serial number: ............................................................
ENVIRONMENTAL TIPS
Important – check for any damage or marks
If you find the dishwasher is damaged or marked, you
must report it within 7 days if you wish to claim for
damage/ marks under the manufacturers warranty.
This does not affect your statutory rights.
IMPORTANT INFORMATION THAT MAY
IMPACT YOUR MANUFACTURER’S WARRANTY
Adherence to the directions for use in this manual
is extremely important for health and safety. Failure
to strictly adhere to the requirements in this manual
may result in personal injury, property damage
and affect your ability to make a claim under the
Westinghouse manufacturer’s warranty provided
with your product. Products must be used, installed
and operated in accordance with this manual. You
may not be able to claim on the Westinghouse
manufacturer’s warranty in the event that your
product fault is due to failure to adhere this manual.
Important safety instructions . . . . . . . . . . . . . 3
Recycling . . . . . . . . . . . . . . . . . . . . . . . .3
Safety information . . . . . . . . . . . . . . . . . . .3
Recommendations . . . . . . . . . . . . . . . . . . . 4
Items not suitable for dishwashing . . . . . . . . . . 4
Description of your appliance . . . . . . . . . . . . . 5
Technical specifications . . . . . . . . . . . . . . . . 5
Conformity with the standards and Test data . . . 5
Quick Start Guide . . . . . . . . . . . . . . . . . . . . 8
Installing the machine . . . . . . . . . . . . . . . . . 9
Positioning the machine . . . . . . . . . . . . . . . . 9
Water connections . . . . . . . . . . . . . . . . . . . 9
Water inlet hose . . . . . . . . . . . . . . . . . . . .9
Water outlet hose . . . . . . . . . . . . . . . . . . . 9
Electrical connection . . . . . . . . . . . . . . . . 10
Fitting the machine undercounter . . . . . . . . . .11
Preparing the machine for use . . . . . . . . . . . . 12
Prior to using the machine . . . . . . . . . . . . . 12
Detergent usage . . . . . . . . . . . . . . . . . . . 12
Filling the detergent compartment . . . . . . . . 12
Combined detergent . . . . . . . . . . . . . . . . . . 12
Filling with rinse aid and setting . . . . . . . . . . . 13
Loading your dishwasher . . . . . . . . . . . . . . . 14
Alternative basket loads . . . . . . . . . . . . . . . 17
Standard loading and Test data . . . . . . . . . . 18
Program descriptions . . . . . . . . . . . . . . . . . 18
Program items . . . . . . . . . . . . . . . . . . . . 18
Switching on the machine and selecting a program 19
Switching on the machine . . . . . . . . . . . . . 19
Program follow-up . . . . . . . . . . . . . . . . . . 20
Changing a program . . . . . . . . . . . . . . . . . 20
Cancelling a program . . . . . . . . . . . . . . . .20
Switching the machine o . . . . . . . . . . . . . 20
Maintenance and Cleaning . . . . . . . . . . . . . . . 21
Filters . . . . . . . . . . . . . . . . . . . . . . . . . 21
Spray arms . . . . . . . . . . . . . . . . . . . . . . 22
Hose filter . . . . . . . . . . . . . . . . . . . . . . . .22
Failure codes and what to do in case of failure . . .23
Practical and useful information . . . . . . . . . . . 23
Troubleshooting . . . . . . . . . . . . . . . . . . . .24
Notes . . . . . . . . . . . . . . . . . . . . . . . . . .25
Warranty . . . . . . . . . . . . . . . . . . . . . . . . .27
ENVIRONMENTAL TIPS
Information on disposal for users
• Most of the packaging materials are recyclable.
Please dispose of those materials through your local
recycling depot or by placing them in appropriate
collection containers.
• If you wish to discard this product, please contact
your local authorities and ask for the correct method
of disposal.
These warnings have been provided in the interest of
safety. You MUST read them carefully before installing or
using the appliance.
Please read the user manual carefully and store in a
handy place for later reference. Pass the user manual on
to possible new owners of the appliance.
If you need assistance, contact your Customer Care
Department. The manufacturer will not accept liability,
should these instructions or any other safety instructions
incorporated in this book be ignored.
The symbols you will see in this booklet have these
meanings:
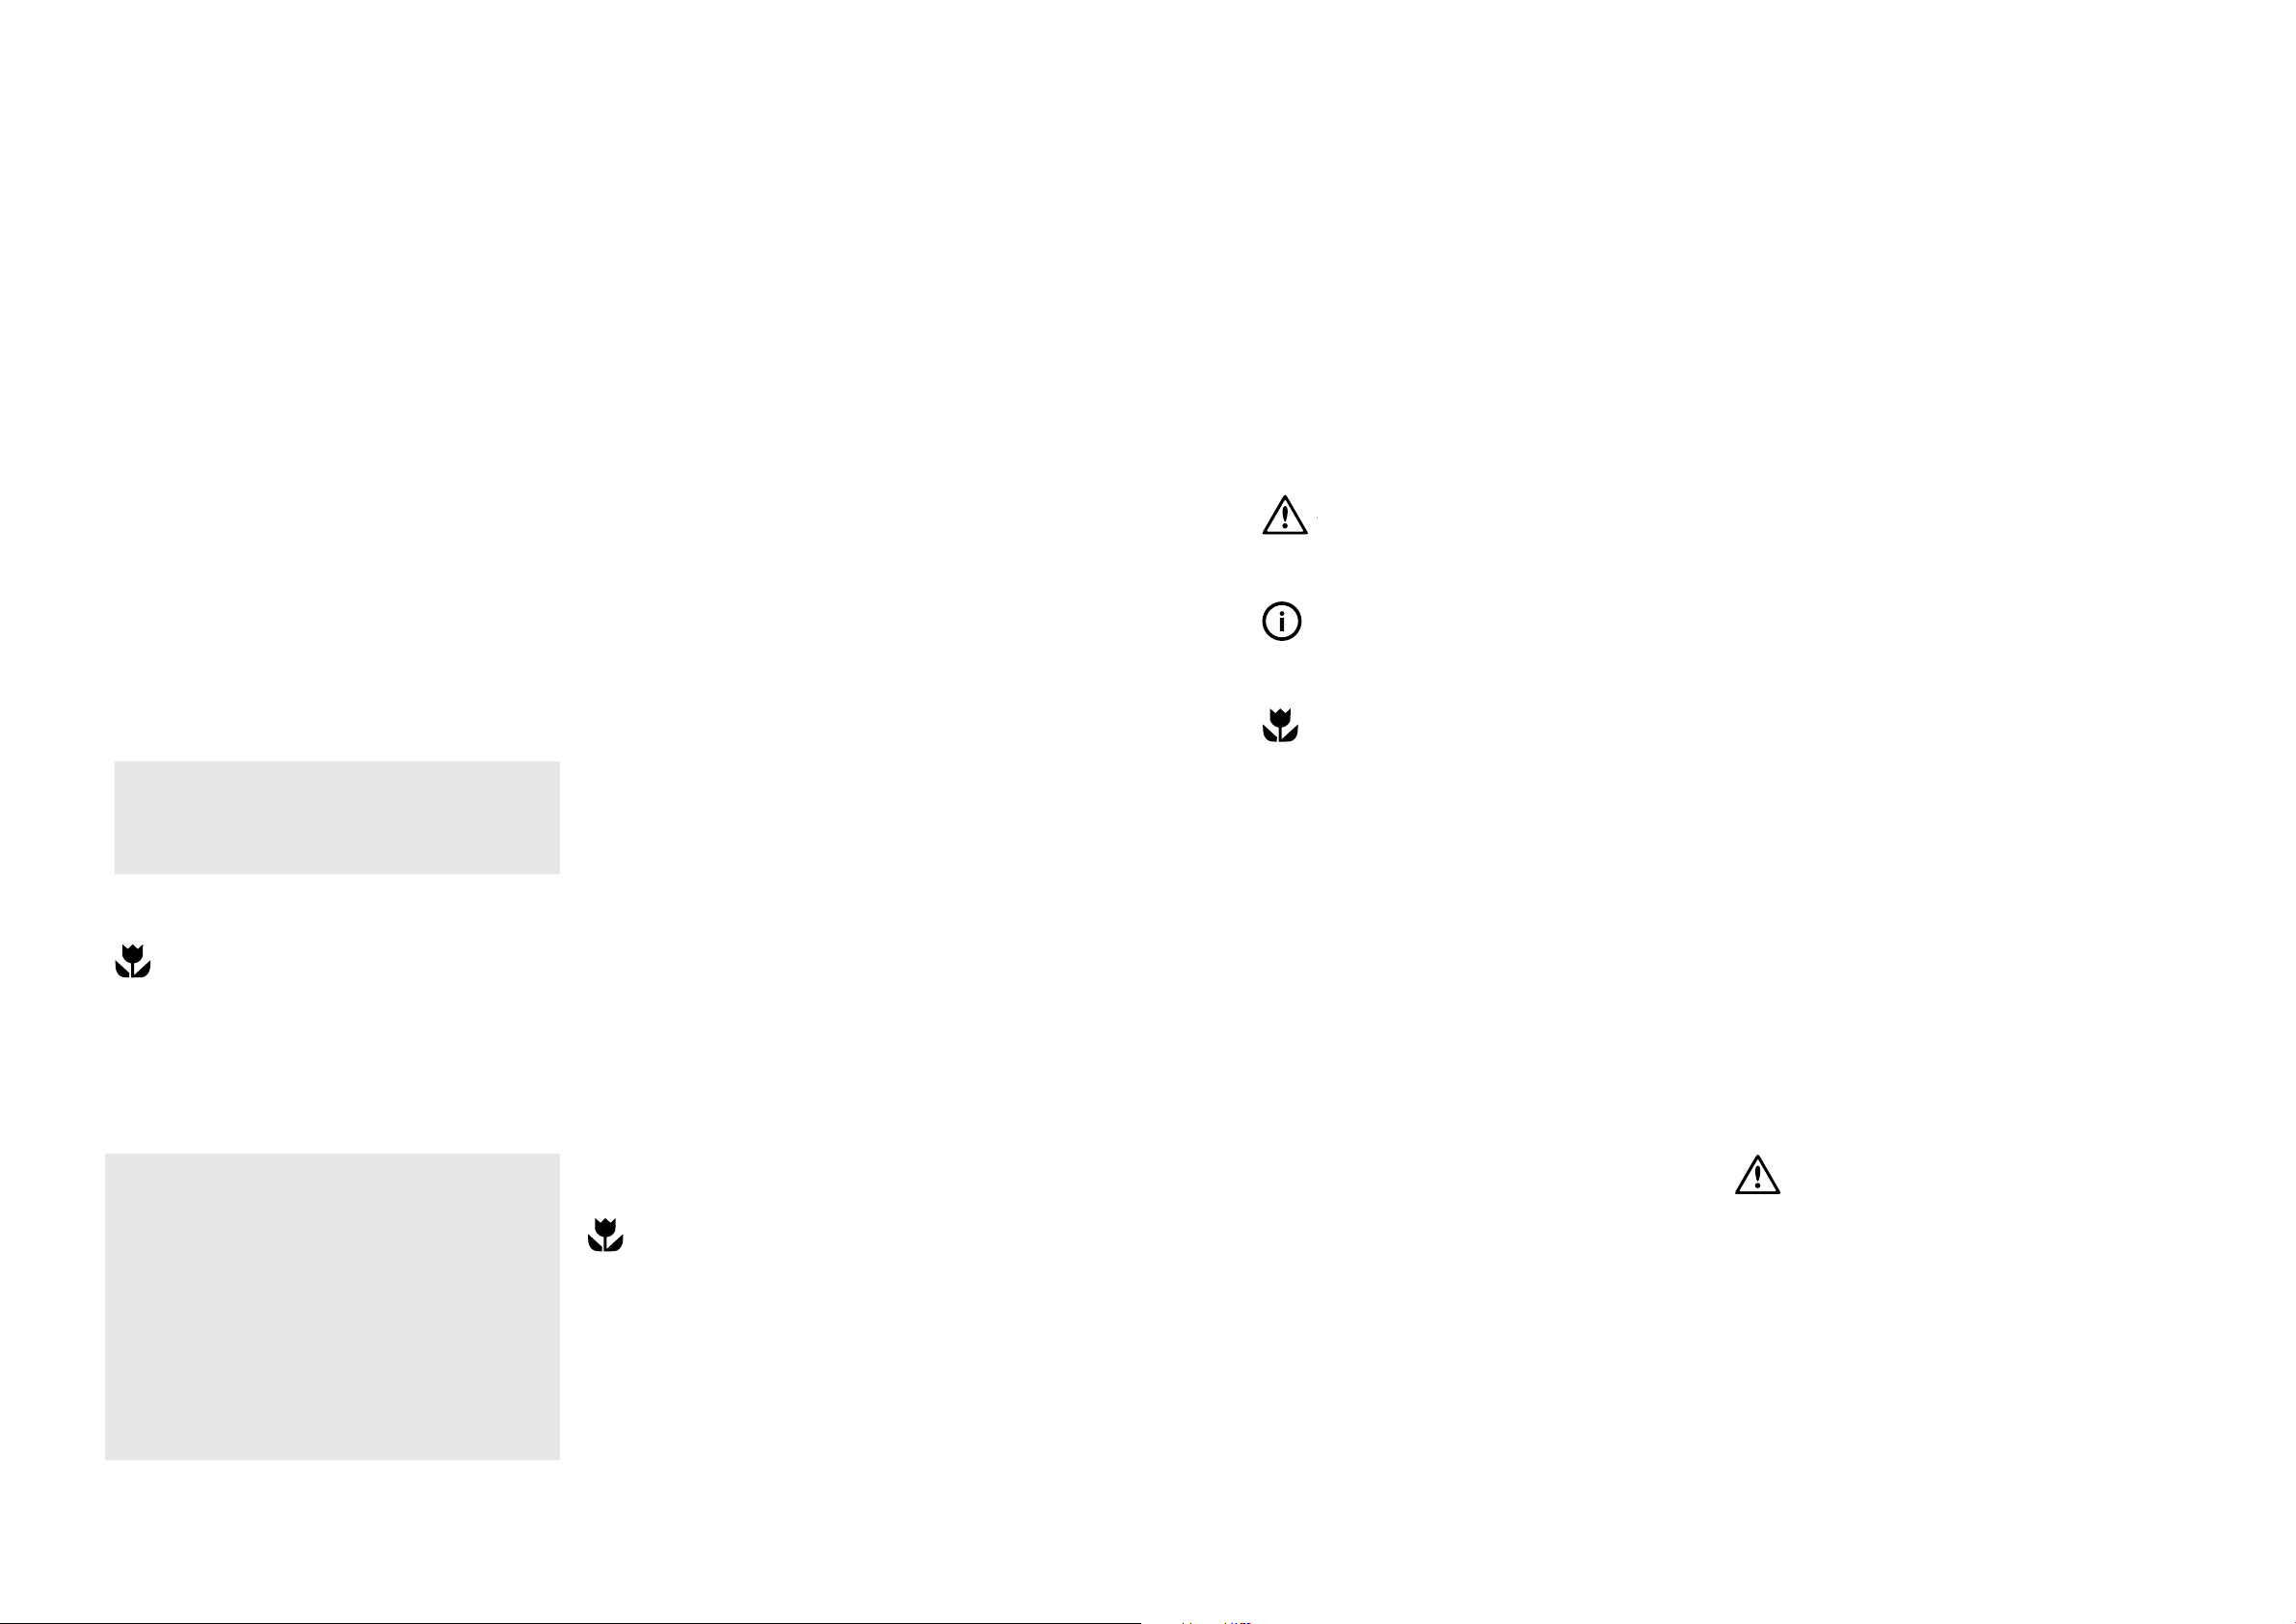
WARNING
This symbol indicates information concerning your
personal safety.
TIPS AND INFORMATION
This symbol indicates tips and information about
use of the appliance.
ENVIRONMENTAL TIPS
This symbol indicates tips and information about
economical and ecological use of the appliance.
Recycling
• Certain components and the packaging of your
machine have been produced from
recyclable materials.
• Plastic parts are marked with international
abbreviations: (>PE< , >PS< , >POM<, >PP<, ....)
• Cardboard parts have been produced from recycled
paper and they should be disposed of into waste
paper collection containers for recycling.
• These materials should not be disposed of into
garbage bins. They should be delivered to recycling
centres instead.
• Contact relevant centres in order to obtain
information on methods and points of disposal.
Safety Information
When you take delivery of your machine
• Check for any damage to your machine or to its
packaging. Never start a damaged machine, make
sure to contact an authorised technician.
• Unwrap the packaging materials as indicated and
dispose of them in accordance with the rules.
The points to pay attention during machine
installation
• Choose a suitable, safe and level location to install
your machine.
• Carry out the installation and connection of your
machine by following the instructions.
• This machine should be installed and repaired by
an authorised technician only.
• Only original spare parts should be used with
the machine.
• Before commencing the dishwasher installation,
be sure that the machine is unplugged.
• Check whether the indoor electrical fuse system
is connected according to the regulations.
• Make sure that the electrical information on the
rating plate is the same as the power supply. If not,
contact an electrician.
• Always use a correctly installed shockproof socket.
• Make sure not to cause damage to the mains plug
and to the mains cable. Should the mains cable
need to be replaced, this must be carried out by our
Authorised Service Centre.
• Connect the mains plug to the mains socket only at
the end of the installation. Make sure that there is
access to the mains plug after the installation.
• Do not pull the mains cable to disconnect the
appliance. Always pull the mains plug.
• If the supply cord is damaged, it must be replaced
by the manufacturer, its Authorised Service Centre or
similarly qualified persons in order to avoid a hazard.
• Pay special attention and make sure that the machine
does not crush the power cord.
• Never use an extension cord or a multiple socket
to make a connection. The plug should be easily
accessible after the machine has been installed.
• After installing the machine, run it unloaded for
the first time.
In daily use
• Do not stand, sit or place a load on the open door of
the dishwasher, it may fall over.
• Only use detergents and rinse aids which are
produced specifically for dishwashers. Otherwise
Electrolux does not take any responsibility for any
damage that might occur to your machine.
WARNING
The water in the machine’s washing section is not
drinking water, do not drink it.
• Do not use water spray and steam to clean the
appliance.
• Due to danger of explosion, do not put into the
machine’s washing section any chemical agents such
as solvents.
• Check whether plastic items are heat-resistant before
washing them in the machine.
• Do not put into your machine those items which
are not suitable for dishwashing. Also, do not
overload basket.
CONTENTS
2 3IMPORTANT SAFETY INSTRUCTIONS
SAFETY
SAFETY INFORMATION AND RECOMMENDATIONS
WARNING
WARNING
WARNING
DESCRIPTION OF YOUR APPLIANCE
• The machine door should not be opened while the
machine is in operation, to avoid the risk of hot water
spraying out. A safety device ensures that
the machine stops if the door is opened.
WARNING
Do not leave your dishwasher’s door open, this may lead
to accidents and injury.
RISK OF INJURY OR
PERMANENT DISABILITY
Place knives and other sharp ended objects in the
cutlery basket in the point down position.
• This appliance is not intended for use by persons
(including children) with reduced physical, sensory
or mental capabilities, or lack of experience and
knowledge, unless they have been given supervision
or instruction concerning use of the appliance by a
person responsible for their safety.
For your children’s safety
• After removing the machine’s packaging, make
sure that the packaging material is out of reach
of children.
• Do not allow children to play with or start the
machine.
• Keep your children away from detergents and
rinse aids.
• Keep children away from the machine while it is
open because there may still be residues of cleaning
substances inside the machine.
• Be sure that your old machine does not pose any
threat to children. Remove the dishwasher door
lock and power supply cord.
In case of malfunctioning
Items not suitable for dishwashing:
• Cigarette ashes, candle leftovers, polish, paint,
chemical substances, iron-alloy materials;
• Forks, spoons and knives with wooden or bone, ivory
or nacre-coated handles; glued items, items soiled
with abrasive, acidic or base chemicals;
• Plastic items that are not heat-resistant, copper
or tin coated containers;
• Aluminium and silver objects (they may discolour,
become dull);
• Certain delicate glass types, porcelains with
ornamental printed patterns (may fade even after
the first wash); certain crystal items (may lose their
transparency over time), laminated cutlery that is not
heat-resistant, lead crystal glasses, cutting boards,
items manufactured with synthetic fibre;
• Absorbent items such as sponges or kitchen rags are
not suitable for dishwashing.
WARNING
Some dishwasher detergents are strongly alkaline. They
can be extremely dangerous if swallowed. Avoid contact
with the skin and eyes and keep children away from
the dishwasher when the door is open. Check that the
detergent compartment is empty after completion of
wash cycle.
10
9
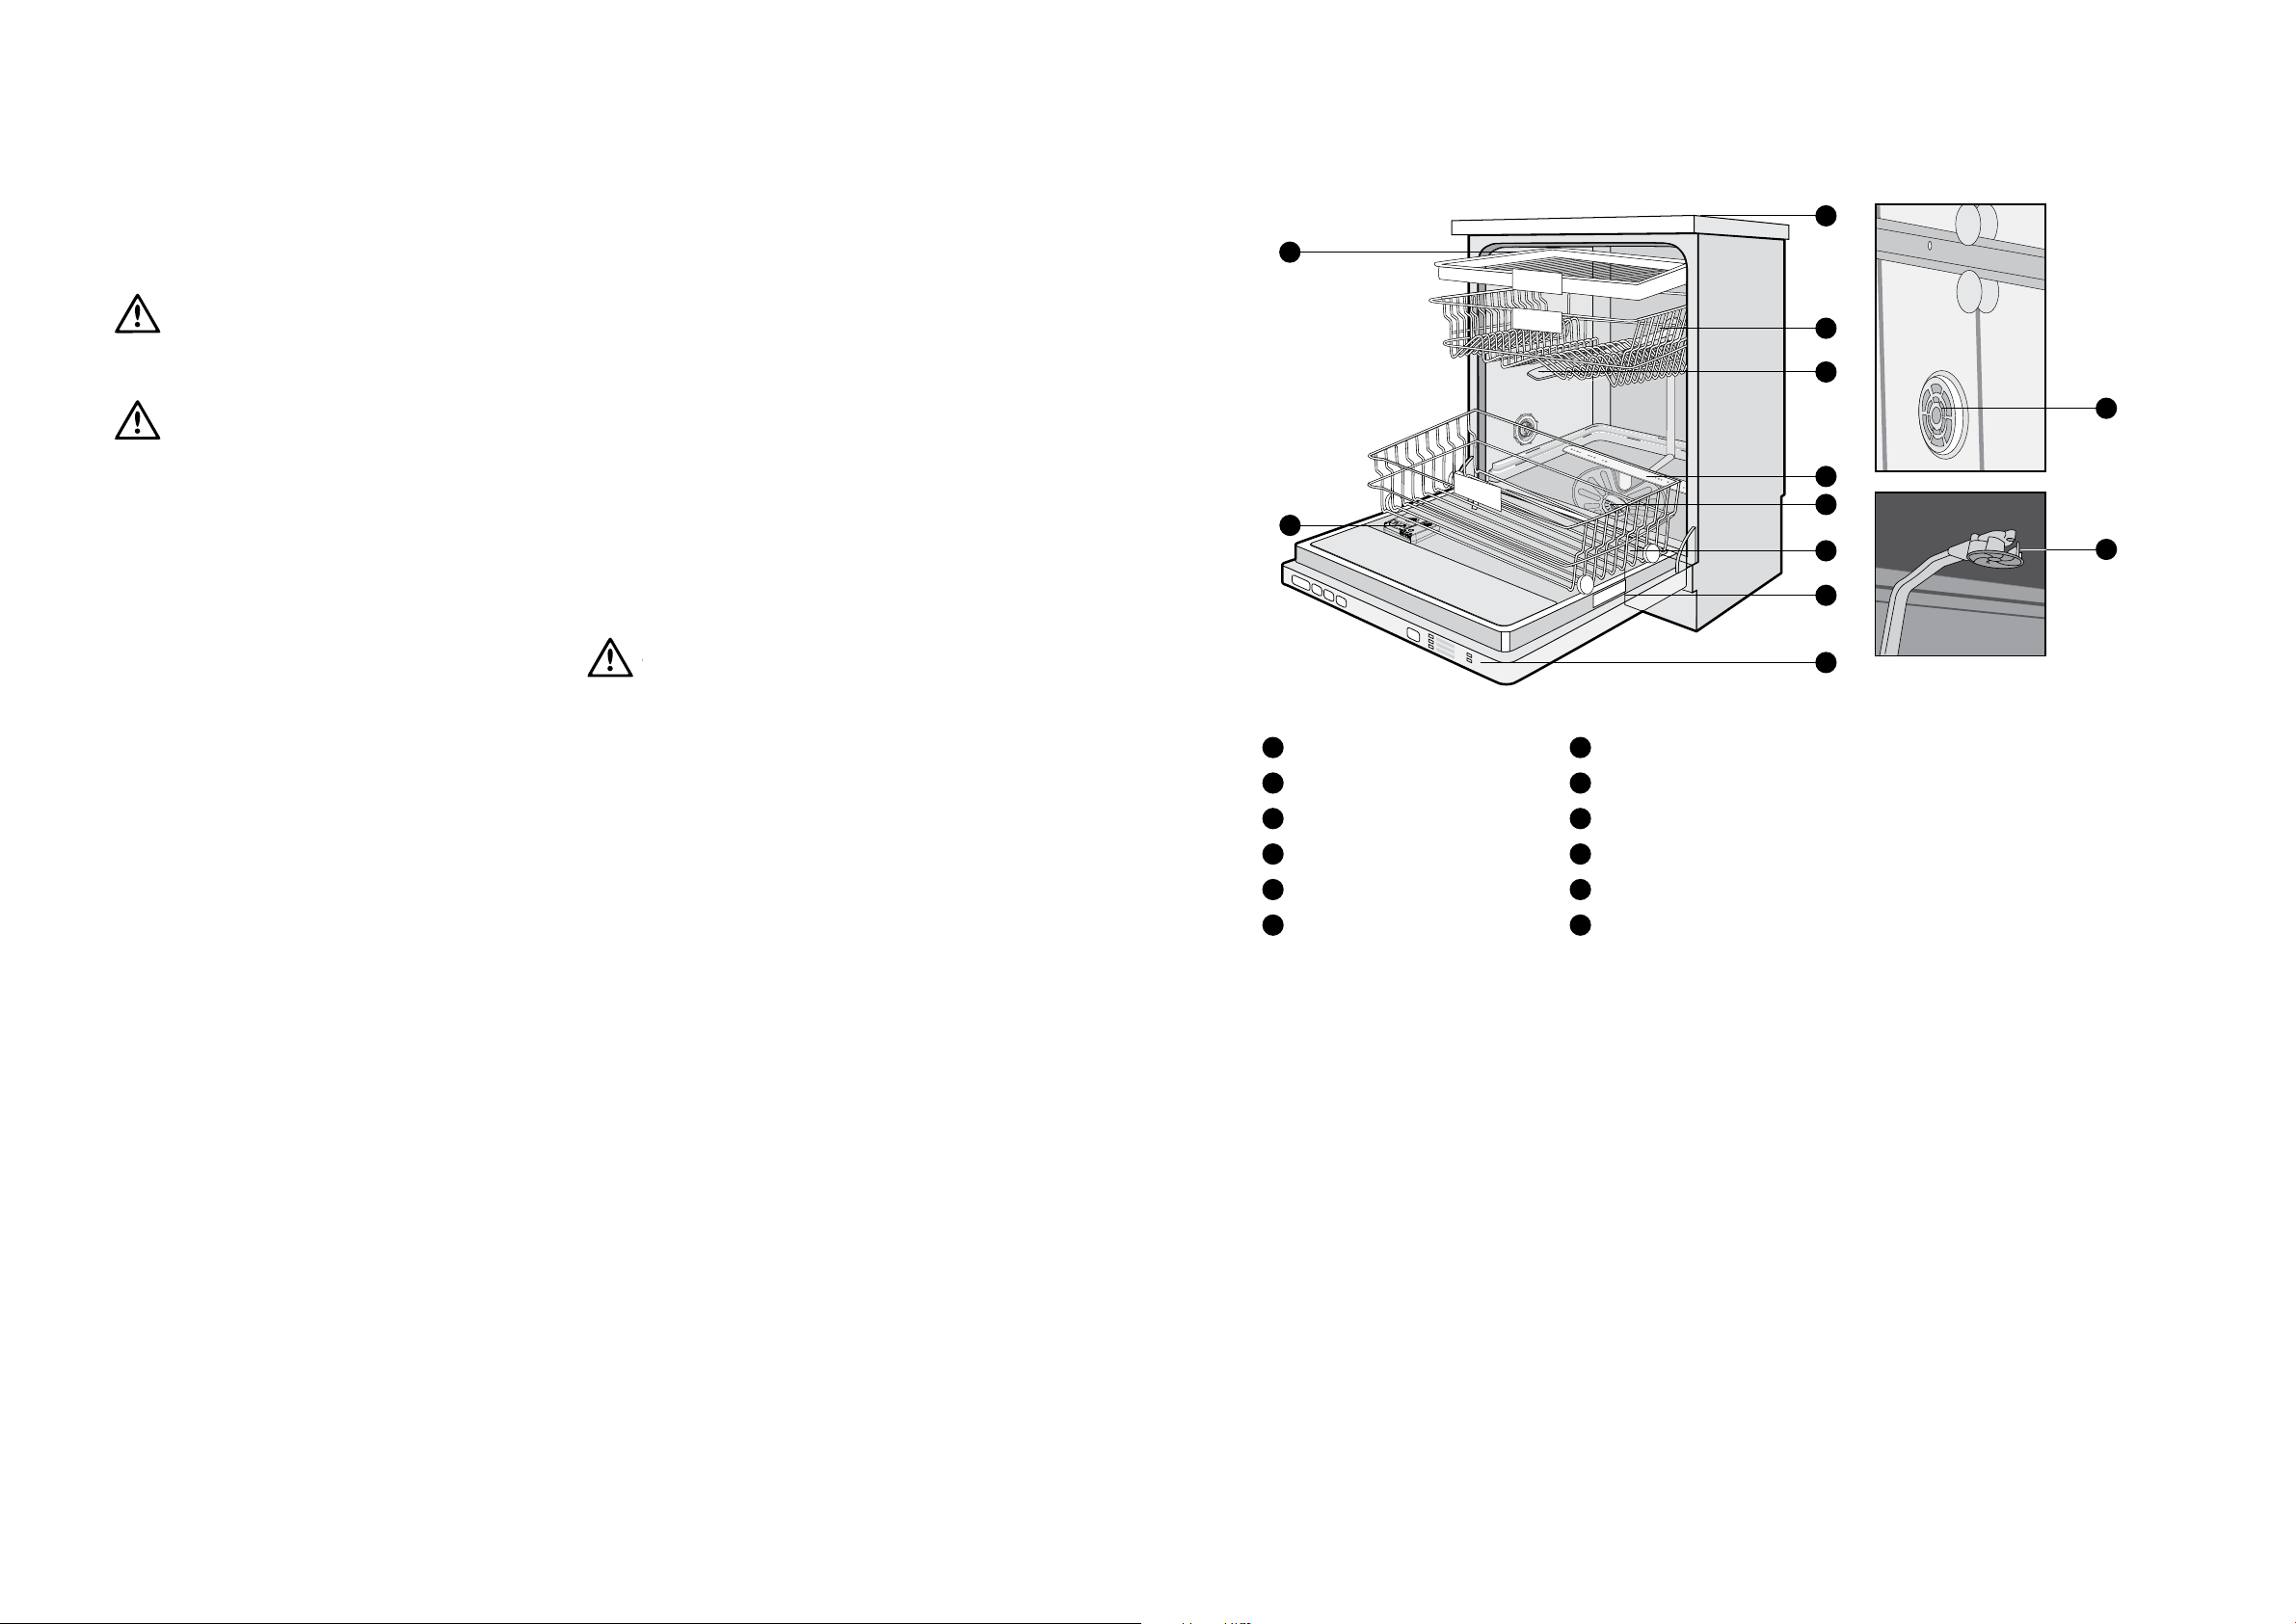
1
Worktop
2
Upper basket with racks
3
Upper spray arm
4
Lower spray arm
5
Filters
6
Lower basket
7
Rating plate
8
Control panel
9
Detergent and rinse-aid dispenser
10
Upper cutlery basket
11
Turbo drying unit
12
Ceiling spray impeller
TECHNICAL SPECIFICATIONS
1
2
3
11
4
5
6
7
8
12
• Any malfunction in the machine should be repaired
by qualified persons. Any repair work performed by
anyone other than the authorised service personnel
will cause your machine to be left outside the scope
of warranty.
• Prior to any repair work on the machine, be sure to
unplug the dishwasher from the power supply. Do
not pull by the cable when unplugging. Make sure
to turn off the water tap.
Recommendations
• For energy and water saving, remove coarse residues
on your dishes before placing the dishes into the
machine. Start your machine after having fully loaded
it.
• Use the pre-wash program only whenever necessary.
• Place items such as bowls, glasses and pots into
the machine face down.
SAFETY DESCRIPTION
Capacity ....................................................................15 place settings
Height ..........................................................................................850 mm
Height (without worktop) ............................................ 820* mm
Width ...........................................................................................598 mm
Depth ......................................................................................... 598 mm
Net weight ...................................................................................... 56 kg
Electricity input ................................................. 220-240 V, 50 Hz
Total power ................................................................................1900 W
Heating power..........................................................................1800 W
Pump power ..................................................................................100W
Drain pump power .....................................................................30 W
Water supply pressure ........ 0.03 MPa (0,3 bar) - 1 MPa (10 bar)
Water supply temperature... ...........................................5 - 60°C
Current ...............................................................................................10 A
• Electrolux reserves the right to amend design
and technical specifications.
• Do not use this appliance with power and
temperature specifications different to those
indicated.
• Do not change the specification of this appliance.
* with counterweight and insulation removed
4 5DESCRIPTION OF YOUR APPLIANCESAFETY INFORMATION AND RECOMMENDATIONS
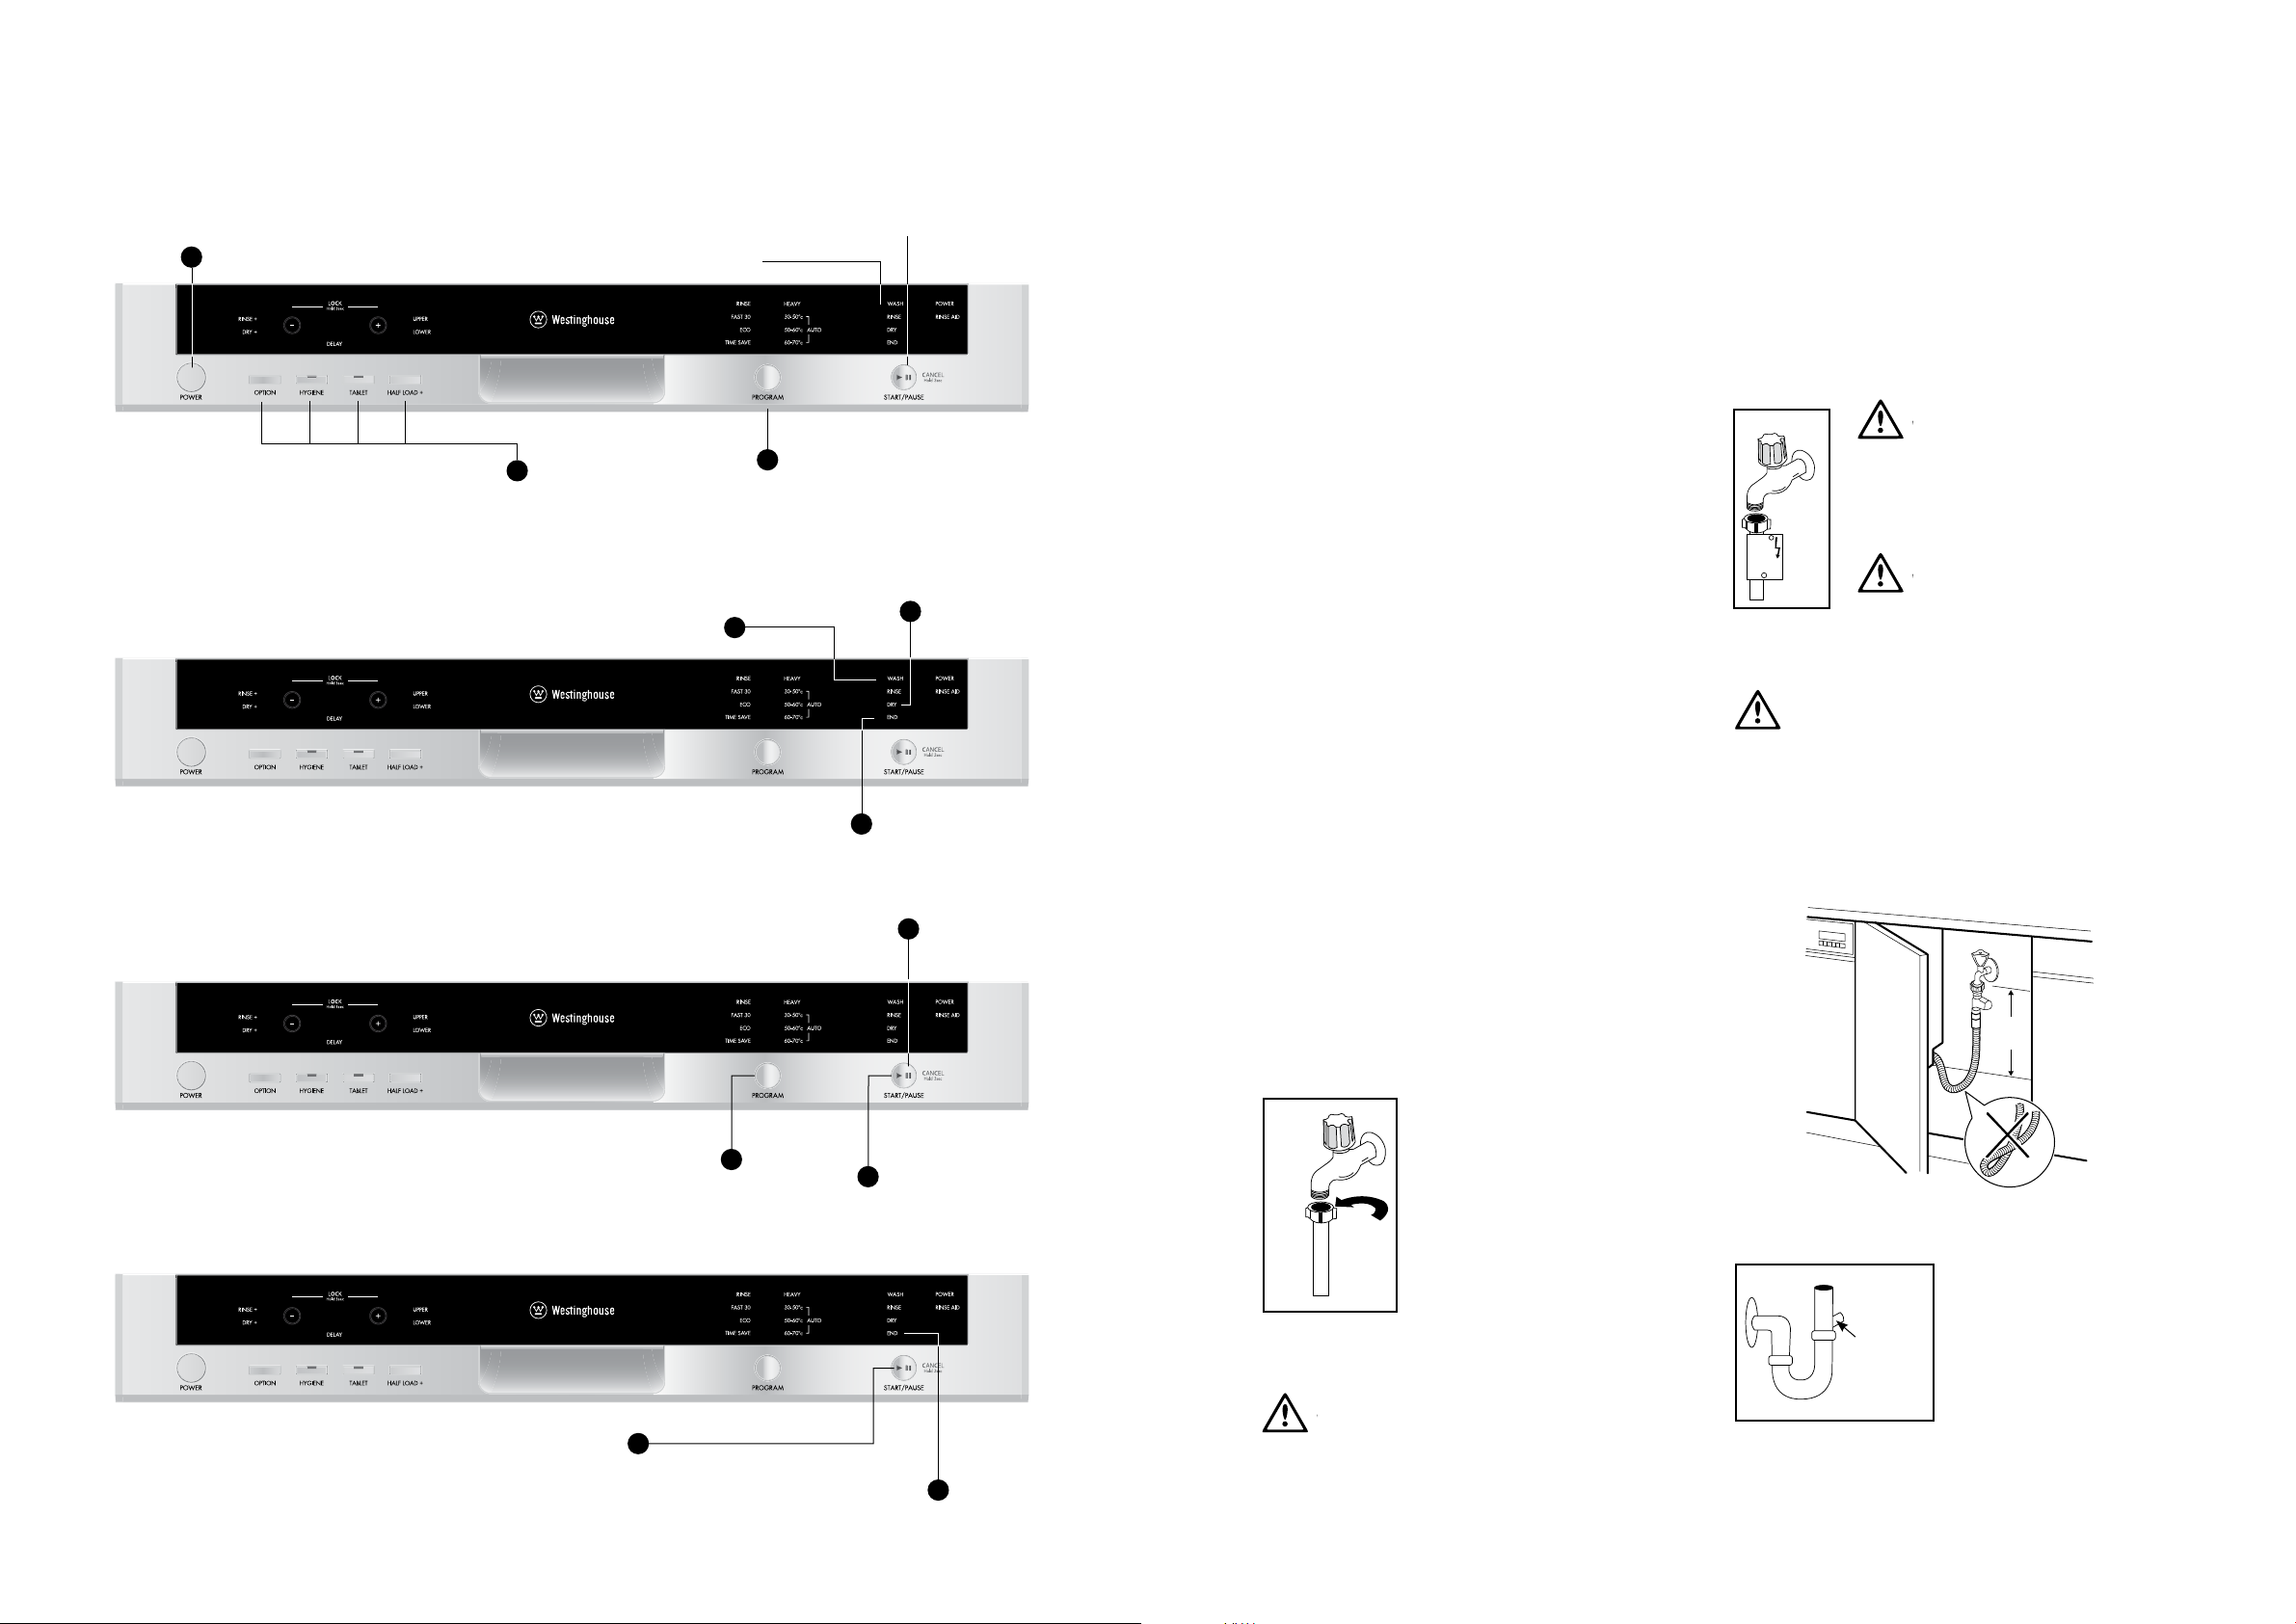
DESCRIPTION OF YOUR APPLIANCE
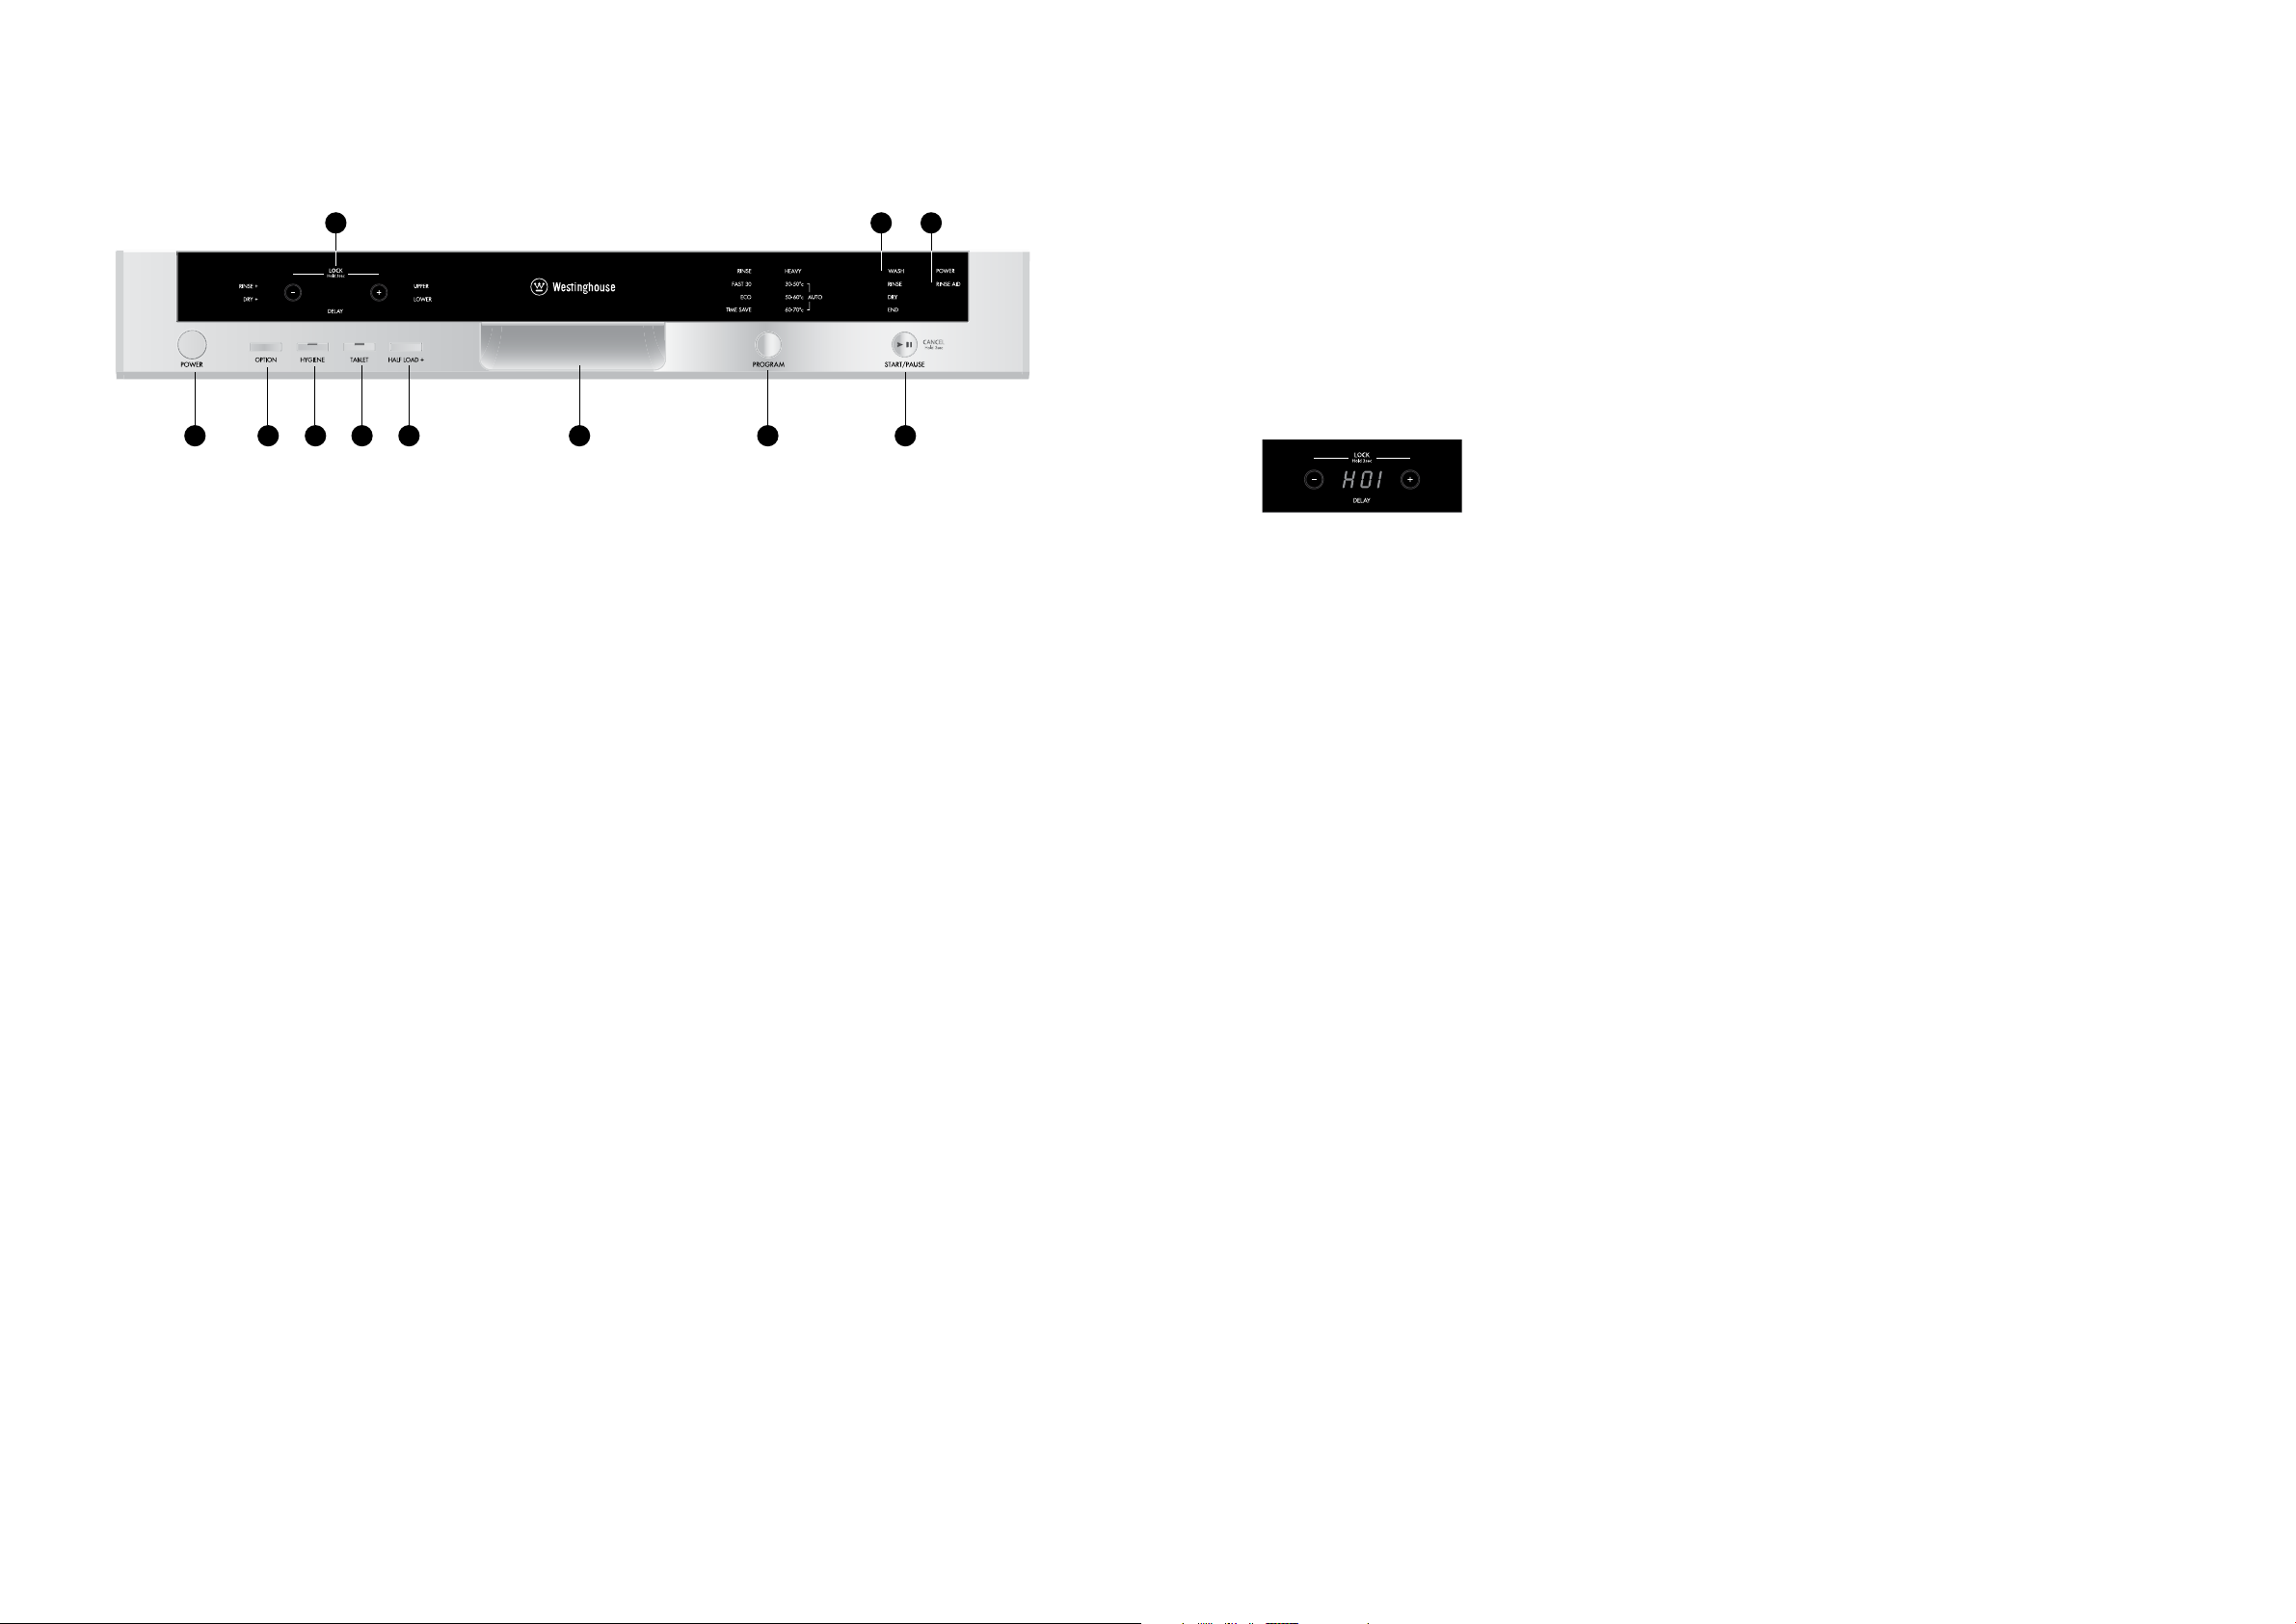
1 2 3 4 5 6 7 8
1. Power button
When pressed on, the machine is energised and the
power light illuminates.
2. Option button rinse+ / dry+
You can add extra rinsing or drying functions for the
selected program by using this option.
Once you select rinse+ function, the light for extra
rinsing illuminates, washing-rinsing time will be added
into the selected program to ensure that your dishes will
be cleaner.
Once you select dry+ function, the light for extra drying
illuminates, extra heating and drying time will be added
into the selected program to be sure that your dishes will
be drier.
3. Hygiene button
By using this option, washing temperature and periods
during respective programs may be changed, which
ensures more hygienic washing.
4. Tablet button
Use this option when using combined detergent that
contains rinse aid and extra functions.
5. Half load + button
Using the half load+ function, three sections for washing
can be selected; lower basket, upper basket and both
baskets.
If you have a small number of dishes in your machine to
wash in both baskets, press the half load+ button and
select the position in which both lights are illuminated.
If you have dishes only in the upper basket, press the half
load+ button and select the position in which the upper
light is illuminated. Washing occurs only on the upper
basket of your machine.
No dishes should be placed in the lower basket while
using this option.
If you have dishes only in the lower basket, press half
load+ button and select the position in which the lower
light is illuminated.
91011
Washing occurs only on the lower basket of your
machine. In using this option, make sure that there
are no dishes in the upper basket.
NOTE: If you have used this option on the last washing
program, this option will remain active also on the next
washing program. If you do not want to use this option
on the newly selected washing program, press the
selected feature button again, and check that the light
on the button goes off.
6. Door handle
The door handle is used to open/close the door of
your machine.
7. Program button
With the program button, you can select a suitable
program for your dishes.
8. Start/Pause button
The Start/Pause button will start the selected program.
In the Pause condition while wash indicator light is on,
Start/Pause LED will blink.
9. Rinse aid/power indicators
When the rinse aid light illuminates, fill in rinse
aid chamber.
The power light indicates power is available to
the appliance.
NOTE: If you have used an extra option on the last
washing program, this feature will remain active also
on the next washing program. To deselect an option on
the newly selected washing program, press the selected
option button again, and check that the indicator light
on the button goes off.
10. Progress indicator Lights
Program status can be monitored via the progress
indicator lights on control panel:
• Wash
• Rinse
• Dry
• End
11. Time indicator and delay display
The time indicator displays the program time and time
remaining for the program.
In addition you can delay the start of the program by
pressing the “+” and “-” buttons before the program is
commenced. The delay function is indicated by the letter
“H” followed by the number of hours selected.
If you want to change the delay time, you can reset it by
pressing START/PAUSE and then using the “+” and “–”
buttons to select the new delay time, then press START/
PAUSE to activate.
Child Lock Operation
In order to activate child lock, press “+” and “–” buttons
simultaneously for 3 seconds. At this time, “CL” appears
for 2 seconds on remaining time indicator. To deactivate
child lock, press “+” and “–” buttons again simultaneously
for 3 seconds. “CL” will blink once.
DESCRIPTION DESCRIPTION
6 7DESCRIPTION OF YOUR APPLIANCEDESCRIPTION OF YOUR APPLIANCE
QUICK START GUIDE
WARNING
WARNING
WARNING
WARNING
INSTALLING THE MACHINE
Switching on the machine
Press the POWER button
1
3
Progress indicator
You can follow the program flow using the progress
indicator lights located on the control panel.
Once the program is completed the end light comes on
Do not open the dishwasher until this light comes on
Changing a program
If you would like to change programs while a washing
program is on.
The Start/Pause button light
turns off once the program starts
and the WASH light is on
Additonal functions
During the washing cycle
the WAS H light is on
1
Press the Pause/Start
button
Once the POWER button is pressed,
the Start/Pause symbol illuminates
Select the program via
2
the PROGRAM button
3
Once completed
the dry light will
illuminate and the
2
machine will run
silently whilst drying
1
Positioning the machine
When considering the location for the dishwasher,
ensure that there is adequate space to enable loading
and unloading of the dishes.
• Do not put your machine in any location where
the ambient temperature can fall below 5°C.
• Before positioning, take the machine out of its
packaging by following the warnings located on
the package.
• Position the machine close to a water tap and drain.
You need to postion your machine, taking into
consideration that its connections will not be
altered once they are made.
• Do not grip the machine by its door or panel in
order to move it.
• Take care to leave a certain clearance from all sides of
the machine so that you can comfortably move
it back and forth during cleaning.
• Make sure that the water inlet and outlet hoses do
not get squeezed while positioning the machine.
Also, make sure that the machine does not stand
on the electrical cable. Adjust the machine’s feet so
that it is level and stable. Proper positioning of the
machine ensures problem-free opening and closing
of its door.
• If the door of your machine does not close properly,
check if the machine is stable on the floor; if not,
adjust the feet and ensure it is level and stable.
Water connection
Ensure that the indoor plumbing is suitable for installing
a dishwasher and complies with AS/NZS 3500.1. Also,
we recommend that you fit a filter at the entrance of
your place or apartment so as to avoid any damage to
your machine because of any contamination (sand, clay,
rust etc) that might be occasionally carried in through
the main’s water supply or the indoor plumbing, and to
avoid problems of staining and formation of deposits
after washing.
• The first time you use the appliance, make sure that
there is no leakage.
• The water inlet hose has a safety valve and a sheath
with an inner mains cable.
After the connections are made, the tap should be
turned on fully and checked for water tightness. For the
safety of your machine, make sure to always turn off the
water inlet tap after each wash program is finished.
WARNING
NOTE: Aquastop inlet hose has
components using 240V. Do not cut
Aquastop inlet hose. Do not let it get
folded, twisted, kinked or crushed.
WARNING
NOTE: A water tempering valve is
required if the water temperature
is over 60°C.
CAUTION
Always use new hoses when you connect the appliance to
the water mains. Old hoses must not be used. The water
inlet hose must be examined at an interval of twelve
months for deterioration and replaced if necessary.
In order to pass the safety valve through the kitchen
cabinets, an opening of at least 45mm x 90mm is
needed.
30cm
min.
Cancelling a program
If you want to cancel current program for any reason.
QUICKSTART
8 9INSTALLING THE MACHINEQUICK START GUIDE
After the dishwasher stops, select the desired
program on the PROGRAM button
Hold the PAUSE/START button for 3 seconds
machine will drain for 30 seconds. The program is
2
1
The END light starts flashing and water inside the
cancelled when the END light stops flashing
Press the Pause/Start
3
button to commence
new program
Water inlet hose
Do not use the water inlet hose of
your old machine, you must use the
new water inlet hose supplied with
your machine. Before connecting
the water inlet hose to the water
tap, ensure clean water is flowing
from the tap before making the
connection. Connect the water inlet
hose directly to the water inlet tap.
The pressure supplied by the tap
should be at a minimum of 0.03
MPa and at a maximum of 1 MPa. If
the water pressure is above 1 MPa, a pressure-relief valve
should be installed.
WARNING
Only turn the locking nut to secure hose – do not turn
the hose.
2
Water drain hose
Remove
entire
internal
membrane
If you connect the water
drain hose to a trap spigot
under the sink, remove the
plastic membrane. If you
do not remove the entire
membrane, remaining food
can cause blockage in the
drain hose spigot. Ensure
a hose clamp is used to
secure the hose to the
spigot.
INSTALLATION
 Loading...