

Westinghouse WDG112WCNG-R, WDE143WC-L, WDG110WCNG-L, WDE143WC-R, WDG112WCNG-L User Manual
...
USER MANUAL
Enjoy peace of mind.
Register your appliance today.
Stay updated on better living services, safety notices and
shop for accessories.
1. Open the camera app on your smartphone and
point at the QR code to scan
Product Registration QR code is located on the
front of your appliance or inside the door rim*.
2. Tap the notification or link to open the registration form
3. Complete your details and enjoy peace of mind
*Exact location of QR code may vary depending on oven model
ELEVATED COOKING
APPLIANCES
WDE143WC, WDE132WC,
WDG112WC, WDG110WC

TIPS & INFORMATION
ENVIRONMENTAL TIPS
WARNING
WARNING
WARNING
TIPS & INFORMATION
ENVIRONMENTAL TIPS
CONTENTSCONGRATULATIONS
IMPORTANT SAFETY INSTRUCTIONS
Dear customer,
Congratulations and thank you for choosing our
elevated cooker.
We are sure you will find it a pleasure to use. Before
you use the elevated cooker, we recommend that you
read through the relevant sections of this manual, which
provides a description of your appliance and its functions.
To avoid the risks that are always present when you use
an appliance, it is important that the appliance is installed
correctly and that you read the safety instructions
carefully to avoid misuse and hazards.
We recommend that you keep this instruction booklet for
future reference and pass it on to any future owners.
After unpacking the appliance, please check it is not
damaged. If in doubt, do not use the appliance but
contact your local customer care centre.
This appliance complies with requirements of Australian
Standard AS/NZS 60335.2.6.
Conditions of use
This appliance is intended to be used in household
and similar applications such as:
• Staff kitchen areas in shops, offices and other
working environments
• Farm houses
• By clients in hotels, motels and other residential
type environments
• Bed and breakfast type environments
Please ensure you read the instruction manual fully
before you call for service, or a full service fee could
be applicable.
Record model and serial number here:
Model number:........................................................................................
Serial number: .........................................................................................
Important Safety Instructions .......................................................3
General Appliance Description – Electric Elevated ............5
General Appliance Description – Gas Elevated ................... 6
Installing the Electric Elevated Cooker .....................................7
Installing the Gas Elevated Cooker............................................ 9
Operating for the First Time ........................................................ 13
Installing Your Oven Accessories ..............................................14
Using the Electric Elevated Cooker..........................................15
Using the Gas Cooker .....................................................................18
General Hints and Tips...................................................................20
Getting to Know Your Oven......................................................... 21
Oven Guide .........................................................................................22
Cleaning and Caring for the Elevated Cooker ...................23
Trouble Shooting ..............................................................................25
Gas conversion procedure ........................................................... 27
Notes ......................................................................................................28
Warranty ................................................................................................ 31
Please read the user manual carefully and store in a handy
place for later reference.
The symbols you will see in this booklet have
these meanings:
WARNING
This symbol indicates information concerning your
personal safety.
CAUTION
This symbol indicates information on how to avoid
damaging the appliance.
IMPORTANT
This symbol indicates tips and information about use
of the appliance.
ENVIRONMENT
This symbol indicates tips and information about
economical and ecological use of the appliance.
IMPORTANT
Check for any damage or marks
If you find the appliance is damaged or marked, you must
report it within 7 days if you wish to claim for damage/
marks under the manufacturer’s warranty. This does not
affect your statutory rights.
ENVIRONMENT
Information on disposal for users
• Most of the packing materials are recyclable.
Please dispose of those materials through your local
recycling depot or by placing them in appropriate
collection containers.
•
If you wish to discard this product, please contact
your local authorities and ask for the correct method
of disposal.
Before making a service call
1. Please read the user manual carefully.
2.
Cooking variations are natural and to be expected.
You should experiment with times, temperatures and
recipes to obtain the best results to your own taste.
3.
New appliances can have an odour during the
first operation.
• It is recommended to ‘run in’ the oven before you
cook. Run the oven at 180°C for 30 minutes and
ensure that the room is well ventilated.
• For products with separate grill compartment,
run the grill on full for 15 minutes with the grill
door open.
4.
If you have purchased a model with a 3 button
programmable clock, you will need to set the clock
in order to begin using your oven.
WARNING
To avoid an electric shock or fire
• This appliance is NOT intended for use by persons
(including children) with reduced physical, sensory
or mental capability, or lack of experience and
knowledge, unless they have been given supervision
or instruction concerning use of the appliance by a
person responsible for their safety.
• WARNING – Accessible parts may become hot
during use. To avoid burns, young children should
be kept away.
• The cooking process has to be supervised.
A short term cooking process has to be supervised
continously.
• Young children should be supervised to ensure they
DO NOT play with this appliance.
• DO NOT operate the hotplates with external timers
or a separate remote control system.
• During use this appliance becomes hot. Care
should be taken to avoid touching hot external,
internal surfaces and hot elements when in use.
Use oven gloves.
• This appliance must NOT be used as a space heater.
• DO NOT install an aftermarket lid or cover over
this appliance.
• DO NOT spray aerosols in the vicinity of this
appliance while it is in operation.
• DO NOT store flammable materials in the appliance
or near this appliance.
• Ensure all specified vents, openings and airspaces are
NOT blocked.
• Install cooker, shelving and fittings in accordance
with the Guide and Installation Instructions, to
avoid accidents.
• DO NOT operate the gas appliance if the smell of
gas persists.
• DO NOT MODIFY THIS APPLIANCE.
PNC: .............................................................................................................
IMPORTANT INFORMATION THAT
MAY IMPACT YOUR MANUFACTURER’S
WARRANTY
Adherence to the directions for use in this manual
is extremely important for health and safety. Failure
to strictly adhere to the requirements in this manual
may result in personal injury, property damage
and affect your ability to make a claim under the
Westinghouse manufacturer’s warranty provided
with your product. Products must be used, installed
and operated in accordance with this manual.
You may not be able to claim on the Westinghouse
manufacturer’s warranty in the event that your
product fault is due to failure to adhere this manual.
2 3
IMPORTANT SAFETY INSTRUCTIONSCONTENTS
WARNING
IMPORTANT SAFETY INSTRUCTIONS
WARNING
WARNING
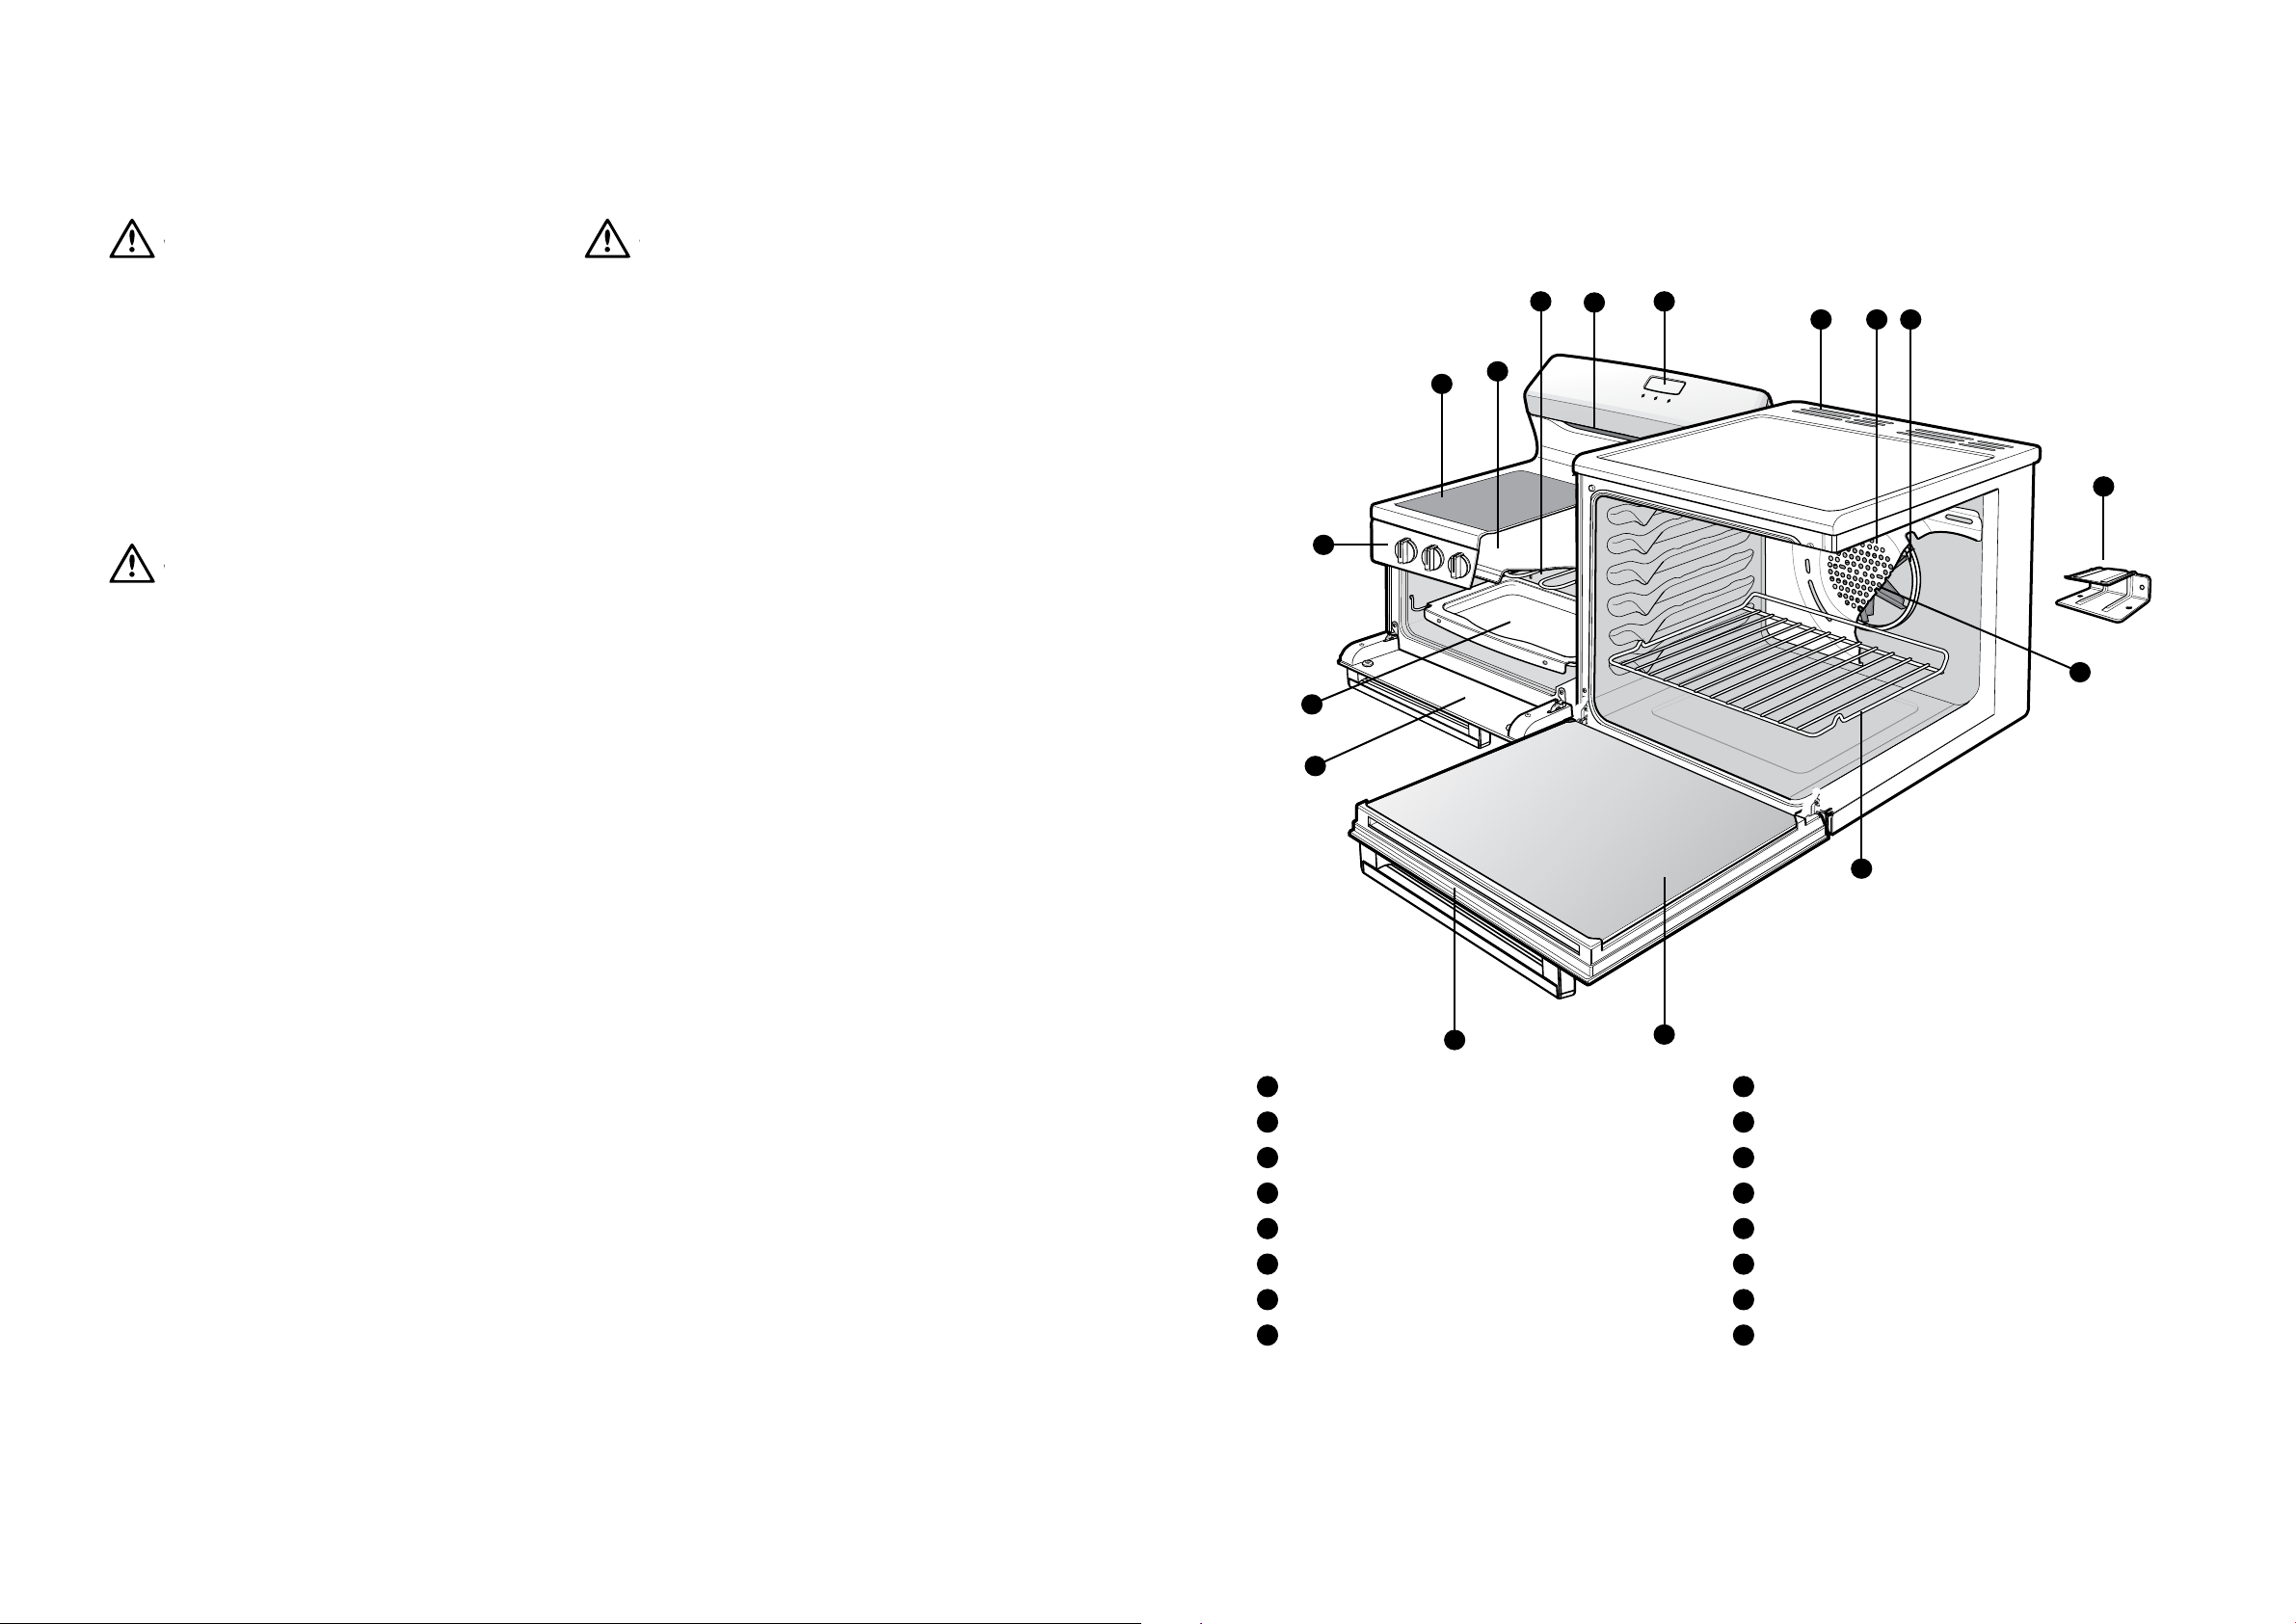
GENERAL APPLIANCE DESCRIPTION – ELECTRIC ELEVATED
(R.H VARIANT SHOWN)
WARNING
Grill warnings
• DO NOT leave grill on unattended.
• Fat left on a grill dish is a fire hazard! Keep grill clean
and turn off grill immediately after use.
• If gas burner does not light in 15 seconds, allow one
minute for gas to clear before trying again.
• Placing thick portions of food under grill can be a
fire hazard.
• DO NOT cover the grill dish insert with foil.
• Keep grill door open when grilling.
WARNING
Oven warnings
• DO NOT use the oven door as a shelf.
• DO NOT push down on an open oven door.
• If the gas oven does not light in 8 seconds, allow 1
minute for gas to clear before trying again.
• DO NOT line oven with foil or place anything on the
bottom of the oven while baking, as trapped heat will
crack or craze the floor of the oven cavity liner.
• DO NOT use polyunsaturated oils (vegetable
oils) as this type of oil can cause black spots or
deposits inside the oven. This residue is very
difficult to remove.
WARNING
Hotplate and burner warnings
• DO NOT allow pots to boil dry, as damage to the
hotplate (and pan) may result.
• DO NOT operate without a pot, fry pan etc on
the hotplates.
• DO NOT allow cookware to overhang the hotplate
onto adjacent bench tops, this will cause scorching to
the bench top surface.
• DO NOT use large utensils that may become unstable.
• Gas models: Ensure burner caps and crowns are in
their correct position.
• If the ceramic glass on cooktop is accidently cracked,
switch off the appliance to avoid the possibility of
electric shock.
• Do not store items on the cooking surfaces.
• Unattended cooking on a hob with fat or oil can be
dangerous and may result in a fire.
6
7
5
4
3
2
1
8
9 10 11
12
13
14
16
1
Grill Door
2
Removable Grill Dish
3
Control Panel
4
Hotplate
5
Grill Reflector
6
Grill Element
7
Grill Vent
8
3 Button Programmable Clock
4 5
IMPORTANT SAFETY INSTRUCTIONS PRODUCT DESCRIPTION
15
9
Oven Vent
10
Fan and Element Cover
11
Oven Element
12
Anti-tilt Plate
13
Oven Fan
14
Removable Shelf
15
Removable Inner Glass
16
Oven Door

GENERAL APPLIANCE DESCRIPTION – GAS ELEVATED
WARNING
WARNING
(R.H VARIANT SHOWN)
5 6
4
3
2
7
8 9
INSTALLING THE ELECTRIC ELEVATED COOKER
Safety Warnings about installation
• In order to avoid overheating of the cooker,
the cooker must not be installed behind a
decorative door
WARNING
• The cooker MUST be installed and serviced by a
qualified technician.
• A Certificate of Compliance MUST be supplied to be
kept by the customer.
• The packing materials MUST be removed before you
install the cooker.
• You MUST follow the installation instructions in this
booklet.
10
• In order to avoid overheating, the cooker must not
be installed behind ta decorative door.
• The surrounding kitchen cabinets MUST be able
to withstand 85°C. Electrolux Products WILL
• The appliance MUST be installed using the flexible
hose supplied.
• The vents, openings and air spaces MUST NOT
be blocked.
• You MUST NOT pull the cooker by the door handles
or the splashback.
• The cooker MUST be checked every five years.
• The cooker MUST NOT be used as a space heater.
Locating the cooker
Study the diagrams below to be sure of the dimensions
required to locate the cooker safely.
NOT accept responsibility for damage caused by
installation into kitchen cabinets which cannot
withstand 85°C.
11
1
15
1
Grill Door
2
Removable Grill Dish
3
Grill Burner Reflector
4
Removable Hotplate Burner
5
Removable Trivet
6
Grill Vent
7
Grill Burner
8
Oven Vent
12
13
320
14
9
Fan Cover
10
Anti-tilt Plate
11
Oven Fan
12
Oven Burner Cover
13
Removable Shelf
14
Removable Inner Glass
15
Oven Door
Dimension to centre
line of anti-tilt plate
1085
60
544
620
WARNING
In order to avoid accidental tipping of the appliance
(for example, by a child climbing onto the open oven
door), the anti-tilt plate MUST be installed.
Position the anti-tilt plate to the rear wall and 762mm
from the left side of the wall. Dimension to the “v”
at the front of the anti-tilt plate and then securely fix
-with fasteners.
1095 Minimum
740 L.H. Oven
200 R.H. Oven
Wiring connection
postion
762
600
300 Maximum
900
Locating V
The following table outlines the distance between the
floor supporting the product and the surface supporting
cooking vessel;
Surface type
Distance (MM)
(Supporting vessel)
Solid Hob 321
Enamel Trivets 327
Ceramic Glass 305
6 7
PRODUCT DESCRIPTION INSTALLING THE ELECTRIC ELEVATED COOKER

WARNING
WARNING
INSTALLING THE ELECTRIC ELEVATED COOKER
INSTALLING THE GAS ELEVATED COOKER
Electric wiring requirements
The cooker MUST be installed in compliance with:
• Wiring connections in AS/NZS 3000 wiring rules.
• Local regulations, municipal building codes and other
statutory regulations.
• Data plate – Gives information about the rating and
is located behind the bottom of the oven door.
For New Zealand only: The cooking range must be
connected to the supply by a supply cord fitted with
the appropriately rated plug that is compatible with the
socket-outlet fitted to the final sub-circuit in the fixed
wiring that is intended to supply this cooking range.
See table below:
MINIMUM
TEMP
RATING
(°C)
MODEL
CURRENT
RATING
(AMPS)
WIRE
SECTION
(MM2)
WDE132WC 50 6 75
WDE143WC 50 6 75
• A functional switch MUST be provided near the
appliance in an accessible position (AS/NZS 3000 –
Clause 4.7.1).
• Wiring MUST be protected against mechanical failure
(AS/NZS 3000 – Clause 3.9).
• Disconnection in the fixed wiring must occur in
accordance with the AS/NZS3000 Wiring Rules.
• The cooker MUST be properly earthed.
• This product has passed the insulation resistance
test after manufacture. If the resistance reading is low
at installation, it is probably caused by moisture from
the atmosphere being absorbed by the elements
after the range has been produced. (Pass at 0.01MΩ
AS/NZS 3000 Wiring Rules Clause 8.3.6.3)
• When connections are made to a multiphase
230/240V supply, the bridge piece MUST be removed
from between the active connections.
• If the supply cord is damaged, it must be replaced
by the manufacturer, its service agent or similarly
qualified persons in order to avoid a hazard.
IMPORTANT: Before you cook in your new oven
it is important that the protective oils used in the
manufacture of the product be removed. Refer to
‘Before Operating your Appliance for the First Time’
in the Using The Oven section.
Hard wiring
1. To gain access to the terminal block, remove the
small rear panel by unscrewing the two screws.
2. Fit wires through the hole in the base using the
appropriate gland to protect insulation of wires
from the hole edge.
3. Set the length of wiring from the gland to terminal
block, ensuring length is sufficient but not excessive.
4. Make connections to terminals.
5. Replace rear panel.
N
A1
A2
Gland
Safety Warnings about installation
• In order to avoid overheating of the cooker,
the cooker must not be installed behind a
decorative door.
WARNING
• The cooker MUST be installed and serviced by a
qualified technician.
• A Certificate of Compliance MUST be supplied to
be kept by the customer.
• The packing materials MUST be removed before
you install the cooker.
• You MUST follow the installation instructions in
this booklet.
• The surrounding kitchen cabinets MUST be able
to withstand 85°C. Electrolux Products WILL
NOT accept responsibility for damage caused
by installation into kitchen cabinets which cannot
• The appliance MUST be installed using the
flexible hose supplied.
• The vents, openings and air spaces MUST NOT
be blocked.
• You MUST NOT pull the cooker by the door
handles or the splashback.
• The cooker MUST be checked every five years.
• The cooker MUST NOT be used as a space heater.
Locating the cooker
Study the diagrams below to be sure of the dimensions
required to locate the cooker safely.
withstand 85°C.
120
minimum
600 minimum
to combustible
material
320
Dimension to centre
line of anti-tilt plate
1085
Gas supply hose
combustible
material
544
620
1.7m
to
40
762
1095 Minimum
280 R.H. Oven
720 L.H. Oven
300 Maximum
2.0m
Electrical service
cord (if fitted)
50mm diameter access
hole to gas supply and
power point (if required)
600
900
Locating V
Rated power input
MODEL TOTAL kW A1 kW A2 kW
WDE132WC 10.1 4.1 6.0
WDE143WC 10.5 4.1 6.4
WARNING
In order to avoid accidental tipping of the appliance (for
example, by a child climbing onto the open oven door),
the anti-tilt plate MUST be installed.
Position the anti-tilt plate to the rear wall and 762mm
from the left side of the wall. Dimension to the “v” at
the front of the anti-tilt plate and then securely fix
with fasteners.
8 9INSTALLING THE GAS ELEVATED COOKER
INSTALLING THE ELECTRIC ELEVATED COOKER

Restraining Device
Anchor Points
Connection
Gas
Point
150mm
650mm
WARNING
WARNING
INSTALLING THE GAS ELEVATED COOKER
INSTALLING THE GAS ELEVATED COOKER
Gas requirements
This appliance must be installed by an authorised person,
according to all codes and regulations of:
• AS/NZS 5601.1 (particular attention to clause 6.10.1 and
figure 6.3 on page 97, and clause 6.10.1.5 and 6.10.1.6
• Local gas fitting regulations, municipal building codes
and other statutory regulations.
The cooker also comes supplied with a LPG gas conversion
kit, should you need to convert the gas from NG to LPG.
Alternatively, you can obtain these by contacting the
Customer Care Centre. Before installation check that
the cooker is suitable for the gas supply. For LPG it is
recommended to have the conversion completed prior to
installation on the bench.
The following table shows the supply and operating
pressures for various supplies.
GAS TYPE NATURAL GAS UNIVERSAL LPG PROPANE
Supply pressure at inlet to appliance regulator
(if fitted)
Operate pressure at appliance test point 1.00 (kPa) 2.75 (kPa) 2.75 (kPa)
1.13 (kPa)
Minimum
2.75* (kPa) 2.75* (kPa)
* If the regulator is placed upstream of the cooker inlet, as is normal for cookers operating on LPG, then the supply
pressure and operating pressure are the same.
The following table shows the injector sizes for each burner.
INJECTOR NATURAL GAS UNIVERSAL LPG PROPANE
Low heat burner 1.00 mm 0.55 mm 0.62 mm
Medium heat burner 1.35 mm 0.70 mm 0.82 mm
High heat burner 1.60 mm 0.90 mm 0.95 mm
Grill – main injector 1.50 mm 0.82 mm 0.82 mm
Gas connection
Read these points before connecting to the gas supply:
• An NG regulator or a LPG test point fitting
is supplied.
• Ensure installation allows withdrawal of appliance.
Operation on NG
1. The appliance regulator be MUST be orientated so
that the pressure nipple is accessible.
2. The arrow showing the direction of flow MUST be
pointed correctly.
3. The regulator has ½” BSP internal thread at the inlet
and outlet.
4. The flat fibre washer provided with the regulator
MUST be used when making the gas connection.
Operation on SNG
• If the cooker is to be used with SNG, then the grill
burner MUST be modified by the replacement of the
shutter, which fits into the throat of the grill burner.
• A conversion kit can be obtained by contacting the
Customer Care Centre.
Grill shutter
Oven – main injector 1.60 mm 0.82 mm 0.95 mm
Oven – bypass screw 0.73 mm 0.45 mm 0.45 mm
Checking pipe size
To work out a suitable pipe size for connection use the information in this table.
NATURAL GAS UNIVERSAL LPG PROPANE
Configuration STD Hob STD Hob STD Hob
Hourly gas consumption for cooker 57.2MJ 45.7MJ 56.5MJ
Also use information about the length of the run, number of elbows, tees and bends, the available service pressure and
the supply requirements. AS/NZS 5601.1 will help you with this matter.
Wiring connection for gas cooker (if applicable)
To allow for disconnection of the appliance after
installation, the plug must be accessible after installation.
If the supply cord is damaged, it must be replaced by
the manufacturer, its service agent or similarly qualified
persons in order to avoid a hazard.
Operation on universal LPG/propane
1. The appliance inlet fitting provided MUST be
orientated so that the pressure nipple is accessible.
2. The inlet fitting has ½” BSP internal thread at the inlet
and outlet.
WARNING
Disconnect electric power before removing control panel.
1. Remove the control panel.
2. Remove the existing NG shutter securing screw (refer
to diagram above) and slide upwards to disengage
from grill burner.
3. Slide the SNG shutter into position and secure with
screws.
Testing the gas cooker
WARNING
You MUST test the cooker after installation, before you
hand it over to the customer.
You MUST have a manometer and a connecting tube.
10 11INSTALLING THE GAS ELEVATED COOKER
INSTALLING THE GAS ELEVATED COOKER
 Loading...