

Page 1
Quick Install Guide
WD Essential External USB Hard Drive
Getting Started
1
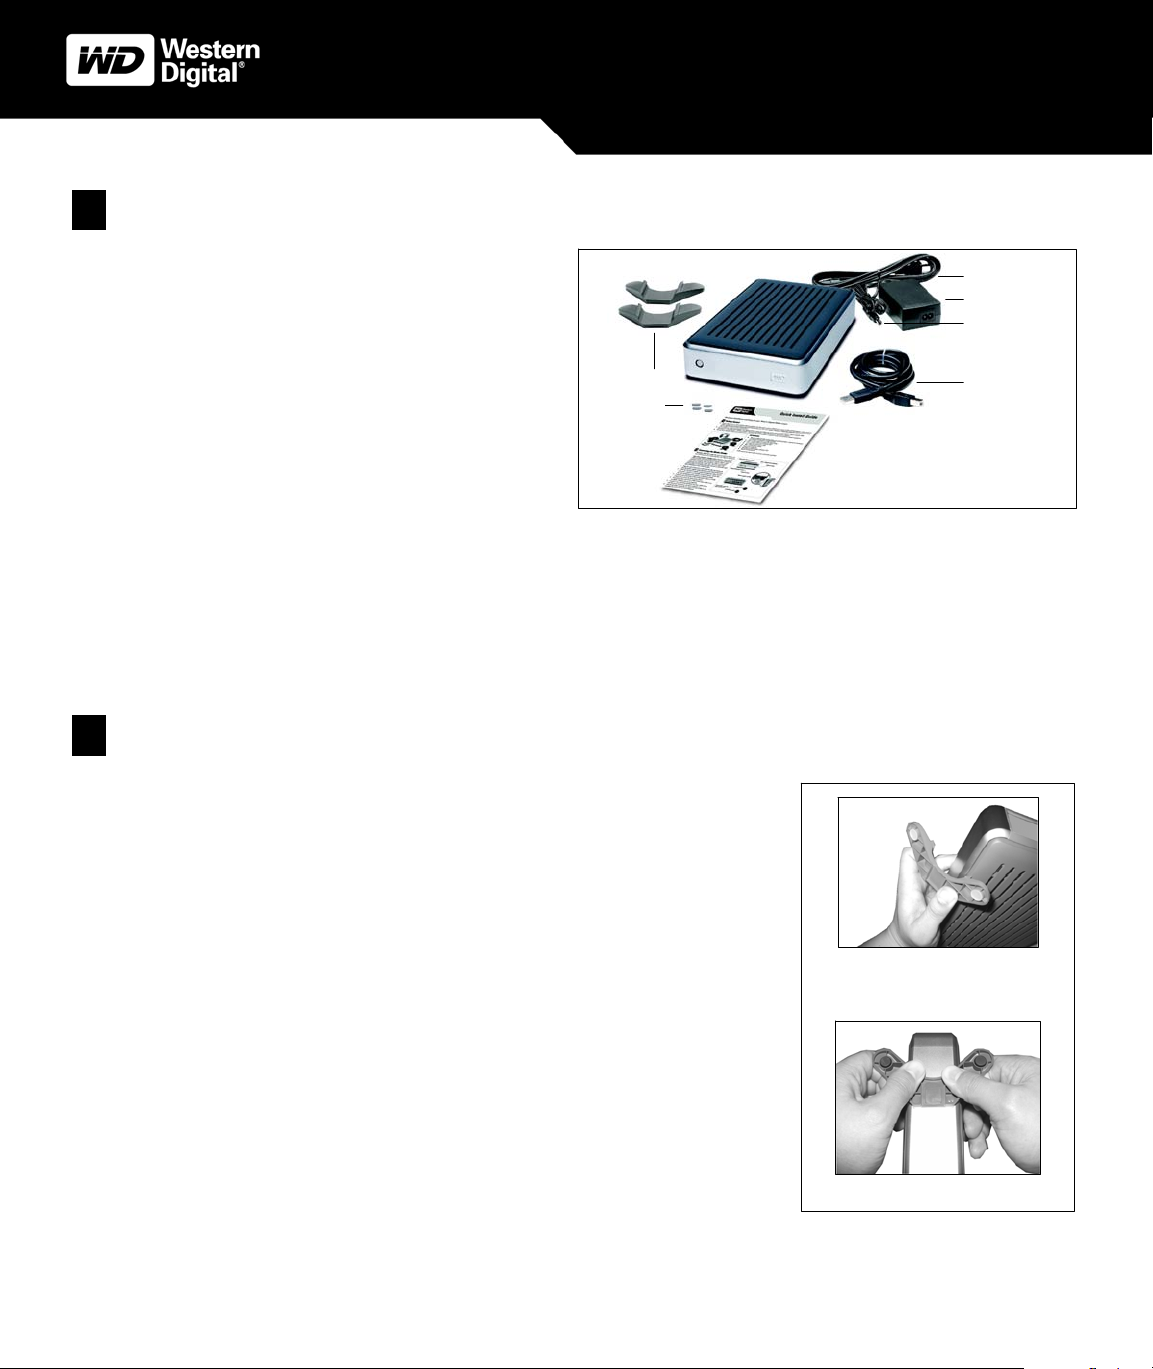
Kit Contents
! WD Essential
! 6 ft. (1.8m) USB 2.0 certified cable
! AC adapter and power cord
! Quick Install Guide
! Two stands for vertical placement
! Four feet for horizontal placement
*USB 2.0 PCI adapter card or built-in USB 2.0 host is required for Hi-Speed USB
performance. USB 2.0 is highly recommended because of the significant reduction in
file transfer time compared to USB 1.1.
System Requirements
Windows
! Available USB port ! Available USB port
! Windows 98SE/Me/2000/XP ! Mac OS 9.2.2 or Mac OS X 10.1.5 or later
™
External USB 2.0* Hard Drive
Stands
Feet
Figure 1
®
Macintosh
®
Power Cord
AC Adapter
AC Adapter Cord
USB 2.0 Cable
Note: For highest performance and reliability, WD recommends that you install the latest service pack (SP) and updates. Windows users, go to the
Start menu and select Windows Update. Mac users, go to the Apple menu and select Software Update.
Connecting the Drive
2
Note: For a single drive, WD recommends using the stands for vertical placement with the Power
button on top for easy access. For stacking multiple drives, use the feet for horizontal placement
Installing the Stands for Vertical Placement
1. Power off the external hard drive and disconnect all its cables.
2. Align the edge of a drive stand onto the side of the drive adjacent to the back (Figure 2).
3. Press the other edge of the stand toward the drive until the stand snaps firmly into place.
Note: Space the stands approximately 3–4 inches apart and approximately
2–3 inches from the edge of the drive for maximum balance and stability.
Install Stands
4. Repeat this process for the other stand.
Removing the Stands
1. Power off the external hard drive and disconnect all its cables.
2. Place the drive upside down on a clean and steady surface.
3. Using both hands, grasp the base of the stand and carefully bend the stand upward
until the stand snaps away from the side of the drive (Figure 2).
Remove Stands
Figure 2
– 1 –
Page 2
Installing the Feet for Horizontal Placement
1. Power off the external hard drive and disconnect all its cables.
2. Place the drive upside down on a clean and steady surface.
3. The back of the drive is keyed with a small crossbar at each corner within the ventilation slots for
feet placement. Align the notch of the foot to the crossbar and insert one end of the foot into the
ventilation slot at a slight angle. The feet are keyed to ensure proper insertion.
4. Press the foot into the groove until it snaps firmly into place.
5. Repeat this process for the three remaining feet.
Removing the Feet
1. Power off the external hard drive and disconnect all its cables.
2. Place the drive upside down on a clean and steady surface.
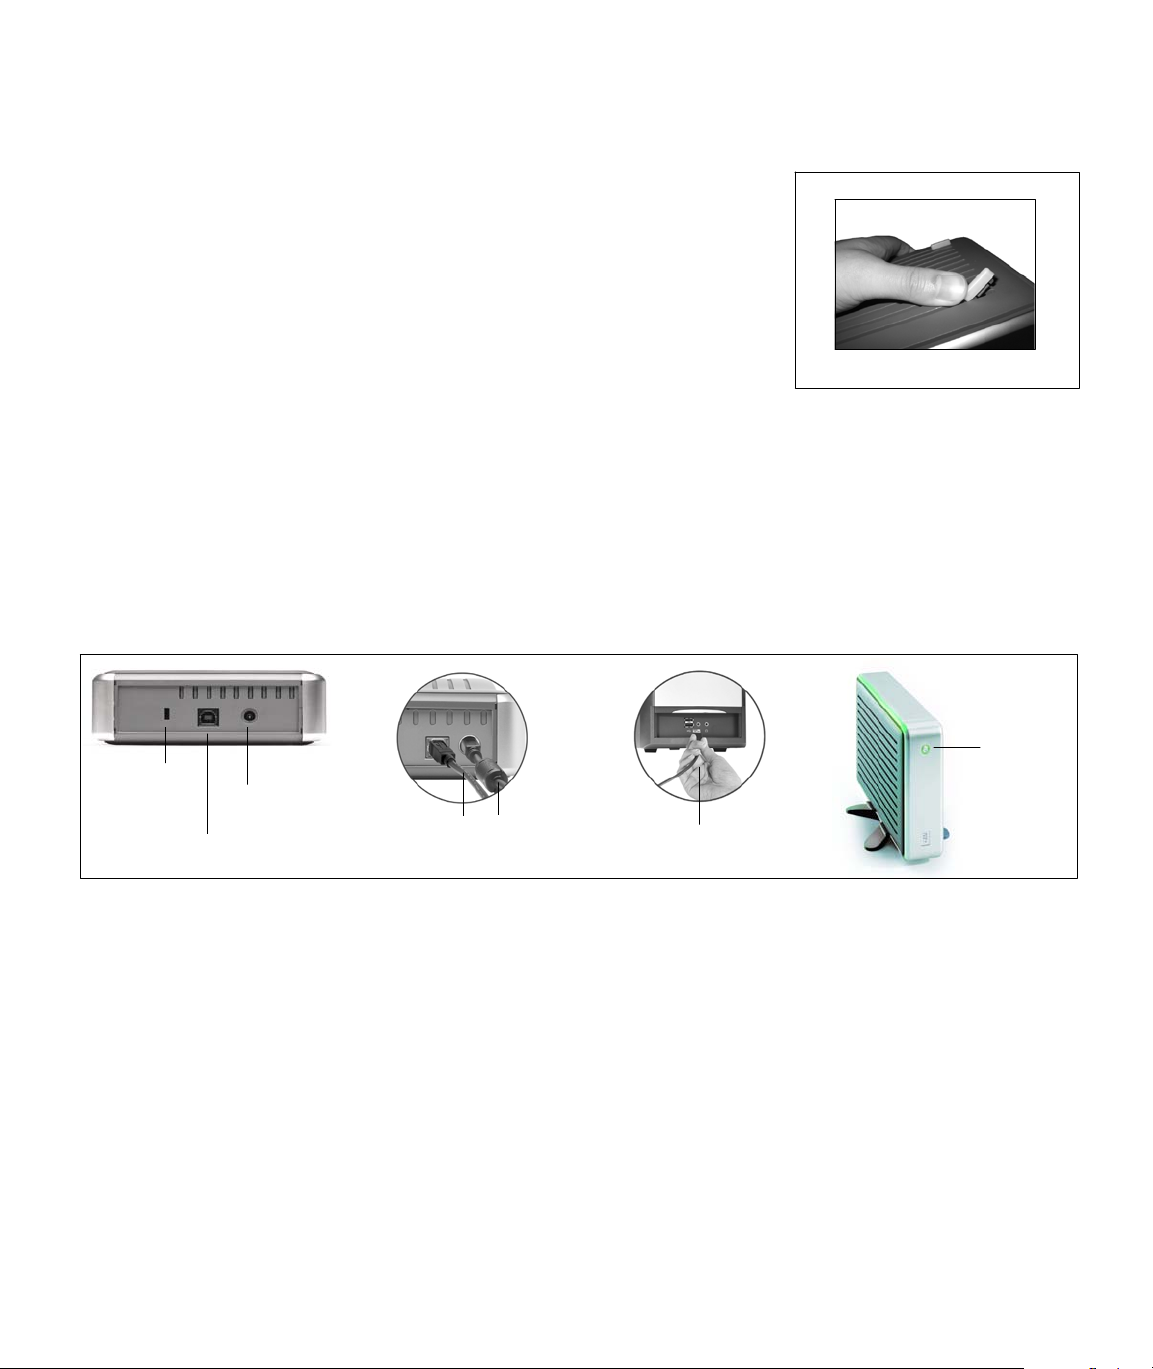
3. Carefully dislodge the foot by firmly pushing it off the ventilation slot (Figure 3).
4. Repeat this process for the three remaining feet.
Remove Feet
Figure 3
Connecting the Cables
Note: If using Windows 98SE, you must install device drivers on your system before connecting the drive (see Section 3).
1. Connect the AC adapter cord to the DC power supply socket on the back of the drive (Figure 4).
2. Connect one end of the power cord to the AC adapter.
3. Connect the other end of the power cord to an electrical outlet.
4. Connect one end of the USB 2.0 cable to the USB 2.0 port on the back of the drive (Figure 4).
5. Connect the other end of the USB 2.0 cable to an available USB port on your computer.
6. Press the Power button to turn on the drive (Figure 4). Your operating system automatically detects the external USB drive. The area
surrounding the Power button illuminates green and flashes to indicate drive activity.
Power Button
Kensington
Security Slot
®
DC Power
Supply Socket
USB 2.0 Port
USB 2.0 Cable AC Adapter Cord
Figure 4
USB 2.0 Cable to
USB 2.0 Port on Computer
Note: Depending on your system configuration, your computer may attempt to boot from your WD USB drive. Refer to your system’s
motherboard BIOS setting documentation to disable this feature or visit support.wdc.com, click Knowledge Base, and search for answer ID 1201.
For more information about booting from external drives, refer to your system documentation or contact your system manufacturer.
– 2 –
Page 3

Setting up the Drive
3
Windows
Note: Your WD drive is preformatted as a single FAT32 partition for compatibility with all Windows operating systems. The FAT32 file system
has a maximum file transfer of 4 GB. For more information about file formats and overcoming file size limitations, refer to your operating system
manual or visit support.wdc.com, click Knowledge Base, and search for answer ID 1053 for Windows 2000 or answer ID 1021 for Windows XP.
Windows 98SE
1. Go to support.wdc.com, click Downloads, locate your product name, and download the device driver installer onto your computer desktop.
2. Double-click the device driver icon to begin installation.
3. When driver installation is completed, restart your computer.
4. After restarting, follow the instructions in Section 2 to connect the drive. Windows automatically detects the drive and a new hard drive icon
appears in the My Computer window. Your WD drive is preformatted as a single FAT32 partition and is ready to use.
Windows Me/2000/XP
1. After connecting the drive, Windows automatically detects your WD drive and installs the drivers.
2. If prompted, restart your computer. A new drive icon appears in the My Computer window. Your WD drive is preformatted as a single FAT32
partition and is ready to use.
Macintosh
Important: You must reinitialize or format your WD drive using Apple’s Disk Utility before using the drive.
Mac OS 9.2.2
1. To format the drive, select Control Panels > Extensions Manager from the Apple menu.
2. Disable File Exchange from the extensions list by clearing the adjacent check box. Click Restart.
3. After restarting, a message appears prompting you to initialize the drive. Enter a name, select Mac OS Extended, and click Initialize.
4. Click Continue to confirm drive initialization. A hard drive icon with the name you assigned appears on the desktop after formatting is
completed. To re-enable File Exchange, select the check box in Extensions Manager and click Restart. Your new WD drive is ready to use.
Mac OS X 10.1.5 or Later
1. To format the drive, select Applications > Utilities > Disk Utility. Select your new drive on the left panel, and click the Erase tab on the right
panel. If prompted, click OK.
2. Select Mac OS Extended from the Volume Format menu, and enter a name for your drive.
3. Click Erase to begin drive formatting. A hard drive icon with the name you assigned appears on the desktop after formatting is completed.
To partition the drive into multiple volumes, select the Partition tab from the Disk Utility program menu and follow the instructions.
If prompted, restart the system. A new hard drive icon appears on the desktop and your WD drive is ready to use.
Disconnecting the Drive
4
CAUTION: To prevent data loss, be sure to close all active applications before shutting down the drive.
Windows
1. Double-click the Safely Remove Hardware icon in your system tray (typically located on
the bottom right corner of your desktop).
2. Select USB Mass Storage Device from the list and click Stop (Figure 5). Click OK to
confirm your selection of the drive to be disconnected.
3. Click Close and press the Power button once. Now you may safely disconnect the USB
cable from your computer and the power cord from the electrical outlet.
Macintosh
1. Find the Removable Disk icon associated with the drive you want to disconnect and drag
it to the Trash icon on your desktop.
2. After the disk icon disappears from the desktop, you may safely disconnect the USB cable
from your computer and the power cord from the electrical outlet.
– 3 –
Safely Remove Hardware Icon
Figure 5
Page 4

Regulatory Compliance
FCC Class B Information
This device has been tested and found to comply with the limits of a Class B
digital device, pursuant to Part 15 of the FCC Rules. These limits are designed
to provide reasonable protection against harmful interference in a residential
installation. This unit generates, uses, and can radiate radio frequency energy
and, if not installed and used in accordance with the instructions, may cause
harmful interference to radio or television reception. However, there is no
guarantee that interference will not occur in a particular installation. Any
changes or modifications not expressly approved by WD could void the user’s
authority to operate this equipment.
The following booklet, prepared by the Federal Communications Commission,
may be helpful: How to Identify and Resolve Radio/TV Interference Problems.
This booklet is Stock No. 004-000-00345-4 available from the US
Government Printing Office, Washington, DC 20402.
CSA Notice
Cet appareil numérique de la classe B est conforme à la norme NMB-003
du Canada.
This Class B digital apparatus complies with Canadian ICES-003.
Underwriters Laboratories Inc.
Approved for US and Canada. CAN/CSA-C22.2 No. 60950-1, UL 60950-1.
Information Technology Equipment - Safety - Part 1: General Requirements
(File E101559).
CE Compliance For Europe
Verified to comply with EN55022 for RF Emissions and EN50082-1 for
Generic Immunity, as applicable.
Warranty Information
This product contains no user-serviceable parts. Refer servicing only to WD
authorized personnel or a WD-approved service center.
Obtaining Service
WD values your business and always attempts to provide you the very best of
service. If this Product requires maintenance, either contact the dealer from
whom you originally purchased the Product or visit our product support Web
site at support.wdc.com for information on how to obtain service or a Return
Material Authorization (RMA). If it is determined that the Product may be
defective, you will be given an RMA number and instructions for Product
return. An unauthorized return (i.e., one for which an RMA number has not
been issued) will be returned to you at your expense. Authorized returns must
be shipped in an approved shipping container, prepaid and insured, to the
address provided on your return paperwork. Your original box and packaging
materials should be kept for storing or shipping your WD product. To
conclusively establish the period of warranty, check the warranty expiration
(serial number required) via support.wdc.com. WD shall have no liability for
lost data regardless of the cause, recovery of lost data, or data contained in any
Product placed in its possession.
Limited Warranty
WD warrants that the Product, in the course of its normal use, will be free
from defects in material and workmanship for a period of one (1) year, unless
otherwise required by law, and will conform to WD’s specification therefor.
This limited warranty period shall commence on the purchase date appearing
on your purchase receipt. WD shall have no liability for any Product returned
if WD determines that the Product was stolen from WD or that the asserted
defect a) is not present, b) cannot reasonably be rectified because of damage
occurring before WD receives the Product, or c) is attributable to misuse,
improper installation, alteration (including removing or obliterating labels and
opening or removing external covers, unless authorized to do so by WD or an
authorized service center), accident or mishandling while in the possession of
someone other than WD. Subject to the limitations specified above, your sole
and exclusive warranty shall be, during the period of warranty specified above
and at WD’s option, the repair or replacement of the Product. The foregoing
warranty of WD shall extend to repaired or replaced Products for the balance
of the applicable period of the original warranty or ninety (90) days from the
date of shipment of a repaired or replaced Product, whichever is longer.
The foregoing limited warranty is WD’s sole warranty and is applicable only to
products sold as new. The remedies provided herein are in lieu of a) any and all
other remedies and warranties, whether expressed, implied or statutory,
including but not limited to, any implied warranty of merchantability or
fitness for a particular purpose, and b) any and all obligations and liabilities of
WD for damages including, but not limited to accidental, consequential, or
special damages, or any financial loss, lost profits or expenses, or lost data
arising out of or in connection with the purchase, use, or performance of the
Product, even if WD has been advised of the possibility of such damages. In the
United States, some states do not allow exclusion or limitations of incidental or
consequential damages, so the limitations above may not apply to you. This
warranty gives you specific legal rights, and you may also have other rights
which vary from state to state.
Technical Support Services
If you need additional information or help during installation or normal use of
this product, visit our product support Web site at
search our knowledge base.
support.wdc.com and
support.wdc.com
www.westerndigital.com
800.ASK.4WDC North America
949.672.7199 Spanish
+800.6008.6008 Asia Pacific
+31.20.4467651 EMEA
Weste r n Digital
20511 Lake Forest Drive
Lake Forest, California 92630 U.S.A.
Western Digital is a registered trademark; and WD, the WD logo, and
WD Essential are trademarks of Western Digital Technologies, Inc. Other
marks may be mentioned herein that belong to other companies.
© 2005 Western Digital Technologies, Inc. All rights reserved.
2079-001050-A02 06/05
– 4 –
 Loading...