

Page 1

WD Sentinel™DX4000
Small Office Storage Server
Administrator’s Quick Install Guide
Page 2

Kit Contents
About Your WD Product
Kit Contents
WD Sentinel™ DX4000 Small Office Storage Server
Ethernet cable
AC adapter
Quick Install Guide
Optional Accessories
For more information on optional accessories for this product, visit
www.shopwd.com (U.S. only). Outside the U.S., visit http://support.wdc.com.
WD Sentinel™ DX4000
Ethernet cable
AC adapter
Quick Install Guide
System Requirements
Local Network:
– Router/switch (Gigabit Ethernet recommended to maximize performance)
– DHCP enabled
Client Computer: A client computer running one of the Windows operating
systems listed below.
Client Operating System Compatibility:
– Windows XP SP3 (32 bit)
– Windows Vista®SP2 (32 or 64 bit)
– Windows 7 (32 or 64 bit) any version
®
– Mac
OS X Leopard
– Mac®OS X Snow Leopard
®
®
– Mac® OS X Lion™ *
Broadband internet connection: Required for remote access outside the LAN
System View (Front)
Power/Status LED
Power button
Drive status LEDs
Scroll buttons
* For Mac OS X Lion, ensure that your WD Sentinel server has the latest software updates from
Microsoft and Western Digital.
WD Sentinel™ DX4000 | 1
Page 3
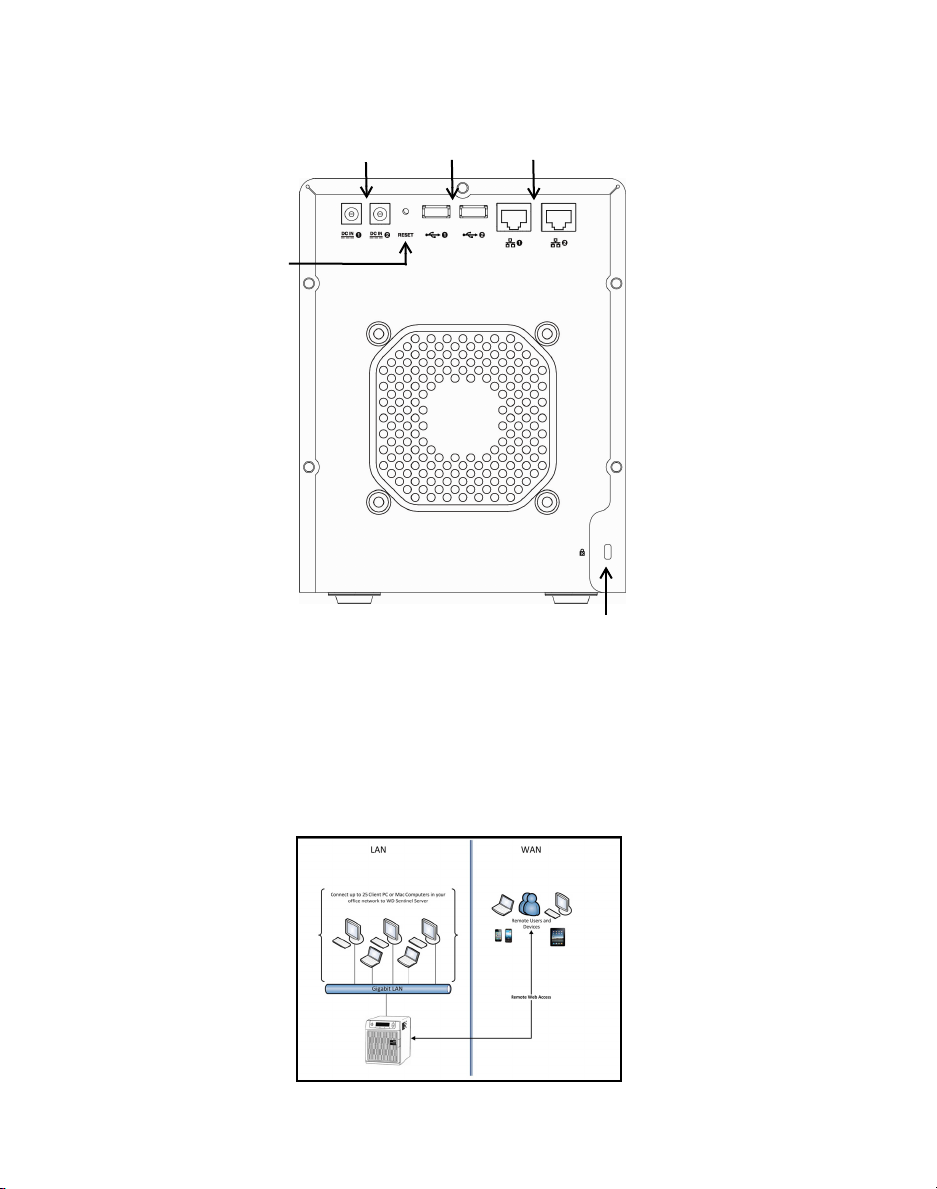
System View (Back)
Reset/Recovery
button
Power ports
1&2
USB ports
1&2
Ethernet ports
1&2
Kensington Security Lock
Introduction
This quick install guide steps the Administrator through the procedures for setting up the WD Sentinel server
and connecting a Windows
Note: Before connecting a Mac computer to the WD Sentinel server, you must connect and configure the WD
Sentinel server with a Windows PC.
®
PC and then a Mac®computer to the server.
How the WD Sentinel Fits into Your Office
2 | WD Sentinel™ DX4000
Page 4

User Roles
Administrator
(e.g., Business Owner)
Primary Setup Tasks
• Physically connects the
WD Sentinel server to the network.
• Configures the WD Sentinel server.
This is a one-time procedure.
• Connects a Windows PC to the
WD Sentinel server by installing
Connector software on it.
Primary User Interface
• Dashboard - Signs in using the
Administrator password (no
username required).
Dashboard Task Examples
• Sets up user accounts and assigns
permissions.
• Manages shared folders.
• Sets up and manages automatic
backup schedule.
• Manages WD Sentinel server
settings, resolves any alerts, and
monitors server performance.
• Sets up Remote Web Access.
• Manages updates.
Internal Users
(e.g., Employees)
Primary Setup Tasks
• None
Primary Interface
• Launchpad - Signs in
using the assigned user
name and password.
Secondary Interface
• Remote Web Access While accessing
remotely, signs in using
the assigned user name
and password.
Launchpad Task
Examples
• Accesses data on
shared storage.
• Starts manual backups.
• Launches Remote Web
Access.
Remote Web Access Task
Examples
• Accesses data on
shared storage.
• Connects to the PCs in
the office remotely.
• Accesses media library.
External Users
(e.g., Clients or Business
Partners)
Primary Setup Tasks
• None
Primary Interface
• Remote Web Access Signs in using the
assigned user name and
password.
Remote Web Access Task
Examples
• Accesses data on
shared storage.
• Accesses media library.
Note: For each user account, the WD Sentinel server enables the Administrator to set detailed permissions for various
shared folders as well as server resources, such as Remote Web Access. At all times, the users are only able to
access the data on the server and other server resources for which they have permissions.
WD Sentinel™ DX4000 | 3
Page 5

Step 1: Connect the
WD Sentinel DX4000 Server to
Your Network
2
1
1. Using the provided Ethernet cable, connect the
WD Sentinel server (either Ethernet port 1 or 2) to
a DHCP-enabled LAN.
2. Using the provided AC power adapter, connect
the WD Sentinel server (either power port 1 or 2)
to an electrical outlet or a UPS.
3. Press the on/off button only once, for up to one
second, to power up the WD Sentinel server.
4. Wait for the LCD on the front of the WD Sentinel
server to display WDSENTINEL and the IP
address before configuring the server.
WARNING! This process takes a few
minutes. Do not interrupt the process. Do not
power off or disconnect the WD Sentinel server.
Step 2. Set up WD Sentinel Server
(one time only)
Your WD Sentinel DX4000 server is now ready to be
configured. This section describes how to use the
one time setup wizard to configure your server for
first use.
The following steps must be performed on a
windows PC connected to the same network and
subnet as your WD Sentinel DX4000 server.
Important: Be sure the Windows computer has
all the latest mandatory and optional Microsoft
updates installed before running the Connector
software.
1. In the address field of an open browser window,
enter http://<IP address>/connect and click
Enter to display the setup wizard download
screen. Use the IP address shown in the LCD of
the WD Sentinel server.
Example: http://192.168.123.225/connect
2. Click Download and run the setup wizard.
3. At the warning prompts, click Run and Yes as
appropriate.
4 | WD Sentinel™ DX4000
Page 6

4. Select the server language from the list
provided and click the arrow to continue.
5. Verify the localization settings, or select the
correct values from the drop-down lists:
7. Click Next to display Microsoft and Western
Digital license agreements. Read the
agreements and select both checkboxes to
accept the license terms:
8. Click Next to personalize your WD Sentinel
server:
6. Click Next to review the date and time, and
then select the checkbox to verify the settings:
a. The WD Sentinel server has a default name of
WDSENTINEL. Enter a unique name for your
WD Sentinel server, for example, CompanyName (must contain 1-12 characters; may be
upper case, lower case, numeric, or a
combination; may include hyphens but no
spaces or special characters).
WARNING! THIS IS THE ONLY TIME YOU
CAN NAME YOUR WD SENTINEL SERVER.
You must assign it a unique name to avoid
naming conflicts should you ever have more
than one WD Sentinel server on the network.
WD Sentinel™ DX4000 | 5
Page 7

b. Enter and confirm a password (must be at
least 8 characters long and contain at least
three of the following categories: uppercase
letters, lowercase letters, numbers, and
symbols; spaces are allowed.) This is the
Administrator password. You will use it later
to connect the client computers to your WD
Sentinel server and to access the
Administration Dashboard.
c. Enter a hint to remind you of the password.
The completion screen appears:
WARNING!
password, it may not be possible to recover it,
and you could potentially lose all your data.
Make sure to record the password and keep it
in a safe location.
9. Click Next and specify how the server software
updates should occur. Make a selection:
Note: If you choose the first or second option
on this screen, the subsequent installation
process may take longer, depending on
Windows updates that may be available at this
time.
The installation begins. The progress bar on the
screen and the LCD of the WD Sentinel server
inform you of the installation’s progress.
Important: This process can take up to 30
minutes and may restart more than once. Do not
interrupt the process. Do not power off or
disconnect the WD Sentinel server.
If you forget the Administrator
Your WD Sentinel server configuration is
complete and the server is ready for use!
10. To connect the current Windows PC computer
to your server, leave the Connect this
Computer checkbox selected, click Finish,
and proceed to Step 3.
Step 3: Connect the First
Computer
Important: Before loading the Connector
software, be sure the computer’s Windows
operating system has the latest update.
Now connect one Windows PC (most likely the one
you have been using) to the WD Sentinel server by
installing Connector software on it.
Note: Before connecting a Mac computer to the
WD Sentinel server, you must first connect and
configure the WD Sentinel server using a
Windows PC running compatible W indows client
OS.
Installing the Connector software joins the client
computer (Windows PC) to your WD Sentinel Server
and installs Launchpad and Dashboard. Users use
Launchpad to access server resources they have
rights to, and the administrator (you) accesses
Dashboard for such tasks as managing the WD
Sentinel server, setting up user accounts, and
managing access to shared folders. In addition,
your Windows PC is configured to backup
automatically to your WD Sentinel server on a daily
basis, as per the backup schedule you set.
WD Sentinel™ DX4000 | 6
Page 8

Use the following one-time procedure for every
Windows PC you connect to the WD Sentinel
server:
1. Click Download software for Windows:
Note: To get to the Connector download
screen, you can also open Internet Explorer
and in the address field, type
http://<IP address>/connect.
Example http://192.168.123.225/connect. The
LCD of the WD Sentinel server displays the WD
Sentinel name and IP address.
2. At the warning prompts, click Run and Yes as
appropriate.
Note: If prompted to do so, type the user name
and password of an account that has
administrator permissions on this client
computer.
An overview of the Connect Computer to the
Server wizard displays:
4. Click Next to display a progress bar. The
installation process may 30 minutes or more to
complete.
5. At the logon screen, enter the Administrator
password for your WD Sentinel server:
6. Click Next and enter a unique description for
your computer so the server will be able to
distinguish yours from others on the network:
3. Click Next to display information about events
that may occur during the installation:
7. Click Next to display wake-up options, and
make a selection:
WD Sentinel™ DX4000 | 7
Page 9

8. Click Next to display Microsoft program
options, and make a selection:
9. Click Next. The installation completes. Select
the checkbox for opening the Dashboard to
configure and monitor the WD Sentinel server.
Click Finish:
Step 4: Access the Dashboard
(Windows PCs Only) and
Launchpad
You can only access the Dashboard using a
Windows PC that is already connected to your WD
Sentinel server. The Dashboard Sign in screen
appears if you elected it to do so after the
Connector software is loaded, or you can navigate
to
Start or >(All)Program(s) >Windows Storage
Server 2008 R2>Windows Storage Server 2008
R2 Dashboard.
Dashboard Sign in (Administrators)
Using the Dashboard, the Administrator performs
administrative tasks such as creating the user
accounts, setting up access privileges to shared
folders and other server resources, managing
shared folders, and monitoring the WD Sentinel
server.
1. On the Dashboard Sign in screen, enter the
Administrator password.
Note: It is a best practice to select the Open
Dashboard to administer your server option and
launch the Dashboard after finishing the
Connector software installation. To take
advantage of shared storage capabilities of your
WD Sentinel server, on the Dashboard, create a
user account and assign access privileges to the
shared folders.
10. Close the browser. If you selected the
checkbox, the Dashboard Sign in screen
displays.
WD Sentinel™ DX4000 | 8
Page 10

2. Click the arrow to display the Dashboard:
2. Click the arrow to display the Launchpad. It
lists four tasks:
Access
, Shared Folders, and Dashboard.
Backup, Remote Web
Best Practices:
Complete the Getting Started tasks on the
Home page of the Dashboard.
Note: For instructions, see the WD Sentinel
DX4000 Administration Guide.
Create at least one active user account
now.
Launchpad Sign in (Users)
After you set up users with a user name, password,
and permissions on the Dashboard, they can
access the Launchpad Sign in screen by one of the
following methods:
On a Windows PC:
Right-click the Launchpad icon in your
system tray and select Open Launchpad
Double-click the Launchpad icon
Navigate to Start or >(All)Program(s)
>Windows Storage Server 2008
R2>Windows Storage Server 2008 R2
Launchpad.
1. Enter your user name and password.
3. Click
Dashboard to display the Dashboard
Sign in screen. Only users with
administrative access and knowledge of the
Administrator password can sign in. General
users entering their user name and
password cannot access the Dashboard.
Step 5: Connect Additional
Computers
Once you have one Windows PC connected to the
WD Sentinel server, you can connect up to 24
additional Windows PCs or Mac computers to your
WD Sentinel server.
Important Steps
Before installing Connector software on a computer,
ensure that:
Windows computers have all the latest
mandatory and optional Microsoft updates
installed.
There are no active backups in progress on the
WD Sentinel server.
Note: Check for active backups on the
Dashboard’s
The screen displays backups in progress.
Once the Connector software is installed, set up an
automated scheduled backup (for after working
hours ) using the Dashboard. Running a manual
backup during the initial connection process will
impact overall system performance.
Computers and Backup tab.
WD Sentinel™ DX4000 | 9
Page 11

Connecting More Windows PCs
1. Open Internet Explorer and in the address field,
type http://<IP address>/connect. Example
http://192.168.123.225/connect. The LCD of
the WD Sentinel server displays the WD Sentinel
name and IP address.
2. Repeat Step 3 on page 7 for every Windows
PC you want to connect.
Connecting Mac Computers
After connecting the first computer to the WD
Sentinel server (using a Windows PC), you can
connect Mac computers:
1. Open Safari and in the address field, type
http://<IP address>/connect, using the IP
address shown on the LCD of the WD Sentinel
server.
Example: http://192.168.123.225/connect.
2. Click the Download software for Mac arrow:
3. Select the Connector software to download,
and at the Connector for Mac warning
prompt, click Open:
4. Type the user name and password of the
account that administers this Mac computer
and click OK:
5. The Connect a Computer to the Server
wizard has seven screens, listed in the left
pane. Click Continue to move through these
screens:
6. Enter the WD Sentinel server’s IP address
shown on the WD Sentinel server’s LCD screen
and click Continue:
WD Sentinel™ DX4000 | 10
Page 12

7. Enter a computer name to uniquely identify the
Mac:
8. Enter the Administrator password for the WD
Sentinel server and click Continue:
10. A progress bar displays the status of the
installation followed by the Summary screen,
verifying that the computer is connected to the
server. Select the Automatically start
Launchpad at startup checkbox and click
Close:
The Launchpad Sign in screen displays. Users
who have been set up on the Dashboard (using a
Windows PC) sign in here:
Note: The Dashboard is not accessible from
Mac computers.
9. A progress bar appears followed by the
computer description screen. Enter a unique
description of the Mac computer and click
Continue:
11. The Launchpad displays three options:
Backup, Remote Web Access, and Shared
Folders.
WD Sentinel™ DX4000 | 11
Page 13

Rebooting the WD Sentinel Server
Following is the cleanest procedure for rebooting
the WD Sentinel server using a Windows PC:
1. On the Dashboard Home page, click the Server
Settings link on the upper right of the window.
2. On the bottom left of the General screen, click
the shutdown arrow and select Restart:
Technical Support Services
http://support.wdc.com
www.westerndigital.com
If you encounter problems with this product, please
contact WD Technical Support.
North America
English 855.556.5117
Spanish 855.556.5117
Asia Pacific +800.6008.6008
Japan 00 531 650442
Europe (toll free*) 00800.27549338
* Austria, Belgium, Denmark, France, Germany, Ireland, Italy,
Netherlands, Norway, Spain, Sweden, Switzerland, United
Kingdom
Europe (non toll free) +31.880062100
Middle East +31.880062100
Africa +31.880062100
Important: To make use of the full capabilities
of the WD Sentinel server, see the WD Sentinel
DX4000 Administration Guide at
http://www.wdc.com/wdproducts/updates/.
WARNING! An unclean shutdown will occur
if you hold the power button down for more
than 3 seconds. This will trigger a system
verification process that would take a long time
to complete.
Western Digital
3355 Michelson Drive, Suite 100
Irvine, California 92612
U.S.A.
Western Digital, WD, the WD logo, and My Book are registered
trademarks; and My Book Live is a trademark of Western Digital
Technologies, Inc. Other marks may be mentioned herein that belong to
other companies. Specifications subject to change without notice.
© 2012 Wester n Digital Technologies, Inc. All rights reserved.
4079-705082-A01 May 2012
WD Sentinel™ DX4000 | 12
 Loading...