

Page 1

Vital Signs Monitors • Vitalfunktionsmonitors • Moniteurs des Signes Vitaux
Modem-Propaq
Check for important Reference Guide Updates
inside the back cover of this manual.
Reference Guide
Modem-Propaq Gebrauchsanweisung
Sehen sie bitte nach, ob sich in der Tasche in der hinteren Umschlagseite
Modem-Propaq
Updates zur Gebrauchsanweisung befinden.
Guide de Référence
Contrôler les mises à jour du Guide de Référence
dans la pochette située au dos de ce manuel.
0123
Page 2

Copyright © 2000 by Protocol Systems, Inc.
Protocol Cordless®, and Flexible Monitoring® are registered trademarks of Protocol Systems, Inc. Protocol
Systems, Inc. is protected under various patents and patents pending.
Copyright Notice:
rights are reserved. The software is protected by United States of America Copyright laws, and international
treaty provisions applicable all over the world. Under such laws, it may be used as intended in the operation of
the product in which it is embedded, but it may not be copied, decompiled, rev erse-engineered, disassemb led, or
otherwise reduced to human-perceivable form. Protocol Systems, Inc. will make available specifications
necessary for interoperability of this software on request; however, users should be aware that use of Protocol
Systems, Inc. hardware and software with devices or software not sold by Protocol or its authorized dealers and
affiliates may lead to erroneous results and consequent danger in patient care, and may also void Protocol’s
warranty.
Disclaimers:
• This manual may be wholly or partially subject to change without notice.
• All rights are reserved. No one is permitted to reproduce or duplicate, in any form, the whole or part of this
manual without permission from Protocol Systems, Inc.
Ausschlusserklärung:
• Dieses Handbuch kann ganz oder teilweise ohne vorherige Ankündigung verändert werden.
• Alle Rechte sind vorbehalten. Es ist niemandem gestattet, dieses Handbuch ohne die Erlaubnis von Protocol
Systems, Inc. ganz oder teilweise zu reproduzieren oder zu vervielfältigen.
Limite de Responsabilité:
• Ce manuel peut être soumis, en tout ou partie, à des modifications sans notification préalable.
• Tous droits réservés. Personne n’est autorisé à reproduire ou copier, sous quelque forme que ce soit, tout ou
partie de ce manuel sans l’autorisation de Protocol Systems, Inc.
For information concerning this document or any Protocol Systems product, contact:
Protocol Systems, Inc.
Customer Service
8500 SW Creekside Place
Beaverton, Oregon 97008-7107 USA
Within USA, toll free:
Phone: (800) 289-2500
Phone Technical Services: (800) 289-2501
WorldWide:
Phone: (503) 526-8500
Fax: (503) 526-4200
Fax Technical Services: (503) 526-4910
Internet:
http://www.protocol.com
Email Technical Services: solutions@protocol.com
Email Marketing Dept.: marketing@protocol.com
Software in this Product is Copyright © 2000 by Protocol Systems, Inc., or its vendors. All
Protocol Systems, Inc. cautions the reader of this manual:
Protocol Systems, Inc. weist die Leser dieses Handbuchs auf folgendes hin:
Protocol Systems, Inc. met en garde le lecteur de ce manuel:
Protocol®, Propaq®, Propaq® CS, Propaq Encore®, Acuity®,
Protocol Medical Systems, Ltd.: NW Europe
Derby Service Centre
St. Georges House
Vernon Gate
Derby DE1 1UQ, United Kingdom
Phone: 44 1332 206208
Fax: 44 1332 206209
Email: uk@protocol.com
Protocol Systems, Inc.: Asia/Pacific
P.O. Box 29020
Christchurch 5, New Zealand
Phone: 64 3 37 94 429
Fax: 64 3 37 92 374
Reorder No:
810-0878-02, Rev A 2/00
Printed in USA
Page 3

Contents • Inhalt • Matières
English—5
Introduction—5
Before You Connect the Modem-Propaq,You Need:—7
Connect to Acuity—8
Temporarily Disconnect the Patient from Propaq,
Then Reconnect—11
Temporarily Disconnect the Propaq from Acuity,
Then Reconnect—12
Move the Patient to Another Location—13
Discontinue Monitoring—15
Acuity Central Monitor and Modem-Propaq Patients—16
Troubleshooting—19
Specifications—20
Cleaning Recommendations—20
Deutsch—21
Einführung—21
Bevor Sie den Modem-Propaq anschließen können, benötigen
Sie folgende Teile:—23
Anschluß an Acuity—24
Den Anschluß des Patienten am Propaq zeitweise unterbrechen,
dann wiederherstellen—27
Den Anschluß des Propaq an Acuity zeitweise unterbrechen,
dann wiederherstellen—28
Den Patienten an einen anderen Ort bewegen—29
Überwachung einstellen—31
Patienten am Acuity Zentralmonitor und dem
Modem-Propaq—32
Fehlersuche —35
Spezifikationen—36
Reinigung—36
English Deutsch
Français
Modem-Propaq Reference Guide 3
Page 4

Français—37
Introduction—37
Ce dont vous avez besoin pour installer
le Modem-Propaq:—39
Relier le patient à Acuity—40
Débrancher temporairement le patient du Propaq, puis
rebrancher—43
Débrancher temporairement le Propaq d’Acuity, puis
rebrancher—44
Transporter le patient ailleurs—45
Interrompre le monitorage—47
Connection entre le moniteur central Acuity et les patients
reliés au Modem-Propaq—48
En cas de problème —51
Spécifications—52
Nettoyage—52
4 Protocol Systems, Inc.
Page 5

English
Introduction
Intended Use
The Modem-Propaq option allows telecommunication between the Acuity System
and a Propaq CS, Propaq Encore, or Pr opaq 100 Series monitor configur ed to interface
with Acuity by means of compatible external modems.
Refer to the
Reference Guide
of the Acuity System and Propaq monitors. Observe all warnings and cautions.
Propaq Directions for Use
for more information about patient monitoring and the intended use
or
Propaq Reference Guide
and
Acuity System
Definitions
Warning
WARNING statements identify conditions or practices that could result in personal
injury.
Caution
CAUTION statements identify conditions or practices that could result in damage to the
equipment or other property.
Note
NOTE statements identify useful tips or points about operation.
English
Modem-Propaq Reference Guide 5
Page 6

General Warnings and Notes
Warning
Use of equipment, accessories, and parts not recommended or supplied by Protocol
Systems, Inc. could result in inaccurate patient information, or could cause damage
to the Propaq monitor and accessories.
Warning
When considering a treatment protocol that involves telecommunication of patient
data, be sure to recognize some possible limitations. Successful telecommunication
requires access to public or private telephone services that may not always be
available or reliable. Be sure to plan for possible limitations or interruptions in patient
monitoring.
Warning
Before connecting a modem-linked Propaq CS, Propaq Encore, or 100 Series monitor
to a telephone line, make sure the telephone line is not equipped with any central
system features such as Call Waiting or Call Forwarding. Also make sure that other
telecommunication devices do not have access to the line, such as other telephones,
modems, fax machines, or automatic burglar alarms. These features and devices can
disrupt modem operation and interrupt or prevent patient monitoring.
Warning
When outside interference causes a modem-linked Propaq CS, Propaq Encore, or
Propaq 100 Series monitor to disconnect from Acuity and display the message
EQUIPMENT ALERT, NETWORK FAULT, patient monitoring is interrupted. (Acuity
displays the message LOSS OF COMMS.) A Propaq CS or Propaq Encore
automatically redials and attempts to reconnect. However, a Propaq 100 Series
monitor may not redial until you turn the modem power off and on, or unplug and plug
the Modem-Propaq cable into the monitor. Contact a Protocol Systems representative
for more information about modem selection and use.
6 Protocol Systems, Inc.
Page 7

Note
A modem-linked Propaq CS, Propaq Encore, or Propaq 100 Series monitor transmits a
maximum of three active patient waveforms to Acuity. The monitor transmits waveforms in
the following priority: ECG1, CO2 (or RESP if no CO2), ECG2, SpO2, and RESP. The
monitor transmits numeric information for all active vital signs. Acuity does not display the
manometer bar for the monitor NIBP.
Disclaimers
Protocol Systems, Inc. cautions the reader of this manual:
• Protocol Systems, Inc. will not be responsible for any injury to the user or other
person(s) that may result from accidents during operation of the Modem-Propaq
option.
• Protocol Systems, Inc. assumes no responsibility for usage not in accordance with
this manual that results in illegal or improper use of the Modem-Propaq option.
Before You Connect the Modem-Propaq,You Need:
• Propaq CS, Propaq Encore, or Propaq 100 Series monitor with an ACUITY or
ACUITY-MODEM connector
• Monitor ac power adapter
• Modem with the MODEM-PROPAQ label
(programmed to call the Acuity Central Monitor)
• Modem ac power adapter
• Modem-Propaq Cable
• Telephone cable
• Access to a standard analog telephone outlet (connected to an outside line)
• Modem carrying case (optional)
Modem label
English
Modem-Propaq Reference Guide 7
Page 8

Connect to Acuity
Prepare the Propaq
For a New Patient (Not Yet Monitored)
1.
Turn the Propaq power off and then on to clear any trend values or alarm limit
settings stored for a previous patient.
Warning
Before you use a Propaq on a new patient, always turn off the Propaq for a few
seconds, then turn it on again. This clears the prior patient’s trends and alarm limit
settings.
For a Patient Who Has Already Been Monitored
1.
To
save
this patient’s trend values and alarm limit settings, keep the Propaq
power on. When you connect to Acuity, the Propaq transfers up to five hours of
trend information to Acuity.
Connect Patient Sensors and Cables
At the Propaq
1.
Look carefully at all the cords and cables, especially near the connectors.
Replace any cord or cable that is broken, torn, or damaged.
Attach Propaq or Propaq telemetry paq sensors to the patient as described in
2.
the
Propaq CS Directions for Use, Propaq Encore Reference Guide, Propaq Reference
Guide, Protocol Cordless Reference Guide,
or
Acuity System Reference Guide.
If not already connected, plug the large connector of the Modem-Propaq Cable
3.
into the modem as shown on page 9. Make sure the two connector screws are
tight (tighten with a screwdriver if necessary).
4.
Plug the modem power adapter into the modem and electrical power outlet as
shown.
8 Protocol Systems, Inc.
Page 9
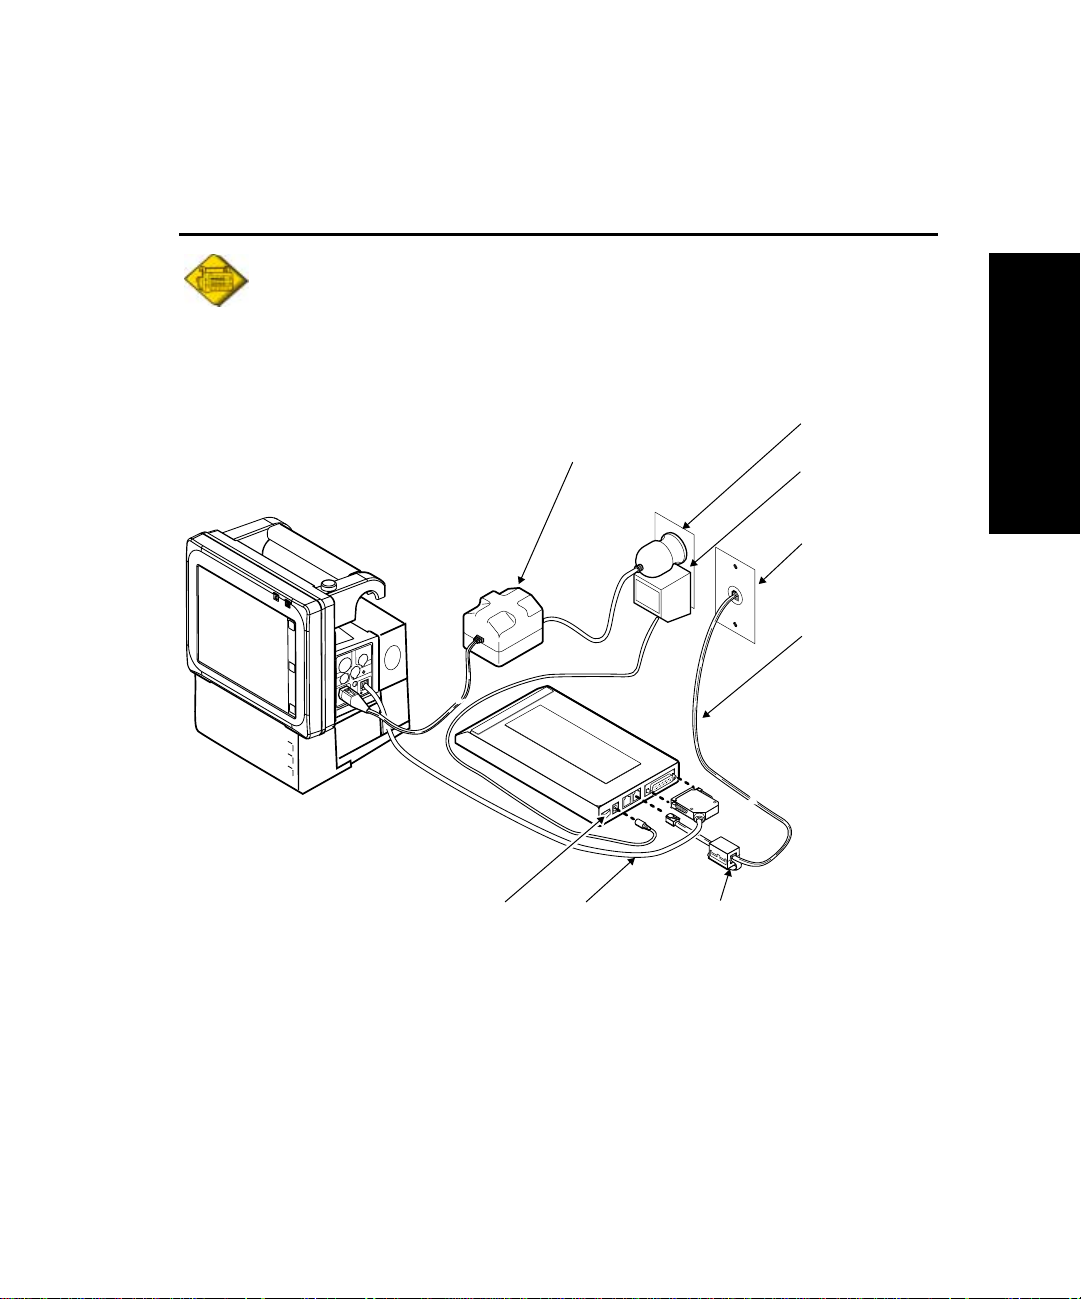
Caution
Do not connect any power adapter to the modem except the power adapter designated for
the modem. Connecting a different power adapter could damage the modem.
Example
Monitor
Power
Adapter
Electrical
Power Outlet
Modem Power
Adapter
Telephone
Outlet
Telephone
Cable
English
Power
Switch
Modem-Propaq
Cable
EMI
Suppressor
Modem-Propaq Reference Guide 9
Page 10

Plug the telephone cable into the telephone outlet and the modem as shown.
5.
Caution
Be sure to plug the telephone cable into a standard analog telephone line that allows access
to an outside line (the same type used in private homes). Plugging the telephone cable into
a digital telephone line (used for computer networks and most internal telephone systems)
could damage the modem. Contact your Biomedical Engineering Department for assistance.
Turn on the modem.
6.
7.
Plug the Modem-Propaq Cable into the Propaq ACUITY-MODEM connector.
Within a few seconds, the modem will automatically dial the Acuity telephone
number. Depending on the phone line quality, the connection may require a
few minutes.
Note
If the modem does not dial and connect to Acuity, unplug and plug in the Modem-Propaq
Cable at the ACUITY-MODEM connector.
At the Acuity Central Monitor
8.
Enter and confirm the patient’s ID information.
Enter a room number if required or desired. Be sure the room number is not
currently assigned to another patient. (For more information about the Acuity
Central Monitor, refer to page 16.)
At the Propaq or the Acuity Central Monitor
If you want to adjust the patient alarm limits, change them at the Propaq (using
9.
the Alarms Menu) or at the Acuity Central Monitor (using the Alarms Setup
Window).
10 Protocol Systems, Inc.
Page 11

Temporarily Disconnect the Patient from Propaq, Then Reconnect
Disconnect all Propaq sensor cables from the patient.
1.
2.
At the Propaq, press keys to acknowledge and disable all Equipment Alerts.
Keep the Propaq turned on to save the patient’s trend information and alarm
3.
limit settings.
Reconnect the Patient to the Propaq
Reconnect the Propaq sensor cables to the patient.
1.
2.
If the Propaq displays CONFIRM PATIENT?, press
YES
.
English
Modem-Propaq Reference Guide 11
Page 12

Temporarily Disconnect the Propaq from Acuity, Then Reconnect
From the Propaq Main Menu, press:
1.
• Propaq CS
• Propaq Encore
• Propaq 100 Series
Within a few seconds, disconnect the Modem-Propaq Cable from the Propaq
2.
ACUITY-MODEM connector.
Keep the Propaq turned on to save the patient’s trend information and alarm
3.
limit settings.
Reconnect Propaq to Acuity
Plug the Modem-Propaq Cable into the Propaq ACUITY-MODEM connector.
1.
Within a few seconds, the modem will automatically dial the Acuity telephone
number. Depending on the phone line quality, the connection may require a
few minutes.
2.
When the Propaq displays CONFIRM PATIENT?, press
NET OFF
SETUP, ACUITY, NET OFF
SYSTEM, NET OFF
YES
.
12 Protocol Systems, Inc.
Page 13

Move the Patient to Another Location
Note
If a Propaq is not turned off, patient data remains stored in the Propaq monitor. When the
Propaq is reconnected to Acuity, it transfers up to five hours of numerical patient data to
Acuity.
Note
The modem is programmed to dial the Acuity telephone number when the Modem-Propaq
Cable is plugged into the Propaq. If you move the patient, consider whether you need to have
the modem programmed for a different phone number (for example, to add an area code for
a long-distance call). If modem reprogramming is needed, contact your Biomedical
Engineering department.
At the Propaq
1.
From the Main Menu, press:
• Propaq CS
• Propaq Encore
• Propaq 100 Series
Within a few seconds, disconnect the Modem-Propaq Cable from the Propaq
2.
ACUITY-MODEM connector.
3.
Turn off the modem and disconnect the modem ac power adapter from the
electrical outlet.
NET OFF
SETUP, ACUITY, NET OFF
SYSTEM, NET OFF
English
4.
Disconnect the modem telephone cable from the telephone outlet.
Leave the Propaq turned on. Disconnect the monitor ac adapter (if connected).
5.
Modem-Propaq Reference Guide 13
Page 14

At the New Propaq Location
6.
Plug the modem power adapter into the electrical power outlet.
7.
Plug the modem telephone cable into the telephone outlet.
Turn on the modem.
8.
9.
Plug the Modem-Propaq Cable into the Propaq ACUITY-MODEM connector.
Within a few seconds, the modem will automatically dial the Acuity telephone
number. Depending on the phone line quality, the connection may require a
few minutes.
Note
If the modem does not dial and connect to Acuity, unplug and plug in the Modem-Propaq
Cable at the ACUITY-MODEM connector.
At the New Propaq Location or Acuity Central Monitor
10.
After connection, the Propaq and Acuity display CONFIRM PATIENT? Do one
of the following:
• Press
OR
• If the patient was previously assigned a room number, Acuity and the
Propaq display a
only the patient’s name. The Acuity Central Monitor then prompts for a
new room number.
to restore the patient’s name
YES
NEW ROOM
button. You can press
and
previous room number.
NEW ROOM
to restore
At the Acuity Central Monitor (if a New Room Number is Needed)
11.
Type the patient’s new room number into the Patient ID Setup Window.
14 Protocol Systems, Inc.
Page 15

Discontinue Monitoring
1. From the Propaq Main Menu, press:
• Propaq CS NET OFF
• Propaq Encore SETUP, ACUITY, NET OFF
• Propaq 100 Series SYSTEM, NET OFF
2. Within a few seconds, turn off the Propaq.
3. Disconnect the Modem-Propaq Cable from the Propaq.
4. Disconnect all Propaq sensor cables from the patient.
English
Modem-Propaq Reference Guide 15
Page 16
Acuity Central Monitor and Modem-Propaq Patients
This information describes how Acuity displays icons and windows for patients
linked to Acuity with the Modem-Propaq (Modem-Linked patients). For more
information about the Acuity System, refer to the Acuity System Reference Guide.
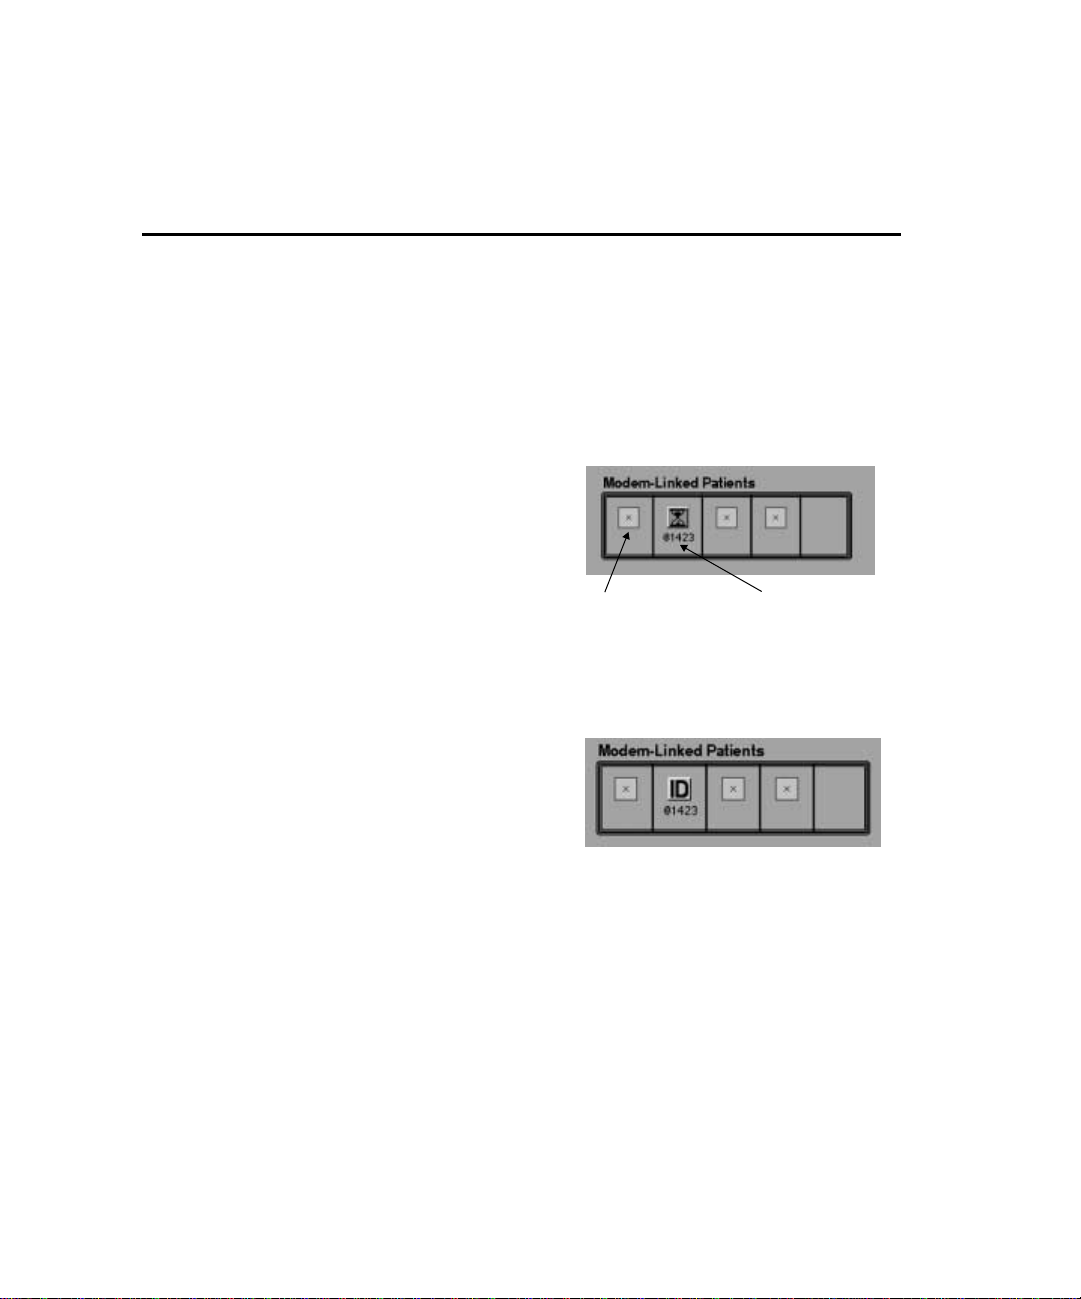
Acuity Map Icons Before the Patient ID is Entered
Before connection, gray port icons
representing unconnected Modem-Propaq
Acuity ports appear in a separate ModemLinked Patients area on the Acuity Map.
During connection, the blue hour-glass icon
appears with @xxxx (xxxx is the port number
Unconnected
Modem-Propaq
port
A Modem-Propaq
is connecting at
Acuity port 1423
for that Modem-Linked Acuity port–such as
1423, for example).
After connection, the yellow ID icon appears
and Acuity displays the Modem-Linked
Patient ID Setup Window.
16 Protocol Systems, Inc.
Page 17

Enter the Patient ID
The telephone indicates this is a Modem-Linked
patient in all Acuity Patient Windows.
Acuity requests
the Room
Number for
Modem-Linked
patients.
The Modem-Linked Patient ID Setup Window
1. Type in the patient’s ID number and name.
2. Type in the patient’s room number. Be sure the room number is not already
assigned to another patient. Click Confirm.
English
If you enter a room number and Acuity displays the No Such Room Window,
click Go Back. Then enter another room number and click Confirm.
Modem-Propaq Reference Guide 17
Page 18

If you click Confirm and Acuity displays the Room Number Unknown
Window, you have not typed in a room number. Do one of the following:
• Click Go Back to return to the
Patient ID Window, then type in a
room number.
OR
• Click Do Anyway to close the Room
Unknown Window. Acuity displays
the yellow RM icon to indicate that
no room number is assigned.
Room number
G2000 is assigned.
This icon will “jump”
to Room G2000 on
the Acuity Map if the
“move icon” feature
is configured.
Since no room
number is
assigned to this
Modem-Linked
patient, the Acuity
port number is
displayed.
Acuity Map Icons After the Patient ID is Entered
The location of a Modem-Linked patient icon on the Acuity Map depends on how
your system administrator has configured your Acuity System. After you enter the
patient ID information, the Modem-Linked icon either “jumps” to the assigned room
location on the Acuity Map or it stays in the Modem-Linked Patients area, depending
on your Acuity configuration. If no room number is assigned to the patient, the icon
stays in the Modem-Linked Patients area.
18 Protocol Systems, Inc.
Page 19

Troubleshooting
Problem Possible Cause Suggestion
Propaq monitor does not
communicate with Acuity.
The modem does not make
a dialing sound after the
Modem-Propaq Cable is
connected to the monitor
ACUITY/MODEM
connector.
The modem dials but does
not complete the connection
with Acuity.
Cables not properly connected. Refer to the illustration on page 9. Make
Modem does not have power. Check the modem. If no lights are
Propaq does not have power. Make sure the Propaq is turned on. If an
The modem telephone cable is
not plugged into the modem
line connector.
The modem volume is turned
down.
The modem telephone cable is
not connected to an outlet for a
standard telephone line, or the
telephone line is not working.
The modem has lost the proper
internal settings and needs to
be reprogrammed.
Noisy telephone line disrupted
communication.
The modem may not be
programmed with a valid Acuity
phone number.
sure all cables and cords are properly
connected and securely attached.
displayed, make sure the modem power
switch is on, and the modem ac power
adapter is securely connected and
plugged into an active ac power source.
ac power adapter is used, make sure it
is securely connected and plugged into
an active ac power source. Confirm the
green light on the right side of the
monitor is on indicating the monitor
battery is being charged.
Refer to the illustration on page 9. Check
all cable connections.
Refer to the modem manufacturer’s
user’s guide for additional modem
information.
Make sure the telephone line is a
standard outside line, and not part of the
hospital’s internal telephone network. Try
connecting a telephone and see if you
can make a voice telephone call.
Contact Biomedical Engineering to
reprogram the modem.
Wait for the modem to automatically
redial and reconnect to Acuity. Allow at
least several minutes for connection.
Contact Biomedical Engineering to
check the phone number programmed
for the modem.
English
Modem-Propaq Reference Guide 19
Page 20

Problem Possible Cause Suggestion
The Propaq disconnects
while transmitting to Acuity.
Acuity does not display all
possible waveforms from
the bedside monitor.
Acuity does not display the
NIBP manometer bar.
A cable was accidentally
disconnected.
Noisy telephone line disrupted
communication.
If the disconnect occurs at the
same time every night, it may
be caused by periodic
maintenance checks by the
telephone company.
The modem power was
accidentally turned off.
A modem-linked monitor
transmits a maximum of three
active patient waveforms to
Acuity (see the note on
page 7).
A modem-linked monitor does
not transmit NIBP manometer
data to Acuity (see the note on
page 7).
Refer to the illustration on page 9. Check
all cable connections.
Wait for the modem to automatically
redial and reconnect to Acuity. Allow at
least several minutes for connection.
Contact the telephone company.
Confirm some modem lights are on. If
not, check the modem power switch and
power adapter connections.
View additional patient wavef orms at the
bedside monitor.
View the NIBP manometer bar at the
bedside monitor.
Specifications
Refer to the modem manufacturer’s user’s guide for additional modem information.
Cleaning Recommendations
Clean the modem and cables with a damp cloth and mild detergent solution.
20 Protocol Systems, Inc.
Page 21

Deutsch
Einführung
Verwendungszweck
Die Modem-Propaq Option ermöglicht eine Datenfernübertragung zwischen dem
Acuity System und einem Propaq CS, Propaq Encore, oder Propaq 100 Serien
Monitor, der so konfiguriert ist, daß er sich mittels eines kompatiblen externen
Modems mit Acuity verbinden läßt.
In der Propaq Gebrauchsanweisung und in der Acuity System-Gebrauchsanweisung finden
Sie weitere Informationen zur Patientenüberwachung und dem Verwendungszweck
des Acuity Systems und der Propaq Monitoren. Beachten Sie alle Warnungen und
Vorsichtshinweise.
Definitionen
Warnung
WARNUNG – Diese Hinweise deuten auf Bedingungen oder Handlungen hin, die zu
Personenschäden führen können.
Vorsicht
VORSICHT – Diese Hinweise deuten auf Bedingungen oder Handlungen hin, die zu
Schäden an den Geräten oder anderen Ausstattungen führen können.
Hinweis
HINWEIS – Diese Hinweise geben nützliche Tips oder Anmerkungen zum Betrieb der
Geräte an.
Deutsch
Modem-Propaq Reference Guide 21
Page 22

Allgemeine Warnungen und Hinweise
Warnung
Der Einsatz von Geräten, Zubehör- und Geräteteilen, die von Protocol Systems, Inc.
weder empfohlen noch geliefert werden, kann zu ungenauen Patienteninformationen
führen oder kann Schäden am Propaq Monitor und den Zubehörteilen verursachen.
Warnung
Falls Sie ein Behandlungsprotokoll mit Fernübertragung von Patientendaten in
Betracht ziehen, müssen Sie sich möglicher Einschränkungen bewußt sein. Für eine
erfolgreiche Datenfernübertragung müssen Sie öffentlicheoder private
Telefondienstleistungsnetze nutzen, die nicht zu jedem Zeitpunkt verfügbar oder
zuverlässig sind. Planen Sie deshalb mögliche Einschränkungen oder
Unterbrechungen in der Patientenüberwachung ein.
Warnung
Bevor Sie einen modemverbundenen Propaq CS, Propaq Encore, oder 100 Serien
Monitor an eine Telefonleitung anschließen, vergewissern Sie sich bitte, daß die
Telefonleitung nicht mit Zentralsystemeigenschaften wie Anklopfen oder
Anrufweiterschaltung ausgerüstet ist. Stellen Sie weiterhin sicher, daß keine anderen
Telekommunikationsgeräte wie z.B. Modems, Faxgeräte oder automatische
Alarmanlagen mit der Telefonleitung verbunden sind. Diese Eigenschaften und
Geräte können den Modembetrieb beeinträchtigen und somit eine
Patientenüberwachung unterbrechen oder verhindern.
Warnung
Falls die Verbindung eines modemverbundenen Propaq CS, Propaq Encore, oder
Propaq 100 Serien Monitors mit Acuity durch Störungen von außen unterbrochen und
die Nachricht TECHNISCHER ALARM, NETZWERK-FEHLER angezeigt wird, wird die
Patientenüberwachung unterbrochen (Acuity zeigt die Nachricht DTENAUST UNTRB
an). Ein Propaq CS oder Propaq Encore führt automatisch eine Wiederwahl durch und
versucht, die Verbindung wieder aufzunehmen. Ein Propaq 100 Serien Monitor nimmt
die Wiederwahl möglicherweise erst vor, wenn Sie den Netzschalter des Modems ausund dann wieder einschalten, oder wenn Sie das Modem-Propaq-Kabel vom Monitor
abziehen und dann wieder anschließen. Um weitere Informationen zur Auswahl und
Anwendung eines Modems zu erhalten, wenden Sie sich bitte an einen Vertreter von
Protocol Systems.
22 Protocol Systems, Inc.
Page 23

Hinweis
Ein mit einem Modem verbundener Propaq CS, Propaq Encore, oder Propaq 100 Serien
Monitor überträgt maximal drei aktive Kurven an Acuity. Der Monitor überträgt Kurven in
folgender Prioritätsreihenfolge: EKG1, CO2 (oder RESP, wenn kein CO2), EKG2, SpO2 und
RESP. Der Monitor übermittelt numerische Informationen für alle aktiven Vitalfunktionen.
Acuity zeigt den Manometerbalken für den Monitor-NIBP nicht an.
Ausschlusserklärung
Protocol Systems, Inc. weist die Leser dieses Handbuchs auf folgendes hin:
• Protocol Systems, Inc. übernimmt keine Verantwortung für Verletzungen, die der
Benutzer oder andere Personen aufgrund eines Unfalls während des Betriebs des
Modem-Propaq davontragen.
• Protocol Systems, Inc. übernimmt ferner keine Verantwortung für eine Nutzung,
die nicht in Einklang mit diesem Handbuch steht und die zu einer rechtswidrigen
oder unvorschriftsmäßigen Nutzung des Modem-Propaq führt.
Bevor Sie den Modem-Propaq anschließen können, benötigen Sie folgende Teile:
• Einen Propaq CS, Propaq Encore, oder Propaq 100 Serien Monitor mit einer
ACUITY oder ACUITY-MODEM Schnittstelle
• Ein Monitor-Wechselstromnetzteil
• Ein Modem mit der MODEM-PROPAQBeschriftung (zum Anruf des Acuity
Zentralmonitors programmiert)
• Ein Modem-Wechselstromnetzteil
• Ein Modem-Propaq Kabel
• Ein Telefonkabel
• Zugang zu einer standardmäßigen analogen Telefonsteckdose
(die an eine Außenleitung angeschlossen ist)
• Modem-Tragkoffer (wahlweise)
Modembeschriftung
Deutsch
Modem-Propaq Reference Guide 23
Page 24

Anschluß an Acuity
Vorbereitung des Propaq
Für einen neuen Patienten (noch nicht zuvor überwacht)
1. Schalten Sie die Stromversorgung des Propaq aus und dann wieder ein, um
von einem vorherigen Patienten gespeicherte Trendwerte und
Alarmgrenzeinstellungen zu löschen.
Warnung
Bevor Sie einen Propaq für einen neuen Patienten verwenden, schalten Sie den
Propaq immer für einige Sekunden aus und schalten Sie ihn dann wieder ein. Dadurch
werden die Trends und Alarmgrenz-einstellungen des vorherigen Patienten gelöscht.
Für einen Patienten, der schon überwacht worden ist
1. Um die Trendwerte und Alarmgrenzeinstellungen dieses Patienten zu
speichern,lassen Sie den Propaq einge-schaltet. Wenn Sie den Anschluß an
Acuity vornehmen, übermittelt der Propaq bis zu fünf Stunden an
Trendinformationen an Acuity.
Anschluß von Patientensensoren und Kabeln
Am Propaq
1. Überprüfen Sie alle Leitungsschnüre und Kabel sorgfältig, besonders an den
Verbindungsstücken. Ersetzen Sie alle Leitungsschnüre und Kabel, die
gebrochen, angerissen oder beschädigt sind.
2. Bringen Sie die Propaq- oder Propaq Telemetry Paq Sensoren am Patienten an,
wie in der Propaq CS Gebrauchsanweisung, Propaq Encore Gebrauchsanweisung, in
der Propaq Gebrauchsanweisung, in der Protocol Cordless Gebrauchsanweisung,
oder in der Acuity System-Gebrauchsanweisung beschrieben.
3. Wenn es nicht schon angeschlossen ist, schließen Sie das große
Verbindungsstück des Modem-Propaq Kabels wie dargestellt am Modem an.
Vergewissern Sie sich, daß die zwei Verbindungs-schrauben fest angezogen
sind (ziehen Sie sie, falls nötig, mit einem Schraubenzieher nach).
24 Protocol Systems, Inc.
Page 25

Vorsicht
Schließen Sie außer dem Modem-Netzteil kein anderes Netzteil an das Modem an. Der
Anschluß eines anderen Netzteils kann das Modem beschädigen.
Exemplar
Netzstromschalter
MonitorNetzteil
Modem-Propaq
Kabel
Netzstromsteckdose
Modemnetzteil
Telefonsteckdose
Deutsch
Telefonkabel
EMI-Entstörungselement
Modem-Propaq Reference Guide 25
Page 26

4. Schließen Sie das Modem-Netzteil wie unten beschrieben an das Modem und
die Netzstromsteckdose an.
5. Stecken Sie das Telefonkabel wie dargestellt in die Telefonsteckdose und das
Modem.
Vorsicht
Vergewissern Sie sich, daß Sie das Telefonkabel in eine standardmäßige analoge
Telefonleitung stecken, die den Zugang zu einer Außenleitung ermöglicht (die Art, die in
Privatgebäuden verwendet wird). Wenn Sie das Telefonkabel in eine digitale Telefonleitung
stecken (die Art, die für Computernetzwerke und die meisten internen Telefonsysteme
verwendet wird), könnten Sie dadurch das Modem beschädigen. Wenden Sie sich an Ihre
Abteilung für biomedizinische Technik für weitere Informationen.
6. Schalten Sie das Modem ein.
7. Stecken Sie das andere Ende des Modem-Propaq Kabels in die Propaq
ACUITY-MODEM Schnittstelle. Das Modem wählt nach ein paar Sekunden
automatisch die Acuity-Telefonnummer an. Je nach Qualität der T elefonleitung
nimmt dieser Vorgang möglicherweise einige Minuten in Anspurch.
Hinweis
Falls das Modem die Nummer nicht wählt und die Verbindung zu Acuity nicht aufnimmt,
ziehen Sie das Modem-Propaq-Kabel vom ACUITY-MODEM-Verbindungsstück ab und
schließen Sie es danach wieder an.
Am Acuity Zentralmonitor
8. Geben Sie die Identifizierungsinformation (ID) des Patienten ein und
bestätigen Sie sie.
Geben Sie falls gewünscht oder notwendig eine Zimmernummer ein.
Vergewissern Sie sich, daß die Zimmernummmer zu diesem Zeitpunkt nicht
einem anderen Patienten zugeordnet ist. (Weitere Hinweise zum Acuity
Zentralmonitor finden Sie auf Seite 32.)
26 Protocol Systems, Inc.
Page 27

Am Propaq oder dem Acuity Zentralmonitor
9. Falls Sie die Alarmgrenzwerte des Patienten anpassen wollen, ändern Sie sie
am Propaq (im Alarmmenü) oder am Acuity Zentralmonitor (im Alarm-SetupFenster).
Den Anschluß des Patienten am Propaq zeitweise unterbrechen, dann wiederherstellen
1. Entfernen Sie alle Propaq-Sensorkabel vom Patienten.
2. Drücken Sie am Propaq die Tasten zur Anerkennung der Gerätealarme und zu
ihrer Deaktivierung.
3. Lassen Sie den Propaq eingeschaltet, um die Trendinformationen und
Alarmgrenzeinstellungen des Patienten zu speichern.
Den Patienten wieder an den Propaq anschließen
1. Bringen Sie die Propaq-Sensorkabel wieder am Patienten an.
2. Wenn der Propaq PAT. BESTÄTIGEN? anzeigt, drücken Sie auf JA.
Deutsch
Modem-Propaq Reference Guide 27
Page 28

Den Anschluß des Propaq an Acuity zeitweise unterbrechen, dann wiederherstellen
1. Im Propaq-Hauptmenü, drücken Sie auf:
• Propaq CS NETZ AUS
• Propaq Encore SETUP, ACUITY, NETZ AUS
• Propaq 100 Serien SYSTEM, NETZ AUS
2. Entfernen Sie innerhalb einiger Sekunden das Modem-Propaq Kabel aus der
Propaq ACUITY-MODEM Schnittstelle.
3. Lassen Sie den Propaq eingeschaltet, um die Trendinformationen des Patienten
und die Alarmgrenzeinstellungen zu speichern.
Den Propaq wieder an Acuity anschließen
1. Stecken Sie das Modem-Propaq Kabel in die Propaq ACUITY-MODEM
Schnittstelle. Das Modem wählt nach ein paar Sekunden automatisch die
Acuity-Telefonnummer an. Je nach Qualität der Telefonleitung nimmt dieser
Vorgang möglicherweise einige Minuten in Anspurch.
2. Wenn der Propaq PAT. BESTÄTIGEN? anzeigt, drücken Sie auf JA.
28 Protocol Systems, Inc.
Page 29

Den Patienten an einen anderen Ort bewegen
Hinweis
Wenn ein Propaq nicht ausgeschaltet wird, bleiben die Patientendaten im Propaq-Monitor
gespeichert. Wenn der Propaq wieder an Acuity angeschlossen wird, werden bis zu fünf
Stunden numerischer Patientendaten an Acuity übertragen.
Hinweis
Das Modem ist so vorprogrammiert, daß es die Acuity Telefonnummer anwählt, sobald das
Modem-Propaq Kabel am Propaq angeschlossen wird. Wenn Sie den Patienten an einen
anderen Ort bewegen, überprüfen Sie, ob Sie das Modem auf eine andere Telefonnummer
programmieren müssen (z. B. durch Hinzufügen einer Vorwahl). Falls das Modem
umprogrammiert werden muß, wenden Sie sich an Ihre Abteilung für biomedizinische
Technik.
Am Propaq
1. Im Hauptmenü, drücken Sie auf:
• Propaq CS NETZ AUS
• Propaq Encore SETUP, ACUITY, NETZ AUS
• Propaq 100 Serien SYSTEM, NETZ AUS
2. Entfernen Sie innerhalb einiger Sekunden das Modem-Propaq-Kabel aus der
Propaq ACUITY-MODEM Schnittstelle.
Deutsch
3. Schalten Sie das Modem aus und entfernen Sie das Modem-
Wechselstromnetzteil aus der Netzstromsteckdose.
4. Entfernen Sie das Modemtelefonkabel aus der Telefonsteckdose.
5. Lassen Sie den Propaq eingeschaltet. Entfernen Sie das Monitor-
Wechselstromnetzteil (falls angeschlossen).
Modem-Propaq Reference Guide 29
Page 30

Am neuen Ort des Propaq
6. Schließen Sie das Modem-Stromnetzteil an der Netzstromsteckdose an.
7. Stecken Sie das Modemtelefonkabel in die Telefonsteckdose.
8. Schalten Sie das Modem ein.
9. Schließen Sie das Modem-Propaq Kabel an die Propaq ACUITY-MODEM
Schnittstelle an. Das Modem wählt nach ein paar Sekunden automatisch die
Acuity-Telefonnummer an. Je nach Qualität der Telefonleitung nimmt dieser
Vorgang möglicherweise einige Minuten in Anspurch.
Hinweis
Falls das Modem die Nummer nicht wählt und die Verbindung zu Acuity nicht aufnimmt,
ziehen Sie das Modem-Propaq-Kabel vom ACUITY-MODEM-Verbindungsstück ab und
schließen Sie es danach wieder an.
Am neuen Ort des Propaq oder am Acuity Zentralmonitor
10. Nach Anschluß zeigen der Propaq und Acuity PAT. BESTÄTIGEN? an. Führen
Sie eine der folgenden Handlungen durch:
• Drücken Sie auf JA, um den Namen des Patienten und die vorherige
Zimmernummer wiederherzustellen.
ODER
• Falls dem Patienten zuvor eine Zimmernummer zugewiesen war, zeigen
Acuity und der Propaq die Taste NEU. ZIMM an. Sie können auf NEU. ZIMM
drücken, um nur den Namen des Patienten wiederherzustellen. Der Acuity
Zentralmonitor fordert Sie dann auf, eine neue Zimmernummer
einzugeben.
Am Acuity Zentralmonitor
(falls eine neue Zimmernummer benötigt wird)
11. Geben Sie die neue Zimmernummer des Patienten im Patienten ID-Setup-
Fenster ein.
30 Protocol Systems, Inc.
Page 31

Überwachung einstellen
1. Im Propaq-Hauptmenü, drücken Sie auf:
• Propaq CS NETZ AUS
• Propaq Encore SETUP, ACUITY, NETZ AUS
• Propaq 100 Serien SYSTEM, NETZ AUS
2. Schalten Sie den Propaq nach ein paar Sekunden ab.
3. Entfernen Sie das Modem-Propaq Kabel vom Propaq.
4. Entfernen Sie alle Propaq Sensorkabel vom Patienten.
Deutsch
Modem-Propaq Reference Guide 31
Page 32

Patienten am Acuity Zentralmonitor und dem Modem-Propaq
Die folgende Information beschreibt, wie Acuity Symbole und Fenster für Patienten
anzeigt, die mit Acuity über den Modem-Propaq verbunden sind
(modemverbundene Patienten). Weitere Informationen über das Acuity System
finden Sie in der Acuity System-Gebrauchsanweisung.
Acuity Grundrißsymbole bevor die Patienten-ID eingegeben wird
Vor dem Anschluß , erscheinen in einem
eigenen Feldfür modemverbundene Patienten
auf der Acuity Grundriß graue
Anschlußsymbole, die nicht verbundene
Modem-Propaq Acuity Anschlüsse darstellen.
Während des Anschlusses erscheint das
blaue Sanduhr-Symbol mit @xxxx (xxxx ist
die Anschlußnummer für diesen
modemverbundenen Acuity Anschluß, wie
z.B. 1423).
Nicht
verbundener
Modem-Propaq
Anschluß
Ein Modem-Propaq
ist angeschlossen
am Acuity Anschluß
1423 an
Nach dem Anschluß erscheint das gelbe IDSymbol und Acuity zeigt das ID-SetupFenster für modemverbundene Patienten an.
32 Protocol Systems, Inc.
Page 33

Eingabe der Patienten-ID
Das Telefon deutet in allen Acuity
Patientenfenstern darauf hin, daß dies
ein modemverbundener Patient ist.
Das ID-Setup-Fenster für modemverbundene Patienten
Acuity verlangt die
Zimmernummer für
modemverbundene
Patienten.
Deutsch
1. Geben Sie die Zimmernummer des Patienten ein.
2. Vergewissern Sie sich, daß die Zimmernummer nicht schon einem anderen
Patienten zugewiesen ist. Klicken Sie auf Bestätigen.
Falls Sie eine Zimmernummer eingeben und Acuity das Meldung Kein Zimmer
mit dieser Nummer vorhanden, klicken Sie auf Zurückgehen. Geben Sie dann
eine andere Zimmernummer ein und klicken Sie auf Bestätigen.
Modem-Propaq Reference Guide 33
Page 34

Falls Sie auf Bestätigen klicken und Acuity das Fenster Zimmer-Nr. unbekannt
anzeigt, haben Sie keine Zimmernummer eingegeben. Führen Sie eine der
folgenden Handlungen aus:
• Klicken Sie auf Zurückgehen,
um zum Patienten-ID-Fenster
zurückzugelangen und geben
Sie dann eine Zimmernummer
ein.
ODER
• Klicken Sie auf Trotzdem
ausführen, um das Fenster
Zimmer-Nr. unbekannt zu
schließen. Acuity zeigt das gelbe
RM Symbol an, um darauf
Zimmernummer G2000
ist zugewiesen. Dieses
Symbol „springt" zu
Zimmer G2000 auf dem
Acuity Grundrißplan,
wenn die Eigenschaft
„Symbol bewegen"
konfiguriert wird.
Da diesem
modemverbundenen
Patienten keine
Zimmernummer
zugewiesen ist, wird
die Acuity
Anschlußnummer
angezeigt.
hinzuweisen, daß keine
Zimmernummer zugewiesen
worden ist.
Acuity Grundrißsymbole nachdem die Patienten-ID eingegeben
wurde
Die Position des Symbols eines modemverbundenen Patienten auf der Acuity
Grundriß hängt davon ab, wie Ihr Systemverwalter Ihr Acuity System konfiguriert
hat. Nachdem Sie die Patienten-ID-Information eingeben, „springt" das Symbol für
die Modemverbindung entweder zu der zugewiesenen Zimmerposition auf der
Acuity Grundriß oder es bleibt im Feld für modemverbundene Patienten, je nach
Ihrer Konfiguration von Acuity. Wenn dem Patienten keine Zimmernummer
zugewiesen wird, bleibt das Symbol im Feld für modemverbundene Patienten
bestehen.
34 Protocol Systems, Inc.
Page 35

Fehlersuche
Problem Mögliche Ursache Lösungsmöglichkeit
Propaq Monitor
kommuniziert nicht
mit Acuity.
Das Modem erzeugt
keinen Wählton,
nachdem das
Modem-Propaq
Kabel am Monitor
ACUITY/MODEM
Verbindungsstück
angeschlossen wird.
Das Modem wählt
die Nummer, nimmt
jedoch keine
Verbindung mit
Acuity auf (forts.).
Kabel nicht richtig verbunden. Siehe Abbildung auf Seite 25. Vergewissern Sie
Modem hat keine
Netzstromversorgung.
Propaq hat keine
Netzstromversorgung.
Das Modemtelefonkabel ist
nicht mit der ModemTelefonbuchse verbunden.
Die Modem-Lautstärke ist sehr
niedrig eingestellt.
Das Modemtelefonkabel ist
nicht mit einer Steckdose für
eine standardmäßige
Telefonleitung verbunden oder
die T elef onleitung funktioniert
nicht.
Das Modem hat die richtigen
internen Einstellungen
verloren und muß neu
programmiert werden.
Gerstörte Telef onleitung hat
Kommunikation unterbrochen.
sich, daß alle Kabel und Leitungsschnüre richtig
verbunden und sicher angebracht sind.
Überprüfen Sie das Modem. Falls keine
Lämpchen aufblinken, vergewissern Sie sich,
daß der Netzschalter des Modems eingeschaltet
ist und das Modem-Wechselstromnetzteil sicher
mit einer aktiven W echselstromquelle verb unden
und eingesteckt ist.
Vergewissern Sie sich, daß der Propaq
eingeschaltet ist. Falls ein Wechselstromnetzteil
verwendet wird, vergewissern Sie sich,
daß es sicher mit einer aktiven
Wechselstromquelle verbunden und eingesteckt
ist. Überprüfen Sie, ob das grüne Lämpchen an
der rechten Seite des Monitors aufleuchtet, was
darauf hinweist, daß die Monitorbatterie
aufgeladen wird.
Siehe Abbildung auf Seite 25. Überprüfen Sie
alle Kabelverbindungen.
Weitere Informationen zum Modem finden Sie im
Benutzerhandbuch des Herstellers.
Vergewissern Sie sich, daß die Telefonleitung
eine standardmäßige Außenleitung ist und nicht
Teil des internen Telefonnetzwerks des Krankenhauses. Versuchen Sie, ein Telefon anzuschließen und einen normalen Telefonanruf von
dieser Leitung aus zu tätigen.
Wenden Sie sich an die Abteilung für
biomedizinische Technik, damit das Modem neu
programmiert werden kann.
Warten Sie, bis das Modem automatisch
wiederwählt und die Verbindung mit Acuity
aufnimmt. Je nach Qualität der Telefonleitung
nimmt dieser Vorgang möglicherweise einige
Minuten in Anspurch.
Deutsch
Modem-Propaq Reference Guide 35
Page 36

Problem Mögliche Ursache Lösungsmöglichkeit
Das Modem wählt
die Nummer, nimmt
jedoch keine
Verbindung mit
Acuity auf.
Der Propaq
unterbricht die
Verbindung
während der
Datenübertragung
an Acuity.
Acuity zeigt nicht
alle möglichen
Kurven vom
PatientenbettMonitor an.
Acuity zeigt den
NIBPManometerbalken
nicht an.
Das Modem ist
möglicherweise nicht mit einer
gültigen Acuity Telefonnummer
programmiert.
Eine Kabelverbindung wurde
aus Versehen unterbrochen.
Eine gerstörte Telefonleitung
hat die Kommunikation
unterbrochen.
Falls die Verbindungsunterbrechung jede Nacht um
dieselbe Zeit auftritt, könnte
die Ursache auf regelmäßige
Wartungsüberprüfungen der
Telefongesellschaft
zurückzuführen sein.
Die Netzversorgung des
Modems wurde aus Versehen
unterbrochen.
Ein modemverbundener
Monitor übermittelt maximal
drei aktive Patientenkurven an
Acuity (siehe Hinweis auf
Seite 23).
Ein modemverbundener
Monitor übermittelt keine
NIBP-Manometerdaten an
Acuity (siehe HInweis auf
Seite 23).
Wenden Sie sich an die Abteilung für
biomedizinische Technik, damit die für das
Modem programmierte T elef onnummer überprüft
werden kann.
Siehe Abbildung auf page 25. Überprüfen Sie
alle Kabelverbindungen.
Warten Sie, bis das Modem automatisch
wiederwählt und die Verbindung mit Acuity
aufnimmt. Je nach Qualität der Telefonleitung
nimmt dieser Vorgang möglicherweise einige
Minuten in Anspurch.
Wenden Sie sich an die Telefongesellschaft.
Verge wissern Sie sich, daß einige Lämpchen am
Modem aufleuchten. Falls dies nicht der Fall ist,
überprüfen Sie den Netzschalter des Modems
und die Wechselstromnetzteil-Verbindungen.
Sehen Sie sich die zusätzlichen Patientenkurven
auf dem bettseitigen Monitor an.
Sehen Sie sich den NIBP-Manometerbalken auf
dem bettseitigen Monitor an.
Spezifikationen
Weitere Informationen zum Modem finden Sie im Benutzerhandbuch des Herstellers.
Reinigung
Reinigen Sie das Modem und die Kabel mit einem feuchten Tuch und einem milden
Reinigungsmittel.
36 Protocol Systems, Inc.
Page 37

Français
Introduction
Utilisation
Le modem-Propaq permet de relier par voie de télécommunication le système Acuity
à un moniteur Propaq CS, Propaq Encore, ou Propaq Série 100 équipé de modems
externes compatibles avec Acuity.
Pour plus d’informations concernant la surveillance du malade et l’utilisation du
système Acuity et des moniteurs Propaq, reportez-vous au Mode d’emploi Propaq ou
Guide de référence Propaq et au Guide de référence du système Acuity. Respectez tous les
avertissements et mises en garde.
Définitions
Mise en Garde
Les énoncés Mise en Garde vous signalent des conditions ou des utilisations pouvant
entraîner des blessures.
Avertissement
Les énoncés Avertissement vous signalent des conditions ou des utilisations pouvant
endommager le matériel ou tout autre équipement.
Note
Les énoncés Note vous donnent des conseils utiles ou soulignent certains points importants
concernant le mode d’emploi.
Modem-Propaq Reference Guide 37
Français
Page 38

Avertissements généraux et remarques
Mise en Garde
L’utilisation de tout équipement, accessoires ou pièces non recommandés ou non
fournis par Protocol Systems, Inc. pourrait entraîner des informations inexactes
concernant le patient, ou endommager le moniteur Propaq et ses accessoires.
Mise en Garde
Avant d’envisager un protocole de traitement nécessitant de télécommuniquer des
données concernant le patient, vous devez prendre connaissance de certaines
restrictions éventuelles. Les services de téléphone dont vous avez besoin pour
télécommuniquer ne sont pas toujours disponibles ni des plus sûrs. Prévoyez
d’autres solutions en cas de restrictions éventuelles ou d’interruptions dans la
surveillance du patient.
Mise en Garde
Avant de connecter à une ligne téléphonique un moniteur Propaq CS, Pr opaq Encore,
ou de Série 100 relié à un modem, assurez-vous qu’aucun service de système central,
tel que le Signal ou le Suivi d’appel, n’est attribué à cette ligne. Assurez-vous
également qu’aucun système de télécommunication n’est connecté à la ligne
téléphonique, comme d’autres téléphones, modems, télécopieurs ou alarmes antivol
automatiques. Ces services et appareils peuvent perturber le fonctionnement du
modem et interrompre ou empêcher le monitorage du patient.
Mise en Garde
Lorsqu’un moniteur Propaq CS, Propaq Encore, ou Propaq de la Série 100 relié à un
modem est déconnecté d’Acuity en raison d’interférences extérieures et que les
messages ALARME MA TERIEL, INCIDENT RESEA U, s’affichent, le suivi du patient est
interrompu. (Acuity affiche le message PERTE DE COMM). Un Propaq CS ou Propaq
Encore recompose automatiquement le numéro pour tenter de se reconnecter.
T outefois, il se peut que le moniteur Propaq de la Série 100 attende que vous éteigniez
et rallumiez le modem, ou débranchiez et rebranchiez le câble Modem-Propaq sur le
moniteur, a v ant de recomposer le numér o. Contactez un a gent technique de Protocol
Systems pour obtenir plus d’informations concernant le choix du modem et son
utilisation.
38 Protocol Systems, Inc.
Page 39

Note
Un moniteur Propaq CS, Propaq Encore, ou Propaq Série 100 relié à un modem transmet à
Acuity un maximum de trois courbes actives. Le moniteur transmet les courbes dans l’ordre
suivant : ECG1, CO2 (ou RESP), ECG2, SpO2, et RESP. Pour tous les signes vitaux active,
le moniteur transmet une information numérique. Acuity n’affiche pas la barre du manomètre
sur un moniteur PSNI.
Limite de Responsabilité
Protocol Systems, Inc. met en garde le lecteur de ce manuel:
• Protocol Systems, Inc. ne pourra être tenu responsable des dommages corporels
subis par l’utilisateur ou par toute autre personne à la suite d’accidents survenus
pendant le fonctionnement du Modem-Propaq.
• Protocol Systems, Inc. n’est aucunement responsable de l’utilisation non conforme
à ce manuel qui engendrerait une utilisation illégale ou incorrecte du ModemPropaq.
Ce dont vous avez besoin pour installer le Modem-Propaq:
• Moniteur Propaq CS, Propaq Encore, ou Propaq Série 100 équipé d’un connecteur
pour ACUITY ou ACUITY -MODEM
• Adaptateur d’alimentation CA pour moniteur
• Modem portant l’étiquette MODEM-PROPAQ
(spécialement programmé pour communiquer
avec le moniteur central Acuity)
• Adaptateur d’alimentation CA pour modem
• Câble Modem-Propaq
• Câble de téléphone
• Accès à une prise de téléphone analogue standard
(connectée à une ligne extérieure)
• Housse de Transport pour le modem (en option)
Etiquette du modem
Français
Modem-Propaq Reference Guide 39
Page 40

Relier le patient à Acuity
Préparer le Propaq
Pour un nouveau patient (pas encore monitoré)
1. Eteignez puis rallumez le Propaq afin d’éliminer toute information en mémoire
concernant un patient précédent, tels les paramètres de tendance ou la
programmation des limites d’alarme.
Mise en Garde
Eteignez toujours le Propaq pendant quelques secondes puis rallumez-le avant de
l’utiliser avec un nouveau patient. Cela élimine les tendances et la programmation des
limites d’alarme du patient précédent.
Pour un patient qui a déjà été monitoré
1. Afin de sauvegarder les paramètres de tendance et la programmation des
limites d’alarme de ce patient, laissez le Propaq en marche. Lorsque vous le
relier à Acuity, le Propaq lui transmet jusqu’à cinq heures d’information sur la
tendance.
Relier les capteurs et câbles du patient
Au Propaq
1. Vérifiez tous les cordons et les câbles, particulièrement ceux près des
connecteurs. Remplacez ceux qui sont cassés, tordus ou abîmés.
2. Rattachez les capteurs du Propaq ou du Télémétrie Propaq au patient, comme
indiqué dans le Mode d’emploi Propaq, Guide de référence Propaq Encore, Guide de
référence Propaq, Guide de référence Protocol Cordless, ou le Guide de Référence du
Système Acuity.
3. Si ce n’est déjà fait, branchez le connecteur le plus large du câble Modem-
Propaq sur le modem, comme le montre l’illustration de la page 41. Assurezvous que les deux vis du connecteur soient bien serrées (resserrez-les à l’aide
d’un tourne-vis si besoin est).
40 Protocol Systems, Inc.
Page 41

4. Branchez l’adaptateur d’alimentation du modem au modem et à la prise de
courant électrique, comme indiqué ci-dessous.
Avertissement
Ne branchez aucun adaptateur sur le modem, sauf celui spécifiquement désigné comme
devant être branché sur le modem. Vous pourriez abîmer le modem en le branchant à un
adaptateur différent.
Exemple
Bouton
March/Arrêt
Adaptateur
d’alimentation
du moniteur
Câble du
Modem-Propaq
Prise de courant
électrique
Adaptateur
d’alimentation
du modem
Prise de
téléphone
Câble de
téléphone
Français
Suppresseur
IEM
Modem-Propaq Reference Guide 41
Page 42

5. Branchez comme indiqué le câble de téléphone à la prise de téléphone et au
modem.
Avertissement
Assurez-vous que la prise de téléphone dans laquelle vous branchez le câble de téléphone
soit bien analogue standard, avec accès à une ligne extérieure (similaire à celles que l’on
trouve dans les maisons d’habitation). Vous pourriez abîmer le modem en branchant le câble
de téléphone dans une prise de téléphone digitale (utilisée pour les réseaux d’ordinateurs et
la plupart des systèmes de téléphone internes). Pour assistance, contactez votre
Département Biomédicale.
6. Allumez le modem.
7. Branchez l’autre extrémité du câble du Modem-Propaq dans le connecteur
Propaq ACUITY-MODEM. Au bout de quelques secondes, le modem
recomposera automatiquement le numéro de téléphone d’Acuity. Selon la
qualité de la ligne, la connexion peut prendre quelques minutes avant
d’aboutir.
Note
Si le modem ne compose pas le numéro et ne se connecte pas à Acuity, débranchez puis
rebranchez le câble Modem-Propaq sur le connecteur ACUITY-MODEM.
Au Moniteur Central Acuity
8. Entrez les informations concernant l’identité du patient, puis confirmez-les.
Si besoin est, vous pouvez entrer un numéro de chambre. Assurez-vous que ce
numéro n’ait pas déjà été attribué à un autre patient. (Voir page 48 pour plus
d’informations concernant le moniteur central Acuity.)
Au Propaq ou au moniteur central Acuity
9. Pour ajuster la programmation des limites d’alarme, vous pouvez les changer
soit au Propaq (en utilisant Menu d’Alarmes), soit au moniteur central Acuity
(en utilisant la fenêtre de Configuration Alarmes).
42 Protocol Systems, Inc.
Page 43

Débrancher temporairement le patient du Propaq, puis rebrancher
1. Détachez du patient tous les câbles des capteurs du Propaq.
2. Au Propaq, appuyez sur les touches nécessaires pour identifier et désactiver
toutes les alertes d’équipement.
3. Maintenez le Propaq en marche afin de sauvegarder les informations de
tendance du patient et la programmation des limites d’alarme.
Rebrancher le patient au Propaq
1. Rattachez les câbles des capteurs du Propaq au patient.
2. Si le Propaq affiche CONFIRMER PATIENT?, sélectionnez OUI.
Modem-Propaq Reference Guide 43
Français
Page 44

Débrancher temporairement le Propaq d’Acuity, puis rebrancher
1. A partir du menu principal du Propaq, sélectionnez :
• Propaq CS RES INAC
• Propaq Encore CONFIG, ACUITY, RES INAC
• Propaq Série 100 SYSTEME, RES NON
2. Attendez quelques secondes, puis débranchez le câble Modem-Propaq du
connecteur ACUITY -MODEM Propaq.
3. Maintenez le Propaq en marche afin de sauvegarder les informations de
tendance et la programmation des limites d’alarme.
Rebrancher le Propaq à Acuity
1. Branchez le câble Modem-Propaq au connecteur ACUITY-MODEM Propaq. Au
bout de quelques secondes, le modem recomposera automatiquement le
numéro de téléphone d’Acuity. Selon la qualité de la ligne, la connexion peut
prendre quelques minutes avant d’aboutir.
2. Lorsque le Propaq affiche CONFIRMER PATIENT?, sélectionnez OUI.
44 Protocol Systems, Inc.
Page 45

Transporter le patient ailleurs
Note
Tant qu’un Propaq reste allumé, les données du patient sont conservées dans le moniteur.
Lorsque le Propaq est rebranché à Acuity, il lui transfert alors jusqu’à cinq heures de
données numériques du patient.
Note
Le modem est programmé pour composer le numéro de téléphone d’Acuity dès que le câble
Modem-Propaq est branché au Propaq. Si vous déplacez le patient, il vous faudra peut-être
programmer le modem pour un numéro de téléphone différent (pour ajouter par exemple
l’indicatif longue distance). Si c’est le cas, contactez votre département Biomédicale.
Au Propaq
1. A partir du menu principal, sélectionnez :
• Propaq CS RES INAC
• Propaq Encore CONFIG, ACUITY, RES INAC
• Propaq Série 100 SYSTEME, RES NON
2. Attendez quelques secondes, puis débranchez le câble Modem-Propaq du
connecteur ACUITY -MODEM Propaq.
3. Eteignez le modem et débranchez de la prise électrique l’adaptateur
d’alimentation du modem.
4. Débranchez de la prise de téléphone le câble de téléphone du modem.
5. Laissez le Propaq allumé. Débranchez l’adaptateur d’alimentation du moniteur
(si connecté).
Modem-Propaq Reference Guide 45
Français
Page 46

Au nouvel emplacement du Propaq
6. Branchez l’adaptateur d’alimentation du modem dans la prise électrique.
7. Branchez le câble de téléphone du modem dans la prise de téléphone.
8. Allumez le modem.
9. Branchez le câble Modem-Propaq au connecteur ACUITY-MODEM Propaq. Au
bout de quelques secondes, le modem recomposera automatiquement le
numéro de téléphone d’Acuity. Selon la qualité de la ligne, la connexion peut
prendre quelques minutes avant d’aboutir.
Note
Si le modem ne compose pas le numéro et ne se connecte pas à Acuity, débranchez puis
rebranchez le câble Modem-Propaq sur le connecteur ACUITY-MODEM.
Au nouvel emplacement du Propaq ou au moniteur central Acuity
10. Une fois la connection effectuée, le Propaq et Acuity affichent CONFIRMER
PATIENT? Vous pouvez alors :
• Sélectionner OUI afin de rétablir le nom du patient et son numéro de
chambre précédent.
OU
• Sélectionner le bouton NVL CHB affiché par Propaq et Acuity, au cas où un
numéro de chambre ait déjà été assigné au patient, afin de rétablir le nom
du patient uniquement. Le moniteur central Acuity vous invite alors à
entrer un nouveau numéro de chambre.
Au moniteur central Acuity (au cas où vous ayez besoin d’un
nouveau numéro de chambre)
11. Entrez le nouveau numéro de chambre du patient dans la fenêtre de mise en
place de l’identité du patient.
46 Protocol Systems, Inc.
Page 47

Interrompre le monitorage
1. A partir du menu principal du Propaq, sélectionnez :
• Propaq CS RES INAC
• Propaq Encore CONFIG, ACUITY, RES INAC
• Propaq Série 100 SYSTEME, RES NON
2. Au bout de quelques secondes, éteignez le Propaq.
3. Détachez le câble Modem-Propaq du Propaq.
4. Détachez tous les câbles des capteurs du patient.
Modem-Propaq Reference Guide 47
Français
Page 48

Connection entre le moniteur central Acuity et les patients reliés au Modem-Propaq
Nous décrivons ici comment Acuity affiche les icônes et les fenêtres pour les patients
reliés à Acuity avec le Modem-Pr opaq. Pour plus d’information concernant le système
Acuity, veuillez consulter le Guide de Référence du Système Acuity.
Icônes du plan d’Acuity avant que l’identité
du patient soit rentrée
Avant la connection, des icônes de port gris
représentant des ports Acuity Modem-Pr opaq
non connectés apparaissent dans une section
séparée du plan d’Acuity, réservée aux
patients reliés au modem.
Port Modem-
Pendant la connection, l’icône bleu apparaît,
avec @xxxx (xxxx est le numéro de ce port
Acuity lié au modem-1423 par exemple).
Après la connection, l’icône jaune d’identité
apparaît, et Acuity affiche la fenêtre de mise
en place d’identité du patient relié au modem.
48 Protocol Systems, Inc.
Propaq non
connecté
Un ModemPropaq établit la
connection au port
Acuity 1423
Page 49

Entrez l’identité du patient
Le téléphone, présent dans toutes les
fenêtres du patient Acuity, indique
que le patient est relié au modem.
Fenêtre de mise en place de l’identité du patient relié au modem
Pour les patients
reliés au modem,
Acuity vous
demande
le numéro de
chambre.
1. Entrez le nom du patient et son numéro d’identité.
2. Entrez son numéro de chambre. Assurez-vous que le numéro de chambre n’ait
pas déjà été attribué à un autre patient. Sélectionnez Confirmer.
Si Acuity affiche la fenêtr e Chambr e Inconnue, sélectionnez Retour. Puis entrez
un nouveau numéro de chambre et sélectionnez Confirmer.
Modem-Propaq Reference Guide 49
Français
Page 50
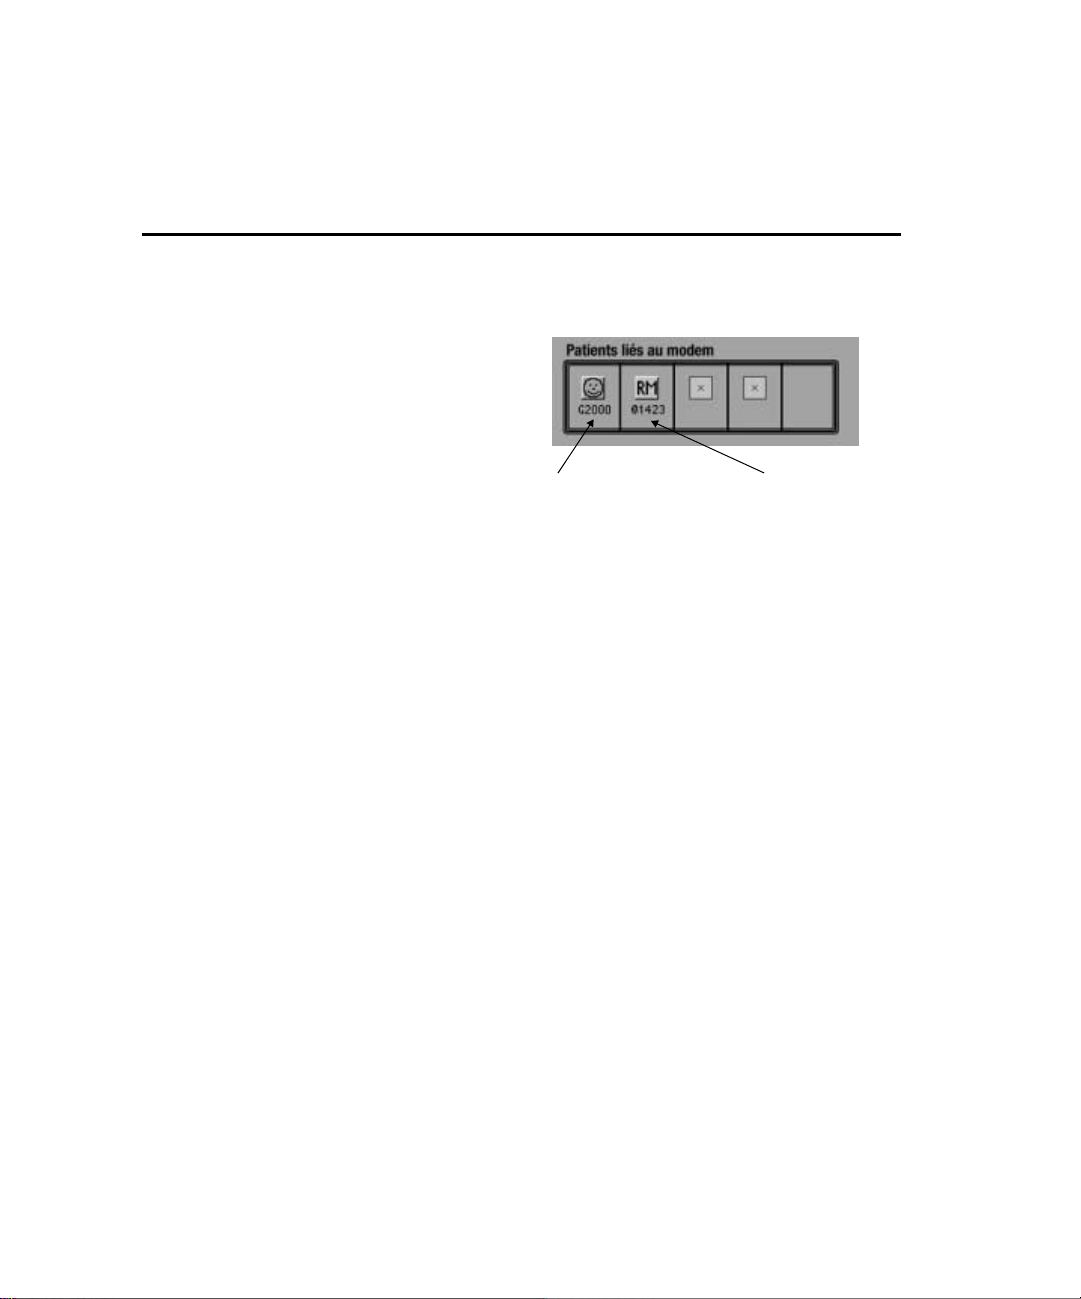
Si Acuity affiche la fenêtre Numéro de Chambre Inconnu lorsque vous
sélectionnez Confirmer, vous n’avez pas entré de numéro de chambre. Vous
pouvez alors :
• Sélectionner Retour afin de
retourner à la fenêtre d’identité
du patient et entrer un numéro
de chambre.
OU
• Sélectionner Continuer pour
fermer la fenêtre Chambre
Inconnue. Acuity affiche alors
l’icône jaune RM qui indique
qu’aucun numéro de chambre
n’a été attribué.
Le numéro de chambre
G2000 a été attribué. Si la
caractéristique "Déplacer
icône" est configurée, cet
icône ira se placer sur la
chambre G2000 du plan
d’Acuity.
Aucun numéro de
chambre n’ayant
été attribué à ce
patient relié au
modem, le numéro
de port Acuity est
affiché.
Icônes du plan d’Acuity après que
l’identité du patient soit rentrée
L ’emplacement sur le plan d’Acuity de l’icône d’un patient relié au modem dépend de
la configuration que votre administrateur système a donné au système Acuity. Après
avoir entré l’identité du patient, l’icône relié au modem va soit se placer à
l’emplacement qui lui est attribué sur le plan d’Acuity, soit rester dans la section
Patients reliés au modem, selon la configuration de votre Acuity. Si aucun numéro de
chambre est attribué au patient, l’icône reste dans la section Patients reliés au modem.
50 Protocol Systems, Inc.
Page 51

En cas de problème
Problème Cause possible Solution
Le moniteur Propaq
ne rentre pas en
communication avec
Acuity.
Le modem n’émet
aucune tonalité
après que le câble
Modem-Propaq soit
branché au
connecteur du
moniteur ACUITY/
MODEM.
Le modem compose
le numéro mais ne
complète pas la
connection avec
Acuity.
Les câbles ne sont pas
branchés correctement.
Le modem n’est pas
alimenté.
Propaq n’est pas alimenté. Assurez-vous que Propaq est en marche. Si vous
Le câble de téléphone du
modem n’est pas branché
au connecteur de ligne du
modem.
Le son du modem est
baissé.
Le câble de téléphone du
modem n’est pas branché à
une prise de téléphone
standard, ou la ligne de
téléphone ne fonctionne
pas.
Le modem ne possède plus
les réglages internes
nécessaires, et doit être
reprogrammé.
Des interférences sur la
ligne de téléphone ont
troublé la communication.
Le modem n’a pas été
programmé avec un numéro
de téléphone pour Acuity
valide.
Reportez-vous à l’illustration page 41. Assurezvous que tous les câbles et cordons sont
correctement branchés et solidement attachés.
Vérifiez le modem. Si aucune lumière n’apparaît,
vérifiez que le bouton d’alimentation est sur la
position marche, et que l’adaptateur d’alimentation
du modem est solidement branché à une source
d’alimentation active.
utilisez un adaptateur d’alimentation, assurez-vous
qu’il est solidement branché à une source
d’alimentation active. Vérifiez que la lumière verte
sur le côté droit du moniteur est allumée, ce qui
indique que la batterie du moniteur est chargée.
Reportez-vous à l’illustration page 41. Vérifiez tous
les branchements des câbles.
Pour toute information complémentaire sur le
modem, reportez-vous au guide de l’utilisateur du
fabricant.
Assurez-vous que la ligne du téléphone soit une
ligne extérieure standard, ne faisant pas partie du
réseau de téléphone interne de l’hôpital. Branchez
un téléphone pour vérifier si vous pouvez effectuer
un appel normal.
Contactez le Département Biomédicale pour
reprogrammer le modem.
Attendez que le modem recompose
automatiquement le numéro et rétablisse la
communication avec Acuity. Selon la qualité de la
ligne, la connexion peut prendre quelques minutes
avant d’aboutir.
Contactez le Département Biomédicale afin de
vérifier le numéro de téléphone programmé pour ce
modem.
Français
Modem-Propaq Reference Guide 51
Page 52

Problème Cause possible Solution
Le moniteur Propaq
déconnecte pendant
la communication
avec Acuity.
Acuity n’affiche pas
toutes les courbes
possibles à partir du
moniteur situé au
chevet du patient.
Acuity n’affiche pas
la barre du
manomètre PSNI.
Un câble a été
accidentellement
déconnecté.
La communicaton est
interrompue par des bruits
sur la ligne de téléphone.
Si la déconnexion se produit
toutes les nuits à la même
heure, il est probable qu’elle
est causée par la
maintenance périodique de
la ligne par la compagnie de
téléphone.
L’alimentation du modem a
été accidentellement
coupée.
Un moniteur relié à un
modem transmet un
maximum de trois courbes
actives du patient à Acuity
(reportez-vous à la
remarque de la page 39).
Un moniteur relié à un
modem ne transmet pas les
données du manomètre
PSNI à Acuity (reportezvous à la remarque de la
page 39).
Reportez-vous à l’illustration de la page 41. Vérifiez
que les câbles sont correctement branchés.
Attendez que le modem recompose
automatiquement le numéro et se reconnecte à
Acuity. Selon la qualité de la ligne, la connexion
peut prendre quelques minutes avant d’aboutir.
Contactez la compagnie de téléphone.
Assurez-vous que certaines lumières du modem
sont allumées. Si ce n’est pas le cas , vérifiez que le
bouton d’alimentation du modem est sur la position
marche et que l’adaptateur d’alimentation est bien
branché.
Visualisez les courbes supplémentaires du patient
sur le moniteur de chevet.
Visualisez la barre du manomètre sur le moniteur
de chevet.
Spécifications
Pour toute information complémentaire sur le modem, reportez-vous au guide de
l’utilisateur du fabricant.
Nettoyage
Nettoyez le modem et les câbles avec un chiffon humide imbibé d’une solution
détergente douce.
52 Protocol Systems, Inc.
 Loading...