

Page 1

Page 2

Thank you for purchasing the Welch Allyn FL-100 Intubating
Fiberscope and Light Source. The operating and maintenance
instructions found in this manual should be followed to ensure
many years of reliable service. Please read these instructions
thoroughly before attempting to use your new instrument.
Page 3

TABLE OF CONTENTS
Conventions ...................................................................................................................... 2
General Precautions........................................................................................................ 2
Symbols .............................................................................................................................. 2
Components ...................................................................................................................... 3
Nomenclature and Function ............................................................................................ 4
Fiberscope ...................................................................................................................... 4
Light Source .................................................................................................................... 5
Accessories........................................................................................................................ 6
Photographic Equipment .................................................................................................. 6
Preparation and Inspection for Use ................................................................................ 7
Inspection of Light Source .............................................................................................. 7
Inspection of Fiberscope.................................................................................................. 8
Preparation Prior to Insertion of Fiberscope.................................................................... 10
Operation ............................................................................................................................ 11
Pretreatment.................................................................................................................... 11
Insertion and Withdrawal ................................................................................................ 11
Care after Use .................................................................................................................... 12
Important Instructions...................................................................................................... 12
Care after Each Procedure................................................................................................ 12
Pre-cleaning at the Examination Room .......................................................................... 12
Cleaning at the Work Room ............................................................................................ 13
Enzymatic Cleaning Solution .......................................................................................... 15
Cleaning of Accessories .................................................................................................. 16
Schematics ........................................................................................................................ 17
Internal Schematics of a Welch Allyn Endoscope .......................................................... 17
Internal Schematic of the Welch Allyn FL-100 Intubating Fiberscope ............................ 18
Internal Schematic Showing Complete Cleaning/Disinfecting System............................ 18
Disinfection and Sterilization............................................................................................ 19
High-level Disinfection .................................................................................................... 19
Compatible Disinfecting Solutions .................................................................................. 21
Disinfection of Accessories.............................................................................................. 21
Sterilization and Aeration ................................................................................................ 22
Care During Storage.......................................................................................................... 24
Servicing ............................................................................................................................ 25
Care and Maintenance Tips .............................................................................................. 25
Leakage Tester Instructions.............................................................................................. 27
Dry Test, Stage I.............................................................................................................. 27
Wet Test, Stage II ............................................................................................................ 28
Specifications .................................................................................................................... 29
1
Page 4

CONVENTIONS
GENERAL PRECAUTIONS
The user of the FL-100 instrument should be thoroughly trained in the techniques of upper airway endoscopy.
This instrument is specifically designed to assist endotracheal intubation as well as diagnosis in the Upper
Airway. Do not use the FL-100 for any purpose other than that for which it is designed.
This manual describes the procedures for inspecting and preparing the instrument for use. It does not describe
the performance of an endoscopic procedure or any of the medical aspects of endotracheal intubation. This
instrument should only be used by physicians or practitioners trained in its use.
Failure to read and understand the material contained in this manual could result in patient injury. Also, failure
to follow the instructions provided herein could result in malfunction and/or damage to the instrument.
This manual contains instructions on the maintenance and reprocessing of the FL-100. Every effort has been
made to ensure that the listed disinfecting and sterilizing solutions and/or processes are compatible with this
instrument and are effective. Since infection control practices are constantly changing, Welch Allyn recommends
that the user remain aware of the latest practices and any federal, local, or hospital regulations pertaining to this
very important issue.
SYMBOLS
WARNING: Indicates a potentially hazardous situation which, it not avoided, could result in
death or serious injury.
CAUTION: Indicates a potentially hazardous situation which, if not avoided, may result in
minor or moderate injury or property damage.
NOTE: Indicates a potentially hazardous situation which, if not avoided, may result in property damage. Also,
advises owner/operator about important information on the use of this equipment.
CAUTION: Federal Law (U.S.A.) restricts this device to sale by/to or on the order of a
physician or other appropriately licensed medical professional.
2
Page 5

COMPONENTS
Welch Allyn
RL-100
LENS CLEANER
Description Components/Qty. Accessories/Qty.
Fiberscope 65300 FL-100 Intubating
Fiberscope (1)
Light Adaptor 650031-3
Welch Allyn ACMI Adaptor (1)
65017 WAACMI
65004
Olympus CLK-3
65005
Olympus CLK-4
65010
Olympus ILK-3
65011 Machida
65014 Pentax
65016 Wolf
65018 Storz
Cap 650008 Eyepiece Cap (1)
Vent Cap 650028 ETO Vent Cap & Tag (1) 65012 each
Cleaner 650007 Lens Cleaner (1) 65304 each
Valve 653014 Rubber Suction Control 65304 each
Valves (3)
Seal 310183 Rubber Inlet Seals (10) 31039 (5)
Brushes 653012 Long 65302 Brush Set
653011 Short (Long, short and
653010 Suction Cylinder suction cylinder)
Cap 653013 Suction Cylinder 65303 each
Closure Cap (1)
49500 Welch Allyn
Light Source
65009 Leakage
Tester
3
Page 6

NOMENCLATURE AND FUNCTION
FIBERSCOPE
Diopter Adjustment Ring
Accommodates differences in eyesight
Immersible Mark
Green line indicates that
it is totally immersible
Diopter Position Marks (White)
Marks must align to ensure
proper focus for assistant’s
observerscope or camera
Deflection Control Lever
Deflects the distal end of
insertion tube 130° up or down
Suction Control Valve
Allows for aspiration through
the accessory/suction channel
Eyepiece
Ocular Lens
Anti-reflection multi-layer
coated optics for clean,
sharp image
Suction Nipple
Allows for attachment to external
suction device
Rubber Inlet Seal
Allows accessories to be passed
through, while preventing fluids and
air to escape
Accessory/Suction Channel Inlet
Allows biopsy forceps and other
accessories to be introduced
Umbilical Cable
Distal End
Accessory/
Suction Channel
Light Guides
Objective Lens
Bending Section
Insertion Tube
Diameter: 3.5 mm
Working length: 600 mm
ETO Vent Cap (Red)
Vents endoscope interior to equalize internal and
external pressure
Note: See sterilization section for use
Venting Connector
Seats ETO vent cap and leakage tester
Light Guide
The Welch Allyn sleeve part number 650031-3 is
standard and comes attached to instrument. Other
adaptor sleeves for other manufacturer’s light
sources are also available (see page 3).
4
Page 7

LIGHT SOURCE
FRONT
Power Switch
Light Control Knob
Fan Grill
Fuse Drawer
AC Power Input
Lamp Access
Knob
BACK
5
Page 8

ACCESSORIES
WELCH ALLYN LIGHT SOURCE (49500) CLEANING BRUSHES
White Bristle Flexible Shaft
CAUTION: It is strongly recommended that only Welch Allyn accessories be used with the
Welch Allyn FL-100 Intubating Fiberscope. Other accessories may adversely affect the performance of the fiberscope. If a unique or highly specialized accessory from another source
is required, please contact Welch Allyn to arrange a test of its compatibility before using it
with the Welch Allyn FL-100 Intubating Fiberscope.
Proximal End
Long (653012)
Short (653011)
Suction Cylinder
(653010)
PHOTOGRAPHIC EQUIPMENT
The Welch Allyn FL-100 Intubating Fiberscope is equipped with a universal eyepiece that will accommodate
most camera adaptors.
6
Page 9

PREPARATION AND INSPECTION FOR USE
Prior to use, the endoscope, Iight source and accessories must be carefully inspected for cleanliness and proper
function to determine that they are appropriate for patient use.
INSPECTION OF LIGHT SOURCE
Please refer to the operating manual of your Welch Allyn Light Source for complete instructions.
CAUTION: Verify that the supply voltage matches the voltage range indicated on the rear
of the Welch Allyn Light Source.
To prevent temporary blinding, turn power on only after the fiber optic bundle is plugged in
and the intensity control knob is set to the minimum position.
The fiber optic bundle port is hot when fiber optic bundle is removed.
1. With the power switch in OFF position, plug light source into a properly grounded hospital grade receptacle.
Welch Allyn light sources are equipped with a hospital grade plug and grounding conductor.
2. The standard Welch Allyn adaptor sleeve included on
FL-100 allows connection to and light transmission
from any Welch Allyn Iight source.
3. Depending upon the manufacturer, model and/or
type of light source to be used, an adaptor may be
needed to make a complete connection between the
source of illumination and the Welch Allyn FL-100
fiberscope. This depends on the manufacturer,
model and/or type of light source. For assistance,
please contact your local Welch Allyn distributor or
service facility.
4. Connect the endoscope light guide plug to the light
source.
5. Turn on the light source to check for proper functioning.
NOTE: Be sure that the correct adaptor is being used for light sources other than Welch Allyn.
WARNING: The risk of thermal injury exists whenever fiber optic instruments are used
with high intensity light sources.
The risk of injury is greatest:
• When a high intensity light source, such as the Welch Allyn HI•Lux lamp, is used.
• During close stationary observation and/or prolonged close contact with mucosa.
• When the fiberscope is advanced slowly through a narrow lumen.
Close stationary viewing should be avoided and the level of illumination should be limited
to the level necessary for adequate visualization.
7
Page 10

INSPECTION OF FIBERSCOPE
Before proceeding, the Welch Allyn FL-100 fiberscope
should be tested for water-tight integrity (example: tear
in the accessory/suction channel). To perform this test,
see the “Leakage Test Instructions” section (page 27).
1. INSPECTION OF THE INSERTION TUBE
a) Check the entire surface of the insertion
tube to assure that abnormal conditions such
as bite marks, wrinkles and dents are not
present. Any indentation in the flexible shaft
of the fiberscope can cause damage to the
fiber optics and internal mechanisms of the
fiberscope.
b) Check the umbilical cable for outward signs
of damage such as buckling, pinch marks, etc.
CAUTION: Do not use any fiberscope with outward signs of damage. An outwardly damaged
fiberscope may cause malfunction during a procedure and further damage the scope.
Leakage Tester
c) Be sure the entire fiberscope is clean and has been subjected to either a high-level disinfection or
sterilization process before each patient use.
NOTE: The distal end of the fiberscope must be protected against damage from impact. Never apply excess
force such as twisting or severe bending of the flexible portion of the fiberscope.
2. INSPECTION OF DEFLECTION CONTROL
To assure smooth articulation, slowly manipulate the deflection control lever. Be sure that a full and
appropriate range of deflection is possible.
CAUTION: If the deflection control lever is not operating smoothly, this may indicate
internal damage to the fiberscope. To avoid the possibility of further damage or malfunction during a procedure, never use the fiberscope if the deflection control lever is not
operating smoothly.
8
Page 11

3. SUCTION MECHANISM
a) Connect suction tubing from an external
suction source to the suction nipple located
on the control body. Place the distal tip of the
endoscope in a basin of water and depress
the suction control valve. Water should be
rapidly aspirated into the suction system
collection container.
b) Release the suction control valve to deter-
mine if the valve freely returns to its OFF
position and the aspiration of water ceases.
NOTE: A rubber inlet seal in good condition must be
on the accessory channel inlet to prevent the loss of
suction. Worn seals will result in leakage and should
be replaced.
Suction Nipple
Depress
Suction
Tube
To Suction Source
Rubber Inlet Seal
9
Page 12
PREPARATION PRIOR TO INSERTION OF FIBERSCOPE
WARNING: Every fiberscope should be properly disinfected or sterilized before each use.
Current infection control guidelines require that endoscopes and their patient contact
accessories either be sterilized or at least be subjected to high-level disinfection. Only
the user can determine if an instrument has undergone appropriate infection control
procedures prior to each clinical use.
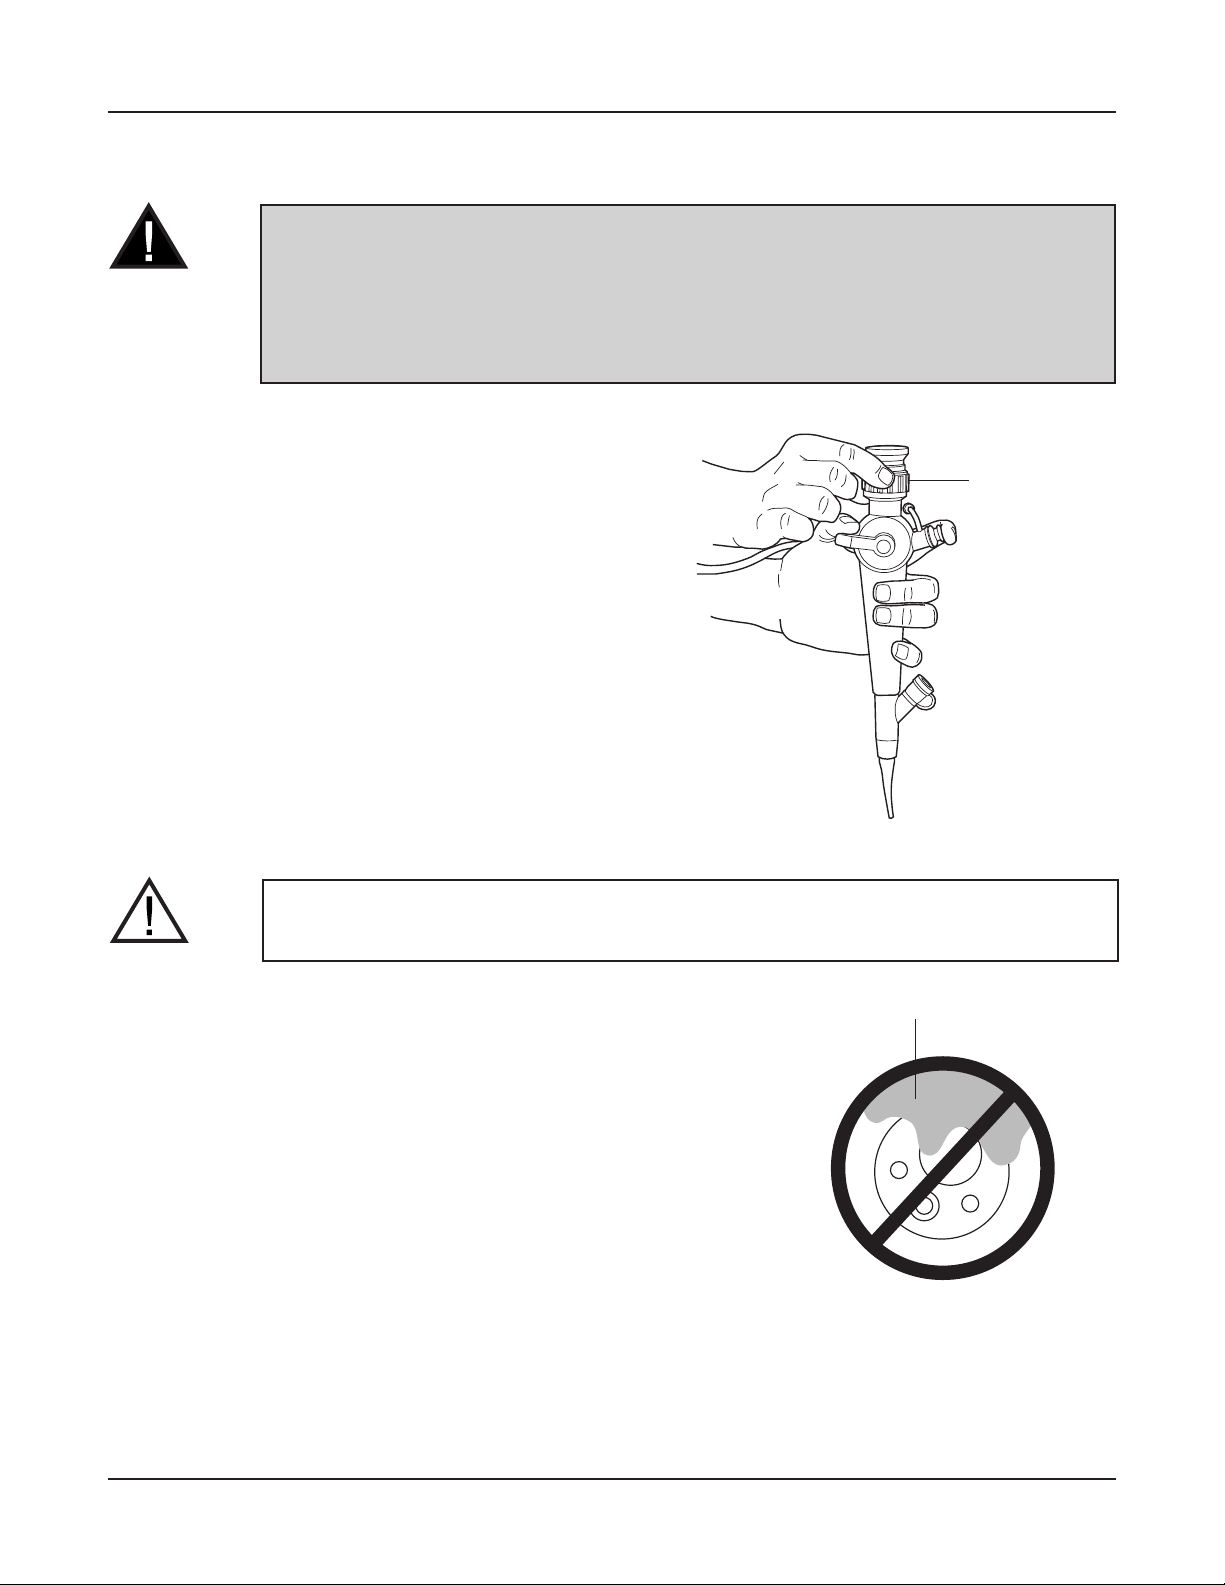
1. If needed, gently clean the objective lens with
a cotton-tip applicator moistened with alcohol.
A lens cleaner (anti-fogging agent) may also
be applied with gauze or appropriate applicator.
2. The user should adjust the diopter adjustment
ring to make sure that a clear view can be
obtained. (No further adjustment should be
necessary during a procedure.)
3. Use a bite block on the insertion tube to protect
the insertion tube after the scope is introduced.
4. Apply a medical grade water soluble lubricant to
the insertion tube. DO NOT use petroleum-based
lubricants.
Diopter
Adjustment Ring
10
CAUTION: Never allow excessive lubricant or lens cleaner on the object lens.
Lubricant
Page 13

OPERATION
WARNING: This instrument should only be used by qualified physicians who are
thoroughly familiar with all the characteristics of this instrument and who are well-versed
in the proper techniques of endoscopy.
PRETREATMENT
1. The patient should be prepared in the normal endoscopy regimen.
INSERTION AND WITHDRAWAL
1. Slowly insert the scope under direct vision. As the distal
end of the scope passes through the pharynx, the
patient should gently bite down on the bite block to
maintain the bite block’s position during the procedure.
2. Adjust the intensity of the light source to obtain a
brightness level suitable for observation.
3. The deflection control lever should be adjusted to
properly position the scope. The deflection of the tip
should be done under direct vision in a gentle and
in a deliberate manner.
4. If bronchial secretions or other debris are present in the
lungs making observation difficult, suctioning should be
performed.
5. Photography can be carried out as necessary.
6. Always withdraw the scope under direct
visualization.
WARNING: If for any reason the image is lost due to power shortage, lamp or light source
failure, etc., straighten the scope tip to its neutral position, and then carefully and slowly
withdraw the insertion tube from the patient.
11
Page 14

CARE AFTER USE
IMPORTANT INSTRUCTIONS
Cleaning-Disinfection-Sterilization: Welch Allyn Endoscopes
Endoscopic instruments should be properly cleaned immediately after each use, to maintain maximum performance and a long service life for the fiberscope. If the fiberscope is left uncleaned for some time after use, dried
blood, mucous or other debris may cause damage to the instrument and may interfere with the reprocessing
ability of the instrument.
WARNING: The importance of meticulous cleaning of the endoscope cannot be
over-emphasized.
Prior to disinfection or sterilization, all instruments must be scrupulously cleaned.
Failure to do so could result in incomplete or ineffective disinfection and sterilization.
CARE AFTER EACH PROCEDURE
PRE-CLEANING AT THE EXAMINATION ROOM
1. Immediately after removing the fiberscope from
the patient, gently wipe all debris from the insertion tube with a gauze moistened with an enzymatic cleaning solution. (See page 15 for a list of
compatible detergents.)
2. Place the distal end of the fiberscope into detergent solution and aspirate through the channel
for 5-10 seconds. Alternate aspiration of solution
and air several times to create agitation for better
pre-cleaning.
Aspirate
12
Page 15

CLEANING AT THE WORK ROOM
1. The fiberscope should be Leak Tested before
proceeding with any further cleaning steps.
NOTE: See section on Leakage Tester Instructions.
The hand-operated Welch Allyn Leakage Tester is
available as an optional accessory.
2. Prepare a basin with warm water and a mild
enzymatic detergent.
CAUTION: BEFORE IMMERSING: Take OFF the “Red” ETO gas sterilization venting cap.
The use of an enzymatic detergent immediately after each procedure to dissolve and
remove organic contaminants and proteinaceous debris is essential to the care and
maintenance of the endoscope from the standpoints of infection control and functionality.
3. Remove the rubber suction control valve and the
rubber inlet seal. Then thoroughly (but gently)
wash the entire surface of the endoscope and its
components. Allow all items to soak in an enzymatic solution for the time period recommended
by the manufacturer of the enzymatic detergent.
NOTE: Do not squeeze or severely bend the
insertion tube. Do not use any abrasive materials.
Be careful to avoid damage to the distal lenses.
Remove
Remove
Suction Control Valve
Remove
Rubber Inlet Seal
13
Page 16

4. Avariety of special brushes are provided to clean the
entire suction system. Brush clean the entire accessory/
suction channel:
a) Use the short cleaning brush and insert the
brush into the opening of the suction nipple.
Gently pass the brush until it appears in
the suction control valve receptacle. Repeat
several times (see Figure 1).
Suction Control
Valve Receptacle
(Cylinder)
Figure 1
Suction
Nipple
(a)
b) Next, insert the same short brush into the
opening at the bottom of the suction control
valve receptacle (cylinder) on the control head
(see Figure 2) and gently advance until resistance is felt (approximately 12 cm). DO NOT
USE EXCESS FORCE. Gently withdraw the
brush. Repeat several times.
NOTE: Be sure to inspect the bottom of the suction control
valve receptacle on the control head for any debris.
c) Insert the long brush into the accessory/suction
channel inlet port and gently advance the brush
until it exits the distal end of the scope. Clean
debris off the brush and then gently withdraw the
brush (see Figure 2).
Repeat several times ensuring that only a clean
brush is introduced into the channel each time.
d) Using the specially designed suction cylinder
cleaning brush, scrub clean the surfaces inside
the suction control valve receptacle on the control head (See Figure 3).
5. Install the suction cylinder closure cap as illustrated.
6. With the rubber inlet seal in place, a large luer slip
syringe can be attached to the end of the suction nipple
and used to flush enzymatic detergent solution into the
entire accessory/suction channel. Be sure the detergent
solution is allowed to remain in contact with the internal
channel surfaces for the recommended exposure time.
The enzymatic detergent should dissolve and/or dislodge
any debris that may be within these internal areas.
Suction Control Valve
Receptacle (Cylinder)
Accessory/Suction
Channel Inlet
(b)
(c)
Figure 2
Suction Cylinder
Figure 3
Suction Cylinder Closure Cap
7. After the scope has been exposed to the detergent
solution for an appropriate time, flush the accessory/
suction channel with air to purge remaining detergent.
WARNING: The enzymatic detergent solution should remain in contact with ALL
internal channels and external scope surfaces for the time period recommended by
the manufacturer of the detergent.
14
Figure 4
Page 17

8. Rinse the entire scope and all its components with clean water.
9. The entire accessory/suction channel should aIso be rinsed free of residual detergent using one of the
following methods:
a) With the suction cylinder closure cap still in place, fill a syringe with clean water and flush the
accessory/suction channel.
b) With the rubber inlet seal still in place, reinstall the rubber suction control valve and aspirate clean
water through the entire channel of the scope.
WARNING: It is important that ALL internal channels, external scope surfaces and
components be thoroughly rinsed with water to remove residuaI detergent solution.
Accessory Suction Channel
10. Purge water from the accessory/suction channel and scope components.
NOTE: 70% alcohol followed by compressed air, not greater than 24 PSI,
may be used to facilitate drying.
11. Gently dry all external surfaces of the fiberscope with a soft gauze.
Do not put tension on the insertion tube of the endoscope while drying, since the outer cover of the bending section may be excessively
Objective
Lens
stretched. Dry the objective lens with a cotton tip applicator.
Light Guides
Distal End
ENZYMATIC CLEANING SOLUTIONS*
Specific reference to brand names is not an endorsement of their efficacy as a cleaning solution. Tests
have shown these solutions to be compatible with Welch Allyn endoscopes, providing the manufacturer’s
directions are adhered to.
Brand Name Source Usage
Endozime The Ruhof Corp.
Klenzyme Calgon Vestal Labs
Enzy-Clean Burnishine Products
Metrizyme Metrex Research Corp.
Follow
Manufacturer’s
Instructions
Enzol Johnson & Johnson Medical
NOTE: Other solutions should not be used until a sample has been submitted to Welch Allyn for compatibility
testing.
*These solutions must be enzymatic detergents or other cleaning agents specially formulated to clean flexible endoscopes.
WARNING: Prior to disinfection or sterilization, it is imperative that the scope and its
components be thoroughly rinsed of any solutions previously used in the cleaning process.
The scope and its components should be thoroughly dried. Failure to do so could result
in ineffective or incomplete disinfection and sterilization.
15
Page 18

CLEANING OF ACCESSORIES
1. Accessories need to be cleaned immediately after each use, since dried blood, mucous or other debris may
cause damage to the instrument and interfere with the ability of the user to reprocess the device.
2. Place the accessories in a basin of warm water and a mild enzymatic detergent. Allow these to soak for the
time period recommended by manufacturer.
3. Clean by gently wiping with a soft gauze.
4. Rinse all residual detergent from the accessory by immersing it under clean water.
NOTE: All detergent must be removed from all the accessories. Any detergent that remains after the water
evaporates can interfere in the subsequent sterilization process.
CAUTION: DO NOT use ultrasonic cleaning methods on the fiberscope itself.
5. Ultrasonic cleaning of accessories is recommended, provided the manufacturer’s instructions and the
parameters below are followed:
Frequency Range 31-45 kHz
Optimum Frequency 10 kHz
Time 5-10 minutes
NOTE: DO NOT use caustic or abrasive solutions in the ultrasonic cleaner.
6. After cleaning and thoroughly rinsing, the accessories should be gently dried using a soft gauze.
NOTE: Other reusable accessories (channel cleaning adaptors, cleaning brushes, bite block, etc.) and scope
components (rubber inlet seals and rubber suction control valves, etc.) may be cleaned in a similar manner as
above. Ultrasonic cleaning methods are recommended for accessories and scope components whose entire
surfaces are not easily accessible by manual cleaning.
16
Page 19

SCHEMATICS
INTERNAL SCHEMA TICS OF A WELCH ALLYN ENDOSCOPE
The following internal schematics have been provided to assist users in better understanding the intricate
construction of Welch Allyn endoscopes. Knowledge of the various internal channels and tubes within an
instrument and their relationship to each other helps facilitate the reprocessing of the endoscope.
The FL-100 intubating fiberscope and its components have been specifically designed for efficient and effective
reprocessing before each use by either a manual or automated method.
Connectors on all Welch Allyn cleaning/disinfecting adaptors and scope inlet ports incorporate standard size
luer-lock and/or luer-slip fittings to easily accommodate reprocessing devices or systems available from other
manufacturers.
The internal schematics show that the Welch Allyn cleaning system promotes efficient unidirectional flow of solutions. Starting from the suction nipple at the control body, solutions travel up to the valve cylinder, pass through
the channel in the insertion tube and finally exit the channel opening at the distal tip of the scope. The elimination of multiple branching channels, combined with a direct pathway for solutions to travel, maximizes flow efficiency and ensures contact of disinfectant/sterilant with all internally exposed channel surfaces.
WARNING (USA): It is imperative that flexible endoscopes and other semi-critical devices
be reprocessed using at least high-level disinfection with an EPA registered sterilant/
disinfectant. It should be noted that any endoscope automated reprocessing device or
system* must be cleared for marketing by the FDA via the 510 (k) premarket notification
or PMA approval process. Only reprocessing solutions/systems satisfying the above
conditions and tested and found to be compatible by Welch Allyn should be used with
Welch Allyn products.
*Liquid chemical germicides (disinfectants/sterilants) to reprocess medical devices come under FDA
regulation and new products must, therefore, undergo a 510 (k) premarket notification submission
prior to introduction into interstate commerce.
17
Page 20

INTERNAL SCHEMATIC OF THE WELCH ALLYN FL-100 INTUBATING FIBERSCOPE
Accessory/Suction Channel
Accessory/Suction Channel Inlet
Suction Cylinder Control Valve
Suction Nipple
Umbilical Cord
To Suction Source
The illustration above shows the entire accessory/suction channel system in the Welch Allyn
FL-100 Intubating Fiberscope.
NOTE: All surface areas of the suction system must first be cleaned with an enzymatic detergent and
then exposed to a high-level disinfectant or sterilant.
INTERNAL SCHEMATIC SHOWING COMPLETE CLEANING/DISINFECTING SYSTEM
Accessory/Suction Channel
Accessory/Suction Channel Inlet
Suction Cylinder Closure Cap
Suction Nipple
Luer-Slip Syringe
with
Cleaning/Disinfecting
Solution
Umbilical Cord
To reprocess the Welch Allyn FL-100 Intubating Fiberscope, first an enzymatic detergent and then a high-level
disinfectant or sterilant must be used. All internal lumens and all external instrument surfaces and scope components (inlet seal, suction control valve, etc.) need to be exposed to detergent and disinfectant/sterilant. Exposure
times of detergent and disinfectant/sterilant must be strictly adhered to.
NOTE: All solution entrance ports and flow pathways are illustrated above.
18
Page 21

DISINFECTION AND STERILIZATION
HIGH-LEVEL DISINFECTION
Before disinfecting the endoscope, it must be completely
cleaned and dried (see “Care after Each Procedure” on
page 12). The user is responsible for determining if the
disinfecting techniques described here accomplish the
desired clinical effect. Before complete immersion in any
disinfecting solution, the endoscope needs to be “Leak
Tested” (see page 27).
CAUTION: BEFORE IMMERSING:
The “Red” ETO gas sterilization venting cap must be taken OFF.
1. Remove the rubber suction control valve.
2. Install the suction cylinder closure cap as illustrated.
3. a) The suction nipple, located on the control body, is designed with a standard luer slip fitting to accommodate
a syringe or other standard device. Fresh disinfecting solution should be drawn into (or flushed through)
the entire accessory/suction channel system. The rubber inlet seal should be in place during the flushing
process.
WARNING:Avoid introduction of air during this process and confirm that no air bubbles exit
the scope tip during flushing (or exit the suction nipple, if aspiration is used). The presence
of air bubbles could prevent contact of the disinfectant with channel surfaces.
b) While the entire scope is immersed and the suction system is filled with disinfectant, the suction
cylinder closure cap and the rubber inlet seal may be removed.
WARNING: It is imperative that ALL internal surfaces of the channels are in contact with the
disinfecting solution for the time period recommended by the manufacturer of the solution.
NOTE: Please refer to the internal schematics on page 18.
19
Page 22

4. While the entire instrument is immersed in disinfecting solution, the syringe used in previous
steps can be removed. The entire instrument,
however, should remain fully immersed in the
disinfecting solution.
5. The endoscope’s component parts should remain
in contact with the disinfecting solution for the
time period recommended by the manufacturer
of the solution. Make sure it is left in long enough
to accomplish the desired clinical effect.
6. After the endoscope and its component parts
have been in contact with the disinfecting solution for the appropriate time, flush the suction
system with air to purge remaining disinfectant.
Remove the scope and its components from the
solution. All residual disinfecting solution must
be thoroughly rinsed from the scope and its
components with clean water.
7. Remove the suction cylinder closure cap, reinstall the rubber suction control valve and the rubber inlet seal.
Thoroughly rinse all outer surfaces of the scope that contacted the disinfecting solution.
8. Attach the scope to an external suction source and aspirate clean water through the channel of the scope.
Then, aspirate air through the channel to remove the residual water.
NOTE: 70% alcohol should be flushed through all channels, followed by compressed air, not greater than
24 PSI, to facilitate drying.
NOTE: All final rinses should be made with sterile water.
9. Gently dry all external surfaces of the fiberscope with a soft gauze. Do not put tension on the insertion
tube while drying, since the outer cover of the bending section may be excessively stretched. Dry the ocular
lens of the eyepiece and the objective lens with a cotton-tip applicator.
20
Page 23

COMPATIBLE DISINFECTING SOLUTIONS
Specific reference to brand names is not an endorsement of their efficacy as a disinfecting solution. Tests have
shown these solutions to be compatible with Welch Allyn endoscopes, providing the manufacturer’s directions
are adhered to.
Solution Brand Name Source Usage
Glutaraldehyde Cidex (14 day) Johnson & Johnson Medical Inc.
Wavicide-01 Wave Energy System Inc.
Metricide (14 day) Metrex Research Corp.
Omnicide NS Omnitec Medical Corp.
Calgo-Cide 14 Calgon Vestal Labs
Sekusept Forte Henkel
Aldehyde Sporcid 10% Fresenius
Tegoment 2% TH. Goldschmidt
NOTE: Other solutions should not be used until a sample has been submitted to Welch Allyn for
compatibility testing.
NOTE: Please refer to the “General Precautions” on page 2 regarding infection control.
DISINFECTION OF ACCESSORIES
WARNING: Current infection control guidelines require accessories that break the
mucosal barrier to be sterilized.
Follow
Manufacturer’s
Instructions
Before disinfecting the accessories, such as bite block, suction control valve, brushes, etc., they must be
completely cleaned and dried (see “Care after Each Procedure”, page 12). The user is responsible for
determining if the disinfecting techniques described here accomplish the desired clinical effect.
1. The accessory should be entirely immersed in disinfecting solution.
2. All accessory surfaces should remain in contact with the disinfecting solution for the time period
recommended by the manufacturer of the solution and acceptable by the user as appropriate.
3. After it has been immersed in the disinfecting solution for the appropriate amount of time, remove it
from the solution.
4. Rinse all residual disinfecting solution from the accessory by totally immersing it in water.
5. After thoroughly rinsing, the accessories should be gently dried using a soft gauze. Compressed
air may also be used to facilitate drying.
NOTE: All final rinses should be made with sterile water.
21
Page 24

STERILIZATION AND AERATION
Before sterilizing the fiberscope, it must be completely cleaned and dried (see “Care after Each Procedure”,
page 12). The user is responsible for determining if the sterilizing techniques described here accomplish the
desired clinical effect.
CAUTION: NEVER place the fiberscope in a steam autoclave!!
NEVER subject the fiberscope to ultrasonic cleaning methods!!
A) ETHYLENE OXIDE GAS STERILIZATION
Ethylene Oxide (ETO) Gas Sterilization can be
performed on these endoscopes. The following
special instructions, which differ from other
endoscopes, must be followed to ensure the
proper performance of the instrument.
1. The endoscope must first have been properly
cleaned and thoroughly dried (see “Care after
Each Procedure”, page 12). Each of the component parts should be removed (suction control
valve, rubber inlet seals, etc.).
WARNING: Failure to thoroughly dry all surface areas could result in incomplete or
ineffective sterilization. Moisture could prevent contact of the ETO gas with the actual
contaminated surfaces.
22
Page 25

2. IMPORTANT: Prior to placing the FL-100 Intubating
Fiberscope in a gas sterilizer or aeration chamber:
a) The “Red” ETO Gas Sterilization Venting Cap
MUST be “ON” securely.
NOTE: This is opposite of the immersion instructions.
b) Temperature must not exceed 55°C (131°F).
c) Pressure must not exceed 24 PSI.
d) Humidity must not exceed 50%.
e) Sterilization procedure must not exceed
4 hours.
3. Following ETO Gas Sterilization, aeration time of 72 hours at room temperature is required.
4. Aeration Chamber: To shorten the aeration time to 12 hours, an aeration chamber may be used,
provided the temperature does not exceed 55°C (131°F).
CAUTION: Prior to placing these endoscopes in an aeration chamber, the “RED” ETO
Gas Sterilization Venting Cap MUST be “ON” securely.
ETO Gas Sterilization Cap
B) COLD STERILIZATION
For those situations where Ethylene Oxide (ETO) Gas Sterilization capability is not available, Welch Allyn endoscopes have been designed to withstand immersion in Glutaraldehyde solution for a maximum of 10 hours to
achieve “Cold Sterilization”. Never fully immerse a Welch Allyn endoscope without first conducting “Leakage
Testing” (see page 27).
CAUTION: NEVER EXCEED 10 HOUR MAXIMUM IMMERSION.
After immersion, the instrument must be thoroughly rinsed to remove all residual Glutaraldehyde solution.
After being thoroughly rinsed, Welch Allyn endoscopes must be allowed to “breathe”, balancing internal and
external humidity, by attaching the “RED” ETO Venting Cap.
23
Page 26

C) OTHER METHODS OF STERILIZATION
In addition to ETO and “Cold Sterilization” techniques, Welch Allyn endoscopes have been found to be
compatible** with the Steris Sterilization®System/Process.
**Based upon current data, repeated use of the Steris System could cause fading of the black anodized metallic components
of Welch Allyn endoscopes. This discoloration is cosmetic in nature only and continued use should not affect the functionality
or watertight integrity of the endoscope.
CAUTION: Other types of cleaning and/or sterilization systems/processes are available
for the reprocessing of medical devices. However, due to the heat sensitive nature and/
or the specific biocompatible materials used in the construction of flexible endoscopes,
some of these marketed systems/processes/solutions could have detrimental effects on
flexible endoscopes.
To avoid the potential for instrument damage, confirm the compatibility of such reprocessing
systems/solutions with Welch Allyn prior to use with any Welch Allyn products.
CARE DURING STORAGE
Thoroughly remove all water from the scope and
accessories. Be sure both are clean and dry.
1. Prior to storage, remove all valves, inlet seals, etc.
to allow thorough drying of internal areas.
2. During storage, the insertion tube of the scope,
the umbilical cable and the accessories should
be kept as straight as possible.
3. The storage area should be dry and airy. Avoid
high humidity, high temperature and areas exposed
to the direct rays of the sun.
4. The “RED” ETO Venting Cap should be placed on
the scope to allow the scope to “breathe”, balancing
internal and external humidity while it is storaged.
WARNING: Prior to storage, it is important that no residual water be left within any internal
channels/lumens of the endoscope or accessories. Thoroughly dry all instrument surfaces
to reduce the potential for bacteria colonization during storage.
NOTE: 70% Alcohol followed by compressed air, NOT greater than 24 PSI, should be used to facilitate drying of
the internal channels.
24
Page 27

SERVICING
Before returning any instrument for repair to Welch Allyn, the instrument should first undergo appropriate reprocessing/decontamination procedures for the purpose of infection control.
1. All instruments requiring repair should be shipped in the original carrying case with appropriate packing, along
with comments describing the instrument damage and complaint.
2. Arepair purchase order number, contact name and phone number of the individual responsible for authorizing repairs, as well as shipping address should be included.
3. The “Red” ETO Gas Sterilization Venting Cap needs to be attached to the instrument, when shipped by
air freight.
4. Any accessories potentially related to the scope damage or complaint should also be returned with the
endoscope.
5. Soaking caps (if applicable) should also be returned with the scope to check/confirm the integrity of their
watertight seal.
NOTE: Instrument repairs should only be performed by an authorized Welch Allyn service facility. Welch Allyn
assumes no liability for any patient/user injury, instrument damage or malfunction, or reprocessing failure due to
repairs made by unauthorized personnel.
CARE AND MAINTENANCE TIPS
Flexible endoscopes have been used to successfully diagnose and treat a wide variety of illnesses for several
decades. Progressive design improvements have made current generation flexible endoscopes, such as the
Welch Allyn FL-100 Intubating Fiberscope, easier to use, although they are more technologically sophisticated
than ever.
To ensure that the instruments are patient-ready and patient-safe, special reprocessing instructions must be followed. To prolong the reliability of the endoscope and prevent instrument malfunction, special care and handling
must be exercised. The health-care professionals who actually care for and reprocess flexible endoscopes are
ultimately responsible for ensuring safe and reliably functioning instruments.
Tremendous efforts have been made in designing instruments that can be reprocessed and maintained as easily
as possible. However, due to the nature of their use and application, flexible endoscopes must be subjected to
special cleaning procedures, followed by a disinfection or sterilization process after every patient use.
Welch Allyn strongly recommends that users review the following suggestions and advice on the care and maintenance of your Welch Allyn endoscopes. However, these tips, particularly those involving scope reprocessing,
should not be interpreted as “shortcuts” and are not intended to substitute directions for the complete instructions found elsewhere in the owner’s manual.
• Avoid soaking the endoscope with accessories (forceps, injection or aspiration needles, etc.) or any sharp-
edged object which could inadvertently scratch or cut the distal bending section sheath. (Subsequent flexing
back and forth of the rubber sheath could eventually stretch the scratched rubber until a pinhole and leak
develops.)
• Exposure to a compatible enzymatic detergent is essential for thorough cleaning of all surfaces of the endo-
scope. Rinsing and drying after cleaning is imperative to prevent dilution of the disinfectant/sterilant.
25
Page 28

• Do NOT reuse disposable accessories intended for single patient or one-time use.
• Do NOT expose the endoscope or accessories to harsh chemical solutions. Strictly adhere to exposure times
recommended by the manufacturers of compatible solutions.
• Avoid contact of any flexible portion of the endoscope with any sharp-edged objects (bed frames, table top cor-
ners, sink drains, accessories hanging in storage cabinets, etc.) at any time during the handling, reprocessing
or storage of the endoscope.
• Avoid stretching of the bending section rubber sheath at the distal portion of the scope. During mechanical
cleaning of the scope with a dampened gauze, do not use excessive force. Agentle back and forth wiping
motion should be sufficient to remove gross debris. Subsequent soaking in an enzymatic detergent will clean
the remainder of debris.
• Disinfectants and sterilants are toxic substances by nature. All residual solution must be thoroughly rinsed and
dried prior to each patient use.
• Avoid attempting to remove or unscrew scope components which should not be removed. Parts such as the
distal portion of the light guide plug and any rubber strain reliefs on either the insertion tube or umbilical cable
are essential to the watertight integrity of the instrument. Removal or loosening of these components and
subsequent immersion could lead to fluid invasion into the endoscope.
• Check for any sharp edges on all surfaces of an automated cleaning/reprocessing unit which may come in con-
tact with an endoscope. Some units may have sharp-edged wire mesh filters and baskets or inlet/outlet ports
which could damage your scope.
• Do NOT introduce air bubbles into the scope’s internal channels during flushing of cleaning and/or disinfect-
ing/sterilizing solutions as these bubbles could interfere in the effectiveness of the disinfection/sterilization
process.
• Do NOT store the endoscope and accessories in the carrying case. This type of dark, humid and unventilated
environment is conducive to bacteria colonization, which increases the risk of cross-contamination.
• Prior to each use, check the condition of all accessories.
Do NOT use any accessories with kinked or bent flexible shafts.
Do NOT use forceps with misaligned cups and/or bent needles/spikes.
Do NOT use aspiration or injection needles which are not retractable or whose sharp tips cannot be protected.
Do NOT use cleaning brushes without smooth or rounded distal tips.
Use of any of the above accessories could result in channel damage and costly repairs.
• Verification of the efficacy level of glutaraldehyde (via test strips or similar methods) is recommended to ensure
potency of glutaraldehyde to achieve high-level disinfection.
• Instrument repairs should only be performed by an authorized Welch Allyn service facility. Welch Allyn assumes
no liability for any patient/user injury, instrument damage or malfunctions, or reprocessing failure due to repairs
made by unauthorized personnel.
26
Page 29

LEAKAGE TESTER INSTRUCTIONS
The leakage test is a simple two (2) stage test of the watertight integrity of the instrument. Air pressure is introduced into the interior of the instrument via a hand pump. The FL-100 scope is then checked for pressure decay
by using a pressure gauge. Asecondary visual check is also performed.
Air Bladder
Scope Connector
Figure 1
DRY TEST, STAGE I
BEFORE IMMERSION, Welch Allyn endoscopes
should be tested for any loss of integrity in their
watertight construction (example: major tear in
accessory/suction channel).
1. Remove the Red ETO Vent Cap from the light
guide. The leakage tester connector and the air
vent on the light guide MUST be completely dry
before connecting the Leakage Tester.
2. Secure the Leakage Tester connector to the air
vent on the scope’s light guide (where the Red
ETO Vent Cap was removed).
Faceplate
Hand Bulb
Pressure Release Valve
3. Confirm that the pressure indicator is at “0”.
NOTE: Make sure the pressure release valve on the
back of the gauge is closed before squeezing the
gauge bulb.
4. Pressurize the scope by pumping the hand bulb
until the indicator on the gauge is in the GREEN
2
zone (0.16-0.20 kg/cm
).
NOTE: During the leak test procedure, the insertion
tube of the scope should be flexed in various positions and the distal bending section should be fully
angulated in all directions to confirm the absence of
a leak.
DO NOT pressurize into the RED Danger zone. Doing
so may cause serious damage to the scope (Figure #3).
5. Observe the gauge pressure to determine if the
indicator remains in the GREEN zone. If the indicator drops from the GREEN zone rapidly, a major
Ieak is indicated.
NOTE: NEVER IMMERSE the entire instrument if the
gauge indicator does not remain in the GREEN zone.
Instead, contact your Welch Allyn Service Center.
Figure 2
Scope Connector
Light Guide
Figure 3
Air Bladder
Vent
Figure 4
27
Page 30

WET TEST, STAGE II
After determining that there are no major leaks in Stage I testing, Welch Allyn endoscopes may be immersed in
clean water to test for loss of integrity in the watertight construction.
1. With the Leakage Tester securely attached to the scope and the scope pressurized with the gauge indicator in
the GREEN zone, the entire scope may be immersed in clean water (Figure #5).
NOTE: Only the Leakage Tester connector and a small portion of its tubing should be immersed. NEVER
immerse the entire Leakage Tester.
2. Observe the instrument carefully while deflecting the distal tip of the scope in all directions. Afew bubbles
may initially occur from recessed areas of the scope. This is normal. If a continuous stream of bubbles is
observed from the same location, a leak is indicated. DO NOT use the scope! Immediately remove it from
the water (Figure #6).
3. After removing the scope from water, release the air pressure within the scope by opening the pressure
release valve on the handle of the Leakage Tester. After the gauge indicates “zero”, disconnect the Leakage
Tester from the scope.
NOTE: NEVER connect or disconnect the Leakage Tester under water. This will cause leakage of water into the
scope and Leakage Tester. This can cause damage to both instruments.
4. If leakage was discovered, thoroughly dry the instrument and contact your Welch Allyn Service Center.
5. If no leakage was discovered, you may proceed with cleaning and disinfection of the scope as described in
the Owner’s Manual.
28
Figure 5 Figure 6
Page 31

SPECIFICATIONS
Accessory/Suction
Channel
Light Guide
Objective Lens
Angle of View 90°
Depth of Field 3-50 mm
Diopter +2 to -8 dptr.
Tip Deflection Up 130°, down 130°
Rigid Distal Diameter 3.4 mm
Insertion Tube Diameter 3.5 mm
Diameter of Accessory/Suction Channel 1.4 mm
Insertion Tube Working Length 600 mm
Total Length 800 mm
NOTE: Specifications are subject to change without notice.
DISTAL END
Up 130°
3.5 mm
0°
1.4 mm
Light Guide
DISTAL TIP BENDING SECTION
Down 130°
29
Page 32

Medical Division
4341 State Street Road
P.O. Box 220
Skaneateles Falls, NY 13153-0220
(800) 535-6663
FAX (315) 685-3361
Printed in U.S.A.
Part No. 653001 Rev. C
 Loading...