

Page 1

Welch Allyn Connex® VM data
management system
Directions for use
Page 2
© 2011 Welch Allyn. All rights are reserved. To support the intended use of the product described in this publication,
the purchaser of the product is permitted to copy this publication, for internal distribution only, from the media
provided by Welch Allyn. No other use, reproduction, or distribution of this publication, or any part of it, is permitted
without written permission from Welch Allyn.
Welch Allyn assumes no responsibility for any injury to anyone, or for any illegal or improper use of the product, that
may result from failure to use this product in accordance with the instructions, cautions, warnings, or statement of
intended use published in this manual.
Welch Allyn and Connex are registered trademarks of Welch Allyn. Windows and SQL Server are registered
trademarks of Microsoft Corporation. Wireshark is a registered trademark of the Wireshark Foundation.
Software in this product is Copyright 2011 Welch Allyn or its vendors. All rights are reserved. The software is
protected by United States of America copyright laws and international treaty provisions applicable worldwide.
Under such laws, the licensee is entitled to use the licensed software as intended in its directions for use. The
software may not be copied, decompiled, reverse-engineered, disassembled, or otherwise reduced to humanperceivable form. This is not a sale of the software or any copy of the software; all right, title, and ownership of the
software remain with Welch Allyn or its vendors.
Federal law restricts this device to sale by or on the order of a physician.
For information about any Welch Allyn product, call Welch Allyn Technical Support:
USA +1 800 289 2501
+1 315 685 4560
Canada +1 800 561 8797 China +86 21 6327 9631
European Call Center +353 46 90 67790 France +33 1 55 69 58 49
Germany +49 695 098 5132 Japan +81 3 6383 0852
Latin America +1 305 669 9003 Netherlands +31 202 061 360
Singapore +65 6419 8100 South Africa +27 11 777 7555
Sweden +46 85 853 6551 United Kingdom +44 207 365 6780
Australia +61 2 9638 3000
DIR 80015826 Ver. B
Manufacturer
Welch Allyn, Inc.
4341 State Street Road
Skaneateles Falls, New York 13153-0220
USA
Regulatory Affairs Representative
Welch Allyn, Limited
Navan Business Park
Dublin Road
Meets essential
requirements of European
Medical Device Directive
93/42/EE
Navan, County Meath
www.welchallyn.com
Republic of Ireland
Page 3

Contents
Introduction ............................................................................................. 1
Getting started ......................................................................................... 3
iii
About these directions for use ...................................................................................................... 1
Intended use ...................................................................................................................................... 1
Safety .................................................................................................................................................. 1
About alerts and alarms ................................................................................................................... 2
Start the Connex VM program ........................................................................................................ 3
End your Connex VM session ......................................................................................................... 3
About the Home page ....................................................................................................................... 4
About assigning/unassigning patients .......................................................................................... 8
Transferring vital signs readings into the system .............................. 11
Capture readings at the workstation ........................................................................................... 11
Import multiple readings for one patient ..................................................................................... 13
Import multiple patients' saved readings ................................................................................... 14
Adjusting settings ................................................................................. 15
Personalize your Connex VM program settings ........................................................................ 15
Program settings ............................................................................................................................. 16
Change your password .................................................................................................................. 17
Managing patients ................................................................................ 19
Create and admit a new patient ................................................................................................... 19
Discharge a patient ........................................................................................................................ 19
Readmit a patient ............................................................................................................................ 19
Delete a patient ............................................................................................................................... 19
Managing patient data .......................................................................... 21
View or edit a patient record ........................................................................................................ 21
View or edit patient contact information .................................................................................... 22
View or edit patient medical history ............................................................................................ 22
Update unreconciled data ............................................................................................................. 22
Delete records from the recycle bin ............................................................................................ 23
Export a patient list ......................................................................................................................... 23
Managing saved vital signs .................................................................. 25
View vital signs information .......................................................................................................... 25
Searching ............................................................................................... 27
Search for patients ......................................................................................................................... 27
Page 4

iv Contents Welch Allyn Connex® VM data management system
Build or edit a saved search ........................................................................................................ 27
Search for unreconciled data ....................................................................................................... 27
Search for a user ............................................................................................................................ 28
Search for tests ............................................................................................................................... 28
Search in the recycle bin ............................................................................................................... 28
Managing users ..................................................................................... 29
Create a user account and assign roles ..................................................................................... 29
Modify a user account ................................................................................................................... 29
Inactivate or activate a user account ......................................................................................... 29
Delete a user account .................................................................................................................... 30
Troubleshooting .................................................................................... 31
Why isn't the workstation communicating with the server? ................................................... 31
Why isn't the wired device communicating? ............................................................................. 31
Why can't I progress to the next step after scanning the bar code? .................................... 32
Why can't I find a certain patient in the system? ...................................................................... 32
Why can't I find a certain patient in the Show list on the Home page? ................................ 32
Why aren't vital signs readings imported from a connected device? ................................... 33
Page 5
Introduction
About these directions for use
Topics included cover the primary use of the product.
Before using the Connex VM system, you must read and understand the directions for use.
For information on using devices that connect to the Connex VM system, consult the directions for
use that came with the devices.
1
Intended use
Welch Allyn Connex is intended for the collection and review of patient data, and also the
communication of the data to information systems. It provides notifications when data deviates
from ranges, allows manual entry of data, provides a means to identify and manage patients, and
provides tools for enhancing productivity.
Healthcare providers and trained personnel are the intended users of the system.
Safety
Safety symbols
Warning statements in this manual
identify conditions or practices that
could lead to illness, injury, or death.
Consult operating instructions.
Caution statements in this manual identify
conditions or practices that could result in damage
to the equipment or other property.
Page 6
2 Introduction Welch Allyn Connex® VM data management system
General warnings
WARNING The Connex VM system transfers data from a vital signs device only
when a user initiates a transfer. Do not mistake the Welch Allyn Connex VM data
management system for a patient monitoring device.
WARNING If the Connex VM program or the computer running the program fails,
take these steps:
a. If a user attempted to capture or import data prior to the failure, verify that the
system received the data.
b. If the system did not receive the data and the user wants to import it when the
system becomes operational, ensure that the device retains the data.
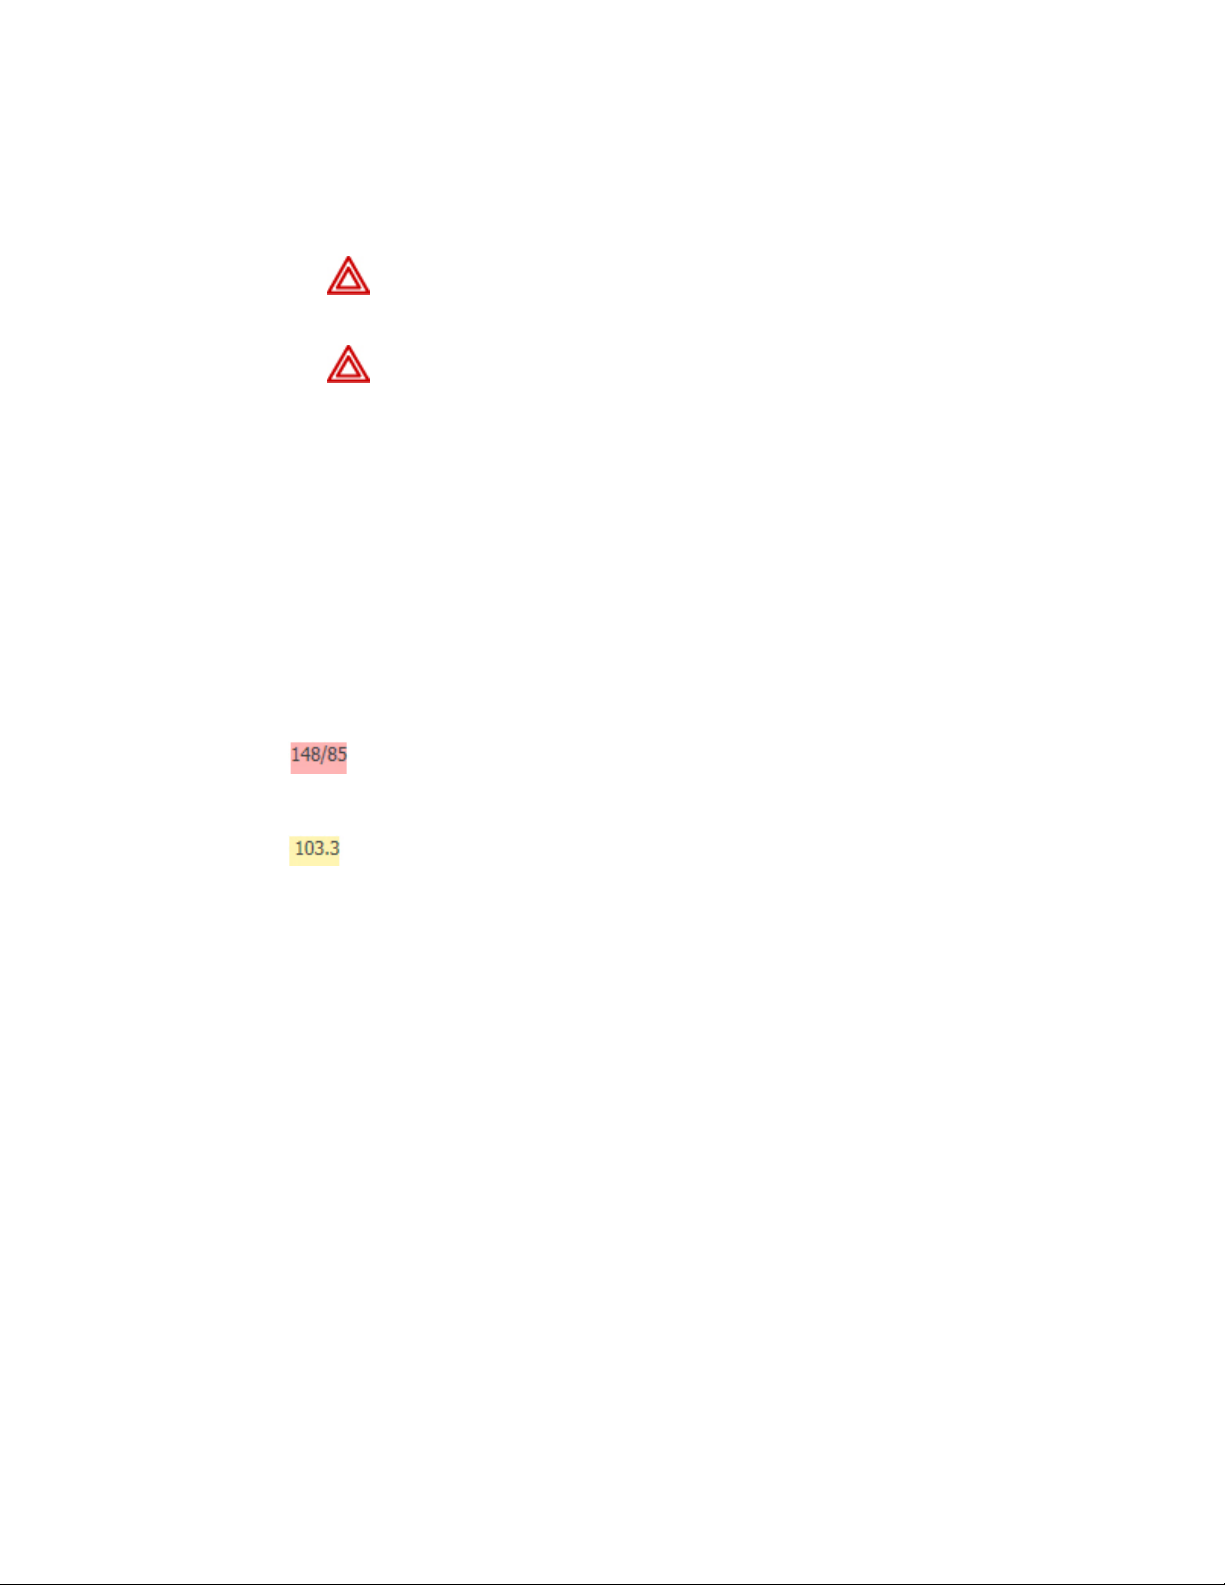
About alerts and alarms
The terms "alarm" and "alert" both refer to readings that are out of range. If a reading is too high or
too low according to the device settings, that reading appears as an alarm (red or yellow,
dependent upon the device). If a reading is too high or too low according to the Connex VM
settings only, that reading appears as an alert (yellow).
Alarm example (red or yellow = according to the device settings):
Alert example (yellow = according to the Connex VM settings only):
If a vital signs reading exceeds both alarm and alert limits, only the alarm will be shown. For a vital
signs capture, one vital sign reading may cause an alarm, while another may cause an alert.
Page 7

Getting started
Start the Connex VM program
1. Start the Connex VM program
3
• On the Windows desktop, double-click the Welch Allyn Connex Workstation icon .
• From the Windows Start menu, click Start > All Programs > Welch Allyn > Connex
VM.
2. If prompted, log on.
The Home page appears. You can now perform tasks according to the permissions that have
been set up for you.
End your Connex VM session
Go to the menu bar and click the desired command.
• File > Exit closes the Connex VM program.
• File > Log off ends your session and leaves the Connex VM program ready for the next
user to log on.
Page 8

4 Getting started Welch Allyn Connex® VM data management system
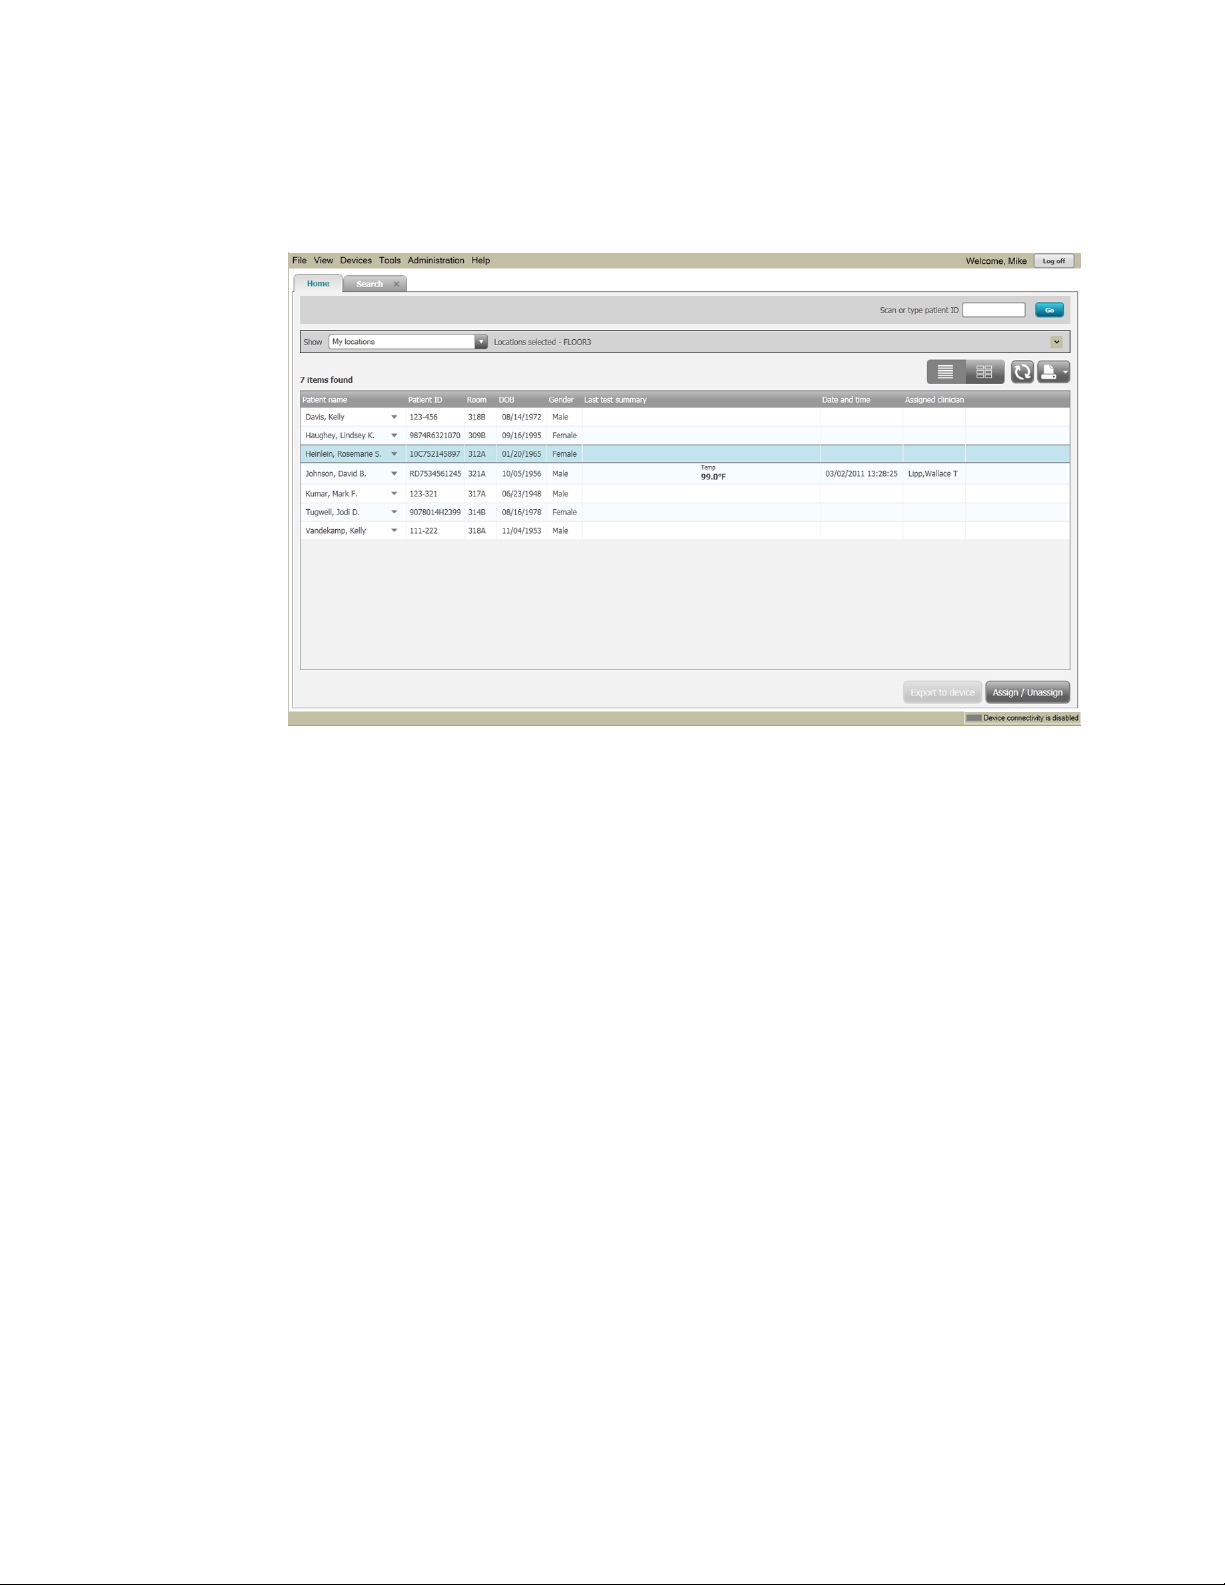
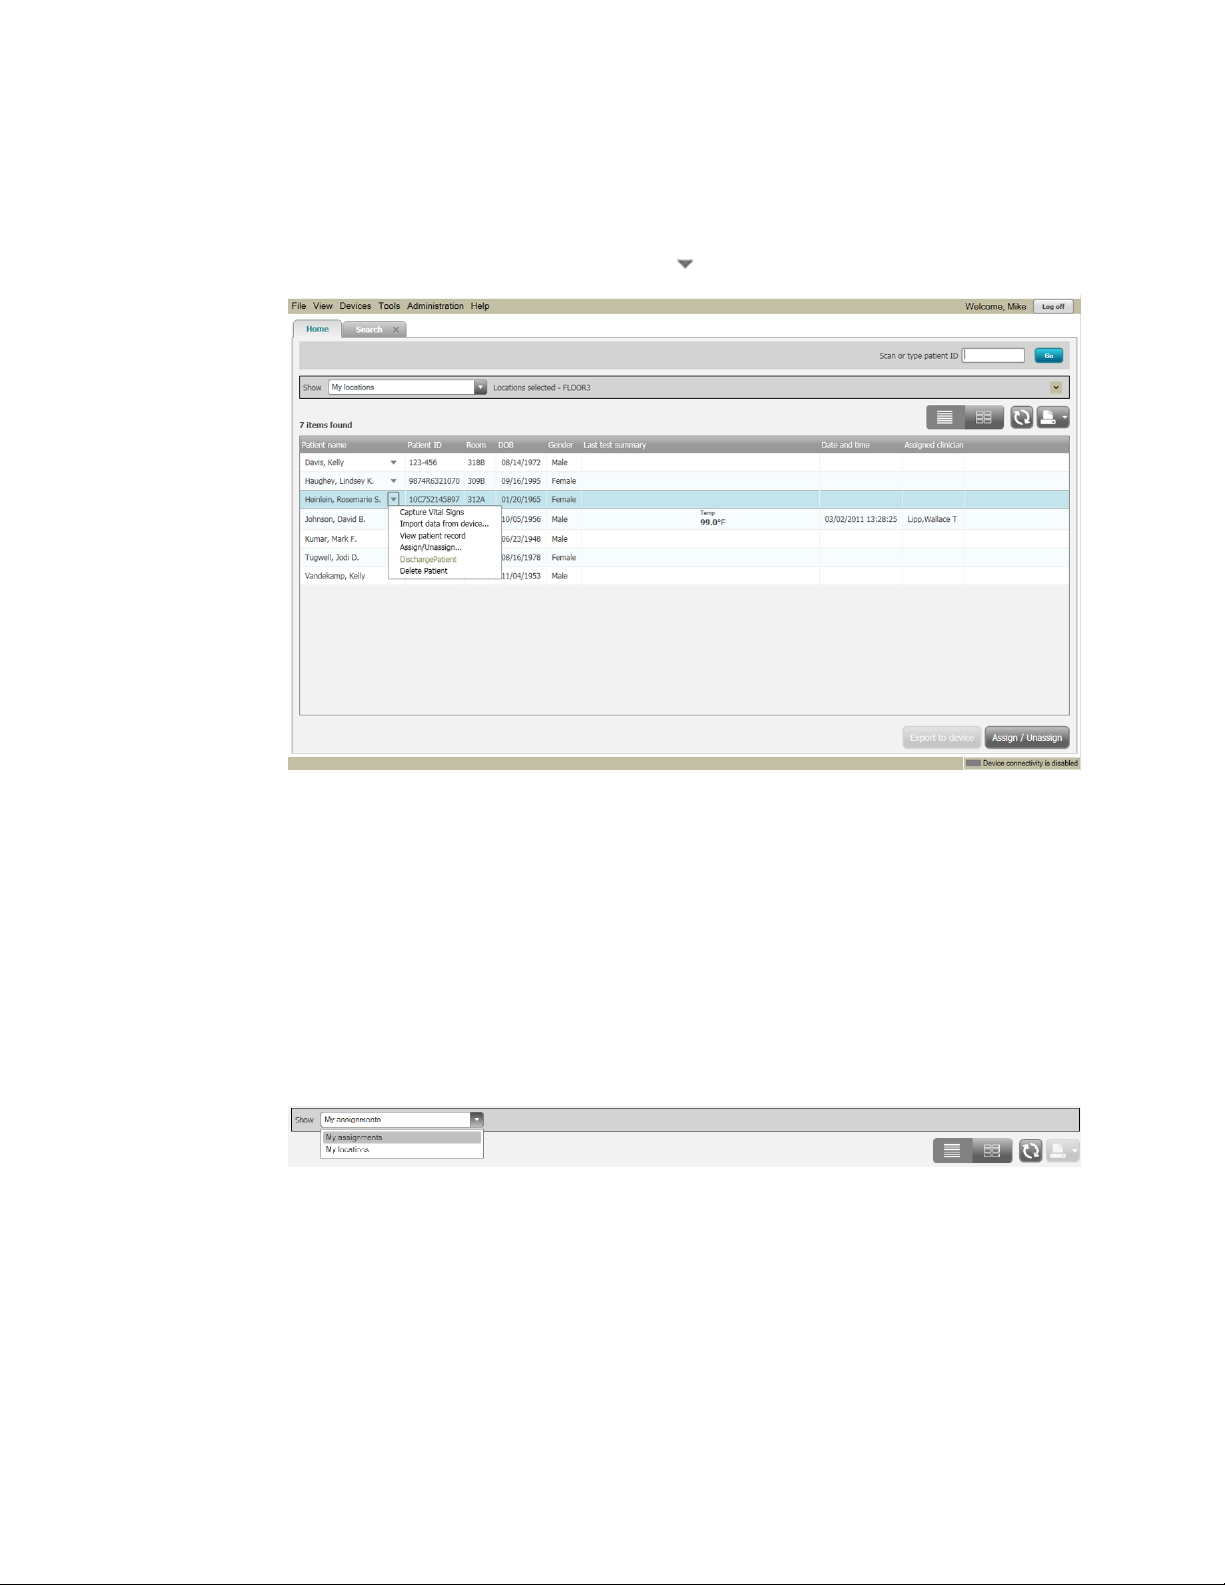
About the Home page
The Home page is the first page that appears when you open the program. This page enables you
to view a list of patients as determined by the selection in the Show list. From the Home page you
can also initiate many common tasks. You can view the Home page at any time by clicking the
Home tab.
The Scan or type patient ID box
You can enter a patient ID either by typing it or by scanning it using a bar code scanner attached to
the computer. Depending on your system configuration, the Go button opens either the patient
record for that ID or the Capture Vital Signs window.
Page 9
Directions for use Getting started 5
The Show list
The Show list enables you to select the information that you want to view. Every system comes
with an option to show My locations. Other options in the Show list are determined by the saved
searches that have been created.
If you want to view information that is not available through your Show list, you can find it by
searching.
Page 10
6
Getting started Welch Allyn Connex® VM data management system
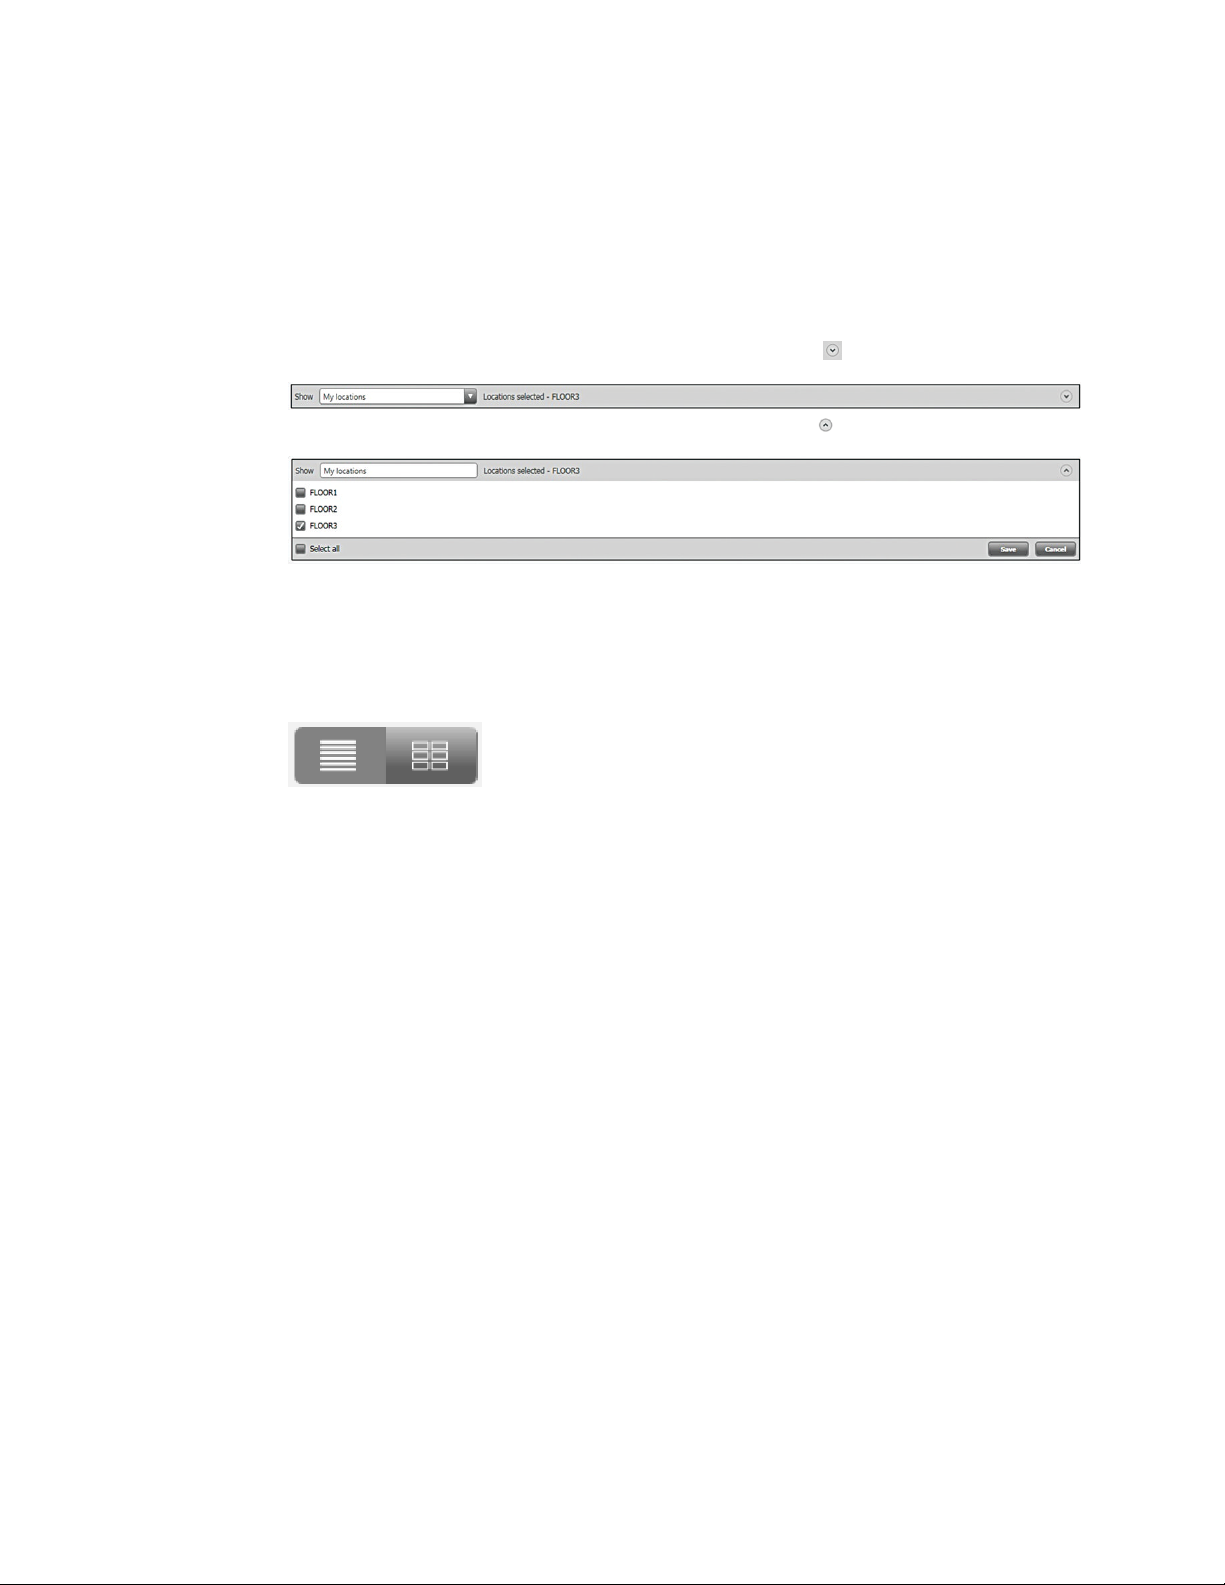
The My locations option
When you select My locations in the Show list, the patients who have been admitted to the
selected locations are listed on the Home page. (If a patient in a selected location does not
appear in your list, you may find that patient by searching.)
You can reveal the location options by clicking the expand symbol ( ).
You can hide the location options by clicking the collapse symbol ( ).
The List and Tile view buttons
The List button allows you to display patient data in list format. The Tile button allows you to view
patient data in tile format.
The Refresh button
The Refresh button updates the displayed data to reflect any recent changes to the database.
The Print button
You can print the contents of the current view by clicking the Print button. Click the Print dropdown arrow, and select the desired command.
The sort order
You can change the order in which the rows are sorted by clicking the desired column heading. For
example, you can sort patients' names in alphabetical order by clicking Patient name.
Page 11
Directions for use Getting started 7
The action menus
You can bring up an action menu by clicking the symbol next to any item in a list.
The Assign/Unassign button
The Assign/Unassign button enables you to assign patients to yourself or to other clinicians.
The My assignments option
When you select My assignments in the Show list, the patients who have been assigned to you
are listed on the Home page.
If a patient does not appear in your list, you may find that patient by searching. If the list is empty,
no patients have been assigned to you.
Page 12
1
2
8 Getting started Welch Allyn Connex® VM data management system
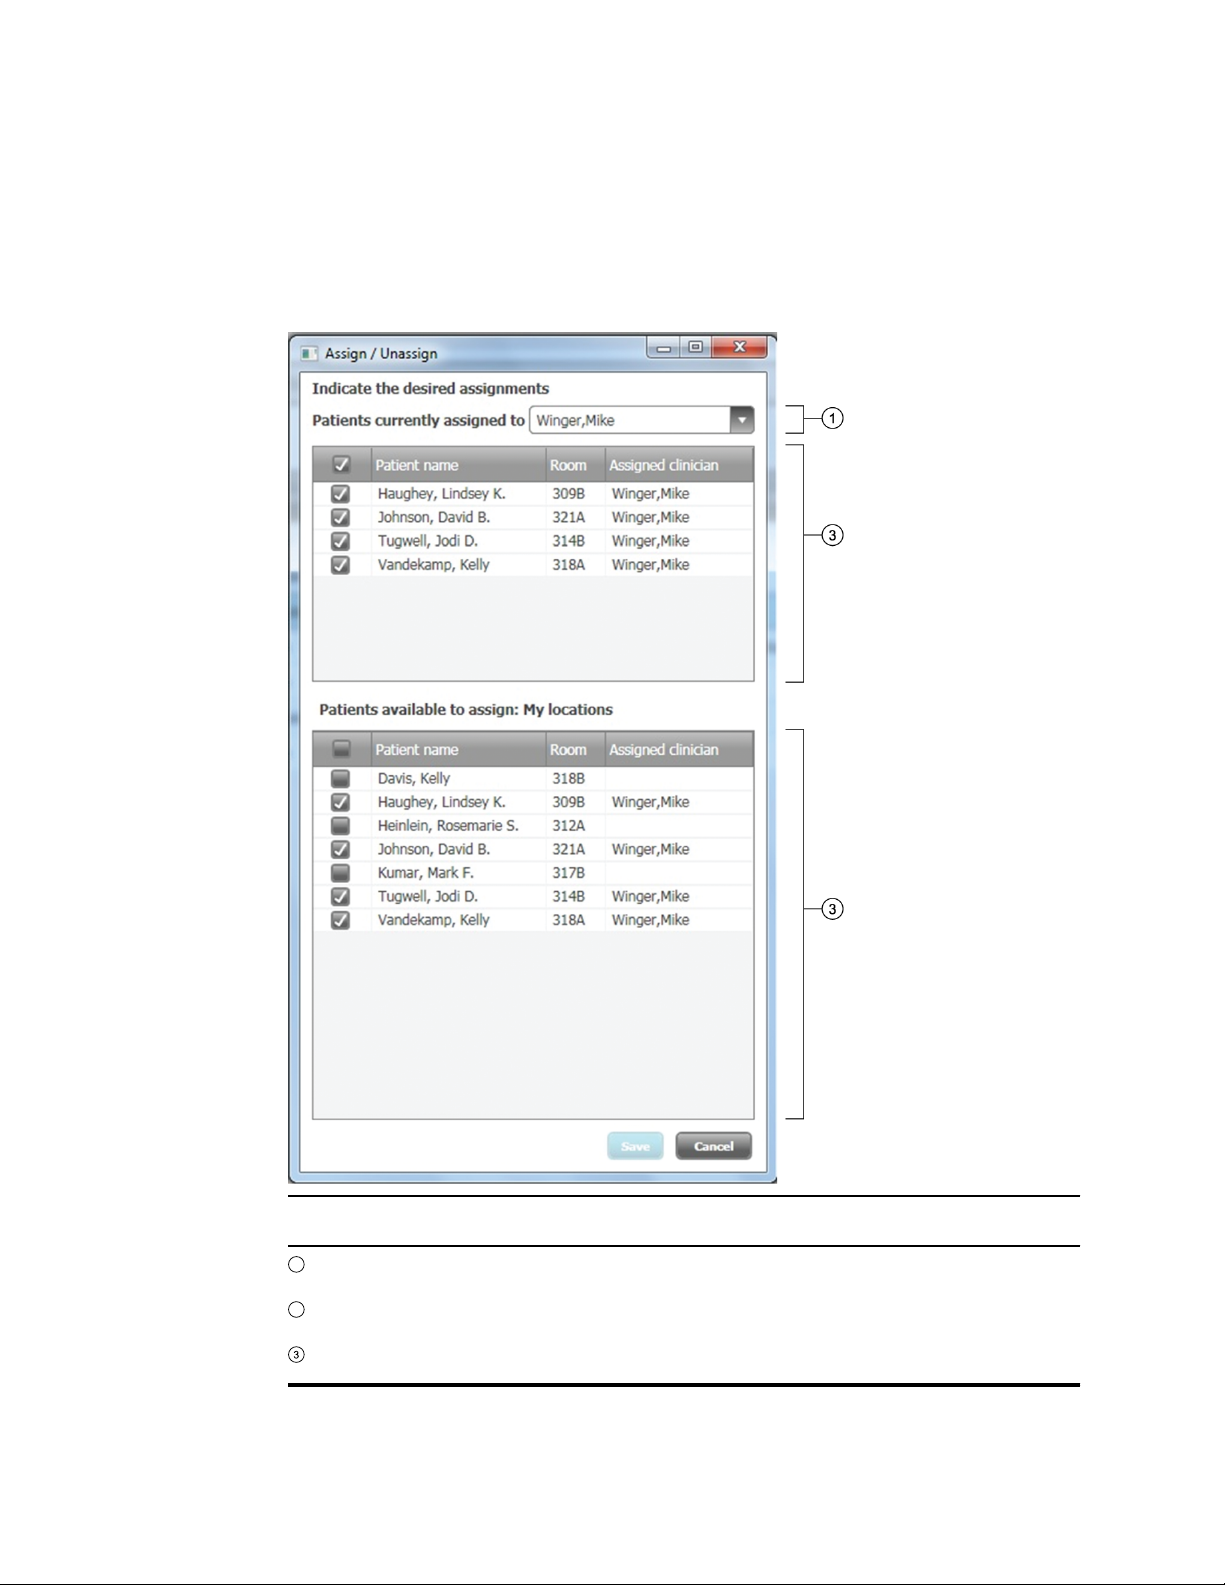
About assigning/unassigning patients
You can assign patients to clinicians, and unassign them as well.
The Assign/Unassign window allows for an efficient way to assign and unassign patients to and
from clinicians, dependent on user roles and privileges.
Item Description
The selected clinician
All of the patients who are assigned to the selected clinician
All of the patients listed on the previous page (Home or Search)
Page 13

Directions for use Getting started 9
Assign patients to clinicians
If you are set up with permission to do so, you can assign patients to yourself or to other clinicians.
You can also make changes to existing assignments.
1. On the Home page or Search page, show a list that includes the patients whom you want to
assign or unassign. (Only the names on that list will be available in the next step.)
2. Click Assign/Unassign.
3. Select a clinician.
4. Select or clear check boxes to indicate which patients you want to assign to that clinician.
5. Click Save.
Page 14

10 Getting started Welch Allyn Connex® VM data management system
Page 15

Transferring vital signs readings into the system
Capture readings at the workstation
From the Connex VM workstation, you can start an NIBP measurement and capture readings from
a vital signs device. This procedure applies to wired vital signs devices that are compatible with
the system.
11
WARNING When you transfer data into the Connex VM system, you associate the
data with a patient by selecting a patient name in the system. Verify that you select
the correct name. If you select an incorrect name, you associate the data with a
wrong patient.
WARNING Whenever you enter data into the Connex VM workstation, verify that
the data is correct before you save it.
1. With the vital signs device connected to the Connex VM workstation, take one of these steps
from the Connex VM Home page:
• Scan or type the patient ID in the Scan or type patient ID box, and then click Go. If
you see the Patient record page, click Capture vital signs.
• Locate the patient name, and click and select Capture vital signs.
Page 16

12 Transferring vital signs readings into the system Welch Allyn Connex® VM data management system
The Capture Vital Signs window appears.
2. Confirm that the patient name at the top of the window is correct.
3. If you are taking an NIBP measurement, click START.
4. (Optional) Add information or revise the readings.
• Select modifiers in the lists.
• Type values in the numerics boxes.
• Type in the Comments box.
• Manually enter or revise information: Click Enter manually. Type values in the numerics
boxes for NIBP, pulse rate, SpO2, temperature, hemoglobin, or weight. In the lower part of
the window, click and type in the Test taken area to change the date or time. During
manual entry, data collection from the device is suspended.
5. Click Save.
Page 17

Directions for use Transferring vital signs readings into the system 13
Import multiple readings for one patient
You can import a patient's saved timed-interval readings from a vital signs device into the Connex
VM system. This procedure applies to wired vital signs devices that are compatible with the
system.
WARNING When you transfer data into the Connex VM system, you associate the
data with a patient by selecting a patient name in the system. Verify that you select
the correct name. If you select an incorrect name, you associate the data with a
wrong patient.
WARNING Whenever you enter data into the Connex VM workstation, verify that
the data is correct before you save it.
WARNING When you initiate data import into the Connex VM system from a vital
signs device, select all data that needs to be retained. When the Connex VM system
imports data, vital signs data (including nonselected data) may be cleared from the
device.
1. With the vital signs device connected to the Connex VM workstation, from the Connex VM
Home page, click next to the patient name and select Import data from device.
The Import Data from Device window appears.
2. Confirm that the patient ID is correct.
3. (Optional) Clear check boxes next to undesired items.
4. (Optional) Edit the information.
a. Click the reading that you want to edit.
b. Click Edit.
c. Type or revise values in numerics boxes, select modifiers in lists, or type in the
Comments box.
d. Click Save.
Manually entered information is marked with an asterisk (*).
5. Click Import.
An “Import complete” message appears.
6. Click Done.
Page 18

14 Transferring vital signs readings into the system Welch Allyn Connex® VM data management system
Import multiple patients' saved readings
You can import multiple patients' saved readings from one vital signs device into the Connex VM
system. This procedure applies to wired vital signs devices that are compatible with the system.
WARNING Whenever you enter data into the Connex VM workstation, verify that
the data is correct before you save it.
WARNING When you initiate data import into the Connex VM system from a vital
signs device, select all data that needs to be retained. When the Connex VM system
imports data, vital signs data (including nonselected data) may be cleared from the
device.
1. With the vital signs device connected to the Connex VM workstation, in the Connex VM menu
bar, click Devices > Import data from device.
The Import Data from Device window appears.
2. (Optional) Clear check boxes next to undesired items.
3. (Optional) Edit the information.
a. Click the reading that you want to edit.
b. Click Edit.
c. Confirm that the patient ID is correct.
d. Type or revise values in numerics boxes, select modifiers in lists, or type in the
Comments box.
e. Click Save.
Manually entered information is marked with an asterisk (*).
4. Click Import.
An “Import complete” message appears.
5. Click Done.
Page 19

Adjusting settings
Personalize your Connex VM program settings
In the Options window, you can adjust Connex VM program settings to your personal preferences.
For each setting, you can use the default setting that was set by your system administrator, or you
can adjust the setting. For certain categories of settings, you can specify to which locales and
languages your adjustments apply.
15
In the menu bar, click Tools > Options.
1.
The Options window appears.
2. In the left pane, expand the Application listing, and then take these steps:
a. Beneath Application, click the category for which you want to adjust settings.
b. Click Edit.
c. In the right pane, adjust the settings.
Clear default check boxes to see setting choices.
d. Click Apply.
e. Repeat Steps a. through d. until you have completed your adjustments.
f. Click Save.
Page 20

16 Adjusting settings Welch Allyn Connex® VM data management system
Program settings
The Connex VM program settings, which are available from the menu bar under Tools > Options,
determine what appears on the screen and in printouts. Unless you are authorized to change
settings for multiple users, your changes will be in affect only when you are logged on.
This list is not comprehensive. Only those settings that require description are listed; others are
self-explanatory.
Tools > Options > Application > General
Setting Description
Show Search tab on
login
Show confirmation
dialog on log off
Automatic logout on
•
•
•
•
•
idle
•
Automatic idle logout
The number of minutes in the idle period.
timeout
Tools > Options > Application > Searches
Setting Description
Standard searches (for
example, My locations)
•
•
Yes: The Search tab is present by default.
No: The Search tab is absent by default. The user can open it from
the menu bar: View > Search.
Yes: A confirmation prompt appears when the user logs off.
No: No confirmation prompt appears when the user logs off.
Yes: Whenever the program has been unused for the designated idle
period, it logs the user off. In single sign-on configurations, which
require that users log on only to the operating system, the program
closes instead.
No: The program does not log users off or close automatically.
Available searches: The standard (built-in) searches that appear
in the Show list on the Home page.
Search options: The settings for the standard searches. To view
or change these settings, you must select the search name. Before
you can make changes to My locations, you must clear the Use
default locations check box.
Saved searches The saved searches that appear in the Show list on the Home page.
Page 21

Directions for use Adjusting settings 17
Tools > Options > Application > Patient
Setting Description
Default patient action
Show patient location
Change your password
You can change your password at any time.
From the menu bar, click File > Change password.
1.
2. Enter the information indicated on the screen.
The action that occurs after the user double-clicks a patient name.
•
View selected patient record
•
Acquire vitals
•
Do nothing
•
Yes: Patient locations are displayed at the top of the Capture Vital
Signs window and at the top of the patient record.
•
No: Patient locations are not displayed.
Page 22

18 Adjusting settings Welch Allyn Connex® VM data management system
Page 23

Managing patients
Create and admit a new patient
In many configurations, patient records are automatically kept in-sync with the hospital
information system. In those configurations, it is generally not necessary or even desirable to enter
patient information manually. If the configuration at your facility allows it, you can create a patient
by following these steps.
19
Select File > Create new patient.
1.
2. Enter patient information.
3. Click Save.
The new patient has a admit status of Admitted in the Connex VM program.
Discharge a patient
1. On the Home page or Search page, click next to the patient name.
2. Select Discharge Patient.
Readmit a patient
1. On the Search page, click next to the patient name.
2. Select Readmit Patient.
Delete a patient
When you delete a patient, the patient record moves to the recycle bin. The deleted record cannot
be viewed, updated, or restored.
On the Home page or Search page, click next to the patient name.
1.
2. Select Delete Patient.
Page 24

20 Managing patients Welch Allyn Connex® VM data management system
Page 25

Managing patient data
View or edit a patient record
1. Locate the correct patient name in the list on your Home page.
2. Next to the patient name, click and click View patient record.
The Patient record page appears.
21
3. Next to the patient's name, click and then click Patient details.
The Patient Details window appears.
4. (Optional) Click Edit. Add, change, or remove patient information.
Page 26

22 Managing patient data Welch Allyn Connex® VM data management system
View or edit patient contact information
1. Open the patient record.
2. Next to the patient's name, click and then click Patient details.
The Patient Details window appears.
3. Click Contact information .
4. (Optional) Click Edit. Add, change, or remove contact information. Specify which piece of
contact information should be primary or secondary.
View or edit patient medical history
You can view a patient's medical history as a whole or for just one point in time by double clicking
an entry in the Date and time column.
Open the patient record.
1.
2. Next to the patient's name, click and then click Patient details.
The Patient Details window appears.
3. Click Medical history.
4. (Optional) Click Edit. Add, change, or remove medical history information.
Update unreconciled data
Unreconciled data can occur when the data imported from a device does not match any patient
records in the system. To search for unreconciled data and reconcile the data with a patient
record:
Click the Search tab or go to View > Search.
1.
2. Click Unreconciled data.
3. Specify search criteria.
4. Click Search.
5. Select the check box to indicate which record you want to assign to a patient ID.
Page 27

Directions for use Managing patient data 23
6. Click Edit.
The Edit window appears.
7. Type or scan the patient ID in the Patient ID box.
8. Click OK.
Delete records from the recycle bin
All information deleted from the Connex VM system will be in the recycle bin. Information deleted
from the recycle bin cannot be restored.
1. Click the Search tab or go to View > Search.
2. Click Recycle Bin.
3. Enter your search criteria.
4. Delete records from recycle bin.
To permanently delete records, select check boxes to indicate which records you want to
delete, then press the Delete button.
Export a patient list
1. On the Home page, click the Export to device button.
The Upload patient list to device window appears.
2. Use check boxes to specify patients for the export list.
3. Click Next.
4. Verify that you have selected the correct names.
5. Click Confirm.
The Export complete message appears.
6. Click Done.
Page 28

24 Managing patient data Welch Allyn Connex® VM data management system
Page 29

Managing saved vital signs
View vital signs information
1. Locate the correct patient name in the list on the Home page.
2. Next to the patient name, click and then click View patient record.
The Patient record page appears.
3. Specify a date range in the Show list.
4. Select a view.
• Summary displays patient data for NIBP, pulse rate, SpO2, hemoglobin and
temperature.
• Vital Signs - Tabular View shows all vital signs in a numeric table.
• Vital Signs - Graph view shows the trends for the selected vital signs.
25
Page 30

26 Managing saved vital signs Welch Allyn Connex® VM data management system
Page 31

Searching
Search for patients
1. Click the Search tab or go to View > Search.
2. Click Patients.
3. Enter your search criteria.
4. Click Search.
27
Build or edit a saved search
The saved search builder enables you to create searches that use more criteria than basic
searches provide. You can also control what information (which columns) will appear in the results
of saved searches. After you save a search, it is accessible from the Search page. If a saved
search will be needed regularly, you might also want to add it to the Show list on the Home
page.
Open the Search page either of these ways:
1.
• Click the Search tab.
• From the menu bar, go to View > Search.
2. Click Saved search.
3. Click Build or edit a saved search.
The Build or Edit a Saved Search window appears.
4. Follow the instructions on the screen.
When you click Finish, the search is saved.
To use a saved search any time, return to the Search page, select Saved search, and click
under Select an existing saved search.
To control which saved searches appear in the Show list on the Home page, go to Tools >
Options > Application > Searches.
Search for unreconciled data
Unreconciled data can occur when the data imported from a device does not match any patient
records in the system. You can search for unreconciled data and print a report of that information,
or you can delete the unreconciled data from the Connex VM system.
Click the Search tab or go to View > Search.
1.
2. Click Unreconciled data.
Page 32

28 Searching Welch Allyn Connex® VM data management system
3. Specify search criteria.
4. Click Search.
5. If the data is invalid, select the top checkbox to delete all information displayed for that data
type. If the data is invalid for just one patient, select the checkbox next to that patient and click
the Delete button.
Search for a user
1. Click the Search tab or go to View > Search.
2. Click Users.
3. Enter your search criteria.
4. Click Search.
Search for tests
1. Click the Search tab or go to View > Search.
2. Click Tests.
3. Enter your search criteria.
4. Click Search.
Search in the recycle bin
All information deleted from the Connex VM system will be in the recycle bin. Information in the
recycle bin cannot be restored.
Click the Search tab or go to View > Search.
1.
2. Click Recycle Bin.
3. Enter your search criteria.
4. Click Search.
5. Expand the vital signs section to view all data in the recycle bin from the specified timeframe.
Page 33

Managing users
Create a user account and assign roles
1. In the menu bar, click Administration > New user.
The New User window appears.
2. Specify account details.
a. Enter ID information.
b. (Optional) Select the Account is active check box.
29
If you do not select this box, you can activate the account later.
c. (Optional) Select the Change the password at next logon check box.
The password is set, and the user can change it at the next logon.
d. Select the Set password check box, and then enter and confirm the password.
3. Type the user title and name in the Clinician name boxes.
4. Select a settings group.
5. Select check boxes next to one or more user roles.
6. Click Save.
Modify a user account
1. Click the Search tab or go to View > Search.
2. Click Users.
3. Enter your search criteria.
4. Click Search.
A list appears.
5. Next to the user ID, click and select Edit user details.
The Modify User window appears.
6. Click Edit.
7. Modify information.
8. Click Save.
Inactivate or activate a user account
1. Click the Search tab or go to View > Search.
Page 34

30 Managing users Welch Allyn Connex® VM data management system
2. Click Users.
3. Enter your search criteria.
4. Click Search.
A list appears.
5. Next to the user ID, click and select Edit user details.
The Modify User window appears.
6. Click Edit.
7. Clear or select the Account is active check box.
8. Click Save.
Delete a user account
1. Click the Search tab or go to View > Search.
2. Click Users.
3. Enter your search criteria.
4. Click Search.
A list appears.
5. Next to the user ID, click and select Delete.
Page 35

Troubleshooting
Why isn't the workstation communicating with the server?
Possible cause Corrective action
31
When I open the Connex VM program, I get an error
message.
The wireless network connection has been lost. Adjust the computer's position to a location where
The network is down; a path to the server cannot be
found.
The server is down. Contact your network administrator or IT resource.
The computer is not connected to the network. Contact your network administrator or IT resource to
Contact your network administrator or IT resource.
there is a known network connection. The system will
attempt to reconnect until it is successful.
Check other software for the same difficulty, and
notify your network administrator or IT resource.
connect the computer to the network.
Why isn't the wired device communicating?
Possible cause Corrective action
The device is turned off or unplugged. Turn on or plug in the device.
The connectivity cable is unattached from the device
or the computer.
Attach the cable to the device and the computer.
The connectivity cable is damaged. Use another cable to transfer the data.
The device has been replaced with another device. Exit the Connex VM program, unplug the cable,
reattach, and then restart the program.
The Connex VM system does not recognize the
device.
In the bottom right corner of the Connex VM window,
right-click the phrase No device connected,
and then click Refresh devices. The message
changes to Device connected.
Page 36

32 Troubleshooting Welch Allyn Connex® VM data management system
Why can't I progress to the next step after scanning the bar code?
Possible cause Corrective action
The cursor is not blinking in the Scan or type
patient ID box on the Home page.
The wristband is improperly printed or damaged. Scan another patient's wristband. If it scans
The bar code scanner is not working. For cordless bar code scanners, check the battery
Click inside the Scan or type patient ID box on
the Home page.
successfully, have a new wristband issued for your
patient.
light. Recharge the battery if necessary.
Why can't I find a certain patient in the system?
Possible cause Corrective action
The patient has no record in the system. Add the patient if appropriate, or check with the
admissions department of your facility.
Patient information was not received in the Connex
VM system; contact your network administrator or
information technology/information systems resource.
An error has occurred during admission. Check with the admissions department of your facility.
Patient record was saved as unreconciled data. Search for record in unreconciled data.
Why can't I find a certain patient in the Show list on the Home page?
Possible cause Corrective action
The patient has recently been transferred to the floor
or is listed at a different location.
Search for the patient.
Page 37

Directions for use Troubleshooting 33
Why aren't vital signs readings imported from a connected device?
Possible cause Corrective action
An error has occurred on the device. Retake the measurement.
The device is powered down. Power the device up.
The Connex VM system does not recognize the
device.
In the bottom right corner of the Connex VM window,
right-click the phrase No device connected,
and then click Refresh devices. The message
changes to Device connected.
Page 38

 Loading...