

Weinmann JOYCE Full Face vented 40 hPa, JOYCE Full Face GEL vented, JOYCE Full Face vented, JOYCE Full Face GEL non vented, JOYCE Full Face Series Instructions For Use Manual
...Page 1

JOYCE Full Face vented
JOYCE Full Face vented 40 hPa
JOYCE Full Face non vented 40 hPa
JOYCE Full Face GEL vented
JOYCE Full Face GEL non vented
plus
JOYCE Full Face
Description of the equipment and instructions for use
vented
Page 2

Übersicht/Overview/Vue d’ensemble/Overzicht/Prospetto/Vista general/Vista Geral/Genel bakış/
Hinweis: Die kompletten Benutzerinformationen bestehen aus diesem Faltblatt und der Gebrauchsanweisung./Note: The complete user information consists of this leaflet and the instructions for use.
Remarque : La documentation complète mise à disposition de l’utilisateur comprend le présent dépliant et le mode d’emploi du masque./Aanwijzing: De complete gebruikersinformatie bestaat uit dit vouwblad en
de gebruiksaanwijzing./Nota: Le informazioni complete per l’utente sono costituite da questo pieghevole e dalle istruzioni per l’uso./Nota: las informaciones para el usuario completas constan de este folleto y el
manual de instrucciones./Nota: As informações completas destinadas ao utilizador são compostas por este folheto e pelas instruções de uso./Uyarı: Kullanıcıya yönelik tüm bilgiler bu ilave açıklama kâğıdından ve kullanma
kılavuzundan ibarettir./Υπόδειξη: Οι πλήρεις πληροφορίες χρήστη αποτελούνται από αυτό το αναδιπλούμενο φύλλο και τις οδηγίες χρήσης.Wskazówka: Kompletne informacje dla użytkownika składają się z niniejszej karty
i instrukcji obsługi./Naputak: Kompletne informacije za korisnika sastoje se od ovog presavijenog lista i upute za uporabu.
Επισκόπηση
/Przegląd/Pregled
A
1
HEADstrap
WEINMANNstrap
6
WEINMANNstrap
2
3
5
4
7
8
non vented
B
JOYCEstrap
JOYCE Full Face
15
14
11
9
101213
12 1011
Page 3

GEL
F
H
C
E
D
G I
non vented
+
Therapiegerät mit aktivem
Ausatemventil!
Therapy unit with
active exhalation valve!
Appareil de traitement avec
soupape expiratoire active !
Therapieapparaat met actief
uitademventiel!
Appareccho terapeutico con
valvola di espirazione attiva!
Aparato de terapia con
válvula de espiración activa!
Aparelho de terapia com
válvula de expiração activa!
Etkin soluk verme valflı
terapi cihazı!
Συσκευή θεραπείας με ενεργή
βαλβίδα εκπνοής!
Urządzenie terapeutyczne
z aktywnym zaworem
wydechowym!
Terapijski uređaj s aktivnim
ventilom za izdisanje!
Optional
Option
Option
Optioneel
Opzione
Opcional
Opcional
Opsiyonel
Προαιρετικά
Opcja
Opcijski
vented
Handhabung/Operation/Mode d’utilisation/Bediening/Operazioni sulla maschera/Manejo/Manuseamento/Kullanım/
Χειρισμός
/Sposób obsługi/Rukovanje
WM 66117l - 09.2012
Page 4

Deutsch 3
English 15
Français 26
Nederlands 38
Italiano 50
Español 63
Português 76
Türkçe 89
Ελληνικά 101
Polski 113
Hrvatski 125
Page 5

DE
Deutsch
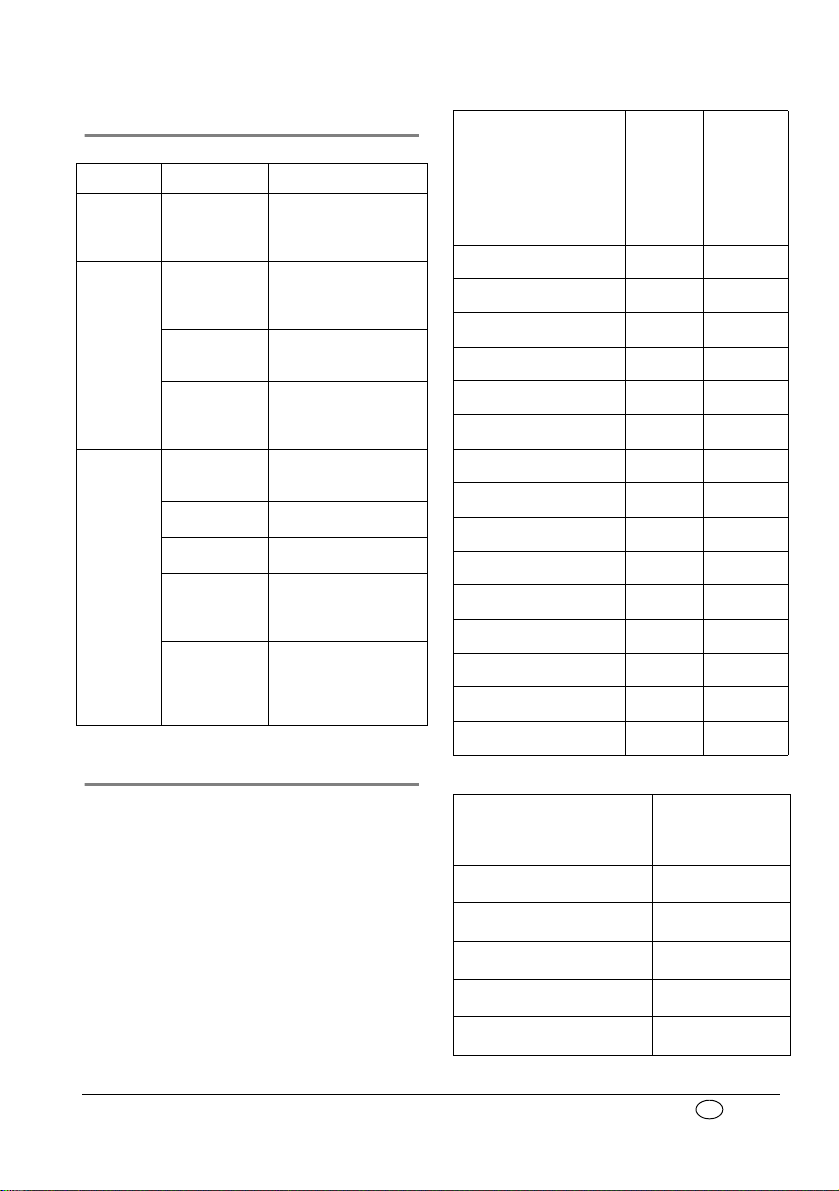
1 Gerätebeschreibung
Legende
(Darstellung der Einzelteile: Siehe Abb.
A auf beigefügtem Faltblatt.)
1 Kopfbänderung
2 Stirnpolster
3 Feinverstellung der Stirnstütze
4 Grobverstellung der Stirnstütze
5 Stirnstütze
6 Bänderungsclip
7 Druckmessanschlüsse
8 Verschluss
9 Notfallausatemventil (
nur vented-Varian-
ten)
10 Drehhülse*
11 Winkel*
12 Sicherungsring*
13 Maskenkörper
14 Maskenwulst
15 Kinnumgriff (nur JOYCE Full
*
non vented-Varianten
plus
vented)
Face
vented-Varianten: transparent;
: blau
Verwendungszweck
Die JOYCE Full Face-Masken sind
Zubehörprodukte. Sie dienen als
Dichtelemente zwischen Patient und
Therapiegerät. Sie werden zur Behandlung
der Schlafapnoe und zur nicht-invasiven
sowie nicht lebenserhaltenden Beatmung
von Patienten mit ventilatorischer Insuffizienz
eingesetzt.
Die non vented-Varianten dürfen
ausschließlich in Kombination mit
Beatmungsgeräten verwendet werden, die
über ein aktives Ausatemventil verfügen.
Vor der Verwendung durch den
Patienten
Patienten müssen vor Therapiebeginn durch
qualifiziertes Personal in die Anwendung der
Maske eingewiesen werden.
2 Sicherheitshinweise
Sicherheitsbestimmungen
Gemäß den Anforderungen der Richtlinie 93/
42/EWG beachten Sie folgende Punkte:
• Lesen Sie diese Gebrauchsanweisung aufmerksam durch. Sie ist Bestandteil der
Maske und muss jederzeit verfügbar sein.
• Verwenden Sie die vented-Varianten niemals, wenn das Notfallausatemventil
beschädigt oder nicht vorhanden ist.
Andernfalls kann es zu erhöhter CO
atmung kommen, sollte das Therapiegerät
ausfallen.
• Verwenden Sie die JOYCE Full Face-Masken niemals bei Patienten, die nicht in der
Lage sind, sie selbstständig abzunehmen
oder die zu Erbrechen neigen. Es besteht
Erstickungsgefahr.
• Betreiben Sie die
JOYCE Full Face-Masken
ausschließlich in den für die einzelnen
Varianten vorgesehenen Therapiedruckbereichen:
– 4-30 hPa: JOYCE Full Face vented
JOYCE Full Face
– 4-40 hPa: JOYCE Full Face vented 40 hPa
JOYCE Full Face non vented 40 hPa
JOYCE Full Face GEL vented
JOYCE Full Face GEL non vented
plus
Andernfalls kann es zur CO2-Rückatmung oder zu Undichtigkeiten
kommen.
• Beim Einsatz von Fremdartikeln kann es zu
Funktionsausfällen und einer eingeschränkten Gebrauchstauglichkeit kommen.
Außerdem können die Anforderungen an die
Bio-Kompatibilität nicht erfüllt sein. Beachten
Sie, dass in diesen Fällen jeglicher Anspruch
auf Garantie und Haftung erlischt, wenn
vented
-Rück-
2
3
Page 6

DE
weder das in der Gebrauchsanweisung empfohlene Zubehör noch Originalersatzteile verwendet werden.
• Patienten mit eingeschränkter Spontanatmung müssen ständig überwacht werden.
Am Beatmungsgerät muss ein
entsprechen-der Unterdruck-/Leckagealarm aktiviert sein.
• Patienten mit obstruktiven und restriktiven
Lungenkrankheiten sollten während der
Verwendung von JOYCE Full Face-Masken
individuell untersucht werden (z. B. hinsichtlich CO
• Verschließen Sie niemals die Öffnung des
Notfallausatemventils bzw. des Ausatemsystems. Andernfalls besteht die Gefahr der
CO
-Rückatmung und der Erstickung.
2
• Die Maske darf nur dann längere Zeit aufgesetzt werden, wenn das Therapiegerät
eingeschaltet ist. Anderfalls besteht die
Gefahr der CO
• Verwenden Sie keine elektrisch leitfähigen
Atemschläuche (Ausnahme: elektrisch
beheizbare Atemschläuche).
• Beachten Sie den Abschnitt 4 “Hygienische
Aufbereitung” zur Vermeidung einer Infektion, einer bakteriellen Kontamination und
von Funktionsbeeinträchtigungen.
-Rückatmung).
2
-Rückatmung.
2
Kontra-Indikationen:
Unter bestimmten Umständen sollten die
JOYCE Full Face-Masken nicht oder nur mit
besonderer Vorsicht eingesetzt werden. Im
Einzelfall obliegt die Entscheidung zur
Therapie mit diesen Masken dem
behandelnden Arzt.
• Funktionsstörung des unteren ÖsophagusSphinkter (unterer Schließmuskel der Speiseröhre)
• Übermäßige Regurgitation (Rückfluss von
Mageninhalt in die Speiseröhre)
• Hustenreflexstörung
• Hiatusbruch (Zwerchfellbruch)
• Narkose oder Sedation
• Offene Gesichtswunden, die zur Entzündung neigen
• Hämodynamische oder kardiorespiratorische Instabilität
• Bewußtlosigkeit
• Klaustrophobie, Angst
• Gesichts- oder Nasenrachendeformationen
• Bart oder andere Hindernisse, die Maske
anzupassen und abzudichten
• Gesichtsverletzungen
• Barotrauma
• Notwendigkeit der Beatmung oder
Atmungsunterstützung von 24 h pro Tag
• Frische Gesichts-, Speiseröhren- oder
Magenoperationen
• Einnahme von Medikamenten, die Erbrechen auslösen können
• Notwendigkeit unverzüglicher Intubation
Nebenwirkungen
Folgende Nebenwirkungen können
auftreten:
Verstopfte Nase, trockene Nase,
morgendliche Mundtrockenheit,
Druckgefühl in den Neben-höhlen,
Brustschmerzen, Kurzatmigkeit, Magenblähungen, Kopfschmerzen, Reizungen der
Bindehaut, störende Geräusche beim Ausatmen, Druckstellen im Gesicht, Rötungen
der Gesichtshaut.
3 Bedienung
Abb. A-I: Siehe beigefügtes Faltblatt.
3.1 Stirnstütze einstellen (Abb. C)
Feinverstellung
Halten Sie die oberen Laschen der Grobverstellung gedrückt. Positionieren Sie die Feinverstellung in einer der drei Rastungen.
Um die Höhe des Stirnpolsters bzw. der Feinverstellung anzupassen (ca. 1 cm), drehen Sie
die Feinverstellung um 180°. Positionieren
Sie diese anschließend wie oben
beschrieben.
4
Page 7

DE
Grobverstellung
Halten Sie die unteren Laschen der Grobverstellung gedrückt. Positionieren Sie letztere
in einer der drei Rastungen des
Maskenkörpers.
3.2 Maske anlegen (Abb. B)
Vorsicht!
Um das Risiko des Erbrechens so gering
wie möglich zu halten, sollte der Patient
3 Stunden vor Verwendung der Maske
nichts mehr essen oder trinken.
1. Haken Sie einen der unteren Bänderungsclips an der Maske aus.
2. Streifen Sie die Kopfbänderung über
Ihren Kopf und haken Sie den
Bänderungsclip wieder ein.
3. Positionieren Sie die Maske auf Ihrem
Gesicht, wie in Abbildung B dargestellt.
Hinweis:
Wenn Sie JOYCE Full Face
wenden, achten Sie darauf, dass der
Kinnumgriff korrekt sitzt, d.h. dass er Ihr
Kinn vollständig umschließt. Anderenfalls kann die Maske bei Bewegungen
verrutschen.
4. Stellen Sie die Kopfbänderung mit Hilfe
der Klettverschlüsse so ein, dass die
Maske dicht, aber nicht zu fest auf dem
Gesicht sitzt.
Nur WEINMANNstrap:
Die Kopfbänderung WEINMANNstrap
bietet dazu folgende Möglichkeiten
(siehe auch „Übersicht“ auf dem beigefügten Faltblatt):
– Klettverschlüsse an den beiden Seiten.
– Klettverschluss oben auf dem Kopf: Lösen
Sie den Klettverschluss, ziehen Sie mit beiden Händen leicht an den Enden der Kopfbänderung und drücken Sie den
Klettverschluss wieder an.
plus
vented ver-
An den Klettzungen erkennen Sie, ob
die Kopfbänderung richtig angebracht
ist. Die Klettzungen an der Stirn haben
dieselbe Farbe wie die Innenseite der
Kopfbänderung.
Nur HEADstrap:
Die Kopfbänderung HEADstrap bietet
dazu folgende Möglichkeiten:
– Grobeinstellung: Schlitz der Kopf-
bänderung.
– Feineinstellung: vier Klettbänder.
5. Stellen Sie, wenn notwendig, die
Stirnstütze neu ein.
3.3 Ausatemsystem (Abb. H)
vented-Varianten
Die vented-Varianten (alle Maskenteile transparent) verfügen über ein so genanntes inte-
griertes Ausatemsystem: Sicherungsring
und Maskenkörper sind so geformt, dass
zwischen diesen Teilen ein Spalt entsteht.
Durch diesen Spalt kann die ausgeatmete
Luft entweichen. Die spezielle Geometrie der
Teile gewährleistet, dass der Spalt beim Aufstecken des Sicherungsringes nicht verschlossen werden kann. Schließen Sie kein
externes Ausatemsystem an, andernfalls wird
der Therapiedruck nicht erreicht.
non vented-Varianten
Warnung!
Die non vented-Varianten (Sicherungsring,
Winkel und Drehhülse in blauer Farbe) verfügen über kein eigenes Ausatemsystem!
Sie dürfen ausschließlich in Kombination
mit Therapiegeräten verwendet werden, die
über ein aktives Ausatemventil verfügen!
Bei Ausfall des Therapiegerätes besteht sonst
die Gefahr der CO
ckung.
Die non vented-Varianten dürfen niemals in
Kombination mit einem externen
Ausatemsystem (wie z.B. Silentflow2)
verwendet werden. Andernfalls ist die
Sicherheitsfunktion bei Geräteausfall nicht
-Rückatmung und Ersti-
2
5
Page 8

DE
gewährleistet. Beachten Sie dazu auch die
Gebrauchsanweisung Ihres Therapiegerätes.
3.4 Notfallausatemventil (Abb. G)
Warnung!
Nur die vented-Varianten sind mit einem
Notfallausatemventil ausgerüstet. Stellen Sie vor
jedem Gebrauch sicher, dass dieses Ventil
korrekt funktioniert (siehe „5.
Funktionskontrolle” auf Seite 10), ansonsten
besteht Erstickungsgefahr!
Sicherheitsfunktion des
Notfallausatemventils
Das Notfallausatemventil verfügt über eine
Atmosphärenöffnung, durch die der Patient
bei Ausfall des Therapiegerätes Raumluft
einatmen kann. Dies reduziert deutlich das
Risiko der CO
die Erstickungsgefahr. Im Inneren des Ventils
befindet sich eine Membran, die zwei
Positionen einnehmen kann:
• Solange das Therapiegerät in Betrieb ist,
wird die Membran durch den Flow vor die
Atmosphärenöffnung gedrückt und verschließt diese vollständig. Der Patient
atmet über das Therapiegerät.
• Bei Ausfall des Therapiegerätes oder wenn
das Gerät nicht angeschlossen ist, befindet
sich die Membran in Ruhestellung, d.h. die
Atmosphärenöffnung ist frei. Der Patient
atmet über diese Öffnung Raumluft.
Vorsicht!
Das Notfallausatemventil ist ein sehr
empfind-liches Bauteil. Handhaben Sie es
stets mit Sorg-falt.
-Rückatmung und damit auch
2
3.5 Maskenteile mit Gel-Füllung
Bei JOYCE Full Face GEL vented und JOYCE
Full Face GEL non vented verfügen das Stirnpolster und der Maskenwulst standardmäßig
über eine Gelfüllung. Gel-Stirnpolster und
Gel-Maskenwulst sind auch für andere
JOYCE Full Face-Varianten als Ersatzteile
lieferbar.
Vorsicht!
Die Maskenteile mit Gelfüllung sind sehr
empfindliche Bauteile. Handhaben Sie sie
stets mit Sorgfalt, um Verformungen und Beschädigungen zu vermeiden.
3.6 Maskenwülste mit Kinnumgriff
JOYCE Full Face
Kinnumgriff, der das Kinn während der
Therapie abstützt und somit verhindert, dass
der Unterkiefer aus dem Maskenwulst
rutscht und die Therapie unterbrochen wird.
plus
vented besitzt einen
3.7 Therapiedruckbereiche
Die einzelnen Varianten der JOYCE Full FaceMasken sind jeweils für einen bestimmten
Therapiedruckbereich lieferbar (siehe „7.
Lieferumfang” auf Seite 11):
– 4-30 hPa: JOYCE Full Face vented
JOYCE Full Face
– 4-40 hPa: JOYCE Full Face vented 40 hPa
JOYCE Full Face non vented 40 hPa
JOYCE Full Face GEL vented
JOYCE Full Face GEL non vented
Die JOYCE Full Face-Masken für den Therapiedruckbereich 4-30 hPa verfügen über einen weichen Maskenwulst, die JOYCE Full
Face-Masken für den Therapiedruckbereich
4-40 hPa über einen härteren Maskenwulst
bzw. einen Gel-Maskenwulst (Gel-Varianten).
Der härtere Maskenwulst für den Therapiedruckbereich 4-40 hPa ist mit der Zahl "40"
gekennzeichnet.
Alle Maskenwülste sind auch einzeln als
Ersatzteile lieferbar, so dass Sie Ihre Maske an
veränderte Therapiebedürfnisse anpassen
können.
plus
vented
3.8 Maske an das Therapiegerät
anschließen (Abb.
Stecken Sie das Schlauchsystem Ihres
Therapiegerätes auf die Drehhülse. Achten
Sie dabei auf eine sichere und luftdichte
Verbindung zum Schlauch. Die Verbindung
darf sich durch den Therapiedruck nicht
lösen.
H)
6
Page 9

DE
Wenn Sie die Maske kurzzeitig vom Schlauch
trennen wollen, ziehen Sie einfach die Drehhülse vom Winkel ab.
Vorsicht!
Bei hohem Risiko der Übertragung von
Keimen zwischen Patient und Gerät sollte ein
Bakterien-filter verwendet werden. Beachten
Sie dazu auch die Gebrauchsanweisung des
Therapiegerätes.
3.9 Druckmessanschlüsse (Abb. E)
Die JOYCE Full Face-Masken sind mit zwei
Anschlüssen versehen, die zur Druckmessung
oder zur Einleitung von Sauerstoff verwendet
werden können.
Vorsicht!
• Eine Sauerstofftherapie kann bei falscher
Anwendung/Dosierung zu Nebenwirkungen führen. Deshalb dürfen Sie eine
solche Therapie nur nach Verordnung eines
Arztes durchführen.
• Beachten Sie zur Durchführung einer Sauerstofftherapie unbedingt die Gebrauchsanweisungen Ihres O
Therapiegerätes.
Wenn die Druckmessanschlüsse nicht
verwendet werden, verschließen Sie diese
stets mit dem beigefügten Verschluss.
Andernfalls entweicht Luft aus den
Anschlüssen und der Therapiedruck wird
nicht erreicht.
-Systems und Ihres
2
3.10 Kompatible Geräte und Zubehör
Therapiegeräte
Die JOYCE Full Face-Masken können mit
allen Geräten, die zur Durchführung der
unter „Verwendungszweck“ beschriebenen
Therapien vorgesehen sind, kombiniert
werden.
Beachten Sie, dass bei ungünstigen
Gerätekom-binationen der tatsächliche
Druck in der Maske eventuell nicht dem
Ihnen verordneten Therapiedruck entspricht.
Dies kann auch dann der Fall sein, wenn der
korrekte Druck am Therapiegerät angezeigt
wird. Lassen Sie Ihre Gerätekombination von
einem Arzt oder Fachhändler so einstellen,
dass der tatsächliche Druck in der Maske
Ihrem Therapiedruck entspricht.
Atemluftbefeuchter
Die JOYCE Full Face-Masken können sowohl
mit Kalt- als auch mit Warmluftbefeuchtern
verwendet werden.
Wählen Sie den Anfeuchtungsgrad nie so
hoch, dass sich Wasser im Luftschlauch niederschlägt. Beachten Sie die Gebrauchsanweisungen Ihres Befeuchters und
Therapiegerätes.
Schnellentriegelung (optional) (Abb. I)
Zum Öffnen der Kopfbänderung in Notsituationen (z. B. Erbrechen) ist als Zubehör eine
Schnellentriegelung lieferbar.
Die Schnellentriegelung besteht aus einem
Spezial-Clip mit Reißleine, der anstelle eines
der unteren Bänderungsclips montiert wird.
Ziehen Sie im Notfall einfach an der
Reißleine. Der Spezial-Clip löst sich von der
Maske. Die Kopfbänderung ist nun geöffnet
und die Maske kann abgenommen werden.
Set Bronchoskopie (optional) (ohne
Abb.)
Das Set Bronchoskopie (Endoskopieadapter
non-vented in Kombination mit
Sicherungsring non-vented (NV)) erlaubt eine
während der fortführenden Beatmung
durchzuführende Endoskopie
(Bronchoskopie).
Die Bronchoskopie darf ausschließlich von
medizinischem Fachpersonal durchgeführt
werden.
Für nähere Informationen beachten Sie bitte
die Kurz-GA WM 67495.
3.11 Nach dem Gebrauch
1. Haken Sie einen der unteren Bänderungsclips an der Maske aus und nehmen Sie
die Maske ab.
7
Page 10

DE
2. Haken Sie die übrigen drei Bänderungsclips aus, um die Kopfbänderung von der
Maske zu lösen.
3. Verfahren Sie wie unter „4 Hygienische
Aufbereitung” beschrieben.
3.12 Zerlegen/Zusammenbau der Maske
Zerlegen der Maske (Abb. G - C)
1. Lösen Sie den Maskenwulst vom Maskenkörper.
2. Entfernen Sie den Verschluss der
Druckmessanschlüsse.
3. Drehen Sie den Sicherungsring gegen
den Uhrzeigersinn in die 11:00 Uhr
Position. Ziehen Sie nun den
Sicherungsring und den Winkel vom
Maskenkörper ab.
4. Drücken Sie den Winkel aus dem Sicherungsring und ziehen Sie die Drehhülse
vom Winkel ab.
5. Nur vented-Varianten: Lösen Sie das
Notfallausatemventil vorsichtig vom
Winkel. Achten Sie darauf, dass die
Membran auf der Innenseite des Ventils
nicht beschädigt wird.
6. Lösen Sie die Grobverstellung vom
Maskenkörper.
7. Lösen Sie die Feinverstellung von der
Grobverstellung. Lösen Sie dann das
Stirnpolster von der Feinverstellung.
Zusammenbau der Maske (Abb. C - G)
1. Setzen Sie das Stirnpolster auf die Feinverstellung. Stecken Sie dann die Feinverstellung auf die Grobverstellung.
2. Stecken Sie die Grobverstellung auf den
Maskenkörper.
3. Stecken Sie die Drehhülse auf den
Winkel, bis sie hörbar einrastet.
4. Nur vented-Varianten: Drücken Sie das
Notfallausatemventil vorsichtig auf den
Winkel, bis es auf beiden Seiten des
Winkels hörbar einrastet. Achten Sie
darauf, dass die Membran auf der
Innenseite des Ventils nicht beschädigt
oder eingeklemmt wird.
5. Drücken Sie die Drehhülse auf den
Winkel. Drücken Sie dann den Winkel in
den Sicherungsring, bis er hörbar
einrastet.
6. Stecken Sie Sicherungsring (in 11:00 Uhr
Position) und Winkel auf den Maskenkörper. Drehen Sie den Sicherungsring in die
12:00 Uhr Position.
7. Stecken Sie den Verschluss auf die
Druckmessanschlüsse.
8. Stecken Sie den Maskenwulst auf den
Maskenkörper.
9. Befestigen Sie die Kopfbänderung mit
den Clips an der Maske.
10.Führen Sie eine Funktionskontrolle durch
(siehe „5. Funktionskontrolle” auf
Seite 10).
4 Hygienische Aufbereitung
4.1 Fristen
Täglich
Reinigen Sie die Maske rückstandsfrei in warmem Wasser. Sie können die Maske dazu
zerlegen wie im Abschnitt 3.12 “Zerlegen/
Zusammenbau der Maske” beschrieben. Verwenden Sie ein mildes Reinigungsmittel (z.B.
Geschirrspülmittel). Spülen Sie danach alle
Teile sorgfältig mit klarem Wasser ab.
Vorsicht!
• Bei Patienten mit einem geschwächten
Immunsystem oder einem besonderen
Krankheitshintergrund kann eine tägliche
Desinfektion oder Sterilisation der Maskenteile erforderlich sein. Konsultieren Sie in
diesem Fall Ihren Arzt.
• Gehen Sie bei der hygienischen Aufberei-
tung der Kontaktflächen zwischen Maskenkörper und Sicherungsring mit größter
Sorgfalt vor. Rückstände an diesen Flächen
können den Therapieerfolg bzw. die
8
Page 11

DE
Funktion des integrierten Ausatemsystems
Geschirrspüler
Handwäsche
Desinfektion*
(vented-Varianten) beeinträchtigen.
Wöchentlich
Zerlegen Sie die Maske wie im Abschnitt 3.12
“Zerlegen/Zusammenbau der Maske”
beschrieben und bereiten Sie die Maskenteile
hygienisch auf (siehe „4.2. Reinigung,
Desinfektion, Sterilisation” auf Seite 9).
4.2 Reinigung, Desinfektion, Sterilisation
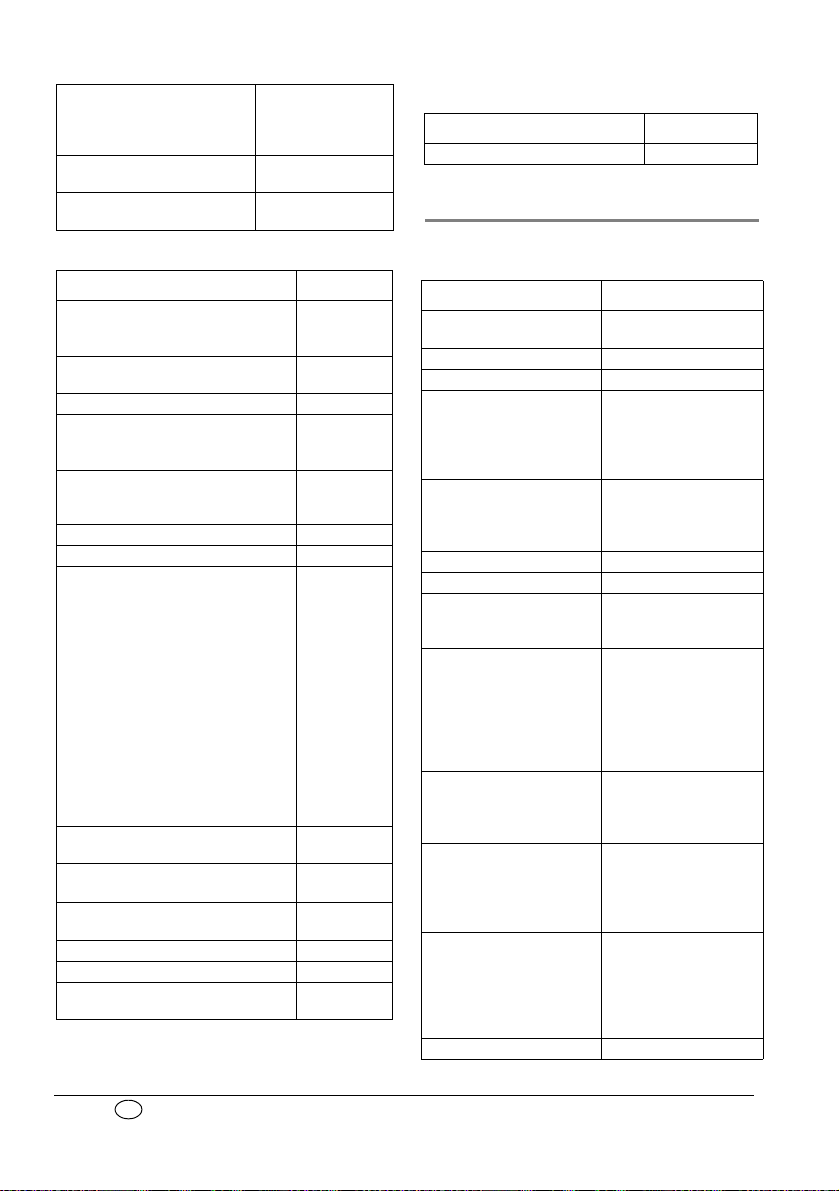
Zulässige Verfahren
Verfahren
Teile
Sterilisation (Alternativ
Maskenwulst ••• •
Maskenwulst GEL •••
Stirnpolster •••
Stirnpolster GEL ••
Ver schlu ss ••• •
Maskenkörper •••
Grobverstellung •••
Feinverstellung •••
Winkel •••
Notfallausatemventil ••
Drehhülse •••
Sicherungsring •••
Bänderungsclip •••
Kopfbänderung
WEINMANNstrap
Kopfbänderung
HEADstrap
Kopfbänderung
JOYCEstrap
Schnellentriegelung •
•
•
•
Vorsicht!
• Reinigen Sie die Maskenteile stets gründlich bevor Sie diese gemäß obiger Tabelle
desinfizieren bzw. sterilisieren.
• Das Notfallausatemventil und die Maskenteile mit Gelfüllung sind sehr empfindliche
Bauteile. Handhaben Sie sie stets mit Sorg-
zur Desinfektion)
falt, um Beschädigungen oder Verformungen zu vermeiden.
Beschreibung der Verfahren
Geschirrspüler
Handwäsche
Desinfektion*
Sterilisation
(Alternativ zur
Desinfektion)
*Wir empfehlen die Desinfektionsmittel
gigasept
Spülgang bei 65°C. Anschließend alle Teile
sorgfältig mit klarem Wasser spülen.
Handwäsche in warmem Wasser.
Verwenden Sie ein mildes
Reinigungsmittel. Anschließend alle Teile
mit klarem Wasser abspülen und an der
Luft trocknen lassen.
In verdünnter Lösung mechanisch reinigen,
z.B. mit einer Bürste. Nach der
Desinfektion alle Teile gründllich mit
destilliertem Wasser spülen und gründlich
trocknen.
Dampfsterilisation in Geräten nach
EN 285. Temperatur 134 °C,
Mindesthaltezeit 3 Minuten.
®
FF (neu), Cidex® OPA und
Aniosyme DD1. Für diese Mittel wurde die
Verträglichkeit nachgewiesen. Beachten Sie
unbedingt die Anweisung der Hersteller.
Hinweise zur hygienischen Aufbereitung und
zur hygienischen Aufbereitung bei
Patientenwechsel finden Sie auch in einer
Broschüre im Info-Portal auf
www.weinmann.de. Wenn Sie keinen
Internetzugang haben, wenden Sie sich an
Weinmann.
Hinweis
Wir empfehlen, bei der hygienischen
Aufbereitung geeignete Handschuhe
(z.B. Einmalhandschuhe) zu tragen.
Waschen Sie das Kopfband vor der ersten Benutzung, da es abfärben könnte.
Das Kopfband darf nur von Hand gewaschen werden!
Bügeln Sie das Kopfband nicht, da
sonst die Klettverschlüsse nicht mehr
halten!
Trocknen Sie die Kopfbänderung nicht
im Trockner!
9
Page 12

DE
4.3 Nach der Aufbereitung
Trocknen Sie alle Teile nach der hygienischen
Aufbereitung gründlich. Überprüfen Sie die
Bauteile auf verbleibende Verschmutzung
oder Beschädigung. Wiederholen Sie
gegebenenfalls die hygienische
Aufbereitung. Ersetzen Sie beschädigte Teile.
Montieren Sie die Maske wieder.
4.4 Patientenwechsel
Soll die Maske für einen anderen Patienten
verwendet werden, muss diese zuvor hygienisch aufbereitet werden.
Zerlegen Sie dazu die Maske. Desinfizieren
oder sterilisieren Sie alle Teile entsprechend
Abschnitt „4.2 Reinigung, Desinfektion,
Sterilisation”.
Verwenden Sie eine neue Kopfbänderung
und gegebenenfalls eine neue
Schnellentriegelung.
5 Funktionskontrolle
Führen Sie vor jedem Gebrauch eine
Funktionskontrolle durch, wie im Folgenden
beschrieben.
Nur vented-Varianten
Überprüfen Sie vor jedem Gebrauch die
Funktion des Notfallausatemventils wie im
Folgenden beschrieben:
1. Stellen Sie sicher, dass Ventil und
Membran trocken, unbeschädigt und
sekretfrei sind. Verwenden Sie die Maske
nicht, wenn das Ventil oder die Membran
beschädigt sind (z. B durch Risse oder
Verformungen). Ersetzen Sie in diesem
Fall das Notfallausatemventil (siehe „7.
Lieferumfang” auf Seite 11).
2. Stellen Sie sicher, dass die Membran des
Ventils die Öffnung des Ventils nicht verschließt. Nur so kann Raumluft in die
Maske strömen.
3. Schließen Sie den Atemschlauch (Lieferumfang des Therapiegerätes) an den
Winkel der Maske, sowie an das
Therapiegerät an.
4. Schalten Sie das Therapiegerät ein. Die
Membran sollte nun die Öffnung im
Notfallausatemventil verschließen. Nur so
kann Luft vom Therapiegerät in die
Maske strömen.
5. Verwenden Sie die Maske nicht, wenn
das Ventil oder die Membran nicht
funktionieren. Ersetzen Sie das Notfallausatemventil. (siehe „7. Lieferumfang” auf
Seite 11)
JOYCE Full Face-Masken
Führen Sie nach jeder hygienischen Aufbereitung eine Sichtkontrolle durch.
Kommt es aufgrund von Beschädigungen am
Maskenwulst zu Undichtigkeiten, wechseln
Sie ihn aus.
Prüfen Sie die Funktionsfähigkeit und die
Dichtigkeit des Kugelgelenkes am Winkel. Ist
es nicht mehr leichtgängig oder undicht,
wechseln Sie Winkel und Sicherungsring aus.
Unbrauchbar gewordene Teile können über
den Hausmüll entsorgt werden.
Verfärbungen des Stirnpolsters und des Maskenwulstes können auftreten. Diese beeinträchtigen aber nicht die Funktion.
10
Page 13
DE
6 Störungen und deren
Beseitigung
vented-Varianten
Störung Ursache Beseitigung
Druckschmerzen im
Gesicht.
Zugluft im
Auge.
Therapiedruck wird
nicht erreicht.
Maske sitzt zu
fest.
Maske sitzt zu
locker.
Maske passt
nicht.
Hoher Therapiedruck.
Maske nicht
korrekt
eingestellt.
Maskenwulst ist
beschädigt.
Schlauch-system
ist undicht.
Luft tritt an
Druckmessanschlüssen aus.
Notfallausatemventil:
– nicht korrekt
montiert
– defekt
Kopfbänderung etwas
weiter einstellen.
Position der Stirnstütze
anpassen.
Kopfbänderung etwas
fester einstellen.
Position der Stirnstütze
anpassen.
Andere Maskengröße
verwenden. Ist beim
Fachhändler erhältlich
Harten Maskenwulst (für
Drücke bis 40 hPa)
verwenden. Ist beim
Fachhändler erhältlich.
Kopfbänderung einstellen.
Position der Stirnstütze
anpassen.
Maskenwulst ersetzen
Steckverbinder und Sitz der
Schlauchmuffen prüfen.
Druckmessanschlüsse mit
Verschluss (im Lieferumfang enthalten)
abdecken.
Notfallausatemventil:
korrekt montieren
ersetzen
7Lieferumfang
Artikel
JOYCE Full Face vented‚
Gr. S
JOYCE Full Face vented‚
Gr. M
JOYCE Full Face vented‚
Gr. L
JOYCE Full Face vented‚
Gr. XL
JOYCE Full Face vented
40 hPa‚ Gr. S
JOYCE Full Face vented
40 hPa‚
Gr. M
JOYCE Full Face vented
40 hPa, Gr. L
JOYCE Full Face vented
40 hPa, Gr. XL
JOYCE Full Face GEL vented‚
Gr. S
JOYCE Full Face GEL vented‚
Gr. M
JOYCE Full Face GEL vented‚
Gr. L
JOYCE Full Face
Gr. S
JOYCE Full Face
Gr. M
JOYCE Full Face
Gr. L
JOYCE Full Face
plus
vented‚
plus
vented‚
plus
vented‚
plus
vented‚
Gr. XL
non vented-Varianten
HEADstrap
Artikel Nr. mit
WEINMANNstrap/
JOYCEstrap
Artikel Nr. mit
WM 26410 WM 26410/1
WM 26420 WM 26420/1
WM 26430 WM 26430/1
WM 26440 WM 26440/1
WM 26411 WM 26411/1
WM 26421 WM 26421/1
WM 26431 WM 26431/1
WM 26441 WM 26441/1
WM 26412 WM 26412/1
WM 26422 WM 26422/1
WM 26432 WM 26432/1
WM 26413
WM 26423
WM 26433
WM 26443
Hinweis
Alle Masken werden komplett montiert
und mit Kopfbänderung geliefert.
Artikel
JOYCE Full Face non vented
40 hPa‚ Gr. S
JOYCE Full Face non vented
40 hPa‚ Gr. M
JOYCE Full Face non vented
40 hPa‚ Gr. L
JOYCE Full Face non vented
40 hPa‚ Gr. XL
JOYCE Full Face GEL non vented‚
Gr. S
Artikel Nr. mit
WEINMANNstrap/
HEADstrap
WM 26461
WM 26471
WM 26481
WM 26491
WM 26462
11
Page 14
DE
Artikel Nr. mit
Artikel
WEINMANNstrap/
HEADstrap
JOYCE Full Face GEL non vented‚
Gr. M
JOYCE Full Face GEL non vented‚
Gr. L
WM 26472
WM 26482
Ersatzteile
Artikel Artikel Nr.
Set Kugelgelenk:
Sicherungsring, Winkel, Drehhülse,
Notfallausatemventil
Set Kugelgelenk non vented:
Sicherungsring, Winkel, Drehhülse
Drehhülse vented WM 26254
Stirnstütze:
Stirnpolster, Grobverstellung
Stirnstütze, Feinverstellung Stirnstütze
Stirnstütze GEL:
Stirnpolster GEL, Grobverstellung
Stirnstütze, Feinverstellung Stirnstütze
Stirnpolster WM 26200
Stirnpolster GEL WM 26209
Maskenwulst 30 hPa, Gr. S
Maskenwulst 30 hPa, Gr. M
Maskenwulst 30 hPa, Gr. L
Maskenwulst 30 hPa, Gr. XL
Maskenwulst 40 hPa, Gr. S
Maskenwulst 40 hPa, Gr. M
Maskenwulst 40 hPa, Gr. L
Maskenwulst 40 hPa, Gr. XL
Maskenwulst GEL FFM, Gr. S
Maskenwulst GEL FFM, Gr. M
Maskenwulst GEL FFM, Gr. L
Maskenwulst FF
Maskenwulst FF
Maskenwulst FF
Maskenwulst FF
plus
plus
plus
plus
, Gr. S
, Gr. M
, Gr. L
, Gr. XL
Kopfbänderung WEINMANNstrap,
inkl. Bänderungsclips WM 26350
Kopfbänderung HEADstrap,
inkl. Bänderungsclips WM 26360
Kopfbänderung JOYCEstrap blau, incl.
Bänderungsclips
Bänderungsclips (4 Stck.) WM 26205
Verschluss WM 26208
Gebrauchsanweisung
DE, EN, FR, NL, IT, ES, PT, TR, EL, PL, HR WM 66117
WM 26569
WM 26207
WM 26201
WM 26115
WM 26510
WM 26520
WM 26530
WM 26540
WM 26511
WM 26521
WM 26531
WM 26541
WM 26512
WM 26522
WM 26532
WM 26586
WM 26587
WM 26588
WM 26589
WM 26290
Zubehör
Artikel Artikel Nr.
Schnellentriegelung (Reißleine) WM 26560
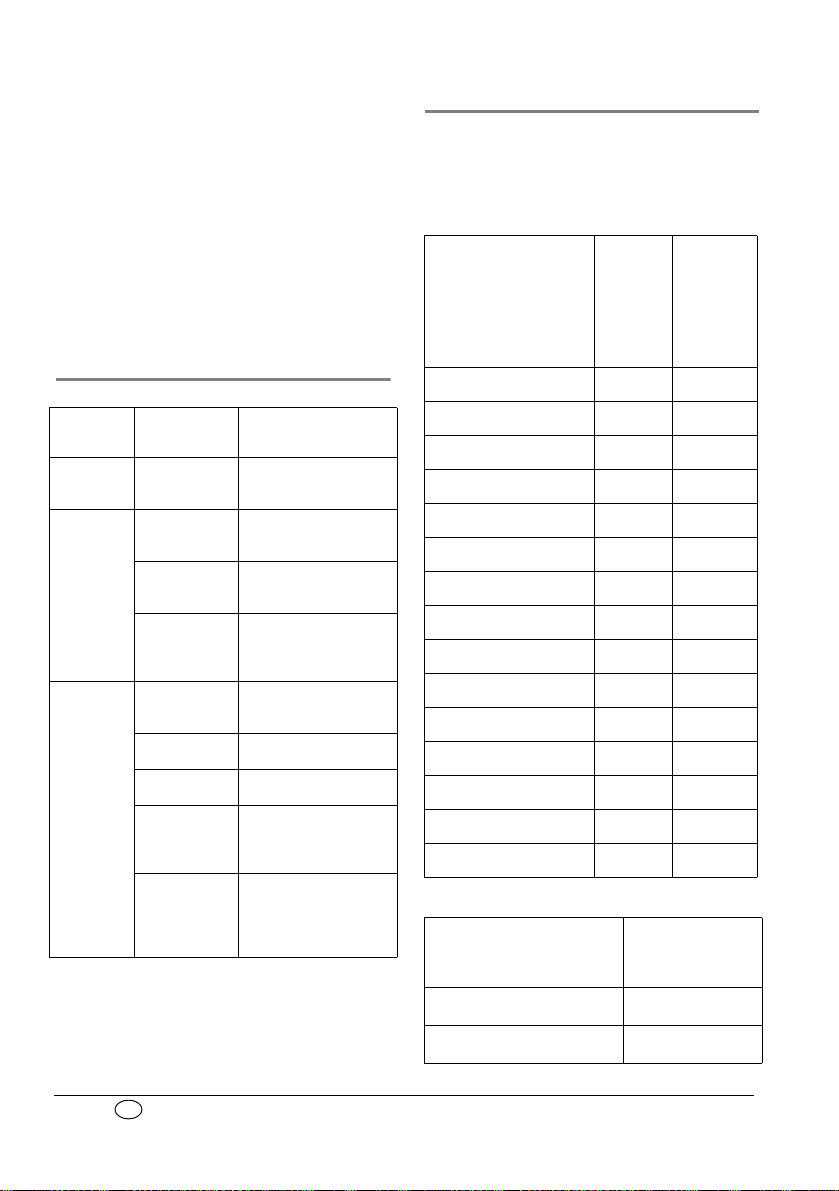
8 Spezifikationen
Technische Daten
Parameter Wert
Produktklasse nach Richtlinie
93/42 EWG:
Abmessungen (BxHxT): ca. 107 x 160 x 106 mm
Gewicht: ca. 102 Gramm
Therapiedruckbereich:
Maskenwulst 30 hPa:
Maskenwulst 40 hPa:
Maskenwulst GEL FFM:
Maskenwulst FF
plus
:
Schlauchanschluss: Konus
nach EN ISO 5356-1
vented-Varianten:
non vented-Varianten
Druckmessanschlüsse: Ø 4 mm
Breite Bänderungsclips: max. 20 mm
Temperaturbereich
Betrieb:
Lagerung
Strömungswiderstand
vented-Varianten:
bei 50 l/min
bei 100 l/min
non vented-Varianten
bei 50 l/min
bei 100 l/min
Strömungswiderstand
Notfallausatemventil
Inspiration bei 50 l/min:
Exspiration bei 50 l/min:
Schaltdruck
Notfallausatemventil
(vented-Varianten)
Öffnen:
Schließen:
Angegebener ZweizahlGeräuschemissionswert
nach ISO 4871:
Schalldruckpegel
Schallleistungspegel
(Unsicherheitsfaktor: 3 dB(A))
Gebrauchsdauer bis zu 12 Monate
II a
1
4 bis 30 hPa
4 bis 40 hPa
4 bis 40 hPa
4 bis 30 hPa
Ø 22 mm (männl.)
Ø 22 mm (weibl.)
+ 5° C bis + 40° C
- 20° C bis + 70° C
0,02 hPa
0,26 hPa
0,09 hPa
0,37 hPa
0,5 hPa
0,5 hPa
≤ 1 hPa
≤ 2 hPa
16,5 dB(A)
24,5 dB(A)
2
1
12
Page 15

DE
Parameter Wert
Mittlerer Leckageflow
JOYCE Full Face vented (l/min)
Ausgangsdruck am Therapiegerät (hPa)
40
50
60
70
80
90
100
0
10
20
30
40
50
60
70
80
90
100
0 5 10 15 20 25 30 35 40
JOYCE FF
vented
JOYCE FF
non vented
Angewandte Normen EN ISO 17510-2:2009
1
abhängig von Größe und Ausführung
2
Materialien, die zur Herstellung von Masken
verwendet werden, altern, wenn sie z.B. aggressiven Reinigungsmitteln ausgesetzt sind.
Im Einzelfall kann es daher notwendig sein,
dass Sie Ihre Maske früher ersetzen müssen
(siehe „5. Funktionskontrolle” auf Seite 10).
Werkstoffe
Artikel Werkstoff
Maskenwulst, Verschluss Silikon
Maskenwulst GEL
Stirnpolster, Sicherungsring TPE, Polypropylen
Stirnpolster GEL
Maskenkörper, Winkel Polycarbonat
Kopfbänderung
WEINMANNstrap
Kopfbänderung JOYCEstrap
Kopfbänderung HEADstrap
Drehhülse, Grobverstellung
Stirnstütze, Feinverstellung
Stirnstütze
Bänderungsclip POM
Ventilkassette
(Notfallausatemventil)
Schnellentriegelung (Reißleine)
Verschluss Druckmessanschlüsse Silikon
Verschluss Endoskopieadapter
non-vented
Maskenwulst, Stirnpolster
Maskenkörper, Winkel,
Endoskopieadapter non-vented
Sicherungsring,
Notfallausatemventil
Konstruktionsänderungen vorbehalten
Silikon,
Silikon-Gel
Silikon,
Silikon-Gel,
Polycarbonat
Lycra, Polyester,
Polyurethan, Nylon,
Baumwolle,
Polyamid
Baumwolle,
Polyamid, Elasthan
Nylon/Spandex
Polyurethan
Polyester/Lycra
Polypropylen
TPE, Polypropylen
POM, Polyester,
Polyamid
Silikon
Silikon und SilikonGel, Silikon-Lack
Polycarbonat,
Polyamid
Polypropylen,
TPE
Alle Teile der Maske sind latexfrei.
Druck-Flow-Kennlinie
In der Druck-Flow-Kennlinie wird der
Auslass-Flow in Abhängigkeit vom
Therapiedruck dargestellt.
9 Garantie
Weinmann räumt dem Kunden eines neuen
originalen Weinmann-Produktes und eines
durch Weinmann eingebauten Ersatzteils
eine beschränkte Herstellergarantie gemäß
der für das jeweilige Produkt geltenden Garantiebedingungen und nachstehend aufgeführte Garantiezeiten ab Kaufdatum ein. Die
Garantiebedingungen sind im Internet unter
www.weinmann.de abrufbar. Auf Wunsch
senden wir Ihnen die Garantiebedingungen
auch zu. Im Garantiefall wenden Sie sich an
Ihren Fachhändler.
Produkt
Weinmann-Geräte inklusive Zubehör
(Ausnahme: Masken) zur Schlafdiagnose,
Schlaftherapie, Heimbeatmung,
Sauerstoffmedizin und Notfallmedizin
Masken inklusive Zubehör, Akku, Batterien*,
Sensoren, Schlauchsysteme
Produkte für den einmaligen Gebrauch Keine
* falls nicht anders in den technischen
Unterlagen angegeben.
Garantie-
zeiten
2 Jahre
6 Monate
13
Page 16

DE
10 Konformitätserklärung
Hiermit erklärt die Weinmann Geräte für
Medizin GmbH + Co. KG, dass das Produkt den
einschlägigen Bestimmungen der Richtlinie 93/
42/EWG für Medizinprodukte entspricht.
Den vollständigen Text der Konformitätserklärung finden Sie unter: www.weinmann.de
14
Page 17

EN
English
1 Description of Equipment
2 Safety instructions
Legend
(Representation of individual parts:
see Fig. A in enclosed leaflet.)
1 Headgear
2 Forehead cushion
3 Fine adjustment component of forehead
support
4 Coarse adjustment component of forehead
support
5 Forehead support
6 Headgear clip
7 Pressure measurement ports
8 Port cap
9 Anti-asphyxia valve (
10 Rotating sleeve*
11 Elbow*
12 Retaining ring*
13 Mask frame
14 Mask cushion
15 Chin strap (JOYCE Full Face
vented variants: transparent;
*
non vented variants
vented variants only)
plus
vented only)
: blue
Intended use
The JOYCE Full Face masks are accessories.
They act as a sealing element between the
patient and the therapy unit. They are used
for the treatment of sleep apnea and for the
non-invasive and non-life-sustaining
ventilation of patients with ventilatory
insufficiency.
The non vented variants may only be used in
combination with ventilation devices which
have an active exhaled air valve.
Before use by the patient
Patients must be instructed in the use of the
mask by qualified personnel before therapy
begins.
Safety regulations
Following the requirements of Directive 93/
42 ECC please observe the following points:
• Please read these operating instructions
through carefully. They are a part of the
product and should be available at all
times.
• Never use the vented variants if the antiasphyxia valve is damaged or missing, as
this may lead to increased CO
if the therapy unit fails.
reinhalation
2
• Never use JOYCE Full Face masks for
patients who are not able to remove it
independently or have a tendency to
vomit. There is a risk of asphyxia.
• Use the JOYCE Full Face masks only in the
therapy pressure ranges intended for the
individual variants:
– 4-30 hPa: JOYCE Full Face vented
JOYCE Full Face
– 4-40 hPa: JOYCE Full Face vented 40 hPa
JOYCE Full Face non vented 40 hPa
JOYCE Full Face GEL vented
JOYCE Full Face GEL non vented
plus
vented
Otherwise it can lead to CO2 reinhalation or to leakages.
• If third-party items are used, functional failures may occur and fitness for use may be
restricted. Biocompatibility requirements may
also not be met. Please note that in such
cases, any claim under warranty and liability
will be voided if neither the accessories nor
genuine replacement parts recommended in
the instructions for use are used.
• Patients with limited spontaneous respiration must be monitored at all times. The
appropriate negative pressure/leak alarm
on the ventilation device must be activated.
• Patients with obstructive and restrictive
lung diseases should be examined on an
individual basis during use of the JOYCE
15
Page 18

EN
Full Face masks (e.g. with regard to the
reinhalation of CO
• Never close the opening of the antiasphyxia valve or the exhaled air system.
Otherwise there is a risk of reinhaling CO
and of asphyxia.
• Do not place the mask over your face for a
prolonged period unless the therapy unit is
switched on. Otherwise there is the risk of
reinhaling CO
• Do not use a breathing hose that is electrically conductive (exception: breathing
tubes which can be heated electrically).
• Follow the instructions in section 4
“Hygiene treatment” to avoid infection,
bacterial contamination and poor functionality of the mask.
).
2
2
.
2
Contraindications:
Under certain circumstances, JOYCE Full Face
masks should not be used or only be used
with particular care. In each case the decision
whether to use these masks for therapy lies
with the doctor in charge.
• Functional disturbance of the lower
oesophageal sphincter (lower sphincter of
the oesophagus)
• Excessive regurgitation (reflux of stomach
contents into the oesophagus)
• Cough reflex disturbance
• Hiatus hernia (diaphragmatic hernia)
• Anesthetic or sedation
• Open facial wounds which tend towards
inflammation
• Haemodynamic or cardiorespiratory instability
• Unconsciousness
• Claustrophobia, anxiety
• Facial deformation or deformation of the
end of the nasopharynx
• Beard or other obstructions to adjusting
and sealing the mask
• Facial injuries
• Barotraumas
• Necessity for ventilation or artificial
respiration 24 hours a day
• Fresh facial, oesophageal or stomach
operations
• Taking medication that can cause vomiting
• Necessity for immediate intubation
Side effects
The following side effects may occur:
Nasal congestion, dry nose, dry mouth in the
morning, sinus pressure, chest pains, breathlessness, flatulence, headaches, irritation of the
conjunctiva, irritating noises during exhalation,
pressure sores on the face, reddening of the
skin.
3 Operation
Fig. A-I: See enclosed leaflet.
3.1 Adjust forehead support (Fig. C)
Fine adjustment component
Squeeze the upper side tabs of the coarse
adjustment component inwards. Position the
fine adjustment component in one of the
three slots.
To adjust the height of the forehead cushion
or the fine adjustment component (approximately 1 cm), turn the fine adjustment component through 180°. Then position this as
described above.
Coarse adjustment component
Squeeze the lower side tabs of the coarse
adjustment component inwards. Place them
in one of the three slots in the mask frame.
3.2 Put on the mask (Fig. B)
Caution!
To minimize the risk of vomiting, the
patient should not eat or drink anything
for 3 hours before using the mask.
1. Unhook one of the lower headgear clips
from the mask.
16
Page 19

EN
2. Place the headgear over your head and
hook the headgear clip back onto the
strap.
3. Position the mask on your face as shown
in Figure B.
Note:
If using JOYCE Full Face
plus
vented, ensure
that the chin strap is correctly located, i.e.
that it surrounds your chin completely.
Otherwise the mask may slip when you
move.
4. Adjust the headgear with the aid of the
hook-and-loop closures so that the mask
seals on the face but is not too tight.
WEINMANNstrap only:
The WEINMANNstrap headgear provides the following additional options
(see also "Overview" on the enclosed
leaflet):
– hook-and-loop closures on both sides.
– hook-and-loop closure on top of the head:
release the hook-and-loop closure, pull
gently on the ends of the headgear with
both hands and push the hook-and-loop
closure back on.
You can tell whether the headgear is
correctly attached by the hook-andloop tabs. The hook-and-loop tabs on
the forehead are the same color as the
inside of the headgear.
HEADstrap only:
The HEADstrap headgear provides the
following options for you to do this:
– coarse adjustments: slot of the headgear.
– fine adjustments: four hook-and-loop
straps."
5. If necessary, re-adjust the forehead
support.
3.3 Exhaled air system (Fig. H)
vented variants
vented variants (all mask components are
transparent) have an integrated exhaled
air system: the retaining ring and mask
frame are shaped in such a way that a gap is
formed between these parts. Through this
gap the exhaled air can escape. The special
geometry of the parts guarantees that when
putting on the retaining ring the gap cannot
be closed. Do not connect an external
exhaled air system, otherwise the therapy
pressure will not be reached.
non vented variants
Warning!
The non vented variants (retaining ring,
elbow and rotating sleeve in blue) do not
have their own exhalation system! They
may only be used in combination with
therapy devices which have an active
exhalation valve! If the therapy device fails,
there is otherwise the risk of re-inhalation of
CO
and suffocation.
2
The non vented variants may never be used
in combination with an external exhalation
system (such as Silentflow2, for example),
otherwise the safety function is not
guaranteed in the event of device failure. See
also the instructions for use for your therapy
device.
3.4 Anti-asphyxia valve (Fig. G)
Warning!
Only the vented variants are equipped
with an anti-asphyxia valve. Ensure that this
valve is working correctly before every use
(see “5. Functional check” on page 21),
otherwise there is a risk of suffocation!
Safety function of the anti-asphyxia
valve
The anti-asphyxia valve has an opening to the
atmosphere through which the patient can
inhale ambient air if the therapy device fails.
This significantly reduces the risk of reinhaling CO
suffocation.
Inside the valve is a membrane which can
adopt either of two positions:
• As long as the therapy device is in operation, the membrane is pressed against the
opening to the atmosphere by the flow,
and thus also the risk of
2
17
Page 20

EN
sealing this opening completely. The
patient breathes through the therapy
device.
• If the therapy device fails or if the device is
not connected, the membrane is in the
resting position, in other words, the opening to the atmosphere is free. The patient
breathes ambient air through this opening.
Caution!
The anti-asphyxia valve is a highly sensitive
component. Always handle it with care.
3.5 Gel-filled mask components
On JOYCE Full Face GEL vented and
JOYCE Full Face GEL non vented, the forehead cushion and the mask cushion are gelfilled as standard. Gel forehead cushions and
gel mask cushions are also available as replacement parts for other JOYCE Full Face
variants.
Caution!
Gel-filled mask components are highly sensitive components. Always handle them with
care to prevent deformation and damage.
3.6 Mask cushions with chin strap
JOYCE Full Face
which supports the chin during therapy to stop
the lower jaw slipping out of the mask cushion
and interrupting therapy.
plus
vented has a chin strap
3.7 Therapy pressure ranges
The individual JOYCE Full Face mask variants
are each available for a particular therapy
pressure range (see “7. Scope of supply” on
page 22):
– 4-30 hPa: JOYCE Full Face vented
JOYCE Full Face
– 4-40 hPa: JOYCE Full Face vented 40 hPa
JOYCE Full Face non vented 40 hPa
JOYCE Full Face GEL vented
JOYCE Full Face GEL non vented
The JOYCE Full Face masks for the therapy
pressure range 4 - 30 hPa have a soft mask
cushion, the JOYCE Full Face masks for the
therapy range 4 - 40 hPa have a harder mask
plus
vented
cushion or a gel mask cushion (gel-filled
variants).
The harder mask cushion for the therapy
pressure range 4 - 40 hPa is marked with the
number "40".
All mask cushions are also available as
individual replacement parts to enable you to
adapt your mask to changed therapy
requirements.
3.8 Connecting the mask to the
therapy unit (Fig.
Push the hose system of your therapy unit
onto the rotating sleeve. Ensure that the
connection to the hose is secure and airtight.
The connection must not be loosened by the
therapy pressure.
If you want to detach the mask temporarily
from the hose, pull the rotating sleeve off the
elbow.
Caution!
If there is a high risk of transferring bacteria
between the patient and the unit, a bacterial
filter should be used. Also pay attention to
the instructions for use of the therapy unit.
H)
3.9 Ports for pressure
measurement (Fig.
JOYCE Full Face masks are fitted with two
ports that can be used to measure pressure
or to feed in oxygen.
Caution!
• Oxygen therapy can have side effects if
incorrectly administered or used in the
wrong dosage. Only carry out this sort of
treatment if prescribed by a doctor.
• When carrying out oxygen therapy, strictly
follow the instructions for use of your O
system and your therapy unit.
When the pressure measurement ports are
not in use, always close them with the caps
provided. Otherwise air will escape from the
ports and the therapy pressure will not be
reached.
E)
2
18
Page 21

EN
3.10 Compatible devices and accessories
Therapy units
JOYCE Full Face masks can be combined with
all units designed for carrying out the
therapies described under “Intended Use”.
Note that if unsuitable device combinations
are used, the actual pressure in the mask may
not correspond to the therapy pressure you
have been prescribed.
This may also happen even if the correct
pressure is indicated on the therapy unit.
Have your device combination adjusted by a
doctor or distributor so that the pressure in
the mask corresponds to your therapy
pressure.
Humidifier
JOYCE Full Face masks can be used with both
cold and warm-air humidifiers.
Never set the humidification level so high
that condensation forms in the air hose.
Follow the instructions for use of your
humidifier and therapy unit.
Quick release cord (optional) (Fig. I)
To open the headgear in an emergency (e.g.
vomiting) a quick release cord can be
supplied as an accessory.
The quick release cord consists of a special
clip with ripcord, which is fitted instead of
one of the lower headgear clips.
In an emergency, simply pull the ripcord. The
special clip will detach itself from the mask.
The headgear is now open and the mask can
be removed.
Bronchoscopy set (optional) (no figure)
The bronchoscopy set (endoscopy adapter
non-vented in combination with retaining
ring non vented (NV)) allows endoscopy
(bronchoscopy) to be performed without
interrupting ventilation.
The bronchoscopy may only be performed by
trained medical staff.
For more detailed information, please see
brief instructions for use WM 67495.
3.11 After usage
1. Undo one of the lower headgear clips
from the mask and remove the mask.
2. Undo the other three headgear clips in
order to remove the headgear from the
mask.
3. Proceed as described in "4 Hygiene
treatment".
3.12 Disassembling/assembling the mask
Disassembling the mask (Fig. G - C)
1. Detach the mask cushion from the mask
frame.
2. Remove the cap from the pressure
measurement ports.
3. Turn the retaining ring anticlockwise to
the 11 o’clock position. Now pull the
retaining ring and the elbow away from
the mask frame.
4. Press the elbow out of the retaining ring
and pull the rotating sleeve off the elbow.
5. Only vented variants: Remove the antiasphyxia valve carefully off the elbow.
Ensure that the membrane on the interior
of the valve is not damaged.
6. Detach the coarse adjustment
component from the mask frame.
7. Detach the fine adjustment component
from the coarse adjustment component.
Then detach the forehead cushion from
the fine adjustment component.
Assembling the mask (Fig. C - G)
1. Attach the forehead cushion to the fine
adjustment component. Then attach the
fine adjustment component to the coarse
adjustment component.
2. Attach the coarse adjustment component
to the mask frame.
3. Push the rotating sleeve onto the elbow
until you hear it click into place.
19
Page 22

EN
4. Only vented variants: Push the anti-
Dishwasher
Hand wash
Disinfection*
Sterilization
(alternative to
disinfection)
asphyxia valve carefully onto the elbow
until you hear it click into place on both
sides of the elbow. Take care that the
membrane on the interior of the valve is
not damaged or jammed.
5. Press the rotating sleeve onto the elbow.
Then press the elbow into the retaining
ring until you hear it click into place.
6. Push the retaining ring (in the 11 o’clock
position) and elbow onto the mask
frame. Turn the retaining ring to the 12
o’clock position.
7. Push the cap onto the pressure
measurement ports.
8. Attach the mask cushion to the mask
frame.
9. Fasten the headgear to the mask with the
clips.
10.Check that everything is working
properly (see “5. Functional check” on
page 21).
4 Hygiene treatment
4.1 Intervals
Daily
Clean the mask in warm water to remove all
residues. To do this the mask can be
disassembled as described in section 3.12
“ Disassembling/assembling the mask”. Use
a mild cleaning agent (e.g. dishwasher
detergent). After cleaning, rinse all parts
carefully with clean water.
Caution!
• For patients with a weakened immune sys-
tem or a special medical history, daily disinfecting or sterilization of the mask
components may be necessary. In this case,
please consult your doctor.
• Please take great care when cleaning and
disinfecting the contact surfaces between
the mask frame and the retaining ring.
Residues on these surfaces can reduce the
success of the therapy and the functioning
of the integrated exhaled air system
(vented variants).
Weekly
Disassemble the mask as described in section
3.12 “ Disassembling/assembling the mask”
and subject the parts of the mask to a
hygiene treatment (see “4.2. Cleaning,
disinfection, sterilization” on page 20).
4.2 Cleaning, disinfection, sterilization
Permissible procedures
Procedure
Parts
Mask cushion ••• •
Mask cushion GEL •••
Forehead cushion •••
Forehead cushion GEL ••
Port cap ••• •
Mask frame •••
Coarse adjustment
component
Fine adjustment
component
Elbow •••
Anti-asphyxia valve ••
Rotating sleeve •••
Retaining ring •••
Headgear clip •••
Headgear
WEINMANNstrap
Headgear HEADstrap •
Headgear JOYCEstrap •
Quick release cord •
Caution!
• Always clean the components of the mask
thoroughly before disinfecting or sterilizing
them as indicated in the above table.
• The emergency exhaled air valve and gelfilled mask components are highly sensitive
•••
•••
•
20
Page 23

EN
components. Always handle them with
care to prevent damage or deformation.
Description of procedures
Dishwasher
Hand wash
Disinfection*
Sterilization
(alternative to
disinfection)
*We recommend the disinfectants
gigasept
Rinse cycle at 65°C. Then carefully rinse
all parts with clean water.
Hand wash in warm water. Use a mild
detergent. Then rinse all parts in clean
water and allow to air-dry.
Clean mechanically, e.g. with a brush,
in dilute solution. After disinfection
rinse all parts thoroughly with distilled
water and dry thoroughly.
Steam sterilization in devices to comply
with EN 285. Temperature 134 °C,
minimum hold time 3 minutes.
®
FF (new), Cidex® OPA and
Aniosyme DD1. Evidence of tolerance to
these disinfectants has been provided. It is
essential to follow the manufacturer’s
instructions.
Notes on the hygiene treatment and on the
hygiene treatment for a change of patient
can be found in a brochure from our
information portal at www.weinmann.de. If
you do not have Internet access, contact
Weinmann.
Note
Wear suitable gloves (e.g. disposable
gloves) during the hygiene treatment.
Wash the HEADstrap headgear before
using for the first time, as the colour
might run.
The headgear may only be washed by
hand!
Do not iron the headgear, otherwise the
hook-and-loop closures will no longer
work!
Do not dry the headgear in a dryer!
4.3 Following treatment
Thoroughly dry all parts following the
hygiene treatment. Check the components
for residual contamination or damage.
Repeat the hygiene treatment if required.
Replace damaged parts. Reassemble the
mask.
4.4 Multiple patient use
If the mask is used by a different patient, it
must be subjected to a hygiene treatment
first.
Disassemble the mask. Disinfect or sterilize all
parts as described in section "4.2 Cleaning,
disinfection, sterilization".
Use a new headgear and where necessary a
new quick release cord.
5 Functional check
Before use check that everything is working
properly as described below.
vented variants
Always check that the anti-asphyxia valve is
working before each use as described below:
1. Ensure that the valve and membrane are
dry, undamaged and free of secretions.
Do not use the mask if the valve or
membrane is damaged (e.g. through
tears and deformation). In this case
replace the anti-asphyxia valve. (see
“7. Scope of supply” on page 22)
2. Ensure that the valve membrane is not
closing the valve aperture. Only then can
ambient air flow into the mask.
3. Attach the breathing hose (delivered with
the therapy unit) to the elbow of the
mask and to the therapy unit.
4. Switch on the therapy unit. The
membrane should now close the
aperture of the anti-asphyxia valve. Only
then can ambient air flow from the
therapy unit into the mask.
5. Do not use the mask if the valve or the
membrane is not working. Replace the
anti-asphyxia valve. (see “7. Scope of
supply” on page 22)
JOYCE Full Face masks
Carry out a visual check after each cleaning
and disinfecting procedure.
21
Page 24
EN
If the mask cushion is damaged and is no
longer airtight, replace it with a new one.
Check the functionality and air-tightness of
the ball-and-socket joint on the elbow. If it
no longer moves easily or is no longer
airtight, replace the elbow and retaining ring.
Parts that are no longer usable can be
disposed of as normal household waste.
The forehead cushion and the mask cushion
may become discolored, but this does not
impair function.
6 Troubleshooting
Mal-
functions
Painful
pressure on
the face.
Draught in
the eyes.
Therapy
pressure is
not reached.
Cause Solution
Mask is too tight.
Mask is too
loose.
Mask does not
fit.
High therapy
pressure.
Mask not
adjusted
correctly.
Mask cushion is
damaged.
Hose system is
not airtight.
Air is escaping
from pressure
measurement
ports.
Anti-asphyxia
valve:
– incorrectly
fitted
– defective
Loosen headgear slightly.
Adjust position of forehead
support.
Tighten headgear slightly.
Adjust position of forehead
support.
Use mask of different size.
Available from your
distributor.
Use hard mask cushion (for
pressures up to 40 hPa).
Available from your
distributor.
Adjust headgear.
Adjust position of forehead
support.
Replace mask cushion.
Check push-fit connector
and fit of hose sleeves.
Cover pressure
measurement ports with
cap (included in package).
Anti-asphyxia valve:
fit correctly
replace
7 Scope of supply
Note
All masks are supplied fully assembled
and with headgear.
vented variants
Article
Article no. with
JOYCE Full Face vented‚ size
S
JOYCE Full Face vented‚ size
M
JOYCE Full Face vented‚ size
L
JOYCE Full Face vented‚ size
XL
JOYCE Full Face vented
40 hPa, size S
JOYCE Full Face vented
40 hPa‚
size M
JOYCE Full Face vented
40 hPa‚ size L
JOYCE Full Face vented
40 hPa‚ size XL
JOYCE Full Face GEL
vented‚ size S
JOYCE Full Face GEL
size
vented‚
M
JOYCE Full Face GEL
vented, size L
JOYCE Full Face
size S
JOYCE Full Face
size M
JOYCE Full Face
size L
JOYCE Full Face
plus
vented‚
plus
vented‚
plus
vented‚
plus
vented‚
size XL
non vented variants
Article
JOYCE Full Face non vented
40 hPa‚ size S
JOYCE Full Face non vented
40 hPa‚ size M
WEINMANNstrap/
WM 26410 WM 26410/1
WM 26420 WM 26420/1
WM 26430 WM 26430/1
WM 26440 WM 26440/1
WM 26411 WM 26411/1
WM 26421 WM 26421/1
WM 26431 WM 26431/1
WM 26441 WM 26441/1
WM 26412 WM 26412/1
WM 26422 WM 26422/1
WM 26432 WM 26432/1
WM 26413
WM 26423
WM 26433
WM 26443
Article no. with
WEINMANNstrap/
WM 26461
WM 26471
Article no.
HEADstrap
HEADstrap
with JOYCEstrap
22
Page 25

EN
Article no. with
Article
WEINMANNstrap/
HEADstrap
JOYCE Full Face non vented
40 hPa‚ size L
JOYCE Full Face non vented
40 hPa‚ size XL
JOYCE Full Face GEL non vented‚
size S
JOYCE Full Face GEL non vented‚
size M
JOYCE Full Face GEL non vented‚
size L
WM 26481
WM 26491
WM 26462
WM 26472
WM 26482
Replacement parts
Article Article no.
Ball-and-socket joint set:
Retaining ring, elbow, rotating sleeve,
anti-asphyxia valve
Ball-and-socket joint set non vented
(blue):
Retaining ring, elbow, rotating sleeve
Rotating sleeve vented WM 26254
Forehead support:
Forehead cushion, coarse adjustment
component forehead support, fine
adjustment component forehead
support
Forehead support GEL:
Forehead cushion GEL, forehead
support coarse adjustment
component, forehead support fine
adjustment component
Forehead cushion WM 26200
Forehead cushion GEL WM 26209
Mask cushion 30 hPa, size S
Mask cushion 30 hPa, size M
Mask cushion 30 hPa, size L Mask
cushion 30 hPa, size XL
Mask cushion 40 hPa, size S
Mask cushion 40 hPa, size M
Mask cushion 40 hPa, size L
Mask cushion 40 hPa, size XL
Mask cushion GEL FFM, Size S
Mask cushion GEL FFM, Size M
Mask cushion GEL FFM, Size L
Mask cushion FF
Mask cushion FF
Mask cushion FF
Mask cushion FF
plus
, size S
plus
, size M
plus
, size L
plus
, size XL
WEINMANNstrap headgear, incl.
headgear clips
WM 26569
WM 26207
WM 26201
WM 26115
WM 26510
WM 26520
WM 26530
WM 26540
WM 26511
WM 26521
WM 26531
WM 26541
WM 26512
WM 26522
WM 26532
WM 26586
WM 26587
WM 26588
WM 26589
WM 26350
Article Article no.
Headgear HEADstrap,
inc. headgear clips WM 26360
JOYCEstrap headgear, blue, incl.
headgear clips
WM 26290
Headgear clips (4 pcs.) WM 26205
Port cap WM 26208
Instructions for use
DE, EN, FR, NL, IT, ES, PT, TR, EL, PL,
HR
WM 66117
Accessories
Article Article no.
Quick release cord (ripcord) WM 26560
8 Specifications
Technical data
Parameters Value
Product category according to
93/42/EEC:
Dimensions (WxHxD):
Weight: c. 102 grams
Therapy pressure range:
Mask cushion 30 hPa:
Mask cushion 40 hPa:
Mask cushion GEL FFM:
Mask cushion FF
plus
:
Hose connector: cone
complying with EN ISO 5356-1
vented variants:
non vented variants:
Pressure measurement ports: Ø 4 mm
Width of headgear clips: max. 20 mm
Temperature range
Operation:
Storage
Flow resistance
vented variants:
at 50 l/min
at 100 l/min
non vented variants:
at 50 l/min
at 100 l/min
Flow resistance anti-asphyxia
valve
Inspiration at 50 l/min.:
Exhalation at 50 l/min.:
II a
c. 107 x 160 x
1
106 mm
4 to 30 hPa
4 to 40 hPa
4 to 40 hPa
4 to 30 hPa
Ø 22 mm (male)
Ø 22 mm (female)
+ 5° C to + 40° C
- 20° C to + 70° C
0.02 hPa
0.26 hPa
0.09 hPa
0.37 hPa
0.5 hPa
0.5 hPa
1
23
Page 26

EN
Parameters Value
Mean leakage flow JOYCE Full
Face vented (l/min)
Output pressure of therapy unit (hPa)
40
50
60
70
80
90
100
0
10
20
30
40
50
60
70
80
90
100
0 5 10 15 20 25 30 35 40
JOYCE FF
vented
JOYCE FF
non vented
Switching pressure
anti-asphyxia valve
(vented variants)
Open:
Close:
Quoted two-figure noise
emission value to ISO 4871:
sound pressure level
sound power level (uncertainty
factor: 3 dB(A))
Working life up to 12 months
Standards applied EN ISO 17510-2:2009
1
depending on size and design
2
If the materials used to produce masks are
exposed to aggressive cleaning agents, for
example, they age. In individual cases,
therefore, you may need to replace your mask
sooner (see “5. Functional check” on page 21).
Subject to design
changes
Materials
Article Material
Mask cushion, port cap Silicone
Mask cushion GEL
Forehead cushion, retaining ring TPE, Polypropylene
Forehead cushion GEL
Mask frame, elbow Polycarbonate
Headgear WEINMANNstrap
Headgear JOYCEstrap
Headgear HEADstrap
Rotating sleeve, forehead support
coarse adjustment component,
forehead support fine adjustment
component
Headgear clip POM
Valve cartridge (anti-asphyxia valve) TPE, Polypropylene
Quick release cord (ripcord)
24
≤1 hPa
≤2 hPa
16.5 dB(A)
24.5 dB(A)
Silicone,
silicone gel
Silicone,
silicone gel,
polycarbonate
Lycra, Polyester,
Polyurethane,
Nylon, Cotton,
Polyamide
Cotton,
polyamide,
elasthane
Nylon/Spandex
Polyurethane
Polyester/Lycra
Polypropylene
POM, Polyester,
Polyamide
Article Material
Plug for pressure measurement
connections
Plug for endoscopy adapter nonvented
Mask cushion, forehead cushion
Mask body, elbow connector,
endoscopy adapter non-vented
2
Retaining ring, emergency exhalation
valve
Silicone
Silicone
Silicone and
silicone gel, silicone
coating
Polycarbonate,
Polyamide
Polypropylene,
TPE
All mask components are latex-free.
Pressure/flow characteristic curve
The pressure/flow characteristic curve shows
outlet flow as a function of therapy pressure.
9Warranty
Weinmann gives the customer a limited
manufacturer warranty on new genuine
Weinmann products and any replacement
part fitted by Weinmann in accordance with
the warranty conditions applicable to the
product in question and in accordance with
the warranty periods from date of purchase
as listed below. The warranty conditions can
be downloaded from www.weinmann.de on
the Internet. We can also send you the
warranty conditions on request. In the event
of a claim under warranty, please contact
your specialist dealer.
Page 27

EN
Product
Weinmann devices including accessories
(except masks) for sleep diagnosis, sleep
therapy, home ventilation, oxygen medicine
and emergency medicine
Masks including accessories, rechargeable
batteries, batteries*, sensors, tube systems
Disposable products None
Period of
guarantee
2 years
6 months
*unless there is information to the contrary
in the technical documentation.
10 Declaration of conformity
Weinmann Geräte für Medizin GmbH + Co.
KG declares herewith that the product
complies fully with the respective regulations
of the Medical Device Directive 93/42/EEC.
The unabridged text of the Declaration of
Conformity can be found on our website at
www.weinmann.de
25
Page 28

FR
Français
1 Description de l'appareil
Légendes
(Représentation schématique des
pièces : Voir la fig. A sur le dépliant
ci-joint.)
1 Harnais
2 Coussinet frontal
3 Dispositif de réglage fin de l'appui frontal
4 Dispositif de réglage grossier de l'appui
frontal
5 Appui frontal
6 Boucle de fixation
7 Raccords de prise de pression
8 Obturateur
9 Soupape expiratoire d'urgence (
unique-
ment variantes vented)
10 Douille rotative*
11 Coude*
12 Bague de blocage*
13 Corps du masque
14 Jupe
15 Sangle de menton (uniquement JOYCE Full
*variantes vented: transparent;
variantes non vented: bleu
Face
plus
vented)
Domaine d'utilisation
Les masques JOYCE Full Face sont des
accessoires. Ils servent d'éléments d'étanchéité
entre le patient et l'appareil de traitement. Ils
sont utilisés pour le traitement de l'apnée du
sommeil et pour la ventilation non invasive,
ne servant pas au maintien en vie, des
patients avec une insuffisance ventilatoire.
Les variantes non vented peuvent
uniquement être utilisées en combinaison
avec les appareils de ventilation équipés
d’une une soupape expiratoire active.
Précautions à prendre avant l'usage
Avant le début du traitement, les patients
doivent être initiés à l'utilisation du masque
par un personnel qualifié.
2 Consignes de sécurité
Exigences de sécurité
Conformément aux exigences de la Directive
93/42/CEE
• Lisez attentivement le présent mode
• N’utilisez jamais les variantes vented si la
• N’utilisez jamais les masques JOYCE Full
• Utilisez exclusivement les masques JOYCE
• L’utilisation d’articles d’autres marques ris-
, veuillez observer ce qui suit :
d'emploi. Il fait partie intégrante du masque et doit être disponible à tout moment.
soupape expiratoire d'urgence est endommagée ou manquante. Il existe sinon un risque accru de réinspiration de CO
défaillance de l'appareil de traitement.
en cas de
2
Face avec des patients qui ne sont à même
de le retirer eux-mêmes ou qui ont tendance à vomir. Risque d'asphyxie !
Full Face dans les plages de pressions thérapeutiques prévues pour les différentes
variantes.
– 4-30 hPa :JOYCE Full Face vented
JOYCE Full Face
– 4-40 hPa :JOYCE Full Face vented 40 hPa
JOYCE Full Face non vented 40 hPa
JOYCE Full Face GEL vented
JOYCE Full Face GEL non vented
plus
vented
Il existe sinon un risque de réinspiration
de CO
ou de défaut d'étanchéité.
2
que d’entraîner des pannes de fonctionnement ainsi qu’une limitation de l’aptitude à
l’emploi. En outre, les exigences en matière
de biocompatibilité risquent de ne pas être
remplies. Veuillez noter que, dans ce cas,
tout droit relatif à la garantie et à la responsabilité sera annulé, si ni les accessoires
recommandés dans la notice d’utilisation ni
les pièces de rechange d’origine ne sont
utilisés.
26
Page 29

FR
• Les patients ayant une respiration spontanée
limitée doivent être surveillés en permanence. Le dispositif d'alarme signalant les fuites/sous-pressions doit être activé sur le
respirateur.
• Les patients souffrant d'affections pulmonaires obstructives et restrictives devraient
faire l'objet d'un examen individuel pendant l'utilisation du masque JOYCE Full
Face (p. ex. à l'égard de la réinspiration de
CO
).
2
• Ne jamais obturer l'orifice de la soupape
expiratoire d'urgence ou du système expiratoire. Il existe sinon un risque de réinspiration du CO
• Le masque ne doit être porté pendant une
durée prolongée que si l'appareil de traitement est branché. Il existe sinon un risque
de réinspiration du CO
• Ne pas utiliser de tuyaux en matériau
conducteur de l'électricité (exception :
tuyaux respiratoires pouvant être chauffés
électriquement).
• Observez les consignes données dans le
chapitre 4 “Précautions d'hygiène” afin de
prévenir les risques d'infection, de contamination bactérienne et de dysfonctionnement.
- expiré et d'étouffement.
2
.
2
Contre-indications :
Dans certaines circonstances, les masques
JOYCE Full Face ne doivent pas être utilisés ou
alors, avec la plus grande prudence. C'est au
médecin traitant qu'il appartient de décider dans
chaque cas si ces masques doivent utilisés ou
non.
• Dysfonctionnement du sphincter inférieur
de l'œsophage (muscle de fermeture du
bas œsophage)
• Régurgitation excessive (reflux du contenu
gastrique dans l'œsophage)
• Perturbation du réflexe de la toux
• Hiatus fracturaire (rupture diaphragmatique)
• Narcose ou sédation
• Blessures ouvertes sur le visage à tendance
inflammatoire
• Instabilité hémodynamique ou cardiorespiratoire
• Evanouissement, inconscience
• Claustrophobie, peur
• Malformations faciales ou rhinopharyngiennes
• Moustache/barbe ou autres obstacles compromettant l'ajustement et l'étanchéité du
masque
• Blessures faciales
• Barotraumatisme
• Nécessité d'une ventilation ou assistance
respiratoire 24 h sur 24
• Opérations récentes du visage, de l'œsophage ou de l'estomac
• Prise de médicaments pouvant provoquer
des vomissements
• Nécessité d'une intubation immédiate
Effets secondaires
L'utilisation du masque peut entraîner les
effets secondaires secondaires suivants :
Nez bouché, sécheresse nasale, sécheresse
buccale matinale, sensation de pression dans
les sinus, douleurs thoraciques,
essoufflememt, ballonnements abdominaux,
migraines, conjonctivite, bruits d'expiration
gênants, rougeurs cutanées et marques sur le
visage.
3 Utilisation
Fig. A-I (voir le dépliant joint.)
3.1 Réglage de l'appui frontal
(fig.
C)
Dispositif de réglage fin
Enfoncez les taquets se trouvant sur le haut
du dispositif de réglage grossier. Positionner
le dispositif de réglage fin dans un des trois
crans.
Pour ajusterr la hauteur du coussinet frontal
ou du dispositif de réglage fin (env. 1 cm),
tournez ce dernier de 180°. Positionnez
27
Page 30

FR
ensuite le dispositif de réglage fin comme
indiqué plus haut.
Dispositif de réglage grossier
Maintenez enfoncés les taquets inférieurs du
dispositif de réglage grossier. Emboîtez ce
dernier dans l'un des trois crans du corps du
masque.
3.2 Pose du masque (fig. B)
Prudence !
Pour limiter au maximum le risque de
vomissement, le patient devrait s'abstenir de manger et de boire dans les 3 heures précédant l'utilisation du masque.
1. Décrochez une des boucles de fixation
inférieures sur le masque.
2. Passez le harnais sur votre tête et
raccrochez la boucle de fixation.
3. Positionnez le masque sur le visage de la
manière indiquée sur la figure B.
Remarque :
Si vous utilisez le masque JOYCE Full
plus
Face
vented, veillez à ce que la sangle
de menton soit correctement placée :
elle doit entourer complètement le
menton. Dans le cas contraire, le masque risque de glisser en cas de mouvement du patient.
4. Ajustez le harnais à l'aide des fermetures
Velcro de manière à ce que le masque
tienne bien sur le visage, mais sans serrer.
Uniquement WEINMANNstrap :
Avec le harnais WEINMANNstrap, les
possibilités suivantes existent (voir également « Aperçu » sur le dépliant cijoint) :
– Fermetures Velcro sur les deux côtés.
– Fermeture Velcro en haut sur la tête : des-
serrez la fermeture Velcro, tirez avec les
deux mains légèrement sur les extrémités
du harnais et refermez la fermeture Velcro.
Les bandes auto-agrippantes vous permettent de savoir si le harnais est fixé
correctement. Les bandes auto-agrippantes sur le front ont la même couleur
que l'intérieur du harnais.
Uniquement le harnais HEADstrap :
Le harnais HEADstrap offre à cet effet
les possibilités suivantes :
– Ajustement grossier : ouverture du harnais.
– Ajustement fin : quatre bandes Velcro.
5. Réglez à nouveau l'appui frontal si besoin
est.
3.3 Système expiratoire (fig. H)
Variantes vented
Les variantes vented (toutes les pièces du
masque sont transparentes) possèdent ce
que l'on appelle un système expiratoire
intégré : la bague de blocage et le corps du
masque ont une forme telle qu'il existe une
fente entre ces pièces. Cette fente permet à
l'air expiré de s'échapper. Grâce à la
géométrie spéciale des pièces, il est garanti
que la fente ne peut être obturée lors de la
mise en place de la bague de blocage. Ne
raccordez pas de système expiratoire externe
car la pression thérapeutique ne pourrait
alors être atteinte.
Variantes non vented
Avertissement !
Les variantes non vented (bague de blocage,
coude et douille rotative de couleur bleue) ne
disposent pas de leur propre système
expiratoire ! Elles peuvent uniquement être
utilisées en combinaison avec les appareils de
thérapie équipés d'une soupape
expiratoire active ! Dans le cas contraire,
les risques d'inspiration de CO
sont réels en cas de panne de l'appareil de
thérapie.
Les variantes non vented ne peuvent jamais
être utilisées en combinaison avec un système
expiratoire externe (comme par ex. le Silentflow 2). Dans le cas contraire, les fonctions de
sécurité ne sont pas assurées en cas de panne
et d'asphyxie
2
28
Page 31

FR
de l'appareil. Veuillez à cet effet également respecter la notice d'utilisation de votre appareil
de thérapie.
3.4 Soupape expiratoire d'urgence
(fig.
G)
Avertissement !
Seules les variantes vented sont équipées
d’une soupape expiratoire d'urgence.
Assurez-vous avant chaque utilisation que
cette soupape fonctionne correctement (voir
« 5. Contrôle du fonctionnement » à la
page 33) car il existe un risque d'asphyxie !
Fonction de sécurité de la soupape
expiratoire d'urgence
La soupape d'expiration d'urgence dispose
d'une ouverture à l'atmosphère par laquelle
le patient peut respirer en cas de panne de
l'appareil de thérapie. Ceci réduit nettement
le risque d'inspiration de CO
risque d'asphyxie.
Une membrane se trouve à l'intérieur de la
soupape. Cette membrane peut adopter
deux positions :
• Aussi longtemps que l'appareil de thérapie
est en fonctionnement, le débit presse la
membrane contre l'ouverture à l'atmosphère pour l'obturer complètement. Le
patient respire par le biais de l'appareil de
thérapie.
• En cas de panne de l'appareil de thérapie ou
lorsque l'appareil n'est pas branché, la
membrane se trouve en position de repos.
En d'autres termes, l'ouverture à l'atmosphère est ouverte. Le patient respire l'air
ambiant.
Attention !
La soupape expiratoire d'urgence est un
élément très sensible. Il importe de la
manipuler avec soin.
et, partant, le
2
3.5 Pièces de masque avec remplissage gel
De série, le coussinet frontal et la jupe des
masques JOYCE Full Face GEL vented et
JOYCE Full Face GEL non vented ont un
remplissage gel. Le coussinet frontal et la
jupe avec remplissage gel sont également
disponibles en pièces de rechange pour les
autres variantes des masques JOYCE Full
Face.
Attention !
Les pièces de masque avec remplissage gel
sont des éléments très fragiles. Manipulez-les
toujours avec soin pour éviter toute déformation ou endommagement.
3.6 Jupes avec sangle de menton
Le masque JOYCE Full Face
d'une sangle de menton qui soutient le
menton, empêchant ainsi la mâchoire
inférieure de glisser de la jupe et
l'interruption de la thérapie.
plus
vented dispose
3.7 Plages de pression thérapeutique
Les différentes variantes des masques JOYCE
Full Face sont disponibles pour des plages de
pressions thérapeutiques particulières (voir
« 7. Equipement fourni » à la page 34):
– 4-30 hPa :JOYCE Full Face vented
JOYCE Full Face
– 4-40 hPa :JOYCE Full Face vented 40 hPa
JOYCE Full Face non vented 40 hPa
JOYCE Full Face GEL vented
JOYCE Full Face GEL non vented
Les masques JOYCE Full Face utilisés pour la
plage de pressions thérapeutiques 4-30 hPa
disposent d’une jupe molle, tandis que la jupe
des masques JOYCE Full Face pour la plage de
pressions thérapeutiques 4-40 hPa est plus
dure ou la jupe est une jupe à remplissage gel
(variantes GEL).
La jupe plus dure destinée à la plage de
pressions thérapeutiques 4-40 hPa porte le
chiffre « 40 ».
Toutes les jupes sont également disponibles
séparément. Vous pouvez ainsi adapter votre
masque à différents besoins thérapeutiques.
plus
vented
29
Page 32

FR
3.8 Raccordement du masque à
l'appareil de traitement (fig.
Emboîtez le circuit patient de l'appareil de
traitement sur la douille rotative. Veillez ce
faisant à ce que le raccord tienne bien et soit
parfaitement étanche. Il ne doit pas se déconnecter sous l'effet de la pression thérapeutique.
Si vous voulez séparer brièvement le masque
du tuyau, tirez simplement la douille hors du
coude.
Prudence !
En cas de risque élévé de contamination
microbienne patient/appareil, il y a lieu d'utiliser
un filtre bactérien. Tenez compte également du
mode d'emploi de l'appareil de traitement.
3.9 Raccords de prise de pression (fig. E)
Les masques JOYCE Full Face possèdent deux
raccords pouvant être utilisés pour une
mesure de la pression ou pour l'injection
d'oxygène.
Prudence !
• Une oxygénothérapie mal conduite ou mal
dosée peut avoir des effets secondaires. Un
tel traitement doit être entrepris uniquement sur prescription médicale.
• Si une oxygénothérapie vous a été prescrite, conformez-vous strictement aux
modes d'emploi de votre source d'O
votre appareil de traitement.
Si les raccords servant à la prise de pression
ne sont pas utilisés, ils doivent toujours être
bouchés au moyen de l'obturateur fourni à
cet effet. A défaut, de l'air s'échappe par les
raccords et la pression prescrite n'est pas
atteinte.
et de
2
3.10 Appareils et accessoires compatibles
Appareils de traitement
Les masques JOYCE Full Face peuvent être
combinés avec tous les appareils destinés au
H)
traitement des affections mentionnés plus
haut sous "Domaine d'utilisation“.
Veuillez noter que dans certaines
configurations défavorables, il arrive que la
pression dans le masque ne corresponde pas
à la pression prescrite pour le traitement.
Ceci peut se produire même si la pression
indiquée sur l'appareil de traitement est
correcte. Il importe donc de faire régler
l'ensemble d'appareils par un médecin ou le
vendeur de manière à assurer que la pression
dans le masque correspond bien à la pression
prescrite.
Humidificateur
Les masques JOYCE Full Face peuvent être
utilisés avec des humidificateurs chauffants
ou non.
Afin d'éviter toute condensation d'eau dans
le tuyau d'air, veillez à ne pas régler
l'humidificateur à un niveau trop élevé.
Conformez-vous aux modes d'emploi de
l'humidificateur et de l'appareil de
traitement.
Déverrouillage rapide (optionnel)
(fig. I)
Un élément de déverouillage rapide est
proposé comme accessoire pour ouvrir le
harnais en cas d'urgence (vomissements p.
ex.).
Il est constitué d'un clip spécial avec corde de
déclenchement qui est monté à la place de
l'un des boucles de fixation au bas du
masque.
En cas d'urgence, tirez simplement sur la
corde. Le clip spécial se détache alors du
masque. Le harnais étant alors ouvert, il est
possible d'enlever le masque.
Kit de bronchoscopie (option)
(non illustré)
Le kit de bronchoscopie (adaptateur
d'endoscopie non-vented combiné à un
circlip non vented (NV)) permet d'effectuer
une endoscopie tout en continuant la
ventilation (bronchoscopie).
30
Page 33

FR
La bronchoscopie doit être réalisée
uniquement par un personnel spécialisé
médical.
Pour de plus amples informations, veuillez
consulter le mode d'emploi abrégé
WM 67495.
3.11 Fin de la séance de traitement
1. Décrochez l'une des boucles de fixation
du bas du masque et enlevez ce dernier.
2. Décrochez les autres boucles pour
séparer le harnais du masque.
3. Procédez comme indiqué au point « 4
Précautions d'hygiène ».
3.12 Démontage/Assemblage du masque
Démontage du masque (fig. G - C)
1. Séparez la jupe du corps du masque.
2. Enlevez l'obturateur bouchant les
raccords de prise de pression.
3. Tournez la bague de blocage dans le sens
contraire des aiguilles d'une montre
jusqu'à la position 11 h 00. Tirez la bague
de blocage et le coude hors du corps du
masque.
4. Dégagez le coude de la bague de blocage
et déboîtez la douille.
5. Variantes vented seulement : Séparez
la soupape expiratoire du coude avec
précaution. Veillez à ce que la membrane
placée sur la face intérieure de la
soupape ne soit pas endommagée.
6. Détachez le dispositif de réglage grossier
du corps du masque.
7. Séparez l'un de l'autre les dispositifs de
réglage grossier et fin. Dégagez le
coussinet frontal du dispositif de réglage
fin.
Assemblage du masque (fig. C-G)
1. Posez le coussinet frontal sur le dispositif
de réglage fin. Emboîtez le dispositif de
réglage fin sur celui de réglage grossier.
2. Emboîtez ce dernier sur le corps du
masque.
3. Emboîtez la douille rotative sur le coude
jusqu'à ce qu'un déclic soit audible.
4. Variantes vented seulement : Enfoncez
la soupape expiratoire d'urgence sur le
coude avec précaution jusqu'à ce qu'un
déclic soit audible des deux côtés du
coude. Veillez à ce que la membrane de
la face intérieure de la soupape ne risque
pas de se coincer ou d'être
endommagée.
5. Emboîtez la douille rotative sur le coude.
Enfoncez ensuite le coude dans la bague
de blocage jusqu'au déclic.
6. Placez la bague de blocage (position 11 h
00) et le coude sur le corps du masque.
Tournez la bague de blocage jusqu'à la
position 12 h 00.
7. Bouchez les raccords de prise de pression
avec l'obturateur.
8. Emboîtez la jupe sur le corps du masque.
9. Fixez le harnais au masque à l'aide des
boucles.
10.Procédez à un contrôle du
fonctionnement (voir « 5. Contrôle du
fonctionnement » à la page 33).
4 Précautions d'hygiène
4.1 Périodicité
Tous les jours
Nettoyez le masque à fond à l'eau chaude.
Pour cela, vous pouvez démonter les
différentes pièces en procédant comme
indiqué au point 3.12 “ Démontage/
Assemblage du masque” . Utilisez un
détergent doux (nettoyant vaisselle p. ex.).
Rincez ensuite toutes les pièces à l'eau claire
avec soin.
Prudence !
• Chez les patients ayant un système immu-
nitaire défaillant ou une anamnèse particu-
31
Page 34

FR
lière, il se peut qu'une désinfection ou une
stérilisation quotidienne des pièces du
masque soit nécessaire. Consultez un
médecin si c'est le cas.
• En procédant à toute opération de nettoyage, désinfection ou stérilisation, veillez
à traiter les surfaces de contact entre le
corps du masque et la bague de blocage
avec de grandes précautions. La présence
de résidus sur ces surfaces peut compromettre le résultat du traitement et/ou le
fonctionnement du système expiratoire
intégré (variantes vented).
Toutes les semaines
Démontez le masque (voir
« 3.12. Démontage/Assemblage du
masque » à la page 31) et décontaminez les
pièces en procédant comme indiqué dans le
chapitre 4.2 “Nettoyage, désinfection
stérilisation” .
4.2 Nettoyage, désinfection stérilisation
Procédés autorisés
Procédé
Composants
Jupe ••• •
Jupe GEL •••
Coussinet frontal •••
Coussinet frontal GEL ••
Obturateur ••• •
Corps du masque •••
Dispositif de réglage
grossier
Dispositif de réglage fin •••
Coude •••
Soupape expiratoire
d'urgence
Douille rotative •••
Bague de blocage •••
Boucle de fixation •••
Harnais
WEINMANNstrap
Harnais HEADstrap •
Lave-vaisselle
Lavage à la main
Désinfection*
•••
••
•
Stérilisation
(en alternative à
Composants
Harnais JOYCEstrap •
Déverrouillage rapide •
Prudence !
• Nettoyez toujours les pièces du masque à
fond avant de les désinfecter ou les stériliser comme indiqué dans le tableau.
• La soupape expiratoire et les pièces de
masque avec remplissage gel sont des éléments très fragiles. Manipulez-les toujours
avec soin pour éviter toute déformation ou
endommagement.
Procédures
Lave-vaisselle
Lavage à la main
Désinfection*
Stérilisation
(en alternative à la
désinfection)
la désinfection)
*Nous recommandons l’emploi des
désinfectants gigasept
®
OPA et Aniosyme DD1. La
Cidex
biocompatibilité a été prouvée pour ces
produits. Respectez impérativement les
consignes des fabricants.
Vous trouverez aussi des indications relatives
aux procédures d'hygiène en cas de
changement de patient dans une brochure
accessible sur le portail d'information
www.weinmann.de. Si vous ne disposez pas
d'un accès à Internet, veuillez contacter
Weinmann.
Procédé
Lave-vaisselle
Lavage à la main
Désinfection*
Lavage à 65°C. Rincer ensuite toutes les
pièces avec soin à l'eau claire.
Lavage à la main dans de l’eau chaude.
Utilisez un détergent doux. Ensuite,
rincez toutes les pièces à l’eau claire et
laissez-les sécher à l’air libre.
Nettoyage mécanique, p. ex. à la brosse,
dans une solution diluée. Après la
désinfection, rincer toutes les pièces à
fond à l'eau distillée et les faire sécher
complètement.
Stérilisation à la vapeur dans des
appareils conformes à EN 285.
Température 134 °C, durée minimale
3 minutes.
®
FF (nouveau),
Stérilisation
(en alternative à
la désinfection)
32
Page 35

FR
Remarque
Nous conseillons le port de gants idoines (p. ex. gants à usage unique) pendant les opérations de décontamination.
Lavez le harnais HEADstrap avant sa
première utilisation. Il pourrait sinon
perdre ses couleurs.
Le harnais peut uniquement être lavé à
la main !
Ne repassez pas le harnais : les fermetures Velcro ne fermeront plus !
Ne séchez jamais le harnais dans le
séchoir !
4.3 Fin des opérations de décontamination
Séchez à fond toutes les pièces. Examinez-les
avec soin pour vous assurer qu'elles sont
propres et en parfait état. Répétez la
procédure de décontamination si besoin est.
Remplacez les pièces endommagées.
Assemblez à nouveau le masque.
4.4 Changement de patient
Si le masque doit être utilisé par un autre
patient, il faut d'abord le décontaminer par
raison d'hygiène.
Démontez le masque au préalable.
Désinfectez ou stérilisez toutes les pièces
conformément au point « 4.2 Nettoyage,
désinfection stérilisation ».
Utilisez un harnais neuf et, le cas échéant, un
élément de déverrouillage rapide neuf aussi.
5 Contrôle du fonctionnement
Avant chaque usage, vérifiez le bon
fonctionnement du masque en procédant
comme indiqué ci-après.
Variantes vented seulement
Vérifiez avant chaque usage que la soupape
expiratoire fonctionne bien en procédant
comme suit :
1. Assurez-vous que la soupape et la membrane sont en bon état, sèches et exemptes de sécrétions. N'utilisez pas le masque
si la soupape ou la membrane sont endommagées (fissuration ou déformation
p. ex.). En pareil cas, remplacez la soupape expiratoire d'urgence. voir
« 7. Equipement fourni » à la page 34
2. Assurez-vous que la membrane ne
bouche pas l'orifice de la soupape. A
défaut, l'air ambiant ne pourrait pénétrer
dans le masque.
3. Reliez le tuyau respiratoire (fourni avec
l'appareil de traitement) au coude du
masque ainsi qu'à l'appareil.
4. Branchez l'appareil de traitement. La
membrane doit alors obturer l'orifice de
la soupape expiratoire d'urgence. A
défaut, l'air provenant de l'appareil de
traitement ne pourrait pénétrer dans le
masque.
5. N'utilisez pas le masque si la soupape ou
la membrane ne fonctionnent pas
correctement. Remplacez la soupape
expiratoire d'urgence. voir
« 7. Equipement fourni » à la page 34
Masques JOYCE Full Face
Procédez à un contrôle visuel à l'issue de
toute opération de décontamination.
Si la jupe est abîmée et que le masque
présente des défauts d'étanchéité, il faut la
remplacer.
Vérifiez le fonctionnement et l'étanchéité de
l'articulation du coude. Si elle est difficile à
manœuvrer ou n'est pas étanche, remplacez
le coude et la bague de blocage.
Les pièces devenues inutilisables peuvent être
éliminées avec les déchets ménagers.
Une décoloration du coussinet frontal et de
la jupe est possible. Ceci n'altère cependant
en rien l'efficacité de l'ensemble.
33
Page 36

FR
6 Anomalies et dépannage
Anomalie Cause Action corrective
Douleurs sur le
visage aux
points d'appui
du masque.
Courant d'air
dans les yeux.
La pression
prescrite n'est
pas atteinte.
Le masque est trop
serré.
Le masque n'est
pas assez serré.
La masque ne vous
va pas.
Pression de
traitement élevée.
Le masque n'est
pas réglé
correctement.
La jupe du masque
est endommagée
Le circuits patient
(tuyaux) n'est pas
étanche
De l'air sort par les
raccords de prise
de pression.
Soupape
expiratoire
d'urgence :
– mal montée
défectueuse
Réglez le harnais en serrant
moins fort.
Modifiez la position de
l'appui frontal.
Réglez le harnais en serrant
plus fort.
Modifiez la position de
l'appui frontal.
Utiliser un masque d'une
autre taille. Disponible chez
votre revendeur
Utilisez un masque ayant
une jupe dure (pour les
pressions de jusqu'à
40 hPa). Disponible chez
votre revendeur.
Réglez le harnais.
Modifiez la position de
l'appui frontal.
Remplacez la jupe.
Vérifiez les raccords et le
siège des manchons des
tuyaux.
Bouchez les raccords avec
l'obturateur fourni avec le
masque.
Soupape expiratoire
d'urgence :
monter correctement
remplacer
7 Equipement fourni
Remarque
Tous les masques sont fournis entièrement montés et équipés d'un serre-tête.
Variantes vented
Article
JOYCE Full Face vented‚
taille S
JOYCE Full Face vented‚
taille M
JOYCE Full Face vented‚
taille L
JOYCE Full Face vented‚
taille XL
JOYCE Full Face vented
40 hPa‚ taille S
JOYCE Full Face vented
40 hPa‚
taille M
JOYCE Full Face vented
40 hPa‚ taille L
JOYCE Full Face vented
40 hPa‚ taille XL
JOYCE Full Face GEL vented‚
taille S
JOYCE Full Face GEL vented‚
taille
M
JOYCE Full Face GEL vented,
taille L
JOYCE Full Face
taille S
JOYCE Full Face
taille M
JOYCE Full Face
taille L
JOYCE Full Face
taille XL
Variantes
JOYCE Full Face non vented
40 hPa‚ taille S
JOYCE Full Face non vented
40 hPa‚ taille M
JOYCE Full Face non vented
40 hPa‚ taille L
JOYCE Full Face non vented
40 hPa‚ taille XL
plus
vented‚
plus
vented‚
plus
vented‚
plus
vented‚
non vented
Article
HEADstrap
WEINMANNstrap/
harnais
Référence avec
Référence avec harnais
WM 26410 WM 26410/1
WM 26420 WM 26420/1
WM 26430 WM 26430/1
WM 26440 WM 26440/1
WM 26411 WM 26411/1
WM 26421 WM 26421/1
WM 26431 WM 26431/1
WM 26441 WM 26441/1
WM 26412 WM 26412/1
WM 26422 WM 26422/1
WM 26432 WM 26432/1
WM 26413
WM 26423
WM 26433
WM 26443
Référence avec
harnais
WEINMANNstrap/
HEADstrap
WM 26461
WM 26471
WM 26481
WM 26491
JOYCEstrap
34
Page 37

FR
Article
JOYCE Full Face GEL non vented‚
taille S
JOYCE Full Face GEL non vented‚
taille M
JOYCE Full Face GEL non vented‚
taille L
Pièces de rechange
Référence avec
harnais
WEINMANNstrap/
HEADstrap
WM 26462
WM 26472
WM 26482
Article Référence
Mode d'emploi
DE, EN, FR, NL, IT, ES, PT, TR, EL, PL, HR WM 66117
Accessoires
Article Référence
Déverrouillage rapide (corde de
déclenchement) WM 26560
8 Spécifications
Article Référence
Ensemble de l'articulation :
WM 26569
Bague de blocage, coude, douille
rotative, soupape expiratoire d'urgence
Ensemble de l'articulation non vented :
WM 26207
bague de blocage, coude, douille rotative
Variantes vented: douille rotative WM 26254
Appui frontal :
WM 26201
Coussinet, dispositifs de réglage grossier
et de réglage fin de l'appui frontal
Appui frontal GEL:
WM 26115
coussinet GEL, dispositifs de réglage
grossier et de réglage fin de l'appui frontal
Coussinet frontal WM 26200
Coussinet frontal GEL WM 26209
Jupe 30 hPa, taille S
Jupe 30 hPa, taille M
Jupe 30 hPa, taille L
Jupe 30 hPa, taille XL
Jupe 40 hPa, taille S
Jupe 40 hPa, taille M
Jupe 40 hPa, taille L
Jupe 40 hPa, taille XL
Jupe GEL FFM, taille S
Jupe GEL FFM, taille M
Jupe GEL FFM, taille L
plus
Jupe FF
, taille S
plus
Jupe FF
, taille M
plus
Jupe FF
, taille L
plus
Jupe FF
, taille XL
Harnais WEINMANNstrap, avec boucles
de fixation
Harnais HEADstrap,
boucles de fixation comprises
Harnais JOYCEstrap bleu, avec boucles
de fixation
WM 26510
WM 26520
WM 26530
WM 26540
WM 26511
WM 26521
WM 26531
WM 26541
WM 26512
WM 26522
WM 26532
WM 26586
WM 26587
WM 26588
WM 26589
WM 26350
WM 26360
WM 26290
Boucles de fixation (lot de 4) WM 26205
Obturateur WM 26208
Caractéristiques techniques
Paramètres Valeur
Classe du produit conformément
á CE 93/42
Dimensions (LxHxP)
Poids : env. 102 g
Plage de pression thérapeutique :
Jupe 30 hPa :
Jupe 40 hPa :
Jupe GEL FFM:
plus
Jupe FF
:
Raccord de tuyau : raccord
conique EN ISO 5356-1
variantes vented:
variantes non vented:
Raccords de prise de pression : Ø 4 mm
Largeur des boucles de fixation : max. 20 mm
Plage de température
Fonctionnement :
Stockage
Résistance à l'écoulement
variantes vented :
à 50 l/min
à 100 l/min
variantes non vented
à 50 l/min
à 100 l/min
Résistance à l'écoulement,
soupape expiratoire d'urgence
Inspiration à 50 l/min :
Expiration à 50 l/min :
Pression acoustique soupape
expiratoire d'urgence
(variantes vented)
Ouverture :
Fermeture :
II a
env.
107 x 160 x 106 mm
4 à 30 hPa
4 à 40 hPa
4 à 40 hPa
4 à 30 hPa
Ø 22 mm (mâle)
Ø 22 mm (femelle)
+ 5° C à + 40° C
- 20° C à + 70° C
0,02 hPa
0,26 hPa
0,09 hPa
0,37 hPa
0,5 hPa
0,5 hPa
≤ 1 hPa
≤ 2 hPa
1
1
35
Page 38

FR
Paramètres Valeur
Fuite intentionnelle moyenne
JOYCE Full Face vented (l/min)
Pression de sortie au niveau
de l'appareil de traitement (hPa)
40
50
60
70
80
90
100
0
10
20
30
40
50
60
70
80
90
100
0 5 10 15 20 25 30 35 40
JOYCE FF
vented
JOYCE FF
non vented
Emissions sonores indiquées
suivant ISO 4871 (deux chiffres) :
Niveau de pression acoustique
Niveau de puissance acoustique
16,5 dB(A)
24,5 dB(A)
facteur d'incertitude : 3 dB(A))
Durée d'utilisation Jusqu’à 12 mois
Normes appliquées EN ISO 17510-2:2009
1
selon la taille et l’exécution
2
Les matériaux utilisés pour la fabrication
des masques se détériorent lorsqu’ils sont,
par exemple, exposés à des produits de nettoyage corrosifs. Dans des cas isolés, il est
dès lors nécessaire de remplacer votre masque plus tôt (voir « 5. Contrôle du
fonctionnement » à la page 33).
Sous réserve de
modifications de la
conception de
l'appareil
Matériaux
Article Matériau
Jupe,
obturateur
Jupe GEL
Coussinet frontal, bague de blocage TPE, polypropylène
Coussinet frontal GEL
Corps du masque, coude Polycarbonate
Harnais WEINMANNstrap
Harnais JOYCEstrap
Harnais HEADstrap
Douille rotative, dispositifs de réglage
grossier et de réglage fin de l'appui
frontal
Boucle de fixation POM
Cassette (soupape expiratoire
d'urgence)
Déverrouillage rapide (corde de
déclenchement)
36
2
Silicone
Silicone,
Gel silicone,
Silicone,
Gel silicone,
polycarbonate
Lycra, Polyester,
Polyuréthane, Nylon,
Coton, Polyamide
Coton,
polyamide,
élasthane
Nylon/Élasthanne,
Polyuréthane,
Polyester/Lycra
Polypropylène
TPE, polypropylène
POM, polyester,
polyamide
Article Matériau
Fermeture des raccords de mesure de
la pression
Fermeture de l'adaptateur
d'endoscopie non-vented
Capitonnage, coussinet frontal
Corps de masque, coude, adaptateur
d'endoscopie non-vented
Circlip, valve expiratoire d'urgence
Silicone
Silicone
Silicone ou gel
silicone, laque
silicone
Polycarbonate,
Polyamide
Polypropylène,
TPE
Toutes les pièces du masque sont exemptes
de latex.
Courbe pression-débit
Courbe pression/débit : la fuite intentionnelle
est représentée en fonction de la pression
thérapeutique.
9 Garantie
Weinmann octroie au client qui achète un
produit neuf d’origine Weinmann et une
pièce de rechange montée par Weinmann
une garantie fabricant limitée conformément
aux conditions de garantie valables pour le
produit concerné ainsi qu’aux délais de
garantie mentionnés ci-après à compter de la
date d’achat. Les conditions de garantie sont
disponibles sur Internet à l’adresse
www.weinmann.de. Nous vous envoyons
également sur demande les conditions de
garantie. En cas de garantie, veuillez vous
adresser à votre détaillant spécialisé
Page 39

FR
Produit
Appareils Weinmann, y compris les
accessoires, (excepté : masques) pour le
diagnostic du sommeil, la thérapie du
sommeil, la ventilation à domicile,
l’oxygénothérapie et la médecine d'urgence
Masques incluant les accessoires, piles,
batteries*, capteurs, circuits patient
Produits à usage unique Aucun
Durées de
garantie
2 ans
6 mois
* Sauf mention contraire dans les
documentations techniques.
10 Declaration de conformité
La société Weinmann Geräte für Medizin
GmbH + Co. KG, déclare par la présente que
le produit est conforme aux dispositions
respectives de la Directive européenne
93/42/CEE relative aux dispositifs médicaux.
Le texte intégral de la déclaration de
conformité est disponible sur Internet à
l‘adresse suivante : www.weinmann.de
37
Page 40

NL
Nederlands
1 Beschrijving van het apparaat
Legenda
(Afbeelding van de afzonderlijke
delen: zie afb. A op het bijgevoegde
vouwblad.)
1 Hoofdbanden
2 Voorhoofdvulling
3 Fijne verstelling van de voorhoofdsteun
4 Grove verstelling van de voorhoofdsteun
5 Voorhoofdsteun
6 Bandenclip
7 Drukmeetaansluitingen
8 Afsluitdop
9 Anti-asfyxieventiel (
alleen vented-
varianten)
10 Draaihuls*
11 Hoek*
12 Borgring*
13 Maskereenheid
14 Maskerverdikking
plus
15 Kinsteun (alleen JOYCE Full Face
*vented-varianten: transparant;
non vented-varianten: blauw
vented)
Toepassing
De JOYCE Full Face maskers zijn accessoires.
Zij zijn bestemd als afdichtelementen tussen
patiënt en therapieapparaat. Zij worden
toegepast voor de behandeling van
slaapapnoe en voor de niet-invasieve en nietlevensbehoudende beademing van patiënten
met ventilatoire insufficiëntie.
De non vented-varianten mogen uitsluitend
in combinatie met beademingsapparaten
worden gebruikt die over een actief
uitademventiel beschikken.
Voor het gebruik door de patiënt
Patiënten moeten voor therapiebegin door
gekwalificeerd personeel over de toepassing
van het masker geïnstrueerd worden.
2 Veiligheidsinstructies
Veiligheidsvoorschriften
Volgens de eisen van de Richtlinie 93/42
EWG dient u de volgende punten in acht te
nemen:
• Lees deze gebruiksaanwijzing aandachtig
door. Deze is bestanddeel van het masker
en moet te allen tijde aanwezig zijn.
• Gebruik de vented-varianten nooit als het
anti-asfyxieventiel beschadigd of niet aanwezig is. Anders kan er een verhoogde
CO
-terugademing ontstaan indien het
2
therapieapparaat uitvalt.
• Gebruik de JOYCE Full Face maskers nooit
bij patiënten, die niet in staat zijn het masker zelfstandig af te nemen of die de neiging tot braken hebben. Er bestaat
verstikkingsgevaar.
• Gebruik het JOYCE Full Face masker uitsluitend in de therapiedrukbereiken die voor
de afzonderlijke varianten zijn voorzien:
– 4-30 hPa: JOYCE Full Face vented
JOYCE Full Face
– 4-40 hPa: JOYCE Full Face vented 40 hPa
JOYCE Full Face non vented 40 hPa
JOYCE Full Face GEL vented
JOYCE Full Face GEL non vented
Anders kan er CO2-terugademing of
lekkage ontstaan.
• Het gebruik van producten van derden kan
tot het uitvallen van functies en een beperkte
gebruiksgeschiktheid leiden. Bovendien kunnen de eisen aan de bio-compatibiliteit eventueel niet zijn vervuld. Houd er rekening mee
dat in deze gevallen elke aanspraak op
garantie en aansprakelijkheid vervalt als de in
de gebruiksaanwijzing aanbevolen toebehoren niet of geen originele reserveonderdelen
gebruikt zijn.
plus
vented
38
Page 41

NL
• Patiënten met een beperkte spontane
ademhaling moeten permanent bewaakt
worden. Op het beademingsapparaat
moet een overeenkomstig onderdruk-/lekkagealarm geactiveerd zijn.
• Patiënten met obstructieve en restrictieve
longziektes moeten tijdens de toepassing
van JOYCE Full Face individueel onderzocht
worden (bijv. m.b.t. CO
• Sluit nooit de opening van het anti-asfyxieventiel c.q. het uitademsysteem. Anders
bestaat er gevaar voor CO
en voor stikken.
• Het masker mag alleen langer tijd worden
opgezet, als het therapieapparaat ingeschakeld is. Anders bestaat er gevaar voor
CO
-terugademing.
2
• Gebruik geen elektrisch geleidbare ademhalingsslangen (uitzondering: elektrisch
verwarmbare ademslangen).
• Let voor het vermijden van een infectie of
bacteriële contaminatie en voor functiebelemmeringen op paragraaf 4 “Hygiënische
voorbereiding” .
-terugademing).
2
-terugademing
2
Contra-indicaties:
Onder bepaalde omstandigheden mogen de
JOYCE Full Face maskers niet of alleen
bijzonder voorzichtig worden gebruikt. In
individuele gevallen is de beslissing van de
therapie met deze maskers onderhevig aan de
verantwoordelijkheid van de behandelende
arts.
• Functiestoring van de onderste oesophagus-sfincter (onderste sluitspier van de
slokdarm)
• Overmatige regurgitatie (terugvloeien van
maaginhoud in de slokdarm)
• Storing van de hoestreflex
• Hiatusbreuk (middenrifbreuk)
• Narcose of sedatie
• Open gezichtswonden die tot ontsteking
neigen.
• Hemodynamische of cardiorespiratorische
instabiliteit
• Bewusteloosheid
• Claustrofobie, angst
• Deformatie van gezicht- of neus/keelholte
• Baard of andere hindernissen bij het aanpassen en afdichten van het masker
• Gezichtsletsel
• Barotrauma
• Noodzaak van beademing of ondersteuning van de ademhaling 24 h per dag
• Recente gezichts-, slokdarm- of maagoperaties
• Het innemen van geneesmiddelen die braken kunnen veroorzaken
• Noodzaak van onmiddellijke intubatie
Bijwerkingen
De volgende bijwerkingen kunnen optreden:
Verstopte neus, droge neus, droge mond bij
het ontwaken, drukgevoel in de bijholtes,
pijn op de borst, kortademigheid,
maagflatulentie, hoofdpijn, irritaties van het
bindvlies, storende geluiden bij het
uitademen, drukplaatsen in het gezicht, rode
plekken in het gezicht.
3Bediening
Afb. A-I: zie bijgevoegd vouwblad.
3.1 Voorhoofdsteun instellen
(afb.
C)
Fijne verstelling
Houd de bovenste lussen van de grove
verstelling ingedrukt. Positioneer de fijne
verstelling in een van de drie
vergrendelingsposities.
Om de hoogte van het voorhoofdspolster
c.q. de fijne verstelling aan te passen (ca.
1 cm), draait u de fijne verstellingen 180°.
Positioneer deze vervolgens op de boven
beschreven wijze.
Grove verstelling
Houd de bovenste lussen van de grove
verstelling ingedrukt. Positioneer de laatste in
39
Page 42

NL
een van de drie vergrendelingsposities van de
maskereenheid.
3.2 Masker aanbrengen (afb. B)
Voorzichtig!
Om het risico van braken zo gering
mogelijk te houden, mag de patiënt 3
uur voor het gebruik van het masker niets meer eten of drinken.
1. Haak een van de onderste bandenclips
van het masker los.
2. Trek de hoofdbanden over het hoofd en
haak de bandenclip weer vast.
3. Positioneer het masker op uw gezicht
zoals getoond in afbeelding B.
Aanwijzing:
Wanneer u de JOYCE Full Face
vented gebruikt, let er dan op dat de
kinsteun correct zit, d.w.z. dat hij helemaal om uw kin sluit. Anders kan het
masker bij bewegingen verschuiven.
4. Stel de hoofdbanden met behulp van de
klittenbandsluitingen zodanig in dat het
masker dicht maar niet te strak op het
gezicht zit.
Alleen WEINMANNstrap:
De hoofdbanden WEINMANNstrap bieden hiervoor de volgende mogelijkheden (zie ook "Overzicht" op de bijgevoegde brochure):
– Klittenbandsluitingen aan beide zijkanten.
– Klittenbandsluiting boven op het hoofd:
maak de klittenband los, trek met beide
handen licht aan de uiteinden van de
hoofdbanden en druk de klittenbandsluiting weer aan.
U herkent aan de klittenbandstrips of
de hoofdbanden correct zijn aangebracht. De klittenbandstrips op het
voorhoofd hebben dezelfde kleur als de
binnenkant van de hoofdbanden.
Alleen HEADstrap:
De hoofdbanden HEADstrap bieden
hiertoe de volgende mogelijkheden:
plus
– Grove instelling: sleuf van de hoofdbanden.
– Fijne instelling: vier klittenbanden.
5. Stel, indien noodzakelijk, de hoofdsteun
van het ademmasker opnieuw in.
3.3 Uitademsysteem (afb. H)
vented-varianten
De vented-varianten (alle maskerdelen
transparant) beschikt over een zogenaamd
geïntegreerd uitademsysteem: borgring
en maskereenheid zijn zodanig gevormd dat
er tussen deze delen een spleet ontstaat.
Door deze spleet kan de uitgeademde lucht
ontwijken. De speciale geometrie van deze
onderdelen garandeert dat de spleet bij het
opsteken van de borgring niet kan worden
gesloten. Sluit geen extern uitademsysteem
aan omdat de therapiedruk anders niet
bereikt wordt.
non vented-varianten
Waarschuwing!
De non vented-varianten (borgring, hoek en
draaihulsring in het blauw) beschikken niet
over een eigen uitademsysteem. Zij mogen
uitsluitend in combinatie met therapieapparaten worden gebruikt, die over een actief
uitademventiel beschikken! Bij uitval van
het therapieapparaat bestaat anders gevaar
van CO
-terugademing en verstikken.
2
De non vented-varianten mogen nooit in
combinatie met een extern
uitademsysteem (zoals de Silentflow2)
worden gebruikt. Anders is de
veiligheidsfunctie bij uitval van het apparaat
niet gewaarborgd. Let ook op de
gebruiksaanwijzing van uw
therapieapparaat.
3.4 Anti-asfyxieventiel (afb. G)
Waarschuwing!
Alleen de vented-varianten zijn uitgerust
met een anti-asfyxieventiel. Controleer voor
elk gebruik, dat dit ventiel correct
functioneert (zie paragraaf 5
"Functiecontrole"), anders bestaat er
verstikkingsgevaar!
40
Page 43

NL
Veiligheidsfunctie van het antiasfyxieventiel
Het anti-asfyxieventiel beschikt over een
atmosfeeropening waardoor de patiënt bij
uitval van het therapieapparaat ruimtelucht
kan inademen. Hierdoor wordt het risico van
-terugademing en zodoende ook het
CO
2
verstikkingsgevaar duidelijk gereduceerd.
In het binnenste van het ventiel bevindt zich
een menbraam dat twee posities kan
aannemen:
• Zolang het therapieapparaat in werking is,
wordt de membraam door de flow voor de
atmosfeeropening gedrukt en sluit deze
volledig af. De patiënt ademt via het therapieapparaat.
• Bij uitval van het therapieapparaat of wanneer het apparaat niet aangesloten is,
bevindt de membraam zich in de rustpositie, d.w.z. de atmosfeeropening is vrij. De
patiënt ademt hierdoor ruimtelucht.
Voorzichtig!
Het anti-asyxieventiel is een zeer gevoelige
component. Behandel het steeds zeer
zorgvuldig.
3.5 Maskeronderdelen met gelvulling
Bij de JOYCE Full Face GEL vented en de JOYCE Full Face GEL non vented beschikken de
voorhoofdvoering en de maskervoering standaard over een gelvulling. De gel voorhoofdvoering en gel maskervoering zijn ook voor
andere JOYCE-varianten leverbaar als reserveonderdelen.
Voorzichtig!
De maskeronderdelen met gelvulling zijn zeer
gevoelige componenten. Behandel deze altijd
zorgvuldig om vervormingen en
beschadigingen te voorkomen.
3.6 Maskervoeringen met kinsteun
JOYCE Full Face
kinsteun, die de kin tijdens de therapie in een
vaste positie houdt en zodoende voorkomt
dat de onderkaak uit de maskervoering glijdt
en de therapie wordt onderbroken.
plus
vented beschikt over een
3.7 Therapiedrukbereiken
De afzonderlijke varianten van de JOYCE Full
Face-maskers zijn telkens leverbaar voor een
bepaald therapiedrukbereik (zie "Omvang
van de levering" op pagina 46):
– 4-30 hPa: JOYCE Full Face vented
JOYCE Full Face
– 4-40 hPa: JOYCE Full Face vented 40 hPa
JOYCE Full Face non vented 40 hPa
JOYCE Full Face GEL vented
JOYCE Full Face GEL non vented
De JOYCE Full Face-maskers voor het therapiedrukbereik 4-30 hPa beschikken over een
zachte maskervoering, de JOYCE-maskers
voor het therapiedrukbereik 4-40 hPa over
een hardere maskervoering resp. een gelvoering (gelvarianten).
De hardere maskervoering voor het therapiedrukbereik 4-40 hPa is gekenmerkt met het
getal "40".
Alle maskervoeringing zijn ook afzonderlijk
leverbaar als reserveonderdeel zodat u uw
masker aan de veranderde therapiebehoeftes
kunt aanpassen.
plus
vented
3.8 Masker op het
therapieapparaat aansluiten
(afb.
H)
Steek het slangsysteem van uw
therapieapparaat op de draaihuls. Let daarbij
op een veilige en luchtdichte verbinding naar
de slang. De verbinding mag door de
therapiedruk niet loslaten.
Als u het masker kort van de slang wilt
loshalen, trek dan gewoond de draaihuls van
de hoek af.
Voorzichtig!
Bij een hoog risico van overdracht van
kiemen tussen patiënt en apparaat moet een
bacteriënfilter worden gebruikt. Zie
daarvoor ook de bijbehorende
gebruiksaanwijzing van het
therapieapparaat.
41
Page 44

NL
3.9 Drukmeetaansluitingen (afb. E)
JOYCE Full Face-maskers zijn van twee
aansluitingen voorzien, die voor de
drukmeting of voor het invoeren van
zuurstof kunnen worden gebruikt.
Voorzichtig!
• Een zuurstoftherapie kan bij verkeerde toepassing/dosering bijwerkingen veroorzaken. Daarom mag u een dergelijke therapie
alleen volgens voorschrift van een arts uitvoeren.
• Let bij de uitvoering van een zuurstoftherapie in elk geval op de gebruiksaanwijzing
van uw O
raat.
Als de drukmeetaansluitingen niet worden
gebruikt, sluit deze dan steeds met de
bijgevoegde afsluitdop af . Anders treedt er
lucht uit bij de aansluitingen en wordt de
therapiedruk niet bereikt.
-systeem en uw therapieappa-
2
3.10 Compatibele apparaten en accessoires
Therapieapparaten
JOYCE Full Face-maskers kunnen met alle
apparaten worden gecombineerd die
bestemd zijn voor de uitvoering van de onder
“Toepassingsdoel” beschreven therapieën.
Let erop dat bij ongunstige combinaties van
apparaten de daadwerkelijke druk in het
masker eventueel niet overeenkomt met de
therapiedruk die u kreeg voorgeschreven.
Dit kan ook het geval zijn als de correcte druk
op het therapieapparaat wordt weergegeven. Laat uw combinatie apparaten door een
arts of vakhandelaar zodanig instellen dat de
daadwerkelijke druk in het masker overeenkomst met uw therapiedruk.
Ademluchtbevochtiger
JOYCE Full Face-maskers kunnen zowel met
koude als met warme luchtbevochtigers
worden gebruikt.
Kies de bevochtiginggraad nooit zo hoog dat
er water in de luchtslang neerslaat. Let op de
gebruiksaanwijzing van uw bevochtiger en
therapieapparaat.
Snelle ontgrendeling (optioneel)
(afb. I)
Om de hoofdbanden in noodsituaties te
openen (bijv. braken) is als accessoire een
snelle ontgrendeling leverbaar.
De snelle ontgrendeling bestaat uit een
speciale clip met scheurkoord die in plaats
van een van de onderste bandenclips
gemonteerd wordt.
Trek in geval van nood gewoon aan het
scheurkoord. De speciale clip laat los van het
masker. De hoofdbanden zijn nu geopend en
het masker kan worden afgezet.
Set bronchoscopie (optioneel)
(zonder afb.)
De bronchoscopie-set (endoscopie-adapter
non-vented in combinatie met borgring non
vented (NV)) maakt de uitvoering van een
endoscopie mogelijk tijdens de permanente
beademing (bronchoscopie).
De bronchoscopie mag uitsluitend door
medisch personeel worden uitgevoerd.
Voor nadere informatie, zie de korte
gebruiksaanwijzing WM 67495.
3.11 Na het gebruik
1. Haak een van de onderste bandenclips
van het masker los en zet het masker af.
2. Haak de overige drie bandenclips los om
de hoofdbanden van het masker los te
halen.
3. Ga te werk zoals beschreven onder "4
Hygiënische voorbereiding".
3.12 Demonteren/monteren van het masker
Demonteren van het masker (afb. G - C)
1. Verwijder de maskerverdikking van de
maskereenheid.
2. Verwijder de afsluitdoppen van de
drukmeetaansluitingen.
42
Page 45

NL
3. Draai de borgring tegen de klok in op de
11:00 uur positie. Trek de borgring en de
hoek van de maskereenheid af.
4. Druk de hoek uit de borgring en trek de
draaihuls los van de hoek.
5. Alleen vented-varianten: Haal het antiasfyxieventiel voorzicht los van de hoek.
Let erop dat het membraan aan de
binnenkant van het ventiel niet
beschadigd wordt.
6. Verwijder de grove verstelling van de
maskereenheid.
7. Maak de fijne verstelling los van de grove
verstelling. Maak dan de
voorhoofdvulling los van de fijne
verdeling.
Monteren van het masker (afb. C - G)
1. Zet de voorhoofdvulling op de fijne
verdeling. Steek vervolgens de fijne
verstelling op de grove verstelling.
2. Steek de grove verstelling op de
maskereenheid.
3. Steek de draaihuls op de hoek totdat
deze hoorbaar ineensluit.
4. Alleen vented-varianten: Druk het antiasfyxieventiel voorzichtig op de hoek tot
het aan beide kanten van de hoek
hoorbaar ineensluit. Let erop dat het
membraan aan de binnenkant van het
ventiel niet wordt beschadigd of
ingeklemd.
5. Druk de draaihuls op de hoek. Druk
vervolgens de hoek in de borgring tot
deze hoorbar ineensluit.
6. Steek de borgring (in 11:00 uur positie)
en hoek op de maskereenheid. Draai de
borgring op de 12:00 positie.
7. Steek de afsluitdop op de
drukmeetaansluitingen.
8. Steek de maskerverdikking op de
maskereenheid.
9. Bevestig de hoofdbanden met de clips op
het masker.
10.Voer een functiecontrole uit (zie
"Functiecontrole" op pagina 45).
4 Hygiënische voorbereiding
4.1 Termijnen
Dagelijks
Reinig het masker grondig in warm water. U
kunt het masker hiervoor demonteren zoals
beschreven in paragraaf 3.12 “ Demonteren/
monteren van het masker” . Gebruik een
mild reinigingsmiddel (bijv. afwasmiddel).
Spoel daarna alle delen zorgvuldig met
schoon water af.
Voorzichtig!
• Bij patiënten met een verzwakt immuunsy-
steem of een bijzondere ziektegeschiedenis
kan een dagelijkse desinfectie of sterilisatie van de maskeronderdelen noodzakelijk
zijn. Consulteer in dit geval uw arts.
• Ga bij de hygiënische voorbereiding van de
contactvlakken tussen maskereenheid en
borgring uiterst zorgvuldig te werk. Overblijfselen op deze oppervlakken kunnen
het succes van de therapie c.q. de functie
van het geïntegreerde uitademsysteem
(vented-varianten) verminderen.
Wekelijks
Demonteer het masker zoals beschreven in
paragraaf 3.12 “ Demonteren/monteren van
het masker” en behandel de
maskeronderdelen hygiënisch. zie
"Reiniging, desinfectie, sterilisatie" op
pagina 44
4.2 Reiniging, desinfectie, sterilisatie
Toegelaten methodes
Voorzichtig!
• Reinig de maskeronderdelen steeds grondig voor u deze conform de bovenstaande
tabel desinfecteert c.q. steriliseert.
43
Page 46

NL
Methodes
Onderdelen
Maskerverdikking
Maskerverdikking
GEL
Voorhoofdvulling
Voorhoofdvulling
GEL
Afsluitdop
Maskereenheid
Grove verstelling
Fijne verstelling
Hoek
Anti-asfyxieventiel
Draaihuls
Borgring
Bandenclip
Hoofdbanden
WEINMANNstrap
Hoofdbanden
HEADstrap
Hoofdbanden
JOYCEstrap
Snelle
ontgrendeling
Vaatwasser
Handwas
Desinfectie*
Sterilisatie
••• •
•••
•••
••
••• •
•••
•••
•••
•••
••
•••
•••
•••
•
•
•
•
(alternatief voor
• Het anti-asfyxieventiel en de maskeronderdelen met gelvulling zijn zeer gevoelige
componenten. Behandel deze altijd zorgvuldig om vervormingen en beschadigingen te voorkomen.
desinfectie)
Beschrijving van de methode
Vaatwasser
Handwas
Desinfectie*
Sterilisatie
(alternatief voor
desinfectie)
*Wij adviseren de desinfectiemiddelen
gigasept
Spoelgang bij 65 °C. Vervolgens alle
delen zorgvuldig met schoon water
afspoelen.
Met de hand wassen in warm water.
Gebruik een mild reinigingsmiddel.
Vervolgens alle onderdelen met
schoon water afspoelen en aan de
lucht laten drogen.
In verdunde oplossing mechanisch
reinigen, bijv. met een borstel. Na de
desinfectie alle onderdelen grondig
met gedestilleerd water spoelen en
zorgvuldig afdrogen.
Stoomsterilisatie in apparaten
overeenkomstig EN 285. Temperatuur
134 °C, min. contactduur 3 minuten.
®
FF (nieuw), Cidex® OPA en
Aniosyme DD1. Voor deze middelen werd
de verdraagbaarheid aangetoond. Let
hiervoor in elk geval ook op de
aanwijzingen van de fabrikant.
Aanwijzingen voor de hygiënische
voorbereiding en voor de hygiënische
voorbereiding bij patiëntwissel vindt u ook in
een brochure in het infoportaal op
www.weinmann.de. Wanneer u geen
internettoegang heeft, neem dan a.u.b.
contact op met Weinmann.
Aanwijzing:
Wij adviseren om bij de hygiënische behandeling geschikte handschoenen
(bijv. wegwerphandschoenen) te dragen.
Was de hoofdbanden HEADstrap voor
het eerste gebruik omdat ze kunnen
afgeven.
De hoofdbanden mogen alleen met de
hand worden gewassen!
De hoofdbanden niet strijken omdat de
klittenbandsluitingen anders niet meer
houden!
Droog de hoofdbanden niet in de
droger!
44
Page 47

NL
4.3 Na de behandeling
Droog alle onderdelen na de hygiënische
behandeling grondig af. Controleer de
componenten op restverontreinigingen of
beschadiging. Herhaal de hygiënische
behandeling indien noodzakelijk. Vervang
beschadigde onderdelen. Monteer het
masker weer.
4.4 Wissel van de patiënt
Wanneer het masker voor een andere patiënt
moet worden gebruikt, moet dit van tevoren
hygiënisch worden behandeld.
Demonteer hiervoor het masker.
Desinfecteer of steriliseer alle onderdelen
overeenkomstig paragraaf "4.2 Reiniging,
desinfectie, sterilisatie".
Gebruik nieuwe hoofdbanden en eventueel
een nieuwe snelle ontgrendeling.
5 Functiecontrole
Voer voor elk gebruik een functiecontrole uit
zoals hierna beschreven.
Alleen vented-varianten
Controleer voor elk gebruik de functie van
het anti-asfyxieventiel zoals hierna
beschreven:
1. Zorg ervoor dat het ventiel en het
membraan droog, ombeschadigd en vrij
van secreet zijn. Gebruik het masker niet als
het ventiel of het membraan beschadigd is
(bijv. door scheuren of vervormingen).
Vervang het anti-asfyxieventiel in dit geval.
zie "Omvang van de levering" op
pagina 46
2. Zorg ervoor dat het membraan van het
ventiel de opening van het ventiel niet afsluit. Alleen zo kan er ruimtelucht in het
masker stromen.
3. Sluit de ademslang (leveringsomvang van
het therapieapparaat) aan de hoek van
het masker en aan het therapieapparaat
aan.
4. Schakel het therapieapparaat in. Het
membraan moet nu de opening in het
anti-asfyxieventiel afsluiten. Alleen zo kan
er lucht van het therapieapparaat in het
masker stromen.
5. Gebruik het masker niet als het ventiel of
het membraan niet functioneren.
Vervang het anti-asfyxieventiel. zie
"Omvang van de levering" op pagina 46
JOYCE Full Face-maskers
Voer na elke hygiënische reiniging een
zichtcontrole uit.
Als er op grond van beschadigingen aan de
maskerverdikkingen lekkage is ontstaan,
dient u het te vervangen.
Controleer de functie en de dichtheid van het
kogelscharnier op de hoek. Als dit niet meer
licht loopt of lekt, vervang dan de hoek en de
borgring.
Onbruikbaar geworden delen kunnen met
het huisvuil verwijderd worden.
Er kunnen verkleuringen van de voorhoofdvulling en de maskerverdikking optreden.
Deze belemmeren de functie echter niet.
6 Storingen en het verhelpen
ervan
Storing Oorzaak Verhelpen
Drukpijn in het
gezicht.
Tocht in het
oog.
Masker zit te
strak.
Masker zit te los.
Masker past niet.
Hoge
therapiedruk.
Hoofdbanden iets losser
instellen.
Positie van de voorhoofdsteun aanpassen.
Hoofdbanden iets strakker instellen.
Positie van de voorhoofdsteun aanpassen.
Andere maskergrootte
gebruiken. Is verkrijgbaar
in de vakhandel
Harde maskerverdikking
(voor drukken tot
40 hPa) gebruiken. Is
verkrijgbaar in de
vakhandel.
45
Page 48

NL
Storing Oorzaak Verhelpen
Hoofdbanden instellen.
Positie van de
voorhoofdsteun
aanpassen.
Maskerverdikking
vervangen.
Steekverbinding en
zitting van de
slangmoffen
controleren.
Drukmeetaansluitingen
met afsluitdop (bij de
levering inbegrepen)
afdekken.
Anti-asfyxieventiel:
correct monteren
vervangen
Therapiedruk
wordt niet
bereikt.
Masker niet
correct ingesteld.
Maskerverdikking is beschadigd.
Slangsysteem is
ondicht.
Lucht treedt uit
bij de meetaansluitingen.
Antiasfyxieventie:
– niet correct
gemonteerd
– defect
7 Omvang van de levering
Aanwijzing:
Alle maskers worden compleet gemonteerd en met hoofdbanden geleverd.
vented-varianten
Artikel
HEADstrap
Artikel nr. met
JOYCE Full Face vented‚
maat S
JOYCE Full Face vented‚
maat M
JOYCE Full Face vented‚
maat L
JOYCE Full Face vented‚
maat XL
JOYCE Full Face vented
40 hPa‚ maat S
JOYCE Full Face vented
40 hPa‚ maat M
JOYCE Full Face vented
40 hPa‚ maat L
WEINMANNstrap/
WM 26410 WM 26410/1
WM 26420 WM 26420/1
WM 26430 WM 26430/1
WM 26440 WM 26440/1
WM 26411 WM 26411/1
WM 26421 WM 26421/1
WM 26431 WM 26431/1
Artikel
Artikel nr.
HEADstrap
JOYCE Full Face vented
40 hPa‚ maat XL
JOYCE Full Face GEL
vented‚ maat S
JOYCE Full Face GEL
vented‚ maat M
JOYCE Full Face GEL
vented, maat L
JOYCE Full Face
maat S
JOYCE Full Face
maat M
JOYCE Full Face
maat L
JOYCE Full Face
maat XL
plus
vented‚
plus
vented‚
plus
vented‚
plus
vented‚
Artikel nr. met
WEINMANNstrap/
WM 26441 WM 26441/1
WM 26412 WM 26412/1
WM 26422 WM 26422/1
WM 26432 WM 26432/1
WM 26413
WM 26423
WM 26433
WM 26443
met JOYCEstrap
non vented-varianten
Artikel nr. met
Artikel
WEINMANNstrap/
HEADstrap
JOYCE Full Face non vented
40 hPa‚ maat S
JOYCE Full Face non vented
40 hPa‚ maat M
JOYCE Full Face non vented
40 hPa‚ maat L
JOYCE Full Face non vented
Artikel nr.
met JOYCEstrap
40 hPa‚ maat XL
JOYCE Full Face GEL non vented‚
maat S
JOYCE Full Face GEL non vented‚
maat M
JOYCE Full Face GEL non vented‚
maat L
WM 26461
WM 26471
WM 26481
WM 26491
WM 26462
WM 26472
WM 26482
46
Page 49

NL
Reserveonderdelen
Artikel Artikel nr.
Set kogelscharnier:
WM 26569
borgring, hoek, draaihuls, antiasfyxieventiel
Set kogelscharnier non vented:
WM 26207
Borgring, hoek, draaihuls
Draaihuls vented WM 26254
Voorhoofdsteun:
WM 26201
Voorhoofdvulling, grove verstelling
voorhoofdsteun, fijne verstelling
voorhoofdsteun
Voorhoofdsteun GEL:
WM 26115
Voorhoofdvulling GEL, grove verstelling
voorhoofdsteun, fijne verstelling,
voorhoofdsteun
Voorhoofdvulling WM 26200
Voorhoofdvulling GEL WM 26209
Maskerverdikk. 30 hPa, maat S
Maskerverdikk. 30 hPa, maat M
Maskerverdikk. 30 hPa, maat L
Maskerverdikk. 30 hPa, maat XL
Maskerverdikk. 40 hPa, maat S
Maskerverdikk. 40 hPa, maat M
Maskerverdikki. 40 hPa, maat L
Maskerverdikki. 40 hPa, maat XL
Maskerverdikking GEL FFM, maat S
Maskerverdikking GEL FFM, maat M
Maskerverdikking GEL FFM, maat L
Maskerverdikk. FF
Maskerverdikk. FF
Maskerverdikk. FF
Maskerverdikk. FF
plus
, maat S
plus
, maat M
plus
, maat L
plus
, maat XL
WM 26510
WM 26520
WM 26530
WM 26540
WM 26511
WM 26521
WM 26531
WM 26541
WM 26512
WM 26522
WM 26532
WM 26586
WM 26587
WM 26588
WM 26589
Hoofdbanden:
WEINMANNstrap, incl. bandenclips WM 26350
Hoofdbanden HEADstrap,
incl. bandenclips
WM 26360
Hoofdbanden, blauw:
JOYCEstrap, incl. bandenclips WM 26290
Bandenclips (4 stuks) WM 26205
Afsluitdop WM 26208
Gebruiksaanwijzing
DE, EN, FR, NL, IT, ES, PT, TR, EL, PL, HR
WM 66117
Accessoires
Artikel Artikel nr.
Snelle ontgrendeling (scheurkoord) WM 26560
8Specificties
Technische gegevens
Parameters Waarde
Productklasse volgens
93/42/EEG:
Afmetingen (BxHxD):
Gewicht: ca. 102 gram
Therapiedrukbereik:
Maskerverdikking 30 hPa:
Maskerverdikking 40 hPa:
Maskerverdikking GEL FFM:
Maskerverdikking FF
plus
Slangaansluiting: Conus
overeenkomstig EN ISO 5356-1
vented-varianten:
non vented-varianten:
Drukmeetaansluitingen: Ø 4 mm
Breedte bandenclips: max. 20 mm
Temperatuurbereik
Werking:
Opslag
Stromingsweerstand
vented-varianten:
bij 50 l/min
bij 100 l/min
non vented-varianten
bij 50 l/min
bij 100 l/min
Stromingsweerstand Antiasfyxieventiel
Inspiratie bij 50 l/min:
Expiratie bij 50 l/min:
Schakeldruk anti-asfyxieventiel
(vented-varianten)
Openen:
Sluiten:
Opgegeven geluidemissiewaarde in twee getallen overeenkomstig ISO 4871:
– Geluiddrukniveau
– Geluidvermogenniveau
(onzekerheidsfactor: 3þdBþ(A))
Gebruiksduur tot max. 12 maanden
Toegepaste normen EN ISO 17510-2:2009
1
afhankelijk van grootte en uitvoering
II a
ca. 107 x 160 x
1
106 mm
1
4 tot 30 hPa
4 tot 40 hPa
4 tot 40 hPa
4 tot 30 hPa
Ø 22 mm (mannelijk)
Ø 22 mm (vrouwelijk)
+ 5° C tot +40° C
- 20° C
tot
+ 70° C
0,02 hPa
0,26 hPa
0,09 hPa
0,37 hPa
0,5 hPa
0,5 hPa
≤ 1 hPa
≤ 2 hPa
16,5 dB(A)
24,5 dB(A)
2
47
Page 50

NL
2
Gemiddelde lekkageflow
JOYCE Full Face vented (l/min)
Uitgangsdruk op het therapieapparaat (hPa)
40
50
60
70
80
90
100
0
10
20
30
40
50
60
70
80
90
100
0 5 10 15 20 25 30 35 40
JOYCE FF
vented
JOYCE FF
non
vented
Het materiaal dat voor de vervaardiging
van maskers wordt gebruikt, veroudert
sneller wanneer het bijvoorbeeld aan
agressieve reinigingsmiddelen wordt
blootgesteld. In individuele gevallen kan
het daarom noodzakelijk zijn, dat u het
masker eerder moet vervangen (zie
"5. Functiecontrole" op pagina 45).
Wijzigingen van de
constructie voorbehouden
Materialen
Artikel Materiaal
Maskerverdikking,
Maskerverdikking GEL
Voorhoofdvulling, borgring TPE, Polypropyleen
Voorhoofdvulling GEL
Maskereenheid, hoek Polycarbonat
Hoofdbanden WEINMANNstrap
Hoofdbanden JOYCEstrap
Hoofdbanden HEADstrap
Draaihuls, grove verstelling
voorhoofdsteun, fijne verstelling
voorhoofdsteun
Bandenclip POM
Ventielcassette (anti-asfyxieventiel) TPE, Polypropyleen
Snelle ontgrendeling (scheurkoord)
Afsluitdop drukmeetaansluitingen Siliconen
Afsluitdop endoscopie-adapter nonvented
Maskerverdikking, voorhoofdvulling
Maskerverdikking, hoek,
endoscopie-adapter non-vented
48
afsluiting
Siliconen
Siliconen,
siliconengel
Siliconen,
siliconengel,
polycarbonaat
Lycra, Polyester,
Polyurethaan,
Nylon, Katoen,
Polyamide
Katoen,
Polyamide,
Elasthaan
Nylon/Spandex
Polyurethaan
Polyester/Lycra
Polypropyleen
POM, Polyester,
Polyamide
Siliconen
Siliconen en
siliconengel,
siliconenlak
Polycarbonaat,
Polyamide
Artikel Materiaal
Borgring, anti-asfyxieventiel
Polypropyleen,
TPE
Alle onderdelen van het masker zijn vrij van
latex.
Drukflow-karakteristiek
In de drukflow-karakteristek wordt de
uitlaatflow afhankelijk van de therapiedruk
weergegeven.
9 Garantie
Weinmann verleent de klant van een nieuw
origineel Weinmann-product en een door
Weinmann gemonteerd reserveonderdeel
een beperkte fabrikantengarantie
overeenkomstig de geldende
garantievoorwaarden voor het
desbetreffende product en de onderstaand
vermelde garantieperiode vanaf koopdatum.
U kunt de garantievoorwaarden op internet
bekijken onder www.weinmann.de.
Desgewenst sturen wij u de
garantievoorwaarden ook toe. Neem in geval
van garantie contact op met uw vakhandel.
Product
Weinmann-apparaten inclusief accessoires
(uitzondering: maskers) voor de
slaapdiagnose, slaaptherapie,
thuisbeademing, zuurstofmedicatie en
spoedeisende hulp
Garantie-
periode
2 jaar
Page 51

NL
Product
Maskers inclusief accessoires, accu's,
batterijen*, sensoren, slangsystemen
Producten voor eenmalig gebruik Geen
Garantie-
periode
6 maanden
* Indien niet anders aangegeven in de
technische documenten.
10 Conformiteitsverklaring
Hierbij verklaart Weinmann Geräte für
Medizin GmbH + Co. KG, dat het product
voldoet aan de desbetreffende voorschriften
van de richtlijn 93/42/EEG voor medische
hulpmiddelen.
De volledige tekst van de
conformiteisverklaring vindt u op:
www.weinmann.de
49
Page 52

IT
Italiano
1 Descrizione dell'apparecchio
Legenda
(Per la raffigurazione dei singoli
componenti vd. Fig. A sul pieghevole
allegato.)
1 Fasce per la testa
2 Cuscinetto per la fronte
3 Regolazione fine dell’appoggio frontale
4 Regolazione grossolana dell’appoggio
frontale
5 Appoggio frontale
6 Clip della fascia
7 Raccordi per la misurazione della pressione
8 Tappo di chiusura
9 Valvola anti-asfissia (
10 Manicotto girevole*
11 Raccordo angolare*
12 Anello di sicurezza*
13 Corpo della maschera
14 Bordo di protezione
15 Cinturino per il mento (solo per JOYCE Full
*versioni vented: trasparente;
versioni non vented: blu
Face
plus
vented)
solo versioni vented)
Impiego previsto
Le maschere JOYCE Full Face sono accessori.
Servono da elementi di tenuta tra il paziente
e l’apparecchio terapeutico. Sono impiegate
per il trattamento dell’apnea notturna e per
la ventilazione non invasiva e salvavita di
pazienti affetti da insufficienza respiratoria.
Le versioni non vented possono essere
utilizzate esclusivamente in combinazione
con apparecchi per la respirazione che
dispongono di una valvola di espirazione
attiva.
Prima dell’impiego da parte dei
pazienti
Prima dell’inizio della terapia i pazienti
devono essere istruiti da personale
qualificato in merito all’uso della maschera.
2 Avvertenze per la sicurezza
Indicazioni di sicurezza
Conformemente ai requisiti della Richtlinie
93/42 EWG, rispettare le seguenti
indicazioni.
• Leggere attentamente le presenti istruzioni
per l'uso: costituiscono parte integrante
della maschera e devono essere tenute
sempre a portata di mano.
• Non utilizzare mai le versioni vented se la
valvola anti-asfissia è danneggiata o non è
presente. In caso contrario vi sarebbe il
pericolo di un’elevata reinspirazione di CO
qualora l’apparecchio terapeutico dovesse
subire un guasto.
• Non utilizzare mai le maschere JOYCE Full
Face con pazienti che non siano in grado di
alzarsi da soli o abbiano la tendenza al
vomito. Esiste il pericolo di soffocamento.
• Utilizzare le maschere JOYCE Full Face
esclusivamente agli intervalli di pressione
terapeutica previsti per le singole versioni:
– 4-30 hPa: JOYCE Full Face vented
JOYCE Full Face
– 4-40 hPa: JOYCE Full Face vented 40 hPa
JOYCE Full Face non vented 40 hPa
JOYCE Full Face GEL vented
JOYCE Full Face GEL non vented
In caso contrario si potrebbe verificare
una reinspirazione di CO
tenuta.
• L’utilizzo di articoli di produttori terzi può
causare anomalie di funzionamento e una
limitata idoneità all’uso. Inoltre i requisiti di
bio-compatibilità potrebbero non essere soddisfatti. Tenere presente che in tali casi
decade qualsiasi diritto relativo a garanzia e
responsabilità qualora non vengano utilizzati
plus
vented
o la perdita di
2
2
50
Page 53

IT
i componenti di ricambio originali e gli accessori consigliati nelle istruzioni d’uso.
• I pazienti con limitazioni della respirazione
spontanea devono essere sottoposti a
costante controllo e sull’apparecchio respiratore deve essere attivato il relativo
allarme a perdita di pressione.
• Durante l’utilizzo di JOYCE Full Face i
pazienti affetti da malattie polmonari
ostruttive e restrittive devono essere esaminati individualmente (per es. riguardo ai
possibili rischi di reinspirazione di CO
• Non chiudere mai l’apertura della valvola
anti-asfissia o dell’espiratore. In caso contrario potrebbe sussistere il rischio di reinspirazione di CO
• La maschera può essere indossata per
lungo tempo solo con l’apparecchio terapeutico acceso. In caso contrario, vi sarebbe
pericolo di reinspirazione di CO
• Per la respirazione non utilizzare tubi conduttori di corrente (eccezione: tubi di inalazione riscaldati elettricamente).
• Rispettare le indicazioni fornite al capitolo 4
“Trattamento igienico” al fine di evitare
infezioni, contaminazione batterica e per
non compromettere il funzionamento della
maschera.
-e di soffocamento.
2
).
2
.
2
Controindicazioni:
In determinate condizioni, le maschere
JOYCE Full Face non devono essere utilizzate
o devono essere impiegate solo prestando la
massima attenzione. In ogni singolo caso, la
decisione di adottare la terapia con queste
maschere spetta al medico curante.
• Disturbo funzionale dello sfintere esofageo
inferiore (muscolo costrittore inferiore
dell’esofago)
• Eccessivo rigurgito (riflusso del contenuto
dello stomaco nell’esofago)
• Disturbo del riflesso della tosse
• Rottura dello iato diaframmatico (rottura
del diaframma)
• Anestesia o sedazione
• Ferite aperte del volto con tendenza
all’infiammazione
• Instabilità emodinamica o cardiorespiratoria
• Perdita di coscienza
• Claustrofobia, ansia
• Deformazioni al volto o al rinofaringe
• Barba o altri impedimenti all’adattamento
e alla tenuta della maschera
• Ferite al volto
• Barotrauma
• Necessita di ventilazione o di supporti alla
respirazione 24 h al giorno
• Operazioni al volto, all’esofago o allo
stomaco eseguite di recente
• Assunzione di farmaci che possono
provocare nausea
• Necessità di immediata intubazione
Effetti collaterali
Possono verificarsi i seguenti effetti
collaterali:
occlusione e secchezza nasale, secchezza
mattutina del cavo orale, senso di oppressione ai seni paranasali, dolori al petto, fiato corto, gonfiore allo stomaco, mal di testa,
infiammazione della congiuntiva, rumori
anomali in fase espiratoria, punti di compressione o arrossamenti sulla pelle del viso.
3 Utilizzo
Fig. A-I: vedere il pieghevole allegato.
3.1 Regolazione dell’appoggio
frontale (Fig.
Dispositivo di regolazione fine
Tenere premute le linguette superiori del
dispositivo di regolazione grossolana.
Posizionare il dispositivo di regolazione fine
in una delle tre posizione di aggancio.
Per adattare l’altezza del cuscinetto frontale
o del dispositivo di regolazione fine (ca.
1 cm), ruotare quest’ultimo di 180° e quindi
C)
51
Page 54

IT
posizionarlo come descritto
precedentemente.
Dispositivo di regolazione grossolana
Tenere premute le linguette inferiori del
dispositivo di regolazione grossolana.
Posizionare quest’ultimo in una delle
posizioni di aggancio del corpo della
maschera.
3.2 Indossare la maschera (Fig. B)
Cautela!
Per ridurre al minimo il rischio di nausea,
da 3 ore prima dell’impiego della maschera il paziente non deve mangiare né bere
nulla.
1. Sganciare una delle clip inferiori delle
fasce della maschera.
2. Passare la fascia sopra alla testa e agganciare nuovamente la clip alla maschera.
3. Posizionare la maschera sul viso come
indicato nella Figura B.
Nota:
Quando si utilizza JOYCE Full Face
vented, assicurarsi che il cinturino per il
mento si trovi nella posizione corretta,
vale a dire che avvolga completamente
il mento. In caso contrario, la maschera
potrebbe scivolare con i movimenti.
4. Mediante le fascette in velcro regolare la
fascia per la testa in modo tale che la
maschera appoggi sul viso senza
esercitare troppa pressione ma
garantendo la tenuta.
Solo WEINMANNstrap:
La fascia per la testa WEINMANNstrap
offre inoltre le seguenti possibilità (ved.
anche "Panoramica" sul pieghevole allegato):
– fascette in velcro su entrambi i lati.
– fascetta in velcro in alto sulla testa: allentare
la fascetta in velcro, tirare leggermente con
entrambe le mani le due estremità della fascia per la testa e premere nuovamente la
fascetta in velcro.
plus
Facendo riferimento alle fascette in velcro, controllare il posizionamento della
fascia per la testa. Le linguette in velcro
sulla fronte hanno lo stesso colore della
parte interna della fascia per la testa.
Solo HEADstrap:
La fascia per la testa HEADstrap offre a
questo scopo le seguenti possibilità:
– regolazione grossolana: fessura della fascia
per la testa.
– regolazione fine: quattro fasce con velcro.
5. Se necessario, regolare nuovamente
l’appoggio frontale.
3.3 Espiratore (Fig. H)
Versioni vented
Versioni vented (tutti i componenti della maschera trasparenti) dispongono di un cosiddetto espiratore integrato: l’anello di
sicurezza e il corpo della maschera sono formati in modo che si crei una fessura tra i
componenti. Attraverso questa fessura può
fuoriuscire l’aria espirata. La speciale geometria dei componenti impedisce la chiusura
della fessura durante il montaggio dell’anello
di sicurezza. Non collegare un sistema di
espirazione esterno, in tal caso non potrebbe
essere raggiunta la pressione di esercizio necessaria per la terapia.
Versioni non vented
Attenzione!
Le versioni non vented (anello di sicurezza,
raccordo angolare e manicotto girevole di
colore blu) non dispongono di alcun
espiratore! Possono essere utilizzate
esclusivamente in combinazione con
apparecchi per la terapia che dispongono di
una valvola anti-asfissia attiva! In caso di
guasto dell’apparecchio per la terapia
sussiste il pericolo di reinalazione di CO
soffocamento.
Le versioni non vented non devono mai
essere utilizzate in combinazione con un
espiratore esterno (come ad es.
Silentflow2). In caso contrario, la funzione di
sicurezza non è garantita in caso di guasto
e di
2
52
Page 55

IT
dell’apparecchio. A questo proposito,
osservare anche le istruzioni per l'uso
dell'apparecchio per la terapia.
3.4 Valvola anti-asfissia (Fig. G)
Attenzione!
Solo le versioni vented
valvola anti-asfissia.
assicurarsi che questa valvola funzioni correttamente (ved. “5. Controllo funzionale” a
pagina 57) per evitare il
mento!
Funzione di sicurezza della valvola
anti-asfissia
La valvola anti-asfissia presenta un'apertura di
ventilazione, attraverso la quale il paziente è in
grado di inspirare aria in caso di guasto dell'apparecchio per la terapia. Questo diminuisce
nettamente il rischio di reinalazione di CO
quindi anche il pericolo di soffocamento.
All'interno della valvola è presente una membrana che può assumere due posizioni:
• Fino a quando l'apparecchio per la terapia
è in uso, la membrana viene spinta dal
flusso davanti all'apertura di ventilazione
chiudendola completamente. Il paziente
respira attraverso l’apparecchio per la terapia.
• In caso di guasto dell'apparecchio per la
terapia o se l'apparecchio non è collegato,
la membrana si trova in posizione di riposo,
vale a dire che l'apertura di ventilazione è
libera. Il paziente inspira aria attraverso
quest'apertura.
Attenzione!
La valvola anti-asfissia è un componente
estremamente delicato. Maneggiarla sempre
con cura.
sono dotate di una
Prima di ogni impiego
pericolo di soffoca-
e
2
3.5 Componenti della maschera con riempimento in gel
Nelle versioni JOYCE Full Face GEL vented e
JOYCE Full Face GEL non vented, il
cuscinetto per la fronte e il bordo di
protezione dispongono di un riempimento in
gel di serie. Il cuscinetto per la fronte e il
bordo di protezione in gel sono disponibili
come ricambi anche per altre versioni JOYCE
Full Face.
Attenzione!
I componenti della maschera con
riempimento di gel sono componenti molto
sensibili. Maneggiarli sempre con cura per
,
evitare deformazioni e danneggiamenti.
3.6 Bordi di protezione con cinturino per il mento
JOYCE Full Face
cinturino per il mento che durante la terapia
sostiene il mento e impedisce quindi che la
mandibola scivoli dal bordo di protezione
causando l’interruzione della terapia.
plus
vented presenta un
3.7 Campo di pressione necessaria per la terapia
Le singole versioni delle maschere JOYCE
Full Face sono disponibili di volta in volta per un
determinato intervallo di pressioni terapeutiche
(ved. “7. Materiale in dotazione” a pagina 59):
– 4-30 hPa: JOYCE Full Face vented
JOYCE Full Face
– 4-40 hPa: JOYCE Full Face vented 40 hPa
JOYCE Full Face non vented 40 hPa
JOYCE Full Face GEL vented
JOYCE Full Face GEL non vented
Le maschere JOYCE Full Face per l’intervallo
di pressioni terapeutiche da 4 a 30 hPa
dispongono di un morbido bordo di
protezione, mentre le maschere JOYCE
Full Face per l’intervallo di pressioni
terapeutiche da 4 a 40 hPa di un bordo di
protezione più duro o di un bordo di
protezione in gel (versioni in gel).
Il bordo di protezione più duro per l'intervallo
di pressioni terapeutiche da 4 a 40 hPa è
contrassegnato dal numero "40".
Tutti i bordi di protezione sono disponibili
anche singolarmente, pertanto la maschera
può essere adattata alle diverse esigenze
terapeutiche.
plus
vented
53
Page 56

IT
3.8 Collegamento della maschera
all’apparecchio terapeutico
(Fig.
H)
Innestare il sistema di tubi del proprio
apparecchio terapeutico al manicotto
girevole. Verificare che il collegamento del
tubo sia saldo e a tenuta d’aria. Il raccordo
non deve allentarsi per via della pressione
raggiunta nel corso della terapia.
Se si desidera scollegare brevemente la
maschera dal tubo, sfilare semplicemente il
manicotto girevole dal raccordo angolare.
Cautela!
In caso di rischio elevato di trasmissione di
germi tra il paziente e l’apparecchio è
necessario utilizzare un filtro antibatterico.
Rispettare anche le istruzioni per l’uso
dell’apparecchio impiegato per la terapia.
3.9 Raccordi per la misurazione
della pressione (Fig.
Le maschere JOYCE Full Face sono munite di
due raccordi che possono essere utilizzati per la
misurazione della pressione o per l’introduzione
dell’ossigeno.
Cautela!
• In caso di errori di applicazione/dosaggio,
una terapia a base di ossigeno può comportare effetti collaterali. Pertanto una tale
terapia deve essere eseguita esclusivamente su prescrizione medica.
• Nell’impiego di una terapia a base di ossigeno occorre rispettare le istruzioni per
l’uso del sistema di somministrazione di O
e dell’apparecchio terapeutico.
Se i raccordi per la misurazione della
pressione non vengono utilizzati, è
necessario chiuderli con l’apposito tappo
fornito. In caso contrario l’aria fuoriesce dai
raccordi e non si raggiunge la pressione
prevista per la terapia.
E)
3.10 Apparecchi e accessori compatibili
Apparecchi terapeutici
Le maschere JOYCE Full Face possono essere
combinate a tutti gli apparecchi previsti per
l’esecuzione delle terapie descritte al
paragrafo “Impiego previsto”.
E’ opportuno considerare che in caso di
combinazioni non adeguate di apparecchi la
pressione effettiva nella maschera potrebbe
non corrispondere alla pressione necessaria
per la terapia prescritta.
Ciò potrebbe verificarsi anche nel caso in cui
l’apparecchio terapeutico visualizzi la pressione
corretta. Si consiglia di far scegliere la
combinazione di apparecchi da un medico o da
un rivenditore specializzato, in modo che la
pressione effettiva all’interno della maschera
corrisponda alla pressione prevista per la
terapia.
Umidificatore dell’aria inalata
Le maschere JOYCE Full Face possono essere
utilizzate con apparecchi di umidificazione
dell’aria a freddo o a caldo.
Non selezionare un grado di umidità tanto
elevato da generare condensa nel tubo
flessibile dell’aria. Rispettare le istruzioni per
l’uso dell’umidificatore e dell’apparecchio
terapeutico.
Dispositivo di sbloccaggio rapido
(opzione) (Fig. I)
Per l’apertura delle fasce per la testa in
situazioni di emergenza (per es. vomito) è
2
disponibile come accessorio un dispositivo di
sbloccaggio rapido.
Il dispositivo di sbloccaggio rapido è
composto da una clip speciale con una
cordicella di strappo che viene montata al
posto della clip inferiore delle fasce.
In caso di emergenza, è sufficiente tirare la
cordicella: la clip speciale si stacca dalla
maschera, la fascia per la testa è aperta e la
maschera può essere rimossa.
54
Page 57

IT
Set per broncoscopia (opzionale)
(senza fig.)
Il set per broncoscopia(adattatore
endoscopico non-vented in combinazione
con anello di sicurezza non-vented (NV))
consente di effettuare un'endoscopia mentre
è in corso la ventilazione(broncoscopia).
La broncoscopia deve essere eseguita
esclusivamente da personale medico
specializzato.
Per ulteriori informazioni consultare la guida
rapida all'uso WM 67495.
3.11 Dopo l’uso
1. Sganciare una delle clip inferiori per le
fasce situate sulla maschera e rimuovere
la maschera.
2. Sganciare le restanti clip per staccare la
fascia per la testa dalla maschera.
3. Procedere come descritto al paragrafo "4
Trattamento igienico".
3.12 Smontaggio/Montaggio della maschera
Smontaggio della maschera (Fig. G - C)
1. Staccare il bordo di protezione dal corpo
della maschera.
2. Rimuovere il tappo di chiusura dei
raccordi di misurazione della pressione.
3. Ruotare l’anello di sicurezza in senso
antiorario nella posizione ore 11. Ora
estrarre l’anello di sicurezza e il raccordo
angolare dal corpo della maschera.
4. Spingere il raccordo angolare fino a farlo
fuoriuscire dall’anello di sicurezza e sfilare
il manicotto girevole dal raccordo
angolare.
5. Solo versioni vented: Staccare con
cautela la valvola anti-asfissia dal
raccordo angolare. Verificare che la
membrana sul lato interno della valvola
non resti danneggiata.
6. Staccare il dispositivo di regolazione
grossolana dal corpo della maschera.
7. Staccare il dispositivo di regolazione fine
dal dispositivo di regolazione grossolana.
Quindi rimuovere il cuscinetto per la
fronte dal dispositivo di regolazione fine.
Montaggio della maschera (Fig. C - G)
1. Posizionare il cuscinetto per la fronte sul
dispositivo di regolazione fine.
Agganciare il dispositivo di regolazione
fine al dispositivo di regolazione
grossolana.
2. Collocare il dispositivo di regolazione
grossolana sul corpo della maschera .
3. Inserire il manicotto girevole sul raccordo
angolare finché non si ode il “clic”
dell’aggancio.
4. Solo versioni vented: Inserire con
cautela la valvola anti-asfissia sul raccordo
angolare finché non si ode il “clic”
dell’aggancio su entrambi i lati. Verificare
che la membrana sul lato interno della
valvola non sia danneggiata o incastrata.
5. Premere il manicotto girevole sul
raccordo angolare. Premere quindi il
raccordo angolare nell’anello di sicurezza
finché non si ode il “clic” dell’aggancio.
6. Montare l’anello di sicurezza (in posizione
ore 11) e il raccordo angolare sul corpo
della maschera. Ruotare l’anello di
sicurezza in posizione ore 12.
7. Inserire il tappo di chiusura sui raccordi
per la misurazione della pressione.
8. Montare il bordo di protezione sul corpo
della maschera.
9. Fissare le fasce per la testa con le clip alla
maschera.
10.Eseguire un controllo funzionale (ved.
“5. Controllo funzionale” a pagina 57).
55
Page 58

IT
4 Trattamento igienico
Lavastoviglie
Lavaggio a mano
Disinfezione*
4.2 Pulizia, disinfezione, sterilizzazione
4.1 Scadenze
Quotidianamente
Pulire la maschera in acqua calda in modo
che non restino residui. A tale scopo è
possibile smontare la maschera come
descritto nel paragrafo 3.12 “ Smontaggio/
Montaggio della maschera” . Utilizzare un
detergente delicato (per es. un detersivo per
stoviglie). Quindi risciacquare accuratamente
tutti i componenti con acqua pulita.
Cautela!
• In caso di pazienti con sistema immunitario
indebolito o con un particolare quadro clinico, potrebbe essere necessario eseguire
una disinfezione o sterilizzazione giorna-
liera di tutti i componenti della maschera.
In tal caso consultare un medico.
• Procedete al trattamento igienico delle
superfici di contatto tra il corpo della
maschera e l’anello di sicurezza con la massima cura. Eventuali residui su queste
superfici possono pregiudicare il successo
della terapia o il funzionamento del sistema
di espirazione integrato (versioni vented).
Settimanalmente
Smontare la maschera come descritto nel
paragrafo 3.12 “ Smontaggio/Montaggio
della maschera” e sottoporla a trattamento
igienico (ved. “4.2. Pulizia, disinfezione,
sterilizzazione” a pagina 56).
Procedimenti consentiti
Procedimento
Componenti
Bordo di protezione
Bordo di protezione GEL
Cuscinetto per la fronte
Cuscinetto per la fronte
GEL
Tappo di chiusura
Corpo della maschera
Dispositivo di regolazione
grossolana
Dispositivo di regolazione
fine
Raccordo angolare
Valvola anti-asfissia
Manicotto girevole
Anello di sicurezza
Clip delle fasce
Fasce per la testa
WEINMANNstrap
Fasce per la testa
HEADstrap
Fasce per la testa
JOYCEstrap
Dispositivo di sbloccaggio
rapido
••• •
•••
•••
••
••• •
•••
•••
•••
•••
••
•••
•••
•••
•
•
•
•
Cautela!
• Pulire sempre a fondo tutti i componenti
della maschera prima di disinfettarli o sterilizzarli conformemente alla tabella riportata sopra.
• La valvola anti-asfissia e i componenti della
maschera con riempimento di gel sono
componenti estremamente delicati.
Maneggiarli sempre con cura per evitare
danneggiamenti o deformazioni.
Sterilizzazione
(in alternativa alla
disinfezione)
56
Page 59

IT
Descrizione dei procedimenti
Lavastoviglie
Lavaggio a mano
Disinfezione*
Sterilizzazione
(in alternativa alla
disinfezione)
*Consigliamo di utilizzare i disinfettanti
gigasept
Ciclo di lavaggio a 65°C. Dopo il
lavaggio risciacquare accuratamente
con acqua pulita.
Lavare a mano in acqua calda.
Utilizzare un detergente delicato.
Successivamente sciacquare tutti i
componenti con acqua pulita e
lasciare asciugare all’aria.
Pulire meccanicamente in una
soluzione diluita, per es. utilizzando
una spazzola. Dopo la disinfezione
risciacquare accuratamente tutti i
componenti con acqua distillata e
asciugare a fondo.
Sterilizzazione a vapore in apparecchi
conformi a EN 285. Temperatura
134° C, tempo minimo di riposo
3 minuti.
®
FF (novità), Cidex® OPA e
Aniosyme DD1, la cui tollerabilità è
dimostrata. Attenersi assolutamente alle
indicazioni del produttore.
Per informazioni sul primo trattamento
igienico e sul trattamento igienico al cambio
del paziente, consultare la relativa brochure
disponibile nel portale informativo
www.weinmann.de. Se non si dispone di un
accesso a Internet, rivolgersi direttamente a
Weinmann.
Nota
Durante il trattamento igienico si consiglia di utilizzare guanti idonei (per es.
guanti monouso).
Lavare la fascia per la testa HEADstrap
prima del primo utilizzo, poiché potrebbe scolorire.
La fascia per la testa può essere lavata
esclusivamente a mano!
Non stirare la fascia poiché la stiratura
potrebbe danneggiare la tenuta delle
fascette in velcro
Non asciugare la fascia per la testa
nell'asciugatrice!
4.3 Dopo il trattamento
Dopo il trattamento igienico asciugare
accuratamente tutti i componenti. Verificare
l’eventuale presenza di sporco residuo o di
danni sui componenti. Se necessario, ripetere
il trattamento igienico. Sostituire i
componenti danneggiati. Rimontare la
maschera.
4.4 Cambio del paziente
Sottoporre la maschera al trattamento
igienico prima di impiegarla per un altro
paziente.
Smontare la maschera Disinfettare o
sterilizzare tutti i componenti
conformemente al paragrafo "4.2 Pulizia,
disinfezione, sterilizzazione".
Utilizzare una nuova fascia per la testa ed
eventualmente un nuovo dispositivo di
sbloccaggio rapido.
5 Controllo funzionale
Prima di ogni impiego effettuare un controllo
funzionale come descritto qui di seguito.
Solo versioni vented:
Prima di ogni utilizzo, controllare il
funzionamento della valvola anti-asfissia
come descritto qui di seguito.
1. Verificare che la valvola e la membrana
siano asciutte, non danneggiate e prive di
secrezioni. Non utilizzare la maschera se
la valvola o la membrana sono
danneggiate (per es. da crepe o
deformazioni). In questo caso sostituire la
valvola anti-asfissia (ved. “7. Materiale in
dotazione” a pagina 59).
2. Verificare che la membrana della valvola
non occluda l’apertura della valvola: solo
in questo modo l’aria può fluire
all’interno della maschera.
3. Collegare il tubo di respirazione (in
dotazione con l’apparecchio terapeutico)
al raccordo angolare della maschera e
all’apparecchio terapeutico.
57
Page 60

IT
4. Accendere l’apparecchio terapeutico. La
membrana deve ora chiudere l’apertura
della valvola anti-asfissia: solo in questo
modo, ora, l’aria proveniente
dall’apparecchio terapeutico può fluire
all’interno della maschera.
5. Non utilizzare la maschera se la valvola o
la membrana non funzionano. Sostituire
la valvola anti-asfissia (ved. “7. Materiale
in dotazione” a pagina 59).
Maschere JOYCE Full Face
Eseguire un controllo visivo dopo ogni
trattamento igienico.
Sostituire il bordo di protezione se si
riscontrano perdite di tenuta dovute a danni
al materiale.
Controllare la funzionalità e la tenuta del
giunto sferico sul raccordo angolare. Se si
riscontrano perdite o problemi di
scorrimento, sostituire il raccordo angolare e
l’anello di sicurezza.
E’ possibile smaltire i componenti divenuti
inutilizzabili insieme ai rifiuti domestici.
Il cuscinetto per la fronte e il bordo di
protezione possono cambiare colore. Questo
non compromette il loro funzionamento.
6 Guasti e relativa eliminazione
Guasto Causa Rimedio
Il paziente
accusa dolori
dovuti alla
compressione
della maschera
sul viso.
Il paziente
avverte aria
sugli occhi.
Non viene
raggiunta la
pressione
necessaria per
la terapia.
La maschera è
troppo stretta.
La maschera è
troppo lenta.
La maschera
non è della
misura giusta.
Pressione per la
terapia troppo
elevata.
La maschera
non è regolata
correttamente.
Il bordo di
protezione della
maschera è
danneggiato.
Il sistema di tubi
non è a tenuta.
Dai raccordi di
misurazione
della pressione
fuoriesce aria.
Valvola antiasfissia:
– non corretta-
mente
montata
– difettosa
Allargare leggermente la
fascia per la testa.
Modificare la posizione
dell’appoggio frontale.
Stringere leggermente la
fascia per la testa.
Modificare la posizione
dell’appoggio frontale.
Utilizzare una maschera di
altra dimensione,
disponibile presso i
rivenditori specializzati.
Utilizzare un bordo di
protezione più duro (per
pressioni fino a 40 hPa),
disponibile presso i
rivenditori specializzati.
Regolare le fasce per la
testa.
Modificare la posizione
dell’appoggio frontale.
Sostituire il bordo di
protezione.
Controllare il connettore e
la corretta posizione dei
manicotti del tubo
flessibile.
Chiudere i raccordi di
misurazione della
pressione con l’apposito
tappo (compreso nella
fornitura).
Valvola anti-asfissia:
correttamente montata
sostituire
58
Page 61

IT
7 Materiale in dotazione
Nota
Tutte le maschere vengono completamente montate e fornite con fasce per la
testa.
Articolo
HEADstrap
N. articolo con
JOYCE Full Face vented‚
misura S
JOYCE Full Face vented‚
misura M
JOYCE Full Face vented‚
misura L
JOYCE Full Face vented‚
misura XL
JOYCE Full Face vented
40 hPa‚ misura S
JOYCE Full Face vented
40 hPa‚
misura M
JOYCE Full Face vented
40 hPa‚ misura L
JOYCE Full Face vented
40 hPa‚ misura XL
JOYCE Full Face GEL
vented‚ misura S
JOYCE Full Face GEL
vented‚ misura
JOYCE Full Face GEL
vented, misura L
JOYCE Full Face
misura S
JOYCE Full Face
misura M
JOYCE Full Face
misura L
JOYCE Full Face
misura XL
M
plus
plus
plus
plus
vented‚
vented‚
vented‚
vented‚
WEINMANNstrap/
WM 26410 WM 26410/1
WM 26420 WM 26420/1
WM 26430 WM 26430/1
WM 26440 WM 26440/1
WM 26411 WM 26411/1
WM 26421 WM 26421/1
WM 26431 WM 26431/1
WM 26441 WM 26441/1
WM 26412 WM 26412/1
WM 26422 WM 26422/1
WM 26432 WM 26432/1
WM 26413
WM 26423
WM 26433
WM 26443
N. articolo
Versioni non vented
N. articolo con
Articolo
WEINMANNstrap/
HEADstrap
JOYCE Full Face no vented
40 hPa‚ misura S
JOYCE Full Face non vented
40 hPa‚ misura M
JOYCE Full Face
40 hPa‚ misura L
JOYCE Full Face
con JOYCEstrap
40 hPa‚ misura XL
JOYCE Full Face GEL non vented‚
misura S
JOYCE Full Face
misura M
JOYCE Full Face
misura L
non vented
non vented
GEL non vented‚
GEL non vented‚
WM 26461
WM 26471
WM 26481
WM 26491
WM 26462
WM 26472
WM 26482
Parti di ricambio
Articolo N. articolo
Set giunto sferico:
anello di sicurezza, raccordo angolare,
manicotto girevole, valvola anti-asfissia
Set giunto sferico non vented:
Anello di sicurezza, raccordo angolare,
manicotto girevole
Manicotto girevole vented WM 26254
Appoggio frontale:
cuscinetto per la fronte, dispositivo di
regolazione grossolana dell’appoggio
frontale, dispositivo di regolazione fine
dell’appoggio frontale
Appoggio frontale GEL:
cuscinetto per la fronte GEL, dispositivo
di regolazione grossolana dell’appoggio
frontale, dispositivo di regolazione fine
dell’appoggio frontale
Cuscinetto per la fronte WM 26200
Cuscinetto per la fronte GEL WM 26209
WM 26569
WM 26207
WM 26201
WM 26115
59
Page 62

IT
Articolo N. articolo
Bordo di protezione 30 hPa, misura S
misura M
misura L
misura XL
Bordo di protezione 40 hPa, misura S
misura M
misura L
misura XL
Bordo di protezione GEL FFM, misura S
misura M
misura L
Bordo di protezione FF
plus
, misura S
misura M
misura L
misura XL
Fascia per la testa WEINMANNstrap,
clip per la fascia inclusa
WM 26510
WM 26520
WM 26530
WM 26540
WM 26511
WM 26521
WM 26531
WM 26541
WM 26512
WM 26522
WM 26532
WM 26586
WM 26587
WM 26588
WM 26589
WM 26350
Fascia per la testa HEADstrap, clip
incluse WM 26360
Fascia per la testa JOYCEstrap blu, clip
per la fascia inclusa
WM 26290
Clip per le fasce (4 pezzi) WM 26205
Tappo di chiusura WM 26208
Istruzioni per l’uso
DE, EN, FR, NL, IT, ES, PT, TR, EL, PL, HR WM 66117
Accessori
Articolo N. articolo
Dispositivo di sbloccaggio rapido
(cordicella di strappo)
WM 26560
8 Specifiche
Dati tecnici
Parametri Valore
Classe di prodotto in base alla
norma 93/42/CEE:
Dimensioni (LxHxP):
Peso: ca. 102 grammi
II a
ca.
107 x 160 x 106 mm
Parametri Valore
Campo di pressione necessaria
per la terapia:
Bordo di protezione 30 hPa:
Bordo di protezione 40 hPa:
Bordo di protezione
GEL FFM:
Bordo di protezione FF
plus
:
da 4 a 30 hPa
da 4 a 40 hPa
da 4 a 40 hPa
da 4 a 30 hPa
Attacco del tubo flessibile:
connettore conico secondo
EN ISO 5356-1
versioni vented:
versioni non vented:
Raccordi di misurazione della
pressione:
Ø 22 mm (uomini)
Ø 22 mm (donne)
Ø 4 mm
Larghezza clip per le fasce: max 20 mm
Intervallo di temperatura
Valori di esercizio:
Stoccaggio
+ 5°C da +40°C
- 20°C
da
+70°C
Resistenza al flusso
versioni vented:
di 50 l/min
di 100 l/min
0,02 hPa
0,26 hPa
versioni non vented
di 50 l/min
di 100 l/min
0,09 hPa
0,37 hPa
Resistenza al flusso, valvola antiasfissia
Inspirazione di 50 l/min:
Espirazione di 50 l/min:
0,5 hPa
0,5 hPa
Pressione di commutazione
valvola anti-asfissia
(versioni vented)
apertura:
chiusura:
≤ 1 hPa
≤ 2 hPa
Valore doppio dichiarato delle
emissioni acustiche secondo la
norma ISO 4871:
– Livello di pressione acustica
– Livello d’intensità sonora
(fattore di incertezza: 3 dB(A))
Durata utile fino a 12 mesi
1
1
Norme applicate EN ISO 17510-2:2009
1
a seconda di formato e versione
2
I materiali utilizzati per la produzione di
16,5 dB(A)
24,5 dB(A)
2
maschere invecchiano se sono esposti ad
esempio a detergenti aggressivi. In casi
singoli, può essere pertanto necessario
sostituire la maschera anticipatamente
60
Page 63

IT
(ved. “5. Controllo funzionale” a
Flusso di perdita medio
JOYCE Full Face vented (l/min)
Pressione di uscita sull’apparecchio (hPa)
40
50
60
70
80
90
100
0
10
20
30
40
50
60
70
80
90
100
0 5 10 15 20 25 30 35 40
JOYCE FF
vented
JOYCE FF
non
vented
pagina 57).
Materiali
Articolo Materiale
Bordo di protezione,
chiusura
Bordo di protezione GEL
Cuscinetto per la fronte, anello di
sicurezza
Cuscinetto per la fronte GEL
Corpo della maschera, raccordo
angolare
Fascia per la testa WEINMANNstrap
Fascia per la testa JOYCEstrap
Fascia per la testa HEADstrap
Manicotto girevole, dispositivo di
regolazione grossolana
dell’appoggio frontale, dispositivo di
regolazione fine dell’appoggio
frontale
Clip delle fasce POM
Cassetta della valvola (valvola antiasfissia)
Dispositivo di sbloccaggio rapido
(cordicella di strappo)
Tappo di chiusura dei raccordi per la
misurazione della pressione
Tappo di chiusura dell'adattatore
endoscopico non-vented
Bordo di protezione, cuscinetto per
la fronte
Corpo della maschera, raccordo
angolare, adattatore endoscopico
non-vented
Anello di sicurezza, valvola antiasfissia
Con riserva di
modifiche costruttive
tappo di
silicone
silicone,
gel di silicone
TPE, polipropilene
silicone,
gel di silicone,
policarbonato
policarbonato
Lycra, Poliestere,
Poliuretano, Nylon,
Cotone,
Poliammide
cotone,
poliammide,
elastan
Nylon/Spandex,
poliuretano,
poliestere/Lycra
polipropilene
TPE, polipropilene
POM, poliestere,
poliammide
silicone
silicone
silicone e gel di
silicone, vernice
siliconica
policarbonato,
poliammide
polipropilene
TPE
Tutti i componenti della maschera sono privi
di lattice.
Curva flusso-pressione
Nella curva flusso-pressione è rappresentato
il flusso di uscita in base alla pressione
necessaria per la terapia.
9 Garanzia
Weinmann concede al cliente di un prodotto
Weinmann nuovo originale e di una parte di
ricambio Weinmann installata una garanzia
limitata del produttore ai sensi delle
Condizioni di garanzia valide per ciascun
prodotto e dei periodi di garanzia dalla data
d’acquisto di seguito indicati. Le Condizioni
di garanzia possono essere consultate in
Internet all’indirizzo www.weinmann.de. Su
richiesta provvederemo anche all’invio delle
Condizioni di garanzia. Per prestazioni in
garanzia rivolgersi al proprio rivenditore
specializzato.
Prodotto
Apparecchi Weinmann comprensivi di
accessori (eccezione: maschere) per
diagnosi del sonno, terapia del sonno,
ventilazione domiciliare,
ossigenoterapia e medicina d’urgenza
Maschere comprensive di accessori,
accumulatore, batterie*, sensori,
sistemi di tubi
Prodotti monouso Nessuna
Durata della
garanzia
2 anni
6 mesi
61
Page 64

IT
* se non diversamente indicato nella
documentazione tecnica.
10 Dichiarazione di conformità
Con la presente Weinmann Geräte für
Medizin GmbH + Co. KG dichiara che il
prodotto è conforme alle disposizioni
pertinenti contenute nella direttiva 93/42/
CEE sui prodotti medici.
Il testo completo della dichiarazione di
conformitá è disponibile all‘indirizzo:
www.weinmann.de
62
Page 65

ES
Español
1 Descripción del aparato
2 Indicaciones de seguridad
Leyenda
(representación de las distintas piezas:
ver figura A en el folleto adjunto).
1 Cintas para la cabeza
2 Almohadilla de apoyo para la frente
3 Ajuste fino del soporte frontal
4 Ajuste aproximado del soporte frontal
5 Soporte frontal
6 Clip para cintas
7 Conexiones para medición de la presión
8 Cierre
9 Válvula de espiración de emergencia (
sólo
variantes vented)
10 Manguito giratorio*
11 Codo*
12 Anillo de seguridad*
13 Cuerpo de máscara
14 Reborde de máscara
15 Sujeción para el mentón (sólo JOYCE Full
*variantes vented: transparente;
variantes non vented: azul
Face
plus
vented)
Finalidad de uso
Las máscaras faciales completas JOYCE son
accesorios. Se utilizan como elementos de
obturación entre el paciente y el aparato de
terapia. Se utilizan para el tratamiento de la
apnea del sueño y para la respiración artificial
no invasiva y no de soporte vital en pacientes
con insuficiencia ventilatoria.
Las variantes non vented sólo pueden
emplearse exclusivamente en combinación
con aparatos de respiración artificial que
dispongan de una válvula de espiración
activa.
Antes del uso por el paciente
Antes el inicio de la terapia, los pacientes
deben ser instruidos en la utilización de la
máscara por personal cualificado.
Disposiciones de seguridad
Conforme a las exigencias de la Directiva 93/
42/CEE tenga en cuenta los siguientes
puntos:
• Lea con atención estas instrucciones de
manejo. Forman parte de la máscara y
deben estar disponibles en todo momento.
• No use nunca variantes vented si la válvula
de espiración de emergencia está dañada o
no disponible. De lo contrario, puede
aumentar el CO
caso de que fallara el aparato de terapia.
nuevamente respirado en
2
• No use nunca las máscaras faciales completas JOYCE con pacientes que no estén en
disposición de quitárselas por sí mismos o
que sean propensos al vómito. Existe peligro de asfixia.
• Utilice las máscaras
JOYCE Full Face exclusi-
vamente en los márgenes de presión de
terapia previstos para las distintas variantes:
– 4-30 hPa: JOYCE Full Face vented
JOYCE Full Face
– 4-40 hPa: JOYCE Full Face vented 40 hPa
JOYCE Full Face non vented 40 hPa
JOYCE Full Face GEL vented
JOYCE Full Face GEL non vented
plus
vented
De lo contrario, puede volverse a respirar el CO
exhalado y producirse fugas.
2
• Si se utilizan artículos de otros fabricantes,
pueden darse fallos en el funcionamiento y
limitarse la aptitud para el uso. Además pueden no cumplirse los requerimientos de biocompatibilidad. Tenga en cuenta que en
estos casos perderá cualquier derecho de
garantía o de indemnización si no utiliza los
accesorios recomendados en el manual de
instrucciones ni las piezas de repuesto
originales.
• Los pacientes con respiración espontánea
limitada deben ser vigilados constantemente. Se debe activar una alarma de
depresión/fugas adecuada en el aparato de
respiración artificial.
63
Page 66

ES
• Los pacientes con enfermedades pulmonares obstructivas y restrictivas se deberían
examinar individualmente durante el
empleo de máscaras JOYCE Full Face (p.
ej., en lo que respecta a volver a respirar
CO
exhalado).
2
• No cierre nunca la abertura de la válvula de
espiración de emergencia o del sistema de
espiración. De lo contrario existe el riesgo
de nueva respiración del CO
asfixia.
• Entonces la máscara sólo se puede colocar
durante un tiempo relativamente largo si
está encendido el aparato de terapia. De lo
contrario existe el riesgo de nueva respiración del CO
• No utilice tubos de respiración conductores
de la electricidad (excepción: tubo flexible
de respiración de calentamiento eléctrico).
• Lea el apartado 4 “Tratamiento higiénico”
para evitar una infección o una contaminación bacteriana y anomalías en el funcionamiento.
exhalado.
2
exhalado y de
2
Contraindicaciones
En determinadas circunstancias es
conveniente no utilizar las máscaras JOYCE
Full Face o utilizarlas teniendo una
precaución especial. En cada caso individual,
la decisión de efectuar una terapia con estas
máscaras debe tomarla el médico que realiza
la terapia.
• Trastornos funcionales del esfínter esofágico inferior (músculo constrictor inferior del
esófago)
• Regurgitación desmesurada (retorno de
contenido del estómago al esófago)
• Trastornos del reflejo de la tos
• Hernia de hiato (hernia diafragmática)
• Narcosis o sedación
• Heridas faciales abiertas que tienden a
inflamación
• Inestabilidad hemodinámica o cardiorrespiratoria
• Pérdida de conocimiento
• Claustrofobia, miedo
• Deformaciones faciales o nasofaríngeas
• Barba u otros obstáculos; adaptar y obturar
la máscara
• Lesiones faciales
• Barotrauma
• Necesidad de respiración artificial o asistida
durante las 24 h del día
• Operaciones recientes en la cara, el esófago o el estómago
• Ingestión de medicamentos que pueden
provocar vómitos
• Necesidad urgente de intubación
Efectos secundarios
Pueden producirse los siguientes efectos
secundarios:
Nariz tapada, sequedad en la nariz, sequedad
de boca matutina, sensación de opresión en
los senos paranasales, dolores en el pecho,
disnea, flatulencias, cefalea, irritaciones de la
conjuntiva, ruidos anómalos en la espiración,
zonas de presión en la cara, enrojecimientos
de la piel de la cara.
3Manejo
Figura A-I: Ver folleto adjunto.
3.1 Ajustar el soporte frontal
(figura
Ajuste fino
Mantenga ahora presionadas las bridas
superiores del ajuste aproximado. Posicione
el ajuste fino en uno de los tres
enclavamientos.
Para adaptar la altura de la almohadilla de
apoyo para la frente o el ajuste fino (aprox.
1 cm), haga girar el ajuste fino 180°.
Posiciónelo seguidamente tal como se
describe arriba.
Ajuste aproximado
Mantenga ahora presionadas las bridas
inferiores del ajuste aproximado. Posiciónelo
C)
64
Page 67

ES
en uno de los tres enclavamientos del cuerpo
de la máscara.
3.2 Coloque la máscara (figura B)
¡Precaución!
Para minimizar en lo posible el riesgo de
vómito, es conveniente que el paciente
no coma ni beba nada desde 3 horas
antes de la utilización de la máscara.
1. Desenganche uno de los clips inferiores
de las cintas de la máscara.
2. Pase las cintas por su cabeza y vuelva a
enganchar el clip para cintas
3. Posicione la máscara en su cabeza tal
como se muestra en la figura B.
Nota:
Si utiliza JOYCE Full Face
ga cuidado de que la sujeción para el
mentón esté correctamente asentada,
es decir, que rodee por completo su barbilla. De lo contrario puede resbalar la
máscara en caso de movimientos.
4. Ajuste la cinta de la cabeza con ayuda de
los cierres de velcro de forma que la
máscara se asiente en la cara
herméticamente, pero sin apretar
demasiado.
Solo WEINMANNstrap:
Las cintas para la cabeza
WEINMANNstrap ofrecen para ello las
siguientes posibilidades (véase también
“Vista general” en el folleto adjunto):
– Abrir el cierre de velcro en ambas partes.
– Cierre de velcro arriba en la cabeza: Suelte
el cierre de velcro, tire ligeramente con las
dos manos de los extremos de las cintas
para la cabeza y vuelva a apretar el cierre de
velcro.
Por las lengüetas de velcro se reconoce
si las cintas para la cabeza están colocadas correctamente. Las lengüetas de
velcro de la frente tienen el mismo color
que la parte interior de las cintas para la
cabeza.
plus
vented, ten-
Sólo HEADstrap:
Las cintas para la cabeza HEADstrap
ofrecen para ello las siguientes posibilidades:
– Ajuste aproximado: Ranura de las cintas
para la cabeza.
– Ajuste fino: Cuatro cintas de velcro.
5. Vuelva a ajustar el soporte frontal en caso
necesario.
3.3 Sistema de espiración (figura H)
Variantes vented
Las variantes vented (todas las piezas de la
máscara transparentes) disponen de un sis-
tema de espiración integrado: la anilla de
fijación y el cuerpo de la máscara están configurados de forma que quede una rendija
entre ambos. A través de esta rendija puede
salir el aire espirado. La geometría especial de
las piezas garantiza que la rendija no pueda
cerrarse al encajar el anillo de seguridad. No
conecte ningún sistema de espiración externo, porque de lo contrario no se alcanzará la
presión de la terapia.
Variantes non vented
¡Advertencia!
Las variantes non vented (anillo de seguridad,
codo y manguito giratorio de color azul) no
disponen de sistema de espiración propio!
Sólo pueden emplearse exclusivamente en
combinación con aparatos de terapia que
dispongan de una válvula de espiración ac-
tiva! De lo contrario, existe el riesgo de nueva respiración del CO
caso de fallo del aparato de terapia.
Las variantes non vented no pueden usarse
nunca en combinación con un sistema de
espiración externo (como p. ej.
Silentflow2). De lo contrario no está
garantizada la función de seguridad en caso
de avería en el aparato. Debe tener en cuenta
también a este respecto el manual de
instrucciones de su aparato de terapia.
exhalado y asfixia en
2
65
Page 68

ES
3.4 Sistema de espiración de
emergencia (figura
¡Advertencia!
Sólo las variantes vented están provistas de
una válvula de espiración de emergencia.
Asegúrese antes de cada uso de que esta
válvula funciona correctamente (véase “5.
Control del funcionamiento” en la página 70);
de lo contrario existe peligro de asfixia.
Función de seguridad de la válvula de
espiración de emergencia
La válvula de espiración de emergencia
dispone de una abertura atmosférica por la
que el paciente puede inspirar aire ambiente
en caso de avería del aparato de terapia. De
este modo se reduce el riesgo de que se
vuelva a respirar el CO
tanto, también el peligro de asfixia. En el
interior de la válvula se encuentra una
membrana que puede adoptar dos
posiciones:
• Mientras el aparato de terapia está en funcionamiento, la membrana es presionada
por el flujo ante la abertura atmosférica, y
la cierra completamente. El paciente respira a través del aparato de terapia.
• En caso de que el aparato de terapia esté
averiado o no conectado, la membrana se
encuentra en posición de reposo, es decir,
que la abertura atmosférica está libre. El
paciente respira aire ambiente a través de
esta abertura.
¡Precaución!
La válvula de espiración de emergencia es un
componente muy sensible. Debe
manipularse siempre con cuidado.
G)
exhalado, y, por lo
2
3.5 Piezas de la máscara con relleno de gel
En la JOYCE Full Face GEL vented y JOYCE
Full Face GEL non vented, la almohadilla de
apoyo para la frente y el reborde de máscara
están rellenas de gel de forma estándar. La
almohadilla de apoyo para la frente y el reborde de máscara rellenos con gel están disponibles también como piezas de repuesto
para otras variantes de JOYCE Full Face.
¡Precaución!
Las piezas de la máscara con relleno de gel
son componentes muy sensibles. Deben manipularse siempre con cuidado para evitar deformaciones y daños.
3.6 Reborde de máscara con sujeción para el mentón
La JOYCE Full Face
sujeción que se apoya en el mentón durante
la terapia y, por lo tanto, evita que la
mandíbula se deslice fuera del reborde de
máscara y se interrumpa la terapia.
plus
vented dispone de una
3.7 Márgenes de presión de terapia
Las distintas variantes de máscaras JOYCE
Full Face están disponibles en cada caso para
un margen de presión de terapia
determinado (véase “7. Volumen de
suministro” en la página 72):
– 4-30 hPa: JOYCE Full Face vented
JOYCE Full Face
– 4-40 hPa: JOYCE Full Face vented 40 hPa
JOYCE Full Face non vented 40 hPa
JOYCE Full Face GEL vented
JOYCE Full Face GEL non vented
Las máscaras JOYCE Full Face para el margen
de presión de terapia de 4-30 hPa disponen
de un reborde de máscara blando; las máscaras JOYCE Full Face para el margen de presión de terapia de 4-40 hPa, de un reborde
de máscara más duro o un reborde de máscara con gel (variantes con gel).
El reborde de máscara más duro para el margen de presión de terapia de 4-40 hPa está
identificado con el número "40".
Todos los rebordes de máscara están
disponibles también como piezas de
repuesto, de modo que puede adaptar su
máscara a las distintas necesidades
terapéuticas.
plus
vented
66
Page 69

ES
3.8 Conecte la máscara en el
aparato de terapia (figura
Encaje el sistema de tubos flexibles de su
aparato de terapia en el manguito giratorio.
Al realizar esta operación, asegúrese de que
la conexión con el tubo flexible sea segura y
hermética al aire. La conexión no debe
soltarse por la presión de la terapia.
Si desea desconectar brevemente la máscara
del tubo, simplemente retire el manguito
giratorio del codo.
¡Precaución!
En caso de alto riesgo de transmisión de
gérmenes entre paciente y aparato es
conveniente utilizar un filtro bacteriano.
Debe tener en cuenta también a este
respecto el manual de instrucciones de su
aparato de terapia.
H)
3.9 Conexiones para la medición de
la presión (figura
Las JOYCE Full Face máscaras están provistas
de dos conexiones, que se pueden emplear
para medir la presión o para la introducción
de oxígeno.
¡Precaución!
• Una terapia de oxígeno puede provocar
efectos secundarios en caso de aplicación o
de dosificación incorrecta. Por este motivo,
únicamente debe utilizar el aparato bajo
prescripción de un médico.
• Para la realización de una terapia con oxígeno tenga en cuenta imprescindiblemente el manual de instrucciones de su
sistema de O
Cuando no se utilizan las conexiones para la
medición de la presión deben mantenerse
siempre cerradas con el cierre que se adjunta.
De lo contrario sale aire por las conexiones y
no se alcanza la presión de la terapia.
y su aparato de terapia.
2
E)
3.10 Dispositivos y accesorios compatibles
Aparatos de terapia
Las máscaras JOYCE Full Face pueden
combinarse con todos los dispositivos
prescritos para la realización de las terapias
que se describen en “Finalidad de uso”.
Tenga en cuenta que en caso de
combinaciones de aparatos poco adecuadas
es posible que la presión efectiva en la
máscara no corresponda a la presión
prescrita para la terapia.
Esto puede ocurrir incluso si se señaliza la
presión correcta en el aparato de terapia.
Haga que un médico o distribuidor
especializado ajuste su combinación de
aparatos, de forma que la presión efectiva de
la máscara se corresponda con su presión de
terapia.
Humidificador del aire de respiración
Las máscaras JOYCE Full Face pueden usarse
con humidificadores, tanto de aire frío como
caliente.
No seleccione nunca un grado de humectación tan alto como para que el agua se condense en el tubo del aire. Debe tener en
cuenta los manuales de instrucciones de su
humidificador y de su aparato de terapia.
Desbloqueo rápido (opcional) (figura I)
Para abrir las cintas de la cabeza en
situaciones de emergencia (p. ej., vómitos)
está disponible como accesorio un
desbloqueo rápido.
El desbloqueo rápido consta de un clip
especial con cuerda de desgarre que se
monta en lugar de uno de los clips inferiores
de las cintas para la cabeza.
En caso de emergencia, simplemente tire de
la cuerda de desgarre. El clip especial se
desprende de la máscara. Las cintas para la
cabeza están ahora abiertas, y se puede
retirar la máscara.
67
Page 70

ES
Set de broncoscopia (opcional)
(sin figura)
El set de broncoscopia (adaptador para
endoscopio non-vented combinado con
anillo de seguridad non-vented (NV))permite
llevar a cabo una endoscopia (broncoscopia)
durante la respiración ininterrumpida.
La broncoscopia debe ser realizada
únicamente por personal médico cualificado.
Para más información preste atención al
breve manual de instrucciones WM 67495.
3.11 Después del uso
1. Desenganche uno de los clips inferiores
de las cintas de la máscara y retire la
máscara.
2. Desenganche los tres clips restantes para
soltar las cintas de la máscara.
3. Proceda tal como se describe en
„4 Tratamiento higiénico”.
3.12 Desarmado/ensamblaje de la máscara
Desarmado de la máscara (figuras G - C)
1. Suelte el reborde de la máscara del
cuerpo de la máscara.
2. Retire el cierre de las conexiones para la
medición de la presión.
3. Gire el anillo de seguridad en sentido
antihorario hasta la posición de las 11:00
h. Desprenda ahora el anillo de seguridad
y el codo del cuerpo de la máscara.
4. Desprenda el codo del anillo de seguridad
y retire el manguito giratorio del codo.
5. Sólo variantes vented: Suelte
cuidadosamente del codo la válvula de
espiración de emergencia. Tenga cuidado
de que la membrana de la parte interior
de la válvula no resulte dañada.
6. Suelte el ajuste aproximado del cuerpo de
la máscara.
7. Suelte el ajuste fino del ajuste
aproximado. Suelte a continuación la
almohadilla de apoyo para la frente del
ajuste fino.
Ensamblaje de la máscara (figuras C G)
1. Coloque la almohadilla de apoyo para la
frente en el ajuste fino. Encaje a
continuación el ajuste fino en el ajuste
aproximado.
2. Encaje el ajuste aproximado en el cuerpo
de la máscara.
3. Encaje el manguito giratorio en el codo
hasta que se enclave de forma audible.
4. Sólo variantes vented: Encaje a presión
la válvula de espiración de emergencia en
el codo cuidadosamente hasta que se
enclave de forma audible en ambos lados
del codo. Tenga cuidado de que la
membrana de la parte interior de la
válvula no resulte dañada o aprisionada.
5. Encaje a presión el manguito giratorio en
el codo. A continuación, encaje a presión
el codo en el anillo de seguridad hasta
que se enclave de forma audible.
6. Encaje el anillo de seguridad (en la
posición de las 11:00 h) y el codo en el
cuerpo de la máscara. Gire el anillo de
seguridad hasta la posición de las 12:00 h.
7. Coloque el cierre en las conexiones para
la medición de la presión.
8. Encaje el reborde de la máscara en el
cuerpo de la máscara.
9. Sujete las cintas para la cabeza a la
máscara con los clips.
10.Realice un control de funcionamiento
(véase “5. Control del funcionamiento”
en la página 70).
68
Page 71

ES
4 Tratamiento higiénico
Lavavajillas
Lavado a mano
Desinfección*
4.2 Limpieza, desinfección,
esterilización
4.1 Plazos
Diariamente
Limpie la máscara con agua caliente hasta que
no queden residuos. Para ello, puede desarmar
la máscara como se describe en la sección 3.12
“ Desarmado/ensamblaje de la máscara”.
Utilice un producto de limpieza suave (p. ej.,
lavavajillas). A continuación, aclare todas las
piezas cuidadosamente con agua limpia.
¡Precaución!
• Para los pacientes que tengan el sistema
inmunológico debilitado o que presenten
un cuadro clínico especial, puede ser necesario realizar diariamente una desinfec-
ción o esterilización de las piezas de la
máscara. En este caso consulte con su
médico.
• Proceda con el máximo cuidado al realizar
el tratamiento higiénico de las superficies
de contacto entre el cuerpo de la máscara
y el anillo de seguridad. Los residuos depositados en estas superficies pueden influir
negativamente sobre el éxito de la terapia y
el funcionamiento del sistema de espiración integrado (variantes vented).
Semanalmente
Desarme la máscara tal como se describe en
la sección 3.12 “ Desarmado/ensamblaje de
la máscara”, y realice el tratamiento
higiénico de las piezas (véase “4.2. Limpieza,
desinfección, esterilización” en la página 69).
Procedimientos permitidos
Procedimientos
Piezas
Reborde de
máscara
Reborde de
máscara GEL
Almohadilla de
apoyo para la
frente
Almohadilla de
apoyo para la
frente GEL
Cierre
Cuerpo de máscara
Ajuste aproximado
Ajuste fino
Codo
Sistema de espiración de emergencia
Manguito giratorio
Anillo de seguridad
Clip para cintas
Cintas para la
cabeza
WEINMANNstrap
Cintas para la
cabeza HEADstrap
Cintas para la
cabeza JOYCEstrap
Desbloqueo rápido
••• •
•••
•••
••
••• •
•••
•••
•••
•••
••
•••
•••
•••
•
•
•
•
Esterilización
(alternativament
e
¡Precaución!
• Lave siempre a fondo las piezas de la máscara antes de desinfectarlas o esterilizarlas
de acuerdo con la tabla superior.
• La válvula de espiración de emergencia con
relleno de gel son componentes muy sensibles. Deben manipularse siempre con cuidado para evitar daños y deformaciones.
69
Page 72

ES
Descripción de los procedimientos
Lavavajillas
Lavado a mano
Desinfección*
Esterilización
(alternativame
nte a la
desinfección)
*Recomendamos los agentes desinfectantes
gigasept
Ciclo de lavado a 65 °C. A
continuación, lave cuidadosamente
todas las piezas con agua limpia.
Lavado a mano en agua caliente.
Utilizar un producto limpiador suave. A
continuación, enjuagar todas las piezas
con agua limpia y dejarlas secar al aire.
Limpiar mecánicamente, p. ej, con un
cepillo, en una solución diluida.
Después de la desinfección, lavar
cuidadosamente todas las piezas con
agua destilada y secarlas a fondo.
Esterilización por vapor en aparatos
según la EN 285, temperatura 134 °C,
tiempo mínimo de mantenimiento 3
minutos.
®
FF (nuevo), Cidex® OPA y
Aniosyme DD1. Se ha confirmado la
compatibilidad para estos medios. Es
imprescindible seguir las instrucciones del
fabricante.
Encontrará también indicaciones para el
acondicionamiento higiénico y para el
acondicionamiento higiénico en caso de
cambio de paciente en un folleto en el portal
de información de www.weinmann.de. Si no
dispone de acceso a Internet, diríjase a
Weinmann.
Nota
Recomendamos llevar guantes adecuados (p. ej., guantes desechables) para el
tratamiento higiénico.
Lave la cinta de apriete antes de usarla
por primera vez, porque podría desteñir.
La cinta de apriete sólo debe lavarse a
mano.
No planche la cinta de apriete, porque
los cierres de velcro perderían la adherencia.
No seque las cintas para la cabeza en la
secadora!
4.3 Después del tratamiento
Tras el tratamiento higiénico, seque
cuidadosamente todas las piezas.
Compruebe que los componentes están
libres de suciedad o daños. En caso
necesario, repita el tratamiento higiénico.
Sustituya las piezas dañadas. Monte de
nuevo la máscara.
4.4 Cambio de paciente
En caso de que deba utilizarse la máscara
para otro paciente, previamente será preciso
acondicionarla higiénicamente.
Para ello, desarme la máscara. Desinfecte o
esterilice todas las piezas como se describe
en la sección „4.2 Limpieza, desinfección,
esterilización”.
Utilice cintas para la cabeza nuevas y, en caso
necesario, un desbloqueo rápido nuevo.
5 Control del funcionamiento
Realice antes de cada uso una comprobación
del funcionamiento, tal como se describe a
continuación.
Sólo variantes vented
Compruebe antes de cada uso el
funcionamiento de la válvula de espiración
de emergencia, tal como se describe a
continuación.
1. Asegúrese de que la válvula y la
membrana están secas, intactas y limpias
de secreciones. No utilice la máscara si la
válvula o la membrana están dañadas (p.
ej., por grietas o deformaciones).
Sustituya en tal caso la válvula de
espiración de emergencia (véase “7.
Volumen de suministro” en la página 72).
2. Asegúrese de que la membrana no cierra
la abertura de la válvula. Sólo así puede
entrar aire ambiente en la máscara.
3. Conecte el tubo flexible de respiración
(incluido en el volumen de suministro del
aparato de terapia) al codo de la
máscara, así como al aparato de terapia
70
Page 73

ES
4. Encienda el aparato de terapia. La
membrana debería cerrar ahora la
abertura de la válvula de espiración de
emergencia. Sólo así puede entrar aire
del aparato de terapia en la máscara.
5. No utilice la máscara si la válvula o la
membrana no funcionan. Sustituya la válvula de espiración de emergencia. (véase
“7. Volumen de suministro” en la
página 72)
Máscaras JOYCE Full Face
Efectúe un control visual después de cada
tratamiento higiénico.
Si se producen fugas originadas por daños en
el reborde de la máscara, sustitúyalo.
Compruebe la capacidad de funcionamiento
y la estanqueidad de la articulación esférica
del codo. Si ha perdido la suavidad de
marcha o la estanqueidad, sustituya el codo
y el anillo de seguridad
Las piezas que ya no son utilizables pueden
eliminarse con la basura doméstica.
Pueden producirse decoloraciones en la almohadilla de apoyo para la frente y reborde
de la máscara, que sin embargo no influyen
sobre el funcionamiento.
6 Averías y soluciones
Avería Causa Solución
Dolores por
la presión en
la cara.
Corriente de
aire en el
ojo.
No se
alcanza la
presión de la
terapia
La máscara se
asienta con
demasiada
fuerza.
La máscara está
demasiado floja.
La máscara no
se ajusta.
Presión de
terapia elevada.
La máscara no
está ajustada
correctamente.
El reborde de la
máscara está
dañado.
El sistema de
tubos flexibles
no es estanco.
Sale aire por las
conexiones para
la medición de la
presión.
Válvula de
espiración de
emergencia:
– montada inco-
rrectamente
– defectuosa
Reajustar ligeramente las
cintas para la cabeza.
Adaptar la posición del
soporte frontal.
Ajustar con algo más de
fuerza las cintas para la
cabeza.
Adaptar la posición del
soporte frontal.
Utilizar otro tamaño de
máscara. Disponible en
un distribuidor
especializado
Utilizar reborde de
máscara duro (para
presiones de hasta
40 hPa). Disponible en
un distribuidor
especializado.
Ajustar las cintas para la
cabeza.
Adaptar la posición del
soporte frontal
Sustituir el reborde de la
mascara.
Comprobar los
conectores enchufables y
el asiento de los
manguitos de tubo
flexible.
Tapar las conexiones para
la medición de la presión
con el cierre (incluido en
el volumen de
suministro).
Válvula de espiración de
emergencia:
montar correctamente
sustituir
71
Page 74

ES
7 Volumen de suministro
Nota
Todas las máscaras se suministran completamente montadas y con cintas para
la cabeza.
Variantes vented
Artículo
HEADstrap
WEINMANNstrap/
JOYCE Full Face vented,
talla S
JOYCE Full Face vented,
talla M
JOYCE Full Face vented,
talla L
JOYCE Full Face vented,
talla XL
JOYCE Full Face vented
40 hPa‚ talla S
JOYCE Full Face vented
40 hPa‚
talla M
JOYCE Full Face vented
40 hPa, talla L
JOYCE Full Face vented
40 hPa, talla XL
JOYCE Full Face
GEL vented‚ talla S
JOYCE Full Face
GEL vented‚ talla M
JOYCE Full Face
GEL vented‚ talla L
JOYCE Full Face
talla S
JOYCE Full Face
talla M
JOYCE Full Face
talla L
JOYCE Full Face
talla XL
plus
plus
plus
plus
vented,
vented‚
vented,
vented‚
Nº de artículo con
WM 26410 WM 26410/1
WM 26420 WM 26420/1
WM 26430 WM 26430/1
WM 26440 WM 26440/1
WM 26411 WM 26411/1
WM 26421 WM 26421/1
WM 26431 WM 26431/1
WM 26441 WM 26441/1
WM 26412 WM 26412/1
WM 26422 WM 26422/1
WM 26432 WM 26432/1
WM 26413
WM 26423
WM 26433
WM 26443
Nº de artículo
variantes non vented
Nº de artículo con
Artículo
WEINMANNstrap/
HEADstrap
JOYCE Full Face non vented
40 hPa‚ talla S
JOYCE Full Face non vented
40 hPa‚ talla M
JOYCE Full Face non vented
40 hPa‚ talla L
JOYCE Full Face non vented
40 hPa‚ talla XL
JOYCE Full Face GEL non vented‚
con JOYCEstrap
talla S
JOYCE Full Face GEL non vented‚
talla M
JOYCE Full Face GEL non vented‚
talla L
WM 26461
WM 26471
WM 26481
WM 26491
WM 26462
WM 26472
WM 26482
Piezas de repuesto
Artículo
Juego de articulación esférica:
anillo de seguridad, codo, manguito
giratorio, válvula de espiración de
emergencia
Juego de articulación esférica non
vented:
anillo de seguridad, codo, manguito
giratorio
Manguito giratorio vented WM 26254
Soporte frontal:
almohadilla de apoyo para la frente,
ajuste aproximado soporte frontal,
ajuste fino soporte frontal
Soporte frontal GEL:
soporte frontal GEL, ajuste
aproximado soporte frontal, ajuste
fino soporte frontal
Almohadilla de apoyo para la frente WM 26200
Almohadilla de apoyo para la frente
GEL
Nº de
artículo
WM 26569
WM 26207
WM 26201
WM 26115
WM 26209
72
Page 75

ES
Artículo
Reborde de máscara 30 hPa, talla S
Reborde de máscara 30 hPa, talla M
Reborde de máscara 30 hPa, talla L
Reborde de máscara 30 hPa, talla XL
Reborde de máscara 40 hPa, talla S
Reborde de máscara 40 hPa, talla M
Reborde de máscara 40 hPa, talla L
Reborde de máscara 40 hPa, talla XL
Reborde de máscara GEL FFM, talla S
Reborde de máscara GEL FFM, talla M
Reborde de máscara GEL FFM, talla L
Reborde de máscara FF
Reborde de máscara FF
Reborde de máscara FF
Reborde de máscara FF
plus
, talla S
plus
, talla M
plus
, talla L
plus
, talla XL
Nº de
artículo
WM 26510
WM 26520
WM 26530
WM 26540
WM 26511
WM 26521
WM 26531
WM 26541
WM 26512
WM 26522
WM 26532
WM 26586
WM 26587
WM 26588
WM 26589
Cintas para la cabeza
WEINMANNstrap, incl. clips para
WM 26350
cintas
Cintas para la cabeza HEADstrap,
incl. clips para cintas
Cintas para la cabeza JOYCEstrap azul,
incl. clips para cintas
WM 26360
WM 26290
Clips para cintas (4 unidades) WM 26205
Cierre WM 26208
Manual de instrucciones
DE, EN, FR, NL, IT, ES, PT, TR, EL, PL, HR WM 66117
Accesorios
Artículo
Desbloqueo rápido (cuerda de
desgarre)
Nº de
artículo
WM 26560
8 Especificaciones
Datos técnicos
Parámetro Valor
Clase de producto según
93/42/EEC:
Dimensiones (An x Al x P):
Peso: aprox. 102 gramos
II a
aprox.
107 x 160 x 106 mm
Parámetro Valor
Margen de presión de terapia:
plus
:
de 4 a 30 hPa
de 4 a 40 hPa
de 4 a 40 hPa
de 4 a 30 hPa
Reborde de máscara 30 hPa:
Reborde de máscara 40 hPa:
Reborde de máscara GEL FFM:
Reborde de máscara FF
Conexión de tubo flexible Cono
según
EN ISO 5356-1
Variantes vented:
Variantes non vented
Conexiones para medición de la
presión:
Ø 22 mm (macho)
Ø 22 mm (hembra)
Ø 4 mm
Anchura clips para cintas: máx. 20 mm
Margen de temperatura
Funcionamiento:
Almacenamiento
+ 5 °C a + 40 °C
- 20 °C a + 70 °C
Resistencia al flujo
Variantes vented:
a 50 l/min
a 100 l/min
0,02 hPa
0,26 hPa
Variantes non vented
a 50 l/min
a 100 l/min
0,09 hPa
0,37 hPa
Resistencia al flujo, válvula de
espiración de emergencia
Inspiración a 50 l/min:
Expiración a 50 l/min:
0,5 hPa
0,5 hPa
Presión de conmutación válvula
de espiración de emergencia
(variantes vented)
Abrir:
Cerrar:
≤ 1 hPa
≤ 2 hPa
Valor indicado de emisión de
ruidos, dos cifras, según ISO
4871:
– Nivel de intensidad acústica
– Nivel de potencia acústica
(factor de incertidumbre:
3 dB(A))
Tiempo de uso hasta 12 meses
16,5 dB(A)
24,5 dB(A)
2
Normas aplicadas EN ISO 17510-2:2009
1
en función del tamaño y la versión.
2
Los materiales que se utilizan para la
1
1
fabricación de máscaras envejecen si están
expuestos, p. ej., a agentes corrosivos. Por lo
tanto, en un caso particular puede ser necesario sustituir la máscara más pronto (véase
73
Page 76

ES
"5 Control del funcionamiento" en la pági-
Flujo de fuga medio
JOYCE Full Face vented (l/min)
Presión de salida en el aparato de terapia
40
50
60
70
80
90
100
0
10
20
30
40
50
60
70
80
90
100
0 5 10 15 20 25 30 35 40
JOYCE FF
vented
JOYCE FF
non
vented
na 70).
Reservado el derecho a
modificaciones
constructivas
Materiales
Artículo Material
Reborde de máscara,
Reborde de máscara GEL
Almohadilla de apoyo para la
frente, anillo de seguridad
Almohadilla de apoyo para la frente
GEL
Cuerpo de máscara, codo Policarbonato
Cintas para la cabeza
WEINMANNstrap
Cintas para la cabeza JOYCEstrap
Cintas para la cabeza HEADstrap
Manguito giratorio, ajuste
aproximado soporte frontal, ajuste
fino soporte frontal
Clip para cintas POM
Caja de válvula (válvula de
espiración de emergencia):
Desbloqueo rápido (cuerda de
desgarre)
Cierre de las conexiones para
medición de la presión
Cierre del adaptador para
endoscopia non vented
Reborde de máscara, almohadilla
de apoyo para la frente
Cuerpo de la máscara, ángulo,
adaptador para endoscopia non
vented
Anillo de seguridad, válvula de
espiración de emergencia
Todas las piezas de la máscara están exentas
de látex.
74
Cierre
Silicona
Silicona,
gel de silicona
TPE, polipropileno
Silicona,
gel de silicona,
policarbonato
Lycra, Poliéster,
Poliuretano, Nilón,
Algodón,
Poliamida
Algodón,
poliamida, elastán
Nilón/spandex
Poliuretano
Poliéster/lycra
Polipropileno
TPE, polipropileno
POM, poliéster,
poliamida
Silicona
Silicona
Silicona y gel de
silicona, pintura
de silicona
Policarbonato,
Poliamida
Polipropileno,
TPE
Curva característica presión-flujo
En la curva característica presión-flujo se
representa el flujo de salida en función de la
presión de la terapia.
9 Garantía
Weinmann otorga al comprador de un
producto original Weinmann o una pieza de
repuesto montada por Weinmann una
garantía del fabricante limitada según las
condiciones de garantía válidas para los
distintos productos y las duraciones de la
garantía a partir de la fecha de compra que
se indican a continuación. Las condiciones de
garantía están disponibles en Internet en
www.weinmann.de. Si lo desea, también
podemos enviarle las condiciones de
garantía. En un caso de garantía, diríjase a su
distribuidor especializado.
Periodos
Producto
Aparatos de Weinmann, incluidos los
accesorios (excepción: máscaras) para
diagnóstico del sueño, terapia del sueño,
asistencia respiratoria a domicilio,
medicina de oxígeno y medicina de
primeros auxilios
Máscaras incluidos accesorios,
acumulador, baterías*, sensores, sistemas
de tubos flexibles
Productos para un solo uso Ninguno
* salvo que se indique otra cosa en la
documentación técnica.
de
garantía
2 años
6 meses
Page 77

ES
10 Declaración de conformidad
Por la presente, Weinmann Geräte für Medizin GmbH + Co. KG declara que el producto
cumple las disposiciones pertinentes de la directiva 93/42/CEE para productos sanitarios.
El texto completo de la declaración de
conformidad se encuentra en:
www.weinmann.de
75
Page 78

PT
Português
1 Descrição do aparelho
Legenda
(Representação das peças soltas: ver
fig. A no folheto incluído.)
1 Tiras de amarrar à volta da cabeça
2 Almofada para a testa
3 Ajuste de precisão do apoio para a testa
4 Ajuste aproximado do apoio para a testa
5 Apoio para a testa
6 Clipe para as tiras de amarrar à volta da
cabeça
7 Entradas de medição da pressão
8 Fecho
9 Válvula de expiração de emergência
apenas variantes vented)
(
10 Casquilho rotativo*
11 Cotovelo*
12 Anel de segurança*
13 Corpo da máscara
14 Rebordo da máscara
15 Tira para prender ao queixo (apenas JOYCE
*Variantes vented: transparente;
variantes non vented: azul
Full Face
plus
vented)
Campo de aplicação
As máscaras JOYCE Full Face são acessórios.
Servem como elementos vedantes entre o
paciente e o aparelho de terapia. São
utilizadas para o tratamento da apneia do
sono e para a ventilação não invasiva, assim
como para a ventilação que não a de suporte
de vida, de pacientes com insuficiência
ventilatória.
As variantes non vented só podem ser
utilizadas em combinação com ventiladores
que disponham de uma válvula de expiração
activa.
Antes da utilização pelo paciente
Antes do início da terapia, os pacientes têm
de ser instruídos na utilização da máscara por
pessoal qualificado.
2 Instruções de segurança
Disposições em matéria de segurança
De acordo com os requisitos da Directiva 93/
42/CEE, tenha atenção aos seguintes pontos:
• Leia com atenção todas as instruções de
uso. Elas são parte integrante da máscara e
têm de estar sempre acessíveis.
• Nunca utilize as variantes vented se a válvula de expiração de emergência estiver danificada ou não estiver disponível. Caso
contrário, poderá verificar-se uma elevada
reinalação de CO
aparelho de terapia.
• Nunca utilize as máscaras JOYCE Full Face
em pacientes que não sejam capazes de as
retirar sozinhos ou que tenham uma tendência para os vómitos. Existe perigo de
asfixia.
• Utilize as máscaras
mente dentro dos limites de pressão de tratamento previstos para cada variante:
– 4-30 hPa: JOYCE Full Face vented
– 4-40 hPa: JOYCE Full Face vented 40 hPa
Caso contrário, poderá verificar-se a
reinalação de CO
• A utilização de artigos de outras marcas
pode provocar falhas de funcionamento e
limitar a aptidão de utilização. Para além
disso, os requisitos de biocompatibilidade
podem não ficar assegurados. Convém ter
presente que, nestas circunstâncias, a garantia perde a validade e que não assumimos
qualquer responsabilidade pela não utilização dos acessórios recomendados nas instru-
, no caso de uma falha do
2
JOYCE Full Face exclusiva-
ou fugas.
2
plus
vented
JOYCE Full Face
JOYCE Full Face non vented 40 hPa
JOYCE Full Face GEL vented
JOYCE Full Face GEL non vented
76
Page 79

PT
ções de uso e das peças sobressalentes
originais.
• Os pacientes com uma respiração espontânea limitada têm de ser permanentemente
monitorizados. No ventilador tem de estar
activado um respectivo alarme de falta de
pressão/fugas.
• Os pacientes com doenças pulmonares
obstrutivas ou restritivas devem ser sujeitos
a uma análise individual durante a utilização de máscaras JOYCE Full Face (p. ex.
quanto à reinalação de CO
• Nunca feche a abertura da válvula de expiração de emergência ou do sistema de
expiração. Caso contrário, existe o perigo
de uma reinalação de CO
• A máscara só pode ser colocada durante
um longo período se o aparelho de terapia
estiver ligado. Caso contrário, existe o
perigo de uma reinalação de CO
• Não utilize tubos de respiração com capacidade de condução eléctrica (excepção:
tubos de aspiração com aquecimento eléctrico).
• Cumpra as indicações da secção 4 “Procedimentos de higiene” para evitar o aparecimento de infecções, contaminações
bacterianas ou limitações de funcionamento.
).
2
e de asfixia.
2
.
2
Contra-indicações:
Sob determinadas circunstâncias, as
máscaras JOYCE Full Face não devem ser
utilizadas ou devem ser utilizadas com muito
cuidado. A decisão sobre um tratamento
com estas máscaras cabe sempre ao médico
responsável.
• Problemas de funcionamento do esfíncter
esofágico inferior (esfíncter inferior do esófago)
• Regurgitação excessiva (refluxo do conteúdo do estômago para o esófago)
• Perturbação do reflexo da tosse
• Hérnia hiatal (hérnia diafragmática)
• Anestesia ou sedação
• Feridas abertas no rosto, com tendência
para inflamações
• Instabilidade hemodinâmica ou
cardiorrespiratória
• Inconsciência
• Claustrofobia, ansiedade
• Deformações faciais ou da rinofaringe
• Barba ou outras obstruções para ajustar ou
vedar a máscara
• Ferimentos no rosto
• Barotrauma
• Necessidade de ventilação ou respiração
artificial de 24 h por dia
• Operações recentes ao rosto, ao esófago
ou ao estômago
• Tomada de medicamentos que possam
causar vómitos
• Necessidade de intubação imediata
Efeitos secundários
Podem ocorrer os seguintes efeitos
secundários:
nariz entupido, nariz seco, boca seca de
manhã, sensação de pressão nos seios nasais,
dores no peito, respiração ofegante,
flatulência, dores de cabeça, irritação da
conjuntiva, ruídos incómodos ao expirar,
pontos de pressão no rosto, vermelhidão da
pele do rosto.
3Operação
Fig. A-I: ver folheto incluído.
3.1 Ajustar o apoio para a testa
(fig.
C)
Ajuste de precisão
Mantenha as abas superiores do ajuste
aproximado premidas. Posicione o ajuste de
precisão numa das três posições fixas.
Para adaptar a altura da almofada para a
testa ou do ajuste de precisão (aprox. 1 cm),
rode o ajuste de precisão em 180°. A seguir,
77
Page 80

PT
posicione o ajuste de precisão conforme
descrito em cima.
Ajuste aproximado
Mantenha as abas inferiores do ajuste
aproximado premidas. Posicione a última aba
numa das três posições fixas do corpo da
máscara.
3.2 Colocar a máscara (fig. B)
Cuidado!
De modo a mater o perigo de vómitos o
mais reduzido possível, o paciente não
deve comer ou beber 3 horas antes de
utilizar a máscara.
1. Desengate da máscara um dos clipes
inferiores para as tiras de amarrar à volta
da cabeça.
2. Passe as tiras de amarrar à volta da
cabeça sobre a cabeça e engate
novamente o clipe.
3. Posicione a máscara sobre o rosto,
conforme representado na figura B.
Nota:
Se utilizar JOYCE Full Face
certifique-se de que a tira para prender
ao queixo assenta correctamente, isto é,
que passar por completo à volta do queixo. Caso contrário, a máscara pode escorregar com os movimentos.
4. Ajuste as tiras de amarrar à volta da
cabeça de forma a que a máscara assente
de forma estanque sobre o rosto, sem
que aperte demasiado, utilizando os
fechos de velcro.
Só WEINMANNstrap:
Para o efeito, as tiras de amarrar à volta
da cabeça WEINMANNstrap oferecem
as seguintes possibilidades (ver também
“Vista geral” no folheto incluído):
– Fechos de velcro de ambos os lados.
– Fecho de velcro em cima sobre a cabeça:
Solte o fecho de velcro, puxe ligeiramente
as extremidades das tiras de amarrar à volta
da cabeça com ambas as mãos e volte a
plus
vented,
assentar o fecho de velcro.
Pelas linguetas de velcro pode reconhecer se as tiras de amarrar à volta da cabeça estão bem colocadas. As linguetas
de velcro na testa têm a mesma cor que
o lado interior das tiras de amarrar à
volta da cabeça.
Apenas HEADstrap:
Para o efeito, as tiras de amarrar à volta
da cabeça HEADstrap oferecem as seguintes possibilidades:
– Ajuste aproximado: ranhura das tiras de
amarrar à volta da cabeça.
– Ajuste de precisão: quatro tiras de velcro.
5. Se necessário, ajuste novamente o apoio
para a testa.
3.3 Sistema de expiração (fig. H)
Variantes vented
As variantes vented (todas as peças da
máscara são transparentes) dispõem de um
sistema denominado sistema de expiração
integrado: a forma do anel de segurança e
do corpo da máscara é tal que existe uma
fenda entre estas peças. O ar expirado pode
sair através desta fenda. A geometria
especial das peças assegura que não seja
possível fechar a fenda ao encaixar o anel de
segurança. Não ligue um sistema de
expiração externo, caso contrário, poderá
não ser alcançada a pressão de tratamento.
Variantes non vented
Atenção!
As variantes non vented (anel de segurança,
cotovelo e casquilho rotativo em azul) não
dispõem de um sistema de expiração
próprio! Estas podem ser utilizadas
exclusivamente em combinação com
aparelhos de terapia que disponham de uma
válvula de expiração activa! Caso
contrário, na falha do aparelho de terapia
existe o perigo de reinalação de CO
asfixia.
As variantes non vented nunca devem ser
utilizadas em combinação com um sistema
e de
2
78
Page 81

PT
de expiração externo (como o Silentflow2).
Caso contrário, não é possível garantir a
função de segurança numa falha do
aparelho. Para tal, tenha em atenção as
instruções de uso do aparelho de terapia.
3.4 Válvula de expiração de
emergência (fig.
Atenção!
Apenas as variantes vented estão equipadas
com uma válvula de expiração de emergência.
Antes de cada utilização, certifique-se de
que esta válvula funciona correctamente (ver “5.
Teste de funcionamento” na página 83), caso
contrário há perigo de asfixia!
Função de segurança da válvula de
expiração de emergência
A válvula de expiração de emergência
dispõem de uma abertura atmosférica que
permite o paciente respirar ar ambiente em
caso de falha do aparelho de terapia. Isto
reduz nitidamente o risco de uma reinalação
e, dessa forma, também o perigo de
de CO
2
asfixia. No interior da válvula encontra-se
uma membrana que pode assumir duas
posições:
• Enquanto o aparelho de terapia está em
funcionamento, a membrana é comprimida através do fluxo contra a abertura
atmosférica, fechando esta abertura por
completo. O paciente respira através do
aparelho de terapia.
• Em caso de falha do aparelho de terapia ou
se o aparelho não estiver ligado, a membrana encontra-se na posição de repouso,
isto é, a abertura atmosférica está aberta.
O paciente respira ar ambiente através
desta abertura.
Cuidado!
A válvula de expiração de emergência é um
componente muito sensível. Deve ser sempre
manuseado com cuidado.
G)
3.5 Peças da máscara com enchimento de gel
As variantes JOYCE Full Face GEL vented e
JOYCE Full Face GEL non vented dispõem
por norma de uma almofada para a testa e
de um rebordo de máscara com enchimento
de gel. A almofada para a testa e o rebordo
de máscara de gel também podem ser
fornecidos para outras variantes do JOYCE
Full Face como peças sobressalentes.
Cuidado!
As peças da máscara com enchimento de gel
são componentes muito sensíveis. Devem ser
sempre manuseados com cuidado, de modo
a evitar deformações e danos.
3.6 Rebordos de máscara com tira para prender ao queixo
JOYCE Full Face
para prender ao queixo que apoia o queixo
durante o tratamento, prevenindo, desta
forma, que o maxilar saia do rebordo da
máscara e interrompa o tratamento.
plus
vented possui uma tira
3.7 Limites de pressão de tratamento
Cada variante das máscaras JOYCE Full Face
pode ser fornecida para um determinado
limite de pressão de tratamento (ver “7.
Material fornecido” na página 85):
– 4-30 hPa: JOYCE Full Face vented
JOYCE Full Face
– 4-40 hPa: JOYCE Full Face vented 40 hPa
JOYCE Full Face non vented 40 hPa
JOYCE Full Face GEL vented
JOYCE Full Face GEL non vented
As máscaras JOYCE Full Face para o limite de
pressão de tratamento 4-30 hPa dispõem de
um rebordo de máscara macio e as máscaras
JOYCE Full Face para o limite de pressão de
tratamento 4-40 hPa dispõem de um
rebordo de máscara mais duro ou de gel
(variantes de gel).
O rebordo de máscara mais duro para o
limite de pressão de tratamento 4-40 hPa
está identificado com o número "40".
Todos os rebordos de máscara também
podem ser fornecidos individualmente como
peça sobressalente, de modo que é possível
plus
vented
79
Page 82

PT
adaptar a máscara a diferentes necessidades
terapêuticas.
3.8 Ligar a máscara ao aparelho de
terapia (fig.
Insira o sistema de tubos do aparelho de
terapia no casquilho rotativo. Assegure-se de
que a ligação ao tubo fica segura e estanque.
A ligação não se pode soltar devido à pressão
de tratamento.
Se desejar separar a máscara durante um
curto espaço de tempo do tubo, basta puxar
para retirar o casquilho rotativo do cotovelo.
Cuidado!
No caso de existir um risco elevado de
transmissão de germes entre o paciente e o
aparelho, deve ser utilizado um filtro de
bactérias. Para tal, tenha em atenção as
instruções de uso do aparelho de terapia.
H)
3.9 Entradas de medição da
pressão (fig.
As máscaras JOYCE Full Face possuem com
duas conexões que podem ser utilizadas para
a medição da pressão ou introdução de
oxigénio.
Cuidado!
• Uma oxigenoterapia mal aplicada ou com
uma dosagem incorrecta pode resultar em
efeitos secundários. Por isso, este tipo de
tratamento só pode ser administrado
mediante receita médica.
• Para realizar uma oxigenoterapia é imprescindível observar as instruções de uso do
sistema de O
Se não forem utilizadas as entradas de
medição da pressão, feche-as sempre com o
fecho fornecido. Caso contrário, sai ar das
conexões e não é alcançada a pressão de
tratamento.
E)
e do aparelho de terapia.
2
3.10 Aparelhos e acessórios compatíveis
Aparelhos de terapia
As máscaras JOYCE Full Face podem ser
combinadas com todos os aparelhos
previstos para a realização das terapias
descritas em “Campo de aplicação”.
Observe que em caso de uma combinação
desfavorável de aparelhos, a pressão real na
máscara poderá não corresponder à pressão
de tratamento prescrita.
Isto pode ocorrer mesmo que no aparelho de
terapia seja indicada a pressão correcta.
Solicite a um médico ou a um agente
autorizado para definir a combinação de
aparelhos de modo a que a pressão real na
máscara corresponda à pressão de
tratamento.
Humidificador do ar de respiração
As máscaras JOYCE Full Face podem ser
utilizadas com humidificadores de ar quente
ou frio.
Nunca seleccione um nível de humidificação
demasiado elevado, ao ponto de se acumular
água no tubo de ar. Tenha em atenção as
instruções de uso do humidificador e do
aparelho de terapia.
Destravamento rápido (opcional)
(fig. I)
Para abrir as tiras de amarrar à volta da
cabeça em situações de emergência (p. ex.
vómitos) pode ser fornecido um acessório de
destravamento rápido.
O destravamento rápido é composto por um
clipe especial com corda de ruptura, que é
montado em vez de um clipe inferior para as
tiras de amarrar à volta do pescoço.
Em situação de emergência basta puxar na
corda de ruptura. O clipe especial solta-se da
máscara. As tiras de amarrar à volta da
cabeça estão agora abertas e a máscara pode
ser retirada.
80
Page 83

PT
Kit de broncoscopia (opcional)
(sem fig.)
O kit de broncoscopia (adaptador de
endoscopia non vented em combinação com
o anel de segurança non vented (NV))
permite efectuar uma endoscopia
(broncoscopia) durante a realização de uma
ventilação.
A broncoscopia só pode ser efectuada por
pessoal médico especializado.
Para informações mais precisas, observe as
instruções de uso abreviadas WM 67495.
3.11 Após a utilização
1. Desengate da máscara um dos clipes
inferiores para as tiras de amarrar à volta
da cabeça e retire a máscara.
2. Desengate os outros três clipes para as
tiras de amarrar à volta da cabeça, de
modo a soltar as tiras da máscara.
3. Proceda conforme descrito em „4
Procedimentos de higiene”.
3.12 Desmontar/montar a máscara
Desmontar a máscara (fig. G - C)
1. Desaperte o rebordo do corpo da
máscara.
2. Retire o fecho das entradas de medição
da pressão.
3. Rode o anel de segurança para a
esquerda, para a posição às 11 horas. A
seguir, retire o anel de segurança e o
cotovelo do corpo da máscara.
4. Expulse o cotovelo do anel de segurança
e retire o casquilho rotativo do cotovelo.
5. Apenas variantes vented: Desaperte
cuidadosamente a válvula de expiração
de emergência do cotovelo. Tenha
cuidado para que a membrana do lado
interior da válvula não seja danificada.
6. Desaperte o ajuste aproximado do corpo
da máscara.
7. Desaperte o ajuste de precisão do ajuste
aproximado. A seguir, desaperte a
almofada para a testa do ajuste de
precisão.
Montar a máscara (fig. C-G)
1. Coloque a almofada para a testa no
ajuste de precisão. A seguir, coloque o
ajuste de precisão no ajuste aproximado.
2. Insira o ajuste aproximado no corpo da
máscara.
3. Insira o casquilho rotativo no cotovelo,
até encaixar de forma audível.
4. Apenas variantes vented: Pressione
cuidadosamente a válvula de expiração
de emergência no cotovelo, até encaixar
dor forma audível de ambos os lados.
Tenha cuidado para que a membrana do
lado interior da válvula não seja
danificada ou fique entalada.
5. Pressione o casquilho rotativo no
cotovelo. A seguir, pressione o cotovelo
no anel de segurança, até encaixar de
forma audível.
6. Enfie o anel de segurança (na posição às
11 horas) e o cotovelo no corpo da
máscara. Rode o anel de segurança para
a posição às 12 horas.
7. Insira o fecho nas entradas de medição
da pressão.
8. Insira o rebordo no corpo da máscara.
9. Fixe as tiras de amarrar à volta da cabeça
com os clipes à máscara.
10.Realize um teste de funcionamento (ver
“5. Teste de funcionamento” na
página 83).
4 Procedimentos de higiene
4.1 Prazos
Diariamente
Limpe a máscara em água quente até ficar
sem resíduos. Para tal, pode desmontar a
máscara, conforme descrito na secção 3.12
“Desmontar/montar a máscara”. Utilize um
81
Page 84

PT
produto de limpeza suave (p. ex. detergente
Máquina de lavar
louça
Lavagem à mão
Desinfecção*
Máquina de lavar
louça
Lavagem à mão
Desinfecção*
para a louça). A seguir, enxagúe
cuidadosamente todas as peças em água
limpa.
Cuidado!
• Nos pacientes com um sistema imunitário
enfraquecido ou com patologias anteriores
especiais, poderá ser necessário proceder a
uma desinfecção ou esterilização diária
das peças da máscara. Nesse caso deve
consultar o seu médico.
• Nos procedimentos de higiene das superfícies de contacto entre o corpo da máscara
e o anel de segurança deve proceder com
o maior cuidado. Os resíduos nestas superfícies podem prejudicar os resultados do
tratamento ou o funcionamento do sistema de expiração integrado (variantes
vented).
Semanalmente
Desmonte a máscara, conforme descrito na
secção 3.12 “Desmontar/montar a
máscara”, e efectue o os procedimentos de
higiene das peças da máscara (ver “4.2.
Limpeza, desinfecção, esterilização” na
página 82).
4.2 Limpeza, desinfecção, esterilização
Procedimentos permitidos
Procedimento
Peças
Esterilização (alternativa
Rebordo de
máscara
Rebordo de
máscara GEL
Almofada para a
testa
Almofada para a
testa GEL
••• •
•••
•••
••
à desinfecção)
Procedimento
Peças
Esterilização (alternativa
à desinfecção)
Fecho
Corpo da máscara
Ajuste
aproximado
Ajuste de precisão
Cotovelo
Válvula de
expiração de
emergência
Casquilho rotativo
Anel de segurança
Clipe para as tiras
de amarrar à volta
da cabeça
Tiras de amarrar à
volta da cabeça
WEINMANNstrap
Tiras de amarrar à
volta da cabeça
HEADstrap
Tiras de amarrar à
volta da cabeça
JOYCEstrap
Destravamento
rápido
••• •
•••
•••
•••
•••
••
•••
•••
•••
•
•
•
•
Cuidado!
• Antes de proceder a uma desinfecção ou
esterilização em conformidade com a
tabela acima, todas as peças da máscara
devem ser limpas muito bem.
• A válvula de expiração de emergência e as
peças da máscara com enchimento de gel
são componentes muito sensíveis. Devem
ser sempre manuseados com cuidado, de
modo a evitar danos ou deformações.
82
Page 85

PT
Descrição dos procedimentos
Máquina de
lavar louça
Lavagem à
mão
Desinfecção*
Esterilização
(alternativa à
desinfecção)
*Recomendam-se os desinfectantes
gigasept
Programa de lavagem a 65°C. A seguir,
enxagúe todas as peças
cuidadosamente com água limpa.
Lavagem à mão em água quente.
Utilize um produto de limpeza suave. A
seguir, enxagúe todas as peças com
água limpa e deixe secar ao ar.
Limpeza mecânica numa solução
diluída, p. ex. com uma escova. Após a
desinfecção, enxagúe todas as peças
cuidadosamente com água destilada e
seque muito bem.
Esterilização a vapor em aparelhos em
conformidade com a norma EN 285.
Temperatura 134 °C, tempo mínimo de
exposição de 3 minutos.
®
FF (novo), Cidex® OPA e
Aniosyme DD1. A compatibilidade foi
comprovada para estes produtos.
É imprescindível observar as instruções dos
fabricantes.
Também pode consultar as indicações
relativas aos procedimentos de higiene em
caso de troca de paciente na brochura no
portal de informação em
www.weinmann.de. Se não tiver acesso à
internet, dirija-se à Weinmann.
Nota
Para realizar os procedimentos de higiene recomenda-se o uso de luvas adequadas (p. ex. luvas descartáveis).
A fita para a cabeça deve ser lavada antes da primeira utilização, uma vez que
pode desbotar.
A fita para a cabeça só pode ser lavada
à mão!
Não passe a fita para a cabeça a ferro,
pois tal pode danificar os fechos de
velcro!
Não seque as tiras de amarrar à volta da
cabeça no secador!
4.3 Após os procedimentos de higiene
Todas as peças devem ser secas
cuidadosamente após os procedimentos de
higiene. Verifique os componentes quanto a
sujidade remanescente ou danos. Se
necessário, repita os procedimentos de
higiene. Substitua as peças danificadas. Volte
a montar a máscara.
4.4 Troca de paciente
A máscara tem de ser primeiro sujeita aos
procedimentos de higiene antes de ser
utilizada em outro paciente.
Para tal, desmonte a máscara. Desinfecte ou
esterilize todas as peças, de acordo com a
secção „4.2 Limpeza, desinfecção,
esterilização”.
Utilize tiras de amarrar à volta da cabeça
movas e, se necessário, um destravamento
rápido novo.
5 Teste de funcionamento
Antes de cada utilização realize um teste de
funcionamento, tal como descrito a seguir.
Apenas variantes vented
Antes de cada utilização deve ser verificada a
válvula de expiração de emergência, tal como
descrito a seguir:
1. Certifique-se de que a válvula e a
membrana estão secas, sem danos e sem
secreções. Não utilize a máscara se a
válvula ou a membrana estiverem
danificadas (p. ex. fissuras ou
deformações). Nesse caso, substitua a
válvula de expiração de emergência (ver
“7. Material fornecido” na página 85).
2. Certifique-se de que a membrana da
válvula não feche a abertura da válvula.
Só assim poderá entrar ar ambiente na
máscara.
3. Ligue o tubo de respiração (material
fornecido do aparelho de terapia) ao
83
Page 86

PT
cotovelo da máscara e também ao
aparelho de terapia.
4. Ligue o aparelho de terapia. Agora, a
membrana deve fechar a abertura na
válvula de expiração de emergência. Só
assim poderá passar ar do aparelho de
terapia para a máscara.
5. Não utilize a máscara se a válvula ou a
membrana não funcionarem. Substitua a
válvula de expiração de emergência (ver
“7. Material fornecido” na página 85).
Máscaras JOYCE Full Face
Depois de realizar os procedimentos de
higiene efectue um exame visual.
Se se verificarem fugas no rebordo da
máscara resultantes de danos, é necessário
substituí-lo.
Verifique o bom funcionamento e a
estanqueidade da rótula junto ao cotovelo.
Se a rótula já não apresentar uma boa
mobilidade ou tiver fugas, é necessário
substituir o cotovelo ou o anel de segurança.
As peças inutilizadas podem ser eliminadas
juntamente com o lixo doméstico.
Poderão ocorrer descolorações na almofada
para a testa e no rebordo da máscara. No
entanto, tal não prejudica o funcionamento.
6 Resolução de problemas
Falha Causa Eliminação
Dores de
pressão no
rosto.
Corrente
de ar no
olho.
Não é
alcançada a
pressão de
tratament.
A máscara está
demasiado
apertada.
A máscara está
demasiado solta.
A máscara não
se adapta.
Pressão de
tratamento
elevada.
A máscara não
está ajustada
correctamente.
O rebordo da
máscara está
danificado.
Sistema de tubos
com fugas.
Sai ar das
entradas de
medição da
pressão.
Válvula de
expiração de
emergência:
– não está
montada
correctamente
– com defeito
Alargar um pouco o ajuste
das tiras de amarrar à volta
da cabeça.
Ajustar a posição do apoio
para a testa.
Apertar um pouco o ajuste
das tiras de amarrar à volta
da cabeça.
Ajustar a posição do apoio
para a testa.
Utilizar outro tamanho de
máscara. Disponível num
agente autorizado.
Utilizar um rebordo de
máscara duro (para uma
pressão até 40 hPa).
Disponível num agente
autorizado.
Ajustar as tiras de amarrar
à volta da cabeça.
Ajustar a posição do apoio
para a testa.
Substituir o rebordo da
máscara.
Verificar o conector e o
assentamento da manga.
Cobrir as entradas de
medição da pressão com o
fecho (incluído no material
fornecido).
Válvula de expiração de
emergência:
montar correctamente
substituir
84
Page 87

PT
7 Material fornecido
Nota
Todas as máscaras são fornecidas completamente montadas e com tiras de
amarrar à volta da cabeça.
Variantes vented
Artigo
N.º artigo com
JOYCE Full Face vented‚
tamanho S
JOYCE Full Face vented‚
tamanho M
JOYCE Full Face vented‚
tamanho L
JOYCE Full Face vented‚
tamanho XL
JOYCE Full Face vented
40 hPa‚ tamanho S
JOYCE Full Face vented
40 hPa‚
tamanho M
JOYCE Full Face vented
40 hPa, tamanho L
JOYCE Full Face vented
40 hPa, tamanho XL
JOYCE Full Face
GEL vented‚ tamanho S
JOYCE Full Face
GEL vented‚ tamanho M
JOYCE Full Face
GEL vented‚ tamanho L
JOYCE Full Face
tamanho S
JOYCE Full Face
tamanho M
JOYCE Full Face
tamanho L
JOYCE Full Face
tamanho XL
plus
vented‚
plus
vented‚
plus
vented‚
plus
vented‚
WEINMANNstrap/
WM 26410 WM 26410/1
WM 26420 WM 26420/1
WM 26430 WM 26430/1
WM 26440 WM 26440/1
WM 26411 WM 26411/1
WM 26421 WM 26421/1
WM 26431 WM 26431/1
WM 26441 WM 26441/1
WM 26412 WM 26412/1
WM 26422 WM 26422/1
WM 26432 WM 26432/1
WM 26413
WM 26423
WM 26433
WM 26443
Variantes non vented
N.º artigo com
Artigo
WEINMANNstrap/
HEADstrap
JOYCE Full Face non vented
40 hPa‚ tamanho S
JOYCE Full Face non vented
40 hPa‚ tamanho M
JOYCE Full Face non vented
40 hPa‚ tamanho L
JOYCE Full Face non vented
40 hPa‚ tamanho XL
N.º artigo
HEADstrap
com JOYCEstrap
JOYCE Full Face GEL non vented‚
tamanho S
JOYCE Full Face GEL non vented‚
tamanho M
JOYCE Full Face GEL non vented‚
tamanho L
WM 26461
WM 26471
WM 26481
WM 26491
WM 26462
WM 26472
WM 26482
Peças sobressalentes
Artigo N.º artigo
Kit de rótulas:
Anel de segurança, cotovelo, casquilho
rotativo, válvula de expiração de
emergência
Kit de rótulas non vented:
Anel de segurança, cotovelo, casquilho
rotativo
Casquilho rotativo vented WM 26254
Apoio para a testa:
Almofada para a testa, ajuste aproximado
do apoio para a testa, ajuste de precisão
do apoio para a testa
Apoio para a testa GEL:
Almofada para a testa GEL, ajuste
aproximado do apoio para a testa, ajuste
de precisão do apoio para a testa
Almofada para a testa WM 26200
Almofada para a testa GEL WM 26209
WM 26569
WM 26207
WM 26201
WM 26115
85
Page 88

PT
Artigo N.º artigo
Rebordo de máscara 30 hPa, tamanho S
Rebordo de máscara 30 hPa, tamanho M
Rebordo de máscara 30 hPa, tamanho L
Rebordo de máscara 30 hPa, tamanho XL
Rebordo de máscara 40 hPa, tamanho S
Rebordo de máscara 40 hPa, tamanho M
Rebordo de máscara 40 hPa, tamanho L
Rebordo de máscara 40 hPa, tamanho XL
Rebordo de máscara GEL FFM, tamanho S
Rebordo de máscara GEL FFM, tamanho M
Rebordo de máscara GEL FFM, tamanho L
Rebordo de máscara FF
Rebordo de máscara FF
Rebordo de máscara FF
Rebordo de máscara FF
plus
, tamanho S
plus
, tamanho M
plus
, tamanho L
plus
, tamanho XL
WM 26510
WM 26520
WM 26530
WM 26540
WM 26511
WM 26521
WM 26531
WM 26541
WM 26512
WM 26522
WM 26532
WM 26586
WM 26587
WM 26588
WM 26589
Tiras de amarrar à volta da cabeça
WEINMANNstrap, incl. clipes para as tiras
WM 26350
de amarrar à volta da cabeça
Tiras de amarrar à volta da cabeça
HEADstrap, incl. clipes para as tiras de
WM 26360
amarrar à volta da cabeça
Tiras de amarrar à volta da cabeça
JOYCEstrap azul, incl. clipes para as tiras
WM 26290
de amarrar à volta da cabeça
Clipes para as tiras de amarrar à volta da
cabeça (4 unid.)
WM 26205
Fecho WM 26208
Instruções de uso
DE, EN, FR, NL, IT, ES, PT, TR, EL, PL, HR WM 66117
Acessórios
Artigo N.º artigo
Destravamento rápido (corda de
ruptura)
WM 26560
8 Especificações
Dados técnicos
Parâmetro Valor
Classe de produtos segundo a
directiva 93/42/CEE do
Conselho:
Dimensões (LxAxP):
Peso: aprox. 102 gramas
Limite de pressão de
tratamento:
Rebordo de máscara 30 hPa:
Rebordo de máscara 40 hPa:
Rebordo de máscara GEL FFM:
Rebordo de máscara FF
Conexão por tubo: cone
segundo EN ISO 5356-1
Variantes vented:
Variantes non vented
Entradas de medição da
pressão:
Clipes largos para as tiras de
amarrar à volta da cabeça:
Gama de temperaturas
Operação:
Armazenamento
Resistência de corrente
Variantes vented:
a 50 l/min
a 100 l/min
Variantes non vented
a 50 l/min
a 100 l/min
Resistência de corrente, válvula
de expiração de emergência
Inspiração com 50 l/min:
Expiração com 50 l/min:
Pressão sonora válvula de
expiração de emergência
(variantes vented)
Abrir:
Fechar:
plus
:
II a
aprox. 107 x 160 x
1
106 mm
4 a 30 hPa
4 a 40 hPa
4 a 40 hPa
4 a 30 hPa
Ø 22 mm (masc.)
Ø 22 mm (fem.)
Ø 4 mm
máx. 20 mm
+ 5° C a + 40° C
- 20° C a + 70° C
0,02 hPa
0,26 hPa
0,09 hPa
0,37 hPa
0,5 hPa
0,5 hPa
≤ 1 hPa
≤ 2 hPa
1
86
Page 89

PT
Parâmetro Valor
Fluxo de fuga médio JOYCE Full
Face vented (l/min)
Pressão de saída no aparelho de terapia (hPa)
40
50
60
70
80
90
100
0
10
20
30
40
50
60
70
80
90
100
0 5 10 15 20 25 30 35 40
JOYCE FF
vented
JOYCE FF
non
vented
Valor de emissão de ruídos de
dois dígitos indicado segundo
ISO 4871:
- Nível de pressão sonora
- Nível de potência sonora
(factor de incerteza: 3 dB(A))
Vida útil até 12 meses
Normas aplicáveis EN ISO 17510-2:2009
1
Dependendo do tamanho e da versão.
2
Os materiais utilizados para o fabrico de
máscaras envelhecem quando são expostos,
p. ex., a produtos de limpeza agressivos. Por
isso, em casos pontuais poderá ser necessário
substituir a máscara mais cedo (ver “5. Teste
de funcionamento” na página 83).
Materiais
Artigo Material
Rebordo de máscara, fecho Silicone
Rebordo de máscara GEL
Almofada para a testa, anel de
segurança
Almofada para a testa GEL
Corpo da máscara, cotovelo Policarbonato
Tiras de amarrar à volta da cabeça
WEINMANNstrap
Tiras de amarrar à volta da cabeça
JOYCEstrap
Tiras de amarrar à volta da cabeça
HEADstrap
Casquilho rotativo, ajuste
aproximado do apoio para a testa,
ajuste de precisão do apoio para a
testa
Clipe para as tiras de amarrar à volta
da cabeça
16,5 dB(A)
24,5 dB(A)
2
Reservamo-nos o
direito de alterar a
estrutura
Silicone,
gel de silicone
TPE, polipropileno
Silicone,
gel de silicone,
policarbonato
Licra, Poliéster,
Poliuretano, Nylon,
Algodão,
Poliamida
Algodão,
poliamida,
elastano
Nylon/spandex
Poliuretano
Poliéster/licra
Polipropileno
POM
Artigo Material
Caixa de válvulas (válvula de
expiração de emergência)
Destravamento rápido (corda de
ruptura)
Fecho das entradas de medição da
pressão
Fecho do adaptador de endoscopia
non vented
Rebordo da máscara, almofada para
a testa
Corpo da máscara, cotovelo,
adaptador de endoscopia non
vented
Anel de segurança, válvula de
expiração de emergência
TPE, polipropileno
POM, poliéster,
poliamida
Silicone
Silicone
Silicone,
gel de silicone, laca
de silicone
Policarbonato,
poliamida
Polipropileno,
TPE
Todas as peças da máscara estão isentas de
látex.
Curva característica pressão/fluxo
Na curva característica pressão/fluxo é
representado o fluxo de saída em função da
pressão de tratamento.
9 Garantia
Pelo novo produto original da Weinmann e
pela peça sobressalente montada pela
Weinmann, a Weinmann concede ao cliente
uma garantia limitada do fabricante de
acordo com as condições de garantia aplicáveis para o respectivo produto, e conforme
os tempos de garantia referidos de seguida
87
Page 90

PT
válidos a partir da data de compra. As condições de garantia podem ser consultadas
na internet em www.weinmann.de. A pedido, podemos enviar-lhe as condições de
garantia.
No caso de querer accionar a garantia,
dirija-se a um agente autorizado.
Produto
Aparelhos Weinmann, incluindo
acessórios (excepção: máscaras) para
diagnóstico do sono, respiração
assistida em casa, oxigenoterapia e
assistência médica de emergência
Máscaras incluindo acessórios,
baterias, pilhas, sensores, sistemas de
tubos
Produtos de utilização única Nenhum
Períodos de
garantia
2 anos
6 meses
* caso não exista indicação em contrário na
documentação técnica
10 Declaração de conformidade
A Weinmann Geräte für Medizin GmbH +
Co. KG declara com a presente, que o
produto está em conformidade com as
especificações aplicáveis da directiva 93/42/
CEE relativa a dispositivos médicos.
O texto completo da declaração de
conformidade encontra-se em:
www.weinmann.de
88
Page 91

TR
Türkçe
1 Ürün açıklamaları
Parçalar
(Tek tek parça resimleri: Bkz. birlikte
verilen katlanır kağıttaki Resim A.)
1 Kafa bandı
2 Alın yastığı
3 Alın desteği ince ayar parçası
4 Alın desteği kaba ayar parçası
5 Alın desteği
6 Bant klipsi
7 Basınç ölçme bağlantıları
8 Tapa
9 Acil durum soluk verme valfı (
sadece
vented modellerinde)
10 Döner kovan*
11 Ara bağlantı parçası*
12 Emniyet bileziği*
13 Maske gövdesi
14 Maske lastiği
15 Çene desteği (sadece JOYCE Full
*
non vented modelleri
plus
vented)
Face
vented modelleri: şeffaf;
: mavi
Kullanım amacı
JOYCE Full Face maskeleri aksesuar
ürünleridir. Bu maskeler, hasta ile terapi
cihazı arasındaki sızdırmazlık elemanları
işlevine sahiptir. Bu maskeler, yetersiz
ventilasyonu olan hastalarda uyku apnesinin
tedavisi ve hastalara girişimsel olmayan ayrıca
yaşamı destekleyici olmayan solunum desteği
vermek amacıyla kullanılır.
non vented modelleri, sadece etkin soluk
verme valfına sahip solunum cihazları ile
birlikte kullanılabilir.
Maske hasta tarafından kullanılmadan
önce
Terapiye başlamadan önce maskenin
kullanımıyla ilgili olarak hastanın uzman
kişilerce bilgilendirilmesi gerekmektedir.
2 Güvenlik uyarıları
Güvenlikle ilgili genel hükümler
93/42 EWG sayılı yönetmelik uyarınca dikkat
edilmesi gereken konular:
• Kullanma kılavuzunu baştan sona dikkat-
lice okuyun. Kullanma kılavuzu, maskenin
bir parçası olup her zaman için hazırda
bulundurulmalıdır.
• vented modellerini, acil durum soluk verme
valfı hasarlı olduğunda veya mevcut olmadığında kesinlikle kullanmayın. Aksi takdirde,
terapi cihazı devre dışı kaldığında yüksek
miktarda CO
• JOYCE Full Face maskelerini, maskeyi kendi
başlarına çıkartamayan veya kusmaya
eğimli hastalarda kesinlikle kullanmayın.
Boğulma tehlikesi vardır.
•
JOYCE Full Face maskelerini, sadece her bir
model için öngörülen terapi basıncı aralıkla-
rında kullanın:
– 4-30 hPa: JOYCE Full Face vented
– 4-40 hPa: JOYCE Full Face vented 40 hPa
Aksi takdirde, CO2 geri solunabilir veya
sızdırmalar meydana gelebilir.
•Başka üreticilere ait ürünlerin kullanılması,
işlev bozukluklarına ve kullanım için kısıtlı
uyumluluğa yol açabilir. Ayrıca, biyolojik
uyumluluğa ilişkin gereklilikler yerine getirilmeyebilir. Kullanma kılavuzunda önerilenlerin
dışında aksesuarların veya orijinal olmayan
yedek parçaların kullanılması halinde, garanti
ve sorumluluk hükümlerinin tamamen geçersiz kalacağını unutmayın.
geri solunabilir.
2
JOYCE Full Face
JOYCE Full Face non vented 40 hPa
JOYCE Full Face GEL vented
JOYCE Full Face GEL non vented
plus
vented
89
Page 92

TR
• Kendi kendine soluk almada zorluk çeken
hastalar sürekli kontrol altında tutulmalıdır.
Solunum cihazında vakum basıncı ve sızdır-
mayı haber veren bir uyarı sistemi etkinleş-
tirilmiş olmalıdır.
• Obstrüktif ve restriktif akciğer hastalığı olan
hastalar, JOYCE Full Face maskeleri kullandıklarında özel olarak muayene edilmelidir
(örneğin CO
• Acil durum soluk verme valfının veya
soluma sisteminin deliğini hiçbir zaman
kapatmayın Aksi takdirde, CO
ve boğulma tehlikesi söz konusudur.
• Maskenin uzun sürelerle kullanımı, ancak
terapi cihazı devredeyken mümkündür. Aksi
takdirde, CO
konusudur.
• Elektrik iletkenliği olan solunum hortumları
kullanmayın (istisna: Elektrikle ısıtılan solunum hortumları).
• Bir enfeksiyonu, bakteriyolojik kontaminasyonu ve işlev bozukluklarını önlemek için 4
“Hijyenik hazırlık işlemleri” başlığı altında
verilen bilgileri dikkatle okuyun.
geri soluması ile ilgili olarak).
2
geri soluma
2
geri soluma tehlikesi söz
2
Kontrendikasyonlar:
JOYCE Full Face maskeleri, bazı durumlarda
kullanılmamalı veya sadece aşırı dikkat
edilerek kullanılmalıdır. Bazı istisnai
durumlarda, terapide bu maskelerin kullanılıp
kullanılmayacağı kararını doktor verir.
•Aşağı özofegal sfinkter (yemek borularının
alt kapama kası) çalışma bozukluğu
•Aşırı regürjitasyon (mide içeriğinin yemek
borusuna geri gelmesi)
• Oksürme refleksi bozukluğu
• Hiatal Hernia (mide fıtığı)
• Anestezi veya sedasyon
• Enfeksiyona eğimli yüzde açık yaralar
• Hemodinamik veya kardiyak respiratuar
dengesizlik
• Bilinçsizlik
• Klostrofobi, Korku
• Yüzde veya burun boşluğunda
deformasyon
• Maskenin düzgün yerleşmesini veya sızdır-
maz hale getirilmesini engelleyen sakal
veya başka engeller
• Yüzde yaralanmalar
• Barotravma
• Solutma uygulaması veya günde 24 saat
soluk alıp verme desteği
• Yeni yüz, yemek borusu veya mide
ameliyatları
• Kusmaya yol açabilecek ilaçların alınması
• Hemen intübasyon gerekliliği
Yan etkiler
Aşağıda sıralanan yan etkiler oluşabilir:
Burun tıkanması, burun kuruması, sabahları
ağız kuruluğu, burun boşluklarında basınç
hissi, göğüs ağrıları, nefes darlığı,
bağırsaklarda gaz, baş ağrısı, burun
mukozasında aşınma, nefes alıp verirken
rahatsız edici sesler, yüzde maskenin temas
ettiği yerlerde izler, yüzde kızarıklıklar.
3 Kullanım
Resim A-I: Bkz. birlikte verilen katlanır
kağıt.
3.1 Alın desteğinin ayarlanması
(Resim
Ince ayar parçası
Kaba ayar parçasındaki üst mandalları basılı
tutun. Ince ayar parçasını ayar kilit
noktalarından birine yerleştirin.
Alın yastığının veya ince ayar parçasının
yüksekliğini ayarlamak için (yaklaşık 1 cm),
ince ayar parçasını 180° çevirin. Ardından
ince ayar parçasını, yukarıda belirtilen şekilde
konumlandırın.
Kaba ayar parçası
Kaba ayar parçasındaki alt mandalları basılı
tutun. Son olarak maske gövdesindeki ayar
kilit noktalarından birine yerleştirin.
C)
90
Page 93

TR
3.2 Maskenin takılması (Resim B)
Dikkat!
Kusma riskini mümkün olduğu kadar
azaltmak için hasta, maskeyi kullanmadan önce 3 saat boyunca hiç bir şey ye-
memeli veya içmemelidir.
1. Maskedeki alt bant klipslerinden birini
çözün.
2. Kafa bandını başınızın üstünden geçirin
ve bant klipsini tekrar yerine takın.
3. Maskeyi, B resminde gösterilen şekilde
yüzünüze oturtun.
Bilgi:
JOYCE Full Face
kullandığınızda, çene desteğinin düzgün
oturmasına dikkat edin. Çene desteği,
çenenizi tamamen kapatmalıdır. Aksi
takdirde, hareket edildiğinde maske
kayabilir.
4. Cırt bantlarını ayarlayarak kafa bantlarını
maskenin sıkı oturacak ancak aşırı baskı
yapmayacak şekilde yüzünüze oturmasını
sağlayın.
Sadece WEINMANNstrap:
WEINMANNstrap kafa bandı, şu seçenekleri sunmaktadır (konuyla ilgili olarak ekte verilen açıklama kağıdındaki
"Genel bakış" bölümüne de bakın):
– Her iki taraftaki cırt bantları.
–Baş üstündeki cırt bandı: Cırt bandını çözüp
ili elinizle kafa bandının uçlarını hafif çekin
ve cırt bandını yeniden bastırın.
Kafa bandının doğru takılıp takılmadığı,
cırt bant çıkıntılarından anlaşılabilir.
Alındaki cırt bandı çıkıntıları kafa bandı-
nın iç yüzüyle aynı renge sahiptir.
Sadece HEADstrap:
HEADstrap kafa bandı, şu seçenekleri
sunmaktadır:
– Kaba ayar: Kafa bandındaki yarığı.
– Hassas ayar: Dört adet cırt bant.
5. Gerektiğinde alın desteğini yeniden
ayarlayın.
plus
vented maskesini
3.3 Soluma sistemi (Resim H)
vented modelleri
vented modelleri (tüm maske parçaları şeffaf-
tır), entegre bir soluma sistemine sahiptir:
Emniyet bileziği ve maske gövdesinin biçimi,
bu parçalar arasında bir boşluk oluşacak şe-
kildedir. Bu boşluktan dışarı solunan hava çı-
kabilmektedir. Parçaların özel geometrisi, bu
boşluğun emniyet bileziğinin takılması sırasında kapanmamasını sağlamaktadır. Harici
bir solum sistemi bağlamayın. Aksi takdirde
terapi basıncına ulaşılamaz.
non vented modelleri
Uyarı!
non vented modellerinde (Emniyet bileziği,
ara bağlantı parçası ve döner kovan mavi
renktedir) kendilerine ait oluma sistemi
bulunmamaktadır! Bu modeldeki maskeler,
sadece etkin soluk verme valfına sahip te-
rapi cihazları ile birlikte kullanılabilir! Aksi
takdirde, terapi cihazı devre dışı kaldığında
geri soluma ve boğulma tehlikesi vardır.
CO
2
non vented modelleri, harici soluma
sistemi (örneğin Silentflow2 gibi) ile birlikte
kesinlikle kullanılamaz. Aksi takdirde, cihaz
devre dışı kaldığında emniyet fonksiyonu
garanti edilemez. Ayrıca terapi cihazınızın
kullanma kılavuzunu dikkate alın.
3.4 Acil durum soluk verme valfı
(Resim
Uyarı!
Sadece vented modelleri bir acil durum soluk
verme valfı ile donatılmıştır. Maskeyi her
defasında kullanmadan önce, bu valfın
düzgün çalıştığından emin olun (bkz. “5. Işlev
kontrolü”, Sayfa 96). Aksi takdirde boğulma
tehlikesi vardır!
Acil durum soluk verme valfının emniyet
fonksiyonu
Acil durum soluk verme valfı, terapi cihazının
devre dışı kalması durumunda hastanın oda
havasını soluyabileceği bir ortam havası
deliğine sahiptir. Bu husus, CO
riskini ve böylece boğulma tehlikesini önemli
G)
geri soluma
2
91
Page 94

TR
ölçüde azaltır. Valfın iç kısmında, iki
pozisyona girebilen bir membran
bulunmaktadır:
• Membran, terapi cihazı çalıştığı sürece hava
akımı tarafından ortam havası deliğine bastırılır ve bu deliği tamamen kapatır. H asta,
terapi cihazı üzerinden nefes alır.
• Membran, terapi cihazı devre dışı kaldığın-
da veya cihaz bağlı olmadığında bekleme
pozisyonunda bulunur ve böylece ortam
havası deliği açık kalır. Hasta, bu delik
üzerinden nefes alır.
Dikkat!
Acil durum soluk verme valfı, çok hassas bir
yapı parçasıdır. Valfı oldukça dikkatli bir
şekilde kullanın.
3.5 Jel dolgulu maske parçaları
JOYCE Full Face GEL vented ve JOYCE Full
Face GEL non vented maskelerinde, alın yastığı ve maske lastiği standart olarak bir jel dolgusuna sahiptir. Jel alın yastığı ve jel maske
lastiği, ayrıca diğer JOYCE Full Face modelleri
için yedek parça olarak teslim edilebilir.
Dikkat!
Jel dolgulu maske parçaları, çok hassas yapı
parçalarıdır. Deformasyonları ve hasarları önlemek için her zaman oldukça dikkatli bir şe-
kilde kullanın.
3.6 Çene destekli maske lastikleri
JOYCE Full Face
çeneyi destekleyen ve böylece maske
lastiğinin alt çeneden kayıp çıkmasını ve
böylece terapinin durmasını önleyen bir çene
desteğine sahiptir.
plus
vented, terapi sırasında
3.7 Terapi basıncı aralıkları
Her bir JOYCE Full Face maskesi modeli,
belirli terapi basıncı aralığı için uygundur ve
bu doğrultuda teslim edilmektedir (bkz. “7.
Teslimat kapsamı”, Sayfa 97):
– 4-30 hPa: JOYCE Full Face vented
JOYCE Full Face
– 4-40 hPa: JOYCE Full Face vented 40 hPa
JOYCE Full Face non vented 40 hPa
JOYCE Full Face GEL vented
plus
vented
JOYCE Full Face GEL non vented
4-30 hPa terapi basıncı aralığına için olan
JOYCE Full Face maskeleri, yumuşak bir maske lastiğine ve 4-40 hPa terapi basıncı aralığı-
na için olan JOYCE Full Face maskeleri, daha
sert bir maske lastiğine veya jel maske lastiği-
ne (Jel modelleri) sahiptir.
4-40 hPa terapi basıncı aralığına ilişkin sert olan
maske lastiğinin üzerinde “40” yazmaktadır.
Tüm maske lastikleri, maskenizi değişen
terapi gereksinimlerine uygun hale
getirebilmeniz için münferit olarak yedek
parça olarak da teslim edilebilir.
3.8 Maskenin terapi cihazına
bağlanması (Resim
Terapi cihazınızın hortum sistemini döner
kovana takın. Hortumun sağlam ve sızdırmaz
bir şekilde takılı olduğundan emin olun.
Hortum bağlantısı, terapi basıncı nedeniyle
yerinden çıkmamalıdır.
Maskeyi kısa bir süre için hortumdan ayırmak
istediğinizde, döner kovanı ara parçadan
kolayca çekip çıkartabilirsiniz.
Dikkat!
Bakteri filtresi Ayrıca terapi cihazınızın
kullanma kılavuzunu dikkate alın.
H)
3.9 Basınç ölçme bağlantıları
(Resim
JOYCE Full Face maskelerinde, basınç ölçmek
veya oksijen vermek için iki adet bağlantı
bulunmaktadır.
Dikkat!
• Oksijen terapilerinde yanlış kullanım veya
yanlış doz uygulanması yan etkilere neden
olabilir. Bu nedenle, bu tür terapiler sadece
doktorun direktifleri doğrultusunda uygulanmalıdır.
• Oksijen terapilerinde, O
terapi cihazınızın kullanma kılavuzlarını
mutlak şekilde dikkate alın.
Basınç ölçme bağlantıları kullanılmadığında,
bu bağlantıları birlikte verilen tapalar ile
kapalı tutun. Aksi takdirde, bu bağlantılardan
hava çıkar ve terapi basıncına ulaşılamaz.
E)
sisteminizin ve
2
92
Page 95

TR
3.10 Uyumlu cihazlar ve aksesuarlar
Terapi cihazları
JOYCE Full Face maskeleri, “Kullanım amacı”
başlığı altında sıralanan terapi
uygulamalarında kullanılan tüm cihazlar ile
birlikte kullanılabilir.
Maskenin uygun olmayan cihazlar ile birlikte
kullanılması halinde, maskedeki basıncın
öngörülen terapi basıncı düzeyinde olup
olmadığına dikkat edin.
Terapi cihazında doğru basınç miktarı
gösteriliyor olsa bile maskedeki basınç doğru
düzeyde olmayabilir. Cihaz
kombinasyonlarınızı bir doktora veya yetkili
satıcıya ayarlattırarak, maskedeki basıncın
terapi basıncı düzeyinde olmasını sağlayın.
Hava nemlendirici cihaz
JOYCE Full Face maskeleri soğuk veya ısıtmalı
tip hava nemlendirici cihazlar ile birlikte
kullanılabilir.
Nemlendirme düzeyini, su yoğuşması nedeniyle hava hortumunda buğulanma oluşma-
yacak düzeyde ayarlayın. Hava nemlendirici
cihazınızın ve terapi cihazınızın kullanım kılavuzlarını dikkate alın.
Hızlı kilit açma mekanizması
(opsiyonel) (Resim I)
Acil durumlarda (örneğin kusma) kafa
bandını açmak için, aksesuar olarak bir hızlı
kilit açma mekanizması temin edilebilir.
Hızlı kilit açma mekanizması, alt bant klipsi
yerine takılan bir çekme ipli özel klipsten
oluşur.
Acil bir durumda çekme ipini çekin. Özel
klips, maskeden çözülür. Kafa bandı açılır ve
maske çıkartılabilir.
Bronkoskopi seti (seçmeli) (resimsiz)
Bronkoskopi seti (non vented (NV) emniyet
bileziği ile birlikte non vented endoskopi
adaptörü), solunum devam ederken
uygulanacak bir endoskopi işlemini
(bronkoskopi) mümkün kılar.
Bronkoskopi sadece tıbbi uzman personel
tarafından uygulanmalıdır.
Daha detaylı bilgi için lütfen WM 67495
numaralı kısa kullanma kılavuzuna bakınız.
3.11 Kullanım sonrası
1. Alt bant klipslerinden birini maskeden
çözün ve maskeyi çıkarın.
2. Diğer üç bant klipsini, kafa bandını
maskeden çözmek için çözün.
3. „4 Hijyenik hazırlık işlemleri” başlığı
altında belirtilen işlem adımlarını
uygulayın.
3.12 Maskenin parçalarına
ayrılması ve birleştirilmesi
Maskenin parçalarına ayrılması (Resim
G - C)
1. Maske lastiğini maske gövdesinden
çözün.
2. Basınç ölçme bağlantılarındaki tapaları
çıkarın.
3. Emniyet bileziğini, saatin ters yönünde
çevirerek saat 11.00 pozisyonuna getirin.
Emniyet bileziğini ve ara bağlantı
parçasını maske gövdesinden çekip
çıkarın.
4. Ara bağlantı parçasını bastırarak emniyet
bileziğinden çıkarın ve döner kovanı ara
bağlantı parçasından çekip çıkarın.
5. Sadece vented modelleri: Acil durum
soluk verme valfını dikkatli bir şekilde ara
bağlantı parçasından sökün. Valfın iç
kısmında bulunan membrana zarar
vermemeye dikkat edin.
6. Kaba ayar parçasını maske gövdesinden
sökün.
7. Ince ayar parçasını kaba ayar parçasından
sökün. Daha sonra da alın yastığını ince
ayar parçasından söküp çıkarın.
Maskenin birleştirilmesi (Resim C - G)
1. Alın yastığını ince ayar parçasına takın.
Daha sonra da ince ayar parçasını kaba
ayar parçasına sokun.
93
Page 96

TR
2. Kaba ayar parçasını maske gövdesine
takın.
3. Döner kovanı ara bağlantı parçasına
sokarak, tıklama sesi duyulacak şekilde
yuvasına oturtun.
4. Sadece vented modelleri: Acil durum
soluk verme valfını bastırarak, ara
bağlantı parçasının her iki tarafında
tıklama sesi duyulacak şekilde oturuncaya
kadar ara bağlantı parçasına takın. Valfın
iç kısmında bulunan membranın zarar
görmemesine veya sıkışmamasına dikkat
edin.
5. Döner kovanı, ara bağlantı parçası
üzerine takın. Ardından ara bağlantı
parçasını emniyet bilezi
tıklama sesi duyuluncaya kadar bastırıp
yuvasına oturtun.
6. Emniyet bileziğini (saat 11.00
pozisyonunda) ve ara bağlantı parçasını
maske gövdesine takın. Emniyet bileziğini
çevirerek saat 12.00 pozisyonuna getirin.
7. Tapayı basınç ölçme bağlantılarına takın.
8. Maske lastiğini maske gövdesine takın.
9. Kafa bandını maskedeki klipslerine takın.
10.Bir işlev kontrolü yapın (bkz. “5. Işlev
kontrolü”, Sayfa 96).
ğine geçirerek
4 Hijyenik hazırlık işlemleri
4.1 Zaman aralıkları
Günlük
Maskeyi, üzerinde herhangi bir artık
kalmayacak şekilde ılık suda temizleyin.
Bunun için maskeyi, 3.12 “ Maskenin
parçalarına ayrılması ve birleştirilmesi”
başlığı altında belirtilen şekilde parçalarına
ayırabilirsiniz. Yumuşak temizlik maddesi
kullanın (örneğin bulaşık deterjanı). Daha
sonra bütün parçaları bol temiz su kullanarak
iyice çalkalayın.
Dikkat!
•bağışıklık sistemi zayıf veya özel bir hastalık
geçmişi olan hastalarda maske parçalarının
günlük olarak dezenfekte veya sterilize
edilmesi gerekli olabilir. Bu tür durumlarda
doktorunuza danışın.
•Hijyenik hazırlık işlemlerini gerçekleştirir-
ken, özellikle maske gövdesi ile emniyet
bileziği arasındaki temas yüzeylerine büyük
özen gösterin. Bu bölümlerde olması muhtemel artıklar, terapinin başarısını veya
entegre soluma sisteminin (vented modelleri) çalışmasını olumsuz şekilde etkileyebilir.
Haftalık
Maskeyi, 3.12 “ Maskenin parçalarına
ayrılması ve birleştirilmesi” başlığı altında
belirtilen şekilde parçalarına ayırın ve maske
parçalarında hijyenik hazırlık işlemi uygulayın
(bkz. “4.2. Temizlik, dezenfeksiyon ve
sterilizasyon”, Sayfa 95).
94
Page 97

TR
4.2 Temizlik, dezenfeksiyon ve sterilizasyon
Müsaade edilen yöntemler
Yöntem
Parçalar
Maske lastiği
Jel maske lastiği
Alın yastığı
Jel alın yastığı
Tapa
Maske gövdesi
Kaba ayar parçası
Ince ayar parçası
Ara bağlantı
parçası
Acil durum soluk
verme valfı
Döner kovan
Emniyet bileziği
Bant klipsi
Kafa bandı
WEINMANNstrap
Kafa bandı
HEADstrap
Kafa bandı
JOYCEstrap
Hızlı kilit açma
mekanizması
Dikkat!
• Maske parçalarını, yukarıdaki tablo uyarın-
ca dezenfekte veya sterilize etmeden önce
iyice temizleyin.
• Acil durum soluk verme valfı ve jel dolgulu
maske parçaları çok hassas yapı parçaları-
dır. Deformasyonları ve hasarları önlemek
için her zaman oldukça dikkatli bir şekilde
kullanın.
Bulaşık makinesi
Elle yıkanan
parçalar
Dezenfeksiyon*
Sterilizasyon
••• •
•••
•••
••
••• •
•••
•••
•••
•••
••
•••
•••
•••
•
•
•
•
(Dezenfeksiyona
Yöntemlerin tanıtımı
Bulaşık
makinesi
Elle yıkanan
parçalar
alternatif olarak)
Dezenfeksiyon
*
Sterilizasyon
(Dezenfeksiyon
a alternatif
olarak)
65°C'lik yıkama programı kullanın ve
ardından tüm parçaları temiz suyla iyice
çalkalayın.
Elle yıkanan parçalar ılık suda yıkanır.
Yum uşak temizlik maddesi kullanın.
Ardından tüm parçaları temiz su ile
çalkalayın ve kendiliğinden kurumaya
bırakın.
Parçaları inceltilmiş solvent içinde
örneğin bir fırça yardımıyla temizleyin.
Dezenfeksiyon işleminin ardından tüm
parçaları destile su ile çalkalayıp
kurumaya bırakın.
EN 285 standardına uygun bir cihazla
buhar ile sterilizasyon. Sıcaklık 134 °C,
Asgari bekletme süresi 3 dakika.
*gigasept® FF (yeni), Cidex® OPA ve
Aniosyme DD1 dezenfeksiyon maddelerini
kullanmanızı öneriyoruz. Bu maddelerin
uyumluluğu test edilmiştir. Üreticinin
talimatlarını mutlak şekilde dikkate alın.
Hijyenik hazırlık işlemine ve hasta
değişiminde yapılacak hijyenik hazırlık
işlemine ilişkin bilgiler, www.weinmann.de
Internet adresinde sunulan bir broşürde
verilmektedir. Internet bağlantınız
olmadığında, lütfen Weinmann firmasına
başvurun.
Bilgi
Hijyenik hazırlık işleminde uygun eldivenler (örneğin tek kullanımlık eldivenler) giymenizi öneriyoruz.
Renk bırakabileceği için kafa bandını ilk
kez kullanmadan önce yıkayın.
Kafa bandı sadece elde yıkanabilir!
Cırt bantlar tutma özelliğini kaybedebi-
leceği için kafa bandını ütülemeyin!
Kafa bandını kurutucuda kurutmayın!
4.3 Hazırlık işlemlerinin ardından
Hijyenik hazırlık işlemlerinin ardından tüm
parçaları iyice kurutun. Yapı parçalarında
herhangi bir hasar veya kirlenme olup
95
Page 98

TR
olmadığını tek tek kontrol edin. Gerektiğinde
hijyenik hazırlık işlemlerini tekrar edin. Hasar
görmüş parçaları yenileriyle değiştirin.
Maskeyi tekrar birleştirin.
4.4 Hasta değişimi
Maske, başka bir hasta tarafından kullanıla-
cağı zaman mutlak suretle hijyenik hazırlık iş-
leminden geçirilmelidir.
Bunun için maskeyi parçalarına ayırın. Tüm
parçaları, „4.2 Temizlik, dezenfeksiyon ve
sterilizasyon” başlığı altında belirtilen şekilde
dezenfekte veya sterilize edin.
Yeni kafa bandı ve gerektiğinde yeni hızlı kilit
açma mekanizması kullanın.
5Işlev kontrolü
Her kullanımdan önce, aşağıda belirtilen
şekilde bir işlev kontrolü yapın.
Sadece vented modelleri
Her kullanımdan önce, aşağıda belirtilen
şekilde acil durum soluk verme valfının
işlevini kontrol edin:
1. Valfın ve membranın kuru, hasarsız ve
tükürüksüz olduğundan emin olun.
Maskeyi, valf veya membran hasarlı
olduğunda kullanmayın (örneğin çatlaklar
veya deformasyon). Böyle bir durumda acil
durum soluk verme valfını değiştirin (bkz.
“7. Teslimat kapsamı”, Sayfa 97).
2. Valfın iç kısmında bulunan membranın,
valfın deliğini kapatmadığından emin
olun. Oda havası, ancak delik açık
olduğunda maskeye girebilir.
3. Solunum hortumunu (terapi cihazının
teslimat kapsamı), maskenin ara bağlantı
parçasına ve terapi cihazına bağlayın.
4. Terapi cihazını
durum soluk verme valfının deliğini
kapatmalıdır. Terapi cihazından maskeye
hava, ancak delik kapalı olduğunda
gidebilir.
5. Maskeyi, valf veya membran çalışmadı-
ğında kullanmayın. Acil durum soluk
açın. Membran, şimdi acil
verme valfını değiştirin. (bkz. “7. Teslimat
kapsamı”, Sayfa 97).
JOYCE Full Face maskeleri
Her hijyenik hazırlık işleminden sonra
maskeyi gözle kontrol edin.
Maske lastiğinde meydana gelen hasarlar
nedeniyle sızıntı meydana geldiğinde, maske
lastiğini yenisiyle değiştirin.
Ara bağlantı parçasındaki bilya başlı mafsalın
çalışmasını ve sızdırmazlığını kontrol edin.
Bilya başlı mafsal zorlanarak hareket ediyor
veya sızıntı yapıyorsa, ara bağlantı parçasını
ve emniyet bileziğini yenisiyle değiştirin.
Kullanılamayacak hale gelmiş parçalar evsel
atıklar üzerinden imha edilebilir.
Alın yastığı
nda ve maske lastiğinde renk deği-
şiklikleri meydana gelebilir. Bu renk değişiklikleri, işlevlerini herhangi bir şekilde etkilemez.
6Arızalar ve çözüm yolları
Arıza Nedeni Çözüm yolu
Yüzde baskı
nedeniyle
ağrı.
Gözlere
hava
çarpıyor.
Maske çok sıkı
bağlı.
Maske gevşek
bağlanmış.
Maske yüze
oturmuyor.
Yüksek terapi
basıncı.
Kafa bandını biraz
gevşetin.
Alın desteğinin yerini
doğru ayarlayın.
Kafa bandını daha sıkı
bağlayın.
Alın desteğinin yerini
doğru ayarlayın.
Başka boy bir maske
kullanın. Yetkili satıcıdan
temin edilebilir
Daha sert maske lastiği
(40 hPa basınçlarına
kadar uygun) kullanın.
Yetkili satıcıdan temin
edilebilir.
96
Page 99

TR
Arıza Nedeni Çözüm yolu
Kafa bandını ayarlayın.
Alın desteğinin yerini
doğru ayarlayın.
Maske lastiğini yenisiyle
değiştirin
Geçmeli bağlantı yerlerini
ve hortum manşonlarını
kontrol edin.
Basınç ölçme
bağlantılarını tapa
(teslimat kapsamına
dahil) ile kapatın.
Acil durum soluk verme
valfı:
Doğru monte edin
Değiştirin
Te r a pi
basıncına
ulaşılamıyor.
Maske ayarları
doğru değil.
Maske lastiği
zarar görmüş.
Hortum
sisteminde
kaçak var.
Basınç ölçme
bağlantılarından
hava çıkıyor.
Acil durum soluk
verme valfı:
– Düzgün
monte
edilmemiş
–Arızalı
7 Teslimat kapsamı
Ürün adı
JOYCE Full Face vented
40 hPa, Boy XL
JOYCE Full Face
GEL vented‚ Boy S
JOYCE Full Face
GEL vented‚ Boy M
JOYCE Full Face
GEL vented‚ Boy L
JOYCE Full Face
Boy S
JOYCE Full Face
Boy M
JOYCE Full Face
Boy L
JOYCE Full Face
Boy XL
plus
vented‚
plus
vented‚
plus
vented‚
plus
vented‚
non vented modelleri
HEADstrap
ile ürün no.
JOYCEstrap
ile ürün no.
WEINMANNstrap/
WM 26441 WM 26441/1
WM 26412 WM 26412/1
WM 26422 WM 26422/1
WM 26432 WM 26432/1
WM 26413
WM 26423
WM 26433
WM 26443
Bilgi
Tüm maskeler komple monte edilmiş
şekilde ve kafa bandı ile birlikte teslim
edilmektedir.
vented modelleri
Ürün adı
HEADstrap
JOYCE Full Face vented‚ Boy
S
JOYCE Full Face vented‚ Boy
M
JOYCE Full Face vented‚ Boy
L
JOYCE Full Face vented‚ Boy
XL
JOYCE Full Face vented
40 hPa‚ Boy S
JOYCE Full Face vented
40 hPa‚
Boy M
JOYCE Full Face vented
40 hPa, Boy L
WEINMANNstrap/
WM 26410 WM 26410/1
WM 26420 WM 26420/1
WM 26430 WM 26430/1
WM 26440 WM 26440/1
WM 26411 WM 26411/1
WM 26421 WM 26421/1
WM 26431 WM 26431/1
Ürün adı
HEADstrap
ile ürün no.
WEINMANNstrap/
JOYCE Full Face non vented
40 hPa‚ Boy S
JOYCE Full Face non vented
40 hPa‚ Boy M
JOYCE Full Face non vented
40 hPa‚ Boy L
JOYCE Full Face non vented
40 hPa‚ Boy XL
ile ürün no.
JOYCEstrap
ile ürün no.
JOYCE Full Face GEL non vented‚
Boy S
JOYCE Full Face GEL non vented‚
Boy M
JOYCE Full Face GEL non vented‚
Boy L
WM 26461
WM 26471
WM 26481
WM 26491
WM 26462
WM 26472
WM 26482
97
Page 100

TR
Yedek parçalar
Ürün adı Ürün No.
Bilya başlı mafsal seti:
Emniyet bileziği, ara bağlantı parçası,
WM 26569
döner kovan, acil durum soluk verme
valfı
Bilya başlı mafsal seti non vented:
WM 26207
Emniyet bileziği, ara bağlantı parçası,
döner kovan
Döner kovan vented WM 26254
Alın desteği:
WM 26201
Alın yastığı, alın desteği kaba ayar
parçası, alın desteği ince ayar parçası
Jel alın desteği:
WM 26115
Jel alın yastığı, alın desteği kaba ayar
parçası, alın desteği ince ayar parçası
Alın yastığı WM 26200
Jel alın yastığı WM 26209
Maske lastiği 30 hPa, Boy S
Maske lastiği 30 hPa, Boy M
Maske lastiği 30 hPa, Boy L
Maske lastiği 30 hPa, Boy XL
Maske lastiği 40 hPa, Boy S
Maske lastiği 40 hPa, Boy M
Maske lastiği 40 hPa, Boy L
Maske lastiği 40 hPa, Boy XL
Jel maske lastiği FFM, Boy S
Jel maske lastiği FFM, Boy M
Jel maske lastiği FFM, Boy L
Maske lastiği FF
Maske lastiği FF
Maske lastiği FF
Maske lastiği FF
plus
, Boy S
plus
, Boy M
plus
, Boy L
plus
, Boy XL
Kafa bantları WEINMANNstrap, bant
klipsleri dahil
WM 26510
WM 26520
WM 26530
WM 26540
WM 26511
WM 26521
WM 26531
WM 26541
WM 26512
WM 26522
WM 26532
WM 26586
WM 26587
WM 26588
WM 26589
WM 26350
Kafa bandı HEADstrap,
bant klipsi dahil WM 26360
Kafa bandı JOYCEstrap, mavi, bant
klipsi dahil
WM 26290
Bant klipsleri (4 adet) WM 26205
Tapa WM 26208
Kullanma kılavuzu
DE, EN, FR, NL, IT, ES, PT, TR, EL, PL, HR WM 66117
Aksesuar
Ürün adı Ürün No.
Hızlı kilit açma mekanizması (çekme ipi) WM 26560
8 Ürün özellikleri
Teknik değerler
Parametre Değer
93/42/EEC (AET)
yönetmeliklerine göre ürün
sınıfı:
Ölçüler (GxYxD):
Ağırlık:
Terapi basıncı aralığı:
Maske lastiği 30 hPa:
Maske lastiği 40 hPa:
Jel maske lastiği FFM:
Maske lastiği FF
plus
:
Hortum bağlantısı:
EN ISO 5356-1 standardına
uygun koni şekli
vented modelleri:
non vented modelleri
Basınç ölçme bağlantıları: Çap: 4 mm
Bant klipsinin genişliği: Maks. 20 mm
Sıcaklık aralığı
Kullanım sırasında:
Depolama sırasında
Akım direnci
vented modelleri:
50 litre/dak.’da
100 litre/dak.’da
non vented modelleri
50 litre/dak.’da
100 litre/dak.’da
Acil durum soluk verme valfı
(vented modelleri)
50 litre/dak.’da
100 litre/dak.’da
Akım direnci acil durum soluk
verme valfı
50 l/dak. değerinde soluk alma
(inspirasyon):
50 l/dak. değerinde soluk
verme (ekspirasyon):
II a
Yak l aşık
107 x 160 x 106 mm
Yak l aşık 102 gram
4 ila 30 hPa arası
4 ila 40 hPa arası
4 ila 40 hPa arası
4 ila 30 hPa arası
Çap: 22 mm (erkek)
Çap: 22 mm (kadın)
+ 5° C’den + 40° C’ye
kadar
- 20° C’den + 70° C
kadar
0,02 hPa
0,26 hPa
0,09 hPa
0,37 hPa
0,5 hPa
2,0 hPa
0,5 hPa
0,5 hPa
1
1
’ye
98
 Loading...