

Page 1
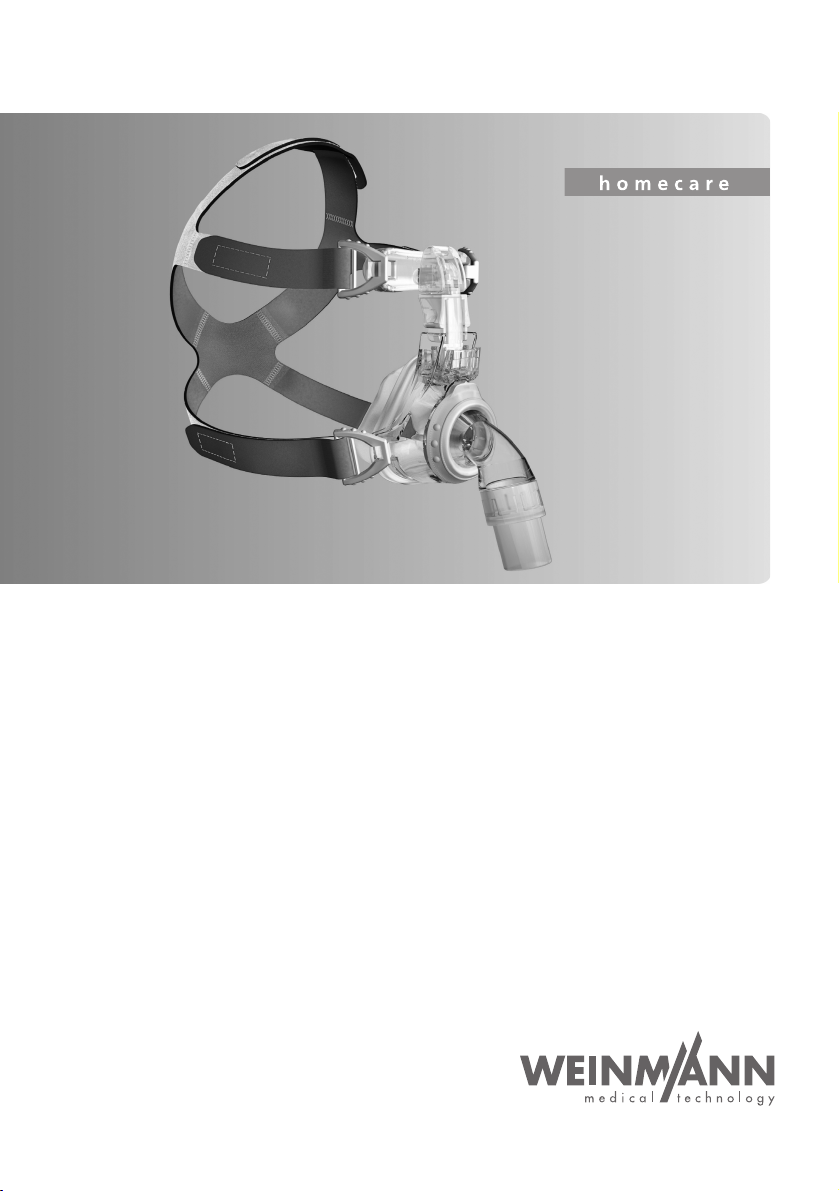
JOYCE vented
JOYCE vented 40 hPa
JOYCE non vented
JOYCE non vented 40 hPa
JOYCE GEL vented
JOYCE GEL non vented
Description of the equipment and instructions for use
Page 2
WEINMANNstrap
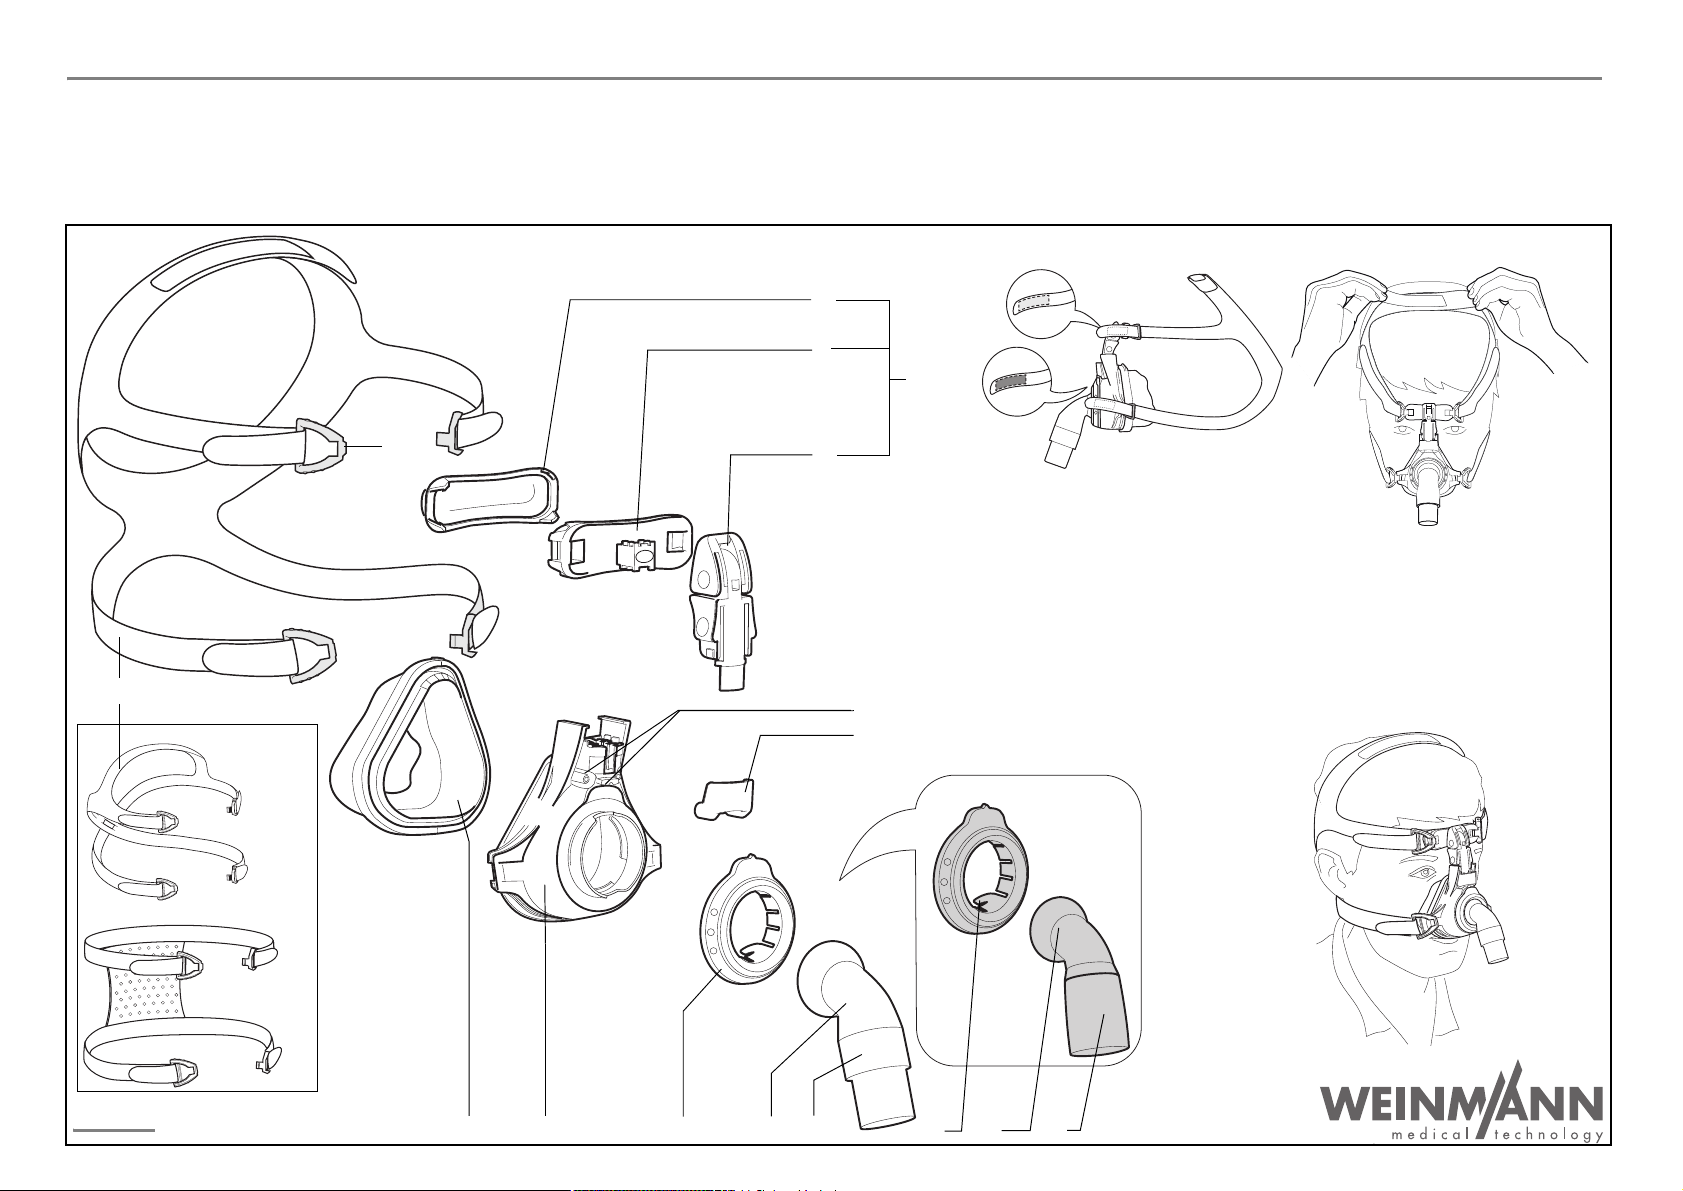
Übersicht/Overview/Vue d’ensemble/Overzicht/Prospetto/Oversigt/Oversikt/Översikt/Vista general/Vista Geral/Genel bakış/
Hinweis: Die kompletten Benutzerinformationen bestehen aus diesem Faltblatt und der Gebrauchsanweisung./Note: The complete user information consists of this leaflet and the instructions for use. Remarque : La
documentation complète mise à disposition de l’utilisateur comprend le présent dépliant et le mode d’emploi du masque./Aanwijzing: De complete gebruikersinformatie bestaat uit dit vouwblad en de gebruiksaanwijzing./Nota:
Le informazioni complete per l’utente sono costituite da questo pieghevole e dalle istruzioni per l’uso./Nota: las informaciones para el usuario completas constan de este folleto y el manual de instrucciones./Nota: As informações
completas destinadas ao utilizador são compostas por este folheto e pelas instruções de uso./Uyarı: Kullanıcıya yönelik tüm bilgiler bu ilave açıklama kâğıdından ve kullanma kılavuzundan ibarettir./Υπόδειξη: Οι πλήρεις
πληροφορίες χρήσης αποτελούνται από αυτό το αναδιπλούμενο φύλλο και τις οδηγίες χρήσης. /Wskazówka: Kompletne informacje dla użytkownika składają się z niniejszej karty i instrukcji obsługi./Naputak: Kompletne informacije
za korisnika sastoje se od ovog presavijenog lista i upute za uporabu.
Επισκόπηση
/Przegląd/Pregled
WEINMANNstrap
2
3
5
1
HEADstrap
JOYCEstrap
6
4
7
8
non vented:
JOYCE
13
12
11
10
10
9
11
9
Page 3

A
C
D
E
GEL
B
non vented
+
Ausatemsystem
Exhaled air system
Système expiratoire
Uitademsysteem
Espiratore
Sistema de espiración
Sistema de expiração
Soluma Sistemi
Σύστημα εκπνοής
System wydechowy
Sustav izdisanja
vented
Handhabung/Operation/Mode d’utilisation/Bediening/Operazioni sulla maschera/Manejo/Manuseamento/Kullanım/
Χειρισμός
/Sposób użytkowania/Rukovanje
WM 16950n - 09.2012
Page 4

Deutsch 3
English 12
Français 20
Nederlands 29
Italiano 38
Español 47
Português 56
Türkçe 65
Ελληνικά 74
Polski 83
Hrvatski 92
Page 5

DE
Deutsch
1 Gerätebeschreibung
Legende
(Darstellung der Einzelteile: Siehe
beigefügtes Faltblatt)
1 Kopfbänderung
2 Stirnpolster
3 Feinverstellung der Stirnstütze
4 Grobverstellung der Stirnstütze
5 Stirnstütze
6 Bänderungsclip
7 Druckmessanschlüsse
8 Verschluss
9 Drehhülse (non vented: in blauer Farbe)
10 Winkel (non vented: in blauer Farbe)
11 Sicherungsring (non vented: in blauer
Farbe)
12 Maskenkörper
13 Maskenwulst
Verwendungszweck
Die Nasalmaske ist ein Zubehörprodukt und
dient als Dichtelement zwischen Patient und
Therapiegerät. Sie wird zur Behandlung der
Schlafapnoe und zur nicht-invasiven
Beatmung von Patienten mit ventilatorischer
Insuffizienz eingesetzt.
Vor der Verwendung durch den
Patienten
Patienten müssen vor Therapiebeginn durch
qualifiziertes Personal in die Anwendung der
Maske eingewiesen werden.
2 Sicherheitshinweise
Sicherheitsbestimmungen
Gemäß den Anforderungen der Richtlinie 93/
42 EWG beachten Sie folgende Punkte:
• Lesen Sie diese Gebrauchsanweisung aufmerksam durch. Sie ist Bestandteil der
Maske und muss jederzeit verfügbar sein.
• Betreiben Sie die Maske ausschließlich in
den für die einzelnen Varianten erforderlichen Therapiedruckbereichen:
– 4-30 hPa: JOYCE vented
JOYCE non vented
– 4-40 hPa: JOYCE vented 40 hPa
JOYCE non vented 40 hPa
JOYCE GEL vented
JOYCE GEL non vented
• Beim Einsatz von Fremdartikeln kann es zu
Funktionsausfällen und einer eingeschränkten Gebrauchstauglichkeit kommen. Außerdem können die
Anforderungen an die Bio-Kompatibilität
nicht erfüllt sein. Beachten Sie, dass in diesen Fällen jeglicher Anspruch auf Garantie
und Haftung erlischt, wenn weder das in
der Gebrauchsanweisung empfohlene
Zubehör noch Originalersatzteile verwendet werden.
• Patienten mit eingeschränkter Spontanatmung müssen ständig überwacht werden.
Am Beatmungsgerät muss ein
entsprechen-der Unterdruck-/Leckagealarm aktiviert sein.
• Patienten mit obstruktiven und restriktiven
Lungenkrankheiten sollten während der
Verwendung von JOYCE-Masken individuell untersucht werden (z. B. hinsichtlich
CO
-Rückatmung).
2
• Verschließen Sie Öffnungen dieser Maske
nur in den Fällen, die in dieser Gebrauchsanweisung beschrieben sind. Andernfalls
besteht die Gefahr der CO
-Rückatmung.
2
• Die Maske darf nur dann längere Zeit aufgesetzt werden, wenn das Therapiegerät
eingeschaltet ist. Andernfalls besteht die
Gefahr der CO
-Rückatmung.
2
• Verwenden Sie keine elektrisch leitfähigen
Atemschläuche (Ausnahme: elektrisch
beheizbare Atemschläuche).
• Beachten Sie den Abschnitt 4 “Hygienische
Aufbereitung” zur Vermeidung einer
Gerätebeschreibung 3
Page 6

DE
Infektion, einer bakteriellen Kontamination
und von Funktionsbeeinträchtigungen.
Nebenwirkungen
Folgende Nebenwirkungen können
auftreten:
Verstopfte Nase, trockene Nase,
morgendliche Mundtrockenheit,
Druckgefühl in den Nebenhöhlen, Reizungen
der Bindehaut, störende Geräusche beim
Ausatmen, Druckstellen im Gesicht,
Rötungen der Gesichtshaut.
3 Bedienung
Abb. A-E: Siehe beigefügtes Faltblatt.
3.1 Stirnstütze einstellen (Abb. A)
Feinverstellung
Halten Sie die oberen Laschen der
Grobverstellung gedrückt. Positionieren Sie
die Feinverstellung in einer der drei
Rastungen.
Um die Höhe des Stirnpolsters bzw. der
Feinverstellung anzupassen (ca. 1 cm),
drehen Sie die Feinverstellung um 180°.
Positionieren Sie diese anschließend wie
oben beschrieben.
Grobverstellung
Halten Sie die unteren Laschen der
Grobverstellung gedrückt. Positionieren Sie
letztere in einer der drei Rastungen des
Maskenkörpers.
3.2 Maske anlegen
1. Haken Sie einen der unteren
Bänderungsclips an der Maske aus.
2. Streifen Sie die Kopfbänderung über
Ihren Kopf und haken Sie den
Bänderungsclip wieder ein.
3. Stellen Sie die Kopfbänderung mit Hilfe
der Klettverschlüsse so ein, dass die
Maske dicht, aber nicht zu fest auf dem
Gesicht sitzt.
Nur WEINMANNstrap:
Die Kopfbänderung WEINMANNstrap
bietet dazu folgende Möglichkeiten
(siehe auch „Übersicht“ auf dem beigefügten Faltblatt):
– Klettverschlüsse an den beiden Seiten.
– Klettverschluss oben auf dem Kopf: Lösen
Sie den Klettverschluss, ziehen Sie mit beiden Händen leicht an den Enden der Kopfbänderung und drücken Sie den
Klettverschluss wieder an.
An den Klettzungen erkennen Sie, ob
die Kopfbänderung richtig angebracht
ist. Die Klettzungen an der Stirn haben
dieselbe Farbe wie die Innenseite der
Kopfbänderung.
Nur HEADstrap:
Die Kopfbänderung HEADstrap bietet
dazu folgende Möglichkeiten (siehe
auch „Übersicht“ auf dem beigefügten
Faltblatt):
– Grobeinstellung: Schlitz "a" oder "b" der
Kopfbänderung.
– Feineinstellung: vier Klettbänder.
4. Stellen Sie, wenn notwendig, die
Stirnstütze neu ein.
3.3 Ausatemsystem (Abb. E)
vented-Varianten
Die vented-Varianten (alle Maskenteile
transparent) verfügen über ein so genanntes
integriertes Ausatemsystem:
Sicherungsring und Maskenkörper sind so
geformt, dass zwischen diesen Teilen ein
Spalt entsteht. Durch diesen Spalt kann die
ausgeatmete Luft entweichen. Die spezielle
Geometrie der Teile gewährleistet, dass der
Spalt beim Aufstecken des Sicherungsringes
nicht verschlossen werden kann. Schließen
Sie kein externes Ausatemsystem an,
andernfalls wird der Therapiedruck nicht
erreicht.
non vented-Varianten
Die non vented-Varianten (Sicherungsring,
Winkel und Drehhülse in blauer Farbe)
4 Bedienung
Page 7

DE
verfügen über kein Ausatemsystem.
Schließen Sie unbedingt ein externes
Ausatemsystem an. Andernfalls besteht die
Gefahr der CO
Erstickung.
Beachten Sie die Gebrauchsanweisung Ihres
Ausatemsystems.
- Rückatmung und der
2
3.4 Maske an das Therapiegerät
anschließen (Abb.
Stecken Sie den Schlauch Ihres
Therapiegerätes auf die Drehhülse (ventedVarianten) bzw. auf Ihr externes
Ausatemsystem (non vented-Varianten).
Achten Sie dabei auf eine sichere und
luftdichte Verbindung zum Schlauch. Die
Verbindung darf sich durch den
Therapiedruck nicht lösen.
Wenn Sie die Maske kurzzeitig vom Schlauch
trennen wollen, ziehen Sie einfach die
Drehhülse vom Winkel ab.
E)
3.5 Maskenteile mit Gel-Füllung
Bei JOYCE GEL vented und JOYCE GEL
non vented verfügen das Stirnpolster und der
Maskenwulst standardmäßig über eine
Gelfüllung. Gel-Stirnpolster und GelMaskenwulst sind auch für andere JOYCEVarianten als Ersatzteile lieferbar.
Vorsicht!
Die Maskenteile mit Gelfüllung sind sehr
empfindliche Bauteile. Handhaben Sie sie
stets mit Sorgfalt, um Verformungen und
Beschädigungen zu vermeiden.
3.6 Therapiedruckbereiche
Die einzelnen Varianten der JOYCE-Masken
sind jeweils für einen bestimmten
Therapiedruckbereich lieferbar (siehe
„7. Lieferumfang” auf Seite 9):
– 4-30 hPa: JOYCE vented
– 4-40 hPa: JOYCE vented 40 hPa
JOYCE non vented
JOYCE non vented 40 hPa
JOYCE GEL vented
JOYCE GEL non vented
Die JOYCE-Masken für den
Therapiedruckbereich 4-30 hPa verfügen
über einen weichen Maskenwulst, die
JOYCE-Masken für den
Therapiedruckbereich 4-40 hPa über einen
härteren Maskenwulst bzw. einen GelMaskenwulst (Gel-Varianten).
Der härtere Maskenwulst für den
Therapiedruckbereich 4-40 hPa ist mit der
Zahl "40" gekennzeichnet.
Weicher (bis 30 hPa) und härterer (bis 40 hPa)
Maskenwulst sowie der Gel-Maskenwulst
(Gel-Varianten) sind auch einzeln als
Ersatzteil lieferbar, so dass Sie Ihre Maske an
veränderte Therapiebedürfnisse anpassen
können.
3.7 Druckmessanschlüsse (Abb. C)
JOYCE-Masken sind mit zwei Anschlüssen
versehen, die zur Druckmessung oder zur
Einleitung von Sauerstoff verwendet werden
können.
Vorsicht!
• Eine Sauerstofftherapie kann bei falscher
Anwendung/Dosierung zu Nebenwirkungen führen. Deshalb dürfen Sie eine
solche Therapie nur nach Verordnung eines
Arztes durchführen.
• Beachten Sie zur Durchführung einer Sauerstofftherapie unbedingt die Gebrauchsanweisungen Ihres O
Therapiegerätes.
Wenn die Druckmessanschlüsse nicht
verwendet werden, verschließen Sie diese
stets mit dem beigefügten Verschluss.
Andernfalls entweicht Luft aus den
Anschlüssen und der Therapiedruck wird
nicht erreicht.
-Systems und Ihres
2
3.8 Kompatible Geräte
Therapiegeräte
JOYCE-Masken können mit allen Geräten,
die zur Durchführung der unter
„Verwendungszweck“ beschriebenen
Therapien vorgesehen sind, kombiniert
werden.
Bedienung 5
Page 8

DE
Beachten Sie, dass bei ungünstigen
Gerätekombinationen der tatsächliche Druck
in der Maske eventuell nicht dem Ihnen
verordneten Therapiedruck entspricht.
Dies kann auch dann der Fall sein, wenn der
korrekte Druck am Therapiegerät angezeigt
wird. Lassen Sie Ihre Gerätekombination von
einem Arzt oder Fachhändler so einstellen,
dass der tatsächliche Druck in der Maske
Ihrem Therapiedruck entspricht.
Atemluftbefeuchter
JOYCE-Masken können sowohl mit Kalt- als
auch mit Warmluftbefeuchtern verwendet
werden.
Wählen Sie den Anfeuchtungsgrad nie so
hoch, dass sich Wasser im Luftschlauch
niederschlägt. Beachten Sie die
Gebrauchsanweisungen Ihres Befeuchters
und Therapiegerätes.
3.9 Nach dem Gebrauch
1. Haken Sie einen der unteren
Bänderungsclips an der Maske aus und
nehmen Sie die Maske ab.
2. Lösen Sie die Bänderungsclips und
nehmen Sie die Kopfbänderung von der
Maske ab.
3. Verfahren Sie wie unter „4 Hygienische
Aufbereitung” beschrieben.
5. Lösen Sie die Grobverstellung vom
Maskenkörper.
6. Lösen Sie die Feinverstellung von der
Grobverstellung. Lösen Sie dann das
Stirnpolster von der Feinverstellung.
Zusammenbau der Maske (Abb. A-D)
1. Setzen Sie das Stirnpolster auf die
Feinverstellung. Stecken Sie dann die
Feinverstellung auf die Grobverstellung.
2. Stecken Sie die Grobverstellung auf den
Maskenkörper.
3. Stecken Sie die Drehhülse auf den
Winkel, bis er hörbar einrastet.
4. Drücken Sie den Winkel in den
Sicherungsring, bis er hörbar einrastet.
5. Stecken Sie Sicherungsring und Winkel
auf den Maskenkörper. Drehen Sie den
Sicherungsring im Uhrzeigersinn, bis er
hörbar einrastet.
6. Stecken Sie den Verschluss auf die
Druckmessanschlüsse.
7. Stecken Sie den Maskenwulst auf den
Maskenkörper.
8. Befestigen Sie die Kopfbänderung mit
den Clips an der Maske.
4 Hygienische Aufbereitung
3.10 Zerlegen/Zusammenbau der Maske
Zerlegen der Maske (Abb. D - A)
1. Lösen Sie den Maskenwulst vom
Maskenkörper.
2. Entfernen Sie den Verschluss der
Druckmessanschlüsse.
3. Drehen Sie den Sicherungsring gegen
den Uhrzeigersinn. Ziehen Sie nun den
Sicherungsring und den Winkel vom
Maskenkörper ab.
4. Drücken Sie den Winkel aus dem
Sicherungsring und ziehen Sie die
Drehhülse vom Winkel ab.
6 Hygienische Aufbereitung
4.1 Fristen
Täglich
Reinigen Sie die Maske rückstandsfrei in
warmem Wasser. Sie können die Maske dazu
zerlegen. Verwenden Sie ein mildes
Reinigungsmittel (z.B. Geschirrspülmittel).
Spülen Sie danach alle Teile sorgfältig mit
klarem Wasser ab.
Vorsicht!
• Bei Patienten mit einem geschwächten
Immunsystem oder einem besonderen
Krankheitshintergrund kann eine tägliche
Desinfektion oder Sterilisation der Masken-
Page 9

DE
teile erforderlich sein. Konsultieren Sie in
Geschirrspüler
Handwäsche
Desinfektion*
Sterilisation
(Alternativ zur
Desinfektion)
diesem Fall Ihren Arzt.
• Gehen Sie bei der hygienischen Aufbereitung der Kontaktflächen zwischen Maskenkörper und Sicherungsring mit größter
Sorgfalt vor. Rückstände an diesen Flächen
können den Therapieerfolg bzw. die Funktion des integrierten Ausatemsystems (vented-Varianten) beeinträchtigen.
Wöchentlich
Zerlegen Sie die Maske und bereiten Sie die
Maskenteile hygienisch auf (siehe
„4.2. Reinigung, Desinfektion, Sterilisation”
auf Seite 7).
4.2 Reinigung, Desinfektion, Sterilisation
Zulässige Verfahren
Verfahren
Te il e
Maskenwulst ••• •
Maskenwulst GEL •••
Stirnpolster •••
Stirnpolster GEL ••
Versch luss ••• •
Maskenkörper •••
Grobverstellung •••
Feinverstellung •••
Winkel •••
Drehhülse •••
Sicherungsring •••
Bänderungsclip •••
Kopfbänderung
WEINMANNstrap
Kopfbänderung
HEADstrap
Kopfbänderung
JOYCEstrap
Vorsicht!
Reinigen Sie die Maskenteile stets
gründlich bevor Sie diese gemäß obiger
Tabelle desinfizieren bzw. sterilisieren.
•
•
•
Die Maskenteile mit Gelfüllung sind
sehr empfindliche Bauteile. Handhaben
Sie sie stets mit Sorgfalt, damit sie nicht
verformt oder beschädigt werden.
Beschreibung der Verfahren
Geschirrspüler
Handwäsche
Desinfektion*
Sterilisation
(Alternativ zur
Desinfektion)
*Wir empfehlen die Desinfektionsmittel
gigasept
Spülgang bei 65 °C. Anschließend alle
Teile sorgfältig mit klarem Wasser
spülen.
Handwäsche in warmem Wasser.
Verwenden Sie ein mildes
Reinigungsmittel. Anschließend alle
Teile mit klarem Wasser abspülen
und an der Luft trocknen lassen.
In verdünnter Lösung mechanisch
reinigen, z.B. mit einer Bürste. Nach der
Desinfektion alle Teile gründllich mit
destilliertem Wasser spülen und
gründlich trocknen.
Dampfsterilisation in Geräten nach
EN 285. Temperatur 134 °C,
Mindesthaltezeit 3 Minuten.
®
FF (neu), Cidex® OPA und
Aniosyme DD1. Für diese Mittel wurde die
Verträglichkeit nachgewiesen. Beachten Sie
unbedingt die Anweisung der Hersteller.
Hinweise zur hygienischen Aufbereitung und
zur hygienischen Aufbereitung bei
Patientenwechsel finden Sie auch in einer
Broschüre im Info-Portal auf
www.weinmann.de. Wenn Sie keinen
Internetzugang haben, wenden Sie sich an
Weinmann.
Hinweis
Wir empfehlen, bei der hygienischen
Aufbereitung geeignete Handschuhe
(z.B. Einmalhandschuhe) zu tragen.
Waschen Sie das Kopfband vor der ersten Benutzung, da es abfärben könnte.
Das Kopfband darf nur von Hand gewaschen werden!
Bügeln Sie das Kopfband nicht, da
sonst die Klettverschlüsse nicht mehr
halten!
Trocknen Sie die Kopfbänderung nicht
im Trockner!
Hygienische Aufbereitung 7
Page 10

DE
4.3 Nach der Aufbereitung
Trocknen Sie alle Teile nach der hygienischen
Aufbereitung gründlich. Überprüfen Sie die
Bauteile auf verbleibende Verschmutzung
oder Beschädigung. Wiederholen Sie
gegebenenfalls die hygienische
Aufbereitung. Ersetzen Sie beschädigte Teile.
Montieren Sie die Maske wieder.
4.4 Patientenwechsel
Soll die Maske für einen anderen Patienten
verwendet werden, muss diese zuvor
hygienisch aufbereitet werden.
Zerlegen Sie dazu die Maske. Desinfizieren
oder sterilisieren Sie alle Teile entsprechend
Abschnitt „4.2 Reinigung, Desinfektion,
Sterilisation”. Verwenden Sie eine neue
Kopfbänderung.
5 Funktionskontrolle
Führen Sie nach jeder hygienischen
Aufbereitung eine Sichtkontrolle durch.
Kommt es aufgrund von Beschädigungen am
Maskenwulst zu Undichtigkeiten, wechseln
Sie ihn aus.
Prüfen Sie die Funktionsfähigkeit und die
Dichtigkeit des Kugelgelenkes am Winkel. Ist
es nicht mehr leichtgängig oder undicht,
wechseln Sie Winkel und Sicherungsring aus.
Unbrauchbar gewordene Teile können über
den Hausmüll entsorgt werden.
Verfärbungen des Stirnpolsters und des
Maskenwulstes können auftreten. Diese
beeinträchtigen aber nicht die Funktion.
6 Störungen und deren
Beseitigung
Störung Ursache Beseitigung
Druckschmerzen
im Gesicht.
Zugluft im
Auge.
Therapiedruck wird
nicht
erreicht.
Maske sitzt zu
fest.
Maske sitzt zu
locker.
Maske passt
nicht.
Hoher
Therapiedruck.
Maske nicht
korrekt
eingestellt.
Maskenwulst
ist beschädigt.
Schlauchsystem ist
undicht.
Luft tritt an
Druckmessanschlüssen
aus.
Kopfbänderung etwas
weiter einstellen.
Position der Stirnstütze
anpassen.
Kopfbänderung etwas
fester einstellen.
Position der Stirnstütze
anpassen.
Andere Maskengröße
verwenden; Wenden Sie
sich an Ihren Fachhändler.
Härteren Maskenwulst
(für Drücke bis 40 hPa)
verwenden. Ist beim Fachhändler erhältlich.
Kopfbänderung
einstellen.
Position der Stirnstütze
anpassen.
Maskenwulst ersetzen.
Steckverbinder und Sitz
der Schlauchmuffen
prüfen.
Druckmessanschlüsse mit
Verschluss (im Lieferumfang enthalten)
abdecken.
8 Funktionskontrolle
Page 11

DE
7Lieferumfang
Hinweis
Alle Masken werden komplett montiert
und mit Kopfbänderung geliefert.
vented-Varianten
Artikel
HEADstrap
Artikel Nr. mit
WEINMANNstrap/
JOYCE vented‚ Gr. S WM 26110 WM 26110/1
JOYCE vented‚ Gr. M WM 26120 WM 26120/1
JOYCE vented‚ Gr. L WM 26130 WM 26130/1
JOYCE vented‚ Gr. XL WM 26140 WM 26140/1
JOYCE vented 40 hPa‚ Gr. S WM 26111 WM 26111/1
JOYCE vented 40 hPa‚
JOYCE vented 40 hPa, Gr. L WM 26131 WM 26131/1
JOYCE vented 40 hPa, Gr. XL WM 26141 WM 26141/1
JOYCE GEL vented‚ Gr. S WM 26112 WM 26112/1
JOYCE GEL vented‚
JOYCE GEL vented, Gr. L WM 26132 WM 26132/1
Gr. M
Gr. M
WM 26121 WM 26121/1
WM 26122 WM 26122/1
non vented-Varianten
Artikel Nr. mit
Artikel
JOYCE non vented‚ Gr. S WM 26160
JOYCE non vented‚ Gr. M WM 26170
JOYCE non vented‚ Gr. L WM 26180
JOYCE non vented‚ Gr. XL WM 26190
JOYCE non vented 40 hPa‚ Gr. S WM 26161
JOYCE non vented 40 hPa‚ Gr. M WM 26171
JOYCE non vented 40 hPa‚ Gr. L WM 26181
JOYCE non vented 40 hPa‚ Gr. XL WM 26191
JOYCE GEL non vented‚ Gr. S WM 26162
JOYCE GEL non vented‚ Gr. M WM 26172
WEINMANNstrap/
Artikel Nr. mit
HEADstrap
Artikel Nr. mit
Artikel
WEINMANNstrap/
HEADstrap
JOYCE GEL non vented‚ Gr. L WM 26182
Ersatzteile
Artikel Artikel Nr.
Set Kugelgelenk:
Sicherungsring, Winkel, Drehhülse
JOYCEstrap
Set Kugelgelenk non vented:
Sicherungsring, Winkel, Drehhülse
Drehhülse vented WM 26254
Stirnstütze:
Stirnpolster, Grobverstellung Stirnstütze,
Feinverstellung Stirnstütze
Stirnstütze GEL:
Stirnpolster GEL, Grobverstellung
Stirnstütze, Feinverstellung Stirnstütze
Stirnpolster WM 26200
Stirnpolster GEL WM 26209
Maskenwulst 30 hPa, Gr. S
Maskenwulst 30 hPa, Gr. M
Maskenwulst 30 hPa, Gr. L
Maskenwulst 30 hPa, Gr. XL
Maskenwulst 40 hPa, Gr. S
Maskenwulst 40 hPa, Gr. M
Maskenwulst 40 hPa, Gr. L
Maskenwulst 40 hPa, Gr. XL
Maskenwulst GEL, Gr. S
Maskenwulst GEL, Gr. M
Maskenwulst GEL, Gr. L
Kopfbänderung WEINMANNstrap, incl.
Bänderungsclips
Kopfbänderung HEADstrap WM 26360
Kopfbänderung JOYCEstrap blau, incl.
Bänderungsclips
Bänderungsclips (4 Stck.) WM 26205
Verschluss WM 26208
Gebrauchsanweisung
DE, EN, FR, NL, IT, ES, PT, TR, EL, PL, HR
RU (pdf, Internet: www.Weinmann.de)
WM 26206
WM 26207
WM 26201
WM 26115
WM 26210
WM 26220
WM 26230
WM 26240
WM 26211
WM 26221
WM 26231
WM 26241
WM 26212
WM 26222
WM 26232
WM 26350
WM 26290
WM 16950
WM 16814
Lieferumfang 9
Page 12
DE
Zubehör
Artikel Artikel Nr.
Ausatemsystem:
Silentflow 2
Schalldämmsystem
8 Spezifikationen
WM 23600
WM 23685
2
Materialien, die zur Herstellung von Masken
verwendet werden, altern, wenn sie z.B.
aggressiven Reinigungsmitteln ausgesetzt
sind. Im Einzelfall kann es daher notwendig
sein, dass Sie Ihre Maske früher ersetzen
müssen (siehe „5. Funktionskontrolle” auf
Seite 8).
Konstruktionsänderungen vorbehalten
Technische Daten
JOYCE Wert
Produktklasse nach Richtlinie
93/42 EWG:
Abmessungen (BxHxT):
Gewicht: ca. 85 Gramm
Therapiedruckbereich:
Maskenwulst weich:
Maskenwulst hart:
Maskenwulst GEL:
Schlauchanschluss: Konus nach
EN ISO 5356-1
vented:
non vented:
Druckmessanschlüsse: Ø 4 mm
Breite Bänderungsclip: max. 20 mm
Temperaturbereich
Betrieb:
Lagerung
Strömungswiderstand
vented:
bei 50 l/min
bei 100 l/min
non vented:
bei 50 l/min
bei 100 l/min
Angegebener ZweizahlGeräuschemissionswert
nach ISO 4871:
– Schalldruckpegel
– Schallleistungspegel
(Unsicherheitsfaktor: 3 dB(A))
Gebrauchsdauer bis zu 12 Monate
Angewandte Normen EN ISO 17510-2:2009
1
abhängig von Größe und Ausführung
II a
ca.
80 x 130 x 90 mm
1
4 bis 30 hPa
4 bis 40 hPa
4 bis 40 hPa
Ø 22 mm (männl.)
Ø 22 mm (weibl.)
+ 5° C bis + 40° C
- 20° C bis + 70° C
0,02 hPa
0,11 hPa
0,09 hPa
0,37 hPa
15 dB(A)
23 dB(A)
1
2
Werkstoffe
Artikel Werkstoff
Maskenwulst,
Maskenwulst GEL
Stirnpolster, Sicherungsring TPE, Polypropylen
Stirnpolster GEL
Maskenkörper, Winkel Polycarbonat
Kopfbänderung WEINMANNstrap
Kopfbänderung JOYCEstrap
Kopfbänderung HEADstrap
Drehhülse, Grobverstellung
Stirnstütze, Feinverstellung
Stirnstütze
Bänderungsclip POM
Ver sch luss
Silikon
Silikon,
Silikon-Gel
Silikon,
Silikon-Gel,
Polycarbonat
Elasthan, Polyester,
Polyurethan, Nylon,
Baumwolle,
Polyamid
Baumwolle,
Polyamid, Elasthan
Nylon/Spandex
Polyurethan
Polyester/Lycra
Polypropylen
Alle Teile der Maske sind latexfrei.
10 Spezifikationen
Page 13

DE
Druck-Flow-Kennlinie
40
50
60
70
80
0
10
20
30
40
50
60
70
80
0 10203040
Mittlerer Leckageflow
vented (l/min)
Ausgangsdruck am Therapiegerät (hPa)
JOYCE
vented
JOYCE
non vented
In der Druck-Flow-Kennlinie wird der
Auslass-Flow in Abhängigkeit vom
Therapiedruck dargestellt.
9 Garantie
Weinmann räumt dem Kunden eines neuen
originalen Weinmann-Produktes und eines
durch Weinmann eingebauten Ersatzteils
eine beschränkte Herstellergarantie gemäß
der für das jeweilige Produkt geltenden
Garantiebedingungen und nachstehend
aufgeführte Garantiezeiten ab Kaufdatum
ein. Die Garantiebedingungen sind im
Internet unter www.weinmann.de abrufbar.
Auf Wunsch senden wir Ihnen die
Garantiebedingungen auch zu. Im
Garantiefall wenden Sie sich an Ihren
Fachhändler.
10 Konformitätserklärung
Hiermit erklärt die Weinmann Geräte für
Medizin GmbH + Co. KG, dass das Produkt
den einschlägigen Bestimmungen der
Richtlinie 93/42/EWG für Medizinprodukte
entspricht.
Den vollständigen Text der
Konformitätserklärung finden Sie unter:
www.weinmann.de
Produkt
Weinmann-Geräte inklusive Zubehör
(Ausnahme: Masken) zur Schlafdiagnose,
Schlaftherapie, Heimbeatmung,
Sauerstoffmedizin und Notfallmedizin
Masken inklusive Zubehör, Akku, Batterien*,
Sensoren, Schlauchsysteme
Produkte für den einmaligen Gebrauch Keine
* falls nicht anders in den technischen
Unterlagen angegeben.
Garantie-
zeiten
2 Jahre
6 Monate
Garantie 11
Page 14

EN
English
1 Device description
Legend
(Description of individual parts: see
enclosed leaflet)
1 Headgear
2 Forehead cushion
3 Fine adjustment component of forehead
support
4 Coarse adjustment component of forehead
support
5 Forehead support
6 Headgear clips
7 Pressure measurement ports
8 Port cap
9 Rotating sleeve (non vented: blue coloured)
10 Elbow (non vented: blue coloured)
11 Retaining ring (non vented: blue coloured)
12 Mask frame
13 Mask cushion
Intended use
The nasal mask is an accessory and acts as a
seal between the patient and the therapy
device. It is used for the treatment of sleep
apnoea and for the non-invasive ventilation
of patients with ventilatory insufficiency.
Before use by the patient
Patients must be instructed in the use of the
mask by qualified personnel before therapy
begins.
2 Safety instructions
Safety regulations
Following the requirements of Richtlinie 93/
42 EWG please observe the following points:
• Please read these instructions for use very
carefully. They are a part of the product
and should be available at all times.
• Use the mask only in the therapy pressure
ranges required for the individual variants:
– 4-30 hPa: JOYCE vented
JOYCE non vented
– 4-40 hPa: JOYCE vented 40 hPa
JOYCE non vented 40 hPa
JOYCE GEL vented
JOYCE GEL non vented
• If third-party items are used, functional failures may occur and fitness for use may be
restricted. Biocompatibility requirements may
also not be met. Please note that in such
cases, any claim under warranty and liability
will be voided if neither the accessories nor
genuine replacement parts recommended in
the instructions for use are used.
• Patients with limited spontaneous respiration must be monitored at all times. The
appropriate negative pressure/leak alarm on
the ventilation device must be activated.
• Patients with obstructive and restrictive
lung diseases should be examined on an
individual basis during use of the JOYCE
masks (for example with regard to re-inhalation of CO
).
2
• Do not close the openings in this mask
except in situations described in these
instructions for use. Otherwise there is a
risk of re-inhaling CO
and of suffocation.
2
• Only put the nasal mask over your face for
a prolonged period when the therapy
device is switched on. Otherwise there is a
risk of re-inhaling CO
.
2
• Do not use a breathing hose that is electrically conductive (exception: breathing
tubes which can be heated electrically).
• Follow the instructions in section 4
“Hygiene treatment” to avoid infection,
bacterial contamination and poor functionality of the mask.
Side-effects
The following side-effects may occur:
nasal congestion, dry nose, dry mouth in the
morning, sinus pressure, irritation of the
conjunctiva, irritating noises during
12 Device description
Page 15

EN
exhalation, pressure sores on the face,
reddening of the skin.
3 Operation
Fig. A-E: see enclosed leaflet.
3.1 Adjust forehead support (Fig. A)
Fine adjustment
Squeeze the upper side tabs of the coarse
adjustment component inwards. Fit the fine
adjustment component into one of the three
notches.
To change the height of the forehead
cushion, i.e. the fine adjustment (by approx.
1 cm), turn the fine adjustment component
through 180°. Then position it as described
above.
Coarse adjustment
Squeeze the lower side tabs of the coarse
adjustment component inwards. Place it in
one of the slots in the mask frame.
3.2 Putting on the mask
1. Unhook one of the lower headgear clips
from the mask.
2. Guide the headgear over your head and
hook the headgear clips back onto the
strap.
3. Adjust the headgear with the aid of the
hook-and-loop closures so that the mask
seals on the face but is not too tight.
WEINMANNstrap only:
The WEINMANNstrap headgear provides the following additional options
(see also "Overview" on the enclosed
leaflet):
– hook-and-loop closures on both sides.
– hook-and-loop closure on top of the head:
release the hook-and-loop closure, pull
gently on the ends of the headgear with
both hands and push the hook-and-loop
closure back on.
You can tell whether the headgear is
correctly attached by the hook-andloop tabs. The hook-and-loop tabs on
the forehead are the same color as the
inside of the headgear.
HEADstrap only:
The HEADstrap headgear provides the
following options for you to do this (see
also ”Overview” on the attached leaflet):
– coarse adjustments: slot "a" or "b" of the
headgear.
– fine adjustments: four hook-and-loop
straps."
4. If necessary, re-adjust the forehead
support.
3.3 Exhaled air system (Fig. E)
vented variants
vented variants (all mask components are
transparent) have a so-called integrated
exhaled air system: the retaining ring and
mask frame are shaped in such a way that a
gap is formed between these parts. Through
this gap the exhaled air can escape. The
special geometry of the parts guarantees that
when putting on the retaining ring the gap
cannot be closed. Do not connect an
external exhaled air system, otherwise the
therapy pressure will not be reached.
non vented variants
non vented variants (retaining ring, elbow and
rotating sleeve in blue) have no exhaled air
system. It is essential to connect an external
exhaled air system. Otherwise there is a risk of
reinhaling CO
Follow the instructions for use of your
exhaled air system.
and of asphyxia.
2
3.4 Connecting the mask to the
therapy device (Fig.
Push the hose of your therapy device onto the
rotating sleeve (vented variants) or onto your
external exhaled air system (non vented
E)
Operation 13
Page 16

EN
variants). Ensure that the connection to the
hose is secure and airtight. The connection
must not be loosened by the therapy pressure.
If you want to detach the mask temporarily
from the hose, pull the rotating sleeve off the
elbow.
3.5 Gel-filled mask components
On JOYCE GEL vented and JOYCE GEL
non vented, the forehead cushion and the
mask cushion are gel-filled as standard. Gel
forehead cushions and gel mask cushions are
also available as replacement parts for other
JOYCE variants.
Caution!
Gel-filled mask components are highly sensitive components. Always handle them with
care to prevent deformation and damage.
3.6 Therapy pressure ranges
The individual JOYCE mask variants are each
available for a particular therapy pressure
range (see “7. Scope of supply” on page 17):
– 4-30 hPa: JOYCE vented
JOYCE non vented
– 4-40 hPa: JOYCE vented 40 hPa
JOYCE non vented 40 hPa
JOYCE GEL vented
JOYCE GEL non vented
The JOYCE masks for the therapy pressure
range 4 - 30 hPa have a soft mask cushion, the
JOYCE masks for the therapy range 4 - 40 hPa
have a harder mask cushion or a gel mask
cushion (gel-filled variants).
The harder mask cushion for the therapy
pressure range 4 - 40 hPa is marked with the
number "40".
The soft (up to 30 hPa) and harder (up to 40
hPa) mask cushion and the gel-filled mask
cushion (gel variants) are also available as
individual replacement parts to enable you to
adapt your mask to changed therapy
requirements.
3.7 Ports for pressure
measurement (Fig.
JOYCE masks are fitted with two ports that
can be used to measure pressure or to feed
in oxygen.
Caution!
• Oxygen therapy can have side-effects if
incorrectly administered or used in the
wrong dosage. Only carry out this sort of
treatment if prescribed by a physician.
• When carrying out oxygen therapy, strictly
follow the instructions for use of your O
system and your therapy device.
When the pressure measurement ports are
not in use, always close them with the cap
provided. Otherwise air will escape from the
ports and the therapy pressure will not be
reached.
C)
3.8 Compatible devices
Therapy devices
JOYCE masks can be combined with all
devices designed for carrying out the
therapies described under "Intended Use".
Note that if unsuitable device combinations
are used, the actual pressure in the mask may
not correspond to the therapy pressure you
have been prescribed.
This may also happen even if the correct
pressure is indicated on the therapy device.
Have your device combination adjusted by a
physician or distributor so that the pressure
in the mask corresponds to your therapy
pressure.
Air humidifiers
JOYCE masks can be used with either cold-air
or warm-air humidifiers.
Never set the humidification level so high
that condensation forms in the air hose.
Follow the instructions for use of your
humidifier and therapy device.
3.9 After use
1.Unhook one of the lower headgear clips
from the mask and remove the mask.
2
14 Operation
Page 17

EN
2. Loosen the headgear clips and remove
the headgear from the mask.
3. Proceed as described in 4 "Hygiene
treatment".
7. Attach the mask cushion to the mask
frame.
8. Fasten the headgear to the mask with the
clips.
3.10 Disassembling/reassembling the mask
Disassembling the mask (Fig. D - A)
1. Detach the mask cushion from the mask
frame.
2. Remove the cap from the pressure
measurement ports.
3. Rotate the retaining ring counterclockwise. Now pull the retaining ring
and the elbow away from the mask
frame.
4. Press the elbow through and out of the
retaining ring and pull the rotating sleeve
off the elbow.
5. Detach the coarse adjustment
component from the mask frame.
6. Detach the fine adjustment component
from the coarse adjustment component.
Then detach the forehead cushion from
the fine adjustment component.
Reassembling the mask (Fig. A - D)
1. Attach the forehead cushion to the fine
adjustment component. Then attach the
fine adjustment component to the coarse
adjustment component.
2. Attach the coarse adjustment component
to the mask frame.
3. Push the rotating sleeve onto the elbow
until you hear it click into place.
4. Press the elbow into the retaining ring
until you hear it click into place.
5. Attach the retaining ring and elbow onto
the mask frame. Turn the retaining ring
clockwise until you hear it click into
place.
6. Push the cap onto the pressure
measurement ports.
4 Hygiene treatment
4.1 Schedule
Daily
Clean the mask in warm water to remove all
residues. You can disassemble the mask for
cleaning. Use a mild cleaning agent (e.g.
dishwasher detergent). After cleaning, rinse
all parts carefully with clean water.
Caution!
• For patients with a weakened immune
system or a special medical history, daily
disinfecting or sterilization of the mask
components may be necessary. In this case,
please consult your doctor.
• Please take great care when cleaning and
disinfecting the contact surfaces between
the mask frame and the retaining ring.
Residues on these surfaces can reduce the
success of the therapy and the functioning
of the integrated exhaled air system (vented variants).
Weekly
Disassemble the mask and subject the parts
of the mask to a hygiene treatment (see
“4.2. Cleaning, disinfection, sterilisation” on
page 15).
4.2 Cleaning, disinfection, sterilisation
Permissible procedures
Caution!
Always clean the components of the
mask thoroughly before disinfecting or
sterilising them as indicated in the
above Table.
Hygiene treatment 15
Page 18

EN
Procedure
Components
Dishwasher
Hand wash
Mask cushion ••• •
Mask cushion GEL •••
Forehead cushion •••
Forehead cushion
GEL
Port cap ••• •
Mask frame •••
Coarse adjustment
component
Fine adjustment
component
Elbow •••
Rotating sleeve •••
Retaining ring •••
Headgear clips •••
Headgear
WEINMANNstrap
Headgear
HEADstrap
Headgear
JOYCEstrap
•••
•••
Disinfection*
••
•
•
•
Gel-filled mask components are highly
sensitive components. Always handle
them with care to prevent deformation
and damage.
Description of procedures
Dishwasher
Hand wash
Disinfection*
Sterilisation
(alternative to
disinfection)
*We recommend the disinfectants
gigasept
Rinse cycle at 65 °C. Then rinse all parts
carefully with clean water.
Hand wash in warm water. Use a mild
detergent. Then rinse all parts in clean
water and allow to air-dry.
Clean mechanically, e.g. with a brush,
in dilute solution. After disinfection
rinse all parts thoroughly with distilled
water and dry thoroughly.
Steam sterilisation in equipment rated
according to EN 285. Temperature 134
°C, minimum sterilisation time
3 minutes.
®
FF (new), Cidex® OPA and
Aniosyme DD1. Evidence of tolerance to
these disinfectants has been provided. It is
essential to follow the manufacturer’s
instructions.
Notes on the hygiene treatment and on the
hygiene treatment for a change of patient
can be found in a brochure from our
information portal at www.weinmann.de. If
Sterilisation (alternative
to disinfection)
you do not have Internet access, contact
Weinmann.
Note
Wear suitable gloves (e.g. disposable
gloves) during the hygiene treatment.
Wash the HEADstrap headgear before
using for the first time, as the colour
might run.
The headgear may only be washed by
hand!
Do not iron the headgear, otherwise the
hook-and-loop closures will no longer
work!
Do not dry the headgear in a dryer!
4.3 Following treatment
Thoroughly dry all parts following the
hygiene treatment. Check the components
for residual contamination or damage.
Repeat the hygiene treatment if required.
Replace damaged parts. Reassemble the
mask.
4.4 Multiple patient use
If the mask is used by a different patient, it
must be subjected to a hygiene treatment
first.
Disassemble the mask. Disinfect or sterilize all
parts as described in section 4.2 "Cleaning,
disinfection, sterilisation". Use a new
headgear.
16 Hygiene treatment
Page 19

EN
5 Functional checks
7 Scope of supply
Carry out a visual check after every hygiene
treatment.
If the mask cushion is damaged and is no
longer airtight, replace it with a new one.
Check the functionality and air-tightness of
the ball-and-socket joint on the elbow. If it
no longer moves easily or is no longer
airtight, replace the elbow and retaining ring.
Parts that are no longer usable can be
disposed of as normal household waste.
The forehead cushion and the mask cushion
may become discolored, but this does not
impair function.
6 Troubleshooting
Problem Cause Solution
Painful
pressure on
the face.
Draught in
the eyes.
Therapy
pressure is
not reached.
Mask is too
tight.
Mask is too
loose.
Mask does not
fit.
High therapy
pressure.
Mask not
adjusted
correctly.
Mask cushion is
damaged.
Hose system is
leaking.
Air is escaping
from pressure
measurement
ports.
Loosen headgear slightly.
Adjust position of forehead
support.
Tighten headgear slightly.
Adjust position of forehead
support.
Use a different size of
mask; contact your
distributor.
Use firmer mask cushion
(for pressures up to 40
hPa). Available from your
distributor.
Adjust headgear.
Adjust position of forehead
support.
Replace mask cushion.
Check push-fit connector
and fit of hose sleeves.
Cover pressure
measurement ports with
cap (included in package).
Note
All masks are supplied fully assembled
and with headgear.
vented variants
Article
Article no.
HEADstrap
Article no. with
JOYCE vented‚ Size S WM 26110 WM 26110/1
JOYCE vented‚ Size M WM 26120 WM 26120/1
JOYCE vented‚ Size L WM 26130 WM 26130/1
JOYCE vented‚ Size XL WM 26140 WM 26140/1
JOYCE vented 40 hPa‚ Size S WM 26111 WM 26111/1
JOYCE vented 40 hPa‚ Size M WM 26121 WM 26121/1
JOYCE vented 40 hPa‚ Size L WM 26131 WM 26131/1
JOYCE vented 40 hPa‚ Size XL WM 26141 WM 26141/1
JOYCE GEL vented‚ Size S WM 26112 WM 26112/1
JOYCE GEL vented‚ Size. M WM 26122 WM 26122/1
JOYCE GEL vented, Size. L WM 26132 WM 26132/1
WEINMANNstrap/
with JOYCEstrap
non vented variants
Article no. with
Article
JOYCE non vented, Size S WM 26160
JOYCE non vented, Size M WM 26170
JOYCE non vented, Size L WM 26180
JOYCE non vented, Size XL WM 26190
JOYCE non vented 40 hPa‚ Size S WM 26161
JOYCE non vented 40 hPa‚ Size M WM 26171
JOYCE non vented 40 hPa‚ Size L WM 26181
JOYCE non vented 40 hPa‚ Size XL WM 26191
JOYCE GEL non vented‚ Size S WM 26162
JOYCE GEL non vented‚ Size M WM 26172
JOYCE GEL non vented‚ Size L WM 26182
WEINMANNstrap/
HEADstrap
Functional checks 17
Page 20

EN
Replacement parts
Article Article no.
Ball-and-socket joint set:
retaining ring, elbow, rotating sleeve
Ball-and-socket joint set non vented:
retaining ring, elbow, rotating sleeve
Rotating sleeve vented WM 26254
Forehead support:
Forehead cushion, forehead support
coarse adjustment component,
forehead support fine adjustment
component
Forehead support GEL:
Forehead cushion GEL, forehead
support coarse adjustment component,
forehead support fine adjustment
component
Forehead cushion WM 26200
Forehead cushion GEL WM 26209
Mask cushion 30 hPa, Size S
Mask cushion 30 hPa, Size M
Mask cushion 30 hPa, Size L
Mask cushion 30 hPa, Size XL
Mask cushion 40 hPa, Size S
Mask cushion 40 hPa, Size M
Mask cushion 40 hPa, Size L
Mask cushion 40 hPa, Size XL
Mask cushion GEL, Size S
Mask cushion GEL, Size M
Mask cushion GEL, Size L
WEINMANNstrap headgear, incl.
headgear clips
Headgear HEADstrap WM 26360
JOYCEstrap headgear, blue, incl.
headgear clips
Headgear clips (4 pcs.) WM 26205
Port cap WM 26208
Instructions for use
DE, EN, FR, NL, IT, ES, PT, TR, EL, PL, HR
RU (pdf, Internet: www.Weinmann.de)
WM 26206
WM 26207
WM 26201
WM 26215
WM 26210
WM 26220
WM 26230
WM 26240
WM 26211
WM 26221
WM 26231
WM 26241
WM 26212
WM 26222
WM 26232
WM 26350
WM 26290
WM 16950
WM 16814
Accessories
Article Article no.
Exhaled air system:
Silentflow 2
Noise reduction system
WM 23600
WM 23685
8 Specifications
Technical data
JOYCE Value
Product category according to
93/42/EEC:
Dimensions (WxHxD): 80 x 130 x 90 mm
Weight: c. 85 grams
Therapy pressure range:
mask cushion soft:
mask cushion hard:
mask cushion GEL:
Hose connector: cone complying
with EN ISO 5356-1
vented:
non vented:
Pressure measurement ports: Ø 4 mm
Width of headgear clips: max. 20 mm
Temperature range
Operation:
Storage:
Flow resistance
vented:
at 50 l/min
at 100 l/min
non vented:
at 50 l/min
at 100 l/min
Quoted two-figure noise emission
value to ISO 4871:
– sound pressure level
– sound power level
(uncertainty factor: 3 dB(A))
Working life up to 12 months
Standards applied EN ISO 17510-2:2009
1
depending on size and design
2
If the materials used to produce masks are
exposed to aggressive cleaning agents, for
example, they age. In individual cases,
therefore, you may need to replace your
mask sooner (see “5. Functional checks”
on page 17).
II a
1
4 to 30 hPa
4 to 40 hPa
4 to 40 hPa
Ø 22 mm (male)
Ø 22 mm (female)
+ 5 °C to + 40 °C
– 20 °C to + 70 °C
0.02 hPa
0.11 hPa
0.09 hPa
0.37 hPa
15 dB(A)
23 dB(A)
Subject to design
changes
2
1
18 Specifications
Page 21

EN
Materials
Mean leakage flow
vented (l/min)
Output pressure of therapy device (hPa)
40
50
60
70
80
0
10
20
30
40
50
60
70
80
0 10203040
JOYCE
vented
JOYCE
non vented
Article Material
Mask cushion, port cap Silicone
Mask cushion GEL
Forehead cushion, retaining ring TPE, Polypropylene
Forehead cushion GEL
Mask frame, elbow Polycarbonate
Headgear WEINMANNstrap
Headgear JOYCEstrap
Headgear HEADstrap
Rotating sleeve, forehead support
coarse adjustment component,
forehead support fine adjustment
component
Headgear clips POM
Silicone,
silicone gel
Silicone,
silicone gel,
polycarbonate
Elasthane, Polyester,
Polyurethane, Nylon,
Cotton, Polyamide
Cotton,
polyamide, elasthane
Nylon/Spandex
Polyurethane
Polyester/Lycra
Polypropylene
All mask components are latex-free.
Pressure/flow characteristic curve
The pressure/flow characteristic curve shows
outlet flow as a function of therapy pressure.
9Warranty
Weinmann gives the customer a limited
manufacturer warranty on new genuine
Weinmann products and any replacement
part fitted by Weinmann in accordance with
the warranty conditions applicable to the
product in question and in accordance with
the warranty periods from date of purchase
as listed below. The warranty conditions can
be downloaded from www.weinmann.de on
the Internet. We can also send you the
warranty conditions on request. In the event
of a claim under warranty, please contact
your specialist dealer.
Product
Weinmann devices including accessories
(except masks) for sleep diagnosis, sleep
therapy, home ventilation, oxygen medicine
and emergency medicine
Masks including accessories, rechargeable
batteries, batteries*, sensors, tube systems
Disposable products None
*unless there is information to the contrary
in the technical documentation.
Period of
guarantee
2 years
6 months
10 Declaration of conformity
Weinmann Geräte für Medizin GmbH + Co.
KG declares herewith that the product
complies fully with the respective regulations
of the Medical Device Directive 93/42/EEC.
The unabridged text of the Declaration of
Conformity can be found on our website at
www.weinmann.de
Warranty 19
Page 22

FR
Français
1 Description de l'appareil
Légendes
(Représentation schématique des
pièces : voir le dépliant joint.)
1 Harnais
2 Coussinet frontal
3 Dispositif de réglage fin de l'appui frontal
4 Dispositif de réglage grossier de l'appui
frontal
5 Appui frontal
6 Boucle de fixation
7 Raccords de prise de pression
8 Obturateur
9 Douille rotative (non vented : de couleur
bleue)
10 Coude (non vented : de couleur bleue)
11 Bague de blocage (non vented : de couleur
bleue)
12 Corps du masque
13 Jupe
Domaine d'utilisation
Le masque nasal est un équipement auxiliaire
qui sert d'élément d'étanchéité entre le
patient et l'appareil. Il est utilisé pour le
traitement de l'apnée du sommeil ainsi que
pour la ventilation non invasive de patients
souffrant d'insuffisance respiratoire.
Précautions à prendre avant l'usage
Avant le début du traitement, les patients
doivent être initiés à l'utilisation du masque
par un personnel qualifié.
2 Consignes de sécurité
Exigences de sécurité
Conformément aux exigences de la directive
93/42 CEE, veuillez observer les points
suivants :
• Lisez attentivement le présent mode
d'emploi. Il fait partie intégrante du masque et doit être disponible à tout moment.
• Utilisez exclusivement le masque dans les
plages de pressions thérapeutiques requises pour les différentes variantes.
– 4-30 hPa: JOYCE vented
JOYCE non vented
– 4-40 hPa: JOYCE vented 40 hPa
JOYCE non vented 40 hPa
JOYCE GEL vented
JOYCE GEL non vented
• L’utilisation d’articles d’autres marques risque
d’entraîner des pannes de fonctionnement
ainsi qu’une limitation de l’aptitude à
l’emploi. En outre, les exigences en matière
de biocompatibilité risquent de ne pas être
remplies. Veuillez noter que, dans ce cas,
tout droit relatif à la garantie et à la responsabilité sera annulé, si ni les accessoires recommandés dans la notice d’utilisation ni les
pièces de rechange d’origine ne sont utilisés.
• Les patients ayant une respiration spontanée
limitée doivent être surveillés en permanence.
Le dispositif d'alarme signalant les fuites/souspressions doit être activé sur le respirateur.
• Les patients souffrant d'affections pulmonaires obstructives et restrictives devraient
faire l'objet d'un examen individuel pendant l'utilisation du masque JOYCE (p. ex.
à l'égard de la réinspiration de CO
).
2
• Ne boucher les orifices du masque que
dans les cas indiqués dans le présent mode
d'emploi. Il existe sinon un risque de réinspiration du CO
et d'étouffement.
2
• Le masque ne doit être porté pendant une
durée prolongée que si l'appareil de traitement est branché. Il existe sinon un risque
de réinspiration du CO
.
2
• Ne pas utiliser de tuyaux en matériau
conducteur de l'électricité (exception :
tuyaux respiratoires pouvant être chauffés
électriquement).
• Observez les consignes données dans le chapitre 4 « Précautions d'hygiène » afin de prévenir les risques d'infection, de contamination
bactérienne et de dysfonctionnement.
20 Description de l'appareil
Page 23

FR
Effets secondaires
L'utilisation du masque peut entraîner les
effets secondaires secondaires suivants :
Nez bouché, sécheresse nasale, sécheresse
bucale matinale, sensation de pression dans
les sinus, conjonctivite, bruits d'expiration
gênants, rougeurs cutanées et marques sur le
visage.
3 Utilisation
Fig. A-E, voir le dépliant joint.)
3.1 Réglage de l'appui frontal
(fig.
A)
Réglage fin
Enfoncez les taquets se trouvant sur le haut
du dispositif de réglage grossier. Placez le
dispositif de réglage fin dans l'un des crans
de positionnement.
Le coussinet frontal est réglable en hauteur
(env. 1 cm). Tournez pour cela le dispositif de
réglage fin de 180° et positionnez-le comme
indiqué plus haut.
Réglage grossier
Enfoncez les taquets se trouvant au bas du
dispositif de réglage grossier. Emboîtez ce
dernier dans l'un des crans de
positionnement du corps du masque.
3.2 Pose du masque
1. Décrochez une des boucles de fixation
inférieures sur le masque.
2. Passez le harnais sur votre tête et
raccrochez la boucle de fixation.
3. Ajustez le harnais à l'aide des fermetures
Velcro de manière à ce que le masque
tienne bien sur le visage, mais sans serrer.
Uniquement WEINMANNstrap :
Avec le harnais WEINMANNstrap, les
possibilités suivantes existent (voir également « Aperçu » sur le dépliant cijoint) :
– Fermetures Velcro sur les deux côtés.
– Fermeture Velcro en haut sur la tête : des-
serrez la fermeture Velcro, tirez avec les
deux mains légèrement sur les extrémités
du harnais et refermez la fermeture Velcro.
Les bandes auto-agrippantes vous permettent de savoir si le harnais est fixé
correctement. Les bandes auto-agrippantes sur le front ont la même couleur
que l'intérieur du harnais.
Uniquement le harnais HEADstrap :
Le harnais HEADstrap offre à cet effet les
possibilités suivantes (voir également
« Vue d’ensemble » sur le feuillet dépliant) :
– Ajustement grossier : ouverture « a » ou «
b » du harnais.
– Ajustement fin : quatre bandes Velcro.
4. Réglez à nouveau l'appui frontal si besoin
est.
3.3 Système expiratoire (fig. E)
Variantes vented
Les variantes vented (toutes les pièces du
masque sont transparentes) disposent d’un
système dit système expiratoire intégré : la
bague de blocage et le corps du masque ont
une forme telle qu'il existe une fente entre ces
pièces. Cette fente permet à l'air expiré de
s'échapper. Grâce à la géométrie spéciale des
pièces, il est garanti que la fente ne peut être
obturée lors de la mise en place de la bague de
blocage. Ne raccordez pas de système
expiratoire externe car la pression
thérapeutique ne pourrait alors être atteinte.
Variantes non vented
Les variantes non vented (bague de blocage,
coude et douille rotative de couleur bleue) ne
disposent d’aucun système expiratoire. Le
raccordement d'un système expiratoire
externe est obligatoire. A défaut, il existe un
risque de réinspiration du CO
Tenez compte des instructions données dans
le mode d'emploi du système expiratoire
utilisé.
et d'asphyxie.
2
Utilisation 21
Page 24

FR
3.4 Raccordement du masque à
l'appareil de traitement (fig.
Emboîtez le tuyau de l’appareil de thérapie
sur la douille rotative (variantes vented) ou
sur votre système expiratoire externe
(variantes non vented). Veillez ce faisant à ce
que le raccord tienne bien et soit
parfaitement étanche. Il ne doit pas se
déconnecter sous l'effet de la pression
thérapeutique.
Pour séparer brièvement le masque du tuyau,
tirez simplement la douille hors du coude.
3.5 Pièces de masque avec remplissage gel
De série, le coussinet frontal et la jupe des
masques JOYCE GEL vented et JOYCE GEL
non vented ont un remplissage gel. Le coussinet frontal et la jupe avec remplissage gel
sont également disponibles en pièces de rechange pour les autres variantes des masques JOYCE.
Attention !
Les pièces de masque avec remplissage gel
sont des éléments très fragiles. Manipulez-les
toujours avec soin pour éviter toute déformation ou endommagement.
3.6 Plages de pression thérapeutique
Les différentes variantes des masques JOYCE
sont disponibles pour chaque plage de
pressions thérapeutiques (voir
« 7. Equipement fourni » à la page 25) :
– 4-30 hPa: JOYCE vented
JOYCE non vented
– 4-40 hPa: JOYCE vented 40 hPa
JOYCE non vented 40 hPa
JOYCE GEL vented
JOYCE GEL non vented
Les masques JOYCE utilisés pour la plage de
pressions thérapeutiques 4-30 hPa disposent
d’une jupe molle, tandis que la jupe des
masques JOYCE pour la plage de pressions
thérapeutiques 4-40 hPa est plus dure ou la
E)
jupe est une jupe à remplissage gel (variantes
Gel).
La jupe plus dure destinés à la plage de
pressions thérapeutiques 4-40 hPa porte le
chiffre « 40 ».
Les jupes molles (jusqu’à 30 hPa), plus dures
(jusqu’à 40 hPa) ainsi que les jupes à
remplissage gel (variantes Gel) sont également
disponibles séparément. Vous pouvez ainsi
adapter votre masque à différents besoins
thérapeutiques.
3.7 Raccords de prise de pression
(fig.
C)
Les masques JOYCE possèdent deux raccords
susceptibles d'être utilisés pour la mesure de
pression ou l'injection d'oxygène.
Prudence !
• Une oxygénothérapie mal conduite ou mal
dosée peut avoir des effets secondaires. Un
tel traitement doit être entrepris uniquement sur prescription médicale.
• Si une oxygénothérapie vous a été prescrite, conformez-vous strictement aux
modes d'emploi de votre source d'O
votre appareil de traitement.
Si les raccords ne sont pas utilisés, ils doivent
toujours être bouchés au moyen de
l'obturateur fourni à cet effet. A défaut, de
l'air s'échappe par les raccords et la pression
prescrite n'est pas atteinte.
et de
2
3.8 Appareils compatibles
Appareils de traitement
Les masques JOYCE peuvent être combinés
avec tous les appareils destinés au traitement
des affections mentionnés plus haut sous
« Domaine d'utilisation ».
Veuillez noter que dans certaines
configurations défavorables, il arrive que la
pression dans le masque ne corresponde pas
à la pression prescrite pour le traitement.
Ceci peut se produire même si l’appareil de
traitement indique une pression correcte.
Veillez donc à faire régler l'ensemble
d'appareils par un médecin ou par le vendeur
22 Utilisation
Page 25

FR
pour assurer que la pression dans le masque
correspond bien à la pression prescrite.
Humidificateur
Les masques JOYCE peuvent être utilisés avec
des humidificateurs chauffants ou non.
Afin d'éviter toute condensation d'eau dans
le tuyau d'air, veillez à ne pas régler
l'humidificateur à un niveau trop élevé.
Conformez-vous aux modes d'emploi de
l'humidificateur et de l'appareil de
traitement.
3.9 Fin de la séance de traitement
1. Décrochez une des boucles de fixation
inférieures sur le masque et enlevez le
masque.
2. Dégagez les boucles et séparez le harnais
du masque.
3. Procédez comme indiqué au
point 4 « Précautions d'hygiène ».
3.10 Démontage/Assemblage du masque
Démontage du masque (fig. D - A)
1. Séparez la jupe du corps du masque.
2. Enlevez l'obturateur bouchant les
raccords de prise de pression.
3. Tournez la bague de blocage dans le sens
contraire des aiguilles d'une montre. Tirez
la bague de blocage et le coude hors du
corps du masque.
4. Dégagez le coude de la bague de blocage
et déboîtez la douille.
5. Séparez le dispositif de réglage grossier
du corps du masque.
6. Séparez l'un de l'autre les dispositifs de
réglage grossier et fin. Dégagez le coussinet frontal du dispositif de réglage fin.
Assemblage du masque (fig. A-D)
1. Posez le coussinet frontal sur le dispositif
de réglage fin. Emboîtez le dispositif de
réglage fin sur celui de réglage grossier.
2. Emboîtez ce dernier sur le corps du
masque.
3. Emboîtez la douille rotative sur le coude
jusqu'à ce qu'un déclic soit audible.
4. Enfoncez le coude dans la bague de
blocage jusqu'au déclic.
5. Emboîtez la bague de blocage et le coude
sur le corps du masque. Tournez la bague
dans le sens des aiguilles d'une montre
jusqu'au déclic.
6. Bouchez les raccords de prise de pression
avec l'obturateur.
7. Emboîtez la jupe sur le corps du masque.
8. Fixez le harnais au masque à l'aide des
boucles.
4 Précautions d'hygiène
4.1 Périodicité
Tous les jours
Nettoyez le masque à fond à l'eau chaude.
Vous pouvez éventuellement le démonter.
Utilisez un détergent doux (nettoyant
vaisselle p. ex.). Rincez ensuite toutes les
pièces à l'eau claire avec soin.
Prudence !
• Chez les patients ayant un système immu-
nitaire défaillant ou une anamnèse particulière, il se peut qu'une désinfection ou une
stérilisation quotidienne des pièces du
masque soit nécessaire. Consultez un
médecin si c'est le cas.
• En procédant à toute opération de net-
toyage, désinfection ou stérilisation, veillez
à traiter les surfaces de contact entre le
corps du masque et la bague de blocage
avec de grandes précautions. La présence
de résidus sur ces surfaces peut compromettre le résultat du traitement et/ou le
fonctionnement du système expiratoire
intégré (variantes vented).
Précautions d'hygiène 23
Page 26

FR
Toutes les semaines
Démontez le masque et décontaminez les
pièces (voir « 4.2. Nettoyage, désinfection
stérilisation » à la page 24).
4.2 Nettoyage, désinfection stérilisation
Procédés autorisés
Procédé
Composants
Jupe ••• •
Jupe GEL •••
Coussinet frontal •••
Coussinet frontal GEL ••
Obturateur ••• •
Corps du masque •••
Dispositif de réglage
grossier
Dispositif de réglage fin •••
Coude •••
Douille rotative •••
Bague de blocage •••
Boucle de fixation •••
Harnais WEINMANNstrap •
Harnais HEADstrap •
Harnais JOYCEstrap •
Prudence !
Nettoyez toujours les pièces du masque
à fond avant de les désinfecter ou de les
stériliser comme indiqué dans le tableau.
Les pièces de masque avec remplissage
gel sont des éléments très fragiles.
Manipulez-les toujours avec soin pour
éviter toute déformation ou endommagement.
Lave-vaisselle
Lavage à la main
Désinfection*
•••
Stérilisation (en
alternative à
la désinfection)
Procédures
Lave-vaisselle
Lavage à la main
Désinfection*
Stérilisation
(en alternative à la
désinfection)
*Nous recommandons l’emploi des
désinfectants gigasept
Cidex
Lavage à 65 °C. Rincer ensuite toutes
les pièces avec soin à l'eau claire.
Lavage à la main dans de l’eau chaude.
Utilisez un détergent doux. Ensuite,
rincez toutes les pièces à l’eau claire et
laissez-les sécher à l’air libre.
Nettoyage mécanique, p. ex. à la
brosse, dans une solution diluée. Après
la désinfection, rincer toutes les pièces à
fond à l'eau distillée et les faire sécher
complètement.
Stérilisation à la vapeur dans des
appareils conformes à EN 285.
Température 134 °C, durée minimale 3
minutes.
®
®
OPA et Aniosyme DD1. La
FF (nouveau),
biocompatibilité a été prouvée pour ces
produits. Respectez impérativement les
consignes des fabricants.
Vous trouverez aussi des indications relatives
aux procédures d'hygiène en cas de
changement de patient dans une brochure
accessible sur le portail d'information
www.weinmann.de. Si vous ne disposez pas
d'un accès à Internet, veuillez contacter
Weinmann.
Remarque
Nous conseillons le port de gants idoines (p. ex. gants à usage unique) pendant les opérations de décontamination.
Lavez le harnais HEADstrap avant sa
première utilisation. Il pourrait sinon
perdre ses couleurs.
Le harnais peut uniquement être lavé à
la main !
Ne repassez pas le harnais : les fermetures Velcro ne fermeront plus !
Ne séchez jamais le harnais dans le
séchoir !
24 Précautions d'hygiène
Page 27

FR
4.3 Fin des opérations de décontamination
Séchez à fond toutes les pièces. Examinez-les
avec soin pour vous assurer qu'elles sont
propres et en parfait état. Répétez la
procédure de décontamination si besoin est.
Remplacez les pièces endommagées.
Assemblez à nouveau le masque.
4.4 Changement de patient
Si le masque doit être utilisé par un autre
patient, il faut le décontaminer au préalable
par mesure d'hygiène.
Démontez le masque. Désinfectez ou
stérilisez toutes les pièces en procédant
comme indiqué au point 4.2 « Nettoyage,
désinfection stérilisation ». Utilisez un
harnais neuf.
5 Contrôle du fonctionnement
Procédez à un contrôle visuel à l'issue de
toute opération de décontamination.
Si la jupe est abîmée et que le masque
présente des défauts d'étanchéité, il faut la
remplacer.
Vérifiez le fonctionnement et l'étanchéité de
l'articulation du coude. Si elle est difficile à
manoeuvrer ou n'est pas étanche, remplacez
le coude et la bague de blocage.
Les pièces devenues inutilisables peuvent être
éliminées avec les déchets ménagers.
Une décoloration du coussinet frontal et de
la jupe est possible. Ceci n'altère cependant
en rien l'efficacité de l'ensemble.
6 Anomalies - Dépannage
Anomalie Cause Action corrective
Douleurs sur
le visage aux
points
d'appui du
masque.
Le masque est
trop serré.
Réglez le harnais en serrant
moins fort.
Modifiez la position de
l'appui frontal.
Anomalie Cause Action corrective
Réglez le harnais en serrant
plus fort.
Modifiez la position de
l'appui frontal.
Prenez un masque d'une
autre taille ; consultez votre
revendeur.
Utilisez un masque ayant
une jupe plus rigide (pour
les pressions de jusqu'à
40 hPa). Disponible chez
votre revendeur.
Réglez le harnais.
Modifiez la position de
l'appui frontal.
Remplacez la jupe.
Vérifiez les raccords et le
siège des manchons des
tuyaux.
Bouchez les raccords avec
l'obturateur fourni avec le
masque.
Courant d'air
dans les yeux.
La pression
prescrite n'est
pas atteinte.
Le masque
n'est pas assez
serré.
Le masque ne
vous va pas.
Pression de traitement élevée.
Le masque
n'est pas réglé
correctement.
La jupe du masque est endommagée.
Le circuit de
tuyaux fuit.
De l'air sort par
les raccords de
prise de pression.
7 Equipement fourni
Remarque
Tous les masques sont fournis entièrement montés et équipés d'un serre-tête.
Variantes vented
Article
HEADstrap
WEINMANNstrap/
Référence avec harnais
JOYCE vented‚ taille S WM 26110 WM 26110/1
JOYCE vented‚ taille M WM 26120 WM 26120/1
JOYCE vented‚ taille L WM 26130 WM 26130/1
JOYCE vented‚ taille XL WM 26140 WM 26140/1
JOYCE vented 40 hPa‚
taille S
JOYCE vented 40 hPa‚
taille M
WM 26111 WM 26111/1
WM 26121 WM 26121/1
harnais
Référence avec
JOYCEstrap
Contrôle du fonctionnement 25
Page 28

FR
Article
HEADstrap
WEINMANNstrap/
harnais
Référence avec
Référence avec harnais
JOYCE vented 40 hPa‚
taille L
JOYCE vented 40 hPa‚
taille XL
JOYCE GEL vented‚ taille S WM 26112 WM 26112/1
JOYCE GEL vented‚
JOYCE GEL vented‚ taille L WM 26132 WM 26132/1
taille M
WM 26131 WM 26131/1
WM 26141 WM 26141/1
WM 26122 WM 26122/1
Variantes non vented
Référence avec
Article
harnais
WEINMANNstrap/
HEADstrap
JOYCE non vented‚ taille S WM 26160
JOYCE non vented‚ taille M WM 26170
JOYCE non vented‚ taille L WM 26180
JOYCE non vented‚ taille XL WM 26190
JOYCE non vented 40 hPa‚ taille S WM 26161
JOYCE non vented 40 hPa‚ taille M WM 26171
JOYCE non vented 40 hPa‚ taille L WM 26181
JOYCE non vented 40 hPa‚ taille XL WM 26191
JOYCE GEL non vented‚ taille S WM 26162
JOYCE GEL non vented‚
JOYCE GEL non vented‚ taille L WM 26182
taille M
WM 26172
Pièces de rechange
Article Référence
Ensemble de l'articulation :
bague de blocage, coude, douille rotative
Ensemble de l'articulation non vented :
bague de blocage, coude, douille rotative
vented: douille rotative WM 26254
Appui frontal :
coussinet, dispositifs de réglage grossier et
de réglage fin de l'appui frontal
Appui frontal GEL:
coussinet GEL, dispositifs de réglage
grossier et de réglage fin de l'appui frontal
Coussinet frontal WM 26200
Coussinet frontal GEL WM 26209
WM 26206
WM 26207
WM 26201
WM 26115
Article Référence
Jupe 30 hPa, taille S
Jupe 30 hPa, taille M
Jupe 30 hPa, taille L
Jupe 30 hPa, taille XL
Jupe 40 hPa, taille S
Jupe 40 hPa, taille M
JOYCEstrap
Jupe 40 hPa, taille L
Jupe 40 hPa, taille XL
Jupe GEL, taille S
Jupe GEL, taille M
Jupe GEL, taille L
Harnais WEINMANNstrap, avec boucles
de fixation
Harnais HEADstrap WM 26360
Harnais JOYCEstrap bleu, avec boucles de
fixation
Boucles de fixation (lot de 4) WM 26205
Obturateur WM 26208
Mode d'emploi
DE, EN, FR, NL, IT, ES, PT, TR, EL, PL, HR
RU (pdf, Internet: www.Weinmann.de)
Accessoires
Article Référence
Système expiratoire :
Silentflow 2
Silencieux
8 Spécifications
Caractéristiques techniques
JOYCE Valeur
Classe du produit conformément
á CE 93/42
Dimensions (LxHxP) 80 x 130 x 90 mm
Poids : env. 85 g
Plage de pression
thérapeutique :
Jupe de masque souple :
Jupe de masque dure :
Jupe GEL :
Raccord de tuyau : raccord
conique EN ISO 5356-1
vented :
non vented :
Raccords de prise de pression : Ø 4 mm
Largeur du boucles de fixation : max. 20 mm
Plage de température
Fonctionnement :
Stockage
WM 26210
WM 26220
WM 26230
WM 26240
WM 26211
WM 26221
WM 26231
WM 26241
WM 26212
WM 26222
WM 26232
WM 26350
WM 26290
WM 16950
WM 16814
WM 23600
WM 23685
II a
1
4 à 30 hPa
4 à 40 hPa
4 à 40 hPa
Ø 22 mm (mâle)
Ø 22 mm (femelle)
+ 5 °C à + 40 °C
- 20 °C à + 70 °C
1
26 Spécifications
Page 29

FR
JOYCE Valeur
Fuite intentionnelle moyenne
vented (l/min)
Pression de sortie au niveau de l'appareil de
traitement (hPa)
40
50
60
70
80
0
10
20
30
40
50
60
70
80
0 10203040
JOYCE
vented
JOYCE
non vented
Résistance à l'écoulement
vented :
à 50 l/min
à 100 l/min
non vented :
à 50 l/min
à 100 l/min
Emissions sonores indiquées
suivant ISO 4871 (deux chiffres) :
– Niveau de pression
acoustique
– Niveau de puissance
acoustique facteur
d'incertitude : 3 dB(A))
Durée d'utilisation Jusqu’à 12 mois
Normes appliquées EN ISO 17510-2:2009
1
selon la taille et l’exécution
2
Les matériaux utilisés pour la fabrication
des masques se détériorent lorsqu’ils sont,
par exemple, exposés à des produits de
nettoyage corrosifs. Dans des cas isolés, il
est dès lors nécessaire de remplacer votre
masque plus tôt (voir « 5. Contrôle du
fonctionnement » à la page 25).
Matériaux
Article Matériau
Jupe,
obturateur
Jupe GEL
Coussinet frontal, bague de
blocage
Coussinet frontal GEL
Corps du masque, coude Polycarbonate
Harnais WEINMANNstrap
Harnais JOYCEstrap
Harnais HEADstrap
0,02 hPa
0,11 hPa
0,09 hPa
0,37 hPa
15 dB(A)
23 dB(A)
2
Sous réserve de
modifications de la
conception de
l'appareil
Silicone
Silicone
Gel silicone,
TPE, polypropylène
Silicone
Gel silicone,
polycarbonate
Élasthane, Polyester,
Polyuréthane, Nylon,
Coton, Polyamide
Coton,
polyamide, élasthane
Nylon/Élasthanne
Polyuréthane
Polyester/Lycra
Article Matériau
Douille rotative, dispositifs de
réglage grossier et de réglage fin
de l'appui frontal
Polypropylène
Boucles de fixation POM
Toutes les pièces du masque sont exemptes
de latex.
Courbe pression-débit
Courbe pression/débit : la fuite intentionnelle
est représentée en fonction de la pression
thérapeutique.
9 Garantie
Weinmann octroie au client qui achète un
produit neuf d’origine Weinmann et une
pièce de rechange montée par Weinmann
une garantie fabricant limitée conformément
aux conditions de garantie valables pour le
produit concerné ainsi qu’aux délais de
garantie mentionnés ci-après à compter de la
date d’achat. Les conditions de garantie sont
disponibles sur Internet à l’adresse
www.weinmann.de. Nous vous envoyons
également sur demande les conditions de
garantie. En cas de garantie, veuillez vous
adresser à votre détaillant spécialisé
Produit
Appareils Weinmann, y compris les
accessoires, (excepté : masques) pour le
diagnostic du sommeil, la thérapie du
sommeil, la ventilation à domicile,
l’oxygénothérapie et la médecine d'urgence
Garantie 27
Durées de
garantie
2 ans
Page 30

FR
Produit
Masques incluant les accessoires, piles,
batteries*, capteurs, circuits patient
Produits à usage unique Aucun
Durées de
garantie
6 mois
* Sauf mention contraire dans les
documentations techniques.
10 Declaration de conformité
La société Weinmann Geräte für Medizin
GmbH + Co. KG, déclare par la présente que
le produit est conforme aux dispositions
respectives de la Directive européenne
93/42/CEE relative aux dispositifs médicaux.
Le texte intégral de la déclaration de
conformité est disponible sur Internet à
l‘adresse suivante : www.weinmann.de
28 Declaration de conformité
Page 31

NL
Nederlands
1 Beschrijving van het apparaat
Legenda
(Afbeelding van de afzonderlijke
delen: zie bijgevoegd vouwblad).
1 Hoofdbanden
2 Voorhoofdvulling
3 Fijne verstelling van de voorhoofdsteun
4 Grove verstelling van de voorhoofdsteun
5 Voorhoofdsteun
6 Bandenclip
7 Drukmeetaansluitingen
8 Afsluitdop
9 Draaihuls (non vented: in het blauw)
10 Hoek (non vented: in het blauw)
11 Borgring (non vented: in het blauw)
12 Maskereenheid
13 Maskerverdikking
Toepassing
Het nasaal masker is een accessoire en
functioneert als afdichtelement tussen
patiënt en therapieapparaat. Het wordt
toegepast voor e behandeling van
slaapapnoe en voor de niet-invasieve
beademing van patiënten met ventilatieinsufficiëntie.
Voor het gebruik door de patiënt
Patiënten moeten voor therapiebegin door
gekwalificeerd personeel over de toepassing
van het masker geïnstrueerd worden.
2 Veiligheidsinstructies
Veiligheidsvoorschriften
Volgens de eisen van de Richtlinie 93/42
EWG dient u de volgende punten in acht te
nemen:
• Lees deze gebruiksaanwijzing aandachtig
door. Deze is bestanddeel van het masker
en moet te allen tijde aanwezig zijn.
• Gebruik het masker uitsluitend in de therapiedrukbereiken die voor de afzonderlijke
varianten nodig zijn.
– 4-30 hPa: JOYCE vented
JOYCE non vented
– 4-40 hPa: JOYCE vented 40 hPa
JOYCE non vented 40 hPa
JOYCE GEL vented
JOYCE GEL non vented
• Het gebruik van producten van derden kan
tot het uitvallen van functies en een beperkte
gebruiksgeschiktheid leiden. Bovendien kunnen de eisen aan de bio-compatibiliteit eventueel niet zijn vervuld. Houd er rekening mee
dat in deze gevallen elke aanspraak op
garantie en aansprakelijkheid vervalt als de in
de gebruiksaanwijzing aanbevolen toebehoren niet of geen originele reserveonderdelen
gebruikt zijn.
• Patiënten met een beperkte spontane
ademhaling moeten permanent bewaakt
worden. Op het beademingsapparaat
moet een overeenkomstig onderdruk-/lekkagealarm geactiveerd zijn.
• Patiënten met obstructieve en restrictieve
longziektes moeten tijdens de toepassing
van JOYCE individueel onderzocht worden
(bijv. m.b.t. CO
-terugademing).
2
• Sluit de openingen van dit masker alleen in
die gevallen, die in deze gebruiksaanwijzing
beschreven zijn. Anders bestaat er gevaar
voor CO
-terugademing en voor stikken.
2
• Het masker mag alleen langer tijd worden
opgezet, als het therapieapparaat ingeschakeld is. Anders bestaat er gevaar voor
CO
-terugademing.
2
• Gebruik geen elektrisch geleidbare ademhalingsslangen (uitzondering: elektrisch
verwarmbare ademslangen).
• Let voor het vermijden van een infectie of
bacteriële contaminatie en voor functiebelemmeringen op paragraaf 4 “Hygiënische
voorbereiding”.
Beschrijving van het apparaat 29
Page 32

NL
Bijwerkingen
De volgende bijwerkingen kunnen optreden:
Verstopte neus, droge neus, droge mond bij
het ontwaken, drukgevoel in de bijholtes,
irritaties van het bindvlies, storende geluiden
bij het uitademen, drukplaatsen in het
gezicht, ode plekken in het gezicht.
3 Bediening
Afb. A-E: zie bijgevoegd vouwblad).
3.1 Voorhoofdsteun instellen
(afb.
A)
Fijne verstelling
Houd de bovenste lussen van de grove
verstelling ingedrukt. Plaats de fijne
verstelling in een van de drie
vergrendelingen.
Om de hoogte van het voorhoofdkussen c.q.
de fijne verstelling aan te passen (ca. 1 cm),
draait u de fijne verstelling 180°. Positioneer
deze vervolgens op de hierboven beschreven
wijze.
Grove verstelling
Houd de onderste lussen van de grove
verstelling ingedrukt. Positioneer de laatste in
een van de vergrendelingsposities van de
maskereenheid.
3.2 Masker opzetten
1. Haak een van de onderste bandenclips
van het masker los.
2. Trek de hoofdbanden over het hooft en
haak de bandenclip weer vast.
3. Stel de hoofdbanden met behulp van de
klittenbandsluitingen zodanig in dat het
masker dicht maar niet te strak op het
gezicht zit.
Alleen WEINMANNstrap:
De hoofdbanden WEINMANNstrap bieden hiervoor de volgende mogelijkheden (zie ook "Overzicht" op de bijgevoegde brochure):
– Klittenbandsluitingen aan beide zijkanten.
– Klittenbandsluiting boven op het hoofd:
maak de klittenband los, trek met beide
handen licht aan de uiteinden van de
hoofdbanden en druk de klittenbandsluiting weer aan.
U herkent aan de klittenbandstrips of
de hoofdbanden correct zijn aangebracht. De klittenbandstrips op het
voorhoofd hebben dezelfde kleur als de
binnenkant van de hoofdbanden.
Alleen HEADstrap:
De hoofdbanden HEADstrap bieden
hiertoe de volgende mogelijkheden (zie
ook "Overzicht" in het bijgevoegde
vouwblad):
– Grove instelling: sleuf "a" of "b" van de
hoofdbanden.
– Fijne instelling: vier klittenbanden.
4. Stel, indien noodzakelijk, de hoofdsteun
van het ademmasker opnieuw in.
3.3 Uitademsysteem (afb. E)
vented-varianten
De vented-varianten (alle maskeronderdelen
transparant) beschikken over een zogenaamd
geïntegreerd uitademsysteem: borgring en
maskereenheid zijn zodanig gevormd dat er
tussen deze delen een spleet ontstaat. Door
deze spleet kan de uitgeademde lucht
ontwijken. De speciale geometrie van deze
onderdelen garandeert dat de spleet bij het
opsteken van de borgring niet kan worden
gesloten. Sluit geen extern uitademsysteem
aan omdat de therapiedruk anders niet
bereikt wordt.
non vented-varianten
De non vented-varianten (borgring, hoek en
draaihuls in het blauw) beschikken niet over
een uitademsysteem. Sluit hierop in elk geval
een uitademsysteem aan. Anders bestaat er
gevaar voor CO
verstikkingsgevaar.
Let op de gebruiksaanwijzing van uw
uitademsysteem
– terugademing en
2
30 Bediening
Page 33

NL
3.4 Masker op het
therapieapparaat aansluiten
(afb.
E)
Steek de slang van uw therapieapparaat op
de draaihuls (vented-varianten) c.q. op het
externe uitademsysteem (non ventedvarianten). Let daarbij op een veilige en
luchtdichte verbinding naar de slang. De
verbinding mag door de therapiedruk niet
loslaten.
Als u het masker kort van de slang wilt
loshalen, trek dan gewoond de draaihuls van
de hoek af.
3.5 Maskeronderdelen met gelvulling
Bij de JOYCE GEL vented en de JOYCE GEL
non vented beschikken de voorhoofdvoering
en de maskervoering standaard over een
gelvulling. De gel voorhoofdvoering en gel
maskervoering zijn ook voor andere JOYCEvarianten leverbaar als reserveonderdelen.
Voorzichtig!
De maskeronderdelen met gelvulling zijn
zeer gevoelige componenten. Behandel deze
altijd zorgvuldig om vervormingen en
beschadigingen te voorkomen.
3.6 Therapiedrukbereiken
De afzonderlijke varianten van de JOYCEmaskers zijn telkens leverbaar voor een
bepaald therapiedrukbereik (zie "7. Omvang
van de levering" op pagina 35):
– 4-30 hPa: JOYCE vented
JOYCE non vented
– 4-40 hPa: JOYCE vented 40 hPa
JOYCE non vented 40 hPa
JOYCE GEL vented
JOYCE GEL non vented
De JOYCE-maskers voor het
therapiedrukbereik 4-30 hPa beschikken over
een zachte maskervoering, de JOYCEmaskers voor het therapiedrukbereik
4-40 hPa over een hardere maskervoering
resp. een gelvoering (gelvarianten).
De hardere maskervoering voor het
therapiedrukbereik 4-40 hPa is gekenmerkt
met het getal "40".
De zachte (tot 30 hPa) en hardere (tot 40
hPa) maskervoering en de gelvoering
(gelvarianten) zijn ook afzonderlijk leverbaar
als reserveonderdeel zodat u uw masker aan
de veranderde therapiebehoeftes kunt
aanpassen.
3.7 Drukmeetaansluitingen (afb. C)
JOYCE maskers zijn van twee aansluitingen
voorzien, die voor de drukmeting of voor het
invoeren van zuurstof kunnen worden
gebruikt.
Voorzichtig!
• Een zuurstoftherapie kan bij verkeerde toepassing/dosering bijwerkingen veroorzaken. Daarom mag u een dergelijke therapie
alleen volgens voorschrift van een arts uitvoeren.
• Let bij de uitvoering van een zuurstoftherapie in elk geval op de gebruiksaanwijzing
van uw O
raat.
Als de drukmeetaansluitingen niet worden
gebruikt, sluit deze dan steeds met de
bijgevoegde afsluitdop af. Anders ontwijkt er
lucht uit de aansluitingen en wordt de
therapiedrk niet ebreikt.
-systeem en uw therapieappa-
2
3.8 Compatibele apparaten
Therapieapparaten
JOYCE maskers kunnen met alle apparaten
worden gecombineerd die bestemd zijn voor
de uitvoering van de onder
“Toepassingsdoel” beschreven therapieën.
Let erop dat bij ongunstige combinaties van
apparaten de daadwerkelijke druk in het
masker eventueel niet overeenkomt met de
therapiedruk die u kreeg voorgeschreven.
Dit kan ook het geval zijn als de correcte druk
op het therapieapparaat wordt
weergegeven. Laat uw combinatie apparaten
door een arts of vakhandelaar zodanig
Bediening 31
Page 34

NL
instellen dat de daadwerkelijke druk in het
masker overeenkomst met uw therapiedruk.
Ademluchtbevochtiger
JOYCE maskers kunnen zowel met koude als
met warme luchtbevochtigers worden
gebruikt.
Kies de bevochtiginggraad nooit zo hoog dat
er water in de luchtslang neerslaat. Let op de
gebruiksaanwijzing van uw bevochtiger en
therapieapparaat.
3.9 Na het gebruik
1. Haak een van de onderste bandenclips
van het masker los en zet het masker af.
2. Maak de bandenclips los en neem de
hoofdbanden van het masker af.
3. Ga te werk zoals beschreven onder
4 "Hygiënische voorbereiding".
3.10 Demonteren/monteren van het masker
Demonteren van het masker (afb. D - A)
1. Verwijder de maskerverdikking van de
maskereenheid.
2. Verwijder de afsluitdoppen van de
drukmeetaansluitingen.
3. Draai de borgring tegen de klok in. Trek
de borgring en de hoek van de
maskereenheid af.
4. Druk de hoek uit de borgring en trek de
draaihuls los van de hoek.
5. Verwijder de grove verstelling van de
maskereenheid.
6. Maak de fine verstelling los van de grove
verstelling. Maak dan de
voorhoofdvulling los van de fijne
verdeling.
Monteren van het masker (afb. A - D)
1. Zet de voorhoofdvulling op de fijne
verdeling. Steek vervolgens de fijne
verstelling op de grove verstelling.
2. Steek de grove verstelling op de
maskereenheid.
3. Steek de draaihuls op de hoek totdat
deze hoorbaar ineensluit.
4. Druk de hoek in de borgring tot deze
hoorbar ineensluit.
5. Steek de borgring en de hoek op de
maskereenheid. Draai de borgring met de
klok mee totdat deze hoorbaar
ineensluit.
6. Steek de afsluitdop op de
drukmeetaansluitingen.
7. Steek de maskerverdikking op de
maskereenheid.
8. Bevestig de hoofdbanden met de clips op
het masker.
4 Hygiënische voorbereiding
4.1 Termijnen
Dagelijks
Reinig het masker grondig in warm water. U
kunt het masker hiertoe demonteren.
Gebruik een mild reinigingsmiddel (bijv.
afwasmiddel). Spoel daarna alle delen
zorgvuldig met schoon water af.
Voorzichtig!
• Bij patiënten met een verzwakt
immuunsysteem of een bijzondere
ziektegeschiedenis kan een dagelijkse
desinfectie of sterilisatie van de
maskeronderdelen noodzakelijk zijn.
Consulteer in dit geval uw arts.
• Ga bij de hygiënische voorbereiding van de
contactvlakken tussen maskereenheid en
borgring uiterst zorgvuldig te werk.
Overblijfselen op deze oppervlakken
kunnen het succes van de therapie c.q. de
functie van het geïntegreerde
uitademsysteem (vented-varianten)
verminderen.
Wekelijks
Demonteer het masker en behandel de
maskeronderdelen hygienisch (zie
"4.2. Reiniging, desinfectie, sterilisatie" op
pagina 33).
32 Hygiënische voorbereiding
Page 35

NL
4.2 Reiniging, desinfectie, sterilisatie
Toegelaten methodes
Methodes
Onderdelen
Maskerverdikking ••• •
Maskerverdikking GEL •••
Voorhoofdvulling •••
Voorhoofdvulling GEL ••
Afsluitdop ••• •
Maskereenheid •••
Grove verstelling •••
Fijne verstelling •••
Hoek •••
Draaihuls •••
Borgring •••
Bandenclip •••
Hoofdbanden
WEINMANNstrap
Hoofdbanden
HEADstrap
Hoofdbanden
JOYCEstrap
Voorzichtig!
Reinig de maskeronderdelen steeds
grondig voor u deze conform de bovenstaande tabel desinfecteert c.q. steriliseert.
De maskeronderdelen met gelvulling
zijn zeer gevoelige componenten. Behandel deze steeds zeer behoedzaam
zodat zij niet vervormd of beschadigd
worden.
Beschrijving van de methode
Vaatwasser
Handwas
Vaatwasser
Handwas
Desinfectie*
Sterilisatie
(alternatief
•
•
•
Spoelgang bij 65 °C vervolgens alle
delen zorgvuldig met schoon water
afspoelen.
Met de hand wassen in warm water.
Gebruik een mild reinigingsmiddel.
Vervolgens alle onderdelen met schoon
water afspoelen en aan de lucht laten
drogen.
In verdunde oplossing mechanisch
Desinfectie*
Sterilisatie
(alternatief voor
desinfectie)
*Wij adviseren de desinfectiemiddelen
voor desinfectie)
gigasept
Aniosyme DD1. Voor deze middelen werd
reinigen, bijv. met een borstel. Na de
desinfectie alle onderdelen grondig met
gedestilleerd water spoelen en
zorgvuldig afdrogen.
Stoomsterilisatie in apparaten
overeenkomstig EN 285. Temperatuur
134 °C, min. contactduur 3 minuten.
®
FF (nieuw), Cidex® OPA en
de verdraagbaarheid aangetoond. Let
hiervoor in elk geval ook op de
aanwijzingen van de fabrikant.
Aanwijzingen voor de hygiënische
voorbereiding en voor de hygiënische
voorbereiding bij patiëntwissel vindt u ook in
een brochure in het infoportaal op
www.weinmann.de. Wanneer u geen
internettoegang heeft, neem dan a.u.b.
contact op met Weinmann.
Aanwijzing:
Wij adviseren om bij de hygiënische behandeling geschikte handschoenen
(bijv. wegwerphandschoenen) te dragen.
Was de hoofdbanden HEADstrap voor
het eerste gebruik omdat ze kunnen
afgeven.
De hoofdbanden mogen alleen met de
hand worden gewassen!
De hoofdbanden niet strijken omdat de
klittenbandsluitingen anders niet meer
houden!
Droog de hoofdbanden niet in de
droger!
4.3 Na de behandeling
Droog alle onderdelen na de hygiënische
behandeling grondig af. Controleer de
componenten op restverontreinigingen of
beschadiging. Herhaal de hygiënische
behandeling indien noodzakelijk. Vervang
beschadigde onderdelen. Monteer het
masker weer.
Hygiënische voorbereiding 33
Page 36

NL
4.4 Wissel van de patiënt
Wanneer het masker voor een andere patiënt
moet worden gebruikt, moet dit van tevoren
hygiënisch worden behandeld.
Demonteer hiervoor het masker.
Desinfecteer of steriliseer alle onderdelen
overeenkomstig alinea 4.2 "Reiniging,
desinfectie, sterilisatie". Gebruik nieuwe
hoofdbanden.
5 Functiecontrole
Voer na elke hygiënische reiniging een
zichtcontrole uit.
Als er op grond van beschadigingen aan de
maskerverdikkingen lekkage is ontstaan,
dient u het te vervangen.
Controleer de functie en de dichtheid van het
kogelscharnier op de hoek. Als dit niet meer
licht loopt of lekt, vervang dan de hoek en de
borgring.
Onbruikbaar geworden delen kunnen met
het huisvuil verwijderd worden.
Er kunnen verkleuringen van de
voorhoofdvulling en de maskerverdikking
optreden. Deze belemmeren de functie
echter niet.
6 Storingen en het verhelpen
ervan
Storing Oorzaak Verhelpen
Hoofdbanden iets
Drukpijn in
het
gezicht.
Tocht in
het oog.
Therapiedruk wordt
niet
bereikt.
Masker zit
te strak.
Masker zit
te los.
Masker past
niet.
Hoge therapiedruk.
Masker niet
correct
ingesteld.
Maskerverdikking is
beschadigd.
Slangsysteem is
ondicht.
Lucht treedt
uit bij de
meetansluitingen.
losser instellen.
Positie van de voor-
hoofdsteun aanpas-
sen.
Hoofdbanden iets
strakker instellen.
Positie van de voor-
hoofdsteun aanpas-
sen.
Andere maskermaat
gebruiken, richt u tot
de vakhandelaar.
Hardere maskerverdik-
king (voor drukken tot
40 hPa) gebruiken. Is
verkrijgbaar in de
vakhandel.
Hoofdbanden instellen.
Positie van de voor-
hoofdsteun aanpassen.
Maskerverdikking
vervangen.
Steekverbinding en
zitting van de slang-
moffen controleren.
Drukmeetaansluitin-
gen met afsluitdop (bij
de levering inbegre-
pen) afdekken.
34 Functiecontrole
Page 37

NL
7 Omvang van de levering
Aanwijzing:
Alle maskers worden compleet gemonteerd en met hoofdbanden geleverd.
vented-varianten
Artikel
Artikel nr.
HEADstrap
Artikel nr. met
WEINMANNstrap/
JOYCE vented‚ maat S WM 26110 WM 26110/1
JOYCE vented‚ maat M WM 26120 WM 26120/1
JOYCE vented‚ maat L WM 26130 WM 26130/1
JOYCE vented‚ maat XL WM 26140 WM 26140/1
JOYCE vented 40 hPa‚
maat S
JOYCE vented 40 hPa‚
maat M
JOYCE vented 40 hPa‚
maat L
JOYCE vented 40 hPa‚
maat XL
JOYCE GEL vented‚ maat S WM 26112 WM 26112/1
JOYCE GEL vented‚
JOYCE GEL vented‚ maat L WM 26132 WM 26132/1
non vented-varianten
Artikel
JOYCE non vented, maat S WM 26160
JOYCE non vented, maat M WM 26170
JOYCE non vented, maat L WM 26180
JOYCE non vented, maat XL WM 26190
JOYCE non vented 40 hPa‚ maat S WM 26161
JOYCE non vented 40 hPa‚ maat M WM 26171
JOYCE non vented 40 hPa‚ maat L WM 26181
JOYCE non vented 40 hPa‚
maat XL
JOYCE GEL non vented‚ maat S WM 26162
JOYCE GEL non vented‚ maat M WM 26172
JOYCE GEL non vented‚ maat L WM 26182
WM 26111 WM 26111/1
WM 26121 WM 26121/1
WM 26131 WM 26131/1
WM 26141 WM 26141/1
maat M
WM 26122 WM 26122/1
Artikel nr. met
WEINMANNstrap/
HEADstrap
WM 26191
Reserveonderdelen
Artikel Artikel nr.
Set kogelscharnier:
Borgring, hoek, draaihuls
Set kogelscharnier non vented:
Borgring, hoek, draaihuls
Draaihuls vented WM 26254
Voorhoofdsteun:
Voorhoofdvulling, grove verstelling
voorhoofdsteun, fijne verstelling,
voorhoofdsteun
Voorhoofdsteun GEL:
Voorhoofdvulling GEL, grove verstelling
met JOYCEstrap
voorhoofdsteun, fijne verstelling,
voorhoofdsteun
Voorhoofdvulling WM 26200
Voorhoofdvulling GEL WM 26209
Maskerverdikking 30 hPa, maat S
Maskerverdikking 30 hPa, maat M
Maskerverdikking 30 hPa, maat L
Maskerverdikking 30 hPa, maat XL
Maskerverdikking 40 hPa, maat S
Maskerverdikking 40 hPa, maat M
Maskerverdikking 40 hPa, maat L
Maskerverdikking 40 hPa, maat XL
Maskerverdikking GEL, maat S
Maskerverdikking GEL, maat M
Maskerverdikking GEL, maat L
Hoofdbanden:
WEINMANNstrap, incl. bandenclips WM 26350
Hoofdbanden HEADstrap WM 26360
Hoofdbanden, blauw:
JOYCEstrap, incl. bandenclips WM 26290
Bandenclips (4 stuks) WM 26205
Afsluitdop WM 26208
Gebruiksaanwijzing
DE, EN, FR, IT, NL, ES, PT, TR, EL, PL, HR
RU (pdf, Internet: www.Weinmann.de)
WM 26206
WM 26207
WM 26201
WM 26215
WM 26210
WM 26220
WM 26230
WM 26240
WM 26211
WM 26221
WM 26231
WM 26241
WM 26212
WM 26222
WM 26232
WM 16950
WM 16814
Accessoires
Artikel Artikel nr.
Uitademsysteem:
Silentflow 2
Geluidisolatiesysteem
WM 23600
WM 23685
Omvang van de levering 35
Page 38

NL
8 Specificties
40
50
60
70
80
0
10
20
30
40
50
60
70
80
0 10203040
JOYCE
vented
JOYCE
non vented
Gemiddelde lekkageflow
vented (l/min)
Uitgangsdruk op het therapieapparaat (hPa)
Technische gegevens
JOYCE Waarde
Productklasse volgens
93/42/EEG:
Afmetingen (BxHxD): 80 x 130 x 90 mm
Gewicht: ca. 85 gram
Therapiedrukbereik:
Maskerverdikking zacht:
Maskerverdikking hard:
Maskerverdikking GEL:
Slangaansluiting: Conus
overeenkomstig EN ISO 5356-1
vented:
non vented:
Drukmeetaansluitingen: Ø 4 mm
Breedte bandenclips: max. 20 mm
Temperatuurbereik
Werking:
Opslag
Stromingsweerstand
vented:
bij 50 l/min
bij 100 l/min
non vented:
bij 50 l/min
bij 100 l/min
Opgegeven geluidemissiewaarde
in twee getallen overeenkomstig
ISO 4871:
– Geluiddrukniveau
– Geluidvermogenniveau
(onzekerheidsfactor: 3 dB (A))
Gebruiksduur tot max. 12 maanden
Toegepaste normen EN ISO 17510-2:2009
1
afhankelijk van grootte en uitvoering
2
Het materiaal dat voor de vervaardiging
van maskers wordt gebruikt, veroudert
sneller wanneer het bijvoorbeeld aan
agressieve reinigingsmiddelen wordt
blootgesteld. In individuele gevallen kan
het daarom noodzakelijk zijn, dat u het
masker eerder moet vervangen (zie
"5. Functiecontrole" op pagina 34).
36 Specificties
II a
4 tot 30 hPa
4 tot 40 hPa
4 tot 40 hPa
Ø 22 mm
(mannelijk)
Ø 22 mm
(vrouwelijk)
+ 5 °C tot + 40 °C
– 20 °C tot + 70 °C
0,02 hPa
0,11 hPa
0,09 hPa
0,37 hPa
15 dB(A)
23 dB(A)
Wijzigingen van de
constructie
voorbehouden
Materialen
Artikel Materiaal
Maskerverdikking,
afsluiting
Maskerverdikking GEL
Siliconen
Siliconen,
siliconengel
Voorhoofdvulling, borgring TPE, Polypropyleen
1
1
Voorhoofdvulling GEL
Siliconen,
siliconengel,
polycarbonaat
Maskereenheid, hoek Polycarbonat
Elasthaan,
Hoofdbanden
WEINMANNstrap
Polyester,
Polyurethaan,
Nylon, Katoen,
Polyamide
Katoen,
Hoofdbanden JOYCEstrap
Polyamide,
Elasthaan
Nylon/Spandex
Hoofdbanden
HEADstrap
Polyurethaan
Polyester/Lycra
Draaihuls, grove verstelling
voorhoofdsteun, fijne ver-
Polypropyleen
stelling voorhoofdsteun
Bandenclip POM
Alle onderdelen van het masker zijn vrij van
latex.
Drukflow-karakteristiek
In de drukflow-karakteristek wordt de
uitlaatflow afhankelijk van de therapiedruk
2
weergegeven.
Page 39

NL
9 Garantie
Weinmann verleent de klant van een nieuw
origineel Weinmann-product en een door
Weinmann gemonteerd reserveonderdeel
een beperkte fabrikantengarantie
overeenkomstig de geldende
garantievoorwaarden voor het
desbetreffende product en de onderstaand
vermelde garantieperiode vanaf koopdatum.
U kunt de garantievoorwaarden op internet
bekijken onder www.weinmann.de.
Desgewenst sturen wij u de
garantievoorwaarden ook toe. Neem in geval
van garantie contact op met uw vakhandel.
Product
Weinmann-apparaten inclusief accessoires
(uitzondering: maskers) voor de
slaapdiagnose, slaaptherapie,
thuisbeademing, zuurstofmedicatie en
spoedeisende hulp
Maskers inclusief accessoires, accu's,
batterijen*, sensoren, slangsystemen
Producten voor eenmalig gebruik Geen
Garantie-
periode
2 jaar
6 maanden
* Indien niet anders aangegeven in de
technische documenten.
10 Conformiteitsverklaring
Hierbij verklaart Weinmann Geräte für
Medizin GmbH + Co. KG, dat het product
voldoet aan de desbetreffende voorschriften
van de richtlijn 93/42/EEG voor medische
hulpmiddelen.
De volledige tekst van de
conformiteisverklaring vindt u op:
www.weinmann.de
Garantie 37
Page 40

IT
Italiano
1 Descrizione dell'apparecchio
Legenda
(per la raffigurazione dei singoli
componenti vedere il pieghevole
allegato)
1 Fasce per la testa
2 Cuscinetto per la fronte
3 Regolazione fine dell’appoggio frontale
4 Regolazione grossolana dell’appoggio
frontale
5 Appoggio frontale
6 Clip della fascia
7 Raccordi per la misurazione della pressione
8 Tappo di chiusura
9 Manicotto girevole (non vented: di colore blu)
10 Raccordo angolare (non vented: di colore blu)
11 Anello di sicurezza (non vented: di colore blu)
12 Corpo della maschera
13 Bordo di protezione
Impiego previsto
La maschera nasale è un accessorio che serve
da elemento di tenuta tra il paziente e
l’apparecchio terapeutico. E’ impiegata per il
trattamento dell’apnea notturna e per la
ventilazione non invasiva di pazienti affetti da
insufficienza respiratoria.
Prima dell’impiego da parte dei
pazienti
Prima dell’inizio della terapia i pazienti
devono essere istruiti da personale
qualificato in merito all’uso della maschera.
2 Avvertenze di sicurezza
Indicazioni di sicurezza
Conformemente ai requisiti della 93/42
EWG, rispettare le seguenti indicazioni.
• Leggere attentamente le presenti istruzioni
per l'uso, che costituiscono parte inte-
grante della maschera e devono essere
tenute sempre a portata di mano.
• Utilizzare la maschera esclusivamente agli
intervalli di pressione terapeutica necessari
per le singole versioni:
– 4-30 hPa: JOYCE vented
JOYCE non vented
– 4-40 hPa: JOYCE vented 40 hPa
JOYCE non vented 40 hPa
JOYCE GEL vented
JOYCE GEL non vented
• L’utilizzo di articoli di produttori terzi può
causare anomalie di funzionamento e una
limitata idoneità all’uso. Inoltre i requisiti di
bio-compatibilità potrebbero non essere
soddisfatti. Tenere presente che in tali casi
decade qualsiasi diritto relativo a garanzia
e responsabilità qualora non vengano utilizzati i componenti di ricambio originali e
gli accessori consigliati nelle istruzioni
d’uso.
• I pazienti con limitazioni della respirazione
spontanea devono essere sottoposti a
costante controllo e sull’apparecchio respiratore deve essere attivato il relativo
allarme a perdita di pressione.
• Durante l’utilizzo di JOYCE i pazienti affetti
da malattie polmonari ostruttive e restrittive devono essere esaminati individualmente (per es. riguardo ai possibili rischi di
reinspirazione di CO
).
2
• Chiudere le aperture di questa maschera
solo nei casi in cui tale operazione sia
descritta nelle presenti istruzioni per l’uso.
In caso contrario potrebbe sussistere il
rischio di reinspirazione di CO
mento.
-e di soffoca-
2
• La maschera può essere indossata per
lungo tempo solo con l’apparecchio terapeutico acceso. In caso contrario, vi sarebbe
pericolo di reinspirazione di CO
.
2
• Per la respirazione non utilizzare tubi conduttori di corrente (eccezione: tubi di inalazione riscaldati elettricamente).
• Rispettare le indicazioni fornite al capitolo
4 “Trattamento igienico” al fine di evitare
infezioni, contaminazione batterica e per
38 Descrizione dell'apparecchio
Page 41

IT
non compromettere il funzionamento della
maschera.
Effetti collaterali
Possono verificarsi i seguenti effetti
collaterali:
occlusione e secchezza nasale, secchezza mattutina del cavo orale, senso di oppressione ai
seni paranasali, infiammazione della congiuntiva, rumori anomali in fase espiratoria, punti di
compressione o arrossamenti sulla pelle del viso.
3 Utilizzo
Fig. A-E: vedere il pieghevole allegato)
3.1 Regolazione dell’appoggio
frontale (Fig.
Regolazione fine
Tenere premute le linguette superiori del
dispositivo di regolazione grossolana.
Sistemare il dispositivo di regolazione fine in
una delle tre posizioni di aggancio.
Per regolare l’altezza del cuscinetto per la
fronte ovvero del dispositivo di regolazione
fine (ca. 1 cm), ruotare il dispositivo di
regolazione fine di 180° e posizionarlo quindi
come descritto precedentemente.
Regolazione grossolana
Tenere premute le linguette inferiori del
dispositivo di regolazione grossolana.
Posizionare quest’ultimo in una delle
posizioni di aggancio del corpo della
maschera.
3.2 Applicazione della maschera
1. Sganciare una delle clip inferiori delle
fasce della maschera.
2. Passare la fascia sopra alla testa e agganciare nuovamente la clip alla maschera.
3. Mediante le fascette in velcro regolare la
fascia per la testa in modo tale che la
maschera appoggi sul viso senza
A)
esercitare troppa pressione ma
garantendo la tenuta.
Solo WEINMANNstrap:
La fascia per la testa WEINMANNstrap
offre inoltre le seguenti possibilità (ved.
anche "Panoramica" sul pieghevole allegato):
– fascette in velcro su entrambi i lati.
– fascetta in velcro in alto sulla testa: allentare
la fascetta in velcro, tirare leggermente con
entrambe le mani le due estremità della fascia per la testa e premere nuovamente la
fascetta in velcro.
Facendo riferimento alle fascette in velcro, controllare il posizionamento della
fascia per la testa. Le linguette in velcro
sulla fronte hanno lo stesso colore della
parte interna della fascia per la testa.
Solo HEADstrap:
La fascia per la testa HEADstrap offre a
questo scopo le seguenti possibilità (vedere anche ”Prospetto” nel pieghevole allegato):
– regolazione grossolana: fessura "a" o "b"
della fascia per la testa.
– regolazione fine: quattro fasce con velcro.
4. Se necessario, regolare nuovamente
l’appoggio frontale.
3.3 Espiratore (Fig. E)
Versioni vented
Le versioni vented (in cui tutte le componenti
della maschera sono trasparenti) dispongono
di un cosiddetto espiratore integrato:
l’anello di sicurezza e il corpo della maschera
sono formati in modo che si crei una fessura
tra i componenti. Attraverso questa fessura
può fuoriuscire l’aria espirata. La speciale
geometria dei componenti impedisce la
chiusura della fessura durante il montaggio
dell’anello di sicurezza. Non collegare un
sistema di espirazione esterno, in tal caso
non potrebbe essere raggiunta la pressione
di esercizio necessaria per la terapia.
Utilizzo 39
Page 42

IT
Versioni non vented
Le versioni non vented (anello di sicurezza,
raccordo angolare e manicotto girevole di
colore blu) non dispongono di alcun
espiratore. È assolutamente necessario
collegare un sistema di espirazione esterno.
In caso contrario sussiste il rischio di
reinspirazione di CO
Osservare le istruzioni per l'uso del proprio
sistema di espirazione.
e di soffocamento.
2
3.4 Collegamento della maschera
all’apparecchio terapeutico
(Fig.
E)
Inserire il tubo dell’apparecchio terapeutico
nel manicotto girevole (versione vented) o nel
sistema di espirazione esterno (versione
non vented). Verificare che il collegamento
del tubo sia saldo e a tenuta d’aria. Il
raccordo non deve allentarsi per via della
pressione raggiunta nel corso della terapia.
Se si desidera scollegare brevemente la
maschera dal tubo, sfilare semplicemente il
manicotto girevole dal raccordo angolare.
3.5 Componenti della maschera con riempimento in gel
Nelle versioni JOYCE GEL vented e
JOYCE GEL non vented, il cuscinetto per la
fronte e il bordo di protezione dispongono di
un riempimento in gel di serie. Il cuscinetto
per la fronte e il bordo di protezione in gel
sono disponibili come ricambi anche per altre
versioni JOYCE.
Attenzione!
I componenti della maschera con
riempimento di gel sono componenti molto
sensibili. Maneggiarli sempre con cura per
evitare deformazioni e danneggiamenti.
3.6 Campo di pressione necessaria per la terapia
Le singole versioni delle maschere JOYCE sono
disponibili di volta in volta per un determinato
intervallo di pressioni terapeutiche (ved.
“7. Materiale in dotazione” a pagina 44):
– 4-30 hPa: JOYCE vented
JOYCE non vented
– 4-40 hPa: JOYCE vented 40 hPa
JOYCE non vented 40 hPa
JOYCE GEL vented
JOYCE GEL non vented
Le maschere JOYCE per l’intervallo di
pressioni terapeutiche da 4 a 30 hPa
dispongono di un morbido bordo di
protezione, mentre le maschere JOYCE per
l’intervallo di pressioni terapeutiche da 4 a 40
hPa di un bordo di protezione più duro o di
un bordo di protezione in gel (versioni in gel).
Il bordo di protezione più duro per l'intervallo
di pressioni terapeutiche da 4 a 40 hPa è
contrassegnato dal numero "40".
Il bordo di protezione più morbido (fino a
30 hPa) e più duro (fino a 40 hPa), come pure
il bordo di protezione in gel (versioni in gel)
sono disponibili anche singolarmente,
pertanto la maschera può essere adattata alle
diverse esigenze terapeutiche.
3.7 Raccordi per la misurazione
della pressione (Fig.
Le maschere JOYCE sono munite di due
raccordi che possono essere utilizzati per la
misurazione della pressione o per
l’introduzione dell’ossigeno.
Cautela!
• In caso di errori di applicazione/dosaggio,
una terapia a base di ossigeno può comportare effetti collaterali. Pertanto una tale
terapia deve essere eseguita esclusivamente su prescrizione medica.
• Nell’impiego di una terapia a base di ossigeno occorre rispettare le istruzioni per
l’uso del sistema di somministrazione di O
e dell’apparecchio terapeutico.
Se i raccordi per la misurazione della
pressione non vengono utilizzati, è
necessario chiuderli con l’apposito tappo
fornito. In caso contrario l’aria fuoriuscirebbe
dai raccordi e la pressione di esercizio per la
terapia non verrebbe raggiunta.
C)
2
40 Utilizzo
Page 43

IT
3.8 Apparecchi compatibili
Apparecchi terapeutici
Le maschere JOYCE possono essere
combinate a tutti gli apparecchi previsti per
l’esecuzione delle terapie descritte al
paragrafo “Impiego previsto”.
E’ opportuno considerare che in caso di
combinazioni non adeguate di apparecchi la
pressione effettiva nella maschera potrebbe
non corrispondere alla pressione necessaria
per la terapia prescritta.
Ciò potrebbe verificarsi anche nel caso in cui
l’apparecchio terapeutico visualizzi la
pressione corretta. Si consiglia di far scegliere
la combinazione di apparecchi da un medico
o da un rivenditore specializzato, in modo
che la pressione effettiva all’interno della
maschera corrisponda alla pressione prevista
per la terapia.
Umidificatore dell’aria inalata
Le maschere JOYCE possono essere utilizzate
con apparecchi di umidificazione dell’aria a
freddo o a caldo.
Non selezionare un grado di umidità tanto
elevato da generare condensa nel tubo
flessibile dell’aria. Rispettare le istruzioni per
l’uso dell’umidificatore e dell’apparecchio
terapeutico.
3.9 Dopo l’uso
1. Sganciare una delle clip inferiori delle
fasce della maschera e togliere la
maschera.
2. Staccare le clip delle fasce e rimuovere le
fasce per la testa dalla maschera.
3. Procedere come descritto al
paragrafo 4 "Trattamento igienico".
3.10 Smontaggio/Montaggio della maschera
Smontaggio della maschera (Fig. D - A)
1. Staccare il bordo di protezione dal corpo
della maschera.
2. Rimuovere il tappo di chiusura dei
raccordi di misurazione della pressione.
3. Ruotare l’anello di sicurezza in senso antiorario. Ora estrarre l’anello di sicurezza
e il raccordo angolare dal corpo della maschera.
4. Spingere il raccordo angolare fino a farlo
fuoriuscire dall’anello di sicurezza e sfilare
il manicotto girevole dal raccordo
angolare.
5. Staccare il dispositivo di regolazione
grossolana dal corpo della maschera.
6. Staccare il dispositivo di regolazione fine
dal dispositivo di regolazione grossolana.
Quindi rimuovere il cuscinetto per la
fronte dal dispositivo di regolazione fine.
Montaggio della maschera (Fig. A - D)
1. Posizionare il cuscinetto per la fronte sul
dispositivo di regolazione fine.
Agganciare il dispositivo di regolazione
fine al dispositivo di regolazione
grossolana.
2. Collocare il dispositivo di regolazione
grossolana sul corpo della maschera .
3. Inserire il manicotto girevole sul raccordo
angolare finché non si ode il “clic”
dell’aggancio.
4. Premere il raccordo angolare nell’anello
di sicurezza finché non si ode il “clic”
dell’aggancio.
5. Montare l’anello di sicurezza e il raccordo
angolare sul corpo della maschera.
Ruotare l’anello di sicurezza in senso
orario finché non si ode il “clic”
dell’aggancio.
6. Inserire il tappo di chiusura sui raccordi
per la misurazione della pressione.
7. Montare il bordo di protezione sul corpo
della maschera.
8. Fissare le fasce per la testa con le clip alla
maschera.
Utilizzo 41
Page 44

IT
4 Trattamento igienico
Procedimento
4.1 Operazioni periodiche
Quotidianamente
Pulire la maschera in acqua calda in modo
che non restino residui. A tale scopo è
possibile smontare la maschera. Utilizzare un
detergente delicato (per es. un detersivo per
stoviglie). Quindi risciacquare accuratamente
tutti i componenti con acqua pulita.
Cautela!
• In caso di pazienti con sistema immunitario
indebolito o con un particolare quadro clinico, potrebbe essere necessario eseguire
una disinfezione o sterilizzazione giorna-
liera di tutti i componenti della maschera.
In tal caso consultare un medico.
• Procedete al trattamento igienico delle
superfici di contatto tra il corpo della
maschera e l’anello di sicurezza con la massima cura. Eventuali residui su queste
superfici possono pregiudicare il successo
della terapia o il funzionamento del
sistema di espirazione integrato (versioni
vented).
Settimanalmente
Smontare la maschera e sottoporla a
trattamento igienico (ved. “4.2. Pulizia,
disinfezione, sterilizzazione” a pagina 42).
4.2 Pulizia, disinfezione, sterilizzazione
Procedimenti consentiti
Procedimento
Componenti
Bordo di protezione ••• •
Bordo di protezione GEL •••
Cuscinetto per la fronte •••
Cuscinetto per la fronte
GEL
Tappo di chiusura ••• •
Lavastoviglie
Lavaggio a mano
Disinfezione*
••
Sterilizzazione
(in alternativa alla
disinfezione)
Componenti
Corpo della maschera •••
Dispositivo di regolazione
grossolana
Dispositivo di regolazione
fine
Raccordo angolare •••
Manicotto girevole •••
Anello di sicurezza •••
Clip delle fasce •••
Fasce per la testa
WEINMANNstrap
Fasce per la testa
HEADstrap
Fasce per la testa
JOYCEstrap
Lavastoviglie
Lavaggio a mano
Disinfezione*
•••
•••
•
•
•
Cautela!
Pulire sempre a fondo tutti i componenti della maschera prima di disinfettarli o
sterilizzarli conformemente alla tabella
riportata sopra.
I componenti della maschera con riempimento di gel sono componenti molto
sensibili. Maneggiarli sempre con cura
per non deformarli o danneggiarli.
Descrizione dei procedimenti
Lavastoviglie
Lavaggio a mano
Disinfezione*
Sterilizzazione
(in alternativa alla
disinfezione)
*Consigliamo di utilizzare i disinfettanti
gigasept
Ciclo di lavaggio a 65 °C. Dopo il
lavaggio risciacquare accuratamente
con acqua pulita.
Lavare a mano in acqua calda. Utilizzare
un detergente delicato.
Successivamente sciacquare tutti i
componenti con acqua pulita e lasciare
asciugare all’aria.
Pulire meccanicamente in una
soluzione diluita, per es. utilizzando una
spazzola. Dopo la disinfezione
risciacquare accuratamente tutti i
componenti con acqua distillata e
asciugare a fondo.
Sterilizzazione a vapore in apparecchi
conformi a EN 285. Temperatura
134 °C, tempo minimo di riposo
3 minuti.
®
FF (novità), Cidex® OPA e
Sterilizzazione
(in alternativa alla
disinfezione)
42 Trattamento igienico
Page 45

IT
Aniosyme DD1, la cui tollerabilità è
dimostrata. Attenersi assolutamente alle
indicazioni del produttore.
Per informazioni sul primo trattamento
igienico e sul trattamento igienico al cambio
del paziente, consultare la relativa brochure
disponibile nel portale informativo
www.weinmann.de. Se non si dispone di un
accesso a Internet, rivolgersi direttamente a
Weinmann.
Nota
Durante il trattamento igienico si consiglia di utilizzare guanti idonei (per es.
guanti monouso).
Lavare la fascia per la testa HEADstrap
prima del primo utilizzo, poiché potrebbe scolorire.
La fascia per la testa può essere lavata
esclusivamente a mano!
Non stirare la fascia poiché la stiratura
potrebbe danneggiare la tenuta delle
fascette in velcro!
Non asciugare la fascia per la testa
nell'asciugatrice!
4.3 Dopo il trattamento
Dopo il trattamento igienico asciugare
accuratamente tutti i componenti. Verificare
l’eventuale presenza di sporco residuo o di
danni sui componenti. Se necessario, ripetere
il trattamento igienico. Sostituire i
componenti danneggiati. Rimontare la
maschera.
4.4 Cambio paziente
Sottoporre la maschera al trattamento
igienico prima di impiegarla per un altro
paziente.
Smontare la maschera e disinfettare o
sterilizzare tutti i componenti come descritto
nel paragrafo 4.2 "Pulizia, disinfezione,
sterilizzazione". Utilizzare nuove fasce per la
testa.
5 Controllo funzionale
Eseguire un controllo visivo dopo ogni
trattamento igienico.
Sostituire il bordo di protezione se si riscontrano perdite di tenuta dovute a danni al materiale.
Controllare la funzionalità e la tenuta del giunto sferico sul raccordo angolare. Se si riscontrano perdite o problemi di scorrimento,
sostituire il raccordo angolare e l’anello di sicurezza.
E’ possibile smaltire i componenti divenuti
inutilizzabili insieme ai rifiuti domestici.
Il cuscinetto per la fronte e il bordo di
protezione possono cambiare colore. Questo
non compromette il loro funzionamento.
6 Anomalie e relativa
eliminazione
Anomalia Causa Rimedio
Il paziente
accusa dolori
dovuti alla
compressione
della maschera
sul viso.
Il paziente
avverte aria
sugli occhi.
La maschera è
troppo stretta.
La maschera è
troppo lenta.
La maschera non
è della misura
giusta.
Pressione per la
terapia troppo
elevata.
Allargare leggermente la
fascia per la testa.
Modificare la posizione
dell’appoggio frontale.
Stringere leggermente la
fascia per la testa.
Modificare la posizione
dell’appoggio frontale.
Utilizzare una maschera di
un’altra misura; contattare il
proprio rivenditore
specializzato.
Utilizzare un bordo di
protezione più duro (per
pressioni fino a 40 hPa),
disponibile presso i
rivenditori specializzati.
Controllo funzionale 43
Page 46

IT
Anomalia Causa Rimedio
Regolare le fasce per la
testa.
Modificare la posizione
dell’appoggio frontale.
Sostituire il bordo di
protezione.
Controllare il connettore e la
corretta posizione dei
manicotti del tubo flessibile.
Chiudere i raccordi di misurazione della pressione con
l’apposito tappo (compreso
nella fornitura).
Non viene
raggiunta la
pressione
necessaria per
la terapia.
La maschera non
è regolata correttamente.
Il bordo di protezione è danneggiato.
Il sistema di tubi
flessibili presenta perdite di
tenuta.
Dai raccordi di
misurazione
della pressione
fuoriesce aria.
7 Materiale in dotazione
Nota
Tutte le maschere vengono completamente montate e fornite con fasce per la
testa.
Versioni vented
Articolo
N. articolo
HEADstrap
N. articolo con
JOYCE vented‚ misura S WM 26110 WM 26110/1
JOYCE vented‚ misura M WM 26120 WM 26120/1
JOYCE vented‚ misura L WM 26130 WM 26130/1
JOYCE vented‚ misura XL WM 26140 WM 26140/1
JOYCE vented 40 hPa‚
misura S
JOYCE vented 40 hPa‚
misura M
JOYCE vented 40 hPa‚
misura L
JOYCE vented 40 hPa‚
misura XL
JOYCE GEL vented‚ misura S WM 26112 WM 26112/1
JOYCE GEL vented‚
misura M
JOYCE GEL vented‚ misura L WM 26132 WM 26132/1
WEINMANNstrap/
WM 26111 WM 26111/1
WM 26121 WM 26121/1
WM 26131 WM 26131/1
WM 26141 WM 26141/1
WM 26122 WM 26122/1
Versioni non vented
N. articolo con
Articolo
WEINMANNstrap/
HEADstrap
JOYCE non vented, misura S WM 26160
JOYCE non vented, misura M WM 26170
JOYCE non vented, misura L WM 26180
JOYCE non vented, misura XL WM 26190
JOYCE non vented 40 hPa‚ misura S WM 26161
JOYCE non vented 40 hPa‚
misura M
JOYCE non vented 40 hPa‚ misura L WM 26181
JOYCE non vented 40 hPa‚
misura XL
JOYCE GEL non vented‚ misura S WM 26162
JOYCE GEL non vented‚ misura M WM 26172
JOYCE GEL non vented‚ misura L WM 26182
WM 26171
WM 26191
Parti di ricambio
Articolo N. articolo
Set giunto sferico:
anello di sicurezza, raccordo angolare,
manicotto girevole
Set giunto sferico non vented:
Anello di sicurezza, raccordo angolare,
manicotto girevole
Manicotto girevole vented WM 26254
Appoggio frontale:
cuscinetto per la fronte, dispositivo di
regolazione grossolana dell’appoggio
con JOYCEstrap
frontale, dispositivo di regolazione fine
dell’appoggio frontale
Appoggio frontale GEL:
cuscinetto per la fronte GEL, dispositivo di
regolazione grossolana dell’appoggio
frontale, dispositivo di regolazione fine
dell’appoggio frontale
Cuscinetto per la fronte WM 26200
Cuscinetto per la fronte GEL WM 26209
Bordo di protezione 30 hPa, misura S
Bordo di protez. 30 hPa, misura M
Bordo di protez. 30 hPa, misura L
Bordo di protez. 30 hPa, misura XL
Bordo di protez. 40 hPa, misura S
Bordo di protez. 40 hPa, misura M
Bordo di protez. 40 hPa, misura L
Bordo di protez. 40 hPa, misura XL
Bordo di protez. GEL, misura S
Bordo di protez. GEL, misura M
Bordo di protez. GEL, misura L
Fascia per la testa WEINMANNstrap, clip
per la fascia inclusa
WM 26206
WM 26207
WM 26201
WM 26115
WM 26210
WM 26220
WM 26230
WM 26240
WM 26211
WM 26221
WM 26231
WM 26241
WM 26212
WM 26222
WM 26232
WM 26350
44 Materiale in dotazione
Page 47

IT
Articolo N. articolo
Fascia per la testa HEADstrap WM 26360
Fascia per la testa JOYCEstrap blu, clip per
la fascia inclusa
Clip per le fasce (4 pezzi) WM 26205
Tappo di chiusura WM 26208
Istruzioni per l’uso
DE, EN, FR, NL, IT, ES, PT, TR, EL, PL, HR
RU (pdf, Internet: www.Weinmann.de)
WM 26290
WM 16950
WM 16814
Accessori
Articolo N. articolo
Espiratore:
Silentflow 2
Silenziatore
WM 23600
WM 23685
8Specifiche
Dati tecnici
JOYCE Valore
Classe di prodotto in base alla
norma 93/42/CEE:
Dimensioni (LxHxP): 80 x 130 x 90 mm
Peso: ca. 85 grammi
Campo di pressione per la terapia:
Bordo di protezione morbido:
Bordo di protezione duro:
Bordo di protezione GEL:
Attacco del tubo flessibile:
connettore conico secondo
EN ISO 5356-1
vented:
non vented:
Raccordi di misurazione della
pressione:
Larghezza clip per le fasce: max 20 mm
Campo di temperatura
Esercizio:
Stoccaggio
Resistenza al flusso
vented:
di 50 l/min
di 100 l/min
non vented:
di 50 l/min
di 100 l/min
II a
1
da 4 a 30 hPa
da 4 a 40 hPa
da 4 a 40 hPa
Ø 22 mm (uomini)
Ø 22 mm (donne)
Ø 4 mm
+ 5 °C - +40 °C
–20 °C - +70 °C
0,02 hPa
0,11 hPa
0,09 hPa
0,37 hPa
JOYCE Valore
Valore doppio dichiarato delle
emissioni acustiche secondo la
norma ISO 4871:
– Livello di pressione acustica
– Livello d’intensità sonora
(fattore di incertezza: 3 dB(A))
Durata utile fino a 12 mesi
Norme applicate EN ISO 17510-2:2009
1
a seconda di formato e versione
2
I materiali utilizzati per la produzione di
15 dB(A)
23 dB(A)
2
maschere invecchiano se sono esposti ad
esempio a detergenti aggressivi. In casi
singoli, può essere pertanto necessario
sostituire la maschera anticipatamente
(ved. “5. Controllo funzionale” a
pagina 43).
Con riserva di
modifiche costruttive
Materiali
Articolo Materiale
1
Bordo di protezione, tappo di
chiusura
Bordo di protezione GEL
Cuscinetto per la fronte, anello di
sicurezza
Cuscinetto per la fronte GEL
Corpo della maschera, raccordo
angolare
Fascia per la testa WEINMANNstrap
Fascia per la testa JOYCEstrap
Fascia per la testa HEADstrap
Manicotto girevole, dispositivo di
regolazione grossolana
dell’appoggio frontale, dispositivo di
regolazione fine dell’appoggio
frontale
Clip delle fasce POM
Silicone
Silicone,
Gel di silicone
TPE, Polipropilene
Silicone,
Gel di silicone,
Policarbonato
Policarbonato
Elastan, Poliestere,
Poliuretano, Nylon,
Cotone, Poliammide
Cotone,
Poliammide, Elastan
Nylon/Spandex
Poliuretano
Poliestere/Lycra
Polipropilene
Tutti i componenti della maschera sono privi
di lattice.
Specifiche 45
Page 48

IT
Curva flusso-pressione
40
50
60
70
80
0
10
20
30
40
50
60
70
80
0 10203040
JOYCE
vented
JOYCE
non vented
Flusso di perdita medio
vented (l/min)
Pressione di uscita sull’apparecchio terapeutico
(hPa)
Nella curva flusso-pressione è rappresentato
il flusso di uscita in base alla pressione
necessaria per la terapia.
9 Garanzia
Weinmann concede al cliente di un prodotto
Weinmann nuovo originale e di una parte di
ricambio Weinmann installata una garanzia
limitata del produttore ai sensi delle
Condizioni di garanzia valide per ciascun
prodotto e dei periodi di garanzia dalla data
d’acquisto di seguito indicati. Le Condizioni
di garanzia possono essere consultate in
Internet all’indirizzo www.weinmann.de. Su
richiesta provvederemo anche all’invio delle
Condizioni di garanzia. Per prestazioni in
garanzia rivolgersi al proprio rivenditore
specializzato.
10 Dichiarazione di conformità
Con la presente Weinmann Geräte für
Medizin GmbH + Co. KG dichiara che il
prodotto è conforme alle disposizioni
pertinenti contenute nella direttiva
93/42/CEE sui prodotti medici.
Il testo completo della dichiarazione di
conformitá è disponibile all‘indirizzo:
www.weinmann.de
Prodotto
Apparecchi Weinmann comprensivi di
accessori (eccezione: maschere) per
diagnosi del sonno, terapia del sonno,
ventilazione domiciliare, ossigenoterapia
e medicina d’urgenza
Maschere comprensive di accessori,
accumulatore, batterie*, sensori, sistemi
di tubi
Prodotti monouso Nessuna
* se non diversamente indicato nella
documentazione tecnica.
46 Garanzia
Durata della
2 anni
6 mesi
garanzia
Page 49

ES
Español
1 Descripción del aparato
Leyenda
(representación de las distintas piezas:
ver folleto adjunto).
1 Cintas para la cabeza
2 Almohadilla de apoyo para la frente
3 Ajuste fino del soporte frontal
4 Ajuste aproximado del soporte frontal
5 Soporte frontal
6 Clip para cintas
7 Conexiones para medición de la presión
8 Cierre
9 Manguito giratorio (non vented: en color
azul)
10 Codo (non vented: en color azul)
11 Manguito giratorio (non vented: en color
azul)
12 Cuerpo de máscara
13 Reborde de máscara
Finalidad de uso
La máscara nasal es un accesorio, y se utiliza
como elemento de obturación entre el
paciente y el aparato de terapia. Se utiliza
para el tratamiento de la apnea del sueño y
para la respiración artificial no invasiva en
pacientes con insuficiencia ventilatoria.
Antes del uso por el paciente
Antes del inicio de la terapia, los pacientes
han de ser instruidos en la utilización de la
máscara por personal cualificado.
2 Indicaciones de seguridad
Disposiciones de seguridad
Conforme a las exigencias de la Directiva 93/
42/CEE tenga en cuenta los siguientes
puntos:
• Lea con atención estas instrucciones de
manejo. Forman parte de la máscara y
deben estar disponibles en todo momento.
• Utilice la máscara exclusivamente en los
márgenes de presión de terapia necesarios
para las distintas variantes:
– 4-30 hPa: JOYCE vented
– 4-40 hPa: JOYCE vented 40 hPa
JOYCE non vented
JOYCE non vented 40 hPa
JOYCE GEL vented
JOYCE GEL non vented
• Si se utilizan artículos de otros fabricantes,
pueden darse fallos en el funcionamiento y
limitarse la aptitud para el uso. Además pueden no cumplirse los requerimientos de biocompatibilidad. Tenga en cuenta que en
estos casos perderá cualquier derecho de
garantía o de indemnización si no utiliza los
accesorios recomendados en el manual de
instrucciones ni las piezas de repuesto originales.
• Los pacientes con respiración espontánea
limitada deben ser vigilados constantemente. Se ha de activar una alarma de
depresión/fugas adecuada en el aparato de
respiración artificial.
• Los pacientes con enfermedades pulmonares obstructivas y restrictivas se deberían
examinar individualmente durante el
empleo de máscaras JOYCE (p. ej., en lo
que respecta a volver a respirar CO
lado).
exha-
2
• Obture las aberturas de esta máscara sólo
en los casos que se describen en estas instrucciones de uso. De lo contrario existe el
riesgo de que se vuelva a respirar el CO
exhalado.
2
• Entonces la máscara sólo se puede colocar
durante un tiempo relativamente largo si
está encendido el aparato de terapia. De lo
contrario existe el riesgo de que se vuelva a
respirar el CO
exhalado.
2
• No utilice tubos de respiración conductores
de la electricidad (excepción: tubo flexible
de respiración de calentamiento eléctrico).
• Lea el apartado 4 “Tratamiento higiénico”
para evitar una infección o una contaminación bacteriana y anomalías en el funcionamiento.
Descripción del aparato 47
Page 50

ES
Efectos secundarios
Pueden producirse los siguientes efectos
secundarios:
Nariz tapada, sequedad en la nariz, sequedad
de boca matutina, sensación de opresión en
los senos paranasales, irritaciones de la
conjuntiva, ruidos anómalos en la espiración,
zonas de presión en la cara, enrojecimientos
de la piel de la cara.
3Manejo
Figura A-E: Ver folleto adjunto.
3.1 Ajustar el soporte frontal
(figura
Ajuste fino
Mantenga ahora presionadas las bridas
superiores del ajuste aproximado. Posicione
el ajuste fino en uno de los tres
enclavamientos.
Para adaptar la altura de la almohadilla de
apoyo para la frente o el ajuste fino (aprox.
1 cm), haga girar el ajuste fino 180°.
Posiciónelo seguidamente tal como se
describe arriba.
Ajuste aproximado
Mantenga ahora presionadas las bridas
inferiores del ajuste aproximado. Posiciónelo
en uno de los tres enclavamientos del cuerpo
de la máscara.
3.2 Aplicación de la máscara
1. Desenganche uno de los clips inferiores
de las cintas de la máscara.
2. Pase las cintas por su cabeza y vuelva a
enganchar el clip para cintas.
3. Ajuste la cinta de la cabeza con ayuda de
los cierres de velcro de forma que la
máscara se asiente en la cara
herméticamente, pero sin apretar
demasiado.
A)
Solo WEINMANNstrap:
Las cintas para la cabeza
WEINMANNstrap ofrecen para ello las
siguientes posibilidades (véase también
“Vista general” en el folleto adjunto):
– Abrir el cierre de velcro en ambas partes.
– Cierre de velcro arriba en la cabeza: Suelte
el cierre de velcro, tire ligeramente con las
dos manos de los extremos de las cintas
para la cabeza y vuelva a apretar el cierre de
velcro.
Por las lengüetas de velcro se reconoce
si las cintas para la cabeza están colocadas correctamente. Las lengüetas de
velcro de la frente tienen el mismo color
que la parte interior de las cintas para la
cabeza.
Sólo HEADstrap:
Las cintas para la cabeza HEADstrap
ofrecen para ello las siguientes posibilidades (véase también “Vista general”
en el folleto adjunto):
– Ajuste aproximado: Ranura "a" o "b" de
las cintas para la cabeza.
– Ajuste fino: Cuatro cintas de velcro.
4. Vuelva a ajustar el soporte frontal en caso
necesario.
3.3 Sistema de espiración (figura E)
Variantes vented
Las variantes vented (todas las piezas de la
máscara transparentes disponen de un
sistema de espiración integrado: la anilla
de fijación y el cuerpo de la máscara están
configurados de forma que quede una
rendija entre ambos. A través de esta rendija
puede salir el aire espirado. La geometría
especial de las piezas garantiza que la rendija
no pueda cerrarse al encajar el anillo de
seguridad. No conecte ningún sistema de
espiración externo, porque de lo contrario no
se alcanzará la presión de la terapia.
48 Manejo
Page 51

ES
Variantes non vented
Las variantes non vented (anillo de seguridad,
codo y manguito giratorio de color azul) no
disponen de sistema de espiración. Es
imprescindible que conecte un sistema de
espiración externo: de lo contrario existe el
riesgo de que se vuelva a respirar el CO
exhalado y de asfixia.
Tenga en cuenta el manual de instrucciones
de su sistema de espiración.
2
3.4 Conecte la máscara al aparato
de terapia (figura
Conecte el tubo flexible de su aparato de
terapia al manguito giratorio (variantes
vented) o a su sistema de espiración externo
(variantes non vented). Al realizar esta
operación, asegúrese de que la conexión con
el tubo flexible sea segura y hermética al aire.
La conexión no debe soltarse por la presión
de la terapia.
Si desea desconectar brevemente la máscara
del tubo, simplemente retire el manguito
giratorio del codo.
E)
3.5 Piezas de la máscara con relleno de gel
En la JOYCE GEL vented y la JOYCE GEL
non vented, la almohadilla de apoyo para la
frente y el reborde de máscara están rellenas
de gel de forma estándar. La almohadilla de
apoyo para la frente y el reborde de máscara
rellenos con gel están disponibles también
como piezas de repuesto para otras variantes
de JOYCE.
¡Precaución!
Las piezas de la máscara con relleno de gel
son componentes muy sensibles. Deben
manipularse siempre con cuidado para evitar
deformaciones y daños.
3.6 Márgenes de presión de terapia
Las distintas variantes de máscaras JOYCE
están disponibles en cada caso para un
margen de presión de terapia determinado
(ver "7 Volumen de suministro" en la
página 53):
– 4-30 hPa: JOYCE vented
– 4-40 hPa: JOYCE vented 40 hPa
Las máscaras JOYCE para el margen de
presión de terapia de 4-30 hPa disponen de
un reborde de máscara blando; las máscaras
JOYCE para el margen de presión de terapia
de 4-40 hPa, de un reborde de máscara más
duro o un reborde de máscara con gel
(variantes con gel).
El reborde de máscara más duro para el
margen de presión de terapia de 4-40 hPa
está identificado con el número "40".
También están disponibles rebordes de
máscara más blandos (hasta 30 hPa) y más
duros (hasta 40 hPa), así como el reborde de
máscara con gel, individualmente como piezas
de repuesto, de modo que puede adaptar su
máscara a las distintas necesidades
terapéuticas.
JOYCE non vented
JOYCE non vented 40 hPa
JOYCE GEL vented
JOYCE GEL non vented
3.7 Conexiones para medición de la
presión (figura
Las máscaras JOYCE están provistas de dos
conexiones, que se pueden emplear para
medir la presión o para la introducción de
oxígeno.
¡Precaución!
• Una terapia de oxígeno puede provocar
efectos secundarios en caso de aplicación o
de dosificación incorrecta. Por este motivo,
únicamente debe utilizar el aparato bajo
prescripción de un médico.
• Para la realización de una terapia con oxígeno tenga en cuenta imprescindiblemente el manual de instrucciones de su
sistema de O
Cuando no se utilizan las conexiones para la
medición de la presión deben mantenerse
siempre cerradas con el cierre que se adjunta.
2
C)
y su aparato de terapia.
Manejo 49
Page 52

ES
De lo contrario sale aire por las conexiones y
no se alcanza la presión de la terapia.
3.8 Aparatos compatibles:
Aparatos de terapia
Las máscaras JOYCE pueden combinarse con
todos los dispositivos prescritos para la
realización de las terapias que se describen
en “Finalidad de uso”.
Tenga en cuenta que en caso de
combinaciones de aparatos poco adecuadas
es posible que la presión efectiva en la
máscara no corresponda a la presión
prescrita para la terapia.
Esto puede ocurrir incluso si se señaliza la
presión correcta en el aparato de terapia.
Haga que un médico o distribuidor
especializado ajuste su combinación de
aparatos, de forma que la presión efectiva de
la máscara se corresponda con su presión de
terapia.
Humidificador del aire de respiración
Las máscaras JOYCE pueden usarse con
humidificadores, tanto de aire frío como
caliente.
No seleccione nunca un grado de
humectación tan alto como para que el agua
se condense en el tubo del aire. Debe tener
en cuenta el manual de instrucciones de su
humidificador y su aparato de terapia.
3.9 Después del uso
1. Desenganche uno de los clips inferiores
de las cintas y retire la máscara.
2. Suelte los clips de las cintas y retire de la
máscara las cintas para la cabeza.
3. Proceda tal como se describe en „4
Tratamiento higiénico”.
3.10 Desarmado/ensamblaje de la máscara
Desarmado de la máscara
(figuras D - A)
1. Suelte el reborde de máscara del cuerpo
de la máscara.
2. Retire el cierre de las conexiones para la
medición de la presión.
3. Gire el anillo de seguridad en sentido
antihorario. Desprenda ahora el anillo de
seguridad y el codo del cuerpo de la
máscara.
4. Desprenda el codo del anillo de seguridad
y retire el manguito giratorio del codo.
5. Suelte el ajuste aproximado del cuerpo de
la máscara.
6. Suelte el ajuste fino del ajuste
aproximado. Suelte a continuación la
almohadilla de apoyo para la frente del
ajuste fino.
Ensamblaje de la máscara
(figuras A - D)
1. Coloque la almohadilla de apoyo para la
frente en el ajuste fino. Encaje a
continuación el ajuste fino en el ajuste
aproximado.
2. Encaje el ajuste aproximado en el cuerpo
de la máscara.
3. Encaje el manguito giratorio en el codo
hasta que se enclave de forma audible.
4. Encaje a presión el codo en el anillo de
seguridad hasta que se enclave de forma
audible.
5. Encaje el anillo de seguridad y el codo en
el cuerpo de la máscara. Gire el anillo de
seguridad en sentido horario hasta que se
enclave de forma audible.
6. Coloque el cierre en las conexiones para
la medición de la presión.
7. Encaje el reborde de la máscara en el
cuerpo de la máscara.
8. Sujete las cintas para la cabeza a la
máscara con los clips.
50 Manejo
Page 53

ES
4 Tratamiento higiénico
Lavavajillas
Lavado a mano
Desinfección*
Esterilización
(alternativamente a
la desinfección)
Lavavajillas
Lavado a mano
Desinfección*
Esterilización
(alternativamente a
la desinfección)
4.1 Plazos
Diariamente
Limpie la máscara con agua caliente hasta
que no queden residuos. Para ello puede
desarmar la máscara. Utilice un producto de
limpieza suave (p. ej., lavavajillas). A
continuación, aclare todas las piezas
cuidadosamente con agua limpia.
¡Precaución!
• Para los pacientes que tengan el sistema
inmunológico debilitado o que presenten
un cuadro clínico especial, puede ser necesario realizar diariamente una desinfec-
ción o esterilización de las piezas de la
máscara. En este caso consulte con su
médico.
• Proceda con el máximo cuidado al realizar
el tratamiento higiénico de las superficies
de contacto entre el cuerpo de la máscara
y el anillo de seguridad. Los residuos depositados en estas superficies pueden influir
negativamente sobre el éxito de la terapia y
el funcionamiento del sistema de espiración integrado (variantes vented).
Semanalmente
Desarme la máscara y realice el tratamiento
higiénico de las piezas (ver "4.2 Limpieza,
desinfección, esterilización" en la página 51).
4.2 Limpieza, desinfección, esterilización
Procedimientos permitidos
Procedimientos
Piezas
Reborde de máscara ••• •
Reborde de máscara GEL •••
Almohadilla de apoyo
para la frente
•••
Procedimientos
Piezas
Almohadilla de apoyo
para la frente GEL
Cierre ••• •
Cuerpo de máscara •••
Ajuste aproximado •••
Ajuste fino •••
Codo •••
Manguito giratorio •••
Anillo de seguridad •••
Clip para cintas •••
Cintas para la cabeza
WEINMANNstrap
Cintas para la cabeza
HEADstrap
Cintas para la cabeza
JOYCEstrap
••
•
•
•
¡Precaución!
Lave siempre a fondo las piezas de la
máscara antes de desinfectarlas o esterilizarlas de acuerdo con la tabla superior.
Las piezas de la máscara con relleno de
gel son componentes muy sensibles.
Deben manipularse siempre con cuidado para evitar que resulten deformadas
o dañadas.
Descripción de los procedimientos
Lavavajillas
Lavado a mano
Desinfección*
Esterilización
(alternativamente a
la desinfección)
Ciclo de lavado a 65 °C. A
continuación, lave cuidadosamente
todas las piezas con agua limpia.
Lavado a mano en agua caliente.
Utilizar un producto limpiador suave.
Enjuague a continuación todas las
piezas con agua limpia
y déjelas secar al aire.
Limpiar mecánicamente, p. ej, con un
cepillo, en una solución diluida.
Después de la desinfección, lavar
cuidadosamente todas las piezas con
agua destilada y secarlas a fondo.
Esterilización por vapor en aparatos
según la EN 285, temperatura 134 °C,
tiempo mínimo de mantenimiento
3 minutos.
Tratamiento higiénico 51
Page 54

ES
*Recomendamos los agentes desinfectantes
gigasept
®
FF (nuevo), Cidex® OPA y
Aniosyme DD1. Se ha confirmado la
compatibilidad para estos medios. Es
imprescindible seguir las instrucciones del
fabricante.
Encontrará también indicaciones para el
acondicionamiento higiénico y para el
acondicionamiento higiénico en caso de
cambio de paciente en un folleto en el portal
de información de www.weinmann.de. Si no
dispone de acceso a Internet, diríjase a
Weinmann.
Nota
Recomendamos llevar guantes adecuados (p. ej., guantes desechables) para el
tratamiento higiénico.
Lave la cinta de apriete antes de usarla
por primera vez, porque podría desteñir.
La cinta de apriete sólo debe lavarse a
mano.
No planche la cinta de apriete, porque
los cierres de velcro perderían la
adherencia.
No seque las cintas para la cabeza en la
secadora!
4.3 Después del tratamiento
Tras el tratamiento higiénico, seque
cuidadosamente todas las piezas.
Compruebe que los componentes están
libres de suciedad o daños. En caso
necesario, repita el tratamiento higiénico.
Sustituya las piezas dañadas. Monte de
nuevo la máscara.
4.4 Cambio de paciente
En caso de que deba utilizarse la máscara
para otro paciente, previamente será preciso
acondicionarla higiénicamente.
Para ello, desarme la máscara. Desinfecte o
esterilice todas las piezas como se describe
en la sección „4.2 Limpieza, desinfección,
esterilización”. Utilice cintas para la cabeza
nuevas.
5 Control del funcionamiento
Efectúe un control visual después de cada
tratamiento higiénico.
Si se producen fugas originadas por daños en
el reborde de la máscara, sustitúyalo.
Compruebe la capacidad de funcionamiento
y la estanqueidad de la articulación esférica
del codo. Si ha perdido la suavidad de
marcha o la estanqueidad, sustituya el codo
y el anillo de seguridad
Las piezas que ya no son utilizables pueden
eliminarse con la basura doméstica.
Pueden producirse decoloraciones en la
almohadilla de apoyo para la frente y reborde
de la máscara, que sin embargo no influyen
sobre el funcionamiento.
6 Averías y soluciones
Avería Causa Solución
Dolores por la
presión en la
cara.
Corriente de
aire en el ojo.
La máscara se
asienta con
demasiada
fuerza.
La máscara está
demasiado floja.
La máscara no se
ajusta.
Presión de
terapia elevada.
Reajustar ligeramente las
cintas para la cabeza.
Adaptar la posición del
soporte frontal.
Ajustar con algo más de
fuerza las cintas para la
cabeza.
Adaptar la posición del
soporte frontal.
Utilizar otro tamaño de
máscara; diríjase a su
distribuidor especializado.
Utilizar reborde de máscara
más duro (para presiones de
hasta 40 hPa). Disp onible en
un distribuidor especializado.
52 Control del funcionamiento
Page 55

ES
Avería Causa Solución
Ajustar las cintas para la
cabeza.
Adaptar la posición del
soporte frontal.
Sustituir el reborde de
mascara.
Comprobar los conectores
enchufables y el asiento de
los manguitos de tubo
flexible.
Tapar las conexiones para la
medición de la presión con
el cierre (incluido en el
volumen de suministro).
No se alcanza
la presión de la
terapia.
La máscara no
está ajustada
correctamente.
El reborde de
máscara está
dañado.
El sistema de
tubos flexibles
no es estanco.
Sale aire por las
conexiones para
la medición de la
presión.
7 Volumen de suministro
Variantes non vented
Nº de artículo con
Artículo
JOYCE non vented‚ talla S WM 26160
JOYCE non vented‚ talla M WM 26170
JOYCE non vented‚ talla L WM 26180
JOYCE non vented‚ talla XL WM 26190
JOYCE non vented 40 hPa‚ talla S WM 26161
JOYCE non vented 40 hPa‚ talla M WM 26171
JOYCE non vented 40 hPa‚ talla L WM 26181
JOYCE non vented 40 hPa‚ talla XL WM 26191
JOYCE GEL non vented‚ talla S WM 26162
JOYCE GEL non vented‚ talla M WM 26172
JOYCE GEL non vented‚ talla L WM 26182
WEINMANNstrap/
HEADstrap
Nota
Todas las máscaras se suministran completamente montadas y con cintas para
la cabeza.
Variantes vented
Artículo
HEADstrap
Nº de artículo
WEINMANNstrap/
JOYCE vented‚ talla S WM 26110 WM 26110/1
JOYCE vented‚ talla M WM 26120 WM 26120/1
JOYCE vented‚ talla L WM 26130 WM 26130/1
JOYCE vented‚ talla XL WM 26140 WM 26140/1
JOYCE vented 40 hPa‚ talla S WM 26111 WM 26111/1
JOYCE vented 40 hPa‚ talla M WM 26121 WM 26121/1
JOYCE vented 40 hPa‚ talla L WM 26131 WM 26131/1
JOYCE vented 40 hPa‚ talla XLWM 26141 WM 26141/1
JOYCE GEL vented‚ talla S WM 26112 WM 26112/1
JOYCE GEL vented‚ talla M WM 26122 WM 26122/1
JOYCE GEL vented‚ talla L WM 26132 WM 26132/1
Nº de artículo con
con JOYCEstrap
Piezas de repuesto
Artículo Nº de artículo
Juego de articulación esférica:
anillo de seguridad, codo, manguito
giratorio
Juego de articulación esférica non
vented:
anillo de seguridad, codo, manguito
giratorio
Manguito giratorio vented WM 26254
Soporte frontal:
Almohadilla de apoyo para la frente,
ajuste aproximado soporte frontal, ajuste
fino soporte frontal
Soporte frontal GEL:
Soporte frontal GEL, ajuste aproximado
soporte frontal, ajuste fino soporte
frontal
Almohadilla de apoyo para la frente WM 26200
Almohadilla de apoyo para la frente GEL WM 26209
Reborde de máscara 30 hPa, talla S
Reborde de máscara 30 hPa, talla M
Reborde de máscara 30 hPa, talla L
Reborde de máscara 30 hPa, talla XL
Reborde de máscara 40 hPa, talla S
Reborde de máscara 40 hPa, talla M
Reborde de máscara 40 hPa, talla L
Reborde de máscara 40 hPa, talla XL
Reborde de máscara GEL, talla S
Reborde de máscara GEL, talla M
Reborde de máscara GEL, talla L
Cintas para la cabeza WEINMANNstrap,
incl. clips para cintas
Cintas para la cabeza HEADstrap WM 26360
WM 26206
WM 26207
WM 26201
WM 26115
WM 26210
WM 26220
WM 26230
WM 26240
WM 26211
WM 26221
WM 26231
WM 26241
WM 26212
WM 26222
WM 26232
WM 26350
Volumen de suministro 53
Page 56

ES
Artículo Nº de artículo
Cintas para la cabeza JOYCEstrap azul,
incl. clips para cintas
Clips para cintas (4 unidades) WM 26205
Cierre WM 26208
Manual de instrucciones
DE, EN, FR, NL, IT, ES, PT, TR, EL, PL, HR
RU (pdf, Internet: www.Weinmann.de)
WM 26290
WM 16950
WM 16814
Accesorios
Artículo
Sistema de espiración:
Silentflow 2
Sistema insonorizante
Nº de
artículo
WM 23600
WM 23685
8 Especificaciones
Datos técnicos
JOYCE Valor
Clase de producto según
93/42/EEC:
Dimensiones (An x Al x P):
Peso: aprox. 85 gramos
Margen de presión de terapia:
Reborde de máscara blando:
Reborde de máscara duro:
Reborde de máscara GEL:
Conexión de tubo flexible: Cono
según DIN EN ISO 5356-1
vented:
non vented:
Conexiones para medición de la
presión:
Anchura clip para cintas: máx. 20 mm
Margen de temperatura
Funcionamiento:
Almacenamiento
Resistencia al flujo
vented:
a 50 l/min
a 100 l/min
non vented:
a 50 l/min
a 100 l/min
II a
aprox.
80 x 130 x 90 mm
de 4 a 30 hPa
de 4 a 40 hPa
de 4 a 40 hPa
Ø 22 mm (macho)
Ø 22 mm (hembra)
Ø 4 mm
+ 5 °C a + 40 °C
- 20 °C a + 70 °C
0,02 hPa
0,11 hPa
0,09 hPa
0,37 hPa
JOYCE Valor
Valor indicado de emisión de
ruidos, dos cifras, según ISO
4871:
– Nivel de intensidad acústica
– Nivel de potencia acústica
(factor de incertidumbre:
3 dB(A))
Tiempo de uso hasta 12 meses
Normas aplicadas EN ISO 17510-2:2009
1
en función del tamaño y la versión.
2
Los materiales que se utilizan para la
15 dB(A)
23 dB(A)
2
fabricación de máscaras envejecen si están
expuestos, p. ej., a agentes corrosivos. Por lo
tanto, en un caso particular puede ser
necesario sustituir la máscara más pronto (ver
"5 Control del funcionamiento" en la
página 52).
Reservado el derecho a
modificaciones
constructivas
Materiales
Artículo Material
1
1
Reborde de máscara, Cierre Silicona
Reborde de máscara GEL
Almohadilla de apoyo para la frente,
anillo de seguridad
Almohadilla de apoyo para la frente
GEL
Cuerpo de máscara, codo Policarbonato
Cintas para la cabeza
WEINMANNstrap
Cintas para la cabeza JOYCEstrap
Cintas para la cabeza HEADstrap
Manguito giratorio, ajuste
aproximado soporte frontal, ajuste
fino soporte frontal
Clip para cintas POM
Silicona,
gel de silicona
TPE, polipropileno
Silicona,
gel de silicona,
policarbonato
Elastán, Poliéster,
Poliuretano, Nilón,
Algodón, Poliamida
Algodón,
poliamida, elastán
Nilón/spandex
Poliuretano
Poliéster/lycra
Polipropileno
Todas las piezas de la máscara están exentas
de látex.
54 Especificaciones
Page 57

ES
Curva característica presión-flujo
40
50
60
70
80
0
10
20
30
40
50
60
70
80
0 10203040
JOYCE
vented
JOYCE
non vented
Flujo de fuga medio
vented (l/min)
Presión de salida en el aparato de terapia (hPa)
En la curva característica presión-flujo se
representa el flujo de salida en función de la
presión de la terapia.
9 Garantía
Weinmann otorga al comprador de un
producto original Weinmann o una pieza de
repuesto montada por Weinmann una
garantía del fabricante limitada según las
condiciones de garantía válidas para los
distintos productos y las duraciones de la
garantía a partir de la fecha de compra que
se indican a continuación. Las condiciones de
garantía están disponibles en Internet en
www.weinmann.de. Si lo desea, también
podemos enviarle las condiciones de
garantía. En un caso de garantía, diríjase a su
distribuidor especializado.
10 Declaración de conformidad
Por la presente, Weinmann Geräte für
Medizin GmbH + Co. KG declara que el
producto cumple las disposiciones
pertinentes de la directiva 93/42/CEE para
productos sanitarios.
El texto completo de la declaración de
conformidad se encuentra en:
www.weinmann.de
Producto
Aparatos de Weinmann, incluidos los
accesorios (excepción: máscaras) para
diagnóstico del sueño, terapia del sueño,
asistencia respiratoria a domicilio, medicina
de oxígeno y medicina de primeros auxilios
Máscaras incluidos accesorios, acumulador,
baterías*, sensores, sistemas de tubos
flexibles
Productos para un solo uso Ninguno
* salvo que se indique otra cosa en la
documentación técnica.
Periodos
de
garantía
2 años
6 meses
Garantía 55
Page 58

PT
Português
1 Descrição do aparelho
Legenda
(Representação das peças soltas: ver
folheto incluído.)
1 Tiras de amarrar à volta da cabeça
2 Almofada para a testa
3 Ajuste de precisão do apoio para a testa
4 Ajuste aproximado do apoio para a testa
5 Apoio para a testa
6 Clipe para as tiras de amarrar à volta da ca-
beça
7 Entradas de medição da pressão
8 Fecho
9 Casquilho rotativo (non vented: em azul)
10 Cotovelo (non vented: em azul)
11 Anel de segurança (non vented: em azul)
12 Corpo da máscara
13 Rebordo da máscara
Campo de aplicação
A máscara nasal é um acessório e serve como
elemento vedante entre o paciente e o
aparelho de terapia. É utilizada para o
tratamento da apneia do sono e para a
ventilação não invasiva de pacientes com
insuficiência ventilatória.
Antes da utilização pelo paciente
Antes do início da terapia, os pacientes têm
de ser instruídos na utilização da máscara por
pessoal qualificado.
2 Instruções de segurança
Disposições em matéria de segurança
De acordo com os requisitos da Directiva 93/42/
CEE, tenha atenção aos seguintes pontos:
• Leia com atenção todas as instruções de
uso. Elas são parte integrante da máscara e
têm de estar sempre acessíveis.
• Utilize a máscara exclusivamente dentro
dos limites de pressão de tratamento
necessários para cada variante:
– 4-30 hPa: JOYCE vented
– 4-40 hPa: JOYCE vented 40 hPa
JOYCE non vented
JOYCE non vented 40 hPa
JOYCE GEL vented
JOYCE GEL non vented
• A utilização de artigos de outras marcas
pode provocar falhas de funcionamento e
limitar a aptidão de utilização. Para além
disso, os requisitos de biocompatibilidade
podem não ficar assegurados. Convém ter
presente que, nestas circunstâncias, a garantia perde a validade e que não assumimos
qualquer responsabilidade pela não utilização dos acessórios recomendados nas instruções de uso e das peças sobressalentes
originais.
• Os pacientes com uma respiração espontânea limitada têm de ser permanentemente
monitorizados. No ventilador tem de estar
activado um respectivo alarme de falta de
pressão/fugas.
• Os pacientes com doenças pulmonares
obstrutivas ou restritivas devem ser sujeitos
a uma análise individual durante a utilização de máscaras JOYCE (p. ex. quanto à
reinalação de CO
).
2
• As aberturas desta máscara só devem ser
fechadas nos casos descritos nas presentes
instruções de uso. Caso contrário, existe o
perigo de uma reinalação de CO
.
2
• A máscara só pode ser colocada durante
um longo período se o aparelho de terapia
estiver ligado. Caso contrário, existe o
perigo de uma reinalação de CO
.
2
• Não utilize tubos de respiração com capacidade de condução eléctrica (excepção:
tubos de aspiração com aquecimento
eléctrico).
• Cumpra as indicações da secção
„4 Procedimentos de higiene” para evitar o
aparecimento de infecções, contaminações
bacterianas ou limitações de funcionamento.
56 Descrição do aparelho
Page 59

PT
Efeitos secundários
Podem ocorrer os seguintes efeitos
secundários:
nariz entupido, nariz seco, boca seca de
manhã, sensação de pressão nos seios nasais,
irritação da conjuntiva, ruídos incómodos ao
expirar, pontos de pressão no rosto,
vermelhidão da pele do rosto.
3Operação
Fig. A-E: ver folheto incluído.
3.1 Ajustar o apoio para a testa
(fig.
A)
Ajuste de precisão
Mantenha as abas superiores do ajuste
aproximado premidas. Posicione o ajuste de
precisão numa das três posições fixas.
Para adaptar a altura da almofada para a
testa ou do ajuste de precisão (aprox. 1 cm),
rode o ajuste de precisão em 180°. A seguir,
posicione o ajuste de precisão conforme
descrito em cima.
Ajuste aproximado
Mantenha as abas inferiores do ajuste
aproximado premidas. Posicione a última aba
numa das três posições fixas do corpo da
máscara.
3.2 Colocar a máscara
1. Desengate da máscara um dos clipes
inferiores para as tiras de amarrar à volta
da cabeça.
2. Passe as tiras de amarrar à volta da cabeça
sobre a cabeça e engate novamente o clipe.
3. Ajuste as tiras de amarrar à volta da
cabeça de forma a que a máscara assente
de forma estanque sobre o rosto, sem
que aperte demasiado, utilizando os
fechos de velcro.
Só WEINMANNstrap:
Para o efeito, as tiras de amarrar à volta
da cabeça WEINMANNstrap oferecem
as seguintes possibilidades (ver também
“Vista geral” no folheto incluído):
– Fechos de velcro de ambos os lados.
– Fecho de velcro em cima sobre a cabeça:
Solte o fecho de velcro, puxe ligeiramente
as extremidades das tiras de amarrar à volta
da cabeça com ambas as mãos e volte a assentar o fecho de velcro.
Pelas linguetas de velcro pode reconhecer se as tiras de amarrar à volta da cabeça estão bem colocadas. As linguetas
de velcro na testa têm a mesma cor que
o lado interior das tiras de amarrar à
volta da cabeça.
Apenas HEADstrap:
Para o efeito, as tiras de amarrar à volta
da cabeça HEADstrap oferecem as seguintes possibilidades (ver também
“Vista geral” no folheto incluído):
– Ajuste aproximado: ranhura "a" ou "b"
das tiras de amarrar à volta da cabeça.
– Ajuste de precisão: quatro tiras de velcro.
4. Se necessário, ajuste novamente o apoio
para a testa.
3.3 Sistema de expiração (fig. E)
Variantes vented
As variantes vented (todas as peças da
máscara são transparentes) dispõem de um
sistema denominado sistema de expiração
integrado: a forma do anel de segurança e
do corpo da máscara é tal que existe uma
fenda entre estas peças. O ar expirado pode
sair através desta fenda. A geometria
especial das peças assegura que não seja
possível fechar a fenda ao encaixar o anel de
segurança. Não ligue um sistema de
expiração externo, caso contrário, poderá
não ser alcançada a pressão de tratamento.
Operação 57
Page 60

PT
Variantes non vented
As variantes non vented (anel de segurança,
cotovelo e casquilho rotativo em azul)
dispõem de um sistema de expiração. É
imprescindível ligar o sistema de expiração
externo. Caso contrário, existe o perigo de
uma reinalação de CO
Tenha em atenção as instruções de uso do
sistema de expiração.
e de asfixia.
2
3.4 Ligar a máscara ao aparelho de
terapia (fig.
Insira o tubo do aparelho de terapia no
casquilho rotativo (variantes vented) ou no
sistema de expiração externo (variantes non
vented). Assegure-se de que a ligação ao
tubo fica segura e estanque. A ligação não se
pode soltar devido à pressão de tratamento.
Se desejar separar a máscara durante um
curto espaço de tempo do tubo, basta puxar
para retirar o casquilho rotativo do cotovelo.
E)
3.5 Peças da máscara com enchimento de gel
As variantes JOYCE GEL vented e JOYCE GEL
non vented dispõem por norma de uma
almofada para a testa e de um rebordo de
máscara com enchimento de gel. A almofada
para a testa e o rebordo de máscara de gel
também podem ser fornecidos para outras
variantes do JOYCE como peças
sobressalentes.
Cuidado!
As peças da máscara com enchimento de gel
são componentes muito sensíveis. Devem ser
sempre manuseados com cuidado, de modo
a evitar deformações e danos.
3.6 Limites de pressão de tratamento
Cada variante das máscaras JOYCE pode ser
fornecida para um determinado limite de
pressão de tratamento (ver “7. Material
fornecido” na página 61):
– 4-30 hPa: JOYCE vented
JOYCE non vented
– 4-40 hPa: JOYCE vented 40 hPa
JOYCE non vented 40 hPa
JOYCE GEL vented
JOYCE GEL non vented
As máscaras JOYCE para o limite de pressão
de tratamento 4-30 hPa dispõem de um
rebordo de máscara macio e as máscaras
JOYCE para o limite de pressão de tratamento
4-40 hPa dispõem de um rebordo de máscara
mais duro ou de gel (variantes de gel).
O rebordo de máscara mais duro para o limite
de pressão de tratamento 4-40 hPa está
identificado com o número "40".
Os rebordos de máscara macio (até 30 hPa) e
mais duro (até 40 hPa), bem como o rebordo
de máscara de gel (variantes de gel), também
podem ser fornecidos individualmente como
peça sobressalente, de modo que é possível
adaptar a máscara a diferentes necessidades
terapêuticas.
3.7 Entradas de medição da
pressão (fig.
As máscaras JOYCE possuem duas conexões
que podem ser utilizadas para a medição da
pressão ou introdução de oxigénio.
Cuidado!
• Uma oxigenoterapia mal aplicada ou com
uma dosagem incorrecta pode resultar em
efeitos secundários. Por isso, este tipo de
tratamento só pode ser administrado
mediante receita médica.
• Para realizar uma oxigenoterapia é imprescindível observar as instruções de uso do sistema de O
Se não forem utilizadas as entradas de
medição da pressão, feche-as sempre com o
fecho fornecido. Caso contrário, sai ar das
conexões e não é alcançada a pressão de
tratamento.
2
C)
e do aparelho de terapia.
3.8 Aparelhos compatíveis
Aparelhos de terapia
As máscaras JOYCE podem ser combinadas
com todos os aparelhos previstos para a
58 Operação
Page 61

PT
realização das terapias descritas em “Campo
de aplicação”.
Observe que em caso de uma combinação
desfavorável de aparelhos, a pressão real na
máscara poderá não corresponder à pressão
de tratamento prescrita.
Isto pode ocorrer mesmo que no aparelho de
terapia seja indicada a pressão correcta.
Solicite a um médico ou a um agente
autorizado para definir a combinação de
aparelhos de modo a que a pressão real na
máscara corresponda à pressão de
tratamento.
Humidificador do ar de respiração
As máscaras JOYCE podem ser utilizadas com
humidificadores de ar quente ou frio.
Nunca seleccione um nível de humidificação
demasiado elevado, ao ponto de se acumular
água no tubo de ar. Tenha em atenção as
instruções de uso do humidificador e do
aparelho de terapia.
3.9 Após a utilização
1. Desengate da máscara um dos clipes
inferiores para as tiras de amarrar à volta
da cabeça e retire a máscara.
2. Desaperte os clipes para as tiras de
amarrar à volta da cabeça e retire as tiras
da máscara.
3. Proceda conforme descrito em
„4 Procedimentos de higiene”.
3.10 Desmontar/montar a máscara
Desmontar a máscara (fig. D - A)
1. Desaperte o rebordo do corpo da
máscara.
2. Retire o fecho das entradas de medição
da pressão.
3. Rode o anel de segurança para a
esquerda. A seguir, retire o anel de
segurança e o cotovelo do corpo da
máscara.
4. Expulse o cotovelo do anel de segurança
e retire o casquilho rotativo do cotovelo.
5. Desaperte o ajuste aproximado do corpo
da máscara.
6. Desaperte o ajuste de precisão do ajuste
aproximado. A seguir, desaperte a
almofada para a testa do ajuste de
precisão.
Montar a máscara (fig. A-D)
1. Coloque a almofada para a testa no
ajuste de precisão. A seguir, coloque o
ajuste de precisão no ajuste aproximado.
2. Insira o ajuste aproximado no corpo da
máscara.
3. Insira o casquilho rotativo no cotovelo,
até encaixar de forma audível.
4. Pressione o cotovelo no anel de
segurança, até encaixar de forma audível.
5. Enfie o anel de segurança e o cotovelo no
corpo da máscara. Rode o anel de
segurança para a direita, até encaixar de
forma audível.
6. Insira o fecho nas entradas de medição
da pressão.
7. Insira o rebordo no corpo da máscara.
8. Fixe as tiras de amarrar à volta da cabeça
com os clipes à máscara.
4 Procedimentos de higiene
4.1 Prazos
Diariamente
Limpe a máscara em água quente até ficar
sem resíduos. Para tal, pode desmontar a
máscara. Utilize um produto de limpeza
suave (p. ex. detergente para a louça). A
seguir, enxagúe cuidadosamente todas as
peças em água limpa.
Cuidado!
• Nos pacientes com um sistema imunitário
enfraquecido ou com patologias anteriores
especiais, poderá ser necessário proceder a
uma desinfecção ou esterilização diária
Procedimentos de higiene 59
Page 62

PT
das peças da máscara. Nesse caso deve
Máquina de lavar
louça
Lavagem à mão
Desinfecção*
Esterilização
(alternativa à
desinfecção)
consultar o seu médico.
• Nos procedimentos de higiene das superfícies de contacto entre o corpo da máscara
e o anel de segurança deve proceder com
o maior cuidado. Os resíduos nestas superfícies podem prejudicar os resultados do
tratamento ou o funcionamento do sistema de expiração integrado (variantes
vented).
Semanalmente
Desmonte a máscara e efectue os
procedimentos de higiene das peças da
máscara (ver “4.2. Limpeza, desinfecção,
esterilização” na página 60).
4.2 Limpeza, desinfecção, esterilização
Procedimentos permitidos
Procedimento
Peças
Rebordo de máscara ••• •
Rebordo de máscara
GEL
Almofada para a testa •••
Almofada para a testa
GEL
Fecho ••• •
Corpo da máscara •••
Ajuste aproximado •••
Ajuste de precisão •••
Cotovelo •••
Casquilho rotativo •••
Anel de segurança •••
Clipe para as tiras de
amarrar à volta da
cabeça
Tiras de amarrar à volta
da cabeça
WEINMANNstrap
Tiras de amarrar à volta
da cabeça HEADstrap
Tiras de amarrar à volta
da cabeça JOYCEstrap
•••
••
•••
•
•
•
Cuidado!
Antes de proceder a uma desinfecção
ou esterilização em conformidade com
a tabela acima, todas as peças da máscara devem ser limpas muito bem.
As peças da máscara com enchimento
de gel são componentes muito sensíveis. Devem ser sempre manuseados
com cuidado, de modo a não serem deformados ou danificados.
Descrição dos procedimentos
Máquina de lavar
louça
Lavagem à mão
Desinfecção*
Esterilização
(alternativa à
desinfecção)
*Recomendam-se os desinfectantes
gigasept
Programa de lavagem a 65 °C. A
seguir, enxagúe todas as peças
cuidadosamente com água limpa.
Lavagem à mão em água quente.
Utilize um produto de limpeza suave. A
seguir, enxagúe todas as peças com
água limpa e deixe secar ao ar.
Limpeza mecânica numa solução
diluída, p. ex. com uma escova. Após a
desinfecção, enxagúe todas as peças
cuidadosamente com água destilada e
seque muito bem.
Esterilização a vapor em aparelhos em
conformidade com a norma EN 285.
Temperatura 134 °C, tempo mínimo de
exposição de 3 minutos.
®
FF (novo), Cidex® OPA e
Aniosyme DD1. A compatibilidade foi
comprovada para estes produtos. É
imprescindível observar as instruções dos
fabricantes.
Também pode consultar as indicações relativas aos procedimentos de higiene em caso
de troca de paciente na brochura no portal
de informação em www.weinmann.de. Se
não tiver acesso à internet, dirija-se à
Weinmann.
Nota
Para realizar os procedimentos de higiene recomenda-se o uso de luvas adequadas (p. ex. luvas descartáveis).
A fita para a cabeça deve ser lavada antes da primeira utilização, uma vez que
pode desbotar.
60 Procedimentos de higiene
Page 63

PT
A fita para a cabeça só pode ser lavada
à mão!
Não passe a fita para a cabeça a ferro,
pois tal pode danificar os fechos de
velcro!
Não seque as tiras de amarrar à volta da
cabeça no secador!
4.3 Após os procedimentos de higiene
Todas as peças devem ser secas
cuidadosamente após os procedimentos de
higiene. Verifique os componentes quanto a
sujidade remanescente ou danos. Se
necessário, repita os procedimentos de
higiene. Substitua as peças danificadas. Volte
a montar a máscara.
4.4 Troca de paciente
A máscara tem de ser primeiro sujeita aos
procedimentos de higiene antes de ser
utilizada em outro paciente.
Para tal, desmonte a máscara. Desinfecte ou
esterilize todas as peças, de acordo com a
secção „4.2 Limpeza, desinfecção,
esterilização”. Utilize tiras de amarrar à volta
da cabeça novas.
5 Teste de funcionamento
Depois de realizar os procedimentos de
higiene efectue um exame visual.
Se se verificarem fugas no rebordo da
máscara resultantes de danos, é necessário
substituí-lo.
Verifique o bom funcionamento e a
estanqueidade da rótula junto ao cotovelo.
Se a rótula já não apresentar uma boa
mobilidade ou tiver fugas, é necessário
substituir o cotovelo ou o anel de segurança.
As peças inutilizadas podem ser eliminadas
juntamente com o lixo doméstico.
Poderão ocorrer descolorações na almofada
para a testa e no rebordo da máscara. No
entanto, tal não prejudica o funcionamento.
6 Resolução de problemas
Falha Causa Eliminação
Dores de
pressão no
rosto.
Corrente de ar
no olho.
Não é
alcançada a
pressão de
tratamento.
A máscara está
demasiado
apertada.
A máscara está
demasiado
solta.
A máscara não
se adapta.
Pressão de
tratamento
elevada.
A máscara não
está ajustada
correctamente.
O rebordo da
máscara está
danificado.
Sistema de
tubos com
fugas.
Sai ar das
entradas de
medição da
pressão.
Alargar um pouco o ajuste
das tiras de amarrar à volta
da cabeça.
Ajustar a posição do apoio
para a testa.
Apertar um pouco o ajuste
das tiras de amarrar à volta
da cabeça.
Ajustar a posição do apoio
para a testa.
Utilizar outro tamanho de
máscara; dirija-se a um
agente autorizado.
Utilizar um rebordo de
máscara mais duro (para
uma pressão até 40 hPa).
Disponível num agente
autorizado.
Ajustar as tiras de amarrar à
volta da cabeça.
Ajustar a posição do apoio
para a testa.
Substituir o rebordo da
máscara.
Verificar o conector e o
assentamento da manga.
Cobrir as entradas de
medição da pressão com o
fecho (incluído no material
fornecido).
7 Material fornecido
Nota
Todas as máscaras são fornecidas completamente montadas e com tiras de
amarrar à volta da cabeça.
Teste de funcionamento 61
Page 64

PT
Variantes vented
Artigo
N.º artigo
HEADstrap
N.º artigo com
JOYCE vented‚ tamanho S WM 26110 WM 26110/1
JOYCE vented‚ tamanho M WM 26120 WM 26120/1
JOYCE vented‚ tamanho L WM 26130 WM 26130/1
JOYCE vented‚ tamanho XL WM 26140 WM 26140/1
JOYCE vented 40 hPa‚
tamanho S
JOYCE vented 40 hPa‚
tamanho M
JOYCE vented 40 hPa,
tamanho L
JOYCE vented 40 hPa,
tamanho XL
JOYCE GEL vented‚
tamanho S
JOYCE GEL vented‚
tamanho M
JOYCE GEL vented,
tamanho L
WEINMANNstrap/
WM 26111 WM 26111/1
WM 26121 WM 26121/1
WM 26131 WM 26131/1
WM 26141 WM 26141/1
WM 26112 WM 26112/1
WM 26122 WM 26122/1
WM 26132 WM 26132/1
com JOYCEstrap
Variantes non vented
N.º artigo com
Artigo
JOYCE non vented‚ tamanho S WM 26160
JOYCE non vented‚ tamanho M WM 26170
JOYCE non vented‚ tamanho L WM 26180
JOYCE non vented‚ tamanho XL WM 26190
JOYCE non vented 40 hPa‚
tamanho S
JOYCE non vented 40 hPa‚
tamanho M
JOYCE non vented 40 hPa‚
tamanho L
JOYCE non vented 40 hPa‚
tamanho XL
JOYCE GEL non vented‚ tamanho S WM 26162
JOYCE GEL non vented‚
tamanho M
JOYCE GEL non vented‚ tamanho L WM 26182
WEINMANNstrap/
HEADstrap
WM 26161
WM 26171
WM 26181
WM 26191
WM 26172
Peças sobressalentes
Artigo N.º artigo
Kit de rótulas:
Anel de segurança, cotovelo, casquilho
rotativo
Kit de rótulas non vented:
Anel de segurança, cotovelo, casquilho
rotativo
Casquilho rotativo vented WM 26254
Apoio para a testa:
Almofada para a testa, ajuste aproximado
do apoio para a testa, ajuste de precisão
do apoio para a testa
Apoio para a testa GEL:
Almofada para a testa GEL, ajuste
aproximado do apoio para a testa, ajuste
de precisão do apoio para a testa
Almofada para a testa WM 26200
Almofada para a testa GEL WM 26209
Rebordo de máscara 30 hPa, tamanho S
Rebordo de máscara 30 hPa, tamanho M
Rebordo de máscara 30 hPa, tamanho L
Rebordo de máscara 30 hPa, tamanho XL
Rebordo de máscara 40 hPa, tamanho S
Rebordo de máscara 40 hPa, tamanho M
Rebordo de máscara 40 hPa, tamanho L
Rebordo de máscara 40 hPa, tamanho XL
Rebordo de máscara GEL, tamanho S
Rebordo de máscara GEL, tamanho M
Rebordo de máscara GEL, tamanho L
Tiras de amarrar à volta da cabeça
WEINMANNstrap, incl. clipes para as tiras
de amarrar à volta da cabeça
Tiras de amarrar à volta da cabeça
HEADstrap
Tiras de amarrar à volta da cabeça
JOYCEstrap azul, incl. clipes para as tiras de
amarrar à volta da cabeça
Clipes para as tiras de amarrar à volta da
cabeça (4 unid.)
Fecho WM 26208
Instruções de uso
DE, EN, FR, NL, IT, ES, PT, TR, EL, PL, HR
RU (pdf, Internet: www.Weinmann.de)
WM 26206
WM 26207
WM 26201
WM 26115
WM 26210
WM 26220
WM 26230
WM 26240
WM 26211
WM 26221
WM 26231
WM 26241
WM 26212
WM 26222
WM 26232
WM 26350
WM 26360
WM 26290
WM 26205
WM 16950
WM 16814
Acessórios
Artigo N.º artigo
Sistema de expiração:
Silentflow 2
Sistema silenciador
WM 23600
WM 23685
62 Material fornecido
Page 65

PT
8 Especificações
40
50
60
70
80
0
10
20
30
40
50
60
70
80
0 10203040
JOYCE
vented
JOYCE
non vented
Fluxo de fuga médio
vented (l/min)
Pressão de saída no aparelho de terapia (hPa)
Dados técnicos
JOYCE Valor
Classe de produtos segundo a
directiva 93/42/CEE do Conselho:
Dimensões (LxAxP):
Peso: aprox. 85 gramas
Limite de pressão de tratamento:
Rebordo máscara macio:
Rebordo de máscara duro:
Rebordo de máscara GEL:
Conexão por tubo: cone segundo
DIN EN ISO 5356-1
vented:
non vented:
Entradas de medição da pressão: Ø 4 mm
Clipes largos para as tiras de
amarrar à volta da cabeça:
Gama de temperaturas
Operação:
Armazenamento
Resistência de corrente
vented:
a 50 l/min
a 100 l/min
non vented:
a 50 l/min
a 100 l/min
Valor de emissão de ruídos de
dois dígitos indicado segundo ISO
4871:
- Nível de pressão sonora
- Nível de potência sonora (factor
de incerteza: 3 dB(A))
Vida útil até 12 meses
Normas aplicáveis EN ISO 17510-2:2009
1
Dependendo do tamanho e da versão.
2
Os materiais utilizados para o fabrico de
máscaras envelhecem quando são expostos,
p. ex., a produtos de limpeza agressivos. Por
isso, em casos pontuais poderá ser necessário
substituir a máscara mais cedo (ver “5. Teste
de funcionamento” na página 61).
II a
aprox.
80 x 130 x 90 mm
4 a 30 hPa
4 a 40 hPa
4 a 40 hPa
Ø 22 mm (masc.)
Ø 22 mm (fem.)
máx. 20 mm
+ 5° C a + 40° C
- 20° C a + 70° C
0,02 hPa
0,11 hPa
0,09 hPa
0,37 hPa
15 dB(A)
23 dB(A)
2
Reservamo-nos o
direito de alterar a
estrutura
Materiais
Artigo Material
Rebordo de máscara, fecho Silicone
Rebordo de máscara GEL
Almofada para a testa, anel de
segurança
1
1
Almofada para a testa GEL
Corpo da máscara, cotovelo Policarbonato
Tiras de amarrar à volta da cabeça
WEINMANNstrap
Tiras de amarrar à volta da cabeça
JOYCEstrap
Tiras de amarrar à volta da cabeça
HEADstrap
Casquilho rotativo, ajuste aproximado
do apoio para a testa, ajuste de
precisão do apoio para a testa
Clipe para as tiras de amarrar à volta
da cabeça
Silicone,
gel de silicone
TPE, polipropileno
Silicone,
gel de silicone,
policarbonato
Elastano, Poliéster,
Poliuretano, Nylon,
Algodão, Poliamida
Algodão,
poliamida, elastano
Nylon/spandex
Poliuretano
Poliéster/licra
Polipropileno
POM
Todas as peças da máscara estão isentas de
látex.
Curva característica pressão/fluxo
Na curva característica pressão/fluxo é
representado o fluxo de saída em função da
pressão de tratamento.
Especificações 63
Page 66

PT
9 Garantia
Pelo novo produto original da Weinmann e
pela peça sobressalente montada pela
Weinmann, a Weinmann concede ao cliente
uma garantia limitada do fabricante de
acordo com as condições de garantia aplicáveis para o respectivo produto, e conforme
os tempos de garantia referidos de seguida
válidos a partir da data de compra. As condições de garantia podem ser consultadas
na internet em www.weinmann.de. A pedido, podemos enviar-lhe as condições de
garantia.
No caso de querer accionar a garantia,
dirija-se a um agente autorizado.
Produto
Aparelhos Weinmann, incluindo
acessórios (excepção: máscaras) para
diagnóstico do sono, respiração assistida
em casa, oxigenoterapia e assistência
médica de emergência
Máscaras incluindo acessórios, baterias,
pilhas, sensores, sistemas de tubos
Produtos de utilização única Nenhum
Períodos de
garantia
2 anos
6 meses
* caso não exista indicação em contrário na
documentação técnica
10 Declaração de conformidade
A Weinmann Geräte für Medizin GmbH +
Co. KG declara com a presente, que o
produto está em conformidade com as
especificações aplicáveis da directiva 93/42/
CEE relativa a dispositivos médicos.
O texto completo da declaração de
conformidade encontra-se em:
www.weinmann.de
64 Garantia
Page 67

TR
Türkçe
1 Ürün açıklamaları
Parçalar
(Tek tek parça resimleri: Ekte bulunan
açıklama kâğıdına bakınız.)
1 Kafa bandı
2 Alın yastığı
3 Alın desteği ince ayar parçası
4 Alın desteği kaba ayar parçası
5 Alın desteği
6 Band klipsi
7 Basınç ölçme bağlantı noktaları
8 Tıpa
9 Döner kovan (non vented: mavi renk)
10 Bağlama parçası
(non vented: mavi renk)
11 Emniyet bileziği (non vented: mavi renk)
12 Maske gövdesi
13 Maske lastiği
Kullanım amacı
Nazal maske ilave bir aksesuar niteliğindedir
ve hasta ile terapi cihazı arasında tamamlayıcı
bir unsurdur. Bu maske, yetersiz ventilasyonu
olan hastalarda uyku apnesinin tedavisi ve
hastalara girişimsel olmayan solunum desteği
vermek amacıyla kullanılır.
Maske hasta tarafından kullanılmadan
önce
Terapiye başlamadan önce maskenin
kullanımıyla ilgili olarak hastanın uzman
kişilerce bilgilendirilmesi gerekmektedir.
2 Güvenlik uyarıları
Güvenlikle ilgili genel hükümler
93/42 EWG sayılı yönetmelik uyarınca dikkat
edilmesi gereken konular:
•Kullanım kılavuzunu baştan sona dikkat-
lice okuyunuz. Kullanım kılavuzu maskenin
bir parçası olup her zaman için hazırda
bulundurulmalıdır.
• Maskeyi, sadece her bir model için gerekli
olan terapi basınç aralıklarında çalıştırınız:
– 4-30 hPa: JOYCE vented
– 4-40 hPa: JOYCE vented 40 hPa
JOYCE non vented
JOYCE non vented 40 hPa
JOYCE GEL vented
JOYCE GEL non vented
• Farklı parçaların kullanılması işlev bozukluklarına ve kullanım için kısıtlı uyumluluğa yol
açabilir. Ayrıca, biyolojik uyumluluğa ilişkin
gereklilikler yerine getirilmeyebilir. Kullanma kılavuzunda önerilenlerin dışında
aksesuarların veya orijinal olmayan yedek
parçaların kullanılması halinde, garanti ve
sorumluluk hükümlerinin tamamen geçersiz kalacağını unutmayınız.
• Kendi kendine soluk almada zorluk çeken
hastalar sürekli kontrol altında tutulmalıdır.
Solunum cihazında düşük basıncı ve sızdır-
mayı haber veren bir alarm tertibatı bulunmalıdır.
• Obstrüktif ve restriktif akciğer hastalığı olan
hastalar JOYCE kullandıkları
süre boyunca
müşahede altında tutulmalıdırlar (örn. CO
geri soluması ile ilgili olarak).
• Maskedeki hava deliklerini sadece bu kullanım kılavuzunda belirtilen durumlarda
kapatınız. Aksi takdirde CO
boğulma tehlikesi söz konusudur.
geri soluma ve
2
• Maskenin uzun sürelerle kullanımı ancak
terapi cihazı devredeyken mümkündür. Aksi
takdirde CO
konusudur.
geri soluma tehlikesi söz
2
• Elektrik iletkenliği olan solunum hortumları kullanmayınız (istisna: Elektrikle ısıtılan
solunum hortumları).
• Bir enfeksiyonu, bakteriyolojik kontaminasyonu ve işlev bozulmalarını engellemek için
4 “Hijyenik hazırlık işlemleri” başlığı altında
verilen bilgileri dikkatlice okuyunuz.
Yan etkiler
Aşağıda sıralanan yan etkiler oluşabilir:
2
Ürün açıklamaları 65
Page 68

TR
Burun tıkanması, burun kuruması, sabahları
ağız kuruluğu, burun boşluklarında basınç
hissi, konjonktif dokuda tahriş, nefes alıp
verirken rahatsız edici sesler, yüzde maskenin
temas ettiği yerlerde izler, yüzde kızarıklıklar.
3 Kullanım
A ve E resimlerı: Ekte bulunan açıklama
kâğıdına bakınız.
3.1 Alın desteğinin ayarlanması
(
A resmi)
Ince ayar
Kaba ayar parçasındaki üst mandalları basılı
tutunuz. Ince ayar parçasını, üç ayar kilit
pozisyonundan birine getiriniz.
Alın desteğinin veya ince ayar parçasının
yüksekliğini (yaklasık 1 cm) ayarlamak için
ince ayar parçasını 180° döndürünüz ve
yukarıda anlatıldığı sekilde yerleştiriniz.
Kaba ayar
Kaba ayar parçasındaki alt mandalları basılı
tutunuz. Bunları maske gövdesindeki ayar
kilit noktalarından birine yerleştiriniz.
3.2 Maskenin takılması
1. Alt kafa bandındaki klipslerden birini
maskeden çözün.
2. Kafa bandını kafanızın arkasından
dolandırarak klipsi tekrar maskedeki
yerine takınız.
3. Cırt bantlarını ayarlayarak kafa bantlarını
maskenin sıkı oturacak ancak aşırı baskı
yapmayacak şekilde yüzünüze oturmasını
sağlayın.
Sadece WEINMANNstrap:
WEINMANNstrap kafa bandı, şu seçenekleri sunmaktadır (konuyla ilgili olarak ekte verilen açıklama kağıdındaki
"Genel bakış" bölümüne de bakın):
– Her iki taraftaki cırt bantları.
–Baş üstündeki cırt bandı: Cırt bandını çözüp
ili elinizle kafa bandının uçlarını hafif çekin
ve cırt bandını yeniden bastırın.
Kafa bandının doğru takılıp takılmadığı,
cırt bant çıkıntılarından anlaşılabilir.
Alındaki cırt bandı çıkıntıları kafa bandı-
nın iç yüzüyle aynı renge sahiptir.
Sadece HEADstrap:
HEADstrap kafa bandı, şu seçenekleri
sunmaktadır (konuyla ilgili olarak ekte
verilen açıklama kağıdındaki "Genel bakış" bölümüne de bakınız):
– Kaba ayar: Kafa bandındaki "a" veya "b"
yarı
ğı.
– Hassas ayar: Dört adet cırt bant.
4. Gerekirse alın desteğini tekrar ayarlayınız.
3.3 Soluma sistemi (Resim E)
vented modelleri
vented modelleri (tüm maske parçaları
şeffaftır), bütünleşik bir soluma sistemine
sahiptir: Emniyet bileziği ve maske gövdesinin
biçimi, bu parçalar arasında bir boşluk
oluşacak şekildedir. Bu boşluktan dışarı
solunan hava çıkabilmektedir. Parçaların özel
şekli, bu boşluğun emniyet bileziğinin
takılması sırasında kapanmamasını
sağlamaktadır. Harici bir solum sistemi
bağlamayınız. Aksi takdirde terapi basıncına
ulaşılmayacaktır.
non vented modelleri
nonþvented modellerinde (Emniyet bileziği,
ara bağlantı parçası ve döner kovan mavi
renktedir) soluma sistemi bulunmamaktadır.
Bu modellerde mutlaka bir ilave soluma
sistemi bağlanmalıdır. Aksi takdirde CO
soluma ve boğulma tehlikesi söz konusudur.
Lütfen soluma sisteminin kullanma
kılavuzunu dikkate alınız.
geri
2
3.4 Maskenin terapi cihazına
bağlanması (Resim
Terapi cihazınızın hortumunu döner kovana
(vented modellerinde) veya ilave soluma
E)
66 Kullanım
Page 69

TR
sistemine (non vented modellerinde) takınız.
Hortumun sağlam ve sızdırmaz bir şekilde
takılı olduğundan emin olunuz. Hortum
bağlantısı terapi basıncı nedeniyle yerinden
çıkmamalıdır.
Maskeyi kısa bir süre için hortumdan ayırmak
istediğinizde döner kovanı ara parçadan
basitçe çekip çıkartabilirsiniz.
3.5 Jel dolgulu maske parçaları
JOYCE GEL vented ve JOYCE GEL non vented
maskelerinde alın yastığı ve maske lastiği,
standart olarak bir jel dolgusuna sahiptir. Jel
alın yastığı ve jel maske lastiği, ayrıca diğer
JOYCE modelleri için yedek parça olarak
teslim edilebilir.
Dikkat!
Jel dolgulu maske parçaları çok hassas
parçalardır. Deformasyonları ve hasarları
önlemek için her zaman oldukça dikkatli bir
şekilde kullanınız.
3.6 Terapi basınç aralıkları
Ayrı JOYCE maskesi modelleri, belirli terapi
basıncı aralığı için uygundur ve bu
doğrultuda teslim edilmektedir (bkz. “7 Kutu
içeriği” sayfa 71):
– 4-30 hPa: JOYCE vented
JOYCE non vented
– 4-40 hPa: JOYCE vented 40 hPa
JOYCE non vented 40 hPa
JOYCE GEL vented
JOYCE GEL non vented
4-30 hPa terapi basınç aralığına ilişkin JOYCE
maskeleri, yumuşak bir lastiğine ve 4-40 hPa
terapi basınç aralığına ilişkin JOYCE
maskeleri, daha sert bir maske lastiğine veya
jel maske lastiğine (Jel modelleri) sahiptir.
4-40 hPa terapi basınç aralığına ilişkin sert
olan maske lastiğinin üzerinde “40”
yazmaktadır.
Yumuşak (30 hPa’ya kadar) ve daha sert
(40 hPa’ya kadar) maske lastikleri ve jel
maske lastiği (Jel modelleri) ayrıca yedek
parça olarak da edinebilir, böylelikle değişen
tedavi ihtiyaçlarına uyum sağlayabilirsiniz.
3.7 Basınç ölçme bağlantıları
(Resim
JOYCE maskelerinde basınç ölçmek veya
oksijen vermek için iki adet bağlantı noktası
bulunmaktadır.
Dikkat!
• Oksijen tedavilerinde yanlış kullanım veya
yanlış doz uygulanması yan etkilere neden
olabilmektedir. Bu nedenle bu tür terapiler
sadece doktorun direktifleri doğrultusunda
uygulanmalıdır.
• Oksijen terapilerinde mutlaka O
zin ve terapi cihazınızın kullanma kılavuzla-
rını dikkate alınız.
Basınç ölçme bağlantı yerleri kullanılmıyorsa
kutu içeriğinde bulunan tıpayı takarak kapalı
tutunuz. Aksi takdirde bu bağlantı
yerlerinden hava sızarak terapi basıncına
ulaşılamayacaktır.
C)
sistemini-
2
3.8 Maskeyle kullanımı uygun cihazlar
Terapi cihazları
JOYCE maskeleri, “Kullanım amacı" başlığı
altında sıralanan terapi uygulamalarında
kullanılan tüm cihazlarla birlikte kullanılabilir.
Maskenin, uygun olmayan cihazlarla birlikte
kullanılması halinde maskedeki basıncın
öngörülen terapi basıncı düzeyinde olup
olmadığına dikkat ediniz.
Terapi cihazında doğru basınç miktarı
gösteriliyor olsa bile maskedeki basınç doğru
düzeyde olmayabilir. Cihaz
kombinasyonlarınızı bir doktor veya uzman
satıcı tarafından ayarlattırarak, maskedeki
basıncın terapi basıncı düzeyinde olmasını
sağlayınız.
Hava nemlendirici cihazlar
JOYCE maskeleri soğuk veya ısıtmalı tip hava
nemlendirici cihazlarla birlikte kullanılabilir.
Nemlendirme düzeyini, hava hortumlarında
su oluşmayacak düzeyde ayarlayınız. Hava
nemlendirme ve terapi cihazlarınızın
kullanma kılavuzlarını dikkate alınız.
Kullanım 67
Page 70

TR
3.9 Kullanım sonrası
1. Alt kafa bandındaki klipslerden birini
maskeden çözün ve maskeyi çıkarın.
2. Bantlardaki tüm klipsleri çözerek kafa
bantlarını maskeden ayırınız.
3. "4 Hijyenik hazırlık işlemleri" başlığı
altında açıklandığı şekilde hareket ediniz.
bileziğini tıklama sesi duyulana kadar saat
yönünde çevirerek yuvasına oturtun.
6. Tıpayı basınç ölçme bağlantı yerlerine
tak
ın.
7. Maske lastiğini maske gövdesine takın.
8. Kafa bantlarını maskedeki klipslerine
takın.
3.10 Maskenin parçalanması ve
birleştirilmesi
Maskenin parçalanması (Resim D - A)
1. Maske lastiğini maske gövdesinden
çıkartın.
2. Basınç ölme bağlantılarındaki tıpayı
çıkartın.
3. Emniyet bileziğini saatin ters yönüne
doğru çevirin. Emniyet bileziğini ve ara
bağlantı parçasını maske gövdesinden
çekip çıkartın.
4. Ara bağlantı parçasını emniyet bileziğinin
içinden bastırarak çıkartın ve döner
kovanı ara bağlantı parçasından çekip
çıkartın.
5. Kaba ayar parçasını maske gövdesinden
sökün.
6. Ince ayar parçasını kaba ayar parçasından
sökün. Daha sonra da alın yastığını
ayar parçasından söküp çıkartın.
Maskenin birleştirilmesi (Resim A-D)
1. Alın yastığı nı ince ayar parçasına takın.
Daha sonra da ince ayar parçasını kaba
ayar parçasına sokun.
2. Kaba ayar parçasını maske gövdesine
takın.
3. Döner kovanı ara bağlantı parçasına
sokarak tıklama sesi duyulacak şekilde
yuvasına oturtun.
4. Ara bağlantı parçasını emniyet bileziğine
geçirerek tıklama sesi duyulana kadar
bastırıp yuvasına oturtun.
5. Emniyet bileziğini ve ara bağlantı
parçasını maske gövdesine takın. Emniyet
ince
4 Hijyenik hazırlık işlemleri
4.1 Zaman aralıkları
Günlük
Maskeyi, üzerinde herhangi bir artık
kalmayacak şekilde ılık suda yıkayın. Maskeyi
parçalarına ayırarak yıkayabilirsiniz. Yumuşak
bir deterjan kullanın (örneğin bulaşık
deterjanı). Daha sonra bütün parçaları bol
temiz su kullanarak dikkatlice durulayın.
Dikkat!
•Bağışıklık sistemi zayıf hastalarda veya bir
hastalığın özel durumundan dolayı maske
parçalarının günlük olarak dezenfeksiyonu veya sterilizasyonu gerekli olabilir. Bu
tür durumlarda bir hekime danışın.
• Hijyenik hazırlık işlemlerini gerçekleştirirken
özellikle maske gövdesi ile emniyet bileziği-
nin arasındaki temas yüzeylerine büyük
özen gösteriniz. Bu bölümlerde olması
muhtemel artıklar, tedavinin başarısını veya
entegre soluma sisteminin (vented modellerinde) çalışmasını olumsuz şekilde etkileyebilir.
Haftalık
Maskeyi parçalarına ayırarak parçaları
hijyenik hazırlık işleminden geçirin (bkz. “4.2
Temizlik, dezenfeksiyon ve sterilizasyon”
sayfa 69).
68 Hijyenik hazırlık işlemleri
Page 71

TR
4.2 Temizlik, dezenfeksiyon ve sterilizasyon
Yapılması gereken işlemler
Işlem türleri
Parçalar
Bulaşık makinesi
Elle yıkanan parçalar
Maske lastiği ••• •
GEL maske lastiği •••
Alın yastığı •••
GEL alın yastığı ••
Tıpa ••• •
Maske gövdesi •••
Kaba ayar parçası •••
Ince ayar parçası •••
Ara bağlantı
parçası
Döner kovan •••
Emniyet bileziği •••
Kafa bantlarının
klipsleri
Kafa bantları
WEINMANNstrap
Kafa bantları
HEADstrap
Kafa bantları
JOYCEstrap
•••
•••
Dikkat!
Maske parçalarını yukarıdaki tabela
uyarınca dezenfekte veya sterilize etmeden önce iyi bir şekilde temizleyin.
Jel dolgulu maske parçaları çok hassas
parçalardır. Deforme olmamaları veya
hasar görmemeleri için bu maske parçalarını, her zaman oldukça dikkatli bir
şekilde kullanınız.
Dezenfeksiyon*
•
•
•
Işlem açıklamaları
Bulaşık makinesi
Elle yıkanan
parçalar
Sterilizasyon
(Dezenfeksiyona
alternatif olarak)
Dezenfeksiyon*
Sterilizasyon
(Dezenfeksiyona
alternatif olarak)
65 °C'lik yıkama programı kullanın ve
ardından tüm parçaları temiz suyla
dikkatli bir şekilde durulayın.
Elle yıkanan parçalar sıcak suda yıkanır.
Yum uşak bir deterjan kullanın.
Ardından tüm parçaları temiz su ile
çalkalayın ve kendiliğinden korumasını
sağlayın.
Parçaları suyla seyreltilmiş
dezenfeksiyon çözeltisi içinde bir sünger
veya fırça yardımıyla temizleyin.
Dezenfeksiyon işleminin ardından tüm
parçaları destile su ile durulayıp
kurumaya bırakın.
EN 285 standartlarındaki bir cihazla
buhar sterilizasyonu. Tüm parçalar
134 °C sıcaklıkta en az 3 dakika
bekletilmelidir.
* gigasept® FF (yeni), Cidex® OPA ve
Aniosyme DD1 dezenfeksiyon maddelerini
kullanmanızı öneriyoruz. Bu maddelerin
uyumluluğu test edilmiştir. Lütfen üreticinin
talimatlarına uyunuz.
Hijyenik hazırlık işlemine ve hasta değişimin-
de yapılacak hijyenik hazırlık işlemine ilişkin
bilgiler, www.weinmann.de Internet adresinde sunulan bir broşürde verilmektedir. Internet bağlantınız olmadığında, lütfen
Weinmann firmasına başvurun.
Uyarı
Hijyenik hazırlık yaparken özel eldiven
kullanmanızı öneririz (örneğin kullan at
tipi eldivenler).
Renk bırakabileceği için HEADstrap kafa
bandını ilk kez kullanmadan önce
yıkayın.
Kafa bandı, sadece elle yıkanabilir!
Cırt bantlar tutma özelliğini kaybedebi-
leceği için kafa bandını ütülemeyin.
Kafa bandını kurutucuda kurutmayın!
4.3 Hazırlık işlemlerinin ardından
Hijyenik hazırlık işlemlerinin ardında tüm
parçaları iyi bir şekilde kurutun. Parçalarda
herhangi bir hasar veya kir artığı olup
olmadığını tek tek kontrol edin. Gerekirse
hijyenik hazırlık işlemlerini tekrar edin. Hasar
Hijyenik hazırlık işlemleri 69
Page 72

TR
görmüş parçaları yenileriyle değiştirin.
Maskeyi tekrar birleştirin.
6 Sorunlar ve çözüm yolları
4.4 Hasta değişimi
Maske başka bir hasta tarafından
kullanılacağı zaman mutlak suretle hijyenik
hazırlık işleminden geçirilmelidir.
Bunun için maskeyi parçalarına ayırın. Tüm
parçaları "4.2 Temizlik, dezenfeksiyon ve
sterilizasyon" başlığı altında tarif edildiği
şekilde dezenfekte veya sterilize edin ve yeni
kafa bantları kullanın.
5Işlev kontrolü
Her bir hijyenik hazırlık işleminden sonra tüm
parçaları tek tek kontrol edin.
Maske lastiğinde meydana gelen bozulmalar
nedeniyle sızıntı meydana gelmesi halinde
maske lastiğini yenisiyle değiştirin.
Ara bağlantı parçasındaki bilyeli bağlantı
yerinin çalışmasını ve sızdırmazlığını kontrol
edin. Bilyeli bağlantı yeri zorlanarak hareket
ediyor veya sızıntı yapıyorsa ara bağlantı
parçasını ve emniyet bileziğini yenisiyle
değiştirin.
Kullanılmayan parçaları tıbbi atık statüsünde
olmayıp ev çöpü aracılı
Alın yastığında ve maske lastiğinde renk
değişiklikleri meydana gelebilir. Bu renk
değişiklikleri, işlevlerini herhangi bir şekilde
etkilemez.
ğıyla imha edilebilirler.
Sorun Nedeni Çözüm yolu
Yüz de b asınç
hissi.
Gözlere hava
çarpıyor.
Te r ap i
basıncına
ulaşılamıyor.
Maske çok sıkı
bağlı.
Maske gevşek
bağlanmış.
Maske yüze
oturmuyor.
Yüksek terapi
basıncı.
Maske ayarları
doğru değil.
Maske lastiği
bozulmuş.
Hortum sistemi
sızdırıyor.
Basınç ölçme
bağlantı
yerlerinden
hava çıkıyor.
Kafa bantlarını hafifçe
gevşetin.
Alın desteğinin yerini
doğru ayarlayın.
Kafa bantlarını daha sıkı
bağlayın.
Alın desteğinin yerini
doğru ayarlayın.
Başka boy bir maske
kullanın. Satıcıyla
bağlantıya geçin.
Daha sert maske lastiği
(40 hPa basınca uygun)
kullanın. Sat
bağlantıya geçin.
Kafa bantlarını ayarlayın.
Alın desteğinin yerini
doğru ayarlayın.
Maske lastiğini yenisiyle
değiştirin.
Bağlantı yerlerini ve
hortum bileziklerini kontrol
edin.
Basınç ölçme bağlantı
yerlerini tıpayı (kutu
ğinde mevcut)
içeri
kullanarak kapatın.
ıcıyla
70 Işlev kontrolü
Page 73

TR
7 Kutu içeriği
Uyarı
Tüm maskeler komple monte edilmiş
şekilde ve kafa bantları ile birlikte teslim
edilmektedir.
vented modelleri
Ürün adı
HEADstrap
ile ürün no.
JOYCEstrap
JOYCE vented‚ Büy. S WM 26110 WM 26110/1
JOYCE vented‚ Büy. M WM 26120 WM 26120/1
JOYCE vented‚ Büy. L WM 26130 WM 26130/1
JOYCE vented‚ Büy. XL WM 26140 WM 26140/1
JOYCE vented 40 hPa‚ Büy. S WM 26111 WM 26111/1
JOYCE vented 40 hPa‚ Büy. M WM 26121 WM 26121/1
JOYCE vented 40 hPa, Büy. L WM 26131 WM 26131/1
JOYCE vented 40 hPa, Büy. XLWM 26141 WM 26141/1
JOYCE GEL vented‚ Büy. S WM 26112 WM 26112/1
JOYCE GEL vented‚ Büy. M WM 26122 WM 26122/1
JOYCE GEL vented, Büy. L WM 26132 WM 26132/1
non vented modelleri
Ürün adı
JOYCE non vented‚ Büy. S WM 26160
JOYCE non vented‚ Büy. M WM 26170
JOYCE non vented‚ Büy. L WM 26180
JOYCE non vented‚ Büy. XL WM 26190
JOYCE non vented 40 hPa‚ Büy. S WM 26161
JOYCE non vented 40 hPa‚ Büy. M WM 26171
JOYCE non vented 40 hPa‚ Büy. L WM 26181
JOYCE non vented 40 hPa‚ Büy. XL WM 26191
JOYCE GEL non vented‚ Büy. S WM 26162
JOYCE GEL non vented‚ Büy. M WM 26172
JOYCE GEL non vented‚ Büy. L WM 26182
WEINMANNstrap/
WEINMANNstrap/
HEADstrap
ile ürün no.
Yedek parçalar
Ürün adı Ürün No.
vented bilyeli bağlantı yeri seti:
Emniyet bileziği, ara bağlantı parçası,
döner kovan
non vented bilyeli bağlantı yeri seti:
emniyet bileziği, ara bağlantı parçası,
döner kovan
vented döner kovan WM 26254
Alın desteği:
Alın yastığı, alın desteği kaba ayar parçası,
alın desteği ince ayar parçası
GEL alın desteği:
ile ürün no.
GEL alın yastığı, alın desteği kaba ayar
parçası, alın desteği ince ayar parçası
Alın yastığı WM 26200
GEL alın yastığı WM 26209
Maske lastiği 30 hPa‚ Büy. S
Maske lasti
Maske lastiği 30 hPa‚ Büy. L
Maske lastiği 30 hPa‚ Büy. XL
Maske lastiği 40 hPa‚ Büy. S
Maske lastiği 40 hPa‚ Büy. M
Maske lastiği 40 hPa‚ Büy. L
Maske lastiği 40 hPa‚ Büy. XL
GEL Maske lastiği‚ Büy. S
GEL Maske lastiği‚ Büy. M
GEL Maske lastiği‚ Büy. L
Kafa bantları WEINMANNstrap, bant
klipsleri dahil
Kafa bantları HEADstrap WM 26360
Kafa bantları JOYCEstrap mavi, bant
klipsleri dahil
Bant klipsleri (4 adet) WM 26205
Tıpa WM 26208
Kullanım kılavuzu
DE, EN, FR, NL, IT, ES, PT, TR, EL, PL, HR
Rusça (pdf, Internet: www.weinmann.de)
ği 30 hPa‚ Büy. M
WM 26206
WM 26207
WM 26201
WM 26215
WM 26210
WM 26220
WM 26230
WM 26240
WM 26211
WM 26221
WM 26231
WM 26241
WM 26212
WM 26222
WM 26232
WM 26350
WM 26290
WM 16950
WM 16814
Ilave aksesuarlar
Ürün adı Ürün No.
Soluma sistemi:
Silentflow 2
Gürültü azaltıcı sistem
WM 23600
WM 23685
Kutu içeriği 71
Page 74

TR
8 Ürün özellikleri
40
50
60
70
80
0
10
20
30
40
50
60
70
80
0 10203040
JOYCE
vented
JOYCE
non vented
Orta seviye akış kaybı
vented (L/dak)
Terapi cihazı çıkış basıncı (hPa)
Teknik değerler
JOYCE Değer
93/42/EEC (AET) yönetmeliklerine
göre ürün sınıfı:
Ölçüler (en, boy, derinlik): 80 x130 x 90 mm
Ağırlık: Takriben 110 gram
Terapi ba s ınç aralıkları:
Yum uşak maske lastiği:
Sert maske lastiği:
Hortum bağlantısı: EN ISO 5356-1
standartlarına göre koni şekli
vented:
non vented:
Basınç ölçme bağlantıları:Ø 4 mm
Bant klipsleri genişliği: max. 20 mm
Sıcaklık aralığı
Kullanım sırasında:
Saklama sırasında
Akış şiddeti direnci
vented:
50 L/dak.’da
100 L/dak.’da
non vented:
50 L/dak.’da
100 L/dak.’da
ISO 4871 uyarınca öngörülen iki
sayılı
gürültü emisyon değeri:
–Ses basınç seviyesi
şiddeti seviyesi
–Ses
(Belirsizlik faktörü: 3 dB(A))
Kullanım ömrü 12 ayar kadar
Uygulanan standartlar EN ISO 17510-2:2009
1
büyüklüğe ve modele bağlı
2
Maskelerin üretiminde kullanılan
malzemeler, örneğin agresif temizlik
maddeleri kullanıldığında eskimektedir. Bu
nedenle bazı durumlarda, maskenizi olması
gereken zamandan daha önce değiştirmeniz
gerekebilir (bkz. “5 Işlev kontrolü” sayfa 70).
72 Ürün özellikleri
II a
4 ila 30 hPa
4 ila 40 hPa
Ø 22 mm (eril uç)
Ø 22 mm (dişil uç)
+ 5 °C’den + 40 °C’ye
kadar
- 20 °C’den +70 °C’ye
kadar
0,02 hPa
0,11 hPa
0,09 hPa
0,37 hPa
15 dB(A)
23 dB(A)
Yapısal değişiklik
yapma hakkı saklıdır
Malzeme
Ürün adı Malzeme
Maske lastiği, tıpa Silikon
GEL Maske lastiği Silikon, Silikon jel
Alın yastığı, emniyet bileziği TPE, polipropilen
1
1
Maske gövdesi, ara bağlantı parçası Polikarbonat
Kafa bantları WEINMANNstrap
Kafa bantları JOYCEstrap
Kafa bantları JOYCEcap
Kafa bantları HEADstrap
Döner kovan, alın desteği kaba ayar
parçası, alın desteği ince ayar parçası
Kafa bantlarının klipsleri
GEL Alın yastığı
Silikon, Silikon jel,
Polikarbonat
Elastan, Polyester,
Poliüretan, Naylon,
Pamul, Poliamid
Pamul,
poliamid, elastan
Pamul,
poliamid, elastan
Naylon/Spandex
Poliüretan
Polyester/Likra
Polipropilen
POM (Asetelik
reçine)
Maske parçaları lateks ihtiva etmemektedir.
Basınç-akış grafiği
Basınç-akış grafiğinde terapi basıncına bağlı
olarak havanın çıkıştaki değerleri
gösterilmektedir.
2
Page 75

TR
9 Garanti
Weinmann, müşterileri için yeni orijinal
Weinmann ürünü ve Weinmann tarafından
monte edilmiş yedek parça için, ilgili ürün için
geçerli olan garanti koşulları ve aşağıda
gösterilen satın alma tarihinden başlamak
üzere garanti süreleri uyarınca sınırlı bir
üretici garantisi vermektedir. Garanti
koşulları, www.weinmann.de İnternet
adresinden öğrenilebilir. Talep etmeniz
halinde garanti koşullarını postayla
göndermemiz de mümkündür. Garanti
durumunda yetkili satıcınıza başvurun.
Ürün
Uyku teşhisine, uyku terapisine, evde
mekanik ventilasyona, tıbbi oksijen
uygulamasına ve acil tıbbi uygulamalar için
aksesuarlar (istisna: maskeler) dahil olmak
üzere Weinmann cihazları
Aksesuarlar, akü, piller*, sensörler, hortum
sistemleri dahil maskeler
Tek kullanımlık ürünler Garanti yok
Garanti
süreleri
2 yıl
6 ay
* Teknik belgelerde farklı bir bilgi verilmediği
takdirde.
10 Uygunluk beyani
Weinmann Geräte für Medizin GmbH + Co.
KG, bu ürünün tıbbi ürünlere ilişkin geçerli
93/42/EEC sayılı yönetmeliğin direktiflerine
uygun olduğunu beyan eder.
Uygunluk beyanının eksiksiz metnini ınternet
adresimizde bulabilirsiniz:
www.weinmann.de
Garanti 73
Page 76

EL
Ελληνικά
1 Περιγραφή συσκευής
Υπόμνημα
(Παράσταση μεμονωμένων
εξαρτημάτων: Βλέπε συνημμένο
αναδιπλούμενο φύλλο.)
1 Περίδεση κεφαλιού
2 Μετωπικό μαξιλάρι
3 Ρύθμιση ακριβείας μετωπικού στηρίγματος
4 Αδρή ρύθμιση μετωπικού στηρίγματος
5 Μετωπικό στήριγμα
6 Κλιπ περίδεσης
7 Υποδοχές μέτρησης πίεσης
8 Τάπα
9 Περιστρεφόμενος δακτύλιος (non vented: σε
μπλε χρώμα)
10 Γωνία (non vented: σε μπλε χρώμα)
11 Δακτύλιος ασφάλειας (non vented: σε μπλε
χρώμα)
12 Σώμα μάσκας
13 Προεξοχή μάσκας
Σκοπός χρήσης
Η ρινική μάσκα είναι ένα αξεσουάρ και
εξυπηρετεί ως στοιχείο στεγανότητας μεταξύ
ασθενούς και συσκευής θεραπείας.
Χρησιμοποιείται στη θεραπεία υπνικής άπνοιας
και στη μη επεμβατική αναπνοή ασθενών με
πνευμονική ανεπάρκεια.
Πριν από τη χρήση από τον ασθενή
Οι ασθενείς πρέπει να έχουν ενημερωθεί πριν
από την έναρξη της θεραπείας από
εξειδικευμένο προσωπικό σε ό,τι αφορά στη
χρήση της μάσκας.
2 Υποδείξεις ασφαλείας
Κανόνες ασφαλείας
Σύμφωνα με τις απαιτήσεις της Οδηγίας 93/42/
EΟΚ λάβετε υπόψη σας τα εξής σημεία:
• Διαβάστε προσεκτικά αυτές τις οδηγίες χρήσης. Οι οδηγίες αποτελούν συστατικό μέρος
της μάσκας και πρέπει να είναι διαθέσιμες ανά
πάσα στιγμή.
• Χρησιμοποιείτε τη μάσκα αποκλειστικά και
μόνο στα αναφερόμενα όρια πίεσης θεραπείας για τις μεμονωμένες παραλλαγές:
– 4-30 hPa: JOYCE vented
– 4-40 hPa: JOYCE vented 40 hPa
JOYCE non vented
JOYCE non vented 40 hPa
JOYCE GEL vented
JOYCE GEL non vented
• Κατά τη χρήση εξαρτημάτων ξένων κατασκευαστών ίσως έρθετε αντιμέτωποι με βλάβες λειτουργίας και περιορισμένη
καταλληλότητα χρήσης. Επίσης, ίσως η
συσκευή να πάψει να ανταποκρίνεται στις
απαιτήσεις βιοσυμβατότητας. Λάβετε υπόψη
σας ότι στις περιπτώσεις αυτές διαγράφεται
οποιαδήποτε αξίωση απόδοσης εγγύησης και
ευθύνης, εφόσον δεν χρησιμοποιούνται τα
εξαρτήματα που προτείνονται στις οδηγίες
χρήσης ή τα αυθεντικά ανταλλακτικά.
•Ασθενείς με περιορισμένη αυθόρμητη αναπνοή πρέπει να παρακολουθούνται συνεχώς.
Στη συσκευή υποβοήθησης αναπνοής πρέπει
να είναι ενεργοποιημένος αντίστοιχος συναγερμός υποπίεσης/διαρροής.
• Ασθενείς με αποφρακτικές και περιοριστικές
ασθένειες πνευμόνων πρέπει κατά τη διάρκεια
χρήσης μασκών JOYCE να εξετάζονται εξατομικευμένα (π.χ. σχετικά με επανεισπνοή CO
• Σφραγίζετε τα ανοίγματα αυτής της μάσκας
μόνο στις περιπτώσεις, οι οποίες περιγράφονται στις παρούσες οδηγίες χρήσης. Σε διαφορετική περίπτωση υφίσταται κίνδυνος
επανεισπνοής CO
.
2
• Η εφαρμογή της μάσκας για μεγάλο χρονικό
διάστημα επιτρέπεται μόνο εφόσον είναι ενεργοποιημένη η συσκευή θεραπείας. Σε διαφορετική περίπτωση υφίσταται κίνδυνος
επανεισπνοής CO
.
2
• Μην χρησιμοποιείτε ηλεκτροαγώγιμους αναπνευστικούς σωλήνες (Εξαίρεση: ηλεκτρικά
θερμαινόμενοι αναπνευστικοί σωλήνες).
).
2
74 Περιγραφή συσκευής
Page 77

EL
• Προσέχετε την ενότητα 4 “Υγειονομική προετοιμασία” προς αποφυγή λοίμωξης, βακτηριακής μόλυνσης και περιορισμών λειτουργίας.
Παρενέργειες
Ενδέχεται να προκύψουν οι ακόλουθες
παρενέργειες:
Βουλωμένη μύτη, ξηρή μύτη, ξηρότητα
στόματος τα πρωινά, αίσθηση πίεσης στους
παραρρινικούς κόλπους, ερεθισμοί του
επιπεφυκότος στα μάτια, ενοχλητικοί θόρυβοι
κατά την εκπνοή, σημεία πίεσης στο πρόσωπο,
κοκκίνισμα δέρματος προσώπου.
3Χειρισμός
Εικ. A-E: Βλέπε συνημμένο αναδιπλούμενο
φύλλο.
3.1 Ρύθμιση μετωπικού στηρίγματος
(Εικ.
A)
Ρύθμιση ακριβείας
Διατηρείτε πατημένους τους πάνω συνδετήρες
της αδρής ρύθμισης. Τοποθετείτε τη ρύθμιση
ακριβείας σε μία από τις τρεις διαβαθμίσεις.
Για να προσαρμόσετε το ύψος του μετωπικού
μαξιλαριού ή της ρύθμισης ακριβείας (περ. 1 cm),
περιστρέφετε τη ρύθμιση ακριβείας κατά 180°.
Κατόπιν τοποθετείτε όπως περιγράφηκε ανωτέρω.
Αδρή ρύθμιση
Διατηρείτε πατημένους τους κάτω συνδετήρες
της αδρής ρύθμισης. Τοποθετείτε τους
τελευταίους σε μία από τις τρεις διαβαθμίσεις
του σώματος μάσκας.
3.2 Εφαρμογή μάσκας
1. Απαγκιστρώνετε ένα από τα κάτω κλιπ
περίδεσης στη μάσκα.
2. Περνάτε την περίδεση κεφαλιού πάνω από
το κεφάλι και αγκιστρώνετε πάλι το κλιπ
περίδεσης.
3. Με τη βοήθεια των αυτοκόλλητων τύπου
Βέλκρο ρυθμίζετε την περίδεση κεφαλιού
έτσι ώστε η μάσκα να εφαρμόζει στεγανά,
αλλά όχι πάρα πολύ σφιχτά στο πρόσωπο.
Μόνο η WEINMANNstrap:
Η περίδεση κεφαλιού WEINMANNstrap
προσφέρει τις παρακάτω δυνατότητες
(βλέπε και „Επισκόπηση“ στο συνημμένο
αναδιπλούμενο φύλλο):
– Αυτοκόλλητα τύπου Βέλκρο στις δύο πλευρές.
– Αυτοκόλλητο τύπου Βέλκρο πάνω στο κεφάλι:
Ανοίξτε το αυτοκόλλητο τύπου Βέλκρο, τραβήξτε με τα δύο σας χέρια απαλά τα άκρα της
περίδεσης κεφαλιού και πατήστε εκ νέου το
αυτοκόλλητο τύπου Βέλκρο.
Στις αυτοκόλλητες γλωσσίδες αναγνωρίζετε αν έχει τοποθετηθεί σωστά η περίδεση
κεφαλιού. Οι αυτοκόλλητες γλωσσίδες στο
μέτωπο έχουν το ίδιο χρώμα με αυτό στην
εσωτερική πλευρά της περίδεσης κεφαλιού.
Μόνο HEADstrap:
Η περίδεση κεφαλιού HEADstrap προσφέρει τις ακόλουθες δυνατότητες (βλέπε επίσης “Επισκόπηση“ στο συνημμένο αναδιπλούμενο φύλλο):
– Αδρή ρύθμιση: σχισμή "a" ή "b" της περίδεσης
κεφαλιού.
– Ρύθμιση ακριβείας: τέσσερις αυτοκόλλητοι
ιμάντες.
4. Ρυθμίζετε, εάν είναι απαραίτητο, το
μετωπικό στήριγμα εκ νέου.
3.3 Σύστημα εκπνοής (Εικ. E)
vented-Παραλλαγές
Οι παραλλαγές vented (όλα τα εξαρτήματα
μάσκας διαφανή) διαθέτουν ένα
ενσωματωμένο σύστημα εκπνοής: Ο
δακτύλιος ασφάλειας και το σώμα μάσκας έχουν
σχεδιαστεί έτσι, ώστε μεταξύ αυτών των
εξαρτημάτων να δημιουργείται σχισμή. Μέσω
αυτής της σχισμής μπορεί να διαφεύγει ο αέρας
εκπνοής. Η ειδική γεωμετρία των εξαρτημάτων
διασφαλίζει το γεγονός ότι κατά την
τοποθέτηση του δακτυλίου ασφάλειας δεν
μπορεί να φράξει η σχισμή. Μη συνδέετε
κανένα εξωτερικό σύστημα εκπνοής, διότι σε
διαφορετική περίπτωση δεν επιτυγχάνεται η
πίεση θεραπείας.
Χειρισμός 75
Page 78

EL
non vented-Παραλλαγές
Οι παραλλαγές non vented (δακτύλιος
ασφάλειας, γωνία και περιστρεφόμενος
δακτύλιος σε μπλε χρώμα) δεν διαθέτουν
σύστημα εκπνοής. Συνδέετε οπωσδήποτε ένα
εξωτερικό σύστημα εκπνοής. Σε διαφορετική
περίπτωση υφίσταται ο κίνδυνος επανεισπνοής
και ασφυξίας.
CO
2
Τηρείτε τις οδηγίες χρήσης του συστήματος
εκπνοής σας.
3.4 Σύνδεση μάσκας στη συσκευή
θεραπείας (Εικ.
Εισάγετε το σωλήνα της συσκευής θεραπείας
σας στον περιστρεφόμενο δακτύλιο
(παραλλαγές vented) ή στο εξωτερικό σύστημα
εκπνοής σας (παραλλαγές non vented).
Προσέχετε ώστε να υπάρχει ασφαλής και
αεροστεγής σύνδεση προς το σωλήνα.
Η σύνδεση δεν επιτρέπεται να λύνεται εξαιτίας
της πίεσης θεραπείας.
Εάν θέλετε να αποσυνδέσετε προσωρινά τη
μάσκα από το σωλήνα, τραβάτε απλά τον
περιστρεφόμενο δακτύλιο από τη γωνία.
E)
3.5 Εξαρτήματα μάσκας με γέμιση γέλης
Στις παραλλαγές JOYCE GEL vented και
JOYCE GEL non vented το μετωπικό μαξιλάρι
και η προεξοχή μάσκας διαθέτουν τυπική γέμιση
γέλης. Το μετωπικό μαξιλάρι γέλης και η
προεξοχή μάσκας γέλης είναι διαθέσιμα ως
ανταλλακτικά και για άλλες παραλλαγές JOYCE.
Προσοχή!
Τα εξαρτήματα της μάσκας με γέμιση γέλης είναι
πολύ ευαίσθητα δομικά μέρη. Να τα
μεταχειρίζεστε πάντα με προσοχή προς
αποφυγή παραμορφώσεων και φθορών.
3.6 Ÿρια πίεσης θεραπείας
Οι μεμονωμένες παραλλαγές των μασκών
JOYCE είναι διαθέσιμες για συγκεκριμένα όρια
πίεσης θεραπείας (ανατρέξτε σε «7 Περιεχόμενα
παράδοσης» στη σελίδα 79):
– 4-30 hPa: JOYCE vented
JOYCE non vented
– 4-40 hPa: JOYCE vented 40 hPa
JOYCE non vented 40 hPa
JOYCE GEL vented
JOYCE GEL non vented
Οι μάσκες JOYCE για όρια πίεσης θεραπείας 4-30
hPa διαθέτουν μαλακή προεξοχή μάσκας, οι
μάσκες JOYCE για όρια πίεσης θεραπείας 440 hPa έχουν σκληρή προεξοχή μάσκας ή
προεξοχή μάσκας με γέμιση γέλης (παραλλαγές
γέλης).
Η πιο σκληρή προεξοχή μάσκας για όρια
θεραπείας 4-40 hPa φέρει σήμανση με αριθμό
"40".
Πιο απαλή (έως 30 hPa) και πιο σκληρή (έως
40 hPa) προεξοχή μάσκας όπως επίσης και η
προεξοχή μάσκας με γέμιση γέλης (παραλλαγές
γέλης) είναι διαθέσιμες επίσης μεμονωμένα ως
ανταλλακτικά, έτσι ώστε να είναι εφικτή η
προσαρμογή της μάσκας σας σε
μεταβαλλόμενες απαιτήσεις θεραπείας.
3.7 Υποδοχές μέτρησης πίεσης
(Εικ.
C)
Οι μάσκες JOYCE διαθέτουν δύο υποδοχές, οι
οποίες μπορούν να χρησιμοποιούνται για τη
μέτρηση πίεσης ή την εισαγωγή οξυγόνου.
Προσοχή!
• Μία θεραπεία οξυγόνου με εσφαλμένη εφαρμογή/δοσολογία μπορεί να έχει παρενέργειες. Συνεπώς η εκτέλεση μιας τέτοιας
θεραπείας επιτρέπεται μόνο κατόπιν εντολής
ιατρού.
• Για την εκτέλεση θεραπείας οξυγόνου λάβετε
οπωσδήποτε υπόψη σας τις οδηγίες χρήσης
του συστήματος O
πείας σας.
Εάν δεν χρησιμοποιούνται οι υποδοχές
μέτρησης πίεσης, τις σφραγίζετε πάντα με τη
συνημμένη τάπα. Σε διαφορετική περίπτωση
διαφεύγει αέρας από τις υποδοχές και δεν
επιτυγχάνεται η πίεση θεραπείας.
και της συσκευής θερα-
2
3.8 Συμβατές συσκευές
Συσκευές θεραπείας
Οι μάσκες JOYCE μπορούν να συνδυαστούν με
όλες τις συσκευές, οι οποίες προβλέπονται για
76 Χειρισμός
Page 79

EL
την εκτέλεση θεραπειών που περιγράφονται
στο σημείο “Σκοπός χρήσης“.
Λάβετε υπόψη σας ότι σε δυσμενείς
συνδυασμούς συσκευών η πραγματική πίεση
στη μάσκα ενδεχομένως να μην ανταποκρίνεται
στην καθορισμένη από τον ιατρό πίεση
θεραπείας.
Αυτό μπορεί να συμβαίνει και σε περίπτωση
κατά την οποία εμφανίζεται η σωστή πίεση στη
συσκευή θεραπείας. Αναθέστε τη ρύθμιση του
συνδυασμού συσκευών σας σε ιατρό ή
εξειδικευμένο αντιπρόσωπο, έτσι ώστε η
πραγματική πίεση στη μάσκα να ανταποκρίνεται
στην πίεση θεραπείας σας.
Υγραντήρας αέρα αναπνοής
Οι μάσκες JOYCE μπορούν να χρησιμοποιούνται
με υγραντήρες ψυχρού ή θερμού αέρα.
Μην επιλέγετε όμως ποτέ το βαθμό ύγρανσης
πολύ υψηλό, ώστε να δημιουργείται
συμπύκνωμα νερού μέσα στο σωλήνα αέρα.
Τηρείτε τις οδηγίες χρήσης του υγραντήρα σας
και της συσκευής θεραπείας.
3.9 Μετά τη χρήση
1. Απαγκιστρώνετε ένα από τα κάτω κλιπ
περίδεσης στη μάσκα και αφαιρείτε τη
μάσκα.
2. Λύνετε τα κλιπ περίδεσης και αφαιρείτε την
περίδεση κεφαλιού από τη μάσκα.
3. Συνεχίζετε όπως περιγράφεται στην ενότητα
“4 Υγειονομική προετοιμασία”.
4. Πιέζετε και αφαιρείτε τη γωνία από το
δακτύλιο ασφάλειας και τραβάτε τον
περιστρεφόμενο δακτύλιο από τη γωνία.
5. Λύνετε την αδρή ρύθμιση από το σώμα
μάσκας.
6. Λύνετε τη ρύθμιση ακριβείας από την αδρή
ρύθμιση. Κατόπιν λύνετε το μετωπικό
μαξιλάρι από τη ρύθμιση ακριβείας.
Συναρμολόγηση μάσκας (Εικ. A - D)
1. Τοποθετείτε το μετωπικό μαξιλάρι στη
ρύθμιση ακριβείας. Εισάγετε μετά τη
ρύθμιση ακριβείας στην αδρή ρύθμιση.
2. Εισάγετε την αδρή ρύθμιση στο σώμα
μάσκας.
3. Εισάγετε τον περιστρεφόμενο δακτύλιο στη
γωνία έως ασφαλίσει με το χαρακτηριστικό
ήχο.
4. Πιέζετε τη γωνία μέσα στο δακτύλιο
ασφάλειας έως ότου ασφαλίσει με το
χαρακτηριστικό ήχο.
5. Εισάγετε δακτύλιο ασφάλειας και γωνία στο
σώμα μάσκας. Περιστρέφετε το δακτύλιο
ασφάλειας δεξιόστροφα έως ότου ασφαλίσει
με το χαρακτηριστικό ήχο.
6. Εισάγετε την τάπα στις υποδοχές μέτρησης
πίεσης.
7. Εισάγετε την προεξοχή μάσκας στο σώμα
μάσκας.
8. Στερεώνετε την περίδεση κεφαλιού με τα
κλιπ πάνω στη μάσκα.
3.10 Αποσυναρμολόγηση/ συναρμολόγηση μάσκας
Αποσυναρμολόγηση μάσκας (Εικ. D - A)
1. Λύνετε την προεξοχή μάσκας από το σώμα
μάσκας.
2. Απομακρύνετε την τάπα των υποδοχών
μέτρησης πίεσης.
3. Περιστρέφετε το δακτύλιο ασφάλειας
αριστερόστροφα. Τραβάτε τώρα το
δακτύλιο ασφάλειας και τη γωνία από το
σώμα μάσκας.
4 Υγειονομική προετοιμασία
4.1 Προθεσμίες
Καθημερινά
Καθαρίζετε τη μάσκα από τα υπολείμματα σε
θερμό νερό. Προς το σκοπό αυτό μπορείτε να
αποσυναρμολογήσετε τη μάσκα. Χρησιμοποιείτε
ένα ήπιο απορρυπαντικό (π.χ. απορρυπαντικό
πιάτων). Κατόπιν ξεπλένετε σχολαστικά όλα τα
εξαρτήματα με καθαρό νερό.
Υγειονομική προετοιμασία 77
Page 80

EL
Προσοχή!
• Σε ασθενείς με ασθενές ανοσοποιητικό σύστημα
ή σε ασθενείς με ιδιαίτερο ιστορικό ασθενειών
ενδέχεται να είναι απαραίτητη η καθημερινή
απολύμανση ή αποστείρωση των εξαρτημάτων
της μάσκας. Στην περίπτωση αυτή απευθυνθείτε
στον ιατρό σας.
• Κατά την υγειονομική προετοιμασία των επιφανειών επαφής μεταξύ σώματος μάσκας και
δακτυλίου ασφάλειας επιδεικνύετε μέγιστη
προσοχή. Υπολείμματα στις επιφάνειες αυτές
ενδέχεται να επηρεάσουν την επιτυχία της
θεραπείας ή τη λειτουργία του ενσωματωμένου συστήματος εκπνοής (παραλλαγές
vented).
Εβδομαδιαία
Αποσυναρμολογείτε τη μάσκα και
προετοιμάζετε υγειονομικά τα εξαρτήματα της
μάσκας (ανατρέξτε σε «4.2 Καθαρισμός,
απολύμανση, αποστείρωση» στη σελίδα 78).
4.2 Καθαρισμός, απολύμανση, αποστείρωση
Επιτρεπόμενες διαδικασίες
Διαδικασία
Εξαρτήματα
Προεξοχή μάσκας ••• •
Προεξοχή μάσκας
GEL
Μετωπικό μαξιλάρι •••
Μετωπικό μαξιλάρι
GEL
Τάπα ••• •
Σώμα μάσκας •••
Αδρή ρύθμιση •••
Ρύθμιση ακριβ είας •••
Γωνία •••
Περιστρεφόμενος
δακτύλιος
Δακτύλιος ασφάλειας •••
Κλιπ περίδεσης •••
Περίδεση κεφαλιού
WEINMANNstrap
Περίδεση κεφαλιού
HEADstrap
Πλυντήριο πιάτων
Πλύσιμο στο χέρι
Απολύμανση*
•••
••
•••
•
•
Αποστείρωση
(εναλλακτικός
τρόπος αντί
απολύμανσης)
Διαδικασία
Εξαρτήματα
Περίδεση κεφαλιού
JOYCEstrap
Πλυντήριο πιάτων
Πλύσιμο στο χέρι
Απολύμανση*
Αποστείρωση
(εναλλακτικός
•
Προσοχή!
Καθαρίζετε πάντα σχολαστικά τα εξαρτήματα της μάσκας πριν τα απολυμάνετε ή
τα αποστειρώσετε σύμφωνα με τον ανωτέρω πίνακα.
Τα εξαρτήματα της μάσκας με γέμιση γέλης είναι πολύ ευαίσθητα δομικά μέρη. Να
τα μεταχειρίζεστε πάντα με προσοχή,
προς αποφυγή παραμορφώσεων ή
φθορών.
Περιγραφή διαδικασιών
Πλυντήριο πιάτων
Πλύσιμο στο χέρι
Απολύμανση*
Αποστείρωση
(εναλλακτικά αντί
απολύμανσης)
*Συνιστούμε τα απολυμαντικά μέσα
gigasept
Πρόγραμμα πλύσης 65 ÆC. Κατόπιν
σχολαστικό ξέπλυμα όλων των
εξαρτημάτων με καθαρό νερό.
Πλύσιμο στο χέρι σε θερμό νερό.
Χρησιμοποιείτε ένα ήπιο απορρυπαντικό.
Κατόπιν ξεπλένετε όλα τα εξαρτήματα με
καθαρό νερό.
Αφήνετε τα εξαρτήματα να στεγνώσουν
στον αέρα.
Καθαρίζετε μηχανικά σε αραιωμένο
διάλυμα, π.χ. με μία βούρτσα. Μετά την
απολύμανση πλένετε σχολαστικά όλα τα
εξαρτήματα με αποσταγμένο νερό και τα
στεγνώνετε σχολαστικά.
Αποστείρωση με ατμό σε συσκευές
προτύπου EN 285. Θερμοκρασία 134 ÆC,
ελάχιστος χρόνος εφαρμογής 3 λεπτά.
®
FF (νέο), Cidex® OPA και Aniosyme
DD1. Για τα μέσα αυτά η συμβατότητα είναι
αποδεδειγμένη. Τηρείτε οπωσδήποτε τις
οδηγίες των κατασκευαστών.
Υποδείξεις σχετικά με την υγειονομική
προετοιμασία και κατά την αλλαγή ασθενούς θα
βρείτε σε έντυπο πληροφοριών στη
διαδικτυακή πύλη www.weinmann.de. Εάν δεν
έχετε διαδικτυακή πρόσβαση, απευθυνθείτε
στην Weinmann.
τρόπος αντί
απολύμανσης)
78 Υγειονομική προετοιμασία
Page 81

EL
Υπόδειξη
Κατά την υγειονομική προετοιμασία προτείνουμε τη χρήση κατάλληλων γαντιών
(π.χ. γάντια μίας χρήσης).
Πλένετε τον ιμάντα κεφαλιού πριν από την
πρώτη χρήση, διότι ενδέχεται να ξεβάψει.
Ο ιμάντας κεφαλιού επιτρέπεται να πλένεται μόνο στο χέρι!
Μην σιδερώνετε τον ιμάντα κεφαλιού, διότι διαφορετικά ενδέχεται να μην συγκρατούν πλέον τα αυτοκόλλητα φερμουάρ!
Μην στεγνώνετε την περίδεση κεφαλιού
στο στεγνωτήριο!
4.3 Μετά την προετοιμασία
Μετά την υγειονομική προετοιμασία
στεγνώνετε σχολαστικά όλα τα εξαρτήματα.
Ελέγχετε τα δομικά μέρη σχετικά με
υπολείμματα ρύπων ή φθορές. Εν ανάγκη
επαναλαμβάνετε την υγειονομική
προετοιμασία. Αντικαταστείτε κατεστραμμένα
εξαρτήματα. Συναρμολογείτε πάλι τη μάσκα.
4.4 Αλλαγή ασθενούς
Σε περίπτωση που η μάσκα χρησιμοποιείται για
έναν άλλο ασθενή, τότε θα πρέπει να
προετοιμάζεται προηγουμένως υγειονομικά.
Προς το σκοπό αυτό αποσυναρμολογείτε τη
μάσκα. Απολυμαίνετε ή αποστειρώνετε όλα τα
εξαρτήματα σύμφωνα με την ενότητα “4.2
Καθαρισμός, απολύμανση, αποστείρωση”.
Χρησιμοποιείτε νέα περίδεση κεφαλιού.
5 Λειτουργικός έλεγχος
Πραγματοποιείτε οπτικό έλεγχο μετά από κάθε
υγειονομική προετοιμασία.
Σε περίπτωση διαρροών στην προεξοχή μάσκας
εξαιτίας φθορών, προβαίνετε σε αντικατάσταση
της προεξοχής μάσκας.
Ελέγχετε τη λειτουργική ικανότητα και τη
στεγανότητα της σφαιρικής άρθρωσης στη
γωνία. Εάν δεν είναι πλέον ευκίνητη ή μη
στεγανή, αντικαταστείτε τη γωνία και το
δακτύλιο ασφάλειας.
Τα άχρηστα πλέον εξαρτήματα μπορούν να
αποσυρθούν μέσω των οικιακών
απορριμμάτων.
Ενδέχεται να εμφανιστούν αποχρωματισμοί του
μετωπικού μαξιλαριού και της προεξοχής
μάσκας. Οι αποχρωματισμοί αυτοί όμως δεν
επηρεάζουν τη λειτουργία.
6 Βλάβες και η αντιμετώπισή
τους
Βλάβη Αιτία Αντιμετώπιση
Πόνοι στο
πρόσωπο
εξαιτίας πίεσης.
Ρεύμα αέρος
στο μάτι.
Δεν
επιτυγχάνεται
πίεση
θεραπείας.
Μάσκα
εφαρμόζει πολύ
σφιχτά.
Μάσκα
εφαρμόζει πολύ
χαλαρά.
Μάσκα δεν
ταιριάζει.
Υψηλή πίεση
θεραπείας.
Μάσκα δεν έχει
ρυθμιστεί σωστά.
Προεξοχή μάσκας
έχει φθορά.
Σύστημα σωλήνα
έχει διαρροή.
Διαφεύγει αέρας
στις υποδοχές
μέτρησης πίεσης.
Ρυθμίζετε περίδεση κεφαλιού
λίγο πιο ευρύχωρα.
Προσαρμόζετε θέση
μετωπικού στηρίγματος.
Ρυθμίζετε περίδεση κεφαλιού
λίγο πιο σφιχτά.
Προσαρμόζετε θέση
μετωπικού στηρίγματος.
Χρησιμοποιείτε άλλο μέγεθος
μάσκας. Απευθυνθείτε στον
ειδικό σας έμπορο.
Χρησιμοποιείτε σκληρότερη
προεξοχή μάσκας (για πιέσεις
έως 40 hPa). Διαθέσιμη στον
ειδικό σας έμπορο.
Ρυθμίζετε περίδεση κεφαλιού.
Προσαρμόζετε θέση
μετωπικού στηρίγματος.
Αντικαταστείτε προεξοχή
μάσκας.
Ελέγχετε βύσμα και θέση
μουφών σωλήνα.
Σφραγίζετε υποδοχές
μέτρησης πίεσης με τάπα
(περιλαμβάνεται στα
περιεχόμενα παράδοσης).
7 Περιεχόμενα παράδοσης
Υπόδειξη
Ÿλες οι μάσκες παραδίδονται σε πλήρη
συναρμολόγηση και με περίδεση
κεφαλιού.
Λειτουργικός έλεγχος 79
Page 82

EL
Παραλλαγές vented
Προϊόν
HEADstrap
Αρ. προϊόντος με
JOYCE vented’ μέγ. S WM 26110 WM 26110/1
JOYCE vented’ μέγ. M WM 261 20 WM 26120/1
JOYCE vented’ μέγ. L WM 26130 WM 26 130/1
JOYCE vented’ μέγ. XL WM 261 40 WM 26140/1
JOYCE vented 40 hPa’ μ έγ. S WM 26111 WM 26111/1
JOYCE vented 40 hPa’ μ έγ. M WM 26121 WM 26121/1
JOYCE vented 40 hPa, μέγ. L WM 26131 WM 26131 /1
JOYCE vented 40 hPa, μέγ. XL WM 26141 WM 26141/1
JOYCE GEL vented’ μέγ. S WM 26112 WM 26112/1
JOYCE GEL vented’ μέγ. M WM 26122 WM 26122/1
JOYCE GEL vented, μέγ. L WM 261 32 WM 26132/1
WEINMANNstrap/
Αρ. προϊόντος
Παραλλαγές non vented
Αρ. προϊόντος με
Προϊόν
WEINMANNstrap/
HEADstrap
JOYCE non vented’ μέγ. S WM 26160
JOYCE non vented’ μέγ. M WM 26170
JOYCE non vented’ μέγ. L WM 26180
JOYCE non vented’ μέγ. XL WM 26190
JOYCE non vented 40 hPa’ μέγ. S WM 26161
JOYCE non vented 40 hPa’ μέγ. M WM 26171
JOYCE non vented 40 hPa’ μέγ. L WM 26181
JOYCE non vented 40 hPa’ μέγ. XL WM 26191
JOYCE GEL non vented’ μέγ. S WM 26162
JOYCE GEL non vented’ μέγ. M WM 26172
JOYCE GEL non vented’ μέγ. L WM 26182
Ανταλλακτικά
Προϊόν Αρ. προϊόντος
Μετωπικό στήριγμα GEL:
μετωπικό μαξιλάρι GEL, αδρή ρύθμιση
μετωπικό στήριγμα, ρύθμιση ακριβείας
μετωπικό στήριγμα
Μετωπικό μαξιλάρι WM 26200
με JOYCEstrap
Μετωπικό μαξιλάρι GEL WM 2620 9
Προεξοχή μάσκας 30 hPa, μέγ. S
Προεξοχή μάσκας 30 hPa, μέγ. Μ
Προεξοχή μάσκας 30 hPa, μέγ. L
Προεξοχή μάσκας 30 hPa, μέγ. XL
Προεξοχή μάσκας 40 hPa, μέγ. S
Προεξοχή μάσκας 40 hPa, μέγ. Μ
Προεξοχή μάσκας 40 hPa, μέγ. L
Προεξοχή μάσκας 40 hPa, μέγ. XL
Προεξοχή μάσκας GEL, μέγ. S
Προεξοχή μάσκας GEL, μέγ. M
Προεξοχή μάσκας GEL, μέγ. L
Περίδεση κεφαλιού WEINMANNstrap, με
κλιπ περίδεσης
Περίδεση κεφαλιού HEADstrap WM 26360
Περίδεση κεφαλιού JOYCEstrap μπλε, με
κλιπ περίδεσης
Κλιπ περίδεσης (4 τέμ.) WM 26205
Τάπα WM 26208
Οδηγίες χρήσης
DE, EN, FR, NL, IT, ES, PT, TR, EL, PL, HR
RU (pdf, Internet: www.Weinmann.de)
WM 26115
WM 26210
WM 26220
WM 26230
WM 26240
WM 26211
WM 26221
WM 26231
WM 26241
WM 26212
WM 26222
WM 26232
WM 26350
WM 26290
WM 16950
WM 16814
Αξεσουάρ
Προϊόν Αρ. προϊόντος
Σύστημα εκπνοής:
Silentflow 2
Σύστημα ηχομόνωσης
WM 23600
WM 23685
Προϊόν Αρ. προϊόντος
Σετ σφαιρικής άρθρωσης:
δακτύλιος ασφάλειας, γωνία,
περιστρεφόμενος δακτύλιος
Σετ σφαιρικής άρθρωσης non vented:
δακτύλιος ασφάλειας, γωνία,
περιστρεφόμενος δακτύλιος
Περιστρεφόμενος δακτύλιος vented WM 26254
Μετωπικό στήριγμα:
μετωπικό μαξιλάρι, αδρή ρύθμιση
μετωπικό στήριγμα, ρύθμιση ακριβείας
μετωπικό στήριγμα
80 Περιεχόμενα παράδοσης
WM 26206
WM 26207
WM 26201
Page 83

EL
8Προδιαγραφές
40
50
60
70
80
0
10
20
30
40
50
60
70
80
0 10203040
Μέση ροή διαρροής
vented(l/min )
Πίεση εξόδου στη συσκευή θεραπείας (hPa)
JOYCE
vented
JOYCE
non vented
Τεχνικά δεδομένα
JOYCE Τιμή
Κλάση προϊόντων σύμφωνα με
93/42/EOK:
Διαστάσεις (ΠxΥxΒ): περ. 80 x 130 x 90 mm
Βάρος: περ. 85 γραμμάρια
Ÿρια πίεσης θεραπείας:
Προεξοχή μάσκας μαλακή:
Προεξοχή μάσκας σκληρή:
Προεξοχή μάσκας GEL:
Σύνδεση σωλήνα: Κώνος σύμφωνα
με EN ISO 5356-1
vented:
non vented:
Υποδοχές μέτρησης πίεσης: 4 mm
Ευρύ κλιπ περίδεσης: μέγ. 20 mm
Ÿρια θερμοκρασίας
Λειτουργία:
Αποθήκευση
Αντίσταση ροής
vented:
σε 50 l/min
σε 100 l/min
non vented:
σε 50 l/min
σε 100 l/min
Αναφερόμενη τιμή εκπομπής
θορύβου
σύμφωνα με ISO 4871:
– Στάθμη ηχητικής πίεσης
–Ηχοστάθμη
(Συντελεστής αβεβαιότητας: 3 dB(A))
Διάρκεια χρήσης έως και 12 μήνες
Εφαρμοσμένα πρότυπα EN ISO 17510-2:2009
1
ανάλογα με μέγεθος και έκδοση
2
Υλικά για την κατασκευή μασκών, γηράσκουν
εάν π.χ. εκτίθενται σε επιθετικά απορρυπαντικά
μέσα. Σε μεμονωμένες περιπτώσεις ενδέχεται να
είναι αναγκαία η αντικατάσταση της μάσκας σας
πιο νωρίς (ανατρέξτε σε «5 Λειτουργικός
έλεγχος» στη σελίδα 79).
II a
4 έως 30 hPa
4 έως 40 hPa
4 έως 40 hPa
22 mm (άρρεν)
22 mm (θήλυ)
+ 5 °C έως + 40 °C
- 20 °C έως + 70 °C
0,02 hPa
0,11 hPa
0,09 hPa
0,37 hPa
15 dB(A)
23 dB(A)
Με επιφύλαξη
κατασκευαστικών
αλλαγών
Υλικά
Προϊόν Υλικό
Προεξοχή μάσκας, τάπα Σιλικόνη
Προεξοχή μάσκας GEL
Μετωπικό μαξιλάρι, δακτύλιος
ασφάλειας
1
1
Μετωπικό μαξιλάρι GEL
Σώμα μάσκας, γωνία Πολυκαρβονικό
Περίδεση κεφαλιού WEINMANNstrap
Περίδεση κεφαλιού JOYCEstrap
Περίδεση κεφαλιού HEADstrap
Περιστρεφόμενος δακτύλιος, αδρή
ρύθμιση μετωπικό στήριγμα, ρύθμιση
ακριβείας μετωπικό στήριγμα
Κλιπ περίδεσης POM
Σιλικόνη,
Σιλικόνη-γέλη
TPE, πολυπροπυλένιο
Σιλικόνη,
Σιλικόνη-γέλη,
Πολυκαρβονικό
Ελαστίνη, Πολυεστέρας,
Πολυουρεθάνη, Nylon,
Βαμβάκι, Πολυαμίδιο
Βαμβάκι,
Πολυαμίδιο, Ελαστίνη
Nylon/Spandex
Πολυουρεθάνη
Πολυεστέρας/Lycra
Πολυπροπυλένιο
Ÿλα τα εξαρτήματα της μάσκας δεν περιέχουν
λατέξ.
Χαρακτηριστική καμπύλη πίεσης ροής
Στη χαρακτηριστική καμπύλη πίεσης ροής
παριστάνεται η ροή εξαγωγής σε εξάρτηση από
την πίεση θεραπείας.
2
Προδιαγραφές 81
Page 84

EL
9Εγγύηση
Η Weinmann παρέχει στον πελάτη ενός νέου
αυθεντικού προϊόντος Weinmann και ενός
ανταλλακτικού που έχει συναρμολογηθεί από
την Weinmann μία περιορισμένη εγγύηση
κατασκευαστή σύμφωνα με τους εγγυητικούς
όρους που ισχύουν για το εκάστοτε προϊόν και
σύμφωνα με τα κατωτέρω αναφερόμενα
χρονικά διαστήματα εγγύησης από την
ημερομηνία αγοράς. Οι εγγυητικοί όροι μπορεί
να κληθούν στο διαδίκτυο στη διαδικτυακή
πύλη www.weinmann.de. Κατόπιν επιθυμίας
σας αποστέλλουμε επίσης τους εγγυητικούς
όρους. Σε περίπτωση εγγυητικής αξίωσης
απευθυνθείτε στον ειδικό σας έμπορο.
Προϊόν
Συσκευές Weinmann με αξεσουάρ (εξαίρεση:
μάσκες) για διάγνωση ύπνου, υπνοθεραπεία,
τεχνητή αναπνοή στο σπίτι, οξυγονοθεραπεία
και παροχή πρώτων βοηθειών
Μάσκες με αξεσουάρ, συσσωρευτές,
μπαταρίες*, αισθητήρες, συστήματα σωλήνα
Προϊόντα μόνο για μία χρήση Κανένα
Διαστήματα
εγγύησης
2 έτη
6 μήνες
* εάν δεν αναφέρεται κάτι διαφορετικό στα
τεχνικά έντυπα.
10 Δήλωση συμμόρφωσης
Με το παρόν, η Weinmann Gerte fr Medizin
GmbH + Co. KG, δηλώνει ότι το προϊόν
ανταποκρίνεται στους σχετικούς κανονισμούς
της Οδηγίας 93/42/ΕΟΚ για ιατρικά βοηθήματα.
Το πλήρες κείμενο της δήλωσης συμμόρφωσης
θα το βρείτε στη διαδικτυακή πύλη:
www.weinmann.de
82 Εγγύηση
Page 85

PL
Polski
1Opis urządzenia
Legenda
(przegląd części: patrz dołączoną
składaną ulotkę)
1 Taśmy podtrzymujące
2 Poduszka czołowa
3 Regulator dokładny podpory czołowej
4 Regulator główny podpory czołowej
5 Podpora czołowa
6 Zatrzask mocujący taśm podtrzymujących
7 Przyłącza pomiaru ciśnienia
8 Zamek
9 Tuleja obrotowa (non vented: w kolorze
niebieskim)
10 Kątownik (non vented: w kolorze niebie-
skim)
11 Pierścień zabezpieczający (non vented: w
kolorze niebieskim)
12 Korpus maski
13 Zgrubienie maski
Przeznaczenie
Maska nosowa należy do akcesoriów i działa
jako element uszczelniający drogę między
pacjentem a urządzeniem terapeutycznym.
Jest używana do leczenia bezdechu sennego
i nieinwazyjnej wentylacji pacjentów z
niewydolnością oddechową.
Przed użyciem przez pacjenta
Przed rozpoczęciem terapii pacjenci muszą
zostać poinstruowani przez
wykwalifikowany personel w zakresie
używania maski.
2 Wskazówki bezpieczeństwa
Zasady bezpieczeństwa
Zgodnie z wymogami Dyrektywa 93/42/WE
należy się stosować do następujących zasad:
•Należy uważnie przeczytać niniejszą
instrukcję obsługi. Jest ona integralną
częścią maski i musi być dostępna w każdej
chwili.
•Stosować maski wyłącznie w wymaganych
dla poszczególnych wariantów zakresach
ciśnienia terapeutycznego:
– 4-30 hPa: JOYCE vented
– 4-40 hPa: JOYCE vented 40 hPa
JOYCE non vented
JOYCE non vented 40 hPa
JOYCE GEL vented
JOYCE GEL non vented
• Przy stosowaniu wyrobów innych
producentów może dojść do awarii i
ograniczenia przydatności do użycia.
Ponadto mogą nie być spełnione
wymagania dotyczące kompatybilności
biologicznej. Należy pamiętać, że wszelkie
roszczenia z tytułu gwarancji i rękojmi
wygasają w przypadku użycia akcesoriów
innych niż wymienione w niniejszej
instrukcji albo nieoryginalnych części
zamiennych.
• Pacjentów z ograniczonym oddechem
spontanicznym należy ciągle monitorować.
W respiratorze musi być aktywny
odpowiedni alarm na wypadek
podciśnienia/nieszczelności.
• Pacjenci z obstrukcyjnymi i restrykcyjnymi
schorzeniami płuc powinni być w czasie
stosowania masek JOYCE indywidualnie
badani (np. pod kątem wtórnej respiracji
CO
).
2
• Otwory tej maski zamykać tylko w
sytuacjach opisanych w niniejszej instrukcji
obsługi. W przeciwnym razie istnieje
zagrożenie wtórną respiracją CO
.
2
•Maskę wolno zakładać na dłuższy czas
tylko pod warunkiem, że urządzenie
terapeutyczne jest włączone.
W przeciwnym razie istnieje zagrożenie
wtórną respiracją CO
.
2
•Nie używać przewodzących elektrycznie
węży oddechowych (wyjątek: ogrzewane
elektrycznie węże oddechowe).
Opis urządzenia 83
Page 86

PL
• Przestrzegać uwag zawartych w rozdziale 4
“Preparacja higieniczna” , aby uniknąć
infekcji lub kontaminacji bakteryjnej oraz
zakłóceń działania.
Skutki uboczne
Mogą wystąpić następujące skutki uboczne:
niedrożny nos, wyschnięty nos, poranna
suchość ust, uczucie ucisku w zatokach,
podrażnienia spojówek, uciążliwe odgłosy
przy oddychaniu, odciski na twarzy,
zaczerwienienia skóry.
3Obsługa
Rys. A-E: patrz dołączoną składaną
ulotkę.
3.1 Ustawianie podpory czołowej
(Rys.
A)
Regulator dokładny
Nacisnąć i przytrzymać górne wypustki
regulatora głównego. Ustawić regulator
dokładny w jednej z trzech pozycji blokady.
Aby dopasować wysokość poduszki czołowej
wzgl. regulatora dokładnego (ok. 1 cm),
obrócić regulator dokładny o 180°.
Następnie ustawić go w opisany wyżej
sposób.
Regulator główny
Nacisnąć i przytrzymać dolne wypustki
regulatora głównego. Ustawić ten regulator
w jednej z trzech pozycji blokady korpusu
maski.
3.2 Zakładanie maski
1. Odczepić jeden z dolnych zatrzasków
taśm podtrzymujących.
2. Założyć taśmy podtrzymujące na głowę i
zamknąć zatrzask taśm podtrzymujących.
3. Ustawić taśmy podtrzymujące przy użyciu
rzepów tak, by maska przylegała
szczelnie, ale nie za mocno do twarzy.
Tylko WEINMANNstrap:
Taśmy podtrzymujące
WEINMANNstrap zapewniają
następujące możliwości (patrz także
„Przegląd“ na dołączonej ulotce
składanej):
– Rzepy po obu stronach.
– Rzep górny na głowie: Otworzyć rzep, lekko
pociągnąć obydwoma rękami za końce
taśm podtrzymujących i docisnąć rzep.
Po językach z rzepami można poznać,
czy taśmy podtrzymujące są
prawidłowo zamocowane. Języki
z rzepami na czole mają ten sam kolor
co wewnętrzna strona taśm
podtrzymujących.
Tylko HEADstrap:
Taśmy podtrzymujące HEADstrap
zapewniają następujące możliwości
(patrz także „Przegląd“ na dołączonej
ulotce składanej):
– Regulacja przybliżona: szczelina "a" albo
"b" taśm podtrzymujących.
– Regulacja dokładna: cztery taśmy rzepowe.
4. W razie potrzeby ustawić podporę
czołową na nowo.
3.3 System wydechowy (rys. E)
Wariantyvented
Warianty vented (wszystkie części maski
przezroczyste) posiadają tak zwany
zintegrowany system wydechowy:
Pierścień zabezpieczający i korpus maski są
ukształtowane tak, że między tymi częściami
powstaje szczelina. Przez tę szczelinę może
uchodzić wydychane powietrze. Specjalna
geometria części uniemożliwia zamknięcie
szczeliny przy zakładaniu pierścienia
zabezpieczającego. Nie podłączać
dodatkowego systemu wydechowego,
w przeciwnym razie ciśnienie terapeutyczne
nie zostanie osiągnięte.
Wariantynon vented
Warianty non vented (pierścień
zabezpieczający, kątownik i tuleja obrotowa
84 Obsługa
Page 87

PL
w kolorze niebieskim) nie posiadają systemu
wydechowego. Należy do nich zawsze
podłączać dodatkowy system wydechowy.
W przeciwnym razie istnieje zagrożenie
wtórną respiracją CO
Przestrzegać wskazówek zawartych
w instrukcji obsługi systemu wydechowego.
i uduszeniem.
2
3.4 Podłączyć maskę do urządzenia
terapeutycznego (rys.
Założyć wąż urządzenia terapeutycznego na
tuleję obrotową (warianty vented) albo na
zewnętrzny system wydechowy (warianty
non-vented). Zapewnić pewne i szczelne
połączenie z wężem. Ciśnienie terapeutyczne
nie może spowodować poluzowania
połączenia.
Jeżeli maska ma zostać na krótko odłączona
od węża, po prostu ściągnąć tuleję obrotową
z kątownika.
E)
3.5 Części maski wypełnione żelem
W maskach JOYCE GEL vented i JOYCE GEL
non vented poduszka czołowa i zgrubienie
maski są wypełnione żelem. Żelowa
poduszka czołowa i żelowe zgrubienie maski
są też dostępne dla innych wariantów masek
JOYCE jako części zamienne.
Ostrożnie!
Części maski wypełnione żelem są bardzo
wrażliwe. Należy nimi manipulować
ostrożnie, aby zapobiec odkształceniom
i uszkodzeniom.
3.6 Zakresy ciśnienia
terapeutycznego
Poszczególne warianty masek JOYCE są
dostępne dla określonego zakresu ciśnienia
terapeutycznego (patrz „7. Zakres dostawy”
na stronie 89):
– 4-30 hPa: JOYCE vented
JOYCE non vented
– 4-40 hPa: JOYCE vented 40 hPa
JOYCE non vented 40 hPa
JOYCE GEL vented
JOYCE GEL non vented
Maski JOYCE dla zakresu ciśnienia
terapeutycznego 4-30 hPa mają miękkie
zgrubienie, a maski JOYCE dla zakresu
ciśnienia terapeutycznego 4-40 hPa
twardsze albo żelowe (warianty żelowe)
zgrubienie.
Twardsze zgrubienie maski dla zakresu
ciśnienia terapeutycznego 4-40 hPa jest
oznaczone liczbą "40".
Miękkie (do 30 hPa) i twardsze (bis 40 hPa), a
także żelowe (warianty żelowe) zgrubienia
masek są też dostępne jako pojedyncze
części zamienne, umożliwiające
dostosowywanie maski do zmienionych
warunków terapii.
3.7 Przyłącza pomiaru ciśnienia
(rys.
C)
Maski JOYCE są wyposażone w dwa
przyłącza, których można używać do
pomiaru ciśnienia albo do doprowadzania
tlenu.
Ostrożnie!
• Terapia tlenowa może przy
nieprawidłowym stosowaniu/dawkowaniu
prowadzić do skutków ubocznych. Taką
terapię można w związku z tym prowadzić
tylko z zalecenia lekarza.
• Przy prowadzeniu terapii tlenowej należy
bezwzględnie przestrzegać instrukcji
obsługi systemu O
terapeutycznego.
Gdy przyłącza pomiaru ciśnienia nie są
używane, należy je zawsze zamykać
dostarczonym zamkiem. W przeciwnym razie
z przyłączy będzie uchodzić powietrze i nie
zostanie osiągnięte ciśnienie terapeutyczne.
i urządzenia
2
3.8 Kompatybilne urządzenia
Urządzenia terapeutyczne
Maski JOYCE można łączyć z wszystkimi
urządzeniami przewidzianymi do terapii
opisanych w punkcie „Przeznaczenie“.
Należy pamiętać, że w przypadku
niekompatybilnych urządzeń rzeczywiste
ciśnienie panujące w masce może nie być
Obsługa 85
Page 88

PL
zgodne z zaleconym ciśnieniem
terapeutycznym.
Może tak być nawet wtedy, gdy urządzenie
terapeutyczne pokazuje prawidłowe
ciśnienie. Kombinacja urządzeń musi zostać
ustawiona przez lekarza lub autoryzowanego
przedstawiciela handlowego tak, by
rzeczywiste ciśnienie w masce było zgodne
z ciśnieniem terapeutycznym.
Nawilżacz powietrza do oddychania
Maski JOYCE mogą być używane zarówno
z nawilżaczami powietrza zimnego, jak
i ciepłego.
Nie wybierać zbyt wysokiego stopnia
nawilżenia, aby w wężu nie gromadziła się
woda. Przestrzegać instrukcji obsługi
nawilżacza i urządzenia terapeutycznego.
3.9 Po użyciu
1. Odczepić jeden z dolnych zatrzasków
taśm podtrzymujących maski i zdjąć
maskę.
2. Poluzować zatrzaski taśm
podtrzymujących i zdjąć taśmy
podtrzymujące z maski.
3. Wykonać czynności opisane w punkcie
„4 Preparacja higieniczna”.
6. Odłączyć regulator dokładny od
regulatora głównego. Zdjąć poduszkę
czołową z regulatora dokładnego.
Składanie maski (rys. A-D)
1. Założyć poduszkę czołową na regulator
dokładny. Założyć regulator dokładny na
regulator główny.
2. Założyć regulator główny na korpus
maski.
3. Założyć tuleję obrotową na kątownik tak,
by została słyszalnie zablokowana.
4. Wcisnąć kątownik do pierścienia
zabezpieczającego tak, by został
słyszalnie zablokowany.
5. Założyć pierścień zabezpieczający
i kątownik na korpus maski. Obracać
pierścień zabezpieczający w kierunku
ruchu wskazówek zegara tak, by został
słyszalnie zablokowany.
6. Założyć zamek na przyłącza pomiaru
ciśnienia.
7. Założyć zgrubienie maski na korpus
maski.
8. Przymocować taśmy podtrzymujące
zatrzaskami do maski.
3.10 Rozbieranie i składanie maski
Rozbieranie maski (rys. D - A)
1. Odłączyć zgrubienie maski od korpusu
maski.
2. Zdjąć zamek przyłączy pomiaru ciśnienia.
3. Obrócić pierścień zabezpieczający w
kierunku przeciwnym do kierunku ruchu
wskazówek zegara. Zdjąć pierścień
zabezpieczający i kątownik z korpusu
maski.
4. Wypchnąć kątownik z pierścienia
zabezpieczającego i zdjąć tuleję
obrotową z kątownika.
5. Odłączyć regulator główny od korpusu
maski.
86 Preparacja higieniczna
4 Preparacja higieniczna
4.1 Terminy
Codziennie
Dokładnie wyczyścić maskę w ciepłej wodzie.
W tym celu można rozebrać maskę. Używać
łagodnego środka czyszczącego (np. płynu
do mycia naczyń). Następnie wypłukać
wszystkie części czystą wodą.
Ostrożnie!
• W przypadku pacjentów z osłabionym
systemem odpornościowym albo ze
szczególnym tłem choroby może być
konieczna codzienna dezynfekcja albo
sterylizacja części maski. W tym przypadku
należy się skonsultować z lekarzem.
Page 89

PL
•Preparację higieniczną powierzchni styku
Zmywarka do naczy
Mycie ręczne
Dezynfekcja*
Sterylizacja (jako
alternatywa dla
dezynfekcji)
korpusu maski i pierścienia
zabezpieczającego należy przeprowadzać
z najwyższą starannością. Pozostałości na
tych powierzchniach mogą zagrozić
powodzeniu terapii albo zakłócić działanie
zintegrowanego systemu wydechowego
(warianty vented).
Co tydzień
Rozebrać maskę i przeprowadzić preparację
higieniczną części maski (patrz
„4.2. Czyszczenie, dezynfekcja, sterylizacja”
na stronie 87).
4.2 Czyszczenie, dezynfekcja, sterylizacja
Dopuszczalne metody
Metoda
Części
Zgrubienie maski ••• •
Zgrubienie maski
GEL
Poduszka czołowa •••
Poduszka czołowa
GEL
Zamek ••• •
Korpus maski •••
Regulator główny •••
Regulator
dokładny
Kątownik •••
Tuleja obrotowa •••
Pierścień
zabezpieczający
Zatrzask taśm
podtrzymujących
Ta śmy
podtrzymujące
WEINMANNstrap
Ta śmy
podtrzymujące
HEADstrap
Ta śmy
podtrzymujące
JOYCEstrap
•••
••
•••
•••
•••
•
•
•
Ostrożnie!
Przed dezynfekcją lub sterylizacją
zgodną z powyższą tabelą należy
zawsze dokładnie wyczyścić części
maski.
Części maski wypełnione żelem są
bardzo wrażliwymi częściami. Należy
nimi manipulować ostrożnie, aby
zapobiec odkształceniu i uszkodzeniu.
Opisy metod
Zmywarka do
naczyń
Mycie ręczne
Dezynfekcja*
Sterylizacja
(jako alternatywa
dla dezynfekcji)
*Zalecamy środki dezynfekcyjne gigasept® FF
(nowość), Cidex
Myć w 65°C. Następnie dokładnie
wypłukać części czystą wodą.
Myć ręcznie w ciepłej wodzie. Używać
łagodnego środka czyszczącego.
Następnie wypłukać wszystkie części
czystą wodą
i wysuszyć na powietrzu.
Czyścić mechanicznie w rozcieńczonym
roztworze, np. szczotką. Po dezynfekcji
wszystkie części dokładnie wypłukać
wodą destylowaną i dokładnie
wysuszyć.
Sterylizować parą w w urządzeniach
spełniających norm
Temperatura 134°C, minimalny czas
działania 3 minuty.
®
OPA i Aniosyme DD1.
ę EN 285.
Nieszkodliwość tych środków została
potwierdzona. Bezwzględnie przestrzegać
wskazówek producentów.
Wskazówki dotyczące preparacji higienicznej
i preparacji higienicznej przy zmianie
pacjenta są też podane w broszurze
znajdującej się na stronie internetowej
www.weinmann.de. W razie braku dostępu
do Internetu należy się skontaktować z firmą
Weinmann.
Wskazówka
Zalecamy noszenie przy preparacji
higienicznej odpowiednich rękawiczek
(np. jednorazowych).
Uprać taśmy podtrzymujące przed
pierwszym użyciem, ponieważ mogą
farbować.
Taśmy przytrzymujące wolno prać tylko
ręcznie!
Preparacja higieniczna 87
Page 90

PL
Nie prasować taśm podtrzymujących,
w przeciwnym razie rzepy zostaną
uszkodzone!
Nie suszyć taśm podtrzymujących
w suszarce!
4.3 Po preparacji
Po preparacji higienicznej dokładnie
wysuszyć wszystkie części. Sprawdzić części
pod kątem nieusuniętych zabrudzeń albo
uszkodzeń. W razie potrzeby powtórzyć
preparację higieniczną. Wymienić
uszkodzone części. Ponownie zmontować
maskę.
4.4 Zmiana pacjenta
Jeżeli maska ma być używana przez innego
pacjenta, należy ją najpierw poddać
preparacji higienicznej.
W tym celu rozebrać maskę. Zdezynfekować
albo wysterylizować wszystkie części zgodnie
z punktem „4.2 Czyszczenie, dezynfekcja,
sterylizacja”. Użyć nowych taśm
podtrzymujących.
5 Kontrola działania
Po każdej preparacji higienicznej należy
przeprowadzić kontrolę wzrokową maski.
Jeżeli wskutek uszkodzenia zgrubienia maski
występują nieszczelności, wymienić
zgrubienie.
Sprawdzić sprawność i szczelność przegubu
kulkowego kątownika. Jeżeli jego ruch jest
utrudniony albo jest on nieszczelny,
wymienić kątownik i pierścień
zabezpieczający.
Uszkodzone części można usuwać
z odpadami domowymi.
Mogą wystąpić odbarwienia poduszki
czołowej i zgrubienia maski. Nie mają one
jednak wpływu na działanie maski.
6 Usterki i ich usuwanie
Usterka Przyczyna Sposób usunięcia
Ból twarzy
spowodowany uciskiem.
Strumień
powietrza w
oko.
Nie jest osią-
gane ciśnie-
nie
terapeutyczne.
Maska jest
dopasowana
za ciasno.
Maska jest
dopasowana
za luźno.
Maska nie
pasuje.
Wysokie ciś-
nienie terapeutyczne.
Maska jest nieprawidłowo
ustawiona.
Uszkodzone
zgrubienie
maski.
Nieszczelny
układ węży.
Powietrze
uchodzi z
przyłączy
pomiaru ciś-
nienia.
Poszerzyć taśmy podtrzymujące.
Dopasować pozycję podpory czołowej.
Ściągnąć taśmy podtrzymujące.
Dopasować pozycję podpory czołowej.
Użyć innego rozmiaru
maski; zwrócić się do
przedstawiciela handlowego.
Użyć twardszego zgrubie-
nia maski (dla ciśnień do
40 hPa). Część ta jest
dostępna u przedstawiciela handlowego.
Ustawić taś
mujące.
Dopasować pozycję podpory czołowej.
Wymienić zgrubienie
maski.
Sprawdzić złącza wtykowe i kształtki węży.
Zamknąć przyłącza
pomiaru ciśnienia
zamkiem (dostarczonym z
maską).
my podtrzy-
88 Kontrola działania
Page 91

PL
7 Zakres dostawy
Wskazówka
Wszystkie maski są dostarczane
w stanie zmontowanym i z taśmami
podtrzymującymi.
Warianty vented
Artykuł
HEADstrap
Nr artykułu z
WEINMANNstrap/
JOYCE vented‚ rozm. S WM 26110 WM 26110/1
JOYCE vented‚ rozm. M WM 26120 WM 26120/1
JOYCE vented‚ rozm. L WM 26130 WM 26130/1
JOYCE vented‚ rozm. XL WM 26140 WM 26140/1
JOYCE vented 40 hPa‚
rozm. S
JOYCE vented 40 hPa‚
rozm. M
JOYCE vented 40 hPa,
rozm. L
JOYCE vented 40 hPa,
rozm. XL
JOYCE GEL vented‚ rozm. S WM 26112 WM 26112/1
JOYCE GEL vented‚
JOYCE GEL vented, rozm. L WM 26132 WM 26132/1
rozm. M
WM 26111 WM 26111/1
WM 26121 WM 26121/1
WM 26131 WM 26131/1
WM 26141 WM 26141/1
WM 26122 WM 26122/1
Warianty non vented
Artykuł
JOYCE non vented‚ rozm. S WM 26160
JOYCE non vented‚ rozm. M WM 26170
JOYCE non vented‚ rozm. L WM 26180
JOYCE non vented‚ rozm. XL WM 26190
JOYCE non vented 40 hPa‚
rozm. S
Nr artykułu z
WEINMANNstrap/
WM 26161
Nr artykułu z
HEADstrap
Nr artykułu z
Artykuł
WEINMANNstrap/
HEADstrap
JOYCE non vented 40 hPa‚
rozm. M
JOYCE non vented 40 hPa‚
rozm. L
JOYCE non vented 40 hPa‚
rozm. XL
JOYCE GEL non vented‚ rozm. S WM 26162
JOYCE GEL non vented‚ rozm. M WM 26172
JOYCEstrap
JOYCE GEL non vented‚ rozm. L WM 26182
WM 26171
WM 26181
WM 26191
Części zamienne
Artykuł Nr artykułu
Zestaw przegubu kulkowego:
pierścień zabezpieczający, kątownik,
tuleja obrotowa
Zestaw przegubu kulkowego nonvented:
pierścień zabezpieczający, kątownik,
tuleja obrotowa
Tuleja obrotowa vented WM 26254
Podpora czołowa:
poduszka czołowa, regulator główny
podpory czołowej, regulator dokładny
podpory czołowej
Podpora czołowa GEL:
poduszka czołowa GEL, regulator
główny podpory czołowej, regulator
dokładny podpory czołowej
Poduszka czołowa WM 26200
Poduszka czołowa GEL WM 26209
Zgrubienie maski 30 hPa, rozm. S
Zgrubienie maski 30 hPa, rozm. M
Zgrubienie maski 30 hPa, rozm. L
Zgrubienie maski 30 hPa, rozm. XL
Zgrubienie maski 40 hPa, rozm. S
Zgrubienie maski 40 hPa, rozm. M
Zgrubienie maski 40 hPa, rozm. L
Zgrubienie maski 40 hPa, rozm. XL
Zgrubienie maski GEL, rozm. S
Zgrubienie maski GEL, rozm. M
Zgrubienie maski GEL, rozm. L
Ta śmy podtrzymujące
WEINMANNstrap, wł. z zatrzaskami
WM 26206
WM 26207
WM 26201
WM 26115
WM 26210
WM 26220
WM 26230
WM 26240
WM 26211
WM 26221
WM 26231
WM 26241
WM 26212
WM 26222
WM 26232
WM 26350
Zakres dostawy 89
Page 92

PL
Artykuł Nr artykułu
Ta śmy podtrzymujące HEADstrap WM 26360
Ta śmy podtrzymujące JOYCEstrap
niebieskie, wł. z zatrzaskami
Zatrzaski taśm podtrzymujących (4 szt.) WM 26205
Zamek WM 26208
Instrukcja obsługi
DE, EN, FR, NL, IT, ES, PT, TR, EL, PL, HR
RU (pdf, Internet: www.Weinmann.de)
WM 26290
WM 16950
WM 16814
Akcesoria
Artykuł Nr artykułu
System wydechowy:
Silentflow 2
System tłumienia odgłosów
WM 23600
WM 23685
8 Specyfikacja
Dane techniczne
JOYCE Wartość
Klasa produktu wg dyrektywy
93/42/WE:
Wymiary (dł. x wys. x szer.):
Ciężar: ok. 85 gramów
Zakres ciśnienia
terapeutycznego:
zgrubienie maski miękkie:
zgrubienie maski twarde:
zgrubienie maski GEL:
Przyłącze węża: stożek, zgodne
z EN ISO 5356-1
vented:
non vented:
Przyłącza pomiaru ciśnienia: Ø 4 mm
Szerokość zatrzasku taśm
podtrzymujących:
Zakres temperatury
użytkowania:
przechowywania:
II a
ok.
80 x 130 x 90 mm
4 do 30 hPa
4 do 40 hPa
4 do 40 hPa
Ø 22 mm (męskie)
Ø 22 mm (żeńskie)
maks. 20 mm
+ 5°C do + 40°C
- 20°C do + 70°C
JOYCE Wartość
Opór przepływu
vented:
przy 50 l/min
przy 100 l/min
non vented:
przy 50 l/min
przy 100 l/min
Podana dwucyfrowa wartość
emisji dźwięku
według ISO 4871:
– poziom ciśnienia
akustycznego
– poziom mocy akustycznej
(współczynnik niepewności:
3 dB(A))
Czas użytkowania do 12 miesięcy
Zastosowane normy EN ISO 17510-2:2009
1
zależnie od rozmiaru i wersji
2
Materiały używane do produkcji masek
0,02 hPa
0,11 hPa
0,09 hPa
0,37 hPa
15 dB(A)
23 dB(A)
2
ulegają starzeniu, gdy są np. narażone na
działanie agresywnych środków
czyszczących. W niektórych przypadkach
może być konieczna wcześniejsza wymiana
maski(patrz „5. Kontrola działania” na
stronie 88).
Zmiany konstrukcyjne
zastrzeżone
1
1
Materiały
Artykuł Materiał
Zgrubienie maski,
Zgrubienie maski GEL
Poduszka czołowa, pierścień
zabezpieczający
Poduszka czołowa GEL
Korpus maski, kątownik Poliwęglan
Ta śmy podtrzymujące
WEINMANNstrap
Ta śmy podtrzymujące JOYCEstrap
zamek
Silikon
Silikon,
żel silikonowy
TPE, polipropylen
Silikon,
żel silikonowy,
poliwęglan
Elastan, poliester,
poliuretan, nylon,
bawełna, poliamid
Bawełna,
poliamid, Elastan
90 Specyfikacja
Page 93

PL
Artykuł Materiał
40
50
60
70
80
0
10
20
30
40
50
60
70
80
0 10203040
Średni przepływ przy
nieszczelności vented (l/min)
Ciśnienie wyjściowe w urządzeniu
terapeutycznym (hPa)
JOYCE
vented
JOYCE
non vented
Ta śmy podtrzymujące HEADstrap
Tuleja obrotowa, regulator główny
podpory czołowej, regulator
dokładny podpory czołowej
Zatrzask taśm podtrzymujących POM
Nylon/Spandex
Poliuretan
Poliester/Lycra
Polipropylen
Żadna z części maski nie zawiera lateksu.
Charakterystyka ciśnienie-przepływ
Charakterystyka ciśnienie-przepływ
przedstawia przepływ wyjściowy w
zależności od ciśnienia terapeutycznego.
9Gwarancja
Okresy
Produkt
gwarancj
i
Urządzenia firmy Weinmann włącznie
z akcesoriami (wyjątek: maski) do diagnostyki
zaburzeń snu, terapii bezdechu sennego,
sztucznego oddychania w domu, terapii
tlenowej i doraźnej
Maski włącznie z akcesoriami, akumulator,
baterie*, czujniki, układy węży
Produkty jednorazowego użytku Brak
2 lata
6 miesięcy
* Jeżeli w dokumentacji technicznej nie
podano inaczej.
10 Deklaracja zgodności
Firma Weinmann Geräte für Medizin GmbH
+ Co.KG oświadcza, że niniejszy produkt
spełnia obowiązujące wymagania dyrektywy
93/42/WE w sprawie wyrobów medycznych.
Pełny tekst deklaracji zgodności dostępny jest
w Internecie pod adresem:
www.weinmann.de
Firma Weinmann udziela klientom
ograniczonej gwarancji na nowo zakupiony,
oryginalny produkt marki Weinmann lub
zamontowaną przez firmę Weinmann część
zamienną, zgodnie z obowiązującymi dla
danego produktu warunkami gwarancji, na
podany niżej okres od daty zakupu. Warunki
gwarancji dostępne są w Internecie pod
adresem www.weinmann.de. Na życzenie
klient może też otrzymać warunki gwarancji
pocztą. W przypadku gwarancyjnym należy
zwrócić się do przedstawiciela handlowego.
Gwarancja 91
Page 94

HR
Hrvatski
1Opis uređaja
Legenda
(Prikaz pojedinih dijelova: Vidi
pridodani savijeni list.)
1 Remenje za glavu
2 Čeoni jastučić
3 Fino podešavanje čeonog oslonca
4 Grubo podešavanje čeonog oslonca
5 Čeoni oslonac
6 Spojnica trake
7 Priključci za mjerenje tlaka
8 Zatvarač
9 Okretna čahura (non vented: plave boje)
10 Kutnik (non vented: plave boje)
11 Sigurnosni prsten (non vented: plave boje)
12 Tijelo maske
13 Zadebljanje maske
Svrha uporabe
Maska za nos je proizvod opreme i služi kao
brtveni element između pacijenta i
terapijskog uređaja. Ona se koristi kod
terapije apneje spavanja i za neinvazivno
davanje umjetnog disanja kod pacijenata s
insuficijencijom ventiliranja.
Prije uporabe kod pacijenta
Kvalificirani personal treba pacijente prije
početka terapije uputiti u uporabu maske.
2 Sigurnosni naputci
Sigurnosne odredbe
Prema zahtjevima iz Smjernica 93/42 EWG
obratite pažnju na slijedeće točke:
• Pažljivo pročitate ovu uputu za uporabu.
Ona je sastavni dio maske i mora biti
dostupna u svako doba.
• Koristite masku isključivo unutar za
pojedine varijante predviđenog područja
terapijskog tlaka:
– 4-30 hPa: JOYCE vented
– 4-40 hPa: JOYCE vented 40 hPa
JOYCE non vented
JOYCE non vented 40 hPa
JOYCE GEL vented
JOYCE GEL non vented
• Kod korištenja stranih artikala može doći
do prestanka funkcija i ograničenja
uporabivosti. Osim toga možda nisu
ispunjeni zahtjevi za biokompatibilnošću.
Obratite pažnju da u takvim slučajevima
gubite svako pravo na jamstvo, ako ne
koristite pribor niti rezervne dijelove koji se
preporučuju u uputama za uporabu.
• Pacijente s ograničenim spontanim
disanjem treba stalno nadzirati. Na uređaju
za davanje umjetnog disanja treba se
aktivirati odgovarajućialarm za podtlak/
propuštanje.
• Pacijente s opstruktivnim i restriktivnim
plućnim bolestima treba tijekom uporabe
JOYCE-maski individualno pregledati (npr.
glede CO
-povratnog disanja).
2
• Otvore maske zatvarajte samo u onim
slučajevima koji su opisani u uputi za
uporabu. Inače postoji opasnost od CO
povratnog disanja.
-
2
• Masku je dopušteno stavljati dulje vrijeme
samo ako je terapijski uređaj uključen. Inače
postoji opasnost od CO
-povratnog disanja.
2
• Ne koristite nikakva električno vodljiva
crijeva za disanje (izuzetak: električno
grijana crijeva za disanje).
• Obratite pažnju na odlomak 4 “Higijenska
priprema” za izbjegavanje infekcija,
bakterijske kontaminacije i za smetnje u
funkcioniranju.
Popratne pojave
Može doći do slijedećih popratnih pojava:
Začepljenje nosa, suhoća nosa, jutarnja
suhoća usta, osjećaj tlaka u paranazalnim
šupljinama, nadraženost spojnog tkiva,
smetajući šumovi prilikom disanja,
92 Opis uređaja
Page 95

HR
3Rukovanje
Sl. A-E: Vidi pridodani savijeni list.
3.1 Podešavanje čeonog oslonca
(sl.
A)
Fino podešavanje
Držite gornje spojnice grubog podešavanja
pritisnutima. Postavite fino podešavanje u
jedan od tri razdjela.
Da bi prilagodili visinu čeonog jastučića odn.
fino podešavanje (oko 1 cm), zakrenite fino
podešavanje za 180°. Postavite ih nakon toga
kao što je gore opisano.
Grubo podešavanje
Držite donje spojnice grubog podešavanja
pritisnutima. Postavite ju u jedan od tri
razdjela tijela maske.
3.2 Stavljanje maske
1. Otkvačite jednu od donjih spojnica
remenja na maski.
2. Prebacite remenje preko glave i ponovo
zakvačite spojnicu remenja.
3. Remenje glave podesite pomoću čičak-
kopči tako da maska brtvi a da pri tome
ne sjedi suviše čvrsto na licu.
Samo WEINMANNstrap:
Remenje za glavu WEINMANNstrap
pruža za to slijedeće mogućnosti (vidi i
„Pregled“ na priloženom presavijenom
listu):
– Čičak-kopče na obje strane.
– Čičak-kopča gore na glavi: Otpustite čičak-
kopču, povucite s obje ruke lagano na
krajevima remenja za glavu i ponovo
pritisnite čičak-kopču.
Po jezičcima čičak-kopče možete
prepoznati da li je remenje za glavu
ispravno pričvršćeno. Jezičci čičak-kopči
na čelu iste su boje kao unutarnja
strana remenja za glavu.
Samo HEADstrap:
Remenje za glavu HEADstrap pruža za
to slijedeće mogućnosti (vidi i
„Pregled“ na priloženom presavijenom
listu):
– Grubo podešavanje: Prorez "a" ili "b"
remenja za glavu.
– Fino podešavanje: četiri čičak-trake.
4. Podesite ukoliko je potrebno ponovo
čeoni oslonac.
3.3 Sustav izdisanja (sl. E)
vented-varijante
vented-varijante (svi dijelovi maske prozirni)
raspolažu takozvanim integriranim
sustavom izdisanja: Sigurnosni prsten i
tijelo maske tako su oblikovani, da između tih
dijelova ostane pukotina. Kroz tu pukotinu
izdahnuti zrak može izlaziti. Specijalna
geometrija dijelova osigurava da se pukotina
prilikom stavljanja sigurnosnog prstena ne
može začepiti. Ne priključujte nikakav
vanjski sustav izdisanja, inače se ne postigne
terapijski tlak.
non vented-varijante
non vented-varijante (sigurnosni prsten,
kutnik i okretna čahura plave boje) ne
raspolažu nikakvim sustavom izdisanja.
Obavezno priključite vanjski sustav izdisanja.
Inače postoji opasnost od CO
disanja i gušenja.
Obratite pažnju na uputu za uporabu sustava
izdisanja.
- povratnog
2
3.4 Priključak maske na terapijski
uređaj (sl.
Nataknite crijevo Vašeg terapijskog uređaja
na okretnu čahuru (vented-varijante) odn. na
Vaš vanjski sustav izdisanja (non ventedvarijante). Pripazite pri tome na siguran i
neprodušan spoj na crijevo. Spoj se ne smije
otpustiti ni uslijed terapijskog tlaka.
Ako želite masku samo na kratko odvojiti od
crijeva, jednostavno izvucite okretnu čahuru s
kutnika.
E)
Rukovanje 93
Page 96

HR
3.5 Dijelovi maske s gel-punjenjem
Kod JOYCE GEL vented i JOYCE GEL
non vented čeoni jastučić i zadebljanje maske
standardno raspolažu gel-punjenjem. Gelčeoni jastučić i Gel-zadebljanje maske mogu
se isporučiti i za druge JOYCE-varijante kao
pojedinačni dijelovi .
Oprez!
Dijelovi maske s gel-punjenjem vrlo su
osjetljivi sastavni dijelovi. Rukujte njima uvijek
pažljivo, da bi izbjegli deformacije ili
oštećenja.
3.6 Područja terapijskog tlaka
Pojedine varijante JOYCE-maski mogu se
isporučiti za po jedno određeno područje
terapijskog tlaka (vidi „7. Obim isporuke” na
stranici 97):
– 4-30 hPa: JOYCE vented
– 4-40 hPa: JOYCE vented 40 hPa
JOYCE-maske za područje terapijskog tlaka
od 4-30 hPa raspolažu mekanim
zadebljanjem maske, JOYCE-maske za
područje terapijskog tlaka od 4-40 hPa
tvrdim zadebljanjem maske odn. gelzadebljanjem maske (gel-varijante).
Tvrđe zadebljanje maske za područje
terapijskog tlaka od 4-40 hPa označeno je
brojem "40".
Mekano (do 30 hPa) i tvrđe (do 50 hPA)
zadebljanje maske kao i gel-zadebljanje
maske (gel-varijante) isporučuju se i
pojedinačno kao rezervni dijelovi tako da
Vašu masku možete prilagoditi različitim
potrebama terapije.
JOYCE non vented
JOYCE non vented 40 hPa
JOYCE GEL vented
JOYCE GEL non vented
3.7 Priključci za mjerenje tlaka
(sl.
C)
JOYCE-maske opremljene su s dva priključka,
koji se mogu koristiti za mjerenje tlaka i
dovođenje kisika.
Pozor!
• Terapija kisikom može kod neispravnog
korištenja / doziranja dovesti do popratnih
učinaka. Stoga je takvu terapiju dopušteno
provesti isključivo prema uputi liječnika.
• Kod provedbe terapije kisikom obavezno
obratite pažnju na uputu za uporabu Vašeg
O
-sustava terapijskog uređaja.
2
Kada se priključci za mjerenje tlaka ne koriste
uvijek ih zatvorite pomoću priloženog
zatvarača. Inače iz priključaka izlazi zrak te se
ne postiže terapijski tlak.
3.8 Kompatibilni uređaji
Terapijski uređaji
JOYCE-maske mogu se kombinirati sa svim
uređajima, koji se predviđeni za provedbu
pod „Svrha uporabe“ opisane terapije.
Pripazite da kod nepovoljnih kombinacija
uređaja stvarni tlak u maski eventualno ne
odgovara Vama propisanom terapijskom
tlaku.
To se može desiti i kada se na terapijskom
uređaju pokazuje ispravan tlak. Dopustite da
liječnik ili specijalizirani trgovac podese Vašu
kombinaciju uređaja tako da stvarni tlak u
maski odgovara Vašem terapijskom tlaku.
Ovlaživač zraka za disanje
JOYCE-maske mogu se koristiti s
ovlaživačima kako hladnog tako i toplog
zraka.
Stupanj ovlaživanja nikada ne birajte tako
visokim da se kondenzira voda u crijevu za
zrak. Obratite pažnju na uputu za uporabu
Vašeg ovlaživača i terapijskog uređaja.
3.9 Nakon uporabe
1. Otkvačite jednu od donjih spojnica
remenja na maski te skinite masku.
2. Otpustite spojnice remenja i skinite
remenje za glavu s maske.
3. Postupite kao što je opisano pod „4
Higijenska priprema”.
94 Rukovanje
Page 97

HR
3.10 Rastavljanje/sastavljanje
Perilica za suđe
Ručno pranje
Dezinfekcija*
Sterilizacija
(alternativno
dezinfekciji)
maske
4 Higijenska priprema
Rastavljanje maske (sl. D - A)
1. Odvojite zadebljanje maske od tijela
maske.
2. Uklonite zatvarač priključka za mjerenje
tlaka.
3. Okrenite sigurnosni prsten suprotno
kazaljki na satu. Izvucite sada sigurnosni
prsten i kutnik s tijela maske.
4. Pritisnite kutnik iz sigurnosnog prstena i
izvucite okretnu čahuru s kutnika.
5. Odvojite grubo podešavanje od tijela
maske
6. Odvojite fino podešavanje od grubog
podešavanja. Odvojite čeoni jastučić od
finog podešavanja.
Sastavljanje maske (sl. A - D)
1. Stavite čeoni jastučić na fino
podešavanje. Stavite onda fino
podešavanje na grubo podešavanje.
2. Utaknite grubo podešavanje na tijelo
maske.
3. Nataknite okretnu čahuru na kutnik tako
da se čujno zaglavi.
4. Pritisnite kutnik u sigurnosni prsten tako
da se čujno zaglavi.
5. Nataknite sigurnosni prsten i kutnik na
tijelo maske. Okrenite sigurnosni prsten u
smjeru kazaljke na satu tako da se čujno
zaglavi.
6. Nataknite zatvarač na priključke za
mjerenje tlaka.
7. Nataknite zadebljanje maske na tijelo
maske.
8. Pričvrstite remenje za glavu pomoću
spojnica na masku.
4.1 Rokovi
Dnevno
Očistite sve ostatke u maski pomoću tople
vode. Za to možete rastaviti masku. Koristite
blago sredstvo za čišćenje (npr. sredstvo za
čišćenje suđa). Nakon toga pažljivo isperite
sve dijelove čistom vodom.
Pozor!
• Kod pacijenata s oslabljenim imunskim
sustavom ili posebnom pozadinom bolesti
može biti potrebno dnevno dezinficirati ili
sterilizirati dijelove maske. Posvjetujte se u
tom slučaju s Vašim liječnikom.
• Higijensku pripremu kontaktnih površina
između tijela maske i sigurnosnog prstena
provodite s najvećom pažnjom. Ostaci na
tim površinama mogu škoditi uspjehu
terapije odn. oslabiti funkciju integriranog
sustava za izdisanje (vented-varijante).
Tjedno
Rastavite masku i pripremite higijenski
dijelove maske (vidi „4.2. Čišćenje,
dezinfekcija, sterilizacija” na stranici 95).
4.2 Čišćenje, dezinfekcija,
sterilizacija
Dopušteni postupci
Postupci
Dijelovi
Zadebljanje maske ••• •
Zadebljanje maske
GEL
Čeoni jastučić •••
Čeoni jastučić GEL ••
Zatvarač ••• •
Tijelo maske •••
Grubo
podešavanje
•••
•••
Higijenska priprema 95
Page 98

HR
Postupci
Perilica za suđe
Ručno pranje
Dezinfekcija*
Sterilizacija
(alternativno
dezinfekciji)
Dijelovi
Fino podešavanje •••
Kutnik •••
Okretna čahura •••
Sigurnosni prsten •••
Spojnica trake •••
Remenje za glavu
WEINMANNstrap
Remenje za glavu
HEADstrap
Remenje za glavu
JOYCEstrap
•
•
•
Pozor!
Očistite dijelove maska uvijek temeljito
prije nego što ih prema gornjoj tablici
dezinficirate odn. sterilizirate.
Dijelovi maske s gel-punjenjem vrlo su
osjetljivi sastavni dijelovi. Rukujte njima
uvijek pažljivo, da bi izbjegli
deformacije ili oštećenja.
Opis postupka
Perilica za suđe
Ručno pranje
Dezinfekcija*
Sterilizacija
(alternativno
dezinfekciji)
*Preporučujemo dezinfekcijska sredstva
gigasept
Korak ispiranja kod 65 °C. Nakon toga
pažljivo isperite sve dijelove čistom
vodom.
Ručno pranje toplom vodom. Koristite
blago sredstvo za čišćenje. Nakon toga
sve dijelove isperite čistom vodom.
i pustite da se svi dijelovi osuše na
zraku.
U razrijeđenoj otopini mehanički
očistite, npr. pomoću četke. Nakon
dezinfekcije isperite sve dijelove
temeljito destiliranom vodom i teme ljito
osušite.
Sterilizacija parom u uređajima prema
EN 285. temperatura 134 °C, najmanje
trajanje 3 minute.
®
FF (novo), Cidex® OPA i
Aniosyme DD1. Za ova sredstva dokazana
je snošljivost. Obratite obavezno pažnju na
uputu proizvođača.
Naputci za higijensku pripremu i higijensku
pripremu kod promjene pacijenta nalaze se u
brošuri u informacijskom portalu pod
www.weinmann.de. Ako ne posjedujete
pristup internetu obratite se Weinmannu.
Napomena
Preporučujemo da prilikom higijenske
pripreme koristite prikladne rukavice
(npr. jednokratne).
Operite traku za glavu prije prve
uporabe, pošto može pustiti boju.
Traku za glavu dopušteno je samo prati
ručno!
Ne peglajte traku za glavu pošto čičak-
kopče neće više držati!
Remenje za glavu nemojte sušiti u
sušilici!
4.3 Nakon pripreme
Temeljito osušite sve dijelove nakon
higijenske pripreme. Ispitajte sastavne
dijelove da li postoje ostaci prljavštine ili
oštećenja. Po potrebi ponovite higijensku
pripremu. Zamijenite oštećene dijelove.
Ponovo montirajte masku.
4.4 Promjena pacijenta
Ako se maska treba koristiti za drugog
pacijenta ona se prethodno mora higijenski
pripremiti.
Za to rastavite masku. Dezinficirajte ili
sterilizirajte sve dijelove prema odlomku „4.2
Čišćenje, dezinfekcija, sterilizacija”. Koristite
novo remenje za glavu.
5 Kontrola funkcija
Provedite nakon svake higijenske pripreme
vizualnu kontrolu.
Ako dođe do propuštanja radi oštećenja
zadebljanja maske, onda ga zamijenite.
Ispitajte funkcioniranje i brtvljenje kugličnog
zgloba na kutniku. Ako se ne kreće lako ili
ako propušta, onda zamijenite kutnik i
sigurnosni prsten.
96 Kontrola funkcija
Page 99

HR
Dijelovi koji se više ne mogu koristiti mogu se
zbrinuti putem kućnog smeća.
Može doći do promjene boje čeonog
jastučića i zadebljanja maske. To međutim ne
utječe na funkcioniranje.
6 Smetnje i njihovo uklanjanje
Smetnja Uzrok Uklanjanje
Bolovi od
tlaka na licu.
Propuh u
oku.
Terapijski
tlak se ne
postigne.
Maska sjedi
suviše čvrsto.
Maska sjedi
suviše labavo.
Maska ne
pristaje.
Visoki
terapijski tlak.
Maska nije
ispravno
podešena.
Zadebljanje
maske je
oštećeno.
Sustav crijeva
propušta.
Zrak izlazi na
priključcima za
mjerenje tlaka.
Remenje za glavu
podesite malo labavije.
Prilagodite položaj
čeonog oslonca.
Remenje za glavu malo
zategnite.
Prilagodite položaj
čeonog oslonca.
Koristite drugu veličinu
maske, obratite se Vašem
specijaliziranom trgovcu.
Koristite tvrđe zadebljanje
maske (za tlakove do
40 hPa). Dobije se kod
specijaliziranog trgovca.
Podesite remenje za
glavu.
Prilagodite položaj
čeonog oslonca.
Zamijenite zadebljanje
maske.
Provjerite utični spoj i
dosjed spojnice crijeva.
Priključke za mjerenje
tlaka prekrijte zatvaračem
(nije sadržan u obimu
isporuke).
7 Obim isporuke
Napomena
Sve se maske isporučuju kompletno
montiranim s remenjem za glavu.
vented-varijante
Artikl
HEADstrap
Br.artikla s
Br. artikla sa
JOYCEstrap
WEINMANNstrap/
JOYCE vented‚ vel. S WM 26110 WM 26110/1
JOYCE vented‚ vel. M WM 26120 WM 26120/1
JOYCE vented‚ vel. L WM 26130 WM 26130/1
JOYCE vented‚ vel. XL WM 26140 WM 26140/1
JOYCE vented 40 hPa‚ vel. S WM 26111 WM 26111/1
JOYCE vented 40 hPa‚
JOYCE vented 40 hPa‚ vel. L WM 26131 WM 26131/1
JOYCE vented 40 hPa‚ vel. XL WM 26141 WM 26141/1
JOYCE GEL vented‚ vel. S WM 26112 WM 26112/1
JOYCE GEL vented‚
JOYCE GEL vented‚ vel. L WM 26132 WM 26132/1
vel. M
vel.. M
WM 26121 WM 26121/1
WM 26122 WM 26122/1
non vented-varijante
Br. artikla sa
Artikl
JOYCE non vented‚ vel. S WM 26160
JOYCE non vented‚ vel. M WM 26170
JOYCE non vented‚ vel. L WM 26180
JOYCE non vented‚ vel. XL WM 26190
JOYCE non vented 40 hPa‚ vel. S WM 26161
JOYCE non vented 40 hPa‚ vel. M WM 26171
JOYCE non vented 40 hPa‚ vel. L WM 26181
JOYCE non vented 40 hPa‚ vel. XL WM 26191
JOYCE GEL non vented‚ vel. S WM 26162
JOYCE GEL non vented‚ vel. M WM 26172
JOYCE GEL non vented‚ vel. L WM 26182
WEINMANNstrap/
HEADstrap
Smetnje i njihovo uklanjanje 97
Page 100

HR
Rezervni dijelovi
Artikl Br. artikla
Komplet kuglični zglob:
Sigurnosni prsten, kutnik, okretna
čahura
Komplet kuglični zglob non vented:
Sigurnosni prsten, kutnik, okretna
čahura
Okretna čahura vented WM 26254
Čeoni oslonac:
Čeoni jastučić, grubo podešavanje
čeonog oslonca, fino podešavanje
čeonog oslonca
Čeoni oslonac GEL:
Čeoni jastučić GEL, grubo podešavanje
čeonog oslonca, fino podešavanje
čeonog oslonca
Čeoni jastučić WM 26200
Čeoni jastučić GEL WM 26209
Zadebljanje maske 30 hPa, vel. S
Zadebljanje maske 30 hPa, vel. M
Zadebljanje maske 30 hPa, vel. L
Zadebljanje maske 30 hPa, vel. XL
Zadebljanje maske 40 hPa, vel. S
Zadebljanje maske 40 hPa, vel. M
Zadebljanje maske 40 hPa, vel. L
Zadebljanje maske 40 hPa, vel. XL
Zadebljanje maske GEL, vel. S
Zadebljanje maske GEL, vel. M
Zadebljanje maske GEL, vel. L
Remenje za glavu WEINMANNstrap,
uklj. spone traka
Remenje za glavu HEADstrap WM 26360
Remenje za glavu JOYCEstrap plavo,
uklj. spone traka
Spone traka (4 kom.) WM 26205
Zatvarač WM 26208
Uputa za uporabu
DE, EN, FR, NL, IT, ES, PT, TR, EL, PL, HR
RU (pdf, Internet: www.Weinmann.de)
WM 26206
WM 26207
WM 26201
WM 26115
WM 26210
WM 26220
WM 26230
WM 26240
WM 26211
WM 26221
WM 26231
WM 26241
WM 26212
WM 26222
WM 26232
WM 26350
WM 26290
WM 16950
WM 16814
Pribor
Artikl Br. artikla
Sustav izdisanja:
Silentflow 2
Sustav prigušavanja zvuka
WM 23600
WM 23685
8 Specifikacije
Tehnički podaci
JOYCE Vrijednost
Klasa proizvoda prema smjernici
93/42 EWG:
Dimenzije (ŠxVxD):
Težina: oko 85 grama
Područje terapijskog tlaka:
Zadebljanje maske mekano:
Zadebljanje maske tvrdo:
Zadebljanje maske GEL:
Priključak crijeva: Konus prema
EN ISO 5356-1
vented:
non vented:
Priključci za mjerenje tlaka: Ø 4 mm
Širina spojnice trake: maks. 20 mm
Temperaturno područje
Pogon:
Skladištenje
Otpor strujanju
vented:
kod 50 l/min
kod 100 l/min
non vented:
kod 50 l/min
kod 100 l/min
Navedena dvobrojčana
vrijednost emisije zvuka
prema ISO 4871:
– Razina zvučnog tlaka
– Razina snage zvuka
(faktor nesigurnosti: 3 dB(A))
Trajanje uporabe do 12 mjeseci
Primijenjene norme EN ISO 17510-2:2009
1
ovisno o veličini i izvedbi
2
Materijali, koji se koriste za proizvodnju
maski, stare kada su izloženi npr. agresivnim
sredstvima za čišćenje. U pojedinom slučaju
stoga može biti potrebno da Vašu masku
morate ranije zamijeniti (vidi „5. Kontrola
funkcija” na stranici 96).
II a
oko
80 x 130 x 90 mm
1
4 do 30 hPa
4 do 40 hPa
4 do 40 hPa
Ø 22 mm (muški)
Ø 22 mm (ženski)
+ 5° C do + 40° C
-20° C do +70° C
0,02 hPa
0,11 hPa
0,09 hPa
0,37 hPa
15 dB(A)
23 dB(A)
2
1
98 Specifikacije
 Loading...