

Page 1

USERS MANUAL
FOR
WEIDMÜLLER PRINTJET
Contents
1. Introduction
2. Contents of supply
3. Safety advice
3.1. Safety instructions
3.2. Precautions
A. Using the PrintJet
B. Handling ink cartridges
C. Positioning the PrintJet
D. Print media
4. Setting up
4.1 Configuring the PrintJet driver
4.2 Basic settings in M-Print
5. PrintJet control panel
6. Replacing an ink cartridge
7. Error messages
8. Faults appearance
8.1 Clean/Check print head
8.2 Printing still appears faint despite cleaning
8.3 MultiCards are not drawn in or not fed
through the printer
8.4 MultiCards are not ejected correctly
9. USB Problems
10. Technical specification
11. Order data
12. CE
Sources of information
Installation Manual
This manual contains information on how to set up and begin
using the PrintJet. It also include information on configuring the
PrintJet and how to install the PrintJet software.
Users Manual
This manual provides information about operating the PrintJet.
It also includes advice on troubleshooting and information
regarding customer support.
1. Introduction
With this manual you receive important information for
installation and starting of the PrintJet.
They find here information about execute settings in the
printer driver and in the M-Software.
For further information, Help or actual driver will find
on our Homepage:
http://www.weidmueller.de/gb/downloads/PrintJet
Question and incitations you could send us via email
printjet@weimueller.de in urgent cases you could reach
us under our service number +49 (0) 52 31 14 12 52
2. Contents of supply
Please check your PrintJet if it complete.
• PrintJet
• Feed in- and feed out rail
• Parallel printer cable
• Power cable
• Clean Unit
• Short Installation Guide
• 2 MulitCards (Typ DEK 5/5)
• CD-Rom ( Printer Driver, Software, online Manauls)
Important:
For first install you must have the Weidmüller ink cartridge Article number 1797460000.
These Article is not included in the content of supply and
must be ordered separate.
Page 2

2
3. Safety advice
3.1 Important safety instructions
• Remove all packaging and all items securing the printer
during transport. Open the cover of the PrintJet and
remove the tapes securing the print head during transport.
• Read the following instructions carefully prior to using the
PrintJet for the first time. In addition, adhere to any warnings and information printed on labels attached to the
PrintJet.
• Do not block or cover any openings in the PrintJet casing.
Do not insert any objects into such openings.
• Make sure that no liquids are allowed to enter the PrintJet.
• The PrintJet must be connected to a power supply that
matches the details printed on the rating label on the
PrintJet.
• Connect the printer only to a properly earthed power
socket. It should not be connected to a power socket to
which other equipment that is switched on and off at
regular intervals is or can be connected, e.g. photocopier,
fan.
• Do not connect the PrintJet to a switched or timer-operated
power socket.
• Do not operate the computer system in the vicinity of
potential electromagnetic interference, e.g. loudspeakers
or base stations for cordless telephones.
• Make sure the power supply cable is not damaged or worn.
• If the PrintJet is connected to the power supply via an
extension lead, make sure that the total current rating of all
the equipment connected to the extension lead does not
exceed the permissible capacity of the extension lead.
Furthermore, make sure that the total current rating of all
the equipment connected to the power socket does not
exceed the permissible capacity of the power socket.
• Never attempt to repair or service the printer yourself.
• In the following cases disconnect the PrintJet from the
power supply and consult a qualified service engineer:
• The power supply cable or the plug is damaged or worn;
liquid has entered the PrintJet; the PrintJet has been drop
ped or the casing has been damaged; the PrintJet no lon
ger operates properly or produces erratic results.
• If the PrintJet is to be connected to a power supply in
Germany, it must be ensured that the buildings electrical
installation is fitted with an appropriate short-circuit fuse.
Other regulations and legislation may apply in other coun
tries. If in doubt, please consult a qualified electrician.
Attention: Warning signal (BGV A 8 (VBG 125) & DIN 4844)
Warning for hand hurting
Please do not touch inside
Warning for hot surface
Please do not touch
3.2 A few precautions
Please observe the following points when using the PrintJet,
handling ink cartridges or choosing a location for the PrintJet.
A. Using the PrintJet
Please observe the following points:
• Do not insert your hand into the PrintJet and do not touch
the ink cartridges while the printer is inoperation.
• Do not move the print head manually as this can damage
the PrintJet.
• Remove the MultiCards from the output rail of the PrintJet
immediately after they have been printed.
• To switch the PrintJet on and off, only use the power switch
at the rear of the printer.
• Before transporting the PrintJet, make sure that the print
head is in the transport position (far right) and the ink car
tridges are correctly inserted.
B Handling ink cartridges
Please observe the following points:
• Unused ink cartridges should be kept in a cool, dry place.
• Keep ink cartridges out of the reach of children. Never
allow children to play with ink cartridges and certainly
never allow them to drink from them.
• Handle used ink cartridges carefully as there may still be
a little ink around the outlet. If you get ink on your skin,
clean this thoroughly with soap and water. If after thorough
rinsing you still feel unwell or have problems with your
vision, consult a doctor immediately.
• Do not shake ink cartridges as ink may leak from them.
• Install ink cartridges immediately after opening the
packaging. Leaving an ink cartridge unpacked for a long
time may lead to inferior printing quality.
• Do not use any ink cartridges whose expiry date
(printed on the packaging) has already expired.
• To achieve best printing results, ink cartridges should
be used within six months of being installed.
• Do not attempt to dismantle or refill ink cartridges.
This can damage the print head.
• If you use an ink cartridge that has previously been stored
in a cold place, first allow it to warm up to room temperature for at least three hours before inserting it into the
PrintJet.
• Do not touch the green IC chip on the side of cartridge.
That could impair normal operation as well as the printing.
• The IC chip on the cartridge contains a wealth of information specific to the cartridge, e.g. amount of ink remaining,
so that the old ink cartridge can be removed and a new
one inserted without any problems.
• However, ink is consumed every time you insert a new
ink cartridge because the PrintJet always performs a
reliability check.
Page 3
3
• If you remove an ink cartridge but wish to use it again later,
you should always protect the ink outlet against dust
and soiling and store the cartridge in the same surroundings
as the PrintJet. Please note that the ink outlet includes a
valve so that it is not necessary to cover or block this
opening. However, handle the cartridge carefully because
otherwise ink can leak out. Never touch the ink outlet or the
area around it.
Please check in certain lages the wash and grate stability
of the marking.
This printer is subject to special connection conditions.
The mains impedance at the point of connection to the
public grid may not exceed (0.14 + 0.09) Ohm. In all other
cases the connection to the public grid may only be carried out after consulting the electricity supply utility responsible.
C. Positioning the PrintJet
Please observe the following points:
• Set up the PrintJet on a flat, stable surface that projects
beyond the footprint of the PrintJet on all sides. The PrintJet
will not operate properly if tilted or placed on a sloping
surface.
• Leave enough space around the PrintJet output so that the
MultiCards can be ejected from the PrintJet.
• Avoid setting up the PrintJet in a position subjected to
severe fluctuations of temperature and humidity. Keep the
PrintJet clear of direct sunshine, strong light and excessive
heat.
• Avoid locations subjected to shock and vibration.
• Avoid locations in which dust can accumulate.
• Position the PrintJet in such a way that there is clearance
for ventilation on all sides of the printer.
• Position the PrintJet in the vicinity of a power socket so
that the plug can be removed easily at any time.
D. Print media
The PrintJet is to be used exclusively for printing Weidmüller
MultiCards
4. Main settings
4.1 PrintJet Driver settings
With the help of the Start menu (Windows 98, 95, 2000
and NT 4.0)
To call up the PrintJet software, open the Start menu and select Settings > Epson Stylus Color 680/685.
Windows 98 and 95
users should select their PrintJet and then go to the File menu
and select Properties.
Windows 2000
users should select their PrintJet and then go to the File menu
and select Printer preferences.
Windows NT 4.0
users should select their PrintJet and then go to the File menu
and select Document standard.
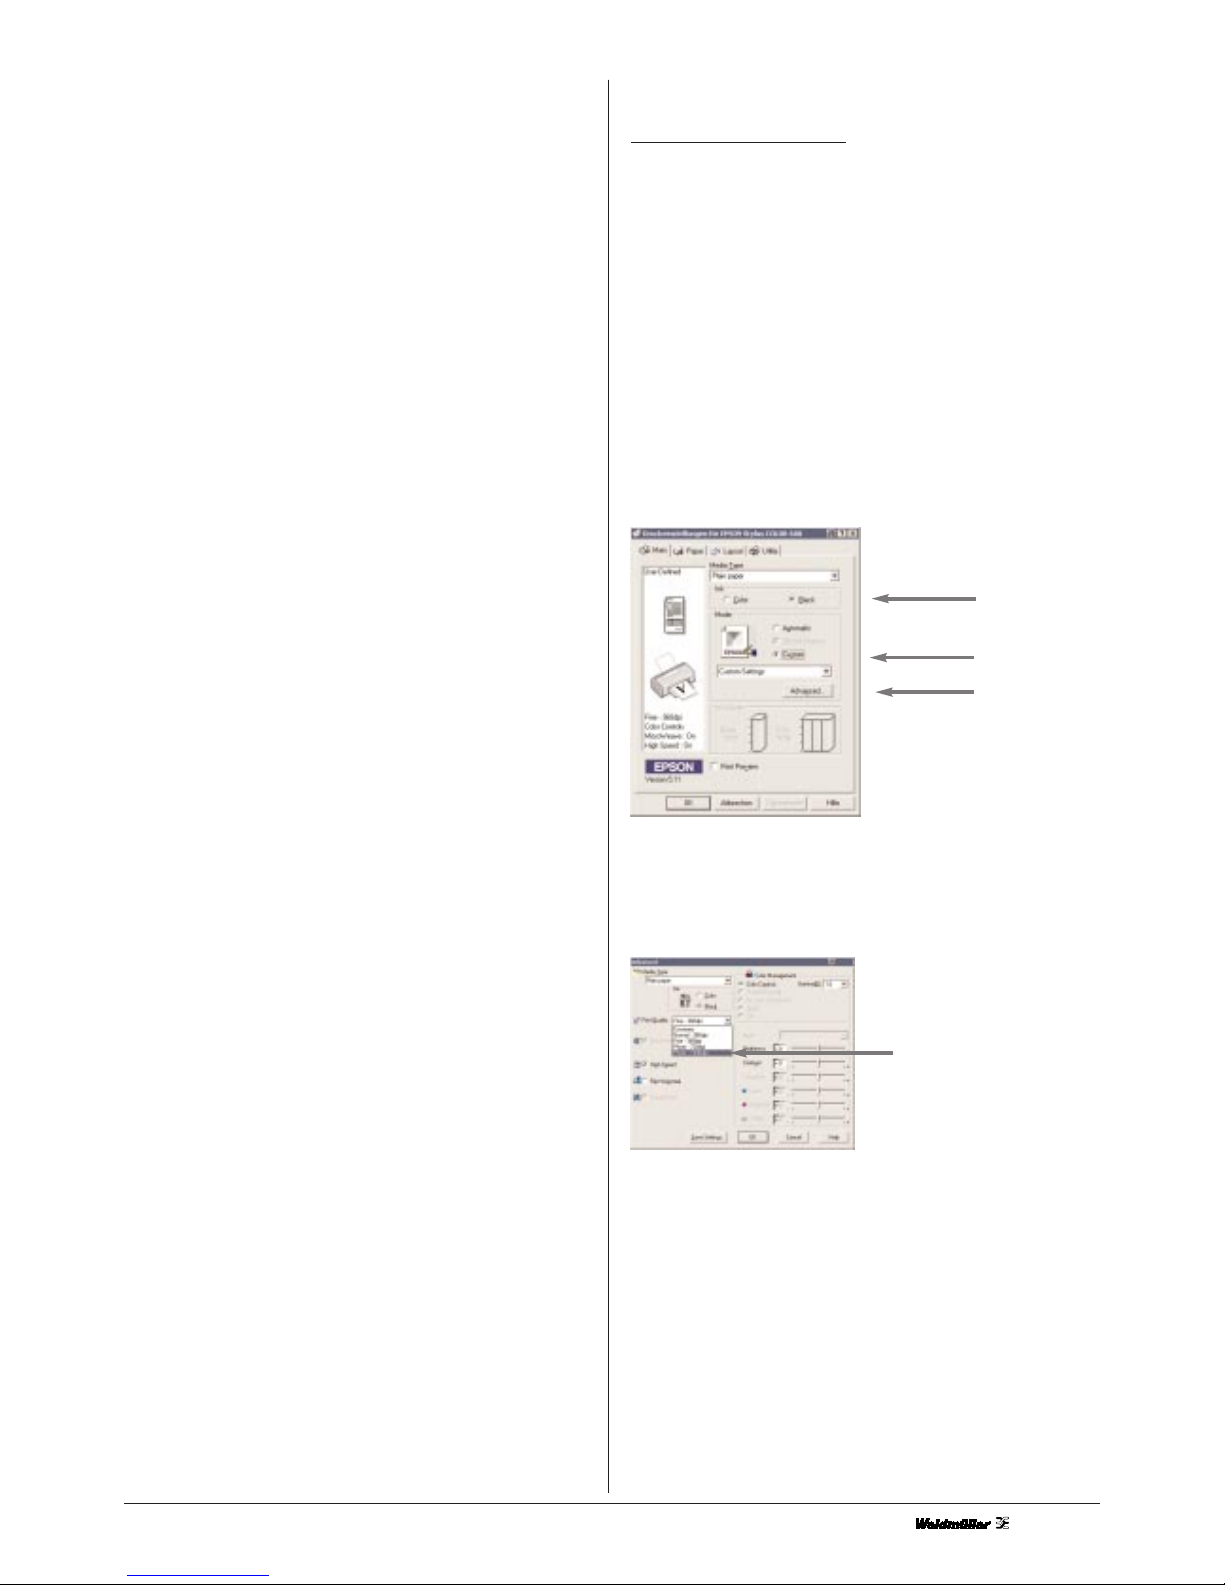
Set the following parameters:
Select the Main index tab:
Media Type: Plain Paper
Colour: black
Mode: custom
Click on the Advanced button.
Select 1440 dpi and confirm with OK.
Select the Paper index tab:
custom
advanced
black
Photo-1440 DPI
Page 4

4
Under Paper format, select User-defined.
Enter a Paper Width of 2100 and paper Paper height of 4000.
Confirm all windows with OK.
4.2 Basic settings in M-Print
The Weidmüller MultiCard is made from polyamide. One property of this is to influence the dimensions of the MultiCard by
1% in the case of large fluctuations in the ambient conditions
(temperature and humidity).
To check the settings, switch off the fusing unit. After
checking the dimensions, you can wash the markings off
the MultiCard with water and reuse it.
Start your M-Print: Start > Programm > M-Print or click to your
link M-Print. Go to File > Plot > Settings, there you could see
the settings of the zero points, which you can change. These
figures represent typical values and must be adapted to suit
your MultiCards and your system with the help of the margin
and scaling functions in M-Print.
Choose the Device Printer EPSON Stylus COLOR 680/685.
Click to Accept and close the other window with cancel.
Connect the Weidmüller PrintJet with your PC
Setting of the zero points
If you change the zero points, it is changed for all MultiCards. If
you need a configuration for one MultiCard, please use the configuration editor with the help in the M-Print.
You see the MultiCard frame with 5 MultiCards.
With a double click of one Card a window will open. In this window you could choose a MulitCard. Confirm you chose with
Ok.
Carry out the fine calibration with the DEK 5.5 MultiCard supplied.
Select the DEK 5.5 from the menu window, label this with the
letter X (see example below) and print out the markers.
In the MultiCard frame you see your selected Cards with a
double click you could open it.
Label this with the letter X (see example below) and print out
the markers.
The MultiCards illustrated below show possible printing results
as produced by the PrintJet.
Compare the MultiCard with this illustration. If the type face displaced, you must adjust it to your system. Calculate the difference and
change the figures margin.
File > Plot > settings
The marking were print on
the Project Field.
The marking were print at
the and of the MultiCard.
The marking were print
beside the MultiCard.
The marking were print beside the MultiCard.
2100
4000
BA
-
+
+
-
DC
-
+
-
+
X
X
X
X
X
X
X
X
X
X
X
X
X
X
X
X
X
X
X
X
X
X
X
X
X
X
X
X
X
X
X
X
X
X
X
X
X
X
X
X
X
X
X
X
X
X
X
X
X
X
X
X
X
X
X
X
X
X
X
X
X
X
X
X
Page 5

5
A: Measure the deviation and increase the margin setting
Vertical.
B: Measure the deviation and decrease the margin setting
Vertical.
C: Measure the deviation and increase the margin setting
Horizontal.
D: Measure the deviation and decrease the margin setting
Horizontal.
5. PrintJet control panel
Button 1: Power setting for fusing unit and temperature
This button allows you to adjust the power of the fusing
unit for various types of marker.
The unit is set to 100% power upon switching on, LED indicator
shows 100%.
Press once to switch the unit to 80% power, LED indicator
shows 80%.
Press twice to switch the unit to 60% power, LED indicator
shows 60%.
Press three times to switch off the fusing unit, e.g. for testing
the jets or adjusting the print head.
Press four times to switch the unit back to 100% power, LED
indicator shows 100%.
Button 2: Replace ink cartridge
Manual control for replacing an ink cartridge.
Button 3: Maintenance
For manual cleaning of ink cartridges.
LED 1: Warning (red LED)
There is a fault with the printer.
LED 2: Operation (green LED)
The PrintJet is ready for operation when the green LED remains
on constantly.
LED 3: Temperature
Shows an overheating from the system
6. Replacing an ink cartridge
The ink cartridges are sealed units. No ink leaks from the
cartridge under normal conditions.
If you get ink on your skin, clean thoroughly with soap
and water. If you get ink in your eyes, immediately rinse
thoroughly with water.
1. Press the Replace ink cartridge button.
2. The print head travels to the middle automatically.
Never move the print head manually.
3. Press the locking clip on the ink cartridge to be replaced
and fold back the clip out of the way.
4. Remove the label on which .Remove. is printed.
5. Insert the cartridge (with the label on top and the
chip facing the input rail) onto the hinges.
6. Carefully press the locking clip down until this clicks
into position.
7. Close the cover of the printer.
8. Press the Replace ink cartridge button.
The ink feed system has now been activated and this process
takes approx. 1-2 minutes. Afterwards, the print head returns
to the start position (on the far right) and the green operating
LED remains on. Never switch off the printer while the green
LED is flashing.
Caution
Use only Weidmüller ink cartridges.
• Remove the old ink cartridge only after first obtaining
a replacement cartridge and ensuring this is ready for
installation. Otherwise, the ink remaining in the jets could
dry and clog the jets.
• Do not refill the ink cartridge. The PrintJet calculates the
remaining level of ink in the cartridge with the help of the
IC chip on the cartridge itself. If you refill the ink cartridge,
the IC chip does not calculate the new level of ink and so
the cartridge will be treated like an empty cartridge.
Note
• Once one of the ink cartridges is empty, you cannot
continue printing. The empty cartridge must first be
replaced before you can continue printing.
• Ink is consumed not only when printing MultiCards but
also when cleaning the print head, when replacing the
ink cartridge and during the self-cleaning cycle, which
takes place every time you switch on the PrintJet.
If you change one cartridge you always open both cover
of the ink cartridges.
Button 2
Button 3
LED1
Button 1
Red LED
LED 2
Locking clip
Hinges
Page 6

6
7. Error messages
Error message: Paper not inserted properly
Indicated by: Red LED remains on constantly and green
LED flashes.
Remedy: Check whether the MultiCard has been
inserted correctly or whether there is an
unknown print job still in the printer driver.
Open the printer driver and delete the
print job.
Error message: Paper jam
Indicated by: Red LED remains on constantly and green
LED flashes.
Remedy: Settings in printer driver: Either the PrintJet
setting or the paper setting is incorrect.
The print setting must be set to 1440 dpi
and the paper setting to a width of 2100
and length of 4000 (see brief installation
instructions). MultiCard was fed through with
out printing: if a forgotten MultiCard is inser
ted after the start, wait to the error message
"Paper would not insert correctly". Insert a
MultiCard now into the Feed-in Rail. Confirm
the error message via software or over the
maintance button.
Importantly: Put never one forget MultiCard during
the introduction process after. The
MultiCard will transported with no print
and produces a error message "paper
jam". Switch the PrintJet off and delete
all print jobs in Driver. Repeat the print
job.
Error message: Ink cartridge not recognised
Remedy: Remove the self-adhesive label and check
whether the ink cartridge has been inserted
properly. Re-install the ink cartridge.
8. Fault appearance
8.1 Clean/Check print head
If printing appears faint or there are unwanted blank stripes in
the labelling, it may be advisable to clean the print head. This
ensures that the jets supply the ink properly.
• Click on PrintJet EPSON Stylus COLOR 680 with
the right mouse button and select Properties from
the pop-up menu.
• This calls up a window in which you select Printer
settings and then the index tab Utility. Click on Print
head cleaning.
8.2 Printing still appears faint despite cleaning
Insert a new ink cartridge and carry out the print head cleaning
process twice.
If the printing still appears faint, you will need to test the jets.
First, switch off the fusing unit power and stick a label over
the MultiCard.
• Call up the printer driver: Start > Settings >
Printer > Epson Stylus COLOR 680.
• This calls up a window in which you select Printer
settings and then the index tab Utility.
Click on print test.
The result is acceptable when fewer than two blank stripes are
present.
Note:
• Cleaning the print head consumes black ink. Therefore,
to avoid wasting ink, clean the print head only when the
printing quality deteriorates, i.e. when the printing
becomes faint.
• Do not start the print head cleaning utility while printing
is in progress as this can effect the quality of the printing.
8.3 MultiCards are not drawn in or not fed through
the printer
Check whether the MultiCard has been pushed right in up to
the stop and whether the input rail has been attached correctly.
8.4 MultiCards are not ejected correctly
Check whether the output rail has been attached correctly.
9. Rectifying USB problems
If you have problems when operating your PrintJet via a USB
port, please read the information given below.
If you terminated the Plug&Play installation of the printer driver
before the procedure had finished, it is possible that either the
USB PrintJet printer driver or the general PrintJet printer driver
was not installed correctly.
Follow the steps given below in order to check the installation
and, if necessary, reinstall the printer drivers.
1. Switch on the PrintJet. Connect the USB cable to the
PrintJet and the computer.
2. Click with the right mouse button on the My Computer
icon on your desktop, then click on Properties.
3. Click on the Device Manager index tab.
Once the printer drivers have been installed correctly, the
EPSON USB PrintJet option appears in the Device Manager
menu.
If the EPSON USB printer option does not appear in the
Device Manager menu, click on the plus sign (+) adjacent to
Other devices in order to display all installed devices.
If USB printer appears under Other devices, the USB printer
driver has not been installed correctly. If the EPSON Stylus
COLOR 680 option appears, the EPSON printer driver has not
been installed correctly.
If neither the USB Printer nor the EPSON Stylus COLOR 680
option appears under Other devices, click on Update, or disconnect the USB cable from the PrintJet and then connect it to
the PrintJet again.
Page 7

7
4. Under Other devices, click on USB printer or EPSON
Stylus COLOR 680, then click on Remove and
confirm this with OK.
5. A window appears; click on OK to close this. To close
the System Properties window, again click on OK.
6. Switch off the PrintJet and restart your computer.
Reinstall all printer drivers following the instructions
in the Setup Manual.
The PrintJet does not operate properly
with the USB cable.
If your PrintJet does not operate properly with the USB cable,
try one or several of the following remedies:
• Use the USB cable recommended.
• If you are using a USB hub, connect the PrintJet to the
first hub or connect the PrintJet directly to the USB
interface of the PC.
• Windows 98 users: Reinstall the USB PrintJet printer
driver and the PrintJet software. To do this, first deinstall
the EPSON PRINTJET software with the help of the
Add/Remove utility in the Windows system. Then deinstall the EPSON USB PrintJet. The next step is to install
the software as described in the Setup Manual. If the
EPSON USB PrintJet is not included in the Add/Remove
Programs list, call up the CD-ROM and double-click on
the run file epusbun.exe in the Win9x folder. Follow the
instructions given on the screen.
10. Technical Specification
PrintJet ink-jet printer
Purpose: Printing of MultiCard markers
Technology: Ink-jet system
Printing quality: 1440 dpi
Printer drivers: Win 9x, Win NT, Windows 2000
Print software: M-Print 1.60 (recommended)
System requirements: Windows 95/98/NT/2000
Feed: Manual feed
Fusing: Thermal fusing
Interfaces: Centronics and USB
Power supply: 230 V a.c., 16 A or 115 V a.c., 20 A
Ambient conditions: Office environment
Ambient temperature: 20-35°C
Dimensions: (L x W x H:) 800 x 450 x 200 mm
Ink system: Ink cartridges (ca. 210000 characters,
Font: Arial, font size:7)
Scope of supply: Power cable, printer drivers, online
manual, (CD-ROM), cleaning unit,
ink cartridge, centronics cable
The avarage print capacity is ca. 400 MultiCards per month.
11. Ordering data
PrintJet with M-Print: 1797410000
Replacement ink cartridge: 1797460000
PrintJet 115V: 1847360000
Cleaning unit: 4062150000
Page 8

8
Subject to technical changes Printed in Germany · 5634300000
Deutschland
Weidmüller Interface GmbH & Co.
Postfach 3030
D-32720 Detmold
Tel. (05231) 14 -0, Fax (0 52 31) 14-20 83
e-mail: info@weidmueller.de
For further Informationen, Support or actual drivers you could find it on our Homepage:
http://www.weidmueller.de/en/downloads/software/printjet
You could reach us under the E-Mail:
printjet@weidmueller.de
Or under the
Service-number: +49 (0) 52 31-14 12 52
 Loading...