

Weed Eater WE20VH Instruction Manual

Please do not return product to retailer.
Por favor, no devuelva el producto al lugar de compra.
Veuillez ne pas retourner le produit au détaillant.
1-855-378-6903
www.weedeater.com
Register your product online at:
Registre su producto en línea en:
Enregistrez votre produit en ligne à l’adresse :
Trademark
WARNING:
ADVERTENCIA:
AVERTISSEMENT:
Lire le manuel d’instructions et bien respecter tous les avertissements et toutes les instructions de sécurité. Tout défaut de le faire
pourrait entraîner des blessures graves.
LOÑAPSEHSILGNE
FRANÇAIS
WEED EATER
9335 Harris Corners Parkway
Charlotte, NC 28269
WEED EATER
850 Matheson Blvd. West
Mississauga, Ontario L5V 0B4
Instruction Manual
Manual de Instrucciones
Manuel d’Instructions
Read and follow all Safety Rules and Operating Instructions before
using this product. Failure to do so can result in serious injury.
Lea el manual de instrucciones y siga todas las advertencias e
instrucciones de seguridad. El no hacerlo puede resultar en
lesiones graves.
20V 12" String Trimmer
WE20VT
Rev. 00 07/13/15

2
TABLE OF CONTENTS
CONTENTS ..................................................................................................................................2
IDENTIFICATION OF SAFETY SYMBOLS ..................................................................................3
SPECIFICATIONS ........................................................................................................................4
SAFETY RULES ...........................................................................................................................5
ASSEMBLY ...................................................................................................................................8
OPERATION ................................................................................................................................10
MAINTENANCE ..........................................................................................................................12
SERVICE AND ADJUSTMENTS................................................................................................14
TROUBLESHOOTING TABLE ...................................................................................................15
LIMITED WARRANTY ................................................................................................................16
EXPLODED VIEW ......................................................................................................................17
PARTS LIST ...............................................................................................................................18
3
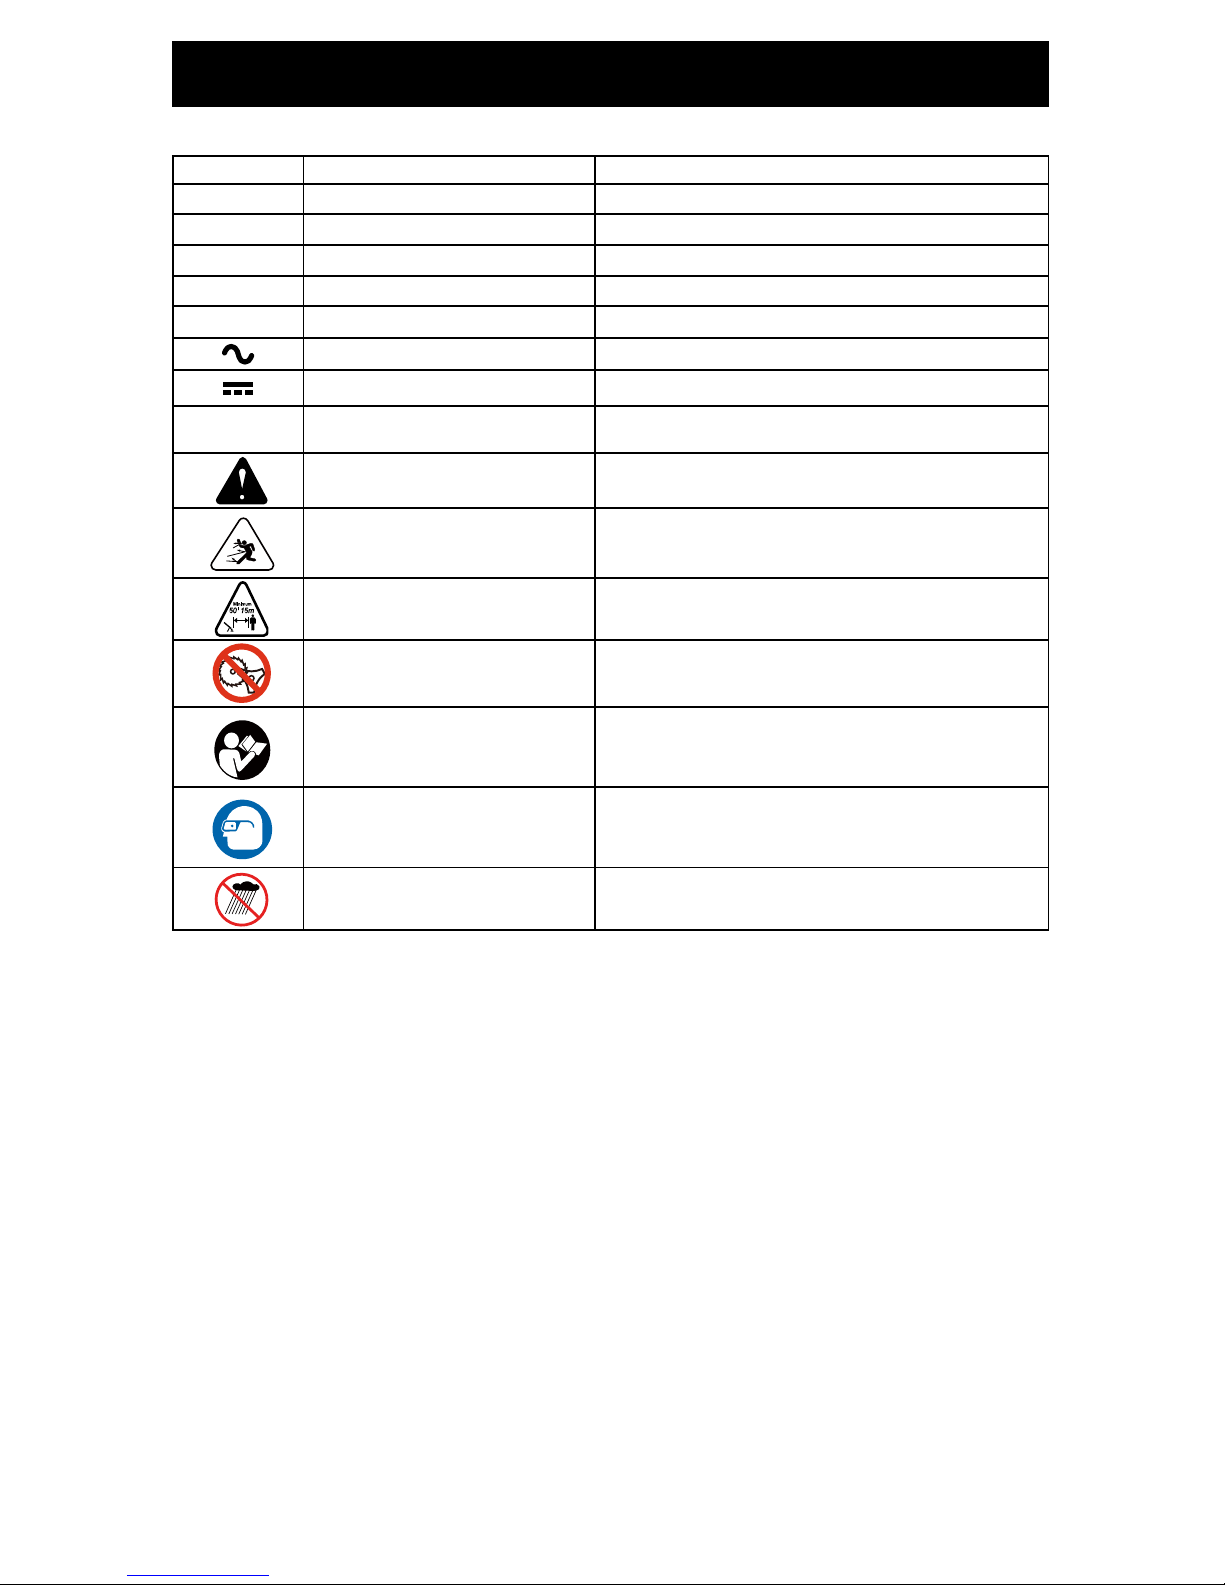
IDENTIFICATION OF SAFETY SYMBOLS
Symbol Name Designation/Explanation
V Volts Voltage
A Amperes Current
Hz Hertz Frequency (cycles per second)
W Watts Power
min Minutes Time
Alternating Current Type of current
Direct Current Type or a characteristic of current
/min
Per Minute
Revolutions, strokes, surface speed, orbits etc.,
per minute
Safety Alert Precautions that involve your safety
Ricochet
Thrown objects can ricochet and result in
personal injury or property damage.
Keep Bystanders Away Keep all bystanders at least 50’ (15 m) away.
No Blade Alert
Do not install or use any type of blade on a
product displaying this symbol.
Read The Operator’s Manual
To reduce the risk of injury, user must read and
understand instruction manual before using this
product.
Wear Eye Protection
Wear eye protection with side shields that
are marked to comply with ANSI Z87.1 when
operating this equipment.
Wet Conditions Alert Do not expose to rain or use in damp locations.

4
SPECIFICATIONS
Motor: 20V
Speed: 8000 (±10%) RPM (no load)
Battery: 20V, 2Ah Lithium-Ion
Battery Run-Time
Up to 25 Minutes
Battery Charge-Time: 4 Hours
Cutting Path: 12” (30.5 cm)
Feed: Automatic Single Line
Line Diameter:
0.065” (1.65 mm)
Unit Weight (without battery): 4.2 lbs (1.91 kg)
Unit Weight (with battery): 5 lbs (2.27 kg)
The following signal words and meanings are intended to explain the levels of risk associated
with this product.
Symbol Name Designation/Explanation
DANGER
Indicates an imminently hazardous situation,
which, if not avoided, could result in death or
serious injury.
WARNING
Indicates a potentially hazardous situation,
which, if not avoided, could result in death or
serious injury.
CAUTION
Indicates a potentially hazardous situation,
which, if not avoided, may result in minor or
moderate injury.
CAUTION
(Without Safety Alert Symbol) Indicates a
situation that may result in property damage.
IDENTIFICATION OF SAFETY SYMBOLS

5
SAFETY RULES
WARNING:
READ ALL SAFETY
WARNINGS AND ALL INSTRUCTIONS.
Failure to follow all instructions listed below
may result in electric shock, re and/or
serious personal injury.
WARNING:
When using this device,
safety precautions must be followed. For your
own safety and that of bystanders, please
read these instructions before operating the
device. Do not use the device without reading
the instruction manual.
OPERATOR SAFETY
• This string trimmer is designed for cutting
grass and soft vegetation, as well as
edging in areas not accessible with a lawn
mower.
• This string trimmer is not designed for
cutting hedges, shrubs, bushes, owers,
or for composting purposes.
• Keep work area clean and well lit.
Cluttered or dark areas invite accidents.
• Do not operate string trimmer in explosive
atmospheres, such as in the presence of
ammable liquids, gases or dust.
• Keep children and bystanders away while
operating string trimmer. Distractions can
cause you to lose control.
• Do not expose string trimmer to rain or wet
conditions.
• Restrict the use of this unit to people who
read, understand, and follow unit and
manual warnings and instructions.
• Children should be supervised to ensure
that they do not play with the device.
• Never allow children or people unfamiliar
with the instructions use the device.
• Turn the string trimmer off while people,
children, or pets are nearby.
• Only use the string trimmer in daylight or
good articial light.
• Before using the device and after any
impact, check for signs of wear or damage
and repair as necessary.
• Never operate without guard, or with
damaged guard.
• Keep hands and feet away from trimmer
cutting line at all times, especially when
turning the unit on.
• Take care against injury from any device
tted for trimming the cutting line length.
After extending new cutting line always
return the device to its normal operating
position before switching on.
• Never use replacement parts or
accessories not provided or recommended
by the manufacturer
.
• Disconnect battery pack from tool before
making any adjustments, changing
accessories, or storing the tool. Such
preventative safety measures reduce the
risk of starting the tool accidentally.
• Store idle tools out of reach of children
and other untrained persons. Tools are
dangerous in the hands of untrained users.
• Always ensure that ventilation openings
are kept clear of debris.
• Dress Properly. Do not wear loose clothing
or jewelery. Contain long hair. Keep your
hair, clothing, and hands away from
moving parts. Loose clothes, jewelry, or
long hair can be caught in moving parts.
• Always wear eye protection, that comply
with ANSI Z87.1.
• Use personal protective equipment. Always
wear eye protection. Protective equipment
such as dust mask, non-skid safety shoes,
hard hat, or hearing protection used for
appropriate conditions will reduce personal
injuries.
• Do not overreach. Keep proper footing and
balance at all times. Proper footing and
balance enable better control of the tool in
unexpected situations.
• Stay Alert. Do not operate string trimmer
when you are tired, ill, or under the
inuence of alcohol, drugs, or medication.
• Store the string trimmer indoors - out of
reach of children.
• Do not charge or operate cordless tools
in damp or wet locations or in the rain.
Following this rule will reduce the risk of
electric shock.
• Keep all bystanders, children, and pets at
least 50 ft. away.
• Use Right Tool – Do not use tool for any
job except that for which it is intended.
• Avoid Unintentional Starting – Do not carry
string trimmer with ngers on the switch.
Be sure the battery is removed while
transporting.
• Do not force tool. Use the correct tool
for your application. The correct tool will
do the job better and safer at the rate for
which it is designed.
• Maintain tool with care. Keep vents clean
for best and safest performance. Follow
instructions for proper maintenance. Do
not attempt to clear clogs from tool without
rst disconnecting the battery.
• Check Damaged Parts – Before further
use of the tool, a guard or other part that
is damaged should be carefully checked
to determine that it will operate properly
and perform its intended function. Check
for alignment of moving parts, binding of
moving parts, breakage of parts, mounting,

6
SAFETY RULES
and any other condition that may affect
its operation. A guard or other part that is
damaged should be properly repaired or
replaced by an authorized service center
unless indicated elsewhere in this manual.
• For use only with WE20VRB battery and
WE20VCH charger.
• Do not open or mutilate the battery.
Released electrolyte is corrosive and may
cause damage to the eyes or skin. It may
be toxic if swallowed.
• Exercise care in handling batteries in order
not to short the battery with conducting
materials such as rings, bracelets, and
keys. The battery or conductor may
overheat and cause burns.
SERVICE
Tool service must be performed only by
qualied repair personnel using only identical
replacement parts. This will ensure that the
safety of the tool is maintained. Service
or maintenance performed by unqualied
personnel may result in a risk of injury. Please
call 1-855-378-6903 for customer support.
BATTERY AND CHARGER
Do not dispose of the battery in a re. The
cell may explode. Check with local codes for
possible special disposal instructions.
DANGER: To avoid serious injury, risk
of re, explosion and danger of electric shock
or electrocution:
• DO NOT probe the charger with conductive
materials. The charging terminals hold
120V.
• If the battery pack case is cracked or
damaged, DO NOT insert into the charger.
Replace the battery pack.
• DO NOT charge these battery packs with
any other type of charger.
• DO NOT allow liquid inside the charger.
• DO NOT try to use the charger for any
other purpose than what is presented in
this manual.
WARNING:
Do not charge the battery
pack in rain or in wet conditions. Do not
immerse the tool, battery pack, or charger in
water or other liquid.
• Do not allow the battery pack or charger
to overheat. If they are warm, allow them
to cool down. Recharge only at room
temperature.
• Do not cover the ventilation slots on top of
the charger. Do not set the charger on a
soft surface. Keep the ventilation slots of
the charger clear.
• Do not allow small metal items or material
such as steel wool, aluminum foil, or other
foreign particles into the charger cavity.
• Unplug the charger before cleaning and
when there is no battery pack in the cavity.
• Do not place the battery charger or the
battery pack in the sun or in a warm
environment. Keep at normal room
temperature.
• Do not try to connect two chargers
together.
• The battery pack cells may develop a small
leak under extreme usage or temperature
conditions. If the outer seal is broken and
the leakage gets on your skin:
-Use soap and water to wash immediately
-Neutralize with lemon juice, vinegar, or
other mild acid.
• If battery uids gets in your eyes, ush
immediately with water for at least 15
minutes. Get immediate medical attention.
WARNING
:
READ AND UNDERSTAND
ALL INSTRUCTIONS. Failure to follow safety
rules listed below may result in electric shock,
re, and/or personal injury.
• Do not abuse the cord. Never use the
cord to carry the tool. Never pull on the
cord to remove plug from the outlet. Keep
cords away from heat, oil, sharp edges,
or moving parts. Replace damaged cords
immediately. They may create a re. Do
not use if damaged.
• Do not place the charger where the power
cord might be stepped on, tripped on, or
subjected to damage.
• A battery-operated tool with integral
batteries or a separate battery pack must
be recharged only with the specied
charger for the battery. A charger that may
be suitable for one type of battery may
create a risk of re when used with another
battery.
• Use a battery-operated tool only with the
specically designated battery pack. Use
of any other batteries may create a risk of
re.
WARNING:
(PROPOSITION 65)
Some dust created by power sanding, sawing,
grinding, drilling, and other construction
activities contains chemicals known to cause
cancer, birth defects or other reproductive
harm. Some examples of these chemicals
are:
• Lead from lead-based paints
;

7
SAFETY RULES
• Crystalline silica from bricks and cement
and other masonry products, and
• Arsenic and chromium from chemically
treated lumber.
Your risk of exposure to these chemicals
varies depending on how often you do this
type of work. To reduce your exposure to
these chemicals, work in a well-ventilated
area, and work with approved safety
equipment, such as dust masks that are
specially designed to lter out microscopic
particles.
BATTERY USE AND CARE
• Recharge only with the charger specied
by the manufacturer. A charger that is
suitable for one type of battery pack may
create a risk of re when used with another
battery pack.
• Use string trimmer only with specically
designated battery packs. Use of any other
battery packs may create a risk of injury
and re.
• When battery pack is not in use, keep it
away from other metal objects, like paper
clips, coins, keys, nails, screws or other
small metal objects, that can make a
connection from one terminal to another.
Shorting the battery terminals together
may cause burns or a re.
• Under abusive conditions, liquid may be
ejected from the battery; avoid contact.
If contact accidentally occurs, ush with
water. If liquid contacts eyes, additionally
seek medical help. Liquid ejected from the
battery may cause irritation or burns.
SAVE ALL WARNINGS AND
INSTRUCTIONS FOR FUTURE
REFERENCE
8
ASSEMBLY
PACKING LIST
This product requires assembly
• 20V String Trimmer
• Auxiliary Handle
• Guard
• 20V 2Ah Battery (WE20VRB)
• 20V Charger (WE20VCH)
• Instruction Manual
If any parts are damaged or missing, please
call 1-855-378-6903.
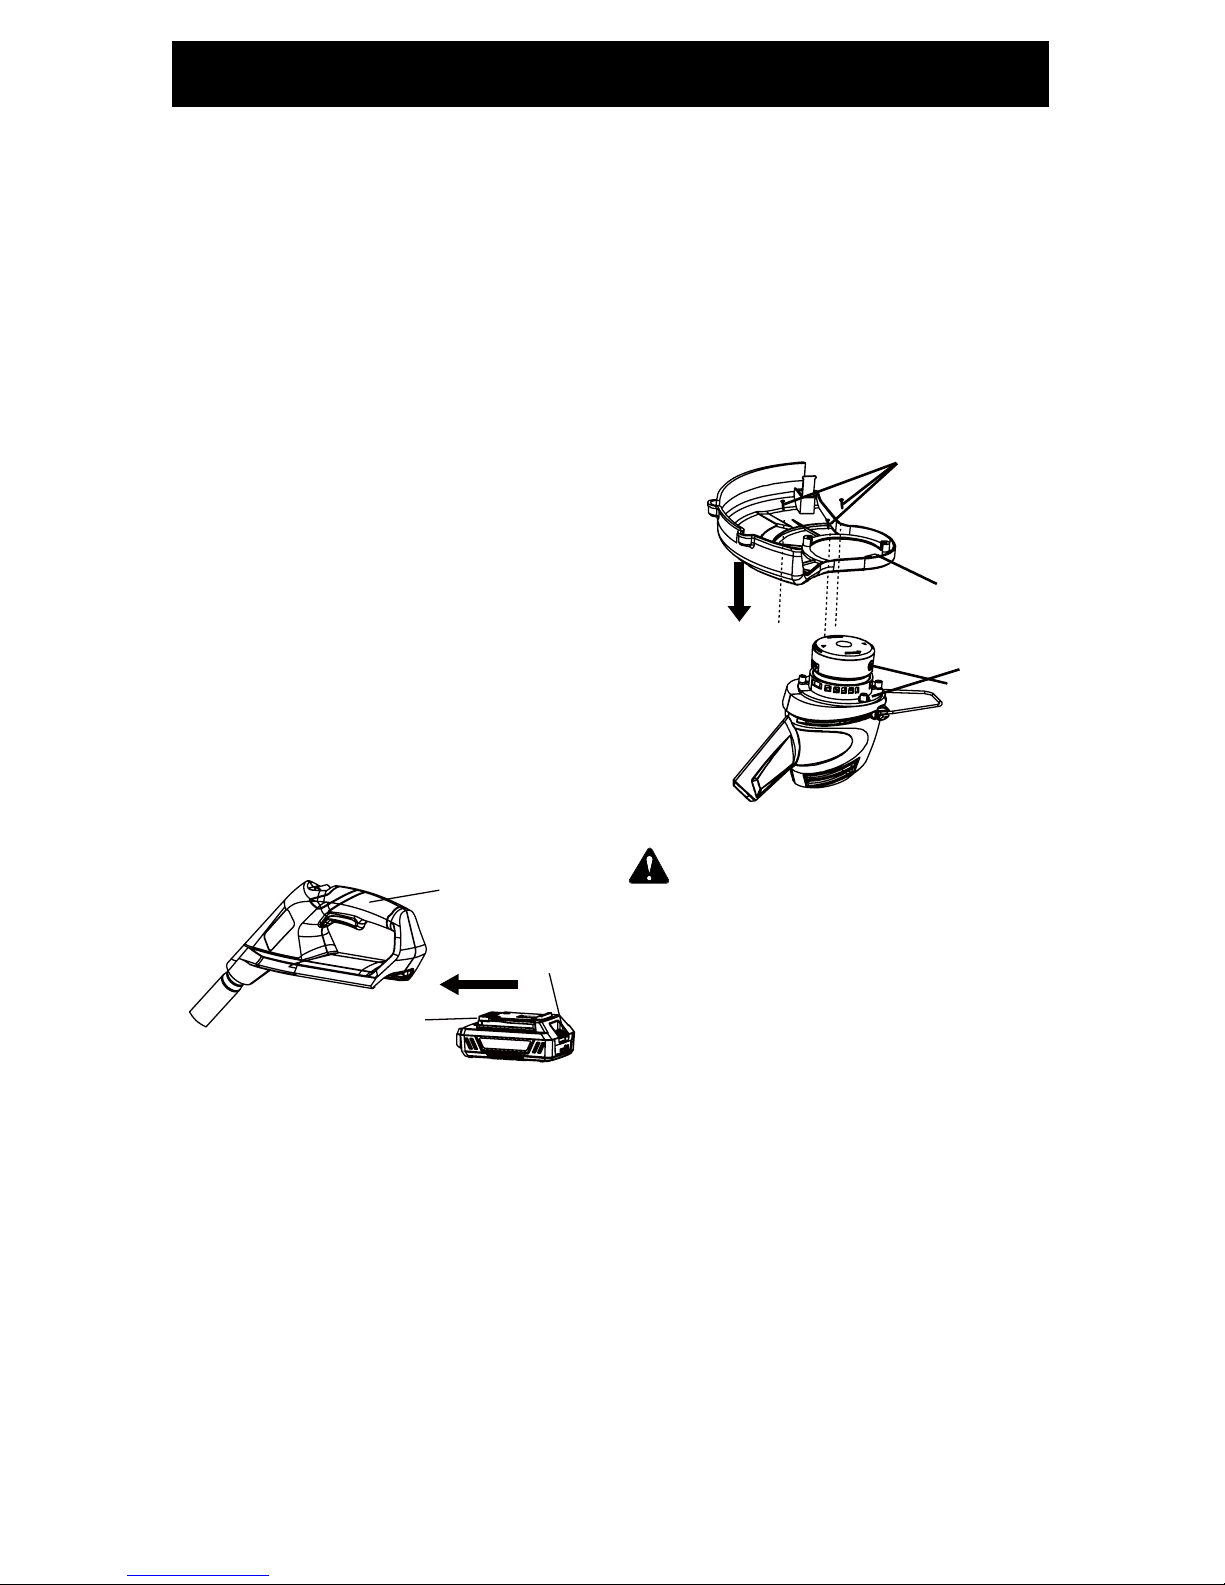
BATTERY REMOVAL
1. Press in and hold the latch button (1) with
rm grip.
2. Grasp the trigger handle (2) rmly. Pull the
battery pack out of the handle.
BATTERY INSTALLATION
1. Align the tongue (3) of the battery pack
with the cavity in the handle housing.
2. Grasp the trigger handle (2) rmly.
3. Push the battery pack into the handle
until both sides lock. The latch button will
click when locked into place.
4. Do not use force when inserting the
battery pack. It should slide into place
and click.
1
2
3
NOTE: The battery pack ts snugly into the
handle to prevent accidental dislodging. It
may require a strong pull to remove.
IMPORTANT: The battery is not shipped fully
charged. It is recommended that the battery
be fully charged before initial use. With
regular use, the battery pack will take 4 hours
or less to charge fully. It is recommended that
the battery be charged every 3 months when
the hedge trimmer is not in use. The battery’s
run time will improve after the third or fourth
charge.
GUARD ASSEMBLY
1. Remove the battery pack.
2. Invert the string trimmer to access the
bottom of the motor housing.
3. Place the guard (2) onto the bottom of
the motor housing (3).
4. Align the screw holes on the guard with
the screw holes on the motor housing.
5. Insert the 3 screws (1) into the guard
connecting to the motor housing. Tighten
the guard into place.
2
1
3
WARNING:
To avoid injury and to
reduce the risk of electric shock or re:
• Replace the battery pack or charger
immediately if the battery case or charger
cord is damaged.
• Always make sure the string trimmer
switch is OFF before inserting or removing
the battery pack.
• Always make sure the battery pack is
removed and the switch turned OFF before
replacing spools or adjusting the line.
• Read, understand, and follow the battery
charger instructions.
9
ASSEMBLY
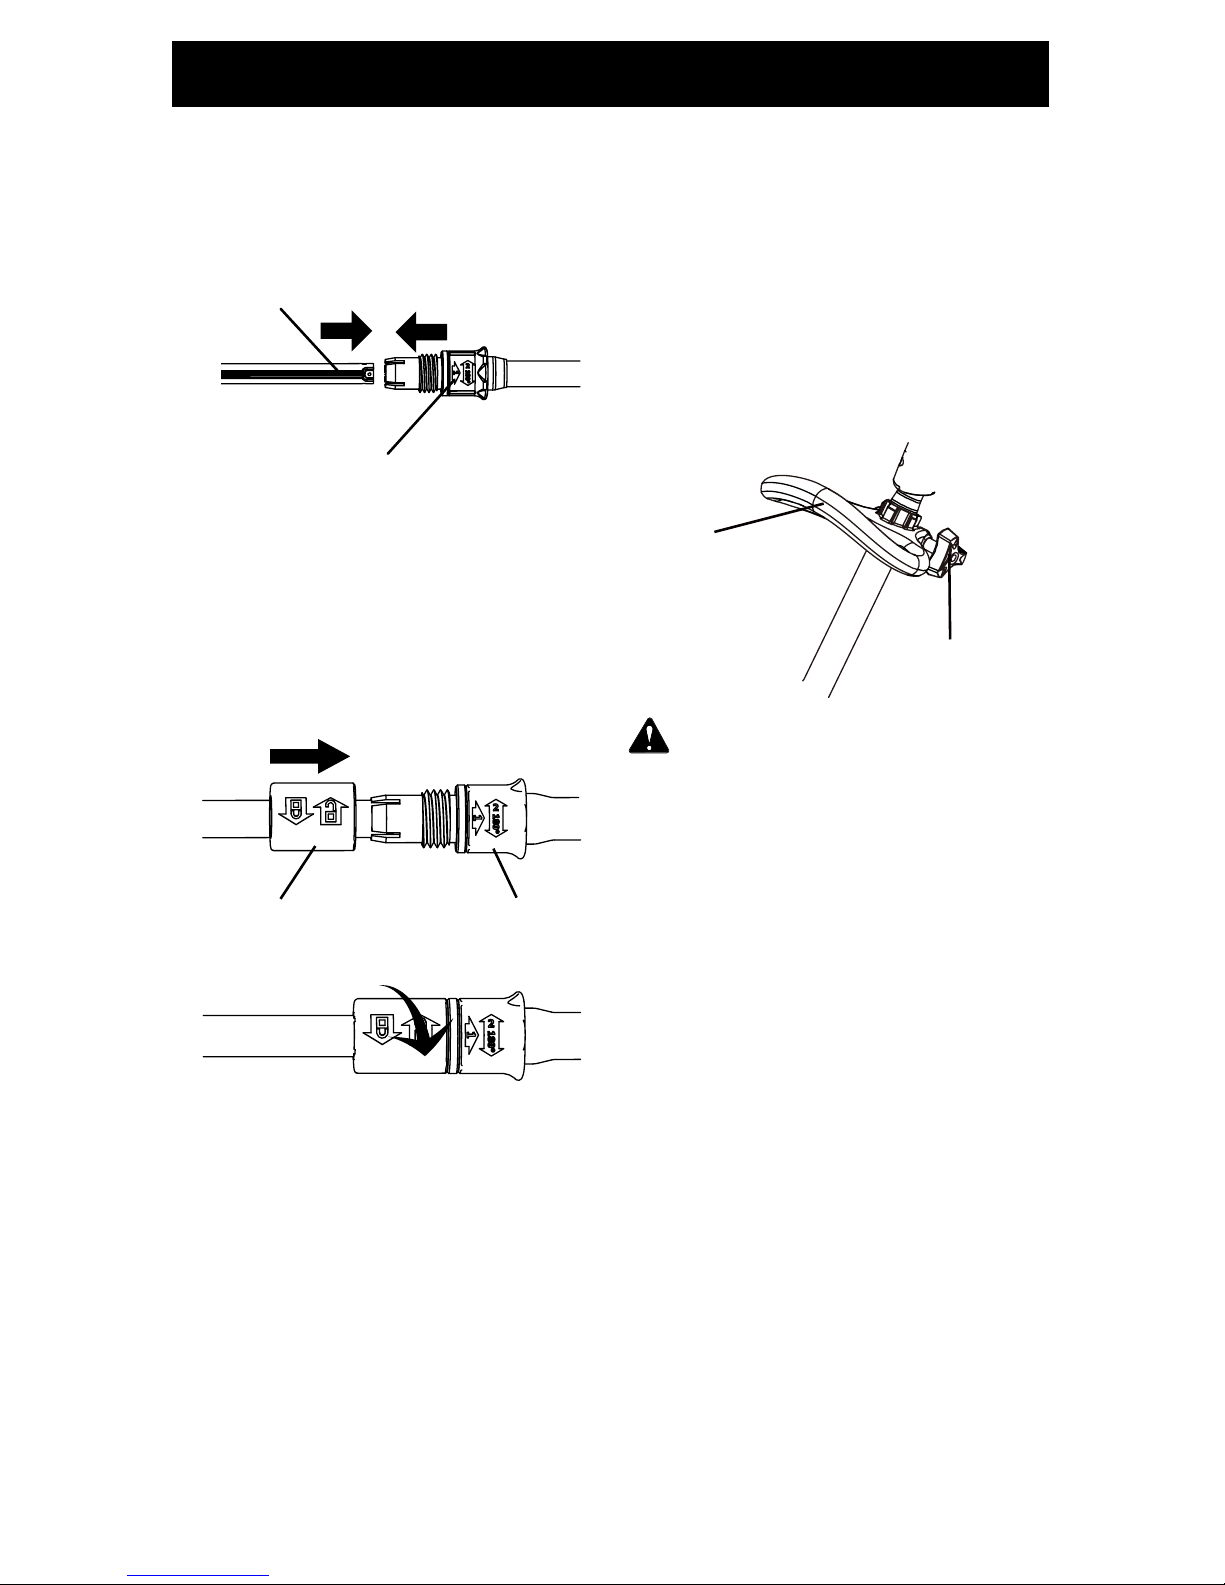
SHAFT ASSEMBLY
1. Align lower tube groove with the
groove inside the upper locking sleeve
assembly. Push tubes together until they
snap into place.
2. Try to pull tubes back apart. If the tubes
do not come apart, they are properly
snapped into place. If the tubes come
apart, repeat step 1 and push until the
tubes snap into place.
3. Slide lower locking sleeve assembly
over upper locking sleeve assembly and
tighten by turning clockwise.
Lower Tube Groove
Upper Locking Sleeve Assembly
Lower Locking
Sleeve Assembly
Upper Locking
Sleeve Assembly
AUXILIARY HANDLE ASSEMBLY
1. Position auxiliary handle (1) onto the
upper portion of the trimmer shaft.
2. Once the auxiliary handle is in the
desired location, tighten the knob (2)
until locked into position.
3. Before operating the string trimmer,
make sure the auxiliary handle (1) is
tightly locked into position
4. Turn the auxiliary handle adjustment
knob (2) clockwise to lock the handle
securely into position.
2
1
WARNING:
To avoid injury, adjust
the auxiliary handle for optimum control and
balance. Do not overreach when operating
the string trimmer. Keep proper balance
at all times for better control of the tool in
unexpected situations.
CUTTING LINE
A pre-wound spool is pre-installed on the
string trimmer. When the cutting line needs to
be replaced, insert a new spool.
10
OPERATION
TELESCOPING SHAFT
The shaft can be extended or shortened for
ease of use.
1. Unscrew shaft coupler and slide to
desired position.
2. Tighten shaft coupler.
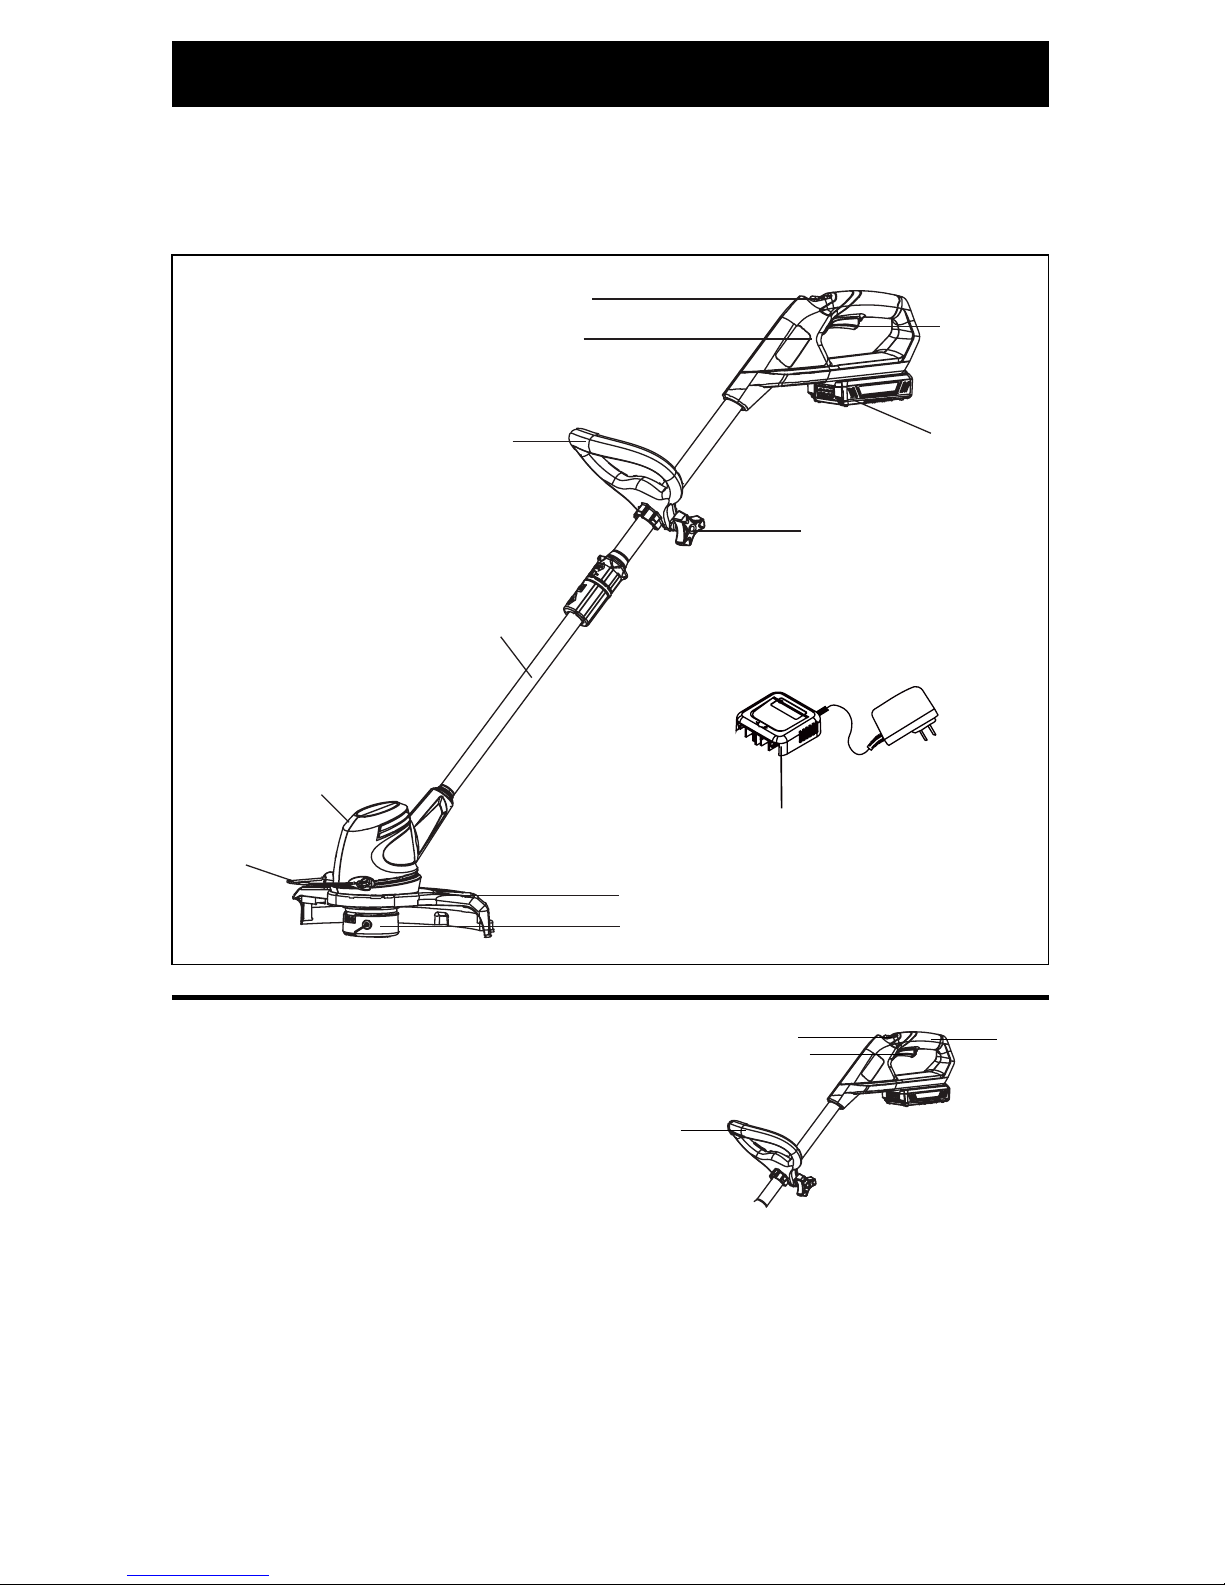
KNOW YOUR STRING TRIMMER
The safe use of this product requires an understanding of the information in this instruction
manual as well as a knowledge of the project you are attempting. Before use of this product,
familiarize yourself with all operating features and safety rules.
TO TURN ON/OFF
1. Place one hand on the trigger handle
(3). Place the other hand on the auxiliary
handle (4).
2. Slide the lock-out button (2) toward the
rear of the handle and hold.
3. Squeeze trigger switch (1). The string
trimmer will turn ON.
4. Release the lock-out button (2). The
string trimmer will stay on as long as the
trigger switch (1) is squeezed ON.
5. Release trigger switch (1) to stop.
Lock-Out Button
Upper Handle
Auxiliary Handle
Auxiliary Handle
Adjustment Knob
Telescoping Shaft
Motor Housing
Edge Guide
Guard
Single-line Cutting Spool
Trigger Switch
1
2
3
4
Battery
Charger
11
OPERATION
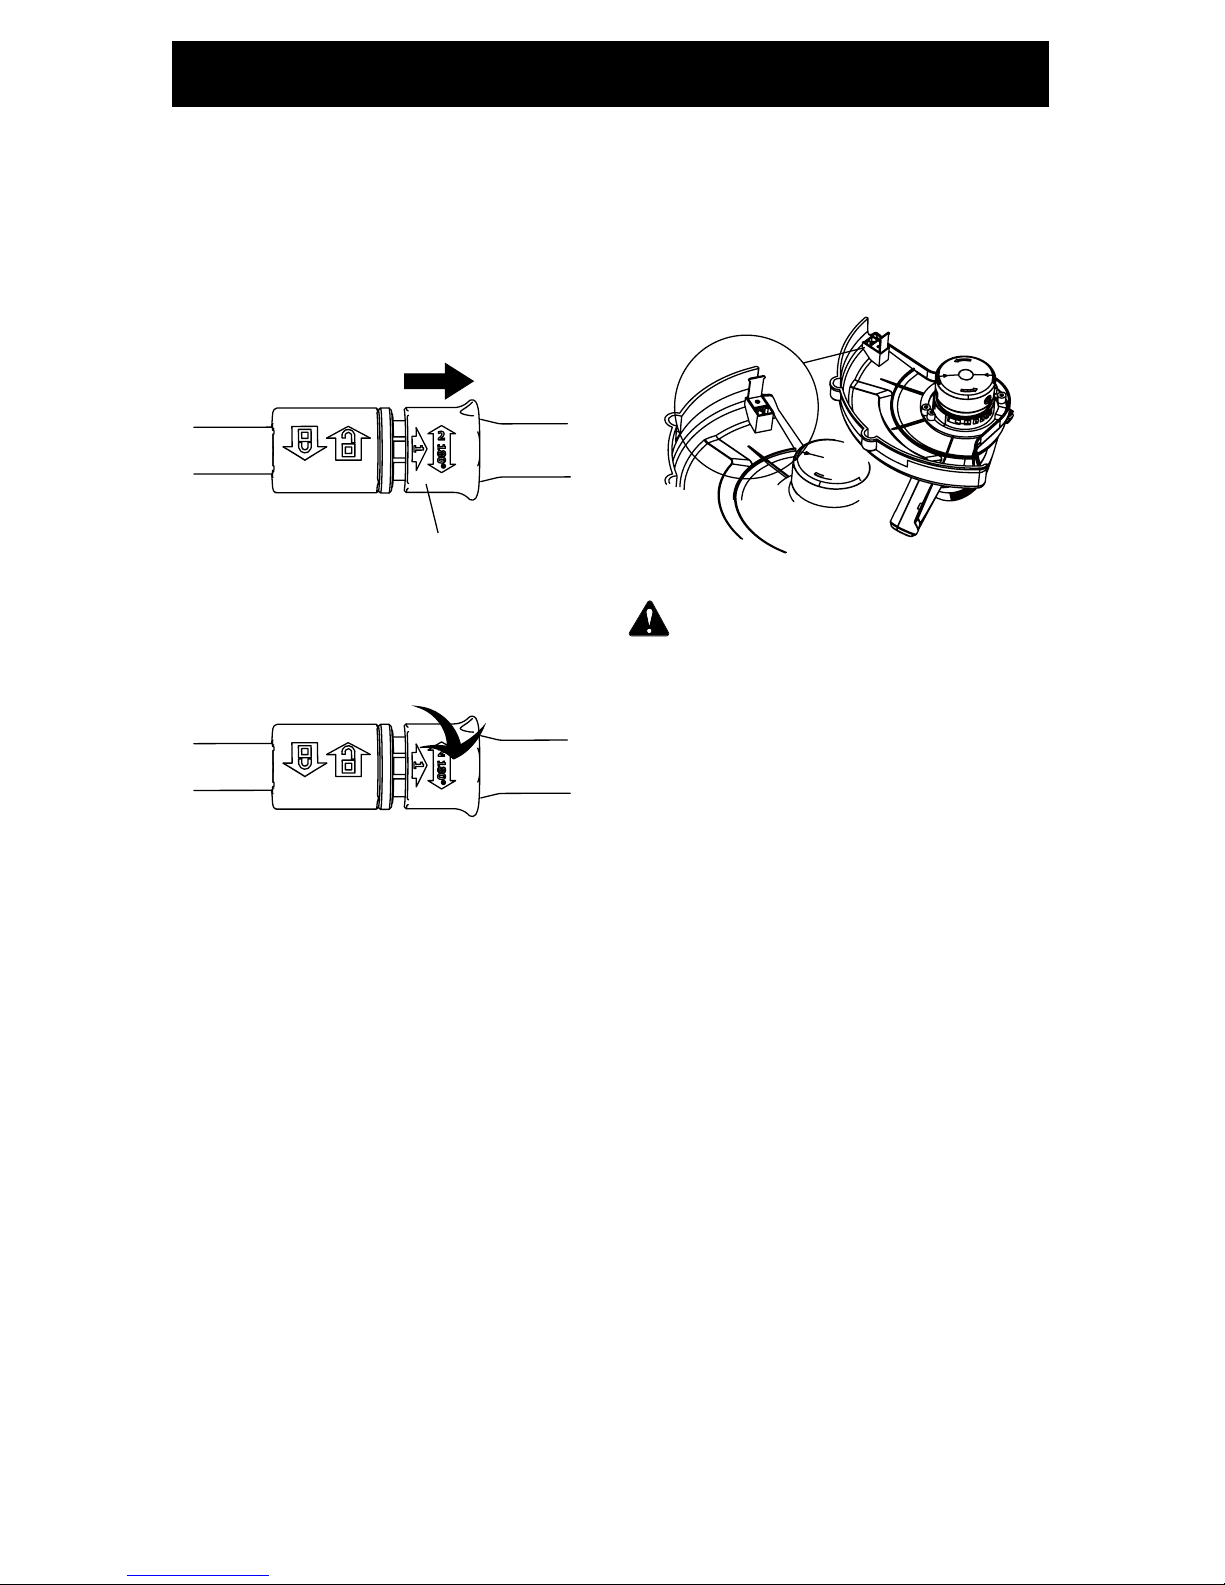
EDGING FUNCTION
The string trimmer is equipped with an
edging feature for use on multiple surfaces.
This includes sidewalks, walkways, patios,
and driveways. It is great for clearing overgrown grass from manicured surfaces.
• Pull up Edging Coupler and turn handle
end counter clockwise.
Edging Coupler
• Release Edging Coupler when handle has
been rotated 180°.
• Flip the edging guide down until it locks
into place.
ADJUST THE CUTTING PATH
The cutting path can be adjusted from 10”12” (25.5-30.5 cm). Philips Head Screwdriver
(Not Supplied) is required.
Loosen the screw and turn the cutter 180°
then tighten the screw.
10’’
12’’
WARNING:
To avoid injury:
• Do not squeeze the trigger while the string
trimmer/edger is inverted.
• Do not carry the string trimmer/edger with
your nger on the trigger switch. Avoid
unintentional starting.
LENGTHENING THE LINE
While the string trimmer is operating, the
cutting line gets worn down and becomes
shorter. This trimmer is equipped with
Automatic Line Advancement, which
automatically feeds additional line to the
correct length as it wears down. If the line
does not automatically advance, the trimmer
line may be tangled or empty. To advance
the line, restart the trimmer. Upon starting,
the line will automatically advance.
12
MAINTENANCE
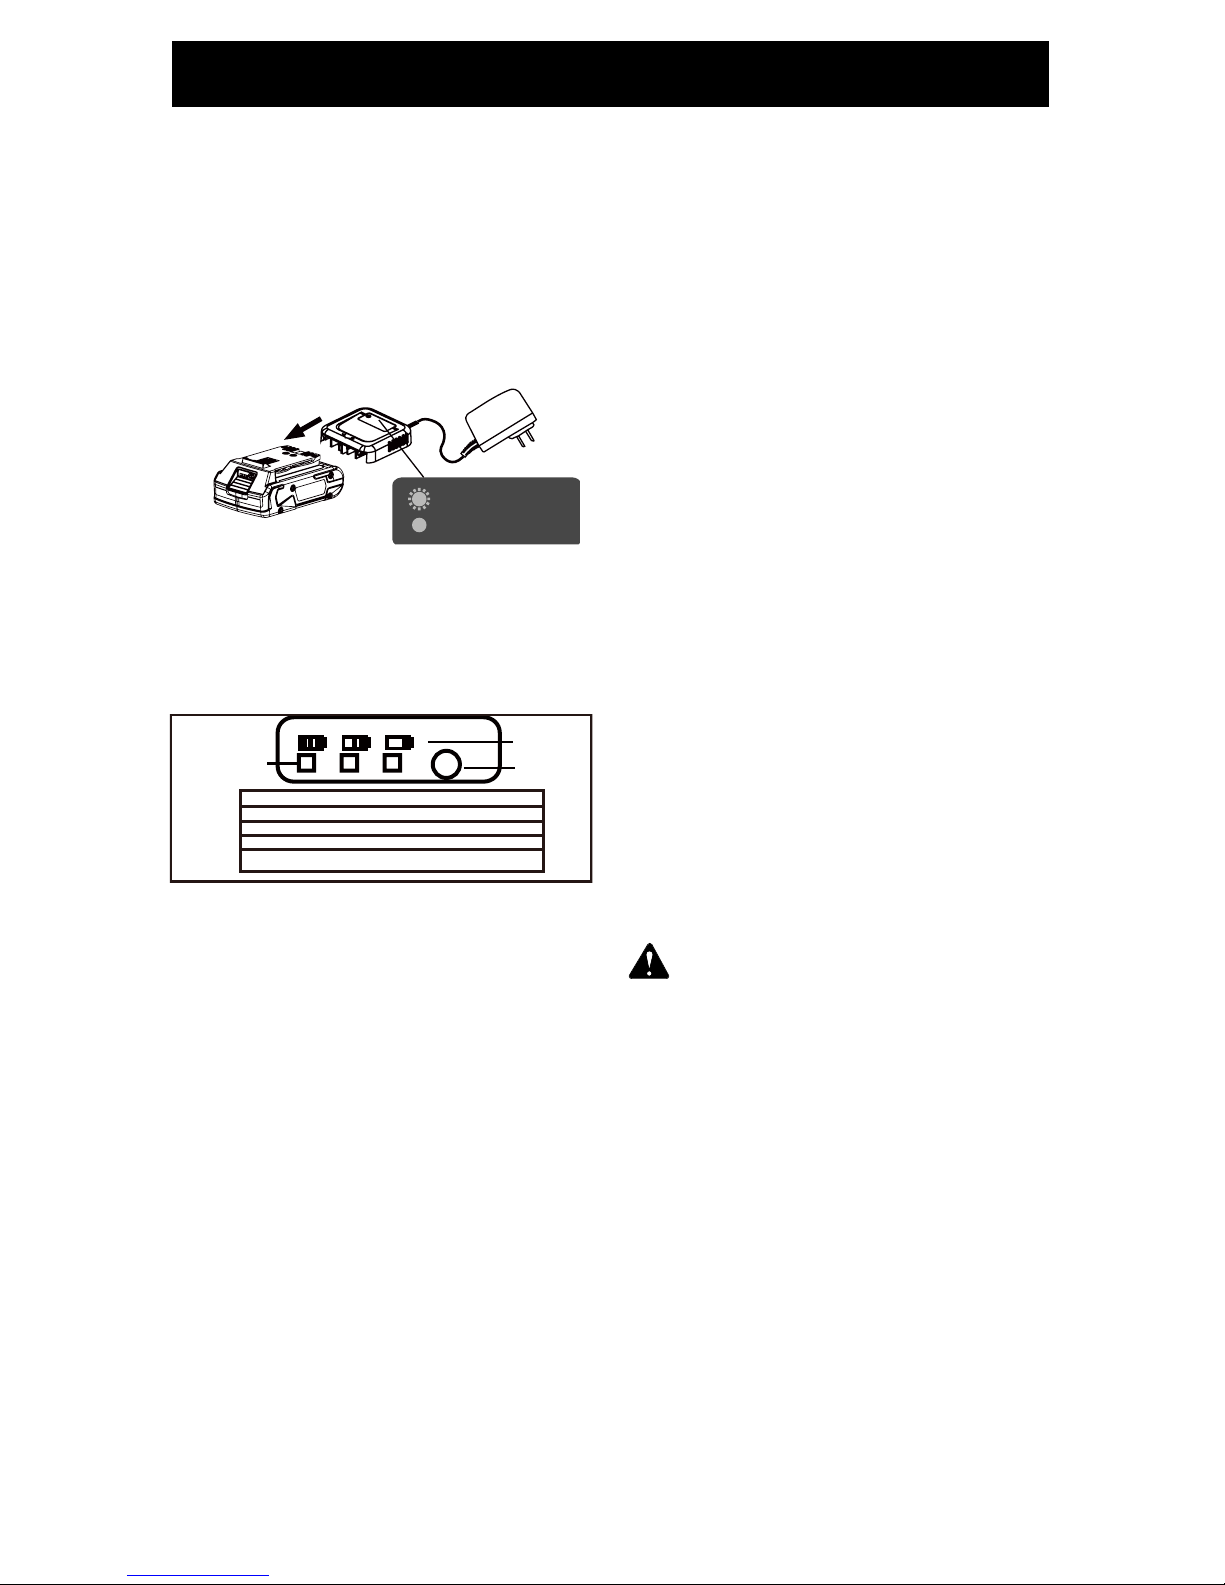
CHARGING PROCEDURE
1. Plug the charger into an AC power
outlet.
2. Slide Charger over Battery Pack
Terminals. Make sure the Charger and
Battery are fully connected.
3. When the battery is charging, the LED
will blink; when the battery is fully
charged, the LED will stop blinking but
will remain illuminated.
CHECKING BATTERY CAPACITY
Press the Battery Capacity Indicator (BCI)
button. The lights will illuminate according to
the battery’s current power level. See chart
below:
CHARGER MAINTENANCE
• Keep the charger clean and clear of debris.
Do not allow foreign material to get into the
recessed cavity or onto the contacts. Wipe
the charger clean with a dry cloth. Do not
use solvents or water, and do not place the
charger in wet conditions.
• Unplug the charger when there is no
battery pack in it.
• Fully charge the batteries before placing
them in storage.
• Store the charger at normal room
temperature. Do not store it in excessive
heat. Do not use the charger in direct
sunlight. Recharge at temperatures
between 32°F and 104°F (0-40°C). If
battery pack is hot, allow it to cool down
before recharging.
BATTERY PACK
• Store the battery pack fully charged.
• Once the charging light turns green,
remove the battery from the charger and
disconnect the charger from the outlet.
• After charging, the battery pack may be
stored on the charger, as long as the
charger is not plugged in.
CUTTING LINE
• Use only .065” (1.65mm) diameter cutting
line. Other sizes will not advance properly
and could result in failure, or cause serious
injury.
• Always wind the line in the same direction
as the arrow on the spool.
CLEANING
1. Wipe the outside of the string trimmer
with a dry, soft cloth. Do not hose down
or wash with water.
2. Scrape the guard and spool area to
remove dried clippings and mud.
3. Brush or blow dust, debris, and grass
clippings out of the air vents. Keep them
free of obstruction.
CAUTION: Do not use strong solvents or
detergents on the plastic housing or plastic
components. Certain household cleaners
may cause damage and may also cause a
shock hazard.
WARNING:
To avoid risk of re,
electric shock, or electrocution:
• Do not use a damp cloth or detergent on
the battery or battery charger.
• Always remove the battery pack before
cleaning, inspecting, or performing any
maintenance on the string trimmer.
BCI BUTTON
LIGHT METER
BATTERY METER
Lights Capacity
The battery is at 80 –100% capacity
The battery is at 50 – 80% capacity
The battery is at 20 – 50% capacity
3 Green Lights
2 Green Lights
1 Green Light
Lights go out
The battery i s under 10% c apacity and
requires charging immediately
Charging/Cargando/En charge
Fully charged/Lleno/Chargé

13
MAINTENANCE
ENVIRONMENTALLY SAFE BATTERY
DISPOSAL
The following toxic and corrosive materials
are in the batteries used in this string
trimmer battery pack: Lithium-Ion, a toxic
material.
WARNING:All toxic materials must
be disposed of in a specied manner to
prevent contamination of the environment.
Before disposing of damaged or worn out
Lithium-Ion battery packs, contact your
local waste disposal agency, or the local
Environmental Protection Agency for
information and specic instructions. Take the
batteries to a local recycling and/or disposal
center, certied for lithium-ion disposal.
WARNING:If the battery pack
cracks or breaks, with or without leaks, do
not recharge it and do not use. Properly
dispose of it and replace with a new battery
pack. DO NOT ATTEMPT TO REPAIR IT!
To avoid injury and risk of re, explosion, or
electric shock, and to avoid damage to the
environment:
• Cover the battery's terminals with heavyduty adhesive tape.
• DO NOT attempt to remove or destroy any
of the battery pack components.
• DO NOT attempt to open the battery pack.
• If a leak develops, the released electrolytes
are corrosive and toxic. DO NOT get the
solution in the eyes or on skin, and do not
swallow it.
• DO NOT place these batteries in your
regular household trash.
• DO NOT incinerate.
• DO NOT place them where they will
become part of any waste landll or
municipal solid waste stream.
• Take them to a certied recycling or
disposal center.
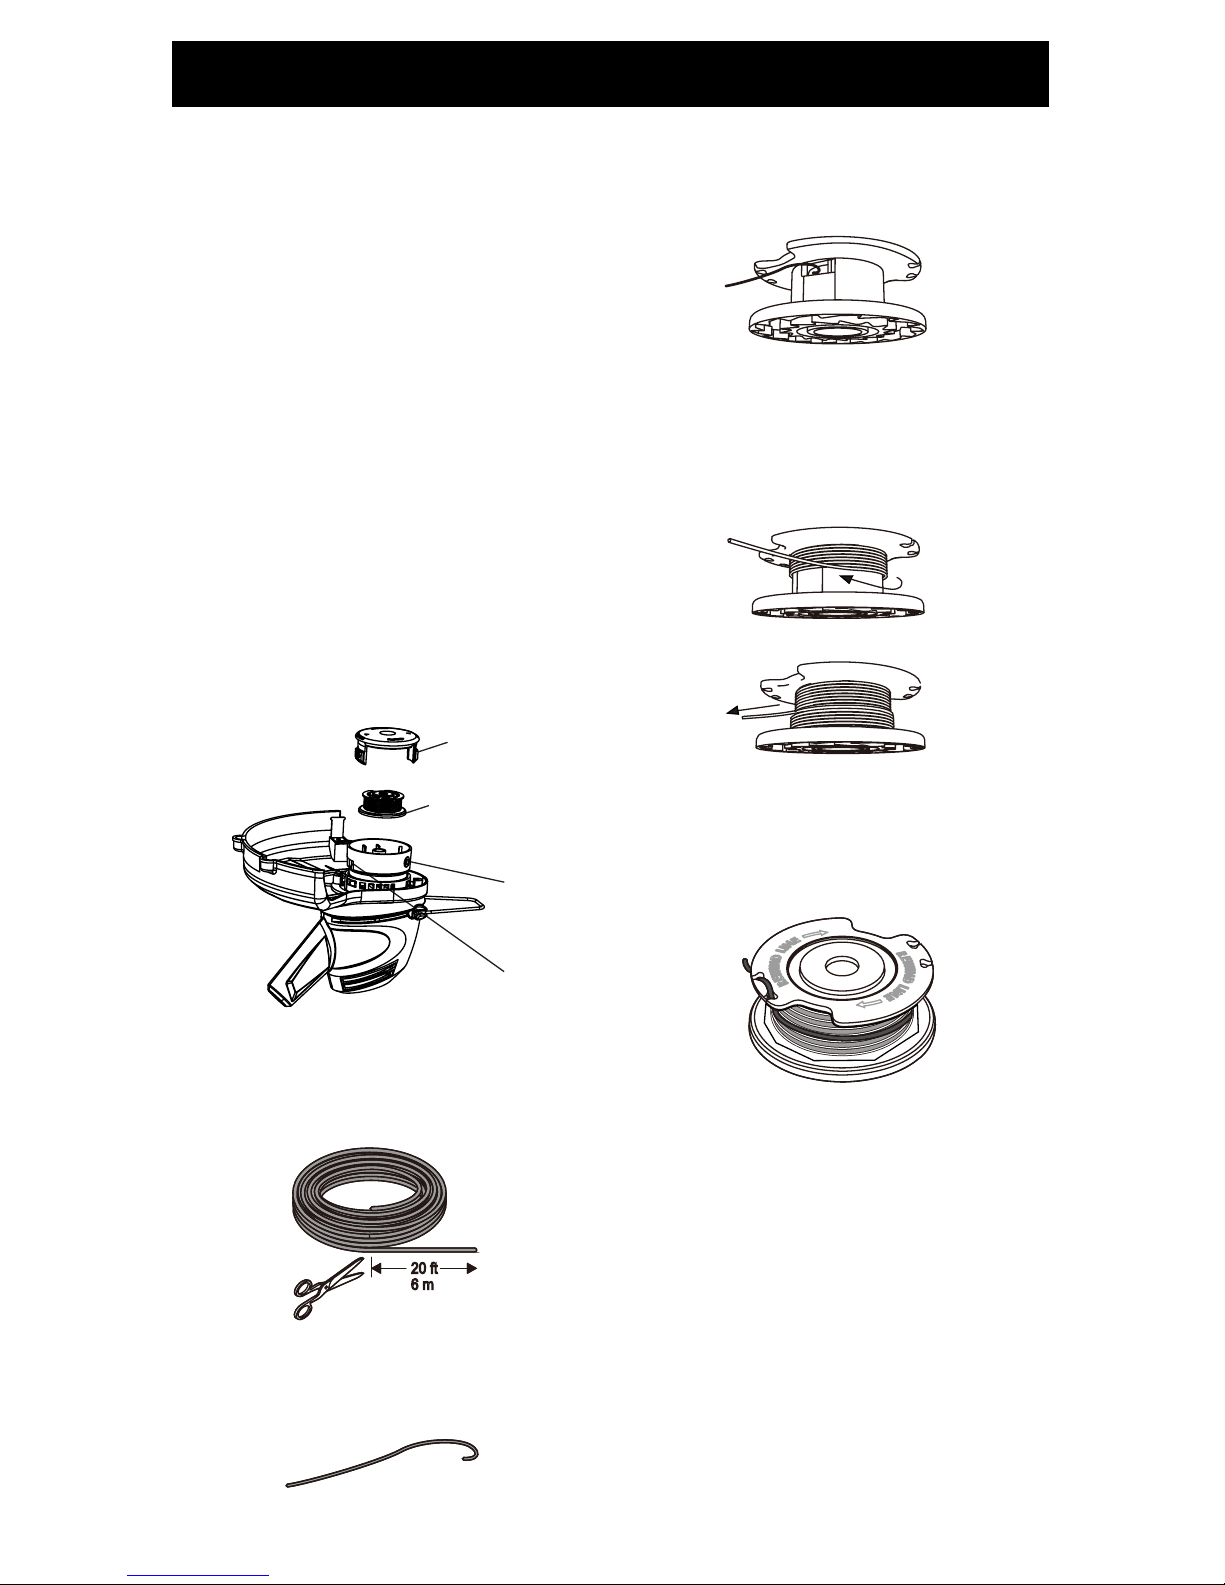
14
3. Take the end of the line that is bent 1/4
of an inch (6.4mm) and stick it in the
hole in the spool head.
4. Once the 1/4 of the line is inserted in to
the hole, wind the spool line clockwise
evenly and overlapping the rst row and
continuing the process until complete.
5. Once complete the last layer of line
should be evenly wounded. To keep the
line from unraveling hook the line as
shown below.
STORAGE
• Ensure the battery is removed from the
string trimmer.
• Wipe any debris off of the string trimmer.
• Store in a dry cool place out of the reach
of children.
• Position unit so that any sharp object
cannot accidentally cause injury.
SERVICE AND ADJUSTMENTS
SPOOL REMOVAL
1. Remove battery from trimmer.
2. Invert string trimmer to access spool.
3. Remove spool cover. Press on the two
tabs parallel to each other on the side of
the cover (2).
4. Remove the spool from spool housing
(3).
SPOOL REPLACEMENT
1. Replace the spool (1) with a new prewound spool.
2. Insert the end of line through the opening
(4) in the spool housing (3).
3. Align the tabs on the spool cover with the
slots in the spool housing on the trimmer
head.
4. Push down on the spool cover, locking it
to the spool housing.
5. To advance the line when initially
installed, you must pull the line while
pressing the line release button on the
side of the spool housing (3).
2
1
4
3
LINE REPLACEMENT
1. Cut the length of line to 20 ft (6m) total
length.
2. Bend one end of the Line 1/4 of an inch
(6.4mm).
20 ft
6 m

15
WARNING: Always stop unit and disconnect from the power source before performing
all of the recommended remedies below except remedies that require unit to be operating.
TROUBLE CAUSE REMEDY
Motor fails to start when
trigger switch is depressed.
1. Battery is not secure.
2. Battery is not charged.
1. To secure the battery pack,
make sure the latches on the
top of the battery pack snap into
place.
2. Charge the battery pack
according to the instructions
included with your model.
String trimmer smokes during
operation.
String trimmer damaged. Do not use string trimmer.
Call for technical service
1-855-378-6903.
Cutting line does not
advance.
1. Line may be tangled on
spool.
2. Line has run out.
1. Remove battery. Remove spool
cover and spool. Unwind spool
and rewind, ensuring that line is
not tangled.
2. Replace spool or spool line.
TROUBLESHOOTING TABLE

16
LIMITED WARRANTY
WEED EATER, a division of Husqvarna
Consumer Outdoor Products N.A., Inc.,
hereby warranties this product, to the
original purchaser with proof of purchase,
for a period of four (4) years against defects
in materials, parts, or workmanship.
WEED EATER, at its own discretion will
repair or replace any and all parts found to
be defective, through normal use, free of
charge to the customer. This warranty is
valid only for units which have been used
for personal use that have not been hired or
rented for industrial/commercial use, and
that have been maintained in accordance
with the instructions in the owners manual
supplied with the product.
Battery carries a two (2) year warranty
against defects in workmanship and
materials. Batteries must be charged in
accordance with the operator's manuals
directions and regulations in order to be
valid.
This warranty is not transferable. This
warranty does not cover damaged parts
from improper handling, commercial use,
abuse, neglect, accident, improper
maintenance, alteration, or the use of
accessories and/or attachments not
specically recommended by WEED
EATER for this product. Additionally, this
warranty does not cover parts that will wear
from normal use, and normal deterioration
of the exterior nish due to use or
exposure. This warranty does not cover
predelivery setup, or normal adjustments
explained in the instruction manual.
Transportation Charges: Transportation
charges for the movement of any power
equipment unit or attachment are the
responsibility of the purchaser. It is
the purchaser’s responsibility to pay
transportation charges for any part submitted
for replacement under this warranty unless
such return is requested in writing by WEED
EATER.
Should you have any unanswered
questions concerning this warranty, please
contact: WEED EATER, a division of
Husqvarna Consumer Outdoor Products
N.A., Inc.
9335 Harris Corners Parkway
Charlotte, NC 28269
1-855-378-6903
In Canada, contact:
WEED EATER
850 Matheson Blvd. West
Mississauga, Ontario L5V 0B4
Giving the model number, serial number
and date of purchase of your product and
the name and address of the authorized
dealer from whom it was purchased.
THIS WARRANTY GIVES YOU SPECIFIC
LEGAL RIGHTS, AND YOU MAY HAVE
OTHER RIGHTS WHICH VARY FROM
STATE TO STATE.
NO CLAIMS FOR CONSEQUENTIAL OR
OTHER DAMAGES WILL BE ALLOWED,
AND THERE ARE NO OTHER EXPRESS
WARRANTIES EXCEPT THOSE
EXPRESSLY STIPULATED HERIN.
SOME STATES DO NOT ALLOW
LIMITATIONS ON HOW LONG AN
IMPLIED WARRANTY LASTS OR THE
EXCLUSION OR LIMITATIONS OF
INCIDENTAL OR CONSEQUENCIAL
DAMAGES, SO THE ABOVE
LIMITATIONS OR EXCLUSION MAY NOT
APPLY TO YOU.
This limited warranty within the meaning of
that term as dened in the Magnuson-Moss
Act of 1975.
The policy of WEED EATER is to
continuously improve its products.
Therefore, WEED EATER reserves the
right to change, modify, or discontinue
models, designs, specications, and
accessories of all products at any time
without notice or obligation to any
purchaser.
 Loading...