


3-SPEED DRINK MIXER
MALTEADORA DE 3 VELOCIDADES BATTEUR À BOISSONS À 3 VITESSES
WDM120TX/WDM240TX/WDM360TX
For your safety and continued enjoyment of this product, always read the instruction book carefully before using.
Para su seguridad y para disfrutar plenamente de este producto, siempre lea cuidadosamente las instrucciones antes de usarlo.
Afin que cet appareil vous procure en toute sécurité beaucoup de satisfaction, lire attentivement le mode d’emploi avant de l’utiliser.
IMPORTANT SAFEGUARDS
When using electrical appliances, basic safety precautions should always be taken, including the following:
1.READ ALL INSTRUCTIONS.
2.Unplug from outlet when not in use, before putting on
or taking off parts, and before cleaning.
3.This appliance is not intended for use by persons (including children) with reduced physical, sensory or mental capabilities, or lack of experience and knowledge.
4.Children should be supervised to ensure that they do not play with the appliance.
5.To protect against electrical hazards, do not put the Waring® Commercial Drink Mixer in water or other liquids.
6.Avoid contact with moving parts.
7.Do not operate the Waring® Commercial Drink Mixer or any other electrical equipment with a damaged cord or plug, or after the unit malfunctions or is dropped or damaged in any manner. Return it to the nearest authorized service facility for examination, repair, or adjustment.
8.Do not use outdoors.
9.Do not let cord hang over edge of table or counter, or touch hot surfaces.
10.Put this instruction manual in a safe place. Do not discard.
SAVE THESE INSTRUCTIONS APPROVED FOR COMMERCIAL USE
GROUNDING INSTRUCTIONS
For your protection, the Waring® Commercial Drink Mixer is equipped with a 3-conductor cord set.
120-volt units are supplied with a molded 3-prong groundingtype plug, and should be used in combination with a properly connected grounding-type outlet as shown in Figure 1.
2
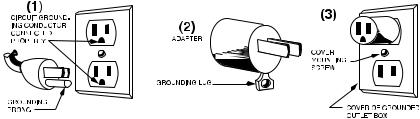
If a grounding-type outlet is not available, an adapter, shown in Figure 2, may be obtained to enable a 2-slot wall outlet to be used with a 3-prong plug.
As shown in Figure 3, the adapter must be grounded by attaching its grounding lug under the screw of the outlet cover plate.
CAUTION: Before using an adapter, it must be determined that the outlet cover plate screw is properly grounded. If in doubt, consult a licensed electrician.
Never use an adapter unless you are sure it is properly grounded. NOTE: Use of an adapter is not permitted in Canada.
HOW TO USE YOUR
WARING® COMMERCIAL DRINK MIXER
Each spindle on your Waring® Commercial Drink Mixer has its own independent 1 peak HP motor. Your new Waring® Commercial Drink Mixer has an automatic ON/OFF button
(actuator) located behind the front tab of each upper cup support that starts the motor when the mixing cup is placed in the proper position on the lower cup support. The cup support has two steps. To activate the automatic ON/OFF button, the bottom of the mixing cup must be securely resting on the upper step of the cup support, and the top rim of the mixing cup must go behind the front tab of the upper cup support.
The motor will continue to operate while the mixing cup remains on the mixer, activating the actuator.
Removal of the mixing cup will shut off the motor.
3

The 3-speed button on the front of the Waring® Commercial Drink Mixer regulates the operating speed. Choose either LO (I), MED (II), or HI (III) speed. For mixing heavy drinks, use HI (III) speed only; for light drinks with more liquid, use LO (I) speed.
The drink mixer can be operated without engaging the ON/OFF cup actuator by using the PULSE  button. The PULSE
  button will operate at whatever speed the 3-speed button is set to. The PULSE
  button will operate only while depressed. Keep a firm grip on the cup while using PULSE
 .
.
Your Waring® Commercial Drink Mixer is supplied with 2 agitators, 1 standard and 1 “butterfly” (with the movable flaps), per spindle. To change agitators, simply hold the spindle shaft with one hand and turn the agitator in a clockwise direction. This will loosen
the screw, and you can unscrew to remove. Insert replacement agitator and screw bottom screw back in. Use only a standard metal mixing cup with the standard agitator.
TIMER INSTRUCTIONS
Your Waring® Commercial Drink Mixer timer can be programmed manually or set while the unit is in use.
KEY USES/DEFINITIONS
1. Plus Button + :
a.Used for scrolling up to set time. If holding down, time will advance by 10 seconds for every 1 second pressed. Every press will advance time 1 second.
b.Used for turning timer On/Off. Press Plus Button fast 3 times to turn timer OFF and display “---”; pressing Plus Button or Minus Button again will turn timer back on.
2.Minus Button - :
a.Used for scrolling down to set time. If holding down, time will decrease by 10 seconds for every 1 second pressed. Every press will decrease time 1 second.
b.Used for setting the countdown timer, holding the Minus Button down for more than 3 seconds puts the timer into the Set mode: S0:00.
4

3. Speed Button:
Every press will increase the speed from Lo to Hi. This is circular, so 3 presses gets you back to Lo.
4. Pulse Button:
Press and hold Pulse Button and the mixer runs at the set speed until button is released.
TIMER RANGE
1. Timer range 0:01 to 9:59
NOTE: To deactivate timer, tap  3 times rapidly. To activate the timer, tap
  or
or  once. Timer will read (R0:00). If you have a unit with more than one timer, the timers will need to be set individually.
1.Manual Timer Programming
–Ensure timer is activated and in the ON position (R0:00).
–Press and hold the  button for 3 seconds to enter the SET mode (display will blink during SET mode), S0:00.
–Use  and
and  buttons to scroll until you reach desired time.
–Wait 5 to 6 seconds and time will be set.
–To reset time, press and hold  and
and  buttons simultaneously for 3 seconds.
2.Assisted Timer Programming
–Ensure timer is activated and in the ON position (R0:00).
–Mount the cup and actuate. Timer will begin to count up.
–When your mix has reached its desired consistency, remove the cup.
–Press and hold the  button for 3 seconds to set the time OR replace the cup within 10 seconds to continue the count.
NOTE: If cup is removed during countdown or count-up, the timer will pause and blink for 10 seconds. Replace the cup within the 10 seconds to continue, or timer will return to set time.
5

CLEANING & SANITIZING INSTRUCTIONS
TO WASH:
1.TURN UNIT OFF USING POWER SWITCH LOCATED ON BACK OF UNIT, OR UNPLUG MIXER POWER CORD FROM ELECTRICAL OUTLET.
DO NOT PUT IN DISHWASHER.
2.To remove the bottom cup supports (C), simply push each support up, then pull out toward you.
3.To remove the upper cup supports (D), firmly hold the notches on both sides of the support, then pull directly out from the base.
Use only low-foaming detergents formulated for cleaning dishware and cooking utensils. These products can be purchased from restaurant and commercial food-service suppliers. Follow the detergent manufacturer’s instructions.
Add 12 ounces of washing solution to mixing cup and place in normal operating position on mixer.
Run on LO speed for a minimum of two (2) minutes.
Empty cup and repeat two-minute run with 12 ounces of water on LO speed.
Empty cup and repeat two-minute run with 12 ounces of sanitizing solution on LO speed.
Empty cup. Run motor for a few seconds with empty cup in normal operating position to spin off any excess moisture. Do not rinse cup, spindle or agitator after sanitizing is completed. Allow all parts to air-dry.
Reassemble ON/OFF cup actuator and mixing cup supports to mixer housing by reversing above steps 2 and 3.
6
TO SANITIZE: Use regular, unscented bleach diluted with water between 50°F and 120°F. Follow the food equipment cleaning instructions on the label to not exceed 200 ppm total available chlorine. The sanitizing dilutions are based on the hypochlorite concentration of the bleach. The dilutions for two commonly available bleach concentrations are:
–Hypochlorite: 5.25% – 3 teaspoons of bleach per gallon of water
–Hypochlorite: 8.25% – 2 teaspoons of bleach per gallon of water
Immerse in or alternately spray item with sanitizing solution and soak for 2 minutes.
Wash, rinse, and sanitize as outlined on page 6 prior to initial use, and whenever mixer will not be used again within a period of one hour to avoid bacteria buildup.
Surfaces of the mixer housing that are outside of the food contact areas may be cleaned as required, using wiping cloths moistened with cleaning solution, rinse water and sanitizing solution.
TURN UNIT OFF OR UNPLUG POWER CORD FROM ELECTRICAL OUTLET BEFORE CLEANING HOUSING. Prevent liquid from running into housing by wringing all excess moisture from wiping cloths before using them.
Washing solutions based on non-sudsing detergents and chlorine-based sanitizing solutions having a minimum chlorine concentration of 100 PPM are recommended.
7
The following washing, rinsing, and sanitizing solutions, or their equivalents, may be used:
SOLUTION |
PRODUCT |
DILUTION IN WATER |
TEMPERATURE |
|
|
|
|
Washing |
International |
1%–2%: 1¼ – 2¾ |
Room |
|
Products |
Ounce/Gallon (lower |
Temperature |
|
Corporation LF2100 |
dilution of 1% for normal |
|
|
Liquid Low-Foam |
cleaning and up to 2% for |
|
|
Cleaner |
more stubborn soils) |
|
|
|
|
|
Rinsing |
Plain Water |
|
Warm 95˚F (35˚C) |
|
|
|
|
Sanitizing |
Clorox® |
2 Teaspoons/Gallon |
|
|
Regular Bleach |
(Alternately a bleach |
|
|
(8.25% Hypochlorite |
with 5.25% Hypochlorite |
|
|
Concentration) |
Concentration can be |
|
|
|
used at dilution of 3 |
|
|
|
Teaspoons/Gallon) |
|
|
|
|
|
Clorox® is a registered trademark owned by the Clorox Corporation.
HELPFUL HINTS
1.Always turn unit off or unplug the Waring® Commercial Drink Mixer before disassembling or assembling parts.
2.Be sure to keep all the instructions, parts lists, and service information in a safe and handy place.
3.If using ice, only use crushed ice or small cubes in the Waring® Commercial Drink Mixer.
4.Clean the Waring® Commercial Drink Mixer thoroughly before initial use.
5.Keep mixing cups clean. Wash, rinse and sanitize thoroughly after use.
6.Be sure that all detachable parts are fastened tightly before operating the Waring® Commercial Drink Mixer.
7.Operate the Waring® Commercial Drink Mixer only when it is fully assembled.
8.To avoid splashing drinks of thin consistency, operate on Speed LO.
Any other servicing should be performed by an authorized service representative.
8
LIMITED ONE YEAR WARRANTY
(U.S. and Canada Only)
Waring warrants every new Waring® Commercial Drink Mixer to be free from defects in materials and workmanship for a period of one year from the date of purchase when used with foodstuffs, nonabrasive liquids (other than detergents) and nonabrasive semiliquids, provided it has not been subject to loads in excess of the indicated rating. In addition, the motor in this appliance has a full three-year warranty.
Under this warranty, the Waring Commercial Division will repair or replace any part that, upon our examination, is defective in materials or workmanship, provided the product is delivered prepaid to the Waring Service Center at:
314 Ella T. Grasso Ave., Torrington, CT 06790, or any Factory Approved Service Center.
This warranty does not: a) apply to any product that has become worn, defective, damaged or broken due to use or due to repairs or servicing by other than the Waring Service Center or a Factory Approved Service Center, or due to abuse, misuse, overloading or tampering; or b) cover incidental or consequential damages of any kind.
The one-year warranty is applicable only to appliances used in the United States or Canada; this supersedes all other express product warranty or warranty statements. For Waring products sold outside of the U.S. and Canada, the warranty is the responsibility of the local importer or distributor. This warranty may vary according to local regulations.
Warning: This warranty is void if appliance is used on Direct Current (DC).
9
SERVICE
Should service on this product in USA or Canada be required at any time, call or write to:
Waring Service Center
314 Ella T. Grasso Ave.
Torrington, CT 06790
Tel. 1-800-492-7464 • FAX (860) 496-9017 or nearest Authorized Service Center
Replacement parts for Waring Out of Warranty repairs are obtainable at the above address.
NOTE: If your application involves the processing of biologically active materials, any items returned for service must be sterilized before being shipped. Such items must be clearly identified as having been sterilized, both by a tag on the item itself and by a statement in the accompanying correspondence. Waring will not accept delivery of any returns unless they are so identified.
10
 Loading...