


User´s Manual microQ Omega/lite/Keyboard
Product information microQ series – Upgrades
Product information microQ series
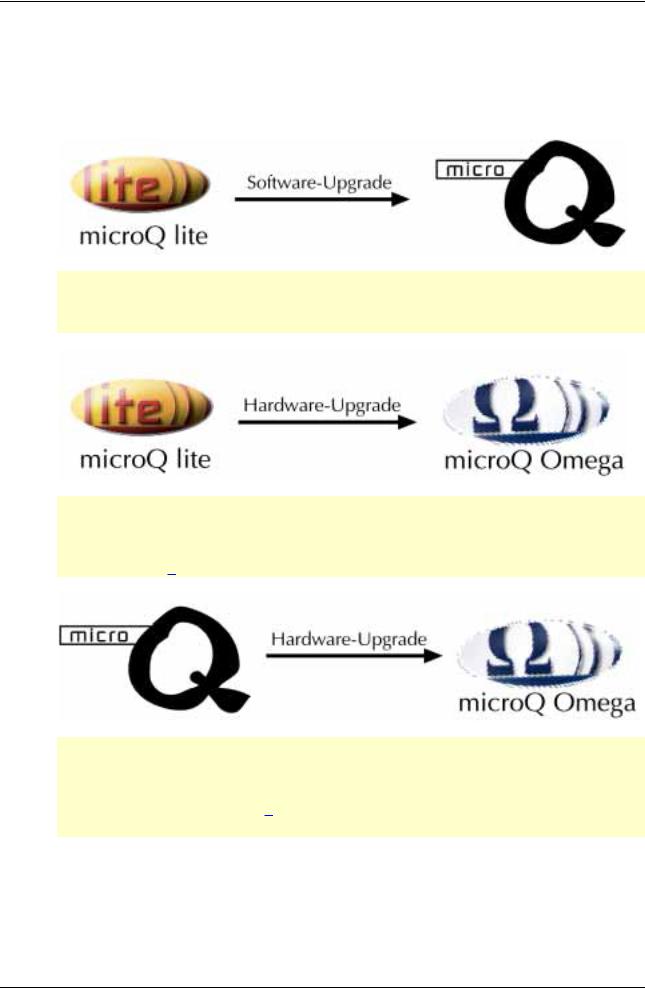
Upgrades
The following upgrades are available:
The microQ lite can be upgraded to a fullrange microQ. Therefore you need a special upgrade software (standard MIDI file format) which can be installed by the customer itself. For more information about price and handling please contact our product support (see page 6).
The microQ lite can be upgraded to a microQ Omega (with up to 75 voices). Therefore you need a hardware modification that is done exclusively by official Waldorf Distributors or official Waldorf Service Centers. More information about price and handling can be found on our website http://www.waldorf-music.com or by contacting our product support (see page 6).
The microQ/microQ Keyboard can be upgraded to a microQ Omega (with up to 75 voices). Therefore you need a hardware modification that is done exclusively by official Waldorf Distributors or official Waldorf Service Centers. More information about price and handling can be found on our website http://www.waldorf-music.com or by contacting our product support (see page 6).
3 |
Waldorf microQ User’s Manual |

Waldorf Merchandise
Dance & Techno Construction
Soundset for microQ and Q
300 Sounds, 2 Drum Maps and 30 Multis for your electronic music production
CD-ROM with bonus tools
Euro 60,00
Waldorf Coffee Mug
Classic Blue colored with silver Waldorf logo and writing
one mouth port
Euro 6,00
Waldorf T-Shirt “Coffee´s ready...” black, with stylish printing available sizes: M/L/XL/XXL
Euro 13,00
Gekko Arpeggio * Gekko Chord**
The reptile with arpeggio or chord memorizer function.
One button, one LED, MIDI In/Out, no external power supply necessary
* Euro 76,00 **Euro 51,00
Zeitlos II
The latest ambient & electronic music CD from Waldorf Records. Previously unreleased tracks from Pete Namlook, DaDamn..aka Hardfloor, Pascal F.E.O.S. etc.
Euro 15,00
Zeitlos I
Timeless ambient and cill-out productions from artists like I Oliver Lieb, Pete Namlook, Astral Projection, Gabriel Le Mar etc.
All tracks are previously unreleased.
Euro 15,00
All prices excluding shippment. Order via Email, Fax or phone
info@waldorf-music.de
Phone +49 (0) 26 42 - 90 20 8-0 Fax -77
Subout
Still available: Independant Electronic Music from famous artists: Oomph!, De/Vision, Front 242, Wolfsheim, Frontline Assembly, Ernst Horn (Deine Lakaien) etc. Previously unreleased tracks.
Euro 10,00
Produktgarantie / Product Warranty
Vielen Dank für den Kauf dieses Waldorf Produktes. Es zeichnet sich durch Zuverlässigkeit und Langlebigkeit aus. Dennoch können Materialoder Verarbeitungsfehler nicht völlig ausgeschlossen werden. Daher bieten wir Ihnen eine verlängerte Garantie. Damit Garantieleistungen in Kraft treten, müssen Kaufrechnung und Garantiekarte vollständig ausgefüllt innerhalb von 14 Tagen zurückgesandt werden. Diese Garantie erstreckt sich auf alle Defekte in Material und Verarbeitung für den Zeitraum von 1 Jahr ab Kauf des Produktes. Während der Garantiezeit ersetzt oder repariert Waldorf- Music AG das durch Waldorf-Music AG oder ein autorisiertes Service Zentrum als defekt befundene Produkt, ohne dem Kunden Materialoder Arbeitsaufwand in Rechnung zu stellen.
Um die Garantie in Anspruch zu nehmen, muß sich der Kunde zunächst telefonisch mit dem zuständigen Vertrieb in Verbindung setzen. Produkte, die ohne vorherige Absprache eingesandt werden, können nicht kostenfrei ausgetauscht bzw. repariert werden.
Das Produkt muß frei und versichert in Originalverpackung eingesandt werden. Detaillierte Fehlerbeschreibungen sind beizufügen. Unfrei und/oder nicht originalverpackt eingesandte Produkte gehen ungeöffnet zurück.
Waldorf-Music AG behält sich vor, das eingesandte Produkt auf den neusten Stand der Technik zu bringen, wenn dies erforderlich sein sollte.
Diese Garantie deckt keine Defekte ab, die durch unsachgemäße Behandlung oder Eingriffe von unautorisierten Personen verursacht wurden und ist beschränkt auf die Behebung von Defekten, die während der normalen Nutzung durch Materialoder Verarbeitungsfehler aufgetreten
sind.
Thank you for choosing this Waldorf product. It is a dependable device and is designed to last. However, the potential for defects in material or workmanship cannot be eradicated completely. This is why we provide an extended warranty for you.
To ensure your unit has full warranty coverage, mail the receipt and the fully completed warranty card back within 14 days of purchase.
This warranty covers all defects in material and workmanship for a period of one year from the date of original purchase. During this time, Waldorf- Music AG will repair or replace the product without charge for materials or labor, provided the product was first inspected and found faulty by Waldorf- Music AG or an authorized service center. You must first contact your dealer or distributor by telephone. Products that were mailed without prior agreement cannot be exchanged or repaired free of charge.
The unit must be insured and sent prepared in its original package. Please include a detailed description of the defect. Products that were not send prepared or in the original package will be returned unopened.
Waldorf-Music AG reserves the right to upgrade the unit with the latest technological advances if necessary.
This warranty does not cover defects due to abuse, operation under other than specified conditions, or repair by unauthorized persons. The warranty covers only those malfunctions caused by material or workmanship defects that occur during normal operation.
Garantiekarte / Warranty Card
Bitte schicken Sie die Garantiekarte vollständig ausgefüllt zusammen mit einer Kopie der Kaufrechnung zurück, um die Produktgarantie in Anspruch nehmen zu können.
Please fill out this warranty card completely, include a copy of the purchase receipt and send the two items to us in order to ensure the warranty is valid.
Waldorf-Music AG c/o Support Schloß Ahrenthal 53489 Sinzig Germany
Name / Name:
Straße / Street:
PLZ, Wohnort / ZIP Code, City:
Land / Country:
Telefon / Telephone:
Email:
Produkt / Product:
microQ Omega |
[O] |
microQ lite |
[O] |
microQ Keyboard |
[O] |
Sonderausstattungen / Custom features:
Seriennummer / Serial number: |
|
Kaufdatum / Purchase date: |
Sonstige verwendete Geräte / Other used equipment:
Name Ihres Händlers / Name of your dealer:
Ort Ihres Händlers / City of your dealer:

Produktunterstützung / Product Support
Wenn Sie Fragen zu Ihrem Waldorf Produkt haben, gibt es vier |
If you have any questions about your Waldorf product, feel free to contact us |
Möglichkeiten, uns zu kontaktieren: |
via one of the four options listed below. |
1 |
Schicken Sie uns eine E-Mail. Das ist der mit |
Abstand effizienteste und schnellste Weg, uns zu |
|
|
erreichen. Ihre Fragen können sofort an die |
|
richtige Stelle weitergeleitet und innerhalb |
|
kürzester Zeit beantwortet werden. |
2 |
Senden Sie uns ein Telefax. Fast so schnell wie E- |
Mail, allerdings für Sie und uns weniger |
|
|
komfortabel. |
3 |
Schicken Sie uns einen Brief. Etwas langsamer, |
dafür jedoch genauso zuverlässig wie ein |
|
|
Telefax. |
4 |
Und wenn es ganz dringend ist, rufen Sie uns an. |
Wir versuchen, Ihre Fragen möglichst sofort zu |
beantworten.
info@waldorf-music.de
+49 (0) 26 42-99 40 77
Waldorf-Music AG
Schloß Ahrenthal
53489 Sinzig, Germany
+49 (0) 26 42 - 99 40 16
Send us an e-mail message. This is the most efficient and fastest way to contact us. Your questions will be forwarded immediately to the resident expert and you will quickly receive an answer.
Send us a fax. This is as fast as e-mail, but not quite as comfortable for you and us.
Send us a letter. It will take a bit longer, but it is just as dependable as a fax.
If you’re in big hurry, call us, we’ll try to answer your questions right away.

Foreword – Development
Foreword
Thank you for purchasing the Waldorf microQ, microQ Keyboard or microQ lite. You now own a synthesizer featuring a wide range of unique sounds from analog to digital.
To ensure your instrument functions properly and enjoys a long life, please read and heed the instructions in this manual.
Development
Software development: |
Albert Huitsing, Stefan Stenzel |
Hardware development: |
Thomas Kircher |
Design: |
Axel Hartmann |
Housing: |
Frank Schneider |
Factory Sound programming: |
Wolfram Franke, Christian Halten, Uwe G. Hoenig, Jörg Hüttner, |
|
Tommy Kircher, Dirk Krause, Hubertus Maaß, Stefan Stenzel, |
|
Tsching, Eric Young |
Manual: |
Holger "Tsching" Steinbrink |
English version proofing: |
Amanda Pehke and Mark Pulver - RedMoon Music |
Head: |
Wolfgang Düren |
Revision Date: |
Version 2.20, January 2003 (mQ lite Vers. 1.38) |
We would like to thank
Holger Bahr, Sigi Barishi, Steffi vom Berg, H.-P. “Bonni” Bonnenberg ( ), Mike Caroll, Geoff Farr, Gunther Gräfe, Florian Gypser, Christian Halten, Martin Herbst, Jörg Hüttner, Thilo Kloft, Werner Kramer, Dirk Krause, Achim Lenzgen, Nicole Jasmin Moser, Wolfgang Mörs, Dr. Georg Müller, Martin Neideck, Stefan Profittlich, Norbert Reiß, Alex Sauff, Beate Walkowiak, Kurt “Lu” Wangard, KD Warnecke, Rocco Zodiac… and anyone we have forgotten.
Waldorf-Music AG is not liable for any erroneous information contained in this manual. The contents of this manual may be updated at any time without prior notice. We made every effort to ensure the information herein is accurate and that the manual contains no contradictory information. Waldorf extends no liabilities in regard to this manual other than those required by local law.
This manual or any portion of it may not be reproduced in any form without the manufacturer's written consent.
Waldorf-Music AG, Schloß Ahrenthal, D-53489 Sinzig, Germany
7 |
Waldorf microQ User’s Manual |
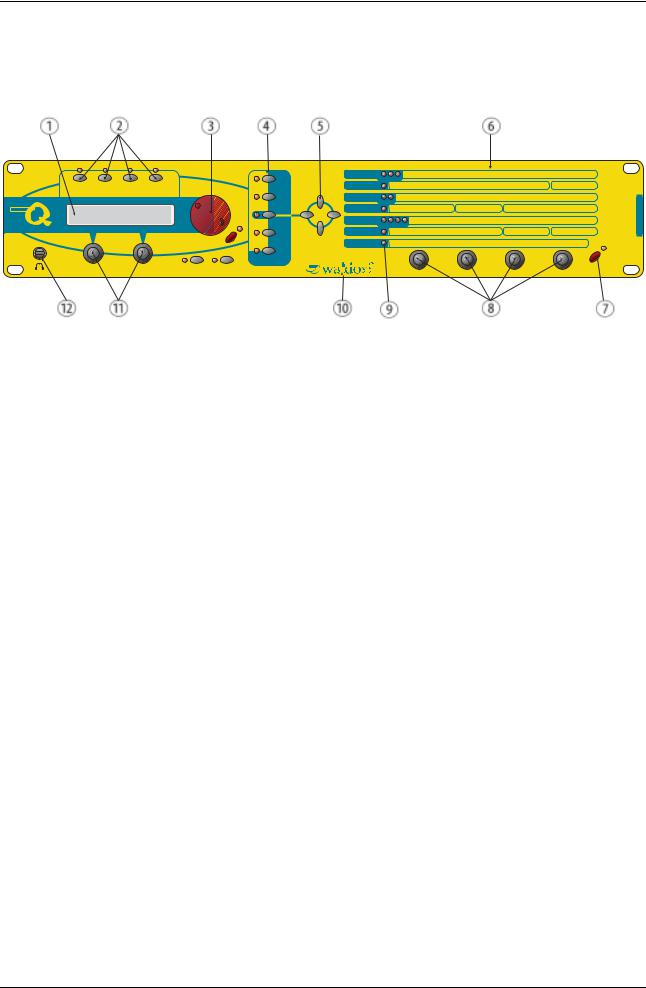
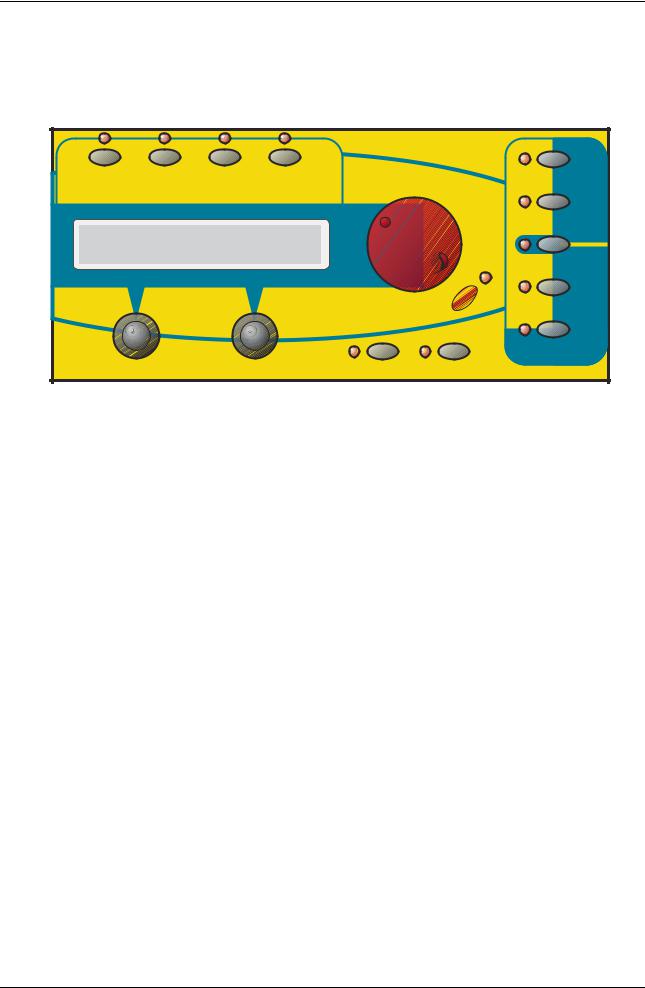
Control Features and Connections – Front Panel microQ Rackversion
Control Features and Connections
Front Panel microQ Rackversion
I n s t . 1 I n s t . 2 I n s t . 3 I n s t . 4 |
G l o b a l |
U t i l i t y |
micro |
M u l t i |
C o m p a r e |
|
|
|
G r a p h i c D i s p l a y |
E d i t |
R e c a l l |
|
||
P l a y |
S o u n d |
S t o r e |
|
S h i f t |
|
M u l t i m o d e |
P e e k |
|
O s c i l l a t o r s |
1 |
2 |
3 |
O c t a v e S e m i |
M i x e r / R o u t i n g |
|
|
O s c 1 B a l a n c e |
|
|
|
|
|
|
F i l t e r s |
1 |
2 |
|
C u t o f f K e y t r a c k |
A m p / F X / A r p . |
|
|
Vo l u m e Ve l o c i t y |
|
|
|
|
|
|
E n v e l o p e s |
|
|
|
A t t a c k L e v e l |
|
F |
A |
3 |
4 |
L F O s |
|
|
L F O 1 S p e e d |
|
M O D M a t r i x |
|
|
S e l e c t |
|
D e t u n e F M
O s c 2 B a l a n c e Re s o n a n c e D r i v e F X M i x
D e c a y D e c a y 2 S h a p e S y n c
S o u r c e
S h a p e P W
O s c 3 B a l a n c e
E n v Ve l o c i t y
A r p M o d e R a n g e S u s t a i n S u s t a i n 2
L F O 2 S p e e d S h a p e A m o u n t
P W M S o u r c e
F i l t e r R o u t i n g
Ty p e P a n n i n g
Te m p o C l o c k
R e l e a s e M o d e
L F O 3 S p e e d S h a p e D e s t i n a t i o n
P o w e r
polyphonic synthesizer
|
Picture 1:Front Panel microQ |
||
|
Display |
|
Endless dials for parameter access |
|
Instrument Select Buttons |
|
LEDs for showing the selected parameter section |
|
Red Alpha Dial for Sound and page access |
|
German synthesizer manufacturer from the |
|
Master Section with function buttons |
|
Schloss Ahrenthal |
|
|
||
|
Navigation buttons |
|
Display parameter dials |
|
|
||
|
|
|
Stereo Headphone jack |
Parameter matrix
Power button with standby/MIDI indicator LED
Waldorf microQ User’s Manual |
8 |
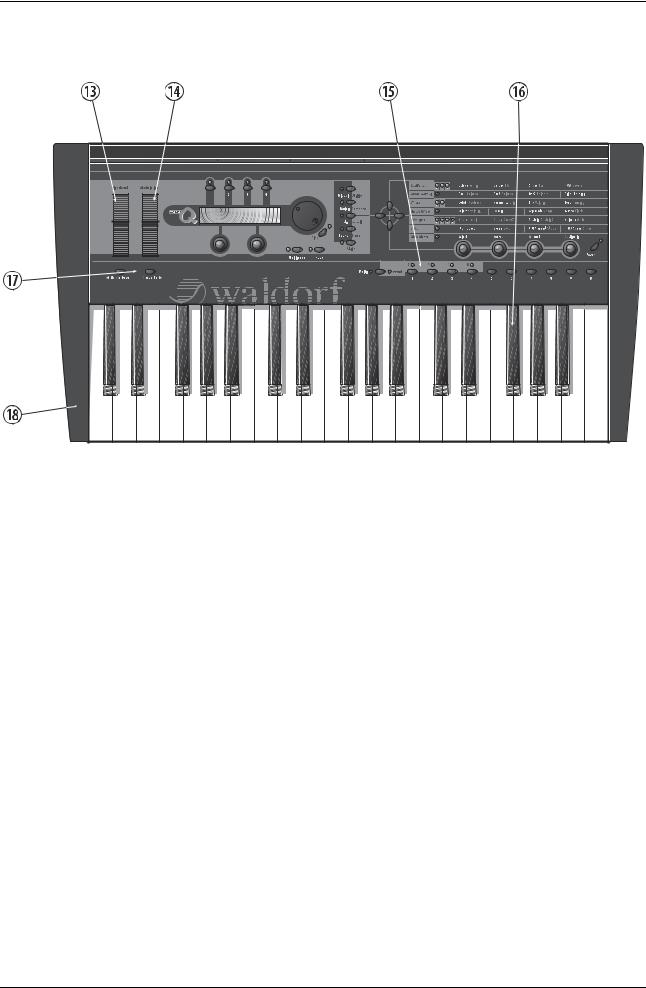
Control Features and Connections – Front Panel microQ Keyboard (additional controls)
Front Panel microQ Keyboard (additional controls)
Picture 2: |
microQ Keyboard |
Pitch Bend
Modulation Wheel
Program Select Section
3-octave keyboard with aftertouch
Keyboard Transpose buttons
Full Metal Jacket
9 |
Waldorf microQ User´s Manual |
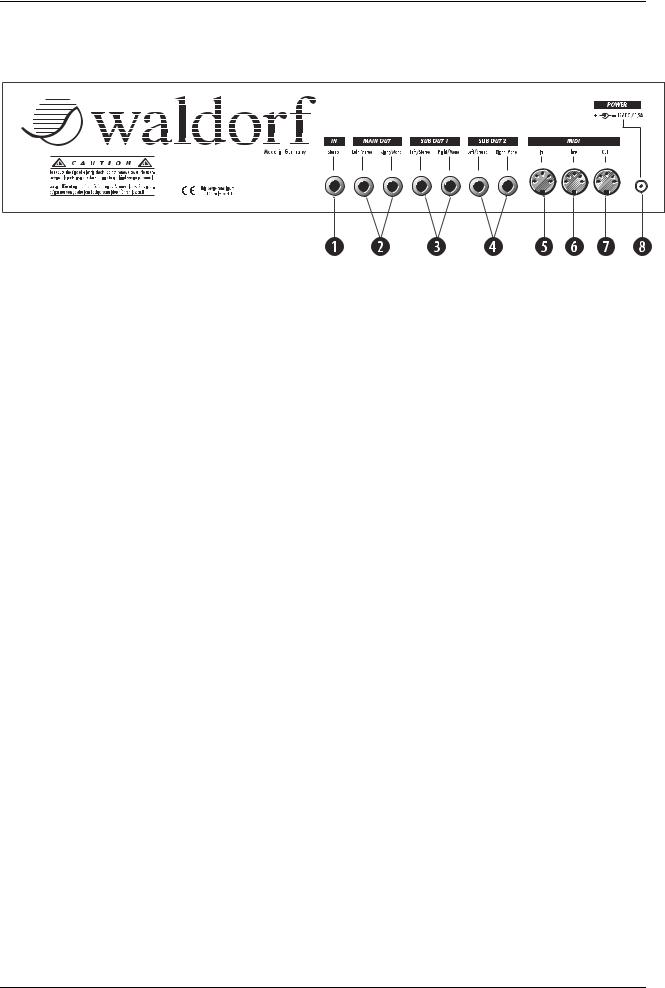
Control Features and Connections - Rear Panel microQ Rack version
Rear Panel microQ Rack version
Picture 3:Rear Panel
Stereo External In jack for feeding external audio signals into the Mixer section.
Main Out jacks. Deliver a stereo line level output signal for connection to a mixing desk or amplifier.
Sub Out 1 jacks. Deliver a stereo line level output signal for connection to a mixing desk or amplifier.
Sub Out 2 jacks. Deliver a stereo line level output signal for connection to a mixing desk or amplifier.
MIDI In jack. Used to receive MIDI data from an external device.
MIDI Thru jack. Echoes MIDI data received at the MIDI In.
MIDI Out jack. Used to transmit MIDI data to an external device.
Power supply socket 100…240V AC
Waldorf microQ User´s Manual |
10 |
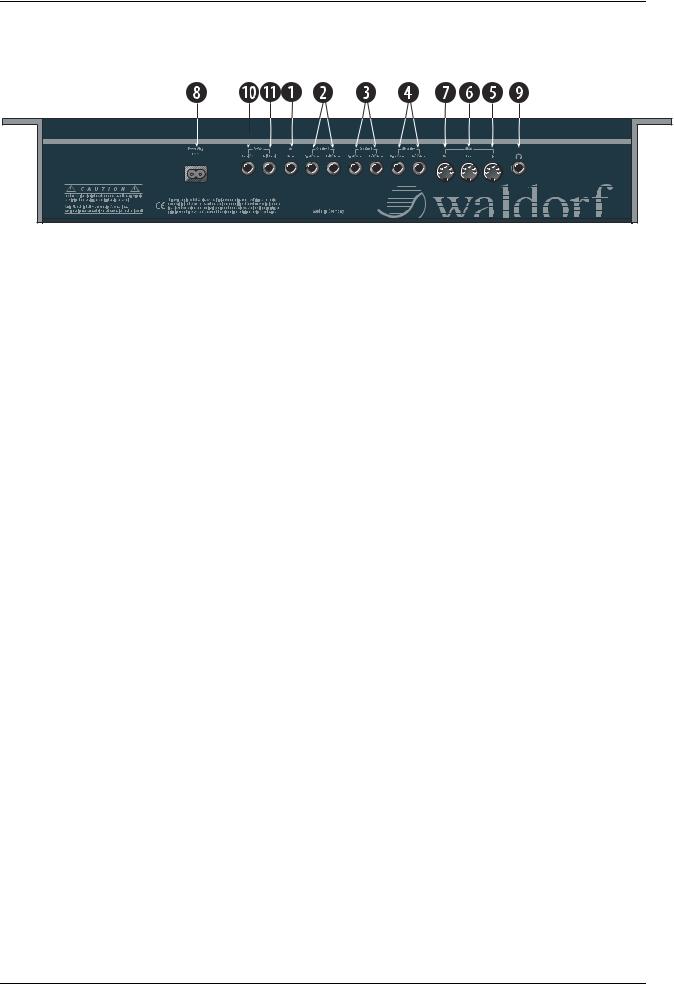
Control Features and Connections – Rear Panel microQ Keyboard
Rear Panel microQ Keyboard
4. Rear Panel microQ Keyboard
Stereo External In jack for feeding external audio signals into the Mixer section.
Main Out jacks. Deliver a stereo line level output signal for connection to a mixing desk or amplifier.
Sub Out 1 jacks. Deliver a stereo line level output signal for connection to a mixing desk or amplifier.
Sub Out 2 jacks. Deliver a stereo line level output signal for connection to a mixing desk or amplifier.
MIDI In jack. Used to receive MIDI data from an external device.
MIDI Thru jack. Echoes MIDI data received at the MIDI In.
MIDI Out jack. Used to transmit MIDI data to an external device.
Power supply socket 100…240V AC
Stereo Headphone jack
Control Pedal/CV In jack for connecting foot controllers or analog control voltages
Hold pedal jack for connecting sustain pedals
11 |
Waldorf microQ User´s Manual |
Contents
Contents |
|
Product information microQ series |
...................3 |
Waldorf Merchandise ....................................... |
4 |
Warranty / Support............................................ |
5 |
Foreword .......................................................... |
7 |
Development...................................................... |
7 |
We would like to thank........................................ |
7 |
Control Features and Connections.................... |
8 |
Front Panel microQ Rack version.......................... |
8 |
Front Panel microQ Keyboard .............................. |
9 |
Rear Panel microQ Rack version......................... |
10 |
Rear Panel microQ Keyboard ............................. |
11 |
Panic Function.................................................. |
25 |
Tempo Indication.............................................. |
25 |
System Volume ................................................. |
26 |
Demo Playback................................................. |
26 |
Demo Sequences .............................................. |
26 |
The Master Section............................................ |
27 |
Selecting Programs ............................................ |
28 |
Selecting Programs with the Page Dial ............ |
28 |
Fast Selection of Sound Banks in Single Mode . 29 |
|
Selecting Programs with the Number Buttons .. |
29 |
Additional Switching Banks in the mQK.......... |
30 |
Category Search ................................................ |
30 |
Instruments and Sounds ..................................... |
31 |
Switching between Instruments ...................... |
31 |
Creating Sound Layers with Instruments .......... |
31 |
Replacing Sounds in Layers ........................... |
31 |
Editing Sounds in Layers................................ |
32 |
Deactivating Sound Layers............................. |
32 |
Contents ......................................................... |
12 |
Introduction .................................................... |
14 |
About this Manual............................................. |
14 |
Symbols....................................................... |
14 |
Highlighted Control Features and Parameters .. |
14 |
What to read? ................................................... |
15 |
If you are new to the whole subject ................ |
15 |
If you have experience with synthesizers......... |
15 |
If you are a synthesizer hotshot ...................... |
17 |
General Safety Guidelines.................................. |
18 |
Suitable Operating Conditions ....................... |
18 |
Power Supply............................................... |
18 |
Operation .................................................... |
18 |
Maintenance................................................ |
18 |
Proper Use................................................... |
19 |
Setup and Connection..................................... |
20 |
Inventory.......................................................... |
20 |
Setup ............................................................... |
20 |
Connections ..................................................... |
20 |
Audio Connections............................................ |
22 |
External Input.................................................... |
23 |
Hold Pedal Input (microQ Keyboard only) ........... |
23 |
Control Pedal/CV Input (microQ Keyboard only) .. |
23 |
Overview......................................................... |
24 |
Memory Structure.............................................. |
24 |
Dynamic Voice Management ............................. |
24 |
Basic Operation .............................................. |
25 |
Switching on..................................................... |
25 |
Switching off..................................................... |
25 |
Switching the Octave/Semitone Setting................ |
32 |
Editing Parameters............................................. |
33 |
Editing Parameter Controls............................. |
33 |
Editing Display Menu Parameter .................... |
34 |
Edit Buffers................................................... |
35 |
Viewing Parameter Values without Change ..... |
35 |
Comparing Edited Programs........................... |
36 |
Recalling Edited Programs ............................. |
36 |
Storing Programs .......................................... |
37 |
Multi Mode ...................................................... |
38 |
Selecting an Instrument for editing ...................... |
38 |
Instrument settings ............................................ |
39 |
Multi Mixer ...................................................... |
44 |
Sound Parameters .......................................... |
45 |
Overview of Functions....................................... |
45 |
Modulation Speed Levels ................................... |
46 |
FM (Frequency Modulation)........................... |
46 |
Fast Modulation............................................ |
46 |
Standard Modulation .................................... |
48 |
Triggering of Voices........................................... |
50 |
Sound Edit Menu .......................................... |
50 |
Oscillators Introduction ..................................... |
53 |
Oscillator Shapes.......................................... |
53 |
Oscillator Section.............................................. |
59 |
Oscillator Parameter Controls ........................ |
59 |
Oscillator Edit Menu ..................................... |
64 |
Mixer/Routing Section ....................................... |
68 |
Mixer/Routing Parameter Controls.................. |
68 |
Mixer/Routing Edit Menu............................... |
69 |
Filter Introduction.............................................. |
72 |
Filter Section..................................................... |
74 |
Selecting and Editing Filters ........................... |
74 |
Filter Parameter Controls ............................... |
74 |
Waldorf microQ User´s Manual |
12 |

|
|
|
Contents |
||
|
|
|
|
|
|
Filter Edit Menu............................................ |
76 |
Mod Matrix Edit Menu ................................ |
122 |
||
Filter Types....................................................... |
78 |
Modifier Matrix............................................... |
122 |
||
Bypass......................................................... |
78 |
The Tempo |
124 |
||
24dB Low Pass and 12dB Low Pass ................ |
78 |
||||
24dB Band Pass and 12dB Band Pass.............. |
79 |
|
|
|
|
24dB High Pass and 12dB High Pass .............. |
79 |
Drum Map ..................................................... |
125 |
||
24dB Notch and 12dB Notch......................... |
80 |
Drum Map Sound Menu |
125 |
||
Comb+ and Comb- |
81 |
||||
|
|
|
|||
Amp/FX/Arp Section .......................................... |
84 |
Global Parameters |
127 |
||
Amplifier Parameter Controls |
84 |
||||
Global Menu |
127 |
||||
Amplifier Pages in the Amp/FX/Arp Edit Menu . 84 |
|||||
Effects.......................................................... |
86 |
Utility Menu............................................... |
136 |
||
Effect Parameter Controls............................... |
86 |
MIDI Control |
138 |
||
Effect Parameter of the Amp/FX/Arp Edit Menu 86 |
|||||
Bypass......................................................... |
87 |
Channel Based MIDI Messages |
138 |
||
Chorus |
87 |
||||
Modifying / Editing Sounds over MIDI |
140 |
||||
Flanger |
87 |
||||
Controllers as Modulation Sources |
140 |
||||
Phaser |
88 |
||||
Changing Sound Parameters with Controllers 140 |
|||||
Overdrive |
89 |
||||
Changing Sound Parameters with SysEx Data 140 |
|||||
Five FX |
89 |
||||
System Exclusive Data Transmission |
140 |
||||
Delay |
91 |
||||
Sending System Exclusive Data |
140 |
||||
Vocoder |
93 |
||||
Receiving System Exclusive Data |
141 |
||||
Reverb |
96 |
||||
|
|
|
|||
Surround Delay Types................................... |
97 |
Other Functions |
142 |
||
Arpeggiator |
100 |
||||
Updating the System Software |
142 |
||||
Arpeggiator Parameter Controls.................... |
100 |
||||
Arpeggiator Parameter of the Amp/FX/Arp Edit |
Appendix |
144 |
|||
Menu ........................................................ |
101 |
||||
Arpeggiator Step Data Pages ........................ |
105 |
Tips & Tricks |
144 |
||
Envelope Section |
108 |
||||
Tips for better voice performance |
145 |
||||
Envelope Parameter Controls |
108 |
||||
Parameter Index |
146 |
||||
ADSR Envelope |
109 |
||||
Technical Data |
147 |
||||
ADS1DS2R Envelope |
110 |
||||
Glossary |
148 |
||||
One Shot Envelope ..................................... |
111 |
||||
Loop S1S2 Envelope ................................... |
112 |
MIDI Controller............................................... |
152 |
||
Loop All Envelope ...................................... |
113 |
MIDI Implementation Chart |
156 |
||
Envelope Edit Menu |
114 |
||||
CE Declaration |
157 |
||||
LFO Section |
115 |
||||
|
|
|
|||
LFO Parameter Controls .............................. |
115 |
|
|
|
|
LFO Edit Menu ........................................... |
116 |
|
|
|
|
Mod Matrix Section ......................................... |
121 |
|
|
|
|
Mod Matrix Parameter Controls ................... |
121 |
|
|
|
|
13 |
Waldorf microQ User´s Manual |
Introduction – About this Manual
Introduction
About this Manual
This manual was written to help you to become familiar with the Waldorf microQ. It will also aid experienced users with routine tasks.
Since this manual is valid for the microQ Keyboard as well as the rack-versions (microQ Omega and microQ lite) we will seperately point out the particular differences. Hence we will talk only of the microQ within the manual
To avoid confusion, the terminology in this manual is based on the microQ´s parameter names. You will find a glossary at the end of this manual; it explains the various terms used.
We also used a uniform set of symbols to show you topics of particular interest or significance. Important terms are highlighted in bold letters.
Symbols
Caution – The comments that follow this symbol will help you avoid errors and malfunctions.
Instruction – Follow these guidelines to execute a desired function.
Info – Additional information on a given topic.
Example – Real-world examples to try out.
Highlighted Control Features and Parameters
All of the microQ’s buttons, controls and parameters are highlighted in bold letters throughout the manual. Example:
•Press the Play button.
Also, each section and the main control elements have position numbers … which refer to the pictures at the beginning of this manual. The connectors on the rear panel are referred to by position numbers … . We suggest you make a copy of these pages to have at hand when needed.
The microQ’s different modes and parameter pages are illustrated in a depiction of the display:
Inst:1 Sound:A001
LosAngeles 2019 T
The value range of a continuous parameter is indicated from low to high with both values shown in italic letters, separated by three dots. Example:
Semi |
-12…+12 |
Waldorf microQ User´s Manual |
14 |

Introduction – What to read?
What to read?
The biggest problem with any manual is to find a way to cover both the needs of an absolute expert and a beginner alike. There are people who read a manual cover to cover while others don’t even touch it. The latter is the worst choice, especially when the manual describes a Waldorf instrument. To ensure that everyone finds the information he needs to work with the microQ, we collected the following information to tell you which chapters you should read at the very least.
If you are new to the whole subject
Is this your first or second synthesizer? Then you should first read the whole manual once. You don’t need to do that while you’re exploring the microQ - you can also read it as you would read a good book. But read it. You don’t need to understand everything but after you’ve read the manual, you know where to find a particular topic. Then it’s time to go deep into the microQ and when you’re stuck, you will find the answer quickly and easily.
Furthermore, we recommend the purchase of a good book explaining synthesizers and sound synthesis in general. This book might help you when you don’t understand a certain term that is used in the manual. The appendix of the microQ manual contains a glossary but it is possible that you want or need even deeper explanation. A good book explaining analog sound synthesis named “Analog Sound Synthesis” can be obtained from the German publisher WIZOO. You can find further info about it and other books covering similar topics at:
http://www.wizoo.com
If you have experience with synthesizers
Do you own a couple of synthesizers, and have you edited some sounds to fit your needs? Then make sure to read at least the following chapters:
Section |
Chapter |
Sub-Chapter |
Introduction |
General Safety Guidelines |
all chapters |
Setup and Connection |
Audio Connections |
|
Basic Operation |
Switching off |
|
|
Panic Function |
|
|
Selecting Programs |
all chapters |
|
Instruments and Sounds |
all chapters |
|
Editing Parameters |
all chapters |
Multi Mode |
Multi Parameters |
all chapters |
|
Instrument Parameters |
all chapters |
15 |
Waldorf microQ User´s Manual |

Introduction – What to read?
Sound Parameters |
Dynamic Performance |
all chapters |
|
Managment |
|
|
Modulation Speed Levels |
|
|
Oscillators |
FM and FM Source |
|
|
Wavetable Oscillators |
|
|
Pulsewidth |
|
|
PWM and PWM Source |
|
|
PitchMod and PitchMod Source |
|
|
Sync |
|
|
Keytrack |
|
|
Glide |
|
Mixer/Routing Section |
Balance |
|
|
Routing |
|
|
RingMod |
|
|
Noise / Ext. Balance |
|
|
N/E Select F1 / F2 Feed |
|
Filter Section |
Selecting and Editing Filters |
|
|
CutoffMod and CutoffMod Source |
|
|
FM and FM Source |
|
|
Drive |
|
|
Env |
|
|
Velo |
|
|
Pan |
|
|
PanMod and PanMod Source |
|
Filter Types |
Notch |
|
|
Comb + and Comb - |
|
Amp/FX/Arp Section |
Velo |
|
|
AmpMod and AmpMod Source |
|
FX |
Global Effect |
|
|
Mix |
|
|
FX Types – Vocoder/Surround |
|
|
Delays |
|
Arpeggiator Edit Menu |
all chapters |
|
Tempo/Clock parameter |
|
|
Envelope Section |
Mode |
|
|
ADS1DS2R Envelope |
|
|
One Shot Envelope |
|
|
LoopS1S2 Envelope |
|
|
Loop All Envelope |
|
LFO Section |
Sync |
|
|
Delay |
|
|
Keytrack |
|
|
Fade |
|
|
Clocked |
|
|
Phase |
|
Mod Matrix |
all chapters |
|
Modifier Matrix |
all chapters |
|
Drum Map |
all chapters |
Global Parameters |
Global Menu |
Sysex Device ID |
|
|
Clock |
|
|
Controller Send |
|
|
Input Gain |
MIDI Control |
Channel Based MIDI |
Program Change Messages |
|
Messages |
Poly Pressure Messages |
|
Influencing and Editing |
all chapters |
|
Sounds over MIDI |
|
|
Other Functions |
Updating the System Software |
Table 1: Suggested chapters for advanced users
Waldorf microQ User´s Manual |
16 |

Introduction – What to read?
If you are a synthesizer hotshot
Do you own a whole bunch of various synthesizers of all flavors, analog, digital, sample playback, and know how to create and modify sounds, multis and other patch types on them? Do you already own any Waldorf synthesizers so that you are familiar with their structure and terminology. Then make sure to read at least the following chapters. They describe the extraordinary features and functions of the microQ.
Section |
Chapter |
Sub-Chapter |
Introduction |
General Safety Guidelines |
Power Supply |
Setup and Connection |
External Input |
|
Basic Operation |
Switching off |
|
|
Panic Function |
|
|
Selecting Programs |
Sound Selection by Category |
|
Instruments and Sounds |
all chapters |
|
Editing Parameters |
all chapters |
Multi Mode |
Multi Parameters |
Ctrl W…Z |
|
Instrument Parameters |
Selecting an Instrument for editing |
|
|
MIDI and Status Settings |
Sound Parameters |
Dynamic Performance |
|
|
Managment |
|
|
Modulation Speed Levels |
|
|
Oscillators |
FM and FM Source |
|
|
Wavetable Oscillators |
|
Mixer |
Balance |
|
|
Routing |
|
|
Noise / Ext. Balance |
|
|
N/E Select F1 / F2 Feed |
|
Filter Section |
Selecting and Editing Filters |
|
|
FM and FM Source |
|
|
Pan |
|
|
PanMod and PanMod Source |
|
Filter Types |
Comb + and Comb - |
|
Vocoder |
all chapters |
|
Arpeggiator Edit Menu |
all chapters |
|
Tempo/clock |
|
|
Envelope Section |
Mode |
|
|
ADS1DS2R Envelope |
|
|
One Shot Envelope |
|
|
LoopS1S2 Envelope |
|
|
Loop All Envelope |
|
LFO Section |
Sync |
|
|
Fade |
|
|
Clocked |
|
|
Phase |
|
Mod Matrix |
all chapters |
|
Modifier Matrix |
all chapters |
|
Global menu |
Sysex Device ID |
|
|
Clock |
|
|
Controller Send |
|
|
Input Gain |
Table 2: Suggested chapters for synthesizer hotshot
17 |
Waldorf microQ User´s Manual |

Introduction – General Safety Guidelines
General Safety Guidelines
Please read the following safety tips carefully! They include several precautions you should always observe when dealing with electronic equipment. Read all of the instructions before operating your device.
Suitable Operating Conditions
•Use the device in enclosed rooms only.
•Never use the device under damp conditions such as in bathrooms, washrooms or around indoor swimming pools.
•Do not use the device in extremely dusty or dirty environments.
•Make sure that adequate ventilation is available at all sides of the device.
•Do not place the device near heat sources such as radiators.
•Do not expose the device to direct sunlight.
•Do not expose the device to extreme vibrations.
Power Supply
•Never use a different power supply or cable than the one that came with the microQ.
•Never install a different plug. If the included power supply is not equipped with a suitable plug for your local sockets, take the microQ and the power supply to a qualified electrician.
•Unplug the device when you are not using it for longer periods.
•Never touch the plug with wet hands.
•Always pull the plug when unplugging the device, never the cable.
Operation
•Never place objects containing liquids on or near the device.
•Place the device on a stable base only. Use a suitable platform or rack.
•Make sure no foreign objects find their way into the chassis. If for some reason this should occur, switch the power off, unplug the device and consult a qualified repair center.
•This device, used on its own or with amplifiers, speakers or headphones, can generate volume levels that may do irreparable damage to your hearing. For this reason you should keep the volume at tolerable levels.
Maintenance
•Do not open the device or remove the cover. Refer all service and repair tasks to qualified personnel. The interior of the chassis contains no components that require user maintenance.
•Use only a dry, soft cloth or brush to clean the device. Never use alcohol, cleaning solutions or similar chemicals. They will damage the surface of the chassis.
Waldorf microQ User´s Manual |
18 |

Introduction – General Safety Guidelines
Proper Use
This device is designed exclusively to produce low-frequency audio signals for the purpose of generating sound. Any other use is prohibited and voids the warranty extended by Waldorf- Music AG. Waldorf-Music AG is not liable for damages due to incorrect use.
Don´t let your microQ beside children or animals. This could leads into critical interactions.
19 |
Waldorf microQ User´s Manual |

Setup and Connection – Inventory
Setup and Connection
Inventory
The Waldorf microQ comes complete with:
•the microQ synthesizer (Omega, lite or Keyboard)
•external power supply or power cable (microQ keyboard)
•this manual including a inlaying warranty card on page 5
Please ensure all the items above were included. If something is missing, contact your local dealer. We recommend that you save the original packing material for future transport.
Make sure you fill out the warranty card and send it to the appropriate distributor or the address printed on the card. This is the only way we can keep you informed of updates and upgrades. Other available services are listed on the warranty card.
Setup
Place the microQ on a clean, even surface. We recommended the installation in a stable 19" rack for the microQ rack version. If you choose to take the device on the road, we suggest transporting it in a special keyboard case, which should be available from your dealer.
Connections
In order to get started with your microQ you will need an AC power outlet, a mixing console, an amp and an audio monitor such as a speaker cabinet. The microQ rack version also needs to connect with a MIDI master keyboard.
You can also use a computer or sequencer to make use of the microQ’s MIDI features.
Waldorf microQ User´s Manual |
20 |
Setup and Connection – Connections
|
|
|
|
|
|
|
|
|
POWER |
IN |
MAIN OUT |
SUB OUT 1 |
SUB OUT 2 |
|
MIDI |
|
|||
Stereo |
Left/Stereo |
Right/Mono |
Left/Stereo |
Right/Mono |
Left/Stereo |
Right/Mono |
In |
Thru |
Out |
|
|
|
|
|
|
|
|
|
|
|
|
|
|
|
|
|
|
|
|
|
|
|
|
|
|
|
|
|
|
|
|
|
|
|
|
|
|
|
|
|
|
|
|
|
|
|
|
|
|
|
|
|
|
|
|
|
|
|
|
|
|
|
|
|
|
|
|
|
|
|
|
|
|
|
|
|
|
|
|
|
|
|
|
|
|
|
|
|
|
|
|
|
|
|
|
|
|
|
|
|
|
|
|
|
|
|
|
|
|
|
|
|
|
|
|
|
|
|
|
|
|
|
|
|
|
|
|
|
|
|
|
|
|
|
|
|
|
|
|
|
|
|
|
|
|
|
|
|
|
|
|
|
|
|
|
|
|
|
|
|
|
|
|
|
|
|
|
|
|
|
|
|
|
|
|
|
|
|
|
|
|
|
|
|
|
|
|
|
|
|
|
|
|
|
|
|
|
|
|
|
|
|
|
|
|
|
|
|
|
|
|
|
|
|
|
|
|
|
|
|
|
|
|
|
|
|
|
|
|
|
|
|
|
|
|
|
|
|
|
|
|
|
|
|
|
|
|
|
|
|
|
|
|
|
|
|
|
|
|
|
|
|
|
|
|
|
|
|
|
|
|
|
|
|
|
|
|
|
|
|
|
|
|
|
|
|
|
|
|
|
|
|
|
|
|
|
|
|
|
|
|
|
|
|
|
|
|
|
|
|
|
|
|
|
|
|
|
|
|
|
|
|
|
|
|
|
|
|
|
|
|
|
|
|
|
|
|
|
|
|
|
|
|
|
|
|
|
|
|
|
|
|
|
|
|
|
|
|
|
|
|
|
|
|
|
|
|
|
|
|
|
|
|
|
|
|
|
|
|
|
|
|
|
|
|
|
|
|
|
|
|
|
|
|
|
|
|
|
|
|
|
|
|
|
|
|
|
|
|
|
|
|
|
|
|
|
|
|
|
|
|
|
|
|
|
|
|
|
|
|
|
|
|
|
|
|
|
|
|
|
|
|
|
|
|
|
|
|
|
|
|
|
|
|
|
|
|
|
|
|
|
|
|
|
|
|
|
|
|
|
|
|
|
|
|
|
|
|
|
|
|
|
|
|
|
|
|
|
|
|
|
|
|
|
|
|
|
|
|
|
|
|
|
|
|
|
|
|
|
|
|
|
|
|
|
|
|
|
|
|
|
|
|
|
|
|
|
|
|
|
|
|
|
|
|
|
|
|
|
|
|
|
|
|
|
Main Output |
|
|
|
|
|
|
|
|
Sub Output 2 |
|
|
|
|
|
|
|
|
|
|
|
|
|
|
|||||||||||||||
|
|
|
|
|
|
|
|
|
|
|
|
|
|
|
|
|
|
|
|
|
|
|
|
|
|
|
|
|||||||||||||||||
|
|
|
|
|
to mixing desk, |
|
|
|
|
|
|
|
to mixing desk or |
|
|
|
MIDI |
Thru |
|
|
|
|
|
|||||||||||||||||||||
|
|
|
|
|
|
|
|
|
|
|
|
|
|
|
|
|
of |
|
|
|
|
|
|
|
|
|||||||||||||||||||
|
|
|
|
|
headphone or |
|
|
|
|
|
|
|
|
|
amplifier |
|
|
to MIDI In |
further |
|
|
|
|
|
||||||||||||||||||||
|
|
|
|
|
|
|
|
|
|
|
|
|
|
|
|
|
|
|
|
|
|
|
|
|
|
|
|
|||||||||||||||||
|
|
|
|
|
|
amplifier |
|
|
|
|
|
|
|
|
Left/Stereo: |
|
|
|
tone generators |
|
|
|
|
|
||||||||||||||||||||
|
|
|
|
|
|
|
|
|
|
|
|
|
|
|
|
|
|
|
|
|
|
|
|
|
|
|
|
|||||||||||||||||
|
|
|
|
|
|
Left/Stereo: |
|
|
|
|
|
|
|
|
Tip: Left Signal |
|
|
|
|
|
|
|
|
|
|
|
|
|
|
|||||||||||||||
|
|
|
|
|
|
|
|
|
|
|
|
|
|
|
|
|
|
|
|
|
|
|
|
|
|
|
|
|||||||||||||||||
|
|
|
|
|
Tip: Left Signal |
|
|
|
|
|
|
|
Ring: Right Signal |
|
|
|
|
|
|
|
|
|
|
|
|
|
|
|||||||||||||||||
|
|
|
|
|
|
|
|
|
|
|
|
|
|
|
|
|
|
|
|
|
|
|
|
|
|
|||||||||||||||||||
|
|
|
Ring: Right Signal |
|
|
|
|
|
|
|
|
|
|
|
|
|
|
|
|
|
|
|
|
|
|
|
|
|
|
|
|
|
|
|||||||||||
|
|
|
|
|
|
|
|
|
|
|
|
|
|
|
|
|
|
|
|
|
|
|
|
|
|
|
|
|
|
|
|
|
||||||||||||
|
|
|
|
|
|
|
|
|
|
|
|
|
|
|
|
|
|
|
|
|
|
|
|
|
|
|
|
|
|
|
|
|
|
MIDI In |
|
|
|
|
|
|
|
|
||
|
|
|
|
|
|
|
|
|
|
|
|
|
|
|
|
|
|
|
|
|
|
|
|
|
|
|
|
|
|
|
|
|
|
|
|
|
|
|
|
MIDI Out |
|
Power Supply |
||
|
|
|
|
|
|
|
|
|
|
|
|
|
|
|
|
Sub Output |
1 |
|
|
|
|
|
|
|
|
|
|
|
|
from MIDI Out of a |
|
|
|
|||||||||||
|
External In |
|
|
|
|
|
|
|
|
to mixing desk or |
|
|
|
|
|
|
|
|
|
|
Computer or a MIDI |
to MIDI In of a |
|
Socket |
||||||||||||||||||||
from mixing desk or |
|
|
|
|
|
|
|
|
|
|
|
|
|
|
|
|
|
|
Computer or tone |
for an external |
||||||||||||||||||||||||
|
|
|
|
|
|
|
|
|
amplifier |
|
|
|
|
|
|
|
|
|
|
|
|
Masterkeyboard |
||||||||||||||||||||||
|
audio source |
|
|
|
|
|
|
|
|
|
|
|
|
|
|
|
|
|
|
|
|
|
power supply |
|||||||||||||||||||||
|
|
|
|
|
|
|
|
|
|
Left/Stereo: |
|
|
|
|
|
|
|
|
|
|
|
|
|
|
|
|
|
|
generator |
|
||||||||||||||
Tip: Left Signal |
|
|
|
|
|
|
|
|
|
|
|
|
|
|
|
|
|
|
|
|
|
|
|
|
|
|
|
|
|
|
|
|
||||||||||||
Ring: Right Signal |
|
|
|
|
|
|
|
|
|
Tip: Left Signal |
|
|
|
|
|
|
|
|
|
|
|
|
|
|
|
|
|
|
|
|
|
|
||||||||||||
|
|
|
|
|
|
|
|
Ring: Right Signal |
|
|
|
|
|
|
|
|
|
|
|
|
|
|
|
|
|
Out |
In |
|
|
|||||||||||||||
|
|
|
|
|
|
|
|
|
|
|
|
|
|
|
|
|
|
|
|
|
|
|
|
|
|
|
|
|
|
|
|
|
|
|||||||||||
|
|
|
|
|
|
|
|
|
|
|
|
|
|
|
|
|
|
|
|
|
|
|
|
|
|
|
|
|
|
|
|
|
|
|
|
|
|
|
|
|
|
|||
|
|
|
|
|
|
|
|
|
|
|
|
|
|
|
|
|
|
|
|
|
|
|
|
|
|
|
|
|
|
|
|
|
|
|
|
|
|
|
|
|
|
|||
|
|
|
|
|
|
|
|
|
|
|
|
|
|
|
|
|
|
|
|
|
|
|
|
|
|
|
|
|
|
|
|
|
|
|
|
|
|
|
|
|
|
|
|
|
|
|
|
|
|
|
|
|
|
|
|
|
|
|
|
|
|
|
|
|
|
|
|
|
|
|
|
|
|
|
|
|
|
|
|
|
|
|
|
|
|
|
|
|
|
|
|
|
|
|
|
|
|
|
|
|
|
|
|
|
|
|
|
|
|
|
|
|
|
|
|
|
|
|
|
|
|
|
|
|
|
|
|
|
|
|
|
|
|
|
|
|
|
|
|
|
|
|
|
|
|
|
|
|
|
|
|
|
|
|
|
|
|
|
|
|
|
|
|
|
|
|
|
|
|
|
|
|
|
|
|
|
|
|
|
|
|
|
|
|
|
|
|
|
|
|
|
|
|
|
|
|
|
|
|
|
|
|
|
|
|
|
|
|
|
|
|
|
|
|
|
|
|
|
|
|
|
|
|
|
|
|
|
|
|
|
|
|
|
|
|
|
|
|
|
|
|
|
|
|
|
|
|
|
|
|
|
|
|
|
|
|
|
|
|
|
|
|
|
|
|
|
|
|
|
|
|
|
|
|
|
|
|
|
|
|
|
|
|
|
|
|
|
|
|
|
|
|
|
|
|
|
|
|
|
|
|
|
|
|
|
|
|
|
|
|
|
|
|
|
|
|
|
|
|
|
|
|
|
|
|
|
|
|
|
|
|
|
|
|
|
|
|
|
|
|
|
|
|
|
|
|
|
|
|
|
|
|
|
|
|
|
|
|
|
|
|
|
|
|
|
|
|
|
|
|
|
|
|
|
|
|
|
|
|
|
|
|
|
|
|
|
|
|
|
|
|
|
|
|
|
|
|
|
|
|
|
|
|
|
|
|
|
|
|
|
|
|
|
|
|
|
|
|
|
|
|
|
|
|
|
|
|
|
|
|
|
|
|
|
|
|
|
|
|
|
|
|
|
|
|
|
|
|
|
|
|
|
|
|
|
|
|
|
|
|
|
|
|
|
|
|
|
|
|
|
|
|
|
|
|
|
|
|
|
|
|
|
|
|
|
|
|
|
|
|
|
|
|
|
|
|
|
|
|
|
|
|
|
|
|
|
|
|
|
|
|
|
|
|
|
|
|
|
|
|
|
|
|
|
|
|
|
|
|
|
|
|
|
|
|
|
|
|
|
|
|
|
|
|
|
|
|
|
|
|
|
|
|
|
|
|
|
|
|
|
|
|
|
|
|
|
|
|
|
|
|
|
|
|
|
|
|
|
|
|
|
|
|
|
|
|
|
|
|
|
|
|
|
|
|
|
|
|
|
|
|
|
|
|
|
|
|
|
|
|
|
|
|
|
|
|
|
|
|
|
|
|
|
|
|
|
|
|
|
|
|
|
|
|
|
|
|
|
|
|
|
|
|
|
|
|
|
|
|
|
|
|
|
|
|
|
|
|
|
|
|
|
|
|
|
|
|
|
|
|
|
|
|
|
|
|
|
|
|
|
|
|
|
|
|
|
|
|
|
|
|
|
|
|
|
|
|
|
|
|
|
|
|
|
|
|
|
|
|
|
|
|
|
|
|
|
|
|
|
|
|
|
|
|
|
|
|
|
|
|
|
|
|
|
|
|
|
|
|
|
|
|
|
|
|
|
|
|
|
|
|
|
|
|
|
|
|
|
|
|
|
|
|
|
|
|
|
|
|
|
|
|
|
|
|
|
|
|
|
|
|
|
|
|
|
|
|
|
|
|
|
|
|
|
|
|
|
|
|
|
|
|
|
|
|
|
|
|
|
|
|
|
|
|
|
|
|
|
|
|
|
|
|
|
|
|
|
|
|
|
|
|
|
|
|
|
|
|
|
|
|
|
|
|
|
|
|
|
|
|
|
|
|
|
|
|
|
|
|
|
|
|
|
|
|
|
|
|
|
|
|
|
|
|
|
|
|
|
|
|
|
|
|
|
|
|
|
|
|
|
|
|
|
|
|
|
|
|
|
|
|
|
|
|
|
|
|
|
|
|
|
|
|
|
|
|
|
|
|
|
|
|
|
|
|
|
|
|
|
|
|
|
|
|
|
|
|
|
|
|
|
|
|
|
|
|
|
|
|
|
|
|
|
|
|
|
|
|
|
|
|
|
|
|
|
|
|
|
|
|
|
|
|
|
|
|
|
|
|
|
|
|
|
|
|
|
|
|
|
|
|
|
|
|
|
|
|
|
|
|
|
|
|
|
|
|
|
|
|
|
|
|
|
|
|
|
|
|
|
|
|
|
|
|
|
|
|
|
|
|
|
|
|
|
|
|
|
|
|
|
|
|
|
|
|
|
|
|
|
|
|
|
|
|
|
|
|
|
|
|
|
|
|
|
|
|
|
|
|
|
|
|
|
|
|
|
|
|
|
|
|
|
|
|
|
|
|
|
|
|
|
|
|
|
|
|
|
|
|
|
|
|
|
|
|
|
|
|
|
|
|
|
|
|
|
|
|
|
|
|
|
|
|
|
|
|
|
|
|
|
|
|
|
|
|
|
|
|
|
|
|
|
|
|
|
|
|
|
|
|
|
|
|
|
|
|
|
|
|
|
|
|
|
|
|
|
|
|
|
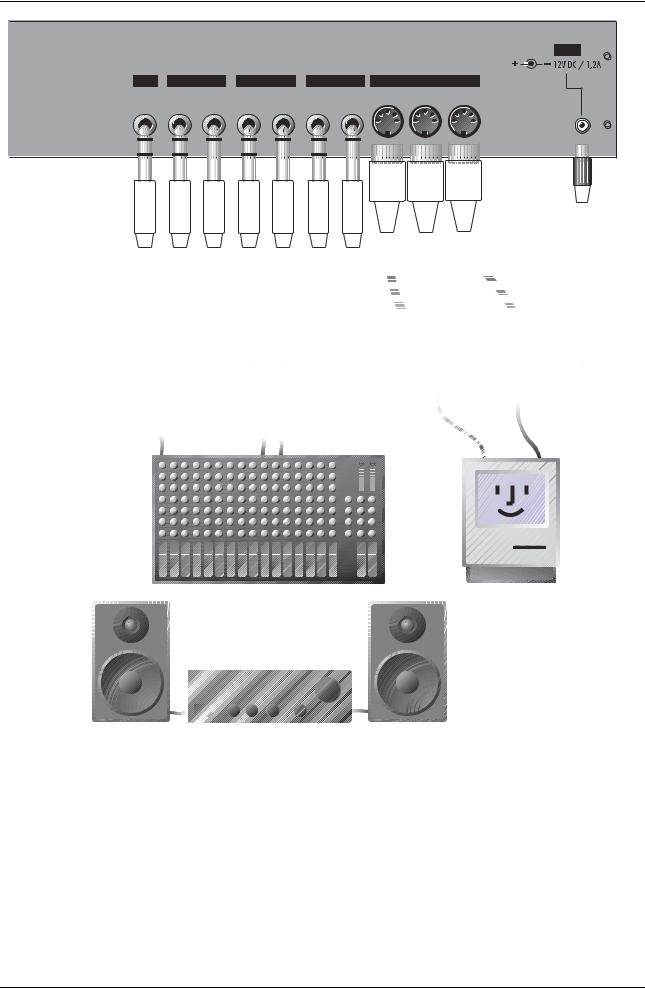
Connections microQ rack version
To connect the devices:
1.Turn all units off.
2.Connect the microQ’s main audio outputs Main Out to your mixing console. Optionally connect the auxilliary audio outputs Sub Out 1 and Sub Out 2 too.
3.To play the microQ rack version you need a MIDI master keyboard. Connect its MIDI Out jack to the microQ´s MIDI In jack . Instead of this you can also connect the microQ to a
MIDI computer system.
4.If you want to use a computer, connect your computer´s MIDI Out jack to the microQ’s
MIDI In jack and the computer´s MIDI In jack to the microQ’s MIDI Out jack .
21 |
Waldorf microQ User´s Manual |
Setup and Connection – Audio Connections
5.Connect the power supply cable or the power cable that came with the microQ with the
Power Supply jack.
6.Plug the other side of the power supply cable or the power cable into a suitable AC power outlet.
7.The microQ should power up itself. If not, switch on the microQ with the Power button
.
8.Then switch on the computer (if connected), the mixing console and finally the amplifier.
To check the correct reception of MIDI Data send any MIDI Events to the microQ; the Power LED lights up on any incoming MIDI Message. If this is not the case please check the MIDI connection to the microQ.
Audio Connections
The microQ provides three analog stereo audio outputs that can be used individually. All outputs are affected by the setting of the System volume control. If you choose to send only one mono or stereo signal to your mixer, use the Main Out jacks. You can connect each output stereophonically or monophonically as follows:
To connect an output stereophonically with two mono cables:
•Connect the Left and Right jack with 1/4-inch mono plugs.
To connect an output stereophonically with one stereo cable:
•Only connect the Left/Stereo jack of the output with a 1/4-inch stereo plug. Don’t plug any cable into the Right/Mono jack of the output pair.
To connect an output monophonically:
•Only connect the Right/Mono jack of the output pair with a 1/4 inch mono plug. Don’t plug any cable into the Left/Stereo jack of the output pair.
The microQ also offers a stereo headphone jack ( microQ Rack versions; microQ Keyboard). The signal on the headphone jack connector is always identical to the Main Out jacks.
The Main volume of the microQ can be changed with the endless knob left below the display while being in Play Mode. This function works in Singleand also in Multimode.
If you do not choose to connect a mixing console, you can patch the microQ’s output signals directly to an amp. Use an input usually called Aux or Tape input.
Before connecting and disconnecting the microQ to a power supply source, turn your amp’s volume control all the way down to avoid damage due to on/off switching noise.
The microQ produces a high level output signal (see technical data). Please take care that the connected playback device is suitable for the high level of an electronic instrument.
Never use the mic or phono input of the connected amp!
Waldorf microQ User´s Manual |
22 |

Setup and Connection – External Input
External Input
The microQ offers a stereo External In jack that can be used to feed an external signal into the mixer section. Therefore, the signal can be processed via the filters and the effects section in the same way as the oscillators.
As the external signal is treated like any other sound source within the microQ, it is necessary to trigger the Amplifier Envelope to get the signal passed through. To do so, notes must be sent to the microQ’s sound generation, either by playing on the keyboard, receiving MIDI notes or via internal arpeggiator. The microQ Omega and the microQ Keyboard also have a Mix In to parameter in the Global menu which enables an external signal to pass through the FX section without triggering a MIDI note.
Hold Pedal Input (microQ keyboard only)
The microQ Keyboard features an input for a hold pedal . These hold pedal must be a so-called sustain pedal with an open state.
The Hold Pedal Jack on the microQ Keyboard is a stereophonic 1/4 inch phono jack with a connection to +5V on the ring. You can connect a sustain pedal to it with a monophonic 1/4 inch phono plug.
Control Pedal/CV Input (microQ Keyboard only)
The microQ Keyboard features an input for a control pedal or control voltage.
If a control pedal is used, a potentiometer of 47 KOhms or higher is recommended. This covers almost any type of control pedal on the market. It doesn’t matter in which direction the control pedal works, this can be adjusted in the Global menu.
If CV is used, make sure to match these specifications:
•Tip: CV in (internally connected to +5V by a 4K7 Resistor)
•Ring: internally connected to +5V by a 4K7 Resistor.
•Input Voltage Range: 0 to 5V
It doesn’t matter if the incoming CV is linear or logarithmic, this can be adjusted in the Global menu as well as the initial offset and the overall gain.
23 |
Waldorf microQ User´s Manual |
Overview – Memory Structure
Overview
Memory Structure
The memory architecture of the microQ is divided into three main sections as shown in the following picture. All memory locations are freely programmable, so there is no separation into preset and user programs.
|
Internal Memory |
|
|
Multi |
Sound |
Drum Map |
|
001 |
Bank C |
001 |
|
. |
|
. |
|
Bank B |
. |
||
. |
|||
. |
Bank A |
. |
|
. |
|||
. |
|||
001 |
. |
||
. |
|||
. |
|||
. |
. |
||
. |
. |
||
. |
|||
100 |
|
||
100 |
20 |
||
|
Memory Structure diagram
•100 Multi programs (Multi 001…100)
A Multi program stores information about how up to 16 Sound programs sound at once.
•300 Sound programs (Sound A001…C100)
A Sound program stores information about the character of a sound.
•20 Drum Maps (Drum Map D001...D020)
A Drum Map contains up to 32 Single Sound Programs which can be organized on the keyboard.
Dynamic Voice Management
The microQ has a Dynamic Voice Management. This means that unused or deactivated parts of the Sound Engine, e.g. Oscillators, Filters, Effects, etc. do not need any CPU capacity. This enhances the following maximum polyphony:
•microQ Omega up to 75 voices
•microQ rack/Keyboard up to 25 voices
•microQ lite 12 voices
Further informations about this can be found in the chapter “Sound Parameters” under the corresponding parameters.
The simple rule of thumb says: the less complex the sound, the higher the available polyphony.
Tips for better voice performance can be found in the appendix on page 145.
Waldorf microQ User´s Manual |
24 |
Basic Operation – Switching on
Basic Operation
Switching on
The microQ is equipped with a software-based power control, which means that it is initially switched on when you connect it to an AC outlet, even if it was switched to standby mode before the power was disconnected. This enables you to switch the microQ on or off through e.g. a main power switch in your studio. However, if you switched the microQ off manually you can switch it on again with the following procedure:
To switch the microQ on manually:
•Press Power to switch the microQ on. The standby LED will go out.
After a couple of seconds the display will change, to show the last sound or multi program that was selected before the microQ was switched off. The microQ is now ready to be played:
Inst:1 Sound:A001
LosAngeles2019 T
Switching off
The microQ has a special shutdown feature that prevents data loss by accidentally pressing the power button.
To switch the microQ off:
•Press and hold the Power button . The display now shows a countdown message from 10 to 0:
Switching off: 8
After counting down to 0 the microQ will switch off. If you release the Power button before, the shutdown process is cancelled.
Panic Function
The Power button is also used to perform a Panic function. The Panic function sends and executes an "All Notes Off" command to terminate stuck notes. Panic immediately sets all envelopes to their release phases. Panic also stops the step sequencer and the arpeggiator playing when running in Hold mode.
To activate this function, briefly press Power .
When holding Power a bit longer, all sound is suppressed and the release phases are cancelled.
Tempo Indication
In Play mode the LED of the Amp/FX/Arp section works as an indicator for the current selected tempo.
25 |
Waldorf microQ User´s Manual |

Basic Operation – System Volume
System Volume
In Play mode you can use the left parameter dial under the display control to adjust the microQ’s master volume. The volume setting is global and affects the levels of all audio outputs including the headphone output.
Demo Playback
The microQ is equipped with several demo songs to show some of its unique features. They should give you a quick overview of the microQ’s sound character and the possibilities you can expect when you start working with your microQ. To listen to the songs in highest quality you should make sure that the microQ is connected stereophonically to a good amplifier/loudspeaker combination. Alternatively, you could use good headphones.
The Demo Playback mode clears all edit buffers. If you have made any changes to existing programs that you would like to keep, you should store them now. However, stored programs aren’t affected in any way.
To start the Demo Playback:
•Press Multimode and Peek simultaneously to enter the demo mode. The microQ shows a selection of various demo songs.
•Press one of the highlighted Instrument buttons to listen to a particular demo song or press the Play button to listen to all demo songs in sequence.
•While you are listening to the music watch the display.
To play back another demo song:
•Press another highlighted Instrument button .
If this gave you an idea of the microQ´s capabilities of, it is time to leave the Demo Playback and to start exploring it yourself.
To exit the Demo Playback Mode:
• Press Peek to exit the demo mode. The microQ returns to normal operation.
Demo Sequences
The microQ is equipped with four demo sequences. These demo sequences give you a way to hear the microQ without playing on the MIDI keyboard.
To play back a demo sequence:
•Press Peek and one of the four Instrument buttons simultaneously to play back a demo sequence with the currently selected sound.
•Press another Instrument button to listen to a particular demo sequence.
•If you want, change the sound by turning the Page Dial .
•Press Multimode to stop the demo sequence playback. The microQ returns to normal operation.
Waldorf microQ User´s Manual |
26 |
Basic Operation – The Master Section
The Master Section
Most of the basic operations like managing programs are done in the Master Section. The picture below shows the controls of the Master Section in detail:
I n s t . 1 |
I n s t . 2 |
I n s t . 3 |
I n s t . 4 |
G l o b a l |
U t i l i t y |
|
G r a p h i c D i s p l a y |
M u l t i |
C o m p a r e |
||||
E d i t |
R e c a l l |
|||||
|
|
|
|
|||
|
|
|
P l a y |
S o u n d |
S t o r e |
|
|
|
|
|
S h i f t |
||
|
|
|
M u l t i m o d e |
P e e k |
|
|
Picture 4: Master Section
As you can see, the Master Section consists of several controls:
•A 2x20 character display that shows program names, parameters and other messages.
•A red alpha dial on the right of the display. It is used to select sound programs or, when editing a program, to select a parameter page.
•Two value dials below the display for adjusting parameters currently shown.
•Four buttons labelled Global/Utility, Multi/Compare, Edit/Recall and Sound/Store. These buttons are used to call special parameter edit pages and to perform several utility functions.
•A button labelled Shift that is used to activate alternative functions of knobs and buttons, labelled in blue color.
•A button labelled Play/OK. Pressing this button will bring back the microQ to Play mode, where sounds can be selected.
•A button labelled Multimode. It is used to activate or deactivate the Multimode.
•A button labelled Peek. Pressing this button allows you to check parameter values without changing them.
27 |
Waldorf microQ User´s Manual |

Basic Operation – Selecting Programs
Selecting Programs
The microQ offers three types of programs, Multis, Sounds and Drum Maps. To switch between them, you can either use the Page Dial or the left parameter dial under the display (only in Play mode). The type of program changed depends on the microQ Single or Multi Mode status.
Single Mode
The Single Mode of the microQ consists of four Instruments that can be played one after the other or at once. This offers a fast way to switch between different sounds in a live situation or to create layered sounds in a studio session without deeper programming. We will come to that later. For now, you only need to know: The buttons Inst. 1…Inst. 4 are used to switch between these Instruments. Each Instrument holds a Sound that can be selected in various ways.
In Single Mode, you can either select Sound Programs or Drum Maps. If you want to build a setup with a particular Sound and a related Drum Map, use the Multi Mode of the microQ.
Multi Mode
The Multi Mode of the microQ consists of 16 Instruments that can be mapped, layered or played individually. For a thorough explanation of the Multi Mode, read the chapter “Multi Mode” on page 38.
Selecting Programs with the Page Dial
With the Page Dial , you can select Multi programs in Multi Mode and Sounds in Single Mode.
To select a Program with the Page Dial :
1.Make sure that the Play LED is lit. If not, press Play in the Master section.
2.If you are in Single Mode (Multimode LED is off), press one of the Instrument buttons Inst. 1…Inst. 4 to select an Instrument that holds the Sound or Drum Map. The LED above
the button lights up and the display content will change to show the current Sound for this Instrument.
3.Use the Page Dial to select an appropriate Program. Turning the dial clockwise
increases the Program number, turning the dial counterclockwise decreases it.
When you are at the end of one Bank and turn the Page Dial further, you will jump to the beginning of the next Bank and vice versa. The only exceptions are the first Program in the first Bank and the last Program in the last Drum Map Bank. The Bank names are:
Sound Bank A to C. Drum Map bank D. Multi Bank
4.The display shows the Program number in the top right corner and the name of the selected Program (name may be different depending on the factory set in your microQ).
Single Mode:
Inst:1 Sound:A001
LosAngeles2019 T
Waldorf microQ User´s Manual |
28 |
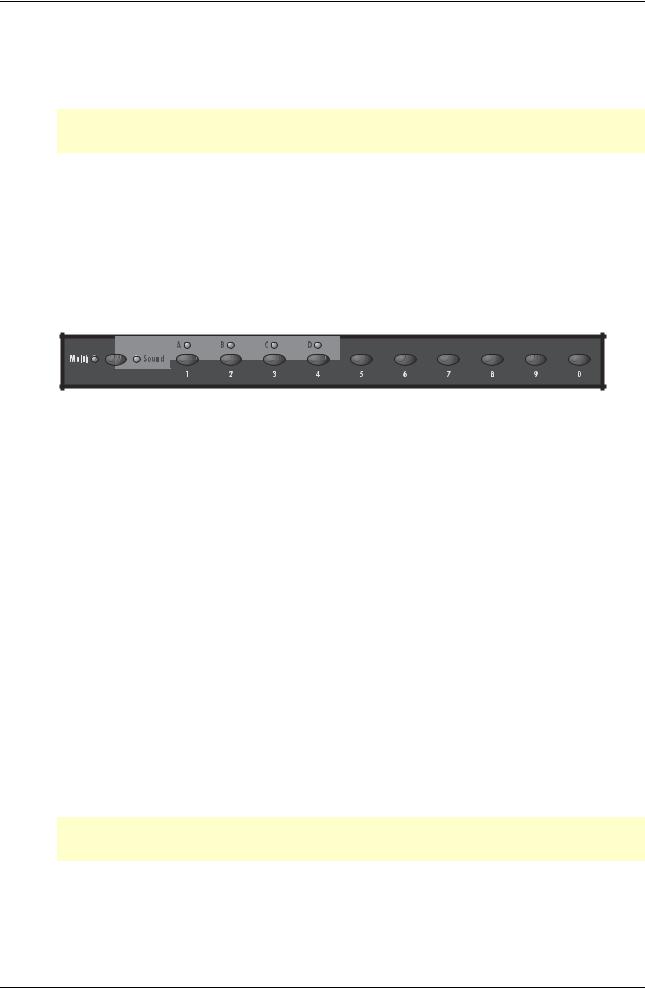
Basic Operation – Selecting Programs
Multi Mode:
Inst:1 |
Multi:009 |
|
Venice |
Beach |
T |
|
|
|
|
|
|
Drum Maps can be found in sound position 01 to 20 in Bank D. The microQ can only hold up to 20 Drum Maps. Therefore higher storage positions aren’t available.
Fast Selection of Sound Banks in Single Mode
In Play mode the Banks can be changed quickly by using the endless knob right below the display. Turning the knob clockwise raises the bank number, turning counterwise lowers it.
Selecting Programs with the Number Buttons (microQ Keyboard only)
At the microQ keyboard you can also use the program button section’s number buttons to select a program. The following picture shows the program button section:
Program button section microQ Keyboard
To the left of the ten number buttons, you can see the Multi/Sound button. This button is used to set the program type that is switched by the number buttons.
Entering a two-digit number will select the corresponding program within the current bank.
Here are three examples:
•Entering 01 will call up Program number 001 in the current bank.
•Entering 99 will call up Program number 099 in the current bank.
•Entering 00 will call up Program number 100 in the current bank.
To select a Program with the Number Buttons :
1. Press the Multi/Sound button until the LED of the Program type you want to select lights up.
2. Press one of the Instrument buttons Inst. 1…Inst. 4 to select an Instrument that holds the Sound. The LED above the button lights up and the display content will change to show the current Sound for this Instrument.
3. Enter a two-digit number with the number buttons.
4. The display shows the Program number in the top right corner and the name of the selected Program.
Drum Maps are located at number 01 to 20 of bank D. You can´t select higher a program number for this program type.
29 |
Waldorf microQ User´s Manual |

Basic Operation – Selecting Programs
Additional Switching Banks in the microQ Keyboard
As described before the microQ’s sound program memory consists of several banks, named "A" to "C". Each of these banks contains 100 Sounds, giving you a total of 300 sounds. The bank D contains 20 Drum Maps.
To switch between program banks in the microQ Keyboard:
1.Press and hold the Multi/Sound button.
2.Use the 4 leftmost numerical buttons to select the desired bank. These buttons are also labelled Bank A to Bank D. The program number will be retained when you change the bank. E.g. if program A025 was selected before, pressing the Bank C button will select program no. C025. Take account that the Drum Map Bank D contains only 20 programs.
3.Release the Multi/Sound button again.
Category Search
The microQ offers a special function to enable easy searches for sounds of similar categories. If you’re searching for pad sounds, only these sounds will be displayed as you scan the storage banks with the red dial. To accomplish this each sound contains 4 extra digits in the sound name to define its sound category. Further details about how to change a sound’s category are described in the chapter „Storing Programs“ on page 37.
Searching for a special sound categroy:
1.Hold down the Shift button
2.Chose a category with the red dial. The following message shows up on the display:
[Sel. Category:Pad ]
3.Release the Shift button
4.Use the red dial to scroll through the patches of the selected category
With the category search function activated, the microQ scans its entire storage bank for only those type of sounds. This can lead to short waiting periods.
Switching off Category Search:
1.Hold down the Shift button.
2.Turn the red dial clockwise until the display shows:
[Sel. Category:----]
3. Release the Shift button.
Category Search doesn’t change any program numbers. It only filters out all patches not belonging to the selected category. Scrolling through patches with this function is much faster because only patches belonging to the selected category are visible.
Waldorf microQ User´s Manual |
30 |

Basic Operation – Instruments and Sounds
Instruments and Sounds
Switching between Instruments to change Sounds
As mentioned before, the Single Mode of the microQ uses four Instruments that can be accessed through the buttons Inst. 1…Inst. 4 .
In a live situation, for example, you can set up the Sounds for the Instruments in advance and quickly switch to them during your performance.
Or, in a studio session, you can try out several Sounds by switching the Instruments back and forth. This is also interesting when working with MIDI. In Single Mode, only the active Instrument (or Sound Layer) responds to MIDI.
To select one instrument:
•Press one of the Instrument buttons Inst. 1…Inst. 4 . The LED above the button lights up and the display content will change to show the settings for this Instrument.
•You can now play the Sound of this Instrument.
There’s no way to store the settings of the four Instruments permanently except when you create a real Multi in Multi Mode. So, see the Instruments as temporary scratch pads.
Creating Sound Layers with Instruments
Beside the feature to select the four Instruments in sequence, you can select two or more Instruments at once to create Sound Layers. This is very handy and allows you to build up big sounds without any deeper programming as you would have to do in Multi Mode. However, if you are very happy with a Sound Layer, you should think about building a Multi with the same settings to store it permanently.
To create a Sound Layer by selecting several Instruments at once:
1.Set up the Instruments to hold the Sounds that you would like to play.
2.Press and hold one of the Instrument buttons Inst. 1…Inst. 4 . The LED above the button lights up and the display content will change.
3.Press additional Instrument buttons briefly. The Instruments will be added to the other Instruments as long as you hold the Instrument button you’ve pressed first. The respective Instrument LEDs light up half as bright to indicate that these Instruments are added.
4.Release the Instrument button you pressed first.
5.The LED of the Instrument you selected first will light fully to indicate that this is the editable Instrument. All other selected Instrument LEDs are dimmed.
Replacing Sounds in Layers
If you are not happy with one Sound of your Sound Layer, you can replace it at any time with a different Sound.
To replace one Sound of a Layer:
1.Press the Instrument button Inst. 1…Inst. 4 that holds the Sound you want to replace. The LED above the Instrument button lights up fully.
2.Select a Sound for this Instrument.
31 |
Waldorf microQ User´s Manual |
 Loading...