


 Loading...
Foreword
Foreword
Thank you for purchasing the Waldorf Largo. You now own a synthesizer with real Waldorf DNA featuring a wide range of unique sounds of high quality.
What to read?
The biggest problem with any manual is to find a way to cover both the needs of an absolute expert and a beginner alike. There are people who read a manual cover to cover while others don’t even touch it. The latter is the worst choice, especially when the manual describes a Waldorf instrument.
If you decide to read the following manual, we promise you a lot of fun while reading about and working with the Waldorf Largo.
Your Waldorf Team
Hint
Waldorf Music GmbH is not liable for any erroneous information contained in this manual. The contents of this manual may be updated at any time without prior notice. We made every effort to ensure the information herein is accurate and that the manual contains no contradictory information. Waldorf Music GmbH extends no liabilities in regard to this manual other than those required by local law.
This manual or any portion of it may not be reproduced in any form without the manufacturer's written consent.
Waldorf Music GmbH, Lilienthal Str. 7, D-53424 Waldorf,
Germany
Largo User´s Manual |
2 |

Foreword
Largo Development Team
Software: |
Wolfram Franke, Stefan Stenzel |
|||
64 Bit and |
|
|
|
|
AAX Porting: |
Thomas Rehaag |
|
|
|
Design: |
Axel Hartmann |
|
|
|
Manual: |
Holger Steinbrink |
|
|
|
Betatest/ Sounddesign: |
Wolfram Franke, André Geisler, |
|||
|
Boele |
Gerkes, |
Daniel |
Gill, |
|
Achim Gratz, Dajan Izzo, Till |
|||
|
Kopper, Dirk Krause, Rob Lee, |
|||
|
Jay de Miceli, Niels Moseley, |
|||
|
Markus |
Moser, |
Dr. |
Georg |
|
Müller, |
Kai Niggemann, |
Don |
|
|
Petersen, Holger |
Steinbrink, Dr. |
||
|
Stefan Trippler |
|
|
|
Largo Version: |
1.5.2, May 2014 |
|
|
|
w Please visit our website www.waldorfmusic.de Maybe you can download a newer version for your Largo.
We would like to thank
Christian Bacaj, Karsten Dubsch, Willie Eckl, Joachim Flor, Michael von Garnier, Frank Schneider, Kurt “Lu” Wangard, and anyone we have forgotten.
3 |
Largo User´s Manual |

Content |
|
Content |
|
Foreword........................................................................................... |
2 |
What to read? .................................................................. |
2 |
Hint................................................................................. |
2 |
Largo Development Team ............................................... |
3 |
We would like to thank ................................................... |
3 |
Content.............................................................................................. |
4 |
Overview ........................................................................................... |
6 |
User Interface .................................................................. |
6 |
Introduction ...................................................................................... |
7 |
About this Manual ........................................................... |
7 |
Symbols .......................................................................... |
7 |
Highlighted Control Features and Parameters .................. |
7 |
Installation ........................................................................................ |
8 |
System Requirements for Windows ................................. |
8 |
Installation under Windows............................................. |
8 |
System Requirements for Mac OS X ................................ |
9 |
Installation under Mac OS X............................................ |
9 |
Activation of Largo ........................................................ |
10 |
Basic Operation.............................................................................. |
10 |
Worth Knowing about Parts........................................... |
12 |
General Operation ........................................................ |
12 |
Control Elements ........................................................... |
13 |
Sound Parameter ........................................................................... |
14 |
Overview of Functions................................................... |
14 |
The Head-up Section ..................................................... |
14 |
The File Menu................................................................ |
14 |
The Edit Menu ............................................................... |
15 |
Sound Selection ............................................................. |
16 |
The Sound Browser........................................................ |
16 |
Program Table ............................................................... |
17 |
File Browser................................................................... |
19 |
Working with the File Browser ....................................... |
20 |
Oscillator Section .......................................................... |
22 |
Activating an Oscillator ................................................. |
22 |
Mixer Section................................................................. |
30 |
The Filter Section ........................................................... |
32 |
The Amplifier Section .................................................... |
38 |
Parameter Module Section ............................................. |
39 |
The LFOs ....................................................................... |
42 |
The Envelopes................................................................ |
45 |
The Modulation Matrix .................................................. |
47 |
The Arpeggiator ............................................................. |
50 |
Arpeggiator Step Editor .................................................. |
56 |
The Effects ..................................................................... |
59 |
Appendix ......................................................................................... |
67 |
Oscillators Introduction ................................................. |
67 |
Filter Introduction .......................................................... |
74 |
Largo User´s Manual |
4 |

Content
The Comb Filter Types................................................... |
76 |
Tips & Tricks .................................................................. |
86 |
Envelope Types in the Largo .......................................... |
81 |
Controller Numbers ....................................................... |
88 |
FM Sources.................................................................... |
84 |
Glossary......................................................................... |
93 |
Modulation Sources....................................................... |
84 |
Product Support ............................................................. |
99 |
Modulation Destinations ............................................... |
85 |
|
|
5 |
Largo User´s Manual |

Overview
Overview
User Interface
a |
Head-up section |
c |
Module parameter section |
b |
Main parameter section |
d |
Virtual Keyboard and Part parameter |
Largo User´s Manual |
6 |

Introduction
About this Manual
This manual was written to help you to become familiar with the Largo synthesizer. It will also aid experienced users with routine tasks.
To avoid confusion, the terminology in this manual is based on the Largo parameter names. You will find a glossary at the end of this manual; it explains the various terms used.
We also used a uniform set of symbols to show you topics of particular interest or significance. Important terms are highlighted in bold letters.
Symbols
mCaution – The comments that follow this symbol will help you avoid errors and malfunctions.
w Info – Additional information on a given topic.
Introduction
+Instruction – Follow these guidelines to execute a desired function.
[ Example – Real-world examples to try out.
Highlighted Control Features and Parameters
All of the Largo´s buttons, controls and parameters are highlighted in bold letters throughout the manual.
Example:
•Turn the Cutoff dial.
The Largo’s different modes and parameter pages are illustrated in a depiction of the display.
The value range of a continuous parameter is indicated from low to high with both values shown in italic letters, separated by three dots.
Example:
Cutoff 0…127
7 |
Largo User´s Manual |

Installation
Installation
System Requirements for Windows
In order to be able to use the Largo, you will need at least:
•A PC with a Pentium IV or AMD Athlon 1 GHz processor or better, we recommend a fast CPU.
•64 MB free RAM.
•Windows XP or newer.
•VST 2.4 compatible host application such as Steinberg Cubase or newer. This must be correctly installed on your computer.
•AAX compatibel host application such as Pro Tools 10. This must be correctly installed on your computer.
wPlease also observe the system requirements of your host application!
wLargo runs within 32 bit as well as 64 bit host applications.
Installation under Windows
Installation from CD-ROM:
1.Start your computer and launch your operating system. Insert the Largo CD-ROM into your DVD/CD-ROM drive. If you have enabled the Autostart function in Windows, the Installer will start automatically and you can proceed with Step 5 below. If not, please proceed as follows:
2.Launch the Explorer or open the window “My Computer”.
3.Double click on the icon for the drive that holds the Largo CD-ROM.
4.Double click on the Largo installer icon. This launches a special installation program.
5.Follow the on-screen instructions.
wAfter installing Largo you will have to activate the program on your computer Please refer to the chapter “Activation of Largo”.
Installation of a downloaded Installer File:
1. Refer to the folder where the downloaded Largo zip archive is located.
Largo User´s Manual |
8 |

2.Double click on the archive file to extraxt it.
3.Double click on the Largo Installer icon. This launches a special installation program.
4.Follow the on-screen instructions.
wAfter installing Largo you will have to activate the program on your computer. Please refer to the chapter “Activation of Largor”.
System Requirements for Mac OS X
In order to be able to use the Largo, you will need at least:
•Mac with 1.5 GHz Intel processor or better.
•Mac OS X 10.6 or newer.
•128 MB of free RAM.
•VST 2.4 compatible host application or a VST3 compatible host application such as Steinberg Cubase. This must be correctly installed on your computer.
or
Installation
•An AudioUnit 2.0 compatible host application such as Apple Logic or GarageBand. This must be correctly installed on your computer.
or
•An AAX compatible host application such as Pro Tools 10. This must be correctly installed on your computer.
wPlease also observe the system requirements of your host application!
wLargo runs within 32 bit as well as 64 bit host applications.
Installation under Mac OS X
Proceed as follows to install the Largo:
Installation from CD-ROM:
1.Quit all other applications so that you return to the Finder. Disable any system activity monitoring software or extension. Then insert the Largo CD into your computer’s DVD/CD-ROM drive.
2.If required, double click on the Largo icon to open the CD window.
9 |
Largo User´s Manual |

Installation
3. Double click on the Largo Installer icon to load the installation software. Follow the instructions on the screen.
wAfter installing Largo you will have to activate the program on your computer Please refer to the chapter “Activation of Largo”.
Installation of a Downloaded Installer File:
1.Refer to the folder where the downloaded Largo zip archive is located.
2.Double click on the archive file to extraxt it.
3.Double click on the Largo Installer DMG icon. This launches a special installation program.
4.Follow the on-screen instructions.
wAfter installing Largo you will have to activate the program on your computer. Please refer to the chapter „Activation of Largo“.
Activation of Largo
Largo uses a software based copy protection called eLicenser. Largo can only run with an activated license.
mReally important — The license code can be used just once and becomes invalid after first use. If you have lost your license code by a hard disk crash or renewing your operating system please contact our support: support@waldorfmusic.de
Independent of installing Largo on a Mac or Windows computer you will need to activate the software. You need to have administrator rights to install and authorize Largo. If your current user account doesn't have administrator rights, please quit the installer, log in as user with administrator rights and start the installer again.
wYou require an active internet connection for license activation.
1.After successful installation of Largo the eLicenser Control Center application will start automatically. If not, please start it manually. The eLicenser Control Center can be found within your Application folder.
2.In the application windows please choose the option “Enter Activation Code”.
Largo User´s Manual |
10 |
3.Enter the 32 digit activation code that was included in your Largo package. Confirm it and follow the instructions.
4.You can download your final activation as software license (SeL) or directly to a connected optional eLicenser USB Key (e.g. Steinberg Key).
wLargo is copy-protected by the Soft eLicenser Copy Protection. You do not need an USB key to authorize Largo on a particular computer. However, we strongly recommend to transfer the Largo license to an eLicenser USB Key (i.e. from Steinberg or eLicenser) during or after activation. Please consult the eLicenser Control Center Online Help how to perform this optional step.
wIf you want to use Largo on different computers or if you want to remove the soft license from your current computer or if you need to reinstall your computer system you must transfer the Largo eLicense to an eLicenser USB Key. Otherwise your soft license will be gone forever.
wPlease note the “Read Me!” and “Important Changes” text files on the Largo CD-ROM, which may contain additional information and/or any changes.
Installation
mIf you want to upgrade your operating system software or exchange any hardware system component make sure to transfer your soft eLicense to an optional eLicenser USB Key before. Otherwise your soft license will be gone forever.
11 |
Largo User´s Manual |

Basic Operation
Basic Operation
Worth Knowing about Parts
Largo offers a sound structure with four parts. All four parts are always saved for each sound program. For each bank, 128 sound programs are saved. The four parts can be controlled either together via MIDI channel 5 or separately via MIDI channels 1, 2, 3 or 4 (Multi sets to Part). Additionally all parts can be played simultaneously regardless of the incoming MIDI channel (Multi sets to Layer) Each part can have its own stereo output. With the Outputs parameter, you can mix all parts together to one stereo output. You can also use this architecture to generate a 4 times multimode or surround sound.
Both Effect units are available for each part without any restrictions.
General Operation
Largo has been optimized for a screen resolution of at least 1024x768 pixels. If your resolution is smaller, you either have to scroll your window.
Largo has various on-screen controls, the behavior of which differs according to the Control Mode settings in the Common menu (Auto/Linear/Circular). The faders can be moved with greater accuracy by holding down the SHIFT key on your computer keyboard while moving your mouse. Clicking the corresponding fader or knob while holding down the CTRL key resets the parameters to the stored values. Mouse scroll wheel is supported for all continuous controls. This excludes buttons and graphic displays.
Doubleclick on any continuous control opens text edit field. This excludes buttons and menus.
Largo User´s Manual |
12 |

Control Elements
Using Largo’s controls is simple. There are some different types of control elements:
Dials
To set a value, click on the dial, hold down the mouse button and drag around the dial in a circle (Control Mode setting: Circular) or move the mouse up and down (Control
Mode setting: Linear).
Parameter Values
These allow to set a parameter value. Click and hold the mouse button on the value and drag the mouse up or down. Pressing Shift
while holding the mouse button allows finer adjustment.
Pop-up Menu
Click on the corresponding parameter to open a pop up
menu where you can choose the desired parameter.
Basic Operation
Switches
Switches are represented by “LEDs”. If a function is active, its “LED” will be lit red and all others within the function block will be dark. To activate a function, click on its “LED”.
Display
The information display shows parameter information and a brief description of the parameter function. In addition, MIDI controller allocations and the current numerical value of the parameter are displayed. If you hover over a parameter using the mouse, the corresponding information appears in the information display.
13 |
Largo User´s Manual |

Sound Parameter
Sound Parameter
Overview of Functions
The Waldorf Largo consists of numerous sound-shaping components. The following pages describe all parameters in detail. Additional information can be found in the Appendix on page 57.
The Head-up Section
The Head-up section provides the global overview and includes the following elements:
1.The Browse and Edit buttons toggle between standard Largo user interface (Edit) and Sound Browser window (Browser).
2.The File menu button opens a pop-down menu containing all functions as loading and saving programs and banks.
3.The Edit menu button opens a pop-down menu containing various functions for editing sound programs and parts.
4.The Sound Selection is for selecting sound programs.
5.The Information Display shows parameter information. In addition, MIDI controller allocations and the current numerical value of the parameter are displayed.
6.The Waldorf logo is clickable and opens a window with vitally important information about the Largo.
The File Menu
Left click on the File menu button to open a pop-down menu with the following parameters:
•Load Bank opens a window to load a Largo soundbank.
•Save Bank opens a window to save the current Largo soundbank.
•Load Program opens a window to load a single Largo sound program.
•Save Program opens a window to save the current Largo sound program.
•Recall Bank recalls all sound edits and recover the original soundbank settings.
Largo User´s Manual |
14 |

•Save All Programs up to this Program saves all sounds from sound program 1 to the current sound program as single sounds.
•Save All Programs up to this Program as Audio Unit Preset (only Mac) saves all sounds from sound program 1 to the current sound program as single AudioUnit presets.
The Edit Menu
Left click on the Edit menu button to open a pop-down menu with the following parameters:
•Copy Program copies the current sound program into the clipboard.
•Paste Program pastes the sound program from the clipboard to the current sound program.
•Recall Program recalls all sound edits and recover the original sound settings.
•Init Program initializes the current sound and set all parameter to standard values.
•Copy Part copies the current selected part into the clipboard.
Sound Parameter
•Paste Part pastes the part from the clipboard to the current part.
•Recall Part recalls all part sound edits and recover the original part settings.
•Init Part initializes the current part and set all parameter to standard values
•Sort by Name Ascending up to this Program arranges all sound programs in alphabetical order up to the actual program.
•Sort by Name Descending up to this Program arranges all sound programs in alphabetical order from to the actual program.
•Sort by Category Ascending up to this Program arranges all sound programs based on the categories up to the actual program.
•Sort by Category Descending up to this Program arranges all sound programs based on the categories from to the actual program.
15 |
Largo User´s Manual |

Sound Parameter
wPlease note that some host applications as Steinberg Cubase 4 or newer use an additional sound data managment. It offers you an alternative way to load and save sounds. Please refer to the corresponding chapter in the manual of your host application.
[ Working with Parts – To set up a sound program with different parts please do the following: Select the desired sound program and use the Copy Part function. Select the destination sound program and use the Paste Part function to paste the new part into the existing program.
Sound Selection
The Sound display shows the name and category of the current sound program. Click on the left arrow buttons to step through the sound programs of the current loaded sound bank. Click on the right arrow button to open a pop-down menu for a faster sound selection.
Doubleclick on the soundname or the category to change it by entering a new indication.
The Sound Browser
Largo offers a comprehensive window for selecting, searching and managing sound programs.
Click on the Browser button in the head-up section to open the Sound Browser window.
The Sound Browser consists of two main sections: The
Program Table on the right and the File Browser on the left.
The upper section offers different search and category options:
•The pop-up menu „Show all“ selects the displayed files types. You can choose between „Show all“,
Largo User´s Manual |
16 |

show „Programs“ only, show „Banks“ only or show „AudioUnit Setting“ (Mac only).
•File Browser search field – here you can type in any name or search strings to find desired sounds, banks etc. Search results will be shown in the File Browser window. Click on the cross to reset the search field.
•Program Table view buttons - here you can choose, if the Program Table shows all sound programs (All) or sound programs from 1-64 or 65-128.
•Program table search field – here you can type in any name or search strings to find desired sounds, categories e.g. Search results will be highlighted in grey. Click on the cross to reset the search field.
Program Table
The Program Table shows all Programs of the currently loaded Bank (or part of, if the views 1-64 or 65-128 are displayed). It allows to quickly access or manage these sounds. Managing includes reordering, copying and pasting, importing and exporting among other functions. It offers the following mouse and keyboard functions:
Sound Parameter
•Click selects a Program. Selected Programs are highlighted with a filled background in a different colour.
•2nd Click renames a Program.
•Double-Click switches to that Program. Active Programs are highlighted with a frame in a different colour.
•Shift + Click selects a contiguous range of Programs.
•Command + Click [Mac] / CTRL + Click [Windows] adds a Program to or removes it from the current selection.
•Right Click [also CTRL + Click on Mac] opens a context menu with the following menu items:
•Open – opens a fxp or aupreset from a desired location.
•Save as Single Programs – saves the selected Programs to a desired location as fxp (VST version) or aupreset (AU version).
•Copy – copies the selected Programs to the system clipboard. This allows copying and pasting Programs between different Largo instances.
17 |
Largo User´s Manual |

Sound Parameter
•Paste – pastes the copied Programs into the currently selected Programs. If there are less Programs selected, the remaining Programs are pasted into the following Programs.
•Init – initializes the selected Programs.
•Select All – selects all Programs in the Program Table.
•Sort By Name/Category Ascending/Descending
– sorts the selected Programs according to the chosen function. Note that Category Sort doesn't sort the factory-given categories alphabetically but in a meaningful order.
•Arrow Key (Up / Down / Left / Right) selects a Program and switches to it.
•Shift + Arrow Key selects a contiguous range of Programs.
Dragging:
•Swap – Drag and Drop entries inside the Program Table swaps the selected Programs with the ones starting at the drop location.
•Copy – Holding Option [Mac] or Alt [Windows] during the drop operation copies the selected Programs to the ones starting at the drop location.
•Import – Drop of a selection of files of known file types from Finder [Mac] or Explorer [Windows] imports them into Programs starting at the drop location. Dropping Bank Files (.fxb) and Program Files (.fxp or .aupreset [Mac]) at once results in undefined behaviour, depending on the order in which the Operating System delivers these files to Largo.
•Export – Drag and Drop on the File Browser, the Finder [Mac], the Explorer [Windows] or any other application that is aware of dragged files saves the selected Programs to disk into the selected folder as invidivual .fxp files (or as .auprest files when run as AudioUnit on Mac). The files are always stored with unique file names so no existing files are overwritten.
•Share – Drop on any application that can handle files to perform further actions with them, such as an email application to easily share Largo Programs with other musicians.
•List – Drop on any application window that doesn't handle files creates a text list from the selected
Largo User´s Manual |
18 |

programs, such as a plain text editor (no rich text editor since that one understands drag & drop of files), e.g. TextEdit [Mac] or Notepad [Windows].
File Browser
The File Browser shows file and folder (directory) hierarchies of certain folders in a tree view similar to the Finder [Mac] or Explorer [Windows]. It allows to quickly access or manage files of all known file types on disk. Managing includes restructuring, duplicating, removing, importing and exporting among other functions. Only known file types are presented, files that Largo doesn't understand are not added to the tree.
Its view differs from the Explorer tree view [Windows] in that it displays folders and files both in the same structure. This allows to view or select files in different folders at once which wouldn't be possible with a split view, which would only show the files of one single folder.
The File Browser shows at least the content of the default Largo Program locations on disk. They are called Local Library (accessible for all users of the particular computer) and User Library (accessible only for the current user) respectively and are located in the following locations (note that folder names might be localized or personalized
Sound Parameter
on your operating system version. Those folder names appear in [brackets]):
Presets Location on a Mac computer:
Local Library: /Library/Audio/Presets/Waldorf/Largo/
User Library: [User home directory]/Library/ Audio/ Presets/Waldorf/Largo/
Preset Location on a Windows computer
wPlease note that we have changed the location of the Largo factory sounds. They are installed in the Local Library folder as written below. If you like, you can overwrite these sounds with your existing sound library in the Windows Explorer.
Local Library: [Largo installation path]\Waldorf\Largo Sounds
User Library: [Documents And Settings]\[User home directory]\[Application Data]\Waldorf\Largo\
Further folders can be added and removed at will but we strongly recommend to not add an entire hard disk or other huge folder structure since scanning those might take a very long time and if the number of found items is huge, Largo might behave unpredictable.
19 |
Largo User´s Manual |

Sound Parameter
Working with the File Browser
The view is divided into three columns. The first column shows the file or folder name, the second the last modification date and the third the category for a Program File. Folders have a small disclosure triangle to their left to reveal or hide their content.
Files or folders that are added to the tree by either dropping them onto the file browser or by using the context menu items Add... or Duplicate are always created with unique file names. These file names are created in the style "original_name number.extension" where "original_name" refers to the original file name without extension, "number" refers to a unique number starting at 1, which is incremented until a unique name is found, and "extension" refers to the original file extension.
The File Browser offers the following mouse and keyboard functions. Please note that all operations which modify files or folders on disk require sufficient access privileges:
•Click selects a file or folder. Selected items are highlighted with a filled background in a different color.
•2nd Click renames a file or folder if possible. The root folders cannot be renamed but all subfolders and
files can. Note that this doesn't change the name of the Sound in that file, it only changes the name of the file on disk. If a name already exists, the file is not renamed.
•Double-Click on a file loads that file into Largo. A Program File (.fxp or .aupreset [Mac]) is loaded into the currently active Program location overwriting the Program that was there previously. A Bank File replaces the whole memory of Largo completely.
•Double-Click on a folder reveals or hides its content.
•Shift + Click selects a contiguous range of files and folders.
•Command + Click [Mac] / CTRL + Click [Windows] adds a file or folder to or removes it from the current selection.
•Right Click (also CTRL + Click on Mac) opens a context menu with the following menu items:
•Open – loads the selected file into Largo.
•New Folder... – creates a new folder on disk inside the selected folder or the enclosing folder if a file is selected. Upon successful creation, the folder can be renamed.
Largo User´s Manual |
20 |
•Add... – shows a file select dialog to select files that are copied into the selected folder or the enclosing folder if a file is selected.
•Rename... – renames a file or folder if possible. The root folders cannot be renamed but all subfolders and files can. Note that this doesn't change the name of the Sound in that file, it only changes the name of the file on disk. If a name already exists, the file is not renamed.
•Duplicate – duplicates the selected files or folders and renames them uniquely.
•Move to Trash – moves the selected files or folders to the system trash.
•Reveal in Finder [Mac] / Reveal in Explorer
[Windows] – reveals the selected files or folders in a Finder [Mac] or Explorer [Windows] window.
•Add Scan Folder... – shows a folder select dialog to select a folder that is scanned for folders and files with known file types and the result is added to the File Browser view. No files are copied by this command, the selected folder is only added to the view tree. All added scan
Sound Parameter
folders are stored in Largo's preferences when Largo is closed and they are added to the File Browser automatically on subsequent launches.
•Remove Scan Folder – removes the selected toplevel folder from the list of scanned folders if possible. The main library folders Local Library and User Library cannot be removed, only the custom scan folders can.
•Refresh – refreshes the content of the selected folder or the enclosing folder if a file is selected.
•Refresh All – refreshes the content of all folders.
•Arrow Key Up / Down select the previous / next file or folder in the file browser.
•Arrow Key Left / Right close or open a selected folder.
•Return (or Enter) loads the selected entry into Largo memory. A Program File is loaded into the currently selected program, a Bank File replaces the whole memory of Largo.
Dragging:
•Move – Drag and Drop inside the File Browser or between the Finder [Mac] or the Explorer [Windows]
21 |
Largo User´s Manual |

Sound Parameter
moves the selected files or folders to the highlighted folder. Note: the files and folders are *moved*, so they are *removed* from their original location and created at their new location. If you don't want that, use the copy command below.
•Copy – Holding Option [Mac] or Alt [Windows] during the drop operation copies the selected files or folders to the new location.
•Load – Drag of selected files to the Program Table loads them into Largo RAM starting at the highlighted location.
Oscillator Section
The Largo offers three oscillators that nearly use the same parameters for editing.
wA detailled introduction of the oscillators can be found in the Appendix.
Activating an Oscillator
Click on the Active button to switch the corresponding oscillator on or off.
Shape Pop-down Menu |
Pulse / Saw / Triangle |
||
/ Sine / Wavetables |
|
|
|
Sets the type of waveform to be |
generated by |
the |
|
Oscillator. The parameter is |
called |
Shape instead |
of |
Largo User´s Manual |
22 |
“waveform”, because it doesn’t necessarily set only one waveform, but sets a specific oscillator model that could produce a number of waveforms depending on other settings. A good example for this behaviour is the Pulse shape. However, the term “waveform” is used interchangeably throughout the manual. The following shapes are currently available:
Pulse
(variable Pulse Width)
Sawtooth |
Triangle |
Sine |
•Pulse selects the pulse waveform. A pulse waveform with a pulse width of 50% has only the odd harmonics of the fundamental frequency present. This waveform produces a hollow / metallic sound. If the Pulse waveform is selected, the parameters Wave and Wave Mod Source are used to change the pulsewidth of the waveform.
•Saw selects the sawtooth waveform. A Sawtooth wave has all the harmonics of the fundamental frequency in descending magnitude. It doesn’t have any further parameters.
Sound Parameter
•Triangle selects the triangular waveform. The triangle mainly consists of the odd harmonics with very low magnitudes. It doesn’t have any further parameters.
•Sine consists of the fundamental frequency only. It has no harmonics at all. It doesn’t have any further parameter.
•68 Wavetables based on classic wavetables of Waldorf synthesizers can be found in oscillator 1 and 2 only. An introduction to the Wavetables can be found in the Appendix of this manual. When a wavetable is selected, the parameters Wave and Wave Mod serve to select the start point of the waves. Furthermore, the modulation sources 01PW and 02PW are active subject to which Oscillator is set to the wavetable.
[ The Pulse shape can be used to create unusual synthesizer sounds and oboe like sounds.
[ The Saw shape can be used for basses, leads, brass and string sounds.
[ The Tri shape can be used for flute sounds or soft pads.
23 |
Largo User´s Manual |
Sound Parameter
[ The Sine shape can be used to produce basses and electric organ sounds.
[ The Sine shape is also perfectly suited for ring modulation or as FM Source.
[ The wavetables are perfect for very vivid sounds.
[ The tips listed here of course are only suggestions. The variety of tones among all Waveforms in the Largo are nearly inexhaustible.
wLeft-click and hold on the Shape display and move the mouse vertically to change the startwave of a Wavetable or the Pulswidth of a Pulse shape.
wLeft-click and hold on the Shape display and move the mouse up or down to change the Oscillator Startphase (see below).
Octave |
128´...1/2´ |
Sets the basic pitch of the oscillator in steps of an octave. The Octave setting is shown as register value, a common measurement based on the length of organ pipes. The reference pitch for the oscillator is generated at MIDI note A3 (note no. 69) when Octave is set to 8’, Semitone and Detune are set to 0, Keytrack is set to 100% and no
pitch modulation is applied. In this case, the oscillator’s frequency will be the same as set in the global Master Tune parameter (usually 440 Hz).
[ Set Octave to 16’ for bass sounds.
[ Set Octave to 8’ if you are creating typical keyboard sounds.
[ Set Octave to 4’ if you are programming strings or other high pitched sounds.
[ When you use an Oscillator to modulate other Oscillators or the Filters, experiment with the Octave parameter. Low settings might result in periodic modulations while high settings might add a bell character to the timbre.
[ Ultra-low settings like 128’ can create very nice rhythmic changes when used with the ring modulator. If this is still not low enough, you can use the Standard Modulation Matrix to apply MAXIMUM to the respective oscillator pitch with a negative amount.
Largo User´s Manual |
24 |

Semitone |
-12...+12 |
Sets the pitch of the oscillator in semitone steps. The standard setting for this parameter is 0, but there are cases where different values are interesting as well.
[ Organ sounds often include a fifth, therefore one oscillator's semitone parameter must be set to +7.
[ Lead and Solo sounds might sound interesting when you set one Oscillator to e.g. a fourth (+5 semitones).
[ When making ring modulated or FM sounds, try to use dissonant values, e.g. +6 or +8.
Detune |
-64...+63 |
Fine-tunes the oscillator in steps of 1/128th of a semitone. The audible result of detuned oscillators is a Chorus or Flanger effect. Use a positive setting for one oscillator and an equivalent negative setting for another.
[ A low value of ±1 results in a slow and soft Flanger effect.
[ Mid-ranged settings of ±5 are perfect for pads and other fat sounding programs.
Sound Parameter
[ High values of ±12 or above will give a strong detune that can be used for accordions or effect sounds.
Bend Range |
-24...+24 |
Determines the intensity of the pitchbend via MIDI Pitchbend messages in semitones for the selected oscillator.
Keytrack |
-200%...+196% |
Determines how much the pitch of the selected oscillator depends on the MIDI note number. The reference note for Keytrack is E3, note number 64. For positive settings, the oscillator pitch rises on notes above the reference note, for negative settings the oscillator pitch falls by the same amount and vice versa. A setting of +100% corresponds to a 1:1 scale, e.g. when an octave is played on the keyboard the pitch changes for the same amount. Other settings than +100% make sense especially when using ring modulation, FM or oscillator synchronization. Try to use values in the range 0%…+75% or even negative settings for one oscillator while leaving the second at +100% Keytrack.
25 |
Largo User´s Manual |

Sound Parameter
FM Source |
see table „FM Sources“ |
Selects the source for the frequency modulation of the selected oscillator.
[ You can create nice E-Piano sounds when you use a high pitched oscillator as FM Source and set its Keytrack to a value between 000% and +050%.
[ The use of Noise is very interesting as FM Source on a high pitched oscillator playing a sine or triangle waveform. With a low FM Amount, the oscillator starts to sound dirty or airy while higher amounts create a coloured noise similar to a filter with high resonance. A side benefit is that the filters are then still free for other purposes.
FM Amount |
0...127 |
Sets the amount of frequency modulation that is applied to the oscillator by the selected FM source. The sound will get more metallic and sometimes even drift out of tune, especially if Oscillator 2 is used as FM Source for Oscillator 3 and Sync is activated. To avoid unusable detune, use a triangular or sine waveform for the FM Source.
[ If you want to bias FM over the keyboard so that higher notes aren’t modulated as strongly as lower notes, use the Modulation Matrix and apply Keytrack to the respective oscillator FM with a negative amount.
Pulsewidth/Wavescan |
0...127 |
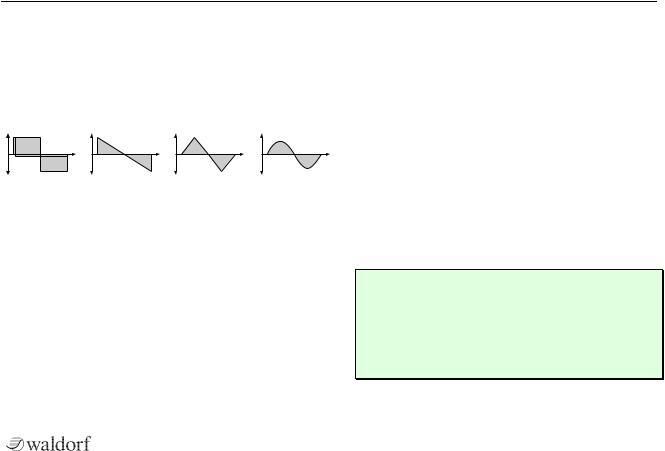
Sets the pulse width of the Pulse waveform or changes the startpoint of the wavetable. Click in the waveform display and drag the mouse up or down to change the value. The value 0 is equivalent to a pulse ratio of 0%, the oscillator is producing no audible signal. The value 127 is equivalent to 50% and produces a symmetric square wave without even harmonics. If you select any waveform other than Pulse or the wavetables, this parameter does not have any effect. The following picture illustrates the effect of the pulsewidth parameter:
|
|
|
|
|
|
|
|
|
|
|
|
|
|
|
|
|
|
|
|
|
|
|
|
|
|
|
|
|
|
|
|
|
|
|
|
|
|
|
|
|
|
|
|
|
|
|
|
|
|
|
|
Pulse Width 50% |
Pulse Width 33% |
Pulse Width 25% |
|
|
Pulse Width <1% |
||||||||||
|
(Square) |
|
|
|
|
|
|
|
|
|
|
(Impulse) |
||||
[ A pulse width of 50% can be used for flute sounds or very hollow bass sounds.
Largo User´s Manual |
26 |
[ A pulse width of around 30% can be used for e- piano or fat bass sounds.
[ A pulse width of around 10% is interesting for Clavinet sounds.
[ Experiment with different start points for the Wavetable waveforms to get an overview of the array of available Waveforms for both wavetables.
Wave Source |
see table „Modulation Sources“ |
Selects the source of the pulsewidth modulation or the wavetable modulation. Common sources for pulsewidth modulation are envelopes and LFOs, but other sources like the modulation wheel or aftertouch can create nice effects as well.
[ To create a thick oscillator sound, use a triangular
LFO as Wave Source with full Wave Amount and a Pulsewidth of around 80. This basic setting is useful for very big string and lead sounds. When you play different notes on the keyboard, you might notice that bass notes sound more detuned than higher notes. To avoid this behaviour, set Keytrack of the used LFO to a positive setting between 50% and 100%.
Sound Parameter
[ To create a Bass sound, use a decaying Envelope as
Wave Source with negative Wave Amount and a
Pulsewidth of around 80…127. This results in a fat attack phase, especially when only one oscillator is used for the Bass.
[ When you want to create a sound with a wave sweep, you should set the startpoint roughly (Pulsewidth) at the desired wave, before you apply any modulation. This will help you to find the basic waveform, before the effect of modulations. Note that you can apply unipolar and bipolar modulation sources. For example, set Pulsewidth to 64, which is almost the middle of the wavetable and apply a slow running LFO to Wave Source to sweep through the whole wavetable.
Wave Amount |
-64...+63 |
This parameter determines the amount of modulation that is applied to the pulsewidth of the oscillator’s square wave. If a wavetable is selected, Wave Amount determines the amount of the wavetable modulation. If you select any waveform other than Pulse or the wavetables, this parameter does not have any effect. The modulation source that affects the pulsewidth is selected by the source parameter described above.
27 |
Largo User´s Manual |

Sound Parameter
Brilliance |
0...127 |
Determines the brilliance of the ocillator models Saw, Pulse and all Wavetables. The models Saw and Pulse dońt play simple waveforms as a sampler. It is based on exact emulations of analog components with digital algorithms. The Brilliance parameter changes defined parameters of these models to point out the higher frequencies. A value of 0 results in perfect interpolation (good for waves with only a few harmonics), 127 results in bright waveform playback (good for brilliant waveforms such as in wavetable Clipper). A value of 64 is nearly similar to the brilliance of the oscillators produced by the Waldorf Q and microQ synthesizers.
wMany people can´t hear the highest frequencies of our oscillators. So don´t be surprised if you can´t hear any difference when using Brilliance. Ask infants, dogs or bats to help you adjusting the oscillator brilliance.
Wavetables are using 64 harmonics. In this case Brilliance can add harmonics for lower frequencies. Higher Brilliance values come close to the sound synthesis process of the earlier wavetable synthesizers as PPG Wave and Waldorf Wave. The Waldorf Microwave II/XT offers a similar parameter called „Quantize“.
Phase |
free/ 0...360° |
Determines the startphase of an oscillator. free results in free-running oscillators as in analog synthesizers, 0..360° determines the phase in degree the oscillator waveform starts with.
Limit |
On / Off |
Available for Oscillator 1 and 2 only. Determines, if the classic wavetables (from Resonant) are played with or without the additional analog waveforms. The analog waveforms are a relict from the former PPG Wave and Microwave synthesizerś want. Ifto youuse thesedon waveforms, use
Limit to mask it.
•Off masks the analog waveforms of a wavetable.
•On plays the analog waveforms of a wavetable.
Sub Oscillator Octave |
1...4 |
Available for Oscillator 1 and 2 only. Sub Oscillator Octave determines the relative proportion of Sub and Main oscillator frequencies. Higher values represent a lower tuning.
Largo User´s Manual |
28 |

Level |
0...127 |
Available for Oscillator 1 and 2 only. Sub Oscillator Level determines the volume of the Suboscillator creating a Square Waveform. A setting of 0 corresponds to no volume. Please note that the loudness of the Suboscillator also depends on the volume of the main oscillator
Sync (only for Osc 2) |
off / on |
Enables or disables oscillator synchronization. When enabled, Oscillator 2 acts as a slave that is controlled by Oscillator 3, the master. Each time Oscillator 3 starts a new cycle, it sends a trigger signal to Oscillator 2, forcing it to restart its waveform cycle, too. As a result, interesting sound effects may be generated, especially when both oscillators are operating at different pitch settings. Using additional pitch modulation by envelopes, LFO, or Pitch bend will lend further movement to sync sounds. The following picture illustrates the principle of oscillator synchronization in a simplified way:
Sound Parameter
new cycle of master oscillator
This oscillator |
synced to this oscillator |
results in this wave |
[ Use Sync for Lead or Solo sounds. Set Oscillator 2 to play one octave and 7 semitones higher, apply an envelope to its pitch with positive amount and you get a screaming sync sound.
[ Sync can also be very interesting on arpeggio sounds. Apply a slow clocked LFO to Oscillator 2 pitch and the arpeggio starts to move.
Osc Pitch Mod Source |
see Table “Modulation |
Sources” |
|
Selects the source of the pitch modulation for all oscillators. A common source for pitch modulation is an LFO whose strength is controlled by the modwheel or aftertouch.
29 |
Largo User´s Manual |

Sound Parameter
[ To create a common pitch vibrato that is controlled by the modwheel, set Osc Pitch Mod Source to LFO1*MW with Osc Pitch Mod Amount set to around +20.
[ To create a sound whose pitch glides in, set Osc Pitch Mod Source to a decaying Envelope with
Osc Pitch Mod Amount set to around –25.
wIf you want to modulate the pitch of individual oscillators, you can do so with the Modulation Matrix.
Osc Pitch Mod Amount |
-64...+63 |
Sets the amount of pitch modulation for all oscillators. Positive amounts will raise the pitch when positive modulation is applied, e.g. by pressing aftertouch on the keyboard. Negative amounts will lower the pitch when positive modulation is applied.
Mixer Section
Osc Level |
0...127 |
Controls the volume of the selected Oscillator.
Osc Balance |
F1 64...mid...F2 |
63 |
|
Determines the ratio of the selected Oscillator’s signal that is sent to the inputs of Filter 1 and Filter 2. If set to F1 64, the signal is sent to Filter 1 only. Higher values will increase the amount of signal that feeds Filter 2 and decrease the amount of signal that feeds Filter 1. If set to mid, both filters will receive the same signal level. If set to F2 63, the signal is sent to Filter 2 only.
Ring Modulation
The following parameters refer to the ring modulator.
Ring Mod Level |
0...127 |
Volume of the ring modulation between Oscillator 1 and 2. From a technical point of view ring modulation is the multiplication of two oscillators’ signals. The result of this operation is a waveform that contains the sums and the differences of the source frequency components. Since the ring modulation generates disharmonic components, it
Largo User´s Manual |
30 |
Loading...