


ENG Operating Manual
Light Control
PULSE HFMD
PULSE PIR
Version IV
ENG
Operating Manual Light Control „PULSE HFMD / PULSE PIR - Vers. IV“
Dear customer,
these operating instructions apply in addition to the instructions for use
of the light. Observe in particular the safety instructions stated in the
instructions for use!
The operating instructions give information on additional setting options on
lights equipped with the PULSE HFMD or PULSE PIR control of version
IV. The functions described here go beyond the general operating options
on the light and are usually rarely required.
Please note that the instructions may also describe functions that are not
available on each light.
Operating units 3
General 4
- Safety instructions 4
- Abbreviations and symbols 4
Operation 5
- General operation 6
- Menu structure 7
- Switching on/off 8
- Changing the light level 9
- Changing the parameterising functions 10
-- List of the parameterising functions 14
-- Changing function (Example) 15
-- Descriptions of the functions 16
2
ENG
Operating Manual Light Control „PULSE HFMD / PULSE PIR - Vers. IV“
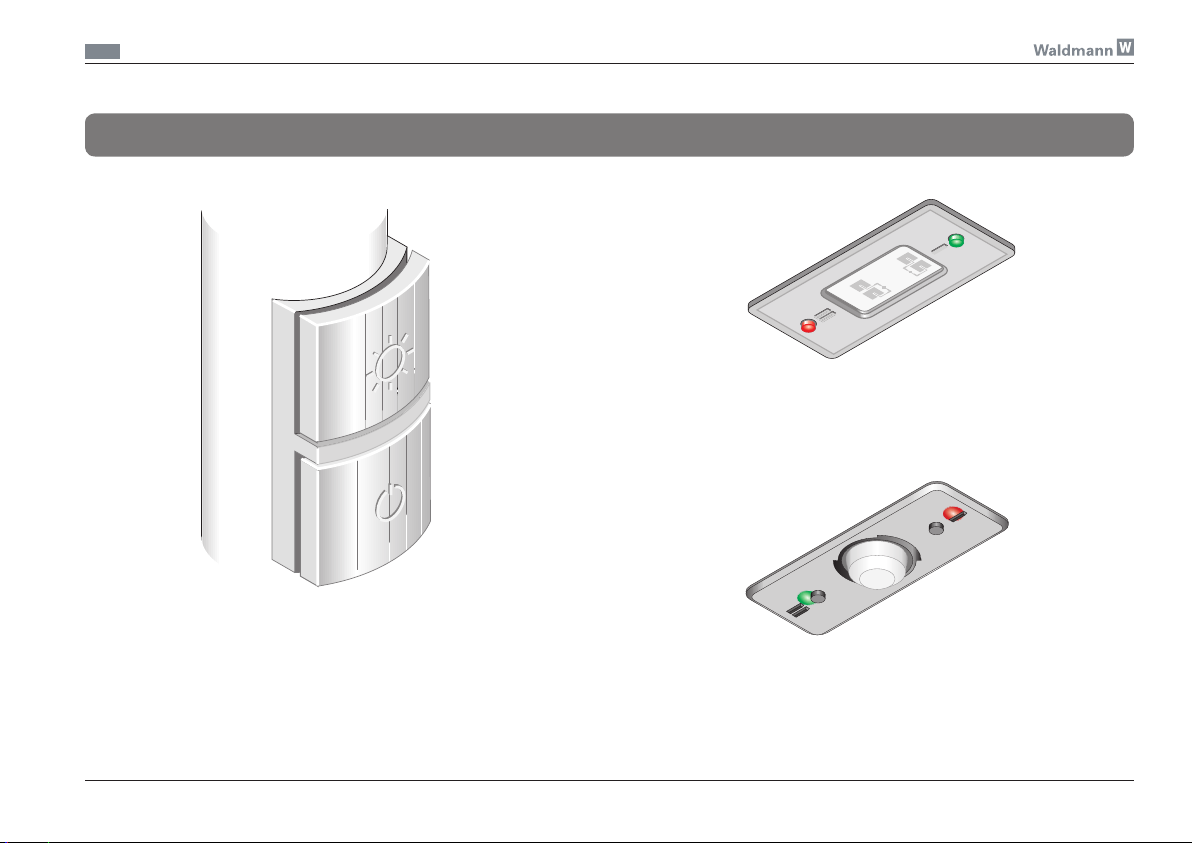
Operating units
Fig. 1
Fig. 2a
Sensor operating unit
"PULSE HFMD"
Fig. 2b
Column operating unit
Sensor operating unit
"PULSE PIR"
3
ENG
Operating Manual Light Control „PULSE HFMD / PULSE PIR - Vers. IV“
General information
Validity of these instructions
These instructions apply to the following lights:
- Lights equipped with Pulse
HFMD from firmware
vers. VFP 04.5 l
- Lights equipped with PULSE
PIR from firmware
vers. VFS 04.4 E
Safety instructions
Make sure to read the instructions
for use of the light, before putting
the light into operation!
Make sure to observe the safety
instructions given in the instructions for use of the light!
The manufacturer cannot be held liable for damage caused by using the unit for purposes contrary
to the designated use or by ignoring safety instructions and warnings.
Abbreviations and symbols:
Savety or
warning information!
Important information
HFMD
High-frequency motion
sensor
PIR
Passive infrared sensor
LED
Light-emitting diode
Light bar LED constantly lit
Light bar LED flashing
4
ENG
Operating Manual Light Control „PULSE HFMD / PULSE PIR - Vers. IV“
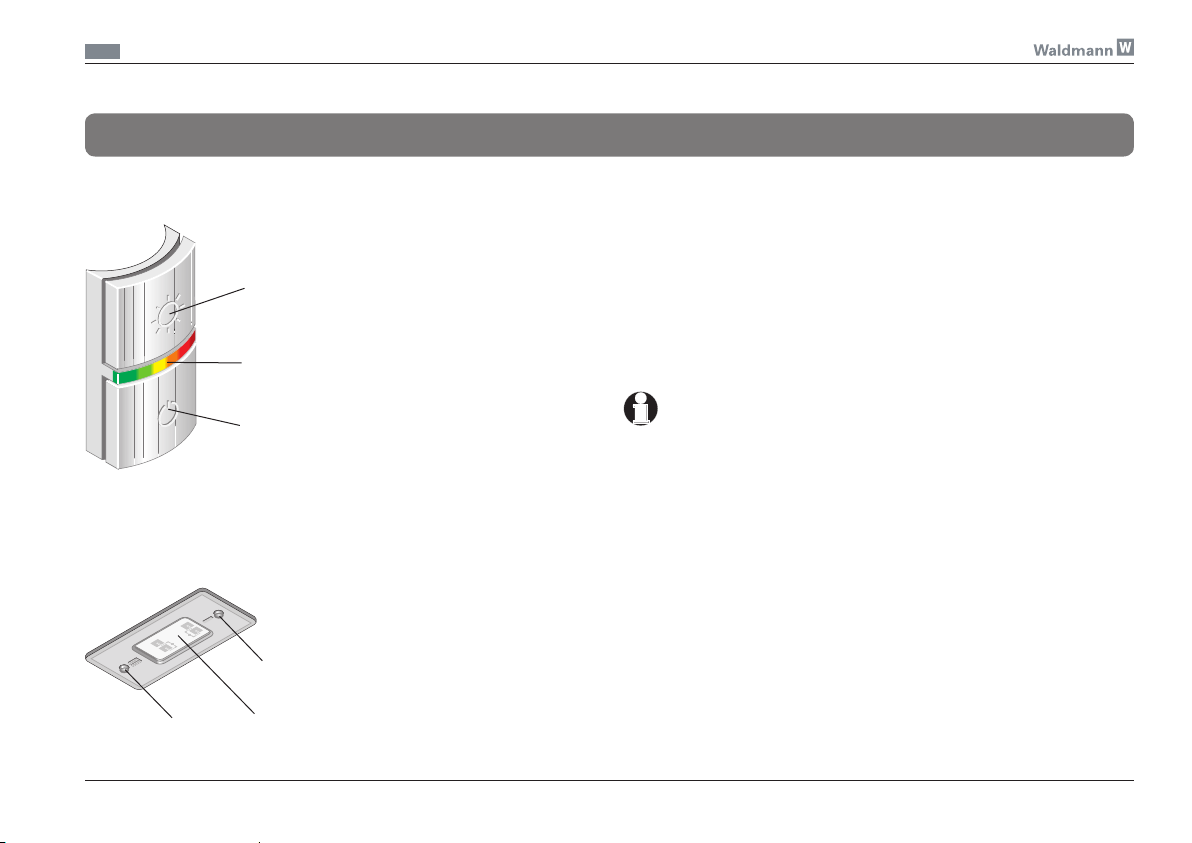
Operation
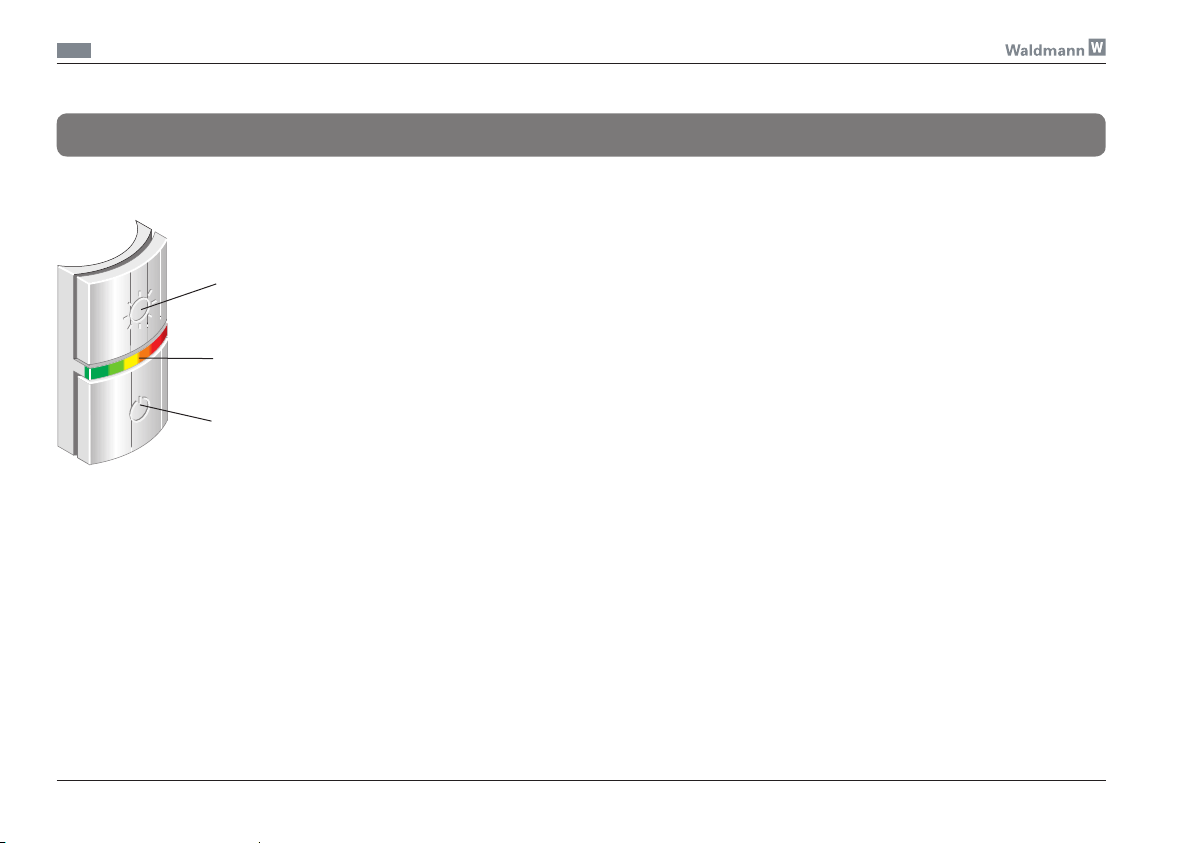
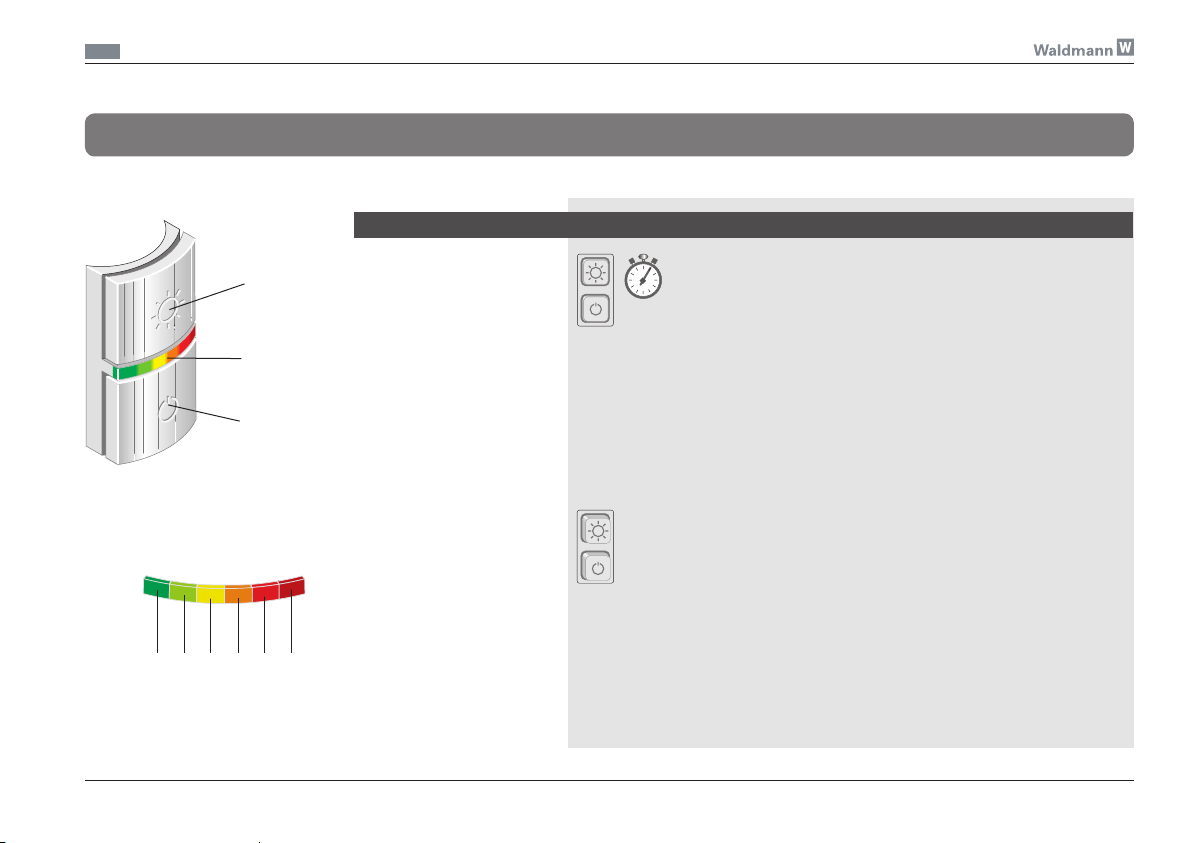
Fig. 3 (column operating unit)
Key I
Light
bar
Key II
Fig. 4 (sensor operating unit)
Key I
+ LED I
Key II
+ LED II
Sensor
Operating and
display elements
All operating and setting functions
be set from the column operating
unit [Fig. 3] or from the sensor
operating unit [Fig. 4].
In the column operating unit, the
fun ctions and settings are displayed via the light bar.
In the sensor operating unit, all
fun ctions and settings are displayed via the two LEDs.
Note: If a column operating unit
is available, the LED disp lay in
the sensor is automatically suppressed.
In-factory setting
The lights are set in-factory such
that initially they can be operated
without changing the settings.
If you want to adapt the light to
individual requirements, you can
change the parameterising functions accordingly (see page 10-35).
Important note!
Both LEDs on the sensor are lit
in green -> Burn-in function is
active.
¾ Ligh t contro l and pre sence
control are disabled.
¾ Dimming is not possible.
¾ Wait for the burn-in time (100
operating hours) to elapse.
Restoring the in-factory
setting
The default settings are restored
by pressing one of the two keys [I
or II] when connecting the light to
the mains.
The following functions are restored:
- Parameterising functions are set
to the default setting.
- All control parameters are set to
the default setting.
- All control and follow-up times
are set to the default setting.
- The burn-in time is deleted (func-The burn-in time is deleted (function „OFF“)
5
ENG
Operating Manual Light Control „PULSE HFMD / PULSE PIR - Vers. IV“
General operation
Fig. 3 Keys
Key I
Light
bar
Key II
Operating elements
By pressing keys I and II, different functions can be executed,
de pen d ing on whi ch key was
pressed:
- Switching on and off
- Changing the light level
- Changing the basic settings
The light is switched on and off by
pressing key II.
The light level can be changed by
pressing key I.
Display
The light bar in the column operating unit is only activated when
basic settings are changed.
In normal operation, the light bar
remains switched off.
In the Parameter Setting mode,
the loaded function and its setting
are displayed.
6

ENG
Operating Manual Light Control „PULSE HFMD / PULSE PIR - Vers. IV“
Menu structure
Functions
ON/OFF
Changing the light level
Changing the
parameterising Level 1 Light bar
functions External switching
Burn-In function
Write protection
Light control
Presence control
Demo mode
Level 2 Sensitivity high
Automatic switch-on
Special function
Sensor LED
Continuous mode
Parameter setting protection
Special function
Level 3 Follow-up time (5, 10, 15, 20, 25, 30 min)
Level 4 Presence range (10, 20, 40, 60, 80, 100%)
Note: The functions written
in blue are not active
in all versions.
7
ENG
Operating Manual Light Control „PULSE HFMD / PULSE PIR - Vers. IV“
Switching On/Off
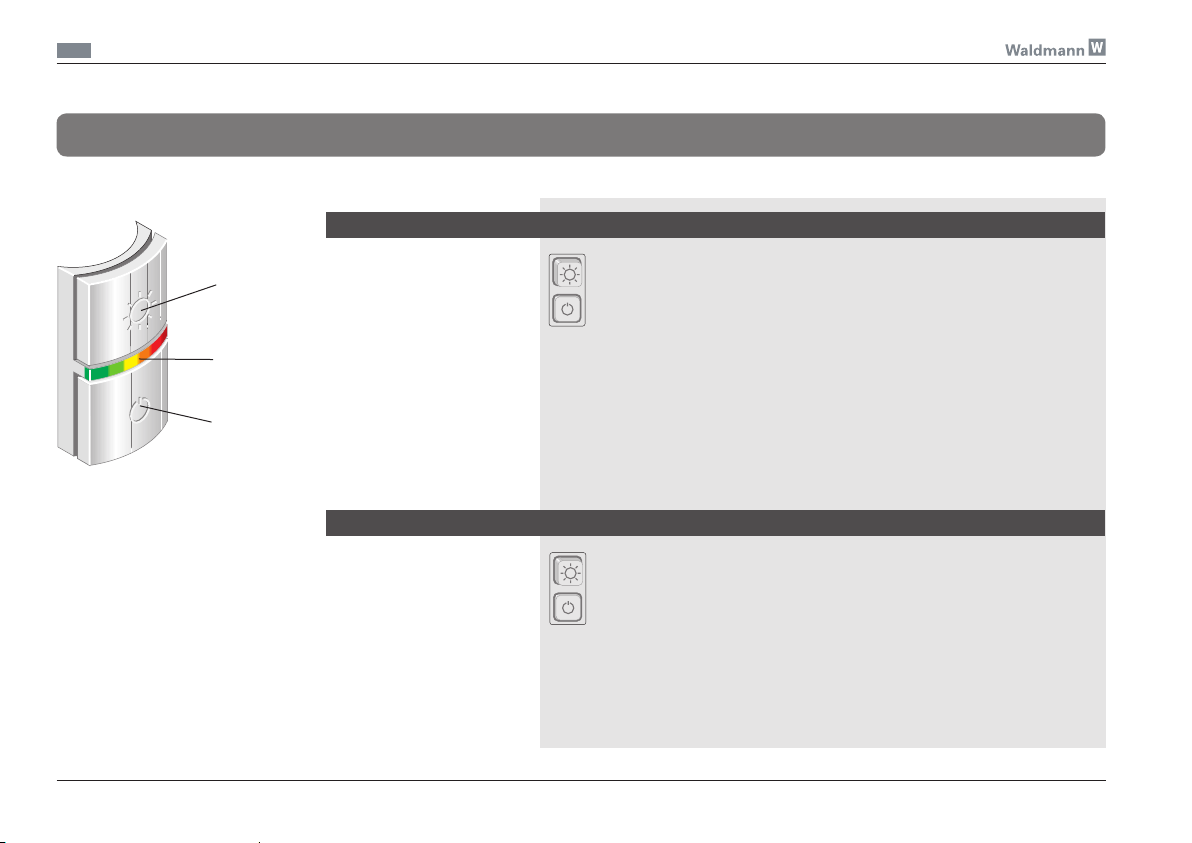
Fig. 3
Actuation Consequence
Switching on
The light is switched on by
Key I
Light
bar
Key II
8
pressing key II.
Note: The light can also be
switched on by pressing
key I.
Switching off
The light is switched off by
pressing key II.
1 x
1 x
Press key II
Press key II
The light is switched on to the
light level set last.
The light is switched off.
The light level set last is saved
automatically.
ENG
Operating Manual Light Control „PULSE HFMD / PULSE PIR - Vers. IV“
Changing the light level (dimming)
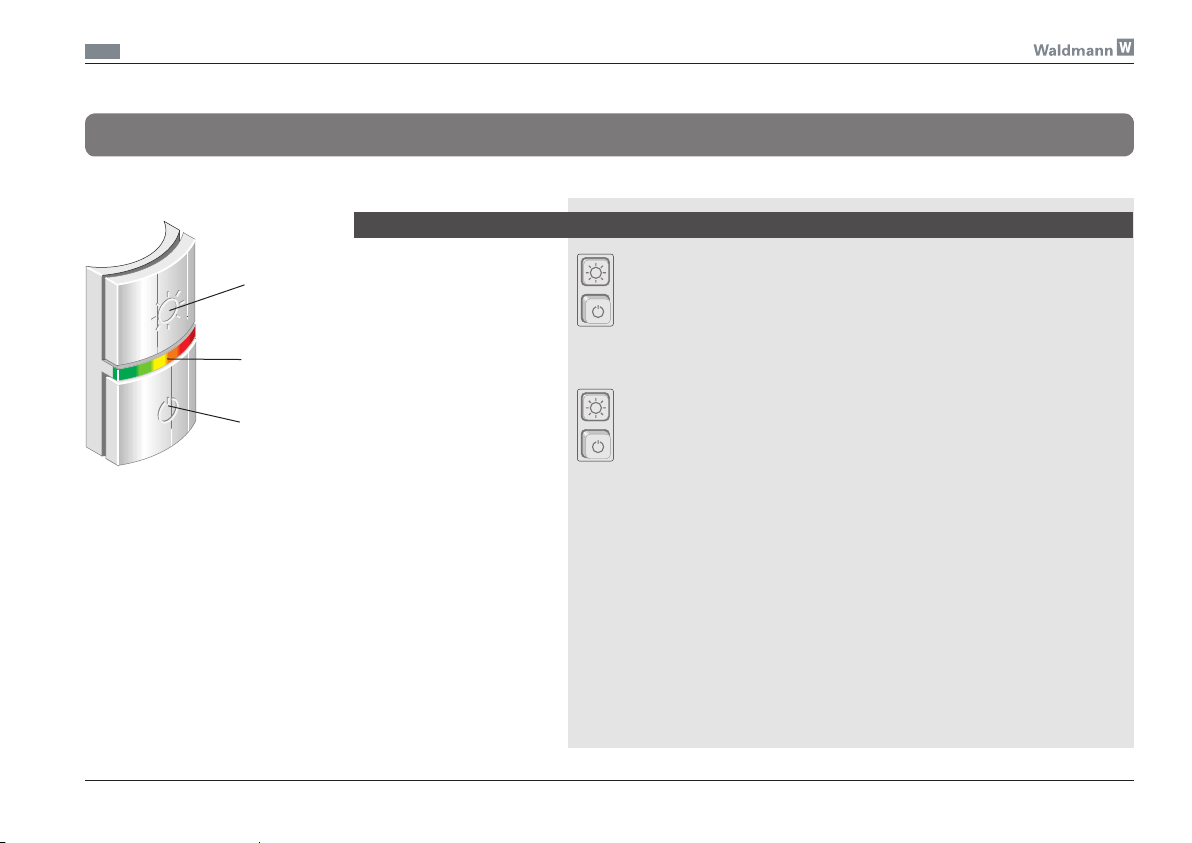
Fig. 3
Setting a new light level
Actuation Consequence
Key I
Light
bar
Key II
Th e l ight le vel ca n b e
changed by pressing key I.
Press key I and hold
it down.
Release key I and press
it again.
After about 1 second, the light
will change its intensity.
The dimming direction
will change.
9
ENG
Operating Manual Light Control „PULSE HFMD / PULSE PIR - Vers. IV“
Changing the parameterising functions
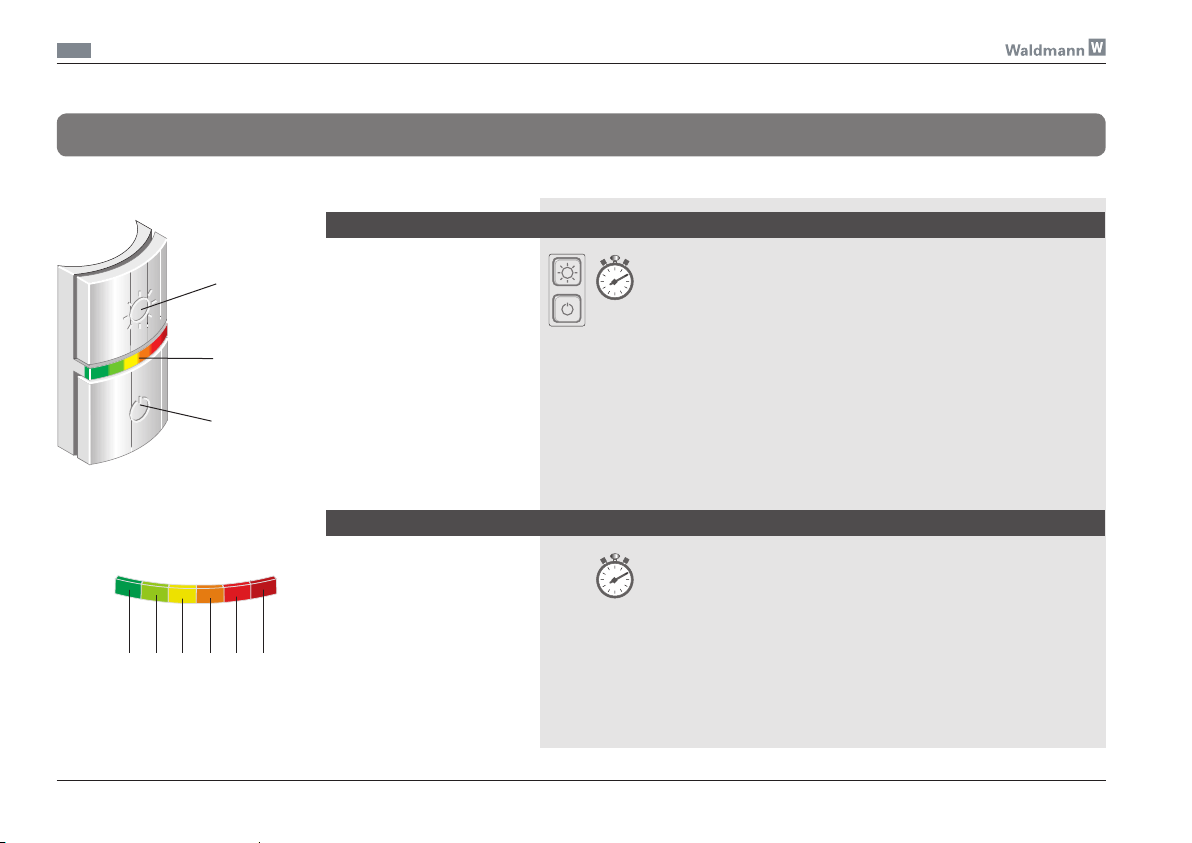
Fig. 3
Switching to the parameterisation mode
Actuation Consequence
Key I
Light
bar
Key II
Fig. 6
LED 1 2 3 4 5 6
10
The parameterisation mode
can be loaded by pressing
both keys simultaneously
for 10 seconds.
Leaving the parameterisation mode
The parameterisation mode
can be left by not pressing
both keys for 10 seconds.
Press both keys
for at least 10 seconds
Do not press any key
for at least 10 seconds
The operating unit switches to
the parameterisation mode (first
to setting level 1).
The LEDs valid for the level will
be lit on the light bar:
LED 1 Level 1
LEDs 1+2 Level 2
LEDs 1+2+3 Level 3
LEDs 1+2+3+4 Level 4
The parameterisation mode is
left.
ENG
Operating Manual Light Control „PULSE HFMD / PULSE PIR - Vers. IV“
Changing the parameterising functions (Continued)
Fig. 3
Changing the setting level
Actuation Consequence
Key I
Light
bar
Key II
Fig. 6
LED 1 2 3 4 5 6
The setti ng l evel can be
loa ded by pressing bot h
keys sim ul tan eo us ly for
10 seconds.
Press both keys for 5
seconds each as often as
necessary for reaching the
desired setting level.
n x
Release both keys
Level 2 has been reached when
LEDs 1 + 2 are lit on the light
bar.
Level 3 has been reached when
LEDs 1 to 3 are lit on the light
bar.
Level 4 has been reached when
LEDs 1 to 2 are lit on the light
bar.
Once the desired setting level has
been reached, the setting of the
first function (x.1) is shown on the
light bar as soon as the keys are
released (LED 1 is lit or flashes
dark green).
11

ENG
Operating Manual Light Control „PULSE HFMD / PULSE PIR - Vers. IV“
Changing the parameterising functions (Continued)
Fig. 3
Changing the function
Actuation Consequence
Key I
Light
bar
Key II
Fig. 6
LED 1 2 3 4 5 6
12
The desired function can be
loaded by pressing key II.
Press key II as often as
necessary for reaching the
desired function.
n x
The LED valid for the function will
be lit or flash on the light bar:
LED 1 Function x.1
LED 2 Function x.2
LED 3 Function x.3
LED 4 Function x.4
LED 5 Function x.5
LED 6 Function x.6
LEDs 5+6 Function x.7

ENG
Operating Manual Light Control „PULSE HFMD / PULSE PIR - Vers. IV“
Changing the parameterising functions (Continued)
Fig. 3
Changing the setting
Actuation Consequence
Key I
Light
bar
Key II
Fig. 6
LED 1 2 3 4 5 6
The function can be toggled
between active and inactive
by pressing key I.
Press key I as often as
n x
necessary for reaching the
desired setting.
The LED on the light bar is continuously lit or flashes to indicate
whether a function is active (ON)
or inactive (OFF), for example:
- LED constantly lit:
Function active (ON)
- LED flashing:
Function inactive (OFF)
13

ENG
Operating Manual Light Control „PULSE HFMD / PULSE PIR - Vers. IV“
List of the parameterising functions
Fig. 3
Key I
Light
bar
Key II
Fig. 6
LED 1 2 3 4 5 6
The following functions can be selected:
The bold-printed values are the in-factory defaults
Level Function Light bar (Fig. 6) Designation
1 Funct. 1.1: LED 1 (dark green) Light bar ON/OFF
1 Funct. 1.2: LED 2 (light green) External switching ON/OFF
1 Funct. 1.3: LED 3 (yellow) Burn-In function ON/OFF
1 Funct. 1.4: LED 4 (orange) Write protection ON/OFF
1 Funct. 1.5: LED 5 (light red) Light control ON/OFF
1 Funct. 1.6: LED 6 (dark red) Presence control ON/OFF
1 Funct. 1.7: LED 6+5 Demo mode ON/OFF
2 Funct. 2.1: LED 1 (dark green) Sensitivity high ON/OFF
2 Funct. 2.2: LED 2 (light green) Automatic switch-on ON/OFF
2 Funct. 2.3: LED 3 (yellow) Special function ON/OFF
2 Funct. 2.4: LED 4 (orange) Sensor LED ON/OFF
2 Funct. 2.5: LED 5 (light red) Continuous mode ON/OFF
2 Funct. 2.6: LED 6 (dark red) Parameter setting protection ON/OFF
2 Funct. 2.7: LEDs 6+5 Special function ON/OFF
3 Funct. 3.1 - 3.6: LEDs 1-6 Follow-up time 5, 10, 15,20, 25, 30 min
4 Funct. 4.1 - 4.6: LEDs 1-6 Range 10, 20, 40 ,60, 80, 100 %
Note: The functions written in blue are not active in all versions. Please note the explanations of the func-
tions on the following pages.
14

ENG
Operating Manual Light Control „PULSE HFMD / PULSE PIR - Vers. IV“
Changing the parameterising functions (Example)
Example
How to load and change the function x.y is shown using the function 2.5 "Continuous mode" as an
example.
a) To load the parameterisation
function:
press both keys for at least
10 seconds
b) To load setting level x:
press both keys (x-1) times
for 2 seconds
c) To load function y:
press key II (y-1) times
d) To change the function:
press key I
e) To leave the parameterisation
mode:
do not press any key for at
least 10 seconds.
Loading the parameterisation mode
Loading setting level 2
Function 2.5 Continuous mode
Changing the function from ON to OFF or vice versa
Actuation Display
Press both keys
for at least 10 seconds
Press both keys again
for 5 seconds
Press key II 4 times
4 x
Press key I as often as
n x
necessary for reaching
the desired value
Light bar LED 1 (dark green)
Parameterisation mode ON
Light bar LEDs 1+2
Level 2
Light bar LED 5 (light red)
Function 2.5
LED changes from constantly lit
to flashing or vice versa:
- constant = Function ON
- flashing = Function OFF
15

ENG
Operating Manual Light Control „PULSE HFMD / PULSE PIR - Vers. IV“
Setting function 1.1
Light bar
Function for switching the light bar
on and off.
By default, the function is set to
“ON”. The light bar is on.
When the function is changed, the
light bar remains switched off in
normal operation.
The function can be changed on
- Lights equipped with HFMD
sensor
- Lights equipped with PIR sensor
- Dimmable lights
Note: In lights without column
operating unit, this function is not
active.
Actuation Display
Loading the parameterisation mode
Loading setting level 1
Function 1.1 Light bar
Changing the function from ON to OFF or vice versa
Press both keys
for at least 10 seconds
Release both keys
Jump to function 1.1
takes place automatically
Press key I as often as
n x
necessary for reaching
the desired value
Light bar LED 1 (dark green)
Parameterisation mode ON
Light bar LED 1 (dark green)
Level 1
Light bar LED 1 (dark green)
Function 1.1
LED changes from constantly lit
to flashing or vice versa:
- constant = Function ON
- flashing = Function OFF
16

ENG
Operating Manual Light Control „PULSE HFMD / PULSE PIR - Vers. IV“
Setting function 1.2
External switching
Function for operating the light via
external switching elements.
By default, the function is set to
"OFF". When power is supplied
from an external source, the light
remains switched off.
When the function is on, the light
will switch to the level set last
as soon as the power supply is
connected (e.g. via a switched
socket).
The function can be changed on
- Lights equipped with HFMD
sensor
- Lights equipped with PIR sensor
- Dimmable lights
Actuation Display
Loading the parameterisation mode
Loading setting level 1
Function 1.2 External switching
Changing the function from ON to OFF or vice versa
Press both keys
for at least 10 seconds
Release both keys
Press key II once
1 x
Press key I as often as
n x
necessary for reaching
the desired value
Light bar LED 1 (dark green)
Parameterisation mode ON
Light bar LED 1 (dark green)
Level 1
Light bar LED 2 (light green)
Function 1.2
LED changes from constantly lit
to flashing or vice versa:
- constant = Function ON
- flashing = Function OFF
17

ENG
Operating Manual Light Control „PULSE HFMD / PULSE PIR - Vers. IV“
Setting function 1.3
Burn-in function
Function for burning in the lamps
By default, the function is set ex
works to "OFF". When the burn-in
function is activated, the following
functions are disabled:
- Light control
- Presence function
- Dimming function
Afte r 100 operating hours, the
function is automatically set to
"OFF" again, i.e., the light can now
be operated without restrictions.
The function can be changed on
- Lights equipped with HFMD
sensor
- Lights equipped with PIR sensor
Actuation Display
Loading the parameterisation mode
Loading setting level 1
Function 1.3 Burn-In function
Changing the function from ON to OFF or vice versa
Press both keys
for at least 10 seconds
Release both keys
Press key II twice
2 x
Press key I as often as
n x
necessary for reaching
the desired value
Light bar LED 1 (dark green)
Parameterisation mode ON
Light bar LED 1 (dark green)
Level 1
Light bar LED 3 (yellow)
Function 1.3
LED changes from constantly lit
to flashing or vice versa:
- constant = Function ON
- flashing = Function OFF
18

ENG
Operating Manual Light Control „PULSE HFMD / PULSE PIR - Vers. IV“
Setting function 1.4
Write protection
Function for allowing or preventing
setting changes.
By default, the function is set to
"OFF", i.e., set levels can always
be overwritten.
The levels cannot be changed if the
write protection is active.
The function can be changed on
- Lights equipped with HFMD
sensor
- Lights equipped with PIR sensor
Actuation Display
Loading the parameterisation mode
Loading setting level 1
Function 1.4 Write protection
Changing the function from ON to OFF or vice versa
Press both keys
for at least 10 seconds
Release both keys
Press key II 3 times
3 x
Press key I as often as
n x
necessary for reaching
the desired value
Light bar LED 1 (dark green)
Parameterisation mode ON
Light bar LED 1 (dark green)
Level 1
Light bar LED 4 (orange)
Function 1.4
LED changes from constantly lit
to flashing or vice versa:
- constant = Function ON
- flashing = Function OFF
19

ENG
Operating Manual Light Control „PULSE HFMD / PULSE PIR - Vers. IV“
Setting function 1.5
Light control
Function for the automatic readjustment of the set brightness in case
the ambient brightness changes.
By d efault, the function is set
to "ON", i.e., the light control is
functioning.
If the light control is off, the light
functions as a dimmable light.
The function can be changed on
- Lights equipped with HFMD
sensor
- Lights equipped with PIR sensor
Actuation Display
Loading the parameterisation mode
Loading setting level 1
Function 1.5 Light control
Changing the function from ON to OFF or vice versa
Press both keys
for at least 10 seconds
Release both keys
Press key II 4 times
4 x
Press key I as often as
n x
necessary for reaching
the desired value
Light bar LED 1 (dark green)
Parameterisation mode ON
Light bar LED 1 (dark green)
Level 1
Light bar LED 5 (light red)
Function 1.5
LED changes from constantly lit
to flashing or vice versa:
- constant = Function ON
- flashing = Function OFF
20

ENG
Operating Manual Light Control „PULSE HFMD / PULSE PIR - Vers. IV“
Setting function 1.6
Presence control
Function for detecting the presence of persons.
By default, the function is set to
"ON", i.e., the presence control is
functioning.
When the function is on, the light
will be automatically switched off
when no presence is detected over
a certain period of time.
If the presence control is switched
off, the light functions as a light
with light control or as a dimmable
light.
The function can be changed on
- Lights equipped with HFMD
sensor
- Lights equipped with PIR sensor
Actuation Display
Loading the parameterisation mode
Loading setting level 1
Function 1.6 Presence control
Changing the function from ON to OFF or vice versa
Press both keys
for at least 10 seconds
Release both keys
Press key II 5 times
5 x
Press key I as often as
n x
necessary for reaching
the desired value
Light bar LED 1 (dark green)
Parameterisation mode ON
Light bar LED 1 (dark green)
Level 1
Light bar LED 6 (dark red)
Function 1.6
LED changes from constantly lit
to flashing or vice versa:
- constant = Function ON
- flashing = Function OFF
21

ENG
Operating Manual Light Control „PULSE HFMD / PULSE PIR - Vers. IV“
Setting function 1.7
Demo mode
Function for demonstration and for
testing the light functions.
By default, the function is set to
"OFF", i.e., the demo mode is not
functioning.
When the demo mode is on, all
control times are effective within
seconds.
Note: This mode is left automatically 10 minutes after the last key
press.
The function can be changed on
- Lights equipped with HFMD
sensor
- Lights equipped with PIR sensor
Actuation Display
Loading the parameterisation mode
Loading setting level 1
Function 1.7 Demo mode
Changing the function from ON to OFF or vice versa
Press both keys
for at least 10 seconds
Release both keys
Press key II 6 times
6 x
Press key I as often as
n x
necessary for reaching
the desired value
Light bar LED 1 (dark green)
Parameterisation mode ON
Light bar LED 1 (dark green)
Level 1
Light bar LEDs 5+6
Function 1.7
LEDs change from constantly lit
to flashing or vice versa:
- constant = Function ON
- flashing = Function OFF
22

ENG
Operating Manual Light Control „PULSE HFMD / PULSE PIR - Vers. IV“
23

ENG
Operating Manual Light Control „PULSE HFMD / PULSE PIR - Vers. IV“
Setting function 2.1
Sensitivity high
Function for changing the sensitivity of the presence control.
By default, the function is set to
"ON", i.e., the presence has its
normal sensitivity (100%). Small
movem ents are als o detect ed
within the detection range of the
sensor.
When the function is set to "OFF",
the presence sensor works with
reduced sensitivity (approx. 50%).
Small movements are no longer detected within the detection range
of the sensor.
The function can only be changed
on
- Lights equipped with HFMD
sensor
Actuation Display
Loading the parameterisation mode
Loading setting level 2
Function 2.1 Sensitivity high
Changing the function from ON to OFF or vice versa
Press both keys
for at least 10 seconds
Press both keys again
for 5 seconds
Release both keys
Press key I as often as
n x
necessary for reaching
the desired value
Light bar LED 1 (dark green)
Parameterisation mode ON
Light bar LEDs 1+2
Level 2
Light bar LED 1 (dark green)
Function 2.1
LED changes from constantly lit
to flashing or vice versa:
- constant = Function ON
- flashing = Function OFF
24

ENG
Operating Manual Light Control „PULSE HFMD / PULSE PIR - Vers. IV“
Setting function 2.2
Automatic switch-on
Function for allowing or suppressing automatic switch-on when
light is insufficient or in case of
presence (semi-automatic).
By default, the function is set to
"ON", i.e., the light is automatically
switched on in case of presence or
when light is insufficient.
When automatic switch-on is off,
the light has to be switched on
manually even in case of presence.
The function can be changed on
- Lights equipped with HFMD
sensor
- Lights equipped with PIR sensor
Actuation Display
Loading the parameterisation mode
Loading setting level 2
Function 2.2 Automatic switch-on
Changing the function from ON to OFF or vice versa
Press both keys
for at least 10 seconds
Press both keys again
for 5 seconds
Press key II once
1 x
Press key I as often as
n x
necessary for reaching
the desired value
Light bar LED 1 (dark green)
Parameterisation mode ON
Light bar LEDs 1+2
Level 2
Light bar LED 2 (light green)
Function 2.2
LED changes from constantly lit
to flashing or vice versa:
- constant = Function ON
- flashing = Function OFF
25

ENG
Operating Manual Light Control „PULSE HFMD / PULSE PIR - Vers. IV“
Setting function 2.3
Special function
The special function cannot be
used.
The function cannot be changed.
Actuation Display
Loading the parameterisation mode
Loading setting level 2
Function 2.3 Special function
Changing the function from ON to OFF or vice versa
Press both keys
for at least 10 seconds
Press both keys again
for 5 seconds
Press key II twice
2 x
Press key I as often as
n x
necessary for reaching
the desired value
Light bar LED 1 (dark green)
Parameterisation mode ON
Light bar LEDs 1+2
Level 2
Light bar LED 3 (yellow)
Function 2.3
LED changes from constantly lit
to flashing or vice versa:
- constant = Function ON
- flashing = Function OFF
26

ENG
Operating Manual Light Control „PULSE HFMD / PULSE PIR - Vers. IV“
Setting function 2.4
Sensor LED
Function for switching both LEDs
in the operating unit sensor on and
off (see Fig. 4).
By default, the function is set to
"OFF", i.e., the LEDs in the light
head are off.
For lights without column operating
unit, the function is set to "ON".
If the function is on, the LEDs in
the light head are lit in addition to
the light bar display.
The function can be changed on
- Lights equipped with HFMD
sensor
- Lights equipped with PIR sensor
Actuation Display
Loading the parameterisation mode
Loading setting level 2
Function 2.4 Sensor LED
Changing the function from ON to OFF or vice versa
Press both keys
for at least 10 seconds
Press both keys again
for 5 seconds
Press key II 3 times
3 x
Press key I as often as
n x
necessary for reaching
the desired value
Light bar LED 1 (dark green)
Parameterisation mode ON
Light bar LEDs 1+2
Level 2
Light bar LED 4 (light green)
Function 2.4
LED changes from constantly lit
to flashing or vice versa:
- constant = Function ON
- flashing = Function OFF
27

ENG
Operating Manual Light Control „PULSE HFMD / PULSE PIR - Vers. IV“
Setting function 2.5
Continuous operation
Function for setting the light to
continuous mode.
By default, the function is set to
"OFF".
When the function is switched
on, the light will work in continuous mode. Even if no presence is
detected, the light will be lit at the
lowest level.
The function can be changed on
- Lights equipped with HFMD
sensor
- Lights equipped with PIR sensor
Actuation Display
Loading the parameterisation mode
Loading setting level 2
Function 2.5 Continuous mode
Changing the function from ON to OFF or vice versa
Press both keys
for at least 10 seconds
Press both keys again
for 5 seconds
Press key II 4 times
4 x
Press key I as often as
n x
necessary for reaching
the desired value
Light bar LED 1 (dark green)
Parameterisation mode ON
Light bar LEDs 1+2
Level 2
Light bar LED 5 (light red)
Function 2.5
LED changes from constantly lit
to flashing or vice versa:
- constant = Function ON
- flashing = Function OFF
28

ENG
Operating Manual Light Control „PULSE HFMD / PULSE PIR - Vers. IV“
Setting function 2.6
Parameter setting protection
Function for activating the parameter setting protection (required for
final inspection)
By default, the function is set to
"OFF".
When the function is switched on,
a factory reset will not overwrite
the set parameters. The parameter
setting of the electronic ballast
units will be carried out.
The function can be changed on
- Lights equipped with HFMD
sensor
- Lights equipped with PIR sensor
Actuation Display
Loading the parameterisation mode
Loading setting level 2
Function 2.6 Parameter setting protection
Changing the function from ON to OFF or vice versa
Press both keys
for at least 10 seconds
Press both keys again
for 5 seconds
Press key II 5 times
5 x
Press key I as often as
n x
necessary for reaching
the desired value
Light bar LED 1 (dark green)
Parameterisation mode ON
Light bar LEDs 1+2
Level 2
Light bar LED 6 (dark red)
Function 2.6
LED changes from constantly lit
to flashing or vice versa:
- constant = Function ON
- flashing = Function OFF
29

ENG
Operating Manual Light Control „PULSE HFMD / PULSE PIR - Vers. IV“
Setting function 2.7
Special function
The special function cannot be
used.
The function cannot be changed.
Actuation Display
Loading the parameterisation mode
Loading setting level 2
Function 2.7 Special function
Changing the function from ON to OFF or vice versa
Press both keys
for at least 10 seconds
Press both keys again
for 5 seconds
Press key II 6 times
6 x
Press key I as often as
n x
necessary for reaching
the desired value
Light bar LED 1 (dark green)
Parameterisation mode ON
Light bar LEDs 1+2
Level 2
Light bar LEDs 5+6
Function 2.7
LED changes from constantly lit
to flashing or vice versa:
- constant = Function ON
- flashing = Function OFF
30

ENG
Operating Manual Light Control „PULSE HFMD / PULSE PIR - Vers. IV“
31

ENG
Operating Manual Light Control „PULSE HFMD / PULSE PIR - Vers. IV“
Setting functions 3.1 to 3.6
Follow-up time
Function for setting the time after
which the light is to be switched off
if no presence is detected.
By default, the follow-up time is
set to 10 min.
6 different follow-up times from 5
to 30 min can be set.
The function can be changed on
- Lights equipped with HFMD
sensor
- Lights equipped with PIR sensor
Actuation Display
Loading the parameterisation mode
Loading setting level 3
Show follow-up time
Press both keys
for at least 10 seconds
Press both keys again
twice
for 5 seconds each
2 x
Release both keys
Light bar LED 1 (dark green)
Parameterisation mode ON
Light bar LEDs 1+2+3
Level 3
5 min
10 min
15 min
20 min
25 min
30 min
Light bar LEDs 1-6
some are flashing
32
Continued >

ENG
Operating Manual Light Control „PULSE HFMD / PULSE PIR - Vers. IV“
Setting functions 3.1 to 3.6 (Continued)
Follow-up time
(Continued)
Actuation Display
Changing the function - Increasing the follow-up time step-by-step
Press key I as often as
n x
necessary for reaching
the desired value
Changing the function - Decreasing the follow-up time step-by-step
Light bar LEDs 1-6
some are flashing
Follow-up time level 3 (15 min)
Each LED that is not flashing
stands for a follow-up time
of 5 min.
5 min
10 min
15 min
20 min
25 min
30 min
Press key II as often as
necessary for reaching
the desired value
n x
Light bar LEDs 1-6
some are flashing
Follow-up time level 1 (5 min)
33

ENG
Operating Manual Light Control „PULSE HFMD / PULSE PIR - Vers. IV“
Setting functions 4.1 to 4.6
Presence range
Function for setting the detection
range of the presence sensor.
By default, the range for the presence sensor is set to 80%.
6 different levels from 10% to
100% can be set.
The function can only be changed
on
- Lights equipped with HFMD
sensor
Note: For lights equipped with PIR
sensor, the range can be changed
by turning the sensor ball (see instructions for use of the light.
Actuation Display
Loading the parameterisation mode
Loading setting level 4
Displaying the presence range
Press both keys
for at least 10 seconds
Press both keys again
three times
for 5 seconds each
3 x
Release both keys
Light bar LED 1 (dark green)
Parameterisation mode ON
Light bar LEDs 1+2+3+4
Level 4
10 %
20 %
40 %
60 %
80 %
100 %
Light bar LEDs 1-6
some are flashing
34
Continued >

ENG
Operating Manual Light Control „PULSE HFMD / PULSE PIR - Vers. IV“
Setting functions 4.1 to 4.6 (Continued)
Presence range
(Continued)
Actuation Display
Changing the function - Increasing the presence range step-by-step
Press key I as often
n x
as necessary
for reaching the
desired value
Changing function - Decreasing presence range step-by-step
Press key II as often
as necessary
for reaching the
n x
desired value
Light bar LEDs 1-6
some are flashing
Presence range level 6 (100 %)
Light bar LEDs 1-6
some are flashing
Presence range level 4 (60 %)
10 %
20 %
40 %
60 %
80 %
100 %
35

ENG
Operating Manual Light Control „PULSE HFMD / PULSE PIR - Vers. IV“
36
Order No. 405 262 110 - © copyright H.Waldmann GmbH & Co. KG - nB/04/2011 - TB - Subject to change - Printed in Germany
Edition: 2011/04/18
 Loading...