

Wacom Intuos GD-0405-R, Intuos GD-0608-R, Intuos GD-0912-R, Intuos GD-1212-R, Intuos GD-1218-R User Manual

USER’S MANUAL FOR WINDOWS
USER’S MANUAL FOR WINDOWS
Navigation
®
®
Contents
Index

Wacom Intuos User’s Manual for Windows®, July 15, 1998
English V1.0 for Windows
Copyright Wacom Company, Limited, 1998
All rights reserved. No part of this manual may be reproduced e xcept f or y our e xpress personal use. W acom reserves the right
to revise this publication without ob ligation to pro vide notification of such changes . Wacom does its best to provide current and
accurate information in this manual. However, Wacom reserves the right to change any specifications and product
configurations at its discretion, without prior notice and without obligation to include such changes in this manual.
TRADEMARKS
Wacom is a registered trademark. Intuos, Tool ID , QuickPoint, DuoSwitch, and DualTrack are trademarks of Wacom Company,
Limited in the United States and/or other countries. Acrobat Reader Copyright 1987-1996 Adobe Systems Incorporated.
All rights reserved. Adobe and Acrobat are trademarks of Adobe Systems Incorporated which may be registered in certain
jurisdictions. MetaCreations is a trademark, and Painter is a registered trademark of MetaCreations Corporation. Microsoft,
MS, IntelliMouse, Windows, Windows 95, and Windows NT are either registered trademarks or trademarks of Microsoft
Corporation in the United States and/or other countries. Any additional company and product names mentioned in this
documentation may be trademarked and/or registered as trademarks. Mention of third-party products is for information
purposes only and constitutes neither an endorsement nor a recommendation. Wacom assumes no responsibility with regard
to the performance or use of these products.
Contents
Index
Page 2

RADIO AND TELEVISION INTERFERENCE
The equipment described in this manual generates, uses, and can radiate radio-frequency energy. If it is not installed and used
properly—that is, in strict accordance with Wacom instructions—it may cause interference with radio and television reception.
FCC NOTICE
This equipment has been tested and found to comply with the limits for a Class B digital device in accordance with the
specifications in Part 15 of FCC rules. These specifications are designed to provide reasonable protection against such
interference in a residential installation. However, there is no guarantee that interference will not occur in a particular
installation.
You can determine whether your tablet is causing interference by disconnecting it from the computer. If the interference stops,
it was probably caused by the tablet.
If your tablet does cause interf erence to r adio or television reception, try to correct the interference by using one or more of the
following measures:
• Rotate the television or radio antenna until the interference stops.
• Move the tablet farther away from the television or radio.
• Plug the computer into an outlet that is on a different circuit from the television or radio.
If necessary, consult your authorized Wacom dealer or an experienced radio/television technician for additional suggestions.
Changes or modifications to this product not authorized by Wacom could void the FCC Certification and negate your authority
to operate the product.
This product was tested for FCC compliance under conditions that included the use of shielded cables and connectors betw een
system components. It is important that you use shielded cables and connectors to reduce the possibility of causing
interference to radios, television sets, and other electronic devices.
Contents
Index
Page 3
CE DECLARATION
The Intuos digitizing tablets, models GD-0405-R, GD-0608-R, GD-0912-R, GD-1212-R, and GD-1218-R, hav e been tested by
the WAVE Corporation in Japan and found to comply to the following harmonized European Norms:
• EN 50082-1 (electromagnetic immunity)
• EN 55022 Class B (electromagnetic emissions)
The Wacom power adaptors have been tested by their manufacturers and found to comply to the following harmonized
European Norms:
• EN 50082-1 or EN 55104 (electromagnetic immunity)
• EN 50081-1 or EN 55014 (electromagnetic emissions)
• EN 60742 (safety of low voltage devices)
Based on the results of these tests, Wacom declares that the above mentioned de vices conf orm to Article 10.1 of the European
Council Directive 89/336/EEC and to the European Council Directive 73/23/EEC, and indicates this conformity by the CE-sign
on each device.
The device must be installed and operated always in strict accordance to the instructions given in this handbook. An y changes
or modifications to this product that were not specifically authorized by Wacom will invalidate this declaration.
Contents
Index
Page 4
TABLE OF CONTENTS
Trademarks 2
Radio and Television Interference 3
FCC Notice 3
CE Declaration 4
About the Manual 8
Navigating the Manual 10
INSTALLATION 11
Things to Know Before Installation 12
Hardware Installation 13
Software Installation 14
Uninstalling the Software 15
Registration 15
Product Information 16
USING INTUOS
Appearance and Features 18
Intuos 4x5 Tablet 18
Intuos 6x8 and 9x12 Tablets 19
Intuos 12x12 and 12x18 Tablets 20
Intuos Tools 21
Setting Up Your Work Area 24
Working with the Tablet 25
Adjusting the Pen Stand 25
Adjusting Tablet Incline 26
Using The Tablet Menu Strip 27
17
Using the Pen 29
Holding the Pen 29
Pointing 30
Clicking 31
Using the Side Switch 32
Dragging 33
Proximity 34
Drawing with Pressure 35
Drawing with Tilt 36
Erasing 37
Eye-Hand Coordination Exercise 38
Using the Airbrush 39
Holding the Airbrush 40
Using the 4D Mouse 41
Setting Right- or Left-Handed Operation 42
Using the 4D Mouse Thumbwheel 43
Using the Lens Cursor 44
Caring for Your Tools and Tablet 45
Replacing the Pen or Airbrush Tip 46
CUSTOMIZING 47
Opening the Control Panel 48
Control Panel Features 49
Tabs 50
Control Panel Lists 52
Control Panel Buttons 54
Contents
Index
TABLE OF CONTENTS
Page 5
Customizing Your Tools 55
Pen and Airbrush Tabs 55
4D Mouse and Lens Cursor Tabs 55
Adjusting Tip Feel 56
Adjusting Double-Click 57
Customizing Tool Buttons 58
Button Functions 59
Airbrush Settings 63
Adjusting Eraser Feel 64
Customizing Tilt Sensitivity 65
Tablet to Screen Mapping 66
Positioning Mode 68
Orientation 69
Aspect 70
Tablet Area 71
Display Area 74
Customizing the 4D Mouse and Lens Cursor 75
Programming the 4D Mouse and Lens Cursor 76
Using Your 4D Mouse as a 15-Button Mouse 76
Creating a Button Box 78
Customizing the 4D Mouse Thumbwheel 79
Customizing the Pop-up Menu 80
Add Keystrokes 81
Add Mapping Options 81
Removing Keystrokes and Mapping Options 81
Customizing Tablet Buttons 82
Working with Multiple Tools 84
Adding a New Tool 85
Using More Than One Tool 86
Working with Application-Specific Settings 87
Creating an Application-Specific Setting 89
Adding Additional Tools to an Application’s Tool List 91
Changing Settings for a Specific Application and Tool 92
Removing Application-Specific Settings 92
Checking Your Tablet Connection 93
Pull-Down Menus 94
File 94
Edit 94
Add 95
Remove 95
Language 96
Help 96
ADVANCED FEATURES 97
Advanced Tip Pressure Settings 98
Click Force Adjustment 99
Pressure Curve Adjustment 100
Advanced Eraser Pressure Settings 102
Copying Settings 103
Using DualTrack 104
Advanced Mapping 105
HA
VING TROUBLE? 110
Testing Your Intuos Tablet 111
Testing Serial Tablets 111
Testing Your Intuos Tools 112
Testing a Pen or Airbrush 112
Testing a 4D Mouse or Lens Cursor 114
Contents
Index
TABLE OF CONTENTS
Page 6
Troubleshooting 115
General Problems 115
Windows-Specific Problems 118
Contacting Technical Support 119
Linking to the Web Page 119
Pre-Contact Checklist 119
Who to Call 120
USA, Canada, Central and South America 121
Europe, Middle East and Africa 122
Japan 123
Asia Pacific (English) 123
Parts and Accessories 136
Ordering Parts and Accessories 136
Pens 136
Airbrush 137
4D Mouse 137
Lens Cursor 137
Other Parts and Accessories 138
License and Warranties (USA) 39
Software License 139
Limited Warranty 140
Warranty on Sales Outside of U.S. and Canada 142
APPENDICES 124
Installing Multiple Tablets 125
Working with AutoCAD 126
Configuring for a Wintab Compatible Digitizer 126
Configuring Tablet Menus and Screen Pointing Areas 128
Product Specifications 131
General Specifications for All Intuos Tablets 131
Intuos 4x5Tablet (Model GD-0405-R) 132
Intuos 6x8Tablet (Model GD-0608-R) 132
Intuos 9x12Tablet (Model GD-0912-R) 132
Intuos 12x12 Tablet (Model GD-1212-R) 133
Intuos 12x18Tablet (Model GD-1218-R) 133
Intuos Pen (Model GP-300E) 133
Intuos Airbrush (Model GP-400E) 134
Intuos Inking Pen (Model GP-110) 134
Intuos Stroke Pen (Model GP-120) 135
Intuos 4D Mouse (Model GC-500) 135
Intuos Lens Cursor (Model GC-210) 135
Contents
Index
GLOSSARY 143
INDEX 147
TABLE OF CONTENTS
Page 7
ABOUT THE MANUAL
This interactive User’s Manual provides quick access to information about Intuos. Just click on a
navigation button or highlighted word to move through the document.
• The T
• Installation
• Using Intuos
• Customizing
• Adv
• Ha
• The Appendices
If you are new to electronic documentation, be sure to read Na
able of Contents enables you to go directly to a topic by clicking on it.
describes how to install the hardware and software, and how to uninstall the software.
introduces you to the many capabilities of your Intuos system, including a description of
the various tablet models, and the features and functions of each Intuos tool. This section also
includes exercises for new users.
describes how you can change the control panel settings to optimize Intuos tablets and
tools for your personal work style.
anced Features allow further customization of your Intuos Graphics Tablet System. Explore them
after you have become familiar with using Intuos and the basic control panel settings.
ving Trouble? Need troubleshooting guidelines? Do you have a question for Technical Support?
You will find the answers to most common questions here.
include product specifications, license and warranty information, and a listing of
replacement parts and accessories. There are tips on working with AutoCAD. If you are using more
than one tablet on your computer , y ou will find instructions on adding and working with multiple tablets .
vigating the Manual.
Contents
Index
Page 8

MALL CAPITAL LETTERS
S
options.
are used to identify the names of keyboard keys, dialog boxes, and control panel
As you read through the
shots of the control panel tabs do not show the tab
Customizing
and
Advanced Features
chapters, you will notice that the screen
buttons. These are intentionally left out in order to
save space within the manual.
Remember that you can always use the Acrobat Reader zoom-in tool to increase the size of the manual
on your display screen.
Certain kinds of information are not included in this manual:
• Information about your specific computer hardware.
• Information about your operating system.
• Information about other Wacom tablets.
• Information about application software. Many graphics applications have built-in support for Intuos
features (such as pressure-sensitivity, tilt, airbrush simulation, 3D navigation with the 4D Mouse, and
two-handed input). You can find a listing of applications that support these features at Wacom’s web
site (see Product Inf
ormation). Refer also to your application manuals for information on how best to
use Intuos features within specific applications.
Your best source of information for the above information is the set of manuals and disks that came with
your hardware, operating system, applications, or other Wacom tablets.
Contents
Index
Page 9
NAVIGATING THE MANUAL
Use the navigation controls to move through the manual:
Go to front page.
Contents
Index
Go to Table of Contents.
Go to Index.
Go back to previous view.
Page back, or page forward.
HEADING TEXT
Topic
Go to beginning of section.
Go to topic.
Topic continued.
The Acrobat Reader provides you with additional tools for using and printing the manual. Refer to the
Acrobat
Reader Online Guide
for more information.
Contents
Index
Page 10
INSTALLATION
Intuos is compatible with Windows 95 or later and NT 4.0 or later, and with all applications that support a
mouse.
Before you install the Intuos Graphics Tablet System, be sure to turn off your computer. Connect the
hardware, then install the software.
THINGS TO KNO
HARDWARE INSTALLATION
SOFTWARE INSTALLATION
UNINSTALLING THE SOFTWARE
REGISTRATION
W BEFORE INSTALLATION
Contents
Index
INSTALLATION
Page 11

THINGS TO KNOW BEFORE INSTALLATION
• Turn off your computer and attach the tablet
• If your computer does not have an available serial port, you will need to remove an existing serial
device or add an additional serial port.
• Some computers have a b uilt-in modem and the external serial port may be disabled or configured with
the same serial port address as the modem. If your tablet does not communicate properly after
installing the hardware and software, chec k your serial port to v erify that it is properly configured. See
Ha
ving Trouble? for more information.
• If you are using a DOS
function in the DOS shell after you install the Wacom drivers for Windows.
shell under Windows 95 or later or NT 4.0 or later, Intuos will automatically
before
installing the software.
Contents
Index
INSTALLATION
Page 12

HARDWARE INSTALLATION
To install your Intuos tablet:
Turn off your computer.
1
Connect the AC power cable
2
to the tablet cable.
Connect the tablet cable to a
3
serial communication port.
Connect the power adaptor to your AC outlet or
4
power strip. The tablet’s LED will light.
Note: If you have a 12x12 or larger tablet, turn on
the power switch (located on the right side of the
tablet).
Turn on your computer.
5
Contents
Index
If you have any trouble with the installation, go to
Having Trouble? Otherwise, move on to Software
Installation.
INSTALLATION
Page 13
SOFTWARE INSTALLATION
To install your Intuos software for Windows 95 or later and NT 4.0 or later:
1. Make sure the tablet’s power and serial cables are connected, then turn on your computer. The status
LED on your tablet should light to indicate the tablet is powered up.
2. After Windows has started, insert the Intuos CD-ROM into your computer. If you see the N
H
ARDWARE FOUND
press E
NTER
. Type the name of your CD-ROM drive, f or e xample d:\. Then press E
dialog box, select D
RIVER FROM DISK PROVIDED BY HARDWARE MANUFACTURER
NTER
screen prompts.
3. If the P
Important:
LUG AND PLAY
If you replaced your mouse with the tablet, press C
Use the arrow keys to select RUN..., and then press E
dialog does not appear, click on the S
NTER
button and then click RUN....
TART
TRL-ESC
to open the S
.
In the dialog box, type d:\setup. If your CD-ROM has a different drive letter, type that letter instead
of d:. Click OK and follow the prompts.
4. When finished, close all open applications and restart your computer. After restarting Windows you
will be able to use your Intuos tool to move the screen cursor.
EW
and
and follow the
TART
menu.
Important:
When starting Windows 95 or later in safe mode, the driver software for Intuos will not
load and the tablet will not function.
If you had any trouble with this installation, go to Ha
Contents
Index
ving Trouble?
INSTALLATION
Page 14
UNINSTALLING THE SOFTWARE
To remove the Intuos software from your system:
1. Click the Windows S
2. In the C
ONTROL PANEL
button. Then choose S
TART
ETTINGS
window, double-click on the ADD/R
and C
EMOVE PROGRAMS
ONTROL PANEL
.
icon.
3. In the dialog box that appears, choose the Wacom tablet option.
4. Click on the ADD/R
EMOVE
... button and follow the prompts to remove the Intuos software driver.
REGISTRATION
To register your product, please complete and mail in the Wacom Registration Card that came with your
tablet.
Online registration may be available in some regions. If available, the Internet location will be printed on
your Registration Card.
Contents
Index
INSTALLATION
Page 15
PRODUCT INFORMATION
To learn more about which software applications currently support your Intuos tablet and tools, visit the
Wacom web site for your region:
USA, Canada, Central and South America http://www.wacom.com/productinfo
Europe, Middle East and Africa http://www.wacom.de/productinfo
Japan http://www.wacom.co.jp
Asia Pacific (English) http://www.wacom.co.jp/asia-pacific
Contents
Index
INSTALLATION
Page 16
USING INTUOS
This section introduces you to the Intuos Graphics Tablet System. If you are new to using a graphics
tablet and tablet input tools, read the following sections. They describe your Intuos tools and explain how
to use them with the tablet.
APPEARANCE AND FEATURES
SETTING UP YOUR WORK AREA
WORKING WITH THE TABLET
USING THE PEN
USING THE AIRBRUSH
USING THE 4D MOUSE
USING THE LENS CURSOR
CARING FOR YOUR TOOLS AND TABLET
Contents
Index
USING INTUOS
Page 17
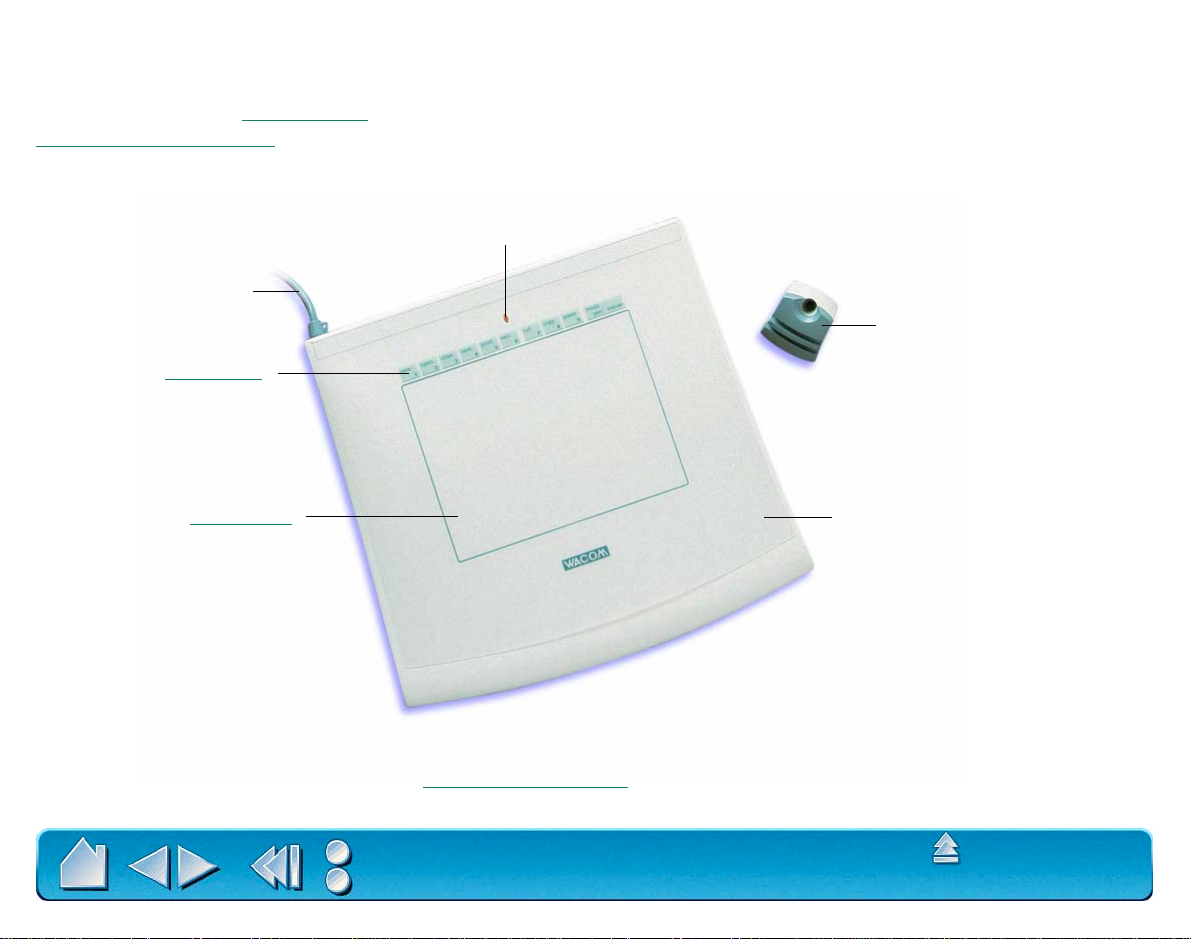
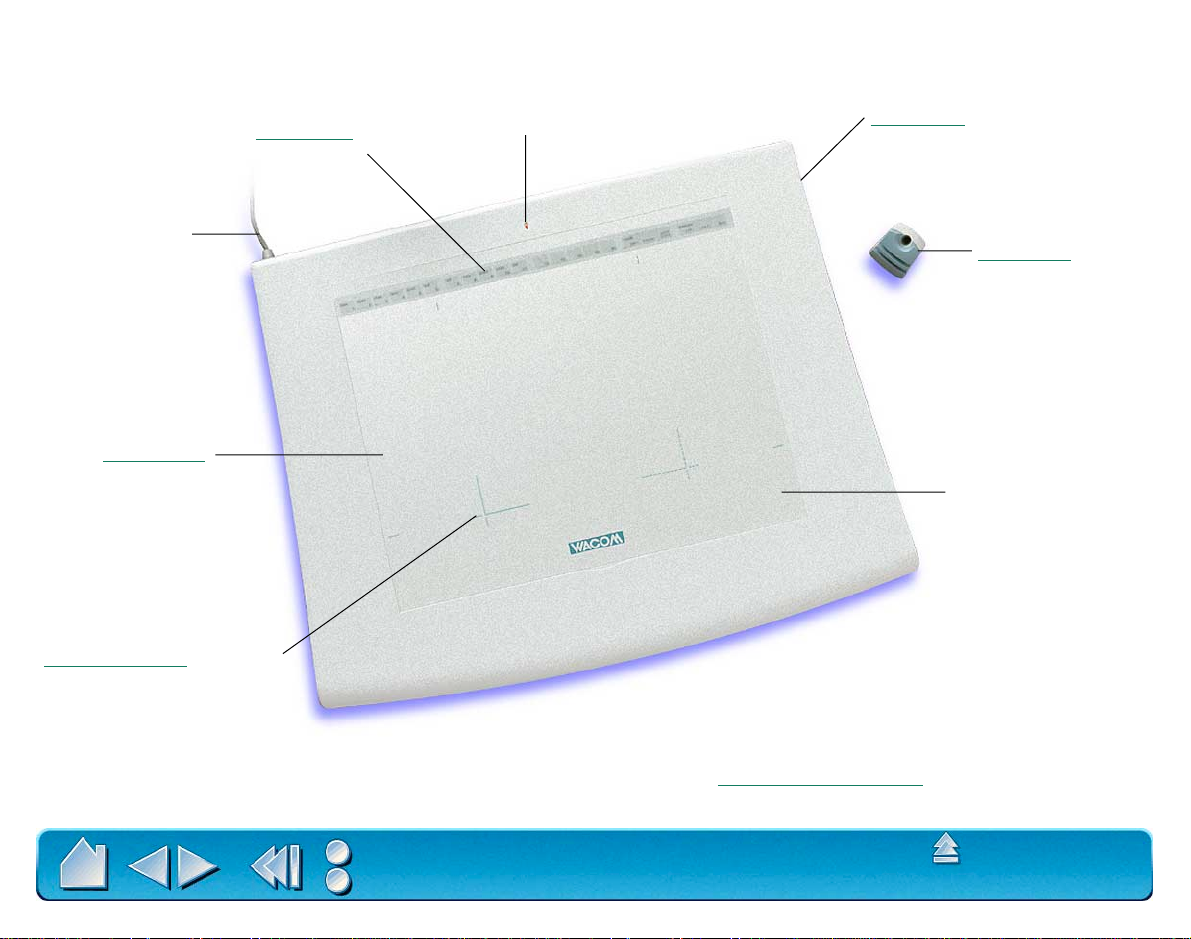
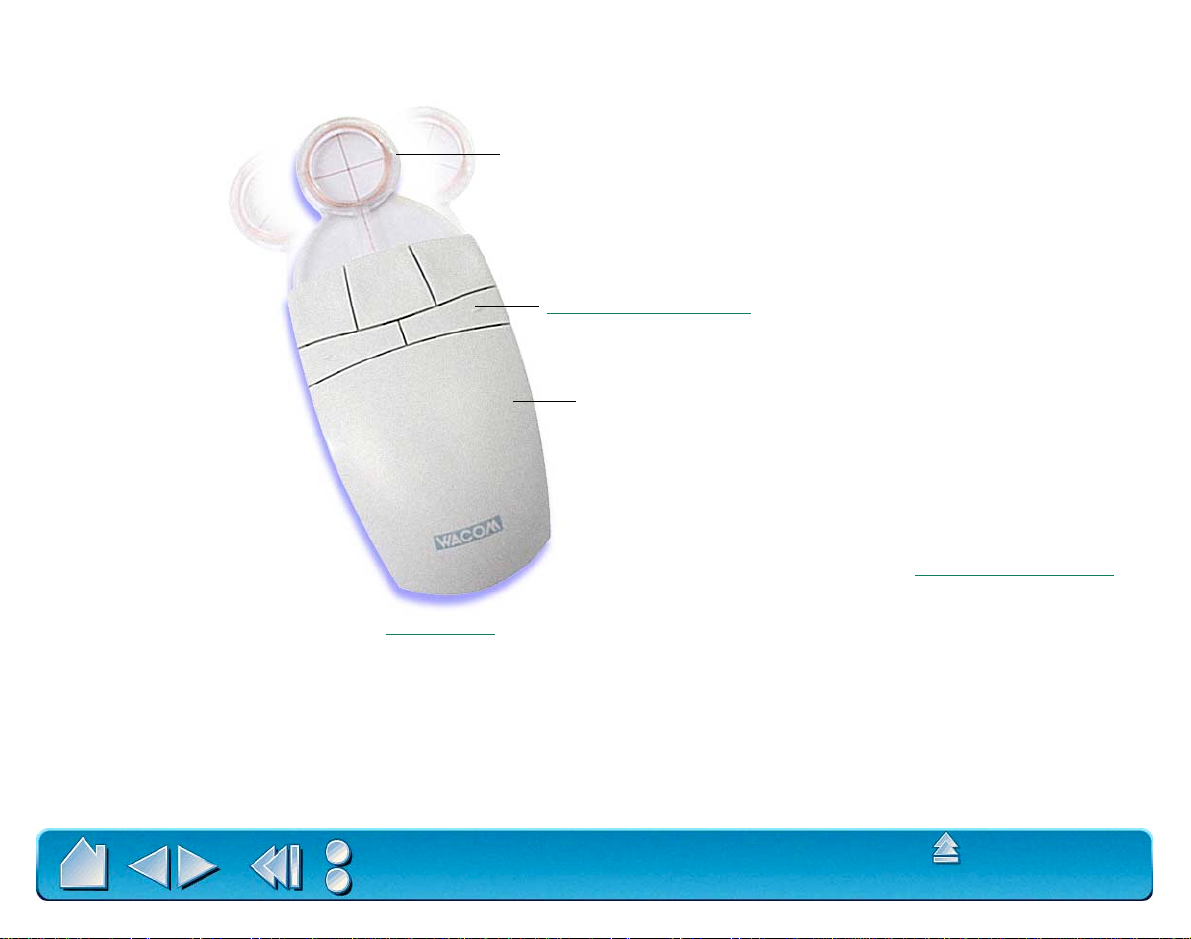
APPEARANCE AND FEATURES
The Intuos Graphics Tablet System consists of two basic elements: a graphics tablet that serves as your
work area, and the Intuos
P
arts and Accessories.
INTUOS 4X5 TABLET
Cable
Menu Strip
Tools you use with the tablet. For a complete listing of Intuos tablets, refer to
Status LED
Pen Stand
Active Area
Note: To learn more about your tablet, see Working with the Tablet.
Contents
Index
Tablet Overlay
USING INTUOS
Page 18
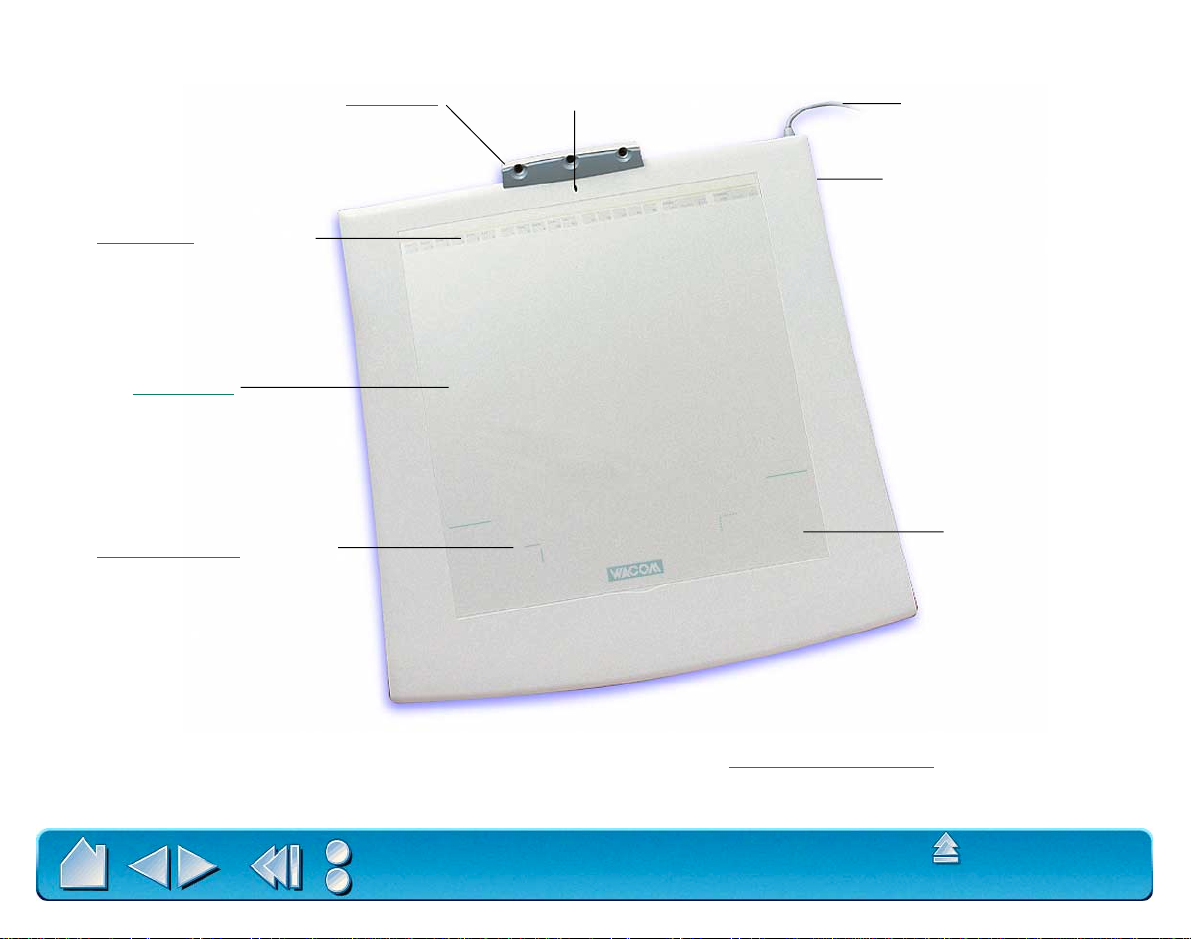
INTUOS 6X8 AND 9X12 TABLETS
Menu Strip
(removable)
Cable
Active Area
QuickPoint Area Markings
(not available for the 6x8
tablet)
Status LED
Incline Bar
(shown attached)
Pen Stand
Tablet Overlay
Note: The Intuos 9x12 tablet is shown. To learn more about your tablet, see Working with the Tablet.
Contents
Index
USING INTUOS
Page 19
INTUOS 12X12 AND 12X18 TABLETS
Menu Strip (removable)
Active Area
QuickPoint Area Markings
Pen Stand
Status LED
Cable
Power Switch
Tablet Overlay
Note: The Intuos 12x12 tablet is shown. To learn more about your tablet, see Working with the Tablet.
Contents
Index
USING INTUOS
Page 20
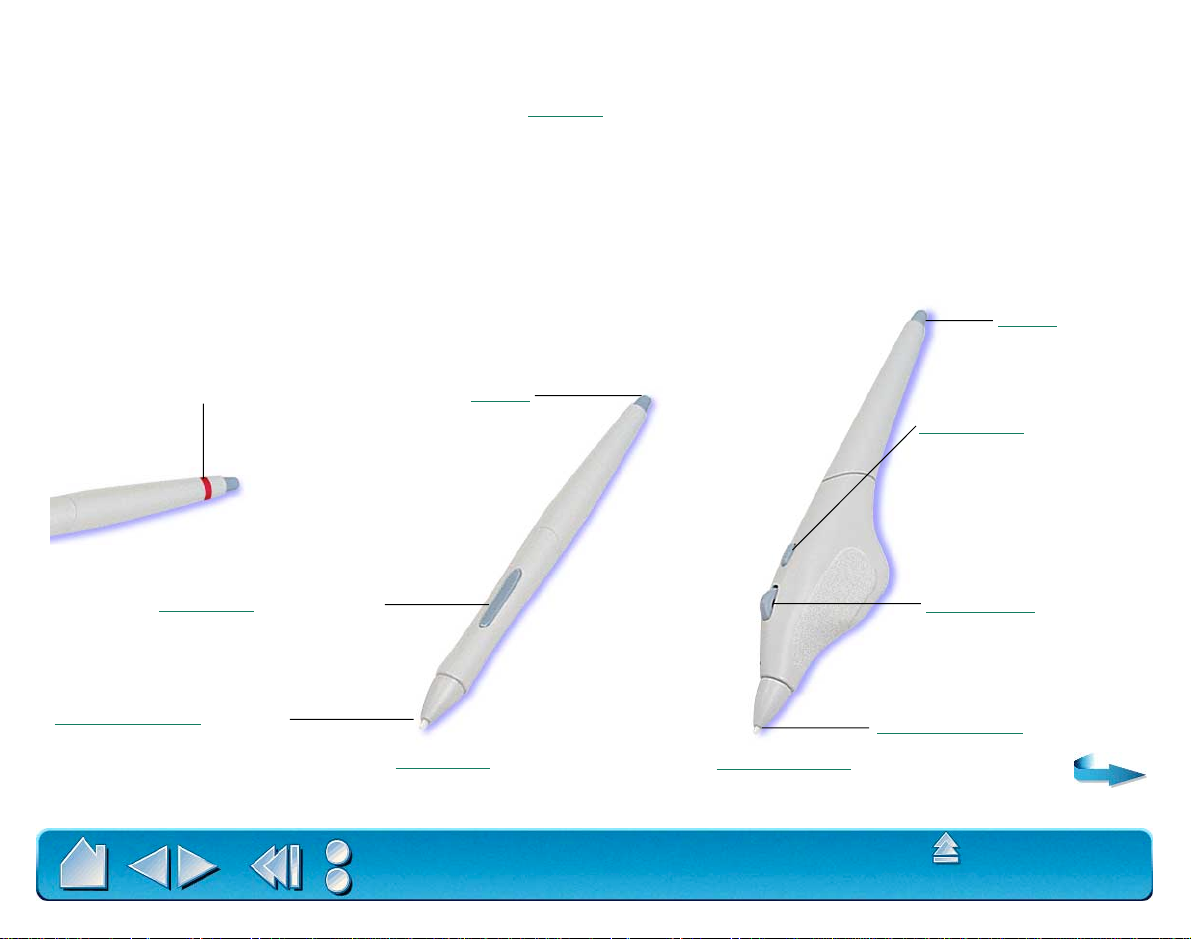
INTUOS TOOLS
A variety of Intuos tools are available for your tablet. All Intuos tools are cordless, batteryless, and
ergonomically designed. Each tool also has a Tool ID, enabling you to work with multiple tools on the
same tablet and to customize each tool differently.
Note:
The tool(s) included with your tablet will vary depending on which tablet model and configuration
you purchased.
The Intuos Pen and Airbrush are pressure-sensitive freehand tools for image editing and creating natural-
looking pen and brush strokes.
Eraser
Apply the color-coded decals
when using multiple pens with
customized settings.
DuoSwitch (rocker style)
Replaceable Nib (pen tip)
Eraser
Side Switch
Fingerwheel
Replaceable Nib
Intuos Pen
Contents
Index
Intuos Airbrush
USING INTUOS
Page 21
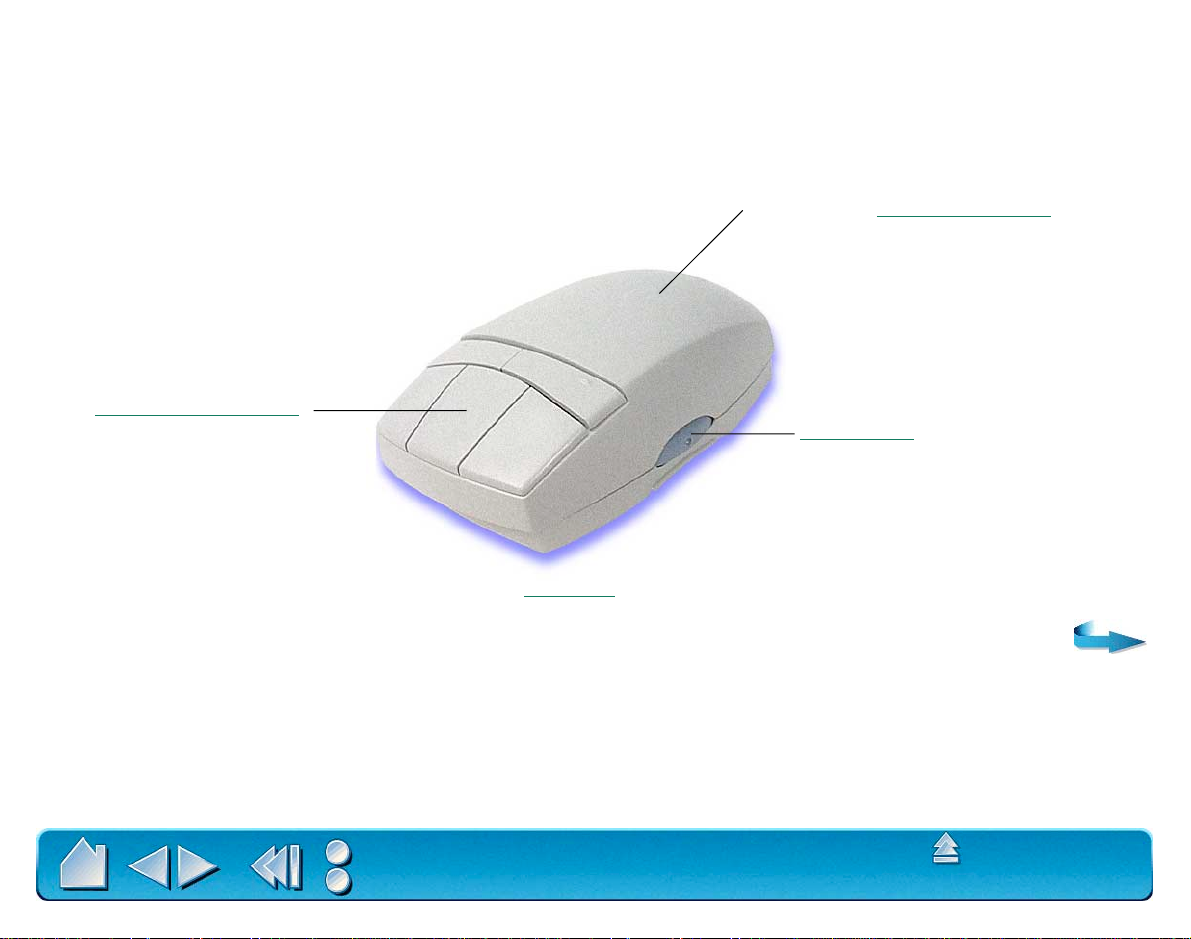
The Intuos 4D Mouse is an ideal tool for 2D or 3D navigation. It provides four degrees of control: x and y
position, thumbwheel position, and positional rotation. The thumbwheel can be set to emulate the
Microsoft IntelliMouse and used for scrolling, zooming, and other tasks in supporting applications.
Adjustable for left- or right-handed use.
Programmable Buttons
Thumbwheel
4D Mouse
Contents
Index
USING INTUOS
Page 22
The Lens Cursor is an ideal tool for entering precise coordinate position information. Use the Lens Cursor
with graphics and CAD applications for very accurate tracing or digitizing images.
Lens (moveable)
Programmable Buttons
Ergonomic Shape
For information on these and other available
Intuos tools, refer to Parts and Accessories.
Lens Cursor
Contents
Index
USING INTUOS
Page 23
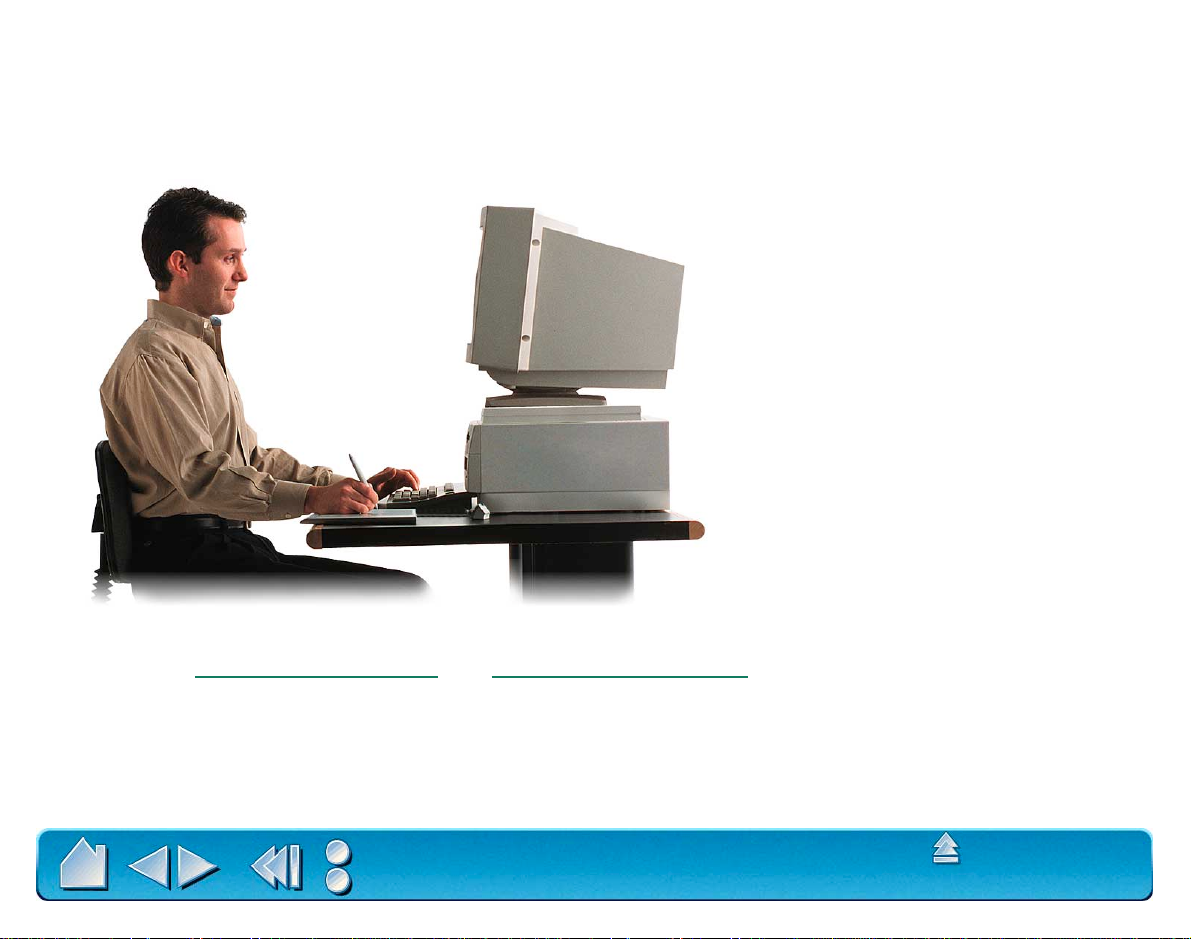
SETTING UP YOUR WORK AREA
Organize your work area so you can work comfortably. Position your Intuos tablet, input tools, and
keyboard so they are easily accessible without unnecessary reaching. Your monitor should be positioned
so you can view it comfortably with a minimum of eyestrain.
To minimize fatigue:
• Take short breaks between tasks to stretch
and relax your muscles.
• Use a gentle grip when working with your
Intuos tools.
• Alternate tasks throughout the day.
• Minimize awkward postures and repetitive
movements that cause discomfort.
For some tablet models, you can adjust the tablet incline and attach the pen stand to better fit your work
style. Refer to Adjusting
Tablet Incline and Adjusting the Pen Stand for additional information.
Contents
Index
USING INTUOS
Page 24
WORKING WITH THE TABLET
Your tablet comes with a pen stand, a customizable menu strip, and a transparent overlay.
ADJUSTING THE PEN STAND
For some tablet models the stand attaches to the tablet, for others it is free-standing.
4x5 tablets: The stand is free-standing. Place it
within easy reach of your tablet.
9x12 tablets: The stand can be free-standing or
attached.
Contents
Index
6x8 tablets: The stand can be free-standing or
attached in either position, and can be used
with or without the incline bar.
12x12 and 12x18 tablets: You must slide the
triple stand in from the left side.
USING INTUOS
Page 25
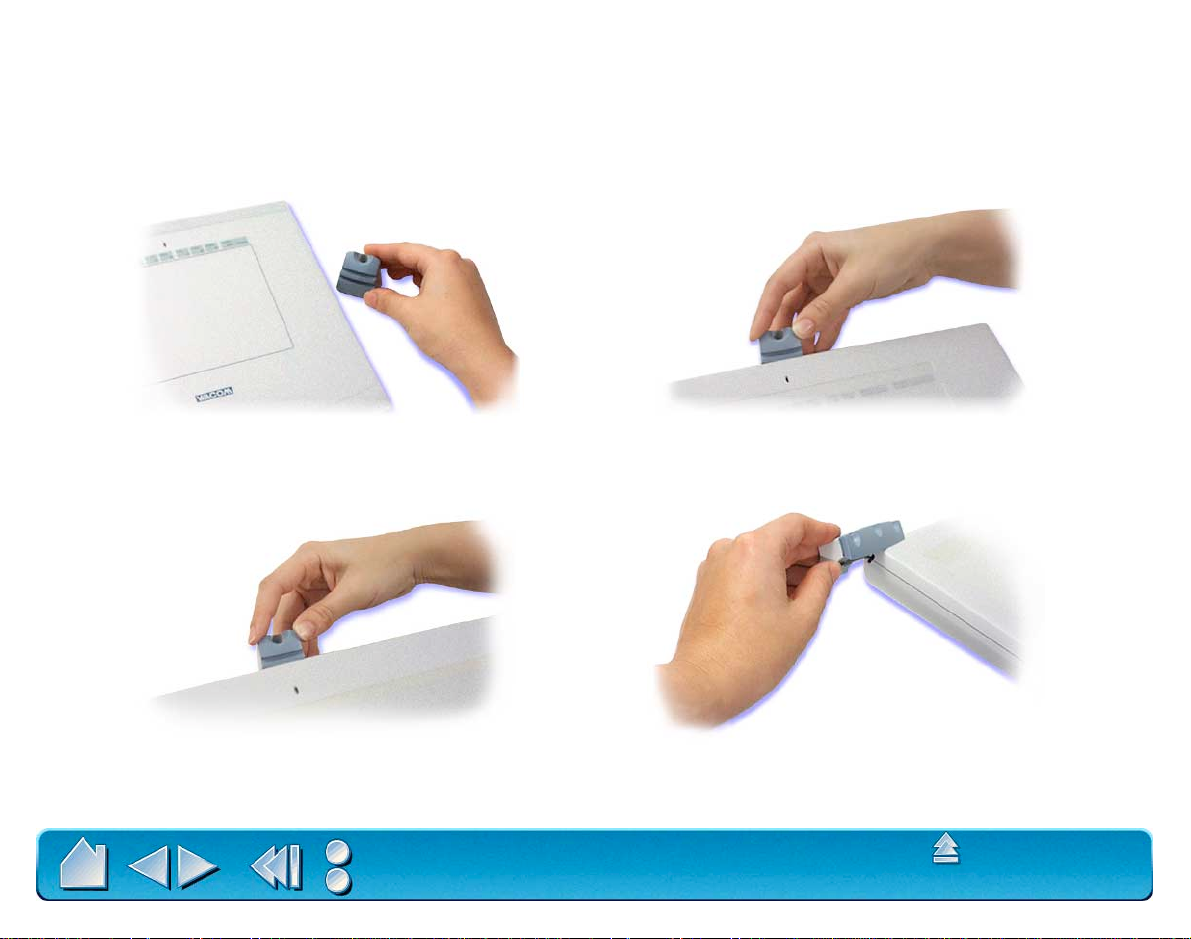
ADJUSTING TABLET INCLINE
Intuos 6x8 and 9x12 tablets come with a rubber bar that can be used to raise the tablet’s incline angle. If
you frequently use the tablet on your lap, you may not want to apply the incline bar. For desktop use, you
may find an inclined tablet position more comfortable.
To attach the incline bar:
1. First turn the tablet upside down and locate the incline bar recess.
2. Remove the paper backing from the incline bar to expose the adhesive. Carefully press the bar’s
adhesive side onto the tablet recess area.
3. Return the tablet to its face up position.
The recess is designed for use in landscape orientation.
Contents
Index
USING INTUOS
Page 26
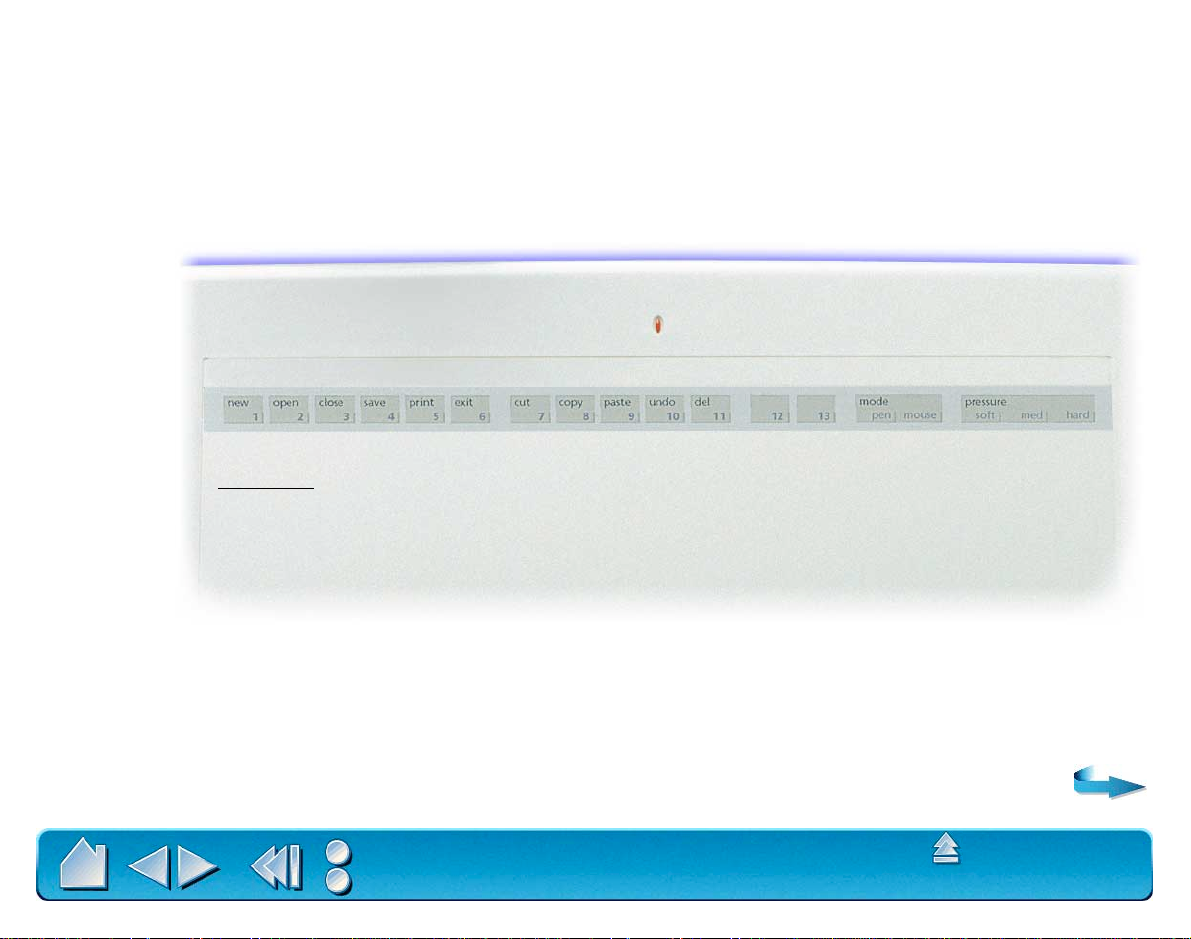
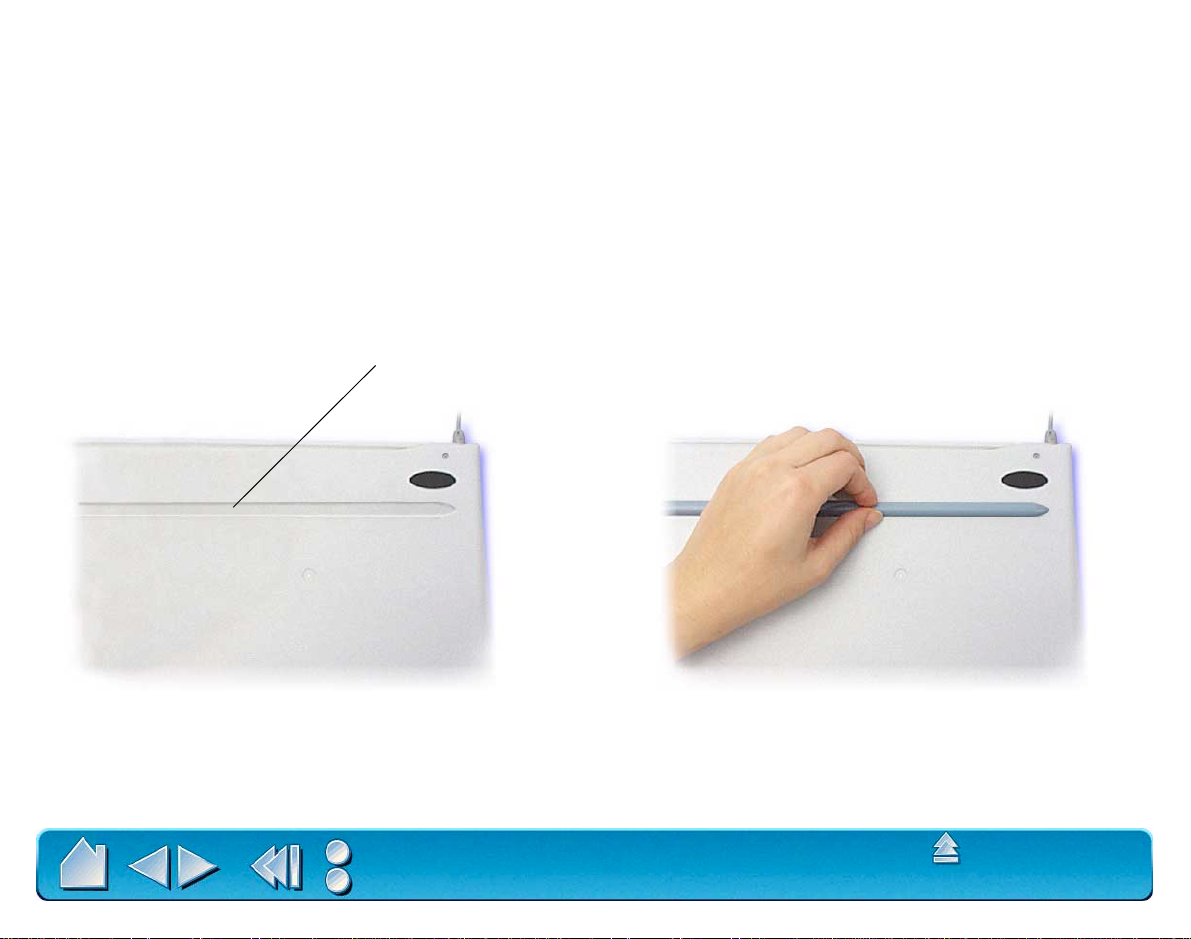
USING THE TABLET MENU STRIP
All Intuos tablets have a menu strip with programmable buttons that allo w you to quickly perform common
tasks. F or 4x5 tab lets, the menu strip is printed on the ov erlay sheet. For 6x8 and larger tablets, the menu
strip is removable, and can be written on with a pencil. The number of available buttons depends on your
tablet model.
To use the menu strip, click on a button with your Intuos tool; the function assigned to that button will
occur.
To remove the menu strip, carefully lift the overlay sheet from the left side
and gently slide the menu strip out. You can use the adhesive side of a
sticky notepad sheet to “grab” the menu strip. When removing and
replacing the menu strip, take care not to bend or tear your tablet overlay.
Notes:
• When pointing to a button, the screen cursor changes to display the button
number. This enables you to select menu buttons with the 4D Mouse.
• Changes to mapping and pressure options apply only to the tool used to
select the respective tablet button.
Contents
Index
USING INTUOS
Page 27
To customize the tablet menu strip buttons, see Customizing Tablet Buttons. By default, the tablet menu
strip buttons will perform common keystroke functions, such as:
Button name Keyboard shortcut Function
new Ctrl+N Open a new document
open Ctrl+O Open an existing document
close Alt+F, C Close a document
save Ctrl+S Save work
print Ctrl+P Print document
exit Alt+F, X Exit application
cut Ctrl+X Cut text or image
copy Ctrl+C Copy text or image
paste Ctrl+V Paste text or image
undo Ctrl+Z Undo last change
del Del Delete selected image or text
Mode Pen N/A Set tool mapping to Pen Mode
Mouse N/A Set tool mapping to Mouse Mode
QuickPoint N/A Set tool mapping to QuickPoint Mode
(9x12 or larger tablets)
Pressure Soft N/A Set the tip feel for a soft setting
Med N/A Set the tip feel for a medium setting
Firm N/A Set the tip feel for a firm setting
Notes: Some applications may not support some tablet button functions, or may use different keyboard shortcuts. Mapping
and pressure settings changed with a tablet button are only in effect for the current session. To permanently save these
settings, open the control panel and click OK.
Contents
Index
USING INTUOS
Page 28
USING THE PEN
Intuos Pens are cordless, batteryless, and pressure sensitive. There are four basic techniques for using
the Intuos Pen: pointing, clicking, double-clicking, and dragging. With a bit of practice, using the pen will
become second nature to you. If you are unfamiliar with using a pen, try the exercises on the following
pages.
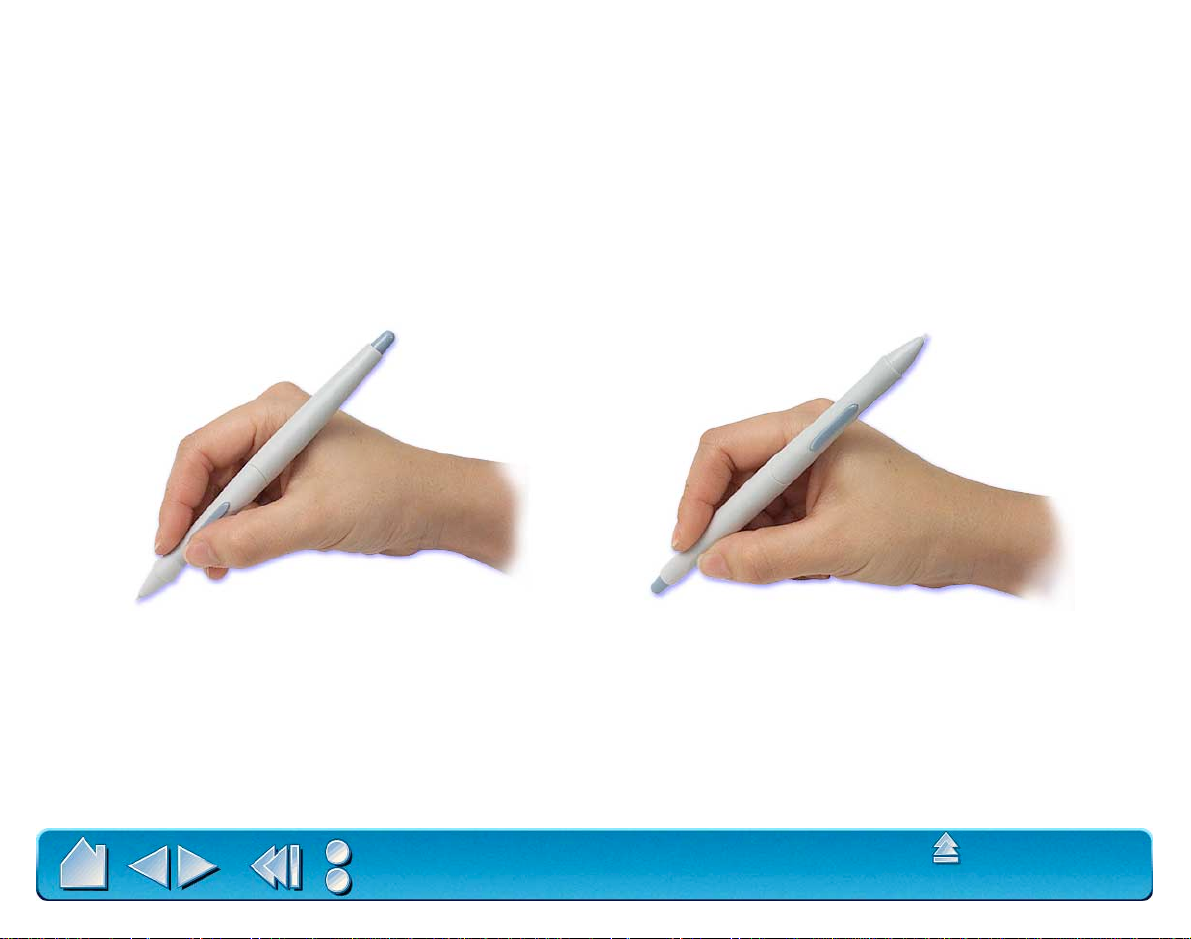
HOLDING THE PEN
Hold the Intuos Pen like you would a normal pen. Make sure the DuoSwitch is in a convenient location
where you can toggle it with your thumb or forefinger, but not accidently press the switch while drawing.
You can tilt the pen in any way that feels most comfortable for drawing.
Important:
Position for drawing
When the pen is not in use, place it in the Intuos pen stand or lay it flat on y our desk. To
Position for erasing
maintain the sensitivity of your pen tip, do not store the pen in a container where it will rest on its tip.
Leaving an Intuos tool on the tablet may interfere with screen cursor positioning when using other
pointing devices.
Contents
Index
USING INTUOS
Page 29
POINTING
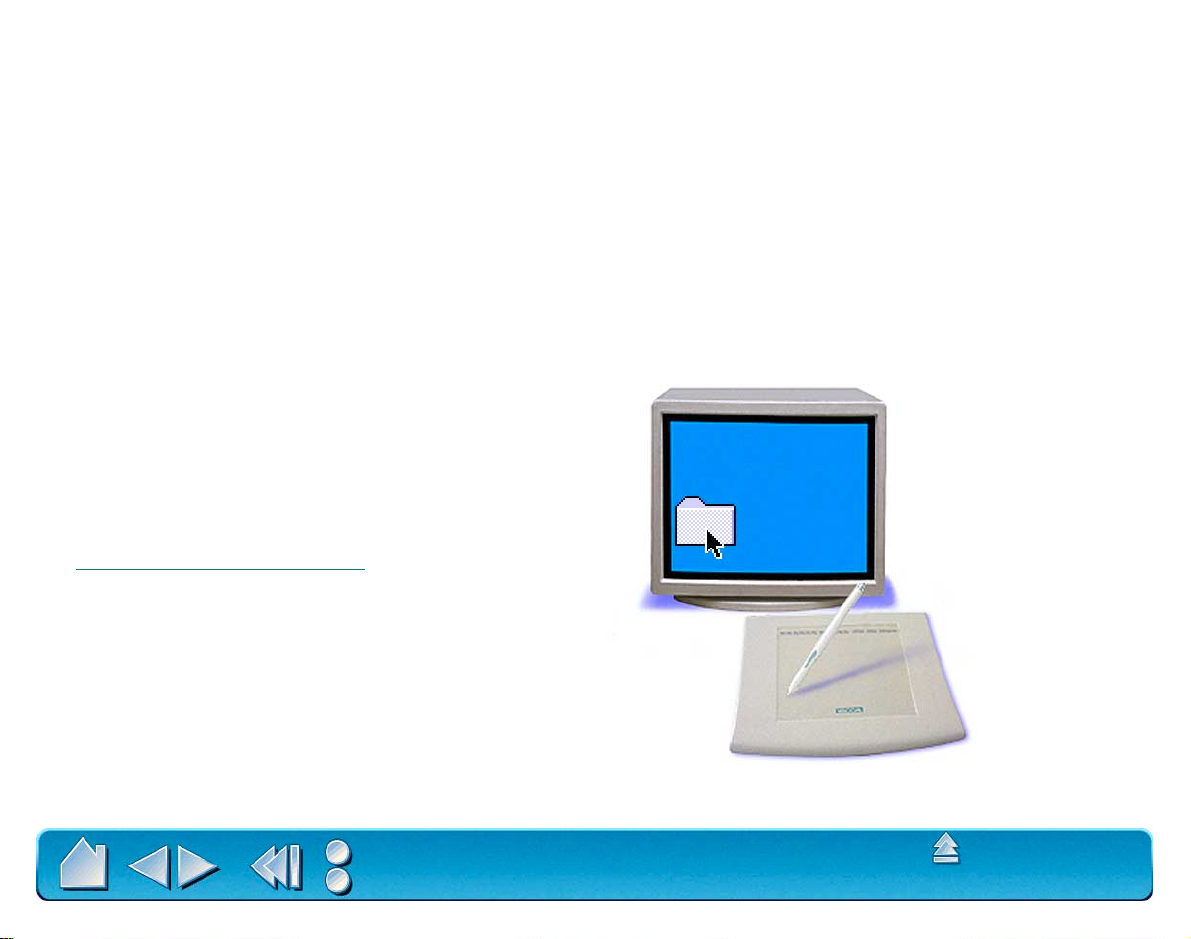
The Intuos Pen positions the pointer (or cursor) on your screen. You can position the screen cursor two
different ways, like a pen (Pen Mode) or like a mouse (Mouse Mode).
• In Pen Mode, the tablet’s active area is like a mapped representation of your computer screen where
every point on the tablet’s active area corresponds to e xactly one point on the displa y screen; where v er
you place the pen on the tablet, the screen cursor will jump to the corresponding point on the screen.
This is the default setting, and makes tracing possible—something you cannot do with a mouse.
• In Mouse Mode, you move the cursor with a “pick up and roll” action similar to using a mouse.
Try moving the screen cursor by lifting the Intuos Pen and placing it in a new location on the tablet. The
cursor instantly jumps to the new location.
Learning Hint: If you are used to
working with a mouse and find that
using a pen is somewhat difficult, try
the Eye-Hand Coordination Exercise.
Pointing Hint: Pointing is easier when
you orient the tablet so the screen cursor
follows the same direction as your hand
movements on the tablet.
Contents
Index
USING INTUOS
Page 30
 Loading...