

Page 1
Help
Contents Back
About This Help...
Navigating the Help
Customizing
Opening the Control Panel
Control Panel Features
Tabs
Control Panel Lists
Control Panel Buttons
Customizing Your Interactive Pen Display
Cintiq Pen Tabs
Calibrating the Interactive Pen Display
Adjusting Tip Feel
Adjusting Double-Click
Customizing Tool Buttons
Button Functions
Adjusting Eraser Feel
Customizing the Pop-up Menu
Add Macros (Macintosh only)
Add Keystrokes
Setting Mouse Speed
Add Mapping Options
Removing Pop-up Menu Options
Working with Application-Specific Settings
Creating an Application-Specific Setting
Changing Settings for a Specific Application
Removing Application-Specific Settings
Checking Your USB Connection Mode
Checking Your Serial Connection
Pull-Down Menus
File
Edit
Add
>>
Remove
Language
Help
Advanced Features
Advanced Tip Pressure Settings
Click Force Adjustment
Pressure Curve Adjustment
Advanced Eraser Pressure Settings
Copying Settings
Using Multiple Tablets
Having T rouble?
Troubleshooting
Testing the Interactive Pen Display
Testing Your Cintiq Pen
Resolving Software Conflicts for Macintosh OS 8 or 9
Using the Extensions Manager
Troubleshooting Tables
USB Connection Problems
Serial Connection Problems
General Problems
Windows-Specific Problems
Macintosh-Specific Problems
Contacting Technical Support
Linking to the Web Page
Pre-Contact Checklist
Who to Call
USA, Canada, Central and South America
Europe, Middle East and Africa
Japan
Asia Pacific (English)
Page 2

Help
Contents Back
<< >>
ABOUT THIS HELP...
This online Help provides quick access to information about your Cintiq or PL series Interactive Pen
Display. Just click on a navigation button or highlighted word to move through the document.
• The information in this document is common to both Windows and Macintosh platforms, unless
otherwise noted.
• Windows screen captures are shown, unless otherwise noted.
NAVIGATING THE HELP
Use the navigation controls to move through the Help:
Contents
Back
<<
>>
Go to table of contents.
Go back to previous view.
Page back.
Page forward.
opic
T
The Acrobat Reader provides you with additional tools for using and printing the manual. Refer to the
Acrobat
Reader Online Guide
Go to topic.
Topic continued.
for more information.
Page 3
Help
Contents Back
<< >>
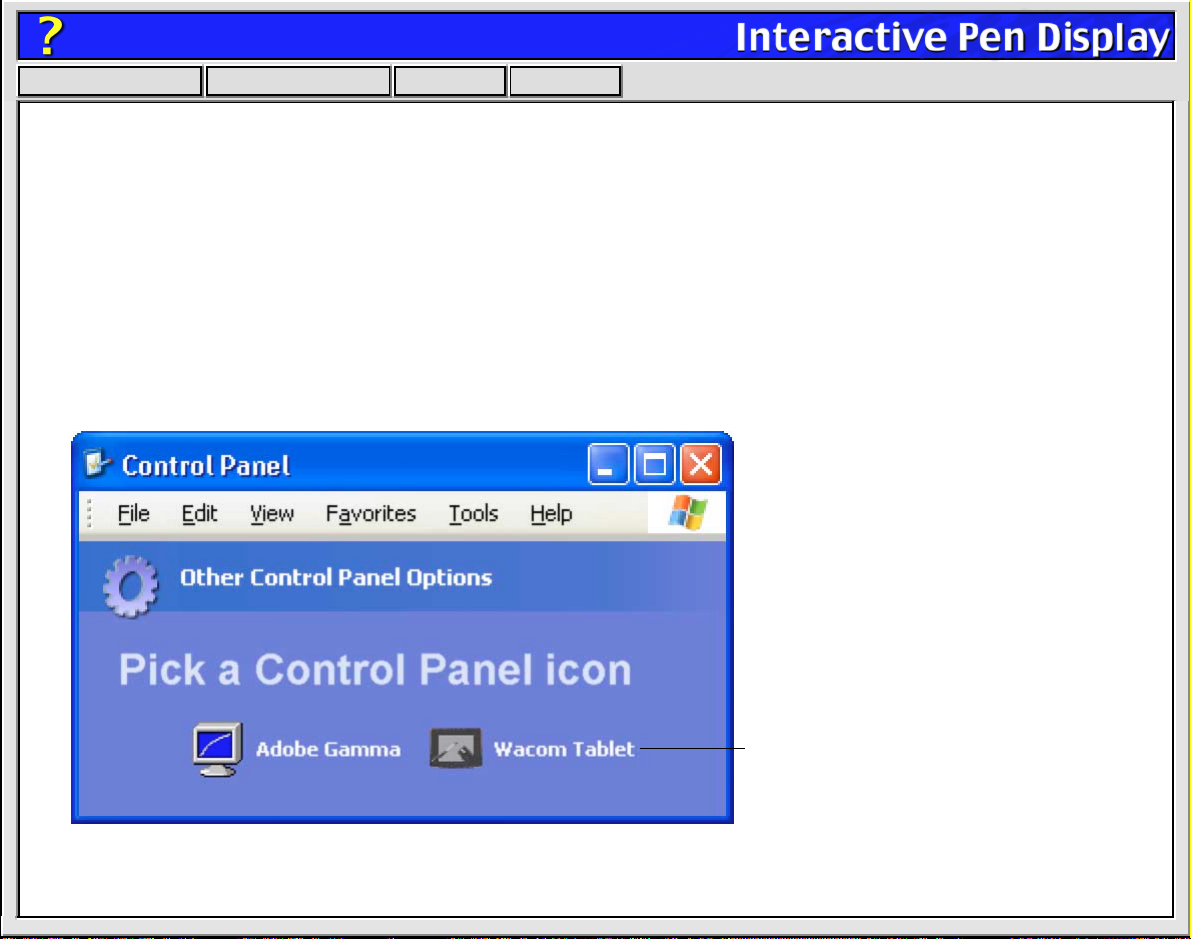
OPENING THE CONTROL PANEL
For Windows:
C
ONTROL PANEL
(For other versions of Windows, click on the Windows S
P
. Double-click on the tablet icon.)
ANEL
Or...
For Macintosh:
With your Cintiq Pen, open the W
operating systems, open the Apple menu and choose C
If you are using Windows XP, with your Cintiq Pen click on the
and select O
If you are using OS X, in the F
THER CONTROL PANEL OPTIONS
INDER
ACOM
folder and double-click on the tablet icon. (For earlier Macintosh
button. Choose
ACOM TABLET
ETTINGS
. Then click on the W
TART
button. Then select S
START
select the GO menu and choose A
ONTROL PANELS
. Double-click on the tablet icon.)
icon.
and C
PPLICATIONS
ONTROL
.
Windows control panel shown above.
To open the Wacom tablet control
panel, double-click here with the
Cintiq Pen.
Page 4
Help
Contents Back
<< >>
CONTROL PANEL FEATURES
Use the Wacom tablet control panel to customize your Interactive Pen Display and Cintiq Pen.
Pull-Down Menus access many control panel features.
The Application List
displays applications
with customized
settings.
The Tool List
displays an icon
for the Cintiq Pen.
Tabs display
settings for
the selected
application.
This button adds an application
to the list at the left.
Control Panel
Buttons
(Windows only)
apply to the
entire control
panel.
The HELP...
button displays
online Help.
Tab buttons
apply only to the
selected tab.
Page 5
Help
Contents Back
<< >>
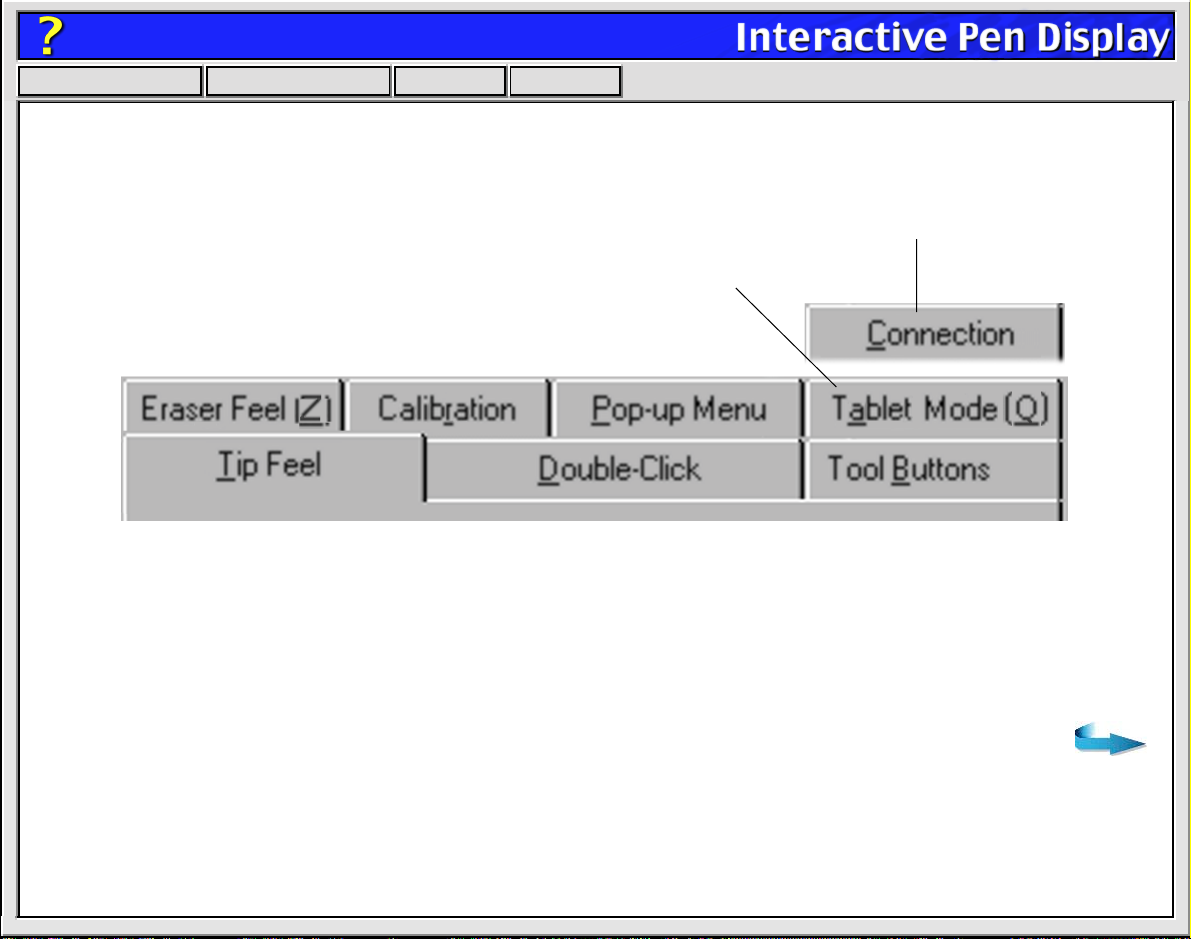
TABS
The tabs allow you to customize your Interactive Pen Display and Cintiq Pen.
Displayed if you are working with a serial connection.
Displayed if you are using a USB connection that supports Recognition Data mode.
Note:
necessary to select or add applications. To customize your tablet or pen, select the tab for the tool
setting(s) that you want to modify.
The A
PPLICATION LIST
is for advanced users who w ant to create application-specific settings; it is not
For Windows:
You can use keyboard shortcuts to select a tab. To select a tab in this manner, hold down
the ALT key and press the key corresponding to the letter underlined on the tab.
Page 6
Help
Contents Back
<< >>
Tab buttons apply only to the selected tab:
• To set the currently open tab to its factory default values, click
•
For Windows:
or last applied settings (whichever is most recent using the OK or A
For Macintosh:
the control panel was opened, click the R
• To copy settings from one application to another, click This will display the Cop
If you hav e changed settings on a tab and w ant to return the tab to its pre viously sa ved
PPLY
buttons), click
If you hav e changed settings on a tab and want to return the tab to the last state when
EVERT TAB
button.
y
Settings dialog box. (The button is inactive until a customized application has been added.)
As you explore the control panel tabs, experiment with different settings to find what works best for you.
You can always click R
ESET TAB TO DEFAULTS
return a tab to its previously saved or last applied settings. Refer to Customizing
to return to the factory settings. Or, click R
Your Interactive Pen
EVERT TAB
to
Display for detailed information on working with tabs.
Page 7
Help
Contents Back
<< >>
CONTROL PANEL LISTS
Located in the upper portion of the control panel, the A
and tool settings for individual applications. For example, you might set your pen tip for a soft feel in
Painter and a firm feel in all other applications.
The APPLICATION LIST displays applications that
have custom pen settings associated with them.
The TOOL LIST displays an icon for the Cintiq Pen.
PPLICATION LIST
allows you to create diff erent tab let
Click to add an installed application to the
APPLICATION LIST. You can customize pen
settings for the selected application.
This button is inactive for
PL and Cintiq series tablets.
• When you first install your tablet, the A
PPLICATION LIST
displays the ALL A
PPLICATIONS
This contains tablet and tool settings for all of your applications.
• The T
OOL LIST
displays an icon f or the pen. (The T
OOL LIST
can display multiple tool icons when used
with Wacom Intuos or Graphire tablets which support the use of multiple input tools.)
When you are ready to create custom settings for individual applications, see W
Specific Settings.
icon.
orking with Application-
Page 8
Help
Contents Back
<< >>
CONTROL PANEL BUTTONS
The control panel buttons apply to all items in the control panel, including tab settings, items in control
panel lists, and menu options.
For Windows:
• To close the control panel and save changes, click
• To close the control panel without saving changes, click
• To apply your changes and remain in the control panel, click The changes you apply
are saved.
• To display online Help for the control panel, click Or, you can choose H
H
pull-down menu.
ELP
Balloon Help, which provides quick information and useful tips, is also available for most control panel
items. To access balloons, pause the screen cursor over the item for which you would like information.
Help for individual dialog boxes is available by clicking on the H
ELP
... button in the specific dialog box.
... from the
ELP
Page 9
Help
Contents Back
<< >>
For Macintosh:
The control panel buttons are common to the entire control panel.
• To exit the control panel, either click on the close bo x (located on the window title bar), or select Q
C
LOSE
from the F
• To display online Help for the control panel, click Or, you can choose H
ILE
menu.
... from the H
ELP
ELP
down menu.
Balloon Help, which provides quick information and useful tips, is also available for most control panel
items. (For Macintosh OS X, tool tips are displayed for most control panel items.) To access balloons,
turn them on by selecting S
HOW BALLOONS
from the H
menu. Help for individual dialog boxes is
ELP
available by clicking on the button in the specific dialog box.
UIT
or
pull-
Page 10
Help
Contents Back
<< >>
CUSTOMIZING YOUR INTERACTIVE PEN DISPLAY
To change your tablet, display, or pen settings, open the Wacom tablet control panel, select the desired
tab, and modify the settings.
CINTIQ PEN TABS
When you open the Wacom tablet control panel, the following tabs are displayed:
Displayed if you are working with a serial connection.
Displayed if you are using a USB connection that supports Recognition Data mode.
Page 11
Help
Contents Back
<< >>
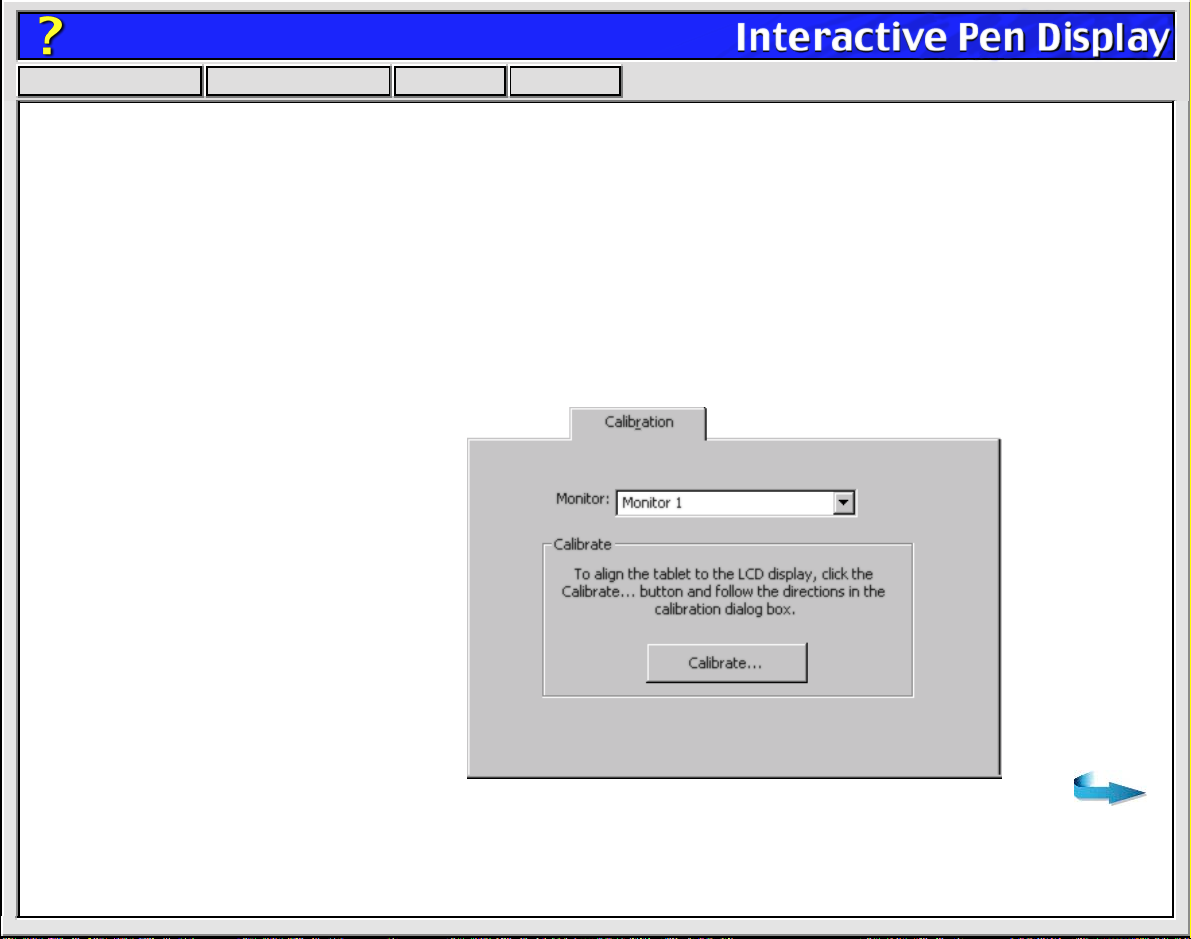
CALIBRATING THE INTERACTIVE PEN DISPLAY
You will need to calibrate the tablet in order to line up the screen cursor position with the position of the
pen on the Interactive Pen Display. On a multiple monitor system you may also have to select the LCD
display when calibrating the tablet.
After setting the tablet in its working position, follow the procedure below to calibrate the tablet.
Important:
make sure the LCD display is properly adjusted before calibrating the tablet.
1. From the control panel, select
the CALIBRATION tab.
2. If you are working with multiple
monitors, select the MONITOR
that corresponds to the tablet’ s
LCD display.
3. Click on the CALIBRATE...
button to display the monitor
calibration screen.
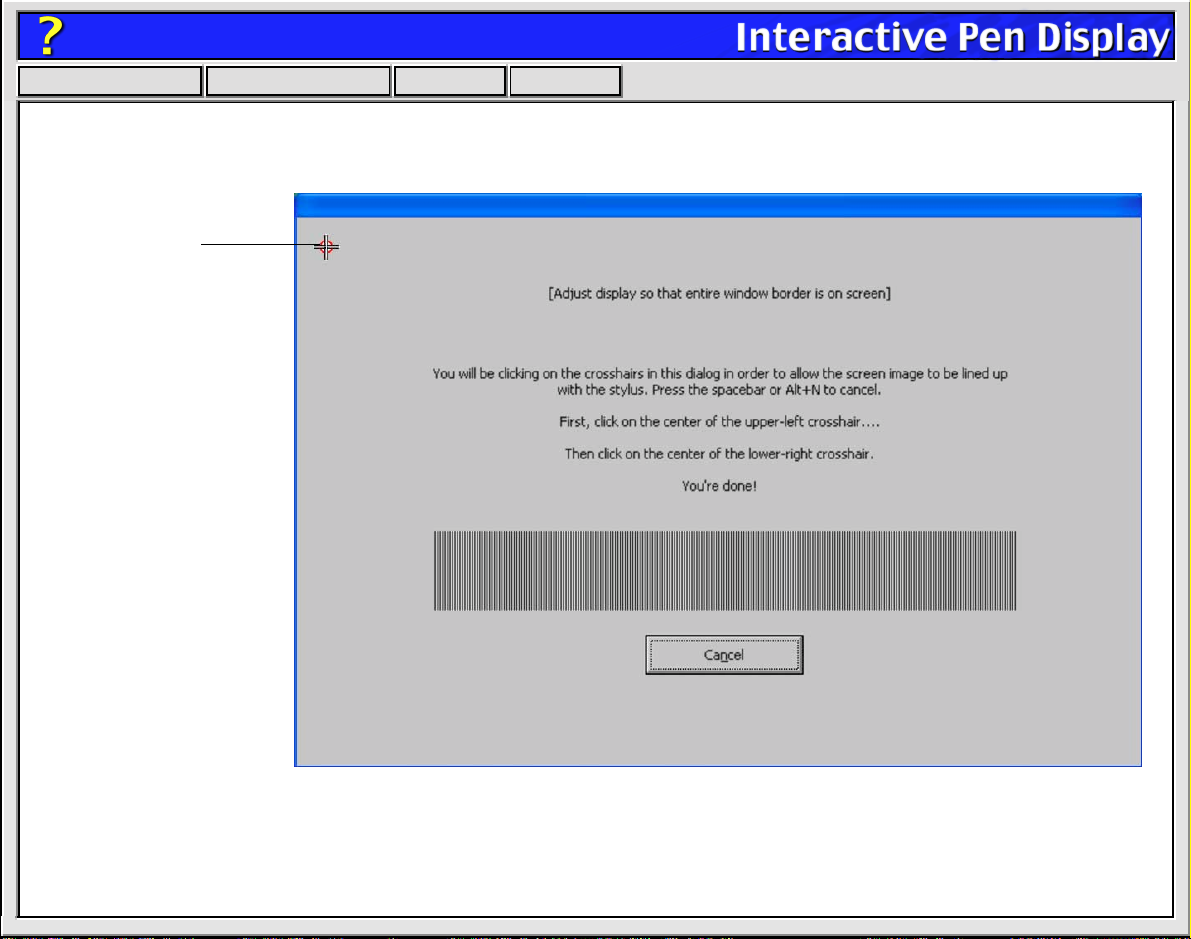
If you are using a V GA connection with your Interactiv e P en Displa y,
Page 12
Help
Contents Back
Cross-hairs
4. Hold the pen as you
normally do, and use
the pen tip to click on
the cross-hairs in the
upper-left corner.
5. Then click on the
cross-hairs that are
displayed in the lowerright corner.
Note: The calibration
setting applies to all
applications.
<< >>
Note: If you are using an analog video (VGA) connection, a series of single pixel lines will be displayed to
allow better adjustment of the Interactive Pen Display. Refer to the Installation Guide and User’s Manual for
details on making this adjustment.
Page 13
Help
Contents Back
<< >>
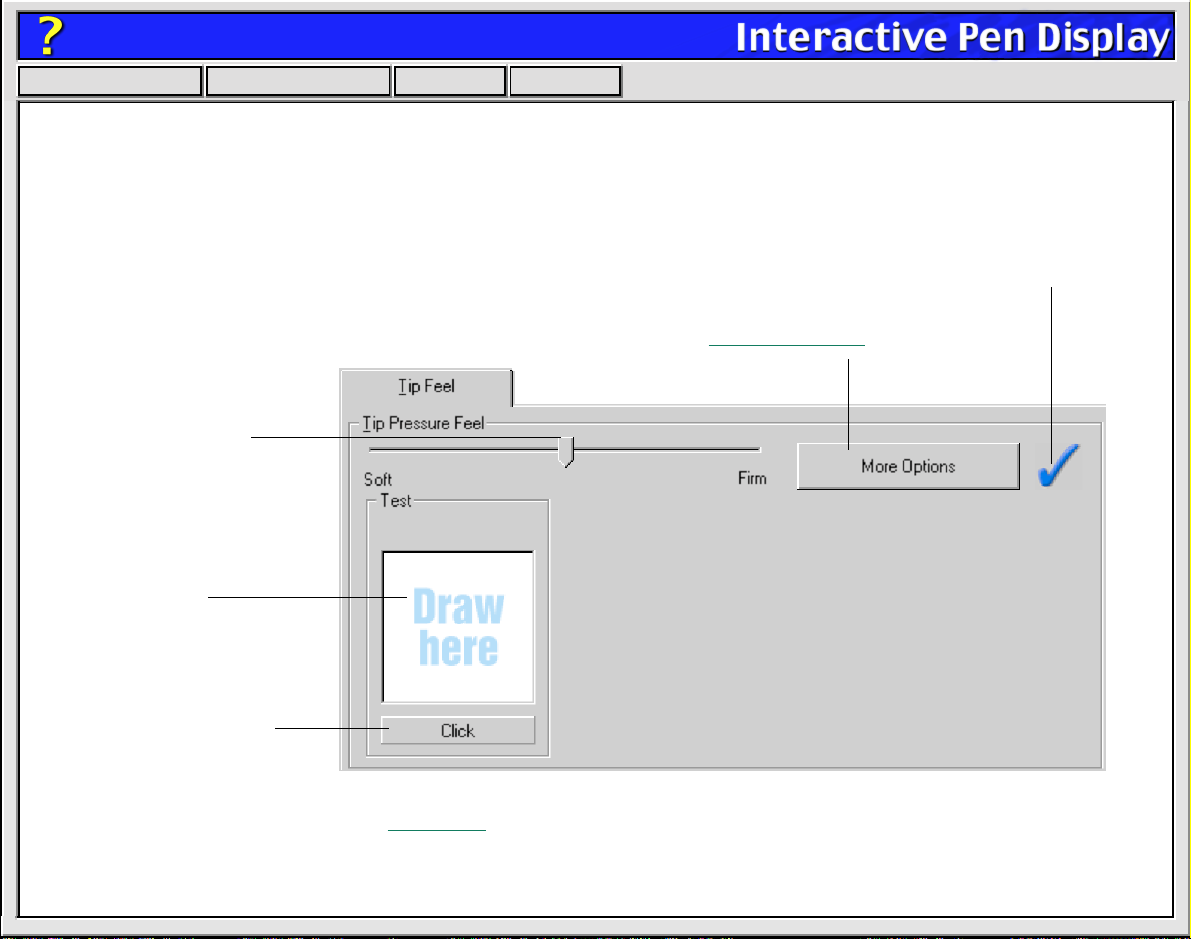
ADJUSTING TIP FEEL
To adjust the sensitivity of your pen tip, select the TIP F
with a light touch, use a soft tip setting. For maximum control while drawing thin lines, use a firm tip
setting.
Drag the slider to a
softer or firmer setting.
Make several pen
strokes to test the
current pressuresensitivity setting.
EEL
tab. To create broad brush strokes or to click
A checkmark appears when advanced settings are in effect.
Toggles to the advanced options display.
Click here with your pen
tip to test the current click
pressure setting.
Note: For all screen shots of tabs, the tab buttons are omitted in order to save space.
Page 14
Help
Contents Back
<< >>
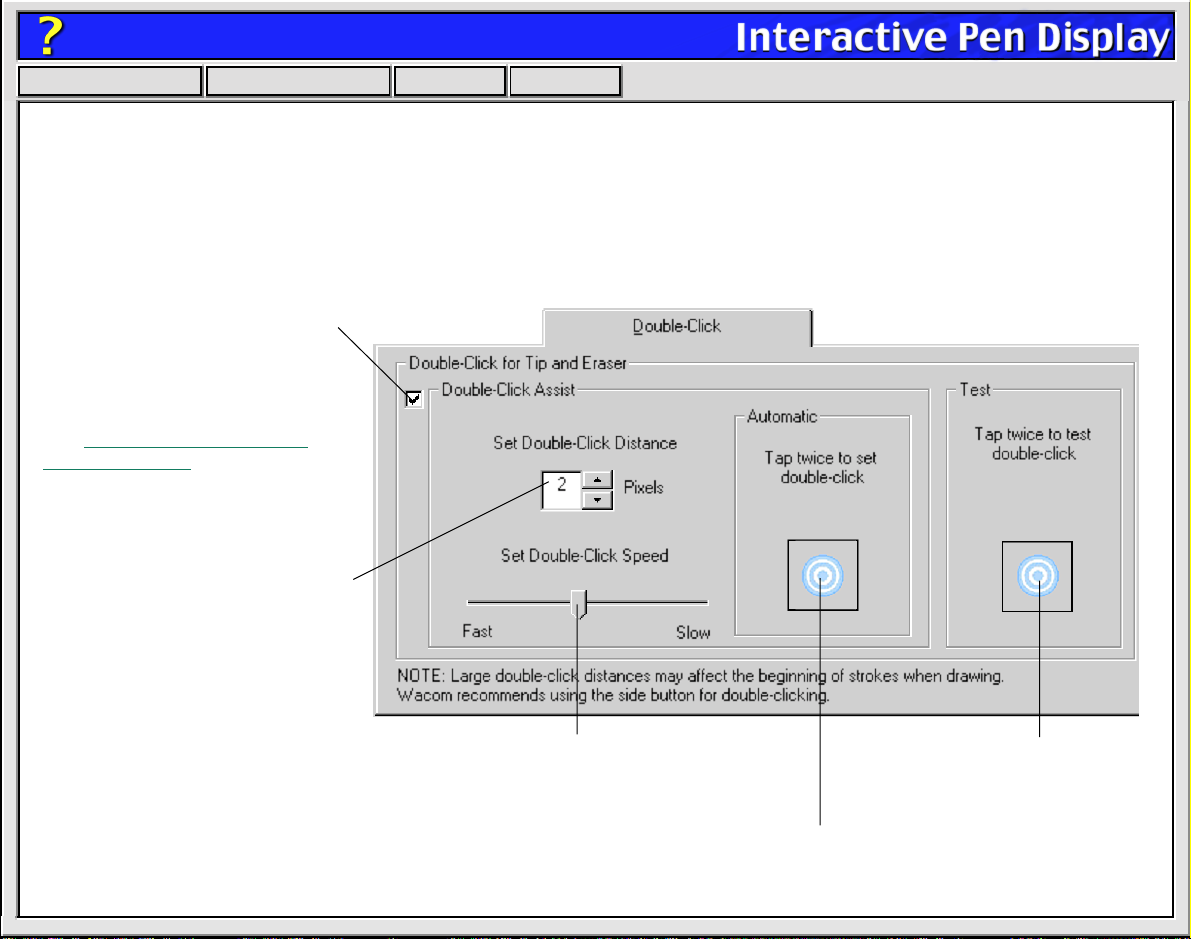
ADJUSTING DOUBLE-CLICK
Double-clicking with the pen tip can be made easier b y e xpanding the tap area that accepts a doub le-clic k
(the double-click distance) and reducing the speed required to perform a double-click. This can be set in
the D
OUBLE-CLICK
some drawing applications, Wacom recommends setting a small double-click distance and using the
upper side switch (Windows) or lower side switch (Macintosh) to double-click.
Use custom double-click settings
when checked.
Note: DOUBLE-CLICK ASSIST can
be enabled for some applications
and disabled for others.
See Working with Application-
Specific Settings for more
information.
Enter a number from 1 to 25 pixels
or click the up and down arrows to
increase or decrease double-click
distance.
tab. Because a large double-click distance may adversely affect your brushstrokes in
Drag the slider to change the double-click speed.
A slower speed makes double-clicking easier.
For Windows:
turning on the Web style interf ace so that y ou
can navigate using a single click of the pen.
You might also consider
Double-click on the target
to test your settings before
applying them.
Tap twice on this icon with your pen tip to automatically set double-click
distance and speed based on the way you normally double-click.
Page 15
Help
Contents Back
<< >>
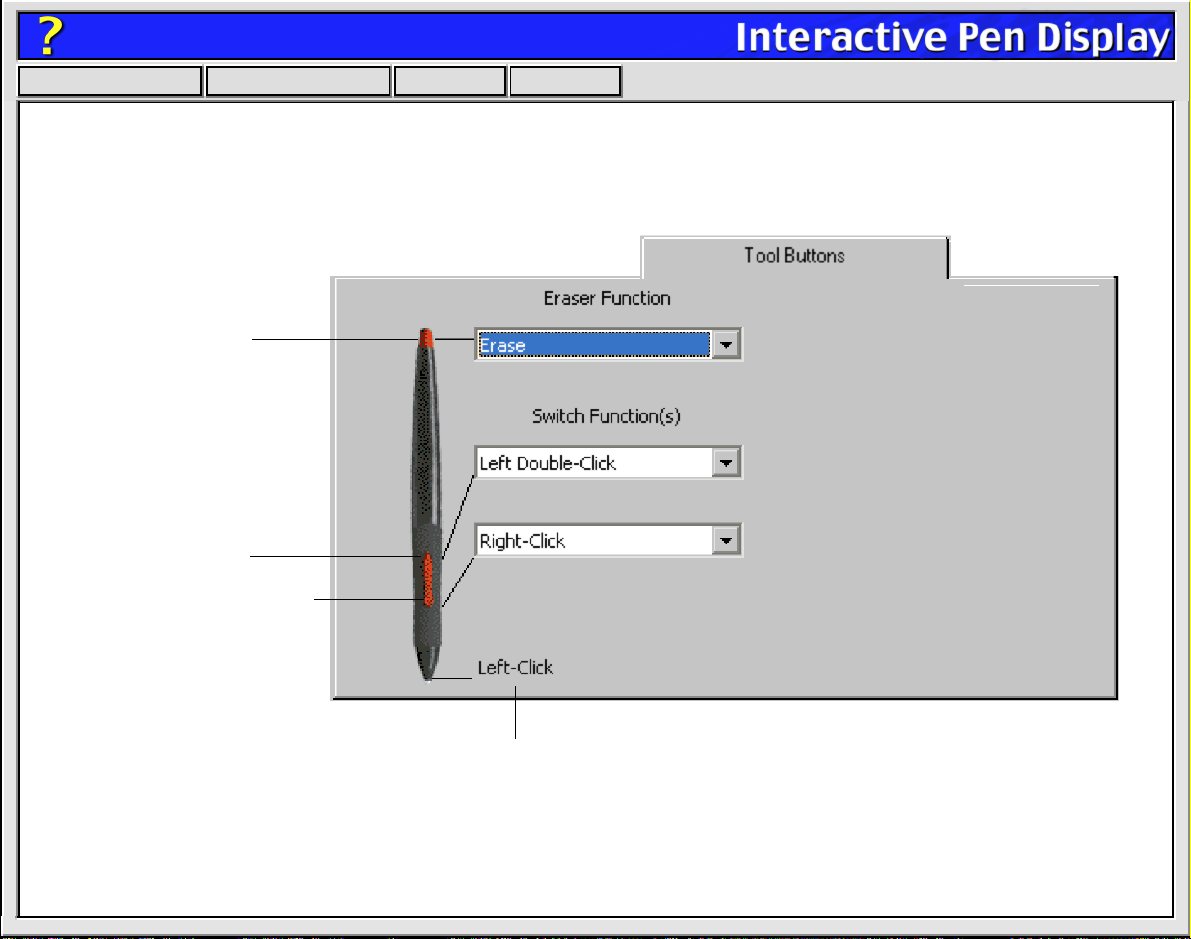
CUSTOMIZING T OOL BUTTONS
Select the T
pen. For each tool button, a pull-down menu enables you to choose the function that will be performed.
Select the function to perform
when using the eraser.
Select the function to
perform when pressing
the upper side switch.
Select the function to perform
when pressing the lower side
switch.
OOL BUTTONS
tab to change the functions assigned to the eraser, side switch, and tip of your
Click here to change the function assigned to the pen tip. The tip must
be set to left click in order to draw in most graphics applications.
Page 16
Help
Contents Back
<< >>
Button Functions
Each button has a pull-down menu that allo ws you to choose the function that will be performed when the
button is pressed. The following list describes all available functions. However, some options are not
available for all buttons.
• L
EFT-CLICK. (Windows and Macintosh OS X only.) Default setting for the pen tip. This option
simulates a left mouse button click. Be sure at least one button performs this function so you can
always navigate and click.
• Click. (Classic Macintosh only.) Default setting for the pen tip. This option simulates a mouse button
click. Be sure at least one button performs this function so you can always navigate and click.
• L
EFT DOUBLE-CLICK. (Windows only.) Default setting for the upper position of the side switch.
When this option is selected, pressing the switch simulates a left mouse button double-click.
For easier double-clicking, use this function instead of tapping twice with your pen tip.
• Double-Click. (Macintosh only.) Default setting for the lower position of the side switch. When this
option is selected, pressing the switch simulates a mouse button double-click. For easier doubleclicking, use this function instead of tapping twice with your pen.
• R
IGHT-CLICK. (Not available on Classic Macintosh.) Default setting for the lower position of the side
switch. This simulates a right mouse button click.
• M
IDDLE-CLICK. (Not available on Classic Macintosh.) Simulates a middle mouse button click.
• L
EFT CLICK-LOCK. (Windows only.) Simulates holding down the left mouse button. Press the tool
button once to initiate click lock. Press the button again to release click lock. Click lock is useful for
dragging objects or selecting blocks of text.
Page 17
Help
Contents Back
<< >>
• Click-Lock. (Macintosh only.) Simulates holding down the mouse button. Press the tool button once
to initiate click lock. Press the button again to release click lock. Click lock is useful for dragging
objects or selecting blocks of text.
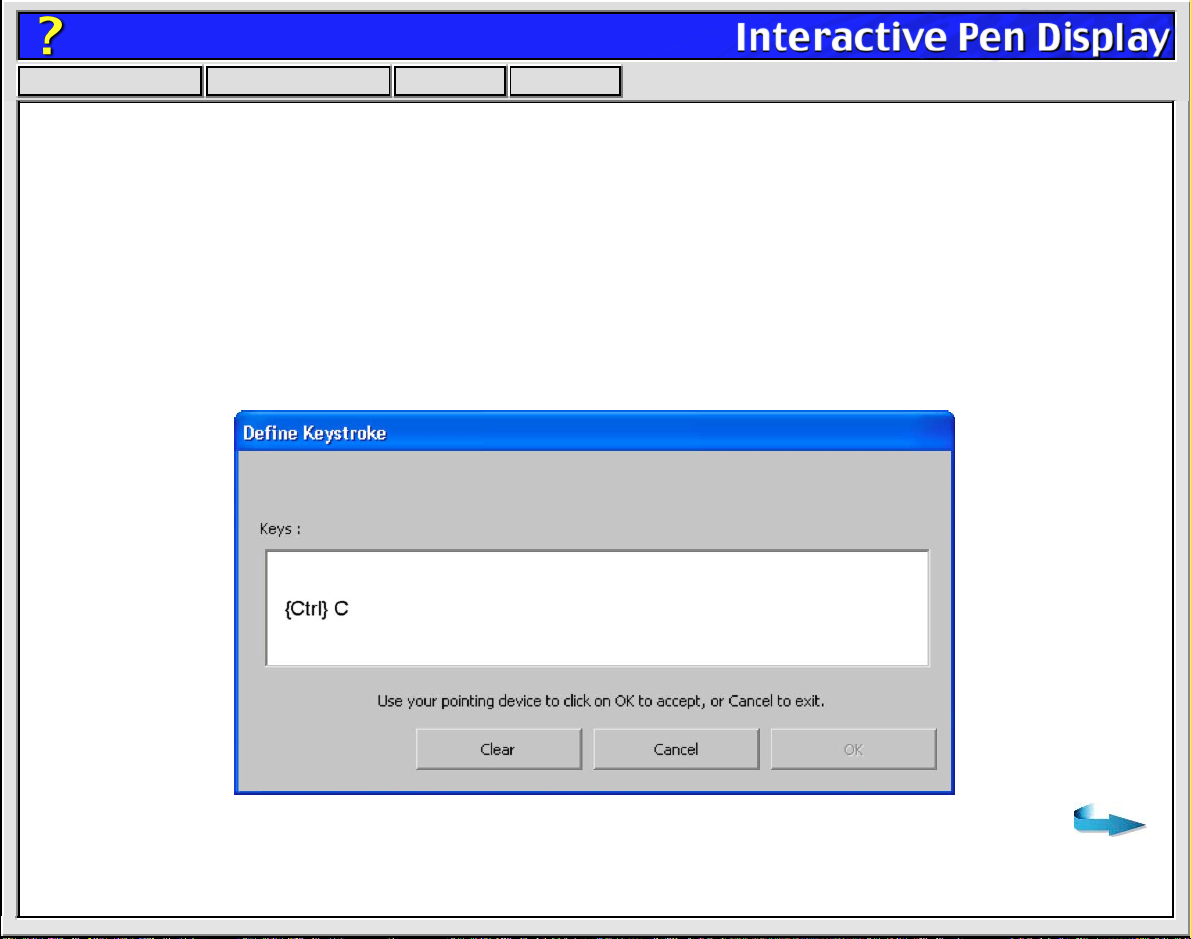
• K
EYSTROKE.... Enables you to simulate a series of keystrokes. When you select this option, the
D
EFINE KEYSTROKE dialog box appears. There, you can enter a keystroke or keystroke sequence to
play back. Keystroke combinations can include letters, numbers, function keys (such as F3) and
modifier keys (such as S
Important:
Because the ENTER key (Windows) or RETURN key (Macintosh) can be selected as a
HIFT or CTRL). After defining a keystroke sequence, click OK.
defined keystrok e , it cannot be used to select OK. You m ust use y our tool to clic k on the OK button.
Page 18
Help
Contents Back
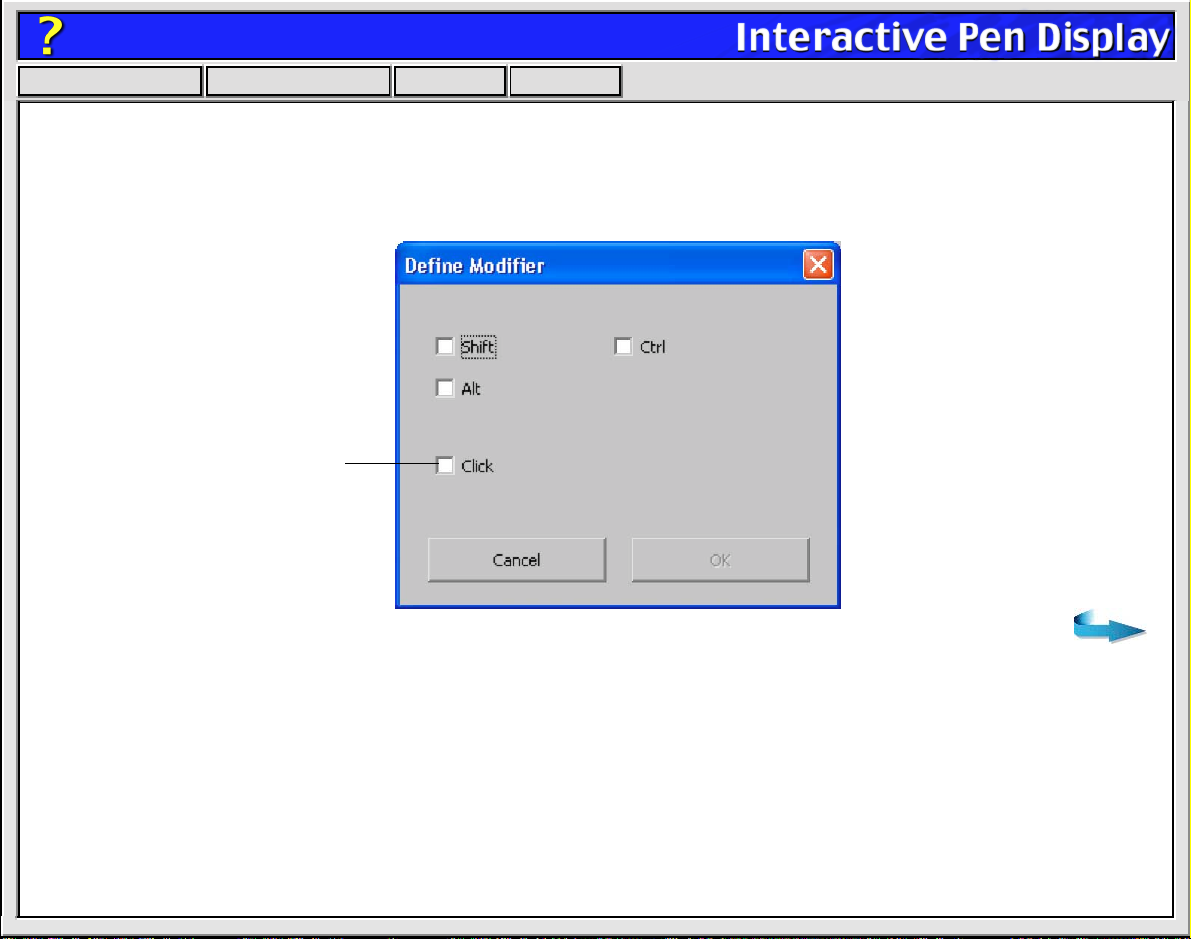
• M
ODIFIER.... Enables you to simulate modifier key(s) (such as SHIFT or CTRL). Many applications use
<< >>
modifier keys to constrain the size or placement of objects. If you select this option, the D
M
ODIFIER dialog box appears. There, you select the modifier key(s) to simulate.
For Macintosh:
options will be SHIFT, CONTROL,
OPTION, COMMAND, and CLICK.
You can select the CLICK box plus
one or more modifier key options
to define the function you want
your tool button to simulate.
Windows dialog box shown above.
EFINE
The available
Page 19
Help
Contents Back
<< >>
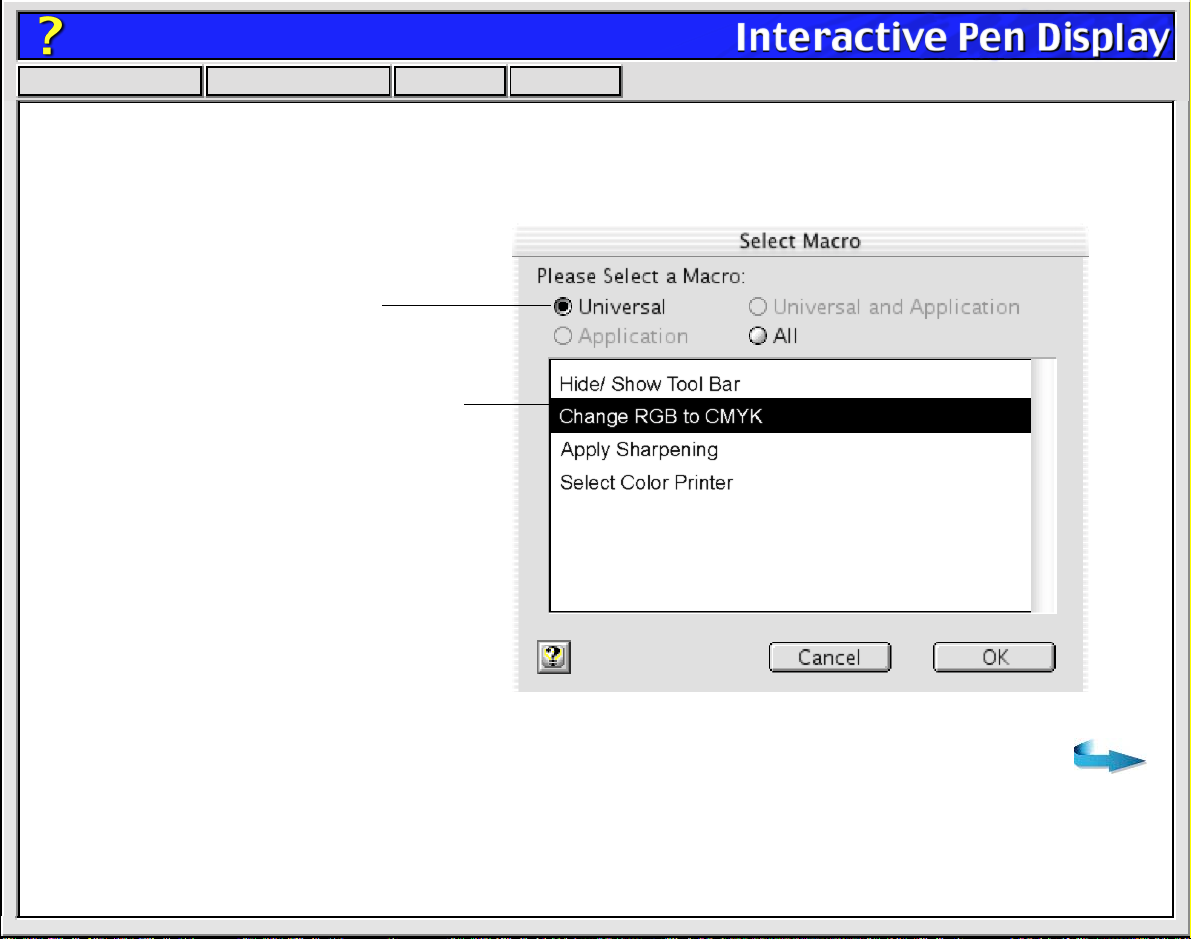
• Macro... (Macintosh only.) Enables you to play a macro sequence. When you select this option, the
S
ELECT MACRO dialog box appears. There, you can select a predefined macro to play back.
After selecting a macro, click OK.
Choose the macro type.
Select the macro you wish to use.
Note: Before you can add macros, you must first
create them with a third-party macro application.
Page 20

Help
Contents Back
• P
RESSURE HOLD. Sets a button so that, when pressed, the pressure is locked at the current pressure
<< >>
level until the button is released. For example, you can paint with pressure-sensitivity until you reach
the brush size that you like. You can then press the button and continue painting with the same size
brush until the button is released.
• M
ODE TOGGLE.... Toggles between PEN MODE and MOUSE MODE. When first setting a tool button to
M
ODE TOGGLE..., the MOUSE SPEED dialog box is displayed where you can adjust the mouse
acceleration and speed.
Sets the screen cursor speed when in MOUSE MODE.
Sets the screen cursor acceleration when in MOUSE MODE.
With the Interactive Pen Display
correctly calibrated in PEN MODE,
the screen cursor should always
follow the physical pen tip on the
screen. PEN MODE is the default
setting.
In MOUSE MODE, the screen
cursor is not directly “linked” to the
pen tip and is positioned like a
mouse, requiring a “pick up and
roll” action to move the cursor on
the screen.
On multiple monitor systems,
MOUSE MODE will allow you to
access the other monitor(s) with
your pen.
You can also switch between PEN
MODE and MOUSE MODE by using
the screen Pop-up Menu.
See Customizing the Pop-up
Menu for more information.
Page 21

Help
Contents Back
• P
OP-UP MENU. Displays a Pop-up Menu on your screen. See Customizing the Pop-up Menu for more
<< >>
information.
• E
RASE. Default setting for the eraser . When the screen cursor is over a text box or application windo w
that is supported by the eraser, the eraser cursor is displayed and any selected text or objects are
deleted.
• I
GNORED. Disables the button function.
Page 22

Help
Contents Back
<< >>
ADJUSTING ERASER FEEL
To adjust the sensitivity of your pen’s eraser, select the ERASER FEEL tab. To erase with a broad stroke or
to click with a light touch, use a soft eraser setting. For maximum control while erasing, use a firm eraser
setting.
A checkmark appears when advanced settings are in effect.
Toggles to the advanced options display.
Drag the slider to a
softer or firmer setting.
Using your eraser, test
the current eraser
pressure-sensitivity
setting by erasing here.
Erase this text. Using your
eraser, select text to test
the current eraser click
pressure setting.
Page 23

Help
Contents Back
<< >>
CUSTOMIZING THE POP-UP MENU
Select the POP-UP MENU tab to customize the available functions on the Pop-up Menu list. The Pop-up
Menu list may include keystroke functions, mapping options, and predefined macros (Macintosh only).
To display the Pop-up Menu, set one of your tool buttons to the P
push that button, the Pop-up Menu is displayed. Select items in the Pop-up Menu by clicking on them.
To close the Pop-up Menu without making a selection, just click outside of the Pop-up Menu.
OP-UP MENU function. Whenever you
For Macintosh:
be available. It can be used to add a predefined
macro to the menu list. Before y ou can add macros,
you must first create them with a third-party macro
application.
Adds a keystroke macro to the menu list.
Displays a Mouse Speed dialog box where y ou can
set the screen cursor speed and acceleration while
in MOUSE MODE. If you remove the PEN MODE and
MOUSE MODE options from the menu list, this button
is replaced with the ADD MAPPING OPTIONS button,
which enables you to add PEN MODE and MOUSE
MODE options back to the Pop-up menu list.
An ADD MACRO... button will also
Displays a list of functions that will appear in the P op-up Menu.
Removes the selected item(s) from the list.
Windows dialog box shown.
Page 24

Help
Contents Back
<< >>
ADD MACROS (MACINTOSH ONLY)
To add a macro to the Pop-up Menu, click on the ADD MACRO... button. A dialog box will appear where
you can select the name of a macro function to add. You can also set different macros for different
applications. See W
Note:
Before you can add macros, you must first create them with a third-party macro application.
orking with Application-Specific Settings for more information.
ADD KEYSTROKES
To add a keystroke definition to the Pop-up Menu, click on the ADD KEYSTROKE... button. A dialog box will
appear where you can specify and name the keystroke function. You can also create different keystroke
functions for different applications. See W
orking with Application-Specific Settings for more information.
Page 25

Help
Contents Back
<< >>
SETTING MOUSE SPEED
To change the screen cursor acceleration and speed when in MOUSE MODE, click on the SET MOUSE
S
PEED... button (located on the POP-UP MENU tab) to display a dialog box where you can make your
adjustments. If you removed the P
button is replaced with the A
M
ODE options back to the menu list.
Sets the screen cursor acceleration when in MOUSE MODE.
DD MAPPING OPTIONS button, which enab les you to add P EN MODE and MOUSE
EN MODE and MOUSE MODE options from the POP-UP MENU list, this
Sets the screen cursor speed when in MOUSE MODE.
Note:
The MOUSE SPEED dialog box will also appear when you first set a tool button to MODE TOGGLE...
from the T
OOL BUTTONS tab.
Page 26

Help
Contents Back
<< >>
ADD MAPPING OPTIONS
Click on the ADD MAPPING OPTIONS button (when visible) to add the PEN MODE and MOUSE MODE mapping
options to the Pop-up Menu list.
• With the Interactive Pen Display correctly calibrated in P
EN MODE, the screen cursor should always
follow the physical pen tip on the screen. PEN MODE is the default setting.
• In MOUSE MODE, the screen cursor is not directly “link ed” to the pen tip and is positioned like a mouse,
requiring a “pick up and roll” action to move the cursor on the screen. On multiple monitor systems,
MOUSE MODE will allow you to access the other monitor(s) with your Cintiq Pen.
REMOVING POP-UP MENU OPTIONS
To remove mapping option(s), keystroke function(s), or macro(s) from the Pop-up Menu list, select the
function(s) you wish to remov e and clic k the R
as a single item. Multiple items may be selected for removal by pressing the S
them.
EMOVE button. Mapping options must be added or remov ed
HIFT key and clicking on
Page 27

Help
Contents Back
<< >>
WORKING WITH APPLICATION-SPECIFIC SETTINGS
You may wish to have different tool settings for a particular application. The APPLICATION LIST lets you
customize your tablet and pen settings for individual applications.
The APPLICATION LIST
displays icons for
applications with
customized settings.
Tab settings apply
only to the selected
application.
Your current selections are highlighted. Wedges emphasiz e
the relationship between tab settings and the selected tool
and application.
Page 28

Help
Contents Back
If application-specific settings have not been created, a single icon labeled A
in the A
PPLICATION LIST, and the pen settings displayed in the tabs are applied to all applications.
<< >>
LL APPLICATIONS is displayed
When a second application is added to the APPLICATION LIST, the ALL APPLICATIONS icon changes to ALL
O
THER APPS, and a new icon is displayed for the new application settings.
If you select the ALL OTHER APPS icon and make changes to the tab settings, your changes will apply to all
applications except the specific one(s) you have added to the list. If you select the icon for a specific
application and make changes to the tab settings, your changes will apply to only that application.
Page 29

Help
Contents Back
<< >>
CREATING AN APPLICATION-SPECIFIC SETTING
To create an application-specific setting, click on the ADD APPLICATION TO LIST... button or select
A
PPLICATIONS FOR CUSTOM SETTINGS... from the ADD pull-down men u. The ADD APPLICATION FOR CUSTOM
S
ETTINGS dialog box appears.
Select an application to add to the
APPLICATION LIST.
Only applications that are
currently running and that have
not previously been added to the
APPLICATION LIST are displayed.
If you have more than one tablet,
select the tablet(s) for which to
add application-specific settings.
BROWSE to select the
executable file of any
application installed on
your computer.
Note: If two programs
have the same file name,
they will share the same
customized settings.
Displays the name of the
selected application.
Note: First customize settings for one application. When you feel comfortable with using
application-specific settings, you can create more application-specific settings.
Click OK to continue.
Page 30

Help
Contents Back
<< >>
CHANGING SETTINGS FOR A SPECIFIC APPLICATION
To change settings for a specific application, from the APPLICATION LIST choose the application you want to
change pen settings for. Change the tab settings for the selected application and tool combination.
REMOVING APPLICATION-SPECIFIC SETTINGS
To remove application-specific settings:
1. Open the REMOVE menu and select CUSTOM SETTINGS FOR APPLICATION....
2. In the R
want to remove the custom settings and click OK.
EMOVE CUSTOM SETTINGS FOR APPLICATION dialog box, select the application(s) for which you
Page 31

Help
Contents Back
<< >>
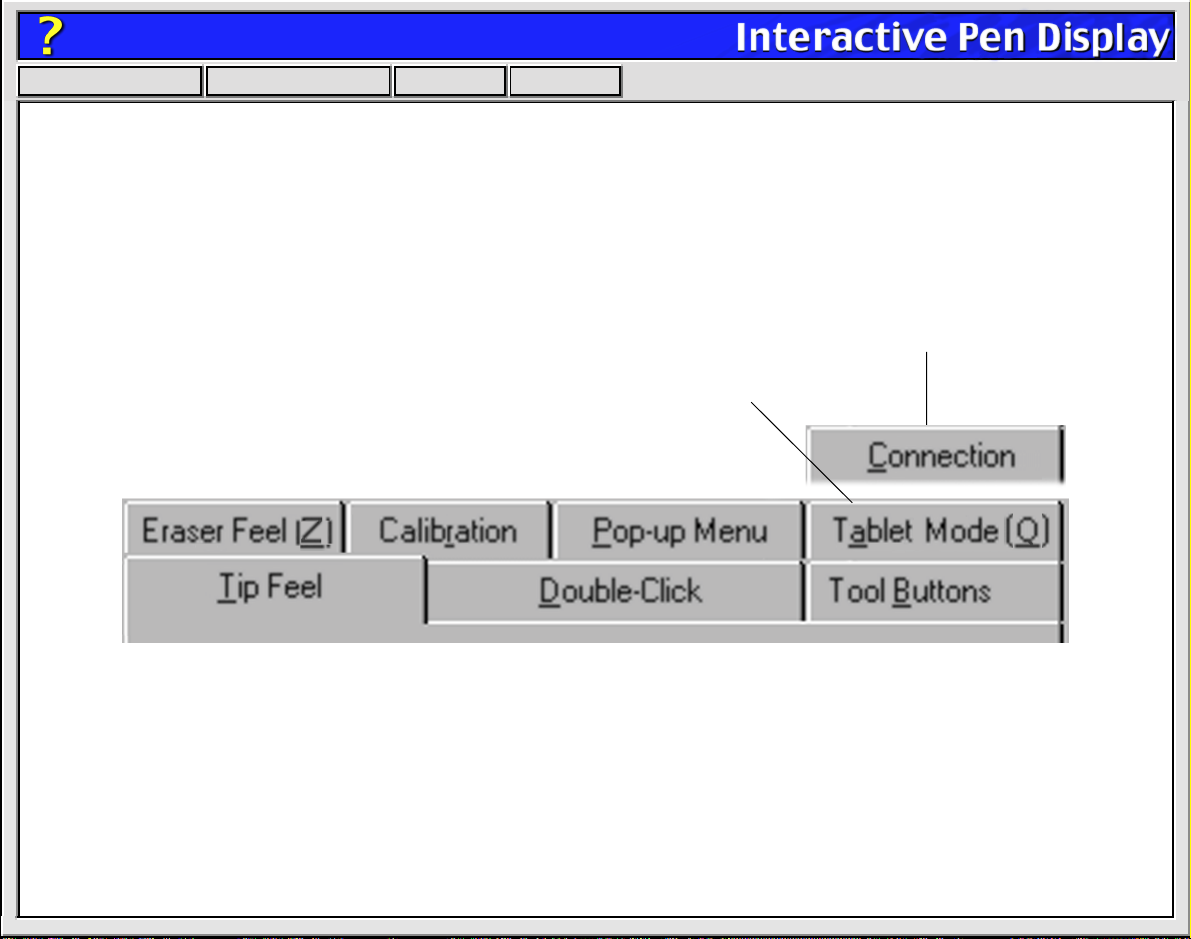
CHECKING YOUR USB CONNECTION MODE
If you are working with a USB connection, select the TABLET MODE tab to set the mode your tablet is
operating in. S
R
ECOGNITION DATA mode increases the number of data packets sent, and should only be used with
handwriting recognition applications which require this setting. Other applications may run slower when
using the R
Recommended for
graphics applications.
Maximum data rate.
Required by some
handwriting recognition
software.
TANDARD mode is the default setting, and is recommended for most applications.
ECOGNITION DATA setting.
Note: This tab is not available for the Cintiq 15X.
Page 32

Help
Contents Back
<< >>
CHECKING YOUR SERIAL CONNECTION
Select the CONNECTION tab to check the status of your tablet serial connection to the serial computer
input port.
When checked, the
tablet driver is on.
Displays all serial ports.
The port in use by the tablet
is selected. Ports used by
other devices are dimmed.
Recommended for
graphics applications.
Maximum data rate.
Required by some
handwriting recognition
software.
Note: MODE options are not
available for the Cintiq 15X.
Displays messages about your selected serial port.
•CONNECTED. The tablet is connected and responding correctly.
•NOT RESPONDING. There is no communication between the tablet
and the computer.
•OVERRIDDEN. Another application has taken over control of the
serial port.
•DRIVER OFF. The tablet driver is turned off.
Page 33

Help
Contents Back
<< >>
PULL-DOWN MENUS
Use the pull-down menus to access additional custom settings options, a language selection menu, and
online documentation. Help is available for most dialog boxes that appear when you make a menu
selection—just click on the dialog box Help button for detailed information on settings and options.
For Windows:
down the A
FILE
The FILE menu contains the following options:
• SUMMARY.... Provides a summary of your current settings.
• EXIT. (Windows only.) Exits the control panel.
• Close or Quit. (Macintosh only.) Closes the control panel and saves any changes.
EDIT
The EDIT menu contains the following options:
You can use keyboard shortcuts to select a menu. To select a menu in this manner, hold
LT key and press the key corresponding to the letter underlined in the menu option.
• COPY SETTINGS TO.... Opens a dialog box where you can copy your customized settings to another application.
You can also access this dialog box by clicking on the COPY SETTINGS TO... tab button.
• RESET SETTINGS.... Opens a dialog box where you can reset your customized settings to their factory default values.
• RENAME TOOL.... Opens a dialog box where you can assign a custom name to your Cintiq Pen.
• PREFERENCES.... Opens a dialog box where you can change general tablet operating preferences.
Page 34

Help
Contents Back
<< >>
ADD
The ADD menu contains the following options:
• TABLET.... Opens a dialog box where you can add one or more tablets.
• APPLICATION FOR CUSTOM SETTINGS.... Opens a dialog box where you can add an application to the APPLICATION LIST.
This is also accessed by clicking on the ADD APPLICATION TO LIST... button. Refer to Working with Application-Specific
Settings for more information.
REMOVE
The REMOVE menu contains the following options:
• TABLET.... Opens a dialog box where you can remove one or more tablets from the control panel driver.
• CUSTOM SETTINGS FOR APPLICATION.... Opens a dialog box where you can remove custom tool settings from an
application.
Note:
If only one item is available for a particular REMOVE menu option, the option will be dimmed.
Page 35

Help
Contents Back
<< >>
LANGUAGE
The LANGUAGE menu allows you to switch between English and other installed languages. Typically, the
language of the operating system is installed when you install the driver, but additional languages can be
installed by performing a custom install over the initial installation.
HELP
The HELP menu contains the following options:
• HELP.... Displays online Help.
• USER’S MANUAL.... An online User’s Manual is not available. Please refer to the printed Installation Guide and User’s
Manual and to the information within this Help file for instructions on using your Interactive Pen Display.
• GETTING STARTED.... Displays an overview of the control panel.
• DIAGNOSTICS.... Displays diagnostics information for your tablet and pen.
• ABOUT.... (Windows only.) Displays information about the control panel and driver.
Page 36

Help
Contents Back
<< >>
ADVANCED TIP PRESSURE SETTINGS
To customize advanced tip pressure settings, from the TIP FEEL tab select MORE OPTIONS. The advanced
options enable you to change the click pressure and pressure curve settings independently. (In the basic
options display, these settings are adjusted simultaneously with the T
Important:
customize advanced settings, then drag the T
The TIP PRESSURE FEEL slider overrides the advanced pressure settings. If you
IP PRESSURE FEEL slider, your advanced settings will
be removed.
Use these controls to manually change the pressure curve shape.
Test the results
of your changes
before you
apply them.
IP PRESSURE FEEL slider.)
Toggles to the basic options display.
After you set advanced
settings, a checkmark
appears.
Use this area to
automatically set the
maximum amount of
force to use when
drawing.
The pressure curve graphically displays the relationship between
force applied to your tool and pressure reported to an application.
Page 37

Help
Contents Back
<< >>
CLICK FORCE ADJUSTMENT
The click force setting adjusts the amount of force required to generate a button click.
The CLICK FORCE bar graphically displays
the force level at which a click occurs.
Enter a value from 1 to 50% or drag
the CLICK FORCE bar to set the force
at which a click occurs.
Note: For optimal performance in graphics applications, set the
click force and minimum tip force to the same value.
Page 38

Help
Contents Back
<< >>
PRESSURE CURVE ADJUSTMENT
Changing the shape of the pressure curve will change the feel of the pen tip. A pressure curve that
increases quickly makes the tip feel more sensitive to changes in force.
The control points at each end of the pressure curve set the minimum and maximum amount of force y our
pen will respond to. If you have a soft touch and want to achieve full pressure without having to apply full
force to your pen, decrease the maximum force level. You can apply less force to your pen and still have
the effects of full pressure. The default for maximum force is 100%.
T o change curve shape,
drag the control point to
a new position.
Enter a value from 20 to 100%, or
drag the MAXIMUM TIP FORCE control
to set the maximum force your pen
tip will respond to.
Enter a value from 0 to 80%, or drag the
MINIMUM TIP FORCE control to set the
minimum force that will register pressure.
Page 39

Help
Contents Back
To automatically set the maximum force for the way you draw, click the S
sever al strok es in the dra wing area. As you draw , the M
<< >>
TART OVER button and draw
AXIMUM TIP FORCE control moves, and the value in
the edit box changes to reflect the peak pressure registered by your hand movements . To start over, click
the S
TART OVER button and begin a new drawing.
While applying normal pressure to the pen tip, draw
several strokes here to automatically set the maximum
force value.
Click here to reset maximum force value to the
start value for this test.
Page 40

Help
Contents Back
<< >>
ADVANCED ERASER PRESSURE SETTINGS
To customize advanced eraser pressure settings, select the ERASER FEEL tab and click on the MORE
O
PTIONS button. You work with the advanced eraser settings in the same manner as with the Advanced
Tip Pressure Settings.
Important:
customize advanced settings, then dr ag the E
will be removed.
The ERASER PRESSURE FEEL slider overrides the advanced pressure settings. If you
RASER PRESSURE FEEL slider, y our adv anced settings
Page 41

Help
Contents Back
<< >>
COPYING SETTINGS
To copy settings from one application to another application, choose the COPY SETTINGS TO... option from
the E
DIT menu, or click on the COPY SETTINGS TO... button. A dialog box is displayed where you can copy
settings between different applications. (Note that the C
an application-specific setting has been created. See Creating an Application-Specifi
information.)
Choose from where settings will be copied.
Select where settings will be copied to.
OPY SETTINGS TO... option will not be active until
c Setting for more
Page 42

Help
Contents Back
<< >>
USING MULTIPLE TABLETS
If multiple Wacom tablets are installed on a single computer when the Wacom tablet control panel is
opened, a T
each installed tablet, and allows you to select the tablet for which your changes will apply.
Select a tablet icon for which to customize
application and tool settings.
If you have more than one tab let attached to
your system, make sure that the tablet you
are calibrating is selected in the TABLET
LIST.
To add an additional tablet, follow the hardware installation instructions for connecting that tablet.
• For USB and serial connections on systems that support “plug and play”, the system automatically
searches the ports. If the new tablet is found, it is initialized and added to the T
• Otherwise, from the Wacom tablet control panel’s A
ABLET LIST is displayed above the APPLICATION LIST. The TABLET LIST contains an icon for
ABLET LIST.
DD menu, choose TABLET... and follow the prompts.
• If multiple tablets are installed, the tablet used to open the Wacom tablet control panel is selected as
the default tablet.
Page 43

Help
Contents Back
<< >>
TROUBLESHOOTING
Most of the time your tablet will work flawlessly. But if y ou are having troub le, Wacom recommends you do
the following:
1. Refer to the troubleshooting procedures described in this section and in the printed Installation Guide
and User’s Manual.
2. Look in the troubleshooting tables. Your problem may be described there and you can try the
solution offered.
3. Open the Readme file for late-breaking information.
4. If you are having a compatibility conflict between your tablet and a new hardware or software product,
it may be helpful to download a new Wacom tablet software driver. Wacom periodically updates the
software driver to maintain compatibility with new products. See Who to Call
5. Check the FAQ (Frequently Asked Question) sheet on the Wacom web site for your region.
See Who to Call
6. If you hav e tried the suggestions in this Help and still cannot resolve the prob lem, then contact Wacom
for Technical Support.
If the Wacom Tablet driver failed to load properly, first perform the recommended action in the error
message on your screen. If that does not solve the problem, perform the troubleshooting tests for your
tablet and pen.
.
for your region.
T
ESTING THE INTERACTIVE PEN DISPLAY
TESTING YOUR CINTIQ PEN
RESOLVING SOFTWARE CONFLICTS FOR MACINTOSH OS 8 OR 9
Page 44

Help
Contents Back
<< >>
TESTING THE INTERACTIVE PEN DISPLAY
If the Wacom Tablet driver failed to load properly, first perform the recommended action in any error
message that may appear on your screen. If that does not solve the problem, perform the following tests.
Important:
to your video card user’s manual, as necessary. Do not connect or disconnect the video or power
cable while the Interactive Pen Display or your computer are turned on – this can damage the LCD
display or computer video card.
1.
Check the tablet and display connections.
to any other documentation that may have come with your product, for information on connecting the
cables.
2.
Check power to the tablet.
connected, the computer is turned on, and the power switch on the Interactive Pen Display is turned
on. If the power LED is not on:
• Check all connections (see above).
• Make sure your computer is turned on.
• Make sure your Interactive Pen Display is turned on.
Important:
to your tablet.
For LCD display setup problems, refer to the Installation Guide and User’s Manual and
Refer to the Installation Guide and User’s Manual, and
You should see the tablet power LED whenever the cables are properly
Use only the AC adaptor that came with the tablet. Other adaptors may cause damage
Page 45

Help
Contents Back
•
For PL-400 and PL-500 series tablets:
constantly lit LED until a video input signal is received from the computer. If your tablet po w er LED
does not light constantly, the most likely reason is that there is no video signal.
Verify that the video cable is properly connected. Remember to always turn off your computer
before disconnecting or connecting the video cable.
Turn on your computer and verify that the power switch on the Interactive Pen Display is in the on
position (pressed inward). Make sure you are using the AC power adaptor that came with your
tablet and that it is plugged into both the tablet and an active power outlet.
If the Interactive Pen Display still does not power up, determine if the DVI or DFP video card has
been properly installed. Most DVI or DFP video cards include an analog video port. You can attach
a CRT monitor to the analog video port in order to verify that the card has been properly installed
and is functioning.
3.
For USB connections,
active USB port. If you are using a USB hub, be sure it is properly connected and active, or try
plugging Cintiq directly into the USB port on your computer.
4.
For serial connections,
C
ONNECTION tab. It should indicate that the tablet is responding. If not, make sure that all tablet
cabling is properly connected.
5.
Check the pen.
should light green. Now, without applying pressure to the pen tip, press the side switch. The status
LED should again light green. If not, make sure you are using the correct pen that came with your
tablet. If you are still having problems, you may have a defective pen or tablet.
Press the pen tip against the surface of the tablet. The status LED on the tablet
make sure your computer is USB ready and that you are connected to an
check the tablet connection. Open the Wacom tablet control panel to the
<< >>
The Interactive Pen Display will not power up or show a
Page 46

Help
Contents Back
<< >>
TESTING YOUR CINTIQ PEN
From the Wacom tablet control panel’s HELP menu, select DIAGNOSTICS... to open the DIAGNOSTICS dialog
box. The tablet driver version, tablet hardware and connection, and pointing device information is shown.
1. While observing the P
A value for proximity, the device name, and device type should be displayed.
2. Move your tool along the tablet surface. The X and Y D
position.
3. Test your pen buttons. The tablet’s status LED should light green each time you click with the tool tip,
press the side switch, or press the tool’s eraser to the tablet.
• Press on the tablet surface with the pen tip—the S
change. (P
RESSURE should change from 0% with no pressure applied to 100% with full pressure is
applied.)
• Next, press the side switch without pressing the tip to the tablet—the S
change. (Do this for both positions of the DuoSwitch.)
Tip = 1, DuoSwitch (lower position) = 2, DuoSwitch (upper position) = 3, Eraser = 1
• Then press the pen’s eraser to the tablet—the S
(P
RESSURE should change from 0% with no pressure applied to 100% with full pressure is applied.)
4. When you are done, click on the C
OINTING DEVICE INFO column, bring your Cintiq P en within pro ximity of the tab let.
ATA values should change to reflect the tool
WITCHES state and PRESSURE value should
WITCHES state should
WITCHES state and PRESSURE value will change.
LOSE button to exit the dialog box.
Page 47

Help
Contents Back
<< >>
RESOLVING SOFTWARE CONFLICTS FOR MACINTOSH OS 8 OR 9
If you are troubleshooting and completed the hardware troubleshooting but did not find a problem, you
may have a software conflict. If the Wacom Tablet icon appears with a red X through it when starting your
computer, f ollo w the steps below to locate a possib le software conflict. (A red X through the Wacom T ablet
icon means the Wacom tablet driver failed to load properly.)
Using the Extensions Manager
You can use the Extensions Manager to resolve a software conflict:
1. Restart your computer with the SHIFT key held down. When the system has fully booted, release the
S
HIFT key. Then from the Apple menu choose CONTROL PANELS and EXTENSIONS MANAGER.
2. From the S
3. Place a checkmark next to the W
prompted to create a duplicate set. Giv e the set a name, such as “test”. Then again select the W
T
ABLET item and restart your computer.
4. If the system starts up successfully with the W
Turn on three of the disabled items and restart. Repeat this process until all items are on or until the
system crashes.
5. If the system crashes again, restart the computer with the spacebar held down (this will bring up the
E
XTENSIONS MANAGER). The conflicting item is most likely one of the most recently enabled items.
6. Now turn off one or two of the items that appear to be the problem.
7. Repeat this process as necessary until you find the offending INIT. If the conflicting item is not
required, leave it disabled. Otherwise, check if an updated version is available or contact Wacom
Technical Support.
ELECTED SET drop-down menu, select the SYSTEM BASE extension set.
ACOM TABLET driver in the list of CONTROL PANELS. You will be
ACOM
ACOM TABLET item active, open the Extensions Manager.
Page 48

Help
Contents Back
<< >>
TROUBLESHOOTING TABLES
If you encounter problems with your Cintiq Pen or Interactive Pen Display, refer to the following tables.
Your problem may be described here, and you can try the solution offered. Be sure you refer to the
Readme file for the latest troubleshooting information.
USB CONNECTION PR
SERIAL CONNECTION PROBLEMS
GENERAL PROBLEMS
WINDOWS-SPECIFIC PROBLEMS
MACINTOSH-SPECIFIC PROBLEMS
OBLEMS
Page 49

Help
Contents Back
<< >>
USB CONNECTION PROBLEMS
The computer does not have
an available USB port.
Check if there is an available USB port on a USB hub. If none are
available you will need to add a USB hub or USB card.
SERIAL CONNECTION PROBLEMS
The computer does not have
an available serial port.
The Cintiq Pen buttons do not
work and the screen cursor will
not move.
Wacom recommends using a USB connection whenever possible.
If you are using a serial connection and you experience this problem,
then remove an existing peripheral serial device and any associated
device drivers for that hardware, or add an additional serial port.
Then install your tablet.
Open the Wacom tablet control panel and go to the C
Verify that the T
to select it.
For Windows:
use the T
to toggle the driver on.
ONNECTION tab.
ABLET DRIVER ON is checked. If not, use your mouse
If you do not hav e a mouse attached to y our computer ,
AB key to select the checkbox and then press the spacebar
Page 50

Help
Contents Back
<< >>
GENERAL PROBLEMS
The tablet power light is off. Check all connections, and make sure your computer and Interactive
Pen Display are turned on. If you have a USB connection, make sure
that you are connected to an active USB port. Always be sure to use
only the AC adaptor that came with the Interactive Pen Display; other
adaptors may cause damage to your product.
For PL-400 and PL-500 series tablets:
up until a video input signal is received from the computer. If your tablet does not
power up, the most likely reason is that there is no video signal.
• Turn on your computer and verify that the power switch on the Interactive Pen
Display is in the on position (pressed inward). Make sure you are using the AC
power adaptor that came with your tablet and that it is plugged into both the
tablet and an active power outlet.
• Verify that the video cable is properly connected. Remember to always turn off
your computer before disconnecting or connecting the video cable.
If the Interactive Pen Display still does not power up, determine if the DVI or DFP
video card has been properly installed. Most DVI or DFP video cards include an
analog video port. Y ou can attach a CR T monitor to the analog video port in order to
verify that the card has been properly installed and is functioning.
The Interactive Pen Display will not power
Page 51

Help
Contents Back
The Cintiq Pen selects
everything or will not stop
drawing.
<< >>
Open the W acom tablet control panel and go to the tool’ s T
Move the T
O
PTIONS button and increase the CLICK FORCE setting.
IP PRESSURE FEEL slider toward FIRM, or select the MORE
IP FEEL tab.
Double-clicking is difficult. Be sure you are quickly tapping the tablet twice in the same place on
the tablet’s active area. Wacom recommends using the side s witch to
double-click.
Try increasing the DOUBLE-CLICK DISTANCE or reducing the doubleclick speed (see Adjusting Doub
Try using a lighter T
For Windows:
IP PRESSURE FEEL (see Adjusting Tip Feel).
You might also consider turning on the Web style
le-Click).
interface so that you can navigate using a single click of the pen.
The eraser selects everything
or will not stop erasing.
Open the Wacom tablet control panel and go to the ERASER FEEL tab .
Move the E
M
ORE OPTIONS button and increase the CLICK FORCE setting.
RASER PRESSURE FEEL slider toward FIRM, or select the
Page 52

Help
Contents Back
There is a delay at the
beginning of pen strokes when
using the Cintiq Pen for
<< >>
Try decreasing the D
OUBLE-CLICK DISTANCE or increasing the double-
click speed (see Adjusting Doub
unchecking the D
OUBLE-CLICK ASSIST checkbox.
le-Click). If that does not work, try
drawing or selecting.
You have to press hard with
the Cintiq Pen when clic king or
drawing.
The Cintiq Pen tip does not
function.
Open the W acom tablet control panel and go to the tool’ s T
Move the T
O
PTIONS button and decrease the CLICK FORCE setting.
IP PRESSURE FEEL slider toward SOFT, or select the MORE
IP FEEL tab.
Make sure the status LED lights green when the tip is pressed. If it
does not, you may have defective hardware (see Troubleshooting).
Check the control panel’s T
assigned to a L
EFT-CLICK (Windows) or CLICK (Macintosh) function.
OOL BUTTONS tab and verify that the tip is
The side switch does not work. Be sure you press the side switch when the pen tip is in pro ximity—do
this without pressing down on the pen tip.
From the Wacom tablet control panel, verify that the side s witch is set
to the proper function for the application and tool that you are using.
Make sure the tablet status LED lights green when y ou press the side
switch. If it does not, you may have defective hardware (see
T
roubleshooting).
Page 53

Help
Contents Back
Changing the function settings
for the Cintiq Pen has no
effect.
The Cintiq Pen tip and screen
cursor do not properly line up.
The screen cursor does not
jump to the pen tip location
when the pen is placed on the
Cintiq display, and it does not
follow the pen tip when the pen
is moved across the display.
<< >>
Make sure that you change the settings for the application you are
using. See W
orking with Application-Specific Settings.
Open the W acom tab let control panel and select the CALIBRATION tab.
Continue with Calibr
ating the Interactive Pen Display.
Make sure the Wacom tablet driver has loaded properly by opening
the Wacom Tablet control panel. If the driver did not load you will see
an error message. If an error message appears, reboot your
computer. If the problem persists, refer to the appropriate instructions
for your platform in the Installation Guide and User’s Manual and
reinstall the Wacom tablet software. (For Macintosh OS X, you must
reboot your computer after installing the Wacom tablet driver for
proper tablet operation.)
If you have customized the button on y our pen or the Pop-up Menu to
switch between P
operating in P
EN and MOUSE MODE, make sure that your tablet is
EN MODE. See Mode Toggle... and Customizing the
Pop-up Menu for more information.
Page 54

Help
Contents Back
The line you are drawing does
not line up with the location of
the screen cursor in paint
applications.
If you have tried the previous
solutions and the screen
cursor and pen tip still do not
line up, the preferences file
may be corrupted. Follow the
procedure for your platform to
delete the preferences file.
<< >>
To function properly, some applications require that the Cintiq Pen is
set to P
M
ODE.
If the Cintiq Pen is set to P
EN MODE. Make sure the pen has not been set to MOUSE
EN MODE and the problem still exists, then
you may have a corrupted preferences file. Follow the instructions in
the text tip to create a new preferences file.
For Windows:
Do a Search or Find for the TABLET.DAT file and
delete it. The file should be located in your Windows or
Windows\System32 folder. Then restart your computer. When the
tablet driver loads, it will create a ne w preferences file with the factory
default settings. Recalibrate the tablet.
For Macintosh OS X:
T
ABLET folders. From the TABLET folder, drag the TABLET
P
REFERENCES to the trash. Log out, and then log back in. When the
From the USERS folder, open the SHARED and
tablet driver loads it will create a new preferences file with factory
default settings. Open the Wacom Tablet Control Panel and
recalibrate the tablet.
For Macintosh OS 8 or 9:
P
REFERENCES and TABLET folders. From the TABLET folder, drag the
T
ABLET PREFERENCES file into the trash. Then restart your computer.
From the SYSTEM FOLDER, open the
When the tablet driver loads it will create a new preferences file with
the factory default settings. Recalibrate the tablet.
Page 55

Help
Contents Back
When using the Interactive
Pen Display on a multiple
monitor system, you cannot
use the Cintiq Pen to control
the other monitor(s).
<< >>
You can use your pen to control the other monitors in M
To use M
T
OGGLE.... Then use the switch to toggle between PEN and MOUSE
M
ODE. See Customizing Tool Buttons and Button Functions.
OUSE MODE, first set the pen’s DuoSwitch button to MODE
OUSE MODE.
You can also set the DuoSwitch button to display the Pop-up Menu.
By adding the PEN and MOUSE MODE mapping options to the Pop-up
Menu, you can then use the pen to select the proper option from the
Pop-up Menu. See Button Functions
and Customizing the Pop-up
Menu.
Page 56

Help
Contents Back
<< >>
WINDOWS-SPECIFIC PROBLEMS
In Windows 95, 98, or Me,
your Cintiq Pen does not
function inside a full screen
DOS window.
After pressing C
the screen cursor cannot be
controlled with your Cintiq
Pen.
Windows NT. Applicationspecific settings do not work
correctly or blue screen crash
occurs.
TRL+ALT+DEL,
You must use a mouse when working in a full screen DOS window.
When the C
active the Wacom tablet will not work. Use your mouse or k eyboard to
continue. When this dialog box is closed, you can again use your pen
to control the screen cursor.
You must update the operating system with Service Pack 3 (SP3) or
later in order for application-specific settings to work correctly.
Running your tablet software on a Windows NT 4.0 system that is not
updated to SP3 may cause you to experience a blue screen crash.
MACINTOSH-SPECIFIC PROBLEMS
At startup, a dialog box
appears telling you that either
the driver failed to load or the
tablet preferences have not
yet been created.
The tablet was not detected at startup. Make sure the USB or serial
interface cable is securely connected and that the power LED on the
tablet is on. If this does not correct the problem, see T
LOSE PROGRAM dialog box (Windows 95, 98, or Me) is
roubleshooting.
Page 57

Help
Contents Back
<< >>
CONTACTING TECHNICAL SUPPORT
If you have a problem with your Wacom Interactive Pen Display, first verify the tablet is correctly installed,
and then check T
information about your problem in the Readme file located on the Interactive Pen Display CD.
For information on accessing Wacom’s 24-hour automated online support and for a directory of Wacom
Technical Support numbers, see Who to Call
LINKING TO THE WEB PAGE
Answers to frequently ask ed questions and troubleshooting tips can be found on the appropriate web site
for your area in Who to Call
PRE-CONTACT CHECKLIST
When you call, you should be at your computer with the following information available:
The Installation Guide and User’s Manual for your product.
Serial and model number. (Look on the back of the Interactive Pen Display.)
Driver version number. (See the Wacom Tablet CD or the Wacom Tablet Control Panel Diagnostics
dialog box.)
The make and model of your computer, and operating system version.
roubleshooting. If you cannot find the answer in this Help, you may find updated
for your region.
.
A list of peripheral devices attached to your computer.
The exact wording of any error message that appeared on your screen.
What happened and what you were doing when the problem occurred.
How you tried to solve the problem.
Page 58

Help
Contents Back
<< >>
WHO TO CALL
If you think your Interactive Pen Display is not working properly, contact the Wacom support staff for the
area where your product was purchased. If you have a modem, you can download the latest software
drivers from the Internet.
USA,
CANADA, CENTRAL AND SOUTH AMERICA
EUROPE, MIDDLE EAST AND AFRICA
JAPAN
ASIA PACIFIC (ENGLISH)
Page 59

Help
Contents Back
<< >>
USA, Canada, Central and South America
Contact your local distributor, or:
Worldwide Web: http://www.wacom.com/productsupport 24-hour Technical Support information:
FAQs—Frequently Asked Questions
and answers. (English)
Software updates. (English)
Email support. (English)
Anonymous FTP Site: ftp.wacom.com/pub/drivers Software updates.
Phone: ++1-360-896-9833 Technical Support. (English)
(7:30 am to 5:00 pm Monday - Thursday,
8:30 am to 5:00 pm Friday, Pacific Time)
FAX: ++1-360-896-9724 Technical Support. (English)
To purchase parts and accessories,
Wacom’s web site at http://www.wacom.com/wacomdirect/ (USA only). Outside of the USA and Canada,
please contact your local dealer or distributor.
call toll-free: 1-888-884-1870 (USA and Canada only) or visit
Page 60

Help
Contents Back
<< >>
Europe, Middle East and Africa
Contact your local distributor, or:
Worldwide Web: http://www.w acom-europe.com Software updates.
Online support database.
Anonymous FTP Site: ftp://ftp.wacom-europe.com/pub/ Software updates.
Phone (Austria): ++43-(0)1-790 825 550 Technical Support.
Phone (Belgium): ++32-(0)2-275 0691 Technical Support.
Phone (France): ++33-(0)1-7020 0070 Technical Support.
Phone (Germany): ++49-(0)69-6630 8200 Technical Support.
Phone (Italy): ++39-(0)2-4528 7050 Technical Support.
Phone (Netherlands): ++31-(0)20-517 4705 Technical Support.
Phone (Switzerland): ++41-(0)1-212 2818 Technical Support.
Phone (United Kingdom): ++44-(0)207-744 0831 Technical Support.
Phone (other countries): ++49-(0)180-500 4397 Technical Support.
FAX: ++49-(0)180-500 4398 Technical Support.
Internet Email: support@wacom-europe.com Technical Support.
T o pur chase parts and accessories,
Technical Support using the appropriate number for your region.
please contact your local dealer or distributor . You can also contact
Page 61

Help
Contents Back
<<
Japan
Contact your local distributor, or:
Worldwide Web: http://tablet.wacom.co.jp Software updates and information.
(Japanese)
Phone: ++81-(0)47-380-8877 Technical Support. (Japanese)
FAX: ++81-(0)47-380-8711 Technical Support. (Japanese)
Internet Email: tablet@wacom.co.jp Technical Support and sales. (Japanese)
To purchase parts and accessories,
please contact your local dealer or distributor.
Asia Pacific (English)
Contact your local distributor, or:
Worldwide Web: http://ap.wacom.co.jp Software updates and information.
(English)
Phone: ++81-(0)3-3371-1595 Technical Support. (English)
FAX: ++81-(0)3-3371-1468 Technical Support. (English)
Inquiry Form: http://ap.wacom.co.jp/faq/tablet/inquiry_form.html Technical Support. (English)
To purchase parts and accessories,
please contact your local dealer or distributor.
 Loading...