

Page 1
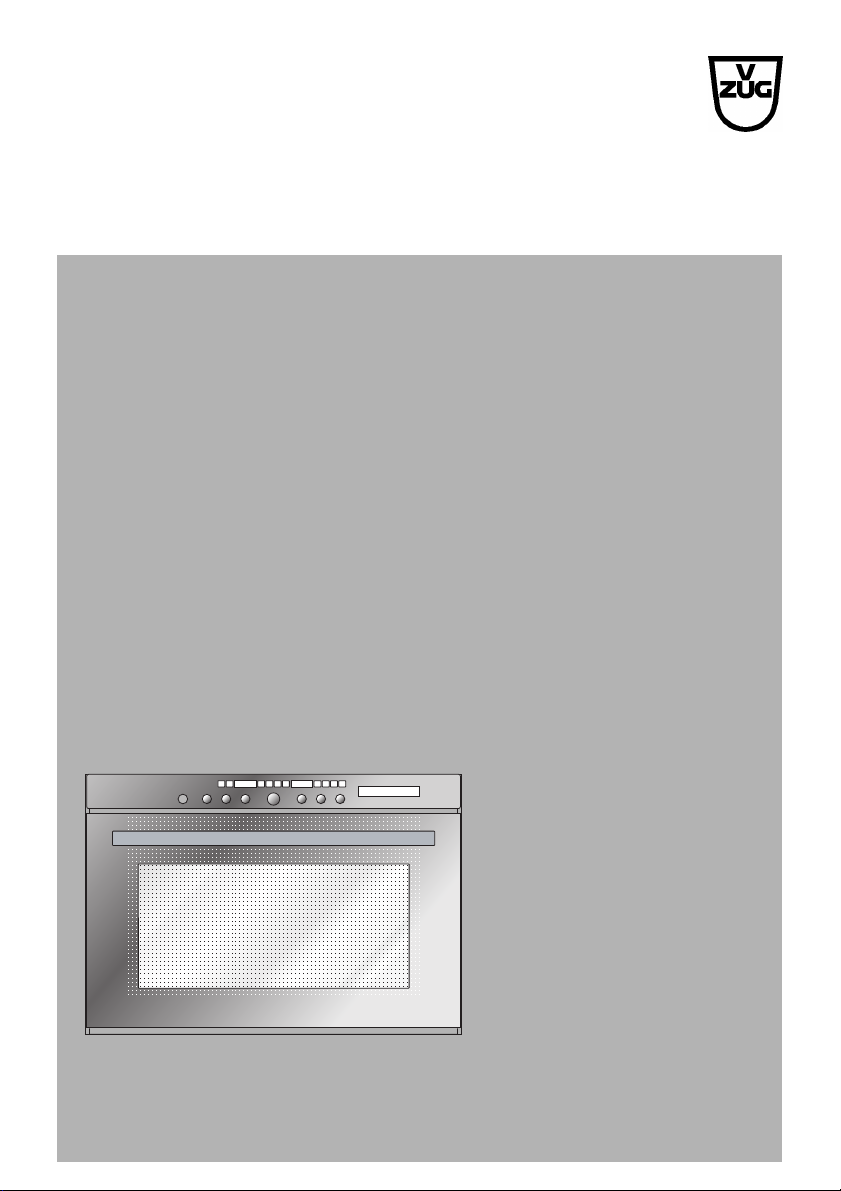
VZUG LTD
CombiSteam Cooker
CombiSteam SL
Operating instructions
Page 2

Dear V-ZUG customer
Thank you for choosing to buy one of our products.
Your appliance is made to high standards and is easy to use. Nevertheless, please
take the time to read these operating instructions in order to familiarize yourself with
the appliance and get the best use out of it.
Please follow the safety precautions.
Modifications
Text, diagrams and data correspond to the technical standard of the appliance at the
time these operating instructions went to press. The right to make technical modifications is reserved.
Symbols used
Denotes important safety precautions. Failure to observe
said precautions can result in injury or damage to the appli
ance or fittings!
A Specifies the steps that must be taken and the order in which they must be taken.
– Describes how the appliance reacts to the steps taken.
䡲 Marks a list.
Denotes useful tips for the user.
Validity
These operating instructions apply to the following models:
Type Model no. Size system
CST-SL 697 55
CST-SL 699 60
Deviations depending on the model are noted in the text.
The model number corresponds to the first three digits on the identification plate.
© V-ZUG LTD, CH-6301 Zug, 2005
2
Page 3

Contents
Safety precautions 5
Before using for the first time . . . . . . . . . . . . . . . . 5
Correct use . . . . . . . . . . . . . . . . . . . . . . . . . . . 6
Children in the home . . . . . . . . . . . . . . . . . . . . . 6
Use . . . . . . . . . . . . . . . . . . . . . . . . . . . . . . . . 7
Appliance description 9
Construction . . . . . . . . . . . . . . . . . . . . . . . . . . . 9
Operating and display elements . . . . . . . . . . . . 10
Using for the first time . . . . . . . . . . . . . . . . . . . . 11
General operating instructions . . . . . . . . . . . . . . 12
User settings 14
Cooking and baking 18
Operating modes . . . . . . . . . . . . . . . . . . . . . . 18
Example of settings . . . . . . . . . . . . . . . . . . . . . 23
Selecting an operating mode . . . . . . . . . . . . . . 24
Checking / Changing the cooking space
temperature . . . . . . . . . . . . . . . . . . . . . . . . . . 25
Changing the operating mode . . . . . . . . . . . . . . 25
Switching off . . . . . . . . . . . . . . . . . . . . . . . . . 26
Optimal use . . . . . . . . . . . . . . . . . . . . . . . . . . 28
Soft roasting 31
Food probe 35
Food probe temperature . . . . . . . . . . . . . . . . . . 37
Clock functions 39
Setting and changing the time . . . . . . . . . . . . . . 39
Timer . . . . . . . . . . . . . . . . . . . . . . . . . . . . . . 41
Operating time . . . . . . . . . . . . . . . . . . . . . . . . 43
Delayed start . . . . . . . . . . . . . . . . . . . . . . . . . 45
3
Page 4

… Contents
Tips on settings 48
Steaming . . . . . . . . . . . . . . . . . . . . . . . . . . . . 48
Regenerating . . . . . . . . . . . . . . . . . . . . . . . . . 51
Professional baking . . . . . . . . . . . . . . . . . . . . . 52
Baking with hot air . . . . . . . . . . . . . . . . . . . . . 53
Baking with hot air humid . . . . . . . . . . . . . . . . . 53
Soft roasting . . . . . . . . . . . . . . . . . . . . . . . . . . 54
Care and maintenance 55
Cleaning the exterior . . . . . . . . . . . . . . . . . . . . 55
Cleaning the cooking space . . . . . . . . . . . . . . . 56
Changing the water filter . . . . . . . . . . . . . . . . . . 58
Descale . . . . . . . . . . . . . . . . . . . . . . . . . . . . . 59
Door seal . . . . . . . . . . . . . . . . . . . . . . . . . . . . 62
Replacing a defect light bulb . . . . . . . . . . . . . . . 62
Troubleshooting 63
What to do if … . . . . . . . . . . . . . . . . . . . . . . . . 63
After a power failure . . . . . . . . . . . . . . . . . . . . 66
Tips and tricks 67
Accessories and spare parts 70
Technical data 71
Disposal 72
Index 73
Repair service 75
Quick instructions 76
4
Page 5

Safety precautions
The appliance corresponds to recognised technology stand
ards and the relevant safety regulations. Proper use of the
appliance is essential to avoid damage and accidents. Please
follow the tips given in these operating instructions.
Before using for the first time
䡲 The appliance must be installed and connected up to the electricity supply in ac-
cordance with the separate installation instructions. The necessary work should be
done by a qualified fitter or electrician.
䡲 Dispose of the packaging material in accordance with local regulations.
䡲 Before using the newly installed appliance for the first time, please follow the tips
in the «Using for the first time» section.
䡲 Make the desired user settings.
5
Page 6

… Safety precautions
Correct use
䡲 The appliance is designed for use in the home for preparing food. No liability is
assumed for any damage caused by improper or incorrect use.
䡲 Not to be used as a room heater or humidifier.
䡲 The appliance should only be installed and operated in a room with an ambient
temperature of between 5 °C and 35 °C. In the event of frost, there is a danger
that residual water left in the pumps can freeze, causing damage. In this case, you
should contact Customer Services.
䡲 Any repairs, modifications or manipulations to the appliance, especially any elec-
trical parts, should only be carried out by the manufacturer, its Customer Services
or similarly qualified persons. Repairs if carried out incorrectly may cause serious
injury, damage to the appliance and fittings, as well as affect the functioning of
the appliance. If the appliance is not working properly or in case of a repair order,
follow the instructions given in the «Repair service» section. Please contact Customer Services if necessary.
䡲 Only original spare parts may be used.
䡲 Retain these operating instructions for future reference. If you sell the appliance or
pass it on to a third party, please ensure these operating instructions accompany
the appliance, together with the instructions on installation. In this way, the new
owner can inform themselves about how to use the appliance correctly and read
the pertinent safety precautions.
Children in the home
䡲 Packaging material (e.g. plastic, polystyrene) can be dangerous for children. Dan-
ger of suffocation! Please keep packaging material away from children.
䡲 The appliance is designed for use by adults who are familiar with these operating
instructions. Children are often unable to recognise the danger of electrical appliances. Ensure proper supervision and do not allow children to play with the appliance – there is a danger that children can hurt themselves.
䡲 Use the childproof locking facility.
6
Page 7

… Safety precautions
Use
䡲 If the appliance is visibly damaged, do not use it. Contact our Customer Services.
䡲 If the appliance is not operating property, disconnect it from the electricity supply
immediately.
䡲 Ensure the mains cables of other electrical appliances do not get caught in the door
of the appliance, as the electrical cable insulation could get damaged.
䡲 If the mains cable is damaged, it must be replaced by Customer Services.
䡲 Ensure there are no foreign bodies or pets in the cooking space before closing the
appliance door.
䡲 Objects that could pose a danger if the appliance were accidentally switched on
should not be stored in the cooking space. Do not store temperature-sensitive or
inflammable materials, e.g. cleaning agents, oven sprays, etc., in the cooking
space.
Caution: Danger of burning!
䡲 The appliance gets very hot when in use.
䡲 The appliance door, especially the glass, can get hot. Danger of burning: Do not
touch the glass. Keep children away!
䡲 Steam and water droplets may escape when the appliance door is opened. Do
not put your hands into the appliance if there is steam in it!
䡲 In the professional baking mode, at the start of the hot air phase steam may escape
from the steam vent.
䡲 Overheated fat and oil can easily catch fire. Heating oil in the cooking space to
sear meat is dangerous and should not be done. Never try to extinguish burning
oil or fat with water (danger of explosion)! Smother the flames with a damp cloth
and keep all doors and windows closed.
䡲 Do not pour spirits (e.g. brandy, whisky, schnapps, etc.) over hot food – danger
of explosion!
䡲 Accessories such as wire shelves and trays, etc. get hot in the cooking space.
Always wear protective gloves or use oven cloths.
7
Page 8

… Safety precautions
䡲 Do not leave the appliance unsupervised when drying herbs, bread, mushrooms,
etc. If the foodstuff dries out too much, this can pose a fire hazard.
䡲 If you notice smoke coming from the appliance or from the cooking space, keep
the appliance door closed. Switch off the appliance or disconnect it from the mains
supply.
䡲 The appliance will remain hot for some time after it is switched off and cool down
only slowly to room temperature. Please allow sufficient time for the appliance to
cool down before, for instance, cleaning it.
Caution: Danger of injury!
䡲 When using or cleaning the appliance be careful not to get fingers trapped in the
door hinges, otherwise there is a risk of injury if the appliance door is moved. Particular care should be taken when children are around.
䡲 Only leave the appliance door open in the at-rest position. An open appliance
door poses danger of tripping or injury! Do not sit or rest on the appliance door
or use it as a storage surface.
How to avoid damaging the appliance
䡲 Close the appliance door carefully.
䡲 Using knives or cutting wheels on the stainless steel tray or the perforated cooking
tray will damage the surface.
䡲 Objects that can rust should not be used in the cooking space as they can cause
rust.
䡲 Silver cutlery should not be used in the cooking space.
䡲 After use, remove any water on the bottom of the cooking space with a soft cloth.
Leave the appliance door open so that the cooking space can cool down.
䡲 When cleaning the appliance make sure no water gets inside the appliance. Use
a moderately damp cloth. Do not spray the inside or outside of the appliance with
water. Do not use a steam cleaner. If water gets inside the appliance, it can cause
damage.
8
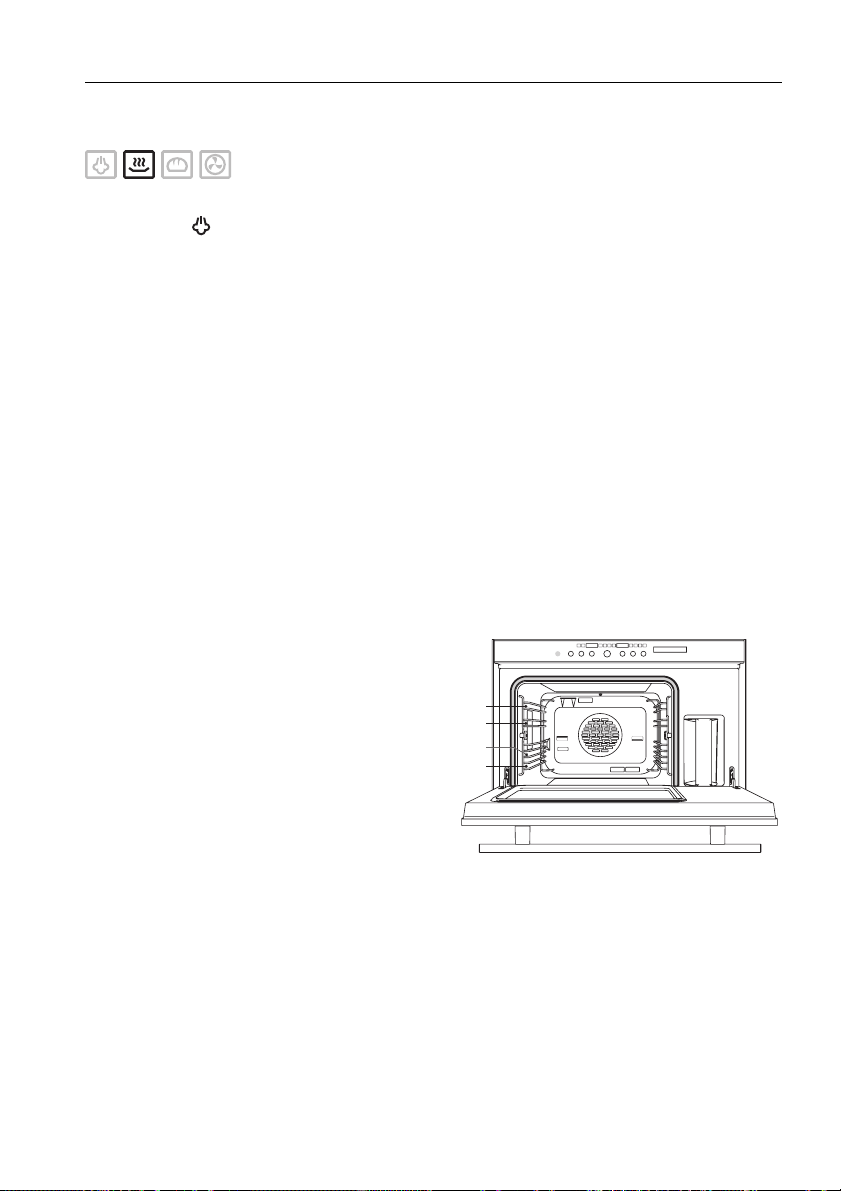
Page 9

Appliance description
Construction
1
2
3
4
5
6
13
14
Operating and display elements
1
Cooking space ventilation
2
Illumination
3
Hot air blower
4
Door seal
5
Appliance door
6
Steam vent
7
Cooking space temperature sensor
8
Steam inlet
9
Socket for food probe
10
Shelf guides
11
Water tank
12
Food probe
13
Wire shelf (2×)
14
Stainless steel tray
15
Perforated cooking tray
16
Water filter (3×)
17
7
8
9
10
11
15
16
12
17
9
Page 10

… Appliance description
Operating and display elements
HI P J Q KLMN
ABC D E FGRO
Buttons
Illumination
A
Cooking space / food probe temperature
B
Operating mode
C
Adjusting knob
D
Timer
E
Operating time and switch-off time
F
Off
G
Symbols
Cooking space temperature
H
Food probe temperature
I
Operating mode
J
Timer
K
Operating time
L
Switch-off time
M
Time
N
Displays
Plain text display
O
Temperature
P
Time, duration and timer
Q
Communications interface
R
10
Page 11
… Appliance description
Using for the first time
Before operating the newly installed appliance for the first time the following steps
should be taken:
A Remove all packaging and transport materials from the cooking space.
A If the display on the right side is flashing , turn the adjusting knob
to set the desired time.
– The display stops flashing after around 15 seconds and the time is set.
A Clean the appliance and the accessories thoroughly.
If needed, adjust the user settings to the water hardness.
A Fill the water tank up to the «MAX 1.25L» mark with cold, fresh drinking water and
slot into position.
A Press the button 3×.
– «Professional baking» «Oven temperature» appear in the plain text display.
– The symbol lights up.
–The symbol flashes.
C
– The temperature display flashes .
A Adjust the cooking space temperature to 180 °C by turning the adjusting
knob.
A Press the adjusting knob to confirm.
A After 30 minutes press the button.
– The appliance switches off.
A Remove any water on the bottom of the cooking space.
11
Page 12

… Appliance description
General operating instructions
Operating using the buttons
The operating mode, cooking space temperature and food probe temperature as well
as the cooking time and various other functions can be selected by pressing the appropriate button once or more.
䡲 The symbol for the function selected lights up or flashes.
䡲 The display flashes with a recommended value.
䡲 Turn the adjusting knob to change the recommended value.
䡲 Press the adjusting knob to start the appliance straightaway.
䡲 If the adjusting knob is not pressed, the appliance will start automatically around
15 seconds after the settings were last changed.
䡲 Additional settings or changes can be made at any time.
䡲 Press the button to switch off the appliance.
12
Page 13
… Appliance description
Operating using the plain text display
When the appliance is switched off, the adjusting knob is used to display plain
text, to select the different operating modes and to confirm.
䡲 Press the adjusting knob to activate the plain text display.
䡲 Turn the adjusting knob to scroll through the menu.
䡲 Press the adjusting knob again to confirm the menu selection.
䡲 Press the button to switch off the appliance.
Select «back» and press the adjusting knob to return to the previous
menu level.
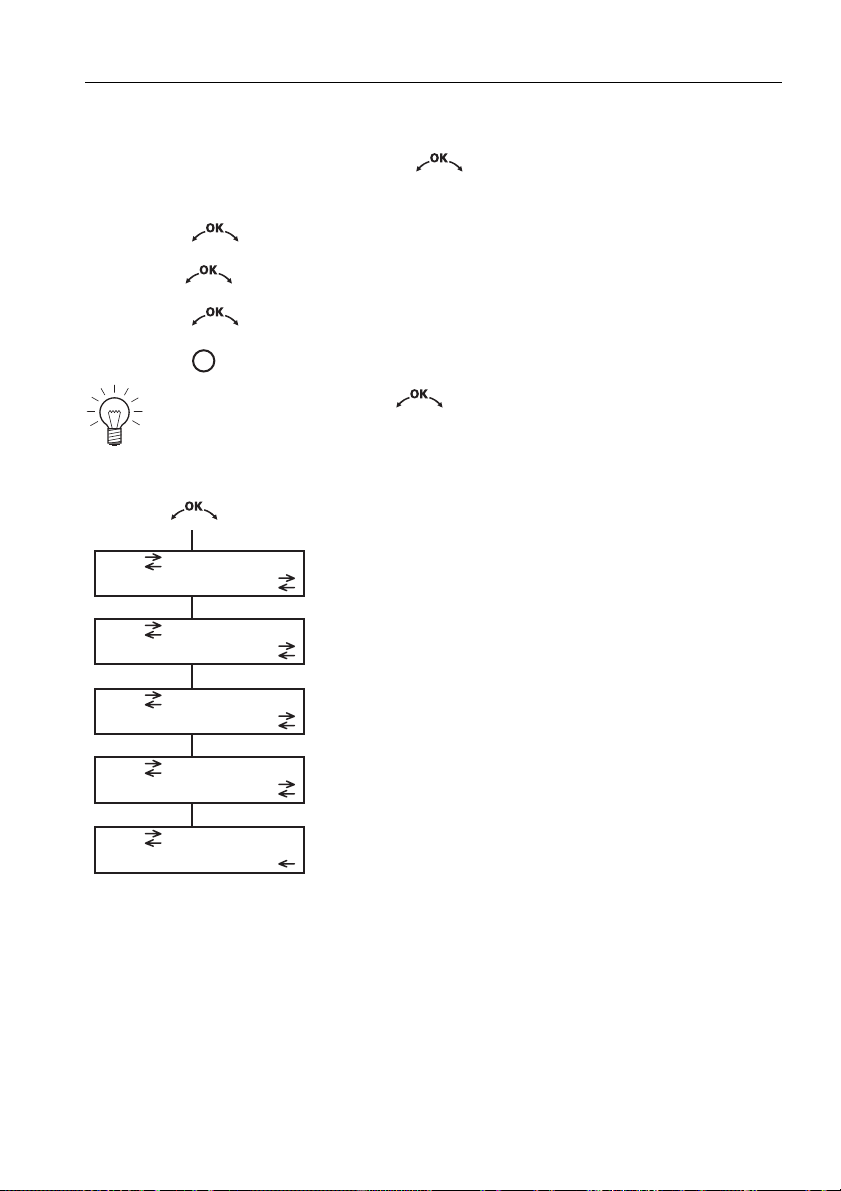
Select and press OK
Soft roasting
Select and press OK
Descaling
Select and press OK
Set time
Select and press OK
User settings
Select and press OK
back
13
Page 14

User settings
You can change the appliance settings to suit your own preferences. The procedure
is the same for all user settings.
A Press the adjusting knob to activate the plain text display.
A Turn the adjusting knob until «User settings» is displayed.
A Press the adjusting knob to confirm.
A Turn the adjusting knob to display options.
A Select desired user settings and press the adjusting knob to confirm.
A Press the button to exit.
14
Page 15
… User settings
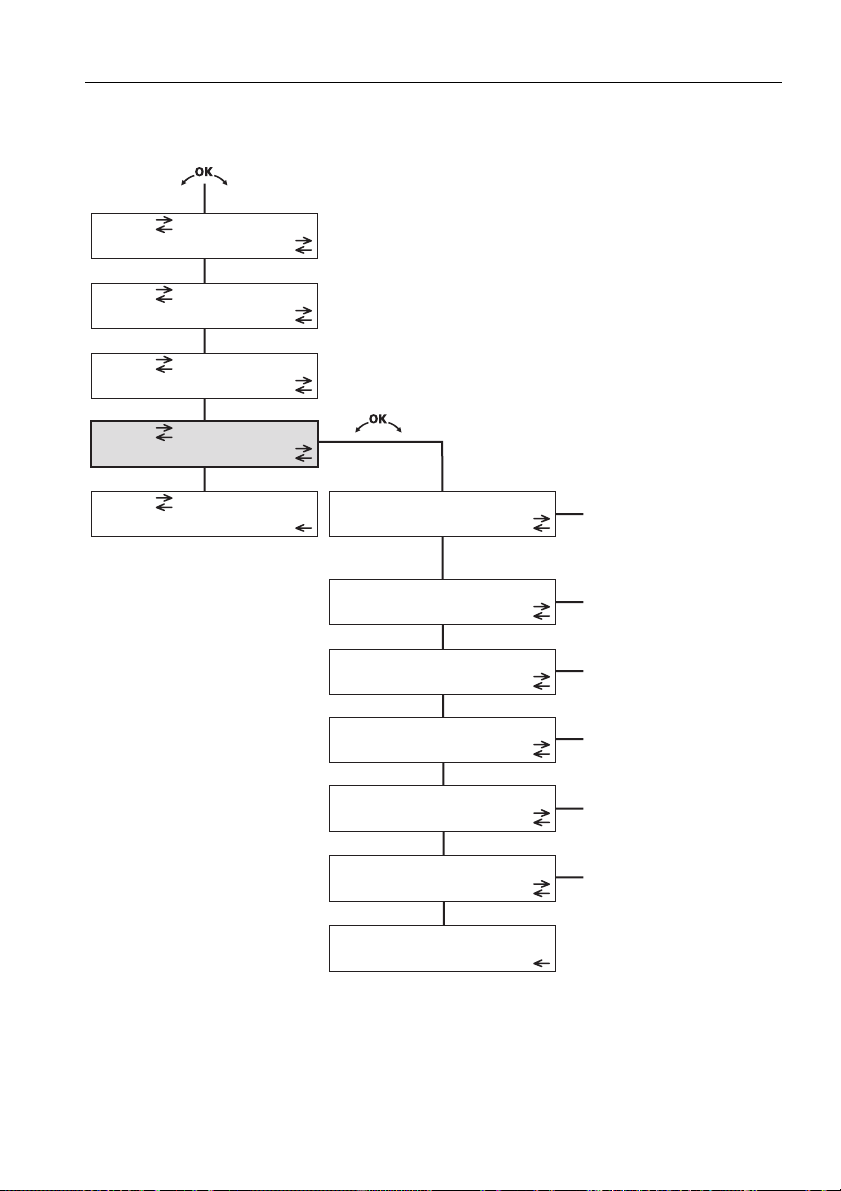
The following diagram gives an overview of the possible user settings.
Select and press OK
Soft roasting
Select and press OK
Descaling
Select and press OK
Set time
Select and press OK
User settings
▪ Text in Deutsch *
Select and press OK
back
User settings
Language
▪ Texte en français
▪ Testo italiano
▪ Text per rumantsch
▪ Text in English
User settings
Childproof lock
User settings
Time display
User settings
Acoustic signal
User settings
Illumination
User settings
Water hardness
User settings
back
▪ off *
▪ on
▪ invisible
▪ visible *
▪ low
▪ loud *
▪ automatically with door *
▪ only with key
▪ 0–15 ˚fH
▪ 16–35 ˚fH *
▪ 36–50 ˚fH
* Factory setting
15
Page 16

… User settings
Childproof lock
The childproof lock is to prevent children from accidentally switching the appliance on.
If the / buttons or the adjusting knob are pressed when the childproof
lock is activated:
– A double acoustic signal is emitted.
– «Childproof lock» appears in the plain text display.
– Nothing happens when either button is pressed.
A When the childproof lock is activated, hold depressed the button and press
the / buttons or the adjusting knob.
– The childproof lock is overridden. The appliance can now be used as normal.
– The childproof lock is automatically reactivated 10 minutes after the appliance
has been switched off.
The / and buttons can be used irrespective of whether the childproof lock is activated or not.
Clock
Select between
䡲 «invisible»
䡲 «visible»
If «invisible» is selected, the time display is not lit up when the appliance is off,
minimizing electricity consumption. When the appliance is on the time is
displayed.
16
Page 17

… User settings
Illumination
Select between
䡲 «automatically with door»
䡲 «only with key»
With the «automatically with door» setting, the illumination automatically comes on
when the appliance door is opened and goes off again when it is closed.
Press the button to switch the illumination on or off at any time.
If the illumination is not switched off by pressing the button, it will go out
automatically 30 minutes after use.
Water hardness
The appliance features a system that automatically indicates when it is time to descale.
The system can be optimised for households with very soft water (also through using
a water softening appliance) and very hard water, by changing the user settings to
the relevant range of water hardness.
There are three settings for water hardness:
Type Water hardness [°fH]
Very soft water 0 to 15
Medium water 16 to 35
Very hard water 36 to 50
The factory settings are set at medium type water.
17
Page 18

Cooking and baking
Operating modes
The operating modes available are described below.
Steaming
Recommended cooking space temperature: 100 °C
(corresponding to maximum boiling temperature)
Range: 30 °C to 100 °C
A Press the button 1×.
– «Steaming» «Oven temperature» appear in the plain text display.
In the steaming mode, steam flows from the boiler into the cooking space. At the same
time, the heating process is supported by hot air. The food is heated up or cooked by
the steam.
䡲 Cooking vegetables at 100 °C
A Use the perforated cooking tray to steam vegetables.
A Add salt to the vegetables ideally after cooking.
䡲 Cooking rice, cereal products and pulses, adding some liquid, at 100 °C
A Put the food in a suitable glass or porcelain dish, add some liquid and place
on the wire shelf.
䡲 Poaching meat and fish at 80 °C to 100 °C
A Use the perforated cooking tray greased lightly with fat or the stainless steel tray
to poach meat and fish.
䡲 Extracting juice from fruit and berries at 100 °C
A For ease of use, place the unperforated cooking tray with a lip (accessory)
underneath the perforated cooking tray.
䡲 Preparing tricky desserts such as crème caramel at 90 °C
A Place dishes on the perforated cooking tray.
䡲 Making yoghurt at 40 °C
A Place pots or bowl on the perforated cooking tray.
18
Page 19
… Cooking and baking
Regeneration
Recommended cooking space temperature: 120 °C
Range: 100 °C to 150 °C
A Press the button 2×.
– «Regeneration» «Oven temperature» appear in the plain text display.
In the regenerating mode, the cooking space is heated by steam and hot air, allowing
food to be regenerated quickly and evenly without drying it out.
䡲 Regenerating dishes or leftovers at 110 °C to 130 °C
A Put the desired amount of food in a dish (not plastic) and then place on the wire
shelf at level 1 or for two portions at levels 1 and 5. The food does not have
to be covered over.
䡲 Preparing (semi-)ready and frozen meals at 110 °C to 130 °C
A Put the desired amount of food in a dish (not plastic) and then place on the wire
shelf.
A maximum of four plates of food can be regenerated at the same time as follows:
䡲 To regenerate three plates of food at the
same time
A Put stainless steel tray at level 1 and
wire shelves at levels 3 and 5.
䡲 Four portions
6
5
3
1
A Cooking tray at level 1
A First wire shelf at level 3
A Stainless steel tray at level 5
A Second wire shelf at level 6
19
Page 20

… Cooking and baking
Professional baking
Recommended cooking space temperature: 210 °C
Range: 100 °C to 230 °C
A Press the button 3×.
– «Professional baking» «Oven temperature» appear in the plain text display.
In the professional baking mode, the food is placed in the cold, unheated cooking
space. In phase one, the food is steamed and then – the length of time depending on
the quantity of food – phase two, i.e. the hot air phase, comes on automatically.
䡲 Baking large loaves of bread using white, wholewheat or wholemeal flour and
yeast or sour dough at 210 °C to 220 °C
A Place the bread dough on the stainless steel tray or in a suitable, rust-proof bak-
ing dish (made of glass, ceramic, silicon, etc.).
䡲 Baking bread buns using white, wholewheat or wholemeal flour and yeast or sour
dough at 220 °C to 230 °C
A Place the bread buns on the stainless steel tray. Baking paper can be used as
normal.
䡲 Baking gugelhopf (ring cake) and savarin (yeast cake), etc. at 200 °C to 220 °C
A Place the prepared dough on the stainless steel tray or in a suitable, rust-proof
baking dish (made of glass, ceramic, silicon, etc.).
䡲 Baking puff pastry, with or without a filling, fresh or deep frozen, at 200 °C to
220 °C
A Place the puff pastry on the stainless steel tray – do not brush the top of the puff
pastry.
It is not possible to achieve consistently good results if the professional baking
operating mode is used several times in succession. The cooking space must
cool down between two professional baking sessions until «Residual heat» no
longer appears in the plain text display. Only in this way is another steaming
phase possible.
20
Page 21

… Cooking and baking
Hot air
Recommended cooking space temperature: 180 °C
Range: 30 °C to 230 °C
A Press the button 4×.
– «Hot air» «Oven temperature» appear in the plain text display.
In the hot air mode, a heating element at the back of the appliance heats up the air
inside the cooking space. A fan circulates the hot air evenly around the cooking
space. The food is warmed evenly from all sides so that it is possible to bake on one
or two levels at the same time.
䡲 Baking cakes, biscuits, flans
A Put the mixture or dough in the usual baking form and then place on the stainless
steel tray or the enamelled cake tray (accessory) to bake.
Hot air humid
Recommended cooking space temperature: 180 °C
Range: 30 °C to 230 °C
A Press the button 5×.
– «Hot air humid» «Oven temperature» appear in the plain text display.
In the hot air humid mode, a heating element at the back of the appliance heats up
the air inside the cooking space. A fan circulates the hot air evenly around the cooking
space. The steam produced during baking is largely retained in the cooking space
ensuring the food retains its moisture. It is possible to bake on one or two levels at the
same time.
䡲 Baking gratins, soufflés and yeast-risen pastry
A Put mixture or dough in the usual baking form and then place on stainless steel
tray or enamelled cake tray (accessory) to bake.
21
Page 22

… Cooking and baking
Hot air + steaming
Recommended cooking space temperature: 180 °C
Range: 30 °C to 230 °C
A Press the button 6×.
– «Hot air + steaming» «Oven temperature» appear in the plain text display.
In the hot air + steaming mode, a heating element at the back of the appliance heats
up the air inside the cooking space. A fan then circulates the hot air evenly around the
cooking space. The amount of steam can be increased by pressing the adjusting knob. The supply of steam can be interrupted by pressing the adjusting
knob again.
䡲 Individual preparation of food using dry and humid heat (e.g. meat)
A When cooking meat, add steam during the first third of the cooking time.
22
Page 23
… Cooking and baking
Example of settings
The procedure is explained using baking bread as an example.
Tips on settings gives:
Professional baking Level Time in mins.
Bread 210–220 1 40–50
A Place the formed bread dough on the stainless steel tray and allow to proof briefly.
A Put the stainless steel tray into the cold cooking space at level 1.
Filling the water tank
Use drinking water only to fill the water tank – do not use
bouillon, wine, demineralised (filtered) or distilled water, etc.
䡲 All operating modes – with the exception of – require the water tank to be full.
䡲 In the operating mode, the water tank can stay in the appliance without it af-
fecting the end cooking result.
A Fill the water tank up to the «MAX 1.25L» mark with cold, fresh drinking water and
slot into position.
Refilling the water
The contents of the water tank normally suffice for one cooking session.
If, however, the water tank needs to be refilled:
A Only fill the water tank up to a maximum of 0.5 l to ensure that the water does not
overflow when it is pumped back.
23
Page 24

… Cooking and baking
Selecting an operating mode
Burn hazard due to heat produced during cooking and
baking. Please read the «Safety precautions» section first.
A Press the button to select the desired operating mode – in this example, profes-
sional baking .
– The symbol lights up.
– The symbol flashes.
– «Professional baking» «Oven temperature» appear in the plain text display.
– The recommended cooking space temperature flashes in the temperature
A Turn the adjusting knob to set the desired temperature – in this example
The recommended cooking space temperature can be changed – as long as the
C
already stopped flashing, press the button.
C
display .
The recommended temperature corresponds to that reached during the hot air
phase. The temperature during the steam phase is pre-programmed.
.
symbol and the temperature display are still flashing. If they have
If the cooking space temperature is not changed within roughly 15 seconds,
the appliance switches on automatically.
A Press the adjusting knob to start the appliance immediately.
– «Professional baking» «Steam phase» appear in the plain text display.
– As long as the cooking space temperature is under 30 °C appears
in the temperature display.
The temperature display can be used to observe the rise in the cooking space
temperature.
Only in the operating mode is a single acoustic signal emitted when the
cooking space temperature set is reached.
24
Page 25

… Cooking and baking
Checking / Changing the cooking space temperature
The set cooking space temperature can be monitored or changed during operation.
A Press the button.
– The symbol flashes for about 15 seconds.
C
– «Professional baking» «Oven temperature» appear in the plain text display.
– The set cooking space temperature flashes in the temperature
display .
A Turn the adjusting knob to change the cooking space temperature.
Changing the operating mode
The operating mode cannot be changed during operation. It is necessary to first end
the operating mode by pressing the button and then select a new operating mode.
End of baking
Hot steam or air may escape when the appliance door is
opened.
To test if the bread is ready, tap the bottom of the loaf and it should sound hollow.
A Take the bread out of the cooking space when ready.
25
Page 26

… Cooking and baking
Switching off
A Press the button.
– The and symbols go out.
– The steam is released at the end of the process for all operating modes (with
– The steam is gradually released from the cooking space – this takes around a
– The cooling fan can continue to run for a certain length of time after the appli-
A Wipe up any water on the bottom of the cooking space with a soft cloth.
C
the exception of the hot air mode).
minute – so that there is no sudden rush of steam when the appliance door is
opened. The appliance door can be opened as soon as the cooking or baking
process has finished.
ance has been switched off. «Residual heat» appears in the plain text display.
The appliance is switched off when the symbols and the plain text display are
no longer lit up.
26
Page 27

… Cooking and baking
Emptying the water tank
The water in the tank may be hot.
When the appliance is switched off, the residual water is pumped back into the water
tank.
– «Hot water» «is pumped off» appear in the plain text display.
A When finished, remove and empty the water tank.
If the text remains for a while and the residual water is not pumped off, then
this is because:
For safety reasons, the residual water is only pumped off when it is below
80 °C.
Any operating mode can be started again at any time.
A Dry the water tank and slot back into position in the appliance.
A Leave the appliance door open so that the cooking space can cool down.
27
Page 28

… Cooking and baking
Optimal use
The recommended baking and roasting temperatures given in older recipe books are
likely to be too high and the recommended levels in the cooking space not ideal. The
section with tips on settings shows how to get the best use out of the appliance.
If in doubt, follow these tips. Note that the temperatures and times given in the tables
are based on typical methods of preparing food and thus are only indicative.
Note on hot air
When the appliance door is opened the hot air function stops. It resumes when the
appliance door is closed again.
If the cooking space temperature is below 100 °C, it is possible to operate
the hot air mode with the appliance door open, for instance to dry fruit.
Cooking space temperature when using hot air
When baking or cooking with hot air, the cooking space temperature needs to be
around 20 °C lower than with top and bottom heat. Recipes often only give temperatures for baking or cooking with top and bottom heat. Compare them to the temperatures given in the tips on settings section of the recipe book that comes separately. If
in doubt, select a lower temperature.
If the cake or roast is nice and brown on the outside but still raw in the middle,
it is usually a sign that the cooking space temperature is too high.
28
Page 29

… Cooking and baking
Baking using hot air and professional baking
Place a suitable baking form (round tin, spring form tin, cake tin, etc.) on the wire shelf.
Push the stainless steel tray to the back of the cooking space for optimum air
circulation.
The level of the shelf in the cooking space is particularly important when using hot air,
hot air humid, hot air + steaming and professional baking.
On one level
䡲 A stainless steel tray
or
䡲 Shallow and deep baking forms, e.g.
spring form or gugelhopf (ring) tins, at
level 1
On two levels
䡲 Stainless steel trays at levels 1 and 5
1
1
5
1
29
Page 30

… Cooking and baking
Saving energy
䡲 Avoid opening the appliance door frequently. This can lengthen the cooking time
significantly, especially when steaming.
䡲 Only switch the illumination on if needed.
䡲 To save energy when baking, for longer cooking times switch the appliance off
some 10 to 15 minutes before the end of the cooking time and use the heat that
is retained in the cooking space. Exceptions: soufflé, sponges, choux pastry and
puff pastry.
Preheating
䡲 Do not preheat the cooking space unless recommended in the recipe or the tips
on settings.
䡲 Do not preheat if using the , and operating modes.
Using accessories
䡲 It is important to put the food that is to be cooked or baked at
the right level in the cooking space. See tips on settings for
which tray or wire shelf to use.
30
䡲 The stainless steel tray and the enamelled cake tray serve as a
baking form for flans and biscuits, etc. and as a drip tray for
use with the wire shelf or perforated cooking tray.
䡲 Using knives or cutting wheels on the stainless steel tray or the
perforated cooking tray will damage the surface.
䡲 The wire shelf should be used for putting cake tins and baking
tins, as well as meat and frozen pizza, etc. on.
䡲 The perforated cooking tray is mainly for steaming fresh or
frozen vegetables.
Page 31

Soft roasting
General remarks
Soft roasting is a patented roasting method, whereby seared meat is cooked in the
appliance at a relatively low temperature for between 2½ and 4½ hours. The temperature is kept purposely relatively low in order to have the meat softly roasted and
ready to eat at the desired time.
The cooking space temperature is regulated by the food probe temperature of the
meat, which is constantly being monitored by the food probe. The cooking space temperature is automatically regulated for optimal soft roasting so that the meat is ready
by the set time. The temperature reading of the food probe plays an important role in
soft roasting, which is why particular care should be taken in positioning the food
probe.
Lean, quality cuts of meat are best for soft roasting. The meat should weigh between
500 g and 2000 g, and – for best results – be no thinner than 4 cm. As a rule of
thumb, the longer you soft roast the meat, the more tender and moisture the meat will
be. This is especially so for thicker pieces of meat. Sinewy or fatty cuts of meat are
less suitable for soft roasting.
A Season with herbs and spices or marinate the meat according to taste.
A Season the meat with salt before searing.
A Remove any marinade made with herbs, mustard, etc. from the meat before sear-
ing, as it burns easily and leaves a bitter taste.
31
Page 32

… Soft roasting
Preparing meat
A Heat some fat in a pan.
A Sear the meat on all sides (for no more than 5 minutes).
A Then place the meat in a glass or porcelain dish.
A Insert the food probe into the thickest part of the meat and ensure that the tip of the
food probe is in the thickest part.
A Put the wire shelf in the cooking space at level 1 and place the dish with the seared
meat on it.
A Plug the food probe into the food probe socket.
Select and start soft roasting
Selecting and starting the soft roasting mode is demonstrated using «Pork neck» «Soft
roasting» as an example.
A Press the adjusting knob to activate the plain text display.
– «Select and press OK» «Soft roasting» appear in the plain text display.
A Press the adjusting knob to confirm.
– «Soft roasting» «Fillet of veal rare» appear in the plain text display.
A Turn the adjusting knob until «Soft roasting» «Pork neck» appear in the plain
text display.
A Press the adjusting knob to confirm.
– The / and symbols light up.
– «Pork neck» «start» appear in the plain text display.
– The preset food probe temperature is shown.
– appears in the right display.
32
Page 33

… Soft roasting
To change the preset food probe temperature:
A Press the button.
A Change the food probe temperature by turning the adjusting knob.
To change the preset operating time:
A Press the button.
A Change the preset operating time by turning the adjusting knob.
To activate the delayed start:
A Press the button 2×.
A Set the desired switch-off time by turning the adjusting knob.
A Press the adjusting knob to confirm.
– The soft roasting mode starts.
– The / and symbols light up.
– The operating time appears in the right display.
– The food probe temperature appears in the temperature display.
To interrupt the programme
A Press the button to temporarily interrupt the soft roasting programme.
– «Pork neck» «continue» appear in the plain text display.
A Press the adjusting knob to continue.
33
Page 34

… Soft roasting
To switch off earlier
A Press the button 2×.
End
A long, intermittent acoustic signal is emitted for one minute when the meat has
finished roasting.
A Press the adjusting knob to cancel the acoustic signal.
34
Page 35

Food probe
Only use the food probe supplied. Do not clean in the
dishwasher.
The food probe is suitable for measuring the food probe temperature of food
between the range of 30 °C to 99 °C.
䡲 When the food has reached the desired food probe tempera-
ture, the appliance can be switched off automatically with the
help of the food probe. A guide to appropriate food probe temperatures can be found in the section on tips on settings.
䡲 The food probe can also be simply used to measure the food
probe temperature of the food in which case the appliance has
to be switched off manually.
䡲 The food probe can be used for all operating modes.
䡲 If the food is left in the cooking space after the appliance has
been switched off, the food probe temperature of the food will
continue to rise somewhat due to the residual heat in the cooking space. This must be taken into account particularly when
cooking meat.
35
Page 36

… Food probe
Positioning the food probe
A To steam, put vegetables in the perforated
32
cooking tray and meat on the wire shelf or
stainless steel tray.
A Insert the food probe 1 into the food at a
horizontal a position as possible. The tip
must be roughly in the thickest part and
should be completely covered in order to
get a correct food probe temperature
reading.
1
With meat, the food probe needs to be inserted in the meatiest part, which
can mean tying the meat up in order to get reliable readings.
Do not position the food probe next to a bone in the meat or in fat.
The socket for the food probe 3 is on the right side of the cooking space. Both the
socket and the food probe are insulated. Always keep the food probe clean.
A Flip back the lid and plug the food probe 2 into the food probe socket 3.
– On plugging the food probe into the socket, appears in the temper-
ature display and the symbol lights up.
36
Page 37

… Food probe
Food probe temperature
The food probe has to be plugged in order to set the food probe temperature.
Setting the food probe temperature
A Press the button 2×.
–The symbol flashes.
– «Food probe temperature» appears in the plain text display.
– The recommended food probe temperature flashes.
A Turn the adjusting knob to set the desired food probe temperature. The food
probe temperature depends on what you are cooking and how well cooked you
want it. See on tips on settings.
If only the food probe temperature is to be measured, reset it to .
A Select operating mode and set desired cooking space temperature.
A Press the adjusting knob to start the appliance.
– The food probe temperature is shown during cooking.
– When the food probe temperature is below 30 °C appears in the
temperature display.
Checking / Changing the food probe temperature
A Press the button 2×.
– The symbol flashes for 15 seconds.
– «Food probe temperature» appears in the plain text display.
– The food probe temperature set flashes in the temperature display .
A Turn the adjusting knob to change the food probe temperature set.
37
Page 38

… Food probe
End of cooking
– The appliance switches off automatically when the food probe temperature has
been reached.
– An acoustic signal is emitted for one minute.
– The symbol flashes.
– «Food probe temperature» «reached» appear in the plain text display.
– The current food probe temperature appears in the temperature display, e.g.
.
A Press the adjusting knob to cancel the acoustic signal.
38
Page 39

Clock functions
The appliance features the following clock functions
䡲 Clock
䡲 Timer (the timer can be used at any time and independently of all other functions)
䡲 Operating time (time-controlled shut-off)
䡲 Delayed start (time-controlled switch-on and shut-off)
Setting and changing the time
You can set or change the time using either the plain text display or a combination of
buttons. As an example, the time is now 10:15 am and the clock should be put for-
ward an hour.
Using the plain text display
A Press the adjusting knob to activate the plain text display.
– «Select and press OK» «Soft roasting» appear in the plain text display.
A Turn the adjusting knob until «Select and press OK» «Set time» appear
in the plain text display.
A Press the adjusting knob to confirm.
– The actual time appears in the right display .
– «Set time» «10:15» appear in the plain text display.
A Turn the adjusting knob to set the time.
– The new time appears in the second line of the plain text display.
– The old time is still in the right display.
A Press the adjusting knob to confirm the new time.
– appears in the right display.
– «Select and press OK» «Set time» appear in the plain text display.
A Press the button to exit.
39
Page 40

… Clock functions
Using a combination of buttons
A Depress the and buttons at the same time.
– The set time and the symbol flash.
A Turn the adjusting knob to set the desired time.
A Press the adjusting knob to confirm.
When the appliance is switched off, the brightness of the clock display is reduced
between 22:00 and 6:00.
The clock cannot be altered if the delayed start function has been activated,
and in which case «Time» «switch off delay first» appear in the plain text
display.
40
Page 41

… Clock functions
Timer
The timer functions like an egg timer. It can be used at any time and independently of
all other functions.
Setting
A Press the button.
–The symbol flashes.
– «Timer» appears in the plain text display.
– flashes in the right display.
A Turn the adjusting knob to set the timer duration.
The timer is set using the following intervals:
䡲 Up to 10 minutes in 10-second intervals, e.g. = 9 minutes and
50 seconds.
䡲 Over 10 minutes in intervals of one minute, e.g. = 1 hour and
12 minutes.
The maximum timer duration that can be set is 9 hours and 59 minutes.
A Press the adjusting knob to start the timer.
– The symbol lights up.
– The time remaining is displayed (provided no operating time has been
entered).
When the time is up:
– A sequence of 5 short acoustic signals is repeated for one minute.
–The symbol flashes.
– «Timer» «finished» appear in the plain text display.
A Press the adjusting knob to cancel the acoustic signal.
41
Page 42

… Clock functions
Checking and changing
A Press the button.
– The symbol flashes.
– «Timer» appears in the plain text display.
– The countdown to the time remaining flashes.
A Turn the adjusting knob to change the timer duration.
A Press the adjusting knob to confirm.
Switching off before time
A Press the button.
– The symbol flashes.
– «Timer» appears in the plain text display.
– The countdown to the time remaining flashes.
A Turn the adjusting knob and turn the timer duration to .
A Press the adjusting knob to confirm.
42
Page 43

… Clock functions
Operating time
The operating time is the length of time that an operating mode is switched on. The
operating mode automatically switches off when the operating time is up.
Setting
A Preheat the cooking space if necessary.
A Place the food in the cooking space.
A Press the button.
–The symbol flashes.
– The symbol and selected operating mode light up.
– «Operating time» appears in the plain text display.
– The recommended cooking time for the selected operating mode flashes in the
A Turn the adjusting knob to set the desired operating time.
A Press the adjusting knob to start operation.
– The symbol for the selected operating mode lights up.
– The and symbols light up.
– The current cooking space temperature is shown in the temperature display.
– The operating time remaining is shown in the right display.
C
right display.
C
Example: You select the operating mode and .
At 9:00 you set an operating time of 1 hour and 15 minutes.
The appliance will switch off at 10:15.
43
Page 44

… Clock functions
Checking and changing
A Press the button.
A Turn the adjusting knob to change the operating time.
A Press the adjusting knob to confirm.
Switching off before time
A Press the button.
End of the operating time
– The selected operating mode automatically switches off when the operating time
is up.
– A long, intermittent acoustic signal is emitted for one minute.
– The symbol flashes.
– «Operating time» «end» appear in the plain text display.
– The current cooking space temperature is shown in the temperature display.
A Press the adjusting knob to cancel the acoustic signal.
44
Page 45

… Clock functions
Delayed start
The delayed start function helps you if you want to have a dish ready for a certain time
but you cannot switch the appliance on or off yourself at just the right time. Set the
operating time as well as the switch-off time. The appliance will switch on – with a
delay – and off again automatically.
If you use the food probe, you will need to estimate the cooking time. You will find a
guide on times in the tips on settings. The appliance will automatically switch on with
a delay and off again when the food probe temperature set is reached. Note that,
depending on the estimated cooking time, this could occur somewhat earlier or later
than the set switch-off time.
Perishables should not be kept unrefrigerated too long.
Setting
A Place the food in the cooking space and select the operating mode and the cook-
ing space temperature.
A Press the button.
–The symbol flashes.
– The symbol and selected operating mode light up.
– «Operating time» appears in the plain text display.
– The recommended cooking time for the selected operating mode flashes in the
C
right display.
A Turn the adjusting knob to set the desired operating time.
A Press the button again.
–The symbol flashes.
– «Switch-off time» appears in the plain text display.
– The actual time and the set operating time flash in the right display.
45
Page 46

… Clock functions
A Turn the adjusting knob to set the desired switch-off time and thus the
delayed start.
The switch-off time can be extended to 23 hours and 59 minutes at the most.
A Press the adjusting knob to confirm.
– The and symbols light up.
– «Delayed start» appears in the plain text display.
– The appliance remains switched off until it turns on automatically.
Example: You select the operating mode and .
At 9:00 you set an operating time of 1 hour and 15 minutes and a switchoff time of 12:30.
The appliance will switch on at 11:15 and off again at 12:30.
Checking and changing
With the delayed start, you can check all the settings but you can only change the
switch-off time.
A Press the button 2×.
– The symbol flashes.
– «Switch-off time» appears in the plain text display.
– The switch-off time flashes in the right display.
A Turn the adjusting knob to change the switch-off time.
A Press the adjusting knob to confirm.
46
Page 47

… Clock functions
Switching off before time
A Press the button.
At switchoff time
– The appliance automatically switches off when the switch-off time is reached.
– A long, intermittent audible signal is emitted for one minute.
– The symbol flashes.
– «Operating time» «finished» appear in the plain text display.
– The current cooking space temperature is shown in the temperature display.
A Press the adjusting knob to cancel the acoustic signal.
47
Page 48

Tips on settings
Below you will find tips on how to prepare some favourite dishes.
The cooking times and temperatures given serve only as guide and may vary depending on the consistency and texture of the food.
Steaming
Place the food into the unheated cooking space.
Vegetables (fresh)
French beans
Broccoli, cauliflower 20–30
Fennel 25–35
Carrots 20–30
Diced potatoes, boiled potatoes 20–25
Whole potatoes 30–45
Mange-tout 10–15
Kohlrabi 15–30
Sweetcorn 45–60
Sweet peppers 10–15
Brussels sprouts 25–30
Asparagus 20–35
Spinach 7–10
100
Time in
mins.
35–45
Accessories
Celery 25–30
Courgettes 10–20
48
Page 49

… Tips on settings
Accompaniments
Rice + liquid
Lentils + liquid 20–60
100
Time in
mins.
20–40
Semolina + liquid 10–15
Meat
Ham (depending on weight)
Pork loin 45–60
100
Time in
mins.
60–90
Sausages 30–45
Fish and seafood
Time in
mins.
Accessories
Accessories
Accessories
Filet of fish
10–20
80
Whole fish 20–30
Mussels
20–30
100
Squid 10–30
49
Page 50

… Tips on settings
Sterilising / Preserving
Cherries 80
Pears
Plums
Extracting juice
Fruit (cherries, grapes, etc.)
Berries (blackcurrants, brambles,
elderberries, etc.)
Blanching
Time in
mins.
30
90Peaches
Time in
mins.
100 max. 90
Time in
mins.
Accessories
Accessories and
special accessories
Accessories
Vegetables e.g. French beans, peas, etc.
100 ca. 5
Desserts
Crème caramel
Time in
mins.
25–30
90
Creams and custards 20–30
Yoghurt 40 5–6 hrs.
50
Accessories
Page 51

… Tips on settings
Regenerating
Place the food in the unheated cooking space.
The cooking time and temperature guidelines for are for regenerating on
several levels at the same time.
Regenerating
Regenerating dishes (1–2 portions)
Regenerating dishes (3–4 portions) 8–10
120
Preparing ready meals
Defrosting
Bread
120–130 ca. 20
Pasta, rice
Meat, fish, poultry 50
Vegetables 100
Time in
See manu-
facturer’s
instructions
in mins.
Depending
on weight
instructions
mins.
6–8
Time
See
Accessories
Accessories
51
Page 52

… Tips on settings
Professional baking
Place the food in the unheated cooking space.
The cooking time and temperature guidelines for are for baking on two
levels at the same time.
Professional baking Level
Ring cake 190–200 1 30–40
Puff pastries (fresh or frozen, with
or without a filling, excluding
flans)
Bread 210–220 1 40–50
Bread buns 220–230
200–220
1
1 + 5
1
1 + 5
Time in
20–35
20–30
mins
Accessories
Special accessories
52
Page 53

… Tips on settings
Baking with hot air
The cooking time and temperature guidelines for are for baking on two
levels at the same time.
Baking with
hot air
Sponge cake base 140–150 yes 1 30–40
Cake 150–160 yes 1 50–55
Flan(s) 180–190 yes
Short-crust pastry
with fruit
Choux pastry 170–180 no
Pizza 210–220 yes
150–160 (yes) 1 50–70
Preheat Level
1
1 + 5
1
1 + 5
1
1 + 5
mins.
40–45
45–50
20–30
20–30
Baking with hot air humid
Baking with
hot air humid
Preheat Level
mins.
Time
in
Time
in
Accessories
Special
accessories
Accessories
Gratin,
soufflés
160–180 no
1
1 + 5
30–60
53
Page 54

… Tips on settings
Soft roasting
A Also see section on «Soft roasting».
temperature and time
Recommended
Time range
Level of
doneness °C Hours
rare 58
Fillet of veal
medium 62
Loin of veal thick end 67
Loin of veal kidney end 67
Veal shoulder 80
Veal neck 81
rare 53
Fillet of beef
medium 57
rare 52
Beef sirloin, roast beef
medium 55
Chuck roast 67
Beef shoulder 72
Loin of beef thick end 67
Hours
Level
3½ 2½ – 4½ 1
Loin of pork kidney end 67
Loin of pork thick end 67
Pork neck (also smoked) 85
rare 63
Leg of lamb
medium 67
Individual soft roasting 70
54
Page 55

Care and maintenance
Cleaning the exterior
A Avoid cleaning the surface of the appliance with abrasive or caustic cleaning
agents, stainless steel cleaner, scouring pads, wire wool, etc., which can damage
the surface.
A Remove any dirt or excess cleaning solution as quickly as possible. Using a cloth
dampened with water, clean the surface (for metallic surfaces rub in the direction
of the original polish lines) and then polish with a soft cloth.
Cleaning the accessories
The food probe should not be cleaned in the dishwasher.
The baking trays, cooking tray, shelves and shelf guides can all be cleaned in the
dishwasher.
55
Page 56

… Care and maintenance
Cleaning the cooking space
The cooking space temperature sensor can be easily dam
aged. Care must be taken not to bend it during cleaning.
A Avoid using abrasive cleaners such as scouring pads, steel wool, etc. as they can
damage the surface.
A Wipe the cooking space clean using a cloth dampened with water only whilst the
appliance is still warm. Finish off by polishing with a soft cloth.
A To remove dried-on dirt, switch the appliance on for a short period (about 30 min-
utes) beforehand, setting it to the operating mode and a temperature of
80 °C. This will soften the dirt.
Over time the cooking space will turn a golden colour. This discolouration is
a normal property of stainless steel and affects neither the cooking or baking
functions nor the operation of the appliance.
Blue tarnish spots and limescale stains can be removed using a caustic clean-
ing agent or some lemon juice.
For ease of cleaning, various parts in the oven space can be easily removed (see the
following pages).
56
Page 57

… Care and maintenance
Removing the shelf guides
A Unscrew the knurled nuts 1 in the front of
the shelf guides in an anti-clockwise
direction.
A Pull the shelf guides 2 to the side of the
2
1
knurled nuts and remove from the front.
A To put back, insert the shelf guides into the
holes in the back wall of the cooking space and position on screw. Screw the
knurled nuts 1 in a clockwise direction till tight.
Removing the appliance door
A Open the appliance door as far as it will go.
A Fold the clamps on the door hinges 1
forward.
A Close the appliance door just enough that it
can be lifted out.
1
A To reassemble, push the hinges into the holes
from the front.
1
2
1
A Open the appliance door as far as it will go
and fold back the clamps on the door
hinges 1.
57
Page 58

… Care and maintenance
Changing the water filter
Over time the water filter can get clogged with fine particles of dirt and limescale,
which are found naturally in water.
If the water filter is blocked, not enough water is being pumped into the boiler.
– In this case, «Please refill water» «and press OK!» appear in the plain text display
even though the water tank is full.
A Remove the water tank.
–The swing arm 1 rises.
1
A Press the swing arm at the back 2.
– The swing arm comes down again.
A Hold the swing arm in one hand.
A Remove the water filter 3 with the other hand.
A Carefully press the new water filter on to the swing
arm.
58
2
3
Page 59

… Care and maintenance
Descale
Whenever steam is produced, irrespective of the hardness of the local water supply
(i.e. the limescale content of the water), limescale is deposited in the boiler.
The appliance automatically recognises when descaling is necessary.
– «Boiler scaled up,» «please descale!» appear in the plain text display.
The time interval between descaling depends on the hardness of the water and fre-
quency of use. If steaming 4× 30 minutes per week, the appliance must be descaled
– depending on water hardness – roughly as follows:
Water hardness Descale after about
Very soft
Medium
Very hard
We recommend you descale the appliance whenever the warning appears in the
plain text display.
Failure to descale the appliance will likely impair the functioning of or cause damage
to the appliance.
18 months
9 months
6 months
Suitable descaling solutions
For descaling, only use the special descaler especially developed
for this appliance and which is available at all good chemists.
With this special descaler, you can achieve a gentle yet professional level of descaling for your appliance.
Standard descaling solutions are not suitable as they may contain
foam additives or not be effective enough.
59
Page 60

… Care and maintenance
Descaling
For safety reasons, the descaling process cannot be
interrupted.
The appliance can be descaled with the appliance door open or closed. The
appliance must be switched off.
A Activate the plain text display by pressing the adjusting knob.
A Turn the adjusting knob until «Descaling» appears.
A Press the adjusting knob to confirm.
– «Descaling» «start» appear in the plain text display.
A Press the adjusting knob to confirm.
– «Fill with 0.5L descaler» «and press OK!» appear in the plain text display.
A Remove and empty the water tank. Pour the entire contents of the special descaler
into the water tank.
A Put the water tank back.
A Press the adjusting knob to confirm.
– The descaling phase starts.
– «Descaling» «running» appear in the plain text display.
When the descaling process is over, which takes about 30 minutes, «Pour out descaler» «Fill with 1.2L water» appear in the plain text display.
A Remove the water tank, pour away the descaler and fill the tank with 1.2 l cold
water.
A Put the water tank back.
– The rinsing phase starts automatically (also if the appliance door is open).
– «Descaling» «1st Rinsing» appear in the plain text display.
60
Page 61

… Care and maintenance
When the 1st rinsing phase is over, «Pour out water» «Fill with1.2L water» appear in
the plain text display.
A Remove the water tank, pour away the water and fill the tank again with 1.2 l cold
water.
A Put the water tank back.
– The rinsing phase starts automatically (also if the appliance door is open).
– «Descaling» «2nd Rinsing» appear in the plain text display.
A When the 2nd rinsing phase is over, «Pour out water» «Descaling completed»
appear in the plain text display.
A Remove, empty and dry the water tank.
61
Page 62

… Care and maintenance
Door seal
If the door seal is damaged, it should be replaced
as follows:
A To make it easier, first remove the appliance
door.
A Remove the damaged door seal 1 and then
clean the seal frame 2.
A Press the new seal 1 into the four corners 2.
Ensure that the thinner part 3 of the seal is
pressed over the frame. Only the thicker
part 4 of the seal should be in the frame 2.
A Fix the seal in the middle of the four sides.
A Then about every 3 cm press the seal into the
frame so that it fits evenly around the frame.
A Use a round, stable object, such as the handle
of a wooden spoon, and some pressure to
smooth out the seal and ensure that it is sitting
evenly in the frame.
1
2
3
4
A Put the appliance door back.
Replacing a defect light bulb
For safety reasons, in case of a defect light bulb please contact our Customer Services.
62
Page 63

Troubleshooting
What to do if …
… the appliance is not working and the displays are not lit up
Possible causes Solution
䡲 Fuse or circuit breaker for
electrical installations in the
A Change the fuse.
A Reset the circuit breaker.
home is defect.
䡲 Fuse or circuit breaker keeps
A Call Customer Services.
blowing.
䡲 No power.
A Check mains supply.
… the appliance starts making noises
Possible causes Solution
䡲 The appliance may emit
Such noise is normal. No action needed.
noise when it is operating
(e.g. pumping noises when
steam is being produced).
… «Please refill water» «and press OK!» appear in the plain text
display
Possible cause Solution
䡲 The water tank is empty.
A Refill the water tank and then put it back in the
appliance.
䡲 The water filter is blocked.
A Change the water filter.
63
Page 64

… Trouble-shooting
… after finishing cooking, «Hot water» «is pumped off» appear in
the plain text display, but even after some time still no water is
being pumped off
Possible causes Solution
䡲 For safety reasons, the wa-
ter in the boiler is not pumped off until the temperature
of the water drops to below
80 °C.
A If there is enough cold water in the water tank,
it will be automatically pumped into the boiler to
cool it down.
A If there is not enough cold water in the water
tank, allow the boiler to cool down on its own
(this can take up to 30 minutes). The appliance
may be used without further ado.
… «Boiler scaled up,» «please descale!» appear in the plain text
display
Possible cause Solution
䡲 The boiler is scaled up.
䡲 The water filter may be
partly blocked.
A Start descaling.
A If it is not too long ago since the appliance was
descaled, change the water filter and start
descaling.
64
Page 65

… Trouble-shooting
… «F.. read instructions» appears in the plain text display
Possible cause Solution
䡲 Various situations can lead
to an «F» error message.
A Cancel error message by pressing the
button.
A Switch the electricity supply off for about
1minute.
A Switch the electricity supply back on again.
A If the message appears again, note down the
error number and then switch the electricity
supply off.
A Call Customer Services.
… «F1 read instructions» appears in the plain text display
Possible cause Solution
䡲 The food probe has not
been inserted into the food.
A Gently pull the food probe out of the socket
(using protective gloves or oven cloth).
A Cancel the error message by pressing the
button.
䡲 The food probe has been
inserted into the food and
A The food probe is defect and has to be
replaced.
plugged into the socket.
65
Page 66

… Trouble-shooting
After a power failure
After a power failure the right display flashes .
Setting the time
A Depress the and buttons at the same time.
A Turn the adjusting knob to set the time.
A Press the adjusting knob to confirm.
䡲 The user settings remain unchanged.
䡲 If there is a power failure during soft roasting, it will be no longer possible
to continue running this operating mode.
䡲 In the event of a power failure during descaling:
A Turn or press the adjusting knob.
– Descaling continues automatically. The phase that was interrupted will
be repeated.
66
Page 67

Tips and tricks
Steaming
When using the
simultaneously. For example, rice or pulses can be prepared at the same time as
vegetables with similar cooking times, saving energy and washing up.
Grains (e.g. rice and millet) and pulses (e.g. lentils and beans), adding an appropriate amount of liquid, can be cooked directly in tableware.
Type of food Weight
Rice 100 g 1½ dl (salted water, bouillon, etc.)
Millet 100 g 1½–2 dl
Semolina 100 g 2–3 dl
Lentils 100 g 2–3 dl
French beans 100 g 3 dl
When using the perforated cooking tray, the stainless steel cooking tray underneath
reduces condensation and avoids food spills on the floor of the cooking space.
Season vegetables after steaming.
steaming mode at 100 °C, a variety of food can be cooked
Amount of liquid to be roughly added
(depending on desired consistency)
67
Page 68

… Tips and tricks
Regenerating
Food that is to be regenerated using the operating mode can be portioned up
directly on heat-proof plates (e.g. porcelain, suitable glass, but not plastic).
With this operating mode, it is not necessary to cover food over. During regenerating
steam is added and so the food cannot dry out.
The bulkier the food when cooked, the lower the cooking space temperature should
be in order to prevent a slight drying-out effect on the surface (through the longer cooking time).
Bread and other starchy foods, such as rice or pasta, can be easily defrosted using
the mode.
Meat and fish should be defrosted at very low temperatures, e.g. 50 °C,
to prevent the food cooking at the edges.
Professional baking
Allow bread, bread buns and other yeast cakes and pastries to proof briefly after forming into shape. 10 minutes is usually sufficient. Place the dough on the stainless steel
tray, put it into the unheated cooking space and bake using the mode.
Yeast and puff pastries to be baked using the professional baking mode do not need
to be brushed with e.g. egg yolk, cream, etc. A nice, shiny crust is formed during
professional baking.
The appliance door should not be opened during the steaming phase. The streaming
in of cold air will prolong the steaming phase and the bread can be oversteamed.
The bread will come out flatter.
For a nice, crispy crust, follow the basic rule: the smaller the item to be baked, the
higher the temperature should be during the hot air phase. Thus the optimum baking
temperature for bread buns is generally higher than for a single loaf of bread.
68
Page 69

… Tips and tricks
Hot air
The cooking time can be reduced only slightly by increasing the cooking space temperature. If the food is cooked on the outside but still raw or doughy on the inside,
lower the temperature of the cooking space slightly and lengthen the cooking time.
With , check that the rack levels used correspond to those recommended in the
tips on settings. Do not push baking tins or high food items right to the back of the
cooking space. Even browning is generally achieved at lower temperatures.
Hot air + steaming
When preparing food that can spit, such as meat, poultry, etc., the oven temperature
should not exceed 180 °C. At higher temperatures, fat can spit onto the oven walls,
causing visible, dark marks that cannot be removed.
69
Page 70

Accessories and spare parts
Accessories
Article no. Length × Width × Height [mm]
2
Stainless steel tray GN K2.3210 354 × 325 × 20
Cake tray, enamelled GN K2.3211 354 × 325 × 20
Cooking tray, unperforated, stainless steel GN K2.3214 354 × 325 × 40
Cooking tray, perforated, stainless steel GN K2.3213 354 × 325 × 40
Cooking tray, unperforated with lip,
stainless steel GN
Wire shelf K2.3096 354 × 325 × 23
Stainless steel tray GN K2.3224 177 × 325 × 20
Cooking tray, unperforated, stainless steel GN K2.3223 177 × 325 × 40
Cooking tray, perforated, stainless steel GN K2.3208 177 × 325 × 40
Recipe book J697.08
Spare parts
Water filter (3×) K2.9910
Shelf guide left K2.3790
Shelf guide right K2.3791
Knurled nut N40.750
Water tank K2.3086
Food probe K2.9119
Door seal K2.4206
/
3
2
/
3
2
/
3
2
/
3
2
/
3
1
/
3
1
/
3
1
/
3
K2.4099 354 × 325 × 40
Article no.
70
2
The measurements of the accessories correspond to Gastronorm GN or
1
/
GN.
3
/
3
Page 71

Technical data
External measurements
55 cm 60 cm
Height: 37.8 cm 37.8 cm
Width: 54.8 cm 59.6 cm
Depth: 55.1 cm 55.1 cm
Weight: 33 kg 33 kg
Electrical connection
Voltage/frequency: 230 V ~50 Hz or 400 V 2N~ 50 Hz
Output: Connected wattage 3500 W
Fuse: 16 A (230 V) or 10 A (400 V)
Heat output
Hot air output: 1900 W
Boiler: 1400 W
Bottom heat: 140 W
Safety concept
As long as power is getting to it, the appliance is constantly monitored by the electronic steering. Any malfunction will appear in the plain text display.
General caution
Maximum load: 2 kg
Guidance notes for testing institutes
The stated measurements according to EN 50304 are to be tested in the hot air humid
operating mode.
71
Page 72

Disposal
Packaging
䡲 All packaging materials (cardboard, plastic film (PE) and polystyrene (EPS)) are
marked accordingly and should, if possible, be collected for recycling and disposed of in an environmentally friendly way.
Disconnection
䡲 Disconnect the appliance from the mains. With a fixed appliance, this is to be car-
ried out by a qualified electrician!
Safety
䡲 To prevent accidents caused by improper use, especially through children playing,
disable the appliance.
䡲 Pull the plug out of the mains socket or have the appliance disconnected from the
mains by a qualified electrician. Then cut the mains cable.
Disposal
䡲 The old appliance should not be discarded as worthless rubbish. If disposed of
correctly, the raw materials can be recovered for recycling.
䡲 The symbol on the identification plate warns that the appliance may not be
disposed of in normal household waste.
䡲 The appliance must be disposed of in accordance with local regulations on waste
disposal.
For more information on the handling, disposal and recycling of this product,
please contact the local authorities, the local recycling facilities for household
waste or the retailer, from whom you purchased this appliance.
72
Page 73

Index
A
Accessories 70
Ordering 75
Usage 30
Accompaniments 49
Adjusting knob 13
Appliance
Description 9
Switching off 26
B
Baking 18
End of 25
With hot air 53
With hot air humid 53
Before using for the first time 5
Blanching 50
Bread 52
Buttons 10
C
Care 55
Childproof lock 16
Children in the home 6
Cleaning
Cooking space 56
Exterior 55
Clock 39
Display 16
Setting 39
Cooking 18
Cooking space temperature 25
D
Defrosting 51
Delayed start 45
Descale 59
Descaling 60
Descaling solutions 59
Desserts 50
Disconnection 72
Display elements 10
Displays 10
Disposal 72
Door seal 62
E
Electrical connection 71
Error message 65
External measurements 71
Extracting juice 50
F
Fish 49
Food probe 35
Food probe temperature 37
H
Heat output 71
Hot air 21, 53, 69
Baking 29
Levels 29
Note 28
Hot air + steaming 22, 69
Hot air humid 21, 53
I
Illumination 17
L
Languages 15
Levels 19
Hot air 29
Light bulb, defect
Replacing 62
73
Page 74

… Index
M
Maintenance 55
Malfunction 75
Meat 49
Preparing 32
O
Operating elements 10
Operating instructions 12
Operating mode 18
Change 25
Select 24
Operating the appliance 12, 23
Operating time 43
Orders 75
P
Packaging 72
Plain text display 13
Poaching 18
Power failure, after a 66
Preserving 50
Professional baking 20, 52, 68
Puff pastries 52
Q
Queries 75
Quick instructions 76
Safety precautions
Before using for the first time 5
Children in the home 6
Correct use 6
Use 7
Saving energy 30
Seafood 49
Service agreements 75
Service centre 75
Settings
Example 23
Tips 48
Soft roasting 31, 54
Select and start 32
Spare parts 70
Ordering 75
Steaming 18, 48
Sterilising 50
Switch-off time 45
Symbols 2, 10
T
Technical data 71
Time
Setting 39
Timer 41
Tips and tricks 67
Trouble-shooting 63
R
Refilling the water 23
Regeneration 19, 51, 68
Repair service 75
S
Safety 72
Safety concept 71
74
U
User settings 14
Using for the first time 11
V
Vegetables 48
W
Water 17
Water filter 58
Water hardness 17
Water tank 23
Page 75

Repair service
The «Troubleshooting» section will help you to carry out
small repairs yourself, saving you the time and trouble of
calling out a service engineer and the cost that goes along
with it.
Whether you contact us for repairs or orders, please always state the serial number
(FN) and the name of the appliance. Enter these details below and also on the service
sticker on the appliance itself. Stick this in a conspicuous place or in your telephone
agenda.
FN
You will also find said details on the certificate of guarantee, the original sales invoice
and the identification plate of the appliance.
A Open the appliance door.
– The identification plate is on the left-side panel.
If the appliance is not working properly, contact your nearest V-ZUG LTD service centre
using freephone 0800 850 850 and stand in close proximity to the appliance.
Queries, orders, service agreements
For administrative or technical queries or problems, as well as for ordering spare parts
and accessories, please contact our head office in Zug on tel. 041 767 67 67.
As regards the maintenance of all our products, when the warranty expires you have
the option of taking out a service agreement. We will be happy to send you the
necessary forms.
Appliance
75
Page 76

Quick instructions
Setting the time
A Depress the and buttons at the same time.
A Turn the adjusting knob to the desired time.
A Press the adjusting knob to confirm.
Selecting the operating mode
A Press the button until the desired operating mode appears.
A Turn the adjusting knob to set the cooking space temperature.
A Press the adjusting knob to start.
Switch off appliance
A Press the button.
Setting the timer
A Press the button.
A Turn the adjusting knob to set the timer duration.
Please read the safety precautions in these operating instructions!
VZUG LTD
Industriestrasse 66, 6301 Zug
Tel. 041 767 67 67, Fax 041 767 61 61
vzug@vzug.ch, www.vzug.ch
Service Centre: Tel. 0800 850 850
J697.09-0
 Loading...