

Page 1

Easy-Cook
Combair-Steam SE
Combi-steam cooker
Page 2

Contents
EasyCook 3
Symbols used................................................................................................................................................................................................................................. 3
Operating modes........................................................................................................................................................................................................................... 3
GourmetGuide................................................................................................................................................................................................................................ 3
Optimal use ....................................................................................................................................................................................................................................4
Settings 5
Vegetables ...................................................................................................................................................................................................................................... 5
Bakery products............................................................................................................................................................................................................................. 9
Flans and pizza ........................................................................................................................................................................................................................... 15
Potatoes........................................................................................................................................................................................................................................ 16
Baked dishes and gratins ......................................................................................................................................................................................................... 16
Meat .............................................................................................................................................................................................................................................. 17
Accompaniments........................................................................................................................................................................................................................ 21
Grains............................................................................................................................................................................................................................................ 23
Pulses ........................................................................................................................................................................................................................................... 24
Poultry ........................................................................................................................................................................................................................................... 25
Fish and seafood........................................................................................................................................................................................................................ 26
Fruit ............................................................................................................................................................................................................................................... 27
Dairy products............................................................................................................................................................................................................................. 29
Desserts ....................................................................................................................................................................................................................................... 29
Mushrooms .................................................................................................................................................................................................................................. 30
Eggs .............................................................................................................................................................................................................................................. 31
Chestnuts ..................................................................................................................................................................................................................................... 31
Preserving, bottling 32
2
Page 3

EasyCook
Symbols used
Operating mode Preheating until the cooking space temperature is reached
GourmetGuide Duration
Food probe temperature Levels
Cooking space temperature Accessories
Temperature levels
Operating modes
Top/bottom heat PizzaPlus
Top/bottom heat humid Grill
Hot air Grill-forced convection
Hot air humid Steam
Hot air with steaming Regeneration
GourmetGuide
Professional baking
3
Page 4

EasyCook
1
Optimal use
The cooking space temperatures and levels given in standard recipe books are in part unlikely to be optimal for this appliance. The
following tables show how to get the best use out of the appliance.
The cooking space temperatures or temperature levels and durations given serve only as guide and may vary depending on the type
and size of the food as well as on individual preference.
▸ Push the Baking tray into the cooking space with the «sloped» side 1 to
the back.
▸ When using the or operating modes, place the stainless steel tray underneath the perforated cooking tray or wire shelf to
catch any food spills and collect condensate.
▸ With the and operating modes, use a dark enamelled tray or a black tray or tin for crispy results.
4
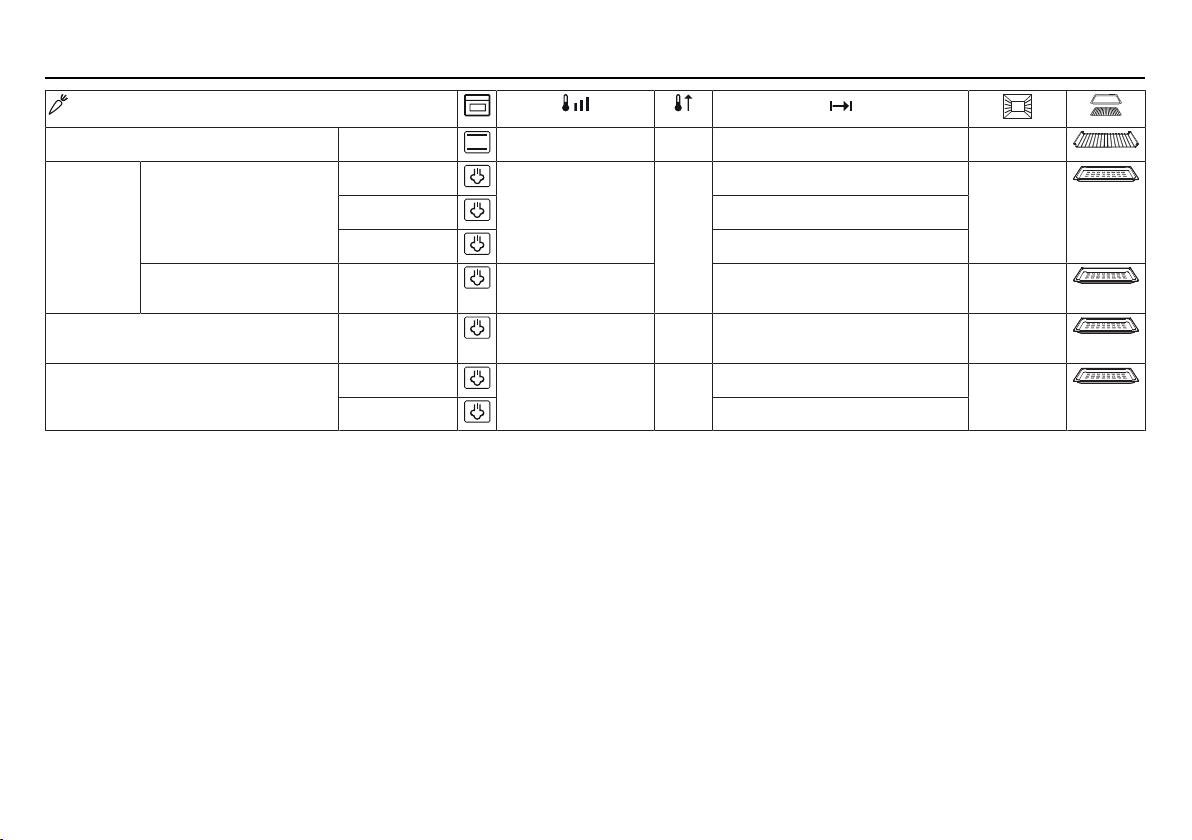
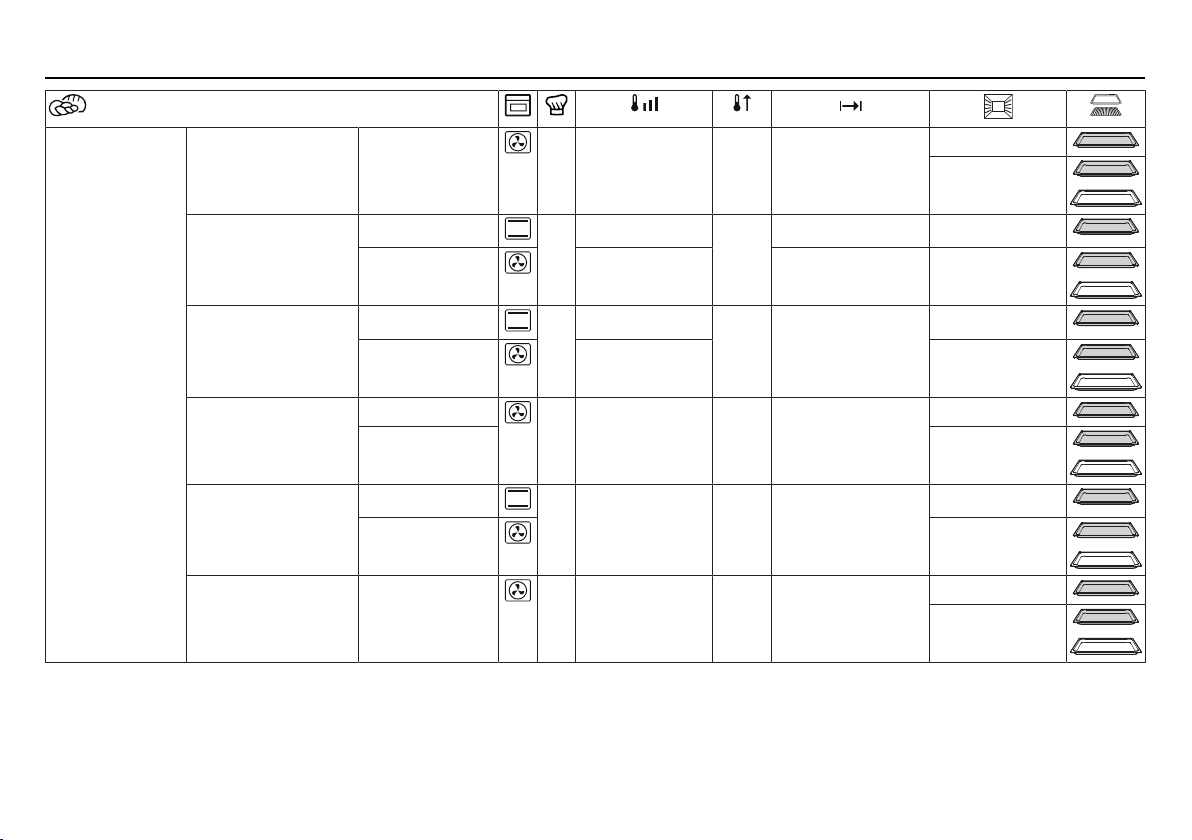
Page 5

Settings
Vegetables
Leaf spinach Cook 100 °C No 7–13 mins. 2
Blanch 5–7 mins.
Cauliflower Cauliflower, whole Cook 100 °C No 20–35 mins. 2
Cauliflower, florets Cook 100 °C No 10–25 mins. 2
Preserve 1 hr. 30 mins.–1 hr. 40 mins.
Broccoli Cook 100 °C No 10–20 mins. 2
Preserve 1 hr. 30 mins.–1 hr. 40 mins.
Chicory Cook 100 °C No 15–30 mins. 2
Peas Cook 100 °C No 15–30 mins. 2
Gherkins Preserve 90 °C No 20–30 mins. 2
Fennel, chopped Cook 100 °C No 10–20 mins. 2
▸ Place the stainless steel tray underneath the perforated cooking tray or wire shelf.
/
5
Page 6
Settings
Vegetables
/
Gratinate Gratinate1) 190–210 °C Yes 10–18 mins. 2
Green
beans
Green beans, fresh Cook 100 °C No 30–50 mins. 2
Blanch 5–15 mins.
Preserve3) 1 hr.–1 hr. 10 mins.
Dried string beans,
Cook 100 °C 35–45 mins. 2
soaked
Cabbage, chopped Cook 100 °C No 20–40 mins. 2
Carrots, chopped Cook 100 °C No 15–25 mins. 2
Preserve 1 hr. 30 mins.–1 hr. 40 mins.
1
)
▸ Put the food in a suitable container and place on the wire shelf.
2
)
▸ Place the stainless steel tray underneath the perforated cooking tray or wire shelf.
3
)
▸ Repeat the preserving step, allowing the jars to cool down completely in between time.
2
)
2
)
2
)
2
)
6
Page 7
Settings
Vegetables
/
Mangetout Cook 100 °C No 10–20 mins. 2
Kohlrabi, chopped Cook 100 °C No 15–25 mins. 2
Swiss chard, mangold Cook 100 °C No 10–20 mins. 2
Corn Corn on the cob Cook 100 °C No 30–45 mins. 2
Polenta Cook2), 3) 100 °C No 30–40 mins. 2
Sweet peppers Cook 100 °C No 8–15 mins. 2
Skin 4 Yes4) 10–20 mins. 4
Beetroot Cook 100 °C No 30 mins.–1 hr. 30 mins. 2
Brussels sprouts Cook 100 °C No 20–30 mins. 2
1
)
▸ Place the stainless steel tray underneath the perforated cooking tray or wire shelf.
2
)
▸ Add 3dl liquid per 100g.
3
)
▸ Put the food in a suitable container and place on the wire shelf.
4
)
▸ Preheat the cooking space for 3 minutes.
1
)
1
)
1
)
1
)
1
)
1
)
1
)
7
Page 8
Settings
Vegetables
/
Sauerkraut Sauerkraut, raw Cook 100 °C No 40 mins.–1 hr. 10 mins. 2
Sauerkraut, precooked Cook 100 °C No 20–30 mins. 2
Scorzonera Cook 100 °C No 25–35 mins. 2
Celery Celery, chopped Cook 100 °C No 15–25 mins. 2
Celeriac, chopped Cook 100 °C No 10–20 mins. 2
Green asparagus Cook 100 °C No 13–17 mins. 2
White asparagus Cook 100 °C No 15–25 mins. 2
Tomatoes Cook 100 °C No 7–13 mins. 2
Skin Yes1) 3–5 mins.
Jerusalem artichoke Cook 100 °C No 15–35 mins. 2
Courgettes, chopped Cook 100 °C No 8–12 mins. 2
▸ Place the stainless steel tray underneath the perforated cooking tray or wire shelf.
1
)
▸ Preheat the cooking space for 5 minutes.
8
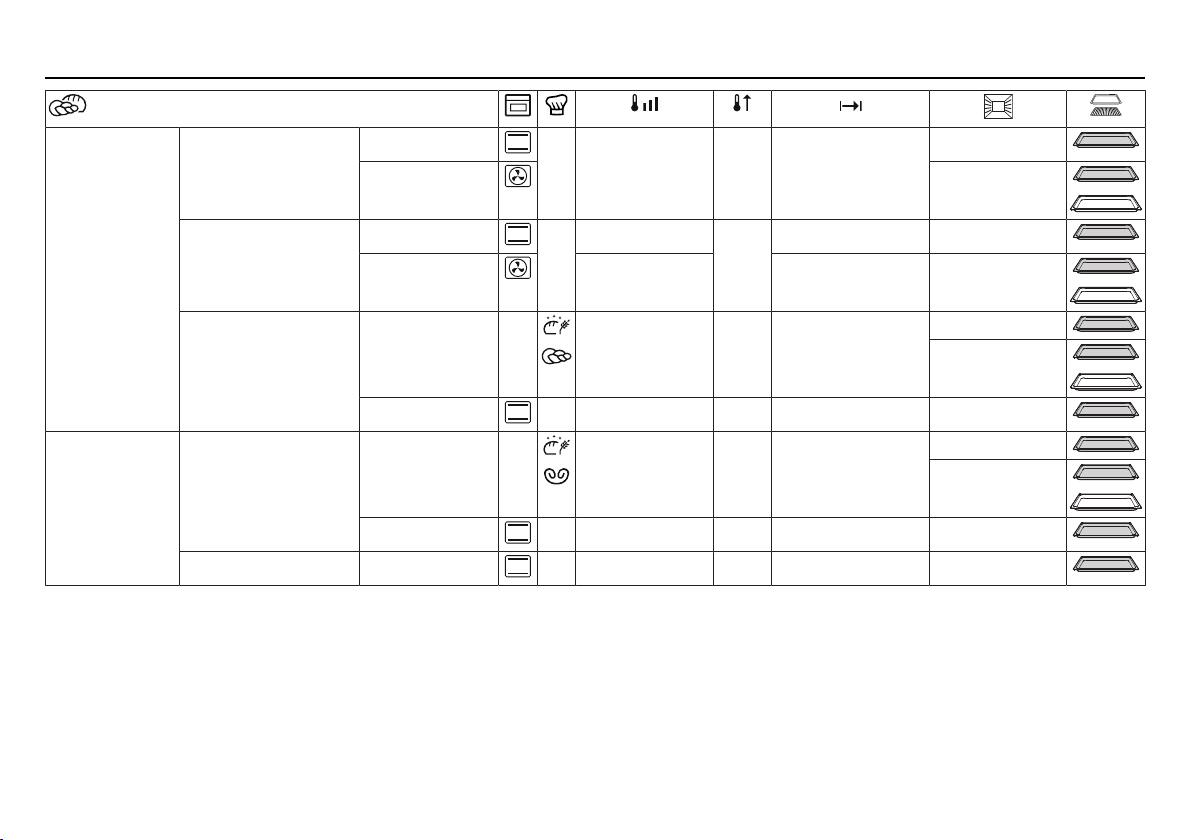
Page 9
Settings
Bakery products
Bread Professional baking 200–220 °C No 35–50 mins. 2
Bake 200–210 °C Yes
Defrost 140–160 °C No 15–25 mins.
Plaited bread Professional baking 180–200 °C No 25–50 mins. 2
Bake
Bake Yes
Bread rolls Professional baking 200–220 °C No 20–40 mins. 2
Bake 20–30 mins.
/
9
Page 10
Settings
Bakery products
Sweet biscuits
and pastries
/
Basler Leckerli
(honey almond
spice cookies)
Brunsli (chocolate
almond spice
cookies)
Chräbeli (aniseed
biscuits)
Eclairs, profiteroles Bake 1 level 170–180 °C Yes 20–35 mins. 2
Mailänderli (butter
biscuits)
Macaroons Bake 180–200 °C Yes 10–20 mins. 2
Bake 160–180 °C Yes 10–25 mins. 2
1+3
Bake 1 level 160–180 °C Yes 8–12 mins. 2
Bake 2 levels 140–160 °C 5–15 mins. 1+3
Bake 1 level 130–145 °C Yes 20–30 mins. 2
Bake 2 levels 120–140 °C 1+3
Bake 2 levels 1+3
Bake 1 level 150–160 °C Yes 7–20 mins. 2
Bake 2 levels 1+3
1+3
10
Page 11
Settings
Bakery products
Sweet biscuits
and pastries
Savouries Aperitif nibbles,
Spitzbuben (jam
biscuits)
Zimtsterne
(cinnamon star
cookies)
Yeast pastries Professional
fresh
Bruschetta Bake 200–220 °C Yes 5–10 mins. 2
/
Bake 1 level 150–160 °C Yes 7–20 mins. 2
Bake 2 levels 1+3
Bake 1 level 160–180 °C Yes 8–12 mins. 2
Bake 2 levels 140–160 °C 5–15 mins. 1+3
180–200 °C No 15–35 mins. 2
baking
Bake 170–190 °C Yes 15–30 mins. 2
Professional
baking
Bake 200–210 °C Yes 10–25 mins. 2
190–210 °C No 20–30 mins. 2
1+3
1+3
11
Page 12

Settings
Bakery products
Savouries Yeast pastries Professional baking 180–200 °C No 20–35 mins. 2
Bake 170–190 °C Yes 15–30 mins. 2
Garlic bread Bake 210–230 °C Yes 5–10 mins. 2
Ham and pineapple
toastie
Puff pastries Hazelnut croissant Professional baking 190–210 °C No 20–35 mins. 2
Ham croissants Professional baking 190–210 °C No 20–35 mins. 2
Sponge cake Roulade Bake 150–170 °C Yes 7–15 mins. 2
Torte Bake 160–180 °C 20–40 mins. 2
Bake 200–220 °C 15–20 mins.
Bake Yes 15–25 mins.
Bake Yes 15–25 mins. 2
/
1+3
1+3
1+3
12
Page 13

Settings
Bakery products
Torte Linzertorte Bake 160–180 °C Yes 40–60 mins. 2
Carrot torte Bake 160–180 °C Yes 40–60 mins. 2
Chocolate torte Bake 160–180 °C Yes 40–60 mins. 2
Japonaise base (thin
nut meringue base)
Cake Bake 150–170 °C Yes 50 mins.–1 hr. 10 mins. 2
Cakes Tray-baked cake Bake 180–200 °C Yes 20–40 mins. 2
Luzerner Lebkuchen
(gingerbread)
Ring
cake
Yeast ring cake Professional
Sponge ring cake Bake 150–170 °C Yes 40–60 mins. 2
Bake 1 level 140–160 °C Yes 20–30 mins. 2
Bake 2 levels 130–150 °C 1+3
Bake 170–180 °C Yes 45 mins.–1 hr. 5 mins. 2
baking
Bake No 30–45 mins.
Bake Yes
/
170–190 °C No 35–50 mins. 2
13
Page 14

Settings
Bakery products
Yeast
pastries
Apple strudel Bake 190–210 °C Yes 30–50 mins. 2
Ring cake Professional baking 170–190 °C No 35–50 mins. 2
Bake No 30–45 mins.
Bake Yes
Yeast ring Professional baking 180–200 °C No 30–45 mins. 2
Bake 170–190 °C Yes 25–45 mins.
Savouries and
biscuits
Rose cake Professional baking 180–200 °C No 30–45 mins. 2
Russian plait Professional baking 180–200 °C No 30–45 mins. 2
Professional baking 180–200 °C No 15–35 mins. 2
Bake 170–190 °C Yes 15–30 mins.
Bake 170–190 °C Yes 25–45 mins.
Bake 170–190 °C Yes 25–45 mins.
/
14
Page 15

Settings
Bakery products
Short crust
pastry
Short crust pastry
case, baked blind
Fruit tart with short
Bake 140–160 °C Yes 15–25 mins. 2
Bake 160–180 °C Yes 35–50 mins. 2
/
crust pastry
Meringue Japonaise base (thin
Bake 1 level 140–160 °C Yes 20–30 mins. 2
nut meringue base)
Bake 2 levels 130–150 °C 1+3
Savouries and
biscuits
1
)
▸ Allow to dry overnight after baking.
Flans and pizzas
Bake1) 80–90 °C No 1 hr. 20 mins.–1 hr. 40 mins. 2
1+3
/
Fruit flan1) Bake 190–210 °C Yes 35–50 mins. 2
Savoury flan Bake 170–200 °C Yes 35–50 mins. 2
Cheese flan Bake 160–180 °C Yes 30–45 mins. 2
Pizza, fresh Bake 180–200 °C Yes 20–30 mins. 2
1
)
▸ With fruit that is very juicy add the sauce or topping after the first 15–20 minutes.
15
Page 16

Settings
Potatoes
Potato gratin Cook1) 170–190 °C No 25–45 mins. 2
Baked potatoes Bake 230 °C No 30–50 mins. 2
Potatoes, whole Cook 100 °C No 30–50 mins. 2
Potato wedges Bake 230 °C No 20–35 mins. 2
Sweet potatoes Cook 100 °C No 20–50 mins. 2
Boiled potatoes Cook 100 °C No 15–25 mins. 2
1
)
▸ Put the food in a suitable container and place on the
wire shelf.
/
2
)
▸ Place the stainless steel tray underneath the perforated
cooking tray or wire shelf.
2
)
2
)
2
)
Baked dishes and gratins
/
Fish gratin Cook 180–200 °C No 20–45 mins. 2
Vegetable gratin Cook 170–190 °C No 20–40 mins. 2
Potato gratin Cook 170–190 °C No 25–45 mins. 2
Lasagne Cook 180–200 °C No 30–50 mins. 2
Sweet baked dish Bake 180–200 °C No 20–50 mins. 2
▸ Put the food in a suitable container and place on the wire shelf.
16
Page 17

Settings
Meat
Veal Rump/loin Low temperature
63 °C 80–90 °C No 2 hrs.–3 hrs. 30 mins. 2
cooking1)
Fillet of veal Steam2) 100 °C No 20–45 mins. 2
Neck of veal Braise1) 78 °C 180–200 °C No 1 hr.–1 hr. 30 mins. 2
Shoulder of veal Roast2) 200–220 °C Yes 1 hr.–1 hr. 20 mins. 2
Geschnetzeltes
Cook1) 100 °C No 30–50 mins.
(chopped meat in
a sauce)
Beef Rump/loin Low temperature
63 °C 80–90 °C No 2 hrs. 20 mins.–
cooking1)
Fillet of beef Low temperature
53–57 °C 80–90 °C No 2 hrs.–3 hrs. 2
cooking1)
Steam2) 100 °C 20–50 mins.
1
)
▸ Put the food in a suitable container and place on the wire shelf.
2
)
▸ Put the food directly on the wire shelf.
3
)
▸ Place the stainless steel tray underneath the perforated cooking tray or wire shelf.
/
3
)
3
)
2
3 hrs. 30 mins.
3
)
17
Page 18

Settings
Meat
Beef Entrecôte,
Roastbeef
Low temperature
cooking1)
53–57 °C 80–90 °C No 2 hrs. 30 mins.–
/
3 hrs. 30 mins.
Roast2) 200–210 °C Yes 35–45 mins.
Shoulder of beef Roast1) 190–210 °C Yes 1 hr.–1 hr. 20 mins. 2
Chuck/rib of beef Roast2) 66–70 °C 180–200 °C Yes 1 hr.–1 hr. 30 mins. 2
Beef ragout Cook1) 160–180 °C No 45–60 mins. 2
Beef goulash Cook1) 160–180 °C No 45–60 mins. 2
Stewing meat Cook1), 4) 100 °C No 1 hr.–1 hr. 30 mins. 2
Geschnetzeltes
Cook1) 100 °C No 30–50 mins. 2
(chopped meat in a
sauce)
1
)
▸ Put the food in a suitable container and place on the wire shelf.
2
)
▸ Put the food directly on the wire shelf.
3
)
▸ Place the stainless steel tray underneath the perforated cooking tray or wire shelf.
4
)
▸ Cover meat completely with liquid.
2
3
)
3
)
18
Page 19

Settings
Meat
Pork Rump/loin Low temperature
65 °C 90–100 °C No 2 hrs.–3 hrs. 30 mins. 2
/
cooking1)
Pork fillet Steam 100 °C No 20–35 mins. 2
Fillet in puff pastry Professional baking 190–210 °C No 25–40 mins. 2
Bake 180–200 °C
Neck of pork Roast3) 190–210 °C No 1 hr.–1 hr. 30 mins. 2
Shoulder of pork Roast3) 180–200 °C Yes 1 hr.–1 hr. 30 mins. 2
Smoked pork loin Cook1) 100 °C No 45 mins.–1 hr. 30 mins. 2
Ham Cook1) 100 °C No 50 mins.–1 hr. 30 mins. 2
Bacon Cook1) 100 °C No 20–40 mins. 2
Saucisson Cook1) 80–100 °C No 30–45 mins. 2
Geschnetzeltes
Cook1) 100 °C No 30–50 mins. 2
(chopped meat in
a sauce)
1
)
▸ Put the food in a suitable container and place on the wire shelf.
2
)
▸ Place the stainless steel tray underneath the perforated cooking tray or wire shelf.
3
)
▸ Put the food directly on the wire shelf.
2
)
2
)
2
)
19
Page 20

Settings
Meat
/
Leg of lamb Roast2) 200–220 °C Yes 1 hr.–1 hr. 40 mins. 2
Meat terrine Cook 90 °C No 15–50 mins. 2
Meat
Bratwurst Grill2) 4 Yes 4) 12–20 mins.5) 4
products
Fleischkäse (specialty meat
Bake 160–180 °C Yes 35–60 mins. 2
loaf)
Meat loaf Cook1) 190–210 °C Yes 45 mins.–1 hr. 10 mins. 2
Smoked pork loin Cook1) 100 °C No 45 mins.–1 hr. 30 mins. 2
Saucisson Cook1) 80–100 °C No 30–45 mins. 2
Ham Cook1) 100 °C No 50 mins.–1 hr. 30 mins. 2
Bacon Cook1) 100 °C No 20–40 mins. 2
Wienerli (Viennese sausage) Cook1) 90 °C No 10–15 mins. 2
1
)
▸ Put the food in a suitable container and place on the wire shelf.
2
)
▸ Put the food directly on the wire shelf.
3
)
▸ Place the stainless steel tray underneath the perforated cooking tray or wire shelf.
4
)
▸ Preheat the cooking space for 3 minutes.
5
)
▸ Turn halfway through the cooking time.
6
)
▸ Put the baking tray at level 2 under the wire shelf.
3
)
6
)
20
Page 21

Settings
Accompaniments
/
Potatoes, whole Cook 100 °C No 30–50 mins. 2
Boiled potatoes Cook 100 °C No 15–25 mins. 2
Potato wedges Bake 230 °C No 20–35 mins. 2
Baked potatoes Bake 230 °C No 30–50 mins. 2
Pasta Regenerate2) 110–130 °C No 6–12 mins. 2
1+3
Spätzli (egg noodles) Regenerate2) 110–130 °C 6–12 mins. 2
1+3
Dry rice Cook2), 3) 100 °C No 20–40 mins. 2
Regenerate2) 110–130 °C 6–12 mins. 2
1+3
1
)
▸ Place the stainless steel tray underneath the perforated cooking tray or wire shelf.
2
)
▸ Put the food in a suitable container and place on the wire shelf.
3
)
▸ Add 1½dl liquid per 100g.
1
)
1
)
21
Page 22

Settings
Accompaniments
/
Risotto Cook2), 9) 100 °C No 30–40 mins. 2
Regenerate2) 110–130 °C 6–12 mins. 2
1+3
Corn on the cob Cook 100 °C No 30–45 mins. 2
Polenta Cook2), 3) 100 °C No 30–40 mins. 2
Wheat (ebly) Cook2), 4) 100 °C No 20–40 mins. 2
Semolina Cook2), 5) 100 °C No 10–15 mins. 2
Millet Cook2), 6) 100 °C No 20–40 mins. 2
Chickpeas7) Cook2), 8) 100 °C No 20–40 mins. 2
Lentils Cook2), 5) 100 °C No 15–60 mins. 2
1
)
▸ Place the stainless steel tray underneath the perforated cooking tray
or wire shelf.
2
)
▸ Put the food in a suitable container and place on the wire shelf.
3
)
▸ Add 3dl liquid per 100g.
4
)
▸ Add 1–1½dl liquid per 100g.
5
)
▸ Add 2–3dl liquid per 100g.
6
)
▸ Add 1½–2dl liquid per 100g.
7
)
▸ Soak overnight.
8
)
▸ Add ½–1dl liquid per 100g.
9
)
▸ Add 2½dl liquid per 100g.
1
)
22
Page 23

Settings
Grains
/
Semolina Cook1), 2) 100 °C No 10–18 mins. 2
Millet Cook1), 3) 100 °C No 20–40 mins. 2
Corn Corn on the cob Cook 100 °C No 30–45 mins. 2
Polenta Cook1), 5) 100 °C No 30–40 mins. 2
Rice Dry rice Cook1), 6) 100 °C No 20–40 mins. 2
Regenerate1) 110–130 °C 6–12 mins. 2
1+3
Risotto Cook1), 7) 100 °C No 30–40 mins. 2
Regenerate1) 110–130 °C 6–12 mins. 2
1+3
Wheat (ebly) Cook1), 8) 100 °C No No 2
1
)
▸ Put the food in a suitable container and place on the wire shelf.
2
)
▸ Add 2–3dl liquid per 100g.
3
)
▸ Add 1½–2dl liquid per 100g.
4
)
▸ Place the stainless steel tray underneath the perforated cooking tray or
5
)
▸ Add 3dl liquid per 100g.
6
)
▸ Add 1½dl liquid per 100g.
7
)
▸ Add 2½dl liquid per 100g.
8
)
▸ Add 1–1½dl liquid per 100g.
wire shelf.
4
)
23
Page 24

Settings
Pulses
Peas Cook 100 °C No 15–30 mins. 2
Green
beans
Mangetout Cook 100 °C No 10–20 mins. 2
Chickpeas 3) Cook 4), 5) 100 °C No 20–40 mins. 2
Lentils Cook 5), 6) 100 °C No 15–60 mins. 2
1
)
2
)
3
)
4
)
5
)
6
)
Green beans, fresh Cook 100 °C No 30–50 mins. 2
Blanch 5–15 mins.
Preserve 2) 1 hr.–1 hr. 10 mins.
Dried string beans,
Cook 100 °C No 35–45 mins. 2
soaked
▸ Place the stainless steel tray underneath the perforated cooking tray or wire shelf.
▸ Repeat the preserving step, allowing the jars to cool down completely in between time.
▸ Soak overnight.
▸ Add ½–1dl liquid per 100g.
▸ Put the food in a suitable container and place on the wire shelf.
▸ Add 2–3dl liquid per 100g.
1
)
1
)
1
)
1
)
24
Page 25

Settings
Poultry
/
Chicken breast Cook 100 °C No 10–25 mins. 2
Cook 200–220 °C Yes 8–15 mins. 2
Chicken leg Cook 210–230 °C Yes 20–30 mins. 2
Chicken, whole Cook2) 170–190 °C No 50 mins.–1 hr. 10 mins. 3) 2
Poultry terrine Cook 90 °C No 15–50 mins. 2
1
)
▸ Place the stainless steel tray underneath the perforated cooking tray or wire shelf.
2
)
▸ Put the food directly on the wire shelf.
3
)
▸ Turn halfway through the cooking time.
4
)
▸ Put the baking tray at level 1 under the wire shelf.
1
)
4
)
25
Page 26

Settings
Fish and seafood
Fish gratin Cook 1) 180–200 °C No 20–45 mins. 2
Gilthead seabream, whole Cook 80–100 °C No 20–30 mins. 2
Roast 180–210 °C Yes 15–25 mins. 2
Trout, whole Cook 80–100 °C No 15–30 mins. 2
Roast 180–210 °C Yes 15–25 mins. 2
Tuna, slice Cook 100 °C No 10–30 mins. 2
Fillet of fish Cook 80–100 °C No 10–20 mins. 2
Roast 200–210 °C Yes 12–20 mins. 2
Mussels Cook 100 °C No 20–30 mins. 2
Fish terrine Cook 100 °C No 15–50 mins. 2
1
)
▸ Put the food in a suitable container and place on the wire shelf.
2
)
▸ Place the stainless steel tray underneath the perforated cooking tray or wire shelf.
/
2
)
2
)
2
)
2
)
2
)
26
Page 27

Settings
Fruit and berries
/
Apples Apple rings Desiccate 1) 60–70 °C No 7 hrs.–8 hrs. 2
1+3
1+2+3
Apple slices Compote 100 °C No 10–20 mins. 2
Preserve 90 °C 30–40 mins.
Pear slices Compote 100 °C No 10–20 mins. 2
Preserve 90 °C 30–60 mins.
Quince slices Cook 3) 100 °C No 30–60 mins. 2
Preserve 90 °C
1
)
▸ Only use ripe fresh food.
▸ Wedge a wooden spoon between the operating panel and the appliance door, leaving an approximately2cm gap open.
▸ Turn the food at regular intervals to ensure even drying.
2
)
▸ Place the stainless steel tray underneath the perforated cooking tray or wire shelf.
3
)
▸ Preparing the jelly.
2
)
2
)
Overdrying poses a fire hazard! Monitor the desiccating and drying process.
27
Page 28

Settings
Fruit and berries
/
Apricots, halves Compote 100 °C No 10–20 mins. 2
Desiccate 1) 65–75 °C 14 hrs.–16 hrs. 2
1+3
1+2+3
Preserve 90 °C 30–40 mins. 2
Plums, halves Compote 100 °C No 10–20 mins. 2
Preserve 90 °C 30–60 mins.
1
)
▸ Only use ripe fresh food.
▸ Wedge a wooden spoon between the operating panel and the appliance door, leaving an approximately2cm gap open.
▸ Turn the food at regular intervals to ensure even drying.
2
)
▸ Place the stainless steel tray underneath the perforated cooking tray or wire shelf.
Overdrying poses a fire hazard! Monitor the desiccating and drying process.
2
)
2
)
28
Page 29

Settings
Fruit and berries
/
Peaches, chopped Compote 100 °C No 10–20 mins. 2
Preserve 30–60 mins.
Cherries, pitted Compote 100 °C No 10–20 mins. 2
Preserve 80 °C 30–60 mins.
1
)
▸ Place the stainless steel tray underneath the perforated cooking tray or wire shelf.
Dairy products
/
Creamy yogurt Make 40 °C No 5 hrs.–6 hrs. 2
Set yogurt Make 40 °C No 7 hrs.–8 hrs. 2
Desserts
/
Creams and custards Cook 90 °C No 20–40 mins. 2
Crème caramel Cook 90 °C No 20–35 mins. 2
Compote Cook 100 °C No 10–16 mins. 2
1
)
1
)
29
Page 30

Settings
Mushrooms
Mushrooms, sliced Desiccate 50–60 °C No 5 hrs.–8 hrs. 2
▸ Only use ripe fresh food.
▸ Wedge a wooden spoon between the operating panel and the appliance door, leaving an approximately2cm gap open.
▸ Turn the food at regular intervals to ensure even drying.
Overdrying poses a fire hazard! Monitor the desiccating and drying process.
/
1+3
1+2+3
30
Page 31

Settings
Mushrooms
/
Mushrooms, sliced Preserve 1) 100 °C No 1 hr. 15 mins.–1 hr. 30 mins. 2
Mushrooms, whole Preserve 1) 100 °C No 1 hr. 15 mins.–1 hr. 30 mins. 2
▸ Place the stainless steel tray underneath the perforated cooking tray or wire shelf.
1
)
▸ Only use precooked mushrooms.
Eggs
/
Eggs, soft-cooked Cook 100 °C No 8–12 mins. 2
Eggs, hard-cooked Cook 100 °C No 15–20 mins. 2
Chestnuts
/
Cook 190–210 °C No 15–30 mins. 2
▸ Score the chestnuts and spread out in the lined accessory.
31
Page 32

Preserving, bottling
Food can be preserved and bottled in special preserving jars. Only use undamaged jars with glass lids, suitable rubber seals and
sealing clips that sit correctly. Do not use jars with screw or bayonet tops as the pressure that builds up cannot be reduced.
Up to 5 jars with a maximum volume of 1 litre each may be placed inside the cooking space. Always use same-size jars.
▸ Put the perforated cooking tray at level 2.
▸ Fill the jars evenly with the food to be preserved, which is at the ambient temperature, and add
liquid (and any sugar, salt or vinegar) as required.
▸ Close the jars according to the manufacturer's instructions.
▸ Place the jars on the perforated cooking tray as shown in the illustration. The jars should not touch one another.
▸ Select the operating mode and cooking space temperature according to the following table.
▸ Select in the operating mode settings.
▸ Select duration according to the following table.
▸ Confirm the settings by pressing the adjusting knob.
▸ When the duration set is up, press the touch button to switch off the appliance.
▸ Leave the appliance door open in the at-rest position.
▸ Leave the jars in the cooking space to cool down completely.
▸ Remove the jars. Check that the jars are sealed tight.
32
Page 33

Preserving, bottling
Vegetables and fruit
/
Carrots 100 °C No 1 hr. 30 mins. 2
Cauliflower 100 °C No 1 hr. 30 mins. 2
Broccoli 100 °C No 60 mins. 2
French beans1) 100 °C No 1 hr. 15 mins.–1 hr. 30 mins. 2
Mushrooms, precooked 90 °C No 20–30 mins. 2
Gherkins 90 °C No 30 mins. 2
Apples 90 °C No 30 mins. 2
Pears 90 °C No 30 mins. 2
Apricots 90 °C No 30 mins. 2
Peaches 90 °C No 30 mins. 2
Quinces 90 °C No 30 mins. 2
Plums 90 °C No 30 mins. 2
Cherries 80 °C No 30 mins. 2
▸ Place the stainless steel tray underneath the perforated cooking tray or wire shelf.
1
)
▸ Repeat the preserving step, allowing the jars to cool down completely in between time.
33
Page 34

Notes
34
Page 35

35
Page 36

Validity
The product family (model no.) corresponds to the first alphanumerics on the identification plate. These operating instructions apply
to:
Type Product family Size system
CSSEZ60 23010 60-600
CSSEZ60c 23010 60-600
V-ZUG Ltd, Industriestrasse 66, CH-6301 Zug
info@vzug.com, www.vzug.com
1007771-R05
 Loading...