

Page 1

Specifications are subject to change without notice.
© 2018 VTech Communications, Inc. All rights reserved.
07/18. VM5251-2_QSG_V4.
Document order number: 96-011941-040-100
Quick start guide
VM5251
VM5251-2
Full Color Video Monitor
Go to www.vtechphones.com
to register your product for enhanced
warranty support and the latest VTech
product news.
Adjust speaker volume
Press / to adjust your parent
unit speaker volume. Even if you have
set the parent unit volume to the
maximum, you may not hear sound from
the baby unit. It depends on the sound
sensitivity setting.
Zoom
Press to zoom in or out.
Talk to your baby unit
Press and hold TALK and speak to your
parent unit. Your voice is transmitted to
the baby unit.
Turn off the parent unit
Press and hold POWER to power off
your parent unit.
63ē
Use the menu
Press to enter the menu, choose a menu
item, or save a setting. You can use the parent
unit for advanced settings or operations,
such as to play or stop the baby unit lullaby,
or to adjust the baby unit sound sensitivity.
While in the menu:
• Pre ss or to scroll among the menu
options.
• Pre ss or to select an item.
• Pre ss to return to the main menu or idle
screen.
Turn off the screen
Press and hold LCD ON/OFF to switch off
the screen. You can still hear sound from the
baby unit.
Tip
• Press any keys on the parent uni t to turn on
the screen again.
63ē
63ē
Basic operation - Parent unit
Key Tone
Low Battery Tone
No Link Alert
Sound alert in split-view
LCD is turning off...
6U]KXOTMULL
6U]KXOTMULL
NOTESNOTE
• Use only the power adapters supplied with this product.
• Make sure the baby monitor i s not connected to a switch-contr olled electric outlet.
• Connect the power ad apters in a vertical or floo r mount position only. The adapter s’ prongs are not
designed to hold the weight of baby monitor, so do not conne ct them to any ceiling, under-the-table,
or cabinet outlets. Otherwise, th e adapters may not properly conn ect to the outlets.
• Make sure the parent unit, the baby units and the power adapter cords are out of reach of children.
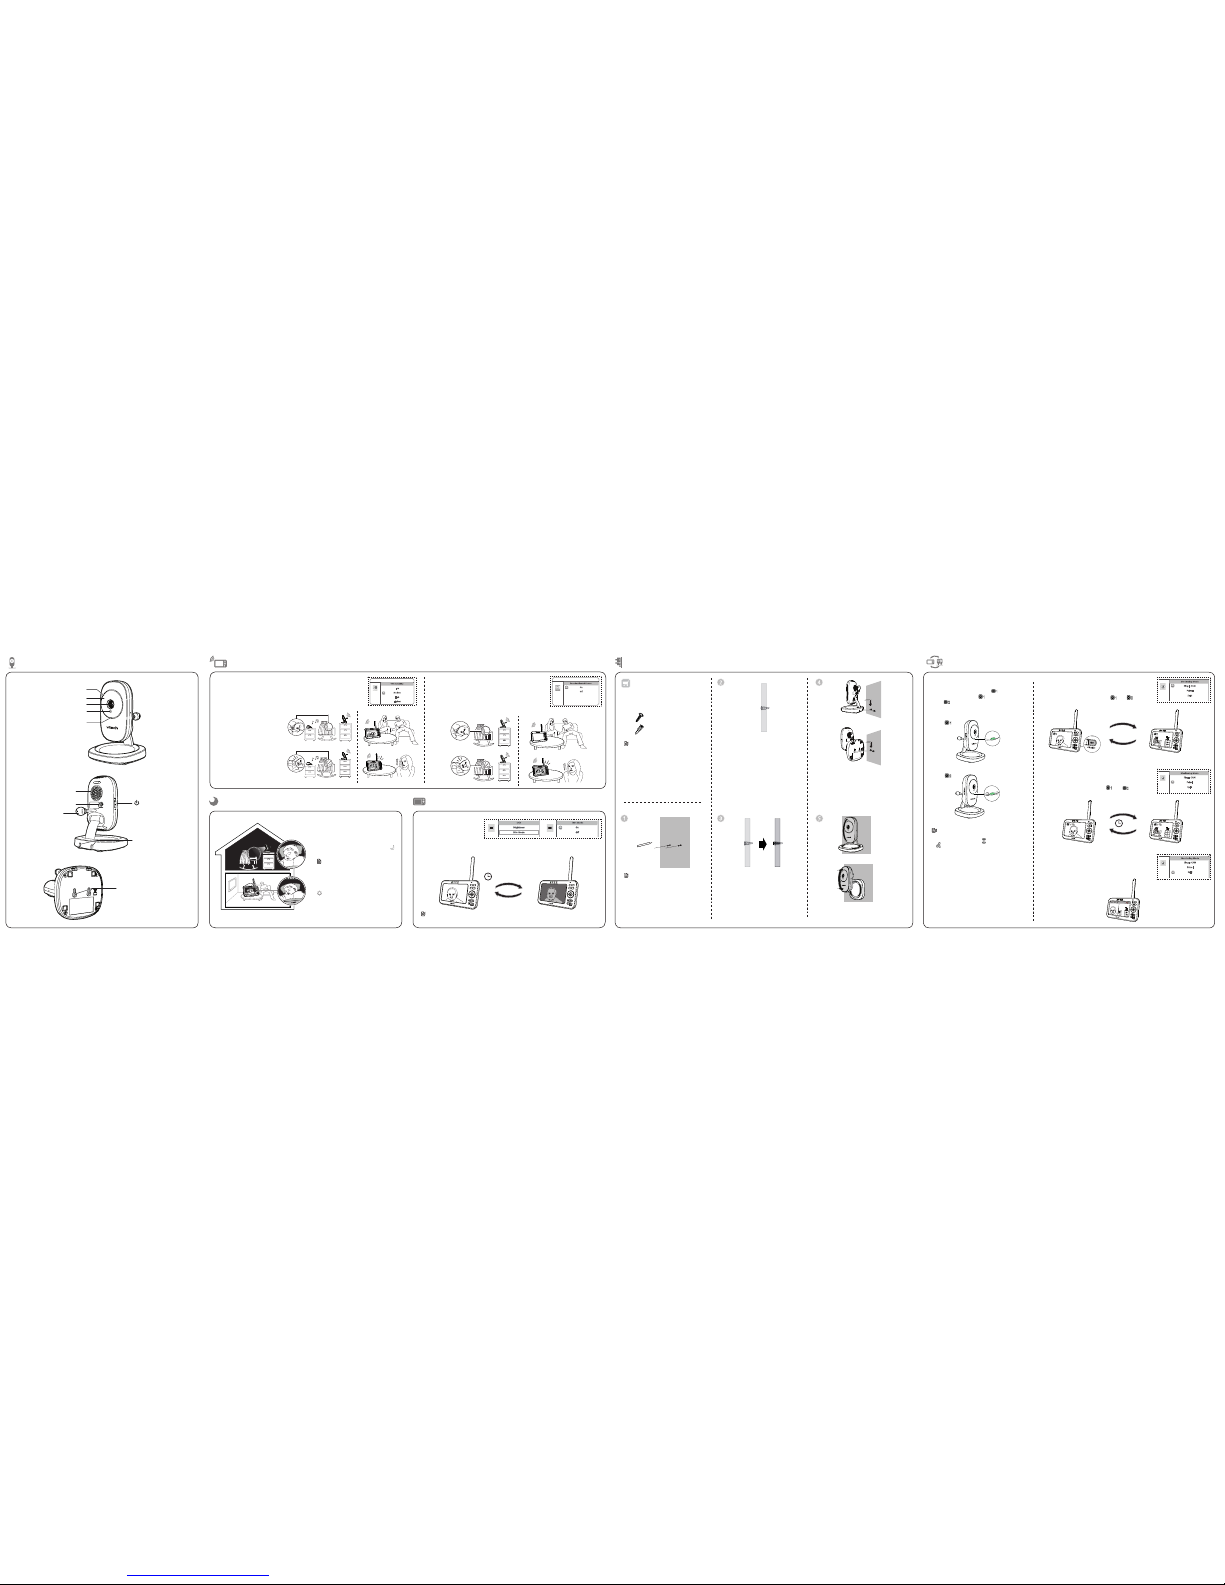
2
Connect the baby monitor
1
Install the battery
THIS SIDE UP
3
Power on or off the baby monitor
Slide the ON/OFF switch to power
on or off your baby unit.
Press and hold POWER to power on
or off your parent unit.
What’s in the box
VM5251 VM5251-2
Strangulation
Hazard
Keep this cord out of reach of children.
The cord needs to be at least three feet
away from the child at all times. Do not
use with an extension cord. Do not
remove this tag.
Éloignez ce cordon des enfants. Le
cordon doit se trouver à au moins trois
pieds d’un enfant et ce, en tout temps.
N’utilisez pas de rallonge. Ne retirez pas
cette étiquette.
Mantenga este cable fuera de la alcance
de los niños. Este cable debe estar por
lo menos tres pies fuera de la alcance
del niño en todo momento. No lo use
con una extensión inalámbrica. No quite
esta etiqueta.
Risque
d’étranglement
Riesgo de
estrangulación
5
Status check
Once you power on both your baby unit and parent unit, your parent unit displays image
from the baby unit, and the LINK LED light turns on.
The ON/OFF LED light of baby unit turns on.
63ē
Long press
Long press
Press and hold
4 Positioning the baby monitor
Caution
• The default volume of your parent
unit is level 4, and the maximum
volume is level 7. If you experience
high-pitched screeching noise from
your baby monitor while positioning:
- Make sure your baby unit and parent
unit are more than 3 feet (1 meter)
apart, OR
- Lower the volume of your parent unit.
>
3ft (1m)
>
<
3ft (1m)
3ft (1m)
>
<
3ft (1m)
3ft (1m)
Powering on
···
6U]KXOTMUT
Long press
Powering off
···
Long press
Overview - Parent unit
Stand
Power jack
Speaker
Antenna
Battery compartment
cover
POWER
TALK
MENU/SELECT
Microphone
VIEW /LCD ON/OFF
LED lights
Zoom
Arrow keys
Volume
Page 2
For VM5251-2 only
If you are viewing baby unit , the POWER
LED light of baby unit turns on. As baby
unit is not being viewed , its POWER LED
light flashes.
NOTESNOTE
Note
• If you power on only one baby unit, you may see
the parent unit displaying and then
No link to CAM # (# represents the baby unit
number), and the LINK LED light flashing.
Press VIEW in Single CAM or Patrol mode to switch
to the baby unit you have powered on.
Status check - Two baby units
Mount the baby unit on dry wall (optional)
Items to purchase
You will need to purchase the
following items separately to
mount your baby unit:
Use a pencil to mark two holes in
parallel. Make sure they are the same
distance apart as the wall mount holes
on the baby unit.
NOTESNOTE
Note
• Check for reception strength and camera
angle before drilling the holes.
2 screws
2 anchors
Drill two holes in the wall.
If you drill the holes into a stud, go to
step 3.
-OR-
If you drill the holes into an object other
than a stud, insert the wall anchors into
the holes. Tap gently on the ends with a
hammer until the wall anchors are flush
with the wall.
Insert the screws into the holes and tighten the screws until only 1/4 inch of the
screws are exposed.
Depending on your preference, choose
the upright or lateral orientation to mount
your unit. Align the wall mount holes at the
bottom or at the rear side of the baby unit
with the screws on the wall. Slide the baby
unit down until it locks into place.
OR
Tilt or rotate to adjust camera angle.
OR
Select Patrol as your monitoring mode to alternately
view the image from baby units and ever y 10
seconds.
Change different views - Patrol
10s
Monitoring Mode
Single CAM
Patrol
Split
Select Split as your monitoring mode to view the
images from both baby units at once.
Change different views - Split
Monitoring Mode
Single CAM
Patrol
Split
In Single CAM or Patrol mode, press VIEW to switch
between the image of baby units and .
Press VIEW
Change different views - Single CAM
Monitoring Mode
Single CAM
Patrol
Split
Night vision
The baby unit has infrared LEDs that
allow you to see your baby clearly at
night or in a dark room. When the baby
unit being viewed detects low light
levels, the infrared LEDs are switched
on automatically. The images from the
baby unit are in black and white, and
appears on the screen.
Notes
• It is normal if you see a shor t white glare
on your parent unit screen as the baby unit
is adapting to the dark environment.
• When the infrared LEDs a re on, the images
are in black and white. This is normal.
Tip
• Depending on the surroundings and other
interfering factors, like lightings, objects,
colors and backgrounds, the video quality
may vary. Adjust the baby unit’s angle or
place the baby unit at a higher level to
prevent glare and blurry display.
Wall mount holes for
lateral mounting
Light sensor
Camera
Microphone
ON/OFF
LED light
Infrared LEDs
ON/OFF switch
Speaker
Power jack
Temperature
sensor
Wall mount holes for
upright mounting
Dim mode
With dim mode preset to
on, your parent unit display
will dim to conserve energy
after 10 minutes of inactivity,
in which there is neither key
pressed nor alert received
from the baby unit.
10 min inactivity
Press any buttons
NOTESNOTE
Note
• If you do not want LCD to dim automatic ally, turn off the Dim Mode.
Dim Mode
On
LCD
Brightness
Dim Mode
Dim Mode
On
NOTESNOTE
Note
• The types of screws and anchors you
need depend on the composition of the
wall.
Overview - Baby unit
Sound sensitivity and sound activation
Sound activationSound sensitivity
When sound activation is on, the parent unit screen stays off
to save power when the baby unit detects no sound.
Once the baby unit detects sounds that are louder than the
chosen sound sensitivity level, the parent unit screen tur ns
on automatically. It will then turn off again after 50 seconds
of no sound detection.
Sound-activated Screen
On
O
With sound sensitivity setting, you can choose to hea r sounds from the
baby unit all the time, or to hear sounds that exceed a certain level. The
default level Highest allows you to hear all sounds (including background
noises).
If you set the sound sensitivity to
a lower level (e.g. Medium), you
will only hear sounds that exceed
the selected level. The baby unit
may not detect soft sounds, and
the parent unit speaker may remain
quiet.
For details, please see Adjust the
sound sensitivity of the baby unit
in the User’s manual.
VOX Sensitivity
Low
Medium
High
Highest
63ē
 Loading...