

Page 1

VTech Communications Ltd
European Headquarters
Armstrong Mall
Farnborough
Hampshire GU14 ONR
UK
Phone 0870 013 32 32
email helpdesk@vtechcomms.co.uk
Compliant to R&TTE Directive 1999/5/EC
we’ve got people talking
Mirage A100
Your Mirage digital phone gives you
the convenience of a cordless phone
with high quality sound and advanced
features.
Your handset must be charged for at
least 24 hours before it’s ready for use.
You can connect up to five additional
handsets to your base station and these can
be purchased separately.
With more than one handset, you can make
internal calls between the handsets.
With three or more handsets, you can use one
of the handsets for a normal call at the same
time as making an intercom call.
The Mirage A100 is GAP compliant.
DECT Digital Cordless Telephone System
Page 2

Contents
• Safety pg 2
• Caring for your phone pg 3
• Warranty information pg 3
• Product features pg 4
• 1 Setting up pg 2
• 2 Basic functions pgs 5-19
• 3 Choosing your handset settings pgs 20-21
• 4 Choosing your base settings pgs 22-23
• 5 Network services pgs 24-27
• 6 Adding and using
additional handsets pgs 28-33
• 7 Adding and using
additional base stations pgs 34-37
• 8 Troubleshooting pgs 38-40
Cord clip
Helps to prevent
accidental disconnection
of the wires.
Phone cord
Connects your
phone to the
phone network.
Power lead
Connects the power
adapter to the
base station.
Page 3

• Do not use your phone in damp, humid
places such as bathrooms.
• Do not dispose of batteries with normal
household waste. Your local council will
be able to give you advice on how to
dispose of them.
• Do not use your phone in places
where there may be volatile or explosive
materials.
• Clean your phone with a damp cloth.
Cleaning it with a dry cloth may give you
an electric shock.
• Never spray cleaning fluids directly onto
the phone.
• Do not expose the batteries to fire
or water.
If you have a heart pace maker
You should talk to your doctor before using this
phone if you have a heart pace maker.
If you have a hearing aid
Your phone works by transmitting radio waves
between the base station and the handset.
You may find that these waves interfere with
your hearing aid and cause a humming noise.
Safety
pg3
Caring for your phone
1 Batteries not approved by us may damage
your phone. Your warranty may be affected
if you use batteries that we do not approve.
2 There is a slight chance that your phone
could be damaged during electrical storms.
We recommend removing the telephone
cord and mains plug during a storm.
3 Avoid standing the phone on antique,
veneered or delicate surfaces as it may
become warm during use.
4 Make sure that the power cord is connected
into the power socket on the base station
and not the phone socket.
5 Your phone gives off radio signals that could
interfere with other electronic equipment
such as computers, radios and televisions.
Leave at least one metre between the base
station and other equipment to minimise
the risk of interference.
Warranty information
Your phone is covered by a 12 month warranty.
The warranty does not cover the batteries,
misuse or damage caused by a storm.
If you have any problems using the phone,
check the Troubleshooting section at the back
of this guide. If this does not solve your
problem, call us on the Helpline number given
in Troubleshooting. This will not affect your
statutory rights.
Your phone details
We may need to ask for these if you call us.
Date you bought the phone / /
Where you bought the phone
Price you paid £
Serial number
Written on the bottom
of the base station.
PIN _ _ _ _ ___ _ __ _ _ _ _ _ __ _
We have pre-set your PIN to 0000 but you can change
this if you want (see page ??). If you make a note of your
PIN here, be sure to keep this guide in a safe place.
Page 4

pg5
Create your own phone system
pg4
Style
• Ergonomic design
• ‘Jelly’ coloured handsets
• Different coloured clip-on covers
Simplicity
• Easy to install – wall fix or table top
• Easy-use menus
• Simple and informative display screens
• Reassuring confirmation tones
• User editable network codes
7 ways to dial
• key and check the number before you dial
• connect to the line before you dial
• from Last number redial
• from your favourites list
• from your quick dial list
• from your call log, if you have caller identity*
• mix of above – good for extension numbers
and home banking type services
Network services
• Factory set BT and cable codes that you can
edit
• Auto redial
• Call waiting
Favourites and quick dial
• Store up to 20 numbers for quick and easy
dialling.
• Name each number.
• Up to 24 digits for each number – ideal for
international numbers or home banking type
services.
• Pause facility for home banking numbers.
• No need to keep re-programming the numbers
– all the handsets share the numbers.
• With caller identity*, caller’s names will be
shown when they call if you’ve programmed
their name and number.
* Caller identity is a chargeable network service available
from your phone company.
You can add up to 6 handsets to your base
station with no need for more phone sockets
or extension leads. All you need is a normal
13 amp socket where you put a charging
station.
You can choose a name for each handset.
This could be anything such as the room
where the phone is normally kept or a
person’s name.
With two or more handsets you can make
free intercom calls between the handsets,
transfer external calls between handsets or
call all the handsets at once.
You can even make 3 party calls between
another handset and an external call or
between a handset and two external calls.
You can use up to four base stations with
one system but we recommend just one base
station for most home systems.
And every handset brings the same superb
Mirage features you’d expect from a Vtech
phone
•
Innovation
• Up to 300 metre range
• Digital DECT technology for high voice quality
• Set the base and handset features to suit you,
including:
– ring volume
– ring melody
– earpiece volume
• Intercom calls
• Call barring with PIN access to stop external
and internal calls
• Keyguard prevents accidental calls
• Advanced NiMH batteries give 12 hours talk
time; 100 hours stand-by
• Last number redial with 5 number memory
• Call log of up to 10 calls you don’t answer
• Mute feature for privacy during calls
Page 5

What’s in this pack
• one Mirage handset
• one Mirage base station
• user guide
• power adapter
• telephone line cord
• two handset batteries
• two spare clip on covers
• two wall fitting screws and plugs
If any of these are missing, please return
the complete pack to your retailer as soon
as you can.
If you want to add more handsets, follow these
instructions to set up your first handset and then
follow the instructions on page ?? of your user
guide.
Your handset must be charged for at
least 24 hours before it’s ready for use.
Choose a good position for your phone.
To improve reception, it should be:
• as high as possible – a second floor is best
• within three metres of the mains socket
and phone socket so that you don’t have
to use extension leads
• away from large metal objects like radiators,
fridges or filing cabinets
• away from metal framed windows
• away from hidden metal pipes
• away from electrical equipment, such as
a TV or microwave.
Reception may be poor if the building’s walls are
very thick or metal framed.
This phone is not designed for making
emergency telephone calls when the power fails.
You should make alternative arrangements for
calls to emergency services.
Setting up
pg7
1 Setting up
1 Plug the power lead into the sockets on the
bottom of the base station.
2 Plug the adapter into a mains power socket
and switch the power on.
3 Fit the handset batteries – making sure they’re
the correct way around.
The handset uses the two AA size NiMH
(Nickel Metal Hydride) batteries supplied.
4 Sit the handset on the base station and leave
for the batteries to charge for at least 24
hours before you try to use your phone
The display will say SEARCHING and then switch
to the stand-by display. There’s more detail
about the display in your user guide.
It’s normal for the handset to get a little warm
as it charges.
5 After the batteries have charged, plug the
phone cord into the base station and into a
phone socket. Only use the phone cord
supplied. Others may not work.
6 Your phone is now ready to use. Follow the
instructions in this guide.
clip the cords in here
to stop the plugs
from being pulled out
power lead phone cord
Page 6
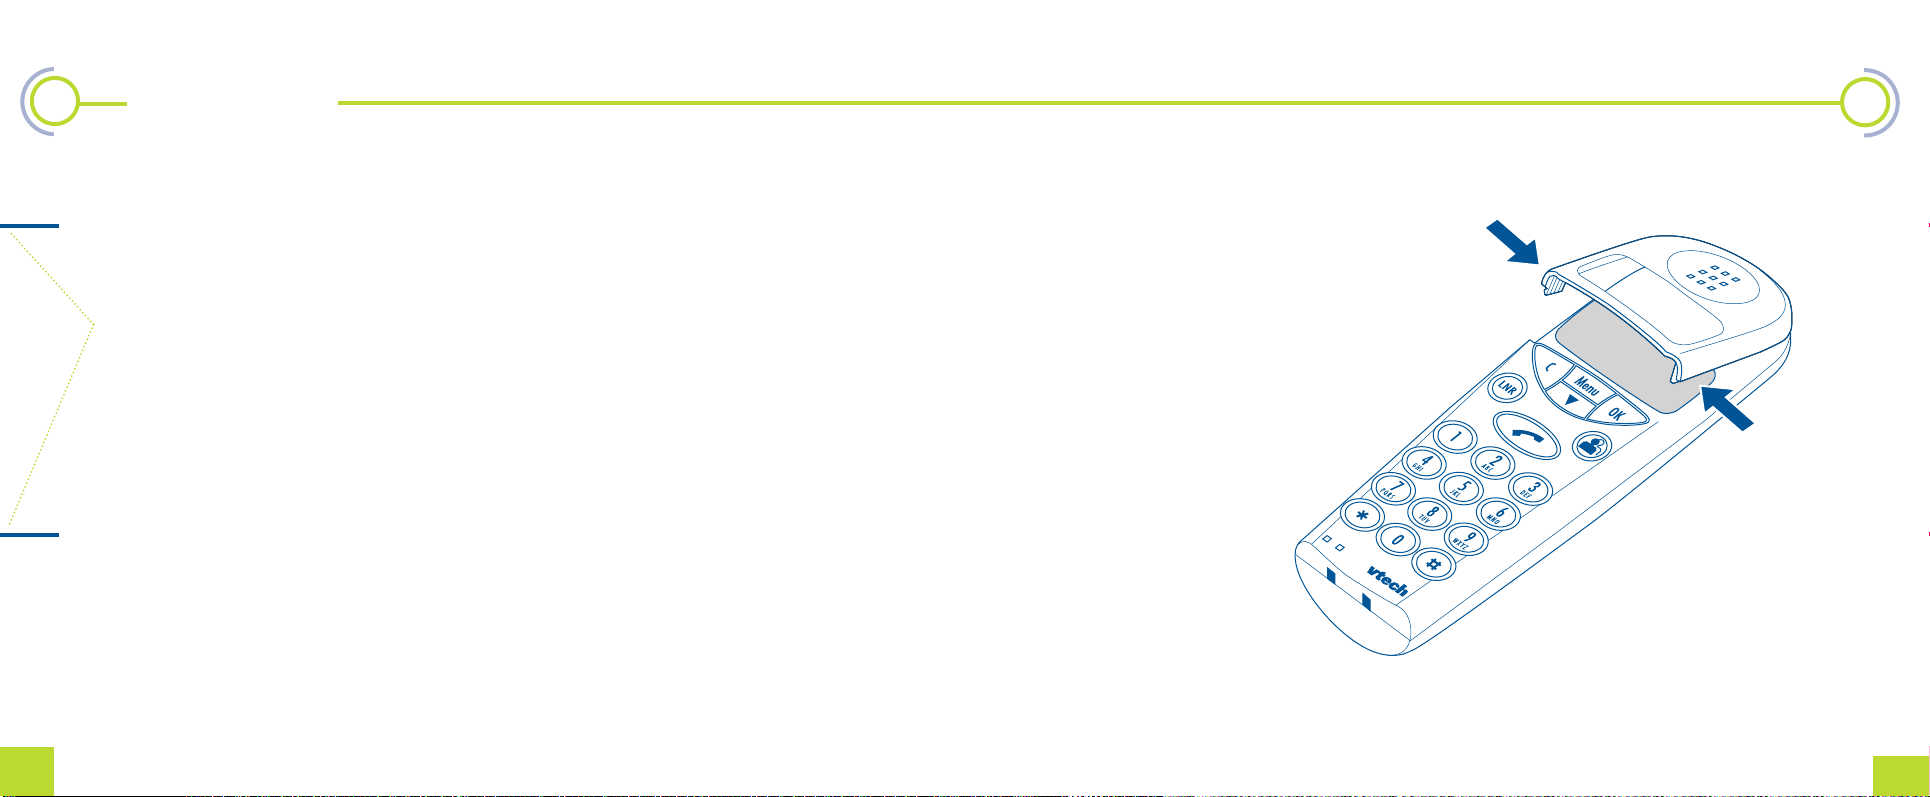
pg9
Your phone comes with three different coloured
handset covers. To change a cover:
1 Gently squeeze the arrows marked on either
side of the screen
2 Lift the cover and slide it away from
the keypad
3 Fit the two tabs at the top of the new cover
into the slots on the top of the handset
4 Click the cover into place.
Fixing your Mirage phone to a wall
Your phone comes with two wall fitting screws
and plugs. Make sure the plugs supplied are
suitable for your wall.
To fix your Mirage phone to a wall:
1 Use this template as a guide to mark the wall
before drilling
Check
• that the leads reach your telephone socket
and mains power supply
• that the handset will not be damaged or
cause damage if it is accidently knocked off
it’s base station
• the position guidelines given in this setting up
guide
2 Use a spirit level or plumb line to ensure the
phone will hang straight
3 Drill two holes where you have marked, insert
the wall plugs and screws – leaving a 3mm
gap between the head of the screw and the
wall
4 Slide the base station onto the screws
• make sure you don’t cut the telephone
line or power cord, this will damage your
phone and invalidate your warranty
Setting up
pg8
1 Setting up
55mm
1 Setting up
Page 7

4 Press and the display will ask you
to confirm you want to switch off
5
When the handset is off, it will not
respond to pages or incoming calls.
Making a call by pre-dialling
When you predial, you can correct
the phone number if you dial it
incorrectly.
1
2 Key in the number
3 If you need to correct a number,
press once for each incorrect digit
and then continue to dial
Press to dial if the number is
correct
1 LOUNGE
SWITCH OFF?
SWITCH OFF
Basic functions
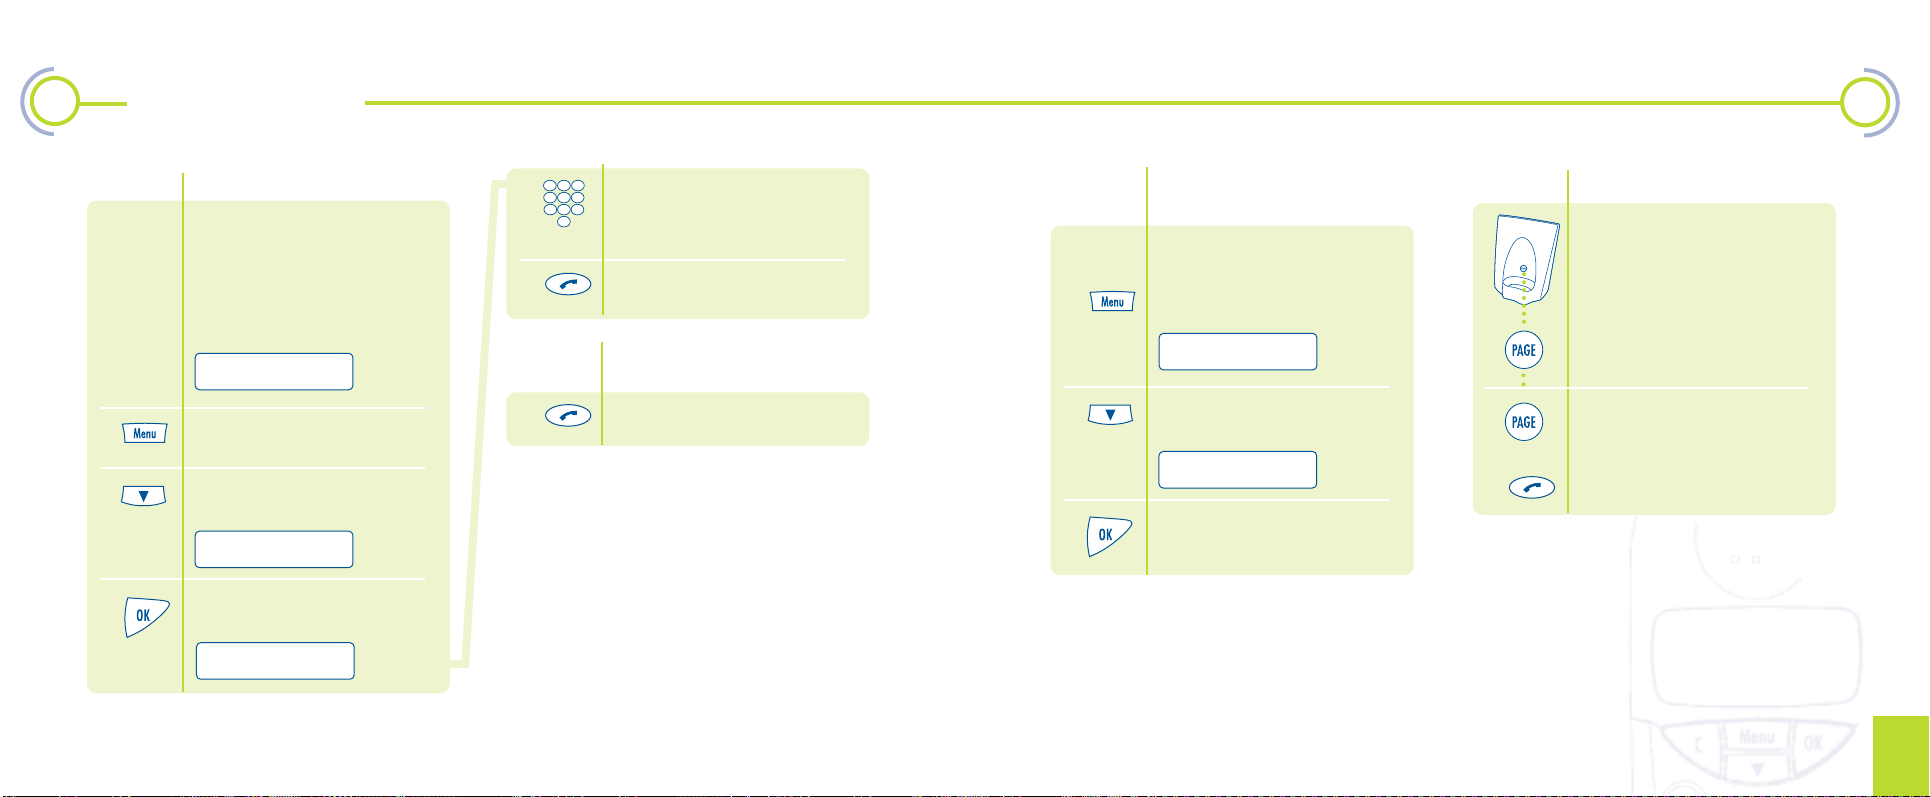
Section contents
• Switching the handset on pg 5
• Switching the handset off pg 5
• Making a call pg 5
• Dialling straight through pg 6
• Ending a call pg 6
• Answering a call at the base station pg 6
• Answering a call when the handset
is elsewhere pg 6
• Changing the earpiece volume
during a call pg 7
• Muting a call pg 7
• Making an inquiry call pg 8
• Switching the keyguard on pg 9
• Switching the keyguard off pg 9
• Calling numbers in the call log pg 10
• Deleting numbers from the call log pg 11
• Using redial pg 12
• Editing a number on your redial list pg 12
• Deleting a redial number pg 13
• Favourite numbers pg 14
• Dialling a favourite number pg 15
• Entering letters pg 15
• Deleting a favourite number pg 15
• Storing or changing a quick dial
number pg 16
• Dialling a quick dial number pg 17
• Deleting a quick dial number pg 17
• Calling anonymously pg 18
• Paging your handsets pg 18
• Automatically redialling a busy
number pg 19
1 LOUNGE
1 LOUNGE
1234567890
Switching the handset on
1 Press and hold until the display
flashes as the phone searches for
the selected base station signal
When it finds the signal, the display
shows the normal screen
Switching the handset off
You should normally leave the
handset on ready to answer calls.
1
2 Press
3 Press several times until the
display says
A
SEARCHING
2 Basic functions
pg11
Page 8

pg13
Changing the earpiece
volume during a call
1
2 Press
3 Press several times until the
screen says
4 Press
5 Press to select the volume
you want
6 Press to confirm the setting
Volume setting now active.
Answering a call when the
handset is switched off
Only the base station will ring if the
handset is off.
1 Press twice
Muting a call
This stops the other person
hearing you but you can still
hear them.
You can’t mute a call while you are
using a menu.
1
2 Press during the call.
The display will show
3 Press again to cancel mute
Basic functions
pg12
Ending a call
1
2 Press or replace the handset on
the base station to end the call
Post dialling a number
This method dials straight
through, but you can’t correct the
number if you dial incorrectly.
1
2 Press
3 Dial the number
If you make a mistake, you’ll need
to end the call and dial again.
Answering a call when the
handset is on the base
The base station and handset
will ring.
If you pay for caller display from
your phone company, the display
will show the number or it will
show their name if you’ve
programmed it as one of your
favourite or quick dial numbers.
1
2 Pick up the handset to answer
the call
Answering a call when the
handset is not on the base
1
2 Press to take the call
a 01234567890
a 01234567890
VOLUME
STORED
a 01234567890
1 LOUNGE
ANDY
ANDY
0121123
2 Basic functions
Page 9

pg15
Switching the keyguard on
The keyguard stops your phone
accidentally dialling numbers
while in a pocket or bag and stops
young children dialling too. It does
not stop emergency calls.
1
2 Press
3 Press several times until the
display says
4 Press
5 Press
The display shows
Switching the keyguard off
1 Key 159 before you dial
You’ll need to switch the
keyguard back on again when
you’ve finished.
Changing the handset name
You can choose any name – up to 8
characters – for the handset, such
as a room or person’s name.
1
2 Press
3 Press several times until the
display says
4 Press
5 Press several times until the
display says
6 Press The display shows the
current name
7 Press and hold until the current
name is deleted
8 Use the keypad to enter the new
name
9 Press to confirm the new name
10 Press and hold to return to the
stand-by display
1 LOUNGE
HS SETTINGS
▼AUDIO
HSET NAME
1 LOUNGE
CANCEL 159
KEYGUARD
ACTIVATE?
Basic functions
pg14
2 Basic functions
Entering letters
Each key selects several letters.
Press a key repeatedly to choose
the letters on it. If the letter you
need is on the same key, wait about
four seconds between presses.
If you make a mistake, press C.
Press 0 for a space.
Page 10

pg17
4 Press
Now you can dial, edit or delete teh
numbers.
Deleting entries from
the call log
1
2 Press
3 Press once
4 Press to choose the call log
5 Scroll through the numbers and
names to the one you want to
delete
6 Press for the delete option
Scroll down again if you want
to delete all the numbers from
the log
7 Press to delete
8 Press to confirm that you
want to delete
Calling numbers from the
call log
If you pay for caller display from
your phone company, your phone
logs the numbers of up to 10
recent unanswered calls so that
you can return them.
It won’t store numbers that
weren’t available or if the caller
withheld their number when
they called you.
If someone calls you twice or
more, only the last call is logged.
1 If there are any new calls, the
display says
It will continue to say new calls
until you have scrolled through
the full list
2 Press
3 Press to scroll through the list of
names and numbers
4 Press to dial a number or press OK
to edit the number and then press
OK again to dial
Accessing the all log
You can access the call log even
when there have been no new calls.
the call log lists the 10 mot recent
unanswered calls.
1
2 Press
3 Press once
1 LOUNGE
NEW CALLS
1 LOUNGE
CALL LOG
▼DELETE
▼CALL LOG
1234567890
▼DELETE LIST
DELETED
Basic functions
pg16
?--DELETE--?
2 Basic functions
Page 11

pg19
Deleting a redial number
1
2 Press
3 Press to scroll through the
numbers
4 Press once
5 Press once
Scroll down again if you want
to delete all the numbers from
the log
Using redial
You can redial any of the last five
numbers you dialled. The numbers
are stored in a list.
1
2 Press
3 Press to scroll through the
numbers
4 Press to dial the number or press
OK to edit the number before you
dial and then press OK again to dial
Editing a number
on your redial list
1
2 Press
3 Press to scroll to the number
you want
4 Press once
5 Press
Use the C button to delete the
numbers and key in the new
number – up to 24 digits long
6 Press to dial the number – or you
can press OK to dial
1 LOUNGE
1 LOUNGE
1 LOUNGE
a 01234567890
a 01234567890
a 01234567890
EDIT
EDIT
DELETE
▼DELETE LIST
6 Press to delete
7 Press to confirm
Basic functions
pg18
?--DELETE--?
DELETED
2 Basic functions
Page 12

pg21
Dialling a favourite number
1
2 Press The display shows the first
favourite number
3 Scroll to the number you
want or press the favourite
number location on the keypad
4 Press or press OK to edit the
number and OK again to dial
Favourite numbers button
This lets you store up to 10
numbers that you can call without
dialling the number.
1
2 Press
The display shows the phone
number or name if there’s already
one stored.
3 Scroll to the location where you
want to store the number or press
the number on the keypad
4 Press
5 Press
6 Key in the phone number
Press the C button if you want to
delete digits of an existing number.
7 Press
The display shows STORED and
asks for you to enter a name
The display shows the name if
there’s already one stored.
8 Key in the name – this can be up
to 10 letters – see the blue panel
If you don’t want to enter a name,
press the C button.
9 Press
10 Press to finish, or scroll to
the next location and store
another number.
1 LOUNGE
Deleting a favourite number
1
2 Press
3 Scroll to the number that you
want to delete
4 Press
5 Press once
6 Press to delete
7 Press and scroll to the next
number you want to delete or
press and hold the C button
to finish
1 LOUNGE
O ▼KAREN
Entering letters
Each key selects several letters.
Press a key repeatedly to choose
the letters on it. If the letter you
need is on the same key, wait about
four seconds between presses.
If you make a mistake, press C.
Press 0 for a space.
▼ DELETE
1 LOUNGE
0 ▼EMPTY
▼EDIT
NUMBER
NAME
STORED
Basic functions
pg20
?--DELETE--?
2 Basic functions
SALLY
Page 13

pg23
Dialling a quick dial number
1
2 Press
3 Press
4 Scroll to the number you want or
press the quick dial number if you
know it
5 Press
Deleting a quick dial
number
1
2 Press
3 Press for the first location
4 Scroll to the number you want
to delete
5 Press
6 Press once
7 Press The handset will ask you
to confirm
8 Press and scroll to the next
number you want to delete or
press and hold the C button
to finish
Storing or changing
a quick dial number
You can store up to 10 numbers in
your phone’s memory to save you
having to key them in each time
you call them.
1
2 Press
3 Press for the first location
The display shows the phone
number if there’s already one
stored.
4 Scroll to the location you want
5 Press
6 Press
7 Key in the phone number
– this can be up to 24 digits
Use the C button if you want to
delete digits of an existing number.
If you want a pause, press and hold
the
H
button until a P appears.
8 Press
The display shows STORED and
asks you to enter a name
9 Key in the name – this can be
up to 10 letters
10 Press
11 Press to finish, or scroll to the
next location and store another
number
1 LOUNGE
▼ QUICKDIAL
DELETE
1 LOUNGE
1 LOUNGE
▼ QUICKDIAL
▼ EDIT
▼ QUICKDIAL
Basic functions
pg22
2 Basic functions
?--DELETE--?
Page 14
pg25
Redialling a number if
it’s busy
The phone network will call back
when the number is free.
1 Press when you hear the
engaged tone
2 Press several times until the
display shows
3 Press listen to the message and
then hang up.
Calling anonymously
You can call anonymously if you
don’t want people with caller
display phones or return services
to know your number.
Only the next call you make
will be anonymous
1
2 Press
3 Press several times until the
display says
4 Press and your next call will
be anonymous
1 LOUNGE
a ANONYM CALL
5 Dial the number on the keypad or
use one of your favourite or quick
dial numbers
6 Press
Cancelling the anonymous
call feature
1 Press twice quickly
▼ INQUIRY
AUTO REDIAL
Basic functions
pg24
CALL ANONYM
Paging your handsets
Any handsets connected to the
base station will ring for up to
1 minute.
This is especially useful for finding
lost handsets.
1 Press the Page button
on the base station
2 To stop the ringing
Press again
or
Press on any handset
Handsets that are switched off
will not respond to paging.
2 Basic functions
Page 15

pg27
The HS SETTING menu lets you
choose how your handset works
You can
• set the handset ringer volume
• choose the handset ring melody
• set the earpiece volume
• decide when tones are used
• select a base station
• reset to the factory settings
• change the handset name
• choose English or German for
the display messages
pg26
Choosing your
handset settings
▼ AUDIO
▼ SELECT BASE
▼ RESET
▼ HSET NAME
▼ LANGUAGE
▼ RINGER VOL
▼ MELODY
▼ VOLUME
▼ TONES
each press selects
a different volume
each press selects
a different melody
each press selects
a different volume
selects English or German
for the display messages
• set the handset
ringer volume to 5
• set the melody to 1
• set the earpiece
volume to 2
• switch all tones on
• set original
handset name
• set the display to
English
selects on or off for a tone
when the battery is low
selects on or off for a tone
when there is no coverage
selects on or off for a tone
when a key is pressed
▼ LOW BATTERY
▼ NO COVERAGE
▼ KEY TONES
See page 36
▼ HS SETTING
Shows a current setting
Press to scroll through menus
Press to select the feature
you want
Press and hold after
setting a feature to leave the
HS SETTING menu
▼ RESET?
▼ LOUNGE
▼ ENGLISH ✓
use the keypad to
enter the name
doing this will
STORED
Confirms a
setting you make
3 Choosing your handset settings
✓
Page 16

The BS SETTING menu lets you
choose how your base station works
You can
• set the base ringer volume
• choose the base ring melody
• bar external and intercom calls from
being made – see page 4
• change your PIN
• de-register any handset from this
base station
• reset to the factory settings
• set your phone to wait for a dial tone after
the access code on a PABX switchboard
pg28
Choosing your
base settings
▼ AUDIO
▼ CALL BARR
▼ CHANGE PIN
▼ DEREG
▼ PABX FUNCT
See page 24
▼ NETWK CODES
See page 35
pg29
▼ RINGER VOL
▼ MELODY
▼ ENTER PIN
▼ ENTER PIN
▼ NETW ACCESS
each press selects
a different volume
each press selects
a different melody
enter your current PIN
enter the switchboard
access code
▼ RESET
▼ ENTER PIN
choose off or on – if you bar calls,
the display will say CALLS BARRED
whenever you try to dial
• empty the favourite
& quick dial lists
• set the base
ringer volume to 5
• set the PIN to 0000
• set the base
melody to 1
• empty the call log
• cancel call barring
• set network codes
to BT
▼ NEW PIN
▼ RESET?
▼ REPEAT
enter your new PIN
re-enter your new PIN
to confirm
Shows a current setting
Press to scroll through menus
Press to select the feature
you want
Press and hold after
setting a feature to leave the
BS SETTING menu
STORED
Confirms a
setting you make
doing this will
▼ BS SETTING
4 Choosing your base settings
✓
Page 17

pg31
Answering a call waiting call
1 Press when you hear the call
waiting beeps during a call
2 Press several times until the
display says
3 Press and then use the menu
button to handle your calls
Rejecting a call waiting call
BT customers can simply ignore
the call. Cable customers may need
to speak to their service provider..
1 Press when you hear the call
waiting beeps during a call
2 Press several times until the
display says
3 Press
pg30
Network services
Switching call waiting
on or off
Call waiting is a chargeable
network service available from
your phone service supplier.
1
2 Press
3 Press several times until the
display says
4 Press
Section contents
• Switching call waiting on or off pg 24
• Answering a call waiting call pg 25
• Rejecting a call waiting call pg 25
• Setting network codes pg 26
Network services are available from BT
and most cable companies.
Contact your phone company for more
information on the services they offer.
See page 32 for information on changing
network service codes.
1 LOUNGE
▼ QUICKDIAL
BS SETTINGS
▼ AUDIO
NETWK CODES
CALL WAIT
/
/
5 Press several times until the
display says
6 Press
7 Press
The shows the current setting
8 Scroll between on or off and
press OK to confirm the setting
you want
9 Listen to the message and then
hang up
▼ ANSWER
▼ REJECT
PLS LISTEN
5 Network services
Page 18

pg33
7 Press
8 Scroll to the code you want to set
9 Press
Use the C button to delete the
current code. Use the keypad to
enter the new code.
To include a recall in the code,
press the menu button and scroll
for a PBX or network recall, then
press OK.
10 Press
11 Scroll to set another code
or press and hold the C button
to finish.
Network services
pg32
1
2 Press
3 Press
Press several times until the
display says
4 Press
5 Press several times until the
display says
6 Press several times until the
display says
1 LOUNGE
STORED
▼ QUICKDIAL
BS SETTINGS
▼ AUDIO
NETWK CODES
CHANGE CODES
Editing network codes
Your phone uses the standard BT
and most cable company access
codes for network services.
Some network services are
chargeable.
You can alter the pre-set codes for:
• inquiry calls
• auto redial calls
• call waiting accept
• call waiting reject
• 3 party calls
• single calls
• switching calls
• call waiting on
• call waiting off
• anonymous calls
• recall
5 Network services
Page 19

Making an inquiry call
An inquiry call lets you talk to two
callers at the same time or switch
between two calls. This is a
network service which your phone
company may charge you for.
1 Make your first call
2 Press during your first call
3 Press
4 Dial the second number
When you get through, the first
call is put on hold and you are
connected to the second call.
Now you can:
• Set up a three party call
• Switch between the two callers
• Hang up
▼ INQUIRY
3 PTY CALL
SWITCH CALL
To set up a three party call
This lets all three people talk
together.
1 Press when you’re talking to one
call and the other is on hold
2 Press
The 3 party call is set up.
Now you can:
• Go back to a single call
• Hang up
To go back to a single call
This puts the second call on hold
again while you talk to the first call.
1 Press during the 3 party call
3 PTY CALL
SINGLE
Network services
pg34
pg35
5 Network services
2 Press
The second call is put on hold while
you talk to the first.
Now you can:
• Set up a three party call again
• Switch between the two callers
• Hang up
To switch between two calls
This puts the current call on hold
while you talk to the other call.
1 Press
2 Press once
3 Press
The current call is put on hold
while you talk to the other caller.
Now you can:
• Set up a three party call
• Hang up
To hang up during a
3 party call
1 Press
You’re disconnected from the 3
party call. The other two callers
can continue talking.
To hang up while a call
is on hold
1 Press
The current call ends and the call
on hold rings you back.
2 Press to answer the call that was
on hold
Page 20

pg37
3 Press several times until the
display says
4 Press
5 If you have more than one
base station, scroll to the one
you want to register to
6 Press
7 Enter your PIN – the factory setting
is 0000
8 Press
This may take up to 2 minutes.
9 Scroll to the handset number you
want
10 Press
11 The display changes to the handset
name. Instructions on changing the
handset name are on page??
Your phone will only allow you
three attempts at entering your
PIN before stopping the
registration. If you enter the
wrong PIN three times, you will
need to start again.
REGISTER
STORED
You can use up to six handsets
with a base station
Section contents
• Registering a handset pg 28
• Using two or more handsets pg 30
• Making an intercom call pg 30
• Answering an intercom call pg 30
• Answering an external call during
an intercom call pg 31
• Making an intercom call during
an external call pg 31
• Transferring an external call to
another handset pg 32
• Switching between an external call
and an intercom call pg 32
• Setting up 3 way calling pg 32
• Calling all your handsets
at once – group call pg 33
pg36
Adding and using additional
handsets
Registering a handset
1 Press the page button on the
base station and hold it down for
about 10 seconds until it beeps
The base station will send out
a registration signal for 15 minutes.
The signal will stop if:
• you successfully register
a handset
• you enter your PIN incorrectly
three times
• the base station already
has six handsets
• a call comes in.
2 Press
SEARCHING
▼ QUICKDIAL
▼ BASE A
ENTER PIN
6 Adding and using additional handsets
Page 21

pg39
Answering an external call
during an intercom call
If a call comes in during an
intercom call, both handsets will
beep and the displays will say CALL
or show the caller’s number if you
have caller display.
1 Press
The intercom call will be put on
hold
Now you can:
• Set up a 3 party call
• Switch between the two calls
• Hang up
Please turn the page for details.
Adding and using additional handsets
pg38
Using two or more handsets
If you have two or more handsets,
you can make free intercom calls
between them.
If you have three or more handsets,
you can have one handset on an
external call while the other two
are on an intercom call.
Making an intercom call
You can only make intercom calls
between handsets that are
registered to the same base station.
1
2 Press
3 Press twice
4 Press
5 Enter the handset number
If the handset is already on a call,
you will hear 3 beeps.
6 Press to end the call
Answering an intercom call
1
2 Press to answer the call
1 LOUNGE
Calling all your handsets
at once – group call
If you have three or more handsets
registered to one base station,
you can call them all at once.
This is useful if you don’t know
where someone is.
The first handset to answer your
call will be connected.
1
2 Press
3 Press several times until the
display says
▼ INT/COM
INT/COM NBR
INT/COM 1
6 Adding and using additional handsets
1 LOUNGE
GROUP CALL
Page 22

pg41
To go back to a single call
This puts the second call on hold
again while you talk to the first call.
1 Press during the 3 party call
2 Press
The external call is put on hold
while you talk to the intercom call.
Now you can:
• Set up a three party call again
• Switch between the two callers
• Hang up
To switch between an external
call and intercom call
This puts the current call on hold
while you talk to the other call.
1 Press
pg40
Making an intercom call
during an external call
The external call is put on hold
while you make the intercom call.
Then you can talk to the intercom
and external call at the same time
or switch between the two calls.
1
Press during the external call
2 Press several times until the
display says
3 Press
4 Enter the handset number 1-6 you
want to intercom
Now you can:
• Transfer the external call
• Set up a 3 party call
• Switch between the two calls
• Hang up
To transfer the external call
1
2 Press
To set up a three party call
This lets all 3 people talk together.
1 Press twice
2 Press The 3 party call is set up.
Now you can:
• Go back to a single call
• Hang up
Adding and using additional handsets
6 Adding and using additional handsets
2 Press once
3
Press The current call is put on hold
while you talk to the other caller.
Now you can:
• Switch between calls again
• Set up a three party call
• Hang up
To hang up during a 3 party call
1 Press
You’re disconnected from the
call. The other 2 callers can continue.
To hang up while a call is
on hold
1 Press The current call ends and
the call on hold rings you back.
2 Press to answer the call that was
on hold
a 0123456789
TRANSFER
SINGLE
3PTY CALL
SWITCH CALL
3 PTY CALL
▼ INQUIRY
INT/COM INQ
INT/COM NBR
Page 23

pg43
De-registering a handset
from a base station
These instructions are to
de-register a handset from
a base station.
1
2 Press
3 Press several times until the
display says
4 Press
5 Press several times until the
display says
6 Press
7 Enter your PIN – the factory setting
is 0000
8 Press
9 Press until the display shows
the handset you want to de-register
10 Press
11 Press to confirm
You can register each handset with up to four base
stations – perhaps if you use your phones across a
large area or you have several different phone lines.
For home use, we recommend that you have one
base station with additional handsets and chargers.
The handset will only work with one base station
at a time – the active base station.
Use the HS SETTINGS menu to choose which base
you want a handset to work with.
If you move out of range of the active base station,
the handset will not work and you will need to make
a base station that’s within range active.
Follow these stages if you buy a new handset and
base station:
• De-register your new handset
• Register the new handset at your existing base
station and register both handsets at the new
base station.
• Choose the letter for the new base station.
• Use the HS SETTINGS menu to choose the base
that you want each handset to work with.
Remember if you move out of range of this base
station, the handset will not work.
▼ DEREG
1 LOUNGE
pg42
Adding and using additional
base stations
▼ BS SETTINGS
▼ AUDIO
ENTER PIN
DEREG?
1 LOUNGE
A
Section contents
• De-registering a handset from
a base station pg 35
• Choosing the active base station pg 36
The letter shows
the active base station
7 Adding and using additional base stations
Page 24

pg45
pg44
Choosing the active
base station
You can only make intercom
calls between handsets that
are registered to the same
base station.
1
2 Press
3 Press several times until the
display says
4 Press
5 Press
6 Press once
7 Press
8 Press until the display shows
the base station you want to be
active
9 Press
The base letter flashes and the
display says
10 Press and hold to leave the
HS SETTING menu
1 LOUNGE
▼ HS SETTINGS
▼ AUDIO
Adding and using additional base stations
STORED
▼ SELECT BASE
7 Adding and using additional base stations
B
SELECT BASE
Troubleshooting
There’s no dial tone
Check
the phone line cord is securely
connected at the handset and base station
the phone cord is not damaged
the power at the base station is on
the handset batteries are properly fitted
and fully charged
the handset is registered to the base
station. Press the page button on the base
station to ensure the handset responds.
If the handset responds, it is registered
to the base station
you have paid your phone bill.
If none of these checks work, ask your service
provider to test the line.
There’s no display on the handset
Check the handset battery is properly fitted
and fully charged. See page 11 for details on
switching the handset on.
My handset doesn’t ring
Check
the handset is switched on
the handset is registered to
the base station
the handset is within range of the
base station
the base station is active – check the
correct base station is active if you have
more than one.
My base station doesn’t ring
Check:
the power switch at the base station
is on and live
the base ringer is set to ON
the phone line cord is securely
connected and not damaged.
Page 25

pg47
I cannot make intercom calls
Check
at least two handsets are registered to the
same base station
you are calling the correct
handset number
the handset you are calling is not busy.
I cannot register an extra
handset to a base station
Check
you have pressed the Page button to send
out the signal
there is a free slot available on the
base – you can register six handsets to each
base station
there is a free slot available on the handset.
You can register a handset to four different
base stations
the correct PIN was entered
The battery icon shows a low charge
Put the handset in the base station to recharge
the battery. When the battery is fully charged the
battery icon will show all three segments.
The battery icon will stop flashing when the
battery is fully charged.
Troubleshooting
pg46
8 Troubleshooting
✆
Helpline – If you cannot solve a problem with your phone,
phone our helpline on 0870 013 32 32
I can hear the caller but they
can’t hear me
Check
the handset microphone is not covered
that the mute function is not on.
There are details about this on page 10.
I cannot store my favourite or quick
dial numbers
You may have pressed the OK button instead of
the Menu button when the display showed the
location where you want to store the numbers.
When you press Menu, the display says EDIT and
you can store your number.
I cannot edit my favourite or quick dial
numbers
You may have pressed the OK button instead of
the Menu button when the display showed the
name or number that you want to edit.
I have spilt liquid on my handset
Remove the battery at once and shake
off any excess liquid. Dry the handset with
a towel and then allow to dry naturally.
Do not apply heat to the handset.
If your handset still does not work, return it to
your supplier to repair. Any damage is not
covered by warranty.
My phone doesn’t work
after an electrical storm
There may have been a power surge through your
telephone line or electrical mains. Disconnect the
power line from your base station and then
reconnect it. The telephone may reset itself.
If this does not work, return the phone
to your supplier to repair. Any damage is not
covered by warranty.
The base letter in the display flashes
The handset is searching for a base. It is out of
range or the base station has no power.
A
1 LOUNGE
B
1 KAREN
A
1 LOUNGE
A
2 KITCHEN
B
2 KITCHEN
B
2 BEDROOM
✓
✓
✗
Intercom calls
available
• A
A
Intercom calls
available
• B
B
No intercom
calls
• B
A
Page 26

pg48
Troubleshooting
The handset flashes REGISTER!
Register the handset or select a different base..
The dispaly says SAME PIN
You tried to change the PIN and used the old PIN
again.
The handset seems to be locked
You cannot make calls if:
• call barring is switched on
• you are trying to access an external line when
another handset is already using it.
• one handset is on an external call while
another two are on an intercom call.
Batteries
Make sure you use only the correct batteries –
AA size NiMH (nickel metal hydride).
Page 27

Your phone at a glance
CCaanncceell
• A short press deletes
the last digit entered.
• A long press deletes
all digits.
• If you press and hold
while you’re using a
menu, the handset
returns to standby.
• If you press this
button during a call
it will mute the
microphone so the
other person can’t
hear you.
LLaasstt NNuummbbeerr RReeddiiaall
Lets you access a
list of the last five
numbers dialled.
TTaallkk
Press to make a call,
answer a call when the
handset is not on the
base and to end a call.
MMiiccrroopphhoonnee
RReemmoovvaabbllee ccoovveerr
EEaarrppiieeccee
DDiissppllaayy
MMeennuu
Lets you access the
main menu when the
phone is in standby or
other menus while
you’re using the phone.
OOKK
Press to confirm a
command or setting
you’ve changed.
FFaavvoouurriitteess
Access your favourite
numbers by pressing
this button.
SSccrroollll
Scrolls down through
menus or lists of
options.
CChhaarrggiinngg ccoonnttaaccttss
These touch the contacts on the base
station to charge the batteries –
you must keep them clean and dry.
Display
The display gives you information
about the current status of the
handset.
Standby display. This shows the
handset is ready for use.
The active base station.
You can have up to four base stations, A – D.
A
1 LOUNGE
Handset number.
You can have up
to six handsets.
The handset is connected to a call.
The microphone is muted so the other
caller can’t hear you.
The battery is fully charged ...
... when it needs to be charged, one
flashing segment shows.
Lounge is the factory setting.
You can change the name to
your own choice.
The base station
PPaaggee
Press this button to page all your
handsets for one minute.
This is can help you find any lost
handsets.
You also use this button to register
additional handsets.
 Loading...