

Page 1

www.vtechphones.com
1
Getting started . . . . . . . . . . . . . . . . . . . . . . 3
Parts checklist . . . . . . . . . . . . . . . . . . . . . 3
Installation . . . . . . . . . . . . . . . . . . . . . . . . 4
Install handset battery . . . . . . . . . . . . . . . . . 4
Connect power to handset charger . . . . . . . . . . 5
Check battery indicator . . . . . . . . . . . . . . . . 6
Belt clip . . . . . . . . . . . . . . . . . . . . . . . . . 6
Registration . . . . . . . . . . . . . . . . . . . . . . . . 7
To register a handset . . . . . . . . . . . . . . . . . 7
To de-register all handsets. . . . . . . . . . . . . . . 8
Handset layout . . . . . . . . . . . . . . . . . . . . . . 9
Handset icons . . . . . . . . . . . . . . . . . . . . 10
Handset LEDs . . . . . . . . . . . . . . . . . . . . 10
Basic operation . . . . . . . . . . . . . . . . . . . . . 11
Telephone Settings . . . . . . . . . . . . . . . . . . . 11
Handset main menu . . . . . . . . . . . . . . . . . 11
Settings . . . . . . . . . . . . . . . . . . . . . . . 11
Sounds . . . . . . . . . . . . . . . . . . . . . . . . 12
Display . . . . . . . . . . . . . . . . . . . . . . . . 12
Ringer volume . . . . . . . . . . . . . . . . . . . . 12
Director y . . . . . . . . . . . . . . . . . . . . . . . . 13
Store a new entry . . . . . . . . . . . . . . . . . . 13
Characters by number . . . . . . . . . . . . . . . . 14
Review and dial entries . . . . . . . . . . . . . . . 14
Edit a directory entr y . . . . . . . . . . . . . . . . . 15
Delete a directory entry . . . . . . . . . . . . . . . 15
Caller ID . . . . . . . . . . . . . . . . . . . . . . . . 16
Caller ID - call waiting ID . . . . . . . . . . . . . . . 16
Table of contents
Review caller ID . . . . . . . . . . . . . . . . . . . 17
Store caller ID in your directory . . . . . . . . . . . 17
Dial from caller ID . . . . . . . . . . . . . . . . . . 19
Delete a caller ID entry . . . . . . . . . . . . . . . 19
Handset operation . . . . . . . . . . . . . . . . . . . 20
Making calls . . . . . . . . . . . . . . . . . . . . . 20
Answering calls . . . . . . . . . . . . . . . . . . . 20
Flash function . . . . . . . . . . . . . . . . . . . . 20
Handset volume . . . . . . . . . . . . . . . . . . . 20
Redial . . . . . . . . . . . . . . . . . . . . . . . . 20
Mute . . . . . . . . . . . . . . . . . . . . . . . . . 21
Intercom . . . . . . . . . . . . . . . . . . . . . . . 21
Call forward . . . . . . . . . . . . . . . . . . . . . 22
Call transfer . . . . . . . . . . . . . . . . . . . . . 23
Conference call . . . . . . . . . . . . . . . . . . . 23
Troubleshooting . . . . . . . . . . . . . . . . . . . . 24
Maintenance . . . . . . . . . . . . . . . . . . . . . . 31
Warranty . . . . . . . . . . . . . . . . . . . . . . . . 31
Important safety instructions . . . . . . . . . . . . . . 32
FCC, ACTA and IC regulations . . . . . . . . . . . . . 33
The RBRC® seal . . . . . . . . . . . . . . . . . . . . 35
Technical specications . . . . . . . . . . . . . . . . 36
Index . . . . . . . . . . . . . . . . . . . . . . . . . . 37
Page 2

NEED HELP?
This manual has all the feature operations and troubleshooting you need to
install your new VTech accessory handset. Please take the time to review
thoroughly to ensure proper installation of this VTech innovative and feature
rich product. You can also visit our website at www.vtechphones.com for
support, shopping, and everything new at VTech.
In Canada, please visit www.vtechcanada.com.
VTech toll free 1(800)595-9511
In Canada dial 1(800)267-7377
Page 3

www.vtechphones.com
3
Getting started
Getting started
1. Charger
2. Handset
3. Belt clip
4. Charger adapter
5. Batter y
6. User’s manual
To p u rc h a s e r e pl a ce m en t
batteries, visit our website at www.
vtechphones.com or call VTech
Communications, Inc. at 1(800)595-
9511. In Canada, contact VTech
Telec o m m u n i c a t i o n s Canada
Ltd. at www.vtechcanada.com or
1(800)267-7377.
Parts checklist
1. Charger
2. Handset
5. Batter y
3. Belt clip
6. User’s manual
• Important!
Before using
this telephone,
you must read
Important
safety
instructions on
pages 32-33.
4. Charger adapter
Page 4
www.vtechphones.com
4
Installation
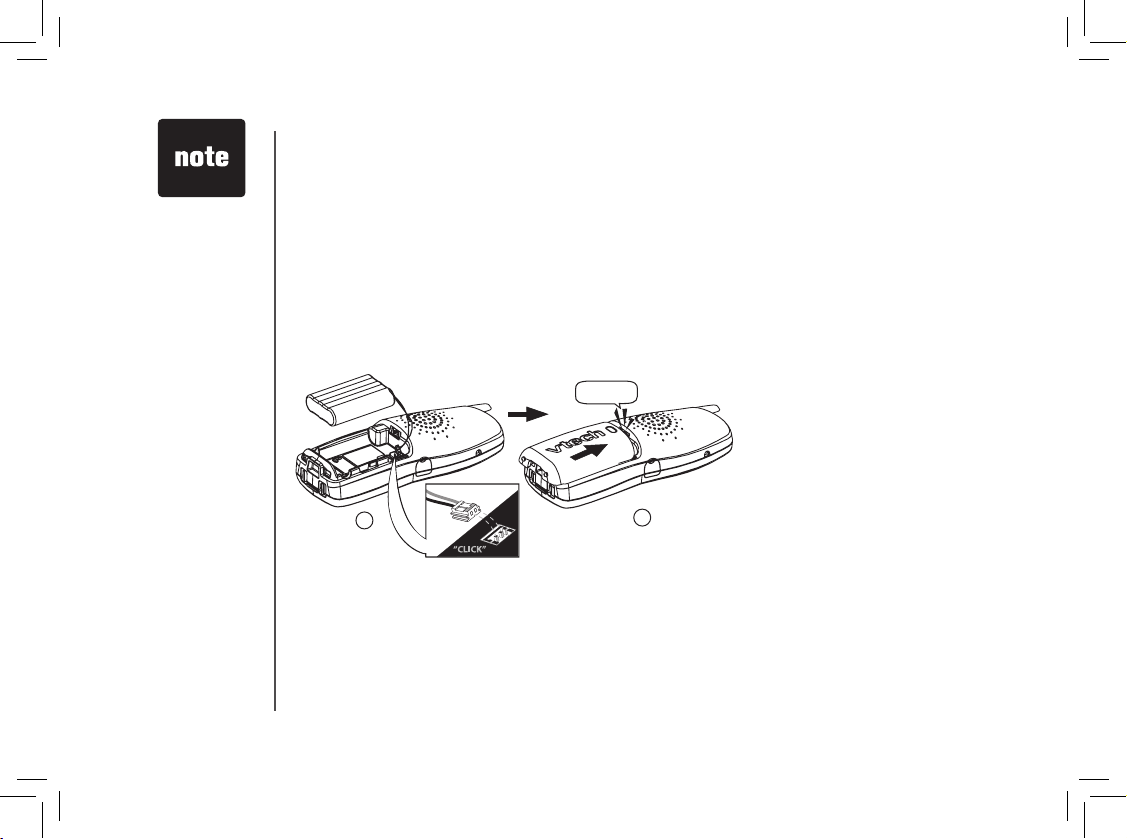
Install handset battery
1. Align the two hol es in the plug with
the socket pins, then sna p th e plug
into place.
2. Place the battery in the compartment with
the wires in the upper right corner.
3. Replace cover by sliding it upwards until
it clicks into place.
• Use only the
provided VTech
battery or
equivalent.
• Place the
handset in
its handset
charger when
not in use to
ensure optimum
performance.
1
3
Page 5
www.vtechphones.com
5
Getting started
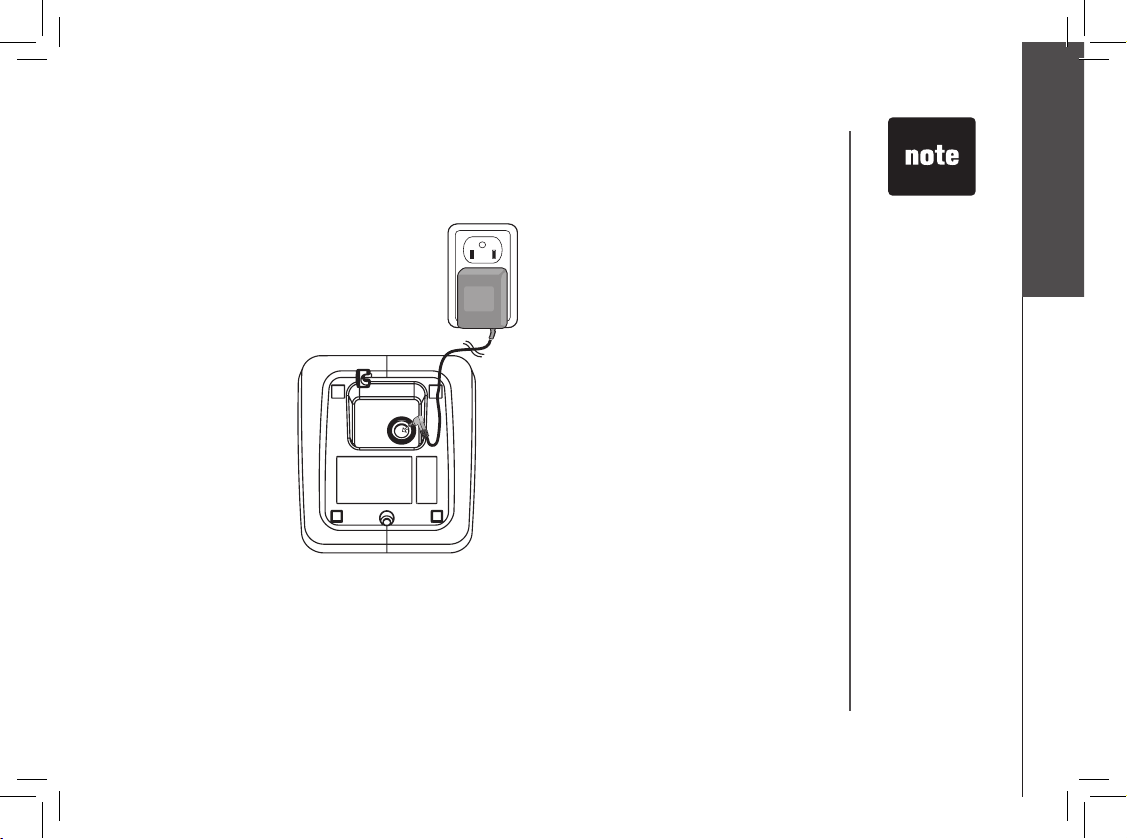
• Connect the
charger adapter
to the underside
of the handset
charger as
illustrated.
• Plug the AC
adapter into an
electrical outlet
not controlled by a
wall switch. If the
batter y has not
been charged,
place the handset
in the handset
charger, and allow
it to charge for at
least 16 hours.
• Use only the
VTech charger
adapter provided
with your
telephone.
• You can keep the
battery charged
by returning the
handset to the
charger or the
base unit af ter
each use.
Connect power to handset charger
Choose the location for your handset charger, and plug charger adapter into an electrical outlet not
controlled by a wall switch.
Installation
Page 6
www.vtechphones.com
6
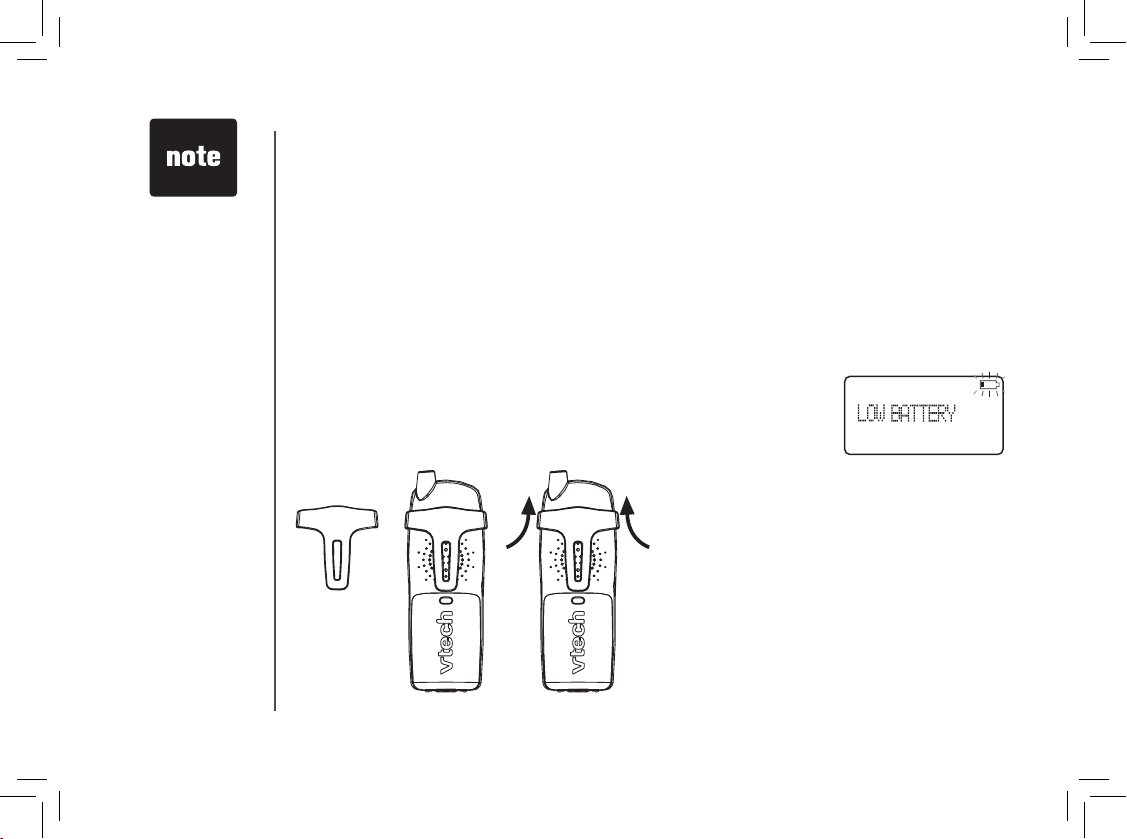
Belt clip (optional)
To removeTo attach
• If the telephone
will not be used for
a long period of
time, remove the
battery to prevent
possible leakage.
• If you have any
trouble installing
the telephone,
please refer to the
troubleshooting
section near the
end of this manual.
Installation
Check battery indicator
If you see WARNING CHECK BATTERY! on the handset display, it indicates one of the following:
1. There is no battery in your handset. You need to install the supplied battery into your handset (see
Install handset battery section on page 4.)
2. The battery needs to be replaced.
3. The battery has been installed incorrectly. Please reinstall (see Install handset battery) and/or
see the diagram in the battery compartment of the handset.
When in LOW BATTERY mode, the keypad sounds, backlighting and speakerphone features will not
work. When the battery has been charged, these features will return to their normal function.
Page 7
www.vtechphones.com
7
Getting started
Registration
NOT REGISTERED
• The handset
number is used
as the extension
number.
• When rst
purchased, the
new handsets
need to be
charged for ve
minutes before
registering to the
telephone base.
• If the registration
is not successful,
lift all handsets
out of their
charger and
place them back
in the charger. Try
the registration
process again.
PRESS FIND HNDST
4 SEC ON BASE
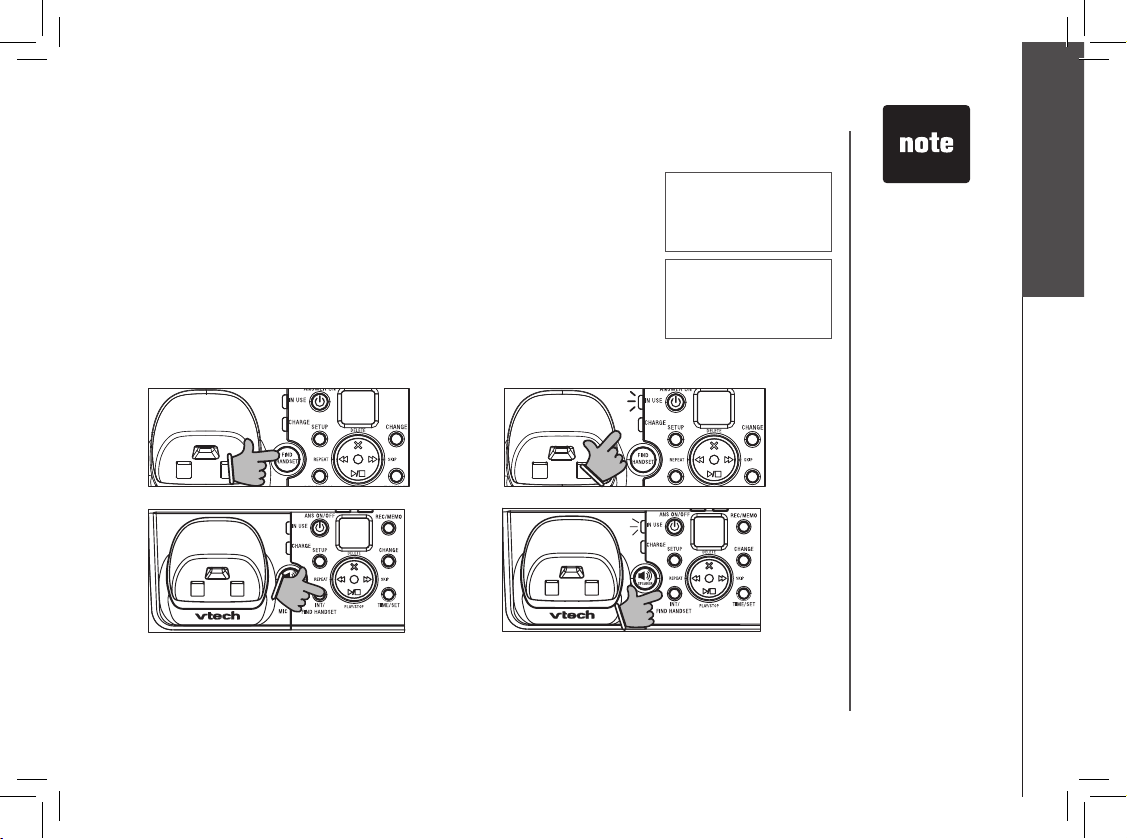
To register a handset
When rst purchased, all accessory handsets show NOT REGISTERED
on the screen. To register a handset:
1. Place the handset in a charger which is connected to the power
socket. If PRESS FIND HNDST 4 SEC ON BASE does not appear
on the screen after a few seconds, lift up handset and place in the
charger again.
2. On the telephone base:
• Press and hold FIND HANDSET for four seconds.
• Release FIND HANDSET once the IN USE light comes on.
on mi6866 telephone base
on mi6879 telephone base
After a while the handset will emit a series of tones, and the newly registered handset will be
assigned the lowest extension number not previously assigned to another system handset (1-4)
when successfully registered. Repeat steps 1 and 2 if the new handset does not successfully
register to the telephone base within two minutes.
Four
seconds
later:
Four
seconds
later:
Page 8

www.vtechphones.com
8
To de-register all handsets
If you are replacing a handset on a system which already has the
maximum number of registered handsets, or if you wish to change the
designated handset number of your registered handsets, you must
rst de-register the handsets, then re-register all handsets.
1. Press and hold FIND HANDSET on the main telephone base for
10 seconds.
2. When the IN USE light starts to ash, release the FIND HANDSET
button.
3. Pressing and releasing FIND HANDSET again will de-register all
handsets and the IN USE light will be off.
4. All handsets will show NOT REGISTERED.
NOT REGISTERED
Registration
• If the
de-registration
process does not
work, you may
need to reset
the system and
try again. To
reset, pick up
the handset and
press the TALK
button. Press
the OFF button
and place the
handset back
into the charger.
Page 9
www.vtechphones.com
9
Getting started
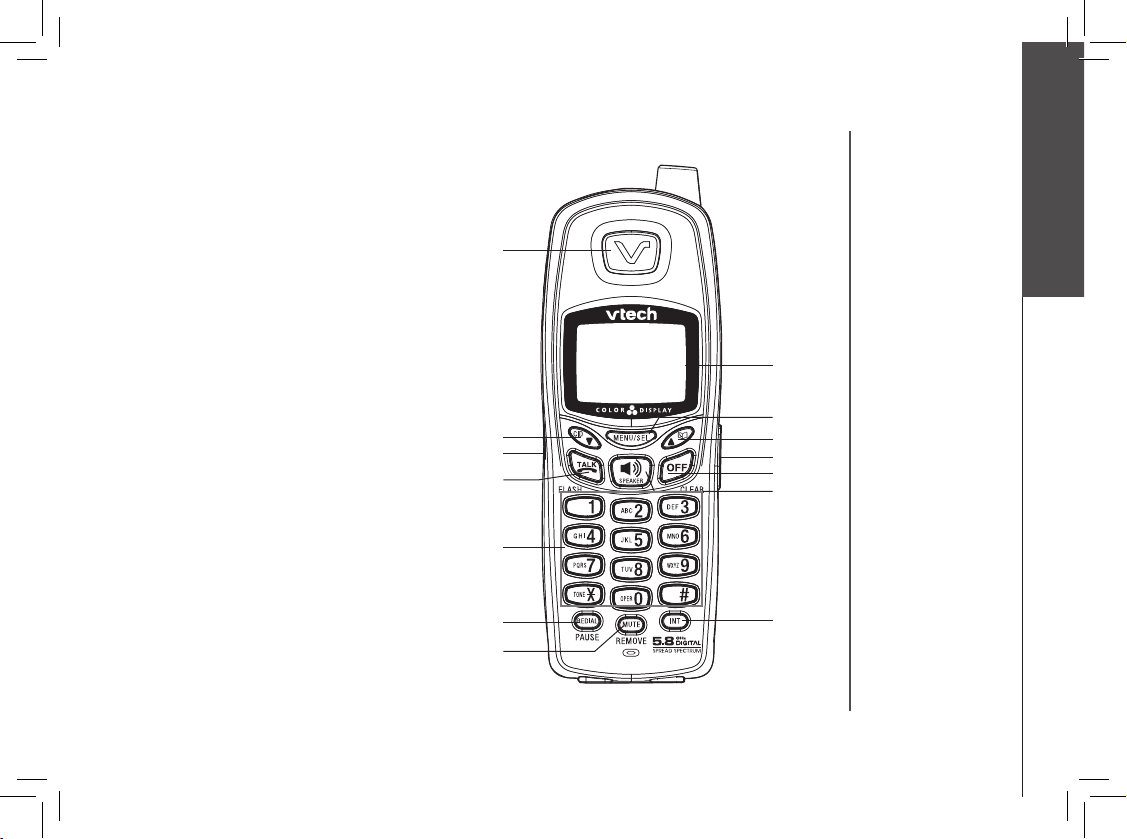
Handset layout
1. Earpiece
2. Caller ID/scroll down
3. Headset jack (2.5mm)
4. Talk/Flash
5. Dialing keys (0-9, *, #)
6. Redial/Pause
7. Mute/Remove
8. LCD Display
9. Menu/Select
10. Directory/scroll up
11. Volume
12. Off/Clear
13. Speaker
14. Intercom
1
2
3
5
6
7
9
12
13
14
4
8
10
11
Page 10
www.vtechphones.com
10
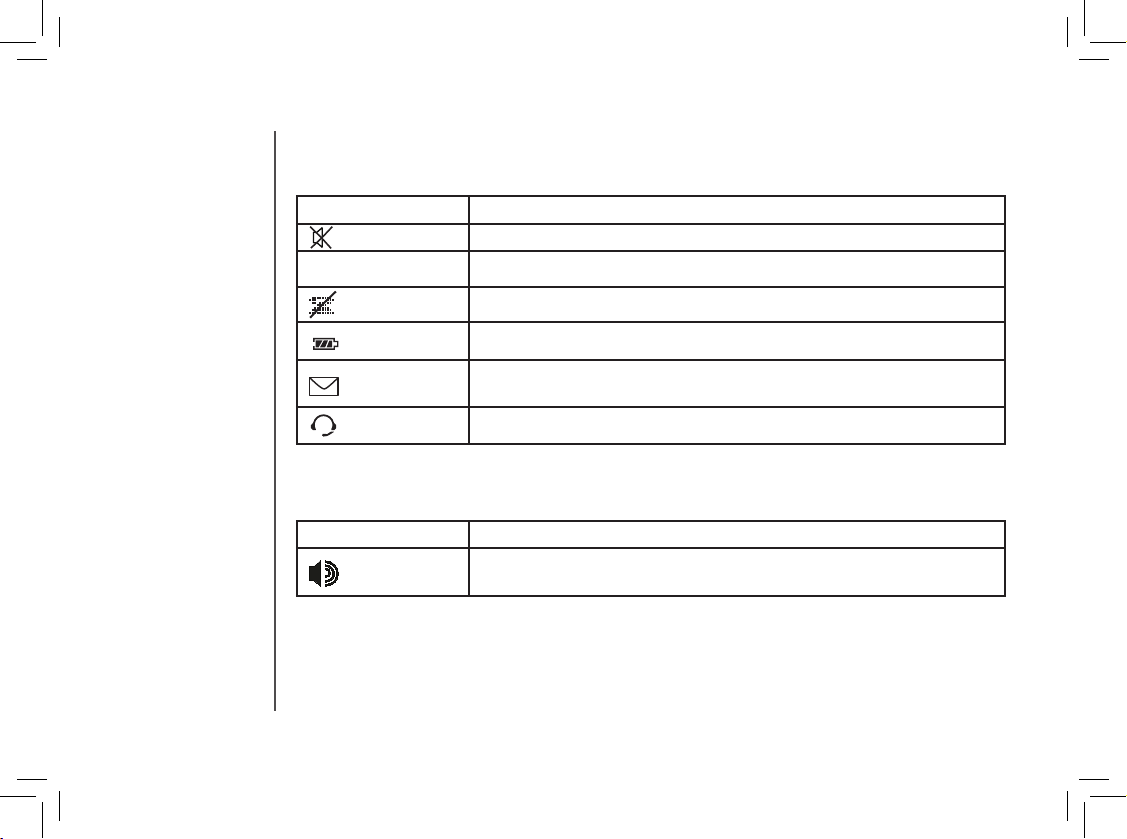
Handset LEDs
LED Description
• On when handset speakerphone is in use.
Handset icons
Icon Description
• The microphone is muted.
NEW • Displayed when viewing a missed call that has not been reviewed.
• The handset ringer is off.
• Low battery indicator or charging indicator.
• Flashes to indicate that there are new voicemail messages. (Service
must be subscribed from your telephone company.)
• Displayed when using a headset with your handset.
Telephone settings
Page 11
www.vtechphones.com
11
Getting started
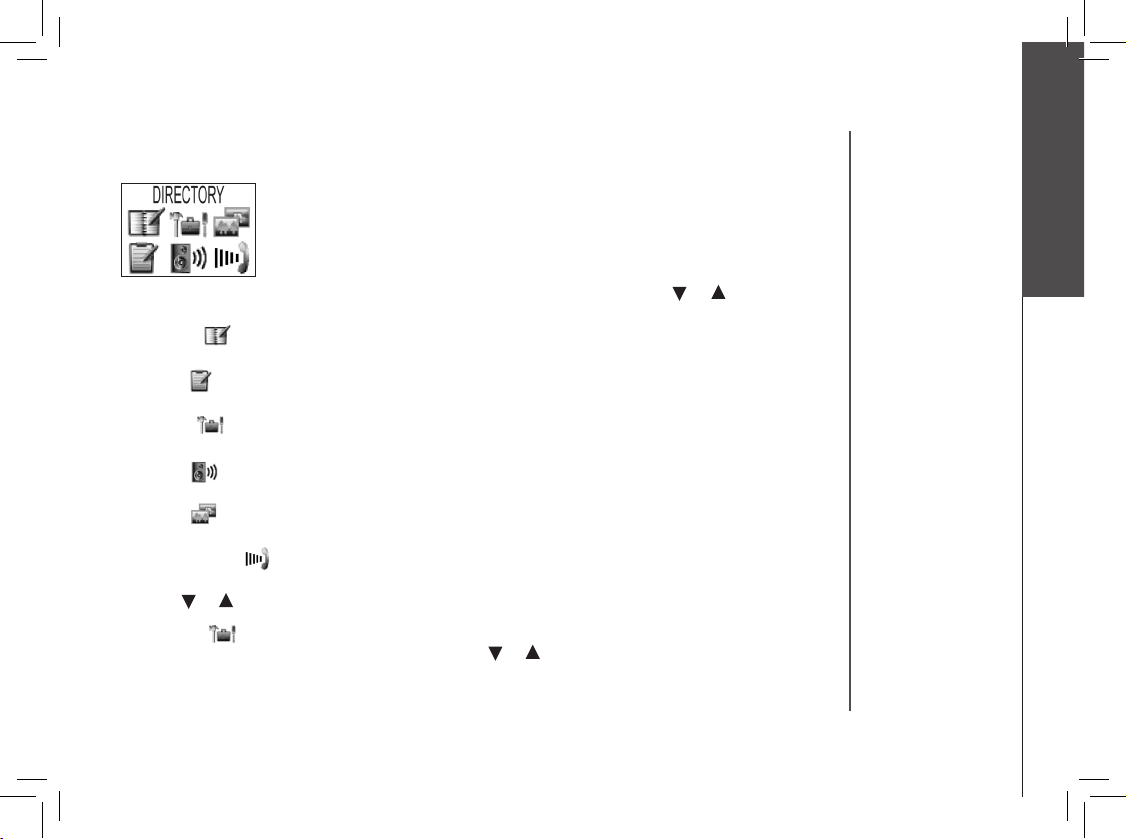
Handset main menu
Enter the main menu options on the handset by pressing MENU. Press the or to select from
the six menu items described below.
Directory ( )
Enter and retrieve up to 50 names and telephone numbers.
Call log ( )
Review caller ID data, select and dial from the caller ID data .
Settings ( )
Change the language of the menu prompts, set dial type and time, clear voicemail.
Sounds ( )
Select ringer tone, turn key tone on or off.
Display ( )
Choose from the ve preset images used as wallpaper or adjust the screen contrast.
Ringer volume ( )
Adjust ringer volume or turn ringer off.
Use the or to reach the desired menu option, then press MENU/SEL to select.
Settings( )
With this icon highlighted, press MENU then press or to reveal the following menu:
Language – This option allows you to change the screen prompts to English, Spanish or French.
Dial type - This option allows you to select tone or pulse dial.
Telephone settings
Page 12

www.vtechphones.com
12
Clock setting - This option allows you to adjust the time displayed on the idle screen.
Clear voicemail - This option allows you to turn the voicemail indicator off.
Sounds ( )
Ringer melody - This option allows you to select one of the 10 (0-9) different ringer tones for
incoming calls.
Key tone - This option allows you to turn the key tone on or off.
Display ( )
Wallpaper - This option allows you to set a wallpaper image. Select WALLPAPER in the main menu,
then use or to view the ve available images. Once you have selected the image, press SEL
and you will hear a conrmation tone.
Contrast - This option allows you to adjust the handset screen contrast.
Ringer volume ( )
This option allows you to adjust the ringer volume or turn the ringer off.
Telephone settings
• When the
telephone is
ringing, pressing
OFF will
temporarily mute
the ringer.
Page 13
www.vtechphones.com
13
Directory
• All handsets
share a common
directory stored
in the telephone
base. Entries in
one handset are
available on all
handsets, and if
a directory entr y
is deleted, it will
disappear from all
handsets.
• While entering
numbers,
press and hold
REDIAL/PAUSE
to add pauses if
necessary.
• If there is a
duplicated
number in the
directory, the
display will
show: ALREADY
SAVED.
Your telephone can store up to 50 entries (numbers with names) in memory. Each memory location
can hold up to 32 digits for the number and 16 characters for the name.
Store a new entry
• Press MENU/SEL on the handset.
• With DIRECTORY highlighted, press SEL.
• Press to select STORE. Press SEL.
• You will be prompted to ENTER NUMBER. Use the dialing keys to
enter the number to be stored in the directory. Press MUTE/REMOVE
to backspace and make corrections. Press SEL when nished
entering the telephone number.
• You will then be prompted to ENTER NAME. Use the dialing keys to
spell the name (see the next page). Press SEL.
• A conrmation tone will sound, and the new directory entry will briey
be displayed.
If the directory is full, the handset will display LIST FULL.
If you wish to store a number from the redial memory into the directory,
press REDIAL /PAUSE then or to scroll to the desired redial
number from memory. Press SEL.
ENTER NUMBER
800-595-9511\
DIRECTORY
ENTER NAME
\
DIRECTORY
LIST FULL
DIRECTORY
Basic operation
Page 14

www.vtechphones.com
14
Directory
Characters by number
Pressing any key causes different characters to be displayed in the following order:
Number of times to press
Key
1 2 3 4 5 6 7 8 9
1 # ‘ , - . &
A B C 2 a b c
D E F 3 d e f
G H I 4 g h i
J K L 5 j k l
M N O 6 m n o
P Q R S 7 p q r s
T U V 8 t u v
W X Y Z 9 w x y z
0
? ! / ( )
@
1
2
3
4
5
6
7
8
9
0
#
Review and dial entries
• Press MENU; with DIRECTORY highlighted, press SEL. With
REVIEW in the rst line, press SEL.
Space
Page 15

www.vtechphones.com
15
Basic operation
Directory
-OR-
With the handset idle, press to enter the directory. The rst directory
entry will be displayed.
• Scroll through the directory entries using and or enter the rst
character of the name to be searched (using the digit keys). Continue
pressing the or scroll keys until you reach the desired entry.
• Press or SPEAKER to dial the number.
Edit a directory entry
• Follow the steps in Review and dial entries (pages 14) to reach the
entry to be edited.
• Press SEL to enter number edit mode.
• Press and release MUTE/REMOVE to backspace, then press the
digit keys to correct the number. Press and hold REDIAL/PAUSE to
add pauses if necessary.
• Press SEL.
• Press MUTE/REMOVE to backspace and use the digit keys to enter
the correct name.
• Press SEL. A conrmation tone will sound.
Delete a directory entry
• Follow the steps in Review and dial entries (pages 14) to reach the entr y to be deleted.
• Press MUTE/REMOVE to delete the entry. A conrmation tone will sound.
• The handset will then advance to the next entry, if any.
ENTER NUMBER
800-595-9511\
DIRECTORY
ENTER NAME
VTECH COM\
DIRECTORY
Page 16

www.vtechphones.com
16
Caller ID
Caller ID - call waiting ID
Your telephone is capable of displaying the number of the caller before
the call is answered (caller ID or CID). If the number is already in the
director y, the name of the caller will also be displayed. Your telephone
can hold up to 50 CID entries.
• The handset display informs you when there are calls not answered by
a system handset. These are missed calls. If you answer a call before
the information appears on the screen, it will not be in the caller ID
log.
• After all missed CID records are reviewed, the screen will show:
• The NEW icon in the lower left corner indicates the call has not yet
been reviewed.
Your telephone can also display the name and number of the call waiting caller, (call waiting caller ID,)
so you can decide whether to answer the incoming call, or continue with the current conversation.
HANDSET 1
11:29AM
• Due to regional
incompatibilities,
CID information may
not be availa ble
for every incoming
call. In addition,
the callers may
intentionally block
their nam es and/or
telephone numbers
from being sent.
• These are
subscr iption
servi ces provided
by most reg ional
telephone
companies. You
must subscribe
to these servic es
to enjoy the
benets of these
features. If you do
not subscribe to
CID services, you
can still use your
telephone and the
other features it
offers.
HANDSET 1
5 MISSED CALLS
11:29AM
Page 17

www.vtechphones.com
17
Basic operation
Caller ID
Review caller ID
You can enter caller ID review mode by pressing when the
handset is idle, and the handset will enter caller ID review mode.
-OR-
• With the handset idle (off), press MENU.
• Press to scroll to CALL LOG.
• Press SEL. Use and to scroll through the call log entries.
When the beginning or the end of the call log is reached, a
double beep will sound.
• If the call log is full, the oldest entry is deleted to make room for
the new call. If the call log is empty the following message is
displayed when you try to review CID records:
Store caller ID in your directory
• Follow the steps in Review caller ID (above) to nd the record
to be stored.
• The telephone number in the caller ID log is sent by the
telephone company. You may have to dial the number differently.
Press the # key repeatedly to see the different dialing options.
You can add or remove the initial 1 and/or the area code. The
various dialing options are:
• Press SEL to store the displayed number.
• If the caller ID record contains both name and number, the name
and number will be stored after pressing SEL.
• If the record does not contain a name, you will be prompted to
EDIT NAME and the screen will show:
• Press OFF any
time to exit the
caller ID log.
• All handsets
share a common
caller ID log
stored in the
telephone base.
If a call log entry
is deleted, it will
disappear from
all handsets.
CALL LOG
CALL LOG EMPTY
CALL LOG
CALL LOG
595-9511
1-595-9511
800-595-9511
1-800-595-9511
ENTER NAME
VTECH COM\
DIRECTORY
Page 18

www.vtechphones.com
18
Caller ID
• If the caller ID record does not contain a number, you will be
prompted to EDIT NUMBER, and the screen will show:
• After the entry has a name and number, press MENU/SEL
to save. A conrmation beep will sound and the screen will
display:
• If both the name and number are missing, for example, as
in a private listing, nothing will be stored, and the screen will
display:
• If the number already exists in the directory, the entry will not
be stored, and the screen will show:
• If the directory is full, the screen will show:
ENTER NUMBER
800-595-9511\
DIRECTORY
SAVED
CALL LOG
UNABLE TO SAVE
CALL LOG
ALREADY SAVED
CALL LOG
LIST FULL
CALL LOG
Page 19

www.vtechphones.com
19
Basic operation
Caller ID
Dial from caller ID
• Follow the steps in Review caller ID (page 17) to nd the entry
to be dialed.
• To change how the number will be dialed, press # repeatedly
to scroll through the various dialing options. The dialing options
are:
• Press or SPEAKER to dial the number.
Delete a caller ID entry
• Follow the steps in Review caller ID (page 17) to nd the
record to be deleted.
• Press REMOVE to delete the record. A conrmation beep will
sound and the previous CID record will be displayed.
Delete all caller ID entries
• To delete all caller ID records when reviewing the call log,
press and hold REMOVE. The screen will display DELETE
ALL CALLS? Press SEL to conrm. Press OFF to return to
the call log record previously displayed.
• The telephone
number in
the caller ID
log is sent by
the telephone
company. You
may have to
dial the number
differently.
Press the # key
repeatedly to
see the different
dialing options.
You can add or
remove the initial
1 and/or the area
code.
CALL LOG
595-9511
1-595-9511
800-595-9511
1-800-595-9511
DELETE ALL
CALLS?
CALL LOG
Page 20

www.vtechphones.com
20
Handset operation
Making calls
• Press (or SPEAKER to use the handset speakerphone feature),
then dial the telephone number.
- OR-
Dial the telephone number rst, then press (or SPEAKER).
• To end your call, press OFF or place the handset in its telephone base.
Answering calls
• Press , SPEAKER or any dialing keys.
• Press OFF to end your call or place the handset into its telephone base.
Flash function
You can use your telephone with services such as call waiting.
When you subscribe to call waiting service from your telephone company,
press /FLASH to switch to the new call when you receive a call waiting
signal. Press /FLASH again to switch back to the original call.
Handset volume
The volume control is on the right side of the handset. During a call, press
the VOL or keys to adjust the listening volume to a comfortable level.
When you reach the maximum or minimum setting, a double beep will
sound. (Follow these instructions to change the volume for the handset,
speakerphone or headset.)
Redial
• When the handset is idle, press REDIAL/PAUSE to display the last ve
telephone numbers dialed from the handset (up to 32 digits for each
number). Use or to scroll through the last ve numbers dialed.
When the beginning or the end of the redial list is reached, a double
beep will sound.
• The procedure
to change
the volume is
the same for
the handset,
speakerphone
and headset.
800-595-9511
REDIAL
Page 21

www.vtechphones.com
21
Basic operation
Handset operation
• If the redial
memory is empty,
and REDIAL is
pressed, a double
beep will sound.
• If the forwarded
call is not
answered
in about 30
seconds, the
external call
is returned to
the originating
handset.
Mute
• During a call, press MUTE to disable the microphone. You cannot be
heard but you can hear the other person. The screen will briey display
MUTED:
• Pr ess M UTE again to return to nor mal two-way conver sati on.
MICROPHONE ON displays briey.
Intercom
• When not on a call, press INT. The rst handset (HS1) will display:
• Press the number of the destination handset using the dial keys (1-
4).
• The destination handset will ring and the screen will display:
• Press , SPEAKER, INT or any dialing key on HS2 to answer the
intercom call. The screen displays:
• Press or SPEAKER to dial the displayed number.
• Press REMOVE to erase the displayed number. A conrmation
beeps.
• Press OFF to exit.
HANDSET 1
IS CALLING
PHONE 00:00:15
INTERCOM TO:
INTERCOM
Page 22

www.vtechphones.com
22
Handset operation
• To end the call, press INT or OFF on either handset, or place the
handset back in the telephone base or charger.
If the destination handset is out of range or on an external call when
paged, the display of the calling handset shows:
Call forward
An external call can be forwarded or transferred from one
handset to another.
• If you are on an external call, you can forward the call to another
handset by pressing and holding INT. The originating handset
will show FORWARD TO and you should input the number of the
destination handset.
• The destination handset will show INCOMING CALL and start
ringing
• Press on the destination handset to answer.
If the forwarded call is not answered within 30 seconds, the external call
returns to the originating handset and the display shows CALL BACK,
and rings for 30 seconds. If the returned call is not answered within 30
seconds, the external call disconnects automatically.
CALL BACK
INTERCOM ENDED
UNABLE TO CALL
TRY AGAIN
FORWARD TO:
Page 23

www.vtechphones.com
23
Basic operation
Conference call
It is possible to establish a conference call between two handsets and
the external line.
If one handset is already connected to the external line, the other can join
the conversation by pressing , a conference call will be established
immediately. Both handsets will show:
Handset operation
Call transfer
• While on an external call, a handset (HS1) can transfer the call to another system handset (HS2)
by pressing INT. The external call is put on hold automatically.
• Select the destination handset number (1-4).
• HS1 shows CALLING HANDSET 2 (HS2).
• HS2 can pick up the transferred call when it rings and the screen shows HANDSET 1 IS
CALLING.
• HS2 can pick up the transferred call by pressing , SPEAKER or INT.
• An intercom call is now established (the external call is still on hold) and HS1 and HS2 are able
to talk to each other. HS1 or HS2 can hang up if they choose and conversation with the external
call can resume. CALL TRANSFERRED is briey displayed on HS1.
If the transferred call is not answered within 100 seconds, the intercom attempt will be automatically
ended and the external call will return to the original party.
PHONE 00:00:15
Page 24

www.vtechphones.com
24
Troubleshooting
If you have difculty operating your telephone, the suggestions below should solve the problem. If you still have
difculty after trying these suggestions, call VTech Communications at 1(800)595-9511. In Canada, call VTech
Telecommunications Canada Ltd. at 1(800)267-7377.
Problem Suggestion
When attempting to
de-register, the IN USE
light is on steadily.
• Pick up the handset in the main telephone base, press to go off hook, and press OFF to
hang up. Begin de-registration again.
My telephone doesn’t
work at all.
• Make sure the power cord is plugged in.
• Make sure the telephone line cord is plugged rmly into the base unit and the telephone wall
jack.
• Disconnect the charger adapter for a few minutes, and then reconnect it.
• Charge the battery in the handset for at least 16 hours. For optimum daily performance, return
the handset to its charger when not in use.
• Reset the telephone base. Unplug the unit’s electrical power. Wait for 15 seconds then plug it
back in. Allow up to one minute for the handset and telephone base to reset.
• You may need to purchase a new battery. Please refer to the Batteries section of the system’s
user’s manual.
I cannot get a dial
tone.
• Try all the suggestions above.
• If the handset displays NOT REGISTERED, follow the instructions on page 7 to register your
handset.
• Move the handset closer to the telephone base. You might have moved out of range.
• Your telephone line cord might be malfunctioning. Try installing a new telephone line cord.
• If the previous suggestions do not work, disconnect the telephone base from the telephone
jack and connect a different telephone. If there is no dial tone on that telephone either, the
problem is in your wiring or local service. Contact your local telephone company.
Page 25

www.vtechphones.com
25
Additional information
Troubleshooting
Problem Suggestion
I cannot dial out. • Make sure there is a dial tone before dialing. The handset may take a second or two to synchronize
with the telephone base and produce a dial tone. This is normal. Wait an extra second before
dialing.
• Make sure your telephone is set to the correct dial mode for the type of service that you have (pulse
or touchtone). Refer to the Telephone settings section (page 11) of this user’s manual to set the
dial mode.
• If the other telephones in your home are having the same problem, the problem is in your wiring
or local service. Contact your local telephone company.
• Eliminate any background noise. Noise from a television, radio or other appliances may cause the
telephone not to dial out properly. If you cannot eliminate the background noise, rst try muting the
handset before dialing, or dialing from another room in your home with less background noise.
My handset beeps
four times and isn’t
performing normally.
• Make sure the power cord is securely plugged into the telephone base. Plug the unit into a
different, working outlet not controlled by a wall switch.
• Move the handset closer to the telephone base. It might have been moved out of range.
• If the handset is in its charger and the CHARGE light does not light, refer to Charge light is
off (page 29) in this Troubleshooting guide.
• Reset the telephone base. Unplug the unit’s electrical power. Wait for 15 seconds then plug it
back in. Allow up to one minute for the handset and base to reset.
• Other electronic products can cause interference with your cordless telephone. Try installing
your telephone as far away from these types of electronic devices as possible: wireless routers,
radios, radio towers, pager towers, cell telephones, intercoms, room monitors, televisions,
personal computers, kitchen appliances and other cordless telephones.
Page 26

www.vtechphones.com
26
Problem Suggestion
UNABLE TO CALL,
TRY AGAIN displays
on my handset.
• Move the handset closer to the telephone base. It might have been moved out of range.
• If the handset is in its charger and the CHARGE light does not light, refer to the CHARGE
light is off (page 29) in this troubleshooting section.
• Reset the telephone base. Unplug the unit’s electrical power. Wait for 15 seconds then plug it
back in. Allow up to one minute for the handset and telephone to reset.
• Other electronic products can cause interference with your cordless telephone. Try installing it
as far away from these types of electronic devices as possible: wireless routers, radios, radio
towers, pager towers, cellular telephones, intercoms, room monitors, televisions, personal
computers, kitchen appliances and other cordless telephones.
The battery does not
hold a charge.
• Charge the battery in the handset for at least 16 hours. For optimum daily performance, return
the handset to its charger when not in use.
• You may need to purchase a new battery. Please refer to the Installation section of the system’s
user’s manual.
• Your telephone might be malfunctioning. Please refer to the Warranty section (pages 31-32)
of this user’s manual for further instruction.
Troubleshooting
Page 27

www.vtechphones.com
27
Additional information
Problem Suggestion
I get noise, static,
or weak signal even
when I’m near the
telephone base.
• Other cordless telephones and 802.11 wireless routers used for home computer networks both use
internal radios to communicate. The radios may interfere with one another. You can improve the
performance of your cordless telephones and your router by:
a. positioning your new telephone as far away as possible from any other existing cordless
telephone system already installed in your home to avoid the two systems interfering with each
other.
b. positioning your telephone base as far as possible from your router, computer or any other
computer devices.
c. selecting channels 4 through 10 for your router (refer to your router’s user manual for more
information).
• Other electronic products can cause interference with your cordless telephone. Try installing your
telephone as far away from these types of electronic devices as possible: wireless routers, radios,
radio towers, pager towers, cellular telephones, intercoms, room monitors, televisions, personal
computers, kitchen appliances and other cordless telephones.
• Microwave ovens operate on the same frequency as your telephone. It is normal to experience static
on your telephone while the microwave oven is in operation. Do not install this telephone in the same
outlet or near the microwave oven.
• If your telephone is plugged in with a modem or surge protector, plug the telephone (or modem/surge
protector) into a different location. If this solves the problem, re-locate your telephone or modem
farther apart from one another, or use a different surge protector.
• Relocate your telephone to a higher location. The telephone will likely have better reception when
installed in a high area.
• If the other telephones in your home are having the same problem, the problem is in your wiring or
local service. Contact your local telephone company (charges may apply.)
I hear other calls while
using my telephone.
• Disconnect your telephone base from the telephone jack, and plug in a regular telephone. If
you still hear other calls, the problem is probably in your wiring or local service. Call your local
telephone company.
Troubleshooting
Page 28

www.vtechphones.com
28
Problem Suggestion
My handset does not
ring when there is an
incoming call.
• Make sure you have the ringer activated. Refer to the section(s) on ringer selection in the
system’s user’s manual.
• Make sure the telephone line cord is plugged rmly into the telephone base and the telephone
jack. Make sure the power cord is plugged in.
• You may be too far from the telephone base.
• Charge the battery in the handset for at least 16 hours. For optimum daily performance, return
the handset to its charger when not in use.
• You may have too many extension telephones on your telephone line to allow all of them to
ring. Try unplugging some of the other telephones.
• The layout of your home or ofce might be limiting the operating range. Try moving the telephone
base to another location, preferably to an upper oor.
• If the other telephones in your home are having the same problem, the problem is in your wiring
or local service. Contact your local telephone company (charges may apply.)
• Test a working telephone at the phone jack. If another telephone has the same problem, the
problem is the phone jack. Contact your local telephone company (charges may apply.)
• Other electronic products can cause interference with your cordless telephone. Try installing
your telephone as far away from these types of electronic devices as possible: wireless routers,
radios, radio towers, pager towers, cellular telephones, intercoms, room monitors, televisions,
personal computers, kitchen appliances and other cordless telephones.
• Your telephone line cord might be malfunctioning. Try installing a new telephone line cord.
Troubleshooting
Page 29

www.vtechphones.com
29
Additional information
Problem Suggestion
My calls fade in and
out while I’m using my
handset.
• Other electronic products can cause interference with your cordless telephone. Try installing
your telephone as far away from these types of electronic devices as possible: wireless routers,
radios, radio towers, pager towers, cellular telephones, intercoms, room monitors, televisions,
personal computers, kitchen appliances and other cordless telephones.
• Microwave ovens operate on the same frequency as your telephone. It is normal to experience
static on your telephone while the microwave oven is in operation. Do not install this telephone
in the same outlet or near the microwave oven.
• If your telephone is plugged in with a modem or surge protector, plug the telephone (or modem/
surge protector) into a different location. If this solves the problem, relocate your telephone or
modem farther apart from one another, or use a different surge protector.
• Relocate your telephone to a higher location. The telephone will have better reception when
installed in a high area.
• If the other telephones in your home are having the same problem, the problem is in your wiring
or local service.
The CHARGE light
is off.
• Clean the handset and charging contacts on the telephone base each month using a pencil
eraser or cloth.
• Make sure the power and line cords are plugged in correctly and rmly.
• Reset the telephone base. Unplug the unit’s electrical power. Wait for 15 seconds then plug it
back in. Allow up to one minute for the handset and the telephone to synchronize.
• Your telephone might be malfunctioning. Please refer to the Warranty section of this user’s
manual for fur ther instruction.
Troubleshooting
Page 30

www.vtechphones.com
30
Problem Suggestion
My caller ID isn’t
working.
• Caller ID is a subscription service. You must subscribe to this service for this feature to work
on your telephone.
• Your caller must be calling from an area that supports caller ID.
• Both you and your caller’s telephone companies must use caller ID compatible equipment.
Common cure for
electronic equipment.
If the unit does not seem to be responding normally, then try putting the handset in its charger.
If it does not seem to respond, do the following (in the order listed):
1. Disconnect the power to the telephone base.
2. Disconnect the handset battery.
3. Wait a few minutes.
4. Connect power to the telephone base.
5. Re-install the battery.
6. Wait for the handset to synchronize with the telephone base. To be safe, allow up to one
minute for this to take place.
Troubleshooting
Page 31

www.vtechphones.com
31
Additional information
Maintenance
Taking care o f your telephone
Your cordless telephone contains sophisticated electronic parts, so it must be treated with care.
Place the handset down gently. Save the original packing materials to protect your telephone if you ever need to ship it.
Avoid water
Your telephone can be damaged if it gets wet. Do not use the handset outdoors in the rain, or handle it with wet hands. Do not install your base unit near a sink, bathtub or shower.
Electrical storms
Electrical storms can sometimes cause power surges harmful to electronic equipment. For your own safety, use caution when using electric appliances during storms.
Cleaning your telephone
Your telephone has a durable plastic casing that should retain its luster for many years. Clean it only with a soft cloth slightly dampened with water or a mild soap. Do not use excess water or
cleaning solvents of any kind.
Remember that electrical appliances can cause serious injury if used when you are wet or standing in water. If your base unit should fall into water, DO NOT RETRIEVE IT UNTIL YOU
UNPLUG THE POWER CORD AND TELEPHONE LINE CORDS FROM THE WALL. Then pull the unit out by the unplugged cords.
What does this limited warranty cover?
• The ma nufacturer of this V Tech pr oduct, VTech Commu nicatio ns, warrants to the hol der of a valid proof of pur chase (“Consum er” or “you”) that t he product and all a ccesso ries provi ded by
VTech in the sa les package (“Pro duct ”) are free fr om materia l defects i n material and workm anship, pur suant to the followi ng terms and c onditions, whe n install ed and used n ormally and in
accord ance wit h operatio n instructions . This limi ted warrant y extends only to th e Consume r for Produc ts purchased and u sed in the Un ited State s of Americ a.
What will VTech Communications do if the Product is not free from material defects in materials and workmanship during the limited warranty period (“Materially Defective Product”)?
• During the lim ited warran ty period, VTech’s auth orized service r epresen tative wil l repair or re place at V Tech’s option, wi thout cha rge, a Materi ally Defective Pro duct. If we r epair thi s
pro duct, we may use new or re furbish ed replac ement parts. If we ch oose to replace thi s produc t, we may repl ace it with a n ew or refurb ished pro duct of the same or sim ilar design. VTech
wi ll return re paired or re placeme nt products to you in wo rking co ndition . VTech will ret ain defective par ts, modules, or equ ipment. R epair or rep lacement of Produc t, at VTech’s option, is
you r exclusive r emedy. You should ex pect the repair or re placeme nt to take approximatel y 30 days.
How long is the limited warranty period?
• The limited warr anty period for th e produc t extends f or ONE (1) YEAR from th e date of purc hase if we re pair or repl ace a Materi ally Defective Prod uct under the term s of this limi ted
war ranty. This l imited war ranty als o applies to repaire d or replacement Pro ducts for a p eriod of either (a) 90 days f rom the dat e the repair ed or repla cement Pro duct is shipped to yo u or (b)
th e time remai ning on the origina l one-year w arranty ; whicheve r is longer.
What is not covered by this limited warranty?
This limited warranty does not cover
1. Product th at has been subjecte d to misuse, acciden t, shipping or other p hysical damage, im proper in stallati on, abnormal oper ation or handling, n eglect , inundati on, re, water or other liq uid
int rusion; or
2. Product th at has been damaged du e to repair, alteration or m odica tion by anyon e other than a n authorized serv ice representati ve of VTech; or
3. Pr oduct to th e extent that the prob lem experienced i s caused by si gnal condition s, networ k reliabil ity or cable or anten na systems; or
4. Product to t he extent th at the problem is cau sed by use wit h non-VTech electri cal acce ssories ; or
Warranty
Page 32

www.vtechphones.com
32
Warranty
5. Pr oduct wh ose warran ty/quali ty sticke rs, Product seria l numbers plates or el ectroni c serial numbers hav e been remov ed, altere d or rendere d illegible; or
6. Pr oduct pur chased, used, ser viced, or shipp ed for repai r from outs ide the Uni ted States , or used for c ommerci al or insti tutional p urposes (includ ing but not limited to Pr oducts u sed for rent al
purpos es ); or
7. Product ret urned without vali d proof of purchase (se e 2 below); or
8. Charges fo r install ation or set u p, adjustm ent of custo mer controls, and in stallation or repa ir of systems o utside the unit.
How do you get warranty service?
• To obtain warr anty service in t he United States of Am erica, c all 1-800-595 -9511 for i nstruc tions reg arding wh ere to return t he Product. Befor e calling f or servi ce, please check th e user’s
man ual. A check of the Pro duct con trols and fe atures may save you a serv ice call.
• Exce pt as provided by app licable l aw, you a ssume the r isk of loss or damage d uring transit and tr ansportation a nd are resp onsible f or deliver y or handling char ges incur red in the transpor t
of Produc t (s) to the s ervice locati on. VTech will r eturn repaired or rep laced product un der this limited war ranty to you , transpo rtatio n, delivery or hand ling char ges prepai d. VTech assumes
no risk for d amage or loss of the Pro duct in tr ansit.
• If the Product f ailure is no t covered by th is limited w arranty, or pr oof of purchase doe s not meet the terms of th is limited w arranty, V Tech will notif y you and will request t hat you authorize the
co st of repair prior to any fu rther repair act ivity. You must pay fo r the cost of repair and r eturn shipping co sts for the r epair of Pro ducts th at are not cover ed by this lim ited warranty.
What must you return with the Product to get warranty service?
1. Ret urn the entire origi nal package and con tents inc luding th e Product t o the VTech ser vice location a long with a d escription of the m alfunction or dif culty;
2. Include “ valid proof of purch ase” (sales receip t) identif ying the Product p urchase d (Produc t model) an d the date of pu rchase or r eceipt; a nd
3. Provide y our name, co mplete and c orrect mailing ad dress, and telepho ne number.
Other Limitations
• This war ranty is the compl ete and exclusive agre ement bet ween you and V Tech. I t supersedes all ot her writ ten or oral co mmunications re lated to this P roduct . VTech provi des no other
war ranties fo r this prod uct. The warrant y exclusive ly descr ibes all of V Tech’s re sponsib ilities regardi ng the prod uct. There are no oth er express wa rrantie s. No one is aut horized to make
mo dicati ons to this limited war ranty and you shoul d not rely on any such mod ication.
State Law Righ ts: This warranty gi ves you specic leg al rights, and you may al so have other r ights which vary fr om state to state.
Limitatio ns: Impl ied warr anties, includi ng those of tness f or a par ticular purp ose and merchantabili ty (an un writte n warrant y that the pr oduct is t fo r ordinary u se) are li mited to one year from
date of purc hase. Some states do n ot allow lim itations o n how long an implied wa rranty l asts, so th e above limitation may n ot apply to you.
• In no event s hall VTech be liable for a ny indirec t, special, inci dental, consequ ential, or similar da mages (includin g, but not lim ited to lost p rots or revenue, inab ility to use the pro duct, or
oth er associated equ ipment, t he cost of su bstitute equipme nt, and claims by thir d parties) resultin g from the use of this pro duct. Some state s do not allow t he exclusion or limit ation of
in cidenta l or consequentia l damages , so the above l imitatio n or exclusion may not ap ply to you.
Important safety instructions
When using your telephone equipment, basic safety precautions should always be followed to reduce the risk of re, electric shock and injury, including the following:
1. Read and understand all instructions.
2. Follow all warnings and instructions marked on the product.
3. Unplug this product from the wall outlet before cleaning. Do not use liquid or aerosol cleaners. Use a damp cloth for cleaning.
4. Do not use this product near water (for example, near a bath tub, kitchen sink or swimming pool).
5. Do not place this product on an unstable surface, such as a table, shelf or stand. The product may fall, causing serious damage.
6. Slots and openings in the back or bottom of the base unit and handset are provided f or ve ntilation . To protect t hem f rom overh eatin g, th ese openi ngs m ust not b e blocked by placing the
Page 33

www.vtechphones.com
33
Additional information
Important safety instructions
FCC Part 15
This equipment has been tested and found to comply with the requirements for a Class B digital device under Part 15 of the Federal Communications Commission (FCC) rules. These requirements
are intended to provide reasonable protection against harmful interference in a residential installation. This equipment generates, uses and can radiate radio frequency energy and, if not installed and
used in accordance with the instructions, may cause harmful interference to radio communications. However, there is no guarantee that interference will not occur in a particular installation. If this
equipment does cause harmful interference to radio or television reception, which can be determined by turning the equipment off and on, the user is encouraged to try to correct the interference by
one or more of the following measures:
* Reorient or relocate the receiving antenna.
* Increase the separation between the equipment and receiver.
* Connect the equipment into an outlet on a circuit different from that to which the receiver is connected.
* Consult the dealer or an experienced radio/TV technician for help.
Changes or modications to this equipment not expressly approved by the party responsible for compliance could void the user’s authority to operate the equipment.
product on a soft surface such as a bed, sofa or rug. This product should never be placed near or over a radiator or heat register. This product should not be placed in any area where proper
ventilation is not provided.
7. This product should be operated only from the type of power source indicated on the marking label. If you are not sure of the type of power supply in your home, consult your dealer or local power
company.
8. Do not allow anything to rest on the power cord. Do not install this product where the cord may have anyone walking on it.
9. Never push objects of any kind into this product through slots in the base or handset as they may touch dangerous voltage points or short out parts that could result in a risk of re or electric shock.
Never spill liquid of any kind on the product.
10. To reduce the risk of electric shock, do not disassemble this product, but take it to an authorized service facility. Opening or removing parts of the base or handset other than specied access
doors may expose you to dangerous voltages or other r isks . Incor rect re assembl ing can cause electri c shock when t he prod uct is subsequently used.
11. Do not overload wall outlets and extension cords as this can result in the risk of re or electric shock.
12. Unplug this product from the wall outlet and refer servicing to an authorized service facility under the
following conditions:
A. When the power supply cord or plug is damaged or frayed.
B. If liquid has been spilled onto the product.
C. If the product has been exposed to rain or water.
D. If the product does not operate normally by following the operating instructions. Adjust only those controls that are covered by the operating instructions, as improper adjustment of
other controls may result in damage and often requires extensive work by an authorized technician to restore the product to normal o peration.
E. If the product has been dropped and the base and/or handset has been damaged.
F. If the product exhibits a distinct change in performance.
13. Avoid using a telephone (other than cordless) during an electrical storm. There is a remote risk of electric shock from lightning.
14. Do not use the telephone to report a gas leak in the vicinity of the leak.
15. Only p ut the handset of your telephone next to your ear when it is in normal talk.
SAVE THESE INSTRUCTIONS
FCC, ACTA and IC regulations
Page 34

www.vtechphones.com
34
FCC, ACTA and IC regulations
To ensure safety of users, the FCC has established criteria for the amount of radio frequency energy that can be safely absorbed by a user or bystander according to the intended usage of the product.
This product has been tested and found to comply with the FCC criteria. The handset may be safely held against the ear of the user. The base unit shall be installed and used such that parts of the user’s
body other than the hands are maintained at a distance of approximately 20 cm (8 inches) or more. If you choose to use a clipping device, please make sure to only use the supplied VTech belt clip.
FCC Part 68 and ACTA
This equipment complies with Part 68 of the FCC rules and with technical requirements adopted by the Administrative Council for Terminal Attachments (ACTA). The label on the back or bottom of this
equipment contains, among other things, a product identier in the format US:AAAEQ##TXXXX. This identier must be provided to your local telephone company upon request.
The plug and jack used to connect this equipment to premises wiring and the telephone network must comply with applicable Part 68 rules and technical requirements adopted by ACTA. A compliant
telephone cord and modular plug is provided with this product. It is designed to be connected to a compatible modular jack that is also compliant. An RJ11 jack should normally be used for connecting
to a single line and an RJ14 jack for two lines. See Installation Instructions in the user’s manual.
The Ringer Equivalence Number (REN) is used to determine how many devices you may connect to your telephone line and still have them ring when you are called. The REN for this product is
encoded as the 6th and 7th characters following the US: in the product identier (e.g., if ## is 03, the REN is 0.3). In most, but not all areas, the sum of all RENs should be ve (5.0) or less. For more
information, please contact your local telephone company.
This equipment may not be used with Party Lines. If you have specially wired alarm dialing equipment connected to your telephone line, ensure the connection of this equipment does not disable your
alarm equipment. If you have questions about what will disable alarm equipment, consult your telephone company or a qualied installer.
If this equipment is malfunctioning, it must be unplugged from the modular jack until the problem has been corrected. Repairs to this telephone equipment can only be made by the manufacturer or its
authorized agents. For repair procedures, follow the instructions outlined under the Limited Warranty.
If this equipment is causing harm to the telephone network, the telephone company may temporarily discontinue your telephone service. The telephone company is required to notify you before
interrupting service. If advance notice is not practical, you will be notied as soon as possible. You will be given the opportunity to correct the problem and the telephone company is required to inform
you of your right to le a complaint with the FCC. Your telephone company may make changes in its facilities, equipment, operation, or procedures that could affect the proper functioning of this product.
The telephone company is required to notify you if such changes are planned.
If this product is equipped with a corded or cordless handset, it is hearing aid compatible.
If this product has memory dialing locations, you may choose to store emergency telephone numbers (e.g., police, re, medical) in these locations. If you do store or test emergency numbers, please:
* Remain on the line and briey explain the reason for the call before hanging up.
* Perform such activities in off-peak hours, such as early morning or late evening.
Industry Canada
This equipment complies with regulations RSS210 and CS-03 of Industry Canada. Operation is subject to the following two conditions: (1) this device may not cause interference, and (2) this device
must accept any interference, including interference that may cause undesired operation of the device.
The term “IC:” before the certication/registration number only signies that the Industry Canada technical specications were met.
The Ringer Equivalence Number (REN) for this terminal equipment is 0.1. The REN is an indication of the maximum number of devices allowed to be connected to a telephone interface. The termination
on an interface may consist of any combination of devices subject only to the requirement that the sum of the RENs of all the devices does not exceed ve.
Page 35

www.vtechphones.com
35
Additional information
The RBRC® Seal on the nickel-metal-hydride battery indicates that VTech Communications, Inc. is
voluntarily par ticipating in an industry program to collect and recycle these batteries at the end of their
useful lives, when taken out of service within the United States and Canada.
The RBRC® program provides a convenient alternative to placing used nickel-metal-hydride batteries into
the trash or municipal waste, which may be illegal in your area.
VTech’s participation in RBRC® makes it easy for you to drop off the spent battery at local retailers participating in the
RBRC® program or at authorized VTech product service centers. Please call 1-800 -8-BATTERYTM for information on Ni-MH
battery recycling and disposal bans/restrictions in your area. VTech’s involvement in this program is part of its commitment
to protecting our environment and conserving natural resources.
RBRC® is a registered trademark of Rechargeable Battery Recycling Corporation.
Patent Information
Technology embodied in this product may be covered by one or more patents. For patent information please refer to our
website: www.vtechphones.com/vtechui/about/patents
The RBRC® seal
Page 36

www.vtechphones.com
36
Technical specications
Frequency control Crystal controlled PLL synthesizer
Transmit frequency Handset: 2400-2483.5 MHz
Receive frequency Handset: 5725-5850 MHz
Channels 95
Nominal effective range Maximum power allowed by the FCC and IC. Actual operating range
may vary according to environmental conditions at the time of use.
Size Handset: 141mm X 50mm X 35mm
Charger: 89mm X 78mm X 53mm
Weight Handset: 141 grams Charger: 76 grams
Power requirements Handset: 600mAh Ni-MH Battery
Charger: 9V DC @ 200mA
Memory Director y: 50 memory locations (in telephone base), up to 32 digits, 16
characters per location
CID: 50 Memory locations
Enhanced 5.8GHz technology–your phone operates on a dual band transmission that combines the best of 5.8GHz and
2.4GHZ technologies, providing enhanced performance over standard cordless telephones.
Page 37

www.vtechphones.com
37
Index
A
Answering calls 20
B
Basic operation 11
Belt clip 6
C
Call forward 22
Call transfer 23
Caller ID - call waiting ID 16
Caller ID 16
Characters by number 14
Check battery indicator 6
Conference call 23
Connect power
to handset charger 5
D
Delete a caller ID entry 19
Delete a directory entry 15
Dial from caller ID 19
Director y 13
Display 12
E
Edit a directory entr y 15
F
FCC, ACTA and IC
regulations 33
Flash function 20
G
Getting started 3
H
Handset icons 10
Handset layout 9
Handset LEDs 10
Handset main menu 11
Handset operation 20
Handset volume 20
I
Important safety instructions 32
Index 37
Install handset battery 4
Installation 4
Intercom 21
M
Maintenance 31
Making calls 20
Mute 21
P
Parts checklist 3
R
Redial 20
Registration 7
Review and dial entries 14
Review caller ID 17
Ringer Volume 12
S
Settings 11
Sounds 12
Store a new entry 13
Store caller ID in
your directory 17
T
Technical specications 36
Telephone settings 11
The RBRC® seal 35
To de-register all handsets 8
To register a handset 7
Troubleshooting 24
W
Warranty 31
Page 38

VTECH TELECOMMUNICATIONS LTD.
A member of THE VTECH GROUP OF COMPANIES
Distributed in the U.S.A. by VTech Communications, Inc. Beaverton, Oregon
Distributed in Canada by VTech Telecommunications Canada Ltd.,
Richmond, B.C.
Copyright ©2006 for VTECH TELECOMMUNICATIONS LTD.
Printed in China
91-000785-010-000
Page 39

User’s Manual
w w w . vt e c h p h o n e s . c o m
Model: mi6807
 Loading...