

Page 1
Go to www.vtechphones.com
(US) to register your product for
enhanced warranty support and the
latest VTech product news.
IS8151-1S
IS8151-2S
IS8151-3S
IS8151
IS8151-2
IS8151-3
Go to phones.vtechcanada.com
(Canada) for the latest VTech
product news.
IS8151-4S
IS8151-5S
IS8152-5S
IS8151-4
IS8151-43
IS8151-47
IS8151-5
IS8152-5
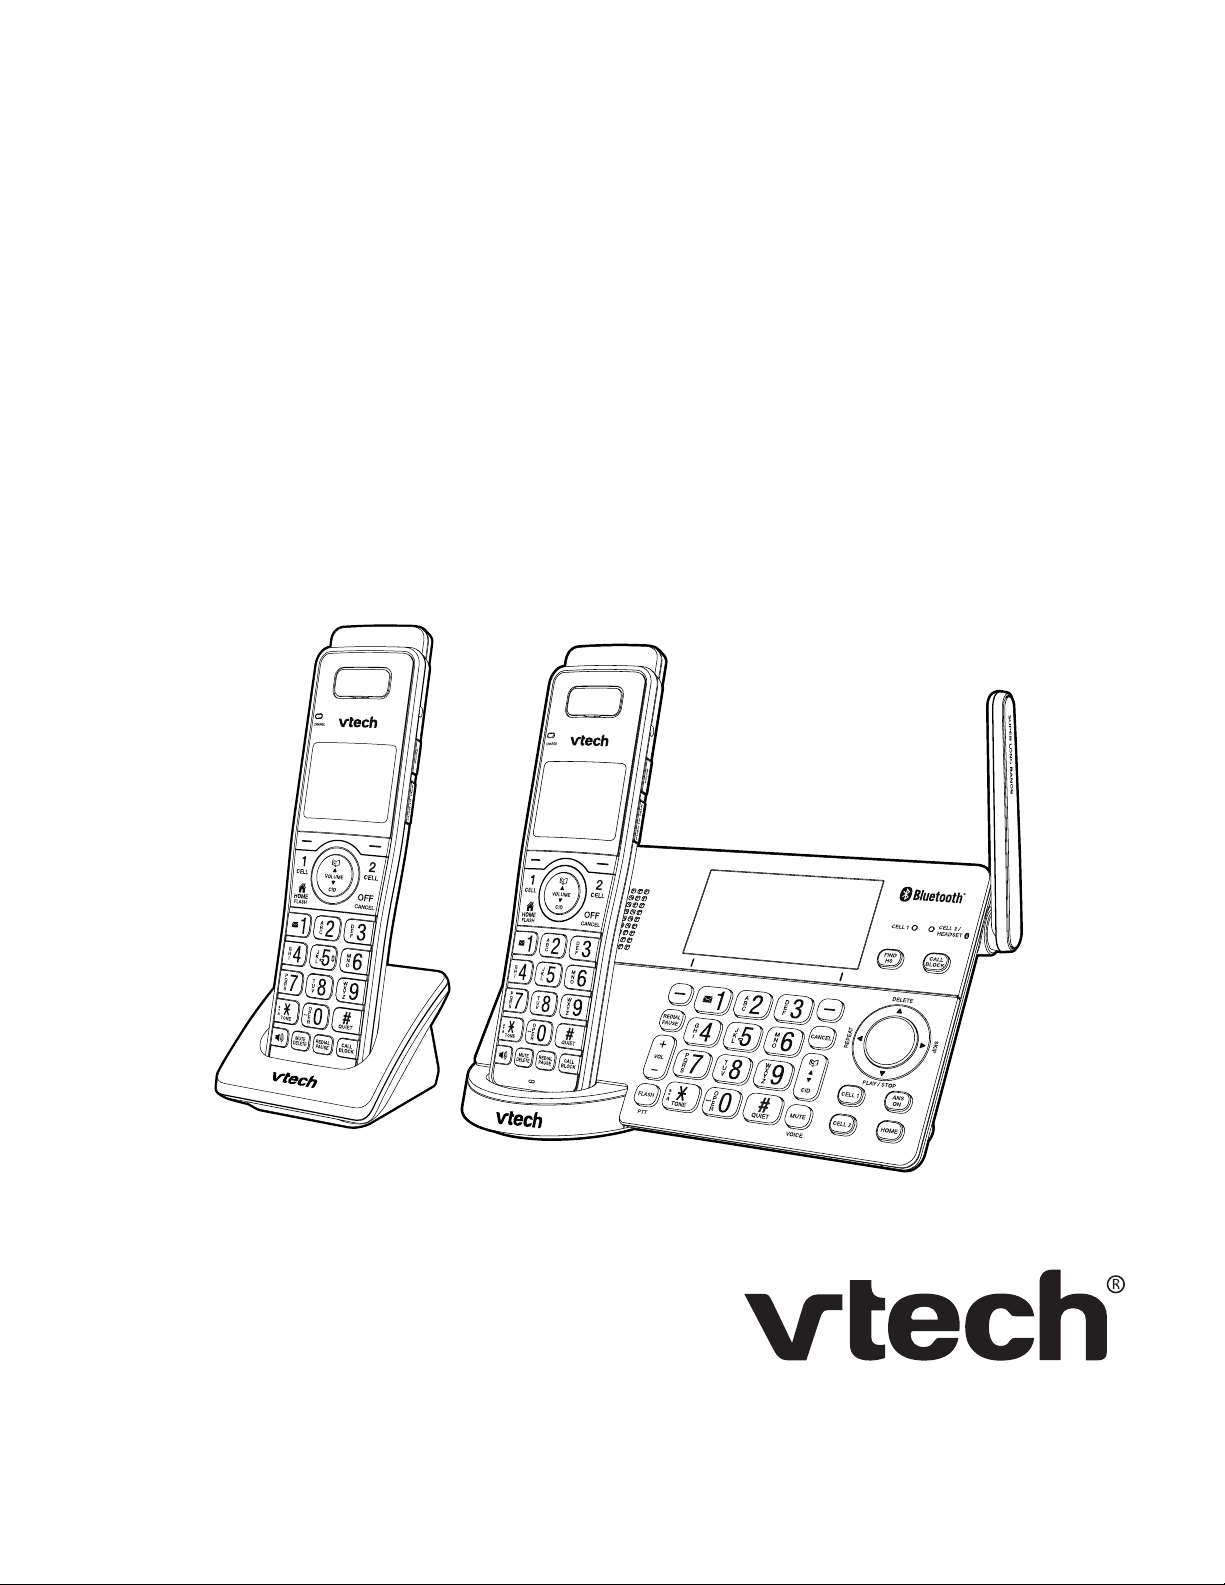
DECT 6.0 Cordless telephone
with BLUETOOTH® wireless technology
User’s manual
Page 2

Congratulations
on purchasing your new VTech product. Before using this
telephone, please read Important safety instructions.
This manual has all the feature operations and troubleshooting
necessary to install and operate your new VTech telephone.
Please review this manual thoroughly to ensure proper
installation and operation of this innovative and feature rich
VTech product.
For support, shopping, and everything new at VTech, visit our
website at
www.vtechphones.com. In Canada, please visit
phones.vtechcanada.com.
Compatible with
Hearing Aid T-Coil
TIA-1083
Telephones identified with this logo have reduced
noise and interference when used with most T-coil
equipped hearing aids and cochlear implants. The
TIA-1083 Compliant Logo is a trademark of the
Telecommunications Industry Association. Used
under license.
T
The ENERGY STAR® program (www.energystar.gov)
recognizes and encourages the use of products that
save energy and help protect our environment. We
are proud to mark this product with the ENERGY
STAR® label indicating it meets the latest energy
efficiency guidelines.
Important safety instructions
When using your telephone equipment, basic safety
precautions should always be followed to reduce the risk
of fire, electric shock and injury, including the following:
1. Read and understand all instructions.
2. Follow all warnings and instructions marked on the
product.
3. Unplug this product from the wall outlet before
cleaning. Do not use liquid or aerosol cleaners. Use a
damp cloth for cleaning.
4. CAUTION: Do not install the telephone base at a height
above 2 meters.
5. Do not use this product near water such as near a
bath tub, wash bowl, kitchen sink, laundry tub or a
swimming pool, or in a wet basement or shower.
6. Do not place this product on an unstable table, shelf,
stand or other unstable surfaces.
7. Avoid placing the telephone system in places with
extreme temperature, direct sunlight, or other electrical
devices. Protect your phone from moisture, dust,
corrosive liquids and fumes.
8. Slots and openings in the back or bottom of the
telephone base and handset are provided for
ventilation. To protect them from overheating, these
openings must not be blocked by placing the product
on a soft surface such as a bed, sofa or rug. This
product should never be placed near or over a radiator
or heat register. This product should not be placed in
any area where proper ventilation is not provided.
9. This product should be operated only from the type
of power source indicated on the marking label. If you
are not sure of the type of power supply in your home
or office, consult your dealer or local power company.
10. Do not allow anything to rest on the power cord. Do
not install this product where the cord may be walked
on.
11. Never push objects of any kind into this product
through the slots in the telephone base or handset
because they may touch dangerous voltage points or
create a short circuit. Never spill liquid of any kind on
the product.
12. To reduce the risk of electric shock, do not disassemble
this product, but take it to an authorized service facility.
Opening or removing parts of the telephone base or
handset other than specified access doors may expose
you to dangerous voltages or other risks. Incorrect
reassembling can cause electric shock when the
product is subsequently used.
13. Do not overload wall outlets and extension cords.
14. Unplug this product from the wall outlet and refer
servicing to an authorized service facility under the
following conditions:
• When the power supply cord or plug is damaged or
frayed.
• If liquid has been spilled onto the product.
• If the product has been exposed to rain or water.
• If the product does not operate normally by
following the operating instructions. Adjust only
those controls that are covered by the operation
instructions. Improper adjustment of other controls may
result in damage and often requires extensive work
by an authorized technician to restore the product to
normal operation.
• If the product has been dropped and the telephone
base and/or handset has been damaged.
• If the product exhibits a distinct change in performance.
15. Avoid using a telephone (other than cordless) during an
electrical storm. There is a remote risk of electric shock from
lightning.
16. Do not use the telephone to report a gas leak in the vicinity
of the leak. Under certain circumstances, a spark may be
created when the adapter is plugged into the power
outlet, or when the handset is replaced in its cradle. This
is a common event associated with the closing of any
electrical circuit. The user should not plug the phone into
a power outlet, and should not put a charged handset
into the cradle, if the phone is located in an environment
containing concentrations of flammable or flamesupporting gases, unless there is adequate ventilation.
A spark in such an environment could create a fire or
explosion. Such environments might include: medical use
of oxygen without adequate ventilation; industrial gases
(cleaning solvents; gasoline vapors; etc.); a leak of natural
gas; etc.
17. Only put the handset of your telephone next to your ear
when it is in normal talk mode.
18. The power adapter is intended to be correctly oriented
in a vertical or floor mount position. The prongs are not
designed to hold the plug in place if it is plugged into a
ceiling, under-the-table or cabinet outlet.
19. For pluggable equipment, the socket outlet shall be
installed near the equipment and shall be easily accessible.
20.
CAUTION: Use only the batteries indicated in this
manual. There may be a risk of explosion if a wrong type
of battery is used for the handset. Use only the supplied
rechargeable batteries or replacement batteries (BT183342/
BT283342) for the handset. Do not dispose of batteries in a
fire. They may explode.
21. Use only the adapter included with this product. Incorrect
adapter polarity or voltage can seriously damage the
product.
SAVE THESE INSTRUCTIONS
Battery
• CAUTION: Use Only Supplied Battery.
• Do not dispose of the battery in a fire. Check with local
waste management codes for special disposal instructions.
• Do not open or mutilate the battery. Released electrolyte is
corrosive and may cause burns or injury to the eyes or skin.
The electrolyte may be toxic if swallowed.
• Exercise care in handling batteries in order not to create a
short circuit with conductive materials.
• Charge the battery provided with this product only in
accordance with the instructions and limitations specified in
this manual.
Precautions for users of implanted cardiac pacemakers
Cardiac pacemakers (applies only to digital cordless
telephones):
Wireless Technology Research, LLC (WTR), an independent
research entity, led a multidisciplinary evaluation of the
interference between portable wireless telephones and
implanted cardiac pacemakers. Supported by the U.S. Food and
Drug Administration, WTR recommends to physicians that:
Pacemaker patients
• Should keep wireless telephones at least six inches from the
pacemaker.
• Should NOT place wireless telephones directly over the
pacemaker, such as in a breast pocket, when it is turned ON.
• Should use the wireless telephone at the ear opposite the
pacemaker.
WTR’s evaluation did not identify any risk to bystanders with
pacemakers from other persons using wireless telephones.
About cordless telephones
• Privacy: The same features that make a cordless telephone
convenient create some limitations. Telephone calls are
transmitted between the telephone base and the cordless
handset by radio waves, so there is a possibility that the
cordless telephone conversations could be intercepted
by radio receiving equipment within range of the cordless
handset. For this reason, you should not think of cordless
telephone conversations as being as private as those on
corded telephones.
• Electrical power: The telephone base of this cordless
telephone must be connected to a working electrical outlet.
The electrical outlet should not be controlled by a wall
switch. Calls cannot be made from the cordless handset
if the telephone base is unplugged, switched off or if the
electrical power is interrupted.
• Potential TV interference: Some cordless telephones
operate at frequencies that may cause interference
to televisions and VCRs. To minimize or prevent such
interference, do not place the telephone base of the
cordless telephone near or on top of a TV or VCR. If
interference is experienced, moving the cordless telephone
farther away from the TV or VCR often reduces or eliminates
the interference.
• Rechargeable batteries: Exercise care in handling batteries
in order not to create a short circuit with conducting material
such as rings, bracelets and keys. The battery or conductor
may overheat and cause harm. Observe proper polarity
between the battery and the battery charger.
• Nickel-metal hydride rechargeable batteries: Dispose of
these batteries in a safe manner. Do not burn or puncture
the battery. Like other batteries of this type, if burned or
punctured, they could release caustic material which could
cause injury.
Page 3

Table of contents
Important safety instructions ................................................................II
What’s in the box .................................................................................. 1
Overview ..............................................................................................2
Telephone base overview .............................................................................2
Handset overview ...........................................................................................3
Charger overview .......................................................................................... 4
Display icons overview.................................................................................. 4
Telephone base lights overview ................................................................. 4
Connect ................................................................................................. 5
Connect the telephone base ........................................................................5
Connect the charger .......................................................................................5
Mount the telephone base ...........................................................................5
Install and charge the battery ...................................................................... 6
Install belt clip .................................................................................................. 7
Improve the telephone signal strength ......................................................7
Before use ............................................................................................. 7
Set date and time ............................................................................................7
Voice guide for Smart call blocker* / Answering system ......................... 7
Check for dial tone..........................................................................................7
Introducing Bluetooth ..........................................................................8
Operating range ............................................................................................ 8
Battery backup mode .................................................................................... 8
Glossary of terms ............................................................................................ 9
VTech Connect to Cell™ application ........................................................... 9
Bluetooth setup ....................................................................................9
Add a cell phone ............................................................................................ 9
Add a headset .............................................................................................. 10
Auto connection ........................................................................................... 10
Bluetooth connection from idle mode .................................................... 10
Review the device list .................................................................................. 10
Connect/disconnect an active device ...................................................... 10
Remove a paired device .............................................................................. 11
Replace an active device .............................................................................11
Download phonebook ................................................................................11
Interruption to phonebook directory download ....................................12
View the directory download information ...............................................12
Remote voice control .......................................................................... 12
Activate remote voice control .....................................................................12
Configure your telephone .................................................................. 13
Use the handset and telephone base menu ............................................13
Set language ..................................................................................................13
Set date and time ..........................................................................................13
Set voice language .......................................................................................13
Caller ID announce .......................................................................................14
Use caller ID to automatically set date and time ......................................14
Set speed dial voicemail number ...............................................................14
Voicemail (visual message waiting) indicator ...........................................14
Clear voicemail indication ............................................................................14
Home area code ...........................................................................................15
Cell area code ................................................................................................15
Dial mode .......................................................................................................15
Temporary tone dialing ...............................................................................15
No line alert ....................................................................................................15
Cell alert ..........................................................................................................15
Telephone operations .........................................................................16
Make, answer or end a home call ............................................................. 16
Call waiting on the home line ..................................................................... 17
Make, answer or end a cell call ................................................................... 17
Call waiting on the cell line ..........................................................................17
Answer an incoming cell call while on a home call .................................18
Answer a home call while on a cell call .....................................................18
Conference home and cell calls .................................................................18
Handset speakerphone ...............................................................................19
Volume ............................................................................................................19
Silence the ringer ..........................................................................................19
Mute ................................................................................................................19
Hold ............................................................................................................... 20
Equalizer ........................................................................................................ 20
Join a call in progress (for multiple handset models only) ................... 20
Chain dialing ..................................................................................................21
Find handset ..................................................................................................22
Redial list ............................................................................................. 22
Review a redial list entry ..............................................................................22
Dial a redial list entry.....................................................................................22
Save a redial entry to the phonebook .......................................................23
Delete a redial list entry ...............................................................................24
Sound settings ....................................................................................24
Key tone ..........................................................................................................24
Ringer tone ....................................................................................................24
Ringer volume ...............................................................................................24
QUIET mode ..................................................................................................25
Temporary ringer silencing .........................................................................25
Intercom ..............................................................................................25
Answer an incoming call during an intercom call ................................... 26
Call transfer using intercom ................................................................ 27
Push-to-talk (PTT) ................................................................................ 28
Turn PTT on or off ..........................................................................................28
PTT call to a single device ............................................................................28
PTT call to multiple devices ........................................................................ 29
Answer a PTT call .......................................................................................... 30
Change a one-to-one PTT call to an intercom call ................................. 30
Answer an incoming call during a PTT call ...............................................30
Make an outgoing call during a PTT call ..................................................30
End or leave a PTT call ................................................................................. 30
Phonebook ......................................................................................... 31
Add a phonebook directory entry .............................................................31
Add a predialed telephone number to the phonebook .......................32
Review a phonebook entry .........................................................................32
3-character alphabetical search ..................................................................33
Dial a phonebook entry ...............................................................................33
Edit a phonebook entry ...............................................................................33
Edit the type of a phonebook entry ......................................................... 34
Delete a phonebook entry ......................................................................... 34
Remove a downloaded cell phone directory ......................................... 34
Caller ID ...............................................................................................34
Review a caller ID log entry........................................................................ 34
Memory match ............................................................................................. 34
Missed call indicator .....................................................................................35
View dialing options.....................................................................................35
Dial a caller ID log entry ...............................................................................35
Save a caller ID log entry to the phonebook ...........................................35
i
Page 4
THIS SIDE UP / CE CÔTÉ VERS LE HAUT
Battery Pack / Bloc-piles :
BT183342/BT283342 (2.4V 400mAh Ni-MH)
WARNING / AVERTISSEMENT :
DO NOT BURN OR PUNCTURE BATTERIES.
NE PAS INCINÉRER OU PERCER LES PILES.
Made in China / Fabriqué en chine CR1952
Save a caller ID log entry to the allow list ................................................. 36
Save a caller ID log entry to the block list ................................................. 37
Save a caller ID log entry to the star name list ..........................................37
Delete the caller ID log entries ...................................................................37
About Smart call blocker ....................................................................38
Call categories ...............................................................................................38
Call handling ................................................................................................. 39
Set Smart call blocker on/off ......................................................................40
Set profile ......................................................................................................40
Block list ......................................................................................................... 41
Allow list ......................................................................................................... 42
Star name list ................................................................................................. 44
Screening announcements......................................................................... 45
Voice guide to set Smart call blocker .......................................................46
Allowed calls ..................................................................................................47
Blocked calls...................................................................................................47
Screen unknown home calls ...................................................................... 48
Screen robocalls ........................................................................................... 49
Option while on a call .................................................................................49
About the built-in answering system and voicemail service .............50
Set your built-in answering system ....................................................50
Turn the answering system on or off ........................................................ 50
Default announcement ................................................................................51
Record your own announcement ..............................................................51
Play the announcement ...............................................................................51
Delete the announcement ..........................................................................51
Voice guide to set Answering system .......................................................52
Set number of rings ......................................................................................53
Set recording time ........................................................................................53
Turn the call screening on or off ................................................................ 54
Turn the message alert tone on or off ...................................................... 54
Answering system and voicemail indicators ...................................... 55
Use the answering machine and voicemail together ......................... 55
Message capacity ..........................................................................................55
Voice prompts ...............................................................................................55
Call screening ................................................................................................55
Call intercept ................................................................................................. 56
Temporarily turn off the message alert tone ........................................... 56
Message playback ....................................................................................... 56
Delete all old messages ...............................................................................57
Record and play memos ............................................................................. 58
Remote access .............................................................................................. 58
Set remote access code .............................................................................. 59
Record, play or delete memos .................................................................. 59
Register a handset ............................................................................. 60
Screen messages ................................................................................ 60
General product care ..........................................................................62
Frequently asked questions ................................................................63
The RBRC seal ......................................................................................65
FCC, ACTA and IC regulations .............................................................66
California Energy Commission battery charging testing instructions 67
For C-UL compliance only ...................................................................68
Limited warranty .................................................................................70
Disclaimer and Limitation of Liability ................................................. 71
Technical specifications ......................................................................71
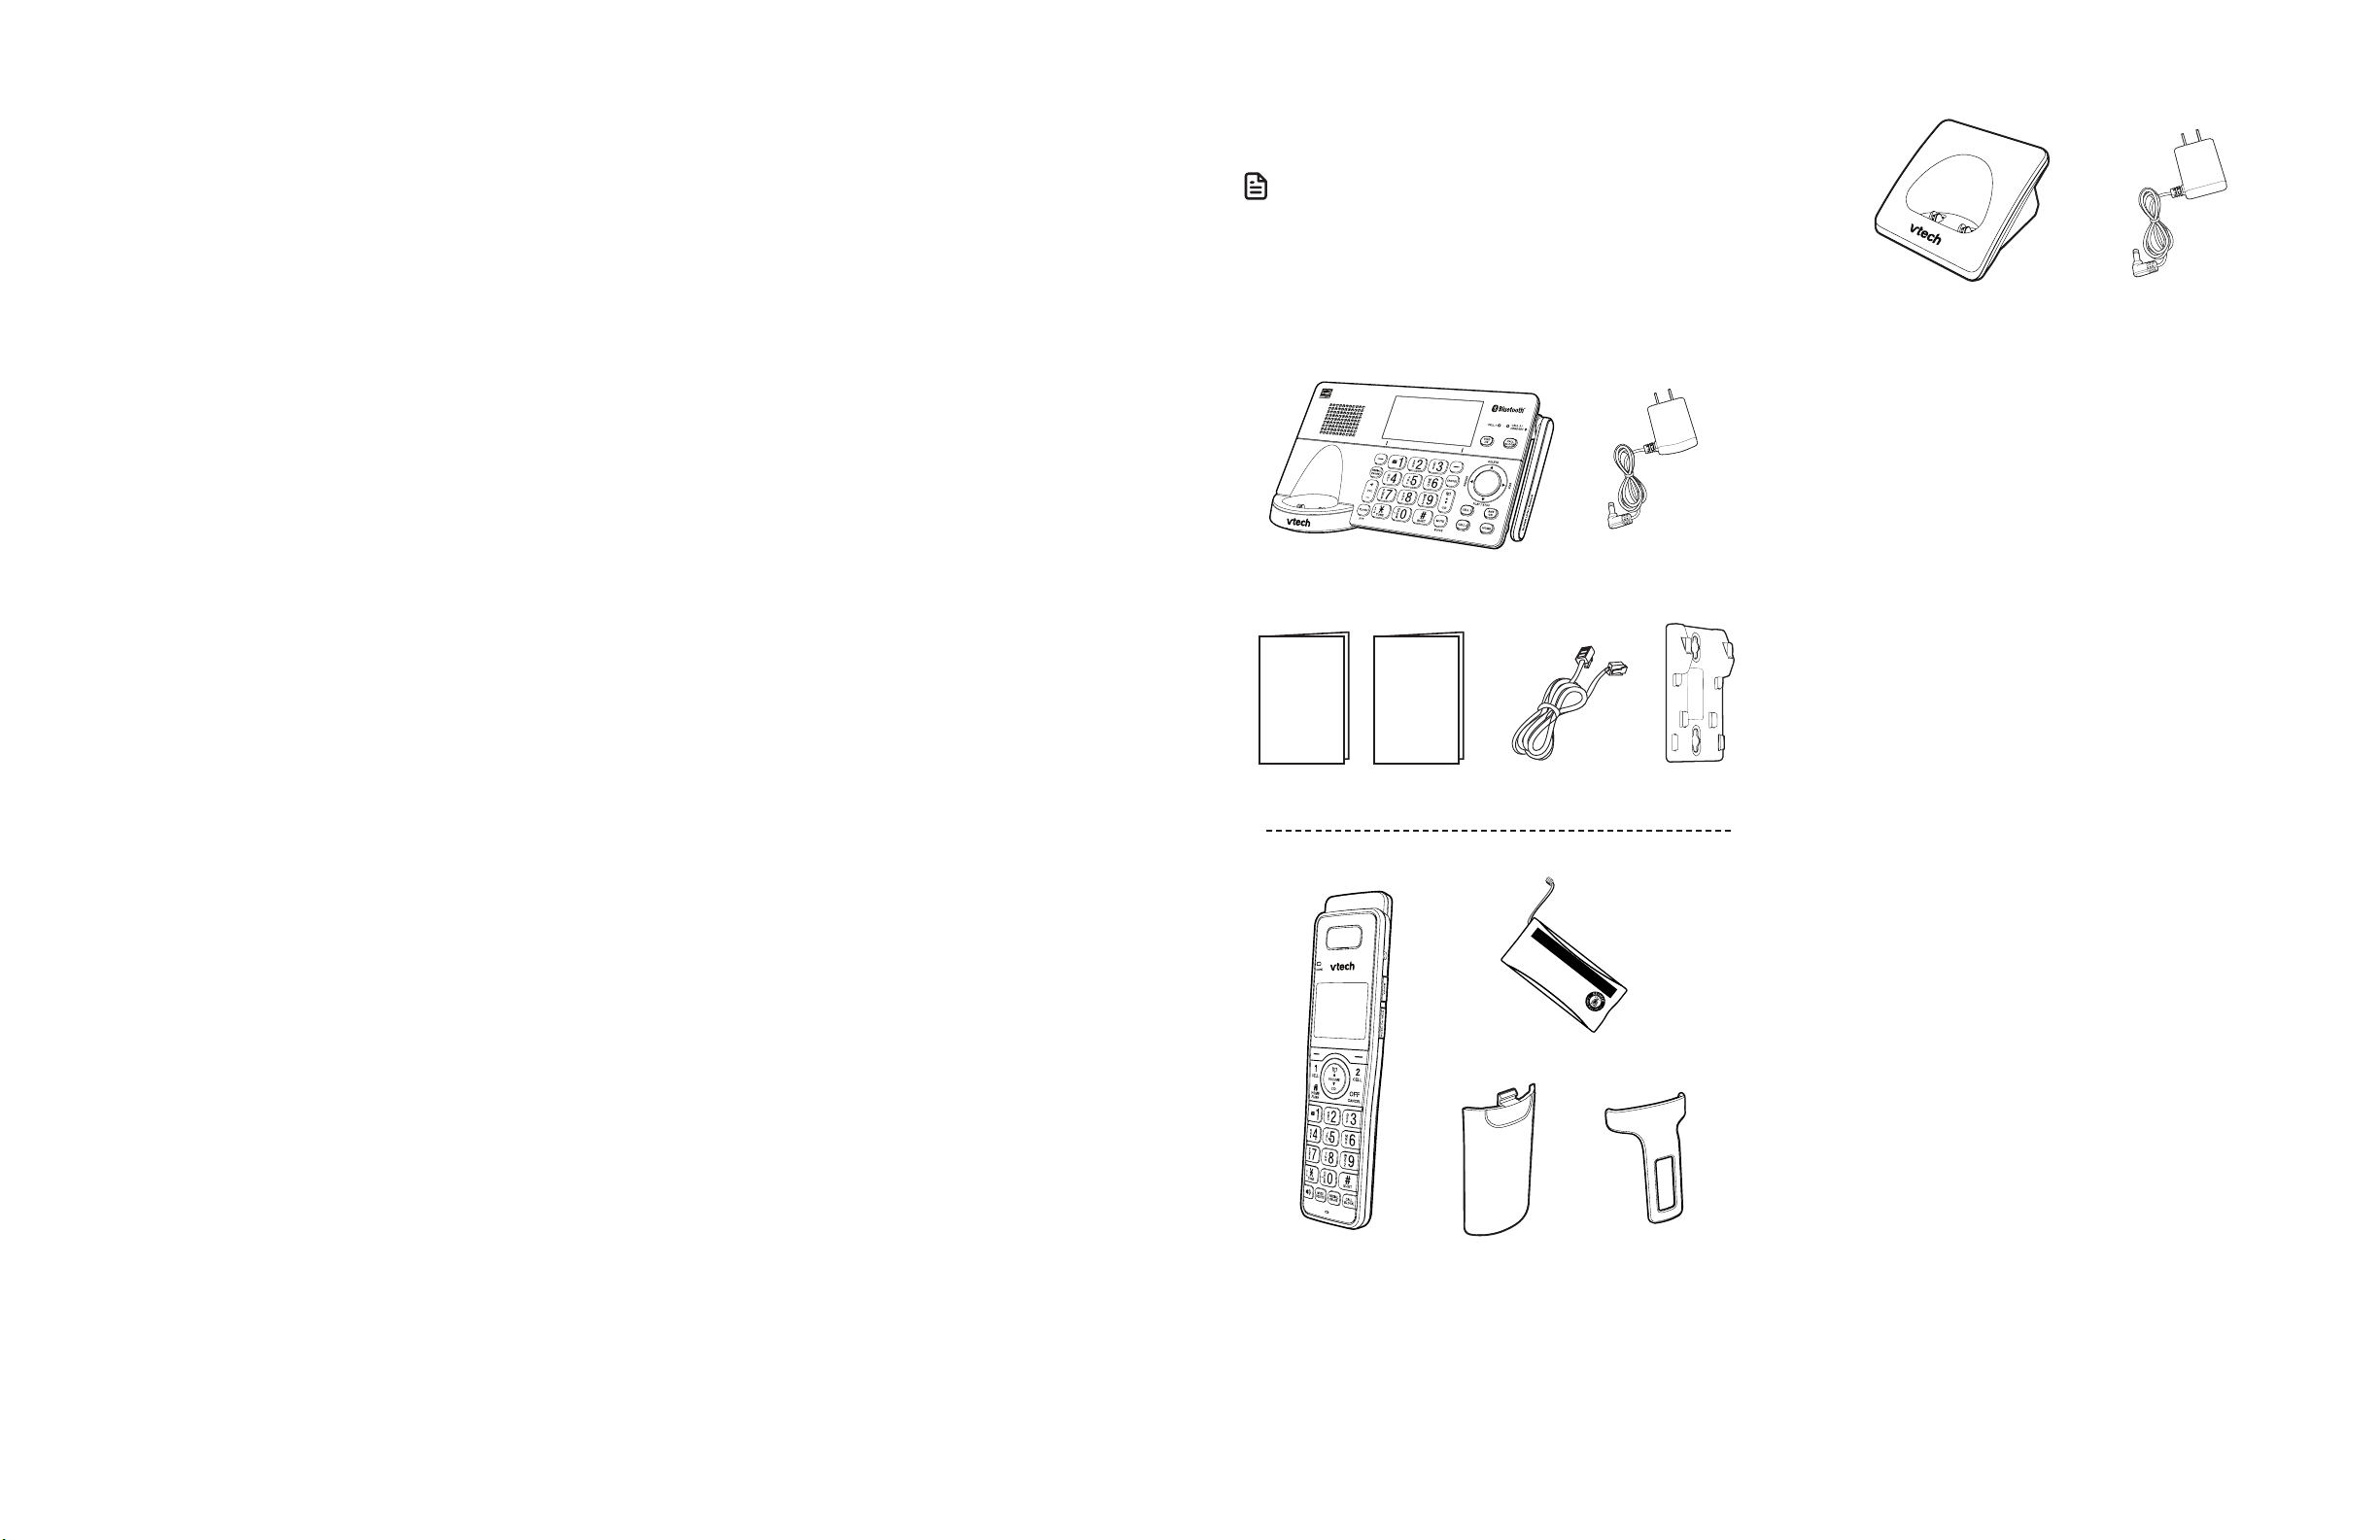
What’s in the box
Your telephone package contains the following items. Save
your sales receipt and original packaging in the event warranty
service is necessary.
NOTE
• To purchase a replacement battery or power adapter, visit our
website at
www.vtechphones.com or call 1 (800) 595-9511. In Canada, go to
phones.vtechcanada.com or call 1 (800) 267-7377.
Quick
start
guide
1 set for IS8151/IS8151-1S
2 sets for IS8151-2/IS8151-2S
3 sets for IS8151-3/IS8151-3S
4 sets for IS8151-4/IS8151-43/IS8151-47/IS8151-4S
5 sets for IS8151-5/IS8151-5S/IS8152-5/IS8152-5S
ii 1
Introducing
Smart call
blocker
1 sets for IS8151-2/IS8151-2S
2 sets for IS8151-3/IS8151-3S
3 sets for IS8151-4/IS8151-43/IS8151-47/IS8151-4S
4 sets for IS8151-5/IS8151-5S/IS8152-5/IS8152-5S
Page 5
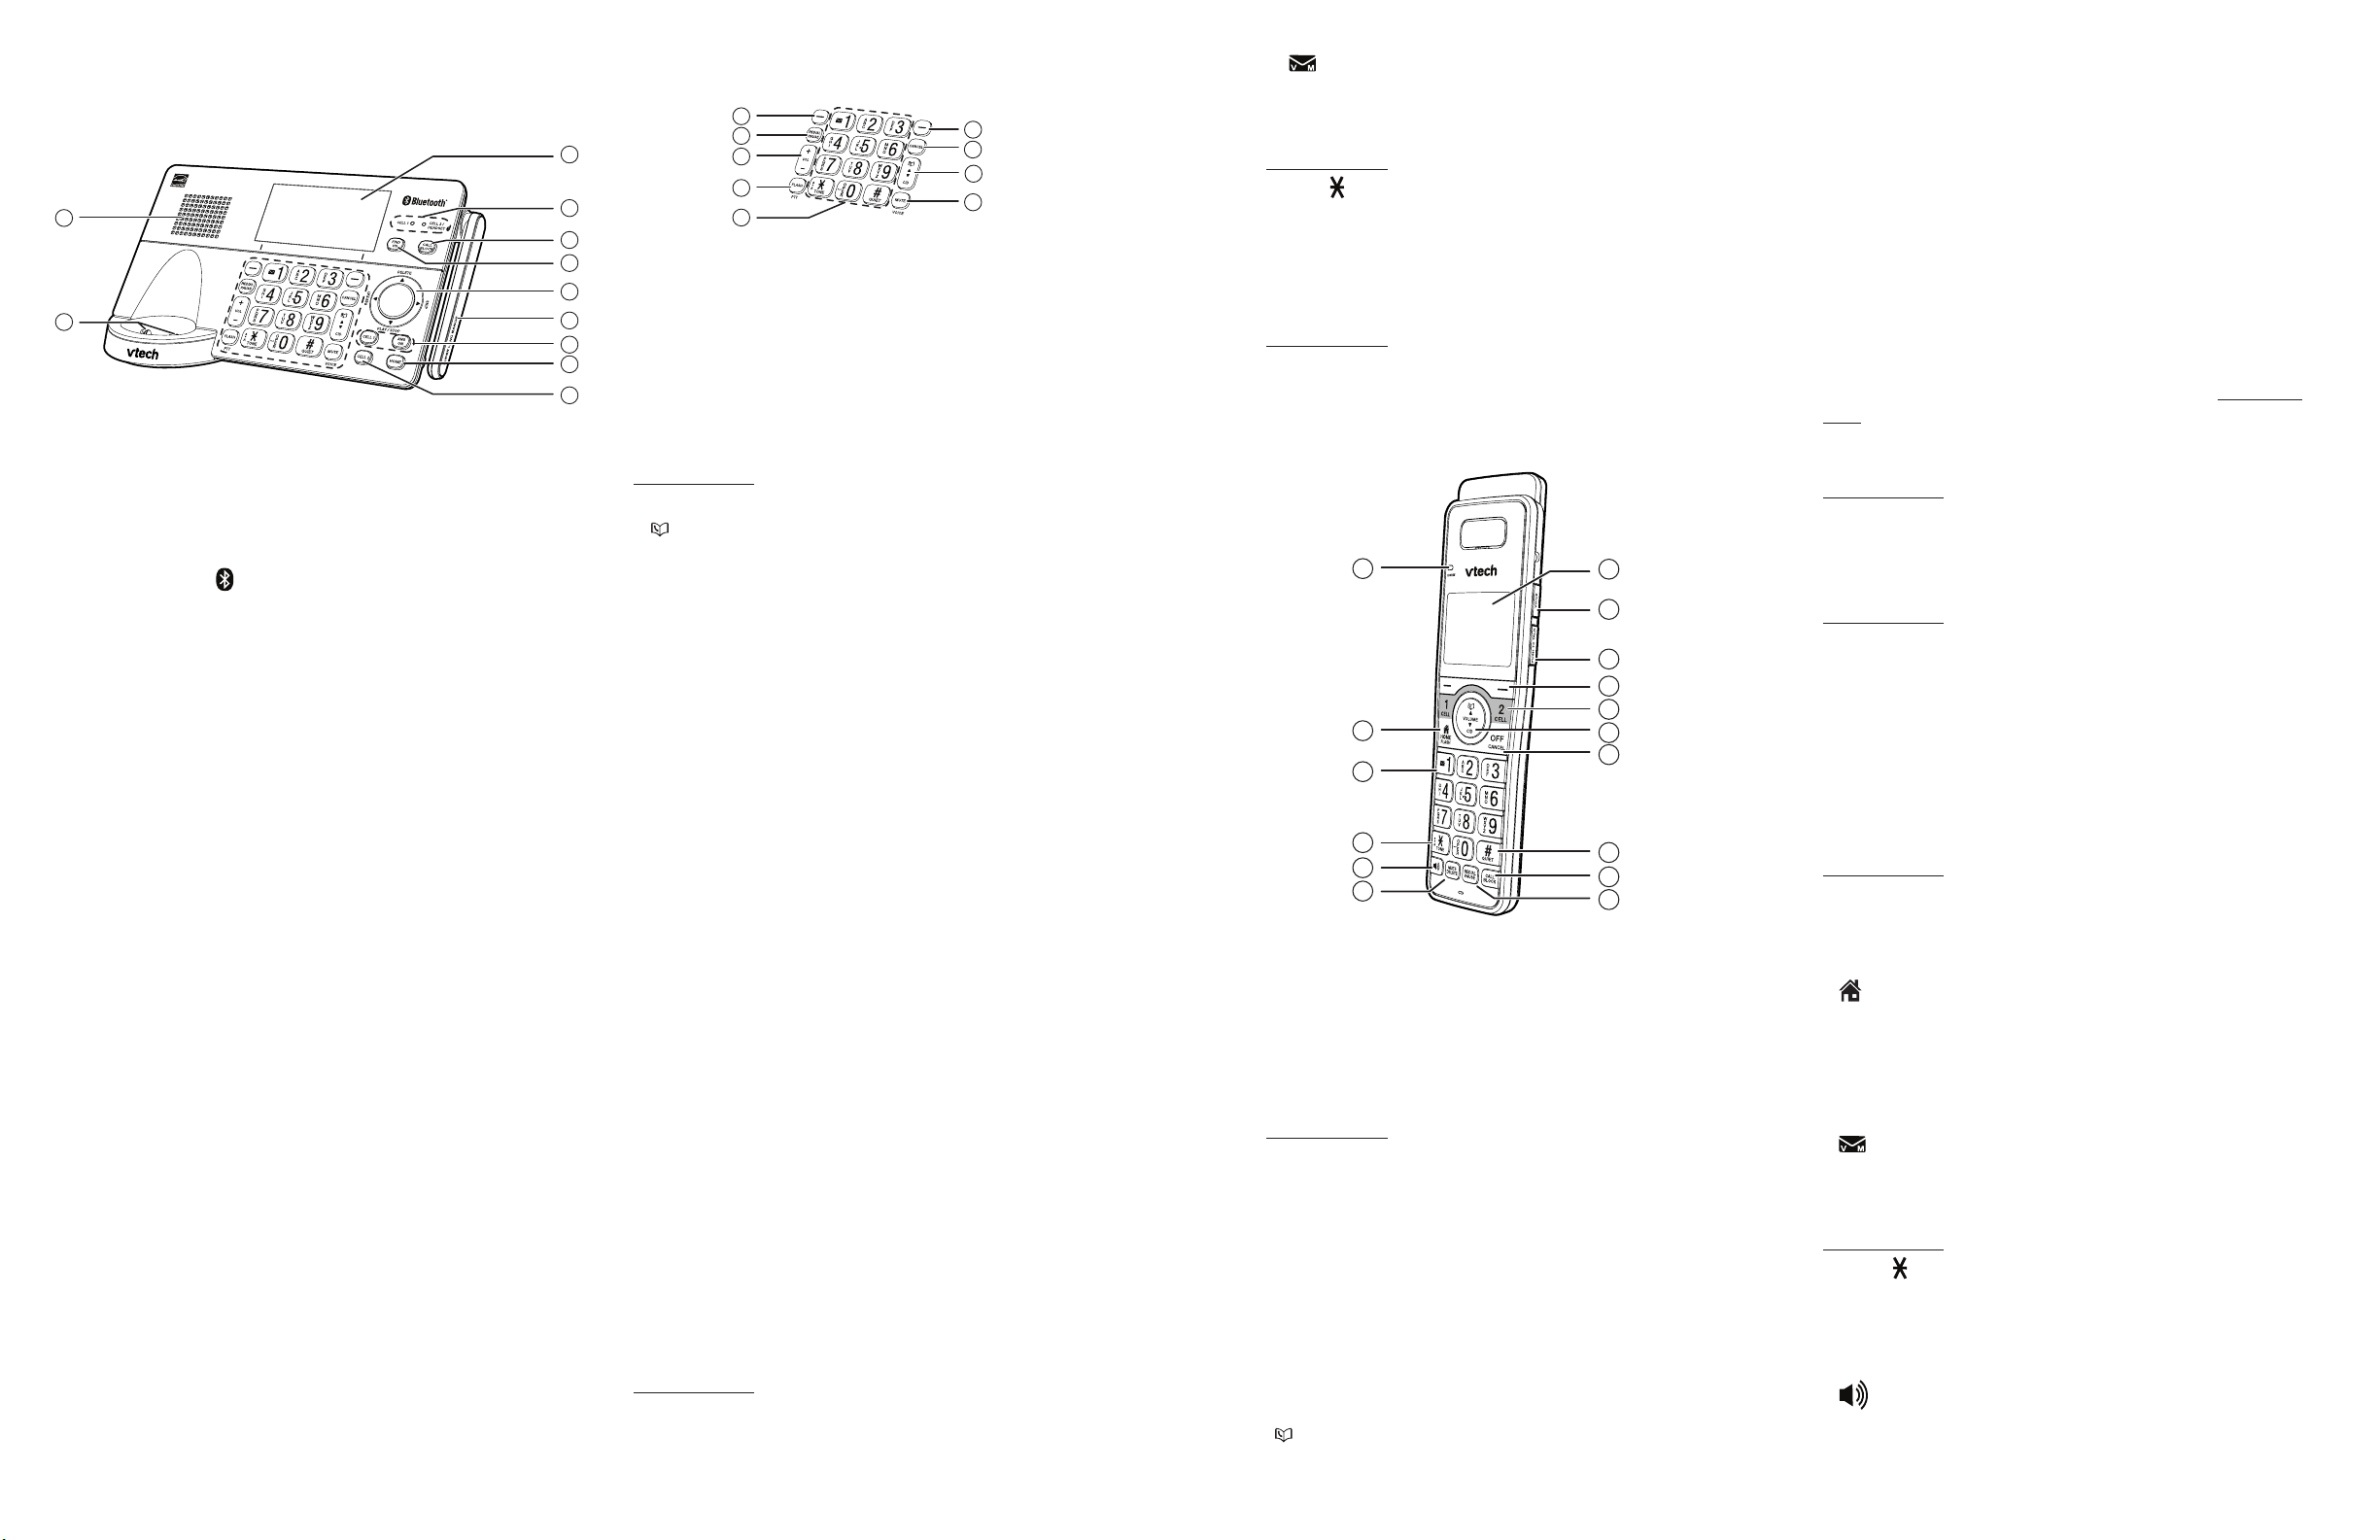
Overview
2
5
6
7
8
9
1
3
4
Telephone base overview
10
11
1 – LCD display
2 – CELL 1 Light
• On when the telephone is paired and connected with a
Bluetooth device.
• Flashes alternately while pairing a Bluetooth device.
CELL 2/Headset Light
• On when the telephone is paired and connected with a
Bluetooth device or headset.
• Flashes alternately while pairing a Bluetooth device or
headset.
3 – CALL BLOCK
• Press to block the incoming call when the telephone is
ringing.
• When on a call, press to block the call.
• When the telephone base is not in use, press to show the
call block menu.
4 – FIND HS
• Press the button to page all system handsets.
5 – SKIP
• Skip to the next message.
PLAY/STOP
• Play messages.
• Stop playing messages.
REPEAT
• During message playback, press to repeat the message.
DELETE
• During message playback, press to delete the message.
6 – Antenna
7 – ANS ON
• Turn on or off the answering system.
8 – HOME
• Press to make or answer a home call.
• Flashes quickly when there is an incoming home call.
9 – CELL 1 / CELL 2
• Press to make or answer a cell call.
10 – Speaker
11 – Charging pole
20 – 1
• While reviewing a caller ID log entry, press repeatedly to
16
1
2
3
4
12 – Softkey
5
• Press to select the menu item displayed above the key.
6
• While in a menu, press to select an item, save an entry or
7
8
9
setting, cancel an operation, or back up to the previous
menu.
13 – CANCEL
17
18
19
20
12
13
14
15
• While in a menu, press to exit without making changes or
add or remove 1 in front of the telephone number before
dialing or saving it in the phonebook.
• Press and hold to set or to dial your voicemail number.
TONE
• Press to switch to tone dialing temporarily during a call if you
have pulse service.
• While entering names, press to change the next letter to
upper or lower case.
QUIET #
• Press and hold to enter the QUIET mode setting screen, or
to deactivate QUIET mode.
Handset overview
press and hold to return to idle mode.
• Press and hold while the telephone is not in use to erase the
missed call indicator.
14 – p
• Press to scroll up while in a menu.
• Press to show phonebook entries when the telephone is not
in use.
11
1
2
• While entering names or numbers, press to move the cursor
to the right.
CID q
• Press to scroll down while in a menu.
• Press to review the caller ID log when the telephone is not
in use.
• While entering names or numbers, press to move the cursor
12
13
3
4
5
6
7
to the left.
15 – MUTE / VOICE
• During a call, press to mute the microphone.
• While the telephone base is ringing, press to silence the
ringer temporarily.
14
15
16
8
9
10
• Press to activate the voice-controlled application of
connected cell phone.
16 – Softkey
• Press to select the menu item displayed above the key.
• While in a menu, press to select an item, save an entry or
setting, cancel an operation, or back up to the previous
menu.
17 – REDIAL / PAUSE
• Press repeatedly to view the numbers dialed.
• While entering numbers, press and hold to insert a dialing
pause.
18 – VOL + / -
• Press to adjust the volume during message playback.
• Press to adjust the listening volume during a call.
• When the phone is not in use, press to adjust the telephone
base ringer volume for all lines.
19 – FLASH / PTT
• Press to display the PTT menu to begin a PTT call.
• Press and hold to begin a one-to-group broadcast when the
telephone base is not in use.
• During a call, press to answer an incoming home call when
you receive a call waiting alert.
1 – LCD display
2 – VOICE
• Press to activate the voice-controlled application of
connected cell phone.
3 – PUSH TO TALK
• Press to initiate a one-to-one or one-to-group broadcast.
• Press and hold to broadcast to a group of system devices.
4 – Softkeys (2)
• Press to select the menu item displayed above the key
• While in a menu, press to select an item, save an entry or
setting, cancel an operation, or back up to the previous
menu.
5 – CELL 1 / CELL 2
• Press to make or answer a cell call.
• During a cell call, press to answer an incoming CELL 1/2 call
when you hear a call waiting alert.
• During message playback, press to call back the caller if the
caller’s number is available.
6 – / pVOLUME
• Press to show phonebook entries when the handset is not in
use.
2 3
• Press to scroll up while in menus.
• While entering names or numbers, press to move the cursor
to the right.
CID / qVOLUME
• Press to show caller ID log when the handset is not in use.
• Press to scroll down while in menus.
• Press to decrease the listening volume when on a call or to
decrease the message playback volume.
• While entering names or numbers, press to move the cursor
to the left.
7 – OFF / CANCEL
• During a call, press to hang up.
• While in a menu, press to cancel an operation, back up to
the previous menu, or exit the menu display; or press and
hold this button to exit to idle mode.
• When the handset is ringing, press to mute the ringer
temporarily.
• Press and hold while the telephone is not in use to erase the
missed call indicator.
8 – QUIET #
• Press to display other dialing options when reviewing a
caller ID log entry.
• Press and hold to enter the QUIET mode setting screen, or
to deactivate QUIET mode.
9 – CALL BLOCK
• Press to block the incoming call when the telephone is
ringing.
• When on a call, press to block the call.
• When the handset is not in use, press to show the call block
menu.
10 – REDIAL / PAUSE
• Press to review the redial list.
• Press and hold to insert a dialing pause while entering a
number.
11 – CHARGE light
• On when the handset is charging in the telephone base or
charger.
12 – HOME / FLASH
• Press to make or answer a home call.
• During message playback, press to call back the caller if the
caller’s number is available.
• During a call, press to answer an incoming home call when
you receive a call waiting alert.
13 – 1
• While reviewing a caller ID log entry, press to add or
remove 1 in front of the telephone number before dialing or
saving it in the phonebook.
• Press and hold to set or to dial your voicemail number.
14 – TONE
• Press to switch to tone dialing temporarily during a call if you
have pulse service.
• While entering names, press to change the next letter to
upper or lower case.
15 –
• Press to make or answer a home or cell call using the
speakerphone.
• Press to switch between the speakerphone and the handset.
Page 6
16 – MUTE / DELETE
2
5
7
6
8
9
10
1
3
4
16
15
14
11
12
13
1
1
1
1
2
2
12:05 pm 7/25
MENU
HANDSET
A
A
n
n
S1
S1
ON2
ON2
1
1
2
2
2
2
1
1
2
2
1
1
1
AAnnS1S1
ON2ON2
22
112211
1
1
• During a call, press to mute the microphone.
• When the handset is ringing, press to mute the ringer
temporarily.
• While reviewing the caller ID log, the phonebook or the
redial memory, press to delete an individual entry.
• During message or announcement playback, press to delete
the playing message or the recorded announcement.
17
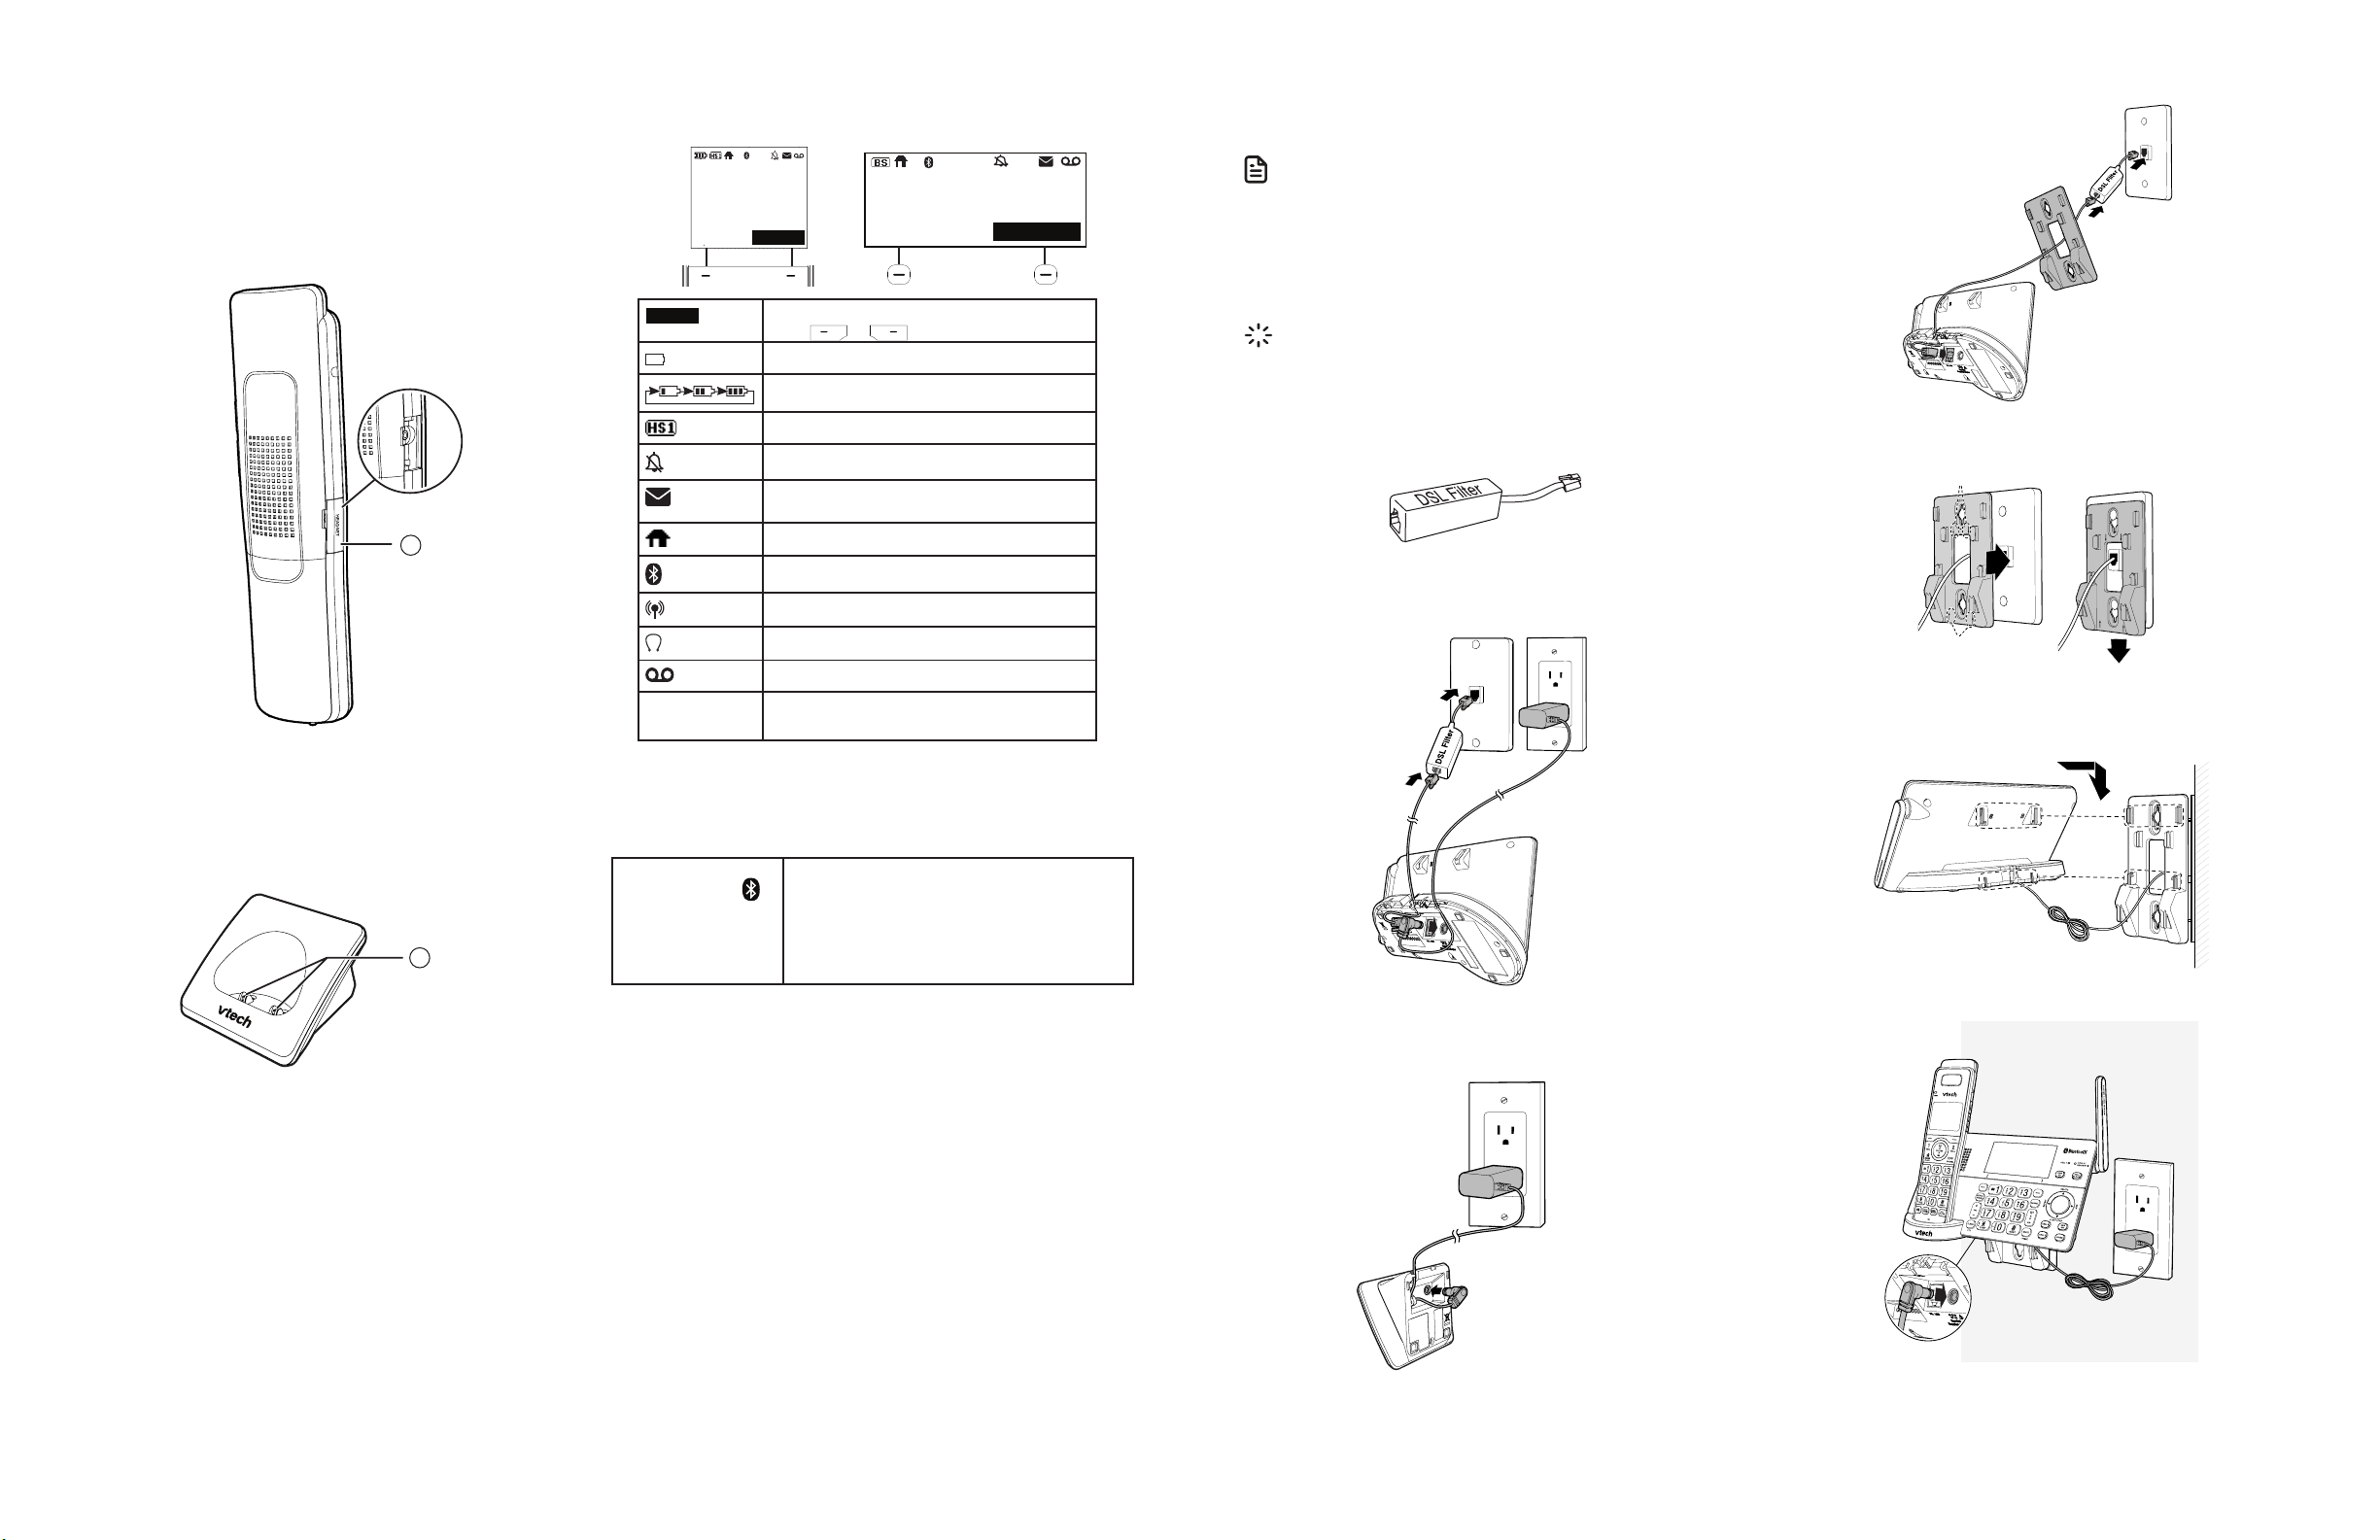
Display icons overview
Handset: Telephone base:
12:05PM
Jun 13
REDIAL MENU
Softkeys
NEW
MENU
1 2
MENU
Option displayed above a softkey.
Press or to select.
The handset battery low and needs charging.
The handset battery is charging.
Handset indicates the handset number.
Handset or telephone base ringer is off.
New voicemail received from your telephone
service provider.
The HOME line is in use.
Bluetooth device is active.
Bluetooth device is in use.
Wireless Bluetooth headset is in use.
Answering system is on.
There are new caller ID log entries and/or
new messages.
12
12:05PM
Jun 13
Connect
You can choose to connect the telephone base for desktop
usage or wall mounting.
NOTES
• Use only the adapters provided.
• Make sure the electrical outlets are not controlled by wall switches.
• The adapters are intended to be correctly oriented in a vertical
or floor mount position. The prongs are not designed to hold
the plug in place if it is plugged into a ceiling, under-the-table or
cabinet outlet.
TIP
• If you subscribe to digital subscriber line (DSL) high-speed Internet
service through your telephone line, make sure you install a
DSL filter (not included) between the telephone line cord and
telephone wall jack. Contact your DSL service provider for more
information.
Connect the telephone base
Mount the telephone base
B
B
B
A
A
A
B
B
A
A
17 – Headset jack
Charger overview
1 – Charging pole
Telephone base lights overview
CELL 1 /
CELL 2/Headset
Light
1
• On when the telephone is paired and
connected with a Bluetooth device or
headset.
• Flashes alternately while pairing a
Bluetooth device or headset.
Connect the charger
4 5
Page 7
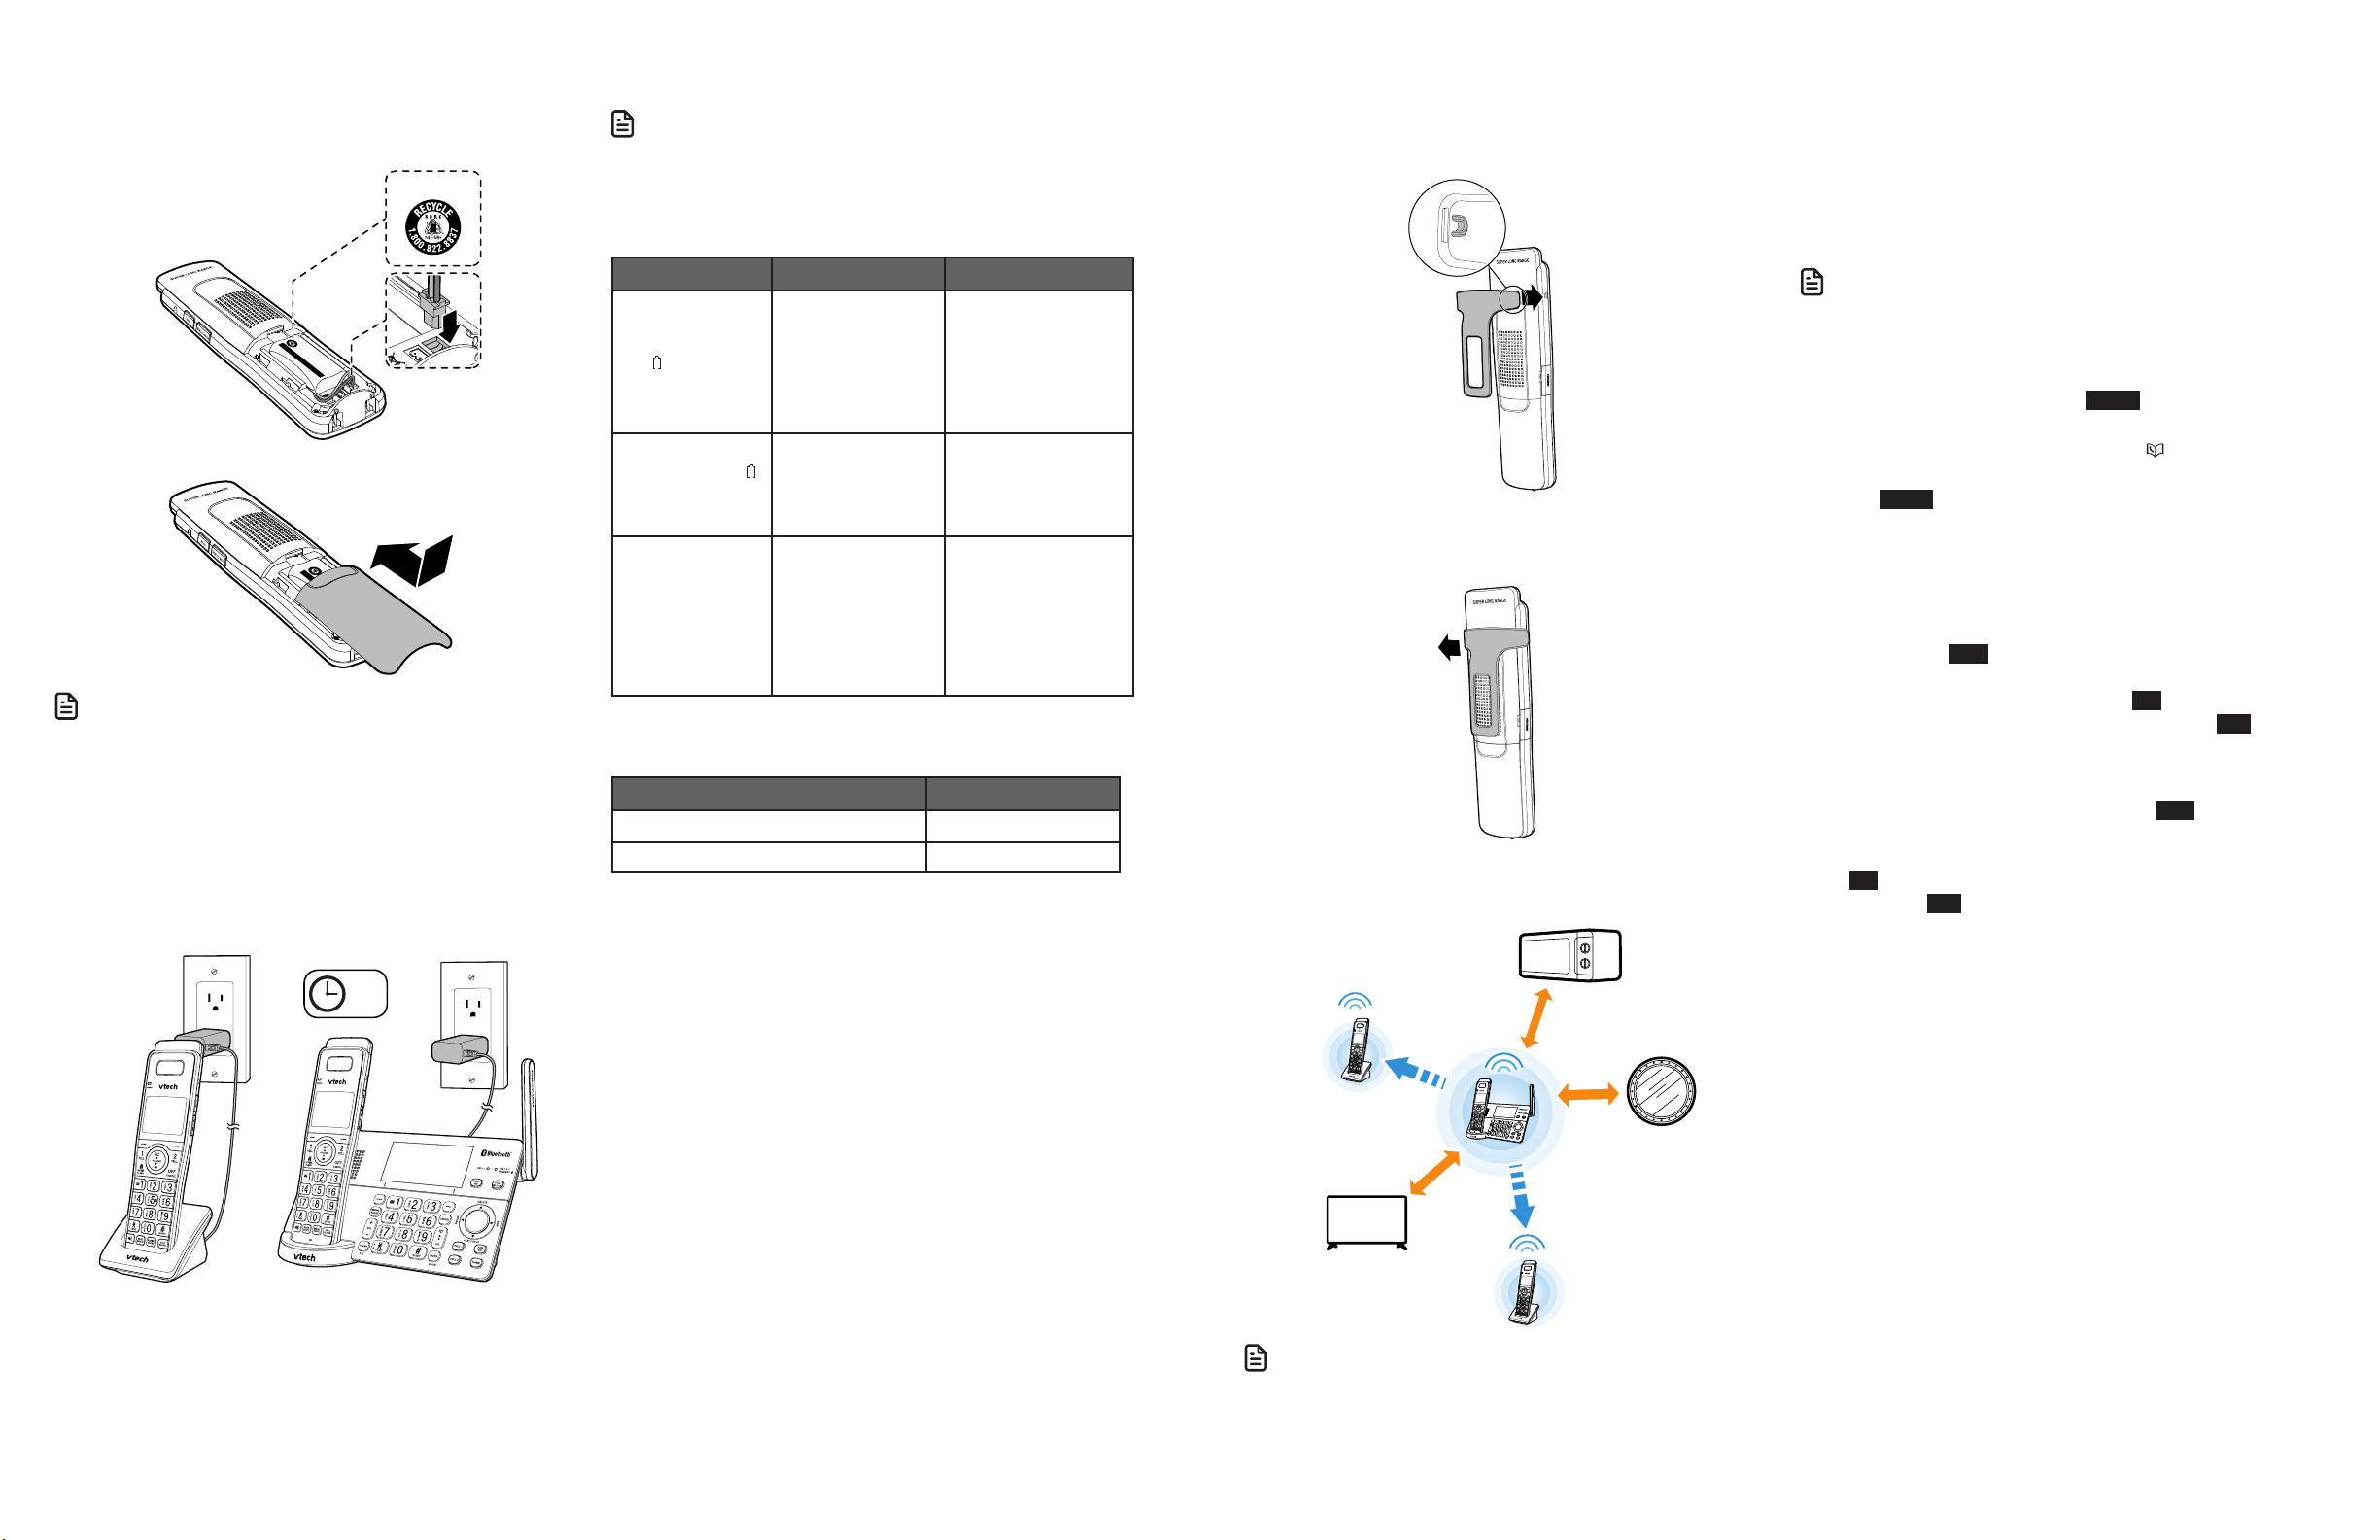
Install and charge the battery
Install the battery
Install the battery as shown below.
THIS SIDE UP
1952
CR
LE HAUT
ATTERIES.
chine
S
OU PERCER LES PILES.
ISSEMENT :
/ CE CÔTÉ VER
VERT
INCINÉRER
NG / A
Made in China / Fabriqué en
NE PAS
DO NOT BURN OR PUNCTURE B
ery Pack / Bloc-piles :
WARNI
THIS SIDE UP
BT183342/BT283342 (2.4V 400mAh Ni-MH)
Batt
1952
CR
LE HAUT
ATTERIES.
chine
S
OU PERCER LES PILES.
ISSEMENT :
a / Fabriqué en
/ CE CÔTÉ VER
VERT
INCINÉRER
n Chin
NG / A
Made i
NE PAS
DO NOT BURN OR PUNCTURE B
ery Pack / Bloc-piles :
WARNI
THIS SIDE UP
BT183342/BT283342 (2.4V 400mAh Ni-MH)
Batt
NOTES
• Use only supplied battery.
• Charge the battery provided with this product only in accordance
with the instructions and limitations specified in this manual.
• If the handset will not be used for a long time, disconnect and
remove the battery to prevent possible leakage.
Charge the battery
Place the handset in the telephone base or the charger to
charge.
Once you have installed the battery, the handset LCD display
indicates the battery status (see the following table).
NOTES
• For best performance, keep the handset in the telephone base or
charger when not in use.
• The battery is fully charged after 12 hours of continuous charging.
• If you place the handset in the telephone base or the charger
without plugging in the battery, the screen displays No battery.
Battery indicators Battery status Action
The screen is
blank, or displays
Place in charger
and flashes.
The screen displays
Low battery and
flashes.
The battery has no
or very little charge.
The handset cannot
be used.
The battery has
enough charge to
be used for a short
Charge without
interruption (at least 30
minutes).
Charge without
interruption (about 30
minutes).
time.
The screen displays
HANDSET X.
The battery is
charged.
To keep the battery
charged, place it in
the telephone base
or charger when not
in use.
When the battery is fully charged, you can expect the
following performance:
Operation Operating time
While in use (talking*) 15 hours
While not in use (standby**) 10 days
* Operating times vary depending on your actual use and the age of
the battery.
** Handset is not charging nor in use.
Install belt clip
To attach the belt clip
Snap the belt clip into the slots on both sides of the cordless
handset.
To remove the belt clip
Lift either of the belt clip tabs outwards from the handset.
Improve the telephone signal strength
Before use
After you install your telephone or power returns following
a power outage and battery depletion, the handset and
telephone base will prompt you to set the date and time, and
to configure the Smart call blocker* and answering system
through voice guide.
Set date and time
NOTE
• Make sure you set the date and time including the year correctly;
otherwise the answering system does not announce the correct
day of the week for your recorded messages time stamp.
1. Use the dialing keys (0-9) to enter the month (MM), date
(DD) and year (YY). Then press NEXT .
2. Use the dialing keys (0-9) to enter the hour (HH) and
minute (MM). Then press q CID or p to choose AM or
PM.
3. Press SAVE to save.
Voice guide for Smart call blocker* / Answering system
After the date and time setting is done or skipped, the handset
and the telephone base will prompt if you want to set Smart
call blocker. Press YES to start the Smart call blocker setup via
voice guide. For more details, see Voice guide to set Smart call
blocker section. To skip the setup, press NO, or press CANCEL
on the handset or telephone base, and then press OK .
After the Smart call blocker setting is done or skipped, the
handset and the telephone base will then prompt if you
want to set up the answering system. Press YES to start the
answering system setup via voice guide. For more details, see
Voice guide to set Answering system section. To skip the setup,
press NO, or press CANCEL on the handset or telephone base,
and then press OK .
Check for dial tone
12 hrs
> 1 m (3 feet)
> 1 m (3 feet)
TV
> 1 m (3 feet)
NOTE
• To avoid interference, place the telephone base in a central
location of the house and at least 3 feet (1 meter) away from thick
walls as well as other household appliances such as, TV, radio,
microwave oven, Wi-Fi router, large mirror, metal furnture and fish
tank.
6 7
Press HOME. If you hear a dial tone, the installation is
successful.
If you do not hear a dial tone:
• Make sure the installation procedures described above are
properly done.
• It may be a wiring problem. If you have changed your
telephone service to digital service from a cable company or
a VoIP service provider, the telephone line may need to be
rewired to allow all existing telephone jacks to work. Contact
your cable/VoIP service provider for more information.
*Includes licenced Qaltel
QaltelTM is a trademark of Truecall Group Limited.
TM
technology.
Page 8
Operating range
This cordless telephone operates with the maximum power
allowed by the Federal Communications Commission (FCC).
Even so, this handset and telephone base can communicate
over only a certain distance - which can vary with the locations
of the telephone base and handset, the weather, and the
layout of your home or office.
When the handset is out of range, the handset displays Out of
range or no pwr at base.
If there is a call while the handset is out of range, it may not
ring, or if it does ring, the call may not connect well when you
press HOME. Move closer to the telephone base, then press
HOME to answer the call.
If the handset moves out of range during a telephone
conversation, there may be interference. To improve reception,
move closer to the telephone base.
Battery backup mode
Battery backup mode allows your telephone system to function
in the event of a power outage. The telephone system uses
stored power from the handset’s battery to operate.
To activate the mode
After the power goes out, if there is already a handset with
enough charge placed in the telephone base, the telephone
system enters battery backup mode automatically. That handset
screen shows Powering base... Don’t pick up. All other handset
screens show Battery backup mode.
-ORORIf
there is no handset placed in the telephone base after the
power goes out, all handsets show Out of range OR no power
at base and Put HS on base to power base, alternately. Place
any handset with enough charge in the telephone base. Its
screen shows Powering base... Don’t pick up. All other handset
screens show Battery backup mode.
Operation
During battery backup mode, the telephone base, answering
system and all Bluetooth related features will be disabled. The
operating time is subject to the battery level of the handset
placed in the telephone base and the actual usage. For optimal
performance, we recommend that you do not use the handset
placed in the telephone base when this mode is on.
Using other system handsets (Recommended):
Operate the handsets the same way as usual, except the
answering system and all Bluetooth related features which will
be disabled.
Using the handset placed in the telephone base:
To maximize the operating time, you are not advised to use this
handset. If you do have to use it, make sure you do not lift it
from the telephone base. All operations should be done with
the handset placed in the telephone base. In this case, calls can
only be made and received using the speakerphone.
Introducing Bluetooth
Refer to the Bluetooth setup section to learn how to set up your
Bluetooth device. Refer to the Telephone operation section
Your new telephone system with Bluetooth wireless technology
has the following features:
on how to operate your Bluetooth devices with your new
telephone system with Bluetooth wireless technology.
• Pair up to 2 Bluetooth enabled devices (cell phones or
headsets) with the telephone base.
• Connect a maximum of 2 Bluetooth enabled devices to
make and receive cell calls. Both devices can be active on a
call at a time.
• Connect a Bluetooth enabled headset for making and
receiving home calls.
• Conference any combination of cell and home call.
• Make and receive calls using your cell phone service with
your telephone base or system handsets.
• Download phonebook entries from your cell phone.
IMPORTANT INFORMATION
• Your telephone is compatible with Bluetooth version 2.0 or
above devices.
• After plugging in the telephone base, wait at least 20
seconds before connecting a Bluetooth device. The screen
shows Bluetooth system busy if you try to connect too soon.
• Refer to the user’s manual of your Bluetooth enabled cell
phone or headset for more information about how that
device uses Bluetooth connectivity.
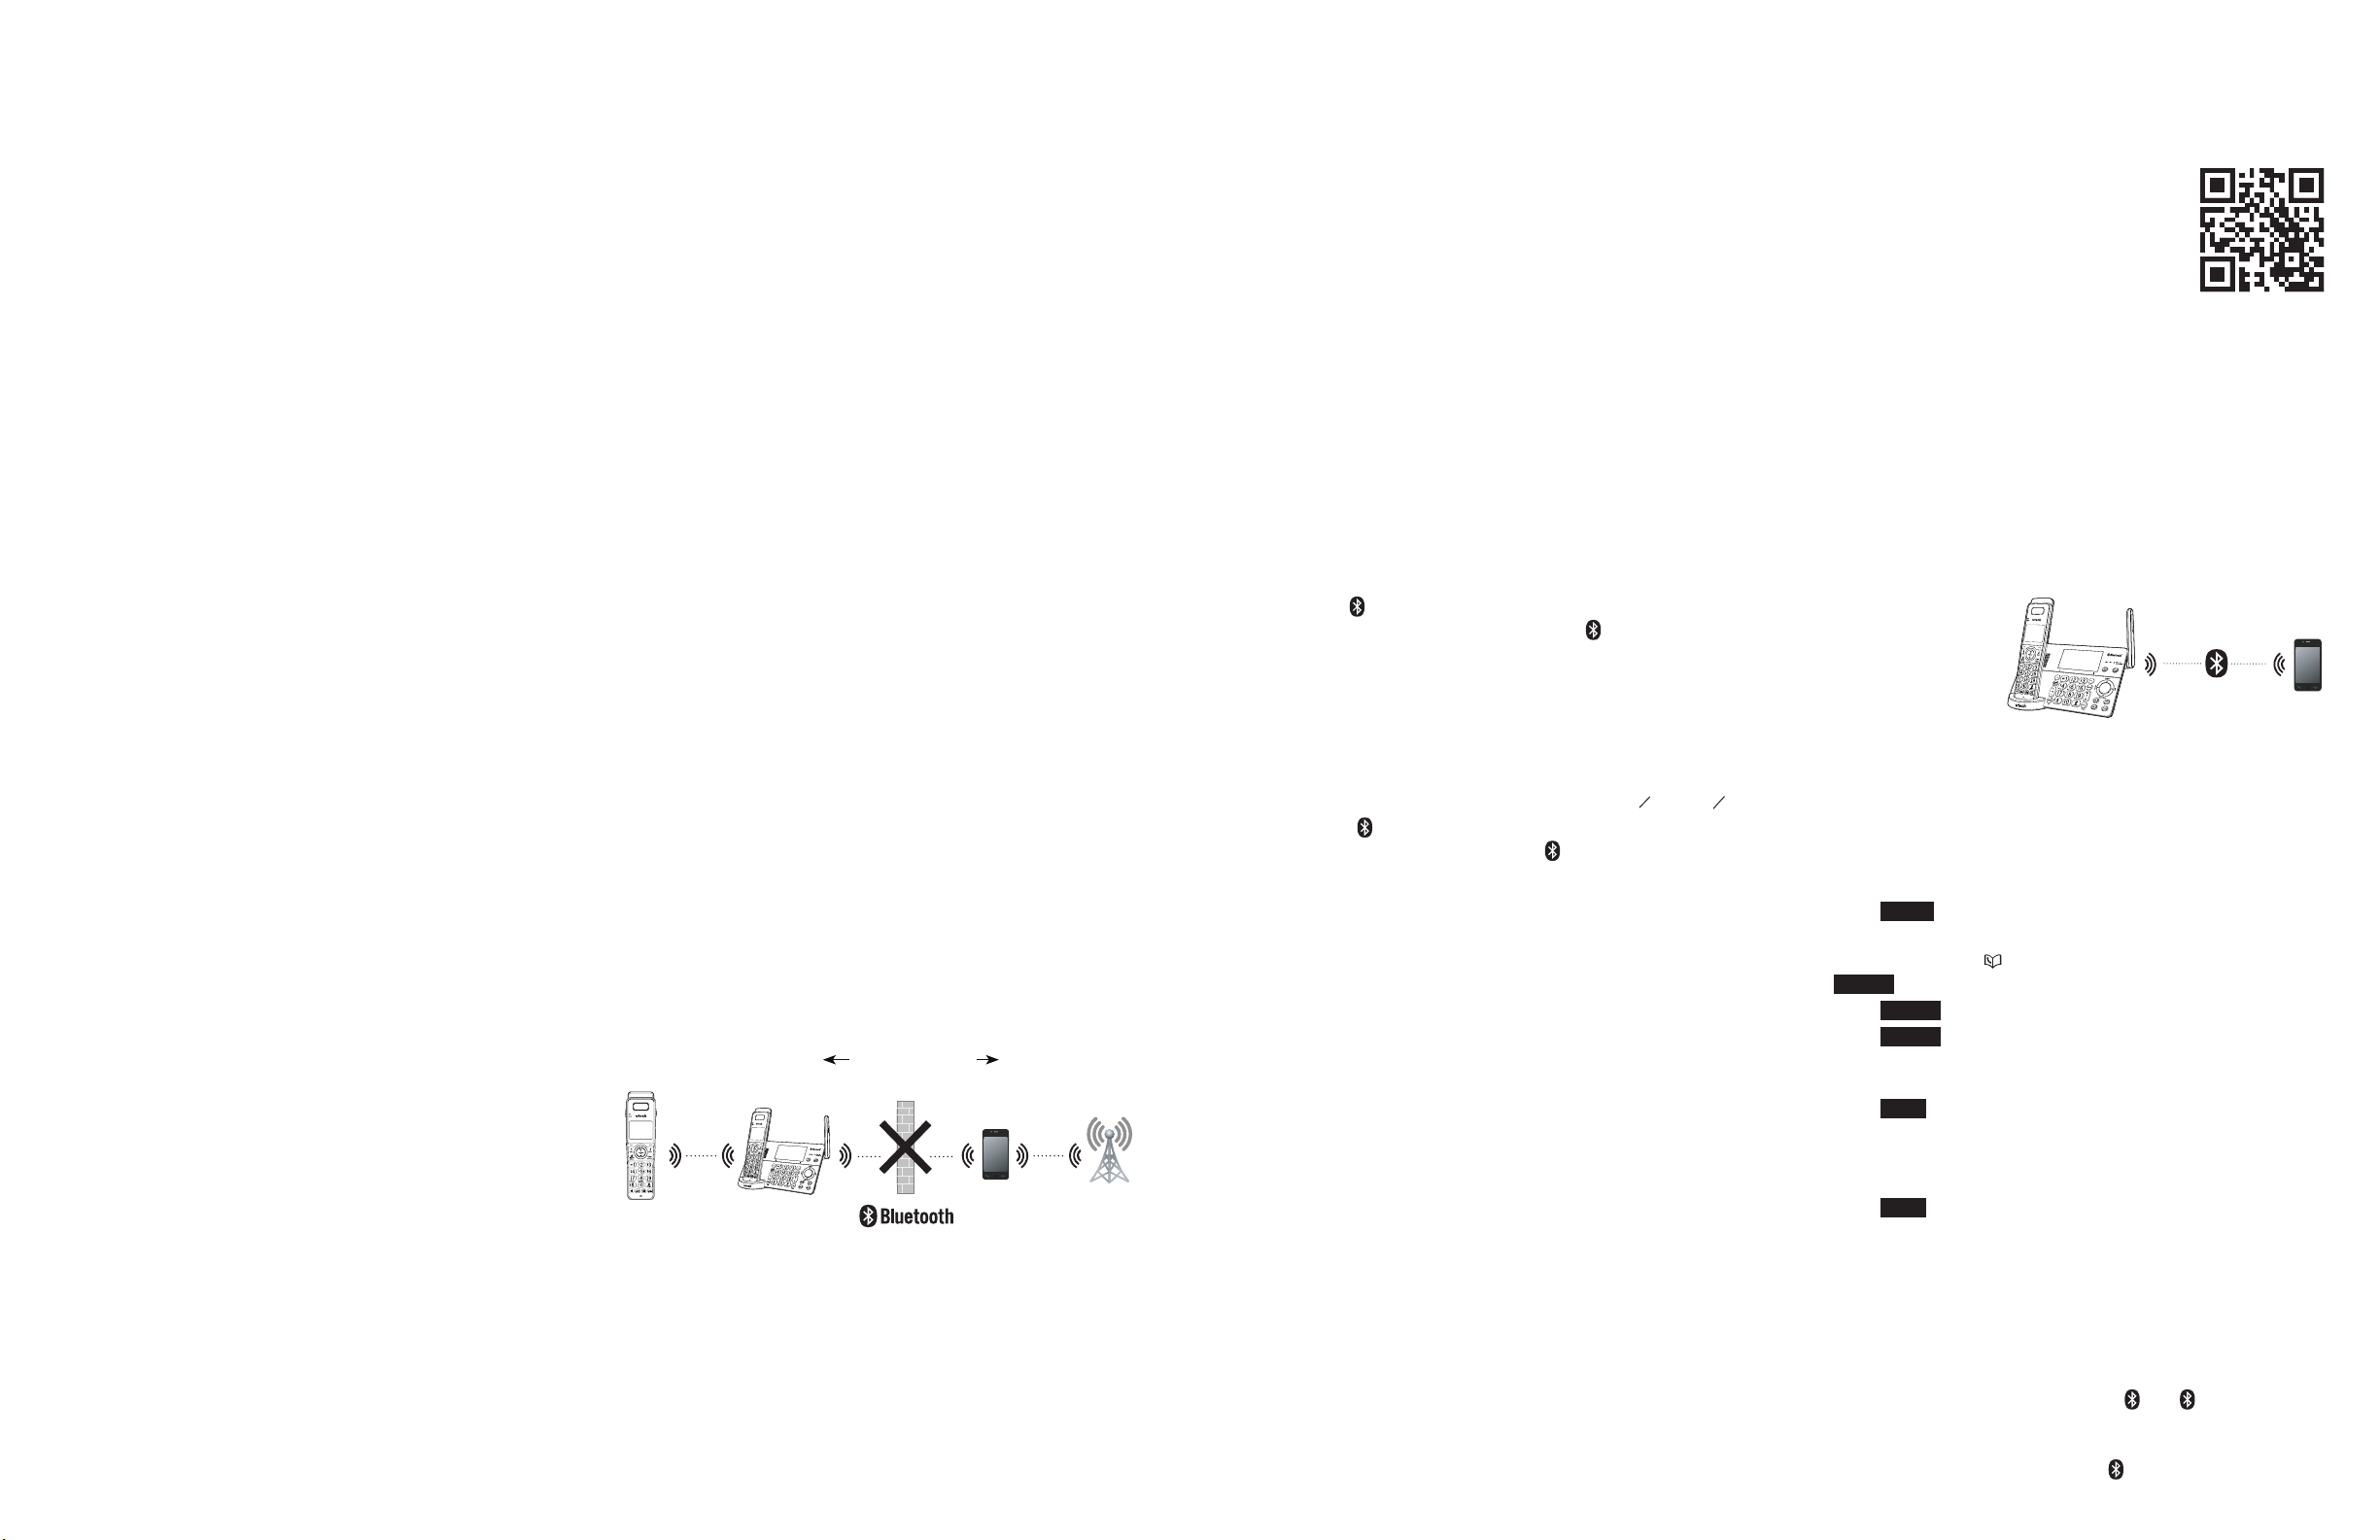
• Bluetooth wireless technology operates within a short range
(a maximum of approximately 15 feet) from the telephone
base. Keep connected cell phones and headsets within this
range.
• If your cell phone has poor reception in your home, the
telephone cannot improve the reception. However, if there
is a location in your house with better reception, you can
leave your cell phone at that location while you use the
telephone cell line. For optimal performance, the cell phone
must be within 15 feet of the telephone base.
• If you experience poor sound quality, it may be caused by
the distance between your cell phone and the telephone
base. To improve the performance, place your cell phone
closer to the telephone base (within 15 feet) and make sure
that there are no physical obstacles such as large furniture or
thick wall in between.
Less than 15
feet for optimal
performance
Glossary of terms
Below are some terms used in this user’s manual to help you
become familiar with using your Bluetooth devices and your
new VTech telephone system.
Active devices - the Device list has two active slots for two cell
phones, or one cell phone and one headset. When a device in
the list is active, it will have a D1: or D2: in front of the device
name. In order to use a Bluetooth device on a call, it must be in
an active slot and be connected.
Bluetooth cell phone - refers to a mobile Bluetooth enabled
cellular telephone.
CELL line - the telephone line associated with your cell phone
service. On your telephone base and handset, press CELL 1 or
CELL 2 to use the cell line.
Connected - when you pair a Bluetooth device to your
telephone system, it is placed in an active slot and automatically
connected. When a device is connected, a 1 and/or 2 will
display after on the handset and telephone base screen.
Also, the CELL 1 and/or CELL 2/HEADSET light on the
telephone base will be on. If a device loses its connection to
the telephone base, it must be reconnected before you can
use the device with the telephone system.
Device list - The list of devices that have been paired to the
telephone. You can pair up to 2 Bluetooth enabled devices (cell
phones or headsets).
Disconnected - when a device is disconnected, 1 and/or 2
displays after on the handset and telephone base screen.
The CELL 1 and/or CELL 2/HEADSET light on the telephone
base is/are off.
Discoverable mode - before a Bluetooth enabled device
can be paired, it must be set to this mode. When pairing
your cell phone, the telephone base will be set to this mode.
Depending on the manufacturer, this mode is sometimes
referred to as Find Me or Visibility.
Paired devices - The Bluetooth enabled devices (cell phones
or headsets) that have shared registration information with the
telephone base. A total of four Bluetooth enabled devices can
be paired to the telephone base. However, only two paired
devices can communicate with the base at a time.
Pairing - sometimes referred to as bonding. The process
of sharing registration information between two Bluetooth
®
IS8151
Cellular signal
• Charge your cell phone while it is connected to the
enabled devices. Your Bluetooth enabled cell phone or
headset must first be paired to the telephone base in order to
use it with this telephone system.
telephone base. Your cell phone’s battery discharges faster
while it is connected to the telephone base via Bluetooth
wireless technology.
• Monitor your cell phone’s usage because minutes may be
deducted from your cellular plan for the duration of all cell
calls, depending on the terms of your plan.
The Bluetooth® word mark and logos are owned by Bluetooth SIG, Inc. and any use
of such marks by VTech Holdings Limited is under license. VTech Holdings Limited
is a member of Bluetooth SIG, Inc. Other trademarks and trade names are those of
their respective owners.
8 9
VTech Connect to Cell™ application
If you are using Bluetooth-enabled Android® phones (OS 2.3 or
higher), you can further extend the flexibility of your telephone
system with use of the free Connect To Cell application.
VTech Connect to Cell comprises Caller ID
manager and Alerts manager that help you
integrate your cell phone with your new
telephone system.
To learn more or download this application via
Google Play® Store, go to
http://www.vtechphones.com/app_connect_to_cell.
Bluetooth setup
To use a Bluetooth enabled cell phone with your IS8151/
IS8251, you must first pair and connect it with the telephone
base. The IS8151/IS8251 telephone base and all system
handsets can be used to make or answer calls on the cell
phone line.
Bluetooth wireless technology operates within a short range
(up to 15 feet). When you pair a Bluetooth cell phone or
Bluetooth headset to
the telephone base,
keep the device within
15 feet of the telephone
base for optimal
performance.
Add a cell phone
Before you begin, make sure that you have cellular coverage
and your Bluetooth enabled cell phone is not connected to any
other Bluetooth device. Refer to your cell phone user’s manual
to learn how to search for or add new Bluetooth devices.
To pair and connect a cell phone:
1. Press MENU on the telephone base in idle mode to enter
the main menu.
2. Press q CID or p to highlight Bluetooth, then press
SELECT.
3. Press SELECT to choose Add device.
4. Press SELECT to choose Add cellular. The screen displays
Please wait... followed by 1. If cell is connected to BT
device, please disconnect it.
5. Press NEXT. The screen displays 2. Place cell phone next to
base.
• All devices that are connected to the telephone base
are disconnected until the pairing process completes.
6. Press NEXT to turn on the telephone base discoverable
mode. Promptly turn on the Bluetooth feature of your cell
phone and search for or add new devices.
7. Once your cell phone finds your AT&T phone (VTech DECT
6.0), press the appropriate key on your cell phone to
continue the pairing process.
8. When a device is successfully connected, the telephone
base displays Cell Phone Y is added and connected to base
and the corresponding status icon ( 1 or 2) displays
(Cell Phone Y represents the device name of your cell
phone). The corresponding device light on the telephone
base (CELL 1 or CELL 2/HEADSET ) turns on.
Page 9

NOTES
• If there are already 2 paired devices on the list, the second one on
the list will be automatically removed, regardless of whether the
pairing of the new device is successful or not.
• The pairing process may take up to one minute. If the pairing
process fails, try again.
• The steps for the pairing process may vary for different cell phones.
If this happens, follow the prompts on your cell phone and your
telephone to complete the pairing process.
• Refer to the user’s manual of your cell phone on how to search for
or add a new Bluetooth device.
Add a headset
Before you begin, make sure that your Bluetooth enabled
headset is not connected to any other Bluetooth device. Refer
to your headset user’s manual to learn how to search for or add
new Bluetooth devices.
To pair and connect a headset:
1. Press MENU on the telephone base in idle mode to enter
the main menu.
2. Press q CID or p to highlight Bluetooth, then press
SELECT.
3. Press SELECT to choose Add device.
4. Press q CID or p to highlight Add headset, then press
SELECT. The screen displays If headset is connected to cell,
please disconnect it.
5. Press NEXT. The screen displays Pls set headset to
discoverable mode. Set your headset to discoverable
mode (refer to the user’s manual of your headset), then
press NEXT. The screen displays Searching for Bluetooth
headsets....
6. When the screen displays the found devices, press q CID
or p to highlight your headset, if necessary, then press
SELECT.
7. The screen displays Adding Headset Y when the base is
connecting to your headset (Headset Y represents the
device name of your Bluetooth headset).
8. When a device is successfully connected, the telephone
base displays Headset Y is added and connected to
base and the corresponding status icon 2 (Headset Y
represents the device name of your Bluetooth headset).
You hear a confirmation tone. The corresponding light on
the telephone base CELL 2/HEADSET turns on.
NOTES
• If there are already 2 paired devices on the device list, the second
one on the list will be automatically removed, regardless of
whether the pairing of the new device is successful or not.
• If there is another headset already active, the screen will show
Only the BT headset in slot 2 can be ready for connection and then
Headset X is deactivated for adding a new device (Headset X
represents the device name of the active Bluetooth headset).
• The pairing process may take up to one minute. If the pairing
process fails, try again.
• When a connected headset is charging, it may disconnect from the
telephone base and the CELL 2/HEADSET light on the telephone
base turns off. For some headset models, you may need to turn on
the headset and reconnect it to the telephone base again.
Auto connection
When an active device moves within Bluetooth range of the
telephone base, or is turned on within range, the telephone
base tries to connect to the device. When the device moves
out of range, it is disconnected. Your device might make a
connect or disconnect sound.
A connected device could also be disconnected by:
• Turning off the Bluetooth device.
• Turning off the Bluetooth feature of the device.
• Disconnecting through the telephone base Device list. If you
disconnect through the Device list, the telephone base will
not attempt to reconnect until your device is moved out of
range and then moves back in range again.
Bluetooth connection from idle mode
When you have active devices that are not connected,
CONNECT appears on the handset and telephone base in idle
mode. Press CONNECT to start connecting an active device.
When there are two active devices, the screen will prompt you
to choose one before connection.
Review the device list
1. Press MENU on the telephone base in idle mode.
2. Press q CID or p to highlight Bluetooth, then press
SELECT.
3. Press q CID or p to highlight Device list, then press
SELECT.
Connect/disconnect an active device
While in the device list menu, you may connect or disconnect
your active device.
1. Press MENU on the telephone base in idle mode.
2. Press q CID or p to highlight Bluetooth, then press
SELECT.
3. Press q CID or p to highlight Device list, then press
SELECT.
4. Press q CID or p to highlight a device, then press
OPTION.
5. Press q CID or p to highlight Connect/Disconnect
(whichever is applicable), then press SELECT. The
telephone base displays Device connected/Device
disconnected. You hear a confirmation tone.
NOTE
• When your active device is connected, you are prompted to select
Disconnect. When your active device is disconnected, you are
prompted to select Connect.
Remove a paired device
When you already have a maximum of 2 devices on the device
list and you want to add another device, you must first delete
one from the list.
1. Press MENU on the telephone base in idle mode.
2. Press q CID or p to highlight Bluetooth, then press
SELECT.
3. Press q CID or p to highlight Device list, then press
SELECT.
4. Press q CID or p to highlight the desired device, then
press
DELETE.
-OR-
• Press q CID or p p to highlight the desired device,
then press OPTION.
• Press q CID or p to highlight Remove, then press
SELECT.
5. The telephone base displays Remove Headset X? (Headset
X represents the device name of your Bluetooth headset).
Press YES to confirm. The telephone base displays Device
removed from device list and you hear a confirmation
tone.
Replace an active device
If you already have 2 active devices on the device list and you
want to activate a different device, you must deactivate one of
the 2 active devices.
1. Press MENU on the telephone base in idle mode.
2. Press q CID or p to highlight Bluetooth, then press
SELECT.
3. Press q CID or p to highlight Device list, then press
SELECT.
4. Press q CID or p to highlight the device you want to
activate without a D1: or D2: prefix, then press OPTION .
5. Press q CID or p to highlight Connect, then press
SELECT . The screen displays Only BT devices in slot 1 or 2
can be ready for connection and then a list of devices for
deactivation.
6. Press q CID or p to highlight the device to be
deactivated, then press NEXT . The screen displays Cell
Phone X is deactivated. and you hear a confirmation tone.
The screen then displays Connecting Cell Phone Y to the
base... (Cell Phone X and Cell Phone Y represent the device
names of your cell phones).
7. Depending on your cell phone settings, you may need to
press a key on your cell phone to confirm the connection.
When the new device is successfully activated and
connected, the screen displays Device connected. You hear
a confirmation tone.
NOTE
• When adding, removing, or replacing a Bluetooth device on
the active devices list, all connected devices are temporarily
disconnected until the procedure completes. It may take up to 2
minutes to reconnect.
Download phonebook
You can download up to 2 or 4* cell phone directories
(phonebooks), depending on your model/ serial, to your
telephone system via Bluetooth wireless technology. Entire
downloaded phonebook directory can store up to 4,000
entries with up to 30 digits for each phone number and 15
characters for each name.
• 2 phone directories with a maximum of 2,000 entries each; -OR-
• 4 phonebook directories with a maximum of 1,000 entries each.
Before downloading a cell phone directory, make sure the
cell phone is paired, active, and connected to your telephone
system.
Place your cell phone next to the telephone base when you
download a cell phone directory to your telephone system.
To download a cell phone directory:
1. Press MENU on the telephone base in idle mode.
2. Press q CID or p to highlight Bluetooth, then press
SELECT.
3. Press q CID or p to highlight Download PB, then press
SELECT.
4. Press q CID or p to highlight a device, then press
SELECT .
5. Press q CID or p to highlight one of the following
options:
• Phone memory - download all contacts stored in your
phone memory.
• SIM card only - download all contacts stored in your
SIM card.
• Phone and SIM - download all contacts stored in both
your phone memory and SIM card.
6. Press SELECT . During the download, the telephone base
displays the progress. All handsets display Downloading....
• Your cell phone may require a passcode. In this case the
screen displays Check cellular. ENTER PASSCODE. Enter
the cell phone passcode into the telephone base and
press SET to save.
• Your cell phone may require you to press a key to
confirm the phonebook download.
• If the selected device’s phonebook has already been
downloaded to your telephone system, the telephone
base displays the last update date of your cell phone.
The phonebook stored on your telephone system for
that cell phone will be erased and replaced with the
current cell phone phonebook. If you have edited the
downloaded entries, those changes will be lost. Press
NEXT to start the download.
• When the Phonebook is full, the telephone base
displays Memory is full. Replace existing directory?.
Press YES . Highlight the cell phone phonebook to
be replaced and press SELECT. The screen displays
Replace Cell Phone X directory? (Cell Phone X
represents the device name of your cell phone). Press
YES to confirm.
7. When the downloading process completes, the telephone
base displays Download ended XXXX entries saved. (XXXX
represents the total number of the downloaded entries).
Press OK to return to the Bluetooth menu.
10 11
Page 10
NOTES
• With certain cell phones, downloading from the SIM card is not
supported. If this is the case, try transferring the contacts from your
SIM card to your cell phone memory first, then download from
your cell phone memory. For more information on how to transfer
contacts from your SIM card to your cell phone memory, see your
cell phone’s user’s manual.
• When downloading the directory from your Bluetooth enabled
cell phone, some data may not transfer. For example, if you have
home, mobile and work numbers for a particular contact, the three
category descriptions may not transfer to your telephone system.
• For certain cell phones, you may need to press a key on your cell
phone to confirm the phonebook download.
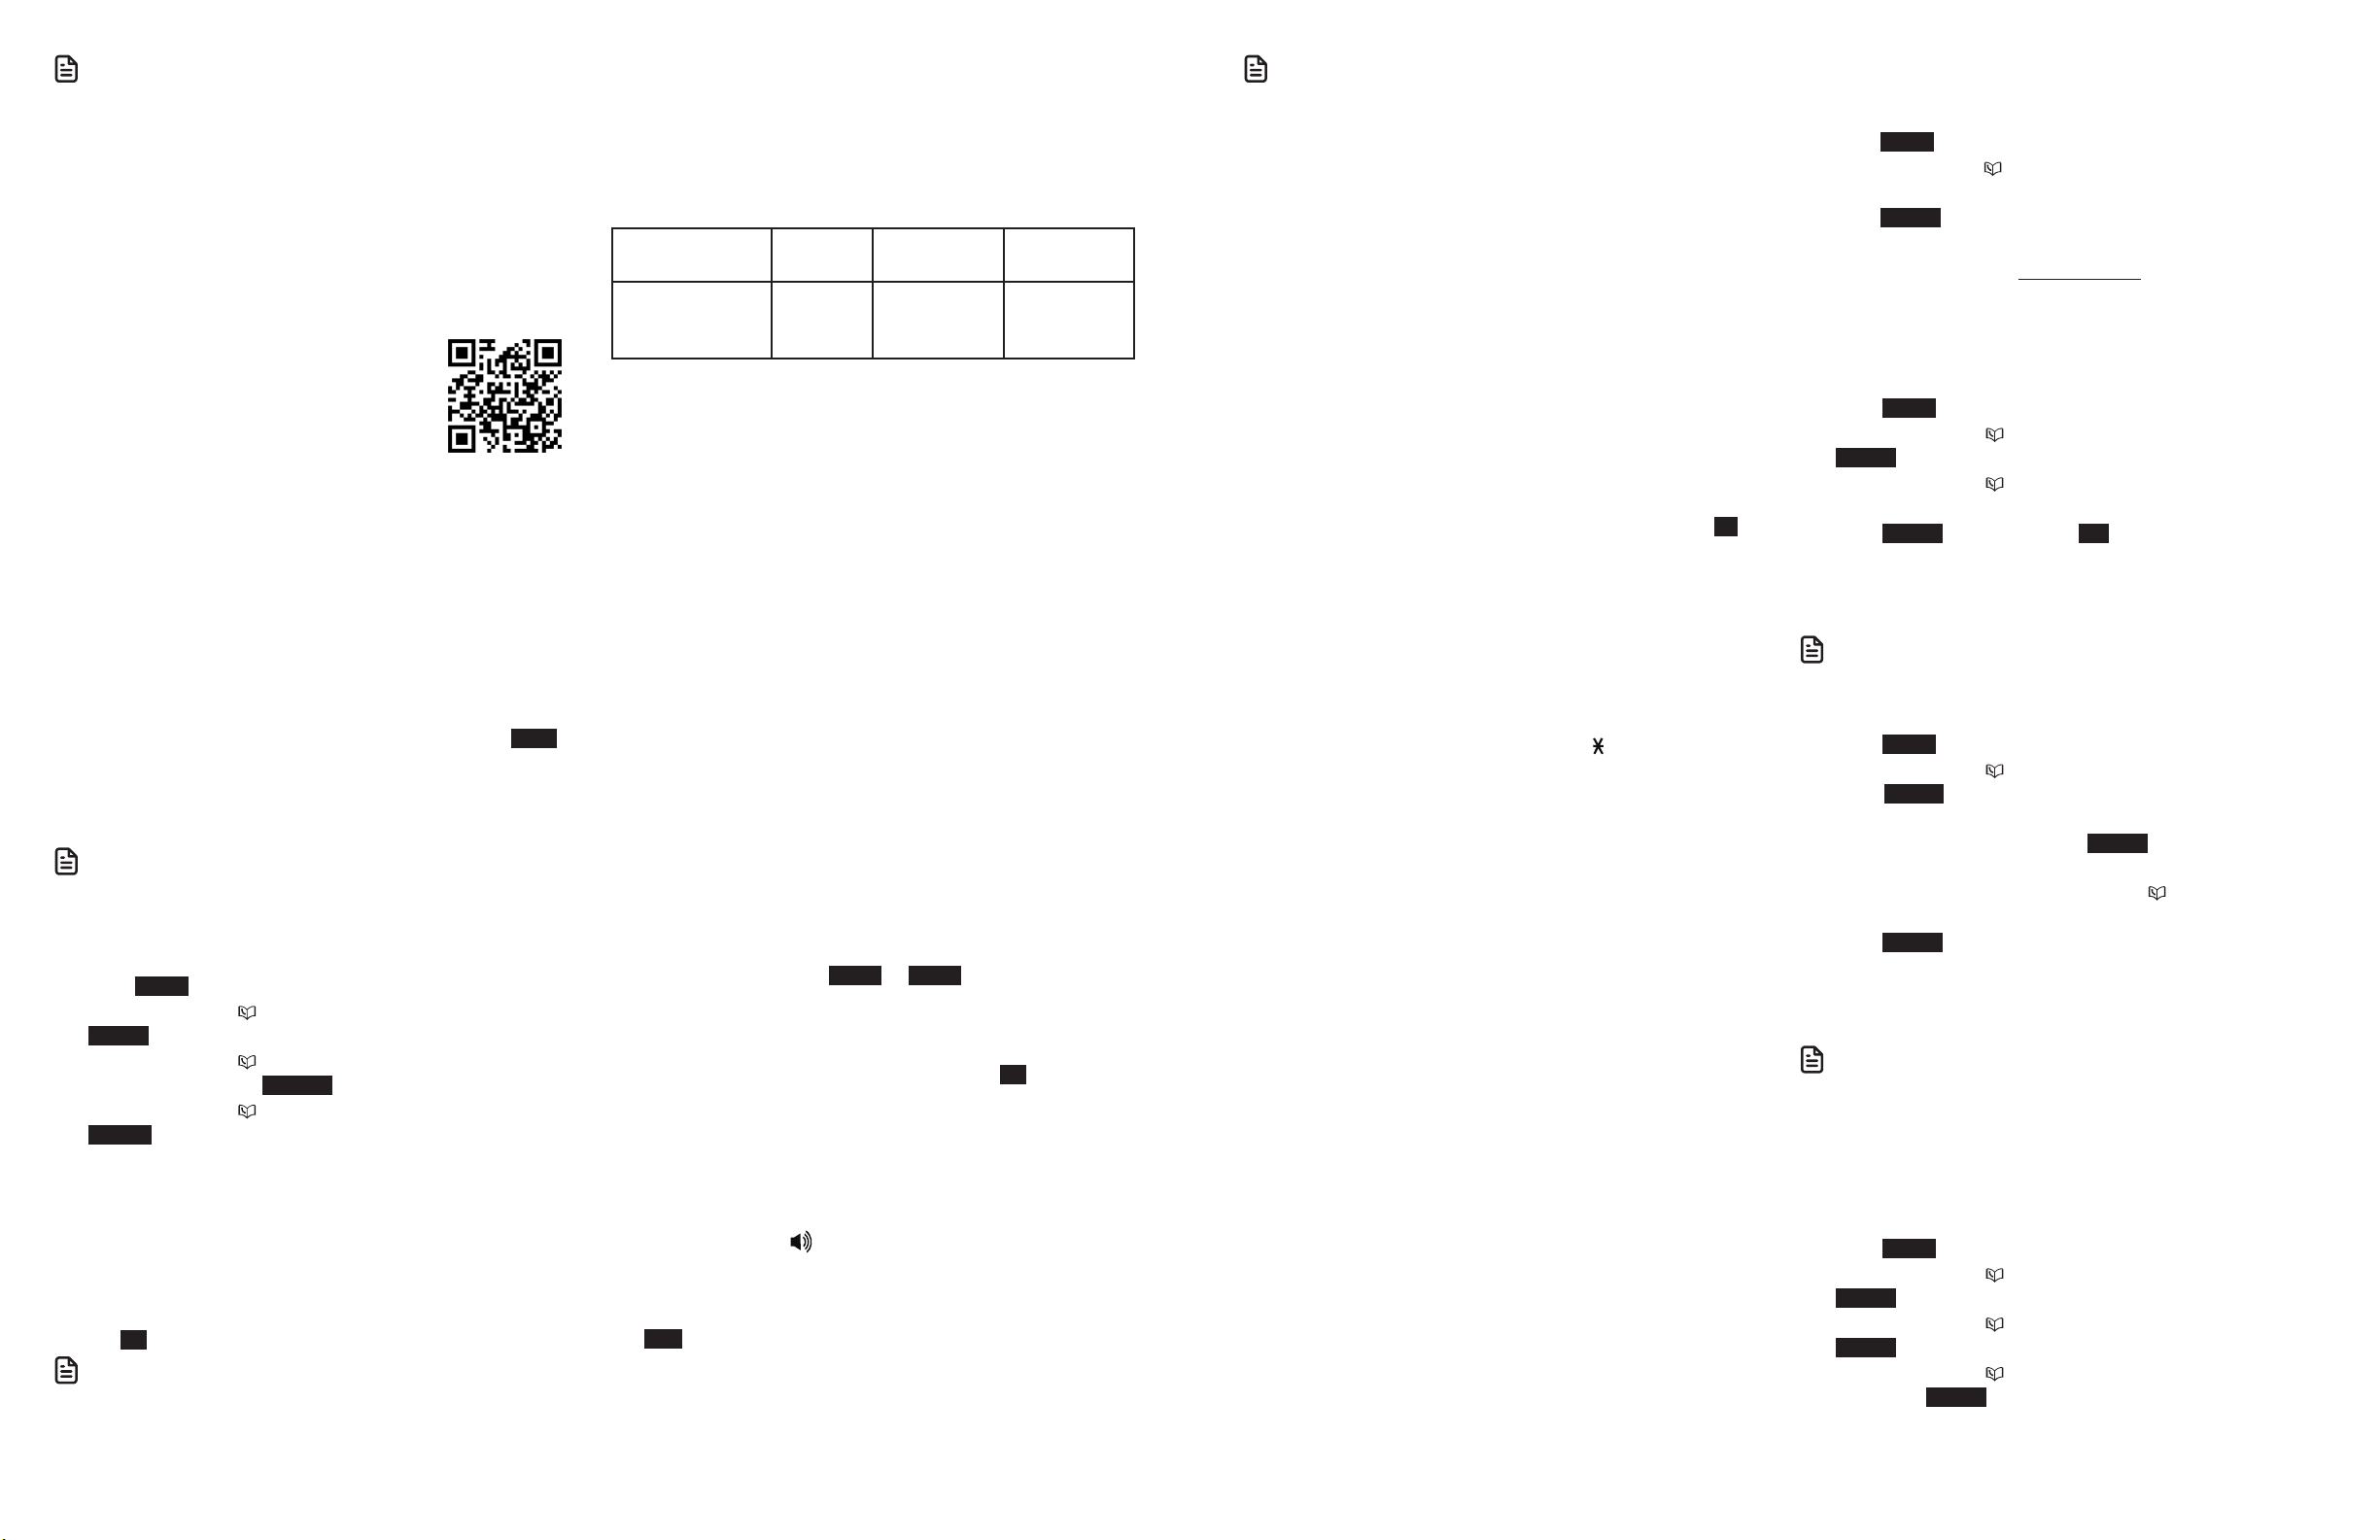
• For Android and Blackberry cell phones,
you may also download your cell phone
phonebook to your IS8151/IS8251 via the VTech
Contact Share application. Scan the QR code on
the right, or go to
www.vtechphones.com/apps/contact_share
for application download.
Interruption to phonebook directory download
If you are downloading a directory from a cell phone and the
phone receives a call, the download process stops and the
telephone base displays Download failed and all the handsets
display Download fail after the call ends. When you try to view
the downloaded directory, the telephone base and handsets
display Last Download failed: MM/DD/YY. You need to
download the directory again (see Download Phonebook).
When you are downloading a directory from a cell phone and
you wish to stop the download process, you may press STOP.
The telephone base displays Download directory cancelled.
The telephone base displays Download failed and all handsets
display Download fail when the telephone returns to idle
mode.
NOTE
• During the download process, do not attempt to make changes to
your cell phone directory.
View the directory download information
1. Press MENU on the telephone base in idle mode.
2. Press q CID or p to highlight Phonebook, then press
SELECT.
3. Press q CID or p to choose the desired downloaded
directory, then press OPTION .
4. Press q CID or p to highlight Last update, then press
SELECT .
• The telephone base displays Cell Phone X Last update
MM/DD/YY Total #XXXX (Cell Phone X represents the
device name of your cell phone).
-OR-
• The telephone base displays Cell Phone X Last
Download failed: MM/DD/YY if there was an
interruption during that directory download.
5. Press OK to exit.
NOTE
• If a handset tries to access the directory while a Bluetooth directory
download is in progress, the screen shows Not available at this
time.
Remote voice control
If you have connected a cell phone to the IS8151/IS8152
telephone system, you can activate the voice-controlled
application (voice app) of the cell phone, such as Siri®, Google
NowTM or S Voice®, using your handset or telephone base.
The remote voice control feature works with:
Voice-controlled
application
Operation
System (Versions
supported)
Before using the remote voice control feature, make sure you
checked the following:
• Your cell phone is paired and connected to your telephone
system via Bluetooth.
• No Bluetooth applications are running in the background of
your cell phone.
• Keep your cell phone within 15 feet of the telephone base.
• Do not lock up your cell phone’s screen or set passcode for
activating the voice app.
• Make sure you have turned on or logged in to the
applications on your cell phone that you will be sending
your voice commands, such as GPS, e-mail and social
networking accounts.
• Your cell phone’s data or Wi-Fi signal is in full strength and
your cell phone can connect to the Internet.
• Try to activate the voice app on your cell phone to ensure it
is in place.
Activate remote voice control
1. Press VOICE on the handset or telephone base.
• If you have connected two cell phones to the
telephone, the telephone shows Activate remote voice
control of 1: Cell Phone X 2: Cell Phone Y (Cell Phone X
and Cell Phone Y represent the device names of your
cell phones). Press CELL 1 or CELL 2.
2. The telephone then shows Activating remote voice
control....
• If the activation fails, the telephone displays Connection
timeout. Please check cell status.. Press OK and try
again.
3. When the telephone base or handset plays the
confirmation tone as forwarded by the cell phone’s voice
app, start speaking toward the telephone base or handset,
and then wait for feedback. Make reply to the voice app’s
feedback, if necessary.
• You can press on the handset to turn off the
speakerphone and listen to the feedback through the
handset earpiece.
4. To end the current remote voice control session, press
END on the telephone base or handset. You can restart by
following Steps 1-3 mentioned above.
Siri® is a registered trademark of Apple Inc.
Google NowTM is a trademark of Google Inc.
S Voice® is a registered mark of Samsung Electronics Co., Ltd.
Siri Google Now S Voice
iOS (8 or
above)
Android (4 or
above)
Android (4 or
above)
NOTES
• Once you have activated the remote voice control feature, you are
using your cell phone’s voice app to operate your cell phone.
• Please check the cell phone user’s manual and the voice app’s help
topics to find out what commands you can use and any limitations
of the voice app.
• Some cell phone manufacturers or network carriers may customize
the phone’s operating system and implement their own voice app.
If you want to use Google Now, you need to manually set it as
your default voice app. For detailed instructions, refer to your cell
phone user’s manual, or contact your cell phone’s manufacturer or
network carrier. You may also go to “Google Product Forums” on
the Internet and check the corresponding help topics.
• Due to the settings of certain cell phones and voice apps, your cell
phone may not support the remote voice control feature. Contact
your cell phone’s manufacturer or network carrier, or check the
voice app’s help topics if you encounter any problems.
• During the remote voice control activation, if your Android cell
phone comes with both a dedicated voice app and Google Now,
it may prompt you to select which voice app to use, and whether
use it for just once or always. Select the desired options. If you do
not respond to your cell phone’s prompt in time, the telephone
displays Connection timeout. Please check cell status.. Press OK
and try again.
• If the cell phone is in use, the telephone displays Bluetooth system
busy.
• If you receive a landline or cell line incoming call when you have
activated remote voice control on a connected cell phone, the
remote voice control operation will be ended.
• The feature may be ended automatically by your cell phone. For
example, a cell call has been established via the remote voice
control feature and the call has just ended.
• If you need to press dialing keys (0-9, TONE , QUIET#) during a
cell call, please make the call using the cell lines of your telephone
system instead of using the voice app via the remote voice control
feature (see Make, answer or end a cell call).
Configure your telephone
Use the handset and telephone base menu
1. Press MENU when the phone is not in use.
2. Press q CID or p until the screen displays the desired
feature menu.
3. Press SELECT.
• To return to the previous menu, press CANCEL.
• To return to idle mode, press and hold CANCEL.
Set language
The LCD language is preset to English. You can select English,
French or Spanish to be used in all screen displays.
1. Press MENU when the telephone is not in use.
2. Press q CID or p to choose Settings and then press
SELECT twice.
3. Press q CID or p to choose English, Français or
Español.
4. Press SELECT, and then press YES to save your setting. You
hear a confirmation tone.
Set date and time
NOTE
• Make sure you set the date and time including the year correctly;
otherwise the answering system does not announce the correct
day of the week for your recorded messages time stamp.
1. Press MENU on the telephone when not in use.
2. Press q CID or p to choose Set date/time and then
press SELECT.
3. Use the dialing keys (0-9) to enter the month (MM), date
(DD) and year (YY). Then press SELECT.
4. Use the dialing keys (0-9) to enter the hour (HH) and
minute (MM). Then press q CID or p to choose AM or
PM.
5. Press SELECT to save your setting. Your hear a confirmation
tone.
Set voice language
NOTE
• This feature is exclusive for Canada version.
The voice prompt language is preset to English. You can select
English or French to be used for the voice prompts in your
answering system.
Using a cordless handset or the telephone base:
1. Press MENU when the telephone is not in use.
2. Press q CID or p to choose Settings, then press
SELECT.
3. Press q CID or p to scroll to Voice language, then press
SELECT.
4. Press q CID or p to choose English or Français and
then press SELECT to save. You hear a confirmation tone.
12 13
Page 11

Caller ID announce
Voicemail (visual message waiting) indicator
Home area code
Dial mode
The caller ID announce feature lets you know who’s calling
without having to look at the display. When you have an
incoming call, the handset and/or base speaks “Call from...”
and the name of the caller based on the phonebook or caller
ID information. If the caller’s name is private or unknown, the
phone number up to the last 11 digits will be announced.
If the caller’s phone number is also private or unknown, no
information will be announced. The default setting is On.
To turn on or off the caller ID announce feature:
1. Press MENU when the telephone is not in use.
2. Press q CID or p on the handset or telephone base to
scroll to Caller ID annc, then press SELECT.
3. Press q CID or p on the handset or telephone base
to highlight On or Off, then press SELECT. There is a
confirmation tone.
Use caller ID to automatically set date and time
If you subscribe to caller ID service, the day, month and time
are set automatically with each incoming call. Follow the steps
mentioned below, to turn the CID time sync feature on or off.
The default setting is On.
1. Press MENU when the telephone is not in use.
2. Press q CID or p on the handset or telephone base to
scroll to Settings, then press SELECT.
3. Press q CID or p on the handset or telephone base to
scroll to CID time sync, then press SELECT.
4. Press q CID or p on the handset or telephone base
to highlight On or Off, then press SELECT. There is a
confirmation tone and the screen returns to the previous
menu.
Set speed dial voicemail number
This feature lets you save your voicemail number for easy
access when you press and hold the 1 key.
To save your voicemail number:
1. Press MENU when the telephone is not in use.
2. Press q CID or p on the handset or telephone base to
scroll to Settings, then press SELECT.
3. Press q CID or p on the handset or telephone base to
scroll to Voicemail #, then press SELECT.
4. Use the dialing keys to enter the voicemail access number
provided by your telephone service provider (up to 30
digits) when prompted.
• Press q CID or p on the handset or telephone base
to move the cursor to the left or right.
• Press MUTE/DELETE on the handset, or press DELETE
on the telephone base to erase a digit.
• Press and hold MUTE/DELETE on the handset, or press
and hold DELETE on the telephone base to erase all
digits.
• Press and hold REDIAL/PAUSE to enter a three-second
dialing pause (a p appears).
5. Press SAVE to save. There is a confirmation tone and the
screen displays Voicemail # saved, then returns to the
previous menu.
If you subscribe to a voicemail service offered by your
telephone service provider, this feature provides a visual
indication when you have new voicemail messages. New
voicemail and appear on the screens.
NOTES
• This feature does not indicate new messages recorded on your
phone’s built-in answering system.
• For more information about the difference between your
answering system and voicemail, see About the built-in answering
system and voicemail service.
Clear voicemail indication
Use this feature when the telephone indicates there is new
voicemail but there is none. For example, when you have
accessed your voicemail while away from home. This feature
only turns off the displayed New voicemail and icon; it
does not delete your voicemail messages. As long as you have
new voicemail messages, your telephone service provider
continues to send the signal to turn on the indicators.
To manually turn off the new voicemail indicators:
1. Press MENU when the telephone is not in use.
2. Press q CID or p on the handset or telephone base to
scroll to Settings, then press SELECT.
3. Press q CID or p on the handset or telephone base to
scroll to Clear voicemail, then press SELECT. The screen
shows Reset Voicemail Indication?.
4. Press YES to turn the voicemail indication off. There is a
confirmation tone and the screen returns to the previous
menu.
NOTES
• Your telephone service provider voicemail may alert you to new
messages with a stutter (broken) dial tone. Contact your telephone
service provider for more details.
• For information about using your voicemail service, contact your
telephone service provider.
If you dial local calls using only seven digits (area code not
required), you can program your home area code so that when
you receive a call within your local area, the telephone number
is automatically stored in the caller ID log without the area
code.
To set the home area code:
1. Press MENU when the telephone is not in use.
2. Press q CID or p to choose Phonebook and then press
SELECT.
3. Press OPTION to choose Home.
4. Press q CID or p to choose Home area code, and then
press SELECT. The screen displays the currently stored
home area code.
5. Use the dialing keys (0-9) to enter the desired home area
code.
• Press DELETE to delete a digit.
• Press and hold DELETE to delete all digits.
6. Press SAVE to confirm. You hear a confirmation tone.
NOTE
• If, in the future, your telephone service provider requires you to
dial the area code when making a local call, or, if you move to
a location that requires it, delete the home area code you have
already programmed following the steps above. After you have
deleted the home area code, ___ appears.
Cell area code
Most cell phone entries are stored in a 10-digit format. If all of
your cell phone entries are stored this way, you do not need to
program your cell area code.
If your cell phone stores entries in a 7-digit format, we
recommend that you program your cell area code so that your
7-digit phonebook entries can be dialed correctly using your
home line.
To set the cell area code:
1. Press MENU when the telephone is not in use.
2. Press q CID or p to choose Phonebook and then press
SELECT.
3. Press OPTION to choose Cell.
4. Press q CID or p to choose Cell area code, and then
press SELECT. The screen displays the currently stored
home area code.
5. Use the dialing keys (0-9) to enter the desired home area
code.
• Press DELETE to delete a digit.
• Press and hold DELETE to delete all digits.
6. Press SAVE to confirm. You hear a confirmation tone.
The dial mode is preset to touch-tone dialing. If you have pulse
(rotary) service, you need to change the dial mode to pulse
dialing before using the telephone.
1. Press MENU when the handset is not in use.
2. Press q CID or p to choose Settings, and then press
SELECT.
3. Press q CID or p to choose Dial mode, then press
SELECT.
4. Press q CID or p to choose Touch-tone or Pulse,
then press SELECT to confirm your selection. You hear a
confirmation tone.
Temporary tone dialing
If you have pulse (rotary) service only, you can switch from
pulse to touch-tone dialing temporarily during a call. This is
useful if you need to send touch-tone signals to access your
telephone banking or long distance services.
1. During a call, press TONE .
2. Use the dialing keys to enter the number. The telephone
sends touch-tone signals. It automatically returns to pulse
dialing mode after you end the call.
No line alert
If there is no telephone line connected to the telephone base,
the screens show No home line. If you do not want to display
this message on the screens (for example, if you use the cell
line only), you can turn the no line alert off using the code, as
described below.
To turn off the no line alert:
Press MENU on the handset or telephone base in idle mode,
then enter 662#. You hear a confirmation tone.
To turn the no line alert back on:
Press MENU on the handset or telephone base in idle mode,
then enter 661#. You hear a confirmation tone.
Cell alert
If you have downloaded the Connect to Cell application and
use the Alerts manager, there are message notifications sent
to your telephone system. Your telephone system beeps once
when your Android cell phone receives text messages, e-mails
or social media updates. You can turn the alert tone on or off
using the code, as described below.
To turn the alert tone off:
Press MENU on the handset or telephone base, then enter
252#. You hear a confirmation tone.
To turn the alert tone back on:
Press MENU on the handset or telephone base, then enter
251#. You hear a confirmation tone.
14 15
Page 12
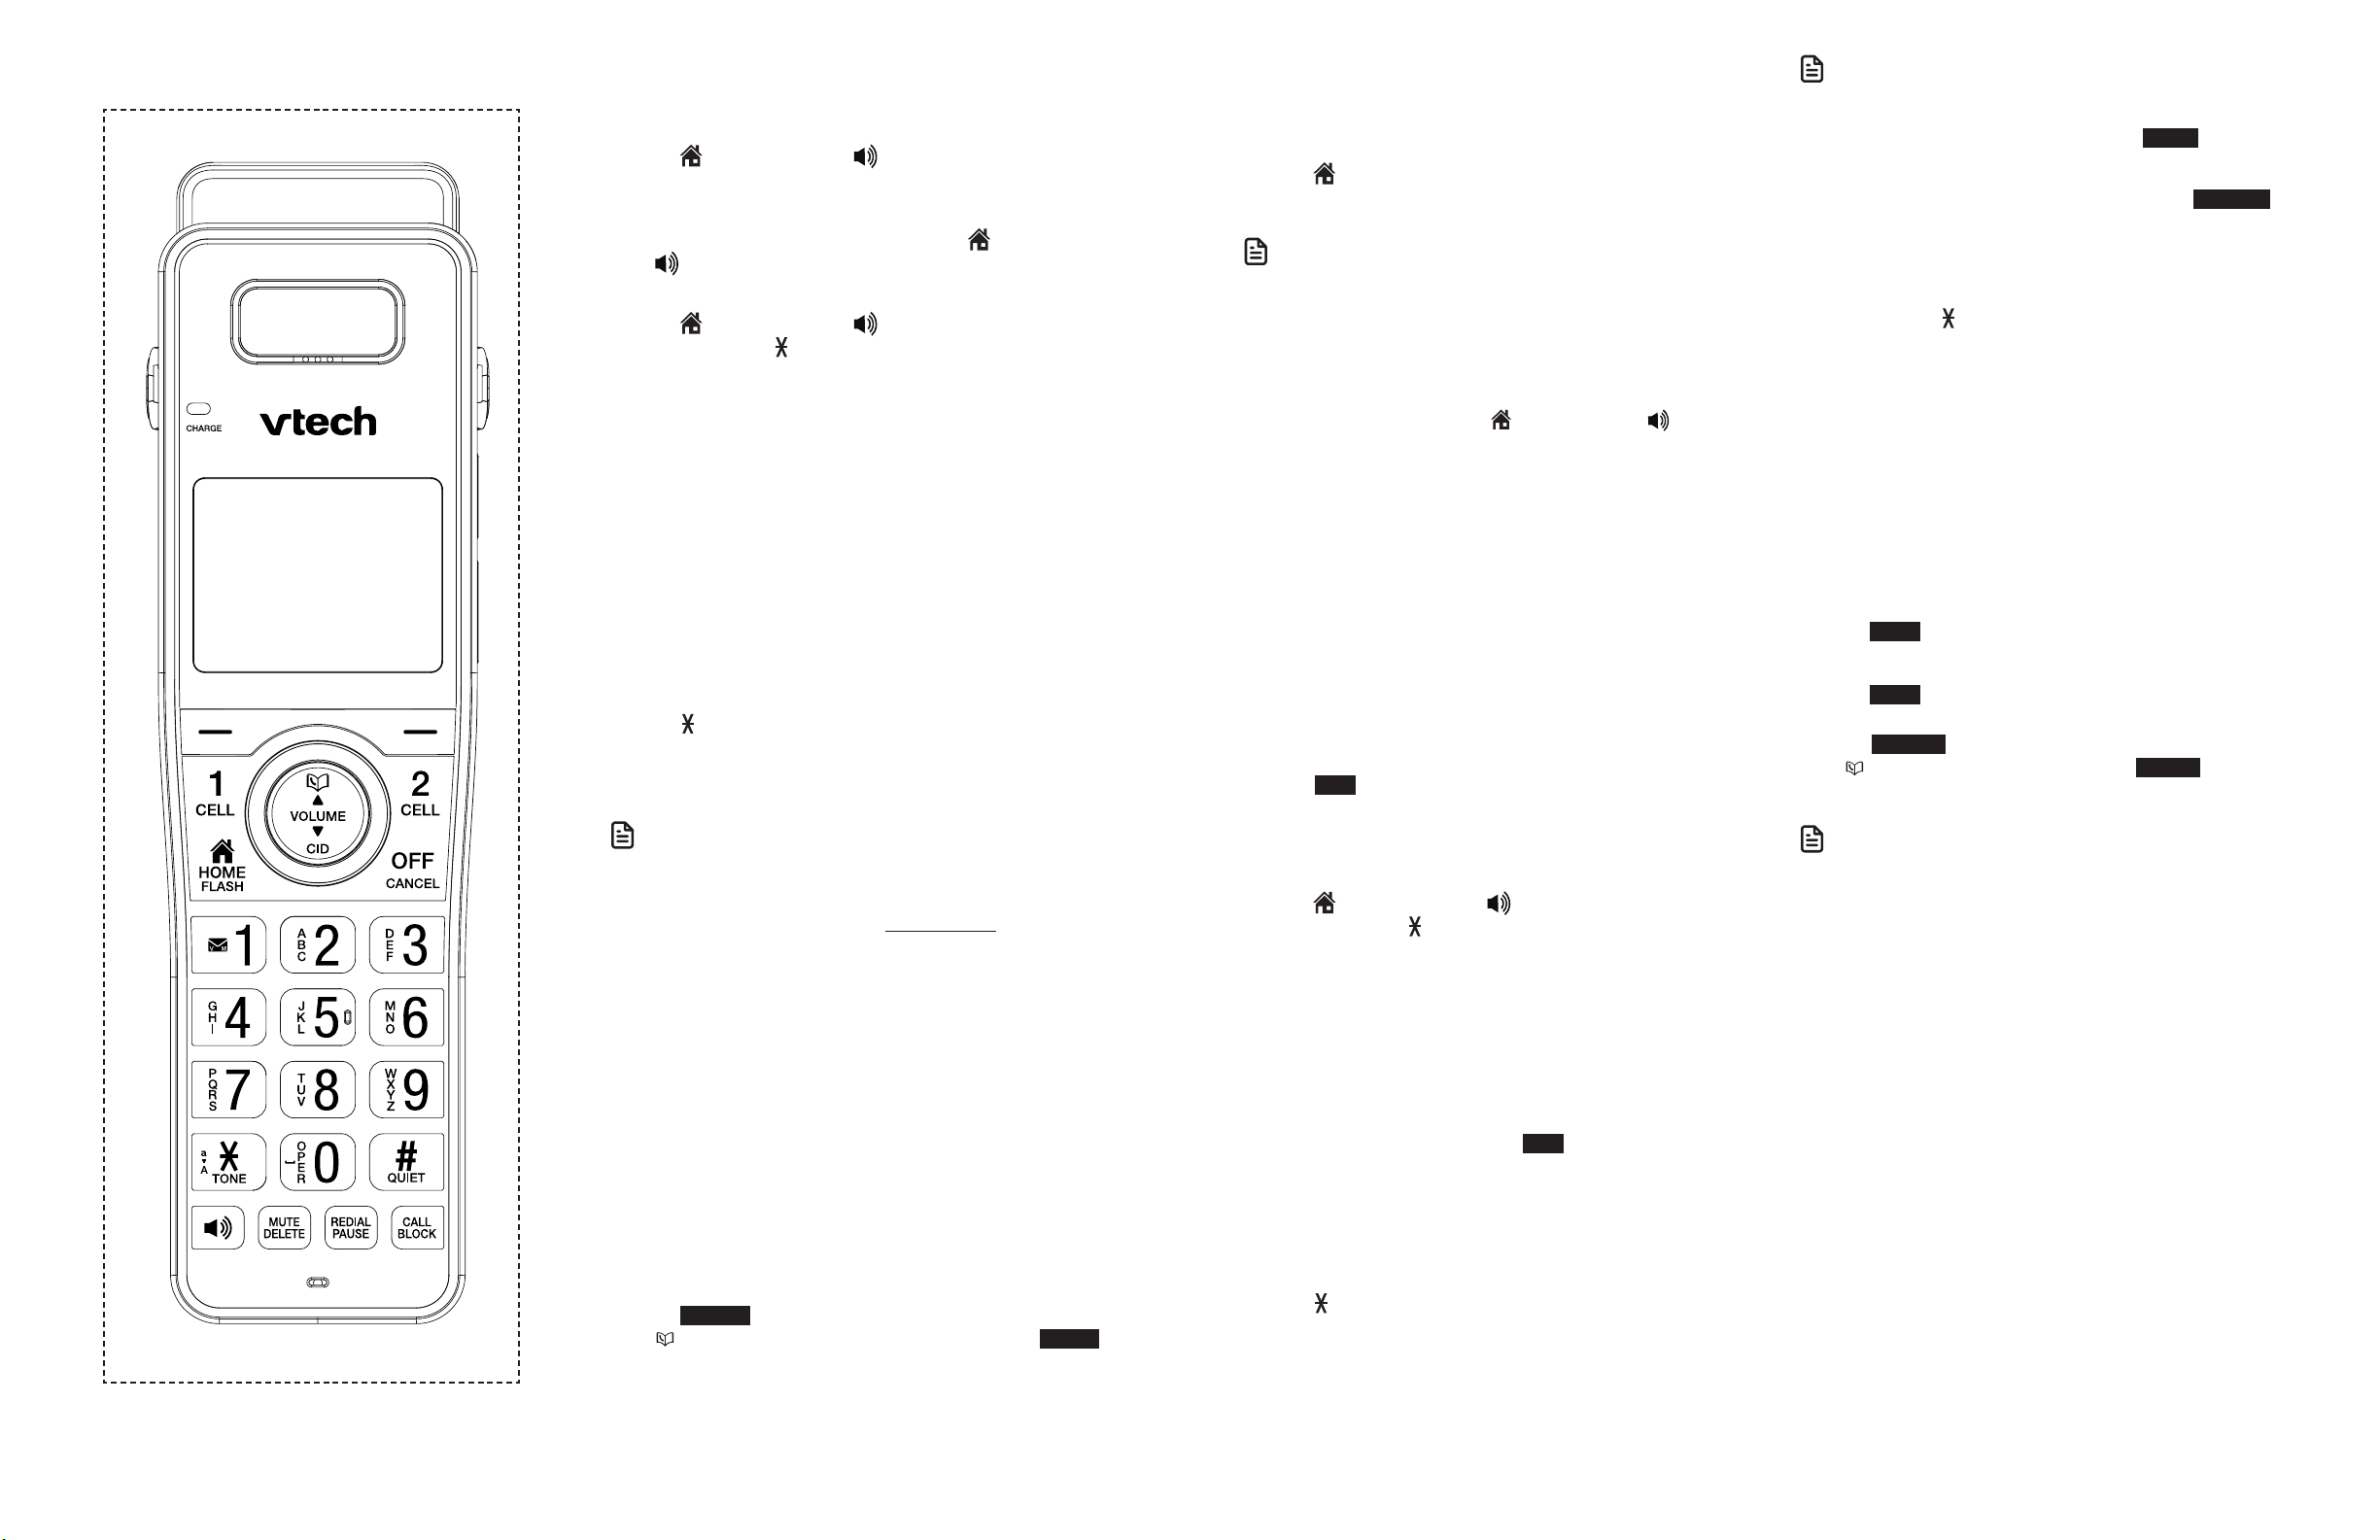
Telephone operations
Handset control key panel:
Make, answer or end a home call
Using a cordless handset:
To make a home call:
• Press HOME/FLASH or , then enter the telephone
number.
To predial a home call:
• Enter the telephone number, then press HOME/FLASH
or .
To answer a home call:
• Press HOME/FLASH or , CELL 1, CELL 2 or any dialing
key (0-9 or TONE ).
To end a home call:
• Press OFF/CANCEL, or put the handset in the telephone
base or charger.
Using the telephone base:
To make a home call:
• Press HOME on the telephone base, then enter the
telephone number.
To predial a home call:
• Enter the telephone number, then press HOME.
To answer a home call:
• Press HOME, CELL 1, CELL 2 or any dialing key (0-9 or
TONE ).
To end a home call:
• Press HOME.
NOTES
• The screen shows the elapsed time as you talk (in hours, minutes
and seconds).
• When predialing (preview numbers before dialing), press
DELETE to backspace and delete; press and hold REDIAL/PAUSE to
insert a dialing pause (a p appears).
• You cannot answer a home call using your connected cell phone.
Using a Bluetooth headset:
You can use a Bluetooth headset for home calls. However, you
need to keep the device within 15 feet of the telephone base
for optimal performance. Please see the user’s manual of your
Bluetooth headset for more information.
To answer a home call using a Bluetooth headset:
• Press the call key on your headset.
To end a home call using a Bluetooth headset:
• Press the call key on your headset.
To transfer a call from the telephone base to a Bluetooth
headset:
• Press OPTION on the telephone base, then press q CID or
p to highlight Use BT Headset and then press SELECT.
The telephone base displays Transferring audio to Headset
A.
Call waiting on the home line
If you subscribe to call waiting service from your telephone
service provider, and someone calls while you are already on a
call, you hear a tone.
• Press HOME/FLASH on the handset, or press PTT/FLASH
on the telephone base to put your current call on hold and
take the new call.
NOTES
• If the Smart call blocker feature is on and in screening mode, and
you receive a call waiting home call:
- If you have already picked up a screened home call, the
telephone checks whether the call waiting call’s number can be
found in the phonebook, block list or allow list. It also checks
whether the caller name is in the star name list. After that, the
telephone displays the caller ID information or Blocked call
accordingly. You can press HOME/FLASH or to take the
new call.
- If the telephone is screening a home call, the call waiting call will
be ignored and logged as missed call in the caller ID log.
• The screening feature of Smart call blocker is applicable to home
calls only:
Make, answer or end a cell call
The IS8151/IS8251 can be used to make or answer calls on the
cell line. You can connect a maximum of 4 Bluetooth enabled
cell phones to the telephone base. Both cell phones can be
used on cell calls at the same time.
Using a cordless handset:
To make a cell call:
• Press CELL 1 or CELL 2. Enter the telephone number, then
press DIAL.
To predial a cell call:
• Enter the telephone number, then press CELL 1 or CELL 2.
To answer a cell call:
• Press HOME/FLASH or , CELL 1, CELL 2 or any dialing
key (0-9 or TONE ).
To end a cell call:
• Press OFF/CANCEL, or put the handset in the telephone
base or charger.
Using the telephone base:
To make a cell call:
• Press CELL 1 or CELL 2 on the telephone base. Enter the
telephone number, then press DIAL.
To predial a cell call:
• Enter the telephone number, then press CELL 1 or CELL 2.
To answer a cell call:
• Press HOME, CELL 1, CELL 2 or any dialing key (0-9 or
TONE ).
To end a cell call:
• Press CELL 1 or CELL 2.
NOTES
• You can also use your cell phone to answer the call. If you answer
with your cell phone, it disconnects from the telephone base.
• If you do not want to answer the call, press REJECT.
• When you try to make a cell call but your cell phone is not
connected to the base, the telephone base displays Cellular phone
not connected. Please connect to proceed.. Press CONNECT
to connect your cell phone to the telephone system. Refer to
Bluetooth connection from idle mode and Connect/disconnect an
active device.
• Make a cell call using the cell lines of your telephone system instead
of the remote voice control feature, if you need to press dialing
keys (0-9, TONE , QUIET#) during a call.
Call waiting on the cell line
If you subscribe to call waiting service from your cell phone
service provider, and someone calls while you are already on a
call, you hear a beep.
Using a cordless handset:
• Press CELL 1 or CELL 2 to put your current call on hold and
take the new call.
• Press CELL 1 or CELL 2 at any time to switch back and
forth between calls.
-OR-
• Press SWAP to switch. To switch back, press CELL 1 or CELL 2.
Using the telephone base:
• Press SWAP on the telephone base. The original call is put
on hold and you take the new call.
• Press OPTION on the telephone base. Press q CID or
p to highlight Swap Cell X. Press SELECT to resume
the original call. The other incoming cell call is put on
hold.
NOTES
• If the Smart call blocker feature is on and in screening mode, and
you receive a call waiting cell call:
- If you have already picked up a screened home call, the
telephone checks whether the call waiting cell call’s number can
be found in the block list. If yes, the telephone displays Blocked
call and rejects the call.
• The screening feature of Smart call blocker is applicable to home
calls only.
16 17
Page 13

Answer an incoming cell call while on a home call
If you are on a home call and you receive an incoming cell
call, you hear a beep and 1 or 2 displays on the handset
or telephone base you are using. The telephone base and all
other handsets ring.
To answer the incoming cell call:
Using a cordless handset or the telephone base:
• Press CELL 1 or CELL 2. The home call is automatically
placed on hold; all other handsets and the telephone
base display Home call on hold and Cell 1/2 line in use,
alternately.
To end the cell call:
Using a cordless handset:
• Press OFF/CANCEL on the handset. The home line is
still on hold. The telephone base and all other handsets
display Home call on hold.
Using the telephone base:
• Press CELL 1 or CELL 2 on the telephone base. The home
line is still on hold. All handsets display Home call on
hold.
To resume the home call on hold:
Using a cordless handset:
• Press HOME/FLASH on the handset.
Using the telephone base:
• Press HOME on the telephone base.
Answer a home call while on a cell call
If you are on a cell call and you receive an incoming home call,
you hear a beep and displays on the handset or telephone
base you are using. The telephone base and all other handsets
ring.
To answer the incoming home call:
Using a cordless handset:
• Press HOME/FLASH on the handset. The cell call is
automatically placed on hold and the telephone base
display Cell 1/2 call on hold and Home line in use,
alternately.
Using the telephone base:
• Press HOME on the telephone base. The cell call is
automatically placed on hold. All handsets display Cell
1/2 call on hold and Home line in use, alternately.
To end the home call:
Using a cordless handset:
• Press OFF/CANCEL on the handset. The cell line is still on
hold. The telephone base and all handsets display Cell
1/2 call on hold.
Using the telephone base:
• Press HOME on the telephone base. The cell line is still
on hold. The telephone base and all handsets display
Cell 1/2 call on hold.
To resume the cell call on hold:
Using a cordless handset:
• Press CELL 1 or CELL 2 on the handset.
Using the telephone base:
• Press CELL 1 or CELL 2 on the telephone base.
NOTE
• If you have turned on your answering system and you do not
answer the incoming home call, the call is answered by your
answering system.
Conference home and cell calls
When you have calls established on the home and cell lines,
you can create a 3-way conference.
To conference both home and cell calls:
1. Press OPTION on the handset or telephone base.
2. Press q CID or p on the handset or telephone base to
highlight Conference.
3. Press SELECT . The conferencing device’s screen displays
Conf.
To select an option while on a conference call:
1. Press OPTION on the handset or telephone base.
2. Press q CID or p on the handset or telephone base to
highlight one of the following options:
• Hold
• End Home line
• End Cell 1/2 line
• Equalizer
• Caller ID log
• Phonebook
3. Press SELECT .
To end a conference call:
• Press OFF/CANCEL on the handset or HOME on the
telephone base. You can also put the handset back in the
telephone base or charger.
Using the home and cell lines together:
• You can be on two different calls at the same time using the
cell line and home line with two handsets.
• You can be on a call using the cell line and a Bluetooth
headset via the home line at the same time.
• If you are on a call using the cell line, you cannot join the
call using your paired cell phone. However, you can join the
call using another IS8151/IS8251 device. Your cell phone
is being used for the phone call so only features that are
normally available during a call can be used.
• Press the same key at any time to switch back and forth
between calls.
Handset speakerphone
During a call, press on the handset to switch between the
speakerphone and normal handset use. In speakerphone
mode, press OFF/CANCEL or return the handset to the
telephone base or charger to hang up.
Volume
While on a call, you can adjust the listening volume on the
handset or telephone base.
If it is a cell call and the volume is too loud, too quiet or drops
out, try changing the volume on your cell phone. On some cell
phones, changing the volume on the cell phone affects your
cell call volume on the IS8151/IS8251 handsets or telephone
base.
To adjust the listening volume of a handset:
• Press p VOLUME q on the handset while on a call.
To adjust the listening volume of the telephone base:
• Press + VOL - on the telephone base while on a call.
NOTE
• The handset earpiece volume setting (1-6) and speakerphone
volume setting (1-6) are independent. The speakerphone
volume setting of the telephone base (1-8) is also
independent.
Silence the ringer
When the telephone is ringing, you can temporarily silence the
ringer of the handset or telephone base without disconnecting
the call. The next call rings normally at the preset volume.
To silence the handset ringer:
• Press MUTE , OFF/CANCEL, MUTE/DELETE or QUIET # on
the handset. The handset screen shows Ringer muted.
To silence the base ringer:
• Press MUTE, MUTE, CANCEL or QUIET #. The telephone
base displays Ringer muted.
Mute
Use the mute function to turn off the microphone. You can hear
the caller, but the caller cannot hear you.
Using a cordless handset:
To mute a call:
• While on a call, press MUTE/DELETE. When mute is on, the
handset shows Muted for a few seconds and MUTE icon
displays until you turn off mute.
To end mute a call:
• Press MUTE/DELETE again. When mute is off, Microphone
ON appears temporarily on the handset.
Using the telephone base:
To mute a call:
• While on a call, press MUTE. When mute is on, the MUTE
light turns on. The telephone base shows Muted for a few
seconds and MUTE icon displays until you turn off mute.
To end mute a call:
• Press MUTE again. When mute is off, Microphone ON
appears temporarily on the telephone base.
Mute is automatically canceled when you end the call.
18 19
Page 14

Hold
You can place any call on hold. You hear an alert tone at the
telephone base if you have not taken the call off of hold after
14 minutes. You hear another alert tone at the telephone
base 30 seconds later. At 15 minutes on hold, the call on hold
automatically disconnects.
To place a home call on hold:
• While on a home call, press OPTION, and then press SELECT
on the handset or telephone base to select HOLD. Home
call on hold appears on the handsets and telephone base.
HOME/FLASH flashes on the handsets and HOME
flashes on the telephone base.
To resume a home call on hold:
• Press HOME/FLASH on handsets or HOME on the
telephone base.
To place a cell call on hold:
• While on a cell call, press OPTION, and then press SELECT
on the handset or telephone base to select HOLD. Cell 1/2
call on hold appears on the handsets and telephone base.
CELL 1 or CELL 2 on the handset or telephone base flashes.
To resume a cell call on hold:
• Press CELL 1 or CELL 2 on the handset or telephone base.
Equalizer
The equalizer feature enables you to change the quality of the
audio to best suit your hearing.
Using a cordless handset or the telephone base:
1. While on a home call or cell call, press OPTION.
2. Press q CID or p on the handset or telephone base to
highlight Equalizer, then press SELECT.
3. Press q CID or p on the handset or telephone base
to select Treble 1, Treble 2, Bass or Natural (the default
setting), then press SELECT.
NOTE
• If you switch the call between the handset and speakerphone by
pressing , the audio setting remains unchanged.
• The current equalizer setting remains unchanged until you
select a new setting.
Join a call in progress (for multiple handset models only)
Another handset can join you on an outside call. The call
continues until all people hang up. You can share an outside
call with telephone base and up to 4 system handsets.
To join a home call:
Using a cordless handset:
• Press HOME/FLASH or on another handset to join the
call.
Using the telephone base:
• Press HOME to join the call.
To join a cell call:
Using a cordless handset:
• Press CELL 1 or CELL 2 on another handset to join the call.
Using the telephone base:
• Press CELL 1 or CELL 2 to join the call.
Chain dialing
Use this feature to initiate a dialing sequence from the numbers
in the phonebook, caller ID log or redial memory while you are
on a call.
Chain dialing is useful when you wish to access other numbers
(such as bank account numbers or access codes) from the
phonebook, caller ID log or redial list.
Using a cordless handset:
To access a number in the phonebook while on a call:
1. Press OPTION.
2. Press q CID or p to scroll to Phonebook, then press
SELECT.
3. Press q CID or p to scroll to the desired entry, then
press REVIEW.
4. Press q CID or p to highlight the desired entry
or perform an alphabetical search (See 3-character
alphabetical search).
5. Press DIAL to dial the number shown.
To access a number in the caller ID log while on a call:
1. Press OPTION.
2. Press q CID or p to scroll to Caller ID log, then press
SELECT.
3. Press q CID or p to scroll to the desired entry, then
press CALL to dial the number shown.
To access a number in the redial list while on a call:
1. Press REDIAL/PAUSE to show the most recently dialed
number.
2. Press q CID or p to scroll to the desired number, or
press REDIAL/PAUSE repeatedly to find the desired
number. Press DIAL to dial the number shown.
Using the telephone base:
To access the phonebook while on a call:
1. Press OPTION.
2. Press q CID or p to scroll to Phonebook and then
press SELECT.
3. Press q CID or p to scroll to the desired entry, then
press REVIEW.
4. Press q CID or p to scroll to the desired entry. Press
DIAL to dial the number shown.
NOTES
• You cannot edit a phonebook entry while on a call. Refer to the
Phonebook section for more details.
• You cannot copy a caller ID log entry into the phonebook while on
a call. Refer to the Caller ID section for more details.
• You cannot erase a redial entry while on a call. Refer to the Redial
list section for more details.
• Press CANCEL to exit redial, phonebook or caller ID log when you
are on a call.
To access the caller ID log while on a call:
1. Press OPTION.
2. Press q CID or p to scroll to Caller ID log and then
press SELECT.
3. Press q CID or p to scroll to the desired number.
4. Press CALL to dial the number shown.
To access the redial list while on a call:
1. Press REDIAL/PAUSE to show the most recently dialed
number.
2. Press q CID or p to scroll to the desired number, or
press REDIAL/PAUSE repeatedly to find the desired
number. Press DIAL to dial the number shown.
20 21
Page 15

Find handset
Use this feature to find the system handset.
To start paging:
• Press FIND HS on the telephone base when not in use.
All idle handsets ring and display ** Paging **.
To end paging:
• Press HOME/FLASH, , or any dialing key (0-9, TONE )
on the handset(s).
-OR-
• Press FIND HS, MUTE, CANCEL or STOP on the telephone
base.
NOTES
• Press MUTE to turn off the ringer of a handset temporarily. Paging
tone continues on the other handset.
• Do not press and hold FIND HS for more than four seconds. It may
lead to handset deregistration. If the handset displays To register
HS and See manual, refer to the Register a handset section to
register the handset back to the telephone base.
Redial list
The telephone base and each handset store the last 10
dialed numbers (up to 30 digits each) in the redial list. The
redial entries of each handset and the telephone base are
independent.
Review a redial list entry
To review the redial list of a handset:
1. Press REDIAL/PAUSE in idle mode.
2. Press q CID, p or REDIAL/PAUSE repeatedly to browse
through the list. The handset beeps twice at the end of the
list.
3. Press OFF/CANCEL to exit.
To review the redial list of the telephone base:
1. Press REDIAL/PAUSE in idle mode.
2. Press q CID, p or REDIAL/PAUSE repeatedly to browse
through the list. The telephone base beeps twice at the
end of the list.
3. Press CANCEL to exit.
Dial a redial list entry
To dial a redial entry on a handset:
1. Press HOME/FLASH, or to use the home line, then
press REDIAL/PAUSE to enter the redial list.
2. Press q CID, p or REDIAL/PAUSE repeatedly to browse
until the desired number displays. The handset beeps
twice at the end of the list.
3. Press DIAL to dial the number displayed.
-OR-
1. Press CELL 1 or CELL 2 to use the cell line, then press
REDIAL/PAUSE to enter the redial list.
2. Press q CID, p or REDIAL/PAUSE repeatedly to browse
until the desired number displays. The handset beeps
twice at the end of the list.
3. Press INSERT to insert the desired number.
4. Press DIAL to dial the number displayed.
-OR-
You can also select a redial entry before dialing.
1. Press REDIAL/PAUSE in idle mode.
2. Press q CID, p or REDIAL/PAUSE repeatedly to browse
until the desired number displays. The handset beeps
twice at the end of the list.
3. Press HOME/FLASH, or to call using the home line,
or CELL 1, CELL 2 to call using the cell line.
-OR-
You can insert the area code to the redial number before
dialing.
1. Enter the area code in idle mode, then press
REDIAL/PAUSE.
2. Press q CID, p or REDIAL/PAUSE repeatedly to browse
until the desired number displays, then press INSERT. The
area code will be added in front of the selected redial
number.
3. Press HOME/FLASH, or to call using the home line,
or CELL 1, CELL 2 to call using the cell line.
22 23
To dial a redial entry on the telephone base:
1. Press HOME to use the home line, then press
REDIAL/PAUSE to enter the redial list.
2. Press q CID, p or REDIAL/PAUSE repeatedly to browse
until the desired number displays. The handset beeps
twice at the end of the list.
3. Press DIAL to dial the number displayed.
-OR-
1. Press CELL 1 or CELL 2 to use the cell line, then press
REDIAL/PAUSE to enter the redial list.
2. Press q CID, p or REDIAL/PAUSE repeatedly to browse
until the desired number displays. The handset beeps
twice at the end of the list.
3. Press INSERT to insert the desired number.
4. Press DIAL to dial the number displayed.
You can also select a redial entry before dialing.
1. Press REDIAL/PAUSE in idle mode.
2. Press q CID, p or REDIAL/PAUSE repeatedly to browse
until the desired number displays. The telephone base
beeps twice at the end of the list.
3. Press HOME to call using the home line, or CELL 1 or CELL 2
to call using the cell line.
-OR-
You can insert the area code to the redial number before
dialing.
1. Enter the area code in idle mode, then press
REDIAL/PAUSE.
2. Press q CID, p or REDIAL/PAUSE repeatedly to browse
until the desired number displays, then press INSERT. The
area code will be added in front of the selected redial
number.
3. Press HOME to call using the home line, or CELL 1, CELL 2
to call using the cell line.
Save a redial entry to the phonebook
Using a cordless handset:
1. Press REDIAL/PAUSE in idle mode.
2. Press q CID, p or REDIAL/PAUSE repeatedly to browse
until the desired number displays.
3. Press SAVE.
4. The screen displays Edit number. Use the dialing keys to
edit the number, if necessary.
• Press MUTE/DELETE or BACKSP to erase a digit.
• Press and hold MUTE/DELETE to erase all digits.
• Press q CID or p to move the cursor to the right or
left.
• Press and hold REDIAL/PAUSE to insert a dialing pause
(a p appears).
5. Press NEXT.
6. Press q CID or p to highlight one of the following
types:
• Home
• Cell
• Work
• Other
7. Press NEXT. The screen displays Enter name. Use the
dialing keys to enter a name.
• Press MUTE/DELETE or BACKSP to erase a character.
• Press and hold MUTE/DELETE to erase all characters.
• Press q CID or p to move the cursor to the right or
left.
8. Press SAVE. You hear a confirmation tone.
Using the telephone base:
1. Press REDIAL/PAUSE in idle mode.
2. Press q CID, p or REDIAL/PAUSE repeatedly to browse
until the desired number displays.
3. Press SAVE.
4. The screen displays EDIT NUMBER. Use the dialing keys to
edit the number, if necessary.
• Press DELETE or BACKSP to erase a digit.
• Press and hold DELETE to erase all digits.
• Press q CID or p to move the cursor to the right or
left.
• Press and hold REDIAL/PAUSE to insert a dialing pause
(a p appears).
5. Press NEXT.
6. Press q CID or p to highlight one of the following
types:
• Home
• Cell
• Work
• Other
7. Press NEXT. The screen displays ENTER NAME. Use the
dialing keys to enter a name.
• Press DELETE or BACKSP to erase a character.
• Press and hold DELETE to erase all characters.
• Press q CID or p to move the cursor to the right or
left.
8. Press SAVE. You hear a confirmation tone.
Page 16

Delete a redial list entry
1. Press REDIAL/PAUSE on the handset or telephone base in
idle mode.
2. Press q CID or p on the handset or telephone base.
-OR-
Press REDIAL/PAUSE repeatedly to browse until the desired
number displays.
3. Press MUTE/DELETE on the handset or DELETE on the
telephone base to delete the displayed number. You hear
a confirmation tone.
Sound settings
Key tone
You can turn the key tone on or off.
1. Press MENU in idle mode to enter the main menu.
2. Press q CID or p on the handset or telephone base to
scroll to Settings, then press SELECT.
3. Press q CID or p on the handset or telephone base to
scroll to Key tone, then press SELECT.
4. Press q CID or p on the handset or telephone base to
select the desired volume or Off.
5. Press SET to save your preference. There is a confirmation
tone and the screen returns to the previous menu.
Ringer tone
You can select the ringer tones for incoming home and cell
calls.
To select a ringer tone:
1. Press MENU on the handset or telephone base in idle
mode to enter the main menu.
2. Press q CID or p on the handset or telephone base to
scroll to Ringers, then press SELECT.
3. Press q CID or p on the handset or telephone base to
scroll to Ringer tone, then press SELECT.
4. Press q CID or p on the handset or telephone base
to highlight All lines, Home, Cell 1 or Cell 2, then press
SELECT .
5. Press q CID or p on the handset or telephone base
to sample each ringer tone. A sample of each ringer tone
plays as you scroll through the choices.
6. Press SELECT to select and save your choice. You hear a
confirmation tone.
NOTE
• If you turn off the ringer volume, you will not hear ringer tone
samples.
Ringer volume
You can set the ringer volume for incoming calls on all lines. A
ringer off icon shows when the volume is set to off.
1. Press MENU on the handset or telephone base in idle
mode to enter the main menu.
2. Press q CID or p on the handset or telephone base to
scroll to Ringers, then press SELECT.
3. Press SELECT again to select Ringer volume.
4. Press q CID or p on the handset or telephone base to
sample each volume level.
5. Press SET to save your preference. There is a confirmation
tone and the screen returns to the previous menu.
-OR-
1. Press + VOL - on the telephone base to set the ringer
volume of the telephone base while it is in idle mode.
2. Press SET to confirm and you hear a confirmation tone.
NOTES
• Changing the handset ringer volume does not affect the base
ringer volume.
• If the ringer volume is set to off, that handset or the telephone base
is silenced for all incoming calls.
• The ringer volume level also determines the ringer levels of
intercom calls.
• If the ringer volume is set to off, the caller ID will not be announced
and the screen will briefly display Caller ID won’t be announced.
QUIET mode
When QUIET mode is turned on, the telephone silences all
sounds during the set period of time (1-12 hours). However,
the handset locator paging tone and any sound-generating
operations initiated by users, such as making calls using
the speakerphone or setting ringer volume, will sound as
normal. After you turn on QUIET mode, this feature activates
immediately and the answering system turns on automatically.
When QUIET mode is on, the answering system takes calls and
records messages without broadcasting them.
To turn QUIET mode on:
1. Press and hold QUIET # in idle mode to enter the QUIET
mode setting screen. The screen shows Set quiet mode
duration (1 to 12 hours) _ _.
2. Use the dialing keys to enter the desired number of hours
(1-12) you would like to turn on QUIET mode, then press
SELECT. Your screen briefly shows Answering sys is ON
during quiet mode and then Quiet mode on in the idle
screen.
To turn QUIET mode off:
• While QUIET mode is on, press and hold QUIET #. The
screen shows Quiet mode is off and you hear a confirmation
tone.
NOTES
• If you change the base ringer, handset ringer, ringer volume, key
tone, or caller ID announce features when QUIET mode is on, the
sample plays but the feature is still muted after saving the setting.
• After QUIET mode is turned off or the set period of time has
expired, all muted features will be activated again.
• The PTT function is not available when QUIET mode is on.
• When QUIET mode is on, and Smart call blocker is on and in
screening mode, all screened home calls will be sent to the
answering system after screening. For more information on Smart
call blocker, see About Smart call blocker.
Temporary ringer silencing
When the telephone is ringing, you can temporarily silence the
ringer of the handset or telephone base without disconnecting
the call. The next call rings normally at the preset volume.
To silence the handset ringer:
• Press MUTE, OFF/CANCEL, MUTE/DELETE or QUIET # on
the handset. The handset screen shows Ringer muted.
To silence the telephone base ringer:
• Press MUTE, MUTE, CANCEL or QUIET #. The telephone
base displays Ringer muted.
Intercom
Use the intercom feature for conversations between two
handsets, a handset and the telephone base, or a handset/
telephone base and a cordless headset (sold separately). You
can buy additional expansion handsets (IS8101, sold separately)
to expand your telephone system (up to 12 handsets or 10
cordless handsets and two cordless headsets).
Using a cordless handset:
1. Press MENU in idle mode to enter the main menu. Press
q CID or p to scroll to Intercom, then press SELECT.
• If you have one handset and no other registered
devices, the handset shows Calling base.
• If you have other registered device(s) or more than one
handset, the handset shows INTERCOM TO:. Use the
dialing keys to enter a specific device number (0 for the
telephone base, 1-9 for handsets 1-9, TONE followed
by 0-2 for handsets 10-12, or # for a single headset,
# followed by 1 or 2 for headset 1 or 2, or TONE
followed by # for all devices), or press q CID or p
to scroll to the desired device and press SELECT. Your
handset screen shows Calling HANDSET X, Calling
BASE 0, Calling headset or Calling all devices.
The destination device(s) rings and shows HANDSET is
calling, HANDSET X is calling or HANDSET X is calling all
(HANDSET represents the handset name, X represents the
handset number).
2. To answer the intercom call, press HOME/FLASH, ,
CELL 1 , CELL 2 or any dialing key (0-9, TONE ) on the
destination handset, or press HOME on the telephone
base. Both devices now show Intercom.
3. To end the intercom call, one party presses END,
OFF/CANCEL, or places the handset back in the telephone
base or charger; or one party presses END on the
telephone base. The other party hears four beeps. Both
devices display Intercom ended.
Using the telephone base:
1. Press MENU in idle mode to enter the main menu. Press
q CID or p to scroll to Intercom, then press SELECT.
• If you have one handset and no other registered
devices, the telephone base shows Calling HANDSET X.
• If you have other registered device(s) or more than one
handset, the telephone base shows INTERCOM TO:.
Use the dialing keys to enter a specific device number
(1-9 for handsets 1-9, TONE followed by 0-2 for
handsets 10-12, or # for a single headset, # followed by
1 or 2 for headset 1 or 2, or TONE followed by # for all
devices), or press q CID or p to scroll to the desired
device and press SELECT. The telephone base shows
Calling HANDSET X or Calling all.
The destination device(s) rings and shows Base is calling,
BASE 0 is calling or BASE 0 is calling all.
2. To answer the intercom call, press HOME, CELL 1 , CELL 2 or
any dialing key (0-9, TONE ) on the telephone base. Both
base and handset now show Intercom.
3. To end the intercom call, one party presses END, CANCEL,
or places the handset back in the telephone base or
charger; or one party presses END on the telephone base.
24 25
Page 17

The other party hears four beeps. Both devices display
Intercom ended.
NOTES
• Before the intercom call is answered, you can cancel it by pressing
OFF/CANCEL on the handset or END on the telephone base.
• If the called party does not answer within 100 seconds, or if the
device is in use, on a call or out of range, the initiating device
shows No answer. Try again..
• To temporarily silence the intercom ringer, press OFF/CANCEL or
MUTE/DELETE on the handset, or press CANCEL or MUTE on the
telephone base.
• You can only use one pair of devices at a time to make intercom
calls.
• For cordless headsets and speakerphones, refer to the
corresponding user’s manual on how to answer and end an
intercom call.
• If a total of two cordless headset(s) and/or speakerphone(s) are
registered to the telephone base, they appear as HEADSET 1 and
HEADSET 2, respectively, in the intercom menu.
Answer an incoming call during an intercom call
When you receive an incoming home call during an intercom
call, the two handsets on the intercom call hear an alert tone.
To answer a home call during an intercom call:
Using a cordless handset:
• Press HOME/FLASH to answer the home call. The
intercom call ends automatically.
• Press OFF/CANCEL to end the intercom call without
answering the incoming call. The telephone continues to
ring. You can press HOME/FLASH to answer the call.
Using the telephone base:
• Press HOME to answer the home call and the intercom call
ends automatically.
• Press BACK and then END to end the intercom call without
answering the incoming call. The telephone continues to
ring. You can press HOME to answer the call.
To answer a cell call during an intercom call:
When you receive an incoming cell call during an intercom call,
the two handsets on the intercom call hear an alert tone.
Using a cordless handset or telephone base:
• Press CELL 1 or CELL 2 to answer the cell call and the
intercom call ends automatically.
NOTES
• If Smart call blocker is on and in screening mode, the telephone
will screen incoming calls with numbers that are not saved in your
phonebook or allow list, or with names that are not saved in the star
name list. See About Smart call blocker.
• For cordless headsets and speakerphones, refer to the
corresponding user’s manual on how to answer an incoming call
during an intercom call.
Call transfer using intercom
Use the intercom feature to transfer an outside call to another
system handset or the telephone base. You can also share an
outside call with another system handset or the telephone
base.
Using a cordless handset:
1. During the call, press OPTION.
2. Press q CID or p to scroll to Intercom, then press
SELECT.
• If you have one handset and no other registered
devices, the handset shows Calling base.
• If you have other registered device(s) or more than one
handset, the handset shows INTERCOM TO:. Use the
dialing keys to enter a specific device number (0 for the
telephone base, 1-9 for handsets 1-9, TONE followed
by 0-2 for handsets 10-12, or # for a single headset,
# followed by 1 or 2 for headset 1 or 2, or TONE
followed by # for all devices), or press q CID or p
to scroll to the desired device and press SELECT.
The call is automatically put on hold. Your handset screen
shows Calling HANDSET X, Calling BASE 0, or Calling all.
The destination device rings and shows HANDSET X is
calling or HANDSET X is calling all.
3. To answer the intercom call, press HOME/FLASH, ,
CELL 1 , CELL 2 or any dialing key (0-9, TONE ) on the
destination handset, or press HOME on the telephone
base.
4. From this intercom call, you have the following options:
• You can transfer the call. Press OPTION and then
press SELECT to select Transfer on the calling handset.
Your screen shows Call transferred. The other device
automatically connects to the outside call.
• You can let the other device join you on the outside call
in a three-way conversation. Press OPTION. Pressq CID
or p to highlight Share call, then press SELECT.
• You can end the intercom call and continue the outside
call with your handset. Press OFF/CANCEL, END,
HOME/FLASH, CELL 1 or CELL 2 on your handset (the
ended intercom call party hears four beeps).
1 or 2 for headset 1 or 2, or TONE followed by # for all
devices), or press q CID or p to scroll to the desired
device and press SELECT.
The call is automatically put on hold. The telephone base
shows Calling HANDSET X or Calling all. The destination
handset(s) rings and shows BASE 0 is calling.
3. To answer the call on any destination handset , press
HOME, CELL 1 , CELL 2 or any dialing key (0-9, TONE )
on the telephone base. Both base and handset now show
Intercom.
4. From this intercom call, you have the following options:
• You can transfer the call. Press OPTION and then press
SELECT to select Transfer on the telephone base. The
telephone base shows Call transferred. The destination
handset automatically connects to the outside call.
• You can let the handset join you on the outside call in a
three-way conversation. Press OPTION. Pressq CID or
p to highlight Share call, then press SELECT.
• You can end the intercom call and continue the outside
call on the telephone base. Press CANCEL, END,
CELL 1 or CELL 2 on the telephone base. The destination
handset shows Intercom ended.
NOTES
• To cancel the call transfer and return to the external call before the
intercom call is answered, press CANCEL on the telephone base.
• If the other device does not answer the intercom call within 100
seconds, or if the device is in use, on a call or out of range, the
initiating device shows No answer. Try again. and returns to the
outside call.
NOTES
• If you want to cancel an intercom call and reconnect to the outside
call before the destination handset answers, press OFF/CANCEL on
the originating handset.
• If the called device is not answered within 100 seconds, or if the
device is in use, on a call or out of range, the initiating device
shows No answer. Try again..
Using the telephone base:
1. During the call, press OPTION.
2. Press q CID or p to scroll to Intercom, then press
SELECT.
• If you have one handset and no other registered
devices, the telephone base shows Calling HANDSET.
• If you have other registered device(s) or more than one
handset, the telephone base shows INTERCOM TO:.
Use the dialing keys to enter a specific device number
(1-9 for handsets 1-9, TONE followed by 0-2 for
handsets 10-12, or # for a single headset, # followed by
26 27
Page 18

Push-to-talk (PTT)
You can directly broadcast messages to the speakerphone
of any device. Press and hold PUSH TO TALK on a handset
or FLASH/PTT on the telephone base to begin two-way
communication.
• Only one device can talk at a time. While talking to another
device, press and hold PUSH TO TALK on the handset or
FLASH/PTT on the telephone base.
• You must release PUSH TO TALK on the handset or
FLASH/PTT on the telephone base, so the other person can
respond.
• Only one PTT session can be active at a time.
• While PTT is in use between two devices, other devices
cannot use the intercom feature but can access the
answering system.
• When you attempt to place a PTT call to another device
which is accessing the answering system or on an intercom
call or outside call, your device screen shows Not available
at this time.
NOTE
• The PTT function is not available when QUIET mode is on.
Turn PTT on or off
Using a cordless handset:
1. Press PUSH TO TALK when the handset is not in use. The
PUSH TO TALK menu displays.
2. Press q CID or p to highlight PTT On/Off, then press
SELECT.
3. Press q CID or p to choose On or Off, then press
SELECT.
Using the telephone base:
1. Press FLASH/PTT when the telephone base is not in use.
The PUSH TO TALK menu displays.
2. Press q CID or p to highlight PTT On/Off, then press
SELECT.
3. Press q CID or p to choose On or Off, then press
SELECT.
NOTE
• The handset or the telephone base screen displays No PTT call
when PTT is turned off.
PTT call to a single device
Using a cordless handset:
1. There are a few ways to begin a PTT call to a single device.
When the handset is not in use:
• If you have one handset, press and hold PUSH TO TALK.
• If you have more than one handset:
♦ Press PUSH TO TALK on the handset, then use the
dialing keys to enter the destination device number.
-OR-
♦ Press PUSH TO TALK on the handset. Pressq CID or
p to highlight the destination device number,
then press SELECT or PUSH TO TALK.
The handset shows Connecting to HANDSET X...
(HANDSET represents the handset name, X represents the
destination handset number) or Connecting to BASE 0...
(BASE represents the base name) for a few seconds. When
the connection is made, both your and the destination
device screens display Press and hold [PTT] to talk.
2. Press and hold PUSH TO TALK. A chirp indicates your
microphone is on. Speak towards the device. Your voice
is broadcast to the destination device. While you are
speaking, your handset shows PTT To HANDSET X or PTT
To BASE 0.
3. Release PUSH TO TALK after speaking. Both devices beep
once again and the screens show Press and hold [PTT]
to talk, then you can press and hold PUSH TO TALK to
continue speaking or the destination device can respond
(see Answer a PTT call).
4. To end the PTT call, press OFF/CANCEL or END, or place
the handset in the telephone base or charger. The handset
shows Push to talk ended.
NOTE
• After PUSH TO TALK is released, the PTT call remains open for a
short time. If no one presses PUSH TO TALK within 10 seconds, the
PTT call ends automatically.
Using the telephone base:
1. There are a few ways to begin a PTT call to a single handset.
When the telephone base is not in use:
• If you have one handset, press and hold FLASH/PTT.
• If you have more than one handset:
♦ Press FLASH/PTT, then use the dialing keys to enter
the destination handset number.
-OR-
♦ Pressq CID or p to highlight the destination
handset number, then press SELECT or FLASH/PTT.
The telephone base shows Connecting to HANDSET X...
(HANDSET represents the handset name, X represents the
destination handset number) for a few seconds. When
the connection is made, both the telephone base and
destination handset display Press and hold [PTT] to talk.
2. Press and hold FLASH/PTT. A chirp indicates your
microphone is on. Speak towards the telephone base. Your
voice is broadcast to the destination handset. While you are
speaking, your telephone base shows PTT To HANDSET X.
3. Release FLASH/PTT after speaking. Both devices beep
once again and the screens show Press and hold [PTT] to
talk, then you can press and hold FLASH/PTT to continue
speaking or the destination device can respond (see
Answer a PTT call).
4. To end the PTT call, press CANCEL or END. The telephone
base shows Push to talk Ended for a few seconds.
NOTE
• After FLASH/PTT is released, the PTT call remains open for a short
time. If no one presses PTT/FLASH within 10 seconds, the PTT call
ends automatically.
PTT call to multiple devices
When there are multiple handsets registered to the phone
system, PTT supports one-to-group calls. PTT supports a
maximum of one-to-four calls when one to five handsets are
registered, and a maximum of one-to-three calls when six or
more handsets are registered. The first three or four registered
handsets will be able to use this feature. Other handsets can
only use PTT for one-to-one calls.
To call multiple devices:
Using a cordless handset:
1. You have two ways to call multiple devices. When the
handset is not in use:
• Press and hold PUSH TO TALK until the handset shows
Connecting to group....
• Press PUSH TO TALK. Press q CID or p to choose
Group. Press SELECT or press PUSH TO TALK and your
handset shows Connecting to group....
When the connection is made, both the caller and the
destination parties hear a beep. The speakerphones on all
other devices automatically activate.
2. You need to press and hold PUSH TO TALK when you
want to speak. Speak towards the handset. Your voice is
broadcast to all devices.
3. Release PUSH TO TALK after speaking.
4. Any extension can reply (see Answer a PTT call).
NOTE
• After PUSH TO TALK is released, the PTT call remains open for a
short time. If no one presses PUSH TO TALK within 10 seconds, the
PTT call ends automatically.
Using the telephone base:
1. You have two ways to call multiple devices. When the
telephone base is not in use:
• Press and hold FLASH/PTT until the screen shows
Connecting to group....
• Press FLASH/PTT. Press q CID or p to choose
Group. Press SELECT or press FLASH/PTT and the
telephone base shows Connecting to group....
When the connection is made, both the caller and the
destination parties hear a beep. The speakerphones on all
other devices automatically activate.
2. You need to press and hold FLASH/PTT when you want
to speak. Speak towards the telephone base. Your voice is
broadcast to all devices.
3. Release FLASH/PTT after speaking.
4. Any extension can reply (see Answer a PTT call).
NOTE
• After FLASH/PTT is released, the PTT call remains open for a short
time. If no one presses FLASH/PTT within 10 seconds, the PTT call
ends automatically.
28 29
Page 19

Answer a PTT call
You can respond to a PTT call, as described below.
Using a cordless handset or the telephone base:
1. When your device receives a PTT call, it beeps and shows
Press and hold [PTT] to talk.
2. When the other party is speaking, your speakerphone light
is on, and your device shows:
• PTT From HANDSET X To devices: X (the first X
represents the initiating handset number, and the
second X represents your handset number; a maximum
of four handset numbers appear).
-OR-
• PTT From BASE 0 To devices: X (the X represents your
handset number; a maximum of four handset numbers
appear).
3. When your speakerphone light is off (the screen shows
Press and hold [PTT] to talk), press and hold PUSH TO TALK
on your handset or FLASH/PTT on your telephone base.
You will hear a chirp. Speak towards the device.
• While you are speaking, your device shows PTT
To BASE 0 or PTT To HANDSET X (X represents the
destination handset number), or PTT To devices: X
(X represents the handset numbers of one or more
destination handsets; a maximum of four handset
numbers appear).
• Your voice is broadcast to all destination devices.
After speaking, release PUSH TO TALK on your handset or
FLASH/PTT on your telephone base. Your device will beep.
After the beep, if your speakerphone light is off, you can
press and hold PUSH TO TALK on your handset or
FLASH/PTT on your telephone base to continue speaking,
or the destination device can respond.
Change a one-to-one PTT call to an intercom call
You can convert a one-to-one PTT session to an intercom call.
Using a cordless handset or the telephone base:
1. When your device shows Press and hold [PTT] to talk, press
INTCOM. The screen shows Switch to Intercom?.
2. Press SELECT. Your device displays Calling BASE 0 or
Calling HANDSET X. The destination device briefly shows
Push to talk Ended and then HANDSET X is calling or BASE
0 is calling. The destination device rings.
3. Press HOME/FLASH or any dialing keys (0-9, or
TONE ) on the destination handset, or press HOME or
any dialing keys (0-9, or TONE ) on the telephone base to
answer the intercom call. Both devices now show Intercom.
4. To end the intercom call, press OFF/CANCEL on your
handset or place the handset in the telephone base or
charger, or press END on the handset or telephone base.
Both screens show Intercom ended.
Answer an incoming call during a PTT call
When you receive an outside call during PTT, there is an alert
tone.
Using a cordless handset or the telephone base:
• During a one-to-one PTT call, press HOME/FLASH,
CELL 1 or CELL 2 on the initiating or destination handset, or
press HOME, CELL 1 or CELL 2 on the telephone base. The
PTT call ends automatically and the outside call is answered.
• During a one-to-group PTT call, press HOME/FLASH,
CELL 1 or CELL 2 on the initiating handset, or press HOME,
CELL 1 or CELL 2 on the telephone base. The PTT call ends
automatically and the outside call is answered.
• During a one-to-group PTT call, press HOME/FLASH,
CELL 1 or CELL 2 on any one of the destination handsets, or
press HOME, CELL 1 or CELL 2 on the telephone base. That
device answers the outside call. The PTT call continues for
the rest of the PTT participants.
• To leave the PTT call without answering the incoming call,
press OFF/CANCEL on your handset or CANCEL on your
telephone base. The telephone continues to ring.
Make an outgoing call during a PTT call
Using a cordless handset or the telephone base:
• During a one-to-one PTT call, press HOME/FLASH on
your handset or press HOME on the telephone base to get a
dial tone. The PTT call ends automatically.
• During a one-to-group PTT call, press HOME/FLASH on
the initiating handset or press HOME on the telephone base.
The PTT call ends automatically and you get a dial tone.
• During a one-to-group PTT call, press HOME/FLASH on
any one of the destination handsets or press HOME on the
telephone base. That device gets a dial tone. The PTT call
continues for the rest of the PTT participants.
End or leave a PTT call
Using a cordless handset or the telephone base:
For one-to-one PTT calls, both initiating and destination
devices can end the PTT call. For PTT calls to multiple devices,
the initiating device can end the PTT call. If any one of the
destination devices leaves the PTT call, the call continues until
all participants or the initiator hangs up.
Press OFF/CANCEL or END on the handset, or press CANCEL
or END on the telephone base. The screen shows Push to talk
Ended.
-OR-
Place the handset in the telephone base or charger, then the
handset returns to idle mode.
NOTE
• After PUSH TO TALK on the handset or FLASH/PTT on the
telephone base is released, the PTT call remains open for a short
time. If no one presses PUSH TO TALK on the handset or
FLASH/PTT on the telephone base within 10 seconds, the PTT call
ends automatically.
Phonebook
The home phonebook directory stores up to 200 entries with
up to 30 digits for each phone number and 15 characters for
each name. Each of the downloaded phonebooks stores up to
1,500 entries with up to 30 digits for each phone number and
15 characters for each name.
• Phonebook entries are stored at the telephone base and
shared by all system handsets. Any changes made on one
device apply to all.
• Only one device can review the phonebook at a time. If
another device tries to enter the phonebook, its screen
shows Not available at this time.
• When you try to save a number already stored in the
phonebook, the screen shows Number already saved.
• Phonebook entries can also be saved to the allow list or
block list. See Allow list and Block list.
• When Smart call blocker is on, calls with numbers saved
in the phonebook will get through and ring on your
telephone. If a number saved in the phonebook is also
saved in the block list, calls from this number will be
blocked.
Add a phonebook directory entry
Using a cordless handset:
1. Press MENU on the handset in idle mode to enter the main
menu.
2. Press q CID or p to scroll to Phonebook, then press
SELECT.
3. Press OPTION to choose Home.
4. Press SELECT to choose Add contact. The screen displays
Enter number.
5. Use the dialing keys to enter a telephone number.
• Press q CID or p to move the cursor to the left or
right.
• Press MUTE/DELETE or BACKSP to erase a digit.
• Press and hold MUTE/DELETE to erase all digits.
• Press and hold REDIAL/PAUSE to insert a dialing pause
(a p appears).
-OR-
Copy a number from the redial list. Press REDIAL/PAUSE
and then q CID, p or REDIAL/PAUSE repeatedly to
locate the number. Press INSERT to copy the displayed
number.
6. Press NEXT.
7. Press q CID or p to highlight one of the following
types:
• Home
• Cell
• Work
• Other
8. Press NEXT. The screen displays Enter name.
9. Use the dialing keys to enter a name (up to 15 characters).
• Press q CID or p to move the cursor to the left or
right.
• Press 0 to add a space.
• Press MUTE/DELETE or BACKSP to erase a character.
• Press and hold MUTE/DELETE to erase all characters.
• Press a>A to change the next letter to upper or lower
case.
10. Press SAVE to confirm. You hear a confirmation tone.
Using the telephone base:
1. Press MENU on the telephone base in idle mode to enter
the main menu.
2. Press q CID or p to scroll to Phonebook, then press
SELECT.
3. Press OPTION to choose Home.
4. Press SELECT to choose Add contact. The screen displays
ENTER NUMBER.
5. Use the dialing keys to enter a telephone number.
• Press q CID or p to move the cursor to the left or
right.
• Press DELETE or BACKSP to erase a digit.
• Press and hold DELETE to erase all digits.
• Press and hold REDIAL/PAUSE to insert a dialing pause
(a p appears).
-OR-
Copy a number from the redial list. Press REDIAL/PAUSE
and then q CID, p or REDIAL/PAUSE repeatedly to
locate the number. Press INSERT to copy the displayed
number.
6. Press NEXT.
7. Press q CID or p to highlight one of the following
types:
• Home
• Cell
• Work
• Other
8. Press NEXT. The screen displays ENTER NAME.
9. Use the dialing keys to enter a name (up to 15 characters).
• Press q CID or p to move the cursor to the left or
right.
• Press 0 to add a space.
• Press DELETE or BACKSP to erase a character.
• Press and hold DELETE to erase all characters.
• Press a>A to change the next letter to upper or lower
case.
10. Press SAVE to confirm. You hear a confirmation tone.
30 31
Page 20

Add a predialed telephone number to the phonebook
You can save a predialed telephone number to the
phonebook.
Using a cordless handset:
1. Enter the telephone number when in idle mode, then
press SAVE to move on to edit the number and then press
NEXT.
2. Press q CID or p to highlight one of the following
types:
• Home
• Cell
• Work
• Other
3. Press NEXT. The screen displays Enter name.
4. Use the dialing keys to edit the name.
• Press q CID or p to move the cursor to the left or
right.
• Press MUTE/DELETE or BACKSP to erase a character.
• Press and hold MUTE/DELETE to erase all characters.
5. Press SAVE to confirm. You hear a confirmation tone.
Using the telephone base:
1. Enter the telephone number when in idle mode, then
press SAVE to move on to edit the number and then press
NEXT.
2. Press q CID or p to highlight one of the following
types:
• Home
• Cell
• Work
• Other
3. Press NEXT. The screen displays ENTER NAME.
4. Use the dialing keys to edit the name.
• Press q CID or p to move the cursor to the left or
right.
• Press DELETE or BACKSP to erase a character.
• Press and hold DELETE to erase all characters.
5. Press SAVE to confirm. You hear a confirmation tone.
Review a phonebook entry
Using the handset:
1. Press p on the handset when in idle mode.
2. Press q CID or p to highlight a phonebook entry, then
press REVIEW.
3. Press q CID or p to browse.
-OR-
1. Press MENU when in idle mode.
2. Press q CID or p to scroll to Phonebook then press
SELECT.
3. Press q CID or p to to highlight a directory, then press
REVIEW.
4. Press q CID or p to browse.
-OR-
1. Press OPTION while on a call.
2. Press q CID or p to scroll to Phonebook then press
SELECT.
3. Press q CID or p to to highlight a directory, then press
REVIEW.
4. Press q CID or p to browse.
Using the telephone base:
1. Press p on the telephone base when in idle mode.
2. Press q CID or p to highlight a phonebook entry, then
press REVIEW.
3. Press q CID or p to browse.
-OR-
1. Press MENU when in idle mode.
2. Press q CID or p to scroll to Phonebook then press
SELECT.
3. Press q CID or p to to highlight a directory, then press
REVIEW.
4. Press q CID or p to browse.
-OR-
1. Press OPTION while on a call.
2. Press q CID or p to scroll to Phonebook then press
SELECT.
3. Press q CID or p to to highlight a directory, then press
REVIEW.
4. Press q CID or p to browse.
NOTE
• When the desired entry displays, press # (pound key) on the
handset or telephone base repeatedly to show different dialing
options.
3-character alphabetical search
You can use the enhanced 3-character search to find your
contacts quickly and efficiently.
1. Follow the steps in Review a phonebook entry above to
enter the phonebook.
2. When an entry appears, use the dialing keys to enter the
letters associated with the name (see page 89). You can
enter up to 3 letters for the search. The letters will show
at the top left hand corner of the screen. After you have
entered one to three letters, the system starts searching in
the phonebook. If there is no name matching the letter(s)
entered, the next closest match in alphabetical order
appears. If necessary, press q or p on the handset or
telephone base to browse.
NOTE
• The cursor automatically moves to the next position 2 seconds after
you enter a letter. If you do not enter another letter in the coming 2
seconds, the system starts searching in the phonebook.
Dial a phonebook entry
You can dial a phonebook entry on any line.
To dial a phonebook entry:
1. Search for the desired entry in the phonebook (see Review
a phonebook entry and 3-character alphabetical search).
2. When the desired entry appears, press # (pound key)
repeatedly on the handset or telephone base to show
different dialing options.
3. When the displayed number is in the correct format, press
HOME/FLASH or on the handset, or press HOME
on the telephone base to use the home line. Press CELL 1
or CELL 2 on the handset or telephone base to use the cell
line.
Edit a phonebook entry
You can edit any phonebook entry. However, be aware that
if you download a phonebook from a cell phone again,
the phonebook is erased and replaced with the current cell
phone directory. If you have edited the downloaded entries
on the IS8151/IS8251, those changes are lost. To avoid losing
changes made to the downloaded phonebook, we suggest
that you edit numbers in your cell phone, then download the
phonebook.
Using a cordless handset:
1. Search for the desired entry in the phonebook (see Review
a phonebook entry and 3-character alphabetical search).
2. When a phonebook entry displays, press EDIT. The screen
shows Edit number along with the phone number to be
edited.
3. Use the dialing keys to edit the number.
• Press q CID or p to move the cursor to the left or
right.
• Press MUTE/DELETE or BACKSP to erase a digit.
• Press and hold MUTE/DELETE to erase all digits.
• Press and hold REDIAL/PAUSE to insert a dialing pause
(a p appears).
4. Press NEXT.
5. Press q CID or p to highlight one of the following
types:
• Home
• Cell
• Work
• Other
6. Press NEXT. The screen displays Enter name.
7. Use the dialing keys to edit the name.
• Press q CID or p to move the cursor to the left or
right.
• Press 0 to add a space.
• Press MUTE/DELETE or BACKSP to erase a character.
• Press and hold MUTE/DELETE to erase all characters.
8. Press SAVE to confirm. You hear a confirmation tone.
Using the telephone base:
1. Search for the desired entry in the phonebook (see Review
a phonebook entry and 3-character alphabetical search).
2. When a phonebook entry displays, press EDIT. The screen
shows EDIT NUMBER along with the phone number to be
edited.
3. Use the dialing keys to edit the number.
• Press q CID or p to move the cursor to the left or
right.
• Press DELETE or BACKSP to erase a digit.
• Press and hold DELETE to erase all digits.
• Press and hold REDIAL/PAUSE to insert a dialing pause
(a p appears).
4. Press NEXT.
5. Press q CID or p to highlight one of the following
types:
• Home
• Cell
• Work
• Other
6. Press NEXT. The screen displays EDIT NAME.
7. Use the dialing keys to edit the name.
• Press q CID or p to move the cursor to the left or
right.
• Press 0 to add a space.
• Press DELETE or BACKSP to erase a character.
• Press and hold DELETE to erase all characters.
8. Press SAVE to confirm. You hear a confirmation tone.
32 33
Page 21

Edit the type of a phonebook entry
If you only want to edit the type of a phonebook entry:
1. Search for the desired entry in the phonebook (see Review
a phonebook entry and 3-character alphabetical search).
2. When a phonebook entry displays, press LABEL. Enter the
corresponding shortcut keys shown on the screen.
-ORPress CLEAR to erase the assigned label.
Delete a phonebook entry
To delete an entry:
1. Search for the desired entry in the phonebook (see Review
a phonebook entry and 3-character alphabetical search).
2. When the desired entry appears, press MUTE/DELETE on
the handset or DELETE on the telephone base. The screen
displays Delete contact? and the name of the entry. Press
YES to confirm.
3. The screen displays Contact deleted and then the
next alphabetical entry in the phonebook. You hear a
confirmation tone.
NOTE
• Once a phonebook entry is deleted, it cannot be retrieved.
Remove a downloaded cell phone directory
Using a cordless handset or telephone base:
1. Search for the desired downloaded phonebook in the
phonebook menu (see Review a phonebook entry and
3-character alphabetical search).
2. When the desired downloaded phonebook is chosen,
press OPTION , then press q CID or p to highlight
Remove dir.
3. Press SELECT . The screen displays Directory Cell Phone X
will be erased (Cell Phone X represents the device name of
your cell phone).
4. Press YES to confirm. You hear a confirmation tone.
Caller ID
If you subscribe to caller ID service, information about each
caller appears after the first or second ring. If you answer a call
before the caller information appears on the screen, it will not
be saved in the caller ID log.
The caller ID log stores up to 30 entries. Each entry has up to 24
digits for the phone number and 15 characters for the name.
If the telephone number has more that 15 digits, only the last 15
digits appear.
If the name has more than 15 characters, only the first 15
characters are shown and saved in the caller ID log.
Entries appear in reverse chronological order. When the caller
ID log is full, the oldest entry is deleted to make room for new
incoming call information.
Caller ID log entries are shared by all system handsets (for
multiple handset models only). Any deletions made on one
handset are reflected on all other handsets.
NOTE
• This product can provide information only if both you and the caller
are in areas offering caller ID service and if both telephone service
providers use compatible equipment. The time and date are sent
by your telephone service provider along with the call information.
Review a caller ID log entry
Review the caller ID log to find out who called, to return
the call, or to copy the caller’s name and number into your
phonebook. Caller ID log empty appears if there are no
records in the caller ID log.
1. When the handset or the telephone base is in idle mode,
press q CID on the handset or telephone base to
review the caller ID log in reverse chronological order
starting with the most recent call.
-ORReview the caller ID log by pressing MENU. Press q CID
or p on the handset or telephone base to scroll to
Caller ID log, then press SELECT twice to select Review.
2. Press q CID or p on the handset or telephone base to
scroll through the list.
NOTE
• Only one handset or the telephone base can review the caller ID
log at a time. If another device tries to enter the phonebook or
caller ID log, it shows Not available at this time.
Memory match
Missed call indicator
When there are calls that have not been reviewed in the caller
ID log, the handset displays XX missed calls.
Each time you review a caller ID log entry marked NEW, the
number of missed calls decreases by one.
When you have reviewed all the missed calls, the missed call
indicator no longer displays.
If you do not want to review the missed calls one by one, but
still want to keep them in the caller ID log, you can press and
hold OFF/CANCEL on the handset for four seconds when the
handset is idle, or press and hold CANCEL on the telephone
base for four seconds when the telephone base is idle. You
will hear a confirmation tone. All the entries in the caller ID log
become old (reviewed already), and the missed calls message
goes away.
View dialing options
Although the caller ID log entries received have 10 digits (the
area code plus the seven-digit number), in some areas, you
may dial only the seven digits, or a 1 plus the seven digits, or a
1 plus the area code plus the seven digits. You can change the
number of digits that you dial from or store to the phonebook.
While reviewing the caller ID log, press # (pound key)
repeatedly to show different dialing options for local and
long distance numbers before dialing or saving the telephone
number in the phonebook.
Press 1 repeatedly if you need to add or remove 1 in front
of the telephone number before dialing or saving it in the
phonebok.
Press # 1-800-595-9511
Press # 595-9511
Press # 1-595-9511
Press # 800-595-9511
-OR-
Press 1 1-800-595-9511
Press 1 800-595-9511
NOTE
• If you have programmed the home area code, only the last seven
digits of the incoming phone numbers from that area code will be
displayed while reviewing the caller ID log. Press # repeatedly to
display all possible dialing options.
Dial a caller ID log entry
1. When in the caller ID log, press q CID or p on the
handset or telephone base to browse.
2. Press HOME/FLASH or on the handset, or HOME on
the telephone base to dial the displayed entry using the
home line.
-ORPress CELL 1 or CELL 2 on the handset or telephone base to
dial the display entry using the cell line.
Save a caller ID log entry to the phonebook
Caller ID log entries can only be saved to the Home directory.
Using a cordless handset:
1. Select a desired entry in the caller ID log (see Review a
caller ID log entry).
2. When the desired entry appears, press SAVE.
3. Press SELECT to select Phonebook. The screen displays Edit
number.
4. Use the dialing keys to edit the number.
• Press q CID or p to move the cursor to the left or
right.
• Press MUTE/DELETE or BACKSP to erase a digit.
• Press and hold MUTE/DELETE to erase all digits.
• Press and hold REDIAL/PAUSE to insert a dialing pause
(a p appears).
5. Press NEXT.
6. Press q CID or p to highlight one of the following
types:
• Home
• Cell
• Work
• Other
7. Press NEXT. The screen displays Edit name.
8. Use the dialing keys to edit the name.
• Press q CID or p to move the cursor to the left or
right.
• Press 0 to add a space.
• Press MUTE/DELETE or BACKSP to erase a character.
• Press and hold MUTE/DELETE to erase all characters.
• Press # (pound key) to move the last word to the
front. For example, Johnson Charlie becomes Charlie
Johnson when you press # (pound key).
9. Press SAVE to confirm. You hear a confirmation tone.
When the incoming telephone number matches the last seven
digits of a telephone number in your phonebook, the screen
displays the stored name of the phonebook entry.
For example, if Linda Jones calls, her name appears as Linda if
this is how you entered it into your phonebook.
NOTE
• The number shown in the caller ID log is in the format sent by the
telephone service provider. It usually delivers 10-digit telephone
numbers (area code plus phone number). If the last seven digits of
the incoming telephone number does not match a number in your
phonebook, the name appears as it is delivered by the telephone
service provider.
34 35
Using the telephone base:
1. Select a desired entry in the caller ID log (see Review the
caller ID log).
2. When the desired entry appears, press SAVE.
3. Press SELECT to select Phonebook. The telephone base
displays EDIT NUMBER.
4. Use the dialing keys to edit the number.
• Press q CID or p to move the cursor to the left or
right.
• Press DELETE or BACKSP to erase a digit.
• Press and hold DELETE to erase all digits.
Page 22

• Press and hold REDIAL/PAUSE to insert a dialing pause
(a p appears).
5. Press NEXT.
6. Press q CID or p to highlight one of the following
types:
• Home
• Cell
• Work
• Other
7. Press NEXT. The telephone base displays EDIT NAME.
8. Use the dialing keys to edit the name.
• Press q CID or p to move the cursor to the left or
right.
• Press 0 to add a space.
• Press DELETE or BACKSP to erase a character.
• Press and hold DELETE to erase all characters.
• Press # (pound key) to move the last word to the
front. For example, Johnson Charlie becomes Charlie
Johnson when you press # (pound key).
9. Press SAVE to confirm. You hear a confirmation tone.
NOTES
• If the caller’s name you received from the telephone service
provider is all in capital letters, the first letter of every word remains
a capital letter, while other letters become lower case. However,
the next letter after the prefix “Mac”, “Mc”, “D’”, “C’” or “O’”, is kept
as a capital letter. For example, the “D” in “MacDonald” is kept as a
capital letter. Another exception is that “VAN DER” will be changed
to “Van der”.
• If the telephone number from the caller ID information has already
been saved in the phonebook under a different name, the new
name will overwrite the old one.
• If you save a block number in the caller ID log to the phonebook,
the original name from the caller ID information will be saved.
Save a caller ID log entry to the allow list
Using a cordless handset:
1. Select a desired entry in the caller ID log (see Review a
caller ID log entry).
2. When the desired entry appears, press SAVE.
3. Press q CID or p to highlight Allow list, and then press
SELECT. The screen displays Edit number.
4. Use the dialing keys to edit the number.
• Press q CID or p to move the cursor to the left or
right.
• Press MUTE/DELETE or BACKSP to erase a digit.
• Press and hold MUTE/DELETE to erase all digits.
• Press and hold REDIAL/PAUSE to insert a dialing pause
(a p appears).
5. Press NEXT. The screen displays Edit name.
6. Use the dialing keys to edit the name.
• Press q CID or p to move the cursor to the left or
right.
• Press 0 to add a space.
• Press MUTE/DELETE or BACKSP to erase a character.
• Press and hold MUTE/DELETE to erase all characters.
• Press # (pound key) to move the last word to the
front. For example, Johnson Charlie becomes Charlie
Johnson when you press # (pound key).
7. Press SAVE to confirm. The screen shows Saved to allow
list.
Using the telephone base:
1. Select a desired entry in the caller ID log (see Review a
caller ID log entry).
2. When the desired entry appears, press SAVE.
3. Press q CID or p to highlight Allow list, and then press
SELECT. The screen displays EDIT NUMBER.
4. Use the dialing keys to edit the number.
• Press q CID or p to move the cursor to the left or
right.
• Press DELETE or BACKSP to erase a digit.
• Press and hold DELETE to erase all digits.
• Press and hold REDIAL/PAUSE to insert a dialing pause
(a p appears).
5. Press NEXT. The telephone base displays EDIT NAME.
6. Use the dialing keys to edit the name.
• Press q CID or p to move the cursor to the left or
right.
• Press 0 to add a space.
• Press DELETE or BACKSP to erase a character.
• Press and hold DELETE to erase all characters.
• Press # (pound key) to move the last word to the
front. For example, Johnson Charlie becomes Charlie
Johnson when you press # (pound key).
7. Press SAVE to confirm. The telephone base shows Saved to
allow list.
Save a caller ID log entry to the block list
Using a cordless handset:
1. Select a desired entry in the caller ID log (see Review a
caller ID log entry).
2. When the desired entry appears, press SAVE.
3. Press q CID or p to highlight Block list, and then press
SELECT. The screen displays Edit number.
4. Use the dialing keys to edit the number.
• Press q CID or p to move the cursor to the left or
right.
• Press MUTE/DELETE or BACKSP to erase a digit.
• Press and hold MUTE/DELETE to erase all digits.
• Press and hold REDIAL/PAUSE to insert a dialing pause
(a p appears).
5. Press NEXT. The screen displays Edit name.
6. Use the dialing keys to edit the name.
• Press q CID or p to move the cursor to the left or
right.
• Press 0 to add a space.
• Press MUTE/DELETE or BACKSP to erase a character.
• Press and hold MUTE/DELETE to erase all characters.
• Press # (pound key) to move the last word to the
front. For example, Johnson Charlie becomes Charlie
Johnson when you press # (pound key).
7. Press SAVE to confirm. The screen shows Saved to block
list.
Using the telephone base:
1. Select a desired entry in the caller ID log (see Review a
caller ID log entry).
2. When the desired entry appears, press SAVE.
3. Press q CID or p to highlight Block list, and then press
SELECT. The screen displays EDIT NUMBER.
4. Use the dialing keys to edit the number.
• Press q CID or p to move the cursor to the left or
right.
• Press DELETE or BACKSP to erase a digit.
• Press and hold DELETE to erase all digits.
• Press and hold REDIAL/PAUSE to insert a dialing pause
(a p appears).
5. Press NEXT. The telephone base displays EDIT NAME.
6. Use the dialing keys to edit the name.
• Press q CID or p to move the cursor to the left or
right.
• Press 0 to add a space.
• Press DELETE or BACKSP to erase a character.
• Press and hold DELETE to erase all characters.
• Press # (pound key) to move the last word to the
front. For example, Johnson Charlie becomes Charlie
Johnson when you press # (pound key).
7. Press SAVE to confirm. The telephone base shows Saved to
block list.
Save a caller ID log entry to the star name list
Using a cordless handset or the telephone base:
1. Select a desired entry in the caller ID log (see Review a
caller ID log entry).
2. When the desired entry appears, press SAVE.
3. Press q CID or p to highlight Star name list, and then
press SELECT. The screen displays Star this name? and then
the caller’s name.
4. Press SELECT to confirm. The screen shows Saved to star
name list.
Delete the caller ID log entries
To delete an entry:
Press MUTE/DELETE on the handset or DELETE on the
telephone base to delete the shown entry.
To delete all entries:
1. Press MENU when in idle mode.
2. Press q CID or p on the handset or press telephone
base to scroll to Caller ID log, then press SELECT.
3. Press q CID or p on the handset or telephone base to
scroll to Del all calls, then press SELECT.
4. When the screen shows Delete all calls?, press YES to
confirm. There is a confirmation tone and the screen
returns to the previous menu.
36 37
Page 23

About Smart call blocker
If you have subscribed to caller ID service, then you can use
Smart call blocker to screen robocalls, telemarketing calls and
unwanted calls for you, while allowing welcome calls to get
through. †
† The screening feature of Smart call blocker is applicable to home calls only.
All incoming cell calls will get through and ring.
You can set up your lists of welcome callers and unwelcome
callers. Smart call blocker allows calls from your welcome callers
to get through, and it blocks calls from your unwelcome callers.
For other unknown home calls, you can allow these calls, block
these calls, or forward these calls to the answering system.
With some easy configurations, you can set to only filter
robocalls on the home line by asking the callers to press the
pound key (#) before the calls are put through to you.
You can also set Smart call blocker to screen incoming home
calls by asking the callers to record their names and press the
pound key (#). After your caller completes the request, your
telephone rings and announces the caller’s name. You can
then choose to block or answer the call, or you can forward the
call to the answering system. If the caller does not respond or
record his/her name, the call is blocked from ringing through.
When you add your welcome callers to your allow list, they will
bypass all screening and ring directly to your handsets.
NOTES
• Smart call blocker is on, once you install your telephone. It allows all
incoming calls to get through and ring by default. You can change
the Smart call blocker settings to screen incoming home calls. For
more details, see Set profile.
• With call screening active, Smart call blocker screens and filters
incoming home calls from numbers or names that are not yet saved
in your phonebook, allow list, block list, or star name list. You can
easily add incoming phone numbers to your allow list and block
list. This allows you to build up your lists of allowed and blocked
numbers, and Smart call blocker will know how to deal with these
calls when they come in again.
• To turn off Smart call blocker, see Set Smart call blocker on/off.
Call categories
Calls are classified into four categories:
Welcome calls
Welcome calls are calls with telephone numbers saved in your
allow list or phonebook, and not in your block list. Welcome
calls also include calls with caller names saved in your star name
list.
NOTES
• All incoming calls on your cell lines will get through and ring, unless
the caller’s numbers are saved in your block list. If you want to
block a cell call, add the number to the block list. See Block list.
• There are many organizations like schools, medical offices,
and pharmacies that use robocalls to communicate important
information to you. Robocall uses an autodialer to deliver prerecorded messages. By entering the name of the organizations into
the star name list, it ensures these calls will ring through when you
only know the caller names but not their numbers.
Unwelcome calls
Unwelcome calls are calls with telephone numbers saved in
your block list, and you want to block their calls.
Calls without numbers (for home calls only)
Calls without numbers are calls that are “out of area“ or with
numbers set to “Private“.
Uncategorized calls (for home calls only)
Uncategorized calls include calls with absent caller ID number,
calls with numbers that are not in your phonebook, allow list, or
block list, or calls with caller ID names that are not in your star
name list.
NOTE
• The allow list stores up to 200 entries, the block list stores up to
1,000 entries, and the star name list stores up to 10 names.
Call handling
• Smart call blocker is set to on, and to allow all incoming calls
by default. When Smart call blocker is on, the first ring of all
incoming calls will be muted.
• If your phonebook, allow list, star name list and block list
are empty when Smart call blocker is on, and you have set
to screen calls, the telephone will screen all incoming home
calls and asks callers to announce their names or press the
pound key (#).
• If Smart call blocker is off, all incoming calls ring, including
numbers saved in the block list.
• If QUIET mode is on, and Smart call blocker is on and in
screening mode, all screened home calls will be sent to the
answering system after screening.
Smart call blocker handles calls in the following ways:
Call category Call control
Welcome calls
• Numbers saved in
allow list.
• Numbers saved in
phonebook.
• Numbers not found
in block list.
• Caller ID names
saved in star name
list.
Unwelcome calls
• Numbers saved in
block list.
Allow
• The telephone rings when
there is an incoming call with
number saved in your allow list
or phonebook, but not in your
block list. Robocalls with caller
names saved in your star name
list will also ring.
• All incoming calls on your cell
line will get through and ring.
Block
The telephone does not ring when
there is an incoming call with
number saved in your block list,
and the call will be rejected.
Call category Call control
Unknown calls (for
home calls only)
You can select one of the following
five profile options for handling all
unknown home calls.
• Calls without
numbers
- Numbers that are
“out of area“ or set
to “Private“.
Screen unknown
The telephone plays the screening
announcement, and then ask the
caller to say his/her name before
the call rings on your telephone.
• Uncategorized calls
- With absent caller
ID number.
- Numbers not found
in phonebook.
- Numbers not found
in allow list.
- Numbers not found
in block list.
- With caller ID names
not found in star
name list
You can then answer the call, and
hear the caller’s name announced.
You can decide whether to accept
or reject the call, or to forward the
call to the answering system.
Screen robot
The telephone plays the screening
announcement, and then ask
the caller to press the pound key
(#) before the call rings on your
telephone. You can then answer
the call.
Allow unknown (default settings)
The telephone allows these calls to
get through and ring. The caller’s
number, even if it is available, will
not be saved to the allow list.
Unknown to answering system
The telephone forwards these calls
to the answering system without
ringing.
Block unknown
The telephone rejects these calls
with block announcement without
ringing. The caller’s number, even
if it’s available, will not be saved to
the block list.
38 39
NOTE
• You can set to screen, allow, or block all unknown home calls
without numbers, or unknown home calls with numbers not saved
in your phonebook, allow list or star name list. You can also send
these calls to the answering system. Allow unknown is the default
profile setting. To change the setting, see Set profile.
Page 24

Set Smart call blocker on/off
The Smart call blocker feature is set to on by default.
Using a cordless handset or the telephone base:
1. Press CALL BLOCK on the handset or telephone base to
enter the call block menu when the telephone is not in use.
- OR -
1. Press MENU on the handset or telephone base in idle
mode to enter the main menu. Then, press q CID or p
to scroll to Smart call blk. Press SELECT.
2. Press SELECT again to choose SCB On/Off.
3. Press q CID or p to scroll to On or Off, and then press
SELECT.
NOTE
• If you set SCB On/Off to Off, all settings under Set profile (see
below) will be invalid.
Set profile
There are five profile setting options, which allows you to
quickly set up Smart call blocker.
Using a cordless handset or the telephone base:
1. Press CALL BLOCK on the handset or telephone base to
enter the call block menu when the telephone is not in use.
- OR -
1. Press MENU on the handset or telephone base in idle
mode to enter the main menu. Then, press q CID or p
to scroll to Smart call blk. Press SELECT.
2. Press q CID or p to scroll to Set profile, and then press
SELECT.
3. Press q CID or p to select one of the following options,
then press SELECT.
• Screen unknown - screen any home calls without
numbers or with numbers not saved in the phonebook,
allow list, or star name list.
- This profile setting sets the telephone to screen all
unknown home calls and asks the callers to say their
names before putting the calls through to you. See
Screen unknown home calls.
• Screen robot - screen robocalls.
- This profile setting sets the telephone to screen all
unknown home calls and asks the callers to press the
pound key (#) before putting the calls through to
you. See Screen robocalls.
• Allow unknown (default setting) - allow all unknown
home calls to ring, except calls with numbers saved in
the block list.
- This profile setting sets the telephone to allow all
unknown home calls to get through and ring. Calls
with numbers saved in the block list will be rejected.
• UnknownToAns.S - forward all unknown home calls to
the answering system.
- This profile setting sets the telephone to forward all
unknown home calls to the answering system.
• Block unknown - block all unknown home calls.
- This profile setting sets the telephone to block all
unknown home calls.
After selecting a profile setting, make sure you have not turned
off Smart call blocker. Refer to the Set Smart call blocker on/
offsection to it on.
NOTES
• If you set SCB On/Off to Off, selected setting under Set profile will
be invalid, and all incoming home and cell calls will ring, including
calls with numbers in your block list.
• There may be robocalls that you do not want to miss. For example,
robocalls with announcements or notices from schools or
pharmacies. You can set up your star name list with these caller
names to allow their calls to get through to you. See Star name list
section.
Block list
Add numbers that you want to prevent their calls from ringing
through. The block list stores up to 1,000 entries.
NOTE
• Home or cell calls with numbers that have been added to your
block list will be blocked.
Add a block list entry:
Using a cordless handset or the telephone base:
1. Press CALL BLOCK on the handset or telephone base to
enter the call block menu when the telephone is not in use.
- OR -
1. Press MENU on the handset or telephone base in idle
mode to enter the main menu. Then, press q CID or p
to scroll to Smart call blk. Press SELECT.
2. Press q CID or p to highlight Block list, and then press
SELECT.
3. Press q CID or p to highlight Add new entry, and then
press SELECT.
4. When the screen displays Enter number, use the dialing
keys to enter the number.
• Press q CID or p to move the cursor to the left or
right.
• Press MUTE/DELETE on the handset or DELETE on the
telephone base to erase a digit.
• Press and hold MUTE/DELETE on the handset or
DELETE on the telephone base to erase all digits.
• Press and hold REDIAL/PAUSE to insert a dialing pause
(a p appears).
-OR-
Copy a number from the redial list by pressing
REDIAL/PAUSE. Then, press q CID, p or
REDIAL/PAUSE repeatedly to find the desired number.
Press INSERT to copy the number.
5. Press NEXT to move to the name.
6. When the screen displays Enter name, use the dialing keys
to enter a name.
• Press q CID or p to move the cursor to the left or
right.
• Press 0 to add a space.
• Press MUTE/DELETE on the handset or DELETE on the
telephone base to erase a character.
• Press and hold MUTE/DELETE on the handset or
DELETE on the telephone base to erase all characters.
• Press TONE to change the next letter to upper or
lower case.
7. Press SAVE to store your block list entry.
NOTES
• Numbers saved in your phonebook can also be saved to the block
list.
• If you save a block entry that has already been saved to the allow
list, the entry in the allow list will be removed.
Review block list:
Using a cordless handset or the telephone base:
1. Press CALL BLOCK on the handset or telephone base to
enter the call block menu when the telephone is not in use.
- OR -
1. Press MENU on the handset or telephone base in idle
mode to enter the main menu. Then, press q CID or p
to scroll to Smart call blk. Press SELECT.
2. Press q CID or p to highlight Block list, and then press
SELECT.
3. Press q CID or p on the handset or telephone base to
browse through the block entries.
Save a caller ID log entry to the block list:
Using a cordless handset or the telephone base:
1. Select a desired entry in the caller ID log (see Review a
caller ID log entry).
2. When the desired entry appears, press SAVE.
3. Press q CID or p to highlight Block list, and then press
SELECT. The screen displays Edit number.
4. Use the dialing keys to edit the number.
• Press q CID or p to move the cursor to the left or
right.
• Press MUTE/DELETE on the handset or DELETE on the
telephone base, or press BACKSP to erase a digit.
• Press and hold MUTE/DELETE on the handset or
DELETE on the telephone base to erase all digits.
• Press and hold REDIAL/PAUSE to insert a dialing pause
(a p appears).
5. Press NEXT. The screen displays Edit name.
6. Use the dialing keys to edit the name.
• Press q CID or p to move the cursor to the left or
right.
• Press 0 to add a space.
• Press MUTE/DELETE on the handset or DELETE on the
telephone base, or press BACKSP to erase a character.
• Press and hold MUTE/DELETE on the handset or
DELETE on the telephone base to erase all characters.
• Press # (pound key) to move the last word to the
front. For example, Johnson Charlie becomes Charlie
Johnson when you press # (pound key).
7. Press SAVE to confirm. The screen shows Saved to block
list.
40 41
Page 25

Edit a block list entry:
Using a cordless handset or the telephone base:
1. Search for the desired entry in the block list (see Review
block list:).
2. When the desired entry appears, press EDIT. The screen
displays Edit number along with the phone number to be
edited. If you only want to edit the name, skip to Step 4.
3. To edit the number.
• Press q CID or p to move the cursor to the left or
right.
• Press MUTE/DELETE on the handset or DELETE on the
telephone base, or press BACKSP to erase a digit.
• Press and hold MUTE/DELETE on the handset or
DELETE on the telephone base to erase all digits.
• Press and hold REDIAL/PAUSE to insert a dialing pause
(a p appears).
4. Press NEXT to move on to the name. The screen displays
Edit name along with the name to be edited.
5. Use the dialing keys to edit the name.
• Press q CID or p to move the cursor to the left or
right.
• Press 0 to add a space.
• Press MUTE/DELETE on the handset or DELETE on the
telephone base, or press BACKSP to erase a character.
• Press and hold MUTE/DELETE on the handset or
DELETE on the telephone base to erase all characters.
• Press TONE to change the next letter to upper or
lower case.
6. Press SAVE to confirm. The screen shows Saved to block
list.
Delete a block list entry:
Using a cordless handset or the telephone base:
1. Search for the desired entry in the block list (see Review
block list:).
2. When the desired entry displays, press MUTE/DELETE on
the handset or DELETE on the telephone base. The screen
shows Delete entry?.
3. Press YES to confirm. The screen show Entry deleted, and
the next entry displays. You cannot retrieve a deleted entry.
NOTE
• If the call block list is empty after an entry is deleted, the screen
displays Block list is empty.
Delete all block list entries:
Using a cordless handset or the telephone base:
1. Press MENU on the handset or telephone base in idle
mode to enter the main menu.
2. Press q CID or p to scroll to Smart call blk, then press
SELECT.
3. Press q CID or p to scroll Block list, and then press
SELECT.
4. Press q CID or p to scroll Delete all, and then press
SELECT. The screen shows Delete all in block list?.
5. Press YES to confirm. The screen displays Deleted. There is
a confirmation tone.
Allow list
Add numbers that you want to allow their calls to get through
to you. The allow list stores up to 200 entries.
Add an allow list entry:
Using a cordless handset or the telephone base:
1. Press CALL BLOCK on the handset or telephone base to
enter the call block menu when the telephone is not in use.
- OR -
1. Press MENU on the handset or telephone base in idle
mode to enter the main menu. Then, press q CID or p
to scroll to Smart call blk. Press SELECT.
Review allow list:
Using a cordless handset or the telephone base:
1. Press CALL BLOCK on the handset or telephone base to
enter the call block menu when the telephone is not in use.
- OR -
1. Press MENU on the handset or telephone base in idle
mode to enter the main menu. Then, press q CID or p
to scroll to Smart call blk. Press SELECT.
2. Press q CID or p to highlight Allow list, and then press
SELECT.
3. Press q CID or p on the handset or telephone base to
browse through the allow list entries.
2. Press q CID or p to highlight Allow list, and then press
SELECT.
3. Press q CID or p to highlight Add new entry, and then
press SELECT.
4. When the screen displays Enter number, use the dialing
keys to enter the number.
• Press q CID or p to move the cursor to the left or
right.
• Press MUTE/DELETE on the handset or DELETE on the
telephone base to erase a digit.
• Press and hold MUTE/DELETE on the handset or
DELETE on the telephone base to erase all digits.
• Press and hold REDIAL/PAUSE to insert a dialing pause
(a p appears).
-OR-
Copy a number from the redial list by pressing
REDIAL/PAUSE. Then, press q CID, p or
REDIAL/PAUSE repeatedly to find the desired number.
Press INSERT to copy the number.
5. Press NEXT to move to the name.
6. When the screen displays Enter name, use the dialing keys
to enter a name.
• Press q CID or p to move the cursor to the left or
right.
• Press 0 to add a space.
• Press MUTE/DELETE on the handset or DELETE on the
telephone base to erase a character.
• Press and hold MUTE/DELETE on the handset or
DELETE on the telephone base to erase all characters.
• Press TONE to change the next letter to upper or
lower case.
Save a caller ID log entry to the allow list:
Using a cordless handset or the telephone base:
1. Select a desired entry in the caller ID log (see Review the
caller ID log).
2. When the desired entry appears, press SAVE.
3. Press q CID or p to highlight Allow list, and then press
SELECT. The screen displays Edit number.
4. Use the dialing keys to edit the number.
• Press q CID or p to move the cursor to the left or
right.
• Press MUTE/DELETE on the handset or DELETE on the
telephone base, or press BACKSP to erase a digit.
• Press and hold MUTE/DELETE on the handset or
DELETE on the telephone base to erase all digits.
• Press and hold REDIAL/PAUSE to insert a dialing pause
(a p appears).
5. Press NEXT. The screen displays Edit name.
6. Use the dialing keys to edit the name.
• Press q CID or p to move the cursor to the left or
right.
• Press 0 to add a space.
• Press MUTE/DELETE on the handset or DELETE on the
telephone base, or press BACKSP to erase a character.
• Press and hold MUTE/DELETE on the handset or
DELETE on the telephone base to erase all characters.
• Press # (pound key) to move the last word to the
front. For example, Johnson Charlie becomes Charlie
Johnson when you press # (pound key).
7. Press SAVE to confirm. The screen shows Saved to allow
list.
7. Press SAVE to store your allow list entry.
Edit an allow list entry:
NOTES
• Numbers saved in your phonebook can also be saved to the allow
list.
• If you save an allow list entry that has already been saved to the
block list, the entry in the block list will be removed.
Using a cordless handset or the telephone base:
1. Search for the desired entry in the allow list (see Review
allow list:).
2. When the desired entry appears, press EDIT. The screen
displays Edit number along with the phone number to be
edited. If you only want to edit the name, skip to Step 4.
3. To edit the number.
• Press q CID or p to move the cursor to the left or
right.
• Press MUTE/DELETE on the handset or DELETE on the
telephone base, or press BACKSP to erase a digit.
• Press and hold MUTE/DELETE on the handset or
42 43
DELETE on the telephone base to erase all digits.
• Press and hold REDIAL/PAUSE to insert a dialing pause
(a p appears).
4. Press NEXT to move on to the name. The screen displays
Edit name along with the name to be edited.
5. Use the dialing keys to edit the name.
• Press q CID or p to move the cursor to the left or
right.
• Press 0 to add a space.
• Press MUTE/DELETE on the handset or DELETE on the
telephone base, or press BACKSP to erase a character.
• Press and hold MUTE/DELETE on the handset or
DELETE on the telephone base to erase all characters.
• Press TONE to change the next letter to upper or
lower case.
6. Press SAVE to confirm. The screen shows Saved to allow
list.
Delete an allow list entry:
Using a cordless handset or the telephone base:
1. Search for the desired entry in the allow list (see Review
allow list:).
2. When the desired entry displays, press MUTE/DELETE on
the handset or DELETE on the telephone base. The screen
shows Delete entry?.
3. Press YES to confirm. The screen show Entry deleted, and
the next entry displays. You cannot retrieve a deleted entry.
NOTE
• If the allow list is empty after an entry is deleted, the screen displays
Allow list is empty.
Delete all allow list entries:
Using a cordless handset or the telephone base:
1. Press CALL BLOCK on the handset or telephone base to
enter the call block menu when the telephone is not in use.
- OR -
1. Press MENU on the handset or telephone base in idle
mode to enter the main menu. Then, press q CID or p
to scroll to Smart call blk. Press SELECT.
2. Press q CID or p to scroll Allow list, and then press
SELECT.
3. Press q CID or p to scroll Delete all, and then press
SELECT. The screen shows Delete all in allow list?.
4. Press YES to confirm. The screen displays Deleted. There is
a confirmation tone.
Page 26

Star name list
There are many organizations like schools, medical offices,
and pharmacies that use robocalls to communicate important
information to you. Robocall uses an autodialer to deliver prerecorded messages. By entering the name of the organizations
into the star name list, it ensures these calls will ring through
when you only know the caller names but not their numbers.
If the first 15 characters of the incoming caller ID’s name match
a name saved in your star name list, the call will get through
and ring. The star name list stores up to 10 names.
Add a star name entry:
Using a cordless handset or the telephone base:
1. Press CALL BLOCK on the handset or telephone base to
enter the call block menu when the telephone is not in use.
- OR -
1. Press MENU on the handset or telephone base in idle
mode to enter the main menu. Then, press q CID or p
to scroll to Smart call blk. Press SELECT.
2. Press q CID or p to highlight Star name list, and then
press SELECT.
3. Press q CID or p to highlight Add new entry, and then
press SELECT.
4. When the screen displays Enter name, use the dialing keys
to enter a name. Press a key repeatedly until the desired
character appears. The first character of every word is
capitalized.
• Press q CID or p to move the cursor to the left or
right.
• Press 0 to add a space.
• Press MUTE/DELETE on the handset or DELETE on the
telephone base to erase a character.
• Press and hold MUTE/DELETE on the handset or
DELETE on the telephone base to erase all characters.
• Press TONE to change the next letter to upper or
lower case.
5. Press SAVE to store your star name entry.
Review star name list:
Using a cordless handset or the telephone base:
1. Press CALL BLOCK on the handset or telephone base to
enter the call block menu when the telephone is not in use.
- OR -
1. Press MENU on the handset or telephone base in idle
mode to enter the main menu. Then, press q CID or p
to scroll to Smart call blk. Press SELECT.
2. Press q CID or p to highlight Star name list, and then
press SELECT.
3. Press q CID or p on the handset or telephone base to
browse through the star name entries.
Save a caller ID log entry to the star name list:
Using a cordless handset or the telephone base:
1. Select a desired entry in the caller ID log (see Review the
caller ID log).
2. When the desired entry appears, press SAVE.
3. Press q CID or p to highlight Star name list, and then
press SELECT. The screen displays Star this name? and then
the caller’s name.
4. Press SELECT to confirm. The screen shows Saved to star
name list.
Edit a star name list entry:
Using a cordless handset or the telephone base:
1. Search for the desired entry in the star name list (see
Review star name list).
2. When the desired entry appears, press EDIT. The screen
displays Edit name along with the name to be edited.
3. Use the dialing keys to edit the name.
• Press q CID or p to move the cursor to the left or
right.
• Press 0 to add a space.
• Press MUTE/DELETE on the handset or DELETE on the
telephone base, or press BACKSP to erase a character.
• Press and hold MUTE/DELETE on the handset or
DELETE on the telephone base to erase all characters.
• Press TONE to change the next letter to upper or
lower case.
4. Press SAVE to confirm. The screen shows Saved to star
name list.
Delete a star name list entry:
Using a cordless handset or the telephone base:
1. Search for the desired entry in the star name list (see
Review star name list:).
2. When the desired entry displays, press MUTE/DELETE on
the handset or DELETE on the telephone base. The screen
shows Delete entry?.
3. Press YES to confirm. The screen show Entry deleted, and
the next entry displays. You cannot retrieve a deleted entry.
Delete all star name list entries:
Using a cordless handset or the telephone base:
1. Press CALL BLOCK on the handset or telephone base to
enter the call block menu when the telephone is not in use.
- OR -
1. Press MENU on the handset or telephone base in idle
mode to enter the main menu. Then, press q CID or p
to scroll to Smart call blk. Press SELECT.
2. Press q CID or p to scroll Star name list, and then press
SELECT.
3. Press q CID or p to scroll Delete all, and then press
SELECT. The screen shows Delete all in star name list?.
4. Press YES to confirm. The screen displays Deleted. There is
a confirmation tone.
Screening announcements
If you have set profile to screen all unknown home calls (Screen
unknown) or screen robocalls (Screen robot), the callers of the
following incoming call categories will hear a screening
announcement.
• Home calls that are “out of area“ or with numbers set to
“Private“.
• Home calls with numbers that are not in your phonebook,
allow list, or block list, or with absent caller ID number.
• Home calls with caller ID names that are not in your star
name list.
The are two default screening announcements for screening
unknown calls and screening robocalls on home line.
Screening with caller name - “Hello. Calls to this number are
being screened by Smart call blocker. Please say your name
after the tone, then press pound.”
-OR-
Screening without caller name - “Hello. Calls to this number
are being screened by Smart call blocker. If you’re a family
member, friend or invited caller, please press pound to be
connected. If you’re a solicitor, please hang up now.”
• This default announcement is played if you have set profile
to screen robocalls on home line.
You can use these announcements, or record your own name
to replace “this number” in both announcements. See Record
your name for all screening announcements section below.
Play your current announcement of screening with caller
name:
Using a cordless handset or the telephone base:
1. Press CALL BLOCK on the handset or telephone base to
enter the call block menu when the telephone is not in use.
- OR -
1. Press MENU on the handset or telephone base in idle
mode to enter the main menu. Then, press q CID or p
to scroll to Smart call blk. Press SELECT.
2. Press q CID or p on the handset or telephone base to
scroll to Screening annc, then press SELECT.
3. Press q CID or p on the handset or telephone base to
scroll to Play annc, then press SELECT.
4. Press q CID or p on the handset or telephone base to
scroll to w/ Caller name, then press SELECT.
Play your current announcement of screening without caller
name:
Using a cordless handset or the telephone base:
1. Press CALL BLOCK on the handset or telephone base to
enter the call block menu when the telephone is not in use.
- OR -
1. Press MENU on the handset or telephone base in idle
mode to enter the main menu. Then, press q CID or p
to scroll to Smart call blk. Press SELECT.
2. Press q CID or p on the handset or telephone base to
scroll to Screening annc, then press SELECT.
3. Press q CID or p on the handset or telephone base to
scroll to Play annc, then press SELECT.
4. Press q CID or p on the handset or telephone base to
scroll to w/o Caller name, then press SELECT.
Record your name for all screening announcements:
Using a cordless handset or the telephone base:
1. Press CALL BLOCK on the handset or telephone base to
enter the call block menu when the telephone is not in use.
- OR -
1. Press MENU on the handset or telephone base in idle
mode to enter the main menu. Then, press q CID or p
to scroll to Smart call blk. Press SELECT.
2. Press q CID or p on the handset or telephone base to
scroll to Screening annc, then press SELECT.
3. Press q CID or p on the handset or telephone base
to scroll to Rec your name, then press SELECT. The system
announces, “Record after the tone. Press stop when you
are done.”
4. Speak towards the handset to record your name, if you are
using the handset, or speak towards the telephone base
to record your name, if you are using the telephone base.
Press STOP to end recording.
To listen to the announcement with your recorded name again,
scroll to Play annc and press SELECT.
44 45
Page 27

Reset all your screening announcements:
Using a cordless handset or the telephone base:
1. Press CALL BLOCK on the handset or telephone base to
enter the call block menu when the telephone is not in use.
- OR -
1. Press MENU on the handset or telephone base in idle
mode to enter the main menu. Then, press q CID or p
to scroll to Smart call blk. Press SELECT.
2. Press q CID or p on the handset or telephone base to
scroll to Screening annc, then press SELECT.
3. Press q CID or p on the handset or telephone base to
scroll to Reset annc, then press SELECT. The screen shows
Reset to default annc?. Press YES to confirm. The screen
shows Annc. reset to default before returning to the
previous menu.
-ORWhile an announcement is playing, press MUTE/DELETE
on the handset, or press DELETE on the telephone base.
The screen shows Annc. Deleted before returning to the
previous menu.
Your name will be deleted from all the screening
announcements, and the telephone will use the default
screening announcements. See Screening announcements.
Voice guide to set Smart call blocker
This feature is an easy and alternative way for you to do the
basic setup of Smart call blocker. You can follow the voice
guide to set your telephone system to allow or to screen all
incoming home calls, or to screen home calls that do not
display a phone number.
1. Press CALL BLOCK on the handset or telephone base to
enter the call block menu when the telephone is not in use.
- OR -
1. Press MENU on the handset or telephone base in idle
mode to enter the main menu. Then, press q CID or p
to scroll to Smart call blk. Press SELECT.
2. Press q CID or p to scroll to Voice guide, then press
SELECT. You hear a voice prompt, “Hello! This voice guide
will assist you with the basic setup of Smart call blocker...”
3. Set up your Smart call blocker feature by inputting
designated numbers, as instructed in the voice guide.
• Press 1 if you want to screen home calls with telephone
numbers that are not saved in your phonebook, allow
list or star name list; or
• Press 2 if you do not want to screen calls, and want to
allow all incoming calls to get through.
NOTES
• The screening feature of Smart call blocker is applicable to home
calls only. All incoming cell calls will get through and ring. If you
want to block a cell call, add the number to the block list. See Block
list.
• You can press OFF/CANCEL on the handset or press CANCEL on
the telephone base to quit the voice guide at any time.
• After a power outage, the system prompts you to set the date and
time. After the date and time setting is done or skipped, the system
then prompts if you want to set up Smart call blocker via voice
guide. Press YES to start the setup.
Allowed calls
If Smart call blocker is on, the following types of incoming calls
can get through to you and ring on your telephone system:
• Home calls with numbers saved in your allow list.
• Home calls with numbers saved in your phonebook, but not
in your block list.
• Home calls with caller ID names saved in your star name list.
• Cell calls with numbers not saved in your block list.
NOTES
• When Smart call blocker is off, all incoming calls will ring on your
telephone system, including calls with numbers saved in the block
list.
• Allow unknown is the default profile setting. If you have not
selected another profile, all unknown home calls will ring.
However, the caller’s numbers, if available, will not be saved to the
allow list. If you want to save the caller’s number to your allow list or
block list, you can retrieve the number from caller ID log and save
it to the allow list or block list. See Save a caller ID log entry to the
block list and Save a caller ID log entry to the allow list. If you want
to retrieve the name from caller ID log and save it to the star name
list. See Save a caller ID log entry to the star name list.
Blocked calls
If Smart call blocker is on, incoming home or cell calls with
numbers saved in your block list will not ring. The telephone
plays the block announcement “Calls to this number are being
screened by Smart call blocker. The number you are calling is
not accepting your call. Please hang up.” to the caller, and the
call will be terminated.
NOTE
• When Smart call blocker is off, all incoming home and cell calls will
ring on your telephone system, including calls with numbers saved
in the block list.
• If you have set profile to Block unknown, all unknown home calls
will be rejected. However, the caller’s numbers, if available, will not
be saved to the block list. If you want to save the caller’s number to
the block list, you can retrieve the number from caller ID log and
save it to the block list. See Save a caller ID log entry to the block
list. You can also retrieve the number and save it to your allow
list. See Save a caller ID log entry to the allow list. If you want to
retrieve the name from caller ID log and save it to the star name list.
See Save a caller ID log entry to the star name list.
• The telephone can respond to remote access code while it is
playing the block announcement. This allows you to access your
answering system from an unknown number remotely. See Remote
access.
46 47
Page 28

Screen unknown home calls
If Smart call blocker is on, and you have set profile to screen
unknown home calls, the telephone plays a screening
announcement to the caller when receiving the following
incoming home calls. It asks the caller to respond before
putting the call through to you.
• Incoming home calls with numbers that are “out of area“ or
with numbers set to “Private“;
• Incoming home calls with absent caller ID numbers;
• Incoming home calls with numbers that are not in your
phonebook, allow list, nor block list; or
• Incoming home calls with names that are not in your star
name list.
Screen calls and ask for caller names
When screening a home call, the telephone announces to
the caller, “Hello. Calls to this number are being screened
by Smart call blocker. Please say your name after the tone,
then press pound.” After the caller completes the request, the
telephone announces to the caller “Please wait a moment
while your call is connected.”. The telephone starts ringing and
displays Screened call. After you pick up the call, the telephone
announces the caller’s name, and then asks whether you
want to answer or reject the call, or to forward the call to the
answering system.
NOTES
• You can set Smart call blocker to screen and filter all unknown
home calls. You can easily add incoming phone numbers to your
allow list and block list. This allows you to build up your lists of
allowed and blocked numbers, and Smart call blocker will know
how to deal with these calls when they come in again.
• The telephone announces to the caller with “Hello. Calls to this
number are being screened by Smart call blocker...” If you have
recorded your name in the screening announcements, your
recorded name will replace “this number” in the announcements.
See Screening announcements.
• The screening feature of Smart call blocker is applicable to home
calls only.
• If the caller hangs up before the call is screened, or without leaving
his/her name while the call is being screened, the call will be
logged as missed call in the caller ID log.
• While a call is being screened, you can press ANSWER,
HOME/FLASH or to stop screening and answer the call.
• After the telephone screened a call, and is ringing and announcing
the caller’s name, you can press OFF/CANCEL or SILENCE to silence
the ringer, or press BLOCK to reject the call directly.
• After you picked up a screened call and the telephone is
announcing the screening options, you can press OFF/CANCEL to
hang up the call.
• If Smart call blocker is on and you receive a call waiting home call:
- Smart call blocker will not screen a call waiting home call without
number while on a call. You can press ANSWER,
HOME/FLASH or to take the new call.
- After you have picked up a screened home call, the telephone
checks whether the call waiting number is in the phonebook,
block list or allow list. It also checks whether the caller name is
in the star name list. After that, The telephone then displays the
caller ID information or “Blocked call” accordingly. You can press
ANSWER, HOME/FLASH or to take the new call, or press
CALL BLOCK on the handset to block it.
- While the telephone is screening a home call, the new call will
be ignored and logged as missed call in the caller ID log.
• Robocalls are unable to respond to the screening announcement,
and therefore, will not get through and ring. If you want to allow
some robocalls to get through, save their names in the star name
list. See Star name list.
• The telephone can respond to remote access code while it is
playing the screening announcement. This allows you to access
your answering system from an unknown number remotely. See
Remote access.
Screened call options
After the telephone screen a home call and starts ringing, the
handset screen displays Screened call. Press HOME/FLASH
or to pick up the call.
After you picked up the call, the telephone announces “Call
from...” and the caller’s name, and then announces, “To answer
the call, press 1. To answer and always allow this number,
press 2. To block this number, press 3. To send this call to the
answering system, press 4. To repeat these options, press *”.
Allow this call once:
• Press 1 to answer the call. The telephone number will not be
added to your allow list.
Always allow this call:
• Press 2 to answer the call. The telephone number will be
added to your allow list.
Block this call:
• Press 3 or CALL BLOCK to block the call. The telephone plays
the block announcement “The number you are calling is
not accepting your call. Please hang up.” to the caller. The
telephone number will be added to your block list.
Send this call to the answering system:
• Press 4 to forward the call to the answering system.
End this call:
• If you do not want to take the call, press OFF/CANCEL on the
handset or press CANCEL on the telephone base to end the
call.
NOTES
• For home calls that are “out of area”, “Private”, or without caller ID,
only options 1 and 4 will be available. The telephone announces
“To answer the call, press 1. To send this call to the answering
system, press 4. To repeat these options, press *”.
• If you select option 4 to send the call to the answering system, the
caller can leave a message even if the answering system is off.
• When the telephone is ringing, you can press MUTE/DELETE on
the handset or DELETE on the telephone base to mute the ringer
temporarily.
Screen robocalls
If Smart call blocker is on, and you have set profile to screen
robocalls, the telephone plays a screening announcement to
the caller when receiving the following incoming home calls.
It asks the caller to press the pound key (#) before putting the
call through to you.
• Incoming home calls with numbers that are “out of area“ or
with numbers set to “Private“;
• Incoming home calls with absent caller ID numbers;
• Incoming home calls with numbers that are not in your
phonebook, allow list, nor block list; or
• Incoming home calls with names that are not in your star
name list.
Screen calls without asking for caller names
When screening a home call, the telephone announces to
the caller, “Hello. Calls to this number are being screened by
Smart call blocker. If you’re a family member, friend or invited
caller, please press pound to be connected. If you’re a solicitor,
please hang up now.” After the caller presses the pound key
(#), the telephone announces to the caller “Please wait a
moment while your call is connected.”. The telephone starts
ringing, and you can answer the call.
This option is suitable for you to filter calls that uses autodialers
to deliver prerecorded messages, for example, robocalls and
telemarketing calls.
NOTES
• The telephone announces to the caller with “Hello. Calls to this
number are being screened by Smart call blocker...” If you have
recorded your name in the screening announcements, your
recorded name will replace “this number” in the announcements.
See Screening announcements.
• The screening feature of Smart call blocker is applicable to home
calls only.
• If the caller hangs up before the home call is screened, or without
leaving his/her name while the call is being screened, the call will
be logged as missed call in the caller ID log.
• While a home call is being screened, you can press ANSWER,
HOME/FLASH or to stop screening and answer the call.
• If Smart call blocker is on and you receive a call waiting home call:
- Smart call blocker will not screen a call waiting home call without
number while on a call. You can press ANSWER,
HOME/FLASH or to take the new call.
- After you have picked up a screened home call, the telephone
checks whether the call waiting number is in the phonebook,
block list or allow list. It also checks whether the caller name is
in the star name list. After that, The telephone then displays the
caller ID information or “Blocked call” accordingly. You can press
ANSWER, HOME/FLASH or to take the new call, or press
CALL BLOCK to block it.
- While the telephone is screening a home call, the new call will
be ignored and logged as missed call in the caller ID log.
• Robocalls are unable to respond to the screening announcement,
and therefore, will not get through and ring. If you want to allow
some robocalls to get through, save their names in the star name
list. See Star name list.
• The telephone can respond to remote access code while it is
playing the screening announcement. This allows you to access
your answering system from an unknown number remotely. See
Remote access.
Option while on a call
When you are on a home or cell call and speaking to the caller,
and you do not want to continue the call, you can press BLOCK
to end the call. The telephone plays the block announcement
“The number you are calling is not accepting your call. Please
hang up.“ to the caller, and the call will be terminated. The
caller’s number, if available, will be added toyour block list.
Using a cordless handset or the telephone base:
• Press BLOCK. The screen displays Block and end? and the
caller’s number, if available. Press YES to end the call.
NOTES
• The caller’s number, if available, will be saved to the block list. The
screen displays Added to block list after pressing YES. If caller’s
number is not available, the screen displays No number available
to block..
• You can press BLOCK to end the call even if Smart call blocker is
turned off.
48 49
Page 29

About the built-in answering system and
1
voicemail service
For message recording, your telephone has a built-in
answering system, and it also supports voicemail service
offered by your telephone service provider (subscription is
required, and fee may apply).
The main differences between them are:
Built-in answering
system
Supported by Telephone system Telephone service provider
Subscription No Yes
Fees No May apply
• After 3 rings by
Answer
incoming
calls
Storage Telephone base Server or System
Display new
messages
Retrieve
messages
default.
• It can be changed
via handset or the
telephone base
menu.
• Handset -
XX new messages
• Telephone base -
XX new messages
• Press on
the telephone base;
OR
• Press MENU, and
then select
Play messages on
the handset; OR
• Access remotely
with an access code.
Telephone base control key panel:
Voicemail service
• Usually after 2 rings.
• It can be changed
by contacting your
telephone service
provider.
• Handset - 1 and
New voicemail
• Telephone base -
• Press on the
dialpad, and enter an
access number from
your telephone service
provider.
Set your built-in answering system
The answering system can record and store up to 99 messages.
Each message can be up to three minutes in length. The
total storage capacity for the announcement, messages and
memos is approximately 22 minutes. The actual recording time
depends on individual message characteristics.
Your answering system allows you to set your announcement,
to save and delete messages, activate call screening, to set
number of rings before pick up, to access remotely, and to
control the recording time.
Turn the answering system on or off
The answering system must be turned on to answer and record
messages.
When the answering system is turned on, the ANS ON light
on the telephone base turns on and ANS ON displays on the
handset.
To turn on or off with the telephone base:
• Press ANS ON to turn the built-in answering system on or
off. When the answering system is turned on, it announces,
“Calls will be answered.” When the answering system is
turned off, it announces, “Calls will not be answered.”
-OR-
1. When the telephone base is in idle mode, press MENU to
enter the main menu.
2. Press SELECT to select Answering sys.
3. Press q CID or p to scroll to Answer ON/OFF, then
press SELECT.
4. Press q CID or p to highlight On or Off, then press
SELECT to save the setting. You hear a confirmation tone.
NOTE
• If the answering system is off and there is an incoming call, the
system answers after ten rings and announces, “Please enter your
remote access code.” See Remote access.
To turn on or off with the handset:
1. When the handset is in idle mode, press MENU to enter
the main menu.
2. Press q CID or p to scroll to Answering sys, then press
SELECT.
3. Press q CID or p to scroll to Answer On/Off, then press
SELECT.
4. Press q CID or p to highlight On or Off, then press
SELECT to save the setting. You hear a confirmation tone.
When the answering system is on, the handset shows ANS ON.
Default announcement
The telephone is preset with a greeting that answers calls with
“Hello, please leave a message after the tone.” You can use
this preset announcement, or replace it with your own.
Record your own announcement
The announcement can be up to 90 seconds in length.
Using a cordless handset:
1. Press MENU when the phone is not in use.
2. Press q CID or p to choose Answering sys then press
SELECT.
3. Press SELECT to select Announcement.
4. Press SELECT to select Record annc. The system announces,
“Record after the tone. Press STOP when you are done.”
5. Speak towards the handset to record your announcement.
Press STOP to end recording. Your recorded
announcement plays.
To listen to the recorded announcement again, scroll to Play
annc and press SELECT.
Using the telephone base:
1. Press MENU when the phone is not in use.
2. Press SELECT to select Answering sys.
3. Press SELECT to select Announcement.
4. Press SELECT to select Record annc. The system announces,
“Record after the tone. Press STOP when you are done.”
5. Speak towards the telephone base to record your
announcement. Press STOP to end recording. Your
recorded announcement plays.
To listen to the recorded announcement again, scroll to Play
annc and press SELECT.
NOTE
• Announcements shorter than two seconds will not be recorded.
Play the announcement
Using a cordless handset:
1. Press MENU when the phone is not in use.
2. Press q CID or p to choose Answering sys, and then
press SELECT.
3. Press SELECT to select Announcement.
4. Press q CID or p to select Play annc, and then press
SELECT.
Using the telephone base:
1. Press MENU when the phone is not in use.
2. Press SELECT to select Answering sys.
3. Press SELECT to select Announcement.
4. Press q CID or p to select Play annc, and then press
SELECT.
Options during playback:
• Press q CID or p on the handset, or press VOL+ or VOL-
on the telephon base to adjust the listening volume.
• Press 5 or OFF to stop at any time.
Delete the announcement
Using a cordless handset:
1. Press MENU when the phone is not in use.
2. Press q CID or p to choose Answering sys, and then
press SELECT.
3. Press SELECT to select Announcement.
4. Press q CID or p to select Play annc, and then press
SELECT.
5. While the announcement is playing, press MUTE/DELETE
to delete the announcement. The system announces
“Announcement deleted”.
-OR-
1. When the handset is in idle mode, press MENU to enter
the main menu.
2. Press q CID or p to scroll to Answering sys, then press
SELECT.
3. Press SELECT again to select Announcement.
4. Press q CID or p to scroll to Reset annc, then press
SELECT. The screen shows Reset to default annc?.
5. Press YES to confirm. The screen shows Annc. reset to
default.
Using the telephone base:
1. Press MENU when the telephone is not in use.
2. Press SELECT to select Answering sys.
3. Press SELECT again to select Announcement.
4. Press q CID or p to select Play annc, and then press
SELECT.
5. While the announcement is playing, press DELETE
to delete the announcement. The system announces
“Announcement deleted”.
50 51
Page 30

-OR-
1. When the telephone is in idle mode, press MENU to enter
the main menu.
2. Press SELECT to select Answering sys.
3. Press SELECT again to select Announcement.
4. Press q CID or p to scroll to Reset annc, then press
SELECT. The screen shows Reset to default annc?.
5. Press YES to confirm. The screen shows Annc. reset to
default.
When your announcement is deleted, the system answers calls
with the default announcement (see Default announcement).
You cannot delete the default announcement.
Voice guide to set Answering system
This feature is an alternative way for you to do the basic setup
of the answering system. You can follow the voice guide to
record your own announcement, set the number of rings, and
set the message alert tone.
Using a cordless handset or the telephone base:
1. Press MENU when the phone is not in use.
2. Press q CID or p to choose Answering sys, and then
press SELECT.
3. Press q CID or p to choose Voice guide, and then
press SELECT. You hear a voice prompt, “This voice guide
will assist you with the basic setup of your answering
system.“
4. Set up your answering system by inputting designated
numbers, as instructed in the voice guide.
NOTES
• You can press OFF/CANCEL on the handset or press CANCEL on
the telephone base to quit the voice guide at any time.
• If the system does not receive any input, it will play an alert
message. If there is still no input, it will announce “Sorry, I still have
not received any input. If you want to restart the voice guide,
please enter the menu and select Voice guide under Answering
system. Good bye.”
• After a power outage, the system prompts you to set the date and
time, and Smart call blocker. After that, the system prompts if you
want to set up the answering system via voice guide. Press YES to
start the setup.
Set number of rings
You can set the answering system to answer an incoming call
after two, three, four, five or six rings. You can also select toll
saver. If toll saver is selected, the answering system answers a
call after two rings when you have new messages, and after
four rings when there are no new messages. This feature allows
you to check for new messages and avoid paying long distance
charges when calling from out of your local area. By default,
the answering system answers an incoming call after four rings.
To set the number of rings:
Using a cordless handset:
1. When the telephone is in idle mode, press MENU to enter
the main menu.
2. Press q CID or p to scroll to Answering sys, then press
SELECT.
3. Press q CID or p to scroll to Ans sys setup, then press
SELECT.
4. Press q CID or p to scroll to # of rings, then press
SELECT.
5. Press q CID or p to choose among 2, 3, 4, 5, 6 or Toll
saver.
6. Press SELECT to save the setting. You hear a confirmation
tone.
Using the telephone base:
1. When the telephone is in idle mode, press MENU to enter
the main menu.
2. Press SELECT to select Answering sys.
3. Press q CID or p to scroll to Ans sys setup, then press
SELECT.
4. Press q CID or p to scroll to # of rings, then press
SELECT.
5. Press q CID or p to choose among 2, 3, 4, 5, 6 or Toll
saver.
6. Press SELECT to save the setting. You hear a confirmation
tone.
Set recording time
You can set the recording time allowed for incoming messages.
The message length is three minutes by default.
To change the setting:
Using a cordless handset:
1. When the telephone is in idle mode, press MENU to enter
the main menu.
2. Press q CID or p to scroll to Answering sys, then press
SELECT.
3. Press q CID or p to scroll to Ans sys setup, then press
SELECT.
4. Press q CID or p to scroll to Recording time, then press
SELECT.
5. Press q CID or p to choose 3 minutes, 2 minutes or 1
minute, then press SELECT to save the setting. You hear a
confirmation tone.
Using the telephone base:
1. When the telephone is in idle mode, press MENU to enter
the main menu.
2. Press SELECT to select Answering sys.
3. Press q CID or p to scroll to Ans sys setup, then press
SELECT.
4. Press SELECT to select Recording time.
5. Press q CID or p to choose 3 minutes, 2 minutes or 1
minute, then press SELECT to save the setting. You hear a
confirmation tone.
NOTES
• If you set the number of rings for the answering system as 2 or 3
rings, the caller ID announce feature may not have enough time to
announce the caller’s full information.
• If Smart call blocker is on, the first ring of all incoming calls will be
muted.
52 53
Page 31

Turn the call screening on or off
Use this feature to choose whether incoming messages can be
heard over the speaker when they are being recorded. If you
turn call screening on, you hear the incoming message. While
monitoring an incoming message, you can answer the call by
pressing
telephone base.
To change the setting:
Using a cordless handset:
1. When the telephone is in idle mode, press MENU to enter
the main menu.
2. Press q CID or p to scroll to Answering sys, then press
SELECT.
3. Press q CID or p to scroll to Ans sys setup, then press
SELECT.
4. Press SELECT to select Call screening.
5. Press q CID or p to choose On or Off, then press
SELECT.
6. Press SELECT to save the setting. You hear a confirmation
tone.
Using the telephone base:
1. When the telephone is in idle mode, press MENU to enter
the main menu.
2. Press SELECT to select Answering sys.
3. Press q CID or p to scroll to Ans sys setup, then press
SELECT.
4. Press SELECT to select Call screening.
5. Press q CID or p to choose On or Off, then press
SELECT.
6. Press SELECT to save the setting. You hear a confirmation
tone.
NOTE
• For more information on call screening, see Call screening.
HOME/FLASH on the handset, or HOME on the
Turn the message alert tone on or off
When the message alert tone is set to On, and there is at
least one new message, the telephone base beeps every ten
seconds. Unless you change it, the message alert tone is set to
off.
There is no audible alert at the handset.
To change the setting:
Using a cordless handset:
1. When the telephone is in idle mode, press MENU to enter
the main menu.
2. Press q CID or p to scroll to Answering sys, then press
SELECT.
3. Press q CID or p to scroll to Ans sys setup, then press
SELECT.
4. Press q CID or p to scroll to Msg alert tone, then press
SELECT.
5. Press q CID or p to choose On or Off.
6. Press SELECT to save the setting. You hear a confirmation
tone.
Using the telephone base:
1. When the telephone is in idle mode, press MENU to enter
the main menu.
2. Press SELECT to select Answering sys.
3. Press q CID or p to scroll to Ans sys setup, then press
SELECT.
4. Press q CID or p to scroll to Msg alert tone, then press
SELECT.
5. Press q CID or p to choose On or Off.
6. Press SELECT to save the setting. You hear a confirmation
tone.
NOTES
• The message alert tone beeps only if all the following conditions
are met:
- Answering system is on.
- Message alert tone setting is on.
- There are new messages.
• Press any key on the telephone base (except FIND HS) to
temporarily silence the message alert tone.
Answering system and voicemail indicators
Your telephone has separate indicators for two different types
of voice messages: those left on its built-in digital answering
system and those left at your telephone service provider’s
voicemail (fees may apply). Your telephone’s built-in digital
answering system messages and voicemail messages are
separate. Each alerts you to new messages differently.
• If and XX New msgs show on the handset and XX New
messages shown on the telephone base, there are new
messages in the built-in answering system. To listen to
messages recorded on your digital answering system, press
PLAY/STOP on the telephone base.
• If and New voicemail display on the handset and
the telephone base, your telephone service provider is
indicating that it has new voicemail for you. To listen to
your voicemail, dial an access number provided by your
telephone service provider, followed by a security code or
PIN.
Some telephone service providers bundle or combine multiple
services like voicemail and call waiting, so you may not be
aware that you have voicemail. To check what services you
have and how to access them, contact your telephone service
provider.
To use your voicemail service rather than the answering system,
turn off the answering system. To use the answering system
rather than your voicemail service, contact your telephone
service provider to deactivate the voicemail service.
Use the answering machine and voicemail together
You can also use your telephone answering system and
voicemail together by setting your built-in answering system
to answer before voicemail answers, as described below.
To learn how to program your voicemail settings, contact
your telephone service provider. If you are on a call, or the
answering system is busy recording a message and you receive
another call, the second caller can leave a voicemail message.
Set the answering system to answer calls at least two rings
earlier than your voicemail is set to answer. For example, if your
voicemail answers after six rings, set the answering system
to answer after four rings. Some voicemail providers may
program the delay before answering calls in seconds instead of
rings. In this case, allow six seconds per ring when determining
the appropriate setting.
Message capacity
The answering system can record up to 99 messages,
depending on the length of each message. Individual
messages can be up to three minutes (see Set recording time),
and the maximum recording time is approximately 22 minutes.
The actual recording time depends on individual message
characteristics. Messages remain available for replay until you
delete them.
When there are new messages (including memos) on the
answering system, the number of messages stored shows in
the message counter.
If the answering system has less than three minutes of
recording time left, it announces, “Less than three minutes
to record,” before message playback at the handset or the
telephone base. Rec mem low displays on the device screen
in idle mode. When you turn on the answering system at the
telephone base, it announces, “Calls will be answered. Less
than three minutes to record.”
If the memory is full, the answering system announces,
“Memory is full,” before message playback. The device screen
displays Rec mem full in idle mode. Once the memory is full,
you cannot turn the answering system back on if it has been
turned off, nor can you record new messages until old ones
have been deleted. Memory full displays if you want to turn on
the answering system on the handset but there is no memory.
Voice prompts
The system provides voice prompts to guide you through the
setup procedures at the telephone base, message playback,
remote access andrecording outgoing announcements.
Call screening
To screen a call at the telephone base:
If the answering system and call screening are on (see Turn the
call screening on or off), the announcement and the incoming
message broadcast at the telephone base when a call is
answered by the answering system.
Options while a message is being recorded:
• Press + VOL - on the telephone base to adjust the call
screening volume.
• Press PLAY/STOP or SILENCE to temporarily silence the call
screening.
• Press PLAY/STOP or SCREEN to temporarily turn on the call
screening if call screening is set to off.
• Press HOME to answer the call.
54 55
To screen a call at the handset:
If the answering system is on and your answering system is
recording a message, press SCREEN to screen the call on your
handset and the screen displays the caller ID information. If
you do not subscribe to caller ID service, the handset shows
Incoming call.
Page 32

Options while a message is being recorded:
• Press q CID or p on the handset to adjust the call
screening volume.
• Press OFF/CANCEL or SILENCE to temporarily silence the call
screening.
• Press SCREEN to temporarily turn on the call screening if call
screening is set to off.
• Press to turn off the speakerphone and screen the call
through the handset earpiece.
Call intercept
While screening a call, you can stop recording and speak to the
caller by pressing
HOME/FLASH on the handset, or pressing
HOME on the telephone base.
Temporarily turn off the message alert tone
If the message alert tone is turned on, the telephone base
beeps every ten seconds when there are new messages.
Pressing any telephone base key (except FIND HS) temporarily
silences the message alert tone.
If you press DELETE when in idle mode to temporarily turn off
the message alert tone, there is a voice prompt directing you
to press DELETE again to delete all old messages. The message
alert tone is temporarily off. Only press DELETE a second time if
you wish to erase all old messages in your answering system.
The message alert tone resumes when you receive another
message.
Message playback
If you have both new and old messages, you can play either
new or old messages. The caller ID information displays on the
screens when you play messages and you can call back the
caller.
When playback begins, the handset screen and telephone
base screen display the message status, caller ID information,
and time and date of the message recorded. You hear the
total number of messages followed by the day and time of the
message. After the last message, the telephone announces,
“End of messages.” and the screen displays End of messages.
NOTE
• Make sure you set the date and time correctly. Refer to Set date
and time under the Configure your telephone section for more
details.
To listen to messages at the telephone base:
Press PLAY/STOP on the telephone base to listen to the
messages.
• If there are new and old messages, press q CID or p to
select Play new msgs or Play old msgs, then press SELECT or
PLAY/STOP.
• If there are only new or only old messages, they will play
automatically.
When the handset is playing a message, its screen shows
[2]-Call info and the caller’s name or number. If the caller’s
information is unavailable, the handset shows No caller info.
The system announces the number of messages, then begins
playback. The message sequence is shown on the telephone
base. If there are no recorded messages, the telephone base
shows No messages and you hear, “You have no message.”
To listen to messages on a cordless handset:
1. When the handset is in idle mode, press MENU to enter
the main menu.
2. Press SELECT to select Play messages.
• If there are new and old messages, press q CID or
p to select Play new msgs or Play old msgs, then
press SELECT.
• If there are only new or only old messages, they will
play automatically.
The system announces the number of messages, then begins
playback. The message sequence is shown on the handset.
If there are no recorded messages, the handset shows No
messages and you hear, “You have no message.”
Options during playback:
When a message is playing, you can adjust the playback
volume, skip, repeat, pause or delete the message.
When messages are playing on the telephone base:
• Press + VOL - to adjust the listening volume.
• Press SKIP or SKIP to skip to the next message.
• Press REPEAT or REPEAT to repeat the playing message.
Press REPEAT or REPEAT twice to listen to the previous
message.
• Press DELETE to delete the playing message. The telephone
base announces, “Message deleted,” and then advances to
the next message.
• Press 2 to pause the playback and show the caller ID
information.
- Press HOME or CALL to use the home line, or press CELL 1 or
CELL 2 to use the cell line to call back the caller. If necessary,
press # (pound key) or 1 to show different dialing options.
- Press CANCEL or BACK to restart the playback. If you do not call
back within 10 seconds, message playback restarts.
• Press PLAY/STOP or CANCEL to stop the playback.
When messages are playing on the handset:
• Press q CID or p to adjust the listening volume.
• Press SKIP to skip to the next message.
• Press REPEAT to repeat the playing message. Press REPEAT
twice to listen to the previous message.
• Press MUTE/DELETE to delete the playing message.
• Press 2 to pause the playback and show the caller ID
information.
- Press HOME/FLASH, CALL or to use the home line, or
press CELL 1 or CELL 2 to use the cell line to call back the caller.
If necessary, press # (pound key) or 1 to show different dialing
options.
- Press OFF/CANCEL or BACK to restart the playback. If you do
not call back within 10 seconds, message playback restarts.
• Press OFF/CANCEL to stop the playback.
NOTES
• Only one handset or the telephone base can access the answering
system at a time.
• During message playback, if there is an incoming call or another
handset makes a call, message playback will be stopped.
Delete all old messages
You can only delete old (reviewed) messages. You cannot
delete new messages until you review them. You cannot
retrieve deleted messages.
To delete all old messages with the telephone base:
1. When the telephone is idle, press DELETE. The system
announces, “To delete all old messages, press DELETE
again.”
2. Press DELETE again. The system announces, “All old
messages deleted!”
-OR-
1. Press MENU when in idle mode to enter the main menu.
2. Press SELECT to select Answering sys.
3. Press q CID or p to highlight Delete all old, then press
SELECT. The screen shows Delete all old messages?.
4. Press YES to confirm. The screen displays Deleting... and
then All old msgs deleted!. There is a confirmation tone.
To delete all old messages on the handset:
1. Press MENU when in idle mode to enter the main menu.
2. Press q CID or p to scroll to Answering sys. Press
SELECT.
3. Press q CID or p to highlight Delete all old, then press
SELECT. The screen shows Delete all old messages?.
4. Press YES to confirm. The screen displays Deleting... and
then All old msgs deleted!. There is a confirmation tone.
56 57
Page 33

Record and play memos
Memos are your own recorded messages used as reminders
for yourself or others using the same answering system. You
can record your own memos using a system handset or the
telephone base. Play and delete them in the same way as
incoming messages.
Record a memo
Using a cordless handset:
1. When the telephone is in idle mode, press MENU to enter
the main menu.
2. Press q CID or p to scroll to Answering sys, then press
SELECT.
3. Press q CID or p to scroll to Record memo, then press
SELECT. The system announces, “Record after the tone.
Press STOP when you are done.”
4. Speak towards the handset to record a memo.
5. Press STOP to stop recording. The system announces,
“Recorded.” and then returns to the previous menu.
Using the telephone base:
1. When the telephone is in idle mode, press MENU to enter
the main menu.
2. Press SELECT to select Answering sys.
3. Press q CID or p to scroll to Record memo, then press
SELECT. The system announces, “Record after the tone.
Press STOP when you are done.”
4. Speak towards the telephone base to record a memo.
5. Press STOP to stop recording. The system announces,
“Recorded.” and then returns to the previous menu.
NOTES
• The system announces “Memory is full,” if you attempt to record a
memo when the memory is full.
• Each memo can be up to four minutes in length.
• Memos shorter than two seconds are not recorded.
Remote access
A two-digit security code is required to access the answering
system remotely from any touch-tone telephone. The preset
code is 19. You can use this preset code, or set your own.
1. Dial your telephone number from any touch-tone
telephone.
2. When the system plays your announcement, enter the
two-digit security code.
3. Enter one of the following remote commands.
Command Description
1 Play all messages.
2 Play only new messages.
3 Delete the current message (during
playback).
33 Delete all old messages.
4 Repeat the current message (during
playback).
5 Stop.
*5 Hear a list of remote commands.
6 Skip to the next message (during playback).
*7 Record a new announcement.
8 End the call.
0 Turn the answering system on or off.
4. Hang up or press 8 to end the call.
NOTES
• If you do not press any key after you enter the remote access
code, all new messages play. If there are no new messages, all old
messages play.
• Once the new messages have played, the telephone announces
the help menu options. If you do not press any key within 20
seconds, the remote access call automatically disconnects.
• When the answering system is turned off, the telephone answers
after 10 rings, and announces, “Please enter your remote access
code.”
• When the memory is full, the answering system answers incoming
calls after 10 rings and announces, “Memory is full. Enter your
remote access code.”
• The telephone can respond to remote access code while it is
playing the screening announcement or block announcement.
This allows you to access you answering system from an unknown
number remotely.
Set remote access code
To access your answering system remotely from any touch-tone
phone, you need to enter a two-digit number (00-99).
To change the remote access code:
Using a cordless handset:
1. When the telephone is in idle mode, press MENU to enter
the main menu.
2. Press q CID or p to scroll to Answering sys, then press
SELECT.
3. Press q CID or p to scroll to Ans sys setup, then press
SELECT.
4. Press q CID or p to scroll to Remote code, then press
SELECT.
5. Use the dialing keys to enter a two-digit number. Press
MUTE/DELETE to backspace and delete a digit.
6. Press SELECT to save the setting. You hear a confirmation
tone.
Using the telephone base:
1. When the telephone is in idle mode, press MENU to enter
the main menu.
2. Press SELECT to select Answering sys.
3. Press q CID or p to scroll to Ans sys setup, then press
SELECT.
4. Press q CID or p to scroll to Remote code, then press
SELECT.
5. Use the dialing keys to enter a two-digit number. Press
DELETE to backspace and delete a digit.
6. Press SELECT to save the setting. You hear a confirmation
tone.
Record, play or delete memos
Memos are your own recorded messages used as reminders
for yourself or others using the same answering system. You
can record your own memos using a system handset. Playback
and delete them in the same way as incoming messages.
1. Press MENU when the phone is not in use.
2. Press q or p to choose Answering sys and then press
SELECT.
3. Press q or p to choose Record memo and then press
SELECT. The handset displays Record in 5 sec (counting
down) and then Recording... Stop [5] and announces,
“Record after the tone. Press 5 when you are done.”
4. Speak towards the handset microphone. Press 5 or OFF
when you finish recording. The handset announces
“Recorded.”
NOTES
• If you record a memo when the answering system memory is full,
the system announces, “Memory is full.”
• Each memo can be up to three minutes in length. Memos shorter
than two second are not recorded.
• When the answering system has less than three minutes of
recording time left, the handset announces, “Less than three
minutes to record,” and displays Rec mem low.
58 59
Page 34

Register a handset
When your handset is deregistered from the telephone base,
follow the steps below to register it back to the telephone
base.
Method 1:
1. Before you begin registration, make sure the handset is out
of the telephone base or charger and shows To register
HS, see manual..
2. Put the handset you wish to register on the telephone base
cradle.
3. The handset shows Registering... Please wait. If the
registration is successful, both the handset and the
telephone base screens display HANDSET X Registered
(HANDSET represents the handset name, X represents the
handset number). Both the handset and the telephone
base beep. The handset is now registered with the
telephone base.
If registration fails, the system will automatically try to register
again. If registration fails after the third try, Registration failed
appears on both screens. The handset shows To register HS,
see manual. and the telephone base returns to idle mode. This
may take up to five minutes to occur. Please start again from
Step 1.
Method 2:
1. Press and hold FIND HS on the telephone base for about
four seconds and it shows Registering... Please wait.
2. Press QUIET # on the handset. The handset shows
Registering... Please wait. If the registration is successful,
both the handset and the telephone base screens display
HANDSET X Registered (HANDSET represents the handset
name, X represents the handset number). Both the
handset and the telephone base beep. The handset is now
registered with the telephone base.
If registration fails, Registration failed appears on both screens.
The handset shows To register HS, see manual. and the
telephone base returns to idle mode. This may take up to five
minutes to occur. Please start again from Step 1.
Screen messages
Added to
allow list
Added to
block list
Added to
star name list
Activating
remote voice
control...
BASE 0
is calling
BASE 0
is calling all
Block list
is empty
Blocked call
Blocking
call...
Bluetooth
system busy
Call
transferred
Caller ID log
empty
Calling
BASE 0
Calling
HANDSET X
Cell
Cell call on hold
Cell line in use
Cell 1/2 alert:
XXX
Cell 1/2 low batt
Connection failed
Connection
timeout.
Please check
cell status.
Contact deleted
The telephone has just added an
entry to the allow list.
The telephone has just added an
entry to the block list.
The telephone has just added an
entry to the star name list.
The telephone is activating remote
voice control.
The telephone base is calling.
The telephone base is calling all
devices (for intercom calls).
There are no call block entries.
An incoming call was blocked.
The Smart call blocker feature of the
telephone is rejecting a call with
block announcement.
You are trying to make a cell call or
access the Bluetooth menu when
the Bluetooth link is already being
used.
You have transferred an outside call
to another device.
There are no entries in the caller ID
log.
The handset is calling the telephone
base (for intercom calls).
The handset or telephone base is
calling another handset (for
intercom calls).
The telephone base is transferring
an outside call to a handset.
The cell line is on a call.
A call on the cell line has been put
on hold.
Another system handset is using the
cell line.
The Android phone that you paired
with this telephone received a
mobile notification.
Message received from Alerts
manager that your cell phone’s
battery is low.
A Bluetooth device failed to
establish a connection with your
telephone system.
The telephone has failed to activate
remote voice control.
A phonebook entry is deleted.
Phonebook empty
Phonebook full
Downloading...
Ended
HANDSET X
is calling
HANDSET X
is calling all
Home
Home call on hold
Home & cell
calls on hold
Home & cell
lines in use
Home line in use
Incoming call
Intercom
Intercom ended
Line in use
Low battery
Microphone ON
Muted
New voicemail
No answer.
Try again.
No battery
No Bluetooth
device is ready
for connection
No caller info
No home line
No entries
found.
Download from
SIM only ?
There are no phonebook entries.
The phonebook is full. You cannot
save any new entries unless
you delete some current entries.
The system is downloading a
directory from a cell phone.
You have just ended a call.
Another system handset is calling.
The handset is calling all devices.
The home line is on a call.
A call on the home line has been
put on hold.
Calls on the home and cell lines
have been put on hold.
Calls on the home and cell lines are
being used.
A system handset or another
telephone on the same home line
is in use.
There is a call coming in.
The device is on an intercom call.
The intercom call has just ended.
An extension phone, or one of the
devices is in use.
The battery is low. You should
charge the battery.
Mute is off so the other party can
hear your voice.
The microphone is off. The other
party cannot hear you.
There are new voicemail messages
from your telephone service
provider.
The device(s) you are trying to
transfer a call to is out of range, off
hook, or has no power.
The handset in the charger has no
battery installed.
There is no Bluetooth device paired
to the telephone system when
you press CELL 1/CELL 2 on the
telephone base or handset.
The caller information is unavailable.
There is no telephone line
connection.
There are no entries found when
you download a cell phone
directory from the cell memory.
No entries
found.
Download from
Phone only ?
No messages
No PTT call
No signal.
Call ended.
Not available
at this time
Number
already saved
Out of range
OR no power
at base
** Paging **
Paging all
devices
Place in charger
PTT From HANDSET
X
To devices:
X
PTT From HANDSET
X
To devices:
X
PTT To HANDSET X
PTT To
BASE 0
Push to talk
Ended
Quiet mode on
Quiet mode is off
Rec mem full
Rec mem low
Registering...
Please wait
Registration
slots are full
Registration
failed
There are no entries found when
you download a cell phone
directory from your SIM card.
There are no entries found in either
the cell or SIM card when you
download a cell phone directory
from both memories.
There are no messages in the
answering system.
The incoming PTT function is turned
off. The handset will not
receive PTT calls.
The phone lost connection with the
telephone base or did not have
a strong enough signal and the
phone call ended.
Someone else is already using the
phonebook or caller ID log.
When a handset tries to access the
answering system or Bluetooth
menu during battery backup mode.
The telephone number you
have entered is already in the
phonebook, allow list or block list..
The telephone base has lost power,
or the handset is out of range.
The cordless handset is paged by
the telephone base.
The telephone base is paging all
devices.
The battery is very low. The handset
should be charged.
One handset has started a PTT
session to another handset and
telephone base.
One handset has started a PTT
session to another handset.
You have started the PTT process
with a handset.
You have started the PTT process
with the telephone base.
The PTT session is ended.
QUIET mode is on.
QUIET mode is turned off.
The system recording time is full.
The system recording time is low.
The handset is registering to the
telephone base.
The telephone base has the
maximum of 12 handsets registered
to it.
The handset registration is not
successful.
60 61
Page 35

Remote voice
control ended.
Ringer off
Ringer muted
Saved to
phonebook
Screened call
Setting up
Answering
system...
Smart call blk
screening...
To register HS,
see manual.
Unable to call.
Try again
Start voice
guide to set
up Smart call
blocker now?
XX Missed calls
XX New msgs
XX New messages
The remote voice control operation
is ended.
The ringer is turned off.
The ringer is off temporarily while
the device is ringing.
An entry has been successfully
saved in the phonebook.
The Smart call blocker feature of the
telephone has screened a call and is
putting the call through to you.
The telephone is playing voice
guide.
The Smart call blocker feature
of the telephone is screening a
call and playing the screening
announcement to the caller.
Screen display before handset
registration.
You try to join a call when there are
already four handsets on
that call.
You try to make an outside call
when another device is transferring
a call with the intercom feature.
After you install your telephone or
power returns following a power
outage, the telephone will prompt
you to set the date and time. After
the date and time setting is done
or skipped, the telephone will then
prompt if you want to set up the
Smart call blocker feature via voice
guide.
There are new calls in the caller ID
log.
Displays on handset screen when
you have new messages in the
answering system.
Displays on telephone base screen
when you have new messages in
the answering system.
General product care
Taking care of your telephone
Your cordless telephone contains sophisticated electronic parts,
so it must be treated with care.
Avoid rough treatment
Place the handset down gently. Save the original packing
materials to protect your telephone if you ever need to ship it.
Avoid water
Your telephone can be damaged if it gets wet. Do not use the
handset outdoors in the rain, or handle it with wet hands. Do
not install the telephone base near a sink, bathtub or shower.
Electrical storms
Electrical storms can sometimes cause power surges harmful to
electronic equipment. For your own safety, take caution when
using electrical appliances during storms.
Cleaning your telephone
Your telephone has a durable plastic casing that should retain
its luster for many years. Clean it only with a dry non-abrasive
cloth. Do not use dampened cloth or cleaning solvents of any
kind.
Frequently asked questions
Below are the questions most frequently asked about the
cordless telephone. If you cannot find the answer to your
question, visit our website at
www.vtechphones.com or call
1 (800) 595-9511 for customer service. In Canada, go to
phones.vtechcanada.com or call 1 (800) 267-7377.
I cannot pair my
cell phone to the
telephone base.
I cannot pair my
headset to the
telephone base.
I cannot connect my
cell phone with the
telephone base.
• Make sure you have cellular coverage.
• Make sure your cell phone is compatible
with your telephone system. Check the
Bluetooth compatibility list at
www.vtechphones.com or
phone.vtechcanada.com.
• Make sure the Bluetooth function of your
cell phone is turned on. See the user’s
manual of your cell phone for more
information.
• Make sure that you set your cell phone to
search for devices.
• If the telephone systems in your cell
phone device history list, delete it and try
pairing again.
• Carefully follow the pairing instructions in
Add a cell phone section and make sure
that your cell phone is not connected to
any other Bluetooth device.
• Turn off your cell phone, then turn it on
again.
• Reset the telephone base. Unplug
the unit’s electrical power. Wait for
approximately 15 seconds, then plug
it back in. Repeat the suggestions
mentioned above.
• Make sure that your Bluetooth headset
is in discoverable mode when pairing
with the telephone base. See the
user’s manual of your headset for more
information on how to set your headset
to discoverable mode.
• Make sure your headset is compatible
with your telephone system. Check the
Bluetooth compatibility list at
www.vtechphones.com or
phone.vtechcanada.com.
• Carefully follow the pairing instructions
in Add a headset section and make sure
that your headset is not connected to any
other Bluetooth device.
• Reset the telephone base. Unplug
the unit’s electrical power. Wait for
approximately 15 seconds, then plug
it back in. Repeat the suggestions
mentioned above.
• Make sure that the Bluetooth function
of your cell phone is turned on. See the
user’s manual of your cell phone for more
information.
• Make sure that your Bluetooth cell phone
is not connected to any other Bluetooth
device.
• Turn off your cell phone, then turn it on
again.
• Make sure that your cell phone is on the
active devices list.
• For some cell phones, you must authorize
the IS8151/IS8251 device in your cell
phone’s Bluetooth feature. See the user’s
manual of your cell phone for more
information.
• Manually connect your cell phone to your
telephone system. Refer to the user’s
manual of your cell phone for more
information.
I cannot connect my
headset with the
telephone base.
I cannot put
my headset in
discoverable mode.
I don’t know how
to search for or add
new devices on my
cell phone.
My cell phone
disconnects with the
telephone base.
My cell phone is
connected to the
telephone base, but
I cannot make a
cell call.
Bluetooth system
busy appears on the
display.
I cannot hear
any audio on my
telephone system
when on a cell call.
The listening volume
of my cell call is too
loud or quiet.
I cannot download
contacts from my cell
phone to my IS8151/
IS8251.
• Make sure that your Bluetooth headset
is not connected to any other Bluetooth
device.
• Make sure that your headset is on the
active devices list.
• Refer to the user’s manual of your
headset for information on how to set
your headset to discoverable mode.
• Make sure that the headset is not
connected to any other Bluetooth device
in order to successfully pair and connect
to the telephone base.
• Carefully follow the pairing process in the
Add a headset section.
• Reset the telephone base. Unplug
the unit’s electrical power. Wait for
approximately 15 seconds, then plug
it back in. Repeat the suggestions
mentioned above.
• Most cell phones have the Bluetooth
feature in the connection or setup
menus. Please refer to the user’s manual
of your cell phone.
• In general, press the menu key on your
cell phone, then look for the Bluetooth
menu in the settings or connection menu.
In the Bluetooth menu, select the option
to search for or add new devices.
• Turn off your cell phone, then turn it on
again.
• Make sure that you are not using your cell
phone when on a cell call.
• Make sure that your cell phone is not in
use when you are trying to make a cell
call.
• For some smartphones, make sure that
the cellular function is turned on.
• Make sure that your cell phone is not in
use when connected and on the active
devices list.
• Make sure that your cell phone or
headset is not connected to any other
Bluetooth device.
• Your telephone system can only use one
Bluetooth device at a time.
• Make sure that your cell phone’s volume
is not too low or muted.
• Reset the telephone base. Unplug
the unit’s electrical power. Wait for
approximately 15 seconds, then plug it
back in.
• Turn off your cell phone, then turn it on
again.
• During a cell call, if the listening volume
is too loud or quiet, try changing the
volume on your cell phone. On some cell
phones, changing the volume on the cell
phone effects your cell call volume on
the IS8151/IS8251.
• Make sure that your cell phone is paired
and connected to the base.
• Make sure you place your cell phone next
to the base while downloading.
• If your cell phone does not support the
download, you can send the directory
from your cell phone. The system can
receive the directory automatically. See
the user’s manual of your cell phone for
more information.
62 63
Page 36

I see duplicate
entries in my
downloaded
directory.
Some of my cell
phone contacts were
not imported to my
IS8151/IS8251.
Can the IS8151/
IS8251 help the poor
cell phone reception
in my house?
My telephone does
not work at all.
The display shows
No home line. I
cannot hear the dial
tone.
I cannot dial out. Make sure there is a dial tone before dialing.
The display shows
To register HS, See
manual.. The handset
does not work at all.
The display shows
Low battery.
The battery does
not charge in the
handset or the
handset battery does
not accept charge.
The telephone does
not ring when there
is an incoming call.
• If you see duplicate directory entries,
you can delete them manually. Another
option is to download again either your
SIM card or phone memory, but not
both.
• Try copying the contacts from your
SIM card to your cell phone memory
first, then download from your phone
memory. If that doesn’t work, try
copying the contacts from your cell
phone memory to your SIM card, then
download from your SIM card. For more
information on how to transfer contacts
between your SIM card and your phone
memory, refer to the user’s manual of
your cell phone.
• If your cell phone has poor reception
in your home, the IS8151/IS8251 cannot
improve the reception. However, if
you have a location in your house with
better reception, you can leave your
cell phone in that location while you use
IS8151/IS8251 cell line. In order for this to
work, the cell phone must be within 15
feet of the telephone base for optimal
performance.
Make sure the telephone base is installed
properly, and battery is installed and
charged correctly. For optimum daily
performance, return the handset to the
telephone base after use.
Disconnect the telephone line cord from
your telephone and connect it to another
telephone. If there is no dial tone on that
other telephone either, then the telephone
line cord may be defective. Try installing a
new telephone line cord.
If changing the telephone line cord does
not help, the wall jack (or the wiring to this
wall jack) may be defective. Contact your
telephone service provider.
You may be using a new cable or VoIP
service, the existing telephone jacks in your
home may no longer work. Contact your
service provider for solutions.
It is normal if the handset takes a second or
two to synchronize with the telephone base
before producing a dial tone. Wait an extra
second before dialing.
Eliminate any background noise. Mute the
handset before dialing, or dial from another
room in your home with less background
noise.
The handset is deregistered from the
telephone base. Follow the steps in Register
a handset to register the handset back to the
telephone base.
Place the handset in the telephone base or
charger for charging.
Make sure the handset is placed in the
telephone base or charger correctly.
If the battery is completely depleted, charge
the battery for at least
30 minutes before use.
You may need to purchase a new battery.
Make sure the ringer volume is not set to off.
The handset may be too far from the
telephone base. Move it closer to the
telephone base.
My handset
beeps and is not
performing normally.
I hear noise on the
cordless handset
and the keys do not
work.
I hear other calls
when using the
telephone.
There is interference
during a telephone
conversation. My
calls fade out when
I am using the
cordless handset.
The telephone does
not receive caller
ID or the telephone
does not show
caller ID during call
waiting.
The display shows
Out of range or no
pwr at base.
I cannot hear any
instruction from
the handset when
I try to record, play
or delete my own
announcement.
The outgoing
announcement is not
clear.
Move the handset closer to the telephone
base. It may be out of range.
Make sure the telephone line cord is
plugged in securely.
Disconnect the telephone base from the
telephone wall jack. Plug in a different
telephone. If you still hear other calls,
the problem is probably in the wiring or
telephone service. Contact your telephone
service provider.
The handset may be out of range. Move it
closer to the telephone base.
If you subscribe to high-speed Internet
service (DSL - digital subscriber line) through
your telephone line, you must install a DSL
filter between the telephone line cord and
the telephone wall jack. The filter prevents
noise and caller ID problems caused by
DSL interference. Contact your DSL service
provider for more information about DSL
filters.
Appliances or other cordless telephones
plugged into the same circuit as the
telephone base can cause interference. Try
moving the appliance or telephone base to
another outlet.
The location of your telephone base can
impact the performance of your cordless
phone. For better reception, install the
telephone base in a centralized location
within your home or office, away from
walls or other obstructions. In many
environments, elevating the telephone base
improves overall performance.
Caller ID is a subscription service. You
must subscribe to this service from your
telephone service provider for this feature
to work on your telephone.
Both your and the caller’s telephone service
providers must use equipment compatible
with the caller ID service.
The caller may not be calling from an area
which supports caller ID.
The caller ID information displays after the
first or second ring.
The handset may be out of range. Move it
closer to the telephone base.
Make sure the power cord is securely
plugged into the telephone base. Use a
working electrical outlet not controlled by a
wall switch.
The handset does not have a speakerphone.
When recording, playing or deleting your
own announcement, the instructions are
announced through the handset receiver.
Make sure you place the handset receiver
close to your ear.
When recording the announcement, make
sure you speak in a normal tone of voice
towards the microphone of the handset.
Make sure there is no background noise
when recording.
The answering
system does not
record messages.
The messages on the
answering system
are very difficult to
hear.
The answering
system does not
announce the correct
day of the week for
recorded messages
time stamp.
The messages on the
answering system
are incomplete.
The answering
system does not
respond to remote
commands.
I subscribe to a
nontraditional
telephone
service that uses
my computer
to establish
connections, and my
telephone doesn’t
work.
I accidentally set my
LCD language to
Spanish or French,
and I don’t know
how to change it
back to English.
Make sure the answering system is on.
When the answering system is on,
ANS ON should display on the handset and
the telephone base.
When the answering machine memory is
full, it does not record new messages until
some old messages are deleted.
If you subscribe to voicemail service, change
the number of rings so that your answering
system answers before your voicemail
service answers. To determine how many
rings activate your voicemail service, contact
your telephone service provider.
Press VOL+ on the telephone base or
VOL on the handset to increase the
listening volume.
Make sure you have set the date and time.
See Configure your telephone section.
If a caller leaves a very long message,
part of it may be lost when the answering
system disconnects the call after the preset
recording time.
If the memory on the answering system
becomes full during a message, the
answering system stops recording and
disconnects the call.
If the caller’s voice is very soft, the answering
system may stop recording and disconnect
the call.
Make sure you enter the correct remote
access code.
Make sure you are calling from a touch-tone
telephone. When dialing a number, there
should be tones. If there are clicks, then it
is not a touch-tone telephone and cannot
activate the answering system.
The answering system may not detect
the remote access code when your
announcement is playing. Wait until the
announcement is over before entering the
code.
Make sure your computer is powered on,
and your Internet is working properly.
Make sure to plug your USB telephone
adapter into a dedicated USB port on your
computer. Do not plug into a multiple port
USB hub (USB splitter) that is not powered.
In a few rare instances, the USB port on your
computer may not have enough power. In
these instances, try using a USB hub with its
own external power supply.
If you are using a firewall, it may prevent
access to your nontraditional telephone
service. Contact your service provider for
more information.
While the handset is not in use, press MENU
and then enter 364# to change the handset
LCD language back to English.
The RBRC seal
The RBRC seal on the nickel-metal hydride battery indicates
that VTech Communications, Inc. is voluntarily participating in
an industry program to collect and recycle these batteries at
the end of their useful lives, when taken out of service within
the United States and Canada.
The program provides a convenient alternative to placing used
nickel-metal hydride batteries into the trash or municipal waste,
which may be illegal in your area.
VTech’s participation makes it easy for you to drop off the
spent battery at local retailers participating in the program or at
authorized VTech product service centers. Please call
1 (800) 8 BATTERY® for information on Ni-MH battery recycling
and disposal bans/restrictions in your area. VTech’s involvement
in this program is part of its commitment to protecting our
environment and conserving natural resources.
The RBRC seal and 1 (800) 8 BATTERY® are registered
trademarks of Call2recycle, Inc.
64 65
Page 37

FCC, ACTA and IC regulations
FCC Part 15
NOTE: This equipment has been tested and found to comply
with the requirements for a Class B digital device under Part 15
of the Federal Communications Commission (FCC) rules. These
requirements are intended to provide reasonable protection
against harmful interference in a residential installation. This
equipment generates, uses and can radiate radio frequency
energy and, if not installed and used in accordance with
the instructions, may cause harmful interference to radio
communications. However, there is no guarantee that
interference will not occur in a particular installation. If this
equipment does cause harmful interference to radio or
television reception, which can be determined by turning the
equipment off and on, the user is encouraged to try to correct
the interference by one or more of the following measures:
• Reorient or relocate the receiving antenna.
• Increase the separation between the equipment and
receiver.
• Connect the equipment into an outlet on a circuit different
from that to which the receiver is connected.
• Consult the dealer or an experienced radio/TV technician for
help.
WARNING: Changes or modifications to this equipment not
expressly approved by the party responsible for compliance
could void the user’s authority to operate the equipment.
This device complies with Part 15 of the FCC rules. Operation is
subject to the following two conditions: (1) this device may not
cause harmful interference, and (2) this device must accept any
interference received, including interference that may cause
undesired operation. Privacy of communications may not be
ensured when using this telephone.
To ensure safety of users, the FCC has established criteria
for the amount of radio frequency energy that can be safely
absorbed by a user or bystander according to the intended
usage of the product. This product has been tested and found
to comply with the FCC criteria. The handset may be safely
held against the ear of the user. The telephone base shall be
installed and used such that parts of the user’s body other than
the hands are maintained at a distance of approximately 20 cm
(8 inches) or more.
This Class B digital apparatus complies with Canadian
requirement:
CAN ICES-3 (B)/NMB-3(B).
FCC Part 68 and ACTA
provided with this product. It is designed to be connected to
a compatible modular jack that is also compliant. An RJ11 jack
should normally be used for connecting to a single line and an
RJ14 jack for two lines. See the installation instructions in the
user’s manual.
The Ringer Equivalence Number (REN) is used to determine
how many devices you may connect to your telephone line
and still have them ring when you are called. The REN for this
product is encoded as the 6th and 7th characters following the
US: in the product identifier (e.g., if ## is 03, the REN is 0.3). In
most, but not all areas, the sum of all RENs should be five (5.0)
or less. For more information, please contact your telephone
service provider.
This equipment may not be used with Party Lines. If you have
specially wired alarm dialing equipment connected to your
telephone line, ensure the connection of this equipment does
not disable your alarm equipment. If you have questions about
what will disable alarm equipment, consult your telephone
service provider or a qualified installer.
If this equipment is malfunctioning, it must be unplugged
from the modular jack until the problem has been corrected.
Replacement to this telephone equipment can only be made
by the manufacturer or its authorized agents. For replacement
procedures, follow the instructions outlined under the Limited
warranty.
If this equipment is causing harm to the telephone network,
the telephone service provider may temporarily discontinue
your telephone service. The telephone service provider is
required to notify you before interrupting service. If advance
notice is not practical, you will be notified as soon as possible.
You will be given the opportunity to correct the problem and
the telephone service provider is required to inform you of
your right to file a complaint with the FCC. Your telephone
service provider may make changes in its facilities, equipment,
operation, or procedures that could affect the proper
functioning of this product. The telephone service provider is
required to notify you if such changes are planned.
If this product is equipped with a corded or cordless handset, it
is hearing aid compatible.
If this product has memory dialing locations, you may choose
to store emergency telephone numbers (e.g., police, fire,
medical) in these locations. If you do store or test emergency
numbers, please:
Remain on the line and briefly explain the reason for the call
before hanging up.
Perform such activities in off-peak hours, such as early morning
or late evening.
The term ‘’IC:‘’ before the certification/registration number only
signifies that the Industry Canada technical specifications were
met.
The Ringer Equivalence Number (REN) for this terminal
equipment is 1.0. The REN indicates the maximum number of
devices allowed to be connected to a telephone interface. The
termination on an interface may consist of any combination of
devices subject only to the requirement that the sum of the
RENs of all the devices not exceed five.
This product meets the applicable Innovation, Science and
Economic Development Canada technical specifications.
California Energy Commission battery charging testing instructions
This telephone is set up to comply with the energy-conserving
standards right out of the box. These instructions are intended for
California Energy Commission (CEC) compliance testing only. When
the CEC battery charging testing mode is activated, all telephone
functions, except battery charging, will be disabled.
To activate the CEC battery charging testing mode:
1. Unplug the telephone base power adapter from the power
outlet. Make sure all handsets are plugged with charged batteries
before proceeding.
2. While you press and hold FIND HS, plug the telephone base
power adapter back to the power outlet.
3. After about 20 seconds, when the HOME light starts flashing,
release FIND HS and then press it again within two seconds.
You hear a confirmation tone. The HOME light turns off and all
handsets display To register HS, see manual.. Allow up to one
minute for the process to complete.
NOTE
• When the phone fails to enter this mode, repeat Step 1 through Step 3
above.
To deactivate the CEC battery charging testing mode:
1. Unplug the telephone base power adapter from the power
outlet, then plug it back in. Then the telephone base is powered
up as normal.
2. Register your handsets back to the telephone base. Refer to
Register a handset.
This equipment complies with Part 68 of the FCC rules and
with technical requirements adopted by the Administrative
Council for Terminal Attachments (ACTA). The label on the back
or bottom of this equipment contains, among other things,
a product identifier in the format US:AAAEQ##TXXXX. This
identifier must be provided to your telephone service provider
upon request.
The plug and jack used to connect this equipment to
premises wiring and the telephone network must comply with
applicable Part 68 rules and technical requirements adopted
by ACTA. A compliant telephone cord and modular plug is
Industry Canada
This device contains licence-exempt transmitter(s)/receiver(s)
that comply with Innovation, Science and Economic
Development Canada’s licence-exempt RSS(s). Operation is
subject to the following two conditions:
(1) This device may not cause interference.
(2) This device must accept any interference, including
interference that may cause undesired operation of the device.
Privacy of communications may not be ensured when using this
telephone.
66 67
Page 38

For C-UL compliance only
Mesures de sécurité importantes
Afin de réduire les risques d’incendie, de blessures corporelles
ou d’électrocution, suivez toujours ces mesures préventives de
base lorsque vous utilisez votre téléphone :
1. Lisez et comprenez bien toutes les instructions.
2. Observez toutes les instructions et mises en garde inscrites
sur l’appareil.
3. Débranchez ce téléphone de la prise murale avant de le
nettoyer. N’utilisez pas de nettoyeurs liquides ni en aérosol.
N’utilisez qu’un chiffon doux et légèrement humecté.
4. ATTENTION: Ne pas installer le socle téléphonique à une
hauteur supérieure à 2 mètres.
5. N’utilisez pas ce produit près de l’eau, tel que près d’un
bain, d’un lavabo, d’un évier de cuisine, d’un bac de
lavage ou d’une piscine, ou dans un sous-sol humide ou
sous la douche.
6. Ne déposez pas ce téléphone sur un chariot, support
ou table chancelants. L’appareil pourrait tomber et être
sérieusement endommagé.
7. Évitez d’installer le système téléphonique dans les endroits
soumis à une température extrême, à la lumière directe
du soleil ou à proximité immédiate d’autres appareils
électriques ou électroniques. Protégez votre téléphone
contre les sources d’humidité, la poussière, les vapeurs et
les liquides corrosifs.
8. Le boîtier de l’appareil est doté de fentes et d’ouvertures
d’aération situées à l’arrière ou en dessous. Afin
d’empêcher la surchauffe, ces ouvertures ne doivent pas
être obstruées en plaçant l’appareil sur un lit, divan, tapis
ou autre surface similaires. Ne placez pas cet appareil à
proximité d’un élément de chauffage ni d’une plinthe
électrique. De plus, ne l’installez pas dans une unité
murale ou un cabinet fermé qui ne possède pas d’aération
adéquate.
9. Ne faites fonctionner cet appareil qu’avec le type
d’alimentation indiqué sur les étiquettes de l’appareil.
Si vous ne connaissez pas le voltage de votre maison,
consultez votre marchand ou votre fournisseur d’électricité.
10. Ne déposez rien sur le cordon d’alimentation. Installez cet
appareil dans un endroit sécuritaire, là où personne ne
pourra trébucher sur la ligne d’alimentation ni le cordon
téléphonique modulaire.
11. N’insérez jamais d’objets à travers les fentes et ouvertures
de cet appareil, car ils pourraient toucher à des points
de tension dangereux ou court-circuiter des pièces, ce
qui constituerait un risque d’incendie ou d’électrocution.
N’échappez pas de liquides dans l’appareil.
12. Afin de réduire les risques d’électrocution, ne démontez
pas l’appareil, mais apportez-le plutôt à un centre de
service qualifié s’il doit être réparé. En enlevant le
couvercle, vous vous exposez à des tensions dangereuses
ou autres dangers similaires. Un remontage inadéquat peut
être à l’origine d’une électrocution lors d’une utilisation
ultérieure de l’appareil. Débranchez l’appareil avant de
procéder au nettoyage. Utilisez un chiffon humide et doux.
13. Ne surchargez pas les prises de courant et les rallonges.
14. Débranchez cet appareil de la prise de courant et
communiquez avec le département de service à la
clientèle de VTech dans les cas suivants :
• Lorsque le cordon d’alimentation est endommagé ou
écorché.
• Si du liquide a été échappé dans l’appareil.
• Si l’appareil a été exposé à une source d’humidité telle
que la pluie ou l’eau.
• Si le produit ne fonctionne pas normalement en
respectant les instructions de fonctionnement. Réglez
uniquement les commandes indiquées dans le les
instructions de fonctionnement. Les réglages incorrects
des autres commandes pourraient provoquer un
dommage qui pourrait exiger un travail exhaustif
de la part d’un technicien autorisé afin de rétablir le
fonctionnement normal de l’appareil.
• Si le produit a été échappé et que le socle et/ou le
combiné a été endommagé.
• Si le produit affiche une nette diminution de sa
performance.
15. Évitez d’utiliser un téléphone (autre qu’un sans fil) pendant
un orage. Les éclairs peuvent être à l’origine d’une
électrocution.
16. N’utilisez pas le téléphone pour rapporter une fuite de
gaz à proximité de la fuite. En certaines circonstances, une
flammèche pourrait être provoquée lorsque l’adaptateur
est branché à une prise de courant, ou lorsque le combiné
est déposé sur le socle. Ceci est un événement commun
associé à la fermeture d’un circuit électrique. L’utilisateur
ne devrait pas brancher le téléphone à une prise de
courant, et ne devrait pas déposer le combiné chargé sur
le socle, si le téléphone se trouve à proximité d’un endroit
comportant des concentrations de gaz inflammables, à
moins que la ventilation soit adéquate. Une flammèche
dans un tel endroit pourrait provoquer un incendie ou une
explosion. De tels environnements peuvent comprendre:
des endroits où l’on utilise de l’oxygène médical sans
ventilation adéquate; des gaz industriels (dissolvants de
nettoyage, des vapeurs d’essence, etc.); une fuite de gaz
naturel, etc.
17. Ne placez que le combiné de votre téléphone près de
votre oreille lorsqu’en mode de conversation.
18. Ces adaptateurs ont été conçus pour être orientés en
position verticale ou montés au sol. Les broches ne sont
pas conçues pour maintenir l’adaptateur en place si celui-ci
est barnché dans une prise au plafond ou sous une table/
armoire.
19. Pour le MATERIEL RACCORDE PAR PRISE DE COURANT, le
socle de prise de courant doit etre installe a proximite du
materiel et doit etre aisement accessible.
20.
d’explosion si vous utilisez le mauvais type de piles pour le
téléphone. N’utilisez que les piles rechargeable inclus ou
les piles de rechange (BT183342/BT283342). N’incinérez pas
les piles. Celles-ci risqueraient d’exploser.
21. N’utilisez que les adaptateurs inclus avec ce produit.
L’utilisation d’un adaptateur dont la polarité ou la tension
serait inadéquate risque d’endommager sérieusement le
produit et mettre votre sécurité en péril.
MISE EN GARDE: Il peut y avoir un risque
CONSERVEZ CES INSTRUCTIONS
Pile
• MISE EN GARDE : N’utilisez que la pile incluse.
• Ne jetez pas la pile au feu. Vérifiez les instructions
spécifiques de mise aux rebus auprès des autorités locales.
• N’ouvrez pas et ne mutilez pas la pile. L’électrolyte qui s’en
échapperait est corrosif et pourrait causer des brûlures ou
des blessures aux yeux ou à la peau. L’électrolyte est toxique
si avalé.
• Soyez prudents lorsque vous manipulez les piles afin d’éviter
les courts-circuits provoqués par des matériaux conducteurs.
• Rechargez la pile incluse avec cet appareil, selon les
instructions et limites spécifiées dans ce guide d’utilisation.
Stimulateurs cardiaques implantés dans l’organisme
Les simulateurs cardiaques (s’applique uniquement aux
téléphones numériques sans fil) :
L’organisme ‘Wireless Technology Research, LLC (WTR)’, une
firme de recherche indépendante, a mené une évaluation
pluridisciplinaire des interférences entre les téléphones sans
fil portatifs et les stimulateurs cardiaques implantés dans
l’organisme. Appuyée par l’Administration des aliments et
drogues (FDA) des États-Unis, la firme WTR recommande aux
médecins :
Avis aux détenteurs de stimulateurs cardiaques
• Ils doivent tenir le téléphone sans fil à une distance d’au
moins six pouces du stimulateur cardiaque.
• Ils ne doivent PAS placer le téléphone sans fil directement
sur le stimulateur cardiaque, tel que dans une poche de
chemise, lorsque celui-ci est en marche.
• Ils doivent utiliser le téléphone sans fil en l’appuyant
sur l’oreille qui se trouve dans la direction opposée au
stimulateur cardiaque.
L’étude effectuée par l’organisme WRS n’a pas identifié de
risque pour les détenteurs de simulateurs cardiaques causés
par les gens qui utilisent un téléphone sans fil à proximité de
ceux-ci.
À propos des téléphones sans fil
• Confidentialité : Les mêmes caractéristiques qui constituent
des avantages pour les téléphones sans fil affichent
également des restrictions. Les appels téléphoniques
sont transmis entre le combiné sans fil et le socle par
le biais d’ondes radio ; il y a donc la possibilité que vos
conversations téléphoniques sans fil soient interceptées par
des équipements de réception radio se trouvant dans la
portée du combiné sans fil. Pour cette raison, vous ne devez
pas percevoir les communications téléphoniques sans fil
comme étant aussi confidentielles que celles des téléphones
à cordons.
• Alimentation électrique : Le socle de ce téléphone sans
fil doit être branché à une prise électrique fonctionnelle.
La prise électrique ne doit pas être contrôlée par un
interrupteur mural. Les appels ne pourront pas être
effectués du combiné sans fil si le socle est débranché ou
mis hors tension ou si le courant est coupé.
• Possibilité d’interférences aux téléviseurs : Certains
téléphones sans fil fonctionnent sur des fréquences
pouvant causer des interférences aux téléviseurs et aux
magnétoscopes. Pour réduire ou prévenir de telles
interférences, ne placez pas le socle du téléphone sans fil
près ou sur un téléviseur ou magnétoscope. S’il y a présence
de parasites, il est conseillé d’éloigner le téléphone sans
fil du téléviseur ou du magnétoscope afin de réduire
possiblement les interférences.
• Piles rechargeables : Manipulez les piles avec soin afin de
ne pas les court-circuiter avec des bagues, bracelets ou clés.
Les piles ou le conducteur peut surchauffer et causer des
blessures. Respectez la polarité adéquate entre la pile et le
chargeur.
• Les bloc-piles rechargeables à l’hydrure métallique de
nickel : Jetez ces blocs-piles de manière écologique et
sécuritaire. Ne les incinérez pas et ne les percez pas. Tel que
les autres piles de ce type, elles pourraient dégager une
matière toxique qui peut causer des blessures corporelles si
elles sont brûlées ou percées.
68 69
Page 39

Limited warranty
What does this limited warranty cover?
The manufacturer of this VTech product, VTech
Communications, Inc. (“VTech”), warrants to the holder of a
valid proof of purchase (“Consumer” or “you”) that the Product
and all accessories provided by VTech in sales package
(“Product”) are free from material defects in material and
workmanship, pursuant to the following terms and conditions,
when installed and used normally and in accordance with
operating instructions. This limited warranty extends only to
the Consumer for Products purchased and used in the United
States of America and Canada.
What will VTech Communications do if the Product is not free
from material defects in materials and workmanship during
the limited warranty period (“Materially Defective Product”)?
During the limited warranty period, VTech’s authorized service
representative will replace at VTech’s option, without charge,
a Materially Defective Product. If we choose to replace the
Product, we may replace it with a new or refurbished Product
of the same or similar design. VTech will return replacement
products to you in working condition. VTech will retain
defective parts, modules, or equipment. Replacement of
the Product, at VTech’s option, is your exclusive remedy. You
should expect the replacement to take approximately 30 days.
How long is the limited warranty period?
The limited warranty period for the product extends for
ONE (1) YEAR from date of purchase (90 days on products
purchased as Refurbished*). This limited warranty also applies
to replacement Products for a period of either (a) 90 days from
the date the replacement Product is shipped to you or (b)
the time remaining on the original one-year limited warranty
(90-day limited warranty on products that are purchased as
Refurbished*). Whichever is longer.
*Refurbished products purchased from our online store carry a
90-day replacement warranty.
What is not covered by this limited warranty?
This limited warranty does not cover:
1. Product that has been subjected to misuse, accident,
shipping or other physical damage, improper installation,
abnormal operation or handling, neglect, inundation, fire,
water or other liquid intrusion; or
2. Product that has been damaged due to repair, alteration or
modification by anyone other than an authorized service
representative of VTech; or
3. Product to the extent that the problem experienced is
caused by signal conditions, network reliability, or cable or
antenna systems; or
4. Product to the extent that the problem is caused by use
with non-VTech electrical accessories; or
5. Product whose warranty/quality stickers, product serial
number plates or electronic serial numbers have been
removed, altered or rendered illegible; or
6. Product purchased, used, serviced, or shipped for repair
from outside the United States, or used for commercial
or institutional purposes (including but not limited to
Products used for rental purposes); or
7. Product returned without valid proof of purchase (see 2
below); or
8. Charges for installation or set up, adjustment of customer
Disclaimer and Limitation of Liability
controls, and installation or repair of systems outside the
unit.
How do you get warranty service?
To obtain warranty service in the United States of America,
please visit our website at www.vtechphones.com or call
1 (800) 595-9511 for instructions regarding where to return the
Product. In Canada, go to phones.vtechcanada.com or dial 1
(800) 267-7377.
NOTE: Before calling for service, please review the user’s
manual - a check of the Product’s controls and features may
save you a service call.
VTech Communications, Inc. and its suppliers assume no
responsibility for any damage or loss resulting from the use of
this user’s manual. VTech Communications, Inc. and its suppliers
assume no responsibility for any loss or claims by third parties
that may arise through the use of this product.
Company: VTech Communications, Inc.
Address: 9020 SW Washington Square Road - Ste 555 Tigard,
OR 97223, United States
Phone: 1 (800) 595-9511 in the U.S. or
1 (800) 267-7377 in Canada
Except as provided by applicable law, you assume the risk
of loss or damage during transit and transportation and are
responsible for delivery or handling charges incurred in the
transport of Product(s) to the service location. VTech will
return replaced product under this limited warranty to you,
transportation, delivery or handling charges prepaid. VTech
assumes no risk for damage or loss of the Product in transit.
What must you return with the Product to get warranty
service?
1. Return the entire original package and contents including
the Product to the VTech service location along with a
Technical specifications
Frequency
control
Transmit
frequency
Channels 5
Nominal
effective
range
Crystal controlled PLL synthesizer
1921.536-1928.448 MHz
Maximum power allowed by FCC and IC.
Actual operating range may vary according to
environmental conditions at the time of use.
description of the malfunction or difficulty;
2. Include “valid proof of purchase” (sales receipt) identifying
the Product purchased (Product model) and the date of
purchase or receipt; and
3. Provide your name, complete and correct mailing address,
and telephone number.
Other limitations
Power
requirements
Memory Phonebook: 200 memory locations;
Handset: 2.4 VDC, AAA×2, Ni-MH battery pack
Telephone base: 6V DC @ 600mA
Charger: 6V DC @ 400mA
up to 30 digits and 15 characters
Caller ID log: 50 memory locations;
up to 24 digits and 15 characters
This warranty is the complete and exclusive agreement
between you and VTech. It supersedes all other written or
oral communications related to this Product. VTech provides
no other warranties for this Product. The warranty exclusively
describes all of VTech’s responsibilities regarding the Product.
There are no other express warranties. No one is authorized to
make modifications to this warranty and you should not rely on
any such modification.
State Law Rights: This warranty gives you specific legal rights,
and you also have other rights which vary from state to state.
Limitations: Implied warranties, including those of fitness for
a particular purpose and merchantability (an unwritten warranty
that the Product is fit for ordinary use) are limited to one year
from date of purchase. Some states do not allow limitations on
how long an implied warranty lasts, so the above limitation may
not apply to you.
In no event shall VTech be liable for any indirect, special,
incidental, consequential, or similar damages (including,
but not limited to lost profits or revenue, inability to use the
product, or other associated equipment, the cost of substitute
equipment, and claims by third parties) resulting from the
use of this product. Some states do not allow the exclusion or
limitation of incidental or consequential damages, so the above
limitation or exclusion may not apply to you.
Please retain your original sales receipt as proof of
purchase.
70 71
Page 40

Designed to fit your home.
And your life.
VTech Communications, Inc. | VTech Technologies Canada Ltd.
A member of THE VTECH GROUP OF COMPANIES.
VTech is a registered trademark of VTech Holdings Limited.
Specifications are subject to change without notice.
© 2021 VTech Communications, Inc. | © 2021 VTech Technologies Canada Ltd.
All rights reserved. 05/21. IS8151-X_IS8152-X_WEBCIB_V1.0
 Loading...