

Page 1

Congratulations
on purchasing your new VTech product.
Before using this telephone, please read the
Important safety instructions
on page 39 of this manual.
This manual has all the feature operations and troubleshooting necessary to install
and operate your new VTech telephone. Please review this manual thoroughly to
ensure proper installation and operation of this innovative and feature rich VTech
product. For support, shopping, and everything new at VTech, visit our website at
www.vtechphones.com. In Canada, please visit www.vtechcanada.com.
Page 2

Table of contents
Installation . . . . . . . . . . . . . . . . . . . . . . . . 1
Parts checklist . . . . . . . . . . . . . . . . . . . . . . 1
Telephone base installation . . . . . . . . . . . . . . . 2
Install handset battery . . . . . . . . . . . . . . . . . . 3
Desk/table bracket installation . . . . . . . . . . . . . . 4
Wall mounting bracket installation . . . . . . . . . . . . 5
Exchangeable colorful handset ring . . . . . . . . . . . 6
Telephone settings . . . . . . . . . . . . . . . . . . . . 7
Handset layout . . . . . . . . . . . . . . . . . . . . . . 7
Telephone base layout . . . . . . . . . . . . . . . . . . 8
Ringer volume . . . . . . . . . . . . . . . . . . . . . . 9
Ringer tone . . . . . . . . . . . . . . . . . . . . . . . . 9
Key tone . . . . . . . . . . . . . . . . . . . . . . . . 10
Language . . . . . . . . . . . . . . . . . . . . . . . . 10
Clear voicemail . . . . . . . . . . . . . . . . . . . . . 11
Dial type . . . . . . . . . . . . . . . . . . . . . . . . 11
Basic operation . . . . . . . . . . . . . . . . . . . . . 12
Make, answer, and end calls . . . . . . . . . . . . . . 12
Speakerphone . . . . . . . . . . . . . . . . . . . . . 12
Mute . . . . . . . . . . . . . . . . . . . . . . . . . . 12
Call waiting . . . . . . . . . . . . . . . . . . . . . . . 12
Volume . . . . . . . . . . . . . . . . . . . . . . . . . 13
Ringer mute. . . . . . . . . . . . . . . . . . . . . . . 13
Temporary tone dialing . . . . . . . . . . . . . . . . . 13
Find handset . . . . . . . . . . . . . . . . . . . . . . 13
Intercom . . . . . . . . . . . . . . . . . . . . . . . . 14
Conference call . . . . . . . . . . . . . . . . . . . . . 14
Transfer an external call . . . . . . . . . . . . . . . . 15
Switch between external and intercom call . . . . . . 15
Answer an incoming call during an intercom call . . . 16
Chain dialing . . . . . . . . . . . . . . . . . . . . . . 16
Advanced operation . . . . . . . . . . . . . . . . . . 17
Director y . . . . . . . . . . . . . . . . . . . . . . . . 17
Store a directory entry . . . . . . . . . . . . . . . . . 17
Character chart . . . . . . . . . . . . . . . . . . . . . 18
Search the director y . . . . . . . . . . . . . . . . . . 19
Dial a directory entry . . . . . . . . . . . . . . . . . . 19
Edit a directory entr y . . . . . . . . . . . . . . . . . . 20
Delete a directory entry. . . . . . . . . . . . . . . . . 20
About caller ID . . . . . . . . . . . . . . . . . . . . . 21
Call log . . . . . . . . . . . . . . . . . . . . . . . . . 21
Missed calls indicator. . . . . . . . . . . . . . . . . . 22
Review the call log . . . . . . . . . . . . . . . . . . . 22
Make CID entries ready to dial . . . . . . . . . . . . . 23
Dial a call log entry . . . . . . . . . . . . . . . . . . . 23
Save an entry to the directory . . . . . . . . . . . . . 23
Delete one or all entries . . . . . . . . . . . . . . . . 24
Call log display screen messages . . . . . . . . . . . 24
Redial list . . . . . . . . . . . . . . . . . . . . . . . . 25
Dial from redial . . . . . . . . . . . . . . . . . . . . . 25
Page 3

Table of contents
Delete a redial entry . . . . . . . . . . . . . . . . . . 25
Answering system operation . . . . . . . . . . . . . . 26
Answering system and voicemail. . . . . . . . . . . . 26
Message capacity . . . . . . . . . . . . . . . . . . . 26
Answering system setup . . . . . . . . . . . . . . . . 27
Activate the answering system . . . . . . . . . . . . . 27
Set the clock . . . . . . . . . . . . . . . . . . . . . . 27
Set number of rings. . . . . . . . . . . . . . . . . . . 28
Set telephone base ringer . . . . . . . . . . . . . . . 29
Set remote access code . . . . . . . . . . . . . . . . 29
Set message alert tone. . . . . . . . . . . . . . . . . 29
Outgoing announcement . . . . . . . . . . . . . . . . 30
Play your announcement . . . . . . . . . . . . . . . 30
Record your own announcement. . . . . . . . . . . . 30
Delete your announcement. . . . . . . . . . . . . . . 31
Message playback . . . . . . . . . . . . . . . . . . . 31
New message indication . . . . . . . . . . . . . . . . 31
Options during playback . . . . . . . . . . . . . . . . 31
Delete all messages . . . . . . . . . . . . . . . . . . 32
Record and play memos . . . . . . . . . . . . . . . . 32
Record a memo. . . . . . . . . . . . . . . . . . . . . 32
Memo playback . . . . . . . . . . . . . . . . . . . . . 32
Remote access . . . . . . . . . . . . . . . . . . . . . 33
Remote access commands . . . . . . . . . . . . . . 33
Commands during playback mode . . . . . . . . . . . 33
Message window displays . . . . . . . . . . . . . . . 34
Handset display screen messages. . . . . . . . . . . 35
Handset and telephone base indicators . . . . . . . . 37
Handset lights . . . . . . . . . . . . . . . . . . . . . 37
Telephone base lights . . . . . . . . . . . . . . . . . 37
Handset icons . . . . . . . . . . . . . . . . . . . . . 37
Battery . . . . . . . . . . . . . . . . . . . . . . . . . 38
Important safety instructions . . . . . . . . . . . . . . 39
Troubleshooting . . . . . . . . . . . . . . . . . . . . 40
Operating range . . . . . . . . . . . . . . . . . . . . 49
Maintenance . . . . . . . . . . . . . . . . . . . . . . 49
About cordless telephones . . . . . . . . . . . . . . . 50
Warranty . . . . . . . . . . . . . . . . . . . . . . . . 50
FCC, ACTA and IC regulations . . . . . . . . . . . . . 52
The RBRC® seal . . . . . . . . . . . . . . . . . . . . 53
Technical specications . . . . . . . . . . . . . . . . 54
Index . . . . . . . . . . . . . . . . . . . . . . . . . . 55
Page 4
Installation
CHAR GE
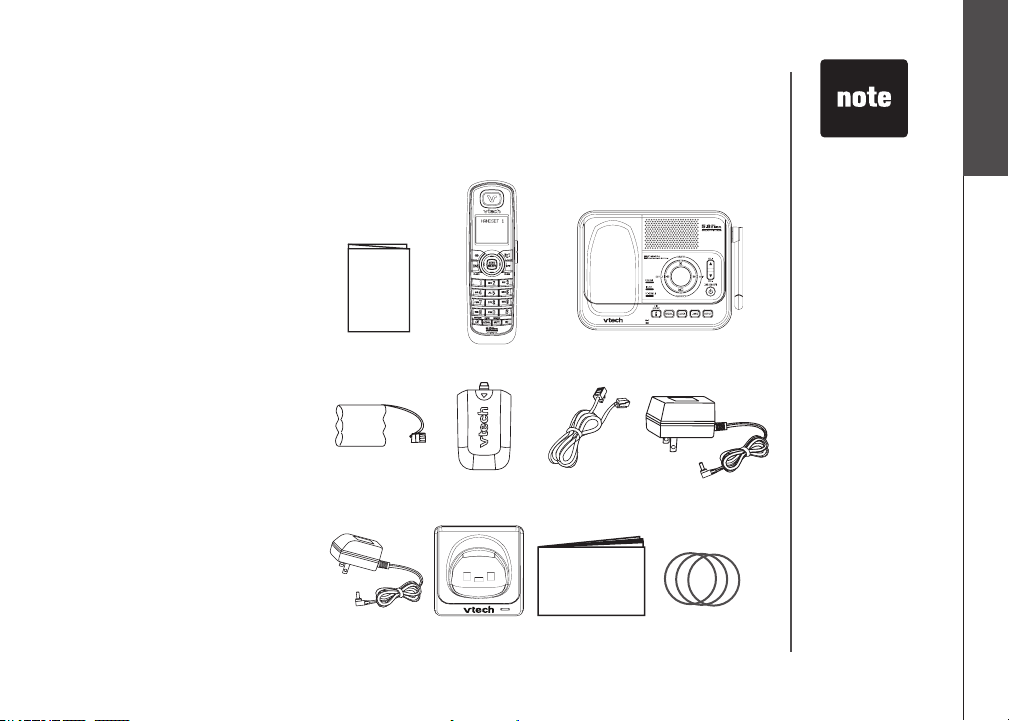
Parts checklist
Remember to save your sales receipt and original packaging in case it is necessary to ship your
telephone for warranty service. Check to make sure the telephone package includes the following:
Quick start guide
1.
Handsets
2.
(3 for DS4121-3 and DS4122-3)
(4 for DS4121-4 and DS4122-4)
Telephone base with wall/desk
3.
bracket
Batteries
4.
(3 for DS4121-3 and DS4122-3)
(4 for DS4121-4 and DS4122-4)
Battery compartment covers
5.
(3 for DS4121-3 and DS4122-3)
(4 for DS4121-4 and DS4122-4)
Telephone line cord
6.
Telephone base power adapter
7.
Charger adapters
8.
(2 for DS4121-3 and DS4122-3)
(3 for DS4121-4 and DS4122-4)
Chargers
9.
(2 for DS4121-3 and DS4122-3)
(3 for DS4121-4 and DS4122-4)
User’s manual
10.
Colorful handset rings
11.
(9 for DS4121-3 and DS4122-3)
(12 for DS4121-4 and DS4122-4)
1. Quick start guide
4. Batteries
8. Charger
adapters
2. Handsets
5. Battery
compartment
covers
9. Chargers
3. Telephone base with wall/desk bracket
6. Telephone line
cord
10. User’s manual
7. Telephone base
power adapter
11. Colorful handset
rings
• To purchase
replacement
batteries, visit our
website at www.
vtechphones.
com or call
1 (800) 595-9511 in
the United States.
In Canada, go to
www.vtechcanada.
com or call
1 (800) 267-7377.
Installation
Basic operation
www.vtechphones.com
1
Page 5

• Use only the AC
power adapter
supplied with this
telephone.
• The power adapters
are intended to be
correctly oriented
in a vertical or oor
mount position.
Your telephone
•
base comes with
the desktop bracket
installed. You may
remove the bracket
before plugging in
the telephone line
and power adapter
if it obstructs the
installation process.
Installation
Telephone base installation
Install the telephone base as shown below. Make sure that the electrical outlet is not controlled by a
wall switch. If you subscribe to high-speed internet service (Digital Subscriber Line - DSL) through
your telephone lines, you must have a DSL lter between the telephone base and the telephone wall
jack. The lter will prevent noise and caller ID problems caused by DSL interference. Please contact
your DSL service provider for more information about DSL lters.
Plug the bigger power adapter into the power jack at the bottom of the telephone base and the
1.
smaller power adapters into the chargers. Route cords through slots and plug the power adapter
into an electrical outlet not controlled by a wall switch.
Plug one end of the telephone line cord into the telephone line jack at the bottom of the telephone
2.
base. Route the telephone line cord through the slot, then plug the other end of the cord into a
telephone wall jack.
Telephone wall jack
DSL lter (not included)
required if you have DSL
high-speed internet service
Telephone line cord
Electrical outlet not
controlled by a wall switch
2
www.vtechphones.com
Page 6

Installation
Install handset battery
If the battery compartment cover is on the handset, press the indentation and slide the cover to
1.
remove.
Align the two holes of the battery plug with the socket pins in the handset battery compartment,
2.
matching the red and black wires to the color-coded label, then snap the plug securely into place.
Place the battery in the compar tment with the wires in the upper left corner.
3.
Position the battery compartment cover and slide it up until it clicks into place.
4.
For optimal performance, we recommend that you charge the handset for 16 hours. You can keep
the battery charged by returning the handset to the telephone base after each use. When the battery
power is fully depleted, a full recharge takes about 16 hours. When the battery is fully charged, it
provides approximately eight hours of talk time or four days of standly time.
1
2
3
4
• If the handset will
not be used for a
long period of time,
disconnect and
remove the bat tery
to prevent possible
leakage.
• To purchase
replacement
batteries, visit our
website at www.
vtechphones.com
or call
1 (800) 595-9511.
In Canada, go to
www.vtechcanada.
com or call
1 (800) 267-7377.
Installation
Basic operation
www.vtechphones.com
3
Page 7
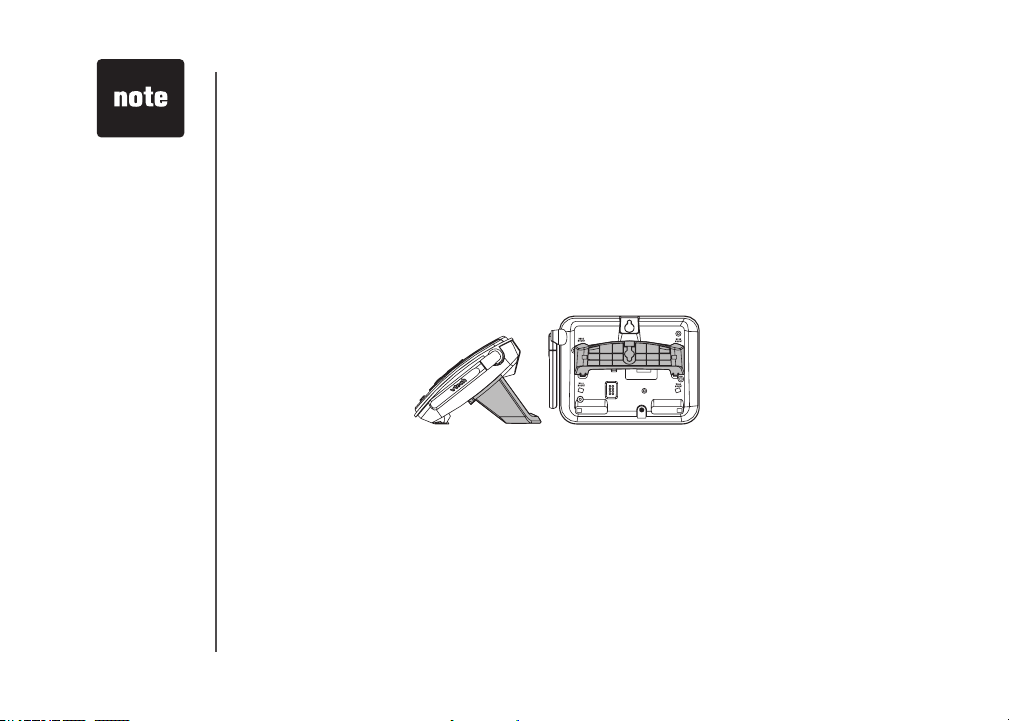
Your telephone
•
base comes with
the desktop bracket
installed. You may
remove the bracket
before plugging in
the telephone line
and power adapter
if it obstructs the
telephone base
installation process
(see page 2).
Installation
Desk/table bracket installation
Your telephone base comes with a desktop bracket already installed.
To remove the desktop bracket:
Press both upper tabs rmly inward and then pull the bracket upward until it is released from the
•
grooves.
To install the desktop bracket:
Position the desktop bracket on the bottom of the telephone base.
1.
Insert the lower tabs of the bracket into the grooves marked DESK MOUNT, then snap the upper
2.
tabs into place.
4
www.vtechphones.com
Page 8

Installation
Wall mounting bracket installation
Your telephone base comes with a desktop bracket installed. If you prefer to mount your telephone
on the wall, it is designed to mount on a standard telephone wall plate.
To install the wall mounting bracket:
First, remove the bracket from the telephone base by carefully pressing on the tabs until the bracket
1.
is released.
Next, rotate the bracket so that the hole for the wall mounting studs is in the same orientation as
2.
the mounting hole on the back of the telephone base.
Insert the lower tabs of the bracket into the grooves marked WALL MOUNT in the telephone base,
3.
then snap the upper tabs into place.
upper tab
lower tab
upper grooves
lower groove
Installation
Basic operation
www.vtechphones.com
5
Page 9

Installation
Exchangeable colorful handset ring
Your telephone comes with additional colorful handset rings. Change the ring to suit your mood or
match your room decor.
To remove the handset ring:
Inser t yo u r thum b n a i l into t h e slot
1. 2. Lift up the color ful handset ring.
underneath the MENU/SELECT button.
Handset ring
To install a new handset ring:
1. Align the desired handset ring against
MENU/SELECT button.
the
2. Press the colorful handset ring
downward until it clicks into place.
6
www.vtechphones.com
Page 10

Telephone settings
Handset layout
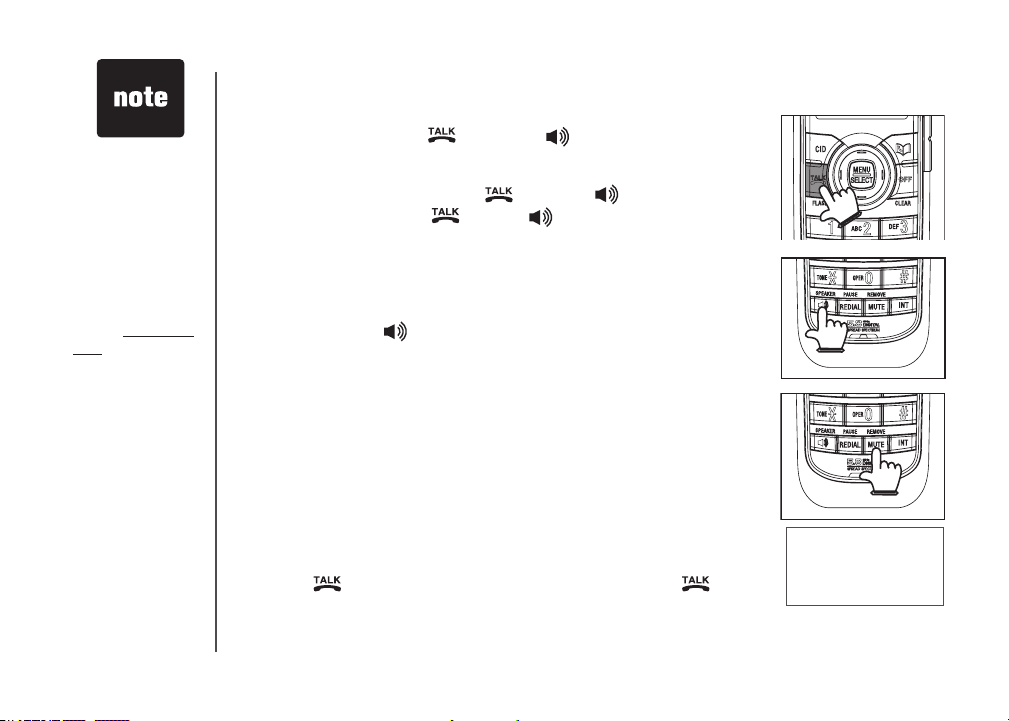
1. Earpiece
2. CID (caller ID)
Press to display caller ID information.
3. /FLASH
Press to make or answer a call. During a
call, press to receive an incoming call if
call waiting is activated.
4. Dial pad keys (0-9, *, #)
5. / SPEAKER (speakerphone)
Press to activate handset speakerphone.
Press again to resume normal handset
use.
6. REDIAL/PAUSE
Press to view the redial memory. Press
and hold to insert a dialing pause when
entering numbers.
7. Microphone
8. Handset display
9. (Directory)
Press to display the directory entries.
10. VOL / (volume)
Press to increase or decrease the listening
volume during a conversation.
Press to adjust the ringer volume while the
handset is not in use.
www.vtechphones.com
11. NavKey/MENU/SELECT
Press the center NavKey to display
menus. Press the up or down NavKey
or to navigate through menus. Press the
left or right NavKey or to navigate
through menus. Press the center NavKey
to select a highlighted menu item.
UP
CENTER
LEFT
12. OFF/CLEAR
During a call, press to hang up. While
using the menus, press to return to the
previous menu. While predialing, press to
delete digits.
13. #
Press repeatedly to display other dialing options
when reviewing the call log (page 23).
14. INT (intercom)
Press to initiate an intercom conversation
between handsets. Press to transfer a call.
15. MUTE/REMOVE
While on a call, pr e ss t o mute th e
microphone. While reviewing the call log,
press to delete an individual entry, or press
and hold to clear the entire call log. While
entering or editing a name or number, press
to delete a character.
RIGHT
DOWN
7
Telephone settings
Basic operation
Page 11
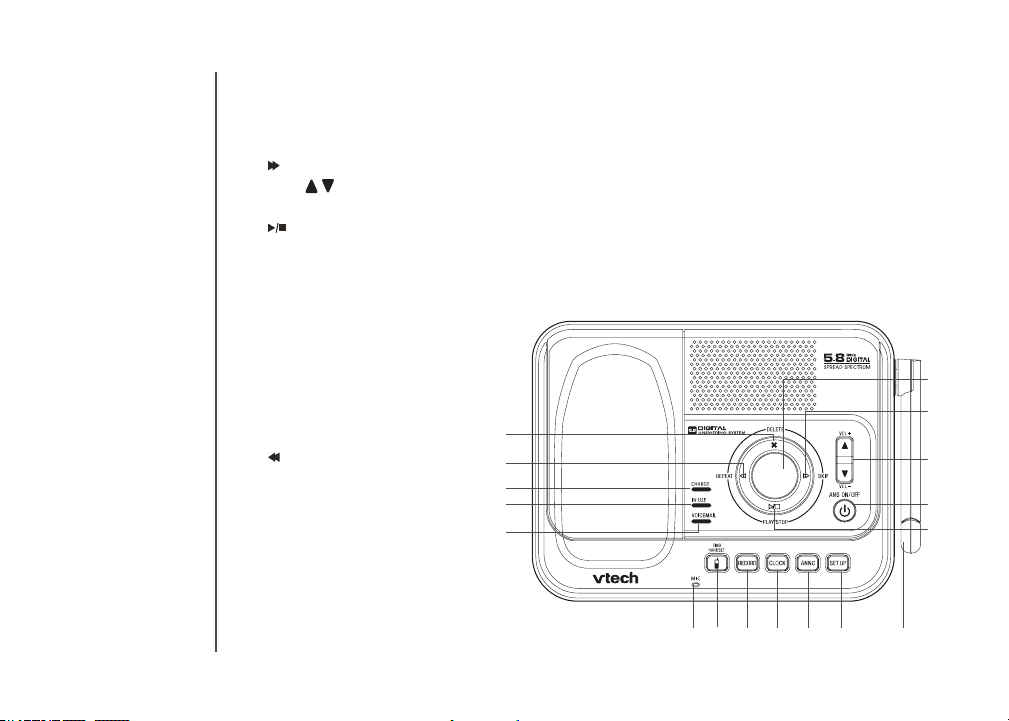
Telephone settings
Telephone base layout
Message window
1.
/SKIP
2.
VOL / (volume +/-)
3.
ANS ON/OFF (Answer on/off)
4.
/PLAY/STOP
5.
Antenna
6.
SET UP
7.
ANNC (announcement)
8.
CLOCK
9.
RECORD
10.
FIND HANDSET
11.
Microphone
12.
VOICEMAIL light
13.
IN USE light
14.
CHARGE light
15.
/REPEAT
16.
X/DELETE
17.
17
16
15
14
13
1
2
3
4
5
10 9 8127
11
8
www.vtechphones.com
6
Page 12

Telephone settings
Ringer volume (handset)
You can adjust the ringer volume either by the volume control on the right side
of the handset or in the handset menu. To change the ringer volume:
Press VOL / to display the current volume level on the screen when
1.
the handset is not in use.
Press VOL or VOL to choose the desired volume level. When nished,
2.
the new volume level will be saved.
-OR-
Press the center NavKey to display the menu when the handset is not
in use.
3. Press the up or down NavKey or to select RINGER VOLUME,
then press the center NavKey to conrm.
4. Press the left or right NavKey or to adjust the volume. A sample of
each ringer volume will be played when scrolling through the choices.
5. Press the center NavKey to save. You’ll hear a conrmation tone.
Ringer tone
This feature allows you to choose the ringer tone for incoming calls.
To choose a ringer tone:
Press the center NavKey to display the menu when the handset is not
1.
in use.
Press the up or down NavKey or to select RINGER TONE, and then
2.
press the center NavKey to conrm.
Press the up or down NavKey or to choose the desired ringer tone. A
3.
sample of the ringer tone will be played when scrolling through the choices.
Press the center NavKey to save. You’ll hear a conrmation tone.
4.
>RINGER VOLUME
RINGER TONE
RINGER VOLUME
>RINGER TONE
KEY TONE
RINGER TONE
1
• The ringer will be
off if the volume is
set to zero, and a
ringer off icon will
be displayed.
If the ringer volume
•
is turned off, the
sample of the ringer
will not be heard
while scrolling
through the options
in RINGER TONE.
The telephone base
•
ringer volume is
set separately. See
page 28 for details.
Telephone settings
Basic operation
www.vtechphones.com
9
Page 13
Telephone settings
Key tone
The handset beeps whenever you press any of the handset keys. You may
turn the key tone feature on or off.
To change the setting:
Press the center NavKey to display the menu when the handset is
1.
not in use.
Press the up or down NavKey or to select KEY TONE, then press
2.
the center NavKey .
Press the up or down NavKey or to alternate between ON or OFF,
3.
then press the center NavKey . You’ll hear a conrmation tone.
Language
The language menu allows you to select from ENGLISH, FRANÇAIS or
ESPAÑOL to be used for the handset display.
To change the setting:
Press the center NavKey to display the menu when the handset is
1.
not in use.
Press the up or down NavKey or to reach LANGUAGE, then press
2.
the center NavKey .
Press the up or down NavKey or to scroll through the choices, then
3.
press the center NavKey . You’ll hear a conrmation tone.
>
KEY TONE
LANGUAGE
KEY TONE
ON
>
LANGUAGE
CLR VOICE MAIL
LANGUAGE
ENGLISH
10
www.vtechphones.com
Page 14

Telephone settings
Clear voicemail
If you subscribe to voicemail services offered by your local telephone service provider, NEW VOICE MAIL
and will appear on the handset, and the VOICEMAIL light on the telephone base will ash when
you have new voicemail messages.
After you have listened to all new voicemail messages, the indicators on both
the handset and telephone base will be turned off automatically.
Use the clear voicemail feature when the telephone indicates that there is
new voicemail but there is none (for example, when you have accessed your
voicemail from a different telephone line while away from home). Clearing the
voicemail waiting indicator only turns off the indicators; it does not delete your
voicemail message(s). If there actually are new voicemail messages, your
local telephone company will continue to send the signal which will turn the
indicators back on.
To turn off these indicators manually:
Press the center NavKey to display the menu when the handset is not
1.
in use.
Press the up or down NavKey or to select CLR VOICE MAIL, and
2.
then press the center NavKey .
Press the center NavKey to conrm when TURN INDICATOR OFF?
3.
displays, or press OFF/CLEAR to return to the previous menu.
Dial type
The dial type is preset for tone dialing.
To change the setting:
Press the center NavKey to display the menu when the handset is not in use.
1.
Press the up or down NavKey or to select DIAL TYPE and then press
2.
the center NavKey .
Press the up or down NavKey or to choose between TONE or PULSE,
3.
and then press the center NavKey to conrm.
You’ll hear a conrmation tone.
4.
Changes made to the dial type on any one handset will be applied to all.
www.vtechphones.com
>CLR VOICE MAIL
DIAL TYPE
TURN INDICATOR
OFF?
>DIAL TYPE
DIRECTORY
DIAL TYPE
TONE
• Your telephone
service provider may
alert you to new
messages with a
stutter (broken) dial
tone. Contact your
service provider for
details.
Telephone settings
Basic operation
11
Page 15
• The screen displays
the elapsed time
as you talk (in
hours, minutes and
seconds).
• While entering
a number, press
MUTE/REMOVE
or OFF/CLEAR
to backspace and
delete; press and
hold
REDIAL/PAUSE
to insert a dialing
pause.
Basic operation
Make, answer, and end calls
To make a call, press /FLASH or /SPEAKER, and then dial
1.
the number.
-OR-
Dial the number and then press /FLASH or /SPEAKER.
To answer a call, press /FLASH, /SPEAKER or any of the dial
2.
pad keys (0-9, #, *).
To end a call, press OFF/CLEAR or put the handset in the telephone
3.
base or charger.
Speakerphone
During a call, press /SPEAKER to switch between speakerphone and
normal handset use.
Mute
The mute function allows you to hear the other party while the other party
cannot hear you.
During a call, press MUTE/REMOVE on the handset.
1.
The screen will display
2.
Press MUTE/REMOVE again to resume the conversation.
3.
Call waiting
If you subscribe to call waiting service from your telephone company, you
will hear an alert tone if there is an incoming call while you are on another
call. Press /FLASH to answer the new incoming call. Press /FLASH
again to return to the original call.
MUTE
.
PHONE 00:00
MUTED
MUTE
12
www.vtechphones.com
Page 16

Basic operation
Volume
During a call, use the volume button on the right side of the handset to adjust
the listening volume.
Press VOL or VOL to adjust the volume to a comfortable level.
•
Ringer mute
You can mute the ringer temporarily when the telephone is ringing.
Press OFF/CLEAR or MUTE/REMOVE on the handset to temporarily
•
silence the ringer. The next call will ring normally.
Temporary tone dialing
If you have pulse (rotary) service, you can change from pulse dialing to touch
tone during a call by pressing TONE*. This is useful if you need to send touch
tone signals for access to telephone banking or long distance services. After
ending your call, your phone will return to pulse dialing mode.
Find handset
This feature allows the telephone base to page all the handsets.
Press FIND HANDSET on the telephone base. All the handsets will ring
1.
and the screens display ** PAGING **.
Press FIND HANDSET again on the telephone base to stop paging; or
2.
press /FLASH, /SPEAKER or any dial pad keys (0-9, #, *) on the
handset.
Telephone settings
• If the ringer on a
handset is turned
off, it will not ring
when you press the
FIND HANDSET
key.
Basic operation
RINGER MUTE
** PAGING **
www.vtechphones.com
13
Page 17
• X represents
the number of
the handset
being called and
Y represents the
number of the
handset that is
calling.
• If the destination
handset does
not answer the
intercom call within
100 seconds, is in
the directory, is in
the call log, is on a
call or out of range,
the screen of the
originating handset
will show
UNABLE TO CALL
TRY AGAIN and
return to idle mode.
Basic operation
Intercom
The intercom feature allows conversation between two registered handsets
of the same system. Only two handsets can be used at a time.
Press INT to display the menu when the handset is not in use.
1.
The originating handset screen will display INTERCOM TO:
2.
Use the dial pad to select the destination handset number.
3.
The originating handset screen will display CALLING HANDSET X.
4.
The de s t i n a t i o n ha n d se t will ri n g an d its sc r e e n will di s p l a y
5.
HANDSET Y IS CALLING.
To answer the intercom call, press /FLASH, /SPEAKER, INT or
6.
any dial pad keys (0-9,#,*) on the destination handset.
To end an intercom call, press INT, OFF/CLEAR or place the handset
7.
back in the telephone base or charger.
Conference call
You can have a conference call with an external line and two registered
handsets.
When one handset is on the line,
Press /FLASH or /SPEAKER on another handset to join the call.
•
-OR-
Press INT to initiate an intercom call.
1.
Follow steps 3 to 5 in the Intercom section above.
2.
After the destination handset has answered, press and hold INT on the
3.
originating handset to let the destination handset join the call.
INTERCOM TO:
CALLING
HANDSET X
HANDSET Y
IS CALLING
14
www.vtechphones.com
Page 18
Basic operation
Transfer an external call
You can transfer an external call from one handset to any other handset.
During a call, press INT to put the call on hold at the originating handset.
1.
The screen will display TRANSFER TO:
Use the dial pad to enter the number of the destination handset and the
2.
originating handset screen will display CALLING HANDSET X.
The destination handset will ring and its screen will display
3.
HANDSET Y IS CALLING.
To answer the c all at the destination handset, press /FLASH,
4.
/SPEAKER, INT or any dial pad keys (0-9, #, *) on the destination handset.
Now the party at the originating handset can have a conversation with the
5.
party at the destination handset. Both screens display INTERCOM.
Press OFF/CLEAR on the originating handset to transfer the call.
6.
Switch between external and intercom call
If you are on an external call and you wish to intercom another handset without
disconnecting the external call:
During a call, press INT to put the call on hold at the originating handset.
1.
The screen will display TRANSFER TO:
Use the dial pad to enter the number of the destination handset and the
2.
originating handset screen will display CALLING HANDSET X.
The destination handset will ring and its screen will display
3.
HANDSET Y IS CALLING.
To answer the c all at the destination handset, press /FLASH,
4.
/SPEAKER, INT or any dial pad keys (0-9, #, *) on the destination handset.
Now the party at the originating handset can have a conversation with the
5.
party at the destination handset. Both screens display INTERCOM.
Press INT repeatedly on the originating handset to alternate between the
6.
external call (outside) and intercom call.
www.vtechphones.com
TRANSFER TO:
INTERCOM
OUTSIDE
• If the destination
handset does
not pick up the
intercom call, the
originating handset
can return to the
external call by
pressing
/FLASH,
OFF/CLEAR or
INT.
• If a call remains on
hold for about 100
seconds, or if the
destination handset
is in the directory, in
the call log, or out
of range, the screen
of the originating
handset shows
UNABLE TO CALL
TRY AGAIN and
reconnects to
the external call
automatically.
15
Basic operation
Page 19

Chain dialing can
•
be useful if you
wish to access
numbers other than
phone numbers
(such as bank
account information
or access codes)
from the directory,
call log or redial list.
Basic operation
Answer an incoming call during an intercom call
During an intercom call, there will be an alert tone signaling an incoming call.
To answer the incoming call, press /FLASH and the intercom call will end automatically.
1.
To terminate the intercom call without answering the incoming call, press OFF/CLEAR on the
2.
handset.
Chain dialing
This feature allows you to initiate a dialing sequence from numbers stored in the directory, call log or
redial list while you are on a call.
To access a number in the directory:
Press to enter the directory menu.
1.
Scroll by pressing or to nd the desired entry.
2.
Press MENU/SELECT to dial the desired number when it is displayed.
3.
To access a number in the call log:
Press CID to enter the call log menu.
1.
Scroll by pressing or to nd the desired entry.
2.
Press MENU/SELECT to dial the desired number when it is displayed.
3.
To access the last number in the redial list:
Press REDIAL/PAUSE to dial.
•
Press REDIAL/PAUSE again within two seconds to cancel the chain dialing.
•
16
www.vtechphones.com
Page 20

Advanced operation
Directory
The directory can store up to 50 entries. Each entry may have up to 32 digits
and 16 characters.
The directory can be accessed when the handset is not in use by pressing
1.
once or the center NavKey three times.
Press OFF/CLEAR to exit the menu without saving any changes.
2.
The screen will display DIRECTORY EMPTY if there are no records in
the directory.
Store a directory entry
Press the center NavKey to display the menu when the handset is not
1.
in use, and then press the center NavKey to enter the director y.
Press the up or down NavKey or to select STORE. Press the center
2.
NavKey to select.
The screen displays ENTER NUMBER. Use the dial pad to enter
3.
the number. Pres s MUTE/REMOVE to backspace; press and hold
REDIAL/PAUSE for at least three seconds to insert a dialing pause. Press
the center NavKey to save.
The screen displays ENTER NAME. Use the dial pad (see the Character
4.
chart on page 18) to enter the name. Press MUTE/REMOVE to backspace;
press # to insert a space.
Press the center NavKey to conrm. You’ll hear a conrmation tone.
5.
When the directory is full and you attempt to save an entry, LIST FULL
•
will be displayed. An existing entry must be deleted to make room for
the new entry.
If you attempt to save a number and name already stored in the director y,
•
ALREADY SAVED will be displayed.
DIRECTORY EMPTY
>DIRECTORY
CALL LOG
>STORE
REVIEW
ENTER NUMBER
_
ENTER NAME
_
LIST FULL
• Only one handset
can review the
directory at a
time. If a handset
attempts to enter
the directory while
another handset
is already in the
directory, NOT
AVAILABLE AT
THIS TIME will be
displayed.
Advanced operation
www.vtechphones.com
17
Page 21

• When entering
a name in the
directory, the rst
letter of each word
will be capitalized
automatically.
• Press the left or
right NavKey
or to move the
cursor one space to
the left or right.
• Press
space.
to enter a
#
Advanced operation
Character chart
Use the dial pad and the chart below to enter a name (up to 16 characters). Each press of a particular
key causes the characters to be displayed in the following order:
Number key
1 1 #
2 A B C 2 a b c
3 D E F 3 d e f
4 G H I 4 g h i
5 J K L 5 j k l
6 M N O 6 m n o
7 P Q R S 7 p q r s
8 T U V 8 t u v
9 W X Y Z 9 w x y z
0 0
*
# space
Press MUTE/REMOVE to backspace and erase when entering characters.
•
Press and hold MUTE/REMOVE to delete the entire entry.
•
1 2 3 4 5 6 7 8 9
*
Characters by number of key presses
,
? ! / ( ) @
, - . &
18
www.vtechphones.com
Page 22

Advanced operation
Search the directory
Entries are sorted alphabetically and names beginning with numbers
are presented rst. An alphabetical search can be done after entering
the directory.
Press to enter the directory or press the center NavKey to select
1.
REVIEW when in the director y.
Press the up or down NavKey to scroll through the directory.
2.
-OR-
You can also use the dial pad to display the rst name beginning with a
letter associated with that key.
For example, press 5 (JKL) once to nd Jenny, twice to nd Kristen, or three
times to nd Linda. If there is no name entry matching your search, the next
closest matching name entry in alphabetical order will be displayed.
Dial a directory entry
Press to enter the directory, or press the center NavKey to select
1.
REVIEW when in the director y menu.
Press the up or down NavKey or to scroll to the desired entr y, or
2.
use the alphabetical search to nd it.
Press /FLASH or /SPEAKER to dial the entr y.
3.
>REVIEW
STORE
VTECH
800-595-9511
Advanced operation
www.vtechphones.com
19
Page 23

Advanced operation
Edit a directory entry
Press to enter the directory, or press the center NavKey three
1.
times.
Press the up or down NavKey or to scroll to the desired entr y, or
2.
use the alphabetical search to nd the number. Press the center NavKey
to select.
The screen displays EDIT NUMBER. Use the dial pad to edit the number.
3.
Press MUTE/REMOVE to backspace; press and hold REDIAL/PAUSE
to insert a dialing pause. Press the center NavKey to save.
The screen displays EDIT NAME. Use the dial pad (see the Character
4.
chart
on page 18) to edit the name. Press MUTE/REMOVE to backspace;
press # to insert a space.
Press the center NavKey to conrm. You’ll hear a conrmation tone.
5.
Delete a directory entry
Press to enter the directory, or press the center NavKey to select
1.
REVIEW when in the director y menu.
Use the up or down NavKey or to scroll to the desired entr y or use
2.
the alphabetical search to nd the number.
Press MUTE/REMOVE to remove the entry. You’ll hear a conrmation
3.
tone.
EDIT NUMBER
595-9511_
EDIT NAME
VTECH_
20
www.vtechphones.com
Page 24

Advanced operation
About caller ID
The caller ID with call waiting feature in this telephone lets you see the name and telephone number
of the caller before answering the call, even when you’re already on a call. These features require
services provided by your local telephone company.
Contact your telephone company if:
you have both caller ID and call waiting, but as separate services (you may need combined service),
•
you have only caller ID service, or only call waiting service, or
•
you do not subscribe to any caller ID or call waiting ser vices but wish to try these services.
•
You can use this telephone with regular caller ID service, and you can use its other features without
subscribing to either caller ID or combined caller ID with call waiting service. There may be fees for
these services, and these services may not be available in all areas.
The caller ID features will work only if both you and the caller are in areas offering caller ID service,
and if both telephone companies use compatible equipment.
Call log
If you subscribe to caller ID service, information about each caller will be displayed after the rst
ring or second ring.
The call log can store up to 50 entries.
•
You can review, redial, and copy the entry into the directory.
•
Entries are displayed in reverse chronological order, i.e. from the most recent entry to the earliest entry.
•
When the call log is full, the oldest entry is deleted to make room for new incoming call information.
•
XX MISSED CALL(S) and
•
and un-reviewed calls). When all the missed calls in the call log have been reviewed, the missed
calls indicator will no longer display.
CALL LOG EMPTY will be displayed if there is no record in the call log.
•
The call log can be accessed by pressing CID, or by pressing the center NavKey , then CALL LOG then
the center NavKey again. The name (if available) and telephone number of the caller will be shown.
NEW
will be displayed if there are new call log entries (including missed
• Due to regional
service differences,
the caller ID
information may
not be available
for every incoming
call. In addition,
the callers may
intentionally block
their names and/or
telephone numbers.
• The time on
all handsets is
automatically set
and updated with
incoming caller ID
information if you
subscribe to this
service.
Advanced operation
www.vtechphones.com
21
Page 25

Advanced operation
Missed calls indicator
When there are unreviewed calls in the call log, the handset screen will
display XX MISSED CALL(S) and
When all the missed calls have been reviewed, the missed calls indicator
will no longer display.
If you do not want to review the missed calls one by one, press and hold
OFF/CLEAR to erase the missed calls indicator. All the entries will be
considered old and kept in the call log.
Review the call log
When in the call log, use the up or down NavKey or to scroll through
•
the call log on the handset.
The name (if available), telephone number, date and time of all incoming
•
calls are displayed on the screen.
There will be an error tone when the list reaches the beginning or the
•
end of the call log.
NEW
.
HANDSET X
XX MISSED CALLS
VTECH
595-9511
NEW
AM
3:45
>CALL LOG
RINGER VOLUME
595-9511
3:45
VTECH
AM
1/02
1/02
22
www.vtechphones.com
Page 26

Advanced operation
Make CID entries ready to dial
Although the call log entries received are 10 digits (the area code plus the
7-digit number), in some areas, you may need to dial only the seven digits,
or a 1 plus the seven digits, or a 1 plus the area code plus the seven digits.
You can change the number of digits that you dial from the call log.
While reviewing the call log, press # repeatedly to display these dialing
options for local and long distance numbers before dialing or saving the
telephone number. See an example at right.
Dial a call log entry
When in the call log, use the up or down NavKey or to scroll to
1.
the desired entry.
Press /FLASH or /SPEAKER to dial the entr y.
2.
Save an entry to the directory
When in the call log, press the up or down NavKey or to scroll to
1.
the desired entry.
Press the center NavKey to save the entry.
2.
If the entry has a name and a number, the screen displays SAVED.
3.
If the entry was previously saved, the screen will display ALREADY SAVED.
4.
If the entry only has a name or a number, EDIT NAME or EDIT NUMBER
5.
will be displayed. Use the dial pad to enter the name or number and then
press the center NavKey to save the entry. You’ll hear a conrmation
tone.
If there is no call er ID inform ation, the scre en wi ll di spl ay UNABLE
6.
TO SAVE.
800-595-9511
1-800-595-9511
1-595-9511
595-9511
SAVED
UNABLE TO SAVE
• Saving or deleting
a number on
one handset will
automatically update
all other handsets.
Only one handset
•
can review the
directory or call
log at a time. If one
handset is viewing
the call log and
another handset
attempts to review
it, the screen
will display NOT
AVAILABLE AT
THIS TIME.
Advanced operation
www.vtechphones.com
23
Page 27

Advanced operation
Delete one or all entries
While in the call log, press the up or down NavKey or to scroll to
1.
the desired entry.
Press MUTE/REMOVE to delete an entry.
2.
Press and hold MUTE/REMOVE to delete all entries, the screen will
3.
display DELETE ALL CALLS? Press the center NavKey and you’ll
hear a conrmation tone.
If you do not want to conrm the deletion, press OFF/CLEAR to return
4.
to the previous menu.
Call log display screen messages
Display: Means:
PRIVATE NAME
PRIVATE NUMBER
PRIVATE CALLER
UNKNOWN NAME
UNKNOWN NUMBER
UNKNOWN CALLER
LONG DISTANCE
The other party is blocking the name information.
The other party is blocking the telephone number information.
The other party is blocking the name and number information.
This caller’s name is unavailable.
This caller’s number is unavailable.
No information is available about this caller.
This is a long distance call.
DELETE ALL
CALLS?
24
www.vtechphones.com
Page 28

Advanced operation
Redial list
The telephone stores the ve most recently dialed numbers on the redial list.
Once there are already ve entries on the redial list, the earliest entry will
•
be deleted to make room for the latest entry.
Entries are displayed in reverse chronological order, i.e. from the latest
•
entry to the earliest entry.
The redial list can be accessed by pressing REDIAL/PAUSE when the
handset is not in use.
Dial from redial
Press REDIAL then press the up or down NavKey or to scroll to
1.
the desired number.
Press /FLASH or /SPEAKER to dial the number.
2.
To change the number before dialing, press the center NavKey to
3.
select the number, and use the dial pad to change the number.
Press MUTE/REMOVE to backspace; press and hold REDIAL/PAUSE
4.
to insert a dialing pause. Press /FLASH or /SPEAKER to dial
the number.
Delete a redial entry
Press REDIAL/PAUSE.
1.
Press the up or down NavKey or to scroll to the desired number, or
2.
press REDIAL/PAUSE repeatedly to scroll to the desired number.
Press MUTE/REMOVE to delete the selected entry and you’ll hear a
3.
conrmation tone.
Advanced operation
www.vtechphones.com
25
Page 29

Answering system operation
Answering system and voicemail
Your telephone has both a digital answering system and
voicemail indication. Voicemail is offered by your telephone
service provider (fees may apply). Your telephone’s answering
system and voicemail indication are independent features,
and each alerts you to new messages differently. For more
information on the voicemail indicators, see page 9. To
listen to your voicemail, you typically dial an access number
provided by your telephone company, followed by a security
code or PIN. To listen to messages recorded on your digital
answering system, press /PLAY/STOP button on the
telephone base.
If you subscribe to caller ID/call waiting service through your telephone service provider, you can
use your telephone answering system and voicemail together. Set your answering system to answer
calls at least two rings earlier than your voicemail is set to answer. For example, set your voicemail to
answer calls after six rings and set your answering system to answer after four rings. Some voicemail
providers may program the delay before answering calls in seconds instead of rings; in this case allow
six seconds per ring when determining the appropriate setting. By doing this, if you are on a call, or if
the answering system is busy recording a message and you receive another call, the second caller
can leave a voicemail message.
Message capacity
The answering system can record up to 99 messages. Each message can be up to four minutes in
length. The total storage capacity for the announcement, messages and memos is approximately
15 minutes. Messages will remain available for replay until they are deleted.
26
www.vtechphones.com
Page 30

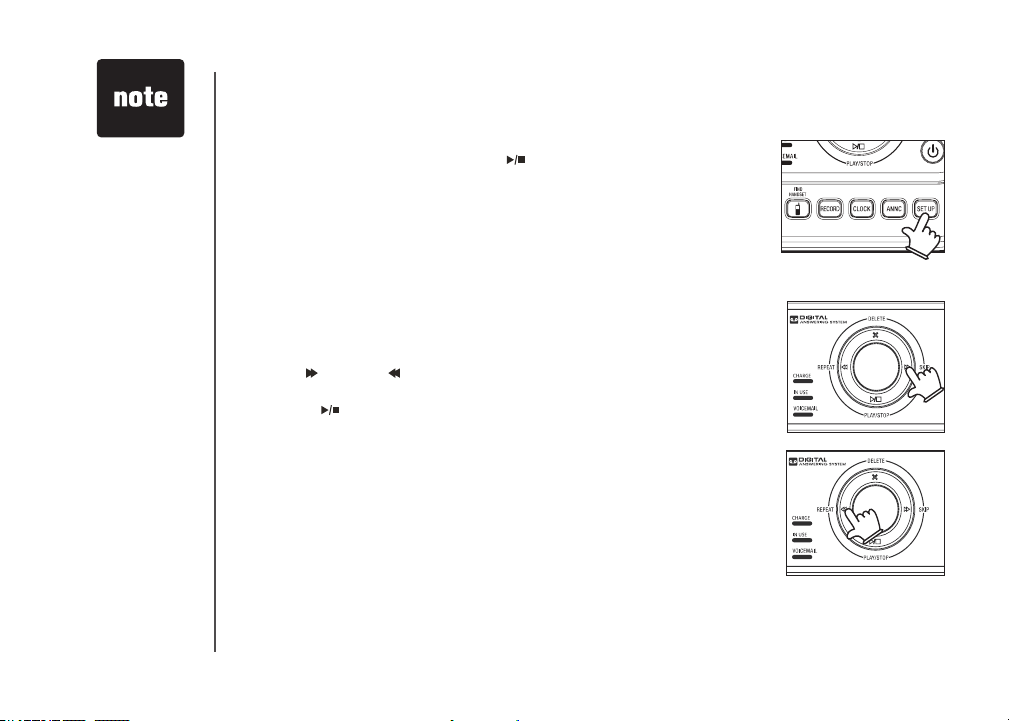
Answering system operation
Answering system setup
Activate the answering system
The answering system must be turned on to answer and record messages.
Press ANS ON/OFF to turn the answering system on or off. When you
press ANS ON/OFF to turn the answering system on, it will announce “Calls
will be answered,” and the ANS ON/OFF light will be on. When you press
ANS ON/OFF to turn the answering system off, it will announce “Calls will
not be answered,” and the ANS ON/OFF light will be off.
Set the clock
Before playing each message, the answering system announces the day
and time of the message received. Before using the answering system, set
the day, time and year, so that messages are dated correctly. If the clock
is not set before new messages are recorded, the system will announce
“Time and day not set.” before each message is played to remind you to
set the clock.
Press CLOCK and the system will announce the current clock setting.
1.
The system will then announce
Press CLOCK again and the system will announce the year.
2.
Press /SKIP or /REPEAT until the system announces the correct year,
3.
then press CLOCK. The system will announce the hour.
Press /SKIP or /REPEAT until the system announces the correct hour,
4.
then press CLOCK. The system will announce the minute.
Press /SKIP or /REPEAT until the system announces the correct
5.
minute, then press CLOCK. The system will announce the day.
Press /SKIP or /REPEAT until the system announces the correct day,
6.
then press CLOCK. After a conrmation tone, the system will announce
the new clock setting and exit the programming mode.
“To set the CLOCK, press CLOCK.”
www.vtechphones.com
• Press and hold
/SKIP to increase
or /REPEAT
to decrease the
minute or year by
increments of 10.
• Incoming caller ID
data will set the
time and date (not
the year). You’ll
need to set the
year so the day of
the week can be
determined from
caller ID data. The
time will only be
set automatically
if you subscribe
to caller ID
service from your
local telephone
company.
Advanced operation
27
Page 31
• Setting the number
of rings to toll saver
can save on long
distance charges
if you call to check
your messages
from a remote
location because
the answering
system will answer
the incoming call
after two rings only
when there are new
messages.
Answering system operation
Answering system setup
The answering system uses voice prompts to guide you through the steps
to setup the answering system. Press /PLAY/STOP anytime to save and
exit the SET UP menu.
Set number of rings
This feature allows you to select the number of rings before the answering
system answers. You can choose from two, four or six rings or toll saver. With
toll saver selected, the answering system answers after two rings when there
is a new message and after four rings when there are no new messages.
To set the number of rings:
Press SET UP when the telephone is not in use and the system announces
1.
the current number of rings setting.
Press /SKIP or /REPEAT until the system announces the desired
2.
setting, then press SET UP to save the setting and go to the next setting,
or press /PLAY/STOP to save and exit set up mode.
If you subscribe to caller ID/call waiting and voicemail service through your
telephone service provider, you can use your telephone answering system
and voicemail together. Set your answering system to answer calls at least
two rings earlier than your voicemail is set to answer. For example, set your
voicemail to answer calls after six rings and set your answering system to
answer after four rings. By doing this, if you are on a call, or if the answering
system is busy recording a message and you receive another call, the second
caller can leave a voicemail message.
28
www.vtechphones.com
Page 32

Answering system operation
Set telephone base ringer
This feature allows you to select the telephone base ringer volume levels. You can choose from HI
(high), OF (off) or LO (low).
To change the setting:
Press SET UP in idle mode until the system announces the telephone base ringer setting.
1.
Press /SKIP or /REPEAT until the system announces the desired telephone base ringer volume
2.
level, then press SET UP to save the setting and go to the next setting or press /PLAY/STOP
to save and exit set up mode.
Set remote access code
A two-digit security code is required to access the answering system remotely from any touch tone
telephone. The code preset at the factory is 19. You can set the code from 10 to 99.
To set the remote access code:
Press SET UP when in idle mode until the system announces the remote access code setting.
1.
Press /SKIP or /REPEAT to change the remote access code by one, or press and hold /SKIP
2.
or /REPEAT to change it by increments of ten.
next setting, or press /PLAY/STOP to save and exit set up mode.
Set message alert tone
This feature programs the system to beep every 10 seconds to alert you of new messages. The
beeping will stop when all new messages have been reviewed.
To set the message alert tone:
Press SET UP when in idle mode until the system announces the message alert tone setting.
1.
Press /SKIP or /REPEAT to alternate between on or off, then press SET UP to save the setting,
2.
and go to the next setting or press /PLAY/STOP to save and exit set up mode.
Press SET UP to save the setting and go to the
• The answering
system must be
turned on for the
message alert tone
to function.
Advanced operation
www.vtechphones.com
29
Page 33

• Your
announcement
can be up to 90
seconds in length.
If you receive calls
•
when the memory
is full, the telephone
will ring 10 times,
then answer and
announce “Memory
is full, enter the
remote access
code.”
Announcements
•
shorter than two
seconds will not be
recorded.
Answering system operation
Outgoing announcement
The outgoing announcement is the greeting callers hear when calls are
answered by the answering system.
The telephone is preset with a greeting that answers calls with “Hello, please
leave a message after the tone.” You can use this preset announcement,
or replace it with your own. While in the ANNC menu, press ANNC again
to exit at anytime.
Play your announcement
Press ANNC while in id le mo d e and the sys tem will anno unce
1.
“Announcement, press PLAY or press RECORD.”
Press /PLAY/STOP to play, and press /PLAY/STOP again to stop
2.
the playback.
Record your own announcement
Press ANNC when the phone is not in use and the system will announce
1.
“Announcement, press PLAY or press RECORD.”
Press RECORD and the system announces “Record after the tone. Press
2.
STOP when you are done.”
After the tone, speak towards the microphone at the bottom front of the
3.
telephone base from about nine inches away.
Press /PLAY/STOP when nished.
4.
The answering system will automatically playback the newly recorded
5.
announcement and there will be a conrmation tone. Press /PLAY/
STOP to stop the playback at anytime.
Press /PLAY/STOP again to r eplay the rec orded announcement .
6.
Press RECORD to record again (follow steps 2 to 4) if you do not like the
announcement just recorded. Press ANNC to exit and return to idle mode.
30
www.vtechphones.com
Page 34

Answering system operation
Delete your announcement
Press ANNC when the phone is not in use and the system will announce
1.
“Announcement, press PLAY or press RECORD.”
Press DELETE and the system will announce “Announcement deleted.”
2.
Message playback
Press /PLAY/STOP to listen to messages.
1.
Press
2.
If you have new messages waiting, you will hear only the new message
(oldest rst). If there are no new messages, the system will play back all
messages (oldest rst).
When playback begins, the total number of messages is announced, followed
by the day and time of the rst message to be played.
New message indication
The message display counter will ash when there are new answering
system messages.
If the new message alert tone is turned on, the telephone base will beep
every ten seconds when there are unreviewed messages.
Options during playback
Press VOL+/VOL- to adjust the speaker volume.
•
Press /SKIP to skip to the next message.
•
Press /REPEAT to repeat the message currently playing. Press twice
•
to listen to the previous message.
Press DELETE to delete the current message. The system will advance
•
to the next message.
/PLAY/STOP again to stop playback.
• When your
announcement
is deleted, calls
will be answered
with the preset
announcement.
• If the system
has less than
ve minutes of
recording time left,
the remaining time
will be announced.
• If
F is ashing in the
message window,
the memor y is
full. You will have
to delete some
messages before
new ones can be
recorded.
Advanced operation
www.vtechphones.com
31
Page 35

• Only old messages
can be deleted.
Messages can only
be deleted after
they are played.
• Memos shorter than
one second will not
be recorded.
•
“Memory is full.” will
be announced if
you press RECORD
when the memory
is full.
• Each memo can be
up to four minutes
in length.
Answering system operation
Delete all messages
Press and hold DELETE when the phone is not in use to delete all old
messages. The system will announce “All old messages deleted.”
Record and play memos
Memos are your own recorded messages used as reminders for yourself
or other household members using the same answering system. They are
saved, played back and deleted the same way as incoming messages.
Record a memo
Press RECORD when the phone is not in use. The system announces
1.
“Record after the tone. Press STOP when you are done.”
After the tone, speak towards the microphone at the bottom front of the
2.
telephone base from about nine inches away.
Press /PLAY/STOP when you nish recording.
3.
Memo playback
Press /PLAY/STOP while in idle mode. See Options during playback
on page 31 for other options.
32
www.vtechphones.com
Page 36

Answering system operation
Remote access
A two-digit security code is required to access the system remotely from any touch tone telephone.
The factory preset code is 19; see page 29 to change it.
Dial your telephone number from any touch tone telephone.
1.
When the system answers and announces the greeting, enter the two-digit security code.
2.
After hearing a double beep, enter one of the remote commands in the following table.
3.
Hang up or press 8 to end the call.
4.
Remote access commands:
Hang up Saves all messages.
1 To play all messages.
2 To play new messages only.
33 To delete all old messages while no message is currently playing.
*5 To play the help menu.
5 Stop.
*7 To record the outgoing announcement.
8 To hang up the call.
0 To turn the answering system on or off.
Commands during playback mode:
3 To delete the message currently playing and announces "Message deleted."
4 To repeat the message that is playing.
44 To play the previous message.
6 To skip to the next message.
• If no key is pressed
after entering
remote access,
any new messages
will be played
automatically.
• Once the new
messages have
been played,
the system will
announce the help
menu options. If
no key is pressed
within 20 seconds,
the remote access
call is automatically
disconnected.
• When the
answering system
is turned off,
the telephone
will answer af ter
10 rings, and
announce “ Please
enter your remote
access code .”
Advanced operation
www.vtechphones.com
33
Page 37

Answering system operation
Message window displays
The message counter usually displays the total number of memos and incoming messages. See the list below for explanations
of other displays in this counter.
0 No messages.
1-98 Total number of old message(s) recorded.
0-98 (ashing) Total number of new and old message(s) recorded. The telephone base
may have lost and regained power.
99 & F (alternating) Memory is full with total number of messages recorded.
1-99 (counting) Elapsed time while recording memo or announcement (up to 90 seconds).
99 (ashing) Recording time exceeds 99 seconds.
1-99 (ashing) Current message number during new message playback.
1-99 Current message number during old message playback.
1-8 Current volume level while adjusting.
10-99 Current remote access code while setting.
ON (or) OF Current answering system status (on or off).
02, 04, 06, tS Current number of rings while setting.
-- Sy s tem is answ erin g a call , or be ing se t the time an d dat e, or being
accessed remotely.
-- (ashing) System is being programmed or initialized.
34
www.vtechphones.com
Page 38

Handset display screen messages
ALREADY SAVED
CALL LOG EMPTY
CALLING HANDSET X
CONNECTING...
CHARGING
DIRECTORY EMPTY
ENDED
HANDSET Y IS CALLING
INTERCOM
INCOMING CALL
INTERCOM ENDED
LINE IN USE
LIST FULL
LOW BATTERY
MICROPHONE ON
NEW VOICE MAIL
NO LINE
The telephone number you have entered is already stored in the directory.
There are no call log entries.
Calling another handset.
The cordless handset is searching for the telephone base.
A handset with low battery has been placed in the telephone base or charger to
recharge.
There are no directory entries.
You have just ended a call.
Another system handset is calling.
The handset is on an intercom call.
There is an incoming call.
The handset is terminating an intercom call.
A handset or another telephone on the same line is in use.
The directory is full.
The battery needs to be recharged.
MUTE has been turned off and the person on the other end can hear you.
There are new voicemail message(s) from the local telephone company.
There is no telephone line connected.
Appendix
www.vtechphones.com
35
Page 39

Handset display screen messages
NO SIGNAL, CALL
ENDED
NOT AVAILABLE
AT THIS TIME
OUTSIDE
**PAGING**
PHONE
PLACE IN CHARGER
RINGER MUTE
SAVED
SPEAKER
UNABLE TO CALL
TRY AGAIN
UNABLE TO SAVE
WARNING
CHECK BATTERY!
XX MISSED CALLS
Communication between handset and telephone base is lost during a call.
One handset is already viewing the call log or directory and another handset attempts to
review it.
Connected to the external call during call transfer.
The cordless handset locator has been activated.
The handset is in use.
The battery is very low. The handset should be placed in the telephone base or charger.
The ringer is muted temporarily during incoming call.
Your operation has been saved.
The handset speakerphone is in use.
You have attempted to make an intercom call, but the handset you are calling is out of range
or on an external call.
You are attempting to save caller ID entry with no name or number.
The battery is not installed or not installed properly in the handset.
-OR -
The battery needs to be replaced.
-OR -
An incorrect battery has been installed by mistake. Use only the supplied VTech battery or
equivalent.
There are un-reviewed calls in your call log.
36
www.vtechphones.com
Page 40

Handset and telephone base indicators
Handset lights
On when the handset speakerphone is in use.•
Telephone base lights
IN USE Flashes when there is an incoming call or another telephone on the same line is in use.
VOICEMAIL
CHARGE On when the handset is in the telephone base or charger and is charging.•
ANS ON/OFF On when the answering system is on.•
Handset icons
MUTE Microphone is muted.•
NEW New call log entries.•
NEW VOICE MAIL
SPEAKER
Battery indicator
•
On when the handset is in use.
•
Flashes when you have new voicemail. Voicemail is offered by your telephone service provider.
•
Ringer off.•
New voicemail received from the local telephone company.•
In speakerphone mode.•
Cycles (low, medium, and full) when handset battery is charging.
•
Flashes when the battery is low and needs charging.
•
Displays solid when the battery is fully charged.
•
www.vtechphones.com
Appendix
37
Page 41

Battery
After the battery is fully charged, you can expect the following performance:
Operation Operating time
While in handset use (talking*) 8 hours
While in speakerphone mode (talking*) 3 hours
While not in use (standby*) 96 hours
* Operating time s are appr oximate. Your re sults may vary.
** Handset is off the tele phone base but no t in use.
The battery needs charging when:
A new battery is installed in the handset.
•
The telephone beeps when taken off the telephone base.
•
Battery indicator on the handset screen is ashing.
•
CAUTION:
To reduce the risk of re, read and follow these instructions:
Use only the battery(ies) provided or equivalent. To order a replacement, visit our website at www.vtechphones.com or
•
call 1 (800) 595-9511. In Canada, go to www.vtechcanada.com or call 1 (800) 267-7377.
Do not dispose of the battery(ies) in a re. They may explode. Check with local waste management codes for special
•
disposal instructions.
Do not open or mutilate the battery(ies). Released electrolyte is corrosive and may cause burns or injury to the eyes or
•
skin. The electrolyte may be toxic if swallowed.
Exercise care in handling batteries in order not to create a short circuit with conductive materials such as rings, bracelets,
•
and keys. The battery and/or conductor may overheat and cause burns.
Charge the battery(ies) provided with or identied for use with this product only in accordance with the instructions and
•
limitations specied in this manual.
WARNING:
TO PREVENT FIRE OR SHOCK HAZARD, DO NOT EXPOSE THIS PRODUCT TO WATER OR ANY TYPE OF MOISTURE.
38
www.vtechphones.com
Page 42

Important safety instructions
When usi ng your tel ephon e equipment, ba sic safety prec autions shoul d always be f ollowed to reduc e the risk of re, electri c shock and injur y, inclu ding th e following:
Read and un derst and all i nstru ction s.
1.
Follow all warnings and ins tructions ma rked on th e produ ct.
2.
Unplug t his product from the wal l outlet b efore cl eaning . Do not use liquid o r aeroso l clean ers. Use a d amp cloth for cl eaning.
3.
Do not use t his product near water (for exa mple, ne ar a bathtu b, kitch en sink , or swimming pool).
4.
Do not place this produc t on an unstable table, shelf, stan d or other u nstab le surf aces.
5.
Slots and openings in the back or bot tom of the te lepho ne bas e and h andset are pr ovided for ve ntilati on. To protect them fro m overh eating, these openings
6.
must not be blo cked by placin g the produc t on a soft surface such a s a bed, sofa or rug. T his pro duct should never be place d near o r over a radiator or heat
register. This prod uct should not b e place d in any area w here pro per ventilation is not prov ided.
This product should be o perate d onl y from th e ty pe of powe r sou rce indic ated on th e mar king label. If you are no t sure of the type of power supply in your
7.
home, consult you r dealer or local power com pany.
Do not allow anyth ing to res t on the power cord. Do not ins tall this produ ct wher e the cor d may be walke d on.
8.
Never push objec ts of any ki nd into th is prod uct thr ough th e slots in the base or hands et as they m ay touch d angerous volt age points or create a shor t circuit
9.
that cou ld resul t in a risk of re or ele ctric s hock. Never spi ll liqui d of any kin d on the pr oduct.
To reduce the risk of e lectr ic s hock, do not d isass emble this prod uct, but take i t to an au thorized servic e fac ility. Opening or removing parts of the b ase o r
10.
handse t other than sp ecie d acce ss doors may ex pose yo u to dan gerous voltag es or ot her risks. Inc orrec t reas sembling can cause electric shock when the
product is subsequen tly use d.
Do not overload wall o utlets and exte nsion c ords as t his can result in t he risk of re or ele ctric s hock.
11.
Unplug t his product from the wal l outlet a nd refer servicing to an au thorized ser vice fa cilit y under t he following co nditions:
12.
When the p ower supply cor d or plug is d amaged or frayed.
A.
If liqui d has been spille d onto the p roduc t.
B.
If the pro duct ha s been exp osed to r ain or water.
C.
If the pro duct do es not operate nor mally by fo llowing the ope rating instructions. Adjust only tho se controls that are covere d by the ope ration i nstru ction s,
D.
as imp roper adjus tment of ot her c ontrol s may result in d amage and o ften requir es ex tensive work by an autho rized technician to re store the produc t to
normal o perati on.
If the pro duct ha s been dr opped a nd the ba se and/or handset has bee n damage d.
E.
If the pro duct exhibits a d istin ct chan ge in per forma nce.
F.
Avoid usin g a telephone (othe r than cordless) during an e lectr ical storm. There is a remote risk of electric sho ck from lightni ng.
13.
Do not use t he telep hone to report a gas leak i n the vic inity of the lea k.
14.
Only put t he hand set of your telepho ne next to your ear wh en it is in no rmal ta lk mode.
15.
The power adapter s are inten ded to be c orrec tly ori ented in a ve rtic al or oo r mount positio n. The pro ngs are not desig ned to hold the plu g in plac e if it is
16.
plugged into a c eiling or an under-the-t able/c abinet outlet .
SAVE THESE INSTRUCTIONS
www.vtechphones.com
Appendix
39
Page 43

Troubleshooting
If you have difculty operating your telephone, please try the suggestions below. For Customer Service, visit our website at
www.vtechphones.com or call 1 (800) 595-9511. In Canada, go to www.vtechcanada.com or call 1 (800) 267-7377.
Problem Suggestion
My telephone does
not work at all.
LOW BATTERY is
displayed on screen.
Make sure the battery is installed and charged correctly (pages 3 and 38). For optimum daily
•
performance, return the cordless handset to the telephone base or charger after use.
Make sure the power adapter is securely plugged into an outlet not controlled by a wall switch.
•
Make sure the telephone line cord is plugged rmly into the telephone base and the telephone
•
wall jack.
Unplug the electrical power to the telephone base. Wait for approximately 15 seconds,
•
then plug it back in. Allow up to one minute for the cordless handset and telephone base to
synchronize.
Charge the battery in the cordless handset for at least 16 hours.
•
Remove and re-insert the battery. If that still does not work, it may be necessary to purchase
•
a new battery.
Disconnect the telephone base from the telephone wall jack and plug in a working telephone.
•
If the other telephone does not work, the problem is probably in the wiring or the local service.
Call the local telephone company.
Place the handset in the telephone base or charger for recharging.
•
Remove and re-install the battery and use it normally until fully discharged, then recharge the
•
handset on the telephone base or charger for 16 hours.
If the above measures do not correct the problem, the batter y may need to be replaced.
•
40
www.vtechphones.com
Page 44

Troubleshooting
Problem Suggestion
The battery does not
charge in the handset
or the handset battery
does not accept
charge.
The CHARGE light
is off.
Make sure the handset is placed in the telephone base or charger correctly. The CHARGE
•
light on the telephone base or charger should be on.
Remove and reinstall the battery, then charge for 16 hours.
•
If the cordless handset is in the charger or in the telephone base but the CHARGE light is not
•
on, refer to The CHARGE light is off in this section.
It may be necessary to purchase a new battery. Please refer to the Battery section (page 38)
•
of this user’s manual.
The telephone might be malfunctioning. Please refer to the Warranty section (page 50) of this
•
user’s manual for further instruction.
Clean the charging contacts on the cordless handset(s) and telephone base each month using
•
a pencil eraser or a dry non-abrasive fabric.
Make sure the power adapter and telephone line cords are plugged in correctly and securely.
•
Unplug the power adapter. Wait for 15 seconds before plugging it back in. Allow up to one
•
minute for the cordless handset and telephone base to reset.
The telephone might be malfunctioning. Please refer to the Warranty section (page 50) of this
•
user’s manual for further instruction.
There is no dial tone. First, try all the above suggestions.
•
Move the cordless handset closer to the telephone base. It might be out of range.
•
The telephone line cord might be malfunctioning. Try installing a new telephone line cord.
•
Disconnect the telephone base from the telephone wall jack and connect a different telephone.
•
If there is no dial tone on this telephone either, the problem is in your wiring or local service.
Contact your local telephone company.
www.vtechphones.com
Appendix
41
Page 45

Troubleshooting
Problem Suggestion
The telephone does
not ring when there is
an incoming call.
The telephone does
not ring when there is
an incoming call.
Make sure the ringer is on (page 9 for handset and page 29 for telephone base).
•
Make sure the telephone line cord and power adapter are plugged in properly (page 2).
•
The cordless handset may be too far from the telephone base. M ove it closer to the
•
telephone base.
There may be too many extension phones on the telephone line to allow all of them to ring
•
simultaneously. Try unplugging some of them.
If the other telephones in your home are having the same problem, the problem is in the wiring
•
or local service. Contact the local telephone company (charges may apply).
Other electronic products can cause interference to your cordless telephone. Try installing your
•
telephone as far away as possible from the following electronic devices: wireless routers, radios,
radio towers, pager towers, cellular telephones, digital telephones, intercoms, room monitors,
televisions, VCRs, personal computers, kitchen appliances, and other cordless telephones.
Test a working telephone at the telephone wall jack. If another telephone has the same problem,
•
the problem is in the telephone wall jack. Contact your local telephone company (charges may
apply).
The telephone line cord might be malfunctioning. Try installing a new telephone line cord.
•
Re-install the battery and place the cordless handset in the telephone base.
•
Wait for the cordless handset to synchronize with the telephone base. Allow up to one minute
•
for this to take place.
42
www.vtechphones.com
Page 46

Troubleshooting
Problem Suggestion
I cannot dial out. First, try all the above suggestions.
My cordless handset
beeps and is not
performing normally.
•
Make sure there is a dial tone before dialing. It is normal if the cordless handset takes a second
•
or two to synchronize with the telephone before producing a dial tone. Wait an extra second
before dialing.
Make sure the telephone is set to the correct dial mode (pulse dial or tone dial) for the service in
•
your area. Refer to the Dial type section of this user’s manual (page 11) to set the dial mode.
If the other telephones in your home are having the same problem, the problem is in the wiring
•
or local service. Contact your local telephone company (charges may apply).
Eliminate any background noise. Noise from a television, radio, or other appliances may cause
•
the telephone not to dial out properly. If you cannot eliminate the background noise, rst try
muting the cordless handset before dialing, or dialing from another room in your home with
less background noise.
Make sure the power cord is securely plugged into the telephone base. Plug the telephone
•
base into a different working electrical outlet not controlled by a wall switch.
Move the cordless handset closer to the telephone base. It may be out of range.
•
Reset the telephone base by unplugging the electrical power to the base. Wait for 15 seconds
•
and plug it back in again. Allow up to one minute for the cordless handset and the telephone
base to synchronize.
Other electronic products can cause interference to your cordless telephone. Try installing
•
your telephone as far away from these electronic devices as possible: wireless routers, radios,
radio towers, pager towers, cellular telephones, intercoms, room monitors, televisions, personal
computers, kitchen appliances and other cordless telephones.
Appendix
www.vtechphones.com
43
Page 47

Troubleshooting
Problem Suggestion
There is interference
during a telephone
conversation.
My calls fade out
when I am using the
cordless handset.
44
The handset may be out of range. Move it closer to the telephone base.
•
Do you have DSL service? If yes, you need to have a DSL lter installed at every telephone
•
wall jack that has a telephone connected to it (page 4). Contact your DSL service provider for
lter information.
Appliances or other cordless telephones plugged into the same circuit as the telephone base
•
can cause interference. Try moving the appliance or telephone base to another outlet.
Other electronic products can cause interference to your cordless telephone. Try installing your
•
telephone as far away as possible from the following electronic devices: wireless routers, radios,
radio towers, pager towers, cellular telephones, digital telephones, intercoms, room monitors,
televisions, VCRs, personal computers, kitchen appliances, and other cordless telephones.
Microwave ovens operate on the same frequency as your telephone. It is normal to experience
•
static on your telephone while the microwave oven is operating. Do not install this telephone
in the same outlet or near a microwave oven.
If your telephone is plugged in with a modem or a surge protector, plug the telephone (or
•
modem/surge protector) into a different location. If this doesn’t solve the problem, re-locate
your telephone or modem farther apart from each other, or use a different surge protector.
The location of your telephone base can impact the performance of your cordless phone. For
•
better reception, install the telephone base in a centralized location within your home or ofce,
away from walls or other obstructions. In many environments, elevating the telephone base
will improve overall performance.
Disconnect the telephone base from the telephone wall jack and plug in a corded telephone.
•
If calls are still not clear, the problem is probably in the wiring or local service. Contact your
local ser vice company (charges may apply).
If the other telephones in your home are having the same problem, the problem is in the wiring
•
or local service. Contact the local telephone company (charges may apply).
www.vtechphones.com
Page 48

Troubleshooting
Problem Suggestion
I hear other calls when
using the telephone.
I hear noise on the
cordless handset, and
none of the keys or
buttons works.
My caller ID features
are not working
properly.
The system does
not receive caller ID
or the system does
not display caller ID
during call waiting.
Disconnect the telephone base from the telephone wall jack. Plug in a different telephone. If
•
you still hear other calls, the problem is probably in the wiring or local service. Call your local
telephone company.
Make sure the telephone line cord is plugged in securely.•
Caller ID is a subscription service. You must subscribe to this service from your local telephone
•
company for this feature to work on your telephone.
The caller may not be calling from an area which supports caller ID.
•
Both you and the caller’s telephone companies must use equipment which are compatible
•
with the caller ID service.
If you subscribe to DSL service, install a DSL lter to the telephone line between the telephone
•
base and the telephone line jack. Contact your DSL service provider for lter information.
Make sure you subscribe to caller ID with call waiting features provided by the local telephone
•
company.
The caller may not be calling from an area which supports caller ID.
•
Both you and the caller’s telephone companies must use equipment which are compatible
•
with caller ID service.
If you subscribe to DSL service, install a DSL lter to the telephone line between the telephone
•
base and the telephone line jack. Contact your DSL service provider for lter information.
Appendix
www.vtechphones.com
45
Page 49

Troubleshooting
Problem Suggestion
Caller ID entries
do not match the
numbers I need to
dial.
CONNECTING... is
shown in the handset
display window. Why
don’t I get a dial tone
when I try to use this
telephone?
Although the call log entries you receive are 10 digits, (the area code plus the 7-digit number,)
•
in some areas, you may need to dial only the seven digits, or a 1 plus the seven digits, or a
1 plus the area code plus the seven digits. You can change the number of digits that you dial
from the call log.
While reviewing the call log, press # repeatedly to display these dialing options for local and
•
long distance numbers before dialing or saving the telephone number.
The handset may be out of range. Move it closer to the telephone base.
•
Make sure the power cord is securely plugged into the telephone base. Use a working electrical
•
outlet that is not controlled by a wall switch.
Reset your telephone by unplugging the power adapter from the telephone base. Disconnect
•
the battery from the cordless handset. Wait for 15 seconds, then plug in the power adapter and
re-install the battery. Place the handset in the telephone base and allow up to one minute for
the handset and telephone base to synchronize.
Other electronic products may prevent your handset and telephone base from communicating
•
with each other. Try installing your telephone base as far away from these electronic devices as
possible: wireless routers, radios, radio towers, pager towers, cellular telephones, intercoms, room
monitors, televisions, personal computers, kitchen appliances and other cordless telephones.
46
www.vtechphones.com
Page 50

Troubleshooting
Problem Suggestion
The answering system
does not answer after
the correct number of
rings.
The outgoing
announcement is not
clear.
The messages on
the system are very
difcult to hear.
The answering system
does not record
messages.
The messages on the
answering system are
incomplete.
Make sure the answering system is on. When the answering system is on, the red light on the
•
ANSWER ON/OFF key should be lit.
If toll saver is activated, the number of rings changes to two when there are new messages
•
waiting (page 28).
If the memor y is full or if the answering system is off, the system will answer after ten rings.
•
In some cases, the answering system will be affected by the ringing system used by the local
•
telephone company.
When recording the announcement, make sure you speak in a normal tone of voice about nine
•
inches from the telephone base.
Make sure there is no background noise (television, music, trafc, etc.) when recording.
•
Press VOL+/VOL- on the telephone base to increase the speaker volume.•
Make sure the answering system is on.
•
If the answering machine memory is full, it will not record new messages until some old
•
messages are deleted.
If a caller leaves a very long message, part of it may be lost when the system disconnects the
•
call after 90 seconds.
If the memory on the system becomes full during a message, the system stops recording and
•
disconnects the call.
If the caller’s voice is very soft, the system may stop recording and disconnect the call.
•
Appendix
www.vtechphones.com
47
Page 51

Troubleshooting
Problem Suggestion
The answering system
does not respond to
remote commands.
Common cure for
electronic equipment.
Make sure your remote access code is correct (page 29).
•
Make sure you are calling from a touch-tone telephone. When dialing a number, there should
•
be tones. If there are clicks, then it is not a touch-tone telephone and cannot activate the
answering system.
The answering system may not detect the remote access code when your announcement is
•
playing. Wait until the announcement is over before entering the code.
There may be interference on the telephone line you are using. Press the dial pad keys rmly
•
when dialing.
If the telephone is not responding normally, try putting the cordless handset in the telephone
•
base or the charger. If it does not seem to respond, try the following (in the order listed):
Disconnect the power to the telephone base.
•
Disconnect the battery on the cordless handset.
•
Wait a few minutes before connecting power to the telephone base.
•
Re-install the battery and place the cordless handset in the telephone base or charger.
•
Wait for the cordless handset to synchronize its connection with the telephone base. Allow up
•
to one minute for this to take place.
48
www.vtechphones.com
Page 52

Operating range
This cord less tele phone ope rates with the maximum power allowed by the Federal Communicati ons Commission (FCC). Even so, this handset and tele phone base can
commun icate over only a certain d istan ce - which can var y with t he locations of t he telephone ba se and handset, t he weather, and the layo ut of your ho me or ofce.
When the h andset is out of ra nge, the h andset w ill dis play CON NECTING.... NOT AVAILABLE AT THIS TIME wi ll be dis played if access i s denie d.
If there is a ca ll whil e the ha ndset is out of range, it migh t not ri ng, or i f it does ring , the c all mig ht not c onnec t well w hen you p ress /FLASH. M ove clo ser to
the tele phone base, then press /FLASH to ans wer the ca ll.
If the han dset move s out of ran ge duri ng a telep hone co nversation, there might be inter ference.
To improve rece ption, move clos er to the te lephone base.
Maintenance
Taking care of your telephone
Your cordless telep hone co ntains sophis ticated electronic p arts, so it must b e treated with car e.
Avoid rough treatment
Place the handset down gently. Save the o riginal packi ng mater ials to pr otect your telephone if you ever need to s hip it.
Avoid water
Your telep hone can be damaged i f it gets wet. Do not u se th e handset o utdoor in the ra in, or handle it with wet han ds. D o not install th e tele phone base near a
sink, bat htub or shower.
Electrical storms
Electr ical storms can sometimes cause power surges harmful to el ectr onic equipment. For your own safet y, take caution when using elec tric al appliances during
storms.
Cleaning your telephone
Your telephon e has a durab le plast ic casing that should retai n its luster for many years . Clean it onl y with a sof t cloth sl ightly dampen ed with water or a mild soap.
Do not use excess water or clean ing sol vents of any kind.
Remember that electrical appliances can cause serious injury if used when you are wet or standing in water. If the telephone base should fall into the water, DO NOT
RETRIEVE IT UNTIL YOU UNPLUG THE POWER CORD AND TELEPHONE LINE CORDS FROM THE WALL. Then pull the unit out by the unplugged cords.
Appendix
www.vtechphones.com
49
Page 53

About cordless telephones
Privacy: The same features that make a cordless telephone convenient create some limitations. Telephone calls are transmitted between the tele phone base and
•
the cordless handset by radio waves, so there is a pos sibili ty that the cordless telephone conversations could be intercepted by radio receiving equipment within
range of t he cord less handset. For this reason, you s hould not think of cordless tele phone c onversations as being as p rivate as t hose on c orded telephones.
Electrical power: The teleph one base of this cordl ess telephone must be conne cted to a working elec tric al outlet. The ele ctric al outlet should not be controlled
•
by a wall swit ch. Call s cannot be made fr om the co rdles s hands et if the telephone base is u nplugged or swi tched off, or if th e elect rical p ower is interrupted.
Potential T V interference: Some cordles s telephones operate at frequencies that may c ause inter ferenc e to televis ions and VCR s. To mini mize or prevent
•
such inter ferenc e, do not place the telephone base of the cordless tele phone near or on top of a TV or VCR. If interference is experienced, moving the cord less
telephone far ther away fr om the T V or VCR will of ten reduce or eliminate the inter feren ce.
Rechargeable batteries: T his pr oduct cont ains ei ther n ickel-cadm ium or nickel -meta l hydri de rec harge able batteri es. Exercise care i n hand ling batteri es in
•
order not to create a short circuit with conducting materia l such as rings, bracel ets, and keys. The battery or conductor may overheat and cause harm. Observe
proper p olarity bet ween the b atter y and the batter y charger.
Nickel -metal hydride rechargeable batteries: Dis pose of these batteries in a safe manner. Do not burn or puncture. Like other batteri es of this type, if burned
•
or punct ured, th ey could releas e caustic materi al whic h could c ause injury.
Warranty
What does this limited warranty cover?
The manufacturer of this V Tech Prod uct warrants to the hold er of a valid proof of purc hase ( “Consumer ” or “ you”) that t he Prod uct a nd all acces sorie s provided
in t he sales package (“Product ”) are free from defects in materi al and workmanshi p, pu rsuant to the foll owing terms and conditions , w hen installed and used
normal ly and in accordanc e with t he Prod uct op erating instr uctio ns. Thi s limit ed warranty ex tends only to t he Consumer fo r Produ cts pur chased and used in the
United States of Am erica and Canad a.
What will VTech do if the Product is not free from defects in materials and workmanship during the limited warranty period (“Materially Defective Product”)?
During the limited warrant y period, VTech’s authorized serv ice representative will repair or replace at VTech’s option , witho ut char ge, a Materially Defective
Produc t. If we repa ir the Product, we may use new or refur bishe d replac ement parts. If we choose to replace the Product, we may replace it with a new or
refurbished Produ ct of the s ame or simi lar design. We w ill retain t he de fective par ts, m odule s, or equipment. Repair or re place ment o f the Produ ct, at VTech’s
option, is your exclusive remedy. VTech w ill return repaired or rep lacem ent Prod ucts to you in work ing conditio n. You should expect t he repair or repl acement to
take appr oximate ly 30 days .
How long is the limited warranty period?
The limite d warrant y period for the Product exte nds for ONE (1) YEAR from the date of purchase. If VTech repairs or rep laces a Materially Defe ctive Prod uct unde r
the terms of this limited warranty, this limited warranty also applies to the repaired or replaceme nt Product for a period of either (a) 90 days from the date th e repaired
or replacement Produc t is ship ped to you or (b) the time remaining on the or igina l one-ye ar warran ty, whichever is longer.
What is not covered by this limited warranty?
This lim ited warr anty d oes not cover:
1. A prod uct th at has be en subj ected to misus e, acci dent, s hippi ng or other physi cal da mage, im prope r insta llatio n, abnormal op eratio n or handling, neglect,
inundation, re, water or oth er liqui d intrusion; or
2. A product that h as been d amaged d ue to repair, alterati on or mod icat ion by anyo ne other t han an aut horize d serv ice represent ative of V Tech; or
50
www.vtechphones.com
Page 54

Warranty
3. A product to the extent that the problem experien ced is c aused by signal co nditi ons, net work re liabil ity, or cab le or ante nna syste ms; or
4. A product to the extent that the problem is c aused by use with n on-VTech ac cess ories; or
5. A product who se warranty/qua lity stickers, produ ct seri al numb er plates o r elect ronic s erial nu mbers h ave been re moved, al tered or rendere d illegible; or
6. A pr oduct pur chase d, used, serv iced, or shipped for repair from outs ide the United States of Amer ica or C anada, or used for commerc ial or in stitutional
purposes (inc luding but not limited to Product s used for rental p urpos es); or
7. A product returned without valid proo f of purchase (see item 2 below); or
8. Charg es for ins tallat ion or set u p, adjust ment of customer contro ls, and install ation or r epair of sy stems ou tside t he unit.
How do you get warranty service?
To obtain warranty ser vice in the United States of America , please call 1 (800) 595- 9511. In Canad a, please call 1 (800) 267-7377. NOTE: Before calling for serv ice,
please r eview the user’s manual - a che ck of the Produc t contr ols and fe atures may s ave you a ser vice c all.
Except as prov ided by appli cable law, you assu me the risk of loss or damag e during tran sit and transport ation and are resp onsib le for deliver y or handlin g charges
incurr ed in the transpor t of the Product(s) to the service locati on. VTech will return repaired or replaced Produ ct under this limite d warranty. Transpor tation , delivery
or handl ing charges are prepaid. VTech assumes no risk for damage o r loss of the Prod uct in t ransit. If the Pr oduct failure is not covered by this limited warra nty,
or proof of pur chase does not meet the terms of thi s limited warrant y, VTech will notif y you and wil l request that you authorize the cost of repair prior to any fur ther
repair ac tivit y. You must pay for th e cost of repair and return shippin g costs for the repair of Pro ducts t hat are not covered by t his limited warr anty.
What must you return with the Product to get warranty service?
1.
Return the entire o riginal packa ge and co ntents includ ing the Product t o the VTech service location along with a d escription of the malf uncti on or dif cul ty; and
2. Inclu de a “valid proo f of purchase” (sal es rece ipt) identify ing the Pr oduct purcha sed (Product mo del) and the date of p urcha se or rec eipt; and
3. Provid e your name, compl ete and co rrect m ailing address, and telephone n umber.
Other Limitations
This warrant y is the c omplete and exclu sive ag reement bet ween you and VTech. It su perse des a ll other wr itten or oral communi cations rel ated to this Produ ct.
VTech prov ides no other warranties for this Produ ct. Th e warranty excl usivel y describes a ll of VTech’s r esponsibili ties re garding the Product . There are no oth er
express w arranties. No on e is authorized to m ake modi cations to thi s limite d warrant y and you s hould n ot rely on a ny such modic ation.
State/ Provinc ial Law R ights: This warranty gi ves you spe cic l egal ri ghts, an d you may als o have other rights , which vary fro m state to st ate or prov ince to p rovinc e.
Limitations: Impl ied warran ties, including those of tness for a particular pur pose and merc hanta bilit y (an unwritten warr anty that the Product is t for ordinary use)
are lim ited t o one year fr om th e date of pur chase. Some states/provinces do no t allow limi tation s on how long an implied warr anty lasts , so t he ab ove lim itatio n
may not app ly to you. In no event shall VTech be liabl e for any indire ct, special, i ncidental, consequen tial, or similar damag es (i nclud ing, but not limited to l ost
prots o r revenue, i nabili ty to use the Product or other asso ciated equipm ent, the cost of su bstitute equipment, a nd claims by third parti es) result ing from the use
of this Produ ct. Some states/provinces do not a llow t he excl usion or lim itatio n of i ncide ntal or con sequential damage s, so the ab ove lim itatio n or exclusio n may
not appl y to you.
Please retain your original sales receipt as proof of purchase.
Appendix
www.vtechphones.com
51
Page 55

FCC, ACTA and IC regulations
FCC Part 15
This equipment has been tested and found to comply with the requir ements for a Class B digital device und er Part 15 of the Federal Com munic ations Co mmission
(FCC) rules. These req uire ment s are intended to provid e reasonab le protection against harmf ul interfe rence in a res ide ntia l installa tion . This equ ipment
generates, uses and can rad iate radio frequenc y energy and, if not installed and used in acco rdanc e with the instructi ons, may cause harmful interference to radio
commun ications. H owever, there is n o guarantee t hat interference w ill not occur in a particular installatio n. If t his equipme nt doe s caus e harm ful interfer ence to
radio or t elevis ion recept ion, which can be deter mined by turnin g the equ ipment of f and on, the user is encouraged to try to c orrec t th e interference by o ne or
more of the following meas ures:
Reorie nt or relo cate the receiving ante nna.
•
Increa se the separatio n betwe en the equipmen t and rec eiver.
•
Connect the equipmen t into an ou tlet on a ci rcuit d iffer ent from t hat to which the re ceiver i s conne cted.
•
Consul t the dealer or an exp erienced radio/T V tech nician for help.
•
Changes or modications to this equipment not expre ssly approved by the party responsi ble for complianc e cou ld void t he user’s auth orit y to operate the
equipm ent.
This dev ice complie s with Part 15 of t he FCC Ru les. Op eratio n is sub ject to the following two conditi ons: (1) this device m ay not cause har mful interfer ence, a nd
(2) this devic e must accept any inter feren ce received, inc luding interference that may cause un desired operat ion. Privacy of communicat ions may not be en sured
when usi ng this te lepho ne.
To ensure safety of user s, the FCC has established criteria for the amount of rad io freque ncy energ y that can be safel y absorbed by a user or bystande r accord ing
to the intended u sage of the product. This product has been tested a nd foun d to comply with the FCC c riteria. The h andset may be saf ely hel d against the ear of
the user. The tel ephon e base shall be insta lled and used such that part s of the user ’s body oth er than the hands are maintained at a distance of appr oximate ly 20
cm (8 inches) or more. If yo u choose to use a cl ippin g device, please make sure to o nly use t he supplied VTech b elt cli p.
This Cla ss B digi tal app aratus complies with Canadian ICES-0 03.
FCC Part 68 and ACTA
This equipmen t complies wit h Part 6 8 of the FC C rules and with technical re quirem ents ad opted by t he Admi nistrative Cou ncil fo r Terminal At tachm ents (ACTA).
The la bel o n the back or bo ttom of this equ ipment contains, among other thin gs, a prod uct i denti er in the format US:AA AEQ##TXX XX. This identier m ust be
provid ed to your lo cal tel ephone company upon re quest.
The plug and jack used to connect this equipment to premises wiring and the telephone network must comply with app licable Part 68 rules and technical requirem ents
adopted by ACTA. A compliant telephone cord and modular plug is provided with this product. It is designed to be con nected to a compati ble modular jack that is also
compliant. An R J11 jack should normall y be used for connecting to a single line and a n RJ14 jack for tw o lines. S ee Installatio n Instructio ns in the user’s manual.
The R inger Equiva lence Numb er (REN) is used to determi ne how many devi ces you may con nect to your te lephone line an d sti ll have them rin g when you are
called. The REN f or this p roduc t is enc oded a s the 6t h and 7th charac ters following the US: in t he product id enti er (e.g., if ## i s 03, the REN is 0.3). In most, b ut
not all are as, the su m of all RENs should b e ve (5.0) or less. For more information, p lease c ontac t your loc al telephone company.
This e quipment may not be used with Part y Line s. If you have specially wired alarm dialin g equipment connected to your telep hone line, e nsure the connection
of this equi pment does not di sable your alarm equipm ent. If you have question s about what will disab le alarm eq uipment, co nsult your telepho ne co mpany or a
quali ed inst aller.
52
www.vtechphones.com
Page 56

FCC, ACTA and IC regulations
If this equipment is malfunctionin g, it must be unplugged from the modular jack until the problem has been corr ected. Repairs to this teleph one equipment can only
be made by the manufacturer or its authorized agents. For repair procedures, fo llow the instru ctions outli ned und er the Lim ited Warranty.
If this equi pment is cau sing harm to th e telepho ne network, the tele phone co mpany may temporari ly disco ntinue your telepho ne serv ice. The tel ephon e company
is req uired to notify you before int errupt ing service. If advanc e notice is not practi cal, you wil l be notie d as soon a s pos sible. You will be gi ven th e opp ortunity
to correct the problem a nd the tel ephon e co mpany is require d to inform you of your right to l e a compl aint with the FCC. Your telephone compa ny may make
change s in its faciliti es, equipment , operat ion, or pr ocedures that c ould af fect t he prop er functionin g of this produc t. The telephone company is requ ired to no tify
you if suc h changes are planned.
If this product i s equip ped wit h a corde d or cord less ha ndset, it is hear ing aid compati ble.
If this prod uct has mem ory dialing loc ations, you may choos e to store emerg ency telephone numbers (e.g., police, re, medical) in these loc ations. If you do store
or test eme rgenc y number s, plea se:
Remain on the line a nd briey explai n the rea son for th e call be fore hanging up.
Perfor m such ac tivit ies in of f-peak hours, s uch as early morning or lat e evening.
Industry Canada
Operation is subject to the following two condition s: (1) thi s device may not cau se harmfu l interfe rence, and (2) this device must ac cept any inter feren ce, including
interference that may cause undesired o perati on.
The term ‘ ’IC: ‘’ before the c erti cation/reg istrat ion number only s ignies that th e Indust ry Canada tech nical s peci cations were met.
The Ringer Equi valenc e Numb er (REN) fo r this te rminal equip ment is 0.1. The REN is an in dicat ion of t he max imum nu mber of devices allowed to be c onnec ted
to a tele phone interface. The termination on an interface may c onsis t of any combination of devices sub ject only to the req uireme nt that the sum of the RENs of
all the devices d oes not exc eed ve.
This pro duct meets the a pplic able Industr y Canada techni cal specic ations.
The RBRC® seal
The RBRC® seal on the nickel -metal-hydride battery indicates that VTech Communications, Inc. is voluntarily participating in an industry program
to colle ct and re cycle t hese bat terie s at the end o f their us eful lives, when t aken out of service within the Un ited States and Canada.
The RBRC® program provides a convenient alternative to placing used nickel- metal -hydri de batter ies into the trash or municipal was te,
which may be illeg al in your area.
VTech’s participation in RBRC® makes it easy for you to drop off the spent battery at loc al retailers par ticipating in the RBRC® program
or at authorized VTech product service cent ers. Please ca ll 1-800-8-BATTERYTM for information on Ni-M H b atter y recycling and
disposal b ans/re stric tions in your area. VTech’s involveme nt in this program is par t of its commitmen t to protecting our environment
and conserving natur al resou rces.
RBRC® is a registered trademark of Rechargeable Batter y Recycling Corporation.
www.vtechphones.com
Appendix
53
Page 57

Technical specications
Frequency control Crystal controlled
Transmit frequency Telephone base: 5725-5850 MHz
Receive frequency Telephone base: 2400-2483.5 MHz
Channels 95
Nominal effective range Maximum power allowed by FCC and IC. Actual operating range may vary according
Size Handset: 139.0mm X 49.0mm X 39.0mm
Weight Handset: 145.0 grams (including battery)
Power requirements Handset: 3 cells AAA 3.6V 550mAh NiMH battery
Memory Director y: 50 memory locations; up to 32 digits and 16 characters per location
PLL synthesizer
Handset: 2400-2483 MHz
Handset: 5725-5850 MHz
to environmental conditions at the time of use.
Telephone base: 177.1mm X 127.2mm X 100.4mm
Charger: 79mm X 90.6mm X 58.4mm
Telephone base: 423.8 grams
Charger: 72.74 grams
Telephone base: DC 9V@ 600mA
Charger: DC 9V @200mA
Call log: 50 memory locations
54
www.vtechphones.com
Page 58

Index
A
About caller ID 21
About cordless telephones 50
Activate the answering system 2
Advanced operation 17
Answer an incoming call during an
intercom call 1
Answer calls 12
Answering system operation 26
Answering system setup 27, 28
6
B
Basic operation 12
Battery 3, 38
C
Call log 21
Call log display screen messages 24
Call waiting 12
Chain dialing 16
Character chart 1
Clear voicemail 1
Commands during playback
mode 33
Conference call 14
8
1
7
D
Delete a directory entry 20
Delete all messages from the answering
system 32
Delete a redial entry 25
Delete from directory 20
Delete your announcement 31
Desk/table bracket installation 4
Dial a call log entry 23
Dial a directory entry 19
Dial from redial 25
Dial type 11
Director y 17
DSL lter 2
E
Edit a directory entr y 20
End calls 12
Exchangeable colorful handset ring 6
F
FCC, ACTA and IC regulations 52
Find handset 13
H
Handset display screen messages 35
Handset icons 37
Handset layout 7
Handset lights 37
I
Important safety instructions 39
Index 55
Install handset battery 3
Installation 1
Intercom 14
K
Key tone 10
L
Language 10
M
Maintenance 49
Make calls 12
Make CID entries ready to dial 23
Memo playback 32
Message capacity 26
Appendix
www.vtechphones.com
55
Page 59

Index
M
Message playback 31
Message window displays 34
Missed calls indicator 22
Mute 12
N
New message indication 31
O
Operating range 49
Options during playback 31
Outgoing announcement 30
P
Parts checklist 1
Play your announcement 30
R
Record a memo 32
Record and play memos 32
Record your own announcement 30
Redial list 25
Remote access 33
Remote access commands 33
Review the call log 22
Ringer mute 13
56
R
Ringer tone 9
Ringer volume 9
S
Save an entry to the directory 23
Search the director y 19
Set message alert tone 29
Set number of rings 28
Set remote access code 29
Set telephone base ringer 29
Set the clock 27
Speakerphone 12
Store a directory entry 17
Switch between external and intercom
call 15
T
Technical specications 54
Telephone base installation 2
Telephone base layout 8
Telephone base lights 37
Telephone settings 7
Temporary tone dialing 13
Transfer an external call 15
Troubleshooting 40
www.vtechphones.com
V
Voicemail 11
Volume 13
W
Wall mounting bracket installation 5
Warranty 50
Page 60

VTECH TELECOMMUNICATIONS LTD.
A member of THE VTECH GROUP OF COMPANIES.
Distributed in the U.S.A. by VTech Communications, Inc., Beaverton, Oregon
Distributed in Canada by VTech Technologies Canada, Ltd., Richmond, B.C.
Copyright ©2008 for VTECH TELECOMMUNICATIONS LTD.
Printed in China.
91-001419-070-100
Page 61

Models:
DS4121-3/DS4122-3/
DS4121-4/DS4122-4
User’s manual
w w w . vt e c h p h o n e s . c o m
 Loading...