

Page 1
Page 2

English - 1 -
Contents
Contents .................................................................1
Safety Information ..................................................2
Markings on the Product.........................................2
Environmental Information......................................3
Features .................................................................3
Accessories Included..............................................4
Standby Notications .............................................. 4
TV Control Switch & Operation...............................4
Inserting the Batteries into the Remote ..................4
Connect Power ...................................................... 4
Antenna Connection ............................................... 4
Notication .............................................................. 5
Specication ...........................................................5
Remote Control ......................................................6
Connections............................................................7
Switching On/Off ..................................................... 8
First Time Installation..............................................8
Media Playback via USB Input ...............................8
Recording a Programme ........................................9
Timeshift Recording ................................................9
Instant Recording ...................................................9
Watching Recorded Programmes .........................9
Recording Conguration ......................................... 9
Media Browser Menu............................................10
CEC and CEC RC Passthrough ........................... 10
E-Manual ..............................................................10
TV Menu Contents................................................ 11
General TV Operation ..........................................15
Using the Channel List .........................................15
Conguring Parental Settings ............................... 15
Electronic Programme Guide (EPG) ....................15
Teletext Services ..................................................16
Software Upgrade.................................................16
Troubleshooting & Tips .........................................17
PC Input Typical Display Modes ........................... 17
AV and HDMI Signal Compatibility ....................... 18
Supported Video File Formats for USB Mode ......19
Supported Picture File Formats for USB Mode ....19
Supported Audio File Formats for USB Mode ......20
Supported Subtitle File Formats for USB Mode ...21
Supported DVI Resolutions ..................................22
Page 3
English - 2 -
Safety Information
Don’t operate your TV in extreme ambient
conditions as this may cause damage to your TV.
CAUTION
RISK OF ELECTRIC SHOCK
DO NOT OPEN
CAUTION: TO REDUCE THE RISK OF ELECTRIC SHOCK DO
NOT REMOVE COVER (OR BACK).
NO USER-SERVICEABLE PARTS INSIDE. REFER
SERVICING TO QUALIFIED SERVICE PERSONNEL.
Note: Follow the on screen instructions for operating the
related features.
In extreme weather (storms, lightning) and long
inactivity periods (going on holiday) disconnect
the TV set from the mains. The mains plug is
used to disconnect TV set from the mains and
therefore it must remain readily operable.
This sign is present wherever there is very
important information on operation and
maintenance of the appliance in the literature
accompanying it.
IMPORTANT - Please read these
instructions fully before installing or
operating
WARNING: Never let people (including
children) with reduced physical, sensory or
mental capabilities or lack of experience and / or
knowledge use electrical devices unsupervised.
• For ventilation purposes, leave a free space of at
least 10 cm all around the set.
•Do not block ventilation holes.
•Do not place the TV on sloping or unstable surfaces,
the TV may tip over.
• Use this device in moderate climates.
• The power cord plug should be easily accessible. Do
not place the TV, furniture, etc. on the power cord.
A damaged power cord/plug can cause re or give
you an electric shock. Handle the power cord by the
plug, do not unplug the TV by pulling the power cord.
Never touch the power cord/plug with wet hands
as this could cause a short circuit or electric shock.
Never make a knot in the power cord or tie it with
other cords. When damaged it must be replaced,
this should only be done by qualied personnel.
•Do not use this TV in a humid or damp environment.
Do not expose the TV to liquids. In case the cabinet
contacts any liquids unplug the TV immediately
and have it checked by qualied personnel before
operating it any further.
•Do not expose the TV to direct sunlight,
open ames or place it near intense heat
sources such as electric heaters.
• Listening in excessive volumes from earphones and
headphones may cause hearing loss.
• Ensure that no open ame sources, such as lit
candles, are placed on top of the TV.
• To prevent injuries, this TV must be securely
attached to a wall by carefully following the
instructions (if the option is available).
• Occasionally, a few non-active pixels may appear
on the screen as a xed blue, green or red point.
Please note that this does not affect the performance
of your product. Take care not to scratch the screen
with ngernails or other hard objects.
• Before cleaning, unplug the TV from the wall socket.
Only use a soft, dry cloth while cleaning.
Warning
Serious injury or death risk
Risk of electric shock
Dangerous voltage risk
Caution
Injury or property damage risk
Important
Operating the system correctly
Notice
Additional notes marked
Markings on the Product
The following symbols are used on the product as
a marker for restrictions and precautions and safety
instructions. Each explanation shall be considered
where the product bears related marking only. Note
such information for security reasons.
Class II Equipment: This appliance is
designed in such a way that it does not require
a safety connection to electrical earth.
Class II Equipment With Functional
Earthing: This appliance is designed in such
a way that it does not require a safety
connection to electrical earth, the earth connection is
used for functional purposes.
Protective Earth Connection: The marked
terminal is intended for connection of the
protective earthing conductor associated with
the supply wiring.
Hazardous Live Terminal: The marked
terminal(s) is/are hazardous live under normal
operating conditions.
Caution, See Operating Instructions: The
marked area(s) contain(s) user replaceable
coin or button cell batteries.
Class 1 Laser Product:
This product contains Class
1 laser source that is safe
under reasonably foreseeable
conditions of operation.
i
CLASS 1
LASER PRODUCT
Page 4

English - 3 -
WARNING
Do not ingest the battery, Chemical Burn
Hazard
(The accessories supplied with or) This pro-
duct may contain a coin/button cell battery.
If the coin/button cell battery is swallowed,
it can cause severe internal burns in just 2
hours and can lead to death.
Keep new and used batteries away from
children.
If the battery compartment does not close
securely, stop using the product and keep it
away from children.
If you think batteries might have been swallowed or placed inside any part of the body,
seek immediate medical attention.
WARNING
Never place a television set in an unstable
location. A television set may fall, causing
serious personal injury or death. Many injuries, particularly to children, can be avoided
by taking simple precautions such as;
• Using cabinets or stands recommended by
the manufacturer of the television set.
• Only using furniture that can safely support
the television set.
• Ensuring the television set is not overhanging
the edge of the supporting furniture.
• Not placing the television set on all furniture
(for example, cupboards or bookcases)
without acnhoring both the furniture and the
television set to a suitable support.
• Educating children about the dangers of
climbing on furniture to reach the television
set or its controls.
If your existing television set is being retained and
relocated, the same considerations as above should
be applied.
Environmental Information
This television is designed to be environment friendly.
To reduce energy consumption, you can follow these
steps:
If you set the Energy Saving to Minimum, Medium,
Maximum or Auto the TV will reduce the energy
consumption accordingly. If you like to set the
Backlight to a xed value set as Custom and adjust
the Backlight (located under the Energy Saving
setting) manually using Left or Right buttons on the
remote. Set as Off to turn this setting off.
Note: Available Energy Saving options may differ depending
on the selected Mode in the System>Picture menu.
The Energy Saving settings can be found in the
System>Picture menu. Note that some picture
settings will be unavailable to be changed.
If pressed Right button while Auto option is selected or
Left button while Custom option is selected, “Screen
will be off in 15 seconds.” message will be displayed
on the screen. Select Proceed and press OK to turn
the screen off immediately. If you don’t press any
button, the screen will be off in 15 seconds. Press
any button on the remote or on the TV to turn the
screen on again.
Note: Screen Off option is not available if the Mode is set
to Game.
When the TV is not in use, please switch off or
disconnect the TV from the mains plug. This will also
reduce energy consumption.
Features
• Remote controlled colour TV
• Fully integrated digital terrestrial/cable/satellite TV
(DVB-T-T2/C)
• HDMI inputs to connect other devices with HDMI
sockets
• USB input
• OSD menu system
• Scart socket for external devices (such as DVD
Players, PVR, video games, etc.)
• Stereo sound system
• Teletext
• Headphone connection
• Automatic programming system
• Manual tuning
• Automatic power down after up to eight hours.
• Sleep timer
• Child lock
• Automatic sound mute when no transmission.
• NTSC playback
• AVL (Automatic Volume Limiting)
Page 5
English - 4 -
• PLL (Frequency Search)
• PC input
• Game Mode (Optional)
• Picture off function
• Programme recording
• Programme timeshifting
Accessories Included
• Remote Control
• Batteries: 2 x AAA
• Instruction Book
StandbyNotications
If the TV does not receive any input signal (e.g. from
an aerial or HDMI source) for 5 minutes, it will go
into standby. When you next switch-on, the following
message will be displayed: “TV switched to stand-by
mode automatically because there was no signal
for a long time.” Press OK to continue.
If the TV is on and it isn’t being operated for a while
it will go into standby. When you next switch-on, the
following message will be displayed. “TV switched to
stand-by mode automatically because no operation
was made for a long time.” Press OK to continue.
TV Control Switch & Operation
1. Up direction
2. Down direction
3. Volume / Info / Sources List selection and
Standby-On switch
The Control button allows you to control the Volume
/ Programme / Source and Standby-On functions of
the TV.
To change volume: Increase the volume by pushing
the button up. Decrease the volume by pushing the
button down.
To change channel: Press the middle of the button,
the information banner will appear on the screen.
Scroll through the stored channels by pushing the
button up or down.
To change source: Press the middle of the button
twice(for the second time in total), the source list will
appear on the screen. Scroll through the available
sources by pushing the button up or down.
To turn the TV off: Press the middle of the button
down and hold it down for a few seconds, the TV will
turn into standby mode.
Notes:
• If you turn the TV off, this circle starts again
beginning with the volume setting.
• Main menu OSD cannot be displayed via control
button.
Operation with the Remote Control
Press the Menu button on your remote control to
display main menu screen. Use the directional buttons
to select a menu tab and press OK to enter. Use the
directional buttons again to select or set an item. Press
Return/Back or Menu button to quit a menu screen.
Input Selection
Once you have connected external systems to your
TV, you can switch to different input sources. Press the
Source button on your remote control consecutively
to select the different sources.
Changing Channels and Volume
You can change the channel and adjust the volume
by using the Volume +/- and Programme +/- buttons
on the remote.
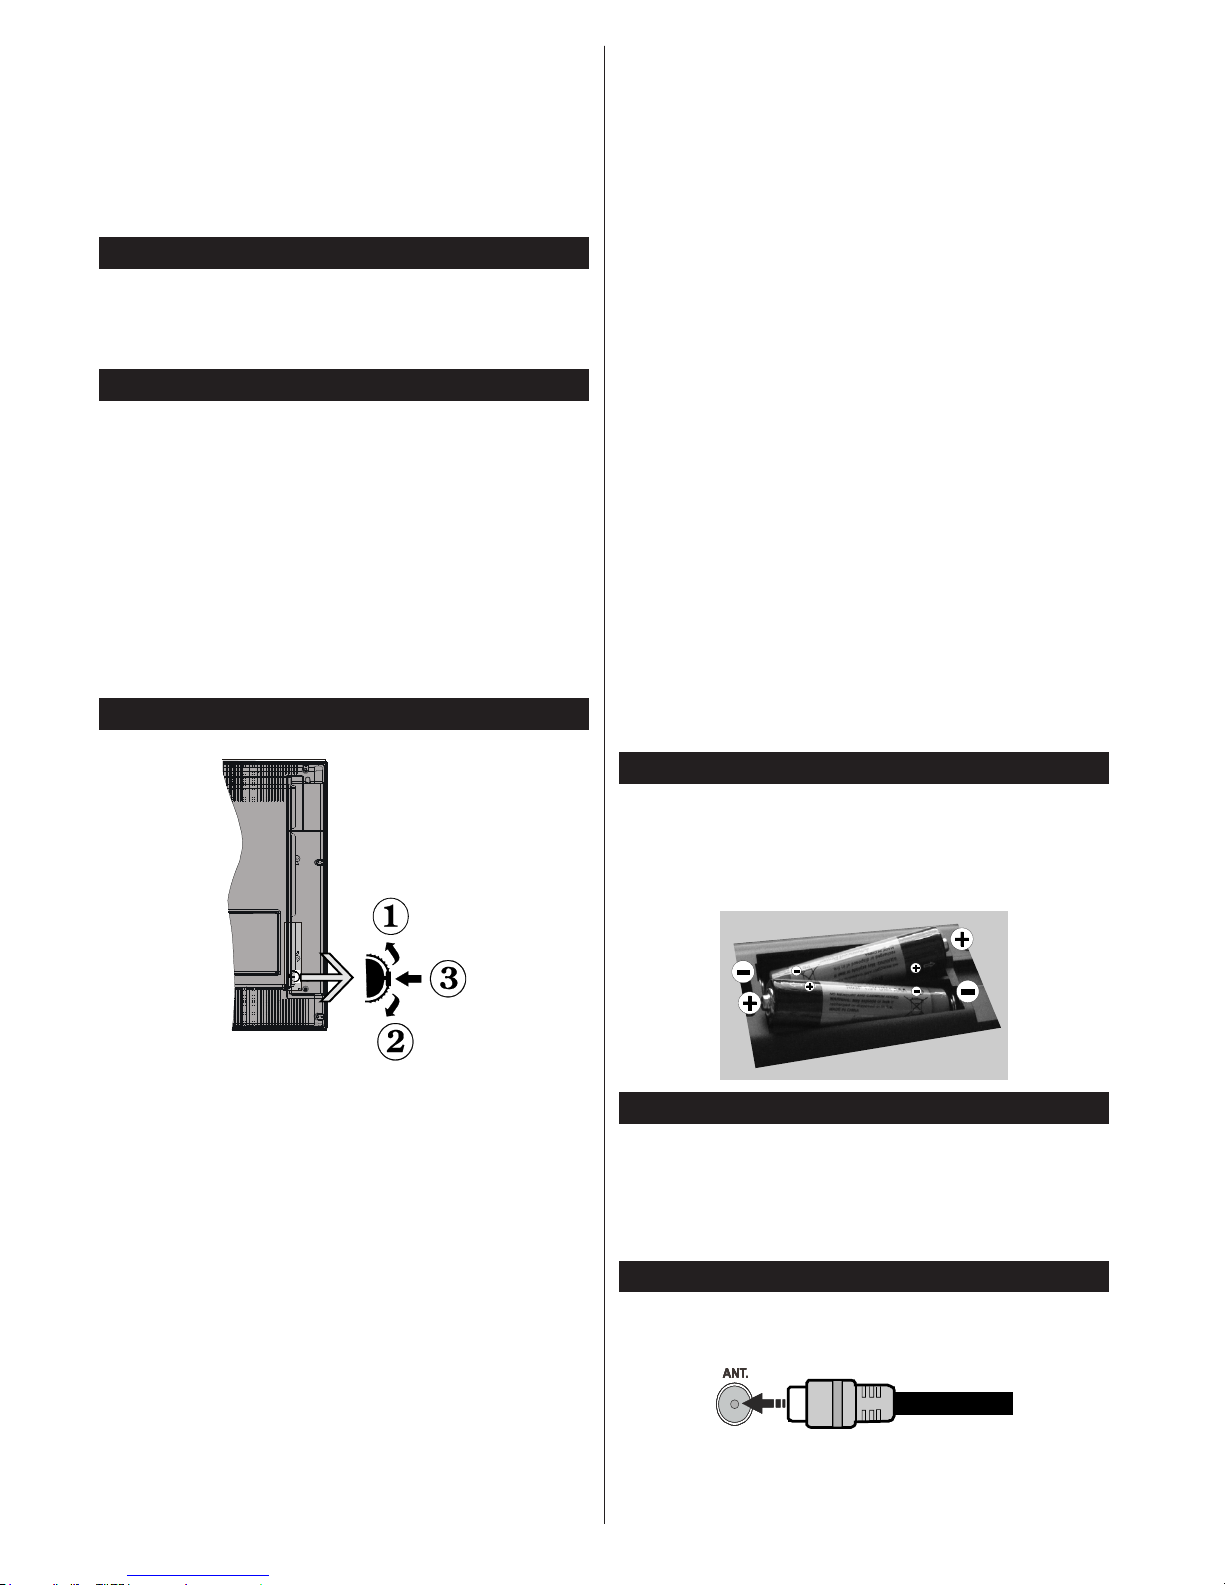
Inserting the Batteries into the Remote
Lift the cover on the back of the remote gently. Insert
two AAA batteries. Make sure the (+) and (-) signs
match (observe correct polarity). Place the cover
back on.
Connect Power
IMPORTANT: The TV set is designed to operate on
220-240V AC, 50 Hz socket. After unpacking, allow
the TV set to reach the ambient room temperature
before you connect the set to the mains. Plug the
power cable to the mains socket outlet.
Antenna Connection
Connect the aerial or cable TV plug to the AERIAL
INPUT (ANT) socket located on the back of the TV.
Page 6
English - 5 -
Notication
TRADEMARK ACKNOWLEDGMENT
The terms HDMI and High-Definition Multimedia
Interface, and the HDMI Logo are trademarks or
registered trademarks of HDMI Licensing LLC in the
United States and other countries.
Manufactured under license from Dolby Laboratories.
Dolby and the double-D symbol are trademarks of
Dolby Laboratories.
Information for Users on Disposal of Old
Equipment and Batteries
[European Union only]
Equipment bearing these symbols should not be
disposed as general household waste.
You should look for appropriate recycling facilities and
systems for the disposal of these products.
Notice: The sign Pb below the symbol for batteries indicates
that this battery contains lead.
Products
Battery
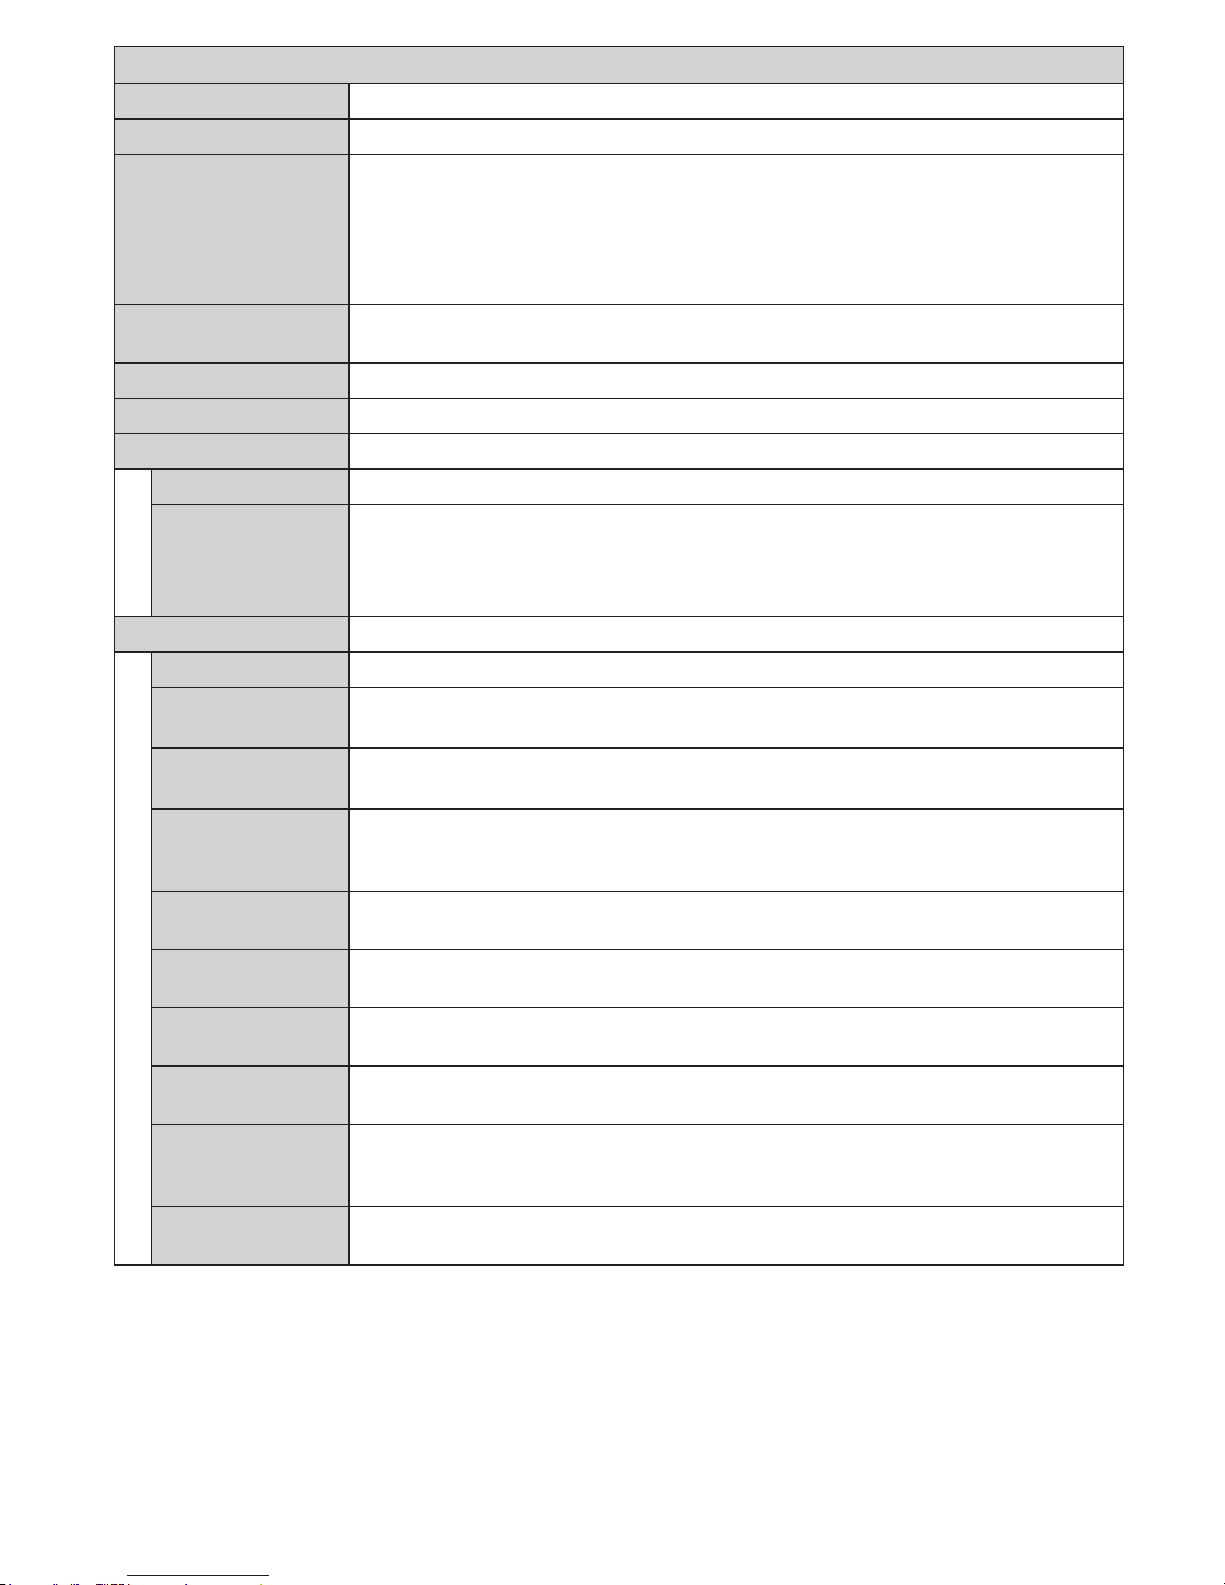
Specication
TV Broadcasting
PAL BG/DK/II’
SECAM BG/DK
Receiving Channels
VHF (BAND I/III) - UHF
(BAND U) - HYPERBAND
Digital Reception
Fully integrated digital
terrestrial-cable TV
(DVB-T-C)
(DVB-T2 compliant)
Number of Preset
Channels
1.000
Channel Indicator On Screen Display
RF Aerial Input 75 Ohm (unbalanced)
Operating Voltage 220-240V AC, 50Hz.
Audio German+Nicam Stereo
Audio Output Power
(WRMS.) (10% THD)
2 x 6W
Power Consumption (W) 65W
Weight (Kg) 6,55W
TV Dimensions DxLxH
(with foot) (mm)
185 x 735 x 478
TV Dimensions DxLxH
(without foot) (mm)
77/97 x 735 x 438
Display 32”
Operation temperature
and operation humidity
0ºC up to 40ºC, 85%
humidity max
Page 7
English - 6 -
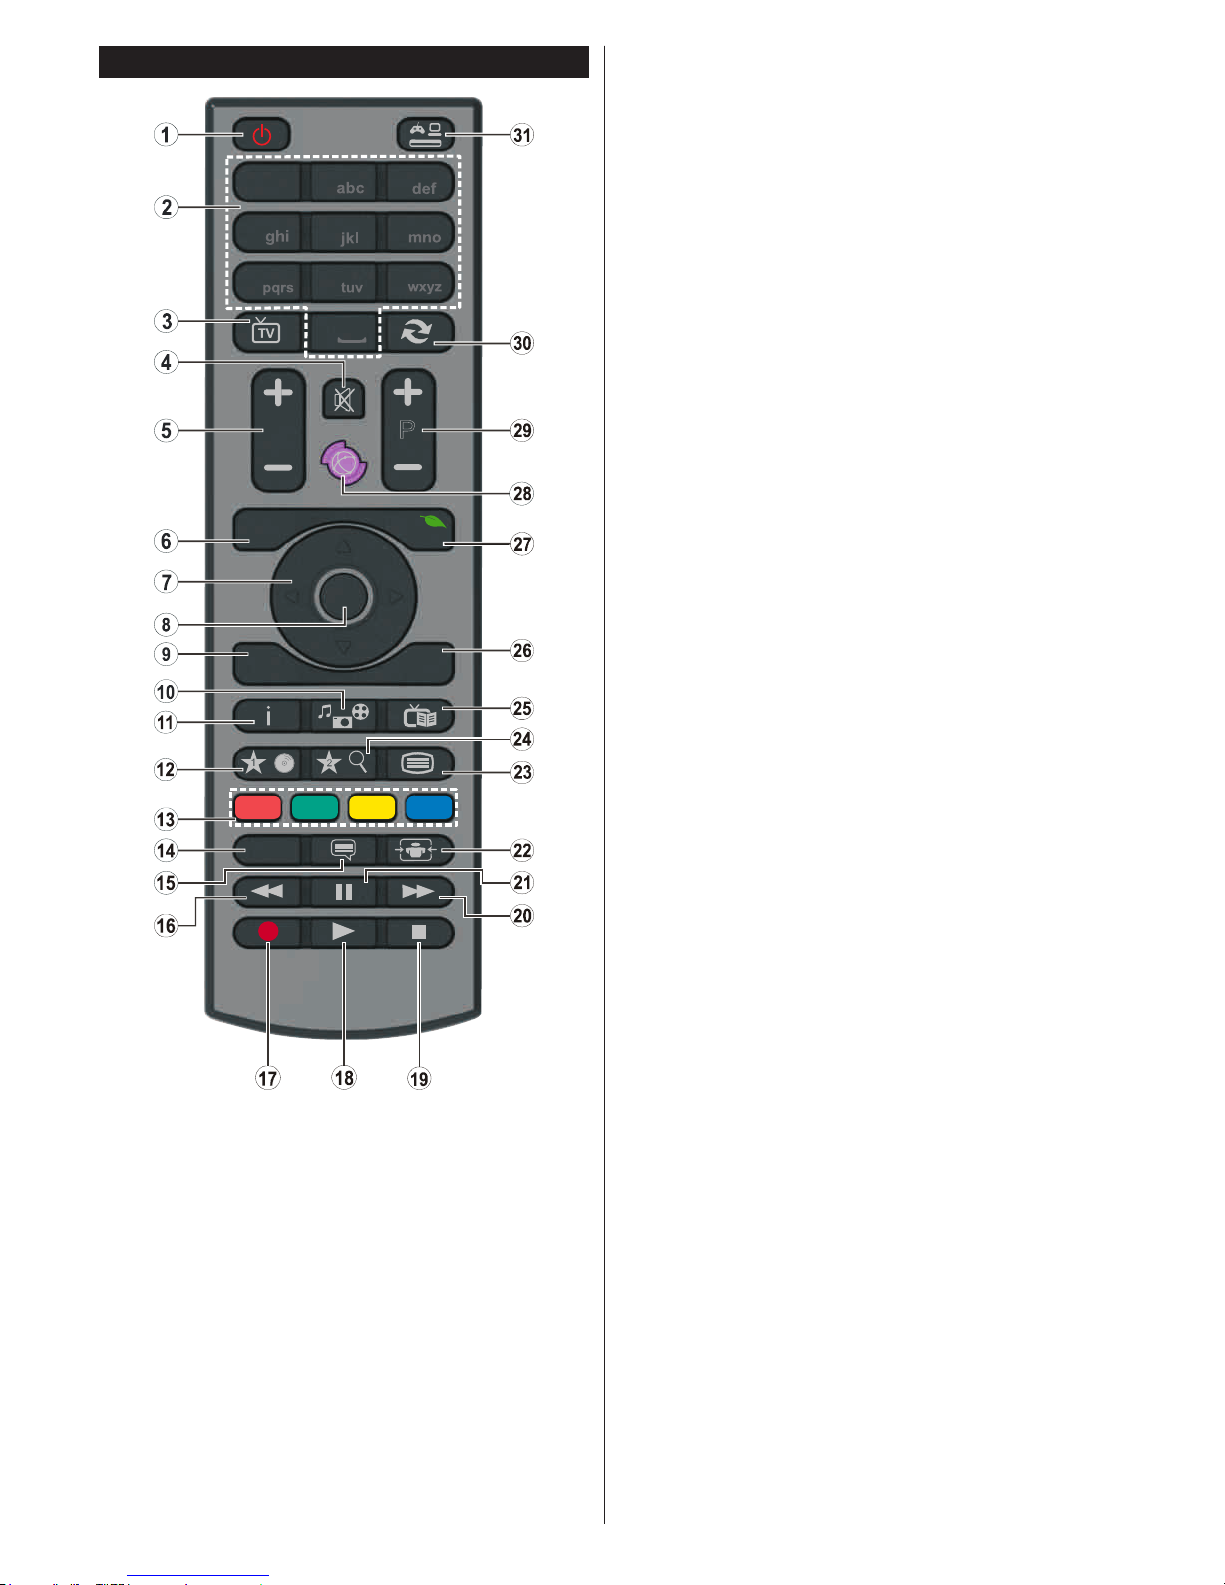
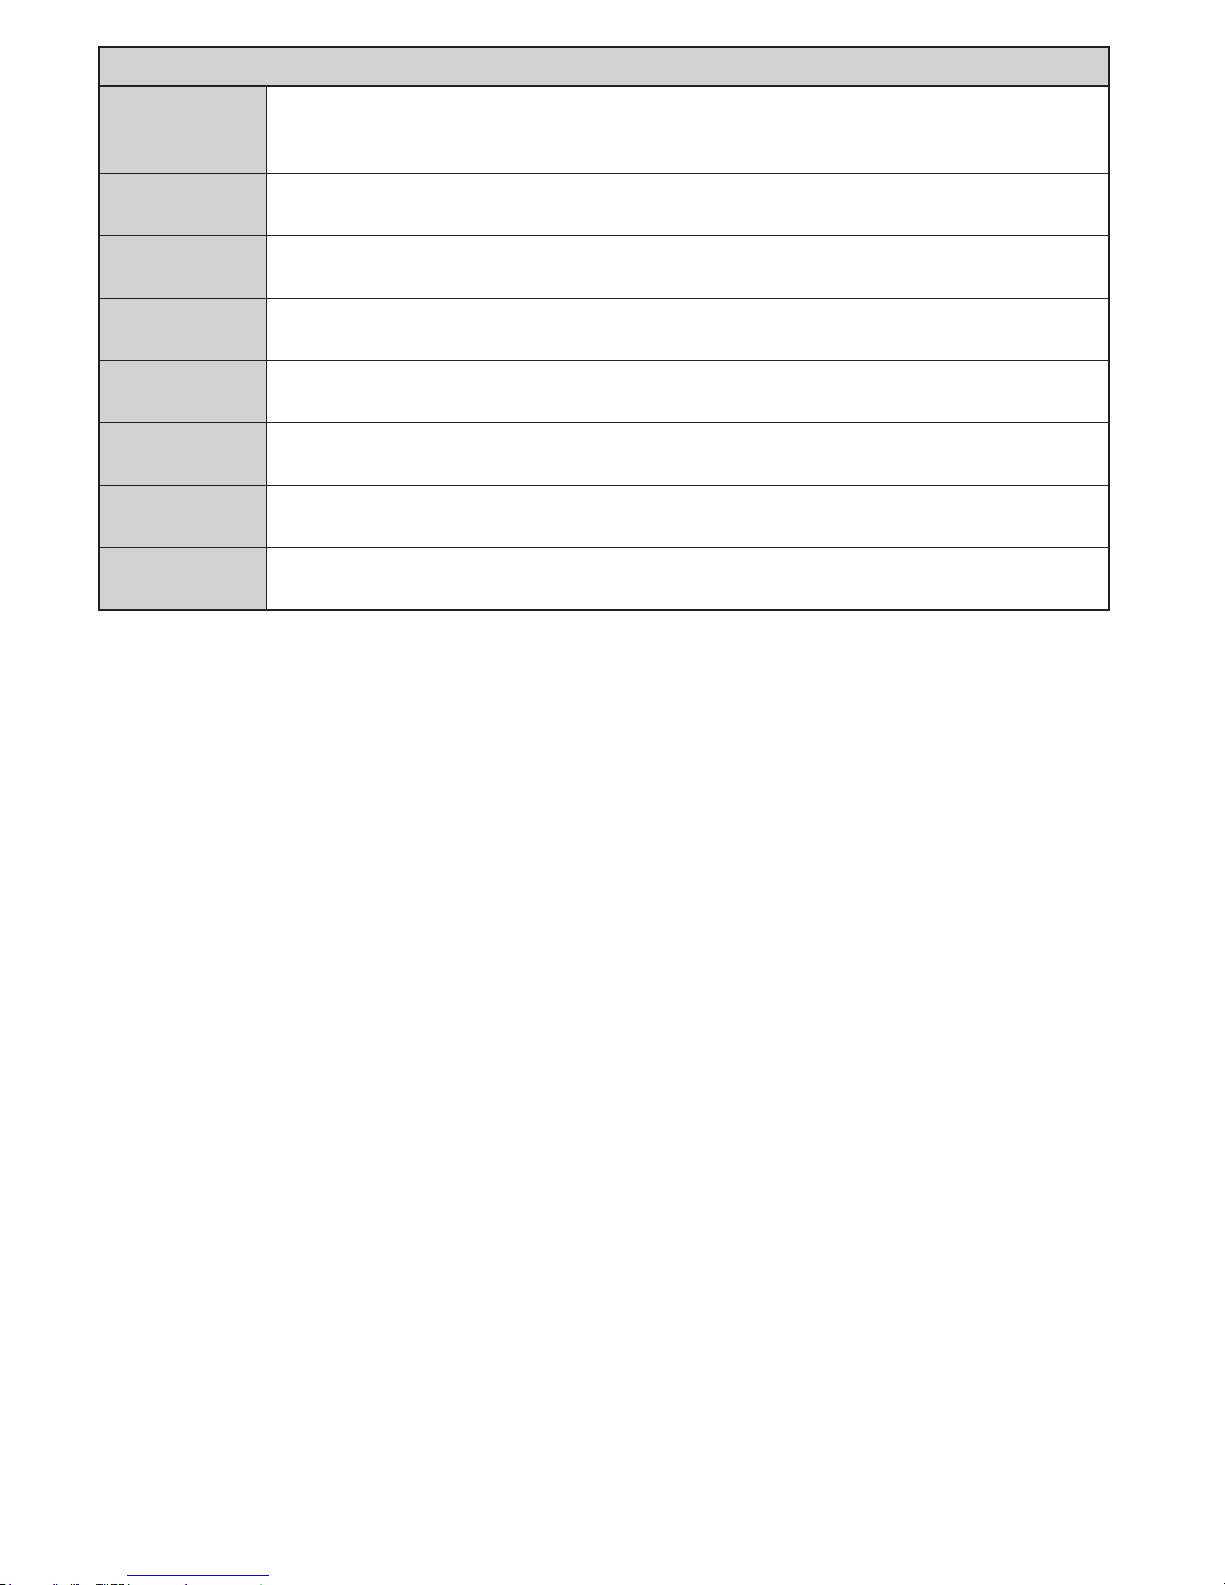
Remote Control
1
2
3
4
5
6
7
8
9
0
V
P
.,/@
LANG.
BACK
EXIT
OK
MENU
Q.
MENU
/
/
(*) MY BUTTON 1 & MY BUTTON 2:
These buttons may have default functions depending on
the model. However you can set a special function to these
buttons by pressing on them for ve seconds when on a
desired source or channel. A conrmation message will be
displayed on the screen. Now the selected MY BUTTON is
associated with the selected function.
Note that if you perform First Time Installation, MY BUTTON
1&2 will return to their default function.
1. Standby: Switches On / Off the TV
2. Numeric buttons: Switches the channel, enters a
number or a letter in the text box on the screen.
3. TV: Displays channel list / Switches to TV Source
4. Mute: Completely turns off the volume of the TV
5. Volume +/-
6. Menu: Displays TV menu
7. Directional buttons: Helps navigate menus, content
etc. and displays the subpages in TXT mode when
pressed Right or Left
8. OK: Conrms user selections, holds the page (in TXT
mode), views channel list (DTV mode)
9. Back/Return: Returns to previous screen, opens
index page (in TXT mode)
10. Media browser: Opens the media browsing screen
11. Info: Displays information about on-screen content,
shows hidden information (reveal - in TXT mode)
12. My button 1 (*)
13. Coloured Buttons: Follow the on-screen instructions
for coloured button functions
14. Language: Switches among sound modes (analogue
TV), displays and changes audio/subtitle language
(digital TV, where available)
15. Subtitles: Turns subtitles on and off (where available)
16. Rapid reverse: Moves frames backwards in media
such as movies
17. Record: Records programmes
18. Play: Starts to play selected media
19. Stop: Stops the media being played
20. Rapid advance: Moves frames forward in media such
as movies
21. Pause: Pauses the media being played, starts
timeshift recording
22. Screen: Changes the aspect ratio of the screen
23. Text: Displays teletext (where available), press again
to superimpose the teletext over a normal broadcast
picture (mix)
24. My button 2 (*)
25. EPG (Electronic programme guide): Displays the
electronic programme guide
26. Exit: Closes and exits from displayed menus or
returns to previous screen
27. Quick Menu: Displays a list of menus for quick access
28. No function
29. Programme +/-
30. Swap: Quickly cycles between previous and current
channels or sources
31. Source: Shows all available broadcast and content
sources
Page 8
English - 7 -
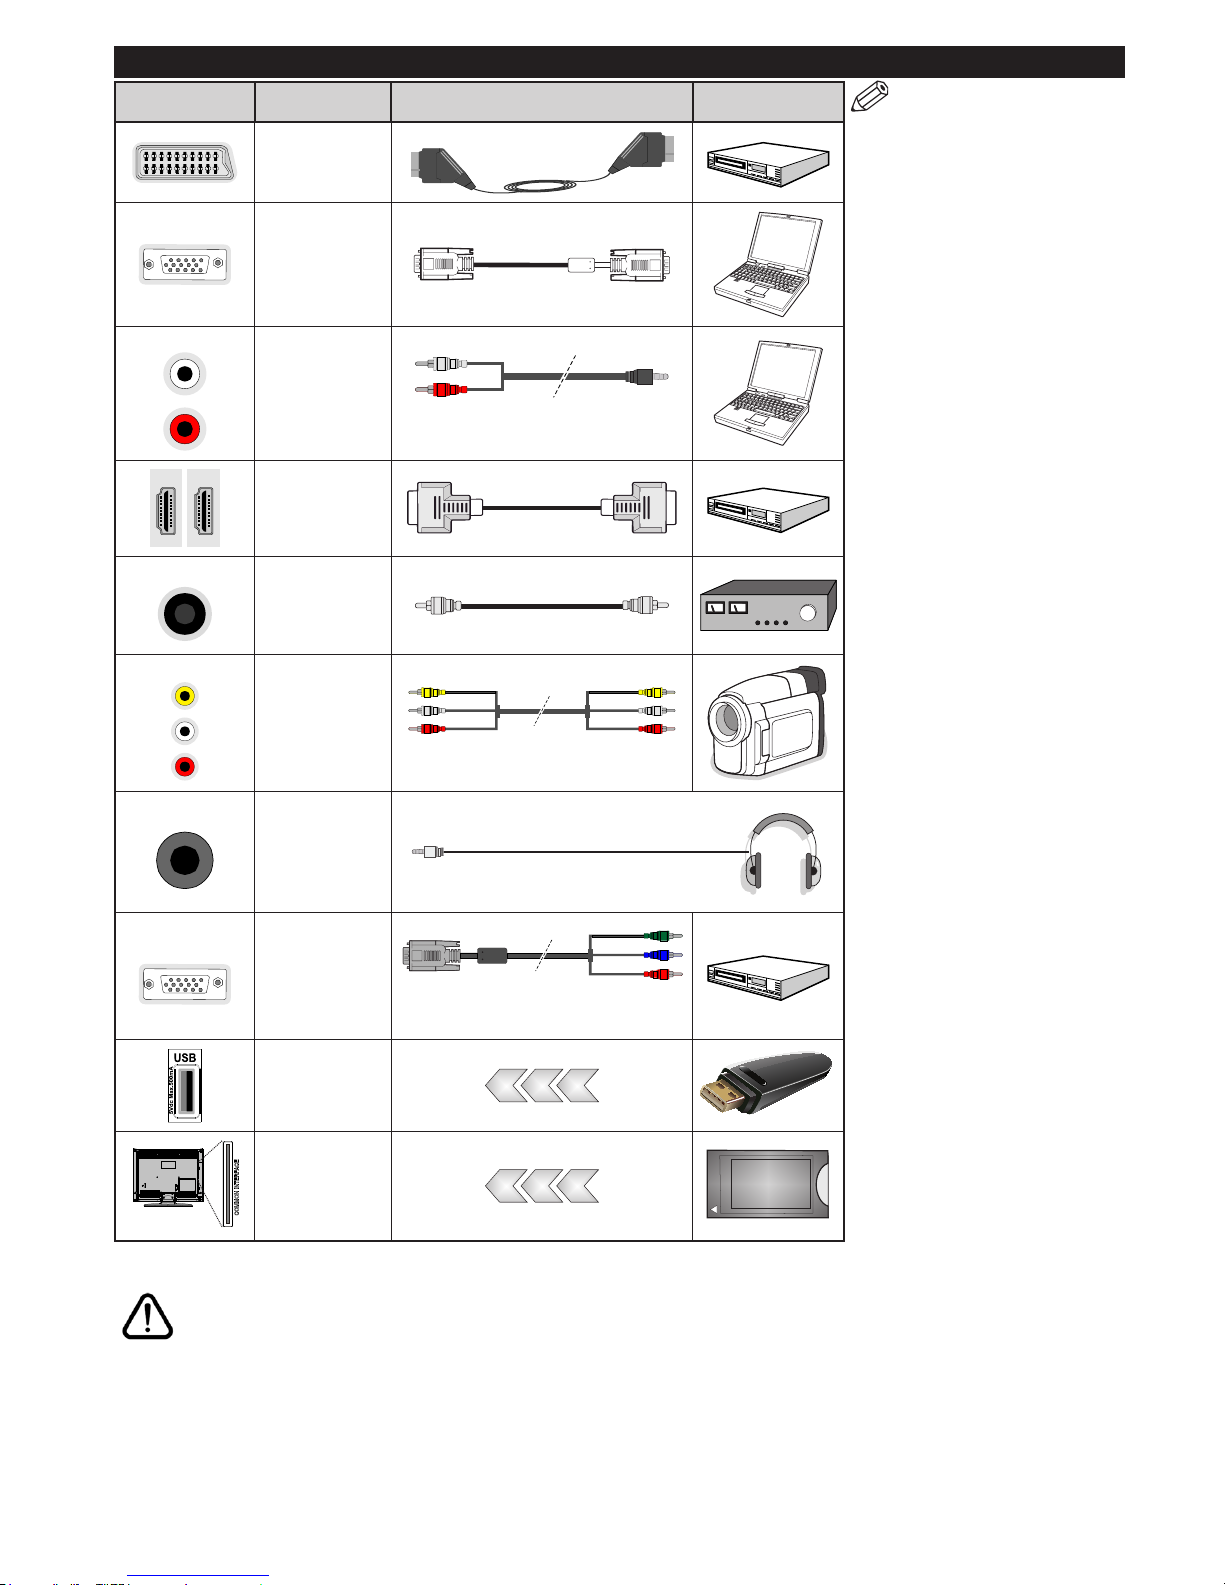
Connections
Connector Type Cables Device
Scart
Connection
(back)
VGA
Connection
(back)
SIDE AV
PC/YPbPr
Audio
Connection
(side)
YPbPr/PC Audio Cable (not
supplied)
HDMI
Connection
(back)
SPDIF
SPDIF
(Coaxial Out)
Connection
(back)
SIDE AV
Side AV
(Audio/Video)
Connection
(side)
AV Cable (not supplied)
HEADPHONE
Headphone
Connection
(side)
YPBPR
YPbPr Video
Connection
(back)
PC to YPbPr Connection Cable
(not supplied)
USB
Connection
(side)
CI
Connection
(side)
CAM
module
NOTE: When connecting
a device via the YPbPr or Side
AV input, you must use the
connection cables to enable
connection. See the illustrations
on the left side. | You can use
YPbPr to VGA cable (not supplied)
to enable YPbPr signal via VGA
input. | You cannot use VGA
and YPbPr at the same time.
| To enable PC/YPbPr audio,
you will need to use the side
audio inputs with a YPbPr/
PC audio cable (not supplied)
for audio connection. | If an
external device is connected via
the SCART socket, the TV will
automatically switch to AV mode.|
When receiving DTV channels
(Mpeg4 H.264) or while in Media
Browser mode, output will not be
available via the scart socket. |
When using the wall mounting
kit (available from third party
in the market, if not supplied),
we recommend that you plug all
your cables into the back of the
TV before mounting on the wall.
| Insert or remove the CI module
only when the TV is SWITCHED
OFF. You should refer to the
module instruction manual for
details of the settings. | The/Each
USB input of your TV supports
devices up to 500mA. Connecting
devices that have current value
above 500mA may damage your
TV. | By connecting an HDMI cable
to your TV, you have to use only a
shielded HDMI cable to guarantee
a sufficient immunity against
parasitic frequency radiation.
If you want to connect a device to the TV, make sure that both the TV and the device are turned off before making
any connection. After the connection is done, you can turn on the units and use them.
Page 9

English - 8 -
Switching On/Off
To Switch the TV On
Connect the power cord to a power source such as a
wall socket (220-240V AC, 50 Hz).
To switch on the TV from standby mode either:
• Press the Standby button, Programme +/- or a
numeric button on the remote control.
• Press the side function switch on the TV until the TV
comes on from standby.
To Switch the TV Off
Press the Standby button on the remote control or
press the side function switch on the TV until the TV
switches into standby mode.
To power down the TV completely, unplug the
power cord from the mains socket.
Note: When the TV is switched into standby mode, the
standby LED can blink to indicate that features such as
Standby Search, Over Air Download or Timer is active. The
LED can also blink when you switch on the TV from standby
mode.
First Time Installation
When turned on for the first time, the language
selection screen is displayed. Select the desired
language and press OK.
On the next screen, set your preferences using the
directional buttons.
Note: Depending on the Country selection you may be asked
to set and conrm a PIN at this point. The selected PIN cannot
be 0000. You have to enter it if you are asked to enter a PIN
for any menu operation later.
About Selecting Broadcast Type
Aerial: If Aerial broadcast search option is turned on,
the TV will search for digital terrestrial broadcasts after
other initial settings are completed.
Cable: If Cable broadcast search option is turned on,
the TV will search for digital cable broadcasts after
other initial settings are completed. According to your
other preferences a conrmation message may be
displayed before starting to search. Select YES and
press OK to proceed. To cancel operation, select NO
and press OK. You can select Network or set values
such as Frequency, Network ID and Search Step.
When nished, press OK button.
Note: Searching duration will change depending on the
selected Search Step.
Analogue: If Analogue broadcast search option is
turned on, the TV will search for analogue broadcasts
after other initial settings are completed.
Additionally you can set a broadcast type as your
favourite one. Priority will be given to the selected
broadcast type during the search process and the
channels of it will be listed on the top of the Channel
List. When nished, press OK to continue.
You can activate Store Mode option at this point.
This option will congure your TV’s settings for store
environment and depending on the TV model being
used, the supported features of it may be displayed
on the top of the screen as an info banner. This option
is intended only for store use. It is recommended to
select Home Mode for home use. This option will be
available in System>Options>More menu and can
be turned off/on later.
Press OK button on the remote control to continue.
After the initial settings are completed TV will start
to search for available broadcasts of the selected
broadcast types.
After all the available stations are stored, scan results
will be displayed. Press OK to continue. The Edit
Channel List menu will be displayed next. You can
edit the channel list according to your preferences or
press the Menu button to quit and watch TV.
While the search continues a message may appear,
asking whether you want to sort channels according
to the LCN(*). Select Yes and press OK to conrm.
(*) LCN is the Logical Channel Number system that organizes
available broadcasts in accordance with a recognizable
channel number sequence (if available).
Note: Do not turn off the TV while initializing first time
installation. Note that, some options may not be available
depending on the country selection.
Media Playback via USB Input
You can connect 2.5” and 3.5” inch (hdd with external power
supply) external hard disk drives or USB memory stick to your
TV by using the USB inputs of the TV.
IMPORTANT! Back up the les on your storage devices
before connecting them to the TV. Manufacturer will
not be responsible for any le damage or data loss.
Certain types of USB devices (e.g. MP3 Players)
or USB hard disk drives/memory sticks may not be
compatible with this TV. The TV supports FAT32
and NTFS disk formatting but recording will not be
available with NTFS formatted disks.
While formatting USB hard drives which have
more than 1TB (Tera Byte) storage space you may
experience some problems in the formatting process.
Wait a little while before each plugging and unplugging
as the player may still be reading les. Failure to do
so may cause physical damage to the USB player
and the USB device itself. Do not pull out your drive
while playing a le.
You can use USB hubs with your TV’s USB inputs.
External power supplied USB hubs are recommended
in such a case.
It is recommended to use the TV’s USB input(s)
directly, if you are going to connect a USB hard disk.
Note: When viewing image les the Media Browser menu
can only display 1000 image les stored on the connected
USB device.
Page 10

English - 9 -
Recording a Programme
IMPORTANT: When using a new USB hard disk
drive, it is recommended that you rst format the disk
using your TV’s Format Disk option in the Media
Browser>Settings>Recording Settings menu.
To record a programme, you should rst connect a
USB disk to your TV while the TV is switched off. You
should then switch on the TV to enable the recording
feature.
To use recording your USB drive should have 2 GB
free space and be USB 2.0 compatible. If the USB
drive is not compatible an error message will be
displayed.
To record long duration programmes such as movies,
it is recommended to use USB Hard disk drives
(HDD’s).
Recorded programmes are saved into the connected
USB disk. If desired, you can store/copy recordings
onto a computer; however, these les will not be
available to be played on a computer. You can play
the recordings only via your TV.
Lip Sync delay may occur during the timeshifting.
Radio record is supported. The TV can record
programmes up to ten hours.
Recorded programmes are split into 4GB partitions.
If the writing speed of the connected USB disk is not
sufcient, the recording may fail and the timeshifting
feature may not be available.
It is recommended to use USB hard disk drives for
recording HD programmes.
Do not plug out the USB/HDD during a recording. This
may harm the connected USB/HDD.
If the AC cord is unplugged while there is an active
USB-recording timer setting, it will be cancelled.
Multipartition support is available. A maximum of two
different partitions are supported. The rst partition of
the USB disk is used for PVR ready features. It also
must be formatted as the primary partition to be used
for the PVR ready features.
Some stream packets may not be recorded because
of signal problems, as a result sometimes videos may
freeze during playback.
Record, Play, Pause, Display (for PlayListDialog) keys
can not be used when teletext is on. If a recording starts
from timer when teletext is on, teletext is automatically
turned off. Also teletext usage is disabled when there
is an ongoing recording or playback.
Timeshift Recording
Press Pause button while watching a broadcast to
activate timeshifting mode. In timeshifting mode, the
programme is paused and simultaneously recorded
to the connected USB disk.
Press Play button again to resume the paused
programme from where you stopped. Press the Stop
button to stop timeshift recording and return to the
live broadcast.
Timeshift cannot be used while in radio mode.
You cannot use the timeshift fast reverse feature before
advancing the playback with the fast forward option.
Instant Recording
Press Record button to start recording an event
instantly while watching a programme. You can
press Record button on the remote control again to
record the next event on the EPG. In this case, an
OSD will be displayed, indicating the programmed
events for recording. Press Stop button to cancel
instant recording.
You can not switch broadcasts or view the media
browser during the recording mode. While recording
a programme or during the timeshifting, a warning
message appears on the screen if your USB device
speed is not sufcient.
Watching Recorded Programmes
Select Recordings from the Media Browser menu.
Select a recorded item from the list (if previously
recorded). Press the OK button to view the Play
Options. Select an option then press OK button.
Note: Viewing main menu and menu items will not be
available during the playback.
Press the Stop button to stop a playback and return
to the Recordings.
Slow Forward
If you press Pause button while watching recorded
programmes, the slow forward feature will be
available. You can use Rapid advance button to
slow forward. Pressing Rapid advance button
consecutively will change slow forwarding speed.
RecordingConguration
Select the Recording Settings item in the Media
Browser>Settings menu to congure the recording
settings.
Format Disk: You can use the Format Disk feature
for formatting the connected USB disk. Your PIN is
required to use the Format Disk feature.
Note: Default PIN can be set to 0000 or 1234. If you have
dened the PIN(is requested depending on the country
selection) during the First Time Installation use the PIN
that you have dened.
IMPORTANT: Formatting your USB drive will erase
ALL the data on it and it’s le system will be converted
to FAT32. In most cases operation errors will be xed
after a format but you will lose ALL your data.
If “USB disk writing speed too slow to record”
message is displayed on the screen while starting a
recording, try restarting the recording. If you still get
the same error, it is possible that your USB disk does
not meet the speed requirements. Try connecting
another USB disk.
Page 11
English - 10 -
Media Browser Menu
You can play photo, music and movie les stored on a
USB disk by connecting it to your TV. Connect a USB
disk to one of the USB inputs located on the side of
the TV. Pressing the Menu button while in the Media
Browser mode will access the Picture, Sound and
Settings menu options. Pressing the Menu button
again will exit from this screen. You can set your Media
Browser preferences by using the Settings menu.
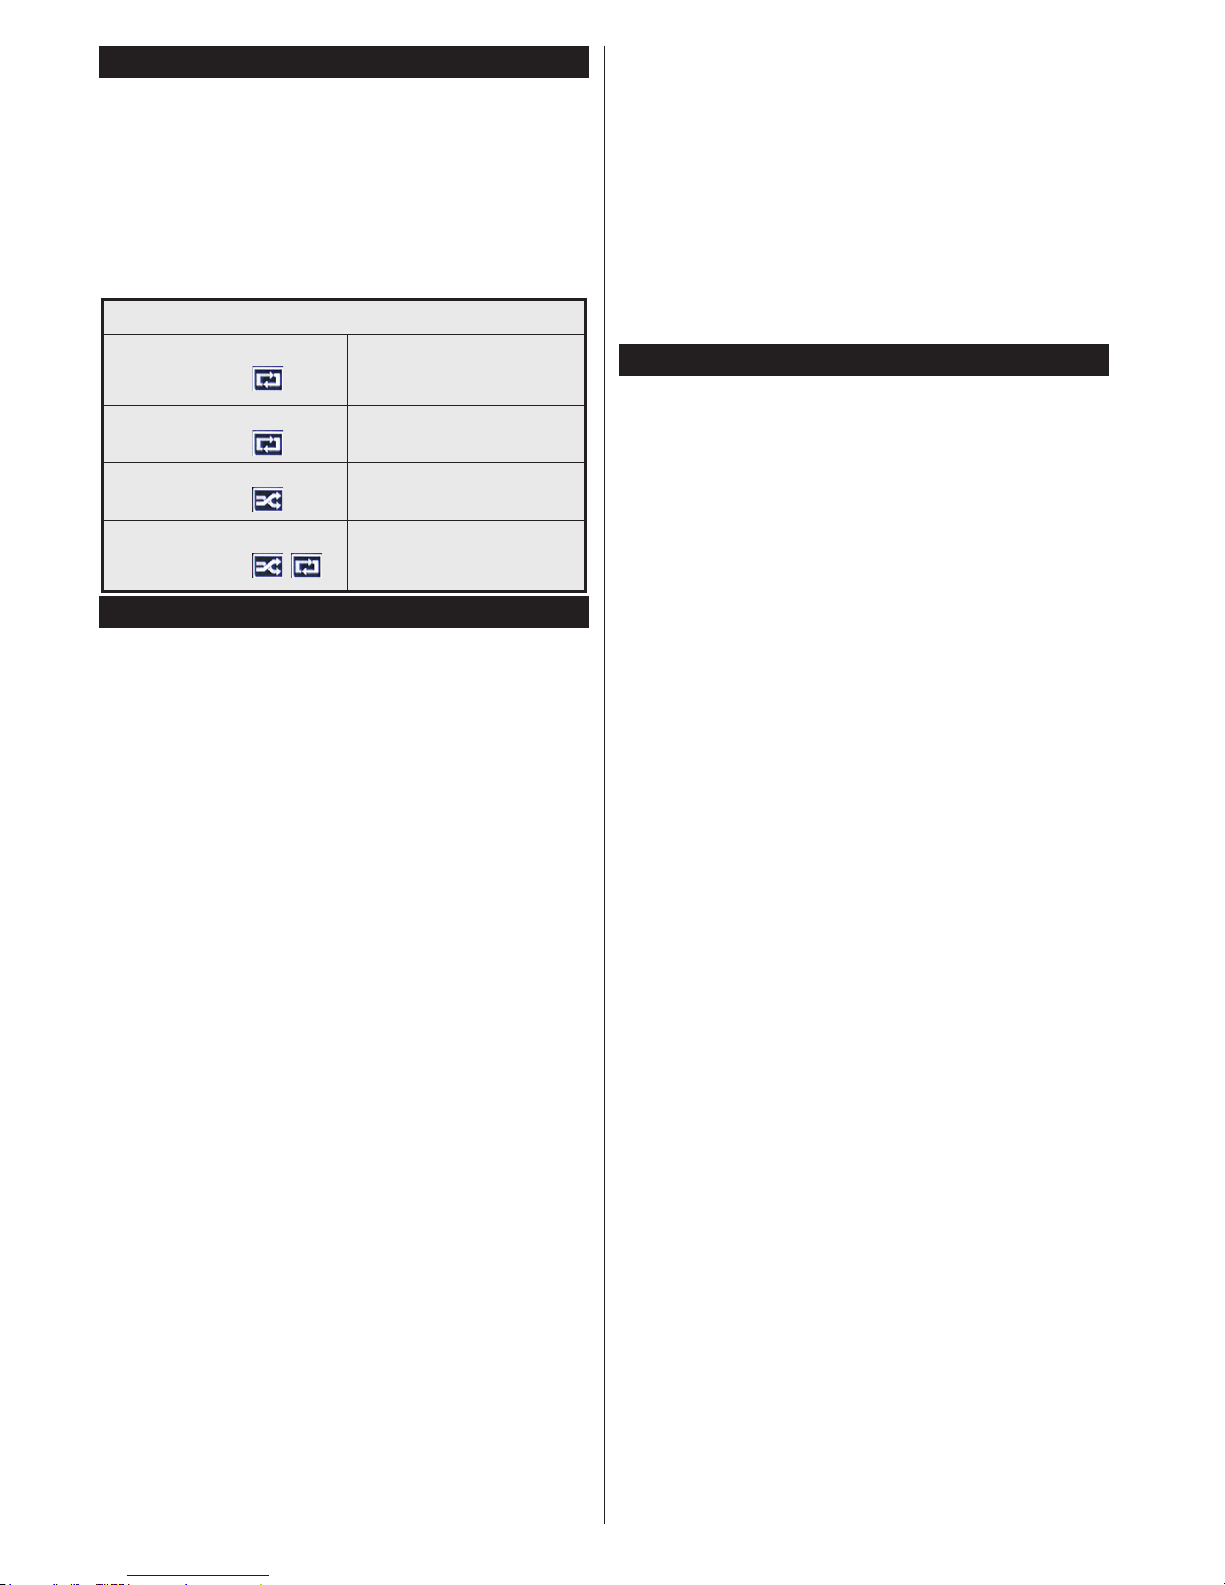
Loop/Shufe Mode Operation
Start playback with the Play
button and activate
All les in the list will be
continuously played in original
order
Start playback with the OK
button and activate
The same le will be played
continuously (repeat)
Start playback with the Play
button and activate
All les in the list will be
played once in random order
Start playback with the Play
button and activate ,
All les in the list will be
continuously played in the
same random order.
CEC and CEC RC Passthrough
This function allows to control the CEC-enabled
devices, that are connected through HDMI ports by
using the remote control of the TV.
The CEC option in the System>Options>More menu
should be set as Enabled at rst. Press the Source
button and select the HDMI input of the connected
CEC device from the Sources List menu. When
new CEC source device is connected, it will be listed
in source menu with its own name instead of the
connected HDMI ports name(such as DVD Player,
Recorder 1 etc.).
The TV remote is automatically able to perform the
main functions after the connected HDMI source has
been selected.
To terminate this operation and control the TV via
the remote again, press Quick Menu button on the
remote, highlight the CEC RC Passthrough and
set as Off by pressing Left or Right button. This
feature can also be enabled or disabled under the
System>Options>More menu.
The TV supports also ARC(Audio Return Channel)
feature. This feature is an audio link meant to replace
other cables between the TV and the audio system
(A/V receiver or speaker system).
When ARC is active, TV does not mute its other audio
outputs automatically. So you need to decrease TV
volume to zero manually, if you want to hear audio
from connected audio device only (same as other
optical or co-axial digital audio outputs). If you want
to change connected device’s volume level, you
should select that device from the source list. In that
case volume control keys are directed to connected
audio device.
Note: ARC is supported only via the HDMI1 input.
System Audio Control
Allows an Audio Amplier/Receiver to be used with
the TV. The volume can be controlled using the
remote control of the TV. To activate this feature set
the Speakers option in the System>Options>More
menu as Amplier. The TV speakers will be muted
and the sound of the watched source will be provided
from the connected sound system.
Note: The audio device should support System Audio Control
feature and CEC option should be set as Enabled.
E-Manual
You can nd instructions for your TV’s features in
the E-Manual.
To use E-Manual, press to the Info button while main
menu is displayed on the screen or press Quick Menu
button, select Information Booklet and press OK.
By using the directional buttons select a desired
category. Every category includes different topics.
Select a topic and press OK to read instructions.
To close the E-Manual screen press the Exit or Menu
button.
Note: The contents of the E-Manual may vary according to
the model.
Page 12

English - 11 -
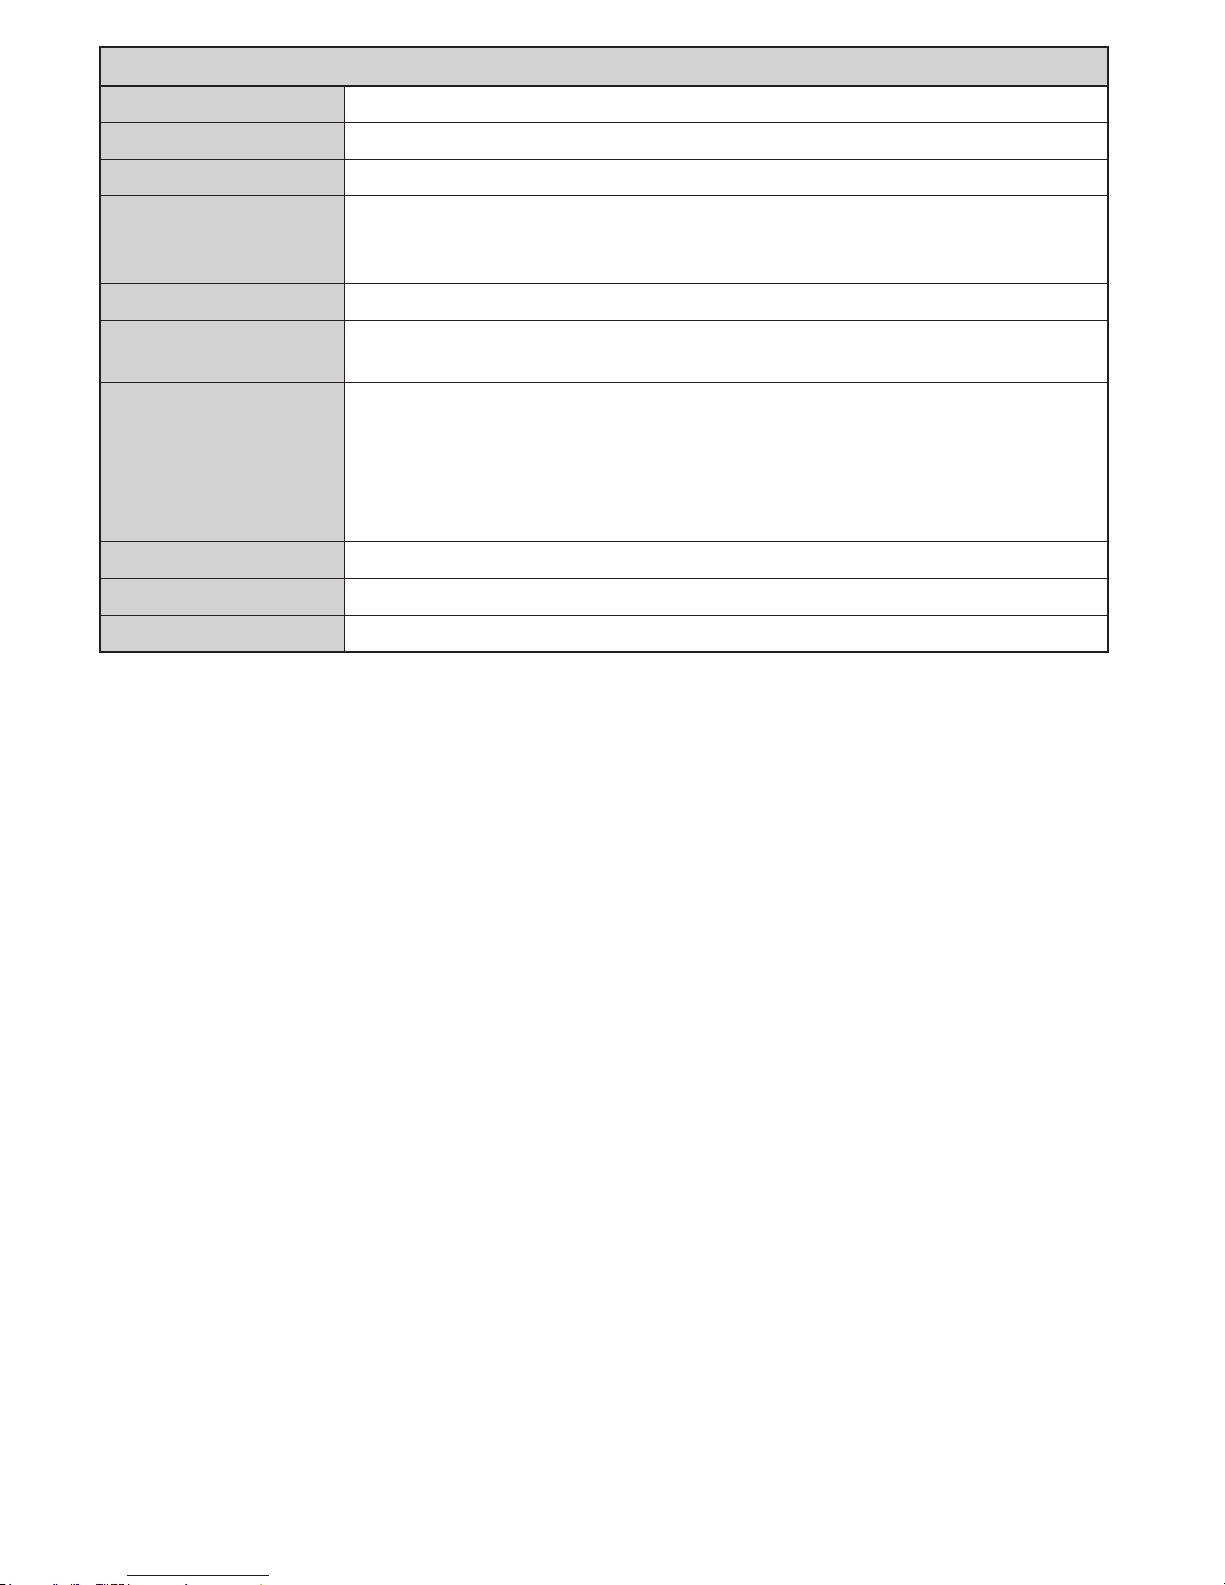
TV Menu Contents
System - Picture Menu Contents
Mode
You can change the picture mode to suit your preference or requirements. Picture mode
can be set to one of these options: Cinema, Game, Sports, Dynamic and Natural.
Contrast
Adjusts the light and dark values on the screen.
Brightness
Adjusts the brightness values on the screen.
Sharpness
Sets the sharpness value for the objects displayed on the screen.
Colour
Sets the colour value, adjusting the colours.
Energy Saving
For setting the Energy Saving to Custom, Minimum, Medium, Maximum, Auto,
Screen Off or Off.
Note: Available options may differ depending on the selected Mode.
Backlight
This setting controls the backlight level. The backlight function will be inactive if the
Energy Saving is set to an option other then Custom.
Advanced Settings
Dynamic Contrast
You can change the dynamic contrast ratio to desired value.
Noise Reduction
If the signal is weak and the picture is noisy, use the Noise Reduction setting to reduce
the amount of noise.
Colour Temp
Sets the desired colour temperature value. Cool, Normal, Warm and Custom options are
available.
White Point
If the Colour Temp option is set as Custom, this setting will be available. Increase the
‘warmth’ or ‘coolness’ of the picture by pressing Left or Right buttons.
Picture Zoom
Sets the desired image size format.
Film Mode
Films are recorded at a different number of frames per second to normal television programmes.
Turn this feature on when you are watching lms to see the fast motion scenes clearly.
Skin Tone
Skin tone can be changed between -5 and 5.
Colour Shift
Adjust the desired colour tone.
HDMI Full Range
While watching from a HDMI source, this feature will be visible. You can use this feature to
enhance blackness in the picture.
PC Position
Appears only when the input source is set to VGA/PC.
Autoposition
Automatically optimizes the display. Press OK to optimize.
H Position
This item shifts the image horizontally to the right hand side or left hand side of the screen.
V Position
This item shifts the image vertically towards the top or bottom of the screen.
Dot Clock
Dot Clock adjustments correct the interference that appear as vertical banding in dot
intensive presentations like spreadsheets or paragraphs or text in smaller fonts.
Phase
Depending on the input source(computer etc.) you may see a hazy or noisy picture on the
screen. You can use phase to get a clearer picture by trial and error.
Reset
Resets the picture settings to factory default settings (except Game mode).
While in VGA (PC) mode, some items in Picture menu will be unavailable. Instead, VGA mode settings will be added to the Picture
Settings while in PC mode.
Page 13
English - 12 -
System - Sound Menu Contents
Volume
Adjusts the volume level.
Equalizer
Selects the equalizer mode. Custom settings can be made only when in User mode.
Balance
Adjusts whether the sound comes from the left or right speaker.
Headphone
Sets headphone volume.
Please ensure before using headphones that the headphone volume is set to a low
level, to prevent damage to your hearing.
Sound Mode
You can select a sound mode (If the viewed channel supports).
AVL (Automatic
Volume Limiting)
Sets the sound to obtain xed output level between programmes.
Headphone/Lineout
When you connect an external amplier to your TV using the headphone jack, you
can select this option as Lineout. If you have connected headphones to the TV, set
this option as Headphone.
Please ensure before using headphones that this menu item is set to Headphone.
If it is set to Lineout, the output from the headphone socket will be set to maximum
which could damage your hearing.
Dynamic Bass
Enables or disables the Dynamic Bass.
Surround sound
Surround sound mode can be changed as On or Off.
Digital Out
Sets digital out audio type.
Page 14
English - 13 -
System - Options Menu Contents
Conditional Access
Controls conditional access modules when available.
Language
You may set a different language depending on the broadcaster and the country.
Parental
Enter correct password to change parental settings. You can easily adjust Menu
Lock, Maturity Lock, Child Lock or Guidance in this menu. You can also set a
new PIN or change the Default CICAM PIN using the related options.
Note: Some menu options may not be available depending on the country selection in the First Time
Installation. Default PIN can be set to 0000 or 1234. If you have dened the PIN(is requested depending on
the country selection) during the First Time Installation use the PIN that you have dened.
Timers
Sets sleep timer to turn off the TV after a certain time. Sets timers for selected
programmes.
Date/Time
Sets date and time.
Sources
Enables or disables selected source options.
Accessibility
Displays accessibility options of the TV.
Hard of Hearing
Enables any special feature sent from the broadcaster.
Audio
Description
A narration track will be played for the blind or visually impaired audience. Press OK
to see all available Audio Description menu options. This feature is available only if
the broadcaster supports it.
Note: Audio description sound feature is not available in recording or time shifting mode.
More
Displays other setting options of the TV.
Menu Timeout
Changes timeout duration for menu screens.
Software
Upgrade
Ensures that your TV has the latest rmware. Press OK to see the menu options.
Application
Version
Displays current software version.
Subtitle Mode
This option is used to select which subtitle mode will be on the screen (DVB subtitle /
Teletext subtitle) if both is available. Default value is DVB subtitle. This feature is available
only for the country option of Norway.
Auto TV OFF
Sets the desired time for the TV to automatically go into standby mode when not
being operated.
Store Mode
Select this mode for store display purposes. Whilst Store Mode is enabled, some
items in the TV menu may not be available.
Power Up Mode
This setting congures the power up mode preference. Last State and Standby
options are available.
CEC
With this setting you can enable and disable CEC functionality completely. Press Left
or Right button to enable or disable the feature.
CEC Auto Power
On
This function allows the connected HDMI-CEC compatible device to turn on the TV
and switch to its input source automatically. Press Left or Right button to enable or
disable the feature.
Speakers
To hear the TV audio from the connected compatible audio device set as Amplier.
You can use the remote control of the TV to control the volume of the audio device.
Page 15
English - 14 -
Installation Menu Contents
Automatic
channel scan
(Retune)
Displays automatic tuning options. Digital Aerial: Searches and stores aerial DVB stations.
Digital Cable: Searches and stores cable DVB stations. Analogue: Searches and stores
analogue stations.
Manual
channel scan
This feature can be used for direct broadcast entry.
Network
channel scan
Searches for the linked channels in the broadcast system. Digital Aerial: Searches for aerial
network channels. Digital Cable: Searches for cable network channels.
Analoguene
tune
You can use this setting for ne tuning analogue channels. This feature is not available if no
analogue channels are stored.
Installation
Settings
Displays installation settings menu. Standby Search (Optional): Your TV will search for new
or missing channels while in standby. Any new found broadcasts will be shown.
Clear Service
List
Use this setting to clear channels stored. This setting is visible only when the Country option
is set to Denmark, Sweden, Norway or Finland.
Select Active
Network
This setting allows you to select only the broadcasts within the selected network to be listed
in the channel list. This feature is available only for the country option of Norway.
First time
installation
Deletes all stored channels and settings, resets TV to factory settings.
Page 16

English - 15 -
General TV Operation
Using the Channel List
The TV sorts all stored stations in the Channel List.
You can edit this channel list, set favourites or set
active stations to be listed by using the Channel List
options. Press the OK/TV button to open the Channel
List. You can lter the listed channels by pressing the
Blue button or open the Edit Channel List menu by
pressing the Green button in order to make advanced
changes in the current list.
Managing the Favourite Lists
You can create four different lists of your favourite
channels. Enter the Channel List in the main menu
or press the Green button while the Channel List
is displayed on the screen in order to open the Edit
Channel List menu. Select the desired channel on
the list. You can make multiple choices by pressing
the Yellow button. Then press the OK button to open
the Channel Edit Options menu and select Add/
Remove Favourites option. Press the OK button
again. Set the desired list option to On. The selected
channel/s will be added to the list. In order to remove
a channel or channels from a favourite list follow the
same steps and set the desired list option to Off.
You can use the Filter function in the Edit Channel
List menu to lter the channels in the Channel list
permanently according to your preferences. Using this
Filter option, you can set one of your four favourite
lists to be displayed everytime the Channel list is
opened. The ltering function in the Channel list
menu will only lter the currently displayed Channel
list in order to nd a channel and tune in to it. This
changes will not remain the next time the Channel
list is opened.
ConguringParentalSettings
The Parental Settings menu options can be used to
prohibit users from viewing of certain programmes,
channels and using of menus. These settings are
located in the System>Options>Parental menu.
To display parental lock menu options, a PIN number
should be entered. After coding the correct PIN
number, Parental Settings menu will be displayed.
Menu Lock: This setting enables or disables access
to all menus or installation menus of the TV.
Maturity Lock: If this option is set, TV gets the
maturity information from the broadcast and if this
maturity level is disabled, disables access to the
broadcast.
Note: If the country option in the First Time Installation is
set as France, Italy or Austria, Maturity Lock’s value will be
set to 18 as default.
Child Lock: If this option is set to ON, the TV can only
be controlled by the remote control. In this case the
control buttons on the TV will not work.
Set PIN: Denes a new PIN number.
Default CICAM PIN: This option will appear as greyed
out if no CI module is inserted into the CI slot of the
TV. You can change the default PIN of the CI CAM
using this option.
Note: Default PIN can be set to 0000 or 1234. If you have
defined the PIN(is requested depending on the country
selection) during the First Time Installation use the PIN that
you have dened.
Some options may not be available depending on the country
selection in the First Time Installation.
Electronic Programme Guide (EPG)
Some channels send information about their
broadcast schedules. Press the Epg button to view
the Programme Guide menu.
There are 3 different types of schedule layouts
available, Timeline Schedule, List Schedule and
Now/Next Schedule. To switch between them follow
the instructions on the bottom of the screen.
Timeline Schedule
Zoom (Yellow button): Press the Yellow button to
see events in a wider time interval.
Filter (Blue button): Views ltering options.
Select Genre (Subtitles button): Displays Select
Genre menu. Using this feature, you can search the
programme guide database in accordance with the
genre. Info available in the programme guide will be
searched and results matching your criteria will be
highlighted.
Options (OK button): Displays event options.
Event Details (Info button): Displays detailed
information about selected events.
Next/Prev Day (Programme +/- buttons): Displays
the events of previous or next day.
Search (Text button): Displays Guide Search menu.
Now (Swap button): Displays current event of the
highlighted channel.
Rec./Stop (Record button): The TV will start to
record the selected event. You can press again to
stop the recording.
IMPORTANT: Connect a USB disk to your TV while the TV
is switched off. You should then switch on the TV to enable
the recording feature.
Note: Switching to a different broadcast or source is not
available during a recording.
List Schedule(*)
(*) In this layout option, only the events of the highlighted
channel will be listed.
Prev. Time Slice (Red button): Displays the events
of previous time slice.
Next/Prev Day (Programme +/- buttons): Displays
the events of previous or next day.
Event Details (Info button): Displays detailed
information about selected events.
Filter (Text button): Views ltering options.
Next Time Slice (Green button): Displays the events
of next time slice.
Page 17

English - 16 -
Options (OK button): Displays event options.
Rec./Stop (Record button): The TV will start to
record the selected event. You can press again to
stop the recording.
IMPORTANT: Connect a USB disk to your TV while the TV
is switched off. You should then switch on the TV to enable
the recording feature.
Note: Switching to a different broadcast or source is not
available during a recording.
Now/Next Schedule
Options (OK button): Displays event options.
Event Details (Info button): Displays detailed
information about selected events.
Filter (Blue button): Views ltering options.
Rec./Stop (Record button): The TV will start to
record the selected events. You can press again to
stop the recording.
IMPORTANT: Connect a USB disk to your TV while the TV
is switched off. You should then switch on the TV to enable
the recording feature.
Note: Switching to a different broadcast or source is not
available during a recording.
Event Options
Use the directional buttons to highlight an event and
press OK button to display Event Options menu. The
following options are available.
Select Channel: Using this option, you can switch to
the selected channel.
Record / Delete Rec. Timer: Select the Record
option and press the OK button. If the event is going
to be broadcasted at a future time, it will be added
to Timers list to be recorded. If the selected event
is being broadcasted at the moment, recording will
start immediately.
To cancel an already set recording, highlight that event
and press the OK button and select the option Delete
Rec. Timer. The recording will be cancelled.
Set Timer on Event / Delete Timer on Event: After
you have selected an event in the EPG menu, press the
OK button. Select Set Timer on Event option and press
the OK button. You can set a timer for future events.
To cancel an already set timer, highlight that event and
press the OK button. Then select Delete Timer on
Event option. The timer will be cancelled.
Notes: You cannot switch to any other channel or source while
there is an active recording or timer on the current channel.
It is not possible to set timer or record timer for two or more
individual events at the same time interval.
Teletext Services
Press the Text button to enter. Press again to activate
mix mode, which allows you to see the teletext page and
the TV broadcast at the same time. Press once more
to exit. If available, sections in the teletext pages will
become colour-coded and can be selected by pressing
the coloured buttons. Follow the instructions displayed
on the screen.
Digital Teletext
Press the Text button to view digital teletext information.
Operate it with the coloured buttons, cursor buttons
and the OK button. The operation method may differ
depending on the contents of the digital teletext. Follow
the instructions displayed on the digital teletext screen.
When the Text button is pressed again, the TV returns
to television broadcast.
Software Upgrade
Your TV is capable of nding and updating the rmware
automatically via the broadcast signal.
Software upgrade search via user interface
On the main menu select System>Options and then
More. Navigate to Software upgrade and press the
OK button. In Upgrade options menu select Scan
for upgrade and press OK button to check for a new
software upgrade.
If a new upgrade is found, it starts to download
the upgrade. After the download is completed
confirm the question asking about rebooting the
TV by pressing the OK to continue with the reboot
operation.
3 AM search and upgrade mode
Your TV will search for new upgrades at 3:00 o’clock if
Automatic scanning option in the Upgrade options
menu is set to Enabled and if the TV is connected
to an aerial signal. If a new software is found and
downloaded successfully, it will be installed at the
next power on.
Note: Do not unplug the power cord while led is blinking
during the reboot process. If the TV fails to come on after the
upgrade, unplug, wait for two minutes then plug it back in.
Page 18
English - 17 -
Troubleshooting & Tips
Tv will not turn on
Make sure the power cord is plugged in securely to
wall outlet. Check if batteries are exhausted. Press
the Power button on the TV.
Poor picture
• Check if you have selected the correct TV system.
• Low signal level can cause picture distortion. Please
check antenna access.
• Check if you have entered the correct channel
frequency if you have done manual tuning.
• The picture quality may degrade when two devices
are connected to the TV at the same time. In such
a case, disconnect one of the devices.
No picture
• This means your TV is not receiving any transmission.
Make sure the correct source has been selected.
• Is the antenna connected properly?
• Is the antenna cable damaged?
• Are suitable plugs used to connect the antenna?
• If you are in doubt, consult your dealer.
No sound
• Check if the TV is muted. Press the Mute button or
increase the volume to check.
• Sound may be coming from only one speaker. Check
the balance settings from Sound menu.
Remote control - no operation
• The batteries may be exhausted. Replace the
batteries.
Input sources - can not be selected
• If you cannot select an input source, it is possible
that no device is connected. If not;
• Check the AV cables and connections if you are
trying to switch to the input source dedicated to the
connected device.
Recording unavailable
To record a programme, you should rst connect a
USB disk to your TV while the TV is switched off.
You should then switch on the TV to enable recording
feature. If you cannot record, try switching off the TV
and then re-inserting the USB device.
USB is too slow
If a “USB disk writing speed too slow to record”
message is displayed on the screen while starting a
recording, try restarting the recording. If you still get
the same error, it is possible that your USB disk does
not meet the speed requirements. Try connecting
another USB disk.
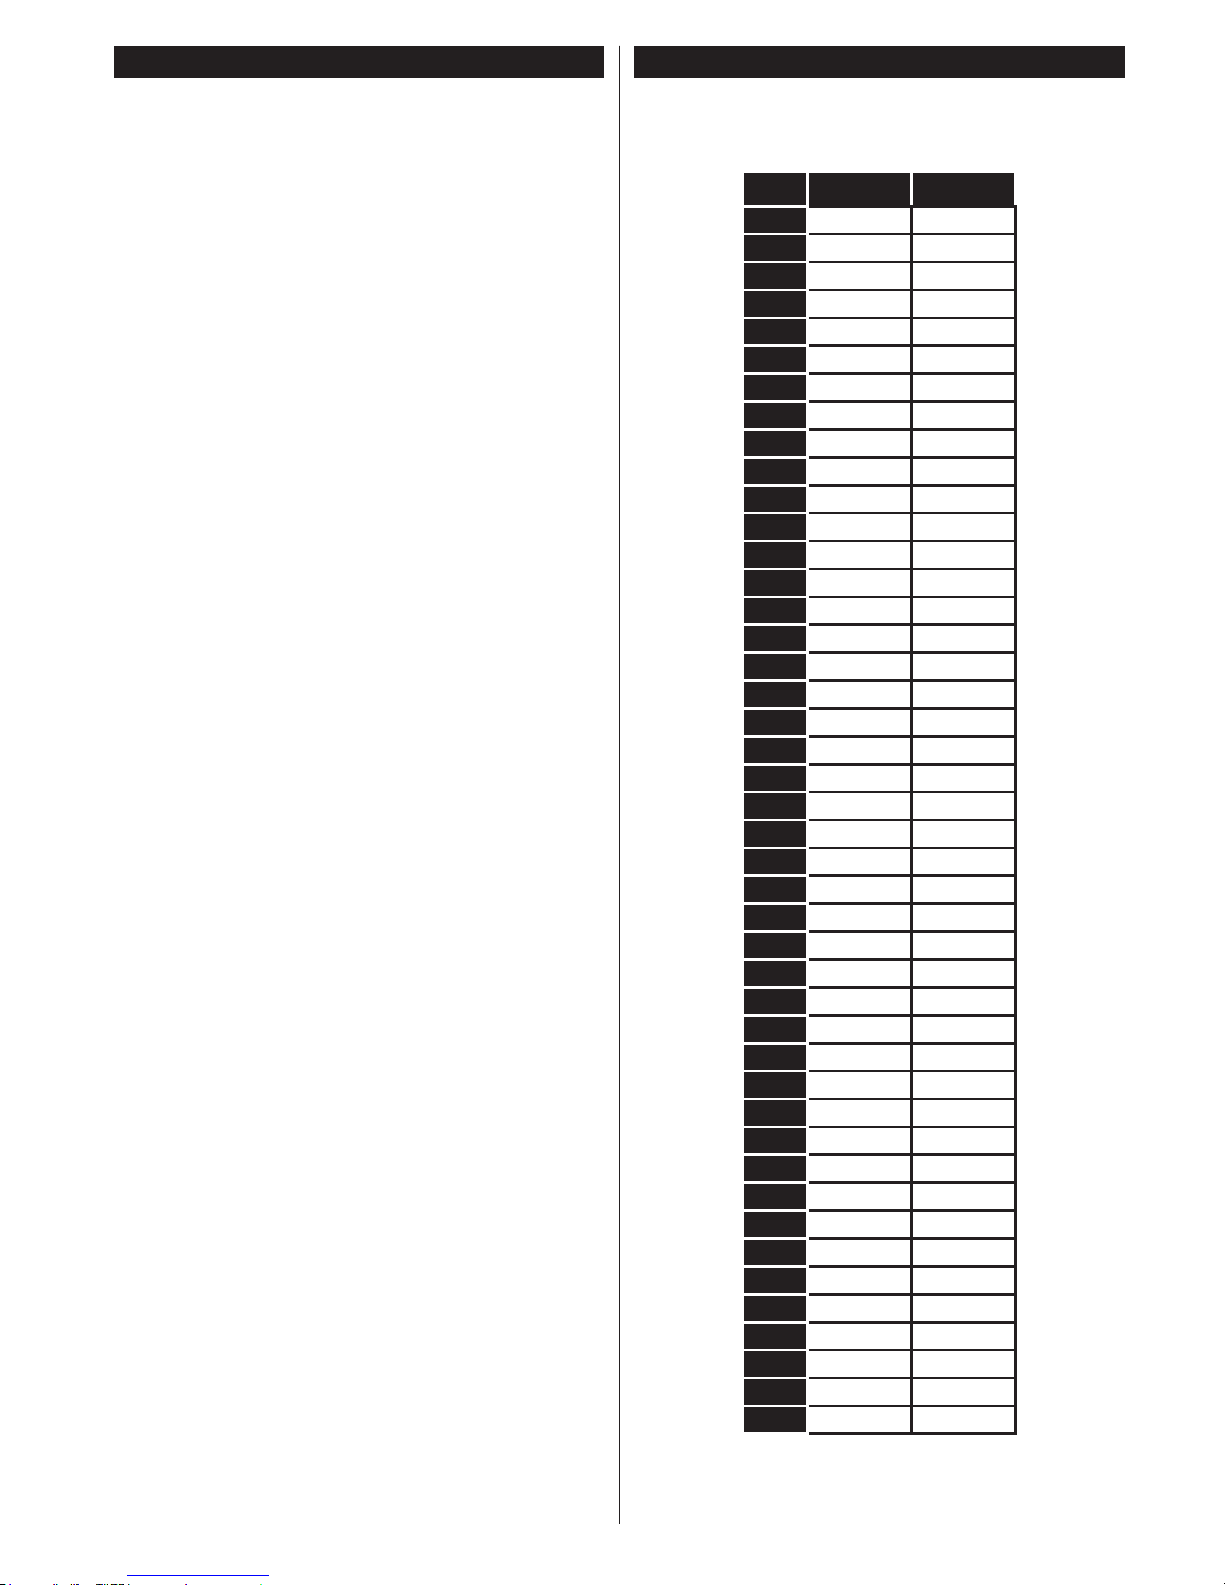
PC Input Typical Display Modes
The following table is an illustration of some of the
typical video display modes. Your TV may not support
all resolutions.
Index Resolution Frequency
1 640x350 85Hz
2 640x400 70Hz
3 640x480 60Hz
4 640x480 66Hz
5 640x480 72Hz
6 640x480 75Hz
7 640x480 85Hz
8 800x600 56Hz
9 800x600 60Hz
10 800x600 70Hz
11 800x600 72Hz
12 800x600 75Hz
13 800x600 85Hz
14 832x624 75Hz
15 1024x768 60Hz
16 1024x768 66Hz
17 1024x768 70Hz
18 1024x768 72Hz
19 1024x768 75Hz
20 1024x768 85Hz
21 1152x864 60Hz
22 1152x864 70Hz
23 1152x864 75Hz
24 1152x864 85Hz
25 1152x870 75Hz
26 1280x768 60Hz
27 1360x768 60Hz
28 1280x768 75Hz
29 1280x768 85Hz
30 1280x960 60Hz
31 1280x960 75Hz
32 1280x960 85Hz
33 1280x1024 60Hz
34 1280x1024 75Hz
35 1280x1024 85Hz
36 1400x1050 60Hz
37 1400x1050 75Hz
38 1400x1050 85Hz
39 1440x900 60Hz
40 1440x900 75Hz
41 1600x1200 60Hz
42 1680x1050 60Hz
43 1920x1080 60Hz
44 1920x1200 60Hz
Page 19
English - 18 -
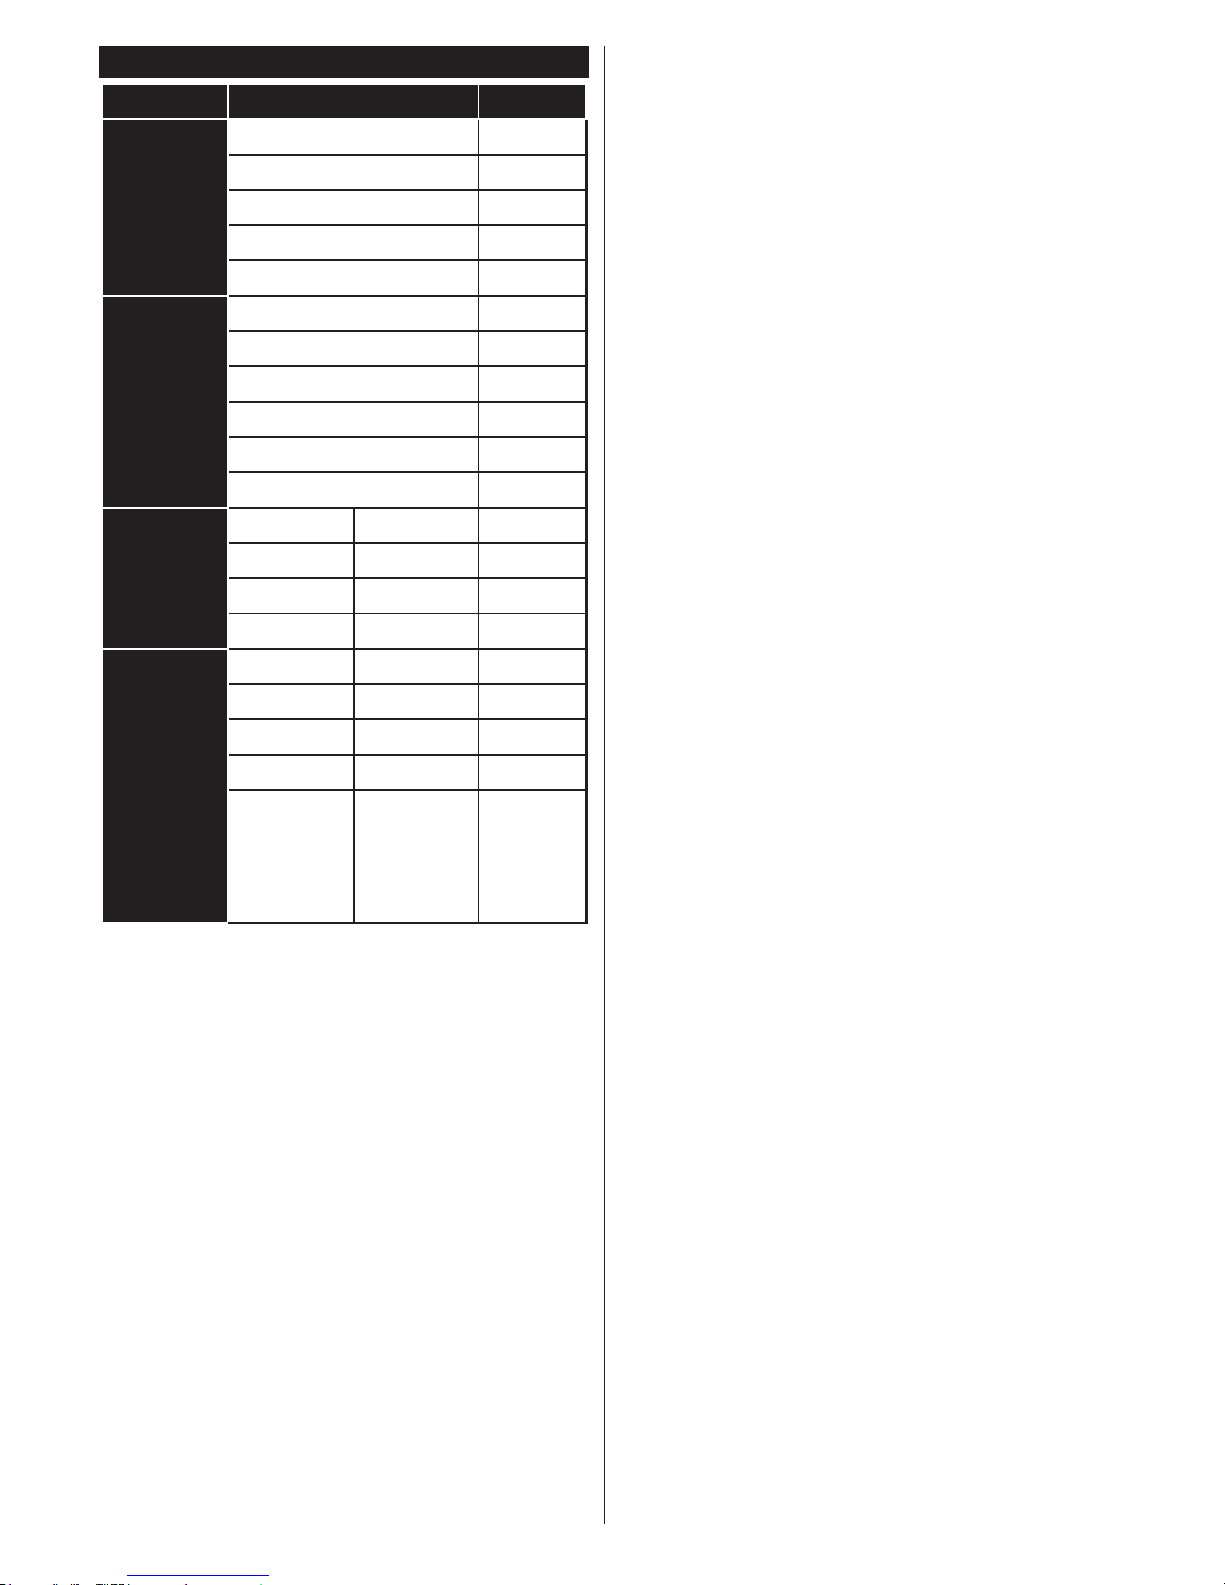
AV and HDMI Signal Compatibility
Source
Supported Signals
Available
EXT
(SCART)
PAL O
SECAM O
NTSC4.43 O
NTSC3.58 O
RGB 50/60
Side AV
PAL O
SECAM O
NTSC4.43 O
NTSC3.58
S-VIDEO 50Hz (PAL)
S-VIDEO 60Hz (NTSC)
YPbPr
480i, 480p 60Hz O
576i, 576p 50Hz O
720p 50Hz,60Hz O
1080i 50Hz,60Hz O
HDMI1
HDMI2
480i, 480p 60Hz O
576i, 576p 50Hz O
720p 50Hz,60Hz O
1080i 50Hz,60Hz O
1080p
24Hz,
25Hz,
30Hz,
50Hz,
60Hz
O
(X: Not Available, O: Available)
In some cases a signal on the TV may not be displayed
properly. The problem may be an inconsistency with
standards from the source equipment (DVD, Set-top
box, etc. ). If you do experience such a problem please
contact your dealer and also the manufacturer of the
source equipment.
Page 20

English - 19 -
Supported Video File Formats for USB Mode
Extension Video Codec SPEC (Resolution) & Bit Rate
.dat, vob MPEG1/2
1080P@30fps - 40 Mbps
.mpg, .mpeg
MPEG1/2,
MPEG4
.ts, .trp, .tp
MPEG1/2, H.264,
AVS, MVC
H.264: 1080Px2@30fps - 62.5 Mbps, 1080P@60fps - 62.5 Mbps MVC:
1080P@30fps - 62.5 Mbps Other: 1080P@30fps - 40Mbps
.mp4, .mov,
.3gpp, .3gp
MPEG1/2,
MPEG4, H.263,
H.264, Motion
JPEG
H.264: 1080Px2@30fps - 62.5 Mbps, 1080P@60fps - 62.5 Mbps Motion JPEG:
640x480@30fps - 10 Mbps Other: 1080P@30fps - 40 Mbps
.avi MPEG1/2,
MPEG4,
Sorenson H.263,
H.263, H.264,
WMV3, Motion
JPEG
.mkv MPEG1/2,
MPEG4, H.263,
H.264, WMV3,
Motion JPEG
.asf Sorenson H.263,
H.264, WMV3,
Motion JPEG
.v WMV3 1080P@30fps - 40 Mbps
.swf RV30/RV40 1080P@30fps - 40 Mbps
.wmv
Supported Picture File Formats for USB Mode
Image Photo Resolution (width x height) Remark
JPEG
Base-line 15360x8640
The limitation of max resolution depends on DRAM
size
Progressive 1024x768
PNG
non-interlace 9600x6400
interlace 1200x800
BMP 9600x6400
Page 21

English - 20 -
Supported Audio File Formats for USB Mode
Extension
Audio Codec Bit Rate Sample rate
.mp3,
MPEG1/2 Layer1 32Kbps ~ 448Kbps
16KHz ~ 48KHzMPEG1/2 Layer2 8Kbps ~ 384Kbps
MPEG1/2 Layer3 8Kbps ~ 320Kbps
.avi
MPEG1/2 Layer1 32Kbps ~ 448Kbps
16KHz ~ 48KHzMPEG1/2 Layer2 8Kbps ~ 384Kbps
MPEG1/2 Layer3 8Kbps ~ 320Kbps
AC3 32Kbps ~ 640Kbps 32KHz, 44.1KHz, 48KHz
AAC, HEAAC 8KHz ~ 48KHz
WMA 128bps ~ 320Kbps 8KHz ~ 48KHz
WMA 10 Pro M0 < 192kbps 48KHz
WMA 10 Pro M1 < 384kbps 48KHz
WMA 10 Pro M2 < 768kbps 96KHz
LPCM 64Kbps ~ 1.5Mbps 8KHz ~ 48KHz
IMA-ADPCM, MS-
ADPCM
384Kbps 8KHz ~ 48KHz
G711 A/mu-law 64Kbps ~ 128Kbps 8KHz
.asf
MPEG1/2 Layer1 32Kbps ~ 448Kbps
16KHz ~ 48KHzMPEG1/2 Layer2 8Kbps ~ 384Kbps
MPEG1/2 Layer3 8Kbps ~ 320Kbps
WMA 128bps ~ 320Kbps 8KHz ~ 48KHz
WMA 10 Pro M0 < 192kbps 48KHz
WMA 10 Pro M1 < 384kbps 48KHz
WMA 10 Pro M2 < 768kbps 96KHz
.mkv, .mka
MPEG1/2 Layer1 32Kbps ~ 448Kbps
16KHz ~ 48KHzMPEG1/2 Layer2 8Kbps ~ 384Kbps
MPEG1/2 Layer3 8Kbps ~ 320Kbps
AC3 32Kbps ~ 640Kbps 32KHz, 44.1KHz, 48KHz
AAC, HEAAC 8KHz ~ 48KHz
WMA 128bps ~ 320Kbps 8KHz ~ 48KHz
WMA 10 Pro M0 < 192kbps 48KHz
WMA 10 Pro M1 < 384kbps 48KHz
WMA 10 Pro M2 < 768kbps 96KHz
VORBIS Up to 48KHz
LPCM 64Kbps ~ 1.5Mbps 8KHz ~ 48KHz
IMA-ADPCM,
MS-ADPCM
384Kbps 8KHz ~ 48KHz
G711 A/mu-law 64Kbps ~ 128Kbps 8KHz
FLAC < 1.6Mbps 8KHz ~ 96KHz
.ts, .trp, .tp,
.dat, .vob,
.mpg, .mpeg
MPEG1/2 Layer1 32Kbps ~ 448Kbps
16KHz ~ 48KHzMPEG1/2 Layer2 8Kbps ~ 384Kbps
MPEG1/2 Layer3 8Kbps ~ 320Kbps
AC3 32Kbps ~ 640Kbps 32KHz, 44.1KHz, 48KHz
EAC3 32Kbps ~ 6Mbps 32KHz, 44.1KHz, 48KHz
AAC, HEAAC 8KHz ~ 48KHz
LPCM 64Kbps ~ 1.5Mbps 8KHz ~ 48KHz
Page 22

English - 21 -
Extension
Audio Codec Bit Rate Sample rate
.wav
MPEG1/2 Layer1 32Kbps ~ 448Kbps
16KHz ~ 48KHzMPEG1/2 Layer2 8Kbps ~ 384Kbps
MPEG1/2 Layer3 8Kbps ~ 320Kbps
LPCM 64Kbps ~ 1.5Mbps 8KHz ~ 48KHz
IMA-ADPCM,
MS-ADPCM
384Kbps 8KHz ~ 48KHz
G711 A/mu-law 64Kbps ~ 128Kbps 8KHz
.3gpp, .3gp,
.mp4, .mov,
.m4a
MPEG1/2 Layer3 8Kbps ~ 320Kbps 16KHz ~ 48KHz
AC3 32Kbps ~ 640Kbps 32KHz, 44.1KHz, 48KHz
EAC3 32Kbps ~ 6Mbps 32KHz, 44.1KHz, 48KHz
AAC, HEAAC 8KHz ~ 48KHz
VORBIS Up to 48KHz
LPCM 64Kbps ~ 1.5Mbps 8KHz ~ 48KHz
IMA-ADPCM,
MS-ADPCM
384Kbps 8KHz ~ 48KHz
G711 A/mu-law 64Kbps ~ 128Kbps 8KHz
.v
MPEG1/2 Layer3 8Kbps ~ 320Kbps 16KHz ~ 48KHz
AAC, HEAAC 8KHz ~ 48KHz
.ac3
AC3 32Kbps ~ 640Kbps 32KHz, 44.1KHz, 48KHz
AAC, HEAAC 8KHz ~ 48KHz
.swf MPEG1/2 Layer3 8Kbps ~ 320Kbps 16KHz ~ 48KHz
.ec3 EAC3 32Kbps ~ 6Mbps 32KHz, 44.1KHz, 48KHz
.rm, .rmvb, .ra
AAC, HEAAC 8KHz ~ 48KHz
LBR (cook) 6Kbps ~ 128Kbps
8KHz, 11.025KHz,
22.05KHz, 44.1KHz
.wma, .wmv
WMA 128bps ~ 320Kbps 8KHz ~ 48KHz
WMA 10 Pro M0 < 192kbps 48KHz
WMA 10 Pro M1 < 384kbps 48KHz
WMA 10 Pro M2 < 768kbps 96KHz
.webm VORBIS Up to 48KHz
Supported Subtitle File Formats for USB Mode
Internal Subtitles
Extension Container Subtitle Code
dat, mpg, mpeg, vob MPG, MPEG DVD Subtitle
ts, trp, tp TS DVB Subtitle
mp4 MP4
DVD Subtitle
UTF-8 Plain Text
mkv MKV
ASS
SSA
UTF-8 Plain Text
VobSub
DVD Subtitle
External Subtitles
Extension Subtitle Parser Remark
.srt Subrip
.ssa/ .ass SubStation Alpha
.smi SAMI
.sub
SubViewer
MicroDVD
DVDSusbtitleSystem
SubIdx (VobSub)
SubViewer 1.0 & 2.0 Only
.txt TMPlayer
Page 23

English - 22 -
Supported DVI Resolutions
When connecting devices to your TV’s connectors by using DVI converter cable(DVI to HDMI cable - not
supplied), you can refer to the following resolution information.
56Hz 60Hz 66Hz 70Hz 72Hz 75Hz
640x400
þ
640x480
þ þ þ þ
800x600
þ þ þ þ þ
832x624
þ
1024x768
þ þ þ þ þ
1152x864
þ þ þ
1152x870
þ
1280x768
þ þ
1360x768
þ
1280x960
þ þ
1280x1024
þ þ
1400x1050
þ þ
1440x900
þ þ
1600x1200
þ
1680x1050
þ
1920x1080
þ
1920x1200
þ
Page 24

Srpski - 23 -
Sadržaj
Bezbednosne Informacije ..................................... 24
Oznake na Proizvodu ...........................................25
Informacije o Zaštiti Okoline .................................25
Opcije ...................................................................26
Uključena Dodatna Oprema .................................26
Obaveštenja o Režimu Pripravnosti .....................26
Kontrolni Prekidač Televizora i Rukovanje ...........26
Umetnite Baterije u Daljinski Upravljač.................27
Povezivanje napajanja .........................................27
Povezivanje antene ..............................................27
Obaveštenje .........................................................27
Daljinski Upravljač ................................................29
Veze......................................................................30
Uključivanje / Isključivanje .................................... 31
Prva Instalacija .....................................................31
Reprodukcija preko USB ulaza.............................31
Snimanje programa ..............................................32
Snimanje sa vremenskim pomeranjem ................32
Instant snimanje ...................................................32
Gledanje snimljenih programa ............................. 32
Konguracija snimanja .........................................32
Meni Pregledač Medija ......................................... 33
CEC i CEC RC Passthrough ................................33
E uputstvo.............................................................33
Opšte Rukovanje Televizorom .............................. 38
Koriščenje Liste Kanala ........................................ 38
Kongurisanje Roditeljskih Postavki ..................... 38
Elektronski vodič kroz programe (EPG) ...............38
Usluge Teleteksta .................................................39
Ažuriranje softvera................................................39
Rešavanje problema i saveti ................................40
PC-ulaz Tipični Režimi Prikazivanja .....................41
Kompatibilnost AV i HDMI Signala ........................ 41
Podržani Formati Datoteka za USB Režim ..........42
Podržani Formati Datoteka Slike za USB Režim..42
Podržani Formati Audio Datoteka za USB Režim 43
Podržani Formati Datoteka Titlova za USB Režim .. 44
Podržane DVI Rezolucije......................................45
Page 25

Srpski - 24 -
Bezbednosne Informacije
Nemojte koristiti televizor u ekstremnim
klimatskim uslovima, jer to može oštetiti vaš
televizor.
OPREZ
OPASNOST OD STRUJNOG
UDARA
NE OTVARATI
OPREZ: DA BI SE UMANJIO RIZIK OD STRUJNOG UDARA,
NE UKLJANJAJTE POKLOPAC (ILI POLEĐINU). U
UNUTRAŠNJOSTI NEMA DELOVA KOJE KORISNIK
MOŽE DA SERVISIRA.
U UNUTRAŠNJOSTI NEMA DELOVA KOJE
KORISNIK MOŽE DA SERVISIRA. SERVISIRANJE
PREPUSTITE ISKLJUČIVO KVALIFIKOVANOM
OSOBLJU.
Napomena: Pratite uputstva na ekranu za rad sa povezanim
funkcijama.
U ekstremnim vremenskim uslovima (oluja,
munje) i tokom dužeg perioda nekorišćenja
(tokom godišnjeg odmora) izvucite kabl iz struje.
Mrežni kabl služi za isključivanje televizora iz
struje i zbog toga mora uvek biti pristupačan.
Ovaj znak je prisutan u pratećoj literaturi svuda
gde postoje važne informacije o rukovanju i
održavanju uređaja.
VAŽNO: Pažljivo pročitajte sva
uputstva pre instalacije ili rukovanja
UPOZORENJE: Nikada ne dozvolite ljudima
(uključujući i decu) sa fizičkim, senzornim ili
mentalnim nedostacima ili nedostatkom iskustva
i/ili znanja da bez nadzora koriste električne
uređaje.
• U ventilacione svrhe, ostavite slobodan prostor od
najmanje 10 cm oko uređaja.
• Nemojte blokirati ventilacione otvore.
• Nemojte postavljati televizor na površine pod
nagibom ili nestabilne površine jer se televizor
može prevrnuti.
• Koristite ovaj uređaj u područjima umerene klime.
• Utikač kabla za napajanje treba da bude lako
dostupan. Ne postavljajte televizor, nameštaj, itd,
na kabl za napajanje. Oštećeni kabl za napajanje
može izazvati požar ili strujni udar. Rukovajte kabl
preko utikača, nemojte isključivati TV povlačenjem
za kabl. Nikada ne dodirujte kabl/utikač mokrim
rukama, jer to može dovesti do kratkog spoja
ili strujnog udara. Nikada nemojte vezivati kabl
za napajanje u čvor ili ga povezivati sa drugim
kablovima. Ako je oštećen, mora da se zameni, a
zamenu sme da obavi samo stručno lice
• Ne koristite ovaj uređaj na mokrom i vlažnom mestu.
Ne izlažite televizor tečnostima. Ukoliko u kućište
upadne neki tvrdi predmet ili tečnost, isključite
televizor iz struje i dajte da ga proveri stručno lice
pre daljeg rukovanja.
• Ne izlažite televizor direktnoj sunčevoj
svetlosti i otvorenom plamenu niti ga
postavljajte u blizini izvora toplote kao što
su električne grejalice.
• Slušanje vrlo jakog zvuka preko slušalice može
dovesti do gubitka sluha.
• Nemojte stavljati izvore otvorenog plamena, kao što
su upaljene sveće, na televizor.
• Da bi se sprečile povrede kada se montira na zid
(ako je ta opcija dostupna), televizor mora da bude
sigurno pričvršćen na zid prema uputstvima za
montažu.
• Povremeno može doći do pojave nekoliko neaktivnih
piksela na ekranu i to u vidu plave, zelene ili
crvene ksne tačke. Imajte u vidu da to ne utiče
na performanse Vašeg proizvoda. Pazite da ne
ogrebete ekran noktima ili nekim drugim tvrdim
predmetima.
• Pre čišćenja, isključite televizor iz struje. Tokom
čišćenja upotrebite meku i suvu krpu.
Upozorenje
Ozbiljna povreda ili
smrtonosni rizik
Opasnost od
strujnog udara
Rizik od opasnog napona
Oprez
Rizik od povrede ili oštećenja
imovine
Važno
Pravilno rukovanje sistemom
Napomena
Obeležene dodatne
napomene
Page 26

Srpski - 25 -
Oznake na Proizvodu
Sledeći simboli se koriste na proizvodu kao
oznake za ograničenja, mere opreza i
bezbednosna uputstva. Svako objašnjenje
će se razmatrati samo ukoliko proizvod
sadrži odgovarajuću oznaku. Imajte u vidu takve
informacije iz bezbednosnih razloga.
Oprema klase II: Ovaj uređaj je projektovan
tako da ne zahteva bezbednosni priključak na
električno uzemljenje.
Oprema klase II sa funkcionalnim
uzemljenjem: Ovaj uređaj je projektovan tako
da ne zahteva bezbednosni priključak na
električno uzemljenje, ono se koristi u funkcionalne
svrhe.
Zaštitno uzemljenje: Označeni konektor je
namenjen za povezivanje provodnika zaštitnog
uzemljenja koje je povezano sa instalacijama
za električno napajanje.
Opasnost - konektor pod naponom:
Označen(i) konektor(i) su opasni jer su pod
naponom tokom normalnih uslova rada.
Oprez, pogledajte uputstvo za rukovanje:
Označena(e) oblast(i) sadrže dugmaste baterije koje
može da zameni korisnik.
Laserski proizvod 1.
klase: Ovaj proizvod sadrži
laserski izvor klase 1 koji
je bezbedan pod razumno
predvidivim uslovima rada.
UPOZORENJE
Nemojte gutati bateriju, opasnost od hemijs-
kih opekotina
(Dodatna oprema isporučena sa, ili) Ovaj
proizvod može da sadrži dugmastu bateriju.
Ukoliko se ta dugmasta baterija proguta,
ona može izazvati ozbiljne unutrašnje ope-
kotine za samo 2 sata, što može dovesti do
smrtnog ishoda.
Držite nove i stare baterije van domašaja
dece.
Ukoliko se odeljak za bateriju ne zatvara
bezbedno, prestanite da koristite proizvod i
držite ga van domašaja dece.
Ukoliko mislite su baterije progutane ili da
se one nalaze u bilo kom delu tela, odmah
zatražite medicinsku pomoć.
CLASS 1
LASER PRODUCT
UPOZORENJE
Televizor nikada ne stavljajte na nestabilnu
podlogu. Televizor može da padne i izazove
ozbiljnu telesnu povredu ili smrt. Mnoge
povrede, naročito povrede dece, se mogu
izbeći ukoliko se preduzmu jednostavne
mere opreza, kao što su:
• Koristite ormane ili stalke koje je preporučio
proizvođač televizora.
• Koristite samo onaj nameštaj koji televizoru
pruža siguran oslonac.
• Proverite da li televizor ne prelazi ivicu
nameštaja na kome stoji.
• Ne stavljajte televizor na svaki komad
nameštaja (na primer, na kredence ili police
za knjige), ukoliko taj komad nameštaja i
televizor nisu pričvršćeni za odgovarajući
oslonac.
• Upoznajte decu sa opasnostima sa kojima
se suočavaju kada se penju na nameštaj
da bi dohvatili televizor ili njegove kontrole.
Ukoliko podupirete ili premeštate postojeći televizor,
važe gore navedene mere.
Informacije o Zaštiti Okoline
Ovaj televizor je napravljen da bude bezbedan za
okolinu. Da biste smanjili potrošnju energije, potrebno
je da preduzmete sledeće korake:
Ako podesite Uštedu Energije na Minimum,
Srednje, Maksimum ili Automatski, TV će smanjiti
potrošnju energije u skladu sa tim. Ako želite da ručno
podesite Pozadinsko Osvetljenje na ksnu vrednost
podešenu kao Prilagođeno i podesite Pozadinsko
osvetljenje (nalazi se u okviru postavke Ušteda
energije) korišćenjem dugmadi za levo ili desno na
daljinskom upravljaču. Podesite na Isključeno da
biste isključili ovu postavku.
Napomena: Dostupne opcije Uštede Energije mogu se
razlikovati u zavisnosti od izabranog Režima u meniju
Sistem>Slika.
Imajte u vidu da se neke postavke slike ne mogu
menjati.
Ako je pritisnuto dugme za desno dok je bila izabrana
opcija Automatski, ili levo dugme dok je izabrana
opcija Prilagođeno, na ekranu će se pojaviti poruka
“Ekran će se isključiti za 15 sekundi”. Izaberite
Nastavi i pritisnite OK da odmah isključite ekran.
Ako ne pritisnete ništa, ekran će se isključiti kroz 15
sekundi. Pritisnite bilo koje dugme na upravljaču ili
televizoru da ponovo upalite ekran.
i
Page 27

Srpski - 26 -
Napomena: Opcija Ekran Isključen nije dostupna ako je
Režim postavljen na Igra.
Kada TV se ne koristi, molimo vas da ga ugasite
ili isključite ga iz dovoda struje. Time ćete smanjiti
potrošnju energije.
Opcije
• TV u boji sa daljinskim upravljanjem.
• Potpuno integrisani digitalni zemaljski/kablovski/
satelitski TV (DVB-T-T2/C).
• HDMI ulazi za povezivanje drugih dostupnog
emitovanja koji imaju HDMI utičnice.
• USB ulaz.
• Sistem OSD menija.
• Ima skart utičnicu za spoljne uređaje (kao što su
DVD plejeri, PVR, uređaji za video igre, itd.).
• Sistem stereo zvuka.
• Teletekst
• Povezivanje slušalica.
• Automatski sistem programiranja.
• Ručno traženje stanica
• Automatsko isključivanje nakon osam sati.
• Tajmer za isključivanje
• Blokada za decu.
• Automatsko prigušivanje zvuka kada nema prenosa.
• NTSC reprodukcija.
• AVL (Automatsko ograničenje jačine zvuka).
• PLL (pretraga frekvencije).
• PC-ulaz.
• Režim igrica (po izboru).
• Fukcija Isključi sliku.
• Snimanje programa
• Tajmšifting programa
Uključena Dodatna Oprema
• Daljinski Upravljač
• Baterije: 2 X AAA
• Uputstvo
Obaveštenja o Režimu Pripravnosti
Ukoliko TV ne prima nikakav ulazni signal (na primer
od antene ili HDMI izvora) tokom 5 minuta, on će
preći u režim pripravnosti. Kada naredni put uključite
TV, pojaviće se sledeća poruka: „‚TV je automatski
prebačen u režim pripravnosti jer duže vreme nije
bilo signala.“ Pritisnite OK za nastavak.
Ako je TV uključen i ne upotrebljava se neko vreme,
prećiće u mirovanje. Kada naredni put uključite TV,
pojaviće se sledeća poruka: „‚TV je automatski
prebačen u režim pripravnosti jer duže vreme nije
bilo signala.“ Pritisnite OK za nastavak.
Kontrolni Prekidač Televizora i Rukovanje
1. Smer nagore
2. Smer nadole
3. Prekidač za izbor jačine zvuka/informacija/izbora
liste izvora i uključivanje režima pripravnosti
Komandno dugme omogućava Vam da kontrolišete
funkcije Jačina zvuka / Program / Izvor i Uključivanje
režima pripravnosti na televizoru.
Promena jačine zvuka: Povečajte jačinu zvuka
pritiskom na dugme sa smerom nagore. Smanjite
jačinu zvuka pritiskom na dugme sa smerom nadole.
Promena kanala: Pritisnite srednji deo dugmeta i
na ekranu će se pojaviti traka sa informacijama o
kanalu. Pomerajte se kroz sačuvane kanale pritiskom
na dugme sa smerom nagore ili sa smerom nadole.
Promena izvora: Dvaput pritisnite srednji deo
dugmeta (ukupno drugi put), na ekranu će se pojaviti
lista izvora. Pomerajte se kroz dostupne izvore
pritiskom na dugme sa smerom nagore ili sa smerom
nadole.
Za isključenje televizora: Pritisnite srednji deo
dugmeta i zadržite ga nekoliko sekundi i TV će preći
u režim mirovanja.
Napomene:
• Ukoliko isključite TV, ciklus ponovo počinje, počevši
od podešavanja jačine zvuka.
• Glavni OSD meni se ne može prikazati pomoću
komandnog dugmeta.
Page 28

Srpski - 27 -
Rukovanje Daljinskim Upravljačem
Pritisnite taster Menu na daljinskom upravljaču da
biste prikazali ekran glavnog menija. Pomoću desnog
i levog dugmeta odaberite karticu menija i pritisnite
OK da biste ušli. Koristite dugmad za smer da biste
izabrali ili postavili stavku. Pritisnite Return/Back/ ili
Menu da biste izašli iz ekrana menija.
Biranje Ulaza
Kada povežete spoljne sisteme na Vaš televizor,
možete prebacivati na različite ulazne izvore. Pritisnite
dugme Source na daljinskom upravljaču nekoliko puta
da biste odabrali različite izvore.
Menjanje Kanala i Jačine Zvuka
Možete promeniti kanal i podesiti jačinu zvuka pomoću
dugmadi Jačina zvuka +/- i Program +/- dugmad na
daljinskom upravljaču.
Umetnite Baterije u Daljinski Upravljač
Nežno podignite stražnji poklopac daljinskog.
Umetnite dve AAA baterije. Osigurite se da se (+)
i (-) znaci odgovaraju (pazite na polaritet). Vratite
poklopac.
Povezivanje napajanja
VAŽNO: Televizor je projektovan za rad na 220-240V
AC, 50Hz. Nakon raspakovanja, dozvolite televizoru
da dostigne sobnu temperaturu, pre nego što ga
priključite na napajanje. Priključite kabl za napajanje
u mrežnu utičnicu.
Povezivanje antene
Povežite priključak antene na utičnicu ULAZA ZA
ANTENU (ANT) koji se nalazi na poleđini televizora.
Obaveštenje
POTVRDA O ZAŠTINOM ZNAKU
Pojmovi HDMI i Multinedijalni interfejs visoke
definicije, kao i HDMI logo su zaštitini znaci ili
registrovani zaštitni znaci kompanije HDMI Licensing
LLC u Sjedinjenim Američkim državama i drugim
zemljama.
Proizvedeno pod licencom Dolby Laboratories. Dolby”
i dupli-D simbol su zaštitni znaci Dolby Laboratories.
Informacije za Korisnike o Odlaganju Dotrajale
Opreme i Baterija u Otpad
[Samo za Evropsku Uniju]
Opremu koja sadrži ove simbole ne treba se sa
običnim kućnim otpadom.
Potražite odgovarajuća postrojenja za reciklažu i
sisteme za odlaganje ovih proizvoda.
Napomena: Znak „Pb“ ispod simbola baterije ukazuje na to
da baterija sadrži olovo.
proizvodi
Baterijski
Page 29

Srpski - 28 -
Specikacije
TV prenos
PAL BG/DK/II’
SECAM BG/DK
Prijem kanala
VHF (OPSEG I/III) UHF
(OPSEG U) HIPER OPSEG
Digitalni prijem
Potpuno integrisani digitalni
zemaljski/kablovski TVuređaj
(DVB-T-C)
(DVB-T2 kompatibilan)
Broj kanala koji su
memorisani
1.000
Indikator kanala Prikaz na ekranu (OSD)
RF antenskı ulaz 75 oma (nebalansirano)
Radni napon 220-240V AC, 50Hz
Audio Nemački+Nicam Stereo
Audio izlazna snaga
(WRMS.) (10% THD)
2 x 6W
Potrošnja sruje (W) 65W
Težina (Kg) 6,55W
Dimenzije televizora
DxŠxV (sa postoljem,
u mm)
185 x 735 x 478
Dimenzije televizora
DxŠxV (bez postolja,
u mm)
77/97 x 735 x 438
Prikaz 32”
Temperatura i vlažnost
vazduha tokom rada
0ºC do 40ºC, 85% relativna
maksimalna vlažnost
vazduha
Page 30

Srpski - 29 -
Daljinski Upravljač
1
2
3
4
5
6
7
8
9
0
V
P
.,/@
LANG.
BACK
EXIT
OK
MENU
Q.
MENU
/
/
(*) MOJE DUGME 1 i MOJE DUGME 2:
U zavisnosti od modela ova dugmad mogu imati osnovne
funkcije. Ipak, možete postaviti specijalnu funkciju ovih
dugmadi tako što ih zadržite za 5 sekundi kada ste na
željenom izvoru, kanalu ili vezu. Na ekranu će se prikazati
potvrdna poruka. Sada je izabrano MOJE DUGME povezano
sa tu funkciju.
Napomenućemo da ukoliko uradite Prvu Instalaciju, MOJE
DUGME 1 i 2 vratiće se na svoju prvobitnu funkciju.
1. Pripravnost: Uključivanje-isključivanje TV aparata
2. Numerički tasteri: Prebacuje kanal, unosi broj ili slovo
u okvir za tekst na ekranu.
3. TV: Prikazuje listu kanala / Prebacuje na TV izvor
4. Prigušenje zvuka: Kompletno isključuje zvuk TV-a
5. Jačina +/-
6. Menu: Prikazuje TV meni
7. Navigacioni tasteri: Pomaze kod navigaciju kroz
menija, sadržaje i td. i prikazuje pod-stranice u teletekstu
kada pritisnite desno ili levo dugme.
8. OK: Potvrđuje izbor korisnika, obeležava stranicu (u
teletekstu), daje listu kanala (u DTV režimu)
9. Povratak/Nazad: Vraća se na prethodni erkan, otvara
indeksnu stranicu (u teletekstu)
10. Pregledač medija: Otvara ekran prelistava medija
11. Informacije: Prikazuje informaciju o sadržaju na ekranu,
prikazuje skrivenu informaciju (otkrivanje - u režimu
teleteksta)
12. Moje dugme 1 (*)
13. Dugmad u Boji: Sledite instrukcije na ekranu za funkcije
dugmadi u boji
14. Jezik: Menja režime zvuka (analogni TV), prikazuje i
menja jezik zvuka/prevoda (gde je to moguće, digitalni
TV)
15. Titl: Uključuje ili isključuje prevode (gde ih ima)
16. Brzo premotavanje unazad: Premotava kadrove
unazad u medijima kao što su lmovi
17. Snimanja: Snima programe
18. Reprodukuj: Započinje reprodukciju izabranog medija
19. Zaustavi: Zaustavlja medij koji se reprodukuje
20. Brzo premotavanje unapred: Pomera kadrove unapred
u medijima kao što su lmovi
21. Pauziraj: Zaustavlja medij koji se reprodukuje, pokreće
snimanje sa vremenskim pomeranjem
22. Ekran: Menja proporciju ekrana
23. Tekst: Prikazuje teletekst (gde ga ima), pritisnite ponovo
postavite teletekst preko normalne TV slike (miks)
24. Moje dugme 2 (*)
25. Elektronski vodič kroz programe (EPG): Prikazuje
elektronski vodič kroz programe
26. Izlaz: Zatvara i izlazi iz prikazanih menija ili vraća na
prethodni ekran
27. Brzi meni: Prikazuje listu menija za brzi pristup
28. Nema funkciju
29. Program +/-
30. Zamena: Brzo menja između zadnjeg i trenutnog kanala
ili izvora
31. Izvor: Prikazuje sve dostupne signale i sadržaje
Page 31

Srpski - 30 -
Veze
Konektor Tip Kablovi Uređaj
Scart
veza
(nazad)
VGA
veza
(nazad)
BOČNI AV
PC /YPbPr
audio
veza
(bočno)
YPbPr/PC
audio kabl (nije isporučen)
HDMI
veza
(nazad)
SPDIF
SPDIF
(Koaksijalni
izlaz)
Veza
(straga)
BOČNI AV
Bočni AV
(Audio/
Video)
veza
(bočno)
AV kabl (nije isporučen)
SLUŠALICE
Povezivanje
slušalica
(bočno)
YPBPR
YPbPr video
veza
(bočno)
PC - YPbPr kabl za povezivanje
(nije isporuèen)
Povezivanje
USB-a
(bočno)
Povezivanje
CI-a
(bočno)
CAM
module
NAPOMENA: Kada
povezujete neki uređaj preko
YPbPr ili bočnog AV ulaza,
morate koristiti isporučene
priključne kablove. Pogledajte
ilustracije na levoj strani. |
Možete da koristite YPbPr ili VGA
kabl (nije isporučen) da biste
omogućili YPbPr signal preko
VGA ulaza. | Ne možete koristiti
VGA i YPbPr u isto vreme. | Da
biste omogućili PC / YPbPr audio,
moraćete da povežete bočne
audio ulaze YPbPr audio kablom
( nije isporučen). | Ukoliko je neki
spoljašnji uređaj povezan preko
SKART utičnice, TV automatski
prelazi na AV režim.| Pri prijemu
DTV kanala (Mpeg4 H.264)
ili u režimu Prelistača medija,
ulaz neće biti dostupan na scart
utičnici. | Kada se koristi komplet
za zidnu montažu (ukoliko nije
isporučen, može se kupiti komplet
trećih strana), preporučuje se
prvo utaknuti sve kable na
zadnjoj strani TV-a pre negovog
montiranja na zid. | Umetajte i
odvajajte CI modul samo kada je
televizor ISKLJUČEN. Za detaljne
informacije o podešavanju
modula, pogledajte njegovo
uputstvo za upotrebu. I Svaki USB
ulaz televizora podržava uređaj
jačine do 500 mA. Povezivanje
uređaja sa jačinom struje većom
od 500mA može oštetiti vaš TV. I
Kada povežete HDMI kabl na vaš
TV, možete upotrebljavati jedino
zaštićeni HDMI kabl da biste
obezbedili odgovarajuću zaštitu
protiv radijacije sa parazitskom
frekvencijom.
Ukoliko želite da povežete neki uređaj na televizor, onda morate ugasiti oba uređaja pre nego šta ih povežete. Nakon
povezivanja, možete uključiti uređaje i koristiti ih.
Page 32

Srpski - 31 -
Uključivanje / Isključivanje
Uključivanje televizora
Povezite kabl za napajanje na izvor struje kao što je
zidna utičnica (220-240V AC, 50 Hz).
Da bi uključili TV iz režima pripravnosti, uradite
sledeće:
• Pritisnite dugme Jačina zvuka, Program +/- ili neko
numeričko dugme na daljinskom upravljaču.
• Pritisnuti bočnog prekidača funkcija sve dok se TV
ne upali iz mirovanja.
Isključivanje televizora
Pritisnite dugme Jačina zvuka na daljinskom
upravljaču ili pritisnite bočni prekidač na televizoru
dok ne pređe u režim pripravnosti.
Da bi potpuno isključili televizor, izvucite kabl za
napajanje iz utičnice.
Napomena : Kada televizor uđe u režim pripravnosti, LED
dioda za režim pripravnosti trepće kako bi označila da su
funkcije kao što su Pretraživanje u režimu pripravnosti,
Preuzimanje preko etra ili Tajmer aktivne. LED takoðe može
da trepće kada televizor uključujete iz režima pripravnosti.
Prva Instalacija
Kada se prvi put uključi, pojavljuje se ekran za izbor
jezika. Izaberite željeni jezik i pritisnite OK.
Na sledećem ekranu podesite željene postavke
koristeći dugmad za smer.
Napomena: Zavisno od izbora zemlje može vam se zatražiti
da postavite i potvrdite PIN. Izabrani PIN ne može biti 0000.
PIN morate uneti kada se to od vas zatraži kasnije za neku
operaciju menijima.
O Izboru tipa Emisije
Antena: Ako je uključena opcija za pretraživanje
Antena, televizor će tražiti digitalne zemaljske emisije
nakon obavljanja početnih podešavanja.
Kabl: Ako je uključena opcija za pretraživanje Kabl,
televizor će tražiti digitalne kablovske emisije nakon
obavljanja početnih podešavanja. U skladu sa vašim
željama, na ekranu se može prikazati potvrdna poruka
pre početka pretraživanja. Izaberite DA i pritisnite OK
da biste nastavili. Da biste otkazali operaciju, izaberite
NE i pritisnite OK. Možete da izaberete Mreža ili
podesite vrednosti kao što su Frekvencija, ID Mreže i
Korak Pretrage. Kada završite, pritisnite dugme OK.
Napomena: Trajanje traženja će se promeniti u zavisnosti
od izabranog Koraka pretrage.
Analogno: Ako je uključena opcija za pretraživanje
Kabl, televizor će tražiti analogne emisije nakon
obavljanja početnih podešavanja.
Pored toga, možete da podesite tip emisije kao
omiljeni. Prioritet se daje izabranom tipu emisije tokom
procesa pretrage, a njegovi kanali će biti navedeni na
vrhu Liste Kanala. Kada završite, pritisnite dugme
OK za nastavak.
Tu možete aktivirati opciju Režim Radnja. Ova opcija
će kongurisati vaš podešavanja vašeg televizora
za okruženje prodavnice u zavisnosti od korišćenog
modela, a podržane funkcije se mogu prikazati pri vrhu
ekrana u obliku reklamne trake sa informacijama. Ova
opcija je namenjena jedino za upotrebu u radnjama.
Za kućnu upotrebu izaberite Režim Kuća. Ova opcija
biće dostupna u meniju Sistem>Opcije>Više i može
se kasnije uključiti/isključiti.
Pritisnite dugme OK na daljinskom upravljaču da biste
nastavili. Nakon obavljanja početnih podešavanja,
televizor će započeti pretragu dostupnih emisija za
izabrane tipove emisija.
Kada se memorišu sve stanice, na ekranu će se
prikazati rezultati pretrage. Pritisnite OK za nastavak.
Zatim će se prikazati meni Uređivanje Liste Kanala.
Listu kanala možete da uredite kako želite ili pritisnite
dugme Menu da biste završili i prešli na gledanje TV-a.
U toku pretrage se može pojaviti poruka koja vas pita
želite li sortirati kanale po LCN-u(*). Izaberite Da i
pritisnite OK za potvrdu.
(*) LCN je sistem Logičkog broja kanala koji organizuje
dostupne emisije u skladu sa prepoznatljivim sekvencama
kanala (ako postoji).
Napomena: Ne isključivati TV tokom Prve instalacije. Neke
opcije su možda nedostupne u zavisnosti od izabrane zemlje.
Reprodukcija preko USB ulaza
Spoljašnje čvrste diskove (sa spoljašnim napajanjem) od 2.5
i 3.5 inča ili USB memorijske uređaje možete povezati na vaš
TV preko USB ulaza.
VAŽNO! Napravite rezervnu kopiju vaših podatka na
uređajima pre nego šta ih povežete na TV. Proizvođač
neće biti odgovoran ni za kakvo oštećenje datoteka ili
gubitak podataka. Određeni tipovi USB uređaja (npr.
MP3 plejeri) ili USB čvrsti diskovi/memorijski stikovi
možda neće biti kompatibilni sa ovim televizorom.
TV podržava FAT32 i NTFS formatiranje diska, ali
snimanje je jedino moguće sa NTFS formatiranim
diskovima.
Mogu nastati neke poteškoće tokom formatiranja
USB memorijskih uređaja koji imaju više od 1 TB
(terabajta) prostora.
Sačekajte malo između svakog umetanja i vađenja
USB uređaja jer plejer možda još čita podatke. To
može dovesti do zičkog oštećenja USB plejera, pa
i samog USB uređaja. Ne izvlačite USB modul dok
reprodukujete datoteku.
Možete koristiti USB habove preko USB ulaza vašeg
televizora. U ovakvim slučajevima preporučuju se
USB habovi sa eksternim napajanjem.
Preporučuje se da direktno koristite USB ulaze
televizora ako povezujete USB čvrsti disk.
Napomena: Kada gledate slike, meni Pregledača Medija
može pokazati samo 1000 slika koje se nalaze na povezanom
USB uređaju.
Page 33

Srpski - 32 -
Snimanje programa
VAŽNO: Kada koristite novi USB disk, preporučuje se da
prvo formatirate disk pomoću opcije Formatiraj disk u
meniju Pregledač multimedija>Postavke>Postavke
snimanja.
Da biste snimili program, morate prvo da povežete
USB disk sa televizorom kada je televizor isključen.
Zatim treba da uključite televizor da biste omogućili
funkciju snimanja.
Da bi se moglo snimati, vaš USB disk mora da ima
najmanje 2 GB slobodnog prostora i da je kompatibilan
sa USB 2.0. Ako USB disk nije kompatibilan, pojavljuje
se poruka o grešci.
Za snimanje programa koji dugo traju, kao što su
lmovi, preporučuje se korišćenje USB čvrstih diskova
(HDD).
Snimljeni programi čuvaju se na povezanom USB
disku. Ako želite, možete ih sačuvati/kopirati na
računaru, ali se oni ne mogu reprodukovati na
računaru. Možete ih reprodukovati samo preko vašeg
televizora.
Po vreme tajmšiftinga se može pojaviti kašnjenje u
sinhronizaciju govora. Snimanje radija nije podržano.
Ovaj televizor može da snima programe u trajanju od
ukupno deset sati.
Snimljeni programi se dele na particije od 4GB.
Ako je brzina upisivanja povezanog USB diska
nedovoljna, snimanje se možda neće obaviti, a
funkcija vremenskog pomeranja može biti nedostupna.
Za snimanje HD programa se preporučuje korišćenje
USB čvrstih diskova.
Nemojte isključivate USB/HDD disk za vreme
snimanja. To može oštetiti disk.
Ako se kabl za napajanje izvuče dok je neki tajmer za
USB snimanje aktivan, on će biti otkazan.
Dostupna je podrška za više particija. Najviše dve
različite particije su podržane. Prva particija USB
diska koristi se za PVR ready funkcije. Takođe, mora
biti formatiran kao primarna particija da bi se koristio
za PVR ready funkcije.
Neki paketi striminga mogu da ne budu snimljeni
radi problema signala, pa nekad video se zaledi u
toku prikaza.
Dugmad za snimanje, reprodukovanje, pauziranje i
prikazivanje (za dijalog plejliste) ne mogu se korisiti
kada je teletekst uključen. Ukoliko snimanje počinje
od tajmera dok je teletekst uključan, teletekst se
automatski isključuje. Takođe, upotreba teleteksta se
onemogućava kada je u toku snimanje ili reprodukcija.
Snimanje sa vremenskim pomeranjem
Pritisnite dugme Pauziraj dok gledate emisiju da
biste prebacili u režim vremenskog pomeranja. U
režimu vremenskog pomeranja, program se pauzira
i istovremeno snima na povezani USB disk.
Ponovo pritisnite Reprodukuj da biste gledali
pauzirani program od trenutka zaustavljanja.
Pritisnite dugme STOP da biste zaustavili vremensko
pomeranje i vratili na prenos uživo.
Tajmšifting se ne može koristiti na radio stanicama.
Nije moguće koristiti odliku "brzo natrag" tajmšiftinga
pre napredovanja u snimku pomoći opcije brzo
napred.
Instant snimanje
Pritisnite Snimaj da biste počeli snimati događaj
instantno dok gledate program. Možete ponovo
pritisnuti dugme Snimaj na daljinskom upravljaču
da snimite sledeći događaj na EPG. U tom slučaju
se prikazuje OSD sa programiranim događajima za
snimanje. Pritisnite dugme Zaustavi da biste otkazali
trenutno snimanje.
Ne možete promeniti emisiju ili gledati Prelistaća
medija toko snimanja. Tokom snimanja programa
ili tokom vremenskog pomeranja, na ekranu se
pojavljuje poruka upozorenja u slučaju da brzina
vašeg USB uređaja nije dovoljna.
Gledanje snimljenih programa
Izaberite Snimke sa menija Prelistač medija. Izaberite
snimak sa liste (ako je prethodno snimljen). Pritisnite
dugme OK da prikažete Opcije reprodukcije.
Izaberite opciju, a zatim pritisnite dugme OK.
Napomena: Prikaz glavnog menija i stavke menija neće biti
dostupni tokom reprodukcije.
Pritisnite dugme Zaustavi da biste zaustavili
reprodukciju i vratili se na Snimke.
Sporo unapred
Ako pritisnete dugme Pauziraj dok gledate snimljene
programe biće dostupna funkcija sporog premotavanja
unapred. Možete koristiti dugme Rapid advance
za sporo premotavanje unapred. Uzastopnim
pritiskanjem dugmeta Rapid advance menja se
brzina sporog premotavanja unapred.
Konguracija snimanja
Odaberite stavku Postavke snimanja u meniju
Pregledač multimedija>Postavke da biste
kongurisali postavke snimanja.
Formatiranje diska: Možete korisiti funkciju
Formatiranje diska da biste formatirali povezani
USB disk. Za korišćenje funkcije Formatiranje diska,
potreban je vaš PIN kod.
Napomena: Fabrički PIN se može postaviti na 0000 ili 1234.
Ako se promeni PIN (traži se u zavisnosti od izabrane zemlje)
tokom Prve Instalacije, koristite PIN koji ste tada uneli.
VAŽNO: Formatiranje USB diska će izbrisati SVE
podatke na njemu, a njegov sistem datoteka biće
konvertovan u FAT32. U većini slučajeva, operativne
greške će biti ispravljene, ali vi ćete izgubiti SVE
svoje podatke.
Ako se prilikom pokretanja snimanja na ekranu
prikaže poruka „Brzina upisa na USB disk je suviše
mala za snimanje“, pokušajte ponovo da pokrenete
snimanje. Ukoliko i dalje dobijate istu grešku, moguće
je da vaš USB disk ne zadovoljava zahteve brzine.
Pokuštajte da povežete drugi USB disk.
Page 34

Srpski - 33 -
Meni Pregledač Medija
Možete puštati slike, muziku ili lmove snimljene
na USB disku preko negovog povezivanja sa TV.
Povežite USB disk do jednog od USB ulaza na boku
vašeg TV-a. Pritiskanjem dugmeta Menu dok ste u
režimu Pregledač Medija daje pristup opcija menija
Slika, Zvuk i Postavke. Ponovnim pritiskanjem
dugmeta Menu izlazi se iz ovog ekrana. Parametre
vašeg Pregledača Medija možete podesiti pomoću
menija Postavke.
Rad opcije Petlja/mešano
Početi repordukciju pomoću
dugmeta Puštanje i aktivirati
Svi fajlovi iz liste će biti
reprodukovani po originalnom
redosledu
Početi repordukciju preko
dugmeta OK i aktivirati
Isti fajl se neprekidno
reprodukuje (ponavlja).
Početi repordukciju pomoću
dugmeta Puštanje i aktivirati
Svi fajlovi iz liste će biti
reprodukovani jednom po
originalnom redosledu.
Početi repordukciju pomoću
dugmeta Puštanje i aktivirati
.
Svi fajlovi iz liste će biti
neprekidno reprodukovani po
istom slučajnom redosledu.
CEC i CEC RC Passthrough
Ova funkcija omogućava da se uređaji sa CECom, povezani preko HDMI ulaza, upravljaju preko
daljinskog upravljača televizora.
Opcija CEC u meniju Sistem>Opcije>Više treba
prvo da se postavi na Omogućena. Pritisnite dugme
Source i izaberite HDMI ulaz povezanog CEC uređaja
iz menija Lista Izvora. Kada je novi CEC uređaj
povezan, on će se prikazati u meniju izvora pod svojim
imenom umesto pod imenom povezanog HDMI porta
(na pr. DVD plejer, Rekorder 1 itd.).
TV automatski može izvršavati glavne funkcije nakon
izbora povezanog HDMI izvora.
Da biste isključili ovu funkciju i ponovo kontrolisali
TV preko daljinskog, pritisnite dugme Quick Menu
na daljinskom, označite CEC RC Passthrough
i postavite ga na Isključeno pritiskom na levo ili
desno dugme. Ova funkcija se može omogućiti ili
onemogućiti preko menija Sistem>Opcije>Više.
TV takođe podržava funkciju ARC (Audio Return
Channel). Ova funkcija predstavlja audio vezu koja
je namenjena da zameni ostale kablove između TV i
audio sistema (A/V resiver ili sistem zvučnika).
Kada je ARC aktivan, TV automatski ne isključuje
zvuk ostalih audio izlaza. Zbog toga morate ručno
smanjiti zvuk TV-a do nule ako želite da slušate zvuk
samo iz povezanog audio uređaja (isto kao i ostali
optički ili koaksijalni digitalni audio izlazi). Ako želite
promeniti jačinu zvuka povezanog uređaja, morate
najpre izabrati taj uređaj iz liste izvora. U tom slučaju,
dugmad za kontrolu zvuka važe za povezani audio
uređaj.
Napomena: ARC se podržava samo preko HDMI1 ulaza.
Audio Kontrola Sistema
Omogućava da se sa televizorom koristi audio
Pojačalo/Prijemnik. Jačina zvuka se može kontrolisati
preko daljinskog upravljača televizora. Da biste
aktivirali ovu funkciju, postavite opciju Zvučnici u
meniju Sistem>Opcije>Više na Pojačalo. Zvučnici
Televizora biće utišani, a zvuk izvora koji se gleda
isporučivaće se preko povezanog audio sistema.
Napomena: Audio uređaj treba da podržava funkciju,
Audio kontrola sistema i opcija CEC treba da se postave na
Omogućeno.
E uputstvo
Uputstva za funkcije vašeg televizora možete naći
u E-uputstvu.
Da biste koristili E-uputstvo, pritisnite dugme Info
dok je na ekranu prikazan glavni meni ili pritisnite
dugme Brzi meni, izaberite Informacije Brošure i
pritisnite OK.
Pomoću tastera za navigaciju izaberite željenu
kategoriju. Svaka kategorija sadrži različite teme.
Izaberite temu i pritisnite OK da pročitate uputstva.
Za zatvaranje E-uputstva, pritisnite dugme Izlaz ili
Meni.
Napomena: Sadržaj u E-uputstva može varirati u zavisnosti
od modela.
Page 35

Srpski - 34 -
Sadržaj Menija Televizor
Sistem - Sadržaj Menija Slike
Režim
Možete promeniti režim slike po vašim željama ili potrebama. Režim slike se može
podesiti na neku od sledećih opcija: Bioskop, Igre, Sportovi, Dinamično i Prirodno.
Kontrast
Podešava vrednosti osvetljenja i zatamnjenja ekrana.
Svetlost
Podešava vrednost svetline ekrana.
Oštrina
Podešava vrednost oštrine za objekte prikazane na ekranu.
Boja
Podešava vrednost boje, prilagođavajući boje.
Ušteda Energije
Za podešavanje Uštede Energije na Prilagođeno, Minimalno, Srednje, Maksimalno,
Automatski, Isključivanje Ekrana ili Isključivanje.
Napomena: Dostupne opcije mogu se razlikovati u zavisnosti od izabranog Režima.
Pozadinsko
Osvetljenje
Ova postavka kontroliše nivo pozadinskog osvetljenja. Funkcija pozadinskog osvetljenja
će biti deaktivirana ako je Ušteda Energije podešena na neku drugu opciju, a ne na
Prilagođeno.
Napredne Postavke
Dinamički
Kontrast
Možete promeniti odnos dinamičkog kontrasta kako želite.
Redukcija Šuma
Ako je emitovani signal slab i ako slika ima šumove, koristite opciju Redukcija Šuma da
biste redukovali iznos šuma.
Temperatura Boje
Podešava željenu vrednost temperature boje. Dostupne su opcije Hladna, Topla i
Prilagođena.
Bela Tačka
Ako je opcija Temperatura Boje podešena na Prilagođeno, ova postavka će biti dostupna.
Povećajte „toplotu“ ili „hladnoću“ slike pritiskanjem dugmeta za pomeranje ulevo ili udesno.
Zumiranje Slike
Podešava željeni format dimenzija slike.
Filmski Režim
Filmovi se u odnosu na obične televizijske programe snimaju sa drugačijim brojem sličica
u sekundi. Uključite ovu opciju kada gledate lmove, da biste jasno videli scene sa brzim
kretanjem.
Ton Kože
Ton kože se može menjati od -5 do 5.
Nijansa Boje
Podešava željeni ton boje.
HDMI Puni Opseg
Za vreme gledanja HDMI izvora, ova opcija će biti vidljiva. Možete koristiti ovu opciju da biste
povećali nivo crne boje na slici.
PC položaj
Pojavljuje se jedino kada je izvor postavljen na VGA/PC.
Auto-Položaj
Automatski optimizuje prikaz. Pritisnite OK radi optimizacije.
H Položaj
Ova stavka horizontalno pomera sliku do leve ili desne strane ekrana.
V Položaj
Ova stavka pomera sliku vertikalno do vrha ili do dna ekrana.
Takt Piksela
Podešavanje takta piksela ispravlja smetnje koje se pojavljuju u vidu vertikalnih traka kod
tačkasto intenzivnih prezentacija, kao što su tabele ili paragra ili tekst u manjim fontovima.
Faza
U zavisnosti od izvora ulaza (kompjuter itd.) možete imati zamućenu sliku ili sa smetnjama.
Možete koristiti fazu i isprobavanjem postići bolju sliku.
Resetovanje
Resetuje postavke slike na fabrički podešene vrednosti. (Osim u režimu Igre).
U VGA (PC) režimu, neke stavke menija Slika neće biti dostupne. Umesto toga će u PC režimu Postavke Slike biti dodate
postavke VGA režima..
Page 36

Srpski - 35 -
Sistem - Sadržaj Menija Zvuka
Jačina Zvuka
Podešava jačinu zvuka.
Ekvilajzer
Bira režim ekvilajzera. Postavke se mogu prilagoditi po želji jedino u režimu
Korisnik.
Balans
Podešava balans zvuka, zvuk iz levog ili desnog zvučnika.
Slušalice
Podešava jačinu zvuka u slušalicama.
Pre korišćenja slušalica treba da se uverite da je jačina zvuka u slušalicama podešena
na nizak nivo kako biste sprečili oštećenje sluha.
Režim Zvuka
Možete da birate režim zvuka (ukoliko izabrani program to podržava).
Avl (Automatsko
Ograničenje Jačine
Zvuka)
Postavlja zvuk tako da se dobije konstantan nivo zvuka između programa.
Slušalice/Linijski Izlaz
Kada povezujete spoljno pojačalo na televizor koristeći konektor za slušalice, možete
izabrati ovu opciju kao Linijski Izlaz. Ukoliko ste povezali slušalice na TV, postavite
ovu opciju na Slušalice.
Pobrinite se da pre korišćenja slušalica ova stavka menija bude postavljena na
Slušalice. Ako je postavljena na Linijski Izlaz, izlaz iz konektora za slušalice će biti
postavljen na maksimum, što bi moglo da vam ošteti sluh.
Dinamički Bas
Uključuje ili isključuje opciju "dinamički bas".
Surround Zvuk
Režim Surround zvuka može da se Uključi ili Isključi.
Digitalni Izlaz
Podešava tip zvuka audio izlaza.
Page 37

Srpski - 36 -
Sistem - Sadržaj Menija Opcije
Uslovni Pristup
Kontroliše uslovne pristupne module kada postoje.
Jezik
Možete postaviti drugi jezik, što zavisi od emitera i zemlje.
Roditeljski
Unesite pravilnu lozinku da biste promenili roditeljske postavke. U ovom meniju lako
možete da podesite Blokadu Menija, Blokadu po Uzrastu, Blokadu za Decu ili
Preporuke. Takođe možete da postavite novi PIN ili da promenite Podrazumevani
CICAM PIN korišćenjem povezanih opcija.
Napomena: Neke opcije možda neće biti dostupne, što zavisi od zemlje koja je izabrana tokom Prve
Instalacije. Fabrički PIN se može postaviti na 0000 ili 1234. Ako se promeni PIN (traži se u zavisnosti od
izabrane zemlje) tokom Prve Instalacije, koristite PIN koji ste tada uneli.
Tajmeri
Postavlja tajmer spavanja koji gasi TV nakon određenog vremena. Podešava tajmere
za izabrane programe.
Datum/Vreme
Podešava datum i vreme.
Izvori
Omogućava ili onemogućava opcije izabranog izvora.
Pristupačnost
Prikazuje opcije pristupačnosti na televizoru.
Za osobe sa
oštećenim
Sluhom
Omogućava bilo koju specijalnu funkciju koju pruža emiter.
Audio Opis
Za slepe osobe ili osobe oštećenog vida biće reprodukovana audio naracija. Pritisnite
OK da bi videli sve opcije menija Audio Opis. Ovo je dostupno samo ako emiter to
podržava.
Napomena: Audio opis nije moguć tokom snimanja ili tajmšiftinga.
Više
Prikazuje druge opcije podešavanja televizora.
Vreme
Prikazivanja
Menija
Menja vreme prikazivanja ekrana menija.
Ažuriranje
Softvera
Obezbeđuje da TV ima najnoviji softver. Pritisnite OK da biste videli opcije menija.
Verzija Aplikacije
Prikazuje trenutnu verziju aplikacije.
Režim Titl
Ova opcija se aktivira za izbor režima titla na ekranu (DVB subtitle / TXT subtitle) ako
su oba dostupna. Podrazumevana vrednost je DVB subtitl. Ova opcija je dostupna
samo za opciju zemlje Norveška.
Automatsko
Isključivanje
Televizora
Postavlja željeno vreme nakon kojeg TV automatski prelazi u pripravnosti ako nije
korišćen.
Režim
Prodavnica
Izaberite ovaj režim za prikazivanje u prodavnici. Dok je Režim Prodavnica aktivan,
neke stavke u TV meniju nisu dostupne.
Režim
Startovanja
Ovo konguriše poželjne postavke startovanja. Dostupne su opcije Poslednji Status
i Mirovanje.
CEC
Preko ove postavke možete u potpunosti omogućiti ili onemogućiti CEC
funkcionalnost. Pritisnite dugme za kretanje na Levo ili na Desno da biste omogućili
ili onemogućili funkciju.
Automatsko
Uključivanje
CEC-a
Ova funkcija omogućava da povezani HDMI-CEC kompatibilni uređaj automatski uključi
televizor i prebaci da na svoj izvor. Pritisnite dugme za kretanje na Levo ili na Desno
da biste omogućili ili onemogućili funkciju.
Zvučnici
Da biste na televizoru čuli zvuk sa povezanog kompatibilnog audio uređaja, postavite
na Pojačalo. Možete koristiti daljinski upravljač televizora da biste kontrolisali jačinu
zvuka audio uređaja.
Page 38

Srpski - 37 -
Sadržaj Menija Instalacije
Automatsko
Skeniranje
Kanala (Novo
Podešavanje)
Prikazuje opcije automatskog podešavanja. Digitalna Antena: Pretražuje i memoriše
DVB stanice. Digitalni Kabl: Pretražuje i memoriše kablovske DVB stanice. Analogno:
Pretražuje i memoriše analogne stanice.
Ručno
Skeniranje
Kanala
Ova funkcija se može koristiti za direktan unos emitera programa.
Skeniranje
Mrežnih
Kanala
Traži povezane kanale u sistemu kanala. Digitalna Antena: Traži antenske kanale. Digitalni
Kabl: Traži kablovske kanale.
Analogno
Fino
Podešavanje
Možete koristiti ovu postavku za no podešavanje analognih kanala. Ovo neće biti dostupno
ako nema ni jednog sačuvanog analognog kanala.
Početna
Podešavanja
Prikazuje meni početnih podešavanja. Pretraživanje u Režimu Pripravnosti (Opcija): TV traži
nove ili nestale kanale dok je u režimu pripravnosti. Svi novi kanali biće prikazani.
Brisanje Liste
Usluga
Upotrebite ovo podešenje za brisanje memorisanih kanala. Ovo podešenje je vidljivo samo
kada je opcija Zemlja postavljena na Dansku, Švedsku, Norvešku ili Finsku.
Izbor Aktivne
Mreže
Ovo podešavanje omogućava da se u listi kanala prikažu samo emisije u okviru izabrane
mreže. Ova opcija je dostupna samo za opciju zemlje Norveška.
Prva
Instalacija
Briše sva sačuvana kanala i postavke, resetuje TV do fabričkih postavki.
Page 39

Srpski - 38 -
Opšte Rukovanje Televizorom
Koriščenje Liste Kanala
Televizor sortira sve memorisane stanice u Listi
Kanala. Možete da uredite ovu listu kanala, da
podešavate omiljene kanale ili da aktivirate stanice
koje treba da se prikažu koristeći opcije Liste kanala.
Pritisnite dugme OK/TV da biste otvorili Liste kanala.
Kanale sa liste možete da ltrirate pritiskom na Plavo
dugme ili otvaranjem menija Uređivanje Liste Kanala
pritiskom na Zeleno dugme da biste izvršili napredne
promene u trenutnoj listi.
Upravljanje Listama Omiljenih
Možete da napravite četiri različite liste svojih
omiljenih kanala. Uđite u Listu Kanala na glavnom
meniju ili pritisnite Zeleno dugme kada je prikazana
Lista kanala da biste otvorili meni Uređivanje Liste
Kanala. Izaberite željeni kanal sa liste. Možete da
izaberete više stavki pritiskom na Žuto dugme. Zatim
pritisnite OK da biste otvorili meni Opcije Uređivanja
Kanala i izaberite opciju Dodaj/Ukloni Omiljene.
Ponovo pritisnite dugme OK. Željenu opciju liste
postavite na Uključeno. Izabrani kanal(i) biće dodati
na listu. Da biste uklonili neki kanal ili kanale sa liste
omiljenih, pratite iste korake i podesite željenu opciju
liste na Isključeno.
Možete da koristite funkciju Filter u meniju Uređivanje
Liste Kanala da biste trajno ltrirali kanale u Listi
kanala onako kako želite. Korišćenjem ove opcije
Filter, možete da podesite da se jedna od vaše četiri
omiljene liste prikazuje svaki put kada se otvori Lista
Kanala. Funkcija ltriranja u meniju Lista Kanala će
ltrirati samo trenutno prikazanu Listu Kanala da bi se
pronašao kanal i njegovo podešavanje. Ove izmene
se neće zadržati do sledećeg otvaranja Liste Kanala.
Kongurisanje Roditeljskih Postavki
Opcije menija Roditeljske Postavke se mogu koristiti
da spreče gledanje određenih programa, kanala i
korišćenje menija. Ove postavke se nalaze u meniju
Sistem>Opcije>Roditeljske.
Za prikazivanje opcija menija roditeljske blokade,
neophodno je uneti PIN broj. Nakon ukucavanja
tačnog PIN-a, prikazaće se meni Roditeljske
Postavke.
Blokiranje Menija: Ova postavka omogućava ili
onemogućava pristup svim menijima ili instalaciju
menija televizora.
Blokada Prema Uzrastu: Kada se podesi, ova opcija
uzima informacije o uzrastu iz emisija i ako je dotični
nivo uzrasta onemogućen, onemogućava pristup
programima.
Napomena: Ako se tokom Prve instalacije zemlja postavi
kao Francuska, Italija ili Austrija, Blokada prema uzrastu
se automatski postavlja na 18.
Blokada za decu: Ako je ova opcija podešena na
UKLJUČENO,TV aparat se može kontrolisati samo
putem daljinskog upravljača. U tom slučaju, kontrolna
dugmad na televizoru neće raditi.
Podešavanje PIN Koda: Deniše novi PIN broj.
Podrazumevani CICAM PIN: Ova opcija će posiveti
ako nijedan CI modul nije umetnut u CI slot na
televizoru. Možete da promenite podrazumevani PIN
CI CAM-a koristeći ovu opciju.
Napomena: Fabrički PIN se može postaviti na 0000 ili 1234.
Ako se promeni PIN (traži se u zavisnosti od izabrane zemlje)
tokom Prve Instalacije, koristite PIN koji ste tada uneli.
Neke opcije možda neće biti dostupne, što zavisi od zemlje
koja je izabrana tokom Prve Instalacije.
Elektronski vodič kroz programe (EPG)
Neki kanali šalju informacije o svom redosledu emisija.
Da biste videli meni za Programski vodič, pritisnite
dugme Epg.
Postoje 3 različita tipa rasporeda, Vremenski
raspored, Lista rasporeda i Raspored Sada/
Sledeće. Da biste se prebacivali između njih, pratite
uputstva na dnu ekrana.
Vremenski raspored
Zumiranje (žuto dugme): Pritisnite Žuto dugme da
vidite događaje u širem intervalu.
Filter (plavo dugme): Prikazuje opcije ltriranja.
Izbor žanra (Subtitles dugme): Prikazuje meni za
Izbor žanra. Pomoću ove funkcije možete pretražiti
bazu podataka programskog vodiča u skladu sa
izabranim žanrom. Pretražuju se informacije koje
su dostupne u programskom vodiču, a rezultati koji
zadovoljavaju vaše kriterijume biće istaknuti.
Opcije (dugme OK): Prikazuje opcije događaja.
Detalji događaja (Info dugme): Prikazuje detaljne
informacije o izabranim događajima.
Sledeći/prethodni dan (dugmad Programme +/-):
Prikazuje događaje za prethodni ili sledeći dan.
Pretraga (dugme Text): Prikazuje meni Pretraživanje
vodiča.
Sada (dugme za zamenu): Prikazije trenutni događaj
na istaknutom kanalu.
Rec./Stop (dugme za snimanje): Televizor će početi
da snima izabrane programe. Možete ga opet pritisnuti
da zaustavite snimanje.
VAŽNO: Povežite USB disk na vaš televizor dok je televizor
isključan. Zatim treba da uključite televizor da biste omogućili
funkciju snimanja.
Napomena: Prelaženje na drugu emisiju ili izvor nije dostupno
u toku snimanja.
Lista rasporeda(*)
(*) Kod ove opcije rasporeda, navode se samo događaji
označenog kanala.
Preth. Vremenski interval (crveno dugme):
Prikazuje događaje iz prethodnog vremenskog
intervala.
Page 40

Srpski - 39 -
Sledeći/prethodni dan (dugmad Programme +/-):
Prikazuje događaje za prethodni ili sledeći dan.
Detalji događaja (Info dugme): Prikazuje detaljne
informacije o izabranim događajima.
Filter (dugme Text): Prikazuje opcije ltriranja.
Sledeći vremenski interval (zeleno dugme):
Prikazuje događaje iz sledećeg vremenskog intervala.
Opcije (dugme OK): Prikazuje opcije događaja.
Rec./Stop (dugme za snimanje): Televizor će početi
da snima izabrane programe. Možete ga opet pritisnuti
da zaustavite snimanje.
VAŽNO: Povežite USB disk na vaš televizor dok je televizor
isključan. Zatim treba da uključite televizor da biste omogućili
funkciju snimanja.
Napomena: Prelaženje na drugu emisiju ili izvor nije dostupno
u toku snimanja.
Raspored Sada/Sledeće
Opcije (dugme OK): Prikazuje opcije događaja.
Detalji događaja (Info dugme): Prikazuje detaljne
informacije o izabranim događajima.
Filter (plavo dugme): Prikazuje opcije ltriranja.
Rec./Stop (dugme za snimanje): Televizor će početi
da snima izabrane programe. Možete ga opet pritisnuti
da zaustavite snimanje.
VAŽNO: Povežite USB disk na vaš televizor dok je televizor
isključan. Zatim treba da uključite televizor da biste omogućili
funkciju snimanja.
Napomena: Prelaženje na drugu emisiju ili izvor nije dostupno
u toku snimanja.
Opcije događaja
Koristeći navigacione tastere, označite događaj
i pritisnite dugme OK da bi se prikazale Opcije
događaja. Dostupne su sledeće opcije:
Biranje kanala: Koristite ovu opciju za prelazak na
izabrani kanal.
Record / Delete Rec. (Snimaj / Izbriši snimak)
Tajmer: Izaberite opciju „Snimaj“ i pritisnite dugme
OK. Ako se program emituje kasnije, biće dodat na
listu Tajmera za snimanje. Ako je izabrani program
u toku, snimanje počinje odmah.
Tajmer. Snimanje će biti otkazano.
Postavi tajmer za događaj / Izbriši tajmer za
događaj: Nakon što ste izabrali događaj u EPG
meniju, pritisnite dugme OK. Odaberite „Postavi
tajmer za događaj“ i pritisnite dugme OK. Možete
podesiti tajmer za buduće događaje. Da biste otkazali
postavljeni tajmer, označite taj događaj i pritisnite OK.
Zatim izaberite opciju „Izbriši tajmer za događaj“.
Tajmer će biti otkazan.
Napomene: Ne možete preći na bilo koji drugi kanal dok
je aktivno snimanje ili je uključen aktivan tajmer za trenutni
kanal.
Nije moguće postaviti tajmer ili tajmer za snimanje za dva ili
više događaja u istom vremenskom intervalu.
Usluge Teleteksta
Pritisnite dugme Text za ulazak. Ponovo pritisnite za
mešoviti režim, koji vam omogućava da u istovremeno
vidite stranicu teleteksta i TV emisiju. Pritisnite ponovo za
izlazak. Kad je dostupno, odeljci na stranicama teleteksta
postaće šifrovani bojom i mogu se birati pritiskanjem
dugmadi u boji. Pratite uputstva koja su prikazana na
ekranu.
Digitalni teletekst
Pritisnite dugme Text da biste videli informacije o
digitalnom teletekstu. Upravljajte njime pomoću dugmadi
u boji, dugmadi kursora i dugmetom OK. Način rada
se može razlikovati, u zavisnosti od sadržaja digtalnog
teleteksta. Pratite uputstva koja su prikazana na ekranu
digitalnog teleteksta. Kada se ponovo pritisne dugme
Text, televizor se vraća na televizijsku emisiju.
Ažuriranje softvera
Vaš TV može naći i ažurirati rmver automatski preko
antenskog/kablovskog signala.
Pretraživanje novijih verzija softvera preko
korisničkog interfejsa
Na glavnom meniju izaberite Sistem>Opcije, a zatim
Više. Idite na opciju Ažuriranje softvera i pritisnite
dugme OK. U Opcijama ažuriranja izaberite Tražiti
nadogradnju i pritisnite OK da biste potražili nove
softverske nadogradnje.
Ako se pronađe novija verzija, on započinje njeno
preuzimanje. Nakon završetka preuzimanja, potvrdite
pitanje o ponovnom pokretanju televizora pritiskom
na OK da bi se nastavilo sa ponovnim pokretanjem.
Pretraživanje u 3 ujutro i režim ažuriranja
Ukoliko je TV povezan na signal iz etra i automatsko
skeniranje iz menija Opcije nadogradnje je
uključeno, vaš TV će tražiti nove nadogradnje u 3:00
ujutro. Ako je pronađen novi softver i ako je uspešno
preuzet, biće instaliran pri sledećem uključivanju.
Napomena: Nemojte izvlačiti kabl ako LED lampica treperi
tokom resetovanja. Ukoliko se TV ne uključi nakon ažuriranja,
isključite ga iz struje, sačekajte dva minuta i zatim ga ponovo
uključite.
Page 41

Srpski - 40 -
Rešavanje problema i saveti
Televizor se ne uključuje
Proverite da li je kabl za napajanje bezbedno
priključen u zidnu utičnicu. Proverite da li su se
baterije ispraznile. Pritisnite dugme za uključivanje i
isključivanje na televizoru.
Loša slika
• Proverite da li ste izabrali odgovarajući TV sistem.
• Nizak nivo signala može dovesti do distorzije slike.
Proverite priključak za antenu.
• Proverite da li ste uneli tačnu frekvenciju kanala
ukoliko ste obavili ručno podešavanje.
• Kvalitet slike može oslabiti kada su dva uređaja
istovremeno povezana na televizor. U tom slučaju,
odvojite jedan od uređaja.
Nema slike
• To znači da Vaš televizor ne prima nikakav prenos.
Proverite da li ste izabrali odgovarajući ulaz.
• Da li je antena pravilno povezana?
• Da li je oštećen kabl antene?
• Da li su za povezivanje antene korišćeni odgovarajući
priključci?
• Ukoliko ste u nedoumici, posavetujte se sa
prodavcem.
Nema zvuka
• Proverite da li je televizor utišan. Pritisnite dugme
Mute ili pojačajte zvuk da biste proverili.
• Možda se zvuk čuje samo iz jednog zvučnika.
Proverite podešavanja balansa u meniju Zvuk.
Daljinski upravljač - ne radi
• Možda su se ispraznile baterije. Zamenite baterije.
Ulazni izvori – ne mogu se izabrati
• Ako ne možete izabrati ulazni izvor, moguće je da
nema povezanog uređaja. U suprotnom,
• Proverite AV kablove i priključke ako pokušavate
da prebacite na ulazni izvor koji je namenjen za
povezani uređaj.
Snimanje nije dostupno
Da biste snimili program, morate prvo da povežete
USB disk sa televizorom kada je televizor isključen.
Zatim treba da uključite televizor da biste omogućili
funkciju snimanja. Ako ne snima, isključite televizor,
a zatim ponovo umetnite USB uređaj.
USB je suviše spor
Ako se prilikom pokretanja snimanja na ekranu
prikaže poruka „Brzina upisa na USB disk je suviše
mala za snimanje“, pokušajte ponovo da pokrenete
snimanje. Ukoliko i dalje dobijate istu grešku, moguće
je da vaš USB disk ne zadovoljava zahteve brzine.
Pokuštajte da povežete drugi USB disk.
Page 42

Srpski - 41 -
PC-ulaz Tipični Režimi Prikazivanja
Sledeća tabela je ilustracija nekih tipičnih režima
video prikaza. Moguće je da Vaš TV ne podržava
sve rezolucije.
Indeks Rezolucija Frekvencija
1 640x350 85Hz
2 640x400 70Hz
3 640x480 60Hz
4 640x480 66Hz
5 640x480 72Hz
6 640x480 75Hz
7 640x480 85Hz
8 800x600 56Hz
9 800x600 60Hz
10 800x600 70Hz
11 800x600 72Hz
12 800x600 75Hz
13 800x600 85Hz
14 832x624 75Hz
15 1024x768 60Hz
16 1024x768 66Hz
17 1024x768 70Hz
18 1024x768 72Hz
19 1024x768 75Hz
20 1024x768 85Hz
21 1152x864 60Hz
22 1152x864 70Hz
23 1152x864 75Hz
24 1152x864 85Hz
25 1152x870 75Hz
26 1280x768 60Hz
27 1360x768 60Hz
28 1280x768 75Hz
29 1280x768 85Hz
30 1280x960 60Hz
31 1280x960 75Hz
32 1280x960 85Hz
33 1280x1024 60Hz
34 1280x1024 75Hz
35 1280x1024 85Hz
36 1400x1050 60Hz
37 1400x1050 75Hz
38 1400x1050 85Hz
39 1440x900 60Hz
40 1440x900 75Hz
41 1600x1200 60Hz
42 1680x1050 60Hz
43 1920x1080 60Hz
44 1920x1200 60Hz
Kompatibilnost AV i HDMI Signala
Izvor
Podržani Signali
Dostupno
EXT
(SCART)
PAL O
SECAM O
NTSC4.43 O
NTSC3.58 O
RGB 50/60
Bočni AV
PAL O
SECAM O
NTSC4.43 O
NTSC3.58
S-VIDEO 50Hz (PAL)
S-VIDEO 60Hz (NTSC)
YPbPr
480i, 480p 60Hz O
576i, 576p 50Hz O
720p 50Hz,60Hz O
1080i 50Hz,60Hz O
HDMI1
HDMI2
480i, 480p 60Hz O
576i, 576p 50Hz O
720p 50Hz,60Hz O
1080i 50Hz,60Hz O
1080p
24Hz,
25Hz,
30Hz,
50Hz,
60Hz
O
(X: Nedostupno, O: Dostupno)
U nekim slučajevima, signal se možda neće
pravilno prikazati na televizoru. Problem može biti
neusaglašenost sa standardima opreme izvora (DVD,
dekoder, itd.). Ako imate takav problem, obratite se
vašem prodavcu ili proizvođaču opreme izvora.
Page 43

Srpski - 42 -
Podržani Formati Datoteka za USB Režim
Ekstenzija Video Kodek Spec (Rezolucija) I Brzina Prenosa
.dat, vob MPEG1/2
1080P@30fps - 40 Mb/s
.mpg, .mpeg
MPEG1/2,
MPEG4
.ts, .trp, .tp
MPEG1/2, H.264,
AVS, MVC
H.264: 1080Px2@30fps - 62.5 Mb/s, 1080P@60fps - 62.5 Mb/s MVC:
1080P@30fps - 62.5 Mb/s Ostalo: 1080P@30fps - 40Mb/s
.mp4, .mov,
.3gpp, .3gp
MPEG1/2,
MPEG4, H.263,
H.264, Motion
JPEG
H.264: 1080Px2@30fps - 62.5 Mb/s, 1080P@60fps - 62.5 Mb/s Motion JPEG:
640x480@30fps - 10 Mb/s Ostalo: 1080P@30fps - 40 Mb/s
.avi MPEG1/2,
MPEG4,
Sorenson H.263,
H.263, H.264,
WMV3, Motion
JPEG
.mkv MPEG1/2,
MPEG4, H.263,
H.264, WMV3,
Motion JPEG
.asf Sorenson H.263,
H.264, WMV3,
Motion JPEG
v WMV3 1080P@30fps - 40 Mb/s
.swf RV30/RV40 1080P@30fps - 40 Mb/s
.wmv
Podržani Formati Datoteka Slike za USB Režim
Slika Fotograja Rezolucija (Širina X Visina) Napomena
JPEG
Osnovni 15360x8640
Ograničenje za maks. rezoluciju zavisi od veličine
DRAM memorije
Progresivno 1024x768
PNG
Neprepleteni 9600x6400
Prepleteni 1200x800
BMP 9600x6400
Page 44

Srpski - 43 -
Podržani Formati Audio Datoteka za USB Režim
Ekstenzija
Audio Kodek Prenosna Brzina Frekvencija Uzorkovanja
.mp3,
MPEG1/2 Sloj1 32Kb/s ~ 448Kb/s
16KHz ~ 48KHzMPEG1/2 Sloj2 8Kb/s , 384Kb/s
MPEG1/2 Sloj3 8Kb/s , 320Kb/s
.avi
MPEG1/2 Sloj1 32Kb/s ~ 448Kb/s
16KHz ~ 48KHzMPEG1/2 Sloj2 8Kb/s , 384Kb/s
MPEG1/2 Sloj3 8Kb/s , 320Kb/s
AC3 32Kb/s ~ 640Kb/s 32KHz, 44,1KHz, 48KHz
AAC, HEAAC 8KHz ~ 48KHz
WMA 128b/s ~ 320Kb/s 8KHz ~ 48KHz
WMA 10 Pro M0 < 192kb/s 48KHz
WMA 10 Pro M1 < 384kb/ss 48KHz
WMA 10 Pro M2 < 768kb/s 96KHz
LPCM 64Kb/s ~ 1,5Mb/s 8KHz ~ 48KHz
IMA-ADPCM, MS-
ADPCM
384Kb/s 8KHz ~ 48KHz
G711 A/mu-law 64Kb/s ~ 128Kb/s 8KHz
.asf
MPEG1/2 Sloj1 32Kb/s ~ 448Kb/s
16KHz ~ 48KHzMPEG1/2 Sloj2 8Kb/s , 384Kb/s
MPEG1/2 Sloj3 8Kb/s , 320Kb/s
WMA 128b/s ~ 320Kb/s 8KHz ~ 48KHz
WMA 10 Pro M0 < 192kb/s 48KHz
WMA 10 Pro M1 < 384kb/ss 48KHz
WMA 10 Pro M2 < 768kb/s 96KHz
.mkv, .mka
MPEG1/2 Sloj1 32Kb/s ~ 448Kb/s
16KHz ~ 48KHzMPEG1/2 Sloj2 8Kb/s , 384Kb/s
MPEG1/2 Sloj3 8Kb/s , 320Kb/s
AC3 32Kb/s ~ 640Kb/s 32KHz, 44,1KHz, 48KHz
AAC, HEAAC 8KHz ~ 48KHz
WMA 128b/s ~ 320Kb/s 8KHz ~ 48KHz
WMA 10 Pro M0 < 192kb/s 48KHz
WMA 10 Pro M1 < 384kb/ss 48KHz
WMA 10 Pro M2 < 768kb/s 96KHz
VORBIS Doo 48KHz
LPCM 64Kb/s ~ 1,5Mb/s 8KHz ~ 48KHz
IMA-ADPCM,
MS-ADPCM
384Kb/s 8KHz ~ 48KHz
G711 A/mu-law 64Kb/s ~ 128Kb/s 8KHz
FLAC < 1,6Mb/s 8KHz ~ 96KHz
.ts, .trp, .tp,
.dat, .vob,
.mpg, .mpeg
MPEG1/2 Sloj1 32Kb/s ~ 448Kb/s
16KHz ~ 48KHzMPEG1/2 Sloj2 8Kb/s , 384Kb/s
MPEG1/2 Sloj3 8Kb/s , 320Kb/s
AC3 32Kb/s ~ 640Kb/s 32KHz, 44,1KHz, 48KHz
EAC3 32Kbps ~ 6Mb/s 32KHz, 44,1KHz, 48KHz
AAC, HEAAC 8KHz ~ 48KHz
LPCM 64Kb/s ~ 1,5Mb/s 8KHz ~ 48KHz
Page 45

Srpski - 44 -
Ekstenzija
Audio Kodek Prenosna Brzina Frekvencija Uzorkovanja
.wav
MPEG1/2 Sloj1 32Kb/s ~ 448Kb/s
16KHz ~ 48KHzMPEG1/2 Sloj2 8Kb/s , 384Kb/s
MPEG1/2 Sloj3 8Kb/s , 320Kb/s
LPCM 64Kb/s ~ 1,5Mb/s 8KHz ~ 48KHz
IMA-ADPCM,
MS-ADPCM
384Kb/s 8KHz ~ 48KHz
G711 A/mu-law 64Kb/s ~ 128Kb/s 8KHz
.3gpp, .3gp,
.mp4, .mov,
.m4a
MPEG1/2 Sloj3 8Kb/s , 320Kb/s 16KHz ~ 48KHz
AC3 32Kb/s ~ 640Kb/s 32KHz, 44,1KHz, 48KHz
EAC3 32Kbps ~ 6Mb/s 32KHz, 44,1KHz, 48KHz
AAC, HEAAC 8KHz ~ 48KHz
VORBIS Doo 48KHz
LPCM 64Kb/s ~ 1,5Mb/s 8KHz ~ 48KHz
IMA-ADPCM,
MS-ADPCM
384Kb/s 8KHz ~ 48KHz
G711 A/mu-law 64Kb/s ~ 128Kb/s 8KHz
v
MPEG1/2 Sloj3 8Kb/s , 320Kb/s 16KHz ~ 48KHz
AAC, HEAAC 8KHz ~ 48KHz
.ac3
AC3 32Kb/s ~ 640Kb/s 32KHz, 44,1KHz, 48KHz
AAC, HEAAC 8KHz ~ 48KHz
.swf MPEG1/2 Sloj3 8Kb/s , 320Kb/s 16KHz ~ 48KHz
.ec3 EAC3 32Kbps ~ 6Mb/s 32KHz, 44,1KHz, 48KHz
.rm, .rmvb, .ra
AAC, HEAAC 8KHz ~ 48KHz
LBR (cook) 6Kb/s ~ 128Kb/s
8KHz, 11,025KHz,
22,05KHz, 44,1KHz
.wma, .wmv
WMA 128b/s ~ 320Kb/s 8KHz ~ 48KHz
WMA 10 Pro M0 < 192kb/s 48KHz
WMA 10 Pro M1 < 384kb/ss 48KHz
WMA 10 Pro M2 < 768kb/s 96KHz
.webm VORBIS Doo 48KHz
Podržani Formati Datoteka Titlova za USB Režim
Interni titlovi
Ekstenzija Kontejner Kod Titla
dat, mpg, mpeg, vob MPG, MPEG DVD titl
ts, trp, tp TS DVB titl
mp4 MP4
DVD titl
UTF-8 običan tekst
mkv MKV
ASS
SSA
UTF-8 običan tekst
VobSub
DVD titl
Spoljni titlovi
Ekstenzija Izdvajač Titla Napomena
.srt Subrip
.ssa/ .ass SubStation Alpha
.smi SAMI
.sub
SubViewer
MicroDVD
DVDSusbtitleSystem
SubIdx (VobSub)
SubViewer 1.0 & 2.0 samo
.txt TMPSloj
Page 46

Srpski - 45 -
Podržane DVI Rezolucije
Kada uređaje povezujete na konektore televizora pomoću DVI konvertorskih kablova (DVI do HDMI kabla -
nisu isporučeni), možete da proverite sledeće informacije o rezoluciji.
56Hz 60Hz 66Hz 70Hz 72Hz 75Hz
640x400
þ
640x480
þ þ þ þ
800x600
þ þ þ þ þ
832x624
þ
1024x768
þ þ þ þ þ
1152x864
þ þ þ
1152x870
þ
1280x768
þ þ
1360x768
þ
1280x960
þ þ
1280x1024
þ þ
1400x1050
þ þ
1440x900
þ þ
1600x1200
þ
1680x1050
þ
1920x1080
þ
1920x1200
þ
Page 47

Bosanski - 46 -
Sadržaj
Sadržaj .................................................................46
Informacija o bezbjednosti .................................... 47
Oznake na proizvodu............................................48
Podaci o Okolini....................................................48
Funkcije ................................................................49
Uključeni Dodaci ................................................... 49
Notikacije u Mirovanju.........................................49
Kontrolni Ključevi TV-a i Upravljanje ..................... 49
Instalacija Baterija u Daljinskom Upravljaču ......... 50
Povezivanje u Struju ............................................ 50
Povezivanje Antene ..............................................50
Obaveštenje .........................................................50
Specikacija..........................................................51
Daljinski Upravljač ................................................52
Povezivanja ..........................................................53
Uključivanje/Isključivanje ...................................... 54
Prva Instalacija .....................................................54
Reprodukcija Preko USB Ulaza............................54
Snimanje Programa .............................................. 55
Snimanje Tajmšifting ............................................. 55
Instant Snimanje ................................................... 55
Gledanje Snimljenih Programa ............................ 55
Konguracija Snimanja ......................................... 55
Meni Pregledač Medija ......................................... 55
CEC i CEC RC Passthrough ................................56
E-Priručnik ............................................................ 56
Sadržaj TV Menija ................................................57
Općenito o Korištenju TV ...................................... 61
Korištenje Liste Kanala ......................................... 61
Konguriše Roditeljske Postavke .........................61
Elektronički Programski Vodič (EPV)....................61
Teletekst Usluga ...................................................62
Ažuriranje Softvera ............................................... 62
Rješavanje Problema i Savjeti .............................. 63
PC-ulaz Tipični Režimi Prikazivanja .....................63
Kompatibilnost AV i HDMI Signala ........................ 64
Podržani Formati Video Datoteka za USB Režim ... 65
Podržani Formati Datoteka sa Slikama za USB
Režim ...................................................................65
Podržani Formati Audio Datoteka za USB Režim ... 66
Podržani Formati Datoteka sa Titlom za USB
Režim ...................................................................67
Podržane DVI Rezolucije......................................68
Page 48

Bosanski - 47 -
Informacija o bezbjednosti
Nemojte uključivanji televizora pod ekstremnim
ambijentalnim uslovima jer to može dovesti do
oštećenja uređaja.
OPREZ
RIZIK OD STRUJNOG UDARA
NE OTVARAJTE
OPREZ: DA BISTE SMANJILI RIZIK OD STRUJNOG UDARA,
NEMOJTE SKIDATI POKLOPAC (ILI STRAŽNJU STRANU)
UNUTRA NEMA DIJELOVA KOJI KORISNIK MOŽE SAM
POPRAVITI. VRŠITI SERVISIRANJE KOD STRUČNOG OSOBLJA.
Napomena: Slijediti instrukcije na ekranu oko rada sa
povezanim odlikama.
U ekstremnim meteorološkim uvjetima (oluje,
munje) i tokom dugog nekorišćenja (kad idete
na odmor) isključite TV iz struje. Mrežni utikač
koristi se za odspajanje TV prijemnika s mreže i
stoga mora ostati nadohvat ruke.
Ovaj znak je prisutan gdje god postoji važna
informacija o funkcioniranju i održavanju uređaja.
VAŽNO - Molimo pročitajte u
potpunosti ove upute pre instaliranja
ili upravljanja.
UPOZORENJE: Nikad ne dopustite da
ljudi (uključujući djecu) sa fizičkim ili
mentalnim sposobnostimaniti ili osobama koje
nemaju dovoljno iskustva i / ili znanja, bez nadzora
koristiti električni uređaj!
• Za ventilaciju ostavite slobodan prostor od najmanje
10 cm oko uređaja.
• Ne blokirati ventilacijske otvore.
• Ne postavljati TV na nagnute ili nestabilne površine,
jer se TV može prevrnuti.
• Koristite ovaj uređaj u umjerenim klimama.
• Utikač kabla mora biti lako dostupan. Ne postavljati
TV, namještaj itd. na kabl. Oštećeni napojni kabl
može izazvati požar ili električni udar. Rukovati
kablom preko utikača, ne isključivati TV povlačenjem
za kabl. Nikada ne dirajte kabl/utikač mokrim
rukama, to može dovjesti do kratkog spoja ili
električnog udara. Nikada nemojte vezivati kabl
u čvor ili vezivati ga s drugim kablovima. Kada je
oštećen, kabl se mora zamjeniti i to treba obaviti
stručno osoblje.
• Ne koristiti ovaj TV na vlažnim mjestima. Ne izlagati
TV tečnostima. Ako neka tečnošt uđe u kučište,
isključite TV iz utičnice i odnesite ga na provjeru u
servis prije ponovnog korištenja.
• Ne izlagati TV direktnoj sunčanoj svijetlosti,
otvorenom plamenu i nemojte ga postavljati
pored jakih izvora topline kao što su električne
grijalice.
• Slušanje prekomijernih nivoa zvuka preko slušalica
može dovijesti do gubitka sluha.
• Nemojte stavljati izvore otvorenog plamena na TV
aparat, npr. upaljene svijeće.
• Da bi se spriječile povrede, kada se ugrađuje na
zid (ukoliko je ta opcija dostupna), uređaj mora
biti sigurno pričvršćen na zid prema uputstvima
montaže.
• Povremeno se na ekranu može pojaviti nekoliko
neaktivnih piksela u obliku ksne plave, zelene
ili crvene tačke. Zapamtite da to ne utječe na
performanse vašeg uređaja. Pazite da ne ogrebete
ekran noktima ili nekim drugim čvrstim objektima.
• Prije čišćenja, isključite uređaj iz utičnice. Upotrebite
mehku i suhu krpu.
Upozorenje
Opasna ozljeda ili smrtonosni
rizik.
Rizik od
električnog udara
Rizik visokog napona
Oprez
Rizik od ozljede ili oštećenja
imovine
Važno
Pravilno rukovanje sistemom
Napomena
Obilježene dodatne primjedbe
Page 49

Bosanski - 48 -
Oznake na proizvodu
Sljedeći simboli se koriste na proizvodu kao znak za
restrikcije, i mjere opreza i mjere sigurnosti. Svako
objašnjenje se uzima u obzir samo kada je na
proizvodu navedena odgovarajuća oznaka. Imajte na
umu takvu informaciju iz sigurnosnih razloga.
Klasa II Oprema: Ovaj uređaj je dizajniran
tako da ne zahtijeva sigurnosnu vezu sa
električnim uzemljenjem.
Klasa II Oprema sa funkcionalnim
uzemljenjem Ovaj uređaj je dizajniran tako
da ne zahtijeva sigurnosnu vezu sa električnim
uzemljenjem, uzemljenje se koristi za funkcionalnu
svrhu.
Zaštitno uzemljenje Označeni terminal je
namijenjen za vezu zaštitnog provodnika
uzemljenja koji je povezan sa žičnim
napajanjem.
Opasni terminl: Opasni terminal(i) je/su
opasni u normalnim uvjetima funkcioniranja.
Oprez, Vidjeti instrukcije za upotrebu:
Označeni dio/dijelovi sadrži/e zamjenjive
žetone ili baterije.
Klasa 1 Laserski proizvod:
Ovaj proizvod sadrži laserski
izvor Klase 1 koji je siguran
u razumno predvidljivim
uvjetima funkcioniranja.
UPOZORENJE
Nemojte gutati bateriju, opasnot od hemijs-
kih opekotina
(Dodatna oprema i) ovaj proizvod može
sadržati žeton/bateriju. Ukoliko se baterija
proguta, može dovesti do teške unutrašnje
opekotine u samo 2 sata i može dovesti do
smrti.
Držite stare i novee baterije dalje od dece.
Ako odeljak baterije se dobro ne zatvara,
prekinuti upotrebu proizvoda i držati ga dalje
od djece.
Ukoliko mislite da su baterije bile proguta-
ne ili postavljene unutar nekog djela tjela,
smesta tražite medicinsku pomoć.
i
CLASS 1
LASER PRODUCT
UPOZORENJE
Ne postavljati televizor na nestabilnu
lokaciju. Televizor može pasti i time uzroko-
vati teške povrede ili smrt. Mnoge ozljede,
naročito kod djece, se mogu izbjeći preduzi-
anjem jednostavnih mjera opreza, poput:
• Upotrebe ormarića ili postolja koje
preporučuje proizvođač televizora.
• Upotrebe najmeštaja koji sigurno podupire
televizor.
• Osiguravanja da televizor ne visi preko ivice
namještaja koji ga podupire.
• Ne postavljanja televizora na sve vrste
namještaja (npr. viseće ormariće ili stalaže
za knjige) bez odgovarajuće podrške i za
televiziju i za namještaj.
• Obrazovanja djece o opasnosti penjanja
na namještaj kako bi se dohvatio televizor
ili upravljač.
Ako postojeći televizor premještate, trebate u obzir
uzeti sve gore navedeno.
Podaci o Okolini
Ovaj TV je napravljen da je prijatelsjki ka okolini. Za
smanjenje potrošnje energije, preduzmite sljedeče
korake:
Ukoliko Uštedu Energije postavite na Minimalno,
Srednje, Maksimalno ili Automatski, TV će u
skladu s tim smanjiti potrošnju energije. Ukoliko
želite postaviti Pozadinsko Svjetlo na određenu
vrijednost, postavite kao Uobičajeno i prilagodite
Pozadinsko svjetlo (nalazi se ispod postavke za
Uštedu Energije) ručno, koristeći Lijevu ili Desnu
tipku na daljinskom upravljaču. Da ovu postavku
isključite, postavite na Isključeno.
Napomena: Dostupne opcije za Uštedu Energije se mogu
razlikovati u zavisnosti od izabranog Režima u meniju
Sistem>Slika.
Postavke za Uštedu Energije se mogu pronaći u
meniju Sistem>Slika. Primjetite da neke postavke
slike neće biti moguće promeniti.
Ako pritisnete Desnu tipku dok je opcija Automatski
odabrana ili Lijevu tipku dok je odabrana opcija
Uobičajeno, na ekranu će se pojaviti poruka: “Ekran
će se ugasiti za 15 sekundi.” Izaberite Produži i
pritisnite OK da biste smjesta isključili ekran. Ako ništa
ne pritisnite, ekran će se isključiti kroz 15 sekundi.
Pritisnite bilo koji taster na daljinskim ili na TV-u da
biste opet uključili ekran.
Page 50

Bosanski - 49 -
Napomena: Opcija Isključen Ekran nije dostupna ako je
Režim postavljen na Igre.
Kada TV se ne koristi, molimo vas da ga ugasite
ili isključite ga od dovoda struje. Tako se takođe
smanjuje potrošnja energije.
Funkcije
• TV u boji s daljinskim upravljanjem
• Potpuno integrisani digitalni zemaljski/kablovska/
satelitski TV (DVB-T-T2/C)
• HDMI ulaze za povezivanje drugih uređaja koji imaju
HDMI utikače
• USB ulaz
• Sistem ekranskog menija.
• Scart utičnica za vanjske uređaje (kao što su DVD
plejeri, PVR, video igre, itd).
• Stereo zvučni sistem
• Teletekst
• Priključak za slušalice
• Sistem automatskog programiranja
• Ručno štelovanje
• Automatsko isključivanje nakon i do osam sati.
• Tajmer za spavanje
• Blokada za djecu
• Automatsko utišavanje zvuka kada nema prijenosa.
• NTSC reprodukcija
• AVL (AOG - Automatsko Ograničavanje Glasnoće)
• PLL (traženje frekvencije)
• PC ulaz
• Režim Igre (po izboru).
• Funkcija Isključi sliku
• Snimanje programa
• Snimanje Tajmšifting.
Uključeni Dodaci
• Daljinski Upravljač
• Baterije: 2 x AAA
• Uputstva
Notikacije u Mirovanju
Ako TV ne dobija nikakav signal (npr. preko antene
ili HDMI izvora) tokom 5 minuta, TV će preći u
mirovanje. Kada sljedeći put uključite TV, pojavit
će se sljedeća poruka. "TV je automatski prešao
u mirovanje jer nije bilo signala duže vrijeme."
Prisnite OK za nastavak.
Ukoliko je TV uključan a s nima se ne upravljava, on
preminuje u mirovanje. Kada sljedeći put uključite
TV, pojaviće se sljedeća poruka. "TV je automatski
prešao u mirovanje jer nije bilo rada duže
vrijeme." Prisnite OK za nastavak.
Kontrolni Ključevi TV-a i Upravljanje
1. Smjer Gore
2. Smjer Dolje
3. Tipka Jačina zvuka/Info/Odabir liste izvora i
Mirovanje-Uključeno
Kontrolni prekidač daje vam mogućnost da
kontrolišete funkcije Jačinu zvuka/ Program/ Izvor i
Mirovanje- uključeno.
Da biste promijenili zvuk: Povećati zvuk pritiskanjem
tipke ka gore. Smanjiti zvuk pritiskanjem tipke ka
dolje.
Da promijenite kanal: Pritisnite sredinu tipke i na
ekranu će se pojaviti baner informacija o kanalu.
Pomičite se kroz snimljene kanale guranjem tipke
prema gore ili dolje.
Da biste promenili izvora: Pritisnite sredinu tastera
dvaput (za drugi put ukupno), lista izvora pojavitće
se na ekranu. Pomičite se kroz dostupne izvore
guranjem tipke prema gore ili dolje.
Da biste isključili TV: Pritisnite sredinu tipke
i zadržite nekoliko sekunda i TV će da pređe u
mirovanje.
Napomene:
• U slučaju da isključite TV, ovaj se krug ponavlja iz
postavke jačine zvuka.
• Pomoću kontrolne dugmadi nije moguće prikazati
OSD glavnog menija.
Upravljanje Pomoću Daljinskog Upravljača
Pritisnite tipku Menu na daljinskm kako bi se prikazao
ekran glavnog menija. Pritiskanjem navigacijskih
Page 51

Bosanski - 50 -
tipki izaberite umetak menija i pritisnite OK da uđete.
Koristite navigacijske tipke ponovo da odaberete ili
postavite stavku. Pritisnite dugme Povratak ili Menu
da izadjete iz ekrana menija.
Odabir Ulaza
Nakon priključivanja vanjskih sistema na vaš TV
moguće je birati između tih izvora. Pritisnite tipku Izvor
na daljinskom upravljaču da izaberete različite izvore.
Mijenjanje Kanala i Jačine Zvuka
Možete promijeniti kanal i podesiti zvuk tipkama V+/- i
P +/- na daljinskom upravljaču.
Instalacija Baterija u Daljinskom Upravljaču
Nježno podignite stražnjeg poklopca daljinskog.
Umetnite dvije AAA baterije. Osigurite se da se slažu
oznake (+) i (-) (obratite pažnju na pravilni polaritet).
Vratite poklopac.
Povezivanje u Struju
VAŽNO: TV-uređaj je dizajniran je za rad na 220-240V
AC, 50Hz. Kad ga raspakujete, pričekajte da se TV
prijemnik prilagodi na temperaturu okoline prije nego
ga uključite u izvor napajanja. Uključite kabl napajanja
u utičnicu mrežnog napajanja.
Povezivanje Antene
Umetnite utikač antene ili kabelske TV u utičnicu
ULAZ ZA ANTENU koji se nalazi na stražnjem dijelu
TV prijemnika.
Obaveštenje
POTVRDA O ZAŠTINOM ZNAKU
Pojmovi HDMI i High-Denition Multimedia Interface
(Multimedijalni Interfejs visoke denicije), kao i HDMI
logo su zaštitni znakovi ili registrirani zaštitni znakovi
kompanije HDMI Licensing LLC u SAD-u i druge
zemlje.
Proizvedeno pod licencom Dolby Laboratories.
Dolby i dvostruki -D simbol zaštitni su znaci Dolby
Laboratories.
Upute o odlaganju stare opreme i Baterija
[Samo za Europsku Uniju]
Oprema na koju ima ovih simbola se ne smije bacati
na obično kućno smeće.
Trebate potražiti prikladna mesta za reciklažu i
sisteme za bacanje ovih proizvoda.
Napomena: Znak Pb ispod simbola baterija označava da
baterija sadrži olovo.
Proizvodi
Baterija
Page 52

Bosanski - 51 -
Specikacija
TV emitovanje
PAL BG/DK/II’
SECAM BG/DK
Prijemni kanali
VHF (BAND I/III) - UHF
(BAND U) - HYPERBAND
Digitalni prijem
Potpuno integrisani digitalni
zemaljski/kablovski TV
(DVB-T/C)
(usklađen sa DVB-T2)
Broj unaprijed
postavljenih kanala
1.000
Indikator kanala Prikaz na ekranu
Ulaz RF antene 75 oma (nebalansirano)
Radni napon 220-240V AC, 50 Hz.
Audio Nemački+Nicam Stereo
Audıo Izlazna Snaga
(WRMS.) (10% THD)
2 x 6W
Potrošnja energije (W) 65W
Težina (kg) 6,55W
Dimenzije TV-a DxLxH
(sa stalkom) (mm)
185 x 735 x 478
Dimenzije TV-a DxLxH
(bez stalka) (mm)
77/97 x 735 x 438
Ekran 32”
Temperatura rukovanja
I vlažnost vazduha
tokom rukovanja
0 °C do 40 °C, 85%
maksimalna vlažnost
Page 53

Bosanski - 52 -
Daljinski Upravljač
1
2
3
4
5
6
7
8
9
0
V
P
.,/@
LANG.
BACK
EXIT
OK
MENU
Q.
MENU
/
/
(*) MOJ TASTER 1 I MOJ TASTER 2:
Ovi tasteri mogu imati osnovnu funkciju ovisno od modela.
Ipak, možete postaviti specijanu funkciju tako što ih pritisnite
tokom 5 sekundi kada se nalazite na željenim izvorom,
kanalom ili vezu. Na ekranu će se prikazati poruka potvrde.
Sada je izabrani MOJ TASTER povezani sa izabranu funkciju.
Imajte na umu da ukoliko uradite Prvu Instalaciju, MOJ
TASTER 1 i 2 vratit će se na prvobitnu funkciju.
1. Pripravnost: Uključivanje/isključivanje televizora
2. Numerički taster: Promjenjuje kanal, unosi broj ili
slovo u okvir za tekst na ekranu.
3. TV: Prikazuje listu kanala / Prebacivanje na TV izvor
4. Utišaj: Isključuje zvuka do kraja
5. Glasnoća +/-
6. Menu: Prikazuje TV meni
7. Direkciona dugmad: Pomaže kod navigacije kroz
meni, sadržaj itd. i prikazuje podstranice u teletekstu
kada se pritisne desni ili lijevi taster.
8. OK: Potvrđuje odabir korisnika, zadržava stranicu (u
teletekstu) daje listu kanala (DTV režime)
9. Nazad/Povratak: Vraća se na prethodni ekran, otvara
iindeksnu stranicu (u teletekstu)
10. Pretraživanje medija: Otvara ekran prelistača medija
11. Info: Prikazuje informaciju u vezi sa sadržajem na
ekranu, prikazuje skrivene informacije (pokazati - u
teletekstu).
12. Moj taster 1 (*)
13. Obojana Dugmad: Slijediti instrukcije na ekranu za
funkcije obojenih tastera
14. Jezik: Mijenja modalitete zvuka (analogni TV),
prikazuje i mijenja jezik zvuka/titlova (digitalna TV ako
je dostupna).
15. Podnaslov: Uključuje ili isključuje titlove (gde ih ima)
16. Brzo unazad: Vraća slike natrag u medijima kao što
su lmovi
17. Snimak: Snima programe
18. Izvedi: Pusta izabrani medijum
19. Zaustavi: Zaustavlja pušteni medijum
20. Brzo napredovanje: Pomjera slike naprijed u
medijima kao što su lmovi
21. Pauza: Pauzira pustenog medijuma, poèinje
tajmšifting.
22. Ekran: Promjenjuje razmjer slike
23. Text: Prikazuje teletekst (gde može), još jednim
pritiskom postavlja teleteksta preko normalne slike
(miks).
24. Moj taster 2 (*)
25. Elektronski programski vodič (EPV): Prikazuje
elektronski vodič programa
26. Izlaz: Zatvara i izlazi iz prikazanih menija ili vraća se
na prethodni ekran.
27. Brzi meni: Prikazuje listu menija brzog pristupa
28. Nema funkcije
29. Programa +/-
30. Zamjena: Brzo prelazi između prethodnog i trenutnog
kanala ili izvora
31. Izvor: Prikazuje sve dostupne signale i izvore sadržaja
Page 54

Bosanski - 53 -
Povezivanja
Konektor Tip Kablovi Uređaj
Skart
Veza
(stražnja)
VGA
Veza
(stražnja)
BOČNI AV
PC/YPbPr
Audio
Veza
(bočna)
YPbPr/PC Audio Kabl (nije
dostavljen)
HDMI
Veza
(stražnja)
SPDIF
SPDIF
(Coaxial Out)
Veza
(stražnja)
BOČNI AV
Bočni AV
(Audio/
Video)
Veza
(bočna)
AV kabl (nije dostavljen)
SLUŠALICE
Veza
Slušalica
(bočna)
YPBPR
YPbPr Video
Veza
(stražnja)
Kabl za YPbPr vezu (nije
dostavljen)
USB
Veza
(bočna)
CI
Veza
(bočna)
CAM
module
NAPOMENA: Kada se
povezuje uređaj preko ulaza
YPbPr ili bočni AV, morate
koristiti dostavljene kablove
za povezivanje. Vidjeti ilustracije
na lijevoj strani. | Možete koristiti
YPbPr do VGA kabela (nije u
kompletu) da biste omogućili
YPbPr signal preko VGA ulaza.
|Ne možete koristiti VGA i YPbPr
u isto vrijeme. Da biste omogućili
PC / YPbPr audio, morat ćete
koristiti bočne audio ulaze
sa PC / YPbPr audio kablom
(nije dostavljen). | Ako se neki
spoljašnji uređaj povezuje preko
SKART-a, TV automatski prelazi
na AV režim. | Tokom prijema
DTV kanala (Mpeg4 H.264) ili u
Pretraživaču medija, nije moguć
izlaz preko skart priključka. kada
se koristi sistem za ugradnju na
zid (neobavezno), preporučujemo
da se prvo utaknu svi kablovi na
zadnjoj strani TV-a prije njegovog
ugrađivanja na zid. | Umetnite ili
vadite CI modul samo kada je TV
aparat ISKLJUČEN. Uputite se
uputstvima modula za detaljne
informacije o podešavanjima. |
Svaki USB ulaz TV-a podržava
uređaje do 500mA. Povezivanje
uređaja koji imaju struju jačiju
od 500mA može oštetiti TV. Kod
povezivanja HDMI kabla na TV,
morate koristiti samo oklopljeni
HDMI kabel kako bi se osiguralo
dovoljno imunitet protiv parazitske
frekvencije zračenja.
Ako želite poVezati neki uređaj na TV, osigurite se da su oba uređaja isključana prije povezivanja. Nakon povezivanja,
možete opet koristiti uređaje.
Page 55

Bosanski - 54 -
Uključivanje/Isključivanje
Uključivanje Televizora
Povežite kabl sa izvorom napajanja, kao naprimjer
zidnom utičnicom (220-240V AC, 50 Hz).
Da biste uključili TV iz režima pripravnosti, uradite
sljedeće:
• Pritisnite tipku Standby, Program +/- ili numeričku
tipku na daljinskom upravljaču.
• Pritisnite bočni funkcionalni prekidač dok se TV ne
uključi iz mirovanja.
Kako Isključiti Televizor
Pritisnite Standby tipku na daljinskom ili pritisnite
bočni funkcionalni prekidač dok TV ne pređe u
mirovanje.
Da biste kompletno isključili TV-uređaj, izvucite
napojni kabl iz utičnice.
Napomena: Ako je TV u režimu mirovanja, LED indikator
mirovanja može treptati označavajući da su aktivne funkcije
poput pretraživanja u mirovanju, preuzimanja putem etera i
tajmera. LED takođe može da trepti kada televizor uključujete
iz režima pripravnosti.
Prva Instalacija
Tokom prvog uključenja, pojavljuje se meni Izbor
jezika. Odaberite željeni jezik i pritisnite OK.
Na sljedećem ekranu postavite svoje preference
pomoću dugmadi smjera.
Napomena: Ovisno od izabrane Zemlje, moguće je da vam
se zatraži da postavite i potvrdite PIN. Izabrani PIN ne može
biti 0000. Morate uneti PIN kada se to od vama zatraži kasnije
kod neke operacije sa menijama.
O Biranju tipa Emitovanja
Antena: Ukoliko je opcija pretrage antene uključena,
TV će tražiti zemaljski signal nakon što se naliziraju
ostale početne postavke.
Kablovska Ukoliko je opcija pretrage Kablovskog
signala uključena, TV će tražiti digitalni kablovski
signal nakon što se finaliziraju ostale početne
postavke. Prema vašim drugim preferencama, može
se prikazati poruka potvrde prije početka pretrage.
Izaberite DA i pritisnite OK za nastavak. Da biste
otkazali operaciju, izaberite NE i pritisnite OK.
Možete izabrati Mreža ili ppstaviti vrijednosti poput
Frekvencije, ID Mreže i Koraka Pretrage. Kada
završite, ponovo pritisnite OK.
Napomena: Trajanje pretrage će se promjeniti u zavisnosti
od izabranoga koraka pretrage.
Analogan: Ukoliko je opcija pretrage analognog
signala uključena, TV će tražiti analogni signal nakon
što se naliziraju ostale početne postavke.
Pored toga možete postaviti neki tip emitovanja
kao svoj omiljeni. Prioritet će se dati odabranoj vrsti
signala u toku procesa pretrage, a njegovi kanali će
biti navedeni na vrhu Liste Kanala. Kada završite,
pritisnite OK.
Ovdje možete aktivirati Režima Radnja. Ova opcija
će kongurisati postavke vašeg TV-a te u zavisnosti
od modela TV-a koji koristite, podržane osobine se
mogu prikazati na vrhu ekrana u info baneru. Ova
opcija je namijenjena jedino za upotrebu u radnjama.
Za domaću uporabu Izabrati režim Kuća. Ova opcija
bit će dostupna u meniju Sistem>Opcije>Više i može
se kasnije uključiti/isključiti.
Pritisnite OK na daljinskom upravljaču da nastavite.
Nakon što su početne postavke završene, TV će
poćeti tražiti dostupna emitovanja u izabranim
tipovima emitovanja.
Kada se memorišu sve dostupne stanice, prikazaće
se rezultati skeniranja. Da nastavite, pritisnite OK.
Potom će se prikazati meni Uredi Listu Kanala.
Možete urediti listu kanala u skladu sa svojim željama
ili pritisnuti tipku Menu da izađete i gledate TV.
Dok se pretraga nastavlja, može se prikazati poruka
koja pita da li želite sortirati kanale po LCN-u (*).
Izaberite Da i pritisnite OK za potvrdu.
(*) LCN je sistem Logičkog broja kanala koji organizuje
dostupne signale u skladu sa prepoznatljivim sekvencama
kanala (ako je dostupan).
Napomena: Nemojte isključivati televizor za vrijeme
pokretanje prve instalacije. Neke opcije nisu dostupne ovisno
od izabrane zemlje.
Reprodukcija Preko USB Ulaza
Možete povezati 2.5 i 3.5 inčni spoljašni čvrsti disk (hdd sa
spoljašnim napajanjem) ili USB štapić na vašem TV-u preko
USB ulaza.
VAŽNO! Napraviti rezervnu kopiju datoteka na
disku pre povezivanja na TV-u. Proizvođač neće biti
odgovoran ni za kakvo oštećivanje datoteka ili gubitak
podataka. Moguče je da izvesni tipovi USB uređaja
(MP3 plejeri) ili USB hard diskovi/memorijski stikovi
možda nisu kompatibilni sa ovim TV aparatom. TV
podržava FAT32 i NTFS formatiranje diska, ali jedino
sa NTFS formatiranim diskovima moguće je snimanje .
Tokom formatiranja može doći do nekih problema
kad formatirate USB drajvove koji imaju više od 1TB
(terabajta) mijesta.
Sačekajte malo između svakog uključenja i isključenja
jer plejer možda još čita fajlove. To može zički oštetiti
USB plejera, pa i samog USB uređaja. Nemojte izvući
USB modul za vrijeme izvođenja datoteke.
Možete koristiti USB habove sa vašeg TVa USB ulaza.
Nadvorešni USB preporučuju se u takvim situacijama.
Može se koristiti USB sa vašeg TVA ukoliko hoćete
da povežete USB hard disk.
Napomena: Kada gledate slike, meni Pretraživača Medija
može pokazati samo 1000 slika sačuvanih na povezanom
USB uređaju.
Page 56

Bosanski - 55 -
Snimanje Programa
VAŽNO: Kada koristite novi USB disk, preporučuje
se da prvo formatirate disk pomoću opcije "Formatiraj
disk" na svom TV-u koji se nalazi u meniju Pretraživač
medija>Postavke>Postavke Snimanja.
Da biste snimili program, morate prvo povezati USB
disk na vašem TV-u dok je TV isključen. Zatim trebali
bi uključiti TV da biste omogućili odliku snimanja.
Da biste snimali vaš drajv mora imati 2 GB slobodnog
mijesta i biti kompatibilan sa USB 2.0. Pojavljuje se
poruka o grešci ako USB drajv nije kompatibilan.
Da bi snimali programe dugog trajanja kao lmovi,
preporučuje se korišćenje USB čvrstih diskova (HDD).
Snimljene programme su sačuvane na povezanim
USB disku. Po želji, možete sačuvati/kopirati snimke
na kompjuter, ipak, ove datoteke se ne mogu puštati
na kompjuteru. Možete ih puštati samo preko TV-a.
Po vreme tajmšiftinga se može pojaviti zadržavanje
sinhronizacije usana. Snimanje radija je podržano. TV
može snimati programe do deset časova.
Snimljeni programi su podijeljeni na dijelove od 4GB.
Ukoliko je brzina snimanja povezanog USB diska
nedovoljna, snimanje može propasti i odlika tajmšifting
može biti nedostupna.
Zato se preporučuje koristiti USB diskove za snimanje
HD programa.
Nemojte iskljuèivate USB disk po vreme snimanja.
To može oštetiti disk.
Ukoliko ste isključili napojni kabl dok je neki tajmer za
USB snimanje aktivan, onda će taj tajmer biti otkazani.
Podržavaju se višestruke particije. Najviše dve
različite particije su podržane. Prva particija USB
diska koristi se za PVR ready odlike. Takođe, mora
biti formatirana kao primarna particija da bi se koristila
za PVR ready odlike.
Neki paketi striminga mogu da ne budu snimljeni
radi problema signala, pa nekad video se zaledi u
toku prikaza.
Dugmad za Snimanje, Puštanje, Pauza, Prikaz (za
dialog plej-liste) se ne mogu korisiti kada je teletekst
uključen. Ukoliko snimanje počinje od tajmera dok je
teletekst uključan, teletekst se automatski isključuje.
Korišćenje teleteksta je takođe onemogućeno kad je
u toku snimanje ili reprodukcija.
Snimanje Tajmšifting
Pritisnite Pauza dok gledate neku emisiju da biste
prebacili na režim Tajmšifting. U režimu tajmšifting,
program je pauziran i u isto vrijeme sniman na
povezani USB disk.
Pritisnite Puštanje još jednom da biste gledali
pauzirani program od trenutka zaustavljanja. Pritisnite
taster OBUSTAVI da biste zaustavili tajmšifting i vratili
na prenos.
Tajmšift se ne može koristiti u radiju.
Ne možete koristiti brzo naprijed tajmšiftinga pre
prebacivanja naprijed reprodukcije preko opcije brzo
naprijed.
Instant Snimanje
Pritisnite Snimanje da biste poèeli snimati dogağaj
instantno dok gledate program. Možete pritisnuti
dugme Snimanje opet da biste snimili sljedeći
događaj u EPG-u. U ovom slučaju, OSD prikazaće
programirane događaje za snimanje. Pritisnite
Obustavi da biste otkazali instant snimanje.
Ne možete prebaciti se na stanice ili gledati
Pretraživača medija tokom snimanja. Tokom snimanja
programa ili tokom tajmšiftinga, pojaviće se poruka
upozorenja ukoliko brzina vašeg USB uređaja nije
dovoljna.
Gledanje Snimljenih Programa
Izaberite Snimci iz menija Pretraživač Medija.
Odaberite snimku sa liste (ukoliko je neka ranije
snimljena). Pritisnite tipku OK kako biste vidjeli Opcije
Reprodukcije. Izaberite opciju i pritisnite OK.
Napomena: Gledanje glavnog menija i stavke menija nisu
dostupne tokom prikazivanja.
Pritisnite Obustavi da biste zaustavili prikazivanje i
da biste se vratili u Snimke.
Sporo Unapred
Ukoliko pritisnete Pauza dok gledate snimljene
programe, odlika sporo unaprijed će biti dostupna.
Možete koristiti Brzo Naprijed idete sporo unaprijed.
Uzastopno pritiskanje dugmeta Brzo Naprijed mijenja
brzino sporog napredovanja.
Konguracija Snimanja
Odaberite stavku Konguracija snimanja u meniju
Pretraživač Medija>Postavke da biste kongurirali
podešavanja snimanja.
Formatiranje Diska: Možete korisiti odliku Formatiraj
Disk biste formatirate povezani USB disk. Da bi
koristili odliku Formatiraj Disk, potreban vam je PIN.
Napomena: Tvornički PIN može biti 0000 ili 1234. Ako ste
postavili PIN (traži se ovisno o izabrane zemlje) tokom Prve
Instalacije, unesite PIN koji ste izabrali.
VAŽNO: Formatiranje USB drajva će obrisati SVE
podatke na njemu i njegov sistem fajlova postat će
FAT32. U najviše slučaja greške rada biće popravljene
nakon formatiranja, ali vi gubite SVE podatke.
Ukoliko se na ekranu prikaže „Učitavanje USB diska
je presporo“ dok počinjete snimanje, pokušajte
restartovati snimanje. Ukoliko još dobijate istu grešku,
moguće je da vaš USB disk ne zadovoljava zahtjeve
brzine. Povežite drugi USB disk.
Meni Pregledač Medija
Možete puštati slike, muziku ili lmove snimljene
na USB disku preko negovog povezivanja sa TVom. Povežite USB na jednog od USB ulaza sa
strane vašeg TV-a. Pritiskom na MENU dok ste
Page 57

Bosanski - 56 -
u Pretraživaču Medija, dobijete pristup opcijama
Menija Slika, Zvuk i Postavke. Još jednim pritiskom
na MENU izlazite iz tog ekrana. Parametre svog
Pretraživača Medija možete podesiti pomoću menija
Postavke.
Rad Režima Petlja/Miješano
Otpočeti reprodukciju sa
Reprodukcija i aktivirati
Svi fajlovi sa liste će biti
reproducirani neprekidno u
originalnom poretku.
Otpočeti reprodukciju sa OK i
aktivirati
Isti fajl će biti neprekidno
reproduciran (ponovno).
Otpočeti reprodukciju sa
Reprodukcija i aktivirati
Svi fajlovi sa liste će biti
reproducirani prema
slučajnom redoslijedu.
Otpočeti reprodukciju sa
Reprodukcija i aktivirati ,
Svi fajlovi sa liste će biti
reproducirani prema istom
slučajnom redoslijedu.
CEC i CEC RC Passthrough
Ova funkcija omogućava kontrolu preko daljinskog
vašeg TV-a iznad CEC-omogućenih uređaja koji su
povezani na vaš TV preko HDMI ulaze.
Opcija CEC u meniju Sistem>Opcije>Više treba
najprije biti postavljena na Omogućeno. Pritisnite
dugme Izvor i izaberite HDMI ulaz povezanog CEC
uređaja iz menija Lista Izvora. Nakon povezivanja
CEC izvornog uređaja, on će biti prikazan u meniju
izvora svojim imenom umesto ime povezanog HDMI
porta (na pr.DVD plejer, Recorder 1 itd.).
Daljinski TV-a automatski može izvršavati glavne
funkcije nakon izbora povezanog HDMI izvora.
Kako biste ovo okončali i opet kontrolirali TV
pomoću daljinskog upravljača, pritisnite Quick
Menu na daljinskom upravljaču, označite CEC
RC Passthrough i odaberite Isključeno tako što
ćete pritisnuti lijevu ili desnu tipku. Ova odlika se
takođe može omogućiti ili onemogućiti u meniju
Sistem>Opcije>Više.
TV takođe podržuje odliku ARC (Audio Return
Channel). Ovo je zvučna veza namjenjena da zamjeni
ostale kablove među TV-a i audio sistema (A/V
prijemnik ili sistem zvučnika).
Tokom aktivnog ARC-a, TV ne ušutkuje automatski
ostale audio izlaze. Zbog toga morate ručno smanjiti
zvuk TV-a do nule ako želite slušati zvuk jedino sa
povezanog audio izvora (isto kao ostali optički ili koaksijalni digitalni audio izlazi). Ako želite promijeniti
jačinu zvuka povezanog uređaja, trebate izabrati taj
uređaj iz liste izvora. U tom slučaju, tasteri zvuka su
usmjereni na povezani audio uređaj.
Napomena: ARC je podržan jedino putem HDMI1 ulaza.
kontrola Zvučnog Sistema
Omogućava korišćenje zvučnog pojačala/prijemnika
sa TV-om. Jačina zvuka se može kontrolisati preko
daljinskog TV-a. Da biste aktivirali ovu odliku, u
meniju Sistem>Opcije>Više postavite opciju Zvučnici
na Pojačalo. Zvučnici TV-a ću biti ušutkani i zvuk
gledanog izvora biće dostavljen sa strane povezanog
zvučnog sistema.
Napomena: Audio uređaj treba podržavati odliku "kontrola
audio sistema" i opcija CEC treba biti postavljena na
Omogućena.
E-Priručnik
Možete naći korisnička uputstva u E-priručniku.
Za upotrebu e-priručnika, pritisnite Info dok je glavni
meni prikazan na ekranu ili pritisnite Brzi meni te
odaberite Informativna Brošura te pritisnite OK.
Izaberite kategoriju preko tastera navigacije. Svaka
kategorija ima različite naslove. Izaberite naslov i
pritisnite OK da biste počeli.
Za zatvaranje E-priručnika pritisnite taster Exit ili
Menu.
Napomena: Sadržaj E-priručnika može varirati u zavisnost
od modela.
Page 58

Bosanski - 57 -
Sadržaj TV Menija
Sistem - Sadržaj Menija Slike
Režim
Možete promeniti mod slike prema vašim željama ili zahtjevima. Režim slike se može
podesiti na neku od sledeæih opcija: Kino, Igre, Sport, Dinamički i Prirodni.
Kontrast
Prilagođuje svijetle i tamne vrijednosti ekrana.
Svjetlost
Prilagođuje vrijednosti svjetlosti ekrana.
Oštrina
Podešava vrijednost oštrine za objekte prikazane na ekranu.
Boja
Podešava vrijednost boje, prilagođavajući boje.
Ušteda Energije
Za postavljanje Uštede Energije na Uobičajeno, Minimalno, Srednje, Maksimalno,
Automatski, İsključenje Ekrana ili Isključeno.
Napomena: Dostupne opcije se mogu razlikovati u odnosu na izabrani Režim.
Pozadinsko
Osvjetljenje
Ova postavka služi za upravljanje razinom pozadinskog osvjetljenja. Funkcija
pozadinskog svjetla neće biti aktivna ako je Ušteda Energije postavljena na bilo koju
drugu opciju osim Uobičajeno.
Napredne Postavke
Dinamični
Kontrast
Možete promjeniti razmjer Dinamičkog kontrasta po želji.
Smanjenje Šuma
Ako je signal slab i ako slika ima šumove, koristite Opciju Redukcija Šuma da biste
redukovali iznos šuma.
Temperatura Boje
Postavlja vrijednost željene temperature boje. Dostupne opcije su: Hladni, Normalni,
Topli i Uobičajeni.
Bijela Tačka
Ukoliko je Ton boje postavljen na Uobičajeni, ova postavka će biti dostupna. Pojačajte
"toplotu" ili "hladnoću" slike upotrebom desne ili lijeve tipke.
Zumiranje Slike
Postavite željeni formati veličine slike.
Režim Filma
Filmovi se snimaju s razlièitom brzinom izmjene slika nego televizijski programi. Uključite
ovu opciju na „automatski“ kada gledate lmove, da biste jasno vidjeli scene sa brzim
kretanjem.
Ton Kože
Nijansa kože se može mijenjati između -5 i 5.
Nijansa Boje
Podesite željeni ton boje.
HDMI puni raspon
Ako gledate iz HDMI izvora, ova osobina će biti vidljiva. Možete ga koristiti da povećate
crnoću slike.
Pozicija PC-a
Pojavljuje se jedino kada je izvor postavljeni na VGA/PC.
Auto Namještanje
Automatski optimizuje prikaz. Pritisnite OK za optimizaciju.
H Pozicija
Ova stavka služi za pomicanje slike horizontalno udesno ili ulijevo na ekranu.
V Pozicija
Ova stavka služi za pomicanje slike vertikalno prema vrhu ili prema dnu ekrana.
Takt Tačaka
Podešavanjem takta točaka ispravljaju se smetnje koje se pojavljuju u vertikalnim prugama
u intenzivnim prikazima točaka kao u proračunskim tablicama, odlomcima ili u tekstu s
manjim fontovima.
Faza
U zavisnosti od izvora (kompjuter i td), možete imati nejasnu ili šumnu sliku na ekranu.
Možete koristiti fazu da bi dobili bolju sliki preko probe.
Resetovanje
Resetuje postavke slike na fabrički podešene vrijednosti. (Osim u režimu Igre)
U VGA režimu (PC) neki predmeti menija Slike neću biti dostupni. Umjesto toga, postavke VGA režima bit će dodane u Postavke
Slike dok je u PC režimu.
Page 59

Bosanski - 58 -
Sistem - Sadržaj Menija Zvuka
Glasnoća
Podešava jačinu zvuka.
Ekvalizator
Postavlja mod ekvilajzera. Postavke po izboru se mogu postaviti jedino u režimu
Korisnik.
Balans
Prilagođuje sa kog zvučnika dolazi zvuk.
Slušalice
Podešava jaèinu zvuka u slušalicama.
Pobrinite se da je zvuk slušalica prije njihove upotrebe potavljen na nisku glasnoću
kako biste spriječili oštećenje sluha.
Režim Zvuka
Možete izabrati režim zvuka (ako izabrani kanal to podržava).
Avl (Aog Automatsko
Ograničavanje
Glasnoće)
Postavlja zvuk da bi se dobila ksna razina izlaza između programa.
Slušalice/Izlaz Linije
Pri povezivanjem spoljašneg pojačala na vaš TV pomoću džeka slušalica, možete
postaviti ovu opciju na Izlaz linije. Ako ste povezali slušalice na vaš TV, postavite
opciju na Slušalice.
Pobrinite se da je ova stavka prije korištenja slišalica postavljena na Slušalice. Ako
je postavljena na Liniju izlaza, izlaz slušalica će biti namješten na maksimum te bi to
moglo uzrokovati oštećenje sluha.
Dinamički Bas
Uključuje ili isključuje dinamičkog basa.
Saraund Saund
Režim Surround zvuka može da se Uključi ili Isključi.
Digitalni Izlaz
Podešava tip zvuka audio izlaza.
Page 60

Bosanski - 59 -
Sistem - Sadržaj Menija Opcija
Uslovni Pristup
Kontroliše uslovne pristupne module kada postoje.
Jezik
Možete postaviti različiti jezik u zavisnosti od emitera i zemlje.
Roditeljski
Umetnite pravilnu lozinku da promjenite roditeljske postavke. U ovom meniju
jednostavno možete prilagoditi Zaključavanje Menija, Zaključavanje po Uzrasti,
Zaključavanje za Djecu ili Smjernice. Možete postaviti i novi PIN ili promijeniti
fabrički CICAM PIN, koristeći odgovarajuće opcije.
Napomena: Neke opcije menija nisu dostupne ovisno od izabrane zemlje tokom Prve Instalacije. Tvornički
PIN može biti 0000 ili 1234. Ako ste postavili PIN (traži se ovisno o izabrane zemlje) tokom Prve Instalacije,
unesite PIN koji ste izabrali.
Tajmeri
Postavlja tajmera da isključi TV nakon nekog vrijemena. Podešava tajmere za
izabrane programe.
Datum/Vrijeme
Podešava datum i vrijeme.
Izvori
Omogućava ili onemogućava opcije izabranog izvora.
Pristupačnost
Prikazuje opcije pristupačnosti TV-a
Za Osobe sa
Oštećenim
Sluhom
Omogućuje bilo kakvu specijalnu odliku poslatu sa strane emitera.
Audio Opis
Za osobe oštećenog vida i za slijepe bit će puštena narativna traka. Pritisnite OK
da biste vidjeli sve dostupne opcije menija Audio Opis. Ovo je moguće jedino ako
emiter to podržuje.
Napomena: Odlika audio opisa neće biti dostupna tokom snimanja ili tajmšiftinga.
Više
Prikazuje druge opcije podešavanja televizora
Istjek Menija
Menja vreme prikazivanja ekrana menija.
Nadogradnja
Softvera
Obezbjeđuje da TV ima zadnjeg softvera. Pritisnite OK da vidite opcije menija.
Verzija Aplikacije
Prikazuje trenutnu verziju softvera.
Režim Titlovi
Ova se opcija koristi za odabit titlova koji se pojavljuju na ekranu (DVB titl/ Teleteksta
titl) ako su oba dostupna. Osnovna vrijednost je DVB titl. Ova osobina je dostupna
samo za Norvešku.
Automatsko
İsključivanje
Televizora
Postavlja željeno vrijeme nakon kojeg TV prelazi u mirovanje kada se ne koristi.
Režim Radnja
Izaberite ovaj režim za pokazivanje radnje. Kada je režim Radnja aktiviran, moguće
je da neke stavke u meniju TV-a ne budu dostupne.
Režim
Startovanje
Ova postavka konguriše preference režima startovanja. Dostupne su opcije
Posljednje stanje i Pripravnost.
CEC
Preko ove postavke možete u cijelosti omogućiti ili onemogućiti CEC funkciju.
Pritisnite tipku za lijevo ili desno da omogućite ili onemogućite ovu odliku.
CEC Auto
Uključivanje
Ova funkcija omogućava da se konektovani HDMI-CEC kompatibilni uređaj uključi na
TV-u i automatski prebaci na svoj izvor ulaza. Pritisnite tipku za Lijevo ili Desno da
omogućite ili onemogućite ovu odliku.
Zvučnici
Da bi mogli čuti zvuk Tv-a sa povezanog kompatibilnog audio uređaja, postavite na
Pojačalo. Možete koristiti daljinski upravljač TV- a da bi upravljavali jačinom zvuka
audio uređaja.
Page 61

Bosanski - 60 -
Sadržaj Menija Instalacije
Automatsko
Skeniranje
Kanala
Prikazuje opcije automatskog štelovanja. Digitalna Antena: Pretražuje i èuva antenske DVB
stanice. Digitalan Kabl: Pretražuje i čuva kablovkse DVB stanice. Analogan: Pretražuje i
čuva analogne stanice.
Ručno
Pretraživanje
Kanala
Ova funkcija se može koristiti za direktan unos emitera programa.
Skeniranje
Mrežnih
Kanala
Traži povezane kanale u sistemu emitovanja. Digitalna Antena: Traženje antenskih kanala.
Digitalan kabl: Traženje antenskih kanala.
Analogno
Fino
Podešavanje
Možžete koristiti ove postavke za no podešivanje analognih kanala. Ovo nije dostupno
ukoliko nema snimljenih analognih kanala.
Postavke
İnstalacije
Prikazuje se meni postavki instalacije Pretraživanje u Mirovanju (Opcionalno): TV će tražiti
nove ili nestale kanale dok je u mirovanju. Sve novonađene kanale biću pokazane.
Brisanje Liste
Usluga
Ova postavka služi za brisanje pohranjenih kanala. Ova Postavka Vidljiva je Samo ako je za
Državu odabrana Danska, Švedska, Norveška ili Finska.
Izaberite
Aktivnu Mrežu
Ova postavka vam omogućava da odaberete kanale u okviru odabrane mreže koji će se
navesti u listi kanala. Ova osobina je dostupna samo za Norvešku.
Prva
İnstalacija
Briše sve sačuvane kanale i postavke, vraća TV na fabričke postavke.
Page 62

Bosanski - 61 -
Općenito o Korištenju TV
Korištenje Liste Kanala
Televizor sortira sve memorisane stanice u listi
kanala. U ovu listu kanala možete da unosite izmjene,
da podešavate omiljene kanale ili da aktivirate
stanice koje treba da se prikažu, koristeći opcije
Liste kanala. Pritisnite tipku OK/TV da otvorite Listu
kanala. Možete ltrirati navedene kanale tako što
ćete pritisnuti Plavu tipku ili otvoriti meni Uredi Listu
Kanala tako što ćete pritisnuti Zelenu tipku ako želite
unijeti napredne izmjene u trenutnu listu.
Upravljanje Omiljenim Listama
Mmožete kreirati četiri različite liste svojih omiljenih
kanala. Otvorite Listu Kanala u glavnom meniju ili
pritisnite Zelenu tipku dok je Lista Kanala prikazana
na ekranu kako biste otvorili meni Uredi Listu Kanala.
Odaberite željeni kanal sa spiska. Pritiskom na Žutu
tipku možete odabrati više kanala. Potom pritisnite
tipku OK da otvorite meni Opcije Uređivanja Kanala
i odaberite opciju Dodaj/Ukloni Omiljene kanale.
Ponovo pritisnite tipku OK. Postavite željenu opciju
liste na Uključeno. Odabrani kanal(i) će biti dodan(i)
na listu. Da uklonite kanal ili kanale sa liste omiljenih
kanala, pratite iste korake i namjestite željenu opciju
liste na Isključeno.
Možete koristiti funkciju Filter u meniju Uredi listu
Kanala da ltrirate kanale u Listi Kanala zauvijek te
u skladu sa svojim preferencijama. Upotrebom opcije
Filter, možete odabrati da jedna od vaših omiljenih
lista bude prikazana svaki put kada otvorite Listu
Kanala. Funkcija ltriranja u meniju Lista Kanala
ltrira samo trenutno prikazanu Listu Kanala kako bi
pronašla kanal i uskladila se s njim. Ove promjene se
neće zadržati kada sljedeći put otvorite Listu Kanala.
Konguriše Roditeljske Postavke
Opcije menija Roditeljska Kontrola se mogu koristiti da
se korisnicima zabrani gledanje određenih programa
i upotreba menija. Ove postavke se nalaze u meniju
Sistem>Opcije>Roditeljska Kontrola.
Za prikazivanje opcija menija roditeljske blokade,
neophodno je uneti PIN broj. Nakon upisanja
ispravnog PIN-a, pokazuje se meni Roditeljska
Kontrola.
Zaključavanje Menija: Ove postavke omogućavaju ili
onemogućavaju pristup svim menijima ili instalacijskim
menijima TV-a.
Blokiranje po Uzrasti: Kada se podesi, ova opcija
uzima informacije o uzrastu iz emisija i ako je dotični
nivo uzrasta onemogućen, onemogućava pristup
programima.
Napomena: Ako je zemlja tokom Prve Instalacije postavljena
na Francuska, Italija ili Austrija, Blokada po uzrastima će biti
automatski postavljena na 18.
Blokada za Decu: Kada je Blokada za djecu
AKTIVIRANA, TV aparat se može kontrolisati samo
putem daljinskog upravljača. Dugmad kontrolne ploče
ne radi u ovom režimu.
Podešavanje PIN-a: Deniše novi PIN broj:
Default CICAM PIN: Ova opcija će se pojaviti kao
posivjela ako nijedan CI modul nije ubačen u CI
slot TV-a. Možete promijeniti fabrički PIN CI CAM-a
koristeći ovu opciju.
Napomena: Tvornički PIN može biti 0000 ili 1234. Ako ste
postavili PIN (traži se ovisno o izabrane zemlje) tokom Prve
İnstalacije, unesite PIN koji ste izabrali.
Neke opcije nisu dostupne ovisno od izabrane zemlje tokom
Prve Instalacije.
Elektronički Programski Vodič (EPV)
Neki kanali praćaju informaciju oko rasporedu njihovih
emisija. Kako biste vidjeli meni Programski Vodič,
pritisnite EPG.
Postoje tri različite vrste rasporeda koje su dostupne
- Raspored vremenske skale, Raspored spiska i
Sada/Sljedeće raspored- Da prelazite između njih,
slijedite uputstva u donjem dijelu ekrana.
Vremenski Raspored
Zoom (Žuto Dugme): Pritisnite Žutu tipku da biste
vidjeli događaje u dužem intervalu.
Filter (Plavo Dugme): Prikazuje opcije ltriranja.
Izaberite Žanr (Tipka Tiltova) Prikazuje meni Izaberi
žanr. Koristeći ovu funkciju možete pretraživati bazu
podataka programskog vodiča prema željenom žanru
ili imenu. Informacija dostupna u vodiču prigrama
bit će pretražena i rezultati koji odgovaraju vašim
kriterijama bit će označeni.
Opcije (Dugme OK): Prikazuje opcije događaja.
Detalji Događaja (Tipka İnfo): Prikazuje detaljnu
informaciju za izabrane događaje.
Sljedeći/Prethodni dan (program +/- tipke):
Prikazuje događaje iz prethodnog ili sljedećeg dana.
Pretraga (tipka Text): Prikazuje meni “Pretraživanje
vodiča”.
Sada (tipka Swap): Prikazuje trenutnog događaja na
označenom kanalu
Snimaj/Stop (tipka Snimanje): TV počinje snimati
izabrani događaj. Možete ga opet pritisnuti da
zaustavite snimanje.
VAŽNO: Povezati USB disk na TV jedino kada je TV isključan.
Zatim trebali bi uključiti TV da biste omogućili odliku snimanja.
Napomena: Prelaženje na drugu emisiju ili izvor nije dostupno
u toku snimanja.
Popisni Raspored(*)
(*) U ovoj opciji će biti navedeni samo događaji označenih
kanala.
Preth. Vremenski Odsječak (Crvena tipka) Prikazuje
programe iz prethodnog vremenskog isječka.
Sljedeći/Prethodni dan (Program +/- tipke):
Prikazuje događaje iz prethodnog ili sljedećeg dana.
Page 63

Bosanski - 62 -
Detalji Događaja (tipka Info): Prikazuje detaljnu
informaciju za izabrane događaje.
Filter (tipka text) Prikazuje opcije ltriranja.
Sljedeći Vremenski Odsječak (Zelena tipka):
Prikazuje programe iz sljedećeg vremenskog isječka.
Opcije (dugme OK): Prikazuje opcije događaja.
Snimaj/Stop (Tipka Snimanje): TV počinje snimati
izabrani događaj. Možete ga opet pritisnuti da
zaustavite snimanje.
VAŽNO: Povezati USB disk na TV jedino kada je TV isključan.
Zatim trebali bi uključiti TV da biste omogućili odliku snimanja.
Napomena: Prelaženje na drugu emisiju ili izvor nije dostupno
u toku snimanja.
Sada/Slijedi Raspored
Opcije (dugme OK): Prikazuje opcije događaja.
Detalji Događaja (tipka Info): Prikazuje detaljnu
informaciju za izabrane događaje.
Filter (Plavo dugme): Prikazuje opcije ltriranja.
Snimaj/Stop (Tipka Snimanje): TV počinje snimati
izabrani događaj. Možete ga opet pritisnuti da
zaustavite snimanje.
VAŽNO: Povezati USB disk na TV jedino kada je TV isključan.
Zatim trebali bi uključiti TV da biste omogućili odliku snimanja.
Napomena: Prelaženje na drugu emisiju ili izvor nije dostupno
u toku snimanja.
Opcije Događaja
Koristite navigacijske tipke da označite događaj i
pritisnite OK da se prikaže meni Opcije Događaja.
Dostupne su sljedeće opcije.
Odabir kanala: Koristeći ovu opciju možete prebaciti
označeni kanal.
Snimaj/Izbriši snim. Tajmer: Izaberite opciju
„Snimaj“ i pritisnite dugme OK. Ako će se događaj
prenositi u budućnosti, bit će dodad na listu tajmera
koji će se snimiti. Ako se izabrani događaj emituje u
tom trenutku, snimanje će odmah početi.
Da biste otkazali postavljeno snimanje, označite taj
događaj i pritisnite dugme OK i odaberite opciju Izbriši
Snimak Tajmer: Snimanje će biti otkazano.
Namjesti timer na događaj / izbriši tajmer sa
događaja: Nakon izbora programa u meniju
EPG, pritisnite OK. Odaberite „Postavi tajmer na
događaj“ i pritisnite OK. Možete postaviti tajmer za
buduće događaje. Za otkazivanje već postavljenog
podsjetnika, označiti taj program i pritisniti OK. Nakon
toga izaberite opciju „Briši tajmer“. Tajmer će biti
otkazan.
Napomene: Ne možete promeniti na bilo koji drugi kanal ili
izvor dok je u toku aktivno snimanje ili tajmer na tekućem
kanalu.
Nije moguće postaviti tajmer ili tajmer snimanja za dva ili
više pojedinačnih događaja u istom vremenskom intervalu.
Teletekst Usluga
Pritisnite tipku Text za ulaz. Pritisnite još jednom za
aktivaciju mješanog moda, šta omogućava u isti mah
vidjeti teletekst stranicu i TV emisiju. Pritisnite još jednom
za izlaz. Ako je dostupno, odjeljci u stranici teleteksta
postaju označeni različitim bojama i mogu se birati
pritiskanjem obojenih tipki. Slijedite uputstva sa ekrana.
Digitalni Teletekst
Pritisnite Text da biste vidjeli informacije digitalnog
teleteksta. Koristite tipke u boji, tipke kursora i tipku OK.
Način rukovanja razlikuje se ovisno o sadržaju digitalnog
teleteksta. Slijedite uputstva sa ekrana digitalnog
teleteksta. Kada se pritisne tipka Text, TV aparat se vraća
na televizijski prenos.
Ažuriranje Softvera
Vaš TV može automatski tražiti i ažurirati softver preko
Antenskog/Kablovskog signala.
Traženje Novijih Verzija Softvera Preko
Korisničkog İnterfejsa
Na glavnom meniju izaberite Sistem>Opcije i onda
Više. Idite do Nadogradnja softvera i pritisnite OK.
U meniju Opcije Nadogradnje odaberite Skeniranje
za Nadogradnju i pritisnite OK da tražite novu
nadogradnju softvera.
Ako se pronađe novija verzija, on započinje njeno
preuzimanje. Nakon kraja preuzimanja, da bi nastavili
sa restartiranjem potvrdite pitanje oko restartiranja
TV-a pritiskom na OK.
Pretraživanje u 3:00 ujutro i režim ažuriranja
Ako je TV povezan na antenski signal i ako je
Automatsko Skeniranje Uključeno u meniju Opcije
Nadogradnje, vaš će TV tražiti nove nadogradnje u
3:00 sati. Ukoliko novi softver je pronađen i uspješno
preuzet, on će biti instalirani tokom slijedećeg
uključivanja.
Napomena: Ne isključujte napojni kabl kada LED trepće
tokom procesa restartiranja. Kad se TV ne upali nakon
ažuriranja, isključiti ga iz struje, sačekati 2 minuta i onda ga
opet uključiti.
Page 64

Bosanski - 63 -
Rješavanje Problema i Savjeti
TV se ne upaljuje
Osigurite se da je utikač bjezbedno utaknut u zid.
Proverite jesu li baterije prazne. Pritisnite taster
Napajanje na TV-u.
Loša slika
• Jeste li odabrali tačan TV sistem?
• Nizak nivo signala može izazvati iskrivljenje slike.
Provjerite dostup antene.
• Proverite jeste li unijeli tačnu frekvenciju kanala ako
ste radili ručno štelovanje.
• Kvalitet slike može degradirati ukoliko ste
istovremeno priključili dva spoljna uređaja na TV.
U tom slučaju, odbacite jedan od spoljnih uređaja.
Nema slike
• To znači da TV ne prima nikakav prijenos. Također,
provjerite je li odabran ispravan izvor.
• Je li antena ispravno priključena?
• Je li kabel antene oštećen?
• Koriste li se odgovarajući utikači za priključivanje
antene?
• Ako niste sigurni, potražite savjet na mjestu kupnje.
Nema zvuka
• Provjerite jeli TV ušutkan. Pritisnite taster Mute ili
pojačajte zvuk za provjeru.
• Zvuk dolazi samo iz jednog zvučnika. Provjerite
ravnotežu u meniju Zvuk.
Daljinski upravljač - ne radi.
• Baterije možda su prazne. Zamijenite baterije.
Izvori ulaza – ne mogu biti izabrani
• Ako ne možete odabrati ulazni izvor, možda nijedan
uređaj nije priključen. U suprotnome,
• Provjerite AV kablove i konekcije ako se pokušavate
prebaciti na izvor ulaza za povezani uređaj.
Snimanje nije moguće
Da biste snimili program, morate prvo povezati USB
disk na vašem TV-u dok je TV isključen. Zatim trebali
bi uključiti TV da biste omogućili odliku snimanja.
Ukoliko ne možete snimati, isključite TV I onda ponovo
umetnite USB.
USB je suviše spor
Ukoliko se na ekranu prikaže poruka „učitavanje USB
diska je presporo“ dok počinjete snimanje, pokušajte
restartovati snimanje. Ukoliko još dobijate istu grešku,
moguće je da vaš USB disk ne zadovoljava zahtjeve
brzine. Povežite drugi USB disk.
PC-ulaz Tipični Režimi Prikazivanja
Sljedeća tabela je ilustracija nekih tipičnih režima
video prikaza. Moguće je da Vaš TV ne podržava
sve rezolucije.
Indeks Rezolucija Frekvencija
1 640x350 85Hz
2 640x400 70Hz
3 640x480 60Hz
4 640x480 66Hz
5 640x480 72Hz
6 640x480 75Hz
7 640x480 85Hz
8 800x600 56Hz
9 800x600 60Hz
10 800x600 70Hz
11 800x600 72Hz
12 800x600 75Hz
13 800x600 85Hz
14 832x624 75Hz
15 1024x768 60Hz
16 1024x768 66Hz
17 1024x768 70Hz
18 1024x768 72Hz
19 1024x768 75Hz
20 1024x768 85Hz
21 1152x864 60Hz
22 1152x864 70Hz
23 1152x864 75Hz
24 1152x864 85Hz
25 1152x870 75Hz
26 1280x768 60Hz
27 1360x768 60Hz
28 1280x768 75Hz
29 1280x768 85Hz
30 1280x960 60Hz
31 1280x960 75Hz
32 1280x960 85Hz
33 1280x1024 60Hz
34 1280x1024 75Hz
35 1280x1024 85Hz
36 1400x1050 60Hz
37 1400x1050 75Hz
38 1400x1050 85Hz
39 1440x900 60Hz
40 1440x900 75Hz
41 1600x1200 60Hz
42 1680x1050 60Hz
43 1920x1080 60Hz
44 1920x1200 60Hz
Page 65

Bosanski - 64 -
Kompatibilnost AV i HDMI Signala
Izvor
Podržani Signali
Dostupno
EXT
(SCART)
PAL O
SECAM O
NTSC4.43 O
NTSC3.58 O
RGB 50/60
Bočni AV
PAL O
SECAM O
NTSC4.43 O
NTSC3.58
S-VIDEO 50Hz (PAL)
S-VIDEO 60Hz (NTSC)
YPbPr
480i, 480p 60Hz O
576i, 576p 50Hz O
720p 50Hz,60Hz O
1080i 50Hz,60Hz O
HDMI1
HDMI2
480i, 480p 60Hz O
576i, 576p 50Hz O
720p 50Hz,60Hz O
1080i 50Hz,60Hz O
1080p
24Hz,
25Hz,
30Hz,
50Hz,
60Hz
O
(X: Nije dostupno, O: Dostupno)
U nekim slučajevima signal kod LCD TV aparata
možda neće biti pravilno prikazan. Uzrok tome
može biti nekonzistentnost sa standardima opreme
(DVD, STB prijemnik, itd.). Iskusite li takav problem,
kontaktirajte predstavnika i proizvođača opreme.
Page 66

Bosanski - 65 -
Podržani Formati Video Datoteka za USB Režim
Nastavak Video-kodek SPEC (Rezolucija) i Brzina Prijenosa
.dat, vob MPEG1/2
1080P@30fps - 40 Mb/s
.mpg, .mpeg
MPEG1/2,
MPEG4
.ts, .trp, .tp
MPEG1/2, H.264,
AVS, MVC
H.264: 1080Px2@30fps - 62.5 Mb/s, 1080P@60fps - 62.5 Mb/s MVC:
1080P@30fps - 62.5 Mb/s Drugo: 1080P@30fps - 40Mb/s
.mp4, .mov,
.3gpp, .3gp
MPEG1/2,
MPEG4, H.263,
H.264, lmski
JPEG
H.264: 1080Px2@30fps - 62.5 Mb/s, 1080P@60fps - 62.5 Mb/s Filmski JPEG:
640x480@30fps - 10 Mb/s Drugo: 1080P@30fps - 40 Mb/s
.avi MPEG1/2,
MPEG4,
Sorenson H.263,
H.263, H.264,
WMV3, Filmski
JPEG
.mkv MPEG1/2,
MPEG4, H.263,
H.264, WMV3,
Filmski JPEG
.asf Sorenson H.263,
H.264, WMV3,
Filmski JPEG
.v WMV3 1080P@30fps - 40 Mb/s
.swf RV30/RV40 1080P@30fps - 40 Mb/s
.wmv
Podržani Formati Datoteka sa Slikama za USB Režim
Slika Foto Rezolucija (Širina x Visina) Napomena
JPEG
Osnovna linija 15360x8640
Ograničenje maksimalne rezolucije ovisi o veličini
DRAM-a
Progresivna 1024x768
PNG
neprepletena 9600x6400
prepletena 1200x800
BMP 9600x6400
Page 67

Bosanski - 66 -
Podržani Formati Audio Datoteka za USB Režim
Nastavak
Audio Kodek Brzina Prijenosa Brzina Uzorkovanja
.mp3,
MPEG1/2 Sloj1 32Kb/s ~ 448Kb/s
16KHz ~ 48KHzMPEG1/2 Sloj2 8Kb/s ~ 384Kb/s
MPEG1/2 Sloj3 8Kb/s ~ 320Kb/s
.avi
MPEG1/2 Sloj1 32Kb/s ~ 448Kb/s
16KHz ~ 48KHzMPEG1/2 Sloj2 8Kb/s ~ 384Kb/s
MPEG1/2 Sloj3 8Kb/s ~ 320Kb/s
AC3 32Kb/s ~ 640Kb/s 32KHz, 44.1KHz, 48KHz
AAC, HEAAC 8KHz ~ 48KHz
WMA 128b/s ~ 320Kb/s 8KHz ~ 48KHz
WMA 10 Pro M0 < 192kb/s 48KHz
WMA 10 Pro M1 < 384kb/s 48KHz
WMA 10 Pro M2 < 768kb/s 96KHz
LPCM 64Kb/s ~ 1.5Mb/s 8KHz ~ 48KHz
IMA-ADPCM, MS-
ADPCM
384Kb/s 8KHz ~ 48KHz
G711 A/mu-law 64Kb/s ~ 128Kb/s 8KHz
.asf
MPEG1/2 Sloj1 32Kb/s ~ 448Kb/s
16KHz ~ 48KHzMPEG1/2 Sloj2 8Kb/s ~ 384Kb/s
MPEG1/2 Sloj3 8Kb/s ~ 320Kb/s
WMA 128b/s ~ 320Kb/s 8KHz ~ 48KHz
WMA 10 Pro M0 < 192kb/s 48KHz
WMA 10 Pro M1 < 384kb/s 48KHz
WMA 10 Pro M2 < 768kb/s 96KHz
.mkv, .mka
MPEG1/2 Sloj1 32Kb/s ~ 448Kb/s
16KHz ~ 48KHzMPEG1/2 Sloj2 8Kb/s ~ 384Kb/s
MPEG1/2 Sloj3 8Kb/s ~ 320Kb/s
AC3 32Kb/s ~ 640Kb/s 32KHz, 44.1KHz, 48KHz
AAC, HEAAC 8KHz ~ 48KHz
WMA 128b/s ~ 320Kb/s 8KHz ~ 48KHz
WMA 10 Pro M0 < 192kb/s 48KHz
WMA 10 Pro M1 < 384kb/s 48KHz
WMA 10 Pro M2 < 768kb/s 96KHz
VORBIS Do 48KHz
LPCM 64Kb/s ~ 1.5Mb/s 8KHz ~ 48KHz
IMA-ADPCM,
MS-ADPCM
384Kb/s 8KHz ~ 48KHz
G711 A/mu-law 64Kb/s ~ 128Kb/s 8KHz
FLAC < 1.6Mb/s 8KHz ~ 96KHz
.ts, .trp, .tp,
.dat, .vob,
.mpg, .mpeg
MPEG1/2 Sloj1 32Kb/s ~ 448Kb/s
16KHz ~ 48KHzMPEG1/2 Sloj2 8Kb/s ~ 384Kb/s
MPEG1/2 Sloj3 8Kb/s ~ 320Kb/s
AC3 32Kb/s ~ 640Kb/s 32KHz, 44.1KHz, 48KHz
EAC3 32Kb/s ~ 6Mb/s 32KHz, 44.1KHz, 48KHz
AAC, HEAAC 8KHz ~ 48KHz
LPCM 64Kb/s ~ 1.5Mb/s 8KHz ~ 48KHz
Page 68

Bosanski - 67 -
Nastavak
Audio Kodek Brzina Prijenosa Brzina Uzorkovanja
.wav
MPEG1/2 Sloj1 32Kb/s ~ 448Kb/s
16KHz ~ 48KHzMPEG1/2 Sloj2 8Kb/s ~ 384Kb/s
MPEG1/2 Sloj3 8Kb/s ~ 320Kb/s
LPCM 64Kb/s ~ 1.5Mb/s 8KHz ~ 48KHz
IMA-ADPCM,
MS-ADPCM
384Kb/s 8KHz ~ 48KHz
G711 A/mu-law 64Kb/s ~ 128Kb/s 8KHz
.3gpp, .3gp,
.mp4, .mov,
.m4a
MPEG1/2 Sloj3 8Kb/s ~ 320Kb/s 16KHz ~ 48KHz
AC3 32Kb/s ~ 640Kb/s 32KHz, 44.1KHz, 48KHz
EAC3 32Kb/s ~ 6Mb/s 32KHz, 44.1KHz, 48KHz
AAC, HEAAC 8KHz ~ 48KHz
VORBIS Do 48KHz
LPCM 64Kb/s ~ 1.5Mb/s 8KHz ~ 48KHz
IMA-ADPCM,
MS-ADPCM
384Kb/s 8KHz ~ 48KHz
G711 A/mu-law 64Kb/s ~ 128Kb/s 8KHz
.v
MPEG1/2 Sloj3 8Kb/s ~ 320Kb/s 16KHz ~ 48KHz
AAC, HEAAC 8KHz ~ 48KHz
.ac3
AC3 32Kb/s ~ 640Kb/s 32KHz, 44.1KHz, 48KHz
AAC, HEAAC 8KHz ~ 48KHz
.swf MPEG1/2 Sloj3 8Kb/s ~ 320Kb/s 16KHz ~ 48KHz
.ec3 EAC3 32Kb/s ~ 6Mb/s 32KHz, 44.1KHz, 48KHz
.rm, .rmvb, .ra
AAC, HEAAC 8KHz ~ 48KHz
LBR (kuhanje) 6Kb/s ~ 128Kb/s
8KHz, 11.025KHz,
22.05KHz, 44.1KHz
.wma, .wmv
WMA 128b/s ~ 320Kb/s 8KHz ~ 48KHz
WMA 10 Pro M0 < 192kb/s 48KHz
WMA 10 Pro M1 < 384kb/s 48KHz
WMA 10 Pro M2 < 768kb/s 96KHz
.webm VORBIS Do 48KHz
Podržani Formati Datoteka sa Titlom za USB Režim
Unutrašnji Titlovi
Nastavak Spremnik Kod za Titlove
dat, mpg, mpeg, vob MPG, MPEG DVD titl
ts, trp, tp TS DVB titl
mp4 MP4
DVD titl
UTF-8 obični tekst
mkv MKV
ASS
SSA
UTF-8 obični tekst
VobSub
DVD titl
Spojlašni Titlovi
Nastavak Analizator Titlova Napomena
.srt Subrip
.ssa/ .ass SubStation Alpha
.smi SAMI
.sub
SubViewer
MicroDVD
DVDSusbtitleSystem
SubIdx (VobSub)
SubViewer, samo verzije 1.0
i 2.0
.txt TMPlayer
Page 69

Bosanski - 68 -
Podržane DVI Rezolucije
Kod priključivanja uređaja napriključke vašeg TV-a koristeći kablove DVI ka HDMI (nisu isporučeni), vodite
se sljedećim podacima o rezoluciji.
56Hz 60Hz 66Hz 70Hz 72Hz 75Hz
640x400
þ
640x480
þ þ þ þ
800x600
þ þ þ þ þ
832x624
þ
1024x768
þ þ þ þ þ
1152x864
þ þ þ
1152x870
þ
1280x768
þ þ
1360x768
þ
1280x960
þ þ
1280x1024
þ þ
1400x1050
þ þ
1440x900
þ þ
1600x1200
þ
1680x1050
þ
1920x1080
þ
1920x1200
þ
Page 70

 Loading...