

Page 1

LET’S LIVE TOGETHER
INSTRUCTION MANUAL
HOME BAKERY
MODEL: BM1329
GB
Read this manual thoroughly before using and save it for future reference.
Page 2

2
IMPORTANT SAFEGUARDS
Before using the electrical appliance, the following basic precautions should always be followed:
1. Read all instructions
2. Before using check that the voltage of wall
outlet corresponds to the one shown on the
rating plate.
3. Do not operate any appliance with a damaged
cord or plug or after the appliance mal
functions, or is dropped or damaged in any
manner. Return appliance to manufacturer
or the nearest authorized service agent for
examination, repair or electrical or mechani
-
cal adjustment.
4. Do not touch hot surfaces. Use handles or
knobs.
5. To protect against electric shock do not
immerse cord, plugs, or housing in water or
other liquid.
6. Unplug from outlet when not in use, before
putting on or taking off parts, and before
cleaning.
7. Do not let cord hang over edge of table or hot
surface.
8. The use of accessory not recommended
by the appliance manufacturer may cause
injuries.
9. This appliance is not intended for used by
persons (including children) with reduced
physical, sensory or mental capabilities, or
lack of experience and knowledge, unless
they have been given supervision or instruction concerning use of the appliances by a
person responsible for their safety.
10. Children should be supervised to ensure that
they do not play with the appliance.
11. Do not place on or near a hot gas or electric
burner, or in a heated oven.
12. Extreme caution must be used when moving
an appliance containing hot oil or other hot
liquids.
13. Do not touch any moving or spinning parts of
the machine when baking..
14. Never switch on the appliance without properly placed bread pan filled ingredients.
15. Never beat the bread pan on the top or edge
to remove the pan, this may damage the
bread pan.
16. Metal foils or other materials must not be
inserted into the home bakery as this can give
rise to the risk of a fire or short circuit.
17. Never cover the home bakery with a towel or
any other material, heat and steam must be
able to escape freely. A fire can be caused if
it is covered by, or comes into contact with
combustible material.
18. Turn any control to OFF, then remove plug
from wall outlet.
19. Do not operate the appliance for other than
its intended use.
20. This appliance has been incorporated with a
grounded plug. Please ensure the wall outlet
in your house is well earthed.
21. This appliance is intended to be used in
household and similar applications such as:
– Staff kitchen areas in shops, offices and
other working environments;
– Farm houses;
– By clients in hotels, motels and other residential type environments;
– Bed and breakfast type environments.
22. The appliance is not intended to be operated
by means of an external timer or separate
remote-control system.
23. Do not use outdoors.
24. Save these instructions
HOUSEHOLD USE ONLY
Page 3
3
fig. 1
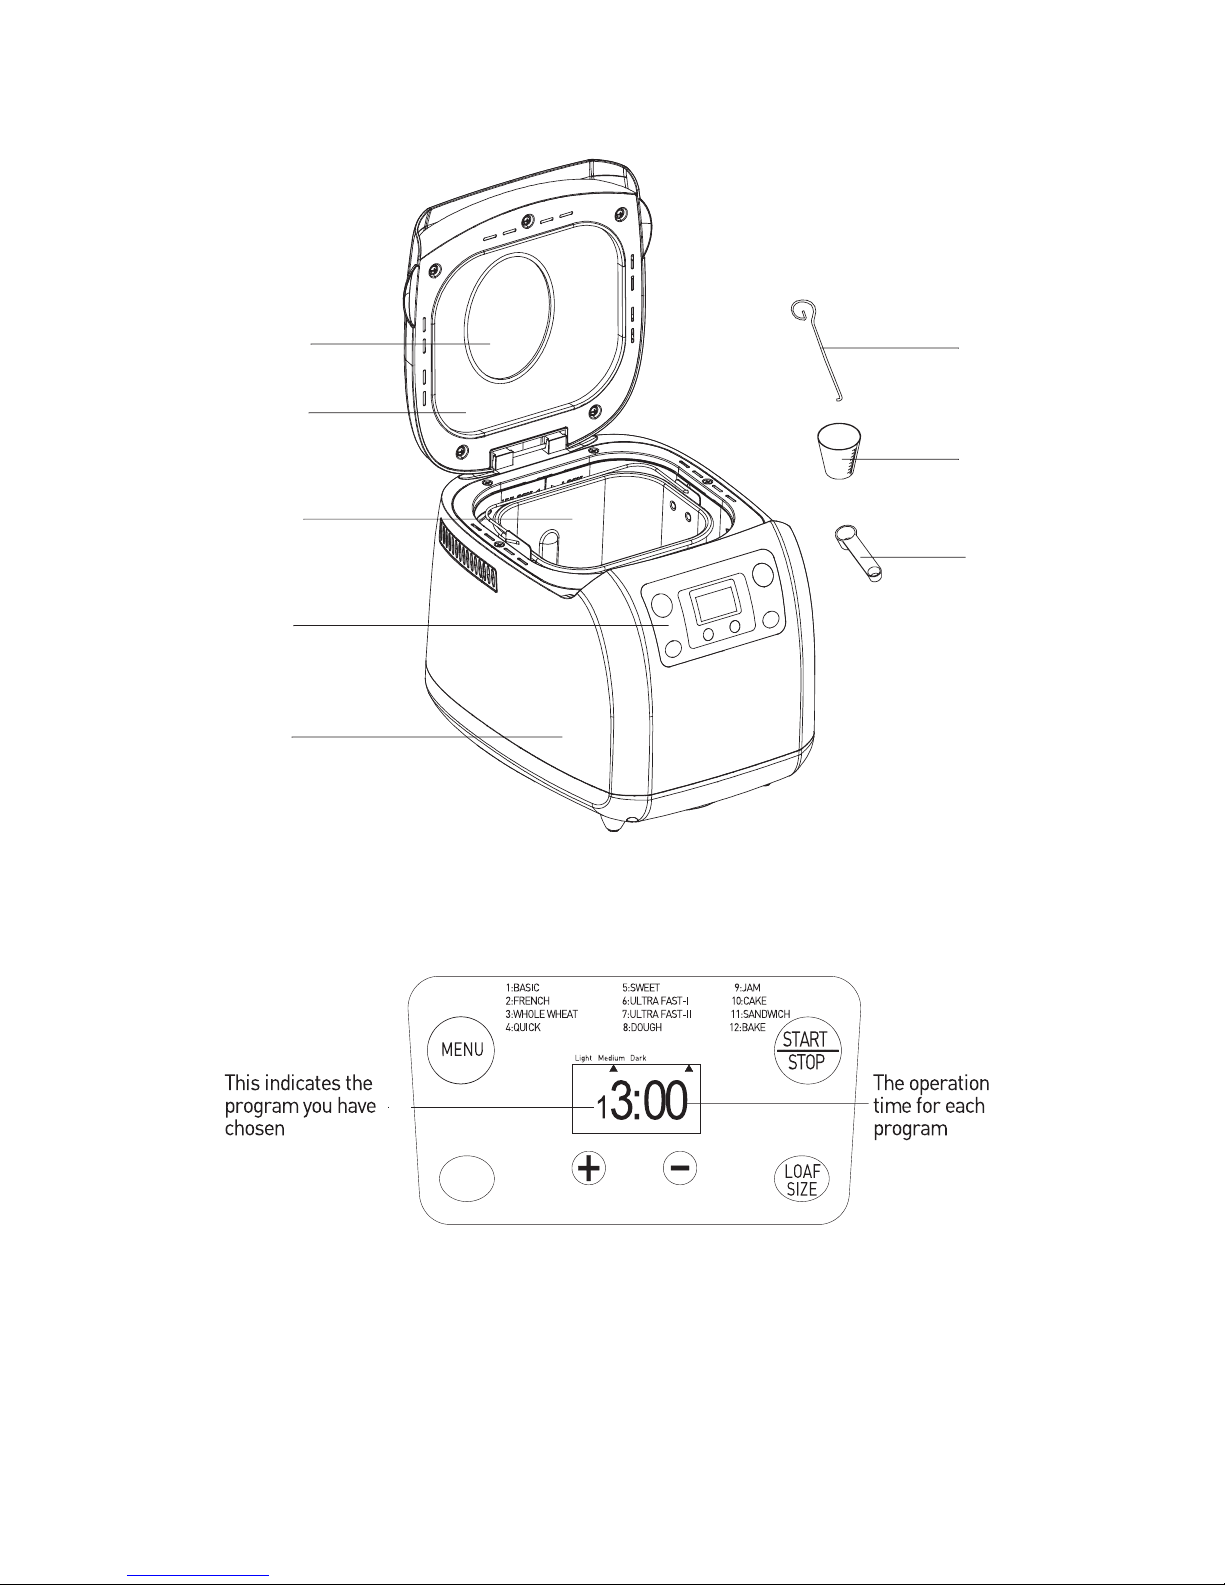
KNOW YOUR HOME BAKERY
Viewing window
Control panel
(see below)
Housing
Lid
Measuring
cup
Hook
Measuring
spoon
Bread pan
(with kneading
blade)
FUNCTION INTRODUCTION
700g/1000g
COLOR
Page 4

4
AFTER STARTUP
As soon as the home bakery is plugged the power supply, a beep will be heard and “1 3:00” appears
in the display. But the two dots between the “3” and “00” don’t flash constantly. The “1” is the default
program. The “2.0LB” and “Medium” are the default settings.
START / STOP
For starting, pausing and stopping the selected operation program.
To start a program, press the START/STOP button once. A short beep will be heard and the two dots
in the time display begin to flash and the program starts. Any other button is inactivated except the
START/STOP button after a program has begun.
To stop the program, press the START/STOP button for approx. 2 seconds, then a long beep will be
heard, it means that the program has been switched off.
PAUSE FUNCTION
After procedure starts up, you can press START/STOP button to interrupt at any time for less than 2s,
the operation will be paused but the setting will be memorized, the outstanding time will be flashed on
the LCD. Press START/STOP button again or within 10 min without pressing any button, the program
will continue.
MENU
It is used to set different programs. Each time it is pressed (accompanied by a short beep) the program
will vary. Press the button discontinuously, the 12 menus will be cycled to show on the LCD display.
Select your desired program. The functions of 12 menus will be explained below.
Program 1: BASIC
For white and mixed breads, it mainly consists of wheat flour or rye flour. The bread has a compact consistency. You can adjust the bread brown by setting the TEMP button.
Program 2: FRENCH
For light breads made from fine flour. French bread requires special timing and temperatures to
achieve that wonderful crispy, nicely browned crust. This is not suitable for baking recipes requiring
butter, margarine or milk.
Program 3: WHOLEWHEAT
Whole wheat bread is a yeast bread that is made with a significant portion of whole wheat flour (50% or
more), rather than with all white bread flour. Breads made from whole wheat flour are more nutritious
because the flour is milled from the entire wheat berry (including the bran and the germ). Using whole
wheat flour produces a bread that is brown to dark brown in color (when all whole wheat flour is used),
and the breads are more flavorful and healthful than breads made with refined white flours (even
though “lost” nutrients are added back into white flours).
Program 4: QUICK
(the loaf size is not applicable)
Kneading, rise and baking loaf within the time less than Basic bread. But the bread baked on this setting is usually smaller with a dense texture.
Program 5: SWEET
The Sweet Breads settings are for baking breads with high amounts of sugar, fats and proteins, all of
which tend to increase browning. Due to a longer phase of rising the bread will be light and airy.
Program 6: ULTRA FAST- I
(the loaf size can not be adjusted, only display the default loaf size of 2.0LB,
and the delay time is not applicable)
Page 5

5
The ultra fast-I setting allow you to prepare white loaf in a reduced time period. The ultra fast-I is for
2.0lb loaves. This rapid program does a great job by producing bread as good as the ones produced on
the standard three hour program in just an hour and thirty-eight minutes.
Program 7: ULTRA FAST- II
(the loaf size can not be adjusted, only display the default loaf size of 1.5LB,
and the delay time is not applicable)
As same as ultra fast-I, only is for 1.5lb loaves and the operation time is an hour and twenty-eight minutes.
Program 8: DOUGH
(the temperature and loaf size are not applicable)
Kneading and rise, but without baking, remove the dough and use for making bread rolls, pizza,
steamed bread, etc.
Program 9: JAM
(the temperature, loaf size and delay time are not applicable. Directly press START/
STOP button once to begin working)
The home bakery is a great cooking environment for homemade jams and chutneys. The paddle automatically keeps the ingredients stirring through the process, they make a wonderful complement to
freshly baked bread!
Program 10: CAKE
(the loaf size is not applicable)
A function that used the mixing action to ready a cake mixture from the requisite ingredients, Kneading,
rise and baking, but rise with soda or baking powder.
Program 11: SANDWICH
Kneading, rise and baking bread for making sandwich, for baking light texture bread with a thinner
crust.
Program 12: BAKE
(the loaf size and delay time are not applicable, but the operation time can be adjusted by pressing “+”or “–” button, press the “+”or “–” button once, the time will increase or decrease
1 minute. The adjusted time range is 10-60 minutes)
The bake setting is a bake only which can be used to increase the baking time on selected settings this
feature is very helpful to set jams and marmalades.
TEMP
With the button you can select Light, Medium or Dark color for the crust. This button is not applicable for
the some programs, the details refer to the corresponding program described in above section “MENU”.
LOAF/SIZE
Press this button to select the size of the bread: 1.5LB, 2.0LB, when you select the desired size, the
LCD will display the corresponding size. Please note the total operation time may vary with the different
loaf size. This button is not applicable for the some programs, the details refer to the corresponding
program described in above section “MENU”.
DELAY TIME“+”OR “”
If you want the appliance do not start working immediately you can use this button to set the delay time.
You must decide how long it will be before your bread is ready by pressing the
“+”or “–”
. Please note the
delay time should include the baking time of program. That is, at the completion of delay time, there is hot
bread can be serviced. At first the program and degree of browning must be selected, then pressing
“+”or
“–”
to increase or decrease the delay time at the increment of 10 minutes. The maximum delay is 13 hours.
Example: Now it is 8:30p.m, if you would like your bread to be ready in the next morning at 7 o’clock, i.e. in
10 hours and 30 minutes. Select your menu, color, loaf size then press the
“+”or “–”
to add the time until
10:30 appears on the LCD. Then press the START/STOP button to activate this delay program. You can see
the dot flashed and LCD will count down to show the remaining time. You will get fresh bread at 7:00 in
Page 6

6
the morning, if you don’t want to take out the bread immediately, the keeping warm time of 1hour starts.
Note: Do not use the timer function when working with easy spoiling ingredients such as eggs, milk,
cream or cheese.
KEEP WARM
Bread can be automatically kept warm for 1 hour after baking. During keeping warm, if you would like
to take the bread out, switch the program off by pressing the START/STOP button.
Note: The programs of DOUGH and JAM do not have the function of keep warm.
MEMORY
If the power supply has been interrupted during the course of making bread, the process of making
bread will be continued automatically within 10 minutes, even without pressing START/STOP button. If
the interruption time exceeds 10 minutes, the memory cannot be kept, you must discard the ingredients
in the bread pan and add the ingredients into bread pan again, and the home bakery must be restarted.
But if the dough has not entered the rising phase when the power supply breaks off, you can press the
START/STOP directly to continue the program from the beginning.
ENVIRONMENT
The machine may work well in a wide range of temperature, but there may be any difference in loaf size
between a very warm room and a very cold room. We suggest that the room temperature should be
within the range of 15 ºC and 34ºC.
WARNING DISPLAY:
1. If the display shows “HHH” after you have pressed START/STOP button, beeps will be heard, it
prompts that the temperature inside is still too high. Then the program has to be stopped. Open the lid
and let the machine cool down for 10 to 20 minutes.
2. If the display shows “LLL” after you have pressed START/STOP button, beeps will be heard, it means
that the temperature inside of bread pan is too low. You should place the home bakery into environment
of higher temperature for use (Except the program of BAKE).
3. If the display shows “EE0” after you have pressed START/STOP button, beeps will be heard, it means the
temperature sensor open circuit, press START/STOP button to stop beeps sound, please check the sensor
carefully by Authorized expert. If the display shows “EE1”, it means the temperature sensor short circuit.
BEFORE THE FIRST USE
The appliance may emit a little smoke and a characteristic smell when you turn it on for the first time.
This is normal and will soon stop. Make sure the appliance has sufficient ventilation.
1. Please check whether all parts and accessories are complete and free of damage.
2. Clean all the parts according to the section“Cleaning and Maintenance”.
3. Set the home bakery on BAKE mode and bake empty for about 10 minutes. Then let it cool down
and clean all the detached parts again.
4. Dry all parts thoroughly and assemble them, the appliance is ready for using.
Page 7
7
HOW TO MAKE BREAD
1. Place the bread pan in position, then turning it in clockwise until they click in correct position. Fix
the kneading blade onto the drive shaft. It is recommended to fill hole with heat-resisting margarine prior to place the kneading blade to avoid the dough sticking the kneading blade, also this
would make the kneading blade be removed from bread easily.
2. Place ingredients into the bread pan. Please keep to the order mentioned in the recipe. Usually the
water or liquid substance should be put firstly, then add sugar, salt and flour, always add yeast or
baking powder as the last ingredient.
Note: the maximum quantities of the flour and yeast which may be used refer to the recipe.
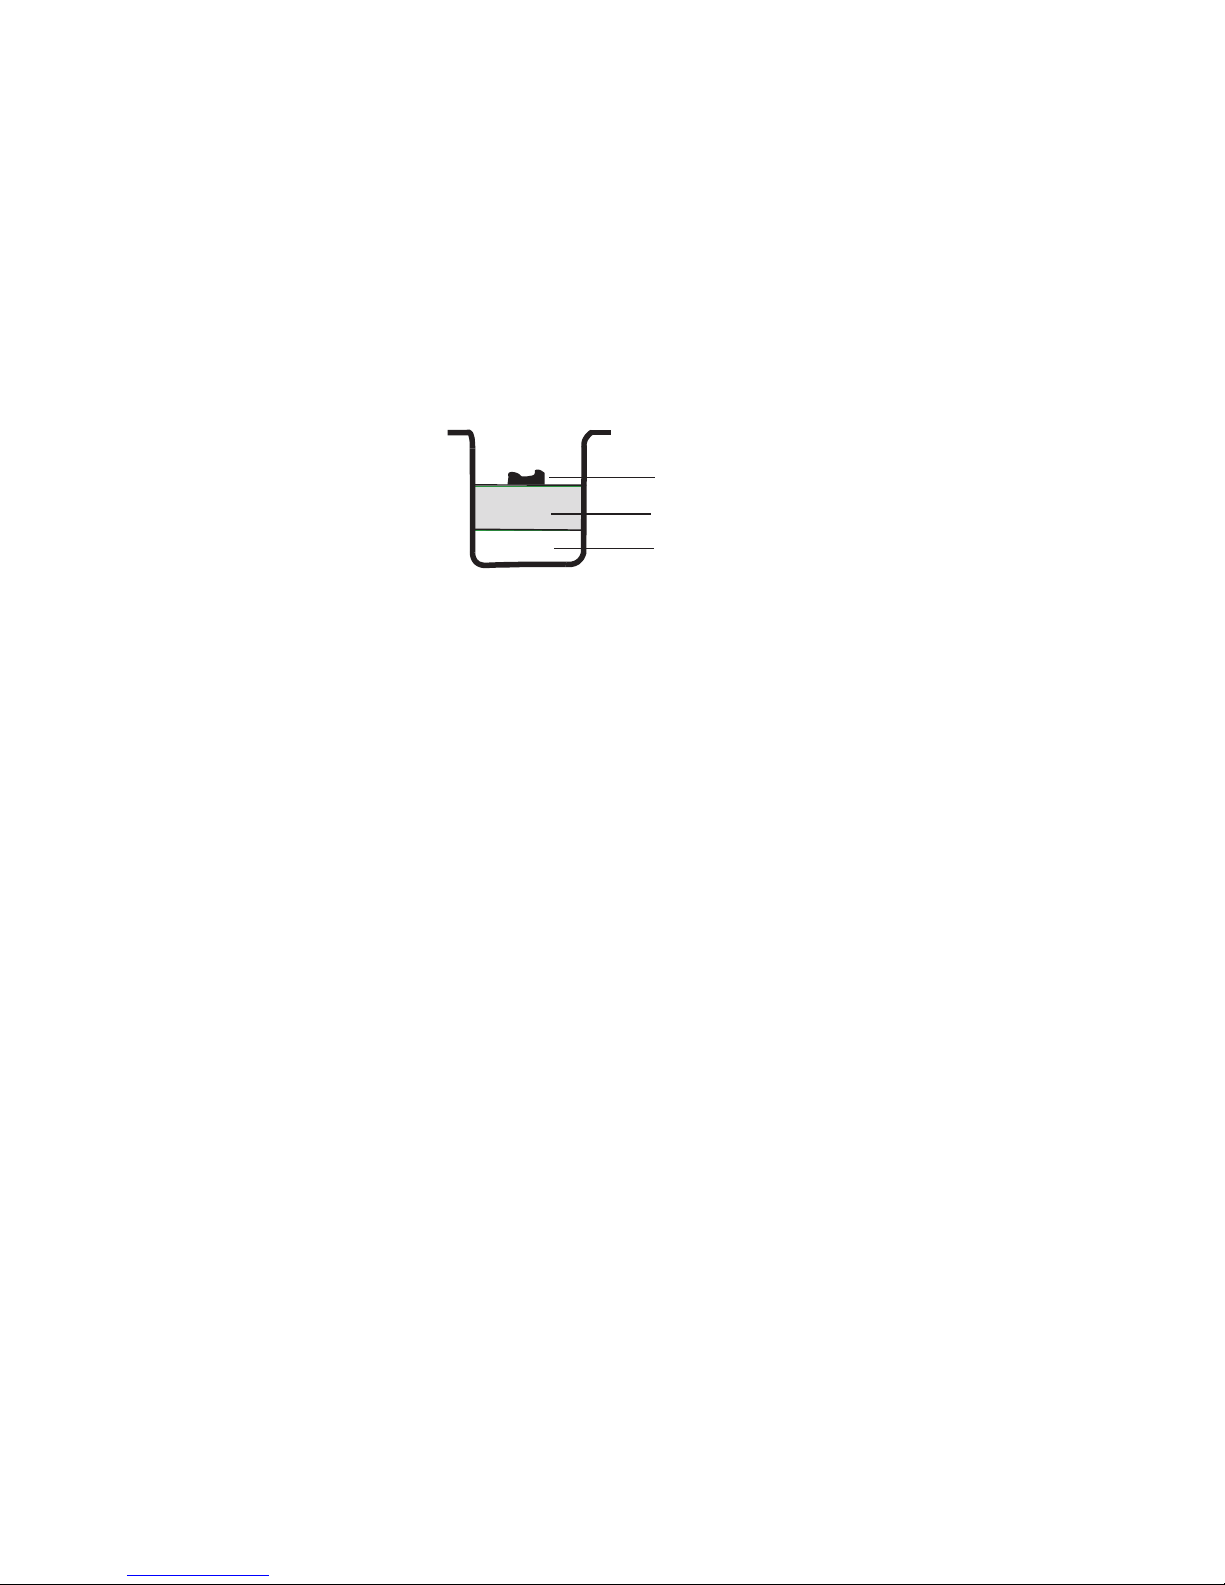
3. Make a small indentation on the top of flour with finger, add yeast into the indentation, make sure it
does not come into contact with the liquid or salt.
Yeast or soda
Dry ingredients
Water or liquid
4. Close the lid gently and plug the power cord into a wall outlet.
5. Press the MENU button until your desired program is selected.
6. Press the TEMP button to select the desired crust color (if applicable)..
7. Press the LOAF/SIZE button to select the desired size (if applicable)..
8. Set the delay time by pressing “+”or “–” button. This step may be skipped if you want the home
bakery to start working immediately.
9. Press the START/STOP button to start working.
10. Once the process has been completed, beeps will be heard. You can press START/STOP button for
approx. 2 seconds to stop the process and take out the bread. Open the Lid and while using oven
mitts, turn the bread pan in anti-clockwise and take out the bread pan.
Caution: the Bread pan and bread may be very hot! Always handle with care.
11. Let the bread pan cool down before removing the bread. Then use non-stick spatula to gently loos-
en the sides of the bread from the pan.
12. Turn bread pan upside down onto a wire cooling rack or clean cooking surface and gently shake
until bread falls out.
13. Let the bread cool for about 20 minutes before slicing. It is recommended slicing bread with
electric cutter or dentate cutter, had better not with fruit knife or kitchen knife, otherwise the bread
may be subject to deformation.
14. If you are out of the room or have not pressed START/STOP button at the end of operation, the bread will
be kept warm automatically for 1 hour(if applicable), when keep warm is finished, beeps will be heard.
15. When do not use or complete operation, unplug the power cord.
Note: Before slicing the loaf, use the hook to remove out the Kneading blade hidden on the bottom of
loaf. The loaf is hot, never use the hand to remove the kneading blade.
Note: If bread has not been completely eaten up, advise you to store the remained bread in sealed plastic bag or vessel. Bread can be stored for about three days during room temperature, if you need more
days storage, pack it with sealed plastic bag or vessel and then place it in the refrigerator, storage time
is at most ten days. As bread made by ourselves does not add preservative, generally storage time is no
longer than that for bread in market.
CLEANING AND MAINTENANCE
Disconnect the machine from the power and let it cool down prior to cleaning.
1. Bread pan: remove the bread pan by turning it in anti-clockwise, then pulling the handle to remove it,
wipe inside and outside of pan with a damp clothes, do not use any sharp or abrasive agents for the
Page 8

8
consideration of protecting the non-stick coating. The pan must be dried completely before installing.
Note: Insert the bread pan and turning it in clockwise until it fixed in correct position. If it cannot be
inserted, adjust the pan lightly to make it is on the correct position then press it down.
2. Kneading blade: If the kneading blade is difficult to remove from the bread, use the hook. Also wipe
the blade carefully with a cotton damp cloth. Both the bread pan and kneading blade are dishwash
-
ing safe components.
3. Housing: gently wipe the outer surface of housing with a wet cloth. Do not use any abrasive cleaner
for cleaning, as this would degrade the high polish of the surface. Never immerse the housing into
water for cleaning.
Note: It is suggested not disassembling the lid for cleaning.
4. Before the home bakery is packed for storage, ensure that it has completely cooled down, clean
and dry, and the lid is closed.
INTRODUCTION OF BREAD INGREDIENTS
1. Bread flour – Bread flour has high content of high gluten (so it can be also called high-gluten flour
which contains high protein), it has good elastic and can keep the size of the bread from collapsing
after rise. As the gluten content is higher than the common flour, so it can be used for making
bread with large size and better inner fiber. Bread flour is the most important ingredient of making
bread.
2. Plain flour – Flour that contains no baking powder, it is applicable for making express bread.
3. Whole-wheat flour – Whole-wheat flour is ground from grain. It contains wheat skin and gluten.
Whole-wheat flour is heavier and more nutrient than common flour. The bread made by wholewheat flour is usually small in size. So many recipes usually combine the whole -wheat flour or
bread flour to achieve the best result.
4. Black wheat flour – Black wheat flour, also named as“rough flour”, it is a kind of high fiber flour,
and it is similar with whole-wheat flour. To obtain the large size after rising, it must be used in
combination with high proportion of bread flour.
5. Self-rising flour – A type of flour that contains baking powder, it is used for making cakes specially.
6. Corn flour and oatmeal flour – Corn flour and oatmeal flour are ground from corn and oatmeal
separately. They are the additive ingredients of making rough bread, which are used for enhancing
the flavor and texture.
7. Sugar – Sugar is very important ingredient to increase sweet taste and color of bread. And it is also
considered as nourishment in the yeast bread. White sugar is largely used. Brown sugar, powder
sugar or cotton sugar may be called by special requirement.
8. Yeast – After yeasting process, the yeast will produce carbon dioxide. The carbon dioxide will
expand bread and make the inner fiber soften. However, yeast fast breeding needs carbohydrate in
sugar and flour as nourishment.
1 tsp. active dry yeast =3/4 tsp. instant yeast
1.5 tsp. active dry yeast =1 tsp. instant yeast
2 tsp. active dry yeast =1.5 tsp. instant yeast
Yeast must be stored in the refrigerator, as the fungus in it will be killed at high temperature, before
using, check the production date and storage life of your yeast. Store it back to the refrigerator as soon
as possible after each use. Usually the failure of bread rising is caused by the bad yeast.
The ways described below will check whether your yeast is fresh and active.
(1) Pour 1/2 cup warm water (45-500C) into a measuring cup.
(2) Put 1 tsp. white sugar into the cup and stir, then sprinkle 2 tsp. yeast over the water.
(3) Place the measuring cup in a warm place for about 10min. Do not stir the water.
(4) The froth should be up to 1 cup. Otherwise the yeast is dead or inactive.
9. Salt – Salt is necessary to improve bread flavor and crust color. But salt can also restrain yeast
from rising. Never use too much salt in a recipe. But bread would be larger if without salt.
10. Egg – Eggs can improve bread texture, make the bread more nourish and large in size, the egg
must be peeled and stirred evenly.
Page 9
9
11. Grease, butter and vegetable oil – Grease can make bread soften and delay storage life. Butter
should be melted or chopped to small particles before using.
12. Baking powder – Baking powder is used for rising the Ultra Fast bread and cake. As it does not
need rise time, and it can produce the air, the air will form bubble to soften the texture of bread
utilizing chemical principle.
13. Soda – It is similar with baking powder. It can also used in combination with baking powder.
14. Water and other liquid – Water is essential ingredient for making bread. Generally speaking, water
temperature between 200C and 250C is the best. The water may be replaced with fresh milk or
water mixed with 2% milk powder, which may enhance bread flavor and improve crust color. Some
recipes may call for juice for the purpose of enhancing bread flavor, e.g. apple juice, orange juice,
lemon juice and so on.
INGREDIENTS MEASUREMENT
One of important step for making good bread is proper amount of ingredients. It is strongly suggested
that use measuring cup or measuring spoon to obtain accurate amount, otherwise the bread will be
largely influenced.
Weighing liquid ingredients
Water, fresh milk or milk powder solution should be measured with measuring cups. Observe the
level of the measuring cup with your eyes horizontally. When you measure cooking oil or other
ingredients, clean the measuring cup thoroughly without any other ingredients.
Dry measurements
Dry measuring must be done by gently spooning ingredients into the measuring cup and then once
filled, leveling off with a knife. Scooping or tapping a measuring cup with more than is required.
This extra amount could affect the balance of the recipe. When measuring small amounts of dry
ingredients, the measuring spoon must be used. Measurements must be level, not heaped as this
small difference could throw out the critical balance of the recipe.
Adding sequence
The sequence of adding ingredients should be abided, generally speaking, the sequence is: liquid
ingredient, eggs, salt and milk powder etc. When adding the ingredient, the flour can’t be wetted
by liquid completely. The yeast can only be placed on the dry flour. And yeast can’t press with salt.
After the flour has been kneaded for some time and a beep will prompt you to put fruit ingredients
into the mixture. If the fruit ingredients are added too early, the flavor will be diminished after long
time mixing. When you use the delay function for a long time, never add the perishable ingredients
such as eggs, fruit ingredient.
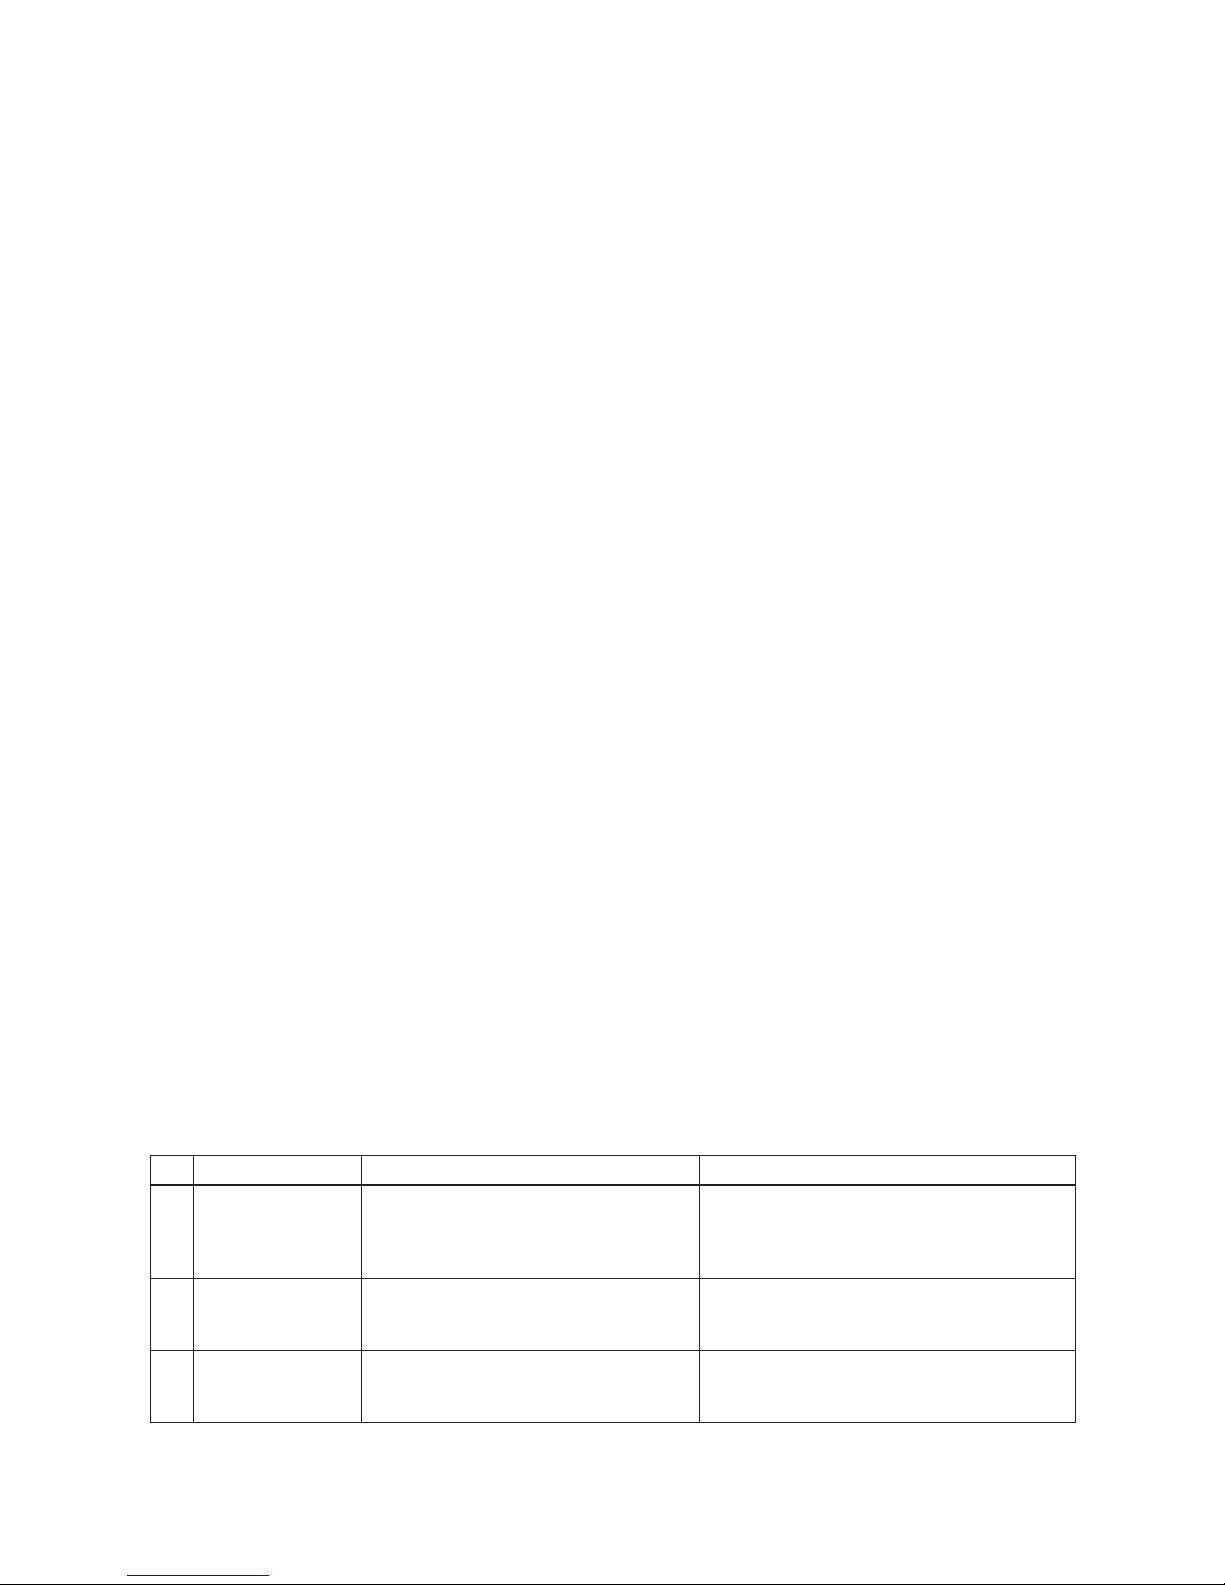
TROUBLE SHOOTING GUIDE
No. Problem Course Solution
1 Smoke from ven
tilation hole when
baking
Some ingredients adhere to the heat
element or nearby, for the first use, oil
remained on the surface of heat element
Unplug the home bakery and clean the heat
element, but be careful not to burn you,
during the first use, dry operating and open
the lid.
2 Bread bottom crust
is too thick
Keep bread warm and leave bread in the
bread pan for a long time so that water is
losing too much
Take bread out soon without keeping it warm
3 It is very difficult to
take bread out
Kneader adheres tightly to the shaft in
bread pan
After taking bread out, put hot water into
bread pan and immerge kneader for 10 min
-
utes, then take it out and clean.
Page 10
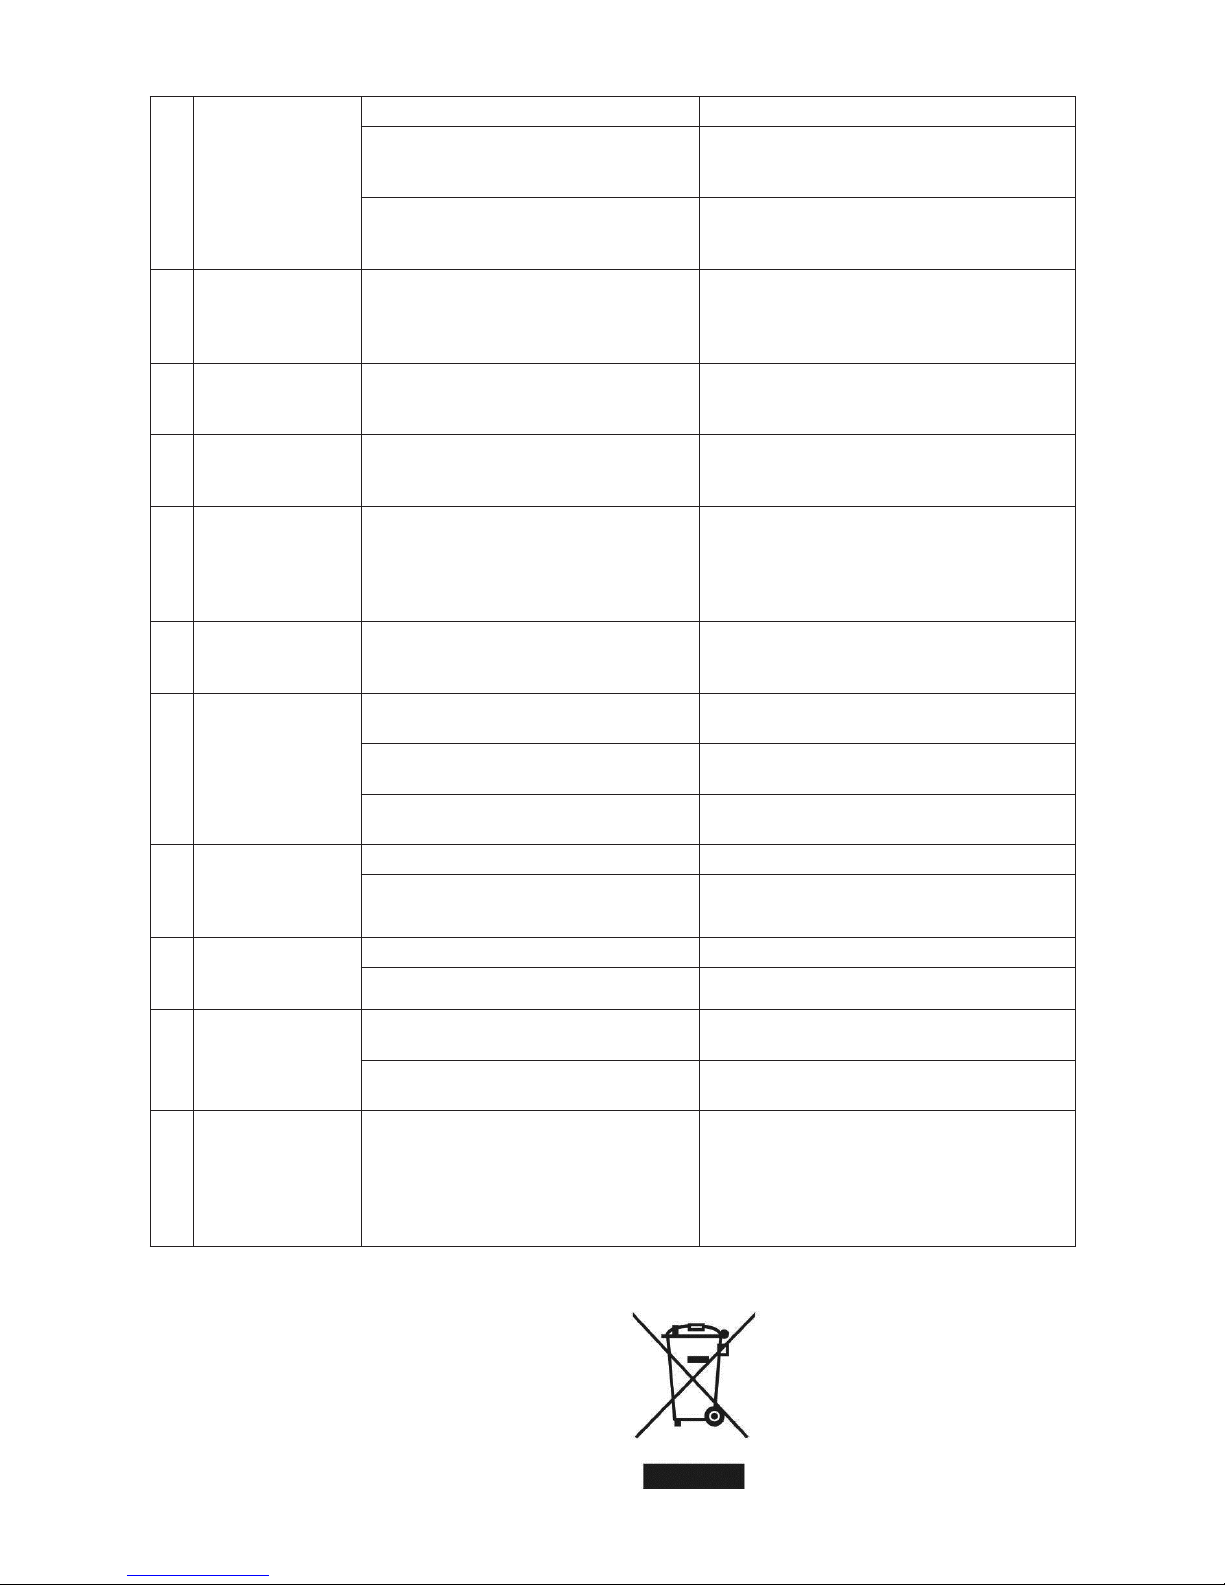
10
4 Stir ingredients not
evenly and bake
badly
1.selected program menu is improper Select the proper program menu
2.after operating, open cover several
times and bread is dry, no brown crust
color
Don’t open cover at the last rise
3.Stir resistance is too large so that
kneader almost can’t rotate and stir
adequately
Check kneader hole, then take bread pan
out and operate without load, if not normal,
contact with the authorized service facility.
5 Display “H:HH”
after pressing
“START/STOP”
button
The temperature in home bakery is too
high to make bread.
Press “START/STOP” button and unplug home
bakery, then take bread pan out and open
cover until the home bakery cools down
6 Hear the motor
noises but dough
isn’t stirred
Bread pan is fixed improperly or dough is
too large to be stirred
Check whether bread pan is fixed properly
and dough is made according to recipe and
the ingredients is weighed accurately
7 Bread size is so
large as to push
cover
Yeast is too much or flour is excessive
or water is too much or environment
temperature is too high
Check the above factors, reduce properly the
amount according to the true reasons
8 Bread size is too
small or bread has
no rise
No yeast or the amount of yeast is not
enough, moreover, yeast may have a poor
activity as water temperature is too high
or yeast is mixed together with salt, or
the environment temperature is lower.
Check the amount and performance of yeast,
increase the environment temperature
properly.
9 Dough is so large
to overflow bread
pan
The amount of liquids is so much as
to make dough soft and yeast is also
excessive.
Reduce the amount of liquids and improve
dough rigidity
10 Bread collapses in
the middle parts
when baking dough
1.used flour is not strong powder and
can’t make dough rise
Use bread flour or strong powder.
2.yeast rate is too rapid or yeast tem
-
perature is too high
Yeast is used under room temperature
3. Excessive water makes dough too wet
and soft.
According to the ability of absorbing water,
adjust water on recipe
11 Bread weight is
very large and
organization con
-
struct is too dense
1.too much flour or short of water Reduce flour or increase water
2.too many fruit ingredients or too much
whole wheat flour
Reduce the amount of corresponding ingredi
-
ents and increase yeast
12 Middle parts are
hollow after cutting
bread
1. Excessive water or yeast or no salt Reduce properly water or yeast and check salt
2.water temperature is too high Check water temperature
13 Bread surface is
adhered to dry
powder
1.there is strong glutinosity ingredients
in bread such as butter and bananas etc.
Do not add strong glutinosity ingredients into
bread.
2.stir not adequately for short of water Check water and mechanical construct of
home bakery
14 Crust is too thick
and baking color
is too dark when
making cakes or
food with excessive
sugar
Different recipes or ingredients have
great effect on making bread, baking
color will become very dark because of
much sugar
If baking color is too dark for the recipe with
excessive sugar, press START/STOP to inter
rupt the program ahead 5-10min of intended
finishing time. Before removing out the bread
you should keep the bread or cake in bread
pan for about 20 minutes with cover closed
You can help protect the environment!
Please remember to respect the local
regulations: hand in the non-working
electrical equipments to an appropriate
waste disposal centre.
ENVIRONMENT FRIENDLY DISPOSAL
Page 11

UPUTSTVO ZA UPOTREBU
PEKAČ HLEBA
MODEL: BM1329
SR
Pažljivo pročitajte ovo uputstvo pre korišćenja i sačuvajte ga za kasniju upotrebu.
Page 12

12
VAŽNA BEZBEDNOSNAUPUTSTVA
Pre upotrebe ovog električnog uređaja, treba
povesti računa o sledećim osnovnim bezbednos
-
nim merama:
1. Pročitajte sva uputstva.
2. Pre upotrebe proverite da li napon u vašoj
zidnoj utičnici odgovara naponu uređaja
koji možete pronaći na natpisnoj tablici na
samom uređaju.
3. Nemojte koristiti bilo koji uređaj sa oštećenim
kablom za napajanje ili utikačem, ili ako dođe
do kvara uređaja, ako ga ispustite ili oštetite
na bilo koji način. Vratite uređaj proizvođaču
ili najbližem ovlašćenom servisu na pregled,
popravku ili zamenu električnih ili me
-
haničkih delova.
4. Ne dodirujte vruće površine na uređaju. Uvek
koristite ručke.
5. Da biste se zaštitili od strujnog udara ne
potapajte kabl za napajanje, utikač ili kućište
uređaja u vodu ili bilo koju drugu tečnost.
6. Isključite uređaj iz struje kad nije u upotre
bi, kad stavljate ili skidate nastavke ili pre
čišćenja.
7. Ne dozvolite da kabl za napajanje visi sa ivice
stola ili iznad grejnog tela.
8. Upotreba neoriginalnih delova i nastavaka
koje nije odobrio proizvođač mogu izazvati
povrede.
9. Ovaj uređaj nije namenjen za upotrebu
od strane osoba (uključujući i decu) sa
smanjenim fizičkim, senzornim i mentalnim
sposobnostima ili nedostatkom iskustva i
znanja, osim ako nisu pod nadzorom osobe
odgovorne za njihovu bezbednost.
10. Korišćenje uređaja od strane dece mora biti
pod nazdorom kako bi se osiguralo da ne
koriste uređaj za igru.
11. Ne postavljajte uređaj na ili u blizini plinskog
ili električnog šporeta, kao i zagrejane rerne.
12. Izuzetno pažljivo se mora postupati kada
pomerate uređaje koji sadrže vrelo ulje ili
druge vrele tečnosti.
13. Ne dodirujte delove koji se pomeraju ili
okreću dok je uređaj u funkciji.
14. Nikada nemojte uključivati uređaj a da
prethodno niste pravilno postavili posudu za
pečenje hleba sa sastojcima.
15. Ne udarajte posudu pri vrhu ili sa strane kako
biste je izvadili pošto može doći do oštećenja.
16. Metalne folije i drugi slični materijali se ne
smeju stavljati u pekač jer može doći do
rizika od požara ili kratkog spoja.
17. Nikad ne pokrivajte pekač sa peškirom ili bilo
kojim drugim materijalom, pošto vruć vazduh
i para moraju neometano da izlaze iz uređaja
dok je u funkciji. Ukoliko je uređaj prekriven
ili dođe u kontakt sa zapaljivim materijalima
može doći do požara.
18. Uvek prvo prikačite kabl za napajanje u sam
uređaj pa tek onda u utičnicu. Za isključivanje
uređaja, pritisnite prvo dugme OFF, pa tek
onda iskopčajte uređaj iz struje.
19. Ne koristite uređaj u bilo koje druge svrhe
osim one za koju je uređaj predviđen.
20. Ovaj uređaj ima kabl za napajanje sa uzemljenjem. Molimo vas da proverite da je je vaša
utičnica takođe propisno uzemljena.
21. Ovaj uređaj je namenjen za kućnu upotrebu i
slično korišćenje od strane:
– Kuhinjskog osoblja u radnjama, kancelarija-
ma i drugim radnim mestima;
– Osoblja na farmama;
– Klijenata u hotelima, motelima i drugim
prebivalištima.
22. Uređaj nije predviđen da radi uz pomoć
eksternog tajmera ili odvojenog sistema za
daljinsko upravljanje.
23. Ne koristiti uređaj napolju.
24. Sačuvajte ova uputstva.
SAMO ZA KUĆNU UPOTREBU
Page 13

13
Slika 1.
UPOZNAJTE VAŠ PEKAČ
prozorčić
tabla sa
kontrolama
(vidi ispod)
kućište
poklopac
merna šolja
kuka
merna kašika
posuda za pečenje
hleba (sa nožem
za gnječenje)
UPOZNAVANJE SA FUNKCIJAMA
Ovo pokazuje
koji ste program
izabrali
Vreme trajanja
svakog programa
NAKON INICIJALNOG NAPAJANJA
Čim se poveže napajanje, uređaj će ispustiti zvučni signal i upaliće se ekran na kojem će pisati “1 3:00”.
Ali dve tačke između “3” i “00” ne trepću stalno. “1” označava standardni program. “2.0LB” i “Medium”
su dva standardna podešavanja.
700g/1000g
COLOR
Page 14

14
FUNKCIJA START/STOP
Start i stop dugme služe da započnete ili zaustavite određeni program pečenja.
Da započnete neki program, pritisnite jednom dugme “START/STOP”. Čućete kratak zvučni signal, dve
tačke počinju da trepću i program počinje sa radom. Nakon što je program započeo svi prekidači osim
“START/STOP” prekidača postaće neaktivni.
Da zaustavite neki program, pritisnite dugme “START/STOP” i držite ga 2 sekunde dok ne čujete duga
-
čak zvučni signal koji označava da je program zaustavljen.
FUNKCIJA PAUSE
Nakon pokretanja bilo kog programa, možete pritisnuti START/STOP da pauzirate program na par
sekundi. Program će biti pauziran, ali će podešavanje ostati memorisano. Preostalo vreme do kraja programa će biti prikazano na LCD ekranu. Pritisnite START/STOP ponovo i program će nastaviti sa radom.
FUNKCIJA MENU
Koristi se za odabir različitih programa. Svaki pritisak na ovaj prekidač (koji prati kratak zvučni signal)
označava promenu programa. Ako pritisnete dugme sa prekidima meni će proći ceo ciklus od 12
programa što će biti propraćeno pozadinskim LED indikatorom. Izaberite vaš željeni program. Funkcije
svih 12 menija će biti objašnjene u daljem tekstu.
Program 1: BASIC
Za bele hlebove i hlebove sa mešanim brašnom, uglavnom pšeničnim i ražanim. Hleb ima kompaktnu
strukturu. Možete podesiti da hleb dobije braon boju podešavanjem regulatora za temperaturu.
Program 2: FRENCH
Za lake hlebove od rastresitog brašna. Francuski hleb zahteva tačno vreme pripreme i temperaturu da
dobije onu sjajnu hrskavu, smeđu koru. Ovaj program nije pogodan za recepte koji zahtevaju korišćenje
putera, margarina ili mleka.
Program 3: WHOLEWHEAT
Hleb od integralnog brašna je kvasni hleb koji sadrži značajnu količinu integralnog brašna (50% ili više).
Hlebovi napravljeni od integralnog brašna su hranljiviji jer se ova vrsta brašna pravi mlevenjem celog
zrna pšenice (uključujući i omot i klicu). Korišćenjem integralnog brašna dobićete hleb tamno smeđe
boje (kad koristite samo integralno brašno), koji ima puniji ukus i zdraviji je od hlebova koji se prave od
prosejanog belog brašna (iako se “izgubljene” hranljive materije vraćaju nazad i u belo brašno).
Program 4: QUICK
Gnječenje, podizanje i pečenje hleba sa bržim režimom rada od programa BASIC. Hleb ispečen u ovom
režimu rada je uglavnom manje veličine i gušće teksture.
Program 5: SWEET
Program za slatke hlebove služi za pravljenje hlebova sa visokom količinom šećera, masti i proteina,
koji u normalnom režimu pečenja dovode do zagorevanja. Usled duže faze podizanja testa, hleb napravljen u ovom režimu će biti lakši i prozračniji.
Program 6: ULTRA FAST- I
(veličina hleba se ne može podesiti, dobija se vekna standardne veličine i ne
može se koristiti funkcija pauze)
Režim Ultra fast - I daje mogućnost pripreme belog hleba za kraći vremenski period. Dobija se vekna
standardne veličine (2.0lb/900g). Ovaj program proizvodi hleb podjednako dobrog kvaliteta kao i standardni program, s tim što standardni program traje tri sata, a u ovom režimu možete ispeći hleb za sat
i tridesetosam minuta.
Program 7: ULTRA FAST- II
(veličina hleba se ne može podesiti, dobija se vekna standardne veličine i
ne može se koristiti funkcija pauze)
Isto kao i prethodni režim, samo za manje vekne (1.5lb/600g). Program takođe traje sat vremena i tridesetosam minuta.
Program 8: DOUGH
(ne mogu se podešavati temperatura i veličina vekne)
Gnječenje i podizanje testa, ali bez pečenja. Nakon završetka operacije, izvadite testo i koristite ga za
Page 15

15
pravljenje rolnica, pica, hlepčića, itd.
Program 9: JAM
(ne mogu se podešavati temperatura, veličina vekne, a funkcija pauze nije dostupna.
Za početak rada samo jednom pritisnite dugme START/STOP)
Pekač hleba je odličan za pravljenje domaćih džemova i ajvara. Lopatica automatski meša sve sastojke
kroz ceo proces, a konačni proizvod je odličan dodatak sveže ispečenom hlebu!
Program 10: CAKE
(ne može se podesiti veličina vekne)
Funkcija koja koristi samo funkciju mešanja za pripremu mešavina za kolače koristeći dozvoljene
sastojke. Gnječenje i podizanje testa, ali bez upotrebe kvasca, već uz pomoć praška za pecivo.
Program 11: SANDWICH
Gnječenje, podizanje i pečenje testa za sendviče, za hlebove lake teksture sa tanjom korom.
Program 12: BAKE
(veličina vekne i funkcija pauze nisu dostupni, ali vreme trajanja operacije se može
podešavati pritiskom na dugme “+”ili “–”, što povećava ili smanjuje vreme trajanja pečenja za po jedan
minut. Vreme pečenja se može podesiti između 10 i 60 minuta)
Program pečenja služi samo za pečenje i može se koristiti kada želite da povećate vreme pečenja nekih
hlebova. Ovaj režim je takođe dosta pogodan za pravljenje džemova i marmelada.
TEMP
Uz pomoć ove funkcije možete odrediti boju kore tako što ćete izabrati između opcija Light, Medium ili
Dark (svetla, srednja i tamna boja). Ova funkcija nije dostupna u nekim režimima rada, koji su navedeni u
prethodnom odeljku “MENU”.
LOAF/SIZE
Pritisnite ovu funkciju kada želite da odredite veličinu hleba: 1.5LB, 2.0LB (900g, 600g). Izabrana
željena veličina će se zatim pojaviti na LCD ekranu. Obratite pažnju da ukupno vreme pečenja zavisi
od veličine vekne. Ova funkcija nije dostupna u nekim režimima rada, koji su navedeni u prethodnom
odeljku “MENU”.
DELAY TIME(“+” ili “–”)
Ako želite da uređaj ne počne odmah sa radom možete upotrebiti ovu funkciju koja služi da odloži vreme
pečenja.
Morate samo da znate koliko vremena je neophodno da prođe pre nego što se program pokrene tako što
ćete podesiti odloženo pečenje koristeći tastere “+” ili “–”. Uzmite u obzir da ova funkcija uključuje i vreme
trajanja programa pečenja. Prvo se mora izabrati željeni program i temperatura, a zatim podesiti vreme za
odlaganje početka rada. Maksimalno vreme odlaganja je 13 sati.
Primer: Sada je 20:30h, ako želite da vaš hleb bude spreman sutra ujutru u 7h, tj. 10 sati i 30 minuta
kasnije, izaberite program pečenja, boju i veličinu vekne i pritisnite “+” ili “–” dok na LCD ekranu ne bude
pisalo 10:30. Zatim pritisnite START/STOP da biste aktivirali odloženi program. Dve tačke će početi da
trepću a LCD časovnik će početi sa odbrojavanjem. U 7 ujutru ćete imati svež hleb. Ako ne želite odmah da
ga izvadite, standardno vreme podgrevanja hleba u pekaču iznosi sat vremena.
Napomena: Nemojte koristiti ovu funkciju kad radite sa sastojcima koji se lako kvare kao što su jaja, mleko
i sir.
KEEP WARM
Toplota hleba se može automatski održati i do 60 minuta nakon završetka pečenja. Tokom trajanja ovog
procesa, ako želite da izvadite hleb, isključite ovu funkciju pritiskom na START/STOP.
Napomena: Funkcija ne važi za programe DOUGH i JAM.
Page 16

16
MEMORY
Ukoliko je došlo do nestanka struje tokom trajanja programa pečenja, proces će se automatski nastaviti posle 10 minuta, čak i bez pritiskanja START/STOP prekidača. Ukoliko nestanak struje potraje
duže od 15 minuta, memorija će biti izgubljena i pekač će morati da se ponovo ručno pokrene. Ali ako
testo nije odmaklo dalje od faze gnječenja tokom nestanka struje, pritiskom na START/STOP prekidač
jednostavno ćete započeti ceo program iz početka.
OKRUŽENJE
Ovaj uređaj radi savršeno u okruženjima sa širokim rasponom temperatura, ali varijacije u spoljašnjoj
temperaturi bi mogle da utiču na razlike u veličini vekni. Preporučuje se da sobna temperatura bude
između 15° i 34°.
INDIKATORI UPOZORENJA:
1. Ako se na ekranu pojavi “HHH” nakon što ste pritisnuli START/STOP, čuće se zvučni signal koji upozorava da je temperatura unutar pekača i dalje previsoka. Program tada morate prekinuti. Otvorite poklopac i
pustite pekač da se ohladi 10 do 20 minuta.
2. Ako se na ekranu pojavi “LLL” nakon što ste pritisnuli START/STOP, čuće se zvučni signal koji upozorava
da je temperatura unutar pekača preniska..
3. Ako se na ekranu pojavi “EE0” nakon što ste pritisnuli START/STOP, čuće se zvučni signal koji upozorava
da se senzor za temperaturu otkačio. Pritisnite START/STOP da zaustavite zvučni signal i pozovite ovlašćenog servisera da pogleda senzor. Ako se na ekranu pojavi “EE1”, to znači da je senzor za temperaturu pod
kratkim spojem.
PRE PRVE UPOTREBE
Uređaj će u početku izbacivati malo dima koji će biti propraćen karakterističnim mirisom. Ovo je normalno i uskoro će prestati. Proverite da uređaj ima dovoljno slobodnog prostora za pravilnu ventilaciju.
1. Molimo vas proverite da li su svi delovi i nastavci neoštećeni.
2. Očistite sve delove u skladu sa uputstvima koje možete naći u odeljku “Čišćenje i održavanje”.
3. Podesite program pekača na BAKE i pecite na prazno oko 10 minuta. Zatim ga pustite da se ohladi i
ponovo očistite sve rasklopive delove.
4. Temeljno osušite sve delove i sastavite pekač. Uređaj je sad spreman za korišćenje.
KAKO DA NAPRAVITE HLEB
1. Postavite posudu za pečenje na svoje mesto, zatim pritisnite na dole i okrenite u smeru kazaljke
na satu dok ne čujete da je posuda u svojoj pravilnoj poziciji. Postavite nož za gnječenje testa na
osovinu. Okrenite noževe u smeru kazaljke na satu dok ne čujete da su u svojoj pravilnoj poziciji.
Preporučuje se da popunite rupe margarinom otpornim na visoke temperature pre postavljanja
noževa. Ovim sprečavate da se testo zalepi ispod noževa kao i njihovo lakše uklanjanje iz hleba.
2. Stavite sve sastojke u posudu za pečenje. Povedite računa o redosledu ubacivanja sastojaka koji se
pominje u receptu.
Obično se prvo stavi voda ili neka druga tečnost, zatim se doda šećer, so i brašno, a tek na kraju
kvasac ili prašak za pecivo..
Napomena: maksimalna količina brašna i kvasca zavisi od recepta.
3. Prstom napravite mali usek na jednoj strani brašna. Ubacite u njega kvasac, pazeći da ne dođe u
kontakt sa vodom ili solju.
Page 17

17
kvasac ili soda
suvi sastojci
voda ili tečnost
4. Pažljivo zatvorite poklopac i uključite kabl za napajanje u utičnicu.
5. Pritisnite prekidač MENU dok ne izaberete željeni program.
6. Pritisnite prekidač TEMP da odaberete željenu boju kore.
7. Pritisnite prekidač LOAF/SIZE da izaberete željenu veličinu vekne.
8. Podesite odloženo pečenje pritiskom na “+” ili “–”. Možete preskočiti ovaj korak ako želite da
počnete sa pečenjem odmah.
9. Pritisnite prekidač START/STOP za početak rada uređaja.
10. Kada program završi čućete zvučni signal. Možete pritisnuti i držati prekidač START/STOP 2 sekun-
de da biste prekinuli zvučni signal i izvadili hleb iz pekača. Otvorite poklopac i koristeći kuhinjske
rukavice čvrsto uhvatite drške posude za pečenje i polako je izvucite na gore i izvan uređaja.
Pažnja: posuda za pečenje i sam hleb mogu biti veoma vrući! Rukujte sa njima pažljivo.
11. Pustite da se posuda za pečenje prohladi pre vađenja hleba. Zatim nežnim pokretima spatule laga-
no oslobodite ivice hleba od posude.
12. Okrenite posudu za pečenje naopačke na metalnu žicu za hlađenje ili čistu kuhinjsku podlogu i
nežno protresite dok hleb ne ispadne iz posude.
13. Pažljivo okrenite hleb i ostavite ga da se prohladi oko 20 minuta pre sečenja. Preporučuje se da
hleb sečete električnim sekačem za hleb ili nazubljenim nožem za hleb.
14. Ukoliko ste napustili prostoriju ili niste pritisnuli prekidač START/STOP na kraju programa, hleb će
se automatski održavati toplim narednih sat vremena pre nego što se uređaj automatski isključi.
15. Kad ne koristite uređaj ili kada ste završili sa nekom operacijom, iskopčajte kabl za napajanje iz
strujne utičnice.
Napomena: Pre sečenja vekne, uz pomoć kuke izvadite nož za gnječenje koji se nalazi na dnu vekne.
Vekna je vruća i nikad ne pokušavajte da izvadite nož golim rukama
Napomena: Ako niste pojeli sav hleb nakon pečenja, preporučujemo vam da ga zamotate u plastičnu
foliju i ostavite za kasnije. Hleb se može čuvati naredna tri dana na sobnoj temperaturi. Ako želite da
vam traje još duže, zamotajte ga u plastičnu foliju i ostavite ga u frižider, gde može da traje i do 10
dana. Pošto u hleb niste stavljali nikakve industrijske aditive za održavanje, vek trajanja hleba će biti
sličan domaćem hlebu koji kupite na pijaci.
ČIŠĆENJE I ODRŽAVANJE
Iskopčajte kabl za napajanje i ostavite uređaj da se ohladi pre početka čišćenja.
1. Posuda za pečenje hleba: Prebrišite unutrašnjost i spoljašnjost vlažnom krpom. Nemojte koristiti bilo
kakva oštra ili abrazivna sredstva kako ne biste skinuli zaštitni teflonski sloj koji služi tome da se hleb
ne lepi za posudu. Ostavite posudu da se u potpunosti osuši pre vraćanja u uređaj.
Napomena: Ubacite posudu za pečenje i okrećući je u smeru kazaljke na satu fiksirajte je u pravilan položaj. Ukoliko posuda ne može da se ubaci u uređaj, pažljivo je pomerajte i kad osetite da je u pravilnom
položaju, pritisnite na dole.
2.
Nož za gnječenje: Ukoliko se nož teško skida sa osovine, napunite rezervoar toplom vodom i sače-
kajte približno 30 minuta a zatim lako uklonite nož. Pažljivo prebrišite sečivo vlažnom pamučnom
krpom. Uzmite u obzir da su i posuda i nož bezbedni za pranje u mašini za pranje posuđa.
3.
Kućište: nežno prebrišite spoljašnju površinu kućišta vlažnom krpom. Nemojte koristiti abrazivna
sredstva za čišćenje pošto će doći do gubitka sjaja spoljašnje površine. Nikad ne potapajte kućište
u vodu da biste ga oprali.
Napomena: Ne preporučuje se skidanje poklopca za čišćenje.
4. Pre nego što spakujte pekač za hleb za odlaganje, proverite da se u potpunosti ohladio, da je čist i
suv i da je poklopac zatvoren.
Page 18

18
UVOD U HLEBNE SASTOJKE
1. Hlebno brašno • Hlebno brašno u sebi sadrži visoku koncentraciju glutena (pa se može nazvati i
brašno bogato glutenom i proteinima), poseduje odlična elastična svojstva i sprečava testo za hleb
da splasne nakon podizanja. Pošto ima veći sadržaj glutena od običnog brašna, može se koristiti
za veće hlebove sa vazdušastijom strukturom unutrašnjih vlakana. Hlebno brašno je najvažniji
sastojak za pravljenje hleba.
2. Obično brašno • Obično brašno se pravi mešanjem kvalitetnog mekog i tvrdog pšeničnog brašna i
koristi se za pravljenje brzih hlebova ili kolača.
3. Integralno pšenično brašno • Integralno pšenično brašno se dobija mlevenjem celih zrna pšenice i
u sebi sadrži mlevenu opnu pšenice i gluten. Integralno pšenično brašno je teže od običnog brašna
i bogatije je hranljivim materijama. Hleb nastao od integralnog brašna je obično manje veličine.
Dosta recepata koristi kombinaciju integralnog i običnog brašna za postizanje najboljih rezultata.
4. Crno pšenično brašno • Crno pšenično brašno, takođe poznato i kao “grubo brašno” je vrsta
brašna bogata vlaknima veoma slična integralnom pšeničnom brašnu. Ako želite da postignete
veću veličinu hleba koristeći ovu vrstu brašna neophodno je da ga izmešate sa većim količinama
hlebnog brašna.
5. Brašno za kolače • Brašno za kolače se dobija mlevenjem “mekane pšenice” ili pšenice koja nija
bogata proteinima, i pravi se isključivo za potrebe pripreme kolača. Različite vrste brašna su
naizgled slične. Ali, u stvarnosti, kvalitet kvasnog podizanja ili moći upijanja različitih vrsta brašna
razlikuje se u zavisnosti od mesta na kome se uzgaja, razloga zbog kojih se uzgaja, procesa mlevenja i veka trajanja. Možete isprobati različite vrste brašna, kao i proizvođača, i izabrati ono koje daje
najbolje rezultate u odnosu na vaša iskustva i ukus.
6. Kukuruzno i ovseno brašno • Kukuruzno i ovseno brašno se pravi mlevenjem kukuruza i ovsa i
koristi se u pekarskoj industriji kao posebni dodatak nekim vrstama hleba za poboljšanje ukusa i
teksture.
7. Šećer • Šećer je veoma važan sastojak koji hlebu daje slatkoću i boju. Uglavnom se koristi beli
šećer, ali u posebnim prilikama mogu se koristiti i smeđi šećer, šećer u prahu ili šećerna vuna.
8. Kvasac • Kvasac prvo prolazi kroz proces kvašenja, a zatim oslobađa ugljen dioksid, usled čega te-
sto narasta, a unutrašnja vlakna smekšavaju. Međutim, kvascu su za rast potrebni i ugljeni hidrati
iz šećera i brašna.
• 1 kašičica aktivnog suvog kvasca = 3/4 kašičice instant kvasca
• 1.5 kašičica aktivnog suvog kvasca = 1 kašičica instant kvasca
• 2 kašičice aktivnog suvog kvasca = 1.5 kašičica instant kvasca
Kvasac se mora držati u frižideru jer će ga napolju ubiti visoka temperatura, pa je neophodno
pre upotrebe pogledati datum proizvodnje i rok trajanja kvasca. Vratite ga u frižider nakon svake
upotrebe. Osušeni kvasac je najčešći uzrok ne dizanja testa. Na sledeći način možete proveriti da li
je vaš kvasac i dalje svež i aktivan ili ne.
(1) sipajte 1/2 šolje tople vode (45-50°C) u mericu
(2) sipajte 1 kašičicu belog šećera u mericu i promešajte, a zatim dodajte 2 kašičice kvasca.
(3) Ostavite mericu na toplom mestu oko 10 minuta. Nemojte mešati.
(4) Ako se do tada ne stvori penica na površini smese, to znači da je vaš kvasac neaktivan.
9. So • So je potrebna da bi poboljšala ukus hleba i dala boju kori. Ali so takođe može da spreči
kvasac da se podigne. Nikad ne stavljajte previše soli. Ako ne želite da stavljate so, slobodno ga
izostavite, a hleb će čak biti veći.
10. Jaja • Jaja mogu da poboljšaju teksturu hleba, obogate ga proteinima i povećaju mu obim. Ako
koristite jaja u smesi za hleb, proverite da ste ljusku potpuno uklonili i da je ravnomerno izmešano.
11. Mast, puter i biljno ulje • Mast čini hleb mekšim i produžava mu rok trajanja. Puter se mora istopiti
ili iseckati na manje komade pre upotrebe, kako bi mogao da se jednako umeša.
12. Prašak za pecivo • Prašak za pecivo se uglavnom koristi za brze hlebove i kolače. Kod upotrebe
praška za pecivo ne treba čekati da testo naraste a prašak ispušta gas koji omekšava teksturu
hleba na hemijskom principu.
13. Soda bikarbona • Radi na istom principu kao i prašak za pecivo. Može se čak i koristiti u kombina-
ciji sa praškom za pecivo.
Page 19

19
14. Voda i druge tečnosti • Voda je od suštinske važnosti za pravljenje hleba. Najbolje je koristiti vodu
temperature između 20°C i 25°C. Ali kad se prave brzi hlebovi najbolja temperatura vode je između
45-50°C. Vodu možete zameniti svežim mlekom ili vodom pomešanom sa 2% mleka u prahu, što
može poboljšati ukus hleba i boju kore. Neki recepti koriste sok u svrhu poboljšanja ukusa. Koriste
se sok od jabuka, narandže, limuna, itd.
TEŽINA SASTOJAKA
Jedan od najvažnijih koraka u pravljenju dobrog hleba je pravilno određivanje količine pojedinačnih
sastojaka. Preporučujemo korišćenje merice kako biste odredili precizne količine.
Merenje tečnih sastojaka
Voda, sveže mleko ili mleko u prahu rastvoreno u vodi bi trebalo meriti mericom. Kada merite ulje
ili druge sastojke, temeljno očistite mericu.
Merenje suvog praška
Suvi prašak bi trebalo držati u prirodnim uslovima i koristiti ga u preciznim razmerama.
Redosled ubacivanja sastojaka
Redosled ubacivanja sastojaka je uopšteno sledeći: tečni sastojci, jaja, so, mleko u prahu, itd.
Prilikom ubacivanja sastojaka, pazite da brašno ne bude potpuno natopljeno tečnošću. Kvasac se
mora staviti isključivo na suvo brašno. Idealno, so ne bi trebala da dođe u kontakt sa kvascem. Nakon što se brašno mešalo neko vreme, zvučni signal će vas obavestiti da u mešavinu dodate voćne
sastojke. Ako se voće doda prerano, izgubiće se ukus od preteranog mešanja. Ako često i na duže
periode prekidate mešanje, nemojte dodavati kvarljive sastojke kao što su jaja i voće.
VODIČ ZA ČESTE PROBLEME
No. Problem Razlog Rešenje
1 Dim izlazi iz otvora
za ventilaciju tokom
pečenja
Neki sastojci prijanjaju za grejne
elemente ili u njihovoj blizini. Ako je u
pitanju prvo korišćenje, može se desiti da je u pekaču ostalo mašinskog
ul
ja od proizvodnje
Isključite kabl za napajanje i očistite
grejni element, pazeći da se ne ope
čete. Ako je u pitanju prvo korišćenje,
u
ključite pekač na prazno i otvorite
poklopac.
2 Donja kora hleba je
predebela
Hleb se dugo podgrevao ili je ostao u
posudi predugo i na taj način izgubio
dosta vode
Izvadite hleb iz posude čim se ispeče
3 Veoma je teško izvaditi
hleb
Nož i njegova osovina su se čvrsto
stegli u posudi za pečenje
Nakon vađenja hleba, sipajte toplu
vodu u posudu za pečenje i izvadite
nož nakon 10 minuta i očistite ga.
4 Sastojci nisu dovoljno
dobro izmešani i hleb
se loše ispekao
1. Izabrani program nije adekvatan Izaberite odgovarajući meni u pro
-
gramu
2
. Zbog čestog otvaranja tokom peče-
nja hleb je suv i nema lepu boju
N
e otvarajte poklopac pre završetka
ciklusa pečenja.
3. Otpor prilikom mešanja sastojaka
je prevelik pa nož ne može da rotira i da meša sastojke adekvatno
P
roverite rupu za nož, zatim izvadite
posudu za pečenje i uključite uređaj
na prazno. Ako se problem nastavi,
kontaktirajte ovlašćenog servisera.
5 Ekran prikazuje “H:HH”
nakon pritiska na
dugme
start/stop
T
emperatura u pekaču je previsoka. Pritisnite start/stop i isključite uređaj
iz struje, zatim izvadite posudu za
pečenje i otvorite poklopac dok se
uređaj ne ohladi
6 Čuje se buka motora
ali testo nije dobro
umešano
Posuda za pečenje nije u dobrom položaju ili je testo preveliko za mešanje
P
roverite da li je posuda za pečenja u
dobrom položaju i da je testo napravljeno u skladu sa receptom i da su svi
s
astojci precizno izmereni
Page 20

20
No. Problem Razlog Rešenje
7 Veličina hleba je preve
-
lika i otvara poklopac
Stavili ste previše kvasca ili brašna
ili premalo vode ili je temperatura
previsoka
Proverite navedene faktore i smanjite
ili povećajte količinu problematičnih
faktora dok ne utvrdite pravi razlog
8 Veličina hleba je
premala ili se uopšte
nije digao
Niste stavili kvasac ili ga ima u nedo
voljnoj količini. Moguće je i da kvasac
ne može da raste jer je temperatura
previsoka ili se izmešao sa solju ili je
spoljašnja temperatura preniska.
Proverite količinu i rast kvasca i
podesite adekvatnu temperaturu.
9 Testo je toliko veliko da
se izliva iz posude za
pečenje
Količina tečnosti je previsoka što je
smekšalo testo, a količina kvasca
preterana.
Smanjite količinu tečnosti i kvasca
10 Hleb se izduva na
sredini
1. Brašno koje ste koristili nije dobro
za podizanje testa
Koristite hlebno brašno ili jači prašak
za pecivo.
2. Kvasac raste prebrzo ili mu je
temperatura previsoka
Kvasac je držan na sobnoj temperaturi
3. Višak vode omekšava testo i čini ga
vlažnim.
U skladu sa sposobnošću upijanja
vode, uskladite količinu vode sa
receptom
11 Težina hleba je preve
lika a struktura hleba
pregusta
1. Previše brašna ili premalo vode Smanjite količinu brašna ili dodajte
još vode
2. Previše voća ili previše integralnog
brašna
Smanjite količinu voćnih sastojaka i
stavite više kvasca
12 Sredina hleba je šuplja 1. Previše vode ili kvasca a premalo
soli
Smanjite količinu vode ili kvasca i
dodajte soli
2. Temperatura vode je previsoka Proverite temperaturu vode
13 Površina hleba se lepi
za suve sastojke
1. Velika količina sastojaka sa glute
-
nom, kao što su puter i banane, itd.
Nemojte dodavati previše sastojaka sa
glutenom.
2. Nedovoljno dobro izmešano sa
malom količinom vode
Proverite količinu vode
14 Kora hleba je predebela
a boja previše tamna
kada se peku kolači ili
hrana sa dosta šećera
Različiti recepti imaju odlične efekte
na pravljenje hleba, a tamna boja
nastaje od previše šećera
Ako je boja previše tamna za recepte
sa dosta šećera, pritisnite start/stop
da zaustavite program 5-10 minu
ta pre predviđenog vremena. Pre
vađenja hleba ili kolača, ostavite ih u
posudi za pečenje oko 20 minuta sa
zatvorenim poklopcem
Možete pomoći u zaštiti životne okoline!
Molimo vas da poštujete lokalne
zakonske regulative: sve neispravne
električne uređaje treba predati
odgovarajućim centrima za reciklažu
elektronskog i električnog otpada.
EKOLOŠKO ODLAGANJE OTPADA
Page 21

NAVODILO ZA UPORABO
PEKAČ KRUHA
MODEL: BM1329
SI
ŽIVIMO SKUPAJ
Pred uporabo pozorno preberite navodilo in ga shranite.
Page 22

22
POMEMBNA VARNOSTNA NAVODILA
Pred uporabo te električne naprave morate upoštevati naslednje varnostne ukrepe:
1.
Preberite vsa navodila.
2. Pred začetkom uporabe preverite, ali električna napetost v vaši stenski vtičnici ustreza
napet
osti v aparatu, navedeni podatek pa
najdete na ploščici, ki je pritrjena na aparat.
3. Aparata s poškodovanim kablom za napajanje
ali vtikačem ne smete v nobenem primeru
uporabljati, prav tako ne, če pride do poškodbe aparata, če ga izpustite ali kakorkoli
pošk
odujete. V takem primeru aparat vrnite
proizvajalcu ali najbližjemu pooblaščenemu
servisu na pregled, popravilo ali zamenjavo
električnih ali mehanskih delov.
4. Ne dotikajte se vročih površin na aparatu.
Vedno uporabljajte ročaje.
5. Zavarujte se pred električnim udarom in nikoli ne spuščajte kabla za napajanje, vtikača
ali ohišja aparata v vodo, ali katerokoli drugo
tekočino.
6. Izključite aparat iz elektrike, ko ga ne uporabljate, ko nastavljate ali snemate nastavke,
ali pr
ed čiščenjem.
7. Kabel za napajanje ne sme viseti z roba mize
ali nad napravami za ogrevanje.
8. Uporaba neoriginalnih delov in nastavkov, ki
jih ne odobri proizvajalec, utegne povzročiti
poškodbe.
9. Naprave ne smejo uporabljati osebe (vštevši
otroke) z manjšimi telesnimi, čutnimi in
mentalnimi zmožnostmi ali manj izkušenj in
znanja, razen v primeru, da jih nadzorujejo
osebe, ki so odgovorne za njihovo varnost.
10. Ko aparat uporabljajo otroci, jih morajo
nadzorovati odrasle osebe, ki preprečijo, da
aparata ne uporabljajo za igranje.
11. Naprave ne hranite na ali v bližini plinskega
ali električnega štedilnika in vroče pečice.
12. Posebna pozornost je nujna pri premikanju
naprav z vrelim oljem ali drugimi vročimi
tekočinami.
13. Ne dotikajte se delov, ki se premikajo ali
obračajo med delovanjem aparata.
14. Aparata ne smete nikoli vklopiti, če pred tem
niste pravilno postavili posode za peko kruha
s sestavinami.
15. Z udarci pri vrhu ali ob straneh posode, ki jo
hočete vzeti ven, lahko posodo poškodujete.
16. V pekač ne smete polagati kovinske folije in
drugih podobnih materialov zaradi tveganja
požara ali kratkega stika.
17. Pekača ne smete pokriti z brisačo ali katerimkoli drugim materialom, ker morata vroč
zrak in para nemoteno uhajati iz naprave med
njenim delovanjem. Če je naprava pokrita, ali
če pride v stik z vnetljivim materialom, lahko
pride do požara.
18. Vedno najprej vklopite kabel za napajanje
v samo napravo in šele nato v vtičnico. Za
izklop naprave najprej pritisnite na gumb OFF
in šele nato izklopite napravo iz električnega
toka.
19. Naprave ne uporabljajte za druge namene
razen tistih, za katere je namenjena.
20. Naprava ima kabel za napajanje z ozemljitvijo. Prosimo, da preverite, ali je vaša vtičnica
pravilno ozemljena.
21. Naprava je namenjena za hišno uporabo in
podobno s strani:
– kuhinjskega osebja v trgovinah, pisarnah in
na drugih delovnih mestih
– osebja na farmah
– klientov v hotelih, motelih in drugih pre-
bivališčih.
22.
Ni predvideno, da naprava deluje s pomočjo
zunanjega timerja ali ločenega sistema za
daljinsko vodenje.
23. Naprave ne uporabljajte v naravi.
24. Shranite ta navodila.
SAMO ZA HIŠNO UPORABO
Page 23

23
Slika 1.
SPOZNAJTE SVOJ PEKAČ
okence
kontrolna
plošča (glej
spodaj)
ohišje
pokrov
merilna skodelica
kavelj
merilna žlička
posoda za peko
(z nožem za
gnetenje)
SPOZNAVANJE FUNKCIJ
prikaz izbranega
programa
koliko traja
določen program
700g/1000g
COLOR
Page 24

24
PO INICIALNEM NAPAJANJU
Takoj, ko se poveže napajanje, naprava odda zvočni signal, vključi se zaslon, na katerem piše “1 3:00”.
Vendar piki med “3” in “00” ne utripata ves čas. “1” označuje standardni program. “2.0LB” in “Medium” sta standardni uravnavi.
FUNKCIJA START/STOP
Stikalo start i stop služi za zagon ali zaustavitev določenega programa peke.
Pred začetkom določenega program pritisnite enkrat na gumb “START/STOP”. Slišali boste kratek
zvočni signal, ki opozarja, da se je program začel. Po začetku programa postanejo vsa stikala razen
stikala “START/STOP” neaktivna.
Če hočete ustaviti program, pritisnite na gumb “START/STOP” in ga držite 2 sekundi, dokler ne slišite
dolgega zvočnega signala, ki opozarja, da je program ustavljen.
FUNKCIJA PAUSE
Po zagonu kateregakoli programa lahko pritisnete na START/STOP, da za nekaj sekund ustavite
program. Program bo ustavljen, uravnava pa bo ostala vspominu. Preostali čas do konca programa bo
prikazan na zaslonu LCD. Spet pritisnite na START/STOP in program se bo nadaljeval.
FUNKCIJA MENU
Uporablja se za izbiro različnih programov. Z vsakim pritiskom na to stikalo (spremlja ga zvočni signal)
označimo spremembo programa. S pritiskom na gumb s prekinitvami menu opravi cel cikel 12 programov, ki jih v ozadju spremlja indikator LED. Izberite si zaželeni program. Funkcije vseh 12 menijev bodo
pojasnjene v nadaljevanju.
Program 1: BASIC
Za beli kruh in kruh z mešano moko, v glavnem pšenično in rženo. Kruh ima kompaktno strukturo. Z
uravnavo regulatorja za temperaturo lahko dosežete, da dobi kruh rjavo barvo.
Program 2: FRENCH
Za lahki kruh iz rahle moke. Francoski kruh zahteva točen čas za pripravo in temperaturo, da dobi sijočo,
hrustljavo in rjavo skorjo. Ta program ni primeren za recepte, ki vsebujejo maslo, margarino, ali mleko.
Program 3: WHOLEWHEAT
Kruh iz integralne moke je kruh s kvasom in vsebuje precej integralne moke (50% ali več). Kruh iz
integralne moke je bolj hranilen, ker se ta vrsta moke pridobi z mletjem celih zrn pšenice (vključno z
ovojem in kalčkom). Z uporabo integralne moke dobimo kruh temno rjave barve (ko uporabimo samo
integralno moko), ki ima boljši okus in je bolj zdrav od kruha iz presejane bele moke (čeprav se “izgubljene” hranilne snovi vrnejo tudi v belo moko).
Program 4: QUICK
Gnetenje, vzhajanje in peka kruha s hitrejšim delovnim režimom od programa BASIC. Kruh, pečen v
tem delovnem režimu, je v glavnem manjše velikosti in ima bolj gosto teksturo.
Program 5: SWEET
Program za sladek kruh je namenjen pripravi kruha z veliko sladkorja, masti in beljakovin, kzaradi
česar v normalnem režimu peke zagorijo. Z daljšim vzhajanjem testa je kruh, narejen v tem režimu,
lažji in lahkotnejši.
Program 6: ULTRA FAST- I
(velikosti kruha ne moremo uravnavati, dobimo štruco standardne veliko-
sti in ne moremo uporabiti funkcije pavza)
Režim Ultra fast - I omogoča pripravo belega kruha v krajšem času. Dobimo štruco standardne velikosti
(2.0lb/900g). Pri tem programu dobimo enako dober kruh kot pri standardnem programu, s tem da traja
standardni program tri ure, v tem režimu pa se lahko kruh speče v eni uri in osemintrideset minut.
Program 7: ULTRA FAST- II
(velikosti kruha ne moremo uravnavati, dobimo štruco standardne veliko-
sti in ne moremo uporabiti funkcije pavza)
Page 25

25
Enako kot prejšnji režim, samo za manjše štruce (1.5lb/600g). Program prav tako traja eno uro in osemintrideset minut.
Program 8: DOUGH
(ne moremo uravnavati temperature in velikosti štruce)
Gnetenje in vzhajanje testa, vendar brez peke. Po končani operaciji vzemite testo in ga uporabite za
pripravo zvitkov, pic, hlebčkov, itn.
Program 9: JAM
(ne moremo uravnavati temperature in velikosti štruce, funkcija pavze pa ni dostopna.
Za začetek dela samo enkrat pritisnite na gumb START/STOP)
Pekač kruha je odličen za pripravo domačih džemov in ajvarja. Lopatica avtomatsko meša vse sestavine
v celotnem procesu, končni proizvod pa je odličen dodatek k sveže spečenemu kruhu!
Program 10: CAKE
(ne moremo uravnavati velikosti štruce)
Funkcija, ki uporablja samo funkcijo mešanja za pripravo mešanic za pecivo z uporabo dovoljenih sestavin. Gnetenje in vzhajanje testa brez uporabe kvasa, pač pa s pomočjo pecilnega praška.
Program 11: SANDWICH
Gnetenje, vzhajanje in peka testa za sendviče, hlebce z lahko teksturo in tanjšo skorjo.
Program 12: BAKE
(velikost štruce in funkcija pavze nista dostopni, trajanje operacije pa se lahko uravnava s pritiskom na gumb “+”ali “–”, kar podaljša ali skrajša peko za eno minuto. Trajanje peke lahko
uravnamo na 10 do 60 minut)
Program peke služi samo za peko in se lahko uporablja, ko bi radi podaljšali peko določenega kruha.
Ta režim je primeren tudi za pripravo džemov in marmelad.
TEMP
S pomočjo te funkcije lahko določite barvo skorje z izbiranjem opcij Light, Medium ali Dark (svetla, srednja in temna barva). Ta funkcija ni dostopna v nekaterih delovnih režimih, ki so navedeni v predhodnem
poglavju “MENU”.
LOAF/SIZE
Pritisnite to funkcijo, ko želite izbrati velikost kruha: 1.5LB, 2.0LB (900g, 600g). Izbrana zaželena velikost se nato pojavi na LCD zaslonu. Upoštevajte, da je celoten čas peke odvisen od velikosti štruce. Pri
nekaterih delovnih režimih, ki so navedeni v predhodnem poglavju “MENU”, te funkcije ni.
DELAY TIME(“+” ili “–”)
Če nočete, da bi naprava takoj začela z delom, lahko uporabite to funkcijo, ki je namenjena prelaganju
začetka peke.
Vedeti morate, čez koliko časa naj se program začne in preloženo peko uravnati z gumbom “+” ali “–”.
Upoštevajte, da je v to funkcijo vključen tudi čas za program peke. Najprej si je treba izbrati poljubni pro
-
gram in temperaturo, nato uravnati čas za prelaganje začetka dela. Peko lahko preložimo za največ 13 ur.
Primer: zdaj je ura 20:30 h, če bi radi, da bi bil vaš kruh pripravljen jutri ob 7. uri, oziroma 10 ur in 30 minut
pozneje, si izberite program peke, barvo in velikost štruce ter pritisnite na“+” ali “+”, dokler na zaslonu
LCD ne piše 10:30. Nato pritisnite na START/STOP in aktivirajte preloženi program. Utripati bosta začeli
dve piki, LCD ura pa bo začela odštevati. Zjutraj ob 7. uri boste imeli svež kruh. Če ga ne bi radi takoj vzeli
iz pečice, znaša standardni čas za segrevanje kruha v pekaču eno uro.
Opomba: te funkcije ne uporabljajte, ko uporabljate sestavine, ki se lahko hitro pokvarijo, kot so jajca,
mleko in sir.
KEEP WARM
Toplota kruha se lahko samodejno ohrani do 60 minut po končani peki. Med trajanjem tega procesa, če
želite vzeti kruh iz pečice, izključite to funkcijo s pritiskom na START/STOP.
Opomba: Funkcija ne velja za programe DOUGH in JAM.
Page 26

26
MEMORY
Če je med trajanjem programa peke zmanjkalo elektrike, se proces samodejno nadaljuje po 10 minutah
celo brez pritiska na stikalo START/STOP. Če traja izklop elektrike več kot 15 minut, se spomin izgubi in
je treba pekač ponovno ročno uravnati. Če pa med izklopom elektrike testo ni napredovalo dlje od faze
gnetenja, s pritiskom na stikalo START/STOP enostavno začnite ves program od začetka.
OKOLJE
Naprava brezhibno deluje v okolju s širokim razponom temperature, vendar utegnejo nihanja pri zunanji
temperaturi vplivati na razlike pri veličini štruc. Priporočena sobna temperatura znaša od 15° do 34°.
OPOZORILNI INDIKATORJI:
1. Če se po pritisku na START/STOP na zaslonu pojavi “HHH”, je slišati zvočni signal, ki opozarja, da je
temperatura v pekaču še naprej previsoka. V takem primeru morate program prekiniti. Odprite pokrov in
pustite, da se pekač hladi 10 do 20 minut.
2. Če se po pritisku na START/STOP na zaslonu pojavi “LLL”, je slišati zvočni signal, ki opozarja, da je
temperatura v pekaču prenizka..
3. Če se po pritisku na START/STOP na zaslonu pojavi “EE0”, je slišati zvočni signal, ki opozarja, da se je
senzor za temperaturo odpel. Pritisnite na START/STOP in ustavite zvočni signal ter pokličite pooblaščenega serviserja, da pregleda senzor. Če se na zaslonu pojavi “EE1”, to pomeni, da je imel senzor za temperaturo kratek stik.
PRED PRVO UPORABO
Na začetku bo iz naprave izhajal dim z značilnim vonjem. To je normalno in bo kmalu prenehalo. Preverite, ali ima naprava dovolj prostora za pravilno prezračevanje.
1. Prosimo, da preverite, ali so vsi deli in dodatki naprave brez poškodb.
2. Očistite vse dele, upoštevajoč navodila iz poglavja “Čiščenje in vzdrževanje”.
3. Uravnajte pekač na program BAKE in pecite „na prazno“ okrog 10 minut. Nato pustite, da se pekač
shladi in ponovno očistite vse dele.
4. Temeljno posušite vse dele in sestavite pekač. Naprava je pripravljena za uporabo.
KAKO PRIPRAVITE KRUH
1. Postavite posodo za peko na svoje mesto, nato pritisnite navzdol in obrnite v smeri urnega kazalca,
dokler ne slišite, da je posoda v pravilnem položaju. Postavite nož za gnetenje testa na os. Obrnite
nože v smeri urnega kazalca, dokler ne slišite, da so v pravilnem položaju. Priporočamo, da pred
namestitvijo nožev luknje zapolnite z margarino, ki je odporna na visoko temperaturo. S tem boste
preprečili, da se testo zalepi pod noži in omogočili njihovo lažje umikanje iz kruha.
2. Dajte vse sestavine v posodo za peko. Upoštevajte vrstni red sestavin iz recepta. Običajno najprej
vlijemo vodo, ali kakšno drugo tekočino, nato dodamo sladkor, sol in moko, šele na koncu kvas ali
pecilni prašek.
Opomba: maksimalna količina moke in kvasa je odvisna od recepta.
3. S prstom naredite majhno luknjo na eni strani moke. Vanjo položite kvas, pri tem pazite, da ne
pride v stik z vodo, ali s soljo.
kvas ali soda
suhe sestavine
voda ali tekočina
Page 27

27
4. Previdno zaprite pokrov in vklopite kabel za napajanje v vtičnico.
5. Pritisnite na gumb MENU, dokler ne izberete zaželenega programa.
6. Pritisnite na gumb TEMP za izbiro poljubne barve skorje.
7. Pritisnite na gumb LOAF/SIZE za izbiro poljubne velikosti štruce.
8. Peko preložite s pritiskom na “+” ali “–”. Če bi radi s peko začeli takoj, vam tega ni treba storiti.
9. Pritisnite na gumb START/STOP za začetek delovanja naprave.
10. Ko se program konča, boste slišali zvočni signal. Lahko pritisnete in držite gumb START/STOP 2
sekundi, da lahko prekinete zvočni signal in vzamete kruh iz pekača.
11. Odprite pokrov in s pomočjo kuhinjskih rokavic trdno primite prijemalke posode za peko, jo počasi
dvignite in potegnite iz naprave.
Pozor: posoda za peko in kruh sta lahko zelo vroča! Previdno ravnajte z njima.
12. Obrnite posodo za peko narobe na kovinsko žico za hlajenje, ali na čist kuhinjski pult in previdno
potresite, dokler kruh ne pade iz posode.
13. Previdno obrnite kruh in ga pustite, da se hladi približno 20 minut preden ga začnete rezati. Pripo-
ročamo, da kruh režete z električnim ali z nazobčanim nožem za kruh.
14.
Če ste zapustili prostor in niste pritisnili gumba START/STOP na koncu programa, ostane kruh
avtomatsko topel v naslednji uri, preden se naprava samodejno izključi.
15. Ko ne uporabljate naprave, ali ko končate z določeno operacijo, izklopite kabel za napajanje iz
električne vtičnice.
Opomba: Preden začnete rezati kruh, s kavljem potegnite nož za gnetenje, ki je na dnu kruha. Kruh je
vroč, noža pa ne smete nikoli poskusiti potegniti z golimi rokami.
Opomba: Če niste pojedli vsega kruha, priporočamo, da ga ovijete v plastično folijo in shranite za
pozneje. Kruh lahko hranite tri dni na sobni temperaturi. Če bi radi, da traja dlje, ga ovijte v plastično
folijo in shranite v hladilniku, kjer lahko traja do 10 dni. Ker kruh nima industrijskih dodatkov za daljše
trajanje, traja enako dolgo kot domači kruh, ki ga kupimo na trgu.
ČIŠČENJE IN VZDRŽEVANJE
Izklopite kabel za napajanje in pustite, da se naprava ohladi pred začetkom čiščenja.
1. Posoda za peko kruha: obrišite notranjost in zunanjost z vlažno krpo. Ne uporabljajte ostrih ali abra-
zivnih sredstev, da se ne poškoduje zaščitni teflonski sloj, ki preprečuje, da se kruh prime na posodo.
Pustite posodo, da se popolnoma posuši, preden jo vrnete v napravo.
Opomba: Vstavite posodo za peko in jo z obračanjem v smeri urnega kazalca fiksirajte v pravilen položaj. Če posode ne morete vstaviti v napravo, jo previdno premikajte in ko ugotovite, da je v pravilnem
položaju, pritisnite navzdol.
2.
Nož za gnetenje: če je nož težko sneti z osi, napolnite zbiralnik s toplo vodo in počakajte približno
30 minut, nato pa enostavno odstranite nož. Previdno obrišite rezilo z vlažno bombažno krpo. Upoštevajte, da sta posoda in nož varna za pranje v pomivalnem stroju.
3.
Ohišje: previdno obrišite zunanjo površino ohišja z vlažno krpo. Ne uporabljajte abrazivnih sredstev
za čiščenje, ker bo zunanja površina zgubila sijaj. Ohišja ne smete potapljati v vodo, da bi ga oprali.
Opomba: ne priporočamo snemanja pokrova za čiščenje.
4. Preden spakirate pekač za kruh, da ga odložite, preverite, ali se je popolnoma ohladil, ali je čist i
suh in ali je pokrov zaprt.
UVOD V SESTAVINE KRUHA
1. Moka za kruh • Moka za kruh vsebuje visoko koncentracijo glutena (imenujemo jo lahko tudi moka,
bogata z glutenom inbeljakovinami), je zelo elastična in preprečuje, da se testo za kruh, po vzhajanju
sesede. Ker vsebuje več glutena kot navadna moka, jo lahko uporabljamo za večje hlebce z bolj rahlo
strukturo notranjih vlaken. Moka za kruh je najpomembnejša sestavina za pripravo kruha.
2. Navadna moka • Navadna moka sestoji iz kakovostne mehke in trde pšenične moke, uporablja pa
se za pripravljanje hitrega kruha in peciva.
3. Integralno pšenično brašno • Integralna pšenična moka Integralno pšenično moko dobimo z mle-
Page 28

28
tjem celih zrn pšenice, vsebuje pa tudi mleto opno pšenice in gluten. Integralna pšenična moka je
težja od navadne moke in vsebuje več hranljivih snovi. Kruh iz integralne moke je običajno manjše
velikosti. V številnih receptih je kombinacija integralne in navadne moke za najboljše rezultate.
4. Črna pšenična moka • Črna pšenična moka, znana tudi kot “groba moka”, je vrsta moke, ki je bo-
gata z vlakninami in je zelo podobna integralni pšenični moki. Če želite večji kruh iz te moke, jo morate zmešati z večjimi količinami moke za kruh.
5.
Moka za pecivo • Moko za pecivo dobimo z mletjem “mehke pšenice”, ali pšenice, ki ni bogataz be-
ljakovinami, izdeluje se izključno za pripravo peciva. Različne vrste moke so si navidez podobne.
V resnici pa je kakovost kvasnega vzhajanja, ali moči vpijanja različnih vrst moke različna glede na
kraj pridelave, razloge pridelave, proces mletja in trajnost. Preizkusite lahko različne vrste moke in
proizvajalcev in si izberete tisto, ki daje najboljše rezultate glede na vaše izkušnje in okus.
6. Koruzna in ovsena moka • Koruzno in ovseno moko dobimo z mletjem koruze in ovsa in jo uporab-
ljamo v pekarski industriji kot poseben dodatek nekaterih vrsta kruha za boljši okus in teksturo.
7. Sladkor • Sladkor je zelo pomembna sestavina, ki kruhu daje sladkost in barvo. Po večini se upo-
rablja beli sladkor, ob posebnih priložnostih lahko uporabimo tudi rjavi sladkor, sladkor v prahu ali
sladkorno peno.
8. Kvas • Kvas gre najprej skozi proces kvašenja, nato sprošča ogljikov dioksid, pri čemer testo vzha-
ja, notranja vlakna se zmehčajo. Vendar kvas za vzhajanje potrebuje tudi ogljikove hidrate iz sladkorja in moke.
• 1 žlička aktivnega suhega kvasa = 3/4 žličke instant kvasa
• 1.5 žlička aktivnega suhega kvasa = 1 žlička instant kvasa
• 2 žlički aktivnega suhega kvasa = 1.5 žlička instant kvasa
Kvas moramo hraniti v hladilniku, aktivnega in suhega, saj ga zunaj ubije visoka temperatura, zato je treba pred uporabo preveriti datum proizvodnje in rok trajanja kvasa. Po vsaki uporabi ga vrnemo v hladilnik. Posušeni kvas je najpogostejši vzrok, da testo ne vzhaja. Ali je vaš kvas še naprej svež in aktiven, lahko preverite na naslednji način:
(1) nalijte 1/2 skodelice tople vode
(45-50°C) v merico
(2) vsujte 1 žličko belega sladkorja v merico in premešajte, nato dodajte 2 žlički kvasa.
(3) Pustite merico na toplem mestu približno 10 minut. Ne smete mešati.
(4) Če se do takrat ne naredi penica na površini zmesi, to pomeni, da je vaš kvas neaktiven.
9. Sol • Sol je potrebna za boljši okus kruha in barvo skorje. Vendar lahko sol prepreči kvas, da vzhaja.
Nikoli ne solite preveč. Če ne želite soliti, sol enostavno izpustite, saj bo kruh celo večji.
10. Jajca • Jajca lahko izboljšajo teksturo kruha, ga obogatijo s proteini in povečajo njegov obseg. Če
uporabljate jajca v zmesi za kruh, preverite, ali ste povsem odstranili lupino in če je testo enako-
merno premešano.
11. Mast, maslo in rastlinsko ulje • Mast vpliva na to, da je kruh mehkejši in podaljša trajnost kruha.
Maslo je treba pred uporabo raztopiti, ali ga sesekljati na manjše kose, da se lahko enako vmeša.
12. Pecilni prašek • Pecilni prašek se po večini uporablja za hitri kruh in pecivo. Pri uporabi pecilne-
ga praška ni treba čakati, da testo naraste, prašek spušča plin, ki zmehča teksturo kruha na kemij-
skem principu.
13. Soda bikarbona • Deluje po enakem principu kot pecilni prašek. Uporablja se lahko celo v kombi-
naciji s pecilnim praškom.
14. Voda in druge tekočine • Voda je zelo pomembna za pripravo kruha. Najbolje je, če uporabljamo
vodo, katere temperatura je med 20°C in 25°C. Pri pripravi hitrega kruha znaša najboljša tempera-
tura vode od 45 do 50°C. Vodo lahko nadomestite s svežim mlekom, ali vodo, pomešano z 2% mleka
v prahu, s čimer lahko izboljšate okus kruha in barvo skorje. V nekaterih receptih se za boljši okus
uporablja sok. Uporablja se jabolčni, pomarančni, limonov sok, itn.
TEŽA SESTAVIN
Eden najpomembnejših korakov pri pripravi dobrega kruha je pravilna odmera količine posamičnih sestavin. Priporočamo uporabo merice za natančne odmerke.
1.
Merjenje tekočih sestavin
Page 29

29
Voda, sveže mleko ali mleko v prahu, raztopljeno v vodi, je treba meriti z merico. Pri merjenju olja, ali
drugih sestavin temeljito očistimo merico.
2. Merjenje suhega praška
3. Suhi prašek mora biti shranjen v naravnih pogojih, uporabljamo pa ga v natančnih odmerkih.
4. Vrstni red dodajanja sestavin
Vrstni red dodajanja sestavin je naslednji: tekoče sestavine, jajca, sol, mleko v prahu, itn. Pri dodajanju
sestavin pazite, da ne bo moka popolnoma zalita s tekočino. Kvas dodamo izključno na suho moko. Ide
alno bi bilo, da sol ne pride v stik s kvasom. Potem, ko se je moka nekaj časa mešala, vas zvočni signal
obvesti, da je treba v mešanico dodati sadje. Če ga dodamo prezgodaj, izgubi okus zaradi pretiranega
mešanja. Če mešanje prekinjate pogosto in za več časa, ne smete dodajati jajc in sadja, ker se te sestavine hitro pokvarijo.
VODIČ ZA POGOSTE TEŽAVE
št. Problem Razlog Rešitev
1 Dim prihaja iz odprtine
za ventilacijo med peko
Nekatere sestavine se prilepijo na
grelne elemente ali blizu njih. V pri
meru prve uporabe se utegne zgoditi,
da je u pekaču ostalo strojno olje od
proizvodnje.
Izključite kabel za napajanje in očistite
grelni element, pazite, da se ne ope
čete. Če gre za prvo uporabo, vklopite
pekač na prazno in odprite pokrov.
2 Spodnja skorja kruha je
predebela
Kruh se je dolgo grel, ali je predol
go ostal v posodi in je zato zgubil veliko vode
Vzemite kruh iz posode takoj, ko je
spečen.
3 Kruh zelo težko spravi
-
mo iz pekača
Nož in njegova os sta se močno spri
-
jela v posodi za peko
Ko vzamete kruh, nalijte toplo vodo v
posodo za peko in po 10 minutah vzemite ven nož in ga očistite.
4 Sestavine niso dovolj
dobro premešane in
kruh se je slabo spekel
1. Izbrani program ni primeren Select the proper program menu
2. Če med peko pečico pogosto odpi
-
ramo, je kruh suh in nima lepe barve
Don’t open cover at the last rise
3.Odpor pri mešanju sestavin je pre
velik, zato se nož ne more obračati in
pravilno mešati sestavin
Preverite odprtino za nož, nato vzemi
te ven posodo za peko in vključite napravo na prazno. Če se težave nadaljujejo, pokličite pooblaščenega serviserja.
5 Zaslon kaže “H:HH”,
ko pritisnemo na gumb
“start/stop”
Temperatura v pekaču je previsoka. Pritisnite “start/stop” in izklopite na
pravo iz elektrike, nato vzemite ven
posodo za peko in odprite pokrov, dok
-
ler se naprava ne shladi
6 Slišati je hrup motor
ja, vendar testo ni dobro
vmešeno
Posoda za peko ni v dobrem položaju,
ali pa je testo preveliko za mešenje
Preverite, ali je posoda za peko v dob
rem položaju in ali je testo narejeno
v skladu z receptom ter ali so vse se
-
stavine natančno odmerjene
7 Velikost kruha je preve
-
lika in odpira pokrov
Dodali ste preveč kvasa ali moke, ali
premalo vode ali pa je temperatura
previsoka
Preverite navedene dejavnike in
zmanjšajte ali povečajte število problematičnih dejavnikov, dokler ne
ugotovite pravega razloga.
8 Velikost kruha je pre
majhna, ali pa kruh
sploh ne vzhaja
Niste dodali kvasa, ali pa ga ni dovolj.
Možno je tudi, da kvas ne more vzhajati, ker je temperatura previsoka, ali
pa se je pomešal s soljo, ali pa je zu
-
nanja temperatura prenizka.
Preverite količino in vzhajanje kvasa
in uravnajte ustrezno temperaturo.
9 Testo je tako veliko,
da se zliva iz posode
za peko
Tekočine je preveč, zato se je testo
zmehčalo, kvasa pa je preveč.
Zmanjšajte količino tekočine in kvasa
Page 30

30
št. Problem Razlog Rešitev
10 Kruh usahne na sredini 1. Uporabljena moka ni dobra za
vzhajanje testa
Uporabite krušno moko ali močnejši
pecilni prašek.
2. Kvas vzhaja prehitro, ali pa je nje
-
gova temperatura previsoka
Kvas je bil shranjen na sobni tempe
-
raturi
2.Višek vode razmehča testo in
povzroča, da je vlažen.
V skladu z zmožnostjo vpijanja vode
uskladite količino vode z receptom
11 Teža kruh je prevelika,
struktura kruha pa pre
-
več gosta
1. Preveč moke, ali premalo vode Zmanjšajte količino moke, ali pa do
-
dajte vodo
2. Preveč sadja ali preveč integral
-
ne moke
Zmanjšajte količino sadnih sestavin in
dodajte kvas
12 Sredica kruha je votla 1. Preveč vode ali kvasa in prema
-
lo soli
Zmanjšajte količino vode ali kvasa in
dodajte sol
2. Temperatura vode je previsoka Preverite temperaturo vode
13 Površina kruha se lepi
na suhe sestavine
1. Veliko sestavin z glutenom, na pri
-
mer maslo in banane, itn.
Ne dodajajte preveč sestavin z glute
-
nom.
2. Premalo zmešano s premalo vode Preverite vodo
14 Skorja kruha je prede
bela, barva pa pretemna, ko se peče pecivo,
ali hrana, ki vsebuje ve
-
liko sladkorja
Različni recepti imajo odlične učinke
pri pripravi kruha, temna barva nas
-
tane, ker je preveč sladkorja.
Če je barva preveč temna za recep
te z veliko sladkorja, pritisnite start/
stop, da ustavite program 5 do 10 mi
nut pred predvidenim časom. Preden
vzamete ven kruh ali pecivo, jih pusti
te v posodi za peko približno 20 minut
z zaprtim pokrovom.
Lahko pomagate pri varstvu okolja!
Prosimo, upoštevajte lokalno zakonodajo: vse nedelujoče električne naprave je treba oddati ustreznim
centrom za recikliranje elektronskih in električnih
odpadkov.
OKOLJU PRIJAZNO ODLAGANJE
Page 31

UPUTSTVO ZA UPOTREBU
PEKAČ HLJEBA
MODEL: BM1329
CG / BIH
Pažljivo pročitajte ovo uputstvo prije korišćenja i sačuvajte ga za kasniju upotrebu.
Page 32

32
VAŽNA BEZBJEDNOSNAUPUTSTVA
Prije upotrebe ovog električnog uređaja, treba
povesti računa o slijedećim osnovnim bezbjednosnim mjerama:
1. Pročitajte sva uputstva.
2. Prije upotrebe provjerite da li napon u vašoj
zidnoj utičnici odgovara naponu uređaja
koji možete pronaći na natpisnoj tablici na
samom uređaju.
3. Nemojte koristiti bilo koji uređaj sa oštećenim
kablom za napajanje ili utikačem, ili ako dođe
do kvara uređaja, ako ga ispustite ili oštetite
na bilo koji način. Vratite uređaj proizvođaču
ili najbližem ovlašćenom servisu na pregled,
popravku ili zamenu električnih ili mehaničkih dijelova.
4. Ne dodirujte vruće površine na uređaju.
Uvijek koristite ručke.
5. Da biste se zaštitili od strujnog udara ne
potapajte kabl za napajanje, utikač ili kućište
uređaja u vodu ili bilo koju drugu tečnost.
6. Isključite uređaj iz struje kad nije u upotrebi, kad stavljate ili skidate nastavke ili pijre
čišćenja.
7. Ne dozvolite da kabl za napajanje visi sa ivice
stola ili iznad grejnog tijela.
8. Upotreba neoriginalnih delova i nastavaka
koje nije odobrio proizvođač mogu izazvati
povrede.
9. Ovaj uređaj nije namenjen za upotrebu
od strane osoba (uključujući i djecu) sa
smanjenim fizičkim, senzornim i mentalnim
sposobnostima ili nedostatkom iskustva i
znanja, osim ako nisu pod nadzorom osobe
odgovorne za njihovu bezbjednost.
10. Korišćenje uređaja od strane djece mora biti
pod nazdorom kako bi se osiguralo da ne
koriste uređaj za igru.
11. Ne postavljajte uređaj na ili u blizini plinskog
ili električnog šporeta, kao i zagrejane rerne.
12. Izuzetno pažljivo se mora postupati kada
pomjerate uređaje koji sadrže vrelo ulje ili
druge vrele tečnosti.
13. Ne dodirujte delove koji se pomeraju ili
okreću dok je uređaj u funkciji.
14. Nikada nemojte uključivati uređaj a da
prethodno niste pravilno postavili posudu za
pečenje hljeba sa sastojcima.
15. Ne udarajte posudu pri vrhu ili sa strane kako
biste je izvadili pošto može doći do oštećenja.
16. Metalne folije i drugi slični materijali se ne
smiju stavljati u pekač jer može doći do rizika
od požara ili kratkog spoja.
17. Nikad ne pokrivajte pekač sa peškirom ili bilo
kojim drugim materijalom, pošto vruć vazduh
i para moraju neometano da izlaze iz uređaja
dok je u funkciji. Ukoliko je uređaj prekriven
ili dođe u kontakt sa zapaljivim materijalima
može doći do požara.
18. Uvijek prvo prikačite kabl za napajanje u sam
uređaj pa tek onda u utičnicu. Za isključivanje
uređaja, pritisnite prvo dugme OFF, pa tek
onda iskopčajte uređaj iz struje.
19. Ne koristite uređaj u bilo koje druge svrhe
osim one za koju je uređaj predviđen.
20. Ovaj uređaj ima kabl za napajanje sa uzemljenjem. Molimo vas da proverite da je je vaša
utičnica takođe propisno uzemljena.
21. Ovaj uređaj je namjenjen za kućnu upotrebu i
slično korišćenje od strane:
– Kuhinjskog osoblja u radnjama, kancelarija-
ma i drugim radnim mestima;
– Osoblja na farmama;
– Klijenata u hotelima, motelima i drugim
prebivalištima.
22. Uređaj nije predviđen da radi uz pomoć
eksternog tajmera ili odvojenog sistema za
daljinsko upravljanje.
23. Ne koristiti uređaj napolju.
24. Sačuvajte ova uputstva.
SAMO ZA KUĆNU UPOTREBU
Page 33

33
Slika 1.
UPOZNAJTE VAŠ PEKAČ
prozorčić
tabla sa
kontrolama
(vidi ispod)
kućište
poklopac
mjerna šolja
kuka
mjerna kašika
posuda za pečenje
hleba (sa nožem
za gnječenje)
UPOZNAVANJE SA FUNKCIJAMA
Ovo pokazuje
koji ste program
izabrali
Vreme trajanja
svakog programa
700g/1000g
COLOR
Page 34

34
NAKON INICIJALNOG NAPAJANJA
Čim se poveže napajanje, uređaj će ispustiti zvučni signal i upaliće se ekran na kojem će pisati “1 3:00”.
Ali dvije tačke između “3” i “00” ne trepću stalno. “1” označava standardni program. “2.0LB” i “Medi
-
um” su dva standardna podešavanja.
FUNKCIJA START/STOP
Start i stop dugme služe da započnete ili zaustavite određeni program pečenja.
Da započnete neki program, pritisnite jednom dugme “START/STOP”. Čućete kratak zvučni signal, dve
tačke počinju da trepću i program počinje sa radom. Nakon što je program započeo svi prekidači osim
“START/STOP” prekidača postaće neaktivni.
Da zaustavite neki program, pritisnite dugme “START/STOP” i držite ga 2 sekunde dok ne čujete dugačak zvučni signal koji označava da je program zaustavljen.
FUNKCIJA PAUSE
Nakon pokretanja bilo kog programa, možete pritisnuti START/STOP da pauzirate program na par
sekundi. Program će biti pauziran, ali će podešavanje ostati memorisano. Preostalo vreme do kraja programa će biti prikazano na LCD ekranu. Pritisnite START/STOP ponovo i program će nastaviti sa radom.
FUNKCIJA MENU
Koristi se za odabir različitih programa. Svaki pritisak na ovaj prekidač (koji prati kratak zvučni signal)
označava promenu programa. Ako pritisnete dugme sa prekidima meni će proći ceo ciklus od 12
programa što će biti propraćeno pozadinskim LED indikatorom. Izaberite vaš željeni program. Funkcije
svih 12 menija će biti objašnjene u daljem tekstu.
Program 1: BASIC
Za bijele hljebove i hljebove sa mješanim brašnom, uglavnom pšeničnim i ražanim. Hljeb ima kompaktnu strukturu. Možete podesiti da hljeb dobije braon boju podešavanjem regulatora za temperaturu.
Program 2: FRENCH
Za lake hljebove od rastresitog brašna. Francuski hljeb zahteva tačno vrijeme pripreme i temperaturu
da dobije onu sjajnu hrskavu, smeđu koru. Ovaj program nije pogodan za recepte koji zahtevaju korišćenje putera, margarina ili mlijeka.
Program 3: WHOLEWHEAT
Hleb od integralnog brašna je kvasni hleb koji sadrži značajnu količinu integralnog brašna (50% ili više).
Hljebovi napravljeni od integralnog brašna su hranljiviji jer se ova vrsta brašna pravi mljevenjem celog
zrna pšenice (uključujući i omot i klicu). Korišćenjem integralnog brašna dobićete hljeb tamno smeđe
boje (kad koristite samo integralno brašno), koji ima puniji ukus i zdraviji je od hljebova koji se prave od
prosejanog belog brašna (iako se “izgubljene” hranljive materije vraćaju nazad i u bijelo brašno).
Program 4: QUICK
Gnječenje, podizanje i pečenje hljeba sa bržim režimom rada od programa BASIC. Hljeb ispečen u ovom
režimu rada je uglavnom manje veličine i gušće teksture.
Program 5: SWEET
Program za slatke hljebove služi za pravljenje hljebova sa visokom količinom šećera, masti i proteina, koji u normalnom režimu pečenja dovode do zagorevanja. Uslijed duže faze podizanja tjesta, hljeb
napravljen u ovom režimu će biti lakši i prozračniji.
Program 6: ULTRA FAST- I
(veličina hljeba se ne može podesiti, dobija se vekna standardne veličine i
ne može se koristiti funkcija pauze)
Režim Ultra fast - I daje mogućnost pripreme bijelog hljeba za kraći vremenski period. Dobija se vekna
standardne veličine (2.0lb/900g). Ovaj program proizvodi hljeb podjednako dobrog kvaliteta kao i standardni program, s tim što standardni program traje tri sata, a u ovom režimu možete ispeći hljeb za sat
Page 35

35
i tridesetosam minuta.
Program 7: ULTRA FAST- II
(veličina hljeba se ne može podesiti, dobija se vekna standardne veličine i
ne može se koristiti funkcija pauze)
Isto kao i prethodni režim, samo za manje vekne (1.5lb/600g). Program takođe traje sat vremena i tridesetosam minuta.
Program 8: DOUGH
(ne mogu se podešavati temperatura i veličina vekne)
Gnječenje i podizanje testa, ali bez pečenja. Nakon završetka operacije, izvadite tijesto i koristite ga za
pravljenje rolnica, pica, hlepčića, itd.
Program 9: JAM
(ne mogu se podešavati temperatura, veličina vekne, a funkcija pauze nije dostupna.
Pekač hljeba je odličan za pravljenje domaćih džemova i ajvara. Lopatica automatski mješa sve sastoj
-
ke kroz cijeli proces, a konačni proizvod je odličan dodatak svježe ispečenom hljebu!
Program 10: CAKE
(ne može se podesiti veličina vekne)
Funkcija koja koristi samo funkciju mješanja za pripremu mješavina za kolače koristeći dozvoljene
sastojke. Gnječenje i podizanje tjesta, ali bez upotrebe kvasca, već uz pomoć praška za pecivo.
Program 11: SANDWICH
Gnječenje, podizanje i pečenje tijesta za sendviče, za hlebove lake teksture sa tanjom korom.
Program 12: BAKE
(veličina vekne i funkcija pauze nisu dostupni, ali vrijeme trajanja operacije se može
podešavati pritiskom na dugme “+”ili “–”, što povećava ili smanjuje vrijeme trajanja pečenja za po jedan
minut. Vrijeme pečenja se može podesiti između 10 i 60 minuta)
Program pečenja služi samo za pečenje i može se koristiti kada želite da povećate vrijeme pečenja
nekih hljebova. Ovaj režim je takođe dosta pogodan za pravljenje džemova i marmelada.
TEMP
Uz pomoć ove funkcije možete odrediti boju kore tako što ćete izabrati između opcija Light, Medium ili
Dark (svetla, srednja i tamna boja). Ova funkcija nije dostupna u nekim režimima rada, koji su navedeni u
prethodnom odjeljku “MENU”.
LOAF/SIZE
Pritisnite ovu funkciju kada želite da odredite veličinu hljeba: 1.5LB, 2.0LB (900g, 600g). Izabrana
željena veličina će se zatim pojaviti na LCD ekranu. Obratite pažnju da ukupno vrijeme pečenja zavisi
od veličine vekne. Ova funkcija nije dostupna u nekim režimima rada, koji su navedeni u prethodnom
odjeljku “MENU”.
DELAY TIME(“+” ili “–”)
Ako želite da uređaj ne počne odmah sa radom možete upotrebiti ovu funkciju koja služi da odloži vreme
pečenja.
Morate samo da znate koliko vremena je neophodno da prođe prije nego što se program pokrene tako
što ćete podesiti odloženo pečenje koristeći tastere “+” ili “–”. Uzmite u obzir da ova funkcija uključuje i
vrijeme trajanja programa pečenja. Prvo se mora izabrati željeni program i temperatura, a zatim podesiti
vrijeme za odlaganje početka rada. Maksimalno vreme odlaganja je 13 sati.
Primer: Sada je 20:30h, ako želite da vaš hljeb bude spreman sutra ujutru u 7h, tj. 10 sati i 30 minuta
kasnije, izaberite program pečenja, boju i veličinu vekne i pritisnite “+” ili “–” dok na LCD ekranu ne bude
pisalo 10:30. Zatim pritisnite START/STOP da biste aktivirali odloženi program. Dve tačke će početi da
trepću a LCD časovnik će početi sa odbrojavanjem. U 7 ujutru ćete imati svež hljeb. Ako ne želite odmah da
ga izvadite, standardno vrijeme podgrijavanja hljeba u pekaču iznosi sat vremena.
Napomena: Nemojte koristiti ovu funkciju kad radite sa sastojcima koji se lako kvare kao što su jaja,
mlijeko i sir.
Page 36

36
KEEP WARM
Toplota hljeba se može automatski održati i do 60 minuta nakon završetka pečenja. Tokom trajanja
ovog procesa, ako želite da izvadite hljeb, isključite ovu funkciju pritiskom na START/STOP.
Napomena: Funkcija ne važi za programe DOUGH i JAM.
MEMORY
Ukoliko je došlo do nestanka struje tokom trajanja programa pečenja, proces će se automatski nastaviti posle 10 minuta, čak i bez pritiskanja START/STOP prekidača. Ukoliko nestanak struje potraje duže
od 15 minuta, memorija će biti izgubljena i pekač će morati da se ponovo ručno pokrene. Ali ako ij nije
odmaklo dalje od faze gnječenja tokom nestanka struje, pritiskom na START/STOP prekidač jednostavno ćete započeti cijeli program iz početka.
OKRUŽENJE
Ovaj uređaj radi savršeno u okruženjima sa širokim rasponom temperatura, ali varijacije u spoljašnjoj
temperaturi bi mogle da utiču na razlike u veličini vekni. Preporučuje se da sobna temperatura bude
između 15° i 34°.
INDIKATORI UPOZORENJA:
1. Ako se na ekranu pojavi “HHH” nakon što ste pritisnuli START/STOP, čuće se zvučni signal koji upozorava da je temperatura unutar pekača i dalje previsoka. Program tada morate prekinuti. Otvorite poklopac i
pustite pekač da se ohladi 10 do 20 minuta.
2. Ako se na ekranu pojavi “LLL” nakon što ste pritisnuli START/STOP, čuće se zvučni signal koji upozorava
da je temperatura unutar pekača preniska..
3. Ako se na ekranu pojavi “EE0” nakon što ste pritisnuli START/STOP, čuće se zvučni signal koji upozorava
da se senzor za temperaturu otkačio. Pritisnite START/STOP da zaustavite zvučni signal i pozovite ovlašćenog servisera da pogleda senzor. Ako se na ekranu pojavi “EE1”, to znači da je senzor za temperaturu pod
kratkim spojem.
PRIJE PRVE UPOTREBE
Uređaj će u početku izbacivati malo dima koji će biti propraćen karakterističnim mirisom. Ovo je normalno i uskoro će prestati. Provjerite da uređaj ima dovoljno slobodnog prostora za pravilnu ventilaciju.
1. Molimo vas provjerite da li su svi djelovi i nastavci neoštećeni.
2. Očistite sve djelove u skladu sa uputstvima koje možete naći u odjeljku “Čišćenje i održavanje”.
3. Podesite program pekača na BAKE i pecite na prazno oko 10 minuta. Zatim ga pustite da se ohladi i
ponovo očistite sve rasklopive djelove.
4. Temeljno osušite sve djelove i sastavite pekač. Uređaj je sad spreman za korišćenje.
KAKO DA NAPRAVITE HLJEB
1. Postavite posudu za pečenje na svoje mesto, zatim pritisnite na dole i okrenite u sjmeru kazaljke
na satu dok ne čujete da je posuda u svojoj pravilnoj poziciji. Postavite nož za gnječenje testa na
osovinu. Okrenite noževe u smeru kazaljke na satu dok ne čujete da su u svojoj pravilnoj poziciji.
Preporučuje se da popunite rupe margarinom otpornim na visoke temperature prije postavljanja
noževa. Ovim spriječavate da se tijesto zalijepi ispod noževa kao i njihovo lakše uklanjanje iz hleba.
2. Stavite sve sastojke u posudu za pečenje. Povedite računa o redosledu ubacivanja sastojaka koji se
pominje u receptu.
Obično se prvo stavi voda ili neka druga tečnost, zatim se doda šećer, so i brašno, a tek na kraju
Page 37

37
kvasac ili prašak za pecivo.
Napomena: maksimalna količina brašna i kvasca zavisi od recepta.
3. Prstom napravite mali usijek na jednoj strani brašna. Ubacite u njega kvasac, pazeći da ne dođe u
kontakt sa vodom ili solju.
kvasac ili soda
suvi sastojci
voda ili tečnost
4. Pažljivo zatvorite poklopac i uključite kabl za napajanje u utičnicu.
5. Pritisnite prekidač MENU dok ne izaberete željeni program.
6. Pritisnite prekidač TEMP da odaberete željenu boju kore.
7. Pritisnite prekidač LOAF/SIZE da izaberete željenu veličinu vekne.
8. Podesite odloženo pečenje pritiskom na “+” ili “–”. Možete preskočiti ovaj korak ako želite da
počnete sa pečenjem odmah.
9. Pritisnite prekidač START/STOP za početak rada uređaja.
10. Kada program završi čućete zvučni signal. Možete pritisnuti i držati prekidač START/STOP 2 sekun-
de da biste prekinuli zvučni signal i izvadili hljeb iz pekača. Otvorite poklopac i koristeći kuhinjske
rukavice čvrsto uhvatite drške posude za pečenje i polako je izvucite na gore i izvan uređaja.
Pažnja: posuda za pečenje i sam hljeb mogu biti veoma vrući! Rukujte sa njima pažljivo.
11. Pustite da se posuda za pečenje prohladi prije vađenja hleba. Zatim nežnim pokretima spatule
lagano oslobodite ivice hljeba od posude.
12. Okrenite posudu za pečenje naopačke na metalnu žicu za hlađenje ili čistu kuhinjsku podlogu i
nježno protresite dok hljeb ne ispadne iz posude.
13. Pažljivo okrenite hljeb i ostavite ga da se prohladi oko 20 minuta prije sečenja. Preporučuje se da
hljeb sečee električnim sjekačem za hljeb ili nazubljenim nožem za hljeb.
14. Ukoliko ste napustili prostoriju ili niste pritisnuli prekidač START/STOP na kraju programa, hljeb
će se automatski održavati toplim narednih sat vremena pre nego što se uređaj automatski isključi.
15. Kad ne koristite uređaj ili kada ste završili sa nekom operacijom, iskopčajte kabl za napajanje iz
strujne utičnice.
Napomena: Prije sječenja vekne, uz pomoć kuke izvadite nož za gnječenje koji se nalazi na dnu vekne.
Vekna je vruća i nikad ne pokušavajte da izvadite nož golim rukama.
Napomena: Ako niste pojeli sav hljeb nakon pečenja, preporučujemo vam da ga zamotate u plastičnu
foliju i ostavite za kasnije. Hljeb se može čuvati naredna tri dana na sobnoj temperaturi. Ako želite
da vam traje još duže, zamotajte ga u plastičnu foliju i ostavite ga u frižider, gde može da traje i do 10
dana. Pošto u hljeb niste stavljali nikakve industrijske aditive za održavanje, vijek trajanja hljeba će biti
sličan domaćem hljebu koji kupite na pijaci.
ČIŠĆENJE I ODRŽAVANJE
Iskopčajte kabl za napajanje i ostavite uređaj da se ohladi prije početka čišćenja.
1. Posuda za pečenje hlјeba: Prebrišite unutrašnjost i spoljašnjost vlažnom krpom. Nemojte koristiti bilo
kakva oštra ili abrazivna sredstva kako ne biste skinuli zaštitni teflonski sloj koji služi tome da se hljeb
ne lijepi za posudu. Ostavite posudu da se u potpunosti osuši prije vraćanja u uređaj.
Napomena: Ubacite posudu za pečenje i okrećući je u smeru kazaljke na satu fiksirajte je u pravilan
položaj. Ukoliko posuda ne može da se ubaci u uređaj, pažljivo je pomjerajte i kad osjetite da je u pravilnom položaju, pritisnite na dole.
2. Nož za gnječenje: Ukoliko se nož teško skida sa osovine, napunite rezervoar toplom vodom i sače-
kajte približno 30 minuta a zatim lako uklonite nož. Pažljivo prebrišite sječivo vlažnom pamučnom
krpom. Uzmite u obzir da su i posuda i nož bezbjedni za pranje u mašini za pranje posuđa.
3. Kućište: nježno prebrišite spoljašnju površinu kućišta vlažnom krpom. Nemojte koristiti abrazivna
sredstva za čišćenje pošto će doći do gubitka sjaja spoljašnje površine. Nikad ne potapajte kućište
Page 38

38
u vodu da biste ga oprali.
Napomena: Ne preporučuje se skidanje poklopca za čišćenje.
4. Prije nego što spakujte pekač za hljeb za odlaganje, provjerite da se u potpunosti ohladio, da je čist
i suv i da je poklopac zatvoren.
UVOD U HLЈEBNE SASTOJKE
1. Hlјebno brašno • Hljebno brašno u sebi sadrži visoku koncentraciju glutena (pa se može nazvati
i brašno bogato glutenom i proteinima), posjeduje odlična elastična svojstva i sprečava tjesto za
hljeb da splasne nakon podizanja. Pošto ima veći sadržaj glutena od običnog brašna, može se kori
stiti za veće hljebove sa vazdušastijom strukturom unutrašnjih vlakana. Hljebno brašno je najvažniji
sastojak za pravljenje hljeba.
2. Obično brašno • Obično brašno se pravi mješanjem kvalitetnog mekog i tvrdog pšeničnog brašna i
koristi se za pravljenje brzih hlebova ili kolača.
3. Integralno pšenično brašno • Integralno pšenično brašno se dobija mljevenjem celih zrna pšenice i
u sebi sadrži mljevenu opnu pšenice i gluten. Integralno pšenično brašno je teže od običnog brašna
i bogatije je hranljivim materijama. Hljeb nastao od integralnog brašna je obično manje veličine.
Dosta recepata koristi kombinaciju integralnog i običnog brašna za postizanje najboljih rezultata.
4. Crno pšenično brašno • Crno pšenično brašno, takođe poznato i kao “grubo brašno” je vrsta
brašna bogata vlaknima veoma slična integralnom pšeničnom brašnu. Ako želite da postignete
veću veličinu hleba koristeći ovu vrstu brašna neophodno je da ga izmješate sa većim količinama
hljebnog brašna.
5. Brašno za kolače • Brašno za kolače se dobija mljevenjem “mekane pšenice” ili pšenice koja
nija bogata proteinima, i pravi se isključivo za potrebe pripreme kolača. Različite vrste brašna su
naizgled slične. Ali, u stvarnosti, kvalitet kvasnog podizanja ili moći upijanja različitih vrsta brašna
razlikuje se u zavisnosti od mesta na kome se uzgaja, razloga zbog kojih se uzgaja, procesa mljevenja i vijeka trajanja. Možete isprobati različite vrste brašna, kao i proizvođača, i izabrati ono koje
daje najbolje rezultate u odnosu na vaša iskustva i ukus.
6. Kukuruzno i ovseno brašno • Kukuruzno i ovseno brašno se pravi mljevenjem kukuruza i ovsa i
koristi se u pekarskoj industriji kao posebni dodatak nekim vrstama hljeba za poboljšanje ukusa i
teksture.
7. Šećer • Šećer je veoma važan sastojak koji hljebu daje slatkoću i boju. Uglavnom se koristi bijeli
šećer, ali u posebnim prilikama mogu se koristiti i smeđi šećer, šećer u prahu ili šećerna vuna.
8. Kvasac • Kvasac prvo prolazi kroz proces kvašenja, a zatim oslobađa ugljen dioksid, usled čega tje-
sto narasta, a unutrašnja vlakna smekšavaju. Međutim, kvascu su za rast potrebni i ugljeni hidrati
iz šećera i brašna.
• 1 kašičica aktivnog suvog kvasca = 3/4 kašičice instant kvasca
• 1.5 kašičica aktivnog suvog kvasca = 1 kašičica instant kvasca
• 2 kašičice aktivnog suvog kvasca = 1.5 kašičica instant kvasca
Kvasac se mora držati u frižideru jer će ga napolju ubiti visoka temperatura, pa je neophodno pre
upotrebe pogledati datum proizvodnje i rok trajanja kvasca. Vratite ga u frižider nakon svake upotrebe. Osušeni kvasac je najčešći uzrok ne dizanja tjesta. Na slijedeći način možete proveriti da li je
vaš kvasac i dalje svijež i aktivan ili ne.
(1) Sipajte 1/2 šolje tople vode (45-500C) u mericu.
(2) Sipajte 1 kašičicu bijelog šećera u mjericu i promješajte, a zatim dodajte 2 kašičice kvasca.
(3) Ostavite mericu na toplom mestu oko 10 minuta. Nemojte mješati.
(4) Ako se do tada ne stvori pjenica na površini smese, to znači da je vaš kvasac neaktivan.
9. So • So je potrebna da bi poboljšala ukus hljeba i dala boju kori. Ali so takođe može da spriječi
kvasac da se podigne. Nikad ne stavljajte previše soli. Ako ne želite da stavljate so, slobodno ga
izostavite, a hljeb će čak biti veći.
10. Jaja • Jaja mogu da poboljšaju teksturu hleba, obogate ga proteinima i povećaju mu obim. Ako ko-
ristite jaja u smjesi za hleb, proverite da ste ljusku potpuno uklonili i da je ravnomerno izmješano.
11. Mast, puter i biljno ulje • Mast čini hljeb mekšim i produžava mu rok trajanja. Puter se mora isto
-
piti ili iseckati na manje komade prije upotrebe, kako bi mogao da se jednako umješa.
Page 39

39
12. Prašak za pecivo • Prašak za pecivo se uglavnom koristi za brze hljebove i kolače. Kod upotrebe
praška za pecivo ne treba čekati da testo naraste a prašak ispušta gas koji omekšava teksturu
hljeba na hemijskom principu.
13. Soda bikarbona • Radi na istom principu kao i prašak za pecivo. Može se čak i koristiti u kombina
-
ciji sa praškom za pecivo.
14. Voda i druge tečnosti • Voda je od suštinske važnosti za pravljenje hljeba. Najbolje je koristiti
vodu temperature između 20°C i 25°C. Ali kad se prave brzi hljebovi najbolja temperatura vode je
između 45-50°C. Vodu možete zamjeniti svježim mlijekom ili vodom pomješanom sa 2% mlijeka
u prahu, što može poboljšati ukus hljeba i boju kore. Neki recepti koriste sok u svrhu poboljšanja
ukusa. Koriste se sok od jabuka, narandže, limuna, itd.
TEŽINA SASTOJAKA
Jedan od najvažnijih koraka u pravljenju dobrog hljeba je pravilno određivanje količine pojedinačnih
sastojaka. Preporučujemo korišćenje mjerice kako biste odredili precizne količine.
Mjerenje tečnih sastojaka
Voda, svježe mlijeko ili mlijeko u prahu rastvoreno u vodi bi trebalo meriti mjericom. Kada merite
ulje ili druge sastojke, temeljno očistite mjericu.
Mjerenje suvog praška
Suvi prašak bi trebalo držati u prirodnim uslovima i koristiti ga u preciznim razmjerama.
Redosled ubacivanja sastojaka
Redosled ubacivanja sastojaka je uopšteno slijedeći: tečni sastojci, jaja, so, mlijeko u prahu, itd.
Prilikom ubacivanja sastojaka, pazite da brašno ne bude potpuno natopljeno tečnošću. Kvasac se
mora staviti isključivo na suvo brašno. Idealno, so ne bi trebala da dođe u kontakt sa kvascem.
Nakon što se brašno mješalo neko vrijeme, zvučni signal će vas obavestiti da u mješavinu dodate
voćne sastojke. Ako se voće doda prerano, izgubiće se ukus od pretjeranog mešanja. Ako često i na
duže periode prekidate mešanje, nemojte dodavati kvarljive sastojke kao što su jaja i voće.
VODIČ ZA ČESTE PROBLEME
No. Problem Razlog Rešenje
1 Dim izlazi iz otvora
za ventilaciju tokom
pečenja
Neki sastojci prijanjaju za grejne
elemente ili u njihovoj blizini. Ako je u
pitanju prvo korišćenje, može se de
siti da je u pekaču ostalo mašinskog
ulja od proizvodnje
Isključite kabl za napajanje i očistite
grejni element, pazeći da se ne ope
čete. Ako je u pitanju prvo korišćenje,
uključite pekač na prazno i otvorite
poklopac.
2 Donja kora hljeba je
predebela
Hljeb se dugo podgrevao ili je ostao u
posudi predugo i na taj način izgubio
dosta vode
Izvadite hleb iz posude čim se ispeče
3 Veoma je teško izvaditi
hljeb
Nož i njegova osovina su se čvrsto
stegli u posudi za pečenje
Nakon vađenja hleba, sipajte toplu
vodu u posudu za pečenje i izvadite
nož nakon 10 minuta i očistite ga.
4 Sastojci nisu dovoljno
dobro izmješani i hljeb
se loše ispekao
1. Izabrani program nije adekvatan
Izaberite odgovarajući meni u
programu
2. Zbog čestog otvaranja tokom pečenja hljeb je suv i nema lijepu boju
Ne otvarajte poklopac pre završetka ciklusa pečenja.
3. Otpor prilikom mješanja sastojaka
je prevelik pa nož ne može da roti
-
ra i da mješa sastojke adekvatno
Proverite rupu za nož, zatim izvadite
posudu za pečenje i uključite uređaj
na prazno. Ako se problem nastavi,
kontaktirajte ovlašćenog servisera.
5 Ekran prikazuje “H:HH”
nakon pritiska na dug
-
me “start/stop”
Temperatura u pekaču je previsoka. Pritisnite “start/stop” i isključite
uređaj iz struje, zatim izvadite posudu
za pečenje i otvorite poklopac dok se
uređaj ne ohladi
Page 40

40
No. Problem Razlog Rešenje
6 Čuje se buka motora
ali tjesto nije dobro
umješano
Posuda za pečenje nije u dobrom
položaju ili je tjesto preveliko za
mješanje
Provjerite da li je posuda za pečenja u
dobrom položaju i da je tjesto napra
vljeno u skladu sa receptom i da su svi
sastojci precizno izmereni
7 Veličina hljeba je preve
-
lika i otvara poklopac
Stavili ste previše kvasca ili brašna
ili premalo vode ili je temperatura
previsoka
Proverite navedene faktore i smanjite
ili povećajte količinu problematičnih
faktora dok ne utvrdite pravi razlog
8 Veličina hljeba je
premala ili se uopšte
nije digao
Niste stavili kvasac ili ga ima u nedo
voljnoj količini. Moguće je i da kvasac
ne može da raste jer je temperatura
previsoka ili se izmješao sa solju ili je
spoljašnja temperatura preniska.
Proverite količinu i rast kvasca i
podesite adekvatnu temperaturu.
9 Tjesto je toliko veliko
da se izliva iz posude za
pečenje
Količina tečnosti je previsoka što je
smekšalo tjesto, a količina kvasca
pretjerana.
Smanjite količinu tečnosti i kvasca
10 Hljeb se izduva na
sredini
1. brašno koje ste koristili nije dobro
za podizanje tjesta
Koristite hljebno brašno ili jači prašak
za pecivo.
2. kvasac raste prebrzo ili mu je
temperatura previsoka
Kvasac je držan na sobnoj temperaturi
3. Višak vode omekšava tjesto i čini
ga vlažnim.
U skladu sa sposobnošću upijanja
vode, uskladite količinu vode sa
receptom
11 Težina hljeba je preve
lika a struktura hljeba
pregusta
1. Previše brašna ili premalo vode Smanjite količinu brašna ili dodajte
još vode
2. Previše voća ili previše integralnog
brašna
Smanjite količinu voćnih sastojaka i
stavite više kvasca
12 Sredina hljeba je šuplja 1. Previše vode ili kvasca a premalo
soli
Smanjite količinu vode ili kvasca i
dodajte soli
2. Temperatura vode je previsoka Proverite temperaturu vode
13 Površina hljeba se lijepi
za suve sastojke
1. Velika količina sastojaka sa glute
-
nom, kao što su puter i banane, itd.
Nemojte dodavati previše sastojaka sa
glutenom.
2. Nedovoljno dobro izmešano sa
malom količinom vode
Provjerite vodu
14 Kora hljeba je predebe
la a boja previše tamna
kada se peku kolači ili
hrana sa dosta šećera
Različiti recepti imaju odlične efekte
na pravljenje hljeba, a tamna boja
nastaje od previše šećera
Ako je boja previše tamna za recepte
sa dosta šećera, pritisnite start/stop
da zaustavite program 5-10 minuta
prije predviđenog vremena. Prije
vađenja hljeba ili kolača, ostavite ih
u posudi za pečenje oko 20 minuta sa
zatvorenim poklopcem
Možete pomoći u zaštiti životne okoline!
Molimo vas da poštujete lokalne
zakonske regulative: sve neispravne
električne uređaje treba predati
odgovarajućim centrima za reciklažu
elektronskog i električnog otpada.
EKOLOŠKO ODLAGANJE OTPADA
www.voxelectronics.com
 Loading...