

Page 1
AVX10USB
10.1” LCD Monitor with Built-In DVD Player
for Rear Seat Entertainment
Installation and Operation Manual
Page 2

Congratulations
Warnings
Safety Precaution
Congratulations on your purchase of this Mobile Video Rear Seat Entertainment
System! The AVX10USB has been designed to provide passengers with unlimited
content options delivering smiles for many miles. Please read the directions that follow
to familiarize yourself with the product to ensure that you obtain the best results from
your equipment.
For safety reasons, when changing video media, it is recommended that the vehicle
is not in motion, and that you do not allow children to unfasten seat belts to change
video media or make any adjustments to the system. System adjustments can be
accomplished using the remote control, while seat belts remain fastened. Enjoy your
entertainment system but remember the safety of all passengers remains the number
one priority.
Do not use any solvents or cleaning materials when cleaning the video monitor.
Do not use any abrasive cleaners, they may scratch the screen.
Use only a lightly dampened lint free cloth to wipe the screen if it is dirty.
Before putting on headphones always adjust the volume setting to the lowest position.
Do not put pressure on the screen.
Caution children to avoid touching or scratching the screen, as it may become dirty or
damaged.
Page 3

3
Table of Contents
Features .............................................................................................................4
Materials Included ......................................................................................... 5
Docking Bracket installation ...................................................................... 6
Wiring Diagram ............................................................................................... 7
Control and Indicators Diagram ................................................................8
Remote Control Operation .......................................................................10
Remote Control Functions ........................................................................11
Source Menu ..................................................................................................15
System Menu Setting and Adjustments ..............................................17
Playing DVDs and Audio Discs ................................................................23
Playing USB/CARD Devices .......................................................................23
Playing MP3 Discs ........................................................................................24
DVD Basics ......................................................................................................25
Troubleshooting ...........................................................................................26
Warranty ..........................................................................................................27
Page 4

4
• 10.1” Digital Thin Film Transistor (TFT) Active Matrix Liquid Crystal Display
LED Backlit Monitor
• Built-in DVD Player
• Last position memory for DVD Player
• Six Audio / Video Source Inputs
DVD, USB, CARD, AV, AUX and HDMI.
• USB 2.0 Port (User Accessible with Media Playback)
• HD Input
• On Screen Display (OSD) for control of picture quality and functions
• Full function remote control
• Plays DVD, CD and MP3 discs
• 100 Channel Wireless FM Modulator
• Dual Channel IR Transmitter
• M1/M2 Operation (for when 2 systems are installed in 1 Vehicle so that IR
Headphone Audio and Remote Control operation is independent)
Features
Type
Resolution
Pixels
Operation Temperature
Storage Temperature
Backlit life
Video Display System
Video Output
Power Source
Dimension (L x W x H)
TFT Active Matrix LCD
1024 RGB(H) x 600(V)
1,843,200
32 ~ 113º F (0 ~ 45º C)
-4 ~ 149º F (-20 ~ 65º C)
20,000 Hours
NTSC / PAL / AUTO
1.0Vp-p @ 75 ohms
12VDC
255mm x 175mm x 42.5mm
10.0in x 6.9in x 1.7in
Specications
Page 5
5
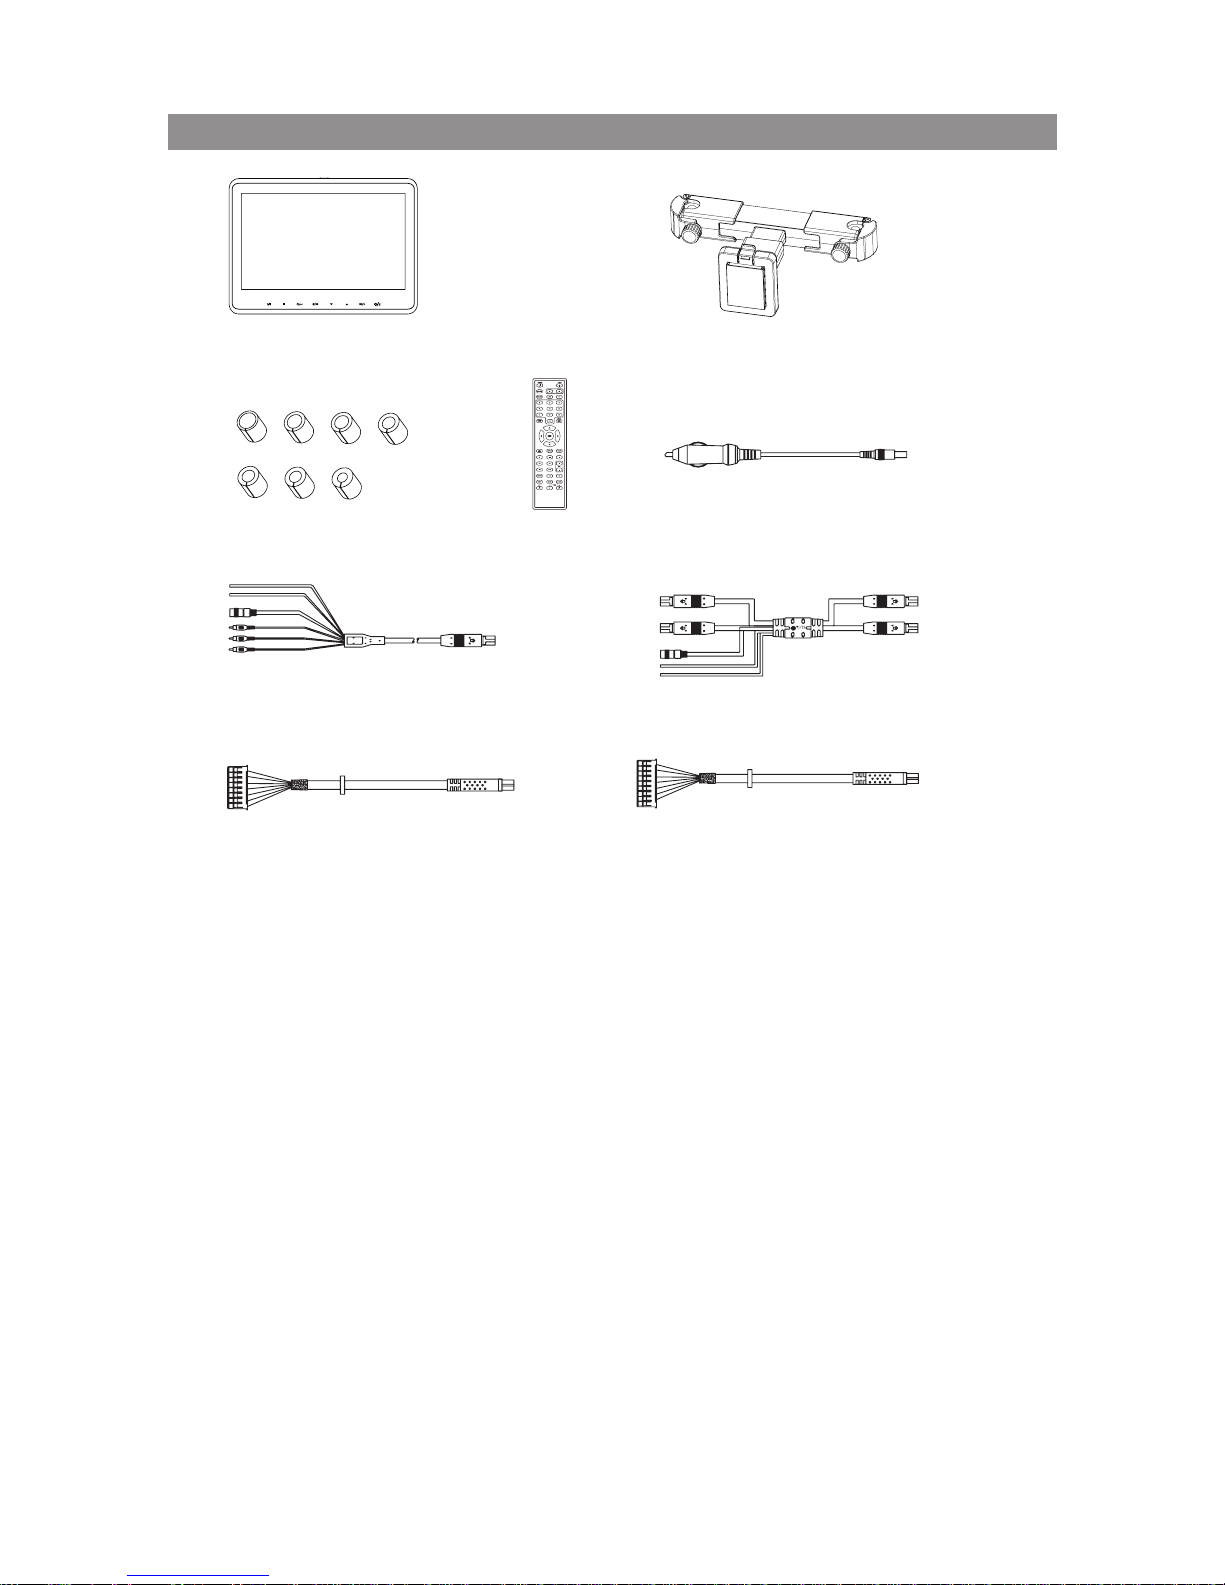
Materials Included
1
67
89
2
345
1. AVX10USB system unit -(1PC)
2. MTB60001 docking bracket -(1PC)
3. Rubber pole adaptor x 7 pairs
Ø9.5mm,Ø11.5mm, Ø12.0mm, Ø12.2mm, Ø13.3mm, Ø13.95mm and Ø15.95mm
Note: This rubber pole adaptor is use to t the MTB60001 docking
bracket on the headrest pole.
4. Remote Control W/ Battery -(1PC)
5.12V Car Cigarettes Adapter(Additional Power Supply) -(1PC)
6. 8P Din Power + AV out RCA cable harness -(1PC)
7. 8P Din M1 + M2 Connector harness -(1PC)
8. 8P Din + 8P Connector AV harness -(1PC)
9. 8P Din + 9P Connector Power harness -(1PC)
Page 6
6
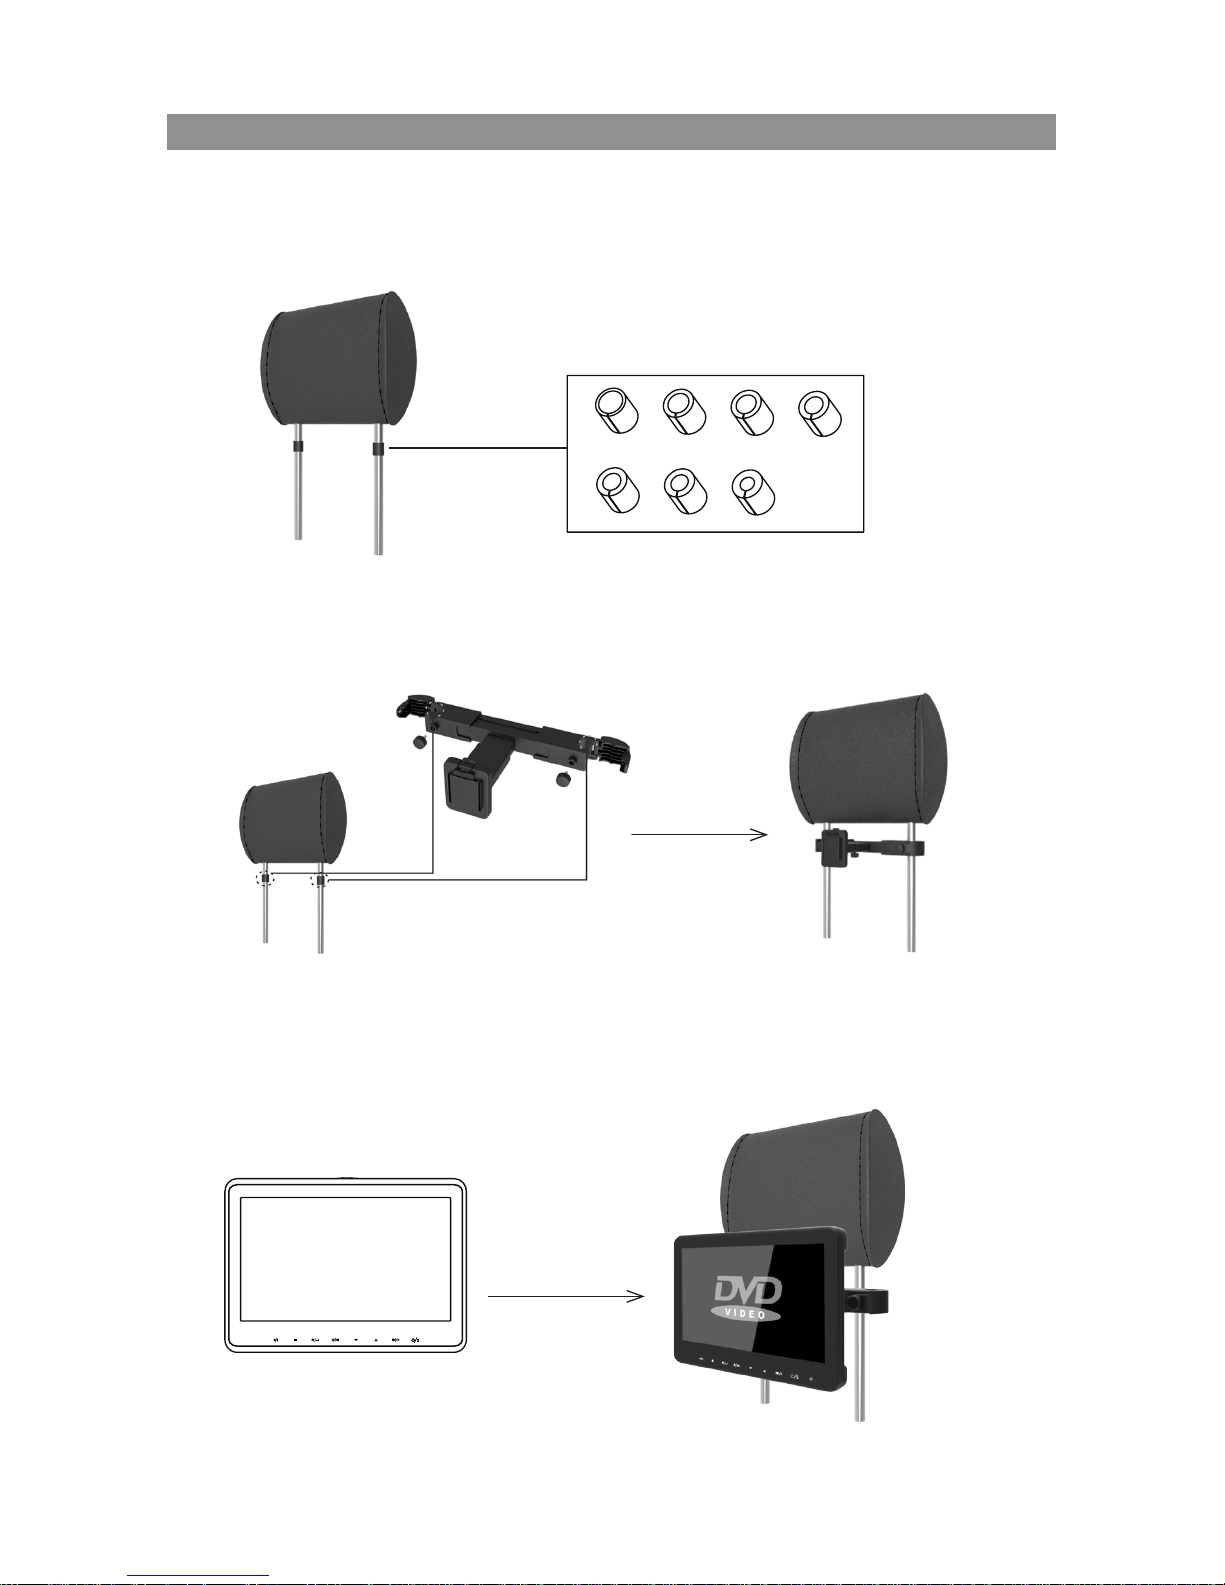
Docking Bracket Installation
1. Choose a correct rubber pole adaptor and put it on the headrest pole before
installing the docking bracket.
2. Install the docking bracket to the headrest pole and tighten with the screw knob.
3. Plug in the harness cable into the monitor with the wires installed properly before
docking it onto the headrest poles.
Page 7
7
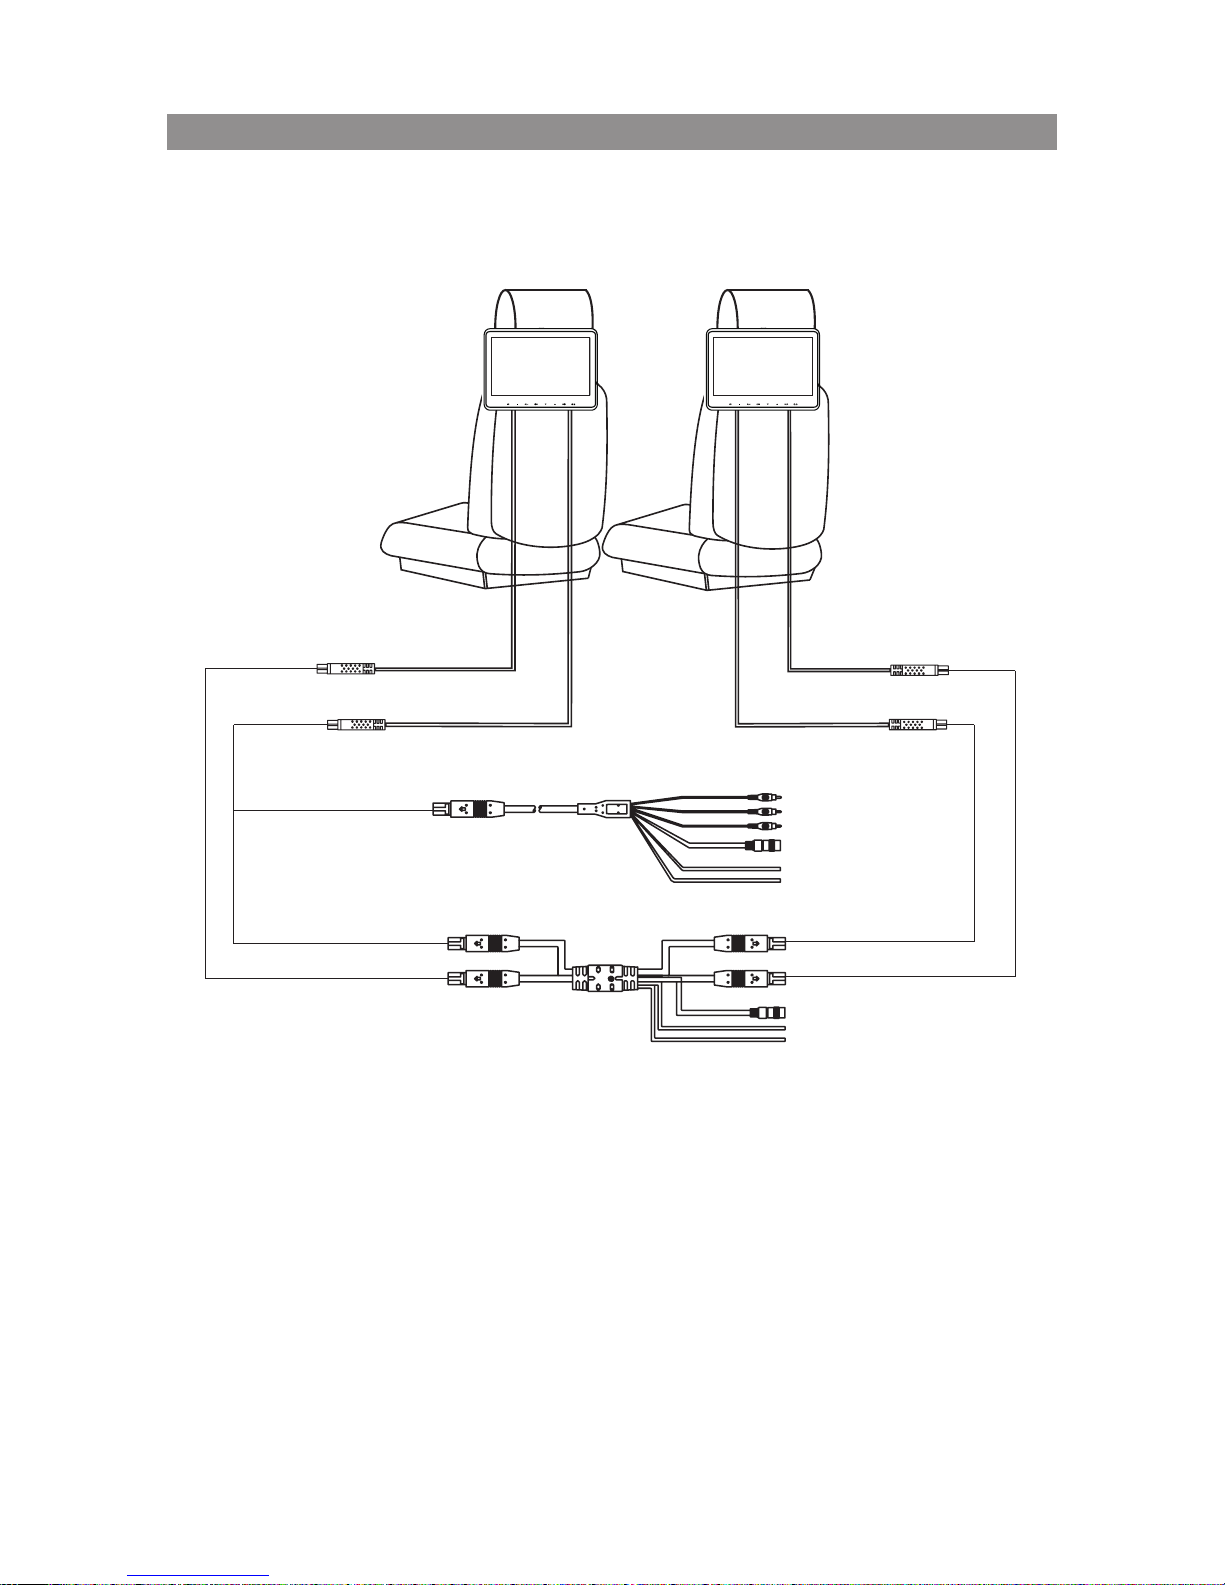
Wiring Diagram
NOTE: Please do not use incorrect cable harness on the monitor system because
user will lose some functions if installed incorrectly.
For single monitor please use the 8P Din + AV Connector Harness( built
with AV input connector).
For dual monitor please use the 8P Din M1 + M2 Connector Harness.
Master Monitor Satellite Monitor
Headrest Cable
Blue
8P Din + AV Connector Harness
Green
Green
Blue
Blue
Green
Ground
Headrest Cable
Blue
Headrest Cable
Green
Headrest Cable
Green
Video In Yellow
Audio In Left White
Audio In Right Red
Or
8P Din M1+M2 Connector Harness
DC 12V In
+12V(ACC)
Ground
DC 12V In
+12V(ACC)
Page 8
8
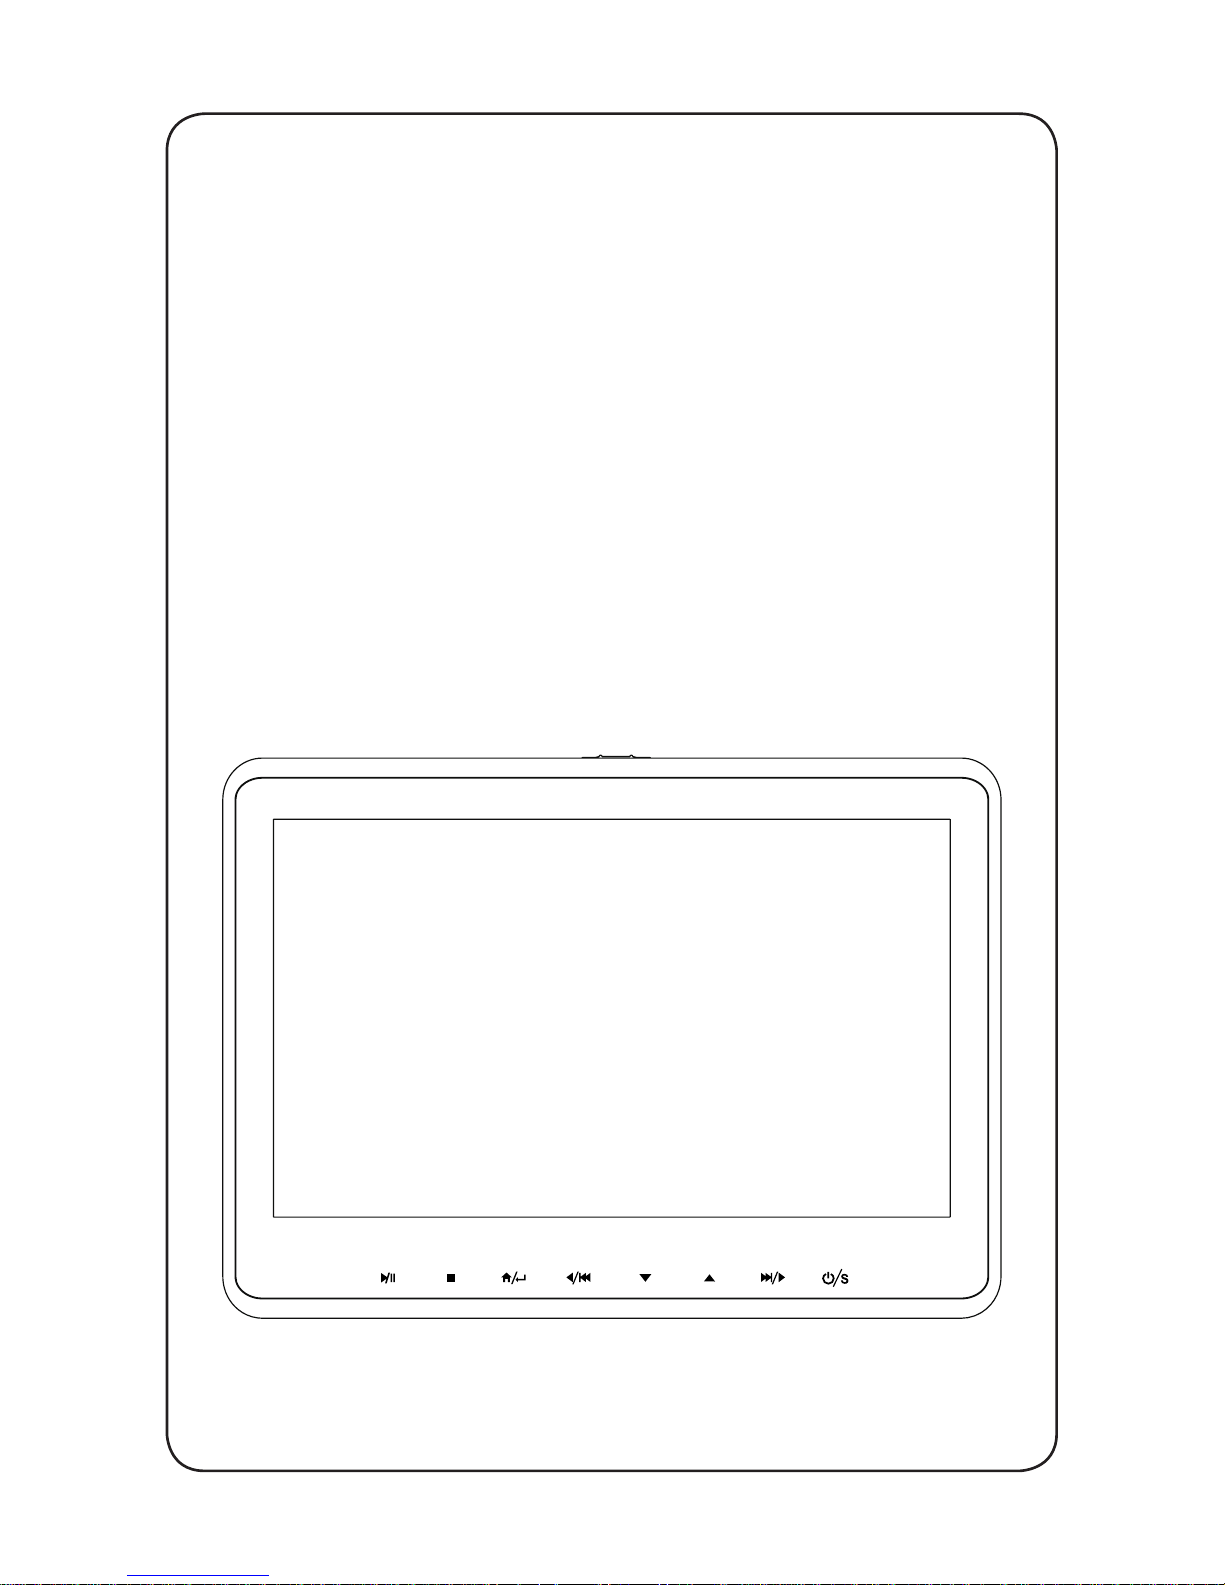
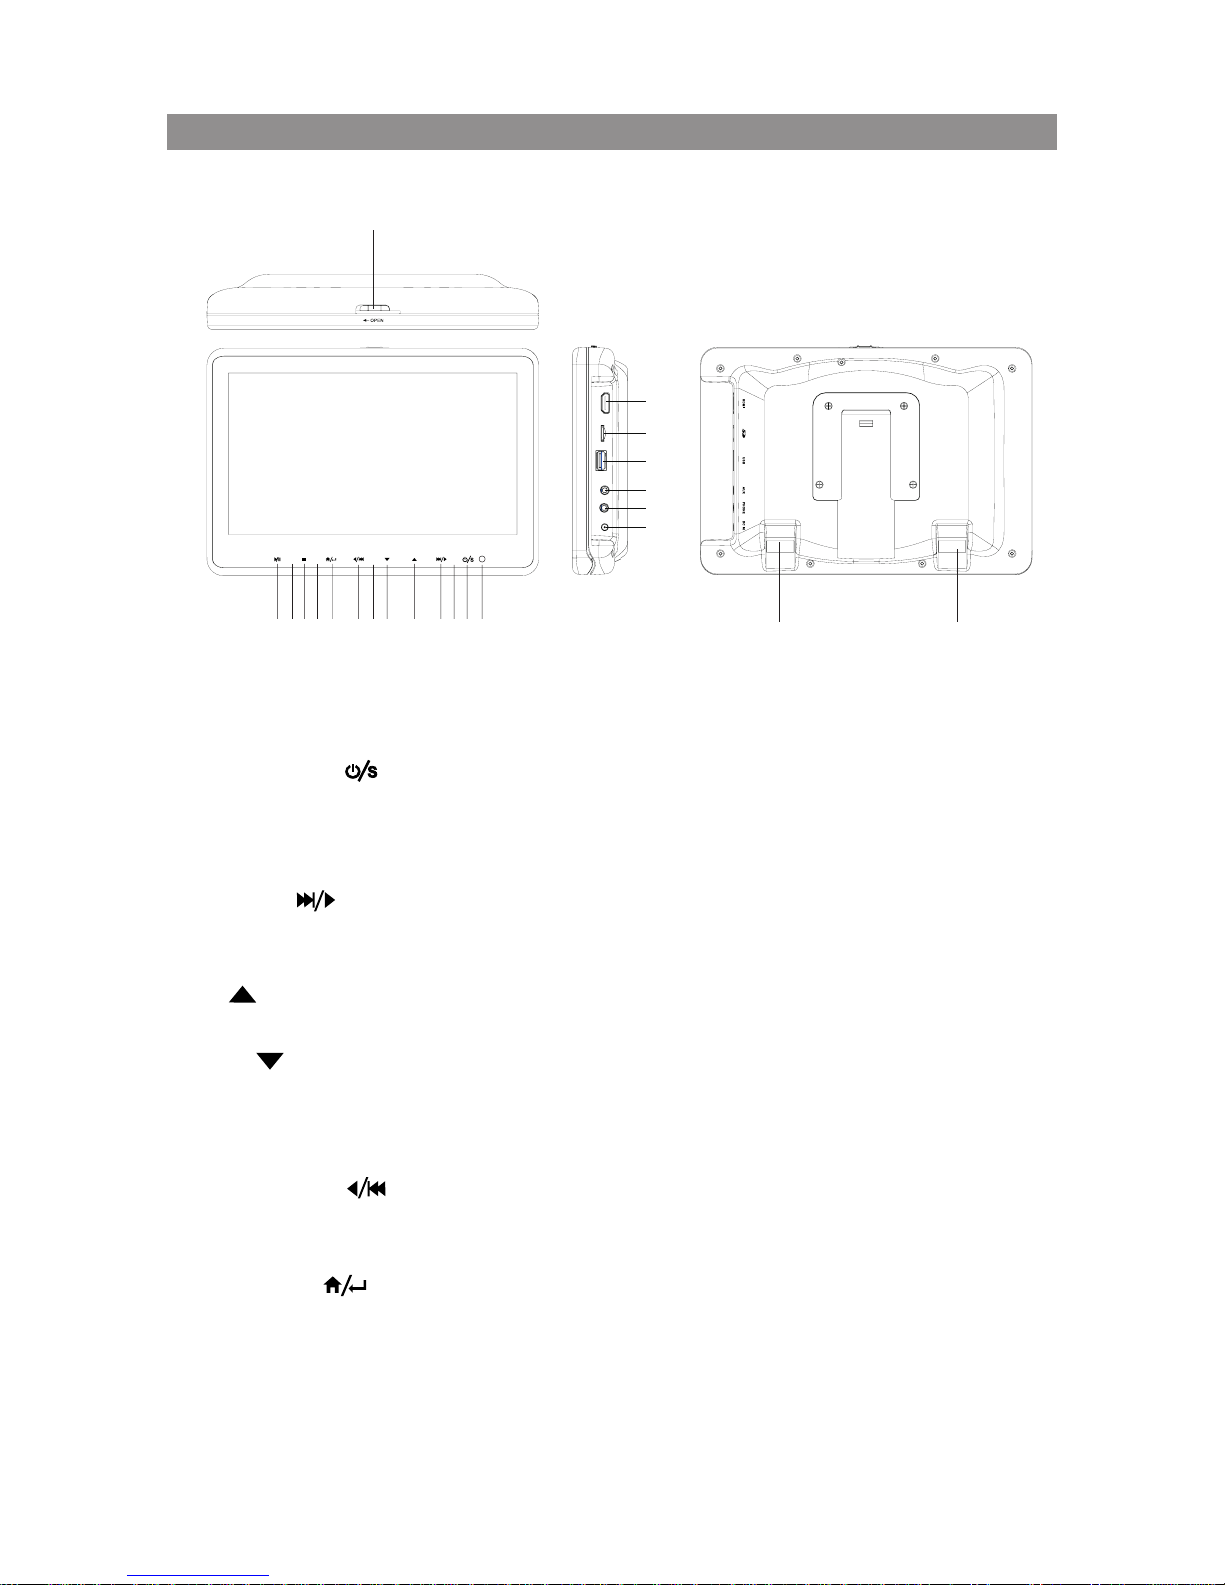
Controls and Indicators Diagram
1
21
22
15
16
17
18
19
20
234568
14
7911 101213
1. Power Indicator
Red light indicator ( Bright = Standby Mode, Dim = Power On
2. Power/ Source ( )
To turn system On/ Off and to select the source.
3. Infrared Transmitter
To broadcast audio signal to IR headphone.
4. Left/ Next( )
Short press for Left cursor and level increase on System Menu pages.
Long press for next chapter, track during play the DVD
.
5. Up( )
Up cursor on System Menu pages and track selection during play the media file
.
6. Down( )
Down cursor on System Menu pages and track selection during play the media files.
7. Remote Sensor
To receive the signal from remote control.
8. Right/ Previous( )
Short press for Right cursor on System Menu pages and level decrease.
Long press for previous chapter, track during play the DVD.
9. Home/ Enter( )
Short press for Enter.
Long press to call up or exit the Main Menu.
10. Infrared Transmitter
To broadcast audio signal to headphones.
Page 9

9
Controls and Indicators Diagram(Continued)
11. Stop( )
Press once for pre-stop, press twice to completely stop the DVD/Media information.
12. Infrared Transmitter
To broadcast audio signal to IR headphone.
13. Play/ Pause( )
To start playback or pause the DVD/Media.
14. Open Knob
To open the DVD player cover to install or remove the disc.
15. HDMI Input
For connection of device with HDMI output.
16. TF Card Input
For connection of TF Card memory device to playback media contents.
17. USB Input
For connection of USB memory device to playback media contents.
18. AUX Input
For connection of external audio and video device.
19. Earphone Jack
To produce audio signal output usingØ3.5mm plug wire headphone.
20. DC Input
To allow DC 12V supply in by using Ø3.0mm DC plug input.
21. Power + AV Input
9 Pin harness cable with power and AV source input.
22. AV Output
8 Pin harness cable with AV source output.
Page 10

10
Remote Control Operation
Battery Replacement
1. Remove the battery cover.
2. Insert two AAA batteries into the battery holder. Be sure to observe the correct polarity.
3. Reinstall the battery cover into the battery holder and make sure the holder is locked..
Page 11

11
Remote Control Functions
Page 12

12
Remote Control Functions(Continued)
* Function control is available on the unit and the Remote Control.
** Function not available in this model.
1. POWER*
Press this button to turn the unit ON and OFF.
2. SOURCE*
Press to display the Source OSD for DVD, USB, CARD, AV,AUX and HDMI1.
3. DVD Source**
No function on this model.
4. DVD Mode Select Button
Switches certain function keys on the remote control for DVD function.
5. NUMBERS
Allow the user to enter the numbers 0-9 for selection of the tracks, titles, chapters or
password setting.
6. SYSTEM MENU
Allows the user to access the system menu. Press the por q cursor buttons to select
PICTURE, AUDIO, SYSTEM, PLAYER, FMM .
7. CURSOR (pqt u)
Use the cursor buttons to access menu selections on the screen.
8. OK
Used to execute a selected setting or menu option.
9. DISC MENU
In DVD mode, press once to access the Root Menu and then press again to resume to
previous screen.
10. DISPLAY
Press once to display current disc information of Title, Chapter & Time. Press again to
display Subtitle, Audio & Angle while the disc is playing.
11. PL AY (u)*
Press to activate the play mode while a disc is loaded into the disc compartment.
12. PAUSE (II)*
Press to pause playback.
OFF OFF OFF
....
DVD TT 0/12 CH 0/25 00:00:00
Page 13

13
Remote Control Functions(Continued)
13. BACKWARD ( )
Press to search in a backward direction. Press repeatedly to change the search speed from
2, 4, 8, 20 times and normal speed.
14. FORWARD ( )
Press to search in a forward direction. Press repeatedly to change the search speed from 2,
4, 8, 20 times and normal speed.
15. PREVIOUS ( )
Press to return to the previous chapter or track.
16. NEXT ( )
Press to skip to the next chapter or track.
17. REPEAT
Allows the user to repeat a selected chapter, title or all track.
18. A-B REPEAT
Allows user to repeat the playback from point A to point B.
Press A-B button On-Screen Display DVD player
Once Repeat A Mark the beginning of the
section to repeat (Set point A)
Twice A-B Mark the end of the section to repeat
(Set point B)
3 times AB Off Cancel the A-B repeat function
19. SUBTITLE
Press to display and select the subtitle language in DVD mode. Each time this button is
pressed, the subtitle language changes.Pressing the button will also turn the subtitles off.
Note: The type and number of subtitle languages vary from disc to disc.
20. ZOOM
Press this button to enlarge or decrease the picture size when playing a DVD disc.
Press ZOOM button DVD Player performs
1 Time Enlarges the picture 2X
2 Times Enlarges the picture 3X
3 Times Enlarges the picture 4X
4 Times Reduces the picture 1/2
5 Times Reduces the picture 1/3
6 Times Reduces the picture 1/4
7 Times Picture is returned to original size
21. IRT ON/OFF
Turns the Infrared Transmitter on/off for IR wireless headphones.
Page 14

14
22. FM MODULATOR CHANNEL SELECT (C)**
No function on this model.
User may use the system menu to select the FM Modulator.
23. FMM ON/OFF
Turns the FM Modulator power on/off.
24. AUDIO
Press to display and select audio language in DVD mode. Each time this button is pressed,
the language changes.
25. PIX ( Picture Select )
This button is used to make picture adjustments. Use the UP or DOWN direction buttons
to select BRIGHTNESS, CONTRAST,COLOR, TINT, or RESET. Use the UP or DOW buttons
to adjust the setting. The OSD will automatically disappear if no adjustments are made
within 6 seconds.
26. VOLUME DOWN (-) or UP (+)
Press to select the increase or decrease the volume for the wired headphones.
27. STOP (n)*
Press to stop playback. (Playback will resume from the point it is stopped).
Press twice to stop playback fully. (Playback will resume from the beginning of the disc).
Note: For MP3 or photo mode, press twice to return to Audio/Photo/Video option
menu.
28. SETUP**
No function on this model.
29. MUTE
Press this button to mute the audio for the wireless FM Modulator, IR headphones and
audio output.
Pressing the button again restores the audio to the previously set level.
30. TV Mode Select
Switches certain function keys on the remote control for monitor functions.
31. MONITOR SELECT
M1 Button – Set the remote control code to allow control of the unit in M1 mode.
M2 Button – Set the remote control code to allow control of the unit in M2 mode.
Note: M1/M2 operation is only for when 2 systems are installed in the same vehicle.
This allows independent Remote Control and independent playback of audio
for each system.
32. EJECT ( )**
No function on this model.
Remote Control Functions(Continued)
Page 15

15
The System is capable of accessing six source inputs. To select or change a source, press the
source button on the front panel or the Source button on the remote control. The source
OSD will appear on the screen as shown in the figure below. Use the + or - cursor buttons
on the front panel or the p or q cursor buttons on the remote control to highlight a source.
Press the Source button on the front panel or the OK button on the remote control to select
the desired source.
DVD
The DVD source input is used to play DVDs, Audio CDs and MP3 discs.
USB
The USB source input is used to read USB and play MP3 les, JPEG les (Photos) and MPEG I, II
files.
CARD
The CARD source input is used to read MICRO SD CARD and play MP3 les, JPEG les (Photos)
and MPEG I, II files.
AV
The AV input connection is performed when there is an external input source connected.
Souce Menu
SOURCE
AV
AUX
HDMI
MOVE
DVD
USB
CARD
Page 16

16
AUX
A An external audio device may be connected to the system using the AUX pigtail P/N
112B3227 (not included) connected to the AUX input. The AUXinput connection is performed
when there is an external input source connected.
HDMI
These Source inputs allow the user to enjoy high-definition digital images and high-quality
sound by connecting a HD device such as a Blu-ray player or smartphone with an HDMI output
to the system. User can connect HDMI device with an optional HDMI cable. Smartphones and
Tablet require the appropriate adapter for your smart device. You can also use this input to
connect a Smart Stick such as a ROKU, Amazon FireTV and Chromecast device (these devices
may require Wi-Fi Hotspot access to stream content which is not included with this system).
Notes:
• This source requires an HDMI enabled device and a special HDMI adapter. Contact your
HDMI device supplier for the adapter.
• Phone functionality (phone calls, texting, etc.) may be limited while using the adapter.
• HDMI content is copy protected and is not available on the AV output of the System.
• This system does not support devices with MHL features.
Source Menu(Continued)
Page 17

17
PICTURE CONTROL
The PICTURE setup functions allows the user to
select and set the picture control function.
BRIGHTNESS, CONTRAST, COLOR adjustments range
from 0 to 32.
TINT adjustments range from -16 to 16.
AUDIO MODE
The AUDIO setup functions allows the user to select
and set the IRT Headphone transmitter "ON" or "OFF"
IRT
The IR transmitter can be set to ON or OFF. The IR
Transmitter must be set to "ON" for the wireless
headphone to be operational.
LANGUAGE
The LANGUAGE setup allows the user to select
ENGLISH,SPANISH, FRENCH, GERMAN for the onscreen language display.
DEFAULT DVD
The DEFAULT DVD allows the user to set the system
default source to DVD ON or OFF.
If souce default is set to ON, every time the unit
is turned off the on, the unit will power up and
automatically switch the source to DVD.
If source default is set to OFF and the system is
turned off then on, the unit will power up in the
source that was last selected.
System Menu Setting and Adjustments
PICTURE
AUDIO
SYSTEM
PLAYER
FMM
ADJUST EXIT
BRIGHTNESS
CONTRAST
COLOR
TINT
MOVE
16
16
0
MENU
16
PICTURE
AUDIO
SYSTEM
PLAYER
FMM
ADJUST EXIT
IRT
MOVE
MENU
ON
VOLUME
16
PICTURE
PICTURE
PICTURE
AUDIO
AUDIO
AUDIO
SYSTEM
SYSTEM
SYSTEM
PLAYER
PLAYER
PLAYER
FMM
FMM
FMM
ADJUST
ADJUST
ADJUST
EXIT
EXIT
EXIT
BRIGHTNESS
LANGUAGE
TV SYSTEM
CONTRAST
DEFAULT DVD
SCREEN SAVER
COLOR
MONITOR MODE
ASPECT RATIO
PASSWORD SETUP
TINT
RESET
RATING
LAST MEMORY
AUDIO LANGUAGE
MOVE
MOVE
MOVE
16
16
16
0
MENU
MENU
MENU
ENGLISH
NTSC
6 ADULT
ON
ON
ON
M1
16:9
ENGLISH
PICTURE
AUDIO
SYSTEM
PLAYER
FMM
ADJUST EXIT
LANGUAGE
DEFAULT DVD
MONITOR MODE
RESET
MOVE
MENU
ENGLISH
ON
M1
PICTURE
AUDIO
SYSTEM
PLAYER
FMM
SELECT EXIT
FM
FMM CHANNEL
MOVE
MENU
ON
PICTURE
AUDIO
SYSTEM
PLAYER
FMM
SELECT EXIT MOVE
MENU
88.1MHz
88.3MHz
88.5MHz
88.7MHz
88.9MHz
89.1MHz
89.3MHz
89.5MHz
89.7MHz
89.9MHz
90.1MHz
90.3MHz
90.5MHz
90.7MHz
90.9MHz
91.1MHz
91.3MHz
91.5MHz
91.7MHz
91.9MHz
92.1MHz
92.3MHz
92.5MHz
92.7MHz
92.9MHz
93.1MHz
93.3MHz
93.5MHz
93.7MHz
93.9MHz
94.1MHz
94.3MHz
94.5MHz
94.7MHz
94.9MHz
95.1MHz
95.3MHz
95.5MHz
95.7MHz
95.9MHz
96.1MHz
96.3MHz
96.5MHz
96.7MHz
96.9MHz
PICTURE
PICTURE
AUDIO
AUDIO
SYSTEM
SYSTEM
PLAYER
PLAYER
FMM
FMM
ADJUST
ADJUST
EXIT
EXIT
BRIGHTNESS
LANGUAGE
CONTRAST
DEFAULT DVD
COLOR
MONITOR MODE
TINT
RESET
MOVE
MOVE
16
16
16
0
MENU
MENU
ENGLISH
ON
M1
PICTURE
AUDIO
SYSTEM
PLAYER
FMM
SELECT EXIT
FM
FMM CHANNEL
MOVE
MENU
ON
PICTURE
AUDIO
SYSTEM
PLAYER
FMM
SELECT EXIT MOVE
MENU
88.1MHz
88.3MHz
88.5MHz
88.7MHz
88.9MHz
89.1MHz
89.3MHz
89.5MHz
89.7MHz
89.9MHz
90.1MHz
90.3MHz
90.5MHz
90.7MHz
90.9MHz
91.1MHz
91.3MHz
91.5MHz
91.7MHz
91.9MHz
92.1MHz
92.3MHz
92.5MHz
92.7MHz
92.9MHz
93.1MHz
93.3MHz
93.5MHz
93.7MHz
93.9MHz
94.1MHz
94.3MHz
94.5MHz
94.7MHz
94.9MHz
95.1MHz
95.3MHz
95.5MHz
95.7MHz
95.9MHz
96.1MHz
96.3MHz
96.5MHz
96.7MHz
96.9MHz
Page 18

18
MONITOR MODE
This allows the user to change the system to M1 or
M2 mode. Once the setting is changed, the remote
control and IR headphones will only work if set to
that same setting.
1.M1 Mode - For the Remote Control to operate the
system when set to M1, press the M1
button on the Remote Control.
Please make sure IR Headphones are set to
Channel A when the system is in M1 mode.
2.M2 Mode - For the Remote Control to operate the
system when set to M2, press the M2
button on the Remote Control.
Please make sure IR Headphones are set to
Channel B when the system is in M2 mode.
RESET
The Reset function allows user to reset all the
setting options to factory settings.
System Menu Setting and Adjustments(Continued)
PICTURE
PICTURE
PICTURE
AUDIO
AUDIO
AUDIO
SYSTEM
SYSTEM
SYSTEM
PLAYER
PLAYER
PLAYER
FMM
FMM
FMM
ADJUST
ADJUST
ADJUST
EXIT
EXIT
EXIT
BRIGHTNESS
LANGUAGE
TV SYSTEM
CONTRAST
DEFAULT DVD
SCREEN SAVER
COLOR
MONITOR MODE
ASPECT RATIO
PASSWORD SETUP
TINT
RESET
RATING
LAST MEMORY
AUDIO LANGUAGE
MOVE
MOVE
MOVE
16
16
16
0
MENU
MENU
MENU
ENGLISH
NTSC
6 ADULT
ON
ON
ON
M1
16:9
ENGLISH
PICTURE
AUDIO
SYSTEM
PLAYER
FMM
ADJUST EXIT
LANGUAGE
DEFAULT DVD
MONITOR MODE
RESET
MOVE
MENU
ENGLISH
ON
M1
PICTURE
AUDIO
SYSTEM
PLAYER
FMM
ADJUST EXIT
LANGUAGE
DEFAULT DVD
MONITOR MODE
RESET
MOVE
MENU
ENGLISH
ON
M1
PICTURE
AUDIO
SYSTEM
PLAYER
FMM
ADJUST EXIT
LANGUAGE
DEFAULT DVD
MONITOR MODE
RESET
MOVE
MENU
ENGLISH
ON
M1
PICTURE
AUDIO
SYSTEM
PLAYER
FMM
SELECT EXIT
FM
FMM CHANNEL
MOVE
MENU
ON
PICTURE
AUDIO
SYSTEM
PLAYER
FMM
SELECT EXIT MOVE
MENU
88.1MHz
88.3MHz
88.5MHz
88.7MHz
88.9MHz
89.1MHz
89.3MHz
89.5MHz
89.7MHz
89.9MHz
90.1MHz
90.3MHz
90.5MHz
90.7MHz
90.9MHz
91.1MHz
91.3MHz
91.5MHz
91.7MHz
91.9MHz
92.1MHz
92.3MHz
92.5MHz
92.7MHz
92.9MHz
93.1MHz
93.3MHz
93.5MHz
93.7MHz
93.9MHz
94.1MHz
94.3MHz
94.5MHz
94.7MHz
94.9MHz
95.1MHz
95.3MHz
95.5MHz
95.7MHz
95.9MHz
96.1MHz
96.3MHz
96.5MHz
96.7MHz
96.9MHz
PICTURE
AUDIO
SYSTEM
PLAYER
FMM
ADJUST EXIT
LANGUAGE
DEFAULT DVD
MONITOR MODE
RESET
MOVE
MENU
PICTURE
AUDIO
SYSTEM
PLAYER
FMM
ADJUST EXIT
IRT
MOVE
MENU
ON
VOLUME
16
ENGLISH
ON
M1
PICTURE
AUDIO
SYSTEM
PLAYER
FMM
ADJUST EXIT MOVE
MENU
YES NO
Page 19

19
PLAYER MODE
The Player setup function allow the user to select DVD
functionality.
TV SYSTEM
The TV SYSTEM setup allows the user to choose
television standard which corresponds to your TV.
NTSC-Select this type for NTSC TV
PAL-Select this type for PAL TV
AUTO-Select this type if the connected screen is
a multi-system TV. The video format of the
disc (NTSC or PAL) will determine the video
signal output.
SCREEN SAVER
This allows you to set the Screen Saver mode.
ON -Screen Saver will appear
OFF -Screen Saver will not appear
Note: The DVD player will enter Screen Saver mode
if the unit is inactive for approximately 2 minutes.
ASPECT RATIO(For DVD Screen Display)
4:3 PS (Pan Scan)
The left and right of the screen are cut off and
displays the central portion of the 16:9 screen.
4:3 LB (Letter Box)
Displays the content of the DVD title in the 16:9
aspect ratio.The black bars will appear at the top
and bottom of the screen.
16:9
This displays a wide picture with black bands on
the upper and lower portion of the screen. The
bandwidth will vary,depending on the aspect ratio
of the disc.
PICTURE
PICTURE
PICTURE
PICTURE
PICTURE
PICTURE
AUDIO
AUDIO
AUDIO
AUDIO
AUDIO
AUDIO
SYSTEM
SYSTEM
SYSTEM
SYSTEM
SYSTEM
SYSTEM
PLAYER
PLAYER
PLAYER
PLAYER
PLAYER
PLAYER
FMM
FMM
FMM
FMM
FMM
FMM
ADJUST
ADJUST
ADJUST
ADJUST
ADJUST
ADJUST
EXIT
EXIT
EXIT
EXIT
EXIT
EXIT
TV SYSTEM
TV SYSTEM
TV SYSTEM
TV SYSTEM
SUBTITLEGLANGUAGE
SUBTITLEGLANGUAGE
SCREEN SAVER
SCREEN SAVER
SCREEN SAVER
SCREEN SAVER
MENU LANGUAGE
MENU LANGUAGE
ASPECT RATIO
ASPECT RATIO
ASPECT RATIO
ASPECT RATIO
PASSWORD SETUP
PASSWORD SETUP
PASSWORD SETUP
PASSWORD SETUP
LAST MEMORY
LAST MEMORY
LAST MEMORY
LAST MEMORY
AUDIO LANGUAGE
AUDIO LANGUAGE
AUDIO LANGUAGE
AUDIO LANGUAGE
MOVE
MOVE
MOVE
MOVE
MOVE
MOVE
MENU
MENU
MENU
MENU
MENU
MENU
NTSC
NTSC
NTSC
NTSC
ENGLISH
ENGLISH
ENGLISH
ENGLISH
ADULT
ADULT
ADULT
ADULT
ON
ON
ON
ON
ON
ON
ON
ON
16:9
16:9
16:9
4:3 PS
ENGLISH
ENGLISH
ENGLISH
ENGLISH
RATING
RATING
RATING RATING
PICTURE
PICTURE
AUDIO
AUDIO
SYSTEM
SYSTEM
PLAYER
PLAYER
FMM
FMM
ADJUST
ADJUST
EXIT
EXIT
TV SYSTEM
TV SYSTEM
SCREEN SAVER
SCREEN SAVER
ASPECT RATIO
ASPECT RATIO
PASSWORD SETUP
PASSWORD SETUP
LAST MEMORY
LAST MEMORY
AUDIO LANGUAGE
AUDIO LANGUAGE
MOVE
MOVE
MENU
MENU
NTSC
NTSC
ADULT
ADULT
ON
ON
ON
ON
16:9
16:9
ENGLISH
ENGLISH
RATING
RATING
System Menu Setting and Adjustments(Continued)
Page 20

20
PICTURE
PICTURE
PICTURE
PICTURE
PICTURE
PICTURE
PICTURE
PICTURE
AUDIO
AUDIO
AUDIO
AUDIO
AUDIO
AUDIO
AUDIO
AUDIO
SYSTEM
SYSTEM
SYSTEM
SYSTEM
SYSTEM
SYSTEM
SYSTEM
SYSTEM
PLAYER
PLAYER
PLAYER
PLAYER
PLAYER
PLAYER
PLAYER
PLAYER
FMM
FMM
FMM
FMM
FMM
FMM
FMM
FMM
ADJUST
ADJUST
ADJUST
ADJUST
ADJUST
ADJUST
ADJUST
ADJUST
EXIT
EXIT
EXIT
EXIT
EXIT
EXIT
EXIT
EXIT
TV SYSTEM
TV SYSTEM
TV SYSTEM
TV SYSTEM
SUBTITLEGLANGUAGE
SUBTITLEGLANGUAGE
TV SYSTEM
TV SYSTEM
SCREEN SAVER
SCREEN SAVER
SCREEN SAVER
SCREEN SAVER
MENU LANGUAGE
MENU LANGUAGE
SCREEN SAVER
SCREEN SAVER
ASPECT RATIO
ASPECT RATIO
ASPECT RATIO
ASPECT RATIO
ASPECT RATIO
ASPECT RATIO
PASSWORD SETUP
PASSWORD SETUP
PASSWORD SETUP
PASSWORD SETUP
PASSWORD SETU
PPASSWORD SETUP
LAST MEMORY
LAST MEMORY
LAST MEMORY
LAST MEMORY
LAST MEMORY
LAST MEMORY
AUDIO LANGUAGE
AUDIO LANGUAGE
AUDIO LANGUAGE
AUDIO LANGUAGE
AUDIO LANGUAGE
AUDIO LANGUAGE
MOVE
MOVE
MOVE
MOVE
MOVE
MOVE
MOVE
MOVE
MENU
MENU
MENU
MENU
MENU
MENU
MENU
MENU
NTSC
NTSC
NTSC
NTSC
ENGLISH
ENGLISH
ENGLISH
ENGLISH
NTSC
NTSC
ADULT
ADULT
ADULT
ADULT
ADULT
ADULT
ON
ON
ON
ON
ON
ON
ON
ON
ON
ON
ON
ON
16:9
16:9
16:9
4:3 PS
16:9
16:9
ENGLISH
ENGLISH
ENGLISH
ENGLISH
ENGLISH
ENGLISH
RATING
RATING
RATING
RATING RATING
RATING
PASSWORD SETUP
The default password is 3308. To change the rating
of the DVD player press 3308 to access the RATING
setting.
NOTE: 3308 must be pressed to set a new
password.
• Press 3308
• Enter the new 4 digit password
• Press SETUP 2 times to exit the setup mode.
NOTE: The 3308 password is always accepted in the
setup menu even after a new password has been
entered. To avoid the possibility of others using
the default password to set the parental level and
change the password, record this default password
in another area and delete it from this manual.
The restriction of viewing disc content by younger
users may be available on some discs, but not on
others.
NOTE: When the password is set to a new
password, that password must be used to play
movies that have content rated above the setting
in the setup menu. The user will be prompted to
put the password in before the movie can play.
After the password is entered press the ENTER
button on the remote control.
LAST MEMORY
The last memory function allows DVD playback
to begin from the point when playback was last
stopped. The last memory feature allows the user
to turn the last memory feature function on or off.
PICTURE
PICTURE
PICTURE
PICTURE
AUDIO
AUDIO
AUDIO
AUDIO
SYSTEM
SYSTEM
SYSTEM
SYSTEM
PLAYER
PLAYER
PLAYER
PLAYER
FMM
FMM
FMM
FMM
ADJUST
ADJUST
ADJUST
ADJUST
EXIT
EXIT
EXIT
EXIT
TV SYSTEM
SUBTITLEGLANGUAGE
SUBTITLEGLANGUAGE
TV SYSTEM
SCREEN SAVER
MENU LANGUAGE
MENU LANGUAGE
SCREEN SAVER
ASPECT RATIO
ASPECT RATIO
PASSWORD SETUP
ASSWORD SETUP
LAST MEMORY
LAST MEMORY
AUDIO LANGUAGE
AUDIO LANGUAGE
MOVE
MOVE
MOVE
MOVE
MENU
MENU
MENU
MENU
NTSC
ENGLISH
ENGLISH
ENGLISH
ENGLISH
NTSC
ADULT
ADULT
ON
ON
ON
ON
16:9
16:9
ENGLISH
ENGLISH
RATING
System Menu Setting and Adjustments(Continued)
PICTURE
AUDIO
SYSTEM
PLAYER
FMM
ADJUST
EXIT
TV SYSTEM
SCREEN SAVER
ASPECT RATIO
PASSWORD SETUP
LAST MEMORY
AUDIO LANGUAGE
MOVE
MENU
NTSC
ADULT
ON
ON
16:9
ENGLISH
RATING
Page 21

21
AUDIO LANGUAGE
This setting allows you to select a preferred audio
language. This function only applies to discs
encoded with different audio languages.
Options: ENGLISH, FRENCH, SPANISH and GERMAN.
NOTE: If the selected language is not available for
the currently playing disc, the disc's default setting
is applied.
SUBTITLE LANGUAGE
This setting allows you to select a preferred subtitle
language. This function only applies to discs
encoded with subtitles. Options: ENGLISH, FRENCH,
SPANISH, GERMAN and OFF.
NOTE: If the selected language is not available for
the currently playing disc, the disc's default setting
is applied.
MENU LANGUAGE
This setting allows you to select a preferred disc
menu language.
Options: ENGLISH, FRENCH, SPANISH and GERMAN.
NOTE: If the selected language is not available for
the currently playing disc, the disc's default setting
is applied.
PICTURE
PICTURE
AUDIO
AUDIO
SYSTEM
SYSTEM
PLAYER
PLAYER
FMM
FMM
ADJUST
ADJUST
EXIT
EXIT
TV SYSTEM
SUBTITLEGLANGUAGE
SCREEN SAVER
MENU LANGUAGE
ASPECT RATIO
PASSWORD SETUP
LAST MEMORY
AUDIO LANGUAGE
MOVE
MOVE
MENU
MENU
NTSC
ENGLISH
ENGLISH
ADULT
ON
ON
16:9
ENGLISH
PICTURE
PICTURE
PICTURE
AUDIO
AUDIO
AUDIO
SYSTEM
SYSTEM
SYSTEM
PLAYER
PLAYER
PLAYER
FMM
FMM
FMM
ADJUST
ADJUST
ADJUST
EXIT
EXIT
EXIT
TV SYSTEM
SUBTITLEGLANGUAGE
SUBTITLEGLANGUAGE
SCREEN SAVER
MENU LANGUAGE
MENU LANGUAGE
ASPECT RATIO
PASSWORD SETUP
LAST MEMORY
AUDIO LANGUAGE
MOVE
MOVE
MOVE
MENU
MENU
MENU
NTSC
ENGLISH
ENGLISH
ENGLISH
ENGLISH
ADULT
ON
ON
16:9
ENGLISH
PICTURE
AUDIO
SYSTEM
PLAYER
FMM
SMART
STREAM
ADJUST EXIT
TV SYSTEM
SCREEN SAVER
ASPECT RATIO
PASSWORD SETUP
LAST MEMORY
AUDIO LANGUAGE
MOVE
MENU
NTSC
ADULT
ON
ON
16:9
ENGLISH
RATING
System Menu Setting and Adjustments(Continued)
Page 22

22
FMM MODULATION(ON/OFF)
This setting allows you to turn the FMM modulator
ON or OFF.
FMM CHANNEL
This setting allows you to select the frequency.
The unit has a 100 channel built-in wireless FM
Modulator. The FM Modulator can be set from
88.1MHz to 107.9MHz , i.e.88.1,88.3,88.5,88.9,90.1
etc.
To choose an FM frequency for audio playback
through your vehicle’s radio:
1. Use the p q t or u cursor buttons to select a
frequency not used by a radio station in the area.
Press OK to select the highlighted frequency.
There are a total of 3 FM CHANNEL pages
containing frequencies from 88.1 MHz to 107.9
MHz in 0.2 MHz steps. To access the additional FM
Channel pages, use the t or u cursor buttons to
highlight the on screen left and right arrows and
press OK. Once the frequency has been selected,
tune the vehicle’s radio to the selected frequency.
2. Press the DVD button to restore the remote
control to DVD functions.
Note: The wireless FM modulator will perform well in
most applications. However, in certain geographical
areas the quality of the wireless signal may be less than
optimal, resulting in static or strong local station bleed
through. If this is a consistent problem, an FMDIRB
(hard wired FM connection) can be installed by your
dealer.
PICTURE
PICTURE
AUDIO
AUDIO
SYSTEM
SYSTEM
PLAYER
PLAYER
FMM
FMM
SELECT
SELECT
EXIT
EXIT
FM MODULATION
FM MODULATION
FMM CHANNEL
FMM CHANNEL
MOVE
MOVE
MENU
MENU
ON
ON
PICTURE
AUDIO
SYSTEM
PLAYER
FMM
SELECT
EXIT
FM MODULATION
FMM CHANNEL
MOVE
MENU
ON
PICTURE PICTURE
AUDIO AUDIO
SYSTEM SYSTEM
PLAYER PLAYER
FMM FMM
SELECT SELECT EXIT EXIT
FM MODULATION FM MODULATION
FMM CHANNEL FMM CHANNEL
MOVE MOVE
MENU MENU
ON ON
PICTURE
AUDIO
SYSTEM
PLAYER
FMM
SELECT EXIT MOVE
MENU
91.1MHz
91.3MHz
91.5MHz
91.7MHz
91.9MHz
92.1MHz
92.3MHz
92.5MHz
92.7MHz
92.9MHz
93.1MHz
93.3MHz
93.5MHz
93.7MHz
93.9MHz
94.1MHz
94.3MHz
94.5MHz
94.7MHz
94.9MHz
95.1MHz
95.3MHz
95.5MHz
95.7MHz
95.9MHz
96.1MHz
96.3MHz
96.5MHz
96.7MHz
96.9MHz
88.1MHz
88.3MHz
88.5MHz
88.7MHz
88.9MHz
89.1MHz
89.3MHz
89.5MHz
89.7MHz
89.9MHz
90.1MHz
90.3MHz
90.5MHz
90.7MHz
90.9MHz
88.1MHz
System Menu Setting and Adjustments(Continued)
Page 23

23
Playing DVDs
When a disc is loaded. Press the DISPLAY button on the remote control to display the
status banner. The status banner includes the disc title, chapter audio language , subtitle
& angle.
Title Selection: Some DVDs contain more than one title (e.g. sitcoms, collections, etc.)
Press the numeric (0-9) buttons to initiate a change of chapter title selection.
Using the repeat feature to select OFF, Chapter, Title and Repeat All to play the movies
contents.
Playing Audio CDs
When playing an audio CD, the DISPLAY banner appears automatically. The track number
and the elapsed time of the disc are displayed.
Selecting a Track: Selection of a specific track is accomplished by using the numbers keys.
Press the number key corresponding to the desired track and the player will implement
the selection.
• Press the previous button (9) to return to the previous chapter or track.
• Press the next button (:) to skip to the next chapter or track.
Using the REPEAT feature
The default mode for the Repeat feature is OFF. Pressing REPEAT on the remote control
consecutively changes the repeat options.
• OFF Plays all songs on the disc and stops after all songs are played
• REP 1 Repeats 1 song
• REP DIR Plays songs in the directory
• REP ALL Plays all songs on the disc repeatedly
Playing USB/CARD Devices
To play a USB/CARD device, change the source to USB/CARD and plug a USB/CARD
device into the USB/CARD port.When a USB/CARD device is inserted into the player the
navigation menu appears automatically.
AUDIO
Enjoy your audio in this mode.
ex: mp3, wma, wav. . .
ENTER
Playing DVD and Audio Discs
Page 24

24
Use the cursor keys
p q t
or
u
and OK to navigate the on screen menus.
The USB port can play AUDIO, PHOTO, VIDEO . The following formats are supported:
Audio
• MP3
• WMA
• AAC
Photo
• JPEG
• BMP
Video*(720 x 576 max resolution)
• AVI (MPEG4-DIVX (DIVX 4.0/5.0), MPEG4-XVID
• MPG (MPEG-1)
• MOV (MPEG4-DIVX)
• FLV (FLV1)
• SWF (FLV1)
• DAT (MPEG1)
• VOB (MPEG2)
Note: All formats may not play depending on the software used to convert the video file
from its original format.
Playing MP3 Discs
MP3 is a format for storing digital audio. An audio CD-quality song can be compressed
into MP3 format with very little loss of quality, while taking up much less space. CD-R
discs that have MP3 format files can be played on the DVD player. The DVD player plays
the songs in the order they were burned on to the disc.
Selecting Folders and Songs:
When an MP3 disc is loaded in the player, the navigation menu will appear on the screen
automatically and a song will start playing.
To change songs use the arrows to select a different song and press the or
button to play the selected song. To change folders press the button to move to the
root folder and press the or button to display all the folders on the disc. Use
the buttons to select a new folder and press the or button to enter the new folder.
The unit will begin playing the first song of the folder.
Playing DVD and Audio Discs(Continued)
Playing MP3 Discs
Page 25

25
To get the optimum use out of the DVD Player, please read the following:
DVD Region Code
The DVD player is preset to a region code at the factory depending on where the DVD
player is sold. A DVD from a different region cannot be played in this unit and the unit will
display "WRONG REGION”.
Region 1- USA, Canada
Region 2- Japan, Europe, South Africa, Middle East, Greenland
Region 3- S. Korea, Taiwan, Hong Kong, Parts of South East Asia
Region 4- Australia, New Zealand, Latin America (including Mexico)
Region 5- Eastern Europe, Russia, India, Africa
Region 6- China
DVD Basics
Page 26

26
PROBLEM SOLUTION
IR remote inoperative • Verify that the battery in the remote is fresh.
• Verify that the remote sensor eye is not obstructed.
Disc won't play • Insert a disc with the label side facing the viewer.
• Check the type of disc you put into disc tray. This DVD only plays
DVD, audio CD and MP3s.
• Both the unit and the disc are coded by region. If the regional
codes don’t match, the disc can’t be played.
Play starts, but then stops
immediately
• The disc is dirty. Clean it.
• Condensation has formed. Allow player to dry out.
No sound or distorted
sound
• Make sure your DVD is connected properly. Make sure all cables
are securely inserted into the appropriate jacks.
• If you are using the 2-channel IR headphones, make sure you
turn on the IR headphone power, make sure the correct channel
(A or B) is selected.
• If the FM Modulator is ON make sure proper frequency has been
selected.
Cannot advance through a
movie
• Most discs prohibit advancing through the opening credits and
warning information that appear at the beginning of movies.
The icon ( ) appears • The feature or action cannot be completed at this time
because:
1. The disc’s software restricts it.
2. The disc’s software doesn’t support the feature (e.g., angles)
3. The feature is not available at the moment.
4. A title or chapter number that is out of range has
been requested.
Picture is distorted • The disc might be damaged. Try another disc.
• It is normal for some distortion to appear during forward or
reverse scan.
Troubleshooting
Page 27

27
Applies to Movies To Go Mobile Video Products
VOXX Electronics Corporation,
180 Marcus Blvd Hauppauge, NY 11788 1-800-645-4994
12 MONTH LIMITED WARRANTY
VOXX ELECTRONICS CORP. (the Company) warrants to the original
retail purchaser of this product that should this product or any part thereof,
under normal use and conditions, be proven defective in material or workman
ship within 12 months from the date of original purchase, such defect(s) will
be repaired or replaced with reconditioned product (at the Company's option)
without charge for parts and repair labor. A game controller, if supplied, is
similarly warranted for ninety (90) days.
To obtain repair or replacement within the terms of this Warranty, the product
is to be delivered with proof of warranty coverage (e.g. dated bill of sale),
specification of defect(s), transportation prepaid, to the Company at the
address shown below.
This Warranty does not extend to the elimination of externally generated static
or noise, to correction of antenna problems, to costs incurred for
installation, removal or reinstallation of the product, or to damage to digital
memory/media devices, gaming devices, discs, speakers, accessories, or
vehicle electrical systems.
This Warranty does not apply to any product or part thereof which, in the
opinion of the Company, has suffered or been damaged through alteration,
improper installation, mishandling, misuse, neglect, accident, or by removal
or defacement of the factory serial number/bar code label(s). THE EXTENT
OF THE COMPANY'S LIABILITY UNDER THIS WARRANTY IS LIMITED TO
THE REPAIR OR REPLACEMENT PROVIDED ABOVE AND, IN NO EVENT,
SHALL THE COMPANY'S LIABILITY EXCEED THE PURCHASE PRICE PAID
BY PURCHASER FOR THE PRODUCT.
This Warranty is in lieu of all other express warranties or liabilities. ANY
IMPLIED WARRANTIES, INCLUDING ANY IMPLIED WARRANTY OF
MERCHANTABILITY, SHALL BE LIMITED TO THE DURATION OF THIS
WRITTEN WARRANTY. ANY ACTION FOR BREACH OF ANY WARRANTY
HEREUNDER INCLUDING ANY IMPLIED WARRANTY OF
MERCHANTABILITY MUST BE BROUGHT WITHIN A PERIOD OF 24
MONTHS FROM DATE OF ORIGINAL PURCHASE. IN NO CASE SHALL
THE COMPANY BE LIABLE FOR ANY CONSEQUENTIAL OR INCIDENTAL
DAMAGES FOR BREACH OF THIS OR ANY OTHER WARRANTY. No
person or representative is authorized to assume for the Company any liability
other than expressed herein in connection with the sale of this product.
Page 28

© 2016 Voxx Electronics Corp.,180 Marcus Blvd Hauppauge, NY 11788
www.voxxelectronics.co
m
 Loading...