

Page 1
VOX AMPLIFICATION LTD.
1 Harrison Close, Knowlhill, Milton Keynes, MK5 8PA, UK
2015 VOX AMPLIFICATION LTD.
www.voxamps.com/
Precautions
Location
Using the unit in the following locations can result in a malfunction.
• In direct sunlight
• Locations of extreme temperature or humidity
• Excessively dusty or dirty locations
• Locations of excessive vibration
• Close to magnetic fields
Power supply
Please connect the designated AC adapter to an AC outlet of the correct voltage. Do not connect
it to an AC outlet of voltage other than that for which your unit is intended.
Interference with other electrical devices
Radios and televisions placed nearby may experience reception interference. Operate this unit
at a suitable distance from radios and televisions.
Handling
To avoid breakage, do not apply excessive force to the switches or controls.
Care
If the exterior becomes dirty, wipe it with a clean, dry cloth. Do not use liquid cleaners such
as benzene or thinner, or cleaning compounds or flammable polishes.
Keep this manual
After reading this manual, please keep it for later reference.
Keeping foreign matter out of your equipment
Never set any container with liquid in it near this equipment. If liquid gets into the equipment,
it could cause a breakdown, fire, or electrical shock. Be careful not to let metal objects get into
the equipment. If something does slip into the equipment, unplug the AC adapter from the wall
outlet. Then contact your nearest VOX dealer or the store where the equipment was purchased.
When this “crossed-out wheeled bin” symbol is displayed on the product,
owner’s manual, battery, or battery package, it signifies that when you wish to
dispose of this product, manual, package or battery you must do so in an approved manner. Do not discard this product, manual, package or battery along
with ordinary household waste. Disposing in the correct manner will prevent
harm to human health and potential damage to the environment. Since the
correct method of disposal will depend on the applicable laws and regulations
in your locality, please contact your local administrative body for details. If the
battery contains heavy metals in excess of the regulated amount, a chemical
symbol is displayed below the “crossed-out wheeled bin” symbol on the battery or battery package.
Notice regarding disposal (EU only)
NOTE: This equipment has been tested and found to comply with the limits for a Class
B digital device, pursuant to Part 15 of the FCC Rules. These limits are designed to provide reasonable protection against harmful interference in a residential installation. This
equipment generates, uses, and can radiate radio frequency energy and, if not installed
and used in accordance with the instructions, may cause harmful interference to radio
communications. However, there is no guarantee that interference will not occur in a
particular installation. If this equipment does cause harmful interference to radio or television reception, which can be determined by turning the equipment off and on, the user is
encouraged to try to correct the interference by one or more of the following measures:
● Reorient or relocate the receiving antenna.
● Increase the separation between the equipment and receiver.
●
Connect the equipment into an outlet on a circuit different from that to which the receiver
is connected.
● Consult the dealer or an experienced radio/TV technician for help.
If items such as cables are included with this equipment, you must use those included items.
Unauthorized changes or modification to this system can void the user’s authority to operate this equipment.
This product has been manufactured according to strict specifications and voltage
requirements that are applicable in the country in which it is intended that this product
should be used. If you have purchased this product via the internet, through mail order,
and/or via a telephone sale, you must verify that this product is intended to be used in
the country in which you reside.
WARNING: Use of this product in any country other than that for which it is intended
could be dangerous and could invalidate the manufacturer’s or distributor’s warranty.
Please also retain your receipt as proof of purchase otherwise your product may be
disqualified from the manufacturer’s or distributor’s warranty.
* All product names and company names are the trademarks or registered trademarks of
their respective owners.
THE FCC REGULATION WARNING
IMPORTANT NOTICE TO CONSUMERS
(for USA)
保証規定(必ずお読みください)
本保証書は、保証期間中に本製品を保証するもので、付属品類(ヘッドホンなど)は保証の対象に
なりません。保証期間内に本製品が故障した場合は、保証規定によって無償修理いたします。
1. 本保証書の有効期間はお買い上げ日より1か年です。
2. 次の修理等は保証期間内であっても有償となります。
•消耗部品(電池、スピーカー、真空管、フェーダーなど)の交換。
•お取扱い方法が不適当のために生じた故障。
•天災(火災、浸水等)によって生じた故障。
•故障の原因が本製品以外の他の機器にある場合。
•不当な改造、調整、部品交換などにより生じた故障または損傷。
•保証書にお買い上げ日、販売店名が未記入の場合、または字句が書き替えられている場合。
•本保証書の提示がない場合。
尚、当社が修理した部分が再度故障した場合は、保証期間外であっても、修理した日より3か月
以内に限り無償修理いたします。
3. 本保証書は日本国内においてのみ有効です。
ThiswarrantyisvalidonlyinJapan.
4. お客様が保証期間中に移転された場合でも、保証は引き続きお使いいただけます。詳しくは、
お客様相談窓口までお問い合わせください。
5. 修理、運送費用が製品の価格より高くなることがありますので、あらかじめお客様相談窓口へ
ご相談ください。発送にかかる費用は、お客様の負担とさせていただきます。
6. 修理中の代替品、商品の貸し出し等は、いかなる場合においても一切行っておりません。
本製品の故障、または使用上生じたお客様の直接、間接の損害につきましては、弊社は一切の責任
を負いかねますのでご了承ください。
本保証書は、保証規定により無償修理をお約束するためのもので、これよりお客様の法律上の権
利を制限するものではありません。
■お願い
1. 保証書に販売年月日等の記入がない場合は無効となります。記入できないときは、お買い上げ
年月日を証明できる領収書等と一緒に保管してください。
2. 保証書は再発行致しませんので、紛失しないように大切に保管してください。
アフターサービス
修理または商品のお取り扱いについてのご質問、ご相談は、お客様相談窓口へお問い合わせくださ
い。
お客様相談窓口
受付時間:月曜~金曜10:00~17:00(祝祭日、窓口休業日を除く)
※PHS等一部の電話ではご利用できません。固定電話または携帯電話からおかけください。
サービス・センター: 〒168-0073東京都杉並区下高井戸1-18-162F
輸入販売元: KORGImportDivision 〒206-0812東京都稲城市矢野口4015-2
http://
VOX AV15
本保証書は、保証規定により無償修理をお約束するものです。
お買い上げ日 年
販売店名.
www.korg-kid.com/
保証書
月 日
Page 2
安全上のご注意
ここに記載した注意事項は、製品を安全に正しくご使用いただき、あなたや他の方々への危害や
損害を未然に防ぐためのものです。
注意事項は誤った取り扱いで生じる危害や損害の大きさ、または切迫の程度によって、内容を「警
告」、「注意」の2つに分けています。これらは、あなたや他の方々の安全や機器の保全に関わる重
要な内容ですので、よく理解した上で必ずお守りください。
図記号の例
記号は、注意(危険、警告を含む)を示しています。記 号の中には、具体的な注意内
容が描かれています。左の図は「一般的な注意、警告、危険」を表しています。
記号は、禁止(してはいけないこと)を示しています。記号の中には、具体的な
注意内容が描かれることがあります。左の図は「分解禁止」を表しています。
記号は、強制(必ず行うこと)を示しています。記号の中には、具体的な注意内
容が描かれることがあります。左の図は「電源プラグをコンセントから抜くこと」を
表しています。
ご使用になる前に必ずお読みください
火災・感電・人身障害の危険を防止するには
以下の指示を守ってください
警告
この注意事項を無視した取り扱いをすると、死亡や重傷を負う可能性があります。
・ACアダプターのプラグは、必ずAC100Vの電源コンセントに差し込む。
・ ACアダプターのプラグにほこりが付着している場合は、ほこりを拭き取る。
感電やショートの恐れがあります。
・本製品はコンセントの近くに設置し、ACアダプターのプラグへ容易に手が届くよう
にする。
・次のような場合には、直ちに電源を切ってACアダプターのプラグをコンセントから
抜く。
○ACアダプターが破損したとき
○異物が内部に入ったとき
○製品に異常や故障が生じたとき
修理が必要なときは、お客様相談窓口へ依頼してください。
・本製品を分解したり改造したりしない。
・ 修理、部品の交換などで、取扱説明書に書かれてること以外は絶対にしない。
・ACアダプターのコードを無理に曲げたり、発熱する機器に近づけない。また、ACアダ
プターのコードの上に重いものをのせない。
コードが破損し、感電や火災の原因になります。
・大音量や不快な程度の音量で長時間使用しない。
大音量で長時間使用すると、難聴になる可能性があります。万一、聴力低下や耳鳴りを
感じたら、専門の医師に相談してください。
・本製品に異物(燃えやすいもの、硬貨、針金など)を入れない。
・温度が極端に高い場所(直射日光の当たる場所、暖房機器の近く、発熱する機器の上な
ど)で使用や保管はしない。
・振動の多い場所で使用や保管はしない。
・ホコリの多い場所で使用や保管はしない。
・風呂場、シャワー室で使用や保管はしない。
・雨天時の野外のように、湿気の多い場所や水滴のかかる場所で、使用や保管はしない。
・本製品の上に、花瓶のような液体が入ったものを置かない。
・本製品に液体をこぼさない。
・濡れた手で本製品を使用しない。
注意
この注意事項を無視した取り扱いをすると、傷害を負う可能性または物理的損害が発生する可能性があ
・ 正常な通気が妨げられない所に設置して使用する。
・ラジオ、テレビ、電子機器などから十分に離して使用する。
ラジオやテレビ等に接近して使用すると、本製品が雑音を受けて誤動作する場合があ
ります。また、ラジオ、テレビ等に雑音が入ることがあります。
本製品をテレビ等の横に設置すると、本製品の磁場によってテレビ等の故障の原因に
なることがあります。
・外装のお手入れは、乾いた柔らかい布を使って軽く拭く。
・ACアダプターをコンセントから抜き差しするときは、必ずプラグを持つ。
・ 長時間使用しないときは、ACアダプターをコンセントから抜く。
・指定のACアダプター以外は使用しない。
・他の電気機器の電源コードと一緒にタコ足配線をしない。
本製品の定格消費電力に合ったコンセントに接続してください。
・ スイッチやツマミなどに必要以上の力を加えない。
故障の原因になります。
・外装のお手入れに、ベンジンやシンナー系の液体、コンパウンド質、強燃性のポリッ
シャーは使用しない。
・不安定な場所に置かない。
本製品が落下してお客様がけがをしたり、本製品が破損する恐れがあります。
・本製品の上に乗ったり、重いものをのせたりしない。
本製品が落下または損傷してお客様がけがをしたり、本製品が破損する恐れがありま
す。
*その他すべての商品名または規格名は関係各社の商標または登録商標です。
ります。
Précautions
Emplacement
L’utilisation de cet instrument dans les endroits suivants peut en entraîner le mauvais
fonctionnement.
• En plein soleil
• Endroits très chauds ou très humides
• Endroits sales ou fort poussiéreux
• Endroits soumis à de fortes vibrations
• A proximité de champs magnétiques
Alimentation
Branchez l’adaptateur secteur mentionné à une prise secteur de tension appropriée.
Evitez de brancher l’adaptateur à une prise de courant dont la tension ne correspond
pas à celle pour laquelle l’appareil est conçu.
Interférences avec d’autres appareils électriques
Les postes de radio et de télévision situés à proximité peuvent par conséquent souffrir
d’interférences à la réception. Veuillez dès lors faire fonctionner cet appareil à une
distance raisonnable de postes de radio et de télévision.
Maniement
Pour éviter de les endommager, manipulez les commandes et les boutons de cet
instrument avec soin.
Entretien
Lorsque l’instrument se salit, nettoyez-le avec un chiffon propre et sec. Ne vous
servez pas d’agents de nettoyage liquides tels que du benzène ou du diluant, voire
des produits inflammables.
Conservez ce manuel
Après avoir lu ce manuel, veuillez le conserver soigneusement pour toute référence
ultérieure.
Evitez toute intrusion d’objets ou de liquide
Ne placez jamais de récipient contenant du liquide près de l’instrument. Si le liquide
se renverse ou coule, il risque de provoquer des dommages, un court-circuit ou une
électrocution. Veillez à ne pas laisser tomber des objets métalliques dans le boîtier
(trombones, par ex.). Si cela se produit, débranchez l’alimentation de la prise de
courant et contactez votre revendeur vox le plus proche ou la surface où vous avez
acheté l’instrument.
Note concernant les dispositions (Seulement EU)
Quand un symbole avec une poubelle barrée d’une croix apparait sur
le produit, le mode d’emploi, les piles ou le pack de piles, cela signifie
que ce produit, manuel ou piles doit être déposé chez un représentant
compétent, et non pas dans une poubelle ou toute autre déchetterie
conventionnelle. Disposer de cette manière, de prévenir les dommages
pour la santé humaine et les dommages potentiels pour l’environnement.
La bonne méthode d’élimination dépendra des lois et règlements applicables dans votre localité, s’il vous plaît, contactez votre organisme
administratif pour plus de détails.
Si la pile contient des métaux lourds au-delà du seuil réglementé, un symbole
chimique est affiché en dessous du symbole de la poubelle barrée d’une croix
sur la pile ou le pack de piles.
Ce produit a été fabriqué suivant des spécifications sévères et des besoins en
tension applicables dans le pays où ce produit doit être utilisé.
Si vous avez acheté ce produit via l’internet, par vente par correspondance ou/
et vente par téléphone, vous devez vérifier que ce produit est bien utilisable
dans le pays où vous résidez.
ATTENTION: L’utilisation de ce produit dans un pays autre que celui pour
lequel il a été conçu peut être dangereuse et annulera la garantie du fabricant ou
du distributeur. Conservez bien votre récépissé qui est la preuve de votre achat,
faute de quoi votre produit ne risque de ne plus être couvert par la garantie du
fabricant ou du distributeur.
* Tous les noms de produits et de sociétés sont des marques commerciales ou dépo-
sées de leur détenteur respectif.
REMARQUE IMPORTANTE POUR LES CLIENTS
Vorsichtsmaßnahmen
Aufstellungsort
Vermeiden Sie das Aufstellen des Geräts an Orten, an denen
• es direkter Sonneneinstrahlung ausgesetzt ist;
• hohe Feuchtigkeit oder Extremtemperaturen auftreten können;
• Staub oder Schmutz in großen Mengen vorhanden sind;
• das Gerät Erschütterungen ausgesetzt sein kann.
• in der Nähe eines Magnetfeldes.
Stromversorgung
Schließen Sie das optionale Netzteil nur an eine geeignete Steckdose an. Verbinden
Sie es niemals mit einer Steckdose einer anderen Spannung.
Störeinflüsse auf andere Elektrogeräte
Dieser kann bei in der Nähe aufgestellten Rund-funkempfängern oder Fernsehgeräten Empfangsstörungen hervorrufen. Betreiben Sie solche Geräte nur in einem
geeigneten Abstand von diesem Erzeugnis.
Bedienung
Vermeiden Sie bei der Bedienung von Schaltern und Reglern unangemessenen
Kraftaufwand.
Reinigung
Bei auftretender Verschmutzung können Sie das Gehäuse mit einem trockenen,
sauberen Tuch abwischen. Verwenden Sie keinerlei Flüssigreiniger wie beispielsweise Reinigungsbenzin, Verdünnungs- oder Spülmittel. Verwenden Sie niemals
brennbare Reiniger.
Bedienungsanleitung
Bewahren Sie diese Bedienungsanleitung gut auf, falls Sie sie später noch einmal
benötigen.
Flüssigkeiten und Fremdkörper
Stellen Sie niemals Behältnisse mit Flüssigkeiten in der Nähe des Geräts auf. Wenn
Flüssigkeit in das Gerät gelangt, können Beschädigung des Geräts, Feuer oder ein
elek-trischer Schlag die Folge sein.
Beachten Sie, daß keinerlei Fremdkörper in das Gerät gelangen. Sollte ein Fremdkörper in das Gerät gelangt sein, so trennen Sie es sofort vom Netz. Wenden Sie sich
dann an Ihren VOX-Fachhändler.
Page 3
576
3
4
8
Wenn Sie das Symbol mit der „durchgekreuzten Mülltonne“ auf Ihrem
Produkt, der dazugehörigen Bedienungsanleitung, der Batterie oder
dem Batteriefach sehen, müssen Sie das Produkt in der vorgeschriebenen
Art und Weise entsorgen. Dies bedeutet, dass dieses Produkt mit elektrischen und elektronischen Komponenten nicht mit dem normalen
Hausmüll entsorgt werden darf. Für Produkte dieser Art existiert ein
separates, gesetzlich festgelegtes Entsorgungssystem. Gebrauchte elektrische und elektronische Geräte müssen separat entsorgt werden, um
ein umweltgerechtes Recycling sicherzustellen. Diese Produkte müssen
bei benannten Sammelstellen abgegeben werden. Die Entsorgung ist für den
Endverbraucher kostenfrei! Bitte erkundigen sie sich bei ihrer zuständigen Behörde, wo sie diese Produkte zur fachgerechten Entsorgung abgeben können.
Falls ihr Produkt mit Batterien oder Akkumulatoren ausgerüstet ist, müssen sie
diese vor Abgabe des Produktes entfernen und separat entsorgen (siehe oben).
Die Abgabe dieses Produktes bei einer zuständigen Stelle hilft ihnen, dass das
Produkt umweltgerecht entsorgt wird. Damit leisten sie persönlich einen nicht
unerheblichen Beitrag zum Schutz der Umwelt und der menschlichen Gesundheit vor möglichen negativen Effekten durch unsachgemäße Entsorgung von
Müll. Batterien oder Akkus, die Schadstoffe enthalten, sind auch mit dem
Symbol einer durchgekreuzten Mülltonne gekennzeichnet. In der Nähe zum
Mülltonnensymbol befindet sich die chemische Bezeichnung des Schadstoffes.
Cd oder NiCd steht für Cadmium, Pb für Blei und Hg für Quecksilber.
Dieses Produkt wurde unter strenger Beachtung von Spezifikationen und
Spannungsanforderungen hergestellt, die im Bestimmungsland gelten. Wenn
Sie dieses Produkt über das Internet, per Postversand und/oder mit telefonischer
Bestellung gekauft haben, müssen Sie bestätigen, dass dieses Produkt für Ihr
Wohngebiet ausgelegt ist.
WARNUNG: Verwendung dieses Produkts in einem anderen Land als dem, für
das es bestimmt ist, verwendet wird, kann gefährlich sein und die Garantie des
Herstellers oder Importeurs hinfällig lassen werden. Bitte bewahren Sie diese
Quittung als Kaufbeleg auf, da andernfalls das Produkt von der Garantie des
Herstellers oder Importeurs ausgeschlossen werden kann.
* Alle Produkt- und Firmennamen sind Warenzeichen oder eingetragene Warenzei-
chen der betreffenden Eigentümer.
Hinweis zur Entsorgung (Nur EU)
WICHTIGER HINWEIS FÜR KUNDEN
Precauciones
Ubicación
El uso de la unidad en las siguientes ubicaciones puede dar como resultado un mal
funcionamiento:
• Expuesto a la luz directa del sol
• Zonas de extremada temperatura o humedad
• Zonas con exceso de suciedad o polvo
• Zonas con excesiva vibración
• Cercano a campos magnéticos
Fuente de alimentación
Por favor, conecte el adaptador de corriente designado a una toma de corriente con
el voltaje adecuado. No lo conecte a una toma de corriente con voltaje diferente al
indicado.
Interferencias con otros aparatos
Las radios y televisores situados cerca pueden experimentar interferencias en la
recepción. Opere este dispositivo a una distancia prudencial de radios y televisores.
Manejo
Para evitar una rotura, no aplique excesiva fuerza a los conmutadores o controles.
Cuidado
Si exterior se ensucia, límpiese con un trapo seco. No use líquidos limpiadores como
disolvente, ni compuestos inflamables.
Guarde este manual
Después de leer este manual, guárdelo para futuras consultas.
Mantenga los elementos externos alejados del equipo
Nunca coloque ningún recipiente con líquido cerca de este equipo, podría causar
un cortocircuito, fuero o descarga eléctrica. Cuide de que no caiga ningún objeto
metálico dentro del equipo.
Cuando aparezca el símbolo del cubo de basura tachado sobre un producto, su manual de usuario, la batería, o el embalaje de cualquiera de
éstos, significa que cuando quiere tire dichos artículos a la basura, ha
de hacerlo en acuerdo con la normativa vigente de la Unión Europea.
No debe verter dichos artículos junto con la basura de casa. Verter este
producto de manera adecuada ayudará a evitar daños a su salud pública y posibles daños al medioambiente. Cada país tiene una normativa
específica acerca de cómo verter productos potencialmente tóxicos, por
tanto le rogamos que se ponga en contacto con su oficina o ministerio
de medioambiente para más detalles. Si la batería contiene metales pesados por
encima del límite permitido, habrá un símbolo de un material químico, debajo
del símbolo del cubo de basura tachado.
Nota respecto a residuos y deshechos (solo UE)
Este producto ha sido fabricado de acuerdo a estrictas especificaciones y requerimientos de voltaje aplicables en el país para el cual está destinado. Si ha comprado
este producto por internet, a través de correo, y/o venta telefónica, debe usted
verificar que el uso de este producto está destinado al país en el cual reside.
AVISO: El uso de este producto en un país distinto al cual está destinado podría
resultar peligroso y podría invalidar la garantía del fabricante o distribuidor. Por
favor guarde su recibo como prueba de compra ya que de otro modo el producto
puede verse privado de la garantía del fabricante o distribuidor.
* Todos los nombres de productos y compañías son marcas comerciales o marcas
registradas de sus respectivos propietarios.
21
NOTA IMPORTANTE PARA EL CONSUMIDOR
Page 4

Introduction
d
Thank you for purchasing the VOX AV15 analog valve amplier. To help you get the
most out of your new instrument, please read this manual carefully.
Main Features
- Our constant R&D of analog designs has enabled us to create a whole new cat-
egory of analog modeling guitar ampliers. This research allows us to create the
sound of legendary t ube guitar ampliers.
- The Pre-amp is powered by a 12AX7(ECC83) tube. This delivers a more dynamic
and harmonically rich sound. For greater exibility, you can change some tube
parameters to really customize your tone.
- The Power-amp also includes a 12AX7(ECC83) tube, allowing for real tube power
amp distortion, even at lower waage levels. Like the pre-amp, you can also
change tube parameters in the power-amp, for greater exibility.
- There are 3 types of analog voiced digital eects included. Each one can be used
independently.
- The AUX IN allows you to plug in your own portable music player, so you to jam
along with your favourite tracks. Plug your headphones into the PHONES jack,
for silent practice. This output is powered by an analog cabinet simulator, giving
the real feel of a guitar amplier.
Setup
Making connections
1. Turn the POWER LEVEL knob on the amp to the minimum position.
2. Connect the included AC adapter to the DC12V jack, and then plug the AC
adapter into an AC outlet.
Only use the specied AC adapter. Using any other AC adapter may cause
malfunctions.
3. Plug the cable that’s connected to your guitar into the INPUT jack. If an audio
player will be used, connect it to the AUX IN jack.
4. Hold down the power button until the LED on the top panel lights up and the amp
is turned on.
Tip To turn off the amp, hold down the power button until the LED turns off.
5. Slowly raise the POWER LEVEL knob to adjust the volume.
The tubes may produce a noise until they have warmed up, or a popping noise
may be produced when the PREAMP CIRCUIT selector is turned. These are
not malfunctions.
Auto power-o function
The amp has an auto power-o function. With this function, the amp is automatically
turned o if there is no input for approximately 1 hour. When the amp is turned o,
it is not turned back on, even if a knob or selector is operated. After the amp is turned
o, turn it on again.
When the input level is extremely low or there is very lile change in the sound,
the auto power-o function may be activated. In addition, depending on the set-
tings and environment, the amp may interpret noise as input, even if the guitar is
not being played.
Tip As the factory default setting, the auto power-off function is enabled.
Enabling/disabling the auto power-o function
1. While holding down the DELAY button, turn on the amp. The EFFECTS button
shows the current setting.
Enabled Disable
2. Press the DELAY button to switch between enabling and disabling the function.
3. Wait without performing any operation for a few seconds. The setting is applied,
and the amp automatically returns to normal operation.
Panel description and functions
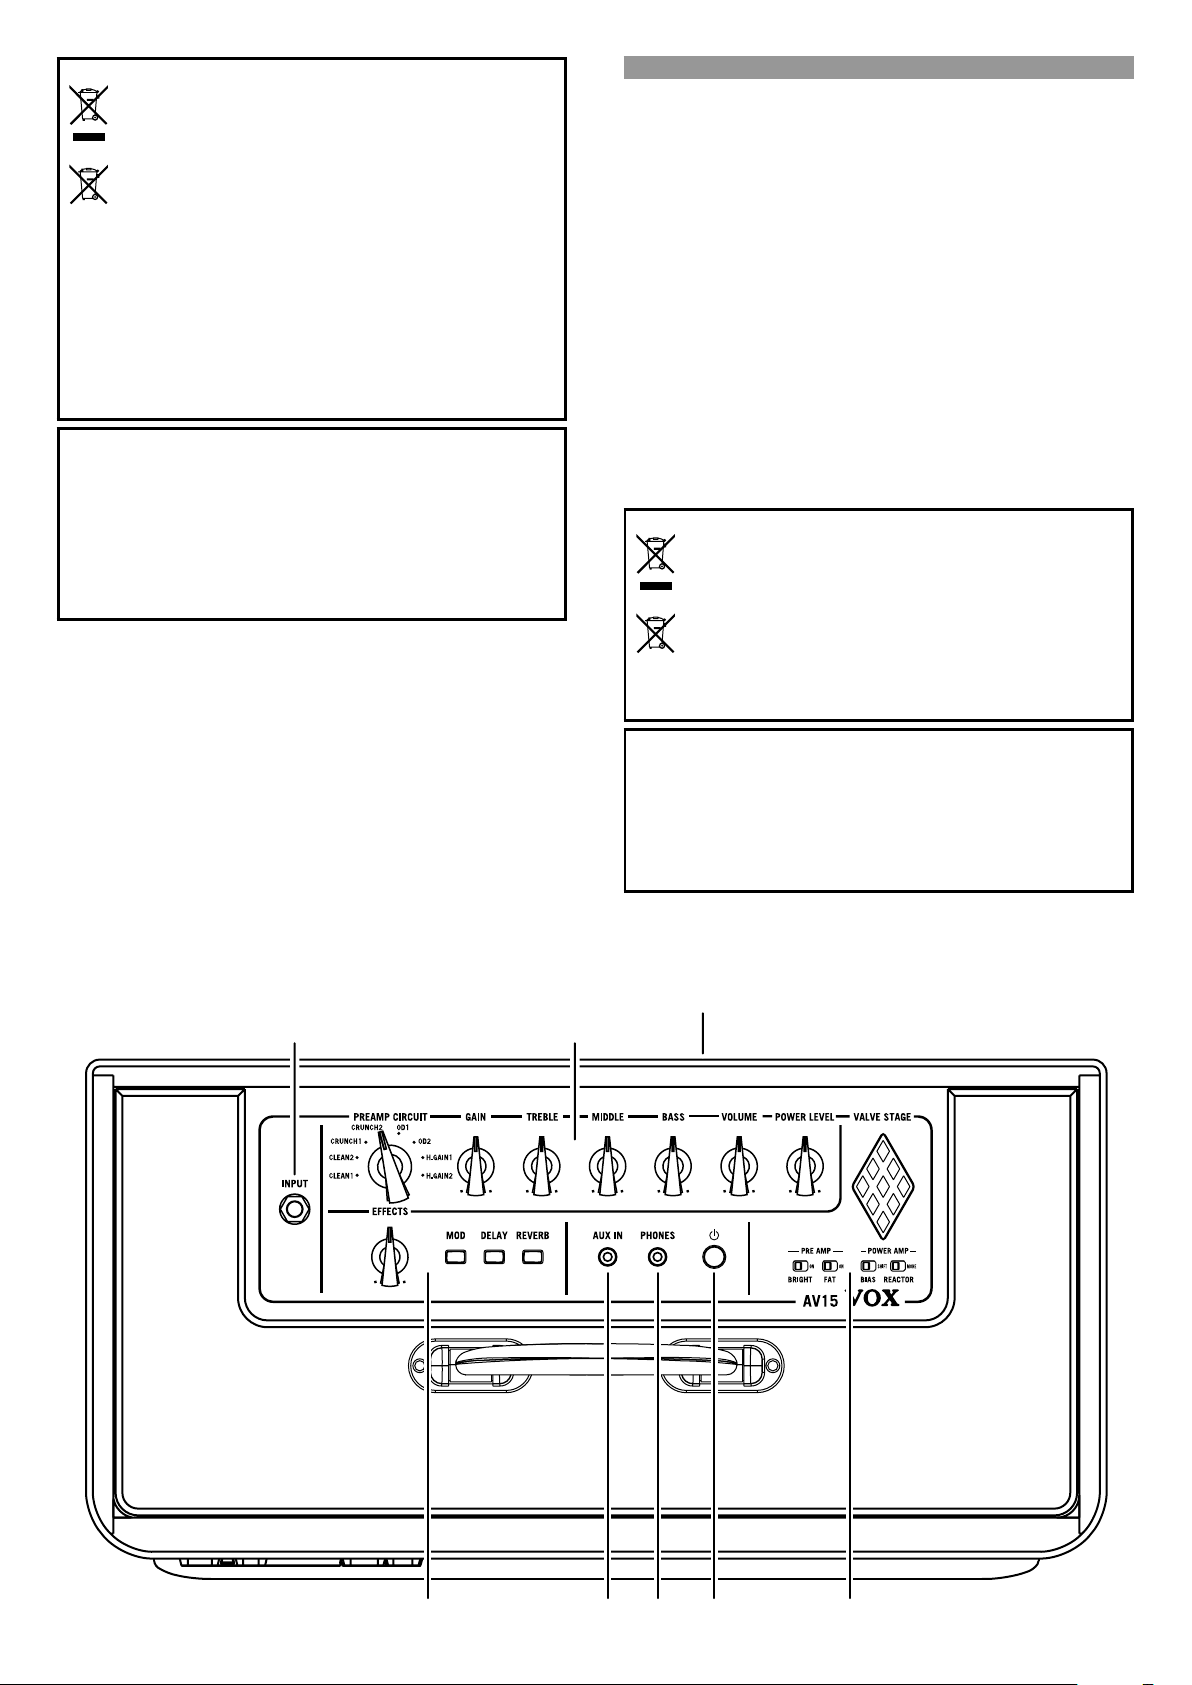
1.
INPUT jack
Plug your guitar in here, ensuring you use a shielded guitar cable.
2.
AMP section
Choose any of the 8 amp models, using the PREAMP CIRCUIT selector.
Turning the VOLUME knob up delivers more drive to the power amp. You can decide
the total waage by using the POWER LEVEL knob. This ensures good power amp
distortion without high volumes.
3.
EFFECTS section
You can use modulation (MOD), delay (DELAY) and reverb (REVERB) independently.
To turn on each eect, you simply push the corresponding buon. The indicator will
light up showing which eects are on. Simply holding the buon turns each eect o.
The EFFECTS knob adjusts the output level for each eect.
Holding the buon whilst turning the EFFECTS knob allows you to adjust these
parameters below.
Eect type Eect
MOD Speed
DELAY Time
REVERB Time
4.
VALVE STAGE section
You can change tube parameters for both the pre-amp and power amp.
Switch Function Position
BRIGHT Adds some brightness. Left=o, Right=on
FAT Adds some low end. Left=o, Right=on
BIAS Changes the bias seing of the waveform.
REACTOR
5.
AUX IN jack
Connect the analog output of an audio device to this jack.
You can connect an audio player to this jack, then play along on your guitar while
listening to your favorite songs.
Adjust the volume for the PHONES jack with the connected device.
6.
PHONES jack
Use this jack if you want to output directly to a mixer or recording device, or when
you want to use headphones. Output level adjusted with the POWER LEVEL knob.
When a device is connected to this jack, no sound will be output from he internal
speaker.
Be sure to connect a stereo plug to this jack.
The REACTOR switch does not aect the output from the PHONES jack.
7.
Power button
Hold down this buon to turn the AV15 on or o.
8.
DC12V jack
Connect the included AC adapter here.
The AC adapter is designed specically for the AV15. Do not use any other
adapter, otherwise a malfunction may occur.
Changes the degree of damping of the
power-amp.
Left=modern,
Right=vintage
Left=at and tight,
Right=dynamic and loose
About the PREAMP CIRCUIT
This amplier has 8, all analog amp models, carefully designed to sound like some of
the best known legendary tube guitar ampliers.
CLEAN1
1.
Clean 2x12 combo amplier with large amounts of headroom. This has a smooth high-
end and a thick low end.
CLEAN2
2.
4x10 combo amplier that was originally designed as a bass amplier. This has a thick
and strong overdrive.
CRUNCH1
3.
The VOX AC15 EF86 channel. You can get many variations of crunch, with a combination of BRIGHT switch and FAT switch.
CRUNCH2
4.
Post 1964 era VOX AC30 Top Boost. This has both a bell chime clean and a dynamic
overdrive.
OD1
5.
This amplier embodies 70’s classic rock. Whilst still being able to provide a dynamic
clean sound.
OD2
6.
This amplier is representative of 80’s hard rock. You can get well-known British
overdrive with any guitar or pickup.
H.GAIN1
7.
A high gain amplier that was born in 90’s. You can play anything from a heavy ri to
a thick lead solo.
H.GAIN2
8.
The highest gain amplier, for those that demand a modern distortion. This is suitable
for 7 string or drop tuning.
Specications
Number of Pre-amp circuit: 8
Number of eects: 3
Input/output jacks: INPUT jack, AUX IN jack, PHONES jack
Power amp output: Maximum approx. 15 W RMS @ 5 ohms
Speaker: VOX original 8" 5 ohms
Power supply: AC adapter jack (DC 12 V )
Current consumption: 2.50 A
Dimensions (W x D x H): 17.72 x 9.21 x 14.84 inches / 450 x 234 x 377 mm
Weight: 16.98 lbs / 7.7 kg
Included items: AC adapter, Owner’s Manual
* Specications and appearance are subject to change without notice for improvement.
Page 5

Introduction
eD
e
Merci d’avoir choisi l’amplicateur analogique à lampes AV15 de VOX. Veuillez lire
aentivement ce manuel an de pouvoir exploiter au mieux toutes les possibilités oertes
par votre nouvel instrument.
Caractéristiques principales
- Grâce aux eorts acharnés de notre département R&D, nous avons créé une toute
nouvelle catégorie d’amplicateurs guitare à modélisation analogique. Et cerise
sur le gâteau, cee quête sonore nous a permis de recréer le son d’amplis guitare à
lampes légendaires.
- Le préampli est alimenté par une lampe 12AX7 (ECC83). Cela produit un son plus
dynamique et plus riche du point de vue harmonique. Pour une exibilité
optimale, vous pouvez modier certains paramètres de la lampe et ainsi vous
tailler un son vraiment « perso ».
- L’amplicateur de puissance est également doté d’une lampe 12AX7 (ECC83)
produisant une authentique distorsion d’ampli de puissance à lampe, même à bas
niveau. Et comme pour le préampli, vous pouvez modier les paramètres de la
lampe de l’ampli de puissance, pour plus de liberté sonore.
- L’ampli propose 3 types de modélisations numériques d’eets analogiques.
Chaque eet peut être utilisé de façon indépendante.
- La prise AUX IN vous permet de raccorder un lecteur de musique portable pour
jammer sur vos morceaux préférés ou travailler des solos. Pour répéter sans
déranger votre entourage, branchez un casque à la prise PHONES. Le signal à la
sortie casque est produit par un simulateur d’enceinte analogique et émule le
grain typique d’un authentique ampli de guitare.
Conguration
Eectuer les connexions
1. Réglez la commande POWER LEVEL de l’ampli sur le minimum.
2. Branchez l’adaptateur secteur fourni à la prise DC12V et reliez son autre fiche à
une prise de courant de tension appropriée.
Utilisez uniquement l’adaptateur secteur spécié. L’utilisation de tout autre
adaptateur secteur pourrait provoquer des dysfonctionnements et/ou endommager l’amplicateur.
3. Branchez le câble relié à votre guitare à la prise INPUT. Si vous souhaitez utiliser
un lecteur audio, branchez-le à la prise AUX IN.
4. Maintenez enfoncé le bouton d’alimentation jusqu’à ce que le témoin du panneau
supérieur s’allume, confirmant la mise sous tension de l’ampli.
Astuce Pour mettre l’ampli hors tension, maintenez son bouton d’alimentation
enfoncé jusqu’à ce que le témoin s’éteigne.
5. Augmentez progressivement le volume en tournant la commande POWER LEVEL.
Les lampes peuvent générer du bruit tant qu’elles ne sont chaudes. En outre,
vous pourriez remarquer un claquement quand vous tournez la commande
PREAMP CIRCUIT. Ces phénomènes sont normaux et n’indiquent pas une
anomalie.
Fonction de coupure automatique de l’alimentation
Cet ampli est doté d’une fonction de coupure automatique de l’alimentation. Cee fonction
met automatiquement l’ampli hors tension lorsqu’il ne reçoit aucun signal et que vous
n’utilisez aucune de ses commandes pendant environ une heure. Une fois l’alimentation de
l’ampli coupée par cee fonction, l’appareil reste hors tension et ne répond à aucune manip.
Pour utiliser à nouveau l’ampli, remeez-le sous tension.
En présence d’un signal d’entrée de niveau extrêmement bas ou d’un son qui ne change
pratiquement pas, la fonction de coupure automatique de l’alimentation pourrait s’activer.
En outre, selon les réglages et les conditions de jeu, il se pourrait que l’ampli identie un
bruit présent comme un signal d’entrée, même si vous ne jouez pas sur votre guitare.
Astuce La fonction de coupure automatique de l’alimentation est activée à la sortie d’usine.
Activer/désactiver la fonction de coupure automatique de l’alimentation
1. Mettez l’ampli sous tension tout en maintenant enfoncé son bouton DELAY. Le
bouton EFFECTS indique le réglage actuel.
Activé
ésactivé
2. Appuyez sur le bouton DELAY pour alterner entre le statut Activé et Désactivé.
3. Ne touchez aucune commande de l’amplificateur pendant quelques secondes. Le
réglage choisi est activé et l’ampli repasse automatiquement en mode normal.
Description des commandes et fonctions
1.
Prise INPUT
C’est ici que vous branchez votre guitare.
2.
Section AMP
Choisissez un des 8 modèles d’ampli avec la commande PREAMP CIRCUIT.
Pour insuer plus de saturation dans l’ampli de puissance, tournez la commande
VOLUME à droite. La commande POWER LEVEL permet de spécier la puissance limite
en was. Ce dosage permet d’obtenir une superbe distorsion d’ampli à lampes sans devoir
monter le niveau sur 11.
3.
Section EFFECTS
Vous disposez d’un eet de modulation (MOD), de retard (DELAY) et de réverbération
(REVERB), tous trois utilisables de façon indépendante.
Pour activer chaque eet, appuyez simplement sur le bouton correspondant. Un témoin
s’allume pour indiquer les eets actifs. Pour désactiver un eet, maintenez simplement
enfoncé le bouton correspondant.
La commande EFFECTS règle le niveau de sortie de chaque eet.
Vous pouvez en outre régler les paramètres ci-dessous en maintenant enfoncé le bouton
voulu tout en tournant la commande EFFECTS.
Type d’eet Eet
MOD Vitesse
DELAY Temps
REVERB Temps
4.
Section VALVE STAGE
Permet de changer les paramètres de lampe à la fois pour le préampli et l’ampli de puissance.
Commutateur Fonction Position
BRIGHT Éclaircit le son.
FAT Produit plus de grave.
BIAS
REACTOR
5.
Prise AUX IN
*Branchez la sortie analogique d’une source audio à cee prise. Vous pouvez y brancher un
lecteur audio et accompagner vos morceaux favoris à la guitare ou encore travailler des
solos.
Réglez le volume du signal de l’appareil externe dans le prise PHONES sur l’appareil
externe.
6.
Prise PHONES
Permet de brancher l’ampli directement à une console de mixage ou un enregistreur, ou
encore de travailler au casque. La commande POWER LEVEL règle le niveau du signal à
cee prise.
Quand une che est branchée à cee prise, le haut-parleur interne ne produit aucun son.
Veillez à brancher une che stéréo à cee prise.
Le commutateur REACTOR n’a pas d’eet sur le signal présent à la prise PHONES.
7.
Bouton d’alimentation
Maintenez ce bouton enfoncé pour mere le AV15 sous/hors tension.
8.
Prise DC12V
Branchez l’adaptateur secteur fourni à cee prise.
Cet adaptateur secteur est spécialement conçu pour alimenter le AV15. N’utilisez aucun
autre adaptateur secteur, car cela risquerait d’endommager l’ampli.
Modie le réglage de polarisation de la
forme d’onde.
Modie le degré d’amortissement («
damping ») de l’ampli de puissance.
Gauche=désactivé,
droite=activé
Gauche=désactivé,
droite=activé
Gauche=moderne,
droite=vintage
Gauche=neutre et compact, droite=dynamique
et large
À propos des PREAMP CIRCUIT
Cet amplicateur dispose de 8 modèles d’amplis 100% analogiques, minutieusement conçus
pour recréer le son de quelques-uns des plus légendaires amplis à lampes pour guitare.
CLEAN1
1.
Son Clean d’un ampli combo 2x12 avec une réserve massive. Ce modèle ore des aigus
chatoyants et des graves profonds.
CLEAN2
2.
L’ampli combo 4x10 était au départ conçu comme un ampli de basse. Ce modèle ore un
son d’overdrive puissant et costaud.
CRUNCH1
3.
Le canal EF86 du VOX AC15 propose un assortiment de sons Crunch ainsi qu’un commutateur BRIGHT et FAT.
CRUNCH2
4.
Modélisation d’un VOX AC30 Top Boost commercialisé après 1964. Il produit un son Clean
d’une éblouissante clarté et une saturation dynamique.
OD1
5.
Cet ampli est l’incarnation du rock des années 1970. Il ore toutefois aussi un superbe
son Clean dynamique.
OD2
6.
Cet ampli est l’ambassadeur du hard-rock des années 1980. Peu importe la guitare ou le
micro utilisé : vous n’aurez aucun mal à obtenir une satu bien British à souhait.
H.GAIN1
7.
Cet amplicateur à gain élevé a vu le jour dans les années 1990. Sa polyvalence permet de
jouer de tout, de ris en béton à des solos décapants.
H.GAIN2
8.
Toujours plus de gain sur cet ampli conçu pour les fanatiques de la distorsion moderne.
Parfait pour jouer sur une 7 cordes ou s’accorder au ras du plancher.
Fiche technique
Numéro du circuit de préamplication: 8
Nombre d’eets: 3
Prises d’entrée/de sortie: Prises INPUT, prise AUX IN, prise PHONES
Sortie de l’ampli de puissance: Environ max. 15 W RMS sous 5 ohms
Haut-parleur: VOX original de 8" et 5 ohms
Alimentation: Prise pour adaptateur secteur (DC 12 V
Consommation électrique: 2,50 A
Dimensions (L x P x H): 450 x 234 x 377 mm
Poids: 7,7 kg
Accessoires fournis: Adaptateur secteur, Manuel d’utilisation
* Les caractéristiques et l’aspect du produit sont susceptibles d’être modiés sans avis
préalable en vue d’une amélioration.
)
Page 6

Vorweg
Ausgeschaltet
Vielen Dank, dass Sie sich für einen analogen Röhrenverstärker VOX AV15 entschieden
haben. Bie lesen Sie vorliegende Bedienungsanleitung gründlich durch, damit Sie Ihr
neues Instrument voll ausnüen können.
Die wichtigsten Funktionen
- Dank unserer eißigen R&D-Abteilung, die ständig analoge Designs unter die
Lupe nimmt, haben wir eine neue Kategorie analoger Modeling-Gitarrenverstär-
ker erschaen, die den Sound legendärer Röhrenverstärker heraueschwört.
- Der Vorverstärker ist mit einer 12AX7(ECC83)-Röhre bewehrt. Diese sorgt für
einen besonders dynamischen, oberton reichen Klang. Damit Sie noch exibler
sind, können Sie bestimmte Röhrenparameter verändern und so Ihren ganz
persönlichen Sound erzeugen.
- Die Endstufe besit ebenfalls eine 12AX7(ECC83)-Röhre. Dies sorgt für eine echte
Röhrenendstufenverzerrung, selbst bei geringer Ausgangsleistung. Wie beim
Vorverstärker können Sie auch hier einige Röhrenparameter der Endstufe
verändern und sind somit noch exibler.
- Der Verstärker verfügt über drei unterschiedliche Typen von analogen Geräten
nachempfundenen Digitaleekten, die Sie unabhängig voneinander nuen
können.
- Ein AUX IN ermöglicht Ihnen den Anschluss eines Musikplayers, so dass Sie Ihre
Lieblinggsongs mit Ihrem Instrument begleiten können. Um beim Üben andere
nicht zu stören, gibt es eine PHONES-Buchse für Ihren Kopörer. An diesem
Ausgang liegt das Signal einer Gitarrenbox-Emulation an, so dass sich Ihr Amp
auch über Kopörer authentisch anhört.
Einrichtung
Verbindungen herstellen
1. Drehen Sie den POWER LEVEL-Regler des Verstärkers auf die
Minimaleinstellung.
2. Verbinden Sie den im Lieferumfang enthaltenen Netzadapter mit der DC12V-
Buchse, und stecken Sie dann den Netzadapter in eine Steckdose ein.
Verwenden Sie ausschließlich den vorgegebenen Neadapter. Der Einsa
eines anderen Neadapters kann Störungen verursachen.
3. Verbinden Sie das an Ihrer Gitarre angeschlossene Kabel mit der INPUT-Buchse.
Verbinden Sie gegebenenfalls einen Audioplayer mit der AUX IN-Buchse.
4. Halten Sie die Netztaste gedrückt, bis die Diode an der Oberseite leuchtet und der
Verstärker eingeschaltet ist.
Tipp Halten Sie zum Ausschalten des Verstärkers die Netztaste gedrückt, bis die
Diode an der Oberseite erlischt.
5. Drehen Sie den POWER LEVEL-Regler langsam, um die Lautstärke einzustellen.
Die Röhren können beim Aufwärmen ein Geräusch erzeugen oder knacken,
wenn der Wahlschalter PREAMP CIRCUIT betätigt wird. Es handelt sich dabei
nicht um Fehlfunktionen.
Automatische Abschaltfunktion
Der Verstärker besit eine automatische Abschaltfunktion. Diese Funktion schaltet den
Amp aus, nachdem dieser etwa eine Stunde lang nicht bedient wurde. Wurde der
Verstärker ausgeschaltet, wird er nicht durch eine Betätigung wieder eingeschaltet. Wurde
der Verstärker ausgeschaltet, müssen Sie ihn wieder einschalten.
Bei extrem niedrigem Eingangspegel oder sehr geringen Änderungen im Sound, wird
die Energiesparfunktion eventuell aktiviert. Zudem kann – je nach Einstellung und
Umgebung – der Amp Rauschen als Eingangssignal interpretieren, auch wenn die
Gitarre nicht gespielt wird.
Tipp Die automatische Abschaltfunktion ist ab Werk eingeschaltet.
Ein-/Ausschalten der automatischen Abschaltfunktion
1. Schalten Sie den Verstärker bei gedrückt gehaltenem DELAY-Taster ein. Die
EFFECTS-Taste zeigt die gegenwärtige Einstellung an.
Eingeschaltet
2. Drücken Sie den DELAY-Taster, um die Funktion ein- bzw. auszuschalten.
3. Führen Sie einige Sekunden lang keine Betätigung aus. Die Einstellung wird
vorgenommen, und der Verstärker kehrt in den Normalbetrieb zurück.
Beschreibung und Funktion des Bedienfelds
1.
INPUT-Buchse
Hier müssen Sie Ihre Gitarre anschließen.
2.
AMP-Sektion
Mit dem PREAMP CIRCUIT-Wahlschalter haben Sie die Auswahl unter 8 Amp-Modellen.
Wenn Sie den VOLUME-Regler aufdrehen, wird die Endstufe mit einem stärkeren Signal
beschickt. Die Gesamtausgangsleistung erhöhen Sie mit dem POWER LEVEL-Regler. Somit
wird selbst bei niedrigen Lautstärkepegeln eine amtliche Endstufenverzerrung erzeugt.
3.
EFFECTS-Sektion
Sie können unabhängig voneinander Modulation (MOD), Delay (DELAY) und Reverb
(REVERB) nuen.
Den Eekt aktivieren Sie jeweils über die entsprechende Taste. Die Leuchtanzeige weist
darauf hin, welche Eekte aktiviert sind. Die Eekte werden ganz einfach durch Gedrückt-
halten der Taste ausgeschaltet.
Mit dem EFFECTS-Regler stellen Sie den Ausgangspegel jedes Eekts ein.
Wenn Sie die Taste gedrückt halten, können Sie mit dem EFFECTS-Regler folgende Parameter ändern.
Eekyp Eekt
MOD Geschwindigkeit
DELAY Zeit
REVERB Zeit
4.
VALVE STAGE-Sektion
Sie können die Röhrenparameter sowohl des Vorverstärkers als auch der Endstufe ändern.
Schalter Funktion Position
BRIGHT Fügt etwas mehr Höhen hinzu. Links=Aus, Rechts=Ein
FAT Fügt etwas mehr Bässe hinzu. Links=Aus, Rechts=Ein
BIAS Ändert den Bias der Wellenform.
REACTOR Ändert den Dämpfungsfaktor der Endstufe.
5.
AUX IN-Buchse
Diese Buchse können Sie mit dem analogen Ausgang eines Audiogeräts verbinden. Sie
können an dieser Buchse einen Audioplayer anschließen und dann Ihre Lieblingssongs auf
der Gitarre begleiten.
Regeln Sie die Lautstärke der PHONES-Buchse bei angeschlossenem Gerät.
6.
PHONES-Buchse
Über diese Buchse können Sie das Ausgangssignal entweder direkt an einen Mixer oder an
ein Aufnahmegerät leiten oder mit Kopörern abhören. Den Ausgangspegel dieser Buchse
können Sie mit dem POWER LEVEL-Regler einstellen.
Wenn an dieser Buchse ein Gerät angeschlossen ist, wird der verstärkereigene
Lautsprecher stummgeschaltet.
Sie müssen an dieser Buchse ein Stereokabel anschließen.
Der REACTOR-Schalter hat keinen Einuss auf die Ausgabe an der PHONES-Buchse.
7.
Netztaste
Halten Sie diese Taste gedrückt, um den AV15 ein- oder auszuschalten.
8.
DC12V-Buchse
Hier wird der Neadapter angeschlossen.
Der Neadapter ist speziell auf den AV15 ausgelegt. Verwenden Sie keinen anderen
Adapter, andernfalls könnten Störungen auftreten.
Links=Modern,
Rechts=Vintage
Links=Flach und eng,
Rechts=dynamisch und weit
Infos zu den PREAMP CIRCUIT
Dieser Verstärker emuliert 8 analoge Amp-Modelle, die diversen legendären GitarrenRöhrenverstärkern nachempfunden sind.
CLEAN1
1.
Cleaner 2x12 Combo-Verstärker mit hoher Aussteuerungsreserve. Dieses Modell bietet
samtige Höhen und kräftige Bässe.
CLEAN2
2.
4 x 10 Combo Amp, der ursprünglich als Bassverstärker entwickelt wurde. Hat einen saen
und kräftigen Overdrive.
CRUNCH1
3.
Der EF86-Kanal des VOX AC15 bietet Ihnen diverse Varianten crunchiger Sounds, sowie
einen BRIGHT- und FAT-Schalter.
CRUNCH2
4.
Der VOX AC30 Top Boost aus der Zeit nach 1964 liefert sowohl einen glockenklaren
Cleansound als auch eine dynamische Übersteuerung.
OD1
5.
Diese Verkörperung eines klassischen Rockverstärkers aus den 70ern bietet Ihnen auch
einen dynamischen Cleansound.
OD2
6.
Dieses Modell steht für den Hardrock der 80er und liefert für jede Gitarre oder jeden
Pickup die typisch britische Übersteuerung.
H.GAIN1
7.
Dieser High-Gain-Amp aus den 90ern eignet sich für die ganze Bandbreite zwischen
Heavy-Ris und feen Lead-Solos.
H.GAIN2
8.
DNoch mehr High-Gain für alle Liebhaber einer zeitgemäßen, modernen Verzerrung.
Dieses Modell eignet sich auch für 7-Saiter oder tiefer gestimmte Gitarren.
Technische Daten
Nummer des Vorverstärker-Schaltkreises: 8
Anzahl der Eekte: 3
Eingangs-/Ausgangsbuchsen: INPUT-Buchse, AUX IN-Buchse, PHONES-Buchse
Ausgangsleistung der Endstufe: Maximal ca. 15 W eektiv bei 5 Ohm
Lautsprecher: VOX original 8", 5 Ohm
Stromversorgung: AC-Neadapterbuchse (DC 12 V
Stromversorgung: 2,50 A
Abmessungen (B x T x H): 450 x 234 x 377 mm
Gewicht: 7,7 kg
Lieferumfang: AC-Neadapter, Bedienungsanleitung
* Änderungen der technischen Daten und des Designs ohne vorherige Ankündigung
vorbehalten.
)
Page 7

Conguración
aD
a
Gracias por adquirir el amplicador de válvula analógica VOX AV15. Para que puedas
sacar el máximo partido de tu nuevo amplicador, por favor lee este manual atentamente.
Características principales
- Nuestro proceso de I+D constante de diseños analógicos nos ha permitido crear
una categoría completamente nueva de amplicadores de modelado de guitarra
analógicos. Esta investigación nos ha permitido crear el sonido de los legendarios
amplicadores de guitarra de tubos.
- El preamplicador recibe alimentación de un tubo 12AX7(ECC83). Esto propor-
ciona un sonido más dinámico y armónicamente rico. Para mejorar la exibilidad,
puede cambiar algunos parámetros de tubo para personalizar de verdad su tono.
- El amplicador de potencia también i ncluye un t ubo 12AX7(ECC83) que permite
una distorsión de amplicador de potencia de tubo real, incluso con los niveles de
voltaje más bajos. Al igual que con el preamplicador, también puede cambiar los
parámetros de tubo en el amplicador de potencia, para mejorar la exibilidad.
- Existen 3 tipos de efectos digitales de voz analógicos incluidos. Cada uno de ellos
se puede utilizar de forma independiente.
- El jack AUX IN le permite conectar su propio reproductor de música portátil, para
que pueda interpretar “jam sessions” con sus pistas favoritas. Conecte sus auriculares en la jack PHONE, para practicar en silencio. Esta salida se alimenta con un
simulador de bae analógico para obtener la sensación real de un amplicador de
guitarra.
Conguración
Hacer las conexiones
1. Pon el mando POWER LEVEL del amplificador al mínimo.
2. Conecta el adaptador de corriente incluido al jack DC12V, y a continuación
enchufa el adaptador de corriente a una toma de electricidad.
Utiliza solamente el adaptador de corriente especicado. Si utilizas otro adaptador de corriente diferente puedes causar una avería.
3. Conecta el cable que está enchufado a la guitarra en el conector de jack INPUT. Si vas a
utilizar un reproductor de audio, conéctalo al jack AUX IN.
4. Mantén pulsado el botón de encendido hasta que el led del panel superior se
ilumine y se encienda el amplificador.
Sugerencia Para apagar el amplificador, mantén pulsado el botón de encendido
hasta se apague el led.
5. Sube lentamente el mando POWER LEVEL para ajustar el volumen.
Es posible que los tubos generen ruido hasta que se calienten, o que se escuche
un chasquido al girar el selector PREAMP CIRCUIT. No se trata de fallos de
funcionamiento.
Función de apagado automático
El amplicador tiene una función de apagado automático. Con esta función, el amplicador se apaga automáticamente si no se realiza ninguna operación durante 1 hora
aproximadamente. Una vez que el amplicador se apaga, no se vuelve a encender ni
aunque se accione un botón o un selector. Después de apagado, vuelve a encenderlo
otra vez.
Cuando el nivel de entrada es extremadamente bajo o se producen muy pocos
cambios en el sonido, es posible que se active la función de apagado automático.
Además, dependiendo de los ajustes y el entorno, el amplicador puede interpretar el ruido como una entrada, aunque no se toque la guitarra.
Sugerencia Como ajuste predeterminado, la función de apagado automático viene
activada de fábrica.
Activación/desactivación de la función de apagado automático
1. Enciende el amplificador mientras mantienes pulsado el botón DELAY. El botón
EFFECTS mostrará el ajuste actual de la función.
Activad
esactivad
2. Pulsa el botón DELAY para activar y desactivar la función alternativamente.
3. Espera sin ejecutar ninguna acción durante unos segundos. De este modo se aplicará
el ajuste y el amplificador volverá automáticamente a su funcionamiento normal.
Descripción de los paneles y funciones
1.
Jack INPUT
Aquí se conecta la guitarra.
2.
Sección AMP
Elija uno de los 8 modelos de amplicador con el selector PREAMP CIRCUIT.
Al subir el mando VOLUME se entrega más potencia al amplicador de potencia.
Puede decidir el voltaje total utilizando el mando POWER LEVEL. Esto garantiza una
distorsión de amplicador de potencia adecuada sin volúmenes altos.
3.
Sección EFFECTS
Puede utilizar la modulación (MOD), el retardo (DELAY) y la reverberación (REVERB)
por separado.
Para activar cada efecto, basta con que presione el botón correspondiente. El indicador de iluminará para mostrar los efectos que están activados. Puede desactivar cada
efecto manteniendo pulsado el botón.
El mando EFFECTS ajusta el nivel de salida de cada efecto.
Si mantiene pulsado el botón mientras gira el mando EFFECTS puede ajustar los
parámetros que se indican a continuación.
Tipo de efecto Efecto
MOD Velocidad
DELAY Tiempo
REVERB Tiempo
4.
Sección VALVE STAGE
Puede cambiar los parámetros de tubo tanto para el preamplicador como para el
amplicador de potencia.
Conmutador Función Posición
BRIGHT Añade brillo.
FAT Añade graves.
BIAS
REACTOR
5.
Jack AUX IN
Aquí puedes conectar la salida analógica de un dispositivo de audio externo, como
por ejemplo un reproductor de audio, y tocar la guitarra acompañado de tus canciones
favoritas.
Ajuste el volumen para el jack para auriculares con el dispositivo conectado.
6.
Jack PHONES
Este es el conector que tienes para enviar la salida directamente a un mezclador o a
una grabadora, o si quieres usar unos auriculares. Utiliza el mando POWER LEVEL
para ajustar el nivel de salida de este conector.
Cuando hay algún dispositivo conectado a este conector, por el altavoz interno no
sale sonido.
Asegúrate de conectar un jack estéreo a este conector.
El conmutador REACTOR no afecta a la salida desde el jack PHONES.
7.
Botón de encendido
Mantén pulsado este botón para encender o apagar el AV15.
8.
Jack DC12V
Conecta aquí el adaptador de corriente incluido.
El adaptador de corriente está especícamente diseñado para el AV15. No utilices
ningún otro adaptador porque se puede producir una avería.
Cambia el ajuste de predisposición de la forma de onda.
Cambia el grado de amortigua-
ción del amplicador de potencia.
Izquierda = desactivado, derecha
= activado
Izquierda = desactivado, derecha
= activado
Izquierda = moderno, derecha
= clásico
Izquierda = bajo y rígido, derecha = dinámico y con proyección
Acerca de los PREAMP CIRCUIT
Este amplicador cuenta con 8 modelos de amplicador analógicos, diseñados
cuidadosamente para que suenen como algunos de los legendarios amplicadores de
guitarra de tubos más conocidos.
CLEAN1
1.
Amplicador de combo 2x12 limpio con grandes cantidades de espacio. Ofrece unos
agudos suaves y unos graves densos.
CLEAN2
2.
Amplicador de combo 4x10 diseñado inicialmente como un amplicador de graves.
Presenta una saturación intensa y densa.
CRUNCH1
3.
El canal VOX AC15 EF8. Puede obtener numerosas variaciones de “crunch”, con una
combinación de los conmutadores BRIGHT y FAT.
CRUNCH2
4.
“Top Boost” VOX AC30 de la época posterior a 1964. Posee un timbre de campana
limpio y una saturación dinámica.
OD1
5.
Este amplicador encarna el rock clásico de la década de 1970. Además, es capaz de
proporcionar un sonido limpio y dinámico.
OD2
6.
Este amplicador representa el rock duro de la década de 1980. Puede obtener la conocida saturación británica con cualquier guitarra o pastilla.
H.GAIN1
7.
Un amplicador de ganancia alta nacido en la década de 1990. Puede reproducir lo que se le
ocurra, desde una frase musical heavy hasta un solo recio.
H.GAIN2
8.
El amplicador de ganancia más alta, para aquellos que exigen una distorsión moderna. Es adecuado para la anación de caída o 7 cuerdas.
Especicaciones
Número de circuito de preamplicador: 8
Efectos: 3
Conectores de entrada/salida: jack INPUT, jack AUX IN, jack PHONES
Potencia de salida: Máxima aprox. 15 W RMS a 5 ohms
Altavoz: VOX original 8" 5 Ω
Alimentación: Adaptador de corriente (CC 12 V
Consumo de corriente: 2,50 A
Dimensiones (ancho x profundo x alto): 450 x 234 x 377 mm
Peso: 7,7 kg
Accesorios incluidos: Adaptador de corriente, Manual del usuario
* Las especicaciones y el aspecto est sujetas a cambios sin previo aviso por mejora.
)
Page 8

はじめに
アース端子付きコンセント
無効
このたびは、VOXアナログ・バルブ・アンプAV15をお買い上げいただきまして、誠に
ありがとうございます。本製品を末永くご愛用いただくためにも、取扱説明書をよくお
読みになって正しい方法でご使用ください。
おもな特長
◦長年培ってきたアナログ回路技術を駆使して、ギター・アンプの歴史的な銘機を、真
空管12AX7(ECC83)を使用したアナログ回路で忠実に再現しました。
◦プリアンプに真空管12AX7(ECC83)を使用し、プレート電圧を高く設定すること
で、ダイナミックなサウンドが得られます。また真空管回路の設定を、お好みに合わ
せてモディファイすることができます。
◦パワーアンプ回路の一部にも真空管を使用し、パワー・レベル・コントロールにより、
パワーアンプの歪み感を保ったまま、音量を調整することができます。またパワー
アンプの特性を、お好みに合わせてモディファイすることができます。
◦アナログ・サウンドに特化した、3種類のエフェクトを搭載しています。
◦AUXIN端子を装備し、オーディオ・プレーヤーなどを接続して、ギターと同時に使用
することができます。またアナログ・キャビネット・シミュレーター搭載のPHONES
端子を装備し、ヘッドホンでも臨場感のあるアンプ・サウンドが楽しめます。
セットアップ
本機のPOWERLEVELノブを最小レベルに設定します。
1.
付属のACアダプターをDC12V端子に接続し、コンセントにACアダプターを接続し
2.
ます。
ACアダプターは、必ず指定のものを使用してください。指定以外のACアダプ
ターを使用した場合、故障の原因となります。
電源コードのコネクターをACアダプターに接続します。
3.
感電と機器の損傷を防ぐために、アース接続を確実に行ってください。
アース端子付きコンセントに接続する場合は
ACアダプター用電源コードのプラグが三芯のためにコンセントに接続できない場
合は、2P-3P変換器を取り付けます。そして、コンセントのアース端子にアース線
を接続し、2P-3P変換器のプラグを差し込みます。
アース接続は、コンセントにプラグを差し込む前に行ってください。また、
警告:
アース接続を外すときは、コンセントからプラグを抜いてから行ってください。
2P-3P変換器
アース線
2P-3P変換器のアース線のU字端子にカバーが付いている場合は、カバーをはずし
てください。
ギターに接続したケーブルをINPUT端子に接続します。オーディオ・プレーヤーを使
4.
用する場合は、AUXIN端子に接続します。
パネルのLEDが点灯するまで電源ボタンを長押しして、電源を入れます。
5.
電源を切るときは、LEDが消灯するまで電源ボタンを長押しします。
Tip
POWERLEVELノブをゆっくりと回して、音量を調節します。
6.
真空管が温まるまで音が出ない場合や、PREAMPCIRCUITセレクターを回す
とポップノイズが出る場合があります。これは故障ではありません。
電源コード
オート・パワー・オフ機能
本機には、オート・パワー・オフ機能が搭載されています。オート・パワー・オフ機能は、
INPUT端子から入力がない状態が約1時間続くと、自動的に電源が切れる機能です。電源
が切れると、ノブやセレクターを操作しても復帰しません。電源を入れ直してください。
入力音の音量や変化が極端に小さい場合は、オート・パワー ・オフ機能が動作する
場合があります。また、設定や環境によってはギターを弾いていなくても、ノイズ
によって、オート・パワー ・オフ機能が動作しない場合があります。
工場出荷時は、オート・パワー・オフ機能は有効に設定されています。
Tip
オート・パワー ・オフ機能の有効/無効を設定する
DELAYボタンを押しながら電源を入れます。エフェクト・ボタンの点灯の仕方で現在
1.
の設定を表します。
有効
DELAYボタンを押して、有効と無効を切り替えます。
2.
数秒間操作しないで待ちます。設定が適用され、自動的に通常の動作に移ります。
3.
各部の名称と機能
1.
INPUT端子
ギターを接続します。
2.
ア ン プ・セ ク シ ョ ン
PREAMPCIRCUITセレクターを操作して、8種類のアンプ回路から選びます。VOLUME
ノブを回していくと、パワーアンプの歪み感が増加し、POWERLEVELノブで最終的な音
量を決定します。音量を上げなくてもパワーアンプのディストーションが得られます。
3.
EFFECTSセクション
モジュレーション(MOD)、ディレイ(DELAY)、リバーブ(REVERB)の各エフェクト
の設定をします。
各ボタンを押すと、対応するエフェクトがオンになります。押したボタンは点滅に切り
替わり、エディット対象として選択されます。EFFECTSノブを使ってエディット対象と
なっているエフェクトの出力レベル(または効果の深さ)を調節をします。
ボタンを押しながらEFFECTSノブを回すと、モジュレーションのスピード、ディレイ/リ
バーブのタイムを調節できます。エフェクトをオフにするには、ボタンを長押しします。
4.
VALVESTAGEセクション
プリアンプ、パワーアンプに使用された真空管の特性をモディファイできます。
BRIGHTスイッチをONにすると、きらびやかなサウンドになります。
FATスイッチをONにすると、低音の豊富なサウンドになります。
BIASスイッチをSHIFT(右側)にすると、歪みやすくビンテージ感のあるサウンドに、
左にすると、歪みにくくモダンなサウンドになります。
REACTORスイッチは、パワーアンプの帰還量を変化させ、ダンピング・ファクターを
切り替えます。MORE(右側)にすると、よりルーズでダイナミックなサウンドに、左側
にすると、よりタイトでフラットなサウンドになります。
5.
AUXIN端子
使用するオーディオ機器のアナログ音声出力を接続します。
オーディオ・プレイヤーなどを接続して再生し、曲に合わせて演奏する場合に便利です。
PHONES端子使用時の音量は、接続機器側で調節してください。
6.
PHONES端子
ミキサーやレコーディング機器等へ直接出力するときや、ヘッドホンを使用する場合
にこの端子に接続します。出力レベルはPOWERLEVELノブで調整します。
この端子に接続すると、内蔵スピーカーから音は出ません。
PHONES端子には、必ずステレオ・プラグを接続してください。
PHONES端子からの出力にはREACTORの効果はかかりません。
7.
電源 ボタン
長押しして電源を入れたり、切ったりします。
8.
DC12V端子
付属のACアダプターを接続します。
ACアダプターは本機専用です。他の製品で使用すると故障の原因となりますので、
絶対に使用しないでください。
PREAMP CIRCUITについて
本機では、歴史的なギター・アンプの銘機をアナログ回路でモデリングした、8種類の
プリアンプ回路を搭載しました。
1.
CLEAN1
高いヘッド・ルームを持った、2x12キャビネットの代表的なクリーン・アンプ・サウン
ド。スムーズな高域と太い低域が特徴です。
2.
CLEAN2
もともとベース用に設計された1959年製4x10コンボ・アンプ。迫力の有るオーバー
ドライブ・サウンドも魅力的です。
3.
CRUNCH1
VOXAC15のEF86チャンネルのモデリング。ブライト・スイッチ、ファット・スイッチ
との組み合わせで、多彩なクランチ・サウンドが得られます。
4.
CRUNCH2
1964年以降のトップ・ブースト回路を搭載したAC30のモデリング。スムーズかつ繊
細なクリーン・サウンドと、野太くダイナミックなクランチ・サウンドが特徴です。
5.
OD1
70年代クラシック・ロック・サウンドの代名詞となる、ブリティッシュ・アンプ。ゲイン
を低く設定した際の、ダイナミックなクリーン・サウンドも魅力的です。
6.
OD2
80年代のハード・ロック・サウンドを代表する、未だに愛用者の多いブリティッシュ・
アンプ。シングルコイル、ハムバッカーどちらでも王道のサウンドが得られます。
7.
H.GAIN1
90年代に登場したハイゲイン・アンプ・サウンド。ヘヴィなリフからリード・ギターまで
こなせます。
8.
H.GAIN2
現代的な要請に応えるハイゲイン・アンプ・サウンド。ロー・チューニングや7弦ギター
での演奏に最適です。
おもな仕様
プリアンプ回路数: 8
エフェクト数: 3
入出力端子: INPUT端子、AUXIN端子、PHONES端子
パワーアンプ出力: 最大約15WRMS@5Ω
スピーカー: VOXオリジナル8インチ5Ω
電源: ACアダプター(DC12V )
消費電流: 2.50A
外形寸法(W×D×H): 450×234×377mm
質量: 7.7kg
付属品: ACアダプター、
※仕様および外観は、改良のため予告なく変更することがあります。
取扱説明書
 Loading...