

Volkswagen vw 1302 s, vw 1302 Instruction Manual

lnstruction Manual
vw1302

Instruction
Manual
vw 1302
s
vw
1,302
ffi
August
1971
VOLKSWAGENWERK
AG
WOLFSBURG

Gontents
Introduction
Care of
vehicle.
Tires
Do-it-yourself
tips
Removing
and installing
seats .
Changing wheels
Adjusting headlights
Bulb
chart
Replacing
bulbs.
Replacing fuses .
C.ara al hattarrr
Towing
Starting trouble
Fuel
and
lubricants
Oil
Changing and Lubrication
Engine .
Manual transmission
VW Automatic
Hinges
and Locks
Air
cleaner
Technical data .
lndex .
Vehicle data
quiz
Test wiring
Safety
and socket
ldentification
plate,
chassis number
and
enginenumber
....9
Operation
Keys
10
Doors
11
Seats.
12
Safety
belts
13
Instrument
panel,
hand
and
foot
controls
14
VW radios
20
Interior trim
22
Sliding
roof
23
Heating
24
Ventilation
......25
Luggage compartments
26
Convertible top
29
What to check .
30
Starting
the engine
. .
32
Driving hints .
33
VW Automatic
34
Winteroperation. ....
38
Traifer towing
40
A
42
46
48
49
JI
52
52
FA
55
56
57
60
62
63
64
65
66
68
74
78
All
pictures
and text
in this instruction
manual are based
on
the
VW 1302 S. Where
ihe controls
and technical
details of the VW
1302 and Convertible models
differ considerably,
attention is
drawn to the difference.
Driving
the VW Automatic is described
in a special section.
In addition
a number
of useful
optional
extras
are also described. Differences
in technical
equipment and
f ittings as
often
required
due to local
regulations in various
countries are not taken
into account.
We
trust
you
will appreciate
that we must reserve
the right to alter, without
notice, any
of the
equipment and
specifications illustrated
or
described in
this manual.
2

Introduction
It is
to
your
advanthge
to
get
to know
your
new
car
quickly
so that
you
will
be able
to
start
off
on
your
first
trip with
complete
confidence.
For this
reason
you
should
read
the first
part
of this
booklet,
which
deals with
the
operation
of
your
Volkswagen,
very
carefully.
The second
part
tells
you
everything
about
winter driving,
trailer
towing
and
care of the
car and
also
contains
some
do-it-yourself
tips.
There
is also
some information
on the
proper
sort
of fuel
and oil
to use, how
to carry
out
oil changes
and lubricate
the
car
and a
colleciion
of
interesting
technical
data.
When
you
have
studied the
manual, and
we
strongly recommend
you
to do
so,
you
will
know
how
to operate
your
car
properly.
You will
then
be entitled
to
expect
many
years
of
reliable
and
economical
service f rom
your
car regardless
of weather,
road
conditions
and
mileage
run.
In this
connection we
should like
lo
mention
the
VW Service
Record
which
is
the
second important
publication
that
you
receive
with
the
vehicle,
The
Service
Record tells
you
exactly
what
points you
have to
watch
to maintain
the
roadworthi-
ness
of
your
car and explains
the Volkswagen
Diagnosis
and
Maintenance
System.
lt also
contains
the Warranty
Voucher
for
your
car and
the conditions
on which
this
voucher
ist issued.
Always
have
the
Service Record
with
you
when
you
take
the vehicle
to a
VW workshop,
it
helps
to establish
proper
contact
with the
workshop
staff.
In
your
own interests:
Have
your
Volkswagen
serviced
as laid
down in
the
Service
Regord
right
from
the
start, Proper
treatment
and
complete
proof
of all
maintenance
work
carried
out
cln
be of vital importance
if
you
should have
occasion to
make
a
ctaim under
warranty.
Volkswagenwerk
Aktiengesellschaft
3

Test
wiring
and
socket
VW
technology
never
stands
still.
Your
new
Volkswagen
haas
numerous
improvements
which
will
help
to maintain
its
reputation
as one
of
the most
reliable
and
economical
automobiles.
But
not only
the vehicle
itself has
been
improved
still
f urther-the
Volkswagen
Diagnosis
and
Maintenance
System
is also
continuously
being
modified
to
keep
it in
line
with
technical
developments'
Advanced
electronic
test
instruments
which
can
check
many
points
in the
Diagnosis
program
automatically
-
without
the
help of
the
test mechanic
-
will-be
introduced.
The
results of
these checks
are
printed
on
the
test
report
simultaneously.
To
do
this,
the
vehicle
is
connected
to the
electronic
system
of
the
diagnosis
stand
by means
of
a special
socket
in the
engine
compartment'
Your
Volkswagen
is
ready
for
this
new
system.
The
vehicle
has a
special
wiring
networli
which
is
connected
to
the
multi-point
socket
in
the engine
compartment
shown
here.
This socket
is used
to connect
the
vehicle
to the
diagnosis
stand'
Please
ensure
that
the
lid of
the socket
is always
closed.
The
Volkswagen
Diagnosis
and
Maintenance
System
is
a
good
thing.
lt
is
the
most
modern
automobtle
servicing
system
in
use
today
and
every
effort
is
being
made
to keep
it constantly
in step
with
technical
developments'

Concerning
your
safety
(Wetl
worth
reading
before
or
alter
studying
the rest
of the
manual.)
For
years
now
our
engineers
have
been leading
the field
in the
development
of
safe automobiles.
Your
Volkswagen
is
the
product
of
this
experience:
Your
vehicle
is
equipped
with
all
the
safety
features
of design
and
trim
which
are necessary
and
which
we
consider
practical.
All for
your
safety,
your
protection
and,
in
addition,
to
reduce
the
danger
to
other
road
users
il the
worst
comes
to the
worst.
As
an interested
reader
you
will
soon
realize,
without
knowing
a
great
deal
about
technical
matters,
that numerous
details
of
your
vehicle
are
designed
in
such
an elaborate
way
to
offer
you
the
highest possible
degree
of
primary
and
secondary
safety.

Here
are
just
a few of
these
safety
features:
O
Independent
suspension
at
lront and
rear. Suspension
struts
at
front,
double-joint
axle
at
rear,
positive wheel
location,
uniform
roadholding.
O Good
weight
distribution
due
to front
luggage
compartment,
no
sagging
at
rear, headlamp
settings
always correct
even
when
ve-
hicle
is fully
loaded.
a Front
disc brakes,.no
fading,
smooth
uniform
braking
of
front
wheels.
O
Dual circuit
brake
system.
O Large,
brilliant
tail and
turn
signal
lights,
back-up
lights
on
request'
O
Hazard
warning lights'
O Pneumatic
windshield
washer
and
two-speed
wipers.
O Safety
cell
passenger
compartment,
front
and
rear ends
designed
to absorb
impact
energY.
Large,
soft
control
knobs
for driver
and
passenger,
clearly marked
with symbols.
Anchorages
for three-point
safety belts
at front and
rear.
Safety
steering
column;
energy-absorbing
steering
wheel hub.
Firmly
fixed
individual
front
seats, backrest
and
seats
fully
ad-
iustable.
Backrests
locked
to
prevent
them tilting
forward.
Padded sun
visors.
Large outside
driving mirror,
hinged
to
yield
on
impact. Inside
mirror
falls out on
impact-
Recessed
door
inner controls,
inner locking knobs'
Side
protection
plates
also
designed
as running boards.
Rounded
door outer
handles
with built-in
impact
proof press
but'
tons.
O Rotary
latch,
anti-burst
door
locks.
a keep
your
vehicle
in
good
mechanical
condition
by
having
regular
maintenance
checks
carried
out by
specialists
a make
use
of
the
"Volkswagen
Diagnosis
and
Maintenance
System".
This system
has been
developed
specially
to cater
lor
the
higher
safety
requirements
of
modern
road
traffic.
o
O
o
a
a
o
o
o
a
You
will agree
that
your
Volkswagen
has
a lot of
built-in
safety'
It
is
now
up to
you
to drive
safely.
Bear the
following
points in
mind:
rl
drive
carefully
and
defensively
O
watch
the
traffic
well
ahead
o
judge
your
speed
and
braking
distances
properly
particularly when
tire adhesion
is reduced
due to
rain or
snow
and
ice

For everyday
use there are also
a few
safety measures w.hich no responsible
driver should
forget:
Before
getting
behind the wheel-
O check that the tires are in
good
condition and
correctly inflated
O ensure that all windows
are clean,
particularly
in the winter
O check that the headlamps, tail
lamps and turn
signals are
clean
O check
that
the lights are working- The
headlamps, turn
signals and
brake
lights work
orly when the ignition is
switched
on.
Before
moving
off
-
O adjust
the driving seat so that
you
are comfortable and
can
reach
all the controls without effort
O set inside and
outside mirrors
properly
O
put your
safety
belt on
and ask
all
your
passengers
to do
the same
O check that the dual
circuit brake
warning
light is working
(if
fitted).
lgnition must be
switched on
first
O check windshield wipers
(ignition
on)
and windshield
washer
O
check
that all
doors are
properly
shut.
Before
getting
into traffic
stream
-
O check
the
brakes
-
after having
a
good
look in the
mirror
O make sure that the haandbrake is
right off.
When
on
the
move
-
O
keep a safe distance
behind
preceding
vehicle
O
give
signals in
good
time when
turning
or changing
lanes
O don't
drive at
top speed when it
is dark
a
switch the low
beams
on
in
good
time at dusk
so that
you
can be
seen
by other road
users. This
also applies
in the daytime
when it
is foggy
or snowing
O use fog
lamps and rear
fog lamps
according
to regulations
O remember
that
you
have
hazard warning
lights
to
use
if
your
car
breaks down
on a busy road. Always
try
to
get
the
vehicle
off the
road
as
quickly
as
possible
when
this
happens.
place
warning
triangle
on road.
O
don't continue
driving when
you
feel
tired
O always
allow for
the carelessness
of other
road
users.
When leaving
the vehicle
-
a
protect
it against
misuse
and theft
by removing
ignition
key
and
locking
the
steering.
Close the windows,
lock
the doors
and
take
steps to stop
car rolling away
especiallywhen
parking
on
gradients,

There
are two
good
things
about
VW all
over the world.
The Volkswagen.
And
the
Volkswagen
Seruice.
You will find VW specialists everywhere.
Not
just
within
a radius
of
a few
thousand
miles but in 140 different
countries. ln more
than
9000
authorised VW
concerns.
You can rest assured that
you
will find VW
Service
everywhere
-
as reasonably
priced
and reliable as at home. We know,
because
we supply all VW concerns with everything
they require. From the smallest replacement
part
to the largest specials
tool.
We don't
just
wish
you pleasant
motoring
-
we
do something
to keep it that way.

ldentif
ication
plate,
chassis
number
and engine number
The identification
plate
is
underneath
the f ront
hood near the
lock.
The
chassis number is stamped
on the frame
tunnel
under the rear seat.
The
engine number is
on the
crankcase flange
for the
generator
support

Operation
Keys
Only
one
key is
required
to open
the doors,
start the
engine
and operate
the lock.
in the
engine
compartment
lid.
It is a
good
idea
to
note the
number of
the
key under
the
plastic
cap.
lf
you
should
lose
the
key,
you
can
then
obtain
a replacement
from
your
VW Dealer
by
quoting
this
number.
The
other
key is
for the
lock in the
glove
box
tid".
10
'
Optional
extra

Doors
Before closing the door it is advisable
to
open
a window slightly. The doorwill then
be easier
to close because the air can escaoe
from
inside the bodv.
1
-
Vent wing fastener
2
-
Window crank
3
-
Lock
release lever.
4
-
Armrest and door
closing
grip
5
-
Safety
knob- for lock
To
open the
vent wing,
turn the
knob
until
the
locking
lug
points
to
the front,
then
swing
the
fastener
forward.
The doors
cannot
be
opened from inside
with
the lock
release
lever
until the
safetv
knobs
have
been lifted.
In
order to ensure
that the doors
can be
open-
ed f rom
outside in an emergency,
do not
press
down the locking
knobs.
when the vehicle
is
in motion.
When leaving
the vehicle,
just
press
the
safety
knob. down
and depress
the latch
in the
outer handle
as
you
close the door.
The
vehicle is
then locked.
lf the
door closes
on
its
own after
the
safety
knob- has
been depressed,
it will not
lock
itself
because
the safety
knob- springs
up
automatically.
This is an
additional
safety
measure
to
prevent you
from
being locked
out
if the
door should
slam shut while
the kev is
still inside
the vehicle.
.
On
the
Convertible there
is a
small lockinq lever
above the release
lever
(3)
instead
of
the
l-ocking
knob
(5).
11

Seats
The
Volkswagen
has
separate
front seats
which
are built so that
you
can
alter seat
position
and backrest
rake to suit
your
re-
quirements.
This
is
quite
simple
-
just
lift the
lever at the lront
right-hand side of
the
seat
and slide the seat
forward or backward.
Make sure
that the lever engages
properly
after
adjusting the seat so
that the seat does
not move
while
you
are
driving.
The
runners are slightly
inclined so
that the
seat
is raised as
it
goes
forward.
The backrest rake can
also be set io
various
angles
with the aid of
the
small
lever at the
back of
the seat frame.
The
backrests have safety catches
which
prevent
them
from tilting
forward when the
brakes
are
applied
very hard. The catches can
be
released by
pulling
up the
knob in the side
of the backrest.
Front seats with built-in
head supports on the
backrests
are
available
as optional extras.
12

Safety
belts
The
front seats
and
the two outer
places
on
the rear
seat can
be
fitted with shoulder
or
lap belts or
combined
shoulder/lap
belts.
The belts
for the driver and
front
passenger
are secured
to the lock
pillar
and
on
the side
of the frame
tunnel in the rear
footwell.
The belts
for the
passengers
at the
rear are
attached
to the
left and
right side
panels
and
in the center
of
the luggage
compartment
floor under
the seat.
There
are two
further
mounting
points
in the
roof
pillars
behind
the
ouarter
windows.
Threaded
plastic
plugs
are
fitted in the
tapped
holes
for the
belt securing
screws.
These
threaded
plugs
must not
be used
to secure
the safty
belts.
13

!nstrument
panel,
hand and
foot
controls

Even when this
is not
your
first Volkswagen
you
should
study the instrument
panel
and try out the controls with the
ignition
switched
on.
1
-
Defroster vents
2
-
Adjustable defroster and fresh
air vents . . .
(page
24/25)
3
-
Speedometer
with fuel
gauge
and warning lights .
(page
16)
4
-
Emergency light switch (page
16)
5
-
Switch
for f resh
air f an
.
(page
25)
6
-
Dual circuit brake warning light. (page
30)
7
-
Lighting switch . (page
16)
8
-
Turn
signal and
dimmer
lever
.
(page
17)
9- Horn
pad
10
-
Steering/ignition lock (page
17)
1 1
-
Fresh air
control knobs (page
25)
12
-
Plate over
radio
aperture
13
-
Glove compartment lid knob, lockable.
. . . .
(page
17)
14- Fuse
box (page
54)
15-Switch forheated
rearwindow* (page
17)
16-Ashtray (page
17)
17
-
Lever
for wipers
and washer (page
18)
18
-
Instrument
panel padding.
19
-
Tank
f lap release
loop
. (page
30)
20
-
Clutch
pedal
21
-
Brake oedal
22- Accleralor
pedal
23
-
Gearshift
lever (page
18)
24-Handbrake
(page
18)
-
Optional extra
On
your
vehicle
the emergency
light
switch
(item
4)
is
on the
right
of the
ashtrav
tc

Speedometer
The following
warning
lamps are
in the
speedometer
dial:
a
-
green - parking
lights.
b
-
green
-
heated
rear
window..
c
-
red
-
generator
and cooling
d
-
green
arrows
-
turn
signals
e
-
red
-
oil
pressure
f
-
red
-
ATF
temperature*
* *
g
-
blue
-
high
beams
Fuel
gauge
When
the needle
is at
the end
of the
"R"mark
there
are about
5 liters
(1 gallon)
of fuel ieft
in
the
tank - time
to refuel
at the
next
oppor-
tunity.
"
Compulsory
in some
countries
otherwise
not
connected.
"
Optional extra,
see
paqe
l7
'
'
On vehicles
with auioriatic
transmission,
see
page
36
16
t'
Emergency
light
system
To switch
on,.
pull
knob out.
(A
warning
lamp
in
the knob
comes
on.)
When
the
system is switched
on, all four
turn
signals flash
at the same
time.
The system
is
used to warn
other road
users
of a dangerous
situation when
moving
or
that
the vehicle
has
broken down
and is
stationary.
Regulations
governing
the
use of this type
of
warning
sys-
tem
vary from
country to
country.
The emergency
light system
remains
in
operation
when ignition is
switched
off.
Lighting
switch
Pull
the knob
out to the first
stop
to
switch
on
the
parking,
license
plate,
tail
lights
and the
instrument
lights.
Pulling
the knob
out to the
next
stop,
switches
the headlamps
on as well.
The instrument
lights
are
controlled
in
brightness
by turning
the lighting
switch.
Please note:
To
prevent
the battery
from
being
run
down
unnecessarily
if
you park
the vehiclE
and forqet
to switch
the headlamps
off and to
ensure t6at
the
.full
battery
capacity is
always
available
for
sranrng..tne.headlamps
are
now
wired
through
the
sreenng/tgnttton
tock:
a the.
headlamps
work
only when
the
ignition is
sw[cneo on
a the headlamps
go
out when
starting
the engine
The
parking
lights and
other tiqhts
operated
bv
the lighting
switch
are not
affected.
-

Turn
signal and dimmer
lever
Lever
up
-
right
turn signals.
Lever down
-
left turn signals.
The turn signals
are cancelled
automatically
after taking
the corner.
Lifting the lever towards
the
steering wheel
switches the headlamp
beams up and
down.
A blue
warning
light in the
speedometer dial
shows when
the headlamp
high
beams are
switched
on. In the
daytime
or
when
only the
parking
lights
are on, the lever
serves as
a
headlamp flasher.
To
signal slight changes
in direction
such as
when
lane
changing, the lever need
only be
moved
until a
slight resistance
is felt and
held
in this
position
(the
warning
lamp must
blink). When released,
the lever
springs
back
to the
central
position
automatically.
Steering/igniton
lock
lf the
key is
difficult to turn
in the lock
or
cannot be
tu
rned
at all, turn
the
steering wheel
to and fro
slightly to release
the locking
pin.
1
-
lgnition
off
-
Steering locked
Key
can be
pulled
out
2
-
lgnition
on
3
-
To start-
The steering
is not locked
until
the
key
has
been
pulled
out and the wheel
turned
until
the locking
pin
engages.
lmportant
Remove key
from lock
only when vehicle
is
stationary.
'
In
order
to
ensure that the full
battery capacity is
available when
starting the
engine,
the headlamps,
wipers, fresh air fan and heated
rear window are
switched
off automalically when
the starter is
o
perareo.
Heated rear
window*
"
This switch is for
the heatable
rear
window
but
it
only works when
the ignition
is
switched
on.
A
g
reen warning
lamp in
the speedometer
dial
(see
page
16)
shows when
the window
is
switched on.
As
soon as the rear
window
is clear,
switch
the heater
element
off to reduce
the load
on
the
battery.
Glove box
To open the
glove
box lid
turn the knob
to
the
left.
On
the
Convertible, the
knob is lockable.
Ashtray
To remove ashtray,
press
the leaf spring down
and
pull
ashtray
out.
'-
Optional extra
17

Lever
for
wipers and
washer
system
Wipers
slow-
Lift
lever
to first
position (1)
Wipers
fast-
Lift lever
to second
Position
(2)
Wipers
off
Press
lever
right down
The blades
park
automatically
when
switched
off.
lf
you
just
lift the
lever
briefly
to the
pressure
point
of
the
first
position
(1)
the wipers
will
make
at
least one
comPlete
stroke.
To operate
washer
Pull
lever
towards
steering
wheel
-
water
is
sprayed
as long
as lever
is
held.
lf
your
car
has a wiper
delay
switch
and
a
wash-wioe
device,
the
lever
has
two further
f
u
nctions:
18
Wiper
delay switch
on
Press
lever
down
from central
position:
The
wipers
make
one
stroke
to
and
fro about
every
10 seconds.
Wash-wipe
device
Only
when
lever
is
in central
position:
Pull
towards
steering
wheel.
Water sprays
on
to
windscreen.
When
you
release
the lever,
the
wipers
make
two or
three
strokes
to
and fro.
Gearshift
lever
for manual
transmission
(see
page
35
for VW Automatic)
Shift
into
reverse
gear
only
when
the vehicle
is standing
still.
Reverse
gear
is
fitted with
a
lock so
that ii cannot
be
engaged uninten-
tionally.
To engange
reverse,
press
the lever
down, move
it
over
to
the lefi
and
pull
it back
to the stop.
When
reverse
gear
is selected
with
the ignition
switched
on,
the back-up
lights-
come on
automatically.
Handbrake
To
release
ihe handbrake,
pull
the lever
up
slightly
first,
and then
depress
the locking
knob.
Optional
extra

le
a
n-
gr
;k
)o
p
They
go
to
"School"
with
VW.
S_9that
you
feel
as
safe
with
your
VW
all
over
the
world
as
you
do
at home.
Every
year
50000
specialists
are
trained
in
VW
service
schools.
Mechanics,
foremen,
service
advisers
from
every
corner
of
the
world.
In
small groups
of
8
-
10
they get
to
know
the
mosi
modern
procedu
res.
By
continuous
training
at
their
place
of work
they
extend
their
knowledge
and
keep
it
right
up to
date.
Result
of this
training: precision
in
servicino
-
and
less
time
spent
on the
work.
For it
is
not
sufficient
for
a VW
workshoo
simply
to
produce
quality.
It
does
so at
reasonable
prices.
19

VW Automobile
Radios
are
also available
as optional
extras. The
models
are called
"Eriden",
"Wolfsburg",
"Hannover"
arid
"lngolstadt"
of
these
sets
for
your
car,
note
the
following:
554
Emden
1
-3
wave
band
press
buttons:
U
:
VHF
(87.6-108
Mc/s)
M
:
Medium wave
(515-1620
kc/s)
L
:
Long wave
(150-290
kcls)
2- Rotary knob on
left:
"Off-on"
and volume
3
-
Rotary knob on
right: Tuning
4
-
Two
control
press
buttons:
left
:
bass, right
:
treble
5
-
Two
station markers
At the back of set: Socket
for
tape
recor-
der and connection
for
automatic
aerial.
Wolfsburg:
1
-3
wave band
press
buttons
K
:
Short
wave
(5.9-6.35
Mc/s)
M
:
Medium
wave
(51
5-1620
kc/s)
L
.:
Long wave
(150-290
kcls)
2-Rotary
knob on
left:
"Off-on"and
volume
3
-
Rotary
knob on
right: Tuning.
4
-
Two tone
central
press
control:
left
:
bass, right:
treble
5
-
Two
station
markers
At the back of
set: Socket
for tape
recor-
der and connection
for
automatic
aerial.
lf
vou have selected one
Hannover
.Four wave
band oress
buttons:
-U
:
VHF
(87.6-
104 Mc/s)
2 x M
:
Medium wave
(515
-
1620 kc/s)
(Ml:51
5-920kc/s)
(M2
:
900
-
1620 kc/s)
.
L
:
Lqng wave
(1
50
-
270
kc/s)
2-One
press
button:
Automatic
station
sbeker
3
-
Rotary knob on
left:
"On-off
"
and volume
4
-
Slide under
left knob:
'Tone
control
-
down
:
bass, up
:
treble
5
-
Rotary knob on
right:
Tuning
6
-
Switch
under right knob: Sensitivity switch
for station seeker
At the back of set: Sockets
for tape re-
corder. station seeker
remote
control
and
connection
for automatic aerial.
20
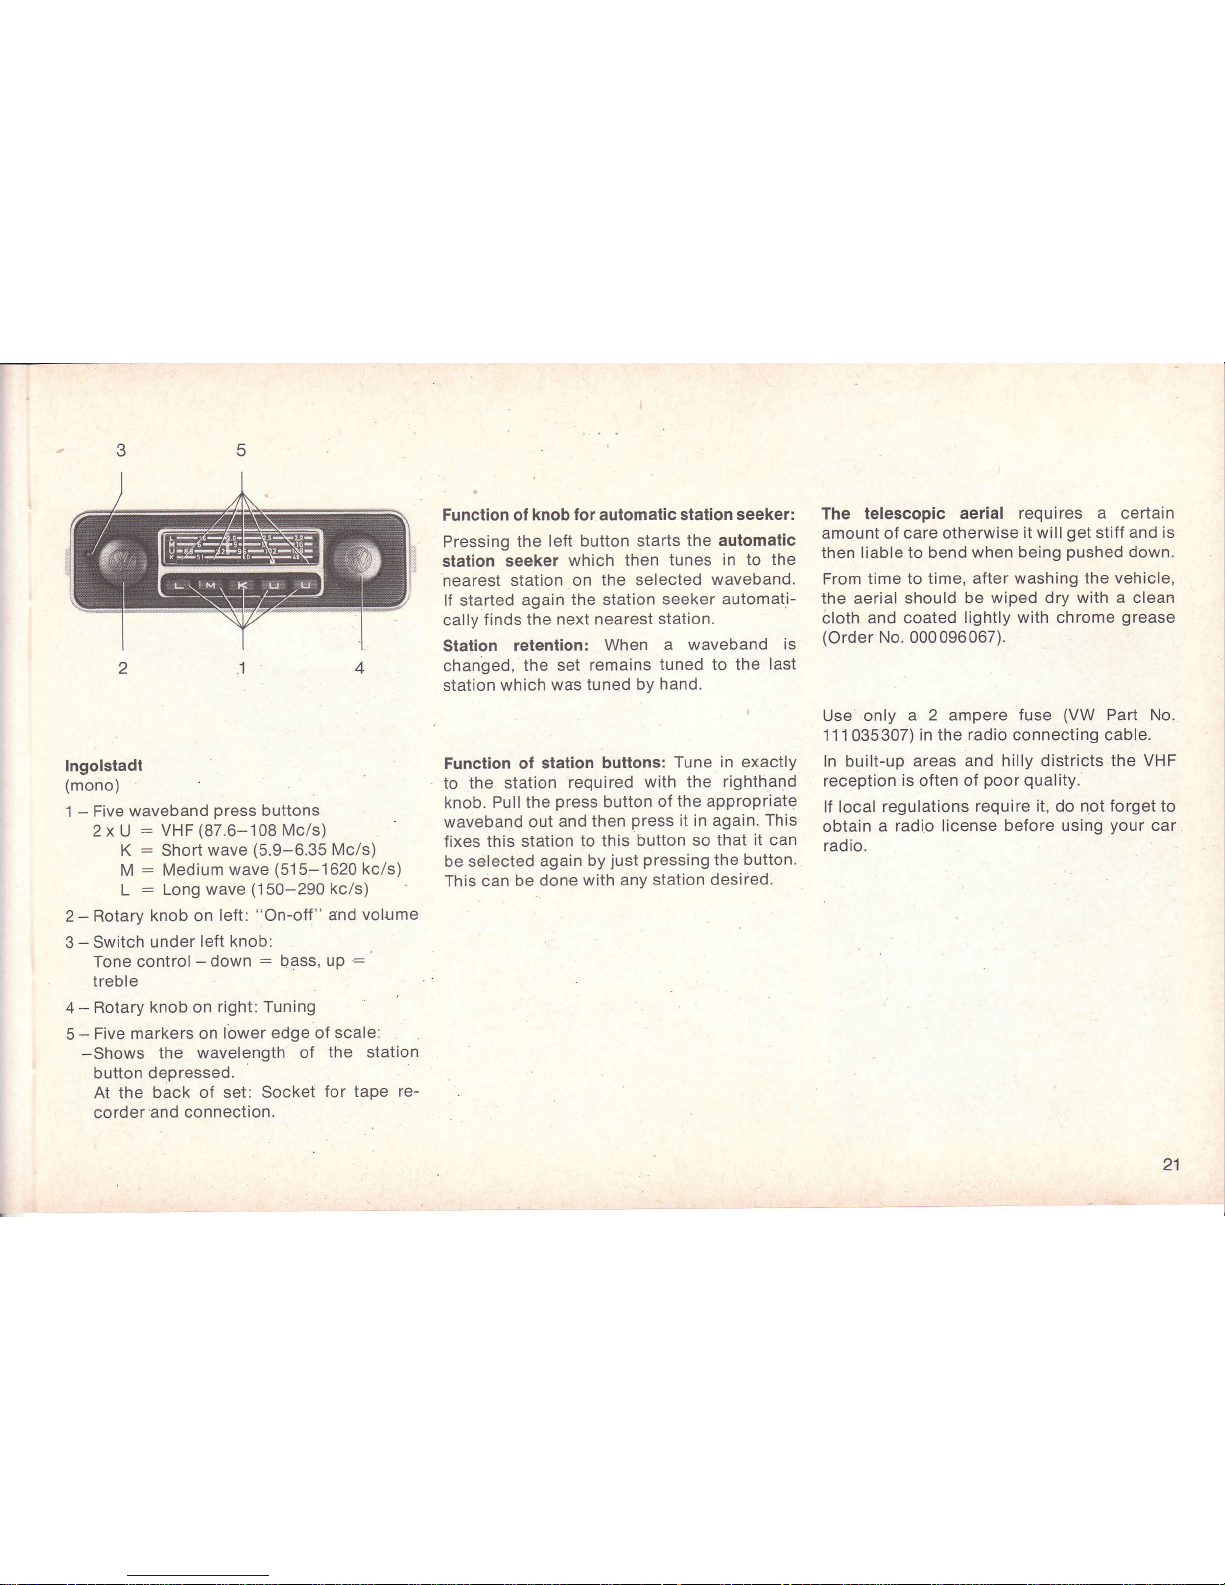
Function of knob
for
automatic station
seeker:
Pressing
the
left button starts
the automatic
station
seeker
which then
tunes in
to the
nearest
station on
the selected
waveband.
lf
started
again
the station
seeker automati-
cally
finds the
next nearest
station.
Station
retention:
When
a waveband
is
changed,
the set
remains
tuned to the
last
station which
was
tuned bv
hand.
Function of
station buttons:
Tune in exactly
to
the station
required
with the
righthand
knob.
Pull the
pr,ess
button
of the appropriate
waveband out
and then
press
it in again. This
fixes this station
to this
button so
that it can
be selected
again
by
just
pressing
the
button.
This ian
be done
with any
station desiied.
The telescopic
aerial requires
a
certain
amount of
care
otherwise
it
will
get
stiff
and is
then liable to bend
when being
pushed
down.
From
time to time, after
washing the vehicle,
the aerial
should be
wiped dry with a clean
bloth
and coated
lightly with chrome
grease
(Order
No.000096067).
Use
only
a 2 ampere fuse
(VW
Part No.
111
035307)
in the radio connecting cable.
ln built-up
areas and hilly districts
the VHF
reception
is
often
of
poor quality.
lf local regulations
require
it,
do
not forget to
obtain
a radio license
before using
your
car
radio.
Ingolstadt
(mono)
'1
-
Five waveband
press
buttons
2xU
:
VHF(87.6-108 Mc/s)
K
:
Short
wave
(5.9-6.35
Mc/s)
M
:
Medium wave
(51
5-1620
kc/s)
L
:
Long wave
(150-290 kcls)
2
-
Rotary knob on
left:
"On-off"
and
volume
3
-
Switch
under
left knob:
Tone control
-
down
:
bass.
up
:
treble
4
-
Rotary
knob
on
right: Tuning
5
-
Five
markers on
lower edge of
scale:
-Shows
the wavelength
of
the station
button depressed.
At the
back of sei: Socket
for tape
re-
corderand
connection.
21

lnterior trim
Sun visors
You can
pull
the driver's
sun visor
out of
the
center
mounting and swing
it
towards
the door
windows
to
prevent
dazzle
trom
the side.
The
passenger's
sun
visor on the Convertible
has a make-uo
mirror built into it.
;l
irl;
Rear view mirrors
Inner and outer
mirrors are specially mounted
so that
they can be set
to
give
clear
vision to
the rear at
all times.
The interior
mirror arm has a
safety
mounting
and falls out on
impact. To install arm again,
just
press
it firmly into mounting.
A non-dazzle mirror
is available as an optional
extra. A small
button at the bottom of the
mirror
alters the angle of
the
mirror
glass
to
Drgp
udzLrE,
Buiton
pressed
forward - anti-dazzle
position
Button
pressed
to rear
-
normal
position.
On
the Convertible,
the
height
of
the
mirror
can be altered
by turning
it
180' so that
you
can see
to the rear
properly
when
the
top
is
open.
22

Ashtray at
rear
To remove ashtray,
press
it
down slightly
and
lift
out. To
put
it
back, insert
the ashtray
at the
top
first,
then
push
it in.
Interior lighting
Switch
positions:
1
-
Light on
only when doors
are
open
2
-
Light off
3
-
Light
on
On
the Convertible the
interior light
is fitted in
the
mirror bracket between
the two
sun visors.
The switch
positions
are:
Right
-
Light
of{
Center
-
Light
on
Left
-
Light
on
only when
doors are
opened.
Sliding roof
For safety reasons,
the
sliding
roof
crank
should always be in
the recess.
When
closing
the roof
turn
the
crank as far
as it will
go
first
then turn
it
back
slightly
until it can be folded
into
the
recess.
a
-
Ooen
roof
b
-
Close
roof
23

a
Heating
Heating control
lever
(1)
Lever up
-
heating
on
Lever
down - heating off
Control
lever for heating in rear footwell
(2)
'
Lever up
-
flaps
open
Lever
down
-
flaps closed
Control
lever for heating in
front footwell
There
is a lever
on
the heater
outlet
on
each
side:
Lever
to rear
(A)
-
admits warm air
Lever forward
(B)
-
cuts warm air
off
Defroster
and lresh
air
vents
Lever to right
-
air flow
to
passenger
com-
partment
Lever
io left
-
air f low
to windshield
The windshield
can be de-iced
quickest
by
directing
all
the warm
air to the vents
in the
instrument
panel
O Close
footwell
outlets
with levers
O Close fresh air
supply
O Move lever for
combined
defroster and
fresh
air vents to
the left.
When the
ice has thawed,
switch
on
fresh air
supply
(or
fan.) to dry
the wet
glass quickly.
As soon as
the windshield is
clear,
open
the
footwell
outlets fully
so that the interior
of
the
body
heats
up as
quickly
and
uniformly as
possible.
-
Optional extra
24
 Loading...