

Page 1

Path
Voice Processing System
Finder
User Guide
Page 2

Voice Processing System
User Guide
December, 2002 - Issue 4
Page 3

I
Issue Release Date Changes
1 04-98 Initial Release
2 04-99 Heading and content changes have been made
for clarification and user readability.
3 06-01 The layout of this user guide was reformatted,
no changes to content have been made.
4 12-02 Mailbox options and Quick Reference diagrams
have been revised to reflect software changes.
LIFE SUPPORT APPLICATIONS POLICY
VODAVI Technology, Inc. products are not authorized for and
should not be used within Life Support applications. Life Support
systems are equipment intended to support or sustain life and
whose failure to perform when properly used in accordance with
instructions provided can be reasonably expected to result in
significant personal injury or death.
VODAVI Technology, Inc. warranty is limited to replacement of
defective components and does not cover injury to persons or
property or other consequential damages.
Copyright © 2002 Vodavi Communications Systems, Inc.
All Rights Reserved
This material is copyrighted by Vodavi Communications Systems, Inc. Any
unauthorized use, reproduction, alteration, or disclosure of this material, or any
part thereof, is strictly prohibited without the express written permission of
Vodavi Communications Systems, Inc.
Vodavi Communications Systems, Inc. reserves the right to make changes to
this material at any time and without notice. The information provided by
Vodavi Communications Systems, Inc. in this manual is believed to be accurate
and reliable, but is not warranted to be true in all cases.
Printed in the United States of America seh/2002
Page 4

December, 2002 Contents - i
Contents
Getting Started ........................................................................... 1
Guidelines ................................................................................................. 1
Logging On ............................................................................................... 3
Integration .......................................................................................... 3
Log On Activities ............................................................................... 4
Personalizing Your Mailbox ................................................................ 5
Required Information ...................................................................... 5
First-Time Setup ................................................................................ 5
Retrieving Messages [1] ............................................................. 7
Voice Messages ....................................................................................... 9
Retrieving a Voice Message .......................................................... 9
Pager Messages ..................................................................................... 10
Retrieving a Pager Message ........................................................ 10
Facsimile Messages .............................................................................. 11
Retrieving a Facsimile Message .................................................11
Managing Messages ............................................................................ 12
Message Management Options ................................................12
Forwarding Messages ......................................................................... 13
Preambles ..........................................................................................13
Forwarding a Message .................................................................. 13
Selecting a Destination ................................................................. 14
Replying To Messages ........................................................................ 15
Sending a Reply ...............................................................................15
Stamping Messages with Time & Date ......................................... 15
Listening to Time/Date Stamp ...................................................15
Message Guidelines ....................................................................... 16
Sending Messages [2] ............................................................... 16
Recording ................................................................................................ 18
Recording a Message .................................................................... 18
Sending .................................................................................................... 18
Selecting a Destination ................................................................. 18
Send Options ....................................................................................19
Page 5

Contents - ii December, 2002
Extended Options [6] ................................................................ 20
Extension Settings [1] ......................................................................... 21
Call Transfer Options ..................................................................... 21
Changing Extension Settings .....................................................21
Supervised Transfer Options ......................................................22
Personal Note Pad [2] .......................................................................... 23
Sample Scenario .............................................................................23
Setting Up a Group & Keyword/ID ........................................... 24
Editing Group/ID Entries ..............................................................24
Personal Options [8] ................................................................. 25
Greeting [1] ............................................................................................. 27
Standard Greeting ..........................................................................27
Temporary Greeting ...................................................................... 27
Recording a Greeting .................................................................... 27
Other Greetings ...............................................................................28
Password [2] ........................................................................................... 29
Password Selection ........................................................................ 29
Editing Your Password ..................................................................29
Mailbox Name [3] ................................................................................. 30
Editing Mailbox Name ..................................................................30
Delete Sent Messages [4] ................................................................... 30
Deleting a Sent Message ............................................................. 30
Other Options [8] .................................................................................. 31
Editing Other Options ...................................................................31
Notification Options ...................................................................... 33
Mailbox State ...................................................................................34
Personal Distribution Lists ...........................................................35
Guest Mailboxes ..............................................................................36
Page 6
Guidelines 1
Getting Started
Getting Started
This section is intended to familiarize you with many of the basic
PathFinder features, provide a basic overview of voice mail and autoattendant fundamentals, and help you log on to and personalize your
own voice mailbox.
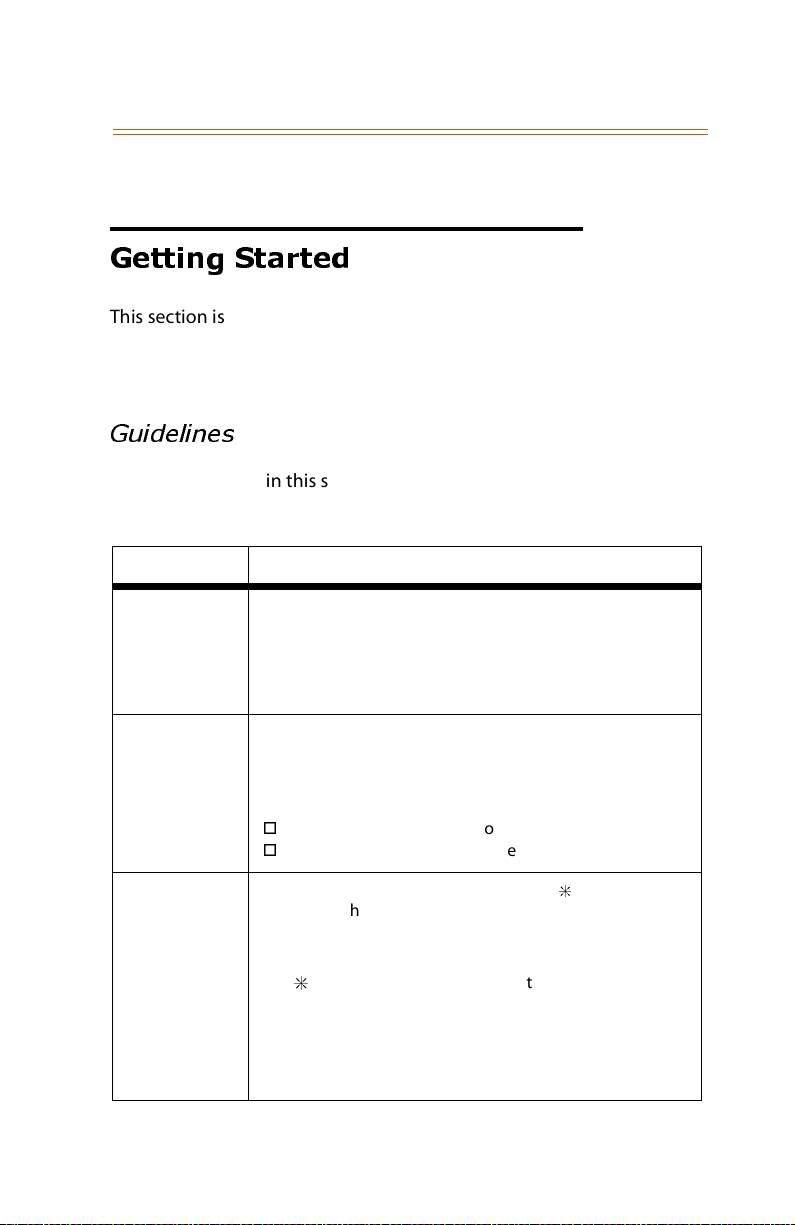
Guidelines
The information in this section provides a basic understanding of
PathFinder’s voice messaging and auto-attendant features.
Feature Explanation
Voice
Messaging
Menus A Menu is a group of features or selections that can be
Universal
Command Keys
The terms Voice Messaging and Voice Mail are used
interchangeably in this manual.
These terms refer to activities such as sending and
retrieving messages and comprise much of your day-today telephone communications.
accessed by using the dial pad of any push-button
telephone.
Menus are constructed in a branching tree structure:
Main menus offer general options.
Subsequent menus offer more specific options.
Universal Command Keys include the [
keys, which help you navigate through the PathFinder
menu structure.
Use these keys to control
.
] Replay the current menu options
[
[#] Return to the previous menu
[9] Terminate the call
These keys are also used at specific points to gain access
to certain features.
PathFinder menus:
.
],[#], and [9]
Page 7

2Guidelines
Getting Started
Feature Explanation
Key-Ahead As you gain experience and become familiar with
PathFinder’s menus, you may not need to listen to all of
the menu selections to k now what option you want to
select. Therefore PathFinder provides a Key-Ahead
feature.
This feature allows you to override the voice prompts and
enter a string of commands without having to wait for the
entire voice prompt to be played.
Password To log on to your voice mailbox, you will need the correct
Password.
Your System Administrator will provide you with the initial
password for your mailbox. You will change this password
when you personalize your mailbox.
Mailbox
Greeting
Mailbox
Name
Desktop
Mailbox
Feat ures
Yo ur Mailbox Greeting is a voice recording that you
record using your own voice.
This recording is heard by callers when PathFinder routes a
call to your personal mailbox.
Your ma ilbox is iden tified b y your Mailbox Name, which is
a recording of you saying your own name.
If no mailbox name is recorded, PathFinder will refer to
your mailbox by its assigned number.
If you have access to the optional Desktop Call Control
module, you may be presented with additional mailbox
options not referenced in this book, such as: E-mail
Messages and Locator Rules.
Check with your System Administrator for software
availability, or refer to the Desktop User Guide for more
detailed information.
Page 8
Logging On 3
Getting Started
Logging On
How you log on to PathFinder depends on whether or not you have
an integrated system.
Integration
Integration tells PathFinder whether or not you are calling from your
extension. This allows you to skip some of the steps normally needed
to log on. Ask the System Administrator whether or not your system is
integrated.
Once you determine whether your system is integrated, follow the
appropriate logon procedure as described.
When you are trying to log on to PathFinder from an
outside t elepho ne, th e logon proced ure is the sa me
whether you have an integrated system or a nonintegrated system. Refer to
Tel ep hone: ” on page 4
Non-Integrated System
1. Press the voice mail key on your telephone, or dial PathFinder’s
internal extension. PathFinder’s main menu greeting will play. It
may be similar to the following: "Thank you for calling
A-Z Communications. Enter the mailbox number
of the person you are trying to reach".
2. Press the voice mail access key (as designated by your System
Administrator).
3. Enter your mailbox number, your mailbox greeting will play.
.
4. Press [
], the following prompt will play: “Please enter
your password”.
5. Enter your password.
Integrated System
1. Press the voice mail key on your telephone, or dial PathFinder’s
internal extension.
2. Enter your password when prompted to do so.
“To Log On From an Outside
for more information.
Page 9
4Logging On
Getting Started
To Log On From an Outside Telephone:
1. Dial PathFinder’s remote access telephone number. PathFinder’s
main menu greeting will play. It may be similar to the following:
"Thank you for calling A-Z Communications.
Please enter the mailbox number of the person
you are trying to reach".
2. Press the voice mail access key (as designated by your System
Administrator).
3. Enter your mailbox number. Your mailbox greeting will play.
.
4. Press [
]. The following prompt will play: “Enter password”.
5. Enter your password. You will then be able to access your
messages and/or mailbox options.
Log On Activities
Once you are logged on, PathFinder will tell you how many new
messages you have received since you last logged on to your
mailbox, and how many saved messages are currently in your
mailbox.
After hearing the number of messages …
you will be prompted with the main menu, from which you can press
[1] to retrieve your messages. Refer to “Retrieving Messages [1]” on
page 7 for more information.
If you have no messages …
PathFinder will prompt you to select one of the other main menu
options:
2 - send a message
8 - change personal options
6 - edit extended options
0 - transfer to a mailbox or extension
Page 10
Personalizing Your Mailbox 5
Getting Started
Personalizing Your Mailbox
The first thing to do as a new user is to personalize your voice
mailbox.
Required Information
After logging on to PathFinder, you should record a personalized
greeting, record your mailbox name, and change the password. To
perform these tasks, you must have the following information:
PathFinder access telephone number: __________
PathFinder access extension: __________________
Your voice mailbox #: _______________________
Initial password: ___________________________
Your extension #: __________________________
If you do not have this information … contact your System
Administrator for assistance.
First-Time Setup
The first time you log on your voice mailbox, the PathFinder tutorial
will walk you through the steps needed to personalize your mailbox.
If the tutorial option has been disabled by your System Administrator,
you will still be able to personalize your mailbox without online
assistance. In three steps, you can record a personal greeting, record a
mailbox name, and edit your password.
Access Mailbox Using Tutorial
1. When prompted, record a mailbox name. This name is used when
callers are being transferred to your extension and when you
forward messages.
2. When prompted, record a Mailbox Greeting. This is the greeting
played for callers who reach your mailbox.
3. Edit your password. Refer to “Password Selection” on page 29 for
hints on selecting a password.
Page 11

6 Personalizing Your Mailbox
Getting Started
4. Once these tutorial items have been completed, PathFinder will
tell you the number of new and saved messages in your mailbox.
You are now ready to start using your voice mailbox.
If you decide not to complete the tutorial at this time, the system
will start the tutorial the next time you access your mailbox.
Access Mailbox Without Tutorial
Listen to the voice prompts as you complete these steps:
1. Log on to your mailbox by dialing the PathFinder access number
and following the instructions. Refer to “Logging On” on page 3 for
more information. If you do not know the initial password,
contact your System Administrator.
2. After you hear the PathFinder main menu, press [8] to change
personal options.
3. Perform the following steps to record a greeting:
a. Press [1] to edit your mailbox greeting.
b. Press [1] to record the standard greeting.
c. Press [2] to record.
d. Listen for the beep, record your greeting, then press [#] to stop
recording.
e. Press [#] to return to the Personal Options menu.
4. From the Personal Options menu, edit your password as follows:
a. Press [2] to edit your password.
b. Enter your new password, then press [#]. Refer to “Pas sword
Selection” on page 29 for hints on selecting a password.
c. Press [#] to return to the Personal Options menu.
5. From Personal Options menu, record mailbox name as follows:
a. Press [3] to edit your mailbox name.
b. Press [2] to record a mailbox name.
c. Listen for the beep, say your name, then press [#] to stop
recording.
d. Press [#] to return to the Personal Options menu.
You are now ready to begin using your voice mailbox …
Page 12
Personalizing Your Mailbox 7
Retrieving Messages [1]
Retrieving Messages [1]
PathFinder manages a wide variety of messaging activities. Your
mailbox not only stores voice messages but can also be used to store
and retrieve other types of messages. For that reason, PathFinder
mailboxes are called “Universal Mailboxes.”
Message Types -- PathFinder will inform you of the number and type
of new and saved messages stored in your mailbox.
Messages can be any of the following types:
Voice Messages
Pager (Beeper) Messages
Facsimile Messages
E-Mail (with optional upgrades)
Playback Order -- When you retrieve messages, PathFinder will play
back all messages stored in your mailbox.
Urgent messages are played back before new messages, and new
messages are played back before saved messages.
The order that saved messages are played back is determined by
your System Administrator (usually … first in, first out).
Systems w ith tele phon e integr ation m ay us e messa ge
waitin g lamp s to no tify yo u of n ew m essa ges.
Page 13
8 Personalizing Your Mailbox
Retrieving Messages [1]
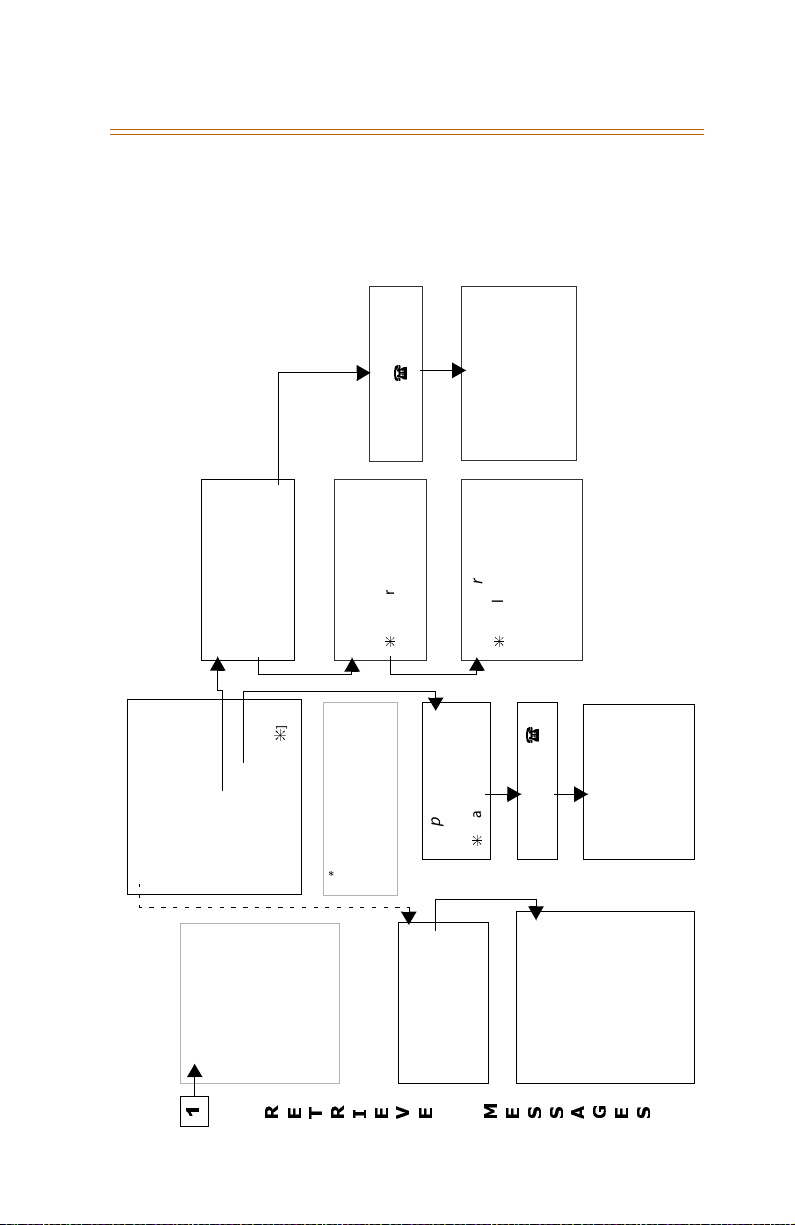
To Access Retrieve Messages -- Press [1] at the PathFinder main
menu to hear the Retrieve Message options available.
Record Preamble
Forward w/Preamble
[1] Continue
[2] Hear Preamble
[3] Cancel Preamble
[4] Re-record Preamble
Forward
Other Address
] Other Address
.
[1] Forward As Is
[3] Cancel Forward
[4] Forward w/Preamble
] [8]
.
[#] Confirm
Enter Mbx or Grp List
number, then press:
[
Reply to Message
While Listening options can
be accessed during message
Managing Messages**
[1] Replay
[2] Save
[3] Delete
[4] Forward
[5] Reply
[8] Date Stamp
Duri ng playba ck … press [
playback.
** Managing Messages and
] Spell Name
.
[
[5] To System List
[6] To Outside Number
[7] To Personal List
] Cancel
Record Reply
.
[#] Confirm
[
Reply Options
[1] Send
[2] Hear
[3] Cancel
[4] Re-record
After entering
voice mailbox >>>
[1] Voice
[2] Page
1
Message Type*
when more than one
[3] Fax
message type is present.
* This menu only plays
While Listening**
[6] Extended Options
[7] Rewind
Extended Options
[8] Fast Forward
[1] Move to saved msgs
[2] Pause
[3] Skip
[4] Slower
RETRI EVE MESSAGES
[6] Faster
[8] Softer
[9] Louder
Page 14
Voice Messages 9
Retrieving Messages [1]
Voice Messages
Voice messages will be played in the following order:
1) Urgent 2) New 3) Saved
Retrieving a Voice Message
1. Log on to PathFinder (refer to “Logging On” on page 3).
2. Press [1] to retrieve messages.
3. Press [1] to retrieve voice messages.
Retrieval for a certain message type (e.g., voice
messages , facs im il e mes sa ges , a nd s o on) is onl y of fer ed
if that type of me ssag e has be en le ft in yo ur ma ilbox .
While Listening -- PathFinder offers three useful message control
options that are active while listening to a voice message:
[6] = Extended Options
[7] = Rewind
[8] = Fast Forward
Extended Options -- Use these options to control how your
messages are played back. Press [6] while listening to a message to
hear the following extended message options:
[1] = Save Move to saved messages to play at a later time
[2] = Pause Put message temporarily on hold
[3] = Skip Proceed to next message
[4] = Slower Slow down message playback
[6] = Faster Speed up message playback
[8] = Softer Reduce message volume
[9] =
Louder Increase message volume
Message Management -- Refer to “Managing Messages” on page 12
for more information on message management options once a
message has been selected.
Page 15

10 Pager Messages
Retrieving Messages [1]
Pager Messages
In addition to voice messages, you may receive and store pager
messages in your mailbox.
When someone leaves a pager message, PathFinder records the
numeric information.
When you retrieve the pager message, PathFinder plays back the
phone number.
Notification -- You can set up PathFinder to call your paging
company you when you have new pager messages.
Depending on how your System Administrator configures your
implementation, you can be notified on your pager with either your
PathFinder mailbox number or the pager message itself.
Refer to “Notification Options” on page 33 for details on setting up
your mailbox for message notification through an outside number,
such as a pager.
The ability to receive pager messages is a COS (class of
service) option. Check with your System Administrator
to see if t his op tion ha s been enable d i n your C OS.
Retrieving a Pager Message
1. Log on to PathFinder (refer to “Logging On” on page 3).
2. Press [1] to retrieve messages.
3. Press [2] to retrieve any pager messages you may have received.
When selected, the system will repeat the retrieve option
number.
This option is only available if you have received a pager
message.
Message Management -- Refer to “Managing Messages” on page 12
for more information on message management options once a
message has been selected.
Page 16

Facsimile Messages 11
Retrieving Messages [1]
Facsimile Messages
Your voice mailbox can also be used to receive and store facsimile
transmissions. This feature can be useful for the following activities:
Receiving confidential facsimiles
Getting facsimiles while traveling or away from your telephone
Passing identical facsimile information to other PathFinder users
You don’t have to worry about the facsimile getting lost or misplaced.
You can store facsimiles until you are ready to retrieve them.
Facsimile messages can be printed on any facsimile machine, making
it possible to retrieve a facsimile message from virtually any
telephone, anywhere.
The abil ity to re ceiv e facsi mile message s is a C OS
option. Check with your System Administrator to see if
this option has been enabled in your COS.
Retrieving a Facsimile Message
1. Log on to PathFinder (refer to “Logging On” on page 3).
2. Press [1] to retrieve messages.
3. Press [3] to retrieve any facsimile messages you may have.
(If you have only facsimile messages, PathFinder will go directly to
the facsimile retrieval menu.)
4. If you have new facsimile messages, you will be able to select one
of the following actions:
1] = Send all new facsimile messages
to a facsimile machine
[#] = Retreive facsimile messages
one by one
Stores each sent facsimile as a
saved message
Puts messages temporarily on
hold
Page 17

12 Managing Messages
Retrieving Messages [1]
The following options will be available for each facsimile message
until you delete them from your mailbox:
[1] = Replay facsimile statistics
[2] = Save facsimile message
[3] = Delete facsimile message
[4] = Forward facsimile message
[5] = Send facsimile message to a facsimile machine
[6] = Skip message
Message Management -- Refer to “Managing Messages” on page 12
for more information on message management options once a
message has been selected.
Managing Messages
PathFinder offers several message management options that are
available during or after message playback.
After a message has been saved o r de leted, the other
message o ption s are no l onger av ailabl e for th at
message.
Message Management Options
The following options are available while reviewing messages:
[1] = Replay the current message
[2] = Save the message
[3] = Delete the message
[4] = Forward the message to another mailbox
[5] = Reply to a voice message or send to a facsimile machine
[8] = Date stamp (hear message date and time)
To conse rve th e valu able sp ace in yo ur mailbox …
remove sav ed me ssage s when n o longer needed .
Page 18

Forwarding Messages 13
Retrieving Messages [1]
Forwarding Messages
You can use PathFinder to pass voice, page, and/or fax messages to
other mailbox owners.
Preambles
You can forward a message as is, or you can attach your own
introductory comment (called a “preamble”) to the message. The
person to whom you forward the message will hear your preamble
before hearing the forwarded message.
If a message you are forwarding already contains a preamble from a
previous sender, you can either forward the message with the current
preamble or add a new preamble of your own.
A message can be for warded with a maximum o f nine
preambles.
Forwarding a Message
1. Log on to PathFinder (refer to “Logging On” on page 3).
2. Press [1] to retrieve messages.
3. Review a message.
4. Press [4] to forward the message.
5. Then select from the following forward options:
[1] = Forward message as is (including any preambles already
attached)
[3] = Cancel message forwarding
[4] = Attach your own preamble to the message (including any
preambles already attached, up to eight)
Page 19

14 Forwarding Messages
Retrieving Messages [1]
If you elected to forward the message as is … proceed to “Selecting a
Destination”.
If you opted to attach your own preamble … perform these steps:
1. Record the preamble.
2. Then choose from the following options:
[1] = Continue
[2] = Hear preamble
[3] = Cancel preamble
[4] = Re-record preamble
3. After you finish editing a preamble, press [1] to continue.
Selecting a Destination
After adding any preambles, you must then select a destination.
PathFinder will allow you to forward a message either to a known
mailbox number or to another destination (a guest mailbox,
distribution list, outside number, or unknown mailbox number).
To forward a message to a known mailbox number:
Enter the mailbox number and press [#] to confirm the entry.
To forward a message to an unknown mailbox number, or to
select another type of address:
.
1. Press [
.
[
] and choose one of the following forward options:
] = Forward to a mailbox based on the spelling of the mailbox
owner’s name
[5] = Forward to a system list
[6] = Forward to an outside telephone number
[7] = Forward to a personal distribution list (refer to “Personal
Distribution Lists” on page 35)
2. After selecting the forwarding destination, press [#] to confirm.
Page 20

Replying To Messages 15
Retrieving Messages [1]
Replying To Messages
Use the reply feature to respond directly to another PathFinder
mailbox owner who has left you a message. You do not have to enter
the original sender’s mailbox number when you send your reply.
If a response is not permitted, PathFinder will inform you that you
cannot reply to this type of message.
Sending a Reply
1. Log on to PathFinder (refer to “Logging On” on page 3).
2. Press [1] to retrieve messages.
3. Review a message.
4. Press [5] to reply to the message.
.
5. Press [#] to confirm the reply option (or [
6. Record your reply, when finished, press any key to continue.
7. When prompted, select from the following options:
[1] = Send your reply and remain in PathFinder
[2] = Hear/Review your reply
[3] = Cancel the reply
[4] = Re-record your reply
] to cancel).
Stamping Messages with Time & Date
PathFinder automatically attaches time and date information to each
new message. You can hear this information at any time while a
message is active (either during or after playback).
Listening to Time/Date Stamp
1. Log on to PathFinder (refer to “Logging On” on page 3).
2. Press [1] to retrieve messages.
3. Review a message.
Page 21

16 Stamping Messages with Time & Date
Sending Messages [2]
4. To hear the time and date the message was received in your
mailbox, you can perform one of the following playback options.
.
While message is playing … press [
playback, then press [8] to hear time/date stamp,
-or-
After message has finished playing … press [8] to hear time & date.
] to interrupt message
Message Guidelines
Message Statuses -- If you hang up without deleting or saving a
message, it is automatically saved in the same state as when you
logged on to the mailbox (e.g., a new message will still be registered
as a new message).
Retention Period -- PathFinder automatically deletes saved
messages after a certain period of time, called the retention period.
Messages are typically retained by PathFinder for one week. Ask your
System Administrator to determine your message retention period.
Automatic Forwarding -- Messages can automatically be forwarded
to another PathFinder mailbox or to another extension. This can be
useful in situations where you will be away for an extended period of
time and you want someone else to monitor your messages. Refer to
“Mailbox State” on page 34 for details on forwarding options.
Sending Messages [2]
PathFinder provides you with the ability to communicate with other
people even when they aren’t available. You accomplish this by sending
a message directly to the person’s mailbox. Effective use of voice
messages can improve communication and reduce the amount of time
wasted playing telephone tag.
Sending a message is comprised of the following three steps:
1) Recording and editing the message
2) Selecting a destination
3) Selecting a message option
Page 22

Stamping Messages with Time & Date 17
Sending Messages [2]
To Access Send Messages -- Press [2] at the PathFinder main menu to
hear the Send Message options available.
Time
[1] a.m.
[2] p.m.
Send Options
] Re-enter number
.
[#] Send (as is)
[
[3] Cancel
[6] Send Options
Message Options
[1] Private
[2] Urgent
[3] Cancel
[4] Confirm Delivery
[5] Future Delivery
[#] Send
(1 through 9)
Future Delivery
- Enter date
- Then enter time
] for other addresses.
.
Enter Mailbox number, then press [#];
or press [
Press [#] after all addresses have
been entered.
Record Options
[1] OK
[2] Hear
[3] Cancel
[4] Append to
[5] Re-record
Other Addresses
] To Spell Name
.
[
[5] To System List
[6] To Outside Number
[7] To Pers onal L ist
Record Message
2
SEND MESSAGES
Page 23

18 Recording
Sending Messages [2]
Recording
Recording a Message
1. Log on to PathFinder (refer to “Logging On” on page 3).
2. Press [2] to send a message.
3. Record your message.
4. After recording, select one of the following options.
[1] = Send
[2]
= Hear/Review your message
[3] = Cancel
[4]
= Append to (pick up at the end of what you have already
recorded)
[5] = Re-record (erase what you have already recorded and rerecord a new message from the beginning
If you append or re-record your message, you must
press [1] to send the messa ge before you can go on
to the next step.
Sending
After recording your message, you are ready to send it.
Selecting a Destination
1. To choose a destination for your message, select one of the
following address options:
a. Enter a mailbox number, then press [#] to confirm mailbox
number,
-or-
.
b. Press [
.
[
[5]
[6] = A phone number outside your PathFinder system
[7] = A personal distribution list (refer to “Personal
Distribution Lists” on page 35)
] to select one of the other address options:
] = A mailbox based on the spelling of the owner’s name
= A system list
Page 24

Sending 19
Sending Messages [2]
2. Select one of the following send options:
[#] = Send message as is
[
.
] = Re-enter the mailbox number
[3] = Cancel
[6] = Send Options
3. To send the message to more addresses, repeat this procedure
(starting with Step 1).
4. When you have sent the message to all desired destinations,
press [#].
Send Options
if you press [6] while in the Send Options menu, you can choose one
of the following Message Options to designate how and when to
send your message:
[1] = Private Prevents message from being forwarded
[2] = Urgent Moves message to front of message queue
[3] = Cancel Terminates your message selections
[4] = Confirm Delivery Repeats these options to allow further selections
[5] = Future Delivery Sends messages at a future date or time
Confirm Delivery -- If you select [4] from the Message Options menu,
the message options will be repeated to allow you to make additional
selections.
Future Delivery -- If you select [5] from the Message Options menu
to request future delivery of your message, complete these steps:
1. Enter the date for delivery.
2. Enter the time for delivery.
3. Indicate a.m. or p.m. for the time you entered:
[1] = a.m.
[2] = p.m.
Page 25

20 Sending
Extended Options [6]
Extended Options [6]
Extended options provide control over certain extension settings,
which control how PathFinder transfers calls to your extension. Other
extension options are used to turn call screening and caller holding on
and off. You can also access the personal voice Note Pad from the
Extended Options menu. The personal Note Pad can be used to store
and retrieve information over the telephone.
To Access Extended Options -- Press [6] at the PathFinder main menu
to hear the various Extended Options available.
group number
Enter Personal Note Pad
21
Change Extension Settings Access Personal Note Pad
6
[1] Transfer to Mailbox
[2] Blind Transfer
EXTE OPTIONSNDED
1 through 8
] Delete group
] Change group description
.
.
[#] Create group
[1] [
[3] [
[3] Supervised Transfer
Supervised Transfer
[1] Call Screening On
[2] Call Holding On
[3] Turn Both On
Page 26

Extension Settings [1] 21
Extended Options [6]
Extension Settings [1]
Extension settings options let you select how a call is processed when
transferred to your extension.
Call Transfer Options
PathFinder offers the following types of call transfer options:
Immediate Transfer -- If immediate transfer to a mailbox is selected,
PathFinder does not ring your extension. The call is immediately
forwarded to your mailbox.
Blind Transfer -- Blind transfers are often referred to as unsupervised
transfers because PathFinder transfers the call to your extension and
does not wait to see if you answer. The call will go unanswered if you
are not available to receive it. Calls will not be forwarded to your
mailbox.
Supervised Transfer -- In supervised transfers, PathFinder monitors
whether or not you answer your phone. If you do not answer, the call
is transferred according to your call forwarding instructions.
If your PathFinder implementation has telephone
integra tio n, do not change transfer options without
consulting your System Administrator.
Changing Extension Settings
1. Log on to PathFinder (refer to “Logging On” on page 3).
2. Press [6] to change extended options.
3. Press [1] to edit extension settings.
4. The following options are available:
[1] = Immediate transfer to a mailbox
[2] = Blind transfer
[3] = Supervised transfer (refer to “Supervised Transfer Options” on
page 22)
Page 27

22 Extension Settings [1]
Extended Options [6]
Supervised Transfer Options
If you select supervised transfer as your extension setting, PathFinder
offers the following additional options:
[1] = Call Screening only
[2] = Call Holding only
[3] = Both Call Screening and Call Holding
[#] = Neither Call Screening nor Call Holding
Call Screening -- allows you to hear who is calling you before you
accept the call.
Prior to transferring a call to your extension, PathFinder asks the caller
to say their name. PathFinder then rings your extension and prompts
you with the message, “Your Caller is <Person’s Name>.”
After you hear the caller’s name, PathFinder will provide you the
following options:
Accept the call
Reject the call (sends the call to your mailbox)
Send the call to another extension
Send the call to another mailbox
Hear the person’s name again
Call Holding -- allows callers to wait on hold if your extension is busy.
PathFinder informs the caller that your line is busy and asks if they
want to hold, transfer to a different extension, or leave a message.
The option to leave a message is only offered if your PathFinder
implementation supports voice mail.
Call holding and call screening may be disabled by the
System Administrator.
Page 28

Personal Note Pad [2] 23
Extended Options [6]
Personal Note Pad [2]
Selecting the Personal Note Pad gives you access to PathFinder’s
programmable voice database. The Note Pad records any kind of
information that you want to retrieve at a later time.
The amount of informati on th at ea c h gro u p can s t ore is
only limi ted by t he am ount of ava ilable disk s pac e.
Sample Scenario
If you want to keep track of your customers’ phone numbers, you
would perform the following steps using your customer information.
For example:
1. Create an information group number [1] with a group description
of "Customer Accounts."
2. Create a keyword or ID for each entry in this group.
Keyword/ID [6] + [2] + [4] translates to MCI on the telephone
key pad.
Keyword/ID [7] + [7] + [7] for Sprint translates to SPR on the
telephone key pad.
3. Record this group’s keyword/ID entries.
Under the keyword/ID [6] + [2] + [4], record any desired
information about MCI, such as your contact name, their
phone number and address.
Under the keyword/ID [7] + [7] + [7], record any desired
information about Sprint.
Page 29

24 Personal Note Pad [2]
Extended Options [6]
Setting Up a Group & Keyword/ID
1. Log on to PathFinder (refer to “Logging On” on page 3).
2. Press [6] for extended options.
3. Press [2] to access the Personal Note Pad.
4. Press key [1] thru [8] for any unused group number.
5. Press [#] to confirm that you want to create a group.
6. Record a description for the group (e.g., "Customer Accounts"),
then press [#] when finished recording. You have now created
and named a group.
7. Select the number for the group you just created.
8. Enter a new keyword/ID for the first entry in this group, then
press [#].
Keywords/IDs can be any combination of keys from
[0] to [9], and up to eight digits in length.
9. Press [#] to record the entry for that keyword/ID, then press [#]
when you are finished.
10. If you want to record any other keyword/ID entries for this group,
complete Steps 8 and 9 for these entries. Press [#] when you are
finished recording keyword/ID entries for this group.
11. Press [#] once to return to the group selection menu, twice to
return to the Extended Options menu, or three times to return to
the main menu.
Editing Group/ID Entries
1. Log on to PathFinder (refer to “Logging On” on page 3).
2. Press [6] for extended options.
3. Press [2] to access the Personal Note Pad.
4. Press a key for any existing group number, from [1] through [8].
5. To edit a group, select one of the following options:
.
Change group description = [1] + [
Delete group and all IDs = [3] + [
]
.
]
Page 30

Personal Note Pad [2] 25
Personal Options [8]
6. To edit or review a keyword/ID, enter the keyword/ID for the
desired entry in a group, then press [#]. PathFinder will play the
selected entry.
7. You can then choose from the following options:
[1] = Review the ID entry
[2] = Re-record the ID entry
[3] = Delete the ID entry
[4] = Append to the ID entry
[#] = Return to previous menu
Personal Options [8]
As a mailbox owner, you have control over many of the features of your
mailbox, PathFinder allows you to modify the following mailbox options
to meet your personal requirements:
[1] = Greeting Plays when callers reach your mailbox.
[2] = Password Used to log on to your mailbox to access
messages and mailbox features.
[3] = Name Identifies your mailbox with the name you
[4] = Delete sent message Allows you to remove a sent message that has
[8] = Other Options Lets you modify notification methods, system
recorded.
not yet been retrieved or saved.
lists, and guest mailboxes.
Page 31

26 Personal Note Pad [2]
Personal Options [8]
To Access Personal Options -- Press [8] at the PathFinder main menu to
hear the various Personal Options available.
leave as is
or press [#] to
then press [#] …
Enter Mb x number,
[1] Hear Name
[2] Record
[3] Delete
[#] Finished
Edit Greeting Edit Password Edit Name Delete a Sent Message
1 2 3 4
8
leave as is
or press [#] to
then press [#] …
Enter new password,
Select
Greeting Options
[1] Hear Greeting
[2] Re-record
[3] Erase
[4] Activate*
[1] Stand. Greeting
[2] Temp. Greeting
[8] Other Greetings
[5] Deactivate*
Other Greetings
(*Temp. & O ther Greeting s only)
[1] Internal
PE RS ONAL OPT I ONS
time
period
[2] Busy
[3] Time Sensitive
Page 32

Greeting [1] 27
Personal Options [8]
Greeting [1]
The mailbox greeting is a message from you that callers hear when
they reach your mailbox. It usually tells callers that you are not
available and instructs them to leave a message. PathFinder supports
three types of greetings as described.
Standard Greeting
The standard greeting is a generic greeting played when your
mailbox is reached by a caller. A typical personalized standard
greeting might sound like this:
"You have reached Beth Williams. Please leave your name, number,
and a short message, and I’ll get back to you."
When recording your greeting, you can review and edit
it until you are satisfied with how it sounds.
Temporary Greeting
A temporary greeting can be used whenever your greeting needs to
be changed on a temporary basis. Use the temporary greeting for
extended periods of absence from the office, such as business trips or
vacations, to inform callers that you will be away from your desk for a
period of time.
Recording a Greeting
1. Log on to PathFinder (refer to “Logging On” on page 3).
2. Press [8] to change personal options.
3. Press [1] to edit greeting.
4. Select the greeting to edit:
[1] = Standard Greeting
[2] = Temporary Greeting
[8] = Other Greetings (refer to “Other Greetings” on page 28)
Page 33

28 Greeting [1]
Personal Options [8]
5. Edit the greeting, using the following menu options:
[1] = Hear Greeting
[2] = Re-Record the Greeting
[3] = Erase the Greeting
[4] = Activate (Temporary or Other Greetings only)
[5] = Deactivate (Temporary or Other Greetings only)
To deac tiv ate yo ur T empo ra ry G r eeti n g, er as e it. If
you erase your Standard Gree ting, a de fault system
greetin g (gi ving yo ur ma ilbox num ber) pl ays fo r
callers.
Other Greetings
You can customize your greeting based on the following parameters:
[1] = Internal Greeting heard only by other PathFinder users when
they reach your mailbox.
[2] = Busy Greeting plays only while you are using your phone
[3] = Time Sensitive
Greetings
Not all Pa thFinde r i mplementations support internal
greetings. P lea se co n sult you r Sy s tem Ad minis tr ator fo r
more information.
and Supervised Transfers have been enabled.
used to assign different greetings to different
time periods.
Time Sensitive Greetings -- can be set to play during certain
PathFinder-defined time periods, such as:
Different times during the day
After hours
Weekends
Holidays
Time periods are set by your System Administrator. To find out what
time settings are available, contact your System Administrator.
Page 34

Password [2] 29
Personal Options [8]
Password [2]
To keep your messages confidential and prevent unauthorized use of
your mailbox, use a mailbox password. Change your password
periodically to help maintain privacy or as often as you like.
Passwords are typically four-digit numbers. If you forget your mailbox
password, your System Administrator can reset it for you.
Password Selection
A password should be easy to remember, but not easy for someone
else to discover.
The last four digits of your best friend’s home phone number or
your favorite uncle’s birth date ARE good passwords.
Consecutive or duplicate numbers are NOT good passwords.
Example … [1] + [2] + [3] + [4] or [5] + [5] + [5] + [5].
Using the keypad to spell out a word that is meaningful only to
you also works well.
Editing Your Password
1. Log on to PathFinder (refer to “Logging On” on page 3).
2. Press [8] to change personal options.
3. Press [2] to edit mailbox password.
4. Choose from these options when editing your mailbox password:
[1] = Review password
[2] = Record a new password
Page 35

30 Mailbox Name [3]
Personal Options [8]
Mailbox Name [3]
Recording your name provides a personalized identity for your
mailbox. When callers leave messages, they hear something similar to
the following: “Message has been sent to Jeff Brown.”
This confirms that messages have been sent to the correct person.
If a name is not recorded for a mailbox, callers will hear the following:
“Message has been sent to Mailbox 1234.”
Editing Mailbox Name
1. Log on to PathFinder (refer to “Logging On” on page 3).
2. Press [8] to change personal options.
3. Press [3] to edit mailbox name.
4. Choose from these options when editing your mailbox name:
[1] = Hear the current mailbox name
[2] = Record a new mailbox name
Delete Sent Messages [4]
You have the option of deleting a message that you have sent, as
long as the message has not yet been saved or deleted.
Deleting a Sent Message
To delete a message that has been sent, perform the following steps:
1. Log on to PathFinder (refer to “Logging On” on page 3).
2. Press [8] to change personal options.
3. Press [4] to delete sent messages.
4. Enter mailbox number where you sent the message and press [#].
You can leave messages untouched by pressing
only [# ] (without entering a mailbox number first).
5. As PathFinder plays each sent message, press either [#] to retain
the message or [3] to delete it.
If you press [3] to delete a message … you must then press either
[#] to confirm deletion or [3] to abort deletion.
Page 36

Other Options [8] 31
Personal Options [8]
Other Options [8]
As a mailbox owner, you have control over certain additional options
and features, including the following:
Message Notification
Mailbox State
Personal Distribution Lists
Guest Mailboxes
Editing Other Options
1. Log on to PathFinder (refer to “Logging On” on page 3).
2. Press [8] to change personal options.
3. Press [8] to edit Other Options.
4. The following Other Options can be changed:
[1] = Alter message notification settings (refer to “Notification
Options” on page 33)
[2] = Change mailbox state (refer to “Mailbox State” on page 34)
[3] = Edit personal lists (refer to “Personal Distribution Lists” on
page 35)
[4] = Administer guest mailboxes (refer to “Guest Mailboxes” on
page 36).
At the PathFinder main menu, press [8] to hear the various
Personal Options available.
Page 37

32 Other Options [8]
Personal Options [8]
To Access Other Personal Options -- Press [8] at the PathFinder main
menu to hear the Other Personal Options available.
[2] Create Guest Mbx
[4] Edit Greeting
Edit List
[1] Review/Modify a List
[2] Create a New List
[3] Delete a List
[#] Finished
Enter List Number
[1] Review/Modify Entries
[2] Add Entries
[3] Delete Entries
Edit Other Options
8
“Mailbox is set to …”
[1] Turn Greeting Off
[4] Forward to Mailbox
[5] Forward to Ext.
[6] Forward to Menu
[7] Forward to Module
[8] Turn Mailbox Off
[1] Notification Setting [2] Mailbox State [3] Distribution List [4] Guest Mailbox
8
Standard Notification
[1] Hear Current Setting
[3] Immediate Only
[4] Enter Notification Time
[5] Outside Number
PE RS ONAL OPTI ONS
Page 38

Other Options [8] 33
Personal Options [8]
Notification Options
Message notification instructs PathFinder how and where to contact
you when a new message is received. This can include sending
notification by dialing an alternate telephone number or by
activating a paging device.
If you are unavailable, PathFinder will periodically redial the
notification number until you receive the message. This number can
be an internal extension, outside phone number, or digital pager.
You can access your messages manually at any time.
However, you may want to activate Notification if you are
expecting an important message or plan to be out of the
office at an unusual time.
To Change Message Notification:
1. Log on to PathFinder (refer to “Logging On” on page 3).
2. Press [8] to change personal options.
3. Press [8] to edit Other Options.
4. Press [1] to change Notification.
5. Select from these options when altering message notification:
[1] = Listen to the
current mailbox settings
[2] = Turn notification off Disables this feature. PathFinder does not
[3] = Immediately notify
of new messages
[4] = Enter a specific
notification time
[5] = Set notification to
an outside number
Do not set the notification number to your own
extension number! Otherwise, PathFinder may leave
countless messages in y our mailbox telling you that
you have new messages.
Tells you what the current notification
settings are.
notify you of new messages. Only available
if notification previously has been activated.
PathFinder notifies you immediately of new
messages. Only available if notification has
been turned off.
Sets a time at which PathFinder notifies you
of new messages.
Sets the number where PathFinder can
attempt to reach you to deliver messages.
Page 39

34 Other Options [8]
Personal Options [8]
Mailbox State
The mailbox state determines how PathFinder processes a call when
someone tries to leave a message. Typically, PathFinder plays your
personal greeting and prompts the caller to leave a message.
However, several other options allow the call to be processed in
different ways.
To Change a Mailbox State:
1. Log on to PathFinder (refer to “Logging On” on page 3).
2. Press [8] to change personal options.
3. Press [8] to edit Other Options.
4. Press [2] to change the mailbox state.
5. Choose from these options when changing your mailbox state:
[1] = Turn greeting off Takes a message without playing a mailbox
greeting. This is available only if greeting is
currently turned on.
[2] = Turn greeting on Plays mailbox greeting before taking a
message. This is available only if greeting is
currently turned off.
[3] = Take messages
in the mailbox
[4] = Forward to a
mailbox
[5] = Forward to an
extension
[6] = Forward to a
menu
[7] = Forward to a
module
[8] = Turn mailbox off Disables the mailbox. Caller hears: "This
Cancel any forwarding options and begin
recording messages in the mailbox.
Transfers the call to a mailbox (not an
extension) other than your own.
Transfers the call to another person’s
extension instead of leaving a message in
your mailbox.
Transfers the caller to a custom-designed
menu. Contact your System Administrator
about forwarding calls to a menu.
Transfers the caller to a specific module.
Contact your System Administrator about
forwarding calls to a module.
mailbox is not available. Press
[1] to try another mailbox or
[0] for an operator."
Page 40

Other Options [8] 35
Personal Options [8]
Personal Distribution Lists
PathFinder provides the ability to automatically send a message to
more than one person through the use of distribution lists. PathFinder
recognizes two kinds of distribution lists:
System Lists -- are created and administered by your System
Administrator. You as a mailbox owner can use these lists, but you
cannot create or modify them. Typically, system lists are created for
groups of people, such as a company department, where more than
one person will use the list to reach the entire group.
Check with your System Administrator to find out what system lists
are available or to request that a system list be created.
Personal Lists -- are similar to system lists, differing only in that they
are created and maintained by individual users.
Guidelines
»
Each mailbox owner can have up to 10 personal lists. List
numbers correspond to the keys on the telephone keypad … [0]
through [9].
»
Each personal lists may contain up to twenty-five mailboxes and/
or outside numbers.
»
Messages are recorded and sent like any other message and may
have delivery options such as confidential, priority, and the like.
Page 41

36 Other Options [8]
Personal Options [8]
To Set Up a Personal List:
1. Log on to PathFinder (refer to “Logging On” on page 3).
2. Press [8] to change Personal Options.
3. Press [8] to edit Other Options.
4. Press [3] to edit Personal Lists.
5. These options are available when editing personal lists:
[1] = Review or modify a list
[2] = Create a new list
[3] = Delete a list
If reviewing or modifying a list … enter the list number that you
want to edit, then select from the following edit options:
[1] = Hear entries
[2] = Add a new entry
[3] = Delete an entry
Guest Mailboxes
Guest mailboxes can be created for individuals who do not have their
own permanent PathFinder mailbox. Guest mailboxes are especially
useful for customers, vendors, or others with whom there is frequent
communication. Guests can receive messages from the person who
has created the mailbox and can send a reply.
Guidelines
»
As a mailbox owner, you can create up to 10 guest mailboxes and
leave up to 10 messages for each guest.
»
If an eleventh message is sent, the oldest message in the guest
mailbox is automatically deleted.
»
A guest on PathFinder can only leave a reply in the guest mailbox
if the mailbox owner has left a message for the guest. Otherwise,
they leave messages in the standard manner.
»
Guest mailboxes may be deleted if not needed.
Page 42

Other Options [8] 37
Personal Options [8]
Mailbox Owner Options
Mailbox owners have the following options when working with guest
mailboxes:
Messages may be forwarded to a guest mailbox
Messages may be replied back to a guest mailbox
Guest mailboxes may be included in personal lists
The owner’s standard mailbox greeting should reflect the availability
of any guest mailboxes. A typical greeting might be as follows:
“Yo u’ve reached Beth Williams. If you think I might have left you a
personal message, press [4], then enter the last four digits of your
phone number.”
(This message assumes that you used the last four digits of a
caller’s phone number to designate the guest mailbox numbers).
Record Guest Mailbox Greeting
Managing your guest mailboxes is your responsibility as the mailbox
owner. In order to leave messages for guests, you must first record a
guest mailbox greeting. Only one greeting is heard for all of your
guest mailboxes. Once a guest mailbox greeting has been recorded,
you can create a guest mailbox.
You must create a guest mailbox before trying to leave
a message in it.
To Edit a Guest Mailbox:
1. Log on to PathFinder (refer to “Logging On” on page 3).
2. Press [8] to change Personal Options.
3. Press [8] to edit Other Options.
4. Press [4] to administer Guest Mailboxes.
5. When prompted, select from these guest mailbox options:
[1] = List current guest mailboxes & number of messages in each
[2] = Create or modify a guest mailbox
[3] = Delete a guest mailbox
[4] = Edit guest mailbox greeting
Page 43

38 Other Options [8]
Personal Options [8]
To Leave a Message:
1. Log on to your mailbox as you normally would.
Press [2] to send a message.
2. Record your message, then press [#] when you are finished.
3. When you are satisfied with your message, press [1] to send it.
.
4. Press [
] to send to other addresses.
5. Press [4] to send to a guest mailbox.
6. Enter the appropriate guest mailbox number, then press [#].
There is no verification given after entering the
guest mailbox number. Be sure to enter the correct
mailbox number.
To Retrieve a Message:
Once a guest mailbox has been created, guests can retrieve messages
by calling PathFinder and logging on to your mailbox.
1. While listening to the mailbox owner’s greeting, the caller
presses [4].
2. The caller is prompted for the guest mailbox number. The guest
then enters the mailbox number followed by [#].
3. PathFinder plays any messages stored in the guest mailbox. If
there are messages, the guest can either replay them, delete
them, or reply to them.
Guests are not allowed to save messages.
Access to Guest Mailbox
A guest cannot send a message from a guest mailbox if there are no
messages from the mailbox owner waiting in the guest mailbox.
Access to the guest mailbox is granted only if the mailbox owner has
left a message for the guest. Otherwise, PathFinder allows the guest
to record a message for the owner’s mailbox just as it would allow any
other caller to record a message.
Page 44

Personal Mailbox Information
System Access #: ________________________________
Mailbox #:______________________________________
Initial Password:_________________________________
(Change your password periodically)
System Administrator’s Name: _____________________
System Administrator’s Extension: __________________
System Administrator’s Mailbox #: __________________
Personal Distribution Lists List #
1 ______________________________ ____________
2 ______________________________ ____________
3 ______________________________ ____________
4 ______________________________ ____________
5 ______________________________ ____________
6 ______________________________ ____________
7 ______________________________ ____________
8 ______________________________ ____________
9 ______________________________ ____________
10 ______________________________ ____________
Page 45

Personal Directory
Name Mailbox Extension
Page 46

Vodavi Communications Systems, Inc.
“We’re Talking Technology”
Visit our website at … www.vodavi.com
 Loading...