

Page 1

&DOO6RUW3UR
)RU:LQGRZV
USER’S GUIDE
70
Part No. CSPMAN3
Issue 2 - May 1999
Page 2

Copyright © 1999 Vodavi Communications Systems, Inc.
All Rights Reserved
This material is copyrighted by VODAVI Communications Systems, Inc. Any unauthorized
reproductions, use or disclosure of this material, or any part thereof, is strictly prohibited and is a
violation of the Copyright Laws of the United States (17 U.S.C. Section 101 et. seq.).
VODAVI Communications Systems In c. reserves the right t o make chan ges in speci fications at any
time and without notice. The information furnished by VODAVI Communications Systems, Inc. in this
material is believed to be accurate and reliable, but is not warranted to be true in all cases.
CallSort Pro™ is a registered trademark of VODAVI Commuinications, Inc.
Page 3

Warranty
Important Notice:
The CallSort Pro Program in this package contains software that is proprietary to
Vodav i C om m uni ca tio ns Syst em s an d is lic ensed to the end-user by VODAVI Communication s Sy ste ms .
By using the CallSort Pro Program, you are agreeing to be bound by the terms and conditions of the
Software License printed on the re verse . You should read the Software L icens e carefull y and d iscu ss this
with the end user. If you do not agree to be bound by it, please notify us in writing within ten (10) days of
receipt of your CallSort Pro Program.
Limited Warranty and Disclaimer:
Vodavi Communications Systems warrants that the CallSort Pro
Program, including the Software licensed on the reverse, shall conform to VODAVI's written
specifications the refo re and will be warran ted ag ainst defect s in m aterial and wor kmans hip fo r a peri od of
twelve (12) months from date of shipment from its U.S. warehouse to Customer (warranty is determined
based on the date the Bar Coded, serialized product ships from the warehouse) provided that the
CallSort Pr o Program r eceives nor mal servic e and mainten ance durin g the warrant y period. VODAVI's
obligation under this w arran ty shal l be limit ed to the repair or repl acement o f any Cal lSort Pro Prog ram or
Software, or part or component therof, which may prove defective under normal and proper use and
servicing during the warranty period. This warranty shall not apply to any CallSort Pro Program or
Software, or part or component thereof, which has been subject to improper handling, lightning damage,
power surge, accident, negligence, alteration, abuse, or misuse.
NOT BE LIABLE FOR THE BREACH OF ANY WARRANTY, EXPRESS OR IMPLIED, INCLUDING WITHOUT LIMITATION THE
WARRANTY OF MERCHANTABILITY OR FITNESS FOR A PARTICULAR PURPOSE OR FOR ANY DAMAGES OR OTHER
OBLIGATION OR LIABILITY ARISING OUT OF OR ON CONNECTION WITH THE SALE, INSTALLATION, USE OR
SERVICING OF THE CALLSORT PRO PROGRAM OR SOFTWARE. IN NO EVENT SHALL VODAVI BE LIABLE FOR
INCIDENTAL, SPECIAL OR CONSEQUENTIAL DAMAGES, OR ANY OTHER DAMAGES WHETHER ARISING FROM
CONTRACT LAW, TORT OR OTHERWISE, NOR SHALL ANY RECOVERY OF ANY KIND AGAINST VODAVI
COMMUNICATIONS SYSTEMS BE GREATER IN AMOUNT THAN THE PURCHASE PRICE OF THE CALLSORT PRO
PROGRAM
Warranty Claims:
PLEASE NOTE
.
To receive warranty service, contact VODAVI Customer Service.
that the installing company (qualified interconnect) is responsible for any transaction
EXCEPT AS STATED ABOVE, VODAVI SHALL
involving material return for repair. The distributor (supply house) should never become involved in any
such procedure. The installing company will always deal directly with VODAVI for repairs.
Post-Warranty Repairs:
After the Warranty Period has expired, Vodavi Communications Systems shall
provide repair and replacement service for your Call Sort Pro Program in accordance with the pro ced ure s
and charges set forth i n th e VO DAVI Customer Serv ic e Po lic y, a copy of w hi ch is av ail abl e u pon request.
Page 4

Software License
By opening this package and placing this system into service, you indicate your acceptance, and the
acceptance of the p urc has er/ use r o f the software included i n t he sy s tem (t he "Software"), of the following
terms and condi tions. Therefore
operating the Software.
Grant of License:
Vodavi Communications Systems (of Scottsdale, Arizona) is licensed to sell, use and
sublicense the Software, and hereby grants Customer a non-transferable, non-exclusive sublicense to
use the Software for its ow n purpo ses on a singl e compute r sy stem o nly. T itle and ownersh ip rights to the
Software and Technical manual shall remain at all times in Vodavi Technology, Inc. No other rights to use
the Software are implied.
Proprietary Materials:
The Software is proprietary to and constitutes trade secrets of Vodavi
Technology, Inc. and the Technical Manual is proprietary to and constitutes trade secrets of Vodavi
Technology, Inc. All applicable rights to patents, copyrights, trademarks, and trade secrets in the
Software and Technical Manual are and shall remain in Vodavi Communications Systems. Customer
shall use utmost diligence to protect the trade secrets and other proprietary rights of Vodavi
Communications Systems in the Software and Technical Manual from disclosure to third parties.
Customer shall also promote compliance by agreement or instruction with the terms and conditions of
this License by employees or others with access to the Software and Technical manual.
Modification and Copies:
However, Customer may not make copies of any portion of the Software to give, sell, sublicense, or
otherwise transfer to any third party, unless (i) such third party acquires all or substantially all of
Customer's assets, (ii) Customer obtains the approval of Vodavi Communications Systems, in writing,
and (iii) Customer retains no copies of the Software. Customer may not copy the Technical Manual. The
transferee must agree in writing to terms and conditions specified by Vodavi Communications Systems,
including execution of a software license and payment to Vodavi Communications Systems of a
customary inspection fee, to be granted the right by Vodavi Communications Systems to use the
Software.
Indemnification:
Vodavi Communications Systems agrees that, if notified promptly and given sole
control of the defense and all related settlement negotiations, it will defend customer against any claim
based on the allegation the Software infringes a valid patent, copyright or trademark, and will pay any
resulting cost, damages and attorneys' fees awarded by a court with respect to any such claim against
Customer. Vodavi Communications Systems shall have no obligations hereunder where Customer has
modified t he Softwa re or us ed the So ftware in combin ation w ith softw are or e quipmen t not pro vided by
Vodavi Communications Systems. If any Software becomes, or in Vodavi Communications Systems'
opinion is likely to become, subject of such claim of infringement, Vodavi Communications Systems will,
at its option and ex pense , eithe r procu re rights for Cus tomer to cont inue usi ng the Softwar e, or rep lace or
modify the Software to provide non-infringing software that performs substantially similar functions to the
original Software. Upon failure of the foregoing provisions, Vodavi Communications Systems will refund
the purchase price of the CallSort Pro Program less a reasonable allowance for use.
STATES THE ENTIRE LIABILITY OF VODAVI COMMUNICATIONS SYSTEMS FOR INFRINGEMENT BY ANY SOFTWARE
PROVIDED WITH THE CALLSORT PRO PROGRAM
Termination of License:
Use of the Software on any equipment other than for which it was obtained or
authorized, or any breach of the provisions of this License shall automatically terminate this License.
Upon termination of this License, Customer shall immediately discontinue all use of the Software and
shall destroy all copies of the Software.
Termination of License:
Use of the Software on any equipment other than for which it was obtained or
authorized, or any breach of the provisions of this License shall automatically terminate this License.
Upon termination of this License, Customer shall immediately discontinue all use of the Software and
shall destroy all copies of the Software.
Termination of License:
Use of the Software on any equipment other than for which it was obtained or
authorized, or any breach of the provisions of this License shall automatically terminate this License.
Upon termination of this License, Customer shall immediately discontinue all use of the Software and
shall destroy all copies of the Software.
READ THIS CAREFULLY
and discus s with the us er of the syste m before
Customer may copy the Software for back-up and archive purposes only.
THE FOREGOING
.
Page 5

Table of Contents
1 Installation
Software Program Functions....................................................................................1-1
Installation Requirements.........................................................................................1-2
Data Collection PC............................................................................................1-2
Client Workstation.............................................................................................1-2
Cable Connections....................................................................................................1-2
RS-232 Communication Standard.................... .................................................1-4
New Cable Installation.......................................................................................1-4
Existing Cable Installation.................................................................................1-4
Installing CallSort Pro..............................................................................................1-5
Communications/Collection Setup...........................................................................1-6
Changing Communication Settings...................................................................1-7
Collecting Sample Data.....................................................................................1-8
Collection/Pricing Menu Options......................................................................1-9
2 Configuring Collection
Setting Up Call Record Types/Layout .....................................................................2-1
Defining Layout Information.............................................................................2-3
Setting Up Number Filters .......................................................................................2-5
Filter Variables ..................................................................................................2-7
Configuring Call Pricing..........................................................................................2-10
Defining Call Model..........................................................................................2-10
Pricing Method Setup........................................................................................2-11
Specifying Markups/Minimums........................................................................2-17
3 Running Collection
Ongoing Operation...................................................................................................3-1
Database Overview............................................................................................3-2
Controlling the Display Screen..........................................................................3-2
Pricer Configuration Options...................................................................................3-3
Output Options...................................................................................................3-3
Input Options .....................................................................................................3-4
Archive Options.................................................................................................3-6
CallSort Pro v3.0 User’s Guide May 1999
Page 6

ii Table of Contents
CallSort Pro v3.0 User’s Guide May 1999
4 System Administration
Administration Setup................................................................................................4 -1
Setting Up Company Information ............................................................................4-3
Defining Organization Levels...................................................................................4-4
Entering Administration Information.......................................................................4-5
User Information................................................................................................4-6
Extension Information........................................................................................4-7
Contact Information...........................................................................................4-8
Account Codes...................................................................................................4-9
Trunk Line Information...................... ......... .......................................................4-10
5 Generating Reports
Administration Setup................................................................................................5 -1
Report Options..........................................................................................................5-2
Running a Report......................................................................................................5-4
Scheduling Reports to Run Automatically.........................................................5-5
Reports Available...............................................................................................5-5
6 FAQs and Troubleshooting
Frequently Asked Questions.....................................................................................6-1
Hints and Tips....................................................................................................6-1
Installation.......................................................................................................... 6 -4
Collection Module.............................................................................................. 6 -5
Reports Module..................................................................................................6-6
Troubleshooting ........................................................................................................6-7
Existing Cable Connection.................................................................................6-7
Configuration and Data Input Source ............................................................... .6-8
Call Collection ...................................................................................................6-9
Garbage in the Data............................................................................................ 6 -10
Call Recording and Reporting............................................................................6-10
Out of Memory...................................................................................................6 -10
Generating Reports...................................... .......................................................6-11
7 Customer Support
Customer Registration..............................................................................................7-1
Product Support...................... ......... .........................................................................7-1
Technical Support.....................................................................................................7-2
Product Replacement Program.................................................................................7-2
Page 7

List of Tables
RS-232 Cable Pin-Outs ..................................................................................................... 1-3
Layout Field Descriptions .................................................................................................2-4
Filter Fields and Descriptions ...........................................................................................2-6
Filters - Special Characters Used ......................................................................................2-7
Filter Examples - Pricing Calls by Department ................................................................2-8
Filter Templates - Record Configuration Examples .........................................................2-9
Fixed Cost Field Descriptions ........................................................................................... 2-13
Pricing Band Field Descriptions .......................................................................................2-15
Markup/Minimum Field Descriptions ...............................................................................2-17
Administrative Icons Described ........................................................................................4-2
Report Options/Descriptions .............................................................................................5-2
Traffic Summary Reports ..................................................................................................5-6
CallSort Pro v3.0 User’s Guide May 1999
Page 8

iv List of Ta bles
CallSort Pro v3.0 User’s Guide May 1999
Page 9

List of Figures
PBX Select Tab (PBX Properties Screen).............................................................2-2
Layout Tab (PBX Properties Screen) .....................................................................2-3
Filter Tab (PBX Properties Screen)........................................................................2-5
Selection Tab - Call Pricing Screen........................................................................2-10
Method Tab - Fixed Cost........................................................................................2-12
Method Tab - Price Band........................................................................................2-14
Markups Tab...........................................................................................................2-17
System Administration Screen................................................................................4-1
CallSort Pro v3.0 User’s Guide May 1999
Page 10

vi List Of Figures
CallSort Pro v3.0 User’s Guide May 1999
Page 11

1 Installation
This document supports Vodavi’s CallSort Pro v3.0. In the following chapters this phone
system will be referred to as CallSort Pro.
This chapter provides instructions to assist you with performing the following tasks:
Prepare th e CallSort Pro operating environment.
Install and configure CallSort Pro, both on the machine that will collect phone system
data and on individual client machines.
Connect the collection PC to the phone system with a proper cable.
Collect sample call records.
Perform any necessary troubleshooting related to configuring CallSort Pro for your
phone system.
Software Program Functions
CallSort Pro comes on high-density (1.44 MB) 3.5" diskettes that include the following set of
software programs:
BDE Configuration -- This program allows you to configure the location of your databases.
Call Collection -- This module records telephone call data, including outgoing telephone
number, extension, and duration of the call. This program is also responsible for real-time
processing and formatting of the call data for report generation.
CallSort Pro -- This module allows you to configure and run reports on the data collected by
this program. It is also used by the system administrator to setup extensions, create system
users, and configure account codes.
For information on limitations regarding installation and copying
of this software, refer to the Warranty section of the License
Agreement.
CallSort Pro v3.0 User’s Guide May 1999
Page 12

1-2 Installation Requirements
Installation May 1999
Installation Requirements
Both Data Colle ction and Client Workstation PCs must meet specific minimum requirements
for CallSort Pro to operate efficiently. Refer to the next two sections to make sure your PC
equipment is compatible.
Data Collection PC
The PC to be used to collect data from the phone system must meet the following minimum
requirements:
An IBM PC or compatible with a 486 processor or higher
8 MB RAM
A hard drive with at least 100 MB free disk space (CallSort Pro requires 19 MB disk of
space for itself; the remainder is the recommen ded capacity for data storage.)
Microsoft Windows 95 or 98, or Windows NT v.4.0 or higher
One available COM/serial port
Client Workstation
If you are installing the Administration and Reports program on a shared network drive,
installation must meet the following minimum requirements:
An IBM PC or compatible with a 486 processor or greater
4 MB RAM
A hard drive with at least 10 MB of free disk space
Microsoft Windows 95 or 98, or Windows NT v.4.0 or higher
Cable Connections
This section guides you t hrough the install ation and testin g of the cable connecti on between the
phone system and a PC. The cab le required for this connecti on depends on whether your phone
system was set up to work with a PC, modem, or printer and is currently using a null-modem
or straight-through cable.
A null-modem cable is typically used to connect to PCs back to back.
A straight-through cable is typically used to connect a PC to a modem or a printer.
Page 13

Cable Connections 1-3
May 1999 Installation
PCs can have two types of RS-232 ports: 25 -pin or 9-pin. They bot h provide the sa me functions
but use differe nt pins to do so. The following t able lis ts the pins use d for both th e 9-pin and t he
25-pin connectors and describes how they are used.
Table 1-1: RS-232 Cable Pin-Outs
9-Pin 25-Pin Type of Signal PC Provides Signal Description
-- 1 Protective
Ground
32Transmit Data
(TD)
2 3 Receive Data
(RD)
7 4 Request To
Send (R TS)
8 5 Clear To Send
(CTS)
6 6 Data Set Ready
(DSR)
5 7 Signal Ground Yes Pin provides a ground wit h reference to pi ns
1 8 Carrier Detect
(CD)
4 20 Data Terminal
Ready (DTR)
-- A connection to the metal chassis of
CallSort Pro.
Yes CallSort Pro considers this signal to be the
outgoing data path.
-- CallSort Pro considers this signal to be the
incoming data path.
Yes Signal is turned on by CallSort Pro to tell
the phone system that CallSort Pro is ready
to receive data.
-- Signal is turned on by the other device to
receive data.
-- Signal is turned on by telephone system to
tell CallSort Pro to send data .
2 and 3.
-- When modems are used between the two
devices instead of a hardwire cable, this pin
indicates to CallSort Pro that its local
modem has contact with the remote modem.
Yes Activated by CallSort Pro to indicat e that it
is ready and operational.
CallSort Pro only requires that data be sent on the Recei ve Data pin and the Signa l Ground pin.
All other input pins are ignored.
The phone system may be conf igured as a PC or a modem. Regardl ess, data sent from the pho ne
system should be sent to the CallSort Pro machine’s Receive Data pi n.
When the CallSort Pro data colle ction starts, the Request To Send (RTS) and Data Terminal
Ready (DTR) pins are “high” indicati ng to the pho ne system that the PC is rea dy to collect data.
Page 14

1-4 Cable Connections
Installation May 1999
RS-232 Communication Standard
RS-232-C is a communicatio n standar d establi shed by th e Electro nic Indus tries Ass ociation . It
defines three things with respect to establishing a communications link between two devices:
Compatible signal and voltage levels.
The design of the connector.
Control information (such as handshaking protocols).
Connector
function. (Refer to
CallSort Pro onl y requ ires that the ph one sy stem send data o n the Receive d Data pin. Al l ot her
input pins are ignored, while output pins for RTS and DTR are always activate.
-- The connector is designed with either 9 or 25 pins, each pin having its own
Table 1-1
in this chapter.) Typically only 2 to 5 pins are used.
Handshaking Protocols
-- Most printers req uire some sort of handshaking protocol due to their
slowness. The handshaking is used to keep the sending device (usually a computer) from
sending data too fast. This handshaking protocol can be implemented in either software (as
control characters in the data stream) or in hardware (using the appropriate RS-232-C pins).
CallSort Pro’s data collection program is a printer emulator. However, due to its internal
buffering scheme, it can keep up with the sending device and does not need to support any
handshaking protocol.
New Cable Installation
Most equipment, including a phone system, can be interfaced to the PC via the null modem
cable. The purpose of this cable is to reroute the incoming and outgoing data signals, and to
hardwire the handshaking control signals so the transmitting device continually transmits.
In the internal cable wir ing, pins for TD and RD (pins 2 and 3 for both 9-pin and 25-pin
cables) are switched between the PC and the phone system; this routes the transmitted
data pin from one device to the received data pin on the other device.
The RTS and CTS pins on each end of the cable are shorted together when the
transmitting device activates the RTS pin, it immediately gets the CTS signal.
The DTR pin is connected to the DSR and CD pins; this always activates the Data Set
Ready and Carrier Detect signals.
Existing Cable Installation
If you previously had a pr inter connected to yo ur transmitting devi ce (e.g., your phone sy stem),
the cable used to connect the printer to the phone system may or may not work with the PC.
Obviously, the first thing to do is try the cable. If it doesn't work, the easiest solution may be
buying a gender changer from a computer supply dealer.
The gender changer needed con sists of two female 25-pin connectors joi ned together by a sho rt
piece of cable. It i s connec ted to your or iginal cabl e and th e PC. (R efer t o chapt er 6,
Troubleshooting
for more suggestions.)
FAQs and
Page 15

Installing CallSort Pro 1-5
May 1999 Installation
Installing CallSort Pro
To install CallSort Pro on the PC designated to collect call data, perform the following steps.
1. Make backup copies of your CallSort Pro master diskettes. Use the copies to install
CallSort Pro. If somethi ng happens to the c opies, you can make ano ther back up from the
master dis kettes. Store y our master diskettes in a saf e place.
2. Start Microsoft Wi ndows.
3. Place CallSort Pro Disk 1 in the diskette drive.
4. Select <Start>, <Run>.
X
5. In the dialog box that displays, type the following command: (
<Enter>. (The letter X represents the
A: OR B
: floppy disk drive on your PC.)
6. Enter your name and the name of your company in the nex t scr een th en cli ck on < Next>.
7. The next screen gives you the option of installing all of CallSort Pro or selected
modules. Select both options for a full installation, and click on <Continue>.
8. The next set of screens are used to determine where to install the program files.
If you want to choose locations other than the defaults, enter them. Click on
<Continue> to proceed with the installation.
The setup program then begins copying files from the CallSort Pro diskettes.
When prompted, replace Disk 1 in your diskette drive with Disk 2, and click on
<OK>. Continue this process for the thir d diskette.
9. Restart the PC so the changes made to system files will take effect. When the PC has
been restarted, the CallSort Pro group is displayed and the program is ready for use.
SETUP
):\
and press
Communications/Collection Setup
Before you can access the Call Collection module, the RS-232 cable must be connected from
the phone system to a serial communications port on your PC (either COM1 or COM2).
You should then collect sample data from your phone system for the following reasons:
To verify that the cable is connected correctly.
To collect sample call records for further use in configuring the Collection module.
Page 16
1-6 Communications/Collection Setup
Installation May 1999
Collection module configuration is covered completely in Chapter 2,
Configuring Collection
The remainder of this chapter shows you how to complete the communications setup for data
collection and to collect sample call records.
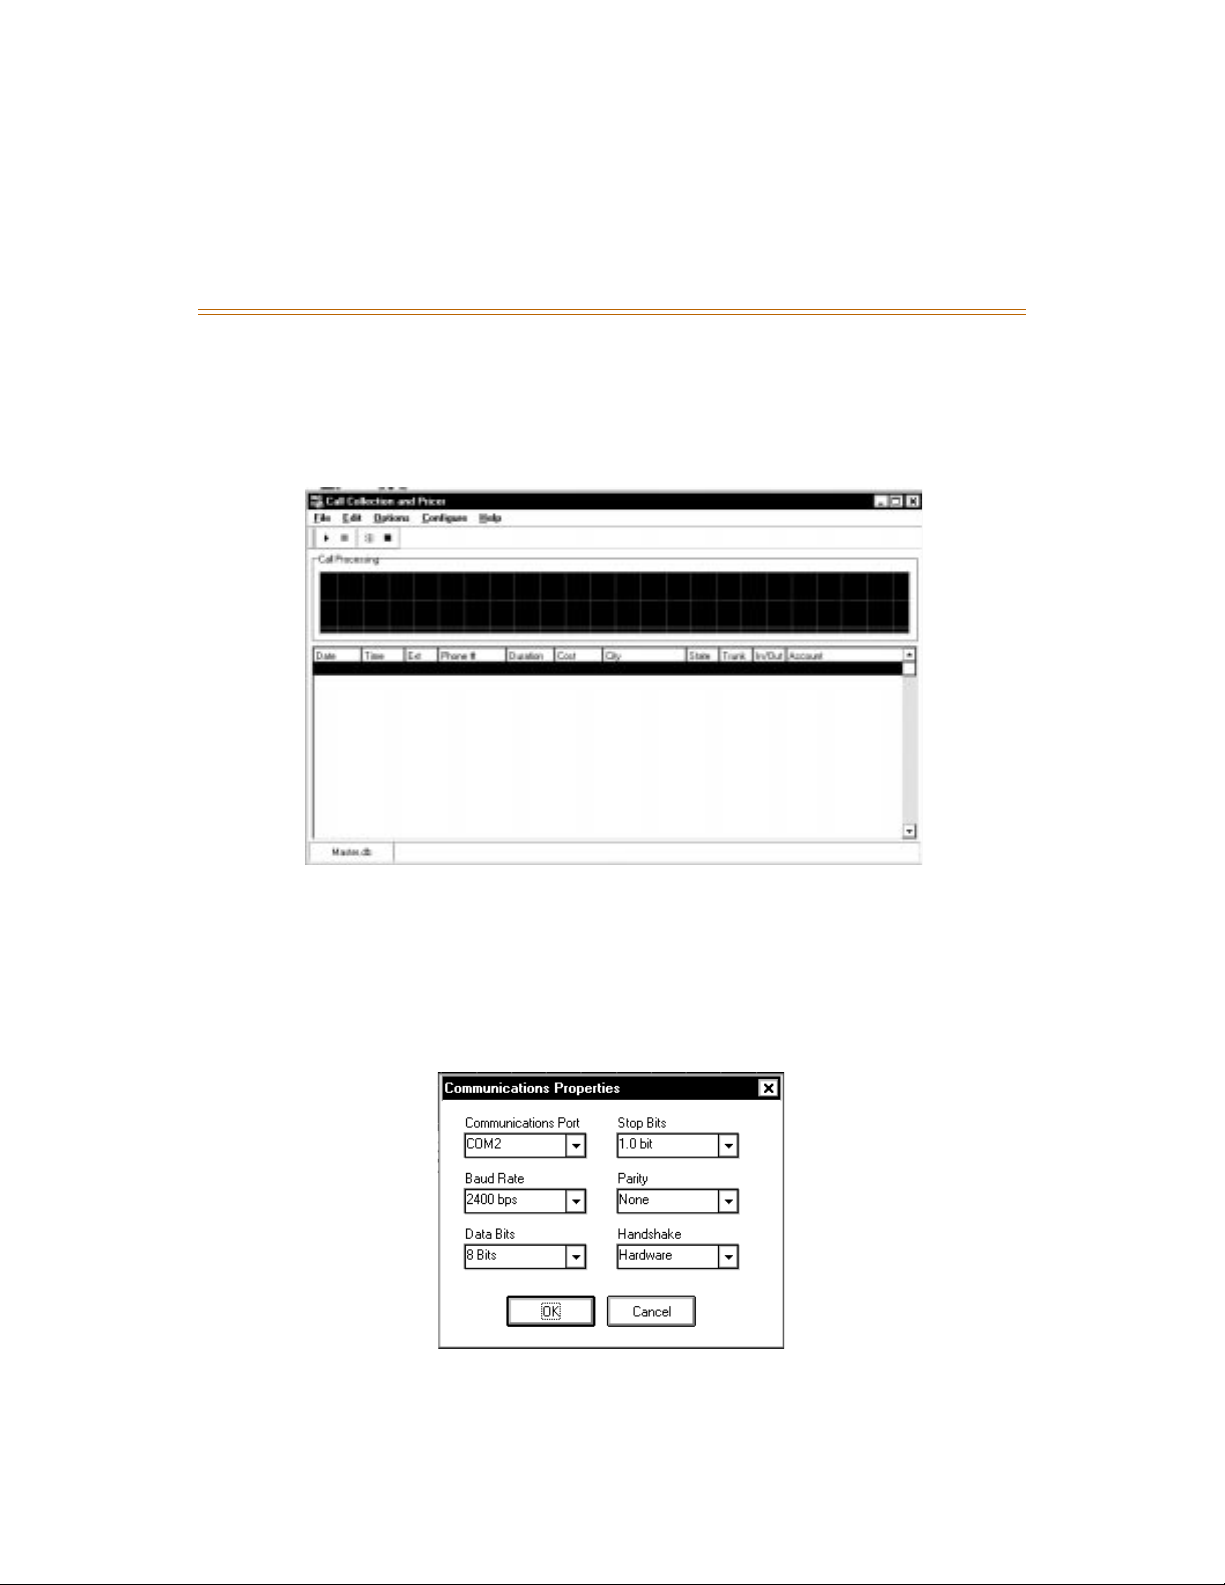
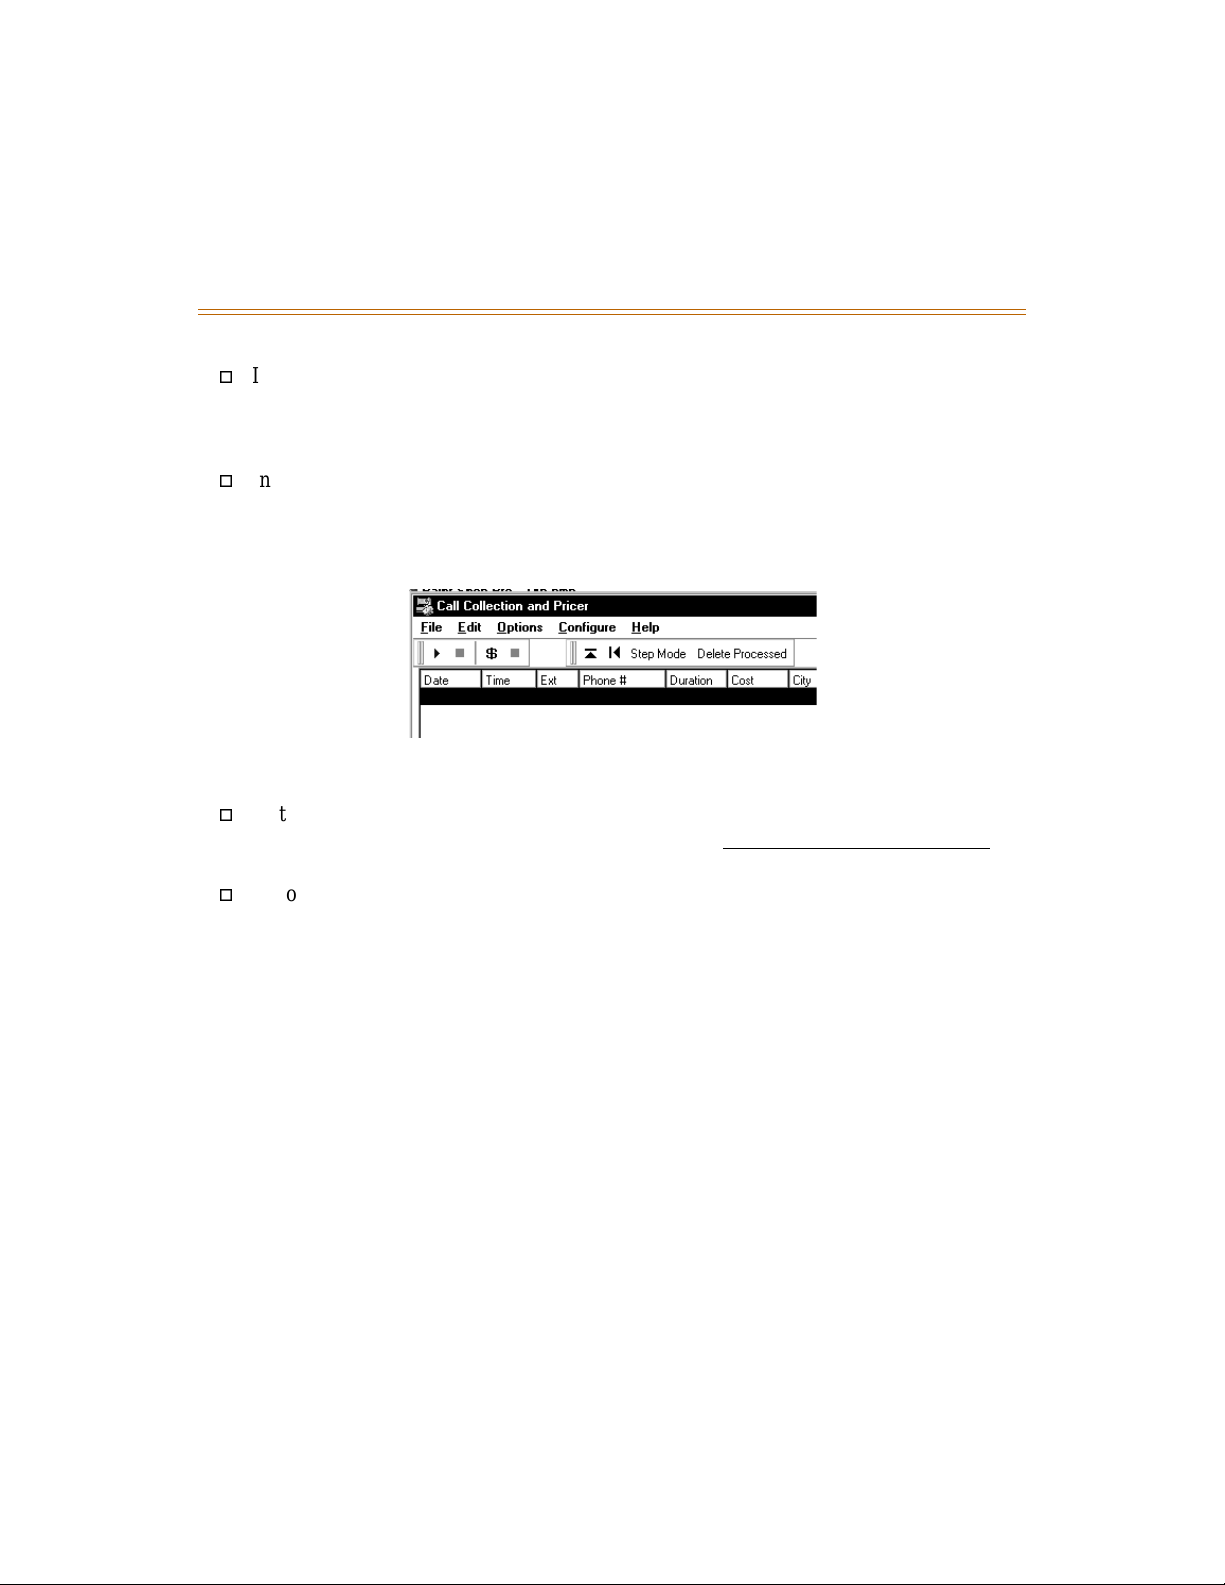
To begin, double-click the Call Collection icon in the CallSort Pro program group. The
following screen is displayed. From here you execute collection and pricing operations.
Changing Communication Settings
.
Next, you must make sure CallSor t Pro is properly configured for communications with your
telephone system.
1. From the Configure menu, select Communications. (The dialog box displays a list of
previously configured communication setups.)
Page 17

Communications/Collection Setup 1-7
May 1999 Installation
2. Change the Communication Properties to match your phone system settings using the
following descriptions:
Communications Port -- Serial port that you want the PC to use for collecting
SMDR records (typically COM1 or COM2).
Baud Rate -- Transmission rate for which your phone system is configured.
Parity, Data Bits, and Stop Bits -- These settings must match the phone system
configuration for transmission of SMDR records.
Handshake -- These options determine the handshaking to be used between the PC
and the phone system. If no option is selected: flow control is turned off; hardware
flow selects Request to Send/Clear to Send handshaking; Xon/Xoff selects ^Q/^S
start/stop flow control. (Use RTS Disable and DTR Disable only if you know they
are required by your phone system.)
3. When you have finished with the communications parameters, click <OK> to save the
new settings as the defaults.
Collecting Sample Data
Now that you have installed the cable and properly set the commun ication par ameters, you are
ready to collect sample call records. T o collect sampl e data, select and define your phone system
as follows :
1. Choose Configure/PBX Define. (The PBX Select tab displays a drop-down list of PBX
Names.)
2. Select the appropriate phone system for your installation and click on <Done>.
If you are already hooked to a phone system, follow these steps to collect data.
1. Select Options/Collection ON. (CallSort Pro is now ready to collect data.)
2. Generate several telephone calls from a phone connected to the phone system.
3. Once you are receiving data (call records appear on the screen as they are being
collected into a raw data file), allow the PC to run for about an hour to collect sample
call records.
If you cannot see any r aw data, re fer to
Source
in Chapter 6,
FAQs and Troubleshooting
Configuration and Data In put
.
4. T o e nd the d ata c ollec tion, sele ct Conn ectio n OFF from t he Opt ions menu. Keep the call
records displayed on the screen to use for the remaining configuration process.
If you already have phone system data stored on floppy or hard disks, follow these steps
to process data.
1. Make sure you have at least 100 records of sample data to work with.
2. Start the Collection module.
Page 18

1-8 Communications/Collection Setup
Installation May 1999
3. Select Configure/Options from the Configure menu.
4. Click on the Input tab. Select Input from File, then click on <OK >.
5. Select the drive and directory that contains the raw data. Select the data file, then click
on <OK>.
6. Click on <Options/Display Processed>.
At this time you should see pric ed data records (properly form atted and in the cor rect columns)
appear on the bottom part of the screen. You can generate all standard reports based on the
priced data. Once you have successfully collected call records, proceed to the next chapter to
finish configuring the Collection module.
Collection/Pricing Menu Options
In the Collection modu le, you can perform a variety of collecti on and pricing functi ons by using
the menu options located on the Call Collection and Pricer screen.
File Menu
provides access to the following functions:
View Error Log -- Allows you to view any errors by CallSort Pro. These errors are
related to area code mismatch es and pricing errors.
Verify Table Structure -- Allows you to correc t errors in data. The Collec tion, Reporting ,
and Other table options scan each table for errors or flaws in the structure of the table,
then corrects the problem. When scanning Other Tables, CallSort Pro scans tables
related to: Account Codes, Extensions, Users, and Trunks. You are prompted for a
password, enter
Update Archives -- Causes CallSort Pro to perform an archive based on your archive
MASTER.
settings under the Configure/Options/Archive Tab.
Edit Menu
contains the Password option which requires that you enter a password before
closing the Collection module. When creating the password, the following screen displays:
The Password option requires that you enter a Password, New Password, and Confirm
Password option.
If this is your first time accessing this option, you can enter anything in the Password
entry and the password will be changed.
Type the password you desire in both the New Password and Confirm Password fields.
Options Menu
is defined in Chapter 3,
Running Collection
.
Configure Menu
Help Menu
contains Help-About whi ch provi des version and co pyright inf ormation regarding
is defined in Chapter 2 ,
Configuring Collection
.
the Collection module and Help-Contents which is reserved for future use.
Page 19

2 Configuring Collection
The Collection module in CallSort Pro interfaces with your phone system and collects,
processes, and places SMDR data in the database for reporting. This chapter defines the
Collection module and its two main features: SMDR layout definition and Pricing.
SMDR Layout or PBX Define Features -- Allows you to customize the CallSort Pro
Collection module to recognize the different record types from you phone system, to
allow you to define what information is placed in your master or reporting database.
Pricing Customize Feat ure -- All ows you to def ine how cal ls are pr iced. The c alls can be
priced on per minute charges based on time of day and where the call is being placed.
Additionally, you can define taxes and markups for calls.
When you are finis hed with this ch apter, you’ll be ready t o begin running the Collection module
to collect data for future reporting.
This chapter assumes you have followed all of the instructions in the
Installation chapter. If not, return to
Chapter 1
leaving the SMDR records displayed on the screen for later use.
Setting Up Call Record Types/Layout
The PBX Define function configures the Collection module for your phone system. This is
necessary because different phone systems record data in different ways. For example: one
manufacturer’s phone system might define Date fields as MM/DD/YY, where another might
define them as YY/MM/DD. PBX Define makes sure that CallSort Pro accommodates your
record types and layout.
before proceeding,
To specify SMDR record types and their layout, select Configure/PBX Define and the
following tab options are displayed on the PBX Properties screen:
PBX Select -- Defines what phone system CallSort Pro is interfacing with.
Layout -- Defines the exact layout of each call record. It also defines what fields in the
SMDR data should be placed in the Master table.
Filter -- Allows you to filter unwanted information from call records before placing the
information into the master table.
Call Types -- Defines incoming and out going ca lls ba sed on th e da ta set up in the Layout
section.
CallSort Pro v3.0 User’s Guide May 1999
Page 20
2-2 Setting Up Call Record Types/Layout
Configuring Collection May 1999
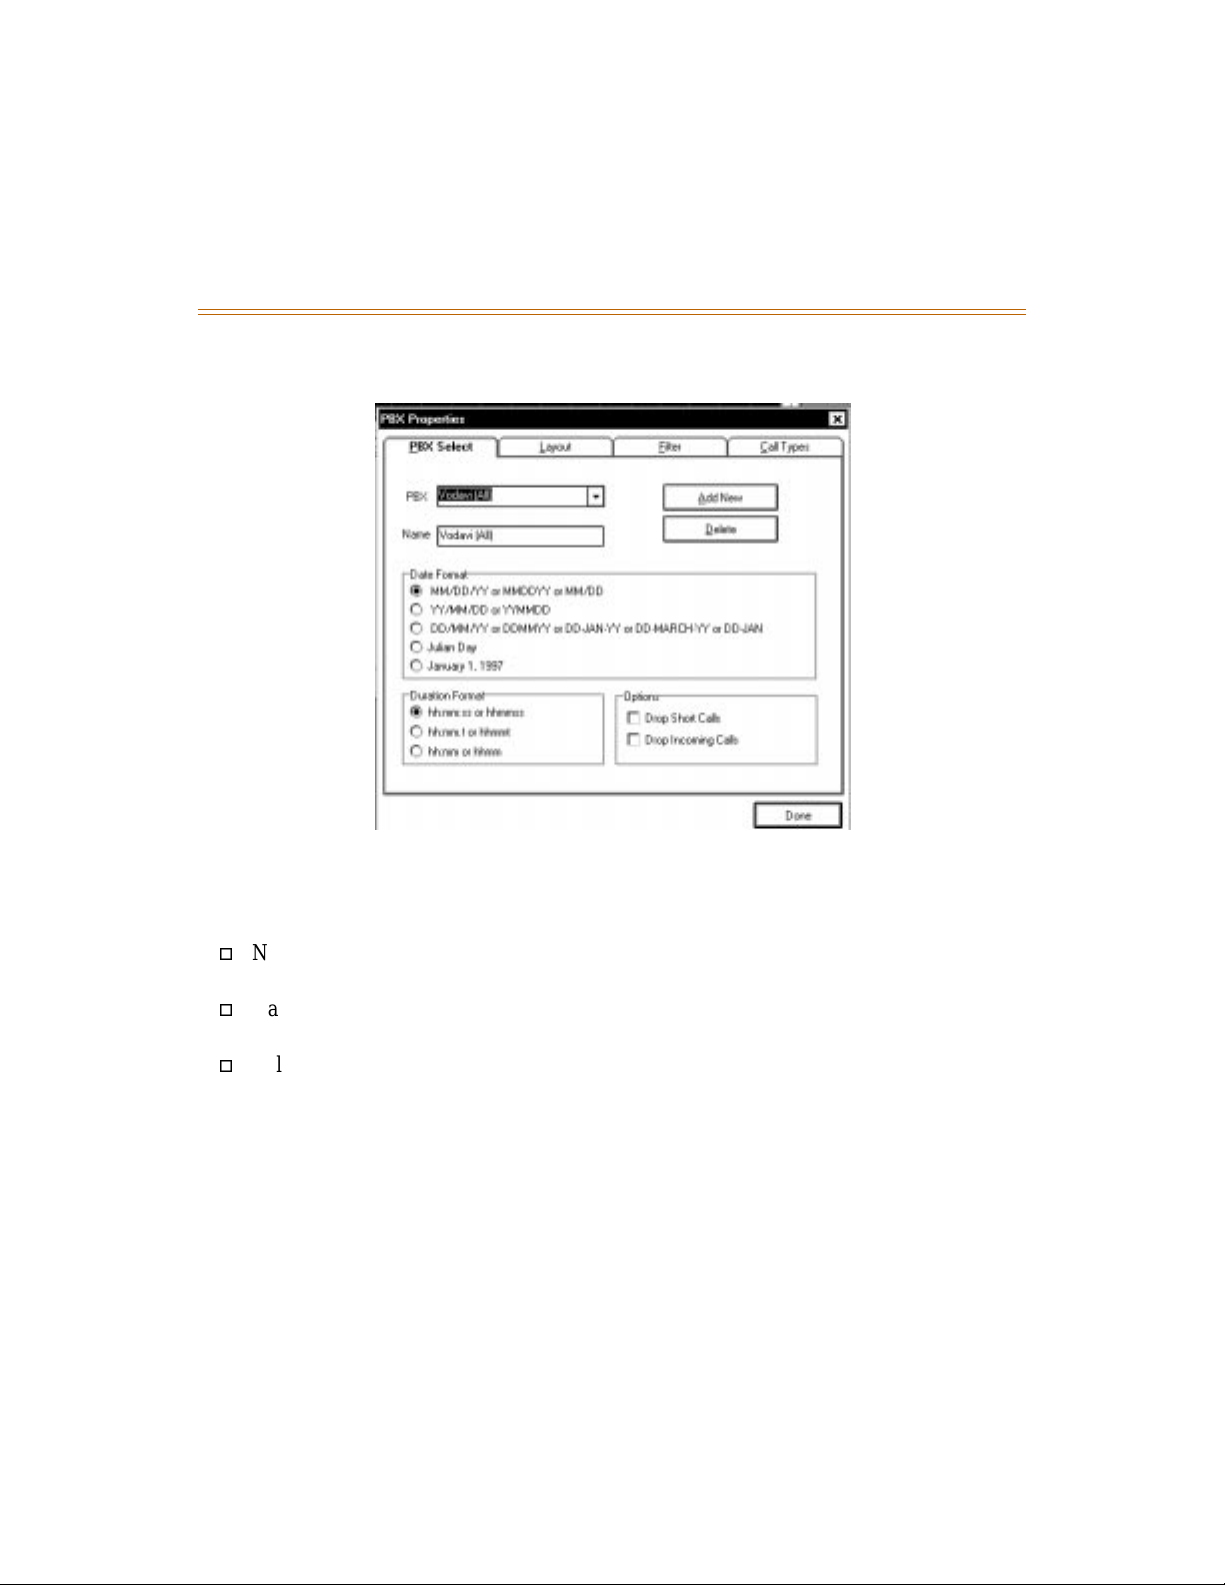
Click on the PBX Select tab and choose your phone system from the PBX drop-down list. (If
your phone system is not listed, contact technical support for assistance.)
Figure 2-1: PBX Select Tab (PBX Properties Screen)
Use the follo wing guideline s to adjust the PB X Select parameters:
Name -- Enter a name for this configuration that helps you identify it in the future (when
you return to the original PBX D efine screen).
Date and Duration Options -- Check the date and time formats. Adjus t them if necessary
to support the date and time formats of your phone system.
Call Record Options -- If you want to eliminate brief calls or incoming calls from
collection, cli ck on t he appropriate option. Short Calls are defined by the parameter you
set for Grace Period, as defined in Specifying Markups/Minimums later in this chapter.
Then proceed with Layout, Number Filters, and Call Record Types as described in the
following sections.
Page 21
Setting Up Call Record Types/Layout 2-3
May 1999 Configuring Collection
Defining Layout Information
To define your phone system’s layout information:
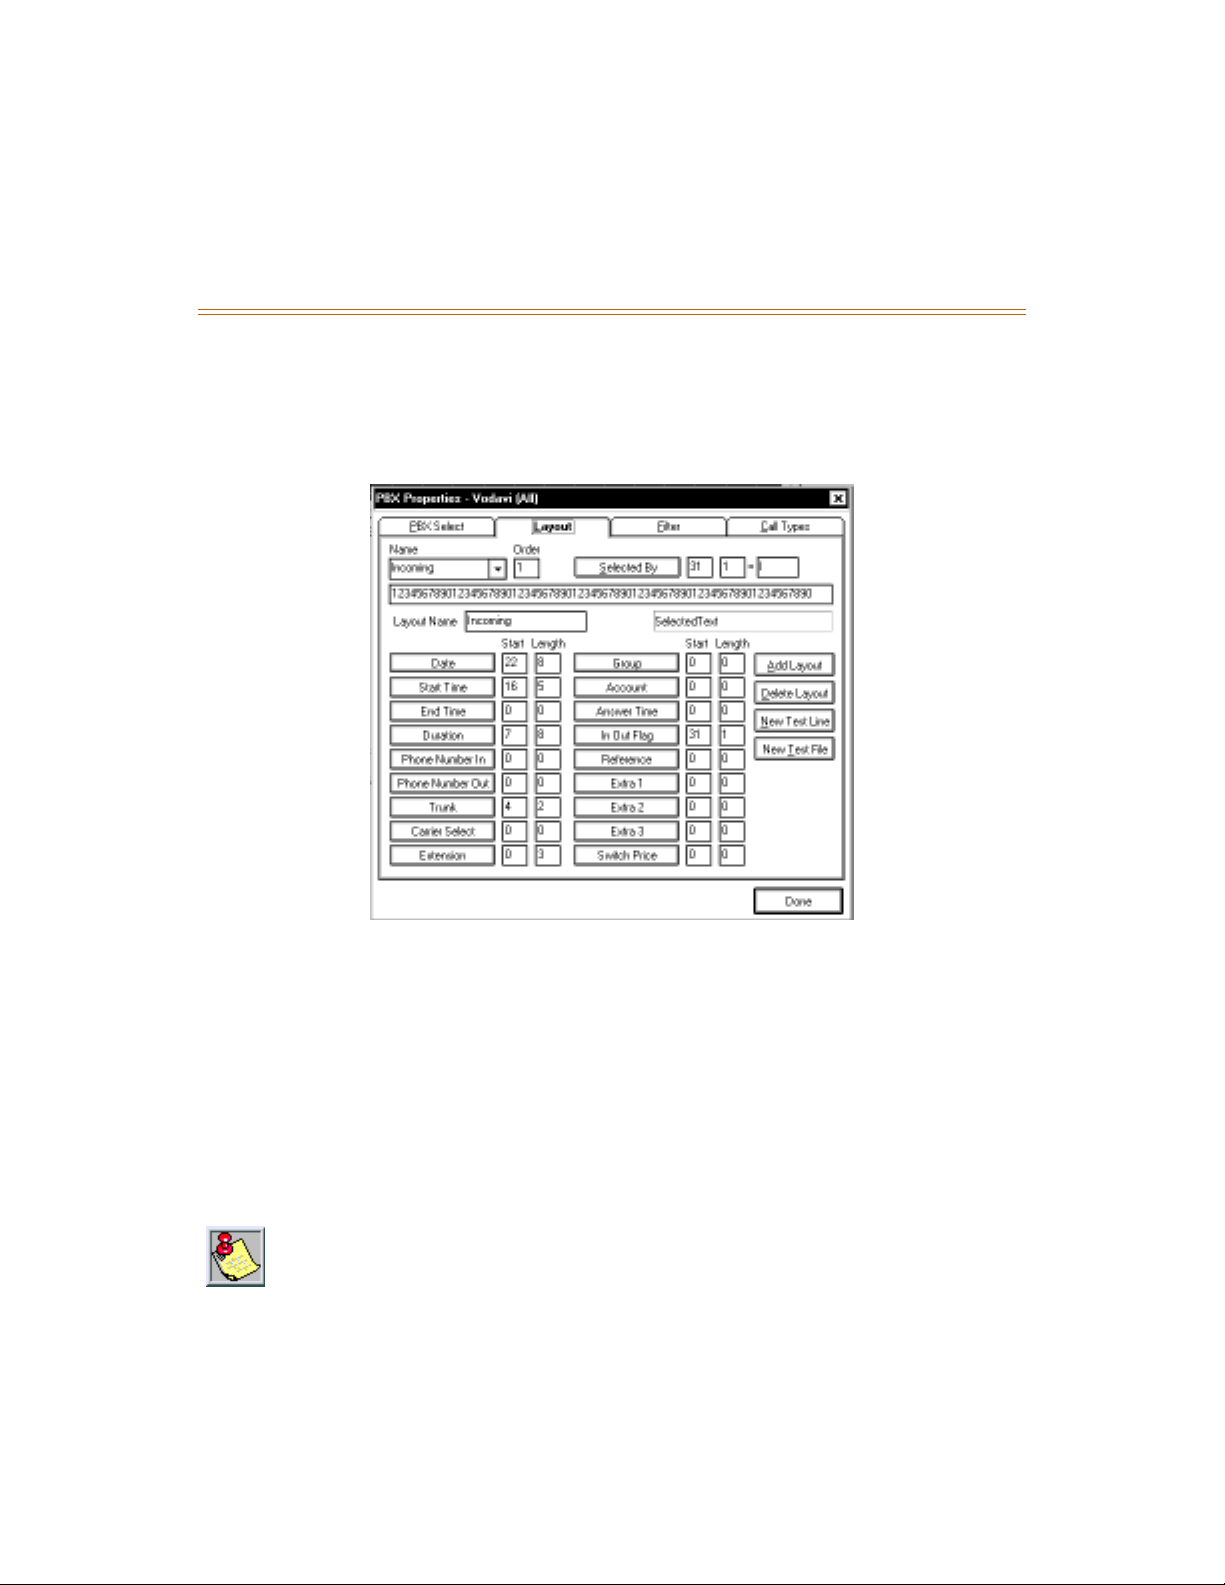
1. Select PBX Define from the Configuration menu and click on the Layout Tab. The
following screen is displayed.
Figure 2-2: Layout Tab (PBX Properties Screen)
2. Click on either <New Test File> or <New Test Line> on the right-hand side of the
screen. This brings up a screen with several lines of raw data. Select a l ine , and cl i ck on
<OK>. This brings you back to the Layout screen shown above.
3. Click on any of the buttons at the bottom of the screen to verify the data for that
particular field.
4. If the data f or a selec te d fie ld is inco rrect , h ighli ght t he in for mation in the sample line of
SMDR data, then click on the corresponding button at the bottom of the screen.
(Incorrect information is displayed in the box to the right of the Layout Name field.)
The SMDR information from your telephone system may not
contain all desired fields. Contact your phone system
manufacturer for more information on SMDR output.
Page 22

2-4 Setting Up Call Record Types/Layout
Configuring Collection May 1999
The fields in the Layout screen are explained in the following table:
Table 2-1: Layout Field Descriptions
Field Name Description
Name Specifies the name of the call type (changing this field also changes the
Layout Name field).
Order Indicates how the information is looked up.
Start Time CallSort Pro automatically calculates the Duration when the SMDR
information has a Start Time, and End Time has an entry in the call record. (If
the SMDR data only provides the Duration, DO NOT select Start Time.)
End Time CallSort Pro automatically calculates the Start Time when the SMDR
information has an End Time, and End T ime has an entry in the call record . (If
the SMDR data only provides the Duration, DO NOT select Start Time.)
Duration Duration is provided in two ways: If a Start Time and End Time are defined in
the call record, CallSort Pro automatically calculates the Duration . If the
Duration of the call is contained in the SMDR record, highlight the Duration in
the sample record and click on Duration.
Phone Number In Incoming phone number provided by ANI/CLID information. (This feature
may not be supported by all pho ne syst ems or may require addi tional sof tware.
Consult your phone system manufacturer for more information.)
Phone Number Out The number that was dialed (should only be used on outgoing call records).
Trunk Indicates the incoming or outgoing trunk the call used.
Carrier Select Defines which carrier was selected for a particular phone call. Special digits
can be dialed before a phone number to define a particular long distance
company, the Carrier Select field is for storing this information.
Extension Represents the extension that either made or received the call.
Group Specifies a particular department’s information.
Account Indicates account code information.
Answer Time Time it takes to answer the call.
In Out Flag W orks in conjunction with Selected By field. These are unique characters on a
line of data that tell whether a call is incoming or outgoing.
Reference Indicates a number that references an account code.
Extra 1, 2, 3 Additional fields that you may want to filter call reports on.
Switch Price How much the switch says a call will cost.
On the right-hand side of the screen, the Add Layout field provides blank fields in which to
enter new information; the Delete Layout field allows you to delete field information.
Page 23
Setting Up Number Filters 2-5
May 1999 Configuring Collection
Setting Up Number Filters
CallSort Pro allows you to se t filters on the data in the phone number field. The Phon e Number
In and Phone Number Out fields are used to filter this information. Filters apply to the
information in the phone number fields, Phone Number in and Phone Number Out defined by
the Layout tab. (Refer to
The Filters func ti on us es special characters non- al phanumeric characters or Fil t er Variables to
help define f ilters for CallSort Pro. These Filter V ariables provi de you with the means to process
the maximum number of call re cords with min imal n umber of call filte rs or rule s. Thes e fil ters
allow CallSort Pro to define long distance, local, international, or operator assisted calls with a
small number of call filters.
To perform any necessary filtering, perform the following steps:
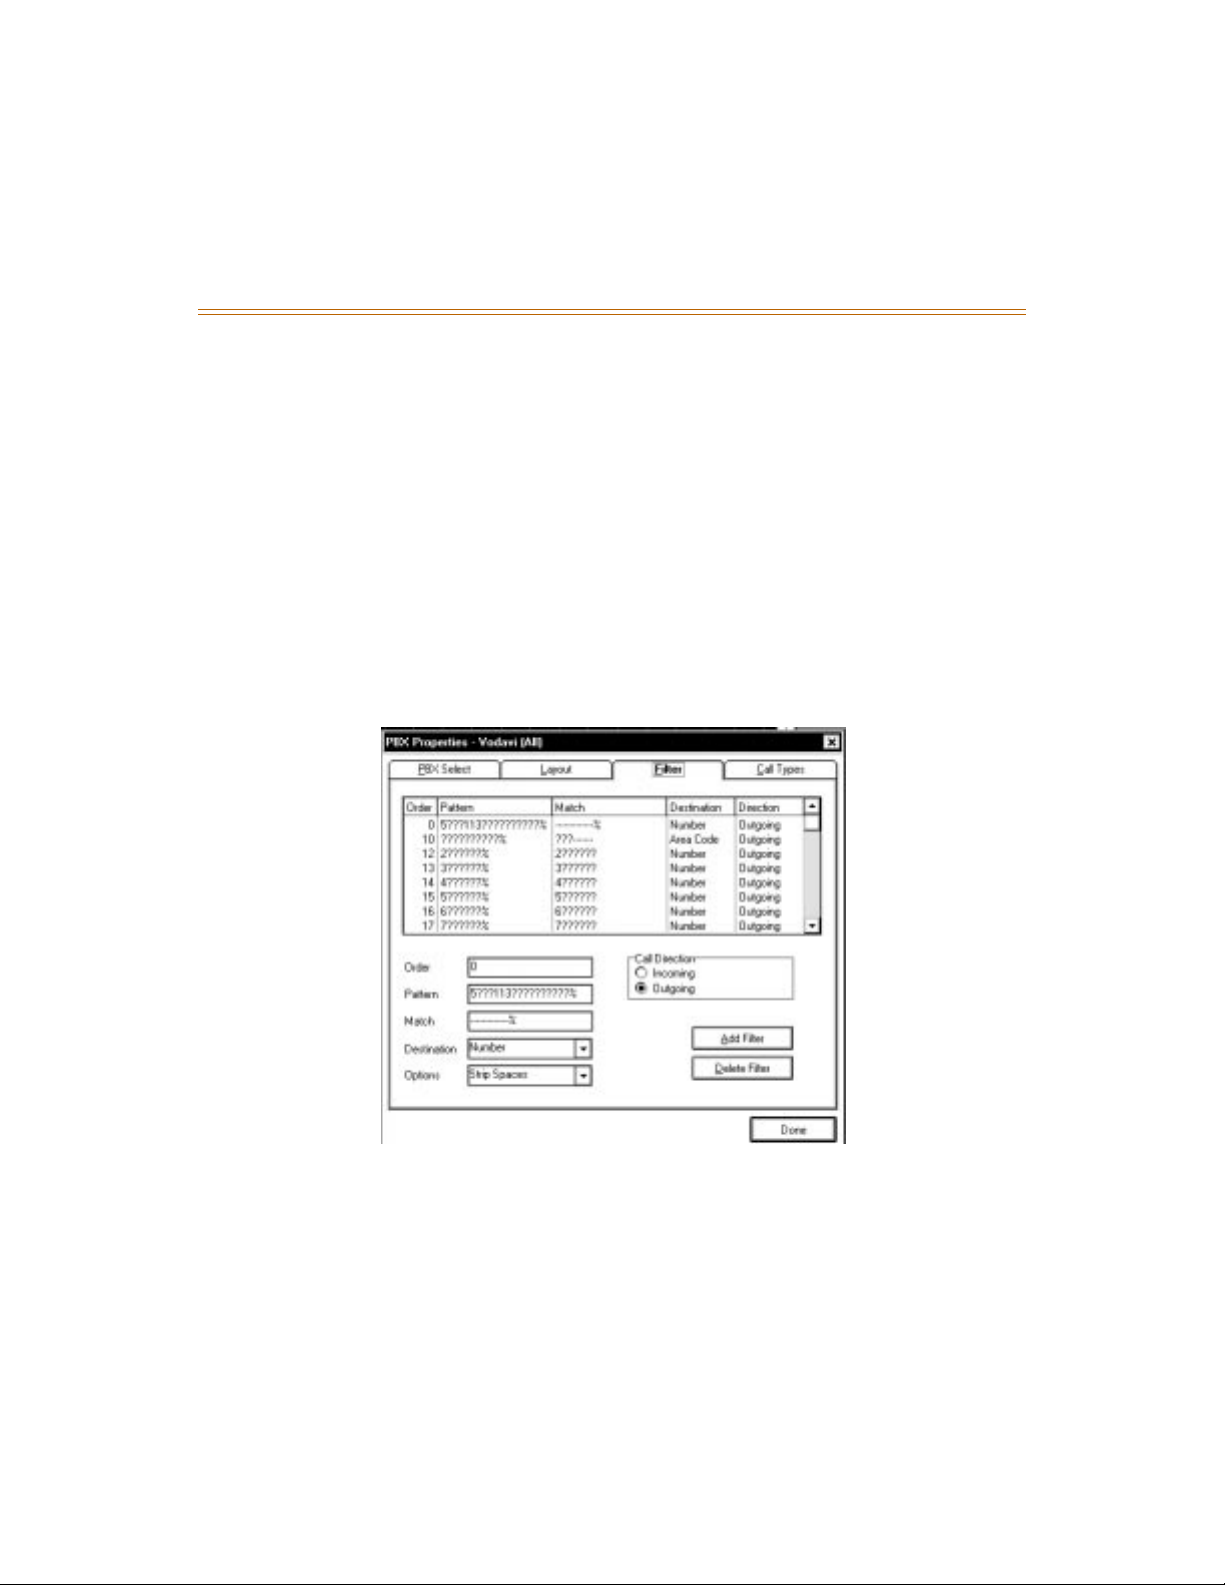
1. In the PBX Properties dialog box, click on the Filter tab. The following screen is
displayed.
Defining Layout Information
in this chapter for more details.)
Figure 2-3: Filter Tab (PBX Properties Screen)
2. Highlight the filter to modify, or click on <Add Filter> to create a new filter, or on
Delete Filte r to delete a filte r.
Page 24
2-6 Setting Up Number Filters
Configuring Collection May 1999
3. Make your changes based on the following options:
Table 2-2: Filter Fields and Descriptions
Field Description
Call Direction Select Incoming or Outgoing depe nding on whether this filter should apply to
incoming or outgoing tele phone calls. The SMDR Layout determines i ncoming
or outgoing calls, refer to
Defining Layout Information
details regarding call layout. The default is Outgoing.
Order This number defines when the filter will be applied. Number filters are applied
in descending order.
Pattern Tells CallSor t Pr o what information to loo k f or i n a p hon e number field (Phone
In or Phone Out from SMDR Lay out). This option uses Filter Variables. (Refer
to next section for more information.)
Match CallSort Pro replaces th e Pattern it f inds in the phone n umber f ield and replaces
it with what is in the Match field. This option uses Filter Variables. (Refer to
next section for more information.)
Destination CallSort Pro takes the resulting information from the Pattern and Match and
places it in the field defined.
in this cha pter for more
Options The Options field defines what to do with non-numeric characters in the phone
number field. CallSort interprets the options as follows :
None
Strip spaces
Do NOT strip non-numeric characters from the phone number fi eld.
--
Strips any spaces from the phone number field, but leaves all
--
other characters.
Strip after * or #
Strips any characters from the phone number field after
--
an * or # symbo l.
Strip * and Spaces -- Strips any characters from the phone number field
after an * to include all spaces.
Filter Variables
Filters allow CallSort Pro to process a large number of call records as follows:
A filter allows CallSort Pro to match a specific telephone number, or remove
information from that telephone number, then place the information into a field in the
master tab le.
The filter Variables allow the smallest number of filters to process the largest number of
call records.
Page 25
Setting Up Number Filters 2-7
May 1999 Configuring Collection
Special Characters for Pattern Matching
The Collection module uses three special characters for pattern matching in number strings: a
question mark (?), a minus sign (-), and a percent sign (%), the symbols function as follows:
In Source String -- A ? is used to match any single character, and a % is used to match
any sequence of 0 or more ch aract ers. Any ot her cha racte r requi re s an exact match fro m
the source string.
In Result Strings -- A ? means to copy the corresponding ? character from the source
string into the result string, a minus sign (-) means to skip the correspondi ng ? character,
and a % means to copy all of the characters which matched the % pattern. Any other
characters are copied. Therefore, if the source string was 17701996621052 it would
match the pattern ????199% but not match ?????199% (as there aren’t 5 characters
before the 199) or ????199???????? (as the source has 14 characters, not 15).
Result string specifications must have the same number of question marks (?) plus
minus signs (-) as the template string has question marks (?). Thus, if you wanted the
target string for the above match to be the area code 770, the target specification would
be -???.
Table 2-3: Filters - Special Characters Used
Symbol Function Example
In the Pattern field, the ? symbol is used
when a single digit or character is
unknown or irrelevant.
In the Match field, this symbol will
?
leave a character unaffected by the filter.
The Pattern field is set to
Match field is set to
If the phone number dialed is
the result will be
If the phone number processed is
9936
, or
4??6
4936
, the filter will not
53946
take effect.
If both the Pattern and Match fields
are set to %, then any outgoing call
will be processed.
If the Pattern field is set to 1% and
%
The % symbol is much like the question
mark, but is used when an unknown
quantity of characters are irrelevant.
the Match field is set to %, then any
call that begins with the number one
will have its number stripped.
The minus sign (-) is used only in the
Match field, and will cause a character
-
identified with a “?” to be eliminated.
If the Pattern field is set to
Match field is set to
, and
5916
5286
5--6
will all become 56 after
passing through the filter (but
won’t be processed.
53946
5??6
.
.
5??6
, then
and the
5936
and the
,
5846
or
9936
,
Page 26
2-8 Setting Up Number Filters
Configuring Collection May 1999
Table 2-3: Filters - Special Characters Used
The | character is used by the filter to
|
separate the Pattern field from the Match
field. It is used for on-screen clarity, and
does not need to be typed in.
--
Pricing Calls By Department - Example
In the final exampl e, any numb ers that s tart wit h 10288 wil l have th e lette r A added as a suff ix.
The letter A is an example and can be any letter . This is done for informationa l purposes to help
you keep up with calls transferred to a specific place. In this case, the A could stand for
accounting. The Transfer To field would be set to Accounting as well. This type of filter is
useful when you want to price a call by department.
Table 2-4: Filter Examples - Pricing Calls by Department
In this field … Type this … To filter like this
Pattern
Match
Pattern
Match
Pattern
Match
10288%
%
41???%
???%
10288%
A
102884043451234
4043451234
414561234
4561234
102889325873495
A
Filter Setup Example
The following paragraphs pro vide an example of a fictitious phone sys te m to illustrate how to
configure call filters for SMDR records.
The first filter is used to strip out leading and trailing spaces, since the number called is of
variable length and somet imes has the character X inserted before the number : It does not show
in the following table, but for this filter the strip out non-numbers check box was checked.
Page 27

Setting Up Number Filters 2-9
May 1999 Configuring Collection
Table 2-5: Filter Templates - Record Configuration Examples
Template Priority and Description Match Result Destination
1 Strips out leading and trailing spaces. % % number
2 Detects the AT&T carrier select string and, if a
????9501022?% ----A- carrier select
match, puts the single character A in the carrier
select string. Since it is possible to have a valid
number of 950-1022, the ex tra ? was added p rior
to the %. This insures no match unless the
number has at least 12 characters in it.
3 Removes the 9501022 carrier select string from
????9501022?% ?????% number
the number and puts the result back into the
number string.
4 Performs a similar function as priority 2, but for
????261?????% ----M----- carrier select
MCI. Note that in this case extra ?s must exist to
ensure that we don't match a 261 exchange in
some area code. This match template requires at
least 12 characters for a match.
5 Strips out the 261 code for MCI. ????261?????% ?????????%number
6 Ensures that an overseas 011 call is not
011% 1011% number
interfered with by the priority 9 and 10 template.
This is accomplished by inserting a 1 in front of
these calls, which will be stripped back off by
the priority 11 template.
7 Detects a leading 0, meaning that the call was
0% Y op assist
operator-assisted. If there is a leading 0, a Y is
placed in the Op Assist string.
1011Strip off the leading 0 or 1 from long distance
calls. Note that the 0 strip must occur before the
1 strip or the international calls would not be
properly treated.
12 Extracts the area code fr om any num ber that is at
least 10 digits long, placing the area code into
the Area Code string.
0% % number
1% % number
??????????% ???------- area code
Page 28
2-10 Configuring Call Pricing
Configuring Collection May 1999
Configuring Call Pricing
In this section you can configure the Call Pricing options available as follows:
Add or modify the call model.
Set up the pricing method for different call types, such as fixed price or charge bands.
Specify markup charges and minimum durations for the charges.
Defining Call Model
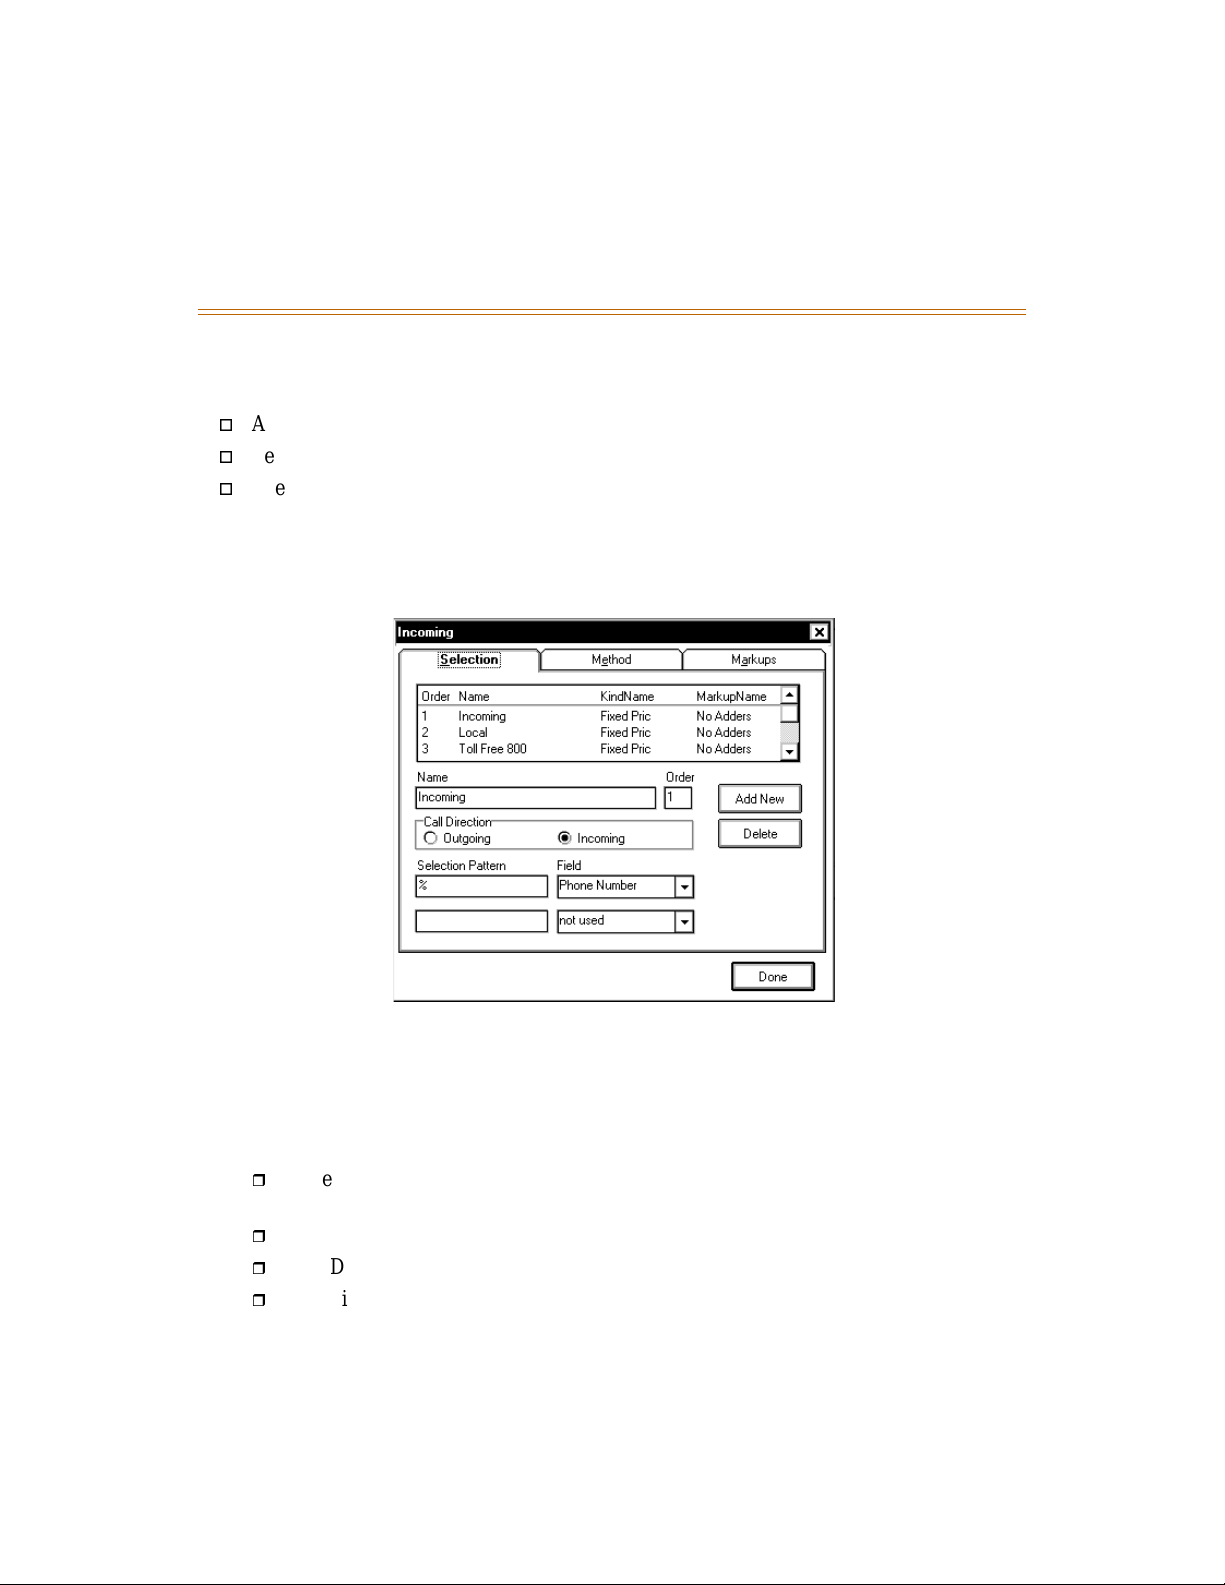
1. To begin, select Pricing Customize from the Configure menu. This screen displays:
Figure 2-4: Selection Tab - Call Pricing Screen
2. Under the Selection tab, highlight the Call Model you want to modify from the list or
click on <Add New> if you want to define another service.
3. Use the following dialog box to modify or create a Call Model.
Order -- Service priority determines the order in which the test is made to determine
which service to use.
Name -- Service name you want displayed in reports and other dialog boxes.
Call Direction -- Specifies whether to apply a pricing to incoming or outgoing calls.
Selection Pattern -- Determines what pattern to match. The Selection pattern uses
the ? and % Filter variables. (Refer to
Filter Variables
in this chapter for more data.)
Page 29
Configuring Call Pricing 2-11
May 1999 Configuring Collection
Field -- Specifies what field to look for the selection pattern in the master table.
There are two criteria fields under the Selection Pattern option. When both the first
and second criteria have entries, they are Boolean ended together so that if both
Criteria 1 and 2 are true, the filter applies. Otherwise the filter doesn’t apply.
4. Then proceed to the remaining two tabs in the Pricing Customize dialog box, Method
and Markups, as described in the following sections.
Pricing Method Setup
Select the Method tab to specify the type of pricing to be used, Fixed Cost or Price Band.
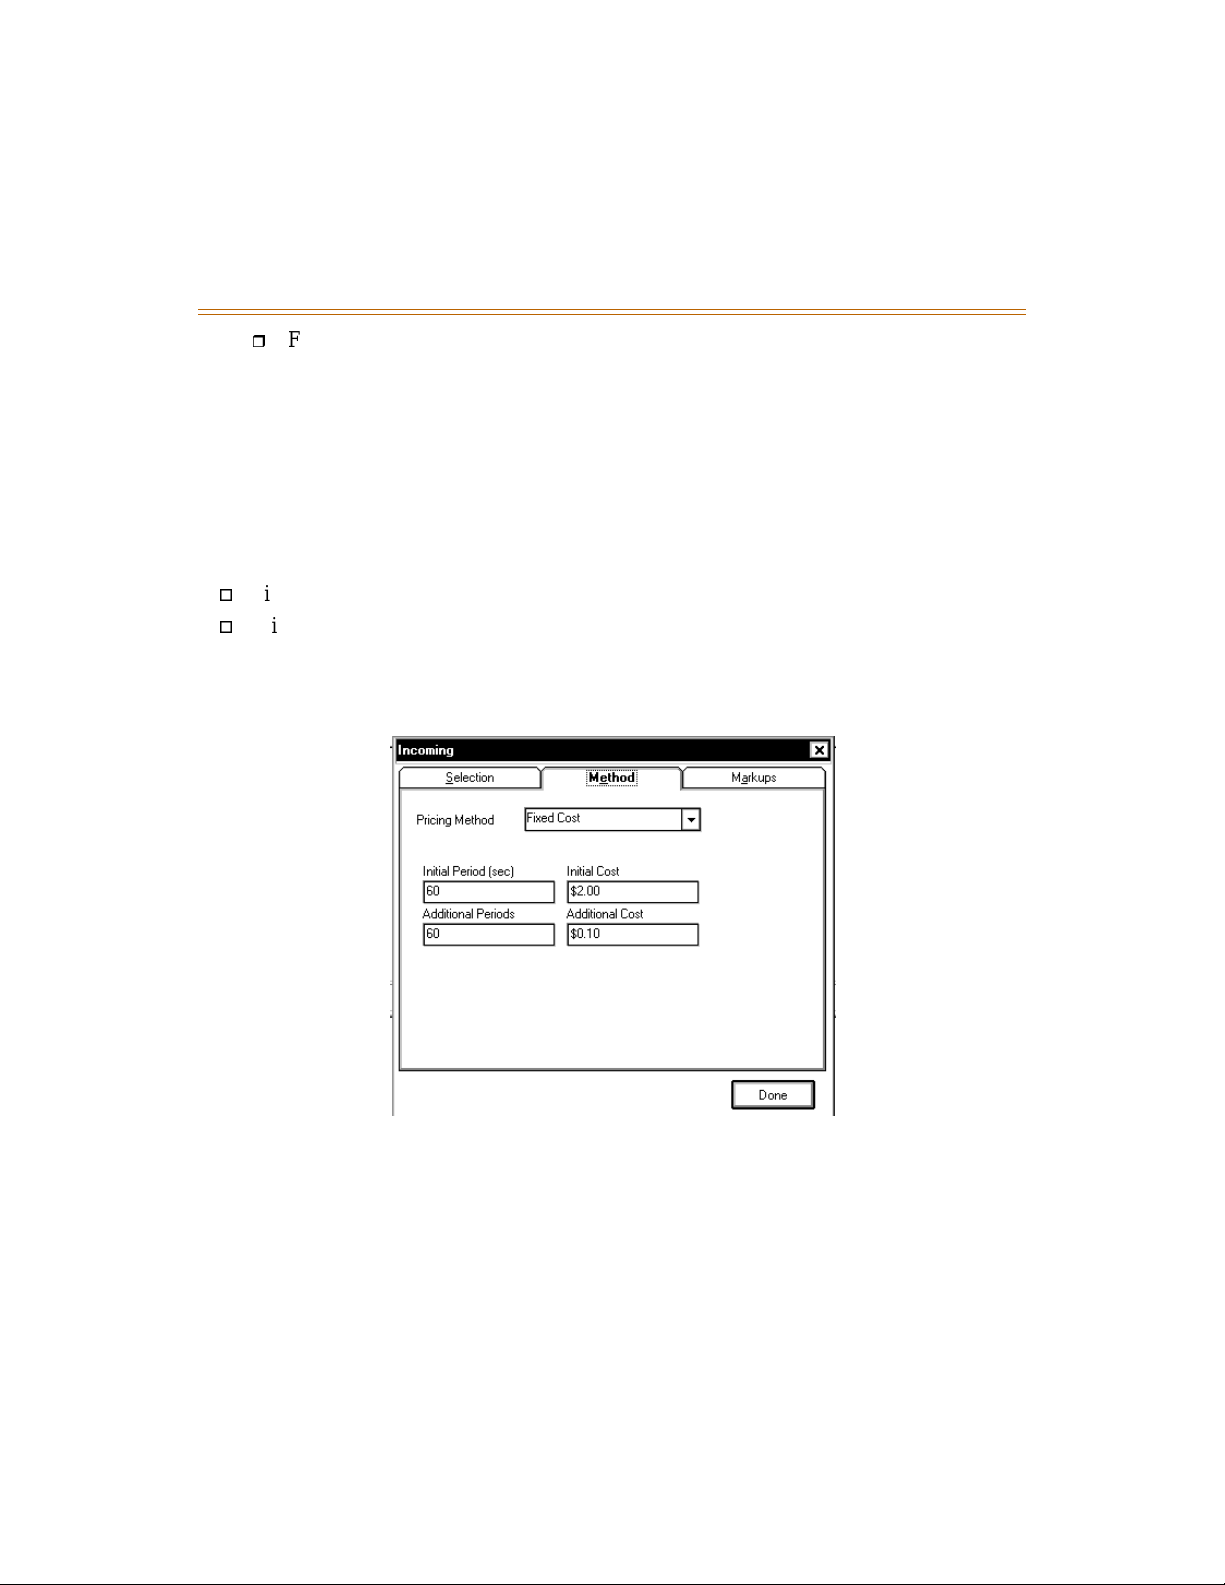
Fixed Cost
Price Band -- For a pricing mechani sm that is time-of-day and duration sens itive for all
If a single ch arge is to apply, regardless of time of day (as with local c al ls) .
--
calls with this service. This is useful for leased lines or other special services.
From the dialog box, you can choose t he band t o use and click o n <Done>, click on <Modify> ,
or <Add New> as needed for new band definition.
.
Figure 2-5: Method Tab - Fixed Cost
Modifying or Adding a Fixed Cost Call
Using fixed pricing causes CallSort Pro to charge a set rate by the minute. To set up such a
charging schedule, perform the following steps:
1. From the Configure menu, select Pricing Customize.
2. Select the type of call you want to price under the Selection tab.
3. Click on the Method tab.
4. Select Fixed Cost as the Pricing Method
Page 30
2-12 Configuring Call Pricing
Configuring Collection May 1999
5. Enter the pricing and time periods described as follows:
Table 2-6: Fixed Cost Field Descriptions
Field Description Example
Initial
Period
Initial Cost Cost for the initial period. To charge $1 for the initial minute of the call, enter 1.00.
Additional
Periods
Additional
Cost
Initial time period for
pricing in seconds.
Unit of time for each
additional time period.
Cost for the time period
listed in Additional
Period.
To charge for the initial minute of the phone call, enter 60.
To charge per minute, enter 60.
To charge per second, enter 1.
To charge 50 cents per minute, enter 60 in Additional
Period and .05 for Additional Cost.
To charge one cent per second, enter 1 in Additional
Period and .01 in Additional Cost.
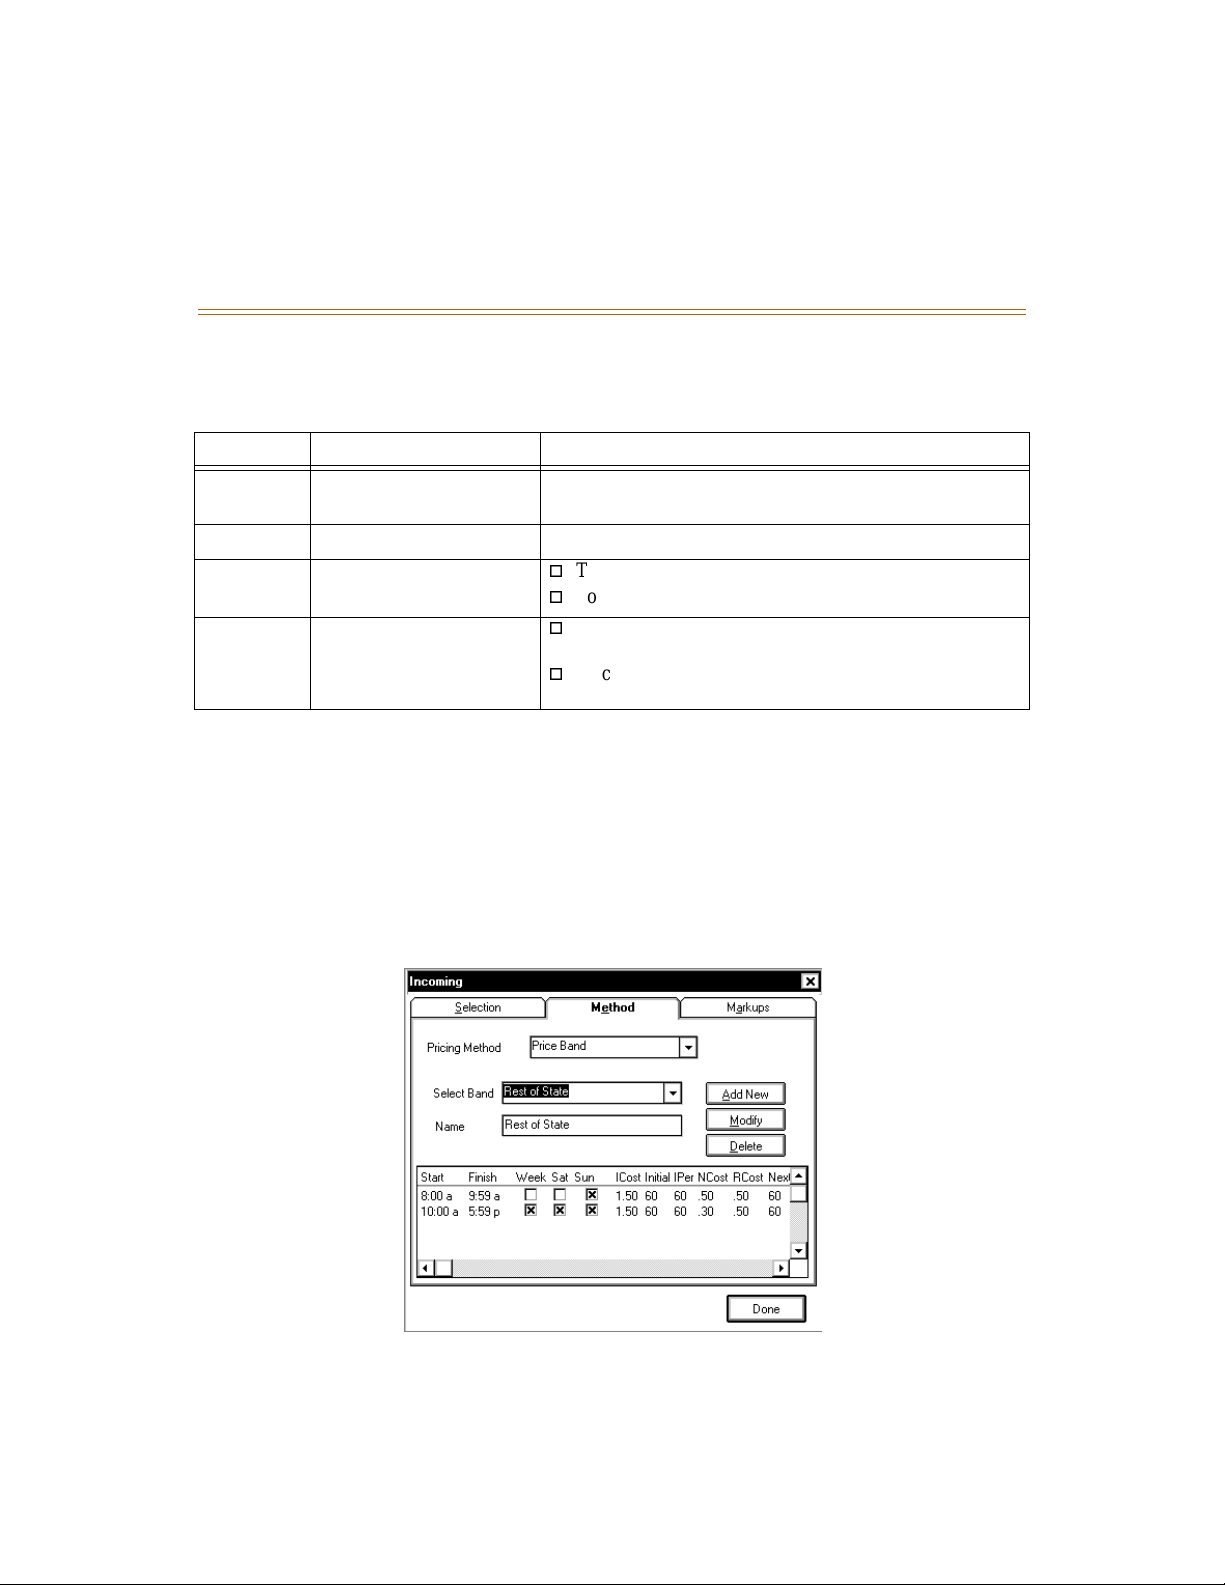
Modifying or Adding a Price Band
Price Bands allow pricing based on ti me of day and day of wee k. Price Band s also all ow more
flexibility over how calls are pri ced. These inst ruction s descri be how to configur e Price Bands.
1. At the Collection module’s main screen, select Configure then Price Customize.
2. On the Selection tab, highlight the call type you want to price. If you want to create a
new Call Model, click <Add New>. Refer to
Defining Call Model
3. Click on the Method tab, then the Pricing Method pull-down menu; choose Price Band.
for more details.
Page 31
Configuring Call Pricing 2-13
May 1999 Configuring Collection
4. In the Select Band pull-down menu, highlight the band to modify, and click on
<Modify>, or click <Add New> to define a new band. A dialog box similar to the
following is displayed (it will contain entries if you are modifying):
Figure 2-6: Method Tab - Price Band
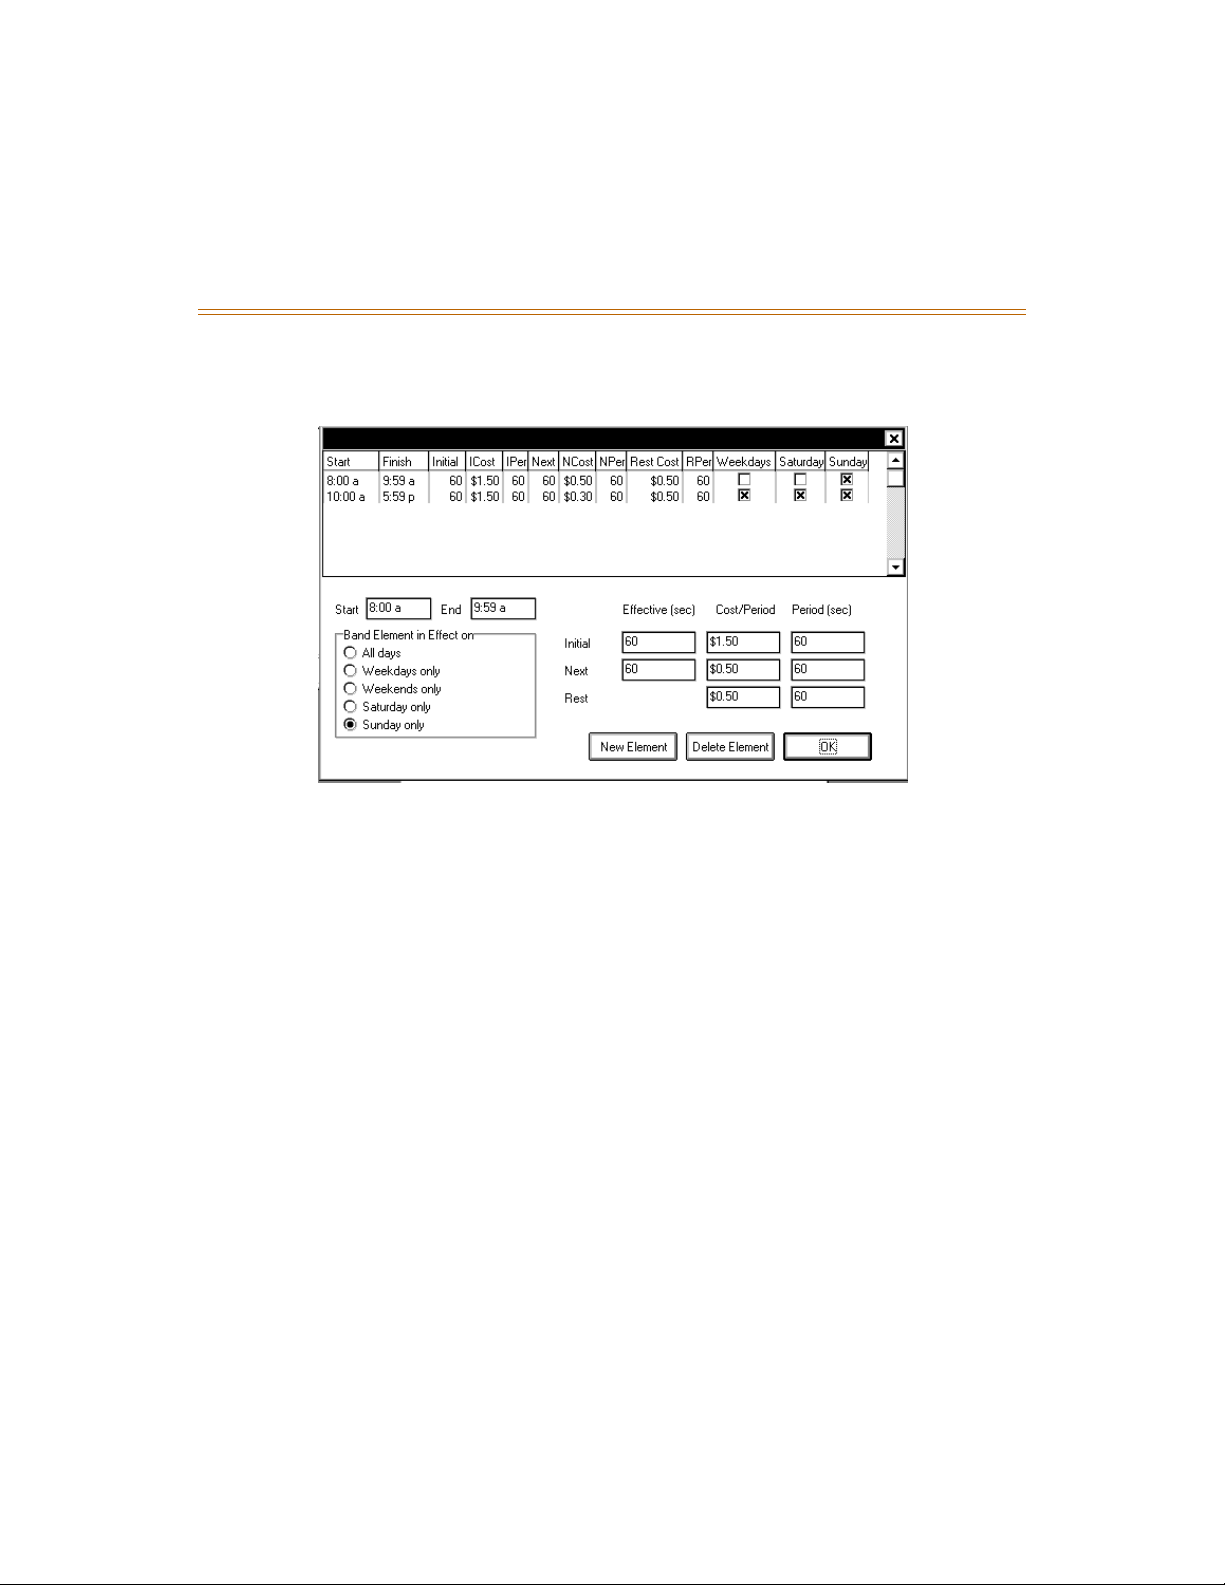
5. In the Start and End fields, enter the time of day that the band should be in effect. This
will allow you to set up different price schedules for different times of the day. If the
band should be in effe ct 24 hours a da y, set Start to 00:00 and End to 23:59. Use 24-hour
(hh:mm) notation to define the Start and End times. Make certain that you account for
all hours of the day when assigning charges or the system may behave erratically.
6. In the Band Element in Effect On area in the bottom left-hand corner of the screen,
check the time period that applies. These options allow you to charge different rates on
certain days. If you want your charge band to be in effect 365 days a year, check All
Days.
7. Under the Initial-Effective (sec) field, enter the time period to represent the first charge
period (for example, 6 0 to make the first char ge period one minute long) . This wi ll make
the first charge period one minute long. Set the first Cost/Peri od fi eld to the cost for this
period, and re-enter the time in the per seconds box (for example, .15 per 60 seconds to
charge 15 cen ts for the first minute).
Page 32

2-14 Configuring Call Pricing
Configuring Collection May 1999
8. In the pr icing table, en ter the following values as described.
Table 2-7: Pricing Band Field Descriptions
Field Description
Initial-Effective (sec) Initial time for the entire cost/period to be in effect.
Initial-Cost/Period Price per period.
Initial-Period (sec) Amount of time priced for the Initial Cost/Period option.
Next-Effective (sec) Time period to represent the next time for the entire cost/
period to be in effect.
Next-Cost/Period Price per interval defined by the Next Period (sec) option.
Next-Period (sec) Interval priced by the cost the Next Cost option.
Rest-Cost/Period Price per interval defined by the Rest Period (sec) option.
Rest-Period (sec) Interval priced by the cost defined by the Next Cost option.
CALL PRICING EXAMPLE
I would like to price the calls between 7:00a and 5:30p, Monday through Friday, using these
costs:
$1 per minute during the first minute of each call.
Each additional minute at 50 cents per minute.
1 cent per second during the initial minute of the call.
The next minute at 2 cents per second during the second minute of the call.
Each additional minute at 50 cents per minute.
To set up this scenario, perform the following steps:
1. Select the appropriate Call Model for this pricing method. (Choose Local for this
sample.)
2. Click on the Method tab, choose Price Band as the Pricing Method, and click on <Add
New>.
3. Type a name for this Price Band in the Name field and click on <Modify>.
4. Enter 07:00 for the Start Time and 17:30 for the End Time.
Page 33
Configuring Call Pricing 2-15
May 1999 Configuring Collection
5. Click on <Weekdays Only>, under the Band In Element On option, and ent er as f ollows:
Initial-Effective = 60 Next-Cost/Period = 0.05
Initial-Cost/Period = 1.00 Next-Period = 60
Initial-Period = 60 Rest-Cost/Period = 0.05
Next-Effective = 60 Rest-Period = 60
6. Click on <New Element>; enter 00:00 for the Start Time and 06:59 for the End Time,
click on <Weekdays Only> under the Band in Element On option, and enter as follows:
Initial-Effective = 60 Next-Cost/Period = 0.05
Initial-Cost/Period = 0.05 Next-Period = 60
Initial-Period = 60 Rest-Cost/Period = 0.05
Next-Effective = 60 Rest-Period = 60
7. Click on <New Element>; enter 17:31 for the Start Time and 23:59 for the End Time,
click on <Weekdays Only> under the Band in Element On option, and enter as follows:
Initial-Effective = 60 Next-Cost/Period = 0.05
Initial-Cost/Period = 0.05 Next-Period = 60
Initial-Period = 60 Rest-Cost/Period = 0.05
Next-Effective = 60 Rest-Period = 60
8. Click on <New Element>; enter 00:00 for the Start Time and 23:59 for the End Time,
click on <Weekends Only> under the Band in Element On option, and enter as follows:
Initial-Effective = 60 Next-Cost/Period = 0.02
Initial-Cost/Period = 0.01 Next-Period = 1
Initial-Period = 1 Rest-Cost/Period = 0.05
Next-Effective = 60 Rest-Period = 60
9. If you need to set up more price rates for different times of the day or week, do so now.
Otherwise, press <OK>.
Page 34
2-16 Configuring Call Pricing
Configuring Collection May 1999
Specifying Markups/Minimums
To specify markup charges and minimum durations for charges, perform the following steps:
1. At the Collection mod ule’s main screen, select <Pricing Cus tomize> f rom the Config ure
menu.
2. In the Service dialog box, specify the markups and minimums you want.
3. In the Define Service dialog box, click on <Markups>.
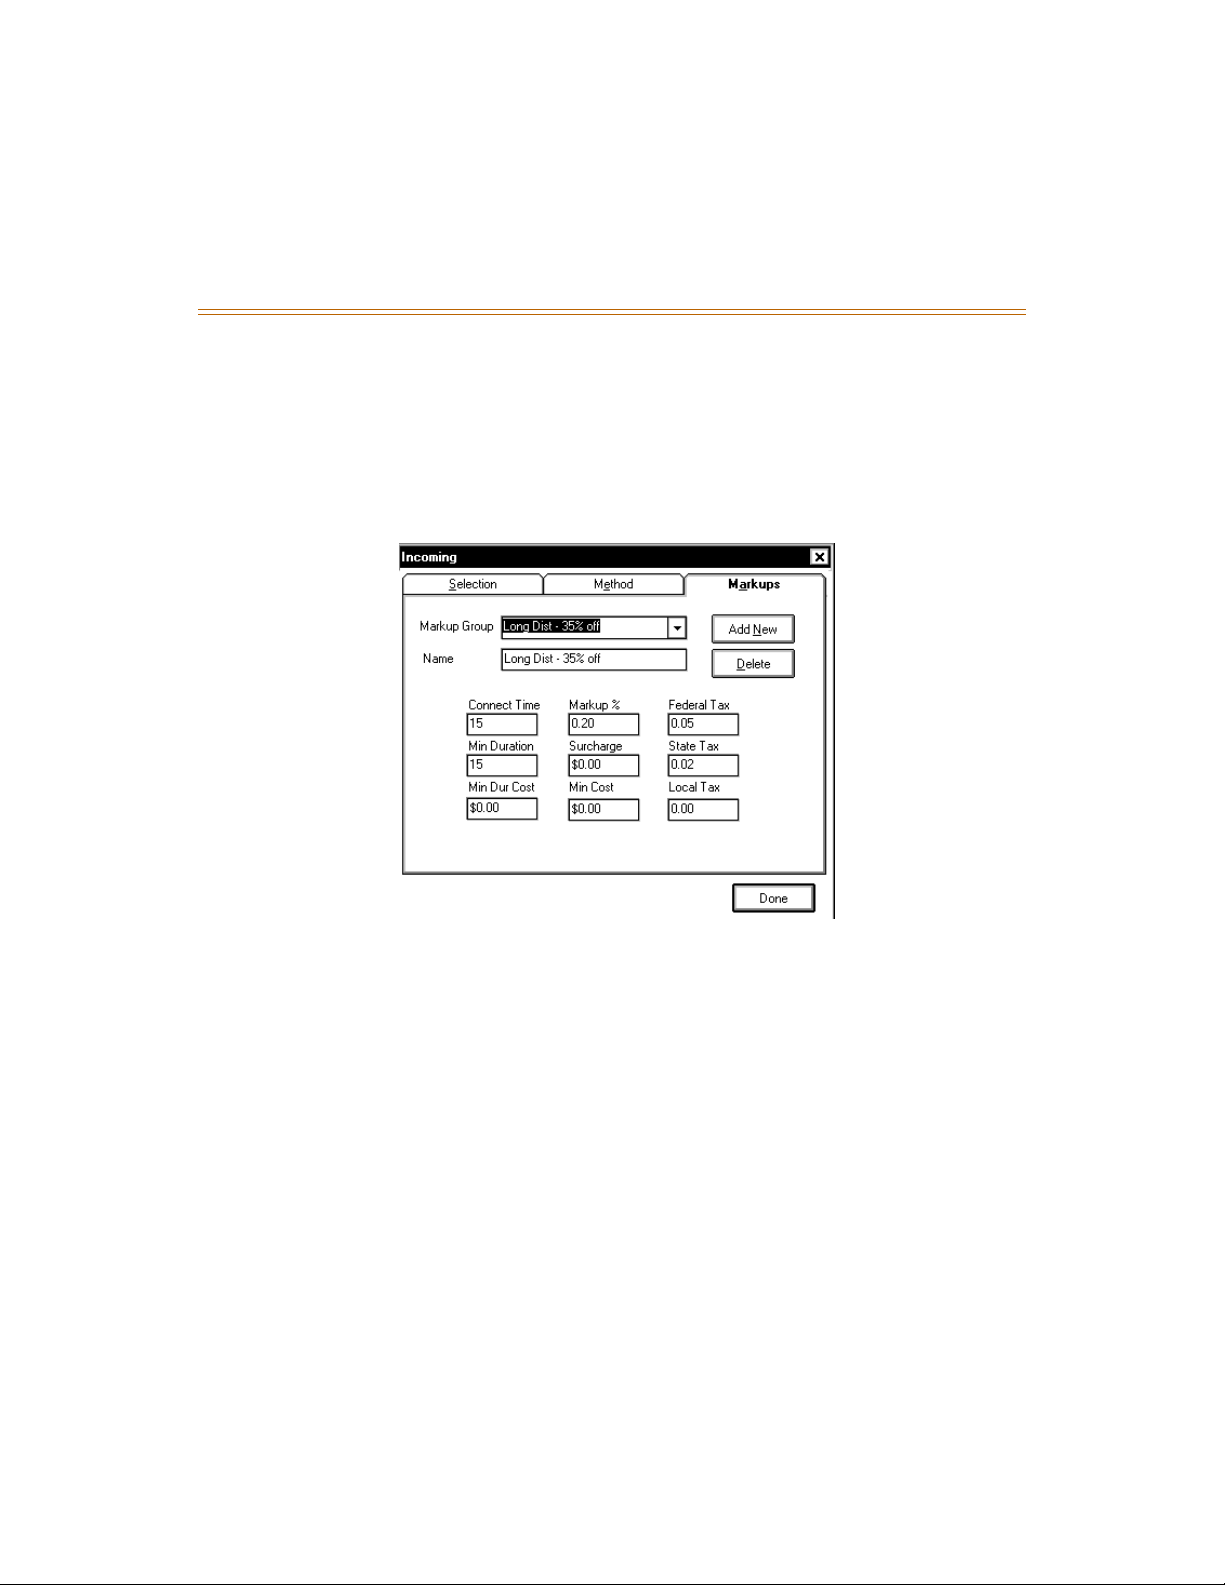
Figure 2-7: Markups Tab
4. In the Markup Group pull-down menu, you can use the pre-defined markups and
minimums, or click on <Add New> as needed for f urther definition.
Page 35
Configuring Call Pricing 2-17
May 1999 Configuring Collection
5. Use the following table to complete the markup and minimum duration charge fields as
described:
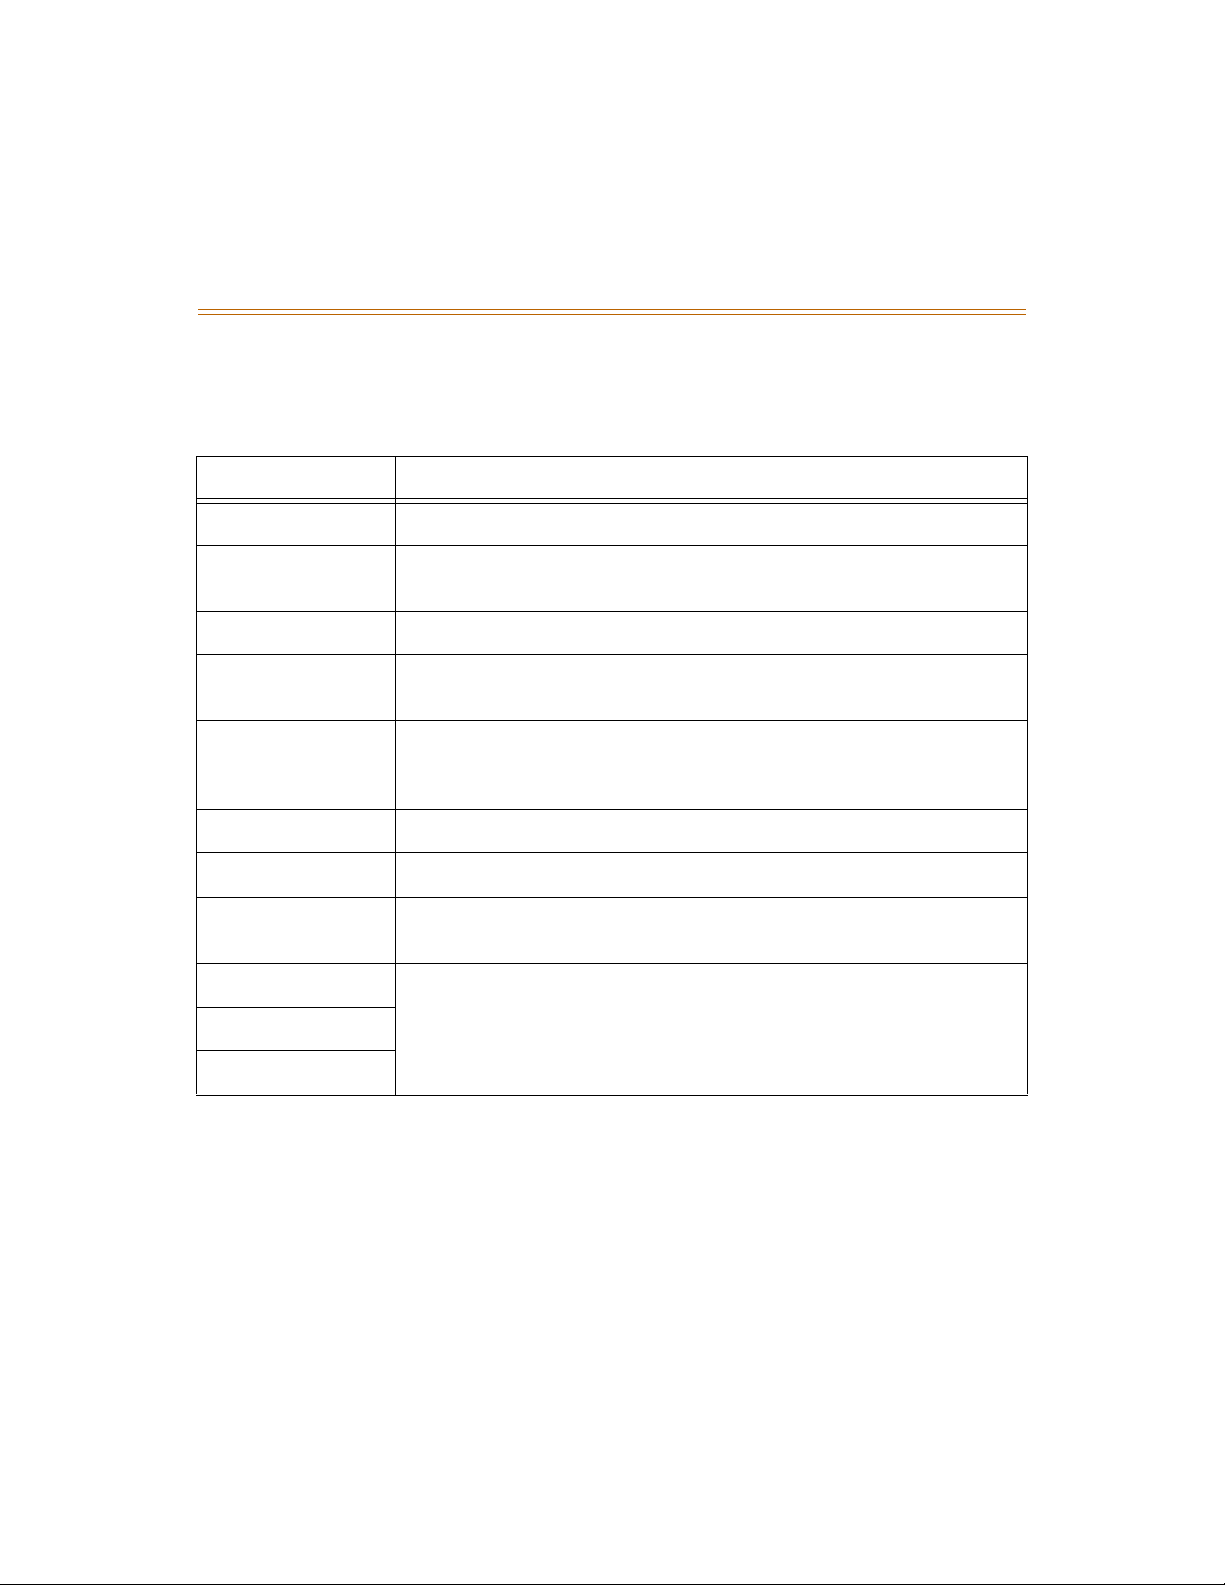
Table 2-8: Markup/Minimum Field Descriptions
Field Description
Markup Group Select Name of the markup scheme you would like to use.
Name When creating a new Markup scheme, you enter the name of the markup
scheme here.
Connect Time Amount of time that is allotted before pricing is started.
Min Duration If a call is shorter than the minimum duration, the call will not be priced by
normal pricing methods.
Min Dur Cost Dollar amount to charge for the minimum duration of a call. Note that
Connect Time + Min Duration time are only charged this amount. This is
before any other pricing begins. Taxes are applied to this cost.
Markup Percentage Markup for the total cost of the call.
Surcharge Any Additional amount, in dollars, to be applied to a call.
Min Cost Minimum cost of any telephone call. If a call does not reach this threshold
via other pricing methods, the call is priced at the minimum cost.
Federal Tax Percentage of tax to apply to the cost of the call, plus any markups or
surcharges.
State Tax
Local T ax
Completing Collection Confi guration
When you have finished t he pro cedure s cove red i n thi s chap ter, you can begin having CallSort
Pro collect call records for use in reports. Proceed with Chapter 3,
Running Collection
.
Page 36

2-18 Configuring Call Pricing
Configuring Collection May 1999
Page 37
3 Running Collection
Now that you have defi ned SMDR records and configur ed the Coll ection module to price c alls,
you’re ready to have CallSort Pro begin collecting data from your system.
Ongoing Operation
Collecting data on an ongoing basis is a very straightforward process.
Refer to your
to place the Collection module in your system’s Startup group.
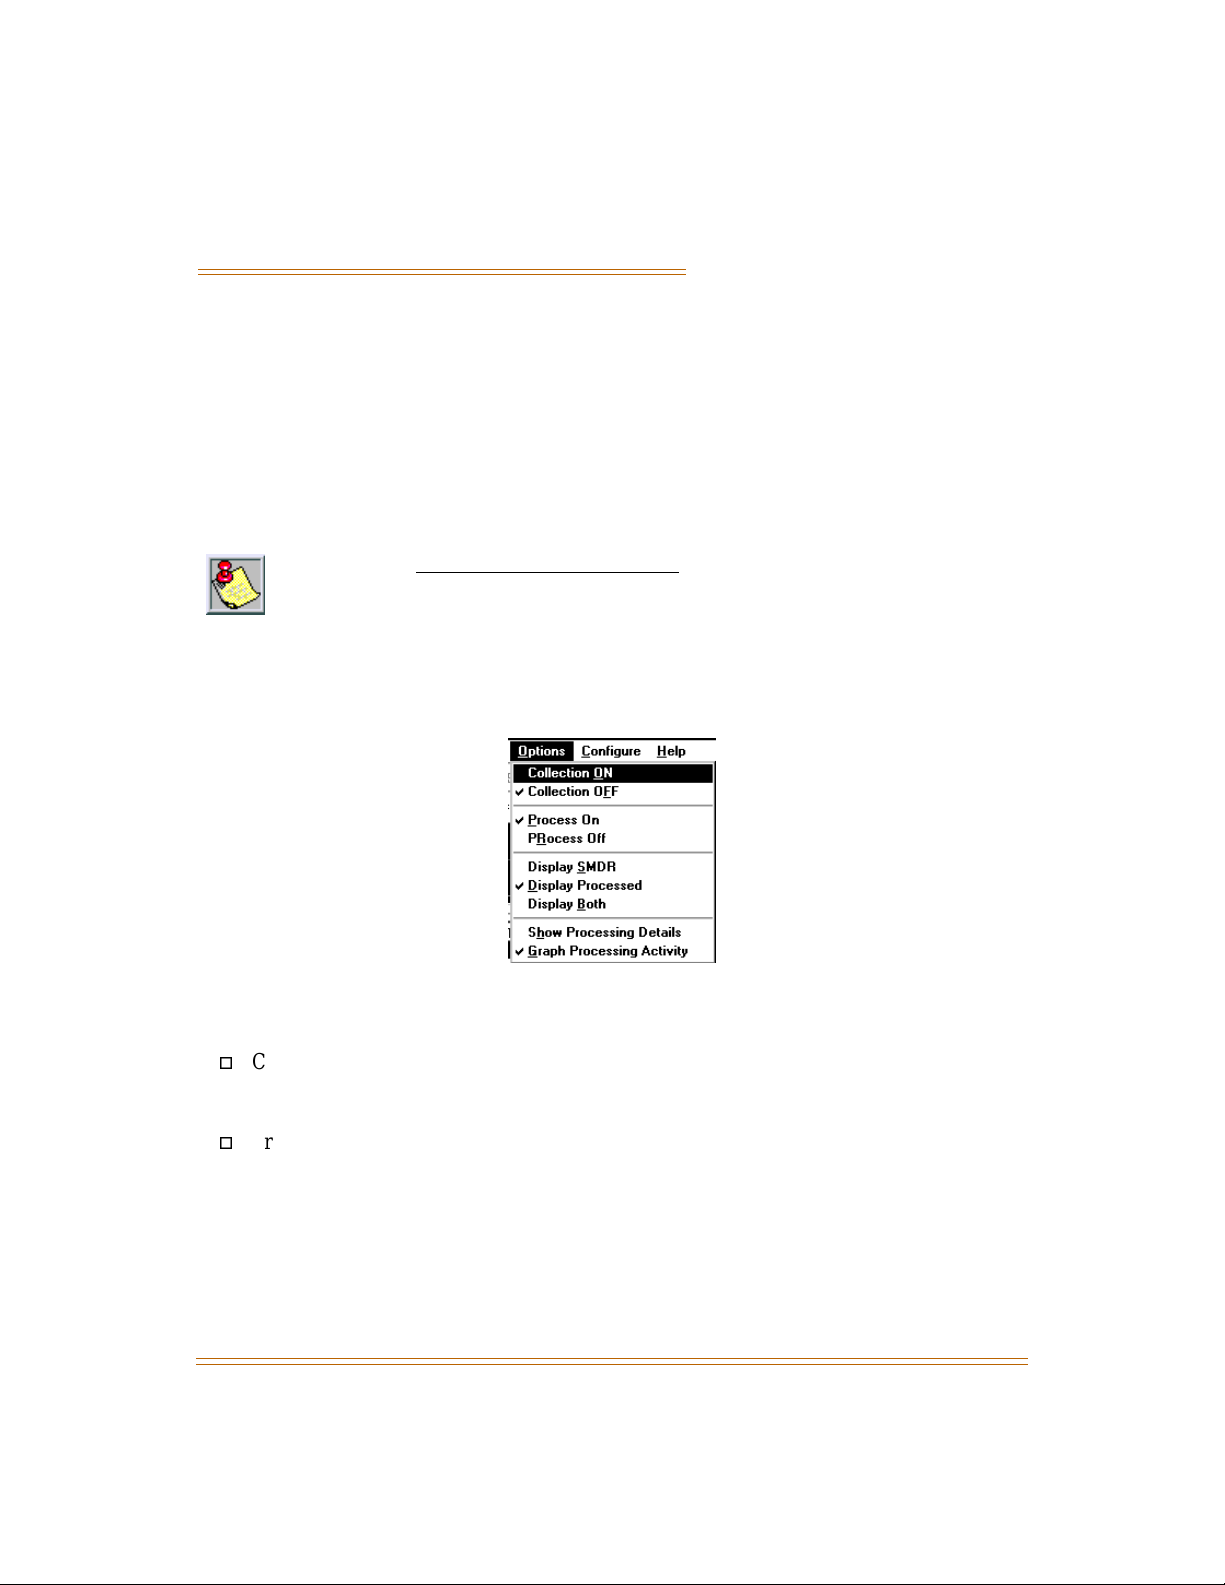
Set the Collection module to run properly with selections from its Options menu, and leave it
running. The Options menu should look similar to the following display during normal
operation.
You should select from the first four options on this menu as follows, and leave the settings
indicated whenever the Collection module is in operation:
Collection ON/OFF -- Select Collection ON to cause the Collection module to receive
the SMDR records from the RS-232 connection. It should be OFF only when you are
first configuring the Collection modul e.
Process On/Off -- Select Process On to transfer data to the Reporting Master table for
storage and Reports. If Process On is not selected, information collected in the
Collection Master table WILL NOT be transferred to the Reporting Master table.
Operating System Inst ructions
for information on how
CallSort Pro v3.0 User’s Guide May 1999
Page 38

3-2 Ongoing Operation
Running Collection May 1999
Database Overview
CallSort Pro uses two databases, one for collecting data, the other for generating reports.
The Collection Master database contains raw SMDR data that has been processed, is
typically stored for a short period of time, and is archived periodically.
The Reporting Master database contains the call record data used to run reports, is not
archived frequently, and can increase to a very large file size (backup is recommend).
Controlling the Displa y Screen
The remaining options on the Options menu control the screen display during Collection
module operation:
Display SMDR -- Displays lines of raw SMDR data on the screen as it is processed.
Display Processed -- Displays pricing operation results during processing which
includes the time, duration, cost, phone number, and destination location for each call.
Display Both -- Turns on both of the above display selections.
Show Processing Details -- Typically used for troubleshooting during communications
with the technical support staff.
Graph Processing Activity -- Graphs call activity.
Page 39
Pricer Configuration Options 3-3
May 1999 Running Collection
Pricer Configuration Options
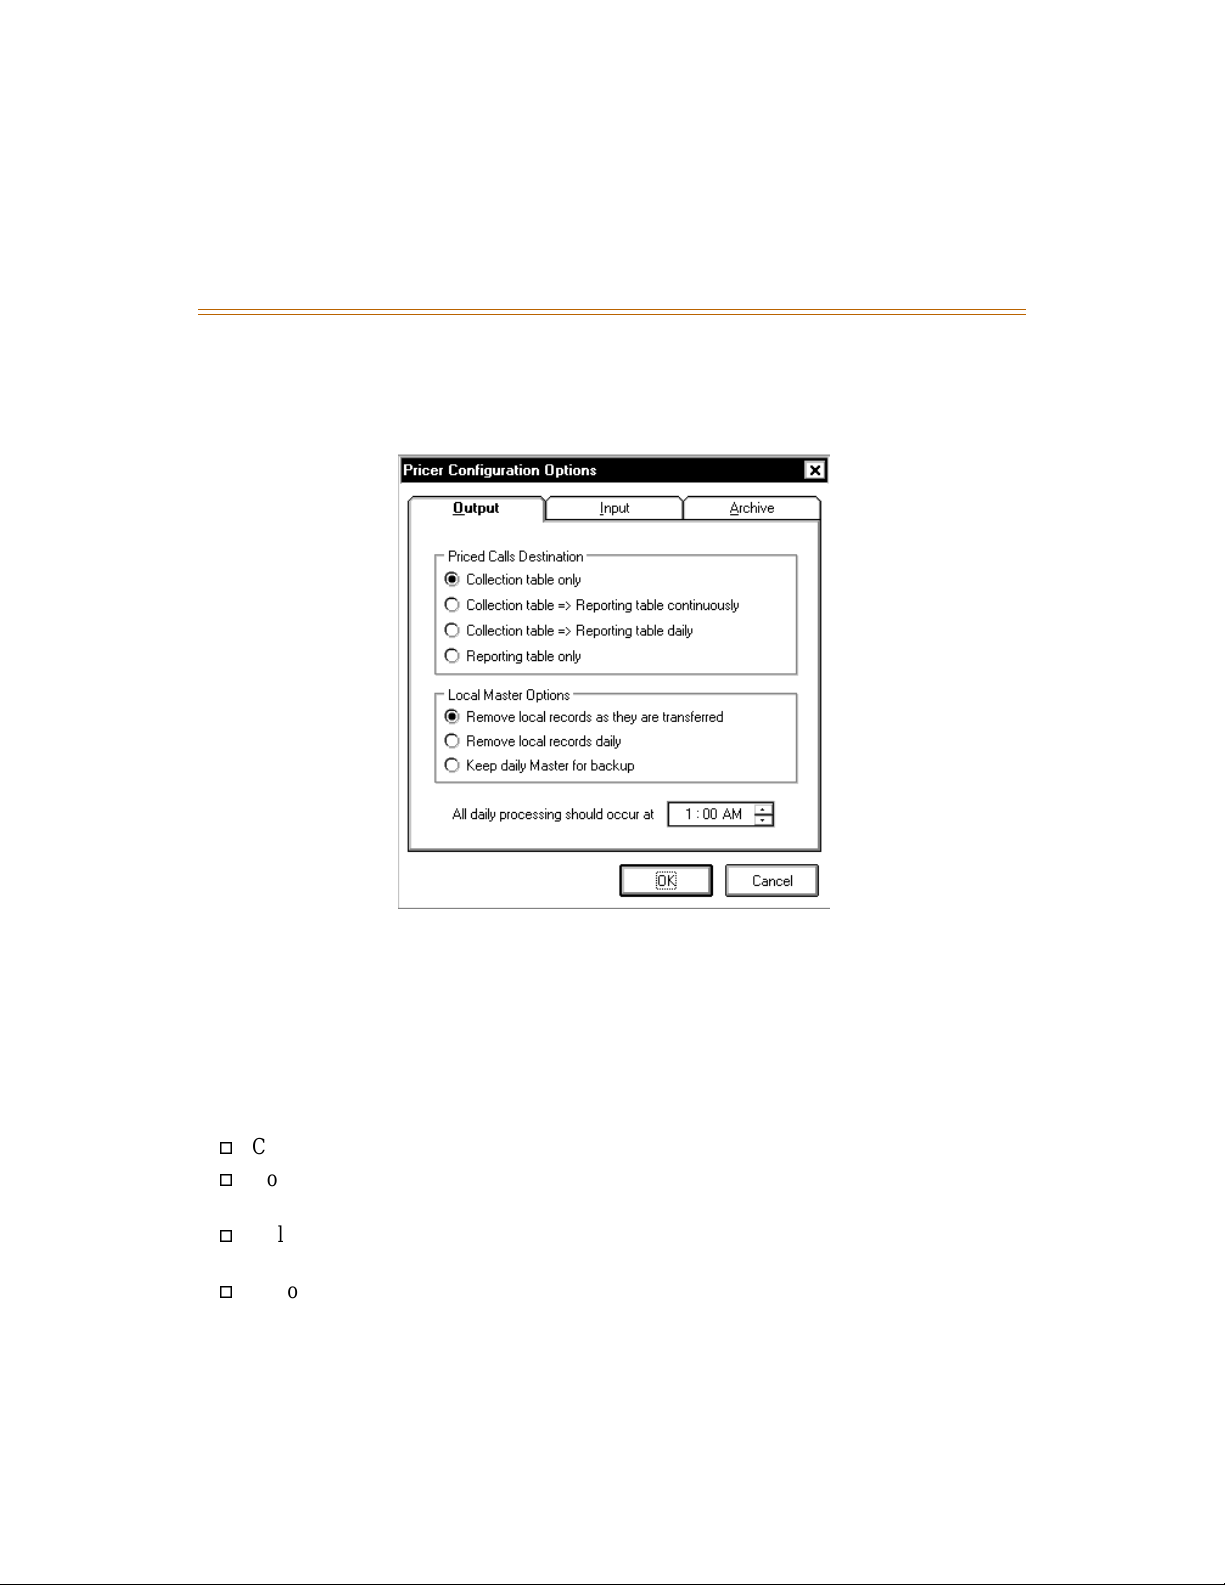
To control pricer configuration options, select Options from the Configure pull-down menu.
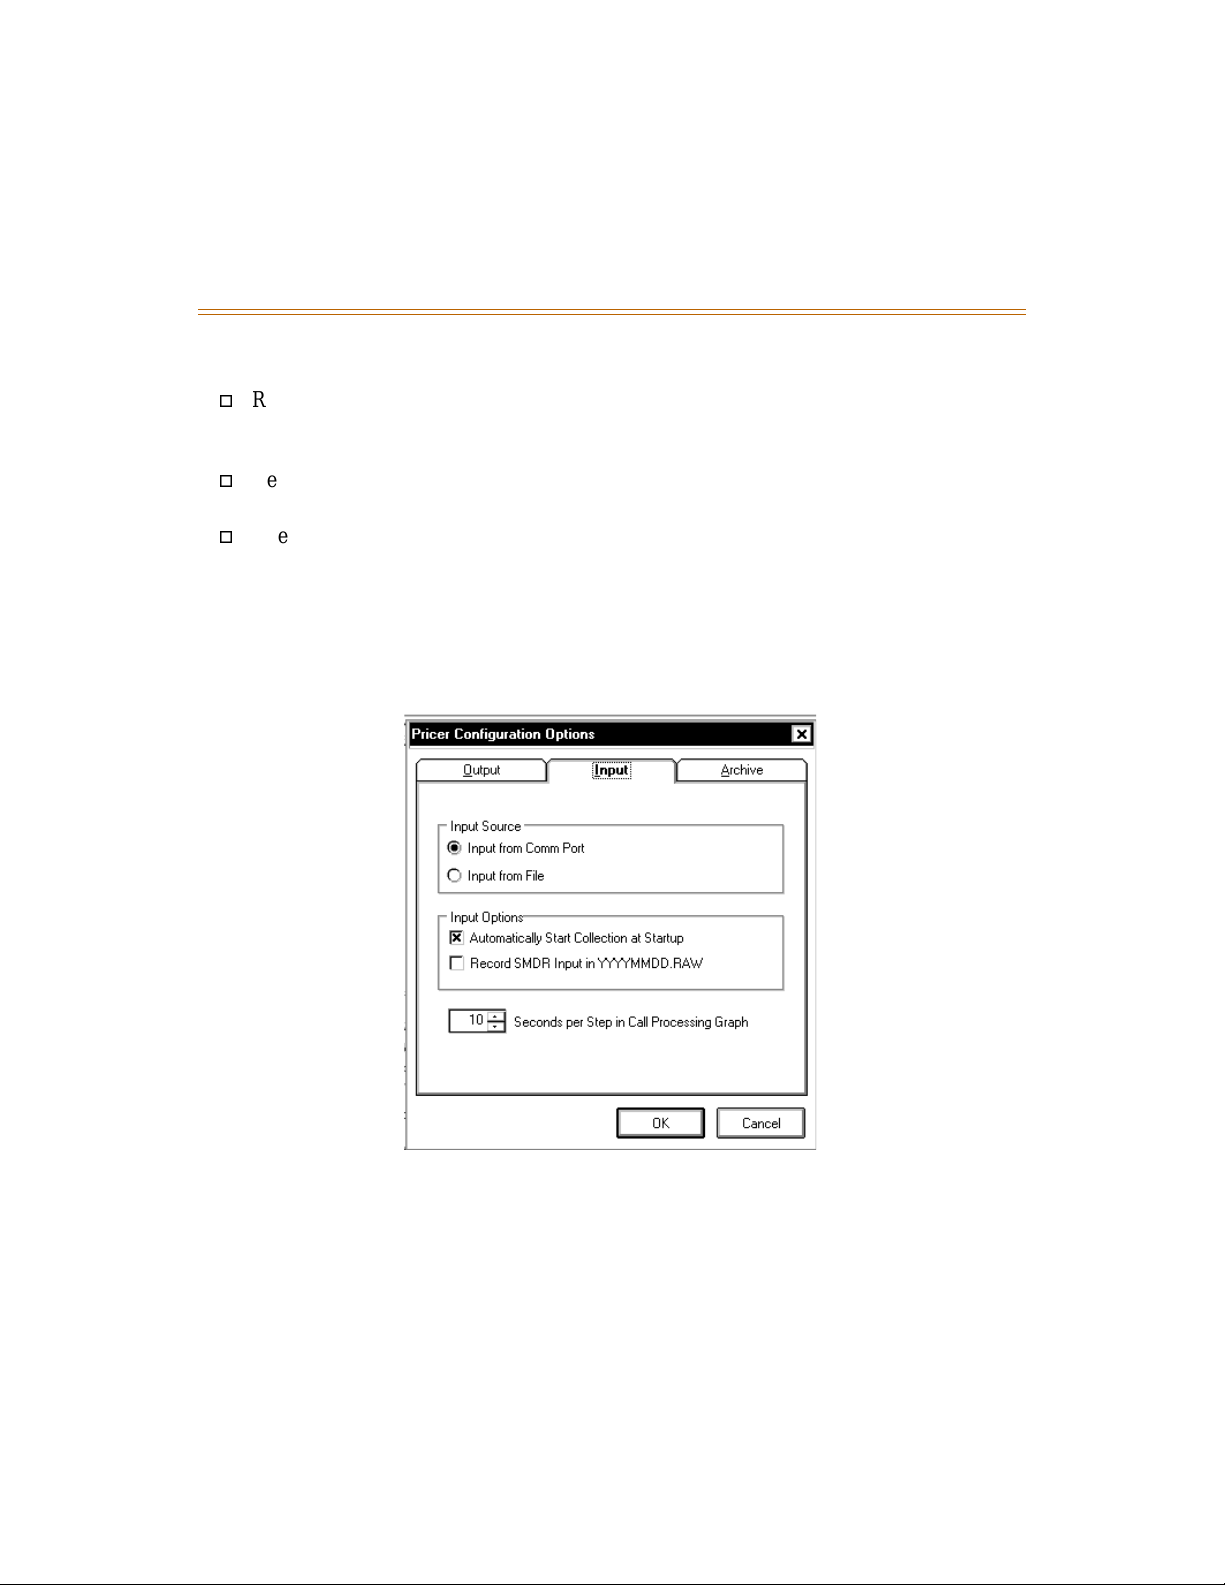
The following screen is displayed:
The Pricer Configuratio n Options menu contai ns Output, Input, an d Archive options which are
described in the following sections.
Output Options
The Output menu provides various options for getting information from a local Master
(collection) tab le to a Reporting Mas ter table. The Priced Calls Desti nation dialog bo x provides
the following options for call destination:
Collection Table Only -- Keeps all calls in th e collection table.
Collection Table => Reporting Table Continuously -- Sends calls from the Collection
table to a Reporting table on a continuous basis.
Collection Table => Reporting Table Daily -- Sends calls from the Collection table to a
Reporting table on a daily basis (you can specify a time at the bottom of the screen).
Reporting Table Only -- Sends all calls to the reporting table.
Page 40
3-4 Pricer Configuration Options
Running Collection May 1999
The Local Master Options allow you to define what t o do with the Co llection Mast er table. The
options are:
Remove Local Records as They are Transferred -- Deletes records from the Collection
Master table as they are moved to the Reporting Master. This option helps to reduce the
size of the C ollection Mas ter table.
Remove Local Records Daily -- Deletes records from the Collection Master table at the
time specified by the All Daily Processing Should Occur at option.
Keep Daily Master for Backup -- Allo ws you to make a backup of t he Collecti on Master
table, and then removes daily records from the Collection Master table.
Input Options
Use the Input option when you are connected to a phone system. Select the Input tab to view
the following menu:
Page 41
Pricer Configuration Options 3-5
May 1999 Running Collection
The Input Source options allow you to determine the source of the SDMR data.
Input from Comm Port -- Causes SMDR data to be read from the COM port on the
Collection PC. The COM port settings are determined by the Communications, refer to
Changing Communication Settings
in chapter 1 for more information on COM port
settings.
Input from File -- CallSort Pro reads SMDR data from a file on the system. When you
start SMDR collection, CallSort Pro requests the filename for SMDR data and g ives you
the option to process the file in Step Mode. Step Mode a llows you to process t he file lin e
by line and is useful for troubleshooting.
In the Input Options dialog box, the following options are available:
Automatically Start Collection at Startup -- Starts collecting and processing data
automatically when you st ar t your PC. (Refer to your
Operating System Instructions
for
using the Startup Group capabilities.)
Record SMDR Input in YYYYMMDD.RAW -- Back up your raw data when checked.
The Seconds per Step in Ca ll Proces sing Graph field al lows you to choose how of ten the g raph
updates itself.
Page 42
3-6 Pricer Configuration Options
Running Collection May 1999
Archive Options
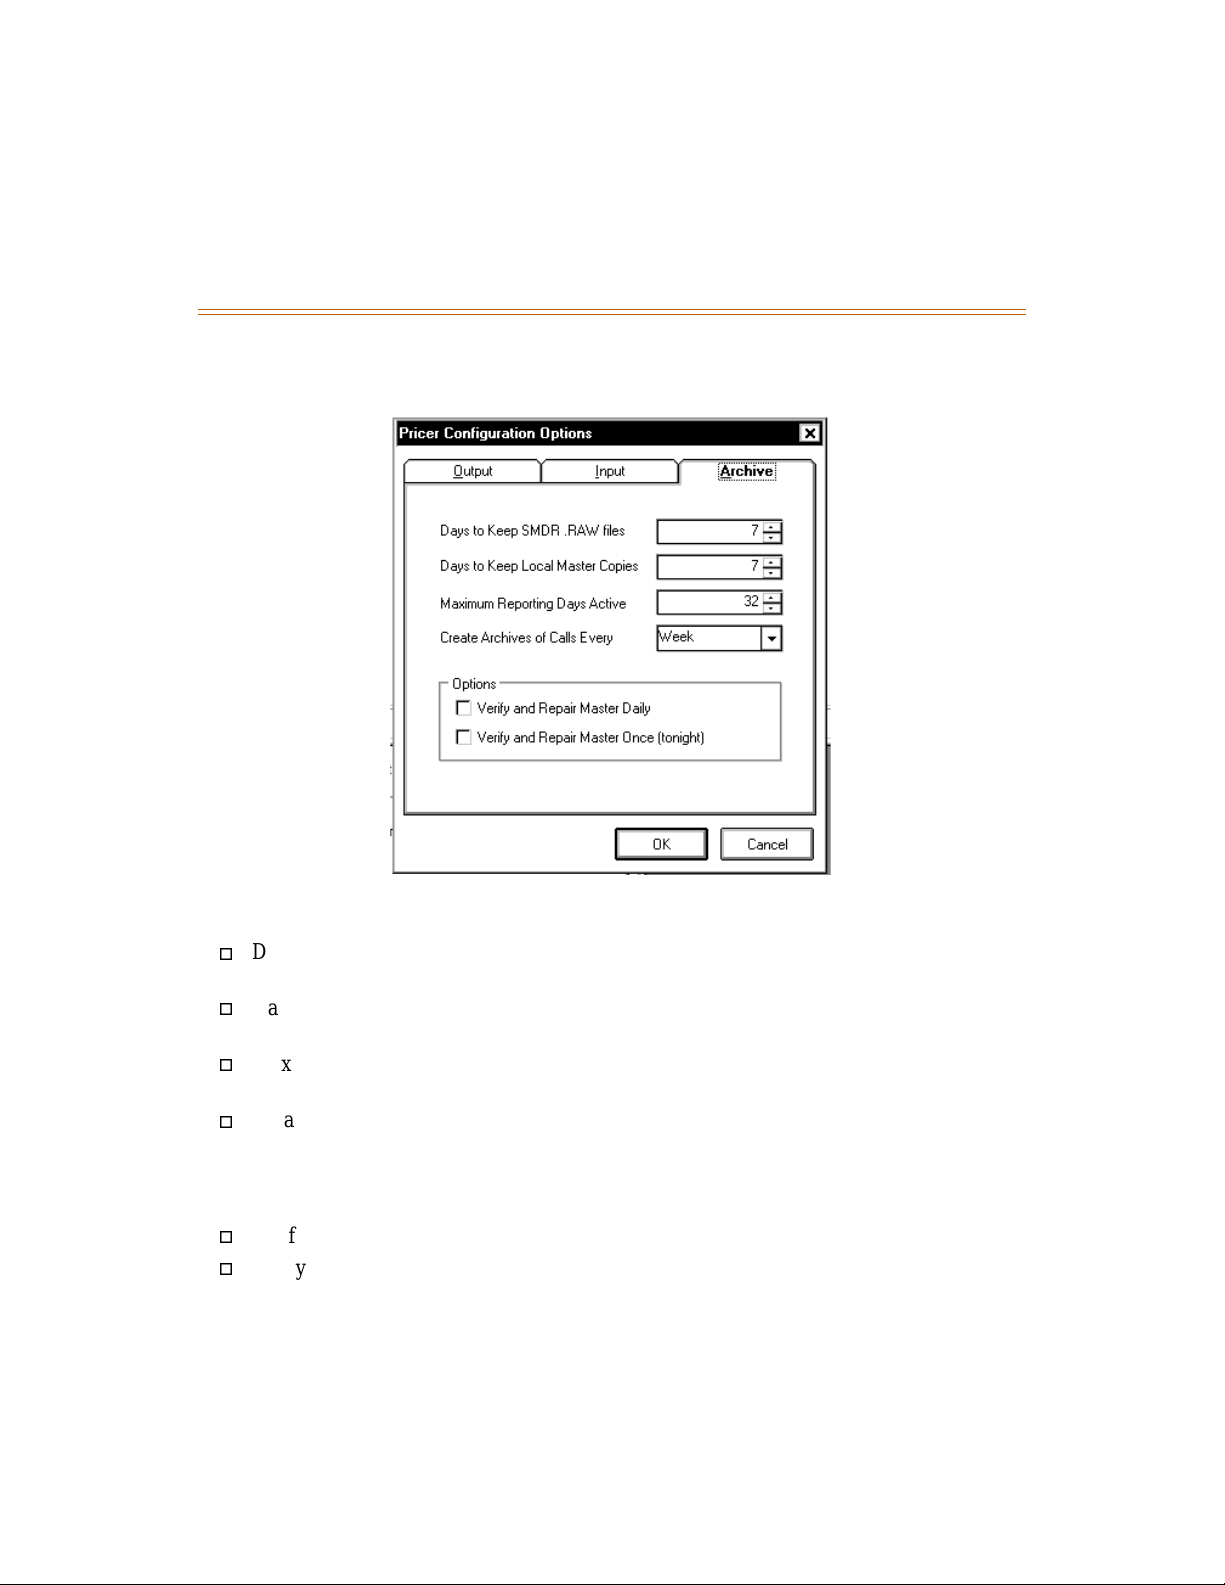
The third tab is Archive. This tab controls when the system arc hives data.
With the Archive option, you can select the following:
Days to Keep SMDR.RAW files -- Defines how many days CallSort Pro keeps
SMDR.RAW data from the phone system.
Days to Keep Local Master Copi es -- Number of d ays for CallSort Pro to keep copies of
the Collection Master table.
Maximum Reporting Days Active -- Total number of days available in the Reporting
Master table.
Create Archives of Call s Every -- Create an archi ve of the Reporting Master t abl e e very
Week, Month, Quarter, or Never.
In the Options box you can specify when to verify and repair the Collection Master table by
selecting one of the following:
Verify and Repair Master Daily -- Checks daily when collection table is not busy.
Verify and Repair Master Once (tonight) -- Checks collection table tonight only.
Page 43
4 System Administration
The Administration and Reporting module provides the capability to manage account
administration a nd report gener ation. This chap ter provide s instruction s for runnin g the System
Administration program to prepa re CallSort Pro with information speci fic to your organization.
This prepares you to se t up the Administrati on module by entering inf ormation on the company ,
the system’s users, phone extensions, acc ounts, a nd trunk lines. Af ter you have comple ted thi s
process, you are ready to begin generating reports with CallSort Pro . (How to produce and
create reports is described in more detail in Chapter 5,
Before proceeding, be sure you have completed all procedures
described in the previous chapters.
Generating Reports
Administration Setup
To begin Administration Setup, select CallSort Pro from the available CallSort Pro program
options. When prompted to enter your user name and password for the first time, enter
MANAGER in both fiel ds. (T o change the password, refer t o
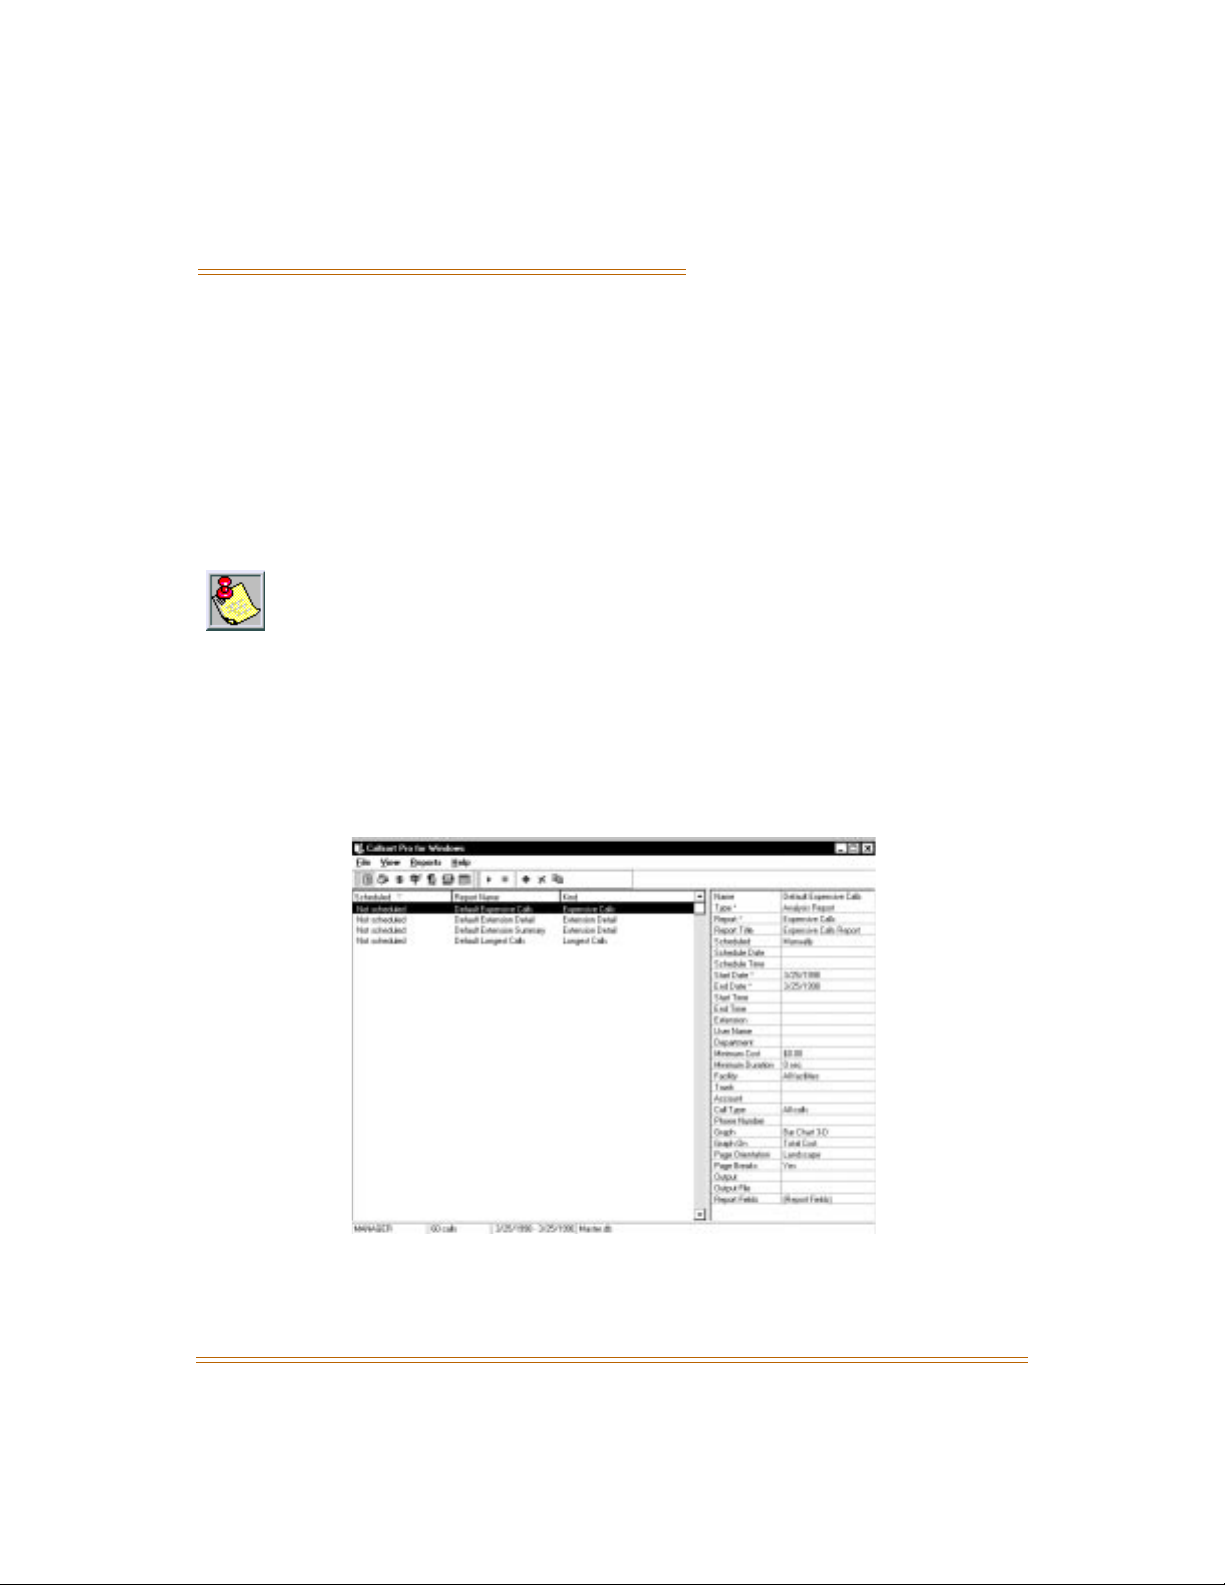
1.) Then click on <OK>, the following screen is displayed.
Menu Options Available
.
in chapter
Figure 4-1: System Administration Screen
CallSort Pro v3.0 User’s Guide May 1999
Page 44
4-2 Administration Setup
System Administration May 1999
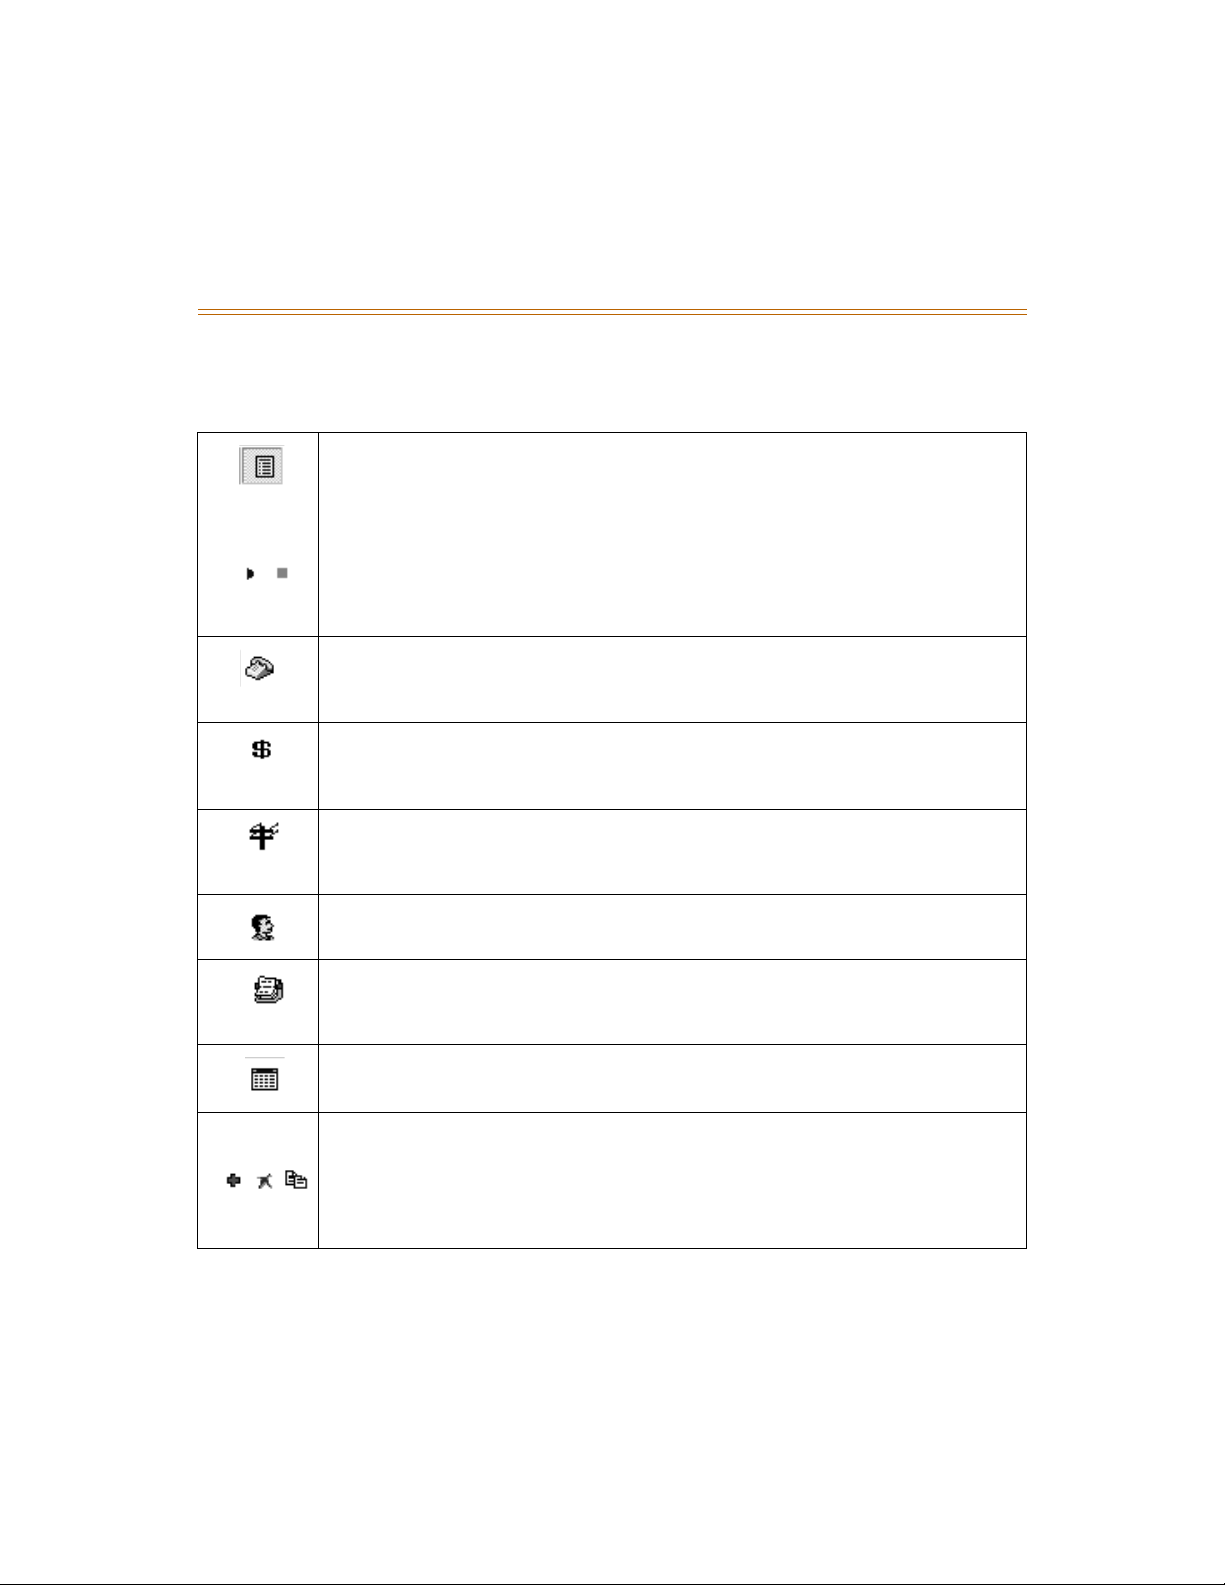
Use the icons on the tool bar that represent a different action or screen view as described:
Table 4-1: Administrative Icons Described
Report Screen
reports have already been defined. Refer to
-- Allows you to configure and schedule reports, and shows what
Contact Information
in this chapter for
more information.
Icons available when viewing the Reports screen:
Arrow -- Run s a query on the database for the report designated on the Report
screen.
Square -- Stops a report from generating once it has been started.
Extension Screen
within CallSort Pro. Refer to
-- Allows assigning a user to a particular extension or extensions
Extension Information
in this chapter for more
information.
Account Code Screen
user or contact information. Refer to
-- Allows account codes to be associated with a particular
Account Codes
in this chapter for more
information.
Trunk Screen
particular trunks within the telephone system. Refer to
-- Shows facility, telephone and telephone numbers associated with
Trunk Line Information
this chapter for more information.
User Screen
system. Refer to
Contact Screen
customers of the business where CallSort Pro is installed. Refer to
Information
-- Defines user names, access levels, and passwords on the CallSort Pro
User Information
in this chapter for more information.
-- Defines contacts related to account codes and typically represent
Contact
in this chapter for more information.
in
Master T a ble
Generating Reports
-- Allows you to view the Reporting Master T able. Refer to chapter 5,
, for more information.
Editing Icons Available:
Plus -- Inserts a new item.
X -- Deletes the currently selected item.
Duplicate Pages -- Copies the currently displayed item and creates a new item with
similar properties.
Page 45
Setting Up Company Information 4-3
May 1999 System Administration
Setting Up Company Information
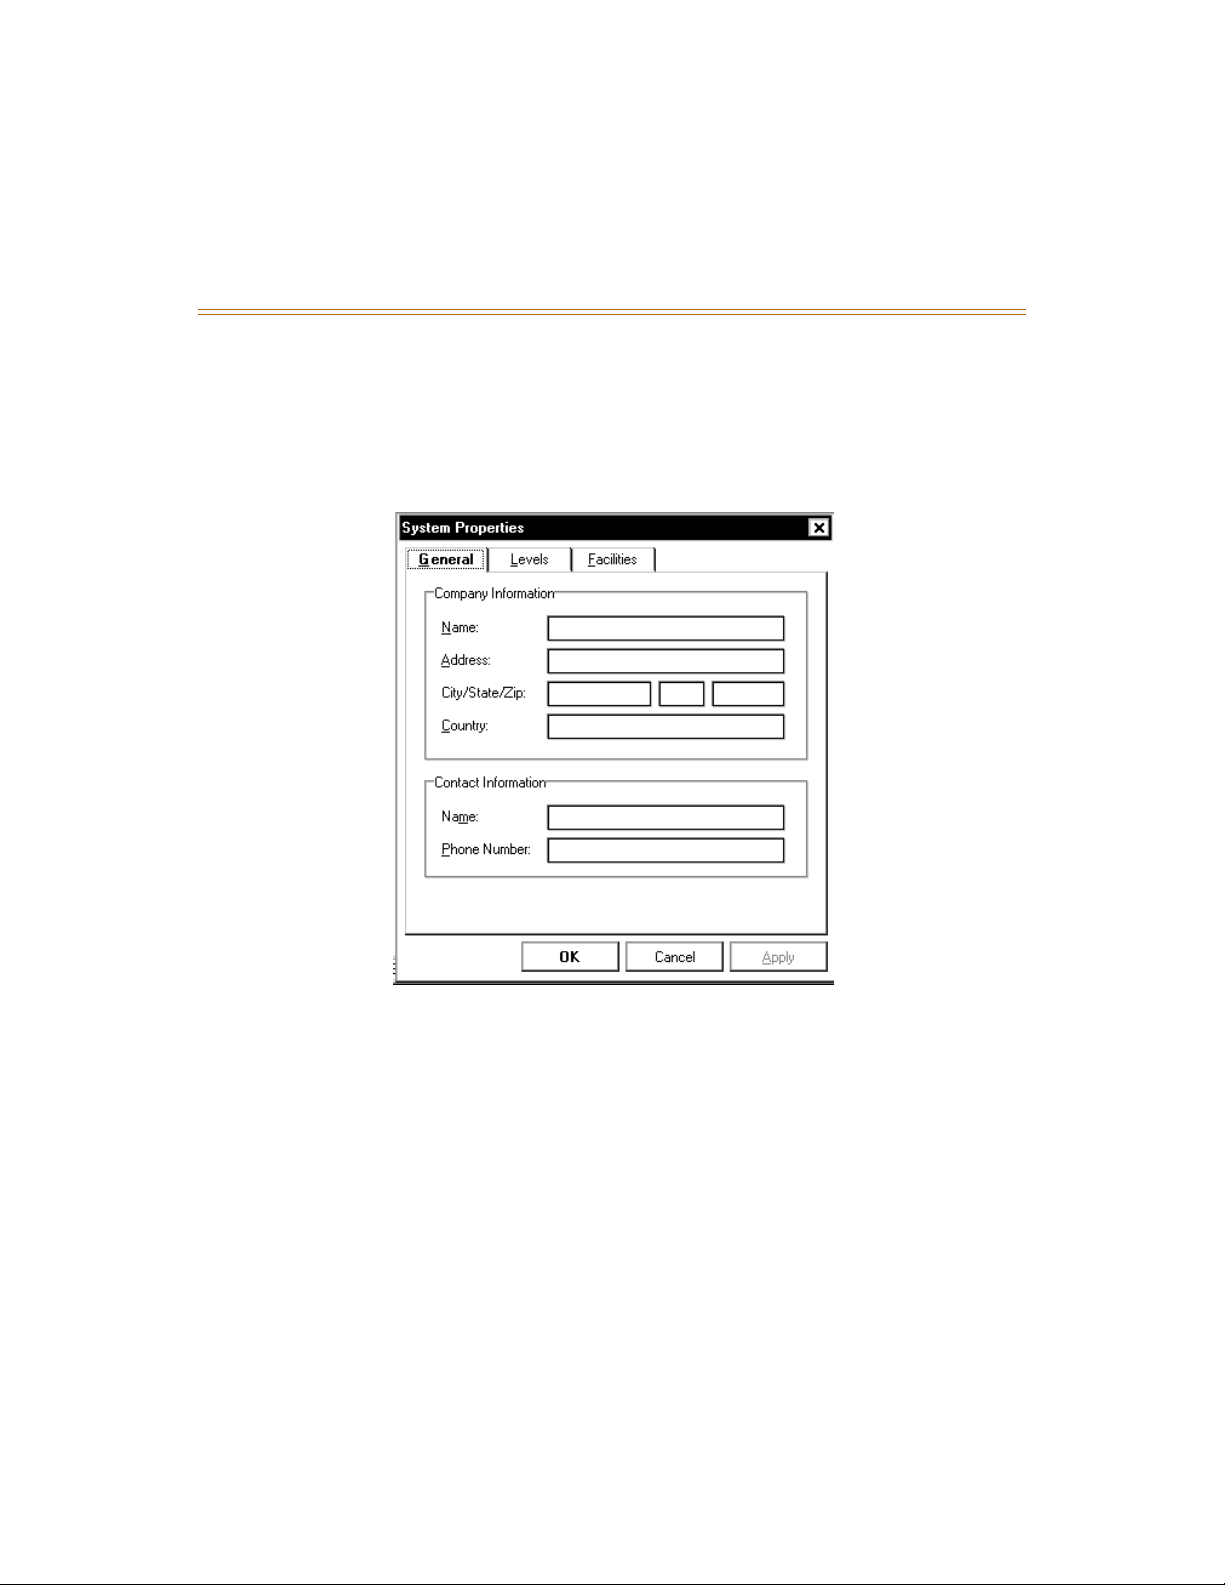
This information i s used t o crea te the hea der of the re port whe n a r eport is gene rated . To begin
entering information about your company, perform the following steps:
1. Select System Properti es from th e File menu, t hen selec t the Gener al tab at th e top of th e
screen. The following screen is displayed:
2. Enter the Name, Address, City/State/Zip and Country for your company.
3. Enter the Name and Phone number for the person responsible for maintenance of
CallSort Pro.
Page 46
4-4 Defining Organization Levels
System Administration May 1999
Defining Organization Levels
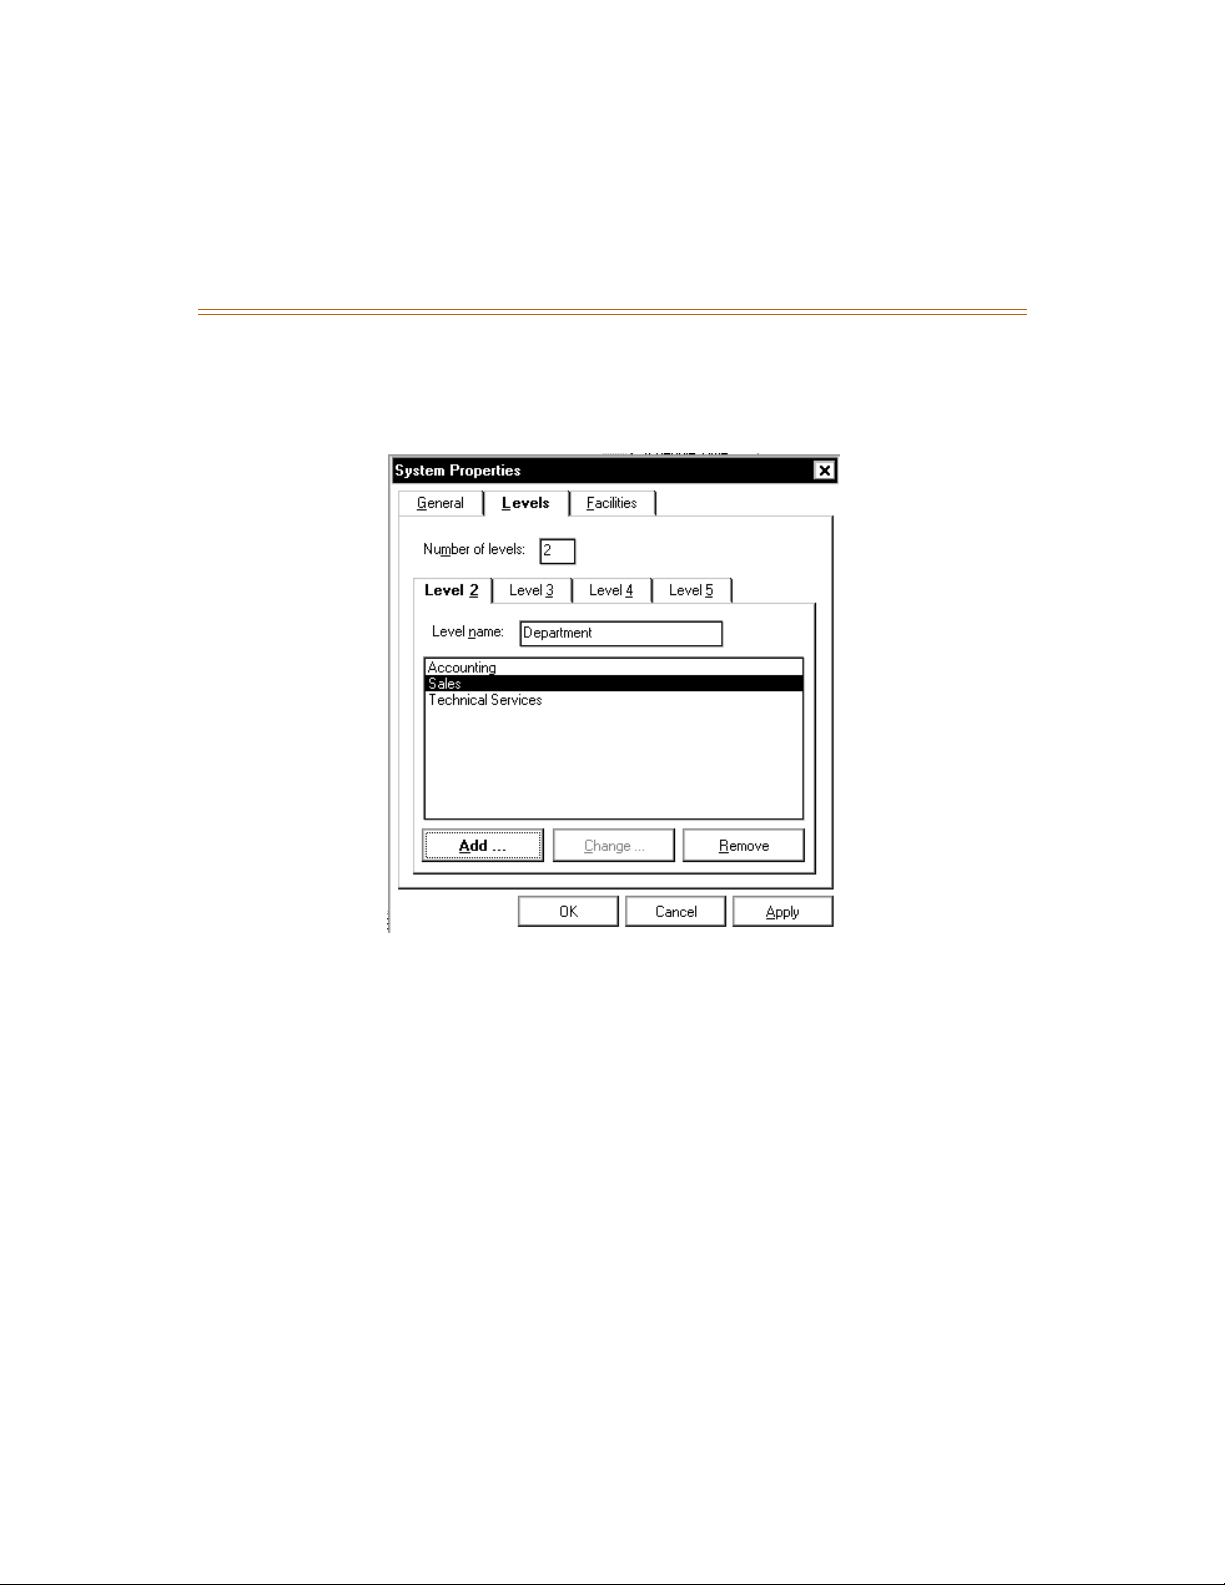
T o define levels in your or ganization, from lowest to highest, sel ect System Pr operties f rom the
File menu, then sele ct the Lev els tab at t he top of the scree n. The foll owing scre en is dis played:
The level information is used in generating reports, and should reflect the divisions of your
organization are related to call accounting. Common levels would be Location, Branch,
Division, and Department.
You can enter any number descriptive names for each level. For example, if Level 2 is named
Department, you can enter Accounting, Sales, Technical Services and any other department
relevant to your application. When creating a report, you will see an option to filter the report
on Department. The options under Department will be Accounting, Sales and Te chnical
Services.
Page 47
Entering Administration Information 4-5
May 1999 System Administration
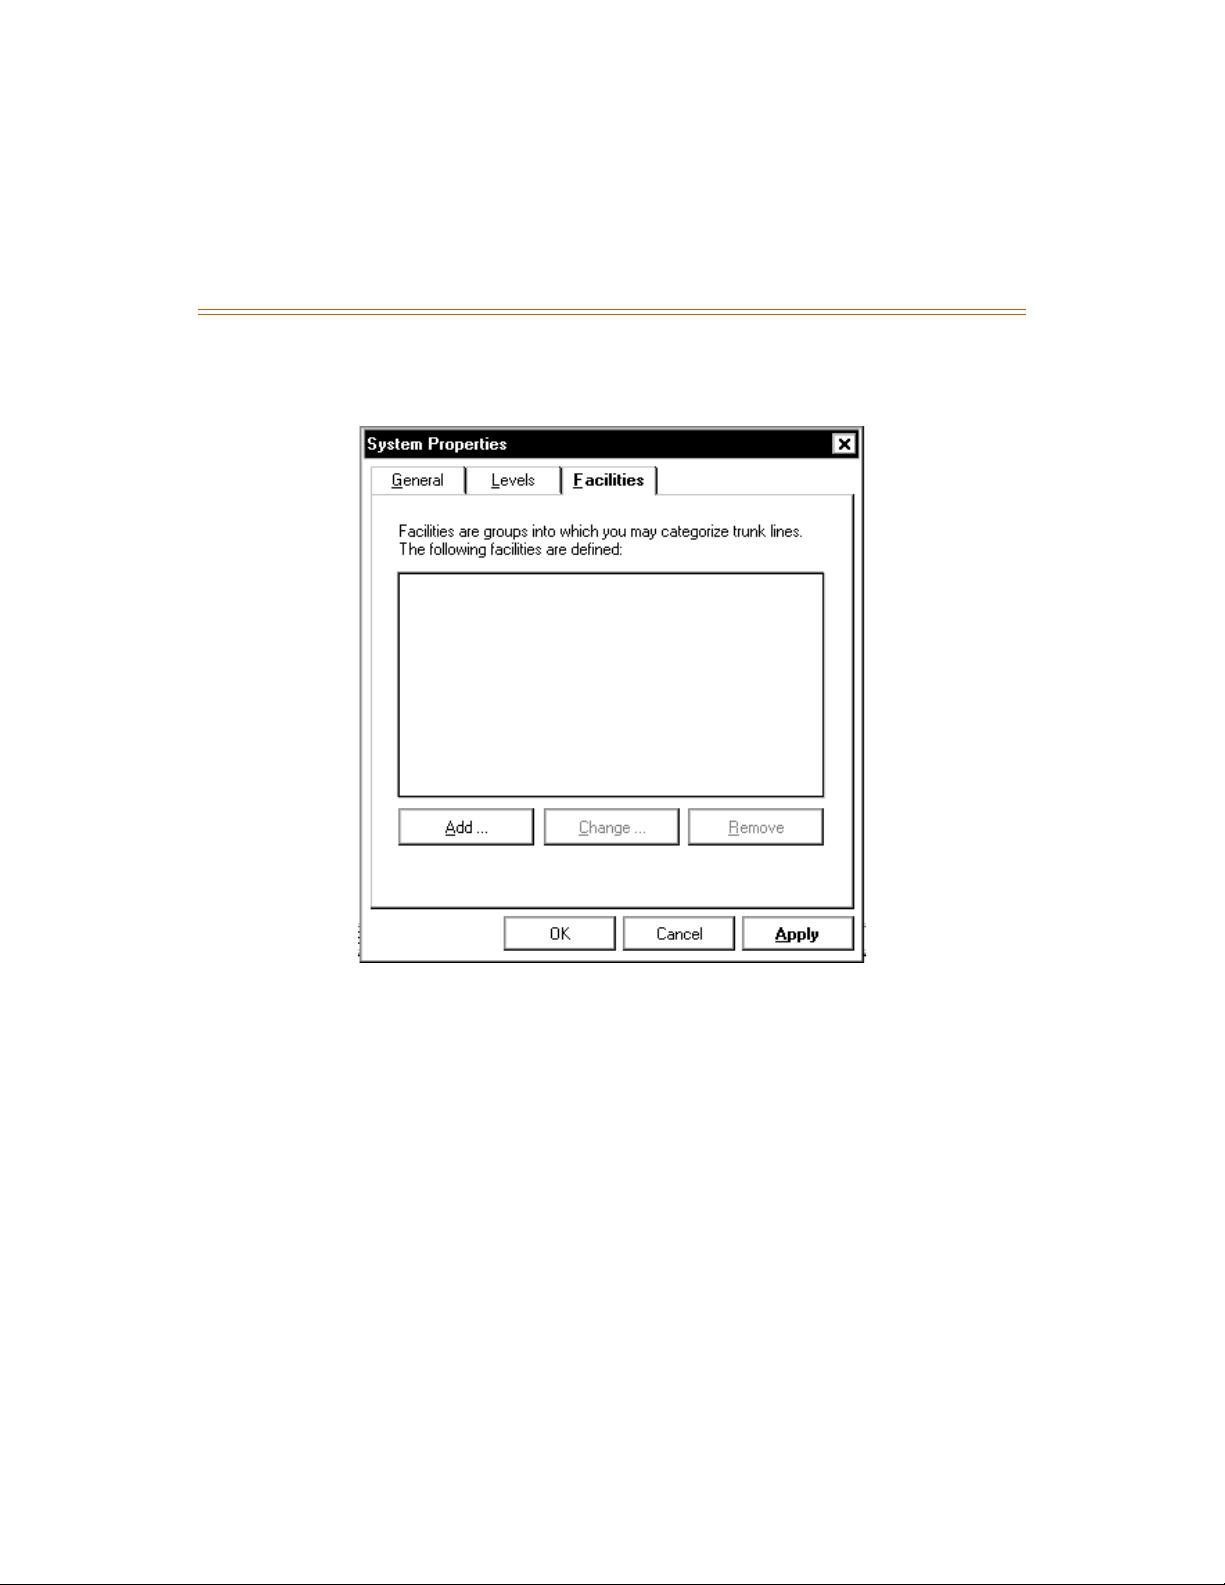
Trunk lin es can be categorized into groups call ed facilities. Enter this info rmat ion through the
File pull-down menu by s electing <File>, <Sys tem Properties>. Then click on the Faci lities tab,
the following screen is displayed
.
Entering Administration Information
The following pages show you how to enter user and extension information through the
Administration module’s screens. All administrati on i nf ormat i on ( use rs, extensions, accounts,
contacts, and trunks) can be entered through the View pull-down menu or by using the icons
along the top of the screen.
Page 48
4-6 Entering Administration Information
System Administration May 1999
User Information
To begin entering a new user:
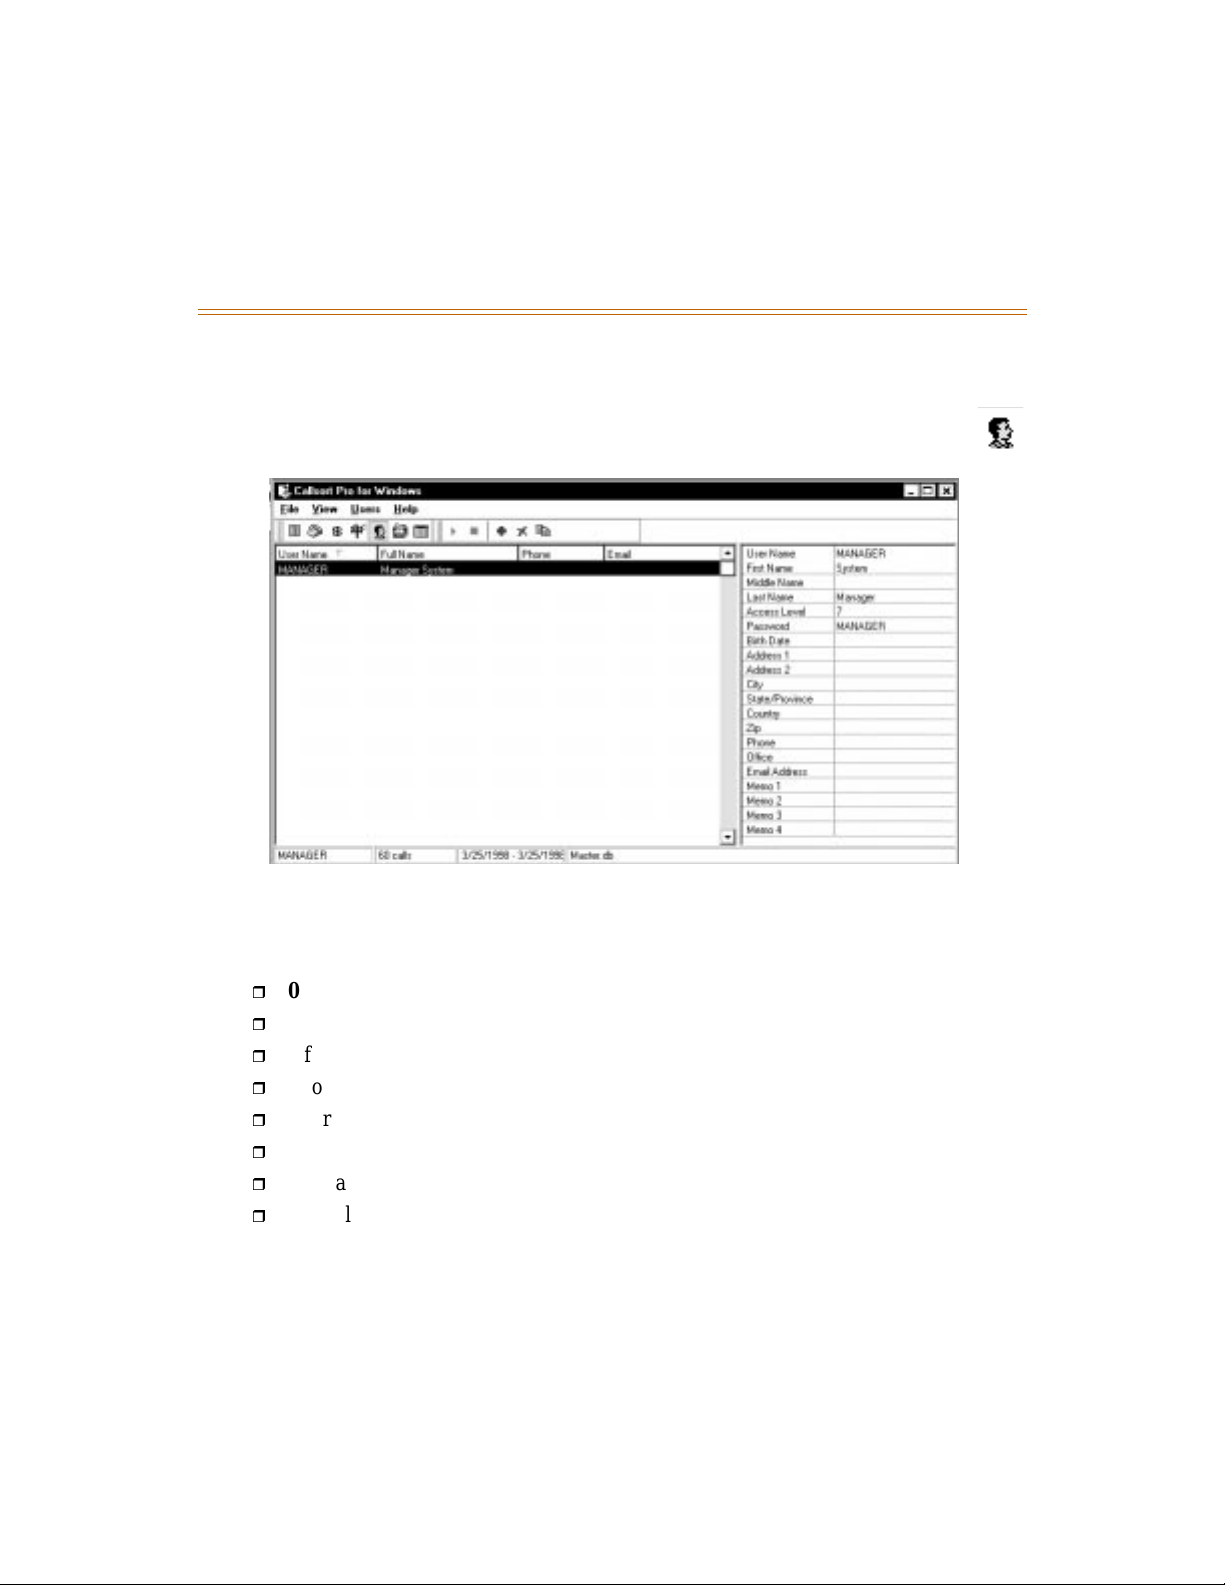
1. Select View then Users, or click on the face icon at the top of the screen. The
following screen is displayed.
2. On the right-hand side of the screen, enter the following user information: CallSort Pro
user name and user first/middle/last names as they should appear on reports.
3. Then, enter the access level granted to this user as follows:
for no access
0
for reports only on the user’s own extension
1
for reports on the 1st defined level of organization
2
for reports through the 2nd defined level of organization
3
for reports through the 3rd defined level of organization
4
for reports through the 4th defined level of organization
5
for all reports, but no system management access
6
for all reports and system management access
7
4. Enter your password a nd modify all other fields for this user. This information is used
when composing reports. The information entered for each User is used when entering
their extensions. The Us er information is then assigned to the extension.
Page 49
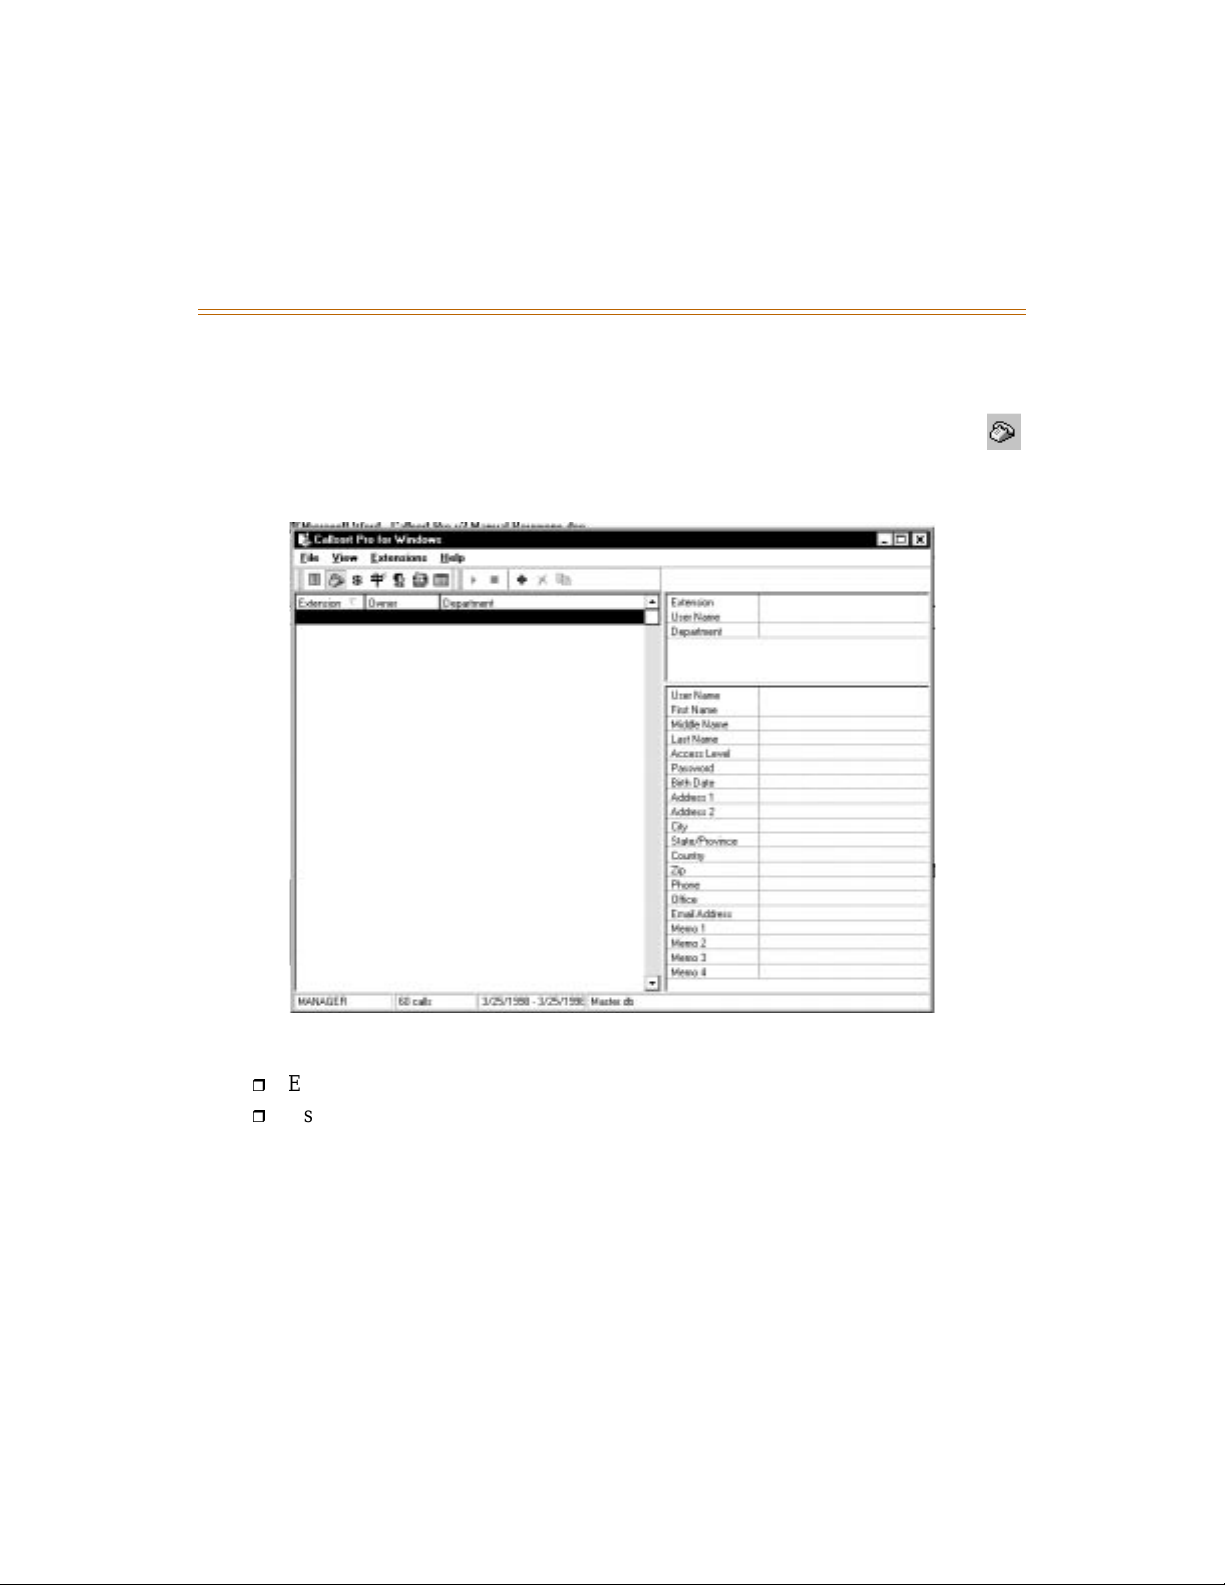
Entering Administration Information 4-7
May 1999 System Administration
Extension Information
When you have entered all user information:
1. T o acces s the Extens ion Editor s creen, sel ect <View> then <Extensions>, or click
on the telephone ico n at t he top of the scree n. Th e Exten sion Edit or screen allo ws
you to enter extensions separately from user information to allow more than one
extension per user.
2. Then complete the Extension and User Name fields as follows:
Extension -- Enter the extension number that you would like to modify.
User Name -- Type or use the pull-down menu to enter the user names. The
information at the bottom of the screen is the user information. (Refer to
Information
in this chapter for more information regarding Users.)
User
3. To change the remaining fields which are related to the Levels previously defined, use
the pull-dow n menus or type the new informatio n for the levels. (Refer to
Organization Levels
in this chapter for more information regarding Levels.)
Defining
4. To adjust the information entered for a particular extension, select <View> and
<Extensions>, or click on the telephone icon. Then use the drop-down Extension list in
the Extension Editor screen to locate the extension to change any necessary fields.
Page 50
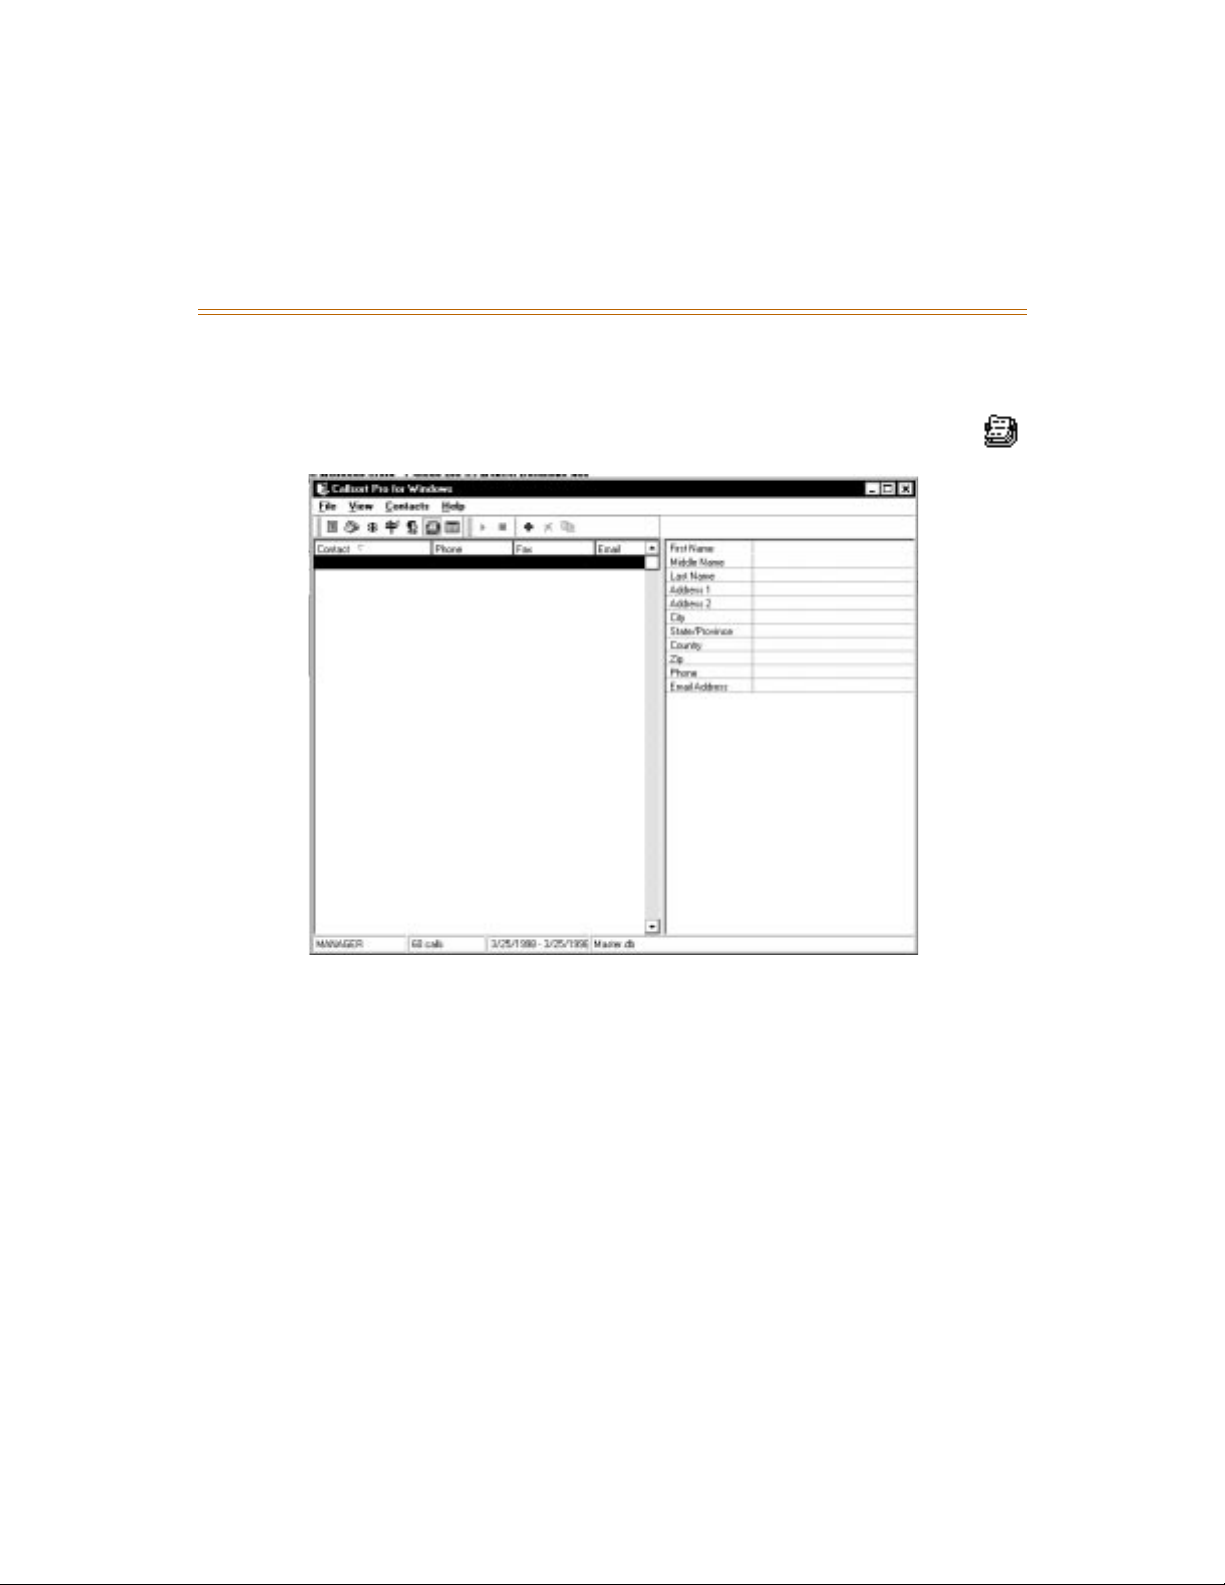
4-8 Entering Administration Information
System Administration May 1999
Contact Information
To edit contact information:
1. Select <View> then <Contacts>, or click on the contact icon at the top of the
screen. The following screen is displayed.
2. Enter contact infor mation as nee ded in th e fi elds al ong the r ight- hand side of t he scre en.
The information entered is used when creating account codes as described in the
Account Codes
section that follows.
Page 51
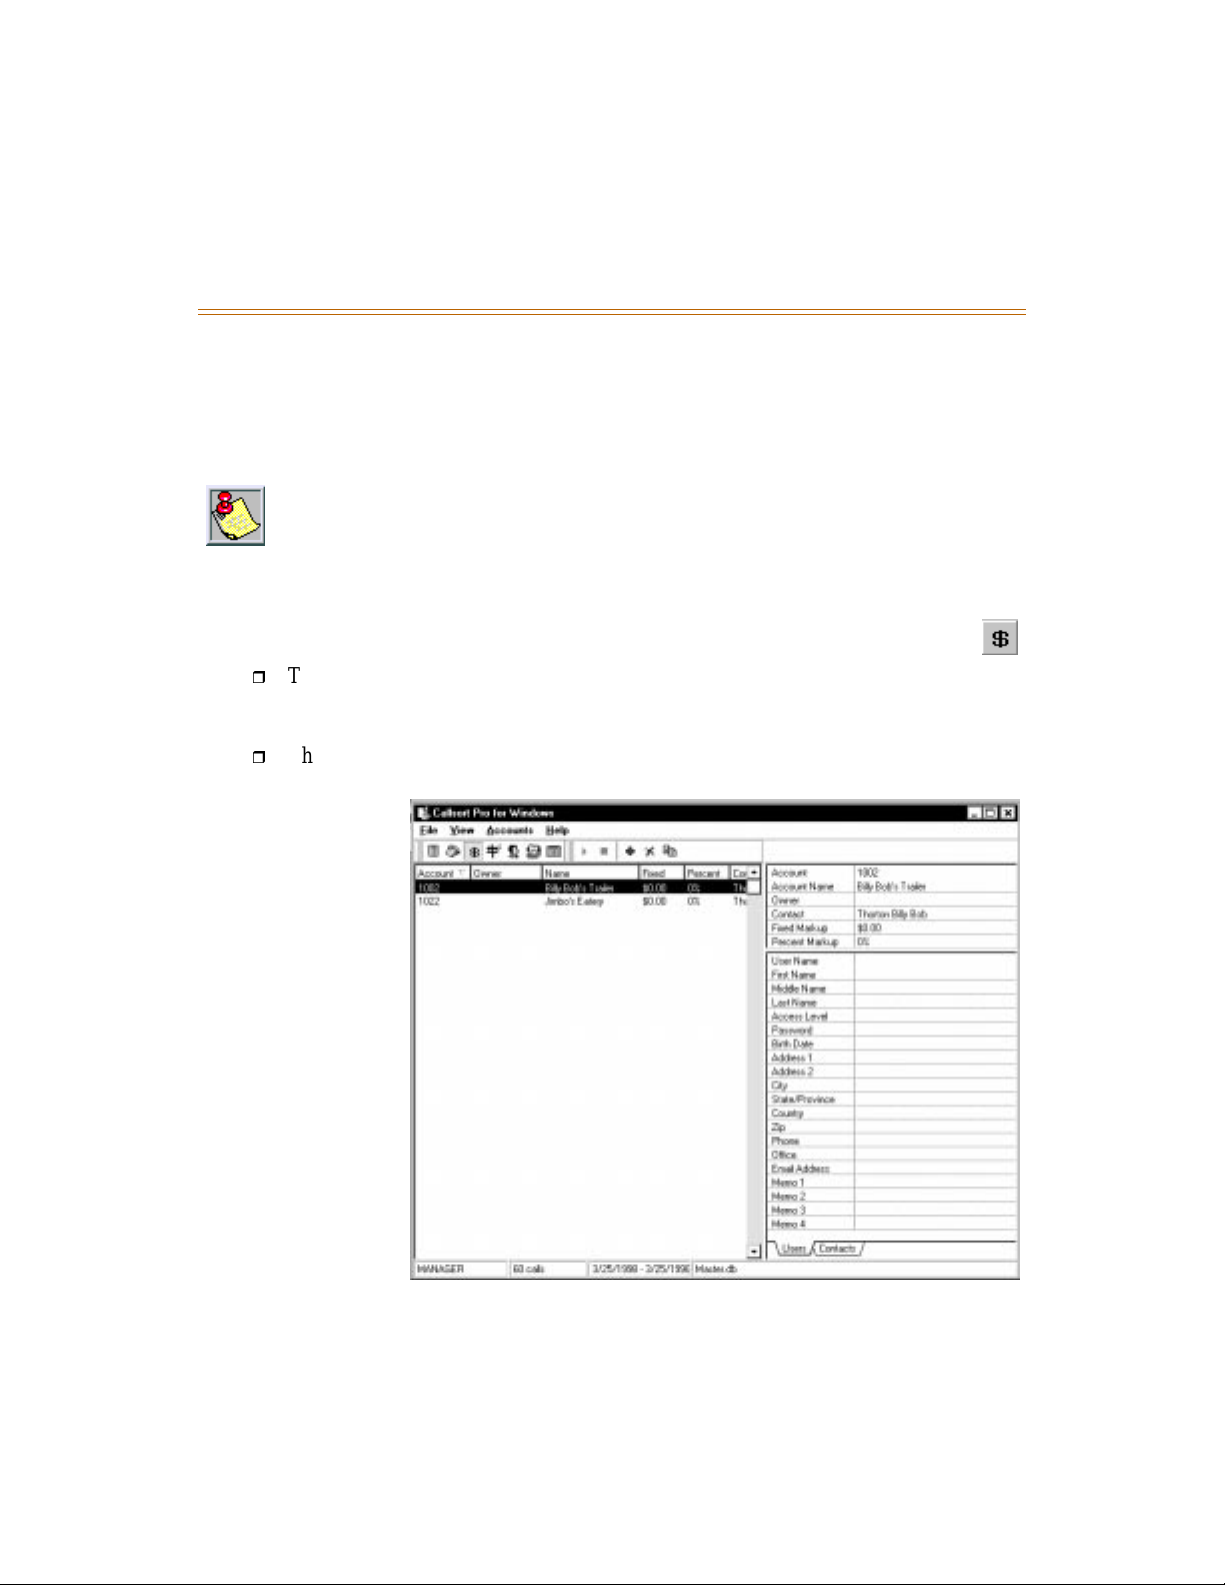
Entering Administration Information 4-9
May 1999 System Administration
Account Codes
CallSort Pro is capable of producing detailed and summary reports for billing customers for
telephone calls, if you configure account codes and your telephone system supports account
codes. The account code reports save you the tedious and time-consuming task of sorting
through the phone bill to collate billing information.
To use this fe ature, your phon e system must be capable of atta ching
an account code (which the user enters when dialing) as a field in
the call record.
To begin entering account information:
1. Select <View> then <Accounts>, or click on the dollar sign icon at the top of the
screen. The following screen is displayed.
The tab in the lower right-han d corner of the screen allows you to enter the
User related to this account. Typically, the User is the person in the company
responsible for this account.
The Contacts tab relates to the contact or billing information for this account code.
Page 52

4-10 Entering Administration Information
System Administration May 1999
2. Enter the account inform ation as follows:
Account -- Enter account code for this information.
Account Name -- Enter the name of the account for this account code. For example,
this would typically be the company name associated with the Account number.
Owner -- The person within the company that is responsible for this account. You
can either type in a name, or use the pull-down menu. When you select an owner,
you will see the bottom of the screen fill with the owner's information.
Contact -- Person at the billed company that is responsible for the bill. You can
either type in a name, or use the pull-down menu. When you select a Contact and
click the Contact tab, you will see the bottom of the screen fill with the contact's
information.
Fixed Markup -- Enter a number to be added to the total amount of the cost of the
call. This markup is a fixed mar kup added t o each te lephone ca ll no matt er how lon g
the telephone call is. This is in addition to any markups or taxes add ed to the price of
the call. (Refer to regarding pricing.)
Percent Markup -- Enter a number that is the percentage markup for the call in
addition to any other markups or taxes. (Refer to
Account Codes
in this chapter
regarding pricing.)
The information in the Users and Contacts sections of the screen can be modified and is
reflected in the user or contact record. (Refer to
Users Information
and
Contact Information
in
this chapter for more details.)
Trunk Line Information
With CallSort Pro, you can obtain detailed and summary reports on trunk line activity. This
enables you to identify possible trunk load levels that require attention. To assign trunks for
reporting purposes:
Page 53
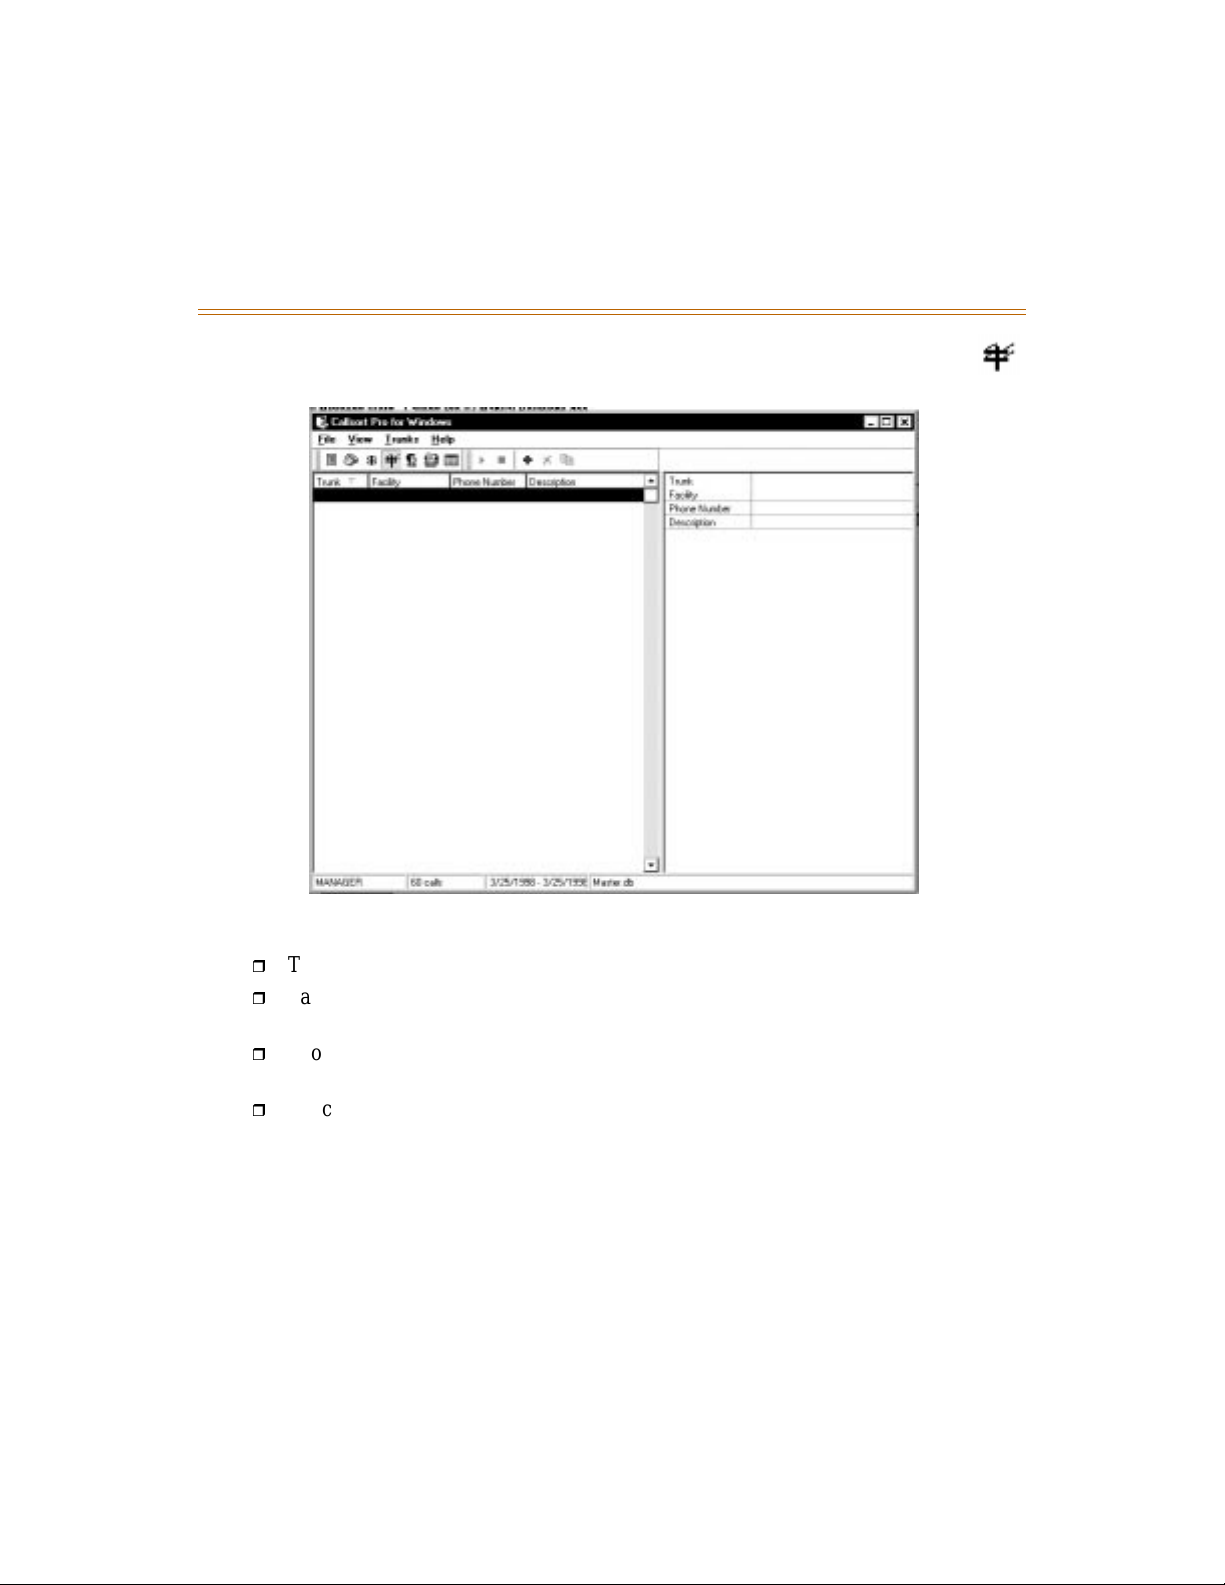
Entering Administration Information 4-11
May 1999 System Administration
1. Select <View> then <Trunk Lines>, or click on the right telephone icon at the
top of the screen. The following screen is displayed:
2. Address the fields along the right-hand side of the screen as follows:
Trunk -- Enter the number for the trunk that appears in the SMDR data.
Facility -- Type the name or use the pull down menus to enter t he faci lit y name. The
Facilities tab under the System properties defines the facilities options.
Phone Number -- Enter the phone number associated with this trunk. For example,
enter 123-123-1234.
Description -- Enter a description of this trunk's function. For example, enter Main
Number.
Facilities allows you to group trunk lines. You can define any number of facilities. When you
modify trunk line s ettings, the facil ity opti ons are displayed. F or exa mple, if y ou have mult iple
locations you can define the facility. You can enter Atlanta as one facility and Birmingham as
another . Then when modifyin g the trunk lines you c an define wh ether the trunk line i s going to
the Atlanta or Birmingham facility.
Page 54

4-12 Entering Administration Information
System Administration May 1999
Page 55
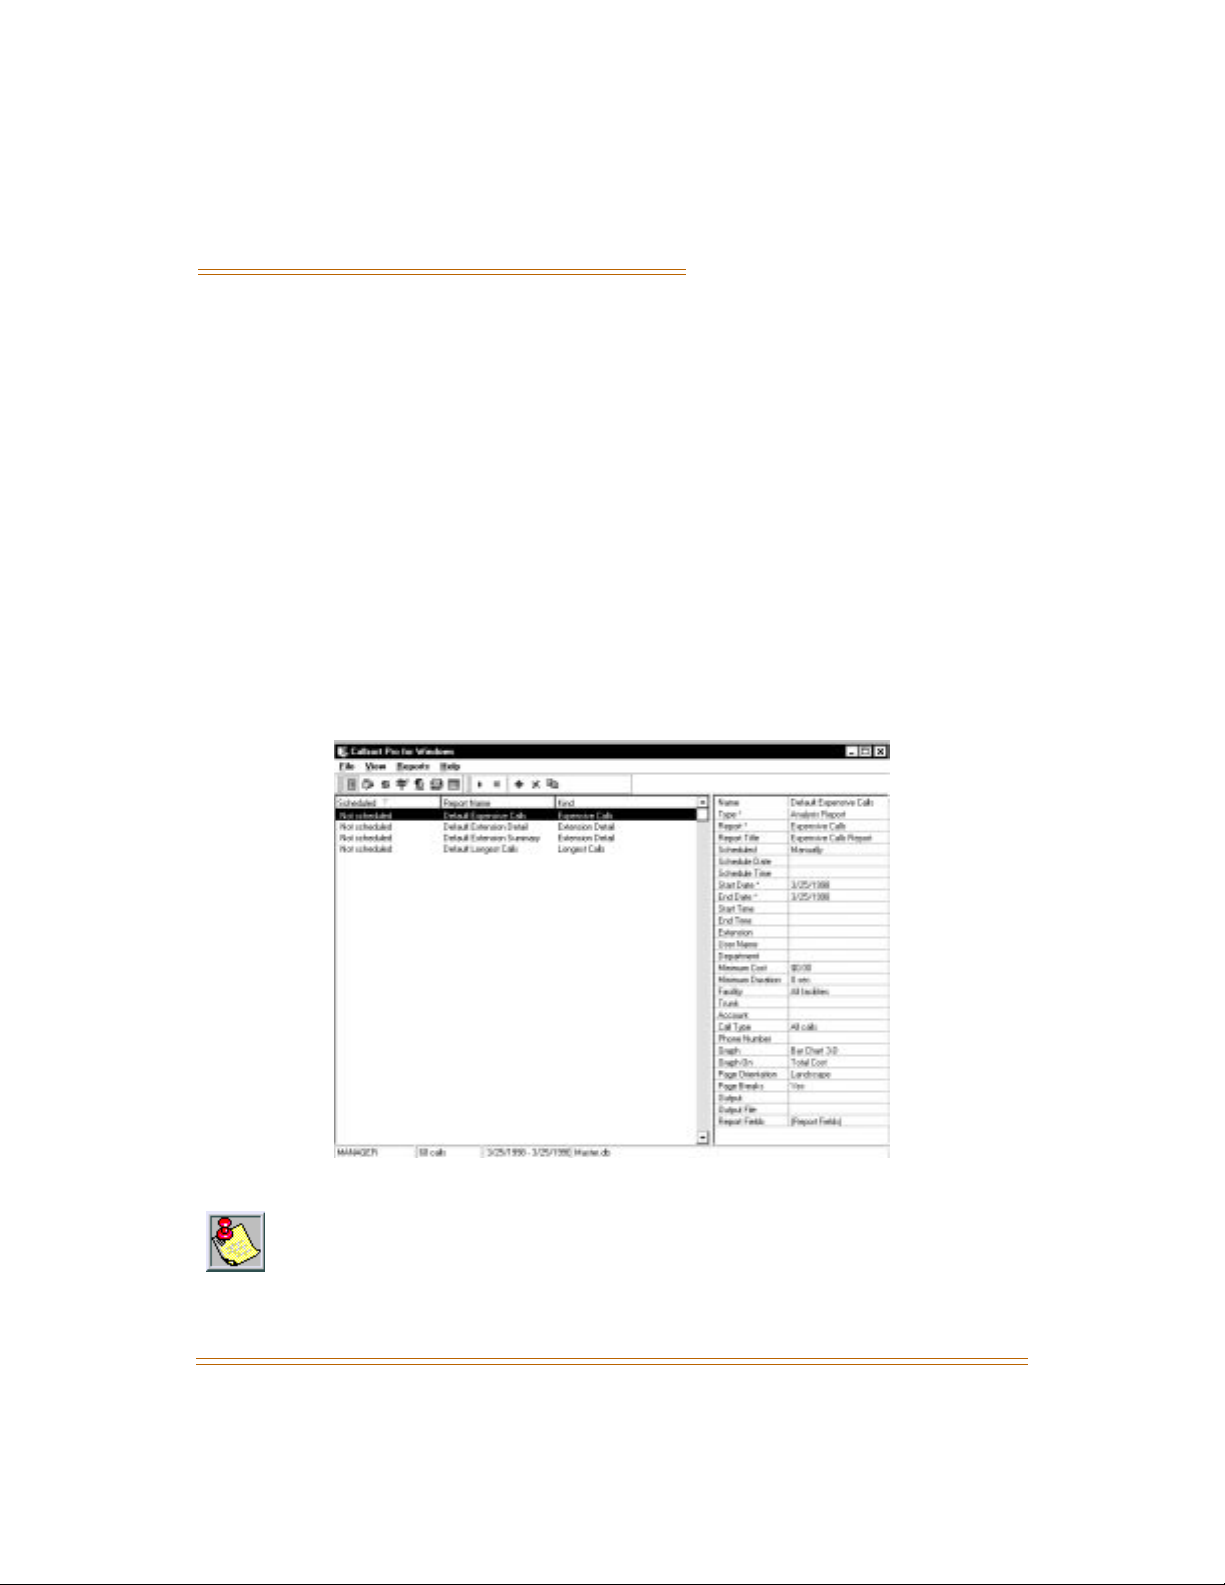
5 Generating Reports
After call records are priced and processed in the Administration module, you can use the
Callsort Pro Reports module to create and generate call reports. This chapter explains how to
use the reporting options and describes the various reports.
Administration Setup
To begin Administration Setup, select CallSort Pro from the avai l abl e CallSort options. When
prompted to enter your user name and password for the first time, enter
and click on <OK>. (To change your password, refer to
Installation
After the password is accepted, the following screen displays, from which you complete all
Administration conf iguration operation s. This screen also provides access to the various re ports
and directory lists available from CallSort Pro.
chapter; assign yourself access level 7, and enter the new password.)
Menu Options Available
MANAGER in both fields,
in the
The bottom of the scr een displa ys: which use r is logged in, number
of records in the reporting master table, date range of the calls
records in the database, and the currently open database.
CallSort Pro v3.0 User’s Guide May 1999
Page 56
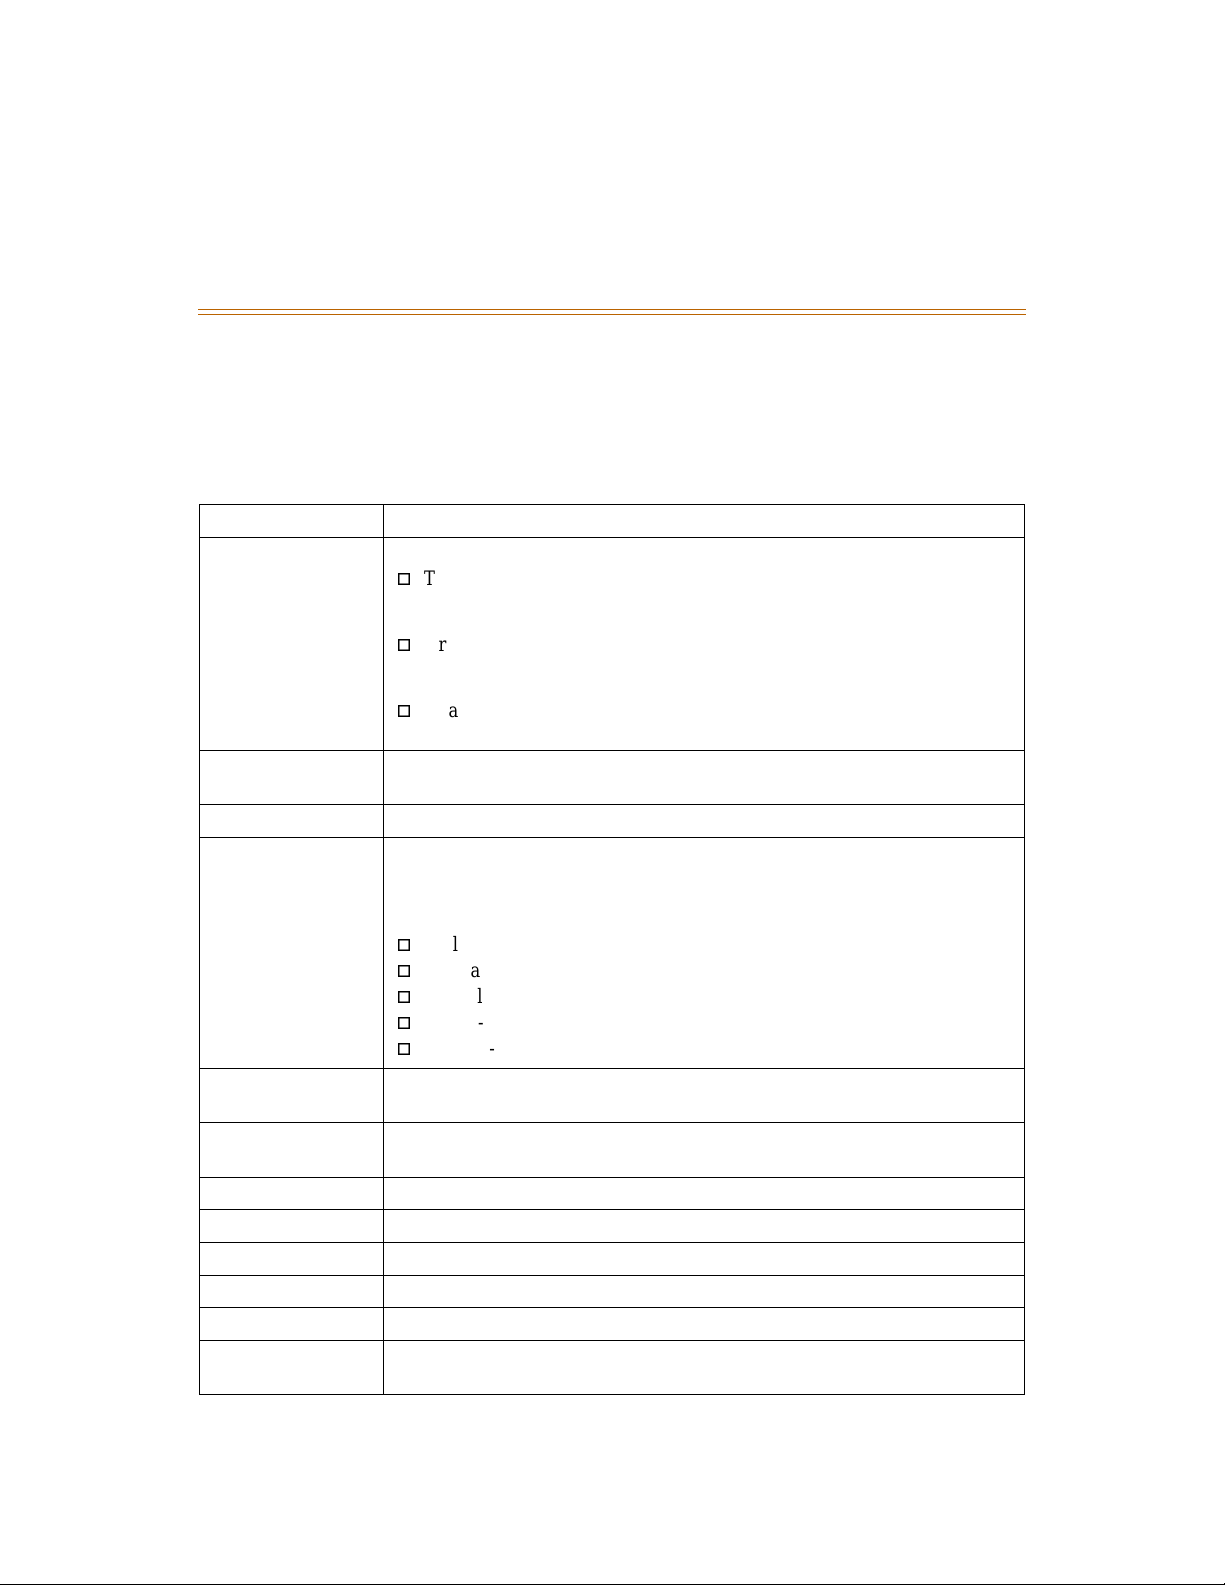
5-2 Report Options
Generating Reports May 1999
Report Options
The right-hand of the scr een conta ins all option s that a re rela ted to reporti ng. Any fie ld with a n
* (asterisk) is required for reports. Modify the fields as options:
Table 5-1: Report Options/Descriptions
Name A descriptive name for the report.
Types* There are three general report categories.
Traffic Reports lend insight into the operation of the phone system by
providing information on: total/average call duration and call counts;
costs based on total, average, and per-minute average.
Organization reports provide both Detail and Summary phone activity
information within your organization by extension, department, cost
center and other hierarchies.
Analysis reports contain special information that helps you examine the
call database to identify usage trends and other associated costs.
Report* This is the actual repor t that is run. The report op tions are bas ed on the repo rt
type you select.
Report Title Information that appears in the header of the report.
Scheduled Determines when the report is run . If Manually is selected the report is run
when the user presses the run report button. If another option is selected the
report options, for example dates and times, are automatically adjusted. The
pull down menu contains the followi ng options:
Daily -- Runs the report daily and adjusts the date report options.
Manually -- Runs the report once, when you decide.
Monthly -- Runs report on a monthly basis on the date defined.
Once -- Runs the report once on the date defined.
W eekly -- Runs the report on a weekly basis on the date and time d efined.
Schedule Date If you choose Daily, Monthly, Once, or Weekly is selected as the Scheduled
option, this is date the report will be run.
Schedule Time If you choose Daily, Monthly, Once, or Weekly is selected as the Scheduled
option, this is time the report will be run.
Start Date* Determines the start of the date range for the report.
End Date* Establishes the end of the date range for the report.
Start Time Determines the start of the time range for the report.
End Time Establishes the end of the time range for the report.
Extension The selection criteria that produces a report for the designated extensio n.
User Name This option allows you to run a report for all extensions allocated to this user
name. (Refer to
System Administration
for more information on users.)
Page 57
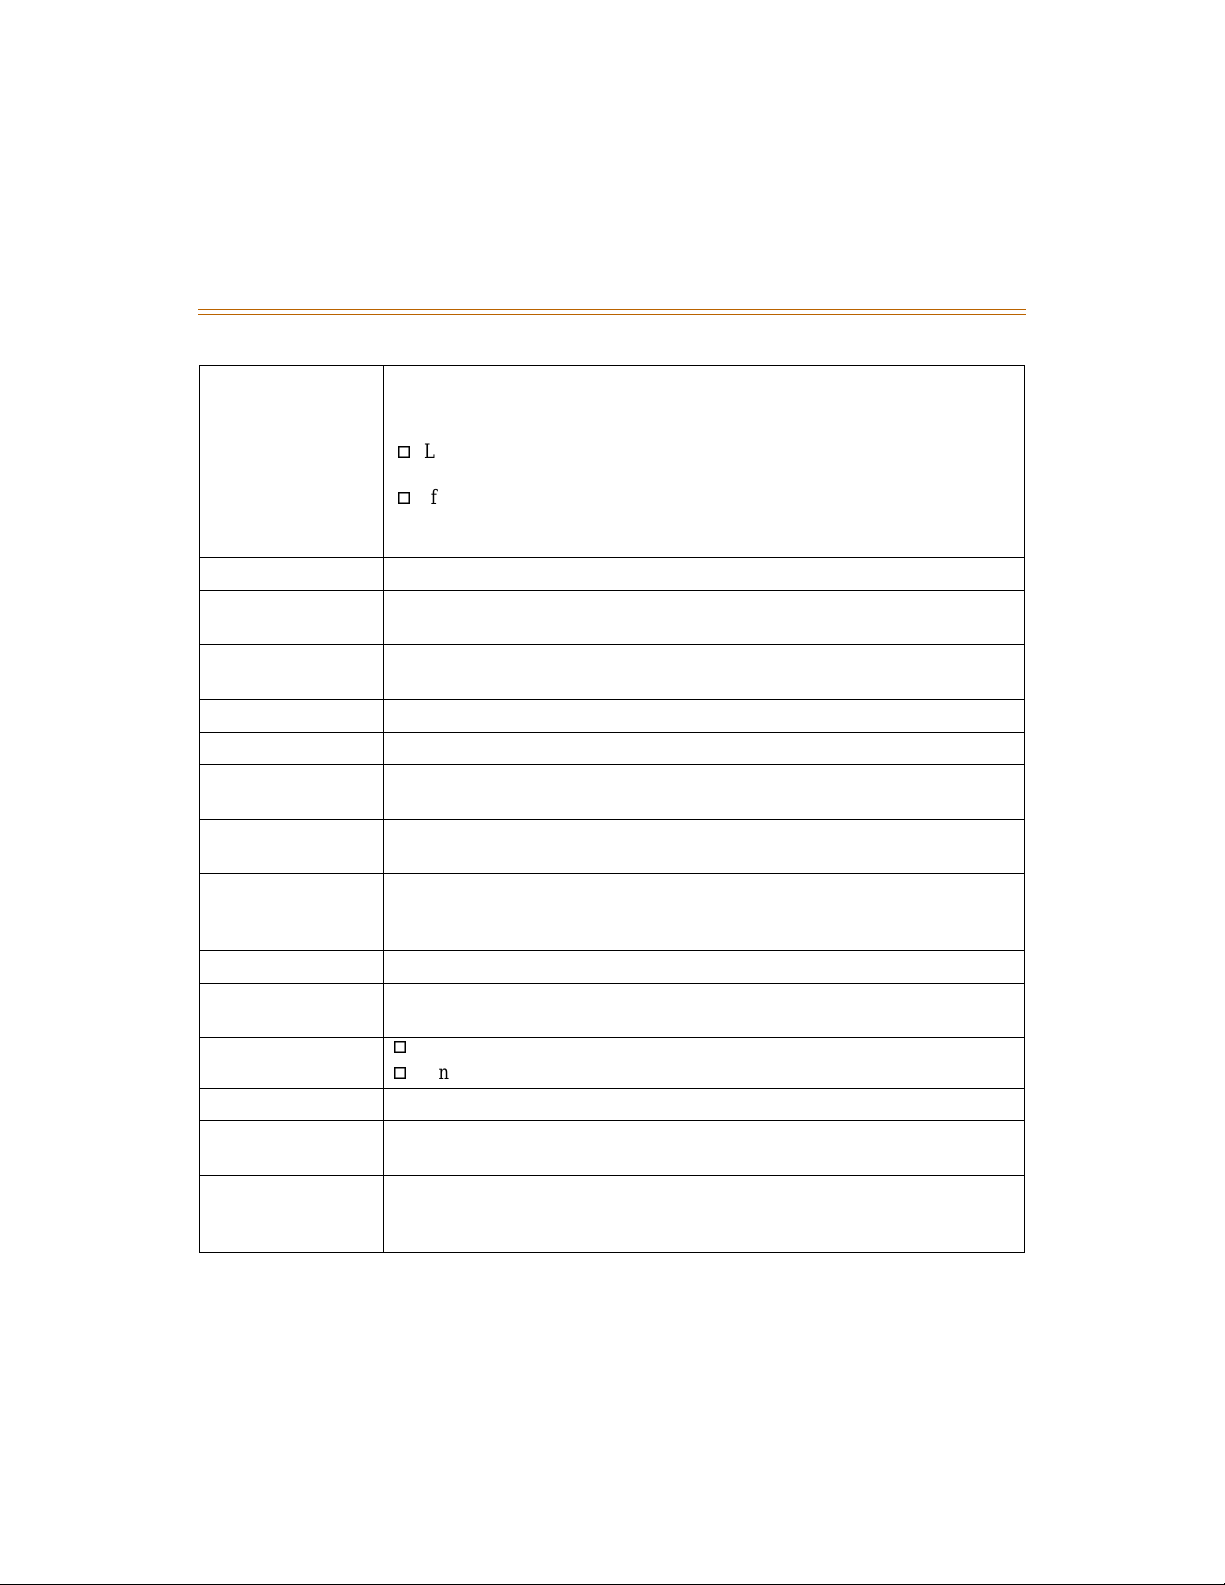
Report Options 5-3
May 1999 Generating Reports
Table 5-1: Report Options/Descriptions
Level Options There are 1-4 options depending on how your system is configured. These
options allow you to run a report for a specific level of your company.
For example:
Level 2 is defined as Department and you have defined Sales, Technical
Services and Accounting departments.
If you wish to run a report on the Sales department, you define the
Department option as Sales and all ext e nsions within the Sales
department.
Minimum Cost Selects calls of greater than a specific dollar amount.
Minimum Duration Selects calls of a greater duration than the specific amount of time
(calculated in seconds.)
Facility Selects a particular facility for reporting. This option offers a drop-down list
of facilities for selection.
Trunk Defines a specific trunk for the report.
Account Defines a specific account code for the report.
Call Type Defines whether the report should be run on incoming only, outgoing only,
or incoming and outgoing calls.
Phone Number If you would like to report on a specific telephone number, type the phone
number in here.
Graph Defines the type of graph to be displayed. (The graph is displayed on the
second page of the report.) The options are: Bar Chart 2-D, Bar Chart 3-D,
None, Pie Chart 2-D and Pie Chart 3-D.
Graph On Defines the axis for the graph defined in the Graph option.
Page Orientation Declares the orientation o f the d ata on the pag e; landscape o r portrait are the
options.
Page Breaks
If yes, this option creates a header at the top of each page of the report.
If no, the header is not at the top of each page.
Output Defines whether the information is printed to the screen or to a printer.
Output File Allows you to define a name for this report. The report will be printed
directly to a file for future use.
Fields Allows you to define which fields you see in the report. You can name as
many or as few fields as you like, but you may not be able to see all fields
due to the limitations of the print e d page.
Page 58
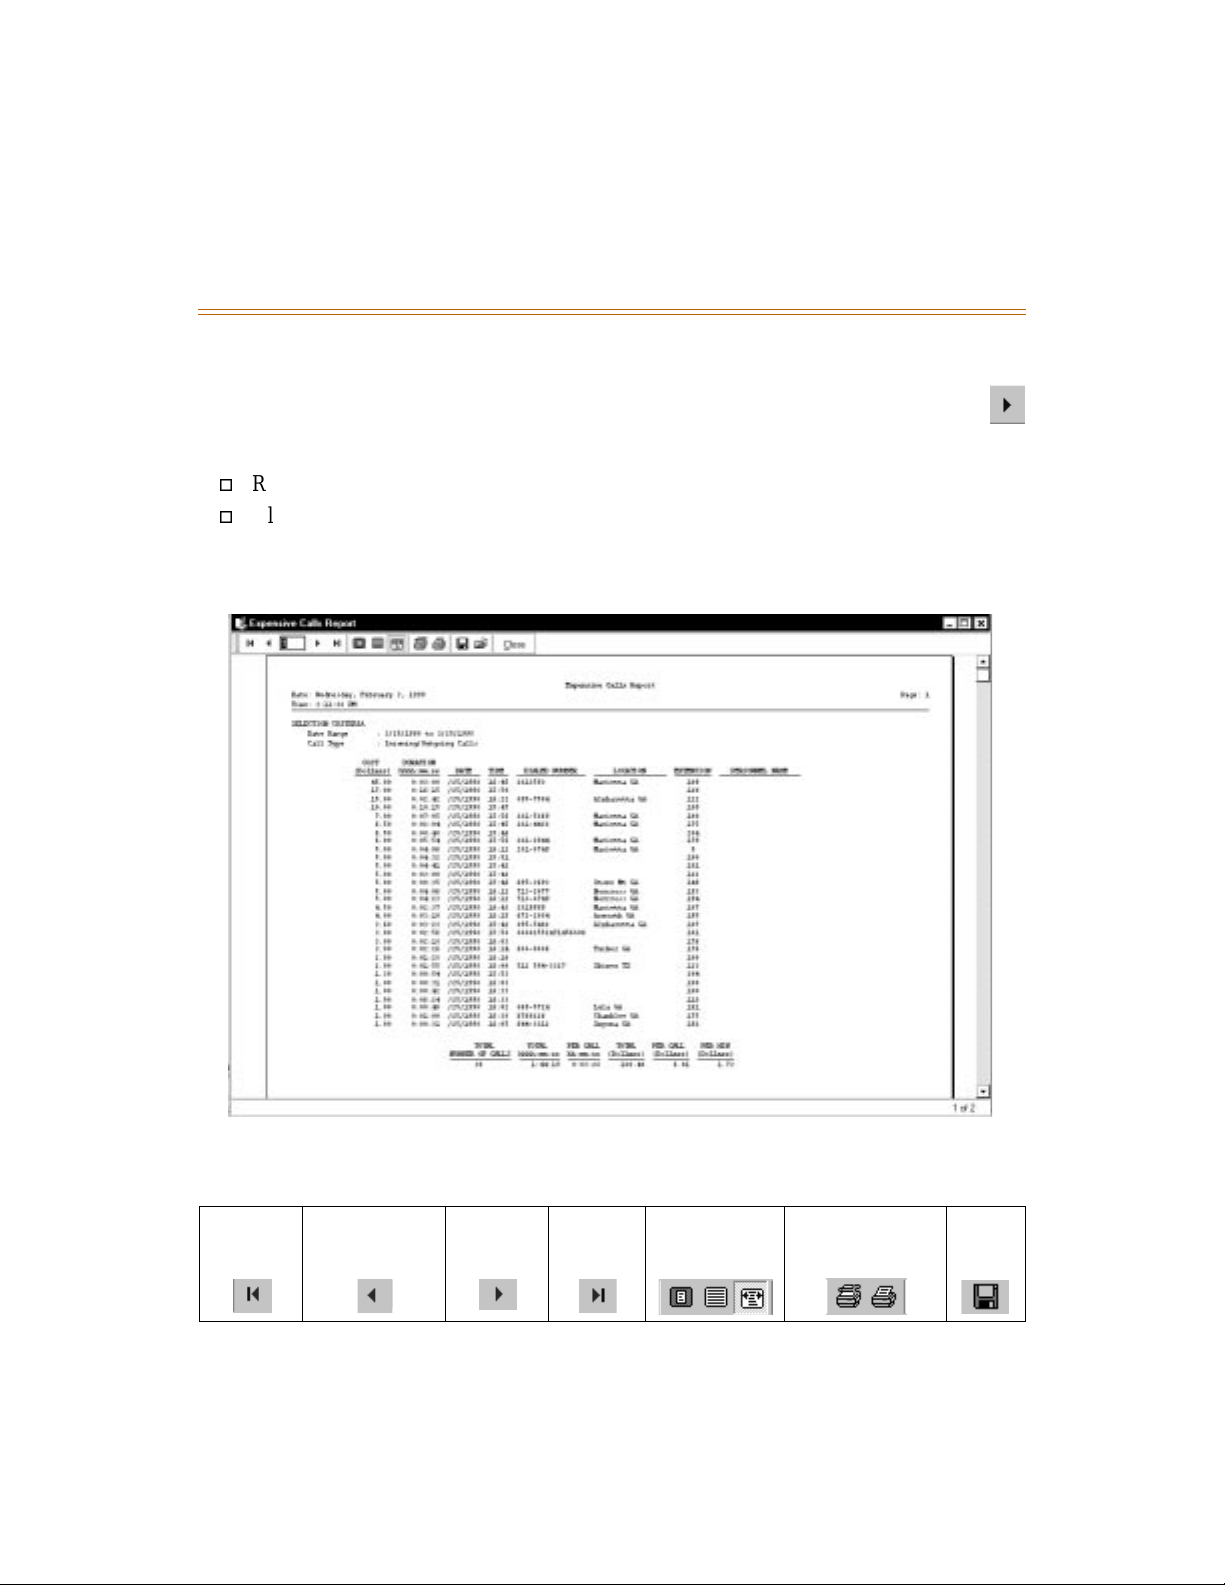
5-4 Running a Report
Generating Reports May 1999
Running a Report
Once you’ve adjusted repo rt filters as needed, you’r e ready to run your reports. Sel ect Run
from the Reports pull-down menu, or press the Play button on the icon toolbar.
Once the report has been generated, it is sent to the output device you selected.
Reports that are first sent to the screen can be printed after they are viewed.
All other report outputs, for example: sending to the printer or to a file format, go
directly into that output destination.
Reports sent to screen look similar to this report:
Use the scroll bar as needed to move up or down the report. For multi-page reports, use the
buttons at the top of the screen to move among the report pages as follows:
Move to
first page
Move to
previous page
Move to
next page
Move to
last page
Zoom
in/out
Print currently
displayed report
Save to
disk
When you are finished vi ewing or pri nting the repor t, click on < Close>. You are returned to th e
Reports main window where you can generate additional reports.
Page 59

Running a Report 5-5
May 1999 Generating Reports
Scheduling Reports to Run A utomatically
While many of the reports you will run with CallSort Pro provide on-demand answers, there
may be other report s you’ll wa nt to run o n a regular ly scheduled b asis. Any report genera ted by
CallSort Pro can easily be set up to run automatically at regularly scheduled intervals.
Adding a Report to Scheduled Reports
Scheduled reports are c ategorically divided into Daily, Manually, Mont hly, Once, and Weekly
reports. Reports c an be sch edu led to r un auto mati call y by fir st manua lly ge ner ating a repor t as
described in the previous section. Next, save the report as a scheduled report by pressing the
Save button on the icon toolbar. Finally, turn on the scheduler by selecting the Schedule Date
and Schedule Time options. When you sav e the rep ort, Call Sort Pro asks you to suppl y a name
for the saved report.
Remember t o set the report output (defau lts to the printer) by
selecting the Output field on the main Administration menu.
Reports Available
With its wide range of reports and user control over report content,
CallSort Pro
provides a
wealth of information to hel p monit or and imp rove the ef fect ivenes s of your telep hone syst em.
Which reports are most helpful will probably vary between departments or managers; the
following sections provide helpful hints for using some of the reports available to you.
Analysis Reports
contain informatio n that help you examine t he call database to id entify usage
trends and their associated costs. Specific Analysis reports include the following information,
for the period that you specify:
Directory Assistance identifies calls to your phone company’s directory assistance
number.
Expensive Calls lists the most expensive calls.
The Frequently Called Numbers shows the most frequently called telephone numbers.
Frequently Called States shows calls for the most frequently called states, in state order.
International Calls lists calls involving international dialing.
Longest Calls lists the longest calls.
Operator Assisted Calls shows calls placed through your phone company’s operator.
Unanswered Calls shows unanswered calls placed through your phone system.
Page 60
5-6 Running a Report
Generating Reports May 1999
Organization Reports
provide both Detail and Summary inf ormation regarding gener al phone
activity within your organization.
Detail reports itemiz e all tele phone acti vity, listing the actual number s tha t are dia led, or
in the case of incoming calls, providing the time the call came in.
Summary reports provide condensed information, including total number of calls,
duration, and cost. Use these reports to control abuse, perform client billing, resell long
distance services, and allocate costs.
Specific Organization reports are available in both Detail and Summary, except where noted,
and include the following:
Account Code reports provide information regarding calls with an identifiable account
number, as specified in the Administration module.
Chronological reports (Detail only) show calls over a time period.
Extension reports show activity sorted by extension number.
Hierarchical reports (Summary only) show activity by organizational level.
Organizational Level reports show call activity sorted by organizational level (as
specified in the Administration module).
Traffic Reports
Provides summary information for total and average call duration.
Specifies criteria you want to report such as: total, average, and per-minute costs.
Helps to highlight trunk lines that are malfunctioning or are blocked.
Indicates whether special lines are practical.
Provides a means for verifying phone bills.
For scheduling purposes.
lend insight into the operation of your phone system as follows:
Specific Traffic reports are available to provide summary information on the following:
Table 5-2: Traffic Summary Reports
Area Code Summary Date Summary Time of Day Summary
Call Area Distribution Duration Summary Trunk Detail
Call Type Distribution Region Summary Trunk Summ ary
Cost Distribution State Summary
Page 61

6 FAQs and Troubleshooting
Frequently Asked Questions
This section lis ts the questions we receive most oft en about using Cal lSo rt Pro , al ong wit h the
answers for each. If you are having difficulty with CallSort Pro, scan the questions here.
Chances are it’s a commonly asked one and that you’ll find the answer quickly.
Questions and ans wers in t his s ection a re or ganized as foll ows to help you find the info rmation
you need:
General Hints and Tips
Installation Q&A
Collection Q&A
Administration Q&A
Reports Q&A
Hints and Tips
Q: I would like to filter out a specific sort of calls, such as 1-800 calls, from my reports.
How can I cause CallSort Pro to ignore these records?
A: CallSort Pro has the ability to selectively ignore records based on various criteria, as
described in Setting up Number Filters in the XXX chapter of this manual. In the example
below, we show how to el iminate al l 1-800 c alls, but yo u could filter ou t any are a code wit h
this method. First, we will establish a number filter so that CallSort Pro can identify 1-800
numbers. Next, we will set a call record type based on that number filter and tell CallSort
Pro to ignore this record type. Follow these steps:
1. Start in the Collection module. Select PBX Define from the Configure menu.
2. Select your phone system type from the list (it is probably already highlighted) and
select the Filter tab. Then click on <Add Filter>.
3. Under Call Direction, select Outgoing. Under Destination, select Reference.
4. Under Order, type in a number after the number you use for international
processing. (The international processing filter looks like this:
|011???????%|1011???????%|. The number for our new filter should be higher than
the number to the left of international processing).
5. In the Pattern field, type:
NOT used in any other number filter).
6. Click on <Call Types>.
1800%
. In the Match field, type X (or any othe r letter
CallSort Pro v3.0 User’s Guide May 1999
Page 62

6-2 Frequently Asked Questions
FAQs and Troubleshooting May 1999
7. Click on <Add Definition>. Under CallType, select Date. Under Field 1, select
Destinatio n Number, then click on <Referenc e>.
8. In the Field 1 Value option, type:
X
(or whatever letter you used in Step 5).
9. Click on <First Line>, then click on <OK>. All 1-800 calls will now be ignored.
Q: How can I filter out my short calls?
A: Follow these steps:
1. Start in the Collection module. Select Pricing Customize from the Configure menu.
2. Clic k on t he service for which you want to filt er out shor t calls. For example, if you
want to filter out short lo ng d istan ce cal ls, cl ick on <Defaul t Long Distan ce>. I f you
want to filter out short local calls, click on <Local >. Then click on <Markup s> at the
top of the screen.
3. Sele ct the ma rkup group that you are usi ng. Typically, this is No Adde rs. If y ou have
a markup scheme established, click on it instead.
4. Observe the Connect Time box. This is the length of calls, in seconds, that will be
filtered out by CallSort Pro. Set this field to the number of seconds that defines a
“short call.”
5. Click on <Done>. Select PBX Define from the Configure menu.
6. Select your phone system. Select the Drop Short Calls option. Short calls will now
be ignored.
Q: I would like to price certain local calls, such as those that begin with the prefix 555,
differently than other local calls. How can I do this?
A: You can tell CallSort Pro to price unlike numbe rs different ly. With the use of wildcar ds such
as ?, you can eit her s peci fy a cert ain number for d iffer ent p ri cing r ates , or yo u c an spec ify a
prefix or suffix for different pricing rates. Refer to
Filter Variables
in chapter 2 for more
information. In t his exam pl e, we will set all local calls that begi n with the prefix 555 to ten
cents a minute. Follow these steps:
1. Start in the Collection module. Select Pricing Customize from the Configure menu.
2. Click on <Add New>. In the Name field, type a name for this type of call, such as
Local 555. Under Order, type:
0
. If the priority is higher than 0, these calls will be
treated as local calls and will never be processed.
3. Click on <Selection Pattern> field. Under Field, select the Phone Number option.
Under Selection Pattern, type 555????. If you wish to charge for a different prefix
instead, use that prefix. If you wish to charge for a specific number, such as 5551212, type that number in the Selection Pattern field.
4. Next, click on <Method>.
5. Select Fixed Cost , and type .1 in the Initial Cost field. CallSort Pro will now charge
10 cents a minute for any call beginning with 555.
Page 63

Frequently Asked Questions 6-3
May 1999 FAQs and Troubleshooting
Q: My phone system supplies account codes for working with various departments. I
would like to be able to generate reports based on account codes. Can I do this?
A: A few phone systems specify acco unt codes in th e call records , enabli ng you to sort recor ds
by department. To take advantage of this, you will need to define your layout to recognize
account codes. Starting in the Collection module, follow these steps:
1. Sele ct PBX Defi ne fr om the Config ure menu.
2. Pick your phone system name from the list and click on <Layout>.
3. Select a line of data that has an account code.
4. Highlight the account code on your line of raw data at the top of the screen, then
click on <Account>. You can now identify records by the account number.
5. Make this modification for all call record types using the Name drop-down box on
the Call Records Layout screen.
Q: I need to get into the Administratio n module, but I have forgotten my pass word. What
can I do?
A: Call Vodavi’s technical support department.
Q: How can I add an extension for a new employee?
A: Start up the Administration module, and refer to
User Information
in chapter 4. You must
enter user informa ti on bef ore a ddi ng a new extension. Follow all pr ocedures in that section.
Q: How can I edit an existing extension?
A: Refer to
Extension Information
in chapter 4.
Q: I have 10 (or 30 , or 50, or 100) extensions set up i n t he Admi nis tr ati on module. I need
to add some more, but the program tells me that I have reached my limit. How can I
add more extensions?
A: You will need to upgrade your vers ion of CallSort Pro to accommodate your ne w extensions.
Contact our sales department for the latest pricing information.
Q: I would like to delet e all t he data in my CallSort Pr o database and start over. How can
I do this?
A: If you just want to get rid of th e cal l re cords and not the extension and administ r ati on data,
follow these steps:
1. Close the Collection and Administration modules.
2. Renaming files is easiest using the DOS prompt. Select Start and Run and type:
command
for Windows 95/98 or cm for Windows NT. You will now be at the DOS
prompt.
3. Type:
4. Rename current database to BACKUP.* by typing:
5. Copy original databases over by typing:
6. To leave DOS prompt, type:
cd\callsort\data\
copy master.* backup.*
copy master$t.*master.*
exit
Page 64

6-4 Frequently Asked Questions
FAQs and Troubleshooting May 1999
A: If you want to delete all data and start over , all original databases are stored in
C:\CALLSORT\ORIGINAL\DATA and C:\CALLSORT\ORIGINAL\PRICER.
1. Close the Collection and Administration modules.
2. Renaming files is easiest using the DOS prompt. Select Start, then Run, and type:
command
for Windows 95/98 or
cmd
for Windows NT. You will now be at the
DOS prompt.
3. Type:
cd\callsort\
4. These steps do not backup your current data, so make sure you are willing to loose
all information.
5. Copy collection and pricing databases by typing:
copy
original\pricer\*.* pricer
6. Copy reporting and administration databases by typing:
copy
original\data\*.* data
7. To leave DOS prompt, type:
exit
Installation
Q: I am trying to install my CallSort Pro for Windows disks, but get the error message
“Severe Error: Problem copying or decompressing files.” What does this mean?
A: Although this can imply a bad disk, it usually means that you are tryin g to install Cal lSort to
the wrong directory. CallSort Pro checks your
LASTDRIVE
statement in your
then attempts to install itself to that drive. When installing CallSort Pro, be sure to specify
the correct drive and directory.
CONFIG.SYS
,
Collection Module
Q: When I start up the Collection module, it does not display any SMDR data.
A: The first thing to check is the configuration of your COM ports and your network cards. If
these are not configured correctly, you will not get anything. Also, you may be having a
conflict with another Windows or DOS program.
1. Close down any unneeded programs, such as screen savers or communications
programs and try restarting Collection in Autostart Mode.
2. Open the Collection module, select Options from the Configure menu, and select
Automatically Start Collection at Setup under the Input button.
3. Exit the Collection module, drag its icon into the StartUp group in Windows, then
Restart Windows.
Q: The Collection module does not appear to be saving my configuration information.
A: Make sure that as you go from one dial og box to anoth er, you click on
boxes. This is the action that saves your information in each step of the process.
in each of these
Done
Page 65

Frequently Asked Questions 6-5
May 1999 FAQs and Troubleshooting
Q: My calls are being pri ced but all l oca l c all s are showing as either the 770 are a co de o r
another incorrect area code.
A: Verify the following information:
1. Check to make sure the length that you have defined for phone numbers in SMDR
Layout is long enough. If, for example, you have the phone number length set to 9
characters, CallSort Pro may decide that a 9-digit telephone number is a local call.
2. Under the Options menu, verify that you have Display Processed selected.
3. Make sure your area code number filters are correct (refer to
in chapter 2).
Filters
Setting Up Number
Q: The Collection module does not start executing when Windows is activated.
A: Restart Collecti on in Autostart Mode. To do th is, open the Collect ion module, select Option s
from the Configure menu, and select Auto start pricer. Exit the Collection module, then
restart Windows (also be sure the Collection module is in the startup group). Note: Auto
Start Pricer is on the Input tab.
Q: The Collection module is not calculating my prices correctly.
A: First, check under Pricing Customize a nd Markups t o make sure you have n ot added a mark
up. If Collection is set to char ge 8 cents a minute for calls, but you added a markup, the price
will be higher th an 8 ce nts a minut e. Note tha t the pric es are ca lcula ted af ter s ubtra ct ing th e
grace period. Therefore, i f you set a minimum duration at 30 seconds and the call’ s duration
is 1 minute and 20 seconds, the charge will be for 50 seconds, even though the duration is
listed as 1:20. Finally, check to make sure that you have not accidentally charged an
incorrect am ount of tax.
Reports Module
Q: My reports are not printing current data, or they are printing no data at all.
A: Consider the following:
In the Reports module, check the information at the bottom of the screen.
It should contain the name of the master database,
MASTER.DB
If the database is set to \
MASTER.DB
, and the number of records contained in the database.
CALLSORT
in \
PRICER\MASTER.DB
. Shut Collection down and start it again. This may cor re ct the
, Collection may be unable to access
problem.
If the Collection module has not been configured properly for your phone system it will not
append to the
Switch to the Collection module.
Select the Options menu, then Display Processed. If you can see properly displayed
MASTER.DB
database. To check your configuration:
priced data you can be assured that the data is being collected.
MASTER.DB
, the range of dates in
Page 66

6-6 Frequently Asked Questions
FAQs and Troubleshooting May 1999
Check the date on the phone system and the PC, then make sure that the data has the
correct date. CallSor t Pro s orts t he rec ord s by date . If fo r s ome re ason th e curr ent date i s
set to a date befor e the date found on the last reco rd, the n it would ap pear as if the dat a is
not being appended. In this case, the data is stored in the database but with the wrong
date. You can run a chronological detail rep ort to identify a call that you have mad e and
determine if the date is set correctly.
Q: I am trying to run reports, but keep getting Paradox errors.
A: Using Windows Program Manager, check to see if the file \
CALLSORT\DATA
is increasing in
size as SMDR data comes t hrough your ph one system. (When the Program Manager is open
MASTER.DB
and
is visible, press F5 as calls come in to see if the file’s number of bytes is
increasing).
MASTER.DB
If
set to
If it is set to \
MASTER.DB
MASTER.DB
does not grow, the Collection module is not writing to it.This should be
in the \
CALLSORT\PRICER
CALLSORT\DATA
in \
CALLSORT\DATA
directory.
, the Collection module may be unable to access the
. Shut down the Collection module and restart the
program. This may correct the problem.
In order to print a report, d ata must be a dded to the
directory. If data is not being added to the
corrupt. Follow these steps to create a new
1. Type
cd\callsort\callsort
. If CallSort Pro was installed in a different
MASTER.DB
MASTER.DB
MASTER.DB
in the \
file, the
file.
CALLSORT\PRICER
MASTER.DB
may be
directory, change to that directory instead.
2. Type
3. Type
del master.*
ren master.*test.*
type:
database to
master.*
TEST
. If you need to restore this database, type
.
cd\callsort\data
. If you would prefer to save a copy of your mast er da tabase ,
instead. This command will rename your master
ren test.*
. If CallSort Pro was installed in a di ffer ent directory,
change to that directory instead.
4. Type
copy master$t.*master*
. This command will start a bl ank copy of the
master dat abase.
Q: I am trying to open CallSort Pro but get the message “Login Failed.”
A: Call Vodavi’s technical support department.
Page 67

Troubleshooting 6-7
May 1999 FAQs and Troubleshooting
Troubleshooting
If you have any difficulty operating any aspect of CallSort Pro, access the CallSort Pro
Knowledge Base by s tarting t he Repor ts mod ule an d sel ecti ng Knowle dge Bas e fro m th e Help
menu.
The Knowledge Base is simil ar to a stan dard he lp fil e, you c an sel ect sp ecifi c topi cs to displa y
information related to your problem or displayed error message. The following text provides
additional information related to specific problems you may have.
Existing Cable Connection
The data being transmitted by the phone system is coming in on the wrong pin.
On the PC side, a 9-pin connector must have the data coming from the phone system sent on
pin 2. For a 25-pin connector, the data must come in on pin 3. Swap the wires between pins 2
and 3. Also make sur e that for a 9-pin connect or , the groun d is pin 5 and f or a 25-pin connector ,
the ground is pin 7.
The transmitting device phone sy stem is exp ecting a handshak ing si gnal tha t is not bein g
provided.
If the cable being used is terminated with a male connector, the PC is not supplying a
handshaking signal needed by the transmitting device.
While the Sample Coll ection pro gram is runni ng it causes the Data Terminal Ready (DTR) and
Request to send (RTS) pins to be activated at the PC connector.
The DTR and RTS pins are always activated (no handshak ing protocol
is needed or su pported). Dependi ng on the t ransmitting devi ce (differs
between manufacturers), the se signals may need to be routed to one or
more of the following pin s on the transmitting device: Pi n 5 , Cle ar to
send Pin 6, Data Set Ready Pin 8, Recei ved Line detector Pin 20, Data
Terminal Ready.
All pin numbers listed are for a 25-pin connector.
Refer to
Cable Connections
in chapter 1 for more information.
Configuration and Data Input Source
If you cannot see any raw data on the screen when performing step 1 of Collecting
Sample Data in Chapter 1:
1. Close the Collection module.
2. Activate the Hyperterminal program (typically located in your Accessories program
group).
Page 68

6-8 Troubleshooting
FAQs and Troubleshooting May 1999
3. Click on
Call
then
Connect
, and follow the instructions on the screen. (Configure the
Hyperterminal settings to match your phone system SMDR settings.
If you are not receiving raw SMDR data from your phone system in the above
procedure:
1. Make sure your phone system is set up to send SMDR.
2. Make sure your phone system cables are connected properly.
3. Make sure the transmit pin on the phone system is connected to the receive pin on the
PC (as discussed in “Purchasing or Fabricating a New Cable” earlier in this chapter.
4. Make sure the RS-232 is working on your PC.
5. If this procedure fails, contact the phone system vendor.
If you receive SMDR data within the Terminal program but did not receive data from
the Collection module:
1. Exit Windows.
2. Turn your computer off, wait 30 seconds, then turn it back on.
3. Start Windows and then start the Collection module.
4. Select Options/Collection On.
5. Return to the Options menu and select Process On.
6. If you are still not receiving call records, recheck the communic at ions configuration for
possible adjustments you may have to make, such as selecting a different COM port.
If you are still una ble to receiv e data after f ollowing this procedure, contact Vodavi’ s Technical
Support department.
If your phone system type is not one of those listed in the screen
above, please contact Technical Support at Vodavi at (Phone
Number For Support Here). We will provide assistance in
configuring CallSort Pro for your data.
Call Collection
The Collection Module Does Not Collect Any Data
Specific info rmation related to this potenti al problem when first setting up the Collection
module is presented in Chapter 1,
Installation
If problems arise after the Collection module has been running successfully, consider the
following:
Make sure you have the correct communications configuration (i.e., baud rate, parity,
stop bits, and data bits). Incorrect parameter entry is the primary cause for nontransmission of data. The Collection module will not work if these are set incorrectly.
, if you are having problems collecting data.
Page 69

Troubleshooting 6-9
May 1999 FAQs and Troubleshooting
Check to make sure that the phone system is definitely sending data. Make sure the
transmit pin on the phone system is connected to the receive pin on the PC.
Make sure that transmit on your phone system is connected to the receive on your PC.
Some phone systems require a handshaking signal to send data, make sure these are set.
Check the RS-232 board o n your P C and make sur e it wor ks. This ca n be done f or you at
the place where you purchased the PC.
If you run any program (such as a communications program) that may re-initialize the
RS-232 port the Call Collection program is using, the data collection will stop. To test
this, make sure that the data is being collected by the background program. Then load
the program that may be re-initializing the RS-232 port, and see if data is still being
collected. If it stops, you should discontinue the use of the communications program on
the call collection PC.
Garbage in the Data
Check the following items to correct the problem:
The length of your RS-232 cable. EI A standard al lows a maxi mum of 50 feet. Howev er,
you might be able to use a longer wire if you make sure it is shielded and does not go in
the vicinity of a noisy environment.
The baud rate, parity, and number of stop bits.
The RS-232 board on your PC.
Your RS-232 connection.
Call Recording and Reporting
Excessive Amount of Call Records are Filtered Out
This is probably due to an incorrect selection character. Your call records will not be
processed if the selection character cannot be found or only matches a few records.
Reconfigure again and make sure you do not use the very first record that is displayed
on the screen.
Occasionally, when the data collection module is activated, a call record has just been
transmitted and possibly only a partial record is stored.
This record can have a few characters missing, making it appear as if it is shifted to the
left. If you configure using this record, all the remaining data will be misread.
Note that transmission corruption is also possible with cables that
are longer than 50 feet.
Page 70

6-10 Troubleshooting
FAQs and Troubleshooting May 1999
Out of Memory
CallSort Pro needs at least 8K of available RAM. Note that you must remove any memory-
resident programs.
Generating Reports
No Report is Printed; Message Indicates No Data Was Found
Check the bottom of the CallSort Pro main screen, which shows the current number of
records. If the number of records is one or zero, Call Configuration was not configured
properly and all data was filtered out.
Check the report parameters and all filters. It is possible that you have set parameters
that cannot be found to be true for any record processed (for example, requesting only
long-distance calls when there were none).
Make sure your date range is valid and fal l s wi th in your data period, and is i n ascending
order (the start date must precede the end date).
Make sure your extension range is for a valid set of extensions.
Corrupt Data Is Noticed In A Report
If you notice data in a report that appears corrupted (for example, a report that lists a
trunk number that does not exist) this probably is a result of incorrectly defining the
fields of the call record.
Go back and verify that you have done this correctly (refer to
Defining Call Model
chapter 2). If descriptive information, such as the extension or department name, does
not appear in a report, it is because it has not been entered into the database.
This information is entered in the Administration module, as described in the
Administration
chapter.
in
System
Page 71

7 Customer Support
This chapter contains important customer, product, and technical support information. Please
read it carefully.
Customer Registration
Please fill out and return your registration card today. Doing so entitles yo u to the followin g
benefits:
Telephone technical support
Expedited technical assistance
Notification of enhancements, updates, and new modules at special reduced prices
Purchase of replacement disks in case of loss, destruction, or defect (when out of
warranty) for a nominal charge
Ongoing product support
Product Support
The best source of support may be your Call Sort Pro dealer, your own organization, or Vodavi,
depending on the nature of the problem and where you purchased the product.
You are entitled to 90 days of telephone support (from the date of purchase). For additional
support refer to the
statement is included in th e CallSort Pro package; please read it carefully.
Maintenance Agreement
described later in this chapter. Your warranty
If you experience problems, we recommend the following steps:
1. Review this document first. It answers most questions.
2. Check your CallSort Pro configuration and make sure you have all the necessary
components.
3. If applicable, consult your dealer. This may be your best source of convenient, local
support.
CallSort Pro v3.0 User’s Guide May 1999
Page 72

7-2 Technical Support
Customer Support May 1999
Technical Su pp ort
Telephone Technical Support is available Monday through Friday, 8:00 am - 5:00 p.m. EST.
The T echnical Support number is: (877 ) 4-VODA VI. Fol low the instructions to reach the pro per
support department.
IMPORTANT
1. Have returned the completed Registration Form (preferably via fax at 770-662-1536).
2. Try to is olate the pro blem. Is it re lated to CallSort Pro or to some aspect of your system?
3. Be sure to have the serial number that appears on the CallSort Pro disk #1 available
when you call.
4. Have available any materials pertaining to your question such as: printouts for you to
refer to or notes you made while operating the system. (This makes it easier for our
technical support analyst to understand the problem and assist you promptly.)
Before you call Technical Support you must follow these steps:
--
Web/Internet Technical Support
For Web / Internet support, use http://www.vodavi.com
Select <Support> followed by <CallSort Pro>
E-Mail Technical Support
For e-mail support, send to Vodavi Technical Support at: [email protected].
Facsimile Support
Our facsimile number for sending your Registration or other information is: (770) 662-1536
Product Replacement Program
In the event that CallSort Pro is found to be defective in materials or workmanship, please
contact Vodavi Technology, Inc. for a return authorization. You will receive instructions on
returning the defective disk for replacement.
Within ninety (90) days of purchase, Vodavi will replace a defective disk free of charge
to registered users.
After ninety days, and for up to one year after the date of purchase, replacement disks
are available to registered users at $20.00 for each defective disk, plus a shipping and
handling charge.
Page 73

Product Replacement Program 7-3
May 1999 Customer Support
If you have not sent in your r egi stration
, you will need to send your regi st ra ti on form along
with the defective disks, proof of purchase, and $30.00 per disk.
Returns and payment, if required, are sent to:
Vodavi Technology, Inc.
8300 E. Raintree Dr.
Scottsdale, AZ 85260
Attn: Technical Support
Maintenance Agreement
After your 90 days of free supp ort, you may purchase a mainten ance contract to exte nd ongoing
support.
The maintenance contrac t is available fo r purchase on a yearly basis and entitle s you to receive
the following:
Ten hours of telephone technical support
24-hour Technical HOTLINE (877-4-VODAVI)
24-hour Technical Support Bulletin Board
24-hour Facsimile Support including Fax Bulletin Board
All software maintenance releases during the year
Maintenance Cost
Effective April, 1999 -- The price of the maintenance agreement is $500 and is subject to
change without notice.
Page 74

7-4 Product Replacement Program
Maintenance Order Form
Company
Contact
Address
Phone
Serial #
Customer Support May 1999
Maintenance Order Form
If you haven’t already returned your CallSort Pro Registration, return it with this form to
receive continued support after the initial 90 days.
Please enclose a che ck for the a ppropr iate amount, p ayab le to Vodavi Technology, Inc ., for the
cost of your maintenance agreement.
For further assistance, please call (770) 662-1500 and press 2 for the Sales Department.
Page 75

Index
A
Account Codes
Administration - Report Setup
Administration Information
Analysis Reports
4-9
5-1
4-5
5-6
C
Cable Connections
New/Existing Cable Installation
RS-232 Standard
Changing Communication Settings
Collecting Sa mple Data
Collectio n/Pricing Menu Options
Contact Information
Customer Support
1-4
1-8
4-8
7-1
D
Database Overview
Defining Layout Information
3-2
2-3
E
E-Mail Technical Support
Extension Information
7-2
4-7
F
Facsimile Support
FAQs
Collection Module
Hints and Tips
Installation
Reports Module
Frequently Asked Questions
7-2
6-5
6-1
6-4
6-6
6-1
1-7
1-9
1-4
I
Installation Requirements
Installing CallSort Pro
1-2
1-5
M
Maintenance
Agreement
Cost
Order Form
7-3
7-3
7-4
O
Organization Levels - Defining
Organization Reports
5-6
4-4
P
PBX Define
Defining Layout Information
Setting Up Number Filters
Pricer Configuration Options
Product
Replacement Program
Support
7-1
2-5
3-3
7-2
R
Report Options/Descriptions
Reports Available
RS-232 Cable Pin-Outs
RS-232 Communication Standard
Running a Report
5-5
5-4
5-2
1-3
S
Scheduled Reports
Setting Up Call Records/Layout
Setting Up Company Information
Setting Up Number Filters
5-5
2-1
2-5
2-3
1-4
4-3
CallSort Pro v3.0 User’s Guide May 1999
Page 76

ii Index
CallSort Pro v3.0 User’s Guide May 1999
Software Program Functions
Support
Product
Technical
7-1
7-2
1-1
T
Technical Support
Traffic Reports
Troubleshooting
Call Collection
Call Recording and Reporting
Configuration and Dat a Input So urce
Existing Cable Connection
Garbage in th e Data
Generating Reports
Out of Memory
Trunk Line Information
7-2
5-7
6-9
6-10
6-11
6-10
4-10
U
User Information
4-6
W
6-10
6-8
6-7
Web/Internet Technical Support
7-2
Page 77

Part No. CSPMAN3 Printed in United States of Amer ica Issue 2, May 1999
 Loading...