

Page 1
Administrator’s Manual
Page 2

VMware, Inc.
Please note that you will always find the most up-to-date technical documentation on our Web site at http://www.vmware.com/support/.
The VMware Web site also provides the latest product updates.
3145 Porter Drive
Palo Alto, CA 94304
www.vmware.com
Copyright © 1998-2006 VMware, Inc. All rights reserved. Protected by one or more of U.S. Patent Nos.
6,397,242, 6,496,847, 6,704,925, 6,711,672, 6,725,289, 6,735,601, 6,785,886, 6,789,156 and 6,795,966; patents
pending. VMware is a registered trademark and the VMware boxes logo, GSX Server, ESX Server, Virtual SMP,
VMotion and VMware ACE are trademarks of VMware, Inc. Microsoft, Windows, and Windows NT are registered
trademarks of Microsoft Corporation. Linux is a registered trademark of Linus Torvalds. All other marks and
names mentioned herein may be trademarks of their respective companies.
Revision 20060308 Version: 1.0 Item: ACE-ENG-Q304-008
Page 3

Table of Contents
Introduction and System Requirements ____________________________9
About VMware ACE _____________________________________________ 10
Ensure Safe Access to Enterprise Resources ________________________ 10
Secure Data on Enterprise PCs __________________________________ 10
Standardize and Secure PC Environments _________________________ 10
Key Features of VMware ACE ___________________________________ 11
The VMware ACE Software _____________________________________ 11
Host System Requirements for VMware ACE Manager __________________ 12
Host System Requirements for End Users ____________________________ 14
Virtual Machine Specifications_____________________________________ 16
Supported Guest Operating Systems _______________________________ 18
Technical Support Resources______________________________________ 20
Documentation on the Web____________________________________ 20
VMware Knowledge Base ______________________________________ 20
VMware User Community______________________________________ 20
Reporting Problems __________________________________________ 20
Learning the Basics of VMware ACE Manager ______________________ 23
Setting Up Your Administrative Workstation __________________________ 24
Creating Packages to Distribute to Users_____________________________ 26
Basic Steps _________________________________________________ 26
Keeping Users Up-to-Date _____________________________________ 27
Troubleshooting Users’ Problems ________________________________ 28
Installing and Configuring VMware ACE Manager __________________ 29
Installing VMware ACE Manager ___________________________________ 30
Installing on a Computer with a Different VMware Product ____________ 30
Installation Steps_____________________________________________ 30
Installing VMware ACE Manager Silently___________________________ 33
Uninstalling VMware ACE Manager ______________________________ 35
Setting Preferences for VMware ACE Manager ________________________ 36
Using Shared Folders in VMware ACE Manager ________________________ 40
Creating Projects _____________________________________________ 43
Creating a Project ______________________________________________ 44
Using the New Project Wizard __________________________________ 44
3
Page 4

Making Project Settings _______________________________________ 46
Checklist: Creating a Project ______________________________________ 49
Adding a Virtual Machine to a Project _______________________________ 51
Adding an Existing Virtual Machine ______________________________ 51
Adding a New Virtual Machine __________________________________ 53
Checklist: Adding a Virtual Machine ________________________________ 63
Setting Policies and Customizing VMware ACE ____________________ 69
Setting Policies for a Project_______________________________________ 71
Using the Policy Editor ________________________________________ 71
Setting Policies for VMware ACE ___________________________________ 74
Hot Fix Policy _______________________________________________ 74
Administrator Access Policy ____________________________________ 75
Troubleshooting Policies_______________________________________ 76
Easy Printer Setup Policies _____________________________________ 77
VMware ACE Window Policies __________________________________ 78
User Preferences Policies_______________________________________ 79
Setting Policies for Virtual Machines ________________________________ 81
Setting Authentication Policies__________________________________ 81
Setting Expiration Policies______________________________________ 83
Setting Copy Protection Policies_________________________________ 84
Setting Device Connection Policies ______________________________ 85
Setting Network Quarantine Policies _____________________________ 85
Configuring the Virtual Machines and Installing Software_______________ 111
Reviewing the Configuration of a Virtual Machine __________________ 111
Installing an Operating System and Applications in the Virtual Machine _ 112
Customizing the VMware ACE Interface ____________________________ 123
Creating and Specifying the Skin File ____________________________ 123
Customizing the VMware ACE Icons_____________________________ 123
Customizing the Title Bar Text _________________________________ 124
Customizing the Removable Device Display ______________________ 124
Shortcut Key Values _________________________________________ 126
Sample Skin File ____________________________________________ 128
Running the Completed Virtual Machine ___________________________ 129
Checking the Configuration before Creating a Package______________ 129
4
www.vmware.com
Page 5

Creating Packages to Deploy to Users ___________________________ 131
Creating a Package ____________________________________________ 132
Contents of the Package ________________________________________ 136
Deploying and Maintaining Packages ___________________________ 137
Deploying Packages ___________________________________________ 138
Installing a Package Silently______________________________________ 139
Updating Virtual Machines ______________________________________ 141
Distributing Software Updates _________________________________ 141
Creating Update Packages ____________________________________ 141
Updating Network Quarantine Versions __________________________ 142
Using nq-set to Update Network Quarantine Versions_______________ 146
Deploying Update Packages _____________________________________ 149
Responding to Hot Fix Requests __________________________________ 150
Using Administrator Access on the End User’s Computer _______________ 152
Installing and Running VMware ACE ____________________________ 153
Installing a VMware ACE Package _________________________________ 154
Running VMware ACE __________________________________________ 156
Starting VMware ACE ________________________________________ 156
Quitting VMware ACE ________________________________________ 157
Enlarging VMware ACE to Fill the Screen _________________________ 159
Understanding VMware ACE Status Indicators _____________________ 159
Controlling Devices Attached to VMware ACE _____________________ 160
Setting VMware ACE Preferences _______________________________ 161
Printing from VMware ACE ____________________________________ 162
Uninstalling VMware ACE _____________________________________ 162
Troubleshooting Problems ____________________________________ 163
Using Virtual Disks ___________________________________________ 167
Configuring Hard Disk Storage in a Virtual Machine ___________________ 168
Virtual Disk Basics ___________________________________________ 168
File Locations ______________________________________________ 169
Defragmenting and Shrinking Virtual Disks _______________________ 171
Adding Drives to a Virtual Machine ________________________________ 173
Adding Virtual Disks to a Virtual Machine _________________________ 173
Adding DVD or CD Drives to a Virtual Machine ____________________ 174
Adding Floppy Drives to a Virtual Machine________________________ 176
Connecting a CD-ROM or Floppy Drive to an Image File _____________ 177
5
Page 6

Disk Performance in Windows NT Guests on Multiprocessor Hosts _______ 178
Improving Performance ______________________________________ 178
Preserving the State of a Virtual Machine ________________________ 179
Using Suspend and Resume _____________________________________ 180
Using the Snapshot ____________________________________________ 182
What Is Captured by the Snapshot? _____________________________ 182
Removing the Snapshot ______________________________________ 183
Ways of Using the Snapshot ___________________________________ 183
The Snapshot and the Virtual Machine’s Hard Disks _________________ 184
The Snapshot and Other Activity in the Virtual Machine _____________ 184
Networking Virtual Machines __________________________________ 187
Components of the Virtual Network _______________________________ 189
Common Networking Configurations ______________________________ 191
Bridged Networking _________________________________________ 191
Network Address Translation (NAT) _____________________________ 192
Host-Only Networking _______________________________________ 193
Changing the Networking Configuration ___________________________ 195
Adding and Modifying Virtual Network Adapters___________________ 195
Understanding NAT ____________________________________________ 196
Using NAT_________________________________________________ 196
The Host Computer and the NAT Network ________________________ 196
DHCP on the NAT Network ____________________________________ 196
DNS on the NAT Network _____________________________________ 197
External Access from the NAT Network___________________________ 197
Considerations for Using NAT __________________________________ 198
Using NAT with NetLogon ____________________________________ 198
Configuring Video and Sound _________________________________ 201
Setting Screen Color Depth in a Virtual Machine______________________ 202
Changing Screen Color Depth on the Host _______________________ 202
Changing Screen Color Depth in the Virtual Machine _______________ 202
Configuring Sound ____________________________________________ 204
Installing Sound Drivers in Windows 9x and Windows NT Guest
Operating Systems __________________________________________ 204
Connecting Devices to Virtual Machines _________________________ 205
Using Parallel Ports ____________________________________________ 207
Parallel Ports _______________________________________________ 207
6
www.vmware.com
Page 7

Installation in Guest Operating Systems __________________________ 207
Special Notes for the Iomega Zip Drive __________________________ 208
Using Serial Ports ______________________________________________ 209
Using a Serial Port on the Host Computer ________________________ 209
Using a File on the Host Computer______________________________ 209
Connecting an Application on the Host to a Virtual Machine _________ 210
Connecting Two Virtual Machines ______________________________ 211
Special Configuration Options for Advanced Users _________________ 212
Using USB Devices in a Virtual Machine ____________________________ 214
Notes on USB Support in VMware ACE___________________________ 214
Enabling and Disabling the USB Controller________________________ 214
Connecting USB Devices _____________________________________ 214
Using USB with a Windows Host________________________________ 215
Replacing USB 2.0 Drivers on a Windows 2000 Host_________________ 215
Installing USB Devices as a Non-Administrator _____________________ 216
Who Has Control over a USB Device? ____________________________ 216
Disconnecting USB Devices from a Virtual Machine _________________ 217
Human Interface Devices _____________________________________ 217
Understanding Policies _______________________________________ 219
Taking Advantage of Policies _____________________________________ 220
Encryption and Authentication Policies_____________________________ 222
Encrypting a Virtual Machine’s Files _____________________________ 222
Determining the Authentication Policy __________________________ 222
Expiration Policies _____________________________________________ 224
Copy Protection Policies ________________________________________ 225
VMware ACE Policies ___________________________________________ 226
Troubleshooting Policies______________________________________ 226
VMware ACE Window Policies _________________________________ 227
Easy Printer Setup Policies ____________________________________ 227
User Preferences Policies______________________________________ 228
Administrator Access Policy ___________________________________ 229
Network Quarantine Policies _____________________________________ 230
Selecting the Type of Network Quarantine________________________ 230
Specifying Access to Networks and Machines _____________________ 232
Allowing Access for Printer, DHCP, DNS and ICMP Traffic _____________ 232
Storing Access Lists for Network Quarantine ______________________ 233
7
Page 8

Using Advanced Network Quarantine _____________________________ 234
Defining Zones _____________________________________________ 235
Defining Host Policies________________________________________ 237
Defining Guest Policies_______________________________________ 240
Writing Plug-In Policy Scripts_____________________________________ 244
Authentication Plug-Ins ______________________________________ 245
Renewal Plug-Ins ___________________________________________ 246
Device Connection Plug-Ins ___________________________________ 247
Network Quarantine Plug-Ins __________________________________ 248
Sample Scripts _____________________________________________ 250
Glossary ____________________________________________________ 259
Index ______________________________________________________ 263
8
www.vmware.com
Page 9

CHAPTER 1
Introduction and System Requirements
Welcome to VMware ACE. This section covers the following topics:
• About VMware ACE on page 10
• Host System Requirements for VMware ACE Manager on page 12
• Host System Requirements for End Users on page 14
• Virtual Machine Specifications on page 16
• Supported Guest Operating Systems on page 18
• Technical Support Resources on page 20
9
Page 10

VMware ACE Administrator’s Manual
About VMware ACE
VMware ACE is an enterprise solution for IT desktop managers who want to rapidly
provision standardized and secure PC environments throughout the extended
enterprise. VMware ACE installs easily, improving the manageability, security and costeffectiveness of any industry-standard PC.
VMware ACE enables IT desktop managers to apply enterprise IT policies to a virtual
machine containing an operating system, enterprise applications and data to create
an isolated PC environment known as an assured computing environment.
Through Virtual Rights Management technology, VMware ACE enables IT desktop
managers to control assured computing environment lifecycles, secure enterprise
information on PCs and ensure compliance with IT policies.
Unlike other products, VMware ACE is a hardware-independent solution that can be
provisioned to any PC and works either connected or disconnected from the
enterprise network.
VMware ACE is used across the enterprise to
• Ensure safe access to enterprise resources from remote and guest PCs
• Secure data on enterprise PCs
• Standardize and secure PC environments
10
Ensure Safe Access to Enterprise Resources
Reduce the threat from unmanaged and unsecured PCs used by telecommuters,
partners and offshore workers to access enterprise resources. VMware ACE enables
safe access to enterprise resources from assured computing environments — isolated
PC environments that run on top of existing PCs. The assured computing
environment contains an operating system, enterprise applications and
preconfigured security settings.
Secure Data on Enterprise PCs
Secure enterprise information in assured computing environments on any PC
throughout the extended enterprise. With Virtual Rights Management, built-in copy
protection controls and automatic encryption, VMware ACE helps prevent theft,
tampering and unauthorized copying of applications, data, system settings and files.
Standardize and Secure PC Environments
Self-policing and hardware-independent, VMware ACE improves the manageability,
security and cost-effectiveness of PCs. Avoid building and supporting hardware-
www.vmware.com
Page 11

CHAPTER 1 Introduction and System Requirements
specific images for PCs. Ensure compliance with IT policies while maintaining end user
freedom.
Key Features of VMware ACE
Manageability
• Design once, deploy anywhere. Create standardized hardware-independent PC
environments and deploy them to any PC throughout the extended enterprise.
• Virtual Rights Management interface. Control VMware ACE lifecycle, security
settings, network settings, system configuration and user interface capabilities.
Security
• Rules-based network access. Identify and quarantine unauthorized or out-ofdate VMware ACE environments. Enable access to the network once the VMware
ACE environment complies with IT policies.
• Tamper-resistant computing environment. Protect the entire VMware ACE
environment, including data and system configuration, with seamless
encryption.
• Copy protected computing environment. Prevent end users from copying
enterprise information.
Usability
• Customizable interface. Customize the behavior and look and feel for end users.
• Flexible computing environment. End users can revert to a previous state within
seconds and can work online or when disconnected from the enterprise
network.
The VMware ACE Software
As an administrator, you install VMware ACE Manager and use it to create virtual
machines and package them for distribution to your end users. It allows you to set
policies to ensure that your end users have a computing environment that meets your
organization’s security requirements.
VMware ACE Manager creates packages that include VMware ACE, the application
your end users use to run the virtual machine. VMware ACE is simple to use and
automatically runs the virtual machine you have configured.
11
Page 12

VMware ACE Administrator’s Manual
Host System Requirements for VMware
ACE Manager
What do you need to get the most out of VMware ACE Manager? Take the following
list of requirements as a starting point. Remember that the virtual machines running
under VMware ACE Manager are like physical computers in many ways — and, like
physical computers, they generally perform better if they have faster processors and
more memory.
PC Hardware
• Standard PC
• 500MHz or faster compatible x86 processor (recommended; 400MHz minimum)
Compatible processors include
• Intel®: Celeron®, Pentium® II, Pentium III, Pentium 4, Pentium M (including
computers with Centrino™ mobile technology), Xeon™ (including “Prestonia”)
• AMD™: Athlon™, Athlon MP, Athlon XP, Duron™, Opteron™
For additional information, including notes on processors that are not
compatible, see the VMware knowledge base at www.vmware.com/support/kb/
enduser/std_adp.php?p_faqid=967.
• Multiprocessor systems supported
• Experimental support for AMD64 Opteron, Athlon 64 and Intel IA-32e CPU
12
Memory
• Enough memory to run the host operating system, plus memory required for
each guest operating system and for applications on the host and guest; see
your guest operating system and application documentation for their memory
requirements
• 256MB recommended, 128MB minimum
Display
• 16-bit display adapter recommended; 8-bit display adapter required
Disk Drives
• 150MB free space required for basic installation
• At least 1GB free disk space recommended for each guest operating system and
the application software used with it; if you use a default setup, the actual disk
www.vmware.com
Page 13

CHAPTER 1 Introduction and System Requirements
space needs are approximately the same as those for installing and running the
guest operating system and applications on a physical computer
• Additional disk space for building packages; temporary files require about as
much space as those of the virtual machine included in the package
• IDE or SCSI hard drives, CD-ROM and DVD-ROM drives supported
Local Area Networking (Optional)
• Any Ethernet controller supported by the host operating system
• Non-Ethernet networks supported using built-in network address translation
(NAT)
Windows Host Operating Systems
• Windows Server 2003 Web Edition, Windows Server 2003 Standard Edition,
Windows Server 2003 Enterprise Edition
• Windows XP Professional and Windows XP Home Edition with Service Pack 1 or 2
• Windows 2000 Professional Service Pack 3 or 4, Windows 2000 Server Service
Pack 3 or 4, Windows 2000 Advanced Server Service Pack 3 or 4
Internet Explorer 4.0 or higher is required for the Help system.
13
Page 14

VMware ACE Administrator’s Manual
Host System Requirements for End Users
What systems do your end users need to get the most out of VMware ACE? Take the
following list of requirements as a starting point. Remember that the virtual machines
running under VMware ACE are like physical computers in many ways — and, like
physical computers, they generally perform better if they have faster processors and
more memory.
PC Hardware
• Standard PC
• 500MHz or faster compatible x86 processor (recommended; 400MHz minimum)
Compatible processors include
• Intel®: Celeron®, Pentium® II, Pentium III, Pentium 4, Pentium M (including
computers with Centrino™ mobile technology), Xeon™ (including “Prestonia”)
• AMD™: Athlon™, Athlon MP, Athlon XP, Duron™, Opteron™
For additional information, including notes on processors that are not
compatible, see the VMware knowledge base at www.vmware.com/support/kb/
enduser/std_adp.php?p_faqid=967.
• Multiprocessor systems supported
• Experimental support for AMD64 Opteron, Athlon 64 or Intel IA-32e CPU
14
Memory
• Enough memory to run the host operating system, plus memory required for
the guest operating system and for applications on the host and guest; see your
guest operating system and application documentation for their memory
requirements
• 256MB recommended, 128MB minimum
Display
• 16-bit display adapter recommended; greater than 8-bit display adapter required
Disk Drives
• 80MB free space required for basic installation
• At least 1GB free disk space recommended for the guest operating system and
the application software used with it; if you use a default setup, the actual disk
space needs are approximately the same as those for installing and running the
guest operating system and applications on a physical computer
www.vmware.com
Page 15

CHAPTER 1 Introduction and System Requirements
• IDE or SCSI hard drives, CD-ROM and DVD-ROM drives supported
Local Area Networking (Optional)
• Any Ethernet controller supported by the host operating system
• Non-Ethernet networks supported using built-in network address translation
(NAT)
Windows Host Operating Systems
• Windows Server 2003 Web Edition, Windows Server 2003 Standard Edition,
Windows Server 2003 Enterprise Edition
• Windows XP Professional and Windows XP Home Edition with Service Pack 1 or 2
• Windows 2000 Professional Service Pack 3 or 4, Windows 2000 Server Service
Pack 3 or 4, Windows 2000 Advanced Server Service Pack 3 or 4
Internet Explorer 4.0 or higher is required for the Help system.
15
Page 16

VMware ACE Administrator’s Manual
Virtual Machine Specifications
Each virtual machine created with VMware ACE Manager provides a platform that
includes the following devices that your guest operating system can see.
Processor
• Same processor as that on host computer
Note: A 64-bit processor runs in 32-bit legacy mode inside the virtual machine.
• Single processor per virtual machine on symmetric multiprocessor systems
Chip Set
• Intel 440BX-based motherboard with NS338 SIO chip and 82093AA IOAPIC
BIOS
• PhoenixBIOS™ 4.0 Release 6 with VESA BIOS
Memory
• Up to 3600MB, depending on host memory
• Maximum of 4GB total available for all virtual machines
Graphics
• VGA and SVGA support
16
IDE Drives
• Up to four devices — disks, CD-ROM or DVD-ROM (DVD drives can be used to
read data DVD-ROM discs; DVD video is not supported)
• IDE virtual disks up to 128GB
• CD-ROM can be a physical device or an ISO image file
SCSI Devices
• Up to seven devices
• SCSI virtual disks up to 256GB
• LSI Logic® LSI53C1030 Ultra320 SCSI I/O controller
• Mylex® (BusLogic) BT-958 compatible host bus adapter (requires add-on driver
from VMware for Windows XP and Windows Server 2003)
Floppy Drives
• Up to two 1.44MB floppy devices
• Physical drives or floppy image files
www.vmware.com
Page 17

Serial (COM) Ports
• Up to four serial (COM) ports
• Output to serial ports, Windows or Linux files, or named pipes
Parallel (LPT) Ports
• Up to two bidirectional parallel (LPT) ports
• Output to parallel ports or host operating system files
USB ports
• Two-port USB 1.1 UHCI controller
• Supports devices including USB printers, scanners, PDAs, hard disk drives,
memory card readers and still digital cameras
Keyboard
• 104-key Windows 95/98 enhanced
Mouse and Drawing Tablets
• PS/2 mouse
• Serial tablets supported
Ethernet Card
• Up to three virtual Ethernet cards
• AMD PCnet-PCI II compatible
CHAPTER 1 Introduction and System Requirements
Sound
• Sound output and input
• Emulates Creative Labs Sound Blaster AudioPCI (MIDI input, game controllers
and joysticks not supported)
Virtual Networking
• Virtual networking supports most Ethernet-based protocols, including TCP/IP,
NetBEUI, Microsoft Networking, Samba, Novell NetWare and Network File System
• Built-in NAT supports client software using TCP/IP, FTP, DNS, HTTP and Telnet
17
Page 18

VMware ACE Administrator’s Manual
Supported Guest Operating Systems
The operating systems listed here have been tested in VMware ACE virtual machines
and are officially supported. For notes on installing the most common guest
operating systems, see the VMware Guest Operating System Installation Guide, available
from the VMware Web site or from the Help menu.
Operating systems that are not listed are not supported for use in a VMware ACE
virtual machine. For the most recent list of supported guest operating systems, see
the support section of the VMware Web site, www.vmware.com/support/.
Microsoft Windows
• Windows, code-named Longhorn, beta (experimental)
• Windows Server 2003 Web Edition, Windows Server 2003 Standard Edition,
Windows Server 2003 Enterprise Edition
• Windows XP Professional and Windows XP Home Edition with Service Pack 1 or 2
(listed versions also supported with no service pack)
• Windows 2000 Professional Service Pack 1, 2, 3 or 4 (also supported with no
service pack); Windows 2000 Server Service Pack 1, 2, 3 or 4 (also supported with
no service pack); Windows 2000 Advanced Server Service Pack 3 or 4
• Windows NT® Workstation 4.0 Service Pack 6a, Windows NT Server 4.0 Service
Pack 6a, Windows NT 4.0 Terminal Server Edition Service Pack 6
• Windows Me
• Windows 98 (including all Customer Service Packs) and Windows 98 SE
• Windows 95 (including Service Pack 1 and all OSR releases)
• Windows for Workgroups 3.11
• Windows 3.1
18
Microsoft MS-DOS
• MS-DOS 6.x
Linux
• Mandrake Linux 8.2, 9.0
• Red Hat Linux 7.0, 7.1, 7.2, 7.3, 8.0, 9.0
• Red Hat Enterprise Linux 2.1, 3.0
• Red Hat Linux Advanced Server 2.1
• SuSE Linux 7.3, 8.0, 8.1, 8.2, 9.0, 9.1
www.vmware.com
Page 19

• SLES 7, 7 patch 2, 8
• Turbolinux Server 7.0, Enterprise Server 8, Workstation 8
Novell NetWare
• NetWare 5.1, 6, 6.5
FreeBSD
• FreeBSD 4.0–4.6.2, 4.8, 5.0
Note: If you use SCSI virtual disks larger than 2GB with FreeBSD 4.0–4.3, there
are known problems, and the guest operating system does not boot. To work
around this issue, see the VMware Guest Operating System Installation Guide,
available from the VMware Web site or from the Help menu.
Solaris
• Solaris x86 Platform Edition 9 (experimental), 10 beta (experimental)
CHAPTER 1 Introduction and System Requirements
19
Page 20

VMware ACE Administrator’s Manual
Technical Support Resources
Documentation on the Web
Full documentation for VMware ACE, including the latest updates to this manual, can
be found on the VMware Web site at www.vmware.com/support/.
VMware Knowledge Base
You can find troubleshooting notes and tips for advanced users in the knowledge
base on the VMware Web site at www.vmware.com/kb.
VMware User Community
Community Discussion Forums
The VMware community discussions forums are a set of moderated discussion forums
hosted on the VMware Web site and open to all VMware users. In the forums, you can
share your experiences in using VMware products, raise technical questions or issues
and benefit from the expertise and advice of other VMware users.
To join in the forum discussions, go to www.vmware.com/community/.
Newsgroups
The VMware newsgroups are primarily forums for users to help each other. You are
encouraged to read and post issues, work-arounds and fixes. While VMware personnel
may read and post to the newsgroups, they are not a channel for official support. The
VMware NNTP news server is at news.vmware.com.
For more information on the newsgroups and community forums, see
www.vmware.com/vcommunity.
20
Reporting Problems
If you have problems while running VMware ACE, please report them to the VMware
support team.
These guidelines describe the information we need from you to diagnose problems.
If a virtual machine exits abnormally or crashes, please run the support script to
collect the appropriate log files and system information. Follow the steps below.
1. Open a command prompt.
2. Change to the VMware ACE Manager program directory.
C:
cd \Program Files\VMware\VMware ACE Manager
www.vmware.com
Page 21

CHAPTER 1 Introduction and System Requirements
If you did not install the program in the default directory, use the appropriate
drive letter and substitute the appropriate path in the cd command above.
3. Run the support script.
cscript vm-support.vbs
4. After the script runs, it displays the name of the directory where it has stored its
output. Use a file compression utility such as WinZip or PKZIP to zip that
directory and include the zip file with your support request.
If you are reporting a problem you encountered while installing VMware ACE, it is also
helpful to have your installation log file. The file is VMInst.log. It is saved in your
temp folder. The default location is C:\Documents and
Settings\<username>\Local Settings\Temp. The Local Settings
folder is hidden by default. To see its contents, open My Computer, choose Tools >
Folder Options, click the View tab and select Show Hidden Files and Folders.
Be sure to register your serial number. You may then report your problems by
submitting a support request at www.vmware.com/requestsupport.
21
Page 22

VMware ACE Administrator’s Manual
22
www.vmware.com
Page 23

CHAPTER 2
Learning the Basics of VMware ACE Manager
The following sections provide an overview of how to use VMware ACE Manager to
create and deploy virtual machines for your end users.
• Setting Up Your Administrative Workstation on page 24
• Creating Packages to Distribute to Users on page 26
• Basic Steps on page 26
• Keeping Users Up-to-Date on page 27
• Troubleshooting Users’ Problems on page 28
23
Page 24

VMware ACE Administrator’s Manual
Setting Up Your Administrative
Workstation
As an administrator, you need to install the VMware ACE Manager software on your
workstation, referred to in this manual as your host computer. You can then run the
VMware ACE Manager, your tool for creating and managing the virtual machines you
distribute to your end users.
For details on how to install the VMware ACE Manager software, see Installing and
Configuring VMware ACE Manager on page 29.
If your company already has a library of standard virtual machines, you need network
access to that library from your host computer.
If you are creating new virtual machines, you need access to installers for the guest
operating systems and application software you plan to install in the virtual machines.
You can install operating systems from CD, from ISO image files on a local drive or on
the network, or from a PXE server. If you need to connect to an ISO file on a network
drive, you use the networking capabilities of your host computer to make that
connection.
You can install application software from CDs or from installers on a local drive or on
the network. If you need to connect to an installer on the network, you use the
networking capabilities of the virtual machine to make that connection. For details on
networking in a virtual machine, see Networking Virtual Machines on page 187. If you
need to use an installer on a local drive, you can use the virtual machine’s networking
capabilities or use shared folders in the virtual machine to gain access to the installer.
For details on using shared folders, see Using Shared Folders in VMware ACE Manager
on page 40.
You need to provide adequate disk space for three types of files:
• Project files — The files that define projects take up relatively little disk space.
The default location for these files is C:\Documents and
Settings\<username>\My Documents\My Projects. To change
the default location, go to Edit > Preferences > Workspace. When you create a
new project, you may specify a location for that project’s files that is different
from the default.
• Virtual machine files — The files for each virtual machine can be quite large,
sometimes as large as several gigabytes. The default location for these files is
C:\Documents and Settings\<username>\My Documents\My
24
www.vmware.com
Page 25

CHAPTER 2 Learning the Basics of VMware ACE Manager
Virtual Machines. To change the default location, go to Edit >
Preferences > Works pace. When you create a new virtual machine, you can
specify a location for that virtual machine’s files that is different from the default.
• Package files — The package files created by VMware ACE Manager may be
quite large. The default location for the package files is a folder named
Package inside the project’s folder. When you create a package, you can
change the location for the package’s files.
In addition, VMware ACE Manager needs a substantial amount of temporary
working space when it creates a package. The total is about twice the combined
sizes of all the components of the package. The wizard displays information
about the amount of space needed and the locations where the space is
needed. If you do not have enough free space, the wizard displays an error
message. You may move or delete files on the target drives to make room for the
wizard’s working files.
25
Page 26
VMware ACE Administrator’s Manual
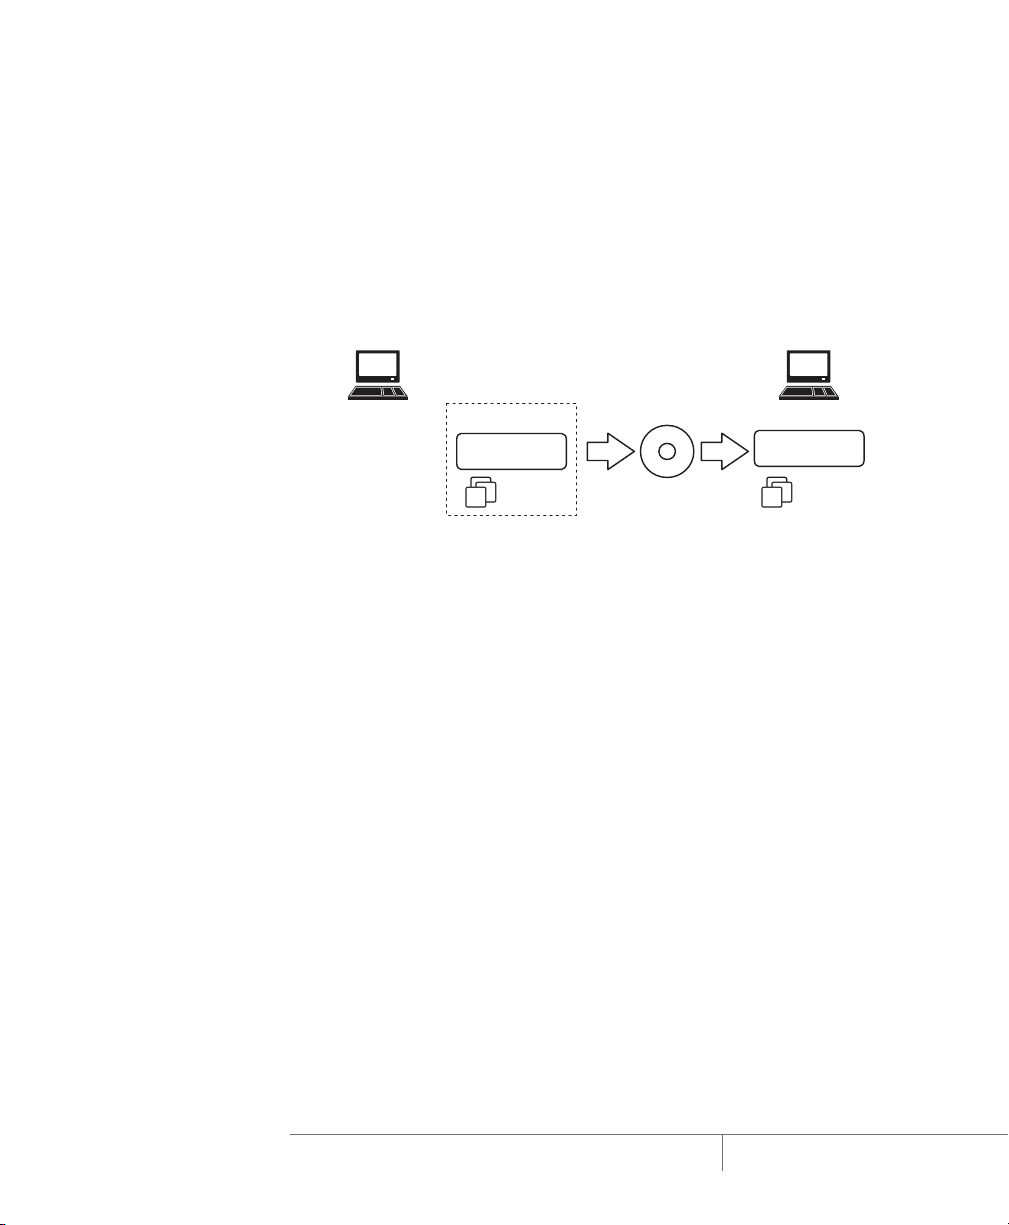
Creating Packages to Distribute to Users
Using the VMware ACE Manager, you create projects that include
• One or more virtual machines
• An application to run the virtual machines
• A set of policies to control the capabilities of the virtual machines
You then create packages, based on the projects, to distribute to your users.
End userAdministrator
VMware ACE
VM
VMware ACE
Manager
Project
VMware ACE
VM
MSI install image
When you create a package, you include VMware ACE and one or more virtual
machines from the project. VMware ACE is the easy-to-use application that runs the
virtual machines. For more information on VMware ACE, see Installing and Running
VMware ACE on page 153.
Basic Steps
At the most basic level, you need to take the following steps to create and deploy
virtual machines:
1. Create a project. Give the project a name that makes it easy to identify. For more
information on creating projects, see Creating a Project on page 44. For a handy
checklist, see Checklist: Creating a Project on page 49.
2. Add one or more virtual machines to the project. You can add existing virtual
machines, create new virtual machines or both. For more information on adding
virtual machines, see Adding a Virtual Machine to a Project on page 51. For a
handy checklist, see Checklist: Adding a Virtual Machine on page 63.
3. Set policies for the virtual machines. You use policies to control what your users
can do with their virtual machines — for example, what network access they
have from the virtual machines and what devices on their host computers they
may use in the virtual machines. For basic information on setting policies, see
Setting Policies and Customizing VMware ACE on page 69. For a detailed
discussion of policies, see Understanding Policies on page 219.
26
www.vmware.com
Page 27

CHAPTER 2 Learning the Basics of VMware ACE Manager
4. Install guest operating systems, VMware Tools and other software in the virtual
machines. For information on installing VMware Tools, see Installing an
Operating System and Applications in the Virtual Machine on page 112. For
notes on installing particular guest operating systems, see the VMware Guest
Operating System Installation Guide, available from the VMware Web site or from
the Help menu.
5. Create packages to deploy to your users. The VMware ACE Manager guides you
through the process and, for large packages, prepares the package so it spans
multiple CDs or DVDs. For more information, see Creating Packages to Deploy to
Users on page 131.
6. Give the packages to your users. You may distribute the packages on CD or DVD,
or you may make them available on a network. The package includes an installer
that installs the full package — VMware ACE and the virtual machines, along
with the policies that control their use. For more information, see Deploying and
Maintaining Packages on page 137.
Keeping Users Up-to-Date
VMware ACE Manager gives you tools you can use to ensure that your end users are
running up-to-date virtual machines.
You may need to provide updates to users’ packages. You may need to update the
guest operating system or provide an update to a program running inside the virtual
machine. Or you may need to update either the virtual machine itself or policies set
for the package — or add a new virtual machine to the package. There are two basic
approaches to updates.
• Deliver updates to the guest operating system or to programs running inside the
virtual machine as you would with any other software updates — for example,
using a patch management system.
• Provide a new package — to replace the virtual machine, to distribute an
additional virtual machine or to change the policies applied to the VMware ACE
application or the virtual machine. If you replace an existing virtual machine by
supplying a new package, your end users lose any data or custom settings
stored in that virtual machine.
If your users connect to your network, you can set network quarantine policies so outof-date virtual machines have restricted access or no access to the network. You may,
for example, give users with out-of-date virtual machines access only to the server
where an update is available.
27
Page 28

VMware ACE Administrator’s Manual
For information on these topics, see Deploying and Maintaining Packages on
page 137.
Troubleshooting Users’ Problems
Your users may need help with lost passwords, expired virtual machines or copyprotected virtual machines that they have moved to a different location. You can use
the hot fix feature to respond to these problems.
For information on using the hot fix feature, see Hot Fix Policy on page 74 and
Responding to Hot Fix Requests on page 150.
You may find it useful to modify the configuration of a virtual machine on an end
user’s computer. You may do so if you have enabled administrator access for VMware
ACE in that package. For information, see Administrator Access Policy on page 75.
28
www.vmware.com
Page 29

CHAPTER 3
Installing and Configuring VMware ACE Manager
The following sections guide you through installing VMware ACE Manager on your
administrative workstation:
• Installing VMware ACE Manager on page 30
• Installing on a Computer with a Different VMware Product on page 30
• Installation Steps on page 30
• Installing VMware ACE Manager Silently on page 33
• Uninstalling VMware ACE Manager on page 35
• Setting Preferences for VMware ACE Manager
• Using Shared Folders in VMware ACE Manager on page 40
29
Page 30

VMware ACE Administrator’s Manual
Installing VMware ACE Manager
Before you begin installing VMware ACE Manager, be sure you have
• A computer and host operating system that meet the system requirements for
running VMware ACE Manager. See Host System Requirements for VMware ACE
Manager on page 12.
• The VMware ACE Manager installation software. If you bought the packaged
distribution of VMware ACE Manager, the installation software is on the CD in
your package. If you bought the electronic distribution, the installation software
is in the file you downloaded.
• Your VMware ACE Manager serial number. The serial number is included in the
VMware ACE Manager package or in the email message confirming your
electronic distribution order.
Installing on a Computer with a Different VMware Product
VMware ACE Manager cannot be installed on a computer with VMware Workstation
or VMware GSX Server installed. If you have one of these products installed on the
computer where you plan to install VMware ACE Manager, use the Add/Remove
Programs control panel to remove the existing product, then install VMware ACE
Manager.
You may install VMware ACE Manager on a computer that has VMware Remote
Console or VMware VirtualCenter installed.
30
Installation Steps
1. Log on to your Microsoft Windows host as the Administrator user or as a user
who is a member of the Windows Administrators group.
Note: On a Windows XP or Windows Server 2003 host computer, you must be
logged on as a local administrator (that is, not logged on to the domain) in order
to install VMware ACE Manager.
Note: Although you must be logged on as an administrator to install VMware
ACE Manager, a user with normal user privileges can run the program after it is
installed. Keep in mind that you need one license for each user.
2. If you are installing from a CD, from the Start menu, choose Run and enter
D:\setup.exe, where D: is the drive letter for your CD-ROM drive.
If you are installing from a downloaded file, from the Start menu, choose Run,
browse to the directory where you saved the downloaded installer file and run
www.vmware.com
Page 31

CHAPTER 3 Installing and Configuring VMware ACE Manager
the installer. (The filename is similar to VMware-ACE-<xxxx>.exe, where
<xxxx> is a series of numbers representing the version and build numbers.)
3. The Welcome dialog box appears.
Click Next.
4. Acknowledge the end user license agreement (EULA). Select the Ye s, I ac cept
the terms in the license agreement option, then click Next.
5. Choose the directory in which to install VMware ACE Manager. To install it in a
directory other than the default, click Change and browse to your directory of
choice. You must install VMware ACE Manager on a local drive, not on a network
31
Page 32

VMware ACE Administrator’s Manual
drive. If the directory you specify does not exist, the installer creates it for you.
Click Next.
Note: Windows and the Microsoft Installer limit the length of a path to a folder
on a local drive to 255 characters. If the path to the VMware ACE Manager
program folder exceeds this limit, an error message appears. You must select or
enter a shorter path.
6. Select which shortcuts you want the installer to create.
7. The installer has gathered the necessary information and is ready to begin
installing the software.
32
If you want to change any settings or information you provided, now is the time
to make those changes. Click Back until you reach the dialog box containing the
information you want to change.
If you do not need to make any changes, click Install. The installer begins
copying files to your computer.
8. If the installer detects that the CD-ROM autorun feature is enabled, you see a
message that gives you the option to disable this feature. Disabling it prevents
undesirable interactions with the virtual machines you install on this system.
www.vmware.com
Page 33

CHAPTER 3 Installing and Configuring VMware ACE Manager
9. If you wish, enter your name, company name and serial number, then click Next.
The serial number is on the registration card in your package. The user and
company information you enter here is then made available in the About box
(Help > About VMware ACE Manager). If you skip this step, you are prompted to
enter your serial number the first time you run VMware ACE Manager.
10. Click Finish. The VMware ACE Manager software is installed.
11. You may see a prompt suggesting that you reboot your PC. If you do, reboot to
allow VMware ACE Manager to complete the installation correctly.
Installing VMware ACE Manager Silently
If you are installing VMware ACE Manager on a number of Windows host computers,
you may want to use the silent installation features of the Microsoft Windows Installer.
Before installing VMware ACE Manager silently, you must ensure that the host
computer has version 2.0 or higher of the MSI runtime engine. This version of the
installer is available in versions of Windows beginning with Windows XP and is
available separately from Microsoft for versions of Windows beginning with Windows
NT 4.0.
The following steps outline the procedures for a silent installation. For additional
details on using the Microsoft Windows Installer, see the Microsoft Web site.
1. Silently extract the administrative installation image from the VMware ACE
Manager installer:
setup.exe /a /s /v"/qn TARGETDIR=<InstallTempPath>"
setup.exe is the name of the installer on the CD distribution. If you are using
a downloaded installer, the filename is similar to VMwareACE-<xxxx>.exe,
where <xxxx> is a series of numbers representing the version and build
numbers.
33
Page 34

VMware ACE Administrator’s Manual
<InstallTempPath> is the full path to the folder where you want to store
the administrative installation image.
2. Run a silent installation using msiexec and the administrative installation
image you extracted in the previous step:
msiexec -i "<InstallTempPath>\VMware ACE.msi"
[INSTALLDIR="<PathToProgramDirectory>"] ADDLOCAL=ALL
[REMOVE=<featurename,featurename>] /qn
Enter the command on one line. If you want to install VMware ACE Manager in a
location other than the default, change the path that follows INSTALLDIR= to
specify the desired location.
You may use the optional REMOVE= property to skip installation of certain
features. The REMOVE= property can take one or more of the following values:
Value Description
Authd The VMware authorization service
Network Networking components including the virtual bridge and the host adapters for
host only networking and NAT networking; do not remove if you want to use
NAT or DHCP
DHCP The virtual DHCP server
NAT The virtual NAT device
34
If you specify more than one value, use a comma to separate the values. For
example, REMOVE=Authd,NAT.
Note: If you specify REMOVE=Network, the installer skips installation of
certain networking components, including NAT and DHCP. There is no need to
specify DHCP or NAT separately.
You may customize the installation further by adding any of the following
installation properties to the command using the format
PROPERTY="value". A value of 1 means true; a value of 0 means false. If you
use the serial number property, enter the serial number, complete with hyphens
(xxxxx-xxxxx-xxxxx-xxxxx).
Property Effect of the Property Default
DESKTOP_SHORTCUT Installs a shortcut on the desktop 1
DISABLE_AUTORUN Disables CD autorun on the host 1
REMOVE_LICENSE (Uninstall only) Removes all stored licenses at uninstall 0
www.vmware.com
Page 35

CHAPTER 3 Installing and Configuring VMware ACE Manager
Property Effect of the Property Default
SERIALNUMBER Automatically enters the serial number
For information on installing a VMware ACE package silently on an end user’s
computer, see Installing a Package Silently on page 139.
Uninstalling VMware ACE Manager
To uninstall VMware ACE Manager, use the Add/Remove Programs control panel.
Select the entry for VMware ACE Manager, then click Remove. Follow the onscreen
instructions.
35
Page 36

VMware ACE Administrator’s Manual
Setting Preferences for VMware ACE
Manager
The Preferences dialog box allows you to change a number of settings that apply to
VMware ACE Manager itself, no matter what virtual machine you are running. The
settings on the Workspace, Input and Hot Keys tabs apply to the user currently logged
on to the host computer. They do not affect settings made by any other user on the
computer. The settings on the Memory tab apply no matter what virtual machine is
running or who is logged on to the host computer. The settings on the Priority tab
apply to all virtual machines for the user currently logged on to the host computer.
They do not affect settings made by any other user on the computer.
To make changes to these settings, choose Edit > Preferences.
36
Workspace — The Workspace tab lets you change the directory in which newly
created projects and virtual machines are stored.
The project directory VMware ACE Manager uses by default is displayed under Default
location for projects. To set a different directory, type in the path or click Browse to
navigate to the directory you want to use. Workstation creates a directory for each
new project under the directory you specify here.
The virtual machine directory VMware ACE Manager uses by default is displayed
under Default location for virtual machines. To set a different directory, type in the
path or click Browse to navigate to the directory you want to use. Workstation creates
a directory for each new virtual machine under the directory you specify here.
If you select the Remember opened tabs between sessions check box, you see a tab
for each opened project and virtual machine the next time you start VMware ACE
www.vmware.com
Page 37

CHAPTER 3 Installing and Configuring VMware ACE Manager
Manager. A virtual machine is considered opened if both of the following conditions
are true:
• The virtual machine was left open.
• The virtual machine was powered on and off, or powered on and suspended.
Use the Check for software updates drop-down list to determine how often VMware
ACE Manager checks to see if new versions of the product are available. You can
choose daily, weekly or monthly automatic checks, or choose Never to turn off
automatic checking. You can check manually at any time by choosing Help > Check
for Updates on the Web.
Input — The Input tab lets you adjust the way that the virtual machine captures
control of keyboard and mouse.
Note: The Grab when cursor enters window option allows you to move the mouse
pointer back into the virtual machine window easily if you have been working in the
virtual machine, then temporarily moved the mouse pointer outside the virtual
machine window. The mouse pointer is grabbed only when VMware ACE Manager
has focus (is the active application). Also, if you release the mouse pointer by pressing
a hot-key combination — Ctrl-Alt by default — you must click inside the virtual
machine window to make VMware ACE Manager grab the mouse pointer again.
37
Page 38

VMware ACE Administrator’s Manual
Hot keys — The Hot Key tab lets you change the key combination that determines
whether certain combinations of keys are passed to the guest operating system or
intercepted by VMware ACE Manager.
Note: Because Ctrl-Alt is the key combination used to tell VMware ACE Manager to
release (ungrab) mouse and keyboard input, combinations that include Ctrl-Alt are
not passed to the guest operating system. If you need to use such a combination —
for example, use Ctrl-Alt-<Fkey> to switch between Linux workspaces in a virtual
machine — press Ctrl-Alt-Space, release Space without releasing Ctrl and Alt, then
press the third key of the key combination you want to send to the guest.
Using this dialog box, you can also construct your own custom hot-key combination.
38
Memory usage— The Memory tab lets you adjust the amount of physical RAM that
can be used by all running virtual machines. It also lets you adjust how much virtual
machine memory may be swapped to disk, allowing you to run more or larger virtual
machines if you are willing to accept slower performance.
www.vmware.com
Page 39

CHAPTER 3 Installing and Configuring VMware ACE Manager
Process priorities — The Priority tab lets you determine the priority that the
Windows process scheduler gives to your virtual machines when mouse and
keyboard input are going to a particular virtual machine and when input is not going
to that virtual machine.
You can adjust these settings to improve overall system performance based on the
relative priority of work you are doing in various virtual machines and on the host
computer.
To change the settings for a particular virtual machine, and override the global
settings, open the virtual machine you want to adjust, choose VM > Settings, click the
Options tab, select Advanced, then select the settings you want for that virtual
machine fromthe drop-down lists under Process priorities.
39
Page 40

VMware ACE Administrator’s Manual
Using Shared Folders in VMware ACE
Manager
With shared folders, you can easily share files among virtual machines and the host
computer. To use shared folders, you must have the current version of VMware Tools
installed in the guest operating system and you must use the virtual machine settings
editor to specify which directories are to be shared.
You can use shared folders with virtual machines running the following guest
operating systems:
• Windows Server 2003
• Windows XP
• Windows 2000
• Windows NT 4.0
• Linux with a kernel version of 2.4 or higher
Note: The shared folder feature works as expected only if the folder you specify exists
on the end users’ computers. This may mean that you or your end users need to take
special steps to create the target folder on the host computer. As a result, you should
consider this an advanced feature in VMware ACE.
To set up one or more shared folders for a virtual machine, be sure the virtual machine
is open in VMware ACE Manager and click its tab to make it the active virtual machine.
Go to VM > Settings > Options and click Shared folders.
40
You can add one or more directories to the list. Those directories may be on the host
computer or they may be network directories accessible from the host computer.
www.vmware.com
Page 41

CHAPTER 3 Installing and Configuring VMware ACE Manager
In a Windows virtual machine, shared folders appear in My Network Places (Network
Neighborhood in a Windows NT virtual machine) under VMware Shared Folders. For
example, if you specify the name Test files for one of your shared folders, you
can navigate to it by opening My Network Places > VMware Shared Folders > .host
> Shared Folders > Test files.
You can also go directly to the folder using the UNC path
\\.host\Shared Folders\Test files.
You can map a shared folder to a drive letter just as you would with a network share.
Note: To see shared folders displayed in this way, you must update VMware Tools in
the virtual machine to the current version. If your guest operating system has the
version of VMware Tools that shipped with VMware Workstation 4.0, shared folders
appear as folders on a designated drive letter.
In a Linux virtual machine, shared folders appear under /mnt/hgfs. So the shared
folder in this example would appear as /mnt/hgfs/Test files.
To add a new shared folder to the list, click Add. On a Windows host, a wizard guides
you through the process. On a Linux host, a dialog box appears. Enter the required
information, then click OK.
Provide the following information:
• The path on the host to the directory you want to share. Type in the full path or
browse to the directory.
Note: If you plan to deploy a virtual machine that uses shared folders, be sure to
specify a path that exists on your end users’ computers. If the path does not exist,
end users see an error message when they try to browse to the folder.
• The name for the directory. This is the name that appears inside the virtual
machine.
• Whether the shared folder is enabled. You may want to add a folder to the list
without enabling it immediately. You can then enable the folder at any time by
clicking its name in this list, clicking Properties and enabling the folder in the
Properties dialog box.
• Access options for the shared folder. You can give the current virtual machine
read-only access, or read-write access. Access to files in the shared folder is also
governed by permission settings on the host computer. For example, if you are
running VMware ACE as a user named User, the virtual machine can read and
write files in the shared folder only if User has permission to read and write them.
41
Page 42

VMware ACE Administrator’s Manual
• Expiration options for the shared folder. You can specify that the folder is always
enabled or that it is enabled only during the current working session. If you
select Disable after this session, the shared folder is disabled when you suspend
or power off the virtual machine.
To change the settings for a shared folder on the list, click the folder’s name to
highlight it, then click Properties. The Properties dialog box appears.
Change any settings you wish, then click OK.
Note: You can use shared folders to share any type of file. However, Windows
shortcuts and Linux symbolic links do not work correctly if you try to use them via
shared folders.
Caution: Do not open a file in a shared folder from more than one application at a
time. For example, you should not open the same file using an application on the host
operating system and another application in the guest operating system. In some
circumstances, doing so could cause data corruption in the file.
42
www.vmware.com
Page 43

CHAPTER 4
Creating Projects
The following sections guide you through the steps needed to create a project and
add virtual machines to the project:
• Creating a Project on page 44
• Checklist: Creating a Project on page 49
• Adding a Virtual Machine to a Project on page 51
• Adding an Existing Virtual Machine on page 51
• Adding a New Virtual Machine on page 53
• Checklist: Adding a Virtual Machine on page 63
43
Page 44

VMware ACE Administrator’s Manual
Creating a Project
A project contains one or more virtual machines and an application used to run those
virtual machines. A wizard guides you through the steps you must take to create a
project.
After you create the project, add one or more virtual machines to the project and set
policies for the virtual machines and for the application. You can move directly from
the New Project Wizard to the New Virtual Machine Wizard or launch the New Virtual
Machine Wizard later by clicking Add virtual machine to project on the project
summary display. You can move directly from the New Virtual Machine Wizard to the
policy editor or launch the policy editor later by clicking Edit policies on any summary
display.
Note: Be sure that all project and virual machine files are stored in a location that is
backed up regularly. You must have access to the original project and virtual machine
files when you create a package to send updates to your end users.
See Checklist: Creating a Project on page 49 for a worksheet you can use to gather the
information you need when you create a new project.
Using the New Project Wizard
To create a project, take the following steps:
1. Start VMware ACE Manager.
The first time you run VMware ACE Manager, you are prompted to enter your
serial number. The serial number is on the registration card in your package. If
you wish, you may also enter your name and your company name. The user and
44
www.vmware.com
Page 45

company information you enter here is made available in the About box (Help >
About VMware ACE Manager).
Click the New Project icon to start the New Project Wizard.
2. Click Next to enter the wizard. The Name the Project panel appears.
CHAPTER 4 Creating Projects
Enter a name for the project in the Project Name field. The name should be
unique and should make it easy for you to identify the project.
The Location field shows the path to the folder where VMware ACE Manager
stores the project file, which contains information about the contents of the
project. You may accept the default location, type in a new location or click
Browse to navigate to a new location.
45
Page 46

VMware ACE Administrator’s Manual
3. Click Next. The Ready to Complete panel appears
Select Open the Add Virtual Machine Wizard if you want to go directly to the
Add Virtual Machine Wizard and add a virtual machine to the project.
Deselect Open the Add Virtual Machine Wizard if you do not want to add a
virtual machine to the project at this time.
Click Finish to complete the New Project Wizard.
Making Project Settings
To specify general settings for the project, choose Project > Settings. The Project
Settings dialog box appears.
46
On the General tab, you may update the project name and add or modify the project
description.
www.vmware.com
Page 47

On the Policies Domain tab, you may choose an Active Directory domain to use for
storing policies for the project.
CHAPTER 4 Creating Projects
On the Offline Policies tab, you may specify whether virtual machines in this project
are allowed to cache policy settings. If you use Active Directory or a Web server to
store policies, offline policies allow your end users to continue working even when
they are unable to connect to the server where the policies are stored — for example,
when they are working offline. Use the drop-down list to specify how long the cached
policies remain valid.
If you enable offline policies, information is cached for the following policies:
• Authentication — the key
• Expiration — the expiration date
• Devices — the list of allowed users
• Network quarantine — all settings
47
Page 48

VMware ACE Administrator’s Manual
On the Recovery Key tab, you may specify the public key to be used for access to
encrypted virtual machines. If you specify password protection for a virtual machine
and want to be able to reset the password for a deployed virtual machine, you must
specify a recovery key before you create the package that includes the virtual
machine.
Select Use recovery key to configure a recovery key.
To use an existing PEM-format key pair, click Browse for Existing Key to navigate to
the public key of the pair you want to use.
To create a new PEM-format key pair, click Create New Recovery Key. The Create New
Recovery Key dialog box appears.
48
Enter a name and location for the key pair. Enter and confirm the password to protect
the private key. Then click OK to generate the keys. It takes several seconds to
generate the keys. When the keys are generated and saved, the Create New Recovery
Key dialog box disappears and the newly generated public key is listed in the field on
the Recovery Key tab.
Note: You must know the password for the private key and the location of the
private key file in order to reset an end user’s password.
www.vmware.com
Page 49

Checklist: Creating a Project
You may find it helpful to photocopy this checklist and use it to collect the
information you should have available when you create a new project.
What’s the name for this project?
_______________________________________________________________
What’s the path to the location where you plan to store this project?
_______________________________________________________________
Be sure you have enough free space at that location to store the files.
What virtual machines do you plan to include in the project?
!
Existing virtual machines. Make a note of the path to the configuration (.vmx)
file for each virtual machine you plan to include.
_______________________________________________________________
_______________________________________________________________
_______________________________________________________________
_______________________________________________________________
!
New virtual machines. You may find it helpful to complete a checklist for each
virtual machine you plan to create. See Checklist: Adding a Virtual Machine on
page 63.
Will this project use network quarantine, with information stored in an Active
Directory server?
!
No.
!
Yes. Use the following Active Directory domain:
_______________________________________________________________
Will this project include password-protected virtual machines and need a recovery
key?
!
No.
!
Yes. Use an existing key pair. Make a note of the path to the private key of the
existing key pair.
_______________________________________________________________
!
Yes. Create a new key pair. Make a note of the location where you plan to store
the new key pair. Follow your organization’s procedure for storing the password
CHAPTER 4 Creating Projects
49
Page 50

VMware ACE Administrator’s Manual
that protects the new private key.You need the password that protects the
private key in order to reset an end user’s password.
_______________________________________________________________
50
www.vmware.com
Page 51

Adding a Virtual Machine to a Project
In VMware ACE Manager, you create a project first, then create a virtual machine
within the project. You cannot create a new virtual machine outside the context of a
project.
Once a virtual machine exists, you may add it to as many projects as you wish.
You may also add virtual machines created with certain other VMware products.
Virtual machines created with the following products may be used in VMware ACE
Manager projects:
• VMware Workstation 4.x
• VMware GSX Server 3.x
See Checklist: Adding a Virtual Machine on page 63 for a worksheet you can use to
gather the information you need when you create a new virtual machine.
Caution: You should not change the name of a virtual machine in a project after you
have created and distributed a package that includes the virtual machine. VMware
ACE uses the name of a virtual machine to determine certain important settings,
especially the name of the folder where the virtual machine is installed on the end
user's computer. If you change the name of a virtual machine after you have
distributed a package to end users, then create an update package using the new
virtual machine name, the package installer attempts to install the update into a
folder with a name based on the new virtual machine name. The update does not
work properly, because the update is not installed into the folder used for the earlier
install.
You may continue directly from the New Project Wizard to the Add Virtual Machine
Wizard. Or you may start the Add Virtual Machine Wizard from the project summary
display. To start the wizard from the project summary display, click Add.
CHAPTER 4 Creating Projects
Adding an Existing Virtual Machine
When the Add Virtual Machine Wizard starts, take the following steps to add an
existing virtual machine to the project:
51
Page 52

VMware ACE Administrator’s Manual
1. Click Next to enter the wizard. The Add New or Existing Virtual Machine panel
appears.
Select Existing virtual machines and click Next.
2. The Select Virtual Machines panel appears.
52
Click Browse and navigate to the configuration (.vmx) file for the virtual
machine you want to add to the project.
You may add one or more virtual machines to the project.
To remove a virtual machine from the list in this panel, choose the virtual
machine’s name in the list, then click Remove.
The new hardware wizard checks the virtual machine and warns you if any of its
configuration settings make it inappropriate for use in VMware ACE. The
following settings generate warnings:
• Generic SCSI device present
• Physical disks attached
• Virtual Ethernet adapters using custom networking
• Nondefault power settings — for example, power on after opening the virtual
machine, enter full screen mode after powering on or close after powering off
www.vmware.com
Page 53

• Nondefault working directory; the default is no directory specified, which
means the virtual machine directory is used as the working directory
• Locked snapshot present
If the wizard warns you about any of these settings, you must open the virtual
machine in the application used to create it and make the appropriate changes.
You may then add the virtual machine to the project.
3. The Ready to Complete panel appears.
Select Set policies after the wizard closes if you want to go directly to the policy
editor and set policies for the virtual machines in the project.
Deselect Set policies after the wizard closes if you do not want to set policies
for the virtual machines at this time.
Click Finish to complete the Add Virtual Machine Wizard.
CHAPTER 4 Creating Projects
Adding a New Virtual Machine
When the Add Virtual Machine Wizard starts, take the following steps to add a new
virtual machine to the project:
1. Click Next to enter the wizard. The Add New or Existing Virtual Machine panel
appears.
53
Page 54

VMware ACE Administrator’s Manual
Select A new virtual machine and click Next.
2. The New Virtual Machine Wizard starts. Click Next to create a new virtual
machine with the wizard.
Select the method you want to use for configuring your virtual machine.
If you select Typi cal, the wizard prompts you to specify or accept defaults for
• The guest operating system
• The virtual machine name and the location of the virtual machine’s files
• The network connection type
• Disk size
• Allocation of space for the disk
• Splitting the disk into 2GB files
Select Custom if you want to
• Store your virtual disk’s files in a particular location
• Use an IDE virtual disk for a guest operating system that would otherwise have
a SCSI virtual disk created by default
By default, the new virtual machine uses an IDE disk for Windows 95, Windows
98, Windows Me, Windows XP, Windows Server 2003, NetWare and FreeBSD
guests. The default for other guest operating systems is a SCSI disk.
• Use a physical disk rather than a virtual disk (this option is not appropriate for a
virtual machine you plan to distribute as part of a project)
• Set memory options that are different from the defaults
54
www.vmware.com
Page 55

3. Select a guest operating system.
This panel asks which operating system you plan to install in the virtual machine.
Select both an operating system and a version.
The Add Virtual Machine Wizard uses this information to select appropriate
default values, such as the amount of memory needed. The wizard also uses this
information when it names associated virtual machine files.
If the operating system you plan to use is not listed, select Other for both guest
operating system and version.
The remaining steps assume you plan to install a Windows XP Professional guest
operating system. You can find detailed installation notes for this and other
guest operating systems in the VMware Guest Operating System Installation Guide,
available on the VMware Web site or from the Help menu.
4. Select a name and folder for the virtual machine.
CHAPTER 4 Creating Projects
The name specified here is used as the name of the folder where the files
associated with this virtual machine are stored.
55
Page 56

VMware ACE Administrator’s Manual
Each virtual machine should have its own folder. All associated files, such as the
configuration file and the disk file, are placed in this folder.
The default folder for this Windows XP Professional virtual machine is
C:\Documents and Settings\<username>\My Documents\My
Virtual Machines\Windows XP Professional.
5. If you selected Typical as your configuration path, skip to step 6.
If you selected Custom as your configuration path, you may adjust the memory
settings or accept the defaults.
When choosing the virtual machine memory settings, you need to consider the
amount of memory required by the guest operating system and applications.
You also need to consider the amount of RAM installed on your end users'
computers and the amount of RAM required by the host operating system. Do
not set the virtual machine memory below the amount recommended for the
guest operating system. If you set virtual machine memory higher than that
minimum, you should not set it so high that the host operating system cannot
run comfortably. For common configurations, set the virtual machine memory
no higher than half the amount of RAM you expect to find on end users' host
computers.
Note: You cannot allocate more than 2GB of memory to a virtual machine if the
virtual machine’s files are stored on a file system such as FAT32 that does not
support files greater than 2GB.
Click Next to continue.
56
www.vmware.com
Page 57

6. Configure the networking capabilities of the virtual machine.
If the package is to be installed on a host computer that is on a network and a
separate IP address is available for the virtual machine (or it can get one
automatically from a DHCP server), select Use bridged networking. This setting
is most likely to be appropriate if the package is to be installed on a computer
connected to an office network.
If the package is to be installed where no separate IP address is available for the
virtual machine but the virtual machine must be able to connect to the Internet,
select Use network address translation (NAT). NAT also allows the end user to
share files between the virtual machine and the host operating system.
For more details about VMware ACE networking options, see Networking Virtual
Machines on page 187.
7. If you selected Typi cal as your configuration path, skip to step 11.
If you selected Custom as your configuration path, continue with the steps
below to configure a disk for the virtual machine.
8. Select the type of SCSI adapter you want to use with the virtual machine.
CHAPTER 4 Creating Projects
An IDE adapter and a SCSI adapter are installed in the virtual machine. You do
not need to make any configuration choices for the IDE adapter. You can choose
57
Page 58

VMware ACE Administrator’s Manual
a BusLogic or an LSI Logic SCSI adapter. The default for your guest operating
system is already selected. All guests except Windows Server 2003, Red Hat
Enterprise Linux 3 and NetWare default to the BusLogic adapter.
The LSI Logic adapter has improved performance and works better with generic
SCSI devices.
The choice of which SCSI adapter to use is separate from the choice to make the
virtual disk an IDE or SCSI disk.
Older guest operating systems do not include a driver for the LSI Logic adapter. If
you choose to use the LSI Logic adapter in an operating system that does not
have a driver for it, you must download the driver from the LSI Logic Web site.
See the VMware Guest Operating System Installation Guide for details about the
driver and the guest operating system you plan to install in this virtual machine.
9. Select the disk you want to use with the virtual machine.
58
Select Create a new virtual disk.
Virtual disks are appropriate for any virtual machines distributed in a package. By
default, virtual disks start as small files on the host computer’s hard drive, then
expand as needed — up to the size you specify in a later step. That step also
allows you to allocate all the disk space when the virtual disk is created, if you
wish.
www.vmware.com
Page 59

10. Select whether to create an IDE or SCSI disk.
The wizard recommends the best choice based on the guest operating system
you selected. All Linux distributions you can select in the wizard use SCSI virtual
disks by default, as do Windows NT, Windows 2000, Windows Server 2003 and
Longhorn. All Windows operating systems except Windows NT, Windows 2000,
Windows Server 2003 and Longhorn use IDE virtual disks by default; NetWare,
FreeBSD, MS-DOS and other guests default to IDE virtual disks.
11. Specify the capacity of the virtual disk.
CHAPTER 4 Creating Projects
Enter the size of the virtual disk that you wish to create.
If you wish, select Allocate all disk space now.
Allocating all the space at the time you create the virtual disk gives somewhat
better performance, but it requires as much disk space as the size you specify for
the virtual disk.
If you do not select this option, the virtual disk’s files start small and grow as
needed, but they can never grow larger than the size you set here.
You can set a size between 0.1GB and 256GB for a SCSI virtual disk or 128GB for
an IDE virtual disk. The default is 4GB.
59
Page 60

VMware ACE Administrator’s Manual
You may also specify whether you want the virtual disk created as one large file
or split into a set of 2GB files. You should split your virtual disk if it may be stored
on a FAT32 file system.
Note: Because the Microsoft installer cannot install files larger than about 4.3GB,
you should also split the virtual disk if the disk is larger than 4GB. You may wish to
split the virtual disk even if it is smaller than 4GB. If you plan to distribute the
VMware ACE package on CD or DVD, the package installs more quickly if you
split the files. For the fastest package installation, be sure that the files that make
up the virtual disks are smaller than 4GB and smaller than the media used to
distribute the package. Thus you get best results if you split the virtual disk files
and distribute the package on DVD.
Make the Virtual Disk Big Enough
The virtual disk should be large enough to hold the guest operating system and
all of the software that you intend to install, with room for data and growth.
You may prefer to increase total disk space by adding virtual disks to the virtual
machine. You can install additional virtual disks using the virtual machine
settings editor (VM > Settings). You must add any additional virtual disks after
completing this wizard but before you create the package for distribution to
your end users.
Consider this example: You need about 500MB of actual free space on the file
system containing the virtual disk to install Windows Me and popular
applications such as Microsoft Office inside the virtual machine. You can set up a
single virtual disk to hold these files. Or you can split them up — installing the
operating system on the first virtual disk and using a second virtual disk for
applications or data files.
60
www.vmware.com
Page 61

12. If you selected Typi cal as your configuration path, click Finish and the wizard
sets up the files needed for the virtual machine.
If you selected Custom as you configuration path, continue with the next step,
specifying the location of the virtual disk’s files.
If you want to specify which device node should be used by your SCSI or IDE
virtual disk, click Advanced.
CHAPTER 4 Creating Projects
On the Specify Advanced Options panel, you can also specify a disk mode. This is
useful in certain special-purpose configurations in which you want to exclude
disks from the snapshot.
Normal disks are included in the snapshot. In most cases, you should use normal
disks, leaving Independent unchecked.
Independent disks are not included in the snapshot.
Caution: The independent disk option should be used only by advanced users
who need it for special-purpose configurations.
61
Page 62

VMware ACE Administrator’s Manual
You have the following options for an independent disk:
• Persistent — changes are immediately and permanently written to the disk.
• Nonpersistent — changes to the disk are discarded when you power off the
virtual machine.
When you have set the filename and location you want to use and have made
any selections you want to make on the advanced settings panel, click Finish.
13. When you click Finish, the wizard sets up the files needed for your virtual
machine.
14. The Ready to Complete panel appears.
62
Select Set policies after the wizard closes if you want to go directly to the polic y
editor and set policies for the virtual machines in the project.
Deselect Set policies after the wizard closes if you do not want to set policies
for the virtual machines at this time.
Click Finish to complete the Add Virtual Machine Wizard.
www.vmware.com
Page 63

Checklist: Adding a Virtual Machine
You may find it helpful to photocopy this checklist and use it to collect the
information you should have available when you add virtual machines to a project.
Do you plan to add an existing virtual machine or create a new one?
!
Existing
What is the path to the configuration (.vmx) file for this virtual machine?
_______________________________________________________________
If you plan to add an existing virtual machine, stop here.
!
New
If you plan to create a new virtual machine, continue with the other items on this
checklist.
What guest operating system do you plan to install in the new virtual machine?
_______________________________________________________________
If you plan to install from installation CDs, be sure to have the CDs available.
If you plan to use a PXE installation server, be sure to enable networking when
you create the virtual machine.
If you plan to install from ISO image files on the network, what is the path to the
ISO files?
_______________________________________________________________
Note: Be sure to install VMware Tools in the virtual machine after you finish installing
the guest operating system.
What applications do you plan to install in the virtual machine?
If you plan to install from installation CDs, be sure to have the CDs available.
If you plan to install from files on the network, be sure to enable networking
when you create the virtual machine and note the paths to the installers below.
_______________________________________________________________
_______________________________________________________________
_______________________________________________________________
_______________________________________________________________
_______________________________________________________________
_______________________________________________________________
CHAPTER 4 Creating Projects
63
Page 64

VMware ACE Administrator’s Manual
Do you need to run Sysprep in the virtual machine?
If you plan to run Sysprep from a CD, be sure to have the CD available.
If you plan to run Sysprep from the network, be sure to enable networking when
you create the virtual machine and note the path to Sysprep below.
_______________________________________________________________
Do you want to take the typical or custom path through the New Virtual Machine
Wizard?
!
Typical
The typical path lets you specify
• The guest operating system
• The virtual machine name and the location of the virtual machine’s files
• The network connection type
• Disk size
• Allocation of space for the disk
• Splitting the disk into 2GB files
!
Custom
The custom path lets you specify
• The guest operating system
• The virtual machine name and the location of the virtual machine’s files
• The network connection type
• A location for the virtual disk files that is different from the location for the
other virtual machine files
• The use of an IDE virtual disk for a guest operating system that would have a
SCSI virtual disk by default
• The use of memory options different from the default
What’s the name for this virtual machine?
_______________________________________________________________
64
www.vmware.com
Page 65

What’s the path to the location where you plan to store this virtual machine?
_______________________________________________________________
Be sure you have enough free space at that location to store the files. If you are
following the custom path, you have an option at a later stage in the wizard to
specify a separate location for the virtual disk files.
Custom path only: How much memory should the virtual machine use?
!
Default set by the wizard
!
Custom setting of ______________________ MB
What kind of networking do you want to use in this virtual machine?
!
Bridged
If the virtual machine will run on a host computer that is on a network and a
separate IP address will be available for the virtual machine (or the virtual
machine can get one automatically from a DHCP server), use bridged
networking. This choice may be appropriate if the virtual machine will run on a
corporate network.
!
NAT
If the virtual machine will need to share an IP address with the host computer,
use network address translation (NAT ). This choice may be the best one if the
virtual machine will run on a home computer.
!
None
Custom path only: What type of virtual SCSI adapter do you want to use in the virtual
machine? The default for your guest operating system is selected by the wizard. The
LSI Logic adapter has improved performance, but some guest operating systems do
not have drivers for this adapter.
!
Default set by the wizard
!
BusLogic
!
LSI Logic
CHAPTER 4 Creating Projects
65
Page 66

VMware ACE Administrator’s Manual
Custom path only: What kind of disk do you want to use in the virtual machine?
!
New virtual disk
This is the best selection in most cases.
!
Existing virtual disk
If you want to reuse an existing virtual disk, select this option. You may want to
select this option if you are creating a virtual machine with the same operating
system and applications as one you created before but you want to apply
different policies. In most cases, if you want to reuse an existing virtual disk, it is
better to add the existing virtual machine to the project.
Custom path only: What disk type do you want to use? The wizard recommends a
selection based on the guest operating system.
!
Default set by the wizard
!
IDE
!
SCSI
How big should the virtual disk be?
!
Default (4GB)
!
Custom size of _______________ GB
You can set a size between 0.1GB and 256GB for a SCSI virtual disk or 128GB for
an IDE virtual disk. The default is 4GB.
What other selections should be made on the panel for configuring the virtual disk?
!
Allocate all disk space
Allocating all the space at the time you create the virtual disk gives somewhat
better performance, but it requires as much disk space as the size you specify for
the virtual disk. It makes the distribution package for your project larger —
possibly much larger. However, it ensures that your users have enough disk
space set aside for the virtual machine and do not run out of space
unexpectedly.
!
Split disk into 2GB files
You should split the virtual disk if it may be stored on a FAT32 file system.
Note: Because the Microsoft installer cannot install files larger than about 4.3GB,
you should also split the virtual disk if the disk is larger than 4GB.
Custom path only: Where do you want to store the virtual disk’s files?
66
www.vmware.com
Page 67

By default, the virtual disk files are stored in the same directory as the virtual
machine’s other files — for example, the configuration file. If you plan to store
the virtual disk files in a different location, note the path below.
_______________________________________________________________
Custom path only: Do you need to specify a particular IDE or SCSI device node to be
used by the virtual disk?
In most cases, you should accept the default. If you need to specify the device
node, make a note of it below.
_______________________________________________________________
CHAPTER 4 Creating Projects
67
Page 68

VMware ACE Administrator’s Manual
68
www.vmware.com
Page 69

CHAPTER 5
Setting Policies and Customizing VMware ACE
The following sections guide you through the steps to set policies for a project,
prepare your virtual machine, customize the VMware ACE interface and run the virtual
machine in the VMware ACE interface:
• Setting Policies for a Project on page 71
• Setting Policies for VMware ACE on page 74
• Setting Policies for Virtual Machines on page 81
• Setting Authentication Policies on page 81
• Setting Expiration Policies on page 83
• Setting Copy Protection Policies on page 84
• Setting Device Connection Policies on page 85
• Setting Network Quarantine Policies on page 85
• Configuring the Virtual Machines and Installing Software on page 111
• Reviewing the Configuration of a Virtual Machine on page 111
69
Page 70

VMware ACE Administrator’s Manual
• Installing an Operating System and Applications in the Virtual Machine on
page 112
• Customizing the VMware ACE Interface on page 123
• Running the Completed Virtual Machine on page 129
• Checking the Configuration before Creating a Package on page 129
70
www.vmware.com
Page 71

CHAPTER 5 Setting Policies and Customizing VMware ACE
Setting Policies for a Project
Policies give you control over many aspects of the virtual machines you distribute to
your end users. You can, for example
• Permit the virtual machine to be used only by certain users and groups defined
in your Active Directory domains.
• Specify which network resources your users may access from the virtual
machine.
• Permit users to connect and disconnect certain removable devices configured
for the virtual machine.
• Control the lifetime of the virtual machine.
For many policy categories, you can write your own plug-ins to determine what
permissions and restrictions to apply.
For additional information on policies, see Understanding Policies on page 219.
Using the Policy Editor
You set policies using the policy editor. You may continue directly from the Add
Virtual Machine Wizard to the policy editor. Or you may start the policy editor from
any summary display. To start the policy editor from the project summary display,
select the name of a virtual machine, then click Policies.
You may set default policies for all virtual machines, policies that apply to a particular
virtual machine and policies that apply to VMware ACE, the application included in
the project.
Before you can set policies based on users and groups in your Active Directory service,
you must choose an Active Directory domain. You must also choose an Active
Directory domain if you want to use the Active Directory service to store dynamic
network quarantine settings.
Note: If you store policies on your Active Directory server, you must be sure end
users’ host computers have been added to the domain where the policies are stored,
and end users must log on to that domain so VMware ACE has access to the policies.
Similarly if you set policies based on users and groups in your Active Directory
domain, end users’ host computers must log on to a domain where those users and
groups are defined.
71
Page 72

VMware ACE Administrator’s Manual
If you attempt to make a policy setting that requires an Active Directory domain and
you have not yet specified the domain, a dialog box notifies you that you need to set
up the domain.
Click Yes to open a second dialog box that allows you to specify the policies domain. If
you click No, you can specify the domain at any time in the project settings editor
(Project > Settings).
72
Choose the appropriate domain name from the Policies domain drop-down list.
The list of settings available in the right pane of the policy editor depends on the
category you select in the left pane. For several categories, the settings are similar to
those in the following list:
www.vmware.com
Page 73

CHAPTER 5 Setting Policies and Customizing VMware ACE
• None — No restrictions are imposed.
• Password — Users must log on with a password.
• Users and groups — Specified users or members of specified groups defined in
your Active Directory service have permission to take the action. Click Add to
add a user or group to the list. To remove a name from the list, select the name of
a user or group in the list, then click Remove.
• Determine using script — Use your own custom plug-in to determine what
settings are applied. Click Set to open a dialog box that lets you locate the plugin script file and specify the command line for running the script. You may also
specify a timeout interval in case the script does not run to completion.
Scripts used in a project must be in the Project Resources folder under
the project folder. They must be in the main Project Resources folder, not
in a subdirectory under that folder. If the scripts need any additional resource
files, place those files in the main Project Resources folder, too.
For details on how to create plug-in scripts, see Writing Plug-In Policy Scripts on
page 244.
73
Page 74

VMware ACE Administrator’s Manual
Setting Policies for VMware ACE
To set policies for VMware ACE, click the + sign beside VMware ACE policies to show
the categories of settings, then edit the settings as described below.
Hot Fix Policy
Select Hot fix to specify that users are allowed to request hot fixes for specific
problems.
74
If you enable the hot fix feature, end users can easily request help to resolve the
following problems:
• Lost or forgotten password
Note: If you want to be able to use a hot fix to reset an end user’s password for
encrypted virtual machines, you must enable recovery for each virtual machine.
For details, see Setting Authentication Policies on page 81.
• Expired VMware ACE environment
• Copy protected VMware ACE environment run from a new location
It is also easy for you to respond to their requests.
To enable the hot fix feature, select Allow users to request a hot fix.
The hot fix request is a file that the end user must submit to an administrator for
action. After enabling the hot fix feature, you must select the preferred way for the
end user to submit the hot fix request. Choose one of the following:
www.vmware.com
Page 75

CHAPTER 5 Setting Policies and Customizing VMware ACE
• Use email to submit hot fix request — The Hot Fix Request Wizard on the end
user’s computer attempts to use a MAPI email client on the host operating
system to send the hot fix request as an attachment to an email message. The
message uses the email address and subject line that you specify here.
• Save the request to a file — The end user saves the script, then must submit it
to an administrator manually.
The end user sees any submission instructions you enter in the field labeled
Specify instructions for users to submit the request.
If you choose email and the automatic submission fails, the Hot Fix Request Wizard
gives the end user an opportunity to save the hot fix request as a file. The end user
must then send the file to an administrator manually.
For details on responding to hot fix requests, see Responding to Hot Fix Requests on
page 150.
For details on how the end user interacts with the Hot Fix Request Wizard, see
Requesting a Hot Fix on page 163.
Administrator Access Policy
Select Administrator access to set an administrator password so you can run the
virtual machine in a special troubleshooting application on the end user’s computer
and make changes to the virtual machine’s configuration.
Select Enable administrator access if you want to enable this function, then enter
and confirm the password to be used for administrator access on the end user’s
75
Page 76

VMware ACE Administrator’s Manual
computer. For more information, see Using Administrator Access on the End User’s
Computer on page 152.
Troubleshooting Policies
Select Troubleshooting to specify which items appear under Troubleshooting on the
VMware ACE menu.
76
Under Power commands, you may select Enable Reset and Power Off commands. If
you enable these commands, the end user may power off or reset the virtual machine
from the menu in VMware ACE (VMware ACE > Troubleshoot > Reset or VMware
ACE > Troubleshoot > Power Off and Exit).
Under Reimage ACE, you may select Enable revert to installed virtual machine
image. If you enable this feature, VMware ACE captures an image of the virtual
machine at the time it is installed on the end user’s machine. The end user may then
revert to this original state by choosing VMware ACE > Troubleshoot > Revert to the
Installed <vmname> Environment, where <vmname> is the name of the virtual
machine.
Note: If the virtual machine uses password authentication, reverting to the installed
environment returns the virtual machine to its state after the initial password was
selected. If you enable this feature, you should also consider implementing hot fixes
so you can respond easily if end users revert and have forgotten their original
passwords.
www.vmware.com
Page 77

CHAPTER 5 Setting Policies and Customizing VMware ACE
Easy Printer Setup Policies
Select Easy printer setup to specify whether to give end users access to a command
that simplifies printer setup for a Windows virtual machine.
Select Enable Add Printer command to provide an Add Printer item on the VMware
ACE menu. End users can use this menu item to set up a printer available on the host
for use in the virtual machine.
Easy printer setup relies on network printer sharing. If you set network quarantine
policies and want to enable easy printer setup, you must also enable printer access on
the Traffic panel of the Network Quarantine Wizard. For details, see Setting Network
Quarantine Policies on page 85.
Some special steps may be necessary if your end users need to connect network
printers to their virtual machines. For details, see Easy Printer Setup Policies on
page 227.
Note: Printer sharing is not supported in Windows Server 2003 Web Edition. As a
result, the easy printer setup feature does not work on a host computer running
Windows Server 2003 Web Edition.
77
Page 78

VMware ACE Administrator’s Manual
VMware ACE Window Policies
Select VMware ACE Window to specify the appearance of VMware ACE on the end
user’s computer.
Under VMware ACE Window, you may select Always run maximized. If you select this
policy, VMware ACE fills the full screen when it starts, hiding the host operating
system. You may find this useful, for example, to avoid user confusion about the
differences between the two environments.
Note: The end user can minimize the VMware ACE display and return to the host
operating system by clicking the minimize button on the toolbar. If the mouse pointer
is not available, pressing Ctrl-Alt minimizes the display.
78
www.vmware.com
Page 79

CHAPTER 5 Setting Policies and Customizing VMware ACE
User Preferences Policies
Select Preferences to specify what settings are available to end users in the VMware
ACE Preferences dialog box (VMware ACE > Preferences).
You may select Allow users to modify the exit behavior of the application. If you do,
the exit behavior settings are available in the Preferences dialog box, as shown below.
The exit behavior preferences allow the end user to specify the following:
• Confirm before exiting the application — When the end user gives the
command to exit VMware ACE, either from the menu or by clicking the X in the
upper right corner of the window or toolbar, a dialog box appears. The end user
may confirm the intention to exit VMware ACE or click Cancel to continue
working.
• Suspend the virtual machine when exiting — This is the default behavior.
VMware ACE suspends the virtual machine and closes. The next time the end
79
Page 80

VMware ACE Administrator’s Manual
user runs the virtual machine, it resumes operation from the point at which it
was suspended.
• Power off the virtual machine when exiting — VMware ACE powers off the
virtual machine. The next time the end user launches VMware ACE, the virtual
machine starts from a powered off state and the guest operating system boots.
80
www.vmware.com
Page 81

CHAPTER 5 Setting Policies and Customizing VMware ACE
Setting Policies for Virtual Machines
In the policy editor, you can edit policies for each virtual machine in the project.
To set policies for an individual virtual machine in your project, click the + sign beside
the name of the virtual machine. The list of policy categories appears below the
virtual machine name and you may edit the settings as described in the following
sections:
• Setting Authentication Policies on page 81
• Setting Expiration Policies on page 83
• Setting Copy Protection Policies on page 84
• Setting Device Connection Policies on page 85
• Setting Network Quarantine Policies on page 85
Setting Authentication Policies
Select Encryption and authentication from the Policy list to specify whether the
virtual machine’s data is to be encrypted and who has access to this virtual machine.
Encrypted Virtual Machine
To protect the contents of the virtual machine, you can specify that the package
installer encrypts the virtual machine when it is installed. To do so, select Encrypt data
and configuration files when this virtual machine is installed. Each installation of
the virtual machine is encrypted differently.
81
Page 82

VMware ACE Administrator’s Manual
You must specify an authentication method if you want the installer to encrypt the
virtual machines. If you select Encrypt data and configuration files when this virtual
machine is installed, you cannot select None as the authentication method.
If you encrypt the virtual machine, its configuration files are automatically protected
against viewing and tampering. Even if you do not encrypt the virtual machine, you
may select Protect virtual machine configuration files from user tampering.
If you encrypt the virtual machine, also select Enable virtual machine recovery if you
want to be able to use a hot fix to reset the end user’s password.
No Authentication Requirements
If you select None, there are no restrictions on access to this virtual machine.
Password Authentication
If you select Password, the virtual machine is password protected and does not run
until the user enters the correct password. Each user must set a password the first time
that user’s installation of this virtual machine is opened.
Click Password Policies to specify requirements for user passwords.
82
To require that passwords be at least a certain length, select Minimum Password
Length, then enter the number of characters required.
To require a mix of characters, select Restrict Password Contents, then select the
types of characters required. You may require that the password include one or more
of the following:
• Capital letters
• Lowercase letters
• Numerals
• Symbols and punctuation
Make the selections you want, then click OK.
Active Directory Authentication
Select Users and groups to enable access by individuals or groups defined in an
Active Directory domain.
www.vmware.com
Page 83

CHAPTER 5 Setting Policies and Customizing VMware ACE
If you attempt to make a policy setting that requires an Active Directory domain and
you have not yet specified the domain, a dialog box notifies you that you need to set
up the domain. Click Ye s to open a second dialog box that allows you to specify the
policies domain. If you click No, you can specify the domain at any time in the project
settings editor (Project > Settings). Select Policies Domain and check to be sure you
have chosen the correct domain.
Click Add to add users or groups to the approved list. The Add Users or Groups dialog
box allows you to select users or groups defined for the currently selected domain.
To remove a user or group from the approved list, select a name, then click Remove.
Script-Based Authentication
Select Determine using script if you want to use your own custom plug-in to
determine who can use the virtual machine. Click Set to open a dialog box that lets
you locate the plug-in script file and specify the command line for running the script.
You may also specify a timeout interval in case the script does not run to completion.
For details on how to create plug-in scripts, see Writing Plug-In Policy Scripts on
page 244.
Setting Expiration Policies
Select Expiration from the Policy list to set an expiration date for the virtual machine.
When a virtual machine expires, the files remain on the end user’s computer, but the
virtual machine cannot be used.
You may select one of the following options for expiration:
83
Page 84

VMware ACE Administrator’s Manual
• Never — The virtual machine does not expire.
• After x days from installation — The virtual machine runs for the specified
number of days after the package is installed, then cannot be used.
• On this date — The virtual machine runs until and on the specified date. It
cannot be used after the specified date.
If the virtual machine is set to expire, you may also specify a script used to renew the
virtual machine. Click Set to open a dialog box that lets you locate the plug-in script
file and specify the command line for running the script. You may also specify a
timeout interval in case the script does not run to completion. For details on creating
scripts, see Writing Plug-In Policy Scripts on page 244.
You may customize the expiration message, enable a warning message, set the time
when the warning message first appears and customize the text of the warning
message.
Setting Copy Protection Policies
Select Copy protection from the Policy list to ensure that virtual machines can run
only from the location where they are originally installed.
84
Select Copy protect this virtual machine to restrict the virtual machine so it can run
only from the location where it is installed by the package installer. If you select this
restriction and the virtual machine is copied or moved to a new location, it cannot run
from that new location.
www.vmware.com
Page 85

CHAPTER 5 Setting Policies and Customizing VMware ACE
Setting Device Connection Policies
Click the + sign to open the Device connection folder, then select a device to specify
who is allowed to connect and disconnect that device. The list for a specific virtual
machine shows only the devices actually configured for that virtual machine. To add
devices, use the virtual machine settings editor (VM > Settings).
You may select one of the following options for each device:
• No one — End users may not connect and disconnect the device.
• Everyone — All end users may connect and disconnect the device.
• Users and groups — Specified users or members of specified groups defined in
your Active Directory service have permission to connect and disconnect the
device. Click Add to add a user or group to the list. To remove a name from the
list, select the name of a user or group in the list, then click Remove.
• Determine using script — Use your own custom plug-in to determine what
settings are applied. Click Set to open a dialog box that lets you locate the plugin script file and specify the command line for running the script. You may also
specify a timeout interval in case the script does not run to completion. For more
information, see Device Connection Plug-Ins on page 247.
Setting Network Quarantine Policies
Network quarantine policies give you flexible control over user access to network
resources. For example, you can
• Allow users to access only specified machines or subnets.
85
Page 86

VMware ACE Administrator’s Manual
• Require that users have up-to-date virtual machines in order to access network
resources.
• Temporarily block virtual machine access to network resources to control a virus
outbreak.
For more information, see Network Quarantine Policies on page 230.
Select Network quarantine to control whether the virtual machine has normal
network access or restricted access on the basis of rules you specify.
86
To allow unrestricted network access, select None – access to all networks and
machines.
To specify network quarantine settings, select Quarantined access to specific
networks and machines, then click Initial Setup to set quarantine policies. The wizard
guides you through the settings. You may rerun the wizard at any time to change the
settings.
www.vmware.com
Page 87

CHAPTER 5 Setting Policies and Customizing VMware ACE
When you click Initial Setup, the Network Quarantine Options panel appears.
Select the type of network quarantine you want to apply to the virtual machine, then
click Next to continue through the wizard.
• Static quarantine — You specify a single list of approved networks and
machines or of networks and machines that are off-limits. The list is stored with
the virtual machine and distributed as part of the package. If you need to make
any changes in the future, you must update the package and distribute the
update to your users. If you select this option, see Static Quarantine on page 88
for the next steps in the wizard.
• Dynamic quarantine — You specify a single list of approved or disapproved
networks and machines. The list is stored on a server. The virtual machine checks
the server frequently and retrieves the list. If you need to make any changes in
the future, you update the list stored on the server. If you select this option, see
Dynamic Quarantine on page 90 for the next steps in the wizard.
• Version-based quarantine — You specify two lists of approved or disapproved
networks and machines. One list is used for up-to-date virtual machines. The
other list is used for out-of-date virtual machines. The lists are stored on a server.
The virtual machine checks the server frequently and retrieves the lists. VMware
ACE uses the list of approved or disapproved networks and machines that is
appropriate for the virtual machine’s version. If you need to make any changes to
the lists or the network quarantine version in the future, you do so by updating
the information stored on the server. If you select this option, see Version-Based
Quarantine on page 95 for the next steps in the wizard.
• Custom quarantine using script — You specify two lists of approved or
disapproved networks and machines. You also specify a script that runs to
determine which list the virtual machine should use. If you select this option, see
Custom Quarantine Using a Script on page 102 for the next steps in the wizard.
87
Page 88

VMware ACE Administrator’s Manual
For guidelines on how to write custom quarantine scripts, see Writing Plug-In
Policy Scripts on page 244.
Static Quarantine
1. The Access panel appears.
Select the way you want to specify network access.
• Allow access to selected networks and machines — Specify a whitelist of
networks and machines with which the virtual machine may communicate.
• Deny access to selected networks and machines — Specify a blacklist of
networks and machines with which the virtual machine is not allowed to
communicate.
You may set up either a whitelist or a blacklist but not both.
2. The Networks and Machines panel appears.
88
Enter the IP address or the fully qualified host name for each network or machine
that this virtual machine may access, then click Add.
If you enter a host name, the wizard resolves the name and displays both the
host name and the IP address in the list.
To specify a single machine, you may also enter its IP address.
www.vmware.com
Page 89

CHAPTER 5 Setting Policies and Customizing VMware ACE
To specify a subnet, enter the starting IP address for the subnet, select Subnet
mask and enter the mask in the corresponding field in dotted quad format.
When the list is complete, click Next.
3. If you specified networks and machines that are allowed, the Network Traffic
panel appears. If you specified networks and machines that are denied, skip to
the next step.
Using this panel, you may set up exceptions to allow certain types of network
traffic that would otherwise be blocked by the rules you set on the Networks
and Machines panel. This is useful, for example, if virtual machine users are
restricted to a particular subnet but the DNS server on your network is not on
that subnet.
• Printer access — Select this option to be sure a Windows virtual machine can
use local and network printers available on the host. Be sure to select this
option if you configure the virtual machine to allow easy printer setup. Easy
printer setup uses network sharing to connect the virtual machine to a printer
configured on the host computer.
• DHCP packets — Select this option if the virtual machine needs to get its IP
address from a DHCP server that is not included in the access list.
• DNS packets — Select this option if the virtual machine needs to resolve IP
addresses using a DNS server that is not included in the access list.
• ICMP packets — Select this option if you need support for the ping
command — for example, to check network connectivity to and from the
virtual machine.
Click Next.
89
Page 90

VMware ACE Administrator’s Manual
4. The Summary panel appears.
This panel displays a summary of the settings you have made using the wizard.
Review the settings to be sure they are correct.
To modify settings, click Back until you reach the appropriate panel to make the
needed change.
If all settings are correct, click Finish. The wizard closes and returns you to the
policy editor.
Dynamic Quarantine
1. The Policy Lookup panel appears.
90
Select the type of server you want to use to store the list of approved networks
and machines. VMware ACE checks the list on this server to determine what
network access is approved for the virtual machine.
• Active Directory — Select this option if you plan to store the network
quarantine policy on your Active Directory server. The wizard adds this
information to your Active Directory server for you.
Note: In order to use the directory service option, you must choose an Active
Directory domain in the project settings editor. If you select Active Directory
and have not yet chosen an Active Directory domain, the wizard opens a
www.vmware.com
Page 91

CHAPTER 5 Setting Policies and Customizing VMware ACE
dialog box that gives you the option of setting the domain at this time. Click
Ye s to open the Policies Domain dialog box.
• Web server — Select this option if you plan to store the network quarantine
list on a Web server. Enter the URL of the file where you plan to store the list.
Be sure to include the filename in the URL. The wizard creates this file for you
at the end of the process.
Click Update Interval to specify how often VMware ACE should check for
changes to the network quarantine policies. You may choose an interval from 5
minutes to 1 day. The default is 5 minutes.
2. The Normal Access panel appears.
Select the way you want to specify network access.
• Full access — No restrictions are imposed.
• Allow access to selected networks and machines — Specify a whitelist of
networks and machines with which the virtual machine may communicate.
• Deny access to selected networks and machines — Specify a blacklist of
networks and machines with which the virtual machine is not allowed to
communicate.
• No access — Block all network access.
You may set up either a whitelist or a blacklist but not both.
91
Page 92

VMware ACE Administrator’s Manual
3. The Networks and Machines panel appears.
Enter the IP address or the fully qualified host name for each network or machine
that should be on the whitelist or blacklist, then click Add.
If you enter a host name, the wizard resolves the name and displays both the
host name and the IP address in the list.
To specify a single machine, you may also enter its IP address.
To specify a subnet, enter the starting IP address for the subnet, select Subnet
mask and enter the mask in the corresponding field in dotted quad format.
When the list is complete, click Next.
4. If you specified networks and machines that are allowed, the Network Traffic
panel appears. If you specified networks and machines that are denied, skip to
the next step.
92
Using this panel, you may set up exceptions to allow certain types of network
traffic that would otherwise be blocked by the rules you set on the Networks
and Machines panel. This is useful, for example, if virtual machine users are
restricted to a particular subnet but the DNS server on your network is not on
that subnet.
www.vmware.com
Page 93

CHAPTER 5 Setting Policies and Customizing VMware ACE
• Printer access — Select this option to be sure a Windows virtual machine can
use local and network printers available on the host. Be sure to select this
option if you configure the virtual machine to allow easy printer setup. Easy
printer setup uses network sharing to connect the virtual machine to a printer
configured on the host computer.
• DHCP packets — Select this option if the virtual machine needs to get its IP
address from a DHCP server that is not included in the access list.
• DNS packets — Select this option if the virtual machine needs to resolve IP
addresses using a DNS server that is not included in the access list.
• ICMP packets — Select this option if you need support for the ping
command — for example, to check network connectivity to and from the
virtual machine.
Click Next.
5. The Messages panel appears.
If you select Display message when dynamic quarantine policy changes, enter
the message you want end users to see when the network quarantine policy
changes.
Click Next to continue.
93
Page 94

VMware ACE Administrator’s Manual
6. The Summary panel appears.
This panel displays a summary of the settings you have made using the wizard.
Review the settings to be sure they are correct.
To modify settings, go to the appropriate panel to make the needed change.
To continue to the Deploy Policy panel, click Next. To set the policy without
deploying it, click Finish.
7. If you selected Web server, the Deploy Policy panel that appears looks like this.
94
Select Mark this policy as deployed and save it to a network quarantine policy
file to capture your policy changes. You may type the path and filename for the
policy file or click Browse to navigate to the location where you want to save the
file. Be sure to copy the updated policy file to the URL shown in this panel. The
new policies take effect as soon as you make the file available on the Web server.
Click Finish to save the policy file.
www.vmware.com
Page 95

CHAPTER 5 Setting Policies and Customizing VMware ACE
If you selected Active Directory, the Deploy Policy panel that appears looks like
this.
Select Deploy the network quarantine policy to your Active Directory server.
When you click Finish, the wizard deploys the new policies, which take effect
immediately.
Version-Based Quarantine
Network access restrictions are based on the virtual machine’s version number. The
virtual machine’s version number can be checked against a directory server or a Web
server that you specify. If the virtual machine’s version number matches criteria you
specify, it is granted normal access to the network, based on rules you set. If the virtual
machine’s version number does not match the criteria you specify, it is granted only
restricted access, based on a second set of rules.
1. The Policy Lookup panel appears.
Select the type of server you want to use to store the list of approved networks
and machines. VMware ACE checks the list on this server to determine what
network access is approved for the virtual machine.
95
Page 96

VMware ACE Administrator’s Manual
• Active Directory — Select this option if you plan to store the network
quarantine policy on your Active Directory server. The wizard adds this
information to your Active Directory server for you.
Note: In order to use the directory service option, you must choose an Active
Directory domain in the project settings editor. If you select Active Directory
and have not yet chosen an Active Directory domain, the wizard opens a
dialog box that gives you the option of setting the domain at this time. Click
Yes to open the Policies Domain dialog box.
• Web server — Select this option if you plan to store the network quarantine
list on a Web server. Enter the URL of the file where you plan to store the list.
Be sure to include the filename in the URL. The wizard creates this file for you
at the end of the process.
Click Update Interval to specify how often VMware ACE should check for
changes to the network quarantine policies. You may choose an interval from 5
minutes to 1 day. The default is 5 minutes.
2. The Normal Access panel appears.
96
Select the way you want to specify network access.
• Full access — No restrictions are imposed.
• Allow access to selected networks and machines — Specify a whitelist of
networks and machines with which the virtual machine may communicate.
• Deny access to selected networks and machines — Specify a blacklist of
networks and machines with which the virtual machine is not allowed to
communicate.
You may set up either a whitelist or a blacklist but not both.
www.vmware.com
Page 97

CHAPTER 5 Setting Policies and Customizing VMware ACE
3. If you are specifying a whitelist or blacklist, the Networks and Machines panel
appears.
Enter the IP address or the fully qualified host name for each network or machine
that should be on the whitelist or blacklist if this virtual machine qualifies for
normal access, then click Add.
If you enter a host name, the wizard resolves the name and displays both the
host name and the IP address in the list.
To specify a single machine, you may also enter its IP address.
To specify a subnet, enter the starting IP address for the subnet, select Subnet
mask and enter the mask in the corresponding field in dotted quad format.
When the list is complete, click Next.
4. If you specified networks and machines that are allowed, the Network Traffic
panel appears. If you specified networks and machines that are denied, skip to
the next step.
Using this panel, you may set up exceptions to allow certain types of network
traffic that would otherwise be blocked by the rules you set on the Networks
and Machines panel. This is useful, for example, if virtual machine users are
restricted to a particular subnet but the DNS server on your network is not on
97
Page 98

VMware ACE Administrator’s Manual
that subnet. At this time, you are making these settings for the virtual machine if
it qualifies for normal access.
• Printer access — Select this option to be sure a Windows virtual machine can
use local and network printers available on the host. Be sure to select this
option if you configure the virtual machine to allow easy printer setup. Easy
printer setup uses network sharing to connect the virtual machine to a printer
configured on the host computer.
• DHCP packets — Select this option if the virtual machine needs to get its IP
address from a DHCP server that is not included in the access list.
• DNS packets — Select this option if the virtual machine needs to resolve IP
addresses using a DNS server that is not included in the access list.
• ICMP packets — Select this option if you need support for the ping
command — for example, to check network connectivity to and from the
virtual machine.
Click Next.
5. The Restricted Access panel appears.
98
Select the way you want to specify network access.
• Allow access to selected networks and machines — Specify a whitelist of
networks and machines with which the virtual machine may communicate.
• Deny access to selected networks and machines — Specify a blacklist of
networks and machines with which the virtual machine is not allowed to
communicate.
• No access — Block all network access.
You may set up either a whitelist or a blacklist but not both.
Click Next to continue.
www.vmware.com
Page 99

CHAPTER 5 Setting Policies and Customizing VMware ACE
6. The Networks and Machines panel appears again.
Enter the IP address or the fully qualified host name for each network or machine
that this virtual machine may access if it does not qualify for normal access, then
click Add.
If you enter a host name, the wizard resolves the name and displays both the
host name and the IP address in the list.
To specify a single machine, you may also enter its IP address.
To specify a subnet, enter the starting IP address for the subnet, select Subnet
mask and enter the mask in the corresponding field in dotted quad format.
When the list is complete, click Next.
7. If you specified networks and machines that are allowed, the Network Traffic
panel appears. If you specified networks and machines that are denied, skip to
the next step.
Using this panel, you may set up exceptions to allow certain types of network
traffic that would otherwise be blocked by the rules you set on the Networks
and Machines panel. This is useful, for example, if virtual machine users are
restricted to a particular subnet but the DNS server on your network is not on
99
Page 100

VMware ACE Administrator’s Manual
that subnet. At this time, you are making these settings for the virtual machine if
it does not qualify for normal access.
• Printer access — Select this option to be sure a Windows virtual machine can
use local and network printers available on the host. Be sure to select this
option if you configure the virtual machine to allow easy printer setup. Easy
printer setup uses network sharing to connect the virtual machine to a printer
configured on the host computer.
• DHCP packets — Select this option if the virtual machine needs to get its IP
address from a DHCP server that is not included in the access list.
• DNS packets — Select this option if the virtual machine needs to resolve IP
addresses using a DNS server that is not included in the access list.
• ICMP packets — Select this option if you need support for the ping
command — for example, to check network connectivity to and from the
virtual machine.
Click Next.
8. The Manage Versions panel appears.
100
To change the name for the initial version of the virtual machine or add a
description, choose the version in the list and click Properties.
The initial version is shown with normal access, but the name is dimmed
because the virtual machine has not yet been deployed.
If you update the virtual machine at some later time, you may return to this
panel to specify which versions have normal access and which versions have
restricted access.
Click Next to continue.
www.vmware.com
 Loading...